owner’s manual - core health and fitness: support · owner’s manual nautilus ® bowflex schwinn...
TRANSCRIPT

Owner’s Manual
Nautilus® Bowflex® Schwinn® Fitness StairMaster® Universal® Nautilus Institute®
StepMill® SM916
001-7198-040208A

Owner’s Manual2
Product Specifications ...................................................................................Safety Warnings & Labels ..............................................................................Getting Started ................................................................................................ Guidelines for Getting Off and On the StepMill ..........................................Operations .......................................................................................................... Display Definitions and Functions ................................................................. Key Functions .................................................................................................... Programs ................................................................................................ Workout Program Keypad ............................................................................... Quick Start Program ......................................................................................... Manual Program ............................................................................................... Fat Burner Program .......................................................................................... Calorie Burner Program ................................................................................... Intervals Program ............................................................................................. Heart Rate Zone Trainer Program .................................................................. Workout Program Options .............................................................................. More Workouts .................................................................................................. Nautilus® Fit Test Program .............................................................................. CPAT Program ................................................................................................... WFI Program ................................................................................................... Calorie Goal ....................................................................................................... HR Intervals Program ....................................................................................... Random Play Program ..................................................................................... Custom Intervals Program .............................................................................. Heart Rate Monitoring ............................................................................. Telemetry Heart Rate ....................................................................................... Maintaining the Transmitter Belt ................................................................... Heart Rate Priority .................................................................................... Console Codes .......................................................................................... Default and Custom Codes .............................................................................. Machine Status Codes ..................................................................................... Diagnostic Codes .............................................................................................. Configuration Codes .........................................................................................Maintenance ................................................................................................... Moving Your Machine ...................................................................................... Schedule ............................................................................................................. External Power Supply ..................................................................................... Recycling .............................................................................................................
Contacting Nautilus, Inc. ................................................................................
Table of Contents
3 4 6 6 7 7 91111121314151617172020252628282930313132323333363739404041414243

Owner’s Manual3
Model SM916
Dimensions: 29 W x 50 L x 81 H (74 cm x 127 cm x 206cm)
Unit Weight: 341 lbs (155 kg)
Shipping Package Weight: 382 lbs (173 kg)
Workout Area: 67 W x 88 L (170 cm x 224 cm)
Power Adapter Ratings:
USA & Canada, 120V 60 Hz input, 12V DC 2.5 A output
International (EU & Australia/New Zealand), 230V (or 220-240V) 50 Hz input, 12V DC 2.5 A output, consult factory for power adapters to be used in other countries.
Max user weight: 300lbs (136 kg)
CSA Certified for US and Canada (Product bears the c-CSA-us mark).(Evaluated per ANSI/UL 1647-2004 and CAN/CSA C22.2 No.0-M91 and CSA C22.2 No.68-92)
Meets FCC-Part 15, Class B.
Meets AS/NZS CISPR22 (Class B:2004) for Australia and New Zealand (Product bears C-tick Mark).
Complies with the following EU Directives (Product bears the CE mark).• Machine Directive: 98/37/EC• Low voltage Directive: 73/23/EEC (Tested per EN 60335-1:2002)• EMC Directive: 2004/108EC (Tested per EN 61000-6-3 AND EN 61000-6-1)• RoHS Directive: 2002/95EC• WEEE Directive: 2002/96EC
Product Specifications

Owner’s Manual4
This icon means a potentially hazardous situation which, if not avoided, could result in death or serious injury.
Before using this equipment, obey the following warnings:
Read and understand the complete Owner's Manual.Read and understand all Warnings on this machine.
If this machine is being used in a commercial setting, end users may not have • access to this Owner’s Manual. It is the responsibility of the facility to instruct users as to the proper usage of the equipment, as well as making them aware of potential hazards.
Keep children away from this machine. Watch them closely when near the • machine. Moving parts that appear dangerous to adults may not appear so to children.
Consult a physician before starting an exercise program. Stop exercising if • you feel pain or tightness in your chest, become short of breath, or feel faint. Contact your doctor before using the machine again.
Examine this machine for loose parts or signs of wear. Pay special attention • to the steps. Contact Nautilus® Customer Service for repair information. Use only genuine StairMaster® replacement parts supplied by Nautilus, Inc.
Set up and operate your StepMill• ® machine on a hard, level surface.
Do not wear loose clothing or jewelry while exercising.•
Maximum user weight limit: 300 lb. (136 kg). Do not use if you are over this • weight.
Stabilize the steps before stepping on them and use caution when stepping off • the machine.
Keep at least 19 inches (50 cm) clear area around the machine. This is the • recommended safe distance for access and passage around and emergency dismounts from the machine.
Warn bystanders to keep a safe distance, at least 3 feet (1 m). Do not allow • anyone to touch the operator while the machine is in motion.
Do not over exert yourself during exercise. Do not try to exercise with more • resistance than you can physically handle.
Important Safety Warnings
Save These Instructions

Before using your product: Find and read all warning labels located on the Stair-Master® Commercial Series StepMill® SM916, prior to using your product. Be sure to replace any warning label if damaged, illegible, or missing. If you need replacement labels, call a Nautilus® Representative at (800) 628-8458 (North America) or (41) (26) 460 77 77 (International office).
Label 1: General exercise warning labels.
Location: Affixed to the lower sides of the mast (see Figure 1).
Label 2: Power caution label.
Location: Affixed to the back of the StepMill® machine (see Figure 1).
Owner’s Manual5
Safety Warning Labels
Figure 1
CautionLabel
WarningLabels

Owner’s Manual6
Note: Throughout this manual, all references to the left or right side and to the front or back, are made as if you were on the machine, ready to exercise.
Guidelines for getting on and off the StepMill® SM916
1. Hold on to the handrails, step onto the staircase, stand up straight and thesteps will rotate slowly.
2. You should see the SELECT WORKOUT message on the display.
3. Select the MANUAL exercise program so you can control the pace of your first workout and get used to the exercise motion. Press [MANUAL] and then press [ENTER].
4. The console will prompt you to enter your body weight. Enter your weight in pounds (or kilograms if the console is set to metric units). Correct entry errors by pressing [CLEAR] before you press [ENTER].
5. The console will prompt you to enter your step rate. Enter your desired step rate from 24 (very easy) to 162 (extremely hard). First time users may want to select a low step rate, for example, 24. Correct entry errors by pressing [CLEAR] before you press [ENTER].
6. The console will prompt you to enter the workout time in 1-minute increments between 5 and 99 minutes. Press [1] , [0] , [ENTER] to exercise for 10 minutes. After time is entered, the console will display ENJOY WORKOUT and your program will begin. If you do not start exercising within 30 seconds, the console will return to the start screen and shut down.
7. When you begin to exercise, the steps will rotate indicating the MANUAL program is starting at the level you selected during data entry.
8. As you become comfortable with the exercise motion, press [LEVEL:£] and [LEVEL:] to adjust the step rate.
9. Relax, maintain an erect posture, and use handrails for balance. Supporting your weight (on handrails) while exercising decreases the exercise intensity.
10. Before stepping off the StepMill, have the rotating steps come to a complete stop. Holding onto the handrails carefully place one foot on the floor and repeat for the other foot.
Getting Started
To avoid injury, carefully follow the instructions.
Owner’s Manual7
Operation
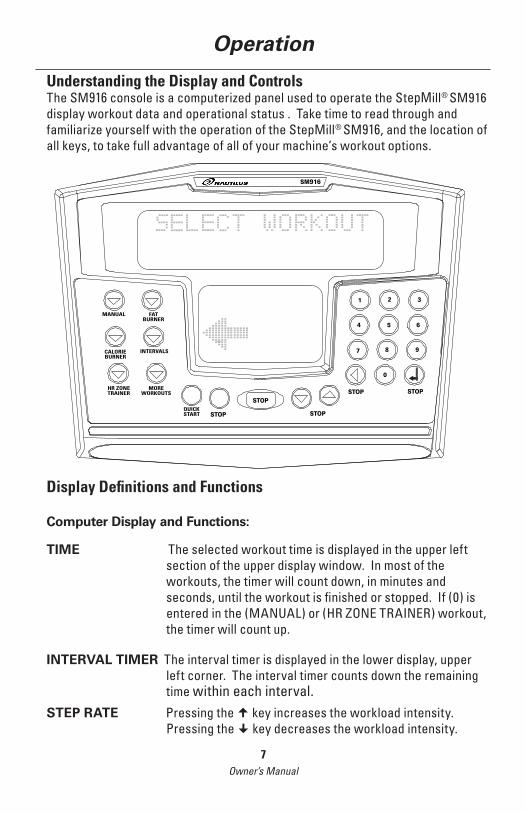
Understanding the Display and Controls The SM916 console is a computerized panel used to operate the StepMill® SM916 display workout data and operational status . Take time to read through and familiarize yourself with the operation of the StepMill® SM916, and the location of all keys, to take full advantage of all of your machine’s workout options.
Display Definitions and Functions
Computer Display and Functions:
TIME The selected workout time is displayed in the upper leftsection of the upper display window. In most of the workouts, the timer will count down, in minutes and seconds, until the workout is finished or stopped. If (0) is entered in the (MANUAL) or (HR ZONE TRAINER) workout, the timer will count up.
INTERVAL TIMER The interval timer is displayed in the lower display, upper left corner. The interval timer counts down the remaining time within each interval.
STEP RATE Pressing the £ key increases the workload intensity. Pressing the key decreases the workload intensity.
SM916
STOP
1 2 3
4 5 6
7 8 9
0
STOP
STOP STOP
STOPQUICKSTART
MOREWORKOUTS
HR ZONETRAINER
CALORIEBURNER
INTERVALS
MANUAL FATBURNER

Owner’s Manual8
HEART RATE Current Heart Rate (HR), in Beats Per Minute (BPM), is
displayed next to the heart icon on the lower display.
Percentage of Maximum HR - An approximation of maximal HR is calculated based on the latest American College of Sports Medicine predictive equation as follows:
Max Heart Rate = 215 – (Age * .75)
Percentage of maximum HR will only be shown in HRC programs.
Example: For a person 40 years of age, max HR is estimated as (215 – (40 (age) * .75) = 185.
185 BPM would be the approximate maximum HR for a 40-year-old user.
If the user works out at 140 BPM, then 76% (140 / 185 = 76%) will be displayed in the upper left corner of the lower display area.
This means that the 40-year-old user working at 140 BPM is at 76% of their maximum HR.
(See the Heart Training programs for more information.)
DISTANCE Provides a cumulative total of the equivalent distance, inmiles (or kilometers if your display is set to metric units), you have traveled.
CALORIES Provides a current total of the number of calories burnedduring a workout.
Note: This number is only an approximation as a user’s caloric expenditure will vary significantly based on a person’s age, gender, weight and metabolism.
CALORIES/HOUR Provides the rate at which calories are burned per hour atthe current resistance level and steps per minute.
SPEED Displays the step rate in steps per minute (SPM).
User should consult a physician to determine an appropriate Target Heart Rate (THR) in which to exercise, based on age, weight and physical condition. While Nautilus® provides some THR ranges, these are only approximations and should not be viewed as a medical recommendation.
Operation

Owner’s Manual9
WATTS During a workout, this statistic displays the power output at the current RPM and intensity level, displayed in watts (746 watts = 1 hp).
METs MET (multiple of the resting metabolic rate) indicates the relative energy cost of exercise. While you are sitting quietly, your body consumes oxygen at the rate of 1 MET or about 3.5 milliliters per kilogram of body mass per minute. When you exercise, your body needs more oxygen in order to function. For example, exercising at 10 METs requires 10 times the resting rate of oxygen consumption, or about 35 milliliters per kilogram per minute. During a workout, the display shows the current MET level. During the workout summary, the average MET level is displayed. During your workout, keeping track of the METs will show you how hard you are working—�the higher the MET level, the harder you are working.
WORKOUT PROFILE The dot-matrix area of the display shows the actual course profile of the selected exercise program. The taller the column, the higher the step rate and/or METs for that interval. The flashing column shows your current interval.
Operation
Key Functions
Display LOCK / UNLOCK - Statistics KeyDuring the exercise program, the Display LOCK / UNLOCK key is used to track workout statistics which are shown in the text line of the display window. When a workout is started, the display is in an unlocked mode and the various exercise statistics will scroll in order. Press the [DISPLAY] key once to turn off the scan feature and show the current statistic in the display window. Press the [DISPLAY] key a second time and the scan feature will turn back on to scroll through the different statistics.
When in the Display Unlock mode, the console will cycle through the following statistics in order: Miles, Calories/Hour, Steps/Min, Floors, Watts, METs.
At the completion of a workout, the statistic averages are calculated based on the accumulation of data during the workout program.

Owner’s Manual10
Operation
QUICK START KEY The Quick Start Key provides an immediate start to aworkout session without having to provide any user information.
LEVEL (STEP RATE) The exercise Step Rate may be changed at any time duringUP & DOWN KEYS a workout. Pressing the £ key increases the step rate
and pressing the key decreases the step rate. After the first press of a Level key, the text line will show the target step rate. Further presses will increase or decrease the step rate.
STOP KEY Press the STOP Key any time you want to pause the workout program for up to 2 minutes. Press the STOP Key a second time, and the workout statistics will be displayed, then the console will return to the SELECT WORKOUT prompt.
NUMERIC KEYPAD The numeric keypad is located on the right side of the (0-9) console. During program setup, this keypad allows you to
quickly enter requested information such as Time, Age, Intensity Level , Weight and HR.
Enter : The ENTER Key confirms workout selections and stores the information used by the console to calculate workout statistics.
Clear: During data entry, the CLEAR Key erases information from the console memory and backs up to the previous data entry prompt.

Owner’s Manual11
Programs
Workout Program KeypadThe workout program keypad is located to the left of the display. There are 6 workout program keys, including a More Workouts key with multiple advanced program options.
While the console is in the SELECT WORKOUT mode, press one of the exercise program keys to preview the desired workout. After selecting the desired workout, follow the prompts to enter the required user data for that program.
When entering data, the user can select the standard default values by pressing [ENTER] at the display prompt without first typing data. This will set up the console with the following default data:
STEP RATE: 41
CHR PERCENT: 70
WEIgHT: 176 lbs. (80 kg)
INTENSITY LEVEL: 3
AgE: (HR Zone Trainer program only) 40 years
Operation
SM916
STOP
1 2 3
4 5 6
7 8 9
0
STOP
STOP STOP
STOPQUICKSTART
MOREWORKOUTS
HR ZONETRAINER
CALORIEBURNER
INTERVALS
MANUAL FATBURNER
Owner’s Manual12
Operation
WORKOUT TIME: The default time in the programmed workouts and Quick Start is 20 minutes. The Manual and HR Zone Trainer programs do not have a specified default time. In this program, the console timer will count up to the maximum time of 99 minutes.
Once you have selected a program, follow the console prompts.
ENTER WEIgHT: Type in your body weight in pounds (or kilograms if your console is set to metric units).
ENTER STEP RATE: Type in your desired step rate. The StepMill® machine has a step rate range of 24 to 162.
ENTER TIME 5-99: Select the workout duration in one minute increments from 5 to 99.
Your weight, step rate or intensity levels are used to calculate the number ofcalories burned for each minute of exercise and the total number of calories burned for the exercise session.
The Quick Start ProgramProvides an immediate start, without having to enter any user information. This program uses the standard default settings to calculate calories burned during a workout session.
1. Press the [QUICK START] key. A message, ENJOY WORKOUT is displayed, the workout begins with exercise statistics accumulating.
2. During the workout:
The step rate may be changed at any time during the workout by pressing the [Level: UP] key to increase the step rate, or the [Level: DOWN] key to decrease the step rate. Any changes to the step rate will be displayed in the current flashing column. The new step rate will continue through the rest of the workout until changed using the Level keys.
3. Press [STOP] to pause the workout. Press [STOP] again to end the workout. The workout statistics will be displayed, and then the console will revert back to the SELECT WORKOUT message.

Owner’s Manual13
Operation
The Manual ProgramThe Manual Program allows you to control the step rate of the StepMill® SM916 during the workout, while accurately calculating exercise statistics based on your weight. The default step rate is 41 unless changed during the data entry mode. The workout profile in the display window is divided into 30 equal intervals within the selected workout time. The profile is based on the MET level, with every 1 MET equating to one vertical bar. MET level is based on a combination of step rate and time.
1. Press the [MANUAL] key. The message, MANUAL WORKOUT will be displayed in the text line and the workout profile displayed in the lower display. Press [ENTER] to accept.
2. The console will display ENTER WEIGHT - LBS (or ENTER WEIGHT - KG if in Metric mode). Enter your weight using the numeric keypad and press [ENTER]. Or, press [ENTER] to accept the default value.
3. The console will display STEP RATE. Enter the desired step rate using the numeric keypad (24 - 162) and press [ENTER]. Or, press [ENTER] to accept the default value.
4. Next, the console will display ENTER TIME 5 – 99. Enter the desired time and press [ENTER]. Or, press [ENTER] to select the default time.
If you press [0] , then the timer will count-up from 0:00 to the maximum time of 99:00.
5. The console will display ENJOY WORKOUT and the timer will begin. The step rate may be changed at any time during the workout by pressing the [Level: UP] key to increase the step rate, or the [Level: DOWN] key to decrease the step rate. Any changes to the step rate will be displayed in the current flashing column. The new step rate will continue through the rest of the workout until changed using the Level keys.
6. Press [STOP] to pause the workout. Press [Stop] again to end the workout. The workout statistics will be displayed, and then the console will revert back to the SELECT WORKOUT message.

Owner’s Manual14
The Fat Burner ProgramThe Fat Burner program is a 30-interval workout designed with moderate changes in intensity level designed to stimulate fat store assimilation for users on a weight control program. The profile in the center display indicates relative intensity. Any changes to the intensity level will not change the look of the remaining profile; however, the new intensity level will continue through the rest of the workout.
1. Press the [FAT BURNER] key. The message, FAT BURNER, will be displayed on the text line with the workout profile displayed in the lower display. Press [ENTER] to accept.
2. The console will display ENTER WEIGHT - LBS (or ENTER WEIGHT - KG if in Metric mode). Enter your weight using the numeric keypad and press [ENTER]. Or, press [ENTER] to accept the default value.
3. The console will display ENTER LEVEL 1-20. Enter the desired intensity level using the numeric keypad and press [ENTER]. Or, press [ENTER] to accept the default value.
4. Next, the console will display ENTER TIME 5–99. Enter the desired time and press [ENTER]. Or, press [ENTER] to select the default time.
5. The console will display ENJOY WORKOUT and the timer will begin. The intensity level may be changed at any time during the workout by pressing the [Level: UP] key to increase the resistance, or the [Level: DOWN] key to decrease the resistance. Any changes to the intensity level will not change the look of the remaining profile; however, the new intensity level will continue through the rest of the workout.
6. Press [STOP] to pause the workout. Press [Stop] again to end the workout. The workout statistics will be displayed, and then the console will revert back to the SELECT WORKOUT message.
Operation

Owner’s Manual15
The Calorie Burner ProgramThe Calorie Burner program is a 30 interval workout designed for users wanting to increase their aerobic capacity. The changes of the intensity in the program are greater than the changes in the Fat Burner program, and are designed specifically to tax the cardiorespiratory system. The profile in the center display indicates relative intensity. Any changes to the intensity level will not change the look of the remaining profile; however, the new intensity level will continue through the rest of the workout.
1. Press the [CALORIE BURNER] key. The message, CALORIE BURNER, will be displayed on the text line with the workout profile displayed in the lower display. Press [ENTER] to accept.
2. The console will display ENTER WEIGHT - LBS (or ENTER WEIGHT - KG if in Metric mode). Enter your weight using the numeric keypad and press [ENTER]. Or, press [ENTER] to accept the default value.
3. The console will display ENTER LEVEL 1-20. Enter the desired intensity level using the numeric keypad and press [ENTER]. Or, press [ENTER] to accept the default value.
4. Next, the console will display ENTER TIME 5-99. Enter the desired time and press [ENTER]. Or, press [ENTER] to select the default time.
5. The console will display ENJOY WORKOUT and the timer will begin. The intensity level may be changed at any time during the workout by pressing the [Level: UP] key to increase the resistance, or the [Level: DOWN] key to decrease the resistance. Any changes to the intensity level will not change the look of the remaining profile; however, the new intensity level will continue through the rest of the workout.
6. Press [STOP] to pause the workout. Press [Stop] again to end the workout. The workout statistics will be displayed, and then the console will revert back to the SELECT WORKOUT message.
Operation

Owner’s Manual16
The Intervals ProgramThe Intervals program is an interval workout containing 8 alternating rest intervals with 7 exercise intervals.
An interval cycle consists of a work phase and a rest phase. You may scale the rest intensity level and the work intensity level independently–which will be saved for the remainder of the workout.
1. Press the [INTERVALS] key. The message, INTERVALS, will be displayed on the text line with the workout profile displayed in the lower display. Press [ENTER] to accept.
2. The console will display ENTER WEIGHT - LBS (or ENTER WEIGHT - KG if in Metric mode). Enter your weight using the numeric keypad and press [ENTER]. Or, press [ENTER] to accept the default value.
3. The console will display ENTER WORK RATE. Enter the desired work rate level using the numeric keypad and press [ENTER]. Or, press [ENTER] to accept the default value.
4. The console will display ENTER REST RATE. Enter the desired rest rate level using the numeric keypad and press (ENTER). Or, press (ENTER) to accept the default value.
5. Next, the console will display ENTER TIME 5–99. Enter the desired time and press [ENTER]. Or, press [ENTER] to select the default time.
6. The console will display ENJOY WORKOUT and the timer will begin. The rate level may be changed at any time during the workout by pressing the [Level: UP] key to increase the resistance, or the [Level: DOWN] key to decrease the resistance. Any changes to the rate level will only change the level in the current rest or work phase. To change the rate level of the work phase, you must change the intensity level during a work phase. To change the rate level of the rest phase, you must change the rate level during a rest phase. Changing the rate level will not change the look of the remaining profile; however, the new intensity rate will continue through the rest of the workout.
7. Press [STOP] to pause the workout. Press [STOP] again to end the workout. The workout statistics will be displayed, and then the console will revert back to the SELECT WORKOUT message.
Operation

Owner’s Manual17
Heart Rate (HR) Zone Trainer ProgramThe HR Zone Trainer program allows you to exercise at a selected THR by automatically varying the intensity level (resistance) during the workout. The default THR is equal to 70% of your maximum HR which is calculated by the following equation:
Max HR = 215 – (Age * .75). Target HR = Max HR * .7 To choose a different THR (between 100 and 180 beats per minute) at any time during the workout, use the numeric keypad to enter the new THR, followed by the [ENTER] key.
The HR Zone Trainer program:
1. Use a telemetry HR chest belt. Remember to wet the electrodes underneath the chest strap. The console must detect a HR signal to allow selection of the HR Zone Trainer program.
2. Press the [HR ZONE TRAINER] key. The message, HR ZONE TRAINER, will be displayed on the text line with the workout profile in the lower display. Press [ENTER] to accept.
3. The console will then display Checking for HR. When the console detects a valid signal from the HR belt it will then proceed to the next step.
4. The console will display ENTER WEIGHT - LBS (or ENTER WEIGHT - KG if in Metric mode). Enter your weight using the numeric keypad and press [ENTER]. Or, press [ENTER] to accept the default value.
5. The console will display ENTER AGE 10 -99. Enter your age using the numeric keypad and press [ENTER]. Or, press [ENTER] to accept the default value of 40 years old.
6. The console will display TARGET HR. A suggested THR will be displayed, based on your the numeric keypad and then press [ENTER]. Or, press [ENTER] to accept the default value.
7. The console will display ENTER TIME 5-99. Enter the desired time and press [ENTER]. Or, press [ENTER] to accept the default value.
8. The console will display ENJOY WORKOUT and the timer willbegin.
Operation

Owner’s Manual18
The following messages may be displayed during a workout:
9. Press [STOP] to pause the workout. Press [STOP] again to end theworkout. The workout statistics will be displayed, and then the console will revert back to the SELECT WORKOUT message.
Target Heart RateThe THR selected by the console is based on age, and is equal to 70% of your maximum HR which is calculated by the following equation:
Max HR = 215 – (Age * .75)Target HR = Max HR * .7
If desired, change the THR at this point by using the numeric keypad to enter the new THR, and then press [ENTER].
During a workout, change to a new THR that is between 100 and 180 beats per minute at any time by using the numeric keypad to enter the new THR, and then pressing (ENTER). The intensity level will change automatically to achieve the new THR.
Options During a WorkoutAfter the message, Enjoy Workout, is displayed, your workout statistics will begin to accumulate. The exercise statistics include, in order:
• MILES
• CAL/HR
• STEPS/MIN
• FLOORS
• WATTS
• METS
Operation
CHECK HR BELT Indicates that the telemetry HR signal has been missing for the last 30 seconds.
HR BELT NEEDED No telemetry belt signal has been sensed during the initial setup time.
HR MODE DISABLED No HR signal is allowed due to the set up option that was chosen. HR monitoring is not possible. To change HR option, refer to the HR Priority section of this manual.

Owner’s Manual19
Target Heart Rate (in HR Control programs only)The 20 x 30 brickyard in the lower half of the display will show the exercise profile of the workout program selected. Each column represents an equal portion of the total workout and the flashing column will advance across the brickyard as you progress through your workout.
Changing Step Rate (SR) or Target Heart Rate (THR) during a WorkoutDuring the workout, the SR may be changed at any time during the workout by pressing the [Level: UP] key to increase the resistance, or the [Level: DOWN] key to decrease the resistance. The console will display STEP RATE.
In HR Control programs, you can use the numeric keys to change the THR. If the user presses a numeric key in a HR Control program, then the message line will display TARGET HR.
Once you enter your desired THR, press [ENTER] to accept, and the console will gradually change the resistance to move you to the new THR.
Target Heart Rate (THR)The WORK THR selected by the console is based on age, and is equal to 80% of your maximum HR which is calculated by the following equation:
Max HR = 215 – (.75 * Age)Target HR = Max HR * .8
If desired, change the THR at this point by using the numeric keypad to enter the new THR, and then press [ENTER]. Change to a new THR (between 100 and 180 beats per minute) during a workout by using the numeric keypad to enter the new THR, and then pressing [ENTER].
The REST THR selected by the console is based on age, and is equal to 65% of your maximum HR which is calculated by the following equation:
Max HR = 215 – (.75 * Age)Target HR = Max HR * .65
If desired, change the THR at this point by using the numeric keypad to enter the new THR, and then press [ENTER].
Pausing Your WorkoutThe program automatically enters the PAUSE state from a workout when the STOP key is pressed. The workout will be suspended, and the program will display the following alternating messages every 3 seconds for up to 2 minutes: WORKOUT PAUSED. PRESS STOP OR START.
Operation

Owner’s Manual20
When the program enters a PAUSE state, the interval timer begins to count down from 2 minutes to show you the time remaining in the pause condition.
To exit the PAUSE state:
• At the end of the two minutes count down, the current workout ends, the accumulated exercise statistics are scrolled, and the program returns to the opening message.
• If the user presses [STOP], then the program ends, the accumulated exercise statistics are scrolled, and the program returns to the opening message.
• If the user presses the [QUICK START] key, then the workout proceeds from where it was suspended.
End of Your WorkoutThe program is at the end of the workout when the workout time is completed, or from the PAUSE state when the [STOP] key is pressed. At this point, each workout statistic is scrolled with averages calculated and displayed for TIME, DISTANCE, CAL, Ave CAL/HR, Ave STEPS/MIN, FLOORS, Ave WATTS, Ave METS.
After the statistics are scrolled, the program returns to the opening message. If you want to replay the exercise statistics, press the Display LOCK/UNLOCK key, and each exercise statistic will be scrolled once for 3 seconds.
More WorkoutsPress the More Workouts key for several advanced program options outlined below. Press the LEVEL UP or DOWN keys to scroll through the MORE WORKOUTS program options. Press ENTER when desired program is displayed.
The Nautilus® Fit Test Program
Understanding Sub-maximal Exercise Testing Before using the StairMaster® StepMill® SM916 for sub-maximal exercise testing, it should be noted that all sub-maximal tests make several assumptions:
• That a steady-state HR is obtained for each exercise workload.
• That a linear relationship exists between HR, oxygen uptake and workload.
• That the maximal HR for a given age is uniform.
• That the mechanical efficiency of the physical activity performed (i.e. oxygen uptake at a given workload) is the same for everyone.
Operation

Owner’s Manual21
It should be kept in mind that any one or all of the above mentioned assumptions may not be met during a sub-maximal exercise test. If for any reason one of the assumptions is not met, then errors in predicting VO2 MAX (Maximum volume of oxygen consumed per unit of time) will occur.
Unfortunately, it is often quite difficult to meet all of the requirements for the four listed assumptions. For example, exercising at a given workload for only a few minutes can involve an insufficient amount of time for many individuals to achieve a true steady-state. To ensure that a steady-state has been achieved, the HR should be measured after two minutes of exercise at a given workload and again after the third minute of exercise at that workload. These two HR’s should then be compared. If a difference of more than five beats per minute between the two is found, the subject should continue to exercise at one-minute intervals at the same workload until two successive HR’s differ by less than five beats per minute.
It is also important that the sub-maximal HR obtained be between 115 and 150 BPM, because it is within this HR range that a linear relationship tends to exist between HR and oxygen uptake or workload for most adults. When the HR is less than 115, many external factors (e.g. talking, laughing, apprehension, etc.) can greatly influence HR. Once the HR reaches a level between 115 and 150, external factors no longer influence HR, and a linear relationship exists. As the HR rises above 150, the HR/oxygen uptake relationship becomes curvilinear.
The third assumption involves maximal HR. Maximal HR is the greatest HR that can be measured when an individual is exercising to the point of volitional fatigue (i.e. exhaustion) during a graded exercise test. The StepMill® SM916 uses the most current published equation developed to estimate the average maximal HR as follows:
Max Heart Rate = 215 – (Age * .75)
Maximal HR can, however, vary greatly among different individuals of the same age. One standard deviation is ±12 BPM, which means that two-thirds of the population varies an average of plus or minus 12 heart beats from the average given by a prediction equation. If an individual’s age-predicted maximal HR is higher than that person’s true maximal HR, then his/her estimated VO2 MAX will be an overestimation of the correct or actual value.
Operation

Owner’s Manual22
The final assumption addresses the issue of mechanical efficiency. Oxygen uptake at any given work rate can vary by approximately 15% between different individuals. Therefore, individuals vary in the amount of oxygen they require to perform a certain exercise workload. Some individuals are more efficient at performing a given task than others. As a result, the average oxygen consumption associated with a given workload may vary significantly from one person to another. Thus, VO2 MAX predicted by sub-maximal exercise tests tends to be overestimated for those who are mechanically efficient and underestimated for those who are inefficient.
The point to remember is that sub-maximal exercise testing, though not as precise as maximal exercise testing, is not without advantages. For example, the results of such testing can provide a fairly accurate reflection of an individual’s fitness status without the cost, risk, effort (on the part of the subject) and time involved in max testing. If an individual is given repeated sub-maximal exercise tests and that person’s HR response to a fixed workload is found to decrease over time, it is reasonably safe to conclude that the individual has made improvements in aerobic (cardiorespiratory) fitness, irrespective of the accuracy of the VO2 MAX prediction.
Pretest ScreeningPrior to any exercise test (maximal or sub-maximal), participants should complete a brief health/medical questionnaire, have their resting blood pressure and HR measured, and provide an informed consent form. The Physical Activity Readiness Questionnaire (PAR-Q) is an example of a valid health/medical questionnaire for screening individuals prior to sub-maximal exercise testing. Canadian health and fitness practitioners have extensively (and quite successfully) used the PAR-Q to determine whether individuals should be given an exercise test. A yes answer to any of the following seven questions taken from the PAR-Q would disqualify a participant from taking part in an exercise test until appropriate medical clearance was obtained.
Physical Activity Readiness Questionnaire (PAR-Q)
1. Has your doctor ever said you have a heart condition and recommended only medically supervised physical activity?
2. Do you have chest pain brought on by physical activity?
3. Have you developed chest pain within the past month?
4. Do you tend to lose consciousness or fall over as a result of dizziness?
5. Do you have a bone or joint problem that could be aggravated by the proposed physical activity?
Operation

Owner’s Manual23
6. Has a doctor ever recommended medication for your blood pressure or a heart condition?
7. Are you aware, through your own experience or a doctor’s advice, of any other physical reason against your exercising without medical supervision?
Nautilus® Sub-maximal Fit TestThe Nautilus® Fit Test is a program that estimates maximal aerobic capacity based on HR response to sub-maximal exercise.
The Nautilus® branching protocol is a series of 3-minute stages of continuous exercise at increasing intensity. The first stage is a warm-up at approximately 4 METs. The intensity of the remaining stages is based on the HR response to the warm-up. The test is designed to raise the steady state HR of the subject to at least 115 BPM. It is important to remember that two consecutive HR measurements must be obtained above 115 BPM to predict VO2 MAX. The test typically lasts from 6 to 15 minutes. The test will terminate if the HR does not continue to rise from state to stage.
In the Nautilus® protocol, each work rate is performed for 3 minutes, with HR’s recorded during the final 4 seconds of the second and third minutes of each stage. If the HR’s are within 5 BPM, then the HR during the last minute is plotted against the work rate, and the program advances to the next 3-minute stage. The program continues for two to four stages until two steady state HR’s above 115 BPM are obtained in two consecutive stages. The line generated from the plotted points is then extended to the age-predicted maximal HR. A corresponding maximal work rate and VO2 MAX can then be calculated.
At the end of the 3rd minute of each stage, if the HR’s at the end of the 2nd and 3rd minute are not within 5 BPM of each other, then that work rate is maintained for an additional minute. At the end of the 4th minute, the HR is compared to the HR at the end of the 3rd minute. If the HR’s are within 5 BPM, then the HR during the 4th minute is plotted against the work rate. If the HR at the end of the 3rd and 4th minute are not within 5 BPM, then the work rate is maintained for one more additional minute. If the HR at the end of the 4th and 5th minutes are within 5 BPM, then the HR at the end of the 5th minute is plotted against the work rate. If the HR at the end of the 4th and 5th minutes are not within 5 BPM, then the test failed.
Operation

Owner’s Manual24
Once two consecutive HR measurements are obtained above 115 BPM range, then the test ends successfully and the results are displayed. Estimated maximum aerobic capacity is shown in ml/kg/min and METs. Next, the results are compared to normative values for others of the same age range and gender.
The Fitness Test program:
1. Put the chest strap on. Remember to wet underneath the chest strap, over the electrodes.
2. Press the [MORE WORKOUTS] key. Then use the Level UP or DOWN keys to scroll through the program options. When the console displays NAUTILUS FIT TEST, press [ENTER] to select.
3. The console will then display Checking for HR. Need HR belt of Hold HR sensors. When the console detects a valid signal it will then proceed to the next step.
4. The console will display ENTER WEIGHT LBS (or ENTER WEIGHT KG if in Metric mode). Enter your weight using the numeric keypad.
5. The console will display ENTER AGE 10-99. Enter your age using the numeric keypad.
6. The console will display ENTER GENDER / 1 - MALE / 2 - FEMALE. Enter your gender code using the numeric keypad.
7. The console will display BEGIN FIT TEST.
8. The test will be terminated early, and the messages TEST TERMINATED / TRY AGAIN LATER will be displayed if:
• The user stops exercising at any point during the test.
• The [STOP] key is pressed.
• The HR response to each work level is the same or less than the previous work level.
• The HR never reaches 115 BPM.
• The HR continues to rise after the fifth minute.
9. The test is complete when two consecutive steady-state HR’s are obtained above 115 BPM. The test can be as short as 6 minutes, or as long as 15 minutes.
Operation

Owner’s Manual25
Note: No cool down is done at the end of the test.
10. The estimated maximal aerobic capacity is displayed in METs, and VO2 MAX. The results are compared to normative values of the same age and gender1 (see below), and given a fitness rating of Low, Fair, Average, Good, or High.
Fitness Rating Norms (VO2 MAX )
AGE 20 – 29 30 – 39 40 – 49 50 – 59 60 +
MenHigh 51.4 + 50.4 + 48.2 + 45.3 + 42.5 +
Good 51.3 – 46.8 50.3 – 44.6 48.1 – 41.8 45.2 – 38.5 42.4 – 35.3
Average 46.7 – 42.5 44.5 – 41.0 41.7 – 38.1 38.4 – 35.2 35.2 – 31.8
Fair 42.4 – 39.5 40.9 – 37.4 38.0 – 35.1 35.1 – 32.3 31.7 – 28.7
Low 39.4 or less 37.3 or less 35.0 or less 32.2 or less 28.6 or less
WomenHigh 44.2 + 41.0 + 39.5 + 35.2 + 35.2 +
Good 44.1 – 38.1 40.9 – 36.7 39.4 – 33.8 35.1 – 30.9 35.1 – 29.4
Average 38.0 – 35.2 36.6 – 33.8 33.7 – 30.9 30.8 – 28.2 29.3 – 25.8
Fair 35.1 – 32.3 33.7 – 30.5 30.8 – 28.3 28.1 – 25.5 25.7 – 23.8
Low 32.2 or less 30.4 or less 28.2 or less 25.4 or less 23.7 or less
1 The American College of Sports Medicine, Guidelines for Exercise Testing and Prescription, 6th Edition, Lippincott Williams & Wilkins, Philidelphia, PA, 2000, p. 77.
CPAT Test ProgramThe first phase is a warm up interval at intensity of 56 step/min and lasts 20 seconds. At the end of the first interval the time counter will reset to zero.
The second phase continues through nine 20 second intervals at an intensity of 68 steps/min. The CPAT Stair Climb Test has a total of 10 intervals and lasts for 3 minutes, 20 seconds (including warm up).
1. Press the MORE WORKOUTS key. Then, use the Level UP or DOWN keys to scroll through the program options. When the console displays CPAT TEST, press [ENTER] to accept.
2. The console will then display BEGIN FIT TEST.
Operation

Owner’s Manual26
WFI Test ProgramThe WFI test assesses the fire fighter’s aerobic capacity expressed as VO2max. The results are calculated and recorded in milliliters (ml) of oxygen per kilogram (kg) of body weight per minute (VO2 max).
These aerobic assessments are submaximal and are based on the heart rate response during graded exercise. Accurate estimation of maximal heart rate (MHR) is critical to the submaximal prediction used in these assessments. A new formula for calculating maximal heart rate is utilized with these protocols, it more accurately accounts for age-related reduction of MHR. Be aware that the heart rate can be affected by variables such as body temperature, hydration state, anxiety, stress and medications. In addition to heart rate, body mass (height-to-weight ratio), is also a significant variable in both prediction equations. The relationship between height and weight is recorded as Body Mass Index (BMI). It is important to note that BMI is not being used in these aerobic protocols to estimate body composition; but rather, is used to represent the mass of each participant.
The test starts at 46 steps/min for 2 minutes, then 53 steps/min for 1 minute (warm-up period). The test time includes the warm-up time. The test is a series of 1-minute intervals with increasing work loads on each subsequent minute.
Note: Once the test starts, the user should not maintain a hold or lean on thehandrails; this will result in overestimation of aerobic capacity.
The test is complete when the heart rate exceeds the Target Heart Rate (THR) for 15 seconds. The total Test Time (TT) begins from the time the user starts on the Stepmill, to the point at which the user exceeds their THR. It does not include the final 15 second qualification period that the heart rate was above the THR.
The qualification period is to verify the user’s heart rate does not exceeds the target, and then drop down to the THR or below for 15 seconds, if it does, then the test continues.
Once the test is completed, the user should cool down for a minimum of 2 minutes at 39 steps/min.
Operation
Target HR = [208 - (0.7* Age)] * 0.85
BMI (in - lbs) = 703* Weight (lbs) / Height (inches)2
BMI (cm - kg) = Weight (Kg) / Height (cm/100)2
VO2max = 57.774 + (1.757 x time) - (0.904 x BMI)

Owner’s Manual27
The test is aborted with no results if any of the following occurs:
• The user stops or pauses the workout at any point during the test.
• The [STOP] key is pressed.
• The THR has not been met after 16 minutes previous work level.
• The Heart Rate signal is lost.
• The equipment malfunctions.
WFI Workout
1. Press the MORE WORKOUTS key. Then, use the Level UP or DOWN keys to scroll through the program options. When the console displays WFI TEST, press [ENTER] to accept.
2. The console will then display Checking for HR. Need HR belt. When the console detects a valid signal it will then proceed to the next step.
3. The console will then display ENTER WEIGHT – LBS (or ENTER WEIGHT – KG if in Metric mode). Enter your weight using the numeric keypad and press (ENTER).
4. The console will display ENTER AGE 10 - 99. Enter your age using the numeric keypad.
5. The console will display ENTER HEIGHT - INCHES ( or ENTER HEIGHT –CM if in Metric mode). Enter your height using the numeric keypad and press (ENTER).
6. The console will then display BEGIN FIT TEST.
After the message, "BEGIN FIT TEST", is displayed, your workout statistics will begin to accumulate. The only exercise statistic displayed during the WFI workout:
• STEPS/MIN
After the succesfull completion of your WFI test, the following statistics will be displayed:
• EST VO2 MAX
• HIGHEST STEP RATE
• ELAPSED TIME
Operation

Owner’s Manual28
Calorie Goal ProgramThe Calorie Goal program allows the user to define a target number of calories to burn during their workout.
1. Press the MORE WORKOUTS key. Then use the Level UP or DOWN keys to scroll through the program options. When the console displays CALORIE GOAL, press [ENTER] to accept.
2. The console will then display ENTER WEIGHT – LBS (or ENTER WEIGHT – KG if in Metric mode). Enter your weight using the numeric keypad and press [ENTER). Or, press [ENTER] to accept the default value.
3. The console will display ENTER STEP RATE. Enter the desired step rate using the numeric keypad and press [ENTER]. Or, press [ENTER] to accept the default value.
4. The console will then display ENTER CALORIES. Enter the desired calorie value using the numeric keypad and press [ENTER]. Or, press [ENTER] to accept the default value.
5. The console will display ENJOY WORKOUT and the timer will begin.
HR Interval ProgramThe HR Interval program allows the user to define an exercise Target HR, time at exercise THR, recovery THR and total exercise time.
1. Press the MORE WORKOUTS key. Then use the Level UP or DOWN keys to scroll through the program options. When the console displays HR INTERVALS, press [ENTER] to accept.
2. The console will then display Checking for HR. Need HR belt or Hold HR sensors. When the console detects a valid signal it will then proceed to the next step.
3. The console will then display ENTER WEIGHT – LBS (or ENTER WEIGHT – KG if in Metric mode). Enter your weight using the numeric keypad and press (ENTER). Or, press [ENTER] to accept the default value.
4. The console will display ENTER AGE 10 - 99. Enter your age using the numeric keypad. Or, press [ENTER] to accept the default value of 40 years old.
5. The console will display WORK TARGET HR. A suggested THR will be displayed, based on your age. Press [ENTER] to accept the calculated THR, or enter a different THR using the numeric keypad and then press [ENTER].
Operation

Owner’s Manual29
6. The console will display ENTER WORK TIME. This is the amount of time you want to exercise in the work THR zone. Enter desired work time using the numeric keypad and press (ENTER).
7. The console will then display REST TARGET HR. A suggested THR will be displayed, based on your age. Press (ENTER) to accept the calculated THR, or enter a different THR using the numeric keypad and then press (ENTER).
8. The console will display ENTER REST TIME. This is the amount of time you want to exercise in the rest THR zone. Enter desired rest time using the numeric keypad and press (ENTER). Or press (ENTER) to accept the default value.
9. The console will then display ENTER TIME. Enter desired total workout time using the numeric keypad and press ENTER. Or, press (ENTER) to accept the default value.
10. The console will display ENJOY WORKOUT and the timer will begin.
Random Play WorkoutThe Random Play Workout is a program that randomly changes the intensity throughout the workout time.
1. Press the MORE WORKOUTS key. Then use the Level UP or DOWN keys to scroll through the program options. When the console displays RANDOM PLAY, press [ENTER] to accept.
2. The console will then display ENTER WEIGHT – LBS (or ENTER WEIGHT – KG if in Metric mode). Enter your weight using the numeric keypad and press (ENTER). Or, press [ENTER] to accept the default value.
3. The console will display ENTER LEVEL. Enter the desired average intensity level using the numeric keypad and press (ENTER). Or, press [ENTER] to accept the default value.
4. The console will then display ENTER TIME. Enter the desired time and press (ENTER). Or, press [ENTER] to accept the default value.
5. The console will display ENJOY WORKOUT and the timer will begin.
Operation

Owner’s Manual30
Custom Intervals WorkoutIn the Custom Intervals workout, users can create a custom interval program by entering Rest Level and Time, Work Level and Time, and total number of intervals.
The Custom Intervals Program:
1. Press the MORE WORKOUTS key. Then, use the Level UP or DOWN keys to scroll through the program options. When the console displays CUSTOM INTERVALS, press [ENTER] to accept.
2. The console will then display ENTER WEIGHT – LBS (or ENTER WEIGHT – KG if in Metric mode). Enter your weight using the numeric keypad and press (ENTER). Or, press [ENTER] to accept the default value.
3. The console will display ENTER WORK RATE. Enter the desired work rate using the numeric keypad and press (ENTER). Or, press [ENTER] to accept the default value.
4. The console will then display ENTER WORK TIME. Enter the desired time and press (ENTER). Or, press [ENTER] to accept the default value.
5. The console will display ENTER REST RATE. Enter the desired rest rate using the numeric keypad and press (ENTER). Or, press [ENTER] to accept the default value.
6. The console will then display ENTER REST TIME. Enter the desired time and press (ENTER). Or, press [ENTER] to accept the default value.
7. The console will display # OF INTERVALS. Enter the desired number of intervals using the numeric keypad and press (ENTER). Interval range is 1-15. Or, press [ENTER] to accept the default value.
8. The console will display ENJOY WORKOUT and the timer will begin.
The Work/Rest Rate may be changed at any time during the workout by pressing the [Level: UP] key to increase the resistance, or the [Level: DOWN] key to decrease the resistance. Any changes to the work/rest rate level will only change the level in the current recovery or exercise phase. To change the step rate of the exercise phase, you must change the step rate during an exercise phase. To change the step rate of the recovery phase, you must change the step rate during a recovery phase. Changing the step rate will not change the look of the remaining profile; however, the new step rate will continue through the rest of the workout.
Operation

Owner’s Manual31
Operation
Heart Rate MonitoringHR monitoring helps users monitor their levels of exertion by displaying the HR during exercise. There is one method of monitoring HR on the Commercial Series StepMill® SM916:
• Telemetry (e.g. using a Polar® or Polar-compatible transmitter belt). A Polar-compatible HR chest belt transmits the heart beat signal to the receiver in the display. The display shows the HR in beats per minute and uses the HR value in HR control mode.
Telemetry Heart Rate The telemetry HR monitoring system consists of the receiver, located in the display, and a transmitter belt (purchased separately) worn across your chest. The monitoring function is activated as soon as you strap on the chest belt with moistened electrodes and step within range of the receiver in the machine. Two electrodes on the underside of the chest belt sense the HR signal and send it to the receiver. The far right decimal point in the HR Display pulses to indicate that the display is receiving a valid signal. A microprocessor in the controller calculates the HR and shows it, in BPM, on the display.
Before you put the transmitter belt on, wet the two electrode patches (the grooved rectangles on the reverse side of the belt). Secure the transmitter belt as high under the pectoral muscles (chest) as is comfortable. The transmitter belt should fit snugly and comfortably, and allow normal breathing.
After the initial belt signal is detected, the display will enter a validation phase in which four good heart beat signals lasting four seconds are required before locking on telemetry HR signals for the duration of the workout session.
If your HR is not being displayed, try the following:
• Move closer to the display.• Tighten the elastic band on the chest belt.• Adjust the belt higher or lower on your chest.• Remoisten the electrodes.• Test your chest strap with a machine that you know is working, or with a HR
watch that you know is working.
Pacemaker users should not use the telemetry transmitter without first consulting with their doctor.

Owner’s Manual32
Operation
Maintaining the Transmitter BeltClean the chest belt regularly with mild soap and water, then dry thoroughly. Residual sweat and moisture keeps the transmitter active and will drain the battery in the transmitter. Do not use abrasives or chemicals such as steel wool or alcohol for cleaning, as they can damage the electrodes permanently. Replacement belts can be purchased from an Authorized Nautilus Fitness Retailer or at www.nautilus.com.
Heart Rate Priority Telemetry (e.g., Polar®) HR signal detection is available. The default priority of HR input is EITHER INPUT.
Locked/Non-Locked HR Signal OptionsThe EITHER INPUT option means that the HR source signal is not fixed during the workout session. If the LOCKED INPUTS option is selected then the HR source signal is locked on the first detected signal during the workout. To set a HR signal input, or to turn off the HR option all together, perform the following steps:
1. On the console keypad, press [Level: UP], [3], [ENTER]. At this point the screen will display CUSTOMIZE. Use the [Level: UP] key until HR INPUTS appears, then press [ENTER] to select th option.
2. There are 6 options to handle HR input signals. Press the [Level: UP] and [Level: DOWN] keys to scroll through the options until you find the option that you want. Press the [ENTER] key to select that option.
LOCKED INPUTS Once the console has detected a valid input signal it will lock the signal for the duration of the workout session.
EITHER INPUT Allows either telemetry or contact HR (not available on the
StepMill® SM916) signals to be detected. Does not lock out a particular input signal for the entire workout. This option will detect either input signal during a workout session, but only one at a time, and only until the other signal terminates.
TELEMETRY ONLY Locks out contact HR signals and will only detect telemetrysignals.
HAND ONLY Locks out telemetry signals and will only detect contact HRsignals (not applicable on the StepMill® SM916).

Owner’s Manual33
BOTH HR OFF Turns off the ability to detect any HR signal. Used in rare situations where there is excessive interference with the HR signals. During workouts where HR is necessary, such as the HR Zone Trainer and the Fitness Test, the console will pick up telemetry HR signals so that the programs are not disabled.
HAND HR PGRM OFF Means that the HR control programs require a telemetrystrap to work.
No single fitness program is suitable for all. All fitness programs should be designed by fitness professionals who are trained to tailor the program to the individual goals and fitness levels of each client. The following information on exercise intensity, duration, and frequency is based on averages and is included here only as a guideline for use by fitness professionals. Programs should be altered for comfort and safety when necessary.
CONSOLE CODESThere are 4 groups of console codes as follows:
• Customization (codes starting with 2 or 3)
• Machine Status (codes starting with 4)
• Diagnostic (codes starting with 6 or 7)
• Configuration (codes starting with 8)
Each group of codes is defined below. To access these console codes and the options within each group, follow the instructions for each section.
Customizing the StepMill® SM916 You can customize several parameters on the StepMill® SM916 to conform to your individual requirements, including changing the workout default values and setting custom parameters such as time limits, changing screen contrast, changing language, and changing units.
To change the workout default values:
1. Press [Level: UP], [2], [ENTER]. The console will display DEFAULTS.
2. Press [Level: UP] or [Level: DOWN] to scan through the default choices. Select the option you want to change by pressing [ENTER]. Then use the [Level: UP] or [Level: DOWN] keys or the numerical keypad to change the value for the selected option. Press [ENTER] to accept the choice for that option.
Operation

Owner’s Manual34
Operation
Defaults options:
Change default weight Use the numeric keypad or [Level: UP] or [Level: DOWN] keys to change the desired default weight for your facility. Press [ENTER] to accept the new value.
Change default workout time Use the numeric keypad or [Level: UP] or [Level: DOWN] keys to change the desired default workout time between 5 and 99 minutes. Press [ENTER] to accept the new value.
Change default age Use the numeric keypad or [Level: UP] or [Level: DOWN] keys to change the desired default age used to calculate target HR. Valid age range is between 10 and 99. Press [ENTER] to accept the new value.
Change default % Target HR Use the numeric keypad or [Level: UP] or [Level: DOWN] keys to change the desired target HR % value based on maximum HR. This is used to calculate the target HR value based on the % of maximum HR. Valid target HR % is between 10% and 90%. Press [ENTER] to accept the new value.
Change default Starting Level Use the numeric keypad or [Level: UP] or [Level: DOWN] keys to change the desired default level between 1 and 20. Press [ENTER] to accept the new value.
Change default Step Rate Use the numeric keypad or [Level: UP] or [Level: DOWN] keys to change the desired default level between 24 and 162. Press [ENTER] to accept the new value.
To customize the console:
1. Press [Level: UP], [3], [ENTER]. The console will display CUSTOMIZE.
2. Press [Level: UP] or [Level: DOWN] to scan through the customize choices. Select the option you want to change by pressing [ENTER]. Then, use the [Level: UP] or [Level: DOWN] keys or the numerical keypad to change the value for the selected option. Press [ENTER] to accept the choice for that option.

Owner’s Manual35
Operation
Cool Down Use the [Level: UP] and [Level: DOWN] keys or the numeric keypad to enter the desired cool down time in minutes. Press [ENTER] to select your option.
Select Stats Use the [Level: UP] or [Level: DOWN] keys to select the desired Stat. Press [ENTER] twice to select your option.
Max time limit Use the numeric keypad to enter the desired time limit between 20 and 99 minutes. Press [ENTER] to accept the new time limit. Press [0] and the display will read TIME LIMIT OFF.
Change units Use the [Level: UP] and [Level: DOWN] keys to toggle between USA units and Metric units. Press [ENTER] to select your option.
HR inputs See HR Priority in the previous section for details of the choices.
Language Use the [Level: UP] and [Level: DOWN] keys to view the choices (English, German, French, Spanish, Italian, Dutch, Portuguese, Japanese). Press [ENTER] to select your option.
Adjust upper LCD screen contrast Use the [Level: UP] and [Level: DOWN] keys to increase or decrease the contrast level of the upper LCD. Press [ENTER] to select your option.
Adjust lower LCD screen contrast Use the [Level: UP] and [Level: DOWN] keys to increase or decrease the contrast level of the lower LCD. Press [ENTER] to select your option.
Auto Repeat (Not Used)
Max Step/Min Step Use the numeric keypad to enter the desired step limit between 24 and 162 Press [ENTER] to select your option.
3. To exit CUSTOMIZE, press the [CLEAR] key.

Owner’s Manual36
Machine Status Codes To view maintenance information such as the run time in hours, number of workouts and distance, as well a machine type and software revision:
1. Press [Level: UP], [4], [ENTER]. The console will display MACHINE STATUS
2. Press [Level: UP] or [Level: DOWN] to scan through the choices to view. Press [CLEAR] to exit the machine status codes.
Machine run time in hours
Display the machine run time in hours. The console will display RUN HOURS #####.
Number of workouts Display the number of times a workout key has been pressed. The console will display WORKOUTS ####.
Floors Display the total floors traveled. The console will display FLOOR #####.
Software revision Display the console software revision number. The console will display CONS 41375-###.
Machine type Display the machine type the console is currently configured to. The console will display STEPMILL or other machine type.
Machine run time in hours since last cleared (used for maintenance) Display the machine run time since last cleared. The console will display MAINT HOURS #####. This will provide the number of hours between service or maintenance calls. The machine run time is reset to zero in the following Diagnostics section.
3. To exit MACHINE STATUS, press the [CLEAR] key.
Operation
Owner’s Manual37
Diagnostic CodesDiagnostic codes are used to test various components of the machine such as the display, keyboard, serial port, alternator, and tachometer, as well as viewing the error log information and resetting the time between service or maintenance calls.
1. Press [Level: UP], [6], [ENTER]. The console will display DIAGNOSTICS
2. Press [Level: UP] or [Level: DOWN] to scan through the choices. Select the option you want to view by pressing [ENTER].
Test display
To test the LCD display, press [ENTER] when the message, DISPLAY TEST is displayed. The console screen alternates turning on all LCD segments and a representative program screen. Verify that all LCD segments turn on.
Test keyboard To test all the keys on the keyboard, press [ENTER] when the message, KEY TEST is displayed. Then, press any key on the keyboard and that key’s name will be displayed in the text line. Press [CLEAR] as the last key to exit this test.
Test serial port
To test the serial port, press [ENTER] when the message, SERIAL TESTS is displayed. This test performs a serial loop back test. Select the CSAFE RS-232 selection. You will need a loop-back test cable inserted into the appropriate connector port to successfully run this test. Console will display either PASS or FAIL.
Test alternator To test the machine’s alternator, press [ENTER] when the message, ALT TEST is displayed. This test verifies the alternator field routines through the console. Position yourself on the machine and press [Level: UP] for field on. After exercising briefly you should build up resistance. For field off, press [Level: DWN].
Test tach response
To test the machine’s tachometer, press [ENTER] when the message, TACH TEST is displayed. Start exercising on the machine. The console should regulate the alternator resistance based on the tach signal to maintain approximately 2,000 RPMs while you are exercising. If not, there is a possible problem in the AC tap or field circuit. Check the alternator, the AC tap wire, the field wire, the diode, the terminal posts, and the main cable.
Operation

Owner’s Manual38
I/O Test Press [ENTER] when the message I/O TEST is displayed. The AUX and B+ values represent the current and voltage delivered from the alternator respectively. AUX is scaled by 1000 and B+ is scaled by 300. These values will increase with the speed of the alternator (note that both values will reach 0 if the alternator is left at rest). The --- string is displayed at all times since the StepMill does not require a magnetic key.
A Sensor B N/A
3. To exit DIAGNOSTICS, press the [CLEAR] key.
To review the error log and reset the service timer:
1. Press [Level: UP], [7], [ENTER]. The console will display MAINTENANCE LOG.
2. Press [Level: UP] or [Level: DOWN] to scan through the choices. Select the option you want by pressing [ENTER].
Error log To display the machine’s error log, press [ENTER] when the message, ERROR LOG, is displayed. The console will report various error messages in the display window. The total amount of errors will be displayed in the upper right window. Note that only the highest priority reported error will be displayed. Errors are handled in two ways. First, as a non-fatal WARNING which will display the text message but continue system operation until you press the [CLEAR] key. The second way is a fatal ERROR which will stop the exercise and return the system to an idle intensity state. The console will display the error text and not let you restart the program unless power has been turned off and then back on. There are 16 error entries available.
Reset service time To reset the time between service or maintenance calls, press [ENTER] when the message, MAINT HOURS is displayed. Press the [0] key, then [ENTER] to reset.
QA ID N/A
Operation

Owner’s Manual39
3. To exit MAINTENANCE LOG, press the [CLEAR] key.
Configuration Codes
1. Press [Level: UP], [8], [ENTER]. The console will display CONFIGURATION.
2. Press [Level: UP] or [Level: DOWN] to scan through the choices. Select the option you want by pressing [ENTER].
Change Machine Changes the machine type from StairClimber, StepMill® machine, Bike rev B, Bike rev A or Elliptical. Scroll through the screen until CHANGE MACHINE is displayed. Press (ENTER), then press [Level: UP] or [Level: DOWN] to scan through the choices. Select the machine type you want by pressing [ENTER].
Reset Data Set Up
Scroll through the screen until RESET DATA SET UP is displayed and press (ENTER). All customized customer settings will be cleared.
NOTE: The Console will need to be reconfigured.
Clear Error Log Scroll through the screen until CLEAR ERROR LOG is displayed and press (ENTER). The word DONE will appear and all accumulated errors in the Erro Log will be cleared.
Reset Console Scroll through the screen until RESET CONSOLE is displayed and press (ENTER). Resets all defaults to original manufacturing settings.
NOTE: The Console will need to be reconfigured.
Operation

Owner’s Manual40
Maintenance RecordsFor ease of maintenance the StepMill® SM916 console will keep track of hours, number of workouts, time between last servicing, etc. You can access any of the custom menus by pressing [LEVEL: UP], [4], [ENTER]. The console will then display MACHINE STATUS. Use the [Level: UP] and [Level: DOWN] keys to scroll through the options. For details, refer to the Machine Status Console Codes in the previous section.
Resetting the Maintenance Hour TimerAfter each maintenance period reset the counter. Press [LEVEL: UP], [7], [ENTER]. Then use the Level keys to scroll through the options. When MAINT HOURS is displayed, press [ENTER]. Press the [0] key, then press [ENTER]. Press [CLEAR] to return to the opening screen.
Moving your StepMill® SM916
The StepMill® SM916 is delivered with attached transport wheels. These same transport wheels will be used whenever the machine needs to be relocated.
Note: 2 people are required to attach/remove the transport wheels and move or relocate the machine. The transport wheels are intended for indoor use only and should never be rolled on concrete or asphalt surfaces.
Initial ServiceUpon receiving your machine, use a soft, clean towel to wipe off the dust, which may have accumulated during shipping. Your new machine will require minor assembly. Refer to the Assembly Manual for details.
Cleaning
1. Do not use glass cleaners or any other household cleaners on the console. Clean the console daily with a water-dampened cloth and wipe dry after cleaning.
Maintenance
The safety and performance of this product can be maintained only if it is inspected regularly for damage and wear.
Pay particular attention to components most susceptible to wear such as steps and lower side covers.
Remove any damaged machine from service and replace damaged compo-nents immediately.
Direct any question regarding mantenance or its function to a qualified Nautilus® Technician. For contact information please see the ImportantContact Numbers page at the back of this manual.

Owner’s Manual41
2. Clean the exterior of the machine daily using soap and water or a diluted, non-mineral based household cleaner such as Fantastik®.
Inspection
1. Inspect the frame for any rust, bubbling, or paint chips during the daily cleaning. The salt in perspiration can damage the unpainted surfaces. Repair the damaged area with a touch-up paint kit purchased from Nautilus® (call Customer Service for order information).
Parts and ServiceRegular and scheduled maintenance will prolong the life of your Nautilus® equipment. Only use genuine Nautilus® replacement parts. The Nautilus® Customer Service Team invites you to call in your order for replacement parts.
External Power Supply
The StairMaster® Commercial Series StepMill® SM916’s external power supply is supplied with the unit and plugs into a standard 115 volt, 15 amp outlet, or a 220-240 volt 50 Hz, 10 amp outlet. (All major voltage plugs are available.) The plug-in for the external power supply is located on the underside of the machine.
Daily Weekly Monthly Every 3 months Comments
General Maintenance
Check Safety & Warning Labels X
Spot Check Step Chains X
Alternator Belt Tension X Tension to 40-54 inlbs
Lubrication
Drive Chains Or every 300 hrs. 30W Oil
Step Hinges X 30W Oil
Bearing Plate X Multi-Purpose grease
Cleaning
Clean Console X Clean with a water dampened cloth and wipe dry after cleaning.
Clean Side Covers X Clean exterior with soap and water or a diluted household cleaner.
Maintenance Schedule
Maintenance

Owner’s Manual42
IMPORTANT: If installing the optional LCD Monitor, refer to the NV915 installation manual at this time.
The console will power on and remain powered whenever the external power supply is connected.
RecyclingDo not dispose of this product as refuse. This product is to be recycled. For information on the proper method of disposal contact a Nautilus® Customer Service Representative.
If you have questions, contact the Customer Service Department at 800-NAUTILUS (800-628-8458), International Office (41) (26) 460 77 77 or refer to the Important Contact Numbers section in this manual.
Maintenance

Owner’s Manual43
Please supply the serial number of your machine and the date of purchase when you call Nautilus®. Use the space in the boxes below to write down this information. To find the serial number on your machine, refer to the Safety Warning Label information page. Dial the number of the office close to you.
Contact Information
Serial Number
Date of Purchase
Please record the following information for future reference.
UNITED STATES OFFICES:
E-mail: [email protected]
TECHNICAL/CUSTOMER SERVICEPhone: 800-NAUTILUS (800-628-8458)Fax: (877) 686-6466E-mail: [email protected]
CORPORATE HEADQUARTERSNautilus, Inc.World Headquarters16400 SE Nautilus DriveVancouver, Washington, USA 98683Phone: (800) NAUTILUS (800) 628-8458
INTERNATIONAL OFFICES:
For technical assistance and a list of distributors in your area, please call or fax one of the following numbers.
INTERNATIONAL CUSTOMER SERVICE Nautilus International S.A.Rue Jean Prouvé1762 Givisiez / SwitzerlandTel: + 41 26 460 77 77Fax: + 41 26 460 77 70E-mail: [email protected]
GERMANY and AUSTRIANautilus Deutschland GmbH Albin-Köbis-Str. 451147 KölnTel: + 49 02203 2020 0Fax: + 49 02203 2020 45 45
ITALY Nautilus Italy S.r.l., Via della Mercanzia, 10340050 Funo di Argelato - BolognaTel: + 39 051 664 6201Fax: + 39 051 664 7461
SWITZERLANDNautilus Switzerland SARue Jean-Prouvé 6, CH-1762 GivisiezTel: + 41 026 460 77 66Fax: + 41 026 460 77 60
UNITED KINGDOMNautilus UK Ltd4 Vincent Avenue,Crownhill, Milton Keynes, Bucks, MK8 0ABTel: + 44 1908 267 345Fax: + 44 1908 567 345
CHINANautilus (Shanghai) Fitness Co., Ltd.7A No.728, Yan’an Road (West), 200050 Shanghai, China Tel: + 86 21 523 707 00Fax: + 86 21 523 707 09

Nautilus® Bowflex® Schwinn® Fitness StairMaster® Universal® Nautilus Institute®
©2008. Nautilus, Inc. All rights reserved. Nautilus, the Nautilus Logo, Bowflex, StairMaster, StairMaster Logo, StepMill, Universal, and Nautilus Institute are either registered trademarks or trademarks of Nautilus, Inc. Schwinn and the Schwinn Quality Seal are registered trademarks. All other trademarks are owned by their respective companies. Nautilus, Inc., World Headquarters, 16400 SE Nautilus Drive, Vancouver, WA 98683 1-800-NAUTILUS www.nautilus.com