owner’s manual getting started - kawai pianos...the cn23 digital piano’s lesson function helps...
TRANSCRIPT

1
PAR
T N
AM
ES
A
ND
FU
NC
TIO
NS
2
GE
TT
ING
STA
RT
ED
3
LES
SO
N F
UN
CT
ION
4
RE
CO
RD
ER
5F
UN
CT
ION
MO
DE
6
AP
PE
ND
ICE
S
Owner’s Manual
CN23_cover_EN.indd 1 2009/11/26 13:07:52

CN23_cover_EN.indd 2 2009/11/26 13:08:10

Page
3
Table of Contents
THANK YOU FOR PURCHASING A KAWAI DIGITAL PIANO!
This KAWAI digital piano is a revolutionary new keyboard instrument, combining the latest in electronic advances with traditional craftsmanship inherited from KAWAI’s many years of experience building fi ne pianos. The CN23 keyboard provides the touch response and full dynamic range required for a superb performance of piano, harpsichord, organ, and other instruments. The CN23 digital piano’s Lesson function helps performers to practice the piano with a collection of etudes from Czerny and Burgmüller, or songs from Alfred’s Basic Piano Library lesson book (USA, Canada, Australia and UK only).
In addition, the CN23 digital piano is equipped with industry standard MIDI (Musical Instrument Digital Interface), allowing a number of other electronic instruments to be controlled and played simultaneously, creating a range of musical possibilities.
This Owner’s Manual contains valuable information to help performers make full use of the instrument’s varied capabilities. Please read all sections carefully and keep this manual handy for future reference.
Important Safety Instructions ..............4
1. PART NAMES AND FUNCTIONS ......8 CONTROL PANEL ....................................................... 8
USING THE ENCLOSED FUNCTION LABEL ............. 8
PEDALS ....................................................................... 9
2. GETTING STARTED .........................101) BASIC OPERATIONS ..................................................... 10
DEMONSTRATION SONGS ...................................... 11
SELECTING A SOUND ............................................. 12
2) DUAL .............................................................................. 13
3) FOUR HANDS ................................................................ 14
4) METRONOME ................................................................ 15
STARTING THE METRONOME ................................. 15
CHANGING THE METRONOME TIME SIGNATURE ... 15
ADJUSTING THE METRONOME TEMPO ................ 16
5) CONCERT MAGIC ......................................................... 17
SELECTING A SONG ................................................ 17
LISTENING TO THE SONG ....................................... 17
PERFORMING A SONG ............................................ 18
CONCERT MAGIC SONG TYPES ............................ 18
CONCERT MAGIC DEMO MODES ........................... 19
3. LESSON FUNCTION ........................20 SELECTING A LESSON SONG FROM THE FIRST
SONG BOOK ............................................................. 20
SELECTING A LESSON SONG FROM THE SECOND
SONG BOOK ............................................................. 20
LISTENING TO A LESSON SONG ............................ 21
EXITING THE LESSON FUNCTION ......................... 21
PRACTICING LEFT AND RIGHT HAND PARTS ....... 21
ADJUSTING THE TEMPO OF A LESSON SONG .... 22
4. RECORDER .....................................231) RECORDING A SONG ................................................... 23
2) PLAYING BACK A SONG ............................................... 24
3) ERASING ALL SONGS .................................................. 24
5. FUNCTION MODE............................251) BASIC OPERATION ....................................................... 25
2) TOUCH TYPE ................................................................. 26
3) TRANSPOSE.................................................................. 26
4) TUNING .......................................................................... 27
5) REVERB ......................................................................... 27
6) DAMPER EFFECT ......................................................... 28
7) CONCERT MAGIC MODE ............................................. 28
8) MIDI CHANNEL SELECT ............................................... 29
ABOUT MIDI .............................................................. 29
CN23 MIDI FUNCTIONS ........................................... 29
9) MIDI LOCAL CONTROL ON/OFF .................................. 30
10) MULTI-TIMBRAL MODE ON/OFF ................................ 31
11) TRANSMIT MIDI PROGRAM CHANGE ....................... 32
6. APPENDICES ...................................331) CONNECTING TO OTHER DEVICES ........................... 33
2) ASSEMBLY INSTRUCTIONS ......................................... 34
3) CONCERT MAGIC SONG LIST ..................................... 36
4) LESSON SONG LIST ..................................................... 37
ALFRED’S BASIC PIANO LIBRARY ......................... 37
BURGMÜLLER & CZERNY ETUDES ....................... 38
5) SPECIFICATIONS .......................................................... 39
6) MIDI IMPLEMENTATION CHART................................... 40
CN23_EN.indd 3 2009/11/26 13:09:00

Page
4
Important Safety Instructions
denotes that care should be taken.The example instructs the user to take care not to allow fingers to be trapped.
denotes a prohibited operation.The example instructs that disassembly of the product is prohibited.
denotes an operation that should be carried out.The example instructs the user to remove the power cord plug from the AC outlet.
Examples of Picture Symbols
Read all the instructions before using the product.
CAUTIONRISK OF ELECTRIC SHOCK
DO NOT OPEN
AVIS : RISQUE DE CHOC ELECTRIQUE - NE PAS OUVRIR.
TO REDUCE THE RISK OF ELECTRIC SHOCK, DO NOT REMOVE COVER (OR BACK).NO USER-SERVICEABLE PARTS INSIDE. REFER SERVICING TO QUALIFIED SERVICE PERSONNEL.
The lighting flash with arrowhead symbol, within an equilateral triangle, is intended to alert the user to the presence of uninsulated “dangerous voltage” within the product’s enclosure that may be of sufficient magnitude to constitute a risk of electric shock to persons.
The exclamation point within an equilateral triangle is intended to alert the user to the presence of important operating and maintenance (servicing) instructions in the literature accompanying the product.
WARNINGTO REDUCE THE RISK OF FIRE OR ELECTRIC SHOCK, DO NOT EXPOSE THIS PRODUCT TO RAIN OR MOISTURE.
INSTRUCTIONS PERTAINING TO A RISK OF FIRE, ELECTRIC SHOCK, OR INJURY TO PERSONS
SAVE THESE INSTRUCTIONS
1) Read these instructions.
2) Keep these instructions.
3) Heed all warnings.
4) Follow all instructions.
5) Do not use this apparatus near water.
6) Clean only with dry cloth.
7) Do not block any ventilation openings. Install in accordance with the manufacturer’s instructions.
8) Do not install near any heat sources such as radiators, heat registers, stoves, or other apparatus (including amplifiers) that produce heat.
9) Do not defeat the safety purpose of the polarized or grounding-type plug. A polarized plug has two blades with one wider than the other. A grounding type plug has two blades and a third grounding prong. The wide blade or the third prongs are provided for your safety. If the provided plug does not fit into your outlet, consult an electrician for replacement of the obsolete outlet.
10) Protect the power cord from being walked on or pinched particularly at plugs, convenience receptacles, and the point where they exit from the apparatus.
11) Only use attachments/accessories specified by the manufacturer.
12) Use only with the cart, stand, tripod, bracket, or table specified by the manufacturer, or sold with the apparatus. When a cart is used, use caution when moving the cart/apparatus combination to avoid injury from tip-over.
13) Unplug this apparatus during lightning storms or when unused for long periods of time.
14) Refer all servicing to qualified service personnel. Servicing is required when the apparatus has been damaged in any way, such as power-supply cord or plug is damaged, liquid has been spilled or object have fallen into the apparatus, the apparatus has been exposed to rain or moisture, does not operate normally, or has been dropped.polarized or grounding-type plug. A polarized plug has two blades with one wider than the other.
CN23_EN.indd 4 2009/11/26 13:09:05
Page
5
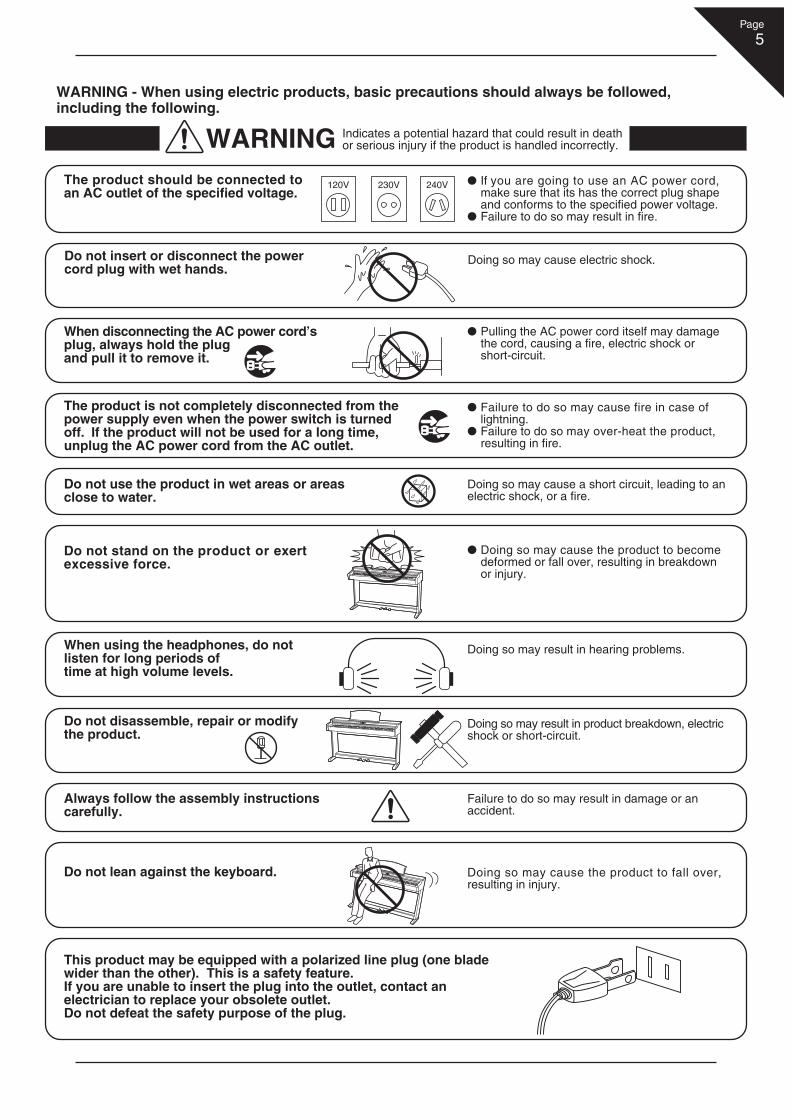
WARNINGThe product should be connected to an AC outlet of the specified voltage.
● If you are going to use an AC power cord, make sure that its has the correct plug shape and conforms to the specified power voltage.● Failure to do so may result in fire.
120V 240V230V
Indicates a potential hazard that could result in death or serious injury if the product is handled incorrectly.
WARNING - When using electric products, basic precautions should always be followed,including the following.
The product is not completely disconnected from the power supply even when the power switch is turned off. If the product will not be used for a long time, unplug the AC power cord from the AC outlet.
● Failure to do so may cause fire in case of lightning.● Failure to do so may over-heat the product, resulting in fire.
When disconnecting the AC power cord’s plug, always hold the plug and pull it to remove it.
● Pulling the AC power cord itself may damage the cord, causing a fire, electric shock or short-circuit.
Do not disassemble, repair or modify the product.
Doing so may result in product breakdown, electric shock or short-circuit.
When using the headphones, do not listen for long periods of time at high volume levels.
Doing so may result in hearing problems.
Do not insert or disconnect the powercord plug with wet hands.
Doing so may cause electric shock.
Doing so may cause a short circuit, leading to an electric shock, or a fire.
Do not use the product in wet areas or areas close to water.
● Doing so may cause the product to become deformed or fall over, resulting in breakdown or injury.
Do not stand on the product or exertexcessive force.
Failure to do so may result in damage or an accident.
Always follow the assembly instructions carefully.
Doing so may cause the product to fall over, resulting in injury.
Do not lean against the keyboard.
This product may be equipped with a polarized line plug (one blade wider than the other). This is a safety feature. If you are unable to insert the plug into the outlet, contact an electrician to replace your obsolete outlet.Do not defeat the safety purpose of the plug.
CN23_EN.indd 5 2009/11/26 13:09:05

Page
6
Failure to do so may damage them, resulting in fire, electric shock or short-circuit.
When connecting the AC power cord and other cords, take care not to get them tangled.
CAUTIONIndicates a potential hazard that could result in injury or damage to the product or other property if the product is handled incorrectly.
Using the product in such areas may result in product breakdown.Use the product only in moderate climates (not in tropical climates).
Do not use the product in the following areas.● Areas, such as those near windows, where the product is exposed to direct sunlight● Extremely hot areas, such as near a heater● Extremely cold areas, such as outside● Extremely humid areas● Areas where a large amount of sand or dust is present● Areas where the product is exposed to excessive vibrations● Areas where the product is unstable.
It is a good practice to have the instrument near the AC outlet and the power cord plug in a position so that it can readily be disconnected in an emergency because electricity is always chargingwhile the plug is in the AC outlet even in a power switch off condition.
● Do not use other AC adaptors to power this instrument.● Do not use the included AC adaptor or AC power cord to power other equipment.
Use only the AC adaptor included with this instrument to power the instrument.
● Doing so may result in discoloration or deformation of the product.● When cleaning the product, put a soft cloth in lukewarm water, squeeze it well, then wipe the product.
Do not wipe the product with benzene or thinner.
● Doing so may cause the product to generate noise.● If the product generates noise, move the product sufficiently away from the electrical appliance or connect it to another AC outlet.
Do not place the product near electricalappliances such as TVs and radios.
Entry of water, needles or hair pins may result in breakdown or short-circuit.The product shall not be exposed to dripping or splashing. No objects filled with liquids, such as vases, shall be placed on the product.
Take care not to allow any foreign matter to enter the product.
Failure to do so may cause breakdown of this product and other devices.
Before connecting cords, make sure that the power to this product and other devices is turned OFF.
Failure to do so may over-heat the product, resulting in fire.
Ensure that the ventilation is not impeded by covering the ventilation openings with items, such as newspaper, table-cloths, curtains, etc.
Please lift up the product when moving it.Please note that the product is heavy and must be carried by more than two persons.Dropping the product may result in breakdown.
Do not drag the product on the floor.Take care not to drop the product.
OFF
CN23_EN.indd 6 2009/11/26 13:09:05

Page
7
The product should be serviced by qualified service personnel when:
● The power supply cord or the plug has been damaged.● Objects have fallen, or liquid has been spilled into the product.● The product has been exposed to rain.● The product does not appear to operate normally or exhibits a marked change in performance.● The product has been dropped, or the enclosure damaged.
The product should be located so that its location or position does not interfere with its properventilation. Ensure a minimum distance of 5cm around the product for sufficient ventilation.
Doing so may cause the illumination to fall over, resulting in fire.
Do not place naked flame, such as lighted candles on the product.
Notes on RepairShould an abnormality occur in the product, immediately turn the power OFF, disconnect the power cord plug, and then contact the shop from which the product was purchased.
CAUTION:To prevent electric shock, match wide blade of plug to wide slot, fully insert.
ATTENTION:Pour éviter les chocs électriques, introduire la lame la plus large de la fiche dans la borne correspondante de la prise et pousser jusqu’au fond.
Instruction for AC power cord (U.K.)Do not plug either terminal of the power cord to the ground of the AC outlet on the wall.
FCC Information (U.S.A)CAUTION : Changes or modifications not expressly approved by the party responsible for compliance could void the user’s authority to operate the equipment.
NOTE : This equipment has been tested and found to comply with the limits for a Class B digital device, pursuant to Part 15 of the FCC Rules. These limits are designed to provide reasonable protection against harmful interference in a residential installation. This equipment generates, uses and can radiate radio frequency energy and, if not installed and used in accordance with the instructions, may cause harmful interference to radio communications. However, there is no guarantee that interference will not occur in a particular installation. If this equipment does cause harmful interference to radio or television reception, which can be determined by turning the equipment off and on, the user is encouraged to try to correct the interference by one or more of the following measures:
• Reorient or relocate the receiving antenna.• Increase the separation between the equipment and receiver.• Connect the equipment into an outlet on a circuit different from that to which the receiver is connected.• Consult the dealer or an experienced radio/TV technician for help.
Canadian Radio Interference RegulationsThis instrument complies with the limits for a class B digital apparatus, pursuant to the Radio Interference Regulations, C.R.C., c. 1374.
An information on Disposal for usersIf your product is marked with this recycling symbol it means that, at the end of its life, you must dispose of it separately by taking it to an appropriate collection point.You should not mix it with general household waste. Disposing of this product correctly will prevent potential negative effects on the environment and human health which could otherwise arise due to inappropriate waste handling.For further details, please contact your local authority. (European Union only)
CN23_EN.indd 7 2009/11/26 13:09:05

Page
8
1
PAR
T N
AM
ES
A
ND
FU
NC
TIO
NS
1. PART NAMES AND FUNCTIONSThis section explains the locations and functions of the panel sliders and buttons.
CONTROL PANEL
USING THE ENCLOSED FUNCTION LABEL
A ‘function label’ is included with the CN23 digital piano. Placing this label at the back of the keyboard will prove
useful when selecting different sounds or changing values, such as the metronome time signature.
Position the function label so that the left end, marked ‘CONCERT GRAND (off/-)’ is aligned with the lowest key.
The underside of the function label has a slight adhesive, allowing this information to be attached to the CN23
digital piano for greater convenience.
Function Label
CONCERT MAGICThe Concert Magic function allows the CN23 digital piano to be enjoyed by those with little or no experience of playing the piano, providing the correct accompaniment and melody by simply pressing a single key on the keyboard. (Page 17)
METRONOMEThe Metronome funct ion provides a steady rhythm with which to aid piano practice.The tempo, time signature, and volume of the metronome can be freely adjusted. (Page 15)
RECORDERThe Recorder function allows a performance to be recorded and played back. (Page 23)
SOUND SELECTThe SOUND SELECT button are used to select the sound that will be heard when playing the CN23 digital piano. (Page 12)
LESSONThe Lesson function provides access to built-in etudes or Alfred lesson books (USA, Canada, UK, AU only), offering an enjoyable piano learning experience. (Page 20)
CN23_EN.indd 8 2009/11/26 13:09:06

Page
9
1
PAR
T N
AM
ES
A
ND
FU
NC
TIO
NS
PEDALS
The CN23 digital piano features three pedals—just like a grand piano: Damper, Sostenuto and Soft.
Damper pedal
Sustains the sound after hands are lifted from the keyboard. The damper pedal is also capable
of responding to half pedaling.
Sostenuto pedal
Depressing this pedal after playing the keyboard and before releasing the keys sustains the
sound of only the keys just played. Any keys that are pressed after the Sostenuto pedal is
depressed will not be sustained after the keys are released.
Soft pedal
Depressing this pedal softens the sound and reduces its volume.
Sostenuto pedal
Soft pedal Damper pedal
HEADPHONE JACKSThe PHONES jacks located on the left of the CN23 digital piano, are used to connect stereo headphones to the instrument.Two pairs of headphones can be connected and used simultaneously.
POWERThe POWER button is used to turn the CN23 digital piano on and off. Be sure to turn off the instrument after playing. (Page 10)
MASTER VOLUMEThe MASTER VOLUME slider controls the master volume level of the internal speakers and connected headphones. Move the slider upward to increase the volume, and downward to decrease the volume. (Page 10)
CN23_EN.indd 9 2009/11/26 13:09:06

Page
10
2
GE
TT
ING
STA
RT
ED
2. GETTING STARTED1) BASIC OPERATIONS
This section provides the basic procedures for turning the power on and playing the CN23 digital piano.
Step 1
Connect one end of the AC power cable to the CN23 digital piano’s power jack and the other end of the cable to a wall AC outlet.
Step 2
Press the POWER button to turn on the power.
The LED indicator for the SOUND SELECT button will
turn on, and the Concert Grand sound will be selected
automatically.
Step 3
Adjust the volume level using the MASTER VOLUME slider.
The MASTER VOLUME slider controls the volume level of the speakers
and connected headphones. Set the volume to a comfortable listening
level - the middle is often a good starting point.
Step 4
Play the piano.
The sound of a Concert Grand piano will be heard as the
keys are pressed.
A different sound can be selected by following the procedures
described in ‘SELECTING A SOUND’ (page 12).
Backside of the unit
Power cable entry point
CN23_EN.indd 10 2009/11/26 13:09:06
Page
11
2
GE
TT
ING
STA
RT
ED
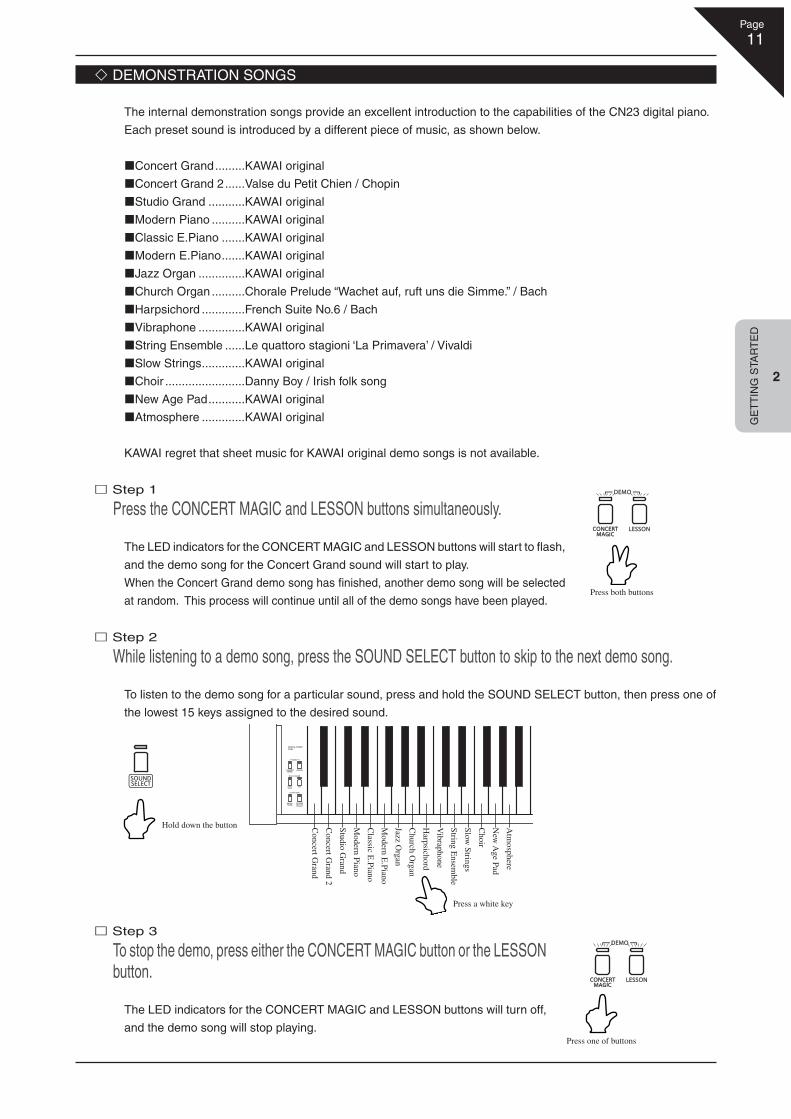
DEMONSTRATION SONGS
The internal demonstration songs provide an excellent introduction to the capabilities of the CN23 digital piano.
Each preset sound is introduced by a different piece of music, as shown below.
Concert Grand .........KAWAI original
Concert Grand 2 ......Valse du Petit Chien / Chopin
Studio Grand ...........KAWAI original
Modern Piano ..........KAWAI original
Classic E.Piano .......KAWAI original
Modern E.Piano .......KAWAI original
Jazz Organ ..............KAWAI original
Church Organ ..........Chorale Prelude “Wachet auf, ruft uns die Simme.” / Bach
Harpsichord .............French Suite No.6 / Bach
Vibraphone ..............KAWAI original
String Ensemble ......Le quattoro stagioni ‘La Primavera’ / Vivaldi
Slow Strings .............KAWAI original
Choir ........................Danny Boy / Irish folk song
New Age Pad ...........KAWAI original
Atmosphere .............KAWAI original
KAWAI regret that sheet music for KAWAI original demo songs is not available.
Step 1
Press the CONCERT MAGIC and LESSON buttons simultaneously.
The LED indicators for the CONCERT MAGIC and LESSON buttons will start to fl ash,
and the demo song for the Concert Grand sound will start to play.
When the Concert Grand demo song has fi nished, another demo song will be selected
at random. This process will continue until all of the demo songs have been played.
Step 2
While listening to a demo song, press the SOUND SELECT button to skip to the next demo song.
To listen to the demo song for a particular sound, press and hold the SOUND SELECT button, then press one of
the lowest 15 keys assigned to the desired sound.
Step 3
To stop the demo, press either the CONCERT MAGIC button or the LESSON button.
The LED indicators for the CONCERT MAGIC and LESSON buttons will turn off,
and the demo song will stop playing.
Press both buttons
Press one of buttons
Atm
osphere
New
Age Pad
Choir
Slow Strings
String Ensem
ble
Vibraphone
Harpsichord
Church O
rgan
Jazz Organ
Modern E
.Piano
Classic E
.Piano
Modern Piano
Studio Grand
Concert G
rand 2
Concert G
rand
Hold down the button
Press a white key
CN23_EN.indd 11 2009/11/26 13:09:06

Page
12
2
GE
TT
ING
STA
RT
ED
SELECTING A SOUND
When power is turned on, the Concert Grand sound will be selected automatically.
There are 15 sound types and three methods to select different sounds.
Method 1
Press the SOUND SELECT button repeatedly to cycle through the 15 sounds until the desired sound is
selected.
Power-on Concert Grand (indicator ON)
When pressed once Concert Grand 2 (indicator fl ashes)
When pressed twice Studio Grand (indicator fl ashes)
: : : : : :
When pressed 7 times Church Organ (indicator fl ashes)
: : : : : :
When pressed 12 times Choir (indicator fl ashes)
: : : : : :
When pressed 15 times Concert Grand (indicator ON)
Method 2
Press and hold the SOUND SELECT button, then press one of the lowest 15 white keys to select a specifi c
sound.
The LED indicator for the SOUND SELECT button will turn on when Concert Grand is selected. When a sound other
than Concert Grand is selected, the LED indicator for the SOUND SELECT button will start to fl ash.
Method 3
Press and hold the SOUND SELECT button for more than one second to return to the Concert
Grand sound.
The LED indicator for the SOUND SELECT button will turn on once again.
Atm
osphere
New
Age Pad
Choir
Slow Strings
String Ensem
ble
Vibraphone
Harpsichord
Church O
rgan
Jazz Organ
Modern E
.Piano
Classic E
.Piano
Modern Piano
Studio Grand
Concert G
rand 2
Concert G
rand
Hold down the button
Use the enclosed ‘function label’ (page 8) for your convenience.
Press a white key
CN23_EN.indd 12 2009/11/26 13:09:07
Page
13
2
GE
TT
ING
STA
RT
ED
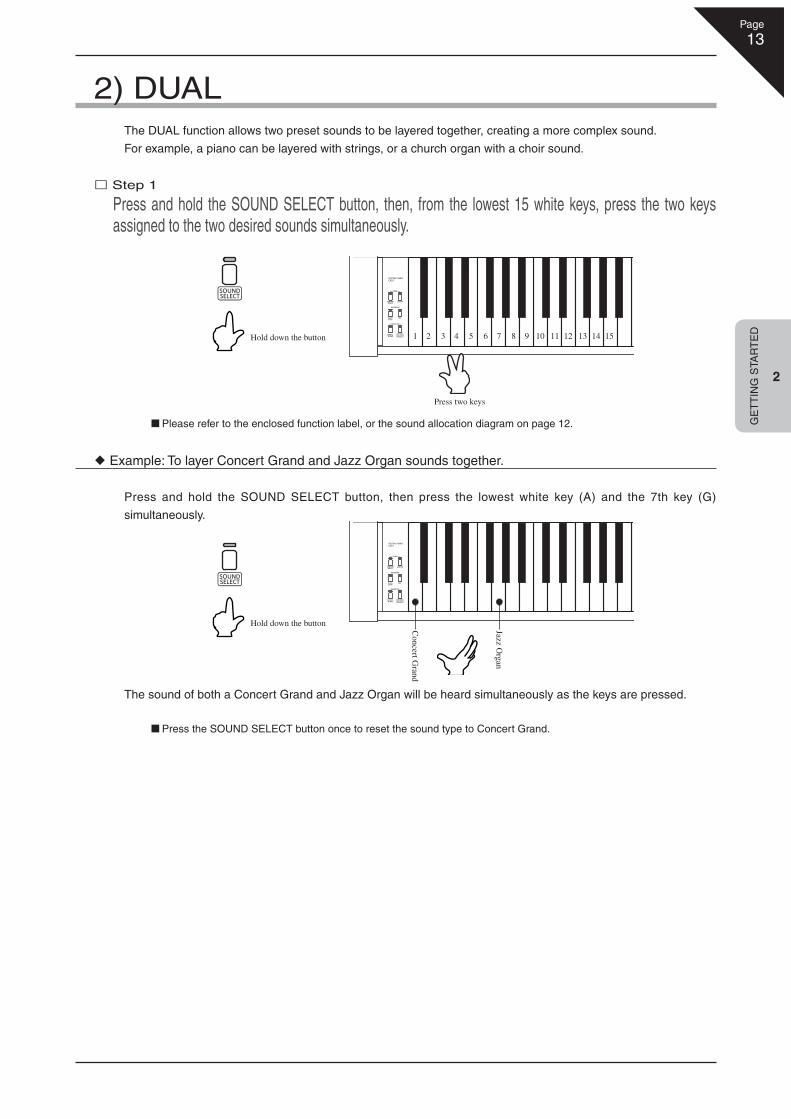
2) DUALThe DUAL function allows two preset sounds to be layered together, creating a more complex sound.
For example, a piano can be layered with strings, or a church organ with a choir sound.
Step 1
Press and hold the SOUND SELECT button, then, from the lowest 15 white keys, press the two keys assigned to the two desired sounds simultaneously.
Please refer to the enclosed function label, or the sound allocation diagram on page 12.
Example: To layer Concert Grand and Jazz Organ sounds together.
Press and hold the SOUND SELECT button, then press the lowest white key (A) and the 7th key (G)
simultaneously.
The sound of both a Concert Grand and Jazz Organ will be heard simultaneously as the keys are pressed.
Press the SOUND SELECT button once to reset the sound type to Concert Grand.
Hold down the button
Hold down the button
Press two keys
1 2 3 4 5 6 7 8 9 10 11 12 13 14 15
Concert G
rand
Jazz Organ
CN23_EN.indd 13 2009/11/26 13:09:07

Page
14
2
GE
TT
ING
STA
RT
ED
3) FOUR HANDSThe FOUR HANDS function divides the keyboard of the CN23 digital piano into separate Lower and Upper sections,
adjusting the octave/pitch of each section to allow two people to play the piano together.
With the FOUR HANDS function activated, the Soft (left) pedal will be used as a damper pedal for the Lower
section, and the Damper (right) pedal will be used as a damper pedal for the Upper section.
Step 1
Press and hold the LESSON button, then press the Soft (left) pedal and Damper (right) pedal simultaneously.
The LED indicator for the LESSON button
will start to fl ash, indicating that FOUR
HANDS mode has been activated.
Step 2
Press the LESSON button again to deactivate FOUR HANDS mode.
The LED indicator for the LESSON button will turn off, and the digital piano will return to normal operation.
With the FOUR HANDS function activated, selecting a different sound will affect both the Lower and Upper sections.
It is not possible to use the Recorder function with the FOUR HANDS function activated.
The Split Point for the FOUR HANDS functions is set to F-3, and cannot be adjusted.
Hold down the button
Soft pedal Damper pedal
Depress both pedals
c
c c
Split Point
Lower section Upper section
CN23_EN.indd 14 2009/11/26 13:09:07

Page
15
2
GE
TT
ING
STA
RT
ED
4) METRONOMERhythm is one of the most important elements when learning music. It is important to practise playing the piano
at the correct tempo and with a steady rhythm. The CN23 digital piano’s metronome function helps learners to
achieve this by providing a steady beat to play along with.
STARTING THE METRONOME
Step 1
Press the METRONOME button.
The LED indicator for the METRONOME button will turn on, and the metronome
will begin counting with a 1/4 beat.
Step 2
Press the METRONOME button again.
The LED indicator for the METRONOME button will turn off, and the metronome will stop counting.
The metronome is set to a default time signature of 1/4 and tempo of 120 each time the piano is turned on.
CHANGING THE METRONOME TIME SIGNATURE
The metronome produces two types of click, with a bell sound indicating the fi rst beat of a bar - this is a 4-beat or
4/4 time signature. It is possible to select a different signature where appropriate. There are seven different types
of time signature available: 1/4, 2/4, 3/4, 4/4, 5/4, 3/8, and 6/8.
The volume level of the metronome can also be changed.
Step 1
Press and hold the METRONOME button, then select the desired time signature by pressing one of the lowermost black keys assigned to that beat.
When the 1/4 beat is selected, only the click sound will be heard. The bell accent will not be heard.
Hold down the button
1/4 2/4 3/4 4/4 5/4 3/8 6/8 - +Volume
Use the enclosed ‘function label’ (page 8) for your convenience.
Hold down the button
CN23_EN.indd 15 2009/11/26 13:09:08

Page
16
2
GE
TT
ING
STA
RT
ED
ADJUSTING THE METRONOME TEMPO
The metronome has a tempo range of 10-300 beats per minute.
The metronome tempo can be specifi ed precisely, or gradually decreased or increased.
Step 1
Press and hold the METRONOME button, then use the lower white keys to either enter the desired tempo in beats per minute (BPM), or gradually decrease or increase the tempo by pressing the ‘-’ or ‘+’ keys.
To set the metronome tempo, press and hold the METRONOME button, and input either a two-digit or three-digit
tempo value. The specifi ed value will be set when the METRONOME button is released.
Example: To set the metronome tempo to 136 beats per minute.
Method 1
Press and hold the METRONOME button, then press key 1, key 3 and key 6.Release the METRONOME button.
Method 2
Press and hold the METRONOME button, then press the ‘- (off)’ or ‘+ (on)’ keys repeatedly to gradually decrease or increase the current tempo by 2 BPM.
Use the enclosed ‘function label’for your convenience. (page 8)
Hold down the button1
number keys
3 6
1 2 3 4 5 6 7 8 9 0 - + off on
CN23_EN.indd 16 2009/11/26 13:09:08

Page
17
2
GE
TT
ING
STA
RT
ED
5) CONCERT MAGICThe great German composer Johann Sebastian Bach once said “Playing the keyboard is simple. Just strike the
right keys at the right time”. Many pianists wish it were quite that straightforward. Fortunately, KAWAI have devised
a method of playing the keyboard that is very simple, without even needing to strike the right keys.
With CONCERT MAGIC, absolutely anyone can sit at the CN23 digital piano and make real music - even complete
beginners who have never taken a piano lesson in their life. To enjoy performing with Concert Magic, simply select
one of the 40 pre-programmed songs and tap any key with a steady rhythm and tempo. Concert Magic will provide
the correct melody and accompaniment notes, regardless of which keys are pressed. With Concert Magic anybody,
young or old, can enjoy playing music from the moment they sit down at the CN23 digital piano.
SELECTING A SONG
The 40 Concert Magic songs are assigned to each of the fi rst 40 white keys, and classifi ed by song category into
six groups, such as Children’s Songs, American Classics, Christmas Songs etc.
Please refer to Appendix 3: ‘CONCERT MAGIC SONG LIST’ on page 36 for a complete listing of available Concert
Magic songs.
Step 1
Press and hold the CONCERT MAGIC button, then press one of the lowest 40 keys assigned to the desired Concert Magic song.
The LED indicator for the CONCERT MAGIC button will turn on, indicating that the Concert Magic function has
been activated.
LISTENING TO THE SONG
If the performer is already familiar with the selected Concert Magic song, he/she may wish to begin playing straight
away. However, those unfamiliar with the piece may alternatively wish to listen to the song fi rst, before attempting
to play it.
Step 1
Press the PLAY/STOP button to listen to the selected Concert Magic song.
The CN23 digital piano will start to playback the selected Concert Magic song.
To listen to a different song, simply repeat the procedure above.
Step 2
Press the PLAY/STOP button or CONCERT MAGIC button once again to fi nish listening to the Concert Magic song.
1 2 3 4 5 6 7 8 9 33 3432 35 36 37 38 39 40
Hold down the button
Song No.
Press a key
CN23_EN.indd 17 2009/11/26 13:09:08

Page
18
2
GE
TT
ING
STA
RT
ED
PERFORMING A SONG
Step 1
Tap out the rhythm of the selected song on any one of the piano’s 88 black or white keys.
Concert Magic songs will respond to changes in playing style. As the keys are tapped harder, the music will grow
louder; if the keys are tapped more softly, the music will become quieter. Tapping faster will cause the music to speed
up, while tapping slower will make the music slow down accordingly. Using Concert Magic, even inexperienced
pianists can sound like they have been playing for years, simply by pressing one key with one fi nger.
Concert Magic is a perfect method for small children to learn music, especially when developing a sense of rhythm.
For older people who may believe it is too late to learn the piano, Concert Magic offers an enjoyable fi rst step.
With Concert Magic, the CN23 digital piano can be enjoyed by everyone in the family, even those who have never
touched a musical instrument in their life.
CONCERT MAGIC SONG TYPES
After playing with Concert Magic for a while, performers may feel that such playing is too easy and that there is
very little to learn. While it is true that some of the songs are very easy to play, even for beginners, there are also
some songs which will prove challenging, and require practice to play profi ciently.
Each of the 40 Concert Magic songs fall into one of three different arrangement types, depending on the skill level
required to perform them.
EASY BEAT
These are the easiest songs to play. To perform them, simply tap out a constant steady beat on any key on the
keyboard.
Look at the following example, ‘Für Elise’. Press the key with a steady sixteenth note rhythm.
MELODY PLAY
These songs are also quite easy to play, especially if they are familiar to the player. To perform them, tap out the
rhythm of the melody on any key on the keyboard. Singing along as the rhythm is tapped can be helpful. Play
‘Twinkle, Twinkle, Little Star’ for example. Follow the melody’s rhythm as shown.
When performing fast songs with Concert Magic, it is sometimes easier to tap two different keys with two alternating
fi ngers in order to play at greater speed.
Key on X X X X X X X X X X X X X X X X X X X X
Key on X X X X X X X X X X X X X X
CN23_EN.indd 18 2009/11/26 13:09:08

Page
19
2
GE
TT
ING
STA
RT
ED
SKILLFUL
These songs range in diffi culty from moderately diffi cult to diffi cult. To perform them, tap out the rhythm of both the
melody and the accompaniment notes on any key on the keyboard, such as ‘Waltz of the Flowers’ shown below.
It may take a little practice to perform the Concert Magic songs profi ciently. A good way to learn is to listen to these
pieces fi rst, and then try to tap out the rhythms that are heard.
Please refer to Appendix 3: ‘CONCERT MAGIC SONG LIST’ on page 36 for a complete listing of available Concert
Magic songs. The arrangement type is marked next to each song title as ‘EB’ for Easy Beat, ‘MP’ for Melody Play
and ‘SK’ for Skillful.
CONCERT MAGIC DEMO MODES
There are three ways to listen to the Concert Magic songs in the DEMO mode.
ALL PLAY
Press the CONCERT MAGIC button and then press the PLAY/STOP button without selecting a song.
The CN23 digital piano will play back the fi rst Concert Magic song, followed by the remaining 39 Concert Magic
songs in order.
RANDOM PLAY
Press the CONCERT MAGIC button and then press the LESSON button.
The CN23 digital piano will play back the fi rst Concert Magic song, followed by the remaining 39 Concert Magic
songs in random order.
CATEGORY PLAY
Press and hold the CONCERT MAGIC button, press the piano key to which the desired song is assigned, and
then press the LESSON button, before fi nally releasing the CONCERT MAGIC button.
The CN23 digital piano will play back the selected song and then continue to play the rest of the songs in the
same category.
To stop the Concert Magic demo, press the PLAY/STOP button.
Key on X X X X X XX X X X X X X
CN23_EN.indd 19 2009/11/26 13:09:09

Page
20
3
LES
SO
N F
UN
CT
ION
3. LESSON FUNCTIONThe CN23 digital piano’s Lesson function helps performers to practice the piano with a collection of etudes from
Burgmüller and Czerny, or songs from Alfred’s Basic Piano Library (USA, Canada, Australia and UK only).
It is possible to listen to each etude or song at various tempos, practicing the left and right hand parts separately.
Alfred’s Basic Piano Library lesson book is sold separately. Please check with local dealers or contact Alfred’s
customer service by telephoning 818-892-2452 (USA & Canada), 0-95240033 (Australia), +44 (0) 279828960
(UK). Or alternatively, by e-mailing [email protected].
Lesson availability differs depending on geographical location:
Book No. Lesson Book NameUS, Canada,
UK, Australia
1 Alfred’s Basic Piano Library Lesson Book Level 1A2 Alfred’s Basic Piano Library Lesson Book Level 1B
Rest of
the World
1 Burgmüller: 25 Progressive Pieces, Opus 1002 Czerny: 30 Czerny Etudes de Mécanisme, Opus 849
Please refer to Appendix 4: ‘LESSON SONG LIST’ on pages 37-38 for a complete listing of available Lesson
Function songs.
SELECTING A LESSON SONG FROM THE FIRST SONG BOOK
Step 1
Press the LESSON button.The LED indicator for the LESSON button will turn on, indicating that lesson mode
is enabled, and the Concert Grand sound will be selected automatically.
Step 2
Press and hold the LESSON button, then press the white key assigned to the desired lesson song.
SELECTING A LESSON SONG FROM THE SECOND SONG BOOK
Example: To select lesson song No. 3
Press and hold the LESSON button, then press one of the black keys, and fi nally press the white key assigned to the desired lesson song.
Hold down the button
1 2 3 4 5 6 7 8 9 10 11 12 13 14 15 16
Press a key
1
2
Hold down the button
1 2 3 4 5 6 7 8 9 10 11 12 13 14 15 16
CN23_EN.indd 20 2009/11/26 13:09:09

Page
21
3
LES
SO
N F
UN
CT
ION
LISTENING TO A LESSON SONG
Before practicing a lesson song, it is possible to listen to an example performance.
Step 1
Press the PLAY/STOP button.
The LED indicator for the PLAY/STOP button will turn on, and the currently selected
lesson song will start to play.
Step 2
Press the PLAY/STOP button once again to stop the performance.
The LED indicator for the PLAY/STOP button will turn off.
The metronome tempo will automatically be set to that of the currently selected lesson song.
EXITING THE LESSON FUNCTION
Press the LESSON button.
The LED indicator for the LESSON button will turn off, and the CN23 digital piano
will return to normal operation mode.
PRACTICING LEFT AND RIGHT HAND PARTS
When entering the lesson mode, the LED indicators for the METRONOME and SOUND SELECT button will turn
on, indicating that both the left hand and right hand parts of the selected lesson will be played.
LISTENING TO THE LEFT HAND PART OF A LESSON SONG
Step 1
Press the SOUND SELECT button.
The LED indicator for the METRONOME button will remain on, but the LED indicator
for the SOUND SELECT button will turn off.
Step 2
Press the PLAY/STOP button to play the selected lesson.
The left hand part of the selected lesson will start to play, allowing the
right hand part to be practiced separately.
Pressing the SOUND SELECT button repeatedly will alternate between selecting the left hand, the right hand, and both
hands for playback.
CN23_EN.indd 21 2009/11/26 13:09:09

Page
22
3
LES
SO
N F
UN
CT
ION
LISTENING TO THE RIGHT HAND PART OF A LESSON SONG
Step 1
Press the SOUND SELECT button twice.
The LED indicator for the SOUND SELECT button will turn on, and the LED
indicator for the METRONOME button will turn off.
Step 2
Press the PLAY/STOP button to play the selected lesson.
The right hand part of the selected lesson will start to play, allowing the left hand part to be practiced separately.
LISTENING TO BOTH HANDS OF A LESSON SONG (RETURNING TO NORMAL PLAYBACK MODE)
Press the SOUND SELECT button three times.
The LED indicators for both the SOUND SELECT and METRONOME buttons
will turn on.
Both the left hand and right hand parts of the lesson song will be selected.
The CN23 digital piano will return to normal playback mode if the
LESSON button is pressed twice (exiting, and re-entering LESSON
mode).
It is also possible to select either the left or right hand parts for playback
directly. Press and hold the LESSON button, then press either the
METRONOME or SOUND SELECT button to select the left or right
hand part respectively.
ADJUSTING THE TEMPO OF A LESSON SONG
Method 1
Press and hold the METRONOME button, then enter the desired tempo as a number using the number keys.Release the METRONOME button.
Method 2
Press and hold the METRONOME button, then press the ‘- (off)’ or ‘+ (on)’ keys repeatedly to gradually decrease or increase the current tempo by 2 BPM.Release the METRONOME button.
Press and hold the METRONOME button, then press the ‘- (off)’ and ‘+ (on)’ keys simultaneously to reset the tempo of
the lesson song.
Selecting the same lesson song again will also reset the tempo of the lesson song.
Press the button twice
Press the button three times
Hold down the button
Right hand partLeft hand part
Hold down the button
- + 1 2 3 4 5 6 7 8 9
CN23_EN.indd 22 2009/11/26 13:09:09

Page
23
4
RE
CO
RD
ER
4. RECORDERThe RECORDER function records performances in a similar way to that of a tape recorder. However, the CN23
digital piano records songs as digital data, instead of audio data - storing the music inside the instrument, and
providing a useful tool for both practicing and playing the piano.
The CN23 digital piano allows up to three different recorder songs to be stored in memory.
1) RECORDING A SONG Step 1
Press the REC button.
The LED indicator for the REC button will start to fl ash, indicating
that the piano is in recording standby mode.
Step 2
Start to play the piano.
The recorder will automatically start recording with the fi rst note
played.
During this time, the LED indicators for the REC and PLAY/STOP
buttons will be turned on.
The recording can also be started by pressing the PLAY/STOP button instead of pressing a key, allowing a blank bar or
‘up beat’ to be inserted at the beginning of a song.
Step 3
Press the PLAY/STOP button to stop recording.
The CN23 digital piano will stop recording and all LED indicators
will turn off while the song is saved to memory.
Do not turn the power off while the song is saving to memory.
The total recording capacity of the CN23 digital piano’s memory is approximately 15,000 notes (3 songs total), with pedal
presses also counted as one note. When the maximum capacity is reached, recording will stop and all music recorded
up until that point will be saved to memory automatically.
To record the piece again, simply repeat the above procedure. The new recording will completely erase the previous
recording.
SELECTING RECORDER SONG
To select a different recorder song:
In Step 1 above, press and hold the REC button,
then press one of the lowest 3 keys to select the
desired song.
When power is turned on, SONG 1 will be selected
automatically.
1 2 3
Hold down the button
Song No.
Press a key
CN23_EN.indd 23 2009/11/26 13:09:10

Page
24
4
RE
CO
RD
ER
2) PLAYING BACK A SONGPress the PLAY/STOP button to start playing the recorded song.
Press the PLAY/STOP button again to stop playback.
To playback a different song, press and hold the PLAY/STOP button, then press one of the lowest 3 keys to select the
desired song.
3) ERASING ALL SONGSThe CN23 digital piano must be turned off in order to erase the recorded song.
Step 1
Turn the power off.
Step 2
Press and hold the PLAY/STOP and REC buttons simultaneously, then press the POWER button to turn the power on.
All 3 recorded songs will be erased.Hold down the buttons
CN23_EN.indd 24 2009/11/26 13:09:10

Page
25
5F
UN
CT
ION
MO
DE
5. FUNCTION MODEThe Function Mode settings allow various advanced parameters of the CN23 digital piano to be adjusted.
1) BASIC OPERATION Step 1
Press and hold the METRONOME and SOUND SELECT buttons simultaneously, then press one of the 10 keys assigned to the desired function.
The LED indicators for the METRONOME and SOUND SELECT buttons will start to fl ash while the settings are being
adjusted.
If the LED indicators for either the CONCERT MAGIC or LESSON buttons are turned on, the Function Mode cannot be
used.
Step 2
While still holding down the METRONOME and SOUND SELECT buttons, press the ‘- (off)’ or ‘+ (on)’ keys to change the value for the selected function.
While holding down the METRONOME
and SOUND SELECT buttons, it is
possible to select other functions,
changing each value successively.
Step 3
Release both the METRONOME and SOUND SELECT buttons to exit Function Mode.
When the power is turned off, Function Mode settings will be reset to the factory default
values, shown below.
Function DefaultTOUCH NormalTRANSPOSE 0TUNING A4=440.0HzREVERB OnDAMPER EFFECT 2 (Normal)CONCERT MAGIC MODE Mode 1MIDI CHANNEL SELECT 1chMIDI LOCAL CONTROL ON/OFF OnMULTI TIMBRAL MODE ON/OFF OffTRANSMIT MIDI PROGRAM CHANGE On
Use the enclosed ‘function label’ (page 8) for your convenience.
Hold down the both buttons
number keys 10TR
AN
SMIT
MID
I PRO
GR
AM
CH
AN
GE
9MU
LTI T
IMB
RA
L M
OD
E O
N/O
FF
8MID
I LO
CA
L C
ON
TR
OL
7MID
I CH
AN
NE
L SE
LE
CT
6CO
NC
ER
T M
AG
IC M
OD
E
5DA
MPE
R E
FFEC
T
4RE
VE
RB
3TU
NIN
G
2TR
AN
SPOSE
1TO
UC
H
MIDI settings
1 2 3 4 5 6 7 8 9 0 - + off on
CN23_EN.indd 25 2009/11/26 13:09:10

Page
26
5
FU
NC
TIO
N M
OD
E
2) TOUCH TYPEWhen playing a piano, the volume of the sound produced increases in direct relation to how hard each key is struck. The
TOUCH function allows different touch sensitivities for the keyboard to be selected, other than the standard touch of an
acoustic piano. The sensitivity can be changed to one of four different settings: Light, Normal, Heavy or Constant.
Step 1
Press and hold the METRONOME and SOUND SELECT buttons simultaneously, then press the key assigned to the TOUCH function.
Step 2
While still holding down the METRONOME and SOUND SELECT buttons, press one of the following keys:
Key1: LIGHT
For those still developing fi nger strength, such as a child, a louder
sound is produced even when the piano is played with a soft
touch.
Key2: NORMAL
The standard setting, reproducing the touch sensitivity of an acoustic piano. This touch type is selected automatically
when the CN23 digital piano is turned on.
Key3: HEAVY
Perfect for those with strong fi ngers or for practicing with a hard touch.
Key4: CONSTANT
This setting is suitable for sounds that have a fi xed dynamic range, such as Organ and Harpsichord. A constant
volume is produced regardless of how hard the keys are struck.
The touch type is automatically set to NORMAL when the CN23 digital piano is turned on.
3) TRANSPOSEThe TRANSPOSE function allows the piano’s keys to be raised or lowered in half steps. This is particularly useful
when accompanying instruments with different tones, or when a song learned in one key must be played in another
key. The transpose feature allows the song to be played in the original key, but heard in another key.
Step 1
Press and hold the METRONOME and SOUND SELECT buttons simultaneously, then press the key assigned to the TRANSPOSE function.
Step 2
While still holding down the METRONOME and SOUND SELECT buttons, press a key on the keyboard to select the desired transposed key.
The CN23 digital piano can be transposed up to 5 half steps
higher (F) or 6 half steps lower (F#).
The transpose value is set to 0 (C) when the CN23 digital piano
is turned on.
The transpose function can be turned off/on, retaining the set
value, by using the ‘- (off)’ or ‘+ (on)’ keys.
number keys
Off On 0 +2 +4 +5 -5 -3 -1 C D E F G A B
+1 +3 -6 -4 -2 C# D# F# G# A#
1 2 3 4 5 6 7 8 9 0 - + off on
number keys
Key1: LIGHT
Key2: NORMAL
Key3: HEAVY
Key4: CONSTANT
1 2 3 4 5 6 7 8 9 0 - + off on
CN23_EN.indd 26 2009/11/26 13:09:10

Page
27
5F
UN
CT
ION
MO
DE
4) TUNINGThe TUNING function allows the piano’s pitch to be fi nely adjusted, and may prove useful when playing with other
instruments.
The factory default value is set to the modern standard A = 440.0 Hz and can be adjusted in 0.5 Hz increments.
Step 1
Press and hold the METRONOME and SOUND SELECT buttons simultaneously then press the key assigned to the TUNING function.
A tuning tone will be played.
Step 2
While still holding down the METRONOME and SOUND SELECT buttons, press the ‘- (off)’ or ‘+ (on)’ keys to lower or raise the tuning pitch by 0.5 Hz, or enter the desired tuning pitch as a three digit number using the number keys.
For example, to set the tuning pitch to A = 441.5 Hz, fi rst press the keys ‘4’, ‘4’, and ‘1’, then press the ‘+ (on)’ key.
Alternatively, fi rst press the keys ‘4’, ‘4’, and ‘2’, then press the ‘- (off)’ key.
5) REVERBThe REVERB function adds reverberation to the sound, simulating the acoustic environment of a recital room,
stage, or concert hall. There are three types of reverb available: Room, Stage and Hall.
The most suitable reverb setting is applied to each sound type automatically.
Step 1
Press and hold the METRONOME and SOUND SELECT buttons simultaneously then press the key assigned to the REVERB function.
Step 2
While still holding down the METRONOME and SOUND SELECT buttons, press one of the following keys to select the Reverb type:
Key 1: ROOM
Key 2: STAGE
Key 3: HALL
The REVERB function is automatically activated when the CN23
digital piano is turned on.
Step 3
To turn on/off the REVERB function, press and hold the METRONOME and SOUND SELECT buttons simultaneously, press the key assigned to the REVERB function, and then press the ‘+ (on)’ or ‘- (off)’ key.
number keys
Reverb OffReverb On
Key 1: ROOM
Key 2: STAGE
Key 3: HALL
1 2 3 4 5 6 7 8 9 0 - + off on
CN23_EN.indd 27 2009/11/26 13:09:11

Page
28
5
FU
NC
TIO
N M
OD
E
6) DAMPER EFFECTWhen the damper pedal is depressed on an acoustic piano, all dampers are lifted up, allowing the strings to vibrate
freely. When a note or chord is played on the piano with the damper pedal depressed, not only will the strings of
the notes played vibrate, but also the strings of other notes, vibrating in sympathetic resonance. The Damper Effect
function of the CN23 digital piano attempts to simulate this phenomenon.
Step 1
Press and hold the METRONOME and SOUND SELECT buttons simultaneously, then press the key assigned to the DAMPER EFFECT function.
Step 2
While still holding down the METRONOME and SOUND SELECT buttons, press one of the following keys to select the Damper Effect type:
Key1:Soft
Key2:Normal
Key3:Strong
The Damper Effect setting is automatically set to Normal when
the CN23 digital piano is turned on.
7) CONCERT MAGIC MODEThe CN23 digital piano offers two ways to enjoy Concert Magic.
Mode 1
Mode 1 categorises each of the 40 Concert Magic songs into one of three different arrangement types, depending
on the skill level required to perform them. They are Easy Beat, Melody Play an Skillful. Please refer to ‘CONCERT
MAGIC SONG TYPES’ on page 18 for further information.
Mode 2
Mode 2 allows Concert Magic songs to be played by simply tapping any key with a constant steady beat, regardless
of the song arrangement type.
Step 1
Press and hold the METRONOME and SOUND SELECT buttons simultaneously, then press the key assigned to the CONCERT MAGIC MODE function.
Step 2
While still holding down the METRONOME and SOUND SELECT buttons, press the ‘+ (on)’ key to set Concert Magic Mode to Mode 2, or the ‘- (off)’ key to set Concert Magic Mode to Mode 1.
The Concert Magic Mode is set to Mode 1 when the CN23 digital piano is turned on.
Damper effect OffDamper effect On
Key 1: Soft
Key 2: Normal
Key 3: Strong
number keys
1 2 3 4 5 6 7 8 9 0 - + off on
CN23_EN.indd 28 2009/11/26 13:09:11
Page
29
5F
UN
CT
ION
MO
DE
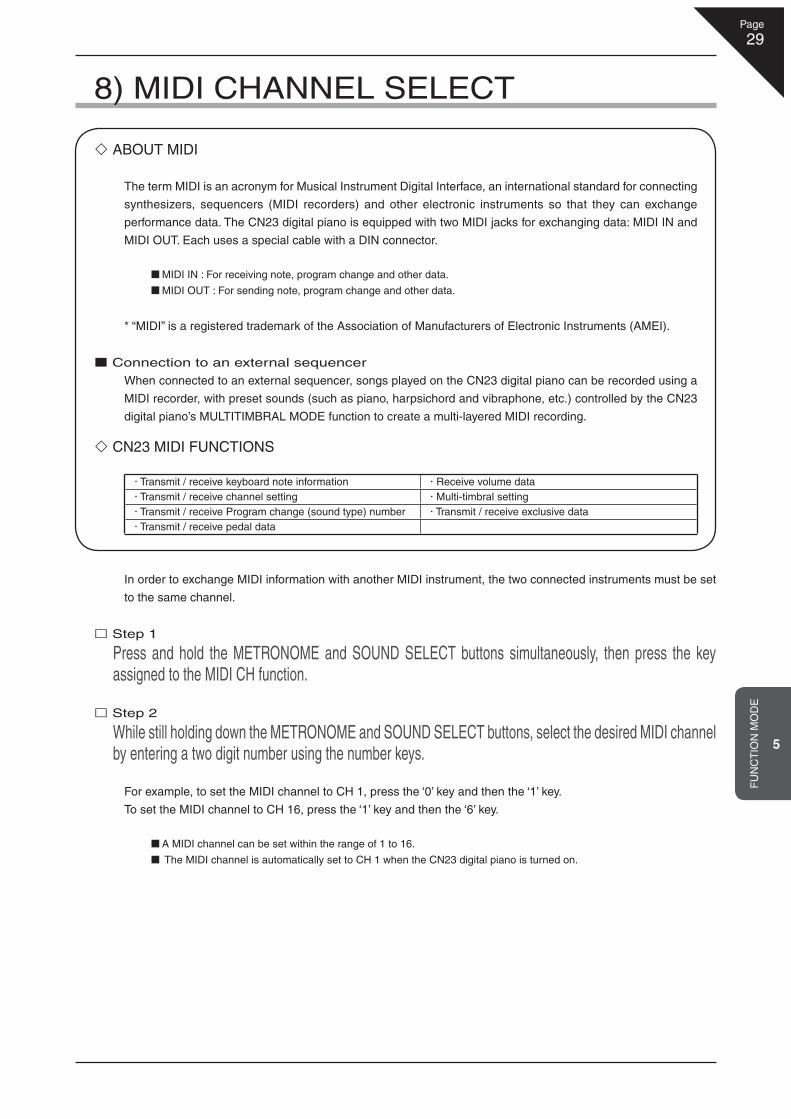
8) MIDI CHANNEL SELECT
In order to exchange MIDI information with another MIDI instrument, the two connected instruments must be set
to the same channel.
Step 1
Press and hold the METRONOME and SOUND SELECT buttons simultaneously, then press the key assigned to the MIDI CH function.
Step 2
While still holding down the METRONOME and SOUND SELECT buttons, select the desired MIDI channel by entering a two digit number using the number keys.
For example, to set the MIDI channel to CH 1, press the ‘0’ key and then the ‘1’ key.
To set the MIDI channel to CH 16, press the ‘1’ key and then the ‘6’ key.
A MIDI channel can be set within the range of 1 to 16.
The MIDI channel is automatically set to CH 1 when the CN23 digital piano is turned on.
ABOUT MIDI
The term MIDI is an acronym for Musical Instrument Digital Interface, an international standard for connecting
synthesizers, sequencers (MIDI recorders) and other electronic instruments so that they can exchange
performance data. The CN23 digital piano is equipped with two MIDI jacks for exchanging data: MIDI IN and
MIDI OUT. Each uses a special cable with a DIN connector.
MIDI IN : For receiving note, program change and other data.
MIDI OUT : For sending note, program change and other data.
* “MIDI” is a registered trademark of the Association of Manufacturers of Electronic Instruments (AMEI).
Connection to an external sequencer
When connected to an external sequencer, songs played on the CN23 digital piano can be recorded using a
MIDI recorder, with preset sounds (such as piano, harpsichord and vibraphone, etc.) controlled by the CN23
digital piano’s MULTITIMBRAL MODE function to create a multi-layered MIDI recording.
CN23 MIDI FUNCTIONS
Transmit / receive keyboard note information Receive volume data Transmit / receive channel setting Multi-timbral setting Transmit / receive Program change (sound type) number Transmit / receive exclusive data Transmit / receive pedal data
CN23_EN.indd 29 2009/11/26 13:09:11

Page
30
5
FU
NC
TIO
N M
OD
E
9) MIDI LOCAL CONTROL ON/OFFThis function is used to control whether or not the sound from the CN23 digital piano will be heard when playing
the keyboard. When MIDI LOCAL CONTROL is set to ‘on’, sound will be heard when playing the CN23 digital
piano’s keyboard. When MIDI LOCAL CONTROL is set to ‘off’, sound will not be heard when playing the CN23
digital piano’s keyboard, however the keyboard data will still be transmitted to an external MIDI device.
When MIDI information is received, the sound will be played through the CN23 digital piano.
Step 1
Press and hold the METRONOME and SOUND SELECT buttons simultaneously, then press the key assigned to the LOCAL function.
Step 2
While still holding down the METRONOME and SOUND SELECT buttons, press the key ‘- (off)’ to set MIDI LOCAL CONTROL to ‘off’, or the ‘+ (on)’ key to set MIDI LOCAL CONTROL to ‘on’.
The MIDI Local Control setting is automatically set to ‘on’ when the CN23 digital piano is turned on.
CN23_EN.indd 30 2009/11/26 13:09:11

Page
31
5F
UN
CT
ION
MO
DE
10) MULTI-TIMBRAL MODE ON/OFFThe procedure described in the MIDI CHANNEL SELECT section is used to transmit or receive data on only
one of the 16 MIDI channels (CH 1 - CH 16). However, by enabling MULTI-TIMBRAL MODE, MIDI data can be
received on more than one MIDI channel, simultaneously playing a different sound on each channel. With this
feature enabled, an external sequencer can be used to enjoy ensemble performances, playing multiple sound
types on a single CN23 digital piano.
The term ‘Multi-Timbral’ is derived from the ability to play multiple timbres simultaneously.
Please refer to the chart below for information regarding received program numbers and the corresponding sound
types.
Data received through CH 10 will not be performed when MULTI-TIMBRAL MODE is enabled.
Step 1
Press and hold the METRONOME and SOUND SELECT buttons simultaneously, then press the key assigned to the MULTI function.
Step 2
While still holding down the METRONOME and SOUND SELECT buttons, press the key ‘- (off)’ to set MULTI-TIMBRAL MODE to ‘off’, or the ‘+ (on)’ key to set MULTI-TIMBRAL MODE to ‘on’.
The MULTI-TIMBRAL MODE setting is automatically set to ‘off’ when the CN23 digital piano is turned on.
Program Change Number Mapping
Sound NameMulti-Timbral mode ON
Multi-Timbral mode OFFProgram # Bank MSB Bank LSB
CONCERT GRAND 1 121 0 1CONCERT GRAND 2 1 95 16 2STUDIO GRAND 1 121 1 3MODERN PIANO 2 121 0 4CLASSIC E.PIANO 5 121 0 5MODERN E.PIANO 6 121 0 6JAZZ ORGAN 18 121 0 7CHURCH ORGAN 20 121 0 8HARPSICHORD 7 121 0 9VIBRAPHONE 12 121 0 10STRING ENSEMBLE 49 121 0 11SLOW STRINGS 45 95 1 12CHOIR 53 121 0 13NEW AGE PAD 89 121 0 14ATMOSPHERE 100 121 0 15
CN23_EN.indd 31 2009/11/26 13:09:11

Page
32
5
FU
NC
TIO
N M
OD
E
11) TRANSMIT MIDI PROGRAM CHANGEThis function determines whether or not the CN23 digital piano will transmit program change information when
sound types are changes. It is also possible to transmit a program change number (ranging from 1 to 128) in order
to change the sound type of an external MIDI sound source.
Step 1
Press and hold the METRONOME and SOUND SELECT buttons simultaneously, then press the key assigned to the PROGRAM function.
Step 2
While still holding down the METRONOME and SOUND SELECT buttons, press the ‘-(off)’ key to disable transmitting program change data when selecting sounds, or the ‘+ (on)’ key to enable transmitting program change data when selecting sounds.
The TRANSMIT PROGRAM CHANGE setting is set to ‘off’ when the CN23 digital piano is turned on.
Step 3
To transmit the desired program change number directly, fi rst press and hold the METRONOME and SOUND SELECT buttons simultaneously, press the key assigned to the PROGRAM function, then enter the three digit number using the number keys.
Three digit program change numbers ranging from 001 to 128 can be transmitted. For example, press ‘0’, ‘0’, and ‘1’ to
transmit program change number 1.
The program change number will be transmitted automatically when the key for the third digit number is pressed.
number keys
Transmit OnTransmit Off
Use these keys to specify the program change number to be transmitted.
1 2 3 4 5 6 7 8 9 0 - + off on
CN23_EN.indd 32 2009/11/26 13:09:11
Page
33
6
AP
PE
ND
ICE
S
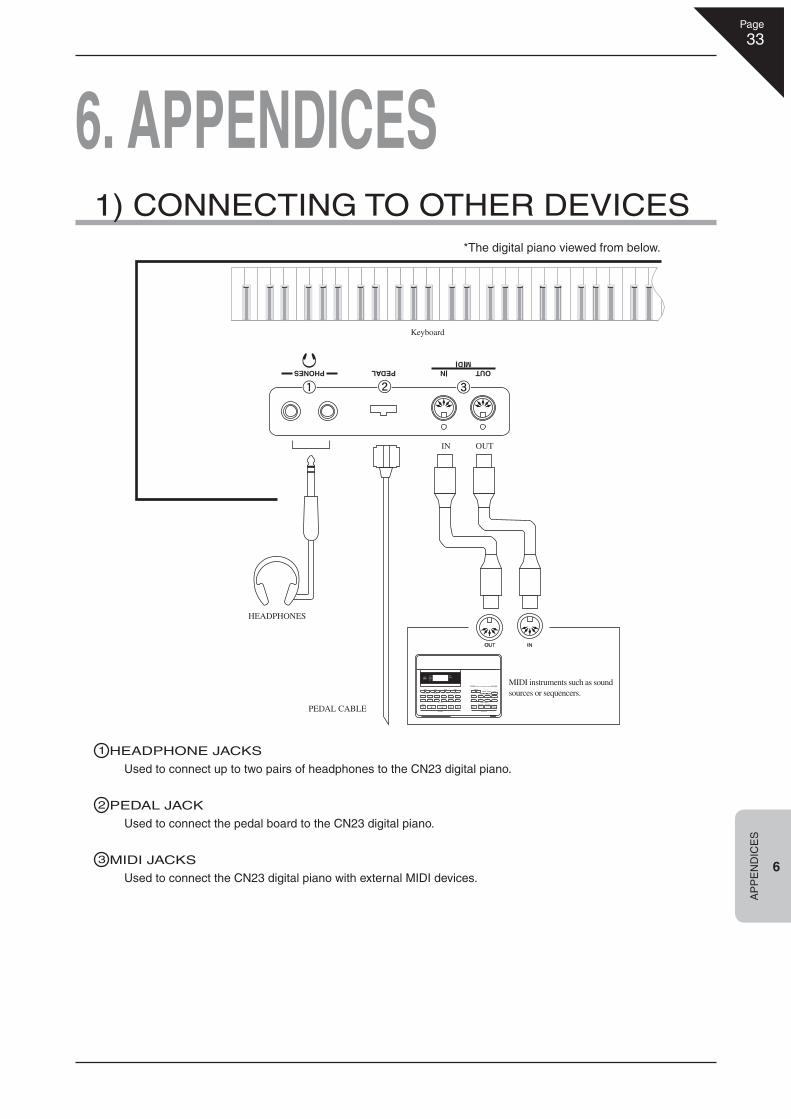
6. APPENDICES1) CONNECTING TO OTHER DEVICES
*The digital piano viewed from below.
1 HEADPHONE JACKS
Used to connect up to two pairs of headphones to the CN23 digital piano.
2 PEDAL JACK
Used to connect the pedal board to the CN23 digital piano.
3 MIDI JACKS
Used to connect the CN23 digital piano with external MIDI devices.
PEDAL CABLE
HEADPHONES
IN OUT
MIDI instruments such as sound sources or sequencers.
Keyboard
CN23_EN.indd 33 2009/11/26 13:09:11

Page
34
6
AP
PE
ND
ICE
S
2) ASSEMBLY INSTRUCTIONS
Before attempting to assemble the CN23 digital piano, ensure that all parts are included.
A Phillips-head screwdriver will also be required to assemble the unit (not included).
PARTS PROVIDED
Side Panel (A) ............................................. 2 pcs.
Back Panel (B) ..............................................1 pc.
Pedal Board (C) ............................................1 pc.
Screw (D) .................................................... 2 pcs.
Screw (E) .................................................... 4 pcs.
Screw (F) .................................................... 4 pcs.
Bolt (with plain washers and
spring washers) (G) .................................... 4 pcs.
Adjuster (H) ...................................................1 pc.
Headphone hook set
Headphone hook .....................................1 pc.
Tapping screw ........................................ 2 pcs.
ASSEMBLY SEQUENCE1. Insert the Adjuster (H) approximately 1 cm into the bottom of
the Pedal Board (C). Untie and extend the connection cord from the Pedal Board. Loosely fasten the left and right Side Panels (A) to the Pedal
Board (C) using the pre-attached screw on the underside of the Pedal Board. After ensuring that the correct Side Panels are used for the left and right side, and that the pedal cable is not caught between the assembled parts, securely fasten the Side Panels to the Pedal Board using two short screws (F) on each side.
2. Fasten the Back Panel (B) to the left and right Side Panels (A) using a single long screw (D) on either side.
Then, fasten the Back Panel to the Pedal Board using four medium screws (E).
Caution Ensure that this section is read thoroughly before attempting to assemble the CN23 digital piano, and
that two or more people work on unit assembly.
When moving the CN23 digital piano, ensure that hands are not caught in the unit, and that the piano
is not dropped on an individual’s feet.
Screw (D)ø4 30
Screw (E)ø4 20
Screw (F)ø4 16
Bolt (G)M6 25
Adjuster (H)
(C)
(B)
(D)
(E)
(A)
Pedal support insert hole (back of the pedal board)
(A)
(F)
Arrow
(C)
Pedal cable
(H)
CN23_EN.indd 34 2009/11/26 13:09:12

Page
35
6
AP
PE
ND
ICE
S
3. Place the piano on the front half of the stand so that the metal fi tting holes are seen when viewed from the top. Slide the piano backward while holding it with one hand so that it does not incline and fall from the stand. The hooks on the piano are then engaged with the metal fi ttings on the Side Panels. Pay attention so that hands or fi ngers are not caught between the stand and piano.
Fasten the piano and the stand with four bolts (with plain washers and spring washers)(G).
First, loosely tighten the bolts to adjust the unit position in order to make sure that all four bolts can be inserted straight. Then, tighten the bolts.
Make sure that the bolts are tightened until the spring washers collapse.
4. Insert the pedal connection cord that comes from Pedal Board (C) into the piano’s pedal jack and fasten with cord clamps.
5. Fix the headphone hook to the holes by using two tapping screws provided in the same plastic bag.
6. Turn the Adjuster (installed on the bottom of C) until it touches the fl oor to support the pedal board.
Caution Ensure that the CN23 digital piano is correctly secured to the stand by using the bolts included.
Failing to do so may result in the unit falling from the stand, causing damage or personal injury.
Caution The pedal board may break if the adjuster
is not touching the fl oor correctly. When
moving the CN23 digital piano, ensure that
the unit is lifted clearly from the fl oor and
not dragged.
Hand or Finger catching hazard
(G)
backside of the unit
Pedal jack
Cordclamp
PedalcordconnectorLockingtab
Holes
Adjuster
Pedal board
Floor
CN23_EN.indd 35 2009/11/26 13:09:12

Page
36
6
AP
PE
ND
ICE
S
3) CONCERT MAGIC SONG LIST
Category Song Name Key ModeChildren’s Songs Twinkle, Twinkle, Little Star 1 MP
I’m A Little Teapot 2 MPMary Had A Little Lamb 3 MPLondon Bridge 4 MPRow, Row, Row, Your Boat 5 MPFrère Jacques 6 MPOld MacDonald Had A Farm 7 MP
Christmas Songs Hark The Herald Angels Sing 8 MPJingle Bells 9 MPDeck The Halls 10 MPO Come All Ye Faithful 11 MPJoy To The World 12 MPSilent Night 13 MPWe Wish You A Merry Christmas 14 MP
American Classics Battle Hymn Of The Republic 15 MPYankee Doodle 16 MPDanny Boy 17 EBClementine 18 MPAuld Lang Syne 19 MPOh Susanna 20 SKThe Camptown Races 21 MPWhen The Saints Go Marching In 22 EBThe Entertainer 23 SK
Classical Selections William Tell Overture 24 SKAndante from Symphony No.94 (Haydn) 25 MPFür Elise 26 EBClair De Lune 27 SKSkater’s Waltz 28 SKBlue Danube Waltz 29 SKGavotte (Gossec) 30 SKWaltz of The Flowers 31 SK
Special Occasions Bridal Chorus 32 MPWedding March 33 SKPomp And Circumstance 34 SK
International Songs When Irish Eyes Are Smiling 35 EBChiapenecas 36 SKSanta Lucia 37 SKFuniculi Funicula 38 SKRomance De L’amour 39 EBMy Wild Irish Rose 40 EB
CN23_EN.indd 36 2009/11/26 13:09:12

Page
37
6
AP
PE
ND
ICE
S
4) LESSON SONG LIST ALFRED’S BASIC PIANO LIBRARY
Alfred’s Basic Piano Library lesson book is sold separately. Please check with local dealers or contact Alfred’s customer
service by telephoning 818-892-2452 (USA & Canada), 0-95240033 (Australia), +44 (0) 279828960 (UK). Or alternatively,
by e-mailing [email protected].
Basic Piano Library Lesson Book Level 1A Basic Piano Library Lesson Book Level 1B1. Right & Left 1. Step Right Up!2. Left & Right 2. The Carousel3. Merrily We Roll Along/O’er the Deep Blue Sea 3. Hail to Thee, America!4. Hand-Bells 4. Brother John5. Jolly Old Saint Nicholas 5. Good Sounds6. Old MacDonald 6. The Cuckoo7. Batter Up! 7. Money Can’ t Buy Ev’ rything!8. My Clever Pup 8. Ping-Pong9. The Zoo 9. Granpa’ s Clock10. Playing in a New Position 10. When the Saints Go Marching In11. Sailing 11. G’ s in the “BAG”12. Skating 12. Join the Fun13. Wishing Well 13. Oom-Pa-pa!14. Rain, Rain! 14. The Clown15. A Happy Song 15. Thumbs on C!16. Position C 16. Waltz Time17. A Happy Song 17. Good King Wenceslas18. See-Saws 18. The Rainbow19. Just a Second! 19. Good Morning to You!20. Balloons 20. Happy Birthday to You!21. Who’s on Third? 21. Yankee Doodle22. Mexican Hat Dance 22. The Windmill23. Rock Song 23. Indians24. Rockets 24. New Position G25. Sea Divers 25. Pedal Play26. Play a Fourth 26. Harp Song27. July the Fourth! 27. Concert Time28. Old Uncle Bill 28. Music Box Rock29. Love Somebody 29. A Cowboy’ s Song30. My Fifth 30. The Magic Man31. The Donkey 31. The Greatest Show on Earth32. Position G 32. The Whirlwind33. Jingle Bells! 33. The Planets34. Willie & Tillie 34. C Major Scale Piece35. A Friend Like YouG 35. G Major Scale Piece36. My Robot 36. Carol in G Major37. Rockin’ Tune 37. The Same Carol in C Major38. Indian Song 38. French Lullaby39. Raindrops 39. Sonatina40. It’ s Halloween! 40. When Our Band Goes Marching By!41. Horse Sense
CN23_EN.indd 37 2009/11/26 13:09:13

Page
38
6
AP
PE
ND
ICE
S
BURGMÜLLER & CZERNY ETUDES
BURGMÜLLER 25(25 ETUDES FACILES, OPUS 100)1. La candeur2. Arabesque3. Pastorale4. Petite réunion5. Innocence6. Progrès7. Courant limpide8. La gracieuse9. La chasse10 Tendre fl eur11. La bergeronnette12. Adieu13. Consolation14. La styrienne15. Ballade16. Douce plainte17. Babillarde18. Inquiétude19. Ave Maria20. Tarentelle21. Harmonie des anges22. Barcarolle23. Retour24. L’ hirondelle25. La chevaleresque
CZERNY 30 (ETUDES DE MÉCANISME, OPUS 849)
* No song names
CN23_EN.indd 38 2009/11/26 13:09:13

Page
39
6
AP
PE
ND
ICE
S
5) SPECIFICATIONS
Keyboard 88 keys, Responsive Hammer Action with Ivory Touch
Internal Sounds 15 voices (Concert Grand, Concert Grand2, Studio Grand, Modern Piano, Classic E.Piano,
Modern E.Piano, Jazz Organ, Church Organ, Harpsichord, Vibraphone, String Ensemble, Slow Strings,
Choir, New Age Pad, Atmosphere)
Polyphony Max. 96 notes
Other Functions Volume, Transpose, Tuning, Dual, Four Hands, Demo (15 songs), Touch Type (Normal, Light, Heavy,
Constant), Reverb (Room, Stage, Hall), Damper Effect, Concert Magic (40 songs), MIDI Functions
Lesson Function 2 song books (Please refer to Appendix 4), right/left parts playable separately, tempo adjustable
Recorder 1 track, 3 song - total memory capacity approximately 15,000 notes
Metronome Time signatures: 1/4, 2/4, 3/4, 4/4, 5/4, 3/8, 6/8
Tempo: 10-300 BPM
Pedals Damper (half-pedalling supported), Soft, Sostenuto
Jacks Headphones x 2, Pedal, MIDI IN/OUT
Key Cover Sliding type
Output Power 20 W x 2
Speakers 12 cm x 2
Power Consumption 50 W
Dimensions 1370 (W) x 407 (D) x 843 (H) mm (without Music Rack)
Weight 42 kg (with Music Rack)
CN23_EN.indd 39 2009/11/26 13:09:13

Page
40
6
AP
PE
ND
ICE
S
KAWAI Model CN23 MIDI Implementation Chart Date : NOVEMBER 2009Version : 1.0
Mode 1: OMNI ON, POLY Mode 2: OMNI ON, MONO
Mode 3: OMNI OFF, POLY Mode 4: OMNI OFF, MONO
: Yes
: No
Function... Transmitted Recognised Remarks
BasicChannel
DefaultChanged
11 - 16
11 - 16
ModeDefaultMessagesAltered
Mode 3 Mode 1Mode 1, 3*
* The default for the OMNI mode is ON. Specifying MIDI channels automatically turns it OFF.
NoteNumber : True voice
15 - 113* 0 - 12715 - 113
* with Transpose
Velocity Note ONNote OFF
9nH v=1-127 8nH v=0
AfterTouch
Key’sCh’s
Pitch Bend
ControlChange
7646667
VolumeDamper PedalSostenuto PedalSoft Pedal
ProgramChange True
See the Program Change Number Mapping on page 31.
System Exclusive
Common: Song Pos.: Song Sel.: Tune
SystemReal time
: Clock: Commands
Aux : Local ON/OFF: All Notes OFF: Active Sense: Reset
CN23_EN.indd 40 2009/11/26 13:09:13

CN23_cover_EN.indd 3 2009/11/26 13:08:10

CN23 Owner’s ManualKPSZ-0309 : 816747
OM1035E-S0911Version.1
Printed in IndonesiaCopyright © 2009 KAWAI Musical Instruments Mfg. Co.,Ltd. All Rights Reserved.
CN23_cover_EN.indd 4 2009/11/26 13:08:10