owner’s manual4 ecm parts description head unit the head unit is the interface through which all...
TRANSCRIPT

Not legal for sale or use on pollution controlled vehicles based and registered in California.
OWNER’S MANUAL
ECM TUNERCummins® part# 46511 | CAT part# 46521
Detroit/Mercedes® part#46531 | Paccar® part#46541

1
ECM TUNERIn
trod
uctio
nU
pdat
ing
Phys
ical
In
stal
latio
nIn
stal
ling
the
Tune
Uni
nsta
lling
th
e Tu
ne
Ope
ratin
g th
e H
DG
TM
ore
In
form
atio
n
Table of ContentsIntroduction ........................................................ 2-7
Vehicle Application Chart ...............................................2Parts List and Description ..............................................3-7
Updating the ECM Tuner ................................... 7-17Overview ........................................................................7-9Installing the Heavy Duty Update Agent .........................10Updating the ECM Tuner ...............................................11-17
Physical Installation ............................................ 18-19Installing the Tune .............................................. 20-44
About Installing the Tune ................................................20Important Preparation Steps ..........................................21-24Detroit®/Mercedes®, Cummins® and Paccar® Engines ....25-32Cat® Engines .................................................................33-44
Uninstalling the Tune .......................................... 45-49Operating the ECM Tuner .................................. 50-64
The Main Menu & Feature Setup ....................................50-64Install Tuning .................................................................................. 51Special Features ............................................................................. 52-53User Options .................................................................................. 53-61Vehicle Settings .............................................................................. 63Vehicle Diagnostics......................................................................... 63-64Show Settings ................................................................................ 64Uninstall Device .............................................................................. 64Update Device Software ................................................................. 65Change Vehicle/Engine ................................................................... 65
More Information ................................................ 65-67USB Mode .....................................................................65Contacting Technical Support ........................................66Checking GT Status .......................................................66Troubleshooting .............................................................67
Notes .................................................................. 68-69

2
ECM TUNERIntroduction
Updating
Physical Installation
Installing the Tune
Uninstalling the Tune
Operating the
HD
GT
More
Information
Table of ContentsIntroduction ........................................................ 2-7
Vehicle Application Chart ...............................................2Parts List and Description ..............................................3-7
Updating the ECM Tuner ................................... 7-17Overview ........................................................................7-9Installing the Heavy Duty Update Agent .........................10Updating the ECM Tuner ...............................................11-17
Physical Installation ............................................ 18-19Installing the Tune .............................................. 20-44
About Installing the Tune ................................................20Important Preparation Steps ..........................................21-24Detroit®/Mercedes®, Cummins® and Paccar® Engines ....25-32Cat® Engines .................................................................33-44
Uninstalling the Tune .......................................... 45-49Operating the ECM Tuner .................................. 50-64
The Main Menu & Feature Setup ....................................50-64Install Tuning .................................................................................. 51Special Features ............................................................................. 52-53User Options .................................................................................. 53-61Vehicle Settings .............................................................................. 63Vehicle Diagnostics......................................................................... 63-64Show Settings ................................................................................ 64Uninstall Device .............................................................................. 64Update Device Software ................................................................. 65Change Vehicle/Engine ................................................................... 65
More Information ................................................ 65-67USB Mode .....................................................................65Contacting Technical Support ........................................66Checking GT Status .......................................................66Troubleshooting .............................................................67
Notes .................................................................. 68-69
Important Note: You MUST uninstall the tune from your engine before taking your vehicle in for ANY type of service.
CAT®
CUMMINS®
DETROIT®/MERCEDES
PACCAR®
Check online at bullydog.com for a list of applications.

3
ECM TUNERIn
trod
uctio
nU
pdat
ing
Phys
ical
In
stal
latio
nIn
stal
ling
the
Tune
Uni
nsta
lling
th
e Tu
ne
Ope
ratin
g th
e H
DG
TM
ore
In
form
atio
n
Parts List and Description
Parts ListHead Unit
HDMI Cable
Mini-USB Cable
microSD Card
SD Card Reader
6-Pin Data Plug
9-Pin Data Plug

4
ECM TUNER
Parts DescriptionHead UnitThe Head Unit is the interface through which all operating functions are performed.
Front SideThe ECM Tuner features a 2.4″ LCD screen and four capacitive touch buttons. Capacitive touch buttons are a button style that is sensitive to the presence of your finger. They do not need to be pushed “in” to activate them; they need only to be touched lightly.
Back Side1. Mini-USB Port: Allows the HDGT to be connected to a
computer with the included Mini-USB cable.2. HDMI Port: Connects the HDMI cable (which links the
Head Unit and the Data Plug).3. Micro SD Card Slot: Houses the included Micro SD
card which stores information for the ECM Tuner.
IntroductionU
pdatingPhysical
InstallationInstalling the
TuneU
ninstalling the Tune
Operating the
HD
GT
More
Information
1
2
3
4
13
2
Note: To access the ports in the head unit of the ECM Tuner, users will have to pull off the enclosing rubber case.

5
ECM TUNERIn
trod
uctio
nU
pdat
ing
Phys
ical
In
stal
latio
nIn
stal
ling
the
Tune
Uni
nsta
lling
th
e Tu
ne
Ope
ratin
g th
e H
DG
TM
ore
In
form
atio
n
6- and 9-Pin Data PlugsThe 6- and 9-pin data plugs connect the ECM Tuner to the vehicle. Count the number of pins in the vehicle data port and use the matching plug. (If both plug types are present, use the 9-pin connection.)
The diagram below shows the important parts of each type of Data Plug:
1. 9-Pin Data Plug Face2. 6-Pin Data Plug Face3. Plug lock ring: Each vehicle data port will have a lock
ring receiver. This lock ring will secure the data plug to the port when it is properly seated in the lock ring receiver.
4. HDMI Port: Connects the HDMI cable (which links the Data Plug and the Head Unit).
1
3
4
2

6
ECM TUNERIntroduction
Updating
Physical Installation
Installing the Tune
Uninstalling the Tune
Operating the
HD
GT
More
Information
HDMI CableThe 5 foot HDMI cable connects the ECM Tuner to the Data Plug. It also features a Mini-USB pigtail port for the Bully Dog Sensor Docking Station.
Mini-USB CableThe Mini-USB cable is a standard, off-the-shelf Mini-USB cable. It can be used to connect the ECM Tuner to a computer.

7
ECM TUNERIn
trod
uctio
nU
pdat
ing
Phys
ical
In
stal
latio
nIn
stal
ling
the
Tune
Uni
nsta
lling
th
e Tu
ne
Ope
ratin
g th
e H
DG
TM
ore
In
form
atio
n
MicroSD Memory CardThe microSD memory card holds all of the electronic files for the ECM Tuner; the ECM Tuner will not function if the card is not installed. The card can also be removed from the ECM Tuner and connected to a computer via the included card reader.

8
ECM TUNERIntroduction
Updating
Physical Installation
Installing the Tune
Uninstalling the Tune
Operating the
HD
GT
More
Information
Updating the ECM Tuner
OverviewWhy do I have to update my ECM Tuner?
1. Vehicle manufacturers regularly change the part numbers and other information that the ECM Tuner uses to communicate effectively with the engine computer. If the ECM Tuner doesn’t have the updated information, it may not work correctly. In order to give our customers the best support possible, Bully Dog releases updates when necessary to keep up with any changes that vehicle manufacturers may make.
2. The Bully Dog technical support team gathers information about any problems experienced by customers and then works with the engineering team to fix the problems as quickly as possible. If these fixes can help other people avoid similar problems, the engineers include them in the updates that are released for everybody. One of the most important troubleshooting steps is to make sure that the ECM Tuner has been updated to the most recently released software version. Updating is quite often an immediate fix for most problems.
3. Bully Dog engineers are constantly working to expand the features and vehicles that the ECM Tuner is able to support. Once a new vehicle or option is unlocked, they make sure it is available to everyone by including it in the updated software version.
These instructions are for use with a Microsoft Windows® computer with an Internet connection. There are currently no alternative methods to update using an Apple® or other computer that cannot successfully run applications designed for Microsoft Windows® operating systems.

9
ECM TUNERIn
trod
uctio
nU
pdat
ing
Phys
ical
In
stal
latio
nIn
stal
ling
the
Tune
Uni
nsta
lling
th
e Tu
ne
Ope
ratin
g th
e H
DG
TM
ore
In
form
atio
n
How often should I update?Make sure to update the ECM Tuner upon receipt. After the first update is complete, there is no need to update the tuner unless there is a glitch or malfunction. The Bully Dog technical support team can provide more information.
What is included in the updates?Updates include new part numbers and other information from vehicle manufacturers, tested fixes for problems customers may encounter, and any additional features or vehicles that Bully Dog engineers have developed.
How can I tell which software version is currently loaded on my ECM Tuner?
1. Go to the Main Menu (top left button).2. Highlight Show
Settings (right button).
3. SELECT the highlighted option (bottom left button).
The software version is listed in the middle of the first screen. It is labeled as SWa version and SWb version.
How can I check for updates?Run the Bully Dog Heavy Duty Update Agent with the ECM Tuner connected. It should read “Update Needed” if it is necessary. To complete the update, press the “Update” button and follow the instructions on the screen.
Go Back GT SYSTEM INFOGT status:Serial #:HW version:Memory:SWa version:SWb version:Tuning Version:Application:Admin. Password:Monitoring Type:Sensor Dock:
Unlocked from Vehicle#################1.5######1.0.5.074.0.3 CUMMINS EGRCUMMINS EGR ‘03 - ’07DisabledUnknownNot Connected

10
ECM TUNERIntroduction
Updating
Physical Installation
Installing the Tune
Uninstalling the Tune
Operating the
HD
GT
More
Information
Installing the Heavy Duty Update Agent1. Open a browser window.
‣ Use the browser you are most familiar with, like Mozilla Firefox®, Google Chrome® or Microsoft Internet Explorer®.
2. Go to http://bigrig.bullydog.com/update_agent.php3. Click on the Update Agent button for the HD GT and
HD WatchDog™.
4. Let the file finish downloading.5. Find the setup.exe file and double-click it to run the
Heavy Duty Update Agent setup.6. If a Windows® dialog box pops
up and warns you that the publisher could not be verified, click Run and/or Install to continue with the Heavy Duty Agent setup.
7. Let the computer finish installing the Heavy Duty Update Agent application.
8. The Heavy Duty Update Agent will automatically run after the installation is complete.
Update Agent for HD GT, ECM Tuner and HD WatchDog

11
ECM TUNER
Updating the ECM Tuner1. Start the Heavy Duty Update Agent (if it is not already
running). ‣ You can check to see if it is already running by
looking for the Bully Dog icon in the System Tray in the bottom right corner of your screen.
‣ If the Heavy Duty Update Agent is already installed, you will find it in the following folder on your Windows Start Menu:
All Programs > Bully Dog Technologies > Heavy Duty Update Agent
‣ If the Heavy Duty Update Agent is not present in your programs list, you will need to install it.
2. Plug the microSD memory card into the card reader.
Intr
oduc
tion
Upd
atin
gPh
ysic
al
Inst
alla
tion
Inst
allin
g th
e Tu
neU
nins
talli
ng
the
Tune
O
pera
ting
the
HD
GT
Mor
e
Info
rmat
ion

12
ECM TUNERIntroduction
Updating
Physical Installation
Installing the Tune
Uninstalling the Tune
Operating the
HD
GT
More
Information
3. Plug the card reader (with the microSD memory card) into a computer USB port.
4. Your computer and the Heavy Duty Update Agent will automatically recognize the memory card.a. Close the window or click Continue without
scanning if a dialog box pops up with an option to “scan and fix BDCARD.”
b. Close the window if you receive an Autoplay pop-up with options like “Open folder to view files.”
c. Likewise, you should close or ignore any other pop-up messages about the newly detected device that might be generated by your computer or any
It is possible to update by keeping the memory card installed and connecting the ECM Tuner to a computer via Mini-USB cable; however, this method is slower and not recommended.

13
ECM TUNERIn
trod
uctio
nU
pdat
ing
Phys
ical
In
stal
latio
nIn
stal
ling
the
Tune
Uni
nsta
lling
th
e Tu
ne
Ope
ratin
g th
e H
DG
TM
ore
In
form
atio
n
anti-virus software that may be running (it is common for these to appear in the System Tray on the bottom right side of your computer screen).
5. The Heavy Duty Update Agent will prompt you to register the ECM Tuner if it has not already been done.a. To register, fill out the fields and click Submit.b. To register at a later time, click Cancel.
6. The Heavy Duty Update Agent will display the status of the software version on the memory card.
‣ If an update is needed, click on the Update button and proceed to step seven.
To register at a later date, open the Heavy Duty Update Agent and open the Tools menu; then click Register Product.
14
ECM TUNERIntroduction
Updating
Physical Installation
Installing the Tune
Uninstalling the Tune
Operating the
HD
GT
More
Information
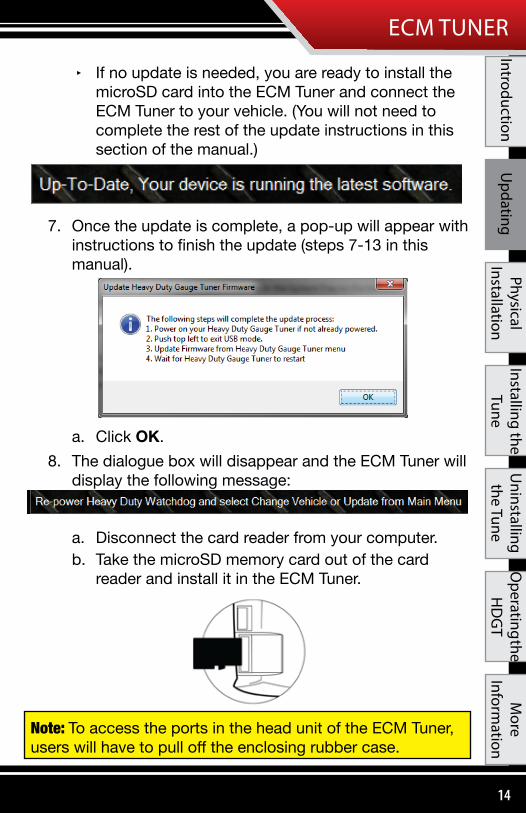
‣ If no update is needed, you are ready to install the microSD card into the ECM Tuner and connect the ECM Tuner to your vehicle. (You will not need to complete the rest of the update instructions in this section of the manual.)
7. Once the update is complete, a pop-up will appear with instructions to finish the update (steps 7-13 in this manual).
a. Click OK.8. The dialogue box will disappear and the ECM Tuner will
display the following message:
a. Disconnect the card reader from your computer.b. Take the microSD memory card out of the card
reader and install it in the ECM Tuner.
Note: To access the ports in the head unit of the ECM Tuner, users will have to pull off the enclosing rubber case.

15
ECM TUNERIn
trod
uctio
nU
pdat
ing
Phys
ical
In
stal
latio
nIn
stal
ling
the
Tune
Uni
nsta
lling
th
e Tu
ne
Ope
ratin
g th
e H
DG
TM
ore
In
form
atio
n
9. Connect the ECM Tuner to a power source. ‣ Use the Mini-USB cable to connect the ECM Tuner
to your computer, then press the top left button to exit USB mode when prompted.
OR
‣ Connect the ECM Tuner to your vehicle, turn the key to the RUN or ON position and the ECM Tuner will power on. Go to the Main Menu (top left button).
10. Go to the Main Menu (top left button).
11. Use the buttons on the right of the ECM Tuner to scroll down and highlight one of the following options:
‣ Update Device SoftwareOR
‣ Change Vehicle/Engine
12. SELECT the highlighted option (bottom left button).13.(a) If you chose Update Device Software:
a. Confirm that the correct engine/vehicle application is listed.
MAIN MENUGo Back
Select
up
DOWN
Uninstall Device
Update Device Software
Change Vehicle/Engine
MAIN MENUGo Back
SELECT
UPUpdate Device Software
Change Vehicle/Engine
16
ECM TUNERIntroduction
Updating
Physical Installation
Installing the Tune
Uninstalling the Tune
Operating the
HD
GT
More
Information
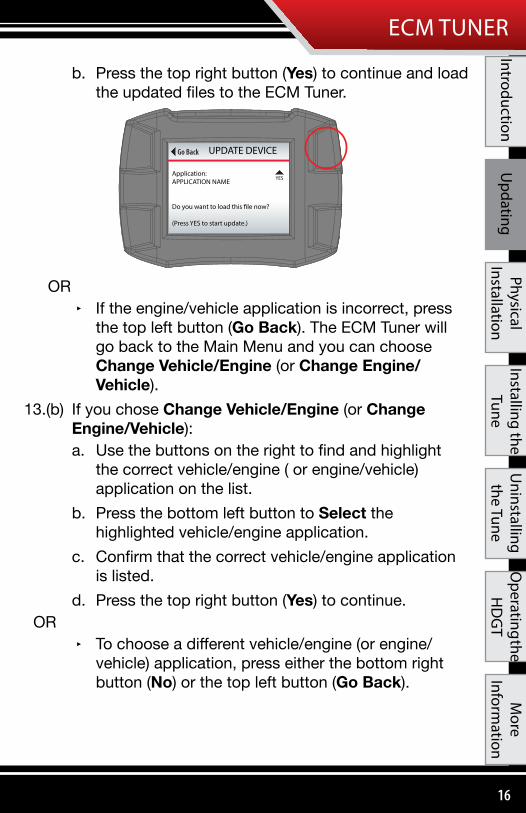
b. Press the top right button (Yes) to continue and load the updated files to the ECM Tuner.
OR ‣ If the engine/vehicle application is incorrect, press
the top left button (Go Back). The ECM Tuner will go back to the Main Menu and you can choose Change Vehicle/Engine (or Change Engine/Vehicle).
13.(b) If you chose Change Vehicle/Engine (or Change Engine/Vehicle):a. Use the buttons on the right to find and highlight
the correct vehicle/engine ( or engine/vehicle) application on the list.
b. Press the bottom left button to Select the highlighted vehicle/engine application.
c. Confirm that the correct vehicle/engine application is listed.
d. Press the top right button (Yes) to continue.OR
‣ To choose a different vehicle/engine (or engine/vehicle) application, press either the bottom right button (No) or the top left button (Go Back).
Go Back UPDATE DEVICE
Application:APPLICATION NAME
Do you want to load this �le now?
(Press YES to start update.)
YES
17
ECM TUNERIn
trod
uctio
nU
pdat
ing
Phys
ical
In
stal
latio
nIn
stal
ling
the
Tune
Uni
nsta
lling
th
e Tu
ne
Ope
ratin
g th
e H
DG
TM
ore
In
form
atio
n
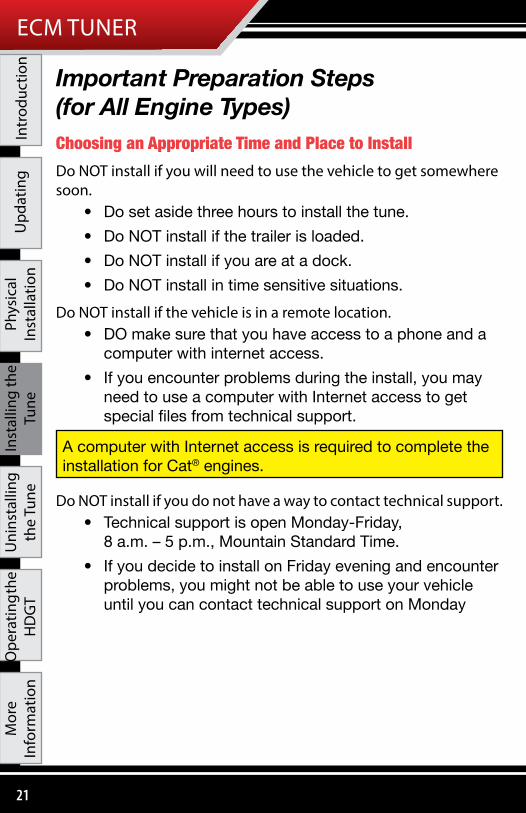
14. Once you have confirmed the vehicle/engine application, the ECM Tuner will load the new files and restart. Once the ECM Tuner has restarted, the update process is complete.
LOADING IMAGE 58%Selected:XXXXXXXXXXXXXX
Loading �le from SD card. BOOTING IMAGE
Screen will darken and Devicewill chirp for 5 seconds.
Do not unplug or cycle key.
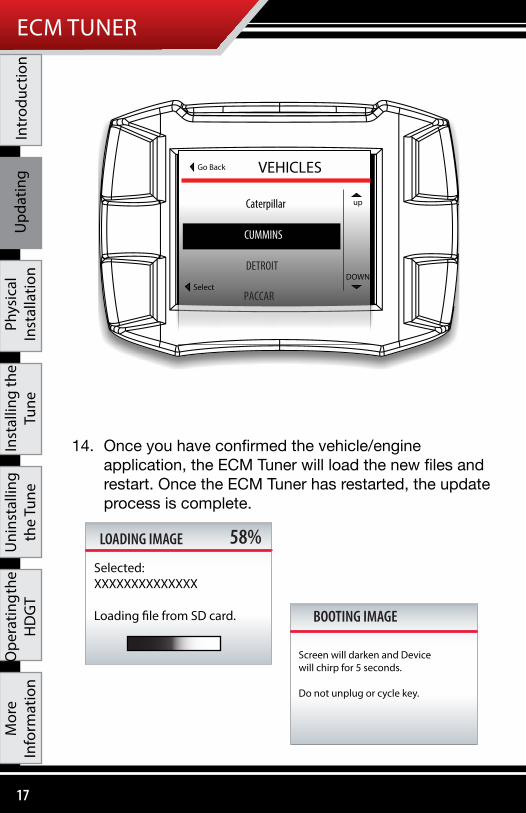
VEHICLESGo Back
Select
up
DOWN
Caterpillar
CUMMINS
DETROIT
PACCAR

18
ECM TUNERIntroduction
Updating
Physical Installation
Installing the Tune
Uninstalling the Tune
Operating the
HD
GT
More
Information
Physical Installation1. Locate the Data Port and Connect the Plug.The vehicle date port is typically located in one of three different locations:
• Underneath the dash. ‣ On the driver’s side of the cab. ‣ On the lower front part of the dash.
• Near the back of the driver’s seat.• Under the driver’s seat.
1. Line up the pin-pattern on the face of the data plug to the hole-pattern on the data port.
2. Press the plug in.
3. Secure the connection by rotating the lock ring on the data plug.
NOTICE: Some trucks may have two data ports. Use the 9-pin connection.
The data port shown above is in a vulnerable position; it is important to protect the connection in this type of situation.

19
ECM TUNERIn
trod
uctio
nU
pdat
ing
Phys
ical
In
stal
latio
nIn
stal
ling
the
Tune
Uni
nsta
lling
th
e Tu
ne
Ope
ratin
g th
e H
DG
TM
ore
In
form
atio
n
1. Connect ECM Tuner and Complete Install.1. Plug in the ECM Tuner and let the device power on.
2. Proceed to the “Installing the Tuning” section. *When the install process is complete, users can disconnect the ECM tuner and store it in a safe spot.
SPECIAL NOTE:Volvo trucks with Cummins® engines, some Cat® engines and Detroit engines® require a direct connection to the engine computer. Bully Dog has created wiring harnesses to address this need. For more information, contact technical support.
Cummins®: 46510-1Cat®: 46520-2
Detroit® DDEC IV: 46530-1

20
ECM TUNERIntroduction
Updating
Physical Installation
Installing the Tune
Uninstalling the Tune
Operating the
HD
GT
More
Information
Installing the TuneIn order to enjoy the advantages of tuning your engine, like additional horsepower and/or fuel economy, you need to use the Install Tuning feature.
The process is basically the same when you are installing the tune, changing certain settings or uninstalling.
CAUTION! This option actively reprograms the engine computer – if the process is interrupted for any reason, it will cause problems which could prevent you from using the HDGT or even being able to drive your vehicle for a few days.
To ensure a successful tune installation, complete the preparation steps.
21
ECM TUNERIn
trod
uctio
nU
pdat
ing
Phys
ical
In
stal
latio
nIn
stal
ling
the
Tune
Uni
nsta
lling
th
e Tu
ne
Ope
ratin
g th
e H
DG
TM
ore
In
form
atio
n
Important Preparation Steps (for All Engine Types)Choosing an Appropriate Time and Place to InstallDo NOT install if you will need to use the vehicle to get somewhere soon.
• Do set aside three hours to install the tune.• Do NOT install if the trailer is loaded.• Do NOT install if you are at a dock.• Do NOT install in time sensitive situations.
Do NOT install if the vehicle is in a remote location.• DO make sure that you have access to a phone and a
computer with internet access.• If you encounter problems during the install, you may
need to use a computer with Internet access to get special files from technical support.
Do NOT install if you do not have a way to contact technical support.• Technical support is open Monday-Friday,
8 a.m. – 5 p.m., Mountain Standard Time.• If you decide to install on Friday evening and encounter
problems, you might not be able to use your vehicle until you can contact technical support on Monday
A computer with Internet access is required to complete the installation for Cat® engines.

22
ECM TUNERIntroduction
Updating
Physical Installation
Installing the Tune
Uninstalling the Tune
Operating the
HD
GT
More
Information
Managing Other Electronics
DO disconnect the ABS fuse.• This can be reconnected after the tune installation is
complete.DO disconnect the trailer wiring from tractor.
• This can be reconnected after the tune installation is complete.
DO turn off all factory installed electronics inside the vehicle. This includes:
• Headlights, header, air conditioning, stereo, DVD players, etc.
• Failing to turn off ALL electronics can prevent successful tune installation.
DO disconnect additional electrical appliances. Remove any chargers or electrical devices connected to:
• Cigarette lighters, USB ports, or other types of electrical outlets in the vehicle.
DO disconnect any other aftermarket electronic device. This includes:• Trailer brakes, stereo, alarm, CB, remote start, DPF
delete, Sirius/XM satellite radio, etc.• Any electrical device that was installed after the vehicle
was released from the factory.• Disconnect these items from the fuse box or other
power connection. You do not have to completely physically uninstall them; must make sure they are not getting power.
Make sure that electrical devices are turned off or disconnected as described below while you are installing the ECM Tuner to your vehicle. Once the tune is installed, you can reconnect them and turn on all of the electronics that you normally use.
IMPORTANT NOTE: Do not use the ECM Tuner with any other electronic device designed to increase horsepower (such as a fooler wire or plug-in box).

23
ECM TUNERIn
trod
uctio
nU
pdat
ing
Phys
ical
In
stal
latio
nIn
stal
ling
the
Tune
Uni
nsta
lling
th
e Tu
ne
Ope
ratin
g th
e H
DG
TM
ore
In
form
atio
n
Make SURE the Battery is ChargedDO make sure that your batteries are fully charged before beginning any download.
• It is a good idea to have a battery charger ready to connect to your vehicle if the batteries begin to lose their charge while you are installing the tune.
Make SURE that the Tuner is ReadyDO update your ECM Tuner.
• Updating requires a computer with Internet access.
Do install the microSD memory card into the ECM Tuner.
DO make sure that the tune has not already been installed.1. Go to the Main Menu on the ECM Tuner.
‣ From the Main Menu, press the top left button on the ECM Tuner.
2. Choose the Show Settings option. ‣ Use the buttons on the right to highlight Show
Settings. ‣ Use the bottom left button to Select the highlighted
option.
IMPORTANT NOTE: It is very important that the tuner is not interrupted while it is writing to your engine computer – if the batteries die and the tune is interrupted it could prevent you from being able to start your vehicle.
Go Back MAIN MENU
UP
DOWNSELECT
Vehicle Diagnostics
Show Settings
Uninstall Device

24
ECM TUNERIntroduction
Updating
Physical Installation
Installing the Tune
Uninstalling the Tune
Operating the
HD
GT
More
Information
3. Check what is showing next to GT status ‣ The information is displayed at the top of the first
screen in the Show Settings option. ‣ Unlocked from Vehicle: continue with your
preparations to install the tune. ‣ Locked to Vehicle:
◦ Connect the ECM Tuner to the original vehicle and uninstall the tune.
◦ If this cannot be done, contact technical support (a fee may be required to reset the device).
‣ Recovery: Contact technical support for further assistance.
Go Back GT SYSTEM INFOGT status:Serial #:HW version:Memory:SWa version:SWb version:Tuning Version:Application:Admin. Password:Monitoring Type:Sensor Dock:
Unlocked from Vehicle#################1.5######1.0.5.074.0.3 CUMMINS EGRCUMMINS EGR ‘03 - ’07DisabledUnknownNot Connected
DOWN

25
ECM TUNERIn
trod
uctio
nU
pdat
ing
Phys
ical
In
stal
latio
nIn
stal
ling
the
Tune
Uni
nsta
lling
th
e Tu
ne
Ope
ratin
g th
e H
DG
TM
ore
In
form
atio
n
Detroit®/Mercedes, Cummins® and Paccar® Engines
Overview
1. Physically install the ECM Tuner.2. Prepare to install the tune.3. Turn the key to the RUN (or ON) position.4. Choose Install Tuning from the Main Menu.5. Follow the onscreen prompts to complete the tune
installation.
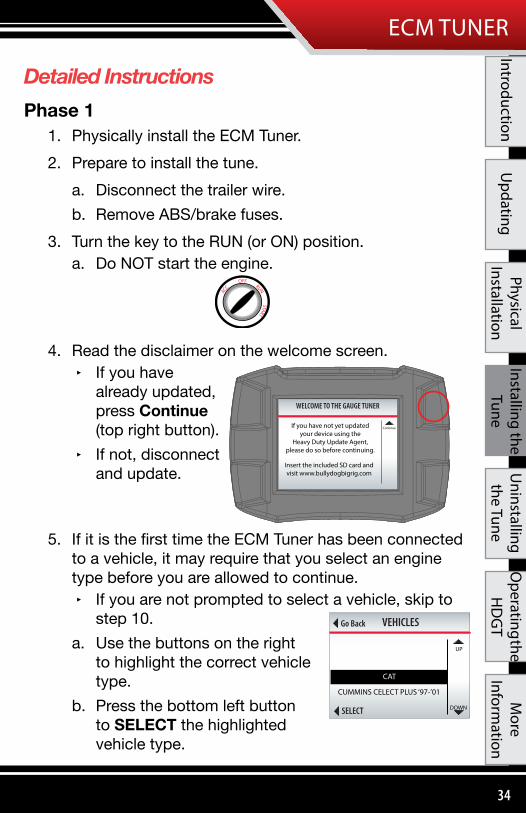
Detailed Instructions1. Physically install the ECM Tuner.
2. Prepare to install the tune.
3. Turn the key to the RUN (or ON) position. ‣ Do NOT start the engine.
AC
C OFF RUN START
In order to provide a basic understanding of the install process, this simplified preview has been provided. It is very important that: 1) you have completed the physical installation, 2) you have completed the preparation steps and 3) you are familiar with the detailed instructions provided before you attempt to install the ECM Tuner.

26
ECM TUNERIntroduction
Updating
Physical Installation
Installing the Tune
Uninstalling the Tune
Operating the
HD
GT
More
Information
4. Read the disclaimer on the welcome screen. ‣ If you have already updated, press Continue (top
right button). ‣ If not, disconnect and update.
5. If it is the first time the ECM Tuner has been connected to a vehicle, you may need to select an engine type.
‣ If you are not prompted to select a vehicle, skip to step 10.
a. Highlight the correct vehicle type (right buttons).
b. SELECT the highlighted option (bottom left button).
6. Double-check and confirm that you have selected the correct vehicle type.
‣ If it is not correct, you can choose NO (bottom right button) or Go Back (top left button) to change to the correct vehicle type.
‣ Press YES (top right button) to continue.
Continue
Insert the included SD card andvisit www.bullydogbigrig.com
If you have not yet updatedyour device using the
Heavy Duty Update Agent,please do so before continuing.
WELCOME TO THE GAUGE TUNER
VEHICLESGo Back
Select
up
DOWN
Caterpillar
CUMMINS
DETROIT
PACCAR
Go Back
NO
YESAre you sure your vehicle is
XXXXXXXXXXXXXXPress YES to continue.
VEHICLES

27
ECM TUNERIn
trod
uctio
nU
pdat
ing
Phys
ical
In
stal
latio
nIn
stal
ling
the
Tune
Uni
nsta
lling
th
e Tu
ne
Ope
ratin
g th
e H
DG
TM
ore
In
form
atio
n
7. The ECM Tuner will load and boot the image (the vehicle files).
‣ This process is fast, it should not take longer than three minutes.
‣ The ECM Tuner will show a percentage counter while it is loading; then the screen will darken and the device will chirp for approximately five seconds while it reboots.
8. The ECM Tuner will update files (load the graphics file from the memory card to the device).
‣ This process if fast and may take one minute or less.
‣ The ECM Tuner will show a percentage counter to track its progress.
9. The ECM Tuner will reboot/restart and show the menu.
LOADING IMAGE 58%Selected:XXXXXXXXXXXXXX
Loading �le from SD card.
BOOTING IMAGE
Screen will darken and Devicewill chirp for 5 seconds.
Do not unplug or cycle key.
UPDATING FILES 47%
Loading graphics �le from SD card.
Go Back MAIN MENU
UP
DOWNSELECT
Install Tuning
Special Features
NOTE: At this point in the install process, you can complete an optional backup of your vehicle files through the Heavy Duty Update Agent; simply follow the normal steps to update the ECM Tuner.

28
ECM TUNERIntroduction
Updating
Physical Installation
Installing the Tune
Uninstalling the Tune
Operating the
HD
GT
More
Information
10. Go to the Main Menu (top left button).
11. Highlight Install Tuning (right buttons).
12. SELECT the highlighted option (bottom left button).
13. You may receive a message stating that the ECM Tuner has not been registered – press Continue (top right button) to proceed with the tuning and be sure to register later.
14. Verify that the correct vehicle type is selected and press YES to continue (top right button).
‣ If the vehicle type is not correct, restart the ECM Tuner by cycling the key (to the OFF and then ON or RUN positions; do NOT start the engine). Then choose Change Vehicle/Engine from the Main Menu to select the correct vehicle type.
Go Back MAIN MENU
UP
DOWNSELECT
Install Tuning
Special Features
Go Back REGISTER
Continue
Device is not registered!
For warranty purposes, it is highlyrecommended to register and updatedevice before installing the tuning.Download the Heavy Duty Update Agentat www.bullydogbigrig.com
Press continue to proceed with tuningand register later.
CAUTIONGo Back
YESPlease verify vehicle type
Installing on aXXXXXXXXXXXIf this is correct press YES to continue
If not, restart and select the correct vehicle.

29
ECM TUNERIn
trod
uctio
nU
pdat
ing
Phys
ical
In
stal
latio
nIn
stal
ling
the
Tune
Uni
nsta
lling
th
e Tu
ne
Ope
ratin
g th
e H
DG
TM
ore
In
form
atio
n
15. Read the disclaimer and press the top right button to Agree and continue.
‣ If you Disagree, press the top left button; this will end the tune installation.
‣ This is the last point at which you can safely exit the tune installation.
16. Verify that the key is in the RUN (or ON) position and press the top right button to Continue.
17. The ECM Tuner will prepare to install the tune. ‣ The ECM Tuner will
show a percentage counter to track its progress.
‣ Do NOT interrupt the ECM Tuner.
18. The ECM Tuner will read the file.
‣ This means that the ECM Tuner is reading the stock file from your engine computer.
‣ This part of the tune installation can take between 30 seconds and 2 hours.
‣ Do NOT interrupt the ECM Tuner.
DISCLAIMERGo Back
agree
disagree
Are you the owner of thisvehicle, have you read the
disclaimer, and do you agreeto all of its terms and conditions?
This is the �nal opportunity to exit the download procedure by
pressing disagree.
PLEASE VERIFY KEYIS IN THE
KEY RUN
RUNPOSITION
PRESS CONTINUE TO PROCEED
Continue
Preparing Device 6%
Please waitDo Not Unplug
Reading File 0%
00010000000102A00003FF32005002A0

30
ECM TUNERIntroduction
Updating
Physical Installation
Installing the Tune
Uninstalling the Tune
Operating the
HD
GT
More
Information
19. When the ECM Tuner is finished reading the file, it will prompt you to select a tune.
‣ Choose between Stock, Economy, Power/Economy and Power.
‣ Use the buttons on the right to highlight the tune you want.
‣ Press the bottom left button to Select the highlighted tune and continue.
20. The ECM Tuner will process the calibration. ‣ The ECM Tuner will
show a percentage counter to track its progress.
‣ Do NOT interrupt the ECM Tuner.
21. The ECM Tuner will read the calibration. ‣ The ECM Tuner will show
a percentage counter to track its progress.
‣ Do NOT interrupt the ECM Tuner.
22. The ECM Tuner will configure the vehicle.
‣ Do NOT interrupt the ECM Tuner.
Processing Calibration 7%Setting...
Power/Econ Tune
Please waitDo Not Unplug
Reading Calibration 45%
Please waitDo Not Unplug
005F0000005F2A00005F492200052A00
SELECT TUNE
Stock
Economy
Economy with Power
UP
DOWN
SELECT
Con�guring Vehicle
Please waitDo Not Unplug

31
ECM TUNERIn
trod
uctio
nU
pdat
ing
Phys
ical
In
stal
latio
nIn
stal
ling
the
Tune
Uni
nsta
lling
th
e Tu
ne
Ope
ratin
g th
e H
DG
TM
ore
In
form
atio
n
23. The ECM Tuner will write the calibration. ‣ This means that the ECM Tuner
is actively writing the tune to the engine computer.
‣ This process can take between 15 and 45 minutes; it will take about 30 minutes on most vehicles.
‣ Do NOT interrupt the ECM Tuner.
24. When the ECM Tuner has finished writing the tune to the engine computer, it will prompt you to turn the key to the OFF position.a. Turn the key to the OFF position.b. Press Continue (top right button).
25. The ECM Tuner will display a countdown.
‣ Leave the key in the OFF position. ‣ Do NOT interrupt the ECM Tuner.
26. After the countdown, the ECM Tuner will prompt you to turn the key to the RUN position.a. Turn the key to the RUN position.
◦ Do NOT start the engine.b. Press Continue (top right button).
Writing Calibration 0%
Please waitDo Not Unplug
PLEASE VERIFY KEYIS IN THE
KEY OFF
OFFPOSITION
PRESS CONTINUE TO PROCEED
Continue
PLEASE VERIFY KEYIS IN THE
KEY RUN
RUNPOSITION
PRESS CONTINUE TO PROCEED
Continue
Please Wait
Finishing Download
6Seconds
Leave Key OFF!DO NOT UNPLUG!!!

32
ECM TUNERIntroduction
Updating
Physical Installation
Installing the Tune
Uninstalling the Tune
Operating the
HD
GT
More
Information
27. The ECM Tuner will complete the tune installation.a. Press Continue (bottom left button).
28. The ECM Tuner will reboot and show the Main Menu screen.a. Test to make sure that your vehicle starts and runs
correctly. If so, the tune has been successfully installed and you are ready to enjoy your ECM Tuner!
‣ Read troubleshooting if your vehicle does not start. ‣ If the ECM Tuner freezes or generates an error
message, contact technical support.
CONTINUE
DOWNLOADING
Download completedsuccesfully!
ECM
TunerGo Back MAIN MENU
UP
DOWNSELECT
Install Tuning
Special Features

33
ECM TUNERIn
trod
uctio
nU
pdat
ing
Phys
ical
In
stal
latio
nIn
stal
ling
the
Tune
Uni
nsta
lling
th
e Tu
ne
Ope
ratin
g th
e H
DG
TM
ore
In
form
atio
n
Cat® EnginesOverview
Phase 11. Physically install the ECM Tuner.2. Prepare to install the tune.3. Turn the key to the RUN (or ON) position.4. Choose Install Tuning from the Main Menu.5. Allow the ECM Tuner to collect information from your
vehicle.Phase 2
1. Disconnect the microSD memory card from the ECM Tuner.
2. Use the card reader to connect the memory card to a computer with Internet access.
3. Use the Update Agent to download the Phase 3 files to the memory card.
Phase 31. Install the memory card into the ECM Tuner.2. Turn the key to the RUN (or ON) position.3. Choose Install Tuning from the Main Menu.4. Follow the onscreen prompts to complete the tune
installation.
In order to provide a basic understanding of the install process, this simplified preview has been provided. It is very important that: 1) you have completed the physical installation described, 2) you have completed thepreparation steps and 3) you are familiar with the detailed instructions provided before you attempt to install the ECM Tuner.
Using the Update Agent for Phase 2 of the Cat® engine tune installation requires registration.
34
ECM TUNERIntroduction
Updating
Physical Installation
Installing the Tune
Uninstalling the Tune
Operating the
HD
GT
More
Information
Detailed InstructionsPhase 1
1. Physically install the ECM Tuner.2. Prepare to install the tune.
a. Disconnect the trailer wire.b. Remove ABS/brake fuses.
3. Turn the key to the RUN (or ON) position.a. Do NOT start the engine.
4. Read the disclaimer on the welcome screen. ‣ If you have
already updated, press Continue (top right button).
‣ If not, disconnect and update.
5. If it is the first time the ECM Tuner has been connected to a vehicle, it may require that you select an engine type before you are allowed to continue.
‣ If you are not prompted to select a vehicle, skip to step 10.
a. Use the buttons on the right to highlight the correct vehicle type.
b. Press the bottom left button to SELECT the highlighted vehicle type.
AC
C OFF RUN START
Continue
Insert the included SD card andvisit www.bullydogbigrig.com
If you have not yet updatedyour device using the
Heavy Duty Update Agent,please do so before continuing.
WELCOME TO THE GAUGE TUNER
Go Back
UP
DOWN
VEHICLES
CAT
SELECT
CUMMINS CELECT PLUS ‘97-’01

35
ECM TUNERIn
trod
uctio
nU
pdat
ing
Phys
ical
In
stal
latio
nIn
stal
ling
the
Tune
Uni
nsta
lling
th
e Tu
ne
Ope
ratin
g th
e H
DG
TM
ore
In
form
atio
n
6. Double-check and confirm that you have selected the correct vehicle type.
‣ If the vehicle is not correct, you can choose NO (bottom right button) or Go Back (top left button) to change to the correct vehicle type.
a. Press YES (top right button) to continue.
7. The ECM Tuner will then load and boot the image (the vehicle files).
‣ This process is fast, it should not take longer than three minutes.
‣ The ECM Tuner will show a percentage counter while it is loading; then the screen will darken and the device will chirp for approximately five seconds while it reboots.
8. The ECM Tuner will update files (load the graphics file from the memory card to the device).
‣ This process is fast and may take one minute or less.
‣ The ECM Tuner will show a percentage counter to track its progress.
Go Back
NO
YESAre you sure your vehicle is
CATPress YES to continue.
VEHICLES
LOADING IMAGE 58%Selected:XXXXXXXXXXXXXX
Loading �le from SD card.
BOOTING IMAGE
Screen will darken and Devicewill chirp for 5 seconds.
Do not unplug or cycle key.
UPDATING FILES 47%
Loading graphics �le from SD card.

36
ECM TUNERIntroduction
Updating
Physical Installation
Installing the Tune
Uninstalling the Tune
Operating the
HD
GT
More
Information
9. The ECM Tuner will restart and show the Main Menu screen in a Demo Mode.
10. Go to the Main Menu (top left button).
11. Highlight Install Tuning (right buttons).
12. SELECT the highlighted option (bottom left button).
13. You may receive a message stating that the ECM Tuner has not been registered.a. Press Continue to proceed with the tuning and be
sure to register later.
ECM
TunerGo Back MAIN MENU
UP
DOWNSELECT
Install Tuning
Special Features
Go Back MAIN MENU
UP
DOWNSELECT
Install Tuning
Special Features
Go Back REGISTER
Continue
Device is not registered!
For warranty purposes, it is highlyrecommended to register and updatedevice before installing the tuning.Download the Heavy Duty Update Agentat www.bullydogbigrig.com
Press continue to proceed with tuningand register later.

37
ECM TUNERIn
trod
uctio
nU
pdat
ing
Phys
ical
In
stal
latio
nIn
stal
ling
the
Tune
Uni
nsta
lling
th
e Tu
ne
Ope
ratin
g th
e H
DG
TM
ore
In
form
atio
n
14. Verify that the correct vehicle type is selected and press Yes to continue (top right button).
‣ If the vehicle type is not correct, restart and select the correct vehicle by cycling the key position and choosing Change Vehicle/Engine from the Main Menu.
15. Read the disclaimer and press the top right button to Agree and continue.
‣ If you Disagree, press the top left button; this will end the tune installation.
‣ This is the last point at which you can safely exit the tune installation.
16. Confirm that the key is in the RUN (or ON) position.
17. Press Continue (top right button).
18. Confirm that you have disconnected the trailer wire and removed the ABS/brake fuses.
19. Press Continue (top right button).
20. Once the ECM Tuner shows that Phase 1 is complete, begin Phase 2.
Go Back
YES
CAUTIONPlease verify vehicle type.
Installing on a:
CATERPILLAR
If this is correct press YES to continue
If not, restart and select the correctvehicle.
DISCLAIMERGo Back
agree
disagree
Are you the owner of thisvehicle, have you read the
disclaimer, and do you agreeto all of its terms and conditions?
This is the �nal opportunity to exit the download procedure by
pressing disagree.
Continue
DOWNLOADINGGT status: UNLOCKED
Phase 1:1 Connect GT to vehicle.
2 Turn ignition key to ON Do not Start the Engine!
3 Press Continue after Key in in the ON position.
Go Back
Continue
CAUTION
During the download processdisconnect trailer electricaland remove ABS/brake fuses.
Press Continue whenready to proceed.
DOWNLOADINGPhase 1 Complete!
Truck Data Acquired.Please Disconnect the GT fromTruck and proceed to Phase 2:
Phase 2:Connect GT to PC and use the
Heavy Duty Update Agentto load the latest �les.

38
ECM TUNERIntroduction
Updating
Physical Installation
Installing the Tune
Uninstalling the Tune
Operating the
HD
GT
More
Information
Phase 2
1. Remove the microSD memory card from the ECM Tuner.
2. Run the Heavy Duty Update Agent on a computer with Internet access.
3. Plug the microSD memory card into the card reader.
4. Plug the card reader (with the microSD card) into a computer USB port.
‣ Close the Autoplay window if it pops up.
‣ Close the window or click Continue without scanning if a dialog box pops up with an option to “scan and fix BDCARD.”
The following installation steps can only be completed with a Microsoft Windows® computer that has Internet access. If you do not have access to a suitable computer, contact your Bully Dog dealer for installation help.

39
ECM TUNERIn
trod
uctio
nU
pdat
ing
Phys
ical
In
stal
latio
nIn
stal
ling
the
Tune
Uni
nsta
lling
th
e Tu
ne
Ope
ratin
g th
e H
DG
TM
ore
In
form
atio
n
5. The Update Agent should automatically recognize the memory card.
‣ The Update Agent may prompt you to complete registration; this is required to continue with Phase 2 of the Cat® engine tune installation.
‣ If the ECM Tuner is already registered, no registration prompt should appear.
6. Click Phase 2: Upload Tuning Files.
7. The Update Agent will read information collected about the vehicle during Phase 1.

40
ECM TUNERIntroduction
Updating
Physical Installation
Installing the Tune
Uninstalling the Tune
Operating the
HD
GT
More
Information
8. Two more progress bars will be displayed. Give the Update Agent time to complete the following tasks:
‣ Download tuning files: The Update Agent will retrieve the correct tuning files from the Bully Dog website.
‣ Files correct, Uploading to Device: The Update Agent is transferring the tuning files to the memory card.
9. Click OK when the Update Agent indicates that Phase 2 is complete.
10. Put the memory card back into the ECM Tuner.
11. Continue to Phase 3.
41
ECM TUNERIn
trod
uctio
nU
pdat
ing
Phys
ical
In
stal
latio
nIn
stal
ling
the
Tune
Uni
nsta
lling
th
e Tu
ne
Ope
ratin
g th
e H
DG
TM
ore
In
form
atio
n
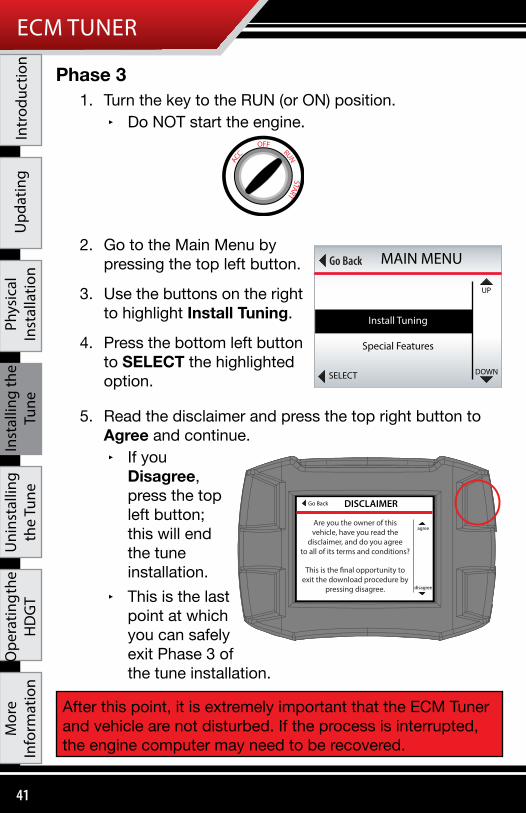
Phase 31. Turn the key to the RUN (or ON) position.
‣ Do NOT start the engine.
2. Go to the Main Menu by pressing the top left button.
3. Use the buttons on the right to highlight Install Tuning.
4. Press the bottom left button to SELECT the highlighted option.
5. Read the disclaimer and press the top right button to Agree and continue.
‣ If you Disagree, press the top left button; this will end the tune installation.
‣ This is the last point at which you can safely exit Phase 3 of the tune installation.
AC
C OFF RUN START
Go Back MAIN MENU
UP
DOWNSELECT
Install Tuning
Special Features
DISCLAIMERGo Back
agree
disagree
Are you the owner of thisvehicle, have you read the
disclaimer, and do you agreeto all of its terms and conditions?
This is the �nal opportunity to exit the download procedure by
pressing disagree.
After this point, it is extremely important that the ECM Tuner and vehicle are not disturbed. If the process is interrupted, the engine computer may need to be recovered.

42
ECM TUNERIntroduction
Updating
Physical Installation
Installing the Tune
Uninstalling the Tune
Operating the
HD
GT
More
Information
6. The ECM Tuner will display the Phase 3 initiation screen.
7. Press the top right button to Continue.
8. The ECM Tuner will provide a list of available engine tunes. Select the tune you prefer:
‣ Stock: Original factory power levels. ‣ Economy: 6-12% improvement in fuel mileage (with
good driving habits). ‣ Power/Economy: 6-12% improvements in fuel
mileage (with good driving habits) plus approximately 18% gain in engine power output.
ContinueGT status: UNLOCKED
Phase 3: GT is Ready to Download to Truck
...Press Continue...
DOWNLOADING
SELECT TUNE
Stock
Economy
Economy with Power
UP
DOWN
SELECT

43
ECM TUNERIn
trod
uctio
nU
pdat
ing
Phys
ical
In
stal
latio
nIn
stal
ling
the
Tune
Uni
nsta
lling
th
e Tu
ne
Ope
ratin
g th
e H
DG
TM
ore
In
form
atio
n
9. The ECM Tuner will build the file. ‣ This process is fast; it should take
a minute or less. ‣ Do NOT interrupt the ECM Tuner.
10. Verify that the key is in the RUN (or ON) position.a. Press CONTINUE (top right button).
11. The ECM Tuner will write the calibration.
‣ Do NOT interrupt the ECM Tuner.
12. Turn the key to the OFF position.a. Press Continue
(top right button).
13. The ECM Tuner will finish the download.
‣ Leave the key in the OFF position. ‣ Do NOT interrupt the ECM Tuner.
14. Turn the key to the RUN (or ON) position.
‣ Do NOT start the engine.a. Press Continue (top right button).
BUILDING FILE 3%Setting...
Power/Econ Tune
Please waitDo Not Unplug
PLEASE VERIFY KEYIS IN THE
KEY RUN
RUNPOSITION
PRESS CONTINUE TO PROCEED
Continue
Writing Calibration 0%
Please waitDo Not Unplug
PLEASE VERIFY KEYIS IN THE
KEY OFF
OFFPOSITION
PRESS CONTINUE TO PROCEED
Continue
Please Wait
Finishing Download
6Seconds
Leave Key OFF!DO NOT UNPLUG!!!
PLEASE VERIFY KEYIS IN THE
KEY RUN
RUNPOSITION
PRESS CONTINUE TO PROCEED
Continue
After the tune is selected, do not unplug or disturb the ECM Tuner or vehicle in any way. If the process is interrupted, the engine computer may need to be recovered.

44
ECM TUNERIntroduction
Updating
Physical Installation
Installing the Tune
Uninstalling the Tune
Operating the
HD
GT
More
Information
15. Once the download has been successfully completed, press Continue (bottom left button).
16. Reconnect the trailer wire and replace the ABS/brake fuse(s).a. Press Continue when
you are ready to proceed (bottom left button).
17. The ECM Tuner will reboot to the menu.a. Start vehicle and make sure it runs correctly. If so,
the tune has been successfully installed and you are ready to enjoy your ECM Tuner!
‣ See troubleshooting if your vehicle does not start. ‣ If the ECM Tuner freezes or generates an error
message, contact technical support.
Go Back MAIN MENU
UP
DOWNSELECT
Install Tuning
Special Features
CONTINUE
DOWNLOADING
Download completedsuccesfully!
Continue
CAUTION
Before driving, please reconnectthe trailer and insert any fusesthat were removed.

45
ECM TUNERIn
trod
uctio
nU
pdat
ing
Phys
ical
In
stal
latio
nIn
stal
ling
the
Tune
Uni
nsta
lling
th
e Tu
ne
Ope
ratin
g th
e H
DG
TM
ore
In
form
atio
n
Uninstalling the Tune
Overview1. Prepare the vehicle to uninstall the tune.2. Turn the key to the RUN (or ON) position.3. Choose Uninstall Device from the Main Menu.4. Follow the prompts on the ECM Tuner screen.
Detailed instructions.1. Prepare the vehicle to uninstall the tune.2. Turn the key to RUN (or ON).
3. Go to the Main Menu (top left button).
The process of uninstalling the tune or “returning to stock” is very similar to the original process of installing the tune because the ECM Tuner actively reprograms the engine computer. This means that the same important preparation steps must be taken to ensure that the engine computer does not need to be recovered.
AC
C OFF RUN START

46
ECM TUNERIntroduction
Updating
Physical Installation
Installing the Tune
Uninstalling the Tune
Operating the
HD
GT
More
Information
4. Highlight Uninstall Device (right buttons).
5. SELECT the highlighted option (bottom left button).
6. Read the disclaimer and press the top right button to Agree and continue.
‣ If you Disagree, press the bottom left button; this will end the tune installation.
‣ This is the last point at which you can safely exit the uninstall process.
7. The ECM Tuner will build the file. ‣ This process if fast; is
should take about one minute.
‣ The ECM Tuner will show a percentage counter to track its progress.
‣ Do NOT interrupt the ECM Tuner.
Go Back MAIN MENU
UP
DOWNSELECT
Show Settings
Uninstall Device
Update Device Software
DISCLAIMERGo Back
agree
disagree
Are you the owner of thisvehicle, have you read the
disclaimer, and do you agreeto all of its terms and conditions?
This is the �nal opportunity to exit the download procedure by
pressing disagree.
BUILDING FILE 3%Setting...
Power/Econ Tune
Please waitDo Not Unplug
47
ECM TUNERIn
trod
uctio
nU
pdat
ing
Phys
ical
In
stal
latio
nIn
stal
ling
the
Tune
Uni
nsta
lling
th
e Tu
ne
Ope
ratin
g th
e H
DG
TM
ore
In
form
atio
n
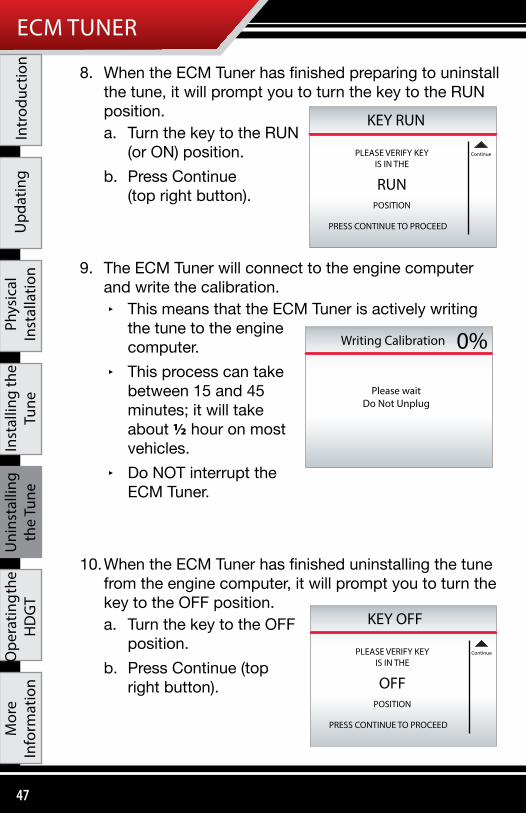
8. When the ECM Tuner has finished preparing to uninstall the tune, it will prompt you to turn the key to the RUN position.a. Turn the key to the RUN
(or ON) position.b. Press Continue
(top right button).
9. The ECM Tuner will connect to the engine computer and write the calibration.
‣ This means that the ECM Tuner is actively writing the tune to the engine computer.
‣ This process can take between 15 and 45 minutes; it will take about ½ hour on most vehicles.
‣ Do NOT interrupt the ECM Tuner.
10. When the ECM Tuner has finished uninstalling the tune from the engine computer, it will prompt you to turn the key to the OFF position.a. Turn the key to the OFF
position.b. Press Continue (top
right button).
PLEASE VERIFY KEYIS IN THE
KEY RUN
RUNPOSITION
PRESS CONTINUE TO PROCEED
Continue
Writing Calibration 0%
Please waitDo Not Unplug
PLEASE VERIFY KEYIS IN THE
KEY OFF
OFFPOSITION
PRESS CONTINUE TO PROCEED
Continue

48
ECM TUNERIntroduction
Updating
Physical Installation
Installing the Tune
Uninstalling the Tune
Operating the
HD
GT
More
Information
11. The ECM Tuner will display a countdown. ‣ Leave the key in the
OFF position. ‣ Do NOT interrupt the
ECM Tuner.
12. After the countdown, the ECM Tuner will prompt you to turn the key to the RUN position.a. Turn the key to the RUN
(or ON) position.a. Do NOT start the
engine.b. Press Continue (top
right button).
13. The ECM Tuner will complete the uninstall download.a. Press Continue (top right button).
Please Wait
Finishing Download
6Seconds
Leave Key OFF!DO NOT UNPLUG!!!
PLEASE VERIFY KEYIS IN THE
KEY RUN
RUNPOSITION
PRESS CONTINUE TO PROCEED
Continue
CONTINUE
DOWNLOADING
Download completedsuccesfully!

49
ECM TUNERIn
trod
uctio
nU
pdat
ing
Phys
ical
In
stal
latio
nIn
stal
ling
the
Tune
Uni
nsta
lling
th
e Tu
ne
Ope
ratin
g th
e H
DG
TM
ore
In
form
atio
n
14. The ECM Tuner will reboot and show the Main Menu screen.a. Test to make sure that your vehicle runs correctly.
◦ If you vehicle does not start, contact technical support.
b. Check the status of the ECM Tuner to make sure that it shows Unlocked.
‣ If the ECM Tuner freezes or generates an error message, contact technical support.
ECM
Tuner
Go Back MAIN MENU
UP
DOWNSELECT
Install Tuning
Special Features

50
ECM TUNERIntroduction
Updating
Physical Installation
Installing the Tune
Uninstalling the Tune
Operating the
HD
GT
More
Information
Operating the ECM TunerMenu and Feature SetupThis section is a comprehensive explanation of the options available on the Main Menu. It includes detailed instructions for features that require setup.
Install TuningInstall the ECM Tuner tune to your vehicle engine.
MAIN MENUGo Back
Select
up
DOWN
Install Tuning
Special Features
User Options
Vehicle Settings
Vehicle Diagnostics
Show Settings
Uninstall Device
Update Device Software
Change Vehicle/Engine
NOTE: From the Main Menu, use the right buttons to scroll through the list. The bottom left button will SELECT the highlighted option and the top left button will Go Back to the Main Menu.
IMPORTANT NOTE: This step actively reprograms the engine computer (ECM/ECU); therefore, it is very important to be fully informed and prepared before beginning the tune installation.

51
ECM TUNERIn
trod
uctio
nU
pdat
ing
Phys
ical
In
stal
latio
nIn
stal
ling
the
Tune
Uni
nsta
lling
th
e Tu
ne
Ope
ratin
g th
e H
DG
TM
ore
In
form
atio
n
Special Features
To access the Special Features on the ECM Tuner:1. Turn the key to the RUN (or ON) position.
‣ Do NOT start the engine.2. Go to the Main Menu (top left button).3. Choose Special Features.
a. Use the buttons on the right to scroll up and down the Main Menu and highlight Special Features.
b. Press the bottom left button to SELECT the highlighted option.
4. Verify that the key is in the RUN position.a. Press Continue (top right button).
5. The ECM Tuner will gather data from your vehicle. ‣ Do NOT interrupt this process. ‣ Do not disconnect the ECM Tuner or cycle the key.
6. Once the ECM Tuner has finished gathering data from your vehicle, it will display the Special Features screen.
‣ The screen will change depending on which features are available for your vehicle.
‣ It will look similar to the illustration below:
The special features described in this section are not available for every vehicle. If a feature is available for a vehicle, then it will appear in the Special Features menu on the ECM Tuner. In order to access the Special Features, the correct vehicle application must be selected on the ECM Tuner; the special features list will change based on the vehicle that has been selected.
SPECIAL FEATURESGo Back
SELECT
UP
DOWN
Current Original
Speed Limiter 74 75Cruise Low 15 30Cruise High 74 73Idle Timer 0 0Modifying these features will lock device
to this vehicle. Unlock by returning to original settings.
Current refers to the value that is currently programed into the engine computer.Original refers to the stock vehicle setting.To modify the current programmed value for any of the available special features highlight the special feature using the right scroll buttons and hit select.

52
ECM TUNERIntroduction
Updating
Physical Installation
Installing the Tune
Uninstalling the Tune
Operating the
HD
GT
More
Information
Speed LimiterAdjust top speed available on the vehicle.
Cruise LowSet the lowest speed at which the cruise control can be set.
Cruise HighSet the highest speed at which the cruise control can be set.
Idle Timer(Cat® Only)Set the maximum amount of time that the vehicle is allowed to run at idle before the engine is automatically shut off.
How to Adjust Special Features1. Access the Special Features as described on page
51.
2. Highlight the feature that you want to change (right buttons).
3. SELECT the highlighted feature (bottom left button).
4. Change the value (right buttons).
5. Save the change by pressing SELECT (bottom left button).
‣ If you do not want to save the change, press Go Back (top left button).
Fuel Economy Tip: Limiting the top speed can dramatically reduce fuel consumption; even dropping down by 1-2 mph will have an effect.
Fuel Economy Tip: Reduce idle time to a minimum to save money and conserve fuel.

53
ECM TUNERIn
trod
uctio
nU
pdat
ing
Phys
ical
In
stal
latio
nIn
stal
ling
the
Tune
Uni
nsta
lling
th
e Tu
ne
Ope
ratin
g th
e H
DG
TM
ore
In
form
atio
n
User OptionsSet personal preferences on the ECM Tuner.
Adjust BacklightAdjust the brightness of the screen; separate settings are available for day and night modes.
1. Go to the Main Menu (top left button).
2. Highlight User Options (right buttons).
3. SELECT the highlighted option (bottom left button).
4. Highlight Adjust Backlight (right buttons).
5. SELECT the highlighted option (bottom left button).
6. Highlight the theme you wish to adjust (right buttons).
‣ The screen will display the highlighted mode. ‣ The current backlight setting for the highlighted
mode will be displayed at the top of the screen.
7. SELECT the highlighted mode (bottom left button).
Go Back
UP
DOWNSELECT
MAIN MENU
Special Features
User Options
Vehicle Settings
Go Back
UP
DOWNSELECT
USER OPTIONS
Adjust Backlight
Set Background Theme
Go Back
DOWNSELECT
BACKLIGHTBacklight level: 100%
Day Theme
Night Theme

54
ECM TUNERIntroduction
Updating
Physical Installation
Installing the Tune
Uninstalling the Tune
Operating the
HD
GT
More
Information
8. Choose the desired backlight percentage (right buttons).
‣ The screen brightness will change to demonstrate the backlight percentage option that is displayed.
‣ It is possible to exit without changing the setting. To exit, press Go Back (top left button).
9. To set the currently displayed backlight percentage, press SELECT (bottom left button).
‣ The ECM Tuner will automatically return to the previous screen.
Set Background ThemeChange the color theme; separate settings are available for day and night modes. Choose from eight preset color themes or create your own customized color theme.
Selecting a Color Theme1. Go to the Main Menu (top left button).
2. Highlight User Options (right buttons).
3. SELECT the highlighted option (bottom left button).
4. Highlight Set Background Theme (right buttons).
5. SELECT the highlighted option (bottom left button).
Go Back
DOWNSELECT
DAY THEME
Backlight level: 100%
Go Back
UP
DOWNSELECT
MAIN MENU
Special Features
User Options
Vehicle Settings
Go Back
UP
DOWNSELECT
USER OPTIONS
Adjust Backlight
Set Background Theme
Bully Dog SENSOR Settings

55
ECM TUNERIn
trod
uctio
nU
pdat
ing
Phys
ical
In
stal
latio
nIn
stal
ling
the
Tune
Uni
nsta
lling
th
e Tu
ne
Ope
ratin
g th
e H
DG
TM
ore
In
form
atio
n
6. Highlight the mode you wish to adjust (right buttons). ‣ The screen will display highlighted mode. ‣ The current color theme for the highlighted mode
will be displayed at the top of the screen.
7. SELECT the highlighted mode (bottom left button).
8. Highlight the desired color theme. ‣ The screen will display the highlighted color theme.
9. SELECT the highlighted theme (bottom left button). ‣ If a preset color theme is selected, the ECM Tuner
will automatically return to the previous screen. ‣ Additional steps are required to set a customized
theme, see the next section.
Go Back
UP
SELECT
COLOR THEMESSpiderNeg
Day Theme
Night Theme
Go Back
UP
DOWNSELECT
COLOR THEMESRedlight
Day Theme
Night Theme
THEMEGo Back
Select
up
DOWN
Redlight
Bluelight
THEMEGo Back
Select
up
DOWN
Redlight
Bluelight
Greenlight
THEMEGo Back
Select
up
DOWN
Bluelight
Greenlight
Hyperblue
THEMEGo Back
Select
up
DOWN
Greenlight
Hyperblue
GreenNeg
THEMEGo Back
Select
up
DOWN
Hyperblue
GreenNeg
RedNeg
THEMEGo Back
Select
up
DOWN
GreenNeg
RedNeg
MonoNeg
THEMEGo Back
Select
up
DOWN
MonoNeg
SpiderNeg
Custom
THEMEGo Back
Select
up
DOWN
RedNeg
MonoNeg
SpiderNeg

56
ECM TUNERIntroduction
Updating
Physical Installation
Installing the Tune
Uninstalling the Tune
Operating the
HD
GT
More
Information
Creating a Custom Color Theme1. Follow the steps listed in the previous section to select
a custom background color theme.
2. Change the background color (right buttons). ‣ The screen with display a preview of each color
option.
3. To set the currently displayed color and advance to the next screen, press SELECT (bottom left button).
‣ It is possible to exit without changing the setting. To exit, press Go Back (top left button).
4. Change the foreground color (right buttons). ‣ The screen will display a preview of each color
option. ‣ The foreground color affects the text and directional
arrows on the screen.
5. To set the currently displayed color and advance to the next screen, press SELECT (bottom left button).
‣ It is possible to exit without changing the setting. To exit, press Go Back (top left button).
CUSTOM THEMEGo Back
SELECT BACKGROUND COLOR
UP
DOWN
Use arrows to changebackground color:
DARK BLUE
CUSTOM THEMEGo Back
SELECT FOREGROUND COLOR
UP
DOWN
Use arrows to changeforeground color:
GRAY

57
ECM TUNERIn
trod
uctio
nU
pdat
ing
Phys
ical
In
stal
latio
nIn
stal
ling
the
Tune
Uni
nsta
lling
th
e Tu
ne
Ope
ratin
g th
e H
DG
TM
ore
In
form
atio
n
6. Change the border color. ‣ The screen will display a preview of each color
option.7. To set the currently displayed color and advance to the
next screen, press SELECT (bottom left button). ‣ The ECM Tuner will go back to the background color
(step 2) and the cycle will continue until you exit the CUSTOM THEME menu.
8. To exit, press Go Back (top left button).
CUSTOM THEMEGo Back
SELECT BORDER COLOR
UP
DOWN
Use arrows to changeborder color:
DARK GRAY
If a color has been selected for one option (background, foreground or border), it will not be available for the other options. For example: If the background is green, then green will not be displayed for the other options until the background is changed to a different color.
58
ECM TUNERIntroduction
Updating
Physical Installation
Installing the Tune
Uninstalling the Tune
Operating the
HD
GT
More
Information
Administrator Password
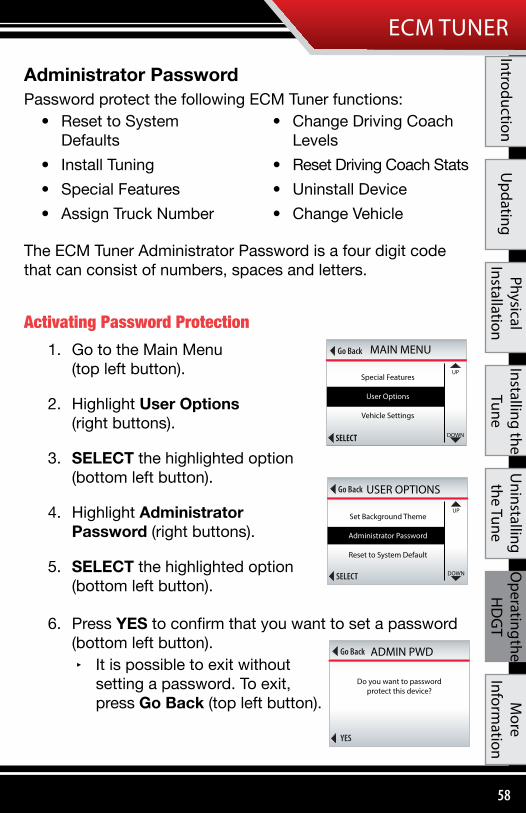
The ECM Tuner Administrator Password is a four digit code that can consist of numbers, spaces and letters.
Activating Password Protection1. Go to the Main Menu
(top left button).
2. Highlight User Options (right buttons).
3. SELECT the highlighted option (bottom left button).
4. Highlight Administrator Password (right buttons).
5. SELECT the highlighted option (bottom left button).
6. Press YES to confirm that you want to set a password (bottom left button).
‣ It is possible to exit without setting a password. To exit, press Go Back (top left button).
Password protect the following ECM Tuner functions:• Reset to System
Defaults• Install Tuning• Special Features• Assign Truck Number
• Change Driving Coach Levels
• Reset Driving Coach Stats• Uninstall Device• Change Vehicle
Go Back
UP
DOWNSELECT
MAIN MENU
Special Features
User Options
Vehicle Settings
Go Back
UP
DOWNSELECT
USER OPTIONS
Set Background Theme
Administrator Password
Reset to System Default
Go Back
YES
ADMIN PWD
Do you want to passwordprotect this device?

59
ECM TUNERIn
trod
uctio
nU
pdat
ing
Phys
ical
In
stal
latio
nIn
stal
ling
the
Tune
Uni
nsta
lling
th
e Tu
ne
Ope
ratin
g th
e H
DG
TM
ore
In
form
atio
n
7. Enter the Administrator Password. ‣ To change the digit currently highlighted by the
cursor, use the buttons on the right. ‣ To move the cursor to the right, press MOVE
CURSOR (bottom left button). If you need to correct a digit to the left of the cursor, press the button repeatedly until it cycles back to correct digit.
8. Press ENTER (top left button).
9. Confirm the password by entering it into the ECM Tuner a second time.
10. Press ENTER (top left button).
11. The ECM Tuner will display a screen confirming that the Administrator Password has been set.
12. Press Go Back (top left button).
ENTER
UP
DOWNMOVE CURSOR
ADMIN PWD
1 1 1 1
If the passwords do not match, the Administrator Password will not be set.
‣ Press Go Back (top left button). ‣ Try again, beginning with step 4.

60
ECM TUNERIntroduction
Updating
Physical Installation
Installing the Tune
Uninstalling the Tune
Operating the
HD
GT
More
Information
Disabling Password Protection1. Go to the Main Menu
(top left button).
2. Highlight User Options (right buttons).
3. SELECT the highlighted option (bottom left button).
4. Highlight Administrator Password (right buttons).
5. SELECT the highlighted option (bottom left button).
6. Press YES to confirm that you want to disable password protection (bottom left button).
7. Enter the Administrator Password. ‣ To change the digit currently highlighted by the
cursor, use the buttons on the right. ‣ To move the cursor to the right, press MOVE
CURSOR (bottom left button). If you need to correct a digit to the left of the cursor, press the button repeatedly until it cycles back to correct digit.
8. Press ENTER (top left button).
9. The ECM Tuner will display a screen confirming that the Administrator Password has been removed.
10. Press Go Back (top left button).
Go Back
UP
DOWNSELECT
MAIN MENU
Special Features
User Options
Vehicle Settings
Go Back
UP
DOWNSELECT
USER OPTIONS
Set Background Theme
Administrator Password
Reset to System Default
Go Back
YES
ADMIN PWD
Do you want to disable thepassword protection?
ENTER
UP
DOWNMOVE CURSOR
ADMIN PWD
1 1 1 1
Go Back ADMIN PWD
Administrator rights
are now unlocked.
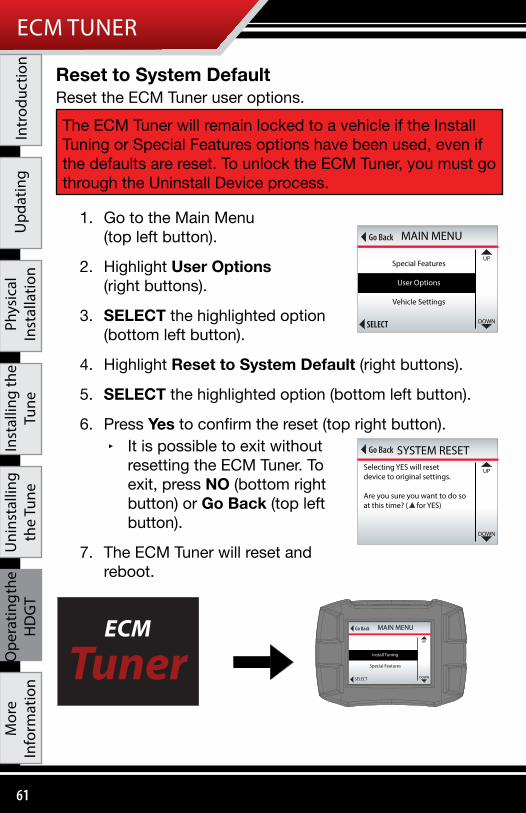
61
ECM TUNERIn
trod
uctio
nU
pdat
ing
Phys
ical
In
stal
latio
nIn
stal
ling
the
Tune
Uni
nsta
lling
th
e Tu
ne
Ope
ratin
g th
e H
DG
TM
ore
In
form
atio
n
Reset to System DefaultReset the ECM Tuner user options.
1. Go to the Main Menu (top left button).
2. Highlight User Options (right buttons).
3. SELECT the highlighted option (bottom left button).
4. Highlight Reset to System Default (right buttons).
5. SELECT the highlighted option (bottom left button).
6. Press Yes to confirm the reset (top right button). ‣ It is possible to exit without
resetting the ECM Tuner. To exit, press NO (bottom right button) or Go Back (top left button).
7. The ECM Tuner will reset and reboot.
The ECM Tuner will remain locked to a vehicle if the Install Tuning or Special Features options have been used, even if the defaults are reset. To unlock the ECM Tuner, you must go through the Uninstall Device process.
Go Back
UP
DOWNSELECT
MAIN MENU
Special Features
User Options
Vehicle Settings
Go Back
UP
DOWN
SYSTEM RESETSelecting YES will resetdevice to original settings.
Are you sure you want to do soat this time? ( for YES)
ECM
TunerGo Back MAIN MENU
UP
DOWNSELECT
Install Tuning
Special Features

62
ECM TUNERIntroduction
Updating
Physical Installation
Installing the Tune
Uninstalling the Tune
Operating the
HD
GT
More
Information
Vehicle SettingsChange communication protocol settings.
Vehicle DiagnosticsRead and erase Diagnostic Trouble Codes (DTCs) from the engine computer. (The tune does not have to be installed to use this function of the ECM Tuner.)To Read DTCs:
1. Go to the Main Menu (top left button).
2. Highlight Vehicle Diagnostics (right button).
3. SELECT the highlighted option (bottom left button).
4. The ECM Tuner will check for DTCs. ‣ If DTCs are detected, the ECM Tuner will display
them on the screen. Keep reading for more information about what to do if DTCs are detected..
‣ If no DTCs are found, the ECM Tuner will display a message that no codes are present.
‣ If the ECM Tuner reports an “Error reading codes,” contact technical support.
5. To exit, press Go Back (top left button).What to do if DTCs are detected:
• Write down the code number and any description that is displayed.
• It is a good idea to discuss any codes that are detected with an OEM certified mechanic.
Go Back
UP
DOWNSELECT
MAIN MENU
Vehicle Settings
Vehicle Diagnostics
Show Settings
DIAGNOSTICSGo Back
SELECT
UP
DOWN
13 Diagnostic codes found:PID:102 FMI: 4 activeLow Voltage Detected at boost pressure sensor
SID:17 FMI: 3 activeUnknown Diagnostic code
PID:94 FMI: 4 activeFuel Delievery Pressure sensor

63
ECM TUNERIn
trod
uctio
nU
pdat
ing
Phys
ical
In
stal
latio
nIn
stal
ling
the
Tune
Uni
nsta
lling
th
e Tu
ne
Ope
ratin
g th
e H
DG
TM
ore
In
form
atio
n
• A helpful website for looking up DTC codes: http://engine-codes.com
• You can also search for information about DTC codes with your favorite search engine.
Show SettingsView ECM Tuner and vehicle information. See “Checking GT Status” section for more information about checking the ECM Tuner status to determine if the unit has been locked to a vehicle.
Uninstall DeviceBegin the process of uninstalling the ECM Tuner tune from the engine computer.
IMPORTANT NOTE: Most DTCs indicate a problem with the engine, not the ECM Tuner. To determine if the ECM Tuner is causing a DTC, follow these steps:
1. Uninstall the tune.2. Drive the vehicle for about one week.
‣ If the DTC comes back during this time, there is a problem with your vehicle and you should contact an OEM certified mechanic.
‣ If the DTC doesn’t come back during this time, proceed to the next step.
3. Reinstall the tune.4. Drive the vehicle for about one week.
‣ If the DTC comes back while the tune is reinstalled, contact Bully Dog technical support.
IMPORTANT NOTE: This step actively reprograms the engine computer (ECM/ECU); therefore, it is very important to be fully informed and prepared before beginning the uninstall process.

64
ECM TUNERIntroduction
Updating
Physical Installation
Installing the Tune
Uninstalling the Tune
Operating the
HD
GT
More
Information
Update Device SoftwareComplete the update process by transferring files from the microSD memory card to the ECM Tuner.
Change Vehicle/EngineSpecify the vehicle engine type.
To Change the Vehicle/Engine:1. Go to the Main Menu
(top left button).2. Highlight Change Vehicle/Engine
(right buttons).3. SELECT the highlighted option
(bottom left button).4. Highlight the correct vehicle/engine
type (right buttons).5. SELECT the highlighted option
(bottom left button).6. Highlight the correct engine type/
year (right buttons).7. SELECT the highlighted option (bottom left button).8. Press YES to confirm the file and
continue (top right button). ‣ To exit without changing the
vehicle type, press NO (bottom right button) or Go Back (top left button).
9. The ECM Tuner will load the vehicle files and reboot. ‣ Do NOT interrupt the ECM Tuner during this
process.
IMPORTANT NOTE: The correct vehicle MUST be selected, or none of the ECM Tuner functions will work properly.
MAIN MENUGo Back
SELECT
UPUpdate Device Software
Change Vehicle/Engine
VEHICLESGo Back
Select
up
DOWN
Caterpillar
CUMMINS
DETROIT
PACCAR
Go Back
NO
YES
XXXXXXXXXXXXXChange Vehicle to:

65
ECM TUNERIn
trod
uctio
nU
pdat
ing
Phys
ical
In
stal
latio
nIn
stal
ling
the
Tune
Uni
nsta
lling
th
e Tu
ne
Ope
ratin
g th
e H
DG
TM
ore
In
form
atio
n
More InformationUSB ModeWhen you connect the ECM Tuner to a computer via USB cable, it enters USB mode.
In order to use the Update Agent, keep the ECM Tuner in USB Mode.
If you want to use your computer to power the ECM Tuner and access some of the functions without connecting it to a vehicle, you can exit USB mode by pressing the top left button as shown in the illustration below:
USB source:SD PRESENTCard DetectedUSB MODEPress Top Left key to exit USB mode

66
ECM TUNERIntroduction
Updating
Physical Installation
Installing the Tune
Uninstalling the Tune
Operating the
HD
GT
More
Information
Contacting Technical SupportTechnical support is open Monday-Friday 8 a.m. – 5 p.m., Mountain Standard Time.
Reduced level services are available for emergencies after hours.
The phone number to contact the heavy duty technical support team is (888) 844-6260.
You should have all of the following items available when contacting technical support:
• Your ECM Tuner• Your vehicle• A computer with Internet access
Checking GT StatusThere are two different aspects of the ECM Tuner that can affect whether or not it can be installed on a vehicle.
1. If the tune on the ECM Tuner has been installed on a vehicle, it is locked and cannot be installed until it has been uninstalled from the original vehicle.
2. If the speed limiter has been adjusted with the ECM Tuner Special Features, it is locked and cannot be installed on another vehicle until it has been uninstalled from the original vehicle.
To Check the Status of the ECM Tuner:1. Go to the Main Menu (top left button).2. Highlight Show Settings (right buttons).3. SELECT the highlighted option (bottom left button).4. The status of the ECM Tuner is listed on the top line of
the first screen.

67
ECM TUNERIn
trod
uctio
nU
pdat
ing
Phys
ical
In
stal
latio
nIn
stal
ling
the
Tune
Uni
nsta
lling
th
e Tu
ne
Ope
ratin
g th
e H
DG
TM
ore
In
form
atio
n
Troubleshooting
SD Card Not Recognized1. Make sure that the microSD memory card is inserted
correctly in the ECM Tuner.2. If it is already installed, remove it and then reinstall it.3. If the error persist, contact technical support
Vehicle Does Not Start1. Uninstall the tune.2. Try to start the vehicle.3. If the vehicle still does not start, contact technical
support.
NOTE: The Show Settings screens will also indicate if the ECM Tuner is locked because the tune has been installed and/or a Special Feature has been used. The screens are different for each vehicle/engine type. To navigate through the Show Settings screens, press UP (top right button) and DOWN (bottom right button).
Go Back GT SYSTEM INFOGT status:Serial #:HW version:Memory:SWa version:SWb version:Tuning Version:Application:Admin. Password:Monitoring Type:Sensor Dock:
Unlocked from Vehicle#################1.5######1.0.5.074.0.3 CUMMINS EGRCUMMINS EGR ‘03 - ’07DisabledUnknownNot Connected
DOWN

68
ECM TUNER
NOTES

OWNER’S MANUALNot legal for sale or use on pollution controlled vehicles based and registered in California.
AFTERMARKET TURBOCHARGERS ⁃ Quicker Spool Up over Stock ⁃ Improve Horsepower and Fuel Economy ⁃ Increase Boost Pressure 6-10 lbs. over Stock Turbos ⁃ Cartridge 100% Balanced for Fast Spool and Longer Life ⁃ No Core Charge ⁃ One Year Warranty
CERAMIC COATED EXHAUST MANIFOLDS ⁃ 18% More Airflow Over Stock ⁃ Two Year Warranty ⁃ EGT Temperatures 300° Cooler vs. Stock ⁃ Improve Fuel Economy ⁃ Additional HP to the Rear Wheels ⁃ Hand Ported and Polished ⁃ Ceramic Coated Finish
Doc. #46511 v1.0