owner & installation manual - solar hot water parts · mounted open circuit or closed circuit...
TRANSCRIPT

www.conergy.com.au
Conergy Active System
Open and Closed Split Systems
Owner & Installation Manual

EN
GLIS
H
Conergy AS Owners Manual�
Owners Information
The environmental benefits
Why Conergy?
What is a Split System?
System components
Your Conergy AS model number
System operation
Important safety information
What should I do during holidays?
Troubleshooting
What should I check before making a service call?
System Maintenance
Pressure limiting valve
Draining the storage tank
Important Installation Notes
Roof location selection
Supplementary heat sources
Collector Installation
Installing the collectors
Connections at the Storage Tank
Removing the hot scoop from the storage tank
Connections for open circuit systems with a PM-600
Connections for closed circuit systems
Electrical Connections to the System
Electrical connections to the system
Electrical connection for gas AES systems
Electrical installation for a PM-600
Comissioning & Customer Handover
Warranty
1
1.1
1.2
1.3
1.4
1.5
1.6
1.7
1.8
2
2.1
3
3.1
3.2
4
4.1
4.2
5
5.1
6
6.1
6.2
6.3
7
7.1
7.2
7.3
8
9
3
3
3
3
5
7
7
8
8
9
9
11
11
11
13
13
13
14
14
18
18
19
20
23
23
24
24
27
28
Table of Contents

EN
GLIS
H
Conergy AS Owners Manual �
1 Owners Information
Congratulations on buying one of the most advanced solar hot water heaters in the world. As the
owner of a Conergy solar water heater you may have some questions about the system and how
it operates. Your solar water heater model is commonly referred to as an Active, Split or Ground
Mounted open circuit or closed circuit system and is one of the most efficient solar water heater
types available.
The environmental benefitsA Conergy Solar Water heater is an excellent and economic energy solution as, by using the sun’s
heat for heating water, we cut down on the amount of fossil fuels burnt to supply electricity to do the
same thing.
Any time you use solar energy to offset the amount of fossil fuels that are burned, you contribute to
everyone’s health and welfare. Operating one solar water heater instead of an electric water heater
saves the equivalent of 1400 litres of oil every year and reduces carbon dioxide emissions by up to
3.4 tonnes per year and sulphur dioxide which contributes to acid rain emissions by more than 6kg.*
Multiply those emissions per household by all the homes in your neighbourhood, town and state and
the benefits of solar for our environment are enormous.
Why Conergy?Conergy offers Australia’s largest range of renewable energy products and our company operates
in 25 countries on 5 continents. Our products are used in hundreds of thousands of homes for Hot
Water and Solar Electricity worldwide and we offer the leading products in these technologies.
To sell solar water heaters in Australia, or achieve any of the state or Federal Government rebates, the
products must comply with the rigorous Australian Standards for hot water and solar hot water. Our
products comply with all of these standards. The Federal Government Renewable Energy Certificate
program, called RECs, is an indication of solar efficiency. If you compare any of the Conergy products
with an equal competitor model, you will find that Conergy achieves more RECs than any of our
competitors.
What is a Split System?A Split System (also referred to as an Active system) is a system where the heated water in the solar
collectors is circulated by a pump, drawing cold water from the storage tank or heat exchanger,
pushing it through the collectors and back to the tank or heat exchanger as heated water. The
location of the tank can be up to 20 meters from the collectors. The pump requires electricity, but
uses a very small proportion of power in comparison to the heat collected by the system. The power
consumed is no greater than 28 watts.
There are two types of Conergy active solar water heaters. The operating methods and instructions
are similar for both. The two types are; “Open Circuit System” & “Closed Circuit System”:
1 Owners Information
1.1
1.2
1.3
* Source: Australian Greenhouse Office

EN
GLIS
H
Conergy AS Owners Manual�
What is an open circuit system?
An Open Circuit System is one where the water used in the household circulates through the solar
collector panels. The circulating pump draws colder water from the lower section of the container
and circulates this water through the collectors before returning it to the container at a point
higher than the point of draw-off thus transferring solar energy to the storage tank. This system
type is used in locations where the ambient temperature never falls below freezing point (0°C or
32°F) and where the water quality is good – less than 600 ppm Total Dissolved Solids (TDS).
What is a closed circuit system?
In this system the pump circulates the transfer fluid around the collector circuit. The water within the
tank circulates via thermosyphon, from the cold bottom of the tank, through the heat exchanger,
where it is heated before returning the container at a point higher than the point of the cold water
inlet.
Open Circuit System
Closed Circuit System
1.3.1
1.3.2
1 Owners Information
EN
GLIS
H
Conergy AS Owners Manual �
System componentsThe main components of your solar water heater are the household water storage tank, the solar
collector(s), circulation pump module & controller, heat exchange module (closed circuit models only)
and the Ancillary Energy Support (AES) System.
1 Owners Information
1.4
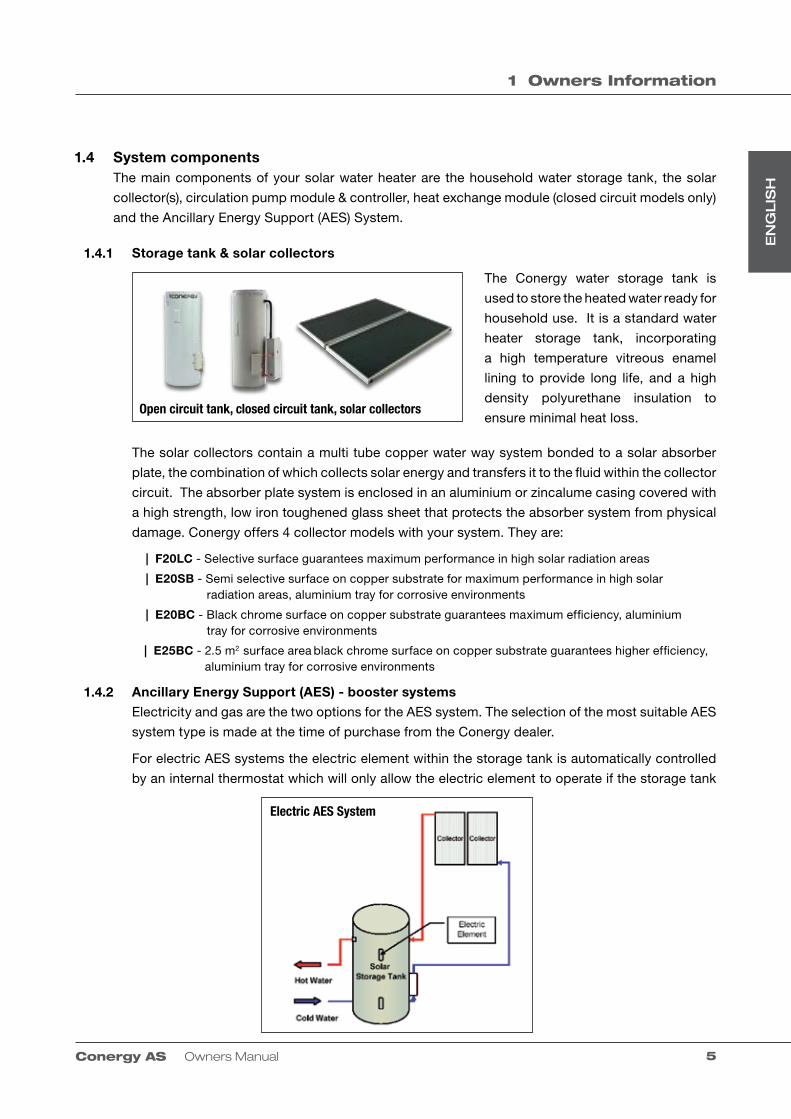
Storage tank & solar collectors
The solar collectors contain a multi tube copper water way system bonded to a solar absorber
plate, the combination of which collects solar energy and transfers it to the fluid within the collector
circuit. The absorber plate system is enclosed in an aluminium or zincalume casing covered with
a high strength, low iron toughened glass sheet that protects the absorber system from physical
damage. Conergy offers 4 collector models with your system. They are:
Ancillary Energy Support (AES) - booster systems
Electricity and gas are the two options for the AES system. The selection of the most suitable AES
system type is made at the time of purchase from the Conergy dealer.
For electric AES systems the electric element within the storage tank is automatically controlled
by an internal thermostat which will only allow the electric element to operate if the storage tank
1.4.1
1.4.2
Open circuit tank, closed circuit tank, solar collectors
Electric AES System
The Conergy water storage tank is
used to store the heated water ready for
household use. It is a standard water
heater storage tank, incorporating
a high temperature vitreous enamel
lining to provide long life, and a high
density polyurethane insulation to
ensure minimal heat loss.
| F20LC - Selective surface guarantees maximum performance in high solar radiation areas
| E20SB - Semi selective surface on copper substrate for maximum performance in high solar radiation areas, aluminium tray for corrosive environments
| E20BC - Black chrome surface on copper substrate guarantees maximum efficiency, aluminium tray for corrosive environments
| E25BC - 2.5 m2 surface area black chrome surface on copper substrate guarantees higher efficiency, aluminium tray for corrosive environments

EN
GLIS
H
Conergy AS Owners Manual�
1 Owners Information
Detecting availability of useful solar energy in the solar collectors. When the temperature of the
solar collector is 6°C higher than the storage tank temperature, the circulation pump is initiated.
If the difference in temperature falls to less than 4°C the circulation pump is stopped.
Controlling maximum storage tank temperature. If the storage tank temperature reaches 70°C,
the circulation pump is stopped to prevent excessive temperatures in the storage tank.
Collector maximum temperature limiting. If for any reason the collector temperature reaches
200°C, circulation is stopped to prevent potential damage to the system components.
Collector Temperature control. During periods when the circulation pump is idle, and if the
water temperature falls below 60°C and will only consume electricity until the water temperature
is increased to 60°C then turns off again.
For gas AES systems a continuous flow gas water heater is fitted adjacent the storage tank in
series with the hot water supply from the storage tank and the household hot water pipe work
system. As the hot water from the solar storage tank passes through the gas heater its temperature
is automatically monitored by the gas heater. If the temperature is below 60°C the gas heater
will add the energy required to deliver hot water of at least 60°C. When the water storage tank
temperature is above 60°C the gas heater will not ignite.
Circulation pump
The circulation pump is a simple device used to circulate the water in the collector circuit. This, in
turn, enables solar energy from the collectors to be transferred to the storage tank location. The
pump consumes only a very small amount of electrical energy (less than 28 watts) to perform this
task. The circulation pump has an integral ‘non-return valve’ to prevent solar energy from reverse
cycling back through the storage tank to the collectors at night.
The electronic control device used to control the circulation pump has a complex set of activities.
It is the brain of the system and ensures optimum system efficiency and safety. The basic functions
are:
1.4.3
1.
2.
3.
4.
Gas AES System
Variable Categories
System Type AS Active Systems (pumped)
HP Heat Pump System Type
TS Thermosiphon, TS
Nominal Volume Nominal Storage Volume
Collector Area 2, 2.5, 4, 5, 6 Nominal Collector Area
Tank Type O Open Circuit
C Closed Circuit
Booster E Electric
G Gas
XX Booster Rating (kWx10 or Lpm)
Tank Material /Designation
V Vitreous Enamel
S Stainless Steel
M Millenium Tank
Collector Type E20SB, E20BC, E25BC or F20LC

EN
GLIS
H
Conergy AS Owners Manual �
Your Conergy Split System model number
System operationA Conergy solar water heater is designed for fully automatic operation, so there is nothing you need
to do for day to day system operation. If the AES System has been fitted with a remote isolator switch
or time-clock, you may make the decision when and if Ancillary Energy Support is permitted. As a
guide you may like to isolate the AES System during the summer months and you may use a time clock
to permit boosting after sunset or any other combination, which suits your usage pattern. Careful use
of these options can further reduce your energy use for hot water supply to the household.
collector temperature rises above 190°C, the circulation pump will be initiated to reduce the
collector temperature to below 185°C. This is to protect the collector from prolonged periods
of extreme temperature.
System Cooling. During the collector circuit temperature control operation, if the storage tank
water temperature has risen above the set 70°C maximum, the controller will initiate the pump
to reduce the excess tank temperature back to the set point of 70°C. This function is to ensure
water temperatures above 70°C are not stored for prolonged periods in the storage tank.
5.
1.5
1.6
1 Owners Information
XX NNN / N / X / XNN / X / XNNXX
System Type - Nominal Volume - Collector Area - Tank Type - Booster - Tank Material - Collector Type
Variable Categories
System Type AS Active Systems (pumped)
HP Heat Pump System Type
TS Thermosiphon, TS
Nominal Volume Nominal Storage Volume
Collector Area 2, 2.5, 4, 5, 6 Nominal Collector Area
Tank Type O Open Circuit
C Closed Circuit
Booster E Electric
G Gas
XX Booster Rating (kWx10 or Lpm)
Tank Material /Designation
V Vitreous Enamel
S Stainless Steel
M Millenium Tank
Collector Type E20SB, E20BC, E25BC or F20LC

EN
GLIS
H
Conergy AS Owners Manual�
1 Owners Information
Important safety information1.
2.
3.
1.7All water heaters have the ability to produce hot water very quickly. To reduce the risk of scald
injury, it is recommended that a temperature control valve be fitted to the hot water supply pipe
work. This valve should be checked at regular intervals to ensure its operation and settings
remain correct.
Please check that the pressure & temperature relief valve drain pipe is not located where it can
cause damage if hot water is discharged.
This water heater is not intended for use by young children or infirm persons without supervision.
Young children should always be supervised to ensure that they do not play with hot water taps
or the water heater.
If you are away for a period of time
If the system is not to be used for a period of a week or more during the summer months,
it is advisable to turn off the electricity supply to the booster and if practical cover the solar
collectors. If the solar collectors are not covered, there is a possibility that the pressure &
temperature relief valve in the storage tank may open and disperse small amounts of hot water
to reduce the storage tank temperature while you are away. This is a normal function and does
not harm the system.
Water discharge through the pressure valve
All Conergy solar water heaters will have either one or two pressure valves in the water pipe
work:
1. A Pressure & Temperature Relief Valve attached to the tank, and possibly;
2. A Cold Water Expansion Valve located in the cold water supply pipe work.
For solar water heaters that only have a Pressure & Temperature Relief Valve, it is normal for
a small water discharge to occur during the heating cycle of the system. This discharge is
water expanding due to the heating process. Normally the discharge will be less than 10 litres
per day. For systems that have both valves, the expansion discharge will occur from the Cold
Water Expansion Valve.
Hydrogen gas can accumulate!
If the hot water system is not used for two weeks or more, a quantity of highly flammable hydrogen
gas may accumulate in the water heater. To dissipate this gas safely, it is recommended that
a hot tap be turned on for several minutes at a sink, basin or bath. Do not use a dishwasher,
clothes washer or other appliance. During this procedure there must be no smoking, open
flame or any other electrical appliance operating nearby. If hydrogen is discharged through the
tap, it will probably make an unusual noise as with air escaping. Do not place hands or any part
of your body beneath the tap during this procedure.
1.7.1
1.7.2
1.7.3

EN
GLIS
H
Conergy AS Owners Manual �
What should I check before making a service call?If there is not enough hot water, it is recommended that the following points are considered before
making a service call. If after checking the following points the problem has not been identified,
please contact the Conergy distributor from whom you purchased the system.
2.1
� Troubleshooting
� Troubleshooting
It is important to know that there are no user serviceable components in the system, and as such,
it is recommended that no covers be removed and no adjustments made to the system settings by
anyone other than an authorised Conergy representative.
Low Solar Energy Input / Shading
If there have been prolonged periods of cloudy weather, or winter is approaching, it may be
necessary to reconsider the permitted AES allowance for time-clock controlled systems, turn
on the AES for systems with a booster isolation switch or turn on the gas supply to gas AES
models.
Often trees or other buildings can shade the solar collectors, or there can be a dirt build up on
the glass cover. Trees should be cut back if possible, or the system relocated if removal of the
shading is not possible, in the present location. If the glass is dirty, this should be cleaned with
any normal domestic glass cleaner.
Ancillary Energy Support (Booster System) not operating
For electric systems, the fuse, circuit breaker supplying the AES System should be checked.
If the time clock (where fitted) and the fuse or circuit breaker are operational and the water is
cold, you can turn the booster isolator on and off to see if the electricity meter speed changes. If
there is no change in speed, it indicates there may be a booster problem and a service call will be
necessary. It is important to remember – Do not open or adjust any electrical covers or devices
yourself.
For gas systems the gas and electric supplies to the gas heater should be checked to ensure they
are both on. If water temperature from the gas heater is below 60°C and both supplies are on and
the gas heater does not ignite there may be a problem and a service call will be necessary.
Excessive water discharge from the Valves?
If there is a discharge of more than 10 litres per day from any of the system’s valves, it indicates
there is a problem that requires a service call.
Are you using more hot water than you think?
Often the hot water usage of showers, washing machines and dishwashers is under estimated.
Review these appliances to determine if your daily usage is greater than the storage volume of
your water heater. Refer to the section “What system do I have?” to determine the storage volume
of your water heater. It is also advisable to inspect tap washers etc. for leakage and replace if
necessary.
2.1.1
2.1.2
2.1.3
2.1.4
EN
GLIS
H
Conergy AS Owners Manual10
� Troubleshooting
2.1.5 Water discharge from frost valve
If your system has a frost valve fitted it will be located at the bottom corner of the collector.
In temperatures that cause frost or freezing the valve will open and some water will discharge
from this valve. There is nothing that needs to be done to the valve or the system, it is operating
correctly. The water will stop discharging once the valve has warmed enough to close again,
usually as the frost clears.

EN
GLIS
H
Conergy AS Owners Manual 11
� System Maintenance
The Conergy system is designed so that there is little to do regarding system maintenance. Personally
inspecting or servicing the system is not recommended.
Should you decide to personally inspect the roof mounted solar collectors it is essential that you use
all safety devices required to ensure your safety. Glass cleaning usually occurs by natural rainfall.
However, if the installation is in an industrial (or similar) area with high levels of airborne particles
then a qualified person can clean the collector glass with normal window cleaning chemicals and
equipment. If rainwater collection occurs from the same roof on which the solar collectors are located,
extra care must be taken to avoid contamination if using chemical cleaning agents.
In the unusual case that the toughened glass collector covers are broken, Conergy does not advise
replacement of the glass. The entire panel should be replaced to maintain the performance and
integrity of the water heater. Replacement panels should be installed by a qualified person.
The lever on the tank relief valves should be operated at least every six months. Failure to do so may
result in failure of the tank. If water does not discharge freely from the valves they should be checked
by the local service agent. The relief valves and relief valve drain lines must not be blocked. Some
water may discharge during each heating cycle.
Every five years you should contact the local service agent to replace all safety valves to ensure
continued life and operational safety of the system. In locations where the potable water has a Total
Dissolved Solids (TDS) of greater than 600 ppm it is recommended to replace all safety valves every
3 years.
The high quality vitreous enamel lined low carbon steel tanks have a sacrificial anode for long tank
life. This anode should be inspected every few years and be replaced when it has worn out. As a
minimum it is recommended that the anode be changed every 5 years.
Pressure limiting valve
Where the water supply pressure is greater than 550 kPa, a 500 kPa pressure limiting valve must
be fitted to limit the supply pressure. As stated previously – personally servicing the system is NOT
recommended.
Draining the storage tank
All plumbing work should be carried out by a licensed tradesperson. To drain the water from the
storage tank the following procedure is to be followed:
1. Turn off and isolate the power supply to the electrical element.
2. Turn off the water supply to the water heater.
3. Release excess pressure from the tank by manually opening the pressure &
temperature relief valves.
3.1
3.2
� System Maintenance

EN
GLIS
H
Conergy AS Owners Manual1�
4. Disconnect the cold water supply pipe connection to the tank.
5. Fit a ½” flexible drain pipe to the cold connection on the tank. Place the open end of
the drain hose in a location where it is safe for the hot water to drain away from the
tank.
6. Manually open the pressure and temperature relief valve which will allow air into the tank. The
water within the tank will flow out via the flexible drain pipe fitted to the cold inlet connection.
Hold the valve open until the tank is empty.
To drain the open circuit collectors, disconnect the cold pipe from the bottom left of the collector
array.
NOTE: This process should not be applied to closed circuit systems.
To Flush the unit, repeat the filling and drawing processes at least once. If there is a need to clean the
waterways, an appropriate, potable water safe, cleaning fluid may be used by a qualified person, in
accordance with local regulations.

EN
GLIS
H
Conergy AS Owners Manual 1�
� Important Installation Notes
4.1
4.2
Do not commence an installation until you have satisfied yourself that all safety issues associated
with working on and lifting components onto a roof have been addressed. All work associated with
the installation must comply with local authority regulations including AS/NZS 3500.4.2, where these
installation instructions and local regulations are in conflict, local regulations must prevail.
Roof location selectionThere are six major factors to consider when selecting the solar water heater installation location;
1.
2.
3.
4.
5.
6.
Supplementary heat sourcesIf a supplementary heat source is connected to the storage tank, the maximum energy input can be
no more that 10 kW, including the electrical element. Where greater input is required, a pressure and
temperature relief valve with a higher kW rating shall be fitted to the storage tank.
Any supplementary heat source must be limited such that the maximum tank temperature is 80°C.
For the interconnecting details e.g. pipe work, of your specific model/configurations, please check
the assembly drawings in the following pages.
� Important Installation Notes
For optimum performance the solar collectors need to face the equator (in Southern hemisphere
this is north and in the Northern hemisphere this is South). Installations on angles of up to 45°
away from the equator do not have a major effect on the annual solar output. Consequently, roof
locations which face less than 45° away from the equator are acceptable. If the collectors are
installed with an east facing bias then the best solar input is achieved in the morning. If there is a
west facing bias the best solar input is in the afternoon.
Careful site inspection is required to ensure the selected location is not subjected to shading
from adjacent trees or buildings throughout the day, but particularly between 9am and 3pm - the
highest solar input times. Shadows are longer in winter than in summer, so a site that is free of
shadows from adjacent objects in summer may have some shadows in winter.
The storage tank should be located as close as possible to the location which uses the most hot
water, usually the bathroom or kitchen. This is to reduce energy losses which may occur if the pipe
work between the solar water heater and the point of use is too long.
The collectors should be located as close as possible to the storage tank location. This is to
reduce energy losses due to long pipe work between the collectors and storage tank. For optimum
performance the collectors should be no more than 20 m of pipe run from the tank. (40m total
- send and return).
To achieve optimum performance the collectors should be installed on a roof pitch of greater than
8° and less than 30°. If the roof pitch is less than 8°, the system will require a mounting frame to
increase the pitch. Installations below 8° do not circulate effectively and the collector glass will
not self clean during rainy periods.
The roof system must be carefully inspected to ensure it can support the systems weight once it
is filled with water. If the roof cannot support the load, additional bracing must be installed before
the solar water heater is installed.

EN
GLIS
H
Conergy AS Owners Manual1�
� Collector Installation
5.1
After selecting the solar collector
location, the final check before
installation is that the available roof
space is sufficient for the solar
collectors being installed.
The length up the roof must be at least
3 metres for all installations.
Please note: Roof areas smaller than the minimum measurements will make installation and
later service work more difficult.
Installing the collectorsThe procedure for solar collector installation is as follows:
Figure 3: Collector Installation Area
Figure 4: Collector Installation General Assembly
1 panel = 2000 mm2 panels = 3000 mm3 panels = 4000 mm
500500
500
500
3000 mm
System Roof space width required
1 panel 2000 mm
2 panel 3000 mm
3 panel 4000 mm
1. Mark a point for the bottom left corner of the collector installation. This point should be at least
500 mm up from the roof edge and 500 mm to the side of any obstruction or roof edge.
2. Place one end of the collector mounting rail (Detail D, 60-3028) adjacent to the location marked
in step 1, and laid horizontally across the roof to the right.
3. Locate two roof trusses which are under the collector mounting rail (as near as possible to the
outer edges of the rail). Clip two collector straps (Detail E, 60-4011) to the collector mounting
rail where the trusses pass under the mounting rail.
� Collector Installation

EN
GLIS
H
Conergy AS Owners Manual 1�
� Collector Installation
4. Adjust the mounting rail so that it is 15 – 20 mm higher (up the roof) on the right side, then
screw fix the collector straps to the roof trusses using the pre-punched holes.
5. Take the first solar collector and place it on the collector mounting rail, at the leftmost end.
For a single collector installation, go directly to step 8.
6. Loosely fit the two collector connectors (Detail B, 60-1002) to the two copper tube spigots on
the right side of collector.
7. Take the second collector and place it onto the right hand side of the collector mounting rail.
Now, slide collector toward the first collector until the two copper tube spigots of that collector
slide fully home into the collector connectors already fitted to the collector. Tighten the
compression nuts of the collector connector fittings (Detail B, 60-1002), taking care not to
twist the copper tubes of the collector. Make sure you use correctly sized spanners and that
the centre nut is held steady whilst the compressing nuts are tightened.
8. Move the collectors so that they are centrally located on the collector mounting rail.
9. Screw fix the collector rail to the collector/s using the screws supplied. (Detail E, 75-3047)
10. To fix the top of the collectors to the roof, take the remaining mounting straps (Detail G, 60-
4011) and place as centrally as possible at the top of each of the collectors with the strap fixing
ends pointing up the roof.
11. Screw fix the collector straps to the collector using the screws supplied. (Detail E, 75-3047)
12. Finally, screw fix the collector straps to the roof rafters to complete the collector mounting.
The following steps relate only to a 3 panel array:
14. Slide a Compression Plug assembly (Detail C, 60-1004) to the top left and bottom right
corners of the array. Tighten the assembly taking care not to twist the copper tubes of the
collector. Make sure you use correctly sized spanners and that the nut is held steady whilst the
compressing plug is tightened.
a. Loosely fit the two collector connectors (Detail B, 60-1002) to the two copper tube
spigots on the right side of the second collector.
b. Locate a roof truss which is under the third panel extension rail (Detail F, 60-3029), as
near as possible to the outer edge of the rail. Clip one collector strap (Detail E, 60-4011)
to the extension rail where the truss will pass under the extension rail.
c. Screw fix the extension rail to the two panel collector rail and second collector already
installed, using the self drilling screws supplied (Detail E, 75-3047) The extension rail is
provided with grooves and pilot holes for correct positioning.
d. Take the third collector and place it onto the right hand side of the extension rail.
Slide the collector toward the second collector until the two copper tube spigots of that
collector slide fully home into the collector connectors.
e. Tighten the compression nuts of the collector connector fittings (Detail B, 60-1002)
taking care not to twist the copper tubes of the collector. Make sure you use correctly
sized spanners and that the centre nut is held steady whilst the compressing nuts are
tightened.

EN
GLIS
H
Conergy AS Owners Manual1�
15. Assemble and install the Hot Connection Union assembly (Detail A) as follows:
16. Slide the 3/4” BSP Compression Union Assembly (Detail D, 60-1003) to the bottom left corner
connection of the array. Tighten the assembly taking care not to twist the copper tubes of the
collector. Make sure you use correctly sized spanners and that the nut is held steady whilst the
compressing union is tightened.
The collector array is now completed and ready for connection to the water heater system.
a. Take the temperature well (Detail A – 60-1072) and slide it onto the copper spigot at the
top right of the collector array. Tighten the assembly taking care not to twist the copper
tubes of the collector. Make sure you use correctly sized spanners and that the nut is held
steady whilst the compressing plug is tightened.
b. Apply thread tape or suitable sealant onto the 1/2” BSP thread of the Temperature Well.
(Detail A, 60-1074)
c. Insert the Temperature Well into the 1/2” BSP socket end of the Hot Connection Union
and tighten normally. Take care not to over tighten.
d. Apply thread tape or suitable sealant onto the 3/8” BSP thread of the Air Bleed Valve.
(Detail A, 60-1028)
e. Screw fit the Air Bleed Valve into the top 3/8” BSP socket and tighten.
f. Open the Air Bleed Valve by turning the knob on top anti-clockwise 11/2 turns from closed.
Detail A-1 (Closed Circuit Systems)Detail A (Open Circuit Systems)
60-1072 60-1028
60-1074
Detail B Detail C
60-1004
� Collector Installation

EN
GLIS
H
Conergy AS Owners Manual 1�
� Collector Installation
Detail F Detail G
Detail D Detail E
60-1003
60-3047
60-3028
60-3029
60-4011

EN
GLIS
H
Conergy AS Owners Manual1�
The Storage Tank is installed and connected to the plumbing installation as normal and detailed
in the Conergy installation instructions supplied with the water heater. The household plumbing
connections should be made to the tank socket fittings on the left side of the storage tank. This
leaves the right side fittings free for connection to the solar collector system.
Note: Installation of solar water heaters in Australia requires a tempering valve on the hot water
supply from the unit for correct installation and safe temperature regulation.
Removing the hot scoop from the storage tankUsing the Wire Hook device supplied (P/No 60-3020), remove the hot scoop from the outlet fitting
of the storage tank. This will not be required for all tanks. Please check the scoop orientation and
ensure it is pointing down. If it points up, please follow this procedure:
15-1012
� Connections at the Storage Tank
� Connections at the Storage Tank
6.1
Insert the hook end of the Wire Hook into the
outlet socket.
NB: - Have the open side of the hook facing down
on insertion.
Put the Wire Hook into the socket until the tee
section reaches the water heater case and can
go no further.
Gently pull back on the hook wire until you feel
the hook take hold of the hot scoop. Once the
hook has taken hold, pull back on the wire hook.
The hot scoop will be withdrawn from the water
heater. During the withdrawal process you will
notice that the scoop was facing upward, toward
the top of the water heater.
Once the hot scoop is withdrawn, discard it.
1.
2.
3.
4.
For Closed Circuit Systems, this procedure is now complete. Proceed to section 9.4. For Open
Circuit Systems, continue to the following step.
5. Reinsert the longer scoop (P/No 15-1012) into the outlet socket making sure that it is pointing
down. It may require some force.
Existing Hot
Scoop
60-3020
60-3020
Wire Hook
engaged
Pull out
existing Hot
Scoop

EN
GLIS
H
Conergy AS Owners Manual 1�
Connections for open circuit systems with a PM-600
1. Ensure that the pump module is installed in an
accessible position.
2. Apply thread tape or a suitable sealant to the
thread of the ¾” BSP to ½” compression union
(P/No 60-1029). Screw the union into the top
outlet) socket on the right side of the storage
tank. Fasten the Collector Hot Connection
(Section 8.0, Step 2) into the compression union.
3. Apply thread tape or a suitable sealant to the
large thread of the ¾” to ½” BSP brass fitting
(P/No 60-5066) and screw into the bottom (inlet)
socket, on the right side of the storage tank.
4. Take the PM-600 module and fasten a Gland
Union (P/No 60-1032) to the Ball Valve (P/No
35-8008) on the lower pump fitting and the
Check Valve (P/No 35-8009) on the upper pump
fitting.
5. Apply thread tape or a suitable sealant to one end of the ½” BSP brass union (P/No 60-5065)
and fasten it into the lower Gland Union attached to the Ball Valve.
5. Loosely attach one end of the 225mm Flexible Connector (P/No 60-1115) to the brass nipple on
the PM-600 module. Loosely attach the other end to the bottom (inlet) fitting of the storage
tank.
6. With the flexible connector loosely fitted, move the pump module into position on the storage
tank and fix in place with the self-drilling screws supplied (P/No 75-3047). Ensure the flexible
connector is not kinked in any way, and the pump module is vertical. Tighten the loose nuts on
the flexible connector.
7. Make the Collector Cold Connection (Chapter 8.0, Step 1) to the upper pump fitting of the PM-
600 module.
8. Open the Ball Valve (P/No 35-8008) by turning the screw slot until it is vertical.
9. Turn on the mains water supply to the unit and fill the storage tank as normal. Check for leaks in
the system and fix as required.
6.2
� Connections at the Storage Tank
60-1032
35-8009
35-8008
60-1032
60-5065
60-1115
60-5066

EN
GLIS
H
Conergy AS Owners Manual�0
� Connections at the Storage Tank
6.3 Connections for closed circuit systems
6.3.1 Installing the HEM-25-B module:
1. Fit the brass unions (P/No 60-1029) to the
sockets on the storage tank.
2. Attach the brass union (P/No 60-1033) to the
top connection of the heat exchanger.
3. Insert the bottom connection of the heat
exchanger to the bottom brass union on the
storage tank.
4. Hook the Mounting Bracket (P/No 20-3085) to
the slot on the rear of the HEM-25-B case.
5. Using a suitable levelling device, ensure the
HEM-25-B module is vertical. Once in position,
screw fix the Mounting Clamp to the storage
tanks using the self drilling screws supplied.
6. Take the Hot Thermosiphon Pipe (P/No 60-
1048), and check the length to ascertain if it needs to be shortened. This will be the case on
250L and 400L installations. Trim the copper to suit.
7. Insert the copper tube to the brass unions and tighten. Even out the insulation on the Hot
Thermosiphon Pipe to cover as much of the brass unions and exposed copper tube as
possible.
8. Using a suitable thread sealant, fix the Cold Inlet Tee (P/No 60-1116) into the inlet socket of the
storage vessel. This assembly is used to provide an inlet for potable water into the storage
vessel, and a thermowell for measuring the temperature of the water in the storage vessel. The
cold temperature sensor from the Pump Module is inserted into this thermowell.
60-1029
60-1048
60-1033
20-3085
60-1116
Spirit Level(not included)
60-1029

EN
GLIS
H
Conergy AS Owners Manual �1
6.3.3 Final connections:
1. Fit the 600mm Flexible Connector (P/No 60-
1124) to the top Fill Fitting on the Pump Module.
This connector is used for the Solar Flow line,
and is designed to be long enough to reach a
stub-out or similar connection on the wall.
2. Fit a 225mm Flexible Connector (P/No 60-1115)
to the other brass nipple on the HEM-25-B
module. This connector is used for the Solar
Return line, and is designed to be long enough
to reach a stub-out or similar connection on the
wall.
3. Plug the Hot Temperature Probe Assembly (P/No 35-1007) into the socket on the base of the Pump
Module. This plug will only fit one way. The temperature probe is inserted into the thermowell at
the hot connection of the collectors.
4. Ensure that the probe pocket is dry before inserting the probe and that it is sealed with silicone
or another suitable weather protection once the probe is in place.
6.3.2 Installing the pump module:
1. Ensure that the pump module is installed in an accessible position.
2. Fit the brass nipples (P/No 60-5066) to both the connection ports on the HEM-25-B module.
3. Take one Fill Fitting (P/No 60-5157), and using a suitable thread sealant, fasten to the outlet side
of the pump on the pump module. Remove the
check valve in this port on PM-600 modules.
4. Take the second Fill Fitting and fasten it to the
Gland Union (P/No 60-1032) using a suitable
thread sealant. Attach the Gland Union to the
Pump Module. A seal is obtained at this
junction by the rubber washer of the Gland
Union.
5. Loosely attach one end of the 225mm Flexible
Connector (P/No 60-1115) to the brass nipple
on the HEM-25-B module. Loosely attach the
other end to the bottom fill fitting on the pump
module.
5. With the flexible connector loosely fitted, move the pump module into position on the storage vessel
and fix in place with the self-drilling screws supplied. Ensure the flexible connector is not kinked in
any way, and the pump module is vertical. Tighten the loose nuts on the flexible connector.
60-5157
60-1032
60-5157
60-1115
60-5066
60-5066
� Connections at the Storage Tank
60-111535-1007
60-1117

EN
GLIS
H
Conergy AS Owners Manual��
6.3.4 Fill procedure for closed circuit systems:
1. The charging procedure is made in two stages.
The first to leak test the system, using potable
water. The second is to charge the system with
ST-5 Solar Transfer Fluid. It is essential that the
solar panels are not exposed to direct sunlight
during this procedure. Cover if necessary.
2. Attach a suitable tube to the barbs on the Fill &
Drain Ports, and secure in place with hose
clamps or similar.
3. Fully open both ports using the Key provided.
4. Commence water flow through the Fill Port until
water is discharged from the Drain Port. This
should happen almost immediately.
5. Close the Isolating Ball Valve by turning the slot
horizontal.
6. Fluid will now move up the system, through the collectors, and return to the HEM-25-B module.
One should hear the sound of air escaping. Wait until a clear stream of water exhausts from the
Drain Port, free of air bubbles and particulate matter. This may take a few minutes.
7. At this stage, close the Drain Port. Wait until the pressure gauge reads about 1.5 - 2 Bar, then
close the Fill Port.
8. Open the Isolating Ball Valve by turning the slot vertical.
9. Thoroughly check the circuit for leaks. Watch the pressure gauge to ensure that there is no
drop in pressure – this may indicate a leak somewhere.
10. Once confident that there are no leaks in the system, repeat steps (1) – (8) of the procedure above
using an ST-5 Solar Transfer Fluid/Potable Water solution instead of straight potable water.
Fill Port
Isolating Ball Valve
Drain Port
Pressure Gauge
6.3.5 Approved solar transfer fluid details:
Name: ST-5 Solar Transfer Fluid
Description: Propylene Glycol
Appearance: Red Liquid
To ensure adequate frost protection, use the full 4.5 litres of ST-5 within the closed circuit. This will
maintain the proportion of glycol above 37% on all closed circuit systems.
� Connections at the Storage Tank

EN
GLIS
H
Conergy AS Owners Manual ��
� Electrical Connections to the System
� Electrical Connections to the System
Note:
1.
2.
3.
4.
5.
6.
7.1 Electrical connection for electric AES systems
For safe performance this water heater is fitted with a Thermostat, and an over temperature cut-out.
These devices should not be tampered with or removed. Do not operate this water heater without the
electrical thermostat and over temperature cut-out in the circuit.
The electric element is only connected in models using an electric AES system. No connection is
made to the electric element for gas AES systems.
For electric AES systems, there are numerous connection alternatives depending on the local electrical
supply tariffs and the costumers’ preferences. The correct alternative should be established with the
Conergy dealer prior to installation. Diagrams for the two most common alternatives are below.
|
|
|
All electrical work must comply with local regulations and AS3000.
All electrical work must be conducted by a suitability licensed electrician.
Refer to the Owner’s Manual supplied with the tank for more detailed information on the specific
requirements of the storage tank.
Do not turn on power to the system until it is filled with water.
The electrical supply to the pump module must be continuously available. Off Peak power
must not be used as both temperature regulation and frost protection are governed by the pump
module
If the supply cord to any appliance is damaged, it must be replaced by the manufacturer or its
service agent or a similarly qualified person in order to avoid a hazard.
The electric AES is designed for single phase, 240V A.C. supply only.
For a single element tank, connections are made at the terminal block under the element cover.
For a twin element tank, connections are made at the terminal block under the lower element
cover. An active connection is made only to terminal A2, the top element.
Figure 5: Single Element Tank Wiring Diagram
EARTHRED
BLACKA1
N
ELE
ME
NT
Figure 6: Twin Element Tank Wiring Diagram
ELE
ME
NT
ELE
ME
NT
BLUE
REDRED
BLACK
A1
A2
N
EARTH
EN
GLIS
H
Conergy AS Owners Manual��
� Electrical Connections to the System
7.2 Electrical connection for gas AES systems
For models using a Gas AES module, it is required to install an external GPO
adjacent the modules location. The module needs a 220-240 Volt, 50 Hz
power supply that must be continuously available. The module is rated at 0.47
Amperes.
Gas booster sample
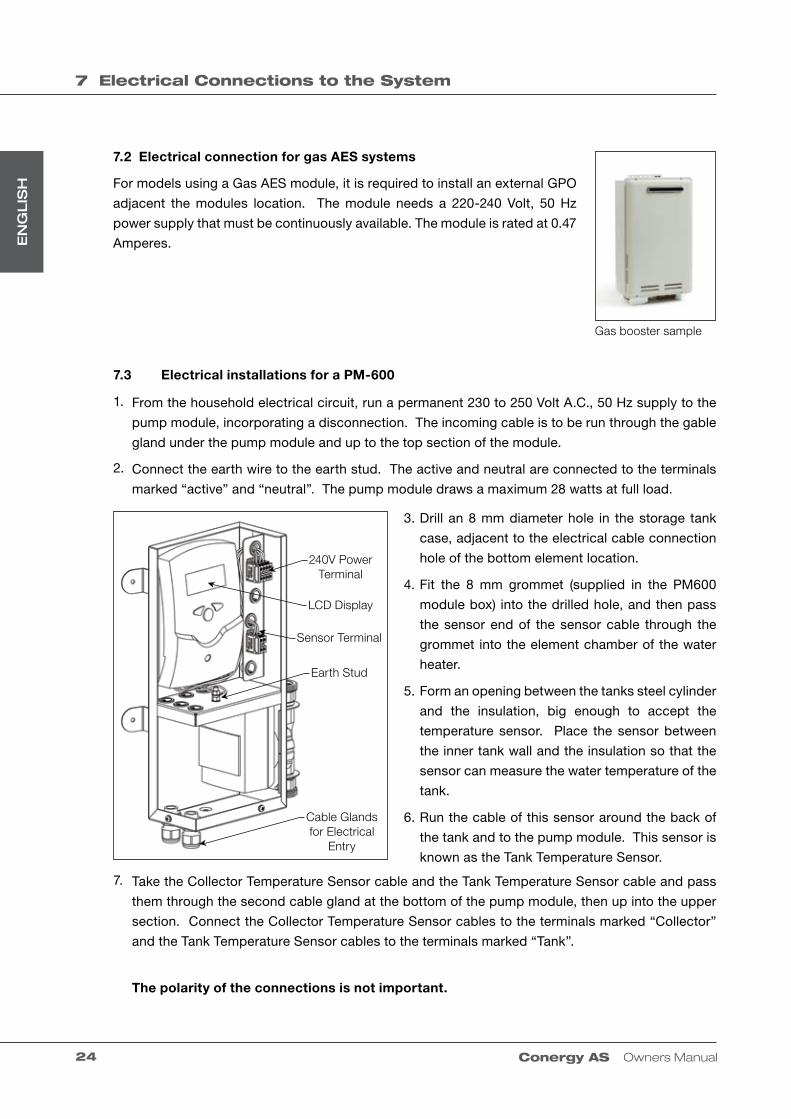
7.3 Electrical installations for a PM-600
1.
2.
7.
From the household electrical circuit, run a permanent 230 to 250 Volt A.C., 50 Hz supply to the
pump module, incorporating a disconnection. The incoming cable is to be run through the gable
gland under the pump module and up to the top section of the module.
Connect the earth wire to the earth stud. The active and neutral are connected to the terminals
marked “active” and “neutral”. The pump module draws a maximum 28 watts at full load.
Take the Collector Temperature Sensor cable and the Tank Temperature Sensor cable and pass
them through the second cable gland at the bottom of the pump module, then up into the upper
section. Connect the Collector Temperature Sensor cables to the terminals marked “Collector”
and the Tank Temperature Sensor cables to the terminals marked “Tank”.
The polarity of the connections is not important.
Drill an 8 mm diameter hole in the storage tank
case, adjacent to the electrical cable connection
hole of the bottom element location.
Fit the 8 mm grommet (supplied in the PM600
module box) into the drilled hole, and then pass
the sensor end of the sensor cable through the
grommet into the element chamber of the water
heater.
Form an opening between the tanks steel cylinder
and the insulation, big enough to accept the
temperature sensor. Place the sensor between
the inner tank wall and the insulation so that the
sensor can measure the water temperature of the
tank.
Run the cable of this sensor around the back of
the tank and to the pump module. This sensor is
known as the Tank Temperature Sensor.
3.
4.
5.
6.
240V Power Terminal
LCD Display
Earth Stud
Cable Glands for Electrical
Entry
Sensor Terminal

EN
GLIS
H
Conergy AS Owners Manual ��
Once the sensors are indicated to be correct, replace the pump module cover and the installation is
completed.
� Electrical Connections to the System
After conducting a final inspection of the electrical
installation, the power may be turned on.
Once the power is turned on, check the LCD screen of
the solar controller within the Pump Module. Fifteen
seconds after the power is applied the screen should
read the sensor temperatures. If the temperatures
are present, this indicates that the sensor cables are
installed and connected correctly.
The temperature shown as TC is the collector
temperature and the temperature shown as TS is
the storage tank temperature. If either of these have
the letters 888, instead of a temperature, it indicates
a break on the sensor cable or connection.
Under normal circumstances no adjustment is
required to the solar controller as it is factory set.
If the collectors are more than 6°C hotter than the
storage tank, the pump will start. This is indicated
by the green light on the left side of the controller
face. If the light is red, the pump is off.
Figure 8: PM-600 Wiring Diagram

EN
GLIS
H
Conergy AS Owners Manual��
� Electrical Connections to the System
7.3.1 Controller field settings for the Deltasol B solar controller
It is not recommended that you alter the optimal factory settings or run the system in manual
for extended periods. Changes in settings may adversely affect solar performance.
Use Buttons 1 & 2 to scroll through the values. The fields should match the values in the table
below.
If there is a need to change a field you have noticed to be incorrect:
1.
2.
3.
4.
5.
Press and hold down Button 1 until “set” appears on the display.
Using Buttons 1 & 2 to scroll, move up and down the fields until the value to be changed is on
screen.
Press Button 3. The “SEt” on the display will start to flash.
Using Buttons 1 & 2 to scroll, adjust the setting to the one shown on the table above.
Save the setting by pressing Button 3. The “SEt” will return to the steady state.
DO
DF
SX
CL
CX
CN
FN
MM
Field
6
4
70
200
190
6
3
2
Value
Figure 8: PM-600 Wiring Diagram
LCD Display
Button 2
Button 1
Button 3

EN
GLIS
H
Conergy AS Owners Manual ��
� Commissioning & Customer Hand Over
When all connections have been completed the solar water heater can be filled with water.
|
|
|
|
|
|
|
Customer hand overThe solar water heater is now fully operational.
Once the solar water heater is commissioned and you are confident it is operating correctly, complete
the installation details on the carbon copy sheet contained in this manual. Please remove the Conergy
(blue) and the installer (pink) copy. Please hand the owner this manual and gas heater manual (if gas
AES is used).
Before leaving the installation ensure that the customer is fully aware of the systems operation and
whom to contact should there be any questions in the future.
Thank you for installing our world class Conergy solar water heater.
Your Conergy Team
Before turning on the cold water supply open one hot tap within the household to release air
from the system during the filling process. Do not leave the open tap unattended during the filling
process.
Turn on the cold water supply and wait for the system to fill.
When water flows from the open hot tap without air bursts then the hot tap can be closed. This
will now pressurise the solar water heater system.
Once the system is pressurised all connections on the water heater must be checked for leaks
and repaired if necessary.
When the system is proven water tight, power and gas can be applied to the AES system.
To test that the element is operational turn the circuit breaker in the switch board on and off. You
should see the power meters speed change during this action.
For gas AES systems turn on a hot water tap and the gas heater will ignite provided the water
temperature is less than 60 °C.
� Commissioning & Customer Hand Over

EN
GLIS
H
Conergy AS Owners Manual��
The Conergy Solar hot water system that you have purchased comes with a comprehensive 5 year parts and labour
warrantly.
The terms of the Warranty and Guarantee are set out below.
1.
2.
3.
4.
5.
6
Your solar hot water system and its components are covered by a 5 year warranty against defective factory parts or
workmanship from the date your hot water unit or solar collector is installed. If the date of installation is unknown, the
warranty commences 1 month after the date of manufacture (which can be found on the serial plate on the hot water unit
and solar collector).
This warranty is for normal use of the solar hot water system and covers the repair and/or replacement of any failed
component in the hot water unit and solar collector or where necessary, the hot water unit and solar collector itself. Under
this warranty Conergy will repair or replace the component or hot water unit or solar collector free of charge (except
for certain transport or travelling time costs which may be payable by the owner under clause 9 below). The decision to
repair or replace the component or hot water unit or solar collector will be entirely at the discretion of Conergy.
The warranty only applies to defects in the hot water unit and solar collector which have arisen solely due to faulty
materials or workmanship.
Installation of your Conergy solar hot water system is not covered under this product / manufacturers warranty and in
cases of installation failure please contact your original installation service provider.
5 Year Guarantee
If any component of the system fails during the initial 5 year warranty period Conergy will replace the failed components
free of charge. (except for certain transport or travelling time costs which may be payable by the owner under clause 9
below).
Scope of Warranty and Guarantee
The warranty and replacement guarantee do not apply to any defects or damage not due to faulty factory parts or
workmanship, installation, including but not limited to defects or damage caused by or resulting from:
6.1
6.2
6.3
6.4
6.5
6.6
6.7
6.8
6.9
� Warranty
Accidental damage, abuse, misuse, maltreatment, abnormal stress or strain, harsh or adverse water conditions,
contamination or corrosion from particles in the water supply, excessive water pressure, over temperature or
neglect of any kind to the hot water unit and solar collector or their components.
Alteration or repair of the hot water unit or solar collector other than by an approved Conergy agent or a technician
of a gas or electricity utility approved by Conergy.
Attachment of any parts or accessories other than those manufactured or approved by Conergy.
Faulty or improper installation of the hot water unit or solar collector, including installation otherwise than in
accordance with the instructions contained in the Owner’s Manual and Installation Manual supplied by Conergy.
Collector glass is not covered by this warranty.
Where hot water temperature & pressure relief valve, cold water expansion valve, check valve and strainer is not
fitted in areas where mains pressure is likely to exceed 550 kPa.
Where a closed circuit heat exchanger is not filled with the correct concentration of ST-5 heat transfer fluid in
accordance with instructions.
In case of overpressure of closed circuit system beyond the 300kPa maximum working pressure.
Where closed circuit has had water addition not in accordance with water quality specifications; and
� Warranty

EN
GLIS
H
Conergy AS Owners Manual ��
7.
8.
9.
10.
11.
12.
13.
14.
6.10
The warranty only applies to the hot water unit and solar collector or components in the hot water unit and solar collector
and does not cover any plumbing or associated parts, including but not limited to; pressure limiting valves, stop cocks,
non return valves, electrical switches, pumps or fuses, supplied by any person installing the hot water unit or solar
collector.
Where a hot water unit and solar collector or a component in a hot water unit or solar collector is replaced by Conergy,
the balance of any original warranty or replacement guarantee period will remain effective. The replacement part or hot
water unit or solar collector does not carry any additional warranty or replacement guarantee.
Where the solar hot water system is located outside the metropolitan area of a capital city and is:
|
|
|
Where the warranty applies but the hot water unit and solar collector is installed or located in a position that does not
comply with the installation instructions or any relevant statutory requirements, the owner of the solar hot water system
will be responsible for the costs of:
|
|
Conergy’s obligations under this warranty and guarantee are limited to repairing or replacing the hot water unit and solar
collector or components. To the extent permitted by law, Conergy will not be liable for any loss or damage to furniture,
carpets, walls, foundations or any other consequential loss of any kind caused by a defect in the hot water unit and solar
collector or any component.
Any claim under the warranty or replacement guarantee must include full details of the defect and/or damage to the hot
water unit and solar collector or components in the hot water unit and solar collector. All claims must be made within
one month of the detection of the defect.
In addition to this warranty and guarantee, certain legislation (including the Trade Practices Act 1974 and consumer
protection legislation of the States and Territories) gives the owner certain rights, which cannot be excluded, restricted
or modified. Nothing in this warranty and replacement guarantee has the effect of excluding, restricting or modifying
those rights.
In the case of a solar hot water system acquired for other than personal domestic or household use, Conergy’s liability
for a breach of a condition or warranty implied by Division 2 of Part V (other than Section 69) of the Trade Practices
Act (1974) and any equivalent State or Territory legislation is expressly limited to any one or more of the following, as
determined by Conergy:
|
|
|
|
Freeze damage to open circuit systems when installed in frost affected areas.
.
More than 25 kilometres from a Conergy office; or
More than 25 kilometres from a Conergy agent.
The owner will be responsible under the warranty, for paying the costs of transporting the hot water unit or solar
collector or any component in the hot water unit or solar collector to and from an approved Conergy agent or to a
Conergy office (including the costs of any insurance associated with that transport) or paying the travelling time of an
approved Conergy agent to and from the owner’s house premises.
The dismantling or removal of cupboards, doors, walls of special equipment and;
Any labour required to gain access to and to bring the system/unit to a position that complies with the installation
instructions or relevant statutory requirements.
The replacement of the hot water unit and solar collector.
The repair of the hot water unit and solar collector.
The payment of the cost of replacing the hot water unit and solar collector or of acquiring an equivalent hot water
unit and solar collector.
Payment of the cost of having the hot water unit and solar collector repaired.
� Warranty

55-4
009-
RE
V1-
0910
For further information call your local Conergy service agent on 1300 137 602 (Australia only),or get in touch with your Conergy state office:
NSW, ACT (Head Office) VIC, SA, TAS QLD, NT WA
Phone 1300 724 531
Email [email protected]
Phone 1300 724 531
Email [email protected]
Phone 1300 724 531
Email [email protected]
Phone 1300 724 531
Email [email protected]