outdoor concepts incorporated, 15080 goldenwest … · outdoor concepts incorporated, 15080...
TRANSCRIPT

Outdoor Concepts Incorporated, 15080 Goldenwest Circle, Westminster, California 92683 (714) 903-1885 www.ociproducts.com
*Because of continuing product improvement thesespecifications are subject to change without notice.
P/N 110253 rev.1 05/2008Built to Perform

Warming Drawer - Installation & Operation Guide
OCI Model# WD30
LivingElegant
Built to Perform

hank you for selecting the OCI Outdoor Warming Drawer. Because of its unique features,we have developedthis Installation and Operation Guide. This guide contains valuable information on how to properly install, use,and care for your new Warming Drawer for years of safe and enjoyable use.
To help us serve you better, please submit your Ownership Registration by visiting our website at www.ociproducts.com and selecting “Customer Service” on the home page and then select “OwnershipRegistration Form”. In addition, keep this guide handy, as it will help answer questions that may arise as you use your new professional quality appliance.
For your convenience, product questions can be answered by an OCI Customer Support Specialist byphone:1-714-903-1885.
For product questions or concerns, you may also contact us via email at [email protected], you may also write to us at:OCI ProductsAttention: Customer Service 15080 Goldenwest CircleWestminster, Ca. 92683
WARNINGThe warming drawer is not intended to be used in conjunction with water. DO NOT fill the drawer or warmingcavity with water. Doing so could create a shock hazard resulting in a possible injury.
WARNINGTO REDUCE THE RISK OF INJURY TO PERSONS IN THE EVENT OF A RANGE TOP GREASE FIRE,OBSERVE THE FOLLOWING: SMOTHER FLAMES with a close-fitting lid, cookie sheet, or metal tray, thenturn off the burner. BE CAREFUL TO PREVENT BURNS. If the flames do not go out immediately EVACUATE AND CALL THE FIRE DEPARTMENT. NEVER PICK UP A FLAMING PAN - You may be burned.DO NOT USE WATER, including wet dishcloths or towels - as a violent steam explosion will result.
Use an extinguisher ONLY if:1.You know you have a Class ABC extinguisher, and you already know howto operate it.2. The fire is small and contained in the area where it started.3. The fire department is being called.4.You can fight the fire with your back to an exit.
WARNINGDO NOT use water on grease fires. Turn OFF the warming drawer, then smother the fire with baking soda oruse a dry chemical or foam-type fire extinguisher.
PLEASE RETAIN THIS MANUAL FOR FUTURE REFERENCE.
Welcome
T
(

Table of Contents
Safety Practices & Precautions 2-3
Installation InstructionsFeatures and Product Specifications 4Product Installation 5Electrical Wiring Diagram 6
Operation and Product Care InformationOperation Information - Temperatures and Settings 7Cleaning the Warming Drawer 8Drawer Assembly Removal 9Drawer Assembly Replacement 10
Suggested temperature settings for keeping foods hot and ready to serve 11
Warranty Information 12
Service 13

READ AND UNDERSTAND THESE PRECAUTIONSl Read this Installation and Operation Guide thoroughly before installation. This will help to
reduce the risk of fire, electric shock, or injury to persons.l Remove all packaging materials from your appliance.l Install according to instructions. See page 4-5 to insure proper installation and servicing.l Be sure to have a qualified service technician install and ground this appliance.l Plug into rated outlet: 120 Volts AC, 5 amp minimum circuit requirement.
PREHEATING INSTRUCTIONSThe Warming Drawer is designed to keep cooked foods warm for extended periods of time. Thedrawer must be pre-heated before use on high (see Operation instructions). If the warming drawer isn’tpre-heated, the internal temperature of the food being warmed could fall below the minimum safelevel and bacteria could develop. Always preheat the drawer according to the instructions describedin the warming drawer operation instruction section.
l Children should not be left alone or unattended in an area where appliances are in use. They should never be allowed to turn knobs, push buttons, sit or stand on any part of an appliance.
l Children in walkers, or children crawling can be attracted to the round door handle and may grab and open the warming drawer. This can result in injury from the door being pulled open on a child, or severe burns if it is in use and hot.
WARNING:Do not store items of interest to children in, above or around any appliance.Children could be seriously injured if they should climb onto the appliance to reach these items.
Be certain to use only dry pot holders: Moist or damp pot holders on hot surfaces may causeburns from steam. Do not use a towel or other bulky cloth in place of pot holders.
l Never store anything in the warming drawer. Flammable materials can catch fire, plastic itemsmay melt or ignite and other types of items could be ruined.
l Do not hang articles from any part of the appliance or place anything against the drawer. Some fabrics are quite flammable and could catch on fire.
l For safety reasons and to avoid damage to the appliance, never sit, stand, or lean on thewarming drawer door.
l For personal safety, wear proper apparel. Loose fitting garments or hanging sleeves shouldnever be worn while using this appliance. Some synthetic fabrics are highly flammable andshould not be worn while using this appliance.
l Do not use aluminum foil to line any part of the warming drawer. Using a foil liner could resultin a fire hazard, or the obstruction of the flow of heat and ventilation air. Foil is an excellent heat insulator and heat will be trapped underneath it. This trapped heat can upset the performance of the warming drawer parts.
WARNING:This appliance is designed for warming of food. Based on safety considerations, never use the warming drawer to warm or heat a room.
Safety Practices and Precautions
2

l As with any cooking or heating appliance, never leave the warming drawer unattended when warming food, this could be a fire hazard.
l Only certain types of glass, heat proof glass-ceramic, ceramic, earthenware or glazes aresuitable for use in this warming drawer. Utensils that are not thermally heat safe may breakwith sudden temperature changes.
l Never heat unopened containers, a build up of pressure may cause the container to burst.
l Grease is flammable, avoid letting grease deposits collect in the warming drawer, clean upspillage.
l DO NOT use water on grease fires. Turn OFF the warming drawer, then smother the fire withbaking soda or use a dry chemical or foam-type fire extinguisher.
l When opening the drawer while keeping sauces warm, tomato sauce, etc., the drawer must beopened slowly to avoid spillage.
l Use care when opening a hot warming drawer; to avoid severe burns,open slowly, allow the hot air or steam to escape before reaching in to remove or replace any foods.
l Do not repair or replace any part of this appliance unless it is specifically recommended in thismanual. All other servicing should be referred to a qualified Service Technician. ServiceTechnicians must disconnect the power supply before servicing this appliance.
l When using the warming drawer: DO NOT TOUCH THE INTERIOR SURFACES or the exteriorarea immediately surrounding the door until it has had sufficient time to cool to avoid burninjuries.
l Clean the warming drawer with caution. Avoid steam burns; do not use a wet sponge or clothto clean the appliance while it is hot. Some cleaners produce noxious fumes if applied to a hotsurface. Follow directions provided by the cleaner manufacturer.
l Be sure all the controls are turned off and the appliance is cool before using any type of aerosol cleaner on or around the appliance. The chemical that produces the spraying action could, in the presence of heat, ignite or cause metal parts to corrode.
l Do not touch the heating element or interior surfaces of the warming drawer, even if theyappear dark in color. They may still be hot enough to cause burn injury, allow sufficient time tocool.
l Do not allow flammable materials which may ignite to come in contact with the hot heatingelement or the interior surface of the warming drawer until the unit has had a sufficient time tocool.
Safety Practices and Precautions
3

Warming Drawer FeaturesPicture? of Product w/ featurescalled out to right - Moist/crisp, etc.
SPECIFICATIONSThe cabinet depth from the outer edge of the face frame to the inside back of the cabinet or wallshould be at least 24” (see figure 02).The Warming Drawer should be installed into a base cabinet with minimum outside dimensions of13-1/4” high by 27” wide by 24”deep.
Power supply required: 120VAC; 5A min., 15A max. circuit.
Features & Product Specifications
Cut-out Dimensions & Product DimensionsIn addition to the cut-out dimension shown, allow extra clearance when building with rock or rock vaneercontruction for the front frame of the warming drawer - see figure below.
4

Step 1 Use the appropriate screws for your type ofinstallation to attach the mounting bracketwhich must be installed for anti-tip safety to thebottom support at the back. See placementdimensions in the illustration at right.
Installation Instructions
Installation of Anti-tip device The lower rear corners of the cabinet need to provide proper support to the back of the WarmingDrawer and the anti-tip mounting bracket. A 120 volt AC outlet should be located no further than 36 inch-es from the back center of the Warming Drawer.
Warming Drawer Installation
Preparation The bottom section of the cabinet should bemade of material with adequate strength to sup-port the weight of the Warming Drawer(80lbs)and needs to be installed to hold the anti-tipmounting bracket.
Step 2 Take note of the Warming Drawer mounting sloton the back side where it will slide onto the anti-tip mounting bracket.Plug power cord into installer provided ACpower outlet.
5

Wiring Diagram
WIRING DIAGRAM SHOWN ON THIS PAGEThe lower rear corners of the cabinet need to provide proper support to the back of the WarmingDrawer and the anti-tip mounting clips. A 120 volt AC outlet should be located no further than 18 inchesfrom the back center of the Warming Drawer.
6
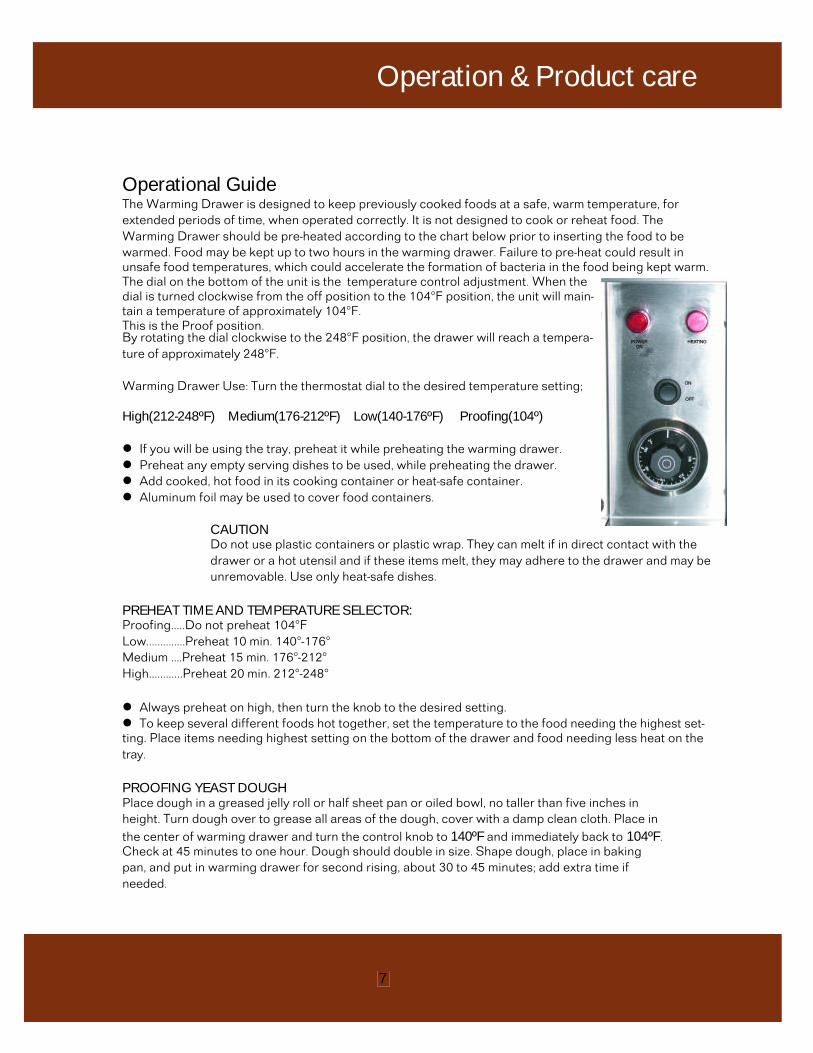
Operational GuideThe Warming Drawer is designed to keep previously cooked foods at a safe, warm temperature, forextended periods of time, when operated correctly. It is not designed to cook or reheat food. TheWarming Drawer should be pre-heated according to the chart below prior to inserting the food to bewarmed. Food may be kept up to two hours in the warming drawer. Failure to pre-heat could result inunsafe food temperatures, which could accelerate the formation of bacteria in the food being kept warm.The dial on the bottom of the unit is the temperature control adjustment. When thedial is turned clockwise from the off position to the 104°F position, the unit will main-tain a temperature of approximately 104°F. This is the Proof position.By rotating the dial clockwise to the 248°F position, the drawer will reach a tempera-ture of approximately 248°F.
Warming Drawer Use: Turn the thermostat dial to the desired temperature setting;
High(212-248ºF) Medium(176-212ºF) Low(140-176ºF) Proofing(104º)
l If you will be using the tray, preheat it while preheating the warming drawer.l Preheat any empty serving dishes to be used, while preheating the drawer.l Add cooked, hot food in its cooking container or heat-safe container.l Aluminum foil may be used to cover food containers.
CAUTIONDo not use plastic containers or plastic wrap. They can melt if in direct contact with the drawer or a hot utensil and if these items melt, they may adhere to the drawer and may be unremovable. Use only heat-safe dishes.
PREHEAT TIME AND TEMPERATURE SELECTOR:Proofing.....Do not preheat 104°FLow..............Preheat 10 min. 140°-176°Medium ....Preheat 15 min. 176°-212°High............Preheat 20 min. 212°-248°
l Always preheat on high, then turn the knob to the desired setting.l To keep several different foods hot together, set the temperature to the food needing the highest set-ting. Place items needing highest setting on the bottom of the drawer and food needing less heat on thetray.
PROOFING YEAST DOUGHPlace dough in a greased jelly roll or half sheet pan or oiled bowl, no taller than five inches inheight. Turn dough over to grease all areas of the dough, cover with a damp clean cloth. Place inthe center of warming drawer and turn the control knob to 140ºF and immediately back to 104ºF.Check at 45 minutes to one hour. Dough should double in size. Shape dough, place in bakingpan, and put in warming drawer for second rising, about 30 to 45 minutes; add extra time ifneeded.
Operation & Product care
7
Cleaning the Warming Drawer
l Be careful cleaning any part of this appliance, particularly the drawer box and back of thedrawer face. All parts of the drawer can be cleaned with a hot soapy damp cloth, rinsed,driedand buffed with a heavy pile cloth. Always try this first, as it is the mildest cleaning procedure.
l Be sure the Warming Drawer is turned off and the appliance is cool before using any type ofaerosol cleaner on or around the appliance. The chemical that produces the spraying actioncould, in the presence of heat, ignite or cause metal parts to corrode.
l Use the mildest cleaning procedure first. Some brands of cleaners are harsher than others,read their directions. Try on a small area first.
l To avoid marring the surface always rub the metal finishes in the direction of the polish grainlines. The cleaner will be more effective when used in the direction of the polish lines.
l Use only clean sponges, soft cloths, paper towels, plastic or non-metal soap pads for cleaningor scouring, as recommended in this section. (Caution: some soap pads can scratch).
l Be sure to rinse all parts thoroughly and to wipe dry to avoid water marks.
l Remove food particles after every used.
- Drawer assembly cleaning: Clean the drawer with warm soapy damp sponge or cloth.
- Drawer Front: Polish after cleaning with stainless steel cleaner in direction of grain.
- Gasket: Clean with warm soapy damp sponge (care should be taken when cleaning the gasketbecause silicon is tough until it is cut, at which time it will tear very easily).
- Control Knob: The on/off temperature knob may be removed to be cleaned
- Light lens: Clean with damp(not wet) cloth or sponge.
- Drawer inner cavity: Clean the drawer with warm soapy damp sponge or cloth.
- Concealed Heating Element: Care should be taken when cleaning the heating element. Only clean theelement when the unit is cool. Use warm soapy water on damp cloth. To access the element for cleaning,carefully remove the drawer assembly following the removal instructions on page>>>
- Stainless Steel tray: May be removed and cleaned with hot soapy water at sink, or placed into dish-washer for cleaning.
Product Care Information
8

Step 1 Pull the drawer open towards you all the wayuntil it reaches the stop position (Fig. 5).
Step 2Push down on the release lever on the right andpush up on the release lever on the left. Pulldrawer straight out of slides. (see Fig. 6 and 7).
Product Care Information
Drawer Assembly removal and replacementBe sure the drawer is cool and no food items or trays are in the drawer. Never attempt to removethe drawer while the unit is on or warm.
Removal Preparation To remove the drawer, first remove plates, trays, etc., from the drawer.
9

Replacing the drawer assembly
Step 1 To reinstall the drawer, extend the slides fully totheir stop position (see photo at right), Lift andalign the drawer in front of the slides and pushinto the slide body.(see figures 8).
Step 2Push the drawer back into the warming drawercabinet securing slide latches.(see figures 9).
Product Care Information
Drawer assembly replacement
WARNINGWith the drawer removed, the heating element is exposed (see figure 8). Never turn the unit on while the drawer is removed. Never let children play near or touch the warming drawer while it is not safely installed. Also note to push the slides back into the cabinet while the drawer is removed to prevent tripping hazzards.
10

Suggested settings to keep foods hot and ready to serve
FOOD TEMPERATURE SLIDE KNOB COVERED/POSITION UNCOVERED
Beef**Rare Low Moist CoveredMedium Med Moist CoveredWell Done Med Moist Covered
Bacon High Crisp Uncovered
Bread Dough Proof Moist Covered
Casseroles Med Moist Covered
Chips High Crisp Uncovered
Cooked Cereal Med Moist Covered
Eggs Med Moist Covered
Fish, Seafood Med Moist Covered
Fried Foods (all) High Crisp Uncovered
Fruit Med Moist Covered
Garlic Bread, Rolls Low Moist Covered
Gravy, Cream Sauces Med Moist Uncovered
Ham Med Moist Covered
Lamb Med Moist Covered
Meat Loaf Med Moist Covered
Pancakes, Waffles High Moist Uncovered
Pies, one crust Med Moist Uncovered
Pies, two crust Med Crisp Uncovered
Pizza Med Crisp Uncovered
Pork Med Moist Covered
Potatoes, baked High Crisp Uncovered
Potatoes, hash browns High Crisp Uncovered
Potatoes, mashed Med Moist Covered
Poultry High Moist Uncovered
Vegetables Med Moist Covered
Temperature Settings
**USDA/FSIS recommends an internal temperature of 145º F as the minimum doneness for beef. Use a portablemeat thermometer to check internal temperatures.
11

Warranty Information
LENGTH OF WARRANTYOne (1) Year Full parts and Labor Covers the entire product
OCI WILL PAY FORAll repair labor and parts found to be defective due to materials or workmanship for one full year “IN HOME”warranty during the first year of ownership. This does not apply if the unit was subjected to other than normalhousehold use. Service must be provided by Authorized Factory Agent during normal working hours. Nocharges will be made for repair or replacement at the location of initial installation or factory for parts returnedpre-paid, through the dealer and claimed within the warranty period, and found by OCI to be defective.
Replacement will be F.O.B. OCI and OCI will not be liable for any transportation costs, labor costs, or exportduties. This warranty shall not apply, nor can we assume responsibility for damage that might result from failureto follow manufactures instructions or local codes,where the appliance has been tampered with or altered in anyway or which, in our judgement, has been subjected to misuse, negligence, or accident. Implied warranty shallnot extend beyond the duration of this written warranty. This warranty is in lieu of all warranties expressed orimplied and all other obligations or liability in connection with the sale of this appliance.
OCI Will Not Pay Forl Installation or start-up.l Shipping damage.l Shipping charges.l Service by an unauthorized agency.l Damage or repairs due to service by an unauthorized agency or the use of unauthorizedparts.l Service during other than normal working hours.l Improper installation, such as improper hook-up, etc.l Service visits to teach you how to use the appliance; correct the installation; reset circuitbreakers or replace home fuses.l Cleaning of filters and outer panels.l Repairs due to other than normal household use.l Damage caused from accident, abuse, alteration, misuse, incorrect installation or installationnot in accordance with local codes.l Units installed in non-residential application such as day care centers, bed and breakfastcenters, churches, nursing homes, restaurants, hotels, schools, etc.l Cosmetic damage past the first 90 days.
This warranty applies to appliances used in residential applications; it does not cover their use in commercial sit-uations. This warranty is for products purchased and retained in the 50 states of the U.S.A., the District ofColumbia and Canada. This warranty applies even if you should move during the warranty period. Should theappliance be sold by the original purchaser during the warranty period, the new owner continues to be protect-ed until the expiration date of the original purchaser’s warranty period. This warranty gives you specific legalrights. You may also have other rights which vary from state to state.
12

How to obtain service:
Before you call for service:1) Is the circuit breaker tripped or the fuse blown?2) Is there a power outage in the area?
For your convenience, product service questions can be answered by an OCI Customer Support Specialist byphone:1-714-903-1885. Monday thru Friday, 8:00 am – 4:30 pm PST. Before you call, please have the following information ready:l Model Numberl Serial Numberl Date of installationl A brief description of the problem
Locating the product Serial #:
Refer to the photo below to locate the Serial # for your Warming Drawer.
Your satisfaction is of the utmost importance to us. If a problem cannot be resolved to yoursatisfaction, please write or email us at:
Write: Outdoor Concepts, Inc.Attention: Customer Support Manager 15080 Goldenwest CircleWestminster, Ca. 92683
Email: [email protected]
Please visit the OCI website for a complete list of products offered:
WWW.OCIPRODUCTS.COM
Customer Service
SERIAL #
13