osteotomy instrument set pso/vcr surgical...
TRANSCRIPT
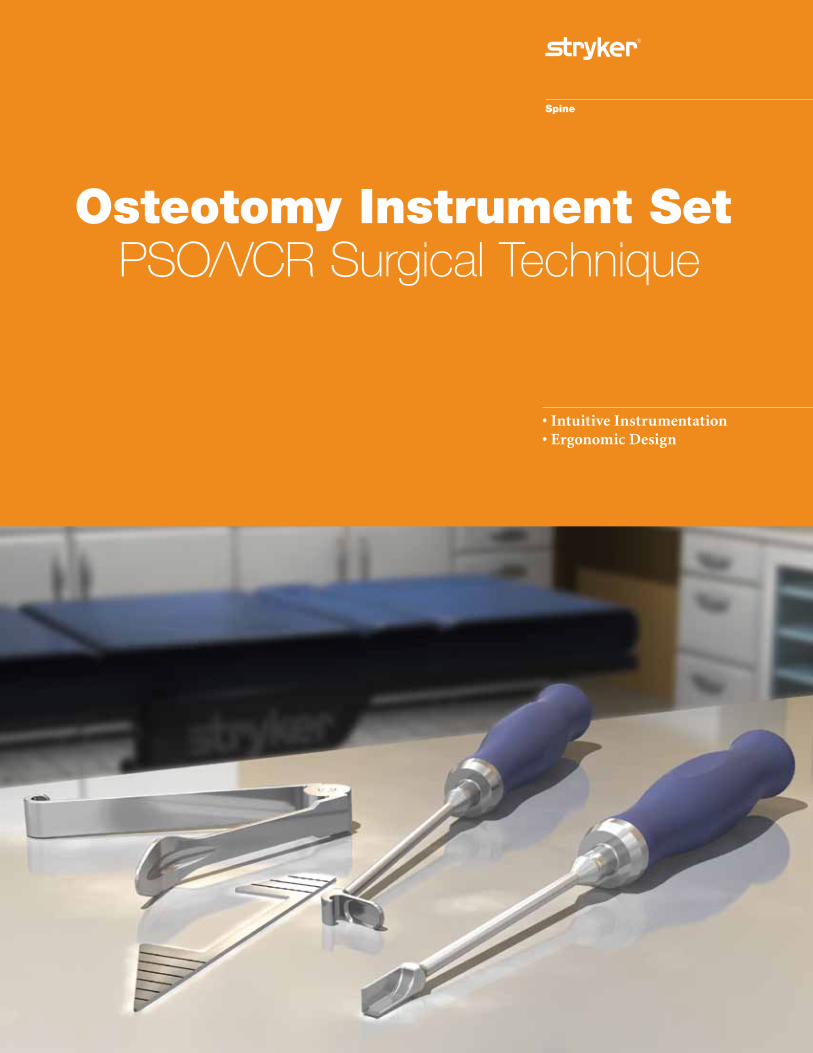
Osteotomy Instrument Set PSO/VCR Surgical Technique
• Intuitive Instrumentation • Ergonomic Design

Osteotomy Instrument Set PSO/VCR Surgical Technique
2
IntroductionPedicle Subtraction Osteotomy (PSO) and Vertebral Column Resection (VCR) procedures provide the surgeon with powerful techniques for correction of fixed sagittal deformity. A pedicle subtraction osteotomy is used in reconstructive spine surgery to facilitate correction of spinal deformities in the sagittal plane. The Osteotomy Instrument Set described in this surgical technique is designed to assist in these technically challenging, complex procedures.
Table of Contents
Patient Positioning . . . . . . . . . . . . . . . . . . . . . . . . . . . . . . . . . . . . . . . . . . . . . . . . . . . 3
Screw Placement . . . . . . . . . . . . . . . . . . . . . . . . . . . . . . . . . . . . . . . . . . . . . . . . . . . . . 3
Resection Planning . . . . . . . . . . . . . . . . . . . . . . . . . . . . . . . . . . . . . . . . . . . . . . . . . . 3
Resection and Removal of Transverse Processes . . . . . . . . . . . . . . . . . . . . . . . . . . 3
Vertebral Body Resection . . . . . . . . . . . . . . . . . . . . . . . . . . . . . . . . . . . . . . . . . . . . . . 5
Resection Assessment and Templating . . . . . . . . . . . . . . . . . . . . . . . . . . . . . . . . . . 6
Vertebral Body Resection . . . . . . . . . . . . . . . . . . . . . . . . . . . . . . . . . . . . . . . . . . . . . . 7
Bone Removal . . . . . . . . . . . . . . . . . . . . . . . . . . . . . . . . . . . . . . . . . . . . . . . . . . . . . . . 8
Posterior Vertebral Body Wall Removal . . . . . . . . . . . . . . . . . . . . . . . . . . . . . . . . . . 9
Closure . . . . . . . . . . . . . . . . . . . . . . . . . . . . . . . . . . . . . . . . . . . . . . . . . . . . . . . . . . . . 11
Instrument Part Numbers . . . . . . . . . . . . . . . . . . . . . . . . . . . . . . . . . . . . . . . . . . . . 12
Instrumentation Instructions . . . . . . . . . . . . . . . . . . . . . . . . . . . . . . . . . . . . . . . . . 13

3
Osteotomy Instrument Set PSO/VCR Surgical Technique
Patient Positioning Diagnosis is based upon patient history, physical findings, and preoperative radiographic assessment.
The patient can be positioned on the operating table in the prone position. Care should be taken to pad all boney prominences. To facilitate venous drainage, the abdomen should not be compressed.
Surgical levels may be verified clinically or radiographically. Preoperative planning defines the most appropriate levels of exposure and resection.
Screw Placement Place spinal fixation at all desired levels. Pedicle screws and/or hooks are acceptable spinal fixation; however, pedicle screws are preferred as they offer enhanced stability in a typically destabilizing PSO/VCR procedure.
Note: It is important to have spinal fixation in place prior to the osteotomy procedure. Please reference the Xia® or Radius® surgical techniques for techniques on pedicle screw placement.
Resection Planning Resection measurement is based on preoperative measurements. The posterior aspect of the resection should extend to the area of the planned vertebral body resection, caudal to the planned pedicle chosen for resection. The cephalad aspect will extend the number of millimeters of closure needed for correction, as measured from the planned posterior resection.
Resection and Removal of Transverse Processes The posterior elements in the resection can be removed with rongeurs, power burr, or curettes.
Note: Posterior elements and transverse processes can be preserved as local bone for grafting.
Note: A small laminectomy above and below the planned closure is often performed to help minimize the risk of dural kinking.
Note: Surgical judgment should be used to determine the amount of retraction.
The transverse process can also be removed or disconnected from the pedicle. It is recommended to remove the transverse process in a way as to leave it as a vascularized bone graft bed.

Osteotomy Instrument Set PSO/VCR Surgical Technique
4
Nerve Root Retractors are designed to be used to protect the dura and nerve roots from the bone removal instruments. They are designed with a small lip on the tip of the instrument, which is designed to fit under the dura to help prevent any dural tears.
12mm Flat Nerve Root Retractor 48920004
The pedicle can be removed with a rongeur or drill. It is surgeon preference as to whether the pedicle is removed at this step or after cancellous bone of the vertebral body has been removed.
Note: The entire pedicle should be removed.

5
Osteotomy Instrument Set PSO/VCR Surgical Technique
Vertebral Body Dissection Use the Adjustable Vertebral Body Retractor to initiate a subperiostial dissection of the vertebral body on which the osteotomy will be performed. It is recommended to start caudal to the cephalad disc space and move anteriorly and laterally so the segmental vessels are swept anterior and lateral.
The Adjustable Vertebral Body Retractors are designed similar to a spoon to fit along the vertebral body where the front edge tapers to a rounded narrow point. This is designed for a final subperiostial dissection anteriorly along the vertebral body. The instrument is in its final position with the tip around the vertebral body at its anterior aspect. This anchors the retractor along the body and allows maximal exposure of the vertebral body to facilitate the performance of the osteotomy.
Adjustable Vertebral Body Retractor
The Adjustable Vertebral Body Retractors are offered in three sizes: 15, 20, and 30mmwidths to allow the surgeon to choose the retractor that is most appropriate for varying patient anatomies. The handle can be adjusted to fit different patient anatomies. Insert the smallest retractor to help get around the anterior aspect of the vertebral body and sequentially increase in size. Retractors can be placed unilaterally or bilaterally.
15mm 48920001
20mm 48920002
30mm 48920003

Osteotomy Instrument Set PSO/VCR Surgical Technique
6
Resection Assessment and Templating Once the retractor is in place, assessment for the resection begins. Carefully assess the degree needed to accomplish the desired correction. These degrees can be subtracted from the postural correction obtained on the operating table, which then gives the degrees of osteotomy correction needed.
Use the Angular Templates to help measure and assess the degree of boney removal needed to obtain the desired correction and to avoid under or over correction.
The Angular Templates are available in 25, 30, and 35 degrees and are designed to assist the surgeon in planning and assessing the adequacy of the osteotomy to confirm the resection will accomplish the desired correction. Depth markings are labeled in 10mm increments to determine depth in the pedicle.
Sequentially insert the Angular Templates into the resection site. The Templates are designed to closely approximate the desired correction.
You will notice, one end of the Angular Template is pointed and the other end is square. The pointed templates are designed for PSO procedures. The square ended templates are designed for VCR and/or PSO techniques with cephalad disc removal. The templates are intentionally longer than the vertebral body to provide maximum flexibility in measurement.
Angular Template
Pointed end for PSO procedures Square end for VCR procedures
Note: Surgical judgment should be used and precautions should be taken when utilizing these instruments.
25° 48920006
30° 48920007
35° 48920008
7
Osteotomy Instrument Set PSO/VCR Surgical Technique
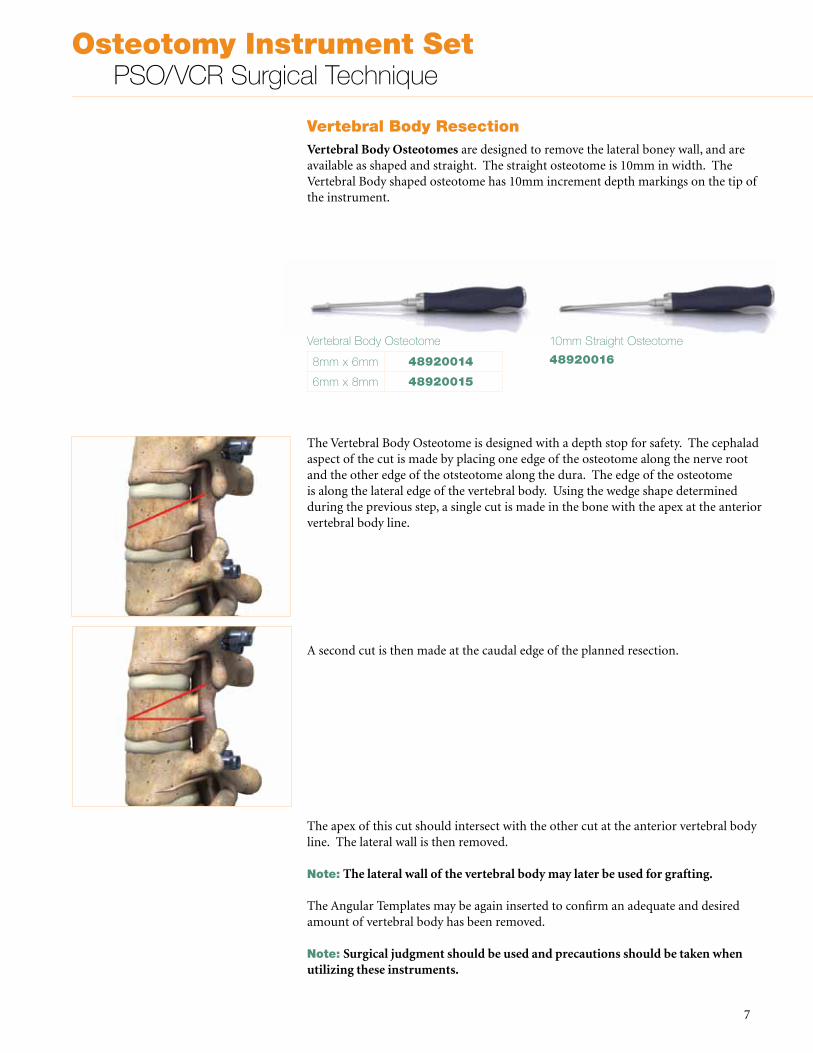
Vertebral Body Resection Vertebral Body Osteotomes are designed to remove the lateral boney wall, and are available as shaped and straight. The straight osteotome is 10mm in width. The Vertebral Body shaped osteotome has 10mm increment depth markings on the tip of the instrument.
Vertebral Body Osteotome
The Vertebral Body Osteotome is designed with a depth stop for safety. The cephalad aspect of the cut is made by placing one edge of the osteotome along the nerve root and the other edge of the otsteotome along the dura. The edge of the osteotome is along the lateral edge of the vertebral body. Using the wedge shape determined during the previous step, a single cut is made in the bone with the apex at the anterior vertebral body line.
A second cut is then made at the caudal edge of the planned resection.
The apex of this cut should intersect with the other cut at the anterior vertebral body line. The lateral wall is then removed.
Note: The lateral wall of the vertebral body may later be used for grafting.
The Angular Templates may be again inserted to confirm an adequate and desired amount of vertebral body has been removed.
Note: Surgical judgment should be used and precautions should be taken when utilizing these instruments.
10mm Straight Osteotome
489200168mm x 6mm 48920014
6mm x 8mm 48920015
Osteotomy Instrument Set PSO/VCR Surgical Technique
8
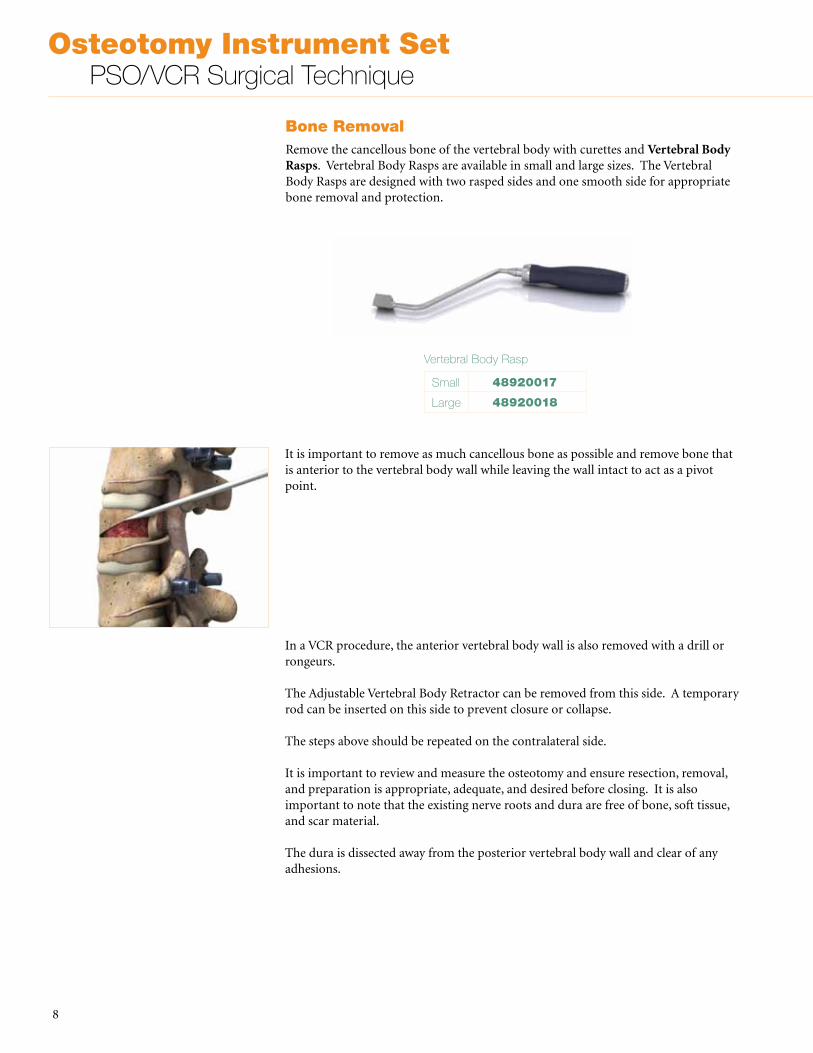
Bone Removal Remove the cancellous bone of the vertebral body with curettes and Vertebral Body Rasps. Vertebral Body Rasps are available in small and large sizes. The Vertebral Body Rasps are designed with two rasped sides and one smooth side for appropriate bone removal and protection.
Vertebral Body Rasp
It is important to remove as much cancellous bone as possible and remove bone that is anterior to the vertebral body wall while leaving the wall intact to act as a pivot point.
In a VCR procedure, the anterior vertebral body wall is also removed with a drill or rongeurs.
The Adjustable Vertebral Body Retractor can be removed from this side. A temporary rod can be inserted on this side to prevent closure or collapse.
The steps above should be repeated on the contralateral side.
It is important to review and measure the osteotomy and ensure resection, removal, and preparation is appropriate, adequate, and desired before closing. It is also important to note that the existing nerve roots and dura are free of bone, soft tissue, and scar material.
The dura is dissected away from the posterior vertebral body wall and clear of any adhesions.
Small 48920017
Large 48920018

9
Osteotomy Instrument Set PSO/VCR Surgical Technique
Posterior Vertebral Body Wall Removal Upon confirmation of an adequate and desired osteotomy, the posterior vertebral body is removed.
The Vertebral Body Punch is inserted dorsal to the posterior vertebral body wall. Posterior Vertebral Body Punches are designed with a foot that fits over the posterior vertebral body wall and a hook that grips the boney edge. These design features are important as they help prevent sliding of the instrument over the posterior vertebral body wall and also help direct forces anterior and medial to the boney elements.
Posterior Vertebral Body Punches are available in varying lengths of 15, 20, 25, and 34mm and widths of 5 and 10mm to accommodate different diameter vertebral body posterior walls.
Posterior Vertebral Body Punch – 5mm width
Posterior Vertebral Body Punch – 10mm width
15mm length 48920009
20mm length 48920010
25mm length 48920012
34mm length 48920013
Note: It is recommended to choose a Posterior Vertebral Body Punch that provides maximum surface area contact with the vertebral body wall.
20mm length 48920011

Osteotomy Instrument Set PSO/VCR Surgical Technique
10
Care should be taken when advancing the instrument to incur the least amount, if any, dural retraction. The instrument should be advanced until the tip of the instrument is visible slightly past the contralateral aspect of the dura.
Note: If a temporary rod has been placed, the instrument should be placed on the side opposite the rod. If two temporary rods have been placed, the instrument should be gently and carefully rotated into position.
A mallet is used to strike the top of the Posterior Vertebral Body Punch and as a result the posterior vertebral body wall is fractured.
The Posterior Vertebral Body Punch is then placed at the opposite end of the resection and the impaction is repeated. The vertebral body should be released and removed.
The site should be reviewed to ensure there are no boney fragments remaining.
Note: The vertebral body can be saved for grafting.

11
Osteotomy Instrument Set PSO/VCR Surgical Technique
Closure If not previously placed, a second temporary rod can be placed to help close the osteotomy. The boney elements should naturally relax and compression of the screws will help achieve closure.
If stable, permanent rods can be inserted for the final construct. A final compression is performed at the osteotomy site and an arthrodesis and fusion are performed.
Note: Care should be taken to confirm the dura and nerve roots are not compressed.
Osteotomy Instrument Set PSO/VCR Surgical Technique
12
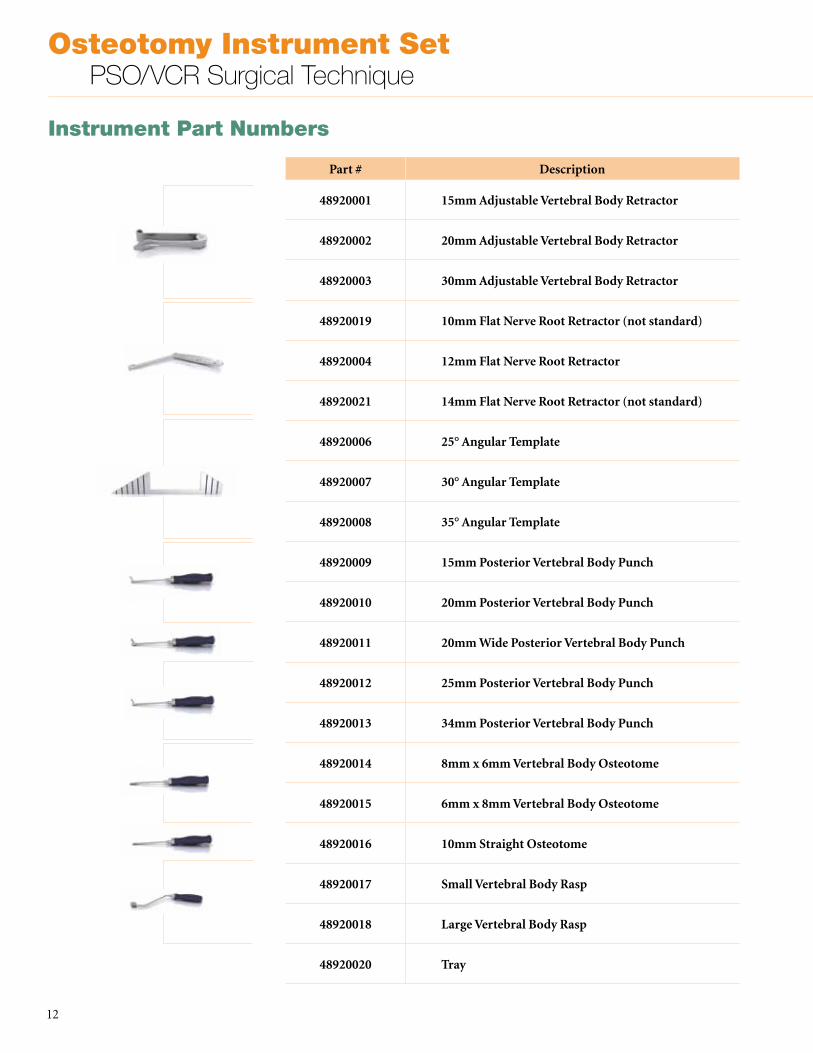
Part # Description
48920001 15mm Adjustable Vertebral Body Retractor
48920002 20mm Adjustable Vertebral Body Retractor
48920003 30mm Adjustable Vertebral Body Retractor
48920019 10mm Flat Nerve Root Retractor (not standard)
48920004 12mm Flat Nerve Root Retractor
48920021 14mm Flat Nerve Root Retractor (not standard)
48920006 25° Angular Template
48920007 30° Angular Template
48920008 35° Angular Template
48920009 15mm Posterior Vertebral Body Punch
48920010 20mm Posterior Vertebral Body Punch
48920011 20mm Wide Posterior Vertebral Body Punch
48920012 25mm Posterior Vertebral Body Punch
48920013 34mm Posterior Vertebral Body Punch
48920014 8mm x 6mm Vertebral Body Osteotome
48920015 6mm x 8mm Vertebral Body Osteotome
48920016 10mm Straight Osteotome
48920017 Small Vertebral Body Rasp
48920018 Large Vertebral Body Rasp
48920020 Tray
Instrument Part Numbers

13
Osteotomy Instrument Set PSO/VCR Surgical Technique
STRYKER SPINE OSTEOTOMY SETINSTRUMENTATION INSTRUCTIONSManufactured by Avalign Technologies & Distributed by STRYKER Spine
SCOPESurgical instruments within the Osteotomy Set are manual medical tools designed solely for use in surgical procedures outlined by the STRYKER Spine Ostoetomy Instrument Set PSO/VCR Surgical Technique. Instruments are made from different materials including stainless steels and medical grade silicone that comply with the standards applicable to them. These materials are not implantable. Avalign Technologies instruments do not contain any Latex components.
USEInstruments contained within the Osteotomy Set must be used in the manner prescribed in the Osteotomy Instrument Set PSO/VCR Surgical Technique provided by STRYKER Spine. Prior to using the instruments, the surgeon shall give full consideration to all aspects of the surgical intervention as well as to the limits of the instrumentation. Recommendations for use are provided in the Osteotomy Instrument Set PSO/VCR Surgical Technique provided by STRYKER Spine.
POTENTIAL ADVERSE EFFECTSIncorrect maintenance, cleaning, or handling may render the instruments unsuitable for their intended use, cause corrosion, dismantling, distortion and/or breakage or cause injury to the patient or operating staff. As a result of the mechanical features required, the instruments contained in the Osteotomy Set are made from NON-IMPLANTABLE materials. In the event an instrument breaks, no fragment must remain in the patient as this could cause post-operative complications and require further intervention.
PRE-OPERATIVE PRECAUTIONSAnyone using the Osteotomy Set can obtain a Surgical Technique by requesting one from a STRYKER Spine representative or distributor. Those using brochures published more than two years before the surgical intervention are advised to request an updated version from STRYKER Spine directly. Do not use any instrument in a manner that it was not designed or intended for as described in the accompanying Surgical Technique. Misuse of instruments could have an adverse effect on the patient or staff.
Ensure that any product intended for reuse is properly cleaned and sterilized to avoid any detrimental effects to the patient or staff.
CAUTIONFederal law (U.S.A) restricts this device to sale by or on the order of a licensed physician.
PACKAGINGInstruments contained in the Osteotomy Set are supplied NON-STERILE in an instrument container or individually packaged. The containers and the packaging of the instruments must be intact when received. The packaging materials must be completely removed prior to cleaning and sterilization.
INSTRUCTION PRIOR TO USEThe life of the instruments depends on the number of times they are used as well as precautions taken in handling, cleaning, and storage. A high level of care must be used to ensure the instruments remain in good working order.
All instruments should be examined for signs of wear damage by doctors and staff in operating centers prior to surgery. The examination shall include a visual and functional inspection of the working surfaces, articulation points, and springs. It should also include verifying all welded connections, that all components are present, and the cleanliness of the orifices and cavities, as well as the absence of any cracks, distortion, impact, corrosion or other change. For instruments with articulations, lubrication may be necessary. Instruments within the set that perform a measuring function must be inspected of wear and the clear visibility of any surface markings.
Neither Avalign Technologies nor STRYKER Spine shall be responsible in the event of the use of instruments that are damaged, incomplete, show signs of excessive wear and tear, or that have been repaired or sharpened outside the control of Avalign Technologies or STRYKER Spine. Any faulty instruments must be replaced prior to any surgical intervention.
INFORMATION FOR CLEANING AND STERILIZATION OF SURGICAL INSTRUMENTSInstruments are provided NON-STERILE.
For safety reasons, non-sterile devices must be pre-cleaned, cleaned and sterilized prior to use. Furthermore, for good maintenance, reusable instruments must be pre-cleaned, cleaned and sterilized immediately after surgery following the sequence of steps outlined in the following sections.
CLEANINGRefer to the table below for specific pre-cleaning and cleaning cycle information for manual cleaning methods. Prepare an enzymatic cleaning solution per the manufacturer’s instructions. Soak soiled instrument in the cleaning solution. Use a soft bristle brush to remove all traces of blood and debris, paying close attention to threads, crevices, seams, and any hard to reach areas. If the instrument has sliding mechanisms, hinged joints or flexible areas, actuate the area to free any trapped blood and debris. Rinse the instrument(s) thoroughly with warm tap water. Rinse all lumens, internal areas, sliding mechanisms, and hinged joints, actuating sliding mechanisms and crevices while rinsing. Ultrasonically clean instrument using an enzymatic solution, prepared in accordance with the manufacturer’s instructions. Rinse the instrument thoroughly with warm water. Rinse all lumens, internal areas, sliding mechanisms, and hinged joints. Actuate sliding mechanisms and hinged joints while rinsing. Dry immediately after final rinse. Dry any internal areas with filtered, compressed air if available. Check for visible soil, if any soil is present, repeat the cleaning procedure. For instruments with moving parts, lubrication with a medical grade water-soluble lubricant may be necessary where applicable.
MANUAL CYCLE INFORMATION
PRE-CLEANING • Alcohol wipe• Soak in cleaning solution• 15 minutes, 40°C (104°F)• Use non-metallic brush• Rinse thoroughly in running water
CLEANING • Soak in Ultrasonic bath• 15 minutes, 40°C (104°F)• Use non-metallic brush• Rinse thoroughly in demineralized water• Dry

Osteotomy Instrument Set PSO/VCR Surgical Technique
14
A facility may choose to use different cleaning cycles other than the cycle suggested if the facility has properly validated the cycle to ensure adequate cleaning to facilitate sterilization.
Inspect all instruments prior to sterilization or storage to ensure instruments are suitable for use. Any instruments showing signs of damage should be set aside and sent for service or repair.
STERILIZATIONSterilize with steam sterilization. The following steam sterilization cycle is suggested based upon validation of a single, wrapped, instrument case, within a properly maintained autoclave. It is critical that process parameters be validated for each facility’s individual type of sterilization equipment and product load configuration.
A facility may choose to use different steam sterilization cycles other than the cycle suggested if the facility has properly validated the cycle to ensure adequate steam penetration and contact with the instrument case for sterilization.
For further information related to the use of this instrument set, please contact your Avalign Technologies or STRYKER Spine representative or distributor.
STORAGEThe instruments are packaged in individual packages or in containers. After they are used they must be stored in a clean, dry and temperate place.
WARRANTYAvalign Technologies does not and will not warranty any repairs made to the product by a source not approved by Avalign Technologies. Avalign Technologies will not be responsible for any product failure with unauthorized repairs.For instruments produced by another manufacturer, reference the manufacturer’s instructions for use.
Manufactured by: Distributed by:Avalign Technologies STRYKER Spine8727 Clinton Park Drive 2 Pearl CourtFort Wayne, IN 46825 Allendale, NJ 07401(260) 484-1500 (201) 760-8000
CYCLE TYPE TEMPERATURE EXPOSURE TIME DRYING TIME
Prevacuum 132 + 3°C (270°F) 4 minutes 30 minutes
15
Osteotomy Instrument Set PSO/VCR Surgical Technique

A surgeon must always rely on his or her own professional clinical judgment when deciding whether to use a particular product when treating a particular patient. Stryker does not dispense medical advice and recommends that surgeons be trained in the use of any particular product before using it in surgery.
The information presented is intended to demonstrate the breadth of Stryker product offerings. A surgeon must always refer to the package insert, product label and/or instructions for use before using any Stryker product. Products may not be available in all markets because product availability is subject to the regulatory and/or medical practices in individual markets. Please contact your Stryker representative if you have questions about the availability of Stryker products in your area. Stryker Corporation or its divisions or other corporate affiliated entities own, use or have applied for the following trademarks or service marks: Stryker. All other trademarks are trademarks of their respective owners or holders.
TLOST-ST-1SC/GS 08/14
Copyright © 2014 StrykerPrinted in USA
Manufactured by Avalign Technologies8727 Clinton Park DriveFort Wayne, IN 46825 (260) 484-1500
Distributed by Stryker Spine2 Pearl CourtAllendale, NJ 07401(201) 760-8000
Black
White
Black
White
mdi Europa GmbHD-30163 Hannover, Germany