orchestration for vmware support prior to calgary
DESCRIPTION
Orchestration for VMware Support Prior to CalgaryTRANSCRIPT

PDF generated using the open source mwlib toolkit. See http://code.pediapress.com/ for more information.PDF generated at: Sun, 16 Mar 2014 17:12:42 PST
Orchestration for VMwareSupport Prior to CalgaryServiceNow

1
Introduction
Orchestration VMware Support Plugin
OverviewThe VMware application for cloud provisioning enables users to request VMware virtual servers through theServiceNow service catalog. When a user requests a virtual server, Orchestration executes preconfigured approvaland provisioning tasks. If the request is approved, Orchestration automatically creates a virtual server from a storedtemplate, configures the virtual machine, and then starts the server. Cloud provisioning is available with the Calgaryrelease.VMware for cloud provisioning is a feature of Orchestration, which is available as a separate subscription from therest of the ServiceNow platform. To purchase an Orchestration subscription, contact your account manager.
Note: If you are using a version of the ServiceNow platform earlier than Calgary, see previous version information in OrchestrationVMware Support - Versions Prior to Calgary.
Upgrade InstructionsAfter you upgrade from an earlier version to the Calgary release, the information in VMware vCenter must beupdated. To add data and update the relationships, either run ServiceNow Discovery or discover vCenter detailsusing the discovery utility that does not require the full Discovery product.
How it WorksOrchestration in the ServiceNow platform integrates with the vCenter [1] API and adds VMware workflow activitiesto the existing Workflow application. These activities enable Orchestration to clone new virtual machines fromtemplates, configure virtual machines, and power virtual machines on and off.
Asset Management IntegrationThe My Assets plugin creates a new model and model category called VMware Instance. The system creates a newasset for this model when cloud provisioning fulfills a virtual machine request, and then creates a VMwareconfiguration item (CI). The new asset appears in the requester's My Assets portal. When the virtual machine isterminated, asset management retires the asset. The My Assets plugin is automatic for new Calgary instances, butmust be activated for upgraded instances.

Orchestration VMware Support Plugin 2
Activating the PluginUsers with the admin role can activate the My Assets plugin on an instance upgraded to Calgary.
Click the plus to expand instructions for activating a plugin.
1. Navigate to System Definition > Plugins.2. Right-click the plugin name on the list and select Activate/Upgrade.
If the plugin depends on other plugins, these plugins and their activation status are listed.3. [Optional] Select the Load demo data check box.
Some plugins include demo data—sample records that are designed to illustrate plugin features for common use cases. Loading demo data isa good policy when first activating the plugin on a development or test instance. You can load demo data after the plugin is activated byrepeating this process and selecting the check box.
4. Click Activate.
Requirements• All virtual machine templates must contain VMware Tools.• For Windows virtual machines (VMs), click here [2] to determine whether Microsoft Sysprep is required on the
vCenter instance.• The vCenter user must have proper credentials for cloning, customization, and powering on the virtual machine.• On Windows 2003 templates, the password for an Administrator must be blank on the base image.
Cloud Provisioning Tasks by GroupTasks for setting up a virtualization product, provisioning virtual resources, and requesting virtual machines from theservice catalog depend on the user group to which you belong.• Virtual Provisioning Cloud Administrator: Members of this group own the cloud provisioning environment
and are responsible for configuring the different virtualization providers used by cloud provisioning.Administrators can create service catalog items from VMware templates and Amazon EC2 images, approverequests for virtual machines, and monitor the cloud provisioning environment using the Service MonitoringPortal.
• Virtual Provisioning Cloud Operator: Members of this group fulfill provisioning requests from users.Operators perform the day-to-day work of cloud provisioning by completing tasks that appear in the CloudOperations Portal. Operators are assigned to specific virtualization providers and must be technically adept withthe products they support.
• Virtual Provisioning Cloud Users: Members of this group can request virtual machines from the service catalogand use the My Virtual Assets portal to manage any virtual machines that are assigned to them.

Orchestration VMware Support Plugin 3
Activating the PluginThe Amazon EC2 feature requires the Orchestration - VMware Support plugin. VMware for cloud provisioning is afeature of Orchestration, which is available as a separate subscription from the rest of the ServiceNow platform. Topurchase an Orchestration subscription and have this plugin activated, contact your account manager.
References[1] http:/ / www. vmware. com/ products/ vcenter-server/[2] http:/ / kb. vmware. com/ selfservice/ microsites/ search. do?language=en_US& cmd=displayKC& externalId=1005593
Requesting a Virtual Server - Versions Prior toCalgary
OverviewUsers can request a Windows or Linux virtual server in the ServiceNow service catalog. Requested virtual serversare subject to normal approvals and some special provisioning tasks. A decommissioning workflow enables a user tomake a service catalog request for the deletion of a virtual server. Any virtual server created from an instance can bedestroyed from that instance. This functionality requires the Orchestration VMware Support plugin.
Note: If you are using the ServiceNow Calgary release or later, see Requesting a VMware Instance in Cloud Provisioning.
AdministratorsFor details about provisioning virtual machines, see Enabling VMware Provisioning.
Requesting a Virtual Server1. Navigate to Self-Service > Service Catalog and select Virtual Server.
2. In the Catalog Item form for this virtual server, complete the following fields:• Operating System: Select the OS of the virtual server you are requesting.

Requesting a Virtual Server - Versions Prior to Calgary 4
• Class: Select a class of server for this operating system that has the desired features (memory, storage, CPUspeed).
• Purpose of requested virtual server: Type a brief justification for this request for the approvers.• Notes for the provisioners: Add any information that the provisioners should know, such as the virtual
server's network name.3. Click Order Now.
The Order Status form appears, displaying a request summary and a Stage indicator for tracking the progressof the request.
4. Bookmark this page and return to it to track the status of this request.You are notified by email notification of the results of your request.

Requesting a Virtual Server - Versions Prior to Calgary 5
Decommissioning a Virtual ServerRequesting the decommissioning of virtual servers through the service catalog launches a workflow that uses theDestroy VMware activity.1. Navigate to Self-Service > Service Catalog > Routine Services and select Decommission virtual server.
2. In the Catalog Item form, select a VM from the Virtual server to decommission list.3. Click Order Now to destroy this virtual server.
Note: This action is irrevocable and launches the VMware - Decommission Workflow immediately. Thevirtual server is destroyed without any further user involvement.
The Order Status form appears, displaying a request summary and a Stage indicator for tracking the progressof the request.
4. Bookmark this page and return to it to track the status of this request.Users are notified by email of the results of their request.

6
Configuration
Configuring VMware - Versions Prior to Calgary
OverviewThese are the initial tasks for configuring Orchestration for VMware.1. Install and configure vCenter.2. Create virtual server templates on the ESX Server.3. Create vCenter and ESX records in ServiceNow.4. Configure the Windows and Linux connection information.5. Allocate IP addresses for virtual servers on the network.6. Assign users to the out-of-box approval and provisioning groups.7. Configure the virtual server products that a user selects in the service catalog.
Note: If you are using the ServiceNow Calgary release or later, see Configuring VMware for Cloud Provisioning.
vCenter and the ESX ServervCenter is VMware’s management console that manages the activities of ESX Servers. ESX Servers contain thevirtual server templates and hosts running virtual machines. Refer to VMware's product documentation forinstructions about installing and configuring vCenter and ESX. Observe the following requirements when setting upServiceNow to interact with vCenter and the ESX Server:• Ensure that all products advertised in the ServiceNow service catalog have corresponding templates on the ESX
Server. The names of the templates on the ESX Server should be descriptive enough to simplify selection duringthe manual phase of provisioning.
• The MID Server probe's user must log into vCenter with the proper VMware role to execute the probe’s action.
ESX ServersWith the proper credentials, ServiceNow Discovery can detect and explore all the ESX Servers in a network.Discovery returns the hardware characteristics of the ESX machines and the relationships to the other VMwarecomponents. If ServiceNow Discovery is not being used, each ESX Server record must be configured manually. Toview the ESX records, navigate to VMware Provisioning > Virtual Servers > ESX Servers. To configure therelationships between VMware components manually, click the green plus sign ( + ) at the top of the Related Itemslist and use the form provided. See VMware Component Relationships for the relationships in the base ServiceNowplatform.

Configuring VMware - Versions Prior to Calgary 7
vCenterCreate a record for each vCenter instance in the network. Provide the name of an active vCenter machine and theURL to the instance. The location of this vCenter is for convenience and is not used anywhere else. Use ServiceNowDiscovery to explore vCenter and record the relationships between the vCenter and the other VMware components.If no discovery product is in use, configure the relationships manually, using the the green plus sign ( + ) in the CIRelations formatter. See VMware Component Relationships for the out-of-box relationships. To access a vCenterinstance record, navigate to VMware Provisioning > Virtual Servers > vCenter Instances.

Configuring VMware - Versions Prior to Calgary 8
VM Configuration in ServiceNowThe VM configuration provides the information necessary to create each type of virtual server offered in the servicecatalog and to power up the virtual machines on the network. This includes:• Credentials and connection information for Windows and Linux.• Identity of resource pools on the ESX Server.• List of available IP addresses to assign to virtual machines as they are added to the network.
NetworkEnsure that the network configuration contains enough IP addresses to meet the demand for new virtual servers.1. Navigate to VMware Provisioning > VM Configurations > VM Networks, and then click New.2. Create a new network configuration record containing the specifics of the network in which virtual servers will be
created.3. Click Submit.4. In the Virtual Machine Allocatible IP Address related list, add the IP addresses within the network that are
available for virtual servers.The provisioning task allocates one of these addresses to each clone it creates.
5. Click Submit.
Windows VMsTo configure the Windows connection information:1. Navigate to VMware Provisioning > VM Configurations > Windows VMs, and then click New.2. Create a new Windows VM configuration record containing the machine and domain login credentials for the
virtual clone, the operating system license key, and the registered user.3. Make sure to include the OS in the name, such as Windows 2008.
This value appears in the Operating System drop-down list in the catalog request item and tells theprovisioning task which configuration information to use.

Configuring VMware - Versions Prior to Calgary 9
4. Click Submit.
Linux VMsTo configure the Linux VM connection information:1. Navigate to VMware Provisioning > VM Configurations > Linux VMs, and then click New.2. Create a new Linux VM configuration record containing the name of the DNS domain.3. Make sure the name of the virtual machine is unique and descriptive.
This value appears in the Operating System drop-down list in the catalog request item and tells theprovisioning task which configuration information to use.
4. Click Submit.
Group MembershipActivating the Orchestration for VMware Support plugin installs the following groups:• Virtual server approvers: Approves requests for virtual servers.• Virtual server networking: Selects network information for virtual servers being provisioned. This group is
available with the Berlin release.• Virtual server provisioners: Provides the configuration information to configure virtual servers.To add users to these groups:1. Navigate to User Administration > Groups.2. Open Virtual server approvers from the list of groups.3. Go to the Group Members related list and click Edit.4. Select one or more users from the list and update the record.

Configuring VMware - Versions Prior to Calgary 10
5. Repeat this process to add members to the Virtual server provisioners and Virtual server networking groups.
Configuring the Catalog Offering in Versions at Berlin or LaterThe hardware configuration options that the requestor selects when ordering a virtual server from the service catalogare configured as display values only, but must represent accurately the products being offered. Users can selectfrom lists of preconfigured virtual servers or build their own server.
CategoriesThis designation is arbitrary and is used to inform the provisioning team about the virtual machine's purpose, but isnot used for any processing. This configuration option is available with the Berlin release.1. Navigate to VMware Provisioning > Service Catalog Configurations > VM Category.2. Click New.3. Create categories for the virtual machines users want to provision.
Examples of categories are: Dev, QA, and Prod.
Class SelectionsVMware classes provide virtual hardware packages that include predefined numbers of CPUs, amounts of memory,data disk size, and related details. Users can choose a VMware class rather than build a virtual machine fromseparate attributes. When the user selects a class, the individual selections for CPU, memory, and disk size arehidden.1. Navigate to VMware Provisioning > Service Catalog Configurations > VM Class Selections.2. Click New.3. Enter the Name to appear in the service catalog and set a Price for this virtual server.
The Order field determines where this class appears in the selection list. The physical hardware requirementsappear in the Class field, and are presented to the requestor in the service catalog.

Configuring VMware - Versions Prior to Calgary 11
4. Click Submit.
OS Selections1. Navigate to VMware Provisioning > Service Catalog Configurations > VM OS Selections.2. Click New.3. Enter a Description of the virtual server as it should appear in the service catalog.
Typically, this contains the operating system and some version information, such as Windows Server 2003 orCentOS 6.
4. In the Type field, select Windows or Linux.Orchestration uses this value to filter available templates for the provisioning task.
5. Click Submit.
CPU SelectionsYou can customize service catalog hardware selections so that users can request the number of CPUs for a virtualserver. The service catalog shows the CPU option only when the user declines the choice of a predefined virtualserver class. This configuration option is available with the Berlin release.1. Navigate to VMware Provisioning > Service Catalog Configurations > VM CPU Selections.2. Click New3. Create a record for each increment of CPUs that a user can request (such as 1, 2, 3).
The number of CPUs defined must be the same in each field on the form.
4. Click Submit.

Configuring VMware - Versions Prior to Calgary 12
Memory SelectionsYou can customize service catalog hardware selections so that users can request a specific amount of memory for avirtual server. This name can contain text. For example, memory expressed as 512 MB, 1 GB, and 2GB would havethe following values: 512, 1024, 2048. The service catalog shows the VM memory option when the user declines thechoice of a predefined virtual server class. This configuration option is available with the Berlin release.1. Navigate to VMware Provisioning > Service Catalog Configurations > VM Memory Selections.2. Click New3. Express the memory available in GB and MB on the form.
The value in GB in the Memory field is for display purposes. The value in the Memory amount value (MB)field expresses the memory in MB and is used to provision the virtual server.
4. Click Submit.
Data Disk Size SelectionsYou can customize service catalog hardware selections so that users can request the virtual server's data disk size.The Data disk size field can have text in it. For example, disk sizes can have display values such as 10GB or 20GB.When converted to MB, these values are expressed as 10,240 and 20,480. The service catalog shows the data disksize option only when the user declines the choice of a predefined virtual server class. This configuration option isavailable with the Berlin release.1. Navigate to VMware Provisioning > Service Catalog Configurations > VM Data Disk Size Selections.2. Click New3. Express the disk sizes offered in GB and MB on the form.
The value in GB in the Data disk size field is for display purposes. The value in the Data disk size value(MB) field expresses the disk capacity in MB and is used to provision the virtual server.
4. Click Submit.
Catalog Offering in versions prior to Berlin

Configuring VMware - Versions Prior to Calgary 13
Configuring the Catalog Offering in Versions Prior to BerlinThe operating system and class that the requestor selects when ordering a virtual server from the Service Catalog are configured as display valuesonly, but must represent accurately the products being offered.
Class Selections
1. Navigate to VMware Provisioning > Service Catalog Configurations > VM Class Selections.2. Click New.3. Type the name for this class that appears in the Service Catalog and configure a price for this virtual server.
The Order field determines where in the drop-down list this class appears. The physical hardware requirements appear in the Class field, andare presented to the requestor in the Service Catalog. These values must match those of the templates in that class.
4. Click Submit.
OS Selection
1. Navigate to VMware Provisioning > Service Catalog Configurations > VM OS Selections.2. Click New.3. Type the Description of the virtual server as it should appear in the Service Catalog.
Typically, this contains the operating system and some version information, such as Windows Server 2003.4. The value of the OS field should be Windows or Linux.
Orchestration uses this value to filter available templates for the provisioning task.
5. Click Submit.
What Do I Do Next?Configure the Resource Pools in ServiceNow as they exist on the ESX Server.

Accessing the vCenter API - Versions Prior to Calgary 14
Accessing the vCenter API - Versions Prior toCalgary
OverviewServiceNow VMware Orchestration activities require specific user privileges to access the vCenter APIs necessary torun workflows for VMware support. These login privileges are not for use within the ServiceNow platform, but areconfigured for the VMware activities on the vCenter instance. Refer to the vCenter documentation [1] for assistance.
Note: If you are using the ServiceNow Calgary release or later, see User Privileges for vCenter API for Cloud Provisioning.
Determining PrivilegesTo determine the user privileges required by the VMware activity that logs into vCenter:1. Navigate to the VMware API documentation [2].2. In the vCenter API page, select All Types in the left navigation menu.
3. Click U-Z in the API index that appears.

Accessing the vCenter API - Versions Prior to Calgary 15
4. Select VirtualMachine in the index.Information appears about a VirtualMachine object in the API.
5. Select Local Methods from the navigation menu at the top of the page.
6. Click the following methods to see the required vCenter login privileges:• CloneVM_Task: No privileges are required.• CustomizeVM_Task: Requires VirtualMachine.Provisioning.Customize• PowerOnVM_Task: Requires VirtualMachine.Interact.PowerOn
References[1] http:/ / www. vmware. com/ support/ pubs/[2] http:/ / www. vmware. com/ support/ developer/ vc-sdk/ visdk41pubs/ ApiReference/ index. html

ESX Resource Pools - Versions Prior to Calgary 16
ESX Resource Pools - Versions Prior to Calgary
OverviewResource pools are configured on the ESX Server and define the maximum amount of resources that templates usingthat pool can consume. An ESX Server property enables resource pools to expand when necessary if the ESX Serverhas additional resources to spare. The Name and Owner fields of each resource pool on the ESX Server must beconfigured within the ServiceNow platform in the cmdb_ci_esx_resource_pool table. When Orchestration forVMware executes its manual provisioning tasks, the provisioner must select the proper resource pool for the virtualserver requested. Discovery finds resource pools on ESX machines and populates the fields on the ESX ResourcePool form automatically.
Prerequisite StepEnsure that vCenter and the ESX Server have been fully configured, including the creation of the templates andresource pools. Complete the tasks in Configuring VMware for Orchestration before proceeding with the procedureson this page.
Configuring Resource Pools in ServiceNowThe ESX Server has a default resource pool called Resources that defines normal resources for a virtual machine.These levels are dynamically generated from shares of the total resources allocated to virtual machines on the ESXServer. For details about how these resources are calculated, see the ESX Server Administration Guide [1].ServiceNow Discovery finds this default resource pool and adds a record to the ESX Resource Pools moduleautomatically. If Discovery is not running on the ServiceNow instance, create a record for the Resources pool.Ensure that the Owner field is correct and leave the resource fields blank. If a provisioner selects the Resources poolwhen provisioning a virtual server, the ESX Server will create a virtual machine for use under a normal load.1. Navigate to VMware Provisioning > Virtual Servers > ESX Resource Pools.2. Click New in the list.3. Create a new record for each resource pool in the ESX Server, ensuring that the Name and Owner fields are
correct.The additional fields are for display purposes only, except for the CPU expandable and Memory expandablefields. Select these check boxes to allow for expansion of the CPU and memory limits when needed if thoseresources are available on the ESX Server. When granted, these extra resources can be revoked if needed toprovision other virtual machines.
4. Click Submit.

ESX Resource Pools - Versions Prior to Calgary 17
What Do I Do Next?After recording the ESX Resource Pools, enter the names and hardware characteristics of the VMware templates intothe ServiceNow platform.
References[1] http:/ / www. vmware. com/ support/ pubs/ esx_pubs. html

VMware Templates - Versions Prior to Calgary 18
VMware Templates - Versions Prior to Calgary
OveriewVMware templates are created on the ESX Server and are used to fulfill virtual server requests from the ServiceNowservice catalog. Discovery populates the CMDB with VMware template information retrieved from vCenter.Orchestration clones these templates to create virtual machines automatically from a system managed by vCenter.Template records describe the computer hardware features of these templates, such as hard disk size and RAM.
Note: If you are using the ServiceNow Calgary release or later, see VMware Templates and Offerings for Cloud Provisioning.
Prerequisite StepEnsure that the resource pools on the ESX Server are fully recorded in ServiceNow before defining the templatesthat are available for selection in the service catalog.
Creating Template RecordsEnsure that the VM name assigned in the ServiceNow template record enables the provisioner to select from theESX Server the proper template to fulfill the service catalog request. ServiceNow compares the Correlation ID inthe template record the provisioner selects with the VMware UUID in vCenter to determine the correct template.1. Navigate to VMware Provisioning > Virtual Servers > VM Templates.2. Click New.3. In the VM name field, enter the template name from the ESX Server.4. Record the features of the actual image that is being used as a template.5. Use the SC OS field to determine which templates are presented to the provisioner for fulfilling the service
catalog request.Orchestration uses the same template for a precofigured class in the selected operating system as it uses for acustom configuration by replacing the specified components with those the user selects.Note: In versions prior to Berlin, custom and preconfigured virtual server selections required separatetemplates. An administrator could mark preconfigured virtual servers with an entry in the SC Class field. Theadministrator selected the class to which a template belonged. These classes define the different templates byhardware features (such as hard disk size and RAM). For example, you might create Silver, Gold, andPlatinum classes, each offering different features. These classes appear in the service catalog for the requesterto select.
ServiceNow Discovery can determine the relationships between the template and the ESX Serverautomatically.

VMware Templates - Versions Prior to Calgary 19
6. If ServiceNow Discovery is not in use, define the relationships between the template and the ESX Servermanually.
a. Click the green plus icon ( + ) after Related Items.The form for defining relationships for this template appears.
b. Define the correct relationships for this template, as described in VMware Component Relationships.

VMware Templates - Versions Prior to Calgary 20
What Do I Do Next?When a user requests a virtual machine from the service catalog, Orchestration executes an approval task formembers of the Virtual server approvers group. Upon approval, Orchestration executes the first provisioning task.Proceed to Approving and Provisioning VMware Requests for instructions.

21
MID Server
MID Server Plugin
OverviewThe Management, Instrumentation, and Discovery (MID) Server is a Java application that runs as a Windows serviceor UNIX daemon. The MID Server facilitates communication and movement of data between the ServiceNowplatform and external applications, data sources, and services.For specific requirements for using the MID Server with Discovery, see MID Server Requirements for Discovery.See the following pages for installation and configuration information:• MID Server Installation• MID Server Configuration
Functional ArchitectureThe MID Server is a Java process that oversees 2 main functional groups of sub-processes, namely Monitors andWorkers. A Monitor runs in a separate thread as a timer object and is configured to execute a task periodically,returning its result to ServiceNow's ECC Queue (External Communication Channel Queue). A Worker is anon-demand thread that executes a task when a corresponding ECC output queue record is read from ServiceNow(The Queue Monitor reads the ECC output queue and triggers a Worker). For example, a Discovery probe is aWorker.Monitors1. Auto Upgrade2. Heartbeat3. Queue Monitor4. Queue Sender5. Synchronizers
• Altiris• LanDesk• Microsoft SMS• JDBC
Workers1. Command Line2. JDBC3. File4. Probes
• HTTP• WMI• SNMP• SSH

MID Server Plugin 22
JAR File SynchronizationIn the Aspen release, an administrator can upload a JAR file to an instance and synchronize it to all MID Servers.The administrator can then write custom probes that use the synchronized JAR file. To upload a JAR file to theinstance:1. Navigate to MID Server > JAR Files.2. Click New.3. Complete the following fields:
• Name: A unique and descriptive name for identifying the file in the instance.• Version: A version number for the file, if one is available.• Source: Location of the JAR file for reference purposes. Source information is not used by the system.• Description: Short description of the JAR file and its purpose in the instance.
4. Click the paper clip icon in the banner and attach the JAR file to the record.
5. Click Submit.6. Restart the MID Server service.
The platform makes the JAR file available to any MID Server configured to communicate with the instance.
System Requirements for Calgary or LaterServiceNow has tested the MID Server in the following environments:• Windows Server 2003, 2008, and 2012. All Windows Server 2008 and 2012 editions are supported. Virtual
machines and 64-bit systems are supported.• Linux: Virtual machines and 64-bit systems are supported. On 64-bit Linux systems, you must install the 32-bit
GNU C library [1] (glibc). The installation command for CentOS is: yum install glibc.i686The minimum suggested configuration is:• 4GB of available RAM per application• 2+GHZ CPU (Multi-core preferred)• 500MB of disk space per application deployed• Can ride-along with other services (dependent on server utilization and resource availability)

MID Server Plugin 23
System Requirements for Berlin or EarlierThe MID Server has run and been tested in the following environments:• Windows Server 2003 and later. Virtual hosts and 64-bit systems are supported.• Linux RedHat ES 3+. On 64-bit Linux systems, the 32-bit GNU C library [1] (glibc) must be installed.• Solaris 2.8+• HP-UX 11.0The minimum suggested configuration is:• 4GB of available RAM per application• 2+GHZ CPU (Multi-core preferred)• 500MB of disk space per application deployed• Can ride-along with other services (dependent on server utilization and resource availability)
Note: When upgrading from a release prior to Berlin, you must reinstall the MID Server. Do not attempt to upgrade the MID Serveralong with the instance in this case.
ApplicationsThe MID Server is used by the following applications:• Discovery• Orchestration• Import Sets• Altiris• Microsoft SMS / SCCM• Avocent LANDesk• HP OpenView Operations• Microsoft System Center Operations Manager (SCOM)• Borland Starteam Integration• Microsoft MIIS
Enhancements
Dublin• Administrators can install a 64-bit MID Server on a 64-bit host system.• Script File synchronization stores all MID Server scripts in the ServiceNow instance to simplify distribution and
security. It is no longer necessary to manually unblock MID Server scripts on the host machine.• Several new business rules ensure that changing a MID Server's name in the configuration parameter also changes
the name in MID Server record. See Available Parameters.• The first MID server to successfully connect with the ServiceNow instance automatically becomes the default
MID Server.

MID Server Plugin 24
CalgaryThe following enhancements have been added as of the Calgary release:• Configuration parameter for SSH command delay: The MID Server configuration parametermid.ssh.initial_delay_ms enables an administrator to configure the amount of time (in milliseconds)that an SSH probe must wait to run a command after connecting to a target device.
• Configuration parameter for credentials: The MID Server configuration parametermid.powershell.local_mid_service_credential_fallback enables the MID Server to use thelogin credentials of its service to access a device if all other credentials fail. This parameter replaces the parametermid.powershell.use_mssqlauth. This parameter defaults to true.
• Access for the discovery_admin role: Users with the discovery_admin role can now access the MID Serverapplication and all its modules from the application navigator. In previous versions, this role had some access toMID Server tables, but no access through the user interface.
• Configuration parameter for MSSQL credentials with PowerShell: The MID Server configuration parametermid.powershell.use_mssqlauth was removed from the platform. MSSQL discoveries with PowerShellnow use either the user account running the MID Server or an Active Discovery credential.
• Configuration parameter for fallback credentials: The MID Server configuration parametermid.powershell.local_mid_service_credential_fallback was added to allow the MID Serverto use the login credentials of its service to access a device if all other credentials fail.
• Configuration parameter for 64-bit Windows hosts: The parameter mid.powershell.path can onlydiscover 64-bit applications running on Windows hosts if the MID Server is also running on a 64-bit Windowshost.
• wrapper.conf configuration file: The wrapper.conf configuration file is not available for user configurationin Calgary and is replaced for that purpose by the wrapper-override.conf file.
• Requirements: Support for certain operating systems has changed in Calgary. The installation command for LinuxCentOS is provided in the documentation.
AspenThe localhost MID Server, which was used as the default MID Server in Discovery Schedules, was removed fromthe platform with the Aspen Patch 3 release. This MID Server originally was intended for demonstration purposesand was not intended as a supported feature.
References[1] http:/ / www. gnu. org/ s/ libc/

Requirements 25
Requirements
OverviewThe ServiceNow MID Server is used for enterprise application and service monitoring, integration, Orchestration,and Discovery. The requirements in this page are specifically for the use of MID Servers with the ServiceNowDiscovery and Orchestration products.
System Requirements for Calgary or LaterServiceNow has tested the MID Server in the following environments:• Windows Server 2003, 2008, and 2012. All Windows Server 2008 and 2012 editions are supported. Virtual
machines and 64-bit systems are supported.• Linux: Virtual machines and 64-bit systems are supported. On 64-bit Linux systems, you must install the 32-bit
GNU C library [1] (glibc). The installation command for CentOS is: yum install glibc.i686The minimum suggested configuration is:• 4GB of available RAM per application• 2+GHZ CPU (Multi-core preferred)• 500MB of disk space per application deployed• Can ride-along with other services (dependent on server utilization and resource availability)
System Requirements for Berlin or EarlierThe MID Server has run and been tested in the following environments:• Windows Server 2003 and later. Virtual hosts and 64-bit systems are supported.• Linux RedHat ES 3+. On 64-bit Linux systems, the 32-bit GNU C library [1] (glibc) must be installed.• Solaris 2.8+• HP-UX 11.0The minimum suggested configuration is:• 4GB of available RAM per application• 2+GHZ CPU (Multi-core preferred)• 500MB of disk space per application deployed• Can ride-along with other services (dependent on server utilization and resource availability)
Note: When upgrading from a release prior to Berlin, you must reinstall the MID Server. Do not attempt to upgrade the MID Serveralong with the instance in this case.
External Connectivity RequirementsThe MidServer communicates securely on port 443 to the instance and requires no inbound connections. In some cases, it might be necessary to allow this communication through the firewall if the MID Server fails to register on the instance. To determine if the application or a network security restriction is to blame for connection failure, attempt to telnet to the instance on port 443 from the server that is hosting the MID Server application. If this connection fails, then the problem could be a web proxy (since 443 is a https connecton) or a Firewall rule

Requirements 26
preventing external TCP connections from that host. Contact network security personnel for the proxy information toadd to the config.xml file, or request that the Firewall be configured to allow access using one of the followingsyntaxes:• <source IP> to <any>• <source IP> to <ServiceNow> any established• <source IP> to <instance_name.service-now.com> 443
Additionally, ensure the MID server can connect to install.service-now.com to download and install updates.
Internal RequirementsThe three methods used for discovering various devices on a network are SSH, WMI and SNMP. SSH is used foraccessing UNIX-like machines. Discovery logs into a machine with SSH and runs commands within an encryptedsession to gather system information. Orchestration logs in to UNIX and Linux machines using SSH to performWorkflow activities. WMI is used by Discovery for Windows based machines and is used for querying the remoteWMI protocol on targets for gathering of Windows information. Orchestration uses PowerShell to run activities onWindows machines. And lastly, SNMP v1/v2 is used on various network devices (Routers, Switches, Printers) byDiscovery and Orchestration. Detailed information is listed below about these methods.
SSH - UNIXFor UNIX-like machines, Discovery and Orchestration use SSH protocol, version 2 [1] to access target machines.SSH is a network protocol that allows data to be exchanged using a secure channel between two networked devices.SSH communicates on port 22 within an encrypted datastream and requires a login to access the targets using twoavailable methods of authentication: a user name and password combination and a user name and shared private key.Specify SSH authentication information and type in the Credentials module. If multiple credentials are entered, theplatform tries one after the other until a successful connection is established or all are ultimately denied. To providefor application relationships a limited number of SUDO commands must be available to be run. Additional details tothese requirements can be found in UNIX/Linux commands requiring root privileges for Discovery andOrchestration.
WMI - WindowsFor Windows machines, Discovery uses the Windows Management Instrumentation (WMI) [2] interface to querydevices. Due to Microsoft security restrictions for WMI, the MID Server application executing the WMI queriesmust run as a domain user with local (target) administrator privileges. When Discovery detects activity on port 135,it launches a WMI query. The response from the Windows device is sent over a Distributed Component ObjectModel (DCOM) port configured for WMI on Windows machines. This can be any port [3]. Ensure that the MIDServer application host machine has access to the targets on all ports due to the unique nature of the WMIrequirements.
Windows PowerShellPowerShell [4] is built on the Windows .NET Framework and is designed to control and automate the administrationof Windows machines and applications. Orchestration uses PowerShell to run Workflow activities on Windowsmachines. PowerShell must be installed on any MID Server that executes these activities. MID Servers usingPowerShell must be installed on a supported Windows operating system. ServiceNow supports PowerShell 2.0.Orchestration activities for PowerShell require a credentials Type of Windows.

Requirements 27
SNMP - NetworkFor network devices, Discovery uses a SNMP scan [5] to get device specific MIBs and OIDs. SNMP is a commonprotocol used on most routers, switches, printers, load balancers and various other network enabled devices. Use a"community string" (password) for authentication when scanning a device via SNMP. Many devices have anout-of-box community string of public which Discovery (by default) uses when querying a target. Define additionalcommunity strings in the Credentials module which are tried in succession, along with public, until a successfulquery returns. In addition to the credentials, the platform also requires the ability to make port 161 SNMP requestsfrom the MID Server to the target. If Access Control Lists (ACLs) are in place to control the IP addresses that canmake these queries, ensure that the IP address of the MID Server is in the ACL. ServiceNow Discovery supportsSNMP versions 1 and 2c [6].The out-of-box Orchestration activity SNMP Query returns the OID of a device and requires SNMP credentials.
WBEMWeb-Based Enterprise Management (WBEM [7]) defines a particular implementation of the CommonInformation Model (CIM [8]): , including protocols for discovering and accessing each CIM implementation.WBEM requires either of two ports, 5989 or 5988 and uses the HTTP transport protocol. WBEM supports SSLencryption and uses CIM user name/password credentials. ServiceNow Discovery launches a WBEM port probe todetect activity on the target ports and to append gathered data to a classification probe that explores CIM Servers.
References[1] http:/ / en. wikipedia. org/ wiki/ Secure_Shell[2] http:/ / en. wikipedia. org/ wiki/ Windows_Management_Instrumentation[3] http:/ / support. microsoft. com/ kb/ 832017[4] http:/ / support. microsoft. com/ kb/ 968929[5] http:/ / en. wikipedia. org/ wiki/ SNMP[6] http:/ / www. paessler. com/ manuals/ prtg_traffic_grapher/ snmpversion12cand3[7] http:/ / en. wikipedia. org/ wiki/ Web-Based_Enterprise_Management[8] http:/ / en. wikipedia. org/ wiki/ Common_Information_Model_(computing)

Installation 28
Installation
OverviewThe Monitoring, Integration, and Discovery (MID) Server is a Java server that facilitates communication andmovement of data between the ServiceNow platform and external applications, data sources, and services.
Satisfying Connection PrerequisitesYou must install a MID Server on a local network resource and configure it to communicate with the machines itwill probe. The local network resource must have these network privileges:• Firewall access: Configure any firewalls between the MID Server and the target devices to allow a connection. If
your network uses a DMZ [1], and if your network security protocols limit port access from within the network tothe DMZ, you might have to deploy a MID Server to a machine within the DMZ to probe the devices there.
• Network access: Configure target devices to allow the MID Server probe to connect. If network security preventsyou from configuring new machines that can connect to the targets, install the MID Server on an existing machinewith connection privileges.
• Network account: Install the MID Server with the proper account, either local or domain administrator.Additionally, for the MID Server to access your ServiceNow instance, satisfy these prerequisites:• Network access to the ServiceNow instance: Configure the network that the MID Server uses to allow traffic
over TCP port 443.• A MID user: Create a ServiceNow user record for the MID Server to use. This user record must have the
mid_server role.
Downloading MID Server FilesEnabling Discovery, Orchestration, or any integration that requires the use of the MID Server, automaticallyactivates the MID Server plugin. After activation, the MID Server application menu appears in the applicationnavigator.
MID Server application menu
To download and install a MID Server, navigate to Mid Server >Downloads on your instance. Select and download the MID Server forthe appropriate operating system. If the download does not beginimmediately, try the download at a later time as the system may bebusy.

Installation 29
MID Server Downloads module
Installing a MID Server on LinuxYou can install a MID server on a 32-bit or 64-bit Linux computer. Ifyou are using a 64-bit operating system with a version of ServiceNowprior to Dublin, see Installing a 32-bit MID Server on 64-bit Linux.
1. Run mkdir -p /servicenow/<mid server name> to create the installation directory.2. Extract the downloaded MID Server archive file, mid.<os>.zip into the /servicenow/<mid server name>
directory.The resulting directory structure is /service-now/<mid server name>/agent.
3. Open the cd /service-now/<mid server name>/agent directory, and edit the config.xml file as follows:• Find the element <parameter name="url" value="UNIQ-nowiki-0-c363d6b0758f2927-QINU //YOUR_INSTANCE.service-now.com" /> andchange the value to the URL of your instance.
• If basic authentication is enabled, as it is by default, enter the MID user credentials in themid.instance.username and mid.instance.password parameters.
• Enter connection information for any proxy server used and remove the comment tags from the proxyconfiguration information.
4. Execute the shell script start.sh.5. In the instance identified in the config.xml file, navigate to MID Server > Servers. If Discovery is installed,
navigate to Discovery > MID Servers.All MID Servers connected to this instance are listed.
6. Make sure that the Status is Up for the MID Server you just installed.
Installing a 32-bit MID Server on 64-bit LinuxA 64-bit MID Server is available with the Dublin release. For releases prior to Dublin, you can install a 32-bit MIDServer on a 64-bit Linux operating system by installing 32-bit libraries. To install the required libraries, run thecommand for your Linux operating system version.• Ubuntu: sudo apt-get install ia32-libs ia32-libs-multiarch libgphoto2-2• Redhat: sudo yum –y install glibc.i686After installing the required libraries, install the MID server.
UninstallingA MID Server running on Linux operates as a single process. You can end this process to accommodate such tasksas redeploying the MID Server to another host machine or changing the unique name of a MID Server whendeploying multiple MID Servers.1. Stop the MID Server process by executing the shell script stop.sh.2. Verify that the MID Server is running by executing the shell script bin/mid.sh status.3. After the MID Server stops, delete the files in the agent directory.

Installation 30
Installing a MID Server on WindowsUse the following procedures to install one or more MID Servers on a single machine.1. Log in to the host machine where you want to install the MID Server.2. Create a directory for the MID Server on the top level of the drive, with a distinctive name, such as
ServiceNow\MID Server1.3. Move the MID Server archive file into the new directory.4. Right-click the archive and select Extract All.5. Navigate to the \agent directory that was created when the file was extracted.6. Edit the config.xml file with a text editor such as WordPad:
• Find the element <parameter name="url" value="UNIQ-nowiki-1-c363d6b0758f2927-QINU //YOUR_INSTANCE.service-now.com" /> andchange the value to the URL of your instance.
• If basic authentication is enabled, as it is by default, enter the user credentials in themid.instance.username and mid.instance.password parameters.
• Find the element <parameter name="name" value="YOUR_MIDSERVER_NAME_GOES_HERE"/> and change the value to define the name of your MID Server.
• Enter connection information for any proxy server used and remove the comment tags from the proxyconfiguration information.NOTE: If this MID Server is installed on a system that contains other MID Servers, edit the wrapper.conf fileas described in the procedure for installing multiple MID Servers.
Installing the MID Server as a Windows ServiceTo run a MID Server as a Windows service in Windows XP, Windows 2000 Server, or Windows Server 2003:1. Open the agent directory in the directory you created for the MID Server installation files. For example, the path
might be C:\ServiceNow\MID Server1\agent.2. Double-click the start.bat file to install the Windows service.To run a MID Server as a Windows service in Windows Vista, Windows 2008 Server, or Windows 7:1. Click the Start button.2. In the search box, type command prompt or cmd.exe.3. In the results list, right-click Command Prompt or cmd.exe, and then click Run as administrator.
This enables the MID Server to be installed with administrative rights under any Windows User AccountControl (UAC) setting.
4. In the command prompt, navigate to \agent in the directory you created for the MID Server files. For example,the path might be C:\ServiceNow\MID Server1\agent.
5. Run start.bat.

Installation 31
Configuring MID Server Service Credentials1. Open the Windows Services console.2. Double-click the ServiceNow <MID Server name> service for each MID Server.3. Select the Log On tab.4. Set Log on as privileges with Domain User or Local Admin credentials.5. In the General tab, set Startup type to Automatic.6. Click OK.7. Restart the ServiceNow <MID Server name> service, and make sure that ServiceNow\<MID Server
name>\agent\logs\agent0.log does not have error messages. If the MID Server does not start, see the ServiceNowknowledge article Review the agent log for MID Server errors (article KB0535148).
8. On the instance this MID Server is connected to, navigate to MID Server > Servers. If Discovery is installed,navigate to Discovery > MID Servers.
All MID Servers connected to this instance are listed.9. Make sure that the Status of the MID Server you just installed is Up.
UninstallingThe MID Server runs as a stand-alone service. It can be removed easily to accommodate such tasks as redeployingthe MID Server to another host machine or changing the unique name of a MID Server when deploying multipleMID Servers.1. Stop the running MID Server service.2. Open a command window (Start > Run > cmd).3. Go to the \agent\bin directory in the MID Server installation directory.4. Double-click the uninstall.bat file.
Installing Multiple MID Servers on a Single SystemYou can install multiple MID Servers on a single host or on a virtual machine using either Linux or Windows.Installing multiple MID Servers may involve other setup steps depending on your network configuration. SeeDeploying Multiple MID Servers for other considerations. For instances using a version prior to Calgary, see theprevious version information.Use the configuration file wrapper-override.conf to enter all configuration information. Do not edit the wrapper.conffile, which contains the default configuration for the MID Server. Any future ServiceNow upgrades overwrite thecontents of the wrapper.conf file, but do not modify the wrapper-override.conf file.1. Log in to the host system or virtual machine where you want to install multiple MID Servers.2. Create a directory for each MID Server on the top level of the drive.
Make sure you create a unique and descriptive name for each MID Server, such as MIDServer_SMS_Int orMIDServer_Disc1.
3. Extract the downloaded MID Server archive file into each MID Server directory.When this is complete, there should be the a directory path that resembles the following for each MID Server:
\ServiceNow\<MID Server name>\agent.4. Using a text editor such as WordPad, edit the config.xml file in each MID Server \agent directory, as follows:
• Find the element <parameter name="url" value="UNIQ-nowiki-2-c363d6b0758f2927-QINU //YOUR_INSTANCE.service-now.com" /> andchange the value to define the name of your MID Server.

Installation 32
• If basic authentication is enabled, as it is by default behavior, enter the user credentials in themid.instance.username and mid.instance.password parameters.
• Find the element <parameter name="name" value="YOUR_MIDSERVER_NAME_GOES_HERE"/> and change the value to define the name of your MID Server.
• Enter connection information for any proxy server used and remove the comment tags from the proxyconfiguration information.
5. For each MID Server, edit the \agent\conf\wrapper-override.conf file with a text editor such as WordPad .• wrapper.name [2]: [Required] This name identifies the MID Server process and must be unique. The default
value is snc_mid.• wrapper.displayname [3]: [Required for Windows] This name is displayed to the user in the Windows
Services console. For example, you might enter ServiceNow DevMID01. The default value is ServiceNowMID Server.
• wrapper.java.command [4]: [Optional] This property defines the path to the java bin directory, either relativeto the agent directory or absolute. The default value is jre/bin/java.
• wrapper.java.initmemory [5]: [Optional] This property defines the initial Java heap size [6] in MB. Thedefault value is 10.
• wrapper.java.maxmemory [7]: [Optional] This value defines the maximum Java heap size in MB. The defaultis 512.Note: These values cannot be edited while the MID Server is running.
Confirming Connectivity1. Restart each ServiceNow MID Server or MID Server service and make sure that \ServiceNow\<MID Server
name>\agent\logs\agent0.log does not have error messages.2. In each instance these MID Servers are connected to, navigate to MID Server > Servers. If Discovery is
installed, navigate to Discovery > MID Servers.All MID Servers connected to this instance are listed.
3. Make sure that the Status is Up for the MID Servers you just installed.
Versions Prior to the Calgary ReleaseMID Servers in versions prior to Calgary
• Log in to the host machine or virtual machine where you want to install multiple MID Servers.• Create a directory for each MID Server on the top level of the drive.
Make sure you create a unique and descriptive name for each MID Server, such as MIDServer_SMS_Int orMIDServer_Disc1.
• Extract the downloaded MID Server zip file into each MID Server directory.When this is complete, you should have the a directory that resembles the following for each MID Server:
\ServiceNow\<MID Server name>\agent.• Using a text editor such as WordPad, edit the config.xml file in each MID Server agent directory, as follows:
• Find the element <parameter name="url" value="UNIQ-nowiki-3-c363d6b0758f2927-QINU //YOUR_INSTANCE.service-now.com" /> andchange the value to the URL of your instance.
• If basic authentication is enabled, as it is by default, enter the user credentials in themid.instance.username and mid.instance.password parameters.

Installation 33
• Find the element <parameter name="name" value="YOUR_MIDSERVER_NAME_GOES_HERE"/> and change the value to define the name of your MID Server.
• Enter connection information for any proxy server used. Be sure to remove the comment tags from the proxyconfiguration information.
• Edit the wrapper.conf file for each MID Server with a text editor such as WordPad. By default, this file is locatedhere:
\ServiceNow\<MID Server name>\agent\conf
• wrapper.console.title=<MID Server name>: This is the title to use when running the MID Server as aconsole.
• wrapper.ntservice.name=<MID Server name>: This is the internal Windows name for the service and isnot displayed. This name must be unique. For example, example: snc_agent2.
• wrapper.ntservice.displayname=<MID Server name>: This is the name that is displayed to the user in theWindows Services console. For example, you might enter ServiceNow MID Server1.
• wrapper.ntservice.description=<New Custom Description>: This is the optional long description of theservice that appears in the Services console.NOTE: These values cannot be edited in this file after you create the service. Make sure you name anddescribe the services correctly before continuing to the next step.
• Install the MID Server as a Windows service:a. For Windows XP, Windows 2000 Server, or Windows Server 2003:
1. Open the \agent folder in the directory you created for the MID Server installation files. For example,the path might be C:\ServiceNow\MID Server1\agent.2. Double-click the start.bat file to install the Windows service.
b. For Vista, Windows 2008 Server, or Windows 7:1. Click the Start button.2. In the search box, enter command prompt or cmd.exe.3. In the results list, right-click Command Prompt or cmd.exe, and then click Run as administrator.
This enables the MID Server to be installed with administrative rights under any Windows UserAccount Control (UAC) setting.
4. In the command prompt, navigate to agent in the directory you created for the MID Server files. Forexample, the path might be C:\ServiceNow\MID Server1\agent.5. Run start.bat.
• Edit each MID Server's credentials.a. Open the Windows Services console.b. Double-click the ServiceNow <MID Server name> service for each MID Server.c. In the properties dialog box, select the Log On tab.d. Set Log on as privileges with Domain User or Local Admin credentials.e. In the General tab, set Startup type to Automatic.f. Click OK.
• Restart each ServiceNow MID Server service and make sure that \ServiceNow\<MID Servername>\agent\logs\agent0.log does not have error messages.
• In each instance these MID Servers are connected to, navigate to MID Server >Servers. If Discovery is installed,navigate to Discovery > MID Servers.

Installation 34
All MID Servers connected to this instance are listed.• Make sure that the Status is Up for the MID Servers you just installed.
Upgrading and TestingThe MID Server is upgraded automatically when you upgrade the instance, starting with the Aspen release. Thesystem that hosts the MID Server must be able to access http://install.service-now.com to automatically upgrade.The MID Server automatically tests connectivity through a public scripted web service.
Upgrade Error MessagesThe MID Server can display the following upgrade error messages.
Message Description
Unable to refresh packages The MID Server displays this as a generic error when the error is not handled by a defined error message.
Failed to query instance for MID Serverbuildstamp
Instance is offline or there is a major version mismatch between the MID Server and the instance (startingwith the Berlin release).
Not a valid package buildstamp InstanceInfo returned an assigned buildstamp that was not in the correct format, such as a versionmismatch (starting with the Berlin release).
Using Basic AuthenticationYou can enforce basic authentication on each request. Basic authentication requires each SOAP request to contain anAuthorization header as specified in the Basic Authentication [8] protocol.To set basic authentication for SOAP messages:1. Navigate to System Properties > Web Services.2. Select the check box for Require basic authorization for incoming SOAP requests.3. Click Save.Supplying basic authentication information, regardless of whether it is required, has an added advantage. The webservice invocation creates or updates data using the supplied credentials. As an example, when you create an incidentrecord, the journal fields have the user id of the basic authenticated user instead of the default Guest user. Thisbehavior allows you to identify data added by a specific MID Server.To provide basic authentication credentials for a MID Server, navigate to C:\Program Files\ServiceNow\<MIDServer name>\agent and edit the config.xml file, as follows:• Find the element <parameter name="mid.instance.username" value=""/> and enter your
instance's administrator user name as the value. For example, you might enter <parametername="mid.instance.username" value="admin"/>.
• Find the element <parameter name="mid.instance.password" value=""/> and enter theconfigured password for this instance as the value. For example, you might enter <parametername="mid.instance.password" value="abc123"/>.
Note: The setting for enforcing strict security controls how ServiceNow uses the credentials you provide for the MID Server. Whenthe setting is enabled, you must provide a user ID with access to the tables the MID Server is trying to access. When the setting isdisabled, any valid user ID allows the MID Server to access to all tables.

Installation 35
Monitoring Your MID ServerA properly functioning MID Server on Windows should be running the following:• A snc_agent service, or custom agent names if there are multiple installations of the MID Server on a Windows
host• A java.exe process• A wrapper.exe processIf the MID Server process is the only Java process running on the host, monitor the memory used by java.exe andalert on less than the maximum configured memory defined in ~\agent\conf\wrapper-override.conf.
Review the following logs for warning, critical, and severe errors:• ~\agent\logs\agent0.log.0• ~\agent\logs\wrapper.txt
Verify that the Windows host has no issues on these standard health metrics:• CPU• Memory• Disk utilization• NT Event log• syslog monitoring
References[1] http:/ / en. wikipedia. org/ wiki/ DMZ_(computing)[2] http:/ / wrapper. tanukisoftware. com/ doc/ english/ prop-name. html[3] http:/ / wrapper. tanukisoftware. com/ doc/ english/ prop-displayname. html[4] http:/ / wrapper. tanukisoftware. com/ doc/ english/ prop-java-command. html[5] http:/ / wrapper. tanukisoftware. com/ doc/ english/ prop-java-initmemory. html[6] http:/ / publib. boulder. ibm. com/ infocenter/ javasdk/ tools/ index. jsp?topic=%2Fcom. ibm. java. doc.
igaa%2F_1vg00014884d287-11c3fb28dae-7ff6_1001. html[7] http:/ / wrapper. tanukisoftware. com/ doc/ english/ prop-java-maxmemory. html[8] http:/ / www. w3. org/ Protocols/ HTTP/ 1. 0/ draft-ietf-http-spec. html#BasicAA

Configuration 36
Configuration
OverviewAdministrators must configure a MID Server to ensure that it has access to sufficient system resources, probes theproper data sources, and communicates with the instance as expected. You must complete all the steps in MIDServer Installation before attempting any of the configuration steps explained here.
Setting MID Server Memory SizeIn the base ServiceNow system, the MID Server memory is set to 512MB, which can be configured in the\agent\conf\wrapper.conf file in the MID Server installation directory. This setting might not be appropriate for theway your organization uses the MID Server. If you want the MID Server to work harder, allocate more resources toit. Or perhaps the MID Server is located in a small branch office with very few devices, and runs in an environmentwhere memory allocation is shared between a print server, mail server, or web proxy server. In this situation, theMID Server memory allocation might have to be reduced.To edit the memory allocation in Calgary or later:1. Navigate to \ServiceNow\<MID Server name>\agent\conf and open the wrapper-override.conf file in a text
editor.For more information about this file, see Installing Multiple MID Servers on a Single System.
2. Locate the following lines in the file:
# OPTIONAL: Maximum Java Heap Size (in MB)
# wrapper.java.maxmemory=512
3. Edit the memory allocation.4. Remove the comment tag (#) from the memory allocation parameter.5. Save the file.6. Restart the MID Server service.
Editing memory allocation in versions prior to Calgary
• Navigate to <MID Server name>\agent\conf and open the wrapper.conf file in a text editor.• Locate the following lines in the file:
# OPTIONAL: Maximum Java Heap Size (in MB)# wrapper.java.maxmemory=512• Edit the memory allocation.• Remove the comment tag (#) from the memory allocation parameter.• Save the file.• Restart the MID Server service.

Configuration 37
Available ParametersSet MID Server configuration parameters in either of the following places:• The Configuration Parameters related list in the MID Server record.• The config.xml file in the \agent folder of your MID Server installation folder.
Note: Changes to parameters only take effect when the MID Server is started (or restarted).
Required ParametersThe following parameters are required for all MID Servers.
Description Name(s) Details
InstanceURL
url Specifies the URL to the associated ServiceNow instance. Normally the URL is similar tohttps://instance.service-now.com, where you replace instance with the name of your instance. If youhost your own ServiceNow instance, use the URL set by your organization.
• Type: string• Default value: none
MID ServerID
mid_sys_id Records the MID Server record's unique identifier. This parameter should be empty when youinitially configure a MID Server. Do not change the value.
• Type: string• Default value: automatically set (GUID)
MID Servername
name Use this parameter to supply a name that is meaningful for you. If you do not supply this parameter,the MID Server uses the default value. A set of business rules synchronizes the name in theconfiguration file with the name in the MID Server record (starting with the Dublin release) Thebusiness rules ensure that changing the name in one location also changes the name in the otherlocation.
• Type: string• Default value: YOUR_MIDSERVER_NAME_GOES_HERE
Instance username
mid.instance.username orglide.glidesoap.username
If your ServiceNow instance has authentication enabled, as it is by default, set this parameter todefine the user name the MID Server should use to log in to the instance.
• Type: string• Default value: none
Instancepassword
mid.instance.password orglide.glidesoap.password
If your ServiceNow instance has authentication enabled, as it is by default, set this parameter todefine the password the MID Server should use to log in to the instance.
• Type: string• Default value: none
Optional ParametersThe following parameters are optional.

Configuration 38
Description Name(s) Details
Credentialsprovider
mid.credentials.provider Specifies the Java class name of the credentials provider.
• Type: string• Default value:
com.service_now.mid.creds.standard.StandardCredentialsProvider
Debug loggingenable
debug.logging Specifies whether to enable logging of MID Server events andmessages (both sent and received). Normally this parameter is onlyused by developers, but it is occasionally useful when troubleshootinga problem. Be aware that setting this parameter to true causes intensivelogging on the MID Server, potentially using considerable disk space.
• Type: true | false• Default value: false
Debug logginglevel
debug.level Controls how much debug logging takes place if debug mode isenabled: 0 = none, 1 = little, 2 = some, and 3 = all.
• Type: integer (0-3)• Default value: 0
Debug modeenable
debug Specifies whether to enable debug logging on the MID Server.Normally this parameter is only used by developers, but it isoccasionally useful when troubleshooting a problem. Be aware thatsetting this parameter to true causes intensive logging on the MIDServer, potentially using considerable disk space.
• Type: true | false• Default value: false
Enables debuglogging for CIM /WBEM / SLP /SMI-S
mid.cim.debug Specifies whether to enable debug logging for CIM, WBEM, SLP, orSMI-S.
• Type: true | false• Default value: false
Disable monitorchecking
disable_monitors Specifies whether to disable the MID Server from actively checking formonitors on the instance.
• Type: true | false• Default value: false
DNS scanningregulator interval(ms)
mid.dns_scan.regulator.internval_ms Specifies the interval between DNS scans in milliseconds.
• Type: integer• Default value: 10
DNS scanningregulator packetsper interval
mid.dns_scan.regulator.packets_per_internval Specifies the number of regulator packets per DNS scan.
• Type: integer• Default value: 1
DNS scanningdefault nameservers
mid.dns_scan.default_name_servers Specifies the host names or IP addresses of the default name servers.
• Type: string• Default value: none
DNS scanningadditional nameservers
mid.dns_scan.additional_name_servers Specifies the host names or IP addresses of any additional nameservers.
• Type: string• Default value: none
DNS scanningload balancingenable
mid.dns_scan.load_balancing_enable Specifies whether to enable load balancing of name servers.
• Type: true | false• Default value: false

Configuration 39
The amount oftime tolook-behind onthe ECCQ whenquerying for morework (s)
mid.eccq.monitor.window Specifies the time period to look behind on the ECC Queue in seconds.The default value is 30 minutes.
• Type: integer• Default value: 1800 seconds
The maximumamount ofstandardmessages toqueue in memoryfor processing
mid.max.messages Specifies the maximum number of messages to hold in memory forprocessing. The default value is computed from themid.threads.max parameter.
• Type: integer• Default value: [10 * mid.threads.max]
Enable automaticinclusion ofSNMP publiccommunity string
mid.snmp.enable_auto_public Specifies whether to enable the SNMP public community string.
• Type: true | false• Default value: true
Timeout to waitfor a response foreach OID request(ms)
mid.snmp.request.timeout Specifies the timeout value for each SNMP OID request. The default is1.5 seconds.
• Type: integer• Default value: 1500 milliseconds
Inactivity timeoutfor an establishedsession - after thefirst response isreceived (ms)
mid.snmp.session.timeout Specifies the timeout value for existing SNMP connections. Thedefault is 0.5 seconds.
• Type: integer• Default value: 500 milliseconds
EnablePowerShell forDiscovery
mid.use_powershell Specifies whether to enable PowerShell for Discovery. The MIDServer requires PowerShell version 2 to operate. If the MID Servercannot find the correct version of PowerShell, it uses WMIRunnerinstead.
• Type: true | false• Default value: false
Decide if thePATHenvironmentvariable should beset for SSHcommands
mid.ssh.set_path Specifies whether to set the PATH environment variable for SSHcommands.
• Type: true | false• Default value: true
Processcommandsagainst localhostvia SSH ratherthan console
mid.ssh.local Specifies whether to execute commands for the MID Server hostmachine (localhost) via SSH rather than from a console. This allowslong-running commands to execute properly.
• Type: true | false• Default value: false
Fixed MID Serverversion
mid.pinned.version Name of the version to which this MID Server is pinned.
• Type: string• Default value: build timestamp
Instance dateformat
instance.date.format Specifies the format the instance uses for dates and times. The primaryimpact of setting this parameter is to allow the MID Server to correctlyrefresh its start and stop times on the MID Server record inServiceNow. The format of this date/time string is identical to that usedby the Java SimpleDateFormat class, documented here [1] in thesection titled Date and Time Patterns.
• Type: string• Default value: yyyy-MM-dd HH:mm:ss

Configuration 40
Instance proxyenable
mid.instance.use_proxy or mid.proxy.use_proxy If your MID Server must go through a web proxy to access theServiceNow instance, set this parameter to true to instruct the MIDServer to use the proxy. You must also set the proxy server's host andport, and perhaps the user name and password as well.
• Type: true | false• Default value: false
Instance proxyhost
mid.proxy.host If your MID Server must go through a web proxy to access theServiceNow instance, set this parameter to define the proxy's host.
• Type: string• Default value: none
Instance proxypassword
mid.proxy.password If your MID Server must go through a web proxy to access theServiceNow instance, and your proxy requires a password, set thisparameter to define that password.
• Type: string• Default value: none
Instance proxyport
mid.proxy.port If your MID Server must go through a web proxy to access theServiceNow instance, set this parameter to define the proxy's port.
• Type: integer (0-65535)• Default value: 80
Instance proxyuser name
mid.proxy.username If the MID Server must go through a web proxy to access theServiceNow instance, and the proxy requires a user name, set thisparameter to define that user name.
• Type: string• Default value: none
MID Serverauto-upgradeenable
auto_upgrade If true or absent, enables the MID Server to periodically check whetherit should upgrade. If false, the MID Server remains on the sameversion, which is generally neither safe or useful.
• Type: true | false• Default value: true
MID Serverconnection cache
mid.connection_cache Specifies whether to cache connections. Set to false to disableconnection caching. This parameter only applies to SSH connections(Discovery).
• Type: true | false• Default value: true
Enable/Disableautomaticallyfalling back to theMID Serverservice usercredential if allother credentialsfail
mid.powershell.local_mid_service_credential_fallback Specifies the login credentials the MID Server uses if all othercredentials fail. This parameter is available starting with the Calgaryrelease.
• Type: true | false• Default value: true
Timeout forWindows probes(s)
mid.windows.probe_timeout Specifies the timeout value for the Windows probe, in seconds. Thedefault value is 5 minutes.
• Type: integer• Default value: 300 seconds

Configuration 41
MID Server ECCquery interval
query_backoff Allows the interval at which the MID Server queries the ECC Queue tolengthen if the MID Server is idle. By default, the MID Server queriesthe ECC Queue for work every 15 seconds. In a system that employs alarge number of MID Servers, these queries can produce unnecessarytraffic during periods of light MID Server activity. When thequery_backoff parameter is set to true, the query interval slowlylengthens for an idle MID Server. Eventually, the interval slows to onequery every four minutes and holds at that rate until the MID Serverhas a job to do. When the MID Server starts work again, the queryinterval for that MID Server immediately increases to once every 15seconds and continues at that rate until the demand on the MID Serverbacks off again.
• Type: true | false• Default value: false
MID Serverimmediateresponse enable
glide.mid.fast.responses Instructs the MID Server to try sending messages to the instance assoon as they are ready. Normally the MID Server sends message to theServiceNow instance serially (that is, one message at a time). Sincemany probes can be run in parallel, there can be multiple messagessimultaneously transmitted to the instance. Setting this parameter totrue may decrease the time between a probe's completion and itsresponse arriving at the instance. However, the multiple simultaneousmessages consume resources, decreasing the overall instanceresponsiveness. If there are communications problems, this parametercan also cause a logjam on the MID Server, as threads normally usedfor running probes may become consumed for sending messages.Generally, leave this parameter out of your configuration. Setting it totrue is meaningful only under very special circumstances.
• Type: true | false• Default value: false
MID Server JMXenable
mid.jmx.enabled Enables a JMX server on the MID Server, which exposes somemanagement information to JMX consoles. Implementing JMXrequires additional configuration of the Java runtime environment.Setting this parameter to true is only recommended for those withdetailed knowledge of the Java security architecture and a specific needfor JMX.
• Type: true | false• Default value: false
MID Server maxtransmissionqueue size
glide.mid.max.sender.queue.size Places an upper limit on how large the queue is allowed to get. TheMID Server starts deleting queued messages if this limit is exceeded.When the MID Server generates messages to the ServiceNow instancefaster than it can send them, it queues them temporarily on the filesystem of the MID Server's host. This queue is normally quite small,and is completely emptied as soon as the MID Server processing slowsfor a short period. However, this queue can grow in size when there arecommunications problems between the MID Server and the instance,and especially if there is an integration running on the MID Server, .
The parameter is of the form {number}[{multiplier}], where {number}is any positive decimal number including non-integers, and theoptional multiplier is any spelling of bytes, kilobytes, megabytes,gigabytes, or terabytes (only the first character is tested, and the test iscase-insensitive). The default multiplier is bytes. White space isliberally tolerated. The following strings all represent valid parameters:"1000000000", "0.5m", "5 GB", "7.67gigas", "145.69392 meg", and"1.1 terra".
• Type: string• Default value: 0.5g

Configuration 42
MID Servermaximumnumber of probethreads
threads.max Controls the number of execution threads (simultaneous work) thatprobes may use. This parameter provides direct control over what CPUresources the MID Server consumes on the computer that hosts it. Todecrease the MID Server's CPU consumption, lower the number ofthreads. To make the MID Server work faster, increase the number ofthreads.
• Type: integer• Default value: 25
MID Server polltime
mid.poll.time Sets the MID Server polling interval (in seconds).
• Type: integer• Default value: 15 seconds
MID Serverrefresh rate
MIDServerRefreshRate Sets the frequency, in seconds, that MID Server checks with theinstance to determine if the MID Server should upgrade itself. Theusual value for this parameter is 65 seconds. To change this value, addthe parameter to the MID Server config.xml file, using the followingsyntax: <parameter name="MIDServerRefreshRate"value="number of seconds" />
• Type: integer• Default value: 65 seconds
MID Server SSHconnection perhost
mid.ssh_connections_per_host Controls the number of concurrent probes the MID Server can runagainst a given host. Lowering the number of concurrent connectionscan slow Discovery.
• Type: integer• Default value: 3
Enable (ordisable) sudo topreserveenvironment (-E)for SSH
mid.ssh.sudo_preserve_environment Specifies whether to use sudo to preserve the environment for SSH.
• Type: true | false• Default value: false
MSSQLcredentials forPowerShell
mid.powershell.use_mssqlauth Determines whether PowerShell should use Integrated WindowsAuthentication [2], also known as Windows Integrated Security, orSQL authentication when attempting to log into the MSSQL instance.PowerShell uses Windows Integrated Security by default.
Note: This parameter is obsolete starting with theCalgary release and was removed from the platform.Microsoft SQL Server discoveries use the PowerShellprobe, which uses the MID Server's credentials. TheCalgary upgrade removes any MSSQL credentials fromthe Credentials [discovery_credentials] table.
• Type: true | false• Default value: false
Port probe packetinterval
mid.shazzam.regulator.interval_ms Sets the interval, in milliseconds, in which Shazzam can launchpackets. This parameter works with themid.shazzam.regulator.packets_per_interval
parameter to set the number of packets allowed in this interval. Bydefault, Shazzam launches one packet each millisecond.
• Type: integer• Default value: 1

Configuration 43
Port probepackets launchedper regulatorinterval
mid.shazzam.regulator.packets_per_interval Sets the number of packets that Shazzam can launch in the configuredtime interval. This parameter works with themid.shazzam.regulator.interval_ms parameter, which sets thatinterval. By default, Shazzam launches one packet each millisecond.
• Type: integer• Default value: 1
Powershell usecredentials table
mid.powershell.use_credentials Specifies whether PowerShell Discovery should use the Windowscredentials from the credentials table. To use PowerShell Discovery ona single domain, set this parameter to false, and then restart the MIDServer. In this case, the MID Server runs the probes with thecredentials of the user for the MID Server process.
• Type: true | false• Default value: true
Path toPowershellexecutable
mid.powershell.path Enables an administrator to point to a specific PowerShell on a MIDServer in cases where more than one PowerShell is installed. Supplythe path to the folder containing the PowerShell executable (forexample, C:\mypowershell or C:\mypowershell\). ServiceNowautomatically appends the string powershell.exe to the path. Thisparameter might be necessary when both 32-bit and 64-bit PowerShellsare active on the same MID Server, and it becomes necessary to launchthe correct PowerShell for the context. Note that 64-bit Windowsemploys file system redirection and the MID Server runs as a 32-bitapplication. If the path is in %WinDir%\System32, Windowsautomatically redirects to %WinDir%\SysWOW64. To avoidredirection, specify the path as %WinDir%\Sysnative. An examplewould be to specifyC:\WINDOWS\sysnative\WindowsPowerShell\v1.0\ instead ofC:\WINDOWS\system32\WindowsPowerShell\v1.0\.
Note: On a 64-bit version of Windows Server 2003 orWindows XP, a Microsoft hotfix [3] may be required toenable this capability.
To discover applications running on a 64-bit Windows machine in theCalgary release, the MID Server must be running on a 64-bit Windowshost machine. For MID Servers installed on 32-bit hosts to discover64-bit Windows applications in the Berlin release, you must add themid.powershell.path parameter to the MID Server and definethe C:\WINDOWS\sysnative\WindowsPowerShell\v1.0\ path.
• Type: string (path)• Default value: none
Query loggingenable
mid.show.queries Instructs the MID Server to log details about every query it makes tothe ServiceNow instance. Normally this parameter is only used bydevelopers, but it is occasionally useful when troubleshooting aproblem. Be aware that setting this parameter to true causes intensivelogging on the MID Server, potentially using considerable disk space.
• Type: true | false• Default value: false
Remote loggingdisable
disable.remote.logging Prevents the MID Server from logging any information to the MIDServer log on the ServiceNow instance. Relatively little information islogged on the instance in any case, but setting this parameter to trueeliminates all logging to the instance..
• Type: true | false• Default value: false

Configuration 44
Set the PATHenvironmentpaths for SSHcommands
mid.ssh.path_override Configure an alternate SSH command path with this parameter tooverride the possible default paths (/usr/sbin: /usr/bin: /bin: /sbin).This MID Server parameter is overridden if an alternate SSH commandpath is configured in a probe parameter.
• Type: string (path)• Default value: none
Shazzam chunksize
mid.shazzam.chunk_size Specifies the maximum number of IP addresses that Shazzam scans inparallel. This parameter primarily controls outbound port consumption.
• Type: integer• Default value: 100
Use theBouncyCastlecryptographicprovider
mid.use.bouncy_castle Use the Bouncy Castle [4] cryptographic provider.
• Type: true | false• Default value: true
Force use ofcached sessionswhen debugging
mid.ssh.debug_cached_session Forces the use of a cached session, instead of a separate SSH session,for debugging.
• Type: true | false• Default value: false
Timeout for SSHcommandexecution (ms)
mid.ssh.command_timeout_ms The timeout duration, in milliseconds, for the execution of an SSHcommand. The default is 30 seconds.
• Type: integer• Default value: 30000 milliseconds
The maximumnumber of timesto retry an SSHoperation after atimeout
mid.ssh.max_retries Specifies the maximum amount of times to retry an SSH operationafter a time-out. The system sleeps two seconds between eachconnection attempt. By default, the MID Server retries once only. Setthe parameter to 0 to disable retries.
• Type: integer• Default value: 1
Sets a differentremove filecommand toreplace thedefault '/bin/rm -f'
mid.ssh.alt_rm Sets a different SSH remove file command.
• Type: string• Default value: none
Delay sendingany SSHcommands to aserver afterconnecting
mid.ssh.initial_delay_ms Delays sending any SSH probe commands to a server after connectingto the target for the time specified, in milliseconds. This parameter isavailable starting with the Calgary release.
• Type: integer• Default value: 0
Comma-separatedstring of IPaddresses forwhich the debuglogging setting istoggled
mid.ssh.debug_exceptions Disables verbose logging for the IP addresses listed. These exceptionsoverride deferred logging and produce continuous, debug log files forthese devices. You can enter IP addresses using any of the followingformats:
• IP address list: Comma-separated list of IP addresses in the IPv4format, such as 10.0.0.2,10.0.10.54,10.10.1.106.
• IP address range: A pair of IPv4 addresses, separated by a hyphensuch as 10.0.0.0-10.0.0.12. An IP address range is inclusive.
• IP network: An IPv4 address followed by a slash and the numbers1-31 for the size of the network mask, such as 10.0.0.0/24. Formore information, see IP Network.
• Type: string (IP address)• Default value: none

Configuration 45
Comma-separatedstring of IPaddresses forwhich the deferlogging setting istoggled
mid.ssh.defer_logging_exceptions Specifies the IP addresses for SSH devices where deferred logging isdisabled. These exceptions override deferred logging and producecontinuous, standard log files for these devices. You can enter IPaddresses using any of the following formats:
• IP address list: Comma-separated list of IP addresses in the IPv4format, such as 10.0.0.2,10.0.10.54,10.10.1.106.
• IP address range: A pair of IPv4 addresses, separated by a hyphensuch as 10.0.0.0-10.0.0.12. An IP address range is inclusive.
• IP network: An IPv4 address followed by a slash and the numbers1-31 for the size of the network mask, such as 10.0.0.0/24. Formore information, see IP Network.
• Type: string (IP address)• Default value: none
Status sendingdisable
disable.status Prevents the MID Server from sending a status report to theServiceNow instance every 10 minutes.
• Type: true | false• Default value: false
Suppress historyfile generation forSSH
mid.ssh.suppress_history Suppresses the generation of the SSH history file.
• Type: true | false• Default value: false
Timeout for allWindows probeson a MID Server
windows_probe_timeout Sets the timeout interval for all Windows probes on a specific MIDServer. This value is overridden by the values configured for individualprobes with the wmi_timeout probe parameter.
• Type: integer• Default value: none
Timeout in ms forSSH socket read
mid.ssh.socket_timeout Specifies the timeout value for the SSH socket to prevent issues createdby a socket timeout. Some devices, such as systems with embeddedcontrollers like UPSs and PDUs, that have SSH enabled require morethan 30 seconds to respond to an authentication request. The defaultvalue of 1 minute ensures such requests do not timeout prematurely.
• Type: integer• Default value: 60000 milliseconds
Timeout in ms forSSH socket read
mid.ssh.session_timeout Specifies the timeout value for the SSH session to prevent issuescreated by a session timeout. Some devices, such as systems withembedded controllers like UPSs and PDUs, that have SSH enabledrequire more than 30 seconds to respond to an authentication request.
• Type: integer• Default value: 30000 milliseconds
Upgrade branch glide.mid.autoupgrade.branch or mid.upgrade.branch Defines a branch (a directory on the distribution server) the MIDServer should download its upgrades from. This might be set if you hada special MID Server version for some reason. Consult withServiceNow before adding this parameter to your configuration.
• Type: string (path)• Default value: none
Upgrade proxyenable
mid.upgrade.use_proxy If your MID Server must go through a web proxy to access the upgradeURL, set this parameter to true to instruct the MID Server to use theproxy. You must also set the proxy server's host and port. If theinstance proxy user name and password are set, they are used for theupgrade proxy as well.
• Type: true | false• Default value: false

Configuration 46
Upgrade proxyhost
glide.mid.autoupgrade.proxy_host orglide.glidesoap.proxy_host
If your MID Server must go through a web proxy to access the upgradeURL, define the proxy's host here.
• Type: string (URL)• Default value: none
Upgrade proxyport
glide.mid.autoupgrade.proxy_port orglide.glidesoap.proxy_port
If your MID Server must go through a web proxy to access the upgradeURL, define the proxy's port here.
• Type: integer (0-65535)• Default value: 80
Upgrade proxyuser
glide.mid.autoupgrade.proxy_user If your MID Server must go through a web proxy to access the upgradeURL, define the proxy's user name here.
• Type: string (URL)• Default value: none
Upgrade proxypassword
glide.mid.autoupgrade.proxy_password If your MID Server must go through a web proxy to access the upgradeURL, define the proxy's password here.
• Type: string• Default value: none
Upgrade URL glide.mid.autoupgrade.host Controls where the MID Server downloads its upgrades from.Normally, you should not set this parameter.
• Type: string (URL)• Default value: [5]
Use keyboardinteractiveauthentication forSSH
mid.ssh.use_keyboard_interactive Uses the keyboard interactive authentication mode in SSH daemons onwhich it is activated.
• Type: true | false• Default value: false
Managing Configuration from the ServiceNow InstanceYou can view and manage your MID Server's configuration from the ServiceNow instance.1. Navigate to the list of MID Servers using one of the following paths:
• MID Server > Servers• Discovery > MID Servers• Orchestration > MID Servers (starting with Dublin)• Orchestration > MID Servers (versions prior to Dublin)
2. From the list of MID Servers, select a MID Server to configure.The Configuration Parameters related list shows all the parameters currently in the MID Server'sconfiguration file. If there are any passwords, they are displayed in asterisks for security reasons.

Configuration 47
3. To add parameters, click New, and then complete the form.After the form is submitted, the MID Server's configuration file is modified to include the new parameter.Changes to existing parameters are reflected in the MID Server's configuration file as well. Changes made tothe MID Server's configuration file do not take place immediately, but rather the next time the MID Server isrestarted. The MID Server form has a related link for restarting the MID Server.
Note: ServiceNow prevents you from saving changes, such as modifying or deleting parameters, that would cause the MID Server tolose communications with the instance. For example, you cannot change the url parameter. Any changes to these protected propertiesmust be made directly in the MID Server's config.xml file.
Editing the config.xml FileThe MID Server's configuration is controlled by an XML file called config.xml. This file is located in the agentdirectory, immediately under the directory where the MID Server is installed. Edit this file directly to make anyconfiguration changes to protected parameters. Many configuration changes, such as those that do not disruptcommunication between the MID Server and the ServiceNow instance, may also be made from the instance.The structure of the config.xml file is simply an outer parameters tag and a series of inner parameter tags. Eachparameter tag has name and value attributes. To change the value of a parameter, edit the value attribute. To add aparameter, add another parameter tag with its name and value. To delete a parameter, delete the entire parameter tag.The order of the parameters within the file is not important. Notice the green comment sections in the sample. Usethese elements to add useful comments to the configuration file.
Note: When configuring the MID Server for use with a proxy server, be sure to remove the comment tags around the proxy sectionsthat you configure.

Configuration 48
Note: The sample file here is from FireFox. Conventional text editors, such as Notepad, Wordpad, or TextEdit, do not display colorsand variable fonts.
Configuring Thread UseBy default, the MID Server uses a maximum of 25 threads. If the MID Server is running on a host containing manyother programs that must compete for CPU time, fewer threads than the default of 25 might be necessary. You canset the MID Server to use as few as 5 threads without issues. If the MID Server needs more speed, and the host ispowerful enough or lightly loaded with other programs, raise the thread setting. The thread limit depends on thehardware and the operating system of the host. You might have to experiment to find the optimal value for yoursituation. The following general observations may be useful:• Most MID Server tasks require file handles to do their job. On the Windows operating system, file handles are
available in a fixed quantity. If you configure too many MID Server threads on a Windows host, the MID Servercan consume all the file handles before approaching maximum CPU usage. This situation appears as an Out offile handles error in the MID Server log and indicates that the MID Server is trying to use too many threads.UNIX and Linux hosts have a much different scheme for allocating file handles. Generally, you can increase MIDServer thread use on these operating systems until the CPU of the host is overloaded.
• Each thread on the MID Server requires some memory. Exactly how much memory varies considerably from taskto task and depends on the equipment being discovered. To increase the number of threads, you might have toincrease the amount of memory that Java uses. If you configure insufficient memory, an Out of memory errorappears in the MID Server log.
To edit the maximum number of threads allowed for the MID Server:1. Open the \agent\config.xml file using any text editor.2. Locate the following lines:
<!-- MID Server Threads -->
<parameter name="threads.max" value="25"/>
3. Edit the value. Keep in mind the cautions described above.4. Save the record.5. Restart the MID Server service.
Adding SSL CertificatesYou can configure the MID Server to connect over SSL by adding the following certificates to the cacerts keystorefile:• Signing Certificate Authority (CA) certificate• MID Server certificateTo add a certificate to a MID Server:1. Open a command prompt and navigate to the folder containing the JRE keytool [6]. For example:cd C:\Program Files (x86)\ServiceNow\<MidServer(s)>\agent\jre\bin
2. Enter the following keytool command to import a certificate into the MID Server's cacerts keystore: keytool -import -alias <certificate alias> -file "<path to certificate>"
-keystore "<path to MID Server(s)>\agent\jre\lib\security\cacerts" For example: keytool -import -alias MyCA -file "C:\myca.cer" -keystore "C:\Program Files

Configuration 49
(x86)\ServiceNow\MIDserver\agent\jre\lib\security\cacerts"
Note: Keytool prompts for a certificate password. If the certificate is for a CA, keytool also asks whether to trust the certificateauthority.
To add a certificate to an instance, see Uploading a Certificate.
The mid_server RoleThe mid_server role allows the MID Server to access protected tables when strict SOAP security is in place. Addthis role to the MID Server user for any instance on which basic authentication is enabled. The system adds thenecessary SOAP roles automatically with the mid_server role.
Script File SynchronizationWindows Internet Explorer enhanced security blocks downloaded files that it determines are potentially dangerous.Without script file synchronization, Internet Explorer blocks files downloaded for use by the MID Server, forcingServiceNow administrators to unblock each file manually. File synchronization creates the files on the MID Serverrather than downloading them, which does not trigger security blocking. Also, file synchronization between scriptrecords on the instance and the MID Server protects any customer updates in those records from being overwrittenduring a ServiceNow upgrade. Script file synchronization is available starting with the Dublin release. If you areusing an older version, see the previous version information.

Configuration 50
How File Synchronization WorksScript files synchronized with the MID Server are stored on the ServiceNow instance in the MID Server Script File[ecc_agent_script_file] table (MID Server > Script Files). When the MID Server first connects to the instance,ServiceNow creates a directory called /scripts in the MID Server root. The instance then creates a parent directory inthe path /scripts/<parent name> using definitions from the ecc_agent_script_file table. Finally, the instance createsthe script files themselves inside the parent directory using the records from the ecc_agent_script_file table.The record for the parent directory looks like this:
The instance creates each script file in the parent directory on the MID Server using the record Name from theecc_agent_script_file table as the file name and the Script field payload as the file contents. A script file recordlooks like this:
Unblocking PowerShell Scripts Prior to the Dublin Release
Expand for previous version information

Configuration 51
Enhanced security on the Windows operating systems can block PowerShell from working with Discovery and Orchestration. If PowerShell doesnot run with Discovery or Orchestration, unblock the MID Server archive:
• MID Server archive: mid.<build date>.<operating system>.<system bit>.zip
If you do not unblock the archive, unblock each individual file:
• Credentials.psm1• LaunchProc.psm1• MSSqlAuth.ps1 (Removed in the Calgary release)• MSSqlWinAuth.ps1 (Removed in the Calgary release)• PSScript.ps1• WMIFetch.psm1• XmlUtil.psm1
Perform this procedure on each MID Server machine:
1. Navigate to the MID Server archive file.2. Right-click the first file in the list and select Properties from the menu.3. In the Properties dialog box, click Unblock.4. Repeat the procedure for each of the remaining files, if necessary.
References[1] http:/ / java. sun. com/ j2se/ 1. 4. 2/ docs/ api/ java/ text/ SimpleDateFormat. html[2] http:/ / msdn. microsoft. com/ en-us/ library/ aa292114(VS. 71). aspx[3] http:/ / support. microsoft. com/ kb/ 942589[4] http:/ / www. bouncycastle. org/[5] http:/ / install. service-now. com/ glide/ distribution/ builds/ mid/[6] http:/ / docs. oracle. com/ javase/ 1. 3/ docs/ tooldocs/ win32/ keytool. html

MID Server Clusters 52
MID Server Clusters
OverviewMID Server clusters enable multiple MID Servers with the appropriate capabilities to be grouped together for loadbalancing and fail-over protection. A MID Server can be added to both a load balancing cluster and a fail-overcluster for more flexibility. MID Server clusters are available for Discovery, Orchestration, and use with productsintegrating with ServiceNow.
MID Server Cluster EventThe following event is triggered when the platform cannot find a MID Server with the appropriate capabilities toreplace a MID Server in a fail-over cluster. Use this event to create an email to notify appropriate users that thecluster has failed.
Event Table Description Business Rule
mid_server.cluster.down MID Server Cluster [ecc_agent_cluster] A MID server cluster has failed MID Server Cluster Management
How Clusters WorkMID Servers in clusters must be able to connect to the all the devices with which they are expected to communicate.Make sure all the MID Servers are added to any Access Control List (ACL) in use. MID Server clusters are managedby a business rule called MID Server Cluster Management, which checks to see if the MID Server assigned to ajob in the ECC Queue belongs to a cluster.
Load BalancingIf the cluster business rule determines that a MID Server is part of a load balancing cluster, the application using theMID Server automatically balances the work between the MID Servers in that cluster. It is best practice to put MIDServers with the same capabilities in a load balancing cluster.
Fail-Over ProtectionMID Servers in a fail-over cluster each have a configured order that the platform uses to determine which MIDServer to use next in case of failure. MID Servers in a fail-over cluster work independently and do not load balancewith other MID Servers in that cluster (although they might also be members of load balancing clusters). When aMID Server fails, the MID Server Cluster Management business rule selects the highest available MID Server inthe order to take over the work. The selected MID Server checks the ECC Queue and starts with jobs that are eitherProcessing or Ready. It is best practice to configure a fail-over MID Server with at least the same capabilities as theMID Server it is intended to relieve.

MID Server Clusters 53
Combining ClustersA MID Server can be a added to both types of clusters at the same time. This diagram shows a scenario in which aMID Server from a load balancing cluster (MID Server D) is also present in a failover cluster.
If MID Server D fails, MID Server E in the failover cluster is available to the load balancing cluster to perform thetasks previously assigned to MID Server D.
Configuring a Cluster1. Navigate to MID Server > Clusters.2. Click New.3. Name the cluster and select the cluster type: Failover or Load Balance.4. Right click in the header bar and select Save from the context menu.5. Click Edit in the Includes MID Servers Related List.6. Select appropriate MID Servers for this cluster from the slushbucket.
Note: All MID Servers in a cluster must have capabilities defined. Ensure that each MID Server has theappropriate capabilities for the job. A MID Server in a failover cluster must have the same capabilities (orexpanded capabilities) as the MID Server it is expected to replace.

Autofinder 54
Autofinder
OverviewMID Servers are associated with IP address ranges, enabling Orchestration to select the correct MID Server to usefor an Orchestration activity based on the IP address of the target machine. This functionality ensures that a MIDServer with proper privileges is available wherever Orchestration probes need to operate in a network. Autofinderalso enables administrators to define specific capabilities for each MID Server within an IP address range.
Configuring a MID Server for an IP Address Range1. Navigate to MID Server > IP Ranges.2. Click New.3. Type a unique name for this MID Server Autofinder IP address range.
This name is for reference only and is not used in any processing.4. Define the IP addresses for this range, using one or more of the following formats in a comma-delimited list.
• IP Address Ranges• IP Networks• IP Address Lists
For additional details about these formats, see Configuring IP Addresses.5. In the Type field, select whether to Include or Exclude these addresses.
6. Click Submit.7. Reopen the form and click Edit in the MID Servers Related List.8. Select one or more MID Servers to use for this IP address range.
The IP address ranges defined here also appear in a Related List in the MID Server's record (Orchestration >MIDServers).

Autofinder 55
MID Server CapabilitiesMID Server capabilities define the specific functions of a MID Server within an IP address range. At least onecapability is required for each MID Server used by Orchestration. The base functionality enables an administrator toselect specific capabilities for the probes launched by each MID Server. You can assign multiple MID Servers to thesame IP address range and give them different capabilities, or assign a MID Server with specific capabilities to morethan one IP address range. When Orchestration initiates a Workflow activity, Orchestration uses the IP address of thetarget machine to locate the MID Server assigned to that network segment that has the necessary capabilities toexecute the activity.The following capabilities are available for Orchestration:• SSH• SNMP• VMware• PowerShell• WMI• SOAP• REST• Resolve DNS
ValuesCapabilities provided in the base system do not have a defined Value string. A MID Server configured to use acapability that has no Value can locate any device using that capability's protocol. If a capability has a defined value,the MID Server using that capability finds only those devices using that protocol that match the value string exactly.The exception to this is the Resolve DNS capability, which is configured to resolve any DNS name into an IPaddress using a partial string match.

Autofinder 56
Scripted Value MatchingA module called Capability Value Tests, enables administrators to create capabilities that find devices using valuesthat do not require exact string matching. Action on these values is controlled by a user-defined script. The ResolveDNS capability is provided in the base system and is configured to resolve DNS names into IP addresses for deviceswhose names end with a specified domain name. The capability Value entered is automatically prefaced with a dotduring processing to match domain syntax. This value can contain one or more sub-domains, but must include theend of the domain string. Matching devices must end with the identical syntax. The script for the Resolve DNScapability determines if a device name matches the criteria defined by Value. If a match exists, the platformperforms the address resolution automatically. For example, if the value for the Resolve DNS capability isservice-now.com, the MID Server with this capability finds lnxlab01.sandiego.service-now.com anddbsrv101.sanjose.service-now.com. If the value is changed to sandiego.service-now.com, then the MID Server findsonly lnxlab01.
Note: If Value in the Resolve DNS capability is blank, then all domains match.
To view the script for evaluating this capability, navigate to MID Server > Capability Value Tests and select ResolveDNS from the list.
Configuring Capabilities1. Navigate to MID Server > Capabilities.2. Select an existing capability or click New to create one.
NOTE: At least one capability is required for each MID Server. Ensure that each IP address range has MIDServers with the necessary capabilities to complete the Orchestration activities on that network segment.
3. Configure the value for a custom capability.An example is a capability for DOMAIN, with a value of service-now.
4. Click Submit.5. Reopen the record and click Edit in the MID Servers Related List.6. Select one or more MID Servers for this capability from the slushbucket.

Autofinder 57
The capability defined here also appears in the primary record for this MID Server.
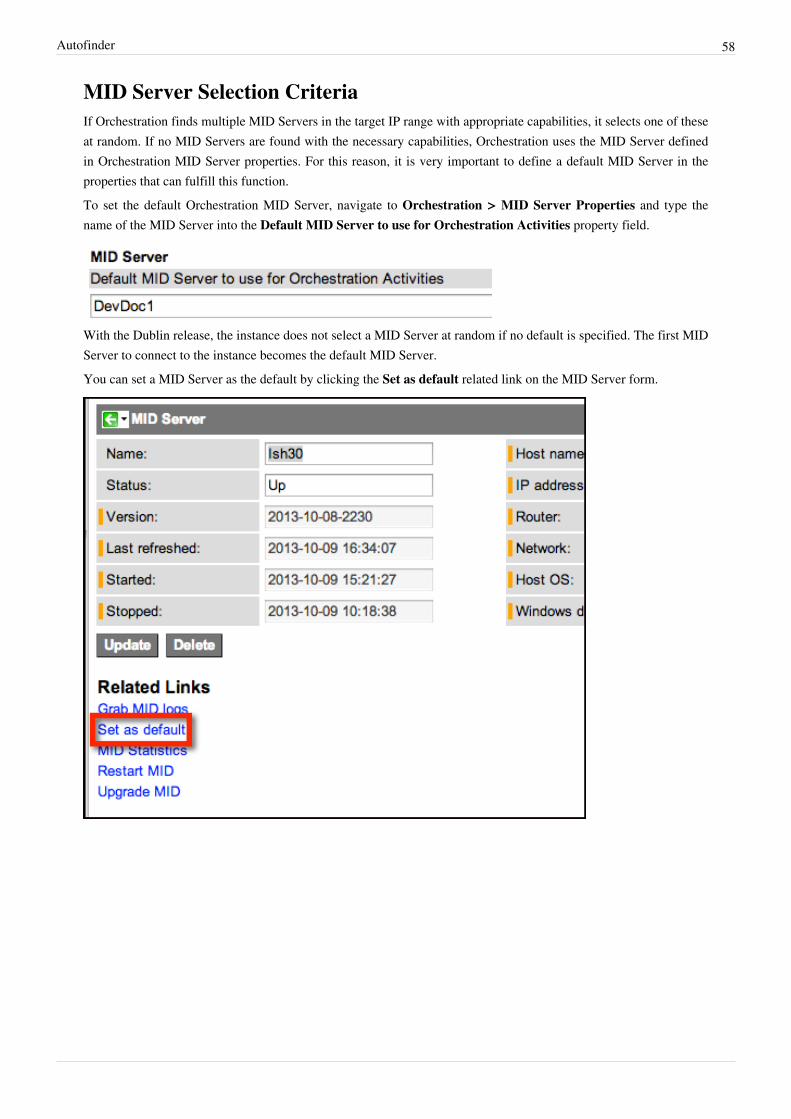
Autofinder 58
MID Server Selection CriteriaIf Orchestration finds multiple MID Servers in the target IP range with appropriate capabilities, it selects one of theseat random. If no MID Servers are found with the necessary capabilities, Orchestration uses the MID Server definedin Orchestration MID Server properties. For this reason, it is very important to define a default MID Server in theproperties that can fulfill this function.To set the default Orchestration MID Server, navigate to Orchestration > MID Server Properties and type thename of the MID Server into the Default MID Server to use for Orchestration Activities property field.
With the Dublin release, the instance does not select a MID Server at random if no default is specified. The first MIDServer to connect to the instance becomes the default MID Server.You can set a MID Server as the default by clicking the Set as default related link on the MID Server form.

59
Approvals and Provisioning
Approving and Provisioning VMware Requests -Versions Prior to Calgary
OverviewService Catalog requests for virtual servers must be approved and then provisioned by members of designatedapproval and provisioning groups. Upon approval of the request, Orchestration creates the virtual server and powersit up on the network automatically, using one of the IP addresses supplied.
Note: If you are using the ServiceNow Calgary release or later, see Approving and Provisioning VMware Requests for CloudProvisioning.
Prerequisite StepBefore continuing, ensure that Orchestration is fully configured, including the creation of template records inServiceNow for the virtual machine images stored on the ESX Server. Approval tasks cannot occur until a request ismade from the Service Catalog.
WorkflowThe approval and provisioning process for each virtual server request in the base platform is controlled by aworkflow (Workflow > Workflow Editor) called Virtual Server. This workflow performs the following tasks:• Creates approval tasks for the approval group.• Collects the provisioning information when the request is approved. (If the request is rejected, the workflow
ends.) The workflow determines if the request is for a Windows or Linux virtual machine and creates catalogtasks to select the proper virtual server template and supply it with the necessary requirements, including theappropriate ESX Resource Pool.
• Sets the variables and provisions the virtual server. Using the template selected, Orchestration clones the virtualserver, attaches the IP address to the new virtual machine (when Guest Customization is configured), and thenpowers it up.
• Notifies the requestor that the virtual machine has been created successfully.
Approving VMware RequestsRequests for virtual servers in the base platform can be approved or rejected by one member in an approval groupcalled Virtual server approvers. When a virtual server is requested through the service catalog, the workflowcreates an approval task in each group member's Service Desk approval queue. To approve or reject a VMwarerequest, navigate to Service Desk > My Approvals and change the state of the request to Approve or Reject. Afterthe first member of the approval group approves the request, the workflow creates the first provisioning task.

Approving and Provisioning VMware Requests - Versions Prior to Calgary 60
Provisioning Virtual ServersAs each provisioning task is completed, the workflow creates the next task in the sequence, based on the selectionsfrom the previous task. Tasks are assigned to users who are members of the appropriate groups.To complete a catalog task:1. Navigate to Service Desk > My Groups Work.2. Select a task that appears in the list.
The list only displays incomplete tasks.3. Make selections for the fields marked as mandatory for that task.4. Click Close Task to complete the task.
The workflow creates the next task in the sequence and assigns it to the appropriate group.
Provisioning TasksThe following catalog tasks are assigned to provisioners when a virtual server is requested. These tasks are presentedin the order shown here.
Task Description Group
Choose template Select an operating system template to be cloned for this virtual server from the VM Template list. Virtual serverprovisioners

Approving and Provisioning VMware Requests - Versions Prior to Calgary 61
Choose vCenterfolder
This task requires the following selections.
• Destination folder: Each template belongs to a vCenter datacenter, which contains folders of virtualmachines. This task requires that you select a folder from this datacenter that contains the provisionedvirtual machine. If no folder is selected, the resulting cloned instance is placed in the folder containingthe template that was used to create the clone.
• Clone VM name: The name of the virtual machine as it appears in VMware vCenter. This name mustbe unique on the ESX server (or the cluster) on which it is being provisioned. Check the note section inthe request form for the name designated by the requestor.
• Guest Customizations: During the provisioning process, the workflow asks if guest customizationswill be applied to the virtual server. Customizations include joining the virtual server to a specificnetwork or domain and assigning a product key to the clone. If you do not elect to apply guestcustomizations to the virtual server, Orchestration provisions the server directly from the template,using only the configuration available to that template.
Virtual serverprovisioners
Choose cluster Clusters appearing in the list are those from the datacenter in which the selected destination folder resides.If the virtual server will not be attached to a cluster, choose None. If this is the case, make sure to select anon-clustered host when asked for host information.
Virtual serverprovisioners
Choose host Select the ESX Server on which to deploy the virtual server. If you did not select a cluster in the earliertask, only those hosts that are not part of a cluster are available. If you did select a cluster for this virtualserver, then the available hosts are all part of the selected cluster.
Virtual serverprovisioners
Choose resourcepools
Select the resource pool to use for this virtual machine. If a cluster was chosen, the available resource poolsbelong to that cluster. If a host was selected (and no cluster), the available resource pools belong to theselected host.
Virtual serverprovisioners
Choose datastore Select the datastore on which the virtual server and any data disks will be provisioned. To put the virtualserver on the datastore where the template is located, select None. The available datastores are for theselected host.
Virtual serverprovisioners
Choose networkinginfo
Appears only when guest customization is required. Select the network and the network configuration thatthe virtual server will use. The IP address allocated to the virtual server is selected from a list of availableaddresses configured in the record for this network. Available networks are those from the datacenter inwhich the selected folder resides.
Virtual servernetworking
Choose networkinginfo without guestcustomization
Appears when no guest customization is required. Select only the network that the virtual server will use.Available networks are those from the datacenter in which the selected destination folder resides.
Virtual servernetworking
What Do I Do Next?This is the final task in the procedure for configuring and enabling the creation of virtual servers using Orchestration.All virtual machines cloned with this procedure are hosted and managed on the ESX server that created them. Ensurethat the list of available IP addresses is maintained for future requests.
62
Reference
VMware Component Relationships
OverviewServiceNow supports the use of virtual machines generated by the VMware application, installed on Windows,Linux, or ESX Servers. The ServiceNow Discovery product can extract information from VMware configurationitems (CI), including their relationships. Discovery is configured to work with the Orchestration VMware SupportPlugin, which enables the automatic cloning of virtual machines by an ESX Server managed by vCenter. Forinformation about data collected by Discovery on vCenter, see Discovery for VMware vCenter.
VMware ArchitectureServiceNow supports two basic types of VMware deployment using the VMware application:• VMware installed on an ESX Server, managed by vCenter.• VMware installed on a Windows or Linux host machine, not managed by vCenter.ServiceNow Discovery can extract information from all the components in a VMware system, including vCenter.Discovery creates records in the CMDB for vCenter, the host machine and all the virtual machines running on thatserver. Discovery finds the stored templates and maps all the relationships between components. In networks that useOrchestration to create and manage virtual servers, Discovery populates records automatically and detects changes inthe network. Without Discovery, all the records for Orchestration VMware Support must be created and updatedmanually, including the relationships between VMware components.

VMware Component Relationships 63
vCenter CloningThe vCenter management console can control multiple ESX Server machines, each of which is capable of hostingmultiple virtual servers cloned from stored templates. The relationships between VMware components for this typeof installation are shown in the following diagram:
RelationshipsThe components in a system managed by vCenter have the following relationships:• VCenter: Manages one or more ESX Servers• ESX Server:
• Managed by vCenter• Gets resources from the Resource Pool• Has registered VMware instances• Virtualizes virtual machines.
• Resource Pool: Defines resources for the ESX Server. See Resource Pools for more information.• VM Instances (including images and templates):
• Registers on the ESX Server• Instantiates individual virtual machines.
• Virtual machines:• Instantiated by VM instances (images and templates)• Virtualized by ESX Server

VMware Component Relationships 64
Establishing Relationships Using DiscoveryServiceNow Discovery identifies appropriate relationships for new virtual machines or updates the relationships forpreviously discovered virtual machines.1. The UNIX classify probe identifies the ESX Server.2. Discovery assumes that the VMware application is running on the ESX Server and creates/updates the application
CI in the CMDB.3. Discovery launches an SSH Probe that discovers all images on the ESX Server, including the unique IDs (UID).4. Discovery then compares the master list of UIDs retrieved from the ESX Server with the UIDs of previously
discovered virtual machines in the CMDB and looks for a match.5. If a match is found, Discovery updates the many-to-many relationship between the VMware components.
VMware Running on a Host MachineIn the basic VMware system, the VMware application runs on a Windows or Linux host machine. This system canclone instances from templates, but cannot be automated. The relationships between VMware components for thistype of installation are shown in the following diagram:
RelationshipsThe components in a VMware system installed on a Windows or Linux host have the following relationships:• Windows or Linux Server: Runs the VMware application• VMware application:
• Runs on a Windows or Linux host machine• Has registered VM instances• Virtualizes virtual machines.
• VM Instances (including images and templates):• Registers on the VMware application• Instantiates individual virtual machines.
• Virtual machines:• Instantiated by VM instances• Virtualized by VMware application

VMware Component Relationships 65
Establishing Relationships Using DiscoveryServiceNow Discovery identifies appropriate relationships for new virtual machines or updates the relationships forpreviously discovered virtual machines.1. The UNIX classify probe (or Windows classify probe) determines the operating system of the host machine.2. Discovery finds the VMware application running on the host machine and creates/updates the application CI in
the CMDB.3. Discovery launches an SSH Probe that discovers all images on the host machine, including the unique IDs (UID).4. Discovery then compares the master list of UIDs from the host machine with the UIDs of previously discovered
virtual machines in the CMDB and looks for a match.5. If a match is found, Discovery updates the many-to-many relationship between the VMware components.
VMware Workflow Activities
OverviewThe Orchestration VMware Support plugin adds these activities for use in workflows. Your ServiceNow instancemust have access to a MID Server configured to use VMware to run these activities. For the list of all Orchestrationactivities, see Orchestration Activities.
Determining VMware Activity Result ValuesVMware activities communicate with vCenter through a MID server. When a VMware activity sends a request, theMID server sends a response to the ECC Queue. All VMware activities set their activity.result value basedon the Payload of the response from the MID Server. If this payload contains an error, the activity result value isfailure. If the the payload contains no error, the activity result value is success. For more information aboutactivity.result, see Using the Activity Result Value.
Virtual Machine UUIDThe VMware universal unique identifier (UUID) required by VMware activities (VM uuid field) must be in thefollowing format: 4210c162-e31e-70e6-4a03-b46abbe17b4f. If you are writing a workflow and not usingan automated workflow from ServiceNow, you must provide a properly formatted UUID. A UUID from anothersource might be in the wrong format. For example the UUID from the VMX file (uuid.bios field) on the virtualmachine appears in this format, 42 10 c1 62 e3 1e 70 e6-4a 03 b4 6a bb e1 7b 4f, and producesan error. If the UUID you have for a virtual machine is not in the correct format, use one of these methods to obtainthe correct value.

VMware Workflow Activities 66
Managed Object BrowserThe Managed Object Browser (MOB) is a vCenter utility that allows users to view detailed information aboutvCenter objects, such as images and virtual machines. To find the UUID of a virtual machine using the MOB:1. Navigate to https://<vCenter IP>/mob to log into the MOB.2. Browse to content, rootFolder, and down the childEntity list into the appropriate datacenter, datastore, and
finally down to the actual virtual machine.3. In the virtual machine, click config and find the uuid field.
Copy this value into the VM uuid variable field of the activity properties form.
Conversion FunctionA method called turnCorrelationIdToUuid in the VMUtils script include converts a UUID to the proper formatautomatically. Use this function to convert a UUID to the proper format within the workflow:
javascript:VMUtils.turnCorrelationIdToUuid(<uuid from another source>)
For example, you can enter javascript:VMUtils.turnCorrelationIdToUuid('42 10 c1 62 e31e 70 e6-4a 03 b4 6a bb e1 7b 4f') directly in the VM uuid field of an activity.Another method is to use the function to create a scratchpad variable that is available to all the activities in theworkflow. For example, you might add a Run Script activity to the beginning of the workflow in which you createthe following variable:
workflow.scratchpad.uuid=VMUtils.turnCorrelationIdToUuid('42 10 c1 62
e3 1e 70 e6-4a 03 b4 6a bb e1 7b 4f')
You can then access this variable from any activity by entering ${workflow.scratchpad.uuid} in the VMuuid field.
Add DiskThe Add Disk activity creates a new disk on a virtual machine. This activity selects a datastore for the new hard diskautomatically if you do not specify one. This activity is available with the Berlin release.
Input VariablesThese variables determine the behavior of the activity:
Field Description
vCenter IP address of the vCenter server that manages the virtual machine to operate.
DatastoreMOR id
The ID of the datastore on which to put this disk. If this variable is blank, Orchestration searches all the datastores associated withthe virtual machine to find one with sufficient space for the disk being added.
VM uuid The VMware universal unique identifier assigned to this virtual machine. If you are creating your own workflow, see VirtualMachine UUID for instructions on properly formatting the unique identifier.
Disk size(MB)
The size of the new disk to create, in megabytes. This activity provisions all the necessary space for the new disk immediately(thick mode).

VMware Workflow Activities 67
Change NetworkThe Change Network activity changes the network that a virtual machine is configured to use. This activity isavailable with the Berlin release.
Input Variables
Field Description
vCenter IP address of the vCenter server that manages the virtual machine to operate.
VMuuid
The VMware universal unique identifier assigned to this virtual machine. If you are creating your own workflow, see Virtual MachineUUID for instructions on properly formatting the unique identifier.
Network Name of the network. For example, Production Network. A virtual machine can only access a network in the same datacenter.
Change StateThe Change State activity sends commands to vCenter to control the power state of a given VMware virtualmachine (such as powering on and powering off the VM). If the VM is already in the state to which it is beingchanged, the workflow takes no action.
Input Variables
Field Description
vCenter IP address to the vCenter server that manages the virtual machine to operate.
Action Select the new state for the virtual machine:
• Power On: turns on a virtual machine that is powered off or suspended and does nothing if the virtual machine is already on.• Power Off: turns off a virtual machine that is powered on or suspended and does nothing if the virtual machine is already off. This
variable returns an error if the virtual machine is suspended.• Suspend: suspends a virtual machine that is powered on and does nothing if the virtual machine is already suspended. This variable
returns an error if the virtual machine is off.• Reset: resets a virtual machine that is powered on. This variable returns an error if the virtual machine is off or suspended.
VMuuid
The VMware universal unique identifier assigned to this virtual machine.
Check VM AliveThe Check VM Alive activity uses the VMware API to determine if a newly configured virtual machine is alive.The virtual machine is alive if its state is powered on and it uses the same IP address it was configured to use.
Input Variables

VMware Workflow Activities 68
Field Description
vCenter IP address of the vCenter server that manages the virtual machine to check.
IPAddress
The IP address that the virtual machine with the VM uuid parameter should have to be declared alive.
VM uuid The VMware universal unique identifier assigned to this virtual machine. If you are creating your own workflow, see Virtual MachineUUID for instructions on properly formatting the unique identifier.
CloneThe Clone activity sends commands to vCenter to clone a given VMware virtual machine or virtual machinetemplate. Several input variables require a MOR ID. ServiceNow stores MOR data in the Object ID field ofconfiguration item records.
Input Variables
Field Description
vCenter IP address of the vCenter server that manages the virtual machine to clone and also will manage the clone.
VM uuid The VMware universal unique identifier assigned to the machine you are cloning. If you are creating your own workflow, seeVirtual Machine UUID for instructions on properly formatting the unique identifier.
Clone name The name to assign to the newly cloned virtual machine.
Folder MORid
The managed object reference ID for the folder in which the cloned virtual machine resides. This variable is optional. If this field isblank, Orchestration places the cloned virtual machine in the same folder as the source virtual machine. This variable is availablewith the Berlin release.
DatastoreMOR id
The managed object reference ID for the datastore the new virtual machine belongs to. This variable is optional. If this field isblank, Orchestration places the cloned virtual machine in the same datastore as the source virtual machine. This variable is availablewith the Berlin release.
Host MOR id The managed object reference ID for the host the new virtual machine is assigned to. This variable is optional. If this field is blank,Orchestration assigns the cloned virtual machine to the same host as the source virtual machine. This variable is available with theBerlin release.
Resourcepool MOR id
The managed object reference ID for the resource pool the new virtual machine is assigned to. This variable is optional whencloning a virtual machine. If this field is blank, Orchestration assigns the cloned virtual machine to the same resource pool as thesource virtual machine. This variable is available with the Berlin release.
ResourcePool
The name of the resource pool the cloned virtual machine is assigned to. This variable is deprecated with the Berlin release - use theResource pool MOR id field instead.
ResourcePool Owner
Owner of the resource pool as seen by vCenter. For example, the owner might be something like labesx01.service-now.com or anIP address. The owner should point to the ESX box on which the original VM and clone are located (whatever vCenter'srepresentation of that ESX name is).

VMware Workflow Activities 69
Configure LinuxThe Configure Linux activity sends commands to vCenter to set the identity and network information on a givenVMware virtual Linux machine. This activity also enables guest customization for the Linux machine. This activityfails if run against a single virtual machine more than once.
Input Variables
Field Description
vCenter IP address of the vCenter server that manages the Linux virtual machine being configured.
VM uuid The VMware universal unique identifier assigned to this virtual machine. If you are creating your own workflow, see Virtual MachineUUID for instructions on properly formatting the unique identifier.
Hostname The operating system name assigned to the Linux virtual machine.
Domain The domain the Linux virtual machine is assigned to.
IPAddress
The IP address assigned to the Linux virtual machine.
Netmask The netmask for the network the Linux virtual machine's IP address belongs to.
Gateway The gateway address for the network the Linux virtual machine's IP address belongs to.
DNS The DNS server for the network the Linux virtual machine's IP address belongs to.
Configure WindowsThe Configure Windows activity sends commands to vCenter to set the identity and network information on a givenVMware virtual Windows machine. This activity also enables guest customization for the Windows machine. Thisactivity fails if run against a single virtual machine more than once.
Input Variables
Field Description
vCenter IP address of the vCenter server that manages the Windows virtual machine being configured.
VM uuid The VMware universal unique identifier assigned to this virtual machine. If you are creating your own workflow, seeVirtual Machine UUID for instructions on properly formatting the unique identifier.
Gateway The gateway address for the network the Windows virtual machine's IP address belongs to.
Administrator Password The password assigned to the Administrator user for this operating system.
Domain AdministratorPassword
The password for the domain user with the proper credentials to move a machine onto the given domain.
Domain Administrator A user who has the credentials to get this Windows machine onto the domain.
DNS The DNS server for the network the Windows virtual machine's IP address belongs to.
Hostname The computer name of the Windows virtual machine.
IP Address The IP address assigned to the Windows virtual machine.
Netmask The netmask for the network the Windows virtual machine's IP address belongs to.
Organization The organization of the registered user for the OS installed on this virtual machine. This value appears in the Propertiesbox of My Computer.
Time Zone The time zone value. For example, the value for the US/Pacific time zone is 4.

VMware Workflow Activities 70
Domain The domain the Windows virtual machine is assigned to.
Product Key The Microsoft product key for the Windows operating system installed on the virtual machine.
Registered User The registered user for the operating system installed on the virtual machine. This user appears in the Properties box ofMy Computer.
Run once A set of Windows commands that run on the specified Windows machine when this activity initializes.
License mode The type of license the Windows operating system uses, either Per server or Per seat. See Microsoft Licensing [1] formore information.
Concurrent connections When using a Per server license mode, the Concurrent connections value specifies how many users can access theWindows machine at a time.
DestroyThe Destroy activity sends a command to vCenter to destroy the named VMware virtual machine. This activitydeletes the virtual machine and removes it from the disk.
Input Variables
Field Description
vCenter IP address of the vCenter server that manages the virtual machine to destroy.
VMuuid
The VMware universal unique identifier assigned to this virtual machine. If you are creating your own workflow, see Virtual MachineUUID for instructions on properly formatting the unique identifier.
ReconfigureThe Reconfigure activity updates the number of CPUs and the amount of memory assigned to a virtual machine.This activity is available with the Berlin release.
Input Variables
Field Description
vCenter IP address of the vCenter server that manages the virtual machine to operate.
VM uuid The VMware universal unique identifier assigned to this virtual machine. If you are creating your own workflow, see Virtual MachineUUID for instructions on properly formatting the unique identifier.
Number ofCPUs
The number of CPUs to allocate to the virtual machine. If this field is blank, you must reconfigure the memory for this virtualmachine.
Memory(MB)
The amount of memory, in megabytes, to allocate to the virtual machine. If this field is blank, you must reconfigure the number ofCPUs for this virtual machine. This value must be divisible by 4. If the amount is not divisible by 4, the activity succeeds but thevirtual machine cannot start.

VMware Workflow Activities 71
Revert to SnapshotThe Revert to Snapshot activity reverts a virtual machine to the state captured in a given snapshot.
Input Variables
Field Description
vCenter IP address of the vCenter server that manages the virtual machine for which the snapshot was created.
VM uuid The VMware universal unique identifier assigned to the virtual machine from which the snapshot was created. If you are creatingyour own workflow, see Virtual Machine UUID for instructions on properly formatting the unique identifier.
Snapshotname
Unique name of the snapshot.
SnapshotMOR id
Reverts the virtual machine to the snapshot with this ManagedObjectReference ID. If this variable is present, the workflow ignoresthe Snapshot name.
SnapshotThe Snapshot activity creates a snapshot of a virtual machine.
Input Variables
Field Description
vCenter IP address of the vCenter server that manages the virtual machine for which you want to create a snapshot.
VM uuid The VMware universal unique identifier assigned to the virtual machine from which the snapshot is created. If you are creatingyour own workflow, see Virtual Machine UUID for instructions on properly formatting the unique identifier.
Snapshot name Unique name of the snapshot.
Snapshotdescription
Description that distinguishes this snapshot from other snapshots of the same virtual machine.
Select Datacenter, Network, and FolderThe Select Datacenter, Network, and Folder activity selects a vCenter datacenter, network, and folder for a virtualmachine (VM) being provisioned. The activity makes these selections by applying virtual machine provisioningrules to the vCenter instance (inferred from the VMware template selected by the requester) and the VM category(selected by the requester).Configure the provisioning rules before allowing any workflow that uses this activity to run. See Provisioning Rulesfor a detailed explanation of this process. The activity must read and process the provisioning rules to configure thecorrect datacenter, network, and folder.

VMware Workflow Activities 72
Input Variables
Name Description
vCenter The sys_id of the vCenter to use.
Category The sys_id of the category to use.
Scratchpad EntriesThe activity writes this data to the workflow scratchpad:
Property Name Contents
selections.datacenter The sys_id of the vCenter datacenter selected.
selections.network The sys_id of the vCenter network selected.
selections.folder The sys_id of the vCenter folder selected.
error A human-readable error message describing exactly what went wrong. This property is set only when this activity fails forany reason.
Select ESX Host and DatastoreThe Select ESX Host and Datastore activity selects a specific ESX host and a vCenter datastore for a virtualmachine (VM) being provisioned. The algorithm selects the combination of ESX host and datastore that can host thevirtual machine with the least possible impact to the virtual hosting infrastructure.
Input Variables
Name Description
Template The sys_id of the template to be provisioned.
Scratchpad EntriesThe activity requires this scratchpad data to run:
Property Name Contents
selections A JavaScript object.
selections.vCenter The sys_id of the vCenter from which to select an ESX host and datastore. This value is generally inferred from the templateby the Select Datacenter, Network, and Folder activity described in this page.
selections.datacenter The sys_id of the vCenter datacenter from which to select an ESX host and datastore. This value is generally set by the SelectDatacenter, Network, and Folder activity.
The activity writes this data to the workflow scratchpad:

VMware Workflow Activities 73
Property Name Contents
selections.esx The sys_id of the vCenter ESX host selected.
selections.datastore The sys_id of the vCenter datastore selected.
selections.cluster The sys_id of the selected vCenter cluster of which the selected ESX host is a member, or null if the selected ESX host is not amember of any cluster.
error A value is set in this property only when this activity fails for any reason. It displays a human-readable error messagedescribing exactly what went wrong.
Selection AlgorithmThe ESX host and datastore selection algorithm makes use of normalized metrics, sometimes called figures of merit[2]. For each object being measured, the result is expressed as a number between 0 and 1 (that's the normalized part).Anything expressed as a percentage is a normalized metric. A glass that's half full of milk is 50% full, as is a 10,000liter fuel storage tank containing 5,000 liters of fuel. Even though they are vastly different in capacity, the fullness ofthose two vessels has been normalized as 50% full. This selection algorithm makes use of similar normalizedmetrics.For each possible combination of ESX host and vCenter datastore, the algorithm computes three normalized metrics:• Storage metric: If the sum of all the storage configured for all virtual machines on a datastore, plus the storage
needed for the virtual machine being provisioned, is less than the capacity of the datastore, then this metric has avalue of 1. Often the possible storage consumption on all virtual machines configured on a datastore is greaterthan the actual capacity of the datastore. This occurs because the virtual hosting environment administrators takeadvantage of the fact that most virtual machines to not use the storage capacity for which they are configured. Theselection algorithm detects this case and computes a metric value that is closer to 0 for datastores that are moreover-allocated, and closer to 1 for datastores that are less over-allocated.
• Compute metric: Generally, the sum of the CPUs allocated for all virtual machines running on an ESX hostexceeds (sometimes greatly exceeds) the number of cores physically present on the ESX host. This occursbecause virtual hosting environment administrators take advantage of the fact that most virtual machines spendmost of their time idling. This algorithm computes a CPU metric that is closer to 0 for ESX hosts that are moreover-allocated for CPUs, and closer to 1 for ESX hosts that are less over-allocated.
• Memory metric: Generally, the sum of the memory (RAM) allocated for all virtual machines running on an ESXhost exceeds (sometimes greatly exceeds) the amount of memory physically present on the ESX host. This occursbecause virtual hosting environment administrators take advantage of the fact that most virtual machines use lessmemory than is allocated for them. This algorithm computes a memory metric that is closer to 0 for ESX hoststhat are more over-allocated for memory, and closer to 1 for ESX hosts that are less over-allocated.
Each of these metrics is then adjusted by a weighting factor, which can be any number greater than or equal to zero.By default, the weighting factor is 1, which means that all three normalized metrics (storage, compute, and memory)are treated as equally important. You can adjust these weighting factors in any fashion to make a particular metriceither more or less important in the overall ESX host and datastore selection process. The closer a weighting factor isto 0, the more important that particular metric will be in the selection. Conversely, the more a weighting factor isgreater than 1, the less important that particular metric will be in the selection. From a purely mathematicalperspective, the raw metric is raised to the power of the weighting factor to obtain the weighted metric. Since the rawmetric is a number in the interval [0,1], the result (for any positive power) is also in the interval [0,1].These weighting factors are controlled by three properties:

VMware Workflow Activities 74
Weighting Factor Property Name
Storage glide.vmware.provisioning.storage_weight
Compute glide.vmware.provisioning.compute_weight
Memory glide.vmware.provisioning.memory_weight
When each of these metrics is calculated for the possible combinations of ESX host and vCenter datastore, themetrics are multiplied together to get an overall normalized metric for that particular ESX host and datastorecombination. The result of this multiplication is always a number between 0 and 1 (inclusive, in the interval [0,1]).The ESX host and the datastore combination with the largest overall normalized metric are the ones selected by thisactivity.
Select IP AddressThe Select IP Address activity selects an IP address for a virtual machine (VM) being provisioned. The selection ismade by finding the IP pool available to the selected vCenter network that has the most unused IP addressesremaining, and then randomly selecting and allocating an unused IP address from that IP pool. IP pools must beassigned before this activity runs in a workflow.
Scratchpad EntriesThe activity requires this scratchpad data to run:
Property Name Contents
selections A JavaScript object.
selections.network The sys_id of the vCenter network selected. Generally, this is set by the Select Datacenter, Network, and Folder activity.
The activity writes these properties to the workflow scratchpad:
Property Name Contents
selections.ip The IP address selected, in dotted-decimal form such as 10.54.228.62.
selections.netmask The netmask of the selected IP address.
selections.dns The IP Address of the DNS server associated with the selected IP address.
selections.gateway The gateway used by the selected IP address.
selections.pool_id The sys_id value of the IP pool that contains the selected IP address.
error A value is set in this property only when this activity fails for any reason. The property then contains a human-readable errormessage describing exactly what went wrong.

VMware Workflow Activities 75
Select NameThe Select Name activity selects a name for a virtual machine (VM) being provisioned. This one name is used forboth the host name and the DNS name. The following algorithm determines the selection:• If a preferred name is supplied, and if that name is available (not already a host name, DNS name, or VMware
image name), then the preferred name is selected and this activity finishes.• If a preferred name is supplied but is not available, the activity appends a hypen (-) and the requester's initials to
the original preferred name. If that modified preferred name is available, then the activity uses the modifiedpreferred name and finishes. For example, if the preferred name supplied was Dev, and the user making therequest was Athena Fontanilla, then you would use Dev-af as the modified preferred name. This activity uses thecurrent.opened_by variable to identify the user who made the service catalog request that caused theworkflow containing this activity to run.
• If no preferred name was supplied, or if neither the preferred name nor the modified preferred name is available,the activity uses the base name specified in the VM template, the requester's initials, and a sequence number, eachseparated by hyphens (-). These are combined with increasing sequence numbers until an available name is found.When an available name is found, the activity selects that name and finishes. For example, if the base name in theVM template was Test, and the user making the request was John Smith, then the very first name tried might beTest-js-4. If that name was not available, the next name checked would be Test-js-5. This process continues untilan available name is found. If the VM template does not have a base name configured, the activity uses the nameglobal.
You can replace the default algorithm, by using the VM template to configure a different script include to use insteadof the default VMnamer script include. This alternative script include must have an initialize method and aprocess method with the same arguments and return values as the VMnamer script include. However, thereplacement script can use any algorithm desired to generate the names.
Note: Developers might find it convenient to use the script include VMnumbers to generate sequence numbers for arbitrary basenames. You may also find it convenient to extend VMnamer to override the process method, to use the other methods definedthere in your own script include.
Input Variables
Name Description
Template The sys_id of the template to be provisioned.
PreferredName
An optional name that is preferred by the requester. If the preferred name is supplied and available, that name or a variant isselected. See the algorithm description, above.
Scratchpad EntriesThe activity writes this data to the workflow scratchpad.

VMware Workflow Activities 76
Property Name Contents
selections.name The name selected for the VM being provisioned.
error A value is set in this property only when this activity fails for any reason. The property then contains a human-readable errormessage describing exactly what went wrong.
References[1] http:/ / www. microsoft. com/ licensing/[2] http:/ / en. wikipedia. org/ wiki/ Figure_of_merit

Article Sources and Contributors 77
Article Sources and ContributorsOrchestration VMware Support Plugin Source: http://wiki.servicenow.com/index.php?oldid=191570 Contributors: Cheryl.dolan, David.Bailey, Joseph.messerschmidt, Steve.wood
Requesting a Virtual Server - Versions Prior to Calgary Source: http://wiki.servicenow.com/index.php?oldid=191549 Contributors: Cheryl.dolan, Davida.hughes, Joseph.messerschmidt,Steve.wood
Configuring VMware - Versions Prior to Calgary Source: http://wiki.servicenow.com/index.php?oldid=191660 Contributors: A.ma, Cheryl.dolan, Davida.hughes, Joseph.messerschmidt,Steve.wood
Accessing the vCenter API - Versions Prior to Calgary Source: http://wiki.servicenow.com/index.php?oldid=191627 Contributors: Cheryl.dolan, Joseph.messerschmidt, Neola, Steve.wood
ESX Resource Pools - Versions Prior to Calgary Source: http://wiki.servicenow.com/index.php?oldid=191711 Contributors: Cheryl.dolan, Joseph.messerschmidt, Steve.wood
VMware Templates - Versions Prior to Calgary Source: http://wiki.servicenow.com/index.php?oldid=191772 Contributors: Cheryl.dolan, Joseph.messerschmidt, Steve.wood, Vaughn.romero
MID Server Plugin Source: http://wiki.servicenow.com/index.php?oldid=89866 Contributors: Aburruss, Bow, CapaJC, Cheryl.dolan, Christen.mitchell, Chuck.tomasi, Dan.sherwin, DavidLoo, David.Bailey, Doogiesd, G.yedwab, Guy.yedwab, Jeremiah.hall, John.andersen, John.roberts, Joseph.messerschmidt, Mark.odonnell, Neola, Rob.woodbyrne, Steve.wood, Tom.dilatush,Vaughn.romero, Vhearne
Requirements Source: http://wiki.servicenow.com/index.php?oldid=191713 Contributors: Bow, CapaJC, David Loo, Doogiesd, Gadi.yedwab, Guy.yedwab, Joseph.messerschmidt,Rob.woodbyrne, Steve.wood, Valor, Vaughn.romero, Vhearne
Installation Source: http://wiki.servicenow.com/index.php?oldid=214005 Contributors: Joseph.messerschmidt, Steve.wood, Vaughn.romero
Configuration Source: http://wiki.servicenow.com/index.php?oldid=193263 Contributors: Aleck.lin, Bow, Cheryl.dolan, David.Bailey, Emily.partridge, Guy.yedwab, Jim.holthaus,Joseph.messerschmidt, Steve.wood, Tom.dilatush, Vaughn.romero, Vhearne, Voytek.blonski
MID Server Clusters Source: http://wiki.servicenow.com/index.php?oldid=191732 Contributors: Joseph.messerschmidt, Steve.wood
Autofinder Source: http://wiki.servicenow.com/index.php?oldid=191832 Contributors: Joseph.messerschmidt, Steve.wood
Approving and Provisioning VMware Requests - Versions Prior to Calgary Source: http://wiki.servicenow.com/index.php?oldid=191638 Contributors: A.ma, Cheryl.dolan, Davida.hughes,Joseph.messerschmidt, Steve.wood, Vaughn.romero
VMware Component Relationships Source: http://wiki.servicenow.com/index.php?oldid=191768 Contributors: Aleck.lin, Joseph.messerschmidt, Steve.wood
VMware Workflow Activities Source: http://wiki.servicenow.com/index.php?oldid=191773 Contributors: Cheryl.dolan, David.Bailey, Emily.partridge, George.rawlins, Jimmy.yuan,Joe.Westrich, Joseph.messerschmidt, Steve.wood

Image Sources, Licenses and Contributors 78
Image Sources, Licenses and ContributorsImage:Warning.gif Source: http://wiki.servicenow.com/index.php?title=File:Warning.gif License: unknown Contributors: CapaJCImage:VM_Service_Catalog1.png Source: http://wiki.servicenow.com/index.php?title=File:VM_Service_Catalog1.png License: unknown Contributors: Steve.woodImage:VM_Service_Catalog2.png Source: http://wiki.servicenow.com/index.php?title=File:VM_Service_Catalog2.png License: unknown Contributors: Steve.woodImage:VM_Service_Catalog3.png Source: http://wiki.servicenow.com/index.php?title=File:VM_Service_Catalog3.png License: unknown Contributors: Steve.woodImage:VM_Service_Catalog4.png Source: http://wiki.servicenow.com/index.php?title=File:VM_Service_Catalog4.png License: unknown Contributors: Steve.woodImage:VM_Service_Catalog5.png Source: http://wiki.servicenow.com/index.php?title=File:VM_Service_Catalog5.png License: unknown Contributors: Steve.woodImage:VM_ESX_Server.png Source: http://wiki.servicenow.com/index.php?title=File:VM_ESX_Server.png License: unknown Contributors: Steve.woodImage:VM_vCenter.png Source: http://wiki.servicenow.com/index.php?title=File:VM_vCenter.png License: unknown Contributors: Steve.woodImage:VM_Config_Network.png Source: http://wiki.servicenow.com/index.php?title=File:VM_Config_Network.png License: unknown Contributors: Steve.woodImage:VM_Config_Windows.png Source: http://wiki.servicenow.com/index.php?title=File:VM_Config_Windows.png License: unknown Contributors: Steve.woodImage:VM_Config_Linux.png Source: http://wiki.servicenow.com/index.php?title=File:VM_Config_Linux.png License: unknown Contributors: Steve.woodImage:VM_Approval_Group.png Source: http://wiki.servicenow.com/index.php?title=File:VM_Approval_Group.png License: unknown Contributors: Steve.woodImage:VM_Class_Select.png Source: http://wiki.servicenow.com/index.php?title=File:VM_Class_Select.png License: unknown Contributors: Steve.woodImage:VM_OS_Select.png Source: http://wiki.servicenow.com/index.php?title=File:VM_OS_Select.png License: unknown Contributors: Steve.woodImage:VM_CPU_Select.png Source: http://wiki.servicenow.com/index.php?title=File:VM_CPU_Select.png License: unknown Contributors: Steve.woodImage:VM_Memory_Select.png Source: http://wiki.servicenow.com/index.php?title=File:VM_Memory_Select.png License: unknown Contributors: Steve.woodImage:VM_Disk_Size_Select.png Source: http://wiki.servicenow.com/index.php?title=File:VM_Disk_Size_Select.png License: unknown Contributors: Steve.woodImage:RBA_VMWare_Privileges1.png Source: http://wiki.servicenow.com/index.php?title=File:RBA_VMWare_Privileges1.png License: unknown Contributors: Steve.woodImage:RBA_VMWare_Privileges2.png Source: http://wiki.servicenow.com/index.php?title=File:RBA_VMWare_Privileges2.png License: unknown Contributors: Steve.woodImage:RBA_VMWare_Privileges3.png Source: http://wiki.servicenow.com/index.php?title=File:RBA_VMWare_Privileges3.png License: unknown Contributors: Steve.woodImage:RBA_VMWare_Privileges4.png Source: http://wiki.servicenow.com/index.php?title=File:RBA_VMWare_Privileges4.png License: unknown Contributors: Steve.woodImage:VM_ESX_Resource_Pool.png Source: http://wiki.servicenow.com/index.php?title=File:VM_ESX_Resource_Pool.png License: unknown Contributors: Steve.woodImage:VM_Template_Record.png Source: http://wiki.servicenow.com/index.php?title=File:VM_Template_Record.png License: unknown Contributors: Steve.woodImage:VM_Template_Define_Rel.png Source: http://wiki.servicenow.com/index.php?title=File:VM_Template_Define_Rel.png License: unknown Contributors: Steve.woodImage:JAR_File_Sync.png Source: http://wiki.servicenow.com/index.php?title=File:JAR_File_Sync.png License: unknown Contributors: Steve.woodImage:mid server menu.png Source: http://wiki.servicenow.com/index.php?title=File:Mid_server_menu.png License: unknown Contributors: Vaughn.romeroImage:MID_Server_Download_Dublin.png Source: http://wiki.servicenow.com/index.php?title=File:MID_Server_Download_Dublin.png License: unknown Contributors: Vaughn.romeroImage:MID config.png Source: http://wiki.servicenow.com/index.php?title=File:MID_config.png License: unknown Contributors: Steve.wood, Tom.dilatushImage:MID config xml.png Source: http://wiki.servicenow.com/index.php?title=File:MID_config_xml.png License: unknown Contributors: Tom.dilatushImage:MID_Server_Roles.png Source: http://wiki.servicenow.com/index.php?title=File:MID_Server_Roles.png License: unknown Contributors: Steve.woodFile:MID_Server_Script_File_Sync.png Source: http://wiki.servicenow.com/index.php?title=File:MID_Server_Script_File_Sync.png License: unknown Contributors: Steve.woodFile:MID_Server_Script_File_Sync2.png Source: http://wiki.servicenow.com/index.php?title=File:MID_Server_Script_File_Sync2.png License: unknown Contributors: Steve.woodImage:MID_Server_Unblock_Config.png Source: http://wiki.servicenow.com/index.php?title=File:MID_Server_Unblock_Config.png License: unknown Contributors: Steve.woodImage:MID_Server_Clusters_Diagram.png Source: http://wiki.servicenow.com/index.php?title=File:MID_Server_Clusters_Diagram.png License: unknown Contributors: Steve.woodImage:MID_Server_Cluster1.png Source: http://wiki.servicenow.com/index.php?title=File:MID_Server_Cluster1.png License: unknown Contributors: Steve.woodImage:MID_Server_IP_Range1.png Source: http://wiki.servicenow.com/index.php?title=File:MID_Server_IP_Range1.png License: unknown Contributors: Steve.woodImage:MID_Server_IP_Range2.png Source: http://wiki.servicenow.com/index.php?title=File:MID_Server_IP_Range2.png License: unknown Contributors: Steve.woodImage:MID_Server_IP_Range3.png Source: http://wiki.servicenow.com/index.php?title=File:MID_Server_IP_Range3.png License: unknown Contributors: Steve.woodImage:MID_Server_Resolve_DNS.png Source: http://wiki.servicenow.com/index.php?title=File:MID_Server_Resolve_DNS.png License: unknown Contributors: Steve.woodImage:MID_Server_Capability2.png Source: http://wiki.servicenow.com/index.php?title=File:MID_Server_Capability2.png License: unknown Contributors: Steve.woodImage:MID_Server_Capability3.png Source: http://wiki.servicenow.com/index.php?title=File:MID_Server_Capability3.png License: unknown Contributors: Steve.woodImage:RBA_MID_Server_Property.png Source: http://wiki.servicenow.com/index.php?title=File:RBA_MID_Server_Property.png License: unknown Contributors: Joseph.messerschmidt,Steve.woodImage:MID_SetDefault.png Source: http://wiki.servicenow.com/index.php?title=File:MID_SetDefault.png License: unknown Contributors: Joseph.messerschmidtImage:VM_Approvals3_Berlin.png Source: http://wiki.servicenow.com/index.php?title=File:VM_Approvals3_Berlin.png License: unknown Contributors: Steve.woodImage:VMWare_VCenter_Diagram.png Source: http://wiki.servicenow.com/index.php?title=File:VMWare_VCenter_Diagram.png License: unknown Contributors: Steve.woodImage:VMWare_No_VCenter_Diagram.png Source: http://wiki.servicenow.com/index.php?title=File:VMWare_No_VCenter_Diagram.png License: unknown Contributors: Steve.wood