oracle9 ias containers for j2ee - oracle | integrated … parkway, redwood city, ca 94065. the...
TRANSCRIPT

Oracle9iAS Containers for J2EEEnterprise JavaBeans Developer’s Guide
Release 2 (9.0.4)
Part No. B10324-01
April 2003
Beta Draft.

Oracle9iAS Containers for J2EE Enterprise JavaBeans Developer’s Guide, Release 2 (9.0.4)
Part No. B10324-01
Copyright © 2002, 2003 Oracle Corporation. All rights reserved.
Primary Author: Sheryl Maring
The Programs (which include both the software and documentation) contain proprietary information of Oracle Corporation; they are provided under a license agreement containing restrictions on use and disclosure and are also protected by copyright, patent and other intellectual and industrial property laws. Reverse engineering, disassembly or decompilation of the Programs, except to the extent required to obtain interoperability with other independently created software or as specified by law, is prohibited.
The information contained in this document is subject to change without notice. If you find any problems in the documentation, please report them to us in writing. Oracle Corporation does not warrant that this document is error-free. Except as may be expressly permitted in your license agreement for these Programs, no part of these Programs may be reproduced or transmitted in any form or by any means, electronic or mechanical, for any purpose, without the express written permission of Oracle Corporation.
If the Programs are delivered to the U.S. Government or anyone licensing or using the programs on behalf of the U.S. Government, the following notice is applicable:
Restricted Rights Notice Programs delivered subject to the DOD FAR Supplement are "commercial computer software" and use, duplication, and disclosure of the Programs, including documentation, shall be subject to the licensing restrictions set forth in the applicable Oracle license agreement. Otherwise, Programs delivered subject to the Federal Acquisition Regulations are "restricted computer software" and use, duplication, and disclosure of the Programs shall be subject to the restrictions in FAR 52.227-19, Commercial Computer Software - Restricted Rights (June, 1987). Oracle Corporation, 500 Oracle Parkway, Redwood City, CA 94065.
The Programs are not intended for use in any nuclear, aviation, mass transit, medical, or other inherently dangerous applications. It shall be the licensee's responsibility to take all appropriate fail-safe, backup, redundancy, and other measures to ensure the safe use of such applications if the Programs are used for such purposes, and Oracle Corporation disclaims liability for any damages caused by such use of the Programs.
Oracle is a registered trademark, and Oracle9i is a trademark or registered trademark of Oracle Corporation. Other names may be trademarks of their respective owners.
Alpha and Beta Draft Documentation Alpha and Beta Draft documentation are considered to be in prerelease status. This documentation is intended for demonstration and preliminary use only. We expect that you may encounter some errors, ranging from typographical errors to data inaccuracies. This documentation is subject to change without notice, and it may not be specific to the hardware on which you are using the software. Please be advised that Oracle Corporation does not warrant prerelease documentation and will not be responsible for any loss, costs, or damages incurred due to the use of this documentation.

Contents
Send Us Your Comments ................................................................................................................ 1-xi
Preface....................................................................................................................................................... 1-xiii
1 EJB Overview
New Features of EJB 2.0 ..................................................................................................................... 1-2Local Interface Support................................................................................................................ 1-2Home Interface Business Methods............................................................................................. 1-3Message-Driven Beans................................................................................................................. 1-4Enterprise JavaBeans Query Language (EJB QL) .................................................................... 1-4CMP Relationships ....................................................................................................................... 1-5CORBA Support - RMI-over-IIOP ............................................................................................. 1-6
Changes in Defaults for Oracle9iAS Version 9.0.4....................................................................... 1-8Invoking Enterprise JavaBeans ........................................................................................................ 1-8Implementing an EJB ......................................................................................................................... 1-9
Bean Implementation ................................................................................................................. 1-10Parameter Passing ...................................................................................................................... 1-10Parameter Objects....................................................................................................................... 1-11
Types of EJBs ..................................................................................................................................... 1-11Session Beans............................................................................................................................... 1-12Entity Beans ................................................................................................................................. 1-17Message-Driven Beans............................................................................................................... 1-24
Difference Between Session and Entity Beans ........................................................................... 1-26Container Services for EJBs ............................................................................................................ 1-27
iii

2 EJB Primer
Develop EJBs ....................................................................................................................................... 2-2Create the Development Directory ............................................................................................ 2-2Implement the EJB ........................................................................................................................ 2-4Access the EJB.............................................................................................................................. 2-10Create the Deployment Descriptor .......................................................................................... 2-24Archive the EJB Application ..................................................................................................... 2-26
Prepare the EJB Application for Assembly.................................................................................. 2-27Modify the Application.XML File ............................................................................................ 2-27Create the EAR File .................................................................................................................... 2-29
Deploy the Enterprise Application to OC4J ................................................................................ 2-29
3 CMP Entity Beans
Entity Bean Overview ........................................................................................................................ 3-2Creating Entity Beans......................................................................................................................... 3-3
Home Interface.............................................................................................................................. 3-4Component Interfaces .................................................................................................................. 3-5Entity Bean Class .......................................................................................................................... 3-6
Primary Key ......................................................................................................................................... 3-9Defining the Primary Key in a Class........................................................................................ 3-11Defining an Auto-Generated Primary Key ............................................................................. 3-12
Persistence Fields .............................................................................................................................. 3-13Default Mapping of Persistent Fields to the Database .......................................................... 3-15Explicit Mapping of Persistent Fields to the Database.......................................................... 3-16
Converstion of CMP Types to Database Types ........................................................................... 3-19Simple Data Types ...................................................................................................................... 3-19Serializable Classes ..................................................................................................................... 3-21Other Entity Beans or Collections ............................................................................................ 3-21
4 Entity Relationship Mapping
Defining Entity-To-Entity Relationships ....................................................................................... 4-2Choosing Cardinality and Direction.......................................................................................... 4-2Requirements in Defining Relationships................................................................................... 4-3
Mapping Object Relationship Fields to the Database............................................................... 4-12
iv

Default Mapping of Relationship Fields to the Database..................................................... 4-12Explicit Mapping of Relationship Fields to the Database..................................................... 4-21
Using a Foreign Key in a Composite Primary Key .................................................................... 4-63How to Override a Foreign Key Database Constraint ............................................................... 4-70
5 EJB Query Language
EJB QL Overview ................................................................................................................................ 5-2Query Methods Overview................................................................................................................. 5-2
Finder Methods............................................................................................................................. 5-2Select Methods .............................................................................................................................. 5-3
Deployment Descriptor Semantics ................................................................................................. 5-5Finder Method Example .................................................................................................................... 5-7
Specifying Finder Methods With EJB QL Syntax..................................................................... 5-7Specifying Finder Methods With OC4J-Specific Syntax ......................................................... 5-9
Select Method Example ................................................................................................................... 5-12Oracle EJB QL Type Extensions: Date, Time, Timestamp, and SQRT.................................... 5-14
6 BMP Entity Beans
Creating BMP Entity Beans .............................................................................................................. 6-2Component and Home Interfaces.................................................................................................... 6-3BMP Entity Bean Implementation .................................................................................................. 6-3
The ejbCreate Implementation ................................................................................................... 6-4The ejbFindByPrimaryKey Implementation............................................................................. 6-7Other Finder Methods ................................................................................................................. 6-8The ejbStore Implementation...................................................................................................... 6-8The ejbLoad Implementation...................................................................................................... 6-9The ejbPassivate Implementation ............................................................................................ 6-10The ejbActivate Implementation .............................................................................................. 6-10The ejbRemove Implementation .............................................................................................. 6-10
Modify XML Deployment Descriptors ........................................................................................ 6-11Create Database Table and Columns for Entity Data ................................................................ 6-12
7 Message-Driven Beans
MDB Overview ................................................................................................................................... 7-2
v

MDB Example...................................................................................................................................... 7-3MDB Implementation Example .................................................................................................. 7-3EJB Deployment Descriptor (ejb-jar.xml) for the MDB ........................................................... 7-6
MDB Using OC4J JMS ....................................................................................................................... 7-7Configure OC4J JMS in the XML files........................................................................................ 7-9Create the Deployment Descriptors to Map OC4J JMS Destination Objects ..................... 7-10Deploying the MDB.................................................................................................................... 7-12
MDB Implementation Using Oracle JMS .................................................................................... 7-12Install And Configure The Resource Provider ....................................................................... 7-14Configure the OC4J XML Files For The Resource Provider ................................................. 7-16Create the Deployment Descriptor to Map Oracle JMS Destination Objects .................... 7-18Deploy the MDB ......................................................................................................................... 7-20
Client Access of MDB ...................................................................................................................... 7-21Using a Logical Name for Accessing the MDB ...................................................................... 7-21Using an Explicit Name for the JNDI Lookup........................................................................ 7-25
Using Transactions With MDBs ..................................................................................................... 7-26
8 Configuring EJB Application Security
Granting Permissions in Browser.................................................................................................... 8-2Authenticating and Authorizing EJB Applications ..................................................................... 8-2
Specifying Users and Groups...................................................................................................... 8-3Specifying Logical Roles in the EJB Deployment Descriptor ................................................. 8-4Specifying Unchecked Security for EJB Methods .................................................................... 8-7Specifying the runAs Security Identity ..................................................................................... 8-8Mapping Logical Roles to Users and Groups........................................................................... 8-8Specifying a Default Role Mapping for Undefined Methods .............................................. 8-10Specifying Users and Groups by the Client ............................................................................ 8-11
Specifying Credentials in EJB Clients .......................................................................................... 8-11Credentials in JNDI Properties ................................................................................................. 8-11Credentials in the InitialContext .............................................................................................. 8-12
9 Advanced EJB Subjects
Packaging and Sharing Classes........................................................................................................ 9-2EJB Lifecycle Issues ............................................................................................................................ 9-3
When Does Stateful Session Bean Passivation Occur?............................................................ 9-3
vi

Configuring Pool Sizes For Entity Beans .................................................................................. 9-6Configuring Lazy Loading on CMP Entity Bean Finder Methods........................................ 9-7
Techniques for Updating Persistence ............................................................................................. 9-8Entity Bean Concurrency and Database Isolation Modes .......................................................... 9-8
Database Isolation Modes ........................................................................................................... 9-8Entity Bean Concurrency Modes................................................................................................ 9-9Exclusive Write Access to the Database .................................................................................. 9-10Effects of the Combination of Isolation and Concurrency Modes ...................................... 9-11Affects of Concurrency Modes on Clustering ........................................................................ 9-11
Configuring Environment References.......................................................................................... 9-12Environment variables............................................................................................................... 9-12Environment References To Other Enterprise JavaBeans .................................................... 9-13Environment References To Resource Manager Connection Factory References ............ 9-20
Common Errors ................................................................................................................................. 9-26Out Of Memory Error During Deployment ........................................................................... 9-26NamingException Thrown........................................................................................................ 9-27Deadlock Conditions.................................................................................................................. 9-27ClassCastException .................................................................................................................... 9-27
10 EJB Clustering
EJB Clustering Overview ................................................................................................................ 10-2Stateless Session Clustering ...................................................................................................... 10-2Stateful Session Bean Clustering .............................................................................................. 10-3Combination of HTTP and EJB Clustering ............................................................................. 10-4
Enabling Clustering For EJBs ......................................................................................................... 10-4Configure the Multicast Address for EJB Clustering ............................................................ 10-4Configure EJB Replication for Stateful Session Beans........................................................... 10-5Application Client Invocation .................................................................................................. 10-6
Load Balancing Options .................................................................................................................. 10-6
11 Active Components for Java
Advantages of AC4J ......................................................................................................................... 11-2AC4J Architecture Overview .......................................................................................................... 11-3AC4J Components Overview ......................................................................................................... 11-6
Active EJB .................................................................................................................................... 11-6
vii

Interaction .................................................................................................................................... 11-7Process .......................................................................................................................................... 11-7Reaction ........................................................................................................................................ 11-8AC4J Data Tokens..................................................................................................................... 11-10Data Bus ..................................................................................................................................... 11-10
Installing and Configuring AC4J and the Database ................................................................ 11-14Data Source Configuration...................................................................................................... 11-16
AC4J Example .................................................................................................................................. 11-17Running the Example............................................................................................................... 11-17Collecting the Response........................................................................................................... 11-21Rerunning the Client ................................................................................................................ 11-22
Explanation of the Example .......................................................................................................... 11-22Overview of Steps..................................................................................................................... 11-28Step 1: Client Sends an Asynchronous Request to the Purchase Order Service Active EJB....... 11-29Step 2: Purchase Order Service Active EJB Processes the Client’s takeOrder Request .. 11-34Step 3: Purchase Order Service Active EJB Processes the processOrder Request........... 11-37Step 4: Inventory and Credit Service Active EJBs Process Requests and Make Asynchronous Responses 11-39Step 5: Asynchronous Responses Are Processed by the processOrderCallback Reaction ......... 11-40Step 6: Client Receives Purchase Order Number Asynchronously and Polls for Purchase Order Status 11-43
AC4J Active EJB Deployment....................................................................................................... 11-46
A OC4J-Specific DTD Reference
OC4J-Specific Deployment Descriptor for EJBs........................................................................... A-3Enterprise Beans Section.............................................................................................................. A-3Assembly Descriptor Section .................................................................................................... A-22
Element Description ......................................................................................................................... A-22
B EJB 1.1 CMP Entity Beans
Creating Entity Beans......................................................................................................................... B-2Home Interface.............................................................................................................................. B-3Remote Interface ........................................................................................................................... B-3
viii

Entity Bean Class .......................................................................................................................... B-4Persistent Data .............................................................................................................................. B-6Primary Key................................................................................................................................... B-8Deploying the Entity Bean ........................................................................................................ B-10
Advanced CMP Entity Beans.......................................................................................................... B-10EJB 1.1 Advanced Finder Methods .......................................................................................... B-10EJB 1.1 Object-Relational Mapping of Persistent Fields........................................................ B-13
C Migration From EJB 1.1 to EJB 2.0 Container Managed Persistence
Introduction to Migrating EJB 1.1 Applications to EJB 2.0......................................................... C-1Use EJB 2.0 Deployment Descriptor Identification ..................................................................... C-2Use Abstract Bean Implementations............................................................................................... C-3Use Standard EJB 2.0 Relationships................................................................................................ C-4Use Local Interfaces for Beans with Relationships...................................................................... C-5Use EJB Query Language (EJBQL) .................................................................................................. C-5Conclusion ........................................................................................................................................... C-7
D Third Party Licenses
Apache HTTP Server.......................................................................................................................... D-2The Apache Software License..................................................................................................... D-2
Apache JServ ........................................................................................................................................ D-4Apache JServ Public License ....................................................................................................... D-4
Index
ix

x

Send Us Your Comments
Oracle9iAS Containers for J2EE Enterprise JavaBeans Developer’s Guide, Release 2 (9.0.4)
Part No. B10324-01
Oracle Corporation welcomes your comments and suggestions on the quality and usefulness of this publication. Your input is an important part of the information used for revision.
■ Did you find any errors?■ Is the information clearly presented?■ Do you need more information? If so, where?■ Are the examples correct? Do you need more examples?■ What features did you like most about this manual?
If you find any errors or have any other suggestions for improvement, please indicate the chapter, section, and page number (if available). You can send comments to us in the following ways:
■ Electronic mail — [email protected]■ FAX - 650-506-7225. Attn: Java Platform Group, Information Development Manager■ Postal service:
Oracle Corporation Information Development Manager500 Oracle Parkway, Mailstop 4op978Redwood Shores, CA 94065USA
Please indicate if you would like a reply.
If you have problems with the software, please contact your local Oracle World Wide Support Center.
xi

xii

Beta Draft xiii
Preface
This guide gets you started building Enterprise JavaBeans for OC4J. It includes code examples to help you develop your application.
Who Should Read This Guide?Anyone developing Enterprise JavaBeans for OC4J will benefit from reading this guide. Written especially for programmers, it will also be of value to architects, systems analysts, project managers, and others interested in EJB applications. To use this guide effectively, you must have a working knowledge of J2EE.
Prerequisite ReadingBefore consulting this Guide, you should read the following:
■ Any J2EE book that enables you to understand the basics of J2EE programming.
■ The Oracle9iAS Containers for J2EE User’s Guide. This guide helps you to understand the minimum requirements for a J2EE application in the OC4J environment.
■ The Sun Microsystems EJB 2.0 specification as a supplement to this guide. This guide assumes that you already have a base understanding of the EJB 2.0 specification details.
Suggested Reading
Books■ Professional Java Server Programming, J2EE Edition, Wrox Press Ltd, 2000.

xiv Beta Draft
■ Mastering Enterprise JavaBeans and the Java2 Platform Enterprise Edition, by Ed Roman. Wily Computer Publishing, 1999.
■ Designing Enterprise Applications with the Java2 Platform, Enterprise Edition, Addison-Wesley, 2000.
■ Core Java by Cornell & Horstmann, second edition, Volume II (Prentice-Hall, 1997) demonstrates several Java concepts relevant to EJBs.
■ The Developer’s Guide to Understanding Enterprise JavaBeans, an overview of EJBs, is available at http://www.Nova-Labs.com.
Online SourcesThere are many useful online sources of information about Java. For example, you can view or download guides and tutorials from the Sun Microsystems home page on the Web:
http://www.sun.com
The current 2.0 EJB specification is available at:
http://java.sun.com/products/ejb/docs.html
Another popular Java Web site is:
http://www.gamelan.com
For Java API documentation, see:
http://www.javasoft.com
How This Guide Is OrganizedThis guide consists of the following:
Chapter 1, "EJB Overview", presents a brief overview of EJBs.
Chapter 2, "EJB Primer", discusses a stateless session bean development for the OC4J server.
Chapter 3, "CMP Entity Beans", discusses a CMP entity bean and advanced issues connected with CMP entity beans.
Chapter 4, "Entity Relationship Mapping", discusses container-managed relationships (CMR) within the entity bean for OC4J.

Beta Draft xv
Chapter 5, "EJB Query Language", provides an overview and examples of setting up query methods that use EJB QL.
Chapter 6, "BMP Entity Beans", discusses a BMP entity bean.
Chapter 7, "Message-Driven Beans", discusses an MDB entity bean.
Chapter 8, "Configuring EJB Application Security", discusses EJB application security.
Chapter 9, "Advanced EJB Subjects", discusses advanced issues for EJBs.
Chapter 10, "EJB Clustering", discusses how to cluster EJBs across OC4J nodes.
Chapter 11, "Active Components for Java", introduces a new methodology to merge the advantages of both asynchronous and request/response communication.
Appendix A, "OC4J-Specific DTD Reference" describes the OC4J-specific deployment descriptor.
Appendix B, "EJB 1.1 CMP Entity Beans" contains the EJB 1.1 CMP entity bean methodology.
Appendix C, "Migration From EJB 1.1 to EJB 2.0 Container Managed Persistence", discusses how to migrate an EJB 1.1 application that uses container managed persistence to the 2.0 specification model.
ConventionsThe following conventions are used in this manual:
Convention Meaning
. . .
Vertical ellipsis points in an example mean that information not directly related to the example has been omitted.
. . . Horizontal ellipsis points in statements or commands mean that parts of the statement or command not directly related to the example have been omitted
boldface text Boldface type in text indicates a term defined in the text, the glossary, or in both locations.
< > Angle brackets enclose user-supplied names.
[ ] Brackets enclose optional clauses from which you can choose one or none.

xvi Beta Draft
EJB Ove
1
EJB OverviewThis chapter discusses EJB concepts that are specified fully in the J2EE specification. The remainder of the chapters in this book show only the tasks necessary to develop your EJBs.
For more details and examples of the concepts presented in this chapter, refer to books written by Sun Microsystems that discuss EJBs and J2EE Blueprint Architecture recommendations.
This chapter includes the following topics:
■ New Features of EJB 2.0
■ Changes in Defaults for Oracle9iAS Version 9.0.4
■ Invoking Enterprise JavaBeans
■ Implementing an EJB
■ Types of EJBs
■ Difference Between Session and Entity Beans
■ Container Services for EJBs
rview 1-1

New Features of EJB 2.0
New Features of EJB 2.0The following sections describe the new features to EJB 2.0:
■ Local Interface Support
■ Home Interface Business Methods
■ Message-Driven Beans
■ Enterprise JavaBeans Query Language (EJB QL)
■ CMP Relationships
■ CORBA Support - RMI-over-IIOP
Local Interface SupportOracle9iAS provides complete support for local interfaces.
A client may access a session or an entity bean only through the methods defined in the bean’s interfaces which define the client’s view of a bean. All other aspects of the bean - method implementations, deployment descriptor settings, abstract schemas, database access calls - are hidden from the client providing modularity and encapsulation. Well designed interfaces simplify the development and maintenance of J2EE applications by shielding clients from any complexities in the business logic and also allowing the EJBs to change internally without affecting the clients. EJBs support two types of client access - remote or local.
Remote Access A remote client of an enterprise bean has the following traits:
1. It may run on a different machine and a different Java Virtual Machine (JVM) than the enterprise bean it accesses.
2. It can be a web component, a J2EE application client, or another enterprise bean.
3. To a remote client, the location of the enterprise bean is transparent. To create an enterprise bean with remote access, you must code a remote interface and a home interface. The remote interface defines the business methods that are specific to the bean.
Local AccessA local client has these characteristics:
1-2 Oracle9iAS Containers for J2EE Enterprise JavaBeans Developer’s Guide

New Features of EJB 2.0
1. It must run in the same JVM as the enterprise bean it accesses.
2. It may be a web component or another enterprise bean.
3. To the local client, the location of the enterprise bean it accesses is not transparent.
4. It is often an entity bean that has a container-managed relationship with another entity bean. To build an enterprise bean that allows local access, you must code a local interface and a local home interface. The local interface defines the bean’s business methods and the local home interface defines its life-cycle and finder methods.
Local Interfaces and Container-Managed Relationships If an entity bean is the target of a container-managed relationship, then it must have local interfaces. Further, if the relationship between the EJBs is bi-directional, both beans must have local interfaces. Moreover, since they require local access, entity beans that participate in a container-managed relationship must reside in the same EJB container. The primary benefit of this locality is increased performance - local calls are usually faster than remote calls.
Local Compared to Remote Access The decision on whether to allow local or remote access depends on the following factors:
1. Container-Managed Relationships - If an entity bean is the target of a container-managed relationship, it must use local access.
2. Tight or Loose Coupling of Related Beans - tightly coupled beans depend on one another. For example, a completed sales order must have one or more line items, which cannot exist without the order to which they belong. The OrderEJB and LineItemEJB beans that model this relationship are tightly coupled. Tightly coupled beans are good candidates for local access. Since they fit together as a logical unit, they probably call each other often and would benefit from the increased performance that is possible with local access.
Home Interface Business MethodsHome interface business methods are used for public usage of methods that do not use entity bean persistent data. If you want to supply methods that perform duties for you that are not associated with any specific bean, a home interface business method allows you to publicize this method.
EJB Overview 1-3

New Features of EJB 2.0
Message-Driven BeansYou can implement EJB 2.0 message-driven beans with Oracle JMS. A full example is provided in Chapter 7, "Message-Driven Beans".
Enterprise JavaBeans Query Language (EJB QL)EJB QL defines the queries for the finder and select methods of an entity bean with container-managed persistence. A subset of SQL92, EJB QL has extensions that allow navigation over the relationships defined in an entity bean’s abstract schema. The abstract schema is part of an entity bean’s deployment descriptor and defines the bean’s persistent fields and relationships. The term "abstract" distinguishes this schema from the physical schema of the underlying datastore. The abstract schema name is referenced by EJB QL queries since the scope of an EJB QL query spans the abstract schemas of related entity beans that are packaged in the same EJB JAR file. For an entity bean with container-managed persistence, an EJB QL query must be defined for every finder method (except findByPrimaryKey). The EJB QL query determines the query that is executed by the EJB container when the finder method is invoked.
Oracle9iAS provides complete support for EJB QL with the following important features:
■ Automatic Code Generation: EJB QL queries are defined in the deployment descriptor of the entity bean. When the EJBs are deployed to Oracle9iAS, the container automatically translates the queries into the SQL dialect of the target data store. Because of this translation, entity beans with container-managed persistence are portable -- their code is not tied to a specific type of data store.
■ Optimized SQL Code Generation: Further, in generating the SQL code, Oracle9iAS makes several optimizations such as the use of bulk SQL, batched statement dispatch, etc. to make database access efficient.
■ Support for Oracle and Non-Oracle Databases: Further, Oracle9iAS provides the ability to execute EJB QL against any database - Oracle, MS SQL-Server, IBM DB/2, Informix, and Sybase.
■ CMP with Relationships: Oracle9iAS supports EJB QL for both single entity beans and also with entity beans that have relationships, with support for any type of multiplicity and directionality.
See Chapter 5, "EJB Query Language" for more information and examples.
1-4 Oracle9iAS Containers for J2EE Enterprise JavaBeans Developer’s Guide

New Features of EJB 2.0
CMP RelationshipsThe EJB 2.0 specification enables the specification of relationships between entity beans. An entity bean can be defined so as to have a relationship with other entity beans. For example, in a project management application the ProjectEJB and TaskEJB beans would be related because a project is made up of a set of tasks. You implement relationships differently for entity beans with bean-managed-persistence than those entity beans that utilize container-managed-persistence. With bean-managed persistence, the code that you write implements the relationships. With container-managed persistence, the EJB container takes care of the relationships for you. For this reason, relationships in entity beans with container-managed persistence are often referred to as container-managed relationships.
■ Relationship Fields - A relationship field in an EJB identifies a related bean. A relationship field is virtual and is defined in the enterprise bean class with access methods. Unlike a persistent field, a relationship field does not represent the bean’s state.
■ Multiplicity in Container-Managed Relationships - There are four types of multiplicities all of which are supported by Oracle9iAS:
– One-to-One - Each entity bean instance is related to a single instance of another entity bean.
– One-to-Many - An entity bean instance is related to multiple instances of the other entity bean.
– Many-to-One - Multiple instances of an entity bean may be related to a single instance of the other entity bean. This multiplicity is the opposite of one-to-many.
– Many-to-Many - The entity bean instances may be related to multiple instances of each other.
■ Direction in Container-Managed Relationships - The direction of a relationship may be either bi-directional or unidirectional. In a bi-directional relationship, each entity bean has a relationship field that refers to the other bean. Through the relationship field, an entity bean’s code can access its related object. If an entity bean has a relative field, then we often say that it "knows" about its related object. For example, if an ProjectEJB bean knows what TaskEJB beans it has and if each TaskEJB bean knows what ProjectEJB bean it belongs to, then they have a bi-directional relationship. In a unidirectional relationship, only one entity bean has a relationship field that refers to the other. Oracle9iAS supports both unidirectional and bi-directional relationships between EJBs.
EJB Overview 1-5

New Features of EJB 2.0
■ EJBQL and CMP With Relationships - EJB QL queries often navigate across relationships. The direction of a relationship determines whether a query can navigate from one bean to another. With Oracle9iAS, EJBQL queries can traverse CMP Relationships with any type of multiplicity and with both unidirectional and bi-directional relationships.
For more information, see Chapter 3, "CMP Entity Beans", Chapter 4, "Entity Relationship Mapping", and Chapter 5, "EJB Query Language".
Oracle9iAS Object-Relational MappingOracle9iAS furnishes, out of the box, its own persistence manager for entity beans, which supplies both simple (1:1) mapping and complex relationship (1:n, m:n) mapping. Oracle9iAS provides complete support for the EJB 2.0 O-R mapping specification.
For more information, see Chapter 4, "Entity Relationship Mapping".
Third Party O-R Mappings - TopLink IntegrationOracle9iAS integrates leading third party O-R mapping solutions including TopLink for Java, with the EJB container. TopLink provides developers with the flexibility to map objects and Enterprise Java Beans to a relational database schema with minimal impact. TopLink for Java provides advanced mapping capabilities such as bean/object identity mapping, type and value transformation, relationship mapping (1:1, 1:n and m:n), object caching and locking, batch writing, and advanced and dynamic query capabilities. TopLink offers a GUI mapping tool - the TopLink Mapping Workbench - which simplifies the process of mapping J2EE components to database objects. TopLink provides EJB 2.0 support, automatic or developer-configured bi-directional relationship maintenance, automatic or developer-configured cache synchronization session management via XML, and optimistic read locking. Oracle9iAS is also integrated with other leading O-R mapping solutions in the market.
For more information on TopLink, see the Oracle9iAS TopLink Getting Started Guide.
CORBA Support - RMI-over-IIOPRMI over IIOP is part of the J2EE 1.3 Specification and provides two important benefits:
■ RMI over IIOP provides the ability to write CORBA applications for the Java platform without learning CORBA Interface Definition Language (IDL).
1-6 Oracle9iAS Containers for J2EE Enterprise JavaBeans Developer’s Guide

New Features of EJB 2.0
■ IIOP eases legacy application and platform integration by allowing applications written in C++, Smalltalk, and other CORBA supported languages to communicate with J2EE components.
Oracle9iAS supports RMI-over-IIOP providing the following important facilities:
■ Automatic IDL Stub and Helper Class Generation - To work with CORBA applications in other languages, IDL, CORBA stubs and skeletons can be generated:
1. Automatically by Oracle9iAS when the J2EE Application is deployed to it.
2. IDL can also be generated from J2EE interfaces using the rmic compiler with the -idl option. Further, developers can use the rmic compiler with the -iiop option to generate IIOP stub and tie classes, rather than Java Remote Messaging Protocol (JRMP) stub and skeleton classes.
■ Objects-By-Value - The Oracle9iAS RMI-IIOP implementation provides flexibility by allowing developers to pass any serializable Java object (Objects By Value) between application components.
■ POA Support - The Portable Object Adapter (POA) is designed to provide an object adapter that can be used with multiple ORB implementations with a minimum of rewriting needed to deal with different vendors’ implementations. The POA is also intended to allow persistent objects -- at least, from the client’s perspective. That is, as far as the client is concerned, these objects are always alive, and maintain data values stored in them, even though physically, the server may have been restarted many times, or the implementation may be provided by many different object implementations. Oracle9iAS provides complete POA support.
■ Interoperating with Other ORBs - The Oracle9iAS RMI-IIOP implementation will interoperate with other ORBs that support the CORBA 2.3 specification. It will not interoperate with older ORBs, because these are unable to handle the IIOP encodings for Objects By Value. This support is needed to send RMI value classes (including strings) over IIOP. Oracle9iAS also provides complete support for the Interoperable Naming, Security, and Transactions elements in the J2EE 1.3 specification allowing developers to build J2EE applications and interoperate them with J2EE applications on other Application Servers and with legacy systems through CORBA.
See the RMI/Interoperability chapter in the Oracle9iAS Containers for J2EE Services Guide for more information.
EJB Overview 1-7

Changes in Defaults for Oracle9iAS Version 9.0.4
Changes in Defaults for Oracle9iAS Version 9.0.4Default values in version 9.0.3 have been modified as follows:
■ Lazy loading for CMP finder methods is now turned off as the default. See "Configuring Lazy Loading on CMP Entity Bean Finder Methods" on page 9-7 for more information.
■ For relationship mapping for a one-to-many relationship, the default scenario used an association table. Now, the default is to use a foreign key.
■ The default value for the trans-attribute for CMP 2.0 entity beans is changed to Required. For more information, see the JTA chapter in the Oracle9iAS Containers for J2EE Services Guide.
■ The max-tx-retries default value is zero. See the EJB section in the Oracle9i Application Server Performance Guide for more information.
■ The max-instances default value is set to zero for all EJBs.
Invoking Enterprise JavaBeansEnterprise JavaBeans (EJBs) can be one of three types: session beans, entity beans, or message-driven beans.
■ Session beans can be stateful or stateless and are used for business logic functionality.
– Stateless session beans are used for business services. They do not retain client state across calls.
– Stateful session beans do maintain state across client calls. Thus, these beans manage business functions for a specific client for the life of that client.
■ Entity beans are normally used for managing persistent data.
■ Message-driven beans are used for receiving messages from a JMS queue or topic.
An EJB has two client interfaces:
■ Component interface (remote and local)—The component interface specifies the business methods that the clients of the object can invoke.
■ Home interface—The home interface defines EJB life cycle methods, such as a method to create and retrieve a reference to the bean object.
The client uses both of these interfaces when invoking a method on a bean.
1-8 Oracle9iAS Containers for J2EE Enterprise JavaBeans Developer’s Guide

Implementing an EJB
Figure 1–1 Events In A Stateless Session Bean
Figure 1–1 demonstrates a stateless session bean and corresponds to the following steps:
1. The client, which can be a standalone Java client, servlet, JSP, or an applet, retrieves the home interface of the bean—normally through JNDI.
2. The client invokes the create method on the home interface reference (home object). This creates the bean instance and returns a reference to the component interface (remote or local interface) of the bean.
3. The client invokes a method defined in the component interface (remote or local interface), which delegates the method call to the corresponding method in the bean instance (through a stub).
4. The client can destroy the bean instance by invoking the remove method that is defined in the component interface (remote or local interface). Some beans, such as stateless session beans, cannot call the remove method. In this case, the con-tainer removes the bean.
Implementing an EJBYou must create the following four major components to develop an EJB:
■ the home interface
■ the component interface (remote or local interface)
■ the implementation of the bean
myapp EJB
HomeInterface
RemoteInterface
BeanInstance
setX( ... ) {}getX( ... ) {}
Servlet
mBean x=home.create();...setX(42, "hiya");r3=getX();
create
ejbCreate
invokemethods
EJB Overview 1-9

Implementing an EJB
■ a deployment descriptor for each EJB
Bean ImplementationYour bean implements the methods within either the SessionBean, EntityBean, or MessageDrivenBean interface. The implementation contains logic for lifecycle methods defined in the home interface, business methods defined in the compo-nent interface (remote or local), and container callback functions defined in the SessionBean, EntityBean, or MessageDrivenBean interface.
Parameter PassingWhen you implement an EJB or write the client code that calls EJB methods, you must be aware of the parameter-passing conventions used with EJBs.
A parameter that you pass to a bean method—or a return value from a bean method—can be any Java type that is serializable. Java primitive types, such as int, double, are serializable. Any non-remote object that implements the java.io.Serializable interface can be passed. A non-remote object that is passed as a parameter to a bean or returned from a bean is passed by value, not by reference. So, for example, if you call a bean method as follows:
public class theNumber { int x;}
Component Description
The home interface Specifies the interface to an object that the container itself implements: the home object. The home interface contains the life cycle methods, such as the create() methods that specify how a bean is created.
The component interface (remote or local)
Specifies the business methods that you implement in the bean. The bean must also implement additional container service methods. The EJB container invokes these methods at different times in the life cycle of a bean.
The bean implementation
Contains the Java code that implements the methods defined in the home interface (life cycle methods), component interface (business methods), and the required container methods (container callback functions).
The deployment descriptor
Specifies attributes of the bean for deployment. These designate configuration specifics, such as environment, interface names, transactional support, type of EJB, and persistence information.
1-10 Oracle9iAS Containers for J2EE Enterprise JavaBeans Developer’s Guide

Types of EJBs
...bean.method1(theNumber);
then method1() in the bean receives a copy of theNumber. If the bean changes the value of theNumber object on the server, this change is not reflected back to the client, because of pass-by-value semantics.
If the non-remote object is complex—such as a class containing several fields—only the non-static and non-transient fields are copied.
When passing a remote object as a parameter, the stub for the remote object is passed. A remote object passed as a parameter must extend remote interfaces.
The next section demonstrates parameter passing to a bean, and remote objects as return values.
Parameter ObjectsThe EmployeeBean getEmployee method returns an EmpRecord object, so this object must be defined somewhere in the application. In this example, an EmpRecord class is included in the same package as the EJB interfaces.
The class is declared as public and must implement the java.io.Serializable interface so that it can be passed back to the client by value, as a serialized remote object. The declaration is as follows:
package employee;
public class EmpRecord implements java.io.Serializable { public String ename; public int empno; public double sal;}
Types of EJBsThere are three types of EJBs: session beans, entity beans, and message-driven beans.
■ Session Beans
Note: The java.io.Serializable interface specifies no methods; it just indicates that the class is serializable. Therefore, there is no need to implement extra methods in the EmpRecord class.
EJB Overview 1-11

Types of EJBs
■ Entity Beans
■ Message-Driven Beans
Session BeansA session bean implements one or more business tasks. A session bean might contain methods that query and update data in a relational table. Session beans are often used to implement services. For example, an application developer might implement one or several session beans that retrieve and update inventory data in a database.
Session beans are transient because they do not survive a server crash or a network failure. If, after a crash, you instantiate a bean that had previously existed, the state of the previous instance is not restored. State can be restored only to entity beans.
A session bean implements the javax.ejb.SessionBean interface, which has the following definition:
public interface javax.ejb.SessionBean extends javax.ejb.EnterpriseBean {public abstract void ejbActivate(); public abstract void ejbPassivate();public abstract void ejbRemove();public abstract void setSessionContext(SessionContext ctx);
}
At a minimum, an EJB must implement the following methods, as specified in the javax.ejb.SessionBean interface:
ejbCreate() The container invokes this method right before it creates the bean. Stateless session beans must do nothing in this method. Stateful session beans can initiate state in this method.
ejbActivate() The container invokes this method right after it reactivates the bean.
ejbPassivate() The container invokes this method right before it passivates the bean. You can turn off passivation for stateful session beans. See "EJB Lifecycle Issues" on page 9-3.
1-12 Oracle9iAS Containers for J2EE Enterprise JavaBeans Developer’s Guide
Types of EJBs
Using setSessionContextYou use this method to obtain a reference to the context of the bean. Session beans have session contexts that the container maintains and makes available to the beans. The bean may use the methods in the session context to make callback requests to the container.
The container invokes setSessionContext method, after it first instantiates the bean, to enable the bean to retrieve the session context. The container will never call this method from within a transaction context. If the bean does not save the session context at this point, the bean will never gain access to the session context.
When the container calls this method, it passes the reference of the SessionCon-text object to the bean. The bean can then store the reference for later use. The fol-lowing example shows the bean saving the session context in the sessctx variable.
import javax.ejb.*;import oracle.oas.ejb.*;
public class myBean implements SessionBean {SessionContext sessctx;
void setSessionContext(SessionContext ctx) {sessctx = ctx; // session context is stored in
// instance variable}// other methods in the bean
}
The javax.ejb.SessionContext interface has the following definition:
public interface SessionContext extends javax.ejb.EJBContext {
ejbRemove() A container invokes this method before it ends the life of the session object. This method performs any required clean-up—for example, closing external resources such as file handles.
setSessionContext(SessionContext ctx)
This method associates a bean instance with its context information. The container calls this method after the bean creation. The enterprise bean can store the reference to the context object in an instance variable, for use in transaction management. Beans that manage their own transactions can use the session context to get the transaction context.
EJB Overview 1-13

Types of EJBs
public abstract EJBObject getEJBObject();}
And the javax.ejb.EJBContext interface has the following definition:
public interface EJBContext { public EJBHome getEJBHome(); public Properties getEnvironment(); public Principal getCallerPrincipal(); public boolean isCallerInRole(String roleName); public UserTransaction getUserTransaction(); public boolean getRollbackOnly(); public void setRollbackOnly();}
A bean needs the session context when it wants to perform the operations listed in Table 1–1.
There are two types of session beans:
■ Stateless Session Beans—Stateless session beans do not share state or identity between method invocations. They are useful mainly in middle-tier application servers that provide a pool of beans to process frequent and brief requests.
■ Stateful Session Beans—Stateful session beans are useful for conversational sessions, in which it is necessary to maintain state, such as instance variable values or transactional state, between method invocations. These session beans are mapped to a single client for the life of that client.
Table 1–1 SessionContext Operations
Method Description
getEnvironment() Get the values of properties for the bean.
getUserTransaction() Get a transaction context, which allows you to demarcate transactions programmatically. This is valid only for beans that have been designated transactional.
setRollbackOnly() Set the current transaction so that it cannot be committed.
getRollbackOnly() Check whether the current transaction has been marked for rollback only.
getEJBHome() Retrieve the object reference to the corresponding EJBHome (home interface) of the bean.
1-14 Oracle9iAS Containers for J2EE Enterprise JavaBeans Developer’s Guide

Types of EJBs
Stateless Session BeansA stateless session bean does not maintain any state for the client. It is strictly a single invocation bean. It is employed for reusable business services that are not connected to any specific client, such as generic currency calculations, mortgage rate calculations, and so on. Stateless session beans may contain client-independent, read-only state across a call. Subsequent calls are handled by other stateless session beans in the pool. The information is used only for the single invocation.
The EJB container maintains a pool of these stateless beans to service multiple clients. An instance is taken out of the pool when a client sends a request. There is no need to initialize the bean with any information. There is implemented only a single create/ejbCreate with no parameters—containing no initialization for the bean within these methods. There is no need to implement any actions within the remove/ejbRemove, ejbPassivate, ejbActivate, and setSessionContext methods. In addition, there is no need for the intended use for these methods in a stateless session bean. Instead, these methods are used mostly for EJBs with state—for stateful session beans and entity beans. Thus, these methods should be empty or extremely simple.
Stateful Session BeansA stateful session bean maintains its state between method calls. Thus, there is one instance of a stateful session bean created for each client. Each stateful session bean contains an identity and a one-to-one mapping with an individual client. The state of this type of bean is maintained across several calls through serialization of its
Implementation Methods
Home Interface Extends javax.ejb.EJBHome and requires a single create() factory method, with no arguments, and a single remove() method.
Component Interface (remote or local)
Extends javax.ejb.EJBObject for the remote interface and javax.ejb.EJBLocalObject for the local interface. It defines the business logic methods, which are implemented in the bean implementation.
Bean implementation Implements SessionBean. This class must be declared as public, contain a public, empty, default constructor, no finalize() method, and implements the methods defined in the component interface. Must contain a single ejbCreate method, with no arguments, to match the create() method in the home interface. Contains empty implementations for the container service methods, such as ejbRemove, and so on.
EJB Overview 1-15

Types of EJBs
state, called passivation. This is why the state that you passivate must be serializable. However, this information does not survive system crashes.
To maintain state for several stateful beans in a pool, it serializes the conversational state of the least recently used stateful bean to a secondary storage. When the bean instance is requested again by its client, the state is activated to a bean within the pool. Thus, all resources are used performantly, and the state is not lost.
The type of state that is saved does not include resources. The container invokes the ejbPassivate method within the bean to provide the bean with a chance to clean up its resources, such as sockets held, database connections, and hash tables with static information. All these resources can be reallocated and recreated during the ejbActivate method.
If the bean instance fails, the state can be lost—unless you take action within your bean to continually save state. However, if you must make sure that state is persistently saved in the case of failovers, you may want to use an entity bean for your implementation. Alternatively, you could also use the SessionSynchronization interface to persist the state transactionally.
For example, a stateful session bean could implement the server side of a shopping cart on-line application, which would have methods to return a list of objects that are available for purchase, put items in the customer’s cart, place an order, change a customer ’s profile, and so on.
Note: You can turn off passivation for stateful session beans. See "EJB Lifecycle Issues" on page 9-3
Implementation Methods
Home Interface Extends javax.ejb.EJBHome and requires one or more create() factory methods, and a single remove() method.
Component Interface (remote or local)
Extends javax.ejb.EJBObject for the remote interface and javax.ejb.EJBLocalObject for the local interface. It defines the business logic methods, which are implemented in the bean implementation.
1-16 Oracle9iAS Containers for J2EE Enterprise JavaBeans Developer’s Guide

Types of EJBs
Entity BeansAn entity bean is a complex business entity. An entity bean models a business entity or models multiple actions within a business process. Entity beans are often used to facilitate business services that involve data and computations on that data. For example, an application developer might implement an entity bean to retrieve and perform computation on items within a purchase order. Your entity bean can manage multiple, dependent, persistent objects in performing its necessary tasks.
An entity bean is a remote object that manages persistent data, performs complex business logic, potentially uses several dependent Java objects, and can be uniquely identified by a primary key. Entity beans are normally coarse-grained persistent objects, because they utilize persistent data stored within several fine-grained persistent Java objects.
Entity beans are persistent because they do survive a server crash or a network failure. When an entity bean is re-instantiated, the state of previous instances is automatically restored.
Uniquely Identified by a Primary KeyEach entity bean has a persistent identity associated with it. That is, the entity bean contains a unique identity that can be retrieved if you have the primary key—given the primary key, a client can retrieve the entity bean. If the bean is not available, the container instantiates the bean and repopulates the persistent data for you.
The type for the unique key is defined by the bean provider.
Bean implementation Implements SessionBean. This class must be declared as public, contain a public, empty, default constructor, no finalize() method, and implement the methods defined in the remote interface. Must contain ejbCreate methods equivalent to the create() methods defined in the home interface. That is, each ejbCreate method is matched—by its parameter signature—to a create method defined in the home interface. Implements the container service methods, such as ejbRemove, and so on. Also, implements the SessionSynchronization interface for Container-Managed Transactions, which includes afterBegin, beforeCompletion, and afterCompletion.
Note: For more information on primary keys, see "Primary Key" on page 3-9.
Implementation Methods
EJB Overview 1-17

Types of EJBs
Managing Persistent DataThe persistence for entity bean data is provided both for saving state when the bean is passivated and for recovering the state when a failover has occurred. Entity beans are able to survive because the data is stored persistently by the container in some form of data storage system, such as a database. Entity beans persist business data using one of the two following methods:
■ Automatically by the container using a container-managed persistent (CMP) entity bean.
■ Programmatically through methods implemented in a bean-managed persistent (BMP) entity bean. These methods use JDBC or SQLJ to manage persistence.
An entity bean manages its data persistence through callback methods, which are defined in the javax.ejb.EntityBean interface. When you implement the EntityBean interface in your bean class, you develop each of the callback functions as designated by the type of persistence that you choose: bean-managed persistence or container-managed persistence. The container invokes the callback functions at designated times.
The javax.ejb.EntityBean interface has the following definition:
public interface javax.ejb.EntityBean extends javax.ejb.EnterpriseBean {public abstract void ejbActivate();
public abstract void ejbLoad();public abstract void ejbPassivate();public abstract void ejbRemove();
public abstract void ejbStore();public abstract void setEntityContext(EntityContext ctx);
public abstract voic unsetEntityContext();}
The container expects these methods to have the following functionality:
1-18 Oracle9iAS Containers for J2EE Enterprise JavaBeans Developer’s Guide

Types of EJBs
■ ejbCreate You must implement an ejbCreate method corresponding to each create method declared in the home interface. When the client invokes the create method, the container first invokes the constructor to instantiate the object, then it invokes the corresponding ejbCreate method. The ejbCreate method performs the following:
■ creates any persistent storage for its data, such as database rows
■ intializes a unique primary key and returns it
■ ejbPostCreate The container invokes this method after the environment is set. For each ejbCreate method, an ejbPostCreate method must exist with the same arguments. This method can be used to initialize parameters within or from the entity context.
■ ejbRemove The container invokes this method before it ends the life of the session object. This method can perform any required clean-up, for example closing external resources such as file handles.
■ ejbStore The container invokes this method right before a transaction commits. It saves the persistent data to an outside resource, such as a database.
■ ejbLoad The container invokes this method when the data should be reinitialized from the database. This normally occurs after activation of an entity bean.
■ setEntityContext Associates the bean instance with context information. The container calls this method after the bean creation. The enterprise bean can store the reference to the context object in an instance variable, for use in transaction management. Beans that manage their own transactions can use the session context to get the transaction context.
You can also allocate any resources that will exist for the lifetime of the bean within this method. You should release these resources in unsetEntityContext.
EJB Overview 1-19

Types of EJBs
Using ejbCreate and ejbPostCreate An entity bean is similar to a session bean because certain callback methods, such as ejbCreate, are invoked at specified times. Entity beans use callback functions for managing its persistent data, primary key, and context information. The following diagram shows what methods are called when an entity bean is created.
Figure 1–2 Creating the Entity Bean
Using setEntityContext An entity bean instance uses this method to retain a reference to its context. Entity beans have contexts that the container maintains and makes available to the beans. The bean may use the methods in the entity context to retrieve information about the bean, such as security, and transactional role. Refer to the Enterprise JavaBeans specification from Sun Microsystems for the full range of information that you can retrieve about the bean from the context.
■ unsetEntityContext Unset the associated entity context and release any resources allocated in setEntityContext.
■ ejbActivate The container calls this method directly before it activates an object that was previously passivated. Perform any necessary reaquisition of resources in this method.
■ ejbPassivate The container calls this method before it passivates the object. Release any resources that can be easily re-created in ejbActivate, and save storage space. Normally, you want to free resources that cannot be passivated, such as sockets or database connections. Retrieve these resources in the ejbActivate method.
Client Entity Bean
create
<Bean> constructorejbCreate(...) primary key constructorejbSetEntityContext()ejbPostCreate(...){{
1-20 Oracle9iAS Containers for J2EE Enterprise JavaBeans Developer’s Guide

Types of EJBs
The container invokes the setEntityContext method, after it first instantiates the bean, to enable the bean to retrieve the context. The container will never call this method from within a transaction context. If the bean does not save the context at this point, the bean will never gain access to the context.
When the container calls this method, it passes the reference of the EntityCon-text object to the bean. The bean can then store the reference for later use. The fol-lowing example shows the bean saving the context in the this.ctx variable.
public void setEntityContext(EntityContext ctx) { this.ctx = ctx; }
Using ejbRemove When the client invokes the remove method, the container invokes the methods shown in Figure 1–3.
Figure 1–3 Removing the Entity Bean
Using ejbStore and ejbLoad In addition, the ejbStore and ejbLoad methods are called for managing your persistent data. These are the most important callback methods—for bean-managed persistent beans. Container-managed persistent beans can leave these methods empty, because the persistence is managed by the container.
■ The ejbStore method is called by the container before the object is passivated or whenever a transaction is about to end. Its purpose is to save the persistent data to an outside resource, such as a database.
■ The ejbLoad method is called by the container before the object is activated or whenever a transaction has begun, or when an entity bean is instantiated. Its purpose is to restore any persistent data that exists for this particular bean instance.
Note: You can also use the setEntityContext and unsetEntityContext methods to allocate and destroy any resources that will exist for the lifetime of the instance.
Client Entity Bean
removeejbUnsetEntityContext()ejbRemove(){
EJB Overview 1-21

Types of EJBs
Container-Managed PersistenceYou can choose to have the container manage your persistent data for the bean. You do not have to implement some of the callback methods to manage persistence for your bean’s data, because the container stores and reloads your persistent data to and from the database. When you use container-managed persistence, the container invokes a persistence manager class that provides the persistence management business logic. In addition, you do not have to provide management for the primary key: the container provides this key for the bean.
■ Callback methods—The container still invokes the callback methods, so you can add logic for other purposes. At the least, you must provide an empty implementation for all callback methods.
■ Primary key—The primary key fields in a CMP bean must be declared as container-managed persistent fields in the deployment descriptor. All fields within the primary key are restricted to be either primitive, serializable, and types that can be mapped to SQL types.
The following table details the implementation requirements for the callback functions of the bean class:
Note: For more information on primary keys, see "Primary Key" on page 3-9.
Callback Method Functionality Required
ejbCreate You must initialize all container-managed persistent fields, including the primary key.
ejbPostCreate You have the option to provide any additional initialization, which can involve the entity context.
ejbRemove No functionality for removing the persistent data from the outside resource is required. You must at least provide an empty implementation for the callback, which means that you can add logic for performing any cleanup functionality you require.
ejbFindByPrimaryKey No functionality is required for returning the primary key to the container. The container manages the primary key—after it is initialized by the ejbCreate method. You still must provide an empty implementation for this method.
1-22 Oracle9iAS Containers for J2EE Enterprise JavaBeans Developer’s Guide

Types of EJBs
Differences Between Bean and Container-Managed PersistenceThere are two methods for managing the persistent data within an entity bean: bean-managed (BMP) and container-managed persistence (CMP). The main difference between BMP and CMP beans is defined by who manages the persistence of the entity bean’s data. With CMP beans, the container manages the persistence—the bean deployment descriptor specifies how to map the data and where the data is stored. With BMP beans, the logic for saving the data and where it is saved is programmed within designated methods. These methods are invoked by the container at the appropriate moments.
In practical terms, the following table provides a definition for both types, and a summary of the programmatic and declarative differences between them:
ejbStore No functionaltiy is required for saving persistent data within this method. The persistent manager saves all persistent data to the database for you. However, you must provide at least an empty implementation.
ejbLoad No functionality is required for restoring persistent data within this method. The persistence manager restores all persistent data for you. However, you must provide at least an empty implementation.
setEntityContext Associates the bean instance with context information. The container calls this method after the bean creation. The enterprise bean can store the reference to the context object in an instance variable, for use in transaction management. Beans that manage their own transactions can use the session context to get the transaction context.
You can also allocate any resources that will exist for the lifetime of the bean within this method. You should release these resources in unsetEntityContext.
unsetEntityContext Unset the associated entity context and release any resources allocated in setEntityContext.
Note: For more information on container-managed persistence, see Chapter 3, "CMP Entity Beans".
Callback Method Functionality Required
EJB Overview 1-23

Types of EJBs
Message-Driven BeansMessage-Driven Beans (MDB) provide an easier method to implement asychronous communication than using straight JMS. MDBs were created to receive asynchronous JMS messages. The container handles much of the setup required for JMS queues and topics. It sends all messages to the interested MDB.
Previously, EJBs could not send or receive JMS messages. It took creating MDBs for an EJB-type object to receive JMS messages. This provides all of the asynchronous and publish/subscribe abilities to an enterprise object that is able to be synchronous with other Java objects.
The purpose of an MDB is to exist within a pool and to receive and process incoming messages from a JMS queue. The container invokes a bean from the queue to handle each incoming message from the queue. No object invokes an MDB
Bean-Managed Persistence Container-Managed Persistence
Persistence management You are required to implement the persistence management within the ejbStore, ejbLoad, ejbCreate, and ejbRemove EntityBean methods. These methods must contain logic for saving and restoring the persistent data.
For example, the ejbStore method must have logic in it to store the entity bean’s data to the appropriate database. If it does not, the data can be lost.
The management of the persistent data is done for you. That is, the container invokes a persistence manager on behalf of your bean.
You use ejbStore and ejbLoad for preparing the data before the commit or for manipulating the data after it is refreshed from the database. The container always invokes the ejbStore method right before the commit. In addition, it always invokes the ejbLoad method right after reinstating CMP data from the database.
Finder methods allowed The findByPrimaryKey method and other finder methods are allowed.
The findByPrimaryKey method and other finder methods clause are allowed.
Defining CMP fields N/A Required within the EJB deployment descriptor. The primary key must also be declared as a CMP field.
Mapping CMP fields to resource destination
N/A Required. Dependent on persistence manager.
Definition of persistence manager
N/A Required within the Oracle-specific deployment descriptor. See the next section for a description of a persistence manager.
1-24 Oracle9iAS Containers for J2EE Enterprise JavaBeans Developer’s Guide

Types of EJBs
directly: all invocation for an MDB comes from the container. After the container invokes the MDB, it can invoke other EJBs or Java objects to continue the request.
A MDB is similar to a stateless session bean because it does not save conversational state and is used for handling multiple incoming requests. Instead of handling direct requests from a client, MDBs handle requests placed on a queue. Figure 1–4 demonstrates this by showing how clients place requests on a queue. The container takes the requests off of the queue and gives the request to an MDB in its pool.
Figure 1–4 Message Driven Beans
MDBs implement the javax.ejb.MessageDrivenBean interface, which also inherits the javax.jms.MessageListener methods. Within these interfaces, the following methods must be implemented:
Method Description
onMessage(msg) The container dequeues a message from the JMS queue associated with this MDB and gives it to this instance by invoking this method. This method must have an implementation for handling the message appropriately.
setMessageDrivenContext(ctx) After the bean is created, the setMessageDrivenContext method is invoked. This method is similar to the EJB setSessionContext and setEntityContext methods.
ejbCreate() This method is used just like the stateless session bean ejbCreate method. No initialization should be done in this method. However, any resources that you allocate within this method will exist for this object.
Pool of MDBs
EJB ContainerJMS Queue
clients
EJB Overview 1-25

Difference Between Session and Entity Beans
The container handles JMS message retrieval and acknowledgment. Your MDB does not have to worry about JMS specifics. The MDB is associated with an existing JMS queue. Once associated, the container handles dequeuing messages and sending acknowledgments. The container communicates the JMS message through the onMessage method.
Difference Between Session and Entity BeansThe major differences between session and entity beans are that entity beans involve a framework for persistent data management, a persistent identity, and complex business logic. The following table illustrates the different interfaces for session and entity beans. Notice that the difference between the two types of EJBs exists within the bean class and the primary key. All of the persistent data management is done within the bean class methods.
ejbRemove() Delete any resources allocated within the ejbCreate method.
Note: For more information on MDBs and JMS, see Chapter 7, "Message-Driven Beans" and the JMS chapter in the Oracle9iAS Containers for J2EE Services Guide.
Entity Bean Session Bean
Local interface Extends javax.ejb.EJBLocalObject
Extends javax.ejb.EJBLocalObject
Remote interface Extends javax.ejb.EJBObject
Extends javax.ejb.EJBObject
Local Home interface Extends javax.ejb.EJBLocalHome
Extends javax.ejb.EJBLocalHome
Remote Home interface
Extends javax.ejb.EJBHome Extends javax.ejb.EJBHome
Bean class Extends javax.ejb.EntityBean
Extends javax.ejb.SessionBean
Method Description
1-26 Oracle9iAS Containers for J2EE Enterprise JavaBeans Developer’s Guide

Container Services for EJBs
Container Services for EJBsOne of the advantages of using EJBs is that the EJB container provides security and transaction services for you. These services, as well as RMI/IIOP, JNDI, Data Source, and JMS, are documented in the following books:
Primary key Used to identify and retrieve specific bean instances
Not used for session beans. Stateful session beans do have an identity, but it is not externalized.
Table 1–2 Location of Information for J2EE Subjects
J2EE Subject The Subject is Documented in this OC4J Documentation Book
JTA Oracle9iAS Containers for J2EE Services Guide
Data Source Oracle9iAS Containers for J2EE Services Guide
JNDI Oracle9iAS Containers for J2EE Services Guide
JMS Oracle9iAS Containers for J2EE Services Guide
RMI and RMI/IIOP Oracle9iAS Containers for J2EE Services Guide
Security Oracle9iAS Containers for J2EE Security Guide
CSiV2 Oracle9iAS Containers for J2EE Security Guide
JCA Oracle9iAS Containers for J2EE Services Guide
Java Object Cache Oracle9iAS Containers for J2EE Services Guide
Web Services Oracle9iAS Web Services Developer’s Guide
HTTPS Oracle9iAS Containers for J2EE Services Guide
Entity Bean Session Bean
EJB Overview 1-27

Container Services for EJBs
1-28 Oracle9iAS Containers for J2EE Enterprise JavaBeans Developer’s Guide

EJB P
2
EJB PrimerAfter you have installed Oracle9iAS Containers for J2EE (OC4J) and configured the base server and default Web site, you can start developing J2EE applications. This chapter assumes that you have a working familiarity with simple J2EE concepts and a basic understanding for EJB development.
The following subjects describe how to develop and deploy EJB applications with OC4J:
■ Develop EJBs—Developing and testing an EJB module within the standard J2EE specification.
■ Prepare the EJB Application for Assembly—Before deploying, you must modify an XML file that acts as a manifest file for the enterprise application.
■ Deploy the Enterprise Application to OC4J—Archive the enterprise Java application into an Enterprise ARchive (EAR) file and deploy it to OC4J.
This chapter uses a stateless session bean example to show you each development phase and deployment steps for an EJB. As an introduction to EJBs, a simple EJB with a basic OC4J-specific configuration is used. You can download the stateless session bean example from the OC4J sample code page at http://otn.oracle.com/sample_code/tech/java/oc4j/htdocs/oc4jsamplecode/oc4j-demo-ejb.html#StatelessSessionBean on the OTN Web site.
rimer 2-1

Develop EJBs
Develop EJBsYou develop EJB components for the OC4J environment in the same way as in any other standard J2EE environment. Here are the steps to develop EJBs:
1. Create the Development Directory—Create a development directory for the enterprise application (as Figure 2–1 shows).
2. Implement the EJB—Develop your EJB with its home interfaces, component interfaces, and bean implementation.
3. Access the EJB—Develop the client to access the bean through the remote or local interface.
4. Create the Deployment Descriptor—Create the standard J2EE EJB deployment descriptor for all beans in your EJB application.
5. Archive the EJB Application—Archive your EJB files into a JAR file.
Create the Development DirectoryAlthough you can develop your application in any manner, we encourage you to use consistent naming for locating your application easily. One method would be to implement your enterprise Java application under a single parent directory structure, separating each module of the application into its own subdirectory.
Our hello example was developed using the directory structure mentioned in the Oracle9iAS Containers for J2EE User’s Guide. Notice in Figure 2–1 that the EJB and Web modules exist under the hello application parent directory and are developed separately in their own directory.
2-2 Oracle9iAS Containers for J2EE Enterprise JavaBeans Developer’s Guide

Develop EJBs
Figure 2–1 Hello Directory Structure
Note: For EJB modules, the top of the module (ejb_module) represents the start of a search path for classes. As a result, classes belonging to packages are expected to be located in a nested directory structure beneath this point. For example, a reference to a package class ’myapp.Hello.class’ is expected to be located in "...hello/ejb_module/myapp/Hello.class".
.../hello/
META-INF/
<ejb_module>EJB classes (Hello.class, ...)META-INF/
ejb-jar.xml
<web_module>/HTML filesJSP pagesWEB-INF/
web.xml
classes/Servlet classes
lib/dependent libraries
/
(HelloServlet.class)
orion-application.xmlapplication.xml
orion-ejb-jar.xml
orion-web.xml
EJB Primer 2-3

Develop EJBs
Implement the EJBWhen you implement a session or entity EJB, create the following:
1. The home interfaces for the bean. The home interface defines the create method for your bean. If the EJB is an entity bean, it also defines the finder method(s) for that bean.
a. The remote home interface extends javax.ejb.EJBHome.
b. The local home interface extends javax.ejb.EJBLocalHome.
2. The component interfaces for the bean.
a. The remote interface declares the methods that a client can invoke remotely. It extends javax.ejb.EJBObject.
b. The local interface declares the methods that a collocated bean can invoke locally. It extends javax.ejb.EJBLocalObject.
3. The bean implementation includes the following:
a. The implementation of the business methods that are declared in the component interfaces.
b. The container callback methods that are inherited from either the javax.ejb.SessionBean or javax.ejb.EntityBean interfaces.
c. The ejb* methods that match the home interface create methods:
* For stateless session beans, provide an ejbCreate method with no parameters.
* For stateful session beans, provide an ejbCreate method with parameters matching those of the create method as defined in the home interfaces.
* For entity beans, provide ejbCreate and ejbPostCreate methods with parameters matching those of the create method as defined in the home interfaces.
Note: Message-driven beans have similar, but not the same, requirements as listed below. See Chapter 7, "Message-Driven Beans" for information.
2-4 Oracle9iAS Containers for J2EE Enterprise JavaBeans Developer’s Guide

Develop EJBs
Creating the Home InterfacesThe home interfaces (remote and local) are used to create the bean instance; thus, they define the create method for your bean. Each type of EJB can define the create method in the following ways:
For each create method, a corresponding ejbCreate method is defined in the bean implementation.
Remote Invocation Any remote client invokes the EJB through its remote interface. The client invokes the create method that is declared within the remote home interface. The container passes the client call to the ejbCreate method—with the appropriate parameter signature—within the bean implementation. You can use the parameter arguments to initialize the state of the new EJB object.
1. The remote home interface must extend the javax.ejb.EJBHome interface.
2. All create methods may throw the following exceptions:
■ javax.ejb.CreateException
■ javax.ejb.EJBException or another RuntimeException
Example 2–1 Remote Home Interface for Session Bean
The following code sample illustrates a remote home interface for a stateless ses-sion bean called HelloHome.
package hello;
import javax.ejb.*;import java.rmi.*;
public interface HelloHome extends EJBHome
EJB Type Create Parameters
Stateless Session Bean Can have only a single create method, with no parameters.
Stateful Session Bean Can have one or more create methods, each with its own defined parameters.
Entity Bean Can have zero or more create methods, each with its own defined parameters. All entity beans must define one or more finder methods, where at least one is a findByPrimaryKey method.
EJB Primer 2-5

Develop EJBs
{ public Hello create() throws CreateException, RemoteException;}
Local Invocation An EJB can be called locally from a client that exists in the same container. Thus, a collocated bean, JSP, or servlet invokes the create method that is declared within the local home interface. The container passes the client call to the ejbCreate method—with the appropriate parameter signature—within the bean implementation. You can use the parameter arguments to initialize the state of the new EJB object.
1. The local home interface must extend the javax.ejb.EJBLocalHome interface.
2. All create methods may throw the following exceptions:
■ javax.ejb.CreateException
■ javax.ejb.EJBException or another RuntimeException
Example 2–2 Local Home Interface for Session Bean
The following code sample shows a local home interface for a stateless session bean called HelloLocalHome.
package hello;
import javax.ejb.*;
public interface HelloLocalHome extends EJBLocalHome{ public HelloLocal create() throws CreateException, EJBException;}
Creating the Component InterfacesThe component interfaces define the business methods of the bean that a client can invoke.
Creating the Remote Interface The remote interface defines the business methods that a remote client can invoke. Here are the requirements for developing the remote interface:
2-6 Oracle9iAS Containers for J2EE Enterprise JavaBeans Developer’s Guide

Develop EJBs
1. The remote interface of the bean must extend the javax.ejb.EJBObject interface, and its methods must throw the java.rmi.RemoteException exception.
2. You must declare the remote interface and its methods as public for remote clients.
3. The remote interface, all its method parameters, and return types must be serializable. In general, any object that is passed between the client and the EJB must be serializable, because RMI marshals and unmarshals the object on both ends.
4. Any exception can be thrown to the client, as long as it is serializable. Runtime exceptions, including EJBException and RemoteException, are transferred back to the client as remote runtime exceptions.
Example 2–3 Remote Interface Example for Hello Session Bean
The following code sample shows a remote interface called Hello with its defined methods, each of which will be implemented in the stateless session bean.
package hello;
import javax.ejb.*;import java.rmi.*;
public interface Hello extends EJBObject{ public String sayHello(String myName) throws RemoteException;}
Creating the Local Interface The local interface defines the business methods of the bean that a local (collocated) client can invoke.
1. The local interface of the bean must extend the javax.ejb.EJBLocalObject interface.
2. You declare the local interface and its methods as public.
Example 2–4 Local Interface for Hello Session Bean
The following code sample contains a local interface called HelloLocal with its defined methods, each of which will be implemented in the stateless session bean.
package hello;
EJB Primer 2-7

Develop EJBs
import javax.ejb.*;
public interface HelloLocal extends EJBLocalObject{ public String sayHello(String myName) throws EJBException;}
Implementing the BeanThe bean contains the business logic for your application. It implements the following methods:
1. The signature for each of these methods must match the signature in the remote or local interface, except that the bean does not throw the RemoteException. Since both the local and the remote interfaces use the bean implementation, the bean implementation cannot throw the RemoteException.
2. The lifecycle methods are inherited from the SessionBean or EntityBean interface. These include the ejb<Action> methods, such as ejbActivate, ejbPassivate, and so on.
3. The ejbCreate methods that correspond to the create method(s) that are declared in the home interfaces. The container invokes the appropriate ejbCreate method when the client invokes the corresponding create method.
4. Any methods that are private to the bean or package used for facilitating the business logic. This includes private methods that your public methods use for completing the tasks requested of them.
Example 2–5 Hello Stateless Session Bean Implementation
The following code shows the bean implementation for the Hello example.
package hello;
Note: You can download the stateless session bean example from the OC4J sample code page at http://otn.oracle.com/sample_code/tech/java/oc4j/htdocs/oc4jsamplecode/oc4j-demo-ejb.html on the OTN Web site.
2-8 Oracle9iAS Containers for J2EE Enterprise JavaBeans Developer’s Guide

Develop EJBs
import javax.ejb.*;
public class HelloBean implements SessionBean{ public SessionContext ctx;
public HelloBean() { // constructor }
public void ejbCreate() throws CreateException { // when bean is created }
public void ejbActivate() { // when bean is activated }
public void ejbPassivate() { // when bean is deactivated }
public void ejbRemove() { // when bean is removed }
public void setSessionContext(SessionContext ctx) { this.ctx = ctx; }
public void unsetSessionContext() { this.ctx = null; }
public String sayHello(String myName) throws EJBException { return ("Hello " + myName); }}
EJB Primer 2-9

Develop EJBs
Access the EJBTo access an EJB from a client, you must do the following:
1. If you are remote, download the oc4j.jar file.
2. Set up JNDI properties for the connection, if necessary.
3. Determine which InitialContextFactory you will use for the connection.
4. Retrieve an EJB using either the JNDI name or an EJB reference, which is configured in the deployment descriptor.
These subjects are discussed in the following sections:
■ Client Installation of OC4J.JAR
■ How to Lookup the EJB Reference
■ Client Implementation to Invoke the EJB
■ EJB Reference Information
■ Setting JNDI Properties
■ Using the Initial Context Factory Classes
■ Accessing an EJB in Another Application
■ Accessing an EJB in a Remote Server
Client Installation of OC4J.JARIn order to access EJBs, the client-side must download the oc4j.jar file. This JAR contains the classes necessary for client interaction. If you download this JAR into a browser, you must grant certain permissions. See "Granting Permissions in Browser" on page 8-2 for a list of these permissions.
How to Lookup the EJB ReferenceBefore you start implementing your call to the EJB in your client, you should consider the following for the JNDI retrieval of the EJB reference of the bean:
Note: You can download this example on OTN from the OC4J sample code page at http://otn.oracle.com/sample_code/tech/java/oc4j/htdocs/oc4jsamplecode/oc4j-demo-ejb.html.
2-10 Oracle9iAS Containers for J2EE Enterprise JavaBeans Developer’s Guide

Develop EJBs
■ Within your client code, you retrieve an EJB reference to the target bean in order to execute methods on that bean. Do you want to set up a logical name for the target bean or use the JNDI name?
– Use the logical name: Modify the client XML configuration file to set up the <ejb-ref> element with the target bean information. The logical name specified in the <ejb-ref-name> element is used in the JNDI lookup. See "EJB Reference Information" on page 2-16 for more information on the <ejb-ref> and <ejb-ref-name> elements.
– Use the actual name: The actual name of the bean is used in the JNDI lookup. This name has been specified in the target bean’s ejb-jar.xml XML deployment descriptors in the <ejb-name> element.
■ The method for accessing EJBs depends on where your client is located relative to the bean it wants to invoke.
– Is the client is collocated with the target bean? Deployed in the same application? Or is the target bean part of an application that is this client’s parent? You do not need to set up any JNDI properties.
– Otherwise, you must set up JNDI properties. There are two methods for setting up JNDI properties. See "Setting JNDI Properties" on page 2-17 for more information
Client Implementation to Invoke the EJBAll EJB clients implement the following steps to instantiate a bean, invoke its methods, and destroy the bean:
1. Look up the home interface through a JNDI lookup. Follow JNDI and the EJB specification conventions for retrieving the bean reference, including setting up JNDI properties if the bean is remote to the client. See "How to Lookup the EJB Reference" on page 2-10.
2. Narrow the returned object from the JNDI lookup to the home interface, as follows:
a. When accessing the remote interface, use the PortableRemoteObject.narrow method to narrow the returned object.
b. When accessing the local interface, cast the returned object with the local home interface type.
EJB Primer 2-11

Develop EJBs
3. Create instances of the bean in the server through the returned object. Invoking the create method on the home interface causes a new bean to be instantiated and returns a bean reference.
4. Invoke business methods, which are defined in the component (remote or local) interface.
5. After you are finished, invoke the remove method. This will either remove the bean instance or return it to a pool. The container controls how to act on the remove method.
These steps are demonstrated in Example 2–6.
Example 2–6 A Servlet Acting as a Local Client
The following example is executed from a servlet that is collocated with the Hello bean. Thus, the session bean uses the local interface, and the JNDI lookup does not require JNDI properties.
package hello;
import javax.servlet.http.*;import javax.servlet.*;import javax.ejb.*;import javax.naming.*;import java.io.IOException;
public class HelloServlet extends HttpServlet
Note: For entity beans that are already instantiated, you can retrieve the bean reference through one of its finder methods.
Note: The JNDI name is specified in the <ejb-local-ref> element in this session bean EJB deployment descriptor as follows:
<ejb-local-ref> <ejb-ref-name>HelloBean</ejb-ref-name> <ejb-ref-type>Session</ejb-ref-type> <local-home>hello.HelloLocalHome</local-home> <local>hello.HelloLocal</local></ejb-local-ref>
2-12 Oracle9iAS Containers for J2EE Enterprise JavaBeans Developer’s Guide

Develop EJBs
{ HelloLocalHome helloHome; HelloLocal hello;
public void init() throws ServletException { try { // 1. Retreive the Home Interface using a JNDI Lookup // Retrieve the initial context for JNDI. // No properties needed when local Context context = new InitialContext();
// Retrieve the home interface using a JNDI lookup using // the java:comp/env bean environment variable // specified in web.xml helloHome = (HelloLocalHome) context.lookup("java:comp/env/HelloBean");
//2. Narrow the returned object to be an HelloHome object. // Since the client is local, cast it to the correct object type. //3. Create the local Hello bean instance, return the reference hello = (HelloLocal)helloHome.create();
} catch(NamingException e) { throw new ServletException("Error looking up home", e); } catch(CreateException e) { throw new ServletException("Error creating local hello bean", e); } }
public void doGet(HttpServletRequest request, HttpServletResponse response) throws ServletException, IOException { response.setContentType("text/html"); ServletOutputStream out = response.getOutputStream(); try { out.println("<html>"); out.println("<body>"); //4. Invoke a business method on the local interface reference.
EJB Primer 2-13

Develop EJBs
out.println(hello.sayHello("James Earl")); out.println("</body>"); out.println("</html>"); } catch(EJBException e) { out.println("EJBException error: " + e.getMessage()); } catch(IOException e) { out.println("IOException error: " + e.getMessage()); } finally { out.close(); } }}
Example 2–7 A Java Client as a Remote Client
The following example is executed from a pure Java client that is a remote client. Any remote client must set up JNDI properties before retrieving the object, using a JNDI lookup.
The jndi.properties file for this client is as follows:
java.naming.factory.initial= com.evermind.server.ApplicationClientInitialContextFactoryjava.naming.provider.url=opmn:ormi://opmnhost:oc4j_inst1/helloworldjava.naming.security.principal=admin
Note: You can download this example on OTN from the OC4J sample code page at http://otn.oracle.com/sample_code/tech/java/oc4j/htdocs/oc4jsamplecode/oc4j-demo-ejb.html.
Note: The JNDI name is specified in the <ejb-ref> element in the this client’s application-client.xml file—as follows:
<ejb-ref> <ejb-ref-name>HelloBean</ejb-ref-name> <ejb-ref-type>Session</ejb-ref-type> <home>hello.HelloHome</home> <remote>hello.Hello</remote> </ejb-ref>
2-14 Oracle9iAS Containers for J2EE Enterprise JavaBeans Developer’s Guide

Develop EJBs
java.naming.security.credentials=welcome
The pure Java client that invokes Hello remotely is as follows:
package hello;
import javax.ejb.*;import javax.naming.*;import javax.rmi.PortableRemoteObject;import java.io.*;import java.util.*;import java.rmi.RemoteException;
/* * A simple client for accessing an EJB. */
public class HelloClient{ public static void main(String[] args) { System.out.println("client started..."); try { // Initial context properties are set in the jndi.properties file //1. Retrieve remote interface using a JNDI lookup*/ Context context = new InitialContext();
// Lookup the HelloHome object. The reference is retrieved from the // application-local context (java:comp/env). The variable is // specified in the application-client.xml). Object homeObject = context.lookup("java:comp/env/Helloworld");
//2. Narrow the reference to HelloHome. Since this is a remote // object, use the PortableRemoteObject.narrow method. HelloHome home = (HelloHome) PortableRemoteObject.narrow (homeObject, HelloHome.class);
//3. Create the remote object and narrow the reference to Hello. Hello remote = (Hello) PortableRemoteObject.narrow(home.create(), Hello.class);
//4. Invoke a business method on the remote interface reference.
EJB Primer 2-15

Develop EJBs
System.out.println(remote.sayHello("James Earl"));
} catch(NamingException e) { System.err.println("NamingException: " + e.getMessage()); } catch(RemoteException e) { System.err.println("RemoteException: " + e.getMessage()); } catch(CreateException e) { System.err.println("FinderException: " + e.getMessage()); } }}
EJB Reference InformationSpecify the EJB reference information for the remote EJB in the <ejb-ref> or <ejb-local-ref> elements in the client’s XML file:
■ application-client.xml: The client is a pure-Java client, invoking the bean outside of the container.
■ ejb-jar.xml: The client is another EJB.
■ web.xml: The client is a servlet or JSP.
A full description or how to set up the <ejb-ref> element is given in "Configuring Environment References" on page 9-12.
For example, if a client wants to access the remote interface of the Hello example, then the client’s XML would define the following:
<ejb-ref><ejb-ref-name>HelloBean</ejb-ref-name><ejb-ref-type>Session</ejb-ref-type><home>hello.HelloHome</home><remote>hello.Hello</remote>
</ejb-ref>
If the client wants to access the local interface of the Hello example, then the client’s XML would define the following:
Note: You can download this example on OTN from the OC4J sample code page at http://otn.oracle.com/sample_code/tech/java/oc4j/htdocs/oc4jsamplecode/oc4j-demo-ejb.html.
2-16 Oracle9iAS Containers for J2EE Enterprise JavaBeans Developer’s Guide

Develop EJBs
<ejb-ref><ejb-ref-name>HelloBean</ejb-ref-name><ejb-ref-type>Session</ejb-ref-type><local-home>hello.HelloLocalHome</local-home><local>hello.HelloLocal</local>
</ejb-ref>
OC4J maps the logical name to the actual JNDI name on the client-side. The server-side receives the JNDI name and resolves it within its JNDI tree.
Setting JNDI PropertiesIf the client is collocated with the target, the client exists within the same application as the target, or the target exists within its parent, then you do not need a JNDI properties file. Else, you must initialize your JNDI properties either within a jndi.properties file, in the system properties, or within your implementation, before the JNDI call. The following sections discuss these three options:
■ No JNDI Properties
■ JNDI Properties File
■ JNDI Properties Within The Implementation
■ JNDI Properties for OC4J Standalone
To specify credentials within the JNDI properties, see "Specifying Credentials in EJB Clients" on page 8-11.
No JNDI Properties A servlet that is collocated with the target bean automatically accesses the JNDI properties for the node. Thus, accessing the EJB is simple: no JNDI properties are required.
//Get the Initial Context for the JNDI lookup for a local EJBInitialContext ic = new InitialContext();//Retrieve the Home interface using JNDI lookupObject helloObject = ic.lookup("java:comp/env/helloBean");
Note: A full description of how to use JNDI, see the JNDI chapter in the Oracle9iAS Containers for J2EE Services Guide.
EJB Primer 2-17

Develop EJBs
This is also true if the target bean is in the same application or an application that has been deployed as this application’s parent. See the Oracle9iAS Containers for J2EE User’s Guide for more information on how to set the parent of the application.
JNDI Properties File If setting the JNDI properties within the jndi.properties file, set the properties as follows. Make sure that this file is accessible from the CLASSPATH.
FactorySee "Using the Initial Context Factory Classes" on page 2-20 for discussion on the initial context factory to use.
java.naming.factory.initial=com.evermind.server.ApplicationClientInitialContextFactory
LocationAll ports, including the RMI port, are dynamically set by OPMN when each OC4J instance starts. When you specify the following URL in the client JNDI properties, the client-side OC4J retrieves the dynamic ports for the instance, and chooses one from the list for communication.
java.naming.provider.url= opmn:ormi://<opmn_host>:<opmn_port>:<oc4j_instance>/<application-name>
The OPMN host name and port number is retrieved from the opmn.xml file. In most cases, OPMN is located on the same machine as the OC4J instance. However, you must specify the host name in case it is located on another machine. The OPMN port number is optional; if excluded, the default is port 6003. The OPMN port is specified in opmn.xml.
The OC4J instance name is defined in the Enterprise Manager.
SecurityWhen you access EJBs in a remote container, you must pass valid credentials to this container. Stand-alone clients define their credentials in the jndi.properties file deployed with the client’s code.
java.naming.security.principal=<username>java.naming.security.credentials=<password>
JNDI Properties Within The Implementation Set the properties with the same values, only with a different syntax. For example, JavaBeans running within the container pass
2-18 Oracle9iAS Containers for J2EE Enterprise JavaBeans Developer’s Guide

Develop EJBs
their credentials within the InitialContext, which is created to look up the remote EJBs.
■ In the java.naming.provider.url, the "opmn:ormi" location string is provided. Both OPMN and OC4J are located on the same host. The OPMN default port is used, so the port number is not specified.
■ In the java.naming.factory.initial, the ApplicationClientInitialContextFactory object is used.
To pass JNDI properties within the Hashtable environment, set these as shown below:
Hashtable env = new Hashtable(); env.put("java.naming.provider.url", "opmn:ormi://opmnhost:oc4j_inst1/ejbsamples"); env.put("java.naming.factory.initial",
"com.evermind.server.ApplicationClientInitialContextFactory"); env.put(Context.SECURITY_PRINCIPAL, "guest"); env.put(Context.SECURITY_CREDENTIALS, "welcome"); Context ic = new InitialContext (env); Object homeObject = ic.lookup("java:comp/env/helloBean");
// Narrow the reference to a HelloHome.HelloHome empHome =
(HelloHome) PortableRemoteObject.narrow(homeObject, HelloHome.class);
JNDI Properties for OC4J Standalone The rules for which initial context factory are the same for OC4J standalone applications. However, since OC4J standalone does not use OPMN, the location URL cannot use the opmn:ormi:// prefix. Instead, the ormi:// prefix is used.
The ORMI default port number is 23791, which can be modified in config/rmi.xml. Thus, set the URL in the jndi.properties, in one of the two ways:
java.naming.provider.url=ormi://<hostname>/<application-name>or
java.naming.provider.url=ormi://<hostname>:23791/<application-name>\
When you access EJBs in a remote container, you must pass valid credentials to this container. Stand-alone clients define their credentials in the jndi.properties file deployed with the client’s code.
EJB Primer 2-19

Develop EJBs
java.naming.security.principal=<username>java.naming.security.credentials=<password>
If you set the properties within the bean implementation, then set them with the same values, just with different syntax. For example, JavaBeans running within the container pass their credentials within the InitialContext, which is created to look up the remote EJBs.
To pass JNDI properties within the Hashtable environment, set these as shown below:
Hashtable env = new Hashtable(); env.put("java.naming.provider.url", "ormi://myhost/ejbsamples"); env.put("java.naming.factory.initial", "com.evermind.server.ApplicationClientInitialContextFactory"); env.put(Context.SECURITY_PRINCIPAL, "guest"); env.put(Context.SECURITY_CREDENTIALS, "welcome"); Context ic = new InitialContext (env); Object homeObject = ic.lookup("java:comp/env/helloBean"); // Narrow the reference to a HelloHome.HelloHome helloHome = (HelloHome) PortableRemoteObject.narrow(homeObject, HelloHome.class);
Using the Initial Context Factory ClassesThe type of initial context factory that you use depends on who the client is. The initial context factory creates the initial context class for the client.
■ If the client is a pure Java client outside of the OC4J container, use the ApplicationClientInitialContextFactory class.
■ If the client is an EJB or servlet client within the OC4J container, use the ApplicationInitialContextFactory class. The ApplicationInitialContextFactory class is the default class; thus, each time you create a new InitialContext without specifying any initial context factory class, your client uses the ApplicationInitialContextFactory class.
■ If the client is an administrative class that is going to manipulate or traverse the JNDI tree, use the com.evermind.server.RMIInitialContextFactory class.
■ If the client is going to use DNS load balancing, use the RMIInitialContextFactory class.
2-20 Oracle9iAS Containers for J2EE Enterprise JavaBeans Developer’s Guide

Develop EJBs
For example, if you have a pure Java client, then you set the initial context factory class ("java.naming.factory.initial") to ApplicationClientInitialContextFactory. The following example sets the initial context factory in the environment, but you could also put this in the JNDI properties file.
env.put("java.naming.factory.initial", "com.evermind.server.ApplicationClientInitialContextFactory");
If the client is an EJB or a servlet calling an EJB in the same application, you can use the default by not setting the JNDI properties with a initial context factory and uses the ApplicationInitialContextFactory object by executing the following:
InitialContext ic = new InitialContext();
If you decide to use the RMIInitialContextFactory class, you must use the JNDI name in the lookup and not a logical name defined in the <ejb-ref> in your XML configuration file.
An Initial Context Factory Specific to DNS Load Balancing To use DNS for load balancing, you must do the following:
1. Within DNS, map a single host name to several IP addresses. Each of the port numbers must be the same for each IP address. Set up the DNS server to return the addresses either in a round-robin or random fashion.
2. Turn off DNS caching on the client. For UNIX machines, you must turn off DNS caching as follows:
a. Kill the NSCD daemon process on the client.
b. Start the OC4J client with the -Dsun.net.inetaddr.ttl=0 option.
3. Within each client, use any initial context factory to create an initial context. You can use either the opmn:ormi:// or the ormi:// prefix in the provider URL. Use opmn:ormi:// syntax for Oracle9iAS applications and the ormi:// for standalone OC4J applications.
4. Set the dedicated.rmicontext property to true.
Each time the lookup occurs on the DNS server, the DNS server hands back a one of the many IP addresses that are mapped to it.
Example 2–8 RMIInitialContextFactory Example
java.naming.factory.initial=
EJB Primer 2-21

Develop EJBs
com.evermind.server.rmi.RMIInitialContextFactoryjava.naming.provider.url=opmn:ormi://myserver:oc4j_inst/applnamejava.naming.security.principal=adminjava.naming.security.credentials=welcomededicated.rmicontext=true
Accessing an EJB in Another ApplicationNormally, you cannot have EJBs communicating across EAR files, that is, across applications that are deployed in separate EAR files. The only way for an EJB to access an EJB that was deployed in a separate EAR file is to declare it to be the parent of the client. Only children can invoke methods in a parent.
For example, there are two EJBs, each deployed within their EAR file, called sales and inventory, where the sales EJB needs to invoke the inventory EJB to check to see if enough widgets are available. Unless the sales EJB defines the inventory EJB to be its parent, the sales EJB cannot invoke any mehtods in the inventory EJB, because they are both deployed in separate EAR files. So, define the inventory EJB to be the parent of the sales EJB and the sales EJB can now invoke any method in its parent.
You can only define the parent during deployment with the deployment wizard. See the "Deploying Applications" section in the "Configuration and Deployment" chapter in Oracle9iAS Containers for J2EE User’s Guide on how to define the parent application of a bean. For broader issues on how to package your classes for method invocation, see "Packaging and Sharing Classes" on page 9-2.
Accessing an EJB in a Remote ServerA multi-tier situation exists when you have the servlets executing in one server which are to connect and communicate with EJBs in another server. Both the servlets and EJBs are contained in the same application. When you deploy the application to two different servers, the servlets normally look for the local EJB first.
In Figure 2–2, the helloBean application is deployed to both server 1 and 2. In order to ensure that the servlets only call out from server 1 to the EJBs in server 2, you must set the remote attribute appropriately in the application before deploying on both servers.
2-22 Oracle9iAS Containers for J2EE Enterprise JavaBeans Developer’s Guide

Develop EJBs
Figure 2–2 Multi-Tier Example
The remote attribute in the <ejb-module> element in orion-application.xml for the EJB module denotes whether the EJBs for this application are deployed or not.
1. In server 1, you must set remote=true in the <ejb-module> element of the orion-application.xml file and then deploy the application. The EJB module within the application will not be deployed. Thus, the servlets will not look for the EJBs locally, but will go out to the remote server for the EJB requests.
2. In server 2, you must set remote=false in the <ejb-module> element of the orion-application.xml file and then deploy the application. The application, including the EJB module, is deployed as normal. The default for the remote attribute is false; thus, simply ensure that the remote attribute is not true and redeploy the application.
3. In the <server> element of the rmi.xml file of server 1, configure the location of server 2, which is the remote server. Provide the hostname, port number, username, and password of the remote server, as follows:
<server host=<remote_host> port=<remote_port> username=<username> password=<password> />
If multiple remote servers are configured, the OC4J container searches all remote servers for the intended EJB application.
server 1 server 2
helloBean helloBean
servlet EJB
remote=true remote=false
define remote locationin <server> element
no definition ofremote location
EJB Primer 2-23

Develop EJBs
Example 2–9 Servlet Accessing EJB in Remote OC4J Instance
The following servlet uses the JNDI name for the target bean: helloBean. This servlet provides the JNDI properties in an RMIInitialContext object. The environment is initialized as follows:
■ The INITIAL_CONTEXT_FACTORY is initialized to a RMIInitialContextFactory.
■ Instead of creating a new InitialContext, it is retrieved.
■ The actual JNDI name is used in the lookup.
■ The remote location URL is opmn:ormi://host:oc4j_inst/application". The OPMN port number uses the default and is omitted.
Hashtable env = new Hashtable();env.put(Context.PROVIDER_URL, "opmn:ormi://theirhost:oc4j_inst/myapp");env.put(Context.SECURITY_PRINCIPAL, "admin");env.put(Context.SECURITY_CREDENTIALS, "welcome");env.put(Context.INITIAL_CONTEXT_FACTORY,
"com.evermind.server.rmi.RMIInitialContextFactory");
Context ic = new com.evermind.server.rmi.RMIInitialContextFactory().
getInitialContext(env);
Object homeObject = ic.lookup("helloBean");
// Narrow the reference to a HelloHome.HelloHome helloHome =
(HelloHome) PortableRemoteObject.narrow(homeObject, HelloHome.class);
Create the Deployment DescriptorAfter implementing and compiling your classes, you must create the standard J2EE EJB deployment descriptor for all beans in the module. The XML deployment descriptor (defined in the ejb-jar.xml file) describes the EJB module of the application. It describes the types of beans, their names, and attributes. The structure for this file is mandated in the DTD file, which is provided at " http://java.sun.com/dtd/ejb-jar_2_0.dtd".
2-24 Oracle9iAS Containers for J2EE Enterprise JavaBeans Developer’s Guide

Develop EJBs
Any EJB container services that you want to configure is also designated in the deployment descriptor. For information about data sources and JTA, see the Oracle9iAS Containers for J2EE Services Guide. For information about security, see the Oracle9iAS Containers for J2EE Security Guide.
After creation, place the deployment descriptors for the EJB application in the META-INF directory that is located in the same directory as the EJB classes. See Figure 2–1 for more information.
The following example shows the sections that are necessary for the Hello example, which implements both a remote and a local interface.
Example 2–10 XML Deployment Descriptor for Hello Bean
The following is the deployment descriptor for a version of the Hello example that uses a stateless session bean. This example defines both the local and remote interfaces. You do not have to define both interface types; you may define only one of them.
<?xml version="1.0"?><!DOCTYPE ejb-jar PUBLIC "-//Sun Microsystems, Inc.//DTD Enterprise JavaBeans 1.1//EN" "http://java.sun.com/j2ee/dtds/ejb-jar_1_1.dtd">
<ejb-jar> <display-name>hello</display-name> <description> An EJB app containing only one Stateless Session Bean </description> <enterprise-beans> <session> <description>no description</description> <display-name>HelloBean</display-name> <ejb-name>HelloBean</ejb-name> <home>hello.HelloHome</home> <remote>hello.Hello</remote> <local-home>hello.HelloLocalHome</local-home> <local>hello.HelloLocal</local> <ejb-class>hello.HelloBean</ejb-class> <session-type>Stateless</session-type> <transaction-type>Container</transaction-type> </session> </enterprise-beans>
EJB Primer 2-25

Develop EJBs
<assembly-descriptor> <container-transaction> <method> <ejb-name>HelloBean</ejb-name> <method-name>*</method-name> </method> <trans-attribute>Supports</trans-attribute> </container-transaction> <security-role> <role-name>users</role-name> </security-role> </assembly-descriptor></ejb-jar>
Archive the EJB ApplicationAfter you have finalized your implementation and created the deployment descriptors, archive your EJB application into a JAR file. The JAR file should include all EJB application files and the deployment descriptor.
For example, to archive your compiled EJB class files and XML files for the Hello example into a JAR file, perform the following in the ../hello/ejb_module directory:
% jar cvf helloworld-ejb.jar .
This archives all files contained within the ejb_module subdirectory within the JAR file.
Note: You can download this example on OTN from the OC4J sample code page at http://otn.oracle.com/sample_code/tech/java/oc4j/htdocs/oc4jsamplecode/oc4j-demo-ejb.html.
Note: If you have included a Web application as part of this enterprise Java application, follow the instructions for building the Web application in the Oracle9iAS Containers for J2EE User’s Guide.
2-26 Oracle9iAS Containers for J2EE Enterprise JavaBeans Developer’s Guide

Prepare the EJB Application for Assembly
Prepare the EJB Application for AssemblyTo prepare the application for deployment, you do the following:
1. Modify the application.xml file with the modules of the enterprise Java application.
2. Archive all elements of the application into an EAR file.
These steps are described in the following sections:
■ Modify the Application.XML File
■ Create the EAR File
Modify the Application.XML FileThe application.xml file acts as the manifest file for the application and contains a list of the modules that are included within your enterprise application. You use each <module> element defined in the application.xml file to designate what comprises your enterprise application. Each module describes one of three things: EJB JAR, Web WAR, or any client files. Respectively, designate the <ejb>, <web>, and <java> elements in separate <module> elements.
■ The <ejb> element specifies the EJB JAR filename.
■ The <web> element specifies the Web WAR filename in the <web-uri> element, and its context in the <context> element.
■ The <java> element specifies the client JAR filename, if any.
As Figure 2–3 shows, the application.xml file is located under a META-INF directory under the parent directory for the application. The JAR, WAR, and client JAR files should be contained within this directory. Because of this proximity, the application.xml file refers to the JAR and WAR files only by name and relative path—not by full directory path. If these files were located in subdirectories under the parent directory, then these subdirectories must be specified in addition to the filename.
EJB Primer 2-27

Prepare the EJB Application for Assembly
Figure 2–3 Archive Directory Format
For example, the following example modifies the <ejb>, <web>, and <java> module elements within application.xml for the Hello EJB application that also contains a servlet that interacts with the EJB.
<?xml version="1.0"?><!DOCTYPE application PUBLIC "-//Sun Microsystems, Inc.//DTD J2EE Application 1.2//EN" "http://java.sun.com/j2ee/dtds/application_1_2.dtd"><application> <display-name>helloworld j2ee application</display-name> <description> A sample J2EE application that uses a Helloworld Session Bean on the server and calls from java/servlet/JSP clients. </description> <module> <ejb>helloworld-ejb.jar</ejb> </module> <module> <web> <web-uri>helloworld-web.war</web-uri> <context-root>/helloworld</context-root> </web> </module> <module> <java>helloworld-client.jar</java> </module></application>
hello/
META-INF/application.xml
helloworld-ejb.jar
helloworld-web.war
helloworld-client.jar
2-28 Oracle9iAS Containers for J2EE Enterprise JavaBeans Developer’s Guide

Deploy the Enterprise Application to OC4J
Create the EAR FileCreate the EAR file that contains the JAR, WAR, and XML files for the application. Note that the application.xml file serves as the EAR manifest file.
To create the helloworld.ear file, execute the following in the hello directory contained in Figure 2–3:
% jar cvf helloworld.ear .
This step archives the application.xml, the helloworld-ejb.jar, the helloworld-web.war, and the helloworld-client.jar files into the helloworld.ear file.
Deploy the Enterprise Application to OC4JAfter archiving your application into an EAR file, deploy the application to OC4J. See the Oracle9iAS Containers for J2EE User’s Guide for information on how to deploy your application.
EJB Primer 2-29

Deploy the Enterprise Application to OC4J
2-30 Oracle9iAS Containers for J2EE Enterprise JavaBeans Developer’s Guide

CMP Entity B
3
CMP Entity BeansThis chapter demonstrates simple Container Managed Persistence (CMP) EJB development with a basic configuration and deployment. Download the CMP entity bean example (cmpapp.jar) from the OC4J sample code page at http://otn.oracle.com/sample_code/tech/java/oc4j/htdocs/oc4jsampleco
de/oc4j-demo-ejb.html on the OTN Web site.
This chapter demonstrates the following:
■ Entity Bean Overview
■ Creating Entity Beans
■ Primary Key
■ Persistence Fields
■ Converstion of CMP Types to Database Types
See Chapter 6, "BMP Entity Beans", for an example of how to create a simple bean-managed persistent entity bean. For a description of persisting object relationships between EJBs, see Chapter 4, "Entity Relationship Mapping".
eans 3-1

Entity Bean Overview
Entity Bean OverviewWith EJB 2.0 and the local interface support, most developers agree that entity beans should be paired with a session bean, servlet, or JSP that acts as the client interface. The entity bean is a coarse-grain bean that encapsulates functionality and represents data and dependent objects. Thus, you decouple the client from the data so that if the data changes, the client is not affected. For efficiency, the session bean, servlet, or JSP can be collocated with entity beans and can coordinate between multiple entity beans through their local interfaces. This is known as a session facade design. See the http://java.sun.com Web site for more information on session facade design.
An entity bean can aggregate objects together and effectively persist data and related objects under the umbrella of transactional, security, and concurrency support through the container. This and the following chapters focus on how to use the persistence functionality of the entity bean.
An entity bean manages persistent data in one of two ways: container-managed persistence (CMP) and bean-managed persistence (BMP). The primary difference between the two is as follows:
■ Container-managed persistence—The EJB container manages data by saving it to a designated resource, which is normally a database. For this to occur, you must define the data that the container is to manage within the deployment descriptors. The container manages the data by saving it to the database.
■ Bean-managed persistence—The bean implementation manages the data within callback methods. All the logic for storing data to your persistent storage must be included in the ejbStore method and reloaded from your storage in the ejbLoad method. The container invokes these methods when necessary.
Note: This book does not cover EJB container services. See the JTA, Data Source, and JNDI chapters in the Oracle9iAS Containers for J2EE Services Guide for more information. For security, see the Oracle9iAS Containers for J2EE Security Guide.
3-2 Oracle9iAS Containers for J2EE Enterprise JavaBeans Developer’s Guide

Creating Entity Beans
Creating Entity BeansTo create an entity bean, perform the following steps:
1. Create the component interfaces for the bean. The component interfaces declare the methods that a client can invoke.
a. The local component interface extends javax.ejb.EJBLocalObject.
b. The remote component interface extends javax.ejb.EJBObject.
2. Create the home interfaces for the bean. The home interface defines the create and finder methods, including findByPrimaryKey, for your bean.
a. The local home interface extends javax.ejb.EJBLocalHome.
b. The remote home interface extends javax.ejb.EJBHome.
3. Define the primary key for the bean. The primary key identifies each entity bean instance and is a serializable class. You can use a simple data type class, such as java.lang.String, or define a complex class, such as one with two or more objects as components of the primary key.
4. Implement the bean. This includes the following:
a. The implementation for the methods that are declared in your component interfaces.
b. The methods that are defined in the javax.ejb.EntityBean interface.
c. The methods that match the methods that are declared in your home interfaces, which include the following:
* The ejbCreate and ejbPostCreate methods with parameters matching the associated create method defined in the home interface.
* Finder methods, other than ejbFindByPrimaryKey and ejbFindAll, that are defined in the home interface. The container generates the ejbFindByPrimaryKey and ejbFindAll method implementations—although you must still provide an empty method for each of these.
5. Create the bean deployment descriptor. The deployment descriptor specifies properties for the bean through XML elements. This step is where you identify the data within the bean that is to be managed by the container. These relationships could also entail other objects, which Chapter 4, "Entity Relationship Mapping" discusses.
CMP Entity Beans 3-3

Creating Entity Beans
Any EJB Container services that you want to configure is also designated in the deployment descriptor. For information about data sources and JTA, see the Oracle9iAS Containers for J2EE Services Guide. For information about security, see the Oracle9iAS Containers for J2EE Security Guide.
6. If the persistent data is saved to or restored from a database and you are not using the defaults provided by the container, then you must ensure that the correct tables exist for the bean. In the default scenario, the container creates the table and columns for your data based on deployment descriptor and datasource information.
7. Create an EJB JAR file containing the bean, component interface, home interface, and the deployment descriptors. Once created, configure the application.xml file, create an EAR file, and deploy the EJB to OC4J.
The following sections demonstrate a simple CMP entity bean. This example continues the use of the employee example, as in other chapters—without adding complexity.
Home InterfaceThe home interface is primarily used for retrieving the bean reference, on which the client can request business methods.
■ The local home interface extends javax.ejb.EJBLocalHome.
■ The remote home interface extends javax.ejb.EJBHome.
The home interface must contain a create method, which the client invokes to create the bean instance. Each create method can have a different signature. For an entity bean, you must develop a findByPrimaryKey method. Optionally, you can develop other finder methods, which are named find<name>, for the bean.
In addition to creation and retrieval methods, you can provide home interface business methods within the home interface. The functionality within these methods cannot access data of a particular entity object. Instead, the purpose of these methods is to provide a way to retrieve information that is not related to a single entity bean instance. When the client invokes any home interface business method, an entity bean is removed from the pool to service the request. Thus, this method can be used to perform operations on general information related to the bean.
Our employee example provides the local home interface with a create, findByPrimaryKey, findAll, and calcSalary methods. The calcSalary method is a home interface business method that calculates the sum of all employee
3-4 Oracle9iAS Containers for J2EE Enterprise JavaBeans Developer’s Guide

Creating Entity Beans
salaries. It does not access the information of a particular employee, but performs a SQL inquiry against the database for all employees.
Example 3–1 Entity Bean Employee Home Interface
The employee home interface provides a method to create the component interface. It also provides two finder methods: one to find a specific employee by an employee number and one that finds all employees. Last, it supplies a home interface business method, calcSalary, to calculate how much all employees cost the business.
The home interface is required to extend javax.ejb.EJBHome and define the create and findByPrimaryKey methods.
package employee;
import javax.ejb.*;import java.rmi.*;
public interface EmployeeLocalHome extends EJBLocalHome{
public EmployeeLocal create(Integer empNo) throws CreateException;
// Find an existing employee public EmployeeLocal findByPrimaryKey (Integer empNo) throws FinderException;
//Find all employees public Collection findAll() throws FinderException;
//Calculate the Salaries of all employees public float calcSalary() throws Exception;}
Component InterfacesThe entity bean component interfaces are the interfaces that the customer sees and invokes methods upon. The component interface defines the business logic methods for the entity bean instance.
■ The local component interface extends javax.ejb.EJBLocalObject.
■ The remote component interface extends javax.ejb.EJBObject.
The employee entity bean example exposes the local component interface, which contains methods for retrieving and updating employee information.
CMP Entity Beans 3-5

Creating Entity Beans
package employee;
import javax.ejb.*;
public interface EmployeeLocal extends EJBLocalObject{ public Integer getEmpNo(); public void setEmpNo(Integer empNo);
public String getEmpName(); public void setEmpName(String empName);
public Float getSalary(); public void setSalary(Float salary);}
Entity Bean ClassThe entity bean class implements the following methods:
■ The target methods for the methods that are declared in the home interface, which include the following:
– the ejbCreate method
– any finder methods, including ejbFindByPrimaryKey
– any home interface business methods, which are prepended with ejbHome in the bean implementation. For example, the calcSalary method is implemented in the ejbHomeCalcSalary method.
■ The business logic methods that are declared in the component interfaces.
■ The methods that are inherited from the EntityBean interface.
However, with container-managed persistence, the container manages most of the target methods and the data objects, thereby leaving little for you to implement.
package employee;
import javax.ejb.*;import java.rmi.*;
public abstract class EmployeeBean implements EntityBean{
private EntityContext ctx;
3-6 Oracle9iAS Containers for J2EE Enterprise JavaBeans Developer’s Guide

Creating Entity Beans
// Each CMP field has a get and set method as accessors public abstract Integer getEmpNo(); public abstract void setEmpNo(Integer empNo);
public abstract String getEmpName(); public abstract void setEmpName(String empName);
public abstract Float getSalary(); public abstract void setSalary(Float salary);
public void EmployeeBean() { // Constructor. Do not initialize anything in this method. // All initialization should be performed in the ejbCreate method. // The passivate() method may destroy these attributes when pooling }
public float ejbHomeCalcSalary() throws Exception { Collection c = null; try { c = ((EmployeeLocalHome)this.ctx.getEJBLocalHome()).findAll();
Iterator i = c.iterator(); float totalSalary = 0; while (i.hasNext()) { EmployeeLocal e = (EmployeeLocal)i.next(); totalSalary = totalSalary + e.getSalary().floatValue(); } return totalSalary; } catch (FinderException e) { System.out.println("Got finder Exception "+e.getMessage()); throw new Exception(e.getMessage()); } }
public EmployeePK ejbCreate(Integer empNo, String empName, Float salary) throws CreateException { setEmpNo(empNo); setEmpName(empName); setSalary(salary);
CMP Entity Beans 3-7

Creating Entity Beans
return new EmployeePK(empNo); }
public void ejbPostCreate(Integer empNo, String empName, Float salary) throws CreateException { // Called just after bean created; container takes care of implementation }
public void ejbStore() { // Called when bean persisted; container takes care of implementation }
public void ejbLoad() { // Called when bean loaded; container takes care of implementation }
public void ejbRemove() throws RemoveException { // Called when bean removed; container takes care of implementation }
public void ejbActivate() { // Called when bean activated; container takes care of implementation. // If you need resources, retrieve them here. }
public void ejbPassivate() { // Called when bean deactivated; container takes care of implementation. // if you set resources in ejbActivate, remove them here. }
public void setEntityContext(EntityContext ctx) { this.ctx = ctx; }
public void unsetEntityContext() { this.ctx = null; }
3-8 Oracle9iAS Containers for J2EE Enterprise JavaBeans Developer’s Guide

Primary Key
}
Primary KeyEach entity bean instance has a primary key that uniquely identifies it from other instances. You must declare the primary key (or the fields contained within a complex primary key) as a container-managed persistent field in the deployment descriptor. All fields within the primary key are restricted to either primitive, serializable, or types that can be mapped to SQL types. You can define your primary key in one of two ways:
■ Define the type of the primary key to be a well-known type. The type is defined in the <prim-key-class> in the deployment descriptor. The data field that is identified as the persistent primary key is identified in the <primkey-field> element in the deployment descriptor. The primary key variable that is declared within the bean class must be declared as public.
■ Define the type of the primary key as a serializable object within a <name>PK class that is serializable. This class is declared in the <prim-key-class> element in the deployment descriptor. This is an advanced method for defining a primary key and is discussed in "Defining the Primary Key in a Class" on page 3-11.
■ Specify an auto-generated primary key: If you specify a java.lang.Object as the primary key class type in <prim-key-class>, but do not specify the primary key name in <primkey-field>, then the primary key is auto-generated by the container. See Defining an Auto-Generated Primary Key on page 3-12 for more information.
For a simple CMP, you can define your primary key to be a well-known type by defining the data type of the primary key within the deployment descriptor.
The employee example defines its primary key as a java.lang.Integer and uses the employee number (empNo) as its primary key.
<enterprise-beans> <entity> <display-name>Employee</display-name>
Note: The entire CMP entity bean example (cmpapp.jar) is available on OTN from the OC4J sample code page at http://otn.oracle.com/sample_code/tech/java/oc4j/htdocs
/oc4jsamplecode/oc4j-demo-ejb.html.
CMP Entity Beans 3-9

Primary Key
<ejb-name>EmployeeBean</ejb-name> <local-home>employee.EmployeeLocalHome</local-home> <local>employee.EmployeeLocal</local> <ejb-class>employee.EmployeeBean</ejb-class> <persistence-type>Container</persistence-type> <prim-key-class>java.lang.Integer</prim-key-class> <reentrant>False</reentrant> <cmp-version>2.x</cmp-version> <abstract-schema-name>Employee</abstract-schema-name> <cmp-field><field-name>empNo</field-name></cmp-field> <cmp-field><field-name>empName</field-name></cmp-field> <cmp-field><field-name>salary</field-name></cmp-field> <primkey-field>empNo</primkey-field> </entity>...</enterprise-beans>
Once defined, the container creates a column in the entity bean table for the primary key and maps the primary key defined in the deployment descriptor to this column.
Within the orion-ejb-jar.xml file, the primary key is mapped to the underlying database persistence storage by mapping the CMP field or primary key field defined in the ejb-jar.xml file to the database column name. In the following orion-ejb-jar.xml fragment, the EmpBean persistence storage is defined as the EMP table in the database that is defined in the jdbc/OracleDS data source. Following the <entity-deployment> element definition, the primary key, empNo, is mapped to the EMPNO column in the Emp table, and the empName and salary CMP fields are mapped to EMPNAME and SALARY columns respectively in the EMP table.
<entity-deployment name="EmpBean" ...table="EMP" data-source="jdbc/OracleDS"... > <primkey-mapping> <cmp-field-mapping name="empNo" persistence-name="EMPNO" /> </primkey-mapping> <cmp-field-mapping name="empName" persistence-name="EMPNAME" /> <cmp-field-mapping name="salary" persistence-name="SALARY" />
Note: The entire CMP entity bean example (cmpapp.jar) is available on OTN from the OC4J sample code page at http://otn.oracle.com/sample_code/tech/java/oc4j/htdocs
/oc4jsamplecode/oc4j-demo-ejb.html.
3-10 Oracle9iAS Containers for J2EE Enterprise JavaBeans Developer’s Guide

Primary Key
Defining the Primary Key in a ClassIf your primary key is more complex than a simple data type, your primary key must be a class that is serializable of the name <name>PK. You define the primary key class within the <prim-key-class> element in the deployment descriptor.
The primary key variables must adhere to the following:
■ Be defined within a <cmp-field><field-name> element in the deployment descriptor. This enables the container to manage the primary key fields.
■ Be declared within the bean class as public and restricted to be either primitive, serializable, or types that can be mapped to SQL types.
■ The names of the variables that make up the primary key must be the same in both the <cmp-field><field-name> elements and in the primary key class.
Within the primary key class, you implement a constructor for creating a primary key instance. Once the primary key class is defined in this manner, the container manages the class.
The following example places the employee number within a primary key class.
package employee;
public class EmployeePK implements java.io.Serializable{ public Integer empNo;
public EmployeePK() { this.empNo = null; }
public EmployeePK(Integer empNo) { this.empNo = empNo; }}
The primary key class is declared within the <prim-key-class> element, and each of its variables are declared within a <cmp-field><field-name> element in the XML deployment descriptor, as follows:
<enterprise-beans> <entity> <description>no description</description>
CMP Entity Beans 3-11

Primary Key
<display-name>EmployeeBean</display-name> <ejb-name>EmployeeBean</ejb-name> <local-home>employee.LocalEmployeeHome</home> <local>employee.LocalEmployee</remote> <ejb-class>employee.EmployeeBean</ejb-class> <persistence-type>Container</persistence-type> <prim-key-class>employee.EmployeePK</prim-key-class> <reentrant>False</reentrant> <cmp-version>2.x</cmp-version> <abstract-schema-name>Employee</abstract-schema-name> <cmp-field><field-name>empNo</field-name></cmp-field> <cmp-field><field-name>empName</field-name></cmp-field> <cmp-field><field-name>salary</field-name></cmp-field> </entity></enterprise-beans>
Once defined, the container creates a column in the entity bean table for the primary key and maps the primary key class defined in the deployment descriptor to this column.
The CMP fields are mapped in the orion-ejb-jar.xml in the same manner as described in "Primary Key" on page 3-9. With a complex primary key, the mapping contains more than a single field; thus, the <cmp-field-mapping> element of the <primkey-mapping> element contains another subelement: the <fields> element. All of the fields of a primary key are each defined in a separate <cmp-field-mapping> element within the <fields> element, as shown below.
<primkey-mapping> <cmp-field-mapping> <fields> <cmp-field-mapping name="empNo" persistence-name="EMPNO" /> </fields> </cmp-field-mapping></primkey-mapping>
Special mapping needs to happen if you have a complex primary key that contains a foreign key. See "Using a Foreign Key in a Composite Primary Key" on page 4-63 for directions.
Defining an Auto-Generated Primary KeyIf you specify a java.lang.Object as the primary key class type in <prim-key-class>, but do not specify the primary key name in <primkey-field>, then the primary key is auto-generated by the container.
3-12 Oracle9iAS Containers for J2EE Enterprise JavaBeans Developer’s Guide

Persistence Fields
The employee example defines its primary key as a java.lang.Object. Thus, the container auto-generates the primary key.
<enterprise-beans> <entity> <display-name>Employee</display-name> <ejb-name>EmployeeBean</ejb-name> <local-home>employee.EmployeeLocalHome</local-home> <local>employee.EmployeeLocal</local> <ejb-class>employee.EmployeeBean</ejb-class> <persistence-type>Container</persistence-type> <prim-key-class>java.lang.Object</prim-key-class> <reentrant>False</reentrant> <cmp-version>2.x</cmp-version> <abstract-schema-name>Employee</abstract-schema-name> <cmp-field><field-name>empNo</field-name></cmp-field> <cmp-field><field-name>empName</field-name></cmp-field> <cmp-field><field-name>salary</field-name></cmp-field> </entity>...</enterprise-beans>
Once defined, the container creates a column called autoid in the entity bean table for the primary key of type LONG. The container uses random numbers for the primary key values. This is generated in the orion-ejb-jar.xml for the bean, as follows:
<primkey-mapping> <cmp-field-mapping name="auto_id" persistence-name="autoid"/></primkey-mapping>
Persistence FieldsThe persistent data in your CMP bean can be one of the following:
■ Persistence field—Simple data type that is persisted to a database table. This field is a direct attribute of the bean.
■ Relationship field—Relationship to another bean.
Each type results in its own complex rules of how to configure. This section discusses persistence fields. For information on relationship fields, see Chapter 4, "Entity Relationship Mapping".
CMP Entity Beans 3-13

Persistence Fields
In CMP entity beans, you define the persistent data both in the bean instance and in the deployment descriptor.
■ Get/Set methods in the bean instance: For each persistence and relationship field, both a get and a set method is created. For persistence fields, the data type of the parameter returned from the get method and passed into the set method defines the simple data type of the field. The name of the field is designated by the name of the get and set methods.
The following XML shows the get and set methods for the employee name persistence field. A String is passed back from the get method and into the set method. Thus, the String is the simple data type of the field. If you remove the "get" and "set" from the method names and then lower the case of the first letter, you have the persistence field name. In this case, empName is the persistence field name.
public abstract String getEmpName() throws RemoteException;public abstract void setEmpName(String empName) throws RemoteException;
■ The deployment descriptor defines these fields as persistent. Each field name must be defined in a <cmp-field><field-name> element in the EJB deployment descriptor. In the employee example, three persistence data fields are defined in the data accessor methods: empNo, empName, and salary.
These fields are defined as persistent fields in the ejb-jar.xml deployment descriptor within the <cmp-field><field-name> element, as follows:
<enterprise-beans> <entity> <display-name>Employee</display-name> <ejb-name>EmployeeBean</ejb-name> <local-home>employee.EmployeeLocalHome</local-home> <local>employee.EmployeeLocal</local> <ejb-class>employee.EmployeeBean</ejb-class> <persistence-type>Container</persistence-type> <prim-key-class>java.lang.Integer</prim-key-class> <reentrant>False</reentrant> <cmp-version>2.x</cmp-version> <abstract-schema-name>Employee</abstract-schema-name> <cmp-field><field-name>empNo</field-name></cmp-field> <cmp-field><field-name>empName</field-name></cmp-field> <cmp-field><field-name>salary</field-name></cmp-field> <primkey-field>empNo</primkey-field> </entity>...</enterprise-beans>
3-14 Oracle9iAS Containers for J2EE Enterprise JavaBeans Developer’s Guide

Persistence Fields
For these fields to be mapped to a database, you can do one of the following:
■ Accept the defaults for these fields and avoid more deployment descriptor configuration. See "Default Mapping of Persistent Fields to the Database" on page 3-15 on how the default mapping occurs.
■ Map the persistent data fields to columns in a table that exists in a designated database. The persistent data mapping is configured within the orion-ejb-jar.xml file. See "Explicit Mapping of Persistent Fields to the Database" on page 3-16 for more information.
Default Mapping of Persistent Fields to the DatabaseIf you simply define the persistent fields in the ejb-jar.xml file, then OC4J provides the following mappings of these fields to the database:
■ Database—The default database as set up in your OC4J instance configuration. For the JNDI name, use the <location> element for emulated data sources and <ejb-location> element for non-emulated data sources.
Upon installation, the default database is a locally installed Oracle database that must be listening on port 1521 with a SID of ORCL. To customize the default database, change the first configured database to point to your database.
■ Table—The container creates a default table where the name of the table is guaranteed to be unique. For all future redeployments, copy the generated orion-ejb-jar.xml file with this table name into the same directory as your ejb-jar.xml file. Thus, all future redeployments have the same table names as first generated. If you do not copy this file over, different table names may be generated.
Note: The entire CMP entity bean example (cmpapp.jar) is available on OTN from the OC4J sample code page at http://otn.oracle.com/sample_code/tech/java/oc4j/htdocs
/oc4jsamplecode/oc4j-demo-ejb.html.
Note: See the Data Source chapter in the Oracle9iAS Containers for J2EE Services Guide for more information on configuring Data Source objects.
CMP Entity Beans 3-15

Persistence Fields
The table name is constructed with the following names, where each is separated by an underscore (_):
– EJB name defined in <ejb-name> in the deployment descriptor.
– JAR file name, including the .jar extension. However, all dashes (-) and periods (.) are converted to underscores (_) to follow SQL conventions. For example, if the name of your JAR file is employee.jar, then employee_jar is appended to the name.
– Application name: This is the name of the application name, which you define during deployment.
If the constructed name is greater than thirty characters, the name is truncated at twenty-four characters. Then six characters made up of an alphanumeric hash code is appended to the name.
For example, if the EJB name is EmpBean, the JAR file is empl.jar, and the application name is employee, then the default table name is EmpBean_empl_jar_employee.
■ Column names—The columns in the entity bean table each have the same name as the <cmp-field> elements in the designated database. The data types for the database, translating Java data types to database data types, are defined in the specific database XML file, such as oracle.xml.
Explicit Mapping of Persistent Fields to the DatabaseAs "Default Mapping of Persistent Fields to the Database" on page 3-15 discusses, your persistent data can be automatically mapped to a database table by the container. However, if the data represented by your bean is more complex or you do not want to accept the defaults that OC4J provides for you, then you can map the persistent data to an existing database table and its columns within the orion-ejb-jar.xml file. Once the fields are mapped, the container provides the persistence storage of the persistent data to the indicated table and rows.
For explicit mapping, Oracle recommends that you do the following:
1. Deploy your application with only the ejb-jar.xml elements configured.
OC4J creates an orion-ejb-jar.xml file for you with the default mappings in them. It is easier to modify these fields than to create them from scratch. This provides you a method for choosing all or part of the modifications that are discussed in this section.
3-16 Oracle9iAS Containers for J2EE Enterprise JavaBeans Developer’s Guide

Persistence Fields
2. Modify the <entity-deployment> element in the orion-ejb-jar.xml file to use the database table and columns you specify.
Once you define persistent fields, each within its own <cmp-field> element, you can map each to a specific database table and column. Thus, you can map CMP fields to existing database tables. The mapping occurs with the OC4J-specific deployment descriptor: orion-ejb-jar.xml.
The explicit mapping of CMP fields is completed within an <entity-deployment> element. This element contains all mapping for an entity bean. However, the attributes and elements that are specific to CMP field mapping is as follows:
<entity-deployment name="..." location="..."table="..." data-source="..."><primkey-mapping>
<cmp-field-mapping name="..." persistence-name="..." /></primkey-mapping><cmp-field-mapping name="..." persistence-name="..." />
...</entity-deployment>
You can configure the following within the orion-ejb-jar.xml file:
1. Configure the <entity-deployment> element for every entity bean that contains CMP fields that will be mapped within it.
2. Configure a <cmp-field-mapping> element for every field within the bean that is mapped. Each <cmp-field-mapping> element must contain the name of the field to be persisted.
Element or Attribute Name Description
name Bean name, which is defined in the ejb-jar.xml file in the <ejb-name> element.
location JNDI location
table Database table name
data-source Data source for the database where the table resides
primkey-mapping Definition of how the primary key is mapped to the table.
cmp-field-mapping The name attribute specifies the <cmp-field> in the deployment descriptor, which is mapped to a table column in the persistence-name attribute.
CMP Entity Beans 3-17

Persistence Fields
a. Configure the primary key in the <primkey-mapping> element contained within its own <cmp-field-mapping> element.
b. Configure simple data types (such as a primitive, simple object, or serializable object) that are mapped to a single field within a single <cmp-field-mapping> element. The name and database field are fully defined within the element attributes.
Example 3–2 Mapping Persistent Fields to a Specific Database Table
The following example demonstrates how to map persistent data fields in your bean instance to database tables and columns by mapping the employee persistence data fields to the Oracle database table EMP.
■ The bean is identified in the <entity-deployment> name attribute. The JNDI name for this bean is defined in the location attribute.
■ The database table name is defined in the table attribute. And the database is specified in the data-source attribute, which should be identical to the <ejb-location> name of a DataSource defined in the data-sources.xml file.
■ The bean primary key, empNo, is mapped to the database table column, EMPNO, within the <primkey-mapping> element.
■ The bean persistent data fields, empName and salary, are mapped to the database table columns ENAME and SAL within the <cmp-field-mapping> element.
<entity-deployment name="EmpBean" location="emp/EmpBean"wrapper="EmpHome_EntityHomeWrapper2" max-tx-retries="3" table="emp" data-source="jdbc/OracleDS"><primkey-mapping>
<cmp-field-mapping name="empNo" persistence-name="empno" /></primkey-mapping><cmp-field-mapping name="empName" persistence-name="ename" /><cmp-field-mapping name="salary" persistence-name="sal" />
...</entity-deployment>
After deployment, OC4J maps the element values to the following:
3-18 Oracle9iAS Containers for J2EE Enterprise JavaBeans Developer’s Guide

Converstion of CMP Types to Database Types
Converstion of CMP Types to Database TypesIn defining the container-managed persistent fields in the <cmp-field> and the primary key types, you can define simple data types and Java user classes that are serializable.
■ Simple Data Types
■ Serializable Classes
■ Other Entity Beans or Collections
Simple Data TypesThe following table provides a list of simple data types, which you can provide in the persistence-type attribute, with the mapping of these types to SQL types and to Oracle database types. None of these mappings are guaranteed to work on non-Oracle databases.
Table 3–1 Simple Data Types
Bean Database
emp/EmpBean EMP table, located at jdbc/OracleDS in the data-sources.xml file
empNo EMPNO column as primary key
empName ENAME column
salary SAL column
Known Type (native) SQL type Oracle type
java.lang.String VARCHAR(255) VARCHAR2(255)
java.lang.Integer[ ] INTEGER NUMBER(20,0)
java.lang.Long[ ] INTEGER NUMBER(20,0)
java.lang.Short[ ] INTEGER NUMBER(10,0)
java.lang.Double[ ] DOUBLE PRECISION NUMBER(30,0)
java.lang.Float[ ] FLOAT NUMBER(20,5)
java.lang.Byte[ ] SMALLINT NUMBER(10,0)
CMP Entity Beans 3-19

Converstion of CMP Types to Database Types
The Date and Time map to DATE in the database, because the DATE contains the time. The Timestamp, however, maps to TIMESTAMP in the database, which gives the time in nanoseconds.
Mapping java.sql.CLOB and java.sql.BLOB directly is not currently supported because these objects are not serializable. However you can map a String or char[] and byte[] to database column type CLOB and BLOB respectively. Mapping a char[] to a CLOB or a byte[] to a BLOB can only be done with an Oracle database. The Oracle JDBC API was modified to handle this operation.
When String and char[] variables map to a VARCHAR2 in the database, it can only hold up to 2K. However, you can map String object or char[] larger than 2K to a CLOB by doing the following:
1. The bean implementation uses the String or char[] objects.
2. The persistence-type attribute of the <cmp-field-mapping> element defines the object as a CLOB, as follows:
<cmp-field-mapping name="stringdata" persistence-name="stringdata" persistence-type="CLOB" />
java.lang.Character[ ] CHAR CHAR(1)
java.lang.Boolean[ ] BIT NUMBER(1,0)
java.util.Date DATETIME DATE
java.sql.Date DATE DATE
java.util.Time DATE DATE
java.sql.Timestamp TIMESTAMP TIMESTAMP
java.lang.String CLOB CLOB
char[ ] CLOB CLOB
byte[ ] BLOB BLOB
java.io.Serializable LONGVARBINARY BLOB
Note: You can modify the mapping of these data types in the config/database-schema/<db>.xml XML configuration files.
Known Type (native) SQL type Oracle type
3-20 Oracle9iAS Containers for J2EE Enterprise JavaBeans Developer’s Guide

Converstion of CMP Types to Database Types
In the same manner, you can map a byte[] in the bean implementation to a BLOB, as follows:
<cmp-field-mapping name="bytedata" persistence-name="bytedata" persistence-type="BLOB" />
Serializable ClassesIn addition to simple data types, you can define user classes that implement Serializable. These classes are stored in a BLOB in the database.
Other Entity Beans or CollectionsYou should not define other entity beans or Collections as a CMP type. Instead, these are relationships and should be defined within a CMR field.
■ A relationship to another entity bean is always defined in a <cmr-field> relationship.
■ Collections promote a "many" relationship and should be configured within a <cmr-field> relationship. Other types, such as Lists, are sub-interfaces of Collections. Oracle recommends that you use Collections.
CMP Entity Beans 3-21

Converstion of CMP Types to Database Types
3-22 Oracle9iAS Containers for J2EE Enterprise JavaBeans Developer’s Guide

Entity Relationship Ma
4
Entity Relationship MappingThis chapter discusses how to develop entity-to-entity relationships. As a developer, you can approach entity relationships from either of the following viewpoint:
■ EJB development—You can use UML diagrams to design the entity beans, and the cardinality and direction of the relationship between each bean, from the perspective of the EJB objects.
■ Database development—You can use ERD diagrams to design the database tables, complete with the cardinality and direction designated by primary and foreign keys, that support the entity beans. The focus is on how the database maps each entity bean and the relationships between them.
This chapter starts by discussing entity relationships from the EJB development viewpoint. Next, it demonstrates how the deployment descriptor maps to database tables. If you want to design with the database development viewpoint, skip to "Mapping Object Relationship Fields to the Database" on page 4-12.
This chapter covers the following topics:
■ Defining Entity-To-Entity Relationships
■ Mapping Object Relationship Fields to the Database
■ Using a Foreign Key in a Composite Primary Key
■ How to Override a Foreign Key Database Constraint
Note: An object-relationship entity bean example (ormapdemo.jar) is available on OTN from the OC4J sample code page at http://otn.oracle.com/sample_code/tech/java/oc4j/htdocs/oc4jsamplecode/oc4j-demo-ejb.html.
pping 4-1

Defining Entity-To-Entity Relationships
Defining Entity-To-Entity RelationshipsThe following sections describe what an entity bean relationship can be and how to define them.
■ Choosing Cardinality and Direction
■ Requirements in Defining Relationships
Choosing Cardinality and DirectionCardinality refers to the number of entity objects on each side of the relationship. Thus, you can define the following types of relationship between EJBs:
■ one-to-one
■ one-to-many or many-to-one (dependent on the direction)
■ many-to-many
In addition, each relationship can unidirectional or bidirectional. For example, a unidirectional relationship can be from an employee to an address. With the employee information, you can retrieve an address. However, with an address, you cannot retrieve the employee. An example of a bidirectional relationship is with a employee/projects example. Given a project number, you can retrieve the employees working on the project. Given an employee number, you can retrieve all projects that the employee is working on. Thus, the relationship is valid in both directions.
You can use a unidirectional relationship when you want to reuse the target from multiple entities. For example, both a husband and a wife may work for the same company. Both of their employee records could point to the same home phone number in a unidirectional relationship. You could not have this situation in a bidirectional relationship.
You define the cardinality and direction of the relationship between two beans in the deployment descriptor.
One-To-One Relationship OverviewA one-to-one relationship is the simplest relationship between two beans. One entity bean relates only to one other entity bean. If our company office contains only cubicles, and only a single employee can sit in each cubicle, then you have a one-to-one relationship: one employee in one designated cubicle. You define a unidirectional definition for this relationship as follows:
employee —> cubicle
4-2 Oracle9iAS Containers for J2EE Enterprise JavaBeans Developer’s Guide

Defining Entity-To-Entity Relationships
However, if you have a cubicle number and want to determine who is assigned to it, you can assign a bidirectional relationship. This would enable you to retrieve the employee and find what cubicle he/she sits in. In addition, you could retrieve the cubicle number and determine who sits there. You define this bidirectional one-to-one relationship as follows:
employee <—> cubicle
One-To-Many or Many-To-One Relationship OverviewIn a one-to-many relationship, one object can reference several instances of another. A many-to-one relationship is when many objects reference a single object. For example, an employee can have multiple addresses: a home address and an office address. If you define these relationships as unidirectional from the perspective of the employee, then you can look up the employee and see all of his/her addresses, but you cannot look up an address to see who lives there. However, if you define this relationship as bidirectional, then you can look up any address and see who lives there.
Many-To-Many Relationship OverviewA many-to-many relationship is complex. For example, each employee can be working on several projects. And each projects has multiple employees working on it. Thus, you have a many-to-many cardinality. The direction does not matter in this instance. You have the following cardinality:
employees <—> projects
In a many-to-many relationship, many objects can reference many objects. This cardinality is the most difficult to manage.
Requirements in Defining RelationshipsHere are the restrictions imposed on defining your relationships:
■ You can define relationships only between CMP 2.0 entity beans.
■ You must declare both EJBs in the relationship within the same deployment descriptor.
■ Each relationship can use only the local interface of the target EJB.
The following are the requirements to define each cardinality type and its direction:
Entity Relationship Mapping 4-3

Defining Entity-To-Entity Relationships
1. Define the abstract accessor methods (get/set methods) for each relationship field. The naming follows the same rules as for the persistence field abstract accessor methods. For example, getAddress and setAddress methods are abstract accessor methods for retrieving and setting an address.
2. Set the relationships in the bean implementation. The primary key must always be set in the ejbCreate method; the foreign key can be set anytime after the ejbCreate method, but not within it.
3. Define each relationship—its cardinality and direction—in the deployment descriptor. The relationship field name is defined in the <cmr-field-name> element. This name must be the same as the abstract accessor methods, without the get/set and the first letter in lower case. For example, the <cmr-field-name> would be address to compliment the getAddress/setAddress abstract accessor methods.
4. If you want cascade delete, then declare the cascade delete option for the one-to-one, one-to-many, and many-to-one relationships. The cascade delete is always specified on the slave side of the relationship, so that when the master entity is deleted, all of the slave entities related to it are subsequently deleted. For example, when an employee has multiple phone numbers, the cascade delete is defined on the phone numbers side. Then, when the employee is deleted, all of the related phone numbers are also deleted.
The following sections provides an example of how to implement each of these requirements:
■ Define the Get/Set Methods for Each Relationship Field
■ Set the Relationships in the Bean Implementation
■ Declare the Relationships in the Deployment Descriptor
■ Decide Whether to Use the Cascade Delete Option
Define the Get/Set Methods for Each Relationship FieldEach relationship field must have the abstract accessor methods defined for it. In a relationship that sets or retrieves only a single entity, the object type passed back and forth must be the local interface of the target entity bean. In a relationship that sets or retrieves multiple objects, the object type passed back and forth is a Set or Collection containing local interface objects.
4-4 Oracle9iAS Containers for J2EE Enterprise JavaBeans Developer’s Guide

Defining Entity-To-Entity Relationships
Example 4–1 Definition of Abstract Accessor Methods for the Employee Example
In this example, the employee has an employee number and a single address. You can retrieve the employee number and address only through the employee. This defines one-to-one relationships that is unidirectional from the perspective of the employee. Then the abstract accessor methods for the employee bean are as follows:
public Integer getEmpNo();public void setEmpNo(Integer empNo);public AddressLocal getAddress();public void setAddress(AddressLocal address);
Because the cardinality is one-to-one, the local interface of the address entity bean is the object type that is passed back and forth in the abstract accessor methods.
The cardinality and direction of the relationship are defined in the deployment descriptor.
Example 4–2 Definition of One-To-Many Abstract Accessor Methods
If the employee example included a one-to-many relationship, the abstract accessor methods would pass back and forth a Set or Collection of objects, each of which contains target bean local interface objects. When you have a "many" relationship, multiple records are being passed back and forth.
A department contains many employees. In this one-to-many example, the abstract accessor methods for the department retrieves multiple employees. Thus, the abstract accessor methods pass a Collection or a Set of employees, as follows:
public Collection getDeptEmployees();public void setDeptEmployees(Collection deptEmpl);
Set the Relationships in the Bean ImplementationOnce you have defined the get/set relationship methods, use them in the bean implementation to set up the relationships. All primary key relationships must be set within the ejbCreate method, as shown in "Entity Bean Class" on page 3-6. If you use a foreign key, as described in "Using a Foreign Key in a Composite Primary Key" on page 4-63, you can set the foreign key as early as the ejbPostCreate method.
When you set the primary key in the ejbCreate, the set methods populate the CMP fields that you define in the deployment descriptor. At the end of the ejbCreate method, these fields are written out to the appropriate database row.
Entity Relationship Mapping 4-5

Defining Entity-To-Entity Relationships
The employee has a primary key of the employee number. The following sets the primary key for the department:
public Integer ejbCreate(Integer empNo) throws CreateException{ setEmpNo(empNo); return empNo;}
Declare the Relationships in the Deployment DescriptorYou define the relationships between entity beans in the same deployment descriptor the entity beans are declared. All entity-to-entity relationships are defined within the <relationships> element and you can define multiple relationships within this element. Each specific entity-to-entity relationship is defined within an <ejb-relation> element. The following XML demonstrates two entity-to-entity relationships defined within an application:
<relationships> <ejb-relation> ... </ejb-relation> <ejb-relation> ... </ejb-relation></relationships>
The following XML shows the full element structure for relationships:
<relationships> <ejb-relation> <ejb-relation-name> </ejb-relation-name> <ejb-relationship-role> <ejb-relationship-role-name> </ejb-relationship-role-name> <multiplicity> </multiplicity> <relationship-role-source> <ejb-name> </ejb-name> </relationship-role-source> <cmr-field> <cmr-field-name> </cmr-field-name> <cmr-field-type> </cmr-field-type> </cmr-field> </ejb-relationship-role> </ejb-relation></relationships>
4-6 Oracle9iAS Containers for J2EE Enterprise JavaBeans Developer’s Guide

Defining Entity-To-Entity Relationships
Table 4–1 describes the usage for each of these elements.
Table 4–1 Description of Relationship Elements of the Deployment Descriptor
These relationships can be one-to-one, one-to-many, or many-to-many. The cardinality is defined within the <multiplicity> element. Each bean defines its cardinality within its own relationship. For example,
Note: An object-relationship entity bean example (ormapdemo.jar) is available on OTN from the OC4J sample code page at http://otn.oracle.com/sample_code/tech/java/oc4j/htdocs/oc4jsamplecode/oc4j-demo-ejb.html.
Deployment Descriptor Element Description
<ejb-relation> Each entity-to-entity relationship is described in a single <ejb-relation> element.
<ejb-relation-name> A user-defined name for the entity-to-entity relationship.
<ejb-relationship-role> Each entity within the relationship is described within its own <ejb-relationship-role>. Thus, there are always two <ejb-relationship-role> entities within the <ejb-relation>.
<ejb-relationship-role-name> A user-defined name to describe the role or involvement of the entity bean in the relationship.
<multiplicity> The declaration of the cardinality for this entity. The value is "one" or "many."
<relationship-role-source><ejb-name> The name of the entity bean. This must equal an EJB name defined in an <entity><ejb-name> element in the ejb-jar.xml file.
<cmr-field><cmr-field-name> A user-defined name to represent the target bean reference. This name must match the abstract accessor methods. For example, if the abstract accessor fields are getAddress() and setAddress(), the CMR field must be address.
<cmr-field><cmr-field-type> Optional. If "many", this type should be a Collection or Set. This is only specified for the "many" side to inform if a Collection or a Set is returned.
Entity Relationship Mapping 4-7

Defining Entity-To-Entity Relationships
■ One-to-one: For one employee to have a relationship with one address, the employee bean is declared with a <multiplicity> of one, and the address bean is declared with a <multiplicity> of one.
■ One-to-many, many-to-one: For one department to have a relationship with multiple employees, the department bean is declared with a <multiplicity> of one, and the employee bean is declared with a <multiplicity> of many. For many employees to belong to a department, you define the same <multiplicity>.
■ Many-to-many: For each employee to have a relationship with multiple projects and each project to have multiple employees working on it, the employee bean is declared with a <multiplicity> of many, and the project is declared with a <multiplicity> of many.
The direction of the relationship is defined by the presence of the <cmr-field> element. The reference to the target entity is defined within the <cmr-field> element. If the relationship is unidirectional, then only one entity within the relationship contains a reference to a target. In this case, the <cmr-field> element is declared in the source entity and contains the target bean reference. If the relationship is bidirectional, both entities should declare a reference to each other’s bean within a <cmr-field> element.
The following demonstrates how to declare direction in the one-to-one employee and address example:
■ Unidirectional: Define the <cmr-field> element within the employee bean section that references the address bean. Do not define a <cmr-field> element in the address bean section of the relationship.
■ Bidirectional: Define a <cmr-field> element in the employee bean section that references the address bean. In addition, define a <cmr-field> element in the address bean section that references the employee bean.
Once you understand how to declare the cardinality and direction of the entity relationships, configuring the EJB deployment descriptor for each relationship is simple.
Example 4–3 One-To-One Relationship Example
The employee example defines a one-to-one unidirectional relationship in which each employee has only one address. This relationship is unidirectional because you can retrieve the address from the employee, but you cannot retrieve the employee from the address. Thus, the employee object has a relationship to the address object.
The ejb-jar.xml file is configured for this example, as follows:
4-8 Oracle9iAS Containers for J2EE Enterprise JavaBeans Developer’s Guide

Defining Entity-To-Entity Relationships
<enterprise-beans> <entity> ... <ejb-name>EmpBean</ejb-name> <local-home>employee.EmpHome</local-home> <local>employee.Emp</local> <ejb-class>employee.EmpBean</ejb-class> ... </entity> <entity> ... <ejb-name>AddressBean</ejb-name> <local-home>employee.AddressHome</local-home> <local>employee.Address</local> <ejb-class>employee.AddressBean</ejb-class> ... </entity></enterprise-beans>...<relationships> <ejb-relation> <ejb-relation-name>Emp-Address</ejb-relation-name> <ejb-relationship-role> <ejb-relationship-role-name>Emp-has-Address </ejb-relationship-role-name> <multiplicity>One</multiplicity> <relationship-role-source><ejb-name>EmpBean</ejb-name> </relationship-role-source> <cmr-field> <cmr-field-name>address</cmr-field-name> </cmr-field> </ejb-relationship-role> <ejb-relationship-role> <ejb-relationship-role-name>Address-has-Emp </ejb-relationship-role-name> <multiplicity>One</multiplicity> <relationship-role-source><ejb-name>AddressBean</ejb-name> </relationship-role-source> </ejb-relationship-role> </ejb-relation></relationships>
The ejb-jar.xml file has defined the following:
Entity Relationship Mapping 4-9

Defining Entity-To-Entity Relationships
■ Configure each <entity> element within the <enterprise-beans> section for each of the entity beans involved in the relationship. For this example, these include an <entity> element for the employee with an <ejb-name> of EmpBean and an <entity> element for the address with an <ejb-name> of AddressBean.
■ Configure the <ejb-relationship> element within the <relationships> section for the one-to-one relationship. For this example, it defines the following:
– An <ejb-relationship-role> element for the employee bean that defines its cardinality as "one" in its <multiplicity> element. The <relationship-role-source> element defines the <ejb-name> as EmpBean, which is the same name in the <entity> element.
– An <ejb-relationship-role> element for the address bean that defines its cardinality as "one" in its <multiplicity> element. The <relationship-role-source> element defines the <ejb-name> as AddressBean, which is the same name in the <entity> element.
■ Configure a <cmr-field> element in the EmpBean relationship that points to the AddressBean. The <cmr-field> element defines address as the AddressBean reference. This element name matches the get and set method names, which are named getAddress and setAddress. These methods identify the local interface of the address entity bean as the data type that is returned from the get method and passed in on the set method.
Decide Whether to Use the Cascade Delete OptionWhen you have relationships between entity beans and the master entity bean is deleted, what happens to the slave beans? If you specify cascade delete, the deletion of a master entity bean automatically deletes all of its slave relationship entity beans. You specify the cascade delete option in the slave relationship definition, which is the object that is deleted automatically.
Note: An object-relationship entity bean example (ormapdemo.jar) is available on OTN from the OC4J sample code page at http://otn.oracle.com/sample_code/tech/java/oc4j/htdocs/oc4jsamplecode/oc4j-demo-ejb.html.
4-10 Oracle9iAS Containers for J2EE Enterprise JavaBeans Developer’s Guide

Defining Entity-To-Entity Relationships
For example, an employee has a relationship with an address object. The address object specifies cascade delete. When the employee, as master in this relationship, is deleted, the address, the slave, is also deleted.
In some instances, you do not want a cascade delete to occur. If you have a department that has a relationship with multiple employees within the department, you do not want all employees to be deleted when you delete the department.
You can only specify a cascade delete on a relationship if the master entity bean has a <multiplicity> of one. Thus, in a one-to-one, the master is obviously a "one". You can specify a cascade delete in a one-to-many relationship, but not in a many-to-one or many-to-many relationship.
Example 4–4 Cascade Delete Requested in the Employee Example
The following deployment descriptor shows the definition of a one-to-one relationship with the employee and his/her address. When the employee is deleted, the slave entity bean—the address—is automatically deleted. You ensure the deletion by specifying the <cascade-delete/> element in the slave entity bean of the relationship. In this case, specify the <cascade-delete/> element in the AddressBean definition.
<relationships> <ejb-relation> <ejb-relation-name>Emp-Address</ejb-relation-name> <ejb-relationship-role> <ejb-relationship-role-name>Emp-has-Address </ejb-relationship-role-name> <multiplicity>One</multiplicity> <relationship-role-source><ejb-name>EmpBean</ejb-name> </relationship-role-source> <cmr-field> <cmr-field-name>address</cmr-field-name> </cmr-field> </ejb-relationship-role> <ejb-relationship-role> <ejb-relationship-role-name>Address-has-Emp </ejb-relationship-role-name> <multiplicity>One</multiplicity> <cascade-delete/> <relationship-role-source><ejb-name>AddressBean</ejb-name> </relationship-role-source> </ejb-relationship-role> </ejb-relation></relationships>
Entity Relationship Mapping 4-11

Mapping Object Relationship Fields to the Database
Mapping Object Relationship Fields to the DatabaseEach entity bean maps to a table in the database. Each of its persistent and relationship fields are saved within a database table in columns. For these fields to be mapped to a database, do one of the following:
■ Accept the defaults for these fields and avoid more deployment descriptor configuration. See "Default Mapping of Relationship Fields to the Database" on page 4-12 to learn how the default mapping occurs. The tables are automatically created for the bean based on the information in the ejb-jar.xml file.
■ Map the fields to columns in a table that already exists in a designated database. The persistent data mapping is configured within the orion-ejb-jar.xml file. See "Explicit Mapping of Relationship Fields to the Database" on page 4-21 for more information.
Default Mapping of Relationship Fields to the Database
When you declare relationship fields in the ejb-jar.xml file, OC4J provides default mappings of these fields to the database when it auto-generates the orion-ejb-jar.xml file. The default mapping is the same as for the persistent fields, as described in "Default Mapping of Persistent Fields to the Database" on page 3-15.
In summary, these defaults include:
■ Database—The default database as set up in your OC4J instance configuration.
Note: This section discusses how OC4J maps relationship fields to the database. Chapter 3, "CMP Entity Beans" discusses persistent field mapping.
Note: For all future redeployments, copy the auto-generated orion-ejb-jar.xml file with this table name into the same directory as your ejb-jar.xml file from the J2EE_HOME/application-deployments directory. Thus, all future redeployments have the same table names as first generated. If you do not copy this file over, different table names may be generated.
4-12 Oracle9iAS Containers for J2EE Enterprise JavaBeans Developer’s Guide

Mapping Object Relationship Fields to the Database
■ Default table—Each entity bean in the relationship represents data in its own database table. The name of the entity bean table makes an effort to be unique, and so it is constructed with the following names, where each is separated by an underscore (_):
– EJB name defined in <ejb-name> in the deployment descriptor.
– JAR file name, including the .jar extension. However, all dashes (-) and periods (.) are converted to underscores (_) to follow SQL conventions. For example, if the name of your JAR file is employee.jar, then employee_jar is appended to the name.
– Application name: You define the application name during deployment.
If the constructed name is greater than thirty characters, the name is truncated at twenty-four characters. An underscore and then five characters made up of an alphanumeric hash code is appended to the name for uniqueness.
For example, if the EJB name is EmpBean, the JAR file is empl.jar, and the application name is employee, then the default table name is EmpBean_empl_jar_employee.
■ Column names in each table—The container generates columns in each table based on the <cmp-field> and <cmr-field> elements defined in the deployment descriptor. A column is created for each <cmp-field> element that relates to the entity bean data. In addition, a column is created for each <cmr-field> element that represents a relationship. In a unidirectional relationship, only a single entity in the relationship defines a <cmr-field> in the deployment descriptor. In a bidirectional relationship, both entities in the relationship define a <cmr-field>.
For each <cmr-field> element, the container creates a foreign key that points to the primary key of the relevant object, as follows:
– In the default one-to-one relationship, the foreign key is created in the database table for the source EJB and is directed to the primary key of the target database table. For example, if one employee has one address, then the foreign key is created within the employee table that points to the primary key of the address table. For more information, see "Example of a Default Mapping of the One-To-One Relationship" on page 4-14.
– In some one-to-many, many-to-one, and all many-to-many relationships, an association table (third table) is created. The association table contains two foreign keys, where each points to the primary key of one of the entity tables. For more information, see "Example of a Default Mapping of One-To-Many and Many-To-Many Relationships" on page 4-15.
Entity Relationship Mapping 4-13

Mapping Object Relationship Fields to the Database
– You can change the one-to-many, many-to-one relationships to use a foreign key in the database table. However, this is an explicit modification that you must do in the orion-ejb-jar.xml file. For more information, see "Explicit Mapping of Relationship Fields to the Database" on page 4-21.
Since the <cmp-field> and <cmr-field> elements represent Java data types, they may not convert to database types in the manner you believe that they should. See "Converstion of CMP Types to Database Types" on page 3-19 for a table of how the conversion occurs. However, you can modify the translation rules for converting Java data types to database data types in the specific database XML files, which are located in j2ee/home/config/database-schemas. This directory includes all database files. The Oracle database conversion file is named oracle.xml.
■ Primary key generation—Both entity tables contain a primary key. The primary key can be defined or auto-generated. See "Primary Key" on page 3-9 for a full description.
– Defined primary key: The primary key is generated as designated in the <primkey-field> element as a simple data type or a class. Thus, the column name is the same as the name in the <primkey-field> element.
– Composite primary key: The primary key is defined within a class, and is made up of several fields. Each field within the composite primary key is represented by a column in the database table, where each is considered part of the primary key in the table.
– Auto-generated primary key: If you specify a java.lang.Object as the primary key class type in <prim-key-class>, but do not specify the primary key name in <primkey-field>, then the primary key is auto-generated by the container. The column is named AUTOID.
Example of a Default Mapping of the One-To-One RelationshipThe one-to-one entity relationship is managed between the entity tables with a foreign key. Figure 4–1 demonstrates the default table mapping of a one-to-one unidirectional relationship between the employee and address bean.
4-14 Oracle9iAS Containers for J2EE Enterprise JavaBeans Developer’s Guide

Mapping Object Relationship Fields to the Database
Figure 4–1 One-To-One Employee Relationship Example
■ The container generates the table names based on the entity bean names, the JAR file the beans are archived in, and the application name that they are deployed under. If the JAR filename is empl.jar and the application name is employee, then the table names are EmpBean_empl_jar_employee and AddressBean_empl_jar_employee.
■ The container generates columns in each table based on the <cmp-field> and <cmr-field> elements declared in the deployment descriptor.
– The columns for the EmpBean table are empno, empname, and salary. A foreign key is created called address, from the <cmr-field> declaration, that points to the primary key column of the AddrBean table.
– The columns for the AddressBean table are an auto-generated long primary key and columns for street, city, state, and zip.
■ The primary key for the employee table is designated in the deployment descriptor as empno. The AddressBean is configured for an auto-generated primary key by specifying only <primkey-class> of java.lang.Object.
Example of a Default Mapping of One-To-Many and Many-To-Many RelationshipsWhen you use the default mapping, the container does not use only a primary key and foreign key in the entity tables to facilitate the one-to-many and many-to-many relationships. Instead, the container creates an association table with two foreign keys, where each foreign key points to each of the entity tables in the relationship.
Figure 4–2 shows the tables that are created for the employee/project relationship.
EmpBean_empl_jar_employee AddressBean_empl_jar_employee
empno empName salary FK:address autoid street city state zip
Entity Relationship Mapping 4-15

Mapping Object Relationship Fields to the Database
Figure 4–2 Many-To-Many Employee Relationship Example
Each project can have multiple employees, and each employee can belong to several projects. Thus, the employee and project relationship is a many-to-many relationship. The container creates three tables to manage this relationship: the employee table, the project table, and the association table for both of these tables.
The association table for this example contains two foreign key columns: one that points to the employee table and one that points to the project table. The column names of the association table are a concatenation of the entity bean name in <ejb-name> element of the ejb-jar.xml file and its primary key name. If the primary key for the bean is auto-generated, then "autoid" is appended as the primary key name. For example, the following are the names for the foreign keys of our employee/project example:
■ The foreign key that points to the employee table is the bean name of EmpBean, followed by the primary key name of empno, which results in the column name EmpBean_empno.
■ The foreign key that points to the address table is the bean name of ProjectBean concatenated with autoid, because the primary key is auto-generated, which results in the column name ProjectBean_autoid.
The following is a demonstration of the association table for the employee/projects relationship. Employee 1 is assigned to projects a, b, and c. Project a involves employees 1, 2, and 3. The association table contains the following:
EmpBean_empl_jar_employee ProjectBean_empl_jar_employee
empno empName salary autoid projectName
FK:EmpBean_empno FK:ProjectBean_autoid
ProjectBean_employees_Em_fj49g
4-16 Oracle9iAS Containers for J2EE Enterprise JavaBeans Developer’s Guide

Mapping Object Relationship Fields to the Database
The association table details all relationships between the two entity beans.
Example 4–5 Deployment Descriptor for a Many-To-Many Relationship
The deployment descriptors for the employee/project many-to-many relationship contains an <ejb-relation> element in which each bean defines its <multiplicity> as many and defines a <cmr-field> to the other bean of type Collection or Set.
<enterprise-beans> <entity> ... <ejb-name>EmpBean</ejb-name> <local-home>employee.EmpHome</local-home> <local>employee.Emp</local> ... <cmp-field><field-name>empNo</field-name></cmp-field> <cmp-field><field-name>empName</field-name></cmp-field> <cmp-field><field-name>salary</field-name></cmp-field> <primkey-field>empNo</primkey-field> <prim-key-class>java.lang.Integer</prim-key-class> ... </entity> <entity> ... <ejb-name>ProjectBean</ejb-name> <local-home>employee.ProjectHome</local-home> <local>employee.Project</local> ... <cmp-field><field-name>projectName</field-name></cmp-field> <prim-key-class>java.lang.Object</prim-key-class> ... </entity></enterprise-beans>
EmpBean_empno ProjectBean_autoid
1 a
1 b
1 c
2 a
3 a
Entity Relationship Mapping 4-17

Mapping Object Relationship Fields to the Database
<relationships> <ejb-relation> <ejb-relation-name>Emps-Projects</ejb-relation-name> <ejb-relationship-role> <ejb-relationship-role-name>Project-has-Emps</ejb-relationship-role-name> <multiplicity>Many</multiplicity> <relationship-role-source> <ejb-name>ProjectBean</ejb-name> </relationship-role-source> <cmr-field> <cmr-field-name>employees</cmr-field-name> <cmr-field-type>java.util.Collection</cmr-field-type> </cmr-field> </ejb-relationship-role> <ejb-relationship-role> <ejb-relationship-role-name>Emp-has-Projects</ejb-relationship-role-name> <multiplicity>Many</multiplicity> <relationship-role-source> <ejb-name>EmpBean</ejb-name> </relationship-role-source> <cmr-field> <cmr-field-name>projects</cmr-field-name> <cmr-field-type>java.util.Collection</cmr-field-type> </cmr-field> </ejb-relationship-role> </ejb-relation></relationships>
The container maps this definition to the following:
■ The container generates the entity tables based on the entity bean names, the JAR file that the beans are archived in, and the application name that they are deployed under. If the JAR filename is empl.jar and the application name is employee, then the table names are EmpBean_empl_jar_employee and ProjectBean_empl_jar_employee.
■ The container generates columns in each entity table based on the <cmp-field> elements declared in the deployment descriptor.
– The columns for the EmpBean table are empno, empname, and salary. The primary key is designated as the empno field.
– The columns for the ProjectBean table are autoid for an auto-generated primary key and a projectName column. The primary key is auto-generated because the <prim-key-class> is defined as java.lang.Object, and no <primkey-field> element is defined.
4-18 Oracle9iAS Containers for J2EE Enterprise JavaBeans Developer’s Guide

Mapping Object Relationship Fields to the Database
■ The container generates an association table in the same manner as the entity table.
– The association table name is created to include the two <cmr-field> element definitions for each of the entity beans in the relationship. The format for the association table name consists of the following, separated by underscores: first bean name, its <cmr-field> to the second bean, second bean name, its <cmr-field> to the first bean, JAR file name, and application name. The rule of thirty characters also applies to this table name, as to the entity tables. Thus, the association table name for the employee/projects relationship is ProjectBean_employees_EmpBean_projects_empl_jar_employee. Because this name is over thirty characters, it is truncated to twenty-four characters, and then an underscore plus five characters of a hash code are added. Thus, the official association table would be something like ProjectBean_employees_Em_fj49g
– Two foreign keys in the association table are created. In this example, each foreign key is defined in a column, where the name is a concatenation of the bean name and the primary key (or autoid if auto-generated). In our example, the column names would be EmpBean_empno and ProjectBean_autoid. These columns are foreign keys to the entity tables that are involved in the relationship. The EmpBean_empno foreign key points to the employee table; the ProjectBean_autoid foreign key points to the projects table.
Example 4–6 Deployment Descriptor for One-To-Many Unidirectional Relationship
Figure 4–3 shows the default database tables for the employee/phone numbers example.
Entity Relationship Mapping 4-19

Mapping Object Relationship Fields to the Database
Figure 4–3 One-To-Many Relationship Employee Example
Each employee can have multiple phone numbers. The employee entity bean, EmpBean, defines a <cmr-field> element designating a Collection of phoneNumbers within the PhoneBean. The deployment descriptors for this exmple are as follows:
<relationships> <ejb-relation> <ejb-relation-name>Emp-Phone</ejb-relation-name> <ejb-relationship-role> <ejb-relationship-role-name>Emp-PhoneNumbers</ejb-relationship-role-name> <multiplicity>One</multiplicity> <relationship-role-source> <ejb-name>EmpBean</ejb-name> </relationship-role-source> <cmr-field> <cmr-field-name>phoneNumbers</cmr-field-name> <cmr-field-type>java.util.Collection</cmr-field-type> </cmr-field> </ejb-relationship-role> <ejb-relationship-role> <ejb-relationship-role-name>Phone-has-Emp</ejb-relationship-role-name> <multiplicity>Many</multiplicity> <relationship-role-source> <ejb-name>PhoneBean</ejb-name> </relationship-role-source> </ejb-relationship-role> </ejb-relation></relationships>
EmpBean_empl_jar_employee PhoneBean_empl_jar_employee
empno empName salary autoid phoneNum
FK:EmpBean_empno FK:PhoneBean_autoid
EmpBean_phoneNumbers_Pho_fj49g
4-20 Oracle9iAS Containers for J2EE Enterprise JavaBeans Developer’s Guide

Mapping Object Relationship Fields to the Database
Explicit Mapping of Relationship Fields to the DatabaseAs "Default Mapping of Relationship Fields to the Database" on page 4-12 discusses, your relationship fields can be automatically mapped to the database tables by the container. However, if you do not want to accept the defaults that OC4J provides for you or if you need to map the fields to an existing database table, then you can map the relationships between entity beans to an existing database table and its columns in the orion-ejb-jar.xml file.
"Explicit Mapping of Persistent Fields to the Database" on page 3-16 discusses how to explicitly map CMP fields. This section is about mapping CMR fields and so builds on that information to show how the relationship mapping occurs.
This chapter provides two levels of information about the orion-ejb-jar.xml elements:
■ A quick, direct guide for identifying the fields in which you would modify if you mapped to an existing database. See "Quick Cookbook for Matching an Existing Database to the Bean Mappings" on page 4-22.
Note: An object-relationship entity bean example (ormapdemo.jar) is available on OTN from the OC4J sample code page at http://otn.oracle.com/sample_code/tech/java/oc4j/htdocs/oc4jsamplecode/oc4j-demo-ejb.html.
Important: You modify elements and attributes of the <entity-deployment> element in the orion-ejb-jar.xml file to explicitly map relationship fields. JDeveloper was created to manage the complex mapping between the entity beans and the database tables. Thus, JDeveloper validates the deployment descriptors and prevents inconsistencies. You are allowed to modify the orion-ejb-jar.xml file on your own; however, we suggest that you use JDeveloper for modifying container-managed relationships. CMR configuration is complex and can be difficult to understand. You can download JDeveloper at the following site: http://otn.oracle.com/software/products/jdev/content.html
Entity Relationship Mapping 4-21

Mapping Object Relationship Fields to the Database
■ An education on all elements used in the CMR mapping and directions on modifying them. See "Steps for Modifying CMR Mapping Elements" on page 4-22.
Quick Cookbook for Matching an Existing Database to the Bean MappingsIf you want to know how to modify the orion-ejb-jar.xml file without understanding what each of the elements are for in this XML file and you do not want to use JDeveloper, then do the following:
1. Deploy your bean with the autocreate-tables element set to false in the orion-application.xml file.
2. Copy the orion-ejb-jar.xml file from the application-deployments/ directory to your development directory.
3. Modify the data-source element to be the correct data source. Note that all beans that are associated with each other must use the same data source.
4. Modify the table attribute to be the correct table. Make sure that it is the correct table for the bean that is defined in the <entity-deployments> element.
5. Modify the persistence-name attributes to the correct column for each bean persistence type, whether a CMP or CMR field.
6. Set the autocreate-tables element in orion-application.xml file to true.
7. Rearchive your application and redeploy.
Steps for Modifying CMR Mapping ElementsIf JDeveloper does not provide the mapping that you need or if you wish to manage the XML on your own, then you should perform the following steps:
1. Deploy your bean with the autocreate-tables element set to false in the orion-application.xml file and the ejb-jar.xml elements configured.
Note: An object-relationship entity bean example (ormapdemo.jar) is available on OTN from the OC4J sample code page at http://otn.oracle.com/sample_code/tech/java/oc4j/htdocs/oc4jsamplecode/oc4j-demo-ejb.html.
4-22 Oracle9iAS Containers for J2EE Enterprise JavaBeans Developer’s Guide

Mapping Object Relationship Fields to the Database
OC4J creates an orion-ejb-jar.xml file for you, with the default mappings in it. It is easier to modify these fields than to create them from scratch.
2. Copy the container-created orion-ejb-jar.xml file from the $J2EE_HOME/application-deployments directory to your development environment.
3. Modify the <entity-deployment> element in the orion-ejb-jar.xml file to use the database table and columns you specify, based on the relationship type. See "Hand-Editing the orion-ejb-jar.xml File to Map Bean Relationships to Database Tables" on page 4-23 for an overview.
Each of the following sections describes how the CMR mapping occurs for each relationship type:
– One-To-One Relationship Explicit Mapping
– Table Mapping For Primary Keys That Use AutoId
– Using a Foreign Key with the One-To-Many Relationship
– Association Table Explicit Mapping for Relationships Overview
– Using an Association Table with a One-to-Many Bidirectional Relationship
– Using an Association Table in a One-to-Many Unidirectional Relationship
– Using an Association Table in Many-to-Many Relationships
4. Set the autocreate-tables element in orion-application.xml file to true.
5. Rearchive your application and redeploy.
Hand-Editing the orion-ejb-jar.xml File to Map Bean Relationships to Database TablesThe relationship between the beans is defined in the <relationships> element in the ejb-jar.xml file; the mapping between the bean and the database table and columns is specified in the <entity-deployment> element in the orion-ejb-jar.xml file.
Note: If you deployed without setting autocreate-tables to false, then OC4J automatically created the default tables, possibly also an association table. You must drop all of these tables before redeploying the application.
Entity Relationship Mapping 4-23

Mapping Object Relationship Fields to the Database
The orion-ejb-jar.xml file maps the bean entity relationships to database table and columns within a <cmp-field-mapping> element. The following is the XML structure of the <entity-deployment> and <cmp-field-mapping> elements for a simple one-to-one relationship:
<entity-deployment name="SourceBeanName" location="JNDIlocation"table="TableName" data-source="DataSourceJNDIName">
...<cmp-field-mapping name="CMRfield_name"> <entity-ref home="targetBeanName"> <cmp-field-mapping name="CMRfield_name"
persistence-name="targetBean_PKcolumn" /> </entity-ref></cmp-field-mapping>
Within this element, you can define the bean name (the source of the relationship that indicates the direction), the JNDI location, the database table to which the information is persisted, and map each of the CMP and CMR fields defined in the ejb-jar.xml file to the underlying persistence storage—the database.
The attributes of the <entity-deployment> element define the following for the bean:
■ The name attribute identifies the EJB name of the bean, which was defined in the <ejb-name> element in the ejb-jar.xml file. This name attribute connects the ejb-jar.xml file definition for the bean to its mapping to the database.
■ The location attribute identities the JNDI name of the bean.
■ The table attribute identifies the database table to which this entity bean is mapped.
■ The data-source attribute identifies the database in which the table resides. The data source must be the same for all beans that interact with each other or are associated with each other. This includes beans that are in the same application, part of the same transaction, or beans that are in a parent-child relationship.
Note: This document refers to beans as the source or target of a relationship. If an employee owns many phones in a unidirectional relationship, then the employee is the source bean and it points to the phones, which are the target.
4-24 Oracle9iAS Containers for J2EE Enterprise JavaBeans Developer’s Guide

Mapping Object Relationship Fields to the Database
The <cmp-field-mapping> element in the orion-ejb-jar.xml file maps the following fields to database columns.
■ The <cmp-field> element in the ejb-jar.xml file defines a CMP field.
■ The <cmr-field> element in the ejb-jar.xml file defines a CMR field.
Figure 4–8 displays how the <cmr-field> element in the ejb-jar.xml file maps to the <cmp-field-mapping> element in the orion-ejb-jar.xml file. The name attribute in the <cmp-field-mapping> provides the link between the two XML files. You must not modify any name attributes.
Figure 4–4 Demonstration of Mapping for a One-To-One Relationship
To fully identify and map CMR fields, nested <cmp-field-mapping> elements are used. The format of the nesting depends on the type of relationship. The database column that is the primary key of the target bean is defined in the persistence-name attribute of the internal <cmp-field-mapping> element. If you have an existing database, you would be modifying the persistence-name attributes for each <cmp-field-mapping> element to match your column names.
The following sections talk about each relationship type and how the mapping occurs:
■ One-To-One Relationship Explicit Mapping
■ Table Mapping For Primary Keys That Use AutoId
■ Using a Foreign Key with the One-To-Many Relationship
■ Association Table Explicit Mapping for Relationships Overview
<cmp-field-mapping name="address"> <entity-ref home="AddressBean"> <cmp-field-mapping name="address"
</entity-ref></cmp-field-mapping>
persistence-name="addressPK" />
.. <relationship-role-source>
<cmr-field> <cmr-field-name>address</cmr-field-name></cmr-field>
<ejb-name>EmpBean</ejb-name></relationship-role-source>
ORION-EJB-JAR.XML
EJB-JAR.XML
Entity Relationship Mapping 4-25

Mapping Object Relationship Fields to the Database
■ Using an Association Table with a One-to-Many Bidirectional Relationship
■ Using an Association Table in a One-to-Many Unidirectional Relationship
■ Using an Association Table in Many-to-Many Relationships
One-To-One Relationship Explicit MappingFigure 4–5 demonstrates a one-to-one unidirectional relationship between a single employee and his/her address. The EmpBean points to the AddressBean that is the employee’s address using the CMR field, address.
Figure 4–5 One-to-One Bean Relationship
Figure 4–6 shows the database tables, EMP and ADDRESS, to which these beans will map. The EMP table has a foreign key, named address, which points to the primary key of the ADDRESS table, AddressPK.
Figure 4–6 One-To-One Employee Relationship Example
The beans and their relationships are specified in both of the deployment descriptors. As Figure 4–7 shows, in the ejb-jar.xml file, the one-to-one relationship between the EmpBean and AddressBean is defined within a <relationships> element. The direction is designated by one or two <cmr-field> elements.
EmpBean AddressBeanaddress
EMP ADDRESS
empno empName salary FK:address AddressPK street city state zip
4-26 Oracle9iAS Containers for J2EE Enterprise JavaBeans Developer’s Guide

Mapping Object Relationship Fields to the Database
The mapping of the beans to their database persistent storage is defined in the orion-ejb-jar.xml file. The one-to-one relationship—whether bidirectional or unidirectional—is mapped on both sides with an <entity-ref> element inside a <cmp-field-mapping> element. The <entity-ref> describes the target entity bean of the relationship.
Entity Relationship Mapping 4-27

Mapping Object Relationship Fields to the Database
Figure 4–7 Demonstration of Mapping for a One-To-One Relationship
To map your bean fields to an existing database, you need to understand the fields within the <cmp-field-mapping> element in the orion-ejb-jar.xml file. This element has the following structure:
<cmp-field-mapping name="CMRfield_name"> <entity-ref home="targetBeanName">
<cmp-field-mapping name="address"> <entity-ref home="AddressBean"> <cmp-field-mapping name="address"
</entity-ref></cmp-field-mapping>
persistence-name="addressPK" />
.. <relationship-role-source>
<cmr-field>
<relationship-role-source>
<cmr-field-name>address</cmr-field-name></cmr-field>
<ejb-name>AddressBean</ejb-name></relationship-role-source>^
<ejb-name>EmpBean</ejb-name></relationship-role-source>
ORION-EJB-JAR.XML
...
EJB-JAR.XML
<multiplicity>One</multiplicity>
<relationships>...<ejb-relation>
<ejb-relation></ejb-relation>
...
</ejb-relation>
...
...
...
<entity-deployment name="AddressBean" ......<cmp-field-mapping name="empNo"><entity-ref home="EmpBean"><cmp-field-mapping name="empNo"
persistence-name="empno"/></entity-ref>
</cmp-field-mapping>...
</entity-deployment>
<entity-deployment name="EmpBean"...
</entity-deployment>
Name of database column for foreign key
4-28 Oracle9iAS Containers for J2EE Enterprise JavaBeans Developer’s Guide

Mapping Object Relationship Fields to the Database
<cmp-field-mapping name="CMRfield_name"persistence-name="targetBean_PKcolumn" />
</entity-ref></cmp-field-mapping>
■ The name attribute of the <cmp-field-mapping> element is the same as the <cmp-field> element in the ejb-jar.xml file. Do not modify the name attribute in the <cmp-field-mapping> element.
■ The target bean name is specified in the home attribute of the <entity-ref> element.
■ The database column that is the primary key of the target bean is defined in the persistence-name attribute of the internal <cmp-field-mapping> element. If you have an existing database, modify the persistence-name attributes for each <cmp-field-mapping> element to match your column names.
Example 4–7 The XML Configuration for One-to-One Unidirectional
The ejb-jar.xml file configuration defines a one-to-one unidirectional relationship between the EmpBean and AddressBean.
<enterprise-beans> <entity> ... <ejb-name>EmpBean</ejb-name> <local-home>employee.EmpHome</local-home> <local>employee.Emp</local> <ejb-class>employee.EmpBean</ejb-class> ... <cmp-field><field-name>empNo</field-name></cmp-field> <cmp-field><field-name>empName</field-name></cmp-field> <cmp-field><field-name>salary</field-name></cmp-field> <primkey-field>empNo</primkey-field> <prim-key-class>java.lang.Integer</prim-key-class> ... </entity> <entity> ... <ejb-name>AddressBean</ejb-name> <local-home>employee.AddressHome</local-home> <local>employee.Address</local> <ejb-class>employee.AddressBean</ejb-class> ...
Entity Relationship Mapping 4-29

Mapping Object Relationship Fields to the Database
<cmp-field><field-name>addressPK</field-name></cmp-field> <cmp-field><field-name>addressDescription</field-name></cmp-field> <primkey-field>addressPK</primkey-field> <prim-key-class>java.lang.Integer</prim-key-class> ... </entity></enterprise-beans><relationships> <ejb-relation> <ejb-relation-name>Emp-Address</ejb-relation-name> <ejb-relationship-role> <ejb-relationship-role-name>Emp-has-Address </ejb-relationship-role-name> <multiplicity>One</multiplicity> <relationship-role-source><ejb-name>EmpBean</ejb-name> </relationship-role-source> <cmr-field> <cmr-field-name>address</cmr-field-name> </cmr-field> </ejb-relationship-role> <ejb-relationship-role> <ejb-relationship-role-name>Address-has-Emp </ejb-relationship-role-name> <multiplicity>One</multiplicity> <relationship-role-source><ejb-name>AddressBean</ejb-name> </relationship-role-source> </ejb-relationship-role> </ejb-relation></relationships>
The EmpBean defines a <cmr-field> for the direction of the relationship showing that each employee has one address. The EMP table that supports EmpBean requires a foreign key to point to the table that supports the AddressBean.
The foreign key from the EMP table to the ADDRESS table is identified as address within the <cmr-field-name> element, which is required on the name attribute of the <cmp-field-mapping> element in the orion-ejb-jar.xml file. Thus, address is the identifier that links the relationship defined in the ejb-jar.xml file to the persistence storage mapping specified in the orion-ejb-jar.xml file.
The following is the orion-ejb-jar.xml file with the elements modified to map to the existing database tables:
<entity-deployment name="EmpBean" location="emp/EmpBean" ...table="EMP" data-source="jdbc/OracleDS" ...>
4-30 Oracle9iAS Containers for J2EE Enterprise JavaBeans Developer’s Guide

Mapping Object Relationship Fields to the Database
<primkey-mapping> <cmp-field-mapping name="empNo" persistence-name="EMPNO" /> </primkey-mapping> <cmp-field-mapping name="empName" persistence-name="ENAME" /> <cmp-field-mapping name="salary" persistence-name="SAL" /> <cmp-field-mapping name="address"> <entity-ref home="AddressBean"> <cmp-field-mapping name="address" persistence-name="addressPK" /> </entity-ref> </cmp-field-mapping> ...</entity-deployment><entity-deployment name="AddressBean" location="emp/AddressBean" ...
table="ADDRESS" data-source="jdbc/OracleDS"... ><primkey-mapping>
<cmp-field-mapping name="addressPK" persistence-name="addressPK" />
</primkey-mapping><cmp-field-mapping name="street" persistence-name="street" /><cmp-field-mapping name="city" persistence-name="city" /><cmp-field-mapping name="state" persistence-name="state" /><cmp-field-mapping name="zip" persistence-name="zip" /><cmp-field-mapping name="EmpBean_address">
<entity-ref home="EmpBean"><cmp-field-mapping name="EmpBean_address"
persistence-name="EMPNO" /></entity-ref>
</cmp-field-mapping>...</entity-deployment>
Entity Relationship Mapping 4-31

Mapping Object Relationship Fields to the Database
The <entity-deployment> mapping for the EmpBean specifies:
■ The <entity-deployment> attributes define the following:
– name attribute: The name of the source bean is EmpBean.
– location attribute: The JNDI location is emp/EmpBean.
– table attribute: The database table in which the persistent data for this entity bean is stored is emp.
– data-source attribute: The database in which this table resides is defined by the data source jdbc/OracleDS.
■ The <cmp-field-mapping> elements identify the table columns and the persistent data to be stored in each: The columns in this table are empno, ename, sal, and address.
– The empno column contains the primary key, as defined in the EmpBean as empNo.
– The empName and salary CMP data are saved in the ename and sal columns.
– The address column is a foreign key in the EmpBean table, EMP, that points to the primary key of the AddressBean table.
■ The <cmp-field-mapping> element for the foreign key defines the following:
– Both of the name attributes identify the <cmr-field> that was defined in the ejb-jar.xml file. This name is address.
Note: This section describes in detail how logical names defined in the ejb-jar.xml file relate to those in the orion-ejb-jar.xml file. And it describes how the logical variables defined in the orion-ejb-jar.xml file relate to the database table and column names. This chapter specifically chooses different names for closely aligned elements in the ejb-jar.xml and orion-ejb-jar.xml files in order that you can understand which names where the mappings occur. However, for efficiency and ease, you can make all related names the same. For example, instead of identifying address and addressPK for identifying the CMR field name and database column name, you could use one name, address, for all of them. Your configuration is easier if all these names are the same.
4-32 Oracle9iAS Containers for J2EE Enterprise JavaBeans Developer’s Guide

Mapping Object Relationship Fields to the Database
– The <entity-ref> home attribute identifies the <ejb-name> of the target bean. The target in this example is the AddressBean.
– The persistence-name attribute identifies the primary key column name of the target bean. In this example, the primary key of the AddressBean table, ADDRESS, is the addressPK column.
Figure 4–8 displays the relationship mapping of the EmpBean address foreign key to the AddressBean addressPK primary key.
Figure 4–8 Demonstration of Explicit Mapping for a One-To-One Relationship
In summary, an address column in the EMP table is a foreign key that points to the primary key, addressPK, in the ADDRESS table. For the example in which the AddressBean has an auto-generated primary key, an address column in the EMP table is a foreign key that points to the primary key, autoid, in the ADDRESS table.
Table Mapping For Primary Keys That Use AutoIdAs described in "Defining an Auto-Generated Primary Key" on page 3-12, you can define that a table use an automatic identifier as the primary key. This results in the following XML configuration in the orion-ejb-jar.xml file for the bean:
<cmp-field-mapping name="address"> <entity-ref home="AddressBean"> <cmp-field-mapping name="address"
</entity-ref></cmp-field-mapping>
persistence-name="addressPK" />
FK:addressPK
PK:addressPK
ADDRESS
EMP
...
...
.. <relationship-role-source>
<cmr-field>
<relationship-role-source>
<cmr-field-name>address</cmr-field-name></cmr-field>
<ejb-name>AddressBean</ejb-name></relationship-role-source>^
<ejb-name>EmpBean</ejb-name></relationship-role-source>
ORION-EJB-JAR.XML
...
EJB-JAR.XML
ENTITY TABLES
Entity Relationship Mapping 4-33

Mapping Object Relationship Fields to the Database
<primkey-mapping> <cmp-field-mapping name="auto_id" persistence-name="autoid"/></primkey-mapping>
In our employee/address example, if the AddressBean had a primary key undefined, so that it defaulted to an autoid, then the table mapping would be as follows:
Figure 4–9 One-To-One Employee Relationship Example With Auto-ID
Using a Foreign Key with the One-To-Many RelationshipAs described in "One-To-Many or Many-To-One Relationship Overview" on page 4-3, one bean, such as a department, can have a relationship to multiple instances of another bean, such as employees. There are several employees in each department. Since this is a bidirectional relationship, you can look up the department from the employee. The relationships between the DeptBean and EmpBean is represented by CMR fields, employees and deptno, as shown in Figure 4–10.
EMP ADDRESS
empno empName salary FK:address autoid street city state zip
4-34 Oracle9iAS Containers for J2EE Enterprise JavaBeans Developer’s Guide

Mapping Object Relationship Fields to the Database
Figure 4–10 One-to-Many Bean Relationship
How this relationship is mapped to database tables depends on your choices. The default method is to include a separate table, known as an association table, which maps the two tables together appropriately. See "Association Table Explicit Mapping for Relationships Overview" on page 4-42 for more information on this mapping.
However, for a one-to-many relationship, you can add a foreign key to the table that defines the "many" side of the relationship—in this case, the table that represents the EmpBean. The foreign key points back to the department to which each employee belongs.
Figure 4–11 shows the department<—>employee example, where each employee belongs to only one department and each department can contain multiple employees. The department table has a primary key. The employee table has a primary key to identify each employee and a foreign key to point back to the employee’s department. If you want to find the department for a single employee, a simple SQL statement retrieves the department information from the foreign key. To find all employees in a department, the container performs a JOIN statement on both the department and employee tables and retrieves all employees with the designated department number.
DeptBean EmpBean*employees dept
Entity Relationship Mapping 4-35

Mapping Object Relationship Fields to the Database
Figure 4–11 Explicit Mapping for One-To-Many Bidirectional Relationship Example
This is not the default behavior. To have this type of relationship, do one or both of the following:
■ Specify -DassociateUsingThirdTable=false on the OC4J startup options before deployment. Restart the OC4J instance. This generates the default mappings, but uses a foreign key.
■ If you need to change the default mappings to existing database tables, then you use either JDeveloper or hand-edit the orion-ejb-jar.xml file to manipulate the <collection-mapping> or <set-mapping> element.
Example 4–8 shows the table mapping for the bidirectional relationship of one department with many employees. The "one" side of the relationship is the department; the "many" side of the relationship is the employee. Figure 4–11 shows the table design. This demonstrates how to hand-edit the orion-ejb-jar.xml file for this relationship to use a foreign key.
Important: You modify elements and attributes of the <entity-deployment> element in the orion-ejb-jar.xml file to explicitly map relationship fields. JDeveloper was created to manage the complex mapping between the entity beans and the database tables. Thus, JDeveloper validates the deployment descriptors and prevents inconsistencies. You are allowed to modify the orion-ejb-jar.xml file on your own; however, we suggest that you use JDeveloper for modifying container-managed relationships. CMR configuration is complex and can be difficult to understand. You can download JDeveloper at the following site: http://otn.oracle.com/software/products/jdev/content.html
EMP
PK:EMPNO ENAME SAL FK:EDEPTNOPK:DEPTNO DNAME
DEPT
4-36 Oracle9iAS Containers for J2EE Enterprise JavaBeans Developer’s Guide

Mapping Object Relationship Fields to the Database
Example 4–8 One-To-Many Relationship Using a Foreign Key
The ejb-jar.xml <relationships> section defines the department-employee bidirectional example, as follows:
<relationships><ejb-relation>
<ejb-relation-name>Dept-Emps</ejb-relation-name><ejb-relationship-role>
<ejb-relationship-role-name>Dept-has-Emps</ejb-relationship-role-name><multiplicity>One</multiplicity><relationship-role-source>
<ejb-name>DeptBean</ejb-name></relationship-role-source><cmr-field>
<cmr-field-name>employees</cmr-field-name><cmr-field-type>java.util.Set</cmr-field-type>
</cmr-field></ejb-relationship-role><ejb-relationship-role>
<ejb-relationship-role-name>Emps-have-Dept</ejb-relationship-role-name><multiplicity>Many</multiplicity><cascade-delete/><relationship-role-source>
<ejb-name>EmpBean</ejb-name></relationship-role-source><cmr-field><cmr-field-name>dept</cmr-field-name></cmr-field>
</ejb-relationship-role></ejb-relation>
</relationships>
The orion-ejb-jar.xml file maps this definition in the following XML. If the table identified in the <collection-mapping> or <set-mapping> element of the "one" relationship (the department) is the name of the target bean’s table (the employee bean table), then the one-to-many relationship is defined with a foreign key. For example, the table attribute in the department definition is EMP.
<?xml version = ’1.0’ encoding = ’windows-1252’?><!DOCTYPE orion-ejb-jar PUBLIC "-//Evermind//DTD Enterprise JavaBeans 2.0 runtime//EN" "http://xmlns.oracle.com/ias/dtds/orion-ejb-jar.dtd"><orion-ejb-jar> <enterprise-beans> <entity-deployment name="DeptBean" data-source="jdbc/scottDS" table="DEPT">
Entity Relationship Mapping 4-37

Mapping Object Relationship Fields to the Database
<primkey-mapping> <cmp-field-mapping name="deptno" persistence-name="DEPTNO" /> /*PK*/ </primkey-mapping> <cmp-field-mapping name="dname" persistence-name="DNAME" /> <cmp-field-mapping name="employees"> /*points from DEPTNO column in EMP to DEPTNO in DEPT*/1. <collection-mapping table="EMP"> /*table where FK lives*/ <primkey-mapping> <cmp-field-mapping name="DeptBean_deptno"> /*CMR field name*/ <entity-ref home="DeptBean"> /*points to DeptBean*/2. <cmp-field-mapping name="DeptBean_deptno" persistence-name="EDEPTNO"/> </entity-ref> </cmp-field-mapping> </primkey-mapping> <value-mapping type="mypackage1.EmpLocal"> <cmp-field-mapping name="EmpBean_empno"> <entity-ref home="EmpBean"> <cmp-field-mapping name="EmpBean_empno"
persistence-name="EMPNO"/> </entity-ref> </cmp-field-mapping> </value-mapping> </collection-mapping> </cmp-field-mapping> </entity-deployment> <entity-deployment name="EmpBean" data-source="jdbc/scottDS" table="EMP"> <primkey-mapping> <cmp-field-mapping name="empNo" persistence-name="EMPNO"/> </primkey-mapping> <cmp-field-mapping name="empName" persistence-name="ENAME" />
<cmp-field-mapping name="salary" persistence-name="SAL" /> <cmp-field-mapping name="dept"> /*foreign key*/ <entity-ref home="DeptBean">2. <cmp-field-mapping name="dept" persistence-name="EDEPTNO" /> </entity-ref> </cmp-field-mapping> </entity-deployment> </enterprise-beans> <assembly-descriptor> <default-method-access> <security-role-mapping impliesAll="true"
name="<default-ejb-caller-role>"/> </default-method-access> </assembly-descriptor>
1.
4-38 Oracle9iAS Containers for J2EE Enterprise JavaBeans Developer’s Guide

Mapping Object Relationship Fields to the Database
</orion-ejb-jar>
The foreign key is defined in the database table of the "many" relationship. In our example, the EDEPTNO foreign key column exists in the EMP database table. This is defined in a persistence-name attribute of the <cmp-field-mapping> element in the EmpBean configuration.
Thus, to manipulate the <collection-mapping> or <set-mapping> element in the orion-ejb-jar.xml file, modify the <entity-deployment> element for the "one" entity bean, which contains the Collection, as follows:
1. Modify the table in the <collection-mapping> or <set-mapping> table attribute in the "one" relationship to be the database table of the "many" relationship. In this example, you would modify this attribute to be the EMP table.
2. Modify the foreign key that points to the "one" relationship within the "many" relationship configuration. In this example, modify the <cmp-field-mapping> element to specify the EDEPTNO foreign key in the persistence-name attribute.
These steps are delineated in the code example in Example 4–8.
Unidirectional One-to-Many Relationship Using a Foreign Key An example of a unidirectional one-to-many relationship is the employee/phones example. An employee can own one or more phone numbers; however, you cannot look up an employee given a phone number. Figure 4–12 demonstrates the bean relationship.
Figure 4–12 One-to-Many Bean Relationship
Figure 4–11 shows the employee—>phone numbers example, where each employee can have multiple phone numbers. The employee table has a primary key. The phone numbers table has a auto-id for the primary key, the phone number, and a foreign key to point back to the employee. If you want to find all phone numbers for
EmpBean PhoneBean*phones
Entity Relationship Mapping 4-39

Mapping Object Relationship Fields to the Database
a single employee, the container performs a JOIN statement on both the employee and phone number tables and retrieves all phone numbers with the designated employee number.
Figure 4–13 Explicit Mapping for One-To-Many Bidirectional Relationship Example
Example 4–9 One-to-Many Unidirectional Example With Foreign Key
The ejb-jar.xml <relationships> section defines the employee-phone numbers unidirectional example, as follows:
<entity><ejb-name>EmpBean</ejb-name>...<cmp-field><field-name>empNo</field-name></cmp-field><cmp-field><field-name>empName</field-name></cmp-field><cmp-field><field-name>salary</field-name></cmp-field><primkey-field>empNo</primkey-field><prim-key-class>java.lang.Integer</prim-key-class>
</entity><entity>
<ejb-name>PhoneBean</ejb-name>...<cmp-field><field-name>phoneNo</field-name></cmp-field><prim-key-class>java.lang.Object</prim-key-class>
</entity>
<relationships><ejb-relation>
<ejb-relation-name>Emp-Phone</ejb-relation-name><ejb-relationship-role>
<ejb-relationship-role-name>Emp-has-Phones</ejb-relationship-role-name><multiplicity>One</multiplicity><relationship-role-source>
<ejb-name>EmpBean</ejb-name>
EMPPK:EMPNO ENAME SAL ... PK:AUTOID PHONE_NO EMPNO
PHONE
4-40 Oracle9iAS Containers for J2EE Enterprise JavaBeans Developer’s Guide

Mapping Object Relationship Fields to the Database
</relationship-role-source><cmr-field>
<cmr-field-name>phones</cmr-field-name></cmr-field>
</ejb-relationship-role><ejb-relationship-role>
<ejb-relationship-role-name>Phones-have-Emp</ejb-relationship-role-name><multiplicity>Many</multiplicity><cascade-delete/><relationship-role-source>
<ejb-name>PhoneBean</ejb-name></relationship-role-source>
</ejb-relationship-role></ejb-relation>
</relationships>
The orion-ejb-jar.xml file maps this definition in the following XML. If the table identified in the <collection-mapping> or <set-mapping> element of the "one" relationship (the employee) is the name of the target bean’s table (the phone bean table), then the container defines the one-to-many relationship with a foreign key. In this example, the target bean’s table is the PHONE database table.
<entity-deployment name="EmpBean" table="EMP"><primkey-mapping>
<cmp-field-mapping name="empNo" persistence-name="EMPNO" /></primkey-mapping><cmp-field-mapping name="empName" persistence-name="ENAME" /><cmp-field-mapping name="salary" persistence-name="SAL" /><cmp-field-mapping name="phones">
1. <collection-mapping table="PHONE"><primkey-mapping>
<cmp-field-mapping name="EmpBean_empno"><entity-ref home="EmpBean">
2. <cmp-field-mapping name="EmpBean_empNo"persistence-name="EMPNO"/>
</entity-ref></cmp-field-mapping>
</primkey-mapping><value-mapping type="hr.PhoneLocal">
<cmp-field-mapping name="autoid"><entity-ref home="PhoneBean">
<cmp-field-mapping name="autoid"persistence-name="AUTOID"/>
</entity-ref>
Entity Relationship Mapping 4-41

Mapping Object Relationship Fields to the Database
</cmp-field-mapping></value-mapping>
</collection-mapping></cmp-field-mapping>
</entity-deployment><entity-deployment name="PhoneBean" table="PHONE">
<primkey-mapping><cmp-field-mapping name="autoid" persistence-name="AUTOID"/>
</primkey-mapping><cmp-field-mapping name="phoneNo" persistence-name="PHONE_NO" /><cmp-field-mapping name="EmpBean_phones">
<entity-ref home="EmpBean">2. <cmp-field-mapping name="EmpBean_phones" persistence-name="EMPNO" />
</entity-ref></cmp-field-mapping>
</entity-deployment>
The foreign key is defined in the database table of the "many" relationship. In our example, the EMPNO foreign key column exists in the PHONE database table. This is defined in a persistence-name attribute of the <cmp-field-mapping> element in the PhoneBean configuration.
Thus, to manipulate the <collection-mapping> or <set-mapping> element in the orion-ejb-jar.xml file, modify the <entity-deployment> element for the "one" entity bean, which contains the Collection, as follows:
1. Modify the table in the <collection-mapping> or <set-mapping> table attribute in the "one" relationship to be the database table for the "many" relationship. In this example, you would modify this attribute to be the PHONE table.
2. Modify the foreign key that points to the "one" relationship within the "many" relationship configuration. In this example, modify the <cmp-field-mapping> element to specify the EMPNO foreign key in the persistence-name attribute.
These steps are delineated in the code example in Example 4–9.
Association Table Explicit Mapping for Relationships OverviewAs described in "One-To-Many or Many-To-One Relationship Overview" on page 4-3, one bean, such as a department, can have a relationship to multiple instances of another bean, such as employees. There are several employees in each department. Since this is a bidirectional relationship, you can look up the department from the employee. The relationships between the DeptBean and
4-42 Oracle9iAS Containers for J2EE Enterprise JavaBeans Developer’s Guide

Mapping Object Relationship Fields to the Database
EmpBean is represented by CMR fields, employees and deptno, as shown in Figure 4–14.
Figure 4–14 One-to-Many Bidirectional Bean Relationship
How this relationship is mapped to database tables depends on your choices. The default method is to include a separate table, known as an association table, which maps the two tables together appropriately. The association table consists of two foreign keys.
For a full description of how an association table works, see "Example of a Default Mapping of One-To-Many and Many-To-Many Relationships" on page 4-15. This section shows how to change the XML configuration for this mapping.
Figure 4–15 shows the department<—>employee example, where each employee belongs to only one department and each department can contain multiple employees. Both the department and employee tables have a primary key. A separate table, the association table, contains two foreign keys. One foreign key points to the department; the other foreign key points to the employee. Every
Note: If you have a composite primary key in either or both tables, the foreign key will be a composite foreign key; thus, the association table will have the appropriate number of columns for each part of the composite foreign key.
Note: If you do not want to use an association table, see "Using a Foreign Key with the One-To-Many Relationship" on page 4-34 for directions on how to use a foreign key in the "one" side of the relationship.
DeptBean EmpBean*employees dept
Entity Relationship Mapping 4-43

Mapping Object Relationship Fields to the Database
relationship has its own row denoting the relationship. Thus, for every employee, a row is created where the first foreign key points to the department the employee belongs to and the second foreign key points to the employee record. The association table in Figure 4–15 shows an association table, DEPT_EMP, where the foreign keys are named DEPARTMENT and EMPLOYEE.
Figure 4–15 Explicit Mapping for One-To-Many Bidirectional Relationship Example
This is the default behavior. If you need to change the default mappings to existing database tables, then you use either JDeveloper or hand-edit the orion-ejb-jar.xml file to manipulate the <collection-mapping> or <set-mapping> element.
EMP
PK:EMPNO ENAME SALPK:DEPTNO DNAME
DEPT
DEPT_EMP
DEPARTMENT EMPLOYEE
4-44 Oracle9iAS Containers for J2EE Enterprise JavaBeans Developer’s Guide

Mapping Object Relationship Fields to the Database
Example 4–10 XML Structure for One-to-Many Relationship Mapping
The relationship that is defined in the ejb-jar.xml file is mapped in the orion-ejb-jar.xml file within a <cmp-field-mapping> element. The <cmp-field-mapping> element contains either a <collection-mapping> or <set-mapping> element. Our example contains a department has many employees. The department describes its "many" relationship to employees with a <collection-mapping> element.
The XML structure for defining a one-to-many relationship includes the following:
<cmp-field-mapping name="CMRfield"> <collection-mapping table="association_table"> <primkey-mapping> <cmp-field-mapping name="CMRfield"
persistence-name="first_column_name_assoc_table" /> </primkey-mapping> <value-mapping type="target_bean_local_home_interface"> <cmp-field-mapping> <entity-ref home="target_bean_EJBname">
Important: You modify elements and attributes of the <entity-deployment> element in the orion-ejb-jar.xml file to explicitly map relationship fields. JDeveloper was created to manage the complex mapping between the entity beans and the database tables. Thus, JDeveloper validates the deployment descriptors and prevents inconsistencies. You are allowed to modify the orion-ejb-jar.xml file on your own; however, we suggest that you use JDeveloper for modifying container-managed relationships. CMR configuration is complex and can be difficult to understand. You can download JDeveloper at the following site: http://otn.oracle.com/software/products/jdev/content.html
Note: The "many" side of the relationship is defined by the <collection-mapping> or <set-mapping> element. The "one" side of the relationship is defined by the <entity-ref> element. Thus, for a one-to-many relationship, a single <collection-mapping> element is used to describe the "many" side.
Entity Relationship Mapping 4-45

Mapping Object Relationship Fields to the Database
<cmp-field-mapping name="CMRfield" persistence-name="second_column_name_assoc_table"/> </entity-ref> </cmp-field-mapping> </value-mapping> </collection-mapping></cmp-field-mapping>
Element or Attribute Description
<cmp-field-mapping> This element maps a persistent field or a relationship field. For relationship fields, it will contain either an <entity-ref> for a one-to-one mapping or a <collection-mapping> for a one-to-many, many-to-one, or many-to-many relationship.
■ The name attribute identifies the <cmp-field> or <cmr-field> that is to be mapped. Do not change this name.
■ The persistence-name attribute identifies the database column. You can modify this name to match your database column name.
<entity-ref> This element identifies the target bean and its primary key to which the foreign key points.
■ The home attribute is not the home interface, but identifies the EJB name of the target bean. This is the logical name of the bean defined in <ejb-name> in the ejb-jar.xml file.
■ The <cmp-field-mapping> within this element identifies the foreign key column name.
<collection-mapping> This element explicitly maps the "many" side of a relationship.
■ The table attribute identifies the association table. You can modify this name to match your own association table name.
This element defines two elements, one for each column in the association table:
■ <primkey-mapping> identifies the first foreign key in the association table.
■ <value-mapping> identifies the second foreign key in the association table.
<primkey-mapping> Within the <collection-mapping>, use this element to identify the first foreign key. You can modify the persistence-name attribute in this element to match the column name in your own association table.
4-46 Oracle9iAS Containers for J2EE Enterprise JavaBeans Developer’s Guide

Mapping Object Relationship Fields to the Database
Using an Association Table with a One-to-Many Bidirectional Relationship The following example shows how a one-to-many bidirectional relationship is configured to use an association table. See "Example of a Default Mapping of One-To-Many and Many-To-Many Relationships" on page 4-15 for information on the default mappings.
In the ejb-jar.xml file, the department defines itself as the "one" side of the relationship and shows that it expects to receive back "many" employees through the definition of a Collection in the <cmr-field> element. The employee defines itself as the "many" side of the relationship.
<relationships><ejb-relation>
<ejb-relation-name>Dept-Emps</ejb-relation-name><ejb-relationship-role>
<ejb-relationship-role-name>Dept-has-Emps</ejb-relationship-role-name><multiplicity>One</multiplicity><relationship-role-source>
<ejb-name>DeptBean</ejb-name></relationship-role-source><cmr-field>
<cmr-field-name>employees</cmr-field-name><cmr-field-type>java.util.Collection</cmr-field-type>
</cmr-field></ejb-relationship-role><ejb-relationship-role>
<ejb-relationship-role-name>Emp-has-Dept</ejb-relationship-role-name><multiplicity>Many</multiplicity><relationship-role-source>
<ejb-name>EmpBean</ejb-name></relationship-role-source><cmr-field>
<cmr-field-name>dept</cmr-field-name></cmr-field>
</ejb-relationship-role>
<value-mapping> Use this element to specify the second foreign key. The type attribute identifies the local interface for the target bean. You can modify the persistence-name attribute in this element to match the column name in your own association table.
Element or Attribute Description
Entity Relationship Mapping 4-47

Mapping Object Relationship Fields to the Database
</ejb-relation></relationships>
In the orion-ejb-jar.xml file, the mapping of this relationship to an association table is described in a <collection-mapping> element. Since this is a one-to-many relationship, the "one" entity bean, the department, has the <collection-mapping> element as it receives back a Collection or Set of the target, the employees.
In the orion-ejb-jar.xml file, the DeptBean <entity-deployment> element defines the <collection-mapping> element to designate a Collection of employees. The <collection-mapping> element defines the association table.
<entity-deployment name="DeptBean" location="DeptBean" table="DEPT" data-source="jdbc/OracleDS" ... ><primkey-mapping>
<cmp-field-mapping name="deptNo" persistence-name="deptNo" /></primkey-mapping><cmp-field-mapping name="deptName" persistence-name="deptName" /><cmp-field-mapping name="employees">
<collection-mapping table="DEPT_EMP"><primkey-mapping>
<cmp-field-mapping name="DeptBean_deptno"><entity-ref home="DeptBean">
<cmp-field-mapping name="DeptBean_deptno"persistence-name="DEPARTMENT" />
</entity-ref></cmp-field-mapping>
</primkey-mapping><value-mapping type="hr.EmpLocal">
<cmp-field-mapping name="EmpBean_empNo"><entity-ref home="EmpBean">
<cmp-field-mapping name="EmpBean_empNo" persistence-name="EMPLOYEE" />
</entity-ref></cmp-field-mapping>
</value-mapping></collection-mapping>
</cmp-field-mapping>...</entity-deployment><entity-deployment name="EmpBean" location="EmpBean"
table="EMP" data-source="jdbc/OracleDS" ... ><primkey-mapping>
<cmp-field-mapping name="empNo" persistence-name="EMPNO" />
4-48 Oracle9iAS Containers for J2EE Enterprise JavaBeans Developer’s Guide

Mapping Object Relationship Fields to the Database
</primkey-mapping><cmp-field-mapping name="empName" persistence-name="ENAME" /><cmp-field-mapping name="salary" persistence-name="SAL" /><cmp-field-mapping name="dept">
<entity-ref home="DeptBean"><cmp-field-mapping name="dept" persistence-name="DEPARTMENT" />
</entity-ref></cmp-field-mapping>
...</entity-deployment>
The following describes how the DeptBean is configured in the orion-ejb-jar.xml file:
■ The relationship from the department to the employee bean is defined in the employees field, which is mapped in the <collection-mapping> element.
■ The association table name is specified in the table attribute, which currently defines the association table name as DEPT_EMP.
■ The foreign keys of the association table are defined as follows:
– The <primkey-mapping> element defines the column name for the foreign key of the current entity bean in the persistence-name attribute, which is DEPARTMENT.
– The <value-mapping> element defines the column name for the foreign key of the target bean in the persistence-name attribute, which is EMPLOYEE.
■ The <value-mapping> element specifies the target entity bean.
– The type attribute of the <value-mapping> element defines the local interface of the target bean that is returned to the source entity bean.
– The <ejb-name> of the target entity bean is defined in the <entity-ref> home attribute.
The following describes how the EmpBean is configured in the orion-ejb-jar.xml file:
■ The relationship from the employee to the department bean is defined in the dept field, which is mapped in the <cmp-field-mapping><entity-ref> element. The persistence-name attribute contains the foreign key in the association table that points to the department bean.
Entity Relationship Mapping 4-49

Mapping Object Relationship Fields to the Database
Using an Association Table in a One-to-Many Unidirectional RelationshipAs described in "One-To-Many or Many-To-One Relationship Overview" on page 4-3, one bean, such as an employee, can have a relationship to multiple instances of another bean, such as phone numbers. For each employee, you can have one or more phone numbers. However, this is a unidirectional relationship. You cannot look up an employee given a phone number.
The relationships between the EmpBean and PhoneBean is represented by a CMR field, phones, as shown in Figure 4–16.
Figure 4–16 One-to-Many Unidirectional Bean Relationship
The relationship is mapped to database tables using an association table, which maps the two tables together appropriately. The association table consists of two foreign keys.
For a full description of how an association table works, see "Example of a Default Mapping of One-To-Many and Many-To-Many Relationships" on page 4-15. This section shows how to change the XML configuration for this mapping.
Note: If you have a composite primary key in either or both tables, the foreign key will be a composite foreign key; thus, the association table will have the appropriate number of columns for each part of the composite foreign key.
Note: If you do not want to use an association table, see "Using a Foreign Key with the One-To-Many Relationship" on page 4-34 for directions on how to use a foreign key in the "one" side of the relationship.
EmpBean PhoneBean*phones
4-50 Oracle9iAS Containers for J2EE Enterprise JavaBeans Developer’s Guide

Mapping Object Relationship Fields to the Database
Figure 4–17 shows the employee—>phone numbers example, where each employee can have multiple phone numbers. Both the employee and phone tables have a primary key. A separate table, the association table, contains two foreign keys. One foreign key points to the employee; the other foreign key points to the phone number. Every relationship has its own row denoting the relationship. Thus, for every phone number, a row is created where the first foreign key points to the employee to which the phone number belongs and the second foreign key points to the phone number record. Figure 4–17 shows an association table, EMP_PHONE, where the foreign keys are named EMPLOYEE and PHONEBEAN_AUTOID.
Figure 4–17 Explicit Mapping for One-To-Many Unidirectional Relationship Example
To change the default mappings to existing database tables, then you use either JDeveloper or hand-edit the orion-ejb-jar.xml file to manipulate the <collection-mapping> or <set-mapping> element.
EMP
PK:EMPNO ENAME SAL PK:AUTO_ID PHONE_NO PHONE_TYPEPHONE
EMP_PHONE
EMPLOYEE PHONEBEAN_AUTOID
Entity Relationship Mapping 4-51

Mapping Object Relationship Fields to the Database
Specifying the One-to-Many Unidirectional Relationship in the XML Deployment Descriptors In the ejb-jar.xml file, the cardinality is defined in the <relationships> element. The following is the ejb-jar.xml file configuration of the one-to-many unidirectional example of the employee and his/her phone numbers.
■ The primary key field of the EmpBean is empNo, as defined in the <primkey-field> element.
■ The primary key of the PhoneBean is not defined, as defined by the absence of the <primkey-field> element and the existence of the <prim-key-class> element. Thus, the primary key is auto-generated and represented by AUTOID. For more information on auto-generated primary keys, see "Defining an Auto-Generated Primary Key" on page 3-12.
■ The CMR field (<cmr-field> element) defining the "many" side of the relationship is a Collection that is identified as phones.
<entity><ejb-name>EmpBean</ejb-name>...<cmp-field><field-name>empNo</field-name></cmp-field><cmp-field><field-name>empName</field-name></cmp-field><cmp-field><field-name>salary</field-name></cmp-field>...<primkey-field>empNo</primkey-field><prim-key-class>java.lang.Integer</prim-key-class>...
</entity><entity>
...
Important: You modify elements and attributes of the <entity-deployment> element in the orion-ejb-jar.xml file to explicitly map relationship fields. JDeveloper was created to manage the complex mapping between the entity beans and the database tables. Thus, JDeveloper validates the deployment descriptors and prevents inconsistencies. You are allowed to modify the orion-ejb-jar.xml file on your own; however, we suggest that you use JDeveloper for modifying container-managed relationships. CMR configuration is complex and can be difficult to understand. You can download JDeveloper at the following site: http://otn.oracle.com/software/products/jdev/content.html
4-52 Oracle9iAS Containers for J2EE Enterprise JavaBeans Developer’s Guide

Mapping Object Relationship Fields to the Database
<ejb-name>PhoneBean</ejb-name>...<cmp-field><field-name>phoneNo</field-name></cmp-field><cmp-field><field-name>phoneType</field-name></cmp-field><prim-key-class>java.lang.Object</prim-key-class>...
</entity><relationships> <ejb-relation> <ejb-relation-name>Emp-Phone</ejb-relation-name> <ejb-relationship-role> <ejb-relationship-role-name>Emp-PhoneNumbers</ejb-relationship-role-name> <multiplicity>One</multiplicity> <relationship-role-source> <ejb-name>EmpBean</ejb-name> </relationship-role-source> <cmr-field> <cmr-field-name>phones</cmr-field-name> <cmr-field-type>java.util.Collection</cmr-field-type> </cmr-field> </ejb-relationship-role> <ejb-relationship-role> <ejb-relationship-role-name>Phone-has-Emp</ejb-relationship-role-name> <multiplicity>Many</multiplicity> <relationship-role-source> <ejb-name>PhoneBean</ejb-name> </relationship-role-source> </ejb-relationship-role> </ejb-relation></relationships>
In the orion-ejb-jar.xml file, the mapping of this relationship to an association table is described in a <collection-mapping> element. The "one" side of the relationship, the employee, owns the "many" entities, the phone numbers; thus, the employee defines the <collection-mapping> element that describes the relationship with the phone numbers. In all one-to-many relationships, the entity bean that is represents the "one" side of the relationship defines the <collection-mapping> element as it receives back a Collection or Set of the target entity bean. The entity bean on the "many" side of the relationship defines a <cmp-field-mapping> <entity-ref> element that shows the relationship back to the entity bean that is the "one" side of the relationship. So, the employee defines the <collection-mapping> element to define its relationship with the phone numbers: the phone numbers uses an <entity-ref> element to define its relationship with the employee.
Entity Relationship Mapping 4-53

Mapping Object Relationship Fields to the Database
In the orion-ejb-jar.xml file for the employee/phone numbers example, the EmpBean <entity-deployment> element defines the <collection-mapping> element to designate a Collection of phone numbers. The <collection-mapping> element specifies the association table.
<entity-deployment name="EmpBean" table="EMP"><primkey-mapping>
<cmp-field-mapping name="empNo" persistence-name="EMPLOYEENO" /></primkey-mapping><cmp-field-mapping name="empName" persistence-name="EMPLOYEENAME" /><cmp-field-mapping name="salary" persistence-name="SAL" /><cmp-field-mapping name="phones">
<collection-mapping table="EMP_PHONE"><primkey-mapping>
<cmp-field-mapping name="EmpBean_empNo"><entity-ref home="EmpBean">
<cmp-field-mapping name="EmpBean_empNo" persistence-name="EMPLOYEENO"/>
</entity-ref></cmp-field-mapping>
</primkey-mapping><value-mapping type="hr.PhoneLocal">
<cmp-field-mapping name="PhoneBean_autoid"><entity-ref home="PhoneBean">
<cmp-field-mapping name="PhoneBean_autoid" persistence-name="AUTOID"/>
</entity-ref></cmp-field-mapping>
</value-mapping></collection-mapping>
...</entity-deployment><entity-deployment name="PhoneBean" table="PHONE">
<primkey-mapping><cmp-field-mapping name="autoid" persistence-name="AUTOID"/>
</primkey-mapping><cmp-field-mapping name="phoneNo" persistence-name="PHONE_NO" /><cmp-field-mapping name="phoneType" persistence-name="PHONE_TYPE" /><cmp-field-mapping name="EmpBean_phones">
<entity-ref home="EmpBean"><cmp-field-mapping name="EmpBean_phones"
persistence-name="EMPLOYEENO" /></entity-ref>
</cmp-field-mapping></entity-deployment>
4-54 Oracle9iAS Containers for J2EE Enterprise JavaBeans Developer’s Guide

Mapping Object Relationship Fields to the Database
The following describes how the EmpBean is defined in the ejb-jar.xml and orion-ejb-jar.xml files. See Figure 4–18 for a graphic of this mapping.
■ The <cmr-field> element in the ejb-jar.xml file defines a name for the relationship with the phone numbers as phones.
■ The phones <cmr-field> element maps to the association table in the orion-ejb-jar.xml file. In the orion-ejb-jar.xml file, the <cmp-field-mapping> for phones contains a <collection-mapping> element. This <collection-mapping> element defines the association table name in the table attribute as EMP_PHONE.
■ The association table has two foreign keys. In this example, the foreign keys are simple. However, if the primary keys are composite, then these foreign keys would be composite as well.
Both foreign keys for the association table are defined as follows:
– The persistence-name attribute in the <primkey-mapping> element defines the association table foreign key column name of the current entity bean, which is EMPLOYEENO.
– The persistence-name attribute in the <value-mapping> element defines the association table foreign key column name of the target bean, which is PhoneBean_AUTOID.
■ The <value-mapping> element specifies the target entity bean.
– The type attribute of the <value-mapping> element defines the local interface of the target bean that is returned to the source entity bean. This example defines the local home interface of the phone bean as hr.PhoneLocal.
– The <ejb-name> of the target entity bean is defined in the <entity-ref> home attribute, which in this example is PhoneBean.
The phone bean configuration in the orion-ejb-jar.xml file defines an <entity-ref> for a relationship to the employee bean.
■ The <ejb-name> of the target entity bean is defined in the <entity-ref> home attribute, which in this example is EmpBean.
■ The persistence-name attribute in the <cmp-field-mapping> element defines the association table foreign key of the current entity bean, which is EMPLOYEENO.
Figure 4–18 shows the following:
Entity Relationship Mapping 4-55

Mapping Object Relationship Fields to the Database
■ How the CMR field name maps to the <cmp-field-mapping> elements in the orion-ejb-jar.xml file.
■ How the association table is defined by the <collection-mapping> element in the employee bean definition.
4-56 Oracle9iAS Containers for J2EE Enterprise JavaBeans Developer’s Guide

Mapping Object Relationship Fields to the Database
Figure 4–18 Explicit Mapping for a One-To-Many Relationship
<relationship-role-source>
<cmr-field>
<relationship-role-source>
<cmr-field-name>phones</cmr-field-name></cmr-field>
<ejb-name>PhoneBean</ejb-name></relationship-role-source>
<ejb-name>EmpBean</ejb-name></relationship-role-source>
ORION-EJB-JAR.XML
...
EJB-JAR.XML
<cmp-field-mapping name="phones"> <collection-mapping table="EMP_PHONE"> <primkey-mapping> <cmp-field-mapping name="EmpBean_empNo" persistence-name="EMPLOYEEN
<value-mapping type="hr.PhoneLocal"> </primkey-mapping>
<cmp-field-mapping name="PhoneBean_autoid"> <entity-ref home="PhoneBean"> <cmp-field-mapping name="PhoneBean_autoid" persistence-name="PhoneBean_AUTOID"/> </entity-ref> </cmp-field-mapping> </value-mapping> </collection-mapping> </cmp-field-mapping>
EMP PHONE
empNo empName salary autoid phoneNumber
FK:EMPLOYEENO FK:PhoneBean_AUTOID
EMP_PHONE
Entity Relationship Mapping 4-57

Mapping Object Relationship Fields to the Database
Using an Association Table in Many-to-Many RelationshipsAs described in "Many-To-Many Relationship Overview" on page 4-3, many beans, such as employees, can have a relationship to multiple instances of another bean, such as projects. There are several employees in each project; each employee can be assigned to multiple projects. Since this is a bidirectional relationship, you can look up the project from the employee. The relationships between the ProjectBean and EmpBean is represented by CMR fields, employees and projects, as shown in Figure 4–19.
Figure 4–19 Many-to-Many Bidirectional Bean Relationship
This relationship is mapped to database tables using as an association table. The association table consists of two foreign keys.
For a full description of how an association table works, see "Example of a Default Mapping of One-To-Many and Many-To-Many Relationships" on page 4-15. This section shows how to change the XML configuration for this mapping.
Figure 4–15 shows the projects<—>employee example, where each employee belongs to one or more projects and each project can contain multiple employees. Both the project and employee tables have a primary key. A separate table, the association table, contains two foreign keys. One foreign key points to the project; the other foreign key points to the employee. Every relationship has its own row denoting the relationship. Thus, for every employee, a row is created where the first foreign key points to the project the employee belongs to and the second foreign key points to the employee record. The association table in Figure 4–15 shows an
Note: If you have a composite primary key in either or both tables, the foreign key will be a composite foreign key; thus, the association table will have the appropriate number of columns for each part of the composite foreign key.
ProjectBean EmpBean*employees projects*
4-58 Oracle9iAS Containers for J2EE Enterprise JavaBeans Developer’s Guide

Mapping Object Relationship Fields to the Database
association table, PROJECT_EMP, where the foreign keys are named PROJECT_NO and EMPLOYEE_NO.
Figure 4–20 Explicit Mapping for One-To-Many Bidirectional Relationship Example
If you need to change the default mappings to existing database tables, then you use either JDeveloper or hand-edit the orion-ejb-jar.xml file to manipulate the <collection-mapping> or <set-mapping> element.
Important: You modify elements and attributes of the <entity-deployment> element in the orion-ejb-jar.xml file to explicitly map relationship fields. JDeveloper was created to manage the complex mapping between the entity beans and the database tables. Thus, JDeveloper validates the deployment descriptors and prevents inconsistencies. You are allowed to modify the orion-ejb-jar.xml file on your own; however, we suggest that you use JDeveloper for modifying container-managed relationships. CMR configuration is complex and can be difficult to understand. You can download JDeveloper at the following site: http://otn.oracle.com/software/products/jdev/content.html
EMP
PK:EMPNO ENAME SAL
PROJECT
PROJECT_EMP
PROJECT_NO EMPLOYEE_NO
PK:PROJECTNO PNAME
Entity Relationship Mapping 4-59

Mapping Object Relationship Fields to the Database
Example 4–11 XML Structure for Many-to-Many Relationship Mapping
The relationship that is defined in the ejb-jar.xml file is mapped in the orion-ejb-jar.xml file within a <cmp-field-mapping> element. The <cmp-field-mapping> element contains either a <collection-mapping> or <set-mapping> element. The project/employee example describes both sides of the "many" relationship with a <collection-mapping> element; thus, both sides use a <collection-mapping> to describe their side of the relationship, even though the information is the same on both sides.
In the ejb-jar.xml file, both sides are define a "many" relationship to each other; thus, both sides declare the <multiplicity> element as Many and define a relationship to each other in a CMR field. The project bean defines the CMR field as employees; the employee bean defines the CMR field as projects. These CMR fields are used in the orion-ejb-jar.xml file to map these relationships in the database tables.
<entity>...<relationships>
<ejb-relation><ejb-relation-name>Emps-Projects</ejb-relation-name><ejb-relationship-role>
<ejb-relationship-role-name>Projects-have-Emps</ejb-relationship-role-name><multiplicity>Many</multiplicity><relationship-role-source>
<ejb-name>ProjectBean</ejb-name></relationship-role-source><cmr-field>
<cmr-field-name>employees</cmr-field-name><cmr-field-type>java.util.Collection</cmr-field-type>
</cmr-field></ejb-relationship-role><ejb-relationship-role>
<ejb-relationship-role-name>Emps-have-Projects</ejb-relationship-role-name><multiplicity>Many</multiplicity><relationship-role-source>
<ejb-name>EmpBean</ejb-name></relationship-role-source><cmr-field>
<cmr-field-name>projects</cmr-field-name><cmr-field-type>java.util.Collection</cmr-field-type>
</cmr-field>
4-60 Oracle9iAS Containers for J2EE Enterprise JavaBeans Developer’s Guide

Mapping Object Relationship Fields to the Database
</ejb-relationship-role></ejb-relation>
</relationships>...</entity>
Then in the orion-ejb-jar.xml file, both sides define the relationship with each other in a <collection-mapping> element. This element defines the association table. An association table is created that contains two foreign keys, where each foreign key points to the primary key of the source and target tables. Thus, explicit mapping of this relationship requires modifying the association table name and its foreign key names. You must modify both <collection-mapping> elements with the same information, because both <collection-mapping> elements contain the same information about the association table. The only difference is that the information is switched in the <primary-key> and <value-mapping> elements in each bean definition. What is defined in the <primary-key> element in the project bean definition will be defined in the <value-mapping> element in the employee bean definition.
<entity-deployment name="EmpBean" location="EmpBean" table="EmpBean_ormap_ormap_ejb" data-source="jdbc/OracleDS" >
...<entity-deployment name="EmpBean" table="EMP"><primkey-mapping>
<cmp-field-mapping name="empNo" persistence-name="EMPNO" /></primkey-mapping><cmp-field-mapping name="empName" persistence-name="ENAME" /><cmp-field-mapping name="salary" persistence-name="SAL" /><cmp-field-mapping name="projects"><collection-mapping table="PROJECT_EMP">
<primkey-mapping><cmp-field-mapping name="EmpBean_empNo">
<entity-ref home="EmpBean"><cmp-field-mapping name="EmpBean_empNo"
persistence-name="EMPLOYEE_NO" /></entity-ref>
</cmp-field-mapping></primkey-mapping><value-mapping type="hr.ProjectLocal">
<cmp-field-mapping name="ProjectBean_projectNo"><entity-ref home="ProjectBean">
<cmp-field-mapping name="ProjectBean_projectNo" persistence-name="PROJECT_NO" />
</entity-ref>
Entity Relationship Mapping 4-61

Mapping Object Relationship Fields to the Database
</cmp-field-mapping></value-mapping>
</collection-mapping></cmp-field-mapping>
...</entity-deployment>...<entity-deployment name="ProjectBean" location="ProjectBean"
table="ProjectBean_ormap_ormap_ejb" data-source="jdbc/OracleDS" ><primkey-mapping>
<cmp-field-mapping name="projectNo" persistence-name="PROJECTNO" /></primkey-mapping><cmp-field-mapping name="projectName" persistence-name="PNAME" /><cmp-field-mapping name="employees">
<collection-mapping table="PROJECT_EMP"><primkey-mapping>
<cmp-field-mapping name="ProjectBean_projectNo"><entity-ref home="ProjectBean">
<cmp-field-mapping name="ProjectBean_projectNo" persistence-name="PROJECT_NO" />
</entity-ref></cmp-field-mapping>
</primkey-mapping><value-mapping type="hr.EmpLocal">
<cmp-field-mapping name="EmpBean_empNo"><entity-ref home="EmpBean">
<cmp-field-mapping name="EmpBean_empNo" persistence-name="EMPLOYEE_NO" />
</entity-ref></cmp-field-mapping>
</value-mapping></collection-mapping>
</cmp-field-mapping>
The following describes the fields in the orion-ejb-jar.xml file:
■ The project bean defines a <cmr-field> element in the ejb-jar.xml file defines a name for the relationship with employees as employees; the employees <cmr-field> element defines a name for the relationship with projects as projects.
■ Both of the projects and employees <cmr-field> elements map to the association table in the orion-ejb-jar.xml file. In this file, each of the <cmp-field-mapping> elements for projects and employees contain a
4-62 Oracle9iAS Containers for J2EE Enterprise JavaBeans Developer’s Guide

Using a Foreign Key in a Composite Primary Key
<collection-mapping> element. This <collection-mapping> element defines the association table name in the table attribute as PROJECT_EMP.
■ The association has two foreign keys. In this example, the foreign keys are simple. However, if the primary keys are composite, then these foreign keys would be composite as well.
Both foreign keys in the EmpBean for the association table are defined as follows:
– The persistence-name attribute in the <primkey-mapping> element defines the association table foreign key of the current entity bean, which is EMPLOYEE_NO.
– The persistence-name attribute in the <value-mapping> element defines the association table foreign key of the target bean, which is PROJECT_NO.
■ The <value-mapping> element in EmpBean specifies the target entity bean.
– The type attribute of the <value-mapping> element defines the local interface of the target bean that is returned to the source entity bean. This example defines the local home interface of the phone bean as hr.ProjectLocal.
– The <ejb-name> of the target entity bean is defined in the <entity-ref> home attribute, which in this example is ProjectBean.
Using a Foreign Key in a Composite Primary Key In the EJB specification, the primary key for an entity bean must be initialized within the ejbCreate method; any relationship that this bean has to another bean cannot be set in the ejbCreate method. The earliest that this relationship can be set in a foreign key is in the ejbPostCreate method.
However, if you have a foreign key within a composite primary key, you have the following problem:
■ You must set all fields within the composite primary key in the ejbCreate method.
■ You cannot set the foreign key in the ejbCreate method.
This section uses the following example to describe the way around this problem:
An order for a company can contain one or more items. The order bean has many items in it. Each item belongs to an order. The primary key for the item is
Entity Relationship Mapping 4-63

Using a Foreign Key in a Composite Primary Key
a composite primary key consisting of the item identifier and the order identifier. The order identifier is a foreign key that points to the order.
You will have to modify the deployment descriptors and bean implementation to add a placeholder CMP field that mimics the actual foreign key field. This field is set during the ejbCreate method. However, both the placeholder CMP field and the foreign key point to the same database column. The actual foreign key is updated during the ejbPostCreate method.
The following example demonstrates how to modify both deployment descriptors and the bean implementation.
Example 4–12 A Foreign Key That Exists in a Primary Key
Each order contains one or more items. Thus, two beans are created, where the OrderBean represents the order and the OrderItemBean represents the items in the order. Each item has a primary key that consists of the item number and the order number to which it belongs. Thus, the primary key for the item contains a foreign key that points to an order bean.
To adjust for a composite primary key, do the following in the ejb-jar.xml file:
1. Define a CMP field in the primary key as a placeholder for the foreign key. This placeholder should be used in the composite primary key class definition.
In this example, an orderId CMP field is defined in a <cmp-field> element. The orderId and itemId CMP fields are used to identify the composite primary key in the OrderItemPK.java.
2. Define the foreign key outside of the primary key definition in its own <cmr-field> element in the <relationships> section.
In this example, the belongToOrder foreign key is defined in a <cmr-field> element for the OrderItemBean, defining the relationship from the item to the order.
Note: You modify the ejb-jar.xml file with the placeholder CMP field and the foreign key. We recommend that you deploy the application with autocreate-tables element in the orion-application.xml file set to false to auto-generate the orion-ejb-jar.xml file, without creating any tables. Then modify the orion-ejb-jar.xml file to point to the correct database columns, set autocreate-tables element to true, and redeploy.
4-64 Oracle9iAS Containers for J2EE Enterprise JavaBeans Developer’s Guide

Using a Foreign Key in a Composite Primary Key
<entity><ejb-name>OrderItemBean</ejb-name><local-home>OrderItemLocalHome</local-home><local>OrderItemLocal</local><ejb-class>OrderItemBean</ejb-class>...<cmp-field><field-name>itemId</field-name></cmp-field><cmp-field><field-name>orderId</field-name></cmp-field><cmp-field><field-name>price</field-name></cmp-field><prim-key-class>OrderItemPK</prim-key-class>...
</entity><relationships>
<ejb-relation><ejb-relation-name>Order-OrderItem</ejb-relation-name><ejb-relationship-role>
<ejb-relationship-role-name>Order-Has-OrderItems</ejb-relationship-role-name><multiplicity>One</multiplicity><relationship-role-source>
<ejb-name>OrderBean</ejb-name></relationship-role-source><cmr-field>
<cmr-field-name>items</cmr-field-name><cmr-field-type>java.util.Collection</cmr-field-type>
</cmr-field></ejb-relationship-role><ejb-relationship-role>
<ejb-relationship-role-name>OrderItems-form-Order</ejb-relationship-role-name><multiplicity>Many</multiplicity><cascade-delete/><relationship-role-source>
<ejb-name>OrderItemBean</ejb-name></relationship-role-source><cmr-field>
<cmr-field-name>belongToOrder</cmr-field-name></cmr-field>
</ejb-relationship-role></ejb-relation>
</relationships>
The OrderItemPK.java class defines what is in the complex primary key, as follows:
Entity Relationship Mapping 4-65

Using a Foreign Key in a Composite Primary Key
public class OrderItemPK implements java.io.Serializable{ public Integer itemId; public Integer orderId;
public OrderItemPK() { this.itemId = null; this.orderId = null; } public OrderItemPK(Integer itemId, Integer orderId) { this.itemId = itemId; this.orderId = orderId; }}
public boolean equals(Object o) { if (o instanceof OrderItemPK) { OrderItemPK pk = (OrderItemPK) o; if (pk.itemId.intValue() == itemId.intValue() && pk.orderId.intValue() == orderId.intValue()) return true; } return false; }
public int hashCode() { return itemId.hashCode() * orderId.hashCode(); }}
If the auto-created database tables are sufficient for you, you do not need to modify the orion-ejb-jar.xml file. However, if you need to map to existing database tables, then you modify the orion-ejb-jar.xml file to point to these tables.
After you allow the orion-ejb-jar.xml file to auto-generate, copy it into your development directory. The database column names are defined in the persistence-name attributes in each of the CMP and CMR field name mappings. Ensure that the persistence-name attributes for both the placeholder CMP field and foreign key are the same.
4-66 Oracle9iAS Containers for J2EE Enterprise JavaBeans Developer’s Guide

Using a Foreign Key in a Composite Primary Key
The following is the orion-ejb-jar.xml file for the order/order item example. In the <entity-deployment> section for the OrderItemBean,
■ The table is defined in the table attribute, which is ORDER_ITEM in this example.
■ The column name for the itemId is defined in the persistence-name attribute as Item_ID.
■ The column name for the placeholder CMP field, orderId, is defined in the persistence-name attribute as Order_ID.
■ The foreign key, belongToOrder, is mapped to the database column, Order_ID, which is the same column as the placeholder CMP field, orderId.
Both the foreign key, belongToOrder, and the placeholder CMP field, orderId, must point to the same database column.
<entity-deployment name="OrderItemBean" table="ORDER_ITEM"><primkey-mapping>
<cmp-field-mapping name="itemId" persistence-name="Item_ID" /><cmp-field-mapping name="orderId" persistence-name="Order_ID" />
</primkey-mapping><cmp-field-mapping name="price" persistence-name="Price" /><cmp-field-mapping name="belongToOrder">
<entity-ref home="OrderBean"><cmp-field-mapping name="belongToOrder"
persistence-name="Order_ID" /></entity-ref>
</cmp-field-mapping></entity-deployment>
<entity-deployment name="OrderBean" table="ORDER"><primkey-mapping>
<cmp-field-mapping name="orderId" persistence-name="Order_ID" /></primkey-mapping><cmp-field-mapping name="orderDesc"
persistence-name="Order_Description" /><cmp-field-mapping name="items">
<collection-mapping table="ORDER_ITEM"><primkey-mapping>
<cmp-field-mapping name="OrderBean_orderId"><entity-ref home="OrderBean">
<cmp-field-mapping name="OrderBean_orderId"persistence-name="Order_ID"/>
</entity-ref>
Entity Relationship Mapping 4-67

Using a Foreign Key in a Composite Primary Key
</cmp-field-mapping></primkey-mapping><value-mapping type="OrderItemLocal">
<cmp-field-mapping name="OrderItemBean_itemId"><entity-ref home="OrderItemBean">
<cmp-field-mapping name="OrderItemBean_itemId"><fields>
<cmp-field-mapping name="OrderItemBean_itemId" persistence-name="Item_ID"/>
<cmp-field-mapping name="OrderItemBean_orderId" persistence-name="Order_ID"/>
</fields></cmp-field-mapping>
</entity-ref></cmp-field-mapping>
</value-mapping></collection-mapping>
</cmp-field-mapping></entity-deployment>
Finally, you must update the bean implementation to work with both the placeholder CMP field and the foreign key.
1. In the ejbCreate method, do the following:
a. Create the placeholder CMP field that takes the place of the foreign key field.
b. Set a value in the placeholder CMP field in the ejbCreate method. This value is written out to the foreign key field in the database table.
2. In the ejbPostCreate method, set the foreign key to the value in the duplicate CMP field.
In our example, the CMP field, orderId, is set in the ejbCreate method and the relationship field, belongToOrder, is set in the ejbPostCreate method.
public OrderItemPK ejbCreate(OrderItem orderItem) throws CreateException{
setItemId(orderItem.getItemId());setOrderId(orderItem.getOrderId());setPrice(orderItem.getPrice());
Note: Since the foreign key is part of a primary key, it can only be set once.
4-68 Oracle9iAS Containers for J2EE Enterprise JavaBeans Developer’s Guide

Using a Foreign Key in a Composite Primary Key
return new OrderItemPK(orderItem.getItemId(),orderItem.getOrderId()) ;}
public void ejbPostCreate(OrderItem orderItem) throws CreateException{
// when just after bean createdtry {
Context ctx = new InitialContext();OrderLocalHome orderHome =
(OrderLocalHome)ctx.lookup("java:comp/env/OrderBean");OrderLocal order = orderHome.findByPrimaryKey(orderItem.getOrderId());
setBelongToOrder(order);}catch(Exception e) {
e.printStackTrace();throw new EJBException(e);
}}
The OrderItem object that is passed into the ejbCreate and ejbPostCreate methods is as follows:
public class OrderItem implements java.io.Serializable{
private Integer itemId; private Integer orderId; private Double price;
public OrderItem(Integer itemId, Integer orderId, Double price) { this.itemId = itemId; this.orderId = orderId; this.price = price; }
public Integer getItemId() { return itemId; }
public void setItemId(Integer itemId) { this.itemId = itemId; }
Entity Relationship Mapping 4-69

How to Override a Foreign Key Database Constraint
public Integer getOrderId() { return orderId; }
public void setOrderId(Integer orderId) { this.orderId = orderId; }
public Double getPrice() { return price; } public void setPrice(Double price) { this.price = price; }
public boolean equals(Object other) { if(other instanceof OrderItem) { OrderItem orderItem = (OrderItem)other; if (itemId.equals(orderItem.getItemId()) && orderId.equals(orderItem.getOrderId()) && price.equals(orderItem.getPrice()) ) { return true; } } return false; }}
How to Override a Foreign Key Database ConstraintIf you have defined your database columns with a constraint, such as NOT NULL, you may encounter an error after the ejbCreate method. An INSERT is performed after the ejbCreate method; thus, if any field in the database row was left null, the constraint raises a database table constraint violation. This occurs mostly with foreign keys as they cannot be assigned until the ejbPostCreate method. In order to avoid this problem, you must relax the constraint on the field in question.
You can relax the database constraints by redefining the offending column to DEFERRABLE. If you relax the constraint, you will have time to set the database field before the transaction commits and avoid the database constraint violation.
The following shows how to create a deferrable constraint for the TEST table:
4-70 Oracle9iAS Containers for J2EE Enterprise JavaBeans Developer’s Guide

How to Override a Foreign Key Database Constraint
create table test (test varchar2(10) not null INITIALLY DEFERRED DEFERRABLE )
Entity Relationship Mapping 4-71

How to Override a Foreign Key Database Constraint
4-72 Oracle9iAS Containers for J2EE Enterprise JavaBeans Developer’s Guide

EJB Query Lang
5
EJB Query LanguageIn EJB 2.0, you can specify query methods using the standardized query language, EJB Query Language (EJB QL).
Chapter 11 of the EJB 2.0 specification and various off-the-shelf books document EJB QL extensively. This chapter briefly overviews the development rules for these methods, but does not describe the EJB QL syntax in detail.
Refer to the EJB 2.0 specification and the following books for detailed syntax:
■ Enterprise JavaBeans, 3rd Edition by Richard Monson-Haefel, O’Reilly Publishers
■ Special Edition Using Enterprise JavaBeans 2.0 by Chuck Cavaness and Brian Keeton, Que Publishers
This chapter covers the following subjects:
■ EJB QL Overview
■ Query Methods Overview
■ Deployment Descriptor Semantics
■ Finder Method Example
■ Select Method Example
■ Oracle EJB QL Type Extensions: Date, Time, Timestamp, and SQRT
uage 5-1

EJB QL Overview
EJB QL OverviewEJB QL is a query language that is similar to SQL. In fact, your knowledge of SQL is beneficial in using EJB QL. SQL applies queries against tables, using column names. EJB QL applies queries against entity beans, using the abstract schema name and the CMP and CMR fields of the bean within the query. The EJB QL statement retains the object terminology.
The container translates the EJB QL statement to the appropriate database SQL statement when the application is deployed. Thus, the container is responsible for converting the entity bean name, CMP field names, and CMR field names to the appropriate database tables and column names. EJB QL is portable to all databases supported by your container.
Query Methods OverviewQuery methods can be finder or select methods:
■ Finder Methods: Use finder methods to retrieve entity bean references.
■ Select Methods: Select methods are for internal use for the entity bean only. Use them to retrieve either entity bean references or CMP values.
Both query method types must throw the FinderException.
Finder MethodsFinder methods are used to retrieve entity bean references. The findByPrimaryKey finder method is always defined in both home interfaces (local and remote) to retrieve the entity reference for this bean using a primary key. You can define other finder methods in either or both the home interfaces to retrieve one or several entity bean references.
Do the following to define finder methods:
1. Define the find<name> method in the desired home interface. You can specify different finder methods in the remote or the local home interface. If you define the same finder method in both home interfaces, it maps to the same bean class definition. The container returns the appropriate home interface type.
2. Define the full query or just the conditional statement (the WHERE clause) for the finder method in the deployment descriptor.
5-2 Oracle9iAS Containers for J2EE Enterprise JavaBeans Developer’s Guide

Query Methods Overview
You can define the query using either EJB QL syntax or OC4J-specific syntax. You can specify either a full query or only the conditional part of the query (the WHERE clause).
■ EJB QL syntax is defined within the ejb-jar.xml file. The syntax is defined by Sun Microsystems in Chapter 11 of the EJB 2.0 specification. An EJB QL statement is created for each finder method in its own <query> element. The container uses this statement to translate the condition on how to retrieve the entity bean references into the relevant SQL statements.
Currently, EJB QL has limited support for GROUP BY and ORDER BY functions, such as AVERAGE and SUM.
See "Specifying Finder Methods With EJB QL Syntax" on page 5-7 for more information.
■ OC4J-specific syntax is defined within the orion-ejb-jar.xml file. When you deploy your application, OC4J translates the EJB QL syntax into the OC4J-specific syntax, which is specified in the query attribute of the <finder-method> element. You can modify the statement in the query attribute for a more complex query using the OC4J syntax. The OC4J-specific query statement in the orion-ejb-jar.xml file takes precedence over its EJB QL statement in the ejb-jar.xml file.
See "Specifying Finder Methods With OC4J-Specific Syntax" on page 5-9 for more information.
If you retrieve only a single entity bean reference, the container returns the same type as returned in the find<name> method. If you request multiple entity bean references, you must define the return type of the find<name> method to return a Collection. If you want to ensure that no duplicates are returned, specify the DISTINCT keyword in the EJB QL statement. An empty Collection is returned if no matches are found.
See the "Finder Method Example" on page 5-7 for more information on both types of finder methods.
Select MethodsSelect methods are used primarily to return values for CMP or CMR fields. All values are returned in their own object type; any primitive types are wrapped in objects that have similar functions (for example, a primitive int type is wrapped in an Integer object). See section 10.5.7 of the EJB 2.0 specification for more information on select methods.
EJB Query Language 5-3

Query Methods Overview
These methods are for internal use within the bean. These methods cannot be called from a client. Thus, you do not define them in the home interfaces. Select methods are used to retrieve entity bean references or the value of a CMP field.
Do the following to define select methods:
1. Define an ejbSelect<name> method in the bean class for each select method. Each method is defined as public abstract. The SQL that is necessary for this method is not included in the implementation.
2. Define the full query or just the conditional statement (the WHERE clause) for the select method in the deployment descriptor. An EJB QL statement is created for each select method in its own <query> element. The container uses this statement to translate the condition into the relevant SQL statements.
See the "Select Method Example" on page 5-12 for more information on both types of finder methods.
Return ObjectsHere are the rules for defining return types for the select method:
■ No objects: If no objects are found, a FinderException is raised.
■ Single object: If you retrieve only a single item, the container returns the same type as returned in the ejbSelect<name> method. If multiple objects are returned, a FinderException is raised.
■ Multiple objects: If you request multiple items, you must define the return type of the ejbSelect<name> method as either a Set or Collection. A Set eliminates duplicates. A Collection may include duplicates. For example, if you want to retrieve all zip codes of all customers, use a Set to eliminate duplicates. To retrieve all customer names, use a Collection to retrieve the full list. An empty Collection or Set is returned if no matches are found.
– Bean interface: If you return the bean interface, the default interface type returned within the Set or Collection is the local bean interface. You can change this to the remote bean interface in the <result-type-mapping> element, as follows:
<result-type-mapping>Remote</result-type-mapping>
– CMP values: If you return a Set or Collection of CMP values, the container determines the object type from the EJB QL select statement.
5-4 Oracle9iAS Containers for J2EE Enterprise JavaBeans Developer’s Guide

Deployment Descriptor Semantics
Deployment Descriptor SemanticsThe structure required for defining both types of query methods is the same in the deployment descriptor.
1. You must define the <abstract-schema-name> element in the <entity> element for each entity bean referred to in the EJB QL statement. This element defines the name that identifies the entity bean in the EJB QL statement. Thus, if you define your <abstract-schema-name> as Employee, then the EJB QL uses Employee in its EJB QL to refer to the EmpBean entity bean.
2. Define the <query> element for each query method (finder and select), except for the findByPrimaryKey finder method.
The <query> element has two main elements:
– The <method-name> element identifies the finder or select method. The finder method is the same name as defined in the component home interfaces. The select method is the same name as defined in the bean class.
– The <ejb-ql> element contains the EJB QL statement for this method.
Example 5–1 Employee FindAll Deployment Descriptor Definition
The following example shows the EmpBean entity bean definition.
■ The <entity> element defines its <abstract-schema-name> as Employee.
■ Two <query> elements define finder methods, findAll and findByEmpNo, in which the EJB QL statement refers to the Employee name.
<entity> <display-name>EmpBean</display-name> <ejb-name>EmpBean</ejb-name> ... <abstract-schema-name>Employee</abstract-schema-name> <cmp-field><field-name>empNo</field-name></cmp-field> <cmp-field><field-name>empName</field-name></cmp-field> <cmp-field><field-name>salary</field-name></cmp-field>
Note: If you want to use the OC4J-specific syntax, you still start with configuring the EJB QL <query> element. Then, after deployment, you modify the query in the orion-ejb-jar.xml file to be the statement that you want.
EJB Query Language 5-5

Deployment Descriptor Semantics
<primkey-field>empNo</primkey-field> <prim-key-class>java.lang.Integer</prim-key-class> ... <query> <description></description> <query-method> <method-name>findAll</method-name> <method-params /> </query-method> <ejb-ql>Select OBJECT(e) From Employee e</ejb-ql> </query>
<query> <description></description> <query-method> <method-name>findByEmpNo</method-name> <method-params> <method-param>java.lang.Integer</method-param> </method-params> </query-method> <ejb-ql>SELECT OBJECT(e) FROM Employee e WHERE e.empNo = ?1 </ejb-ql></query>
...</entity>
The EJB QL statement for the findAll method is simple. It selects objects, identified by the variable e, from the Employee entity beans. Thus, it selects all Employee entity bean objects. The EJB QL statement for the findByEmpNo method selects all objects where the employee name is equal to the first input parameter to the method. After deployment, OC4J translates the EJB QL statements into <finder-method> elements in the orion-ejb-jar.xml file, as follows:
<finder-method query=""> /*the empty where clause finds all employees*/<finder-method query="$empname = $1"> /*this finds all records where
employee is equal to the first input parameter.*/
See "Finder Method Example" on page 5-7 for more information and examples.
5-6 Oracle9iAS Containers for J2EE Enterprise JavaBeans Developer’s Guide

Finder Method Example
Finder Method ExampleTo define finder methods in a CMP entity bean, do the following:
1. Define the finder method in one or both of the home interfaces.
2. Define the finder method definition in the deployment descriptor.
The following sections demonstrate how to create finder methods using either the EJB QL syntax or the OC4J-specific syntax:
■ Specifying Finder Methods With EJB QL Syntax
■ Specifying Finder Methods With OC4J-Specific Syntax
Specifying Finder Methods With EJB QL SyntaxThere are two steps for creating a finder method:
1. Define the Finder Method in the Home Interface
2. Define the Finder Method Definition in the Deployment Descriptor
Define the Finder Method in the Home InterfaceYou must add the finder method to the home interface. For example, if you want to retrieve all employees, define the findAll method in the home interface (local home interface for this example), as follows:
public Collection findAll() throws FinderException;
To retrieve data for a single employee, define the findByEmpNo in the home interface, as follows:
public EmployeeLocal findByEmpNo(Integer empNo) throws FinderException;
The returned bean interface is the local interface, EmployeeLocal. The input parameter is an employee number, empNo, which is substituted in the EJB QL ?1 parameter.
Define the Finder Method Definition in the Deployment DescriptorEach finder method is defined in the deployment descriptor in a <query> element. Example 5–1 contains the EJB QL statement for the findAll method. The following example shows the deployment descriptor for the findByEmpNo method:
EJB Query Language 5-7

Finder Method Example
<query> <description></description> <query-method> <method-name>findByEmpNo</method-name> <method-params> <method-param>java.lang.Integer</method-param> </method-params> </query-method> <ejb-ql>SELECT OBJECT(e) FROM Employee e WHERE e.empNo = ?1 </ejb-ql></query>
The EJB QL statement for the findByEmpName method selects the Employee object where the employee number is substituted in the EJB QL ?1 parameter. The ? symbol denotes a place holder for the method parameters. Thus, the findByEmpNo is required to supply at least one parameter. The empNo passed in on the findByEmpNo method is substituted in the ?1 position here. The variable, e, identifies the Employee object in the WHERE condition.
Relationship Finder ExampleFor the EJB QL statement that involves a relationship between entity beans, both entity beans are referenced within the EJB QL statement. The following example shows the findByDeptNo method. This finder method is defined within the employee bean, which references the department entity bean. This method retrieves all employees that belong to a department.
<query> <description></description> <query-method> <method-name>findByDeptNo</method-name> <method-params> <method-param>java.lang.Integer</method-param> </method-params> </query-method> <ejb-ql>SELECT OBJECT(e) From Employee e, IN (e.dept) AS d WHERE d.deptNo = ?1 </ejb-ql></query>
The <abstract-schema-name> element for the employee bean is Employee. The employee bean defines a relationship with the department bean through a CMR
5-8 Oracle9iAS Containers for J2EE Enterprise JavaBeans Developer’s Guide

Finder Method Example
field, called dept. Thus, the department bean is referenced in the EJB QL through the dept CMR field. The department primary key is deptNo. The department number that the query is executed with is given in the input parameter and substituted in ?1.
Specifying Finder Methods With OC4J-Specific SyntaxThere are two steps for creating a finder method:
1. Add the Finder Method to Home Interface
2. Add the Query to the OC4J-Specific Deployment Descriptor
Add the Finder Method to Home InterfaceYou must first add the finder method to the home interface. For example, with the employee entity bean, if we wanted to retrieve all employees, the findAll method would be defined within the home interface, as follows:
public Collection findAll() throws FinderException, RemoteException;
Add the Query to the OC4J-Specific Deployment DescriptorAfter specifying the finder method in the home interface, modify the orion-ejb-jar.xml file with the finder method query.
The <finder-method> element defines all finder methods—excluding the findByPrimaryKey method. The simplest finder method to define is the findByAll method. The query attribute in the <finder-method> element can specify a full query or just the WHERE clause for the query. If you want all rows retrieved, then an empty query (query="") returns all records.
OC4J-specific finder methods are configured in the orion-ejb-jar.xml file in a <finder-method> element. Each <finder-method> element specifies a partial or full SQL statement in its query attribute, as follows:
<finder-method query=""> /*the empty where clause finds all */OR<finder-method query="$empname = $1"> /*this finds all records where
employee is equal to the first input parameter.*/
If you have a <finder-method> with a query attribute, it takes precedence over any EJB QL modifications to the same method in the ejb-jar.xml file.
To define a complex finder method, do the following:
EJB Query Language 5-9

Finder Method Example
1. Define a simple query that is similar using EJB QL in the ejb-jar.xml file.
2. Deploy the application. When you deploy, OC4J translates the EJB QL statement to the OC4J-specific equivalent. The full SQL statement that will be executed is displayed in a comment.
3. Modify the query attribute of the <finder-method> in the orion-ejb-jar.xml file to have the exact complexity you desire. When you redeploy, OC4J translates the new query and will write out a new comment with the exact SQL statement that will be executed. Check the comment to verify that you have the right syntax.
If you want to use the EJB QL syntax and you have an existing definition in orion-ejb-jar.xml file, then do the following:
1. Erase the query attribute of the <finder-method> in the orion-ejb-jar.xml file.
2. Redeploy the application. OC4J notes that the query attribute is not present and uses the EJB QL methodology from the ejb-jar.xml file instead.
Example 5–2 OC4J-Specific Finder Syntax
The following example retrieves all records from the EmployeeBean. The method name is findAll, and it requires no parameters because it returns a Collection of all employees.
<finder-method query=""><!-- Generated SQL: "select EmployeeBean.empNo, EmployeeBean.empName, EmployeeBean.salary from EmployeeBean" --> <method> <ejb-name>EmployeeBean</ejb-name> <method-name>findAll</method-name> <method-params></method-params> </method></finder-method>
After deployment, OC4J will add the commented line of what query will be. Use the comment to verify that it is the type of query that you expect.
To be more specific, modify the query attribute with the appropriate WHERE clause. This clause refers to passed in parameters using the ’$’ symbol: the first parameter is denoted by $1, the second by $2. All <cmp-field> elements that are used within the WHERE clause are denoted by $<cmp-field> name.
5-10 Oracle9iAS Containers for J2EE Enterprise JavaBeans Developer’s Guide

Finder Method Example
The following example specifies a findByName method (which should be defined in the home interface) where the name of the employee is given as in the method parameter, which is substituted for the $1. It is matched to the CMP name, "empName". Thus, our query attribute is modified to contain the following for the WHERE clause: "$empname=$1".
<finder-method query="$empname = $1"> <method> <ejb-name>EmployeeBean</ejb-name> <method-name>findByName</method-name> <method-params> <method-param>java.lang.String</method-param> </method-params> </method></finder-method>
If you have more than one method parameter, each parameter type is defined in successive <method-param> elements and referred to in the query statement by successive $n, where n represents the number.
If you wanted to specify a full query and not just the section after the WHERE clause, specify the partial attribute to FALSE and then define the full query in the query attribute. The default value for partial is true, which is why it is not specified on the previous finder-method example.
<finder-method partial="false" query="select * from EMP where $empName = $1"> <!-- Generated SQL: "select * from EMP where EMP.ENAME = ?" --> <method> <ejb-name>EmployeeBean</ejb-name> <method-name>findByName</method-name> <method-params> <method-param>java.lang.String</method-param> </method-params> </method></finder-method>
Specifying the full SQL query is useful for complex SQL statements.
Note: You can also specify a SQL JOIN in the query attribute.
EJB Query Language 5-11

Select Method Example
For entity bean finder methods, lazy loading can cause the select method to be invoked more than once. To turn on lazy loading and enforce only a single execution of this finder method, set the lazy-loading property to true.
<finder-method partial="false" query="select * from EMP where $empName = $1" lazy-loading=true> <!-- Generated SQL: "select * from EMP where EMP.ENAME = ?" --> <method> <ejb-name>EmployeeBean</ejb-name> <method-name>findByName</method-name> <method-params> <method-param>java.lang.String</method-param> </method-params> </method>
</finder-method>
Select Method ExampleTo define select methods in a CMP entity bean, do the following:
1. Define the select method in the bean class as ejbSelect<name>.
2. Define the select method definition in the deployment descriptor.
Define the Select Method in the Bean ClassAdd the select method in the bean class as an abstract method. For example, if you want to retrieve all employees whose salary falls within a range, define the ejbSelectBySalaryRange method, as follows:
public abstract Collection ejbSelectBySalaryRange(Float s1, Float s2) throws FinderException;
Because the select method retrieves multiple employees, a Collection is returned. The low and high end of the salary range are input parameters, which are substituted in the EJB QL ?1 and ?2 parameters. The first input parameter is returned in ?1; the second input parameter is returned in ?2. The order of the all
Note: You cannot modify the query statement for an ejbSelect method in the orion-ejb-jar.xml file, as you can for finder methods.
5-12 Oracle9iAS Containers for J2EE Enterprise JavaBeans Developer’s Guide

Select Method Example
declared method parameters is the same as the order of the ?1, ?2, ... ?n EJB QL parameters.
Define the Select Method Definition in the Deployment DescriptorEach select method is defined in the deployment descriptor in a <query> element. The following example shows the deployment descriptor for both the ejbSelectBySalaryRange and ejbSelectNameBySalaryRange methods:
<query> <description></description> <query-method> <method-name>ejbSelectBySalaryRange</method-name> <method-params> <method-param>java.lang.Float</method-param> <method-param>java.lang.Float</method-param> </method-params> </query-method> <ejb-ql>SELECT DISTINCT OBJECT(e) From Employee e WHERE e.salary BETWEEN ?1 AND ?2 </ejb-ql></query><query> <description></description> <query-method> <method-name>ejbSelectNameBySalaryRange</method-name> <method-params> <method-param>java.lang.Float</method-param> <method-param>java.lang.Float</method-param> </method-params> </query-method> <ejb-ql>SELECT e.empName From Employee e WHERE e.salary BETWEEN ?1 AND ?2 </ejb-ql></query>
Both of these methods provide two input parameters of type float. The types of these expected input parameters are defined in the <method-param> elements.
The EJB QL is defined in the <ejb-ql> element. Both methods evaluate the CMP field of salary within the EJB QL statement by the e.salary. The e represents the Employee objects; the salary represents the CMP field within that object.
EJB Query Language 5-13

Oracle EJB QL Type Extensions: Date, Time, Timestamp, and SQRT
Separating it with a period shows the relationship between the entity bean and its CMP field.
The two input parameters designate the low and high salary ranges and are substituted in the ?1 and ?2 positions respectively.
The ejbSelectBySalaryRange method returns objects, where the DISTINCT keyword ensures that no duplicate records are returned. The ejbSelectNameBySalaryRange returns only the names of the employees, which is a String. This demonstrates one of the advantages of using select statements, in that you can return only the values of CMP fields within your objects.
Oracle EJB QL Type Extensions: Date, Time, Timestamp, and SQRTEven though the current version of the EJB specification does not support Date, Time, Timestamp, and SQRT, we have added support for these types, as follows:
■ SQRT(v) : Both the double primitive type and the java.lang.Double types are supported for arguments.
■ java.util.Date, java.sql.Date, java.sql.Time. and java.sql.Timestamp are allowed in an EJB QL binary expression, such as equality expressions.
5-14 Oracle9iAS Containers for J2EE Enterprise JavaBeans Developer’s Guide

BMP Entity B
6
BMP Entity BeansYou must implement the storing and reloading of data in a bean-managed persistent (BMP) bean. The bean implementation manages the data within callback methods. All the logic for storing data to your persistent storage is included in the ejbStore method, and reloaded from your storage in the ejbLoad method. The container invokes these methods when necessary.
This chapter demonstrates simple BMP EJB development with a basic configuration and deployment. Download the BMP entity bean example (bmpapp.jar) from the OC4J sample code page at http://otn.oracle.com/sample_code/tech/java/oc4j/htdocs/oc4jsamplecode/oc4j-demo-ejb.html on the OTN site.
The following sections discuss how to implement data persistence:
■ Creating BMP Entity Beans
■ Component and Home Interfaces
■ BMP Entity Bean Implementation
■ Create Database Table and Columns for Entity Data
eans 6-1

Creating BMP Entity Beans
Creating BMP Entity BeansAs Chapter 3, "CMP Entity Beans" indicates, the steps for creating an entity bean are as follows:
1. Create the component interfaces for the bean. The component interfaces declare the methods that a client can invoke.
a. The local component interface extends javax.ejb.EJBLocalObject.
b. The remote component interface extends javax.ejb.EJBObject.
2. Create the home interfaces for the bean. The home interface defines the create and finder methods, including findByPrimaryKey, for your bean.
a. The local home interface extends javax.ejb.EJBLocalHome.
b. The remote home interface extends javax.ejb.EJBHome.
3. Define the primary key for the bean. The primary key identifies each entity bean instance and is a serializable class. You can use a simple data type class, such as java.lang.String, or define a complex class, such as one with two or more objects as components of the primary key.
4. Implement the bean. This includes the following:
a. The implementation for the methods that are declared in your component interfaces.
b. The methods that are defined in the javax.ejb.EntityBean interface.
c. The methods that match the methods that are declared in your home interface, which include the following:
* The ejbCreate and ejbPostCreate methods with parameters matching the associated create method defined in the home interface.
* Finder methods that are defined in the home interface. The ejbFindByPrimaryKey corresponds to the findByPrimaryKey method in the home interface. It retrieves the primary key and validates that it exists. Any other finder methods defined in the home interface must also be implemented in the bean implementation.
d. The methods defined in the javax.ejb.EntityBean interface. The ejbCreate, ejbPostCreate, and ejbFindByPrimaryKey are already mentioned above. The other methods are as follows:
* Persistent saving of the data within the ejbStore method.
6-2 Oracle9iAS Containers for J2EE Enterprise JavaBeans Developer’s Guide

BMP Entity Bean Implementation
* Restoring the persistent data to the bean within your implementation of the ejbLoad method.
* Passivation of the bean instance within the ejbPassivate method.
* Activation of the passivated bean instance within the ejbActivate method.
5. If the persistent data is saved to or restored from a database, you must ensure that the correct tables exist for the bean.
6. Create the bean deployment descriptor. The deployment descriptor specifies properties for the bean through XML elements.
Any EJB Container services that you want to configure is also designated in the deployment descriptor. For information about data sources and JTA, see the Oracle9iAS Containers for J2EE Services Guide. For information about security, see the Oracle9iAS Containers for J2EE Security Guide.
7. Create an EJB JAR file containing the bean, component interface, home interface, and the deployment descriptors. Once created, configure the application.xml file, create an EAR file, and deploy the EJB to OC4J.
Component and Home InterfacesThe BMP entity bean definition of the component and home interfaces are identical to the CMP entity bean. For examples of how the component and home interfaces are implemented, see "Creating Entity Beans" on page 3-3.
BMP Entity Bean ImplementationBecause the container is not managing the primary key nor the saving of the persistent data, the bean callback functions must include the implementation logic for these functions. The container invokes the ejbCreate, ejbFindByPrimaryKey, other finder methods, ejbStore, and ejbLoad methods where it is appropriate.
Note: This book does not cover EJB container services. See the JTA, Data Source, and JNDI chapters in the Oracle9iAS Containers for J2EE Services Guide for more information. For security, see the Oracle9iAS Containers for J2EE Security Guide.
BMP Entity Beans 6-3

BMP Entity Bean Implementation
The ejbCreate ImplementationThe ejbCreate method is responsible primarily for the creation of the primary key. This includes creating the primary key, creating the persistent data representation for the key, initializing the key to a unique value, and returning this key to the container. The container maps the key to the entity bean reference.
The following example shows the ejbCreate method for the employee example, which initializes the primary key, empNo. It should automatically generate a primary key that is the next available number in the employee number sequence. However, for this example to be simple, the ejbCreate method requires that the user provide the unique employee number.
In addition, because the full data for the employee is provided within this method, the data is saved within the context variables of this instance. After initialization, it returns this key to the container.
// The create methods takes care of generating a new empNo and returns// its primary key to the containerpublic Integer ejbCreate (Integer empNo, String empName, Float salary)
throws CreateException{ this.empNo = empNo; this.empName = empName; this.salary = salary; return (empNo);}
The deployment descriptor defines only the primary key class in the <prim-key-class> element. Because the bean is saving the data, there is no definition of persistence data in the deployment descriptor. Note that the deployment descriptor does define the database the bean uses in the <resource-ref> element. For more information on database configuration, see "Modify XML Deployment Descriptors" on page 6-11.
<enterprise-beans> <entity>
Note: The entire BMP entity bean example (bmpapp.jar) is available on OTN from the OC4J sample code page at http://otn.oracle.com/sample_code/tech/java/oc4j/htdocs/oc4jsamplecode/oc4j-demo-ejb.html.
6-4 Oracle9iAS Containers for J2EE Enterprise JavaBeans Developer’s Guide

BMP Entity Bean Implementation
<display-name>EmployeeBean</display-name> <ejb-name>EmployeeBean</ejb-name> <local-home>employee.EmployeeHome</local-home> <local>employee.Employee</local> <ejb-class>employee.EmployeeBean</ejb-class> <persistence-type>Bean</persistence-type> <prim-key-class>java.lang.Integer</prim-key-class> <reentrant>False</reentrant> <resource-ref> <res-ref-name>jdbc/OracleDS</res-ref-name> <res-type>javax.sql.DataSource</res-type> <res-auth>Application</res-auth> </resource-ref> </entity></enterprise-beans>
Alternatively, you can create a complex primary key based on several data types. You define a complex primary key within its own class, as follows:
package employee;
public class EmployeePK implements java.io.Serializable{ public Integer empNo; public String empName; public Float salary;
public EmployeePK(Integer empNo) { this.empNo = empNo; this.empName = null; this.salary = null; }
public EmployeePK(Integer empNo, String empName, Float salary) { this.empNo = empNo; this.empName = empName; this.salary = salary; } }
For a primary key class, you define the class in the <prim-key-class> element, which is the same for the simple primary key definition.
BMP Entity Beans 6-5

BMP Entity Bean Implementation
<enterprise-beans> <entity> <display-name>EmployeeBean</display-name> <ejb-name>EmployeeBean</ejb-name> <local-home>employee.EmployeeHome</local-home> <local>employee.Employee</local> <ejb-class>employee.EmployeeBean</ejb-class> <persistence-type>Bean</persistence-type> <prim-key-class>employee.EmployeePK</prim-key-class> <reentrant>False</reentrant> <resource-ref> <res-ref-name>jdbc/OracleDS</res-ref-name> <res-type>javax.sql.DataSource</res-type> <res-auth>Application</res-auth> </resource-ref> </entity></enterprise-beans>
The employee example requires that the employee number is given to the bean by the user. Another method would be to generate the employee number by computing the next available employee number, and use this in combination with the employee’s name and office location.
After defining the complex primary key class, you would create your primary key within the ejbCreate method, as follows:
public EmployeePK ejbCreate(Integer empNo, String empName, Float salary) throws CreateException{ pk = new EmployeePK(empNo, empName, salary); ...}
The other task that the ejbCreate (or ejbPostCreate) should handle is allocating any resources necessary for the life of the bean. For this example, because we already have the information for the employee, the ejbCreate performs the following:
1. Retrieves a connection to the database. This connection remains open for the life of the bean. It is used to update employee information within the database. It should be released in ejbPassivate and ejbRemove, and reallocated in ejbActivate.
2. Updates the database with the employee information.
This is executed, as follows:
6-6 Oracle9iAS Containers for J2EE Enterprise JavaBeans Developer’s Guide

BMP Entity Bean Implementation
public EmployeePK ejbCreate(Integer empNo, String empName, Float salary) throws CreateException{ pk = new EmployeePK(empNo, empName, salary); conn = getConnection(dsName); ps = conn.prepareStatement("INSERT INTO EMPLOYEEBEAN (EmpNo, EmpName, SAL)
VALUES ( "+this.empNo.intValue()+", "+this.empName+","+this.salary.floatValue()+")");
ps.executeUpdate(); ps.close(); return pk;}
The ejbFindByPrimaryKey ImplementationThe ejbFindByPrimaryKey implementation is a requirement for all BMP entity beans. Its primary responsibility is to ensure that the primary key is valid. Once it is validated, it returns the primary key to the container, which uses the key to return the component interface reference to the user.
This sample verifies that the employee number is valid and returns the primary key, which is the employee number, to the container. A more complex verification would be necessary if the primary key was a class.
public Integer ejbFindByPrimaryKey(Integer empNoPK) throws FinderException{ if (empNoPK == null) { throw new FinderException("Primary key cannot be null"); }
ps = conn.prepareStatement("SELECT EMPNO FROM EMPLOYEEBEAN WHERE EMPNO = ?");
ps.setInt(1, empNoPK.intValue()); ps.executeQuery(); ResultSet rs = ps.getResultSet(); if (rs.next()) { /*PK is validated because it exists already*/ } else { throw new FinderException("Failed to select this PK"); }
ps.close(); return empNoPK;
BMP Entity Beans 6-7

BMP Entity Bean Implementation
}
Other Finder MethodsYou can create other finder methods beyond the single ejbFindByPrimaryKey.
To create other finder methods, do the following:
1. Add the finder method to the home interface.
2. Implement the finder method in the BMP bean implementation.
These finder methods need only to gather the primary keys for all of the entity beans that should be returned to the user. The container maps the primary keys to references to each entity bean within either a Collection (if multiple references are returned) or to the single class type.
The following example shows the implementation of a finder method that returns all employee records.
public Collection ejbFindAll() throws FinderException{ Vector recs = new Vector();
ps = conn.prepareStatement("SELECT EMPNO FROM EMPLOYEEBEAN"); ps.executeQuery(); ResultSet rs = ps.getResultSet();
int i = 0;
while (rs.next()) { retEmpNo = new Integer(rs.getInt(1)); recs.add(retEmpNo); }
ps.close(); return recs;}
The ejbStore ImplementationThe container invokes the ejbStore method when the persistent data should be saved to the database. This includes whenever the primary key is "dirtied", or before the container passivates the bean instance or removes the instance. The BMP
6-8 Oracle9iAS Containers for J2EE Enterprise JavaBeans Developer’s Guide

BMP Entity Bean Implementation
bean is responsible for ensuring that all data is stored to some resource, such as a database, within this method.
public void ejbStore(){ //Container invokes this method to instruct the instance to //synchronize its state by storing it to the underlying database ps = conn.prepareStatement("UPDATE EMPLOYEEBEAN SET EMPNAME=?,
SALARY=? WHERE EMPNO=?)"; ps.setString(1, this.empName); ps.setFloat(2, this.salary.floatValue()); ps.setInt(3, this.empNo.intValue()); if (ps.executeUpdate() != 1) { throw new EJBException("Failed to update record"); } ps.close();}
The ejbLoad ImplementationThe container invokes the ejbLoad method after activating the bean instance. The purpose of this method is to repopulate the persistent data with the saved state. For most ejbLoad methods, this implies reading the data from a database into the instance data variables.
public void ejbLoad(){ //Container invokes this method to instruct the instance to //synchronize its state by loading it from the underlying database this.empNo = ctx.getPrimaryKey(); ps = conn.prepareStatement("SELECT EMP_NO, EMP_NAME, SALARY WHERE EMPNAME=?"); ps.setInt(1, this.empNo.intValue()); ps.executeQuery(); ResultSet rs = ps.getResultSet(); if (rs.next()) { this.empNo = new Integer(rs.getInt(1)); this.empName = new String(rs.getString(2)); this.salary = new Float(rs.getFloat(3)); } else { throw new FinderException("Failed to select this PK"); } ps.close();}
BMP Entity Beans 6-9

BMP Entity Bean Implementation
The ejbPassivate ImplementationThe ejbPassivate method is invoked directly before the bean instance is serialized for future use. Normally, this is invoked when the instance has not been used in a while. It will be re-activated, through the ejbActivate method, the next time the user invokes a method on this instance.
Before the bean is passivated, you should release all resources and release any static information that would be too large to be serialized. Any large, static information that can be easily regenerated within the ejbActivate method should be released in this method.
In our example, the only resource that cannot be serialized is the open database connection. It is closed in this method and reopened in the ejbActivate method.
public void ejbPassivate(){ // Container invokes this method on an instance before the instance // becomes disassociated with a specific EJB object conn.close();}
The ejbActivate ImplementationAs the ejbPassivate method section states, the container invokes this method when the bean instance is reactivated. That is, the user has asked to invoke a method on this instance. This method is used to open resources and rebuild static information that was released in the ejbPassivate method.
Our employee example opens the database connection where the employee information is stored.
public void ejbActivate(){ // Container invokes this method when the instance is taken out // of the pool of available instances to become associated with // a specific EJB object conn = getConnection(dsName);}
The ejbRemove ImplementationThe container invokes the ejbRemove method before removing the bean instance itself or by placing the instance back into the bean pool. This means that the information that was represented by this entity bean should be removed—both by
6-10 Oracle9iAS Containers for J2EE Enterprise JavaBeans Developer’s Guide

Modify XML Deployment Descriptors
the instance being destroyed and removed from within persistent storage. The employee example removes the employee and all associated information from the database before the instance is destroyed. Close the database connection.
public void ejbRemove() throws RemoveException{ //Container invokes this method befor it removes the EJB object //that is currently associated with the instance ps = conn.prepareStatement("DELETE FROM EMPLOYEEBEAN WHERE EMPNO=?"); ps.setInt(1, this.empNo.intValue()); if (ps.executeUpdate() != 1) { throw new RemoveException("Failed to delete record"); } ps.close(); conn.close();}
Modify XML Deployment DescriptorsIn addition to the configuration described in "Creating Entity Beans" on page 3-3, you must modify and add the following to your ejb-jar.xml deployment descriptor:
1. Configure the persistence type to be "Bean" in the <persistence-type> element.
2. Configure an resource reference for the database persistence storage in the <resource-ref> element.
Our employee used the database environment element of "jdbc/OracleDS". This is configured in the <resource-ref> element as follows:
<resource-ref> <res-ref-name>jdbc/OracleDS</res-ref-name> <res-type>javax.sql.DataSource</res-type> <res-auth>Application</res-auth></resource-ref>
The database specified in the <res-ref-name> element maps to a <ejb-location> element in the data-sources.xml file. Our "jdbc/OracleDS" database is configured in the data-sources.xml file, as shown below:
<data-source class="com.evermind.sql.DriverManagerDataSource"
BMP Entity Beans 6-11

Create Database Table and Columns for Entity Data
name="Oracle" location="jdbc/OracleCoreDS" pooled-location="jdbc/pool/OraclePoolDS" ejb-location="jdbc/OracleDS" xa-location="jdbc/xa/OracleXADS" connection-driver="oracle.jdbc.driver.OracleDriver" url="jdbc:oracle:thin:@myhost:1521:orcl" username="scott" password="tiger" max-connections="300" min-connections="5" max-connect-attempts="10" connection-retry-interval="1" inactivity-timeout="30" wait-timeout="30"/>
Create Database Table and Columns for Entity DataIf your entity bean stores its persistent data within a database, you need to create the appropriate table with the proper columns for the entity bean. This table must be created before the bean is loaded into the database. The container will not create this table for BMP beans, but it will create it automatically for CMP beans.
In our employee example, you must create the following table in the database defined in the data-sources.xml file:
The following shows the SQL commands that create these fields.
CREATE TABLE EMPLOYEEBEAN (
Note: The entire BMP entity bean example (bmpapp.jar) is available on OTN from the OC4J sample code page at http://otn.oracle.com/sample_code/tech/java/oc4j/htdocs/oc4jsamplecode/oc4j-demo-ejb.html.
Table Columns
EMPLOYEEBEAN ■ employee number (EMPNO)
■ employee name (EMPNAME)
■ salary (SALARY)
6-12 Oracle9iAS Containers for J2EE Enterprise JavaBeans Developer’s Guide

Create Database Table and Columns for Entity Data
EMPNO NUMBER NOT NULL, EMPNAME VARCHAR2(255) NOT NULL, SALARY FLOAT NOT NULL, CONSTRAINT EMPNO PRIMARY KEY)
Note: This book does not cover EJB container services. See the Data Source chapter in the Oracle9iAS Containers for J2EE Services Guide for information on how to configure your Data Source object.
BMP Entity Beans 6-13

Create Database Table and Columns for Entity Data
6-14 Oracle9iAS Containers for J2EE Enterprise JavaBeans Developer’s Guide

Message-Driven B
7
Message-Driven BeansThe following sections discuss the tasks in creating an MDB in Oracle9iAS Containers for J2EE (OC4J) and demonstrate MDB development with a basic configuration to use either OC4J JMS or Oracle JMS as the resource provider.
■ MDB Overview
■ MDB Example
■ MDB Using OC4J JMS
■ MDB Implementation Using Oracle JMS
■ Client Access of MDB
■ Using Transactions With MDBs
Download the MDB example used in this chapter from the OC4J sample code page at http://otn.oracle.com/sample_code/tech/java/oc4j/htdocs/oc4jsamplecode/oc4j-demo-ejb.html on the OTN web site.
eans 7-1
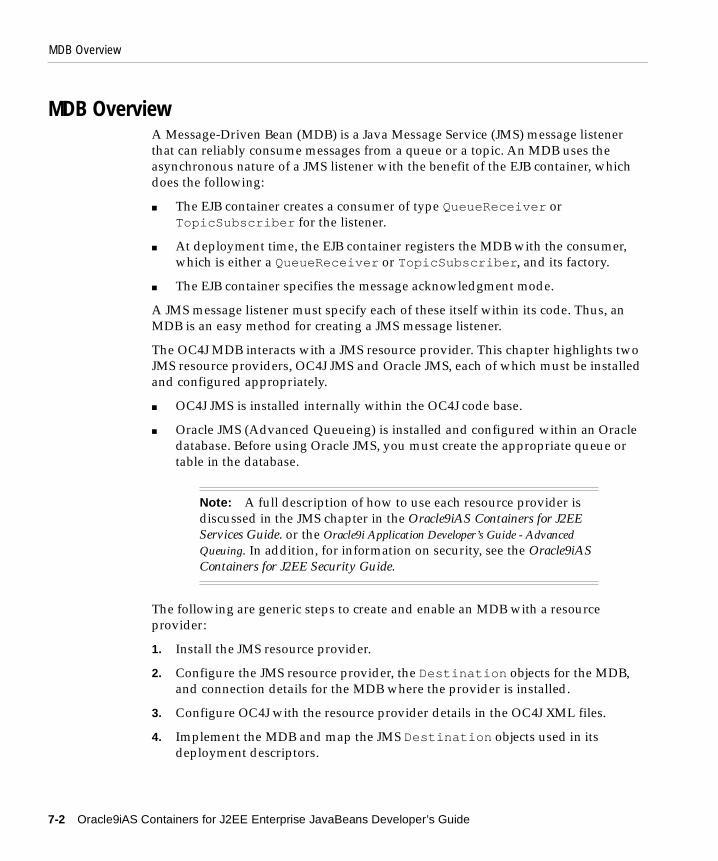
MDB Overview
MDB OverviewA Message-Driven Bean (MDB) is a Java Message Service (JMS) message listener that can reliably consume messages from a queue or a topic. An MDB uses the asynchronous nature of a JMS listener with the benefit of the EJB container, which does the following:
■ The EJB container creates a consumer of type QueueReceiver or TopicSubscriber for the listener.
■ At deployment time, the EJB container registers the MDB with the consumer, which is either a QueueReceiver or TopicSubscriber, and its factory.
■ The EJB container specifies the message acknowledgment mode.
A JMS message listener must specify each of these itself within its code. Thus, an MDB is an easy method for creating a JMS message listener.
The OC4J MDB interacts with a JMS resource provider. This chapter highlights two JMS resource providers, OC4J JMS and Oracle JMS, each of which must be installed and configured appropriately.
■ OC4J JMS is installed internally within the OC4J code base.
■ Oracle JMS (Advanced Queueing) is installed and configured within an Oracle database. Before using Oracle JMS, you must create the appropriate queue or table in the database.
The following are generic steps to create and enable an MDB with a resource provider:
1. Install the JMS resource provider.
2. Configure the JMS resource provider, the Destination objects for the MDB, and connection details for the MDB where the provider is installed.
3. Configure OC4J with the resource provider details in the OC4J XML files.
4. Implement the MDB and map the JMS Destination objects used in its deployment descriptors.
Note: A full description of how to use each resource provider is discussed in the JMS chapter in the Oracle9iAS Containers for J2EE Services Guide. or the Oracle9i Application Developer’s Guide - Advanced Queuing. In addition, for information on security, see the Oracle9iAS Containers for J2EE Security Guide.
7-2 Oracle9iAS Containers for J2EE Enterprise JavaBeans Developer’s Guide

MDB Example
This chapter provides examples of the MessageBean MDB implemented using the OC4J JMS and Oracle JMS resource providers. "MDB Example" on page 7-3 shows the MDB example. The deployment descriptor for this MDB and the JMS configuration necessary is shown in the following sections for each provider:
■ MDB Using OC4J JMS
■ MDB Implementation Using Oracle JMS
MDB ExampleThe MDB can process incoming asynchronous requests. Any message for the MDB is routed to the onMessage method of the MDB from the queue or topic. Other clients may have access to the same queue or topic to put on messages for the MDB. Most MDBs receive messages from a queue or a topic, then invoke an entity bean to process the request contained within the message.
The MDB implementation and the ejb-jar.xml deployment descriptor are exactly the same for the OC4J JMS or Oracle JMS resource providers. The orion-ejb-jar.xml deployment descriptor contains provider-specific configuration. See "MDB Using OC4J JMS" on page 7-7 and "MDB Implementation Using Oracle JMS" on page 7-12 for the specific configuration in the orion-ejb-jar.xml deployment descriptor.
MDB Implementation ExampleWhen you implement an MDB, you do the following:
1. The bean class must be defined as public (not final or abstract).
2. The bean class must implement the javax.ejb.MessageDrivenBean and javax.jms.MessageListener interfaces, which include the following:
■ the onMessage method in the MessageListener interface
■ the setMessageDrivenContext method in the MessageDrivenBean interface
3. The bean class must implement the container callback methods that normally match methods in the EJB home interface. Remote, local, and home interfaces are not implemented with an MDB. However, some of the callback methods required for these interfaces are implemented in the bean implementation. These methods include the following:
■ an ejbCreate method
Message-Driven Beans 7-3

MDB Example
■ an ejbRemove method
Example 7–1 MessageBean MDB Implementation Example
The following MDB example is the MessageBean MDB, which prints out a message sent to it through a durable topic. The topic is identified in the deployment descriptors and the JMS configuration.
package cart.ejb;
import com.evermind.server.ThreadState;
import java.io.Serializable;import java.rmi.RemoteException; import javax.ejb.MessageDrivenBean;import javax.ejb.MessageDrivenContext;import javax.ejb.CreateException;import javax.naming.*;import javax.transaction.*;import javax.jms.*;
public class MessageBean implements javax.ejb.MessageDrivenBean, javax.jms.MessageListener { private transient MessageDrivenContext mdbCtx = null; /* Constructor, which is public and takes no arguments.*/ public MessageBean() { } /* setMessageDrivenContext method */ public void setMessageDrivenContext(MessageDrivenContext mdc) { /* As with all EJBs, you must set the context in order to be able to use it at another time within the MDB methods. */ this.mdbCtx = mdc; } /* ejbCreate method, declared as public (but not final or * static), with a return type of void, and with no arguments. */ public void ejbCreate() throws Exception { /* no implementation is necessary for this MDB */ /* An MDB does not carry state for an individual client. However, you can retrieve state for use across many calls for multiple clients - state
7-4 Oracle9iAS Containers for J2EE Enterprise JavaBeans Developer’s Guide

MDB Example
such as an entity bean reference or a database connection. If so, retrieve these within the ejbCreate and remove them in the ejbRemove method. */ }
/* ejbRemove method */ public void ejbRemove() { /* no implementation is necessary for this MDB*/ }
/** * onMessage method * Casts the incoming Message to a TextMessage and displays * the text. */ public void onMessage(Message msg) { /* The whole point for this message MDB is to receive and print messages. It is not complicated, but it shows how MDBs are set up to receive JMS messages from queues and topics. */
msgdata = new byte[20];
try { /* This message was created as a JMS BytesMessage. */ if (msg instanceof BytesMessage) { /* Convert the BytesMessage into printable text... */ BytesMessage msgBytes = (BytesMessage) msg; int bytesRead = msgBytes.readBytes(msgdata); String txt = new String(msgdata); /* Print out message */ System.out.println("Message received=" + txt); } } catch (Exception e) { throw new RuntimeException("onMessage throws exception"); } }}
Message-Driven Beans 7-5

MDB Example
EJB Deployment Descriptor (ejb-jar.xml) for the MDBWithin the EJB deployment descriptor (ejb-jar.xml), define the MDB name, class, JNDI reference, and JMS Destination type (queue or topic) in the <message-driven> element. If a topic is specified, you must also define whether it is durable.
The following example demonstrates the deployment information for the MessageBean MDB in the <message-driven> element, as follows:
■ MDB name specified in the <ejb-name> element.
■ MDB class defined in the <ejb-class> element, which ties the <message-driven> element to the specific MDB implementation.
■ JMS Destination type is a Topic that is specified in the <message-driven-destination><destination-type> element.
■ The durability of the topic, which is specified in the <message-driven-destination><subscription-durability> element. Options are "Durable" or "nonDurable."
■ The type of transaction to use is defined in the <transaction-type> element. The value can be Container or Bean. If Container is specified, define the onMessage method within the <container-transaction> element with the type of CMT support.
<?xml version="1.0" encoding="UTF-8"?><!DOCTYPE ejb-jar PUBLIC "-//Sun Microsystems, Inc.//DTD Enterprise JavaBeans 2.0//EN" "http://java.sun.com/dtd/ejb-jar_2_0.dtd">
<ejb-jar> <description>A demo cart bean package.</description> <display-name>A simple cart jar</display-name>
<enterprise-beans> ... <message-driven> <description></description> <display-name>MessageBeanTpc</display-name>
Note: The entire MDB example is available on OTN from the OC4J sample code page at http://otn.oracle.com/sample_code/tech/java/oc4j/htdocs/oc4jsamplecode/oc4j-demo-ejb.html.
7-6 Oracle9iAS Containers for J2EE Enterprise JavaBeans Developer’s Guide

MDB Using OC4J JMS
<ejb-name>MessageBeanTpc</ejb-name> <ejb-class>cart.ejb.MessageBean</ejb-class> <transaction-type>Container</transaction-type> <message-driven-destination> <destination-type>javax.jms.Topic</destination-type> <subscription-durability>Durable</subscription-durability> </message-driven-destination> </message-driven> ... <assembly-descriptor> <container-transaction> <method> <ejb-name>MessageBeanTpc</ejb-name> <method-name>onMessage</method-name> </method> <trans-attribute>Required</trans-attribute> </container-transaction> ... </assembly-descriptor> </enterprise-beans>
The deployment descriptor for this MDB and the JMS configuration necessary is shown in the following sections for each provider:
■ MDB Using OC4J JMS
■ MDB Implementation Using Oracle JMS
Instructions on how a client sends a JMS message to the MDB is discussed in "Client Access of MDB" on page 7-21.
MDB Using OC4J JMSThe MDB can process incoming asynchronous requests using OC4J JMS. When you use OC4J JMS, this resource provider is already installed. And all configuration for the resource provider occurs within the OC4J XML files; thus, only steps three and four (as listed in "MDB Overview" on page 7-2) are necessary.
Note: The entire MDB example is available on OTN from the OC4J sample code page at http://otn.oracle.com/sample_code/tech/java/oc4j/htdocs/oc4jsamplecode/oc4j-demo-ejb.html.
Message-Driven Beans 7-7

MDB Using OC4J JMS
Figure 7–1 shows how a client sends an asynchronous request directly to the OC4J JMS queue or topic that is located internally within OC4J. The MDB receives the message directly from OC4J JMS.
Figure 7–1 Demonstration of an MDB Interacting with an OC4J JMS Destination
The following sections demonstrate an MDB that uses OC4J JMS as the resource provider.
■ Configure OC4J JMS in the XML files
■ Create the Deployment Descriptors to Map OC4J JMS Destination Objects
■ Deploying the MDB
Note: The entire MDB example is available on OTN from the OC4J sample code page at http://otn.oracle.com/sample_code/tech/java/oc4j/htdocs/oc4jsamplecode/oc4j-demo-ejb.html.
Queue or TopicMDB
OC4J
CLIENT
7-8 Oracle9iAS Containers for J2EE Enterprise JavaBeans Developer’s Guide

MDB Using OC4J JMS
Configure OC4J JMS in the XML filesOC4J JMS is automatically enabled. You only configure the JMS Destination objects used by the MDB. If your MDB accesses a database for inquiries and so on, then you can configure the DataSource used. Both of these are covered in the following sections:
■ JMS Destination Object Configuration
■ DataSource Configuration
JMS Destination Object ConfigurationConfigure the topic or queue in the jms.xml file to which the client sends all messages that are destined for the MDB. The name, location, and connection factory for either Destination type must be specified.
The following jms.xml file configuration specifies a topic—named jms/Topic/senderTopic—that is used by the MessageBean example. The topic connection factory is defined as jms/Topic/senderTopicConnectionFactory.
<?xml version="1.0" ?><!DOCTYPE jms-server PUBLIC "OC4J JMS server" "http://xmlns.oracle.com/ias/dtds/jms-server.dtd">
<jms-server port="9128"> <topic location="jms/Topic/senderTopic"> </topic>
<topic-connection-factory location="jms/Topic/senderTopicConnectionFactory"> </topic-connection-factory>
<!-- path to the log-file where JMS-events/errors are stored --> <log> <file path="../log/jms.log" /> </log></jms-server>
Note: A full description of how to use each resource provider is discussed in the JMS chapter in the Oracle9iAS Containers for J2EE Services Guide. or the Oracle9i Application Developer’s Guide - Advanced Queuing.
Message-Driven Beans 7-9

MDB Using OC4J JMS
DataSource ConfigurationIf the MDB accesses a database, configure the DataSource for that database. A database is not required for OC4J JMS functionality. Full details for DataSource configuration is provided in the Oracle9iAS Containers for J2EE Services Guide.
The database that the MessageBean example uses is configured in the data-sources.xml file, as follows:
<data-source class="com.evermind.sql.DriverManagerDataSource" name="OracleDS" location="jdbc/OracleCoreDS" xa-location="jdbc/xa/OracleXADS" ejb-location="jdbc/OracleDS" connection-driver="oracle.jdbc.driver.OracleDriver" username="admin" password="admin" url="jdbc:oracle:thin:@mysun:1521:orcl" inactivity-timeout="30"/>
Customize this data source to match your environment. For example, substitute the host name, port, and SID of your database for mysun:1521:orcl.
Create the Deployment Descriptors to Map OC4J JMS Destination ObjectsThe steps to create an MDB are as follows:
1. Implement the bean, as shown in "MDB Example" on page 7-3.
2. Create the MDB deployment descriptors.
a. Define the JMS connection factory and Destination used in the EJB deployment descriptor (ejb-jar.xml) . Define if any durable subscriptions are used, as shown in "MDB Example" on page 7-3.
b. Map the logical names for the JMS connection factory and Destination type to their actual JNDI names in the OC4J-specific deployment descriptor (orion-ejb-jar.xml).
Note: Instead of providing the password in the clear, you can use password indirection. For details on password indirection, see the Oracle9iAS Containers for J2EE Services Guide.
7-10 Oracle9iAS Containers for J2EE Enterprise JavaBeans Developer’s Guide

MDB Using OC4J JMS
c. If the MDB is a container-managed transaction, specify the onMessage method in the <container-transaction> element.
3. Create an EJB JAR file containing the bean and the deployment descriptors. Configure the application-specific application.xml file, create an EAR file, and install the EJB in OC4J.
Configure the MDB deployment descriptors to use the OC4J JMS Destination objects that are defined in the jms.xml file. In this example, the MDB uses a topic that is defined in the jms.xml file as "jms/Topic/senderTopic" with a connection factory of "jms/Topic/senderTopicConnectionFactory." See "JMS Destination Object Configuration" on page 7-9 for the JMS configuration of this example.
■ The EJB deployment descriptor (ejb-jar.xml) specifies whether a queue or a topic is used. The MessageBean example uses a durable topic, as shown in "MDB Example" on page 7-3.
■ The OC4J-specific deployment descriptor (orion-ejb-jar.xml) informs the container which JMS Destination that is defined in the jms.xml file to associate with the MDB.
OC4J-Specific Deployment Descriptor (orion-ejb-jar.xml)The OC4J-specific deployment descriptor associates the MDB to the correct queue or topic. You could have several topics and queues defined in your jms.xml file. For information on defining these JMS Destination types in jms.xml, see either "JMS Destination Object Configuration" on page 7-9 or the JMS chapter in Oracle9iAS Containers for J2EE Services Guide.
In order to identify the Destination that is to be associated with the MDB, you map the Destination location and connection factory location to the MDB through the <message-driven-deployment> element in the orion-ejb-jar.xml file.
The following is the orion-ejb-jar.xml deployment descriptor for the MessageBean example. It maps a JMS Topic to the MessageBean MDB, providing the following:
■ MDB name, as defined in the <ejb-name> in the EJB deployment descriptor, is specified in the name attribute.
■ JMS Destination, as defined in the jms.xml file, is specified in the destination-location attribute.
Message-Driven Beans 7-11

MDB Implementation Using Oracle JMS
■ JMS Destination Connection Factory, as defined in the jms.xml file, is specified in the connection-factory-location attribute.
■ A durable topic name, which is user-defined, is specified in the subscription-name attribute.
Once all of these are specified in the <message-driven-deployment> element, the container knows how to map the MDB to the correct JMS Destination.
<enterprise-beans> ... <message-driven-deployment name="MessageBeanTpc" connection-factory-location="jms/Topic/senderTopicConnectionFactory" destination-location="jms/Topic/senderTopic" subscription-name="MDBSUB"> </message-driven-deployment> ...</enterprise-beans>
Deploying the MDBArchive your EJB into a JAR file. You deploy the MDB the same way as the session bean, which is detailed in "Prepare the EJB Application for Assembly" on page 2-27 and "Deploy the Enterprise Application to OC4J" on page 2-29.
MDB Implementation Using Oracle JMS The MDB processes incoming asynchronous requests using Oracle JMS (Advanced Queueing) as follows:
1. The MDB opens a JMS connection to the database using a data source with a username and password. The data source represents the Oracle JMS resource provider and uses a JDBC driver to facilitate the JMS connection.
2. The MDB opens a JMS session over the JMS connection.
3. Any message for the MDB is routed to the onMessage method of the MDB from the queue or topic. Other clients may have access to the same queue or topic to put on messages for the MDB.
Note: Instructions on how a client sends a JMS message to the MDB is discussed in "Client Access of MDB" on page 7-21.
7-12 Oracle9iAS Containers for J2EE Enterprise JavaBeans Developer’s Guide

MDB Implementation Using Oracle JMS
At any time, the client can send a message to the Oracle JMS topic or queue, which is located in the database.
Figure 7–2 Demonstration of an MDB Interacting with an Oracle JMS Destination
The following sections demonstrate an MDB that uses Oracle JMS as the resource provider.
■ Install And Configure The Resource Provider
■ Configure the OC4J XML Files For The Resource Provider
■ Create the Deployment Descriptor to Map Oracle JMS Destination Objects
■ Deploy the MDB
Note: The entire MDB example is available on OTN from the OC4J sample code page at http://otn.oracle.com/sample_code/tech/java/oc4j/htdocs/oc4jsamplecode/oc4j-demo-ejb.html.
JMS connection over a
JDBC connectionQueue or TopicMDB DS
OC4J
CLIENT
Message-Driven Beans 7-13

MDB Implementation Using Oracle JMS
Install And Configure The Resource ProviderYou or your DBA must install Oracle JMS according to the Oracle9i Application Developer’s Guide - Advanced Queuing and generic database manuals. Once you have installed and configured this JMS provider, you must apply additional configuration for each MDB. This includes the following:
1. You or your DBA should create an RDBMS user through which the MDB connects to the database. Grant this user appropriate access privileges to perform Oracle JMS operations. See "Create User and Assign Privileges" on page 7-14.
2. You or your DBA should create the tables and queues to support the JMS Destination objects. See "Create JMS Destination Objects" on page 7-15.
Create User and Assign Privileges Create an RDBMS user through which the MDB connects to the database. Grant access privileges to this user to perform Oracle JMS operations. The privileges that you need depend on what functionality you are requesting. Refer to the Oracle9i Application Developer’s Guide - Advanced Queuing for more information on privileges necessary for each type of function.
The following example creates MYUSER, which must be created within its own schema, with privileges required for Oracle JMS operations. Some of these privileges are only required for this demo; thus, the privileges are grouped into two groups: one for all MDBs and one for this example.
create user MYUSER identified by MYPASSWORD;
grant create database link, create sequence, create session, create synonym, create public synonym, drop public synonym, create table, create view, create indextype,
Note: A full description of how to use each resource provider is discussed in the JMS chapter in the Oracle9iAS Containers for J2EE Services Guide. or the Oracle9i Application Developer’s Guide - Advanced Queuing.
Note: The following sections use the SQL for creating queues, topics, their tables, and assigning privileges that is provided within the MDB demo on OTN.
7-14 Oracle9iAS Containers for J2EE Enterprise JavaBeans Developer’s Guide

MDB Implementation Using Oracle JMS
create procedure, create trigger, create type, unlimited tablespace to MYUSER;grant connect, resource to MYUSER;grant execute on sys.dbms_aqadm to MYUSER;grant execute on sys.dbms_aq to MYUSER;grant execute on sys.dbms_aqin to MYUSER;grant execute on sys.dbms_aqjms to MYUSER;grant aq_administrator_role to MYUSER;
connect MYUSER/MYPASSWORD;
You may need to grant other privileges, such as two-phase commit (requires FORCE ANY TRANSACTION) or system administration privileges, based on what the user needs.
grant force any transaction to MYUSER;
Create JMS Destination ObjectsEach resource provider requires its own method for creating the JMS Destination object. Refer to the Oracle9i Application Developer’s Guide - Advanced Queuing for more information on the DBMS_AQADM packages and Oracle JMS messages types. For our example, Oracle JMS requires the following methods:
1. Create the tables that handle the JMS Destination (queue or topic).
In Oracle JMS, both topics and queues use a queue table. The Oracle JMS example within this chapter creates two tables: QTque for a queue and QTtpc for a topic.
To create the queue table, execute the following SQL:
DBMS_AQADM.CREATE_QUEUE_TABLE( Queue_table => ’QTque’, Queue_payload_type => ’SYS.AQ$_JMS_BYTES_MESSAGE’, multiple_consumers => false);
The type of message is defined as one of the following:
■ Bytes: SYS.AQ$_JMS_BYTES_MESSAGE
■ Map: SYS.AQ$_JMS_MAP_MESSAGE
Note: The SQL for creating the tables for the Oracle JMS example is included in the MDB example available from OTN.
Message-Driven Beans 7-15

MDB Implementation Using Oracle JMS
■ Stream: SYS.AQ$_JMS_STREAM_MESSAGE
■ Text: SYS.AQ$_JMS_TEXT_MESSAGE
■ Object: SYS.AQ$_JMS_OBJECT_MESSAGE
The third parameter denotes whether there are multiple consumers or not; thus, is always false for a queue and true for a topic.
To create the topic table, execute the following SQL:
DBMS_AQADM.CREATE_QUEUE_TABLE( Queue_table => ’QTtpc’, Queue_payload_type => ’SYS.AQ$_JMS_BYTES_MESSAGE’, multiple_consumers => TRUE);
2. Create the JMS Destination. If you are creating a topic, you must add each subscriber for the topic. This example chooses to use durable subscribers, which results in additional configuration within the deployment descriptors.
The Oracle JMS example within this chapter requires a single topic with two subscribers—topic1 with MDBSUB and MDBSUB2—and a single queue—queue1.
The following creates a topic called topic1 within the topic table QTtpc. After creation, two durable subscribers are added to the topic. Finally, the topic is started and a user is granted a privilege to it.
DBMS_AQADM.CREATE_QUEUE( ’topic1’, ’QTtpc’);DBMS_AQADM.ADD_SUBSCRIBER(’topic1’, sys.aq$_agent(’MDSUB’, null, null));DBMS_AQADM.ADD_SUBSCRIBER(’topic1’, sys.aq$_agent(’MDSUB2’, null, null));DBMS_AQADM.START_QUEUE(’topic1’);
The following creates a queue called queue1 within the queue table QTque. After creation, the queue is started.
DBMS_AQADM.CREATE_QUEUE( ’queue1’ , ’QTque’);DBMS_AQADM.START_QUEUE(’queue1’);
Configure the OC4J XML Files For The Resource ProviderTo use the Oracle JMS resource provider, you must configure the following in the OC4J XML files:
■ Configure the DataSource
■ Identify the JNDI Name Of The Oracle JMS Data Source
7-16 Oracle9iAS Containers for J2EE Enterprise JavaBeans Developer’s Guide

MDB Implementation Using Oracle JMS
Configure the DataSourceConfigure a data source for the database where the Oracle JMS resource provider is installed. The JMS topics and queues use database tables and queues to facilitate messaging. The type of data source you use depends on the functionality you want.
Transactional Functionality For no transactions or single-phase transactions, you can use either an emulated or non-emulated data sources. For two-phase commit transaction support, you can use only a non-emulated data source.
Example 7–2 Non-Emulated DataSource With Thin JDBC Driver
The following example contains a non-emulated data source that uses the thin JDBC driver. It can support a two-phase commit transaction; it cannot support session pooling.
The example is displayed in the format of an XML definition; see the Oracle9iAS Containers for J2EE User’s Guide for directions on adding a new data source to the configuration.
<data-source class="com.evermind.sql.OrionCMTDataSource" name="myDS" location="jdbc/MyDS" connection-driver="oracle.jdbc.driver.OracleDriver" username="myuser" password="mypasswd" url="jdbc:oracle:thin:@myhost.foo.com:1521:mydb" inactivity-timeout="30"/>
Customize this data source to match your environment. For example, substitute the host name, port, and SID of your database for mysun:1521:orcl.
Identify the JNDI Name Of The Oracle JMS Data SourceIdentify the JNDI name of the data source that is to be used as the Oracle JMS resource provider within the <resource-provider> element.
Note: Instead of providing the password in the clear, you can use password indirection. For details, see the Oracle9iAS Containers for J2EE Services Guide.
Message-Driven Beans 7-17

MDB Implementation Using Oracle JMS
■ If this is to be the resource provider for all applications (global), configure the global application.xml file.
■ If this is to be the resource provider for a single application (local), configure the orion-application.xml file of the application.
The following code sample shows how to configure the resource provider using XML syntax for Oracle JMS.
■ class attribute—The Oracle JMS resource provider is implemented by the oracle.jms.OjmsContext class, which is configured in the class attribute.
■ property attribute—Identify the data source that is to be used as this resource provider in the property element. The topic or queue connects to this data source to access the tables and queues that facilitate the messaging.
The following example demonstrates that the data source identified by "jdbc/myDS" is to be used as the Oracle JMS resource provider. This JNDI name is identified in the location element in Example 7–2.
<resource-provider class="oracle.jms.OjmsContext" name="cartojms1"> <description> OJMS/AQ </description> <property name="datasource" value="jdbc/myDS"></property></resource-provider>
Create the Deployment Descriptor to Map Oracle JMS Destination ObjectsTo create an MDB that uses the Oracle JMS resource provider, perform the following steps:
1. Implement the bean, as shown in "MDB Example" on page 7-3.
2. Create the MDB deployment descriptors.
a. Define the JMS connection factory and Destination used in the EJB deployment descriptor. Define if any durable subscriptions are used.
b. Map the JMS connection factory and Destination type to the MDB in the OC4J-specific deployment descriptor—orion-ejb-jar.xml.
c. If the MDB is a container-managed transaction, specify the onMessage method in the <container-transaction> element.
3. Create an EJB JAR file containing the bean and the deployment descriptors. Configure the application-specific application.xml file, create an EAR file, and install the EJB in OC4J.
7-18 Oracle9iAS Containers for J2EE Enterprise JavaBeans Developer’s Guide

MDB Implementation Using Oracle JMS
The deployment descriptors define MDB configuration in the <message-driven> element.
■ The EJB deployment descriptor (ejb-jar.xml) specifies whether a queue or a topic is used. The MessageBean example defines a durable topic, as shown in "MDB Example" on page 7-3.
■ The OC4J-specific deployment descriptor (orion-ejb-jar.xml) associates the queue or topic with the actual JMS Destination created in the resource provider.
OC4J-Specific Deployment Descriptor (orion-ejb-jar.xml)Once you have configured the MDB and the JMS Destination type, inform the container which JMS Destination to associate with the MDB. To identify the Destination that is to be associated with the MDB, map the Destination location and connection factory to the MDB through the <message-driven-deployment> element in the orion-ejb-jar.xml file.
The following is the orion-ejb-jar.xml deployment descriptor for the MessageBean example. It maps an Oracle JMS Topic to the MessageBean MDB, providing the following:
■ MDB name, as defined in the <message-driven><ejb-name> in the EJB deployment descriptor, is specified in the name attribute.
■ JMS Destination Connection Factory is specified in the connection-factory-location attribute. The syntax is "java:comp/resource" + resource provider name + "TopicConnectionFactories" or "QueueConnectionFactories" + a user defined name. The user-defined name can be anything and does not match any other configuration. The client uses this name to access the connection factory.
The xxxConnectionFactories details what type of factory is being defined. For this example, the resource provider name is defined in the <resource-provider> element in the application.xml file as cartojms1 and the user defined name is aqTcf.
■ JMS Destination is specified in the destination-location element. The syntax is "java:comp/resource" + resource provider name + "Topics" or "Queues" + Destination name. The Topic or Queue details what type of Destination is being defined. The Destination name is the actual queue or topic name defined in the database.
Message-Driven Beans 7-19

MDB Implementation Using Oracle JMS
For this example, the resource provider name is defined in the <resource-provider> element in the application.xml file as cartojms1. In this example, the topic name is topic1.
■ Because this is a topic, the subscription name is defined in the subscription-name attribute. Two subscriptions were created from the SQL in the database: MDBSUB and MDBSUB2. This topic uses the MDBSUB subscription.
■ Listener threads, as defined in the listener-threads attribute. The listener threads are spawned off when MDBs are deployed and are used to listen for incoming JMS messages on the topic or queue. These threads concurrently consume JMS messages. The default is one thread.
■ transaction timeout, as defined in the transaction-timeout attribute. This attribute controls the transaction timeout interval for any container-managed transactional MDB. The default is one day. If the transaction has not completed in this time frame, the transaction is rolled back.
After you specify all of these in the <message-driven-deployment> element, the container knows how to map the MDB to the correct JMS Destination.
<enterprise-beans> <message-driven-deployment name="MessageBeanTpc" connection-factory-location= "java:comp/resource/cartojms1/TopicConnectionFactories/aqTcf" destination-location="java:comp/resource/cartojms1/Topics/topic1" subscription-name="MDBSUB" listener-threads=50 transaction-timeout=172800> ...</enterprise-beans>
Deploy the MDBArchive your MDB into a JAR file. You deploy the MDB in the same way as the session bean, which "Prepare the EJB Application for Assembly" on page 2-27 and "Deploy the Enterprise Application to OC4J" on page 2-29 describe.
Note: Instructions on how a client sends a JMS message to the MDB is discussed in "Client Access of MDB" on page 7-21.
7-20 Oracle9iAS Containers for J2EE Enterprise JavaBeans Developer’s Guide

Client Access of MDB
Client Access of MDBThe client—which can be a pure Java client, a JSP, servlet, or EJB—sends a message to the MDB through a JMS Destination. The client can retrieve the JMS Destination and connection factory either through using its explicit name or by a logical name. The following sections describe both methods for retrieving the JNDI name.
■ Using a Logical Name for Accessing the MDB
■ Using an Explicit Name for the JNDI Lookup
Using a Logical Name for Accessing the MDBIf you want to use a logical name in your client application code, then define a <resource-ref> element and map it to the topic or queue name in a <resource-ref-mapping> element in the client XML files, as follows:
■ A true Java client—in the application-client.xml file
■ An EJB client—the ejb-jar.xml file
■ For JSPs and servlets—the web.xml file
You can create logical names for the connection factory and Destination objects, as follows:
■ The connection factory is identified in the client’s XML deployment descriptor file within a <resource-ref> element.
– The logical name that you want the connection factory to be identified as is defined in the <res-ref-name> element.
– The connection factory class type is defined in the <res-type> element as either javax.jms.QueueConnectionFactory or javax.jms.TopicConnectionFactory.
– The authentication responsibility (Container or Bean) is defined in the <res-auth> element.
Note: You may have to add the JNDI properties if the client is not co-located with the MDB. The examples provided in the following sections do not include setting the JNDI properties. See "Client Implementation to Invoke the EJB" on page 7-21 for instructions on setting these properties.
Message-Driven Beans 7-21

Client Access of MDB
– The sharing scope (Shareable or Unshareable) is defined in the <res-sharing-scope> element.
■ The JMS Destination—the topic or queue—is identified in a <resource-env-ref> element.
– The logical name that you want the topic or queue to be identified as is defined in the <resource-env-ref-name> element.
– The Destination class type is defined in the <resource-env-ref-type> element as either javax.jms.Queue or javax.jms.Topic.
The following shows an example of how to specify logical names for our topic example.
<resource-ref> <res-ref-name>senderTopicConnectionFactory</res-ref-name> <res-type>javax.jms.TopicConnectionFactory</res-type> <res-auth>Container</res-auth> <res-sharing-scope>Shareable</res-sharing-scope></resource-ref><resource-env-ref> <resource-env-ref-name>senderTopic</resource-env-ref-name> <resource-env-ref-type>javax.jms.Topic</resource-env-ref-type></resource-env-ref>
Then, you map the logical names to actual names in the OC4J deployment descriptors. The actual names, or JNDI names, are different in OC4J JMS than in Oracle JMS. However, the mapping is defined in one of the following XML files:
■ For a true Java client—the orion-application-client.xml
■ For an EJB client—the orion-ejb-jar.xml
■ For JSPs and servlets—the orion-web.xml file.
The logical names in the client’s deployment descriptor are mapped as follows:
■ The logical name for the connection factory defined in the <resource-ref> element is mapped to its JNDI name in the <resource-ref-mapping> element.
■ The logical name for the JMS Destination defined in the <resource-env-ref> element is mapped to its JNDI name in the <resource-env-ref-mapping> element.
7-22 Oracle9iAS Containers for J2EE Enterprise JavaBeans Developer’s Guide

Client Access of MDB
JNDI Naming for OC4J JMS The JNDI name for the OC4J JMS Destination and connection factory is defined by you within the jms.xml file. As shown in "JMS Destination Object Configuration" on page 7-9, the JNDI names for the topic and the topic connection factory are as follows:
■ The JNDI name for the topic is "jms/Topic/senderTopic."
■ The JNDI name for the topic connection factory is "jms/Topic/senderTopicConnectionFactory."
Prepend both of these names with "java:comp/env/" and you have the mapping in the orion-ejb-jar.xml file as follows:
<resource-ref-mapping name="senderTopicConnectionFactory" location="java:comp/env/jms/Topic/senderTopicConnectionFactory"></resource-ref-mapping>
<resource-env-ref-mapping name="senderTopic" location="java:comp/env/jms/Topic/senderTopic"></resource-env-ref-mapping>
JNDI Naming for Oracle JMSThe JNDI naming for Oracle JMS Destination and connection factory objects is the same name that was specified in the orion-ejb-jar.xml file for the MDB as described in "OC4J-Specific Deployment Descriptor (orion-ejb-jar.xml)" on page 7-19.
■ The connection factory syntax is "java:comp/resource" + resource provider name + "TopicConnectionFactories" or "QueueConnectionFactories" + a user defined name. The xxxConnectionFactories details what type of factory is being defined. For this example, the orion-ejb-jar.xml file defines the connection factory name as "java:comp/resource/cartojms1/TopicConnectionFactories/aqTcf".
■ The JMS Destination syntax is "java:comp/resource" + resource provider name + "Topics" or "Queues" + Destination name. The Topic or Queue details what type of Destination is being defined. The Destination name is the actual queue or topic name defined in the database.
For this example, the orion-ejb-jar.xml lfile defines the JNDI name for the topic as "java:comp/resource/cartojms1/Topics/topic1."
Message-Driven Beans 7-23

Client Access of MDB
The following example maps the logical names for the connection factory and topic to their actual JNDI names. Specifically, the topic defined logically as "senderTopic" in the ejb-jar.xml file is mapped to its JNDI name of "java:comp/resource/cartojms1/Topics/topic1."
<resource-ref-mapping name="senderTopicConnectionFactory" location="java:comp/resource/cartojms1/TopicConnectionFactories/aqTcf"></resource-ref-mapping>
<resource-env-ref-mapping name="senderTopic" location="java:comp/resource/cartojms1/Topics/topic1"></resource-env-ref-mapping>
Client Sends JMS Message Using Logical NamesOnce the resources have been defined, the client sends a JMS message to the MDB by doing the following:
1. Retrieve both the configured JMS Destination and its connection factory using a JNDI lookup.
2. Create a connection from the connection factory. For a queue, start the connection.
3. Create a session over the connection.
4. Providing the retrieved JMS Destination, create a sender for a queue, or a publisher for a topic.
5. Create the message.
6. Send out the message using either the queue sender or the topic publisher.
7. Close the queue session. Close the connection for either JMS Destination types.
The following JSP client code sends a message over a topic to the MessageBean MDB.
<%@ page import="javax.jms.*, javax.naming.*, java.util.*" %><%
//1a. Lookup the MessageBean topicjndiContext = new InitialContext();topic = (Topic)jndiContext.lookup("senderTopic");
7-24 Oracle9iAS Containers for J2EE Enterprise JavaBeans Developer’s Guide

Client Access of MDB
//1b. Lookup the MessageBean Connection factorytopicConnectionFactory = (TopicConnectionFactory)jndiContext.lookup("senderTopicConnectionFactory");
//2 & 3. Retrieve a connection and a session on top of the connectiontopicConnection = topicConnectionFactory.createTopicConnection();topicSession = topicConnection.createTopicSession(true, Session.AUTO_ACKNOWLEDGE);
//4. Create the publisher for any messages destined for the topictopicPublisher = topicSession.createPublisher(topic);
//5 & 6. Create the message to be sent and send it.for (int ii = 0; ii < numMsgs; ii++){ message = topicSession.createBytesMessage(); String sndstr = "1::This is message " + (ii + 1) + " " + item; byte[] msgdata = sndstr.getBytes(); message.writeBytes(msgdata); topicPublisher.publish(message); System.out.println("--->Sent message: " + sndstr);}
//7. Close publisher, session, and connection for topictopicPublisher.close();topicSession.close();topicConnection.close();
%>Message sent!
Using an Explicit Name for the JNDI LookupInstead of mapping the JNDI names to a logical name, you can use the actual JNDI name. For this scenario, you would use the JNDI name, plus the prepended string, for each JMS resource provider directly in the JNDI lookup. The following sections show how a client would access both resource providers with explicit JNDI names.
Accessing OC4J JMS Destination with Explicit JNDI NamesThe JNDI lookup requires the OC4J JMS Destination and connection factory as defined by you within the jms.xml file, prepended with "java:comp/env/." The JNDI lookup statements for the MessageBean example are as follows:
Message-Driven Beans 7-25

Using Transactions With MDBs
//Lookup the MessageBean Topictopic = (Topic)jndiContext.lookup("java:comp/env/jms/Topic/senderTopic");
//Lookup the MessageBean Connection factorytopicConnectionFactory = (TopicConnectionFactory)jndiContext.lookup("java:comp/env/jms/Topic/senderTopicConnectionFactory");
Note that the same names for the topic and the connection factory are used in the client’s configuration, the jms.xml, and the MDB deployment descriptors.
Accessing Oracle JMS Destination with Explicit JNDI NamesThe JNDI lookup requires the Oracle JMS Destination and connection factory as would have been defined by you within the orion-ejb-jar.xml file. See "JNDI Naming for Oracle JMS" on page 7-23. The JNDI lookup statements for the MessageBean example are as follows:
/* Retrieve an Oracle JMS Topic through JNDI */topic = (Topic) ic.lookup("java:comp/resource/ojms/Topics/topic1");/*Retrieve the Oracle JMS Topic connection factory */topicConnectionFactory = (TopicConnectionFactory) ic.lookup ("java:comp/resource/ojms/TopicConnectionFactories/aqTcf");
Using Transactions With MDBsThe default transaction attribute (trans-attribute) for MDBs is different from all other entity beans. For all other entity beans, the default is REQUIRED; for MDBs, the default is NOT_SUPPORTED.
7-26 Oracle9iAS Containers for J2EE Enterprise JavaBeans Developer’s Guide

Configuring EJB Application Security 8-1
8Configuring EJB Application Security
EJB application security involves two realms: granting permissions if you download into a browser and configuring your application for authentication and authorization. This chapter talks about setting up users, roles, and groups for EJBs. However, for basic OC4J security configuration information, including CSiV2, see the Oracle9iAS Containers for J2EE Security Guide.
This chapter covers the following subjects:
■ Granting Permissions in Browser
■ Authenticating and Authorizing EJB Applications
■ Specifying Credentials in EJB Clients

Granting Permissions in Browser
8-2 Oracle9iAS Containers for J2EE Enterprise JavaBeans Developer’s Guide
Granting Permissions in BrowserIf you download the EJB application as a client where the security manager is active, you must grant the following permissions before you can execute:
permission java.net.SocketPermission "*:*", "connect,resolve";permission java.lang.RuntimePermission "createClassLoader";permission java.lang.RuntimePermission "getClassLoader";permission java.util.PropertyPermission "*", "read";permission java.util.PropertyPermission "LoadBalanceOnLookup",
"read,write";
Authenticating and Authorizing EJB ApplicationsFor EJB authentication and authorization, you define the principals under which each method executes by configuring of the EJB deployment descriptor. The container enforces that the user who is trying to execute the method is the same as defined within the deployment descriptor.
The EJB deployment descriptor enables you to define security roles under which each method is allowed to execute. These methods are mapped to users or groups in the OC4J-specific deployment descriptor. The users and groups are defined within your designated security user managers, which uses either the JAZN or XML user manager. For a full description of security user managers, see the Oracle9iAS Containers for J2EE User’s Guide and Oracle9iAS Containers for J2EE Services Guide.
For authentication and authorization, this section focuses on XML configuration within the EJB deployment descriptors. EJB authorization is specified within the EJB and OC4J-specific deployment descriptors. You can manage the authorization piece of your security within the deployment descriptors, as follows:
■ The EJB deployment descriptor describes access rules using logical roles.
■ The OC4J-specific deployment descriptor maps the logical roles to concrete users and groups, which are defined either the JAZN or XML user managers.
Users and groups are identities known by the container. Roles are the logical identities each application uses to indicate access rights to its different objects. The username/passwords can be digital certificates and, in the case of SSL, private key pairs.
Thus, the definition and mapping of roles is demonstrated in Figure 8–1.

Authenticating and Authorizing EJB Applications
Configuring EJB Application Security 8-3
Figure 8–1 Role Mapping
Defining users, groups, and roles are discussed in the following sections:
■ Specifying Users and Groups
■ Specifying Logical Roles in the EJB Deployment Descriptor
■ Specifying Unchecked Security for EJB Methods
■ Specifying the runAs Security Identity
■ Mapping Logical Roles to Users and Groups
■ Specifying a Default Role Mapping for Undefined Methods
■ Specifying Users and Groups by the Client
Specifying Users and GroupsOC4J supports the definition of users and groups—either shared by all deployed applications or specific to given applications. You define shared or application-specific users and groups within either the JAZN or XML user managers. See the Oracle9iAS Containers for J2EE User’s Guide and Oracle9iAS Containers for J2EE Services Guide. for directions.
Note: For basic OC4J security configuration information, including CSiV2, see the Oracle9iAS Containers for J2EE Security Guide.
<security_role>
<security_role_mapping>
<group>
<user> <user><user>
ejb-jar.xml
orion-ejb-jar.xml
principals.xml
<security-role-ref><role-link>

Authenticating and Authorizing EJB Applications
8-4 Oracle9iAS Containers for J2EE Enterprise JavaBeans Developer’s Guide
Specifying Logical Roles in the EJB Deployment DescriptorAs shown in Figure 8–2, you can use a logical name for a role within your bean implementation, and map this logical name to the correct database role or user. The mapping of the logical name to a database role is specified in the OC4J-specific deployment descriptor. See "Mapping Logical Roles to Users and Groups" on page 8-8 for more information.
Figure 8–2 Security Mapping
If you use a logical name for a database role within your bean implementation for methods such as isCallerInRole, you can map the logical name to an actual database role by doing the following:
1. Declare the logical name within the <enterprise-beans> section <security-role-ref> element. For example, to define a role used within the purchase order example, you may have checked, within the bean’s implementation, to see if the caller had authorization to sign a purchase order. Thus, the caller would have to be signed in under a correct role. In order for the bean to not need to be aware of database roles, you can check isCallerInRole on a logical name, such as POMgr, since only purchase order managers can sign off on the order. Thus, you would define the logical security role, POMgr within the <security-role-ref><role-name> element within the <enterprise-beans> section, as follows:
EJB Deployment Descriptor
<enterprise-beans>... <security-role-ref> <role-name>POMgr</role-name> <role-link>myMgr</role-link> <security-role-ref...</enterprise-beans><assembly-descriptor>... <security-role> <role-name>myMgr</role-name> </security-role> <method-permission> <role-name>myMgr</role-name> <method>. . .</method> </method-permission>...</assembly-descriptor>

Authenticating and Authorizing EJB Applications
Configuring EJB Application Security 8-5
<enterprise-beans>... <security-role-ref> <role-name>POMgr</role-name> <role-link>myMgr</role-link> </security-role-ref></enterprise-beans>
The <role-link> element within the <security-role-ref> element can be the actual database role, which is defined further within the <assembly-descriptor> section. Alternatively, it can be another logical name, which is still defined more in the <assembly-descriptor> section and is mapped to an actual database role within the Oracle-specific deployment descriptor.
2. Define the role and the methods that it applies to. In the purchase order example, any method executed within the PurchaseOrder bean must have authorized itself as myMgr. Note that PurchaseOrder is the name declared in the <entity | session><ejb-name> element.
Thus, the following defines the role as myMgr, the EJB as PurchaseOrder, and all methods by denoting the ’*’ symbol.
<assembly-descriptor> <security-role> <description>Role needed purchase order authorization</description> <role-name>myMgr</role-name> </security-role> <method-permission> <role-name>myMgr</role-name> <method> <ejb-name>PurchaseOrder</ejb-name>
Note: The <security-role-ref> element is not required. You only specify it when using security context methods within your bean.
Note: The myMgr role in the <security-role> element is the same as the <role-link> element within the <enterprise-beans> section. This ties the logical name of POMgr to the myMgr definition.

Authenticating and Authorizing EJB Applications
8-6 Oracle9iAS Containers for J2EE Enterprise JavaBeans Developer’s Guide
<method-name>*</method-name> </method> </method-permission>...</assembly-descriptor>
After performing both steps, you can refer to POMgr within the bean’s implementation and the container translates POMgr to myMgr.
The <method-permission><method> element is used to specify the security role for one or more methods within an interface or implementation. According to the EJB specification, this definition can be of one of the following forms:
1. Defining all methods within a bean by specifying the bean name and using the ’*’ character to denote all methods within the bean, as follows:
<method-permission>
<role-name>myMgr</role-name> <method>
<ejb-name>EJBNAME</ejb-name><method-name>*</method-name>
</method></method-permission>
2. Defining a specific method that is uniquely identified within the bean. Use the appropriate interface name and method name, as follows:
<method-permission>
<role-name>myMgr</role-name> <method>
<ejb-name>myBean</ejb-name><method-name>myMethodInMyBean</method-name>
</method></method-permission>
Note: If you define different roles within the <method-permission> element for methods in the same EJB, the resulting permission is a union of all the method permissions defined for the methods of this bean.

Authenticating and Authorizing EJB Applications
Configuring EJB Application Security 8-7
3. Defining a method with a specific signature among many overloaded versions, as follows:
<method-permission>
<role-name>myMgr</role-name> <method>
<ejb-name>myBean</ejb-name><method-name>myMethod</method-name><method-params>
<method-param>javax.lang.String</method-param><method-param>javax.lang.String</method-param>
</method-params> </method>
</method-permission>
The parameters are the fully-qualified Java types of the method’s input parameters. If the method has no input arguments, the <method-params> element contains no elements. Arrays are specified by the array element’s type, followed by one or more pair of square brackets, such as int[ ][ ].
Specifying Unchecked Security for EJB MethodsIf you want certain methods to not be checked for security roles, you define these methods as unchecked, as follows:
<method-permission> <unchecked/> <method> <ejb-name>EJBNAME</ejb-name> <method-name>*</method-name> </method></method-permission>
Instead of a <role-name> element defined, you define an <unchecked/> element. When executing any methods in the EJBNAME bean, the container does not check for security. Unchecked methods always override any other role definitions.
Note: If there are multiple methods with the same overloaded name, the element of this style refers to all the methods with the overloaded name.

Authenticating and Authorizing EJB Applications
8-8 Oracle9iAS Containers for J2EE Enterprise JavaBeans Developer’s Guide
Specifying the runAs Security IdentityYou can specify that all methods of an EJB execute under a specific identity. That is, the container does not check different roles for permission to run specific methods; instead, the container executes all of the EJB methods under the specified security identity. You can specify a particular role or the caller’s identity as the security identity.
Specify the runAs security identity in the <security-identity> element, which is contained in the <enterprise-beans> section. The following XML demonstrates that the POMgr is the role under which all the entity bean methods execute.
<enterprise-beans> <entity> ... <security-identity> <run-as> <role-name>POMgr</role-name> </run-as> </security-identity>... </entity></enterprise-beans>
Alternatively, the following XML example demonstrates how to specify that all methods of the bean execute under the identity of the caller:
<enterprise-beans> <entity> ... <security-identity> <use-caller-identity/> </security-identity>... </entity></enterprise-beans>
Mapping Logical Roles to Users and GroupsYou can use logical roles or actual users and groups in the EJB deployment descriptor. However, if you use logical roles, you must map them to the actual users and groups defined either in the JAZN or XML User Managers.

Authenticating and Authorizing EJB Applications
Configuring EJB Application Security 8-9
Map the logical roles defined in the application deployment descriptors to JAZN or XML User Manager users or groups through the <security-role-mapping> element in the OC4J-specific deployment descriptor.
■ The name attribute of this element defines the logical role that is to be mapped.
■ The group or user element maps the logical role to a group or user name. This group or user must be defined in the JAZN or XML User Manager configuration. See Oracle9iAS Containers for J2EE User’s Guide and Oracle9iAS Containers for J2EE Services Guide for a description of the JAZN and XML User Managers.
Example 8–1 Mapping Logical Role to Actual Role
This example maps the logical role POMGR to the managers group in the orion-ejb-jar.xml file. Any user that can log in as part of this group is considered to have the POMGR role; thus, it can execute the methods of PurchaseOrderBean.
<security-role-mapping name="POMGR"> <group name="managers" /> </security-role-mapping>
To map this role to a specific user, do the following:
<security-role-mapping name="POMGR"> <user name="guest" /> </security-role-mapping>
Lastly, you can map a role to a specific user within a specific group, as follows:
<security-role-mapping name="POMGR"> <group name="managers" /><user name="guest" /> </security-role-mapping>
As shown in Figure 8–3, the logical role name for POMGR defined in the EJB deployment descriptor is mapped to managers within the OC4J-specific deployment descriptor in the <security-role-mapping> element.
Note: You can map a logical role to a single group or to several groups.

Authenticating and Authorizing EJB Applications
8-10 Oracle9iAS Containers for J2EE Enterprise JavaBeans Developer’s Guide
Figure 8–3 Security Mapping
Notice that the <role-name> in the EJB deployment descriptor is the same as the name attribute in the <security-role-mapping> element in the OC4J-specific deployment descriptor. This is what identifies the mapping.
Specifying a Default Role Mapping for Undefined MethodsIf any methods have not been associated with a role mapping, they are mapped to the default security role through the <default-method-access> element in the orion-ejb-jar.xml file. The following is the automatic mapping for any insecure methods:
<default-method-access> <security-role-mapping name="<default-ejb-caller-role>" impliesAll="true" > </security-role-mapping></default-method-access>
The default role is <default-ejb-caller-role> and is defined in the name attribute. You can replace this string with any name for the default role. The impliesAll attribute indicates whether any security role checking occurs for these methods. This attribute defaults to true, which states that no security role checking occurs for these methods. If you set this attribute to false, the container will check for this default role on these methods.
If the impliesAll attribute is false, you must map the default role defined in the name attribute to a JAZN or XML user or group through the <user> and <group> elements. The following example shows how all methods not associated with a method permission are mapped to the "others" group.
EJB Deployment Descriptor OC4J-specific Deployment Descriptor
... <security-role> <role-name>POMGR</role-name> </security-role> <method-permission> <role-name>POMGR</role-name> <method>. . .</method> </method-permission>...</assembly-descriptor>
<assembly-descriptor> <security-role-mapping name="POMGR"> <group name="managers">
</assembly-descriptor> </security-role-mapping>

Specifying Credentials in EJB Clients
Configuring EJB Application Security 8-11
<default-method-access> <security-role-mapping name="default-role" impliesAll="false" > <group name="others" /> </security-role-mapping></default-method-access>
Specifying Users and Groups by the ClientIn order for the client to access methods that are protected by users and groups, the client must provide the correct user or group name with a password that the JAZN or XML User Manager recognizes. And the user or group must be the same one as designated in the security role for the intended method. See "Specifying Credentials in EJB Clients" on page 8-11 for more information.
Specifying Credentials in EJB ClientsWhen you access EJBs in a remote container, you must pass valid credentials to this container. See "Setting JNDI Properties" on page 2-17 for more information.
■ Pure Java clients define their credentials in the jndi.properties file deployed with the EAR file.
■ Servlets or JavaBeans running within the container pass their credentials within the InitialContext, which is created to look up the remote EJBs.
Credentials in JNDI PropertiesIndicate the username (principal) and password (credentials) to use when looking up remote EJBs in the jndi.properties file.
For example, if you want to access remote EJBs as POMGR/welcome, define the following properties. The factory.initial property indicates that you will use the Oracle JNDI implementation:
Note: For basic OC4J security configuration information, including CSiV2, see the Oracle9iAS Containers for J2EE Security Guide.
Note: For basic OC4J security configuration information, including CSiV2, see the Oracle9iAS Containers for J2EE Security Guide.

Specifying Credentials in EJB Clients
8-12 Oracle9iAS Containers for J2EE Enterprise JavaBeans Developer’s Guide
java.naming.security.principal=POMGRjava.naming.security.credentials=welcomejava.naming.factory.initial=
com.evermind.server.ApplicationClientInitialContextFactoryjava.naming.provider.url=opmn:ormi://opmnhost:oc4j_inst1/ejbsamples
In your application program, authenticate and access the remote EJBs, as shown below:
InitialContext ic = new InitialContext();CustomerHome = (CustomerHome)ic.lookup("java:comp/env/purchaseOrderBean");
Credentials in the InitialContextTo access remote EJBs from a servlet or JavaBean, pass the credentials in the InitialContext object, as follows:
Hashtable env = new Hashtable(); env.put("java.naming.provider.url",
"opmn:ormi://opmnhost:oc4j_inst1/ejbsamples"); env.put("java.naming.factory.initial",
"com.evermind.server.ApplicationClientInitialContextFactory"); env.put(Context.SECURITY_PRINCIPAL, "POMGR"); env.put(Context.SECURITY_CREDENTIALS, "welcome"); Context ic = new InitialContext (env); CustomerHome = (CustomerHome)ic.lookup("java:comp/env/purchaseOrderBean")

Advanced EJB Su
9
Advanced EJB SubjectsThis chapter discusses how to extend beyond the basics mentioned in each of the previous chapters.
Some of the EJB container services that you want to configure in the deployment descriptor are documented in other books. For information about data sources, JTA, JNDI, and RMI/IIOP, see the Oracle9iAS Containers for J2EE Services Guide. For information about security, including CSiV2, see the Oracle9iAS Containers for J2EE Security Guide.
This chapter covers the following subjects:
■ Packaging and Sharing Classes
■ EJB Lifecycle Issues
■ Techniques for Updating Persistence
■ Entity Bean Concurrency and Database Isolation Modes
■ Configuring Environment References
■ Common Errors
bjects 9-1

Packaging and Sharing Classes
Packaging and Sharing ClassesWhen you have an EJB or Web application that references other shared EJB classes, you should place the referenced classes in a shared JAR. In certain situations, if you copy the shared EJB classes into WAR file or another application that references them, you may receive a ClassCastException because of a class loader issue. To be completely safe, never copy referenced EJB classes into the WAR file of its application or into another application.
Web application: The Web application copies referenced EJB classes in its WAR file in the same application. As described in the Oracle9iAS Containers for J2EE Servlet Developer’s Guide, you can specify where to load the classes from in the <web-app-class-loader> element. However, when executing, the Web application retrieves the EJB bean reference using JNDI, the following may occur:
■ If the bean reference is loaded from within the EJB JAR file, no exceptions are thrown and the execution continues correctly.
■ If the bean reference is loaded from the copied classes within the WAR file, a ClassCastException is thrown.
Separate application: A separate application copies referenced EJB classes into its EAR file. If both applications are executing within the same process and the bean reference is retrieved using JNDI lookup, one of the following occurs:
■ If the bean reference is loaded from the source classes, no exceptions are thrown and the execution continues correctly.
■ If the bean reference is loaded from the copied classes, a ClassCastException is thrown.
To avoid this problem, do one of the following:
■ If two EJBs use the same classes, include these classes in one of the EJBs. Place both EJBs in the same JAR file. After deployment, both EJBs can use the common classes.
■ Place the shared classes in its own JAR file in the application. Reference the shared JAR file in the class-path of the EJB JAR manifest.mf file, as follows:
class-path:shared_classes.jar
The location of the shared_classes.jar is relative to where the JAR that references it is located in the EAR file. In this example, the shared_classes.jar file is at the same level as the EJB JAR.
9-2 Oracle9iAS Containers for J2EE Enterprise JavaBeans Developer’s Guide

EJB Lifecycle Issues
■ If all applications reference these classes, archive the shared classes in a JAR file and place this JAR file in the shared library directory of the default application. You can set shared library directories in the General Properties page of the default application. The home/lib is a default shared library.
■ If you want only certain applications to reference these classes, archive the shared classes in its own application, deploy the EAR for the application, and have the applications that reference the shared classes declare the shared classes application as its parent.
The default parent is the global application. The children see the namespace of its parent application. This is used in order to share services such as EJBs among multiple applications. See the Oracle9iAS Containers for J2EE User’s Guide for directions on how to specify a parent application.
EJB Lifecycle IssuesThe following sections describe the EJB lifecycle issues in OC4J:
■ When Does Stateful Session Bean Passivation Occur?
■ Configuring Pool Sizes For Entity Beans
■ Configuring Lazy Loading on CMP Entity Bean Finder Methods
When Does Stateful Session Bean Passivation Occur?Passivation enables the container to preserve the conversational state of an inactive idle bean instance by serializing the bean and its state into a secondary storage and removing it from memory. Before passivation, the container invokes the ejbPassivate() method enabling the bean developer to clean up held resources, such as database connections, TCP/IP sockets, or any resources that cannot be transparently passivated using object serialization. The object types that can be serialized and passivated are listed at the end of this section.
When a client invokes one of the methods of the passivated bean instance, the preserved conversational state data is activated, by de-serializing the bean from secondary storage and brought back into memory. Before activation, the container invokes the ejbActivate() method so that the bean developer can restore the resources released during ejbPassivate().
Passivation is enabled by default. You can turn off passivation for stateful session beans by setting the <sfsb-config> element in the server.xml file to false. There are rules on what type of attributes a stateful session bean can have. Some
Advanced EJB Subjects 9-3

EJB Lifecycle Issues
stateful session beans are not prepared for passivation and will fail everytime. In this case, disable passivation. The other reason is, passivation carries an overhead with it, and if they want speed and is not really worried about resources, then can turn this off.
An example of how to turn off passivation is as follows:
<sfsb-config enable-passivation="false"/>
Passivation is invoked based on any combination of the following criteria:
■ idle timeout expires
You can set an idle timeout for each bean. When this timeout expires, passivation occurs. Set the idletime attribute in <session-deployment> to the appropriate number of seconds. Default: 300 seconds. (5 min.). To disable, specify "never."
■ out of resources
Each of the following attributes in <session-deployment> define resource thresholds, when to check for those thresholds, and number of beans to passivate when the threshold is met.
* memory-threshold - This attribute defines a threshold for how much used JVM memory is allowed before passivation should occur. Specify an integer that is translated as a percentage. When reached, beans are passivated, even if their idle timeout has not expired. Default: 80%. To disable, specify "never."
* max-instances-threshold - This attribute defines a threshold for how many actives beans exist in relation to the max-instances attribute definition. Specify an integer that is translated as a percentage. If you define that the max-instances is 100 and the max-instances-threshold is 90%, then when the active bean instances reaches past 90, passivation of beans occurs. Default: 90%. To disable, specify "never."
* resource-check-interval - The container checks all resources at this time interval. At this time, if any of the thresholds have been
Note: See the <sfsb-config> element defined in the server.xml section of the Oracle9iAS Containers for J2EE User’s Guide appendix for more information.
9-4 Oracle9iAS Containers for J2EE Enterprise JavaBeans Developer’s Guide

EJB Lifecycle Issues
reached, passivation occurs. Default: 180 sec. (3 min.). To disable, specify "never."
* passivate-count - This attribute is an integer that defines the number of beans to be passivated if any of the resource thresholds have been reached. Passivation of beans is performed using the least recently used algorithm. Default: one-third of the max-instances attribute. You can disable this attribute by setting the count to zero or a negative number.
■ The number of bean instances allowed is reached
This number is set within the <session-deployment> max-instances attribute. The max-instances attribute controls the number of bean instances allowed in memory. When this value is reached, the container attempts to passivate the oldest bean instance from memory. If unsuccessful, the container waits the number of milliseconds set in the call-timeout attribute to see if a bean instance is removed from memory, either thru another passivation, calling the bean remove() method, or bean expiration, before a TimeoutExpiredException is thrown back to the client. Leave the max-instances value at zero to allow an infinite number of bean instances. Default is 0, which is infinite.
■ OC4J instance termination
All bean instances in the container’s memory that are not passivated are serialized to the secondary storage. Upon OC4J start-up, these passivated beans are restored back to memory.
For serialization (during passivation) to the secondary storage to be successful, the conversational state of a bean must consist of only primitive values and the following special types:
■ serializable objects
■ null
■ a reference to a component interface (EJBObject or EJBLocalObject)
■ a reference to a home interface (EJBHome or EJBLocalHome)
■ a reference to the SessionContext object
■ a reference to the environment naming context
■ a reference to the UserTransaction interface
■ a reference to a resource manager connection factory
Advanced EJB Subjects 9-5

EJB Lifecycle Issues
The bean developer is responsible for ensuring that all fields are of these types within the ejbPassivate() method. Any transient or non-serializable field should be set to null in this method.
If the passivation serialization fails, then the container attempts to recover the bean back to memory as if nothing happened. No future passivation attempts will occur for any beans that fail passivation. Also, if activation fails, the bean and its references are completely removed from the container.
If new bean data is propagated to a passivated bean in a cluster, then the bean instance data is overwritten by the propagated data.
Configuring Pool Sizes For Entity Beans You can set the minimum and maximum number of the bean instance pool, which contains EJB implementation instances that currently do not have assigned state. While the bean instance is in pool state, it is generic and can be assigned to a wrapper instance.
You can set the pool number with the following attributes of the <entity-deployment> element.
■ The max-instances attribute sets the maximum entity bean instances to be allowed in the pool. An entity bean is set to a pooled state if not associated with a wrapper instance. Thus, it is generic.
The default is 0, which means infinite. If you wanted to set the maximum bean implementation instances to 20, you would do as follows:
<entity-deployment ... max-instances="20" ...</entity-deployment>
■ The min-instances attribute sets the minimum number allowed in the pool as follows:
<entity-deployment ... min-instances="2" ...</entity-deployment>
9-6 Oracle9iAS Containers for J2EE Enterprise JavaBeans Developer’s Guide

EJB Lifecycle Issues
Configuring Lazy Loading on CMP Entity Bean Finder MethodsEach finder method retrieves one or more objects. In the default scenario (which is set to no lazy loading), the finder method causes a single SQL select statement to be executed against the database. For a CMP bean, one or more objects are retrieved with all of their CMP fields. So, for example, if you implement an ejbFindAllEmployees method, this finder retrieves all employee objects with all of the CMP fields in each employee object.
You may want to use the lazy loading feature if the following is true:
■ If the number of objects that you are retrieving is so large that loading them all into your local cache would be a performance degradation
■ If the number of CMP fields in the object is large (for example, 200 CMP fields in a single object) that loading multiple objects at the same time with all of its CMP fields would be a performance degradation
If you turn on lazy loading, then only the primary keys of the objects retrieved within the finder are returned. Then, only when you access the object within your implementation, the OC4J container uploads the actual object based on the primary key. With the ejbFindAllEmployees finder method example, all of the employee primary keys are returned in a Collection. Each time you access one of the employees in the Collection, OC4J uses the primary key to retrieve the single employee object from the database.
You have a performance consideration with lazy loading, as well. If you have lazy loading turned on, each time an object is accessed through its primary key, another round-trip is executed between the container and the database. If your implementation uses a bulk of the retrieved objects, you may consider using the default with no lazy loading turned on.
To turn on lazy loading in the findByPrimaryKey method, set the findByPrimaryKey-lazy-loading attribute to true, as follows:
<entity-deployment ... findByPrimaryKey-lazy-loading="true" ... >
To turn on lazy loading in any custom finder method, set the lazy-loading attribute to true in the <finder-method> element for that custom finder, as follows:
<finder-method ... lazy-loading="true" ...> ...</finder-method>
Advanced EJB Subjects 9-7

Techniques for Updating Persistence
Techniques for Updating PersistenceBy default, the container persists only the modified fields in the bean. At the end of each call, a SQL command is created to update these fields. However, if you want to have all of your persistence fields updated, set the following attribute to false:
<entity-deployment ... update-changed-fields-only="false" ...</entity-deployment>
If you choose to have all fields updated, the SQL parsing cache is used. The same SQL command is used for each update.
Entity Bean Concurrency and Database Isolation ModesIn order to avoid resource contention and overwriting each others changes to database tables while allowing concurrent execution, entity bean concurrency and database isolation modes are provided.
■ Database Isolation Modes
■ Entity Bean Concurrency Modes
Database Isolation ModesThe java.sql.Connection object represents a connection to a specific database. Database isolation modes are provided to define protection against resource contention. When two or more users try to update the same resource, a lost update can occur. That is, one user can overwrite the other user’s data without realizing it. The java.sql.Connection standard provides four isolation modes, of which Oracle only supports two of these modes. These are as follows:
■ TRANSACTION_READ_COMMITTED: Dirty reads are prevented; non-repeatable reads and phantom reads can occur. This level only prohibits a transaction from reading a row with uncommitted changes in it.
■ TRANSACTION_SERIALIZABLE: Dirty reads, non-repeatable reads and phantom reads are prevented. This level includes the prohibitions in TRANSACTION_REPEATABLE_READ and further prohibits the situation where one transaction reads all rows that satisfy a WHERE condition, a second transaction inserts a row that satisfies that WHERE condition, and the first transaction rereads for the same condition, retrieving the additional "phantom" row in the second read.
9-8 Oracle9iAS Containers for J2EE Enterprise JavaBeans Developer’s Guide

Entity Bean Concurrency and Database Isolation Modes
You can configure one of these database isolation modes for a specific bean. That is, you can specify that when the bean starts a transaction, the database isolation mode for this bean be what is specified in the OC4J-specific deployment descriptor. Specify the isolation mode on what is important for the bean: parallel execution or data consistency. The isolation mode for this bean is set for the entire transaction.
The isolation mode can be set for each entity bean in the isolation attribute of the <entity-deployment> element. The values can be committed or serializable. The default is committed. To change it to serializable, configure the following in the orion-ejb-jar.xml for the intended bean:
<entity-deployment ... isolation="serializable" ...</entity-deployment>
There is always a trade-off between performance and data consistency. The serializable isolation mode provides data consistency; the committed isolation mode provides for parallel execution.
If you do not set an isolation mode, you receive the mode that is configured in the database. Setting the isolation mode within the OC4J-specific deployment descriptor temporarily overrides the database configured isolation mode for the life of the global transaction for this bean. That is, if you define the bean to use the serializable mode, then the OC4J container will force the database to be serializable for this bean only until the end of the transaction.
Entity Bean Concurrency ModesOC4J also provides concurrency modes for handling resource contention and parallel execution within container-managed persistence (CMP) entity beans.
Note: There is a danger of lost updates with the serializable mode if the max-tx-retries element in the OC4J-specific deployment descriptor is greater than zero. The default for this value is three. If this element is set to greater than zero, then the container retries the update if a second blocked client receives a ORA-8177 exception. The retry would find the row unlocked and the update would occur. Thus, the second client’s update succeeds and overwrites the first client’s update. If you use serializable, you should consider setting the max-tx-retries element to zero for data consistency.
Advanced EJB Subjects 9-9

Entity Bean Concurrency and Database Isolation Modes
Bean-managed persistence entity beans manage the resource locking within the bean implementation themselves. The concurrency modes configure when to block to manage resource contention or when to execute in parallel.
The concurrency modes are as follows:
■ PESSIMISTIC: This manages resource contention and does not allow parallel execution. Only one user at a time is allowed to execute the entity bean at a single time.
■ OPTIMISTIC: Multiple users can execute the entity bean in parallel. It does not monitor resource contention; thus, the burden of the data consistency is placed on the database isolation modes.
■ READ-ONLY: Multiple users can execute the entity bean in parallel. The container does not allow any updates to the bean’s state.
To enable the CMP entity bean concurrency mode, add the appropriate concurrency value of "pessimistic", "optimistic", or "read-only" to the locking-mode attribute of the <entity-deployment> element in the OC4J-specific deployment descriptor (orion-ejb-jar.xml). The default is "optimistic". To modify the concurrency mode to pessimistic, do the following:
<entity-deployment ... locking-mode="pessimistic" ...</entity-deployment>
These concurrency modes are defined per bean and the effects of locking apply on the transaction boundaries.
Parallel execution requires that the pool size for wrapper and bean instances are set correctly. For more information on how to configure the pool sizes, see "Configuring Environment References" on page 9-12.
Exclusive Write Access to the DatabaseThe exclusive-write-access attribute of the <entity-deployment> element states that this is the only bean that accesses its table in the database and that no external methods are used to update the resource. It informs the OC4J instance that any cache maintained for this bean will only be dirtied by this bean. Essentially, if you set this attribute to true, you are assuring the container that this is the only bean that will update the tables used within this bean. Thus, any cache maintained for the bean does not need to constantly update from the back-end database.
9-10 Oracle9iAS Containers for J2EE Enterprise JavaBeans Developer’s Guide

Entity Bean Concurrency and Database Isolation Modes
This flag does not prevent you from updating the table; that is, it does not actually lock the table. However, if you update the table from another bean or manually, the results are not automatically updated within this bean.
The default for this attribute is false. Because of the effects of the entity bean concurrency modes, this element is only allowed to be set to true for a read-only entity bean. OC4J will always reset this attribute to false for pessimistic and optimistic concurrency modes.
<entity-deployment ... exclusive-write-access="true" ...</entity-deployment>
Effects of the Combination of Isolation and Concurrency ModesFor the pessimistic and read-only concurrency modes, the setting of the database isolation mode does not matter. These isolation modes only matter if an external source is modifying the database.
If you choose optimistic with committed, you have the potential to lose an update. If you choose optimistic with serializable, you will never lose an update. Thus, your data will always be consistent. However, you can receive an ORA-8177 exception as a resource contention error.
Differences Between Pessimistic and Optimistic/SerializableAn entity bean with the pessimistic concurrency mode does not allow multiple clients to execute the bean instance. Only one client is allowed to execute the instance at any one moment. An entity bean with the optimistic concurrency mode allows multiple instances of the bean implementation to execute in parallel. Setting the database isolation mode to serializable does not allow these multiple bean implementation instances to update the same row at the same time. Thus, the only difference between a pessimistic concurrency bean and an optimistic/serializable bean is where the blocking occurs. A pessimistic bean blocks at the bean instance; the other blocks at the database row.
Affects of Concurrency Modes on ClusteringAll concurrency modes behave in a similar manner whether they are used within a standalone or a clustered environment. This is because the concurrency modes are locked at the database level. Thus, even if a pessimistic bean instance is clustered across nodes, the instant one instance tries to execute, the database locks out all other instances.
Advanced EJB Subjects 9-11

Configuring Environment References
Configuring Environment ReferencesYou can create three types of environment elements that are accessible to your bean during runtime: environment variables, EJB references, and resource managers. These environment elements are static and can not be changed by the bean.
ISVs typically develop EJBs that are independent from the EJB container. In order to distance the bean implementation from the container specifics, you can create environment elements that map to one of the following: defined variables, entity beans, or resource managers. This indirection enables the bean developer to refer to existing variables, EJBs, and a JDBC DataSource without specifying the actual name. These names are defined in the deployment descriptor and are linked to the actual names within the OC4J-specific deployment descriptor.
Environment variablesYou can create environment variables that your bean accesses through a lookup on the InitialContext. These variables are defined within an <env-entry> element and can be of the following types: String, Integer, Boolean, Double, Byte, Short, Long, and Float. The name of the environment variable is defined within <env-entry-name>, the type is defined in <env-entry-type>, and its initialized value is defined in <env-entry-value>. The <env-entry-name> is relative to the "java:comp/env" context.
For example, the following two environment variables are declared within the XML deployment descriptor for java:comp/env/minBalance and java:comp/env/maxCreditBalance.
<env-entry> <env-entry-name>minBalance</env-entry-name> <env-entry-type>java.lang.Integer</env-entry-type> <env-entry-value>500</env-entry-value></env-entry><env-entry> <env-entry-name>maxCreditBalance</env-entry-name> <env-entry-type>java.lang.Integer</env-entry-type> <env-entry-value>10000</env-entry-value></env-entry>
Within the bean’s code, you would access these environment variables through the InitialContext, as follows:
InitialContext ic = new InitialContext();
9-12 Oracle9iAS Containers for J2EE Enterprise JavaBeans Developer’s Guide

Configuring Environment References
Integer min = (Integer) ic.lookup("java:comp/env/minBalance");Integer max = (Integer) ic.lookup("java:comp/env/maxCreditBalance"));
Notice that to retrieve the values of the environment variables, you prefix each environment element with "java:comp/env/", which is the location that the container stored the environment variable.
If you wanted the value of the environment variable to be defined in the OC4J-specific deployment descriptor, you can map the <env-entry-name> to the <env-entry-mapping> element in the OC4J-specific deployment descriptor. This means that the value specified in the orion-ejb-jar.xml file overrides any value that may be specified in the ejb-jar.xml file. The type specified in the EJB deployment descriptor stays the same.
Figure 9–1 shows how the minBalance environment variable is defined as 500 within the OC4J-specific deployment descriptor.
Figure 9–1 Environment Variable Mapping
Environment References To Other Enterprise JavaBeansYou can define an environment reference to an EJB through either its local or remote interface within the deployment descriptor. If your bean calls out to another bean, you can enable your bean to invoke the second bean using a reference defined within the deployment descriptors. You create a logical name within the EJB deployment descriptor, which is mapped to the concrete name of the bean within the OC4J-specific deployment descriptor.
Declaring the target bean as an environment reference provides a level of indirection: the originating bean can refer to the target bean with a logical name.
A reference to the local interface of a bean is defined in an <ejb-local-ref> element; a reference to the remote interface of a bean is defined in an <ejb-ref> element.
EJB Deployment Descriptor OC4J-specific Deployment Descriptor
<env-entry> <env-entry-name>minBalance</env-entry-name>
.
<env-entry-type>java.lang.Integer</env-entry-type> <env-entry-value>300</env-entry-value>
<env-entry-mapping name="minBalance"> 500</env-entry-mapping>
.
.
</env-entry>
Advanced EJB Subjects 9-13

Configuring Environment References
To define a reference to another EJB within the JAR or in a bean declared as a parent, you provide the following:
1. Name—provide a name for the target bean. This name is what the bean uses within the JNDI URL for accessing the target bean. The name should begin with "ejb/", such as "ejb/myEmployee", and will be available within the "java:comp/env/ejb" context.
– This name can be the actual name of the bean; that is, the name defined within the <ejb-name> element in the <session> or <entity> elements.
– This name can be a logical name that you want to use in your implementation. But it is not the actual name of the bean. If you use a logical name, the actual name must either be specified in the <ejb-link> element or <ejb-ref-mapping> element in the OC4J-specific deployment descriptor.
2. Type—define whether the bean is a session or an entity bean. Value should be either "Session" or "Entity".
3. Home—provide the fully qualified home interface name.
4. Remote—provide the fully qualified remote interface name.
5. Link—provide a name that links this EJB reference with the actual JNDI URL. This is optional.
Examples of References to a Local InterfaceIf you have two beans in the JAR: BeanA and BeanB. If BeanB creates a reference to the local interface of BeanA, you can define this reference in one of three methods:
■ Provide the actual name of the bean. BeanB would define the following <ejb-local-ref> within its definition:
<ejb-local-ref> <ejb-ref-name>myBeans/BeanA</ejb-ref-name> <ejb-ref-type>Session</ejb-ref-type> <local-home>myBeans.BeanALocalHome</local-home> <local>myBeans.BeanALocal</local></ejb-local-ref>
No <ejb-link> is necessary for this method. However, the BeanB implementation must refer to BeanA in the JNDI retrieval, which would use
9-14 Oracle9iAS Containers for J2EE Enterprise JavaBeans Developer’s Guide

Configuring Environment References
java:comp/env/myBeans/BeanA for retrieval within an EJB or Java client and use "myBeans/BeanA" within a servlet.
■ Provide the actual name of the bean in the <ejb-link> element. This method allows you to use any logical name in your bean implementation for the JNDI retrieval:
<ejb-local-ref> <ejb-ref-name>ejb/nextVal</ejb-ref-name> <ejb-ref-type>Session</ejb-ref-type> <local-home>myBeans.BeanALocalHome</local-home> <local>myBeans.BeanALocal</local> <ejb-link>myBeans/BeanA</ejb-link></ejb-local-ref>
BeanB would use java:comp/env/ejb/nextVal in the JNDI retrieval of BeanA.
■ Provide the logical name of the bean in the <ejb-ref-name> and the actual name of the bean in the <ejb-ref-mapping> element in the OC4J-specific deployment descriptor.
The reference in the EJB deployment descriptor would be as follows:
<ejb-local-ref> <ejb-ref-name>ejb/nextVal</ejb-ref-name> <ejb-ref-type>Session</ejb-ref-type> <local-home>myBeans.BeanALocalHome</local-home> <local>myBeans.BeanALocal</local></ejb-local-ref>
The "ejb/nextVal" logical name is mapped to an actual name in the OC4J-deployment descriptor as follows:
<ejb-ref-mapping name="ejb/nextVal" location="myBeans/BeanA"/>
BeanB would use java:comp/env/ejb/nextVal in the JNDI retrieval of BeanA.
Note: Servlets do not require the prefix of "java:comp/env" in the JNDI lookup. Thus, they will always either reference just the actual JNDI name or the logical name of the EJB.
Advanced EJB Subjects 9-15

Configuring Environment References
As shown in Figure 9–3, the logical name for the bean is mapped to the JNDI name by providing the same name, "ejb/nextVal", in both the <ejb-ref-name> in the EJB deployment descriptor and the name attribute within the <ejb-ref-mapping> element in the OC4J-specific deployment descriptor.
Figure 9–2 EJB Reference Mapping
Example 9–1 Defining a Local EJB Reference Within the Environment
The following example defines a reference to the local interface of the Hello bean, as follows:
1. The logical name used for the target bean within the originating bean is "java:comp/env/ejb/HelloWorld".
2. The target bean is a session bean.
3. Its local home interface is hello.HelloLocalHome; its local interface is hello.HelloLocal.
4. The link to the JNDI URL for this bean is defined in the OC4J-specific deployment descriptor under the "HelloWorldBean" name.
As shown in Figure 9–3, the <ejb-link> is mapped to the name attribute within the <ejb-ref-mapping> element in the OC4J-specific deployment descriptor by providing the same logical name in both elements. The Oracle-specific deployment descriptor would have the following definition to map the logical bean name of "java:comp/env/ejb/HelloWorld" to the JNDI URL "/test/myHello".
EJB Deployment Descriptor OC4J-specific Deployment Descriptor
<ejb-local--ref> <ejb-ref-name>ejb/nextVal</ejb-ref-name>
</ejb-local-ref>
<ejb-ref-mapping name="ejb/nextVal" location="myBeans/BeanA" />
.
EJBDeploymentDescriptor
<ejb-local-ref> <description>Hello World Bean</description> <ejb-ref-name>ejb/HelloWorld</ejb-ref-name> <ejb-ref-type>Session</ejb-ref-type> <local-home>hello.HelloLocalHome</local-home> <local>hello.HelloLocal</local></ejb-ref>
9-16 Oracle9iAS Containers for J2EE Enterprise JavaBeans Developer’s Guide

Configuring Environment References
To invoke this bean from within your implementation, you use the <ejb-ref-name> defined in the EJB deployment descriptor. In EJB or pure Java clients, you prefix this name with "java:comp/env/ejb/", which is where the container places the EJB references defined in the deployment descriptor. Servlets only require the logical name defined in the <ejb-ref-name>.
The following is a lookup from an EJB client:
InitialContext ic = new InitialContext();HelloHome hh = (HelloHome)ic.lookup("java:comp/env/ejb/HelloWorld");
The following is a lookup from a servlet, if the servlet defines the logical name of "ejb/HelloWorld" in <ejb-local-ref> in its web.xml file and maps it to the actual name of "/test/myHello" within the orion-web.xml file.
InitialContext ic = new InitialContext();HelloHome hh = (HelloHome)ic.lookup("ejb/HelloWorld");
Examples of References to a Remote InterfaceIf you have two beans in the JAR: BeanA and BeanB. If BeanB creates a reference to BeanA, you can define this reference in one of three methods:
■ Provide the actual name of the bean. BeanB would define the following <ejb-ref> within its definition:
<ejb-ref> <ejb-ref-name>myBeans/BeanA</ejb-ref-name> <ejb-ref-type>Session</ejb-ref-type> <home>myBeans.BeanAHome</home> <remote>myBeans.BeanA</remote></ejb-ref>
No <ejb-link> is necessary for this method. However, the BeanB implementation must refer to BeanA in the JNDI retrieval, which would use java:comp/env/myBeans/BeanA for retrieval within an EJB or Java client and use "myBeans/BeanA" within a servlet.
OC4J-specificDeploymentDescriptor
<ejb-ref-mapping name="ejb/HelloWorld" location="/test/myHello"/>
Advanced EJB Subjects 9-17

Configuring Environment References
■ Provide the actual name of the bean in the <ejb-link> element. This method allows you to use any logical name in your bean implementation for the JNDI retrieval:
<ejb-ref> <ejb-ref-name>ejb/nextVal</ejb-ref-name> <ejb-ref-type>Session</ejb-ref-type> <home>myBeans.BeanAHome</home> <remote>myBeans.BeanA</remote> <ejb-link>myBeans/BeanA</ejb-link></ejb-ref>
BeanB would use java:comp/env/ejb/nextVal in the JNDI retrieval of BeanA.
■ Provide the logical name of the bean in the <ejb-ref-name> and the actual name of the bean in the <ejb-ref-mapping> element in the OC4J-specific deployment descriptor.
The reference in the EJB deployment descriptor would be as follows:
<ejb-ref> <ejb-ref-name>ejb/nextVal</ejb-ref-name> <ejb-ref-type>Session</ejb-ref-type> <home>myBeans.BeanAHome</home> <remote>myBeans.BeanA</remote></ejb-ref>
The "ejb/nextVal" logical name is mapped to an actual name in the OC4J-deployment descriptor as follows:
<ejb-ref-mapping name="ejb/nextVal" location="myBeans/BeanA"/>
BeanB would use java:comp/env/ejb/nextVal in the JNDI retrieval of BeanA.
As shown in Figure 9–3, the logical name for the bean is mapped to the JNDI name by providing the same name, "ejb/nextVal", in both the <ejb-ref-name> in the
Note: Servlets do not require the prefix of "java:comp/env" in the JNDI lookup. Thus, they will always either reference just the actual JNDI name or the logical name of the EJB.
9-18 Oracle9iAS Containers for J2EE Enterprise JavaBeans Developer’s Guide

Configuring Environment References
EJB deployment descriptor and the name attribute within the <ejb-ref-mapping> element in the OC4J-specific deployment descriptor.
Figure 9–3 EJB Reference Mapping
Example 9–2 Defining an EJB Reference Within the Environment
The following example defines a reference to the Hello bean, as follows:
1. The logical name used for the target bean within the originating bean is "java:comp/env/ejb/HelloWorld".
2. The target bean is a session bean.
3. Its home interface is hello.HelloHome; its remote interface is hello.Hello.
4. The link to the JNDI URL for this bean is defined in the OC4J-specific deployment descriptor under the "HelloWorldBean" name.
As shown in Figure 9–3, the <ejb-link> is mapped to the name attribute within the <ejb-ref-mapping> element in the OC4J-specific deployment descriptor by providing the same logical name in both elements. The Oracle-specific deployment descriptor would have the following definition to map the logical bean name of "java:comp/env/ejb/HelloWorld" to the JNDI URL "/test/myHello".
EJB Deployment Descriptor OC4J-specific Deployment Descriptor
<ejb-ref> <ejb-ref-name>ejb/nextVal</ejb-ref-name>
</ejb-ref>
<ejb-ref-mapping name="ejb/nextVal" location="myBeans/BeanA" />
.
EJBDeploymentDescriptor
<ejb-ref> <description>Hello World Bean</description> <ejb-ref-name>ejb/HelloWorld</ejb-ref-name> <ejb-ref-type>Session</ejb-ref-type> <home>hello.HelloHome</home> <remote>hello.Hello</remote></ejb-ref>
OC4J-specificDeploymentDescriptor
<ejb-ref-mapping name="ejb/HelloWorld" location="/test/myHello"/>
Advanced EJB Subjects 9-19

Configuring Environment References
To invoke this bean from within your implementation, you use the <ejb-ref-name> defined in the EJB deployment descriptor. In EJB or pure Java clients, you prefix this name with "java:comp/env/ejb/", which is where the container places the EJB references defined in the deployment descriptor. Servlets only require the logical name defined in the <ejb-ref-name>.
The following is a lookup from an EJB client:
InitialContext ic = new InitialContext();HelloHome hh = (HelloHome)ic.lookup("java:comp/env/ejb/HelloWorld");
The following is a lookup from a servlet, if the servlet defines the logical name of "ejb/HelloWorld" in <ejb-ref> in its web.xml file and maps it to the actual name of "/test/myHello" within the orion-web.xml file.
InitialContext ic = new InitialContext();HelloHome hh = (HelloHome)ic.lookup("ejb/HelloWorld");
Environment References To Resource Manager Connection Factory References The resource manager connection factory references can include resource managers such as JMS, Java mail, URL, and JDBC DataSource objects. Similar to the EJB references, you can access these objects from JNDI by creating an environment element for each object reference. However, these references can only be used for retrieving the object within the bean that defines these references. Each is fully described in the following sections:
■ JDBC DataSource
■ Mail Session
■ URL
JDBC DataSourceYou can access a database through JDBC either using the traditional method or by creating an environment element for a JDBC DataSource. In order to create an environment element for your JDBC DataSource, you must do the following:
1. Define the DataSource in the data-sources.xml file.
2. Create a logical name within the <res-ref-name> element in the EJB deployment descriptor. This name should always start with "jdbc". In the bean code, the lookup of this reference is always prefaced by "java:comp/env/jdbc".
9-20 Oracle9iAS Containers for J2EE Enterprise JavaBeans Developer’s Guide

Configuring Environment References
3. Map the logical name within the EJB deployment descriptor to the JNDI name, created in step 1, within the OC4J-specific deployment descriptor.
4. Lookup the object reference within the bean with the "java:comp/env/jdbc" preface and the logical name defined in the EJB deployment descriptor.
As shown in Figure 9–4, the JDBC DataSource uses the JNDI name "test/OrderDataSource". The logical name that the bean knows this resource as is "jdbc/OrderDB". These names are mapped together within the OC4J-specific deployment descriptor. Thus, within the bean’s implementation, the bean can retrieve the connection to OrderDataSource by using the "java:comp/env/jdbc/OrderDB" environment element.
Figure 9–4 JDBC Resource Manager Mapping
Example 9–3 Defining an environment element for JDBC Connection
The environment element is defined within the EJB deployment descriptor by providing the logical name, "jdbc/OrderDB", its type of javax.sql.DataSource, and the authenticator of "Application".
The environment element of "jdbc/OrderDB" is mapped to the JNDI bound name for the connection, "test/OrderDataSource" within the Oracle-specific deployment descriptor.
EJB Deployment Descriptor
OC4J-specific Deployment Descriptor<enterprise-beans> .<resource-ref> <res-ref-name>jdbc/OrderDB</res-ref-name> <res-type>javax.sql.DataSource</res-type>
<resource-ref-mapping name="jdbc/OrderDB" location="test/OrderDataSource"/>
<res-auth>Application</res-auth>
</enterprise-beans></resource-ref>
EJBDeploymentDescriptor
<resource-ref> <res-ref-name>jdbc/OrderDB</res-ref-name> <res-type>javax.sql.DataSource</res-type> <res-auth>Application</res-auth></resource-ref>
Advanced EJB Subjects 9-21

Configuring Environment References
Once deployed, the bean can retrieve the JDBC DataSource as follows:
javax.sql.DataSource db;java.sql.Connection conn;...db = (javax.sql.DataSource) initCtx.lookup("java:comp/env/jdbc/OrderDB");conn = db.getConnection();
Mail SessionYou can create an environment element for a Java mail Session object through the following:
1. Bind the javax.mail.Session reference within the JNDI name space in the application.xml file using the <mail-session> element, as follows:
<mail-session location="mail/MailSession" smtp-host="mysmtp.oraclecorp.com"> <property name="mail.transport.protocol" value="smtp"/> <property name="mail.smtp.from" value="[email protected]"/></mail-session>
The location attribute contains the JNDI name specified in the location attribute of the <resource-ref-mapping> element in the OC4J-specific deployment descriptor.
2. Create a logical name within the <res-ref-name> element in the EJB deployment descriptor. This name should always start with "mail". In the bean code, the lookup of this reference is always prefaced by "java:comp/env/mail".
Note: This example assumes that a DataSource is specified in the data-sources.xml file with the JNDI name of "/test/OrderDataSource".
OC4J-specificDeploymentDescriptor
<resource-ref-mapping name="jdbc/OrderDB" location="/test/OrderDataSource"/>
9-22 Oracle9iAS Containers for J2EE Enterprise JavaBeans Developer’s Guide

Configuring Environment References
3. Map the logical name within the EJB deployment descriptor to the JNDI name, created in step 1, within the OC4J-specific deployment descriptor.
4. Lookup the object reference within the bean with the "java:comp/env/mail" preface and the logical name defined in the EJB deployment descriptor.
As shown in Figure 9–5, the Session object was bound to the JNDI name "/test/myMailSession". The logical name that the bean knows this resource as is "mail/testMailSession". These names are mapped together within the OC4J-specific deployment descriptor. Thus, within the bean’s implementation, the bean can retrieve the connection to the bound Session object by using the "java:comp/env/mail/testMailSession" environment element.
Figure 9–5 Session Resource Manager Mapping
This environment element is defined with the following information:
Example 9–4 Defining an environment element for Java mail Session
The environment element is defined within the EJB deployment descriptor by providing the logical name, "mail/testMailSession", its type of javax.mail.Session, and the authenticator of "Application".
Element Description
<res-ref-name> The logical name of the Session object to be used within the originating bean. The name should be prefixed with "mail/". In our example, the logical name for our mail session is "mail/testMailSession".
<res-type> The Java type of the resource. For the Java mail Session object, this is javax.mail.Session.
<res-auth> Define who is responsible for signing on to the database. The value can be "Application" or "Container" based on who provides the authentication information.
EJB Deployment Descriptor
OC4J-specific Deployment Descriptor<enterprise-beans> .<resource-ref> <res-ref-name>mail/testMailSession</res-ref-name> <res-type>javax.mail.Session</res-type>
<resource-ref-mapping name="mail/testMailSession" location="/test/myMailSession" />
<res-auth>Application</res-auth>
</enterprise-beans></resource-ref>
Advanced EJB Subjects 9-23

Configuring Environment References
The environment element of "mail/testMailSession" is mapped to the JNDI bound name for the connection, "test/myMailSession" within the OC4J-specific deployment descriptor.
Once deployed, the bean can retrieve the Session object reference as follows:
InitialContext ic = new InitialContext();Session session = (Session) ic.lookup("java:comp/env/mail/testMailSession");
//The following uses the mail session object//Create a message objectMimeMessage msg = new MimeMessage(session);
//Construct an address arrayString mailTo = "[email protected]";InternetAddress addr = new InternetAddress(mailto);InternetAddress addrs[] = new InternetAddress[1];addrs[0] = addr;
//set the message parametersmsg.setRecipients(Message.RecipientType.TO, addrs);msg.setSubject("testSend()" + new Date());msg.setContent(msgText, "text/plain");
//send the mail messageTransport.send(msg);
EJBDeploymentDescriptor
<resource-ref> <res-ref-name>mail/testMailSession</res-ref-name> <res-type>javax.mail.Session</res-type> <res-auth>Application</res-auth></resource-ref>
OC4J-specificDeploymentDescriptor
<resource-ref-mapping name="mail/testMailSession" location="/test/myMailSession" />
9-24 Oracle9iAS Containers for J2EE Enterprise JavaBeans Developer’s Guide

Configuring Environment References
URLYou can create an environment element for a Java URL object through the following:
1. Create a logical name within the <res-ref-name> element in the EJB deployment descriptor. This name should always start with "url". In the bean code, the lookup of this reference is always prefaced by "java:comp/env/url".
2. Map the logical name within the EJB deployment descriptor to the URL within the OC4J-specific deployment descriptor.
3. Lookup the object reference within the bean with the "java:comp/env/url" preface and the logical name defined in the EJB deployment descriptor.
As shown in Figure 9–6, the URL object was bound to the URL "www.myURL.com". The logical name that the bean knows this resource as is "url/testURL". These names are mapped together within the OC4J-specific deployment descriptor. Thus, within the bean’s implementation, the bean can retrieve a reference to the URL object by using the "java:comp/env/url/testURL" environment element.
Figure 9–6 URL Resource Manager Mapping
This environment element is defined with the following information:
Element Description
<res-ref-name> The logical name of the URL object to be used within the originating bean. The name should be prefixed with "url/". In our example, the logical name for our URL is "url/testURL".
<res-type> The Java type of the resource. For the Java URL object, this is java.net.URL.
<res-auth> Define who is responsible for signing on to the database. At this time, the only value supported is "Application". The application provides the authentication information.
EJB Deployment Descriptor
OC4J-specific Deployment Descriptor<enterprise-beans> .<resource-ref> <res-ref-name>url/testURL</res-ref-name> <res-type>java.net.URL</res-type>
<resource-ref-mapping name="url/testURL" location="www.myURL.com" />
<res-auth>Application</res-auth>
</enterprise-beans></resource-ref>
Advanced EJB Subjects 9-25

Common Errors
Example 9–5 Defining an Environment Element for a URL
The environment element is defined within the EJB deployment descriptor by providing the logical name, "url/testURL", its type of java.net.URL, and the authenticator of "Application".
The environment element of "url/testURL" is mapped to the URL "www.myURL.com" within the OC4J-specific deployment descriptor.
Once deployed, the bean can retrieve the URL object reference as follows:
InitialContext ic = new InitialContext();URL url = (URL) ic.lookup("java:comp/env/url/testURL");
//The following uses the URL objectURLConection conn = url.openConnection();
Common ErrorsThe following are common errors that may occur when executing EJBs:\
■ Out Of Memory Error During Deployment
■ NamingException Thrown
■ Deadlock Conditions
■ ClassCastException
Out Of Memory Error During DeploymentIf the deployment process is interrupted for any reason, you may need to clean up the temp directory, which by default is /var/tmp, on your system. The deployment
EJBDeploymentDescriptor
<resource-ref> <res-ref-name>url/testURL</res-ref-name> <res-type>java.net.URL</res-type> <res-auth>Application</res-auth></resource-ref>
OC4J-specificDeploymentDescriptor
<resource-ref-mapping name="url/testURL" location="www.myURL.com" />
9-26 Oracle9iAS Containers for J2EE Enterprise JavaBeans Developer’s Guide

Common Errors
wizard uses 20 MB in swap space of the temp directory for storing information during the deployment process. At completion, the deployment wizard cleans up the temp directory of its additional files. However, if the wizard is interrupted, it may not have the time or opportunity to clean up the temp directory. Thus, you must clean up any additional deployment files from this directory yourself. If you do not, this directory may fill up, which will disable any further deployment. If you receive an Out of Memory error, check for space available in the temp directory.
To change the temp directory, set the command-line option for the OC4J process to java.io.tmpdir=<new_tmp_dir>. You can set this command-line option in the Server Properties page. Drill down to the OC4J Home Page. Scroll down to the Administration Section. Select Server Properties. On this page, Scroll down to the Command Line Options section and add the java.io.tmpdir variable definition to the OC4J Options line. All new OC4J processes will start with this property.
NamingException ThrownIf you are trying to remotely access an EJB and you receive an javax.naming.NamingException error, your JNDI properties are probably not initialized properly. See "Setting JNDI Properties" on page 2-17 for a discussion on setting up JNDI properties when accessing an EJB from a remote object or remote servlet.
Deadlock ConditionsIf the call sequence of several beans cause a deadlock scenario, the OC4J container notices the deadlock condition and throws a Remote exception that details the deadlock condition in one of the offending beans.
ClassCastExceptionWhen you have an EJB or Web application that references other shared EJB classes, you should place the referenced classes in a shared JAR. In certain situations, if you copy the shared EJB classes into WAR file or another application that references them, you may receive a ClassCastException because of a class loader issue. To be completely safe, never copy referenced EJB classes into the WAR file of its application or into another application.
See "Packaging and Sharing Classes" on page 9-2 for more information.
Advanced EJB Subjects 9-27

Common Errors
9-28 Oracle9iAS Containers for J2EE Enterprise JavaBeans Developer’s Guide

EJB Clu
10
EJB ClusteringThe methods for providing clustering—including load balancing and failover—are different for HTTP requests than for EJB communications because Web components use different protocols than EJB components. This chapter specifically discusses EJB clustering. For a complete overview of Oracle9iAS clustering—including the instructions for setting up the HTTP failover and load balancing environment—see the clustering chapter in the Oracle9iAS Containers for J2EE User’s Guide.
The following is discussed in this chapter:
■ EJB Clustering Overview
■ Enabling Clustering For EJBs
■ Load Balancing Options
stering 10-1

EJB Clustering Overview
EJB Clustering OverviewClustered EJBs behave in their own manner. However, only stateful session beans are clustered. To create an EJB cluster, you specify nodes that are to be involved in the cluster, configure each OC4J instance within the node with the same multicast address, username, and password, and deploy the EJB to one of these nodes.
The following characteristics apply to EJB clustering:
■ Unlike HTTP clustering, EJBs involved in a cluster cannot be sub-grouped in an island. Instead, all EJBs within the cluster are in one group.
■ Transactions cannot failover. There is no reinstating an interrupted transaction in another bean. Instead, the transaction rolls back and must start over.
■ Load balancing occurs in a random fashion throughout all OC4J processes in the cluster for EJBs.
■ The performance for clustering stateful session beans is dependent on the type of replication and load balancing options you choose.
Clustering for each of the session bean types are discussed in the following sections:
■ Stateless Session Clustering
■ Stateful Session Bean Clustering
■ Combination of HTTP and EJB Clustering
Stateless Session ClusteringStateless session beans do not have any state to be replicated among hosts in a cluster. Thus, no failover option is necessary. Load balancing is provided automatically with OPMN, which uses a random algorithm. Stateless session beans are not clustered; the load balancing happens in any environment where the OPMN components know about each other. You can configure the frequency of the load
Warning: EJB clustering only works over the ORMI protocol, not over the RMI/IIOP protocol.
Note: For an overview of how clustering works, see the clustering chapter of the Oracle9iAS Containers for J2EE User’s Guide.
10-2 Oracle9iAS Containers for J2EE Enterprise JavaBeans Developer’s Guide

EJB Clustering Overview
balancing from the client using the options described in "Load Balancing Options" on page 10-6.
Stateful Session Bean ClusteringLoad balancing is provided automatically with OPMN, which uses a random algorithm. Failover requires that the state of the bean is replicated, so that when the original bean terminates unexpectedly, the request can be forwarded to another OC4J process. You can configure the frequency of the load balancing from the client using the options described in "Load Balancing Options" on page 10-6.
For failover, stateful session beans must replicate state among hosts. There are three options for stateful session bean replication, where each option defines the interval when the bean state is sent. All of the state is sent out to all other OC4J processes in the cluster, so it can have an impact on your performance. The fewer times the state is sent out, the better your performance. However, there is a trade-off between performance and the confidence that the bean state is replicated to cover for all areas of the bean instance failing. Thus, choose one of the following replication modes:
■ JVM termination replication—The state of the stateful session bean is replicated to only one other host in the cluster (with the same multicast address, port) when the JVM is terminating. Since this uses JDK 1.3 shutdown hooks, you must use JVM version 1.3 or later. This is the most performant option, because the state is replicated only once. However, it is not very reliable for the following reasons:
– Your state is not replicated if the host is terminated unexpectedly.
– The state of the bean exists only on a single host at any time; you carry a higher risk that the state does not replicate and is lost.
■ End of call replication—The state of the stateful session bean is replicated to all hosts in the cluster (with the same multicast address, port) at the end of each EJB method call. If the node loses power, then the state has already been replicated. This method is less performant than the JVM termination replication mode, because the state is sent out more often. However, the guarantee for reliance is higher.
■ Stateful session context replication—This is a finer-grain replication mode. In HTTP clustering, you can manage when and the type of information that is replicated through the setAttribute method of the HTTPSession object. We offer a similar method through a new OC4J-specific class: com.evermind.server.ejb.statefulSessionContext. Although this
EJB Clustering 10-3

Enabling Clustering For EJBs
option is a performant and reliable mechanism, it does not comply with the J2EE specification. If you provide this within your server code, you cannot port this application to any non-Oracle J2EE server. The guarantee of reliance and the performance question is answered by how often you decide to send the state out to the OC4J processes in the cluster.
See "Configure EJB Replication for Stateful Session Beans" on page 10-5 for configuration and implementation details for each of these stateful session bean clustering options.
Combination of HTTP and EJB ClusteringIf you have a servlet that invokes an EJB, you must configure both HTTP and EJB clustering. For HTTP clustering options, see the Clustering chapter of the Oracle9iAS Containers for J2EE User’s Guide.
Enabling Clustering For EJBsFor a full description of how to set up an OC4J cluster, see the Oracle9iAS Containers for J2EE User’s Guide.This section describes how to only configure for EJB state replication within the cluster.
To enable the OC4J nodes for EJB clustering, you must perform the following tasks:
1. Configure each host in the cluster with an identical multicast address (host and port number), including a username and password.
2. If you have stateful session beans, choose state replication type.
3. Deploy the EJB to be clustered.
Configure the Multicast Address for EJB ClusteringWithin the OC4J Instance page in the Enterprise Manager, do the following:
1. Scroll down to the Administration section of the OC4J Home Page.
2. Select Replication Properties in the Instance Properties column.
3. Scroll down to the EJB Applications section. Figure 10–1 shows this section.
4. Select the Replicate State checkbox.
5. Optionally, you can provide the multicast host IP address and port number. If you do not provide the host and port for the multicast address, it defaults to host IP address 230.0.0.1 and port number 9127. The host IP address must be
10-4 Oracle9iAS Containers for J2EE Enterprise JavaBeans Developer’s Guide

Enabling Clustering For EJBs
between 224.0.0.2 through 239.255.255.255. Do not use the same multicast address for both HTTP and EJB multicast addresses.
You can test a network for multicast ability by pinging the following hosts:
■ To ping all multicast hosts, execute: ping 224.0.0.1.
■ To ping all multicast routers, execute: ping 224.0.0.2.
6. Provide the username and password, which is used to authenticate itself to other hosts in the cluster over the multicast address. The username and password must be consistent in the multicast address to be in the same cluster.
Figure 10–1 EJB State Replication Configuration
7. Configure the type of stateful session bean replication within the orion-ejb-jar.xml file within the JAR file. See "Configure EJB Replication for Stateful Session Beans" on page 10-5 for full details. You can configure these within the orion-ejb-jar.xml file before deployment or add this through the Enterprise Manager screens after deployment. If you add this after deployment, drill down to the JAR file from the application page.
Configure EJB Replication for Stateful Session BeansModify the orion-ejb-jar.xml file to add the state replication configuration for stateful session beans. Since you configure the replication type for the stateful session bean within the bean deployment descriptor, each bean can use a different type of replication.
EJB Clustering 10-5

Load Balancing Options
VM Termination ReplicationSet the replication attribute of the <session-deployment> tag in the orion-ejb-jar.xml file to "VMTermination". This is shown below:
<session-deployment replication="VMTermination" .../>
End of Call ReplicationSet the replication attribute of the <session-deployment> tag in the orion-ejb-jar.xml file to "EndOfCall". This is shown below:
<session-deployment replication="EndOfCall" .../>
Stateful Session ContextNo static configuration is necessary when using the stateful session context to replicate information across the clustered nodes. To replicate the desired state, set the information that you want replicated and execute the setAttribute method within the StatefulSessionContext class in the server code. This enables you to designate what information is replicated and when it is replicated. The state indicated in the parameters of this method is replicated to all hosts in the cluster that share the same multicast address, username, and password.
Application Client InvocationThe client invokes an EJB within a cluster in exactly the same manner as it would any other EJB. See "Setting JNDI Properties" on page 2-17 for a full discussion on how to set up JNDI properties, if necessary, and other issues.
The only difference is if you configure for shuffling in the load balancing option. See "Load Balancing Options" on page 10-6.
Load Balancing OptionsThe client retrieves a random OC4J process when the first lookup is executed. The selection of which OC4J process that services the client is always randomly chosen from among the pooled OC4J processes in the cluster. However, you can choose to have the client do the following:
■ If you do not set any options, then the client interacts with the OC4J process that was initially chosen at the first lookup for the entire conversation.
■ If you do set one of two options, then the client chooses another OC4J process with which to interact at specific points in the client’s implementation. Each
10-6 Oracle9iAS Containers for J2EE Enterprise JavaBeans Developer’s Guide

Load Balancing Options
time a client requests another OC4J process, this process is also chosen randomly from the OC4J processes involved in the cluster.
These options are as follows:
■ LoadBalanceOnLookup property: If this property is set to true, then the client retrieves another OC4J process each time a lookup is performed. If the client performs more than one lookup, then each time a lookup is executed, the current OC4J process is released and a different OC4J process is retrieved.
The following configures the LoadBalanceOnLookup property on the client to true in the JNDI properties before retrieving the InitialContext:
env.put("LoadBalanceOnLookup", "true");
■ dedicated.rmicontext property: If this property is set to true, then each time the client retrieves a new InitialContext, the client also retrieves a new OC4J process. If you want to use multiple OC4J processes within your client, this option is more performant and less burdensome on the application server than the LoadBalanceOnLookup property.
The fewer times that the client retrieves a new OC4J process, the more performant it is and the less burdensome the client is on the application server. Retrieving a new OC4J process does cause a performance hit.
EJB Clustering 10-7

Load Balancing Options
10-8 Oracle9iAS Containers for J2EE Enterprise JavaBeans Developer’s Guide

Beta Draft (4/2/03) Active Components
11
Active Components for JavaActive Components for Java (AC4J) is a framework that extends J2EE to enable applications to interact as peers in a loosely coupled manner. Two or more applications that are participating in a business interaction asynchronously exchange information for the purpose of requesting service and responding with results.
This chapter describes the Oracle solution for managing loosely coupled interactions between autonomous applications. It covers the following topics:
■ Advantages of AC4J
■ AC4J Architecture Overview
■ AC4J Components Overview
■ Installing and Configuring AC4J and the Database
■ AC4J Example
■ Explanation of the Example
■ AC4J Active EJB Deployment
for Java 11-1

Advantages of AC4J
Advantages of AC4JOften business applications require the ability to perform long-lived interactions between different application services. Applications should be able to communicate with other applications over a long period of time, without limiting resources, and with the ability to survive system crashes. Each application, when communicating with another application, exists as a peer. In other words, both applications can make requests to each other, but neither application can assume control over the resources that its peer application owns. In this environment, the communication between two applications is often disconnected, meaning the applications cannot rely on a constant system connection. The tasks that are performed sometimes may take days, even months, to complete; therefore, the long-lived interactions require asynchronous communication.
A practical example shows how this works. You might want to implement a purchase order (PO) processing system. The system would allow a client or customer to make an asynchronous purchase order request, without having to wait for the possibly rather lengthy purchase order processing to complete. The purchase order processing service itself would make two asynchronous requests, one to a credit service and one to an inventory service, to verify the customer’s credit and check the inventory for the purchase order line items. The asynchronous nature of the two parallel requests to the services would allow the purchase order processing service to create an order based on the customer's request and respond with the corresponding order in a timely fashion. After both services returned with their responses, the purchase order processing service could consolidate both results and either cancel the order or continue processing it. (The returns would most likely not happen simultaneously and could potentially take hours, days, or even weeks.) The client could inquire on the status of the order at any given time, based on the order number originally returned by the purchase order processing service.
To implement such a system, the framework must enable applications to perform long-lived interactions as autonomous peers. For any application to exist over an unspecified period of time, the application must be reliable; it must be recoverable and restartable in case of system failures during that time. The application must also be scalable—that is, the long-running application cannot block execution or lock resources for long periods of time. For the application to execute within a reasonable time frame, the framework must provide performance enhancements through concurrently executing computations.
The Java 2 Platform, Enterprise Edition (J2EE), created by Sun Microsystems, provides an excellent environment for building reliable, scalable, tightly coupled applications. One of the main components that aid in this is Enterprise Java Beans (EJBs). It also supplies the building blocks for developing a new framework for
11-2 Oracle9iAS Containers for J2EE Services Guide Beta Draft

AC4J Architecture Overview
satisfying the requirements for long-lived interactions, such as the one outlined in the previous example. EJBs, Java Message Service (JMS), and Java Transaction API (JTA) can be fused together in such a way that applications with support for long-lived interactions can easily be built.
Given the features of J2EE, why do we provide AC4J? Why are existing J2EE technologies, such as EJBs, JMS, and JTA not enough for building such a purchase order processing system?
Unfortunately, the tightly coupled synchronous communication of EJBs does not allow for long-lived interactions, or autonomous peer-to-peer communication. On the other hand, the loosely coupled, asynchronous communication of JMS does not allow the component-based request-response communication that is necessary between application services—at least not in a simple, out of the box manner. In addition, the need for the JTA coordinator to control all resources that are involved in the two-phase commit means that autonomous resources cannot be included in global transactions. Thus, J2EE by itself does not provide the full solution necessary for easily developing applications that use long-lived interactions.
We believe that to support the requirements for long-lived interactions, business solutions require an application component methodology that combines the advantages of EJBs, JMS, and JTA. Specifically, the new methodology must include answers to the following needs.
The application must be able to invoke EJB methods interactively, yet in the disconnected, non-blocking mode that is provided by asynchronous communication; in other words, a true integration of EJB method invocation with JMS messaging properties. This enables requests to be directed to the bean implementation, but in a loosely coupled manner that does not require static connections between the two parties, or the blocking of the requestor until a response is received. Furthermore, exceptions must be handled within the asynchronous environment and propagated back to the client. All services that are executing within the asynchronous environment should still contain a context for data, such as parameters and local variables. The environment should also provide basic time-management capabilities that allow for the programmatic or declarative delay of the execution flow, as well as for the forced execution of certain service operations based on time-out properties.
AC4J Architecture OverviewAC4J beans are known as active EJBs. These are EJBs (stateless session or entity beans) that extend JMS attributes. Thus, active EJBs have all of the properties, services, and Quality of Service of any EJB, plus the asynchronous abilities of JMS.
Beta Draft Active Components for Java 11-3

AC4J Architecture Overview
An active EJB contains the business logic. These beans are loosely coupled beans, such that each bean can use either (or both) request-response synchronous or message-driven asynchronous communication to peer objects. Because active EJBs fully comply with the EJB specification, each active EJB uses all EJB features, such as being component-based and reusable and providing access to EJB services, such as security and transactional behavior.
All active EJBs exist within AC4J Interactions. Everything necessary for long-lived interactions is encapsulated within the AC4J Interaction, including all the request-response synchronous and one-way asynchronous communication properties. An AC4J Interaction is a long-lived unit of work that reflects the behavior of a business transaction. The AC4J Interaction replaces global transactions with its own methodology to avoid resource contention, allowing autonomous resources within the transaction, and enabling systems with differing constraints to interact. It groups a series of data exchanges between processes.
Underlying all of the AC4J interactions, the AC4J data bus routes AC4J data tokens (active data and events) between AC4J processes. The AC4J data bus is the fundamental component in AC4J. Applications attach to the AC4J data bus to exchange data and request services. The data bus is responsible for the routing and matching of AC4J data Tokens with registered AC4J reactions and enables transparent load-balancing of the attached application. AC4J data tokens describe a request for service, or a response from a service request, or an exception condition, such as an expiration of a timer.
The AC4J interaction can contain one or more AC4J processes. An AC4J process represents a business task. Each AC4J process provides the transactional and security context within which the application logic executes. It also manages concurrently executing computations, which are known as AC4J reactions. Furthermore, it encapsulates active data (local variables, input parameters, and responses) and matches the incoming active data to its intended recipients—AC4J reactions that are registered with the AC4J process. The AC4J process also maintains the data flow context that determines how to return the response to the caller. The context describes the destination to which the response data are returned.
An application can be dynamically partitioned into concurrently executing AC4J reactions. Each AC4J reaction is executed when specified conditions apply and all required data have arrived. AC4J reactions are the reactive entities that wait for the appropriate active data to arrive before invoking the intended bean method. After the method has processed the data, the AC4J reaction returns responses based on the context. All activities that are executed within the scope of the AC4J reaction execute under the ACID (atomicity, consistency, isolation, durability) properties of a JTA transaction.
11-4 Oracle9iAS Containers for J2EE Services Guide Beta Draft

AC4J Architecture Overview
AC4J reactions perform the detailed work of a business task by:
■ Pushing data to and pull data from the AC4J data bus
■ Processing service requests
■ Requesting service from other active EJBs
■ Returning results to the caller active EJB business task or to the application client
■ Enforcing business constraints that preserve the consistency of a business transaction
■ Providing application restartability in case of failures
AC4J also furnishes certain time-management capabilities: allowing the execution flow to be delayed for a certain amount of time before executing a component, or executing a component after a certain amount of time (the time-out) even if the required data tokens for its execution have not yet arrived.
In summary, AC4J allows EJBs to interact in a loosely coupled fashion by performing the following:
■ Hiding queues and topics and related JMS constructs from applications
■ Supplying automatic definition of communication message formats
■ Automatically packing and unpacking messages
■ Automatically routing service requests to the appropriate service provider
■ Automatically propagating the security context
■ Supplying authorization and identity impersonation
■ Providing automatic exception routing and handling
■ Offering transactional data-driven execution of EJB applications
■ Offering transparent scheduling and activation of EJBs, and execution of their methods
■ Furnishing support for forking and joining operations, which involves parallel invocation of EJB methods and synchronization on their results
■ Providing automatic tracking of the work in progress
All the preceding features are fully integrated in the EJB framework.
Beta Draft Active Components for Java 11-5

AC4J Components Overview
AC4J Components OverviewThis section covers the following topics:
■ Active EJB
■ Interaction
■ Process
■ Reaction
■ AC4J Data Tokens
■ Data Bus
Active EJBTraditional EJBs are passive—that is, they must be ready to immediately service a request from a client and return results quickly. Failure to do so causes an EJB to be unusable. AC4J allows standard stateless session and entity EJBs to become active. Active EJBs permit requests for service to be decoupled from the actual service execution. The policies that control when and which EJB methods are actually invoked are controlled by the service provider EJB. This decoupling permits service requests and service providers to interact as autonomous peers.
An application can create or look up a JEMHandle and then request service from a business task, which is exposed in the EJB interface.
An active EJB is uniquely identified by a JEMHandle object. A JEMHandle object encapsulates the following:
■ Active EJB name
■ J2EE application name
■ EJB JAR name
■ EJB name
■ Class name
■ EJB home interface name
Note: Within AC4J, you might see JEM, which is an internal name that is equivalent to AC4J, in sample code, file names, and directory paths.
11-6 Oracle9iAS Containers for J2EE Services Guide Beta Draft

AC4J Components Overview
■ EJB remote interface name
■ Instance name (SID) of the database in which the AC4J data bus resides
■ Primary key of the EJB (available only for entity beans)
InteractionAn interaction is a long-lived unit of work that reflects the behavior of a business transaction. A business transaction can span multiple applications that reside in different organizations. The life of a business transaction differs from the life of a local or a global transaction in that the duration of a business transaction in such a disconnected environment can be arbitrarily long.
An interaction represents a business goal that you want to complete. For example, if a customer wants to buy something from a business, all the actions that are necessary to allow the customer to pay for and receive the item he wants are characterized as an interaction. The interaction groups a series of business data exchanges by providing the global execution context of the business transaction.
These applications can run in isolation and commit or roll back their own data without knowledge of other applications. However, these applications should not be considered as different pieces, because the relationships formed among them must be coordinated and their consistency maintained. When a business transaction becomes inconsistent, its participating applications may need to recover. The application recovery can be obtained by registering compensating reactions. For example, when the supplier has confirmed the purchase order request back to the buyer, the buyer must register a compensating reaction. The reaction monitors additional responses from the supplier that might inform him that, for example, the purchase order cannot be fulfilled because the manufacturing department is running late. If the supplier’s confirmation of the request is cancelled, then the buyer’s compensating reaction is matched and then fired to allow the buyer application to recover its application consistency. This reaction can pick a new supplier and request the item from the supplier or abandon the purchase order process completely.
An interaction is uniquely identified by an interaction identifier (IID). An interaction can contain multiple processes.
ProcessA process identifies a business task. In the purchase order example, a process exists for each of the following business tasks: creating a purchase order, checking inventory, and checking customer credit.
Beta Draft Active Components for Java 11-7

AC4J Components Overview
Each process does the following:
■ Encapsulates the reactions that perform its detailed work
■ Encapsulates data tokens, which contain the business task input parameters and its responses
■ Maintains the data flow context that determines how to return the response to the invoking business task
A process is uniquely identified by a JEMPortHandle object, which encapsulates the process context and the JEMHandle of the active EJB that the process belongs to. The process context is a union of an interaction identifier and the process activation identifier. AC4J automatically creates the interaction and process activation identifiers within a call operation. Alternatively, the application can supply them in the AC4J JEMSession::call operation.
ReactionA reaction performs the detailed work of a process. Using this construct, an application can specify its persistence interest in the availability of a collection of correlated data tokens that trigger the execution of an active EJB method.
When a process is created as the result of an AC4J call operation, AC4J implicitly creates a base reaction. Additionally, an application can explicitly create a reaction at run time, using the JEMReaction::registerReaction operation to synchronize on data tokens. The implicit or explicit registerReaction operation specifies the active EJB method to be executed when matching succeeds.
The reaction processes incoming requests, returns results based on the request, and enforces business constraints to preserve application consistency. When all data tokens are available and the conditions are matched, the reaction is fired. It can consume one or more input data parameters, process them, and then possibly produces one or more output data tokens for other reactions. Results returned by a reaction (active EJB method) are converted to data tokens by the AC4J infrastructure and routed to the caller. The reaction can request additional services from other active EJBs to complete the business task. These requests result in the creation of new data tokens, which are pushed and routed by the AC4J data bus.
Reactions inside a process context instance can push data tokens to the AC4J data bus in the following ways:
■ By issuing one or more JEMReaction::call operations that request service from other processes in the same or different interaction context instance
■ By returning or throwing exception operations to the caller processes
11-8 Oracle9iAS Containers for J2EE Services Guide Beta Draft

AC4J Components Overview
■ By registering a timer, using the JEMReaction::registerReactionTimer operation
When the timer expires, AC4J pushes a time-out exception data token in the current reaction context instance.
Reactions inside a process context instance can pull data tokens from the AC4J data bus by registering one or more reactions in the current process context instance, using the JEMReaction::registerReaction method.
One or more reactions can exist for each business task. A reaction is used for the request, and another for the response, to support the asynchronous nature in a request-response environment. The number of reactions depends on the number of requests and responses that are necessary.
"AC4J Example" on page 11-17 demonstrates how you can receive an asynchronous communication between processes, but still have a request-response environment. The processOrder process is the business task for creating the purchase order. To create the purchase order, you must check the inventory and the customer’s credit. Thus, the processOrder reaction invokes the following processes:
■ checkINV
When the customer asks for a new purchase and provides the data of the items wanted, the checkINV process is activated, its JEMInventoryBean active EJB is instantiated, and its base reaction (checkINV) is fired. Later, it returns its results to the processOrder process and its JEMPurchaseOrderBean active EJB.
■ checkCRED
To check the customer’s credit, this process is activated, its JEMCreditBean active EJB is instantiated, and its base reaction (checkCRED) reacts. Later, it returns its results to the takeOrder process and its JEMPurchaseOrderBean active EJB.
After sending the asynchronous requests to the checkINV and checkCRED processes, the processOrder reaction registers another reaction in the same process (processOrderCallback) that waits for the responses back from both the checkCRED and checkINV processes. When all data tokens expected from these processes are available, the processOrderCallback reaction fires and processes the responses.
Beta Draft Active Components for Java 11-9

AC4J Components Overview
AC4J Data TokensThe activation of a reaction is triggered by the availability of data tokens. Availability is defined by the arrival of one or more data tokens, with the right conditions and the right access mode.
When an application requests a service by using an AC4J call operation, the system automatically pushes a request data token, which comprises the following:
■ A process descriptor, which specifies the service that is requested (such as takeOrder)
■ A request JEMPortHandle object of the service provider to which the request is destined
■ A response JEMPortHandle object, which contains the process context (interaction and process activation identifiers) instance and the JEMHandle of the requester process that will later receive the results from the service provider
■ Business task input arguments, which the service provider uses to honor the service
Later, when a reaction returns a response data token that is automatically generated by AC4J when an active EJB returns or throws an exception, AC4J fills in the routing information. It sends the returned information to the caller process and fills the port handle object of the response data token. In the case in which the caller of the returning process is a client and not another process, then the data bus stores the response data token to a special data bus area from where the client can retrieve it, using the JEMSession::receiveReactionResponseObjectInstance operation.
The data types of the objects that are carried inside an input or output data token can be basic data types (such as integer, string, float, boolean) or constructed class types (such as Java serializable objects).
Data BusImproving the autonomy, scalability, and availability of applications requires components that are requesting services to be unaware of the identity, location, and
Note: To satisfy the AC4J requirement of not locking resources, the call should be an asynchronous AC4J call. However, you can still perform synchronous EJB calls to another bean.
11-10 Oracle9iAS Containers for J2EE Services Guide Beta Draft

AC4J Components Overview
number of components that provide these services. In AC4J, applications are attached to a data bus before starting their operation. The AC4J data bus is responsible for routing and matching data tokens that are pushed and must be pulled by registered reactions. Additionally, the data bus enables scheduling, activation, and execution of the matched reactions.
Matching ReactionsThe data bus routing subsystem is responsible for making the different types of data tokens available at the specified destination—the process context instance that comprises the interaction identifier and the process activation identifier—specified by a JEMPortHandle object.
When data tokens are routed and become available in the data bus inside a process context instance, AC4J tries to match these data tokens with all registered reactions that are available in that context instance. The system tries to match the data token tags that are specified in a reaction template, evaluating all constraint conditions against the matched data tokens, to filter and discard the inappropriate ones.
Availability of some data tokens does not mean that a registered reaction matches immediately. Only when all data tokens required by a reaction become available does matching succeed.
For example, inside the processOrder process, the processOrder base reaction has registered the processOrderCallback reaction that is waiting for the checkCRED and checkINV processes to respond. When the checkINV process responds to the takeOrder process, the processOrderCalback reaction is not matched because it is also waiting for the checkCRED process to respond. When the checkCRED process responds to the processOrder process, the processOrderCallback reaction is matched.
Additionally, data tokens that are available in the data bus can be matched with a reaction that will be registered in the future. This matching can be used for sequencing processes, in which the completion of one process can enable another process.
Matching data tokens with reactions triggers the activation of zero, one, or more reactions, which are executed in parallel if they do not conflict for shared resources.
Firing ReactionsEach method of the remote interface of an active EJB implements the application business logic. When the data tokens become available and are matched with a reaction, AC4J verifies that the types (primitive or class types) of the data tokens
Beta Draft Active Components for Java 11-11

AC4J Components Overview
that are matched on the tags also match the types of active EJB method types of the reaction. Then AC4J verifies that the matched reaction is authorized to pull the available matched data tokens. If everything passes successfully, then AC4J schedules the activation of the reaction.
When the matched reaction is fired, the AC4J container begins a JTA transaction and instantiates the requested active EJB (stateless session bean or entity EJB), using the primary key inside the JEMHandle request object (the primary key is needed only in case of entity beans). Then the EJB method of the fired reaction is executed using the matched data tokens of the reaction.
AC4J automatically commits the current reaction at the end of every active EJB method. A reaction commit marks the end of a JTA transaction so that all its changes to shared data tokens, and all its service requests and responses that have been sent, become visible. The activation of a reaction has "exactly once" semantics (that is, the code specifies that it executes exactly once) if the reaction commits. If a failure occurs after a commit, then the reaction cannot be rolled back and the changes will persist. If a failure occurs before or during a commit, then the container rolls back the current reaction. A reaction rollback reverses all changes to shared data tokens, and the service requests and responses are never sent to any recipient component. In case of failures, the data bus tries again to fire the reaction for a preconfigured number of times. The reaction is marked as completed, with exception completion status if the maximum retry attempts are reached.
In traditional databases, where the duration of a transaction is short, abnormal situations cause the whole transaction to be undone, so all performed work is lost and must be submitted again for execution. Because interactions usually have long duration and contain a large number of reactions, AC4J provides additional mechanisms to handle exceptions.
AC4J automatically makes a reaction persist in the data bus if it completes successfully. The state that is saved (process input variable data, process local variable data, and data flow context information) can be used to continue the application with minimum restart time from the last reaction. When a node becomes unavailable, all reactions that were running and did not end successfully are rolled back. AC4J then again executes the interrupted reactions in another OC4J instance.
AC4J uses a mechanism to capture, propagate, and match the application state and control flow information that are needed for resuming an application after the unexpected error. Additionally, because reaction execution is data-driven, there is no need for the system to keep a volatile or persistent copy of the entire program state (such as program execution stack) to facilitate the storage of the control flow descriptors or the storage of data variables.
11-12 Oracle9iAS Containers for J2EE Services Guide Beta Draft

AC4J Components Overview
Figure 11–1 illustrates how, when all data tokens are available and the conditions are matched, the reaction fires, which causes the method to execute. This method can return results that are converted to data tokens by the AC4J infrastructure and routed to the caller, and can request additional services from other active EJBs to complete the business task. These requests result in the creation of new data tokens, which are pushed and routed by the AC4J data bus.
Figure 11–1 Firing a Reaction
O_1
006
datatoken
datatoken
datatoken
datatoken
datatoken
datatoken
datatoken
push
push
push
pull
pull
pull
ReactionMatching
Conditions
datatoken
All data tokensare availableand conditionsmatched, soreaction firesand executesthe active EJBmethod.
push
push
Beta Draft Active Components for Java 11-13

Installing and Configuring AC4J and the Database
Installing and Configuring AC4J and the DatabaseBefore you can execute any AC4J applications, you must initialize an Oracle9i database as a repository for the AC4J data bus. You must set up the following in the database:
■ AC4J connection and session capabilities—This feature defines the number of threads AC4J can observe in the data bus.
■ AC4J system tablespace.
■ AC4J superuser—You must create this user, and it must have special privileges for transactions, security, and administration.
■ AC4J data bus—It must have a configurable number of tables and AQ topics and queues.
■ One or more client users.
To initialize the AC4J data bus in the database, perform the following steps:
11-14 Oracle9iAS Containers for J2EE Services Guide Beta Draft

Installing and Configuring AC4J and the Database
1. Set the environment variable $AC4J_DEMO_DIR to the path to the top-level directory of the AC4J demo (the directory that contains the files common.xml, purchaseOrder, and README.txt). In UNIX, use this command:
setenv AC4J_DEMO_DIR path_to_AC4J_demo
2. Unpack the AC4J SQL scripts from J2EE_HOME/sql/ac4j-sql.jar, into a new subdirectory AC4J_DEMO_DIR/ac4j/sql:
cd $AC4J_DEMO_DIR/ac4jmkdir sqlcd sqljar xvf $J2EE_HOME/sql/ac4j-sql.jar
3. Before executing the script createall.sql that was unpacked in step 1, make sure that the arguments to the two calls in the script are correct for your database configuration. The two calls are:
createjem.sql sys_user sys_pwd DB_instance tablespacecreateclient.sql sys_user sys_pwd AC4J_user AC4J_pwd tablespace
Table 11–1 contains the meanings and defaults of the arguments.
Note: In this chapter, where the notation J2EE_HOME appears in text, it indicates the full path of the J2EE home directory. This is the directory in which the file oc4j.jar resides. In UNIX syntax, this would be $J2EE_HOME, which is equivalent functionally to the Windows environment variable %J2EE_HOME%. In code examples, $J2EE_HOME appears. These are UNIX examples; in Windows, you would substitute %J2EE_HOME% and use backslashes in path names.
Table 11–1 createall Script Call Arguments
Argument Meaning Script Default
sys_user Database system user sys
sys_pwd Database system password knl_test7
DB_instance Database instance Usually = inst1
tablespace Table space for AC4J tables Usually = system
AC4J_user Database AC4J user JEMCLIUSER
Beta Draft Active Components for Java 11-15

Installing and Configuring AC4J and the Database
The argument values may be different for your installation. If so, change them by editing the script.
4. Execute the script createall.sql:
cd $AC4J_DEMO_DIR/sqlsqlplus /nolog @createall.sql
Data Source ConfigurationConfigure the following data sources in the data-sources.xml file in J2EE_HOME/config/:
<data-sources>
<!-- NON-Emulated DataSources: used for JEM server --> <data-source class="com.evermind.sql.OrionCMTDataSource" name="nonEmulatedDS" location="jdbc/nonEmulatedDS" connection-driver="oracle.jdbc.driver.OracleDriver" username="jemuser" password="jempasswd" url="jdbc:oracle:thin:@host:port:sid" inactivity-timeout="30" > </data-source>
<!-- Emulated DataSources: used for JEM client --> <data-source class="com.evermind.sql.DriverManagerDataSource" name="OracleDS" location="jdbc/OracleCoreDS" xa-location="jdbc/xa/OracleXADS"
AC4J_pwd Database AC4J password JEMCLIPASSWD
Note: The first time you run the script, it is normal to see four error messages, reporting that one synonym and three database links cannot be dropped because they do not exist. You can safely ignore these. You should not see any other error messages.
Table 11–1 createall Script Call Arguments
Argument Meaning Script Default
11-16 Oracle9iAS Containers for J2EE Services Guide Beta Draft

AC4J Example
ejb-location="jdbc/OracleDS" connection-driver="oracle.jdbc.driver.OracleDriver" username="jemuser" password="jempasswd" url="jdbc:oracle:thin:@host:port:sid" inactivity-timeout="30" > </data-source>
</data-sources>
In the preceding code, you must replace host, port, and sid with the host name, port number, and database SID of the Oracle database instance on which the AC4J data bus has been installed. Do the replacement for both data sources.
The jemuser is the superuser user name, and the jemcliuser is the default client user name, created with the SQL script createall.sql.
AC4J ExampleAC4J is designed for complex applications that interact with each other over long periods of time. This section illustrates the usage of AC4J with a simple purchase order example. To simplify the presentation of the example, it does not show error handling and import statements. You can find the full code for the purchase order example in the directory J2EE_HOME/demo/ac4j.
Running the ExampleTo run the example, perform the following steps:
1. Initialize the AC4J data bus.
Create and populate the database tables required for running the example by executing the createTables.sql script with the following commands:
cd $J2EE_HOME/demo/ac4j/purchaseOrder/sql/sqlplus /nolog @createTables.sql
2. Edit the database configuration files:
You must set up the data sources used by the demo in the file J2EE_HOME/config/data-sources.xml.
3. Build the example.
Beta Draft Active Components for Java 11-17

AC4J Example
You must build all three services, by running the default ant rule in each of their directories, as follows:
cd $J2EE_HOME/demo/ac4j/purchaseOrder(cd purchaseOrderService; ant)(cd creditService; ant)(cd inventoryService; ant)
You can also clean the services in a similar manner:
cd $J2EE_HOME/demo/ac4j/purchaseOrder(cd purchaseOrderService; ant clean)(cd creditService; ant clean)(cd inventoryService; ant clean)
4. Start an OC4J instance, as follows:
cd $J2EE_HOMEjava -Doracle.aurora.jem.aq.close.interval=2 -jar oc4j.jar
5. Deploy the three services.
Refer to the Oracle9iAS Containers for J2EE User’s Guide for information on deploying an EJB on Oracle9i Application Server, and the Oracle9iAS Containers for J2EE Standalone User's Guide for a standalone implementation. The following example shows standalone usage:
cd $J2EE_HOME/demo/ac4j/purchaseOrderjava -jar $J2EE_HOME/admin.jar ormi://localhost admin welcome -deploy \ -file purchaseOrderService/lib/purchaseOrderService.ear \ -deploymentName purchaseOrderServicejava -jar $J2EE_HOME/admin.jar ormi://localhost admin welcome -deploy \ -file inventoryService/lib/inventoryService.ear \
Note: The ant utility is open-source and portable (between application servers, as well as operating systems), and is therefore ideal for Java-based applications. You can obtain ant and accompanying documentation at the following site:
http://jakarta.apache.org/ant/
Some of the sample applications that come with OC4J are set up to use ant. You can study the accompanying build.xml files for models.
11-18 Oracle9iAS Containers for J2EE Services Guide Beta Draft

AC4J Example
-deploymentName inventoryServicejava -jar $J2EE_HOME/admin.jar ormi://localhost admin welcome -deploy \ -file creditService/lib/creditService.ear \ -deploymentName creditService
Three messages from the application server appear, one for each service that is deployed. Each message reads JEM Server started.
6. Run the client.
Make a purchase order request by invoking the ant rule reqpo in the purchaseOrderService subdirectory, as follows:
cd $J2EE_HOME/demo/ac4j/purchaseOrder/purchaseOrderService/ant reqpo
Application Server OutputThe application server produces output similar to the following:
----------- sample of expected app server output from ant reqpo ---------------=======>PurchaseorderServiceBean.ejbCreate(): begin/end=======>PurchaseOrderServiceBean.takeOrder(): begin : clientName = scott : creditCardNumber = 1111-3333-4444-8888 : (productName, quantity) = pen, 3 : (productName, quantity) = pencil, 1=======>PurchaseOrderServiceBean.createPO(): begin=======>PurchaseOrderBean.ejbCreate(): begin=======>PurchaseOrderBean.createPONumber(): begin : poNum=1=======>PurchaseOrderBean.createPONumber(): end=======>PurchaseOrderBean.evaluateTotalCost(): begin=======>PurchaseOrderBean.evaluateTotalCost(): end---Total Cost = 0.75=======>PurchaseOrderBean.ejbCreate(): end---poNumber= 1=======>PurchaseOrderBean.ejbPostCreate(): begin=======>LineItemBean: ejbCreate: lineItemName = pen quantity = 3=======>LineItemBean: ejbCreate: lineItemName = pencil quantity = 1=======>PurchaseOrderBean.ejbPostCreate(): end---getLineItems().size= 2 createPO()---poNumber= 1=======>PurchaseOrderServiceBean.createPO(): end
Note: The credit and inventory services do not have clients. The user interacts directly only with the PurchaseOrder service, which, in turn, interacts with the other two services.
Beta Draft Active Components for Java 11-19

AC4J Example
: poNumber= 1=======>PurchaseOrderServiceBean.startProcessingPOrder(): begin=======>PurchaseOrderServiceBean.startProcessingPOrder(): end=======>PurchaseOrderServiceBean.takeOrder(): end=======>PurchaseOrderServiceBean.processOrder(): begin---poNumber= 1=======>PurchaseOrderServiceBean.callCreditService(): begin=======>PurchaseOrderServiceBean.callCreditService(): end=======>PurchaseOrderServiceBean.callInventoryService(): begin=======>PurchaseOrderServiceBean.callInventoryService(): end=======>PurchaseOrderServiceBean.registerAsyncRespHandler(): begin=======>PurchaseOrderServiceBean.registerAsyncRespHandler(): end=======>PurchaseOrderServiceBean.processOrder(): end---status= STATUS_INPROCESS=======>CreditServiceBean: ejbCreate: begin/end=======>CreditServiceBean: checkCRED: begin : clientName = SCOTT : creditCardNumber = 1111-3333-4444-8888 : amount = 0.75=======>InventoryServiceBean: ejbCreate: begin/end=======>InventoryServiceBean: checkINV: begin : (product, quantity) = pen, 3 : (product, quantity) = pencil, 1 : CreditorRemote found : creditorName = SCOTT : availableCredit = 5000.0=======>CreditServiceBean: checkCRED: end--returning CREDIT APPROVED : BEFORE: availableUnits[0] = 700 : AFTER: availableUnits[0] = 697 : BEFORE: availableUnits[1] = 600 : AFTER: availableUnits[1] = 599 : Returning: : invCheck[0]=true : invCheck[1]=true=======>InventoryServiceBean: checkINV: end=======>PurchaseOrderServiceBean.processOrderCallback(): begin.credInfo=CREDIT APPROVED=======>PurchaseOrderServiceBean.callBackMethod(): poNumber= 1 : invInfo[0] = true : invInfo[1] = true=======>PurchaseOrderServiceBean.callBackMethod(): end---credInfo=CREDIT APPROVED poNumber=1 currentStatus= STATUS_SHIPPED=======>PurchaseOrderServiceBean.getStatus(): begin---poNumber= 1=======>PurchaseOrderServiceBean.getStatus(): end---poNumber= 1 status=STATUS_SHIPPED-------- (end) sample of expected app server output from ant reqpo ------------
11-20 Oracle9iAS Containers for J2EE Services Guide Beta Draft

AC4J Example
Client OutputThe client produces output similar to the following:
--------------- sample of expected client output from ant reqpo --------------reqpo: [java] Getting AC4J Connection and Session...
[java] sendRequest: begin [java] customer name = IID = scott [java] credit card number = 1111-3333-4444-8888 [java] item names = pen,pencil [java] quantities = 3,1
[java] takeOrder request made. Process Context is: [java] Interaction Identifier (IID) = scott [java] Activation Identifier (AID) = AE3D71D56E835817E0340003BA137479
[java] Execute the following to receive PO response and track status: [java] ant -DAID=AE3D71D56E835817E0340003BA137479 resppo------------- (end) sample of expected client output from ant reqpo ----------
Collecting the ResponseThe response to the purchase order request is collected by executing a second ant target, resppo. You must supply the activity ID (AID) of the request as a property (ant -DAID=<AID> resppo). As a convenience, reqpo outputs the required ant command line for that request, as the last line of its output. You can use cut-and-paste to copy the text to the command line, for quicker entry.
Here is an example that uses the preceding AID:
cd $J2EE_HOME/demo/ac4j/purchaseOrder/purchaseOrderService/ant -DAID=AE3D71D56E835817E0340003BA137479 resppo
The program automatically terminates when it receives a STATUS_SHIPPED status.
The exact output depends on how soon after the purchase order request is made that ant resppo is executed.
ant resppo OutputExecuting the resppo client of ant produces output similar to the following:
Beta Draft Active Components for Java 11-21

Explanation of the Example
--------------- sample of expected output from ant resppo -------------------resppo: [java] Getting AC4J Connection and Session...
[java] receiveResponse: begin [java] receiveResponse: receiving async response [java] receiveResponse: response received [java] receiveResponse: Purchase Order number = 1 [java] receiveResponse: polling for PO status... [java] status = STATUS_SHIPPED
[java] receiveResponse: Status = SHIPPED. Done.------------ (end) sample of expected output from ant resppo ------------------
Rerunning the ClientTo rerun the client (and submit a different purchase order), rerun ant reqpo, as described in step 6 under "Running the Example" on page 11-17.
Explanation of the ExampleThis section gives an overview of the steps that occur in the execution of the purchase order example. Figure 11–2 illustrates the steps, with the numbers corresponding to the step numbers in the description that follows.
11-22 Oracle9iAS Containers for J2EE Services Guide Beta Draft

Explanation of the Example
Figure 11–2 Steps in the Purchase Order Example
(collection oftables within
data bus)
client
Interaction
takeOrder process
processOrder process
PurchaseOrderService beanactive EJB
O_1
007
InventoryService beanactive EJB
firing reaction
processOrderCallbackbase reaction
processOrder base reaction
firing reaction
firing reaction
firing reaction
checkINV process
checkINV base reaction
checkCRED process
checkCREDbase reaction
Credit Service beanactive EJB
1
2c
2b
3a
3b
46
4
takeOrder process
AC4Jdata bus
Beta Draft Active Components for Java 11-23

Explanation of the Example
The "Overview of Steps" on page 11-28 is followed by a section for each step. Each step section explains the code for that step in detail.
11-24 Oracle9iAS Containers for J2EE Services Guide Beta Draft

Explanation of the Example
In Figure 11–2, only the return of the purchase order number from the takeOrder process to the client (steps 2 and 6) is shown as going through the AC4J data bus. This is a simplification, made to emphasize the flow of control between the different AC4J processes and reactions.
In fact, as "AC4J Data Tokens" on page 11-10 explains, all AC4J calls (including replies) are mediated by the AC4J data bus. Figure 11–3 illustrates this for two of the steps from the example: the call from the processOrder base reaction to the checkINV process (step 3a) and the return of the reply of the checkINV process to the takeOrder process (step 4).
Beta Draft Active Components for Java 11-25

Explanation of the Example
Figure 11–3 All AC4J Calls Are Mediated by the Data Bus
Interaction 3a
processOrder Process
JEMPurchaseOrderService beanActive EJB
O_1
008
JEMInventoryService beanActive EJB
firing reaction
checkINV process
firing reaction
firing reaction
data tokensdata tokens
data tokens
AC4Jdata bus
3a) 3a)
4) 4)fire processOrderCallback reaction
return to ProcessOrder process
fire checkINV processcall checkINV process
11-26 Oracle9iAS Containers for J2EE Services Guide Beta Draft

Explanation of the Example
Beta Draft Active Components for Java 11-27

Explanation of the Example
Overview of StepsThe steps that occur in the execution of the purchase order example are as follows:
1. Step 1: Client Sends an Asynchronous Request to the Purchase Order Service Active EJB
The request (takeOrder) is sent through the data bus and starts a new AC4J process.
2. Step 2: Purchase Order Service Active EJB Processes the Client’s takeOrder Request
The takeOrder method does the following, to start the processing of the new purchase order:
a. Creates a purchase order entity bean to represent the new purchase order. The creation of this bean in turn causes the appropriate product and line item beans to be created. This is done using regular EJB entity beans. AC4J is not involved.
b. Sends an asynchronous request to the processOrder process. This is a method on the same bean (PurchaseOrderService bean), but it forms the base reaction of a new AC4J process.
c. Returns the purchase order number assigned when the purchase order entity bean was created.
By initiating another reaction, the takeOrder reaction can finish, and return the purchase order number assigned to this purchase order back to the client as early as possible, so the client can start to poll for the purchase order status.
3. Step 3: Purchase Order Service Active EJB Processes the processOrder Request
The processOrder reaction starts a new purchase order. It performs the following:
a. Sends an asynchronous request to the checkINV process of the InventoryService active EJB, to verify that the items are in inventory
b. Sends an asynchronous request to the checkCRED process of the CreditService active EJB, to verify that the customer’s credit is satisfactory
c. Registers a processOrderCallback reaction in the current process to receive the results from the preceding two requests.
11-28 Oracle9iAS Containers for J2EE Services Guide Beta Draft

Explanation of the Example
4. Step 4: Inventory and Credit Service Active EJBs Process Requests and Make Asynchronous Responses
Both the checkINV and checkCRED processes return responses.
5. Step 5: Asynchronous Responses Are Processed by the processOrderCallback Reaction
The processOrderCallback reaction, within the processOrder process, reacts to the information that is provided by the checkINV and checkCRED processes. If satisfactory, the status of the purchase order entity bean is updated. No confirmation is sent to the client.
6. Step 6: Client Receives Purchase Order Number Asynchronously and Polls for Purchase Order Status
The purchase order number returned from step 2 is returned by the AC4J data bus and can be received asynchronously by the client at any time after that. After the client has the purchase order number, it then polls for the status of the purchase order, using a regular EJB call.
Step 1: Client Sends an Asynchronous Request to the Purchase Order Service Active EJB
The code sample in Example 11–1 shows the steps that the client takes in sending an asynchronous request to the PurchaseOrderService active EJB.
Example 11–1 Client Sends an Asynchronous Request to POS Active EJB
static final String DATA_SOURCE_NAME = "java:comp/env/jdbc/OracleDS";static final String BEAN_NAME = "java:comp/env/ejb/PurchaseOrderService";static final String ACTIVE_EJB_NAME = "JEMPurchaseOrderService";static final String METHOD_NAME = "takeOrder";static final String DB_USER = "JEMUSER";static final String DB_PASSWD = "JEMPASSWD";
public static void main(String[] args){
// 1.0. Create a JNDI ContextContext context = new InitialContext();
// 1.1. Look up the DataSource where AC4J data bus resides DataSource client_ds = (DataSource) context.lookup(DATA_SOURCE_NAME);
// 1.2. Obtain a JDBC connection to the DataSource
Beta Draft Active Components for Java 11-29

Explanation of the Example
OracleConnection conn =(OracleConnection)client_ds.getConnection(DB_USER, DB_PASSWD);
// 1.3. Create an AC4J connection, using the JDBC Connectionac4j_conn = new JEMConnection(conn);
// 1.4. Create an AC4J session on the data busac4j_sess = new JEMSession(ac4j_conn);
// 1.5. Look up the handle of the PurchaseOrderService Active EJBactiveEJBHandle = (JEMHandle)context.lookup(ACTIVE_EJB_NAME);
// 1.6. Prepare input parameters for asynchronous call
// 1.6a. Make String and int arrays from itemNames and quantities argsString[] itemNames = getStringArrayFromInput(args[3]);int[] quantities = getIntArrayFromInput(args[4]);
// 1.6b. Make a Class array of input parameter typesClass[] inputClassTypes = new Class[] { String.class,
String.class,itemNames.getClass(),quantities.getClass() };
// 1.6c. Make an Object array of input parameter valuesObject[] inputParams = new Object[] { (Object) new String(args[1]),
(Object) args[2],(Object) itemNames,(Object) quantities };
// 1.7. Make the asynchronous call// IID = customer name (args[1]), AID = null = auto-assignedJEMEmitToken request = ac4j_sess.call(args[1],
null,activeEJBHandle,METHOD_NAME,inputClassTypes,inputParams,null, 0, 0);
// 1.8. Commit the transaction((OracleConnection)ac4j_sess.getJEMConnection().getConnection()).commit();
// 1.9. Get the AID auto-assigned to the request just made// Also, Confirm IID (will be value set above - just showing the API)
11-30 Oracle9iAS Containers for J2EE Services Guide Beta Draft

Explanation of the Example
// IID + AID = ’Process Context’ of the requestJEMPortHandle portHandle = request.getPortHandle();String iid = portHandle.getIid();String aid = portHandle.getAid(); System.out.println("takeOrder request made. Process Context is:");System.out.println(" Interaction Identifier (IID) = " + iid);System.out.println(" Activation Identifier (AID) = " + aid);
// 1.10 Close AC4J session and connection and JDBC connectionac4j_sess.close();ac4j_conn.close();conn.close();
}
The client exists outside of an AC4J server and is requesting a service from an active EJB through the AC4J data bus. The AC4J data bus is the conduit and controls the asynchronous communication between the client and all reactions. Every client residing outside of an AC4J server must first connect to the AC4J data bus and create a new session for interaction to occur.
After a connection to the AC4J data bus has been retrieved and an AC4J session has been created within it, asynchronous messages can be sent to active EJBs in the same or other AC4J instances. The AC4J data bus coordinates the asynchronous messages and acts as a transactional manager for all active EJBs in the transaction.
The following explanation corresponds to the numbering in Example 11–1.
1.0 to 1.4 Retrieve an AC4J ConnectionBecause an AC4J connection exists above a JDBC connection, steps 1.0 to 1.4 retrieve that AC4J connection.
1.1 Retrieve the DataSource defined for the database acting as the AC4J conduit.
Define the DataSource to use in the data-sources.xml file as an emulated data source. See "Data Source Configuration" on page 11-16 for more information.
Context context = new InitialContext();DataSource client_ds = (DataSource) context.lookup(DATA_SOURCE_NAME);
1.2 Retrieve the JDBC connection from the DataSource object.
OracleConnection conn = (OracleConnection)client_ds.getConnection(DB_USER, DB_PASSWD);
Beta Draft Active Components for Java 11-31

Explanation of the Example
1.3 Create an AC4J connection from the JDBC connection object.
ac4j_conn = new JEMConnection(conn);
1.4 Create an AC4J session in a specified data bus.
Providing the name of the data bus, use the AC4J connection to the database and create a session within the data bus in the indicated Oracle database.
ac4j_sess = new JEMSession(ac4j_conn);
1.5 to 1.11 Send an Asynchronous Request
Once an AC4J session has been created on the AC4J data bus, the client can send asynchronous messages to active EJBs. The client must provide the active EJB handle, the process handle, and all the required input parameters to the base reaction. Steps 1.5 to 1.11 explain the details of the call that the client must make to complete the AC4J request.
1.5 Obtain active EJB handle.
In a synchronous EJB environment, you would use a remote EJB handle to make an invocation. In an AC4J asynchronous environment, you must provide a similar handle of class type JEMHandle that identifies an active EJB. You can obtain the active EJB handle by looking up the jem-name that is defined in the orion-ejb-jar.xml file (see "AC4J Active EJB Deployment" on page 11-46).
// 1.5. Look up the handle of the PurchaseOrderService Active EJBactiveEJBHandle = (JEMHandle)context.lookup(ACTIVE_EJB_NAME);
1.6 Prepare input parameters for asynchronous call.
The client prepares two arrays—an array of class types, to identify the type of each parameter, and an array of objects, to provide the values. Each has four parameters: two strings (customer name and credit card number), an array of strings (items), and an array of integers (quantities):
Class[] inputClassTypes = new Class[] { String.class, String.class, itemNames.getClass(), quantities.getClass() };
Object[] inputParams = new Object[] { (Object) new String(args[1]), (Object) args[2], (Object) itemNames, (Object) quantities };
11-32 Oracle9iAS Containers for J2EE Services Guide Beta Draft
Explanation of the Example
1.7 Make the asynchronous call.
The JEMSession::call contains the interaction identifier of the EJB, the process activation identifier to identify the process where the method is instantiated, and the JEMHandle of the active EJB.
The interaction and process activation identifier (which together form the process context) are optional and can be omitted or can be null, in which case the system automatically creates them. The data bus identifies the context of the process and routes the data tokens to the intended process. Thus, all EJB calls are invoked asynchronously, through the mediation of the data bus.
// IID = customer name (args[1]), AID = null = auto-assignedJEMEmitToken request = ac4j_sess.call(args[1], null, activeEJBHandle, METHOD_NAME, inputClassTypes, inputParams, null, 0, 0);
1.8 Commit the transaction.
The client must commit the changes to the AC4J data bus. If the transaction is not committed, then the request is lost and is not visible to the AC4J data bus. To make the request visible to the AC4J data bus, perform the JDBC commit as follows:
((OracleConnection)ac4j_sess.getJEMConnection().getConnection()).commit();
1.9 Get the AID auto-assigned to the request just made.
In this case, the IID was given, but the AID was left null—to be auto-assigned by AC4J. The AID that is assigned must be read from the port handle, and retained to rendezvous asynchronously with the reply later, in Step 6.
JEMPortHandle portHandle = request.getPortHandle();String aid = portHandle.getAid();
1.10 Close session and connections.
Finally, the client must close the AC4J session and connection, and the JDBC connection. This is necessary only because the client does not exist within an AC4J container. For applications running within an AC4J container (such as the active EJBs in this example), the container automatically closes the session and connections.
ac4j_sess.close();
Beta Draft Active Components for Java 11-33

Explanation of the Example
ac4j_conn.close();conn.close();
Step 2: Purchase Order Service Active EJB Processes the Client’s takeOrder RequestThe code sample in Example 11–2 shows the steps that the purchase order service active EJB takes in processing the client’s takeOrder request.
After the client commits its request, the AC4J data bus matches the data tokens provided by the client with those of the requested reaction and internally schedules the instantiation of the PurchaseOrderBean active EJB and activation of the takeOrder process. The takeOrder process starts a takeOrder base reaction, which starts a new purchase order.
This reaction, takeOrder, processes the client’s request by performing the following steps:
1. Creates a purchase order entity bean to represent the new purchase order. The creation of this bean, in turn, causes the appropriate product and line item beans to be created. This is done using regular EJB entity beans. AC4J is not involved.
2. Sends an asynchronous request to the processOrder process. This is a method on the same bean (PurchaseOrderService bean), but forms the base reaction of a new AC4J process.
3. Returns the purchase order number that was assigned when the purchase order entity bean was created.
By initiating another reaction, the takeOrder reaction can finish, and return the purchase order number that was assigned to this purchase order back to the client as early as possible, so the client can start to poll for the purchase order status.
Example 11–2 shows the code that performs these steps.
Example 11–2 Purchase Order Service Active EJB Processes the Client’s takeOrder Request
public int takeOrder(String clientName, String creditCardNumber, String[] productNames, int[] quantities) throws RemoteException, TestException{ int poNumber = 0; // 2.1. Create Purchase Order Entity Bean, and get PO Number in return // (Regular EJB Entity Beans code. Not shown)
11-34 Oracle9iAS Containers for J2EE Services Guide Beta Draft

Explanation of the Example
poNumber = createPO(clientName, creditCardNumber, productNames, quantities); // 2.2. Get the current AC4J reaction JEMReaction currentAC4JReaction = (JEMReaction)JEMReaction.getReaction(); // 2.3. Make an asynchronous call to the processOrder reaction on this // Bean, so can return PO Number to client now // 2.3a. Look up the AC4J handle for this Bean (PurchaseOrderService) Context context = new InitialContext(); JEMHandle ac4jPOSBeanHandle = (JEMHandle)context.lookup(jemPurchaseOrderServiceBeanName); // 2.3b. Prepare input parameter Types for processOrder method Class[] inputClassTypes = new Class[] { Integer.TYPE, productNames.getClass(), quantities.getClass() }; // 2.3c. Prepare input parameter Values for processOrder method Object[] inputParams = new Object[] { (Object) (new Integer(poNumber)), (Object) productNames, (Object) quantities }; // 2.3d. Make asynchronous call to processOrder JEMEmitToken emitToken = null; emitToken = currentAC4JReaction.call(null, null, ac4jPOSBeanHandle, "processOrder", inputClassTypes, null, inputParams, null, null, null, 0, 0); // 2.4 Return the PO Number of the new Purchase Order return poNumber; }
The AC4J data bus instantiates the active EJB, JEMPurchaseOrderBean (corresponding to the JEMHandle that is provided by the client), in an AC4J server. The takeOrder process starts a takeOrder base reaction. The implementation of the takeOrder method performs the steps shown in the example. The following explanation corresponds to the numbering in Example 11–2.
2.1 Create purchase order entity bean, and get purchase order number in return.
This step involves regular EJB entity bean programming, and is not shown.
Beta Draft Active Components for Java 11-35

Explanation of the Example
2.2 Get the current AC4J reaction.
The current reaction, takeOrder, is running in an AC4J server. The application code retrieves the current reaction as follows:
JEMReaction currentAC4JReaction = (JEMReaction)JEMReaction.getReaction();
This is done so that the call made in step 2.4 can be made in the context of the current request (that is, as another reaction in the same AC4J process).
The interaction ID (IID) and activity ID (AID) of the current process context could be obtained from the current reaction, as follows:
String iid = currentAC4JReaction.getIid();String aid = currentAC4JReaction.getAid();
This would allow, among other things, the new call to be made in the context of the same interaction, but with a different activity ID, thus creating a new process in the same interaction.
2.3 Make an asynchronous call to the processOrder reaction on this bean.
The steps taken in making the asynchronous call are the same as those taken by the client in Steps 1.5 to 1.7. The transaction does not need to be committed by the application; AC4J automatically commits the transaction when the method returns.
By initiating another reaction, the takeOrder reaction can finish, and return the purchase order number assigned to this purchase order back to the client as early as possible, so the client can start to poll for the purchase order status.
2.4 Return the purchase order number of the new purchase order.
The application returns the value using the normal synchronous style, as follows:
return poNumber;
How this value is passed back to the client depends on the style of call made by the client.
In this case, the client called the method asynchronously, by way the AC4J data bus. Therefore, AC4J takes the return value and packages it in an AC4J data token, which is placed on the data bus. The client receives the value asynchronously, by registering a reaction that consumes that data token. In this example, this is performed in Step 6. (Step 6 could proceed any time after step 2 completes, that is, once the reply data token is placed on the data bus.)
Had the client called the same active EJB method synchronously, by means of a regular EJB call, the value would have been returned to the client synchronously, in
11-36 Oracle9iAS Containers for J2EE Services Guide Beta Draft

Explanation of the Example
the normal way. The reason is that AC4J-enabled active EJBs can still be called as regular EJBs.
Step 3: Purchase Order Service Active EJB Processes the processOrder RequestThe processOrder reaction starts a new purchase order. It performs the following:
1. Sends an asynchronous request to the checkINV process of the InventoryService active EJB, to verify that the items are in inventory.
2. Sends an asynchronous request to the checkCRED process of the CreditService active EJB, to verify that the customer’s credit is satisfactory.
3. Registers a processOrderCallback reaction in the current process to receive the results from the preceding two requests.
Example 11–3 shows the code that performs these steps.
Example 11–3 Purchase Order Service Active EJB Processes the processOrder Request
public void processOrder(int poNumber, String[] productNames, int[] quantities) throws RemoteException, TestException{ PurchaseOrderRemote poRemote = null; // 3.1. Get the current AC4J reaction JEMReaction currentAC4JReaction = (JEMReaction)JEMReaction.getReaction(); // 3.2. Look up purchase order Entity Bean, so can pass reference to // Credit and Inventory Services poRemote = lookupPOBean(new Integer(poNumber)); // 3.3. Make an asynchronous call to the Credit Service JEMEmitToken creditToken = callCreditService(currentAC4JReaction, poRemote); // 3.4. Make an asynchronous call to the Inventory Service JEMEmitToken inventoryToken = callInventoryService(currentAC4JReaction, productNames, quantities); // 3.5. Register processOrderCallback Reaction registerCallback(currentAC4JReaction, new JEMEmitToken[] {inventoryToken, creditToken});
Beta Draft Active Components for Java 11-37

Explanation of the Example
// 3.6. Update Purchase Order status to INPROCESS poRemote.setStatus(Status.getString(Status.STATUS_INPROCESS)); }
The following explanation corresponds to the numbering in Example 11–3.
3.1 Get the current AC4J reaction.
The purpose of this is to register the new (callback) reaction in 3.6. The callback reaction is registered in the same process as the current reaction so that it can access data that is associated with this process. See Step 5 for details.
JEMReaction currentAC4JReaction = (JEMReaction)JEMReaction.getReaction();
3.2 Look up purchase order entity bean.
This is done so that the reference to the purchase order entity bean can be passed in the request made to the credit service, so that it can query the bean directly.
poRemote = lookupPOBean(new Integer(poNumber));
3.3 Make an asynchronous call to the credit service.
The steps taken in making the asynchronous call are identical to those taken by the client in Steps 1.5 to 1.7. The transaction does not need to be committed by the application; AC4J automatically commits the transaction when the method returns. The checkCRED method of the credit service active EJB is called, starting a new checkCRED process.
JEMEmitToken creditToken = callCreditService(currentAC4JReaction, poRemote);
3.4 Make an asynchronous call to the inventory service.
This step is similar to 3.3. The only difference is that the purchase order entity bean reference is not passed to the service. The product names and quantities are sufficient information. This difference is not an AC4J issue; rather, it is how this example has been implemented.
The checkINV method of the credit service active EJB is called, starting a new checkINV process.
JEMEmitToken inventoryToken = callInventoryService(currentAC4JReaction, productNames, quantities);
11-38 Oracle9iAS Containers for J2EE Services Guide Beta Draft

Explanation of the Example
3.5 Register processOrderCallback reaction.
Register a new reaction in the current process:
registerCallback(currentAC4JReaction, new JEMEmitToken[] {inventoryToken, creditToken});
The reaction specifies interest in the tokens returned by the asynchronous calls to the credit and inventory services, made in steps 3.3 and 3.4. The new reaction will be scheduled to execute when the reply tokens from both calls are placed on the AC4J data bus (that is, when both services return from the calls).
The callback reaction is registered in the same process as the current reaction so that it can access data that is associated with this process. See "Step 5: Asynchronous Responses Are Processed by the processOrderCallback Reaction" on page 11-40 for details.
3.6 Update purchase order status to INPROCESS.
This state is maintained so that it can be returned to a client that polls to check the status of the purchase order. See "Step 6: Client Receives Purchase Order Number Asynchronously and Polls for Purchase Order Status" on page 11-43 for details.
poRemote.setStatus(Status.getString(Status.STATUS_INPROCESS));
The takeOrder base reaction is completed only after the AC4J infrastructure commits the transaction that includes the calls to the other two active EJBs and a registered reaction.
Step 4: Inventory and Credit Service Active EJBs Process Requests and Make Asynchronous Responses
The checkINV and checkCRED processes receive the requests from the AC4J data bus as if they were invoked from any other EJB. The JEMInventoryBean and JEMCreditBean active EJBs are instantiated. The checkINV and checkCRED base reactions are fired when they receive the data tokens, which were initiated from the processOrder reaction, from the AC4J data bus. Both of them receive the request, perform their tasks, and return. The returned values are forwarded by the AC4J data bus to the registered reaction, processOrderCallback.
The code sample in Example 11–4 illustrates the checkINV method. The checkCRED method is the same as in its AC4J responsibilities.
Beta Draft Active Components for Java 11-39
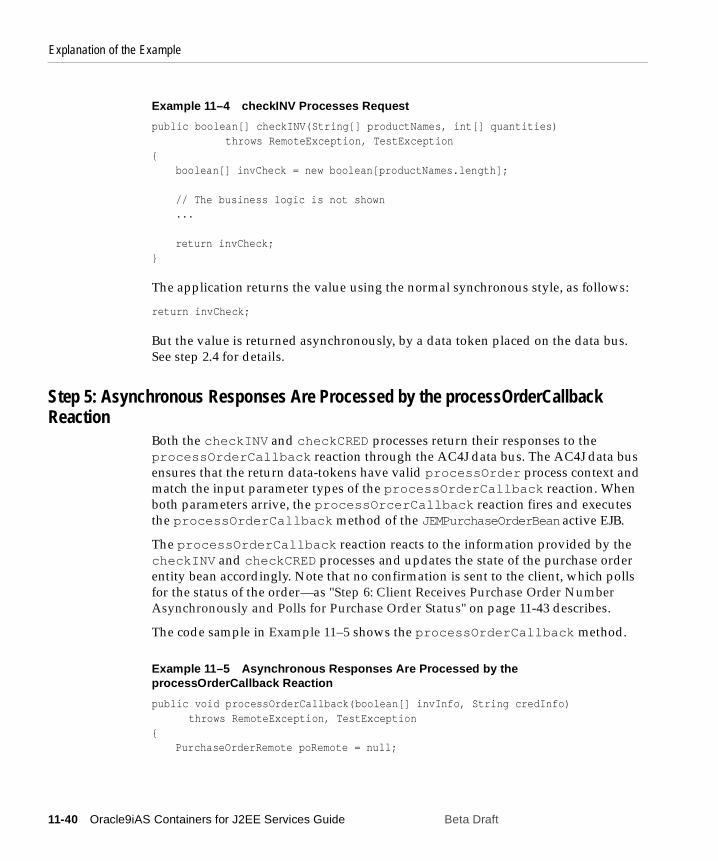
Explanation of the Example
Example 11–4 checkINV Processes Request
public boolean[] checkINV(String[] productNames, int[] quantities) throws RemoteException, TestException{
boolean[] invCheck = new boolean[productNames.length];
// The business logic is not shown...
return invCheck;}
The application returns the value using the normal synchronous style, as follows:
return invCheck;
But the value is returned asynchronously, by a data token placed on the data bus. See step 2.4 for details.
Step 5: Asynchronous Responses Are Processed by the processOrderCallback Reaction
Both the checkINV and checkCRED processes return their responses to the processOrderCallback reaction through the AC4J data bus. The AC4J data bus ensures that the return data-tokens have valid processOrder process context and match the input parameter types of the processOrderCallback reaction. When both parameters arrive, the processOrcerCallback reaction fires and executes the processOrderCallback method of the JEMPurchaseOrderBean active EJB.
The processOrderCallback reaction reacts to the information provided by the checkINV and checkCRED processes and updates the state of the purchase order entity bean accordingly. Note that no confirmation is sent to the client, which polls for the status of the order—as "Step 6: Client Receives Purchase Order Number Asynchronously and Polls for Purchase Order Status" on page 11-43 describes.
The code sample in Example 11–5 shows the processOrderCallback method.
Example 11–5 Asynchronous Responses Are Processed by the processOrderCallback Reaction
public void processOrderCallback(boolean[] invInfo, String credInfo) throws RemoteException, TestException{
PurchaseOrderRemote poRemote = null;
11-40 Oracle9iAS Containers for J2EE Services Guide Beta Draft

Explanation of the Example
Integer poNumber = null;
// This Reaction (processOrderCallback) was invoked asynchronously by// it’s parent Reaction (processOrder) by doing // "JEMReaction.registerReaction".//// This reaction can access all it’s parent’s variables by using // the JEMProcess concept as shown in the following 3 steps.//// In this case, it is the PO Number that is accessed.
// 5.1. Obtain the current AC4J process handleJEMProcess currentAC4JProcess = (JEMProcess) JEMProcess.getProcess();
// 5.2. Retrieve the first input parameter of parent reaction (processOrder)JEMTuple inTuple = currentAC4JProcess.getInTupleByIndx(0);
// 5.3. Get PO Number from parent’s input parameterpoNumber = (Integer)inTuple.getObjInst();
// 5.4. Look up PurchaseOrder Entity BeanpoRemote = lookupPOBean(poNumber);
// 5.5. Start updating the PO status depending on the replies...poRemote.setStatus(Status.getString(Status.STATUS_PROCESSED));
// 5.6. Check the credit infoint local_status = Status.STATUS_PROCESSED;if(credInfo != null){
if(credInfo.equalsIgnoreCase("credit approved"))local_status = Status.STATUS_VALID_CREDIT;
else if(credInfo.equalsIgnoreCase("credit failed"))local_status = Status.STATUS_CANCELLED_NOCREDIT;
else if(credInfo.equalsIgnoreCase("Invalid Credit Card"))local_status = Status.STATUS_INVALID_CREDIT_CARD;
} elselocal_status = Status.STATUS_CANCELLED_NOCREDIT;
// 5.7. Check the inventory infofor(int i=0; local_status == Status.STATUS_VALID_CREDIT && i<invInfo.length;
i++){
if(!invInfo[i])local_status = Status.STATUS_CANCELLED_NOINV;
Beta Draft Active Components for Java 11-41

Explanation of the Example
}
// 5.8. Set the final status of the Purchase Orderif(local_status == Status.STATUS_VALID_CREDIT)
poRemote.setStatus(Status.getString(Status.STATUS_SHIPPED));else
poRemote.setStatus(Status.getString(local_status));}The following explanation corresponds to the numbering in Example 11–5.
5.1 Obtain the current AC4J process handle.
The processOrderCallback reaction resides in the same process as the processOrder reaction that created it; processOrder is the base reaction of the processOrder process, and processOrderCallback is a child reaction.
A handle to the process is obtained so that the current reaction can access data that is global to the process - in this case one of the input parameters to the base reaction, the purchase order number.
JEMProcess currentAC4JProcess = (JEMProcess) JEMProcess.getProcess();
5.2 Retrieve the first input parameter of parent reaction.
The parent reaction is the base reaction of this process. The first parameter is the first token in the tuple:
JEMTuple inTuple = currentAC4JProcess.getInTupleByIndx(0);
5.3 Get purchase order number from parent’s input parameter.
From the whole set of parameters, the purchase order number is retrieved:
poNumber = (Integer)inTuple.getObjInst();
5.4 Look up purchase order entity bean.
This entity bean is obtained to be able to update the order status steps 5.5 to 5.7:
poRemote = lookupPOBean(poNumber);
5.5 to 5.7 Update the purchase order status, depending on the replies.
These steps are normal entity bean operations, not involving AC4J.
11-42 Oracle9iAS Containers for J2EE Services Guide Beta Draft

Explanation of the Example
Step 6: Client Receives Purchase Order Number Asynchronously and Polls for Purchase Order Status
The client must know the response to its purchase order request. As stated earlier, each request (or call) is identified by a process context (interaction ID, IID, plus activation ID, AID). Using the process context, the client can pull the response from the AC4J data bus.
The client can then parse the received JEMEmitToken from the response. If the client existed inside the OC4J container, then the container would deconstruct the JEMEmitToken to the required type. Outside the container, the client must parse out the response correctly, as shown in Example 11–6.
Only the purchase order number is returned by the asynchronous reply, not the status of the order itself. After the client has the order number, it polls the purchase order entity bean directly, by means of regular synchronous EJB calls, until the order completes.
Example 11–6 Client Receives Purchase Order Number Asynchronously and Polls for Purchase Order Status
static final String DATA_SOURCE_NAME = "java:comp/env/jdbc/OracleDS";static final String BEAN_NAME = "java:comp/env/ejb/PurchaseOrderService";static final String ACTIVE_EJB_NAME = "JEMPurchaseOrderService";static final String DB_USER = "JEMUSER";static final String DB_PASSWD = "JEMPASSWD";
public static void main(String[] args) throws ClassNotFoundException, Exception{
// 6.0. Create a JNDI ContextContext context = new InitialContext();
// 6.1. Look up the DataSource where AC4J data bus residesDataSource client_ds = (DataSource) context.lookup(DATA_SOURCE_NAME);
// 6.2. Obtain a JDBC connection to the DataSourceOracleConnection conn =(OracleConnection)client_ds.getConnection(DB_USER, DB_PASSWD);
// 6.3. Create an AC4J connection, using the JDBC Connectionac4j_conn = new JEMConnection(conn);
// 6.4. Create an AC4J session on the data busac4j_sess = new JEMSession(ac4j_conn);
Beta Draft Active Components for Java 11-43

Explanation of the Example
// 6.5. Look up the handle of the PurchaseOrderService Active EJBactiveEJBHandle = (JEMHandle)context.lookup(ACTIVE_EJB_NAME);
// 6.6. Receive Response for the specified Process Context// (IID + AID) plus reaction (takeOrder)// Blocks indefintely, because timeout is 0JEMEmitToken resptoken =
ac4j_sess.receiveReactionResponse(args[1], // IIDargs[2], // AIDactiveEJBHandle, // Active EJB Handle"takeOrder", // Reaction/Method0); // Timeout (seconds)
// 6.7. Retrieve data from Reaction ResponseObject object = resptoken.getReactionResponseObjectInstance();
// 6.8. Extract PurchaseOrder Number from dataInteger poNumber = retrievePONumber(object);
// 6.9. Commit the transaction((OracleConnection)ac4j_sess.getJEMConnection().getConnection()).commit();
// 6.10. Look up the PurchaseOrder Service BeanPurchaseOrderServiceRemote posb = lookupPurchaseOrderServiceBean();
// 6.11. Poll the Purchase Order status - synchronously (regular EJB calls)// until the status = shippedSystem.out.println("receiveResponse: polling for PO status...");String status = "";while(status.compareTo("STATUS_SHIPPED") != 0){
status = posb.getStatus(poNumber.intValue());System.out.println(" status = " + status);
}
if (status.compareTo("STATUS_SHIPPED") == 0){
System.out.println("\nreceiveResponse: Status = SHIPPED. Done.");}
}
The following explanation corresponds to the numbering in Example 11–6.
6.0 to 6.4 Retrieve an AC4J connection.
These steps are identical to steps 1.0 to 1.4.
11-44 Oracle9iAS Containers for J2EE Services Guide Beta Draft
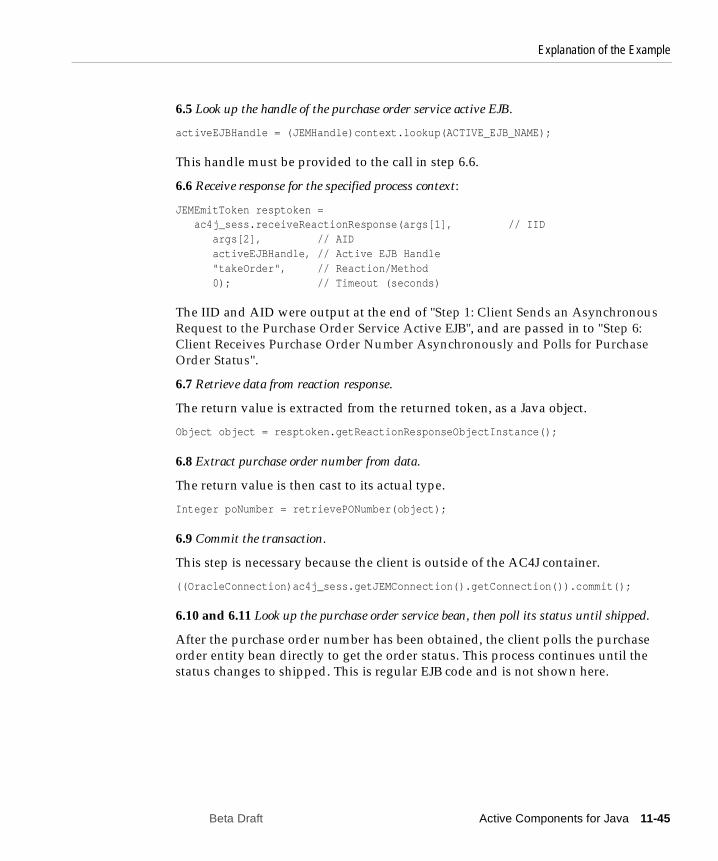
Explanation of the Example
6.5 Look up the handle of the purchase order service active EJB.
activeEJBHandle = (JEMHandle)context.lookup(ACTIVE_EJB_NAME);
This handle must be provided to the call in step 6.6.
6.6 Receive response for the specified process context:
JEMEmitToken resptoken = ac4j_sess.receiveReactionResponse(args[1], // IID args[2], // AID activeEJBHandle, // Active EJB Handle "takeOrder", // Reaction/Method 0); // Timeout (seconds)
The IID and AID were output at the end of "Step 1: Client Sends an Asynchronous Request to the Purchase Order Service Active EJB", and are passed in to "Step 6: Client Receives Purchase Order Number Asynchronously and Polls for Purchase Order Status".
6.7 Retrieve data from reaction response.
The return value is extracted from the returned token, as a Java object.
Object object = resptoken.getReactionResponseObjectInstance();
6.8 Extract purchase order number from data.
The return value is then cast to its actual type.
Integer poNumber = retrievePONumber(object);
6.9 Commit the transaction.
This step is necessary because the client is outside of the AC4J container.
((OracleConnection)ac4j_sess.getJEMConnection().getConnection()).commit();
6.10 and 6.11 Look up the purchase order service bean, then poll its status until shipped.
After the purchase order number has been obtained, the client polls the purchase order entity bean directly to get the order status. This process continues until the status changes to shipped. This is regular EJB code and is not shown here.
Beta Draft Active Components for Java 11-45

AC4J Active EJB Deployment
AC4J Active EJB DeploymentThe active EJB is developed as any other EJB. The changes that enable the EJB to be used in an AC4J interaction are in the OC4J-specific deployment descriptor. These are discussed below:
Deploy the EJB with AC4J element specifications in the OC4J-specific deployment descriptor. The following example defines the takeOrder EJB as an active EJB.
■ The <jem-server-extension> element defines the database with the data bus that the active EJBs in this JAR file use for their AC4J communication.
<jem-server-extension data-source-location="jdbc/jemSuperuserDS"> <description>AC4J datasource location</description></jem-server-extension>
■ The <jem-deployment> element in the orion-ejb-jar.xml file identifies the EJB that is defined in the ejb-jar.xml file as an active EJB. This element provides an AC4J name (jem-name) that is used to identify the bean within the AC4J calls. For example, this bean is defined as JEMPurchaseOrderBean, which was used in the JEMHandle creation. The identity of the caller, which is allowed to request services and retrieve responses from the active EJB, can be declared in the called-by tag. This caller tag identifies the user in the data bus. For example, JEMCLIUSER is the user name that was employed to create a jem-session,
<jem-deployment jem-name="JEMPurchaseOrderBean" ejb-name="PurchaseOrderBean"> <description>AC4J EJB</description> <called-by> <caller caller-identity="JEMCLIUSER"/> </called-by></jem-deployment>
Here is the entire orion-ejb-jar.xml file for the three active EJBs:
<?xml version="1.0" encoding="utf-8"?><!DOCTYPE orion-ejb-jar PUBLIC "-//Evermind//DTD Enterprise JavaBeans 1.1 runtime//EN" "http://xmlns.oracle.com/ias/dtds/orion-ejb-jar.dtd">
<orion-ejb-jar> <enterprise-beans> <entity-deployment name="Products" location="ejb/Product" table="PRODUCTS_PURCHASEORDERSERVICE" data-source="jdbc/nonEmulatedDS" > </entity-deployment>
11-46 Oracle9iAS Containers for J2EE Services Guide Beta Draft

AC4J Active EJB Deployment
<jem-server-extension data-source-location="jdbc/nonEmulatedDS" scheduling-threads="1"> <description>JEMServer Deployment</description> </jem-server-extension>
<jem-deployment jem-name="JEMPurchaseOrderService" ejb-name="PurchaseOrderService" > <called-by> <caller caller-identity="JEMUSER" /> </called-by>
<security-identity> <description>using the caller identity</description> <use-caller-identity /> </security-identity> </jem-deployment> </enterprise-beans>
<assembly-descriptor> <security-role-mapping name="JEMUSER"> <user name="JEMUSER" /> </security-role-mapping> <default-method-access> <security-role-mapping name="<default-ejb-caller-role>" impliesAll="true" /> </default-method-access> </assembly-descriptor></orion-ejb-jar>
Beta Draft Active Components for Java 11-47

AC4J Active EJB Deployment
11-48 Oracle9iAS Containers for J2EE Services Guide Beta Draft

OC4J-Specific DTD Refe
A
OC4J-Specific DTD ReferenceThis appendix describes the elements contained within the OC4J-specific EJB deployment descriptor: orion-ejb-jar.dtd. This appendix covers the structure and briefly describes the elements in this DTD; however, most of these elements are fully described in other sections of this book.
The DTD is located at http://xmlns.oracle.com/ias/dtds/orion-ejb-jar.dtd.
The description of this deployment descriptor has been divided into the following sections:
■ Overall description of each element section—Each section of elements of this XML file is described in "OC4J-Specific Deployment Descriptor for EJBs" on page A-3.
■ Element description—An alphabetical listing and description for each element is discussed in "Element Description" on page A-22.
Whenever you deploy an application, OC4J automatically generates the OC4J-specific XML file with the default elements. If you want to change these defaults, you must copy the orion-ejb-jar.xml file to where your original ejb-jar.xml file is located and change it in this location. If you change the XML file within the deployed location, OC4J simply overwrites these changes when the application is deployed again. The changes only stay constant when changed in the development directories.
Oracle recommends that you add your OC4J-specific XML files within the recommended development structure as shown in Figure A–1.
rence A-1

Figure A–1 Development Application Directory Structure
applications/<appname>/
META-INF/application.xml
<ejb_module>EJB classes (my.ejb.class maps to /my/ejb/class)META-INF/
ejb-jar.xml
<web_module>/index.htmlJSP pagesWEB-INF/
web.xml
classes/Servlet classes
<client_module>/
Client classesMETA-INF/
application-client.xml
lib/
dependent libraries
/
(my.Servlet to /my/Servlet)
orion-ejb-jar.xml
orion-web.xml
orion-application-client.xml
A-2 Oracle9iAS Containers for J2EE Enterprise JavaBeans Developer’s Guide

OC4J-Specific Deployment Descriptor for EJBs
OC4J-Specific Deployment Descriptor for EJBsThe OC4J-specific deployment descriptor contains extended deployment information for session beans, entity beans, message driven beans, and security for these EJBs. The major element structure within this deployment descriptor has the following structure:
<orion-ejb-jar deployment-time=... deployment-version=...> <enterprise-beans> <session-deployment ...></session-deployment> <entity-deployment ...></entity-deployment> <message-driven-deployment ...></message-driven-deployment> <jem-deployment ...></jem-deployment> <jem-server-extension ...></jem-server-extension> </enterprise-beans> <assembly-descriptor> <security-role-mapping ...></security-role-mapping> <default-method-access></default-method-access> </assembly-descriptor></orion-ejb-jar>
Each section under the <orion-ejb-jar> main tag has its own purpose. These are described in the sections below:
■ Enterprise Beans Section
■ Assembly Descriptor Section
Enterprise Beans SectionThe <enterprise-beans> section defines additional deployment information for all EJBs: session beans, entity beans, and message driven beans. There is a section for each type of EJB.
The following sections describe the elements within <enterprise-beans> element;
■ Session Bean Section
■ Entity Bean Section
■ Message Driven Bean Section
■ EJB 1.1 CMP Field Mapping Section
■ Method Definition
OC4J-Specific DTD Reference A-3

OC4J-Specific Deployment Descriptor for EJBs
Session Bean SectionThe <session-deployment> section provides additional deployment information for a session bean deployed within this JAR file. The <session-deployment> section contains the following structure:
<session-deployment pool-cache-timeout=... call-timeout=... copy-by-value=... location=... max-instances=... min-instances=... max-tx-retries=... name=... persistence-filename=... replication=... timeout=... idletime=... memory-threshold=... max-instances-threshold=... resource-check-interval=... passivate-count=... wrapper=... local-wrapper=... <ior-security-config> <transport-config> <integrity></integrity> <confidentiality></confidentiality> <establish-trust-in-target></establish-trust-in-target> <establish-trust-in-client></establish-trust-in-client> </transport-config> <as-context> <auth-method></auth-method> <realm></realm> <required></required> </as-context> <sas-context> <caller-propagation></caller-propagation> </sas-context> </ior-security-config> <env-entry-mapping name=...> </env-entry-mapping <ejb-ref-mapping location=... name=... /> <resource-ref-mapping location=... name=... > <lookup-context location=...> <context-attribute name=... value=... /> </lookup-context> </resource-ref-mapping> <resource-env-ref-mapping location=... name=... /></session-deployment>
Each of the element groups are discussed in the following sections of the OC4J documentation set:
■ A session bean example, which includes the <session-deployment> element, is described in "Create the Deployment Descriptor" on page 2-24 in Chapter 2, "EJB Primer".
A-4 Oracle9iAS Containers for J2EE Enterprise JavaBeans Developer’s Guide

OC4J-Specific Deployment Descriptor for EJBs
■ The <ior-security-config> element is an interoperability element, which is discussed fully in the Interoperability chapter in the Oracle9iAS Containers for J2EE Services Guide.
■ The <env-entry-mapping> element maps environment variables to JNDI names and is discussed in "Environment variables" on page 9-12.
■ The <ejb-ref-mapping> element maps any EJB references to JNDI names and is discussed in "Environment References To Other Enterprise JavaBeans" on page 9-20.
■ The <resource-ref-mapping> element maps any EJB references to JNDI names and is discussed in "Environment References To Resource Manager Connection Factory References" on page 9-20.
■ The <resource-env-ref-mapping> element is used to map an administered object for a resource. For example, to use JMS, the bean must obtain both a JMS factory object and a destination object. These objects are retrieved at the same time from JNDI. The <resource-ref> element declares the JMS factory and the <resource-env-ref> elment is used to declare the destination. Thus, the <resource-env-ref-mapping> element maps the destination object. See "Using a Logical Name for Accessing the MDB" on page 7-21 for more information.
The attributes for the <session-deployment> element are as follows:
Table A–1 Attributes for <session-deployment> Element
Attribute Description
pool-cache-timeout The pool-cache-timeout applies for stateless session EJBs. This parameter specifies how long to keep stateless sessions cached in the pool.
For stateless session beans, if you specify a pool-cache-timeout, then at every pool-cache-timeout interval, all beans in the pool, of the corresponding bean type, are removed. If the value specified is zero or negative, then the pool-cache-timeout is disabled and beans are not removed from the pool.
Default Value: 60 (seconds)
OC4J-Specific DTD Reference A-5

OC4J-Specific Deployment Descriptor for EJBs
call-timeout This parameter specifies the maximum time to wait for any resource to make a business/life-cycle method invocation. This is not a timeout for how long a business method invocation can take.
If the timeout is reached, a TimedOutException is thrown. This excludes database connections.
Default Values: 90000 milliseconds. Set to 0 if you want the timeout to be forever. See the EJB section in the Oracle9i Application Server Performance Guide for more information.
copy-by-value Whether or not to copy (clone) all the incoming and outgoing parameters in EJB calls. Set to ’false’ if you are certain that your application does not assume copy-by-value semantics for a speed-up. The default is ’true’.
location The JNDI-name to which this bean will be bound.
max-instances The number of bean instances allowed in memory—either instantiated or pooled. When this value is reached, the container attempts to passivate the oldest bean instance from memory. If unsuccessful, the container waits the number of milliseconds set in the call-timeout attribute to see if a bean instance is removed from memory, either through passivation, its remove() method, or bean expiration, before a TimeoutExpiredException is thrown back to the client. To allow an infinite number of bean instances, the max-instances attribute can be set to zero. Default is 0, which means infinite. This applies to both stateless and stateful session beans.
min-instances The number of minimum bean implementation instances to be kept instantiated or pooled. The default is 0. This setting is valid for stateless session beans only.
Table A–1 Attributes for <session-deployment> Element (Cont.)
Attribute Description
A-6 Oracle9iAS Containers for J2EE Enterprise JavaBeans Developer’s Guide

OC4J-Specific Deployment Descriptor for EJBs
max-tx-retries This parameter specifies the number of times to retry a transaction that was rolled back due to system-level failures. The default is 0.
Generally, we recommend that you add retries only where errors are seen that could be resolved through retries. For example, if you are using serializable isolation and you want to retry the transaction automatically if there is a conflict, you might want to use retries. However, if the bean wants to be notified when there is a conflict, then in this case, you should leave max-tx-retries=0.
Default Value: 3. See the EJB section in the Oracle9i Application Server Performance Guide for more information.
name The name of the bean, which matches the name of a bean in the assembly section of the EJB deployment descriptor (ejb-jar.xml).
persistence-filename Path to the file where sessions are stored across restarts.
replication Configuration of the state replication for stateful session beans. Values can be VMTermination, EndOfCall, or None. None is the default. See "Configure EJB Replication for Stateful Session Beans" on page 10-5 for more information.
timeout The timeout applies for stateful session EJBs. If the value is zero or negative, then all timeouts are disabled.
The timeout parameter is an inactivity timeout for stateful session beans. Every 30 seconds the pool clean up logic is invoked. Within the pool clean up logic, only the sessions that timed out, by passing the timeout value, are deleted.
Adjust the timeout based on your applications use of stateful session beans. For example, if stateful session beans are not removed explicitly by your application, and the application creates many stateful session beans, then you may want to lower the timeout value.
If your application requires that a stateful session bean be available for longer than 30 minutes, then adjust the timeout value accordingly.
Default Value: 30 (minutes)
Table A–1 Attributes for <session-deployment> Element (Cont.)
Attribute Description
OC4J-Specific DTD Reference A-7

OC4J-Specific Deployment Descriptor for EJBs
idletime You can set an idle timeout for each bean. When this timeout expires, passivation occurs. Set this attribute to the appropriate number of seconds. Default: 300 seconds. (5 min.). To disable, specify "never."
memory-threshold This attribute defines a threshold for how much used JVM memory is allowed before passivation should occur. Specify an integer that is translated as a percentage. When reached, beans are passivated, even if their idle timeout has not expired. Default: 80%. To disable, specify "never."
max-instances-threshold This attribute defines a threshold for how many actives beans exist in relation to the max-instances attribute definition. Specify an integer that is translated as a percentage. If you define that the max-instances is 100 and the max-instances-threshold is 90%, then when the active bean instances reaches past 90, passivation of beans occurs. Default: 90%. To disable, specify "never."
resource-check-interval The container checks all resources at this time interval. At this time, if any of the thresholds have been reached, passivation occurs. Default: 180 sec. (3 min.). To disable, specify "never."
passivate-count This attribute is an integer that defines the number of beans to be passivated if any of the resource thresholds have been reached. Passivation of beans is performed using the least recently used algorithm. Default: one-third of the max-instances attribute. You can disable this attribute by setting the count to zero or a negative number.
wrapper Name of the OC4J wrapper class for this bean. This is an internal server value and should not be edited.
local-wrapper Name of the OC4J local home wrapper class for this bean. This is an internal server value and should not be edited.
Table A–1 Attributes for <session-deployment> Element (Cont.)
Attribute Description
A-8 Oracle9iAS Containers for J2EE Enterprise JavaBeans Developer’s Guide

OC4J-Specific Deployment Descriptor for EJBs
Entity Bean SectionThe <entity-deployment> section provides additional deployment information for an entity bean deployed within this JAR file. The <entity-deployment> section contains the following structure:
<entity-deployment call-timeout=... clustering-schema=... copy-by-value=... data-source=... exclusive-write-access=... do-select-before-insert=... instance-cache-timeout=... isolation=... location=... locking-mode=... max-instances=... min-instances=... max-tx-retries=... update-chnaged-fields-only=... name=... pool-cache-timeout=... table=... validity-timeout=... force-update=... wrapper=... local-wrapper=... delay-updates-until-commit=... findByPrimaryKey-lazy-loading=... > <ior-security-config> <transport-config> <integrity></integrity> <confidentiality></confidentiality> <establish-trust-in-target></establish-trust-in-target> <establish-trust-in-client></establish-trust-in-client> </transport-config> <as-context> <auth-method></auth-method> <realm></realm> <required></required> </as-context> <sas-context> <caller-propagation></caller-propagation> </sas-context> </ior-security-config> <primkey-mapping> <cmp-field-mapping ejb-reference-home=... name=... persistence-name=... persistence-type=...></cmp-field-mapping> </primkey-mapping> <cmp-field-mapping ejb-reference-home=... name=... persistence-name=... persistence-type=...> </cmp-field-mapping> <finder-method partial=... query=... lazy-loading=...> <method></method> </finder-method> <env-entry-mapping name=...></env-entry-mapping> <ejb-ref-mapping location=... name=... /> <resource-ref-mapping location=... name=... > <lookup-context location=...> <context-attribute name=... value=... /> </lookup-context>
OC4J-Specific DTD Reference A-9

OC4J-Specific Deployment Descriptor for EJBs
</resource-ref-mapping> <resource-env-ref-mapping location=... name=... /></entity-deployment>
Each of the element groups are discussed in the following sections of the OC4J documentation set:
■ Entity bean examples, which includes the <entity-deployment> element, are described in Chapter 3, "CMP Entity Beans", Chapter 4, "Entity Relationship Mapping", Chapter 5, "EJB Query Language", and Chapter 6, "BMP Entity Beans".
■ The <ior-security-config> element configures CSIv2 security policies for interoperability, which is discussed fully in the Interoperability chapter in the Oracle9iAS Containers for J2EE Services Guide.
■ The <primkey-mapping> element maps the primary key to the CMP field it represents. See "Explicit Mapping of Persistent Fields to the Database" on page 3-16 for more information.
■ The <cmp-field-mapping> element maps each <cmp-field> element to its database row. See "Explicit Mapping of Persistent Fields to the Database" on page 3-16 for more information.
■ The <finder-method> element is used to create finder methods for EJB 1.1 entity beans. To create EJB 2.0 finder methods, see "Entity Relationship Mapping". To continue to use EJB 1.1 finder methods with this element, see "EJB 1.1 Advanced Finder Methods" on page B-10.
■ The <env-entry-mapping> element maps environment variables to JNDI names and is discussed in "Environment variables" on page 9-12.
■ The <ejb-ref-mapping> element maps any EJB references to JNDI names and is discussed in "Environment References To Other Enterprise JavaBeans" on page 9-20.
■ The <resource-ref-mapping> element maps any EJB references to JNDI names and is discussed in "Environment References To Resource Manager Connection Factory References" on page 9-20.
■ The <resource-env-ref-mapping> element is used to map an administered object for a resource. For example, to use JMS, the bean must obtain both a JMS factory object and a destination object. These objects are retrieved at the same time from JNDI. The <resource-ref> element declares the JMS factory and the <resource-env-ref> elment is used to declare the destination. Thus, the <resource-env-ref-mapping> element maps the destination object. See
A-10 Oracle9iAS Containers for J2EE Enterprise JavaBeans Developer’s Guide

OC4J-Specific Deployment Descriptor for EJBs
"Using a Logical Name for Accessing the MDB" on page 7-21 for more information.
The attributes for the <entity-deployment> element are as follows:
Table A–2 Attributes for <entity-deployment> Element
Attribute Description
call-timeout This parameter specifies the maximum time to wait for any resource to make a business/life-cycle method invocation. This is not a timeout for how long a business method invocation can take.
If the timeout is reached, a TimedOutException is thrown. This excludes database connections.
Default Values: 90000 milliseconds. Set to 0 if you want the timeout to be forever. See the EJB section in the Oracle9i Application Server Performance Guide for more information.
clustering-schema Do not use. Not needed in this release.
copy-by-value Whether or not to copy (clone) all the incoming and outgoing parameters in EJB calls. Set to ’false’ if you are certain that your application does not assume copy-by-value semantics for a speed-up. The default is ’true’.
data-source The name of the data source used if using container-managed persistence.
OC4J-Specific DTD Reference A-11

OC4J-Specific Deployment Descriptor for EJBs
exclusive-write-access Whether or not the EJB-server has exclusive write (update) access to the database backend. This can be used only for entity beans that use a "read_only" locking mode. In this case, it increases the performance for common bean operations and enables better caching.
This parameter corresponds to which commit option is used (A, B or C, as defined in the EJB specification). When exclusive-write-access = true, this is commit option A.
Default is false for beans with locking-mode=optimistic or pessimistic and true for locking-mode=read-only.
The exclusive-write-access is forced to false if locking is pessimistic or optimistic, and is not used with EJB clustering. The exclusive-write-access can be false with read-only locking, but read-only won’t have any performance impact if exclusive-write-access=false, since ejbStores are already skipped when no fields have been changed. To see a performance advantage and avoid doing ejbLoads for read-only beans, you must also set exclusive-write-access=true.
See "Exclusive Write Access to the Database" on page 9-10 for more information.
do-select-before-insert If false, you avoid executing a select before an insert. The extra select normally checks to see if the entity already exists before doing the insert to avoid duplicates.
If a unique key constraint is defined for the entity, then we recommend setting this to false. If there is no unique key constraint, setting this to false leads to not detecting a duplicate insert. To prevent duplicate inserts in this case, leave it set to true.
For performance, Oracle recommends setting this to false to avoid the extra select before insert. Default Value: true
Table A–2 Attributes for <entity-deployment> Element (Cont.)
Attribute Description
A-12 Oracle9iAS Containers for J2EE Enterprise JavaBeans Developer’s Guide

OC4J-Specific Deployment Descriptor for EJBs
instance-cache-timeout The amount of time in seconds that entity wrapper instances are assigned to an identity. If you specify ’never’, you retain the wrapper instances until they are garbage collected. The default is 60 seconds.
location The JNDI-name to which this bean will be bound.
isolation Specifies the isolation-level for database actions. The valid values for Oracle databases are ’serializable’ and ’committed’. The default is ’committed’. Non-Oracle databases can be the following: ’none’, ’committed’, ’serializable’, ’uncommitted’, and ’repeatable_read’.
For more information, see "Entity Bean Concurrency and Database Isolation Modes" on page 9-8 and Oracle9i Application Server Performance Guide .
locking-mode The concurrency modes configure when to block to manage resource contention or when to execute in parallel. For more information, see "Entity Bean Concurrency and Database Isolation Modes" on page 9-8 and Oracle9i Application Server Performance Guide . The concurrency modes are as follows:
■ PESSIMISTIC: This manages resource contention and does not allow parallel execution. Only one user at a time is allowed to execute the entity bean at a single time.
■ OPTIMISTIC: Multiple users can execute the entity bean in parallel. It does not monitor resource contention; thus, the burden of the data consistency is placed on the database isolation modes. This is the default.
■ READ-ONLY: Multiple users can execute the entity bean in parallel. The container does not allow any updates to the bean’s state.
max-instances The number of maximum bean implementation instances to be kept instantiated or pooled. The default is 0, which means infinite. See "Configuring Environment References" on page 9-12 for more information.
Table A–2 Attributes for <entity-deployment> Element (Cont.)
Attribute Description
OC4J-Specific DTD Reference A-13

OC4J-Specific Deployment Descriptor for EJBs
min-instances The number of minimum bean implementation instances to be kept instantiated or pooled. The default is 0. See "Configuring Environment References" on page 9-12 for more information.
max-tx-retries This parameter specifies the number of times to retry a transaction that was rolled back due to system-level failures. The default is 0.
Generally, we recommend that you add retries only where errors are seen that could be resolved through retries. For example, if you are using serializable isolation and you want to retry the transaction automatically if there is a conflict, you might want to use retries. However, if the bean wants to be notified when there is a conflict, then in this case, you should leave max-tx-retries=0.
Default Value: 3. See the EJB section in the Oracle9i Application Server Performance Guide for more information.
update-changed-fields-only Specifies whether the container updates only modified fields or all fields to persistence storage for CMP entity beans when ejbStore is invoked. The default is true, which specifies to only update modified fields. See "Techniques for Updating Persistence" on page 9-8 for more information.
disble-wrapper-cache If true, a pool of wrapper instances is not maintained. The default is true. See "Configuring Environment References" on page 9-12 for more information.
name The name of the bean, which matches the name of a bean in the assembly section of the EJB deployment descriptor (ejb-jar.xml).
pool-cache-timeout The amount of time in seconds that the bean implementation instances are to be kept in the "pooled" (unassigned) state, specifying ’never ’ retains the instances until they are garbage collected. The default is 60.
Table A–2 Attributes for <entity-deployment> Element (Cont.)
Attribute Description
A-14 Oracle9iAS Containers for J2EE Enterprise JavaBeans Developer’s Guide

OC4J-Specific Deployment Descriptor for EJBs
table The name of the table in the database if using container-managed persistence.
validity-timeout The maximum amount of time (in milliseconds) that an entity is valid in the cache (before being reloaded). Useful for loosely coupled environments where rare updates from legacy systems occur. This attribute is only valid for entity beans with locking mode of read_only and when exclusive-write-access="true" (the default).
We recommend that if the data is never being modified externally (and therefore you’ve set exclusive-write-access=true), that you can set this to 0 or -1, to disable this option, since the data in the cache will always be valid for read-only EJBs that are never modified externally.
If the EJB is generally not modified externally, so you’re using exclusive-write-access=true, yet occasionally the table is updated so you need to update the cache occasionally, then set this to a value corresponding to the interval you think the data may be changing externally.
force-update If OC4J does not believe that any of the persistence data has changed, the force-update attribute set to true means that OC4J will still execute the EJB lifecycle by invoking the ejbStore method. This manages data in transient fields and sets appropriate persistent fields during the ejbStore method. For example, an image might be kept in one format in memory, but stored in a different format in the database. The default is false.
wrapper Name of the OC4J remote home wrapper class for this bean. This is an internal server value and should not be edited.
local-wrapper Name of the OC4J local home wrapper class for this bean. This is an internal server value and should not be edited.
Table A–2 Attributes for <entity-deployment> Element (Cont.)
Attribute Description
OC4J-Specific DTD Reference A-15

OC4J-Specific Deployment Descriptor for EJBs
Message Driven Bean SectionThe <message-driven-deployment> section provides additional deployment information for a message driven bean deployed within this JAR file. The <message-driven-deployment> section contains the following structure:
<message-driven-deployment cache-timeout=... connection-factory-location=... destination-location=... name=... subscription-name=... listener-threads=... transaction-timeout=...> <env-entry-mapping name=...></env-entry-mapping> <ejb-ref-mapping location=... name=... /> <resource-ref-mapping location=... name=... > <lookup-context location=...> <context-attribute name=... value=... /> </lookup-context> </resource-ref-mapping> <resource-env-ref-mapping location=... name=... /></message-driven-deployment>
Each of the element groups are discussed in the following sections of the OC4J documentation set:
■ A message-driven bean example, which includes the <message-driven-deployment> element, is described in Chapter 7, "Message-Driven Beans".
■ The <env-entry-mapping> element maps environment variables to JNDI names and is discussed in "Environment variables" on page 9-12.
■ The <ejb-ref-mapping> element maps any EJB references to JNDI names and is discussed in "Environment References To Other Enterprise JavaBeans" on page 9-20.
■ The <resource-ref-mapping> element maps any EJB references to JNDI names and is discussed in "Environment References To Resource Manager Connection Factory References" on page 9-20.
delay-updates-until-commit This attribute is valid only for CMP entity beans. Defers the flushing of transactional data until commit time or not. The default is true. Set this value to false to update persistence data after completion of every EJB method invocation - except ejbRemove() and the finder methods.
Table A–2 Attributes for <entity-deployment> Element (Cont.)
Attribute Description
A-16 Oracle9iAS Containers for J2EE Enterprise JavaBeans Developer’s Guide

OC4J-Specific Deployment Descriptor for EJBs
■ The <resource-env-ref-mapping> element is used to map an administered object for a resource. For example, to use JMS, the bean must obtain both a JMS factory object and a destination object. These objects are retrieved at the same time from JNDI. The <resource-ref> element declares the JMS factory and the <resource-env-ref> elment is used to declare the destination. Thus, the <resource-env-ref-mapping> element maps the destination object. See "Using a Logical Name for Accessing the MDB" on page 7-21 for more information.
The attributes for the <message-driven-deployment> element are as follows:
Table A–3 Attributes for <message-driven-deployment> Element
Attribute Description
cache-timeout Do not use this element.
connection-factory-location
The JNDI location of the connection factory to use. The JMS Destination Connection Factory is specified in the connection-factory-location attribute. The syntax is "java:comp/resource" + resource provider name + "TopicConnectionFactories" or "QueueConnectionFactories" + user defined name. The xxxConnectionFactories details what type of factory is being defined. For more information, see "OC4J-Specific Deployment Descriptor (orion-ejb-jar.xml)" on page 7-19.
destination-location The JNDI location of the destination (queue/topic) to use. The JMS Destination is specified in the destination-location attribute. The syntax is "java:comp/resource" + resource provider name + "Topics" or "Queues" + Destination name. The Topic or Queue details what type of Destination is being defined. The Destination name is the actual queue or topic name defined in the database. For more information, see "OC4J-Specific Deployment Descriptor (orion-ejb-jar.xml)" on page 7-19.
max-instances Do not use this element. Use listener-threads instead
min-instances Do not use this element.
name The name of the bean, which matches the name of a bean in the assembly section of the EJB deployment descriptor (ejb-jar.xml).
OC4J-Specific DTD Reference A-17

OC4J-Specific Deployment Descriptor for EJBs
AC4J Active EJB SectionThe <jem-server-extension> section defines the JNDI name of the database where the AC4J Databus is installed. The <jem-server-extension> contains the following structure:
<jem-server-extension data-source-location=... scheduling-threads=...> <description></description> <data-bus data-bus-name=... url=.../></jem-server-extension>
For more information on this element, see the Oracle9iAS Containers for J2EE Services Guide.
The <jem-deployment> section provides additional deployment information for an active EJB deployed within this JAR file. The <jem-deployment> section contains the following structure:
<jem-deployment jem-name=... ejb-name=...> <description></description> <data-bus data-bus-name=... url=.../> <called-by> <caller caller-identity=.../> </called-by> <security-identity> <description></description> <use-caller-identity></use-caller-identity>
subscription-name If this is a topic, the subscription name is defined in the subscription-name attribute. For more information, see "OC4J-Specific Deployment Descriptor (orion-ejb-jar.xml)" on page 7-19.
listener-threads The listener threads are used to concurrently consume JMS messages. The default is one thread. For more information, see "OC4J-Specific Deployment Descriptor (orion-ejb-jar.xml)" on page 7-19.
transaction-timeout This attribute controls the transaction timeout interval for any container-managed transactional MDB. The default is one day. If the transaction has not completed in this timeframe, the transaction is rolled back. For more information, see "OC4J-Specific Deployment Descriptor (orion-ejb-jar.xml)" on page 7-19.
Table A–3 Attributes for <message-driven-deployment> Element
Attribute Description
A-18 Oracle9iAS Containers for J2EE Enterprise JavaBeans Developer’s Guide

OC4J-Specific Deployment Descriptor for EJBs
</security-identity></jem-deployment>
The called-by element lets the application deployer to control or restrict the usage of the asynchronous methods defined on the AC4J bean. In the following example "CLIUSER", "SVRUSER" and "XTRAUSER" can invoke all methods defined on AC4JBeanA, which corresponds to the EJB with name="ABean". If "USER1" or "USER2" invoke this AC4JBeanA, then the container throws SecurityException.
<jem-deployment jem-name="AC4JBeanA" ejb-name="ABean"> <called-by> <caller caller-identity="CLIUSER"/> <caller caller-identity="SVRUSER"/> <caller caller-identity="XTRAUSER"/> </called-by></jem-deployment>
If the application deployer defines a security-role for the ABean EJB with role="USER1", then "USER1" can invoke all the methods on the ABean EJB synchronously. However, "USER1" can not invoke the same asynchronous methods in AC4JBeanA unless the called-by element is defined for "USER1".
For more information on this element, see the Oracle9iAS Containers for J2EE Services Guide.
EJB 1.1 CMP Field Mapping SectionIf you still use EJB 1.1 CMP entity beans, you use the following elements to map the CMP fields to the database. See "Mapping EJB 1.1 CMP Fields to a Database Table and Its Columns" on page B-13 for a discussion on mapping EJB 1.1 CMP data fields.
The following are the XML elements used for CMP persistent data field mapping within the orion-ejb-jar.xml file:
<cmp-field-mapping ejb-reference-home=... name=... persistence-name=... persistence-type=...> <fields> <cmp-field-mapping ejb-reference-home=... name=... persistence-name=... persistence-type=...></cmp-field-mapping> </fields> <properties> <cmp-field-mapping ejb-reference-home=... name=... persistence-name=... persistence-type=...></cmp-field-mapping> </properties>
OC4J-Specific DTD Reference A-19

OC4J-Specific Deployment Descriptor for EJBs
<entity-ref home=...> <cmp-field-mapping ejb-reference-home=... name=... persistence-name=... persistence-type=...></cmp-field-mapping> </entity-ref> <list-mapping table=...> <primkey-mapping> <cmp-field-mapping ejb-reference-home=... name=... persistence-name=... persistence-type=...></cmp-field-mapping> </primkey-mapping> <value-mapping immutable="true|false" type=...> <cmp-field-mapping ejb-reference-home=... name=... persistence-name=... persistence-type=...></cmp-field-mapping> </value-mapping> </list-mapping> <collection-mapping table=...> <primkey-mapping> <cmp-field-mapping ejb-reference-home=... name=... persistence-name=... persistence-type=...></cmp-field-mapping> </primkey-mapping> <value-mapping immutable="true|false" type=...> <cmp-field-mapping ejb-reference-home=... name=... persistence-name=... persistence-type=...></cmp-field-mapping> </value-mapping> </collection-mapping> <set-mapping table=...> <primkey-mapping> <cmp-field-mapping ejb-reference-home=... name=... persistence-name=... persistence-type=...></cmp-field-mapping> </primkey-mapping> <value-mapping immutable="true|false" type=...> <cmp-field-mapping ejb-reference-home=... name=... persistence-name=... persistence-type=...></cmp-field-mapping> </value-mapping> </set-mapping> <map-mapping table=...> <primkey-mapping> <cmp-field-mapping ejb-reference-home=... name=... persistence-name=... persistence-type=...></cmp-field-mapping> </primkey-mapping> <map-key-mapping type=...> <cmp-field-mapping ejb-reference-home=... name=... persistence-name=... persistence-type=...></cmp-field-mapping> </map-key-mapping> <value-mapping immutable="true|false" type=...> <cmp-field-mapping ejb-reference-home=... name=... persistence-name=...
A-20 Oracle9iAS Containers for J2EE Enterprise JavaBeans Developer’s Guide

OC4J-Specific Deployment Descriptor for EJBs
persistence-type=...></cmp-field-mapping> </value-mapping> </map-mapping></cmp-field-mapping>
Method DefinitionThe following structure is used to specify the methods (and possibly parameters of that method) of the bean.
<method> <description></description> <ejb-name></ejb-name> <method-intf></method-intf> <method-name></method-name> <method-params> <method-param></method-param> </method-params></method>
The style used can be one of the following:
1. When referring to all the methods of the specified enterprise bean’s home and remote interfaces, specify the methods as follows:
<method><ejb-name>EJBNAME</ejb-name>
<method-name>*</method-name></method>
2. When referring to multiple methods with the same overloaded name, specify the methods as follows:
<method><ejb-name>EJBNAME</ejb-name>
<method-name>METHOD</method-name></method>>
3. When referring to a single method within a set of methods with an overloaded name, you can specify each parameter within the method as follows:
<method> <ejb-name>EJBNAME</ejb-name>
<method-name>METHOD</method-name><method-params>
OC4J-Specific DTD Reference A-21

Element Description
<method-param>PARAM-1</method-param> <method-param>PARAM-2</method-param> ... <method-param>PARAM-n</method-param></method-params>
</method>
The <method> element is used within the security and MDB sections. See "OC4J-Specific Deployment Descriptor (orion-ejb-jar.xml)" on page 7-19 and "Specifying Logical Roles in the EJB Deployment Descriptor" on page 8-4 for more information.
Assembly Descriptor SectionIn addition to specifying deployment information for individual beans, you can also specify addition deployment mapping information for security in the <assembly-descriptor> section. The <assembly-descriptor> section contains the following structure:
<assembly-descriptor> <security-role-mapping impliesAll=... name=...> <group name=... /> <user name=... /> </security-role-mapping> <default-method-access> <security-role-mapping impliesAll=... name=...> <group name=... /> <user name=... /> </security-role-mapping> </default-method-access></assembly-descriptor>
Each of the element groups are discussed in the following sections of the OC4J documentation set:
■ The <security-role-mapping> element is described in "Mapping Logical Roles to Users and Groups" on page 8-8.
■ The <default-method-access> element is described in "Specifying a Default Role Mapping for Undefined Methods" on page 8-10.
Element Description<assembly-descriptor>
A-22 Oracle9iAS Containers for J2EE Enterprise JavaBeans Developer’s Guide

Element Description
The mapping of the assembly descriptor elements.
<called-by>Enables the application deployer to control or restrict the usage of the asynchronous methods defined on the AC4J bean. You specify the user identity that is allowed to execute all methods of the bean in this element. The identities that can be execute the AC4J beans are identified in one or more <caller> elements.
<caller>Each caller identity allowed to execute methods on the AC4J bean are defined in a single <caller> element.
Attributes:
■ caller-identity - The security role that is allowed to execute the AC4J bean methods.
<cmp-field-mapping>Deployment information for a container-managed persistence field. If no subtags are used to define different behavior, the field is persisted through serialization or native handling of "recognized" primitive types.
Attributes:
■ ejb-reference-home - The JNDI-location of the fields remote EJB-home if the field is an entity EJBObject or an EJBHome.
■ name - The name of the field.
■ persistence-name - The name of the field in the database table.
■ persistence-type - The database type (valid values varies from database to database) of the field.
<collection-mapping>Specifies a relational mapping of a Collection type. A Collection consists of n unordered items (order isnt specified and not relevant). The field containing the mapping must be of type java.util.Collection.
Attributes:
■ table - The name of the table in the database.
<context-attribute>An attribute sent to the context. The only mandatory attribute in JNDI is the ’java.naming.factory.initial’ which is the classname of the context factory implementation.
OC4J-Specific DTD Reference A-23

Element Description
Attributes:
■ name - The name of the attribute.
■ value - The value of the attribute.
<data-bus>The name and url of a specific Databus for an AC4J object.
Attributes:
■ data-bus-name - The user-defined name of the Databus.
■ url - The URL of the Databus, which is similar to a JDBC URL.
<default-method-access>The default method access policy for methods not tied to a method-permission.
<description> A short description.
<ejb-name> The ejb-name element specifies an enterprise bean’s name. This name is assigned by the ejb-jar file producer to name the enterprise bean in the ejb-jar file’s deployment descriptor. The name must be unique among the names of the enterprise beans in the same ejb-jar file. The enterprise bean code does not depend on the name; therefore the name can be changed during the application-assembly process without breaking the enterprise bean’s function. There is no architected relationship between the ejb-name in the deployment descriptor and the JNDI name that the Deployer will assign to the enterprise bean’s home. The name must conform to the lexical rules for an NMTOKEN.
<ejb-ref-mapping>The ejb-ref element that is used for the declaration of a reference to another enterprise bean’s home. The ejb-ref-mapping element ties this to a JNDI-location when deploying.
Attributes:
■ location - The JNDI location to look up the EJB home from.
■ name - The ejb-ref’s name. Matches the name of an ejb-ref in ejb-jar.xml.
<enterprise-beans>The beans contained in this EJB JAR file.
<entity-deployment>Deployment information for an entity bean.
A-24 Oracle9iAS Containers for J2EE Enterprise JavaBeans Developer’s Guide

Element Description
Attributes:
■ call-timeout - The time (long milliseconds in decimal) to wait for any resource that the EJB uses, except database connections, if it is busy (before throwing a RemoteException, treating it as a deadlock). This is also used as a SQL query timeout. If the timeout occurs before the SQL query finishes, a SQL exception is thrown. If zero, the timeout is disabled. The default is 90 seconds.
■ clustering-schema - Not recommended to use.
■ copy-by-value - Whether or not to copy all the incoming/outgoing parameters for all incoming and outgoing EJB calls. Set to ’false’ if your application does not assume copy-by-value semantics for these parameters. The default is ’true’.
■ data-source - The name of the data source used if using container-managed persistence.
■ delay-updates-until-commit - Defers the flushing of transactional data until commit time or not. The default is true. If you want each change to be updated in the database, set this element to false.
■ do-select-before insert - If false, you avoid executing a select before an insert. The extra select normally checks to see if the entity already exists before doing the insert to avoid duplicates.
If a unique key constraint is defined for the entity, then we recommend setting this to false. If there is no unique key constraint, setting this to false leads to not detecting a duplicate insert. To prevent duplicate inserts in this case, leave it set to true.
For performance, Oracle recommends setting this to false to avoid the extra select before insert. Default Value: true
■ exclusive-write-access - Whether or not the EJB-server has exclusive write (update) access to the database backend. This can be used only for entity beans that use a "read_only" locking mode. In this case, it increases the performance for common bean operations and enables better caching. The default is false. See "Exclusive Write Access to the Database" on page 9-10 for more information.
■ findByPrimaryKey-lazy-loading="true|false" - For entity bean finder methods, lazy loading can cause the select method to be invoked more than once. To turn on lazy loading and enforce only a single execution of this finder method, set this property to true. The default is false. See "Configuring Lazy Loading on CMP Entity Bean Finder Methods" on page 9-7 for more information.
OC4J-Specific DTD Reference A-25

Element Description
■ instance-cache-timeout - The amount of time in seconds that entity wrapper instances are assigned to an identity. If you specify ’never ’, you retain the wrapper instances until they are garbage collected. The default is 60 seconds.
■ isolation - Specifies the isolation-level for database actions. The valid values for Oracle databases are ’serializable’ and ’committed’. The default is ’committed’. Non-Oracle databases can be the following: ’none’, ’committed’, ’serializable’, ’uncommitted’, and ’repeatable_read’. For more information, see "Entity Bean Concurrency and Database Isolation Modes" on page 9-8 and Oracle9i Application Server Performance Guide .
■ local-wrapper - Name of the OC4J local home wrapper class for this bean. This is an internal server value and should not be edited.
■ location - The JNDI-name this bean will be bound to.
■ locking-mode - The concurrency modes configure when to block to manage resource contention or when to execute in parallel. For more information, see "Entity Bean Concurrency and Database Isolation Modes" on page 9-8 and Oracle9i Application Server Performance Guide . The concurrency modes are as follows:
– PESSIMISTIC: This manages resource contention and does not allow parallel execution. Only one user at a time is allowed to execute the entity bean at a single time.
– OPTIMISTIC: Multiple users can execute the entity bean in parallel. It does not monitor resource contention; thus, the burden of the data consistency is placed on the database isolation modes. This is the default.
– READ-ONLY: Multiple users can execute the entity bean in parallel. The container does not allow any updates to the bean’s state.
■ max-instances - The number of maximum bean implementation instances to be kept instantiated or pooled. The default is 0, which means infinite. See "Configuring Environment References" on page 9-12 for more information.
■ min-instances - The number of minimum bean implementation instances to be kept instantiated or pooled. The default is 0. See "Configuring Environment References" on page 9-12 for more information.
■ max-tx-retries—The number of times to retry a transaction that was rolled back due to system-level failures. The default is 0. Leave the setting to zero if using the serializable isolation level. Within a transaction, the container uses the max-tx-retries value of the first invoked bean within the transaction. The
A-26 Oracle9iAS Containers for J2EE Enterprise JavaBeans Developer’s Guide

Element Description
performance guide recommends that you leave this value at 0 and add retries only where errors are seen that could be resolved through a retry.
■ name - The name of the bean, this matches the name of a bean in the assembly descriptor (ejb-jar.xml).
■ pool-cache-timeout - The amount of time in seconds that the bean implementation instances are to be kept in the "pooled" (unassigned) state, specifying ’never ’ retains the instances until they are garbage collected. The default is 60.
■ table - The name of the table in the database if using container-managed persistence.
■ validity-timeout - The maximum amount of time (in milliseconds) that an entity is valid in the cache (before being reloaded). Useful for loosely coupled environments where rare updates from legacy systems occur. This attribute is only valid for entity beans with locking mode of read_only and when exclusive-write-access="true" (the default).
We recommend that if the data is never being modified externally (and therefore you've set exclusive-write-access=true), that you can set this to 0 or -1, to disable this option, since the data in the cache will always be valid for read-only EJBs that are never modified externally.
If the EJB is generally not modified externally, so you're using exclusive-write-access=true, yet occasionally the table is updated so you need to update the cache occasionally, then set this to a value corresponding to the interval you think the data may be changing externally.
■ update-changed-fields-only - Specifies whether the container updates only modified fields or all fields to persistence storage for CMP entity beans when ejbStore is invoked. The default is true, which specifies to only update modified fields. See "Techniques for Updating Persistence" on page 9-8 for more information.
■ wrapper - Name of the OC4J remote home wrapper class for this bean. (internal server attribute, do not edit)
<entity-ref>Specified the configuration for persisting an entity reference via it’s primary key. The child-tag of this tag is the specification of how to persist the primary key.
Attributes:
■ home - JNDI location of the EJBHome to get lookup the beans at.
OC4J-Specific DTD Reference A-27

Element Description
<env-entry-mapping>Overrides the value of an env-entry in the assembly descriptor. It is used to keep the EAR clean from deployment-specific values. The body is the value.
Attribute:
■ name - The name of the context parameter.
<fields>Specifies the configuration of a field-based (java class field) mapping persistence for this field. The fields that are to be persisted have to be public, non-static, non-final and the type of the containing object has to have an empty constructor.
<finder-method>The definition of a container-managed finder method. This defines the selection criteria in a findByXXX() method in the bean’s home.
Attributes:
■ partial - Whether or not the specified query is a partial one. A partial query is the ’where’ clause or the ’order’ (if it starts with order) clause of the SQL query. Queries are partial by default. If partial="false" is specified then the full query is to be entered as value for the query attribute and you need to make sure that the query produces a result-set containing all of the CMP fields. This is useful when doing advances queries involving table joins and similar.
■ query - The query part of an SQL statement. This is the section following the WHERE keyword in the statement. Special tokens are $number which denotes an method argument number and $name which denotes a cmp-field name. For instance the query for "findByAge(int age)" would be (assuming the cmp-field is named ’age’): "$1 = $age".
■ lazy-loading - For entity bean finder methods, lazy loading can cause the select method to be invoked more than once. To turn on lazy loading and enforce only a single execution of this finder method, set this property to true. The default is false. See "Configuring Lazy Loading on CMP Entity Bean Finder Methods" on page 9-7 for more information.
<group>A group that this <security-role-mapping> implies. That is, all members of the specified group are included in this role.
Attributes:
■ name - The name of the group.
A-28 Oracle9iAS Containers for J2EE Enterprise JavaBeans Developer’s Guide

Element Description
<ior-security-config>The <ior-security-config> element configures CSIv2 security policies for interoperability, which is discussed fully in the Interoperability chapter in the Oracle9iAS Containers for J2EE Services Guide.
<jem-deployment>Specifies an active EJB for deployment into the AC4J container.
Attributes:
■ jem-name - An AC4J name that is used to identify the bean within the AC4J calls
■ ejb-name - Identifies the EJB defined in the ejb-jar.xml file as an active EJB.
<jem-server-extension>Describes the database server where the Databus is installed
Attributes:
■ data-source-location - Provides the JNDI data source definition of the database where the Databus exists. The data source is configured in the data-sources.xml file.
■ scheduling-threads - If greater than 1, then multiple OC4J threads can act in parallel. Default is 1.
<list-mapping>Specifies a relational mapping of a List type. A List is a sequential (where order/index is important) Collection of items. The field containing the mapping must be of type java.util.List or the legacy types java.util.Vector or Type[].
Attributes:
■ table - The name of the table in the database.
<lookup-context>The specification of an optional javax.naming.Context implementation used for retrieving the resource. This is useful when using third party modules, such as a third party JMS server. Either use the context implementation supplied by the resource vendor or, if none exists, write an implementation that negotiates with the vendor software.
Attribute:
■ location - The name looked for in the foreign context when retrieving the resource.
OC4J-Specific DTD Reference A-29

Element Description
<map-key-mapping>Specifies a mapping of the map key. Map keys are always immutable.
Attributes:
■ type - The fully qualified class name of the type of the value. Examples are com.acme.Product, java.lang.String etc.
<map-mapping>Specifies a relational mapping of a Map type. A Map consists of n unique keys and their mapping to values. The field containing the mapping must be of type java.util.Map or the legacy types java.util.Hashtable or java.util.Properties.
Attributes:
■ table - The name of the table in the database.
<message-driven-deployment>Deployment information for a MDB.
Attributes:
■ connection-factory-location: The JNDI location of the connection factory to use. The JMS Destination Connection Factory is specified in the connection-factory-location attribute. The syntax is "java:comp/resource" + resource provider name + "TopicConnectionFactories" or "QueueConnectionFactories" + user defined name. The xxxConnectionFactories details what type of factory is being defined.
■ destination-location: The JNDI location of the destination (queue/topic) to use. The JMS Destination is specified in the destination-location attribute. The syntax is "java:comp/resource" + resource provider name + "Topics" or "Queues" + Destination name. The Topic or Queue details what type of Destination is being defined. The Destination name is the actual queue or topic name defined in the database.
■ name - The name of the bean, this matches the name of a bean in the assembly descriptor (ejb-jar.xml).
■ subscription-name: If this is a topic, the subscription name is defined in the subscription-name attribute.
■ listener-threads: The listener threads are used to concurrently consume JMS messages. The default is one thread.
A-30 Oracle9iAS Containers for J2EE Enterprise JavaBeans Developer’s Guide

Element Description
■ transaction-timeout: This attribute controls the transaction timeout interval for any container-managed transactional MDB. The default is one day. If the transaction has not completed in this timeframe, the transaction is rolled back.
<method>Specify the methods (and possibly parameters of that method) of the bean.
<method-intf>The method-intf element allows a method element to differentiate between the methods with the same name and signature that are defined in both the remote and home interfaces. The method-intf element must be one of the following: Home or Remote.
<method-name>The method-name element contains a name of an enterprise bean method, or the asterisk (*) character. The asterisk is used when the element denotes all the methods of an enterprise bean’s remote and home interfaces.
<method-param>The method-param element contains the fully-qualified Java type name of a method parameter.
<method-params>The method-params element contains a list of the fully-qualified Java type names of the method parameters.
<orion-ejb-jar>An orion-ejb-jar.xml file contains the OC4J-specific deployment information for an EJB. It is used to specify initial deployment properties. After each deployment the deployment file is reformatted and altered by the server for additional information.
Attributes:
■ deployment-time - The time (long milliseconds in decimal) of the last deployment, if not matching the last editing date the jar will be redeployed. (internal server value, do not edit)
■ deployment-version - The version of OC4J this jar was deployed with, if it’s not matching the current version then it will be redeployed. (internal server value, do not edit)
<primkey-mapping>Designates how the primary key is mapped.
OC4J-Specific DTD Reference A-31

Element Description
<properties>Specifies the configuration of a property-based (bean properties) mapping persistence for this field. The properties have to adhere to the usual JavaBeans specification and the type of the containing object has to have an empty constructor This is also designated within the EJB specification.
<resource-ref-mapping>The resource-ref element is used for the declaration of a reference to an external resource such as a data source, JMS queue, or mail session. The resource-ref-mapping ties this to a JNDI-location when deploying.
Attributes:
■ location - The JNDI location to look up the resource factory from.
■ name - The resource-ref name. Matches the name of an resource-ref in ejb-jar.xml.
<resource-env-ref-mapping>The resource-env-ref-mapping element element is used to map an administered object for a resource. For example, to use JMS, the bean must obtain both a JMS factory object and a destination object. These objects are retrieved at the same time from JNDI. The <resource-ref> element declares the JMS factory and the <resource-env-ref> elment is used to declare the destination. Thus, the <resource-env-ref-mapping> element maps the destination object. See "Using a Logical Name for Accessing the MDB" on page 7-21 for more information.
Attributes:
■ location - The JNDI location from which to look up the administered resource.
■ name - The resource-env-ref name in ejb-jar.xml.
<role-name>The security role that the AC4J EJB methods are run under when using the <run-as-specified-identity> element.
A-32 Oracle9iAS Containers for J2EE Enterprise JavaBeans Developer’s Guide

Element Description
<run-as-specified-identity>You can specify that all methods of an AC4J EJB execute under a specific identity. That is, the container does not check different roles for permission to run specific methods; instead, the container executes all of the AC4J EJB methods under the specified security identity.
<security-identity>Describes if the AC4J Databus should use the caller or run-as identity for the AC4J bean security.
<security-role-mapping> The runtime mapping (to groups and users) of a role. Maps to a security-role of the same name in the assembly descriptor.
Attributes:
■ impliesAll - Whether or not this mapping implies all users. The default is false.
■ name - The name of the role
<session-deployment>Deployment information for a session bean.
Attributes:
■ pool-cache-timeout—How long to keep stateless sessions cached in the pool. Only applies to stateless session beans. Legal values are positive integer values or ’never’. For stateless session beans, if you specify a pool-cache-timeout, then at every pool-cache-timeout interval, all beans in the pool, of the corresponding bean type, are removed. If the value specified is zero or negative, then the pool-cache-timeout is disabled and beans are not removed from the pool.
Default Value: 60 (seconds)
■ call-timeout—The time (long milliseconds in decimal) to wait for any resource that the EJB uses, excluding database connections, if it is busy. After this times out, a RemoteException is thrown and the EJB is treated as involved in a deadlock. If value is set to 0, OC4J waits for the EJB "forever". This is the default.
■ copy-by-value—Whether or not to copy (clone) all the incoming and outgoing parameters in EJB calls. Set to ’false’ if you are certain that your application does not assume copy-by-value semantics for a speed-up. The default is ’true’.
OC4J-Specific DTD Reference A-33

Element Description
■ local-wrapper—Name of the OC4J wrapper class for this bean. This is an internal server value and should not be edited.
■ location—The JNDI-name that this bean will be bound to.
max-instances - This attribute controls the number of bean instances allowed in memory—either instantiated or pooled. When this value is reached, the container attempts to passivate the oldest bean instance from memory. If unsuccessful, the container waits the number of milliseconds set in the call-timeout attribute to see if a bean instance is removed from memory, either through passivation, its remove() method, or bean expiration, before a TimeoutExpiredException is thrown back to the client. To allow an infinite number of bean instances, the max-instances attribute can be set to zero. Default is 0, which is infinite. This applies to both stateless and stateful session beans.
■ max-instances-threshold - This attribute defines a threshold for how many actives beans exist in relation to the max-instances attribute definition. Specify an integer that is translated as a percentage. If you define that the max-instances is 100 and the max-instances-threshold is 90%, then when the active bean instances reaches past 90, passivation of beans occurs. Default: 90%. To disable, specify "never." See "EJB Lifecycle Issues" on page 9-3 for more information.
■ max-tx-retries—The number of times to retry a transaction that was rolled back due to system-level failures. The default is 0. Within a transaction, the container uses the max-tx-retries value of the first invoked bean within the transaction. The performance guide recommends that you leave this value to 0 and add retries only where errors are seen that could be resolved through a retry.
■ memory-threshold - This attribute defines a threshold for how much used JVM memory is allowed before passivation should occur. Specify an integer that is translated as a percentage. When reached, beans are passivated, even if their idle timeout has not expired. Default: 80%. To disable, specify "never." See "EJB Lifecycle Issues" on page 9-3 for more information.
■ min-instances - The number of minimum bean implementation instances to be kept instantiated or pooled. The default is zero. This applies only to stateless session beans.
■ name—The name of the bean, which matches the name of a bean in the assembly section of the EJB deployment descriptor (ejb-jar.xml).
■ resource-check-interval - The container checks all resources at this time interval. At this time, if any of the thresholds have been reached, passivation occurs.
A-34 Oracle9iAS Containers for J2EE Enterprise JavaBeans Developer’s Guide

Element Description
Default: 180 sec. (3 min.). To disable, specify "never." See "EJB Lifecycle Issues" on page 9-3 for more information.
■ passivate-count - This attribute is an integer that defines the number of beans to be passivated if any of the resource thresholds have been reached. Passivation of beans is performed using the least recently used algorithm. Default: one-third of the max-instances attribute. You can disable this attribute by setting the count to zero or a negative number. See "EJB Lifecycle Issues" on page 9-3 for more information.
■ persistence-filename—Path to the file where sessions are stored across restarts.
■ timeout—Inactivity timeout in seconds. If the value is zero or negative, then all timeouts are disabled. The default is 30 minutes. Every 30 seconds, the pool clean up logic is invoked. Within the pool clean up logic, only the sessions that timed out, by passing the timeout value, are deleted.
Adjust the timeout based on your applications use of stateful session beans. For example, if stateful session beans are not removed explicitly by your application, and the application creates many stateful session beans, then you may want to lower the timeout value.
If your application requires that a stateful session bean be available for longer than 30 minutes, then adjust the timeout value accordingly.
■ wrapper—Name of the OC4J wrapper class for this bean. This is an internal server value and should not be edited.
<set-mapping>Specifies a relational mapping of a Set type. A Set consists of n unique unordered items (order is not specified and not relevant). The field containing the mapping must be of type java.util.Set.
Attributes:
■ table - The name of the table in the database.
<use-caller-identity>You can specify that all methods of an AC4J EJB execute under the caller ’s identity.
<user>A user that this security-role-mapping implies.
Attributes:
■ name - The name of the user.
<value-mapping>
OC4J-Specific DTD Reference A-35

Element Description
Specified a mapping of the primary key part of a set of fields.
Attributes:
■ immutable - Whether or not the value can be trusted to be immutable once added to the Collection/Map. Setting this to true will optimize database operations extensively. The default value is "true" for set-mapping and map-mappings and "false" for collection-mapping and list-mapping.
■ type - The fully qualified class name of the type of the value. Examples are com.acme.OrderEntry, java.lang.String, and so on.
A-36 Oracle9iAS Containers for J2EE Enterprise JavaBeans Developer’s Guide

Beta Draft EJB 1.1 CMP Entity Beans B-1
BEJB 1.1 CMP Entity Beans
If you have EJB 1.1 CMP entity beans from last release, this appendix informs you of how OC4J maps your EJB 1.1 CMP deployment descriptor elements to OC4J-specific mappings. Oracle encourages you to migrate to using the EJB 2.0 method for CMP entity beans; however, Oracle supports both specifications.
This chapter demonstrates simple CMP EJB 1.1 development with a basic configuration and deployment. Download the CMP entity bean example (cmpapp.jar) from the OC4J sample code page at http://otn.oracle.com/sample_code/tech/java/oc4j/htdocs/oc4jsamplecode/oc4j-demo-ejb.html on the OTN site.
This chapter demonstrates the following:
■ Creating Entity Beans—Demonstrates how to create a simple container-managed persistent entity bean.
■ Advanced CMP Entity Beans—Demonstrates advanced configuration for finder methods, object-relational mapping, and so on.
See Chapter 3, "CMP Entity Beans" for details on CMP EJB 2.0 entity beans.

Creating Entity Beans
B-2 Product Title/BookTitle as a Variable Beta Draft
Creating Entity BeansTo create an entity bean, perform the following steps:
1. Create a remote interface for the bean. The remote interface declares the methods that a client can invoke. It must extend javax.ejb.EJBObject.
2. Create a home interface for the bean. The home interface must extend javax.ejb.EJBHome. It defines the create and finder methods, including findByPrimaryKey, for your bean.
3. Define the primary key for the bean. The primary key identifies each entity bean instance. The primary key must be either a well-known class, such as java.lang.String, or defined within its own class.
4. Implement the bean. This includes the following:
a. The implementation for the methods that are declared in your remote interface.
b. The methods that are defined in the javax.ejb.EntityBean interface.
c. The methods that match the methods that are declared in your home interface. This includes the following:
* the ejbCreate and ejbPostCreate methods with parameters matching the associated create method defined in the home interface
* an ejbFindByPrimary key method, which corresponds to the findByPrimaryKey method of the home interface
* any other finder methods that were defined in the home interface
5. Create the bean deployment descriptor. The deployment descriptor specifies properties for the bean through XML elements. This step is where you identify the data within the bean that is to be managed by the container.
6. If the persistent data is saved to or restored from a database and you are not using the defaults provided by the container, then you must ensure that the correct tables exist for the bean. In the extreme default scenario, the container will actually create the table and columns for your data based on deployment descriptor and datasource information.
7. Create an EJB JAR file containing the bean, the remote and home interfaces, and the deployment descriptor. Once created, configure the application.xml file, create an EAR file, and install the EJB in OC4J.

Creating Entity Beans
Beta Draft EJB 1.1 CMP Entity Beans B-3
The following sections demonstrate a simple CMP entity bean. This example continues the use of the employee example, as in other chapters—without adding complexity.
Home InterfaceThe home interface must contain a create method, which the client invokes to create the bean instance. Each create method can have a different signature. For an entity bean, you must develop a findByPrimaryKey method. Optionally, you can develop other finder methods for the bean, which are named find<name>.
Example B–1 Entity Bean Employee Home Interface
To demonstrate an entity bean, this example creates a bean that manages a purchase order. The entity bean contains a list of items that were ordered by the customer.
The home interface extends javax.ejb.EJBHome and defines the create and findByPrimaryKey methods.
package employee;
import javax.ejb.*;import java.rmi.*;
public interface EmployeeHome extends EJBHome{
public Employee create(Integer empNo) throws CreateException, RemoteException;
// Find an existing employee public Employee findByPrimaryKey (Integer empNo) throws FinderException, RemoteException;
//Find all employees public Collection findAll() throws FinderException, RemoteException;}
Remote InterfaceThe entity bean remote interface is the interface that the customer sees and invokes methods upon. It extends javax.ejb.EJBObject and defines the business logic

Creating Entity Beans
B-4 Product Title/BookTitle as a Variable Beta Draft
methods. For our employee entity bean, the remote interface contains methods for adding and removing employees, and retrieving and setting employee information.
package employee;
import javax.ejb.*;import java.rmi.*;import java.util.*;
public interface Employee extends EJBObject{ // getter remote methods public Integer getEmpNo() throws RemoteException; public String getEmpName() throws RemoteException; public Float getSalary() throws RemoteException;
// setter remote methods public void setEmpName(String newEmpName) throws RemoteException; public void setSalary(Float newSalary) throws RemoteException;}
Entity Bean ClassThe entity bean class must implement the following methods:
■ the target methods for the methods that are declared in the home interface, which includes the ejbCreate method and any finder methods, including ejbFindByPrimaryKey
■ the business logic methods that are declared in the remote interface
■ the methods that are inherited from the EntityBean interface
However, with container-managed persistence, the container manages most of the target methods and the data objects. This leaves little for you to implement.
package employee;
import javax.ejb.*;import java.rmi.*;
public class EmployeeBean extends Object implements EntityBean{
public Integer empNo; public String empName; public Float salary;

Creating Entity Beans
Beta Draft EJB 1.1 CMP Entity Beans B-5
public EntityContext entityContext;
public EmployeeBean() { // Constructor. Do not initialize anything in this method. // All initialization should be performed in the ejbCreate method. }
public Integer getEmpNo() { return empNo; }
public String getEmpName() { return empName; }
public Float getSalary() { return salary; }
public void setEmpName(String empName) { this.empName = empName; }
public void setSalary(Float salary) { this.salary = salary; }
public Integer ejbCreate(Integer empNo) throws CreateException, RemoteException { this.empNo = empNo; return empNo; }
public void ejbPostCreate(Integer empNo) throws CreateException, RemoteException { // Called just after bean created; container takes care of implementation }

Creating Entity Beans
B-6 Product Title/BookTitle as a Variable Beta Draft
public void ejbStore() { // Called when bean persisted; container takes care of implementation }
public void ejbLoad() { // Called when bean loaded; container takes care of implementation }
public void ejbRemove() { // Called when bean removed; container takes care of implementation }
public void ejbActivate() { // Called when bean activated; container takes care of implementation. // If you need resources, retrieve them here. }
public void ejbPassivate() { // Called when bean deactivated; container takes care of implementation. // if you set resources in ejbActivate, remove them here. }
public void setEntityContext(EntityContext entityContext) { this.entityContext = entityContext; }
public void unsetEntityContext() { this.entityContext = null; }}
Persistent DataIn CMP entity beans, you define the persistent data both in the bean instance and in the deployment descriptor. The declaration of the data fields in the bean instance creates the resources for the fields. The deployment descriptor defines these fields as persistent.

Creating Entity Beans
Beta Draft EJB 1.1 CMP Entity Beans B-7
In our employee example, the data fields are defined in the bean instance, as follows:
public Integer empNo;public String empName;public Float salary;
These fields are defined as persistent fields in the ejb-jar.xml deployment descriptor within the <cmp-field><field-name> element, as follows:
<enterprise-beans> <entity> <display-name>Employee</display-name> <ejb-name>EmployeeBean</ejb-name> <home>employee.EmployeeHome</home> <remote>employee.Employee</remote> <ejb-class>employee.EmployeeBean</ejb-class> <persistence-type>Container</persistence-type> <prim-key-class>java.lang.Integer</prim-key-class> <reentrant>False</reentrant> <cmp-field><field-name>empNo</field-name></cmp-field> <cmp-field><field-name>empName</field-name></cmp-field> <cmp-field><field-name>salary</field-name></cmp-field> <primkey-field>empNo</primkey-field> </entity>...</enterprise-beans>
In most cases, you map the persistent data fields to columns in a table that exists in a designated database. However, you can accept the defaults for these fields—thus, avoiding more deployment descriptor configuration.
OC4J contains some defaults for mapping these fields to a database and its table.
■ Database—The default database as set up in your OC4J instance configuration. For the JNDI name, use the <location> element for emulated data sources and <ejb-location> element for non-emulated data sources.
Upon installation, the default database is a locally installed Oracle database that must be listening on port 1521 with a SID of ORCL. To customize the default database, change the first configured database (including its <ejb-location>) to point to your database.
■ Table with correct column names—The container creates a default table with the same name as the bean name (defined in <ejb-name>), with columns having the same name as the <cmp-field> elements in the designated database. The

Creating Entity Beans
B-8 Product Title/BookTitle as a Variable Beta Draft
data types for the database, translating Java data types to database data types, are defined in the specific database XML file, such as oracle.xml.
If you want to designate another database or generate a table that has a different naming convention, see "EJB 1.1 Object-Relational Mapping of Persistent Fields" on page B-13 for a description of how to customize your database, table, and column names.
Primary KeyEach entity bean instance has a primary key that uniquely identifies it from other instances. You must declare the primary key (or the fields contained within a complex primary key) as a container-managed persistent field in the deployment descriptor. All fields within the primary key are restricted to either primitive, serializable, or types that can be mapped to SQL types. You can define your primary key in one of two ways:
■ Define the type of the primary key to be a well-known type. The type is defined in the <prim-key-class> in the deployment descriptor. The data field that is identified as the persistent primary key is identified in the <primkey-field> element in the deployment descriptor. The primary key variable that is declared within the bean class must be declared as public.
■ Define the type of the primary key as a serializable object within a <name>PK class that is serializable. This class is declared in the <prim-key-class> element in the deployment descriptor. This is an advanced method for defining a primary key, so it is discussed in "Defining the Primary Key in a Class" on page B-9.
For a simple CMP, you can define your primary key to be a well-known type by defining the data type of the primary key within the deployment descriptor.
The employee example defines its primary key as a java.lang.Integer and uses the employee number (empNo) as its primary key.
<enterprise-beans> <entity> <display-name>Employee</display-name> <ejb-name>EmployeeBean</ejb-name> <home>employee.EmployeeHome</home> <remote>employee.Employee</remote> <ejb-class>employee.EmployeeBean</ejb-class> <persistence-type>Container</persistence-type> <prim-key-class>java.lang.Integer</prim-key-class> <reentrant>False</reentrant>

Creating Entity Beans
Beta Draft EJB 1.1 CMP Entity Beans B-9
<cmp-field><field-name>empNo</field-name></cmp-field> <cmp-field><field-name>empName</field-name></cmp-field> <cmp-field><field-name>salary</field-name></cmp-field> <primkey-field>empNo</primkey-field> </entity>...</enterprise-beans>
Defining the Primary Key in a ClassIf your primary key is more complex than a simple data type, your primary key must be a class that is serializable of the name <name>PK. You define the primary key class within the <prim-key-class> element in the deployment descriptor.
The primary key variables must adhere to the following:
■ Be defined within a <cmp-field><field-name> element in the deployment descriptor. This enables the container to manage the primary key fields.
■ Be declared within the bean class as public and restricted to be either primitive, serializable, or types that can be mapped to SQL types.
Within the primary key class, you implement a constructor for creating a primary key instance. Once defined in this manner, the container manages the primary key, as well as storing the persistent data.
The following example is a complex primary key made up of employee number and country code. Our company is so large that it reuses employee numbers in different countries. Thus, the combination of both the employee number and the country code uniquely identifies each employee.
package employee;
public class EmpPK implements java.io.Serializable{ public Integer empNo; public String countryCode;
//constructor public EmpPK ( ) { }}
The primary key class is declared within the <prim-key-class> element and its variables, each within a <cmp-field><field-name> element in the XML deployment descriptor, as follows:
<enterprise-beans>

Advanced CMP Entity Beans
B-10 Product Title/BookTitle as a Variable Beta Draft
<entity> <display-name>Employee</display-name> <ejb-name>EmployeeBean</ejb-name> <home>employee.EmployeeHome</home> <remote>employee.Employee</remote> <ejb-class>employee.EmployeeBean</ejb-class> <persistence-type>Container</persistence-type> <prim-key-class>employee.EmpPK</prim-key-class> <reentrant>False</reentrant> <cmp-field><field-name>empNo</field-name></cmp-field> <cmp-field><field-name>countryCode</field-name></cmp-field> </entity> ...</enterprise-beans>
Deploying the Entity BeanArchive your EJB into a JAR file. You deploy the entity bean in the same way as the session bean, which "Prepare the EJB Application for Assembly" on page 2-27 and "Deploy the Enterprise Application to OC4J" on page 2-29 explain in detail.
Advanced CMP Entity BeansThis section discusses how to implement your bean beyond the simple CMP entity bean. It includes the following sections:
■ EJB 1.1 Advanced Finder Methods
■ EJB 1.1 Object-Relational Mapping of Persistent Fields
EJB 1.1 Advanced Finder MethodsSpecifying the findByPrimaryKey method is easy to do in OC4J. All the fields for defining a simple or complex primary key are specified within the ejb-jar.xml deployment descriptor. However, if you want to define other finder methods in a CMP entity bean, you must do the following:
1. Add the finder method to the home interface.
2. Add the EJB 1.1 finder method definition to the OC4J-specific deployment descriptor—the orion-ejb-jar.xml file.

Advanced CMP Entity Beans
Beta Draft EJB 1.1 CMP Entity Beans B-11
Add the Finder Method to Home InterfaceYou must first add the finder method to the home interface. For example, with the employee entity bean, if we wanted to retrieve all employees, the findAll method would be defined within the home interface, as follows:
public Collection findAll() throws FinderException, RemoteException;
Add the EJB 1.1 Finder Method Definition to the OC4J-Specific Deployment DescriptorAfter specifying the finder method in the home interface, modify the orion-ejb-jar.xml file with the EJB 1.1 finder method specifics. The container identifies the correct query necessary for retrieving the required fields.
The EJB 1.1 <finder-method> element defines all finder methods—excluding the findByPrimaryKey method. The simplest finder method to define is the findByAll method. The query attribute in the <finder-method> element specifies the WHERE clause for the query. If you want all rows retrieved, then an empty query (query="") returns all records.
The following example retrieves all records from the EmployeeBean. The method name is findAll, and it requires no parameters because it returns a Collection of all employees.
<finder-method query=""> <method> <ejb-name>EmployeeBean</ejb-name> <method-name>findAll</method-name> <method-params></method-params> </method></finder-method>
After deploying the application with this bean, OC4J adds the following statement of what query it invokes as a comment in the finder method definition:
<finder-method query=""><!-- Generated SQL: "select EmployeeBean.empNo, EmployeeBean.empName, EmployeeBean.salary from EmployeeBean" --> <method> <ejb-name>EmployeeBean</ejb-name> <method-name>findAll</method-name> <method-params></method-params> </method></finder-method>

Advanced CMP Entity Beans
B-12 Product Title/BookTitle as a Variable Beta Draft
Verify that it is the type of query that you expect.
To be more specific, modify the query attribute with the appropriate WHERE clause. This clause refers to passed in parameters using the ’$’ symbol: the first parameter is denoted by $1, the second by $2. All <cmp-field> elements that are used within the WHERE clause are denoted by $<cmp-field> name.
The following example specifies a findByName method (which should be defined in the home interface) where the name of the employee is given as in the method parameter, which is substituted for the $1. It is matched to the CMP name, "empName". Thus, our query attribute is modified to contain the following for the WHERE clause: "$empname=$1".
<finder-method query="$empname = $1"> <method> <ejb-name>EmployeeBean</ejb-name> <method-name>findByName</method-name> <method-params> <method-param>java.lang.String</method-param> </method-params> </method></finder-method>
If you have more than one method parameter, each parameter type is defined in successive <method-param> elements and referred to in the query statement by successive $n, where n represents the number.
If you wanted to specify a full query and not just the section after the WHERE clause, specify the partial attribute to FALSE and then define the full query in the query attribute. The default value for partial is true, which is why it is not specified on the previous finder-method example.
<finder-method partial="false" query="select * from EMP where $empName = $1"> <!-- Generated SQL: "select * from EMP where EMP.ENAME = ?" --> <method> <ejb-name>EmployeeBean</ejb-name> <method-name>findByName</method-name> <method-params> <method-param>java.lang.String</method-param> </method-params> </method>
Note: You can also specify a SQL JOIN in the query attribute.

Advanced CMP Entity Beans
Beta Draft EJB 1.1 CMP Entity Beans B-13
</finder-method>
Specifying the full SQL query is useful for complex SQL statements.
For entity bean finder methods, lazy loading can cause the select method to be invoked more than once. To turn on lazy loading and enforce only a single execution of this finder method, set the lazy-loading property to true.
<finder-method partial="false" query="select * from EMP where $empName = $1" lazy-loading=true> <!-- Generated SQL: "select * from EMP where EMP.ENAME = ?" --> <method> <ejb-name>EmployeeBean</ejb-name> <method-name>findByName</method-name> <method-params> <method-param>java.lang.String</method-param> </method-params> </method></finder-method>
EJB 1.1 Object-Relational Mapping of Persistent FieldsAs "Persistent Data" on page B-6 discusses, your persistent data can be automatically mapped to a database table by the container. However, if the data represented by your bean is more complex or you do not want to accept the defaults that OC4J provides for you, then map the CMP designated fields to an existing database table and its applicable rows within the orion-ejb-jar.xml file. Once mapped, the container provides the persistence storage of the CMP data to the indicated table and rows.
Before configuring the object-relational mapping, add the DataSource used for the destination within the <resource-ref> element in the ejb-jar.xml file.
Mapping EJB 1.1 CMP Fields to a Database Table and Its ColumnsConfigure the following within the orion-ejb-jar.xml file:
1. Configure the <entity-deployment> element for every entity bean that contains CMP fields that will be mapped within it.
2. Configure a <cmp-field-mapping> element for every field within the bean that is mapped. Each <cmp-field-mapping> element must contain the name of the field to be persisted.

Advanced CMP Entity Beans
B-14 Product Title/BookTitle as a Variable Beta Draft
a. Configure the primary key in the <primkey-mapping> element contained within its own <cmp-field-mapping> element.
b. Configure simple data types (such as a primitive, simple object, or serializable object) that are mapped to a single field within a single <cmp-field-mapping> element. The name and database field are fully defined within the element attributes.
c. Configure complex data types using one of the many sub-elements of the <cmp-field-mapping> element. These can be one of the following:
* If you define an object as your complex data type, then specify each field or property within the object in the <fields> or <properties> element.
* If you specify a field defined in another entity bean, then define the home interface of this entity bean in the <entity-ref> element.
* If you define a List, Collection, Set, or Map of fields, then define these fields within the <list-mapping>, <collection-mapping>, <set-mapping>, <map-mapping> elements.
Examples for simple and complex O-R mappings are shown in the following sections:
■ EJB 1.1 One-to-One Mapping Example
■ EJB 1.1 One-to-Many Mapping Example
EJB 1.1 One-to-One Mapping Example The following example demonstrates how to map EJB 1.1 persistent data fields in your bean instance to database tables and columns by mapping the employee persistence data fields to the Oracle database table EMP.
■ The bean is identified in the <entity-deployment> name attribute. The JNDI name for this bean is defined in the location attribute.
■ The database table name is defined in the table attribute. And the database is specified in the data-source attribute, which should be identical to the <ejb-location> name of a DataSource defined in the data-sources.xml file.
■ The bean primary key, empNo, is mapped to the database table column, EMPNO, within the <primkey-mapping> element.

Advanced CMP Entity Beans
Beta Draft EJB 1.1 CMP Entity Beans B-15
■ The bean persistent data fields, empName and salary, are mapped to the database table columns ENAME and SAL within the <cmp-field-mapping> element.
<entity-deployment name="EmpBean" location="emp/EmpBean"wrapper="EmpHome_EntityHomeWrapper2" max-tx-retries="3" table="emp" data-source="jdbc/OracleDS"><primkey-mapping><cmp-field-mapping name="empNo" persistence-name="empno" /></primkey-mapping><cmp-field-mapping name="empName" persistence-name="ename" /><cmp-field-mapping name="salary" persistence-name="sal" /> ...</entity-deployment>
After deployment, OC4J maps this to the following:
EJB 1.1 One-to-Many Mapping Example If you have two beans that access two tables for their data, you must map the persistent data from both beans to the respective tables.
We added a department number to our employee example. Each employee belongs to a department; each department has multiple employees. The container will handle this object-relational mapping; however, you must specify how the data is stored.
The employee data maps to the employee database table; the department data is mapped to the database department table. The employee database table also contains a foreign key of the department number to link this information together.
The XML configuration for the employee bean, EmpBean, is as follows:
■ Same XML configuration details for the employee bean as stated above, with the addition of the definition of the department number as part of the employee entity bean.
Bean Database
emp/EmpBean EMP table, located at jdbc/OracleDS in the data-sources.xml file
empNo EMPNO column as primary key
empName ENAME column
salary SAL column

Advanced CMP Entity Beans
B-16 Product Title/BookTitle as a Variable Beta Draft
■ The department number is defined in the bean instance as deptno, which relates to the department number defined in the DeptBean. Thus, the DeptBean, its deptno field, and its mapping to the database column, deptno, is configured within a <cmp-field-mapping><entity-ref> element, as follows:
<entity-deployment name="EmpBean" location="emp/EmpBean"wrapper="EmpHome_EntityHomeWrapper2" max-tx-retries="3" table="emp" data-source="jdbc/OracleDS">
<primkey-mapping> <cmp-field-mapping name="empNo" persistence-name="empno" /> </primkey-mapping> <cmp-field-mapping name="empName" persistence-name="ename" /> <cmp-field-mapping name="salary" persistence-name="sal" /> <cmp-field-mapping name="dept"> <entity-ref home="dept/DeptBean"> <cmp-field-mapping name="dept" persistence-name="deptno" /> </entity-ref> </cmp-field-mapping> <finder-method query=""> <!-- Generated SQL: "select EMP.empno, EMP.ename, EMP.sal, EMP.deptno from EMP" --> <method> <ejb-name>EmpBean</ejb-name> <method-name>findAll</method-name> <method-params></method-params> </method> </finder-method> </entity-deployment>
The XML configuration for the department bean, DeptBean, is as follows:
■ The bean is identified in the <entity-deployment> name attribute. The JNDI name for this bean is defined in the location attribute.
■ The database table name is defined in the table attribute. And the database is specified in the data-source attribute, which should be identical to the <ejb-location> name of a DataSource defined in the data-sources.xml file.
Note: This definition within the EmpBean configuration refers to the definition of the deptno within the DeptBean configuration.

Advanced CMP Entity Beans
Beta Draft EJB 1.1 CMP Entity Beans B-17
■ The bean primary key, deptNo, is mapped to the dept database table in its DEPTNO column within the <primkey-mapping> element.
■ The bean persistent data field, deptName, is mapped to the DEPT database table in its DNAME column within a <cmp-field-mapping> element.
■ The bean persistent data field, employees, is actually a bean—the employee bean. Thus, the example uses the <collection-mapping> element to specify all fields within the employee bean. A Collection containing the employee information is returned. See the bold text in the example below.
– The employees field maps to the EmpBean entity bean. Its home interface reference is defined in the home attribute of the <entity-ref> element.
– The primary key used to retrieve the employees is defined as deptNo within the <primkey-mapping> element and is mapped to the database column DEPTNO.
– All fields that are of interest to the department bean are defined within <cmp-field-mapping> elements. The bean instance fields within the EmpBean that are of interest are empNo, empName, and salary. Their respective database columns are also specified: EMPNO, ENAME, and SAL. The database table itself is defined in the EmpBean <entity-deployment> definition.
<entity-deployment name="DeptBean" location="dept/DeptBean"wrapper="DeptHome_EntityHomeWrapper2" max-tx-retries="3" table="dept" data-source="jdbc/OracleDS"> <primkey-mapping> <cmp-field-mapping name="deptNo" persistence-name="deptno" /> </primkey-mapping> <cmp-field-mapping name="deptName" persistence-name="dname" /> <cmp-field-mapping name="employees"> <collection-mapping table="emp"> <primkey-mapping> <cmp-field-mapping name="deptNo" persistence-name="deptno" /> </primkey-mapping> <value-mapping type="emp.Emp"> <cmp-field-mapping> <entity-ref home="emp/EmpBean"> <cmp-field-mapping name="empNo" persistence-name="empno"/> <cmp-field-mapping name="empName" persistence-name="ename"/> <cmp-field-mapping name="salary" persistence-name="sal"/> </entity-ref> </cmp-field-mapping> </value-mapping>

Advanced CMP Entity Beans
B-18 Product Title/BookTitle as a Variable Beta Draft
</collection-mapping> </cmp-field-mapping> ... </entity-deployment>

Beta Draft Migration From EJB 1.1 to EJB 2.0 Container ManagedPersistence C-1
CMigration From EJB 1.1 to EJB 2.0
Container Managed Persistence
Previous to Oracle9iAS Release 2 (9.0.3), container managed persistence and relationships were defined in the Oracle-specific deployment descriptor, which employed an Oracle-specific implementation of EJB 2.0 features that had not been completely designed at that time. For example, you used to define a finder method with its SQL statement in the orion-ejb-jar.xml file; currently, you define finder methods using EJBQL SQL within the ejb-jar.xml file. The following sections describe how to migrate the Oracle-specific EJB 2.0 features to the actual EJB 2.0 specification methodology:
■ Introduction to Migrating EJB 1.1 Applications to EJB 2.0
■ Use EJB 2.0 Deployment Descriptor Identification
■ Use Abstract Bean Implementations
■ Use Standard EJB 2.0 Relationships
■ Use Local Interfaces for Beans with Relationships
■ Use EJB Query Language (EJBQL)
Introduction to Migrating EJB 1.1 Applications to EJB 2.0The most significant change in the EJB 2.0 specification was in both Container Managed Persistence (CMP) and Container Managed Relationships (CMR). Beginning in Oracle9iAS Release 2 (9.0.3), OC4J is J2EE 1.3 compatible and implements the entire EJB 2.0 specification. Prior versions of Oracle9iAS provided an Oracle-specific implementation for some of the EJB 2.0 features before the EJB 2.0 specification was complete. Now that the EJB 2.0 specification is final, applications

Use EJB 2.0 Deployment Descriptor Identification
C-2 Product Title/BookTitle as a Variable Beta Draft
using these Oracle-specific preview features should be modified to use the EJB 2.0 functionality.
This document guides you to migrate any EJB applications that use the Oracle-specific preview features to using the standard EJB 2.0 functionality—specifically for the EJB 2.0 CMP and CMR features. You only need to read this document if you used CMP based entity beans and any of the following features:
■ relationships between entity beans
■ dependent objects and database table mappings
Use EJB 2.0 Deployment Descriptor IdentificationThe following changes are basic to all applications that use EJB 2.0 features:
1. Change your EJB deployment descriptor.
To use EJB 2.0, the EJB deployment descriptor requires the following changes:
a. Update the DOCTYPE tag to specify the EJB 2.0 DTD, which validates the document, as follows:
<!DOCTYPE ejb-jarPUBLIC "-//Sun Microsystems, Inc.//DTD Enterprise JavaBeans 2.0//EN" "http://java.sun.com/dtd/ejb-jar_2_0.dtd">
This tells the XML parser to validate your ejb-jar.xml file using the EJB 2.0 DTD.
b. Configure the EJB container to use the EJB 2.0 CMP mechanism. Specify the <cmp-version> element to 2.x within the body of the <entity> element.
<entity> ... <cmp-version>2.x</cmp-version> ...</entity>
c. Provide an abstract schema name for your bean. This name is used within EJBQL queries to refer to the bean.
<entity> ... <abstract-schema-name>Topping</abstract-schema-name> ...</entity>

Use Abstract Bean Implementations
Beta Draft Migration From EJB 1.1 to EJB 2.0 Container ManagedPersistence C-3
Use Abstract Bean ImplementationsIn EJB 2.0, entity beans that use CMP are defined as abstract beans. You must provide only the definition of the bean class, not the code implementation. During deployment, the container looks at the deployment descriptor and the methods you have defined for the bean, and then generates the required implementation class for your abstract bean definition. The container-generated implementation defines the instance fields required to hold the bean state and the accessor methods used to manipulate the state of the bean. Thus, the container is more intimately involved with the operations that are being performed on the bean and puts the container in a position to make optimizations on the way it is managing and controlling the bean.
To make an existing bean class abstract, do the following:
1. Change the definition of your bean class so that it is now declared as an abstract class.
public class EmployeeBean implements javax.ejb.EntityBean{ ..}
becomes
public abstract class EmployeeBean implements javax.ejb.EntityBean{ ..}
2. Replace the instance fields you use to hold the entity bean state with abstract accessor methods. Change the method signature to add the abstract keyword and remove the code from the method body. The container generates the code required to get and set the values for the instance fields.
For example, the standard EJB 1.1 accessor model for the age field:
public int getAge(){ return _age;}
public void setAge(int age){ this._age = age;}

Use Standard EJB 2.0 Relationships
C-4 Product Title/BookTitle as a Variable Beta Draft
become the following in the EJB 2.0 accessor model:
public abstract int getAge();public abstract setAge(int age);
3. For any non-accessor methods in the bean implementation, modify any code that directly accesses the instance fields to use the corresponding get or set accessor method instead. Since the instance fields are no longer defined directly in the bean class, the fields cannot be used to obtain and manipulate the state of the bean. Instead, the accessors methods must be used to access the bean fields.
Use Standard EJB 2.0 RelationshipsPrior to Oracle9iAS Release 2 (9.0.3), the relationships in object models were supported using Oracle-specific mechanisms, which was based on an early version of the EJB 2.0 specification. You could program simple one-to-many relationships within the bean implementation class. You could construct more complex object models that used dependent objects, other entity beans, or collections of objects through configuring the Oracle-specific EJB deployment descriptor. None of these approaches resulted in the creation of a portable EJB application.
In this release, OC4J provides a fully compliant implementation; thus, you should migrate any code you have that uses the Oracle-specific relationship mechanisms to use the standard EJB 2.0 mechanism.
The Oracle-specific relationships are defined with the <cmp-field-mapping> element in the orion-ejb-jar.xml file. Each relationship must be removed and redefined using the <relationship> element in the ejb-jar.xml file. In the EJB 2.0 specification, a relationship between two objects (entity beans) is defined using the <relationship> element in the standard ejb-jar.xml deployment descriptor. This relationship is automatically managed by the EJB container and is deployable to any J2EE product that supports EJB 2.0.
The following example is an EJB 2.0 configuration of a one-to-many relationship. A single department has multiple employees. The department is implemented in the DeptBean; the employee is implemented within the EmpBean. See Chapter 3, "CMP Entity Beans" for information on container managed persistence; see Chapter 4, "Entity Relationship Mapping" for more information on relationships.
<ejb-relation> <ejb-relation-name>Dept-Emps</ejb-relation-name> <ejb-relationship-role> <ejb-relationship-role-name>Dept-has-Emps</ejb-relationship-role-name>

Use EJB Query Language (EJBQL)
Beta Draft Migration From EJB 1.1 to EJB 2.0 Container ManagedPersistence C-5
<multiplicity>One</multiplicity> <relationship-role-source> <ejb-name>DeptBean</ejb-name> </relationship-role-source> <cmr-field> <cmr-field-name>employees</cmr-field-name> <cmr-field-type>java.util.Collection</cmr-field-type> </cmr-field> </ejb-relationship-role> <ejb-relationship-role> <ejb-relationship-role-name>Emps-have-Dept</ejb-relationship-role-name> <multiplicity>Many</multiplicity> <relationship-role-source> <ejb-name>EmpBean</ejb-name> </relationship-role-source> <cmr-field><cmr-field-name>dept</cmr-field-name></cmr-field> </ejb-relationship-role></ejb-relation>
Each entity bean that forms part of a relationship specified within the ejb-jar.xml file must be deployed within the same EJB-JAR file.
Use Local Interfaces for Beans with RelationshipsOracle recommends that the entity beans inside the EJB-JAR file are constructed using local interfaces. Your client can look up a local interface from components that are deployed within the same application (the same JAR file) and are running inside the same OC4J JVM.
All entity beans should be modified to provide the local interface to their clients, in addition to the remote interface.
Use EJB Query Language (EJBQL)In the Oracle9iAS version previous to Release 2 (9.0.3), all finder methods and its SQL were defined in an Oracle-specific manner in the orion-ejb-jar.xml file using the <finder-method> element. Once the EJB 2.0 specification was complete, this Oracle-specific methodology was not necessary anymore. As denoted in Chapter 5, "EJB Query Language", your pre-existing finder methods will still work, if you do not want to change them. However, you can eliminate them and use the EJB 2.0 method for finders within the <query> element in the ejb-jar.xml file. These finder methods use EJBQL to define the SQL for the queries.

Use EJB Query Language (EJBQL)
C-6 Product Title/BookTitle as a Variable Beta Draft
The following is an example of an EJBQL finder method where the SQL selects all departments.
<query> <description></description> <query-method> <method-name>findAll</method-name> <method-params/> </query-method> <result-type-mapping>Local</result-type-mapping> <ejb-ql>Select OBJECT(d) From Dept d</ejb-ql></query>
At deployment time, the EJB deployment descriptor (ejb-jar.xml file) is parsed. If it is available, the Oracle-specific deployment descriptor (orion-ejb-jar.xml file) is also parsed. If the orion-ejb-jar.xml file is not provided, one is created for you with the defaults and other configuration based upon what you configured in the ejb-jar.xml file. In the case of EJBQL, the SQL is placed in the orion-ejb-jar.xml file. You can customize your SQL further by modifying the orion-ejb-jar.xml file.
Example C–1 One-to-One Unidirectional
Below are the elements from the ejb-jar.xml file that describe the one-to-one unidirectional relationship between an employee and an address. The employee is represented by the EmpBean EJB and the address by the AddressBean EJB.
<ejb-relation><ejb-relation-name>Emp-Address</ejb-relation-name><ejb-relationship-role><ejb-relationship-role-name>Emp-has-Address</ejb-relationship-role-name><multiplicity>One</multiplicity><relationship-role-source><ejb-name>EmpBean</ejb-name></relationship-role-source><cmr-field><cmr-field-name>address</cmr-field-name></cmr-field></ejb-relationship-role><ejb-relationship-role><ejb-relationship-role-name>Address-has-Emp</ejb-relationship-role-name><multiplicity>One</multiplicity><cascade-delete/>

Conclusion
Beta Draft Migration From EJB 1.1 to EJB 2.0 Container ManagedPersistence C-7
<relationship-role-source><ejb-name>AddressBean</ejb-name></relationship-role-source></ejb-relationship-role></ejb-relation>
There are two main differences between this example and the one-to-many relationship. Both sides of the relationship have the multiplicity of One to define the one-to-one nature. Secondly the Address relation does not have a <cmr-field> element. This means that the relationship is unidirectional.
ConclusionModeling relationships between EJBs was not simple with EJB 1.1. As of EJB 2.0, the definition of relationships and persistence was addressed. We also strongly recommend that you try Oracle JDeveloper, which provides alternative methods with wizards to alleviate the tedious and error prone manual method of managing the deployment descriptors. You can download JDeveloper at the following site: http://otn.oracle.com/software/products/jdev/content.html.

Conclusion
C-8 Product Title/BookTitle as a Variable Beta Draft

Third Party Lice
D
Third Party LicensesThis appendix includes the Third Party License for all the third party products included with Oracle9i Application Server. Topics include:
■ Apache HTTP Server
■ Apache JServ
nses D-1

Apache HTTP Server
Apache HTTP ServerUnder the terms of the Apache license, Oracle is required to provide the following notices. However, the Oracle program license that accompanied this product determines your right to use the Oracle program, including the Apache software, and the terms contained in the following notices do not change those rights. Notwithstanding anything to the contrary in the Oracle program license, the Apache software is provided by Oracle "AS IS" and without warranty or support of any kind from Oracle or Apache.
The Apache Software License/* ==================================================================== * The Apache Software License, Version 1.1 * * Copyright (c) 2000 The Apache Software Foundation. All rights * reserved. * * Redistribution and use in source and binary forms, with or without * modification, are permitted provided that the following conditions * are met: * * 1. Redistributions of source code must retain the above copyright * notice, this list of conditions and the following disclaimer. * * 2. Redistributions in binary form must reproduce the above copyright * notice, this list of conditions and the following disclaimer in * the documentation and/or other materials provided with the * distribution. * * 3. The end-user documentation included with the redistribution, * if any, must include the following acknowledgment: * "This product includes software developed by the * Apache Software Foundation (http://www.apache.org/)." * Alternately, this acknowledgment may appear in the software itself, * if and wherever such third-party acknowledgments normally appear. * * 4. The names "Apache" and "Apache Software Foundation" must * not be used to endorse or promote products derived from this * software without prior written permission. For written * permission, please contact [email protected]. * * 5. Products derived from this software may not be called "Apache", * nor may "Apache" appear in their name, without prior written
D-2 Oracle9iAS Containers for J2EE Enterprise JavaBeans Developer’s Guide

Apache HTTP Server
* permission of the Apache Software Foundation. * * THIS SOFTWARE IS PROVIDED ‘‘AS IS’’ AND ANY EXPRESSED OR IMPLIED * WARRANTIES, INCLUDING, BUT NOT LIMITED TO, THE IMPLIED WARRANTIES * OF MERCHANTABILITY AND FITNESS FOR A PARTICULAR PURPOSE ARE * DISCLAIMED. IN NO EVENT SHALL THE APACHE SOFTWARE FOUNDATION OR * ITS CONTRIBUTORS BE LIABLE FOR ANY DIRECT, INDIRECT, INCIDENTAL, * SPECIAL, EXEMPLARY, OR CONSEQUENTIAL DAMAGES (INCLUDING, BUT NOT * LIMITED TO, PROCUREMENT OF SUBSTITUTE GOODS OR SERVICES; LOSS OF * USE, DATA, OR PROFITS; OR BUSINESS INTERRUPTION) HOWEVER CAUSED AND * ON ANY THEORY OF LIABILITY, WHETHER IN CONTRACT, STRICT LIABILITY, * OR TORT (INCLUDING NEGLIGENCE OR OTHERWISE) ARISING IN ANY WAY OUT * OF THE USE OF THIS SOFTWARE, EVEN IF ADVISED OF THE POSSIBILITY OF * SUCH DAMAGE. * ==================================================================== * * This software consists of voluntary contributions made by many * individuals on behalf of the Apache Software Foundation. For more * information on the Apache Software Foundation, please see * <http://www.apache.org/>. * * Portions of this software are based upon public domain software * originally written at the National Center for Supercomputing Applications, * University of Illinois, Urbana-Champaign. */
Third Party Licenses D-3

Apache JServ
Apache JServUnder the terms of the Apache license, Oracle is required to provide the following notices. However, the Oracle program license that accompanied this product determines your right to use the Oracle program, including the Apache software, and the terms contained in the following notices do not change those rights. Notwithstanding anything to the contrary in the Oracle program license, the Apache software is provided by Oracle "AS IS" and without warranty or support of any kind from Oracle or Apache.
Apache JServ Public LicenseRedistribution and use in source and binary forms, with or without modification, are permitted provided that the following conditions are met:
■ Redistribution of source code must retain the above copyright notice, this list of conditions and the following disclaimer.
■ Redistribution in binary form must reproduce the above copyright notice, this list of conditions and the following disclaimer in the documentation and/or other materials provided with the distribution.
■ All advertising materials mentioning features or use of this software must display the following acknowledgment:
This product includes software developed by the Java Apache Project for use in the Apache JServ servlet engine project (http://java.apache.org/).
■ The names "Apache JServ", "Apache JServ Servlet Engine" and "Java Apache Project" must not be used to endorse or promote products derived from this software without prior written permission.
■ Products derived from this software may not be called "Apache JServ" nor may "Apache" nor "Apache JServ" appear in their names without prior written permission of the Java Apache Project.
■ Redistribution of any form whatsoever must retain the following acknowledgment:
This product includes software developed by the Java Apache Project for use in the Apache JServ servlet engine project (http://java.apache.org/).
THIS SOFTWARE IS PROVIDED BY THE JAVA APACHE PROJECT "AS IS" AND ANY EXPRESSED OR IMPLIED WARRANTIES, INCLUDING, BUT NOT LIMITED TO, THE IMPLIED WARRANTIES OF MERCHANTABILITY AND FITNESS FOR A PARTICULAR PURPOSE ARE DISCLAIMED. IN NO EVENT SHALL THE JAVA
D-4 Oracle9iAS Containers for J2EE Enterprise JavaBeans Developer’s Guide

Apache JServ
APACHE PROJECT OR ITS CONTRIBUTORS BE LIABLE FOR ANY DIRECT, INDIRECT, INCIDENTAL, SPECIAL, EXEMPLARY, OR CONSEQUENTIAL DAMAGES (INCLUDING, BUT NOT LIMITED TO, PROCUREMENT OF SUBSTITUTE GOODS OR SERVICES; LOSS OF USE, DATA, OR PROFITS; OR BUSINESS INTERRUPTION) HOWEVER CAUSED AND ON ANY THEORY OF LIABILITY, WHETHER IN CONTRACT, STRICT LIABILITY, OR TORT (INCLUDING NEGLIGENCE OR OTHERWISE) ARISING IN ANY WAY OUT OF THE USE OF THIS SOFTWARE, EVEN IF ADVISED OF THE POSSIBILITY OF SUCH DAMAGE.
Third Party Licenses D-5

Apache JServ
D-6 Oracle9iAS Containers for J2EE Enterprise JavaBeans Developer’s Guide

Index
element, 3-20 element, 9-3Symbols<abstract-schema-name> element, 5-5, 5-8<assembly-descriptor> element, A-22<caller> element, A-23<cascade-delete/> element, 4-11<cmp-field-mapping> element, 4-32, 4-55, 4-62,
A-10, A-23, C-4<cmp-version> element, C-2<cmr-field> element, 3-21, 4-7, 4-13, 4-47<cmr-field-name> element, 4-4, 4-7<cmr-field-type> element, 4-7<collection-mapping> element, 4-36, 4-44, 4-48,
4-49, 4-51, 4-53, 4-55, 4-59, 4-63, A-23<container-transaction> element, 7-6, 7-11<context-attribute> element, A-23<default-method-access> element, 8-10, A-22, A-24<delay-updates-until-commit> attribute, A-25<description> element, A-24<destination-type> element, 7-6<ejb> element, 2-27<ejb-link> element, 9-16, 9-18, 9-19<ejb-location> element, 6-11<ejb-mapping> element, 9-16, 9-19<ejb-module> element, 2-23<ejb-name> element, 9-16, 9-19, A-24<ejb-ql>, 5-5<ejb-ql> element, 5-13<ejb-ref> element, 2-21, 9-16, 9-19<ejb-ref-mapping> element, 9-16, 9-19, A-5, A-10,
A-16, A-24
<ejb-ref-name> element, 2-11, 9-16, 9-17, 9-19, 9-20<ejb-ref-type> element, 9-16, 9-19<ejb-relation> element, 4-7<ejb-relation-name> element, 4-7<ejb-relationship-role> element, 4-7<ejb-relationship-role-name> element, 4-7<enterprise-beans> element, A-3, A-24<entity-deployment> element, 4-21, 4-23, 4-32,
4-36, 4-45, 4-52, 4-59, 9-9, 9-10, A-9, A-10, A-24<entity-ref> element, A-27<env-entry> element, 9-12<env-entry-mapping> element, A-5, A-10, A-16,
A-28<env-entry-name> element, 9-12<env-entry-type> element, 9-12<env-entry-value> element, 9-12<fields> element, A-28<finder-method> element, 5-9, A-10, A-28, C-5<group> element, A-28<home> element, 9-16, 9-19<ior-security-config> element, A-5, A-10, A-29<java> element, 2-27<jem-deployment> element, A-18, A-29<jem-server-extension> element, A-18, A-29<jndi-name> element, 9-16, 9-19, 9-23, 9-25<list-mapping> element, A-29<lookup-context> element, A-29<map-key-mapping> element, A-30<map-mapping> element, A-30<mapping> element, 9-16, 9-19, 9-23, 9-25<max-tx-retries> element, 1-8, 9-9<message-driven> element, 7-6<message-driven-deployment> element, 7-11, 7-12,
7-19, A-16, A-30
Index-1

<message-driven-destination> element, 7-6<method> element, A-21, A-22, A-31
defined, 8-6<method-intf> element, A-31<method-name> element, 5-5, A-31<method-param> element, 5-13, A-31<method-params> element, A-31<method-permission> element, 8-3, 8-4, 8-6<module> element, 2-27<multiplicity> element, 4-7<orion-ejb-jar> element, A-3, A-31<persistence-type> element, 6-11<prim-key-class> element, 3-9, 6-4, B-8<primkey-mapping> element, 4-49, 4-55, 4-63,
A-10, A-31<properties> element, A-32<query> element, 5-3, 5-4, 5-5, 5-13, C-5<query> element., 5-7<relationship> element, C-4<relationship-role-source> element, 4-7<relationships> element, 4-6, 4-23, 4-52<remote> element, 9-16, 9-19<res-auth> element, 9-23, 9-25<resource-env-ref> element, 7-22<resource-env-ref-mapping> element, A-5, A-10,
A-17, A-32<resource-provider> element, 7-17<resource-ref> element, 6-11, 7-21<resource-ref-mapping> element, 9-23, 9-25, A-5,
A-10, A-16, A-32<res-ref-name> element, 9-23, 9-25<res-type> element, 9-23, 9-25<result-type-mapping> element, 5-4<role-link> element, 8-3, 8-4, 8-5<role-name> element, 8-3, 8-4<run-as> element, 8-8<security-identity> element, 8-8<security-role> element, 8-3, 8-4<security-role-mapping> element, 8-9, A-22, A-33<security-role-ref> element, 8-3, 8-4<server> element, 2-23<session-deployment> element, 10-6, A-4, A-33<set-mapping> element, 4-36, 4-44, 4-51, 4-59, A-35<subscription-durability> element, 7-6<transaction-type> element, 7-6
<unchecked/> element, 8-7<use-caller-identity/> element, 8-8<user> element, A-35<value-mapping> element, A-35<value-mapping> element, 4-49, 4-55, 4-63<web> element, 2-27
AAC4J, 11-1accessing EJBs, 2-10Active Components for Java, see AC4Japplication.xml file, 2-27, 7-11, 7-18
example, 2-28overview, 2-27
archivingdirections, 2-26EAR file, 2-29EJBs, 2-26
associateUsingThirdTable property, 4-36association table, 4-42, 4-50, 4-58autocreate-tables element, 4-22, 4-23, 4-64
Bbean
accessing remotely, 1-8activation, 1-12creating, 2-4, 3-3, B-2environment, 1-14implementation, 2-8interface, 1-8overview, 1-1passivation, 1-12removal, 2-12steps for invocation, 1-9
bean-managed persistent, see BMPBLOB, 3-20BMP
create database tables, 6-12creation process, 6-2defined, 6-1deployment descriptor, 6-11ejbCreate implementation, 6-4home and remote interfaces, 6-3
Index-2

implementation details, 6-3persistence, 1-21
Ccache-timeout attribute, A-17called-by attribute, A-23caller-identity attribute, A-23call-timeout attribute, A-6, A-11, A-25, A-33ClassCastException, 9-2, 9-27CLOB, 3-20clustering, 10-1 to 10-7
concurrency mode effect, 9-11clustering-schema attribute, A-25CMP
data types, 3-19migration, C-1overview, 1-22persistence update configuration, 9-8
CMRassociation table, 4-42, 4-50, 4-58cardinality, 4-7cascade delete option, 4-10default mapping, 4-12define get/set methods, 4-4deployment descriptor, 4-6direction, 4-7explicit relationship mapping, 4-21many-to-many, 4-3, 4-8, 4-15, 4-58many-to-one, 4-3, 4-8mapping relationships, 4-12one-to-many, 4-3, 4-8, 4-15, 4-34, 4-42, 4-47, 4-50one-to-one, 4-2, 4-8, 4-14relationship definition, 4-3types of relationships, 4-2
Collections, 3-21command-line options, 9-27component interface
overview, 1-9concurrency modes, 9-8
clustering, 9-11connection-factory-location attribute, 7-12, 7-19,
A-30context
session, 1-14
transaction, 1-14copy-by-value attribute, A-6, A-11, A-25, A-33create method, 2-12, 3-3, 3-4, 3-5, 6-2, B-2, B-3
EJBHome interface, 1-9, 2-4, 2-5CreateException, 2-5, 2-6
Ddata types, 3-19
mapping, 3-19database constraints
foreign key, 4-70data-bus attribute, A-24data-source attribute, A-11, A-25DataSource object, 9-21data-source-location attribute, A-29data-sources.xml file, 6-11, 6-12Date, 5-14DBMS_AQADM package, 7-15deadlock
recovery, 9-27dedicated.rmicontext property, 10-7delay-updates-until-commit attribute, A-16deployment
error recovery, 9-26deployment descriptor, 1-10, 2-24, 3-3, 6-3, B-2
BMP, 6-11EJB QL, 5-5EJB reference, 9-13entity bean, A-9, B-10environment variables, 9-12JDBC DataSource, 9-20MDB, 7-10, 7-18message-driven bean, A-16security, 8-3, 8-4, 8-9session bean, A-5
destination-location attribute, 7-11, 7-19, A-30disble-wrapper-cache attribute, A-14DNS round-robin, 2-21do-select-before-insert attribute, A-12, A-25DTD file, 2-24
EEAR file, 2-1
Index-3

creation, 2-29EJB
archive, 2-26clustering, 10-1 to 10-7creating, 2-2, 2-4, 2-8, 3-3, B-2deployment descriptor, 2-24development suggestions, 2-2difference between session and entity, 1-26home interface, 2-5JAR file, 3-4, 6-3, 7-11, 7-18, B-2local interface, 2-7overview, 1-1parameter passing, 1-10referencing other EJBs, 9-2, 9-27remote interface, 2-6replication, 10-5security, 8-2setting pool size, 9-6
EJB QL?1, 5-14deployment descriptor, 5-5DISTINCT keyword, 5-14documentation, 5-1finder method
example, 5-7overview, 5-2
input parameter syntax, 5-14overview, 5-2query methods, 5-2select method
example, 5-12overview, 5-3
statement example, 5-6, 5-8EJB Query Language, see EJB QLejbActivate method, 1-12, 1-20, 6-3, 6-10EJBContext interface, 1-14ejbCreate method, 1-19, 1-20, 1-22, 2-4, 2-5, 3-3, 6-2,
6-4, B-2initializing primary key, 6-4MDB, 7-3SessionBean interface, 1-12
EJBException, 2-5, 2-6, 2-7ejbFindByPrimaryKey method, 1-22, 6-4, 6-7, B-2EJBHome interface, 2-4, 2-5, 3-3, 3-4, 6-2, B-2
create method, 3-3, 3-4, 3-5, 6-2, B-2, B-3
findByPrimaryKey method, 3-3, 3-5, 6-2, B-2, B-3
ejb-jar.xml file, 2-24, 6-11ejbLoad method, 1-19, 1-21, 1-23, 6-3, 6-9EJBLocalHome interface, 2-4, 2-6, 3-3, 3-4, 6-2EJBLocalObject interface, 2-4, 2-7, 3-3, 3-5, 6-2ejb-name attribute, A-29EJBObject interface, 2-4, 2-7, 3-3, 3-5, 6-2, B-2, B-3ejbPassivate method, 1-12, 1-20, 6-3, 6-10ejbPostCreate method, 1-19, 1-22, 3-3, 6-2, B-2ejb-reference-home attribute, A-23ejbRemove method, 1-13, 1-19, 1-21, 1-22, 6-10
MDB, 7-4EJBs
accessing, 2-10ejbStore method, 1-19, 1-21, 1-23, 6-2, 6-8enable-passivation attribute, 9-4Enterprise Archive file, see EAR fileEnterprise Java Beans, see EJBentity bean
class implementation, 3-6, B-4context information, 1-20creating, 1-20, 3-3, 3-4, B-2, B-3deploy, B-10deployment descriptor, A-9finder methods, 3-4, 6-4, B-3home interface, 3-4, B-3overview, 1-11, 1-17persistent data, 1-18, 1-21primary key, 1-17relationships, see CMRremote interface, 3-5, B-3removing, 1-21
EntityBean interface, 1-10, 1-18, 1-22, 2-4, 3-3, 6-2, B-2
ejbActivate method, 1-20, 6-3ejbCreate method, 1-19, 1-20, 1-22ejbFindByPrimaryKey method, 1-22, B-2ejbLoad method, 1-19, 1-21, 1-23, 6-3ejbPassivate method, 1-20, 6-3ejbPostCreate method, 1-19ejbRemove method, 1-19, 1-21, 1-22ejbStore method, 1-19, 1-21, 1-23, 6-2setEntityContext method, 1-19, 1-20, 1-23unsetEntityContext method, 1-20
Index-4

environment referencesURL, 9-25
environment, retrieval, 1-14exclusive-write-access attribute, 9-10, A-12, A-25
FfindByPrimaryKey method, 3-3, 6-2, B-2findByPrimaryKey-lazy-loading attribute, 9-7,
A-25finder
lazy loading, 9-7finder method
backwards compatibility, 5-9EJB QL example, 5-7overview, 5-2
finder methods, 6-4BMP, 6-8entity bean, 3-4, B-3findByPrimaryKey method, 3-5, B-3
force-update attribute, A-15foreign key
database constraints, 4-70deferrable, 4-70
GgetEJBHome method, 1-14getEnvironment method, 1-14getRollbackOnly method, 1-14getUserTransaction method, 1-14
Hhome interface
creating, 2-4, 3-3, 6-2, B-2lookup, 2-11overview, 1-8, 1-9
Iidletime attribute, 9-4, A-8immutable attribute, A-36impliesAll attribute, 8-10, A-33instance-cache-timeout attribute, A-13, A-26
invoking EJBs, 2-10isCallerInRole method, 8-4isolation attribute, 9-9, A-13, A-26isolation modes, 9-8
JJAR
archiving command, 2-26jar command, 2-26JAR file, 3-4, 6-3, 7-11, 7-18, B-2
EJB, 2-26Java mail
Session object, 9-22jem-name attribute, A-29JMS
Destination, 7-16durable subscriptions, 7-10handled by MDB, 1-24OC4J JMS, 7-3 to ??, 7-7 to 7-12Oracle JMS, 7-12 to 7-20Topic, 7-11
jms.xml file, 7-11JNDI
lookup, 2-11
Llazy loading, 1-8, 9-7lazy-loading attribute, 5-12, 9-7, A-28, B-13listener-threads attribute, 7-20, A-18, A-30Lists, 3-21load balancing, 10-6LoadBalanceOnLookup property, 10-7local home interface
example, 2-6local interface
creating, 2-7example, 2-7overview, 1-9
local-wrapper attribute, A-8, A-15, A-26, A-34location attribute, A-6, A-13, A-26, A-29, A-32,
A-34locking-mode attribute, 9-10, A-13, A-26
Index-5

Mmail
Session object, 9-22mapping
relationships, 4-21max-instances
default value, 1-8max-instances attribute, 9-6, A-6, A-13, A-17, A-26,
A-34max-instances-threshold attribute, 9-4, A-8, A-34max-tx-retries attribute, A-7, A-14, A-26, A-34MDB
configuration, 7-11, 7-19creation, 7-10, 7-18deployment descriptor, 7-10, 7-18jms.xml file, 7-11onMessage method, 7-12overview, 1-11, 1-24, 7-2performance, 7-20, A-30transaction timeout, 7-20, A-31
memory-threshold attribute, 9-4, A-8, A-34message-driven bean
deployment descriptor, A-16Message-Driven Beans, see MDBMessageDrivenBean interface, 1-25, 7-3
setMessageDrivenContext method, 7-3MessageListener interface, 1-25, 7-3
onMessage method, 7-3migration
CMP, C-1min-instances attribute, 9-6, A-6, A-14, A-17, A-26,
A-34multi-tier environment, 2-22
Nname attribute, A-7, A-14, A-17, A-27, A-30, A-33,
A-34narrowing, 2-11
OOC4J
command-line options, 9-27OC4J JMS, 7-3 to ??, 7-7 to 7-12
onMessage method, 1-25, 7-3, 7-12optimisitic concurrency mode, 9-10optimistic concurrency mode, A-13, A-26ORA-8177 exception, 9-11Oracle JMS, 7-12 to 7-20, ?? to 7-21
create resource provider, 7-16orion-ejb-jar.xml file, 7-10, 7-18, 7-19Out of Memory error, 9-27
Ppackaging
referenced EJB classes, 9-2, 9-27parameters
object types, 1-11passing conventions, 1-10
parent application, 9-3partial attribute, A-28pass by reference, 1-10pass by value, 1-10passivate-count attribute, 9-5, A-8, A-35passivation criteria, 9-3 to 9-6performance setting
DNS load balancing option, 2-21permissions, 8-2persistence
bean-managed, 1-21container-managed, 1-22container-managed vs. bean-managed, 1-23create database tables, 6-12data management, 1-20field modification, 9-8managing, 3-4, B-2managing in BMP, 6-3overview, 1-18
persistence-filename attribute, A-7, A-35persistence-name attribute, A-23persistence-type attribute, 3-19, 3-20, A-23
mappings, 3-19pessimistic concurrency mode, A-13, A-26pessimistic conncurrency mode, 9-10pool
setting size, 9-6pool-cache-timeout attribute, A-5, A-14, A-27, A-33PortableRemoteObject
Index-6

narrow method, 2-11primary key, 3-3, 6-2, B-2
autoidmapping to table, 4-33
complex class, 6-6complex definition, 6-5creating, 6-4entity bean, 1-22, 3-9, B-8management, 1-20overview, 1-17, 3-9, B-8simple definition, 6-4
PropertyPermission, 8-2
Qquery attribute, A-28
Rread-only concurrency mode, 9-10, A-13, A-26remote
accessing, 2-22remote attribute, 2-22remote home interface
example, 2-5remote interface
business methods, 2-12creating, 2-4, 2-6, 3-3, 6-2, B-2example, 2-7overview, 1-8, 1-9
RemoteException, 2-7remove method, 2-12
EJBHome interface, 1-9replication attribute, A-7resource-check-interval attribute, 9-4, A-8, A-34runAs security identity, 8-8RuntimePermission, 8-2
Sscheduling-threads attribute, A-29security, 8-2
permissions, 8-2SecurityException, A-19security-identity element, A-33
select methodEJB QL example, 5-12overview, 5-3
Serializable interface, 1-11session bean
class implementation, 1-10context, 1-13deployment descriptor, A-4, A-5local home interface, 2-6methods, 1-12overview, 1-11, 1-12remote home interface, 2-5removing, 1-13stateful, 1-8, 1-15stateless, 1-8, 1-15
Session object, 9-22SessionBean interface, 1-10
EJB, 1-12, 2-4ejbActivate method, 1-12ejbCreate method, 1-12ejbPassivate method, 1-12ejbRemove method, 1-13setSessionContext method, 1-13
SessionContextinterface, 1-13
setEntityContext method, 1-19, 1-20, 1-23setMessageDrivenContext method, 1-25, 7-3setRollbackOnly method, 1-14setSessionContext method, 1-13, 1-21SocketPermission, 8-2SQRT, 5-14stateful session bean
clustering, 10-3overview, 1-15
StatefulSessionContext, 10-6stateless session bean
clustering, 10-2overview, 1-15
subscription-name attribute, 7-20, A-18, A-30
Ttable attribute, A-15, A-27, A-29, A-30Time, 5-14TimedOutException, A-6, A-11
Index-7

timeout attribute, A-7, A-35TimeoutExpiredException, A-6, A-34Timestamp, 5-14transaction
commit, 1-14context propagation, 1-14retrieve status, 1-14rollback, 1-14
TRANSACTION_READ_COMMITTED, 9-8TRANSACTION_SERIALIZABLE, 9-8transaction-timeout attribute, 7-20, A-18, A-31trans-attribute
default value, 1-8trans-attribute attribute, 7-26type attribute, A-30, A-36
UunsetEntityContext method, 1-20, 1-23update-changed-fields-only attribute, 9-8, A-14,
A-27
Vvalidity-timeout attribute, A-15, A-27
Wwrapper attribute, A-8, A-15, A-27, A-35
XXML
BMP, 6-11deployment descriptor, 3-3, 6-3, B-2
Index-8