oracle® revenue management and billing · you need to create oracle functions and packages for...
TRANSCRIPT

Oracle® Revenue Management and Billing
Version 2.7.0.1.0
Reports Installation Guide
Revision 6.1
F21094-01
July, 2019

Oracle Revenue Management and Billing Reports Installation Guide
ii Copyright © 2019, Oracle and/or its affiliates. All rights reserved.
Oracle Revenue Management and Billing Reports Installation Guide
F21094-01
Copyright Notice
Copyright © 2019, Oracle and/or its affiliates. All rights reserved.
Trademark Notice
Oracle and Java are registered trademarks of Oracle Corporation and/or its affiliates. Other names may be trademarks of their respective owners.
Intel and Intel Xeon are trademarks or registered trademarks of Intel Corporation. All SPARC trademarks are used under license and are trademarks or registered trademarks of SPARC International, Inc. AMD, Opteron, the AMD logo, and the AMD Opteron logo are trademarks or registered trademarks of Advanced Micro Devices. UNIX is a registered trademark of The Open Group.
License Restrictions Warranty/Consequential Damages Disclaimer
This software and related documentation are provided under a license agreement containing restrictions on use and disclosure, and are protected by intellectual property laws. Except as expressly permitted in your license agreement or allowed by law, you may not use, copy, reproduce, translate, broadcast, modify, license, transmit, distribute, exhibit, perform, publish, or display any part, in any form, or by any means. Reverse engineering, disassembly, or de-compilation of this software, unless required by law for interoperability, is prohibited.
Warranty Disclaimer
The information contained herein is subject to change without notice and is not warranted to be error-free. If you find any errors, please report them to us in writing.
Restricted Rights Notice
If this software or related documentation is delivered to the U.S. Government or anyone licensing it on behalf of the U.S. Government, the following notice is applicable:
U.S. GOVERNMENT RIGHTS
Oracle programs, including any operating system, integrated software, any programs installed on the hardware and/or documentation delivered to U.S. Government end users are “commercial computer software” pursuant to the applicable Federal Acquisition Regulation and agency-specific supplemental regulations. As such, use, duplication, disclosure, modification, and adaptation of the programs, including any operating system, integrated software, any programs installed on the hardware and/or documentation shall be subject to license terms and restrictions applicable to the programs. No other rights are granted to the U.S. Government.
Hazardous Applications Notice
This software is developed for general use in a variety of information management applications. It is not developed or intended for use in any inherently dangerous applications, including applications that may create a risk of personal injury. If you use this software in dangerous applications, then you shall be responsible to take all appropriate fail-safe, backup, redundancy, and other measures to ensure the safe use of this software. Oracle Corporation and its affiliates disclaim any liability for any damages caused by use of this software in dangerous applications.
Oracle Revenue Management and Billing Reports Installation Guide
Copyright © 2019, Oracle and/or its affiliates. All rights reserved. iii
Third Party Content, Products, and Services Disclaimer
This software and documentation may provide access to or information on content, products, and services from third parties. Oracle Corporation and its affiliates are not responsible for and expressly disclaim all warranties of any kind with respect to third party content, products, and services. Oracle Corporation and its affiliates will not be responsible for any loss, costs, or damages incurred due to your access to or use of third party content, products, or services.

Oracle Revenue Management and Billing Reports Installation Guide
iv Copyright © 2019, Oracle and/or its affiliates. All rights reserved.
Preface
About This Document Oracle Revenue Management and Billing (ORMB) may optionally be configured to use the reporting feature. You can generate reports from ORMB only if Oracle Business Intelligence Publisher is integrated with ORMB.
ORMB provides you with 10 sample reports that you can use for reporting or as a starting point for creating a new report. This document helps you to understand how to install reports in Oracle BI Publisher and ORMB. It also explains how to create new reports from scratch or using the sample report as a starting point.
Intended Audience This document is intended for the following audience:
End-Users
Implementation Team
Consulting Team
Development Team
Organization of the Document The information in this document is organized into the following sections:
Section No. Section Name Description
Section 1 Installing Reports Lists and describes the set of activities that need to be completed before using the reporting feature in ORMB.
Section 2 Defining a New Report Explains how to define a new report in ORMB.
Section 3 Using Sample Report as a Starting Point
Explains how to use an existing report to create a new report.

Oracle Revenue Management and Billing Reports Installation Guide
Copyright © 2019, Oracle and/or its affiliates. All rights reserved. v
Related Documents
You can refer to the following documents for more information:
Document Description
Oracle Revenue Management and Billing Banking User Guide
Lists and describes various banking features in Oracle Revenue Management and Billing. It also describes all screens related to these features and explains how to perform various tasks in the application.
Oracle Revenue Management and Billing Insurance User Guide
Lists and describes various insurance features in Oracle Revenue Management and Billing. It also describes all screens related to these features and explains how to perform various tasks in the application.
Oracle Revenue Management and Billing Version 2.7.0.1.0 Release Notes
Provides a brief description about the new features and enhancements made in this release. It also highlights the bug fixes and known issues in this release.
Report Designer's Guide for Oracle Business Intelligence Publisher
Explains how to create a report and how to design report layouts using a variety of template types to display the data from an Oracle Business Intelligence Publisher data model.
Administrator's Guide for Oracle Business Intelligence Publisher
Explains how to administer Oracle Business Intelligence
Publisher, including how to configure security, set up data source connections, define delivery servers, manage the scheduler and delivery server load, and configure run-time properties.

Oracle Revenue Management and Billing Reports Installation Guide
vi Copyright © 2019, Oracle and/or its affiliates. All rights reserved.
Contents
1. Installing Reports ................................................................................................................................... 1
1.1 Installing Oracle Business Intelligence (BI) Publisher ................................................................... 1
1.2 Downloading Sample Reports Package ........................................................................................ 1
1.3 Creating a User to Connect to Data Source .................................................................................. 2
1.4 Creating Oracle Functions and Packages ...................................................................................... 2
1.5 Compiling Invalid Objects ............................................................................................................. 2
1.6 Configuring Security ..................................................................................................................... 3
1.7 Configuring ORMB to Invoke Oracle BI Publisher ......................................................................... 4
1.7.1 Setting up Installation Options ........................................................................................ 4
1.7.2 Setting up Reporting Options .......................................................................................... 5
1.7.3 Defining an Algorithm to Validate the Date Format ........................................................ 6
1.7.4 Defining the System Default Access Group ..................................................................... 7
1.7.5 Assigning the System Default Access Group to a User .................................................... 7
1.7.6 Granting Access to the CILZRPTP Application Service ..................................................... 8
1.7.7 Granting Access to Sample Report’s Application Service ................................................ 8
1.8 Configuring the Oracle BI Publisher Server .................................................................................. 9
1.8.1 Setting the Security Model for BI Publisher ................................................................... 10
1.8.2 Creating a Data Source................................................................................................... 10
1.8.3 Application Roles in BI Publisher ................................................................................... 14
1.8.4 Application Roles Required for Executing ORMB Reports ............................................. 15
1.8.5 Creating an Application Role using Oracle Enterprise Manager .................................... 16
1.8.6 Granting Access to the Data Source .............................................................................. 17
1.8.7 Creating a User using Oracle WebLogic Server Administration Console ....................... 19
1.8.8 Assigning a Role to a User .............................................................................................. 21
1.9 Publishing Sample Reports in Oracle BI Publisher ...................................................................... 22
1.10 Defining a Company Title ............................................................................................................ 26
1.11 Defining a Company Address ...................................................................................................... 26
1.12 Defining a Company Logo ........................................................................................................... 27
1.13 Copying Sample Reports Definition in ORMB ............................................................................. 30
1.14 Generating Sample Reports ........................................................................................................ 30
2. Defining a New Report......................................................................................................................... 32
3. Using Sample Report as a Starting Point ............................................................................................. 36

Oracle Revenue Management and Billing Reports Installation Guide
Copyright © 2019, Oracle and/or its affiliates. All rights reserved. 1
1. Installing Reports This section lists and describes the following activities that you need to complete in the specified order to use the reporting feature in ORMB:
1. Installing Oracle Business Intelligence (BI) Publisher
2. Downloading Sample Reports Package
3. Creating a User to connect to Data Source
4. Creating Oracle Functions and Packages
5. Compiling Invalid Objects
6. Configuring Security
7. Configuring ORMB to Invoke Oracle BI Publisher
8. Configuring the Oracle BI Publisher Server
9. Publishing Sample Reports in Oracle BI Publisher
10. Defining a Company Title
11. Defining a Company Address
12. Defining a Company Logo
13. Copying Sample Reports Definition in ORMB
14. Generating Sample Reports
1.1 Installing Oracle Business Intelligence (BI) Publisher
You can install Oracle Business Intelligence Publisher 12.2.1.3.0 on Windows, AIX or Linux platforms. You can download Oracle BI Publisher 12.2.1.3.0 from Oracle Technology Network or Oracle Software Delivery Cloud.
1.2 Downloading Sample Reports Package To download and decompress the sample reports package, you need to do the following:
1. Download the CERTIFY ORMB 2.7.0.1.0 SAMPLE REPORTS WITH BI PUBLISHER 12C (12.2.1.3.0) patch (Patch Number: 30019055) from My Oracle Support. A zip file is downloaded.
2. Create a temporary folder named TEMPDIR on your local machine.
3. Unzip the downloaded file in the TEMPDIR folder. The contents of the zip file are extracted in the TEMPDIR folder. The contents include the ORMB_Reports folder. This folder contains below files:
i. BI-Publisher/functions/oracle: Contains functions required to generate data to be displayed on reports.
ii. BI-Publisher/logo: Contains company logo to be displayed on reports.
iii. BI-Publisher/reportDefinitions: Contains report definitions of Sample Reports to be copied in ORMB, if reports do not already exist in ORMB.
Oracle Revenue Management and Billing Reports Installation Guide
2 Copyright © 2019, Oracle and/or its affiliates. All rights reserved.
iv. BI-Publisher/reportFiles: Contains the zip file of ORMB Sample Reports to be uploaded in BI Publisher.
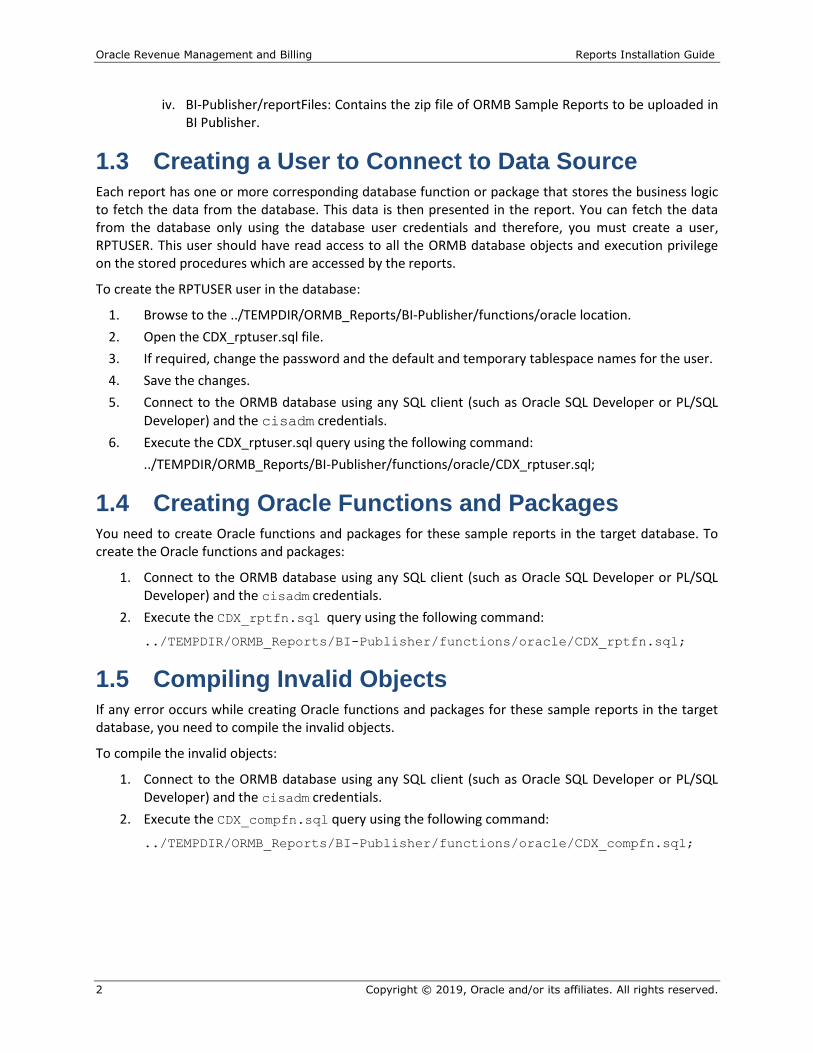
1.3 Creating a User to Connect to Data Source Each report has one or more corresponding database function or package that stores the business logic to fetch the data from the database. This data is then presented in the report. You can fetch the data from the database only using the database user credentials and therefore, you must create a user, RPTUSER. This user should have read access to all the ORMB database objects and execution privilege on the stored procedures which are accessed by the reports.
To create the RPTUSER user in the database:
1. Browse to the ../TEMPDIR/ORMB_Reports/BI-Publisher/functions/oracle location.
2. Open the CDX_rptuser.sql file.
3. If required, change the password and the default and temporary tablespace names for the user.
4. Save the changes.
5. Connect to the ORMB database using any SQL client (such as Oracle SQL Developer or PL/SQL Developer) and the cisadm credentials.
6. Execute the CDX_rptuser.sql query using the following command:
../TEMPDIR/ORMB_Reports/BI-Publisher/functions/oracle/CDX_rptuser.sql;
1.4 Creating Oracle Functions and Packages You need to create Oracle functions and packages for these sample reports in the target database. To create the Oracle functions and packages:
1. Connect to the ORMB database using any SQL client (such as Oracle SQL Developer or PL/SQL Developer) and the cisadm credentials.
2. Execute the CDX_rptfn.sql query using the following command:
../TEMPDIR/ORMB_Reports/BI-Publisher/functions/oracle/CDX_rptfn.sql;
1.5 Compiling Invalid Objects If any error occurs while creating Oracle functions and packages for these sample reports in the target database, you need to compile the invalid objects.
To compile the invalid objects:
1. Connect to the ORMB database using any SQL client (such as Oracle SQL Developer or PL/SQL Developer) and the cisadm credentials.
2. Execute the CDX_compfn.sql query using the following command:
../TEMPDIR/ORMB_Reports/BI-Publisher/functions/oracle/CDX_compfn.sql;
Oracle Revenue Management and Billing Reports Installation Guide
Copyright © 2019, Oracle and/or its affiliates. All rights reserved. 3
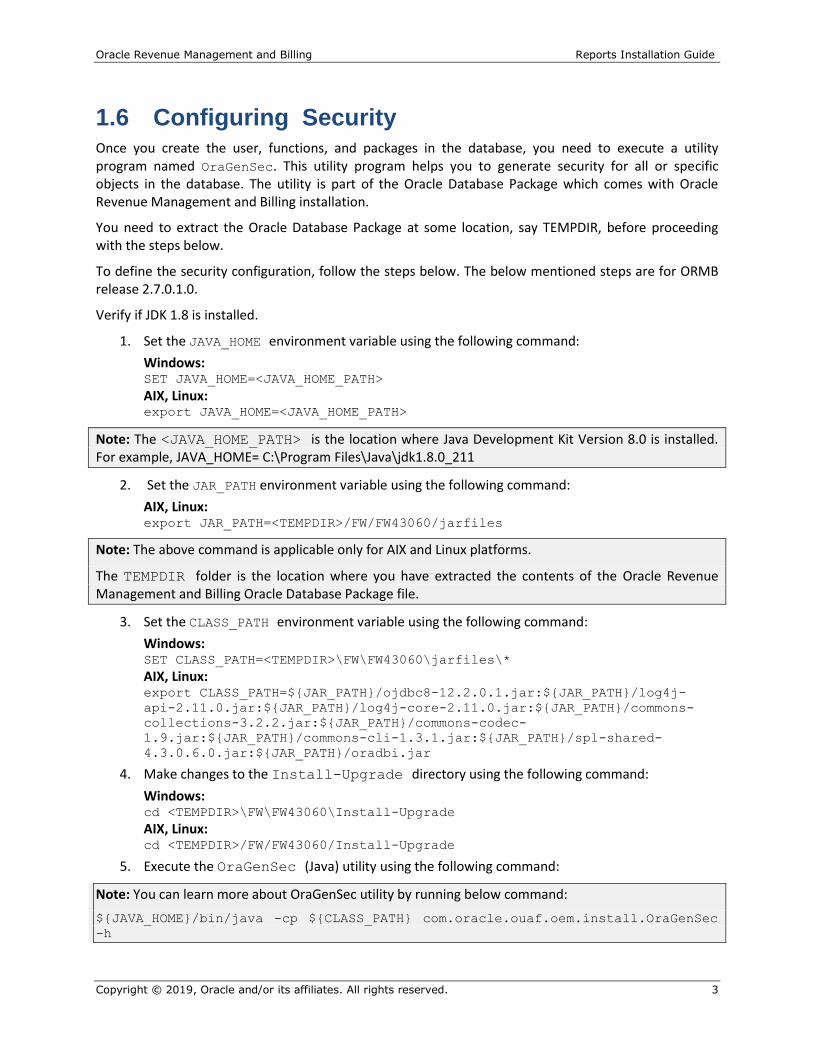
1.6 Configuring Security Once you create the user, functions, and packages in the database, you need to execute a utility program named OraGenSec. This utility program helps you to generate security for all or specific objects in the database. The utility is part of the Oracle Database Package which comes with Oracle Revenue Management and Billing installation.
You need to extract the Oracle Database Package at some location, say TEMPDIR, before proceeding with the steps below.
To define the security configuration, follow the steps below. The below mentioned steps are for ORMB release 2.7.0.1.0.
Verify if JDK 1.8 is installed.
1. Set the JAVA_HOME environment variable using the following command:
Windows: SET JAVA_HOME=<JAVA_HOME_PATH>
AIX, Linux: export JAVA_HOME=<JAVA_HOME_PATH>
Note: The <JAVA_HOME_PATH> is the location where Java Development Kit Version 8.0 is installed. For example, JAVA_HOME= C:\Program Files\Java\jdk1.8.0_211
2. Set the JAR_PATH environment variable using the following command:
AIX, Linux: export JAR_PATH=<TEMPDIR>/FW/FW43060/jarfiles
Note: The above command is applicable only for AIX and Linux platforms.
The TEMPDIR folder is the location where you have extracted the contents of the Oracle Revenue Management and Billing Oracle Database Package file.
3. Set the CLASS_PATH environment variable using the following command:
Windows: SET CLASS_PATH=<TEMPDIR>\FW\FW43060\jarfiles\*
AIX, Linux: export CLASS_PATH=${JAR_PATH}/ojdbc8-12.2.0.1.jar:${JAR_PATH}/log4j-
api-2.11.0.jar:${JAR_PATH}/log4j-core-2.11.0.jar:${JAR_PATH}/commons-
collections-3.2.2.jar:${JAR_PATH}/commons-codec-
1.9.jar:${JAR_PATH}/commons-cli-1.3.1.jar:${JAR_PATH}/spl-shared-
4.3.0.6.0.jar:${JAR_PATH}/oradbi.jar
4. Make changes to the Install-Upgrade directory using the following command:
Windows: cd <TEMPDIR>\FW\FW43060\Install-Upgrade
AIX, Linux: cd <TEMPDIR>/FW/FW43060/Install-Upgrade
5. Execute the OraGenSec (Java) utility using the following command:
Note: You can learn more about OraGenSec utility by running below command:
${JAVA_HOME}/bin/java -cp ${CLASS_PATH} com.oracle.ouaf.oem.install.OraGenSec
-h

Oracle Revenue Management and Billing Reports Installation Guide
4 Copyright © 2019, Oracle and/or its affiliates. All rights reserved.
Windows: %JAVA_HOME%\bin\java -Xmx1500m -cp %CLASS_PATH%
com.oracle.ouaf.oem.install.OraGenSec -d
<DB_USER>,<DB_USER_PASSWORD>,jdbc:oracle:thin:@<DB_HOST>:<DB_PORT>/<DB_
SID> -a A -l OraGenSec.log -r CIS_READ,CIS_READ -u
<DB_RPT_USER>,<DB_RPT_USER>
AIX, Linux: ${JAVA_HOME}/bin/java -Xmx1500m -cp ${CLASS_PATH}
com.oracle.ouaf.oem.install.OraGenSec -d
<DB_USER>,<DB_USER_PASSWORD>,jdbc:oracle:thin:@<DB_HOST>:<DB_PORT>/<DB_
SID> -a A -l OraGenSec.log -r CIS_READ,CIS_READ -u
<DB_RPT_USER>,<DB_RPT_USER>
Please find details of each parameter below:
Parameter Description
<DB_USER> Name of the owner of the database schema.
Example: CISADM
<DB_USER_PASSWORD> Password for the user
<DB_HOST> Hostname of database
<DB_PORT> Port of database
<DB_SID> Service name / Service Id of database
OraGenSec.log Utility Log file.
<DB_RPT_USER> Oracle DB user in which synonyms need to be created
Example: RPTUSER
6. After completion of execution, a Message appears as “Process Completed Successfully, Now Exiting ...”
1.7 Configuring ORMB to Invoke Oracle BI Publisher You need to configure ORMB to invoke Oracle BI Publisher from within ORMB. To configure, you need to:
1. Set the Installation Options
2. Set the Reporting Options
3. Define an Algorithm to Validate the Date Format
4. Define the System Default Access Group
5. Assign the System Default Access Group to a User
6. Grant Access to the CILZRPTP Application Service
7. Grant Access to Sample Report’s Application Service
1.7.1 Setting up Installation Options
ORMB provides an installation algorithm plug-in spot called Reporting Tool. This plug-in spot must contain an algorithm that invokes your reporting tool in real-time.
Oracle Revenue Management and Billing Reports Installation Guide
Copyright © 2019, Oracle and/or its affiliates. All rights reserved. 5
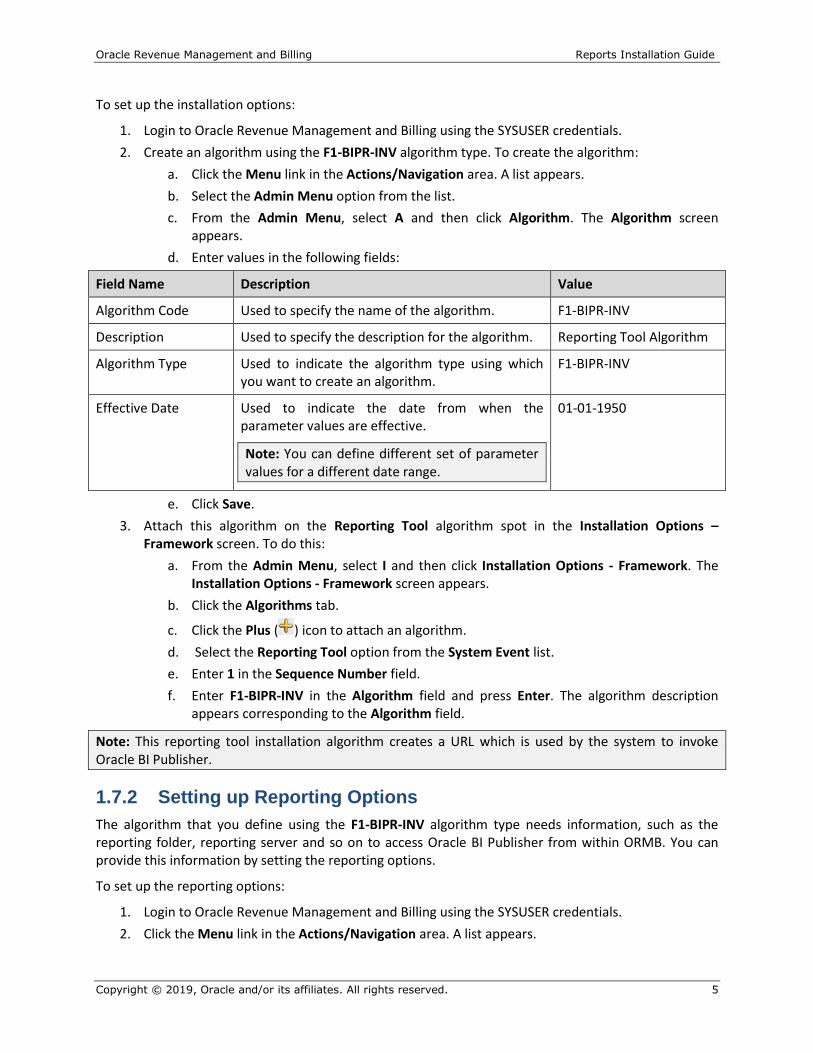
To set up the installation options:
1. Login to Oracle Revenue Management and Billing using the SYSUSER credentials.
2. Create an algorithm using the F1-BIPR-INV algorithm type. To create the algorithm:
a. Click the Menu link in the Actions/Navigation area. A list appears.
b. Select the Admin Menu option from the list.
c. From the Admin Menu, select A and then click Algorithm. The Algorithm screen appears.
d. Enter values in the following fields:
Field Name Description Value
Algorithm Code Used to specify the name of the algorithm. F1-BIPR-INV
Description Used to specify the description for the algorithm. Reporting Tool Algorithm
Algorithm Type Used to indicate the algorithm type using which you want to create an algorithm.
F1-BIPR-INV
Effective Date Used to indicate the date from when the parameter values are effective.
Note: You can define different set of parameter values for a different date range.
01-01-1950
e. Click Save.
3. Attach this algorithm on the Reporting Tool algorithm spot in the Installation Options – Framework screen. To do this:
a. From the Admin Menu, select I and then click Installation Options - Framework. The Installation Options - Framework screen appears.
b. Click the Algorithms tab.
c. Click the Plus ( ) icon to attach an algorithm.
d. Select the Reporting Tool option from the System Event list.
e. Enter 1 in the Sequence Number field.
f. Enter F1-BIPR-INV in the Algorithm field and press Enter. The algorithm description appears corresponding to the Algorithm field.
Note: This reporting tool installation algorithm creates a URL which is used by the system to invoke Oracle BI Publisher.
1.7.2 Setting up Reporting Options
The algorithm that you define using the F1-BIPR-INV algorithm type needs information, such as the reporting folder, reporting server and so on to access Oracle BI Publisher from within ORMB. You can provide this information by setting the reporting options.
To set up the reporting options:
1. Login to Oracle Revenue Management and Billing using the SYSUSER credentials.
2. Click the Menu link in the Actions/Navigation area. A list appears.

Oracle Revenue Management and Billing Reports Installation Guide
6 Copyright © 2019, Oracle and/or its affiliates. All rights reserved.
3. Select the Admin Menu option from the list.
4. From the Admin Menu, select R and then click Reporting Options. The Reporting Options screen appears. It contains the following fields:
Field Description
Report Option Used to specify the reporting option.
Value Used to specify the value for the reporting option.
5. Set the following reporting options:
Reporting Option Description Value
Reporting Folder Used to specify the name of the Oracle BI Publisher Shared folder created for storing reports.
ORMB
Reporting Server Used to specify the URL of the server where Oracle BI Publisher is installed.
You must specify the URL in the following format:
http://<Oracle_BI_Publish
er_Server_IP>:<Port_Numbe
r>
Suppress User Credentials (Y/N)
Used to indicate whether user credentials must be suppressed while generating a report.
Y
6. Click Save.
Note: In case you need any additional information to access Oracle BI Publisher from within ORMB, you can add additional reporting options in the Report Option list. To add additional reporting options, you need to define additional field values for the RPT_OPT_FLG field in the Look Up screen.
1.7.3 Defining an Algorithm to Validate the Date Format
The date format specified while generating reports from ORMB must be validated. The date format must be in the YYYY-MM-DD format. You need to define an algorithm using the ADHV-DTD algorithm type which will validate the date format.
To define an algorithm to validate the date format:
1. Login to Oracle Revenue Management and Billing using the SYSUSER credentials.
2. Click the Menu link in the Actions/Navigation area. A list appears.
3. Select the Admin Menu option from the list.
4. From the Admin Menu, select A and then click Algorithm. The Algorithm screen appears.
5. Enter values in the following fields:
Field Name Description Value
Algorithm Code Used to specify the name of the algorithm. CI_DTD_YMD
Description Used to specify the description for the algorithm. Validate Date Format
Oracle Revenue Management and Billing Reports Installation Guide
Copyright © 2019, Oracle and/or its affiliates. All rights reserved. 7
Field Name Description Value
Algorithm Type Used to indicate the algorithm type using which you want to create an algorithm.
ADHV-DTD
Effective Date Used to indicate the date from when the parameter values are effective.
Note: You can define different set of parameter values for a different date range.
01-01-1950
6. Set the value of the Date Format1 (Stored Format) parameter to YYYY-MM-DD.
7. Click Save.
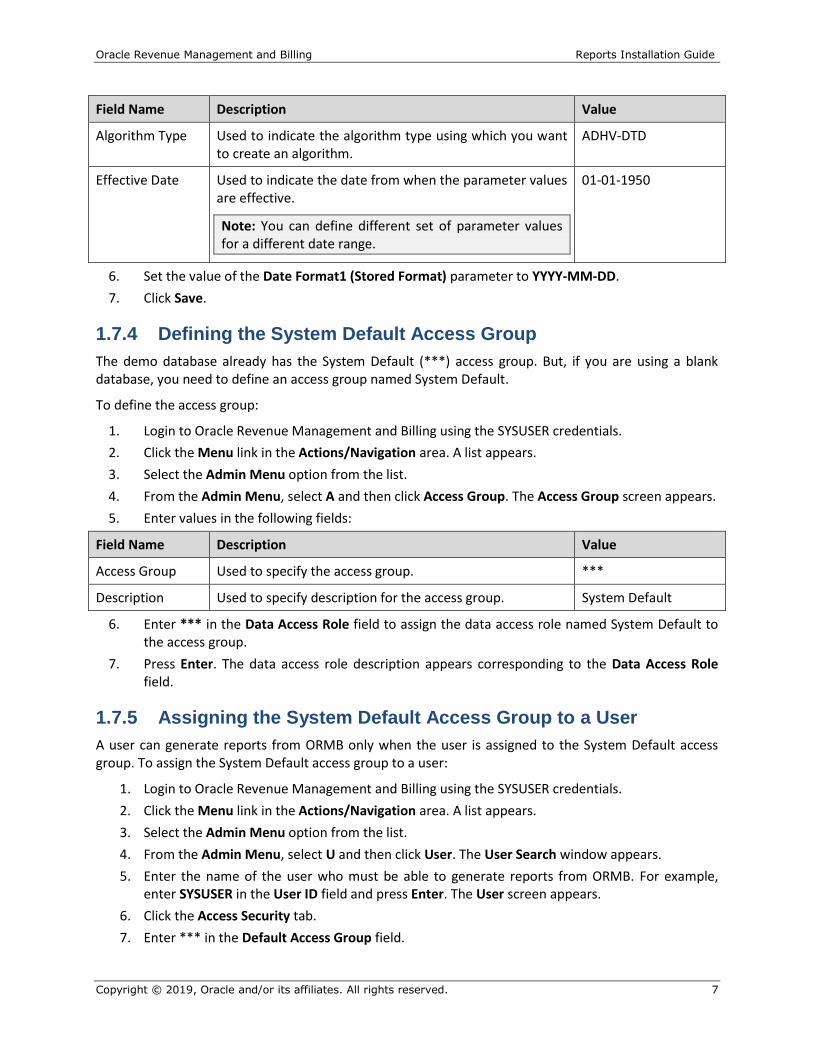
1.7.4 Defining the System Default Access Group
The demo database already has the System Default (***) access group. But, if you are using a blank database, you need to define an access group named System Default.
To define the access group:
1. Login to Oracle Revenue Management and Billing using the SYSUSER credentials.
2. Click the Menu link in the Actions/Navigation area. A list appears.
3. Select the Admin Menu option from the list.
4. From the Admin Menu, select A and then click Access Group. The Access Group screen appears.
5. Enter values in the following fields:
Field Name Description Value
Access Group Used to specify the access group. ***
Description Used to specify description for the access group. System Default
6. Enter *** in the Data Access Role field to assign the data access role named System Default to the access group.
7. Press Enter. The data access role description appears corresponding to the Data Access Role field.
1.7.5 Assigning the System Default Access Group to a User
A user can generate reports from ORMB only when the user is assigned to the System Default access group. To assign the System Default access group to a user:
1. Login to Oracle Revenue Management and Billing using the SYSUSER credentials.
2. Click the Menu link in the Actions/Navigation area. A list appears.
3. Select the Admin Menu option from the list.
4. From the Admin Menu, select U and then click User. The User Search window appears.
5. Enter the name of the user who must be able to generate reports from ORMB. For example, enter SYSUSER in the User ID field and press Enter. The User screen appears.
6. Click the Access Security tab.
7. Enter *** in the Default Access Group field.

Oracle Revenue Management and Billing Reports Installation Guide
8 Copyright © 2019, Oracle and/or its affiliates. All rights reserved.
8. Click Save.
1.7.6 Granting Access to the CILZRPTP Application Service
A user can access the Report Submission screen only when the user group to which the user belongs has access to the CILZRPTP application service. To grant access to the CILZRPTP application service:
1. Login to Oracle Revenue Management and Billing using the SYSUSER credentials.
2. Click the Menu link in the Actions/Navigation area. A list appears.
3. Select the Admin Menu option from the list.
4. From the Admin Menu, select A and then click Application Service. The Application Service Search window appears.
5. Enter CILZRPTP in the Application Service field and press Enter. The Application Service screen appears.
6. Click the Application Security tab.
7. In the User Groups without Access zone, click the Grant Access button corresponding to the user group to whom you want to grant access to the CILZRPTP application service. The User Group screen appears.
8. Ensure that the Application Services tab is selected.
9. Enter the date till when you want to grant access to the application service in the Expiration Date field.
10. Enter C in the Access Mode field and press Enter. The access mode description appears corresponding to the Access Mode field.
11. Click the Plus ( ) icon to add another access mode.
12. Enter R in the Access Mode field and press Enter. The access mode description appears corresponding to the Access Mode field.
13. Click Save.
14. Go back to the Application Service screen.
15. In the Application Security tab, note that the user group is added in the User Groups with Access zone. This indicates that the user group now has access to the CILZRPTP application service.
1.7.7 Granting Access to Sample Report’s Application Service
Each sample report has a corresponding application service. A user can generate a sample report only when the user group to which the user belongs has access to the respective application service.
To grant access to the application service of report CI_CSEOPN:
1. Login to Oracle Revenue Management and Billing using the SYSUSER credentials.
2. Click the Menu link in the Actions/Navigation area. A list appears.
3. Select the Admin Menu option from the list.
4. From the Admin Menu, select R and then click Report Definition. The Report Definition Search window appears.
5. Enter CI_CSEOPN in the Report Code field and press Enter. The details of CI_CSEOPN report appear.

Oracle Revenue Management and Billing Reports Installation Guide
Copyright © 2019, Oracle and/or its affiliates. All rights reserved. 9
6. Go to Application Service field and click on the Application Service link next to the field. The Application Service screen of CI_CSEOPN report appears.
7. Click the Application Security tab.
8. In the User Groups without Access zone, click the Grant Access button corresponding to the user group to whom you want to grant access to the CI_CSEOPN application service. The User Group screen appears.
9. Ensure that the Application Services tab is selected.
10. Enter the date till when you want to grant access to the application service in the Expiration Date field.
11. Enter A in the Access Mode field and press Enter. The access mode description appears corresponding to the Access Mode field.
12. Click the Plus ( ) icon to add change access mode.
13. Enter C in the Access Mode field and press Enter. The access mode description appears corresponding to the Access Mode field.
14. Click the Plus ( ) icon to add delete access mode.
15. Enter D in the Access Mode field and press Enter. The access mode description appears corresponding to the Access Mode field.
16. Click the Plus ( ) icon to add inquiry access mode.
17. Enter R in the Access Mode field and press Enter. The access mode description appears corresponding to the Access Mode field.
18. Click Save.
19. Go back to the Application Service screen.
20. In the Application Security tab, note that the user group is added in the User Groups with Access zone. This indicates that the user group now has access to the CI_CSEOPN application service.
Similarly, you need to grant access to the application services of following reports so that the user can generate the respective sample report:
CI_CSESGS
CI_CSESTS
CI_CUSTCN
CI_GLACSM
CI_LTRGN_ENG
CI_PMTBAL
CI_RCVAGA
CI_TDENTR
CI_TXPYBL
1.8 Configuring the Oracle BI Publisher Server While configuring the Oracle BI Publisher Server, you need to:
1. Set the Security Model for BI Publisher

Oracle Revenue Management and Billing Reports Installation Guide
10 Copyright © 2019, Oracle and/or its affiliates. All rights reserved.
2. Create a Data Source
3. Create an Application Role
4. Grant the Application Role access to the Data Source
5. Create a User
6. Assign the Application Role to user
1.8.1 Setting the Security Model for BI Publisher
The default security model for BI Publisher is Oracle Fusion Middleware. Verify this setting:
1. Log in to the Oracle BI Publisher Server using the administrator credentials.
2. Click the Administration link in the upper right corner of the screen. The Administration page appears.
3. Under the Security Center section, click the Security Configuration link. The Security Configuration tab appears.
4. Scroll down to Authorization section and set Security Model to Oracle Fusion Middleware.
Figure 1: Security Configuration Tab
For more information on BI Publisher security models and related configuration, refer to sections ‘Configuring Oracle Fusion Middleware Security Model’ and ‘Alternative Security Options’ respectively of Administrator's Guide for Oracle Business Intelligence Publisher.
1.8.2 Creating a Data Source
For detailed steps on creating data source, please refer to section Setting Up a JDBC Connection to the Data Source of Administrator's Guide for Oracle Business Intelligence Publisher.

Oracle Revenue Management and Billing Reports Installation Guide
Copyright © 2019, Oracle and/or its affiliates. All rights reserved. 11
To create a data source:
1. Log in to the Oracle BI Publisher Server using the administrator’s credentials.
2. Click the Administration link in the upper right corner of this screen. The Administration page appears.
Figure 2: Administration Page
3. Under the Data Sources section, click the JDBC Connection link. The JDBC tab appears with a list of existing JDBC connections.
Figure 3: JDBC Tab
4. Click Add Data Source to add a new data source. The Add Data Source page appears.

Oracle Revenue Management and Billing Reports Installation Guide
12 Copyright © 2019, Oracle and/or its affiliates. All rights reserved.
Figure 4: Add Data Source Page
The Add Data Source page contains the following sections:
General – Allows you to specify details of a new JDBC connection. It contains the following fields:
Field Description
Data Source Name Used to specify the name of the data source.
Driver Type Used to select the database type from the drop-down list.
Database Driver Class Used to identify the driver type.
Connection String Used to specify the database connection string.
Use System User Used to indicate that you want to use the BI system user to establish connection to the BI Server database.
Note: This is reserved for connections to the Oracle BI Server.
Username Used to specify the user name to access the database.
Oracle Revenue Management and Billing Reports Installation Guide
Copyright © 2019, Oracle and/or its affiliates. All rights reserved. 13
Field Description
Password Used to specify the password to access the database.
Pre Process Function Used to specify the PL/SQL function that you want to execute when a connection to a JDBC data source is established.
Post Process Function Used to specify the PL/SQL function that you want to execute when a connection to a JDBC data source is closed.
Use Proxy Authentication When you select the Use Proxy Authentication check box, Oracle BI Publisher passes the user name and password of the individual user (as logged into Oracle BI Publisher) to the data source and thus preserves the client identity and privileges when the Oracle BI Publisher server connects to the data source.
Note: While creating the data source, ensure that the Use Proxy Authentication check box is not selected. Otherwise, you will not be able to view the reports in Oracle BI Publisher.
Backup Data Source – Allows you to establish connection to a backup database.
Security – Allows you to select the user-defined roles to which you want to grant access to the data source.
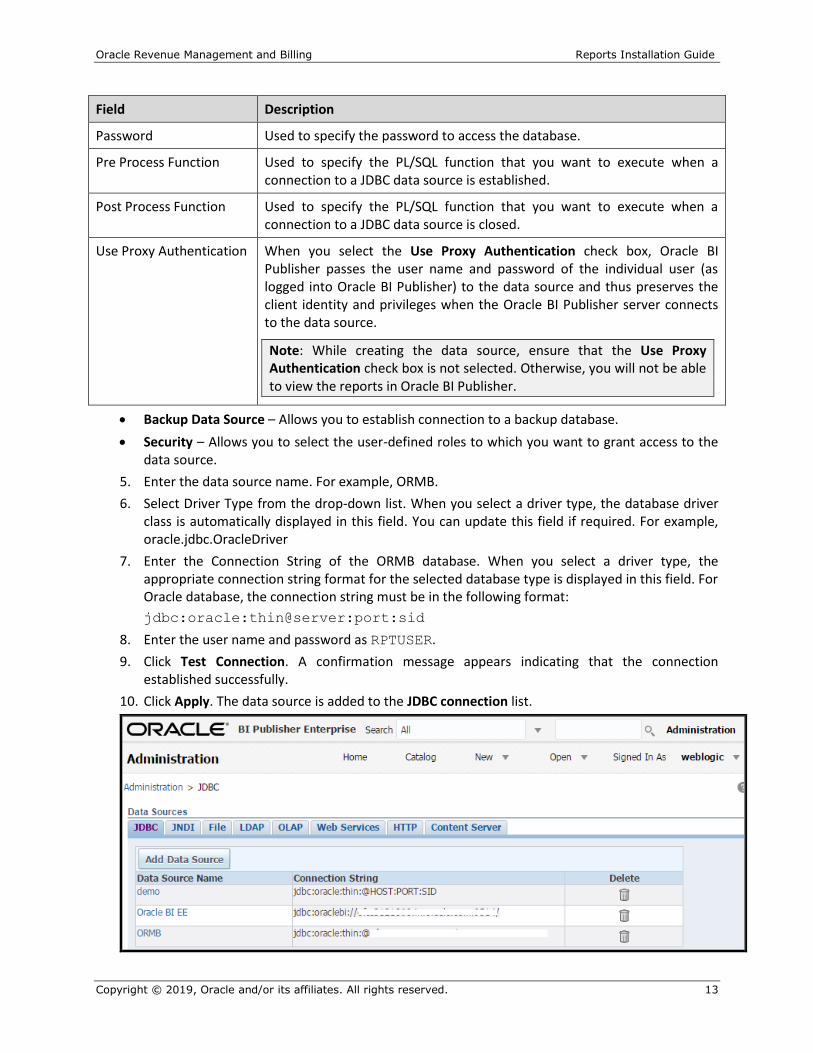
5. Enter the data source name. For example, ORMB.
6. Select Driver Type from the drop-down list. When you select a driver type, the database driver class is automatically displayed in this field. You can update this field if required. For example, oracle.jdbc.OracleDriver
7. Enter the Connection String of the ORMB database. When you select a driver type, the appropriate connection string format for the selected database type is displayed in this field. For Oracle database, the connection string must be in the following format:
jdbc:oracle:thin@server:port:sid
8. Enter the user name and password as RPTUSER.
9. Click Test Connection. A confirmation message appears indicating that the connection established successfully.
10. Click Apply. The data source is added to the JDBC connection list.
Oracle Revenue Management and Billing Reports Installation Guide
14 Copyright © 2019, Oracle and/or its affiliates. All rights reserved.
Figure 5: JDBC Tab with Newly Added Data Source
1.8.3 Application Roles in BI Publisher
The BI Publisher Sample Application comes with three predefined application roles which have certain privileges associated with them:
BIServiceAdministrator
BIContentAuthor
BIConsumer
To view the Application Roles:
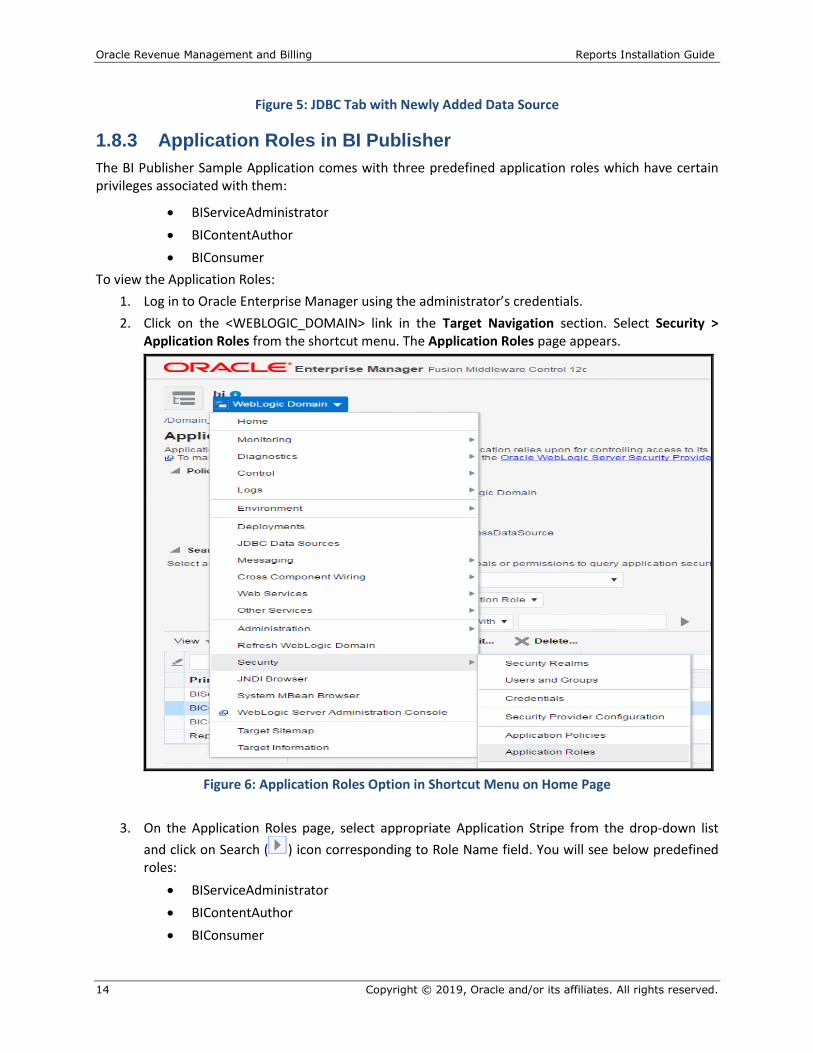
1. Log in to Oracle Enterprise Manager using the administrator’s credentials.
2. Click on the <WEBLOGIC_DOMAIN> link in the Target Navigation section. Select Security > Application Roles from the shortcut menu. The Application Roles page appears.
Figure 6: Application Roles Option in Shortcut Menu on Home Page
3. On the Application Roles page, select appropriate Application Stripe from the drop-down list
and click on Search ( ) icon corresponding to Role Name field. You will see below predefined roles:
BIServiceAdministrator
BIContentAuthor
BIConsumer

Oracle Revenue Management and Billing Reports Installation Guide
Copyright © 2019, Oracle and/or its affiliates. All rights reserved. 15
Figure 7: Application Roles Page
The privileges provided by each of the application roles are as follows:
1. BIServiceAdministrator - This role confers privileges required to administer the sample application. With this role, the user automatically gets all the privileges of the other two roles - BIContentAuthor and BIConsumer.
2. BIContentAuthor - Users with this role can create most types of content like reports, data model, etc.
With this role, the user automatically gets all the privileges of BIConsumer role.
3. BIConsumer - Users granted this role can consume content but are restricted in what they can create.
The authenticated role is a special application role provided by the Oracle Fusion Middleware security model though not listed under application stripe above. BI Publisher uses the authenticated application role to grant permissions implicitly derived by the role.
The authenticated role is a member of the BIConsumer role by default. Because of this, all authenticated role members are granted the permissions of the BIConsumer role implicitly. In other words, every user is by default assigned the BIConsumer role.
For more information on these predefined roles, refer to Default Application Roles and Permissions section of Administrator's Guide for Oracle Business Intelligence Publisher.
1.8.4 Application Roles Required for Executing ORMB Reports
The roles required for ORMB reporting are as below:
1. ORMB Administrator:
Can perform administrative tasks like creating data sources, granting data source access to roles, configuring BI Publisher security model, uploading ORMB reports in BI Catalog, etc.
Can also edit reports and data models as well as execute reports.

Oracle Revenue Management and Billing Reports Installation Guide
16 Copyright © 2019, Oracle and/or its affiliates. All rights reserved.
Mapping required to BIServiceAdministrator role. To map a role to user, refer to the Assigning a Role to a User section.
2. ORMB Reporting Analyst:
Can create and edit reports and data models as well as execute reports.
Mapping required to BIContentAuthor role. To assign a role to user, refer to Assigning a Role to a User section.
For executing reports, user should have same privileges as required by ORMB Consumer below.
3. ORMB Consumer:
Can only run reports, cannot edit them or create new reports and data models.
User should also have access to ORMB data source referenced by the reports. For this, user should be mapped to an application role which in turn has access to the report data source. For creating custom role, refer to Creating an Application Role using Oracle Enterprise Manager section and for more information on how to grant data source access to the role, refer to Granting Access to the Data Source section. This role should then be assigned to the ORMB Consumer to run reports. To assign this custom role, refer to Assigning a Role to a User section.
If a single user has to be given all the privileges of admin, author and consumer of reports, map the user to BIServiceAdministrator role.
If a single user has to be made the author as well as consumer of reports, follow the steps below:
Create an application role - For more information, refer to Creating an Application Role using Oracle Enterprise Manager section.
Grant the role access to the data source - For more information, refer to Granting Access to the Data Source section.
Map this custom role to the predefined BIContentAuthor role required for creation and modification of content - For more information, refer to Assigning a Role to a User section. Note that mapping a role to another role is similar to mapping a user to a role.
Assign the custom role to the user - For more information, refer to Assigning a Role to a User section.
For more information on permission grants to user, refer to Permission Grants and Inheritance section of Administrator's Guide for Oracle Business Intelligence Publisher.
1.8.5 Creating an Application Role using Oracle Enterprise Manager
Create an application role which will have access to the ORMB data source referenced by the sample reports.
For detailed steps on creating a new role, please refer to Creating Application Roles Using Fusion Middleware Control section of Administrator's Guide for Oracle Business Intelligence Publisher.
To create a role using Oracle Enterprise Manager:
1. Log in to Oracle Enterprise Manager using the administrator’s credentials.
2. Right-click on the <WEBLOGIC_DOMAIN> link in the Target Navigation section.
Oracle Revenue Management and Billing Reports Installation Guide
Copyright © 2019, Oracle and/or its affiliates. All rights reserved. 17
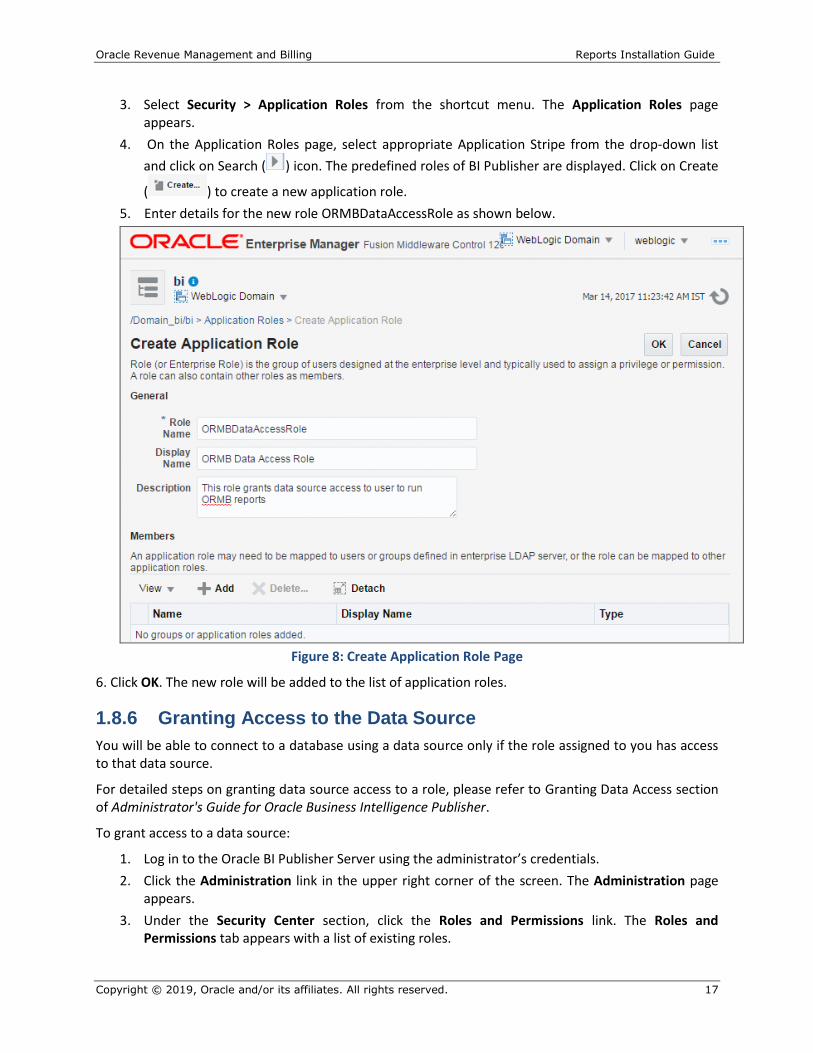
3. Select Security > Application Roles from the shortcut menu. The Application Roles page appears.
4. On the Application Roles page, select appropriate Application Stripe from the drop-down list
and click on Search ( ) icon. The predefined roles of BI Publisher are displayed. Click on Create
( ) to create a new application role.
5. Enter details for the new role ORMBDataAccessRole as shown below.
Figure 8: Create Application Role Page
6. Click OK. The new role will be added to the list of application roles.
1.8.6 Granting Access to the Data Source
You will be able to connect to a database using a data source only if the role assigned to you has access to that data source.
For detailed steps on granting data source access to a role, please refer to Granting Data Access section of Administrator's Guide for Oracle Business Intelligence Publisher.
To grant access to a data source:
1. Log in to the Oracle BI Publisher Server using the administrator’s credentials.
2. Click the Administration link in the upper right corner of the screen. The Administration page appears.
3. Under the Security Center section, click the Roles and Permissions link. The Roles and Permissions tab appears with a list of existing roles.

Oracle Revenue Management and Billing Reports Installation Guide
18 Copyright © 2019, Oracle and/or its affiliates. All rights reserved.
Figure 9: Roles and Permissions Tab
4. Click the Add Data Sources ( ) icon corresponding to the role to which you want to grant access to the data source. The Add Data Sources page appears.
5. Select the ORMB data source (to which you want to grant access) in the Available Data Sources
list and click the Move ( ) button. The selected data source is moved to the Allowed Data Sources list.
Figure 10: Add Data Sources to Role Page
6. Click Apply. The Roles and Permissions tab appears.
Oracle Revenue Management and Billing Reports Installation Guide
Copyright © 2019, Oracle and/or its affiliates. All rights reserved. 19
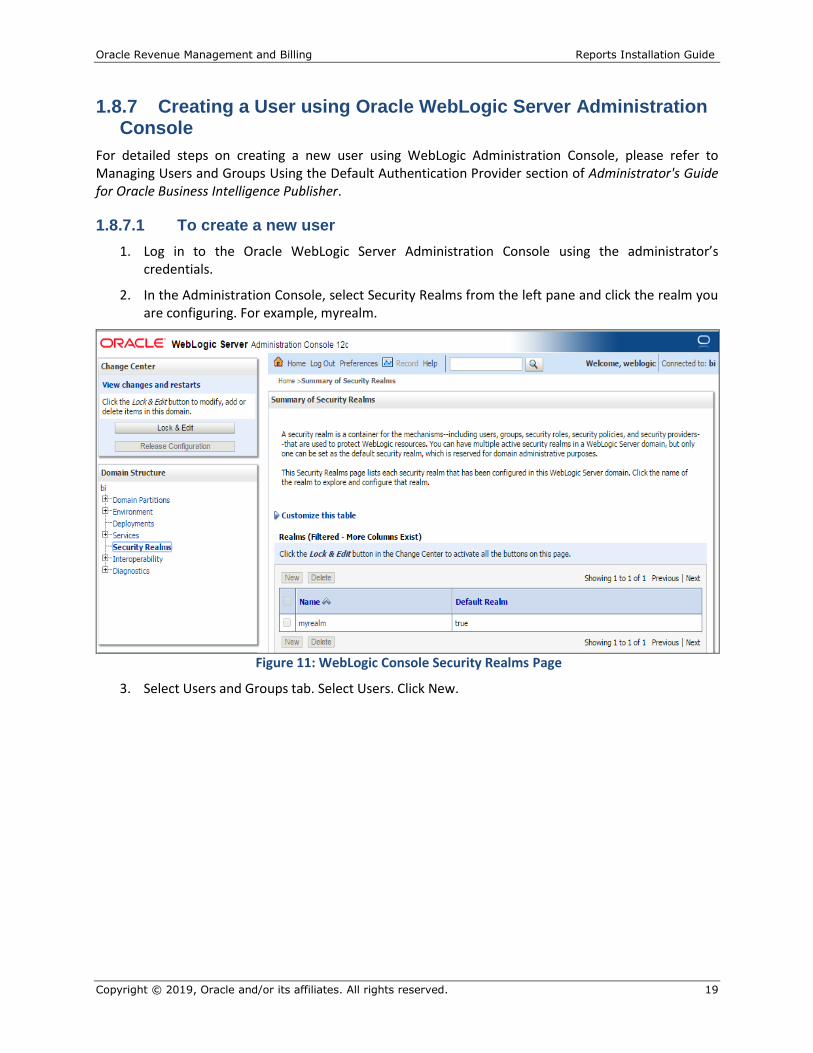
1.8.7 Creating a User using Oracle WebLogic Server Administration Console
For detailed steps on creating a new user using WebLogic Administration Console, please refer to Managing Users and Groups Using the Default Authentication Provider section of Administrator's Guide for Oracle Business Intelligence Publisher.
1.8.7.1 To create a new user
1. Log in to the Oracle WebLogic Server Administration Console using the administrator’s credentials.
2. In the Administration Console, select Security Realms from the left pane and click the realm you are configuring. For example, myrealm.
Figure 11: WebLogic Console Security Realms Page
3. Select Users and Groups tab. Select Users. Click New.

Oracle Revenue Management and Billing Reports Installation Guide
20 Copyright © 2019, Oracle and/or its affiliates. All rights reserved.
Figure 12: Users tab under Users and Groups
4. Enter details of the new user.
Figure 13: Create User Page

Oracle Revenue Management and Billing Reports Installation Guide
Copyright © 2019, Oracle and/or its affiliates. All rights reserved. 21
5. Click OK. The user name is added to the User table.
1.8.8 Assigning a Role to a User
For detailed steps on assigning an application role to a user using Oracle Enterprise Manager, refer to Modifying Membership in an Application Role section of Administrator's Guide for Oracle Business Intelligence Publisher.
The new user should be assigned appropriate role in order to run ORMB reports. For more information, refer to Application Roles Required for Executing ORMB Reports section.
1.8.8.1 To Assign a Role to a User
1. Log in to Oracle Enterprise Manager using the administrator’s credentials.
2. Right-click on the <WEBLOGIC_DOMAIN> link in the Target Navigation section. Select Security > Application Roles from the shortcut menu. The Application Roles page appears.
3. On the Application Roles page, select appropriate Application Stripe from the drop-down list
and click on Search ( ) icon corresponding to Role Name field. Select ORMBDataAccessRole as Role Name. Click Edit.
Figure 14: Application Roles Page with Custom Role Selected
4. On the Edit Application Role page, click on Add option in Members section and add rptuser. rptuser will be listed under members of ORMB Data Access Role. Click OK to apply the changes.

Oracle Revenue Management and Billing Reports Installation Guide
22 Copyright © 2019, Oracle and/or its affiliates. All rights reserved.
5. rptuser will be assigned to custom ORMBDataAccessRole which is required to run sample reports.
Figure 15: Edit Application Role Page
1.9 Publishing Sample Reports in Oracle BI Publisher
ORMB provides you with 10 sample reports that you can use for reporting or as a starting point for creating a new report. You can use these reports only when you publish them in Oracle BI Publisher.
To publish sample reports in Oracle BI Publisher:
1. Login to the Oracle BI Publisher Server with any user mapped to BIServiceAdministrator role. For more information, refer to Application Roles Required for Executing ORMB Reports section.
In this case, installation was done using WebLogic user, so it was by default mapped to BIServiceAdministrator role. The Home page appears.

Oracle Revenue Management and Billing Reports Installation Guide
Copyright © 2019, Oracle and/or its affiliates. All rights reserved. 23
Figure 16: BI Publisher Home Page
2. Click the Catalog link. The Catalog page appears. Click on Shared Folders.
Figure 17: Catalog Page
Tip: Alternatively, you can access the Catalog page by clicking the Catalog Folders link in the left pane of the Home page.

Oracle Revenue Management and Billing Reports Installation Guide
24 Copyright © 2019, Oracle and/or its affiliates. All rights reserved.
3. Click the Upload ( ) icon in the toolbar. The Upload dialog box appears.
Figure 18: Upload Window
4. Click Choose File to browse and select the file.
5. Browse to the ../TEMPDIR/ORMB_Reports/BI-Publisher/reportFiles location where the ORMB.xdrz file is present.
6. Select the ORMB.xdrz file and click Open. The file name and path appears in the Upload field.
7. Click Upload. The sample reports are uploaded in the Shared Folders/ORMB folder.
Figure 19: Catalog Page
8. For each report, click the Edit link corresponding to the report. The sample report page appears.

Oracle Revenue Management and Billing Reports Installation Guide
Copyright © 2019, Oracle and/or its affiliates. All rights reserved. 25
Figure 20: Sample Report Page
9. Click the Properties ( ) button in the toolbar. The Report Properties dialog box appears.
Figure 21: Report Properties Dialog Box

Oracle Revenue Management and Billing Reports Installation Guide
26 Copyright © 2019, Oracle and/or its affiliates. All rights reserved.
Ensure that the Run Report Online check box is selected in the General tab. Otherwise, you will not be able to view the reports from ORMB.
1.10 Defining a Company Title When you generate a report, the company title appears at the top of the report. To define a company title:
1. Login to Oracle Revenue Management and Billing using the SYSUSER credentials.
2. Click the Menu link in the Actions/Navigation area. A list appears.
3. Select the Admin Menu option from the list.
4. From the Admin Menu, select I and then click Installation Options – Framework. The Installation Options – Framework screen appears.
5. Click the Messages tab. The Messages tab appears.
6. Click the Add ( ) icon to add a new message.
7. Select Company Title for Reports from the Installation Message Type list.
8. Enter your company name in the Installation Message Text field.
Figure 22: Installation Options – Framework Screen
9. Click Save. Now, when you generate a report, this company title will appear at the top of the report.
Note: There is a function called CIZCOMPFN in the reports which receives the user ID as a parameter. The purpose of this function is to retrieve the company’s title in the user’s language from the appropriate installation message record.
1.11 Defining a Company Address To define a company address for letters:

Oracle Revenue Management and Billing Reports Installation Guide
Copyright © 2019, Oracle and/or its affiliates. All rights reserved. 27
1. Login to Oracle Revenue Management and Billing using the SYSUSER credentials.
2. Click the Menu link in the Actions/Navigation area. A list appears.
3. Select the Admin Menu option from the list.
4. From the Admin Menu, select I and then click Installation Options – Framework. The Installation Options – Framework screen appears.
5. Click the Messages tab. The Messages tab appears.
6. Click the Add ( ) icon to add a new message.
7. Select Company Address for letters from the Installation Message Type list.
8. Enter your company address in the Installation Message Text field.
Figure 23: Installation Options – Framework Screen
9. Click Save.
1.12 Defining a Company Logo When you generate a report, company’s logo appears in the upper-left corner of the report. For more information on different ways to change an image on report template, refer to Inserting Images and Charts section of Report Designer's Guide for Oracle Business Intelligence Publisher.
Follow the steps below to change the company logo by directly inserting the image in template:
1. Log in to the Oracle BI Publisher Server with any user having BIContentAuthor role. This role is required to edit the report. For more information, refer to Application Roles Required for Executing ORMB Reports section.
2. Go to Catalog and navigate to the uploaded ORMB reports within the Folders section. Click the Edit link option next to report name.

Oracle Revenue Management and Billing Reports Installation Guide
28 Copyright © 2019, Oracle and/or its affiliates. All rights reserved.
Figure 24: Catalog - ORMB
3. The Report Edit page opens displaying the .rtf template used:
Figure 25: Report – Edit Page
4. Click on Edit link below the template, in this case CI_CSEOPN_BASE. The template file gets downloaded.
5. Edit the template file and replace the company logo as desired.
6. Click the Delete link below the template to replace the existing template with the modified template. Click on Add New Layout button at the top right corner.
7. Click on Upload icon ( ) at the bottom left corner to upload the new template.

Oracle Revenue Management and Billing Reports Installation Guide
Copyright © 2019, Oracle and/or its affiliates. All rights reserved. 29
Figure 26: Report – Layout Page
8. Enter the details for the modified template and click Upload.
Figure 27: Report – Upload Template Page
9. The new template gets uploaded.

Oracle Revenue Management and Billing Reports Installation Guide
30 Copyright © 2019, Oracle and/or its affiliates. All rights reserved.
Figure 28: Report – New Template Uploaded
10. Repeat the above steps for all the reports requiring logo change.
For detailed information on editing templates in BI Publisher, please refer to document Report Designer's Guide for Oracle Business Intelligence Publisher.
1.13 Copying Sample Reports Definition in ORMB If you are using a blank database, you need to copy the sample reports’ definition in ORMB so that you can generate reports from ORMB. To copy the sample reports’ definition in ORMB:
1. Connect to the ORMB database using any SQL client (such as Oracle SQL Developer or PL/SQL Developer) and the cisadm credentials.
2. Execute the report-definition.sql query from the ../TEMPDIR/ORMB_Reports/BI-Publisher/reportDefinitions folder.
Note: You do not have to copy the sample reports’ definition in the demo database. This is because the sample reports’ definition is already available in the demo database.
1.14 Generating Sample Reports For more information on privileges required to run sample reports, refer to Application Roles Required for Executing ORMB Reports section. With reference to the example in this document, rptuser which is mapped to ORMBDataAccessRole can be used to run reports.
Oracle Revenue Management and Billing provides you with the following reports that you can use for reporting or as a starting point for creating a new report:
Open Cases by Type (CI_CSEOPN)
Case Statistics for a Given Status (CI_CSESGS)
Case Statistics by Case Type (CI_CSESTS)
Customer Contact by Type (CI_CUSTCN)
GL Accounting Summary (CI_GLACSM)
Letter Print - Sample Welcome Letter (CI_LTRGN_ENG)
Payments Balance (CI_PMTBAL)
Receivables Aging (CI_RCVAGA)

Oracle Revenue Management and Billing Reports Installation Guide
Copyright © 2019, Oracle and/or its affiliates. All rights reserved. 31
To Do Entries (CI_TDENTR)
Tax Payables Analysis (CI_TXPYBL)
The Report Submission screen allows you to generate these reports. For more information on how to generate these reports, refer to Reporting chapter in Oracle Revenue Management and Billing Banking User Guide.

Oracle Revenue Management and Billing Reports Installation Guide
32 Copyright © 2019, Oracle and/or its affiliates. All rights reserved.
2. Defining a New Report You can change the attributes of these sample reports or can define new reports from scratch in ORMB based on the business requirements. To define a new report in ORMB:
1. Login to ORMB.
2. From the Admin Menu, select R and then click the Add ( ) icon corresponding to the Report Definition menu option. The Report Definition screen appears.
The Report Definition screen contains the following tabs:
Main – Allows you to specify the basic details of the report.
Labels – Allows you to specify the labels that you want to use in the report.
Note: The report definition and the report layout must contain the same labels that you want to use in the report.
Parameters – Allows you to define parameters for the report.
The Main tab contains the following fields:
Field Description
Report Code Used to specify the code that uniquely identifies the report.
Note: It is recommended to prefix the report code with CM. If you do not do this, there is a slight possibility that a future release of the application could introduce a new report with the same name.
Description Used to specify the description for the report.
External Reference ID Used to specify the identifier for this report in the external reporting tool.
Application Service Used to specify the application service for the report.
Note: The application service enables users to generate the report from within ORMB. Once you define an application service for each report, you can use application security to define which users may access this report.
Validation Algorithm Used to specify the validation algorithm for the report.
Note: If you want some field level validations to be defined for the report, create a validation algorithm and attach it in this field.
Long Description Used to describe the functionality of the report. This description is displayed in the Report Submission screen.
Report Font Used to specify the font face that you want to use for the report.
Note: This field is not effective. Currently, the details are specified in the .rtf file of each report.

Oracle Revenue Management and Billing Reports Installation Guide
Copyright © 2019, Oracle and/or its affiliates. All rights reserved. 33
Field Description
Report Font Size Used to specify the font size that you want to use for the report.
Note: This field is not effective. Currently, the details are specified in the .rtf file of each report.
Customer Specific Font/Layout Used to specify the font face that you want to use as per the business requirements.
Note: This field is not effective.
Customer Specific Font Size Used to specify the font size that you want to use as per the business requirements.
Note: This field is not effective.
Note: There is a function called CIZINSTFN in the reports which receives the user ID and report code as parameters. The purpose of this function is to retrieve the following: Font and font size from the report definition; Date, time and number format from the user’s display profile; Currency from the installation record; Currency symbol and position from the currency record.
Figure 29: Report Definition – Main Tab
3. Enter the details of the report in the Main tab.
4. Click the Labels tab. The Labels tab appears.

Oracle Revenue Management and Billing Reports Installation Guide
34 Copyright © 2019, Oracle and/or its affiliates. All rights reserved.
Figure 30: Report Definition – Labels Tab
The Labels tab contains the following fields:
Field Description
Sequence Used to specify the sequence in which the labels will be displayed in the report.
Label Used to specify the name of the field.
Note: There is a function called CIZLBALLFN in the reports which receives the user ID and report code as parameters. The purpose of this function is to retrieve all the labels defined in the report definition.
5. Enter the sequence number and select the field using the Search for Field ( ) icon in the Label field.
Note: You can add or delete labels from the report by clicking the Add ( ) icon or the Delete ( ) icon, respectively.
6. Click the Parameters tab. The Parameters tab appears.
Figure 31: Report Definition – Parameters Tab
The Parameters tab contains the following fields:
Field Description

Oracle Revenue Management and Billing Reports Installation Guide
Copyright © 2019, Oracle and/or its affiliates. All rights reserved. 35
Field Description
Parameter Code Used to specify the code that uniquely identifies the parameter.
Required Used to indicate whether the parameter is mandatory or not.
Sequence Used to indicate the order in which the parameter should appear in the Report Submission screen. It must be the same as the sequence defined in the reporting tool.
Characteristic Type Used to specify the characteristic type of the parameter.
Default Value Used to specify the default value for this parameter.
Description Used to specify the description of the parameter.
Long Description Used to describe the functionality of the parameter. You can view this
description by clicking the View Long Description ( ) icon corresponding to the parameter in the Report Submission screen.
7. Enter the details of the parameter.
Note: You can add or delete parameters from the report by clicking the Add ( ) icon or the Delete ( ) icon, respectively.
8. Click Save on the toolbar.

Oracle Revenue Management and Billing Reports Installation Guide
36 Copyright © 2019, Oracle and/or its affiliates. All rights reserved.
3. Using Sample Report as a Starting Point To use sample report as a starting point for creating a new report in Oracle BI Publisher, you need to do the following:
Create a copy of the report and save it in the appropriate directory. Prefix the new report name with CM.
Review the stored procedures used for this report. If you want to change the data that is being accessed, copy the stored procedure and prefix it with CM. Make the appropriate changes in the new stored procedure.
Note:
Performance Consideration - When designing a stored procedure, you must consider the performance of the report when executed. Contact your database administrator for any support.
Defining Messages - The stored procedures provided with the system use messages defined in the message category 30. If the new stored procedures require new messages, use message category 90000 or greater which are reserved for implementation.
Review the parameters used in the report. Make the appropriate changes to the parameters required by the report. This affects how you define your report.
Determine whether you require field level validation to be defined for the report parameters. If yes, then create an appropriate validation algorithm.
Review the labels used in the report. Make the appropriate changes to the labels required by the report. This affects how you define your report.
Review the layout of the report and make any desired changes based on the business needs.
Once you create a report in Oracle BI Publisher, you need to do the following:
1. Publish the report in Oracle BI Publisher. For more information, refer to Publishing Sample Reports in Oracle BI Publisher section.
2. Define the report in ORMB. For more information, refer to Defining a New Report section.
3. Ensure that the user’s user group has access to the report’s application service.