oracle payment interface oracle hospitality cruise ...this document is to guide users attempting to...
TRANSCRIPT

Oracle® Payment Interface
Oracle Hospitality Cruise Shipboard Property Management System Installation Guide Release 6.2.2.2 F13012-03
December 2019

2
Copyright © 2019, 2019, Oracle and/or its affiliates. All rights reserved.
This software and related documentation are provided under a license agreement containing
restrictions on use and disclosure and are protected by intellectual property laws. Except as
expressly permitted in your license agreement or allowed by law, you may not use, copy,
reproduce, translate, broadcast, modify, license, transmit, distribute, exhibit, perform, publish, or
display any part, in any form, or by any means. Reverse engineering, disassembly, or
decompilation of this software, unless required by law for interoperability, is prohibited.
The information contained herein is subject to change without notice and is not warranted to be
error-free. If you find any errors, please report them to us in writing.
If this software or related documentation is delivered to the U.S. Government or anyone licensing it
on behalf of the U.S. Government, then the following notice is applicable:
U.S. GOVERNMENT END USERS: Oracle programs, including any operating system, integrated
software, any programs installed on the hardware, and/or documentation, delivered to U.S.
Government end users are "commercial computer software" pursuant to the applicable Federal
Acquisition Regulation and agency-specific supplemental regulations. As such, use, duplication,
disclosure, modification, and adaptation of the programs, including any operating system,
integrated software, any programs installed on the hardware, and/or documentation, shall be
subject to license terms and license restrictions applicable to the programs. No other rights are
granted to the U.S. Government.
This software or hardware is developed for general use in a variety of information management
applications. It is not developed or intended for use in any inherently dangerous applications,
including applications that may create a risk of personal injury. If you use this software or
hardware in dangerous applications, then you shall be responsible to take all appropriate fail-safe,
backup, redundancy, and other measures to ensure its safe use. Oracle Corporation and its
affiliates disclaim any liability for any damages caused by use of this software or hardware in
dangerous applications.
Oracle and Java are registered trademarks of Oracle and/or its affiliates. Other names may be
trademarks of their respective owners.
Intel and Intel Xeon are trademarks or registered trademarks of Intel Corporation. All SPARC
trademarks are used under license and are trademarks or registered trademarks of SPARC
International, Inc. AMD, Opteron, the AMD logo, and the AMD Opteron logo are trademarks or
registered trademarks of Advanced Micro Devices. UNIX is a registered trademark of The Open
Group.
This software or hardware and documentation may provide access to or information about content,
products, and services from third parties. Oracle Corporation and its affiliates are not responsible
for and expressly disclaim all warranties of any kind with respect to third-party content, products,
and services unless otherwise set forth in an applicable agreement between you and Oracle. Oracle
Corporation and its affiliates will not be responsible for any loss, costs, or damages incurred due to
your access to or use of third-party content, products, or services, except as set forth in an
applicable agreement between you and Oracle.
Contents 3
Contents
Preface ....................................................................................................... 4
Audience .................................................................................................................................. 4
Customer Support ................................................................................................................... 4
Documentation ........................................................................................................................ 4
Revision History ...................................................................................................................... 4
1 Pre-Installation ..................................................................................... 5
2 Installing the OPI ................................................................................. 6
3 Installing OPI Patchset ....................................................................... 11
PatchSet 6.2.2.0 ...................................................................................................................... 11
InterimPatch 6.2.2.2.7............................................................................................................ 11
4 Configuring OPI ................................................................................. 12
Token Exchange Handling .................................................................................................. 14
PSP - Client Side Certificates ........................................................................................ 14
5 SPMS Configuration .......................................................................... 19
OHC OPI Web Service:......................................................................................................... 19
OHC OPI Daemon Service Configuration: ........................................................................ 19
OHC OPI Manager ............................................................................................................... 20
6 Integration With Simphony OPI ........................................................ 22
Prerequisites .......................................................................................................................... 22
Compatibility ......................................................................................................................... 22
Installing and Configuring OPI Native Driver ................................................................. 22
Configuring SimphonyPOS Tender Media ................................................................ 22
Function supported ....................................................................................................... 23
Configuring Operation Client ...................................................................................... 25

4 Preface
Preface
This document is to guide users attempting to configure Oracle Payment Interface (OPI)
with Shipboard Property Management System (SPMS).
Audience This document is intended to cover the steps required to setup OPI to handle the
integration with Shipboard Property Management System.
Customer Support To contact Oracle Customer Support, access My Oracle Support at the following URL:
https://support.oracle.com
When contacting Customer Support, please provide the following:
Product version and program/module name
Functional and technical description of the problem (include business impact)
Detailed step-by-step instructions to re-create
Exact error message received and any associated log files
Screen shots of each step you take
Documentation Oracle Hospitality product documentation is available on the Oracle Help Center at
https://docs.oracle.com/en/industries/hospitality/cruise.html
Revision History
Date Description of Change
January 2019
December 2019
Initial publication.
Updated additional requirements in
Pre-Installation section.
Updated acronym in Pre-Installation
section.
Updated the Automated WebServices
Installer – Installation Guide
hyperlink, in OHC OPI Web Service
section.
Added Configuration Setup to
integrate with Simphony OPI.

Pre-Installation 5
1 Pre-Installation
Consider the following guidelines before installing OPI with SPMS:
SPMS Release 8.0.8 is the minimum release you can use to integrate with OPI.
OPI 6.2 does not install a database. If doing a clean install of OPI, a database
must be installed first.
OPI requires jre1.8.0_191 to be installed before OPI installation.
OPI requires at least 6 GB of free disk space, 4GB Memory and you must install
OPI using a System Administrator account.
OPI 6.2 no longer includes MySQL within the OPI Installer as it did in previous
versions. The OPI now supports multiple database types.
A database is still required to hold the OPI configuration and audit event data,
but must be installed separately prior to installing OPI.
A Root access to the database is required during the OPI installation, only to
create a dedicated OPI database user, which can have a lower level of privilege
than the Root user, and is used for OPI tasks once installation is complete.
Supported Database Types
The Oracle Payment Interface Installer release 6.2 supports the following database
connections:
MySQL Database 5.7
Oracle Database 12c
Downloading the OPI 6.2 Installer and Patchset
The OPI 6.2 Installer is available for download from Oracle Software Delivery Cloud,
search by:
Release: Oracle Payment Interface.
Select: REL: Oracle Payment Interface 6.2
Download the OPI PatchSet 6.2.2.0 and InterimPatch 6.2.2.7 from My Oracle
Support.
During the installation of OPI, you must confirm the following:
Chain Code and Property Code.
IP address of the OPI Server.
Ensure you have the SQL root/Oracle user password for OPI database.

6 Installing the OPI
2 Installing the OPI
1. Copy OraclePaymentInterfaceInstaller-6.2.0.0.exe, double click it to
launch the install.
2. Select your language, and then click OK.
3. Click Next on the Welcome to the InstallShield Wizard for Oracle Payment Interface
window.
4. Click Next on the OPI Prerequisites window.
5. The Setup Type window, select the Complete option to install all program features,
and then click Next.
6. At the Choose Destination Location window, accept the default installation location,
and then click Next.
7. Click Install on the Ready to Install the Program window.
8. At the Setup Type window, select the database type used and click Next.
Note: OPI does not install any database, so the database must already be installed.

Installing the OPI 7
9. Accept the default Port # of 3306 (for MySQL), and then click Next.
10. At the Server Login window, enter the credentials for the DBA user of the selected
database type, and then click Next.
For MySQL the Login ID: = root
For other database types, the DBA user name/Login ID may be different.
Enter the correct password for the DBA user.

8 Installing the OPI
11. At the Database User Credentials window, input the following and click Next.
User Name: Create a new user.
Password: Create a password.
Confirm password
12. Click OK on the Database connection successful dialog.
13. Click OK on the Database Configuration operation successful dialog.
14. At the Configuration Tool Superuser Credentials window, enter the following and
click Next
User Name: To Create the super user account to access OPI configuration tools
Password: Create a password.
Confirm the password

Installing the OPI 9
15. Click OK on the ‘Create SuperUser operation successful’ dialog.
16. At the Configuration Tool Connection Settings window, enter the Host IP and click
Next.
Host: May leave this as 127.0.0.1 if the OPI configuration server is installed on
this PC. Otherwise, specify the name or IP address of the PC where the OPI
configuration server will be installed.
Leave the default Port as 8090.

10 Installing the OPI
17. At the Configuration Tool Passphrase window, enter the Passphrase and click Next.
18. At the Configuration Wizard window, select PMS, click Next then Close to complete
the OPI installation.

Installing OPI Patchset 11
3 Installing OPI Patchset
PatchSet 6.2.2.0 1. Right-click OraclePaymentInterfaceInstaller_PatchSet_6.2.2.0.exe
and Run as Administrator to begin installing OPI 6.2.2.
2. Click Next, and then click Yes to continue.
3. Click OK on the PatchUpdate operation was successful dialog box.
4. The OPI installer saves detailed upgrade logs in the
OraclePaymentInterface_TempLogs folder on the OPI drive. You can delete
this folder if it is not needed.
InterimPatch 6.2.2.2.7 1. Right-click
OraclePaymentInterfaceInstaller_InterimPatch_6.2.2.2.exe and Run
as Administrator to begin installing OPI 6.2.2.
2. Click Next, and then click Yes to continue.
3. Click OK on the PatchUpdate operation was successful dialog box.
4. The OPI installer saves detailed upgrade logs in the
OraclePaymentInterface_TempLogs folder on the OPI drive. You can delete
this folder if it is not needed.

12 Configuring OPI
4 Configuring OPI
This section describes the configuration in OPI System integrated with SPMS.
1. Double-click on C:\OraclePaymentInterface\V6.2\Config\LaunchConfiguration.bat
2. Login with the Super user account you created during OPI installation.
3. Go to Core Configuration, check option Enable Cruise PMS and then click Save.

Configuring OPI 13
4. Go to Merchant Tab to configure the PMS Merchant details.
5. Click on ‘ + ‘ and select New PMS Merchant.
6. New PMS Merchant screen appears, set below for SPMS uses :
a. OPERA chain: SPMS Chain code for the Merchant.
b. Property Code: SPMS Property code for the Merchant.
c. Name: Name of the Merchant.
d. City: City location of the Merchant.
e. State or Province: State or Province location of the Merchant.
f. Country: Country location of the Merchant, this will indicate which currency it
will operate when selected.
7. Click on Save.
8. The IFC8 Settings and Terminals tab will appear.

14 Configuring OPI
9. Set the below for the IFC8 settings:
a. IFC8 Key: This key will be inserted into OHC OPI Daemon for validation
between OPI with SPMS.
b. IFC8 Host: OHC OPI Daemon machines Host name or IP Address.
c. IFC8 Port: OHC OPI Daemon port number.
10. Click Save.
11. Go to PSP Configuration tab and set below for SPMS uses:
OPI to PSP Communication Configuration:
a. Select OPI Mode: Middleware
b. Set Primary Host: Specify the middleware server information.
c. Set Failover Host: Specify the failover middleware server information.
12. Click Save.
13. Click Sign out to logout the configuration screen.
Token Exchange Handling This section describes the settings for the token exchange handling between OPI and
SPMS.
The Payment Service provider will need to provide the certificate for the PSP root
certificate and the client certificate.
PSP - Client Side Certificates
The communication from OPI to the PSP for token exchange uses HTTPS with a client
certificate for client authentication. That is, while a server side certificate is expected to be
deployed at PSP (server side) for HTTPS communication, PSP is also expected to provide
a client side certificate to be deployed at OPI side. OPI will present this client certificate
during HTTPS communication with PSP so that PSP can authenticate OPI properly.
In order to achieve this, PSP is required to provide two files:
A client side certificate file in the name of “OPI_PSP_1.pfx”, this is a PKCS#12
Certificate file that contains a public key and a private key and will be protected
by a password. If the file provided by PSP has a different name, rename to
“OPI_PSP_1.pfx” before deploying it to OPI.
The root certificate file for the server side certificate that is deployed at PSP side.
OPI needs to load this root certificate file into the Java Key store so that OPI can
properly recognize and trust the server side certificate deployed at PSP side. We
expect the root certificate file provided by PSP to be in the format of .cer or .crt.
For the demo purpose in this document, we assume the file has the name “ca-
cert.crt”.

Configuring OPI 15
Handling the Client Side Certificate
To deploy the client certificate on the OPI side, place the file in folder \OraclePaymentInterface\v6.2\Services\OPI\key\
The passwords set by the PSP must meet the minimum complexity requirements
discussed below or it will not be possible to enter the details to the OPI configuration.
Note: The PSP Client Side Certificates expiration date will vary depending on what the
PSP set during creation of the certificate. Check the expiration date in the properties of
the certificate files. Be aware the PSP certificates must be updated prior to the expiration
date to avoid downtime to the interface.
Handling the Root Certificate File
In order to load the root certificate file for the PSP server certificate into the Java key
store, perform the following steps:
Creating a JKS From a command prompt change to the JRE bin folder, in order for the keytool command
to be recognized.
The exact path of your JRE bin folder will depend on the environment on which you are
running the commands, and the JRE version you have installed, but may be similar to the
example path shown below;
The three (3) commands below, when run in sequence;
Create a new Java keystore,
Delete the default key created inside the Java Key Store
Import the supplied root certificate in its place:
In the following example, the root .cer / .crt file is named ca-cert.crt, and is located in the
folder C:\Certificates. Adjust file names and paths to be relevant to your details.

16 Configuring OPI
OPI expects that the Java key store file that contains the root certificate for PSP server
certificate to be in the name of “OPI_PSP_1Root”.
keytool -genkey -alias tempalias -keystore C:\Certificates\OPI_PSP_1Root
You must supply some basic information during the creation of the Java keystore,
including a password when prompt
You should use the same key password as for the keystore password when prompted.
(i.e. RETURN if same as keystore password – Press Enter)
keytool -delete -alias tempalias -keystore C:\Certificates\OPI_PSP_1Root
keytool -import -alias myrootca -file C:\Certificates\ca-cert.crt -keystore
C:\Certificates\OPI_PSP_1Root –trustcacerts

Configuring OPI 17
Verify the new Java keystore’s details by running the following command if required;
keytool –list –keystore c:\Certificates\OPI_PSP_1Root

18 Configuring OPI
OPI_PSP_1.pfx & OPI_PSP_1Root must be located in the following folder: \OraclePaymentInterface\v6.2\Services\OPI\key\
Configuring Token Exchange
1. In OPI Configuration, go to Token Exchange tab and set below for SPMS uses :
Host URL: The PSP Host URL for Token Exchange
Failover URL: The PSP Failover Host URL for Token Exchange. If a failover
URL is not available, leave this blank
Keystore Password: Password of the Key Store containing the PSP Root
Certificate
Repeat Keystore Password: Password of the Key Store containing the PSP
Root Certificate
Certificate Password: Password of the Client Side Password provided by the
PSP
Repeat Certificate Password: Password of the Client Side Password
provided by the PSP
2. Click Save.
3. Click Sign out to close.
4. Restart the OPI Services.
SPMS Configuration 19
5 SPMS Configuration
In order to enable OPI handling, login to Administration module, System Setup,
Database Parameters, and set the value to “OPI” under ‘Not Specified’ group, CC
Transfer Format.
OHC OPI Web Service: Refer to Automated WebServices Installer – Installation Guide to install OHC OPI Web
Services and OHC OPI Daemon Service.
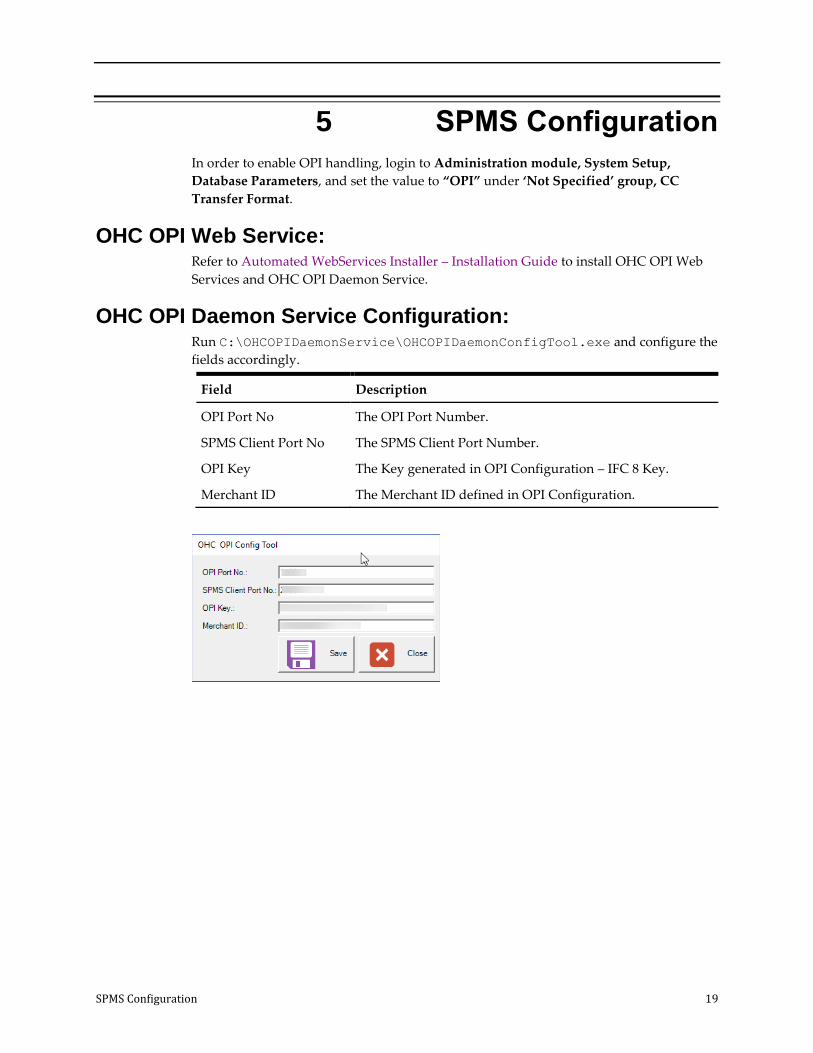
OHC OPI Daemon Service Configuration: Run C:\OHCOPIDaemonService\OHCOPIDaemonConfigTool.exe and configure the
fields accordingly.
Field Description
OPI Port No The OPI Port Number.
SPMS Client Port No The SPMS Client Port Number.
OPI Key The Key generated in OPI Configuration – IFC 8 Key.
Merchant ID The Merchant ID defined in OPI Configuration.

20 SPMS Configuration
OHC OPI Manager 1. Run OHC OPI Manager.exe in C:\Program Files (x86)\Oracle
Hospitality Cruise.
2. Navigate to the Configuration tab.
3. Click on Connection under Setup pane.
4. Enter the following options:
Description Value
OPI Interface URL This is where OHC OPI Daemon is installed (in format
ws://ip address:)
SPMS Client Port No. The same SPMS client Port Number that defined in OPI
Daemon Config Tool.
OPI Daemon Port No. The same OPI Daemon Port Number that defined in
OPI Daemon Config Tool.
Workstation No. Workstation Number of the client.
Merchant ID Combination of OPERA Chain and Property Code
values defined in OPI Configuration, for example:.
CHAIN|PROP1.
5. Click the Test Connection to confirm the connection to OHC OPI Daemon is
established.

SPMS Configuration 21
6. Click on Parameter under Setup pane, select OPI Web API Service URL and insert
the hostname or IP with port number where the OHC OPI Web Service is installed,
for example: https://localhost:1569/.

22 Integration With Simphony OPI
6 Integration With Simphony OPI
In order to integrate SPMS with OPI using Simphony OPI Native Driver for credit card
transactions, you must adhere to the settings and configurations detailed in this chapter.
Before you begin,
Understand that this chapter is only applicable if you are integrating SPMS with
Simphony OPI using OPI Native Driver
Download the latest version Oracle Hospitality Simphony Native Driver
Installation Guide from Oracle Help Centre.
Study the requirements and setup detailed in the guide.
Ensure all the Prerequisites mentioned in this chapter are met.
Prerequisites Below is the minimum requirement to integrate Cruise Simphony Interface with
Simphony Point-of-Sale (SimphonyPOS)
Administrator login on SimphonyPOS
OHCSPMSPOSInterface.DLL
Simphony 2.9 or higher
OPI 6.2 only
DevExpress.*.DLL
o DevExpress.Data.v8.2.DLL
o DevExpress.Utils.v8.2.DLL
o DevExpress.XtraEditors.v8.2.DLL
o DevExpress.XtraGrid.v8.2.DLL
o DevExpress.XtraLayout.v8.2.DLL
Compatibility SPMS version 8.0.12 or later. For customer operating on version below 8.0.12,
database upgrade to the recommended or latest version is required.
Installing and Configuring OPI Native Driver A comprehensive document on how to install and configure the OPI Native Driver is
available at Oracle Help Centre. Download the latest version Oracle Hospitality
Simphony Native Driver Installation Guide and follow the steps outlined in the
document.
Configuring SimphonyPOS Tender Media
In order for SPMS to accept the Credit Card Tender from SimphonyPOS, you must
specify the System Account value in the Tender Media, Data Extension, System
Account Value parameter.

Integration With Simphony OPI 23
At the OHC Management module, input the same account number in the System
Account to matches the above.
Function supported
Below is the function used to post the Credit Card transaction at the Simphony POS
workstation into SPMS You must configure these two functions at the Page Design for
user to perform a Sale and Settlement transaction.

24 Integration With Simphony OPI
1. CreditAuthAndPay - This function obtains an authorization and finalize the
transaction at the same time, which is also known as a Sale transaction. This function
is intended for counter service agent’s use, where the guest is present at the
workstation and completes the payment using the PIN Entry Device (PED).
2. CCard Finalize Function - This key finalizes the credit card transaction through the
SimphonyPOS. This function key posts the previously authorized credit card to the
check as a payment typically closing the check, unless an amount is less than the
check total was entered first.
You may need to set some of the options in order for the operator to have the access right
to perform void of the transaction. Refer below screen shot on the roles to enable to
perform void transaction.

Integration With Simphony OPI 25
Configuring Operation Client
In order to run the OHCPOSInterface.dll in POS Operation client, these are the
configuration steps.
1. Navigate to the following path at the WS client.
:\Micros\Simphony\WebServer\ServiceHost.exe.config
2. Open the file in notepad
3. Add the below configuration into the runtime configuration
<NetFx40_LegacySecurityPolicy enabled="true"/>
4. Uncomment the following settings in configuration file.
<runtime>
<assemblyBinding xmlns="urn:schemas-microsoft-com:asm.v1">
<probing privatePath="wwwroot\EGateway\Handlers"/>
</assemblyBinding>
<legacyCorruptedStateExceptionsPolicy enabled="true" />
<NetFx40_LegacySecurityPolicy enabled="true"/>
<AppContextSwitchOverrides
value="Switch.System.IO.UseLegacyPathHandling=true" /> <!--Added for .Net
Framework 4.6.2-->
</runtime>
<!-- 45Migration (uncomment for 4.5 runtime) -->
<startup useLegacyV2RuntimeActivationPolicy="true">
<supportedRuntime version="v4.0" sku=".NETFramework,Version=v4.6.2"/>
<supportedRuntime version="v2.0.50727"/>
</startup>