oq -analyst quick start user guide version 6.15 quick... · oq®-analyst quick start user guide...
TRANSCRIPT

OQ®-Analyst
Quick Start User Guide
Version 6.15.02
Email: [email protected] Web: www.OQMeasures.com Phone: 1.801.649.5449 © OQ Measures, LLC
Table of Contents 1. Overview………………………………………………………………………………………………. 2
2. How to Access OQ®-Analyst………………………………………………………………………… 2
3. Navigating OQ®-Analyst……………………………………………………………………………… 3
4. Management Tab……………………………………………………………………………………… 4
4.1 Management Employees Subtab…………………………………………………………. 4
4.1.1 Creating a New Employee Account………………………………………….... 6
4.1.2 Updating an Employee Account………………………………………………... 6
4.2 Management Clients Subtab………………………………………………………………. 6
4.2.1 Creating a New Client Record………………………………………………….. 8
4.2.2 Updating a Client Record……………………………………………………….. 8
5. Client Administration Methods……………………………………………………………………….. 9
5.1 OQ®-A Client Administration Entry Method………………………………………………. 9
5.2 OQ®-A Kiosk Entry Method………………………………………………………………... 11
5.3 OQ®-A Offline Application………………………………………………………………….. 12
5.4 Manual Administration……………………………………………………………………… 13
6. Administer Questionnaires Tab……………………………………………………………………… 13
6.1 Review Questionnaires Subtab……………………………………………………………. 13
6.1.1 Understanding the Questionnaire History Box………………………………... 14
6.1.2 Viewing the Clinician Report……………………………………………………. 15
6.1.3 The Initial Report…………………………………………………………………. 15
6.1.4 Interpreting the Clinician Report……………………………………………….. 16
6.1.5 Viewing the Client Report……………………………………………………….. 19
6.1.6 Interpreting the Client Report…………………………………………………… 19
6.2 New Questionnaire Subtab………………………………………………………………… 20
6.2.1 Manually Entering Questionnaire Data………………………………………… 20
7. Reporting Tab…………………………………………………………………………………………. 21
7.1 Individual Reporting Subtab……………………………………………………………….. 22
8. Preferences Tab………………………………………………………………………………………. 22
8.1 Changing your Password………………………………………………………………….. 23
9. OQ®-Analyst Security Model…………………………………………………………………………. 23
10. Additional Information……………………………………………………………………………….. 24
Page 2 of 24 OQ®-Analyst Quick Start User Guide Version 6.15.02
Email: [email protected] Web: www.OQMeasures.com Phone: 1.801.649.5449 © OQ Measures, LLC 2012
1. Overview
This quick start user guide will provide a basic overview to get you started and walk you through navigating the various screens available in the OQ®-Analyst system. If you would like more information please refer to the full OQ®-Analyst User Manual, which can be viewed by clicking on the OQ®-Analyst Documentation Site link on the home page after you login to the system.
OQ®-Analyst is a web-based software system that allows for electronic administration of outcome measures, questionnaires, and satisfaction surveys. Our instruments provide instant feedback to clinicians regarding a client’s progress across sessions and uses algorithms to predict and help prevent treatment failures. For more information and a complete list of available OQ Measures instruments, please visit our website www.oqmeasures.com.
There is nothing to install, making it convenient and easy to use from anywhere using an internet connection and a desktop computer, laptop, or tablet (including iPads and Smart Phones). OQ®-Analyst is multi-browser compatible and supports the latest versions of the following browsers: Internet Explorer, Firefox, Chrome, and Safari.
Your organization’s OQ®-Analyst software system has its own unique URL that was provided by our IT Support Team during your initial setup. We recommend you bookmark this URL for easy and secure access to your system. To obtain or verify your unique URL, please contact your IT support person or OQ Measures IT Support at:
Phone: (801) 649-5449
Toll Free: (888) 647-2673
Email: [email protected]
2. How to Access OQ®-Analyst
Note: Before you can login to the system you must obtain a user name and password from your System Administrator. If you are having trouble logging into the system, please contact your System Administrator or OQ Measures IT Support. 1. Logon to a device with an internet connection
2. Open a compatible browser window and browse to your organization’s unique URL
3. Type your user name in the User Name field
4. Type your password in the Password field
5. Click [logon].

Page 3 of 24 OQ®-Analyst Quick Start User Guide Version 6.15.02
Email: [email protected] Web: www.OQMeasures.com Phone: 1.801.649.5449 © OQ Measures, LLC 2012
3. Navigating OQ®-Analyst
After you login, OQ®-Analyst will open to your Home page. The Navigation bar is located at the top of each page and displays the different tabs available in the application. Your current page will be indicated by the blue tab.

Page 4 of 24 OQ®-Analyst Quick Start User Guide Version 6.15.02
Email: [email protected] Web: www.OQMeasures.com Phone: 1.801.649.5449 © OQ Measures, LLC 2012
Several of the tabs also contain subtabs that are listed on the blue bar directly below the Navigation bar. Your current subtab will be indicated in bold lettering.
IMPORTANT: Please remember to click [Log Off] when exiting the application. This will ensure you completely disconnect from the database and maintain HIPAA compliance. Simply closing the browser window does not log you out of the OQ®-Analyst database immediately and an active session will remain open until the system times out. [Log Off] is located in the upper right corner of your home page.
NOTE: INTERNET BROWSER SETTING It is important to disable the autofill option for user name and password in order to maintain system security and HIPAA compliance. This needs to be done with each browser. For more information, please refer to the full OQ®-Analyst user manual, which can be viewed by clicking on the OQ®-Analyst Documentation Site link on your home page.
4. Management Tab
The Management tab allows you to add, view and edit employee and client information. Only those users with an Administrative or System Administrator access level will be able to access the Management tab.
4.1 Management Employees Subtab
IMPORTANT: Before you can begin using OQ®-Analyst, your System Administrator must add you as an Employee to the system. Only users with an Access Level of System Administrator can view this subtab. In order to maintain HIPAA compliance, we recommend each employee have their own unique login name and password that is not shared with another employee. We also recommend performing a partial name search before adding an employee to the database. This will reduce the likelihood of duplicate entries.

Page 5 of 24 OQ®-Analyst Quick Start User Guide Version 6.15.02
Email: [email protected] Web: www.OQMeasures.com Phone: 1.801.649.5449 © OQ Measures, LLC 2012
The Employees subtab allows you to add, view, search and edit employee information. Employees fields include (an * indicates required field): Last Name *: The last name of the employee (20 alphanumeric characters or less) First Name *: The first name of the employee (20 alphanumeric characters or less) Custom ID: The custom ID assigned to an employee (not required) is a unique ID up to 20 alphanumeric characters. Assigned by your organization, this id number can be used to integrate with your Electronic Medical Record (EMR) system Login Name *: The user ID the employee will use when accessing OQ®-Analyst. Assigned by your organization, the Login Name can be up to 100 characters in length and must be unique Password *: The default password for the employee. For security purposes, the password must be alphanumeric, at least 6 characters in length, and is case sensitive. The default password changeme1 will require an employee to change their password after their initial login Re-enter *: Re-enter the password for confirmation Role *: Clerical, Clinician, Corporate, or Supervisor. For more information please refer to the full OQ®-Analyst Security Model document Access Level *: Standard User, Administrative, Executive User, System Admin, or Not Assigned. For more information please refer to the full OQ®-Analyst Security Model document Agency: The organization to which the employee is assigned Clinic(s) *: The clinic(s) to which the employee is assigned Supervisor: A list of employees filtered to only those assigned the role of Supervisor within OQ®-
Analyst. The Supervisor assignment is optional and is only available for those employees assigned the role of Clinician. This allows mental health professionals with a role of Supervisor to access the case loads of clinicians assigned to them.

Page 6 of 24 OQ®-Analyst Quick Start User Guide Version 6.15.02
Email: [email protected] Web: www.OQMeasures.com Phone: 1.801.649.5449 © OQ Measures, LLC 2012
In addition to the above mentioned fields, the following items are available when viewing an existing Employee account: List Active Clients: Opens a box containing a list of all active clients assigned to this employee Reassign Client: Allows you to reassign an active client to a new, available clinician Clear All Secondary Assignments: Clears all secondary assignments associated with this employee.
4.1.1 Creating a New Employee Account:
1. Access the Management tab and select the Employees subtab
2. Select [New]
3. Enter the required information in the Add Employee box and click [Add].
4.1.2 Updating an Employee Account:
1. Access the Management tab and select the Employees subtab
2. Enter full or partial last name to view all available Employees and click [Search] 3. Highlight Employee name in search results box and click [Show Info].
4.2 Management Clients Subtab
IMPORTANT: Before you can administer questionnaire(s) to a client, the client must first be added to the OQ®-Analyst database by a user with an Administrative or System Administrator Access Level. We also recommend performing a partial name search before adding a client to the database. This will reduce the likelihood of duplicate entries.
Page 7 of 24 OQ®-Analyst Quick Start User Guide Version 6.15.02
Email: [email protected] Web: www.OQMeasures.com Phone: 1.801.649.5449 © OQ Measures, LLC 2012
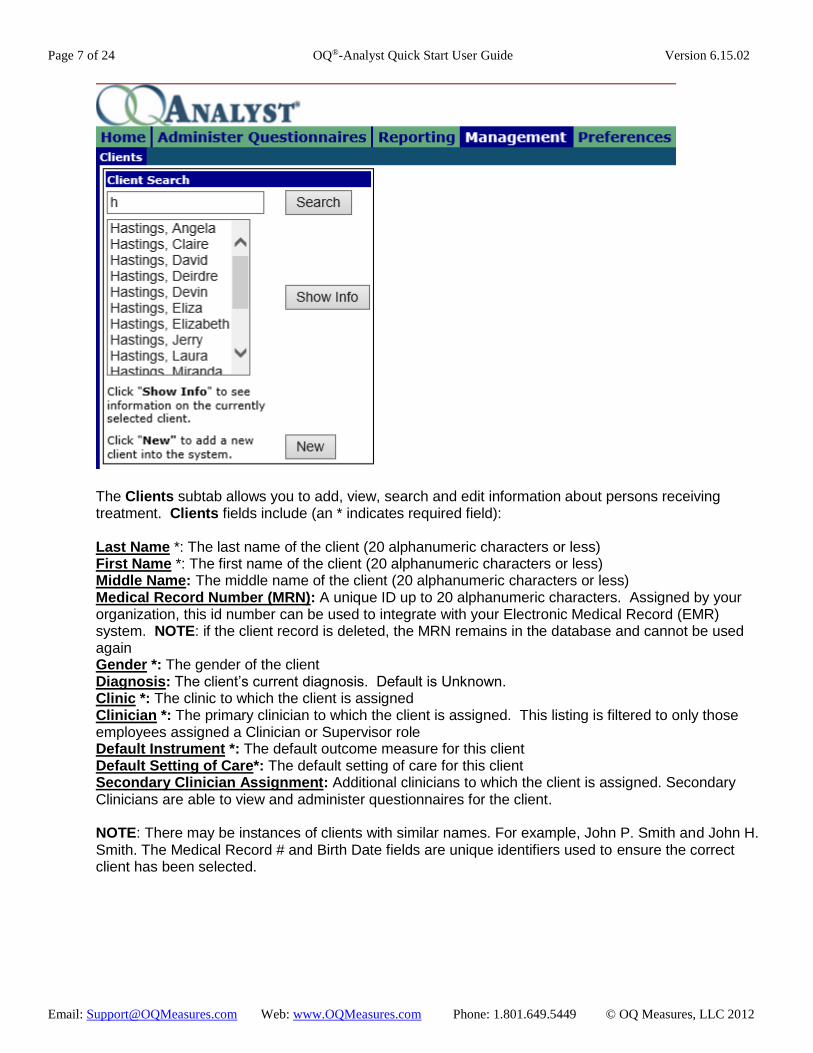
The Clients subtab allows you to add, view, search and edit information about persons receiving treatment. Clients fields include (an * indicates required field): Last Name *: The last name of the client (20 alphanumeric characters or less) First Name *: The first name of the client (20 alphanumeric characters or less) Middle Name: The middle name of the client (20 alphanumeric characters or less) Medical Record Number (MRN): A unique ID up to 20 alphanumeric characters. Assigned by your organization, this id number can be used to integrate with your Electronic Medical Record (EMR) system. NOTE: if the client record is deleted, the MRN remains in the database and cannot be used again Gender *: The gender of the client Diagnosis: The client’s current diagnosis. Default is Unknown. Clinic *: The clinic to which the client is assigned Clinician *: The primary clinician to which the client is assigned. This listing is filtered to only those employees assigned a Clinician or Supervisor role Default Instrument *: The default outcome measure for this client Default Setting of Care*: The default setting of care for this client Secondary Clinician Assignment: Additional clinicians to which the client is assigned. Secondary Clinicians are able to view and administer questionnaires for the client. NOTE: There may be instances of clients with similar names. For example, John P. Smith and John H. Smith. The Medical Record # and Birth Date fields are unique identifiers used to ensure the correct client has been selected.

Page 8 of 24 OQ®-Analyst Quick Start User Guide Version 6.15.02
Email: [email protected] Web: www.OQMeasures.com Phone: 1.801.649.5449 © OQ Measures, LLC 2012
4.2.1 Creating a New Client Record:
1. Access the Management tab and select the Clients subtab
2. Select [New]
3. Enter the required information for the client in the Add Client box and click [Add].
4.2.2 Updating a Client Record:
1. Access the Management tab and select the Clients subtab
2. Enter full or partial last name or Medical Record Number to view available Clients and click
[Search]
3. Highlight Client name in search results box and click [Show Info] 4. Edit Client information and click [Update].

Page 9 of 24 OQ®-Analyst Quick Start User Guide Version 6.15.02
Email: [email protected] Web: www.OQMeasures.com Phone: 1.801.649.5449 © OQ Measures, LLC 2012
5. Client Administration Methods
Now that your clients have been added to the system, you are ready to administer questionnaires. Our instruments can be administered in a variety of ways depending on your needs and client’s preferences. Using an internet connection (your choice of browser) and a desktop computer, laptop, or tablet (including iPads and Smart Phones), there are several easy and convenient methods for administering a questionnaire. These methods include the OQ®-A Client Administration, OQ®-A Kiosk Administration, and OQ®-A Offline Application. A basic overview of each method is provided below. For more information, please refer to the OQ®-Analyst Documentation Site link found on your OQ®-Analyst home page.
5.1 OQ®-A Client Administration Entry Method
The OQ®-A Client Administration is the primary and most preferred method for completing a questionnaire. This method allows a client to view the questionnaire as a list of questions that are easy to scroll through. This method can be completed on any device, and is ideal for smaller devices such as tablets or smart phones since it offers a larger font size. A unique URL has been setup specifically for your organization and can be found on the New Questionnaire subtab in OQ®-Analyst. We recommend you bookmark this URL on the device(s) used to administer the questionnaire(s).

Page 10 of 24 OQ®-Analyst Quick Start User Guide Version 6.15.02
Email: [email protected] Web: www.OQMeasures.com Phone: 1.801.649.5449 © OQ Measures, LLC 2012
This method requires the Medical Record Number (MRN) and Birth Date (DOB) when logging into the questionnaire. Since this combination is unique to each client, this ensures a secure login and client match. This also allows the secured URL to be emailed to clients prior to a therapy session for easy and convenient administration.
Next the administrator or client will select which questionnaire to complete (the default questionnaire will already be selected) and click [Begin]. After scrolling through the questionnaire and answering each question, your client can simply click [Finish] to submit the questionnaire. If the questionnaire contains unanswered questions, the system will ask “Do you want to go back and answer the questions you left blank?” The client can select [Go Back] or [Finish (with blank answers)]. Any blank questions will be highlighted in red and easy to identify as shown below. NOTE: If more than 10% of a questionnaire’s responses are left blank, the questionnaire is considered invalid and the data gathered will be excluded from aggregate reporting to ensure the report data is accurate.
Page 11 of 24 OQ®-Analyst Quick Start User Guide Version 6.15.02
Email: [email protected] Web: www.OQMeasures.com Phone: 1.801.649.5449 © OQ Measures, LLC 2012
Once the Client clicks [Finish], the questionnaire and Clinician Report is immediately available for review.
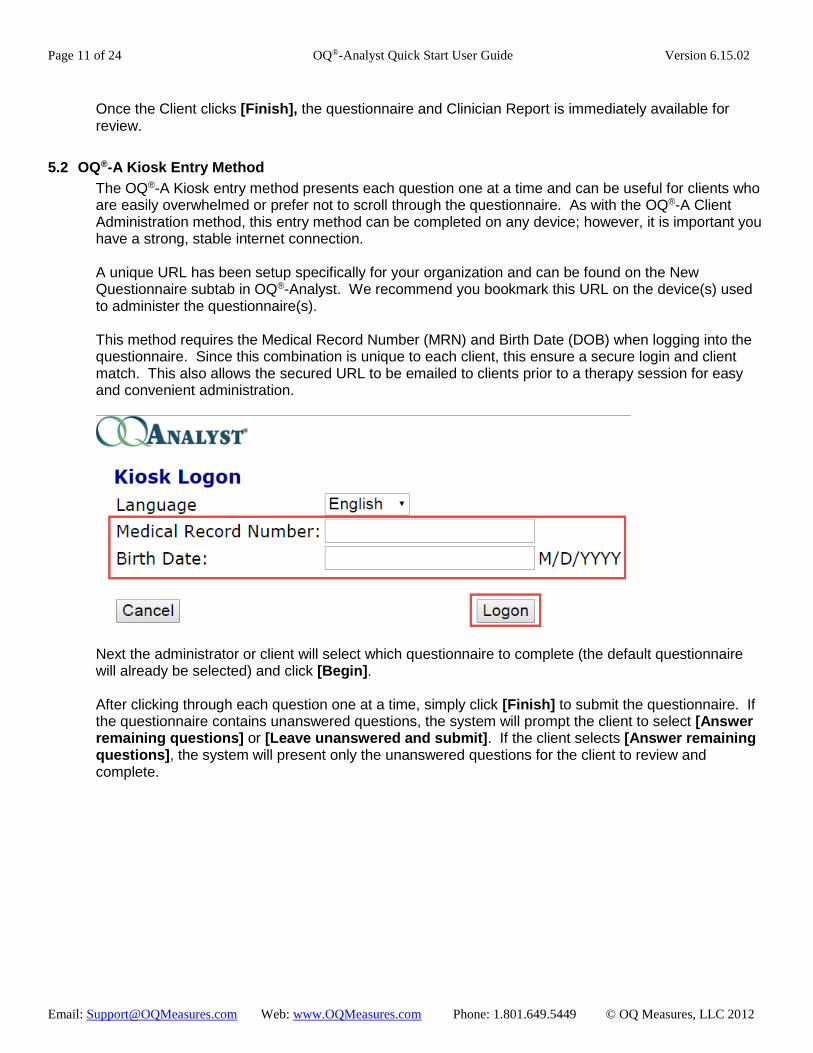
5.2 OQ®-A Kiosk Entry Method
The OQ®-A Kiosk entry method presents each question one at a time and can be useful for clients who are easily overwhelmed or prefer not to scroll through the questionnaire. As with the OQ®-A Client Administration method, this entry method can be completed on any device; however, it is important you have a strong, stable internet connection. A unique URL has been setup specifically for your organization and can be found on the New Questionnaire subtab in OQ®-Analyst. We recommend you bookmark this URL on the device(s) used to administer the questionnaire(s). This method requires the Medical Record Number (MRN) and Birth Date (DOB) when logging into the questionnaire. Since this combination is unique to each client, this ensure a secure login and client match. This also allows the secured URL to be emailed to clients prior to a therapy session for easy and convenient administration.
Next the administrator or client will select which questionnaire to complete (the default questionnaire will already be selected) and click [Begin]. After clicking through each question one at a time, simply click [Finish] to submit the questionnaire. If the questionnaire contains unanswered questions, the system will prompt the client to select [Answer remaining questions] or [Leave unanswered and submit]. If the client selects [Answer remaining questions], the system will present only the unanswered questions for the client to review and complete.

Page 12 of 24 OQ®-Analyst Quick Start User Guide Version 6.15.02
Email: [email protected] Web: www.OQMeasures.com Phone: 1.801.649.5449 © OQ Measures, LLC 2012
Once the Client clicks [Finish], the questionnaire and Clinician Report is immediately available for review.
5.3 OQ®-A Offline Application
As a result of the need for clinicians to treat clients in all sorts of settings, the OQ®-Analyst supports several administration methods. The Offline Application is one such method that allows the administering of questionnaires without having an internet connection. The application makes it possible for a clinician to administer a questionnaire on a tablet and immediately view the score on a “lite” Clinician Report anywhere a client may need to be seen. The application is capable of holding many questionnaires from different clients to meet the clinical needs of a clinician that is constantly on the move and stores the questionnaire data until it can be uploaded and seamlessly linked to your clients’ questionnaire history once an internet connection is reestablished. The Offline Application is only available on Windows Operating System (Windows 7 and above). For more information, please refer to the OQ®-Analyst documentation site link on your home page.
Page 13 of 24 OQ®-Analyst Quick Start User Guide Version 6.15.02
Email: [email protected] Web: www.OQMeasures.com Phone: 1.801.649.5449 © OQ Measures, LLC 2012
5.4 Manual Administration
OQ®-Analyst offers an easy method for manually entering questionnaire data into the system. This entry method is useful when your clients are not able to complete the questionnaires electronically or prefer the paper form. IMPORTANT: This method is only used by clinicians or an administrator entering data into the system. It is not intended for clients. Please refer to section 6.2.1 below for more information on manually entering questionnaire data into the system.
6. Administer Questionnaires Tab
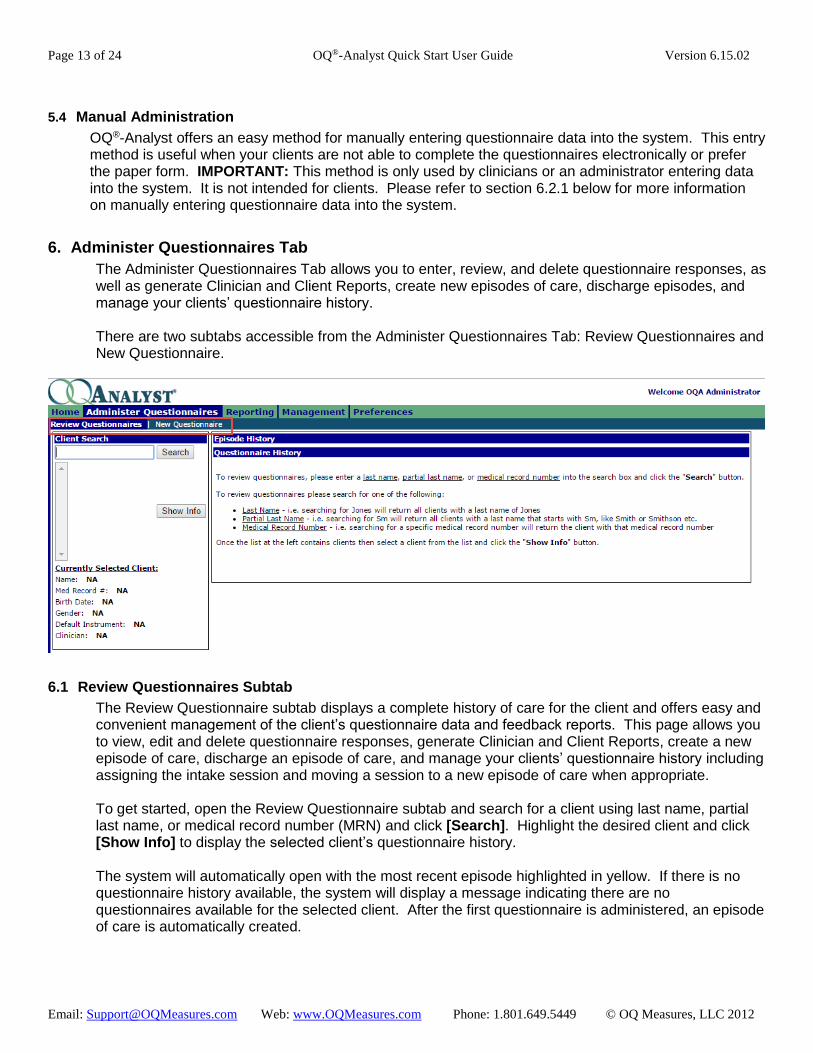
The Administer Questionnaires Tab allows you to enter, review, and delete questionnaire responses, as well as generate Clinician and Client Reports, create new episodes of care, discharge episodes, and manage your clients’ questionnaire history. There are two subtabs accessible from the Administer Questionnaires Tab: Review Questionnaires and New Questionnaire.
6.1 Review Questionnaires Subtab
The Review Questionnaire subtab displays a complete history of care for the client and offers easy and convenient management of the client’s questionnaire data and feedback reports. This page allows you to view, edit and delete questionnaire responses, generate Clinician and Client Reports, create a new episode of care, discharge an episode of care, and manage your clients’ questionnaire history including assigning the intake session and moving a session to a new episode of care when appropriate. To get started, open the Review Questionnaire subtab and search for a client using last name, partial last name, or medical record number (MRN) and click [Search]. Highlight the desired client and click [Show Info] to display the selected client’s questionnaire history. The system will automatically open with the most recent episode highlighted in yellow. If there is no questionnaire history available, the system will display a message indicating there are no questionnaires available for the selected client. After the first questionnaire is administered, an episode of care is automatically created.
Page 14 of 24 OQ®-Analyst Quick Start User Guide Version 6.15.02
Email: [email protected] Web: www.OQMeasures.com Phone: 1.801.649.5449 © OQ Measures, LLC 2012
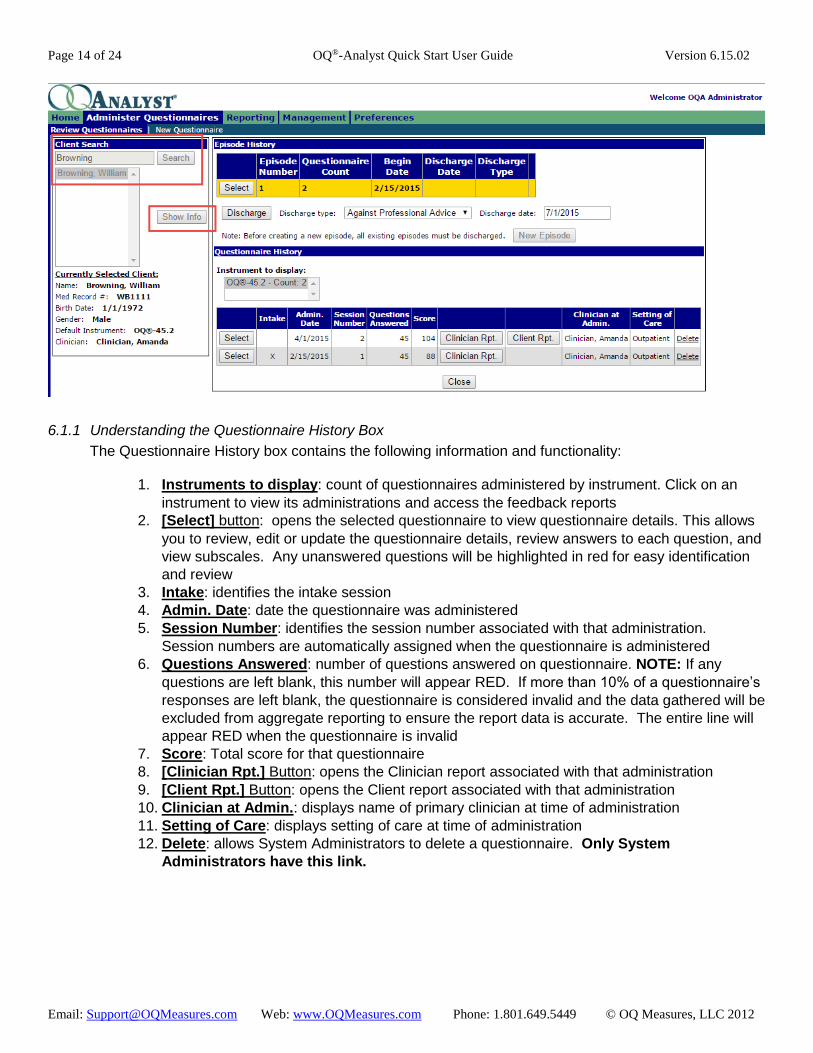
6.1.1 Understanding the Questionnaire History Box
The Questionnaire History box contains the following information and functionality:
1. Instruments to display: count of questionnaires administered by instrument. Click on an
instrument to view its administrations and access the feedback reports
2. [Select] button: opens the selected questionnaire to view questionnaire details. This allows
you to review, edit or update the questionnaire details, review answers to each question, and
view subscales. Any unanswered questions will be highlighted in red for easy identification
and review
3. Intake: identifies the intake session
4. Admin. Date: date the questionnaire was administered
5. Session Number: identifies the session number associated with that administration.
Session numbers are automatically assigned when the questionnaire is administered
6. Questions Answered: number of questions answered on questionnaire. NOTE: If any
questions are left blank, this number will appear RED. If more than 10% of a questionnaire’s
responses are left blank, the questionnaire is considered invalid and the data gathered will be
excluded from aggregate reporting to ensure the report data is accurate. The entire line will
appear RED when the questionnaire is invalid
7. Score: Total score for that questionnaire
8. [Clinician Rpt.] Button: opens the Clinician report associated with that administration
9. [Client Rpt.] Button: opens the Client report associated with that administration
10. Clinician at Admin.: displays name of primary clinician at time of administration
11. Setting of Care: displays setting of care at time of administration
12. Delete: allows System Administrators to delete a questionnaire. Only System
Administrators have this link.

Page 15 of 24 OQ®-Analyst Quick Start User Guide Version 6.15.02
Email: [email protected] Web: www.OQMeasures.com Phone: 1.801.649.5449 © OQ Measures, LLC 2012
6.1.2 Viewing the Clinician Report
1. Access the Administer Questionnaires tab and select the Review Questionnaires subtab
2. Search for a client using last name, partial last name, or medical record number (MRN) and click [Search]
3. Highlight the desired client and click [Show Info]
4. Select [Clinician Report] for the desired questionnaire and a new window will open containing the Clinician Report
NOTE: Clinician and Client reports will not open if you have the “Pop-up Blocker” turned on. It is necessary to have this turned off when using OQ®-Analyst. If a new window does not appear after clicking on the button to open a report, make sure your browser is set to allow pop-ups for the OQ®-Analyst website.
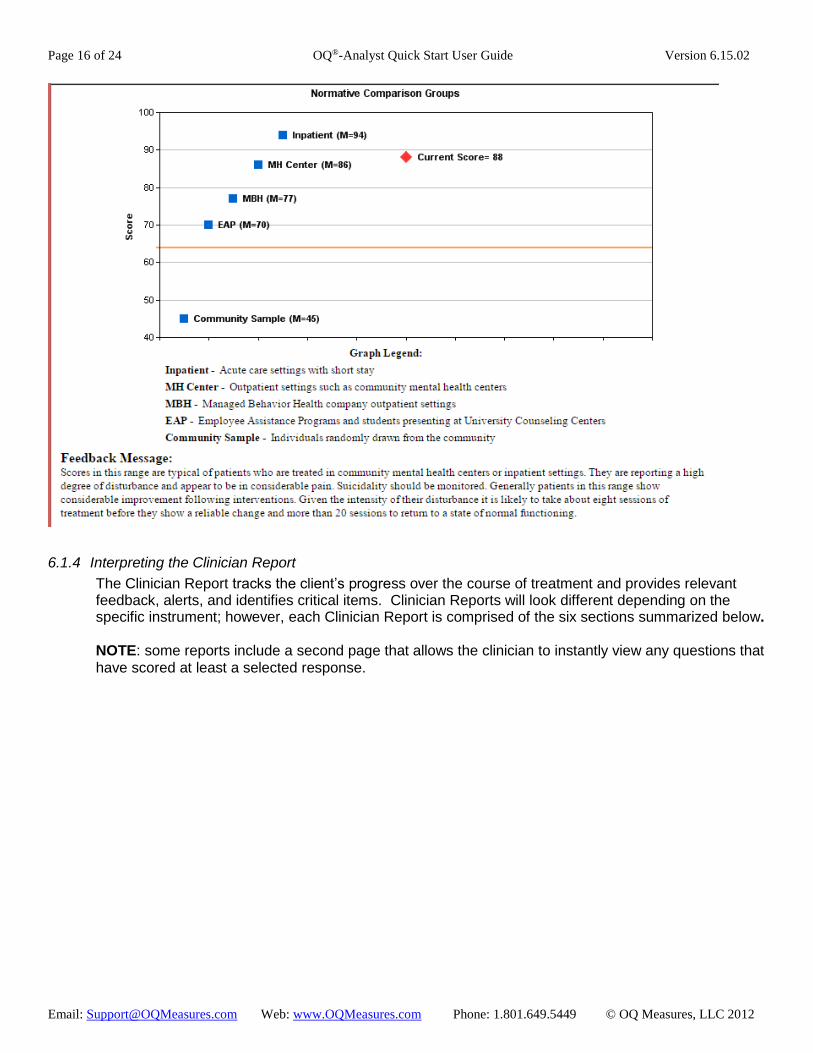
6.1.3 The Initial Report
The Clinician Report for the initial administration of the questionnaire emphasizes interpretation of the intake score and implications for treatment planning. This report is intended to help the clinician recognize the client’s degree of overall distress. Below is an example of an initial graph showing the intake score compared to the normative comparison groups and a typical Feedback Message. In general, the more distressed the client is, the more sessions of therapy will be necessary for the client to return to a normal state of functioning.
Page 16 of 24 OQ®-Analyst Quick Start User Guide Version 6.15.02
Email: [email protected] Web: www.OQMeasures.com Phone: 1.801.649.5449 © OQ Measures, LLC 2012
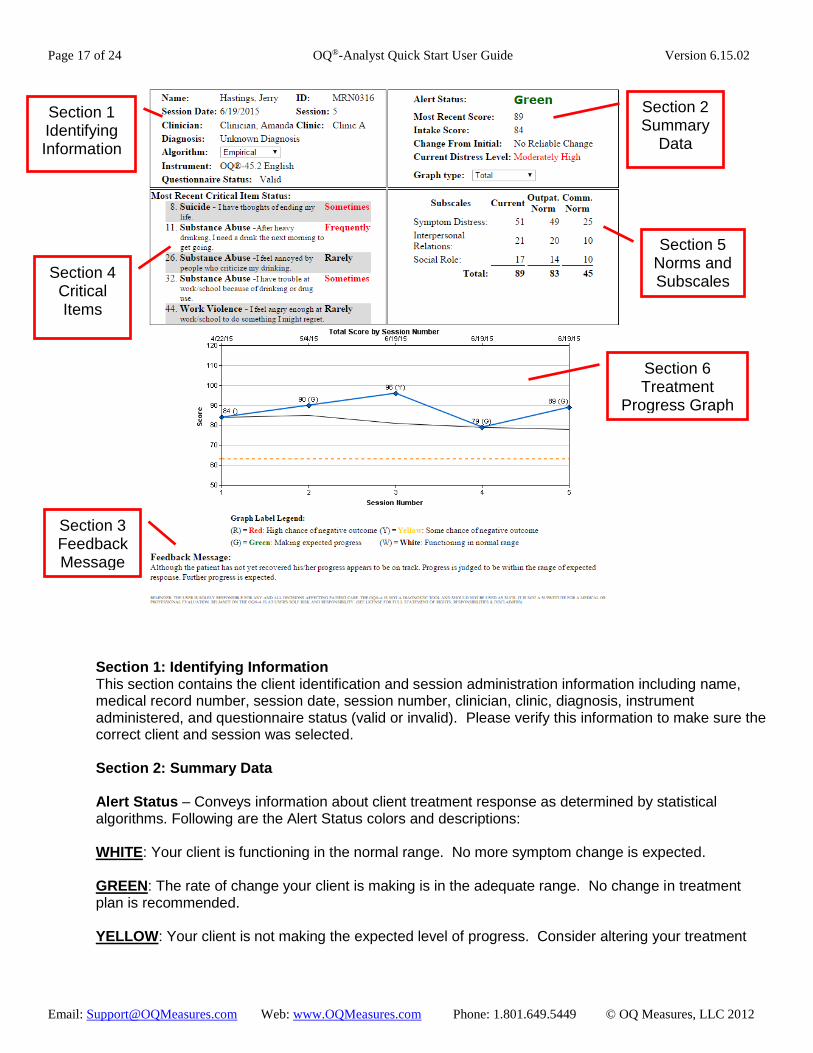
6.1.4 Interpreting the Clinician Report
The Clinician Report tracks the client’s progress over the course of treatment and provides relevant feedback, alerts, and identifies critical items. Clinician Reports will look different depending on the specific instrument; however, each Clinician Report is comprised of the six sections summarized below. NOTE: some reports include a second page that allows the clinician to instantly view any questions that have scored at least a selected response.
Page 17 of 24 OQ®-Analyst Quick Start User Guide Version 6.15.02
Email: [email protected] Web: www.OQMeasures.com Phone: 1.801.649.5449 © OQ Measures, LLC 2012
Section 1: Identifying Information This section contains the client identification and session administration information including name, medical record number, session date, session number, clinician, clinic, diagnosis, instrument administered, and questionnaire status (valid or invalid). Please verify this information to make sure the correct client and session was selected. Section 2: Summary Data Alert Status – Conveys information about client treatment response as determined by statistical algorithms. Following are the Alert Status colors and descriptions: WHITE: Your client is functioning in the normal range. No more symptom change is expected. GREEN: The rate of change your client is making is in the adequate range. No change in treatment plan is recommended. YELLOW: Your client is not making the expected level of progress. Consider altering your treatment
Section 6 Treatment
Progress Graph
Section 2 Summary
Data
Section 5 Norms and Subscales
Section 4 Critical Items
Section 1 Identifying Information
Section 3 Feedback Message

Page 18 of 24 OQ®-Analyst Quick Start User Guide Version 6.15.02
Email: [email protected] Web: www.OQMeasures.com Phone: 1.801.649.5449 © OQ Measures, LLC 2012
plan by intensifying treatment, shifting intervention strategies, and monitoring progress especially carefully. Your client may end up with no significant benefits from therapy. RED: Your client is not making the expected level of progress. Chances are they may have a negative symptomatic outcome. Steps should be taken to carefully review the care and decide on a new course of action. Red alerts allow you to identify clients who have a tendency to drop out of therapy before treatment ends. Speedy feedback to the clinician and clients can reduce failure by two-thirds.
BLUE Secondary Alert: Some clients may also receive a Blue secondary alert in addition to one of the other alerts. The Blue secondary alert indicates that the patient’s change from intake at the session of interest is so dramatically positive that there is a very high probability the patient will end treatment with clinically significant change and maintain the change for a minimum of one year following end of treatment.
Most Recent Score – Total score for the most recent administration of the questionnaire
Intake Score – Total score for the Intake administration of the questionnaire (may or may not be initial administration) Change From Initial – A classification of change based on calculations of clinically significant change using Jacobson & Truax formulas. (For more information about the Reliable Change Index and cutoff scores, please refer to your Administration and Scoring Manual). Change from Initial may be Reliably Improved, No Reliable Change, and Reliably Worse.
Current Distress Level – A classification of current distress level. Distress Level may be Low, Moderate, Moderately High, High, or Very High
Graph Type – defaults to Total. Graph types include Total, Subscale, and Critical Items (this item differs per instrument)
Section 3: Feedback Message The feedback message consists of a written summary of the Alert Status. These messages are particularly useful when clients signal a Yellow or Red Alert Status. As the feedback messages that accompany these alerts suggest, research has shown patients who signal Yellow or Red anytime during treatment are at risk for leaving treatment with a negative outcome.
Section 4: Most Recent Critical Item Status A summary of client’s responses to specific items identified as important by panel of expert clinicians. These items screen for risk of suicide, substance abuse, workplace violence, or other critical symptoms (depending on instrument). It is recommended that clinicians consider any response greater than rarely as an alert to possible risk in these areas. Responses of almost always, frequently, and sometimes are presented in RED font. Responses of never and rarely are presented in BLACK font.
Section 5: Norms and Subscales Provides normative comparisons with current subscale scores (when available; not all instruments have subscales) in order to compare the client to other normative groups (Please refer to your Administration and Scoring Manual for more information).
Section 6: Treatment Progress Graph Provides a graph of client scores from the initial administration through the most current administration of the questionnaire. The Alert Status is indicated on the graph by the associated letter inside

Page 19 of 24 OQ®-Analyst Quick Start User Guide Version 6.15.02
Email: [email protected] Web: www.OQMeasures.com Phone: 1.801.649.5449 © OQ Measures, LLC 2012
parentheses – (W), (G), (Y), or (R). The orange horizontal line drawn across the graph represents the clinical cut off score. (Please refer to your Administration and Scoring Manual for more information).
6.1.5 Viewing the Client Report (Not Available for all Instruments)
1. Access the Administer Questionnaires tab and select the Review Questionnaires subtab
2. Search for a client using last name, partial last name, or medical record number (MRN) and click [Search]
3. Highlight the desired client and click [Show Info]
4. Select [Client Rpt.] for the desired questionnaire and a new window will open containing the Client Report. If a new window does not appear, make sure that your browser is set to allow pop-ups for the OQ®-Analyst website.
6.1.6 Interpreting the Client Report
The Client Report provides a feedback message and graph displaying client progress that is based upon the same algorithms used to generate the Clinician Report. Messages range from suggestions that the client is functioning quite well, is progressing but in need of further help, or is not progressing as expected and encouraged to discuss progress with the therapist. Feedback is, by design, encouraging as well as empirically based. We recommend using this report to help engage your clients in therapy. Research has shown that clients find the feedback desirable and would like to have a copy. It also shows that feedback given directly to clients in the form provided in the Client Report has a positive effect on treatment outcome.

Page 20 of 24 OQ®-Analyst Quick Start User Guide Version 6.15.02
Email: [email protected] Web: www.OQMeasures.com Phone: 1.801.649.5449 © OQ Measures, LLC 2012
6.2 New Questionnaire Subtab
The New Questionnaire subtab allows you to administer a new questionnaire or enter questionnaire responses manually. In addition, this subtab contains a complete list of instrument(s) your organization currently has licensed and allows you to print a paper copy of the questionnaires from the software. We recommend printing and storing a selection of questionnaires to have on hand in the event your internet connection is not available for a period of time. This will allow you to administer the questionnaire(s) on paper and manually enter the responses once the internet connection is restored. This method may also be used when working in the field or away from your office. To open a printable version of the questionnaire, simply click on the link for the instrument you wish to print. After the questionnaire has been completed, follow the steps below to enter the data in OQ®-Analyst.
6.2.1 Manually Entering Questionnaire Data
OQ®-Analyst offers an easy method for manually entering questionnaire data into the system. This entry method is useful when your clients are not able to complete the questionnaires electronically or prefer the paper form. IMPORTANT: This method is only used by clinicians or an administrator entering data into the system. It is not intended for clients. Please refer to section 5 for information on client administration methods.
Note: 10-Key manually entry is available in Internet Explorer. We recommend using this method as it is the easiest and fastest method for entering your clients’ responses. Enter the number next to the appropriate answer. If a number other than 0-4 is keyed, the question will be left blank and the system will move to the next question.
Following are the steps for manually entering questionnaire data:
Click on link to print a paper copy of questionnaire

Page 21 of 24 OQ®-Analyst Quick Start User Guide Version 6.15.02
Email: [email protected] Web: www.OQMeasures.com Phone: 1.801.649.5449 © OQ Measures, LLC 2012
1. Access the Administer Questionnaires tab and select the New Questionnaires subtab
2. Enter the full last name, partial last name or medical record number (MRN) to view available clients and click [Search]
3. Highlight the desired client and click [Show Info]. Verify the identifying information
4. Select an instrument using the drop-down list (the default instrument will automatically be selected)
5. Click [Manual] to display the questionnaire at the bottom of the page
6. Enter or modify Questionnaire Detail data as needed (Session Number, Completed By, Date, Clinic, Setting of Care)
7. Manually enter the questionnaire responses
8. Click [Submit] when finished.
7. Reporting Tab
This quick start user guide will provide an overview of the Individual reporting subtab. For more information on the Reporting tab and other available subtabs, please refer to the full OQ®-Analyst User Manual, which can be viewed by clicking on the OQ®-Analyst documentation site link on the home page.
Page 22 of 24 OQ®-Analyst Quick Start User Guide Version 6.15.02
Email: [email protected] Web: www.OQMeasures.com Phone: 1.801.649.5449 © OQ Measures, LLC 2012
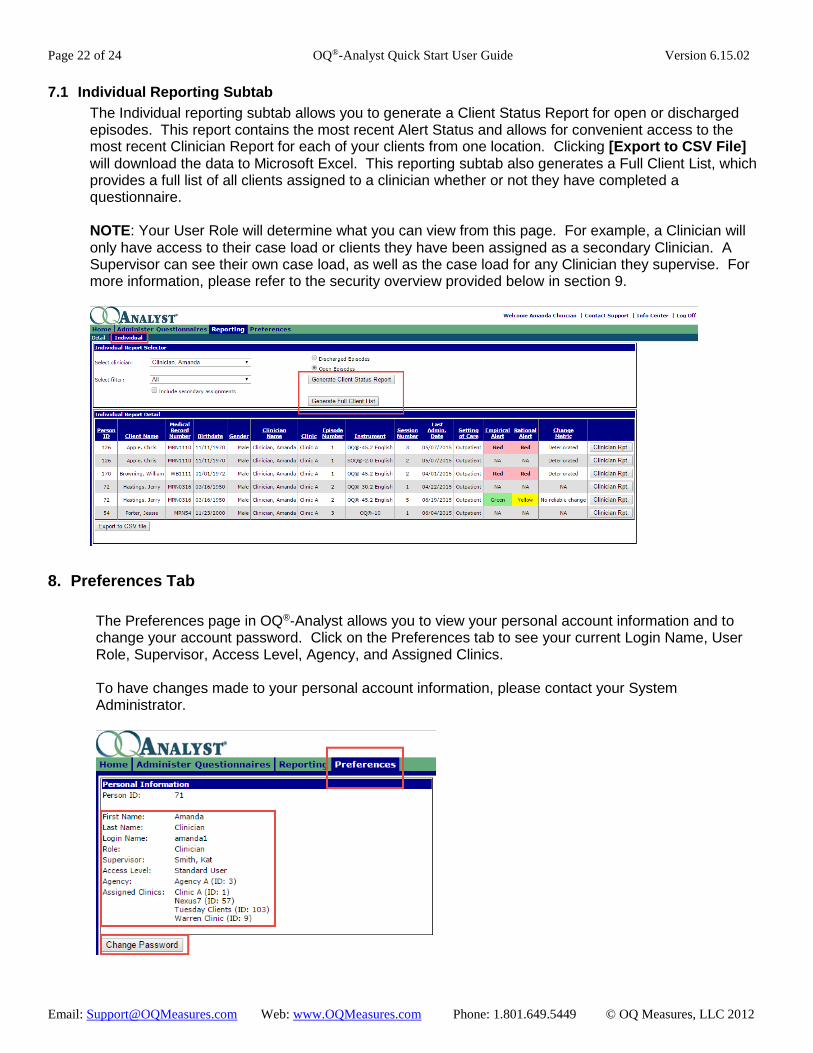
7.1 Individual Reporting Subtab
The Individual reporting subtab allows you to generate a Client Status Report for open or discharged episodes. This report contains the most recent Alert Status and allows for convenient access to the most recent Clinician Report for each of your clients from one location. Clicking [Export to CSV File] will download the data to Microsoft Excel. This reporting subtab also generates a Full Client List, which provides a full list of all clients assigned to a clinician whether or not they have completed a questionnaire. NOTE: Your User Role will determine what you can view from this page. For example, a Clinician will only have access to their case load or clients they have been assigned as a secondary Clinician. A Supervisor can see their own case load, as well as the case load for any Clinician they supervise. For more information, please refer to the security overview provided below in section 9.
8. Preferences Tab
The Preferences page in OQ®-Analyst allows you to view your personal account information and to change your account password. Click on the Preferences tab to see your current Login Name, User Role, Supervisor, Access Level, Agency, and Assigned Clinics. To have changes made to your personal account information, please contact your System Administrator.

Page 23 of 24 OQ®-Analyst Quick Start User Guide Version 6.15.02
Email: [email protected] Web: www.OQMeasures.com Phone: 1.801.649.5449 © OQ Measures, LLC 2012
8.1 Changing your Password
To change your password, simply click [Change Password] to open the change password box shown below.
Enter your current password, new password and re-enter new password. Click [Update] to save your changes.
9. OQ®-Analyst Security Model
The chart below provides a basic overview of our security model. If you are having an issue accessing client records or do not have sufficient rights within the system, please contact your system administrator. For more information please refer to the full OQ®-Analyst Security Model document, which can be viewed by clicking on the OQ®-Analyst Documentation Site link on the OQ®-Analyst home page after you login to the system.

Page 24 of 24 OQ®-Analyst Quick Start User Guide Version 6.15.02
Email: [email protected] Web: www.OQMeasures.com Phone: 1.801.649.5449 © OQ Measures, LLC 2012
10. Additional Information
For more information, please refer to the full OQ®-Analyst User Manual that can be viewed by clicking on the OQ®-Analyst documentation site link on your home page, or contact your System Administrator.
To contact OQ Measures Support with any further questions:
Phone: (801) 649-5449
Toll Free: (888) 647-2673
Email: [email protected]