operator manual - aws · pdf filethe user should carry out manual handling of test equipment...
TRANSCRIPT


Operator Manual

Table of Contents
i
1.Notices........................................................................................................... 1 Limited Warranty & Limitation of Liability ......................................................................................................... 2 Copyright............................................................................................................................................................... 2 E&OE...................................................................................................................................................................... 2 Declaration of Conformity ................................................................................................................................... 3
2.General Guidance Notes ............................................................................... 5 Safety ..................................................................................................................................................................... 6 Installation and use of Test Equipment.............................................................................................................. 7 Assessment of Test Area..................................................................................................................................... 8 Safe Application of Test Equipment ................................................................................................................... 9 Maintenance ........................................................................................................................................................ 10 Summary of Safety Information ........................................................................................................................ 11
3.Introduction to Safety Testing .................................................................... 13 Methods of Construction for Electrical Safety ................................................................................................ 14 Test Requirements to Determine Electrical Safety ......................................................................................... 15
Visual Inspection............................................................................................................................................... 15 Electrical Safety ................................................................................................................................................ 15 Earth Bond Continuity ....................................................................................................................................... 16 Electrical Insulation ........................................................................................................................................... 17 Earth Leakage Current...................................................................................................................................... 17 Functional Operation......................................................................................................................................... 18
3.Introducing the B255 ................................................................................... 19 Facia Controls..................................................................................................................................................... 21 Accessories......................................................................................................................................................... 22 Rear Panel Connections .................................................................................................................................... 25

Table of Contents
4.Set-Up Procedures ....................................................................................... 27 The Test Area ...................................................................................................................................................... 29 Instrument Wiring and Connections ................................................................................................................. 30 Instrument Set-Up............................................................................................................................................... 31
5.Test Application........................................................................................... 33 Visual Inspection................................................................................................................................................. 34
Casing ............................................................................................................................................................... 34 Supply Lead....................................................................................................................................................... 34 Plugs and Fuses................................................................................................................................................ 34 Switches and Function Selectors ...................................................................................................................... 35
Electrical Safety Tests – General ...................................................................................................................... 36 Earthed (Class I) Equipment .............................................................................................................................. 36
Earth Test .......................................................................................................................................................... 36 Flash Test – Line+Neutral to Earth ................................................................................................................... 38
Double Insulated (Class II) Equipment ............................................................................................................. 40 Flash Test – Line+Neutral to Probe .................................................................................................................. 40
Earth Leakage Test (Class 1 Earthed/Grounded Products)............................................................................ 42 Earth Leakage Test (Class 2 Double Insulated Products) .............................................................................. 43 Typical Earth Leakage Values……………………………….…………………………………………………………44 Load (Run) Current Measurement..................................................................................................................... 45
6.Instrument Integrity..................................................................................... 47 Calibration ........................................................................................................................................................... 48 Operational Checks ............................................................................................................................................ 48
Check Procedure – Earth Continuity ................................................................................................................. 49 Check Procedure – Class I (LN-E) Flash Test Trip........................................................................................... 49
ii
Check Procedure – Class II (LN-Probe) Flash Test Trip................................................................................... 50

Table of Contents
i
7.Additional Information................................................................................. 51 Useful Reference Material.................................................................................................................................. 52 Useful Addresses ............................................................................................................................................... 53 Training................................................................................................................................................................ 54

1.Notices
1

Notices
2
Limited Warranty & Limitation of Liability CLARE Instruments Limited guarantees this product for a period of 1 year. The period of warranty will come into effect on the day of delivery. Copyright All rights reserved. Nothing from this edition may be multiplied, or made public in any form or manner, either electronically, mechanically, by photocopying, recording or in any manner without prior written consent from CLARE Instruments Limited. This also applies to any accompanying drawings, diagrams or illustrations. E&OE The information contained within this manual is given in good faith and is provided for guidance only. Although all reasonable care has been taken to ensure accuracy of the information, CLARE Instruments Limited, their agents and distributors, accept no responsibility for any errors or omissions within this document, nor for any misinterpretations by the user. For clarification on any part of this document please contact CLARE Instruments Limited, or your local agent, before operating the instrument. Due to a policy of continuous development CLARE Instruments Limited reserve the right to alter or amend equipment specifications and descriptions outlined in this publication without prior notice. No part of this publication shall be deemed to form, or be part of, any contract for the equipment unless specifically referred to as an inclusion within such contract.
Notices
Declaration of Conformity
For the Clare B255 Power Tool & Appliance Tester
Manufactured by:
Clare Instruments Ltd. Woods Way, Goring-by-Sea, Worthing, West Sussex. BN12 4QY
Millennium Statement This product is Millennium compliant and conforms fully to the BSI DISC PD2000-1 document.
Statement of Conformity
Based on test results using appropriate standards, the product is in conformity with Electromagnetic Compatibility Directive 89/336/EEC and Low Voltage Directive 73/23/EEC.
Standards Used:
EN 61010-1 (1993) Safety Requirements for Electrical Equipment for Measurement, Control and Laboratory Use.
EN 50081-1 (1992) Electromagnetic Compatibility. Generic Emission Standard: EN55022 Class B.
EN 50082-1 (1992) Electromagnetic Compatibility. Generic Immunity Standard: IEC1000-4-2, -4-3, -4-4, -4-5.
The tests have been performed in a typical configuration.
Conformity is indicated by the symbol - , for ‘Conformité Européenne’
3


2.General Guidance Notes
5

General Guidance Notes
6
Safety The design of the B255 Portable Appliance Tester meets the European Commission Directive No. 73/23/EEC, relating to the “Low Voltage Directive”. This is in accordance with BS EN 61010-1: 1993 – Safety requirements for electrical equipment for measurement control, and laboratory use. This unit is also compliant with EN 50191 Draft. The design of the equipment is safe when used under the following conditions:
Indoor use; Altitude up to 2000 m; Temperature 5°C to 40°C; Maximum relative humidity 80% for temperatures up to 31°C to 50% at 40°C; Mains supply voltage fluctuations of ±10% of the nominal voltage.
The user MUST follow the remainder of this section on safety, installation, guidance and maintenance to guarantee safe operation and to maintain the equipment in a safe condition. WARNING! Any interruption of the protective earth conductor (mains input earth) inside or outside the equipment is likely to make the equipment dangerous. The user must not intentionally interrupt the protective earth conductor.

General Guidance Notes
When connected to the mains supply, internal terminals of the equipment may be live and the opening of covers or removal of parts is likely to expose live parts. The user must disconnect the equipment from ALL voltage sources before any adjustment, replacement, maintenance or repair. Use only fuses with the required rated current and of the specified type for replacement –
Mains Quick Blow Type F The user must not use makeshift fuses or short-circuit fuse holders. The user should carry out manual handling of test equipment in accordance with regulatory guidance notes. That is those supplied by the Health & Safety Executive or Croner’s and the Health & Safety at Work Act. Installation and use of Test Equipment Electrical safety tests (particularly Flash Tests) are required to comply with Legislative Documents on electrical and electronic product testing which may encroach the EMC (Electromagnetic Compatibility) requirements. This standard came into effect on 1st January 1996. The design of the test equipment will minimise the effects of electromagnetic disturbances, but some interference may result from particular applications dependent on the type of product being tested. Therefore, the user is responsible for installing and using the test equipment according to the manufacturers’ instructions. The user of the test equipment is responsible for detecting electromagnetic disturbances and must resolve the situation with the technical assistance of the manufacturer. In some cases it may involve constructing an electromagnetic screen (Faraday cage) enclosing the test equipment and test pieces complete with associated input filters. The user should achieve a reduction in electromagnetic disturbances to a point where they are no longer troublesome.
7
General Guidance Notes
8
Assessment of Test Area Before installing the test equipment the user shall make an assessment of potential electromagnetic disturbance problems in the surrounding area and take the following points into account - • Supply cables (other than those supplying the test equipment), control cables, signalling and telephone
cables. These can be above, below or adjacent to the test equipment. • Radio and television transmitters and receivers within a distance of 30 metres; • Computer and other control equipment within a distance of 10 metres; • Safety critical equipment (i.e. the guarding of industrial machinery); • The health of people in the surrounding area. Of approximately 2-3 metres (that is the use of hearing aids,
pacemakers, etc.); • Delicate electronic equipment used for calibration or measurement. The size of the surrounding area to be considered will depend on the overall structure of the building and other activities taking place. It is important to note that the surrounding area may well extend beyond the boundaries of the premises. Position the equipment with adequate ventilation and easy access to all sides of the equipment for maintenance purposes. Generally this means not enclosing the equipment (unless specifically designed so) or burying it under other test equipment.
General Guidance Notes
Safe Application of Test Equipment Any person operating electrical test equipment should be 18 years or over and should have had adequate training in the use of the particular piece of equipment. The degree of training should be appropriate for the competence and experience of the operator. Position the test equipment in a clearly defined test area with access limited to the operator only. Construct all test benches of insulated material, preferably wood. Use steel benches covered in insulating material under certain circumstances only. The item under test must be on an insulated surface (where possible, as with large or unwieldy items this may not be possible). DO NOT touch or come into contact with the instrument case or any other Earthed metalwork (for example conduit or metal trunking, etc.) whilst applying the safety tests. The operator should also be on an insulated surface such as British Standard approved rubber matting or nail free duckboard.
THE ITEM UNDER TEST MUST NOT BE TOUCHED WHILST THE FLASH TESTS ARE APPLIED
A supervisor should carry out the “Setting-up Procedure” before each shift to safeguard correct operation following the instructions supplied. This instrument incorporates an ac Flash trip device that defaults to 5mA. The trip mechanism operates within 10 milliseconds to safeguard the operator and make the flash test non-lethal and non-destructive.
9

General Guidance Notes
10
Maintenance Clare Instruments Ltd. supplies a guarantee against defective material and faulty manufacture for a twelve month period from the date of delivery. Prior to despatch the equipment undergoes careful inspection and comprehensive testing. Report any defect discovered with the equipment in respect of materials or workmanship within the guarantee period. We undertake to put right the defect at our expense subject to our standard conditions of sale. Our responsibility is limited, in all cases, to the cost of making good the defect in the equipment. This does not apply to defects caused by abnormal conditions of working, accident, misuse, neglect or wear and tear. In the event of difficulty or apparent malfunction, it is advisable to contact Clare Instruments Ltd. On –
Telephone 01903 502551 or Fax 01903 244258.
We recommend that the complete instrument be returned to us for repair or re-calibration:
The Service Department Clare Instruments Ltd.
Woods Way Goring-by-Sea WORTHING West Sussex BN12 4QY

General Guidance Notes
Please take adequate care with packing and arrange insurance cover against transit damage or loss when returning the instrument – if possible use the original packing box and supports. Regularly calibrate all test equipment to meet internal quality or regulatory licensing authority requirements and to keep the equipment in a safe working condition. Return the equipment to Clare Instruments for this purpose. Keep the equipment in a clean condition. Examine all input and test output leads and connectors regularly to guarantee they are in a safe working condition. The equipment contains parts that are specific to the equipment only, therefore, order spare parts from the address on the previous page. Clare Instruments Ltd. strictly forbid any use of spare parts, other than those acquired from the original manufacturer. Summary of Safety Information Should there be any doubt about location, setting up procedure or operation of the test equipment, contact Clare Instruments Ltd. Report any apparent malfunctions immediately. Maintain the test equipment in accordance with Health and Safety at Work Act and the Electricity at Work Regulations. The supply socket used for connection to the incoming mains system should undergo earth loop impedance measurements in keeping with the regulations to guarantee safe operation. NOTE Your Health and Safety Inspector may, with the benefit of on-site observations, offer alternate or additional instructions to the above recommendations.
11


3.Introduction to Safety Testing
13

Introduction to Safety Testing
14
Under the requirements of the Health and Safety at Work Acts it is the responsibility of the ‘supplier’ of electrical equipment to ensure that it is electrically safe. The ‘supplier’ can be the Manufacturer, the Importer or the Hirer and by inference the Repairer. Manufacturers and Importers generally satisfy their obligations by ensuring conformity to the relevant safety standards prior to placing the equipment on the market and have little or no further interest in the continuing in-service maintenance and routine testing of the product other than in responding to customer feed-back and enquiry. The Hire Industry however must ensure compliance with safety regulations each and every time a power tool or appliance is hired out. Repairers of power tools and appliances also have statutory obligations to ensure that the repaired item complies fully with original manufacturer’s specifications and the relevant standards. As well as being aware of the legal requirements it also helps to appreciate the reasons for testing if there is a clear understanding of how construction and test requirements aim to provide ‘Electrical Safety’ – Methods of Construction for Electrical Safety To provide the user with protection against electric shock, general methods of construction must ensure firstly that all ‘live’ parts are insulated and secondly that should this basic insulation fail the ‘live’ parts are prevented form creating a hazard to the user. This second level of protection is achieved either by ‘earthing’ all accessible conductive surfaces or by providing ‘double insulation’ in the form of a second insulating layer or by reinforcing the primary insulating layer.
Introduction to Safety Testing
Earthed equipment is referred to as Class I. Earthing is achieved by connecting all accessible conductive surfaces (the tool body or outer casing and associated fixings etc) to the supply earth via a low impedance protective conductor. Then if any ‘live’ part comes into contact with these surfaces the hazardous current is drawn harmlessly to earth through the protective conductor rather than the person holding the tool. The protective conductor is the green/yellow ‘earth’ wire in standard 3 core mains supply leads. Double Insulated equipment is referred to as Class II. All accessible conductive surfaces are additionally insulated from internal ‘live’ parts and components. No ‘earth’ wire is present in the supply lead. All such equipment is clearly identified by a prominent square within a square symbol. Test Requirements to Determine Electrical Safety The most appropriate way of verifying Electrical Safety is to carry out a series of routine Safety Tests that both reflect those tests used in the manufacturing process and, particularly in the Hire Industry, take into account the effects of normal wear and tear. Visual Inspection It is important when carrying out routine testing to first check for signs of undue wear and tear by a thorough visual inspection – a nick in the supply cable or a cracked casing etc can easily lead to hazardous situations when the power tool or appliance is in use. Electrical Safety The tests to verify satisfactory ‘earth bonding’ and insulation levels will depend on –
15

Introduction to Safety Testing
16
a. The basic construction of the tool – Class I/Earthed or Class II/Double Insulated and b. The original standard that it was manufactured to-
the most common British Standards relating to equipment used in the Hire Industry being BS EN 50144 for hand held power tools and BS EN 60335-1 for general appliances, however clear guidance should be sought from the manufacturer, or importer, to determine appropriate requirements.
Earth Bond Continuity Most type testing standards, including those referred to above, require that the earth bond resistance between all accessible conductive surfaces and the ‘Earthing’ terminal within the item, does not exceed 0.1 Ohm. Compliance should be checked by resistance measurement using a test current equal to 1.5 times the rated current or to 25A, whichever is the greater, from an a.c. voltage source not exceeding 12V. In practice, routine testing will always include the supply lead and the measurement will be made between the earth pin of the supply plug and exposed metal (conductive) surfaces of the tool. As a generalisation, most power tools will still meet the 0.1 Ohm limit, and an earth bond resistance up to 0.3 Ohms may be acceptable when supply leads up to 5 metres in length are included. This figure can be further increased by 0.1 Ohm for each additional 5 metres of supply lead length, but this may also be dependent on the cross-sectional area (csa) of the conductor being used. NOTE Where exposed metal parts cannot be seen to form a continuos surface with all other exposed metal, such as a metal grille in a plastic housing or a remote switch panel, OR where moving guards or detachable accessories are also made of metal, measurements must be taken from all surfaces back to the Earth pin of the plug top.

Introduction to Safety Testing
Electrical Insulation To check the insulation, between the ‘live’ conductors (Line and Neutral) and all exposed metal surfaces, a high voltage a.c. Flash Test is applied. The voltage will depend on the construction class of the tool or appliance – 1250V for standard Class I (Earthed) tools and appliances 3000V for routine testing of Class II (double insulated) equipment 3750V for Class II equipment following repair or reconditioning operations Under normal conditions the leakage current at the appropriate Flash Test voltage should not exceed 5mA Some Class I equipment may suffer from the effects of high capacitive leakages associated with exceptionally long supply leads or certain methods of suppression filtering, or a combination of the two. Under these conditions a reduced test voltage of 500V or an increased leakage level of up to 10mA may be permissible – if in doubt advice must be sought from the equipment manufacturer. All safety tests must be carried out with the supply switch of the tool or appliance in the ON position to ensure that all ‘live’ parts are included when checking insulation. Multi-function tools and appliances must be FULLY tested with supply and function switches set for each operating mode. Earth Leakage Current For equipment fitted with contactor, relay or low voltage ‘electronic’ start switching devices (often referred to as ‘dead mans handles’), typically those that require mains voltage to be applied before all operating circuits are made, it may be impractical to apply a Flash Test to the complete wiring system of the product. In such cases it may be more appropriate to measure the Earth Leakage current when the equipment is powered up and running.
17
Introduction to Safety Testing
18
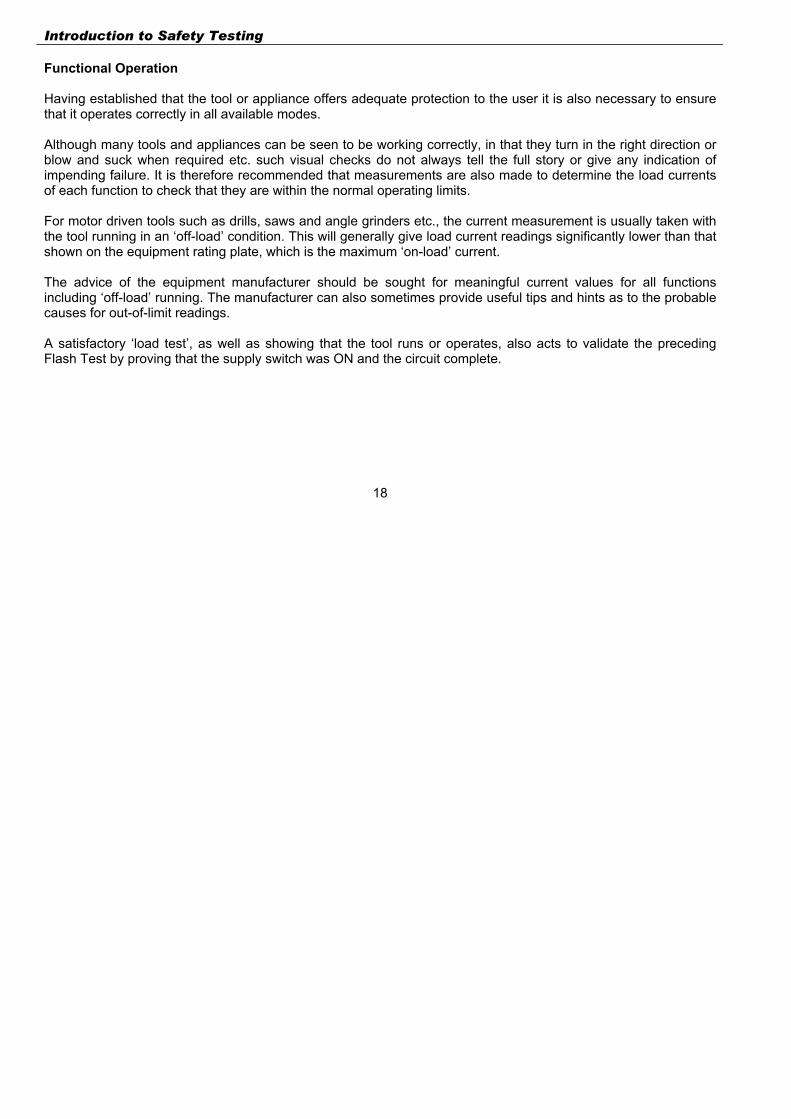
Functional Operation Having established that the tool or appliance offers adequate protection to the user it is also necessary to ensure that it operates correctly in all available modes. Although many tools and appliances can be seen to be working correctly, in that they turn in the right direction or blow and suck when required etc. such visual checks do not always tell the full story or give any indication of impending failure. It is therefore recommended that measurements are also made to determine the load currents of each function to check that they are within the normal operating limits. For motor driven tools such as drills, saws and angle grinders etc., the current measurement is usually taken with the tool running in an ‘off-load’ condition. This will generally give load current readings significantly lower than that shown on the equipment rating plate, which is the maximum ‘on-load’ current. The advice of the equipment manufacturer should be sought for meaningful current values for all functions including ‘off-load’ running. The manufacturer can also sometimes provide useful tips and hints as to the probable causes for out-of-limit readings. A satisfactory ‘load test’, as well as showing that the tool runs or operates, also acts to validate the preceding Flash Test by proving that the supply switch was ON and the circuit complete.

3.Introducing the B255
19

Introducing the B255
20
FIG.1 Facia Controls

Introducing the B255
Facia Controls 1. Display Meter – multi-scale meter to show Earth Circuit Resistance, Load Current and Leakage Current
values. 2. Set Inf. Control – used for setting the full scale (INF.) indication of the meter to compensate for mains
fluctuations or differences from location to location. Please refer to Set-Up Procedures for adjustment details. 3. Test Selector – a rotary switch for selecting the required test. When connecting or disconnecting items to be
tested OR when the instrument is to be left un-attended or tests are not being applied, always set this switch to one of the STANDBY positions, the test buttons are then disabled.
4. Supply Switch – an illuminated two-button device for controlling the incoming supply to the instrument. Firmly
depress the upper green button to turn the instrument ON, (button illuminates) and the lower red button to turn it OFF. This switch also acts as a miniature circuit breaker (mcb) to protect internal wiring.
5. Flash Test Result indicators – a green PASS lamp and red FAIL lamp indicate test status whenever any of
the Flash tests are applied, a flash fault is also indicated by a high pitched audible alarm. 6. Safety Test buttons – the white, momentary action, PRESS TO TEST button is used to apply the selected
Earth or Flash test. The adjacent, red, 10mA button can be used to increase the standard 5mA trip level for the 500V and 1250V LN-E tests only - this button must be depressed and held BEFORE the main TEST button is depressed.
7. Load Test buttons – the LOAD TEST button is used to apply mains voltage to the product under test and the
resultant run current is displayed on the middle 0-25A scale. For readings below 2.5A the meter range can be expanded to read 0-2.5A full scale by also depressing the 2.5A button.
21
Introducing the B255
22
The LOAD TEST button is also used to apply a selected EARTH LEAKAGE test, which again requires the product to be powered. The measured leakage current will be displayed on the lower 0-5mA meter scale.
8. Set Zero control – used to set ‘mechanical zero’ on the meter. This is carried out during factory build and
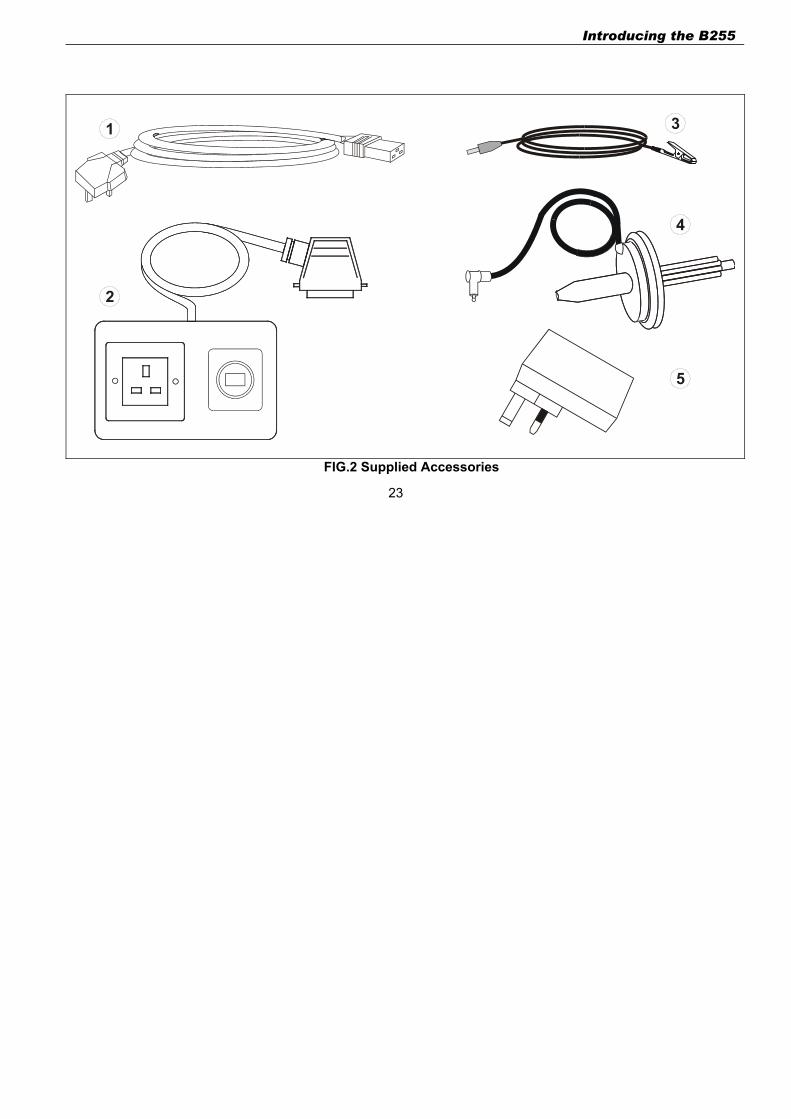
calibration procedures and should not normally be re-adjusted by the user. Accessories 1. Mains Lead – fitted with a standard BS1363 square pin 13A plug top for connection to an Earthed supply
outlet. It is also recommended that the outlet is fitted with an RCD protection device. 2. Test Output Socket Box – the standard box is fitted with sockets to accept 230V / 13A and industrial 110V /
16A plugs. When testing 110V products, an external supply source will be required to carry out Earth Leakage and Load Current tests. Other connector combinations can be catered for, as optional extras and to special order.
3. Earth Return clip lead – this green clip lead is used to complete the Earth Continuity test path when testing
Earthed (Class 1) equipment – the lead is not required when testing Double Insulated (Class 2) equipment. 4. Flash Test Probe – a high voltage safety probe for use when applying the 3000V and 3750V LN-Probe flash
tests to Double Insulated (Class 2) products – the probe is not required when testing Earthed (Class1) equipment.
5. Fault Simulator – used to check the correct operation of the Flash test trips and Earth Continuity measuring
circuits. This simple to use device should be used on a regular basis, even daily, to ensure that the B255 continues to provide accurate safety test results. See under Operating Procedures for instructions.
Introducing the B255
FIG.2 Supplied Accessories
23
Introducing the B255
24
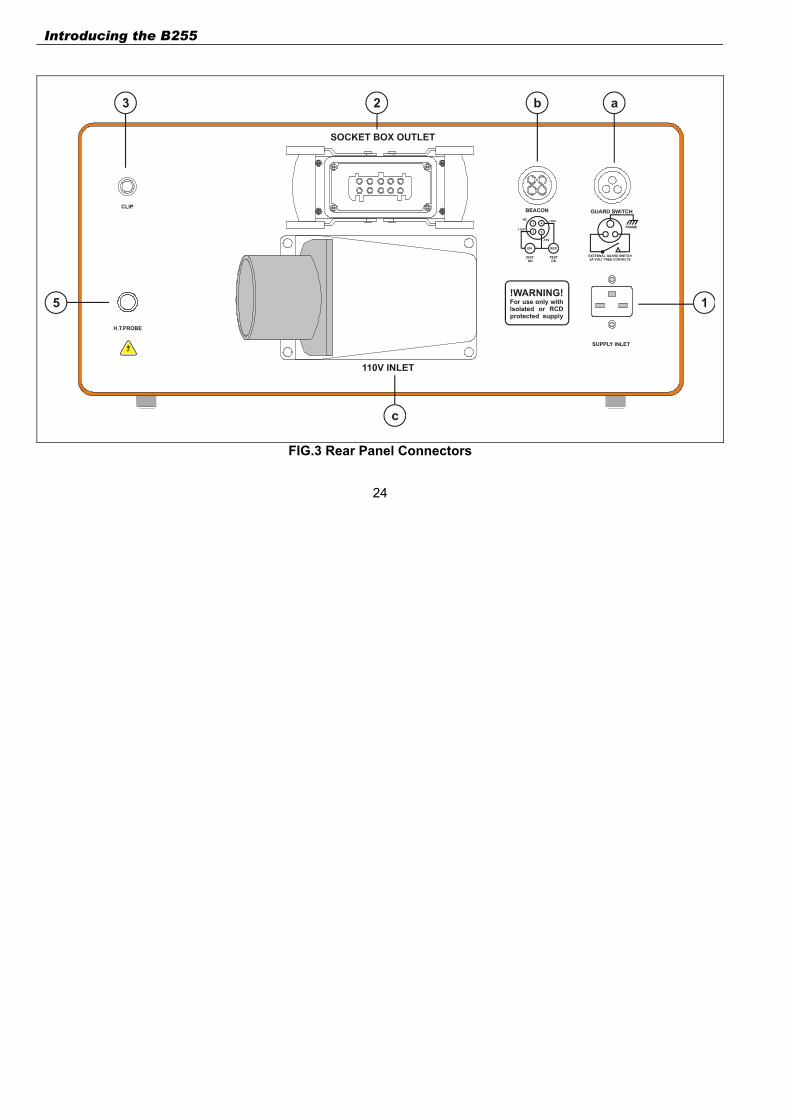
FIG.3 Rear Panel Connectors

Introducing the B255
Rear Panel Connections The various connectors shown in the illustration opposite are numbered, where appropriate, to correspond with the accessories described on the preceding pages – other connectors are described below. a. Guard / Safety Switch – used to connect the guard (door) switch from the Test Area barrier or other external
safety interlock system – a mating plug top is supplied for wiring purposes. Switch contacts must be normally open, closing to start, and be volt-free but with a minimum rating of 2A / 24Vd.c.
As an alternative to the guard switch, a remote, manually operated Safety switch can be supplied as an optional accessory. Where no guard or safety switch is to be used, a shorting link must be wired across the contact terminal pins.
b. Beacon Port – this socket can be used to connect any standard Green / Red, 2 lamp, safety beacon fitted
with 24V 5W bulbs. The mating plug should be wired in accordance with the adjacent wiring diagram on the label. The beacon provides a visual indication of instrument status – Green light shows that the instrument is switched ON, with power on and safety interlock closed, and ready for test application. The Red light shows that a test is being applied.
A pre-wired status beacon can be supplied as an optional extra.
c. 110V / 32A Inlet – when applying Earth Leakage or Load Current tests to 110V industrial equipment, an external supply source is required. Any standard, single-phase, 240 / 110V safety-isolating transformer can be used, provided that it has a VA rating to suit the product(s) to be tested.
25

Introducing the B255
26

4.Set-Up Procedures
27

Set-Up Procedures
28
FIG.4 Suggested Test Area

Set-Up Procedures
The Test Area Appliance testing can be hazardous and various common sense precautions must be observed.
NEVER COME INTO BODILY CONTACT WITH AN APPLIANCE BEING TESTED. Ensure that the ‘test area’ is clearly defined and offers limited access to persons other than the ‘tester’. At the same time it is advisable to have somebody else in the near vicinity who can give assistance should anything go wrong. Ensure that the appliance to be tested is on an insulated workbench – never use a metal bench – a robust wooden bench with a securely fitted rubberised worktop is best. The floor surface of the test area should also be insulated with rubber matting to provide protection to the operator and to permit larger equipment to be stood on the floor for testing. Walls and partitions should also be made of insulating materials. Arrange the test bench so that test instrument controls can be operated without having to reach over or lean across the tool or appliance during testing. This is particularly important when testing motorised equipment such as drills and lawn mowers etc. Ensure adequate warning to others that testing is in progress. The B255 is fitted with a beacon port, which can be used to drive a standard, 2 lamp, beacon (available as an optional extra). If used, this should be sited so that it can be clearly seen by other people in the immediate vicinity of the test area. It is recommended that the supply sockets in workshops and especially those used in any ‘test area’, are protected by an Earth Leakage Circuit Breaker.
29

Set-Up Procedures
30
Ensure that the person responsible for testing is competent and fully trained in both the general principles of Safety Testing and the correct use of the required test instruments, or is closely supervised by someone of the required competence. Never leave an appliance connected to the test set when un-attended. Always check that the intended test is suitable for the appliance – if the Class II (Double Insulated) symbol is not clearly visible the appliance must be assumed to be of Class I (Earthed) construction. Some ‘electronic’ equipment may not be constructed to withstand the high current ‘earth bond’ or high voltage ‘flash’ tests applied by this instrument. IF IN DOUBT refer to the appliance manufacturers recommendations or seek qualified advice. Instrument Wiring and Connections Site the instrument in accordance with the General Guidance Notes, and other recommendations elsewhere in this Manual, and to satisfy operator safety and ease of use. Connect the Test Output box to the rear-mounted outlet on the instrument and site the connector box within the test area for easy access. Wire your Guard Interlock / Safety switch circuit to the input socket on the rear panel, using the plug top supplied – if no safety interlock is to be employed, the plug must be fitted with a shorting link, otherwise the instrument won’t work.
Set-Up Procedures
Wire your status beacon to the Beacon Port on the rear panel, again using the mating plug top supplied. Position the beacon so that it can be clearly seen outside the test area. To fully test 110V products, connect the output lead from your external 240 / 110V isolating transformer into the 110V Inlet connector on the rear panel of the instrument. Connect the Earth Return clip lead and Flash test probe into their respective sockets on the rear panel. It is recommended that provision is made, within the test area, for storage of the clip and probe when not in use – rather than just leave them thrown down on the bench top. Instrument Set-Up Ensure that the rotary Test Selector switch is set to either STANDBY position. Connect the supply lead into the Supply socket on the back of the instrument and connect to an Earthed, 230V 50Hz, supply outlet. It is recommended that the outlet to be used is protected with an Earth Leakage Circuit Breaker. Switch on the instrument by firmly depressing the green button on the front mounted SUPPLY switch, the green button will light and, if the status beacon is connected, the green beacon lamp will also light to warn that the test set is powered up. The following set-up procedure may need the use of a small, flat bladed, screwdriver. Ensure that the green Earth Return clip lead is isolated (not clipped to anything) and set the rotary Test Selector to EARTH TEST.
31

Set-Up Procedures
32
Close the Guard switch, the red beacon light will come on to warn that a test is about to be applied. Depress the white PRESS TO TEST button and watch the pointer on the panel meter. It should move up scale (to the right) and come to rest on the INF. mark - if it does, no adjustment is necessary. Release the test button. If the meter pointer doesn’t reach the INF. mark or overshoots it, keep the test button depressed and use a small, flat-bladed, screwdriver to adjust the SET INF. control (see FIG.1 Item 2 on page 20) until the pointer is correctly set. Release the test button. Reset the test selector to the STANDBY position. The test set is now ready for test application.

5.Test Application
33
Test Application
Visual Inspection Before applying any electrical tests a thorough visual inspection of the appliance must be carried out. This may well form the greater part – 75% or more – of any test routine. Casing Check for signs of undue wear, cracks or dents missing components such as guards, covers or hand grips etc. Ensure that all screws and catches are present and secure. Check for evidence of excessive dirt build-up, especially in and around any ventilation slots. Also ensure that that all movable guards operate smoothly. Supply Lead Check for any signs of damage or fraying along the entire length. This should also include any extension lead that may be regularly used with the appliance. Ensure that any cable entry or connector is sound and secure. Plugs and Fuses Thoroughly check plug tops for damage and ensure that all wires are correctly connected. Ensure that cable grips and strain relief bushes are properly secure. 34

Test Application
Check that the correctly rated fuses are fitted – even a 5A fuse fitted in place of a recommended 3A fuse may give rise to a potentially dangerous fault condition. Switches and Function Selectors Ensure that all switches, including rotary selector devices, operate smoothly and in the expected manner. Set supply switches to the ON position in preparation for the Safety Test. Multi-function appliances, such as a two heat/two speed heater, will require testing in each operating mode. Any fault or irregularity found by the visual inspection must be corrected BEFORE electrical testing is carried out.
35

Test Application
Electrical Safety Tests – General Remember –
ELECTRICAL SAFETY TESTING CAN BE DANGEROUS ENSURE THAT YOU ARE AWARE OF ALL POTENTIAL HAZARDS
Plug the power cord of the product to be tested into the appropriate 230V/13A or 110V/16A socket on the Test Output Box. Various other test socket combinations can be supplied as optional extras or, alternatively, adaptors to convert the relevant socket to suit other equipment plug styles can be used if required. If intending to apply Earth Leakage and Load (Run) tests to 110V equipment, ensure that a suitable external 110V safety isolating supply is connected to the 110V/32A Inlet on the back panel of the test set. The B255 is mainly intended for single phase equipment but can be used for applying the Safety tests (Earth and Flash) to 3 phase equipment using appropriate adaptors, however this instrument CANNOT be used to apply the Leakage and Load (Run) tests to 3 phase equipment. Earthed (Class I) Equipment Earth Test Set the Test Selector to the Earth Test position. Attach the green clip lead from the instrument to clean exposed metal on the appliance. Good connections are essential for accurate measurement and to prevent any high current sparks occurring when the test button is depressed. 36

Test Application
Depress and hold the PRESS TO TEST button for 5 seconds whilst observing the EC Ohms scale of meter. For most power tools and appliances, the meter reading will be below 0.1 Ohm (within the white zone). Readings up to 0.5 Ohms (within the orange zone) may be acceptable - particularly when supply leads up to 5 metres in length are included, although this may also be dependent on the cross-sectional area (csa) of the conductor being used. Readings in the red zone usually mean that the Earth wiring of the product is faulty and should be investigated further. Similarly, if the recorded readings show an increase in value from one routine test to the next, it may indicate a loose connection, corroded terminals or partially broken Earth wire. Again further investigation may be required.
ANY FAULTS MUST BE REPAIRED OR CORRECTED BEFORE CARRYING OUT OTHER TESTS WARNING The high Earth test current will cause a certain amount of self-heating, to both the appliance wiring and the test circuitry. To keep this within acceptable limits and prevent over-heating –
DO NOT APPLY EARTH TESTS FOR MORE THAN 5 SECONDS OR MORE THAN 2 TESTS PER MINUTE. NOTE - Where exposed metal parts do not form part of a continuous surface with all other exposed metal the Earth test must be repeated with the earth clip attached to each exposed metal surface in turn.
37
Test Application
Flash Test – Line+Neutral to Earth The supply switch of the tool or appliance must be in the ON position to ensure that all ‘live’ parts are included when applying a Flash test. For contactor or electronic start products refer to the Earth Leakage section. Set the Test Selector to -
1250V LN-E for most normal equipment. 500V LN-E for heavily suppressed equipment.
FLASH TESTING CAN BE HAZARDOUS – DO NOT TOUCH THE PRODUCT UNDER TEST
Depress the PRESS TO TEST button and observe the TEST RESULT lamps. The green FLASH PASS lamp should come on. If the red FLASH FAIL lamp glows and the audible alarm sounds, one of the following conditions is indicated – a) The insulation is unsatisfactory, permitting a leakage current in excess of the nominal 5mA at test voltage, b) A flash-over has occurred between the Earth path and one or other of the Line and Neutral paths; c) The presence of a high leakage suppression filter or high brightness neon in the supply circuit gives rise to a
total leakage current in excess of the nominal 5mA at test voltage. The appliance should be considered unsafe, clearly marked as such and withdrawn for full workshop investigation and repair. It must be FULLY re-tested following repair. 38

Test Application
NOTE Tools and appliances that fall into category ‘c’,and some heavy duty equipment, particularly the larger power tools - such as 2500W angle grinders etc., may have inherently higher leakages which require a pass level of up to 10mA at test voltage. If this is the case, and provided that the manufacturer advises testing this to a higher threshold, the 10mA Flash trip can be employed. WARNING Testing in this 10mA mode increases the hazard to the operator, remember -
DO NOT TOUCH THE ITEM UNDER TEST To apply the Flash Test using the increased trip threshold, first depress the red 10mA button and hold it in, then also depress the white PRESS TO TEST button for 5 seconds, in the normal way. The green FLASH PASS lamp should light. Release both buttons at the end of the 5 second test period. If the appliance still fails and the FLASH FAIL lamp and alarm come on, the product must be considered unsafe. It should be clearly marked to show this and withdrawn for full workshop investigation and repair. It must be FULLY re-tested again following repair.
39
Test Application
Double Insulated (Class II) Equipment This test requires the use of the safety Flash Test probe. This has a retractable tip which is exposed by depressing the red button on the handle. The supply switch of the tool or appliance must be in the ON position to ensure that all ‘live’ parts are included when applying a Flash test. For contactor or electronic start products refer to the Earth Leakage section. Ensure that the appliance is secured and positioned so as to allow access to the various test points. Flash Test – Line+Neutral to Probe Set the Test Selector to – 3000V LN-Probe for routine re-testing 3750V LN-Probe for repaired or reconditioned equipment
DO NOT ALLOW BODILY CONTACT WITH THE APPLIANCE, ITS SUPPLY LEAD OR THE FLASH PROBE TIP,
WHEN THE FOLLOWING TESTS ARE BEING APPLIED Depress and hold the PRESS TO TEST button and apply the Flash Probe tip to all exposed metal surfaces, screw heads, casing joints and around switches and cable entries. In short, anywhere on the outer surface of the product that may become ‘live’ if an internal fault was present, i.e. loose strands of wire touching exposed metal or poking through body mouldings etc.
40

Test Application
WARNING If, during testing, it becomes necessary to move the appliance for easier access to a test point –
REMOVE THE PROBE AND RELEASE THE TEST BUTTON FIRST. At each test point observe the TEST RESULT lamps, the green FLASH PASS lamp should be on, and remain on, to indicate that no flash-over has occurred at that point to which the probe tip is applied. If the Flash FAIL lamp and audible alarm come on, the insulation – between the Line or Neutral paths and the point of test – has failed to withstand the applied voltage. The appliance must be considered unsafe. It should be clearly marked to show this and withdrawn for full workshop investigation and repair. It must be FULLY re-tested following repair.
41

Test Application
Earth Leakage Test (Class 1 Earthed/Grounded Products) This test is intended as an alternative to the relevant Flash Test for equipment fitted with contactor, relay or low voltage ‘electronic’ start switching devices (often referred to as ‘dead mans handles’), i.e. typically those products that require the mains voltage to be present BEFORE any function switches can operate. WARNING During the following test, the equipment being measured will be in it’s normal operating state. Power tools and rotating machinery must be made safe BEFORE starting the test – ensure that portable equipment is properly secure and that any moving parts are adequately guarded to prevent damage or injury. Set the Test Selector to the Earth Leakage position and then depress & hold the LOAD TEST button. Now operate the product function switch(es) for normal running - the Earth Leakage current will be displayed on the 0-5mA (lower) scale of the meter. The leakage value must fall within the appliance manufacturer’s specifications or conform to other relevant standards – typical values are shown in the chart opposite. Release product switches and the LOAD TEST button as soon as a reading has been taken. 42

Test Application
Earth Leakage Test (Class 2 Double Insulated Products) This test is intended as an alternative to the relevant Flash Test for equipment fitted with contactor, relay or low voltage ‘electronic’ start switching devices (often referred to as ‘dead mans handles’), i.e. typically those products that require the mains voltage to be present BEFORE any function switches can operate. WARNING During the following test, the equipment being measured will be in it’s normal operating state. Power tools and rotating machinery must be made safe BEFORE starting the test – ensure that portable equipment is properly secure and that any moving parts are adequately guarded to prevent damage or injury. Set the Test Selector to the Earth Leakage position, connect the green clip lead to the green banana socket on the test output box. Attach the clip end to the accessible metal of the item under test. NOTE – do not connect the clip to any moving parts. Depress & hold the LOAD TEST button. Now operate the product function switch(es) for normal running - the Earth Leakage current will be displayed on the 0-5mA (lower) scale of the meter. The leakage value must fall within the appliance manufacturer’s specifications or conform to other relevant standards – typical values are shown in the chart opposite. Release product switches and the LOAD TEST button as soon as a reading has been taken.
43

Test Application
Typical Earth Leakage Values
Hand-held Tools
To BS EN 50144
Household Appliances
To BS EN 60335
Luminaires
To BS EN 60598
IT Equipment
To EN60950
Class I portable appliances 0.75mA 0.75mA 1.0mA 0.75mA
Class I stationary appliances - 0.75mA per kilowatt - 3.5mA
Class II appliances 0.25mA 0.25mA 0.5mA 0.25mA The values above are for guidance only, product specific values must be determined from manufacturer data.
44
Test Application
Load (Run) Current Measurement It is advisable to only apply a Load Test if the product has successfully undergone a Safety Test first. Check that the product to be tested is connected to the correct test output socket for the supply voltage required – 230V or 110V – and for 110V products, that a suitable external supply source is connected to the instrument. NOTE For 230V appliances the maximum permissible load current is 15A and for 110V equipment the maximum measurable current is 25A, provided that the external supply is suitably rated. ENSURE THAT THE APPLIANCE CANNOT MOVE AND IS ADEQUATELY GUARDED TO PREVENT ANY HAZARD BEING CAUSED BY OR TO MOVING PARTS OR HEATING ELEMENTS DURING THE APPLICATION OF THE TEST SUPPLY VOLTAGE. Set the Test Selector to any of the safety test ranges but NOT Earth Leakage. Depress & hold the LOAD TEST button and then operate the product - allow sufficient time for the product to reach a steady state condition and then read the current being indicated on the 0-25A, middle, scale of the meter. To improve readability of low current values (below 2.5A), also depress the 2.5A button to expand the readout range – the previous value is now multiplied by 10. The indicated value should be within the limits specified, by the manufacturer, for off-load operation.
45

Test Application
Fault Indication A zero current reading and non-operation of the product may indicate an open circuit Line or Neutral path – release the test button first and check that switches on the product operate correctly. If the switches appear to operate correctly, there may be a break in the supply lead and if this is the case any previous safety tests will be invalid. On the other hand, if any switches are not operating correctly they may well have been OFF during the safety tests, again creating an invalid test. In either case complete re-testing will be required once the problem has been resolved. A current in excess of the manufacturer’s specifications may indicate, among other things, a short-circuit heating element, out of balance field coil windings, tight bearings or even a tight gear train. A really serious fault, such as a short circuit, will trip the SUPPLY mcb on the instrument or external supply and may even blow supply fuses. Disconnect the appliance before re-setting the mcb and also check plug top and switch board fuses if the instrument SUPPLY lamp now fails to operate. All suspected faults must be investigated and corrected by qualified personnel and the product FULLY re-tested.
46

6.Instrument Integrity
47
Instrument Integrity
Calibration Regulatory authorities require that test instruments are re-calibrated at least annually. CLARE offer a full calibration service for this instrument, although any other suitably approved test establishment can be used. Operational Checks As well as the instrument undergoing annual, or more frequent, re-calibration by qualified personnel
THE USER MUST CHECK THE SAFETY TEST CIRCUITS AT REGULAR INTERVALS TO DETERMINE THE OPERATIONAL INTEGRITY
The B255 is supplied with a FAULT SIMULATOR (model Y250) specifically for this purpose. The simulator is designed for direct plug-in connection to the test output box using the 13A/230V Test Socket and, by applying the following series of simple check routines, can be used to check both Earth and Flash ‘Safety’ tests. It is recommended that such operational checks are carried out at least weekly, if not daily. NOTE The Y250 must be kept with the instrument at all times and should be included in the full calibration programme.
48

Instrument Integrity
Check Procedure – Earth Continuity Connect and set-up the Appliance Tester in the normal way and then plug the Y250 into the 13A test socket on the test output box. Attach the Earth Return clip lead, from the tester, across BOTH of the brass tags on the simulator so that they are shorted together – NOTE do not permanently short these tags by bending them together or creating a soldered link. Set the test selector to Earth Test, close the guard switch and depress the PRESS TO TEST push button for 3 seconds. The instrument meter should indicate a value of approximately 0.2 Ohms on the upper scale. Release the button. Check Procedure – Class I (LN-E) Flash Test Trip Leaving the clip lead attached to the Y250, select the 500V Flash test. Close the guard switch and depress the PRESS TO TEST button, the green FLASH PASS lamp should glow. Release the test button and select the 1250V Flash test. Depress the PRESS TO TEST button, the red FLASH FAIL lamp and the audible alarm must now come on. When satisfied that the above Class I check results are as required, disconnect and stow away the Earth Return clip lead.
49

Instrument Integrity
Check Procedure – Class II (LN-Probe) Flash Test Trip Bring out the Flash Probe in readiness for the next check. Select the 3750V Flash test, depress the PRESS TO TEST button and apply the tip of the Flash Probe to the plastic body of the simulator. The green FLASH PASS lamp must remain on. Apply the tip of the Flash Probe to the exposed metal in the small hole marked HT PROBE on the simulator. The red FLASH FAIL lamp and the audible alarm must come on. If the B255 fails to respond correctly to any of these Check Procedures it must be withdrawn from service for thorough investigation and correction by qualified personnel.
50

7.Additional Information
51

Additional Information
Useful Reference Material The following short list of British Standards, Legislative Documents and Guidance Notes is intended as a pointer to reference material that will assist in a greater understanding of the whys and wherefores of Electrical Safety Testing. References made to such documents within this Manual are for guidance and illustration only and as such are generalised interpretations of the spirit of the various regulations. If any conflict arises from the text of this Manual then the relevant Standards or Legislation must take precedence. Statutory Legislation – The Health and Safety At Work Act 1974 ISBN 0 10 543774 3The Electricity At Work Regulation 1989 ISBN 0 11 096635 XThe Plugs and Sockets (Safety) Regulation 1987 ISBN 0 11 076603 2 Health & Safety Executive Guidance Notes - Protection Against Electric Shock GS27Electrical Test Equipment GS38Electrical Testing HS(G) 13Memorandum on the Electricity at Work Regulations 1989 HS(R) 25The Safe Use of Portable Electrical Apparatus PM 32 British Standards - BS EN 2754 Construction of electrical equipment for protection against electric shock BS EN 50144 Hand-held electric motor-operated tools BS EN 60335-1 Safety of Household and similar electrical appliances 52
Additional Information
The British Standards Institute publishes an extensive list of other standards relevant to electrical equipment under the designation SL 26. Certain trade organisations and manufacturers also publish useful ‘how to’ guides and ‘Codes of Practice’ with particular emphasis on their member or customer requirements or product line. Useful Addresses
British Standards Institute Head Office 389 Chiswick High Road. LONDON. W4 4AL 0208 996 9001
Health and Safety Executive Information Centre St.Hughs Centre. Trinity Road. BOOTLE. Merseyside. L20 3QY 0870 154 5500
H.M. Stationary Office PO Box 276. LONDON. SW8 5DT 0870 600 5522
Hire Association Europe 2 Holland Road West. Waterlink. BIRMINGHAM. B6 4DW 0121 326 6677
For product specific information the product manufacturer is the best source of technical information relating to their product and routine re-testing procedures.
53

Additional Information
Training The Clare Training Department have formulated a variety of courses covering all aspects of Electrical Safety Testing – from choosing the right equipment, to safe test areas, to meaningful test application etc. Courses are generally designed to be held at the customer’s facility and include comprehensive course notes and practical demonstrations, with all trainees participating in ‘hands-on’ practical sessions. For full details please contact our Training Department.
54

