operating manual palm bladder scanner - emechmedical · to use an adapter which does not meet the...
TRANSCRIPT

Operating Manual
Palm Bladder Scanner
-PBS V3.1-
MCube Europe Ltd - Old Sarum - Salisbury-SP4 6EB

Operating Manual Palm Bladder Scanner PBS V3.1 MCube Europe Ltd. Salisbury - SP46EB v.01.10 - 2 -

Operating Manual Palm Bladder Scanner PBS V3.1 MCube Europe Ltd. Salisbury - SP46EB v.01.10 - 1 -
To ensure you use this device correctly and safely,
please read this manual before use.
Safety notices
1. This device is equipped with a special rechargeable lithium aggregation
battery. It has a power supply carrying capacity of 6300 mAh.
It can be (re)charged by an AC adapter and a mobile charger with an AC
220V ± 10% and 50/60 Hz input. Auxiliary power supply socket should only
be connected on recommendation by PTS Linkton. Do not use any other
charger or different voltage.
2. Regularly check the device power supply: if the power voltage is low the
device will not work normally. The device will self check on start up.
The screen will display: "Battery test ……Ok".
When the setup procedure is finished the battery capacity is shown at the
top of the screen in the right pictogram. (status bar)
Recharge the battery or use a spare battery of the same capacity when the
power supply is insufficient to operate.
3. Before switching on:
• connect the battery and close the cover of the battery cavity
• tightly fix the probe to the main unit

Operating Manual Palm Bladder Scanner PBS V3.1 MCube Europe Ltd. Salisbury - SP46EB v.01.10 - 2 -
4. Always ensure that there are no heavy objects on the device
especially the LCD screen.
5. Do not leave the device unattended when switched on.
6. After use, always turn off the power supply.
7. Do not drop the device or probe. The manufacturer cannot take any
responsibility for such damage. The crystal of the probe is especially
vulnerable and may break on impact if dropped.
8. Stop using the device immediately if any of the following abnormalities
occur;
• the device produces abnormal noise
• the device emits smoke
• over exposure of the brightness of the screen.
• short circuit of the unit
9. If AC-adapter is damaged, please contact manufacturer for replacement
or purchase a new adapter with standard GB9706.1-2007. Its output
parameter must accord with article no 2.9 in Chapter 2 (see page - 9 -).
To use an adapter which does not meet the requirements is dangerous.
Operating Manual Palm Bladder Scanner PBS V3.1 MCube Europe Ltd. Salisbury - SP46EB v.01.10 - 3 -
Caution
• installation must be implemented by a qualified person
• device operators must be trained and qualified
• the repair of the device must be carried out by PTS-Linkton technicians
or trained medical service engineers
• Avoid strong interference from other electromagnetic instruments
• Adjust time set before operation
• The system will be shut down automatically if no further operation
follows within 10 minutes

Operating Manual Palm Bladder Scanner PBS V3.1 MCube Europe Ltd. Salisbury - SP46EB v.01.10 - 4 -
Contents
Chapter 1 General page - 7 -
1.1 Features - 7 -
1.2 Applications - 8 -
1.3 Relevant marks - 8 -
1.4 Environmental test requirement - 8 -
Chapter 2 Technical specifications - 9 -
Chapter 3 System principles - 11 -
3.1 General principles - 11 -
3.1.1 Brief introduction of PBS - 11 - 11 -
3.1.2 System components - 12 -
3.1.3 Hardware components - 12 -
3.1.4 Embedded software system - 13 -
3.2 Device diagram - 15 -
Chapter 4 Keyboard control - 19 -
4.1 Keyboard - 19 -
4.2 Keyboard explanation - 19 -
Chapter 5 Environmental requirements - 20 -
5.1 Environmental requirements for use - 20 -
5.2 Requirements for device storage - 20 -
5.3 Transportation requirements - 21 -

Operating Manual Palm Bladder Scanner PBS V3.1 MCube Europe Ltd. Salisbury - SP46EB v.01.10 - 5 -
Chapter 6 Installation - 22 -
6.1 Unpacking and control - 22 -
6.2 Device installation - 22 -
6.2.1 Battery installation - 22 -
6.2.2 Probe installation - 22 -
Chapter 7 Device operation - 23 -
7.1 Preparation before switch on the device - 23 -
7.2 Switching on the device - 23 -
7.2.1 Explanation of check screen - 24 -
7.2.2 Function keys - 24 -
7.3 Main screen of system - 25 -
7.3.1 Explanation of illustrations of status bar - 25 -
7.3.2 Operation with main interface of system - 26 -
(Ready screen)
7.4 Scan screen - 26 -
7.4.1 Pre-scan (mode) screen - 26 -
7.4.2 Scan (mode) screen - 27 -
7.5 Scan result screen - 27 -
7.5.1 Grey-scale screen - 28 -
7.5.2 Grey scale screen (with red line outline) - 29 -
7.6 Arrow Guiding Location System - 30 -
7.7 Edit and / or save screen - 32 -
7.8 History screen - 33 -

Operating Manual Palm Bladder Scanner PBS V3.1 MCube Europe Ltd. Salisbury - SP46EB v.01.10 - 6 -
7.9 System reset / install screen - 35 -
7.10 Print scanned result - 41 -
7.11 Export data from your device to your PC - 41 -
7.12 Printer - 43 -
7.13 Battery (re)charging - 44 -
Chapter 8 Transportation and storage - 45 -
8.1 Transportation - 45 -
8.2 Storage - 45 -
Chapter 9 Maintenance and service guidance - 46 -
9.1 Probe maintenance - 46 -
9.2 Device maintenance - 47 -
9.3 Service guide - 47 –
Appendix 1 Caution for Polymer Lithium-ion battery - 48 -
Appendix 2 Note for testing the PBS (on a phantom) - 51 -

Operating Manual Palm Bladder Scanner PBS V3.1 MCube Europe Ltd. Salisbury - SP46EB v.01.10 - 7 -
Chapter 1 General
1.1 Features
The Palm Bladder Scanner PBS V3.1 ultrasound system is a portable non
invasive electronic device for measuring the bladder volume. It is small,
light weight and has a large TFT LCD screen display.
The device consists of an ultrasonic probe and a data processing system.
It has a Real-Time Pre-Scan function for an accurate bladder location.
It has an additional help function for finding the bladder; the Arrow Guiding
Location System (AGLS).
The colour display (TFT LCD) has 600 x 480 pixels; its measured results can
be printed out using a thermal printer or stored in a built-in flash-disk. The
measurement records which are stored on the flash-disk can be sent to a
computer through a USB cable interface. The device is battery powered.
The device is built strictly in accordance with the national standard
GB9706.1-2007 "Medical electrical equipment Part 1: General requirements
for safety" in its design and manufacture. The whole process of design,
production and sale is controlled by ISO13485:2003QMS. The internal power
supply the device has protection type: class 1, to prevent the risk of electric
shock and type: B for charging. Its performance is stable and reliable.
The device has a CE-mark.

Operating Manual Palm Bladder Scanner PBS V3.1 MCube Europe Ltd. Salisbury - SP46EB v.01.10 - 8 -
1.2 Applications
The device is used for measurement of human bladder volume.
The device measures bladder volume in a non invasive way for easy clinical
examination.
The device must not be used on burns, or scar tissue.
1.3 Relevant marks
USB interface Class II equipment
Probe B-mode application part
Printer Prevent splashing water
Prompt sound Attention to refer random files!
Alarm DC
Battery AC
1.4 Environmental test requirement
The environmental conditions for the device conform to the requirements of
GB/T 14710-1993 standard of Registered Product for Medical Equipment.
More environmental requirements in chapter 5 page - 20 -
IPX4

Operating Manual Palm Bladder Scanner PBS V3.1 MCube Europe Ltd. Salisbury - SP46EB v.01.10 - 9 -
Chapter 2 Technical specifications
2.1 Transducer freq: 2.6MHz
2.2 Scan method: Mechanical scan
2.3 Sway angle: 120°± 2°
2.4 Rotating angle: 180°± 2°
2.5 Scan depth: ≤140 mm
2.6 Display screen: 8.0 inches / 20.32 cm TFT colour LCD
2.7 Power supply for the device: internal battery of 6300mAh capacity
2.8 Battery control: capacity indicator and alarm for lower power
2.9 Recharge device:
power adapter: Input voltage: ~220V±10%;
output voltage: 7.4V ± 0.1V
2.10 USB interface: for saving data and upgrade software
2.11 Serial interface: for printer
2.12 Printer: prints micro characters, graphic and image, measured
volume in ml. and edited patient ID.
2.13 Screen display: 4 cross-section ultrasound images ,
measurement result, real-time date, time and hospital name
2.14 Patient record: memory for 100 data (records), including all scanned
pictures (12 pictures per patient)
2.15 Patient ID: 8 digits
2.16 Max. measurement: 999ml

Operating Manual Palm Bladder Scanner PBS V3.1 MCube Europe Ltd. Salisbury - SP46EB v.01.10 - 10 -
2.17 Measurement difference: ± 25%(when volume value ≤ 150ml)
Measurement difference: ± 15%(when volume value>150ml)
2.18 Selection of measurement location: A grey scale and black and
white window will give you clear information of the bladder position
during pre-scan function, prior to measuring
2.19 Measurement method: After pre-scan, the measurement will be
automatically shown after the “ scan” key is pressed once more.
2.20 Gender selection: for male and female
2.21 Language of interface: English
2.22 Dimensions (Shell size): 320 x 180 x 65 mm
2.23 Weight: 1.8 kg

Operating Manual Palm Bladder Scanner PBS V3.1 MCube Europe Ltd. Salisbury - SP46EB v.01.10 - 11 -
Chapter 3 System principles
3.1 General principles
3.1.1 Brief introduction about the PBS
The PBS is a medical device which operates with B-mode ultrasound
technology, a very high performance and ultra-modern computer technology.
The device consists of a unit and is connected to a probe. During the
pre-scan function, it easily and quickly detects the bladder area, the shape of
the bladder, the difference between the tissues by B-mode ultrasound
technology. The signal is processed and displayed on the TFT LCD screen;
so you see the angle of scanning, how much of the bladder has been
scanned; whether total or partial scanning has occurred and performance in
grey scale or in black and white.
After identifying the bladder, the scan button is pressed again and the
calculated volume of the scanned bladder is displayed in a view seconds.
In general: the device shows very quickly the location and measurement
result in ml. and gives the user the information needed.
After scanning the results are displayed in 4 planes (4 out of 12 planes) which
are coloured with a red line, to verify that the whole bladder has been
scanned.

Operating Manual Palm Bladder Scanner PBS V3.1 MCube Europe Ltd. Salisbury - SP46EB v.01.10 - 12 -
3.1.2 System components
The PBS consists of three parts; the hardware circuit, the embedded software
and the device housing (shell). This manual only includes the programming of
hardware circuit and the embedded software.
The hardware circuit is designed to allow for possible heat release (cooling
possibility) of the housing (device shell). Also the hardware circuit and
housing have effective electromagnetic compatibility and anti-interference
shielding.
3.1.3 Hardware components
The hardware circuit consists of an embedded micro-controller system,
B-mode transducer, B-mode signal processing module, B-mode signal A/D
conversion module, step-motor driving module, TFT LCD display system,
print system, keyboard input, high speed USB interface, and a power/battery
management system. Their composition is as follows: (see next page).

Operating Manual Palm Bladder Scanner PBS V3.1 MCube Europe Ltd. Salisbury - SP46EB v.01.10 - 13 -
Fig. 3-1: hardware framework
3.1.4 Embedded software system
For stability and ease of operation, the embedded software system is
specifically for the hardware structure. The software modules mainly include
B-mode ultrasonic-image data acquisition, image edge identification,
step-motor drive control, LCD drive, graphical menu display, printing,
power/battery management and USB data communication.
Its components are shown in Fig. 3-2 next page.

Operating Manual Palm Bladder Scanner PBS V3.1 MCube Europe Ltd. Salisbury - SP46EB v.01.10 - 14 -
Fig. 3-2: software modules structure

Operating Manual Palm Bladder Scanner PBS V3.1 MCube Europe Ltd. Salisbury - SP46EB v.01.10 - 15 -
3.2 Device diagram
The PBS V3.1 consists of a mainframe, ultrasonic probe and external thermal
printer.
1. The mainframe: the first screen after the device is switched on
Fig. 3-3: mainframe
Indicator lights
LCD screen
operating keys
3 7
2
1
1
2
4
3
5
7 6

Operating Manual Palm Bladder Scanner PBS V3.1 MCube Europe Ltd. Salisbury - SP46EB v.01.10 - 16 -
Probe connection PC connection Printer connection
Fig. 3-4: side view of the device
2. Probe: Fig. 3-5: probe
scan key
probe transducer
3 2 1

Operating Manual Palm Bladder Scanner PBS V3.1 MCube Europe Ltd. Salisbury - SP46EB v.01.10 - 17 -
3. Battery cavity
battery box
battery socket
Fig. 3-6: battery cavity
4. Back view of device
battery cover
screw bolts
for probe socket battery cover lock bolts for battery cover
Fig. 3-7: back cover of device

Operating Manual Palm Bladder Scanner PBS V3.1 MCube Europe Ltd. Salisbury - SP46EB v.01.10 - 18 -
5. Battery placement
battery Fig. 3-8: battery placement

Operating Manual Palm Bladder Scanner PBS V3.1 MCube Europe Ltd. Salisbury - SP46EB v.01.10 - 19 -
Chapter 4 Keyboard control
4.1 Keyboard
Fig. 4-1: keyboard
4.2 Key board explanation
Indicator light: indicating the present status
LCD screen: displaying images and result after measuring
POWER key: power switch
SCAN key: start of pre-scan function then of measurement
PRINT key: print control
▲ or ▼ and ◄ or► keys: direction control and functional shortcut
OK key: confirm and reset
1
2
3
4
5
6
7
1
2
4
3
5
7 6

Operating Manual Palm Bladder Scanner PBS V3.1 MCube Europe Ltd. Salisbury - SP46EB v.01.10 - 20 -
Chapter 5 Environmental requirements
5.1 Environmental requirements for use of the device
1. Environmental temperature range: + 5 C °~ + 40 C °
2. Relative humidity: ≤ 80%
3. Atmospheric pressure: 700 ~ 1060 hPa
4. Power supply of charger: AC 220V±22V, 50Hz±1Hz
5. Keep away from strong electric field, strong magnetic field and
high-voltage equipment
6. Use the socket from independent power supply net
7. As with all ultrasound equipment, subdued light improves the image clarity
in the operating room which should be clean, pollution free and quiet.
5.2 Requirements for device storage
1. The device should be stored in a room with a temperature of
+ 5 C ° ~ + 40 C °, relative humidity 0% ~ 80%, and sunlight should be
avoided.
2. Damage on the surface of the probe due to impact will affect
measurement results.
3. Avoid any external damage when carrying or storing

Operating Manual Palm Bladder Scanner PBS V3.1 MCube Europe Ltd. Salisbury - SP46EB v.01.10 - 21 -
5.3 Transportation requirements
1. The range of environmental temperature: -10 C° ~ + 55 C°
2. Relative humidity: ≤ 80%
3. Atmospheric pressure: 500 ~ 1060 hPa
4. The battery must be removed from the device and transported separately

Operating Manual Palm Bladder Scanner PBS V3.1 MCube Europe Ltd. Salisbury - SP46EB v.01.10 - 22 -
Chapter 6 Installation
6.1 Unpacking and control
Please check the device against the checklist supplied in the suitcase and
check if any damage is present after transportation, before installation as in
paragraph 6.2 described.
6.2 Device installation
6.2.1 Battery installation
Remove the two bolts on the back of the device, before opening the battery
cover (see Fig. 3-7). Place the recharged battery fully into the battery cavity
(see Fig. 3-8). Be sure that the battery is (re)charged and a good connection
is made before closing the cover. Be certain to push the cover lock in the
direction of the arrow (see Fig. 3-7).
Note: The device must be switched off before removing the battery.
Note: The two batteries supplied are already fully charged.
Note: (The first charge of battery will last 8 hours); recharging about 4 – 5
hours. (see for more information page - 44 -, Fig. 7-16)
6.2.2 Probe installation
Plug the probe in the probe socket which is located on the side of the device
(see Fig. 3-4) and fix by screwing the bolts (see Fig. 3-7).

Operating Manual Palm Bladder Scanner PBS V3.1 MCube Europe Ltd. Salisbury - SP46EB v.01.10 - 23 -
Chapter 7 Device operation
7.1 Preparation before switching on the device
1. Check that the battery is installed correctly and its cover is locked
2. Check that the probe is correctly connected
3. Check that the device is fixed correctly on a trolley or at another safe place
before operation
7.2 Switching on the device
Switch on the device by holding down the power key. The device will check
the capacity of the battery, printer connection, probe connection and memory
capacity. The results of this check are shown on the first screen.
Fig. 7-1: Checking screen after switching on the device
Notice: This screen will appear directly after switching on and self-check is successful or
you will be prompted by alarm if any item of self-check has failed.

Operating Manual Palm Bladder Scanner PBS V3.1 MCube Europe Ltd. Salisbury - SP46EB v.01.10 - 24 -
7.2.1 Explanation of check screen
Battery: OK shows the battery capacity is OK
Fail shows the battery capacity is low, needs to be recharged
Probe: OK shows the connection of probe is correct
Fail shows the probe is disconnected
Printer: OK shows the printer is available
Fail shows the printer is disconnected or out of paper
Memory: 100 % shows the maximum storage capacity
7.2.2 Function keys
While showing the self-check screen, two keys appear and
1. : you can enter the main screen of system by pressing “►” (right) if
one of the tests are failing. You will be prompted by an alarm.
You have 20 seconds to do this action, or the device shuts
down automatically.
When all (self check) tests are `OK` the main screen is appearing
automatically.
2 . : the device is shut down directly by pressing and holding down
the “Power” key.

Operating Manual Palm Bladder Scanner PBS V3.1 MCube Europe Ltd. Salisbury - SP46EB v.01.10 - 25 -
7.3 Main screen of system
Enter the main screen of system by pressing the direction key “►” once. The
main screen of system is shown in figure 7-2.
Fig. 7-2: Main screen of system
7.3.1 Explanation of illustrations of the status bar
USB probe printer sound alarm battery
normal / connection
problem / closed
Fig. 7-3: explanation of illustrations
status bar
Function navigation keys

Operating Manual Palm Bladder Scanner PBS V3.1 MCube Europe Ltd. Salisbury - SP46EB v.01.10 - 26 -
7.3.2 Operation with main interface of system (Ready screen)
1. Press direction key "▲" (up) for selecting gender. The icon of the gender
will change every time you press, to male or female
2. Press direction key "◄" (left) to enter history screen (browse)
3. Press OK / Menu key to enter the system menu (reset screen)
4. Press "SCAN" to enter pre-scan screen
7.4 Scan screen
7.4.1 Pre-scan (mode) screen
After pressing "SCAN" you enter pre-scan mode
Fig. 7-4: Pre-scan screen of system
During pre-scan, 4 real-time images are shown. The left images are in
grey-scale, the right images are in black and white. The pre-scan function is
to locate the bladder. It is important to get the complete bladder into the
scanning area. During pre-scan mode there is no volume measurement.
grey-scale black and white
- Put gel on the probe head
- Avoid air trapping in gel
- Put probe on abdomen and aim at bladder
- Point scan key on probe towards patients head

Operating Manual Palm Bladder Scanner PBS V3.1 MCube Europe Ltd. Salisbury - SP46EB v.01.10 - 27 -
7.4.2 Scan (mode) screen
Press "SCAN" again and you will enter the scan-mode
Fig. 7-5 A: scanning screen of system
Notice:
Do not press any function keys whilst scanning. The duration of scanning is
± 6 seconds. It is important to keep the probe in a fixed position during the
scanning period. After scanning and calculation the system will show the
results directly in a new screen.
Fig. 7-5 B: calculation screen of system
Means first of twelve planes.
You can chose 12 or 24 planes.
(see chapter 7.9 system reset / install)
Means first calculation
of first plane

Operating Manual Palm Bladder Scanner PBS V3.1 MCube Europe Ltd. Salisbury - SP46EB v.01.10 - 28 -
7.5 Scan result screen
7.5.1 Grey-scale screen
The scan result screen shows the current scan result.
Fig. 7-6: Scan result in grey scale screen (image 1-4)
After scanning the images are shown in three pages (4 images per page). The function keys shown are as follows: A: Fig. 7-7: B
Press "▲" key for next 4 images or to go back to previous images
Press "▼" to switch to 2-colour mode or back to grey-scale mode
Press "◄" to enter editing mode or saving mode
Press "►" to return to READY main screen. (see figure 7-2 main screen)
Max. scanned
result in this
patient
sequence
Current scan result

Operating Manual Palm Bladder Scanner PBS V3.1 MCube Europe Ltd. Salisbury - SP46EB v.01.10 - 29 -
7.5.2 Grey-scale screen (with red line outline)
Fig. 7-8: scan result in grey-scale screen with red line (image 1-4)
The total quantity of images are twelve frames separately displayed on three
pages. The result of volume measuring is shown on the right side above the
function keys. If the bladder is out of the circle, it means that it is partly out of
the scanning area. (see 7.6 next page)
You can also see that the images which are shown in black and white and
with a red line contour, are the same as the images shown in grey-scale.
Now you know that the scan result is accurate. If not you should scan again.
Note: "For more accurate measurement, the area of the bladder with red line
contour should be the same as the area of the bladder in grey-scale."
The function keys are working in the same way in both image displays
(grey-scale and black and white).
You can print the current images or the measurement by pressing the
"PRINT" key on front of the panel.

Operating Manual Palm Bladder Scanner PBS V3.1 MCube Europe Ltd. Salisbury - SP46EB v.01.10 - 30 -
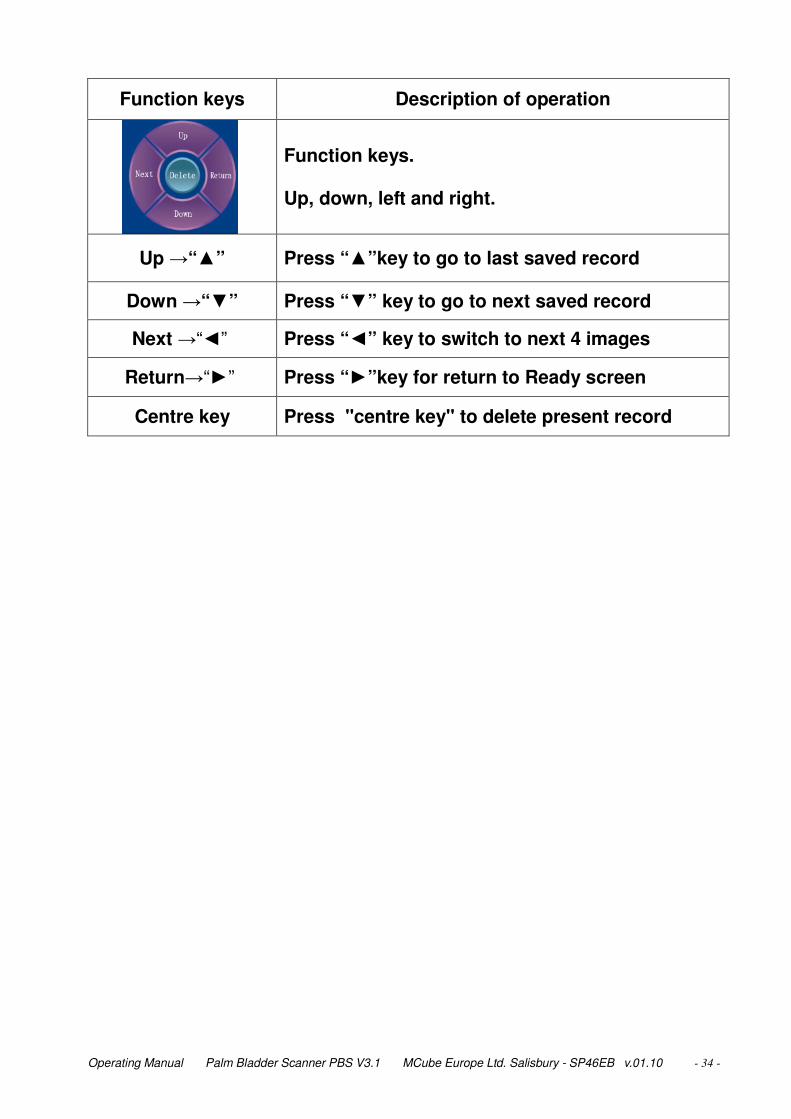
Function keys Description of operation
Function keys. Up, down, left and right.
Next →“▲” Press “▲”key to switch each of four images
Switch →“▼” Press “▼” key to switch between grey scale image mode and black and white image mode.
Save/edit →“◄” Press “◄” key to enter edit/save screen.
Return→“►” Press “►”key for return to Ready screen.
7.6 Arrow Guiding Location System for locating the bladder
Hold the scan key side (see fig. 3-5 page 16) of your probe in the direction of
the patients head. (This mode will not operate on a phantom)
Place the probe on the abdomen, just above the pubic bone towards the
bladder at about a 30°- 60° angle. When you press the "Scan" key the scan
result will be checked by the "Arrow Guiding Location System" and if
necessary the system will give an arrow showing how to improve your aim.
The red arrow in figure 7-9 (1-8) shows where to aim.
Fig. 7-9 .1 move to down-left Fig. 7-9 .2 move to down-right

Operating Manual Palm Bladder Scanner PBS V3.1 MCube Europe Ltd. Salisbury - SP46EB v.01.10 - 31 -
Fig. 7-9 .3 move to up-left Fig. 7-9 .4 move to up-right
Fig. 7-9 .5 move probe head down Fig. 7-9 .6 move probe head up
Fig. 7-9 .7 move probe head to the left Fig. 7-9 .8 move probe head to the right

Operating Manual Palm Bladder Scanner PBS V3.1 MCube Europe Ltd. Salisbury - SP46EB v.01.10 - 32 -
7.7 Edit and / or save screen
Fig. 7-10: edit and / or save screen
When you have scan result screen Fig. 7-6 page 28 or Fig. 7-8 page 29,
press "◄" key to enter edit and / or save mode. Use "▲", "▼", "◄" or "►" key
to select a character. A selected character will be highlighted in white.
After selection press "OK" key to confirm. The selected character will be
displayed at the ID-bar. Use "PRINT" key on front panel to save editing. It will
take 5 seconds. Use "SCAN" key on front panel to return to READY screen if
you do not want to save the record (fig.7-2 main screen).
Note:
1. The maximum number of characters you can use for patient-ID is 8.
2. There is no need to fill in gender as system registers it automatically after
your gender selection prior to pre-scanning
3. Do not use any function key during saving period.
Bladder

Operating Manual Palm Bladder Scanner PBS V3.1 MCube Europe Ltd. Salisbury - SP46EB v.01.10 - 33 -
7.8 History screen
It is possible to browse through the history of (100) measured results.
1. In the READY screen (fig.7-2 main screen) you press "◄" key to enter this
mode(Browse key)
2. The contents of the record will be shown; patient-ID, gender, measured
bladder volume in ml. and 12 images/frames in three pages. (Fig. 7-10)
3. The images can only be shown in grey scale.
4. Press "PRINT" to print selected record.
5. Press "OK" key to delete selected record.
6. After selecting a record and deleting, the next record in order will be
displayed.
7. Note: Only image no.1 and 2 (unless you installed another number),
measured volume, patient-ID and gender will be printed out in black and
white.
Fig. 7-11: History / Browse screen
Bladder
Operating Manual Palm Bladder Scanner PBS V3.1 MCube Europe Ltd. Salisbury - SP46EB v.01.10 - 34 -
Function keys Description of operation
Function keys. Up, down, left and right.
Up →“▲” Press “▲”key to go to last saved record
Down →“▼” Press “▼” key to go to next saved record
Next →“◄” Press “◄” key to switch to next 4 images
Return→“►” Press “►”key for return to Ready screen
Centre key Press "centre key" to delete present record
Operating Manual Palm Bladder Scanner PBS V3.1 MCube Europe Ltd. Salisbury - SP46EB v.01.10 - 35 -
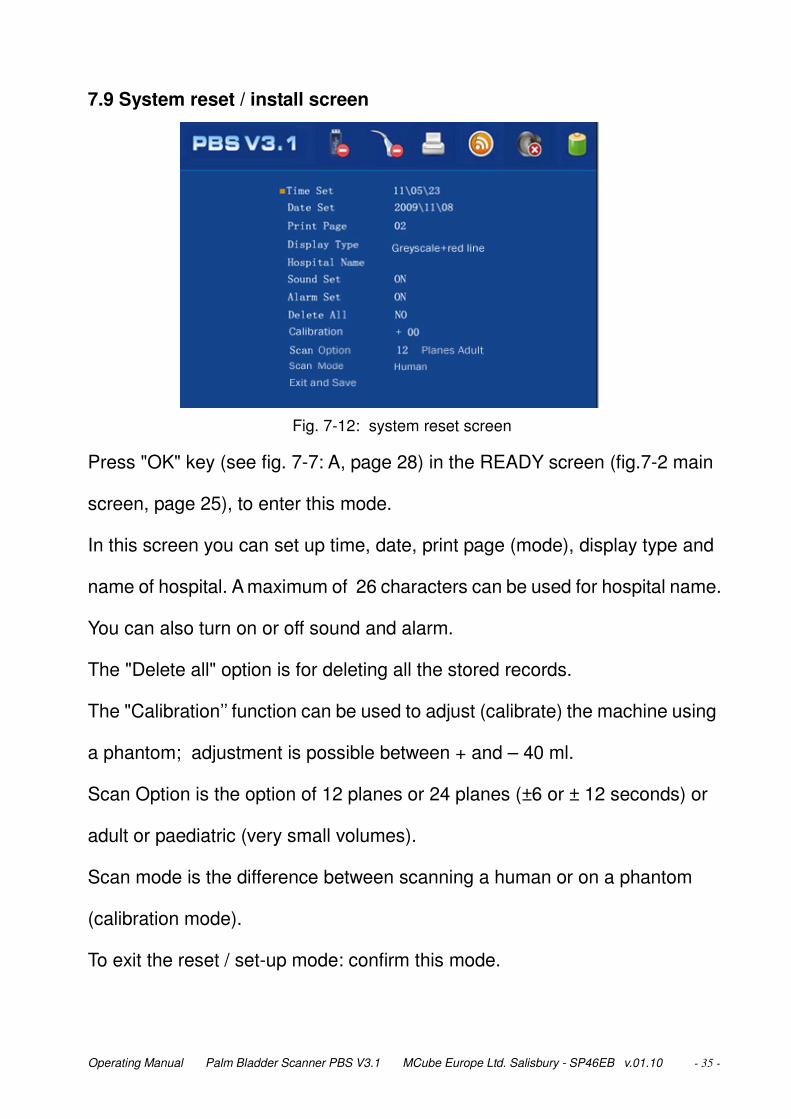
7.9 System reset / install screen
Fig. 7-12: system reset screen
Press "OK" key (see fig. 7-7: A, page 28) in the READY screen (fig.7-2 main
screen, page 25), to enter this mode.
In this screen you can set up time, date, print page (mode), display type and
name of hospital. A maximum of 26 characters can be used for hospital name.
You can also turn on or off sound and alarm.
The "Delete all" option is for deleting all the stored records.
The "Calibration’’ function can be used to adjust (calibrate) the machine using
a phantom; adjustment is possible between + and – 40 ml.
Scan Option is the option of 12 planes or 24 planes (±6 or ± 12 seconds) or
adult or paediatric (very small volumes).
Scan mode is the difference between scanning a human or on a phantom
(calibration mode).
To exit the reset / set-up mode: confirm this mode.

Operating Manual Palm Bladder Scanner PBS V3.1 MCube Europe Ltd. Salisbury - SP46EB v.01.10 - 36 -
System reset / set-up;
Time Set: For time setting, the format is HH\MM\SS.
1. Press "OK" key in the READY screen, to enter this System reset mode.
2. Press “▲” or “▼” key to move cursor “■” to this item.
3. Press "OK" key, HH display will underline, press “▲” or “▼” key for
adjusting.
4. Press “◄” or “►” key; the underline will move in HH, MM, SS.
5. Press "OK" key, the cursor “■” will move to the front of adjusted item.
Date Set: For setting date of system, the format is yyyy/mm/dd.
1. Press "OK" key in the READY screen, to enter this System reset mode.
2. Press “▲” or “▼” key to move cursor “■” to this item
3. Press "OK" key, yyyy display will underline, press “▲” or “▼” key for
adjusting.
4. Press “◄” or “►” key; the underline will move in yyyy, mm, dd.
5. Press "OK" key, the cursor “■” will move to the front of adjusted item.
Print Page: Two (up to 24) images can be printed.
Note: when you have selected scan page with 24 planes, it is possible to
select all the 24 images for printing. If you have selected scan page with 12
planes, it is still possible to print 24 images, but number 13-24 will be black.
It always starts with image 1 and 2 and the number of images you selected.
(If you selected 10 images it will be number 1 till 11, or when you selected 16

Operating Manual Palm Bladder Scanner PBS V3.1 MCube Europe Ltd. Salisbury - SP46EB v.01.10 - 37 -
it will be number 1 till 17).
1. Press "OK" key in the READY screen, to enter this System reset mode.
2. Press “▲” or “▼” key to move cursor “■” to this item.
3. Press "OK" key, the page numbers will display with underline.
Press “▲” or “▼” key to select what you want to print between 02, 04, 06,
08, 10, 12, 14, 16, 18, 20, 22 or 24.
4. Press "OK" key , the cursor “■” will move to the front of adjusted item.
Display Type: Image display mode for selecting;
a. grey scale image or b. grey scale image with a red line contour.
Note: This can be selected for showing the images after scanning, not for
pre-scan mode or printing.
"Grey scale" means that the scan results will be shown just in grey scale.
"Grey scale + red line" means that the scan results will be shown directly in
grey with a red line contour.
1. Press "OK" key in the READY interface, to enter this System reset mode.
2. Press “▲” or “▼” key to move cursor “■” to this item.
3. Press "OK" key, the mode display will underline in Grey scale or
Grey scale + red line, selection.
4. Press "OK" key, the cursor “■” will move to the front of adjusted item.
Hospital Name: Edit your Hospital name. (up to 26 characters)
1. Press "OK" key in the READY screen, to enter this System reset mode.

Operating Manual Palm Bladder Scanner PBS V3.1 MCube Europe Ltd. Salisbury - SP46EB v.01.10 - 38 -
2. Press “▲” or “▼” key to move cursor “■” to this item.
3. Press "OK" key to enter edit screen for entering hospital name.
4. Press SCAN key to auto-save and return to System reset screen after
editing hospital name.
5. Press "OK" key, the cursor “■” will move to the front of adjusted item.
Sound Set: On / Off set-up for key-press sound
1. Press "OK" key in the READY screen, to enter this System reset mode.
2. Press “▲” or “▼” key to move cursor “■” to this item.
3. Press "OK" key, On or Off display will underline, press “▲” or “▼”
for selection.
4. Press "OK" key, the cursor “■” will move to the front of adjusted item.
Alarm Set: On / Off set-up for system alarm
1. Press "OK" key in the READY screen, to enter this System reset mode.
2. Press “▲” or “▼” key to move cursor “■” to this item.
3. Press "OK" key, On or Off display will underline, press “▲” or “▼”
for selection.
4. Press "OK" key, the cursor “■” will move to the front of adjusted item.
Delete All: Delete all records in memory (NO/YES)
1. Press "OK" key in the READY screen, to enter this System reset mode.
2. Press “▲” or “▼” key to move cursor “■” to this item.

Operating Manual Palm Bladder Scanner PBS V3.1 MCube Europe Ltd. Salisbury - SP46EB v.01.10 - 39 -
3. Press "OK" key , the cursor “■” will move to “No”, default “No” without
operation. Press“▲” or “▼” to select “YES”, then select "OK" key, the
system will display “ Formatting. Please Wait! ”. The operation is finished
when the system display shows "Formatting completed!"; that means that
all records have been deleted before returning to System reset screen
automatically.
4. Press "OK" key, the cursor “■” will move to the front of adjusted item.
Calibration = Fine tuning: use to optimize measurements by calibrating
the device using a phantom. (+ or - 40 ml max.)
1. Press "OK" key in the READY screen, to enter this System reset mode.
2. Press “▲” or “▼” key to move cursor “■” to this item.
3. Press ‘’OK” key to move cursor “■” to either + or – It will be underlined
without making any changes. Press “▲” or “▼” key to select one, then
press ‘’►‘’ key, the number will be underlined. Now change the number
by pressing either the “▲” or “▼” key to increase or decrease.
After measurement on the phantom using the centre holder this number
can be changed to gain more accuracy in measurement.
This parameter can only be changed after several measurements on the
same phantom with an equivalent result in volume.
After adjustment proceed to step 4.
For the complete calibration, read our "Calibration Procedure for PBS".
4. Press "OK" key, to move cursor “■” to the beginning of the adjusted line.

Operating Manual Palm Bladder Scanner PBS V3.1 MCube Europe Ltd. Salisbury - SP46EB v.01.10 - 40 -
Scan Page: You can choose a scanning method of 12 planes (± 6 seconds)
which is the traditional way of scanning, or for a scanning method of
24 planes which will take double the time (± 12 seconds) but is even more
accurate. Adult or paediatric (very small volumes).
1. Press "OK" key in the READY screen, to enter this System reset mode.
2. Press “▲” or “▼” key to move cursor “■” to this item.
3. Press ‘’OK” key to move cursor “■” to either 12 or 24. It will be underlined
without making any changes. Press“▲”or“▼” key to select the other number.
4. Press "OK" key, to move cursor “■” to the beginning of the adjusted line.
Scan mode: Choose Human if you want to scan on patients or Phantom if
you want the calibration mode.
1. Press "OK" key in the READY screen, to enter this Scan mode.
2. Press “▲” or “▼” key to move cursor “■” to this item.
3. Press ‘’OK” key to move cursor “■” to either Human or Phantom.
4. Press "OK" key, to move cursor “■” to the beginning of the adjusted line.
Exit Setup: Exit from reset / set-up and return to Ready screen.
1. Press “▲” or “▼” key to move cursor “■” to this item.
2. Press "OK" key to exit system reset/set-up mode.
Operating Manual Palm Bladder Scanner PBS V3.1 MCube Europe Ltd. Salisbury - SP46EB v.01.10 - 41 -
7.10 Print scanned result
There are two modes for printing the scanned result.
1. The first option is “Scanned record printing”. That is to print the record
directly after scanning. You are printing the scanned and measured data
and the black and white image. The patient-ID (name) is empty.
2. The second option is “Historical record printing”. Here you can print the
saved records and the black and white image. You browse through the
saved records in the "Browse screen", after the user saved the record.
(see for more information 7.8 History screen, page - 33 -)
The edited details or patient-ID (name) will be displayed and printed in
the record.
Note: Please refer to "Print Page" set-up item under "System reset"
screen for the quantity of black and white images which will be
printed out (page - 36 -).
7.11 Export data from your device to your PC
It is possible to export the saved records/data to your PC through the USB
connection. The system builds a folder and stores 12 or 24 images in black
and white format and the patient information.
The system needs to enter this "USB connection mode" for transferring the
data to your PC.

Operating Manual Palm Bladder Scanner PBS V3.1 MCube Europe Ltd. Salisbury - SP46EB v.01.10 - 42 -
The procedure for transferring is as follows.
1. Shut down the power of your device. (PBS)
2. Connect your device and your PC with the USB-cable.
Connecting to the printer socket on your device
3. Switch on the power of your device.
4. Control the status bar. means that the connection is correct,
means a failed connection.
5. Look for a new found hard disc into your PC.
6. Open this new found hard disc and copy this folder to a designated place
on your PC.
7. Shut down the power of your device (PBS), after copying.
Disconnect the USB-cable and restart your device to get the normal
mode.
Note:
1. Make sure that the USB-connection is correct before switching on your
device.
2. Do not write or delete on this hard disc through your PC.
3. The memory (hard)disc of your device is a read-only mode.
4. Do not use your device (PBS) during the USB- connection. You have to
disconnect and restart your device first to get the normal operating mode.
5. This USB-connection can also be used for upgrading software.
This upgrading will be done by your supplier, and you will get an adjusted
operating manual.

Operating Manual Palm Bladder Scanner PBS V3.1 MCube Europe Ltd. Salisbury - SP46EB v.01.10 - 43 -
7.12 Printer
Your device (PBS) is equipped with an external thermal printer, build in a
cradle. The printer can be connected to the device through a USB-cable.
The system uses COM / communication mode for printing.
The COM set-up is as follows:
Baud rate : 19200bps Start bit: 1
Data bit : 8 Stop bit: 1
Parity bit : N/A Print direction : reverse printing
Connect your device with the printer and it will automatically be switched on.
Your device will test its connection to the printer (see also status bar).
Changing paper:
Fig: 7-13 Fig: 7-14 Fig: 7-15 Fig: 7-16
1. Open the printer as shown in Fig: 7-13 and Fig: 7-14
2. Pull out some paper and put the roll into the holder, see Fig: 7-15
3. Pull some paper out and shut the lid of the printer, see Fig: 7-16
4. The printer will not print if the paper is not placed in the right way

Operating Manual Palm Bladder Scanner PBS V3.1 MCube Europe Ltd. Salisbury - SP46EB v.01.10 - 44 -
7.13 Battery (re)charging
The battery re-charger consists of a charger and an AC-adapter.
Figure: 7-17: charger
1. Disconnect the AC adapter from power supply 220V
2. Plug in AC adapter into the socket of charger
3. Place the battery into the charger and be sure that the connection
between battery socket and battery, and the connection between adapter
and socket for charger is correct. (see Fig: 7-17)
4. Plug in the AC adapter into the power supply 220V for (re)charging the
battery. The indication light will light up (yellow). The first charge will take
8 hours and will have been carried out when you receive your device;
recharging about 4 – 5 hours.
5. When (re)charging is completed, the indication light (green) will light up
6. Disconnect the AC adapter from the power supply 220V again and
remove the battery
AC
Adapter Charger Power Supply
220V
battery socket of charger
charging completed
indication light
Socket for charger
Indication light
for charging

Operating Manual Palm Bladder Scanner PBS V3.1 MCube Europe Ltd. Salisbury - SP46EB v.01.10 - 45 -
Chapter 8 Transportation and storage
8.1 Transportation
The marks on the device packaging case conform to GB/T191-2008
"Packaging and storage Illustrated Marks" are requirements. The suitcase is
of a simple shockproof quality, suitable for transportation by air, rail, road and
sea. Rain, snow, immersion and collision should be avoided (see chapter 5.3
transportation requirements: page - 21 -)
8.2 Storage
If the device has been in its packaging for a period exceeding 6 months, it
must be removed and charged for 4 hours.
After charging re-insert it into its packaging following directions printed on the
casing and return to storage. Do not place the device one top of the other and
ensure no other heavy goods are placed on the device.
(See chapter 5.2 page - 20 -, for details about storage environment.
Good indoor ventilation is required; avoid strong sunlight, irradiation and
corrosive gases.

Operating Manual Palm Bladder Scanner PBS V3.1 MCube Europe Ltd. Salisbury - SP46EB v.01.10 - 46 -
Chapter 9 Maintenance and service guidance
9.1 Probe maintenance
1. The probe is the most fragile and costly part of the device; therefore
protect against dropping. When not in use, it should be placed back into
the case, unplug the probe, or put it in the opening at the side of the
trolley.
2. Care should be taken whilst using the probe.
3. Extra protection for the sound window's surface is necessary as the
slightest damage will effect the probe and shorten its life time.
4. The transmission gel should be of a neutral PH and should be of the
highest quality. Avoid trapping air in the gel as it will affect the picture
quality.
5. Clean the probe thoroughly in the way recommended by Infection Control.
6. The probe is not water proof but the connecting line of the probe window
is water resistant.
7. The probe's water resistance grade is : IP x 4.
8. Check daily or during the maintenance cycle:
a. the acoustic lens part of the probe (probe window) if it is
damaged, stop using immediately.
b. the probe cable and probe pin before use. If damaged do
not use the device.
Operating Manual Palm Bladder Scanner PBS V3.1 MCube Europe Ltd. Salisbury - SP46EB v.01.10 - 47 -
9.2 Device maintenance
1. When the device’s surface and screen needs to be cleaned, ensure it is
switched off.
2. Clean the surface and screen with a clean damp cloth. Do not use
organic liquid (ethanol, gasoline etc.) but a special screen cleaner.
Inappropriate cleaning will affect the definition of the screen, may change
the surface colour and affect its appearance as well as shorten its usable
life.
3. Ensure that no liquids can damage the device or enter any of the devices
panels.
9.3 Service guide
1. If your device malfunctions, ensure all connections are tight.
2. Ensure that the battery is charged.
3. If you are unable to resolve some malfunction yourself, contact your
distributor.
The following information should be provided:
a. Model and configuration.
b. Device and probe number and delivery date.
c. Detailed description of malfunction correctly describing all
information on the screen.
d. Whether it has been recently repaired; date of repair.

Operating Manual Palm Bladder Scanner PBS V3.1 MCube Europe Ltd. Salisbury - SP46EB v.01.10 - 48 -
Appendix 1
Caution for Polymer Lithium-ion battery
Handle with care:
1. Keep the battery in clean condition.
2. Avoid sharp objects in combination with the battery.
3. Do not perforate the battery.
4. Avoid dropping or any kind of impact to the battery.
5. Do not transport the battery with other metal objects.
Notice:
1. Battery charging:
In order to perform properly and securely and to avoid the battery
heating or leaking it is necessary that:
• the charger is charged with a constant current and pressure.
• the charging current of a single battery is below 1C5A during charging.
• the temperature range is 0 ~ 45 C°
2. Battery discharging:
In order to perform properly and securely the discharging must be
processed within the standard limits, to ensure that:
• the discharge current is less than 1C5A
• the temperature range is -20C° ~ 60C°
Operating Manual Palm Bladder Scanner PBS V3.1 MCube Europe Ltd. Salisbury - SP46EB v.01.10 - 49 -
3. Storage of Polymer Lithium-ion battery:
• The storage temperature must be:
within one month: -5C° ~ 45C°
within two months: -5C° ~ 35C°
within three months: 0C° ~ 45C°
• The humidity must be 45 ~ 75%
• Keep voltage between 7.2V ~ 7.8V
• The battery needs to be charged / discharged at least every 90 days, if in
long term storage without use, to keep the function correctly
• Keep the battery in a dry and cool place when stored for over three
months
4. Transportation of Polymer Lithium-ion battery:
• The battery must be transported under the condition of a Voltage of
7.2V ~ 7.8V
5. Other directions for Polymer Lithium-ion battery:
a. In order to prevent leakage, (over)heating and explosion, please pay
attention to the following:
• Do not disassemble/dismantle the battery under any circumstances
• Do not put into water. Keep dry
• Keep away from heat, such as fire or heater during (re)charging and
discharging
• Welding the battery is forbidden

Operating Manual Palm Bladder Scanner PBS V3.1 MCube Europe Ltd. Salisbury - SP46EB v.01.10 - 50 -
• Keep away from microwave or high pressure
• Do not use or place the battery in high temperature, direct sunshine,
overheated car etc. It can result in overheating, catching fire, reduced
function or shorten its life time
b. When used normally no leakage of fluid is possible. In case of contact
with electrolytes, wash with running water and inform your doctor.
c. Do not use damaged batteries.
d. Keep away from children.
e. The manufacturer cannot be held responsible for any damage of the
battery by misuse.

Operating Manual Palm Bladder Scanner PBS V3.1 MCube Europe Ltd. Salisbury - SP46EB v.01.10 - 51 -
Appendix 2
Note for testing the PBS (on a phantom).
For testing your device on a phantom please follow these instructions:
1. Please reset the gender mode to male mode after switching on the device.
2. Put the probe precisely in the middle of the phantom and keep it upright,
making sure it is exactly perpendicular.
3. Don't push to hard on the phantom. It should just touch the surface.
If the probe is not placed correctly in the middle of the phantom, the image
will not be correct and the distance between the top of the phantom area
and the top of the surface edge is too small (Picture: 1).
Picture: 1
The same problem can exist if you press too hard on the abdomen (just
above the pubic bone) to get the bladder in the scanning area.
This distance between top
area of phantom and edge
of scan area is too small.

Operating Manual Palm Bladder Scanner PBS V3.1 MCube Europe Ltd. Salisbury - SP46EB v.01.10 - 52 -
Most of the time it is better to look at the pictures during pre-scanning to see
of the bladder is complete and the distance between scan head and bladder
is as long as possible. (Picture: 2)
The measurement will be most accurate now.
Picture:2
As you can see the difference in scan result:
The contour (red line) of the bladder in picture 3 has been affected;
the contour of the bladder in picture 4 is complete and will be more accurate.
Picture: 3 Picture: 4
The right
distance