operating manual (english) - gfk etilize · operating manual control sheet*3 *1 image capture plus...
TRANSCRIPT

Model No. KV-S5076H
KV-S5046H
Operating Manual
Document Scanner
These instructions contain information on operating the scanner. Before reading these instructions, please read
the Quick Installation Guide enclosed with this unit.
Keep all documentation in a safe place for future reference.

IntroductionThank you for purchasing a Panasonic Document Scanner.
Feature HighlightsSuperior Paper Feeding• This scanner features an advanced paper-feeding mechanism that adjusts the pressure of the rollers and
the amount of time that the rollers are applied to the document according to the condition of the document.As a result, this scanner can scan a wide range of paper weights, from very thin 20 g/m² (5 lb.) paper tovery thick 157 g/m² (42 lb.) paper.
High-speed Double Sided Scanning• This scanner can scan documents at high speed, regardless of the image type (monochrome / color).
Single sided: 100 pages/minute, double sided: 200 images/minute (200 dpi, 300 dpi) for KV-S5076HSingle sided: 80 pages/minute, double sided: 160 images/minute (200 dpi, 300 dpi) for KV-S5046H* Speeds based on scanning A4 size paper in landscape orientation.
Support for High-efficiency Scanning Jobs• Self-cleaning function
This scanner has self-cleaning brushes that clean paper dust off of the scanning glass. The KV-S5076Halso contains an ionizer that, by emitting ions, reduces the amount of paper dust that accumulates on thescanning glass.
• Stapled document detection (KV-S5076H only)This scanner has a stapled document detection that detects documents that contain staples and stopsscanning before any serious damage occurs.
• Background color switch functionUsing the software, you can switch the background color of scanned images between white and black.
• Mechanical deskew (KV-S5076H only)In addition to adjusting skewed documents via the software (deskew), this scanner supports the mechanicaldeskew function that detects skew in documents before they are scanned, and adjusts the document usingthe feeding mechanism. With this function, you can reduce the various problems that arise from skeweddocuments.
• Double feed detection functionThis scanner contains ultrasonic sensors that detect double feeding. Double feeding can be detected evenif you scan documents that contain paper of various thicknesses.
• Double Feed Skip (DFS) functionIf scanning has been stopped because a double feed was detected, you can easily resume scanning bypressing the Skip button (SKIP). When you scan documents that include items that you do not want to bedetected as double feeding (for example, documents that have receipts attached, envelopes, etc.), thedouble feed detection function can be enabled and still scan these documents.
Other Features• You can set the left and right document guides independently. By doing so, you can reliably scan
documents of differing paper sizes.• The paper feed path can be opened widely to easily remove jammed paper and perform maintenance.• This scanner has a counter function which indicates the approximate time for cleaning and replacement
of the rollers. The counters can be configured and checked in User Utility.
2 Operating Manual
Introduction

About the DocumentationThe scanner documentation consists of 2 manuals: the Operating Manual (this manual), and the QuickInstallation Guide.
Operating Manual(this manual) This manual provides all information required to use the unit.
Quick Installation GuideThe Quick Installation Guide explains about safety precautions and otherimportant information, and outlines brief installation procedures of the unit andsoftware.
About the Software HelpEach software contains help files.For details about viewing the help files, see "To view the help" (page 22).
Software / Manual CD-ROM Contents
Drivers
Device Driver
TWAIN
ISIS
Applications Image Capture Plus*1
UtilitiesUser Utility
Scan Button Setting Tool
Documents*2Operating Manual
Control sheet*3
*1 Image Capture Plus is a Panasonic original application for configuring advanced scanning settings.*2 Each document is a PDF document. To view documents correctly, install Adobe® Reader®.*3 For details about the control sheet, see "Using Control Sheets" (page 42).
Operating Manual 3
Introduction

System RequirementsComputer IBM® PC/AT or compatible machine with a CD-ROM drive
CPU Intel® Core™2 Duo 1.8 GHz or higher
Interface USB 2.0 / USB 3.0
Note• For details about the system requirements, refer to [Read me first] in the Software / Manual CD-ROM.• The scanning speed differs depending on the host computer’s operating environment or the application
used.• Due to the slower speed of USB 1.1, it is recommended to use a USB 2.0 / USB 3.0 interface.• If you connect the unit to a USB hub, it is not guaranteed to work.
Abbreviations• Windows® refers to the Microsoft® Windows® operating system (hereafter Windows).• Windows® XP refers to the Microsoft® Windows® XP operating system (hereafter Windows XP).• Windows Vista® refers to the Microsoft® Windows Vista® operating system (hereafter Windows Vista).• The explanations and screen shots in this manual are based on the Windows 7 operating system.• The screen shots used in this manual may differ from the screens displayed on your computer.• The illustrations in this manual are based on the KV-S5076H.
4 Operating Manual
Introduction

Trademarks• Microsoft, Windows, Windows Vista, and Internet Explorer are either registered trademarks or trademarks
of Microsoft Corporation in the United States and/or other countries.• ISIS is a registered trademark or trademark of EMC Corporation in the United States and other countries.• IBM is a trademark of International Business Machines Corporation in the United States, other countries,
or both.• Intel and Intel Core are trademarks of Intel Corporation in the U.S. and other countries.• Adobe and Adobe Reader are either registered trademarks or trademarks of Adobe Systems Incorporated
in the United States and/or other countries.• All other trademarks identified herein are the property of their respective owners.
About Consumables and Optional AccessoriesConsumables and optional accessories available for this unit are as follows:n Consumables• Roller exchange kit (Part No.: KV-SS060)• Roller cleaning paper (Part No.: KV-SS03)• Ink cartridge (Part No.: KV-SS021)n Optional Accessories• Imprinter unit (Part No.: KV-SS014)
For details, see "Consumables and Optional Accessories" (page 60).
Operating Manual 5
Introduction
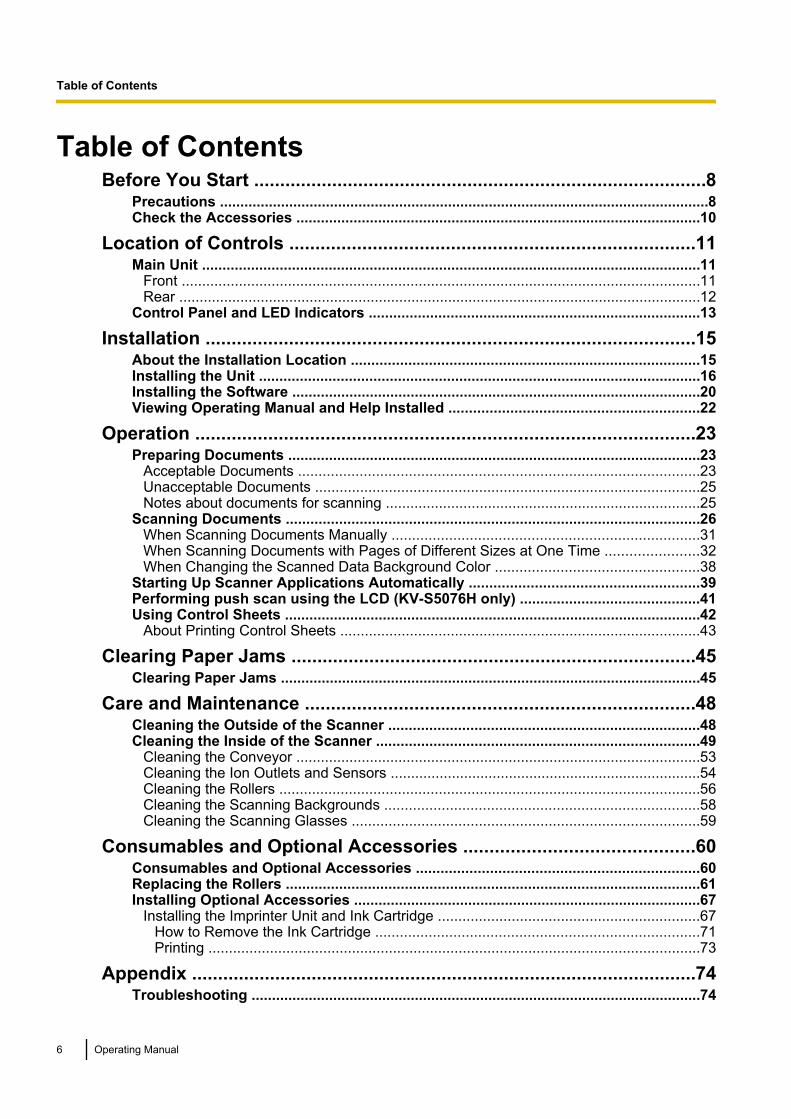
Table of ContentsBefore You Start .......................................................................................8
Precautions ........................................................................................................................8Check the Accessories ...................................................................................................10
Location of Controls ..............................................................................11Main Unit ..........................................................................................................................11
Front ...............................................................................................................................11Rear ................................................................................................................................12
Control Panel and LED Indicators .................................................................................13
Installation ..............................................................................................15About the Installation Location .....................................................................................15Installing the Unit ............................................................................................................16Installing the Software ....................................................................................................20Viewing Operating Manual and Help Installed .............................................................22
Operation ................................................................................................23Preparing Documents .....................................................................................................23
Acceptable Documents ..................................................................................................23Unacceptable Documents ..............................................................................................25Notes about documents for scanning .............................................................................25
Scanning Documents .....................................................................................................26When Scanning Documents Manually ...........................................................................31When Scanning Documents with Pages of Different Sizes at One Time .......................32When Changing the Scanned Data Background Color ..................................................38
Starting Up Scanner Applications Automatically ........................................................39Performing push scan using the LCD (KV-S5076H only) ............................................41Using Control Sheets ......................................................................................................42
About Printing Control Sheets ........................................................................................43
Clearing Paper Jams ..............................................................................45Clearing Paper Jams .......................................................................................................45
Care and Maintenance ...........................................................................48Cleaning the Outside of the Scanner ............................................................................48Cleaning the Inside of the Scanner ...............................................................................49
Cleaning the Conveyor ...................................................................................................53Cleaning the Ion Outlets and Sensors ............................................................................54Cleaning the Rollers .......................................................................................................56Cleaning the Scanning Backgrounds .............................................................................58Cleaning the Scanning Glasses .....................................................................................59
Consumables and Optional Accessories ............................................60Consumables and Optional Accessories .....................................................................60Replacing the Rollers .....................................................................................................61Installing Optional Accessories .....................................................................................67
Installing the Imprinter Unit and Ink Cartridge ................................................................67How to Remove the Ink Cartridge ...............................................................................71Printing ........................................................................................................................73
Appendix .................................................................................................74Troubleshooting ..............................................................................................................74
6 Operating Manual
Table of Contents

Error Messages (KV-S5076H only) ................................................................................77Shading Adjustment .......................................................................................................78Deleting Installed Software ............................................................................................79Repacking Instructions ..................................................................................................80Specifications ..................................................................................................................82
Index..............................................................................................................84
Operating Manual 7
Table of Contents
PrecautionsIllegal Duplication
It is unlawful to make duplication of certaindocuments.Duplicating certain documents may be illegal inyour country/area.Penalties of fines and/or imprisonment may beimposed on those found guilty. The following areexamples of items that may be illegal to duplicatein your country/area.
• Currency• Bank notes and checks• Bank and government bonds, and securities• Passports, licenses, official or private
documents, identification cards, and the like• Copyright materials, or trademarks without
the consent of the owner• Postage stamps, and other negotiable
instruments
This list is not inclusive, and no liability isassumed for either its completeness or accuracy.In case of doubt, contact your legal counsel.
NoticeInstall your machine near a supervised areato prevent illegal duplication from beingmade.
Installation• Do not place the unit in direct sunlight, in a cold
draft, or near heating apparatus.• Do not place the unit near apparatus which
generate electronic or magnetic noise.• Protect the unit from static electricity.• Do not move the unit immediately from a cold place
to a warm place. It may cause dew.
CD-ROM• Do not write or stick paper on the front and/or back
of CD-ROM.• Do not touch the data side of the CD-ROM. When
handling the CD-ROM, be careful not to leavefingerprints or otherwise damage the CD-ROM.
• Do not leave the CD-ROM where it is directlyexposed to sunlight or near a heater for extendedperiods.
• Do not throw or bend the CD-ROM.
8 Operating Manual
Before You Start
Before You Start

Roller Cleaning Paper• Keep the roller cleaning paper out of reach of small
children.• Do not store the roller cleaning paper in direct
sunlight or in a place with a temperature over40 °C (104 °F).
• Only use the roller cleaning paper to clean therollers and scanning glass.
• For details about the roller cleaning paper, pleaserefer to the Material Safety Data Sheet (MSDS).Please ask your Panasonic sales company aboutobtaining the Material Safety Data Sheet.
KEEP AWAY FROM FIRE.
Security NoticeThe management of documents and scanned data isthe responsibility of the user. In particular, pay attentionto the following points.• Make sure you have the same number of pages for
important documents both before and afterscanning, and take care not to leave any pages inthe scanner.
• Periodically back up important data.• When having your computer or hard disk serviced,
or when disposing of your computer or hard disk,completely erase any stored image data.
Others• Make sure to remove paper clips and staples from
documents before scanning. Failing to do so candamage the unit, document, or both.
• Do not use thinner, benzine, or cleaners containingabrasives or surfactants, for cleaning the outside ofscanner.
Operating Manual 9
Before You Start
Check the AccessoriesCheck that all accessories are included before installing the unit. In the event that an item is missing, pleasecontact your dealer.
Accessories Name Notes
Power cordTwo power cords may be included. Use thepower cord appropriate for where you use theunit.
USB cable —
Software /Manual CD-ROM Drivers, Applications, Utilities, Documents
Double feed prevention roller —
Exit support sheet —
Shading paper Use this paper when performing shadingadjustment.
Roller cleaning paper —
Quick Installation Guide —
Note• It is highly recommended to keep the original carton and all packing materials. They are necessary
when repacking.
10 Operating Manual
Before You Start

Main Unit
Front
7
1
2
3
4
5
8
9
10
11
126
Document guidesADF door releaseFeed extension trayDocument guides selectorExit guidesExit trayExit stoppersExit extension trayADF doorManual feed selectorSwitches the scanning method between continuous scanning (Auto) and manual scanning (Manual).Feed trayControl panelFor details, refer to "Control Panel and LED Indicators" (page 13).
Operating Manual 11
L
o
c
a
t
i
o
n
o
f
C
o
n
t
r
o
l
s
Location of Controls
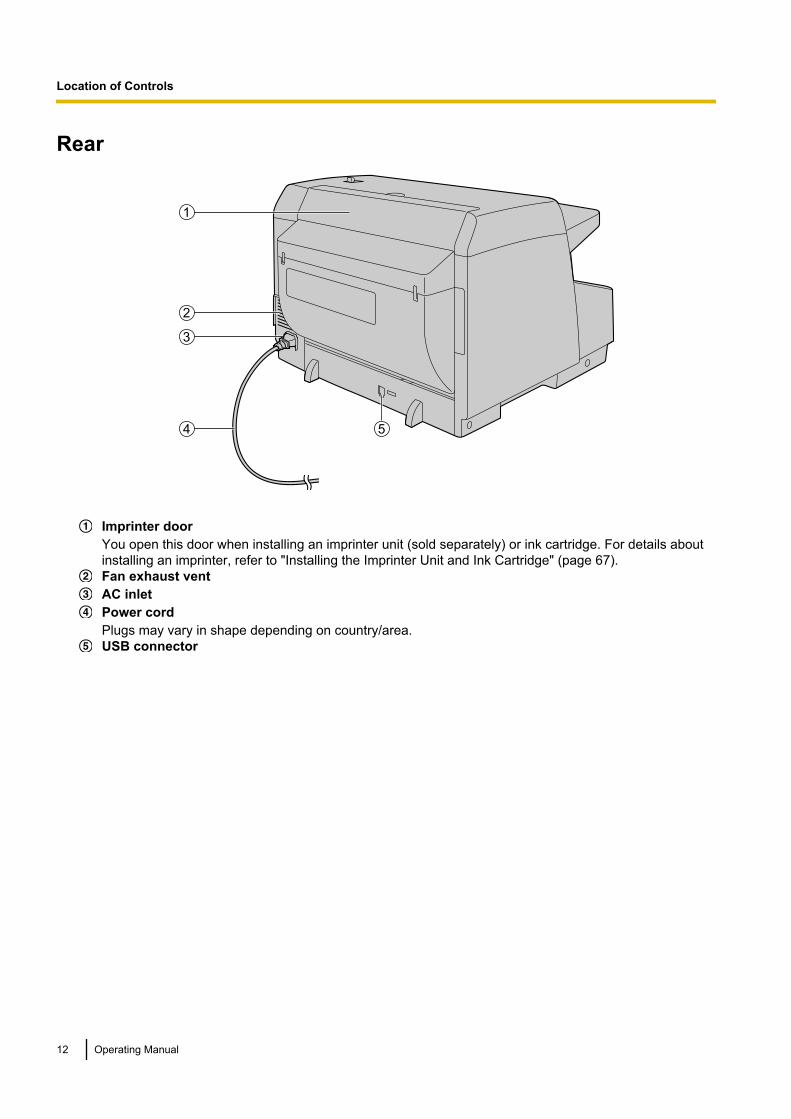
Rear
1
2
3
54
Imprinter doorYou open this door when installing an imprinter unit (sold separately) or ink cartridge. For details aboutinstalling an imprinter, refer to "Installing the Imprinter Unit and Ink Cartridge" (page 67).Fan exhaust ventAC inletPower cordPlugs may vary in shape depending on country/area.USB connector
12 Operating Manual
Location of Controls
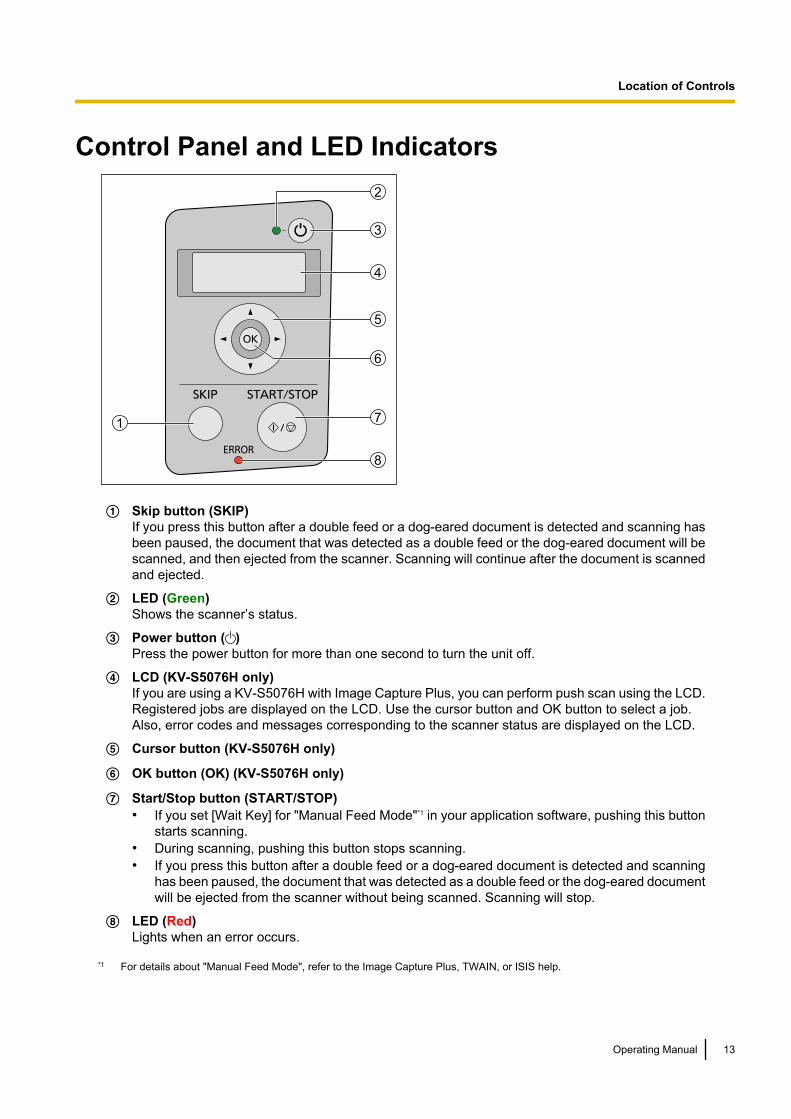
Control Panel and LED Indicators
1
3
6
4
5
7
8
2
A Skip button (SKIP)If you press this button after a double feed or a dog-eared document is detected and scanning hasbeen paused, the document that was detected as a double feed or the dog-eared document will bescanned, and then ejected from the scanner. Scanning will continue after the document is scannedand ejected.
B LED (Green)Shows the scanner’s status.
C Power button ( )Press the power button for more than one second to turn the unit off.
D LCD (KV-S5076H only)If you are using a KV-S5076H with Image Capture Plus, you can perform push scan using the LCD.Registered jobs are displayed on the LCD. Use the cursor button and OK button to select a job.Also, error codes and messages corresponding to the scanner status are displayed on the LCD.
E Cursor button (KV-S5076H only)
F OK button (OK) (KV-S5076H only)
G Start/Stop button (START/STOP)• If you set [Wait Key] for "Manual Feed Mode"*1 in your application software, pushing this button
starts scanning.• During scanning, pushing this button stops scanning.• If you press this button after a double feed or a dog-eared document is detected and scanning
has been paused, the document that was detected as a double feed or the dog-eared documentwill be ejected from the scanner without being scanned. Scanning will stop.
H LED (Red)Lights when an error occurs.
*1 For details about "Manual Feed Mode", refer to the Image Capture Plus, TWAIN, or ISIS help.
Operating Manual 13
Location of Controls
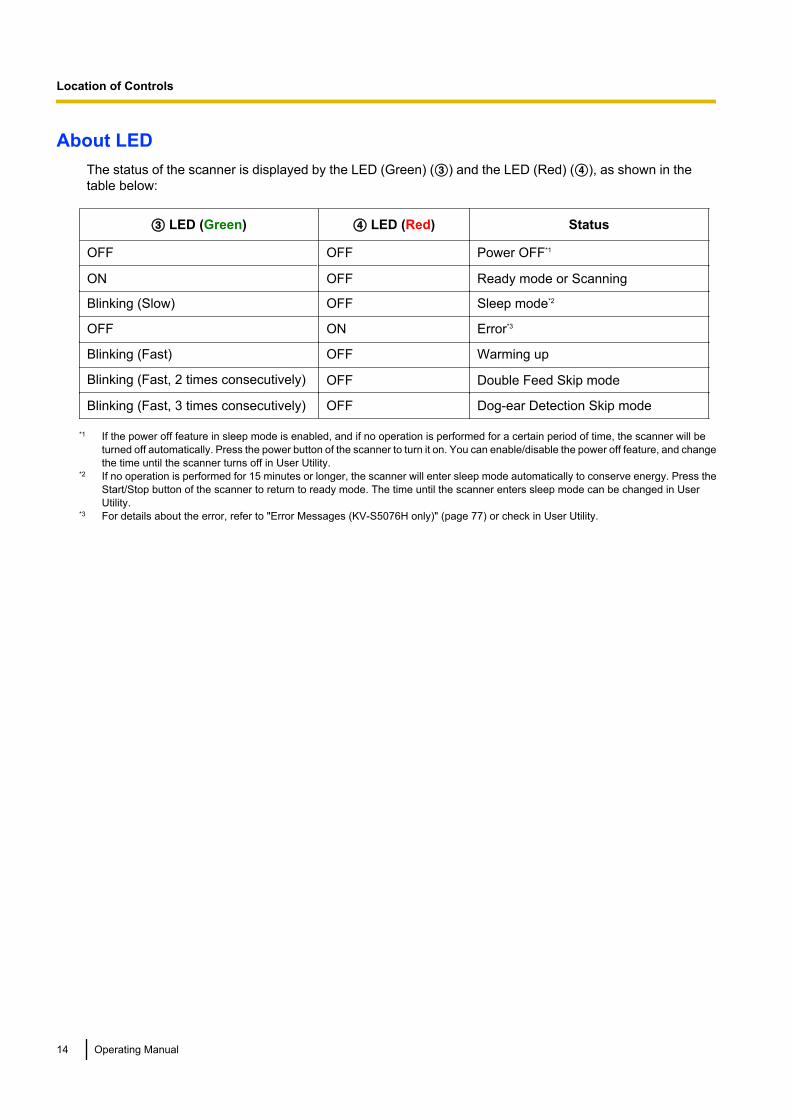
About LEDThe status of the scanner is displayed by the LED (Green) (C) and the LED (Red) (D), as shown in thetable below:
C LED (Green) D LED (Red) Status
OFF OFF Power OFF*1
ON OFF Ready mode or Scanning
Blinking (Slow) OFF Sleep mode*2
OFF ON Error*3
Blinking (Fast) OFF Warming up
Blinking (Fast, 2 times consecutively) OFF Double Feed Skip mode
Blinking (Fast, 3 times consecutively) OFF Dog-ear Detection Skip mode
*1 If the power off feature in sleep mode is enabled, and if no operation is performed for a certain period of time, the scanner will beturned off automatically. Press the power button of the scanner to turn it on. You can enable/disable the power off feature, and changethe time until the scanner turns off in User Utility.
*2 If no operation is performed for 15 minutes or longer, the scanner will enter sleep mode automatically to conserve energy. Press theStart/Stop button of the scanner to return to ready mode. The time until the scanner enters sleep mode can be changed in UserUtility.
*3 For details about the error, refer to "Error Messages (KV-S5076H only)" (page 77) or check in User Utility.
14 Operating Manual
Location of Controls

About the Installation LocationIn order to ensure proper operation, install the unit maintaining the proper distances from surrounding objects,as shown in the following illustration.
200 mm
(7.9 in.)
250 mm
(9.8 in.)
Top view200 mm
(7.9 in.)
200 mm
(7.9 in.)
Notice• Do not move the unit immediately from a cold place to a warm place. It may cause dew.
Note• It is recommended to move this unit with two persons, and holding it by both side grips.• The weight of this unit is approximately 24 kg (53 lb.) when packaged, or approximately 18 kg
(39.5 lb.) by itself.
Operating Manual 15
I
n
s
t
a
l
l
a
t
i
o
n
Installation

Installing the Unit1. Remove all packing tape.
2. Push the ADF door release (A) upwards, and open the ADF door (B).
12
3. Use the indents (A) to pull the double feed prevention roller cover towards you to open it.
1
16 Operating Manual
Installation
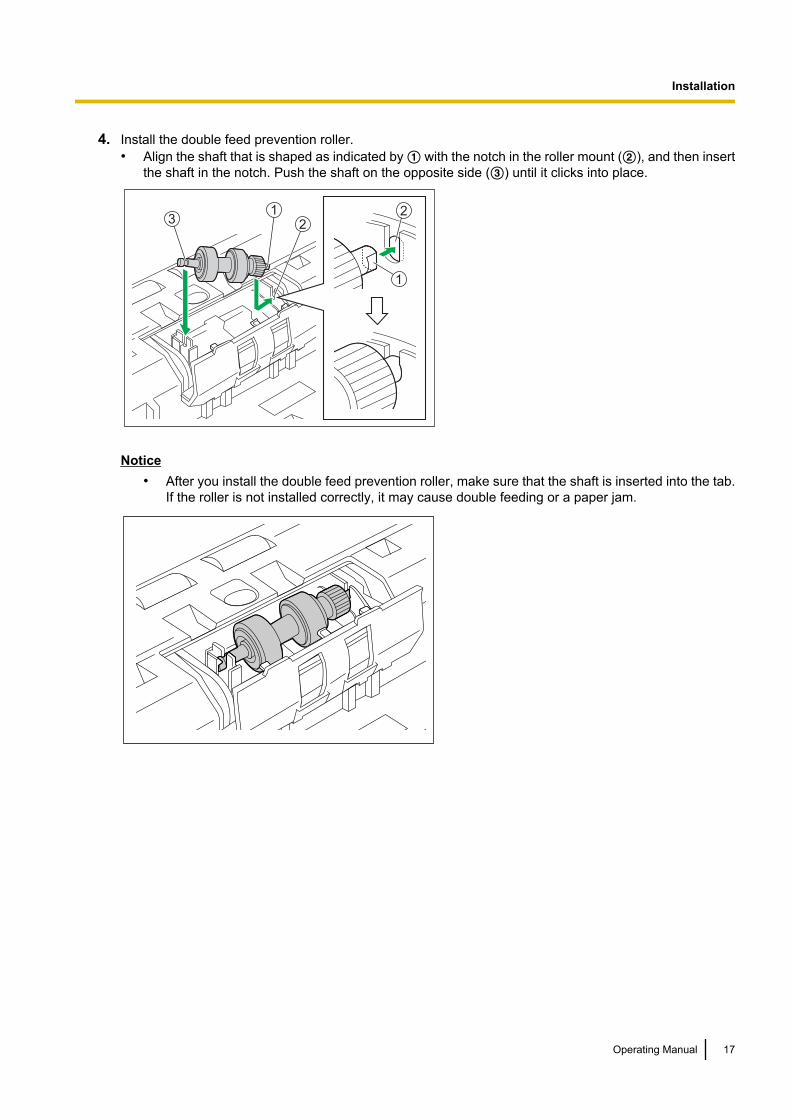
4. Install the double feed prevention roller.• Align the shaft that is shaped as indicated by A with the notch in the roller mount (B), and then insert
the shaft in the notch. Push the shaft on the opposite side (C) until it clicks into place.
1
13 2
2
Notice• After you install the double feed prevention roller, make sure that the shaft is inserted into the tab.
If the roller is not installed correctly, it may cause double feeding or a paper jam.
Operating Manual 17
Installation

5. Push the double feed prevention roller cover until it clicks into place to close it.
Notice• Make sure that the double feed prevention roller cover does not stick up.
If the double feed prevention roller cover is closed incompletely, damage or paper jams can occur.
6. Close the ADF door.• Push both sides of the ADF door down slowly until it clicks into place.
18 Operating Manual
Installation
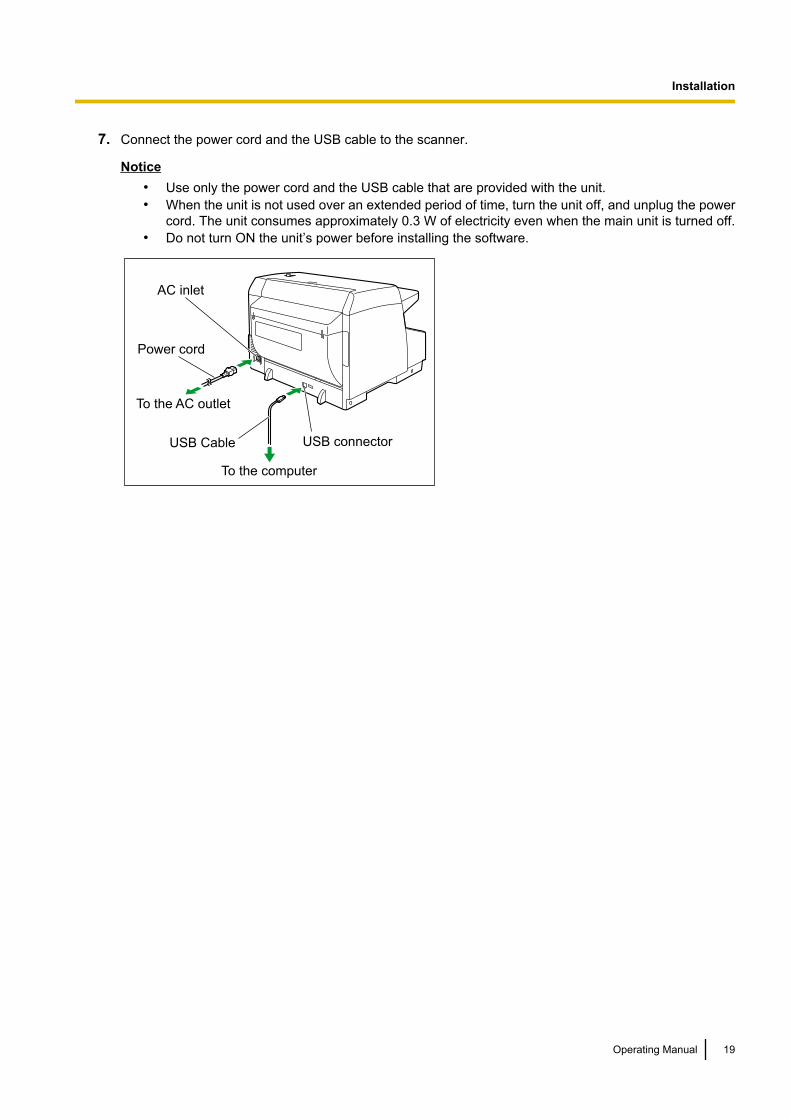
7. Connect the power cord and the USB cable to the scanner.
Notice• Use only the power cord and the USB cable that are provided with the unit.• When the unit is not used over an extended period of time, turn the unit off, and unplug the power
cord. The unit consumes approximately 0.3 W of electricity even when the main unit is turned off.• Do not turn ON the unit’s power before installing the software.
USB connector
To the computer
USB Cable
To the AC outlet
Power cord
AC inlet
Operating Manual 19
Installation

Installing the SoftwareThe software on the enclosed Software / Manual CD-ROM can be installed on your computer.You can select from the 2 installation methods below, depending on your needs.a. Complete: Install all the drivers, applications, utilities and Operating Manual.b. Custom: Install one of the software or Operating Manual.
Note• Normally, it is recommended to select [Complete].
Notice• Make sure to log on as an administrator to install the software.
1. Check that the unit has been turned off.• Press the power button for more than one second to turn the unit off.
2. Insert the Software / Manual CD-ROM into the CD/DVD drive on your computer.• If you have a feature called "Autorun" activated, the installation process will start automatically.• The setup window will appear.
Note• If the AutoPlay dialog box is displayed, select [CDRun.exe].• If the setup window does not appear, double-click [CDRun.exe] in the Software / Manual CD-ROM.
3. Select your scanner model.4. Check the [Read me first] file.
5. Select the desired installation methods from "Software" on the left side of the screen.• If you selected [Complete], continue to step 7.
If you selected [Custom], continue to step 6.
20 Operating Manual
Installation

6. If you selected [Custom] for the installation type in step 5, select the item that you want to install.
Note• If you select TWAIN or ISIS, Image Capture Plus will also be installed.
7. Follow the instructions on the screen and complete the installation.• Restart your computer if you are prompted to do so.
8. Press the power button (A) to turn ON the unit’s power.
1
• The LED (Green) will flash and then turn on.• If the hardware wizard appears, follow the on-screen instructions to complete installation.
Operating Manual 21
Installation

Viewing Operating Manual and Help InstalledIf the manuals and software that were included on the Software / Manual CD-ROM have been installed on yourcomputer, you can use the following procedure to view the Operating Manual and the software’s help.
To view the Operating Manual1. Select [All Programs] ® [Panasonic] ® [Scanner Manuals].2. Select the manual.
• The manual will open.
Note• In Windows 8, select the [Panasonic Document Scanner] section on the Apps screen.
To view the helpNote
• We recommend that you view the help using Internet Explorer® 6.0 or later for Windows.
For Image Capture Plus1. Select [All Programs] ® [Panasonic] ® [Image Capture Plus] ® [Image Capture Plus Help].
For User Utility or Scan Button Setting Tool1. Select [All Programs] ® [Panasonic] ® [Scanner Tools].2. Select that item’s help.
Note• In Windows 8, select the [Panasonic Document Scanner] section on the Apps screen.
For TWAIN or ISIS1. Click the help button on any driver screen.
22 Operating Manual
Installation
Preparing DocumentsNotice
• Make sure to remove paper clips and staples from documents before scanning. Failing to do so candamage the unit, document, or both.
• Before feeding, ensure that the document is not creased or folded. If the document is creased or folded,a paper jam or damage to the document may occur.
• When scanning important documents, confirm that the number of scanned images matches the numberof pages in the feed tray. Also, check the condition of the scanned documents.
• Remove documents from the exit tray after they have been scanned.
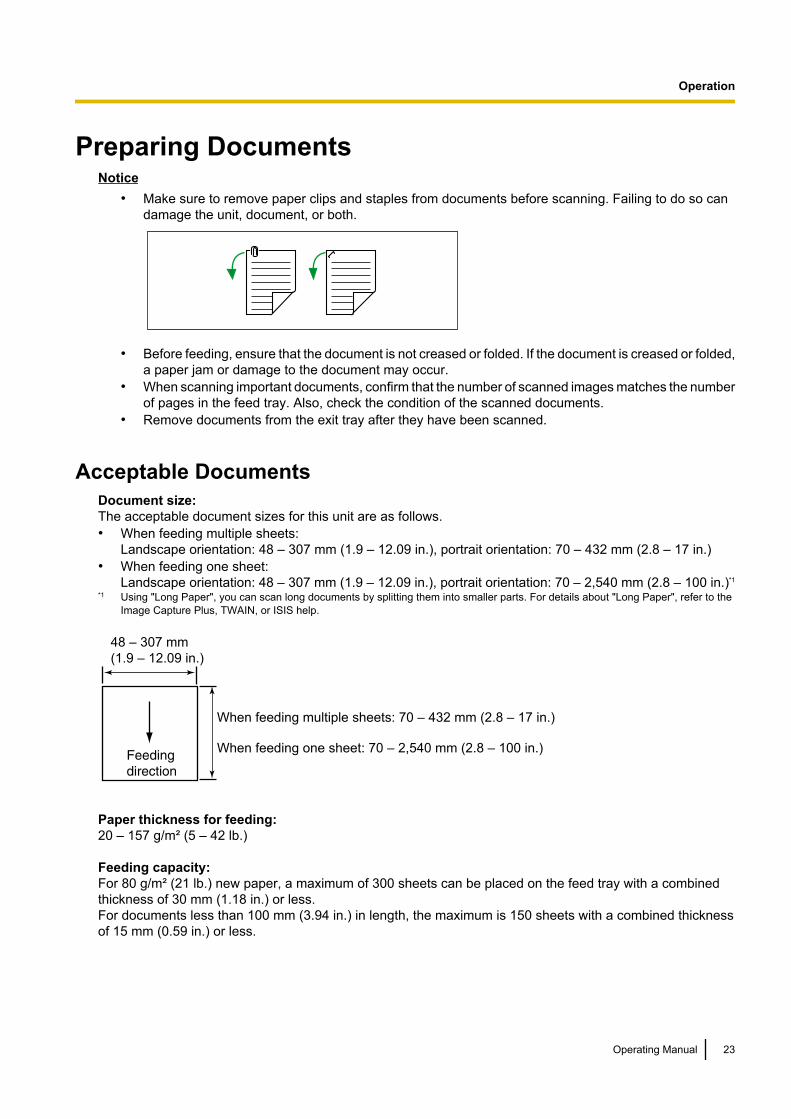
Acceptable DocumentsDocument size:The acceptable document sizes for this unit are as follows.• When feeding multiple sheets:
Landscape orientation: 48 – 307 mm (1.9 – 12.09 in.), portrait orientation: 70 – 432 mm (2.8 – 17 in.)• When feeding one sheet:
Landscape orientation: 48 – 307 mm (1.9 – 12.09 in.), portrait orientation: 70 – 2,540 mm (2.8 – 100 in.)*1
*1 Using "Long Paper", you can scan long documents by splitting them into smaller parts. For details about "Long Paper", refer to theImage Capture Plus, TWAIN, or ISIS help.
48 – 307 mm
(1.9 – 12.09 in.)
When feeding multiple sheets: 70 – 432 mm (2.8 – 17 in.)
When feeding one sheet: 70 – 2,540 mm (2.8 – 100 in.)
Paper thickness for feeding:20 – 157 g/m² (5 – 42 lb.)
Feeding capacity:For 80 g/m² (21 lb.) new paper, a maximum of 300 sheets can be placed on the feed tray with a combinedthickness of 30 mm (1.18 in.) or less.For documents less than 100 mm (3.94 in.) in length, the maximum is 150 sheets with a combined thicknessof 15 mm (0.59 in.) or less.
Operating Manual 23
O
p
e
r
a
t
i
o
n
Operation

Document types• Plain paper • Recycled paper
• Bond paper • OCR paper
• Newspaper • Bank checks
• Carbonless copy paper • Tracing paper
Recommended paper: Plain paper
Documents must also meet the following conditions
Curl
Feeding directionLess than
10 mm
(0.4 in.)
FoldingLess than
10 mm
(0.4 in.)
Feeding direction
24 Operating Manual
Operation

Unacceptable DocumentsThe following types of documents may not scan properly:• Torn or frayed documents• Curled, wrinkled or folded documents• Carbon paper• Thick or irregular documents such as envelopes, documents that are glued together, etc.• Perforated or punched paper• Non-rectangular or irregularly shaped paper• Coated paper• Photographs*1
• Extremely smooth, shiny paper, or paper that is highly textured*1
*1 Documents may become scratched or damaged, etc.
Do not scan the following types of paper:• Documents out of specified size, thickness, and weight• Thermal or photosensitive paper• Cloths, metallic sheets, OHP sheets, plastic films, etc.• Documents containing hard attachments such as metal or plastic (ex. clips or staples)• Bound or glued documents• Document with wet ink or cinnabar seal ink
Notes about documents for scanning• Depending on the paper type, scanning results may be poor when you scan unacceptable documents, or
even documents that should be acceptable.If scanned images are skewed, paper jams occur, or double feeding occurs, try scanning again after doingthe following:– Clean the rollers and sensors.– Reduce the number of sheets of paper loaded on the feed tray.– Change the orientation of documents placed in portrait orientation to landscape orientation, or vice
versa.– In the scan settings, set "Feeding Speed" to [Slow].*1
– Scan the documents using manual scanning.• When using stapled document detection, completely flatten any curling or creases on the rear end of the
document, and then perform scanning. (KV-S5076H only)
*1 For details about configuring the scan settings, refer to the Image Capture Plus, TWAIN, or ISIS help.
Operating Manual 25
Operation
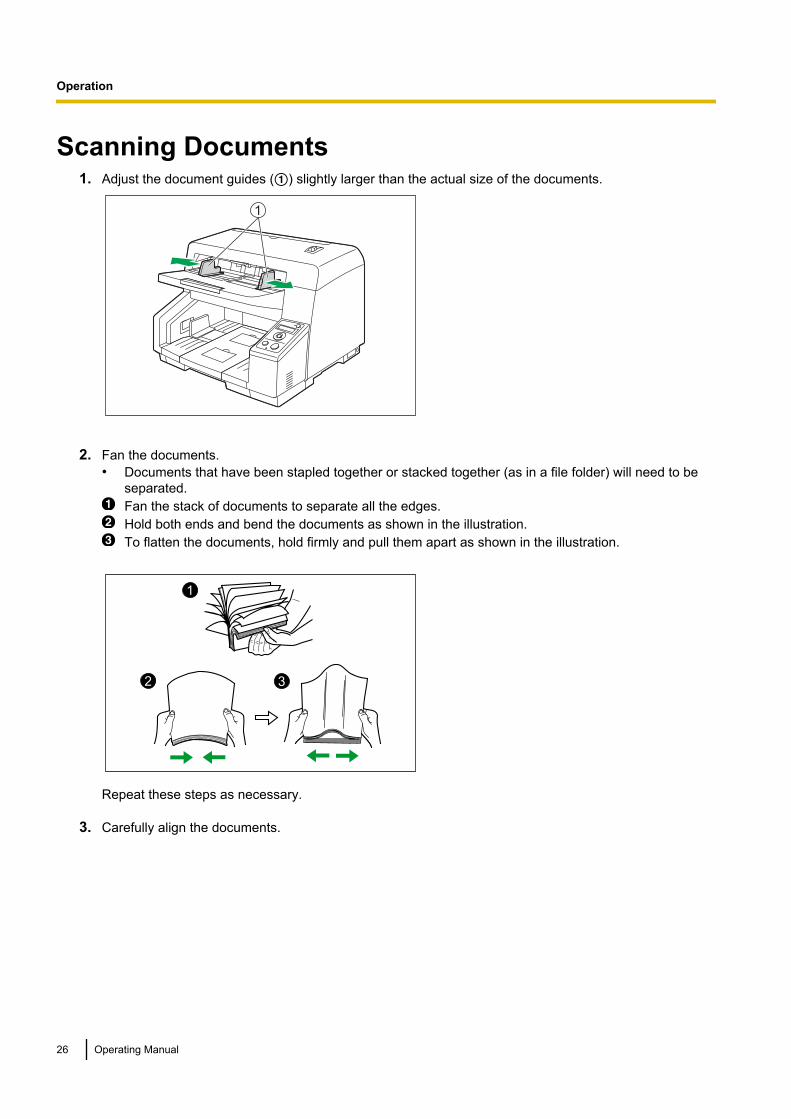
Scanning Documents1. Adjust the document guides (A) slightly larger than the actual size of the documents.
1
2. Fan the documents.• Documents that have been stapled together or stacked together (as in a file folder) will need to be
separated.Fan the stack of documents to separate all the edges.Hold both ends and bend the documents as shown in the illustration.To flatten the documents, hold firmly and pull them apart as shown in the illustration.
1
2 3
Repeat these steps as necessary.
3. Carefully align the documents.
26 Operating Manual
Operation
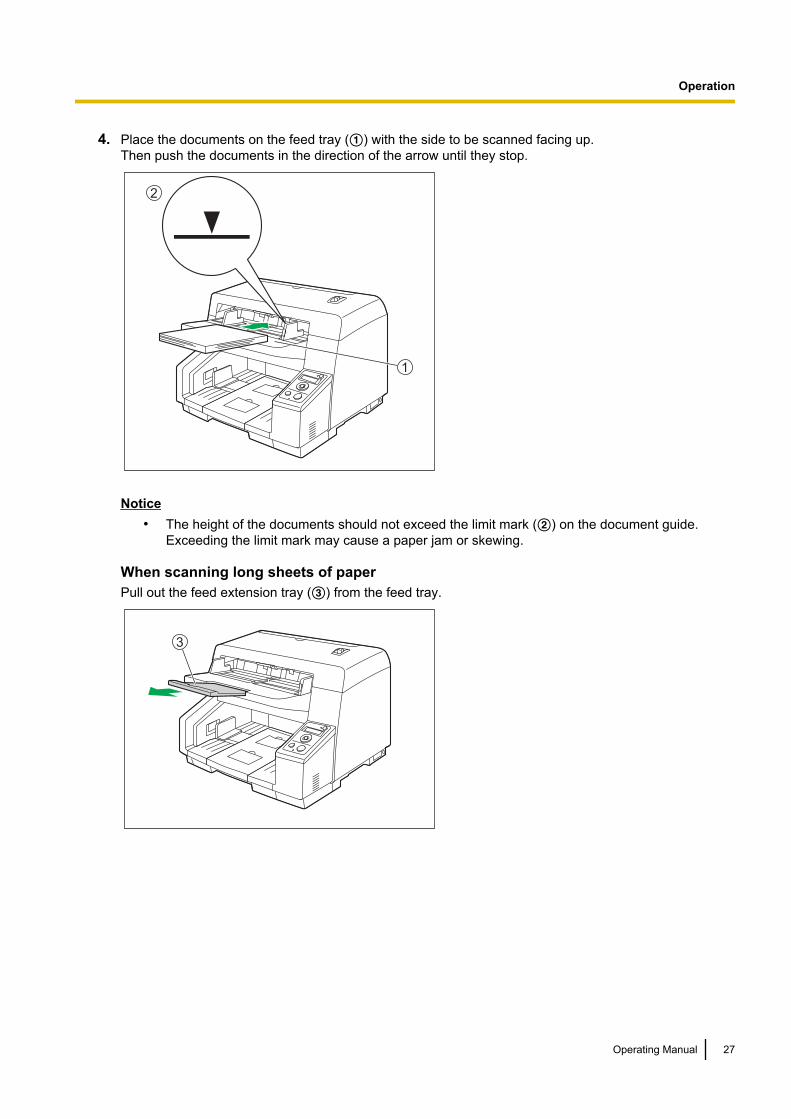
4. Place the documents on the feed tray (A) with the side to be scanned facing up.Then push the documents in the direction of the arrow until they stop.
2
1
Notice• The height of the documents should not exceed the limit mark (B) on the document guide.
Exceeding the limit mark may cause a paper jam or skewing.
When scanning long sheets of paperPull out the feed extension tray (C) from the feed tray.
3
Operating Manual 27
Operation

5. Slide the document guides (A) to match the width of the document to be scanned.
1
• When scanning documents with pages of different sizes at one time, see "When Scanning Documentswith Pages of Different Sizes at One Time" (page 32).
• To secure the document guides (A), lower the document guide lock (B).
1
2
28 Operating Manual
Operation

6. Raise either the front side (A) or back side (B) exit stopper according to the size of the documents.
12
7. Adjust the exit extension tray (A) to match the size of the documents.
1
Operating Manual 29
Operation
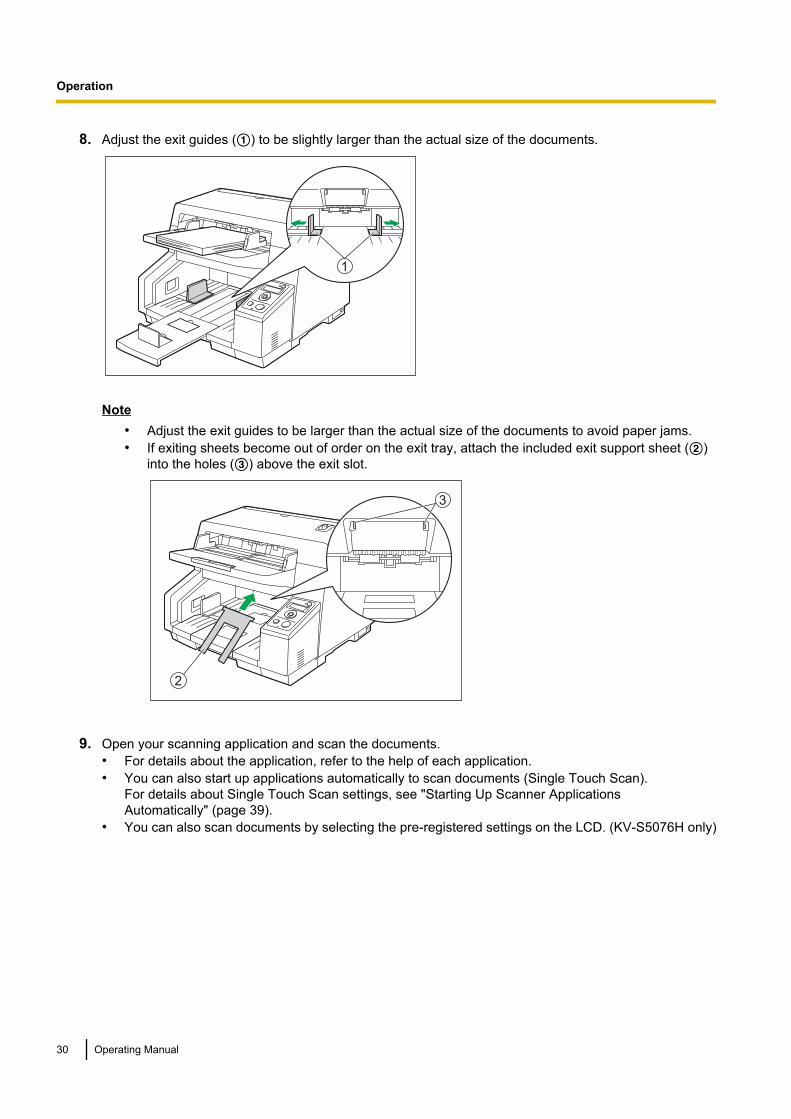
8. Adjust the exit guides (A) to be slightly larger than the actual size of the documents.
1
Note• Adjust the exit guides to be larger than the actual size of the documents to avoid paper jams.• If exiting sheets become out of order on the exit tray, attach the included exit support sheet (B)
into the holes (C) above the exit slot.
2
3
9. Open your scanning application and scan the documents.• For details about the application, refer to the help of each application.• You can also start up applications automatically to scan documents (Single Touch Scan).
For details about Single Touch Scan settings, see "Starting Up Scanner ApplicationsAutomatically" (page 39).
• You can also scan documents by selecting the pre-registered settings on the LCD. (KV-S5076H only)
30 Operating Manual
Operation
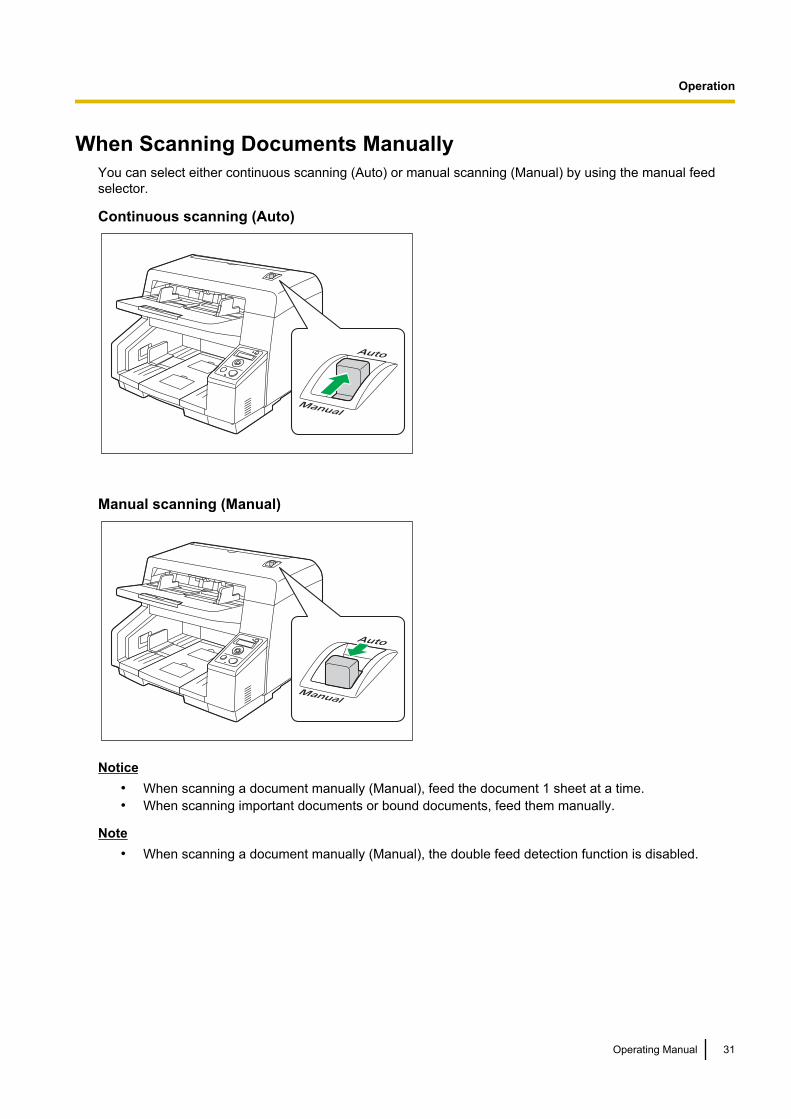
When Scanning Documents ManuallyYou can select either continuous scanning (Auto) or manual scanning (Manual) by using the manual feedselector.
Continuous scanning (Auto)
Manual scanning (Manual)
Notice• When scanning a document manually (Manual), feed the document 1 sheet at a time.• When scanning important documents or bound documents, feed them manually.
Note• When scanning a document manually (Manual), the double feed detection function is disabled.
Operating Manual 31
Operation
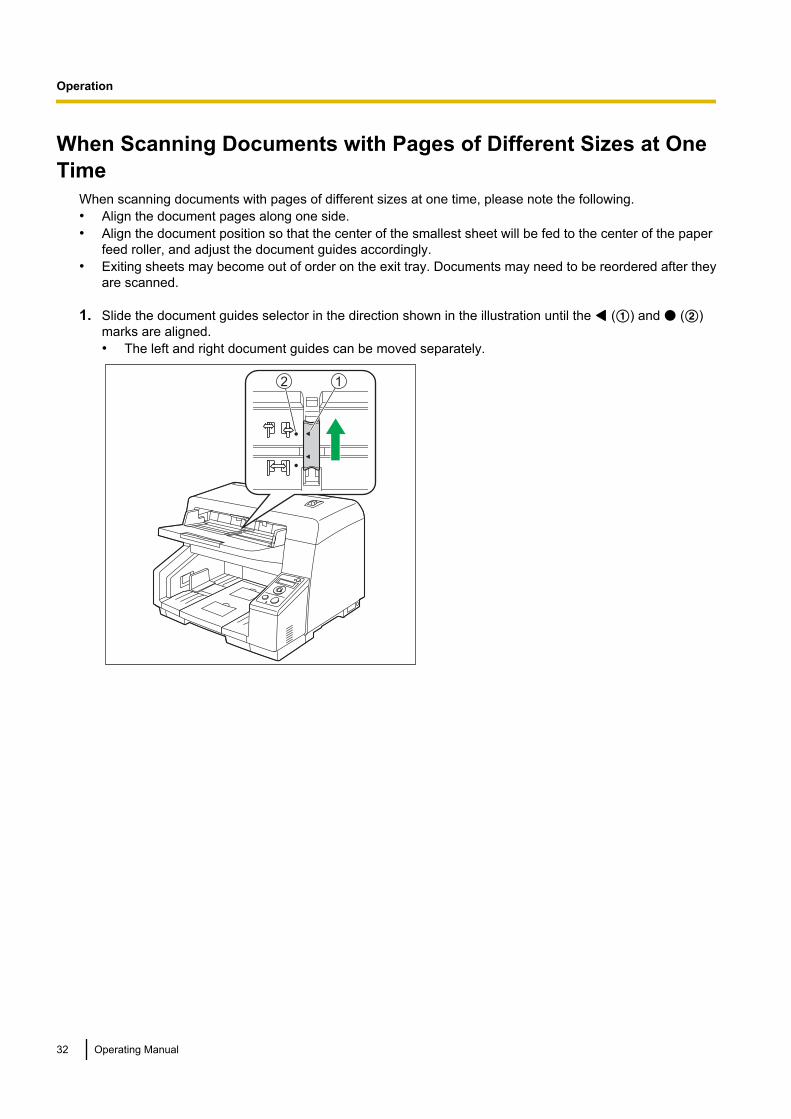
When Scanning Documents with Pages of Different Sizes at OneTime
When scanning documents with pages of different sizes at one time, please note the following.• Align the document pages along one side.• Align the document position so that the center of the smallest sheet will be fed to the center of the paper
feed roller, and adjust the document guides accordingly.• Exiting sheets may become out of order on the exit tray. Documents may need to be reordered after they
are scanned.
1. Slide the document guides selector in the direction shown in the illustration until the (A) and (B)marks are aligned.• The left and right document guides can be moved separately.
12
32 Operating Manual
Operation
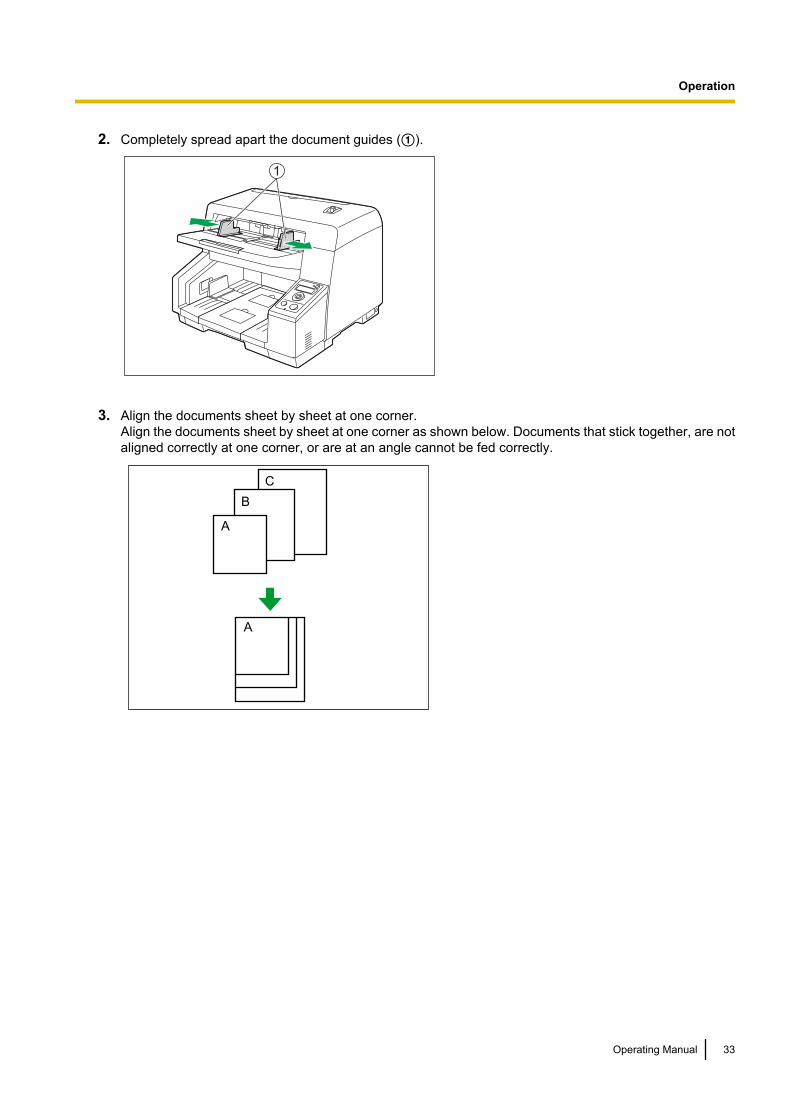
2. Completely spread apart the document guides (A).
1
3. Align the documents sheet by sheet at one corner.Align the documents sheet by sheet at one corner as shown below. Documents that stick together, are notaligned correctly at one corner, or are at an angle cannot be fed correctly.
A
B
C
A
Operating Manual 33
Operation

4. Place the documents on the feed tray (A) with the scanning side facing up.• Align the document position so that the center of the smallest sheet will be fed to the center of the paper
feed roller (B). If the document is not properly aligned, the pages will not be fed correctly.
A
1
2
3
Notice• The height of the documents should not exceed the limit mark (C) on the document guide.
Exceeding the limit mark may cause a paper jam or skewing.• Depending on the types of paper, the document may not be fed smoothly. In such case, reduce
the number of sheets of the document.
34 Operating Manual
Operation
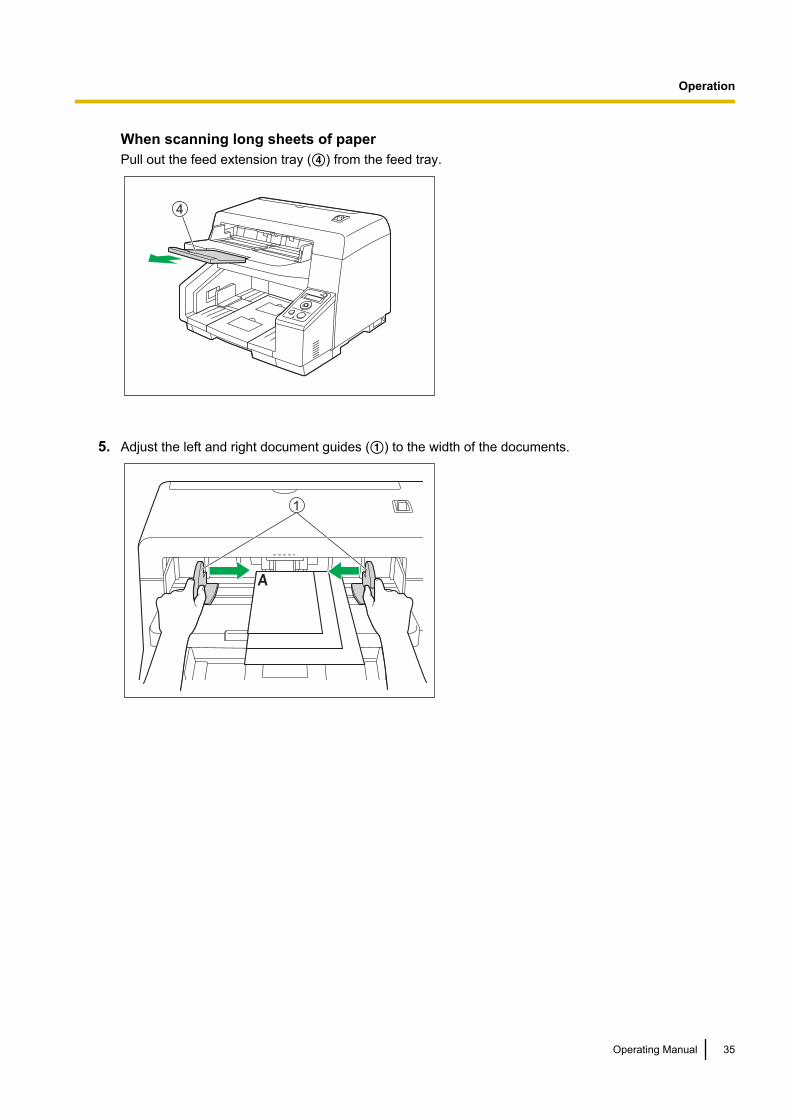
When scanning long sheets of paperPull out the feed extension tray (D) from the feed tray.
4
5. Adjust the left and right document guides (A) to the width of the documents.
A
1
Operating Manual 35
Operation
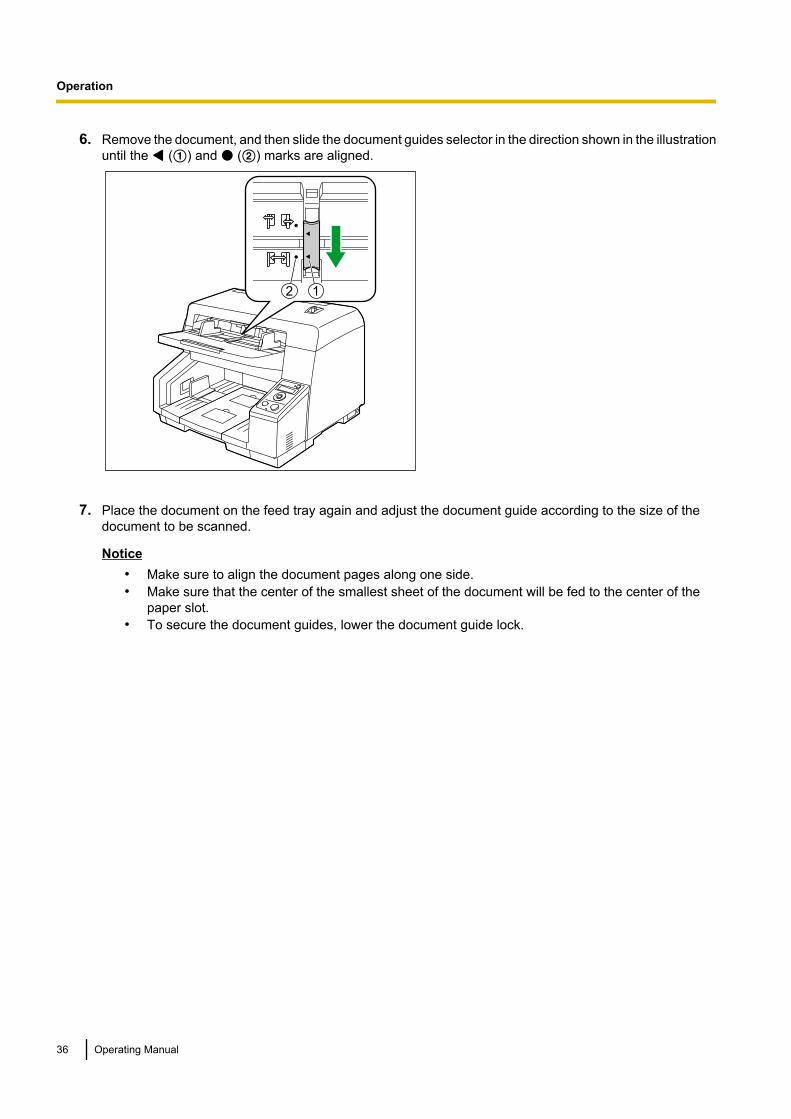
6. Remove the document, and then slide the document guides selector in the direction shown in the illustrationuntil the (A) and (B) marks are aligned.
12
7. Place the document on the feed tray again and adjust the document guide according to the size of thedocument to be scanned.
Notice• Make sure to align the document pages along one side.• Make sure that the center of the smallest sheet of the document will be fed to the center of the
paper slot.• To secure the document guides, lower the document guide lock.
36 Operating Manual
Operation

Adjusting the left and right document guides to their original position1. Slide the document guides selector in the direction shown in the illustration until the (A) and (B)
marks are aligned.
12
2. Completely spread apart the document guides.
3. Slide the document guides selector in the direction shown in the illustration until the (A) and (B)marks are aligned.
12
Operating Manual 37
Operation

When Changing the Scanned Data Background ColorUsing the software, you can switch the background color of scanned images between white and black.For details, refer to the Image Capture Plus, TWAIN, or ISIS help.
38 Operating Manual
Operation

Starting Up Scanner Applications AutomaticallyYou can configure settings so that the application starts up automatically by "placing a document on the unit’sfeed tray" ("Touch Free Scanning") or by "Single Touch Scanning".
Note• If you are using a KV-S5076H, you can perform push scan using the LCD (page 41).• If you are using a KV-S5046H, press the Start/Stop button to perform Single Touch Scanning.
Setting the application to start upSet whether an application will automatically start up and select under which conditions it will start up in theScan Button Setting Tool.1. Double click the ( ) icon in the notification area of the task bar to open the Scan Button Setting Tool.
• In Windows 8, open the Scan Button Setting Tool on the Desktop screen.2. Select Single Touch Scanning or Touch Free Scanning for the condition to automatically start up the
application.3. Select the application to start up.
Note• The set application is enabled for both "Touch Free Scanning" and "Single Touch Scanning".• For details about the Scan Button Setting Tool, refer to the Scan Button Setting Tool help.
Setting the scanning conditionsScanning conditions are set on the setting screen of each application. For details about the setting screen ofeach application, refer to the manual or help for that application.
Note• If you are using a KV-S5076H, press the OK button for more than 2 seconds to open the application
setting screen.• If you are using a KV-S5046H, press the Start/Stop button for more than 2 seconds to open the
application setting screen.• If the unit is in sleep mode, press the Start/Stop button to return to ready mode first.
Operating Manual 39
Operation
Checking eventsCheck the following if an application does not start up after being set.1. Display the Scan properties screen.
• If you are using Windows 8 / Windows 7:[Control Panel] ® [View devices and printers], right-click the scanner icon, and display the [Scanproperties] screen.
• If you are using Windows Vista:[Control Panel] ® [Scanners and Cameras], select the scanner icon, and then click the Propertiesbutton.
• If you are using Windows XP:[Control Panel] ® [Scanners and Cameras], right-click the scanner icon, and display the Propertiesscreen.
2. Click the [Events] tab.3. Check that Scan Button Setting Tool is selected as the program to start for each event.
• If an application other than Scan Button Setting Tool is selected, change the application to Scan ButtonSetting Tool.
4. Click [OK].5. Restart the computer.
40 Operating Manual
Operation
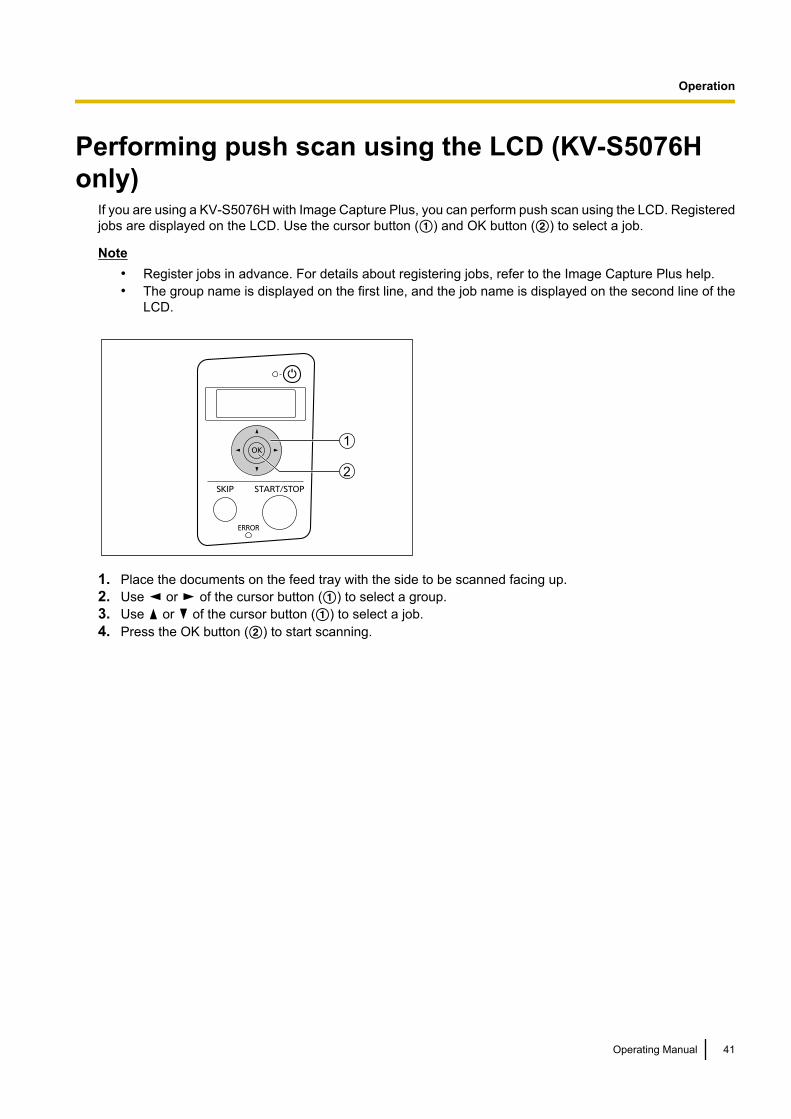
Performing push scan using the LCD (KV-S5076Honly)
If you are using a KV-S5076H with Image Capture Plus, you can perform push scan using the LCD. Registeredjobs are displayed on the LCD. Use the cursor button (A) and OK button (B) to select a job.
Note• Register jobs in advance. For details about registering jobs, refer to the Image Capture Plus help.• The group name is displayed on the first line, and the job name is displayed on the second line of the
LCD.
1
2
1. Place the documents on the feed tray with the side to be scanned facing up.2. Use or of the cursor button (A) to select a group.3. Use or of the cursor button (A) to select a job.4. Press the OK button (B) to start scanning.
Operating Manual 41
Operation

Using Control SheetsPlacing a control sheet in the middle of documents lets you change the scanning conditions for pages scannedafter the control sheet. Also, you can change the folder used to save the scan data of documents scannedafter the control sheet.• Print out control sheets from the included CD-ROM.
B
Simplex
A Documents
Control sheet
Code
Documents
Control sheet functionsSimplex, Duplex, Binary, 256 level gray, Color, Dynamic Threshold, Dither, Error diffusion, Function #1–#9, Separation Sheet
• For details about control sheets, refer to "Detect Control Sheet" in the Image Capture Plus, TWAIN, orISIS help.
• For details about separation sheets, refer to "Detect Separation Sheet" in the Image Capture Plus,TWAIN, or ISIS help.
42 Operating Manual
Operation
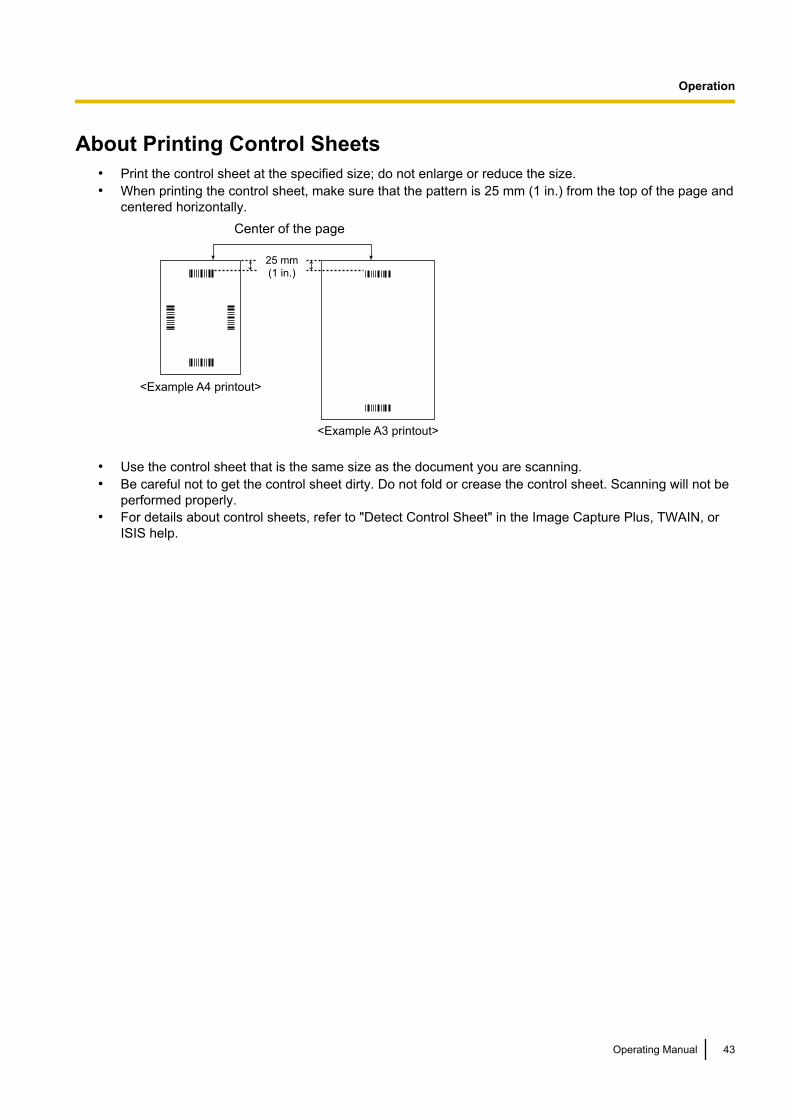
About Printing Control Sheets• Print the control sheet at the specified size; do not enlarge or reduce the size.• When printing the control sheet, make sure that the pattern is 25 mm (1 in.) from the top of the page and
centered horizontally.Center of the page
<Example A4 printout>
<Example A3 printout>
25 mm
(1 in.)
• Use the control sheet that is the same size as the document you are scanning.• Be careful not to get the control sheet dirty. Do not fold or crease the control sheet. Scanning will not be
performed properly.• For details about control sheets, refer to "Detect Control Sheet" in the Image Capture Plus, TWAIN, or
ISIS help.
Operating Manual 43
Operation

Printing control sheetsNote
• In order to print control sheets, Adobe Reader must be installed on your computer.• Refer to the instruction manual for your printer for details about changing print settings.
1. Insert the included CD-ROM into the CD/DVD driver on your computer.• If you have a feature called "Autorun" activated, the installation process will start automatically.• The setup window will appear.
Note• If the AutoPlay dialog box is displayed, select [CDRun.exe].• If the setup window does not appear, double-click [CDRun.exe] in the Software / Manual CD-ROM.
2. Select your scanner.
3. Select [Control Sheet] from "Documents" on the right side of the screen.
4. Print the control sheets at the same size as your document.
44 Operating Manual
Operation

Clearing Paper JamsTorn paper, thin paper or paper that is creased on the top edge may cause paper jams. If a paper jam occurs,remove the jammed sheet according to the following procedure.
CAUTION• Do not touch the conveyor immediately after continuous scanning.
This area becomes very hot and can cause burns.Wait until the conveyor’s temperature decreases.
1. Push the ADF door release (A) upwards, and open the ADF door (B).• Remove any documents from the feed tray.
12
Operating Manual 45
C
l
e
a
r
i
n
g
P
a
p
e
r
J
a
m
s
Clearing Paper Jams

2. Remove the jammed sheet of paper.
When a paper jam occurs inside the scanner:Remove the jammed sheet of paper from the inside of the ADF door.
When a paper jam occurs at the exit slot:Pull the jammed paper from the exit slot (A) towards the front.
1
46 Operating Manual
Clearing Paper Jams
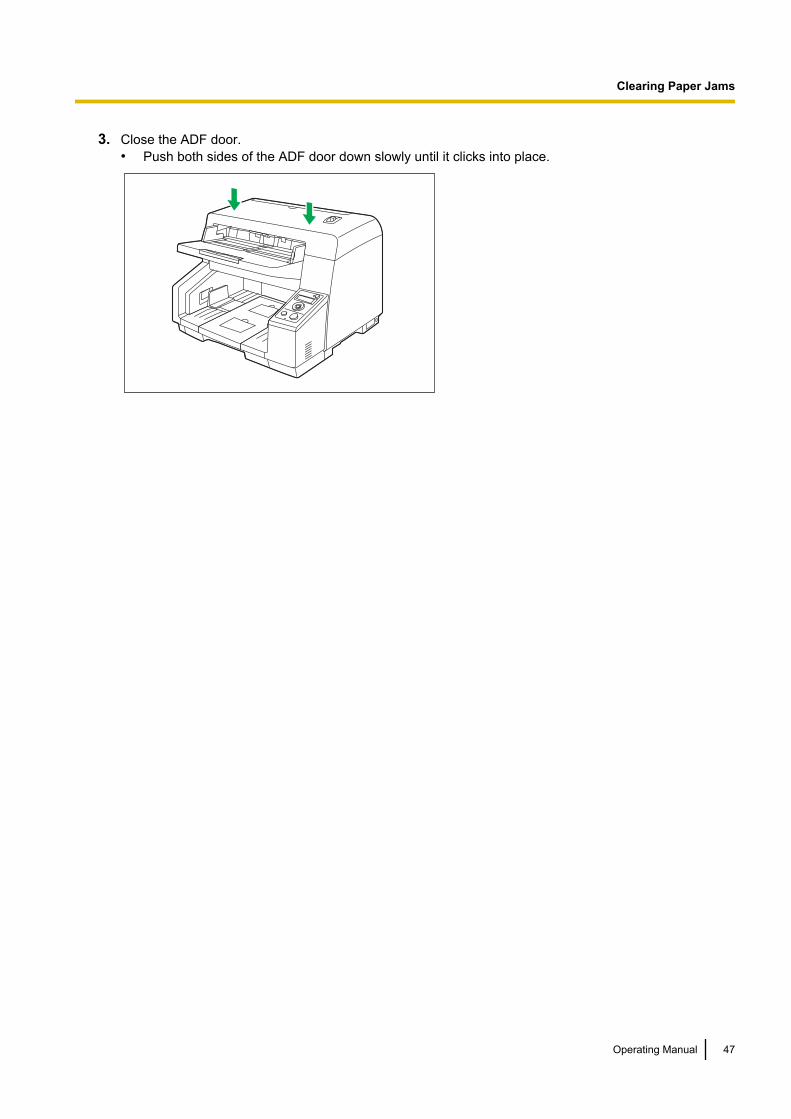
3. Close the ADF door.• Push both sides of the ADF door down slowly until it clicks into place.
Operating Manual 47
Clearing Paper Jams
Cleaning the Outside of the ScannerNotice
• Do not use commercially available cleaners, detergent, thinner, or benzine. (Doing so may causedeformation, discoloration or damage.)
• Clean the scanner at least once a month.
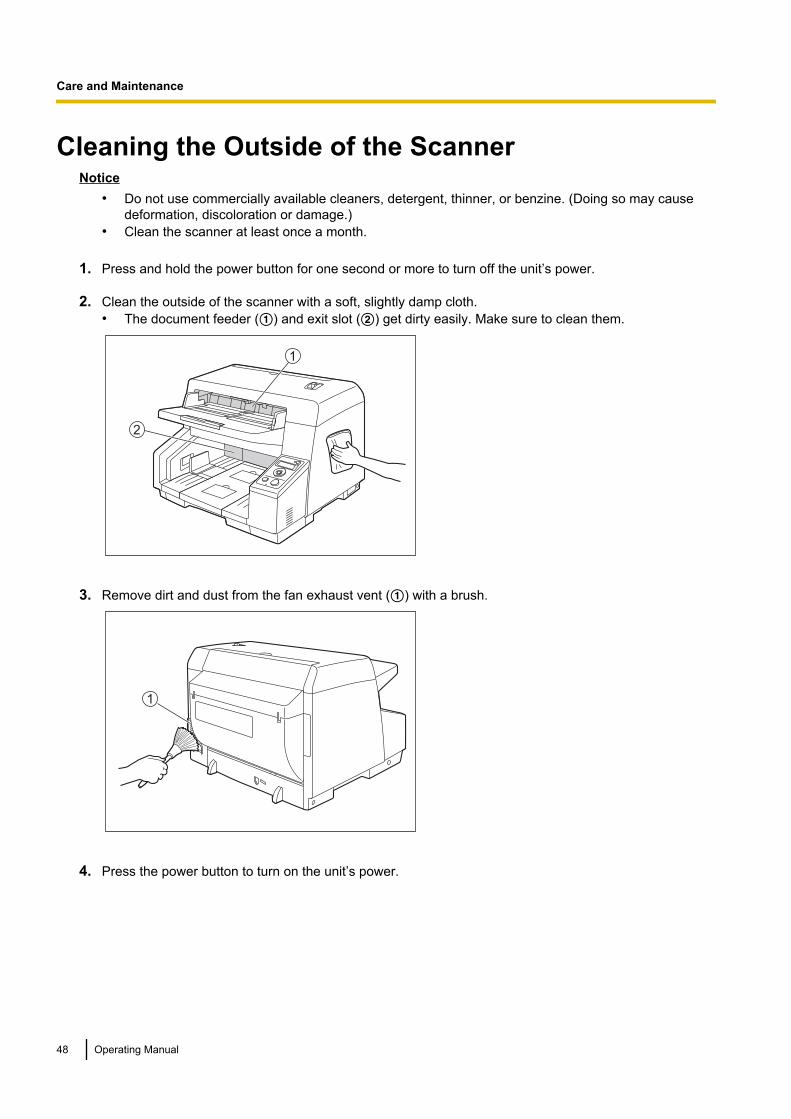
1. Press and hold the power button for one second or more to turn off the unit’s power.
2. Clean the outside of the scanner with a soft, slightly damp cloth.• The document feeder (A) and exit slot (B) get dirty easily. Make sure to clean them.
2
1
3. Remove dirt and dust from the fan exhaust vent (A) with a brush.
1
4. Press the power button to turn on the unit’s power.
48 Operating Manual
C
a
r
e
a
n
d
M
a
i
n
t
e
n
a
n
c
e
Care and Maintenance
Cleaning the Inside of the ScannerCAUTION
• Do not touch the conveyor immediately after continuous scanning.This area becomes very hot and can cause burns.Wait until the conveyor’s temperature decreases.
Note• Clean the inside of the scanner when approximately 20,000 sheets have been scanned. The time for
cleaning may differ depending on documents you scan. To maintain proper scanning, clean the scannerparts frequently.
• Clean the rollers and sensors if paper jamming or double feeding occurs frequently.• If double feed detection does not function properly, clean the double feed detectors.• Clean the scanning glass when black or white lines appear on the scanned images.
Operating Manual 49
Care and Maintenance

About the roller cleaning paperUsing a pair of scissors, open the bag along the dotted line (A), and take out the roller cleaning paper.
1
Notice• Keep the roller cleaning paper out of reach of small children.• Do not store the roller cleaning paper in direct sunlight or in a place with temperature over 40 °C
(104 °F).• Only use the roller cleaning paper to clean the rollers and scanning glass.• For details about the roller cleaning paper, please refer to the Material Safety Data Sheet (MSDS).
Please ask your Panasonic sales company about obtaining the Material Safety Data Sheet.
Note• If the bag is left opened for a long period of time before using it, the alcohol will evaporate.
Please use the roller cleaning paper immediately after opening the bag.• To purchase the roller cleaning paper (KV-SS03), please contact your dealer, or call our Supplies and
Accessories department at 1-800-726-2797 (U.S.A. only).
50 Operating Manual
Care and Maintenance

1. Prepare the following cleaning supplies.• Soft and dry cloth
Used to clean the conveyor.• Thin cotton swab
Used to clean the ion outlets and sensors.• Roller cleaning paper (KV-SS03)
Used to clean the rollers, scanning backgrounds, and scanning glasses.Use of the roller cleaning paper is recommended. If you do not have the roller cleaning paper, use asoft cloth with a small amount of isopropyl alcohol or water.Do not use commercially available cleaners, detergent, thinner, or benzine. (Doing so may causedeformation, discoloration or damage.)
2. Press and hold the power button for one second or more to turn off the unit’s power.
3. Push the ADF door release (A) upwards, and open the ADF door (B).
12
4. Clean the conveyor, sensors, rollers, scanning backgrounds, and scanning glasses.• Clean the parts in the following order: conveyor, ion outlets and sensors, rollers, scanning backgrounds,
scanning glasses.• For details about cleaning, refer to the following:
– "Cleaning the Conveyor" (page 53)– "Cleaning the Ion Outlets and Sensors" (page 54)– "Cleaning the Rollers" (page 56)– "Cleaning the Scanning Backgrounds" (page 58)– "Cleaning the Scanning Glasses" (page 59)
Operating Manual 51
Care and Maintenance

5. Close the ADF door.• After cleaning, push both sides of the ADF door down slowly until it clicks into place.
6. Press the power button to turn on the unit’s power.
Notice• If roller cleaning notifications via the After Clean Roller Counter are enabled, after turning on the
unit’s power, reset the After Clean Roller Counter in User Utility to 0.For details, refer to the User Utility help.
52 Operating Manual
Care and Maintenance
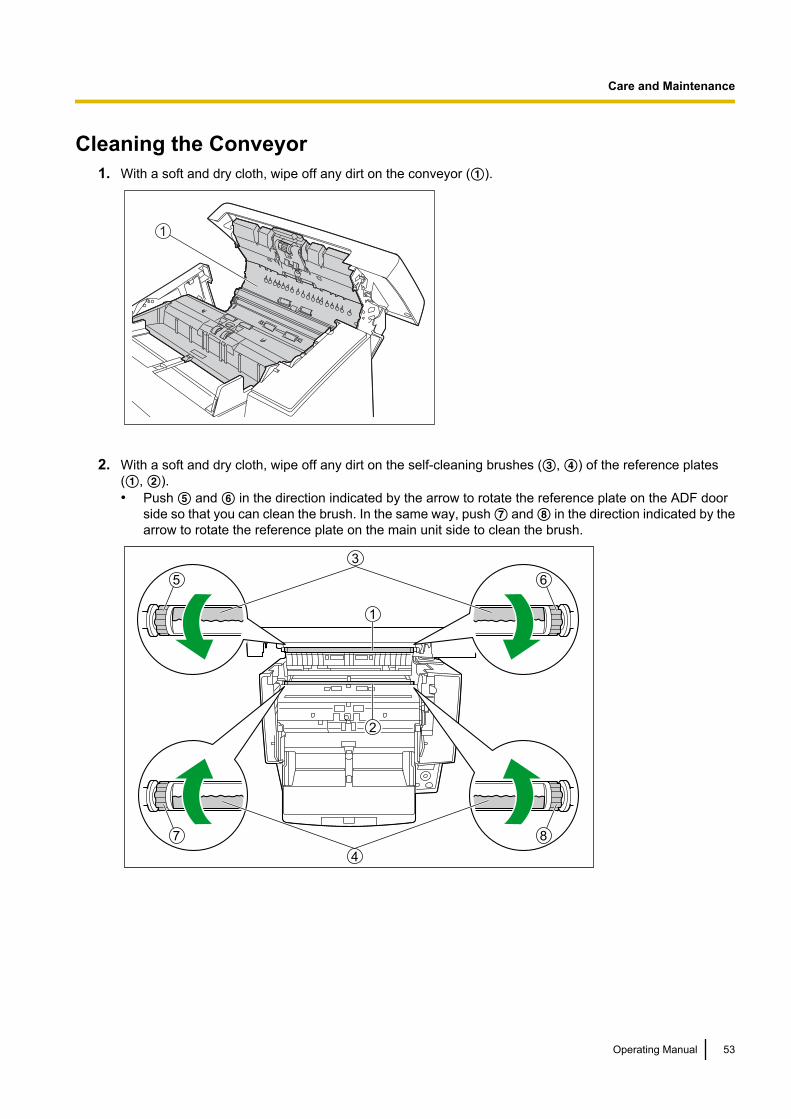
Cleaning the Conveyor1. With a soft and dry cloth, wipe off any dirt on the conveyor (A).
1
2. With a soft and dry cloth, wipe off any dirt on the self-cleaning brushes (C, D) of the reference plates(A, B).• Push E and F in the direction indicated by the arrow to rotate the reference plate on the ADF door
side so that you can clean the brush. In the same way, push G and H in the direction indicated by thearrow to rotate the reference plate on the main unit side to clean the brush.
5 6
7 8
3
4
1
2
Operating Manual 53
Care and Maintenance

Cleaning the Ion Outlets and Sensors1. Remove dust from the ion outlets (A) with a cotton swab.
• With a thin cotton swab, remove dust from the ion outlets, and then wipe the center of the inner partsapproximately 5 times.
1
Notice• Do not apply too much pressure on the parts.
2. Remove dust from the sensors (A, B, C, D, E, F) and reflectors (G) with a cotton swab.
Location of Sensors
1
2
2
3
4
5
6
A Waiting sensor
B Double feed detector
C Slip detect sensor
D Starting sensor
E Paper sensor
F Skew sensor
54 Operating Manual
Care and Maintenance

Location of Reflectors
7
7
G Reflectors
Operating Manual 55
Care and Maintenance
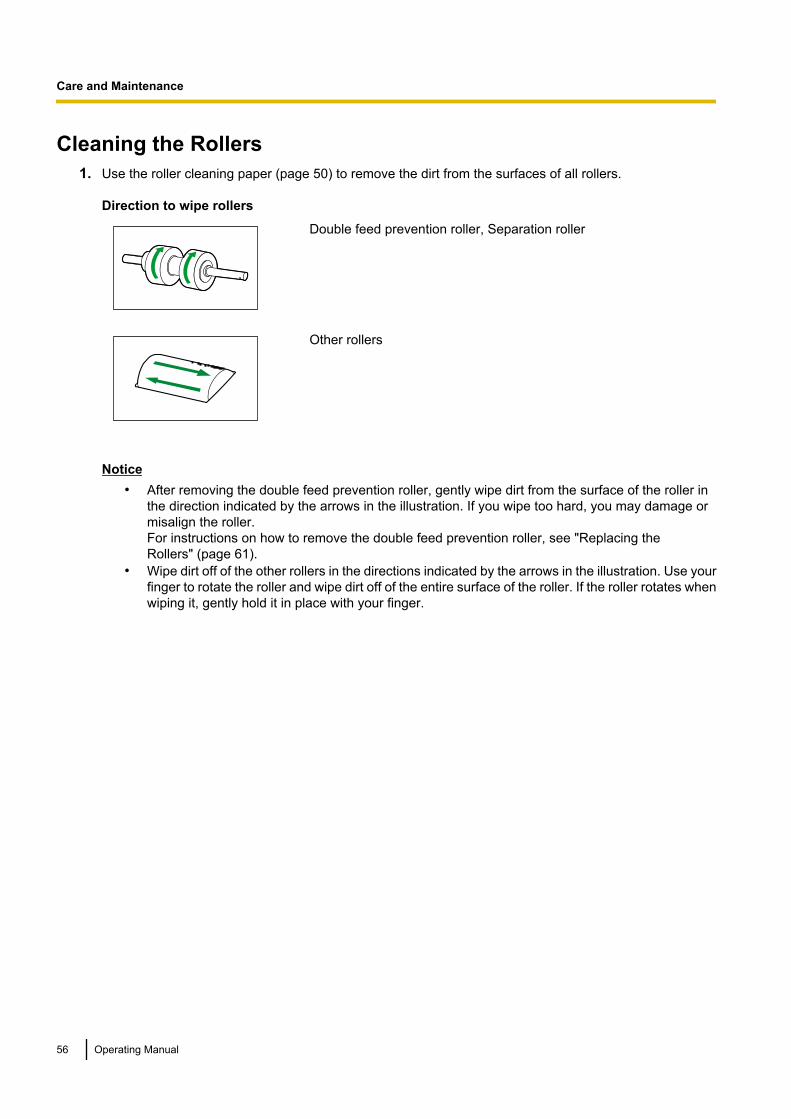
Cleaning the Rollers1. Use the roller cleaning paper (page 50) to remove the dirt from the surfaces of all rollers.
Direction to wipe rollers
Double feed prevention roller, Separation roller
Other rollers
Notice• After removing the double feed prevention roller, gently wipe dirt from the surface of the roller in
the direction indicated by the arrows in the illustration. If you wipe too hard, you may damage ormisalign the roller.For instructions on how to remove the double feed prevention roller, see "Replacing theRollers" (page 61).
• Wipe dirt off of the other rollers in the directions indicated by the arrows in the illustration. Use yourfinger to rotate the roller and wipe dirt off of the entire surface of the roller. If the roller rotates whenwiping it, gently hold it in place with your finger.
56 Operating Manual
Care and Maintenance
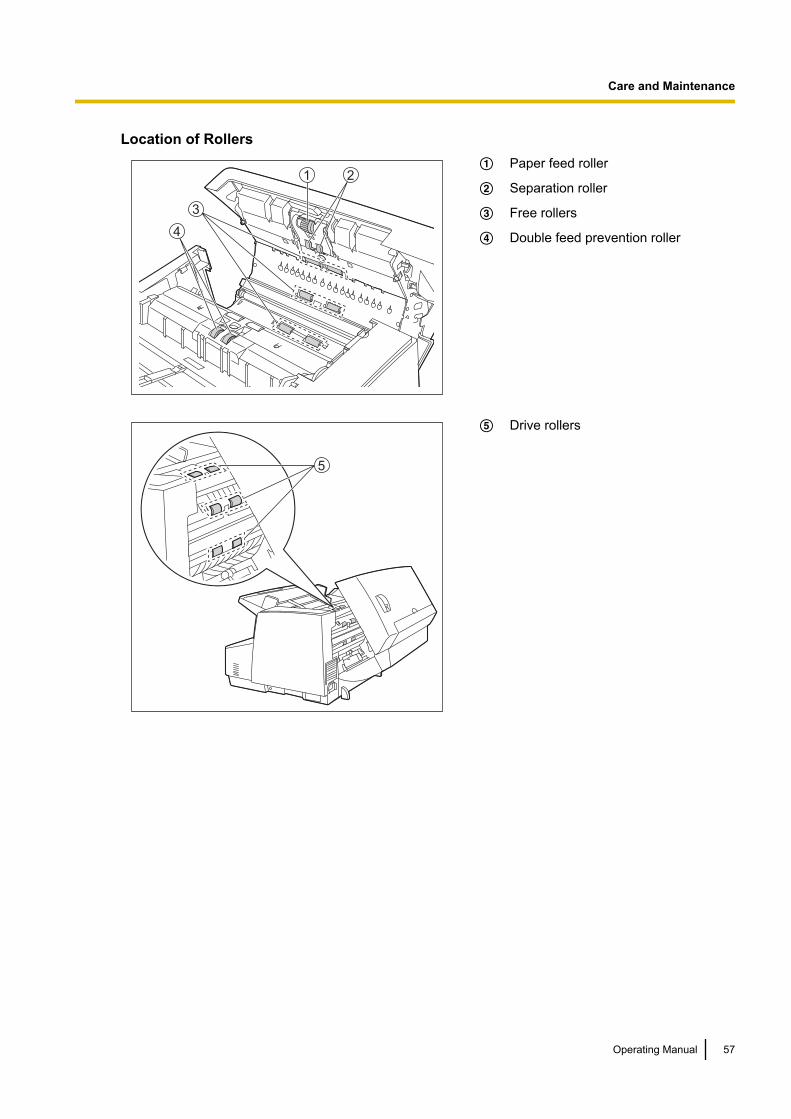
Location of Rollers
3
4
1 2A Paper feed roller
B Separation roller
C Free rollers
D Double feed prevention roller
5
E Drive rollers
Operating Manual 57
Care and Maintenance

Cleaning the Scanning Backgrounds1. Wipe the scanning backgrounds (C, D) on each reference plate (A, B) with the roller cleaning paper
(page 50).• Push E and F in the direction indicated by the arrow to rotate the reference plate on the ADF door
side. Clean both the white and black backgrounds. In the same way, push G and H in the directionindicated by the arrow to rotate the reference plate on the main unit side to clean the white and blackbackgrounds.
5 6
7 8
3
4
1
2
58 Operating Manual
Care and Maintenance
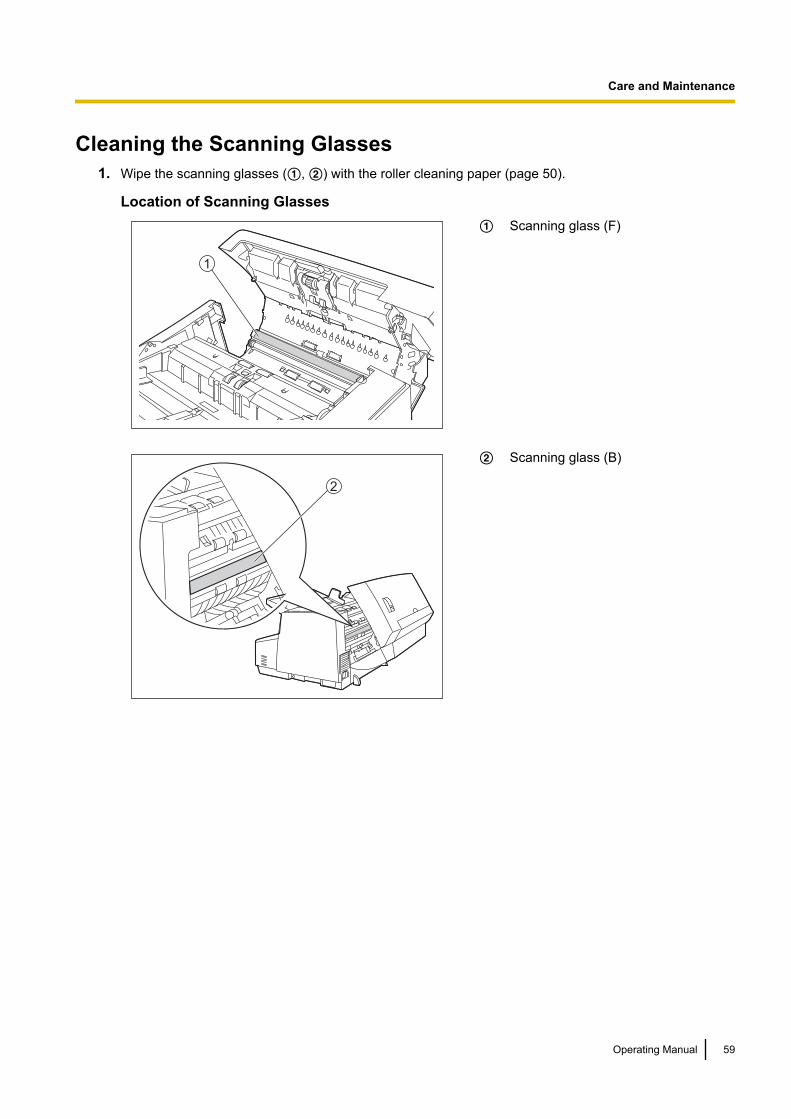
Cleaning the Scanning Glasses1. Wipe the scanning glasses (A, B) with the roller cleaning paper (page 50).
Location of Scanning Glasses
1
A Scanning glass (F)
2
B Scanning glass (B)
Operating Manual 59
Care and Maintenance
Consumables and Optional Accessories Part Name Part Number Notes
Consumables
Roller exchange kit• Paper feed roller
module• Double feed prevention
roller
KV-SS060 —
Roller cleaning paper KV-SS03 See "About the roller cleaningpaper" (page 50).
Ink cartridge KV-SS021
For optional imprinter unit.For instructions on installation andremoval, see "Installing theImprinter Unit and Ink Cartridge" (page 67).
OptionalAccessories Imprinter unit KV-SS014
Prints text and numbers ondocuments. Includes 1 inkcartridge.For instructions on installation, see"Installing the Imprinter Unit and InkCartridge" (page 67).
Note• To purchase separately sold items, contact your dealer.
When to replace the rollersAs a rough guideline, we recommend to replace the paper feed roller module and double feed prevention rollerafter scanning 350,000 sheets of paper. ("350,000 sheets" is based on scanning normal paper. Depending onthe type of paper and other factors, the actual lifetime for the rollers will differ.)In User Utility, you can check the number of sheets that have been scanned.
60 Operating Manual
C
o
n
s
u
m
a
b
l
e
s
a
n
d
O
p
t
i
o
n
a
l
A
c
c
e
s
s
o
r
i
e
s
Consumables and Optional Accessories
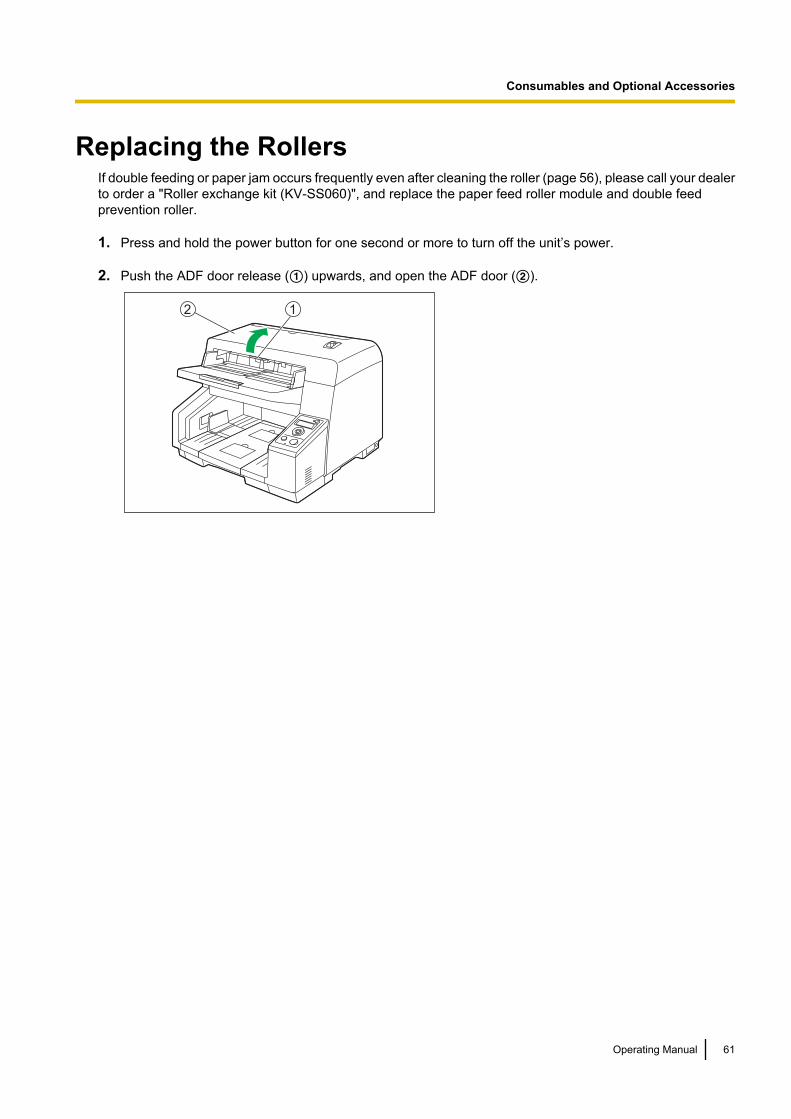
Replacing the RollersIf double feeding or paper jam occurs frequently even after cleaning the roller (page 56), please call your dealerto order a "Roller exchange kit (KV-SS060)", and replace the paper feed roller module and double feedprevention roller.
1. Press and hold the power button for one second or more to turn off the unit’s power.
2. Push the ADF door release (A) upwards, and open the ADF door (B).
12
Operating Manual 61
Consumables and Optional Accessories

3. Move the lever (A) of the paper feed roller module in the order indicated by the arrow (A, B), and thenpull out the module towards you.
12
1
4. Open the "Roller exchange kit (KV-SS060)" (sold separately) and take out the new paper feed rollermodule.
62 Operating Manual
Consumables and Optional Accessories

5. Install the new paper feed roller module.• With the lever (A) of the paper feed roller module lowered, insert both protrusions (B) into the grooves
(C), and then slowly raise the lever in the direction indicated by the arrow until it clicks into place.
3
1
2 33
2
2
Notice• Make sure that the paper feed roller module’s lever is firmly set. If the lever is not firmly set, the
lever or the paper feed roller module might become damaged or might not function correctly.
Operating Manual 63
Consumables and Optional Accessories

6. Use the indents (A) to pull the double feed prevention roller cover towards you to open it.
1
7. While pulling the tab (A) in the direction indicated by the arrow, lift the double feed prevention roller (B)in the direction of the arrow. Then, pull out the right shaft (when facing it) from the notch in the roller mount.
1
2
8. Open the "Roller exchange kit (KV-SS060)" (sold separately) and take out the new double feed preventionroller.
64 Operating Manual
Consumables and Optional Accessories

9. Install the new double feed prevention roller.• Align the shaft that is shaped as indicated by A with the notch in the roller mount (B), and then insert
the shaft in the notch. Push the shaft on the opposite side (C) until it clicks into place.
1
13 2
2
Notice• After you install the double feed prevention roller, make sure that the shaft is inserted into the tab.
If the roller is not installed correctly, it may cause double feeding or a paper jam.
Operating Manual 65
Consumables and Optional Accessories
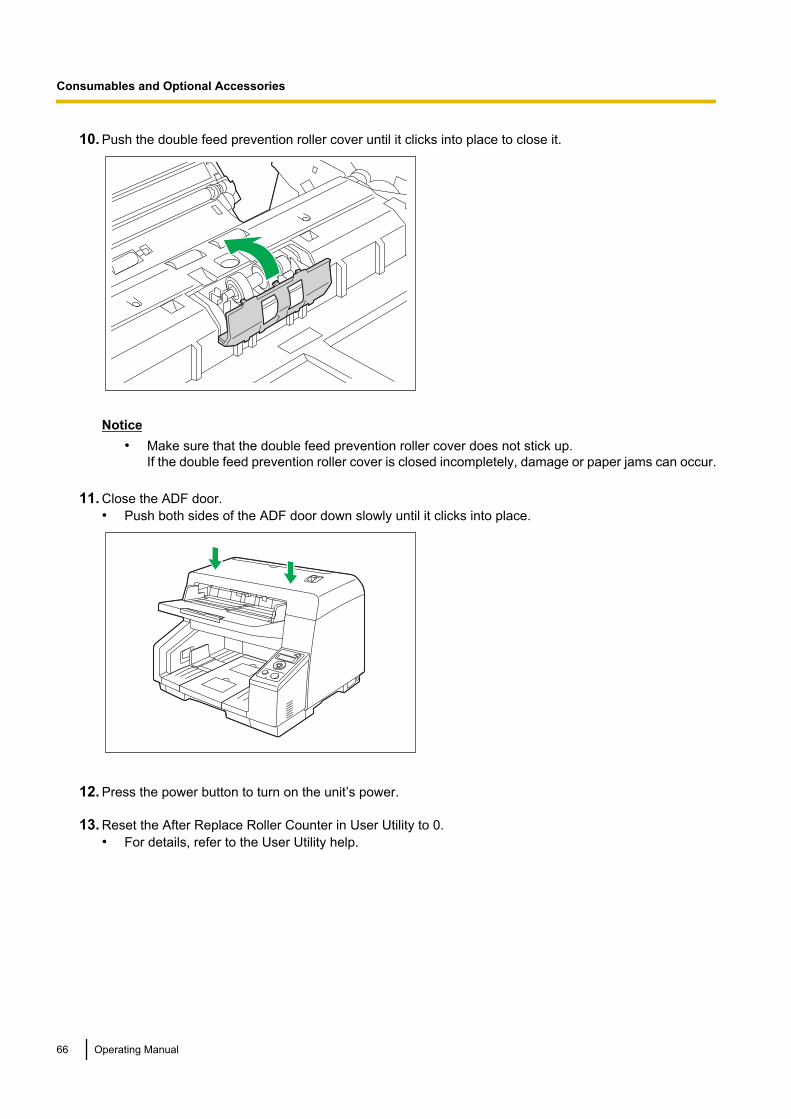
10. Push the double feed prevention roller cover until it clicks into place to close it.
Notice• Make sure that the double feed prevention roller cover does not stick up.
If the double feed prevention roller cover is closed incompletely, damage or paper jams can occur.
11. Close the ADF door.• Push both sides of the ADF door down slowly until it clicks into place.
12. Press the power button to turn on the unit’s power.
13. Reset the After Replace Roller Counter in User Utility to 0.• For details, refer to the User Utility help.
66 Operating Manual
Consumables and Optional Accessories

Installing Optional Accessories
Installing the Imprinter Unit and Ink CartridgeThe imprinter prints on the face of the document before scanning. The printed text will also be scanned.
1. Press and hold the power button for one second or more to turn off the unit’s power.
2. Open the imprinter door.
3. Connect the cable.
Notice• Be sure to correctly match the rib with the slot prior to inserting the connector.
Operating Manual 67
Consumables and Optional Accessories
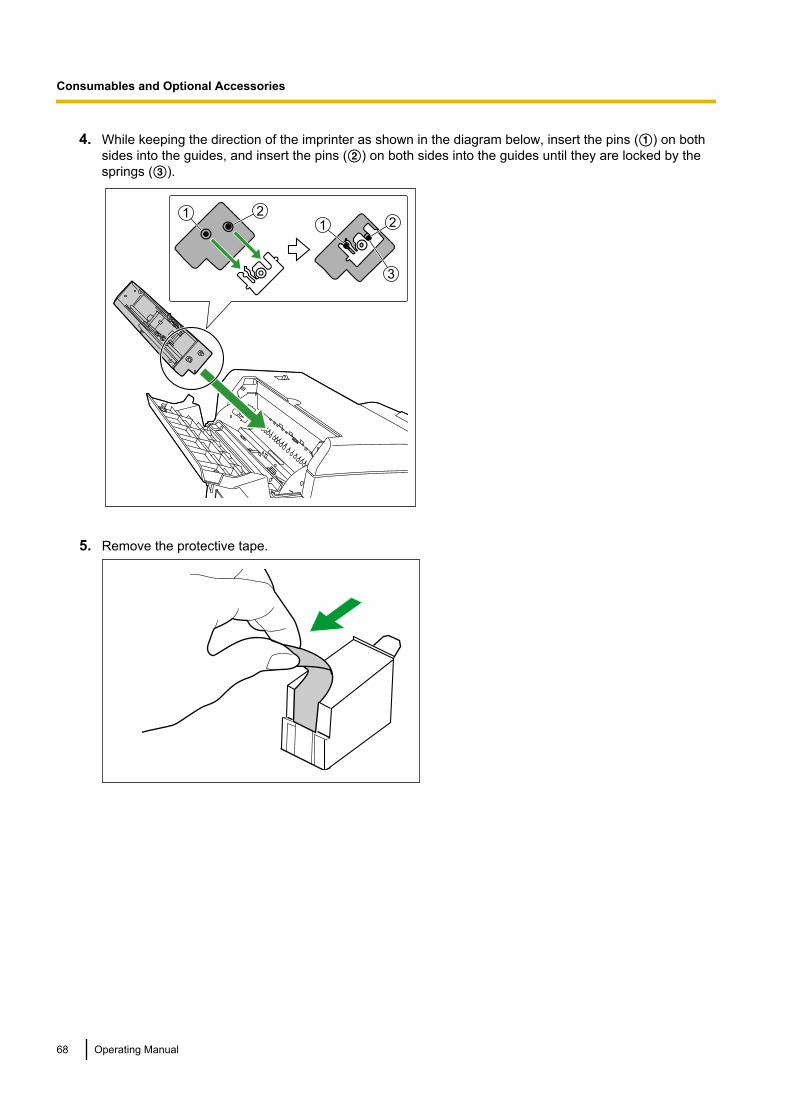
4. While keeping the direction of the imprinter as shown in the diagram below, insert the pins (A) on bothsides into the guides, and insert the pins (B) on both sides into the guides until they are locked by thesprings (C).
11
22
3
5. Remove the protective tape.
68 Operating Manual
Consumables and Optional Accessories

6. Move the carriage to the ink cartridge exchange position.
Notice• Adjust the position following the label on the imprinter.
7. Insert the ink cartridge into the carriage.
8. Lock the ink cartridge adjustment lever (A).
1
Operating Manual 69
Consumables and Optional Accessories
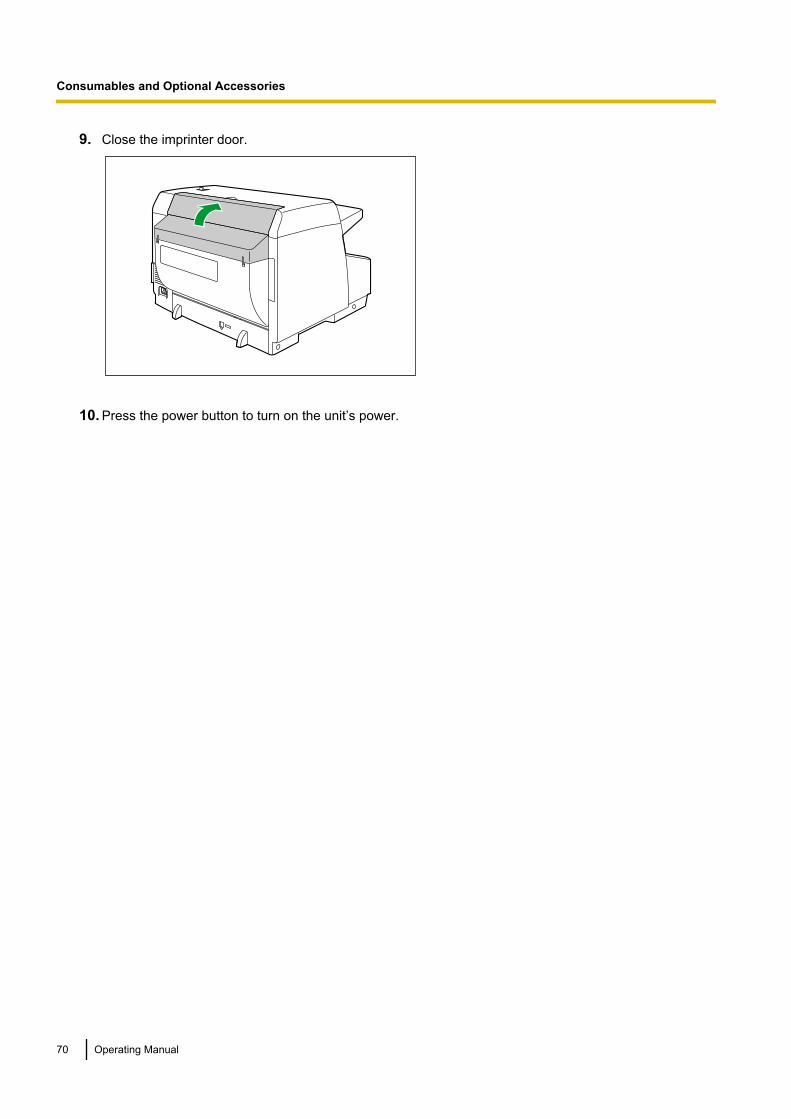
9. Close the imprinter door.
10. Press the power button to turn on the unit’s power.
70 Operating Manual
Consumables and Optional Accessories

How to Remove the Ink CartridgeRemove the old ink cartridge before installing a new ink cartridge.1. Press and hold the power button for one second or more to turn off the unit’s power.
2. Open the imprinter door.
3. Move the carriage to the ink cartridge exchange position.
Notice• Adjust the position following the label on the imprinter.
4. Pinch the ink cartridge adjustment lever (A) and lift it.
1
Operating Manual 71
Consumables and Optional Accessories

5. Remove the ink cartridge (A).
1
• For details about installing a new ink cartridge, refer to step 5 and after in "Installing the Imprinter Unitand Ink Cartridge" (page 67).
72 Operating Manual
Consumables and Optional Accessories

PrintingAdjusting the imprinter printing position1. Move the carriage to the desired printing position, and align the indicator (A) with the " " mark (B).
• The " " mark indicates the printing position. Printing is not available in any other position.
2
1
Printing Position
16.5 mm (0.6 in.)
30.8 mm (1.2 in.)
141 mm (5.6 in.)
121 mm (4.8 in.)
109.3 mm (4.3 in.)
97.5 mm (3.8 in.) 97.5 mm (3.8 in.)
83.5 mm (3.3 in.) 83.5 mm (3.3 in.)
66.8 mm (2.6 in.) 66.8 mm (2.6 in.)
56.5 mm (2.2 in.) 56.5 mm (2.2 in.)
45 mm (1.8 in.) 45 mm (1.8 in.)
30.8 mm (1.2 in.)
16.5 mm (0.6 in.)
Document size Document sizeCenter
PrintingPrinting can be set from the Image Capture Plus software and the TWAIN and ISIS drivers. For details, referto the Image Capture Plus, TWAIN, or ISIS help.
Operating Manual 73
Consumables and Optional Accessories
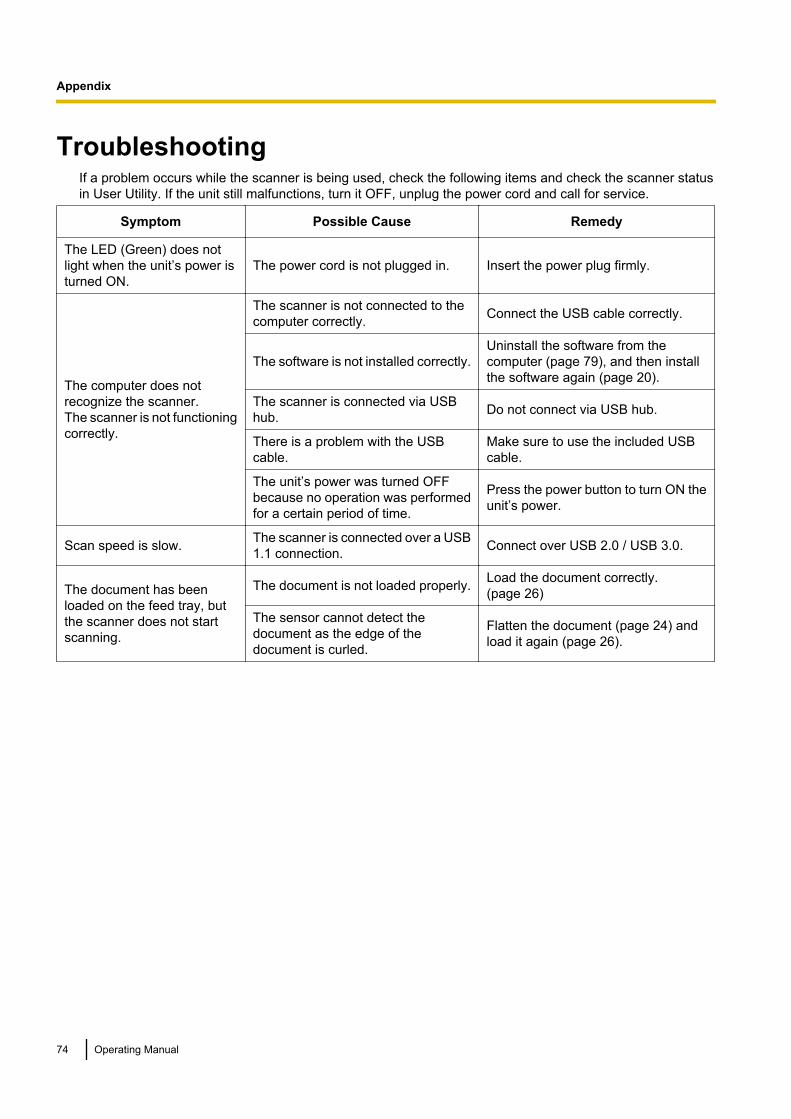
TroubleshootingIf a problem occurs while the scanner is being used, check the following items and check the scanner statusin User Utility. If the unit still malfunctions, turn it OFF, unplug the power cord and call for service.
Symptom Possible Cause Remedy
The LED (Green) does notlight when the unit’s power isturned ON.
The power cord is not plugged in. Insert the power plug firmly.
The computer does notrecognize the scanner.The scanner is not functioningcorrectly.
The scanner is not connected to thecomputer correctly. Connect the USB cable correctly.
The software is not installed correctly.Uninstall the software from thecomputer (page 79), and then installthe software again (page 20).
The scanner is connected via USBhub. Do not connect via USB hub.
There is a problem with the USBcable.
Make sure to use the included USBcable.
The unit’s power was turned OFFbecause no operation was performedfor a certain period of time.
Press the power button to turn ON theunit’s power.
Scan speed is slow. The scanner is connected over a USB1.1 connection. Connect over USB 2.0 / USB 3.0.
The document has beenloaded on the feed tray, butthe scanner does not startscanning.
The document is not loaded properly. Load the document correctly.(page 26)
The sensor cannot detect thedocument as the edge of thedocument is curled.
Flatten the document (page 24) andload it again (page 26).
74 Operating Manual
A
p
p
e
n
d
i
x
Appendix
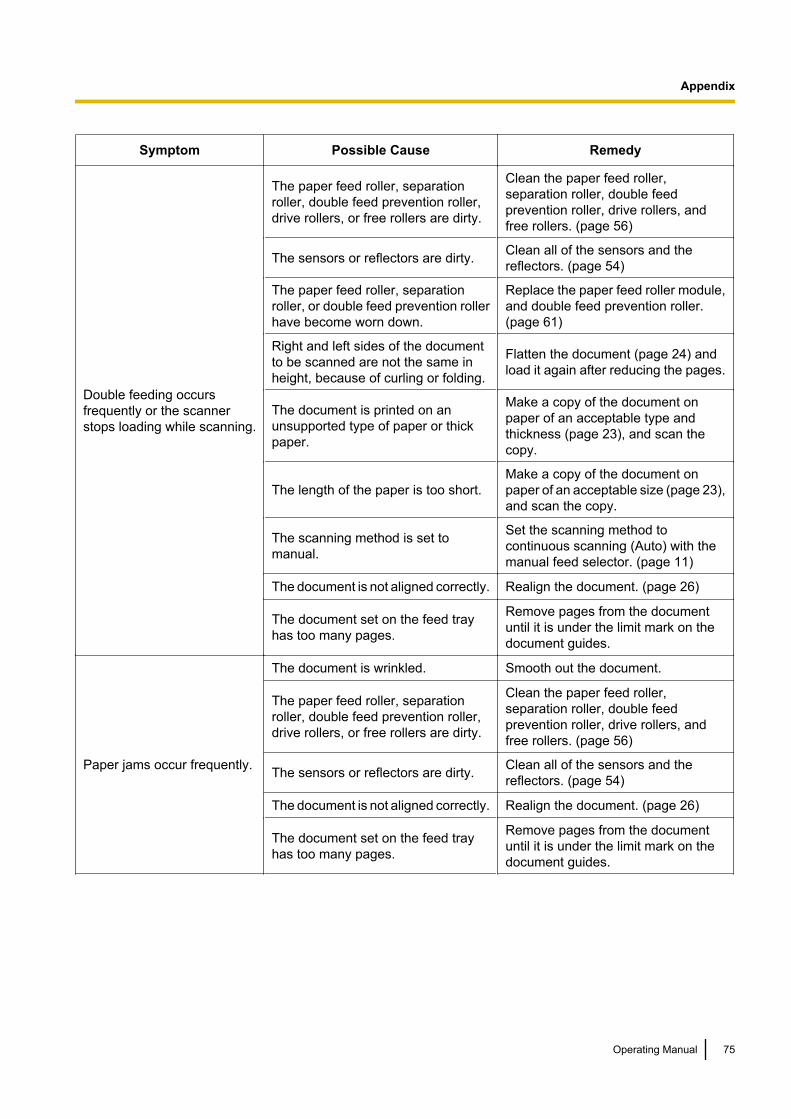
Symptom Possible Cause Remedy
Double feeding occursfrequently or the scannerstops loading while scanning.
The paper feed roller, separationroller, double feed prevention roller,drive rollers, or free rollers are dirty.
Clean the paper feed roller,separation roller, double feedprevention roller, drive rollers, andfree rollers. (page 56)
The sensors or reflectors are dirty. Clean all of the sensors and thereflectors. (page 54)
The paper feed roller, separationroller, or double feed prevention rollerhave become worn down.
Replace the paper feed roller module,and double feed prevention roller. (page 61)
Right and left sides of the documentto be scanned are not the same inheight, because of curling or folding.
Flatten the document (page 24) andload it again after reducing the pages.
The document is printed on anunsupported type of paper or thickpaper.
Make a copy of the document onpaper of an acceptable type andthickness (page 23), and scan thecopy.
The length of the paper is too short.Make a copy of the document onpaper of an acceptable size (page 23),and scan the copy.
The scanning method is set tomanual.
Set the scanning method tocontinuous scanning (Auto) with themanual feed selector. (page 11)
The document is not aligned correctly. Realign the document. (page 26)
The document set on the feed trayhas too many pages.
Remove pages from the documentuntil it is under the limit mark on thedocument guides.
Paper jams occur frequently.
The document is wrinkled. Smooth out the document.
The paper feed roller, separationroller, double feed prevention roller,drive rollers, or free rollers are dirty.
Clean the paper feed roller,separation roller, double feedprevention roller, drive rollers, andfree rollers. (page 56)
The sensors or reflectors are dirty. Clean all of the sensors and thereflectors. (page 54)
The document is not aligned correctly. Realign the document. (page 26)
The document set on the feed trayhas too many pages.
Remove pages from the documentuntil it is under the limit mark on thedocument guides.
Operating Manual 75
Appendix
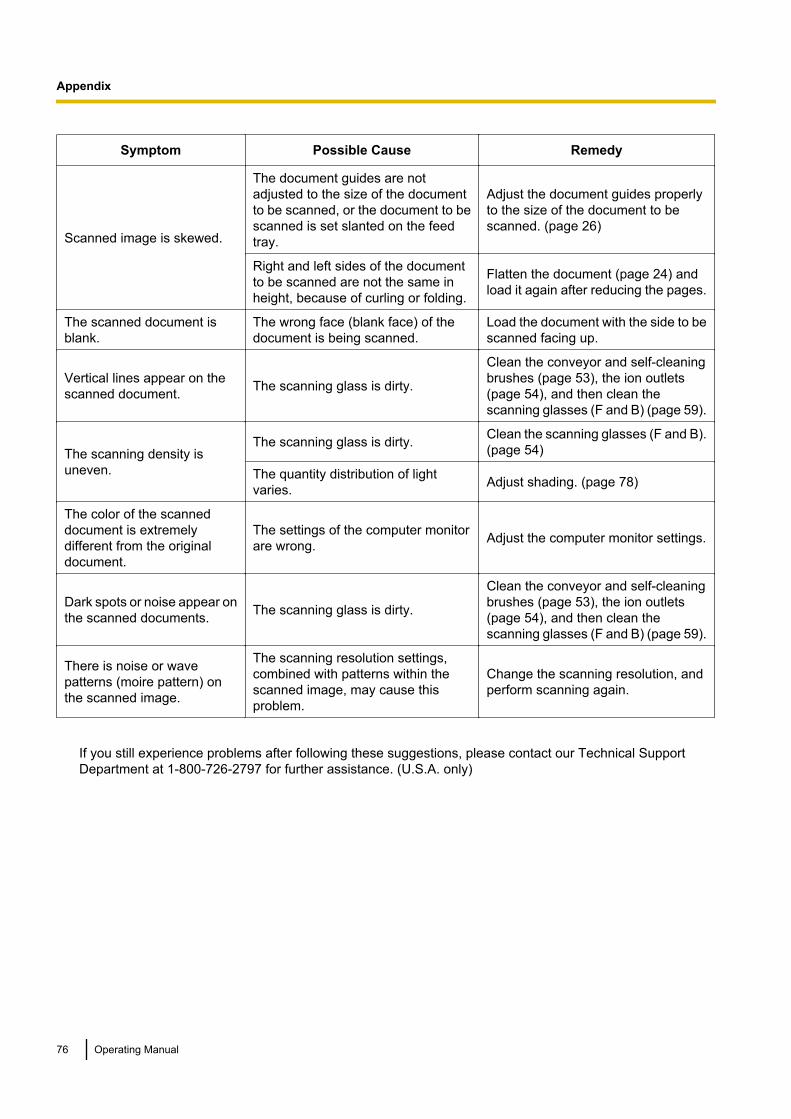
Symptom Possible Cause Remedy
Scanned image is skewed.
The document guides are notadjusted to the size of the documentto be scanned, or the document to bescanned is set slanted on the feedtray.
Adjust the document guides properlyto the size of the document to bescanned. (page 26)
Right and left sides of the documentto be scanned are not the same inheight, because of curling or folding.
Flatten the document (page 24) andload it again after reducing the pages.
The scanned document isblank.
The wrong face (blank face) of thedocument is being scanned.
Load the document with the side to bescanned facing up.
Vertical lines appear on thescanned document. The scanning glass is dirty.
Clean the conveyor and self-cleaningbrushes (page 53), the ion outlets (page 54), and then clean thescanning glasses (F and B) (page 59).
The scanning density isuneven.
The scanning glass is dirty. Clean the scanning glasses (F and B).(page 54)
The quantity distribution of lightvaries. Adjust shading. (page 78)
The color of the scanneddocument is extremelydifferent from the originaldocument.
The settings of the computer monitorare wrong. Adjust the computer monitor settings.
Dark spots or noise appear onthe scanned documents. The scanning glass is dirty.
Clean the conveyor and self-cleaningbrushes (page 53), the ion outlets (page 54), and then clean thescanning glasses (F and B) (page 59).
There is noise or wavepatterns (moire pattern) onthe scanned image.
The scanning resolution settings,combined with patterns within thescanned image, may cause thisproblem.
Change the scanning resolution, andperform scanning again.
If you still experience problems after following these suggestions, please contact our Technical SupportDepartment at 1-800-726-2797 for further assistance. (U.S.A. only)
76 Operating Manual
Appendix
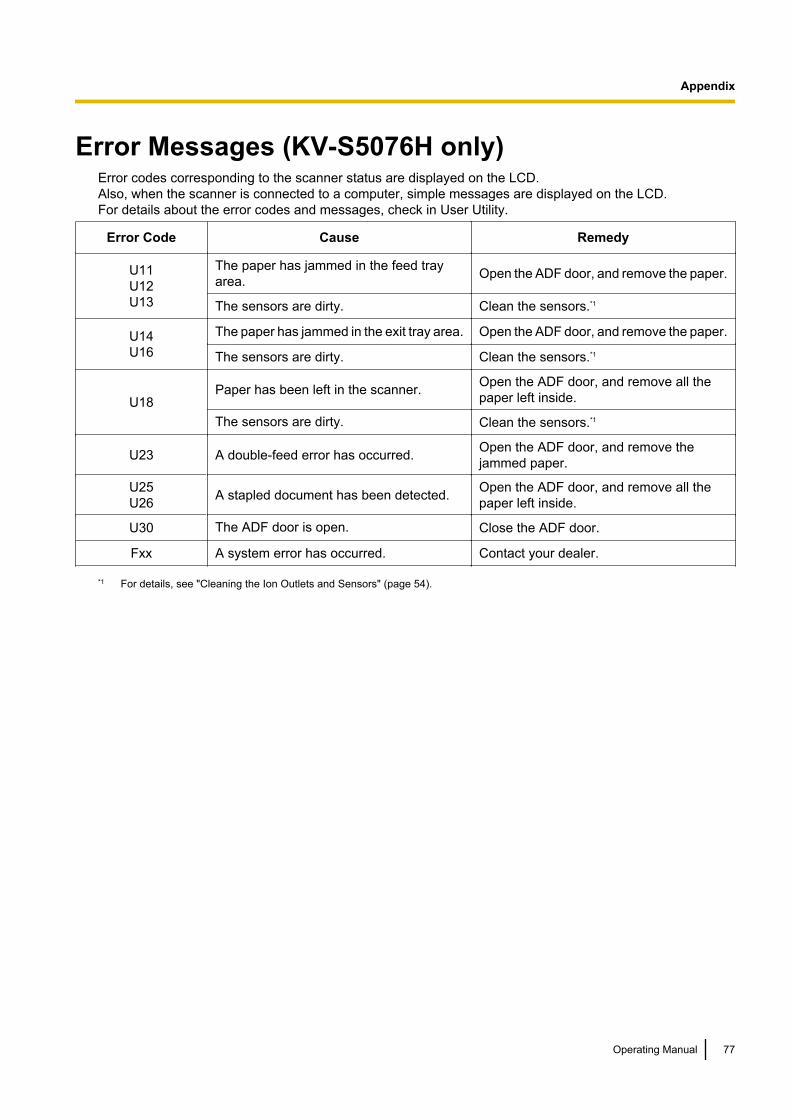
Error Messages (KV-S5076H only)Error codes corresponding to the scanner status are displayed on the LCD.Also, when the scanner is connected to a computer, simple messages are displayed on the LCD.For details about the error codes and messages, check in User Utility.
Error Code Cause Remedy
U11U12U13
The paper has jammed in the feed trayarea. Open the ADF door, and remove the paper.
The sensors are dirty. Clean the sensors.*1
U14U16
The paper has jammed in the exit tray area. Open the ADF door, and remove the paper.
The sensors are dirty. Clean the sensors.*1
U18Paper has been left in the scanner. Open the ADF door, and remove all the
paper left inside.
The sensors are dirty. Clean the sensors.*1
U23 A double-feed error has occurred. Open the ADF door, and remove thejammed paper.
U25U26 A stapled document has been detected. Open the ADF door, and remove all the
paper left inside.
U30 The ADF door is open. Close the ADF door.
Fxx A system error has occurred. Contact your dealer.
*1 For details, see "Cleaning the Ion Outlets and Sensors" (page 54).
Operating Manual 77
Appendix

Shading AdjustmentAbout shading adjustment
The shading adjustment function corrects variations in the lamp intensity and pixel sensor sensitivity, andreduces unevenness in density in scanned images. It can be carried out by means of the User Utility using thespecial shading paper, which is provided with this scanner.
When shading adjustment is requiredPerform shading adjustment when the density and brightness of sections of scanned images is considerablyuneven, or when image quality does not improve after cleaning the inside of the scanner.
Before proceeding with the shading adjustmentBefore beginning shading adjustment, thoroughly clean the scanning glass (F), scanning glass (B), conveyorsin the scanning area, self-cleaning brushes, ion outlets, and all rollers.If you perform shading adjustment while these parts are dirty, lines will appear on scanned images.
Shading adjustment procedure1. Start the User Utility.2. Click [User Shading...] on the main menu, and operate as the image display dictates.
Note• For further details, refer to section "[User Shading]" in the help for User Utility.
Notice• If the shading adjustment has not been performed properly, then lines might appear on scanned images
even after adjusting the shading or lines might not be eliminated even after cleaning the scanning glass.Clean the parts, and then adjust the shading again.
78 Operating Manual
Appendix

Deleting Installed SoftwareIf you want to remove the software that is installed on your computer, follow the procedure below to uninstallthem.
1. In [Control Panel], open [Uninstall a program].• In Windows XP, select [Add or Remove Programs].
2. Select the item that you want to uninstall.• The software is displayed with the program names below:
Software Program Name
Device driver Panasonic Document Scanner Device Driver X.XX*1
TWAIN KV-S5076H KV-S5046H TWAIN Driver
ISIS KV-S5076H KV-S5046H ISIS Driver
Image Capture Plus Image Capture Plus
User Utility Panasonic Scanner User Utility
Manuals Panasonic Scanner Manuals
*1 "X.XX" and the number that follows a program name are the software version. When you upgrade the software, the numbersabove may be different from the actual software version.
3. Follow the instructions on the screen.
Operating Manual 79
Appendix
Repacking InstructionsIt is highly recommended that you keep the original carton and ALL packing materials. If you need to transportor ship the scanner, please follow these instructions.
Note• Improper repacking of the scanner may result in a service charge to repair the scanner.• Please use the original carton and all of the original packing materials.• The scanner should be handled in the correct (horizontal) position.
Required Materials• Original scanner carton and packing materials• Shipping tape and scissors
1. Unplug the power cord from the outlet, and remove the power cord and USB cable from the scanner.
2. Remove the exit support sheet.
3. Return the exit stoppers and exit extension tray to their original (non-extended) positions.
4. Remove the double feed prevention roller (page 64).
80 Operating Manual
Appendix

5. Pack the scanner.
5
1
4
2
3
A Joint
B Power cord
C USB cable
D Double feed prevention roller
E • Software / Manual CD-ROM• Quick Installation Guide• Shading paper• Roller cleaning paper• Exit support sheet
Operating Manual 81
Appendix
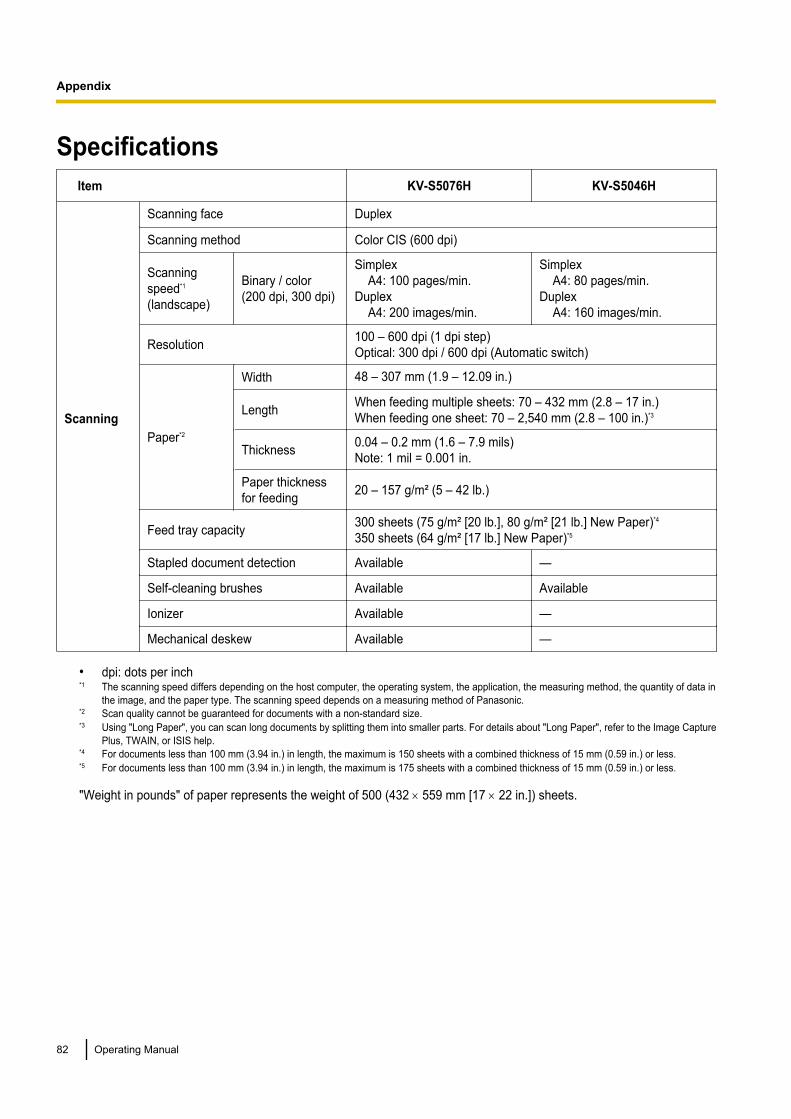
Specifications Item KV-S5076H KV-S5046H
Scanning
Scanning face Duplex
Scanning method Color CIS (600 dpi)
Scanningspeed*1
(landscape)
Binary / color(200 dpi, 300 dpi)
Simplex A4: 100 pages/min.Duplex A4: 200 images/min.
Simplex A4: 80 pages/min.Duplex A4: 160 images/min.
Resolution 100 – 600 dpi (1 dpi step)Optical: 300 dpi / 600 dpi (Automatic switch)
Paper*2
Width 48 – 307 mm (1.9 – 12.09 in.)
Length When feeding multiple sheets: 70 – 432 mm (2.8 – 17 in.)When feeding one sheet: 70 – 2,540 mm (2.8 – 100 in.)*3
Thickness 0.04 – 0.2 mm (1.6 – 7.9 mils)Note: 1 mil = 0.001 in.
Paper thicknessfor feeding 20 – 157 g/m² (5 – 42 lb.)
Feed tray capacity 300 sheets (75 g/m² [20 lb.], 80 g/m² [21 lb.] New Paper)*4
350 sheets (64 g/m² [17 lb.] New Paper)*5
Stapled document detection Available —
Self-cleaning brushes Available Available
Ionizer Available —
Mechanical deskew Available —
• dpi: dots per inch*1 The scanning speed differs depending on the host computer, the operating system, the application, the measuring method, the quantity of data in
the image, and the paper type. The scanning speed depends on a measuring method of Panasonic.*2 Scan quality cannot be guaranteed for documents with a non-standard size.*3 Using "Long Paper", you can scan long documents by splitting them into smaller parts. For details about "Long Paper", refer to the Image Capture
Plus, TWAIN, or ISIS help.*4 For documents less than 100 mm (3.94 in.) in length, the maximum is 150 sheets with a combined thickness of 15 mm (0.59 in.) or less.*5 For documents less than 100 mm (3.94 in.) in length, the maximum is 175 sheets with a combined thickness of 15 mm (0.59 in.) or less.
"Weight in pounds" of paper represents the weight of 500 (432 ´ 559 mm [17 ´ 22 in.]) sheets.
82 Operating Manual
Appendix
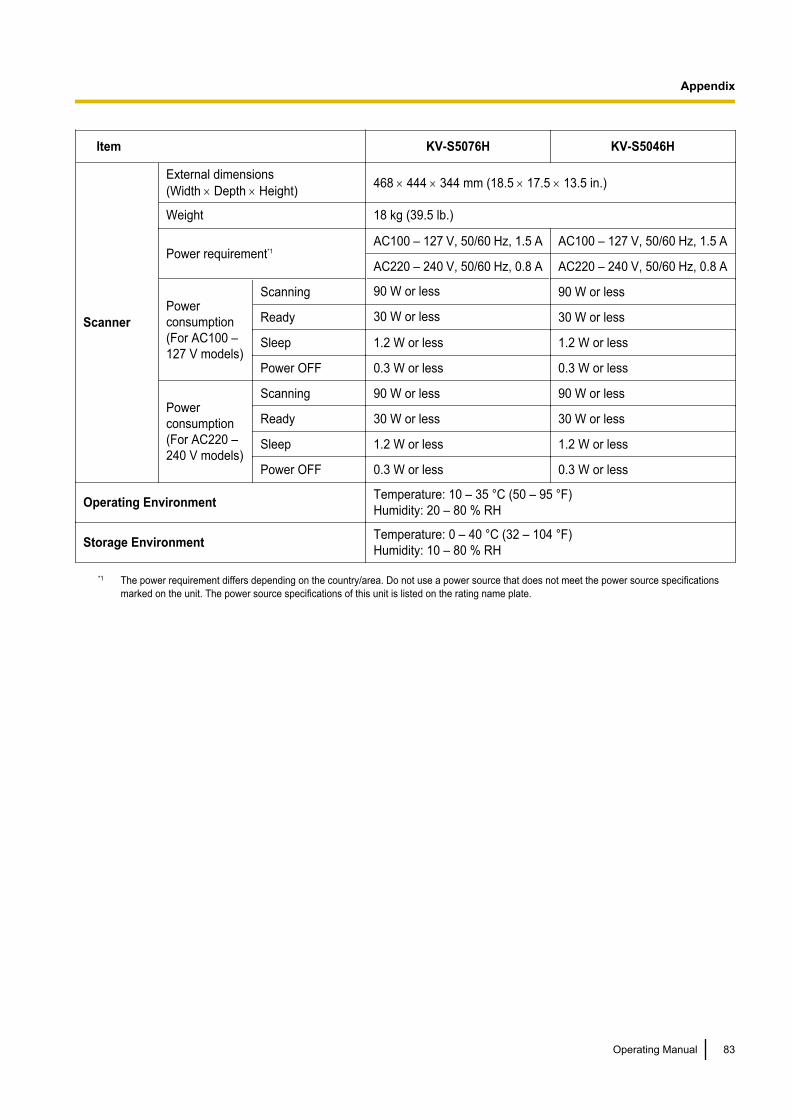
Item KV-S5076H KV-S5046H
Scanner
External dimensions(Width ´ Depth ´ Height) 468 ´ 444 ´ 344 mm (18.5 ´ 17.5 ´ 13.5 in.)
Weight 18 kg (39.5 lb.)
Power requirement*1AC100 – 127 V, 50/60 Hz, 1.5 A AC100 – 127 V, 50/60 Hz, 1.5 A
AC220 – 240 V, 50/60 Hz, 0.8 A AC220 – 240 V, 50/60 Hz, 0.8 A
Powerconsumption(For AC100 –127 V models)
Scanning 90 W or less 90 W or less
Ready 30 W or less 30 W or less
Sleep 1.2 W or less 1.2 W or less
Power OFF 0.3 W or less 0.3 W or less
Powerconsumption(For AC220 –240 V models)
Scanning 90 W or less 90 W or less
Ready 30 W or less 30 W or less
Sleep 1.2 W or less 1.2 W or less
Power OFF 0.3 W or less 0.3 W or less
Operating Environment Temperature: 10 – 35 °C (50 – 95 °F)Humidity: 20 – 80 % RH
Storage Environment Temperature: 0 – 40 °C (32 – 104 °F)Humidity: 10 – 80 % RH
*1 The power requirement differs depending on the country/area. Do not use a power source that does not meet the power source specificationsmarked on the unit. The power source specifications of this unit is listed on the rating name plate.
Operating Manual 83
Appendix
IndexAAC inlet 12Accessories 10ADF door 11, 16ADF door release 11, 16Adjusting the imprinter printing position 73
BBackground color switch function 2, 38
CCleaning the inside of the scanner 49
Conveyor 53Ion outlets and sensors 54Rollers 56Scanning backgrounds 58Scanning glasses 59
Cleaning the outside of the scanner 48Consumables 60Control panel 11, 13Control sheet 3, 42Cursor button 13, 41
DDocument feeder 48Document guides 11, 26Document guides selector 11, 32Documents
Acceptable documents 23Scanning documents 26Unacceptable documents 25
Double feed detection function 2Double feed prevention roller 10, 17Double Feed Skip (DFS) function 2, 13
EError messages 77Exit extension tray 11, 29Exit guides 11, 30Exit slot 46, 48Exit stoppers 11, 29Exit support sheet 10, 30Exit tray 11External dimensions 83
FFan exhaust vent 12, 48Feed extension tray 11, 27Feed tray 11, 27Feed tray capacity 82
IImprinter door 12, 67Imprinter unit 60, 67
Ink cartridge 60, 67Installation location 15Ionizer 82
LLCD 13, 41LED (Green) 13, 14LED (Red) 13, 14Limit mark 27, 34
MManual feed selector 11, 31Mechanical deskew 2, 82
OOK button 13, 41Operating Environment 83Optional accessories 60
PPaper 82Paper feed roller module 61Paper jams 25, 45Power button 13, 21Power consumption 83Power cord 10, 12, 19Power requirements 83Precautions 8
QQuick Installation Guide 3, 10
RReference plate 53, 58Reflectors 55Repacking 80Replacing the rollers 61Resolution 82Roller cleaning paper 9, 10, 50, 60Roller exchange kit 60Rollers
Double feed prevention roller 57, 61Drive rollers 57Free rollers 57Paper feed roller 57Separation roller 57
SScan Button Setting Tool 3, 39Scanning face 82Scanning glass 59Scanning method 82Scanning speed 82Self-cleaning brushes 82Self-cleaning function 2Sensors
Double feed detector 54
84 Operating Manual
Index
Paper sensor 54Skew sensor 54Slip detect sensor 54Starting sensor 54Waiting sensor 54
Shading adjustment 78Shading paper 10, 78Skip button 13Software
Install 20Uninstall 79
Software / Manual CD-ROM 3, 10, 20Specifications 82Stapled document detection 2, 25, 82Start/Stop button 13Starting up applications automatically
Single Touch Scanning 39Touch Free Scanning 39
Storage Environment 83
TTroubleshooting 74
UUSB cable 10, 19USB connector 12User Utility 3, 14, 66
WWeight 83
Operating Manual 85
Index

PNQX6283YA DD1013HS1037© Panasonic Corporation 2013