operating, maintenance & parts manual and manuals/yale hoist/yale... · operating, maintenance...
TRANSCRIPT

OPERATING, MAINTENANCE & PARTS MANUALMANUAL #: 115633-12
HIGH CAPACITY ELECTRIC WIRE ROPE HOISTS
Capacities from 15 to 60 tons

2 115633-12 Nov 2012
TABLE OF CONTENTS
ORDERING/MODEL NUMBER SYSTEM ................................ 3
HOIST OPERATION & MAINTENANCE ............................ 4-23
Safe Hoisting Practices ................................................................. 4Before Operating Hoist Applying the Load Moving the Load Parking Safety Laws for Passenger Elevators Inspection, Preventive Maintenance and Testing
Yale Hoist Duty Service Classifications ......................................... 5
Repair Parts Ordering & Return Information ................................. 5
Hoist Serial Numbers .................................................................... 5
Installation Instructions ................................................................. 5
Adjustment of Limit Switches .................................................... 6-7
Basic Suspensions ........................................................................ 8
Hoist Maintenance and Inspection .......................................... 8-10Daily Inspection Monthly Inspection Quarterly Inspection Annual Inspection Function Testing After Repair WIre Rope Mainenance and Inspection
Reeving .................................................................................. 10-11
Disassembly & Reassembly ........................................................ 12
Troubleshooting ........................................................................... 13
Hoist Gear Drive Information ................................................. 14-17
Motor Brake Installation & Maintenance ............................... 18-21
Helical & Bevel Reducer Lubrication ..................................... 22-23
TROLLEY OPERATION & MAINTENANCE ...................... 24-40
General Information ..................................................................... 24
Installation ................................................................................... 24
Start-up and Pre-Operational Inspection .................................... 25
Operation ............................................................................... 25-29
Inspection .............................................................................. 29-30
Maintenance .......................................................................... 30-33
Replacement Parts ................................................................ 34-40
RECOMMENDED SPARE PARTS ........................................... 41
WARRANTY ................................................................................ 41

3 115633-12 Nov 2012
LODEKING MODEL NUMBER SYSTEM
Example: Model # L060T03312102
Model
Capacity (Tons)
Suspension Or Mounting
Lift (Feet)
Lifting Speed (FPM)
Gage (In.)
"T" for "Top Runner"or "D" for "Deck Mount"
60-ton LodeKingTop running suspension33 ft. of lift (12 ft./min.)Double reevedGage is 102 in.
(1) (3) (1) (3) (3)(2)
12 102L T 033060

4 115633-12 Nov 2012
HOIST OPERATION & MAINTENANCE
SAFE HOISTING PRACTICESFor your own safety and that of your fellow workers, Material Han-dling Equipment must be used as recommended by the Manufac-turer. Failure to heed the following recommendations could endanger your life. Use good common sense and judgement at all times. Safety is the responsibility of the operator of the equipment. You must be competent and attempt to foresee and avoid all hazardous conditions. To be safe as possible, the hoist must be given proper preventive maintenance and testing as described in the ANSI B30.16 Safety Code For Overhead Hoists and this manual.
Before Operating Hoist
1. Do not operate hoist unless you are properly trained, physically fit, and authorized to do so. You must be familiar with all operat-ing controls of the hoist, warnings and instructions on the hoist, the safe hoisting practices listed in this manual, ANSI B30.16 Safety Code For Overhead Hoists, and all pertinent Federal, State, and local regulations before beginning operation.
2. Do not allow unqualified personnel to operate the hoist.
3. Test all controls and limit switches and make sure hoist is well lubricated at beginning of each shift. Make sure needed lubrica-tion, adjustments, or repairs are made by appointed personnel before operations are begun.
4. Be familiar with the equipment and its proper care. Do not operate hoist if adjustments or repairs are necessary, if any damage or undue wear is known or suspected, or if any warning, operating, or capacity instructions normally attached to hoist are damaged, obscured or missing. Report these items promptly to the proper person and also notify next operator when changing shifts.
5. Do not operate hoist if it is functioning improperly.
6. Do not operate hoist with an out-of-order sign attached until sign has been removed by a properly authorized person.
7. Do not adjust or repair hoist unless qualified for maintenance of hoist.
8. Be sure the power supply is disconnected before maintenance and repair procedure is performed.
9. Do not use the wire rope as a ground for welding.
10. Do not touch a welding electrode to the wire rope.
Applying the Load
11. Never wrap the wire rope around the load, or allow it to drag under load.
12. Always use slings or other approved devices to attach load.
13. Be sure the sling is properly seated in the saddle of the hook. Do not allow hook latch to support any part of load.
14. Do not apply a load to tip of hook, or in such a way as to cause bending, or prying forces on the hook or hook support block.
15. Be sure wire ropes are not kinked or twisted or that multiple part ropes are not twisted about each other.
16. Do not operate hoist if wire rope is not seated properly in the grooves of the drum or sheaves.
17. Do not load hoist with less than two wraps of rope on the drum.
18. Center hoist unit over the load before lifting. Avoid side pull.
19. Never pick up a load beyond the rated capacity appearing on the hoist, except for properly authorized tests.
20. Do not use a load limiting device to measure the maximum load to be lifted. It is a safety device only.
Moving the Load
21. Do not engage in any activity which will divert your attention while operating hoist.
22. Respond to signals from designated personnel only, except for stop signals.
23. Never lift a load with the hoist until you and all other personnel are clear of load.
24. Make sure load has proper clearance before moving.
25. Inch the hoist slowly into engagement with a load, but avoid excessive plugging, inching, and quick reversals of load.
26. Do not lift load more than a few inches until it is well balanced in the sling or lifting device.
27. Each time a load approaching rated capacity is handled, check load brake action by raising load just clear of supports and continuing only after you are sure brake is operating properly.
28. Do not transport load over personnel.
29. Never carry personnel on the hook or the load.
30. Avoid swinging of load or load hook when traveling the hoist.
31. On trolley mounted hoists, avoid sharp contact between trolleys, or between trolleys and rail stops.
32. Do not use limit devices as a normal means of stopping the hoist. These are emergency devices only.
33. Do not exceed the maximum duty cycle specified by the manufacturer.
Parking
34. Do not leave load suspended in the air for extended or unat-tended periods.
35. Keep load block above head level when not in use.
Safety Laws for Passenger Elevators
The safety laws for passenger elevators specify construction details that are not incorporated In Yale Hoists. We recommend that pas-senger elevator operation equipment be used that meets all state and national safety codes. Yale Hoists will not accept responsibility for applications of Yale Hoists on passenger elevators.
Inspection, Preventive Maintenance and Testing
A preventive maintenance program should be initiated for this hoist immediately after it is entered into service. The preventive mainte-nance program should comply with recommendations in the ap-plicable Yale Parts and Instruction Manual, and all pertinent Federal, State and Local regulations. Regular inspections, maintenance and testing required should be followed for the life of the hoist and writ-ten inspection records kept as specified. Sample inspection check-lists are included in back of this manual. Extra inspection checklists can be obtained from your nearest authorized Yale Distributor.
DO NOT USE YALE HOISTS OR TROLLEYS FOR PASSENGER ELEVATOR APPLICATIONS.

5 115633-12 Nov 2012
HOIST OPERATION & MAINTENANCE
Yale Hoist Duty Class
Typical Areas of Application
Operational Time Ratings
Uniformly Distributed Work Periods
Infrequent Work Period Hoist Running 50% Time
(3)Max. on Time
Min./Hr.
(4)Max. No. ofStarts/Hr.
(5)Max. Time FromCold Start Min.
(6)Max. No. of
Starts
H3
General Machine Shop, fabricating, assembly, storage and warehousing. Where loads and utilization are randomly distributed, with total running time of equipment not exceeding 15-25% of the work period.
15 150 60 200
H4
High volume handling in steel warehousing, general machine shops, fabricating, assembly, mills and foundries. Total running time does not exceed 35% of work period. Loads at or near rated capacity frequently handled.
21 300 30 300
H5
Material bulk handling in combination with buckets, magnets or heavy attachments. Often cab operated. Duty cycle exceeds 35% and approaches continuous operation. User must specify exact details of operation including attachment weights.
Up to continuous 600 Not Applicable Not Applicable
Hoist Serial Numbers
The hoist serial number is stamped on the nameplate. The nameplates also designate the model number, capacity, speed, current characteristics, and service rating of the hoist or trolley.
YALE HOIST DUTY SERVICE CLASSIFICATIONS
Repair Parts Ordering Information
This parts and instruction manual contains information required to install and maintain your Yale LodeKing Series Electric Hoist. To insure prompt service, each repair parts order should be placed with your local distributor, and must contain the following information:
Please give all information listed below in items 1 through 4. This will enable your distributor to fill your order promptly.
1. Give complete data from hoist nameplate, including hoist serial number, model number, voltage, frequency, and hertz.
2. Give part numbers, description and quantity of parts required.
3. Give correct shipping destination.
4. For ordering motor repair parts, give all data on the hoist, gearcase and motor nameplates.
Return of Parts
If it becomes necessary to return the complete hoist or certain parts to the factory, a letter requesting such a return is necessary. This let-ter should contain an explanation for requesting the return. A return authorization will be issued giving you clearance for returning the hoist or parts to the factory.
1. ROPE AND DRUM: Check the hoist rope for any signs of damage and make sure it lies properly in the grooves of the drum and sheaves. Make sure the rope is well lubricated.
2. LUBRICATION: Every attempt has been made to ship the hoist with the proper amount of lubricating oil in the gearcase. Before placing the unit-in operation, check the level on the sight gauge. The oil should be level with the level hole. If more oil is needed, consult the Lubrication Chart. Also make sure breather plug hole is cleared.
3. CURRENT SUPPLY: make sure the electric current supply corresponds with the rating listed on the hoist nameplate. Make sure duty cycle capabilities of hoist are fully understood by all operators.
4. ELECTRICAL CONNECTIONS: Open the control box and check all the electrical connections ~ to be sure they are tight and that none of the hardware vibrated loose during shipment.
THE HOIST MUST BE GROUNDED. TO DO THIS CONNECT A SUITABLE GROUND WIRE IN THE SUPPLY WIRING TO A SOLID GROUND AND TO THE SUPPLY GROUNDING LUG SUPPLIED IN THE HOIST CONTROL PANEL.
TO INSURE CORRECT OPERATION OF THE SAFETY LIMIT STOPS, IT IS VERY IMPORTANT THAT THE HOOK TRAVEL IS IN THE HOISTING DIRECTION WHEN THE ‘UP’ BUTTON IS PRESSED. IF IT IS NOT, INTERCHANGE ANY TWO OF THE MOTOR LEADS IN THE MOTOR CONDUIT BOX. DO NOT CHANGE PUSHBUTTON WIRING. INTERCHANGING WIRES ON THE LINE SIDE OF THE INVERTER WILL NOT AF-FECT SHAFT ROTATION DIRECTION. IF THE HOIST IS OPERATED WITH INCORRECT POWER CONNEC-TIONS, THE SAFETY LIMIT STOPS WILL BE INEF-FECTIVE AND SERIOUS DAMAGE AND DANGEROUS ACCIDENTS MAY RESULT.
5. PUSH BUTTON CONTROL:
INSTALLATION INSTRUCTIONSBefore the unit is shipped from the factory it is rigidly tested and carefully adjusted for proper operation. However, the following points must be checked to insure correct installation and avoid damage to the hoist.

6 115633-12 Nov 2012
HOIST OPERATION & MAINTENANCE
Adjustments of Limit Switches
1. UPPER LIMIT SWITCH: After the hoist is determined to be running in the proper direction, lower the hook to approximately eight feet (8) below the hoist. Check the limit switch by running the hook upward and lifting the rod or weight by hand. When the rod or weight is lifted from one-half inch (1/2) to two inches (2) the hoist should cutoff. Any further lifting of the rod or weight should close the lowering circuit and cause the hook to lower.
2. UPPER AND LOWER LIMIT SWITCH: (Note warnings and cau-tions below)
3. ROTARY CAM LIMIT SWITCH (SEE NEXT PAGE FOR DIAGRAMS)
OPERATION Rotation of drive shaft (D) in either direction causes all cam
gear assemblies (I) to turn, actuating the contact blocks (K). A timing line appears in the notch (J) when the corre-sponding contact block is actuated. Cam for each contact block is independently adjustable. Each contact block contains one normally open and one normally closed contact set.
TERMINAL OF INDIVIDUAL SNAP SWITCH MUST BE WIRED SAME POLARITY.
ADJUSTMENT
1. Operate the equipment until the desired travel limit is reached, taking into account coasting or braking dis-tance.
2. Loosen the screw (C) for the cam wheel which actuates the contact block you wish to adjust.
3. Insert the adjustment tool (G) into the guide hole (H) closest to the cam wheel being adjusted. Engage teeth on adjustment tool with teeth on cam wheel.
4. Rotate adjusting tool, either direction, until the black line (E) appears in the notch (J). This will be the approximate position at which the contact block will be actuated.
5. Tighten the cam screw (C). Avoid over-tightening which could damage screw and screw threads.
CONTACT BLOCK TERMINALS VIEWED FROM TOPA Terminals N.C. B Terminals N.O.
SPDT Switch
DPDT Switch
HAZARDOUS VOLTAGE. CAN CAUSE DEATH, SERIOUS PERSONAL INJURY, OR PROPERTY DAMAGE.
DISCONNECT POWER BEFORE WORKING ON THIS EQUIPMENT.
EACH STEP OUTLINED BELOW MUST BE FOLLOWED FOR PROTECTION AGAINST ELECTRICAL SHOCK AND INJURY FROM MOVING COMPONENTS.
AT LEAST THREE WRAPS OF ROPE MUST REMAIN ON THE DRUM IN THE LOWEST POSITION.
WHEN UPPER PLUGGING LIMIT SWITCH IS USED, MAKE SURE TRAVELING NUT (OR GEARED) LIMIT SWITCH TRIPS FIRST, ALLOWING THE ROD OR WEIGHT TYPE SWITCH TO ACT AS THE BACKUP LIMIT.
WHEN MOUNTING ROTARY LIMIT SWITCH, ALIGN DRIVE SHAFT (D) WITH COUPLING TO MINIMIZE STRESS ON SHAFT AND BUSHINGS.
DO NOT USE HAMMER OR SIMILAR TOOL TO FORCE COUPLING OR SPROCKET ONTO DRIVE SHAFT.
EXCESSIVE STRESS ON SHAFT MAY RESULT IN DAMAGE TO ROTARY LIMIT SWITCH AND COULD INVALIDATE WARRANTY.
When Adjusting Limit Switches:
*Timing line is black on white standard dwell cam. Line is white on black long dwell cam.

7 115633-12 Nov 2012
HOIST OPERATION & MAINTENANCE
Rotary Cam Limit Switch Adjustment Diagrams
C - Cam Screw
D - Drive Shaft Assembly
E - Black Timing Line (Black on white cam for Standard Dwell. White on black cam for Long Dwell)
F - Cam
G - Adjustment Tool
H - Guide Hole
I - Cam Gear Assembly (White for Standard Dwell. Black for Long Dwell)
J - Notch
K - Contact Block and (2) 6-32 x 1" screws
L - Contact Block Screws
N - Helical/Cam Drive Gear Assembly
P - Ground Screw
Q - Top Plate Screws
R - Switch Mounting Plate
S - Cam Mounting Plate
T - Cover
U - Threaded Outlet

8 115633-12 Nov 2012
HOIST OPERATION & MAINTENANCE
Basic Suspensions
The basic hoist suspension type is a top running motorized trolley for double rails. Before mounting on beam or rail, make sure supporting structure has adequate strength to safely support the loading which will be imposed.
On top running motorized trolleys, make sure rail size is correct for wheels and that distance between rails is correct for trolley throughout entire rail lengths.
DO NOT OPERATE THE HOIST IF ABOVE INSPECTION INDICATES THAT MAINTENANCE IS NEEDED.
Preventative Maintenance Schedule
The required periods between inspections will vary due to the wide range of duty cycles and operating conditions encountered with equipment. The following recommended inspection periods are based on duty of specified service rating with single shift operation (40 hours per week) under normal environmental conditions. If the hoist is used under adverse environmental conditions it should be inspected more frequently.
Daily Inspection
Inspect the following items before operating hoist:
1. ELECTRICAL CONNECTIONS: Check for worn or frayed wires, for loose connections and for damage to, or improper operation of, push button assembly.
2. LIMIT SWITCH: Check the upper and lower limit switch by run-ning the hook without load, and at the slowest speed obtainable, to the maximum up and maximum down positions. Then test with increasing speeds up to maximum. The switch should shut the hoist off before the bottom block contacts the rod or weight type limit switch at the upper extreme. Three wraps of rope should remain on the drum at the shut-off point at the lowest extreme. If adjustment is necessary, refer to geared limit switch section.
3. HOOK: Check for cracks or deformation. Check for damaged or missing latch. A bent or twisted hook indicates overloading or abuse of unit. Other load bearing components of the hoist or trolley should be inspected if overloading is apparent or sus-pected. The bottom hook must swivel freely.
4. WIRE ROPE: Check for proper seating in drum grooves. Check for wear, unstranding, fraying, kinks, or broken wires in the wire rope, and condition of end connections. (If damage is noted, see wire rope instructions under monthly inspection.)
5. HOOK DRIFT: With a load, the hook should stop promptly when the push button is released. Hook drift of more than 2 inches indicates the motor brake is malfunctioning. (See quarterly and annual inspection instructions for more details.)
6. UNUSUAL CONDITIONS: Excessive noise, oil leaks, etc. should be investigated.
Monthly Inspection
1. ALL ITEMS UNDER DAILY INSPECTION.
2. LUBRICATION: Check the level and condition of the gearcase lubricant. The level must be maintained at the gearcase sight gauge. If the level is low, check for leaks. Replace gaskets and shaft seals if necessary. An excessively black color lubricant indicates a chemical change in the lubricant caused by excessive heat, which in turn is caused by heavy duty cycles. Lubricant that is very black in color must be replaced to prevent shortened life of drive components. Lubricate wire rope and other points as required. Refer to lubrication chart.
3. HOOK: Check hook retaining nuts and collars, and means used to secure them. Replace hook if throat opening allows safety latch to disengage from throat opening, or if there is 10 degrees or more twist from normal plane of hook.
4. PUSH BUTTON: Check the ground connections to be sure that the wire cores from the push button cable and the power cord are secured. Tighten the grounding screw and replace the lock-washer if it is missing.
5. BEARINGS: Check all bearings for noisy operation, which is an indication of wear.
6. HARDWARE: Check for loose bolts, nuts and rivets.
7. WIRE ROPE: Check conditions of wire rope using inspection checklist. Refer to wire rope inspection.
8. WARNING LABELS: Check for absence or illegibility of warning decals and tags and replace if necessary.
9. SUPPORTING STRUCTURE OR TROLLEY: Should be checked for continued ability to support the imposed loads. Check for loose suspension or support bolts, axle nuts, etc.
10. INSPECTION CHECKLIST: Fill out inspection checklist at the back of this manual, sign, date and file for future reference.
FOR OPTIMUM LUBRICATION AND COOLING, OIL LEVEL MUST BE MAINTAINED AT THE SIGHT GAUGE LEVEL.
NEVER ALLOW WIRE ROPE TO OPERATE DRY.
Quarterly Inspection
1. ALL ITEMS UNDER DAILY AND MONTHLY INSPECTION.
2. MOTOR BRAKE: Check for excessive or uneven disc wear. Check for excessive magnet gap. Lubricate linkage as required.

9 115633-12 Nov 2012
HOIST OPERATION & MAINTENANCE
Annual Inspection
1. ALL ITEMS UNDER DAILY, MONTHLY AND QUARTERLY INSPECTION.
2. EQUALIZE SHEAVE, IDLER SHEAVE, AND PINS. Check for cracked or worn sheaves, pins and bearings.
3. HOOKS: Magnetic particle or other suitable crack detecting inspection should be performed if need is indicated by external appearance. Check for loose retaining nuts and collars.
4. LOAD BEARING PARTS: Check for worn, cracked or distorted parts, such as suspension housings, outriggers, clevises, yokes, hook blocks, suspension bolts, shafts, locking devices and bearings on hoist (also on trolley, if so equipped).
5. MOTOR BRAKE: Check for excessive or uneven disc wear. On direct acting, check for excessive magnet gap. Lubricate linkage as required.
6. WIRING AND TERMINALS: See that all connections are tight. Terminals are to be securely crimped to wires and the insulation sound. Bent terminals can usually be straightened to provide a tight fit. Replace terminals or wire if necessary.
7. SHEAVES AND DRUMS: Inspect rope sheaves and drums for excessive wear. When the groove of a sheave or rope drum becomes worn excessively it should be replaced. Worn grooves on the drum or sheave can greatly reduce the useful life of the hoisting rope.
9. BEARING LUBRICATION: The motor, sheave, and outer drum bearings are a pre-lubricated sealed design and normally will not need to be lubricated.
10. INSPECTION CHECKLIST: Fill out inspection checklist at the back of this manual, sign, date and file for future reference.
PRIOR TO TESTING, ALL SUPPORTING STRUCTURES, ANCHORAGES, AND/OR SUSPENSIONS MUST BE APPROVED BY THE APPOINTED PERSON FOR THE TEST LOADS USED.
Function Testing After Repair
After repair or replacement of parts, function test hoist by operating unloaded hoist into both upper and lower limits, first with slowest speed possible, then with increasing speeds up to maximum. Limit switch mechanisms must be adjusted so they will trip in sufficient time to prevent damage to any part of the hoisting arrangement. See instructions for adjustment of limit switches. Then test operation of hoist and brake by lifting 100% of rated load. (A normal load lifted may be substituted if no load bearing parts were altered.) If hoist is equipped with a load limiting device, and load bearing parts have been altered, the first test load should be only 100% of rated load. The test should be prepared by the person responsible and kept on file for future reference.
PRIOR TO TESTING, ALL SUPPORTING STRUCTURES, ANCHORAGES, AND/OR SUSPENSIONS MUST BE APPROVED BY THE APPOINTED PERSON FOR THE TEST LOADS USED.

10 115633-12 Nov 2012
HOIST OPERATION & MAINTENANCE
Wrong Way Right Way
Wire Rope Inspection
All wire rope should be inspected once a month and a signed and dated inspection report maintained. The inspection checklists at the back of this manual can be used to record these inspections. Wire rope should be replaced if any of the following conditions are noted.
1. Twelve randomly distributed broken wires in one rope lay, or four broken wires in one strand in one rope lay.
2. Wear of one-third (1/3) of the original diameter of outside individual wires.
3. Kinking, crushing, birdcaging or any distortion of the wire rope structure.
4. Evidence of heat damage.
5. Reductions from nominal diameter of more than the following values:
6. Rope clamps should be checked to ensure bolts are properly torqued.
REPLACEMENT WIRE ROPE SHOULD BE THE SAME SIZE, GRADE AND CONSTRUCTION AS THE ORIGINAL WIRE ROPE. BEFORE REPLACING WIRE ROPE, READ REEVING PROCEDURE. AFTER WIRE ROPE REPLACEMENT CHECK FOR PROPER LIMIT SWITCH OPERATION.
ROPE PILE-ON HOISTING DRUM WILL SEVERELY DAMAGE THE HOISTING ROPE. IF THIS CONDITION IS NOTED, THE HOISTING ROPE SHOULD BE INSPECTED ACCORDING TO THE ABOVE PARAGRAPH ON WIRE ROPE INSPECTION. IF DAMAGED ROPE IS FOUND, CHECK DRUM AND FRAME MEMBERS FOR DAMAGE.
New Rope Diameter Maximum Reduction
5/16 inch and under 1/64 inch
3/8 inch through 1/2 inch 1/32 inch
9/16 inch through 3/4 inch 3/64 inch
7/8 inch through 1-1/8 inch 1/16 inch
Broken Wires Kinked Bird Cage
How to Measure Wire Rope
The correct diameter of a wire rope is the diameter of a circum-scribed circle which will enclose all the strands. It is the largest cross-sectional measurement. The measurement should be made carefully with calipers. The illustrations below show the correct and incorrect method of measuring the diameter of wire rope.
GENERAL INSTRUCTIONS
Procedure for Reeving Wire Rope on Drum
DOUBLE REEVED UNITS
Note: Rotary cam limit switch must be set for (3) safety wrap.
1. Anchor the rope in the drum on one side. Install rope retainer.
2. Stretch out rope to make sure there are no twists or kinks.
3. Reeve the free end of the rope through the bottom block and all sheaves.
4. Anchor the free end of the rope in the other side of the drum. Install rope retainer.
5. Push the “UP” button to reeve both sides of the drum, making sure there is enough force on the rope to insure proper reeving in all drum grooves.
Note: When the bottom block is raised to the upper limit, the block should be at the midpoint of the ungrooved portion of the drum and even with idler sheave. If this is not so, the unit is reeved incorrectly.
ALL UNITS WITH A LOWER LIMIT SWITCH MUST HAVE A MINIMUM OF THREE WRAPS OF WIRE ROPE ON THE DRUM WHEN THE BOTTOM BLOCK IS IN THE LOWEST POSITION.

11 115633-12 Nov 2012
HOIST OPERATION & MAINTENANCE
11 115633-12 Nov 2012
HOIST OPERATION & MAINTENANCE
Reeving Types
Yale powered wire rope hoists and winches are reeved in various ways to gain desired advantages. Proper reeving insures maximum life of the hoist drum, wire rope, and bottom block assembly while obtaining the best characteristics of capacity, lift, and speed for the basic unit.
Reeving is “double”, i.e. two ropes coming from the drum. Close headroom hoists are double reeved. “Part” designates the number of times the rope runs between the hoist and bottom block. For example: With 2 part double reeving, the rope runs from the rope drum to the bottom block, up to the equalizer sheave, back to the bottom block, then back to the rope drum, indicating 4 “parts” of rope supporting the load.
The drawings below show the characteristics of each principal method of reeving.
Advantages of double reeved units include minimum lateral hook drift (keeping load in the same approximate position in relation to the drum and beam) and a lower hoist headroom requirement.
4 Part Reeving
8 Part Reeving6 Part Reeving
12 Part Reeving10 Part Reeving

12 115633-12 Nov 2012
HOIST OPERATION & MAINTENANCE
Disassembly
To completely disassemble the hoist, follow the disassembly proce-dures in the order listed.
To disassembly any one specific part of the hoist, follow the instruc-tions for that specific section.
1. REMOVE HOIST ROPE, BOTTOM BLOCK OR BOTTOM HOOK.
1) Remove or readjust geared limit to negate lower limit (see instructions (a) through (f)).
2) Operate hoist in down direction until no cable remains on the drum. Remove rope clamps and pull rope from the drum.
3) Remove power from the hoist.
4) Remove rope clamps.
5) Remove limit switch weight from the hoist cable.
6) Remove pin holding equalizer sheave yoke in hoist frame. (4 part rope only
7) Remove shafts holding the sheaves in the yoke or frame and remove cable.
2. REMOVE MOTOR BRAKE (DIRECT ACTING).
a. Disconnect encoder cable from encoder.
b. Remove fan shroud screws and remove shroud.
c. Loosen set screws holding encoder to shaft and remove encoder.
d. Remove screws holding fan to shaft and remove fan.
e. Disconnect brake cable within motor terminal box and remove cable from terminal box.
f. Remove four socket head screws holding brake to motor. Remove brake.
3. REMOVE GEAR CASE.
a. Run hoist in down direction and clear all rope from the hoist drum.
b. Remove drum supports and drums. Caution must be used when removing drums to ensure that the hollow bore does not become nicked or damaged.
c. Remove bolts (4) from under the gearbox mounting plate.
d. Lift gear case from trolley frame.
BEFORE DOING MAINTENANCE WORK ON THIS HOIST, READ THE FOLLOWING INSTRUCTIONS THOROUGHLY. REFER TO THE REPLACEMENT PARTS SECTION FOR PARTS IDENTIFICATION.
DISCONNECT ALL POWER TO THE HOIST BY DISCONNECTING THE POWER FEED LINE BEFORE ATTEMPTING SERVICE OR REPAIR.
THE GEAR CASE ASSEMBLIES CAN BE VERY HEAVY. IF POSSIBLE, IT IS BEST TO SUPPORT THEIR WEIGHT PRIOR TO REMOVAL.
4. REMOVE LIMIT SWITCH, TRAVELING NUT OR GEARED.
a. Geared Upper and Lower Limit Switch
1) Disconnect all power from hoist.
2) Remove the cover from the limit switch and disconnect the wiring. Note the color coding or tag the wires so they can be reconnected correctly. Loosen the cord fitting and remove the cord.
3) Remove the bolts and lockwashers that hold the limit switch assembly to the bracket. Remove the limit switch assembly from the bracket.
b. Weight Operated Upper Limit Switch
1) Disconnect all power from the hoist.
2) Remove the clamping screws holding operating weight around the wire rope and remove the weight.
3) Remove bolts holding the limit switch bracket to the hoist and remove the limit switch assembly.
4) Loosen the clamping screw holding the hub on the limit switch shaft and remove the hub and lever assembly. Note its position carefully so it can be reinstalled correctly.
5) Remove the screws holding the limit switch to the bracket.
6) Remove the limit cover and disconnect the wiring. Note the color coding or tag the wires so they can be reconnected correctly. Loosen the cord fitting and remove the cord from the limit switch.
5. REMOVE CONTROLS OR CONTROL BOX.
a. Remove all power from the hoist.
b. Disconnect and tag all wires coming into the control box.
c. Remove nuts, bolts and lockwashers holding control panel in the box.
d. Remove control panel.
e. Disconnect all flex conduit, limit switch cord, push-button cord and power leads from control box.
f. Remove nuts and lockwashers holding control box and remove. Control box may be heavy and should be supported before removing.
Reassembly
The assembly sequence is basically the reverse of the disassembly sequence previously described. The following special instructions should be observed during reassembly.
1. Before the gear case is assembled, all internal parts should be inspected for damage or excessive wear. Replace parts as required.
2. Be sure the drum shaft is free of paint or other material which would interfere with installation. Lubricate the shaft with Never-Seez® to prevent galling.
3. Be sure the motor brake is properly adjusted before it is installed on the motor.
4. Bolt gear case to the frame using (4) M30 bolts x (2) 25 mm dowel pins
5. Slide drums into gear case. The drum spacer goes on the drum opposite the motor.
6. Install outer bearing support. It may be required to move the bearing support fore/aft to align the bearing. Check alignment with a dial indicator to measure runout at the outboard shaft. Contact factory if runout exceeds 0.0003"
7. Re-reeve.

13 115633-12 Nov 2012
HOIST OPERATION & MAINTENANCE
TROUBLESHOOTING
Possible Cause Remedy
Motor brake slipping* Adjust brake. Check for oil on brake discs.
Motor brake not closing*Adjust for proper clearance. See brake instructions.
Load Drifts or Drops
Possible Cause Remedy
Wrong coil Replace with proper voltage coil.
Motor brake too tight Adjust brake. See brake instructions.
Brake Coil Burned Out
Possible Cause Remedy
Blown or loose fuse Replace or tighten fuse
Tripped breaker Reset breaker
Lose terminal screws Check and tighten all loose screws
Low voltageCheck voltage at line side of mainline contactor (when provided) or line side of hoist fuse base
Low voltage or no voltage to push button circuit
Check voltage at output side of transformer. Wrong voltage tap may have been selected. For example: 460 volt tap used when line voltage is 230 volt. Check control circuit fuse.
Defective push buttonCheck contact points at push button to see if points touch. If not, replace.
Defective push button cord. (Wire may be pinched,
broken or bare.)Check for lack of continuity or short to ground.
Motor brake coil burnedReplace. Check to make sure coil is proper coil for voltage applied.
Defective stator Rewind stator
Rotor loose on shaft Replace
Hoist Does Not Operate
Possible Cause Remedy
Defective stator Replace or rewind stator
Worn motor bearings Replace
Bent rotor shaft Replace
Rotor dragging in statorTighten motor bolts. Check for foreign matter between rotor and stator. Check for worn motor bearings.
Stator loose in frameRewind stator if necessary.Reposition and anchor in accordance with motor manufacturers instructions.
Low voltageCheck with local utility company and/or increase wire size.
Motor Overheats, Excessive Amperage Draw
Possible Cause Remedy
Motor bolts loose Tighten
Rotor dragging in statorCheck for bent rotor shaft or worn bearings. Replace worn or damaged parts.
Motor bearings loose Replace bearings
Motor Noisy
Possible Cause Remedy
Wrong tap used on primary side
Replace transformer if necessary. Primary tap must match line voltage.
Shorted transformer Replace
Shorted control circuit Correct short
Transformer Overheats or Burns Out
Possible Cause Remedy
Hoist not grounded Ground hoist
Power leads or control wires shorted to hoist frame.
Repair or replace
Grounded motor Replace
Slight electrical leakage from any of the electrical
components on hoist.Make sure hoist is properly grounded.
Hoist Shocks Operator
* With vector control, the inverter will fault and warning horn will sound in the event of any brake related issues. If these conditions are observed (Brake slip or failure to set), see the hoist inverter manual to troubleshoot inverter related brake faults and the brake manual for proper adjustment of brake.
14 115633-12 Nov 2012
HOIST OPERATION & MAINTENANCE
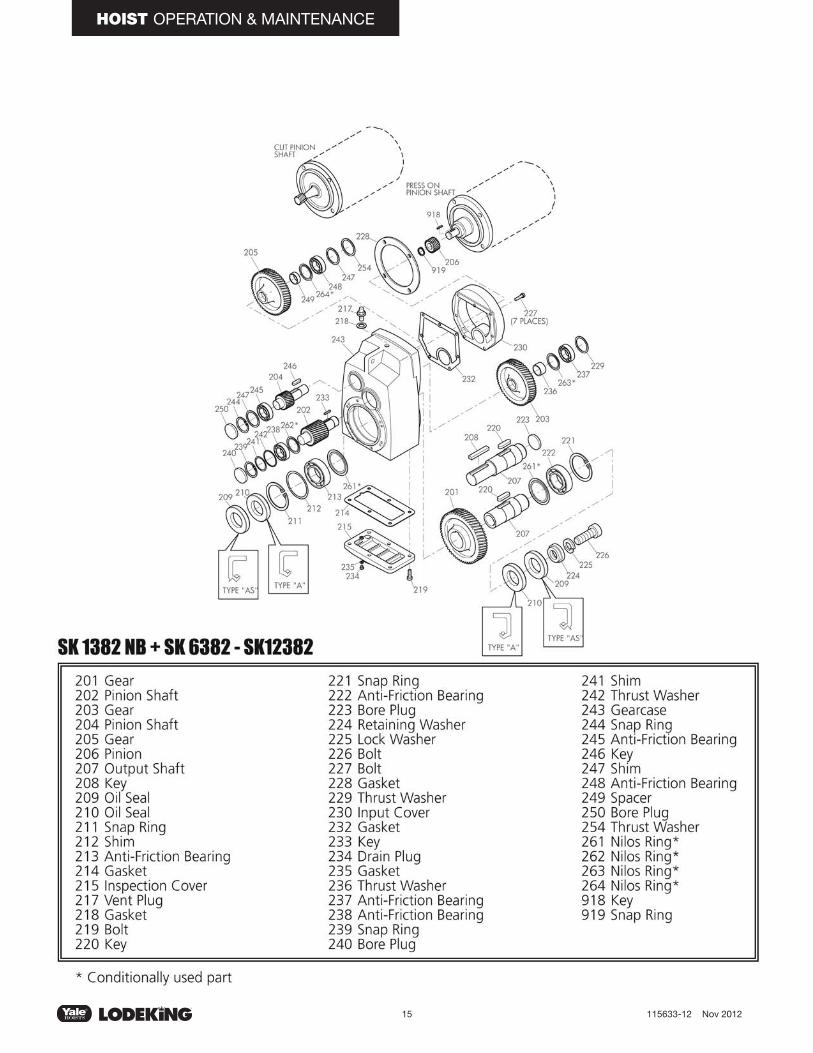
HOIST GEAR DRIVE
General Instructions
One can receive the detailed installation and maintenance instruc-tions by entering a serial number (or NORD order number) at the appropriate location on the NORD web site.
1. Record the serial number from your gearmotor, gear reducer, or motor nameplate, or record the serial number found on your order confirmation.
2. Go to www.nord.com/docs to download the appropriate operating instructions.
EXAMPLE: www.nord.com/docs
All work involved in the transport, connection, commissioning and maintenance of any NORD prod-uct must be carried out by qualified and responsible technicians. All applicable national, regional, and local work regulations and safety requirements must also be complied with. NORD assumes no liability for personal injury, accidental death, or equipment damage and malfunctions resulting from failure to comply with installation or operating instructions, safety notes, or any work regulations and laws!
Gear unit installation and maintenance work may only be performed when no power is available to the prime mover or motor. Electric motors, electrical brakes, and variable frequency drives, contain potentially dangerous high-voltage. Prior to installation or maintenance, shut down the power at the circuit breaker or power switch. While working on the drive, make sure the power from the prime mover is isolated or secured on “lock-out” to prevent accidental start-up and to safeguard against injury!
Surfaces of motors and gear units may become hot during operation or shortly after start-up. In some instances additional protection against accidental contact may be necessary. Use caution to avoid burns or serious injury!
Safety Notes
All work including transportation, storage, installation, electrical connection, commissioning, servicing, maintenance and repair must be performed only by qualified specialists or personnel. It is recom-mended that repairs to NORD Products are carried out by the NORD Service Department. Instructions related to operational safety will be emphasized as shown.
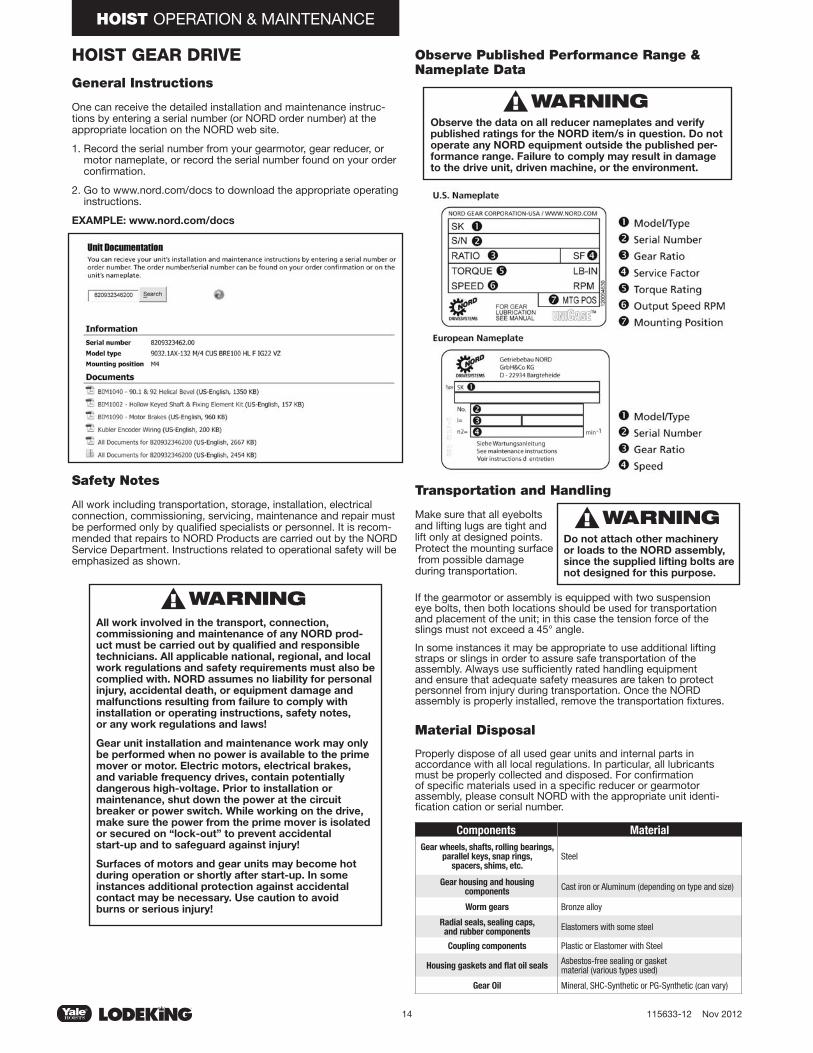
Observe Published Performance Range & Nameplate Data
Observe the data on all reducer nameplates and verify published ratings for the NORD item/s in question. Do not operate any NORD equipment outside the published per-formance range. Failure to comply may result in damage to the drive unit, driven machine, or the environment.
Transportation and Handling
Make sure that all eyebolts and lifting lugs are tight and lift only at designed points. Protect the mounting surface from possible damage during transportation.
Do not attach other machinery or loads to the NORD assembly, since the supplied lifting bolts are not designed for this purpose.
If the gearmotor or assembly is equipped with two suspension eye bolts, then both locations should be used for transportation and placement of the unit; in this case the tension force of the slings must not exceed a 45° angle.
In some instances it may be appropriate to use additional lifting straps or slings in order to assure safe transportation of the assembly. Always use sufficiently rated handling equipment and ensure that adequate safety measures are taken to protect personnel from injury during transportation. Once the NORD assembly is properly installed, remove the transportation fixtures.
Material Disposal
Properly dispose of all used gear units and internal parts in accordance with all local regulations. In particular, all lubricants must be properly collected and disposed. For confirmation of specific materials used in a specific reducer or gearmotor assembly, please consult NORD with the appropriate unit identi-fication cation or serial number.
Components MaterialGear wheels, shafts, rolling bearings,
parallel keys, snap rings, spacers, shims, etc.
Steel
Gear housing and housingcomponents Cast iron or Aluminum (depending on type and size)
Worm gears Bronze alloy
Radial seals, sealing caps, and rubber components Elastomers with some steel
Coupling components Plastic or Elastomer with Steel
Housing gaskets and flat oil seals Asbestos-free sealing or gasketmaterial (various types used)
Gear Oil Mineral, SHC-Synthetic or PG-Synthetic (can vary)
15 115633-12 Nov 2012
HOIST OPERATION & MAINTENANCE

16 115633-12 Nov 2012
HOIST OPERATION & MAINTENANCE

17 115633-12 Nov 2012
HOIST OPERATION & MAINTENANCE
Troubleshooting
This section identifies some of the most common issues involved with NORD Gear speed reducers , and provides recommendations to assist you in defining and answering your questions as you work with our products. You may also contact our Engineering/Application departments if your questions are not answered in the table below.
Problem with the Reducer Possible Causes Suggested Remedy
Runs Hot
Overloading Load exceeds the capacity of the reducer Check rated capacity of reducer, replace with unit of sufficient capacity or reduce the load.
Improper Lubrication
Insufficient lubrication Check lubricant level and adjust up to recommended levels.
Excessive lubrication Check lubricant level and adjust down to recommended levels.
Wrong lubrication Flush out and refill with correct lubricant as recommended.
Runs Noisy
Loose foundation Bolts
Weak mounting structure Inspect mounting of reducer. Tighten loose bolts and/or reinforce mounting and structure.
Loose hold down bolts Tighten bolts.
Failure of bearingsMay be due to lack of lubricant Replace bearing. Clean and flush reducer
and fill with recommended lubricant.
Overload Check rated capacity of reducer.
Insufficient lubricant
Level of lubricant in reducer not properly maintained
Check lubricant level and adjust to factory recommended level.
Output Shaft Does Not Turn
Internal parts arebroken or missing
Overloading of reducer can cause damage
Replace broken parts. Check rated capacity of reducer.
Key missing or sheared off on input shaft Replace key.
Coupling loose or disconnected Properly align reducer and coupling. Tighten coupling.
Oil Leakage
Worn seals Caused by dirt or grit entering seal Replace seals. Autovent may be clogged. Replace or clean.
Unit runs hot or leaks
Overfilled reducer Check lubricant level and adjust to recommended level.
Vent clogged. Clean or replace, being sure to prevent any dirt from falling into the reducer.
Incorrect fill level Improper mounting position, such as wall or ceiling mount of horizontal reducer
Check mounting position on the name tag & verify with mounting chart in manual.

18 115633-12 Nov 2012
HOIST OPERATION & MAINTENANCE
Hand Release Lever (HL)It is common to supply the NORD brake with a hand release lever assembly. The hand release lever allows the brake to be manually released without requiring that the brake be energized with volt-age. The lever has a spring return that allows the brake to be hand released and returned automatically to its set position. The handle of the hand release lever can be unscrewed for easy removal.
MOTOR BRAKE INSTALLATION & MAINTENANCEThe standard NORD motor brake is “spring-set”. When power is re-moved and the brake is de-energized (power-off), the brake springs exert a force against the armature plate in turn preventing the brake rotor (or brake disc) from rotating. When the brake coil is energized (power-on), a magnetic field builds and pulls the armature plate across the air gap to the brake casing, which releases the brake rotor and allows the motor shaft to rotate.
NORD brakes are DC voltage brakes and in most instances are supplied with a motor mounted brake rectifier for easy connections to AC power. AC power is taken directly from the power line or from the terminal block of the motor and converted to DC by the supplied rectifier.
Basic Brake Operation
Brake Air Gap In order to obtain optimal brake performance and maximum brake life, it is necessary to periodically check and reset the brake air gap. As the brake rotor wears and decreases in thickness, the air gap will increase. If the air gap is too large, the brake coil may not have enough magnetic force to pull the metal armature disc across the gap and the brake will drag.
When a complete brake motor is supplied by NORD, the air gap is already set at the factory. If the brake is ordered as a part, the air gap must be set in the field . All brake air gap adjustments must be made with the brake assembled onto the motor and power off (brake engaged).
To assure proper assembly and proper functioning of the brake, the hand-lever must be assembled to the brake, and the hand-lever air gap must be adjusted, before the brake is assembled to the motor.
Once adjusted properly, the hand-lever air gap setting should not be altered, even when readjusting the air gap setting.
1. Place the hand-lever over the brake housing (as shown) and align the pins.
2. Screw the bolts with washer and spring into the pins.
3. Using a feeler gage, adjust the hand-lever air gap per the table below.
Brake Hand-Lever Installation & Adjustment
When a brake motor with hand-lever is supplied by NORD, both the hand lever air gap and brake air gap are set at the factory. When ordered as parts, proper hand-lever and air gap adjust-
ments must be made in the field. Hand-lever adjustments must al-ways be made prior to assembling the brake to the motor. All brake air gap adjustments must be made with the brake assembled to the motor and the power off (brake engaged).
When setting the hand-lever gap or dimension “y” the magnetic brake coil housing and the anchor plate must be kept uniform all around.
Brake SizeDimension "y"
mm. in.
BRE 5 1 0.040
BRE 10 1 0.040
BRE 20 1 0.040
BRE 40 1 0.040
BRE 60 1 0.040
BRE 100 1.2 0.047
BRE 150 1.2 0.047
BRE 250 1.2 0.047
BRE 400 1.5 0.059
BRE 800 1.5 0.059
BRE 1200 1.5 0.059
Hand-Lever Air Gap Setting

19 115633-12 Nov 2012
HOIST OPERATION & MAINTENANCE
MOTOR BRAKE INSTALLATION & MAINTENANCE (CONTINUED)
Setting the Brake Air Gap NORD spring-loaded brakes are virtually maintenance free. However, the air-gap of the brake rotor or brake disc must be periodically checked and adjusted. If necessary, the worn brake rotor must be replaced. The Brake Air Gap Settings table serves as guide to check and set the brake air gap as needed.
When a complete brake motor is supplied by NORD, the air gap is already set at the factory. If the brake is ordered as a part, the air gap must be set in the field. All brake air gap adjustments must be made with the brake assembled to the motor and the power off (brake engaged).
The brake air gap is checked by placing a feeler gage between metal anchor plate and the brake coil housing as shown in the diagram below. This procedure is identical even for the larger BRE800 and BRE1200 twin rotor brakes.
Procedure
The brake air gap is checked by placing a feeler gage between metal anchor plate and the brake coil housing as shown in the diagram below. This procedure is identical even for the larger BRE800 and BRE1200 twin rotor brakes.
1. Loosen the fixing screws that attach the brake to the motor’s end-shield by approximately half a turn.
2. If required, the brake assembly may be loosened slightly from the motor’s end shield by turning the threaded setting bolts (hollow screws) that surround the fixing screws, coun-ter clockwise, into the brake coil housing.
3. Depending upon whether or not the air gap needs to be de-creased or increased, turn the fixing screws accordingly until the desired nominal air gap (Table 6) is reached, as measured using the appropriate feeler gauge.
a. Turning the fixing screws clockwise allows the brake coil housing to be moved towards the anchor plate and reduces the air gap.
b. Turning the fixing screws counter-clockwise allows the brake coil housing to be moved away from the anchor plate and increases the air gap.
4. If the setting bolts (hollow screws) were adjusted as sug-gested in Step 2, re-secure the brake coil housing firmly against the motor’s end shield by turning the setting bolts (hollow screws) clockwise, out of the brake coil housing.
5. Tighten the fixing screws to the appropriate torque.
6. Re-check and measure the air gap in multiple locations to check for appropriate spacing. Repeat the steps as needed until the desired air gap spacing is uniform and consistent all the way around the brake.
Brake Size
Fixing Screw Tightening Torque
Nominal Air Gap Setting*
Maximum Air Gap**
lbs./ft. Nm in. mm in. mm
BRE 5 2.2 3 0.008 0.2 0.024 0.6
BRE 10 4.4 6 0.008 0.2 0.028 0.7
BRE 20 7.4 10 0.012 0.3 0.031 0.8
BRE 40 7.4 10 0.012 0.3 0.035 0.9
BRE 60 18 25 0.012 0.3 0.039 1.0
BRE 100 18 25 0.016 0.4 0.043 1.1
BRE 150 18 25 0.016 0.4 0.043 1.1
BRE 250 37 50 0.020 0.5 0.047 1.2
BRE 400 37 50 0.020 0.5 0.047 1.2
BRE 800 37 50 0.024 0.6 0.047 1.2
BRE 1200 37 50 0.024 0.6 0.047 1.2
Brake Air Gap Settings
* Tolerance: + 0.004 in [+ 0.1 mm] ** Brake air gap must be re-adjusted before the stated value.

20 115633-12 Nov 2012
HOIST OPERATION & MAINTENANCE
MOTOR BRAKE INSTALLATION & MAINTENANCE (CONTINUED)
Brake Rotor (Brake Disc) Wear Assessment Periodically the brake rotor or brake disc must also be checked for wear. If the brake rotors wear approaches the minimum allowed thickness, then the part should be replaced. Use the table below to determine whether or not the brake rotor requires replacement.
Brake Size
Nominal Brake Rotor Thickness*
Minimum Brake Rotor Thickness**
in. mm in. mm
BRE 5 0.295 7.5 0.177 4.5
BRE 10 0.335 8.5 0.217 5.5
BRE 20 0.406 10.3 0.295 7.5
BRE 40 0.492 12.5 0.374 9.5
BRE 60 0.571 14.5 0.453 11.5
BRE 100 0.630 16 0.492 12.5
BRE 150 0.709 18 0.571 14.5
BRE 250 0.787 20 0.650 16.5
BRE 400 0.787 20 0.650 16.5
BRE 800 0.787 20 0.650 16.5
BRE 1200 0.866 22 0.689 17.5
Brake Rotor Thickness
* As new condition. ** Worn condition - brake rotor replacement is required!
Brake Pad Replacement (reference Spare Parts list on next page)When the brake pad is worn the pad should be replaced to maintain proper brake operation and ensure safety.
Required Tools
1. Phillips head screw drivers (fan shroud removal)
2. External snap ring pliers (fan and brake hub removal).
3. Large flat head screw driver or small pry bar (fan removal)
4. Metric T-handle wrenches and open-end wrenches.
Procedure
1. Remove the fixing screws (946) securing the fan cover (940) to the motor end-shield (932). If the brake has a hand release (937), the lever arm should be removed by unscrew-ing it.
2. Remove the fan cover (940) and note the position of the hand release slot if applicable.
3. Remove the snap ring holding the cooling fan (939) and carefully remove the cooling fan (939), key and second snap ring (997).
4. If the brake is equipped with a dust boot (992), remove it.
5. Remove the socket head cap screws holding the brake coil (936) to the motor end-shield (932).
6. Remove the brake coil (936), noting the hand release (937) and power cable locations.
7. Slide the brake rotor (993) off the brake hub (938) which is secured to the motor shaft.
8. Clean the brake, install the new brake rotor pad and reas-semble the brake in reverse order of the steps outlined.
21 115633-12 Nov 2012
HOIST OPERATION & MAINTENANCE
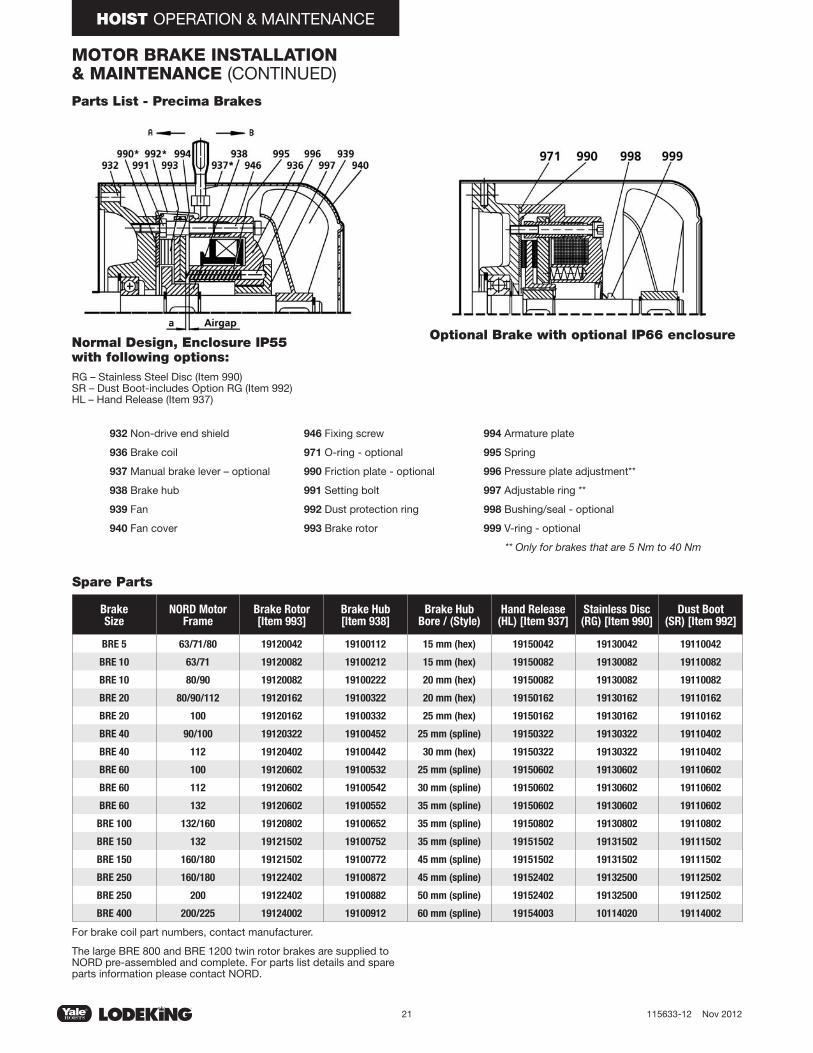
MOTOR BRAKE INSTALLATION & MAINTENANCE (CONTINUED)
Parts List - Precima Brakes
Normal Design, Enclosure IP55 with following options:RG – Stainless Steel Disc (Item 990) SR – Dust Boot-includes Option RG (Item 992) HL – Hand Release (Item 937)
Optional Brake with optional IP66 enclosure
932 Non-drive end shield
936 Brake coil
937 Manual brake lever – optional
938 Brake hub
939 Fan
940 Fan cover
946 Fixing screw
971 O-ring - optional
990 Friction plate - optional
991 Setting bolt
992 Dust protection ring
993 Brake rotor
994 Armature plate
995 Spring
996 Pressure plate adjustment**
997 Adjustable ring **
998 Bushing/seal - optional
999 V-ring - optional
** Only for brakes that are 5 Nm to 40 Nm
Brake Size
NORD Motor Frame
Brake Rotor [Item 993]
Brake Hub [Item 938]
Brake Hub Bore / (Style)
Hand Release (HL) [Item 937]
Stainless Disc (RG) [Item 990]
Dust Boot (SR) [Item 992]
BRE 5 63/71/80 19120042 19100112 15 mm (hex) 19150042 19130042 19110042
BRE 10 63/71 19120082 19100212 15 mm (hex) 19150082 19130082 19110082
BRE 10 80/90 19120082 19100222 20 mm (hex) 19150082 19130082 19110082
BRE 20 80/90/112 19120162 19100322 20 mm (hex) 19150162 19130162 19110162
BRE 20 100 19120162 19100332 25 mm (hex) 19150162 19130162 19110162
BRE 40 90/100 19120322 19100452 25 mm (spline) 19150322 19130322 19110402
BRE 40 112 19120402 19100442 30 mm (hex) 19150322 19130322 19110402
BRE 60 100 19120602 19100532 25 mm (spline) 19150602 19130602 19110602
BRE 60 112 19120602 19100542 30 mm (spline) 19150602 19130602 19110602
BRE 60 132 19120602 19100552 35 mm (spline) 19150602 19130602 19110602
BRE 100 132/160 19120802 19100652 35 mm (spline) 19150802 19130802 19110802
BRE 150 132 19121502 19100752 35 mm (spline) 19151502 19131502 19111502
BRE 150 160/180 19121502 19100772 45 mm (spline) 19151502 19131502 19111502
BRE 250 160/180 19122402 19100872 45 mm (spline) 19152402 19132500 19112502
BRE 250 200 19122402 19100882 50 mm (spline) 19152402 19132500 19112502
BRE 400 200/225 19124002 19100912 60 mm (spline) 19154003 10114020 19114002
Spare Parts
For brake coil part numbers, contact manufacturer.
The large BRE 800 and BRE 1200 twin rotor brakes are supplied to NORD pre-assembled and complete. For parts list details and spare parts information please contact NORD.

22 115633-12 Nov 2012
HOIST OPERATION & MAINTENANCE
HELICAL & BEVEL REDUCER LUBRICATION
Importance of Proper LubricationProper gearbox lubrication is essential in order to reduce friction, heat, and component wear. Lubricants reduce heat and wear by inserting a protective “fluid boundary” between mating parts and preventing direct metal to metal contact. Lubricants also help prevent corrosion and oxidation, minimize foam, improve heat transfer, optimize reducer efficiency , absorb shock loads and reduce noise.
Most NORD reducers are shipped from the factory with a pre-determined oil fill level in accordance to the specified reducer size and mounting position.
Standard Oil TypeThe following tables indicate the standard oil fill type used. Please see user manual U11000 for more specific information and for optional helical and bevel gear lubricants:
Oil ViscosityViscosity, or the oil’s resistance to shear under load, is often con-sidered the single most important property of any gear oil.
Often one will consider making a viscosity correction to the oil to improve the performance when operating the gear unit at low temperature or high temperature.
In cases of extreme load conditions, gear pairs and anti-friction bearings may be more susceptible to sliding or scuffing wear. In these operating conditions, it may also be beneficial to consider an increased lubrication viscosity and/or a lubrication with improved anti-wear additive packages.
The user should consult with their primary lubrication supplier before considering changes in oil type or viscosity.
Maximum Oil Sump Temperature LimitTo prevent reducer overheating, the reducer’s maximum oil sump temperature limit must not be exceeded for prolonged periods of operation (up to 3 hours continuous operation depending upon reducer size).
Serviceable Gear Units
Helical In-line
Standard Oil Fill:ISO VG 220, Mineral Oil
Clincher Parallel-Shaft
Right-Angle Bevel
NORDBLOC® Series In-line
NORDBLOC®.1 Series In-line
Standard Series In-line
For shipping purposes, the following large Clincher™ gear units are supplied without oil: Clincher™ Sizes SK11282, SK11382 and SK12382
Maintenance-free units are supplied as sealed units with no vent-plug. Consult NORD prior to ordering if interested in ordering any of the above sizes as serviceable gear units.
Consult the sticker adjacent to the fill plug to determine the type of lubricant installed at the factory. Some units have special lubricants designed to operate in certain environments or intended to extend the service life or service temperature range of the lubricant. If in doubt about which lubricant is needed for a certain application, please contact NORD Gear.
Use caution when specifying gear reducers for high temperature service. If there is concern about exceeding the allowable safe operating temperatures, please consult NORD to discuss alternatives.
Maintenance-free / Lubricated For Life Gear Units
Clincher™ sizes SK0182NB,SK0282NB & SK1382NB Standard Oil Fill:
ISO VG220 SHC/PAOSynthetic OilNORDBLOC® Sizes SK172,
SK272, SK371F, SK372, SK373,SK320
Oil TypeMaximum Oil Temperature Limit
NORD AGMA 9005-D94
Mineral 80-85°C (176-185°F) 95°C (203°F)
Synthetic 105°C (220°F) 107°C (225°F)
The Importance of Routine Oil AnalysisRoutine oil analysis, sound lubrication practices, and good tracking of oil performance trends will help establish proper lubrication maintenance and change-out intervals. To maxi-mize equipment reliability, NORD Gear generally recommends a condition-based lubrication maintenance program. One may take exceptions to this general recommendation on sealed-for-life or maintenance-free gear units or smaller and less costly gear units. In these instances, the replacement cost of the gear unit is often small compared to the costs associated with this type of oil analysis program.
NORD suggests replacing the gear oil if oil analysis indicates any of the following:
• Viscosity has changed by approximately 10% or more.
• Debris particles (silicon, dust, dirt or sand) exceed 25 ppm.
• Iron content exceeds 150-200 ppm.
• Water content is greater than 0.05% (500 ppm).
• The total acid number (TAN) tests indicate a signifi-cant level of oxidative break-down of the oil, and a critical reduction in performance; If the TAN number measured changes by more than 5% over the new oil, then an oil change would be recommended.
Lubrication ReplacementIf the gear unit is filled with mineral oil, the lubricant should be replaced at least after every 10,000 operating hours or after every two years. If the gear unit is filled with synthetic oil, the lubricant should be replaced at least after every 20,000 operating hours or after every four years. Often gear reducers are exposed to ex-treme ambient conditions, hostile environments, wet conditions, or dirty and dusty operating areas. Especially in these situations, it is important to establish a condition-based oil service interval.

23 115633-12 Nov 2012
HOIST OPERATION & MAINTENANCE
HELICAL & BEVEL REDUCER LUBRICATION (CONTINUED)
Mounting Position and Oil Fill QuantityAll NORD Gear reducers are shipped from the factory with a pre-determined oil fiIl level in accordance to the specified reducer size and mounting position. For additional information, please see the separate mounting position diagrams and the corresponding oil fill quantity tables for the specified gear unit.
The gearbox name tag will indicate the mounting position that was provided. For mounting orientations other than shown in the mounting position charts, please consult NORD Gear.
Oil Plug LocationsAll gear units are assembled with the oil fill-level, oil-drain and vent plugs installed in their proper locations, according to the specified mounting position. All standard plugs are metric and utilize sealing gaskets between the head of the plug and the reducer housing.
Drain and Fill-Level PlugsAll reducer drain plugs are metric socket head cap screws. For easier identification, it is NORD’s standard practice to provide a hex-head screw for the fill-level plug. For ease of draining the used oil from the gear reducer, use the socket head screw located at the lowest part of the gearbox.
Open Vent - An optional open vent can be supplied by NORD. The open vent comes closed upon delivery with a transportation sealing plug (see Warning).
Filtered Vent - NORD may offer an optional filtered vent, which allows gases to permeate, but does not allow dust and debris to pass through the vent.
Vent Plug LocationsReducer venting allows for air pressure differences that occur during operation, between the inner space of the reducer and the atmosphere, while ensuring leak-free operation. The AUTOVENT™ is standard for all vented gear units, unless otherwise noted.
AUTOVENT™ - The AUTOVENT™ helps prevent bearing and gear damage by behaving like a check valve to block the entry of foreign material (water, dust, corrosives, etc.). The breather opens at approximately 2-3 psi during operation and closes tightly as the gearbox cools. This option is perfect for humid conditions and wash-down environments, helping to maintain proper oil cleanliness, and reducing foaming and oxidation. NORD may choose to offer one of two style options as shown in Figure 1. The Type 2 AUTOVENT™ comes closed upon delivery with a transportation sealing plug (see Warning).
AUTOVENT™ Types
Actual oil volume can vary slightly depending upon the gear case size, mounting and ratio. Prior to commissioning the reducer, check the oil-fill level using the reducer’s oil level plug and drain or add additional oil as needed. The minimum acceptable oil level is 0.15 in (4mm) below the oil level hole.
To prevent build-up of excessive pressure, sealed vents must be activated as shown prior to gear unit start up.
Drain Plug Fill Level Plug
Type 1 Type 2 with transportation plug
Sealed Vent
Activated Vent

24 115633-12 Nov 2012
TROLLEY OPERATION & MAINTENANCE
This manual contains important information to help you install, operate, maintain and service your new top running trolley. We recommend that you study its contents thoroughly before putting the trolley into use. With proper installation, application of correct op-erating procedures, and practicing the recommended maintenance suggestions you will be assured of the maximum service from your trolley.
The trolley described in this manual are intended for indoor service. Trolleys to be used for outdoor service require special consider-ations.
IMPORTANT: When ordering replacement parts be sure to include Catalog, Part and Serial Numbers of the endtrucks and or drive gearmotor along with individual part numbers of components needed as identified elsewhere in this manual.
Information given in this manual is subject to change without notice.
GENERAL DESCRIPTION
General
These top running trolleys are designed to operate on parallel crane runway beams with ASCE Rail from 25# to 105# rail or square bar. Specific rail range is wheel diameter dependant. Motors are de-signed for operation on three phase power supplies from 190 to 415 V-50 Hz and 200 to 575 V-60 Hz. Trolley motors and brakes are de-signed and intended strictly for variable frequency control operated by pushbutton pendant or radio control. Pendant may be located and suspended from an independent festoon or attached directly to the hoist and trolley. Top running double girder cranes described herein are built to 1 through 20 tonne with spans to 50 feet (15.2 meter). Cranes are designed per CMAA Specifications 70 and 74 to meet Class C Moderate Duty Service classification.
Basic ConstructionEach endtruck has a drive and trailer wheel which run on the runway rails. The wheels are double flanged, flat tread with an integral rotat-ing axle supported by anti-friction bearings. Each endtruck is driven by a helical gearmotor and brake. This drive engages the drive wheel by a splined connection.
BEFORE INSTALLING THE CRANE ON THE RUNWAY, LOCK THE RUNWAY CONDUCTOR DISCONNECT SWITCH IN THE OPEN (OFF) POSITION.
INSTALLING TROLLEYThe installation of the crane on the runway shall be performed only by a qualified crane installer.
For information regarding attaching, lifting and moving the loads during installation, refer to ANSI B30.2-latest edition, Chapter 2-3 Overhead and Gantry Cranes (Single or Multiple Girder, Top Running Trolley Hoist; ANSI B30.17-latest edition, Chapter 17-3 Overhead and Gantry Cranes (Trolley, Single Girder, Underhung Hoist) and other applicable codes.
Prior to the start of any crane erection the building should be measured to confirm span and clearances. These measurements should be checked against the corresponding crane measurements to insure correctness of “fit”. After assuring that the crane fits the building, determine orientation of crane position with respect to the runway. In addition, verify building and runway power supply to ensure it matches the power requirements of the crane.
These types of cranes are usually lifted into position on the runway in one piece. Total weight of this crane should be checked against lifting equipment selected for erection of this crane.
Immediately after the crane is placed on the runway rails check the wheel flange clearances to the rail. Clearance between the side of rail head and inside flange of wheel should be between a total of 3/4” and 1-1/8”, depending on the wheel and rail combination and whether or not the truck is centered on the rail. Total wheel float should not be less than the 3/4" as recommended by CMAA Specifications #70 and #74.
Before attempting any electrical connections the main power switch feeding the runway conductors must be LOCKED IN THE OPEN (OFF) POSITION.
IN ACCORDANCE WITH ARTICLE 610 OF NFPA NO. 70 NATIONAL ELECTRIC CODE A SEPARATE BONDING CONDUCTOR MUST BE RUN FOR GROUND. GROUNDING THROUGH THE WHEELS TO GIRDERS AND RUNWAY STEEL IS NOT PERMITTED.
GEARMOTORS PROVIDED WITH THIS TROLLEY ARE INTENDED FOR VARIABLE FREQUENCY CONTROL ONLY. THE BRAKE USED ON THE GEARMOTOR IS A HOLDING BRAKE WITH NO PROVISION FOR TORQUE ADJUSTMENT. SEVERE LOAD SWING WILL RESULT WITHOUT THE CONTROLLED DECELERATION WHEN STOPPING PROVIDED BY THE VARIABLE FREQUENCY CONTROL. THE USE OF CONTACTOR, ACROSS THE LINE STARTING, CONTROLS IS NOT PERMITTED, WILL RESULT IN DAMAGE AND PREMATURE FAILURE OF THESE UNITS AND VOID ANY WARRANTY.
A FUSED DISCONNECT SWITCH OR CIRCUIT BREAKER MUST BE INSTALLED AND ELECTRICALLY POSITIONED BETWEEN BUILDING POWER SUPPLY AND CRANE RUNWAY CONDUCTOR SYSTEM. THIS DISCONNECT MUST BE LOCKABLE IN THE OPEN POSITION, IN-SIGHT AND IN-REACH FOR THE CRANE OPERATOR, AND CLEARLY LABELED. A SECOND LOCKABLE DISCONNECT IS REQUIRED ON THE BRIDGE CRANE, ELECTRICALLY POSITIONED BETWEEN THE RUNWAY CONDUCTOR SYSTEM AND BRIDGE CONTROLS. REFER TO ARTICLE 610 OF NFPA NO. 70 NATIONAL ELECTRIC CODE, OSHA REGULATION 1910.179, ANSI/ASME B30.2 AND B30.17, LOCAL, STATE AND PROVIN-CIAL STANDARDS AND REGULATIONS FOR SPECIFIC REQUIREMENTS.
PRIOR TO PLACING THE CRANE INTO SERVICE, THE CRANE SHALL RECEIVE AN INITIAL INSPECTION. THIS INSPECTION SHOULD BE PERFORMED BY A QUALI-FIED PERSON IN ACCORDANCE WITH ANSI/ ASME B30.2 OR B30.17, LOCAL, STATE AND PROVINCIAL STANDARDS AND REGULATIONS.

25 115633-12 Nov 2012
TROLLEY OPERATION & MAINTENANCE
START-UP AND PRE-OPERATIONAL INSPECTIONAfter the crane has been installed on the runway and the crane, hoist and trolley has been connected to electrical service but prior to plac-ing into service, as a minimum the following inspections should be made by a qualified person.
1. Check the main collector system for proper adjustment to main-tain proper contact with conductors. Check along runway for pos-sible interference if power is supplied by a cable reel or festooned cable.
2. Check the cross and pushbutton festoon conductors for adjust-ment, including cable loop depth, and tracking.
3. Check oil level in both drive gearcases and axle bearing grease fittings (if provided) for proper lubrication. If lubrication is required refer to the LUBRICATION SECTION of this manual.
4. Inspect crane to make certain that all bolted connections and attachments are properly tightened and that all electrical connec-tions are secure.
5. Inspect and adjust the motor brake air gap. Refer to the MAINTE-NANCE SECTION of this manual.
6. The hoist/trolley should be inspected as instructed in the hoist/ trolley manufacturers instruction manual. For a double girder crane inspect the clearance between wheel flanges and the girder rail per manufacturers requirements. If hoist is equipped with adjustable limit switches, confirm settings meet the applications requirements.
7. Inspect the alignment of the trolley end stops to the trolley.
8. Turn power on at both disconnects and mainline. Inspect hoist for reverse phase condition by ensuring push button operation cor-responds to intended direction of travel and correct if necessary per manufacturer’s instructions.
9. Operate the trolley to verify both motors operate in the same direction.
10. With no load, operate hoist/trolley back and forth the full length of girder. During the operation ensure and verify proper clear-ances from obstructions per CMAA, ASME B30.2, ASME B30.17 and OSHA requirements.
11. Load testing the crane should be performed in accordance with ANSI/ASME B30.2 or B30.17, local, state and/or provincial codes and regulations. A written report should be prepared dur-ing the performance of this test and placed on file.
LOCK MAIN RUNWAY DISCONNECT SWITCH IN OPEN POSITION BEFORE ATTEMPTING TO ADJUST MAIN COLLECTORS OR CONDUCTORS.
OPERATION
Operator Qualifications
Safe and efficient crane operation requires skill, extreme care, good judgment, alertness, concentration and knowledge of and rigid ad-herence to proven safety rules and practices. No person should be permitted to operate a crane or hoist:
1. who does not possess the above characteristics.
2. who is not qualified or has handicaps that could adversely affect such operation.
3. who has not been properly instructed.
4. who has not been informed and does not have a thorough knowl-edge of all applicable safe operating practices, including those in this book as well as of rigging equipment and practices.
Operating Rules
Operating rules listed below are an earnest effort to encourage SAFETY and are not intended to take precedence over individual plant safety rules and regulations or rules set forth by various ap-plicable codes.
A good operator operates his crane as smoothly as possible and knows and follows the suggested rules below for safe, efficient crane handling.
Operating Precautions
Safe operation of an overhead hoist is the operator’s responsibility. Listed below are some basic rules that can make an operator aware of dangerous practices to avoid and precautions to take for his own safety and the safety of others. Observance of these rules in addi-tion to frequent examinations and periodic inspection of the equip-ment may save injury to personnel and damage to the equipment.
DO Always center trolley over load when hoisting.
DO NOT stand and DO NOT cause or allow others to stand or get under any load the trolley is supporting.
DO keep clear, and make sure others keep clear, of any load the trolley is supporting.
DO NOT attempt to operate trolley before completing tests and adjustments.
Improper and careless operation can result in a hazardous condition for operator and load.
ALWAYS be sure load is clear of obstruction before traversing load.
Refer to hoist and trolley instruction manuals for safety warnings on hoists and trolleys.
Read and comply with ANSI B30.2 or B30.17-latest edition.
Read and comply with all local, state and national safety codes.
THESE TROLLEYS HOISTS ARE NOT DESIGNED NOR INTENDED TO BE USED FOR SUPPORT OR TRANSPORT OF PEOPLE OR FOR TRANSPORTING LOADS OVER PEOPLE.
SEE APPLICABLE NATIONAL, STATE AND LOCAL SAFETY CODES AND REGULATIONS FOR ADDITIONAL REQUIREMENTS RELATING TO SAFE OPERATING PRACTICES, INCLUDING ANSI B30.2 OR ANSI B30.17 - LATEST EDITION.
IF TROLLEY IS MOUNTED ON A RAIL, THEN END STOPS MUST BE INSTALLED TO PREVENT TROLLEY FROM RUNNING OFF THE END OF THE RAIL RESULTING IN INJURY TO THE OPERATOR AND OTHERS AND DAMAGES TO THE LOAD AND OTHER PROPERTY. END STOPS FOR THE TROLLEY MUST ALSO BE INSTALLED.
MAKE SURE ALL INSTALLATION AND START-UP INSPECTION HAVE BEEN MADE IN ACCORDANCE WITH INSTRUCTIONS FURNISHED WITH THE HOIST AND TROLLEY BEFORE TURNING ON THE POWER.

26 115633-12 Nov 2012
TROLLEY OPERATION & MAINTENANCE
STEP 5.
The trolley motion buttons are typically labeled “Left” and “Right”. The hoist motion buttons are typically labeled “Up” and “Down”. Practice and become acquainted with these controls.
STEP 6.
Once the operator(s) are acquainted and comfortable operating the crane and the hoist/trolley, they shall learn the Pre-Shift inspection procedure. Refer to the INSPECTION section of this manual.
Set lower limit switches of the hoist and insure proper functioning per the Hoist Manufacturer's Manual.
When operating the hoist in the up direction CAREFULLY OBSERVE the relationship of the hook block and the bottom of the hoist frame. The hoist upper limit switch, when working properly, should cause the hoist up motion to stop and/or reverse direction.
Learning the Controls
After making certain the crane is completely and properly installed, with the crane connected to the electrical service and all the instal-lation and start-up inspections made, the crane operator(s) should learn and become acquainted with the controls.
On cranes having any or all motions electrically operated, the opera-tor should locate the runway disconnect and make sure this switch is locked open (POWER OFF). The operator should now operate the various push buttons to get the “feel” and determine that they do not bind or stick in any position. The operator should become familiar with push button location for their respective motions as well as “start” and “stop” buttons (normally the top two green and red buttons), which operate the crane main line contactor. The mainline contactor will shut off power to all motions.
IF ANY PUSH BUTTON BINDS OR STICKS IN ANY POSITION - DO NOT TURN THE POWER ON - DETERMINE THE CAUSE OF THE MALFUNCTION AND CORRECT IT BEFORE OPERATING THE CRANE.
IF, WHEN DEPRESSING THE HOIST "UP" BUTTON, THE HOOK SHOULD LOWER - STOP AT ONCE - DO NOT ATTEMPT TO OPERATE AGAIN. REPORT THIS CONDITION TO THE PROPER SUPERVISOR FOR CORRECTION WITH THE INSTRUCTIONS FUR-NISHED WITH YOUR HOIST MANUAL BY A QUALI-FIED CRANE TECHNICIAN.
Learning the Controls While Operating Crane with No Load
Having inspected and tried the control, the crane operator is now ready to try the crane under power.
ALWAYS ALLOW THE TROLLEY TO COME TO A COMPLETE STOP BEFORE CHANGING DIRECTION. ABRUPT CHANGE OF TROLLEY DIRECTION WHILE IN MOTION MAY CAUSE ADVERSE OPERATING CHARACTERISTICS OR DAMAGE TO TROLLEY AND DRIVE COMPONENTS.
STEP 1. Close the crane runway disconnect switch.
STEP 2.
Close the crane disconnect switch mounted on the crane. The crane main disconnect switch is located in the bridge panel and is operable from the front of the panel without opening the panel. The switch is operated by rotating the handle. The “OFF” and “ON” posi-tions of the switch are marked on the switch assembly.
The bridge control panel also contains a 3-pole mainline contactor. This contactor is connected in the electrical system on the load side of the crane main disconnect switch, so that all the crane power flows through this contactor. The mainline contactor is opened and closed (turned off and on) by means of the stop- start buttons on the pendant push button station. This stop-start circuit, as well as other control circuits, typically operate at 115 volts. This 115 volt control circuit voltage is obtained from a transformer mounted in the bridge control panel.
STEP 3.
Press the start or green push button which will close the mainline contactor, applying power to all control devices. The crane is now ready for use.
STEP 4.
The drive motors on the trolley are controlled by inverters, programmable variable frequency control. Standard programming on Yale provided controls is two step infinitely variable. The motion buttons on the pushbutton for the crane, typically labeled “FWD” and “REV” are two step buttons, for this programming. The first step is the initial starting speed of the crane and it also performs a speed hold function. The second step of the button performs an acceleration function.
To operate the crane, press the button for desired direction, FWD or REV, to the first step. The crane will start moving and accelerate to its programmed starting speed. Press the same button further to the second step and the crane will accelerate up to full speed. If the crane reaches a desired speed during this acceleration, back the button off to the first step to hold that speed. If the crane is traveling too fast and you wish to slow it down, release the motion button completely and the crane will start to decelerate. Once the desired slower speed is obtained, press button to the first step to hold that speed. To bring the crane to a stop release the motion button com-pletely, the crane will decelerate to a stop and the holding brakes will set.
Practice operating the crane in both directions, accelerating to intermediate and full speeds, decelerating to a slower speed, and bringing it to a stop. Get acquainted with the operating characteris-tics of this crane, acceleration, deceleration and stopping distances, to ensure smooth load movement, accurate load positioning, and to minimize load swing.
IF DEFAULT SETTINGS FOR THE TROLLEYS VARIABLE FREQUENCY CONTROL, INVERTER, DOES NOT MEET YOUR SPECIFIC REQUIREMENTS IT CAN BE RE-PROGRAMMED. PROGRAMMING OF THE INVERTER SHALL BE DONE BY A QUALIFIED CRANE TECHNICIAN PER THE MANUFACTURER’S INSTRUCTION MANUAL. EACH CRANE HAS A MAXIMUM SPEED SETTING BASED ON ITS CAPACITY, SPAN, DUTY CLASSIFICATION, ETC. DO NOT EXCEED MAXIMUM SPEED FOR WHICH THE CRANE WAS SPECIFIED WHEN ORDERED.

27 115633-12 Nov 2012
TROLLEY OPERATION & MAINTENANCE
DO NOT CONTACT OR STRIKE THE HOIST FRAME WITH THE HOOK BLOCK. IF THE HOIST MOTION IS NOT INTERRUPTED BY THE LIMIT SWITCH, STOP THE HOIST BY REMOVING YOUR FINGER FROM THE BUTTON AND/OR DEPRESSING THE STOP BUTTON. DO NOT ATTEMPT FURTHER OPERATION UNTIL THE LIMIT SWITCH IS OPERABLE. CONSULT THE HOIST MANUFACTURER'S INSTRUCTIONS.
THIS EQUIPMENT IS NOT DESIGNED OR SUITABLE AS A POWER SOURCE FOR LIFTING, LOWERING, OR TRANSPORT OF PERSONS.
JOGGING IS THE RAPID AND REPEATED PRESSING OF A MOTION PUSHBUTTON (HOIST/TROLLEY) TO GET THE EQUIPMENT TO MOVE IN SHORT INCRE-MENTS OR “INCHING”. ALTHOUGH JOGGING MAY BE NECESSARY TO POSITION A LOAD, EXCESSIVE JOGGING WILL CAUSE PREMATURE WEAR AND FAIL-URE OF MOTORS, BRAKES AND CONTROLS. IT WILL ALSO CAUSE THE MOTORS TO QUICKLY OVERHEAT, RESULTING IN THEIR THERMAL PROTECTION TO DIS-ABLE TROLLEY MOTION UNTIL COOLED.
DO NOT OPERATE A CRANE, HOIST OR TROLLEY HAVING UNUSUAL VIBRATIONS, SOUNDS, WARN-INGS OR WITH ANYTHING WRONG OR APPARENTLY WRONG. DANGER MAY BE PRESENT THAT THE CRANE OPERATOR CANNOT SEE. DETERMINE AND CORRECT THE CAUSE OF THE UNUSUAL CONDI-TIONS AND MAKE CERTAIN THAT THE CRANE CAN BE OPERATED SAFELY.
Operating the Crane
Once the crane has successfully passed its Start-up and Pre- Op-erational (Initial) inspection, and all the crane operators have been successfully trained and/or licensed, it is now ready to be placed into service.
STEP 1.
Turn power on to the crane, disconnects and mainline. If not already done so, perform Pre-Shift Inspection, refer to the Inspection Sec-tion of this manual.
STEP 2.
Move the crane to the load making certain the load hook is high enough to clear any obstruction in its path. Position the hoist and trolley so that the load hook is centered over the load. Lower the load hook for load attachment. For larger sized loads, the use of a rigging or load director may need to be used to direct the lift and movement of the load. This person should use the proper hand signals as shown in this manual. The crane operator should respond only the signals of the designated person directing the load, except for emergency stop as shown on the next page: OPERATOR HAND SIGNALS.
PRIOR TO ATTACHING OR LIFTING A LOAD, KNOW THE WEIGHT OF THE LOAD AND THE BELOW THE HOOK LIFTING DEVICES (SPREADER OR LIFTING BEAMS, MAGNETS, GRABS, SLINGS, ETC.). THE TO-TAL WEIGHT OF THE LOAD AND LIFTING DEVICES SHALL NOT EXCEED THE RATED CAPACITY OF THE HOIST AND/OR CRANE.
STEP 3.
Attach load to load hook. Slowly raise the hook until the slack has been taken out of the below the hook devices. When the floor man signals and the operator is satisfied the load is secure in the sling, lift the load slowly until clear. Now, hoisting speed can be increased and maintained until the load is clear of all obstructions or the floor man gives the signal to stop.
STEP 4.
Starting slowly and increasing speed as distance permits, move the trolley toward the point where the load is to be lowered. Decelerate and stop by releasing the push button. Final spotting is accom-plished by pressing the button to the first step to creep into position.
STEP 5.
Learn to judge the stopping distance of the trolley, both with light and full loads. This will enable you to “spot” loads with the minimum amount of jogging and excessive load swing.

28 115633-12 Nov 2012
OPERATOR HAND SIGNALS
USE MAIN HOISTTap fist on head, then use regular signals.
USE WHIPLINE(AUXILIARY HOIST)Tap elbow with one hand, then use regular signals.
HOISTWith forearm vertical and forefinger pointing up, move hand in small horizontal circle.
LOWERWith arm extended downward and forefinger pointing down, move hand in small horizontal circle.
RAISE BOOMArm extended and fingers closed up with thumb pointing upward.
LOWER BOOMArm extended and fingers closed with thumb pointing downward.
RAISE BOOM & LOWER LOADArm extended and thumb pointing up, flex fingers in and out as long as load movement is required.
LOWER BOOM & RAISE LOADArm extended and thumb pointing down, flex fingers in and out as long as load movement is required.
SWINGArm extended, with fingers in direction of swing of boom.
EXTEND BOOM(TELESCOPING BOOMS)With both fists in front of body with thumbs pointing outward.
RETRACT BOOM(TELESCOPING BOOMS)With both fists in front of body with thumbs pointing toward each other.
MOVE SLOWLY(EXAMPLE - “HOIST SLOWLY”)Use one hand to give any motion signal and place the other hand motionless in front of the hand giving the motion signal.
EXTEND BOOM(TELESCOPING BOOMS)ONE HAND SIGNAL: One fist in front of the chest with the thumb tapping the chest.
RETRACT BOOM(TELESCOPING BOOMS)ONE HAND SIGNAL: One fist in front of the chest with the thumb point-ing outward and heel of fist tapping the chest.
STOPArm extended and palm down, move arm horizontally back and forth.
EMERGENCY STOPWith both arms extended and palms down, move arms horizontally back and forth.
TRAVEL ONE TRACK - LAND CRANES ONLYIndicate track to be locked by raising fist on that size. Rotate other fist in front of body in direction that opposite track is to travel (from the crane operator’s perspective.
TRAVELBOTH TRACKS - LAND CRANES ONLYUse both fists in front of body, making a circular motion about each other, indicating direction of travel, forward or backward.
DOG EVERYTHINGClasp hands in front of the body.
MULTIPLE TROLLEYSHold up one finger for block marked “1” and two fingers for block marked “2”. Regular hand signals to follow.
MAGNET IS DISCONNECTEDCrane operator spreads both hands apart with palms up.
TRAVEL/ BRIDGE TRAVELWith arm extended forward & hand open & slightly raised, making a pushing motion in the direction of travel.
TROLLEY TRAVELWith palm up, fingers closed and thumb pointing in the direction of motion, jerk hand horizontally.

29 115633-12 Nov 2012
TROLLEY OPERATION & MAINTENANCE
INSPECTIONOverhead cranes are subject to four levels of inspection; Initial, Pre-Shift, Frequent and Periodical in accordance with the latest editions of ANSI/ASME B30.2, B30.17 and CMAA 78. These inspections are necessary to ensure the equipment is safe for use and operating at its required performance level. Inspection criteria described herein are general requirements. Specific inspection criteria will be based on the options and accessories provided with your crane. Refer to the manufacturer’s maintenance manual for the hoist/trolley and its specific inspection criteria.
Initial Inspection
New, re-installed, altered, repaired and modified cranes shall be inspected prior to initial use. Inspection of all altered, repaired or modified cranes may be limited to the provisions affected by the work as determined by a qualified crane technician. Inspections shall include, but not limited to, clearances, operating speeds, lu-brication, control settings, safety devices, etc. Refer to START UP and PRE-OPERATIONAL INSPECTION elsewhere in this manual.
NEVER LEAVE AN UNATTENDED LOAD HANGING FROM THE CRANE. LOAD MUST BE SAFELY PLACED ON FLOOR PRIOR TO THE CRANE OPERATOR LEAVING THE CONTROLS.
When crane is not in use, during the work period, it should be parked in a safe location, such as the end of the bay or a location that will not interfere with the movement of people, materials and equipment. Turn power off to the mainline contactor of the crane. Store the pendant against a wall or column to prevent damage from traffic. At the end of the work period or day, park crane as described herein and turn power off at both disconnects.
Responsibility for Safe Operation
Each crane operator should be held directly responsible for the safe operation of his crane. The crane operator should STOP the crane and refuse to handle loads when:
1. there is any doubt as to SAFETY.
2. any unusual vibrations or sounds are noticed before or when starting the lift or traverse motions.
3. there are arguments or disagreements with the floor man or hitchers.
4. the operator feels ill or is not alert.
Frequent Inspection
Frequent inspections are to be performed by a qualified designated person. Inspection intervals vary by class of service, for Class C Service cranes they are to be performed monthly at a minimum. Hooks and wire rope or load chain are to be inspected in monthly intervals as a minimum and recorded including date, serial/trace numbers and a signature. Frequent inspections also include a thorough operational inspection. Items to be inspected include limit switches, lubrication levels in all gearcases, wheels, bearings, etc., brakes, electrical equipment and all safety devices. Crane is to be operated without a load to check for any unusual sounds, vibrations, or anything that may be apparently wrong. The designated person shall determine if conditions found are a hazard and a more detailed inspection is necessary. Refer to the typical Inspection Schedule and Maintenance Report in this manual.
CRANES THAT HAVE BEEN SITTING IDLE FOR A PERIOD BETWEEN ONE TO SIX MONTHS SHALL RECEIVE THE FREQUENT INSPECTION PRIOR TO ITS USE.
Pre-Shift Inspection
A pre-shift inspection shall be performed by the crane operator or designated person at the beginning of each shift, or the first time the crane is used during each shift. This is a visual and operational inspection to ensure the equipment is in good working order. Items to be checked include limit switches, brakes, electrical equipment and all safety devices. Crane is to be operated without a load to check for any unusual sounds, vibrations, or anything that may be apparently wrong. Any discrepancies or suspected discrepancies shall be immediately reported to crane operator’s supervisor. Below is a check list which can be used for this inspection.
Item Inspection Instruction
Tagged Crane or Hoist Check that crane or hoist is not tagged with an out-of-order sign.
Control Devices Test run that all motions agree with control device markings.
Brakes Check that all motions do not excessive drift and that stopping distance is normal.
HookCheck for damage, cracks, nicks, gouges, deforma-tions of the throat opening, wear on saddle or load bearing point, and twist. Refer to the manual furnished by the original crane manufacturer.
Hook Latch If a hook latch is required, check for proper operation.
Wire Rope Check for broken wires, broken strands, kinks, and any deformation or damage to the rope structure.
Hoist ChainCheck for cracks, nicks, gouges, wear and stretch-check that the chain is in the upper and lower sprockets and in the chain guide.
Reeving Check that the wire rope is properly reeved and that rope parts are not twisted about each other.
Limit SwitchesCheck that the upper limit device stops the lifting motion of the hoist load block before striking any part of the hoist or crane.
Oil Leakage Check for any sign of oil leakage on the crane and on the floor beneath the crane.
Unusual Sounds Check for any unusual sounds from the crane or hoist mechanism while operating the crane or hoist.
Warning and Safety Labels
Check that warning and other safety labels are not missing and are legible.
Housekeeping and Lighting
Check area for accumulation of material to prevent tripping or slipping. Also check area for poor lighting.
Pre-Operation Inspection Checklist

30 115633-12 Nov 2012
TROLLEY OPERATION & MAINTENANCE
Periodic Inspection
Periodic inspections are to be performed by a qualified designated person. Inspection intervals vary by class of service. For Class C Service crane, they are to be performed annually at a minimum. Frequency of this inspection may have to be increased based on the severity of the duty cycle and environmental conditions the crane is subjected to. A written, dated and signed inspection report shall be provided and maintained on file. All worn, damaged or mal-functioning parts are to be repaired or replaced to maintain a SAFE operational crane. Refer to the typical Inspection Schedule and Maintenance Report found elsewhere in this manual.
Items to be inspected include but are not limited to:
1. All functional operating mechanisms for misadjustment interfering with crane operation.
2. Operating parts for excessive wear.
3. All safety devices for malfunction.
4. All connections and mountings for loose bolts, nuts and other fasteners for tightness.
5. All structural members and welds for deformation, cracks or corrosion.
6. All electrical apparatus, including control contactors, limit switches, push button stations for signs of pitted contact points, wear or deterioration.
7. All hoists and trolleys installed on the crane in accordance with the manufacturer’s recommendation.
CRANES THAT HAVE BEEN SITTING IDLE FOR SIX MONTHS OR GREATER SHALL RECEIVE A COMPLETE PERIODIC INSPECTION PRIOR TO ITS USE.
ALWAYS LOCK MAIN SWITCH IN THE OPEN POSITION (OFF) BEFORE INSPECTION.
MAINTENANCE
General
Maintenance services required on top running cranes are, for the most part, simple periodic inspections and adjustments. Procedures for lubrication, routine adjustments and replacement of parts, if required, are described in the following paragraphs.
Lubrication
AXLE BEARINGS
Axle bearings on the 4.5" (115 mm) and 6.3" (160 mm) diameter wheels are permanently lubricated, with no additional lubrication requirements. Axle bearings on the 7.9" (200 mm) and 10.2" (260 mm) diameter wheels require periodical lubrication. To access grease fittings, remove the rail sweep. Fitting is located on the pilot diameter of each bearing cage, four total per endtruck as shown in figures 3 & 4. Lubricate with NLGI #2 General Purpose Grease, every three months. Replace rail sweep upon completion. Using a torque wrench, tighten all bolts to 72 ft. lbs. torque for all size end trucks. Frequency of and type of lubrication used may be adjusted based the severity of the duty cycle and operating environment.
Figure 3: Trailer Wheel
GREASE FITTING
Figure 4: Drive Wheel
GREASE FITTING

31 115633-12 Nov 2012
TROLLEY OPERATION & MAINTENANCE
Wheel and Bearing Removal & Replacement
Refer to parts illustration Figure 7.
To remove the wheels follow the steps below:
1. Remove load and below the hook devices from hook. Move hoist and trolley to opposite end of crane from end work is being done.
2. Disconnect power and lock out.
3. Remove load from wheel axle. This can be accomplished by jack-ing or lifting at the girder(s). Jacking or lifting only one end of the truck may permanently damage the crane.
4. If working on driver wheel, unplug motor leads from gearmotor and remove gearmotor from bearing cage. Remove rail sweep from endtruck and bolts from bearing cages.
5. Jack endtruck to height that will allow bearing cage to roll out from end of endtruck.
6. Roll wheel, bearings and bearing caps assembly from under endtruck and remove from runway. Be careful not to drop bearing caps, bearings and wheel from runway height.
7. Remove bearing caps, bearings should stay on wheel axle.
8. Remove bearings from axle. Depending on the condition of the bearings and axles, a bearing puller may be required. Be careful not to damage bearing fits on axle.
9. Inspect axle bearing diameter and wheel tread diameter and flange for excessive wear, spalling and work hardening on the tread and flange, nicks and gouges on bearing diameters, etc. Replace wheel if necessary.
10. Prior to re-assembling bearings to axle, pack the roller bearings with grease. Use NLGI #2 general purpose grease unless the severity of the duty cycle and/or operating environment warrants otherwise. Press bearings onto wheel axle, ensure they are fully seated.
11. Assemble both bearing caps onto bearings
12. Place wheel assembly onto runway rail and roll it into place in the endtruck. Orient the grease fitting (if provided) on bearing cap, pointing towards the rail sweep.
13. Carefully lower endtruck, ensuring bearing caps and the endtruck pilot diameters align properly. Install and tighten bear-ing cap bolts. Using a torque wrench, tighten all bolts to 36 ft. lbs. torque for 115 mm (4.5"), 160 mm (6.3") and 200 mm (7.9") end trucks and 72 ft. lbs. torque for 260 mm (10.2") end trucks.
14. Lower endtruck onto runway rail.
15. Re-install rail sweep and gearmotor. Connect motor power plug. Refer to page 30 for torque specifications.
16. Turn power back on to crane and inspect crane for proper opera-tion.
MAKE SURE THAT TRUCK IS ADEQUATELY SUPPORTED SO THAT IT CANNOT DROP WHEN WHEEL IS REMOVED. DUE TO THE WEIGHT OF THE WHEELS AND BEARING CAGES, MAKE SURE THAT THE PROPER EQUIPMENT IS IN PLACE TO SAFELY REMOVE THE WHEELS AND BEARING CAGES FROM THE END TRUCK. ALSO LOCK MAIN RUNWAY DISCONNECT SWITCH IN THE OPEN POSITION (OFF) WHEN WORKING ON WHEELS ADJACENT TO RUNWAY CONDUCTORS.
GEARMOTOR (Endtruck)
The gearcase lubricant should be changed after 10,000 hours of use, based on moderate (Class C) service. Lubrication frequency will need to be increased dependant on the severity of service. Oil re-quired is Aral Degol BG 220 gear oil (suitable substitutes are Texaco Pinnacle 220 & Shell Omala 220). Do not mix lubricant types (this applies in particular to mineral and synthetic lubricants). Too much lubricant can lead to overheating. Gearcase is not provided with, nor requires a vent plug.
Figure 5: Gearcase Drain/Filler Plug
DRAIN FILLER PLUG
TO CHANGE GEARCASE OIL:
1. Disconnect and lock out power supply.
2. Unplug motor connection.
3. Unbolt complete gearmotor from endtruck. Gearmotors weigh up to approximately 75 lbs.
4. Remove drain/filler plug on top of gearcase as shown in figure 5. Tip motor to drain oil in to proper container. Properly dispose of used oil.
5. Fill gearcase with correct amount of oil per chart above and replace drain/filler plug.
6. Mount complete gearmotor back on endtruck and bolt back into place. Using a torque wrench, tighten all bolts to 7.5 ft. lbs. torque for 115 mm (4.5") and 160 mm (6.3") end trucks and 18 ft. lbs. torque for 200 mm (7.9") and 260 mm (10.2") end trucks.
7. Re-install motor plug
8. Turn power back on to crane and test run, checking for any signs of leaks.
Motor Horsepower KW Gearcase Oil
Capacity (liters)
0.75 .55 .18
1.0 .75 .18
1.5 1.2 .40
2.0 1.5 .55
3.0 2.2 .55
HOIST & TROLLEY
For hoist and trolley lubrication instructions refer to the manu-facturer’s manuals.

32 115633-12 Nov 2012
TROLLEY OPERATION & MAINTENANCE
Motor End Bell
Shroud Bolt
Brake Disc
O-Ring Magnet Body
Retaining Rings (where applicable)
ShroudBrake Mounting Bolts
Air Gap
Plastic Fan (where applicable)
MOTOR BRAKESStandard motor brakes are DC rectified solenoid activated, spring set disc type brakes. Brake is intended to be used strictly as a holding brake and does NOT have any torque adjustment for decel-erating and stopping the crane. Deceleration and stopping is to be provided by the variable frequency (inverter) motor control.
Brake Air Gap Inspection
To inspect brake air gap refer to figure 6:
1. Disconnect and lock out power supply
2. Remove brake cover
3. Carefully roll the o-ring back towards the magnet body exposing the air gap between the armature plate and magnet. Use feeler gauge and measure the gap between the armature plate and mag-net. If gap exceeds maximum allowed, replace the brake.
4. Roll o-ring back into place and re-install brake cover.
5. Turn power back on to crane and test brakes for proper operation.
Motor Horsepower KW Normal
Air GapMaximum
Air GapBrake Mounting Bolt
Torque
0.75 .55
0.2 mm(.008 in.)
0.3mm(.012 in.) 3 Nm
(2.2 ft. lbs.)
1.0 .75
1.5 1.2
2.0 1.5 0.4 mm(.016 in.)3.0 2.2
Brake Rectifier Removal and Replacement
Rectifier is located inside the motor conduit box cover. To replace follow these steps:
1. Disconnect and lock out power supply.
2. Unplug motor leads and open conduit box.
3. Remove rectifier and unplug wires.
4. Plug wires into replacement rectifier.
a. Connect brake leads to DC side of rectifier, terminals marked “+” & “–”.
b. Connect leads from the plug to the AC side, two terminals marked “~”.
5. Re-assemble in reverse order disassembly.
6. Turn power onto crane and test for proper operation.
Brake Removal and Replacement
If brake air gap exceeds the maximum allowed, or is not functioning properly, the brake may need to be replaced. Follow these instruc-tions.
1. Turn power off to crane and lock out
2. Unplug motor leads, open motor conduit box and disconnect brake leads from rectifier
3. Remove brake cover
4. Remove retaining ring and fan (if applicable).
5. Remove (3) mounting bolts holding brake magnet body in place. Pull brake leads from motor, remove magnet, brake coil and rotor.
6. Re-assemble in reverse order, and tighten mounting bolts to specified torque.
7. Turn power back on to crane and test brakes for proper operation.
Figure 6: Motor Brake
Electrical
1. Gearmotors
a. The gearmotors are inverter duty. If gearmotor requires any service or repairs, other than what is described in this manual, the complete gearmotor must be replaced.
b. For hoist and trolley motors, consult the hoist and trolley literature.
2. Control Panel
a. All connections should be checked frequently for tightness.
3. Hoist and Trolley Panel, brakes, limit switches, etc. Consult hoist and trolley litera-ture for maintenance and spare parts information.

33 115633-12 Nov 2012
COMPONENT, UNIT OR PARTAND LOCATION *RECOMMENDED
INSPECTION INTERVAL
CONDITION(Check column best indicating condition when part or
unit is inspected. Use note column to the right if condi-tion is not listed below.)
CORRECTIVE ACTION NOTES
Loca
tion
Com
pone
nt, U
nit
or P
art
Mon
thly
Sem
i-An
nual
Good
Adju
stm
ent
Requ
ired
Repa
ir Re
quire
d(L
oose
Par
ts O
r W
ires)
Repl
acem
ent
Requ
ired
(Wor
n Or
Dam
aged
)
Lubr
icat
ion
Requ
ired
(Low
Oil
Or G
reas
e Ru
st O
r Cor
rosi
on)
Clea
ning
Or
Pain
ting
Requ
ired (Indicate corrective action taken during inspection and
note date. For corrective action to be done after inspec-tion, a designated person must determine that the existing deficiency does not constitute a safety hazard before allowing unit to operate. When corrective action is completed, describe and note date in this column.)
DATE
LOCA
TION
HOIS
T
Motor
Motor Brake
Mechanical Load Brake
Overload Clutch
Couplings
Gears, Shafts & Bearings
Upper Block
Lower Block
Hook & Throat Opening Record Hook Throat Opening
Hoist Rope X
Rope Drum
Guards
Limit Switch
CONT
ROL
PANE
LS
& PU
SHBU
TTON Trolley Panel
Hoist Panel
Pushbutton
Wiring
TROL
LEY
Motor
Brake (When so Equip.)
Couplings
Gears, Shafts & Bearings
Frame
Wheels
Bumpers
Guards
Conductors
Collectors
RUNW
AYS
Monorail Joints
Monorail
Main Conductors
Main Collectors
MIS
C
General Condition
Load Attach. Chains
Rope Slings & Connect.
Change Gearcase Lub.
Grounding Faults
* See text for daily & weekly requirementsInspection interval
Typical Inspection Schedule and Maintenance Report form. User must adjust inspection interval and components to suit their individual conditions and usage.
Signed & dated report required - OSHAX Magnetic particle or equivalent examination required.
INSPECTION SCHEDULE AND MAINTENANCE REPORTCRANE SERIAL NO. (MFGRS.) _______________________________________________
CAPACITY _____________________________________________________________
TYPE __________________________________________________________________
VOLTAGE _______________________________________________________________
CUSTOMER CRANE IDENTITY NO. ____________________________________________
LOCATION IN PLANT ______________________________________________________
THIS INSPECTION IS
INSPECTED BY ________________________________ DATE ______________________
MONTHLY SEMI-ANNUAL ANNUAL

34 115633-12 Nov 2012
TROLLEY OPERATION & MAINTENANCE
REPLACEMENT PARTSThe following parts lists and illustrations cover standard model cranes. Typical units are used as the basis for the exploded parts illustrations; therefore, certain variations may occur from the parts information given. For this reason always give the catalog number, sales order number, model number, motor horsepower, voltage, phase and frequency when ordering replacement parts. For motors, gear cases and electrical components, give complete nameplate data.
The numbers assigned to the parts of the various assemblies in the parts lists, may not be the part numbers used in manufacturing the part. They are identification numbers, that when given with the catalog number permits us to identify, select or manufacture, and ship the correct part needed.
NON-FACTORY AUTHORIZATIONS OR MODIFICA-TION OF EQUIPMENT AND USE OF NON-FACTORY REPAIR PARTS CAN LEAD TO DANGEROUS OP-ERATION AND INJURY. TO AVOID INJURY:
DO NOT ALTER OR MODIFY EQUIPMENT WITHOUT FACTORY AUTHORIZATION.
DO USE ONLY FACTORY PROVIDED REPLACEMENT PARTS.
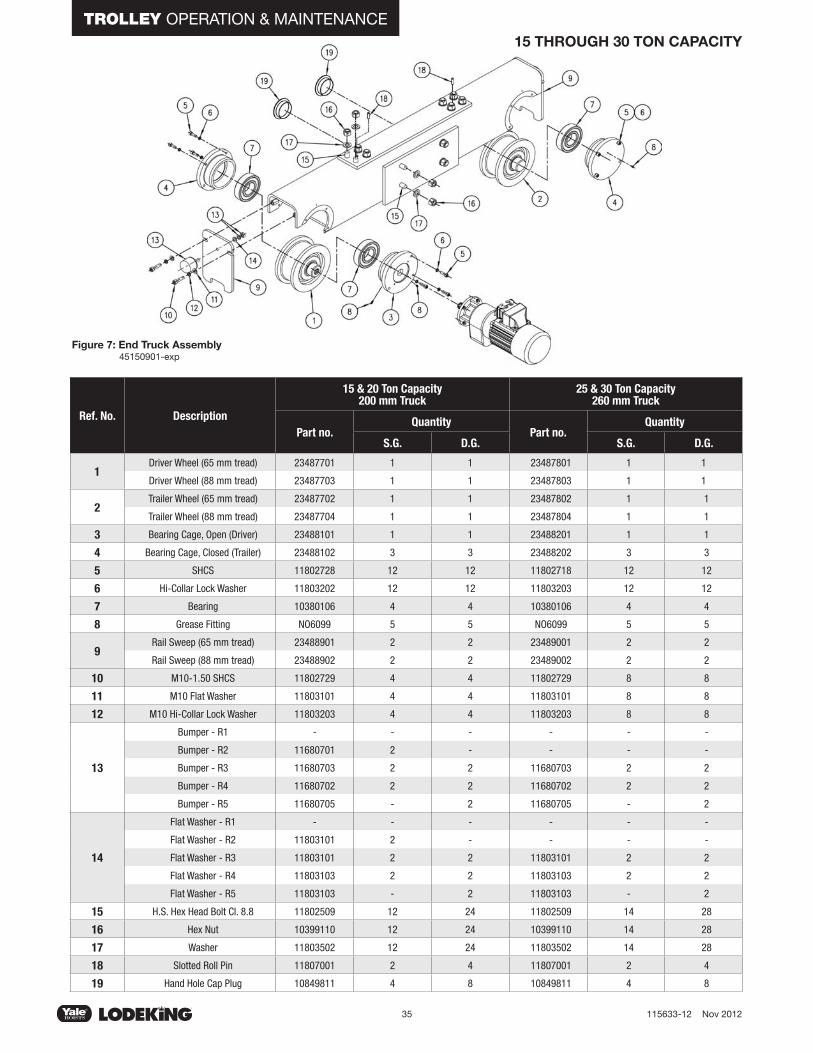
35 115633-12 Nov 2012
TROLLEY OPERATION & MAINTENANCE
Figure 7: End Truck Assembly
Ref. No. Description
15 & 20 Ton Capacity200 mm Truck
25 & 30 Ton Capacity260 mm Truck
Part no.Quantity
Part no.Quantity
S.G. D.G. S.G. D.G.
1Driver Wheel (65 mm tread) 23487701 1 1 23487801 1 1
Driver Wheel (88 mm tread) 23487703 1 1 23487803 1 1
2Trailer Wheel (65 mm tread) 23487702 1 1 23487802 1 1
Trailer Wheel (88 mm tread) 23487704 1 1 23487804 1 1
3 Bearing Cage, Open (Driver) 23488101 1 1 23488201 1 1
4 Bearing Cage, Closed (Trailer) 23488102 3 3 23488202 3 3
5 SHCS 11802728 12 12 11802718 12 12
6 Hi-Collar Lock Washer 11803202 12 12 11803203 12 12
7 Bearing 10380106 4 4 10380106 4 4
8 Grease Fitting NO6099 5 5 NO6099 5 5
9Rail Sweep (65 mm tread) 23488901 2 2 23489001 2 2
Rail Sweep (88 mm tread) 23488902 2 2 23489002 2 2
10 M10-1.50 SHCS 11802729 4 4 11802729 8 8
11 M10 Flat Washer 11803101 4 4 11803101 8 8
12 M10 Hi-Collar Lock Washer 11803203 4 4 11803203 8 8
13
Bumper - R1 - - - - - -
Bumper - R2 11680701 2 - - - -
Bumper - R3 11680703 2 2 11680703 2 2
Bumper - R4 11680702 2 2 11680702 2 2
Bumper - R5 11680705 - 2 11680705 - 2
14
Flat Washer - R1 - - - - - -
Flat Washer - R2 11803101 2 - - - -
Flat Washer - R3 11803101 2 2 11803101 2 2
Flat Washer - R4 11803103 2 2 11803103 2 2
Flat Washer - R5 11803103 - 2 11803103 - 2
15 H.S. Hex Head Bolt Cl. 8.8 11802509 12 24 11802509 14 28
16 Hex Nut 10399110 12 24 10399110 14 28
17 Washer 11803502 12 24 11803502 14 28
18 Slotted Roll Pin 11807001 2 4 11807001 2 4
19 Hand Hole Cap Plug 10849811 4 8 10849811 4 8
45150901-exp
15 THROUGH 30 TON CAPACITY

36 115633-12 Nov 2012
TROLLEY OPERATION & MAINTENANCE
Figure 8: Gearmotor
Ref. No. Description Quantity
15 & 20 Ton Capacity 25 & 30 Ton Capacity
200 mm Truck(1.2 kW, 1½ hp)
260 mm Truck(1.55 kW, 2 hp)
260 mm Truck(2.2 kW, 3 hp)
Part Number Part Number Part Number
Gearmotor Repair Parts1 Mounting Hardware Kit 1 45152052 45152053
2Brake Rectifier, (380/460V & 575V) 1 45152065
Brake Rectifier, (190/200-230V) 1 45152066
3Complete Brake Kit 180VDC, (190/200-230V & 380/460V) 1 45152059 45152061
Complete Brake Kit 250VDC, (575V) 1 45152060 45152062
4 Fan Kit (where applicable) 1 45152077 45152078
5 Shroud Kit 1 45152082 45152083
6 Mating Easy Connect Plug (where applicable) 1 11829301
Complete Gearmotor Assembly
7
190volt-3phase-50Hz, 208/230volt-3phase-60Hz
1
45152021 45152031 45152041
380volt-3phase-50Hz, 460volt-3phase-60Hz 45152023 45152033 45152043
575volt-3phase-60Hz 45152024 45152034 45152044

37 115633-12 Nov 2012
TROLLEY OPERATION & MAINTENANCE
3323
70-1
40 THROUGH 60 TON CAPACITY

38 115633-12 Nov 2012
TROLLEY OPERATION & MAINTENANCE
ReferenceNo.
ComponentDescription
QuantityRequired*
Truck Wheel Size
40 through 50 Ton Capacity
60 TonCapacity
12 in.Key No.
15 in.Key No.
1
Truck Tube Weldment
(Order by
wheelbase (in.))
42
1
TRT-1021 TRT-1051
48 TRT-1022 TRT-1052
54 TRT-1023 TRT-1053
60 TRT-1024 TRT-1054
66 TRT-1025 TRT-1055
72 TRT-1026 TRT-1056
78 TRT-1027 TRT-1057
84 TRT-1028 TRT-1058
90 TRT-1029 TRT-1059
96 TRT-1030 TRT-1060
102 TRT-1031 TRT-1061
108 TRT-1032 TRT-1062
114 TRT-1033 TRT-1063
120 TRT-1034 TRT-1064
126 TRT-1035 TRT-1065
132 TRT-1036 TRT-1066
138 TRT-1037 TRT-1067
144 TRT-1038 TRT-1068
150 TRT-1039 TRT-1069
156 TRT-1040 TRT-1070
162 TRT-1041 TRT-1071
168 TRT-1042 TRT-1072
174 TRT-1043 TRT-1073
2Driver Axle
(Order by reducer)
LT2282
1
TRT-1121 –
LT3282 TRT-1122 TRT-1131
LT4282 TRT-1123 TRT-1132
LT5282 TRT-1124 TRT-1133
LT6282 – TRT-1134
LT7282 – –
Center Drive TRT-1125 TRT-1135
3Reducer Key
(Order by reducer)
LT2282
1
TRT-1161 –
LT3282 TRT-1162 TRT-1171
LT4282 TRT-1163 TRT-1172
LT5282 TRT-1164 TRT-1173
LT6282 – TRT-1174
LT7282 – –
Center Drive TRT-1165 TRT-1175
4
Axle Retaining Ring
(Order by reducer)
LT2282
1
TRT-1211 –
LT3282 TRT-1212 TRT-1221
LT4282 TRT-1213 TRT-1222
LT5282 TRT-1214 TRT-1223
LT6282 – TRT-1224
LT7282 – –
Center Drive – –
5 Driver Wheel Key 1 TRT-1242 TRT-1243
6 Trailer Axle 1 TRT-1252 TRT-1253
PARTS LIST
* Quantities listed are for one (1) complete end truck

39 115633-12 Nov 2012
TROLLEY OPERATION & MAINTENANCE
ReferenceNo.
ComponentDescription
QuantityRequired*
Truck Wheel Size
40 through 50 Ton Capacity
60 TonCapacity
12 in.Key No.
15 in.Key No.
7
Driver Wheel
(Order by rail size &tread type)**
20#-30#, ST
1
20#-30#, TT
40#-60#, ST
40#-60#, TT
30#-50#, ST TRT-1311 TRT-1321
30#-50#, TT TRT-1312 TRT-1322
55#-105#, ST TRT-1313 TRT-1323
55#-105#, TT TRT-1314 TRT-1324
8Trailer Wheel
(Order by rail size & tread type)**
20#-30#, ST
1
20#-30#, TT
40#-60#, ST
40#-60#, TT
30#-50#, ST TRT-1411 TRT-1421
30#-50#, TT TRT-1412 TRT-1422
55#-105#, ST TRT-1413 TRT-1423
55#-105#, TT TRT-1414 TRT-1424
9 Bearing Cage with hole 1 TRT-1502 TRT-1503
10 Bearing Cage w/o hole 3 TRT-1512 TRT-1513
11 Wheel Bearing 4 TRT-1522 TRT-1523
12 Bearing Cage Bolt 12 TRT-1532 TRT-1533
13 Bearing Cage Lockwasher 12 TRT-1542 TRT-1543
14 Lubrication Fitting 4 TRT-1552 TRT-1553
15
Rail Sweep ( 20#-30# Rail)
2Rail Sweep ( 40#-60# Rail)Rail Sweep ( 30#-50# Rail) TRT-1611 TRT-1621
Rail Sweep ( 55#-105# Rail) TRT-1612 TRT-1622
16 Rail Sweep Bolt 12 TRT-1652 TRT-1653
17 Rail Sweep Locknut 12 TRT-1662 TRT-1663
18Bumpers
(Includes nuts & lockwashers)
R3
2
TRT-1771 TRT-1771
R4 TRT-1772 TRT-1772
R5 TRT-1773 TRT-1773
R6 TRT-1774 TRT-1774
R7 TRT-1775 TRT-1775
R8 TRT-1776 TRT-1776
19 FlatWashers
R3
2
TRT-1781 TRT-1781
R4 TRT-1782 TRT-1782
R5 TRT-1783 TRT-1783
R6 TRT-1784 TRT-1784
R7 TRT-1785 TRT-1785
R8 TRT-1786 TRT-1786
PARTS LIST
* Quantities listed are for one (1) complete end truck
** ST = Straight Tread Wheels TT = Tapered Tread Wheels
** If bronze wheels or rail sweeps are required, follow the Key No. with a "B" for bronze.
For example, a 9" bronze driver wheel for 20#-30# rail with straight tread must be ordered as TRT-1301B
(CONTINUED)

40 115633-12 Nov 2012
TROLLEY OPERATION & MAINTENANCE
ReferenceNo.
ComponentDescription
QuantityRequired*
Truck Wheel Size
40 through 50 Ton Capacity
60 TonCapacity
12 in.Key No.
15 in.Key No.
Wheel Assemblies
(Order by drive type, rail size, & tread
type) **
DRIVER WHEELASSEMBLY
LT2282
20#-30#, ST
1
– –20#-30#, TT – –40#-60#, ST – –40#-60#, TT – –30#-50#, ST TRT-2055 –30#-50#, TT TRT-2056 –
55#-105#, ST TRT-2057 –55#-105#, TT TRT-2058 –
DRIVER WHEELASSEMBLY
LT3282
20#-30#, ST
1
– –20#-30#, TT – –40#-60#, ST – –40#-60#, TT – –30#-50#, ST TRT-2063 TRT-211330#-50#, TT TRT-2064 TRT-2114
55#-105#, ST TRT-2065 TRT-211555#-105#, TT TRT-2066 TRT-2116
DRIVER WHEELASSEMBLY
LT4282
30#-50#, ST
1
TRT-2067 TRT-211730#-50#, TT TRT-2068 TRT-2118
55#-105#, ST TRT-2069 TRT-211955#-105#, TT TRT-2070 TRT-2120
DRIVER WHEELASSEMBLY
LT5282
30#-50#, ST
1
TRT-2071 TRT-212130#-50#, TT TRT-2072 TRT-2122
55#-105#, ST TRT-2073 TRT-212355#-105#, TT TRT-2074 TRT-2124
DRIVER WHEELASSEMBLY
LT6282
30#-50#, ST
1
– TRT-212530#-50#, TT – TRT-2126
55#-105#, ST – TRT-212755#-105#, TT – TRT-2128
DRIVER WHEELASSEMBLY
LT7282
30#-50#, ST
1
– –30#-50#, TT – –
55#-105#, ST – –55#-105#, TT – –
Approximate Weight of Assembly (lbs.) 235 415
Center DriveAssembly
20#-30#, ST
1
– –20#-30#, TT – –40#-60#, ST – –40#-60#, TT – –30#-50#, ST TRT-2089 TRT-213930#-50#, TT TRT-2090 TRT-2140
55#-105#, ST TRT-2091 TRT-214155#-105#, TT TRT-2092 TRT-2142
Approximate Weight of Assembly (lbs.) 235 415
Trailer Wheel Assembly
20#-30#, ST
1
– –20#-30#, TT – –40#-60#, ST – –40#-60#, TT – –30#-50#, ST TRT-2097 TRT-214730#-50#, TT TRT-2098 TRT-2148
55#-105#, ST TRT-2099 TRT-214955#-105#, TT TRT-2100 TRT-2150
Approximate Weight of Assembly (lbs.) 225 400
PARTS LIST
* Quantities listed are for one (1) complete end truck
** ST = Straight Tread Wheels TT = Tapered Tread Wheels
(CONTINUED)
** If bronze wheels or rail sweeps are required, follow the Key No. with a "B" for bronze.
For example, a 9" bronze driver wheel for 20#-30# rail with straight tread must be ordered as TRT-1301B

41 115633-12 Nov 2012
TROLLEY OPERATION & MAINTENANCE
RECOMMENDED SPARE PARTS FOR YOUR YALE CRANECertain parts of your crane will, in time, require replacement under normal wear conditions. It is suggested that the following parts be purchased for your crane as spares for future use.
• 1 Set of Wheel Bearings
• 1 Set of Fuses
Note: When ordering parts always furnish the part number and the manufacturer's serial number.
WARRANTY WARRANTY AND LIMITATION OF REMEDY AND LIABILITY
A. Seller warrants that its products and parts, when shipped, and its work (including installation, construction and start-up), when performed, will meet applicable specifications, will be of good quality and will be free from defects in material and workmanship. All claims for defective products or parts under this warranty must be made in writing immediately upon discovery and in any event, within one (1) year from shipment of the applicable item unless Seller specifically assumes installation, construction or start-up responsibility. All claims for defective products or parts when Seller specifically assumes installation, construction or start-up responsibility and all claims for defective work must be made in writing immediately upon discovery and in any event, within one (1) year from completion of the applicable work by Seller, provid-ed; however, all claims for defective products and parts must be made in writing no later than eighteen (18) months after shipment. Defective items must be held for Seller’s inspection and returned to the original f.o.b. point upon request. THE ‘FOREGOING IS EX-PRESSLY IN LIEU OF ALL OTHER WARRANTIES WHATSOEVER, EXPRESS, IMPLIED AND STATUTORY, INCLUDING, WITHOUT LIMITATION, THE IMPLIED WARRANTIES OF MERCHANTABIL-ITY AND FITNESS.
B. Upon Buyer’s submission of a claim as provided above and its substantiation, Seller shall at its option either (i) repair or replace its product, part or work at either the original f.o.b. point of de-livery or at Seller’s authorized service station nearest Buyer or (ii) refund an equitable portion of the purchase price.
C. This warranty is contingent upon Buyer’s proper maintenance and care of Seller’s products, and does not extend to normal wear and tear. Seller reserves the right to void warranty in event of Buyer’s use of inappropriate materials in the course of repair or maintenance, or if Seller’s products have been dismantled prior to submission to Seller for warranty inspection.
D. The foregoing is Seller’s only obligation and Buyer’s exclusive remedy for breach of warranty and is Buyer’s exclusive remedy hereunder by way of breach of contract, tort, strict liability or otherwise. In no event shall Buyer be entitled to or Seller liable for incidental or consequential damages. Any action for breach of this warranty must be commenced within one (1) year after the cause of action has accrued.

Phone (800) 888.0985 • (716) 689.5400 • Fax: (716) 689.5644 • www.cmworks.com
© 2012 Columbus McKinnon Corporation. All Rights Reserved. MANUAL #: 115633-12 1112-BB