opera bridge installation and support guide€¦ · 2. opera to utg. o opera bridge adds the...
TRANSCRIPT

Join us for treats Thursday, Month Day, at 3:00 p.m. in the kitchen.
Installation and Support Guide
Copyright © 2020 Shift4 Payments, LLC. All rights reserved.
OPERA Bridge

OPERA Bridge Installation and Support Guide
© 2020 Shift4 Payments, LLC. All rights reserved. Version 1.0 External Use NDA Page 2 of 69
Product Overview 6
Background 7
Requirements 7
How OPERA Bridge Works 8
UTG Communication 8
Opera Communication 8
Overview of Transaction Process 8
Normal Transactions 8
Special Token Transactions 9
Installation Overview 9
Preinstallation Steps 9
Overview 9
Check OPERA Version 10
Check Oracle DB version 10
Purge Credit Cards 11
Check Expired Credit Card 11
Check if Purge is Configured 12
Check Chain and Property Code 13
Check Wallets Folder 14
Settle In house Guests 15
Settle Credit Card Batch 15
Print Downtime Report 16
Enable TLS 1.2 for WinHTTP and SChannel 16
WinHTTP and Internet Settings for TLS 1.2 16
Automatic 16
Manual 16
WinHTTP Support for TLS 1.2 to Windows Registry 16
Internet Settings Support for TLS 1.2 to Windows Registry 16
SCHANNEL for TLS 1.2 (Windows 7 and Windows 2008R2) 17
Disable SSL 2.0 Client 17
Disable SSL 2.0 Server 17
Disable SSL 3.0 Client 17
Disable SSL 3.0 Server 17
Disable TLS 1.1 Client 17

OPERA Bridge Installation and Support Guide
© 2020 Shift4 Payments, LLC. All rights reserved. Version 1.0 External Use NDA Page 3 of 69
Disable TLS 1.1 Server 18
Enable TLS 1.2 Client 18
Enable TLS 1.2 Server 18
Enable TLS 1.2 Communication 18
Installing UTG 18
Install UTG Software 18
Configure OPERA Interface 18
Add Devices and Lanes 20
Installing Certificates 21
Installing Certificates in OPERA Workstations and Services 21
Open Microsoft Management Console 21
Open User Account Certificate Store 22
Open Computer Account Certificate Store 23
Open Service Account Certificate Store 24
Verify all Windows Stores Are Open 26
Overview of Certificate Installation Steps 26
Import Certificates in Computer Account Certificate Store 26
Import Certificates in User Certificate Store 30
Import Certificates in Service Certificate Store 31
Verify Certificates Are Installed in Certificate Stores 32
Installing Certificates in Oracle Database Wallets 34
Overview 34
Version and Interface differences 34
Terminology 34
Steps to replace the certificates in OPERA database 34
Extra Steps to Import Other Certificates in Database Wallet 35
Configuring OPERA 36
Stop Extra Services 36
Create CCW Interface 36
Application Settings 38
Credit Card Vault 39
Chip and Pin 40
Configure URL 40
Configure Wallet Password 41
OPERA 5.4 41
OPERA 5.5 42

OPERA Bridge Installation and Support Guide
© 2020 Shift4 Payments, LLC. All rights reserved. Version 1.0 External Use NDA Page 4 of 69
Disable Manual Entry 43
Credit Card Functionality Setup 44
Workstation Setup 45
Verifying Chip Transactions and Installation 48
Bulk Tokenization 48
Check and Backup Table 48
Conversion 48
Start Extra Services 52
Installation Troubleshooting 52
Oracle Database Errors 52
ORA-28759: failure to open file 52
ORA-29106: Cannot import PKCS #12 wallet 52
ORA-29024: Certificate validation failure 52
ORA-29223: Cannot Create Certificate Chain 52
ORA-28860: Fatal SSL Error 52
ORA-53203 Security Violation 52
Network Access Denied by Access Control List 53
Rollback Procedures 53
CCW Interface - Non tokenized 53
CCW interface - Tokenized 53
Troubleshooting OPERA Bridge 54
Running Card Present Transactions 54 Check-in from the Reservation Details Screen 54 Step 1 –Setting the Payment Type 54 Step 2 –Initiating the Chip and PIN Window 55 Step 3 –Activating the Payment Method Window 56 Step 4 –Submitting a CP Authorization Request 57 Step 5 –Acquiring the EMV Chip Data 58
Chip Transactions for Multiple Charges 59 Chip Transactions From the Billing Screen 60 Check-in from the Arrivals Screen 61
Step 1: Search and Display all Due In Guests 61 Step 2: Check-in Guest 62 Step 3: Change the Payment Method to Chip and PIN 63 Step 4 –Submitting a CP Authorization Request 63 Step 5 –Acquiring the EMV Chip Data 64

OPERA Bridge Installation and Support Guide
© 2020 Shift4 Payments, LLC. All rights reserved. Version 1.0 External Use NDA Page 5 of 69
Troubleshooting Tokenization Issues 64
Viewing Tokens in OPERA 64
Viewing A Token With A Single Card on File: 65
Viewing a Token With Multiple Cards On File: 65
Using the Multi-Pay Window: 66
Using the Change Log: 67
Troubleshooting OXI Tokenization Issues 67
Oracle ACL 69

OPERA Bridge Installation and Support Guide
© 2020 Shift4 Payments, LLC. All rights reserved. Version 1.0 External Use NDA Page 6 of 69
Copyright Notice Shift4 Payments 1491 Center Crossing Road Las Vegas, NV 89144 702.597.2480 www.shift4.com [email protected] Document Title: OPERA Bridge Installation and Support Guide Publication Date: February 4, 2020 Copyright © 2020 Shift4 Payments. All rights reserved worldwide. *Universal Transaction Gateway® (UTG)®, DOLLARS ON THE NET®, 4Go®, i4Go®, and 4Word® are covered by one or more of the following U.S. Pat. Nos.: 7770789; 7841523; 7891563; 8328095; 8688589; 8690056; 9082120; 9256874; 9495680. All trademarks, service marks, product names, and logos are the property of their respective owners. Shift4 Payments may have patents, patent applications, trademarks, copyrights, or other intellectual property rights covering subject matter in this document. The furnishing of this document does not give any license to these patents, trademarks, copyrights, or other intellectual property except as expressly provided in any written license agreement from Shift4 Payments. All graphics are property of Shift4 Payments. No part of this publication may be reproduced, stored in a retrieval system, or transmitted in any form or by any means without prior written permission of Shift4 Payments. The contents of this publication are the property of Shift4 Payments. Shift4 Payments reserves the right to revise this document and to periodically make changes to the content thereof without any obligation or notification to any organization of such revisions or changes unless required to do so by prior written agreement. Notice of Confidentiality This document contains information that is proprietary to Shift4 Payments. It carries the Shift4 classification “External Use NDA.” It is provided for the sole purpose of specifying instructions for Shift4 Payments products. The recipient agrees to maintain this information in confidence and not reproduce or otherwise disclose this information. Please refer to the signed Bilateral Non-Disclosure and Confidentiality Agreement for additional agreements and expectations. Notice to Governmental End Users If any Shift4 product is acquired under the terms of a Department of Defense contract: use, duplication, or disclosure by the US Government is subject to restrictions as set forth in subparagraph (c)(1)(ii) of 252.227.7013. Civilian agency contract: use, reproduction, or disclosure is subject to 52.227-19 (a) through (d) and restrictions set forth in the accompanying end user agreement. Unpublished rights reserved under the copyright laws of the United States.
OPERA Bridge Installation and Support Guide
© 2020 Shift4 Payments, LLC. All rights reserved. Version 1.0 External Use NDA Page 7 of 69
Product Overview
Background EMV and hotels:
● A few years ago, the credit card industry adopted the EMV standards for payment cards, and the chip cards that comply with those standards. This was done to reduce card present fraud.
● The chip is very difficult to counterfeit and works very well in stopping card present fraud, where a fake or duplicate card is physically presented to the merchant during the transaction.
● The credit card industry has given the various industries (retail, restaurants, and hotels, etc.) time to adjust to chip processing.
● However, chip read credit card transactions (or EMV dipped) are becoming extremely important for security and financial implications.
● A merchant will lose any chargeback request if a credit card payment transaction has the capability to be chip processed, but is not.
● Within the hotel payments environment, many transactions will always be card not present (CNP) and therefore never qualify as EMV/chip read. This includes the following:
o OTA Virtual Card authorization and payments (i.e. Expedia and Priceline). o Refunds to guests. (Refunds are always processed as CNP in lodging as the guest has
typically left.) o Extra Charges. (Extra Charges are also always processed as CNP in lodging as the guest
has typically left.) o Card on File check-ins (where the clerk uses the guest’s credit card or token that is
attached to the reservation booking). o Due In (Arrival) Card Verification processes (where a hotel on the day of a guest arrival
runs an authorization to ensure the credit card number provided in the reservation is good). If the authorization response to this transaction is used as the check-in authorization, the charge will end up ultimately as CNP qualified.
o Post check-in charges posted to rooms on a split folio (where the guest isn’t present). o Some mobile check in applications. o Split folios where the second folio does not obtain a card present read.
● However, when the customer and the chip card are present and available, the credit card payment authorization should be chip inserted/read.
Requirements ● For Tokenization:
○ Opera Version – 5.0.03.01 e8 ○ Opera Version – 5.0.04.01 e8 ○ Opera Version – 5.0.04.02 e15 or higher
● For SHA2: Oracle Database 11.2.0.4 or higher ● For TLS1.2: Oracle Database 11.2.0.4.170531 or higher, Windows 2008 (with registry changes) or higher.

OPERA Bridge Installation and Support Guide
© 2020 Shift4 Payments, LLC. All rights reserved. Version 1.0 External Use NDA Page 8 of 69
How OPERA Bridge Works
UTG Communication There are two segments of communication in OPERA bridge:
1. UTG to the gateway and to the PIN pads communication is not changing in any way. 2. OPERA to UTG.
o OPERA Bridge adds the ability of UTG to process messages using OPERA’s Hotel Edition HTTP XML Credit Card Specification.
o OPERA Bridge allows hotels using OPERA to accept EMV without using Oracle’s Payment Gateway (OPG) or Oracle’s Payment Interface (OPI).
Note: For older OPERA versions, UTG requires the use of SHA1 certificates. This is because the Oracle Database that is used by these systems does not support SHA2.
Overview of a Typical Hotel setup
Opera Communication
Overview of Transaction Process Below is an overview of the transaction process.
● Normal Transactions: OPERA WS <> OPERA system <> UTG <> Gateway
● Special Token Transactions: Single Get Token (manual entry enabled) OPERA WS/OXI <> UTG <> Gateway

OPERA Bridge Installation and Support Guide
© 2020 Shift4 Payments, LLC. All rights reserved. Version 1.0 External Use NDA Page 9 of 69
Normal Transactions
This is the majority of traffic that is initiated. A transaction is initiated by a workstation and is sent to the Opera Bridge API in UTG. It is then sent to Shift4 gateway for processing.
The UTG certificate located in the Oracle Database Wallet location is used in this transaction.
Special Token Transactions
OXI and OPERA (manual entry in software) initiates get token or get CC to UTG. For this to happen successfully, the UTG certificate needs to be installed on the workstation, OXI, or OEDS service in respective servers.
The UTG certificate imported into Windows Store is used in this transaction. Opera uses the Organization (O) value, which is the chain code, to find the certificate.
Installation Overview Here is an overview of the steps to install OPERA Bridge.
1. Enable TLS 1.2 and disable old protocols. 2. Install UTG.
a. Configure API Interface. b. Generate Certificate for OPERA. c. Add Lanes.
3. Configure OPERA. a. Install Certificates.
i. Install Certificate on Workstations and Services. ii. Install Certificate in Oracle Database Wallet.
b. Configuration of OPERA. i. Create CCW interface.
ii. Activate Vault. iii. Activate Chip and Pin. iv. Enable Online Settlement. v. Setup Workstation.
vi. Backup credit card table. vii. Bulk Tokenization.
4. Verify functionality. Note: Please ask the hotel to do a full backup of their system in case of issues before proceeding.
Pre-installation Steps
Overview There are a few things that need to be done as part of pre-installation steps:
● Software version meets the minimum requirement. ● Purge old CC. ● Note Chain and Property code to do configuration.
OPERA Bridge Installation and Support Guide
© 2020 Shift4 Payments, LLC. All rights reserved. Version 1.0 External Use NDA Page 10 of 69
● Check the Wallets folder.
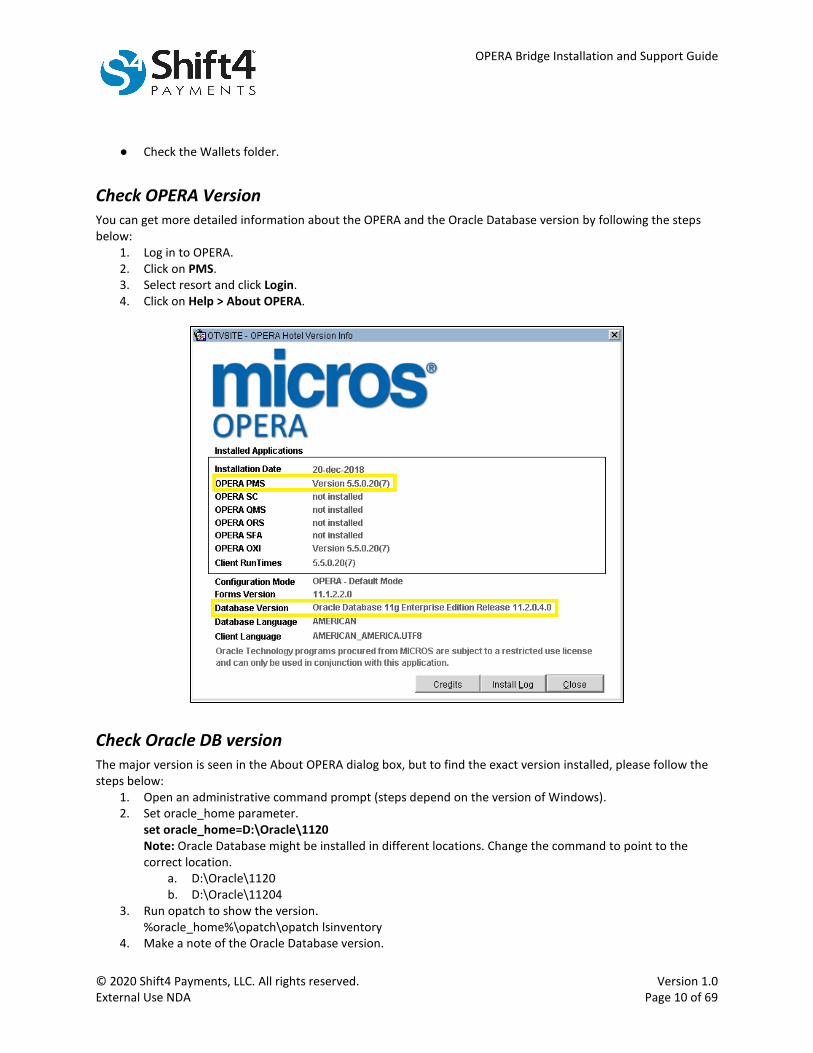
Check OPERA Version You can get more detailed information about the OPERA and the Oracle Database version by following the steps below:
1. Log in to OPERA. 2. Click on PMS. 3. Select resort and click Login. 4. Click on Help > About OPERA.
Check Oracle DB version The major version is seen in the About OPERA dialog box, but to find the exact version installed, please follow the steps below:
1. Open an administrative command prompt (steps depend on the version of Windows). 2. Set oracle_home parameter.
set oracle_home=D:\Oracle\1120 Note: Oracle Database might be installed in different locations. Change the command to point to the correct location.
a. D:\Oracle\1120 b. D:\Oracle\11204
3. Run opatch to show the version. %oracle_home%\opatch\opatch lsinventory
4. Make a note of the Oracle Database version.

OPERA Bridge Installation and Support Guide
© 2020 Shift4 Payments, LLC. All rights reserved. Version 1.0 External Use NDA Page 11 of 69
Purge Credit Cards It is recommended to purge old and unnecessary card data so that the migration is smooth and quick. This is run during the night audit.
● Check frequently used profiles for any expired and unnecessary cards, and delete it manually. ● Check if the purge routine is configured.
Check Expired Credit Card 1. Log in to OPERA. 2. Click on PMS. 3. Select resort and click Login. 4. Click Reservation > Profile. 5. Type in frequently used profile name and click Search. 6. Select the profile. 7. Click Edit. 8. Click Options > Credit Cards. 9. Search for expired or unused credit cards and click Delete.
OPERA Bridge Installation and Support Guide
© 2020 Shift4 Payments, LLC. All rights reserved. Version 1.0 External Use NDA Page 12 of 69
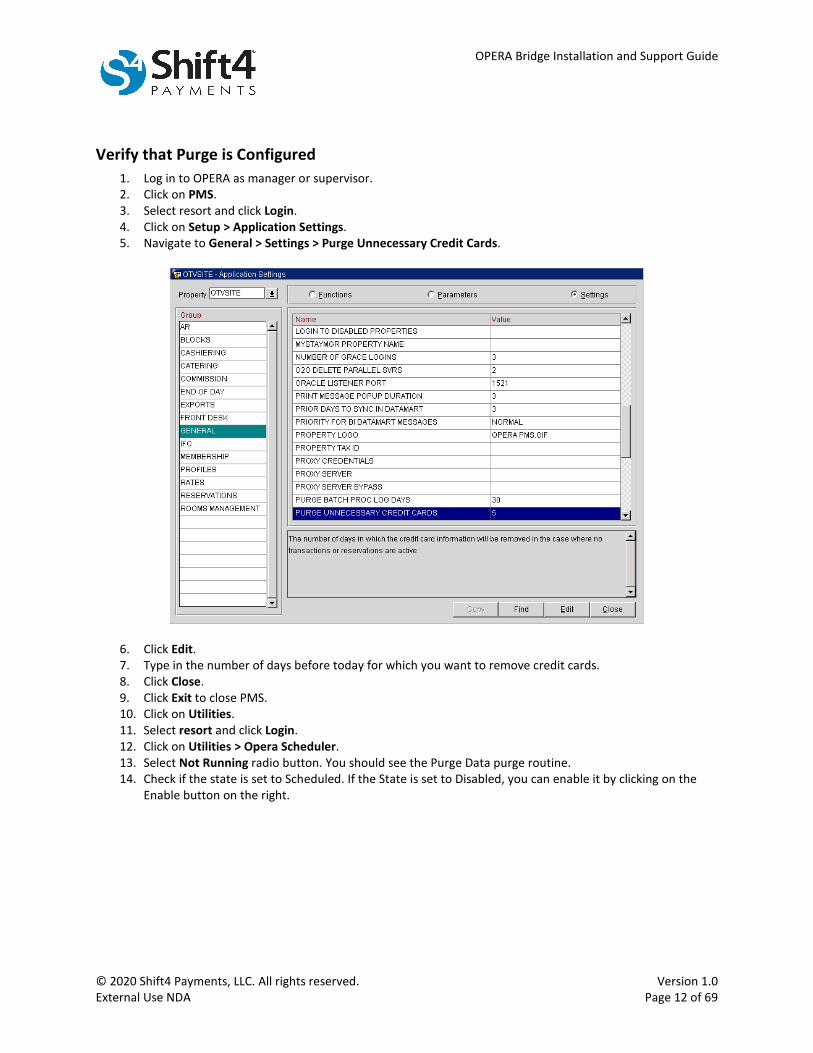
Verify that Purge is Configured 1. Log in to OPERA as manager or supervisor. 2. Click on PMS. 3. Select resort and click Login. 4. Click on Setup > Application Settings. 5. Navigate to General > Settings > Purge Unnecessary Credit Cards.
6. Click Edit. 7. Type in the number of days before today for which you want to remove credit cards. 8. Click Close. 9. Click Exit to close PMS. 10. Click on Utilities. 11. Select resort and click Login. 12. Click on Utilities > Opera Scheduler. 13. Select Not Running radio button. You should see the Purge Data purge routine. 14. Check if the state is set to Scheduled. If the State is set to Disabled, you can enable it by clicking on the
Enable button on the right.
OPERA Bridge Installation and Support Guide
© 2020 Shift4 Payments, LLC. All rights reserved. Version 1.0 External Use NDA Page 13 of 69
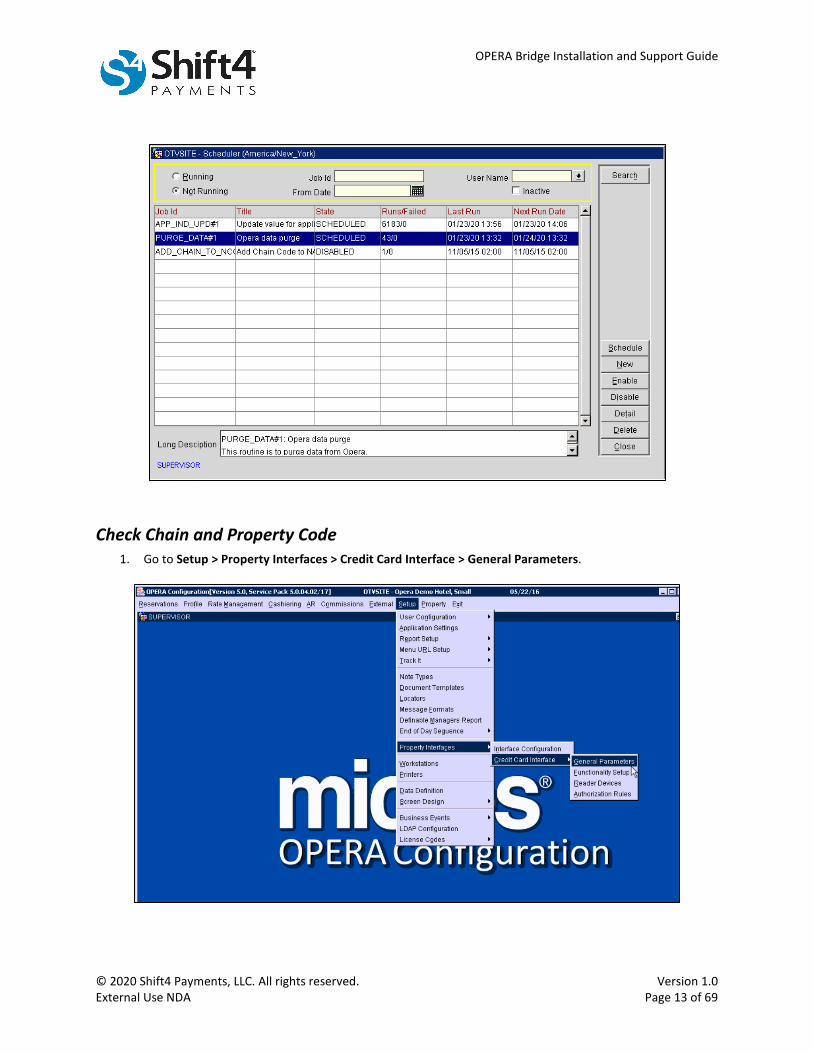
Check Chain and Property Code 1. Go to Setup > Property Interfaces > Credit Card Interface > General Parameters.

OPERA Bridge Installation and Support Guide
© 2020 Shift4 Payments, LLC. All rights reserved. Version 1.0 External Use NDA Page 14 of 69
2. Note the Hotel ID and Property ID of a site.
Check Wallets Folder The database wallets are stored in subfolders in the following format: <Base Folder>\<Product Code>\<Resort> Normally the default directory is located in D:\Oracle\Admin\OPERA\Wallets, but sometimes it could be in a different location. For example, for resort NHSEQ with product code UTG, the wallet folder is: D:\Oracle\Admin\OPERA\Wallets\UTG\NHSEQ\ You can find the base folder by following the steps below:
1. Log in to sqlplus as sys. 2. Run the following command to find the wallets folder and make a note of it:
select o_http_client.get_wallet_directory() from dual 3. Make a note of the base folder.

OPERA Bridge Installation and Support Guide
© 2020 Shift4 Payments, LLC. All rights reserved. Version 1.0 External Use NDA Page 15 of 69
Settle In house Guests Ask the hotel to settle out any outstanding authorizations they want to settle for in house guests. The authorization will be lost during conversion.
Settle Credit Card Batch If the hotel is using Batch Settlement, the credit cards are stored in a batch settlement bin until it can be settled out. It is best to settle out these cards before doing the UTG install as UTG will not know about these transactions. Please have the hotel follow the steps below to settle any credit card transactions. It is recommended to go back at least 7 days or more and check for outstanding transactions.
1. Log in to OPERA. 2. Click on PMS. 3. Select resort and click Login. 4. Click on Cashiering > Credit Cards > Settlements.
5. Select date and click Search.
6. Select the transaction and click on Settle to settle any outstanding transactions.

OPERA Bridge Installation and Support Guide
© 2020 Shift4 Payments, LLC. All rights reserved. Version 1.0 External Use NDA Page 16 of 69
Print Downtime Report Please have the hotel print out their downtime reports so that they are ready to function without the PMS and to have historical data. Please ask the hotel to perform the following steps:
1. Log in to PMS. 2. Click on Miscellaneous > Reports. 3. Search for Downtime Reports. 4. Click OK. 5. Click Print.
Enable TLS 1.2 for WinHTTP and SChannel It is recommended that TLS1.2 be enabled for communication if it is supported. For the merchant to support TLS1.2 they need the following:
● Windows 7 and Windows 2008 with patches can support TLS1.2. ● Oracle Database is 11.2.0.4.170531 or higher.
For newer Windows 2012 Server, TLS 1.2 is enabled along with other encryption. It is recommended to disable the older encryption. Note: It is recommended to create a Windows Registry backup or a Restore Point before implementing these changes.
WinHTTP and Internet Settings for TLS 1.2
Automatic Apply the latest Windows Update, and apply the Easy Fix from the link below. This will enable both WinHTTP and Internet Settings support for TLS 1.2. https://support.microsoft.com/en-us/help/3140245/update-to-enable-tls-1-1-and-tls-1-2-as-a-default-secure-protocols-in
Manual Or manually create or update the DefaultSecureProtocols and SecureProtocol registry entry in the following path:
WinHTTP Support for TLS 1.2 to Windows Registry For 32-bit computers: HKLM\SOFTWARE\Microsoft\Windows\CurrentVersion\Internet Settings\WinHttp DWORD name: DefaultSecureProtocols DWORD value: 0x00000a00 (to enable both TLS 1.1 and 1.2), 0x00000800 (to enable TLS 1.2 only) For 64-bit computers: HKLM\SOFTWARE\Wow6432Node\Microsoft\Windows\CurrentVersion\Internet Settings\WinHttp DWORD name: DefaultSecureProtocols DWORD value: 0x00000a00 (to enable both TLS 1.1 and 1.2), 0x00000800 (to enable TLS 1.2 only)
Internet Settings Support for TLS 1.2 to Windows Registry Create a SecureProtocols entry in the Internet Settings sub-key below and set it to DWORD value of a80 to Enable TLS 1.2 support.

OPERA Bridge Installation and Support Guide
© 2020 Shift4 Payments, LLC. All rights reserved. Version 1.0 External Use NDA Page 17 of 69
For 32-bit Computers: HKLM\SOFTWARE\Microsoft\Windows\CurrentVersion\Internet Settings DWORD name: SecureProtocols DWORD value: 0x00000a80 (to enable TLS 1.1 and TLS 1.2) For 64-bit Computers: HKLM\SOFTWARE\WOW6432Node\Microsoft\Windows\CurrentVersion\Internet Settings DWORD name: SecureProtocols DWORD value: 0x00000a80 (to enable TLS 1.1 and TLS 1.2)
SCHANNEL for TLS 1.2 (Windows 7 and Windows 2008R2) Create Enabled & DisabledByDefault entries in the appropriate Client sub-key below and, set the DWORD value to 0 to disable the sub-key or 1 to enable the sub-key.
Disable SSL 2.0 Client HKLM\SYSTEM\CurrentControlSet\Control\SecurityProviders\SCHANNEL\Protocols\SSL 2.0\Client DWORD name: DisabledByDefault DWORD value: 1 DWORD name: Enabled DWORD value: 0
Disable SSL 2.0 Server HKLM\SYSTEM\CurrentControlSet\Control\SecurityProviders\SCHANNEL\Protocols\SSL 2.0\Server DWORD name: DisabledByDefault DWORD value: 1 DWORD name: Enabled DWORD value: 0
Disable SSL 3.0 Client HKLM\SYSTEM\CurrentControlSet\Control\SecurityProviders\SCHANNEL\Protocols\SSL 3.0\Client DWORD name: DisabledByDefault DWORD value: 1 DWORD name: Enabled DWORD value: 0
Disable SSL 3.0 Server HKLM\SYSTEM\CurrentControlSet\Control\SecurityProviders\SCHANNEL\Protocols\SSL 3.0\Server DWORD name: DisabledByDefault DWORD value: 1 DWORD name: Enabled DWORD value: 0
Disable TLS 1.1 Client HKLM\SYSTEM\CurrentControlSet\Control\SecurityProviders\SCHANNEL\Protocols\TLS 1.1\Client DWORD name: DisabledByDefault DWORD value: 1
OPERA Bridge Installation and Support Guide
© 2020 Shift4 Payments, LLC. All rights reserved. Version 1.0 External Use NDA Page 18 of 69
DWORD name: Enabled DWORD value: 0
Disable TLS 1.1 Server HKLM\SYSTEM\CurrentControlSet\Control\SecurityProviders\SCHANNEL\Protocols\TLS 1.1\Server DWORD name: DisabledByDefault DWORD value: 1 DWORD name: Enabled DWORD value: 0
Enable TLS 1.2 Client HKLM\SYSTEM\CurrentControlSet\Control\SecurityProviders\SCHANNEL\Protocols\TLS 1.2\Client DWORD name: DisabledByDefault DWORD value: 0 DWORD name: Enabled DWORD value: 1
Enable TLS 1.2 Server HKLM\SYSTEM\CurrentControlSet\Control\SecurityProviders\SCHANNEL\Protocols\TLS 1.2\Server DWORD name: DisabledByDefault DWORD value: 0 DWORD name: Enabled DWORD value: 1
Enable TLS 1.2 Communication There are several OPERA components that check the IE and Java Settings to see if TLS 1.2 is enabled, such as the OXI Processor Windows Services (Uses IE Settings) and GetID operations from OPERA UI (uses Java Settings). The Internet Explorer settings must be updated to allow TLS 1.2 so that the OXI services will make the proper connection.
Installing UTG
Install UTG Software Download and run the installer for UTG software. Please refer to the UTG Installation and Configuration Guide.

OPERA Bridge Installation and Support Guide
© 2020 Shift4 Payments, LLC. All rights reserved. Version 1.0 External Use NDA Page 19 of 69
Configure OPERA Interface 1. Add the “OPERA” interface to API Interfaces.
2. Fill the dialog box as noted below. a. The host address is the IP address of the OPERA server. b. Select the TLS version:
i. Oracle DB 11.2.0.4 or lower: TLS 1.0 ii. Oracle DB 11.2.0.4.170531 (OPERA 5.5 or higher): TLS 1.2
c. Enter the site’s chain and property codes. Note: These codes are found in the OPERA system under Configuration > Property Interfaces > General Parameters.
d. Select if you want to use SHA1 or SHA2: i. Oracle DB 11.2.0.3: SHA1
ii. Oracle DB 11.2.0.4: SHA2 e. Click Generate Certificate. f. Save both the oputg2.pfx and ewallet.p12 file in UTG2 folder.

OPERA Bridge Installation and Support Guide
© 2020 Shift4 Payments, LLC. All rights reserved. Version 1.0 External Use NDA Page 20 of 69
g. UTG will display the ewallet password. Make a note of the password and provide it to the merchant. Note: The password for the certificate will only appear once. It is the responsibility of the site to record and manage that password. The installer will need this password for the rest of the installation.
h. Click OK, I Wrote the Password Down. 3. Click OK.
Add Devices and Lanes 4. Go to the Devices tab and add the required number of pin pads to UTG.
a. Select the device type, connection, and any communication parameter for the pin pad.

OPERA Bridge Installation and Support Guide
© 2020 Shift4 Payments, LLC. All rights reserved. Version 1.0 External Use NDA Page 21 of 69
b. Enter the API Terminal ID. It is the last 32 of OPERA registered terminal ID and must be provided by the site. One workstation ID must be provided per pinpad.
c. Enable MCE and configure it as per the requirement of the merchant.
5. Click OK.
Installing Certificates
Installing Certificates in OPERA Workstations and Services
Open Microsoft Management Console 1. Press the Start button on the windows desktop.

OPERA Bridge Installation and Support Guide
© 2020 Shift4 Payments, LLC. All rights reserved. Version 1.0 External Use NDA Page 22 of 69
2. Click on Run… The Run dialog box appears. 3. Type mmc in the text box.
4. Press the Enter key or press the OK button. The Console 1 window displays.
Open User Account Certificate Store 5. Select the Console Root folder entry in the left panel. 6. Select File from the menu bar. 7. Select Add/Remove Snap-in… from the menu.
8. The Add/Remove Snap-in dialog box displays.

OPERA Bridge Installation and Support Guide
© 2020 Shift4 Payments, LLC. All rights reserved. Version 1.0 External Use NDA Page 23 of 69
9. Press the Add button. The Add Standalone Snap-in dialog window displays. 10. Select Certificates from the list of snap-ins. 11. Click the Add button. The Certificates Snap-in wizard appears.
12. Ensure the option My user account is selected. 13. Press the Finish button.
Open Computer Account Certificate Store 14. In the Add Standalone Snap-in dialog window, select Certificates. 15. Press the Add button. The Certificates Snap-in wizard appears again. 16. Select the Computer account option.

OPERA Bridge Installation and Support Guide
© 2020 Shift4 Payments, LLC. All rights reserved. Version 1.0 External Use NDA Page 24 of 69
17. Press the Next button. The final step of the wizard displays. 18. Ensure that the Local computer: (the computer this console is running on) option is selected.
19. Press the Finish button.
Open Service Account Certificate Store Note: This is only required if there are services that will conduct transactions directly. For example, OPERA OXI and OEDS services.
20. In the Add Standalone Snap-in dialog window, select Certificates. 21. Press the Add button. The Certificates Snap-in wizard appears again. 22. Select the Service account option.

OPERA Bridge Installation and Support Guide
© 2020 Shift4 Payments, LLC. All rights reserved. Version 1.0 External Use NDA Page 25 of 69
23. Press the Next button.
24. Make sure Local Computer: (the computer this console is running on) option is selected.

OPERA Bridge Installation and Support Guide
© 2020 Shift4 Payments, LLC. All rights reserved. Version 1.0 External Use NDA Page 26 of 69
25. Press the Next button. The list of services in the workstation is displayed.
26. Select the Oracle Service that deals with credit card data. Some common interfaces are the OPERA OXI and OEDS services.
27. Press the Finish button. 28. Repeat for any other services that will perform transactions.
Verify all Windows Stores Are Open 29. Click the Close button on the Add Standalone Snap-in dialog window. 30. Verify that you now have three certificate entries in the Selected snap-in section of Add/Remove Snap-in
dialog: ● Certificate – Current User ● Certificates – (Local Computer). ● Certificates – Service (<Service Name>) on Local Computer
31. Press OK to close the Add/Remove Snap-in dialog window.
Overview of Certificate Installation Steps The UTG certificates will have to be installed in multiple certificate stores.
1. Remove all old and expired certificates. 2. Load certificates under Console Root - Certificates (Local Computer) under Trusted Root Certification
Authorities – Certificates folder. 3. Repeat the same steps under the Console Root – Certificates (Current User). 4. Repeat the same steps under the Console Root – Certificates - Service (<Service Name>) on Local
Computer. This is only required for interface servers like OPERA OXI and OEDS.
Import Certificates in Computer Account Certificate Store Back in the Console1 window there will be three new entries under the Console Root folder in the left panel that corresponds to the certificate snap-ins you just created.
1. Expand the Certificates (Local Computer) entry under the Console Root entry.
OPERA Bridge Installation and Support Guide
© 2020 Shift4 Payments, LLC. All rights reserved. Version 1.0 External Use NDA Page 27 of 69
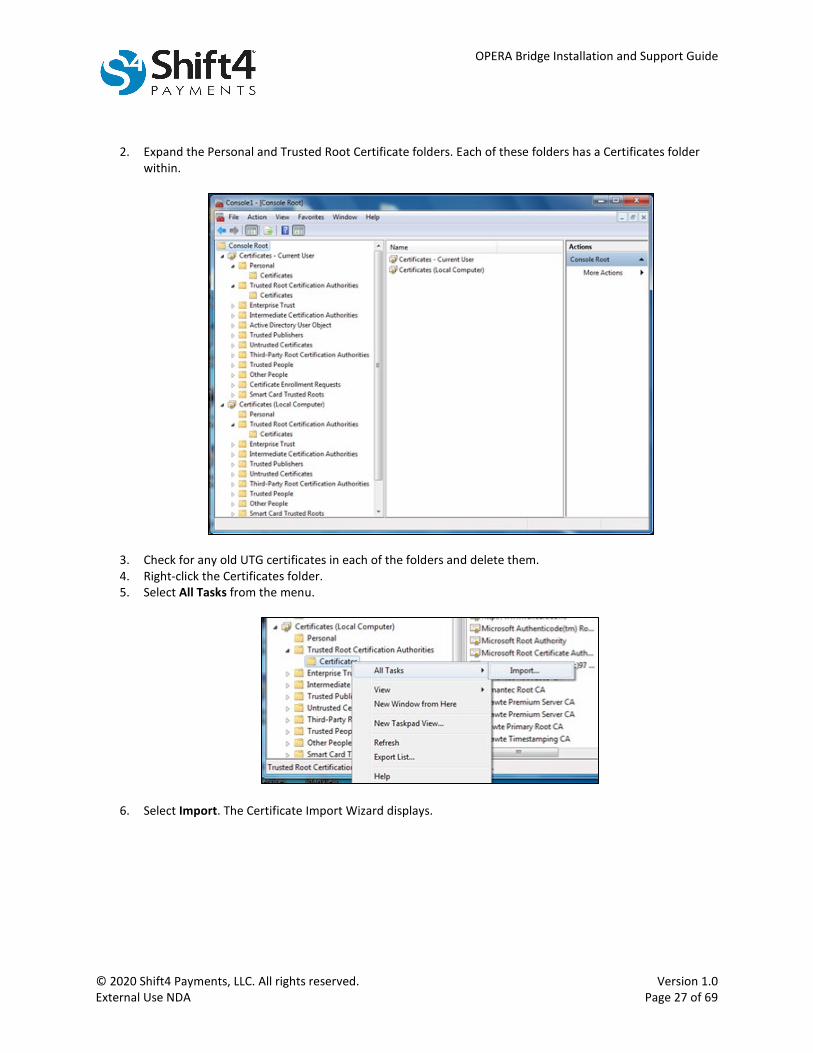
2. Expand the Personal and Trusted Root Certificate folders. Each of these folders has a Certificates folder within.
3. Check for any old UTG certificates in each of the folders and delete them. 4. Right-click the Certificates folder. 5. Select All Tasks from the menu.
6. Select Import. The Certificate Import Wizard displays.

OPERA Bridge Installation and Support Guide
© 2020 Shift4 Payments, LLC. All rights reserved. Version 1.0 External Use NDA Page 28 of 69
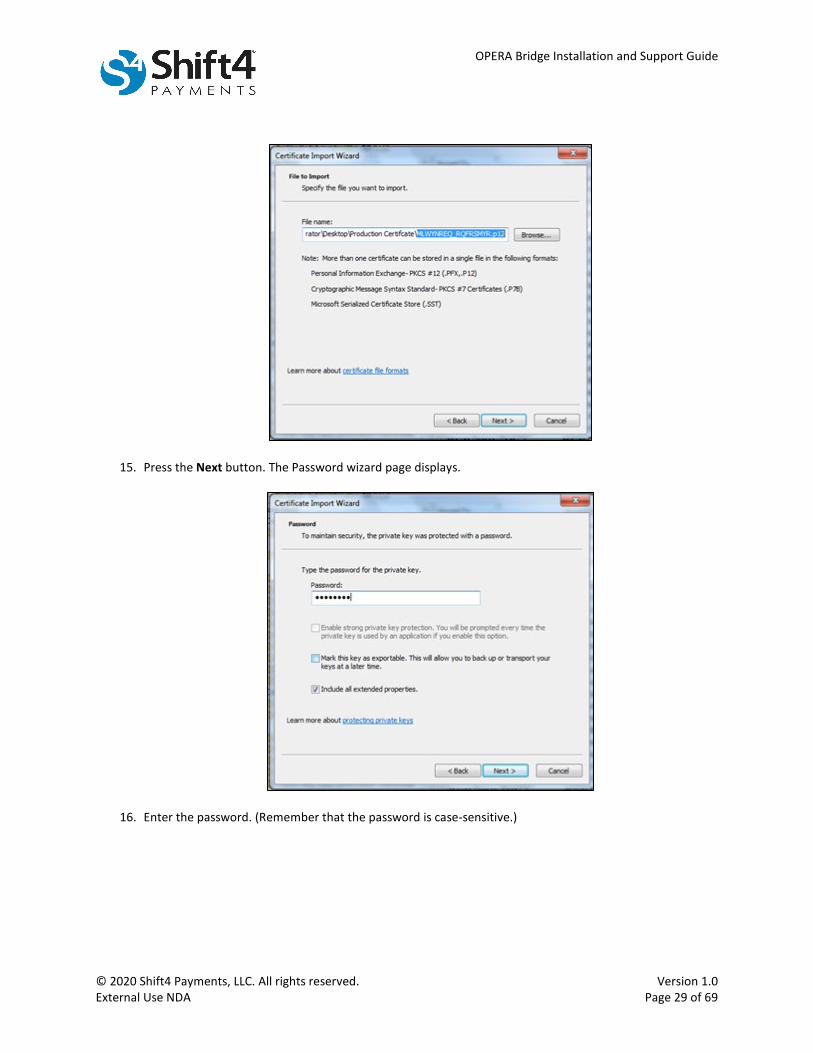
7. Press the Next button. The File to Import wizard panel displays.
8. Press the Browse button. The Open dialog window appears. 9. Navigate to the folder where you saved the certificate files extracted earlier. 10. Click on the drop-down arrow in the Files type selection box and change it to ALL files (*.*) 11. The certificate files will now be visible in the file window. 12. Select the client certificate file ewallet.p12.
13. Press the Open button. The Open file dialog window closes. 14. The path to the file now appears in the File name field in the Certificate Import Wizard.
OPERA Bridge Installation and Support Guide
© 2020 Shift4 Payments, LLC. All rights reserved. Version 1.0 External Use NDA Page 29 of 69
15. Press the Next button. The Password wizard page displays.
16. Enter the password. (Remember that the password is case-sensitive.)

OPERA Bridge Installation and Support Guide
© 2020 Shift4 Payments, LLC. All rights reserved. Version 1.0 External Use NDA Page 30 of 69
17. Press the Next button. The Certificate Store wizard page displays.
Note: For service accounts, please select Place all certificates in the following store. For others please select Automatically select the certificate store based on the type of certificate.
18. Ensure the Automatically Select Certificate Store Based on Type of Certificate option is selected. 19. Press the Next button. The Completing the Certificate Import Wizard page is displayed with a summary of
the work done. 20. Press the Finish button. A dialog window will display stating The import was successful. Click OK.
Import Certificates in User Certificate Store 21. Expand the Certificates – Current User entry in the Console Root window. 22. Expand the Trusted Root Certification Authorities and the Personal folders under the Certificates –
Current User entry. 23. The Certificates folder displays only under the Trusted Root Certification Authorities folder. (Steps follow
to add the certificates folder to the Personal folder below). 24. Repeat steps 1 - 19 in the section entitled Installing Certificates in OPERA Workstations and Services –
Certificates folder under Certificates – Current User.

OPERA Bridge Installation and Support Guide
© 2020 Shift4 Payments, LLC. All rights reserved. Version 1.0 External Use NDA Page 31 of 69
25. Right click the Personal folder under the Certificates – Current User entry. 26. Select All Tasks from the menu. 27. Select Import from the options on the next menu. The Certificate Import Wizard displays. Repeat steps 1 -
19 in the section above entitled Installing Certificates in OPERA Workstations and Services.
Import Certificates in Service Certificate Store 28. Expand the Certificates - Service (<service name>) on Local Computer entry in the Console Root window. 29. Expand the Trusted Root Certification Authorities and the Personal folders under the Certificates - Service
(<service name>) on Local Computer entry.

OPERA Bridge Installation and Support Guide
© 2020 Shift4 Payments, LLC. All rights reserved. Version 1.0 External Use NDA Page 32 of 69
30. The Certificates folder displays only under the Trusted Root Certification Authorities folder. (Steps follow to add the certificates folder to the Personal folder below).
31. Right click the Personal folder under the Certificates – Current User entry. 32. Select All Tasks from the menu. 33. Select Import from the options on the next menu. The Certificate Import Wizard displays. Repeat steps 1 -
20 in the section above entitled Installing Certificates in OPERA Workstations and Services.
Verify Certificates Are Installed in Certificate Stores Once completed the certificate is displayed with any other certificates loaded in the system. To view the loaded certificates, you may need to right click each Certificates folder and press Refresh from the menu. Ensure that each location below has an entry for the certificate: Console Root
a. Certificates – Current User i. Personal
1. Certificates ii. Trusted Root Certificate Authorities
1. Certificates b. Certificates (Local Computer)
i. Personal 1. Certificates
ii. Trusted Root Certificate Authorities 1. Certificates

OPERA Bridge Installation and Support Guide
© 2020 Shift4 Payments, LLC. All rights reserved. Version 1.0 External Use NDA Page 33 of 69
c. Certificates - Service (<service name>) on Local Computer i. Personal
1. Certificates
34. Save your work by selecting File from the menu. 35. Select Save from the menu. 36. Close the Console1 window.

OPERA Bridge Installation and Support Guide
© 2020 Shift4 Payments, LLC. All rights reserved. Version 1.0 External Use NDA Page 34 of 69
Installing Certificates in Oracle Database Wallets
Overview OPERA uses Oracle database as backend. The certificates have to be installed in the Oracle Database Wallets for it to properly communicate with UTG. This wallet is normally used to do the following transactions.
● Additional authorizations ● CC final on checkouts ● Authorizations on tokens ● End of day (Batch Close) transactions
Version and Interface differences The location of wallet has changed over the years based on the type of interface used. Normally the wallet is located in the following locations.
Interface Wallet Location Password
mLodge (Non vaulted) D:\oracle\admin\OPERA\wallets Application Settings > General > Settings > Default Wallet Password
UTG & LTV (Vaulted) ● Non cluster: D:\oracle\admin\OPERA\wallets\<Product Code>\<Resort Code>
● Cluster: D:\oracle \admin\<Cluster Node>\wallets\<Product Code>\<Resort Code>
● For OPERA 5.5.20 and lower, password is located in Application Settings > IFC > Settings > Wallet Password
● For OPERA 5.5.20 and higher, password is located in Configuration > Setup > Property Interfaces > Interface Configuration > <Select the interface> > click Edit > Navigate to Custom Data Tab > Wallet Password
Terminology Product Code = It is the product code of the interface in the interface configuration of OPERA Cluster Node = Database cluster node, found in RAC environments Resort Code = Site code
Steps to replace the certificates in OPERA database The steps for certificates are similar between versions of OPERA, but the location of the wallet and password could differ as noted in the previous section. Note: There are generic wallets that can be used that have the correct certificates built into them.
1. If a certificate already exists, make a copy of it PRIOR to changing the certificate. 2. Navigate to the wallet folder location on the database server.

OPERA Bridge Installation and Support Guide
© 2020 Shift4 Payments, LLC. All rights reserved. Version 1.0 External Use NDA Page 35 of 69
3. Make copies of the current ewallet.p12 and cwallet.sso. 4. Rename the provided client certificate <COMP>_<SITE>.p12 to ewallet.p12. 5. Replace the ewallet.p12. 6. Open an administrative command prompt and navigate to the wallet folder location. 7. Make an auto login file (cwallet.sso).
a. You can do this with the Oracle Wallet Manager, but make sure you are using the correct version of the Wallet Manager that matches your database version.
b. You can also run the following command in the administrative command prompt: D:\ORACLE\1120\bin\orapki wallet create -wallet ewallet.p12 -pwd <ML provided password> -auto_login
8. Update the security permission of the files. You can run the following command in the administrative command prompt: cacls D:\oracle\admin\Opera\wallets\*.* /e /g everyone:f
9. Update the password in the location noted above in OPERA.
Extra Steps to Import Other Certificates in Database Wallet It might be required to import additional certificates into the database wallet. This database wallet is used by the database to communicate with other interfaces and systems. To import a certificate into the wallet, either use the Oracle wallet manager or the orapki tool.
1. Open Oracle Wallet Manager 2. Make sure the version of the Wallet Manager matches the database. You can do this by going to Help >
About. 3. Click Wallet > Open. If you get a prompt stating that the default wallet folder does not exist, press Yes to
continue. 4. Browse to the wallet folder location. (See Version and Interface Differences section for location) 5. Type in the wallet password, and click OK. 6. Click on Operations > Import Trusted Certificate. 7. Browse to the certificate and click OK. 8. Click OK again to close the dialog box.

OPERA Bridge Installation and Support Guide
© 2020 Shift4 Payments, LLC. All rights reserved. Version 1.0 External Use NDA Page 36 of 69
Configuring OPERA
Stop Extra Services It will be necessary to stop extra OPERA interfaces at this point. These are normally installed as services on their respective servers. Some examples of interfaces are,
● OXI interfaces: these are named as OPERA Interface for <Interface Name> ● OEDS interfaces: these services have OAP or OWS prefix
Note: ● Make a note of the services stopped so that they can be started. ● Some OEDS services have to be started in certain order. Look for start and stop scripts on desktop.
Create CCW Interface 1. Open Configuration from the OPERA login screen.
2. Access Interface Configuration
OPERA Bridge Installation and Support Guide
© 2020 Shift4 Payments, LLC. All rights reserved. Version 1.0 External Use NDA Page 37 of 69
9. Disable any current CCW Interface.
a. Select the interface. b. Click on Edit. c. Uncheck Active. d. Click Save and Close.
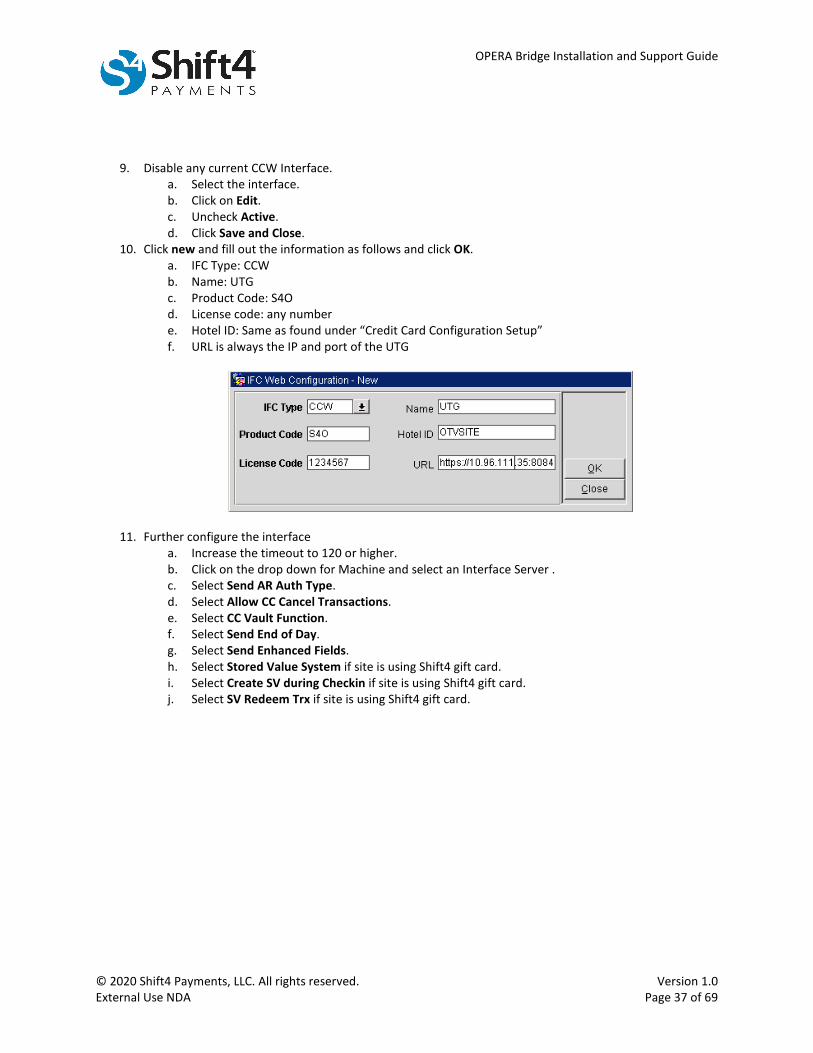
10. Click new and fill out the information as follows and click OK. a. IFC Type: CCW b. Name: UTG c. Product Code: S4O d. License code: any number e. Hotel ID: Same as found under “Credit Card Configuration Setup” f. URL is always the IP and port of the UTG
11. Further configure the interface a. Increase the timeout to 120 or higher. b. Click on the drop down for Machine and select an Interface Server . c. Select Send AR Auth Type. d. Select Allow CC Cancel Transactions. e. Select CC Vault Function. f. Select Send End of Day. g. Select Send Enhanced Fields. h. Select Stored Value System if site is using Shift4 gift card. i. Select Create SV during Checkin if site is using Shift4 gift card. j. Select SV Redeem Trx if site is using Shift4 gift card.

OPERA Bridge Installation and Support Guide
© 2020 Shift4 Payments, LLC. All rights reserved. Version 1.0 External Use NDA Page 38 of 69
OPERA Bridge Installation and Support Guide
© 2020 Shift4 Payments, LLC. All rights reserved. Version 1.0 External Use NDA Page 39 of 69
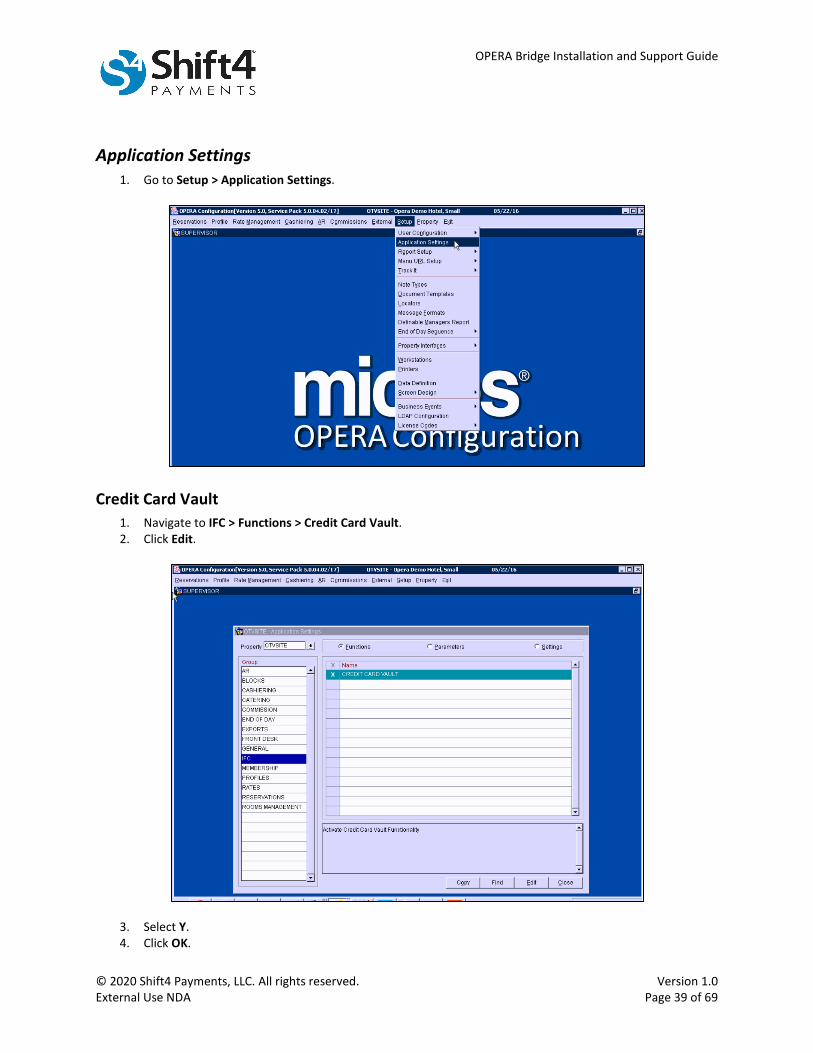
Application Settings 1. Go to Setup > Application Settings.
Credit Card Vault 1. Navigate to IFC > Functions > Credit Card Vault. 2. Click Edit.
3. Select Y. 4. Click OK.

OPERA Bridge Installation and Support Guide
© 2020 Shift4 Payments, LLC. All rights reserved. Version 1.0 External Use NDA Page 40 of 69
Chip and Pin 1. Navigate to IFC > Parameters > Chip and Pin.
2. Click Edit. 3. Select Y. 4. Click OK.
Configure URL Note: This could be missing in newer versions of OPERA.
1. Navigate to IFC > Settings > Credit Card Vault Web Service URL.

OPERA Bridge Installation and Support Guide
© 2020 Shift4 Payments, LLC. All rights reserved. Version 1.0 External Use NDA Page 41 of 69
2. Click Edit.
3. Enter the IP address of the machine where UTG resides. 4. Click OK.
Configure Wallet Password This step can differ depending on the version of OPERA.
● For OPERA 5.4 or lower, this setting is in the application setting ● For OPERA 5.5 or higher, this setting is in the Custom Data tab in the interface configuration
OPERA 5.4 1. Navigate to IFC > Settings > Wallet Password.

OPERA Bridge Installation and Support Guide
© 2020 Shift4 Payments, LLC. All rights reserved. Version 1.0 External Use NDA Page 42 of 69
2. Click Edit.
3. Enter the wallet password. 4. Click OK.
OPERA 5.5 1. Go to Setup > Property Interfaces > Credit Card Interface > Interface Configuration. 2. Select the UTG interface and click Edit. 3. Click Custom Data tab. 4. Input the Chain Code. 5. Type in Wallet Password. 6. Change Vault ID to the Interface number seen on the top left side.

OPERA Bridge Installation and Support Guide
© 2020 Shift4 Payments, LLC. All rights reserved. Version 1.0 External Use NDA Page 43 of 69
7. Click Save.
Disable Manual Entry The hotel can disable manual entry of the credit card in the OPERA application and only use the EMV pin pad device or other P2PE device. They can do so by changing this configuration in OPERA.
Users will be greeted with the following dialog box if the card is manually entered.
To disable manual entry please follow the steps below, 1. Go to Setup > Application Settings.

OPERA Bridge Installation and Support Guide
© 2020 Shift4 Payments, LLC. All rights reserved. Version 1.0 External Use NDA Page 44 of 69
2. Go to General > Parameters > Restrict Credit Card Manual Entry.
3. Click Edit. 4. Select Y. 5. Click OK.
Credit Card Functionality Setup 1. Go to Setup > Property Interfaces > Credit Card Interface > Functionality Setup.
a. Select Online settlement. b. Select Manual Authorization Notification. c. Select Force Auth. During Check In / Interactive Auth. Window to only allow check in if there was
a successful authorization. d. Select drop down for Chip and Pin and select all the cards you want to configure for pin pad
transaction and Click OK.

OPERA Bridge Installation and Support Guide
© 2020 Shift4 Payments, LLC. All rights reserved. Version 1.0 External Use NDA Page 45 of 69
e. Add cards that support reversal by clicking on the drop down and selecting the card types.

OPERA Bridge Installation and Support Guide
© 2020 Shift4 Payments, LLC. All rights reserved. Version 1.0 External Use NDA Page 46 of 69
Workstation Setup 1. Click Setup > Workstations.
2. Select the workstation and click on Edit.

OPERA Bridge Installation and Support Guide
© 2020 Shift4 Payments, LLC. All rights reserved. Version 1.0 External Use NDA Page 47 of 69
3. If the workstation also has an IDTECH device, select Swiper Reader Attached and click the drop down for
Reader No and select IDTECH and click OK.
4. Select Chip & Pin Device Available.
5. Click OK. 6. Repeat the above steps for all workstations that need configuration. 7. Click Close to close out of Workstations.

OPERA Bridge Installation and Support Guide
© 2020 Shift4 Payments, LLC. All rights reserved. Version 1.0 External Use NDA Page 48 of 69
Verifying Chip Transactions and Installation
It is important to run a test transaction after installing the OPERA bridge. A transaction should be run from a PIN pad and verified in Lighthouse Transaction Manager as “Card Present.” The following transactions should be run and confirmed during the installation:
● Get Token (adding a card to a reservation) ● Authorization ● Settlement
Bulk Tokenization It will be necessary to convert the current credit cards in the OPERA system to tokens. This is done by the bulk tokenization process. To do a bulk tokenization, please follow the steps below. These steps might be different depending on the version of OPERA.
Check and Backup Table 1. Count number of cards to be tokenized in name$_credit_card table.
Select count(1) From name$_credit_card Where purged_yn = ‘N’ And credit_Card_number like ‘~%’
2. Backup the name$_credit_card table by running the following as OPERA database user. create table name$_credit_card_backup as select * from name$_credit_card
Conversion 3. Log in to OPERA as manager or supervisor. 4. Click on Utilities. 5. Select resort and click on Login. 6. Click on Utilities > Convert Vault CC Information. 7. Click OK.
a. For OPERA 5.4, i. Click Test.
ii. OPERA will ask to verify the URL, click OK.

OPERA Bridge Installation and Support Guide
© 2020 Shift4 Payments, LLC. All rights reserved. Version 1.0 External Use NDA Page 49 of 69
iii. OPERA will run a heartbeat test. If everything works it will show Passed.
b. For OPERA 5.5, i. Click Cfg/TestDB.
ii. OPERA will pull the information from the configuration done previously and ask you to confirm it. Click OK.

OPERA Bridge Installation and Support Guide
© 2020 Shift4 Payments, LLC. All rights reserved. Version 1.0 External Use NDA Page 50 of 69
iii. Type in the default source certificate location (default: D:\Oracle\Admin\Opera\Wallets) and the certificate password, and click Apply.
iv. Click OK to start configuration. v. Opera will configure the ACL and show the dialog box below, click OK.
vi. You can click on the Log button to check for any errors.
vii. Click on Test Client.

OPERA Bridge Installation and Support Guide
© 2020 Shift4 Payments, LLC. All rights reserved. Version 1.0 External Use NDA Page 51 of 69
viii. Click OK to confirm the URL.
ix. MICROS Payment Application will open. Type in credit card information and click OK.
x. OPERA will run a tokenization test and return Passed if successful. 8. If Pre-Authorization is enabled, click on Pre Auth, this will initiate a pre authorization for currently pre-
authorized reservations. 9. Click OK once it is one. 10. Click on C/I Auth (Convert In house guests) to convert credit cards attached to reservations in house
currently into tokens. 11. Click OK once it is done. 12. Let site know that they can resume regular operation at this time but they will not be able to process
future credit cards. 13. Click Convert CC to convert the rest of credit card data to tokens.
Note: If the hotel is large with lots of credit card data (name$_credit_card table exceeds 700000 records), please run the Future CC and select the resort and arrival date in future you want to convert.
14. Click Yes when it prompts Have you done the Pre Auth and C/I Auth transactions? 15. Click Yes when it prompts This will start converting the Credit Card Data. Do you want to proceed? 16. Click OK when Conversion is complete dialog box shows 17. If tokenization is successful drop backup table by running the following command as OPERA database
user. If there are failed tokenization please escalate drop table name$_credit_card_backup
OPERA Bridge Installation and Support Guide
© 2020 Shift4 Payments, LLC. All rights reserved. Version 1.0 External Use NDA Page 52 of 69
Start Extra Services Start all the extra OPERA interfaces that were stopped earlier. These are normally installed as services on their respective servers. Some examples of interfaces are:
● OXI interfaces: these are named as OPERA Interface for <Interface Name> ● OEDS interfaces: these services have OAP or OWS prefix
Note: ● Double check that the services stopped earlier are started. ● Some OEDS services have to be started in a certain order. Look for start and stop scripts on desktop.
Installation Troubleshooting
Oracle Database Errors
ORA-28759: failure to open file The wallets directory or the certificate cannot be found. Check the location of the ewallet.p12. Make sure that it is in the correct folder. Also double check that the wallet has FULL CONTROL for EVERYONE permissions. Ensure that if MLI product code is in use that the folder used is MLI and same for MLV. An MLV interface will not recognize an MLI folder and vice versa.
ORA-29106: Cannot import PKCS #12 wallet The wallet password in Application Settings does not match the password for the wallet. Double check your password and confirm with Shift4 as needed.
ORA-29024: Certificate validation failure There is no wallet password configured in Application Settings for that Resort. Go to Application Settings > IFC > Settings > Wallet Password and input the password. Problem also could be due to incorrect wallet being used. Please double check the wallet.
ORA-29223: Cannot Create Certificate Chain There was a problem with the packaging of the P12 because the signing certificate is not in the wallet. Contact UTG for a new P12 and password. This can also be fixed by using the Oracle Wallet Manager to import additional root CA from the package provided.
ORA-28860: Fatal SSL Error An ACL Profile exists but it is not configured. Assign Connection & Use-Client Certificate Privileges and assign the Wallet Path. Problem also could be due to incorrect wallet being used. Please double check the wallet.
ORA-53203 Security Violation Too many attempts were made to access the certificate with the wrong password. You can wait for the lockout to expire or bounce the database.

OPERA Bridge Installation and Support Guide
© 2020 Shift4 Payments, LLC. All rights reserved. Version 1.0 External Use NDA Page 53 of 69
Network Access Denied by Access Control List No ACL Profile exists. Contact Oracle to create an ACL Profile, assign Connection & Use-Client Certificate Privileges, and assign the Wallet Path.
Rollback Procedures
CCW Interface - Non tokenized In the event that an installation of OPERA Bridge fails on a site that already has an active CCW interface that is not tokenized the rollback steps are as follows:
● Disable the CCW interface communicating with UTG. ● Enable the old CCW interface. ● Revert the following changes if edited:
○ Chip and Pin ○ Credit Card Vault ○ Batch settlement method ○ Functionality setup
● If the site has a security certificate reinstall the original certificate that was in the OPERA wallet folder. UTG does not need to be uninstalled and can continue to reside wherever it was installed. Once the URL is reverted, no traffic will go to UTG. Likewise the Oracle Wallet does not need to be removed because once “Chip and Pin” and “Credit Card Vault” are deactivated, the wallet will not be used.
CCW interface - Tokenized In the event that an installation of OPERA Bridge fails on a site that already has an active CCW interface that is tokenized, the rollback steps are as follows:
● Disable the CCW interface communicating with UTG. ● Enable the old CCW interface. ● Revert the following changes if edited:
○ Chip and Pin ○ Batch settlement method ○ Functionality setup
● Reinstall the original certificate that was in the OPERA wallet. UTG does not need to be uninstalled and can continue to reside wherever it was installed. Once the CCW interface is reverted, no traffic will go to UTG.

OPERA Bridge Installation and Support Guide
© 2020 Shift4 Payments, LLC. All rights reserved. Version 1.0 External Use NDA Page 54 of 69
Troubleshooting OPERA Bridge
Running Card Present Transactions The main change from the perspective of the hotel staff with OPERA Bridge is how transactions are to be run. Please see the “How to Run an EMV Chip Transaction in Opera” document for those steps.
Check-in from the Reservation Details Screen There are generally two ways to check guests in Opera PMS.
● From the Reservation Details screen (shown) and, ● From the Front Desk Arrivals screen (screen to come).
The Reservation Details screen allows the clerk to adjust room and stay details.
Step 1 –Setting the Payment Type ● To perform a proper EMV transaction from the reservation details screen, the clerk needs to change the
payment to CP (Chip and PIN).

OPERA Bridge Installation and Support Guide
© 2020 Shift4 Payments, LLC. All rights reserved. Version 1.0 External Use NDA Page 55 of 69
● This can be done from the drop down arrow, or by just typing CP in the window.
Step 2 –Initiating the Chip and PIN Window ● Once CP is chosen, the credit card on file (usually from the reservation booking) disappears. ● Once the Payment Type has been set to CP, the clerk needs to press the OK button at the bottom right of
the screen.

OPERA Bridge Installation and Support Guide
© 2020 Shift4 Payments, LLC. All rights reserved. Version 1.0 External Use NDA Page 56 of 69
● DO NOT PRESS THE PAYMENT APPLICATION ICON TO THE RIGHT OF THE CREDIT CARD # FIELD.

OPERA Bridge Installation and Support Guide
© 2020 Shift4 Payments, LLC. All rights reserved. Version 1.0 External Use NDA Page 57 of 69
Step 3 –Activating the Payment Method Window The clerk clicks Yes to confirm check in process.
Step 4 –Submitting a CP Authorization Request ● From the Payment Method screen, the clerk clicks OK to initiate a request for authorization. ● Notice there is no credit card attached. ● This action will light up the payment entry device (PED).

OPERA Bridge Installation and Support Guide
© 2020 Shift4 Payments, LLC. All rights reserved. Version 1.0 External Use NDA Page 58 of 69
● Note: a room must be assigned to the guest before any of this process can be performed.
Step 5 –Acquiring the EMV Chip Data ● The Authorization window indicates that an authorization request has been sent to OPG, then to
TransactionLink, then to the PED. ● The PED should be lit and awaiting credit card insert. ● There is a 2 minute timeout for the guest to insert and process their card.

OPERA Bridge Installation and Support Guide
© 2020 Shift4 Payments, LLC. All rights reserved. Version 1.0 External Use NDA Page 59 of 69
● After card insertion, the PED will prompt for the amount confirmation. The guest needs to press F1 to initiate the EMV transaction.
Chip Transactions for Multiple Charges ● Precondition: the customer and chip card must be present to perform the following transaction. ● When adding multiple charges and to have them both chip read, create the multiple charges window. ● Change the payment type to CP. ● Prefill in the Amt/Pct. ● Click the OK button.

OPERA Bridge Installation and Support Guide
© 2020 Shift4 Payments, LLC. All rights reserved. Version 1.0 External Use NDA Page 60 of 69
● Opera will send two authorizations, one after the other, to the chip reader to perform the EMV/chip authorization.
Chip Transactions from the Billing Screen ● Precondition: the customer and chip card must be present to perform the following transaction. ● When performing a billing function, access the billing screen via Cashiering, and create the charge to the
guest. ● In the Payment screen, choose CP for chip. ● Any credit card information will be wiped from this screen. ● Then click Post. ● The Opera system will send a payment authorization request to the PIN Pad for the chip insert.

OPERA Bridge Installation and Support Guide
© 2020 Shift4 Payments, LLC. All rights reserved. Version 1.0 External Use NDA Page 61 of 69
Check-in from the Arrivals Screen ● The Arrivals window shows all the “Due Ins” that are expected for that day. ● Opera provides a “quick access” button to check guests in directly from the Arrivals screen instead of
needing to access the Reservation window. ● All check in authorizations must have a room assignment before a transaction can be performed.
Step 1: Search and Display all Due In Guests ● From the Arrivals window, press search to display all the guests who are due to arrive. ● Guests who match these criteria will be listed in the grid on the lower half of the screen.

OPERA Bridge Installation and Support Guide
© 2020 Shift4 Payments, LLC. All rights reserved. Version 1.0 External Use NDA Page 62 of 69
● Identify the guest you wish to check in.
Step 2: Check-in Guest Once the guest has been identified, the clerk should press the Check In button on the right (shown).

OPERA Bridge Installation and Support Guide
© 2020 Shift4 Payments, LLC. All rights reserved. Version 1.0 External Use NDA Page 63 of 69
Step 3: Change the Payment Method to Chip and PIN ● After the Check In button has been pressed, the Payment Method window is initiated. ● To perform a proper EMV transaction, the clerk needs to change the payment to CP (Chip and PIN). ● Users can do this by the drop down arrow menu (shown), or by simply typing in CP into the Method of
Payment field.
Step 4 –Submitting a CP Authorization Request ● Once the Payment Type has been set to CP, the clerk needs to press the OK button at the bottom right of
the screen. ● DO NOT PRESS THE PAYMENT APPLICATION ICON TO THE RIGHT OF THE CREDIT CARD # FIELD.

OPERA Bridge Installation and Support Guide
© 2020 Shift4 Payments, LLC. All rights reserved. Version 1.0 External Use NDA Page 64 of 69
Step 5 –Acquiring the EMV Chip Data ● The Authorization window indicates that an authorization request has been sent to OPG, then to
TransactionLink, then to the PED. ● The PED should be lit and awaiting credit card insert. ● There is a 2 minute timeout for the guest to insert and process their card. ● After card insertion, the PED will prompt for the amount confirmation. The guest needs to press F1 to
initiate the EMV transaction.
Troubleshooting Tokenization Issues
Viewing Tokens in OPERA One of the first things that should be done when a tokenization issue is suspected is to verify the tokens on a reservation. There are several ways to view the tokens.

OPERA Bridge Installation and Support Guide
© 2020 Shift4 Payments, LLC. All rights reserved. Version 1.0 External Use NDA Page 65 of 69
Viewing a Token with a Single Card on File: When a reservation has only a single card on file, the token can easily be accessed from the reservation by right clicking and selecting Vault Token Id. The token will then be displayed in place of the confirmation number.
Viewing a Token with Multiple Cards on File:
There are two ways you can view token numbers on a reservation that has multiple credit cards on file. The first is to use the Multi-Pay Window on the reservation and the second is to use the Change Log.

OPERA Bridge Installation and Support Guide
© 2020 Shift4 Payments, LLC. All rights reserved. Version 1.0 External Use NDA Page 66 of 69
Using the Multi-Pay Window: First enter the multi-pay window from the reservation page. Right click on the card type of the credit card you wish to obtain the token for and select Vault Token Id.
OPERA Bridge Installation and Support Guide
© 2020 Shift4 Payments, LLC. All rights reserved. Version 1.0 External Use NDA Page 67 of 69
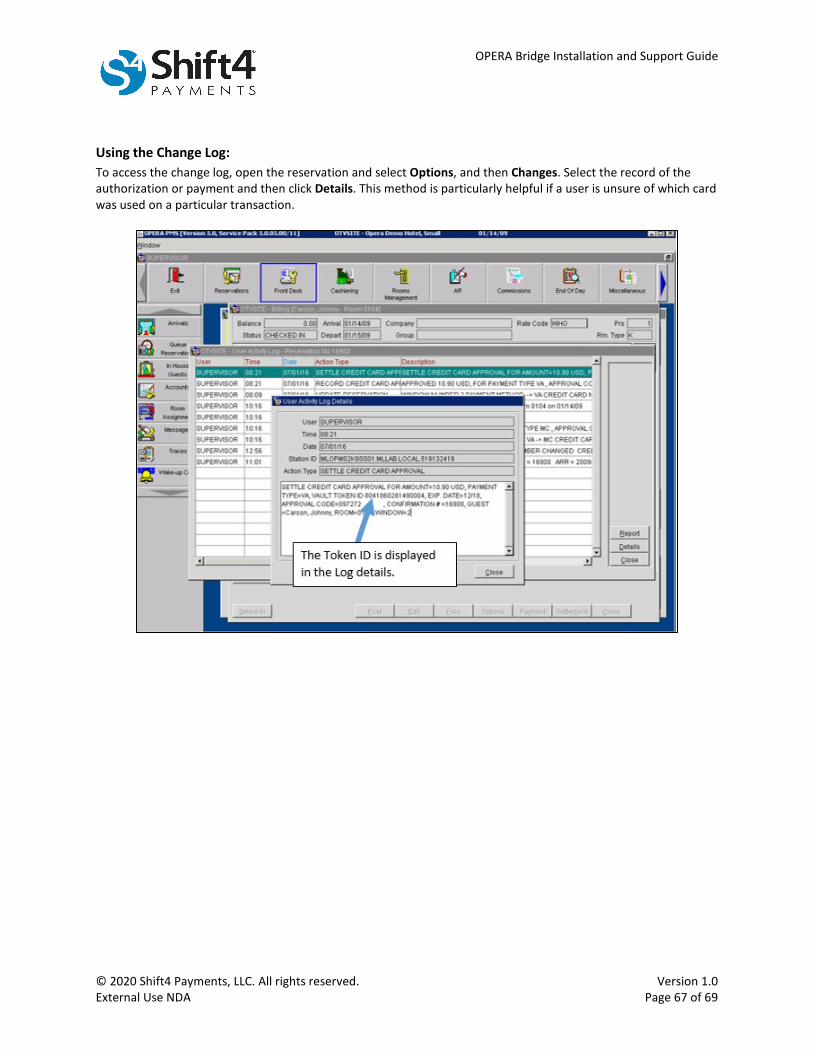
Using the Change Log: To access the change log, open the reservation and select Options, and then Changes. Select the record of the authorization or payment and then click Details. This method is particularly helpful if a user is unsure of which card was used on a particular transaction.

OPERA Bridge Installation and Support Guide
© 2020 Shift4 Payments, LLC. All rights reserved. Version 1.0 External Use NDA Page 68 of 69
Troubleshooting OXI Tokenization Issues
OXI stands for “OPERA Exchange Interface.” It is a module that allows a site to receive external reservation data. For an OPERA site using tokenization, on rare occasions you’ll get the following warning:
In short this is what is occurring: 1. OXI receives a reservation from a third party source. 2. OXI requests a token from Shift4. 3. OXI formats the xml message incorrectly causing the credit card to fail a mod10 check. 4. Shift4 rejects the message do to the failure of the mod10 check. 5. OXI inserts the reservation into the database defaulting the reservation to cash, since it did not
receive a token and cannot insert a non-tokenized number into the database. This error is well known to Oracle and several different solutions exist including a hotfix. One version of a solution which does not involve a hotfix is summarized below:
1. Export the OXI interface SID data. 2. Uninstall the OXI Processor Shell. 3. Reinstall the OXI Processor Shell. 4. Re-import the OXI SID data with global settings. 5. Restart the 10GAPPR2ProcessManager. 6. Restart the OXI services. 7. Re-import the Shift4 provided P12 to certificate stores. 8. Acquire the latest version of CcHttpLib.DLL and copy it along the entire file path to
D:\oracle\10gappr2\jdk\bin. 9. Redeploy the OXISerlets.war file. 10. Reload the microsifc.jar & messageinterceptor.jar files.

OPERA Bridge Installation and Support Guide
© 2020 Shift4 Payments, LLC. All rights reserved. Version 1.0 External Use NDA Page 69 of 69
Shift4 does not deploy the fix for this, but it is good to be able to explain what is actually occurring. Currently there are four separate bug tickets at Oracle with fixes deployed in the following versions:
● Bug 22442929 JIRA:HOXI-907 Version: 5.5.2.0 ● Bug 23519208 JIRA:HOXI-3619 Version: 5.5.1.6 ● Bug 23519262 JIRA:HOXI-3620 Version: 5.5.0.15 ● Bug 23519282 JIRA:HOXI-3621 Version: 5.4.2.24
The only way to deal with this problem besides deploying one of the permanent fixes, is to have the site call the entity that provided the card number (Expedia, Priceline, etc.), and have them give that card verbally to the site.
Oracle ACL Oracle ACL should not be troubleshot by Shift4 as it involves multiple database changes to OPERA. If there are problems with ACL, Oracle Technical Support should be engaged.