openspirit scan for studio user's guide - tibco software · scan for studio . user’s guide ....
TRANSCRIPT
TIBCO OpenSpirit® Scan for Studio User’s Guide Software Release 6.0.0
July 2017

Important Information SOME TIBCO SOFTWARE EMBEDS OR BUNDLES OTHER TIBCO SOFTWARE. USE OF SUCH EMBEDDED OR BUNDLED TIBCO SOFTWARE IS SOLELY TO ENABLE THE FUNCTIONALITY (OR PROVIDE LIMITED ADD-ON FUNCTIONALITY) OF THE LICENSED TIBCO SOFTWARE. THE EMBEDDED OR BUNDLED SOFTWARE IS NOT LICENSED TO BE USED OR ACCESSED BY ANY OTHER TIBCO SOFTWARE OR FOR ANY OTHER PURPOSE.
USE OF TIBCO SOFTWARE AND THIS DOCUMENTIS SUBJECT TO THE TERMS AND CONDITIONS OF A LICENSE AGREEMENT FOUND IN EITHER A SEPARATELY EXECUTED SOFTWARE LICENSE AGREEMENT, OR, IF THERE IS NO SUCH SEPARATE AGREEMENT, THE CLICKWRAP END USER LICENSE AGREEMENT WHICH IS DISPLAYED DURING DOWNLOAD OR INSTALLATION OF THE SOFTWARE (AND WHICH IS DUPLICATED IN THE LICENSE FILE) OR IF THERE IS NO SUCH SOFTWARE LICENSE AGREEMENT OR CLICKWRAP END USER LICENSE AGREEMENT, THE LICENSE(S) LOCATED IN THE “LICENSE” FILE(S) OF THE SOFTWARE. USE OF THIS DOCUMENT IS SUBJECT TO THOSE TERMS AND CONDITIONS, AND YOUR USE HEREOF SHALL CONSTITUTE ACCEPTANCE OF AND AN AGREEMENT TO BE BOUND BY THE SAME.
This document contains confidential information that is subject to U.S. and international copyright laws and treaties. No part of this document may be reproduced in any form without the written authorization of TIBCO Software Inc.
TIBCO, OpenSpirit, and TIBCO OpenSpirit Scan for Studio are either registered trademarks or trademarks of TIBCO Software Inc. in the United States and/or other countries.
All other product and company names and marks mentioned in this document are the property of their respective owners and are mentioned for identification purposes only.
THIS SOFTWARE MAY BE AVAILABLE ON MULTIPLE OPERATING SYSTEMS. HOWEVER, NOT ALL OPERATING SYSTEM PLATFORMS FOR A SPECIFIC SOFTWARE VERSION ARE RELEASED AT THE SAME TIME. SEE THE RELEASE NOTES FOR THE AVAILABILITY OF THIS SOFTWARE VERSIONON A SPECIFIC OPERATING SYSTEM PLATFORM.
THIS DOCUMENT IS PROVIDED “AS IS” WITHOUT WARRANTY OF ANY KIND, EITHER EXPRESS OR IMPLIED, INCLUDING, BUT NOT LIMITED TO, THE IMPLIED WARRANTIES OF MERCHANTABILITY, FITNESS FOR A PARTICULAR PURPOSE, OR NON-INFRINGEMENT.
THIS DOCUMENT COULD INCLUDE TECHNICAL INACCURACIES OR TYPOGRAPHICAL ERRORS. CHANGES ARE PERIODICALLY ADDED TO THE INFORMATION HEREIN; THESE CHANGES WILL BE INCORPORATED IN NEW EDITIONS OF THIS DOCUMENT. TIBCO SOFTWARE INC. MAY MAKE IMPROVEMENTS AND/OR CHANGES IN THE PRODUCT(S) AND/OR THE PROGRAM(S) DESCRIBED IN THIS DOCUMENT AT ANY TIME.
THE CONTENTS OF THIS DOCUMENT MAY BE MODIFIED AND/OR QUALIFIED, DIRECTLY OR INDIRECTLY, BY OTHER DOCUMENTATION WHICH ACCOMPANIES THIS SOFTWARE, INCLUDING BUT NOT LIMITED TO ANY RELEASE NOTES AND "READ ME" FILES.
Copyright © 2000-2017 TIBCO Software Inc. ALL RIGHTS RESERVED. TIBCO Software Inc. Confidential Information

iii
Table of Contents Overview ......................................................................................................................... 4
Studio OpenSpirit Data Sources ........................................................................................ 6
Installation ....................................................................................................................... 7
Supported Platforms ..................................................................................................... 7
System Requirements .................................................................................................... 7
Installing Scan for Studio .............................................................................................. 8
Installing Scan Utility Engine ...................................................................................... 10
Windows Firewall Exemption Rules ........................................................................... 16
Scan Report File Location ........................................................................................... 17
Uninstalling Scan for Studio ........................................................................................ 17
Running Scan for Studio ............................................................................................. 18
Configuring the Studio Indexing Service ......................................................................... 19
OpenSpirit Data Source .................................................................................................. 21
Creating an OpenSpirit Data Source ............................................................................ 21
Model View Loading ............................................................................................... 21
OpenSpirit Data Source Creation Window .............................................................. 22
Data Source Properties ................................................................................................ 23
Scan Job ................................................................................................................. 24
Log Level ................................................................................................................ 25
Model View ............................................................................................................ 25
Data Sources ........................................................................................................... 25
Data Types.............................................................................................................. 26
Content Filter ............................................................................................................. 30
Assigned Index ........................................................................................................... 30
Schedule ..................................................................................................................... 31
Viewing Scan Job Run Output ........................................................................................ 33
Viewing from Studio Manager .................................................................................... 33
Viewing from Job Run History .................................................................................... 34
Managing OpenSpirit Data Sources ................................................................................ 35
Glossary ......................................................................................................................... 36

4 | Overview
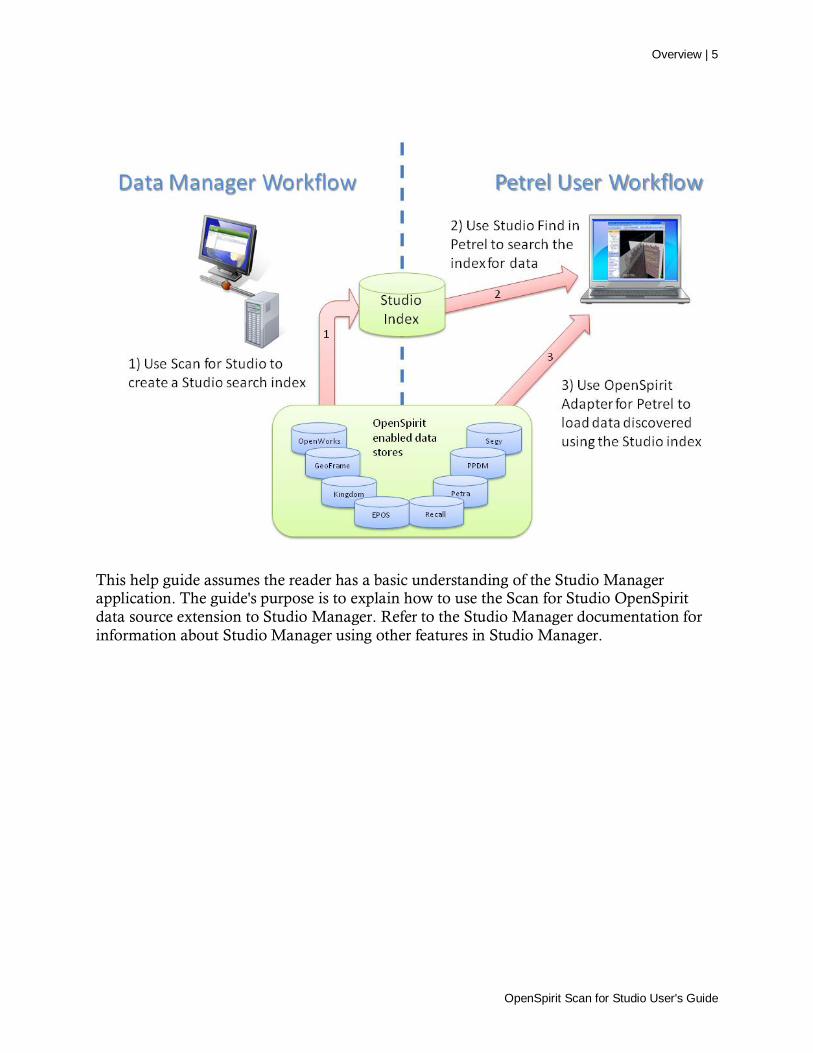
Overview TIBCO OpenSpirit® Scan for Studio (Scan for Studio) is a plug-in to the Schlumberger Studio Manager application. The Scan for Studio plug-in enables Studio Manager to include OpenSpirit data sources in a Petrel data environment. This enables data managers to create Studio indexes from any data source that is supported by an OpenSpirit data connector. The Studio index can then be used by Petrel users to discover data that resides in the scanned OpenSpirit data sources and load it into their Petrel project using the TIBCO OpenSpirit® Adapter for Petrel (Petrel Adapter).
Scan for Studio queries OpenSpirit enabled data stores (e.g. OpenWorks, GeoFrame, PPDM, Kingdom, Petra, etc.) and writes information about the data into a Studio index. The resulting Studio index can then be used by Petrel users to discover data that resides in the OpenSpirit enabled data stores, and optionally to load the data into a Petrel project.
The data that is queried from the OpenSpirit enabled data stores and written to the Studio index contains selected attributes that would be useful to a Studio index search filter. This includes identifying information and spatial location information. The attributes that are queried and written to the Studio index are determined by the default Scan for Studio model view. See the Model View Manager section of the OpenSpirit Desktop Help guide for more information about OpenSpirit model views.
Spatial information must be written to the Studio index as WGS-84 latitude and longitude values. A transform to WGS-84 must be defined in the data sources that are queried by Scan for Studio for the spatial location information to be included in the Studio index.
The following diagram illustrates the workflows involved in providing OpenSpirit data access to Studio users. The Scan for Studio product is used in the data manager workflow. The Petrel Adapter product is used in the Petrel user workflow. This help guide covers use of Scan for Studio. See the Petrel Adapter help guide for information about the Petrel user workflows.
OpenSpirit Scan for Studio User's Guide
Overview | 5
This help guide assumes the reader has a basic understanding of the Studio Manager application. The guide's purpose is to explain how to use the Scan for Studio OpenSpirit data source extension to Studio Manager. Refer to the Studio Manager documentation for information about Studio Manager using other features in Studio Manager.
OpenSpirit Scan for Studio User's Guide
6 | Studio OpenSpirit Data Sources
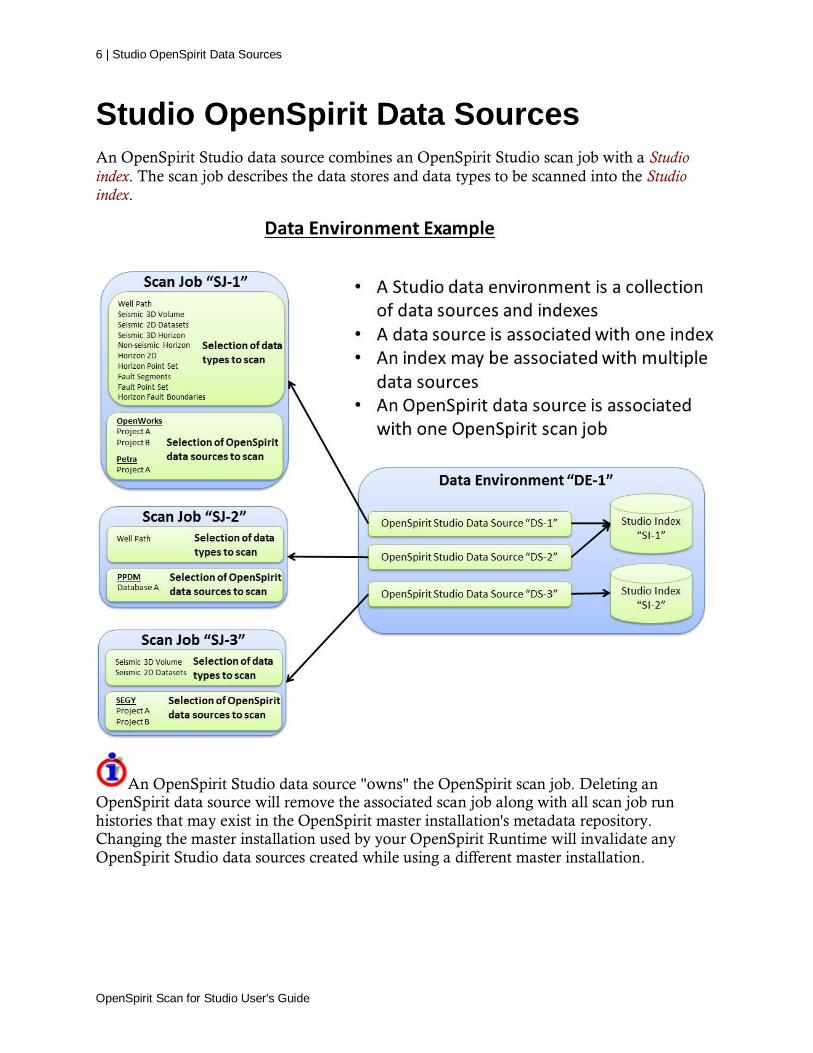
Studio OpenSpirit Data Sources An OpenSpirit Studio data source combines an OpenSpirit Studio scan job with a Studio index. The scan job describes the data stores and data types to be scanned into the Studio index.
An OpenSpirit Studio data source "owns" the OpenSpirit scan job. Deleting an OpenSpirit data source will remove the associated scan job along with all scan job run histories that may exist in the OpenSpirit master installation's metadata repository. Changing the master installation used by your OpenSpirit Runtime will invalidate any OpenSpirit Studio data sources created while using a different master installation.
OpenSpirit Scan for Studio User's Guide

Installation | 7
Installation Studio Manager and the TIBCO OpenSpirit Runtime must be installed prior to installing Scan for Studio. The following table shows the required versions of these prerequisite software products.
Prerequisite Software Versions
Studio Manager 2017.1or higher TIBCO OpenSpirit Runtime 4.2.0 or higher TIBCO OpenSpirit Scan Utility Engine(1) 2016.0.0 or higher
1) The TIBCO OpenSpirit Scan Utility Engine is needed to run Scan for Studio. An install kit containing the TIBCO OpenSpirit Scan Utility Engine required to run Scan for Studio is provided on the Scan for Studio product download site for use by customers that do not already have TIBCO OpenSpirit Scan Utility installed into their OpenSpirit Runtime.
2) Customers that have the full TIBCO OpenSpirit Scan Utility installed do not need to install the TIBCO OpenSpirit Scan Utility Engine.
3) A license for TIBCO OpenSpirit Scan Utility is not needed to run Scan for Studio.
Studio Manager must be installed prior to installing Scan for Studio. Also, TIBCO OpenSpirit Runtime and either TIBCO OpenSpirit Scan Utility Engine or the complete TIBCO OpenSpirit Scan Utility must be installed prior to running Scan for Studio.
Supported Platforms Scan for Studio is supported on the operating system platforms supported by both the TIBCO OpenSpirit Runtime and by Studio Manager. Refer to the supported platforms information for those products.
System Requirements The Scan for Studio installer adds files to the Studio Manager extensions folder. The files created in your Studio Manager installation are placed in a new %StudioManager2017Home%Extensions\TIBCO\Scan for Studio folder which is created by the installer. The installer adds a plug-in to Studio Manager which requires it to modify the StudioManager.exe.config and StudioIndexer.exe.config configuration files. The account used to install Scan for Studio must have write access to these Studio Manager files and folders.
The Studio Manager installation folder is determined using the StudioManager2017Home environment variable which is set when Studio Manager is installed. Scan for Studio will not install if this environment variable is not found.
OpenSpirit Scan for Studio User's Guide
8 | Installation
The Scan for Studio installation requires 3MB of disk space to be available on the drive hosting the %StudioManager2017Home%Extensions folder.
The OpenSpirit Runtime software installation on the computer used to create and run OpenSpirit Studio scan jobs should be configured to use an OpenSpirit master installation that will not change. OpenSpirit data sources created in Studio data environments reference information stored in the OpenSpirit master's metadata repository. Changing the OpenSpirit Runtime to use a different OpenSpirit master installation after OpenSpirit Studio data sources have been created will invalidate the OpenSpirit Studio data sources.
The OpenSpirit Runtime used for Scan for Studio should have data sources configured for all the data stores that you would like to index using Scan for Studio. See the Data Source Configuration Tool Help section of the OpenSpirit help guide.
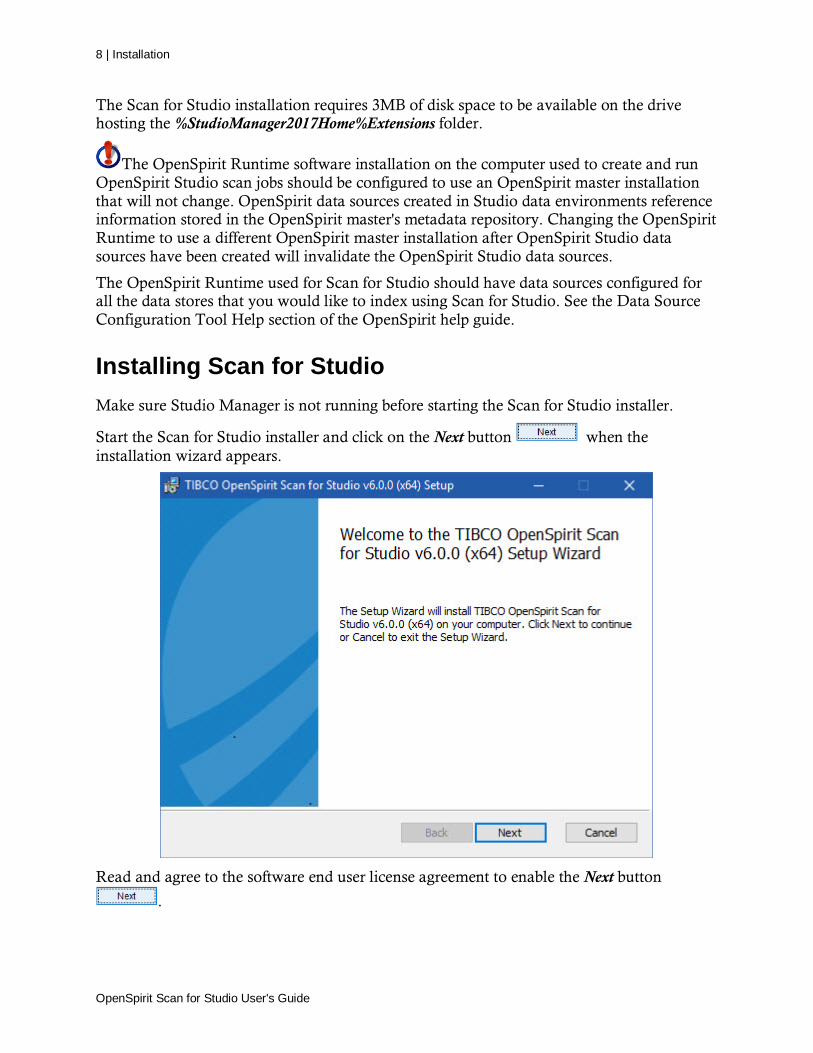
Installing Scan for Studio Make sure Studio Manager is not running before starting the Scan for Studio installer.
Start the Scan for Studio installer and click on the Next button when the installation wizard appears.
Read and agree to the software end user license agreement to enable the Next button
.
OpenSpirit Scan for Studio User's Guide

Installation | 9
Click on the Next button to proceed to the ready to install panel.
Click the Install button to begin installing Scan for Studio.
OpenSpirit Scan for Studio User's Guide

10 | Installation
An installation progress panel will appear while the Scan for Studio components are being installed. This phase of the installation typically takes less than a minute to run. A completion message panel appears when the Scan for Studio components have been installed.
Click on the Finish button to dismiss the installer.
Installing Scan Utility Engine Scan for Studio uses the scan engine portion of the TIBCO Scan Utility product. The Scan Utility Engine must be installed prior to running Scan for Studio if you do not already have the TIBCO Scan Utility product installed on the computer you will be using to run Scan for Studio. There is no need to install the Scan Utility Engine if you already have the TIBCO Scan Utility product installed.
Make sure the OpenSpirit Desktop is not running before starting the Scan Utility Engine installer.
Start the Scan Utility Engine installer and click on the Next button when the installation wizard appears.
OpenSpirit Scan for Studio User's Guide
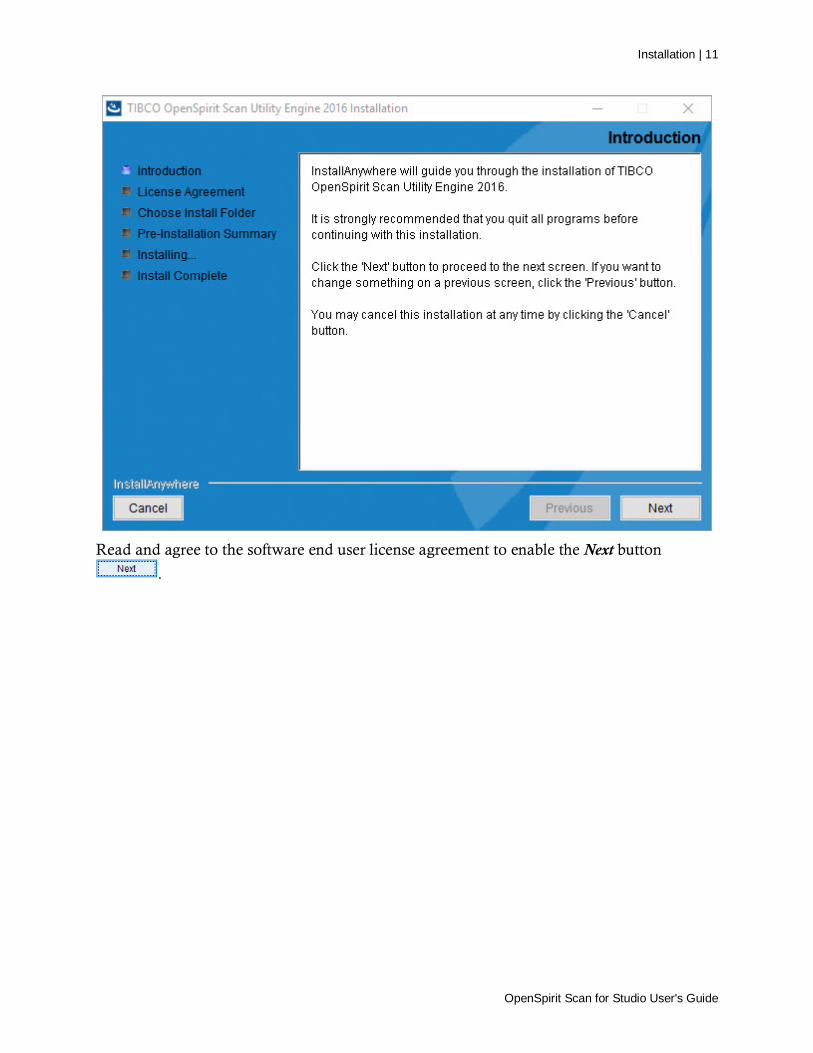
Installation | 11
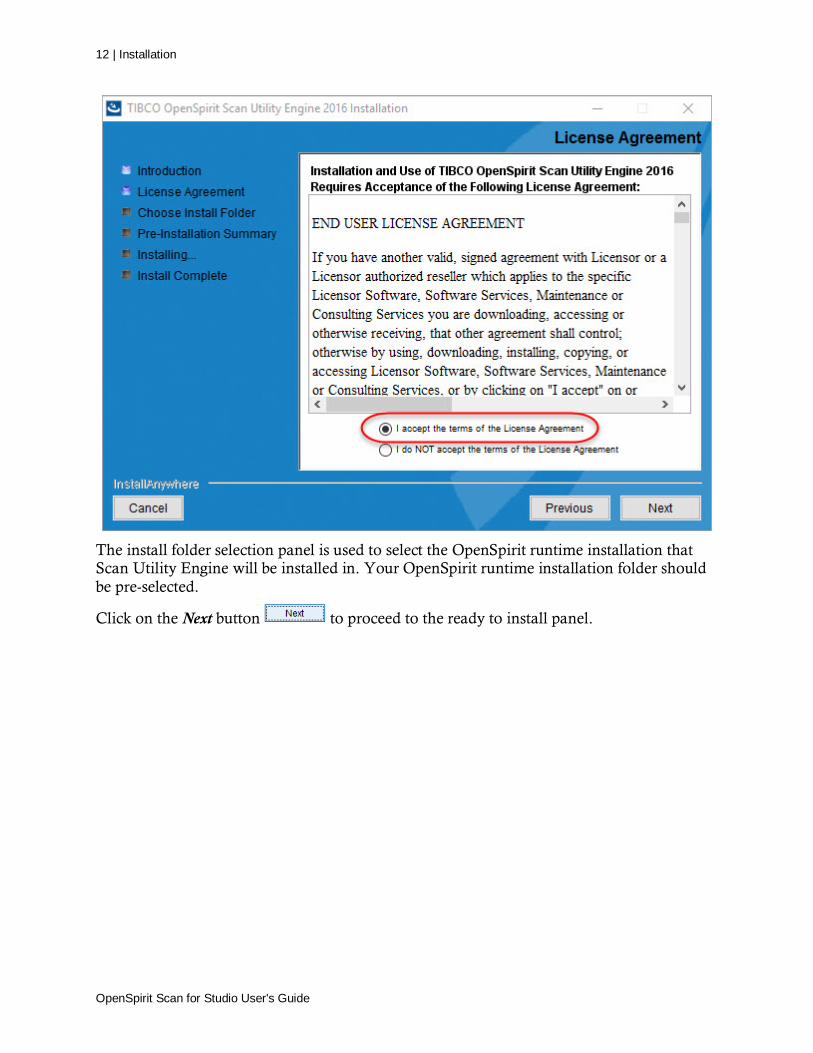
Read and agree to the software end user license agreement to enable the Next button
.
OpenSpirit Scan for Studio User's Guide
12 | Installation
The install folder selection panel is used to select the OpenSpirit runtime installation that Scan Utility Engine will be installed in. Your OpenSpirit runtime installation folder should be pre-selected.
Click on the Next button to proceed to the ready to install panel.
OpenSpirit Scan for Studio User's Guide

Installation | 13
\
An error window will appear if the Scan Utility Engine is already installed in your OpenSpirit runtime. Click on the Ok button to exit the Scan Utility Engine installer.
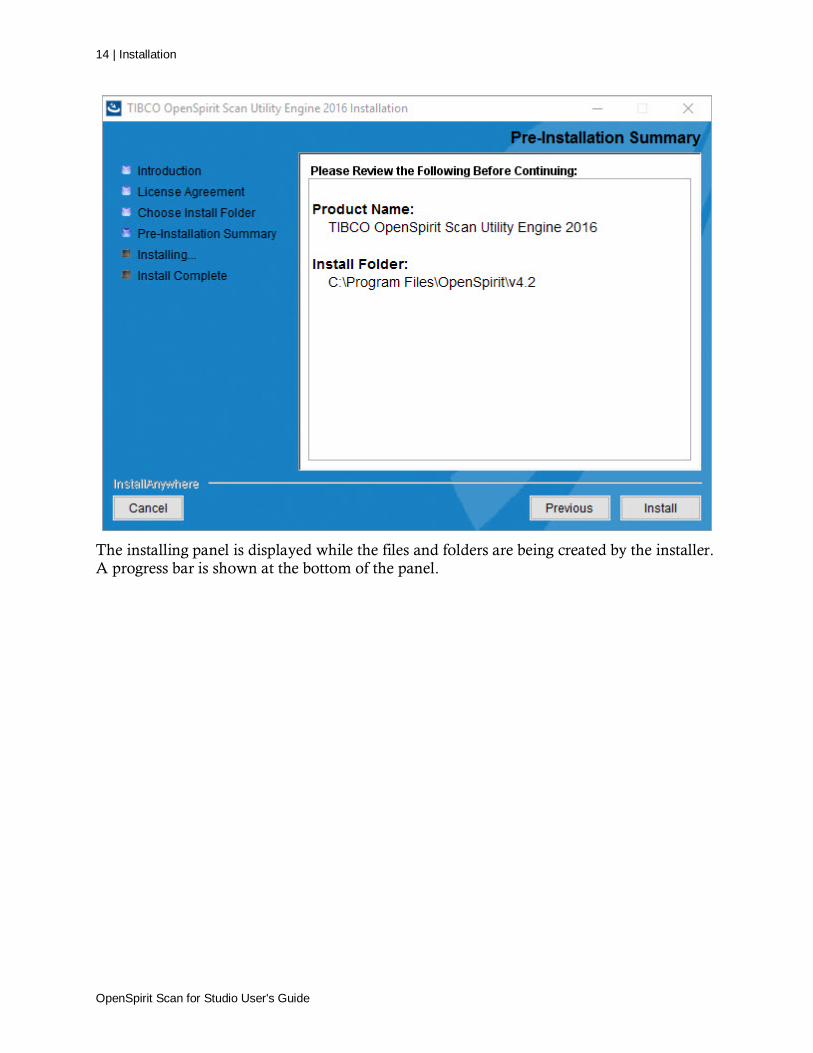
The Pre-Installation Summary panel appears if you do not already have the Scan Utility Engine installed in your OpenSpirit runtime.
Click the Install button to begin installing the Scan Utility Engine.
OpenSpirit Scan for Studio User's Guide
14 | Installation
The installing panel is displayed while the files and folders are being created by the installer. A progress bar is shown at the bottom of the panel.
OpenSpirit Scan for Studio User's Guide

Installation | 15
The install complete panel appears when the files have all been installed.
OpenSpirit Scan for Studio User's Guide

16 | Installation
Click on the Done button to exit the installer. The installation is complete.
Windows Firewall Exemption Rules Firewall exemptions are required for three Studio Manager executables The Studio Manager executables that must be exempted are:
%StudioManager2017Home%StudioManager.exe
%StudioManager2017Home%StudioIndexer.exe
%StudioManager2017Home%StudioIndexerService.exe
A Windows batch script is provided that contains commands to add the exemptions to your Windows firewall. The batch file is located in the %StudioManager2017Home%Extensions\TIBCO\Scan for Studio folder in a file named FirewallExemptionRules.bat. You will need Administrator or elevated privileges in order to successfully run the script. Consult with your IT administrator about adding the rules if a firewall is being run on the system you will be using to create or run indexing jobs.
OpenSpirit Scan for Studio User's Guide

Installation | 17
Scan Report File Location Two report files are created during an OpenSpirit Scan for Studio indexing job run. Examples of the reports are provided in the Viewing Scan Job Run Output section of this help guide. The default location for the report files is %LOCALAPPDATA%\OpenSpirit\<OpenSpirit-runtime-version>\logs\ScanLogs where <OpenSpirit-runtime-version> is the version of the OpenSpirit Runtime used by Scan for Studio and %LOCALAPPDATA% is the Windows app data folder for the Windows account used to run the Studio Indexing Service. For example, the default location for the report files when running the Studio Indexing Service using an account named JaneSmith and using an OpenSpirit version 4.2.0 runtime would be C:\Users\JaneSmith\AppData\Local\OpenSpirit\v4.2\logs\ScanLogs.
Using the default report file location prevents accounts other than the account used to run the Studio Indexing service from viewing the reports. This problem can be solved by editing scanLogLocation setting in the appSettings section of the %StudioManager2017Home%Extensions\TIBCO\Scan for Studio\OpenSpiritStudioIndexer.dll.config configuration file in your Scan for Studio installation. The default value for this setting is a blank value.
<appSettings>
<add key = "scanLogLocation" value=""/>
</appSettings>
Change the setting value to a network shared folder that the user running the Studio Indexing service has write permissions on and users needing to view the report files have read permission on. For example, to have the report files written to a network share folder named \\fileserver1\studio-scan-reports change the appSettings to the following.
<appSettings>
<add key = "scanLogLocation" value="\\fileserver1\studio-scan-reports"/>
</appSettings>
The reports are put into the OpenSpirit metadata repository after the indexing job has completed, so other users can view the reports without configuring a network folder. Users can use the Job Run History tool in the OpenSpirit Desktop to view the reports once the indexing run has completed if they have been granted the Administer Scan Jobs OpenSpirit user right.
Uninstalling Scan for Studio Scan for Studio is uninstalled using the Windows Program and Features tool found in the Windows Control Panel. Open the Programs and Features tool, select the TIBCO OpenSpirit Scan for Studio program and click on the Uninstall button.
OpenSpirit Scan for Studio User's Guide

18 | Installation
Running Scan for Studio Scan for Studio is used from within Studio Manager. The following sections of this help guide explain how to use Scan for Studio. Start Studio Manager to begin using Scan for Studio.
OpenSpirit Scan for Studio User's Guide

Configuring the Studio Indexing Service | 19
Configuring the Studio Indexing Service It is important to make sure the Studio indexing service is properly configured prior to scheduling an indexing run.
A caution sign is displayed next to the Service user option at the bottom of the Index Schedules app window if the indexing service has not been configured.
Click on the set user button to proceed with setting up the account that will be used to run the Studio indexing service. This will add a User name and a Password entry field. Enter the user name using the form domain\user.
If the user button is disabled you will need to run Studio Manager as a Windows administrator.
It is best if the Windows login account used for the Indexing service user is the same account used to create the Scan for Studio indexing data sources. This account needs write access to the index folders that will be used for the indexing output. The account also needs access to the OpenSpirit data sources referenced by the Scan for Studio indexing data sources.
Your OpenSpirit administrator must grant the Administer Scan Jobs user right to all OpenSpirit users that will be creating or running OpenSpirit indexing jobs if your Studio
OpenSpirit Scan for Studio User's Guide

20 | Configuring the Studio Indexing Service
Manager installation has been configured to use a Shared Indexing environment. The Administer Scan Jobs user right is granted using the User Manager tool in the OpenSpirit Desktop. The Administer Scan Jobs right must also be granted to the account used to run the Studio indexing service.
Click on the green check button after entering the user name and password to save the change and start the Studio indexing service.
OpenSpirit Scan for Studio User's Guide
OpenSpirit Data Source | 21
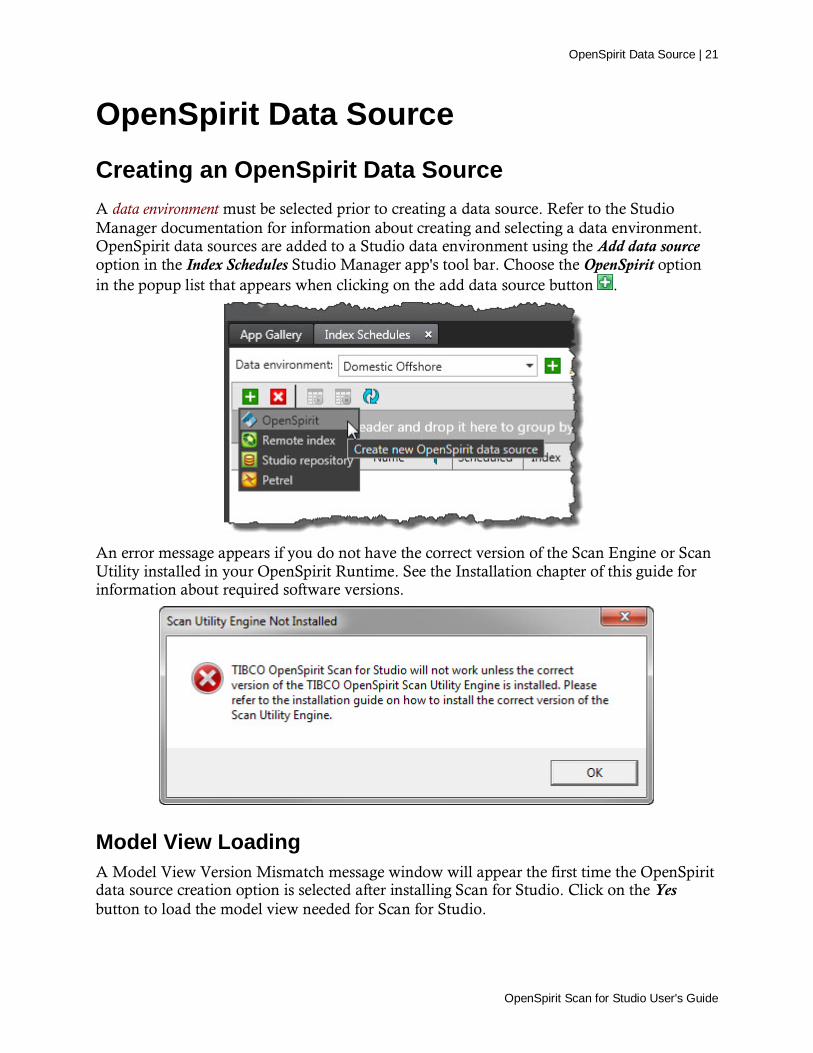
OpenSpirit Data Source Creating an OpenSpirit Data Source A data environment must be selected prior to creating a data source. Refer to the Studio Manager documentation for information about creating and selecting a data environment. OpenSpirit data sources are added to a Studio data environment using the Add data source option in the Index Schedules Studio Manager app's tool bar. Choose the OpenSpirit option in the popup list that appears when clicking on the add data source button .
An error message appears if you do not have the correct version of the Scan Engine or Scan Utility installed in your OpenSpirit Runtime. See the Installation chapter of this guide for information about required software versions.
Model View Loading A Model View Version Mismatch message window will appear the first time the OpenSpirit data source creation option is selected after installing Scan for Studio. Click on the Yes button to load the model view needed for Scan for Studio.
OpenSpirit Scan for Studio User's Guide

22 | OpenSpirit Data Source
A confirmation message appears when the model view has been loaded.
Click on the Ok button to dismiss the confirmation message and display the OpenSpirit Scan for Studio data source creation window.
OpenSpirit Data Source Creation Window The top section of the window is used to create an OpenSpirit scan job that defines the data sources and data types to be indexed. The center section of the window is used to optionally select a content filter and select the Studio index that the data will be written to.
OpenSpirit Scan for Studio User's Guide

OpenSpirit Data Source | 23
The bottom section of the window is used to optionally schedule the indexing job runs.
A scan job and an index must be created and selected before pressing the Save button
to create the OpenSpirit Studio data source.
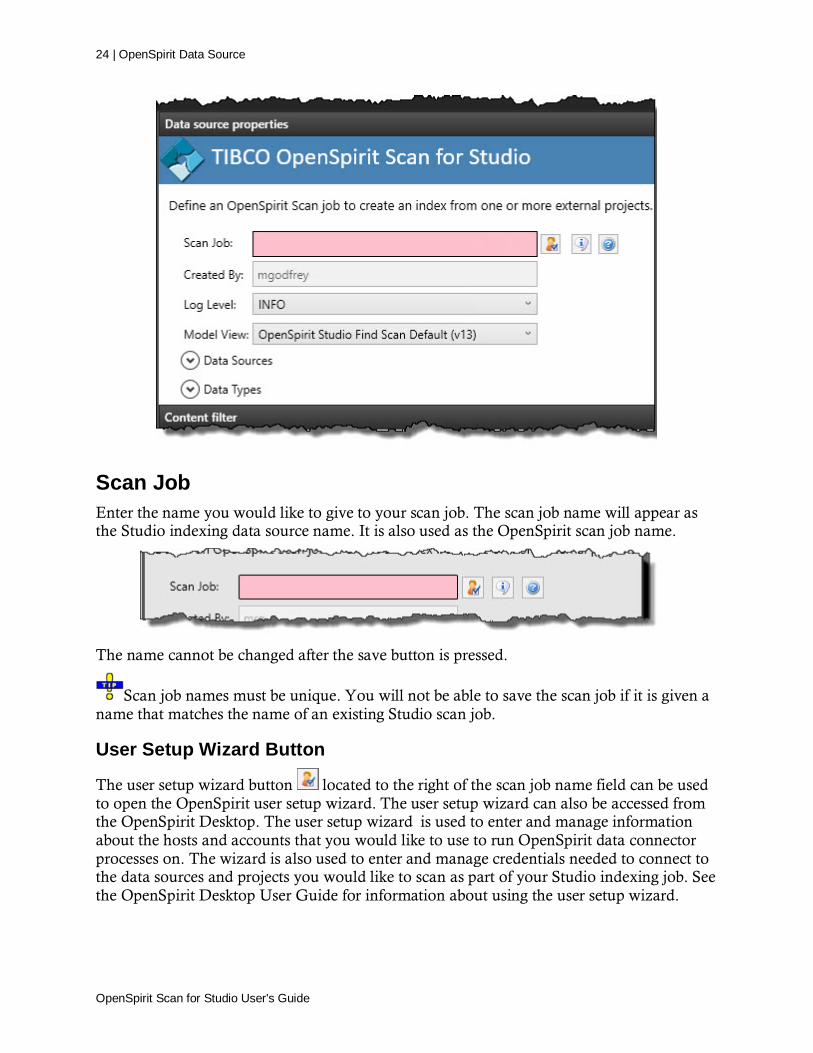
Data Source Properties The top section of the add data source window is used to create a scan job. A scan job defines the OpenSpirit data sources that will be indexed and the data types to include in the index.
OpenSpirit Scan for Studio User's Guide
24 | OpenSpirit Data Source
Scan Job Enter the name you would like to give to your scan job. The scan job name will appear as the Studio indexing data source name. It is also used as the OpenSpirit scan job name.
The name cannot be changed after the save button is pressed.
Scan job names must be unique. You will not be able to save the scan job if it is given a name that matches the name of an existing Studio scan job.
User Setup Wizard Button
The user setup wizard button located to the right of the scan job name field can be used to open the OpenSpirit user setup wizard. The user setup wizard can also be accessed from the OpenSpirit Desktop. The user setup wizard is used to enter and manage information about the hosts and accounts that you would like to use to run OpenSpirit data connector processes on. The wizard is also used to enter and manage credentials needed to connect to the data sources and projects you would like to scan as part of your Studio indexing job. See the OpenSpirit Desktop User Guide for information about using the user setup wizard.
OpenSpirit Scan for Studio User's Guide

OpenSpirit Data Source | 25
About Button
The about button displays the Scan for Studio version number and OpenSpirit Runtime version numbers.
Help Button
Clicking the help button opens this help guide.
Log Level The log level selection controls the amount of information that appears in the indexing log created during the indexing run.
The default log level in INFO. You may be asked to change the log level to DEBUG when investigating indexing problems.
Setting the log level to DEBUG will cause your scan job log file to become very large and will increase the time required to perform an indexing run.
Model View The model view selection determines the data types and attributes that are available for indexing. The model view also determines the names that will be used for the data types and attributes when they are written to the Studio index. A default model view is provided with Scan for Studio. The default model view cannot be modified. However, the Model View Manager tool provided in the OpenSpirit Desktop can be used to create new custom model views if the default model view does not produce a Studio index format that meets your company's needs. See the Model View Manager Help guide for more information about creating and editing model views..
Data Sources Select the data sources and/or projects that you would like this scan job to index. Any required data source credentials or server activation settings should be entered for the selected data sources using the user setup wizard.
OpenSpirit Scan for Studio User's Guide

26 | OpenSpirit Data Source
The Scan Data Sources tab is similar to the Data Source Selection window that is displayed when opening the OpenSpirit Data Selector tool in the OpenSpirit Desktop.
The Data Sources section of the Data Source Properties window displays a list of all the OpenSpirit data sources that have been configured in your OpenSpirit installation. Data sources that partition data by project can be expanded to display their available projects by clicking on the right facing arrow that is located to the left of each data source containing projects.
Click on the check box next to the OpenSpirit data sources and/or projects you wish to include in the Studio data source. Selected OpenSpirit data sources and projects will be scanned during the Studio indexing run.
Some data sources (e.g. OpenWorks and GeoFrame) will only show projects that the user has permission to access. Access will depend on the account chosen in the OpenSpirit user setup wizard settings to use for running data connector processes. Also, the user account configured to run the Studio indexing service must also have permission to access the selected data sources and projects for the indexing to succeed.
Data Types The Data Types section of the Data Source Properties window is used to select the data types to be included in the Studio index.
OpenSpirit Scan for Studio User's Guide

OpenSpirit Data Source | 27
The data types are organized into expandable groupings based on the data type groups defined in the scan model view. The most commonly scanned data types are selected by default. Clicking on a group will expand it to reveal the individual data types within the group and thus allowing individual data types to be selected or deselected. Expanding the groups also provides access to behavior options for some data types, such as line thinning parameters.
Each data type group contains a tri-state check box to the left of the group name. The check box will appear as a solid square if some, but not all, of the data types within the group are selected. The check box will contain a check mark if all of the data types within the group are selected. The check box will appear empty if none of the data types in the
group are selected. Clicking on the expand button next to a group name will show all of
the data types in the group. Clicking again on the collapse button will close the data type group.
Data Types and Options The following tables describe the data types that can be scanned along with any scan options when using the default Studio scan model view.
OpenSpirit Scan for Studio User's Guide
28 | OpenSpirit Data Source
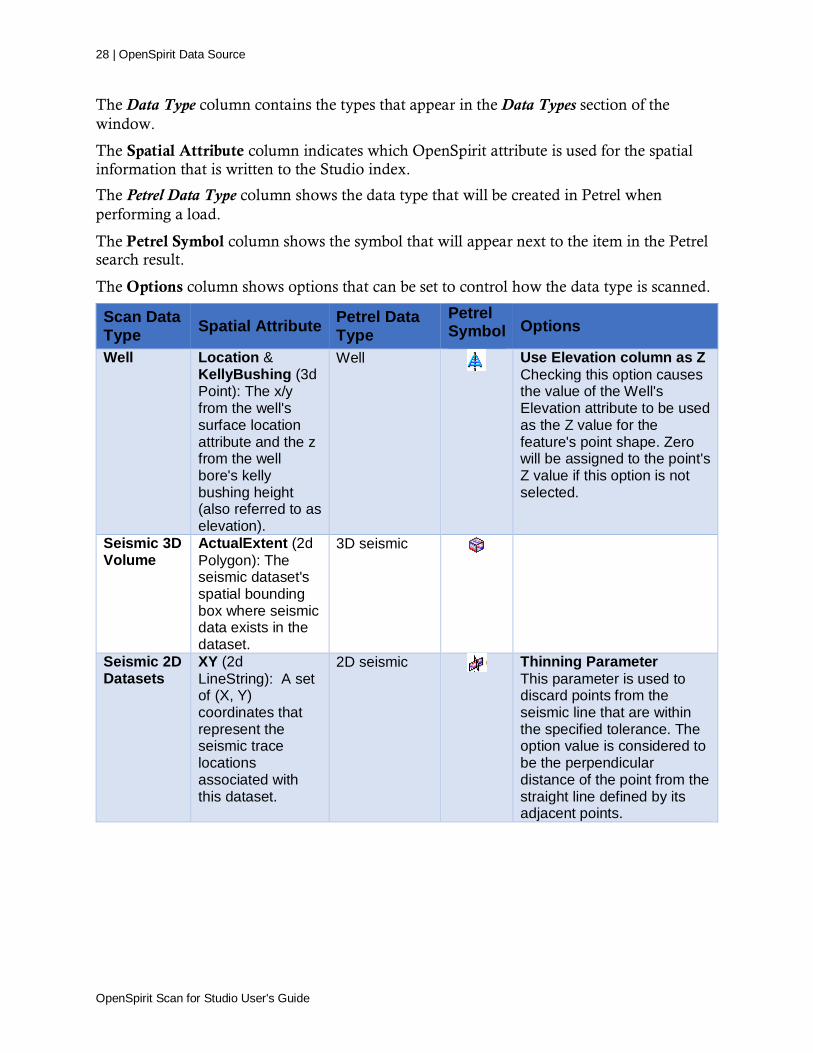
The Data Type column contains the types that appear in the Data Types section of the window.
The Spatial Attribute column indicates which OpenSpirit attribute is used for the spatial information that is written to the Studio index.
The Petrel Data Type column shows the data type that will be created in Petrel when performing a load.
The Petrel Symbol column shows the symbol that will appear next to the item in the Petrel search result.
The Options column shows options that can be set to control how the data type is scanned.
Scan Data Type Spatial Attribute Petrel Data
Type Petrel Symbol Options
Well Location & KellyBushing (3d Point): The x/y from the well's surface location attribute and the z from the well bore's kelly bushing height (also referred to as elevation).
Well
Use Elevation column as Z Checking this option causes the value of the Well's Elevation attribute to be used as the Z value for the feature's point shape. Zero will be assigned to the point's Z value if this option is not selected.
Seismic 3D Volume
ActualExtent (2d Polygon): The seismic dataset's spatial bounding box where seismic data exists in the dataset.
3D seismic
Seismic 2D Datasets
XY (2d LineString): A set of (X, Y) coordinates that represent the seismic trace locations associated with this dataset.
2D seismic
Thinning Parameter This parameter is used to discard points from the seismic line that are within the specified tolerance. The option value is considered to be the perpendicular distance of the point from the straight line defined by its adjacent points.
OpenSpirit Scan for Studio User's Guide
OpenSpirit Data Source | 29
Scan Data Type Spatial Attribute Petrel Data
Type Petrel Symbol Options
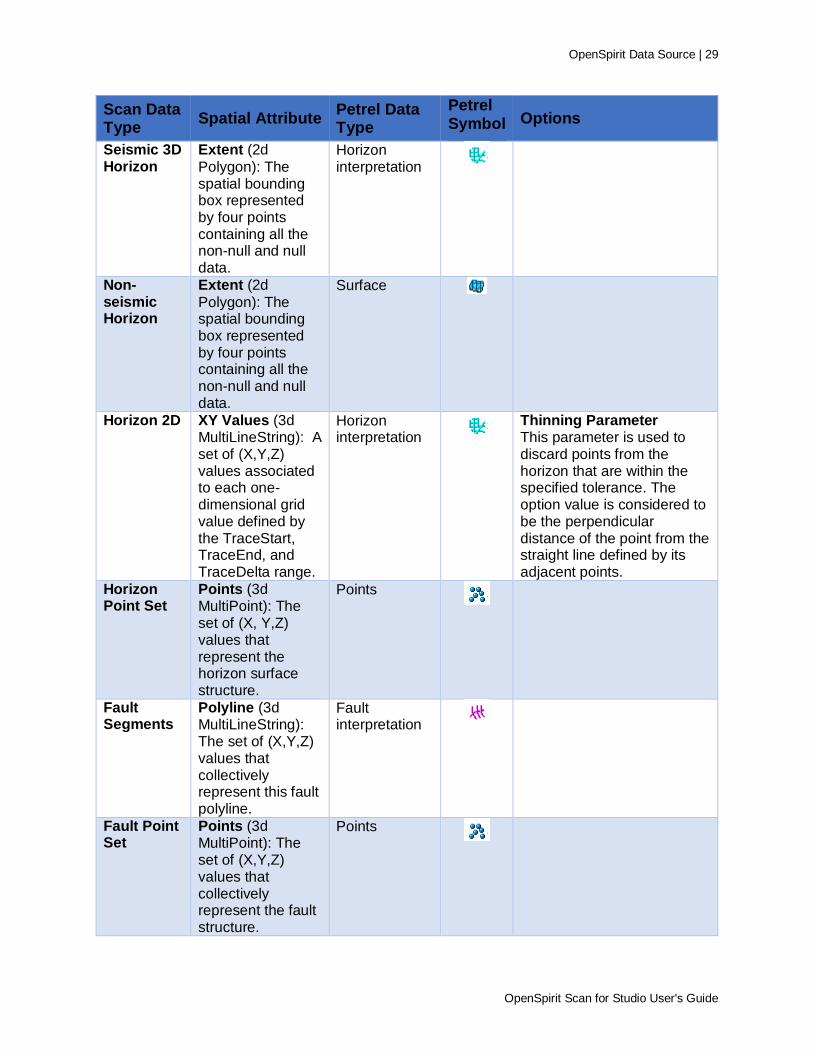
Seismic 3D Horizon
Extent (2d Polygon): The spatial bounding box represented by four points containing all the non-null and null data.
Horizon interpretation
Non-seismic Horizon
Extent (2d Polygon): The spatial bounding box represented by four points containing all the non-null and null data.
Surface
Horizon 2D XY Values (3d MultiLineString): A set of (X,Y,Z) values associated to each one-dimensional grid value defined by the TraceStart, TraceEnd, and TraceDelta range.
Horizon interpretation
Thinning Parameter This parameter is used to discard points from the horizon that are within the specified tolerance. The option value is considered to be the perpendicular distance of the point from the straight line defined by its adjacent points.
Horizon Point Set
Points (3d MultiPoint): The set of (X, Y,Z) values that represent the horizon surface structure.
Points
Fault Segments
Polyline (3d MultiLineString): The set of (X,Y,Z) values that collectively represent this fault polyline.
Fault interpretation
Fault Point Set
Points (3d MultiPoint): The set of (X,Y,Z) values that collectively represent the fault structure.
Points
OpenSpirit Scan for Studio User's Guide

30 | OpenSpirit Data Source
Scan Data Type Spatial Attribute Petrel Data
Type Petrel Symbol Options
Horizon Fault Boundaries
Points (3d MultiLineString): The set of ordered (X,Y,Z) points that, when connected, form the horizon/fault boundary (fault polygon).
Lines/polygons
Content Filter You can optionally create and select a Content filter to exclude data types and attributes from being written to the index. The filter is applied as data is being written to the index. Filters do not control the data that is read from the data sources being scanned.
Data types must be selected in the Data_Types list as well as in the content filter for the data type to be scanned and written to the index.
It is more efficient to exclude a data type by not selecting it in the Data_Types list than by excluding it with a content filter. Excluding data types using the Data_Types list avoids the overhead of reading the data type.
See the Index Content filter section of the Studio Manager Help Center for more information about creating and using content filters.
Assigned Index Use the index selection list found in the Assigned index section of the data source creation window to select the index to use for the data source.
OpenSpirit Scan for Studio User's Guide

OpenSpirit Data Source | 31
New indexes can be created using the Indexes Studio Manager app or by clicking on the create button to the right of the index selection list. Clicking on the create button adds an Index name and Index path entry field to the Assigned index section. Enter the name you would like to give the new index and the folder path that the index will be stored in.
Enter the index name and folder path, then press the green check button to create the index. The new index will appear in the index selection list.
Schedule Indexing runs are scheduled using the Schedule section of the add data source window. Select the Schedule indexing option to enable the scheduling entry fields. The First run entry section determines the date and time of the initial run. The Run every section determines the time interval between subsequent runs.
OpenSpirit uses the term run scan job to refer to the act of scanning data sources and writing information to the index. Studio uses the term run indexing to refer to the same thing.
OpenSpirit Scan for Studio User's Guide

32 | OpenSpirit Data Source
Deselect the Schedule indexing option if you do not want the indexing to be performed on a regular interval. The Run indexing now icon in the Index Schedules app tool bar can be used to initiate an unscheduled indexing run.
The default value for the first run is the current date. Pressing the save button on the add data source window with the default indexing schedule settings will cause the indexing to begin immediately. The first run date and time must be set to values in the future or the schedule indexing option must be deselected to avoid an immediate indexing run.
OpenSpirit Scan for Studio User's Guide

Viewing Scan Job Run Output | 33
Viewing Scan Job Run Output Reports of a scan job run can be viewed from Studio Manager or using the OpenSpirit Desktop's Job Run History tool.
Viewing from Studio Manager Scan job run reports can be viewed from Studio Manager by clicking on the hyperlink in the Log column of the data source table in the Index Schedules window.
This will open a Log File window which shows information about the indexing run. Logs created by Scan for Studio indexing runs contain two hyperlinks which appear in blue underlined text. The first hyperlink is to a summary report of the scan job run. The second hyperlink is to a details report.
Clicking on a hyperlink opens the report in your web browser. The summary report shows the completion status of the scan job run including the number of each data type that was scanned.
OpenSpirit Scan for Studio User's Guide

34 | Viewing Scan Job Run Output
The details report shows detailed messages produced at each step of the scan job run.
Spatial data must be written to the Studio index using the WGS-84 coordinate reference system. Coordinate transform errors will appear in the detail report for data items having spatial information that could not converted to WGS-84. This can be caused by the source project coordinate system not having a transform to WGS-84 or it can be caused by a data item having a spatial location that falls outside the bounds of the transform to WGS-84. Following is an example of a transform error from a scan job detail report.
Viewing from Job Run History Scan for Studio scan job runs are displayed in the OpenSpirit Desktop's Job Run History tool. The Studio log file is only available for the most recent scan job run. The OpenSpirit Desktop's Job Run History tool can be used to view any scan job run that has not been explicitly deleted.
The Job Run History tool is opened by selecting the Tools > DataManager > Job Run History
menu item in the OpenSpirit Desktop, or by clicking on the Job Run History icon in the OpenSpirit Desktop's Data Manager tool bar. See the Job Run History section of the OpenSpirit Desktop help for information about using the Job Run History tool.
OpenSpirit Scan for Studio User's Guide

Managing OpenSpirit Data Sources | 35
Managing OpenSpirit Data Sources An indexing run of an OpenSpirit Studio data source will only scan items that have been created or modified since the most recent run of the scan job. This is done to improve performance of regularly scheduled indexing runs. Use the OpenSpirit Job Run History tool to delete all histories of a scan job in order to force the next indexing run to re-scan all the data rather than just scanning data created or modified since the last run.
Deleting an OpenSpirit Studio indexing data source will delete the associated scan job and all its run histories.
Changing your OpenSpirit Runtime to use a different OpenSpirit master installation will invalidate any OpenSpirit data sources created using a different master installation.
OpenSpirit Scan for Studio User's Guide

36 | Glossary
Glossary D
data environment: A collection of Studio data sources, Petrel reference projects, a Studio repository, and Petrel Studio indexes.
P Petrel Adapter: TIBCO OpenSpirit Adapter for Petrel
S Scan for Studio: TIBCO OpenSpirit Scan for Studio
Studio index: A file based catalog of data that can be searched using the Studio search feature in Petrel.
W WGS-84: World Geodetic System 1984
OpenSpirit Scan for Studio User's Guide