openshift container platform 3 - access.redhat.com · openshift container platform 3.9 ansible...
TRANSCRIPT
OpenShift Container Platform 3.9
Ansible Playbook Bundle Development Guide
Developing with Ansible Playbook Bundle (APB)
Last Updated: 2018-09-11


OpenShift Container Platform 3.9 Ansible Playbook Bundle DevelopmentGuide
Developing with Ansible Playbook Bundle (APB)
Legal Notice
Copyright © 2018 Red Hat, Inc.
The text of and illustrations in this document are licensed by Red Hat under a Creative CommonsAttribution–Share Alike 3.0 Unported license ("CC-BY-SA"). An explanation of CC-BY-SA isavailable athttp://creativecommons.org/licenses/by-sa/3.0/. In accordance with CC-BY-SA, if you distribute this document or an adaptation of it, you mustprovide the URL for the original version.
Red Hat, as the licensor of this document, waives the right to enforce, and agrees not to assert,Section 4d of CC-BY-SA to the fullest extent permitted by applicable law.
Red Hat, Red Hat Enterprise Linux, the Shadowman logo, JBoss, OpenShift, Fedora, the Infinitylogo, and RHCE are trademarks of Red Hat, Inc., registered in the United States and othercountries.
Linux ® is the registered trademark of Linus Torvalds in the United States and other countries.
Java ® is a registered trademark of Oracle and/or its affiliates.
XFS ® is a trademark of Silicon Graphics International Corp. or its subsidiaries in the United Statesand/or other countries.
MySQL ® is a registered trademark of MySQL AB in the United States, the European Union andother countries.
Node.js ® is an official trademark of Joyent. Red Hat Software Collections is not formally related toor endorsed by the official Joyent Node.js open source or commercial project.
The OpenStack ® Word Mark and OpenStack logo are either registered trademarks/service marksor trademarks/service marks of the OpenStack Foundation, in the United States and other countriesand are used with the OpenStack Foundation's permission. We are not affiliated with, endorsed orsponsored by the OpenStack Foundation, or the OpenStack community.
All other trademarks are the property of their respective owners.
Abstract
This guide outlines the design concepts and workflow of APB
. . . . . . . . . . . . . . . . . . . . . . . . . . . . . . . . . . . . . . . . . . . . . . . . . . . . . . . . . . . . . . . . . . . . . . . . . . . . . . . . . . . . . . . . . . . . . . . . . . . . . . . . . . . . . . . . . . . . . . . . . . . . . . . . . . . . . . . . . . . . . . . . . . . . . . . . . . . . . . . . . . . . . . . . . . . . . . . . . . . . . . . . . . . . . . . . . . . . . . . . . . . . . . . . . . . . . . . . . . . . . . . . . . . . . . . . . . . . . . . . . . . . . . . . . . . . . . . . . . . . . . . . . . . . . . . . . . . . . . . .
. . . . . . . . . . . . . . . . . . . . . . . . . . . . . . . . . . . . . . . . . . . . . . . . . . . . . . . . . . . . . . . . . . . . . . . . . . . . . . . . . . . . . . . . . . . . . . . . . . . . . . . . . . . . . . . . . . . . . . . . . . . . . . . . . . . . . . . . . . . . . . . . . . . . . . . . . . . . . . . . . . . . . . . . . . . . . . . . . . . . . . . . . . . . . . . . . . . . . . . . . . . . . . . . . . . . . . . . . . . . . . . . . . . . . . . . . . . . . . . . . . . . . . . . . . . . . . . . . . . . . . . . . . . . . . . . . . . . . . . .
Table of Contents
CHAPTER 1. INTRODUCTION1.1. ABOUT THIS GUIDE1.2. DESIGN OVERVIEW1.3. WORKFLOW
1.3.1. Preparation1.3.1.1. APB Initialization1.3.1.2. APB Spec File1.3.1.3. Actions
1.3.2. Build1.3.3. Deploy
CHAPTER 2. CLI TOOLING2.1. OVERVIEW2.2. INSTALLING THE TOOL
2.2.1. Prerequisites2.2.1.1. Docker Daemon2.2.1.2. Access Permissions
2.2.2. Installing via RPM2.2.3. Verifying the Installation
2.3. TYPICAL WORKFLOWS2.3.1. Local Registry2.3.2. Remote Registry
2.4. APB CREATION COMMANDS2.4.1. init
DescriptionUsageArgumentsOptionsExamples
2.4.2. prepareDescriptionUsageOptionsExamples
2.4.3. buildDescriptionUsageOptionsExamples
2.4.4. pushDescriptionUsageOptionsExamples
2.4.5. testDescriptionUsageOptionsExamples
2.5. BROKER UTILITY COMMANDS2.5.1. list
5555556677
11111111111112121212131313131313131415151515151616161616161617171718181818181818
Table of Contents
1
. . . . . . . . . . . . . . . . . . . . . . . . . . . . . . . . . . . . . . . . . . . . . . . . . . . . . . . . . . . . . . . . . . . . . . . . . . . . . . . . . . . . . . . . . . . . . . . . . . . . . . . . . . . . . . . . . . . . . . . . . . . . . . . . . . . . . . . . . . . . . . . . . . . . . . . . . . . . . . . . . . . . . . . . . . . . . . . . . . . . . . . . . . . . . . . . . . . . . . . . . . . . . . . . . . . . . . . . . . . . . . . . . . . . . . . . . . . . . . . . . . . . . . . . . . . . . . . . . . . . . . . . . . . . . . . . . . . . . . . .
DescriptionUsageOptionsExamples
2.5.2. bootstrapDescriptionUsageOptionsExamples
2.5.3. removeDescriptionUsageOptionsExamples
2.5.4. relistDescriptionUsageOptionsExamples
2.6. OTHER COMMANDS2.6.1. help
DescriptionUsageExamples
CHAPTER 3. WRITING APBS3.1. WRITING APBS: GETTING STARTED
3.1.1. Overview3.1.2. Before You Begin3.1.3. Creating Your First APB3.1.4. Adding Actions
3.1.4.1. Provision3.1.4.1.1. Creating a Deploying Configuration3.1.4.1.2. Creating a Service3.1.4.1.3. Creating a Route
3.1.4.2. Deprovision3.1.4.2.1. Bind
3.1.4.2.1.1. Preparation3.1.4.2.1.2. Executing From the UI
3.1.4.2.2. Test3.1.4.2.2.1. Writing a Test Action3.1.4.2.2.2. Writing a Verify Role3.1.4.2.2.3. Saving Test Results3.1.4.2.2.4. Running a Test Action
3.2. WRITING APBS: REFERENCE3.2.1. Overview3.2.2. Directory Structure3.2.3. APB Spec File
3.2.3.1. Top-level Structure3.2.3.2. Metadata3.2.3.3. Plans3.2.3.4. Plan Metadata3.2.3.5. Parameters
181818191919191920202020202021212121212121222222
23232323232526283031323333374242434444454545454647474748
OpenShift Container Platform 3.9 Ansible Playbook Bundle Development Guide
2

3.2.3.6. APB Spec Versioning3.2.3.6.1. Major Version3.2.3.6.2. Minor Version
3.2.4. Dockerfile3.2.5. APB Actions (Playbooks)3.2.6. Working With Common Resources
3.2.6.1. Service3.2.6.2. Deployment Configuration3.2.6.3. Route3.2.6.4. Persistent Volume
3.2.7. Optional Variables3.2.8. Working With the Restricted SCC3.2.9. Using a ConfigMap Within an APB
49494949505051515252535454
Table of Contents
3

OpenShift Container Platform 3.9 Ansible Playbook Bundle Development Guide
4
CHAPTER 1. INTRODUCTION
1.1. ABOUT THIS GUIDE
This guide outlines the design concepts and workflow of Ansible Playbook Bundles (APBs), shows howto install and use the apb CLI tooling, and provides a tutorial and reference material on writing your ownAPBs.
1.2. DESIGN OVERVIEW
An APB is a lightweight application definition that borrows several concepts from the Nulecule andAtomicapp projects, namely the concept of a short-lived container with the sole purpose of orchestratingthe deployment of the intended application. For the case of APBs, this short-lived container is the APBitself: a container with an Ansible runtime environment plus any files required to assist in orchestration,such as playbooks, roles, and extra dependencies.
The OpenShift Ansible broker (OAB) is an implementation of the Open Service Broker (OSB) API thatmanages applications defined by APBs. The OAB is supported and deployed by default starting inOpenShift Container Platform 3.7.
Specification of an APB is intended to be lightweight, consisting of several named playbooks and ametadata file to capture information such as parameters to pass into the application.
1.3. WORKFLOW
The APB workflow is broken up into the following steps:
1. Preparation
a. APB initialization
b. APB spec file
c. Actions (provision, deprovision, bind, unbind)
2. Build
3. Deploy
1.3.1. Preparation
You must prepare your APB’s directory structure and spec file before you can build and deploy it. TheGetting Started topic provides a step by step tutorial on creating your first APB, while the followingsections briefly cover this workflow.
1.3.1.1. APB Initialization
The apb init command creates the required skeleton directory structure and a few required files (forexample, the apb.yml spec file) for the APB.
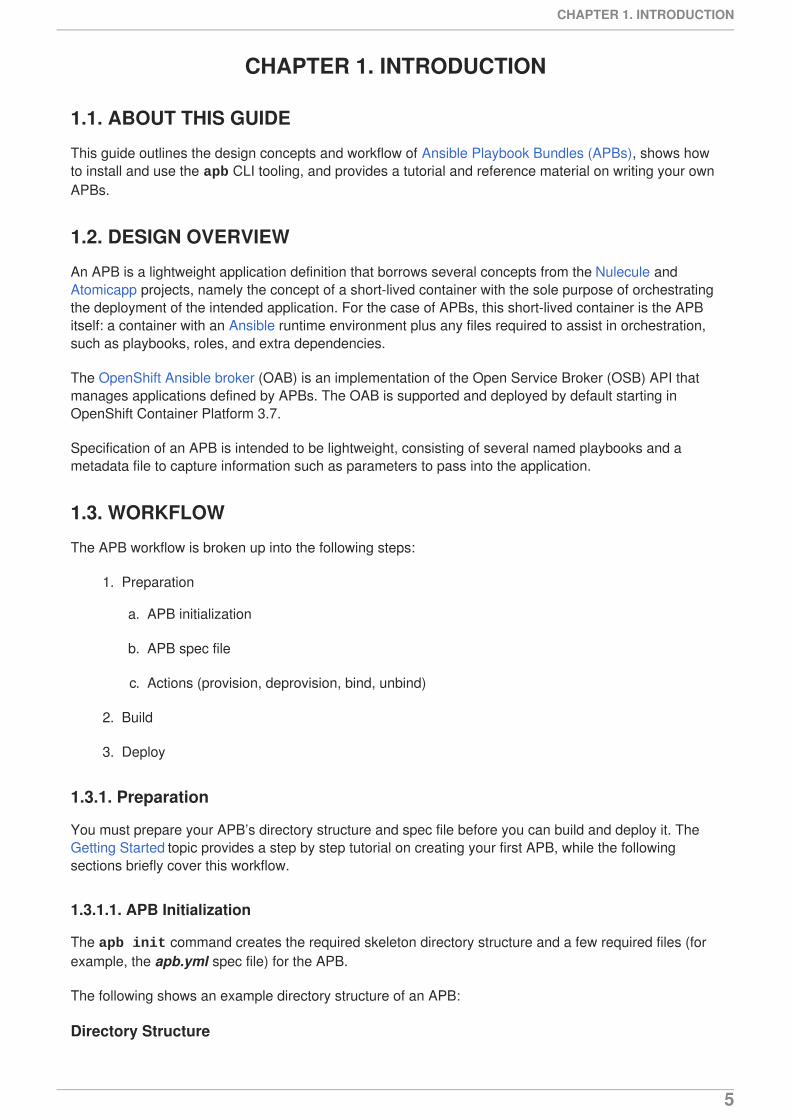
The following shows an example directory structure of an APB:
Directory Structure
CHAPTER 1. INTRODUCTION
5
1
2
example-apb/├── Dockerfile├── apb.yml└── roles/│ └── example-apb-openshift│ ├── defaults│ │ └── main.yml│ └── tasks│ └── main.yml└── playbooks/ └── provision.yml └── deprovision.yml └── bind.yml └── unbind.yml
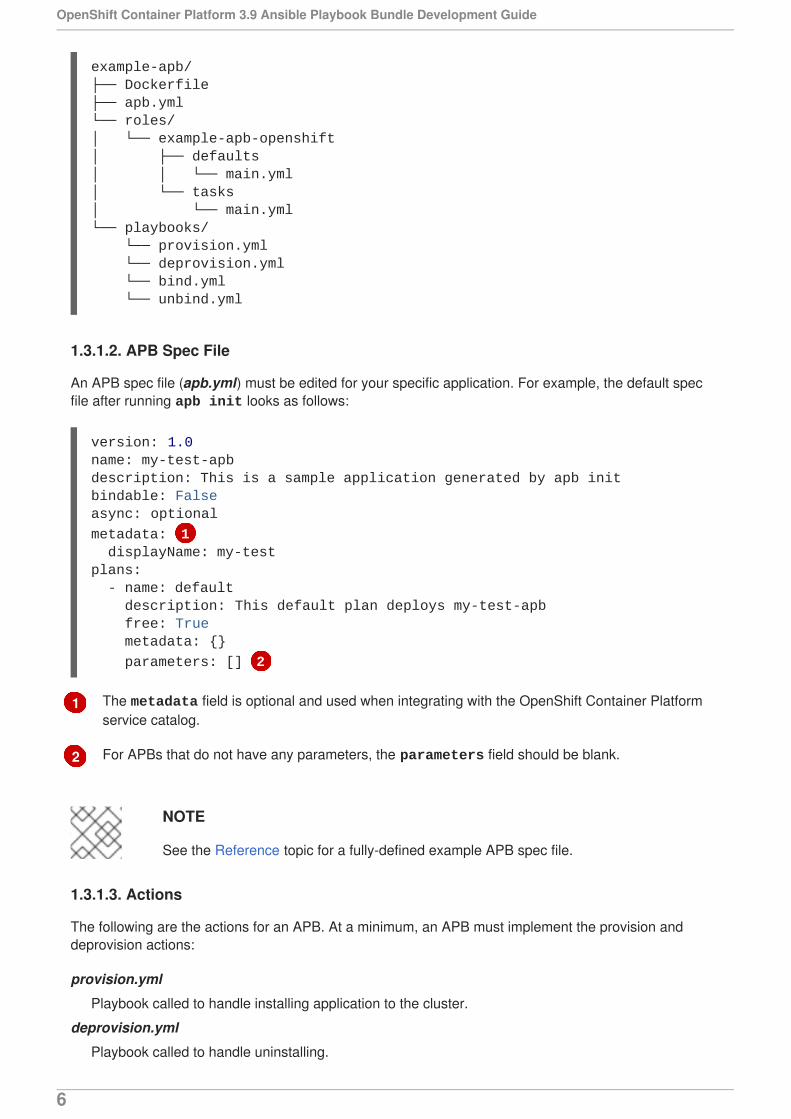
1.3.1.2. APB Spec File
An APB spec file (apb.yml) must be edited for your specific application. For example, the default specfile after running apb init looks as follows:
The metadata field is optional and used when integrating with the OpenShift Container Platformservice catalog.
For APBs that do not have any parameters, the parameters field should be blank.
NOTE
See the Reference topic for a fully-defined example APB spec file.
1.3.1.3. Actions
The following are the actions for an APB. At a minimum, an APB must implement the provision anddeprovision actions:
provision.yml
Playbook called to handle installing application to the cluster.
deprovision.yml
Playbook called to handle uninstalling.
version: 1.0name: my-test-apbdescription: This is a sample application generated by apb initbindable: Falseasync: optional
metadata: 1 displayName: my-testplans: - name: default description: This default plan deploys my-test-apb free: True metadata: {}
parameters: [] 2
OpenShift Container Platform 3.9 Ansible Playbook Bundle Development Guide
6

bind.yml
Playbook to grant access to another service to use this service, such as generating credentials.
unbind.yml
Playbook to revoke access to this service.
test.yml
(Optional) Playbook to test that the APB is vaild.
The required named playbooks correspond to methods defined by the OSB API. For example, when theOAB needs to provision an APB it will execute provision.yml.
After the required named playbooks have been generated, the files can be used directly to testmanagement of the application. A developer may want to work with this directory of files, make tweaks,run, repeat until they are happy with the behavior. They can test the playbooks by invoking Ansibledirectly with the playbook and any required variables.
1.3.2. Build
The build step is responsible for building a container image from the named playbooks for distribution.Packaging combines a base image containing an Ansible runtime with Ansible artifacts and anydependencies required to run the playbooks.
The result is a container image with an ENTRYPOINT set to take in several arguments, one of which isthe method to execute, such as provision and deprovision.
Figure 1.1. APB Build
1.3.3. Deploy
Deploying an APB means invoking the container and passing in the name of the playbook to executealong with any required variables. It is possible to invoke the APB directly without going through theOAB. Each APB is packaged so its ENTRYPOINT will invoke Ansible when run. The container is intendedto be short-lived, coming up to execute the Ansible playbook for managing the application then exiting.
In a typical APB deploy, the APB container will provision an application by running the provision.ymlplaybook, which executes an Ansible role. The role is responsible for creating the OpenShift ContainerPlatform resources, perhaps through calling oc create commands or leveraging Ansible modules. Theend result is that the APB runs Ansible to talk to OpenShift Container Platform to orchestrate theprovisioning of the intended application.
The following diagrams illustrate this deployment flow in two phases: a user discovering a list of availableAPBs and then requesting their chosen APB be provisioned to their project:
CHAPTER 1. INTRODUCTION
7

Figure 1.2. Listing Available APBs
An OpenShift Container Platform user is interested in provisioning a service into their project, sothey interact with the service catalog by accessing the OpenShift Container Platform UI (web console orCLI) to discover any APBs that are already available.
The service catalog requests a list of APBs from the OAB to show the user.
The OAB searches all configured container registries (the cluster’s OpenShift Container Registry orany other remote registry) for any APBs (images with a specific label, for example LABEL=apb-1.0).
The OAB returns the discovered list to the service catalog, to be viewed by the user in theOpenShift Container Platform UI.
OpenShift Container Platform 3.9 Ansible Playbook Bundle Development Guide
8
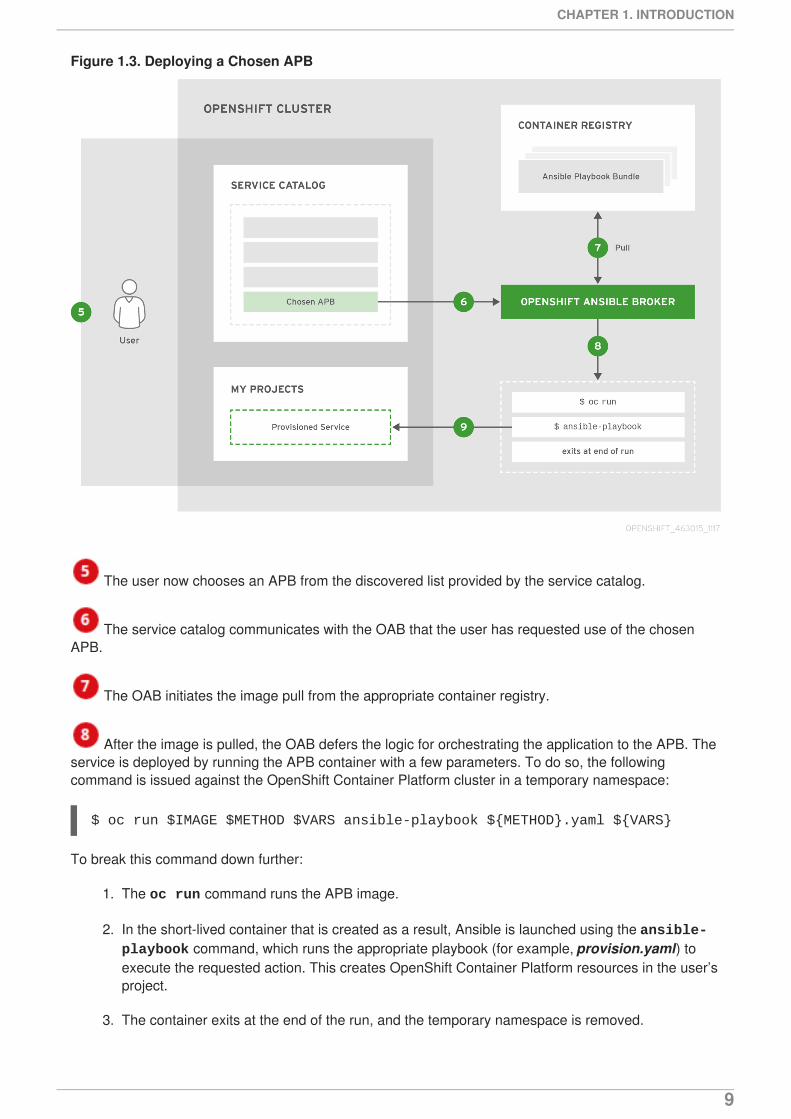
Figure 1.3. Deploying a Chosen APB
The user now chooses an APB from the discovered list provided by the service catalog.
The service catalog communicates with the OAB that the user has requested use of the chosenAPB.
The OAB initiates the image pull from the appropriate container registry.
After the image is pulled, the OAB defers the logic for orchestrating the application to the APB. Theservice is deployed by running the APB container with a few parameters. To do so, the followingcommand is issued against the OpenShift Container Platform cluster in a temporary namespace:
$ oc run $IMAGE $METHOD $VARS ansible-playbook ${METHOD}.yaml ${VARS}
To break this command down further:
1. The oc run command runs the APB image.
2. In the short-lived container that is created as a result, Ansible is launched using the ansible-playbook command, which runs the appropriate playbook (for example, provision.yaml) toexecute the requested action. This creates OpenShift Container Platform resources in the user’sproject.
3. The container exits at the end of the run, and the temporary namespace is removed.
CHAPTER 1. INTRODUCTION
9

As a result, the user views via the OpenShift Container Platform UI that their requested service hasbeen successfully provisioned in their project.
OpenShift Container Platform 3.9 Ansible Playbook Bundle Development Guide
10
CHAPTER 2. CLI TOOLING
2.1. OVERVIEW
The apb CLI tool helps Ansible Playbook Bundle (APB) authors create, build, and publish their APBs tocontainer registries. It enforces best practices and takes care of the details so they should be easy todeploy.
2.2. INSTALLING THE TOOL
2.2.1. Prerequisites
2.2.1.1. Docker Daemon
The docker daemon must be correctly installed and running on the system.
2.2.1.2. Access Permissions
The apb tool requires you to be logged in as a tokened cluster user; the default system:admin systemuser is not sufficient because it does not have a token that can be used for the tool’s authentication. Inaddition, there are a number of local roles (project-scoped) and cluster roles (cluster-wide) that mustexist to permit the full breadth of the apb tool’s functions (see Cluster and Local RBAC).
The easiest option is to ensure the user has the cluster-admin cluster role. To add this role to anotheruser, you can run the following as a user that already has such permissions (for example, thesystem:admin default system user):
WARNING
This is effectively cluster root and should only be used in a development setting.
$ oc adm policy add-cluster-role-to-user cluster-admin <user>$ oc login -u <user> <openshift_server>
If you would like a more strictly permissioned environment, an OpenShift template is provided that bydefault will permission a user called developer. The template must be run by a user with sufficientpermissions to create the various roles. The developer user does not have such permissions, but thesystem:admin user is sufficient.
To run the template:
1. Download the openshift-permissions.template.yaml file locally.
2. Run the following command:
$ oc process -f openshift-permissions.template.yaml \ -p BROKER_NAMESPACE=openshift-ansible-service-broker \
CHAPTER 2. CLI TOOLING
11
1
-p GLOBAL_IMAGE_PROJECT=default \
[-p USER=<your_desired_user>] \ 1 | oc create -f -
By default, the template will permission the developer user. You can optionally use the -pflag to override this default value with your desired user.
2.2.2. Installing via RPM
The APB CLI tool is provided by the apb package, which is available from the rhel-7-server-ose-3.7-rpms channel:
$ sudo yum install apb
2.2.3. Verifying the Installation
Run apb help to make sure the tool is installed correctly:
$ apb helpusage: apb [-h] [--debug] [--project BASE_PATH] {init,help,prepare,push,bootstrap,list,remove,build} ...
APB tooling for assisting in building and packaging APBs.
optional arguments: -h, --help show this help message and exit --debug Enable debug output --project BASE_PATH, -p BASE_PATH Specify a path to your project. Defaults to CWD.
subcommand: {init,help,prepare,push,bootstrap,list,remove,build} init Initialize the directory for APB development help Display this help message prepare Prepare an ansible-container project for APB packaging push Push local APB spec to an OAB bootstrap Tell OAB to reload APBs from the container repository list List APBs from the target OAB remove Remove APBs from the target OAB build Build and package APB container
2.3. TYPICAL WORKFLOWS
2.3.1. Local Registry
In order to use the OpenShift Container Registry to source APBs, you must have configured theOpenShift Ansible broker to use the local_openshift type registry adapter. See the config section formore information.
OpenShift Container Platform 3.9 Ansible Playbook Bundle Development Guide
12

$ apb init my-new-apb$ cd my-new-apb$ apb build$ apb push$ apb list
If you are using a namespace other than the default openshift namespace to host your APBs, thenyou can use the following command:
$ apb push --namespace <namespace>
2.3.2. Remote Registry
OAB can also be configured to use a remote registry and organization such asdocker.io/ansibleplaybookbundle or your own personal account. In order to use this for developingAPBs, you can build and push to your remote registry and then bootstrap to reload your APBs:
$ apb init my-new-apb$ cd my-new-apb$ apb build --tag docker.io/my-org/my-new-apb$ docker push docker.io/my-org/my-new-apb$ apb bootstrap$ apb list
2.4. APB CREATION COMMANDS
2.4.1. init
DescriptionInitializes a directory structure for a new APB. Also creates example files for the new APB with sensibledefaults.
Usage
$ apb init [OPTIONS] NAME
ArgumentsNAME: Name of the APB and directory to be created.
Options
Option, Shorthand Description
--help, -h Show help message
--force Force re-init and overwrite the directory
--async {required,optional,unsupported}
Specify asynchronous operation on application.Usually defaulted to optional.
--bindable Generate an application with bindable settings
CHAPTER 2. CLI TOOLING
13
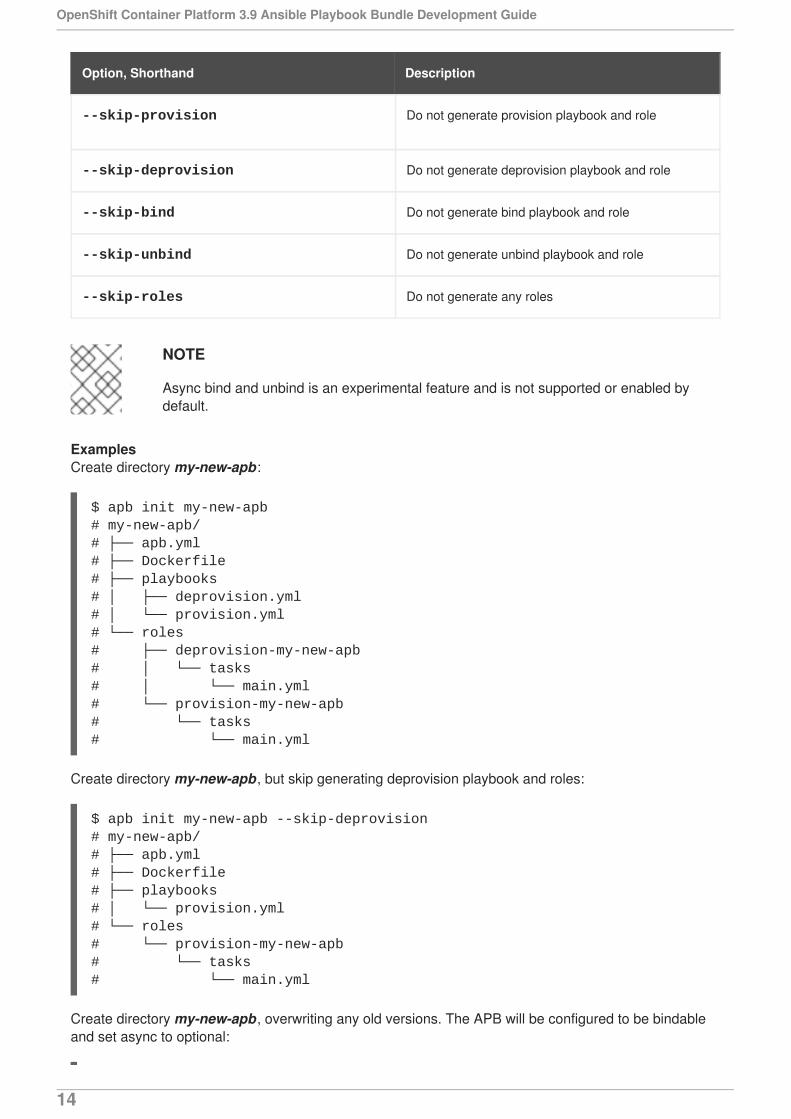
--skip-provision Do not generate provision playbook and role
--skip-deprovision Do not generate deprovision playbook and role
--skip-bind Do not generate bind playbook and role
--skip-unbind Do not generate unbind playbook and role
--skip-roles Do not generate any roles
Option, Shorthand Description
NOTE
Async bind and unbind is an experimental feature and is not supported or enabled bydefault.
ExamplesCreate directory my-new-apb :
$ apb init my-new-apb# my-new-apb/# ├── apb.yml# ├── Dockerfile# ├── playbooks# │ ├── deprovision.yml# │ └── provision.yml# └── roles# ├── deprovision-my-new-apb# │ └── tasks# │ └── main.yml# └── provision-my-new-apb# └── tasks# └── main.yml
Create directory my-new-apb , but skip generating deprovision playbook and roles:
$ apb init my-new-apb --skip-deprovision# my-new-apb/# ├── apb.yml# ├── Dockerfile# ├── playbooks# │ └── provision.yml# └── roles# └── provision-my-new-apb# └── tasks# └── main.yml
Create directory my-new-apb , overwriting any old versions. The APB will be configured to be bindableand set async to optional:
OpenShift Container Platform 3.9 Ansible Playbook Bundle Development Guide
14
$ apb init my-new-apb --force --bindable --async optional# my-new-apb/# ├── apb.yml# ├── Dockerfile# ├── playbooks# │ ├── bind.yml# │ ├── deprovision.yml# │ ├── provision.yml# │ └── unbind.yml# └── roles# ├── bind-my-new-apb# │ └── tasks# │ └── main.yml# ├── deprovision-my-new-apb# │ └── tasks# │ └── main.yml# ├── provision-my-new-apb# │ └── tasks# │ └── main.yml# └── unbind-my-new-apb# └── tasks# └── main.yml
2.4.2. prepare
DescriptionCompiles the APB into base64 encoding and writes it as a label to the Dockerfile.
This will allow the OAB to read the APB metadata from the registry without downloading the images. Thiscommand must be run from inside the APB directory. Running the build command will automaticallyrun prepare as well, meaning you generally do not need to run prepare by itself.
Usage
$ apb prepare [OPTIONS]
Options
Option, Shorthand Description
--help, -h Show help message
--dockerfile DOCKERFILE, -f DOCKERFILE
Writes the APB spec to the target file name insteadof a file named Dockerfile
ExamplesWrites the label for the spec field in the Dockerfile:
$ apb prepare
Writes the label for the spec field in Dockerfile-custom:
$ apb prepare --dockerfile Dockerfile-custom
CHAPTER 2. CLI TOOLING
15
2.4.3. build
DescriptionBuilds the image for the APB.
Similar to running apb prepare and docker build with a tag.
Usage
$ apb build [OPTIONS]
Options
Option, Shorthand Description
--help, -h Show help message
--tag TAG Sets the tag of the built image to a string in theformat <registry>/<org>/<name>
--registry Registry portion of the tag of the image (e.g., docker.io)
--org, -o User or organization portion of the tag of the image
ExamplesBuild the image and use the name field from apb.yml as the tag:
$ apb build
Build the image and use the tag docker.io/my-org/my-new-apb:
$ apb build --tag docker.io/my-org/my-new-apb
Build the image and use the tag docker.io/my-org/<my-apb-name>:
$ apb build --registry docker.io --org my-org
Build the image using the file Dockerfile-custom as the Dockerfile definition:
$ apb build --dockerfile Dockerfile-custom
2.4.4. push
DescriptionUploads the APB to an OpenShift Container Registry or a broker mock registry where it will be read bythe OAB.
When using the broker’s mock registry, the spec is uploaded and will be displayed in OpenShiftContainer Platform, but OpenShift Container Platform will pull the image from the registry normally.Usually that means the registry where oc cluster up was performed.
OpenShift Container Platform 3.9 Ansible Playbook Bundle Development Guide
16
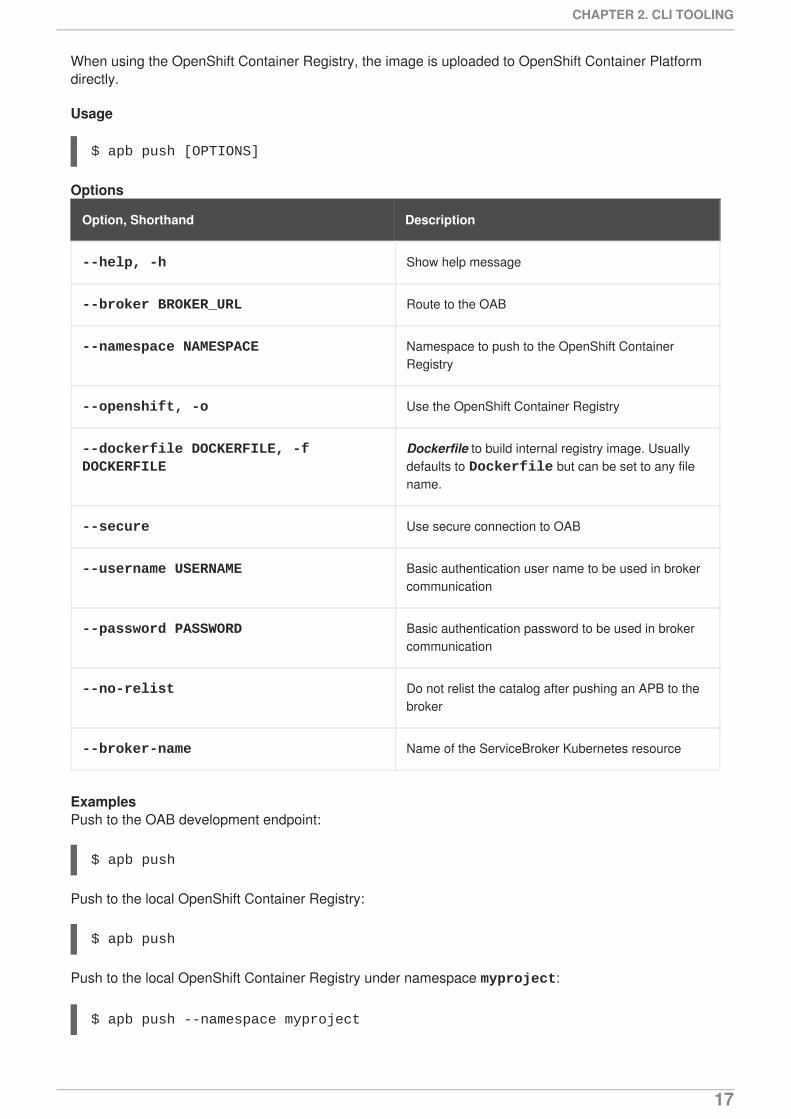
When using the OpenShift Container Registry, the image is uploaded to OpenShift Container Platformdirectly.
Usage
$ apb push [OPTIONS]
Options
Option, Shorthand Description
--help, -h Show help message
--broker BROKER_URL Route to the OAB
--namespace NAMESPACE Namespace to push to the OpenShift ContainerRegistry
--openshift, -o Use the OpenShift Container Registry
--dockerfile DOCKERFILE, -f DOCKERFILE
Dockerfile to build internal registry image. Usuallydefaults to Dockerfile but can be set to any filename.
--secure Use secure connection to OAB
--username USERNAME Basic authentication user name to be used in brokercommunication
--password PASSWORD Basic authentication password to be used in brokercommunication
--no-relist Do not relist the catalog after pushing an APB to thebroker
--broker-name Name of the ServiceBroker Kubernetes resource
ExamplesPush to the OAB development endpoint:
$ apb push
Push to the local OpenShift Container Registry:
$ apb push
Push to the local OpenShift Container Registry under namespace myproject:
$ apb push --namespace myproject
CHAPTER 2. CLI TOOLING
17
2.4.5. test
DescriptionRuns the APB unit tests.
Usage
$ apb test [OPTIONS]
Options
Option, Shorthand Description
--help, -h Show help message
--tag TAG Sets the tag of the built image to a string in theformat <registry>/<org>/<name>
ExamplesRun the tests:
$ apb test
Run the tests but use a specific tag on the built image:
$ apb test --tag docker.io/my-org/my-new-apb
2.5. BROKER UTILITY COMMANDS
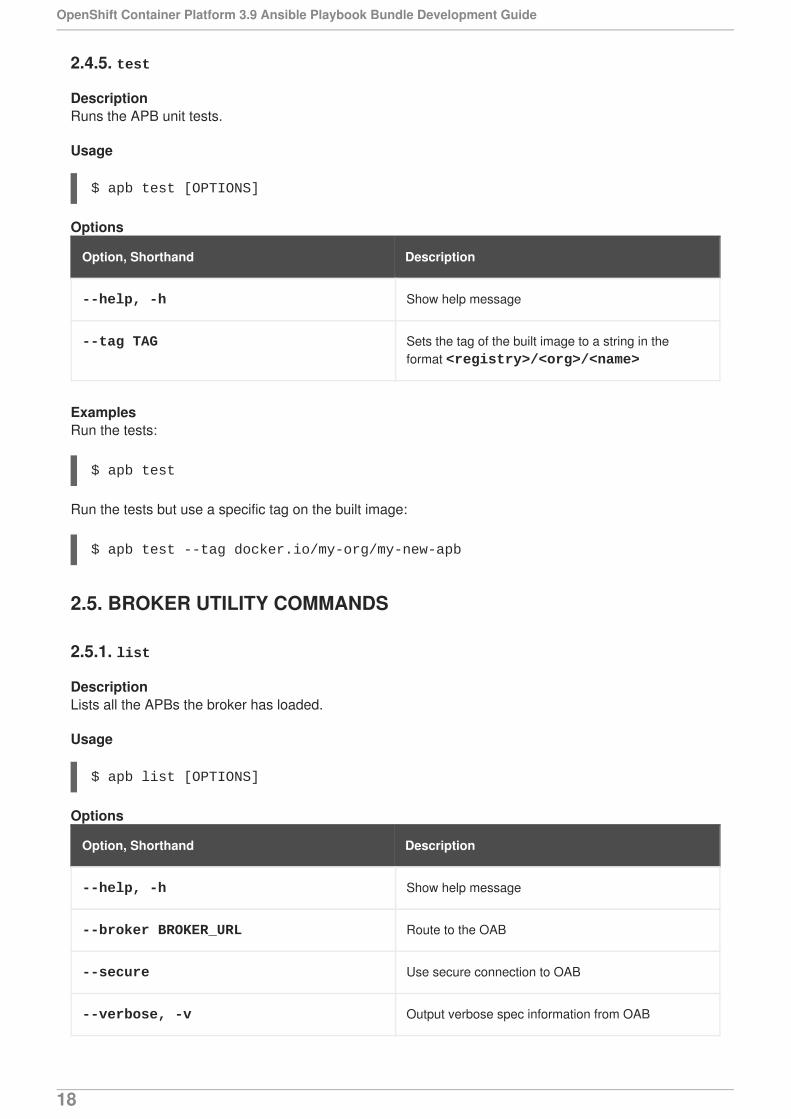
2.5.1. list
DescriptionLists all the APBs the broker has loaded.
Usage
$ apb list [OPTIONS]
Options
Option, Shorthand Description
--help, -h Show help message
--broker BROKER_URL Route to the OAB
--secure Use secure connection to OAB
--verbose, -v Output verbose spec information from OAB
OpenShift Container Platform 3.9 Ansible Playbook Bundle Development Guide
18

--output {yaml,json}, -o {yaml,json}
Specify verbose output format in yaml (default) orjson
--username BASIC_AUTH_USERNAME, -u BASIC_AUTH_USERNAME
Specify the basic authentication user name to beused
--password BASIC_AUTH_PASSWORD, -p BASIC_AUTH_PASSWORD
Specify the basic authentication password to be used
Option, Shorthand Description
ExamplesBasic list of APBs including name, ID, and description:
$ apb list
List verbose, easily readable specs:
$ apb list -v
List all the JSON output:
$ apb list -v -o json
2.5.2. bootstrap
DescriptionRequests the OAB to reload all APBs from the registries.
Usage
$ apb bootstrap [OPTIONS]
Options
Option, Shorthand Description
--help, -h Show help message
--broker BROKER_URL Route to the OAB
--secure Use secure connection to OAB
--no-relist Do not relist the catalog after bootstrapping thebroker
--username BASIC_AUTH_USERNAME, -u BASIC_AUTH_USERNAME
Specify the basic authentication user name to beused
CHAPTER 2. CLI TOOLING
19

--password BASIC_AUTH_PASSWORD, -p BASIC_AUTH_PASSWORD
Specify the basic authentication password to be used
--broker-name BROKER_NAME Name of the ServiceBroker Kubernetes resource
Option, Shorthand Description
ExamplesBasic reload of APBs:
$ apb bootstrap
2.5.3. remove
DescriptionRemoves one (or all) APBs from the OAB.
Usage
$ apb remove [OPTIONS]
Options
Option, Shorthand Description
--help, -h Show help message
--broker BROKER_URL Route to the OAB
--secure Use secure connection to OAB
--all Remove all stored APBs
--id ID ID of APB to remove
--secure Use secure connection to OAB
--username BASIC_AUTH_USERNAME, -u BASIC_AUTH_USERNAME
Specify the basic authentication user name to beused
--password BASIC_AUTH_PASSWORD, -p BASIC_AUTH_PASSWORD
Specify the basic authentication password to be used
--no-relist Do not relist the catalog after deletion
ExamplesRemove an APB using an ID:
OpenShift Container Platform 3.9 Ansible Playbook Bundle Development Guide
20

$ apb remove --id ca91b61da8476984f18fc13883ae2fdb
NOTE
If you need an ID of an APB, use:
$ apb listID NAME DESCRIPTIONca91b61da8476984f18fc13883ae2fdb dh-etherpad-apb Note taking web application
Remove all APBs:
$ apb remove --all
2.5.4. relist
DescriptionForces service catalog to relist the provided services to match the broker.
Usage
$ apb relist [OPTIONS]
Options
Option, Shorthand Description
--help, -h Show help message
--broker-name BROKER_NAME Name of the ServiceBroker Kubernetes resource
--secure Use secure connection to OAB
--username BASIC_AUTH_USERNAME, -u BASIC_AUTH_USERNAME
Specify the basic authentication user name to beused
--password BASIC_AUTH_PASSWORD, -p BASIC_AUTH_PASSWORD
Specify the basic authentication password to be used
Examples
$ apb relist
2.6. OTHER COMMANDS
2.6.1. help
CHAPTER 2. CLI TOOLING
21

DescriptionDisplays a help message.
Usage
$ apb help
Examples
$ apb help
$ apb -h
OpenShift Container Platform 3.9 Ansible Playbook Bundle Development Guide
22
CHAPTER 3. WRITING APBS
3.1. WRITING APBS: GETTING STARTED
3.1.1. Overview
In this tutorial, you will walk through the creation of some sample Ansible Playbook Bundles (APBs). Youwill create actions for them to allow provision, deprovision, bind, and unbind. You can find moreinformation about the design of APBs in the Design topic. More in-depth information about writing APBsis available in the Reference topic.
NOTE
For the remainder of this tutorial, substitute your own information for items marked inbrackets; for example, <host>:<port> might need to be replaced with 172.17.0.1.nip.io:8443.
3.1.2. Before You Begin
Before getting started creating your own APBs, you must set up your development environment:
1. Ensure you have access to an OpenShift Container Platform cluster. The cluster should berunning both the service catalog and the OpenShift Ansible broker (OAB), which is supportedstarting with OpenShift Container Platform 3.7.
2. Install the APB tools as documented in the CLI Tooling topic. To verify, you can run the apb help command and check for a valid response.
3.1.3. Creating Your First APB
In this tutorial, you will create an APB for a containerized hello world application. You will work through abasic APB that will mirror the APB hello-world-apb.
1. Your first task is to initialize the APB using the apb CLI tool. This creates the skeleton for yourAPB. The command for this is simple:
$ apb init my-test-apb
After initialization, you will see the following file structure:
my-test-apb/├── apb.yml├── Dockerfile├── playbooks│ ├── deprovision.yml│ └── provision.yml└── roles ├── deprovision-my-test-apb │ └── tasks │ └── main.yml └── provision-my-test-apb └── tasks └── main.yml
CHAPTER 3. WRITING APBS
23

Two files were created at the root directory: an apb.yml (the APB spec file) and a Dockerfile.These are the minimum files required for any APB. For more information about the APB specfile, see the Reference topic. There is also an explanation of what you can do in the Dockerfile.
apb.yml
Dockerfile
FROM ansibleplaybookbundle/apb-base
LABEL "com.redhat.apb.spec"=\
COPY playbooks /opt/apb/actionsCOPY roles /opt/ansible/rolesRUN chmod -R g=u /opt/{ansible,apb}USER apb
2. In the Dockerfile, there are two updates to make:
a. Change the FROM directive to use the image from the Red Hat Container Catalog. The firstline should now read:
FROM openshift3/apb-base
b. Update com.redhat.apb.spec in the LABEL instruction with a base64 encoded version ofapb.yml. To do this, run apb prepare:
$ cd my-test-apb$ apb prepare
This updates the Dockerfile as follows:
Dockerfile
FROM openshift3/apb-base
LABEL "com.redhat.apb.spec"=\"dmVyc2lvbjogMS4wCm5hbWU6IG15LXRlc3QtYXBiCmRlc2NyaXB0aW9uOiBUaGlzIGlzIGEgc2Ft\
version: 1.0name: my-test-apbdescription: This is a sample application generated by apb initbindable: Falseasync: optionalmetadata: displayName: my-testplans: - name: default description: This default plan deploys my-test-apb free: True metadata: {} parameters: []
OpenShift Container Platform 3.9 Ansible Playbook Bundle Development Guide
24

cGxlIGFwcGxpY2F0aW9uIGdlbmVyYXRlZCBieSBhcGIgaW5pdApiaW5kYWJsZTogRmFsc2UKYXN5\bmM6IG9wdGlvbmFsCm1ldGFkYXRhOgogIGRpc3BsYXlOYW1lOiBteS10ZXN0CnBsYW5zOgogIC0g\bmFtZTogZGVmYXVsdAogICAgZGVzY3JpcHRpb246IFRoaXMgZGVmYXVsdCBwbGFuIGRlcGxveXMg\bXktdGVzdC1hcGIKICAgIGZyZWU6IFRydWUKICAgIG1ldGFkYXRhOiB7fQogICAgcGFyYW1ldGVy\czogW10="
COPY playbooks /opt/apb/actionsCOPY roles /opt/ansible/rolesRUN chmod -R g=u /opt/{ansible,apb}USER apb
3. At this point, you have a fully formed APB that you can build. If you skipped using apb prepare, the apb build command will still prepare the APB before building the image:
$ apb build
4. You can now push the new APB image to the local OpenShift Container Registry:
$ apb push
5. Querying the OAB will now show your new APB listed:
$ apb listID NAME DESCRIPTION< ------------ ID -------------> dh-my-test-apb This is a sample application generated by apb init
Similarly, visiting the OpenShift Container Platform web console will now display the new APBnamed my-test-apb in the service catalog under the All and Other tabs.
3.1.4. Adding Actions
The brand new APB created in the last section does not do much in its current state. For that, you mustadd some actions. The actions supported are:
provision
deprovision
bind
unbind
test
You will add each of these actions in the following sections. But before beginning:
1. Ensure that you are logged in to your OpenShift Container Platform cluster via the oc CLI. Thiswill ensure the apb tool can interact with OpenShift Container Platform and the OAB:
# oc login <cluster_host>:<port> -u <user_name> -p <password>
CHAPTER 3. WRITING APBS
25

1
2
2. Log in to the OpenShift Container Platform web console and verify your APB listed in thecatalog:
Figure 3.1. OpenShift Container Platform Web Console
3. Create a project named getting-started where you will deploy OpenShift Container Platformresources. You can create it using the web console or CLI:
$ oc new-project getting-started
3.1.4.1. Provision
During the apb init process, two parts of the provision task were stubbed out. The playbook,playbooks/provision.yml, and the associated role in roles/provision-my-test-apb:
Inspect this playbook.
Edit this role.
The playbooks/provision.yml file is the Ansible playbook that will be run when the provision action iscalled from the OAB. You can change the playbook, but for now you can just leave the code as is.
playbooks/provision.yml
my-test-apb├── apb.yml├── Dockerfile├── playbooks
│ └── provision.yml 1└── roles └── provision-my-test-apb └── tasks
└── main.yml 2
- name: my-test-apb playbook to provision the application
OpenShift Container Platform 3.9 Ansible Playbook Bundle Development Guide
26
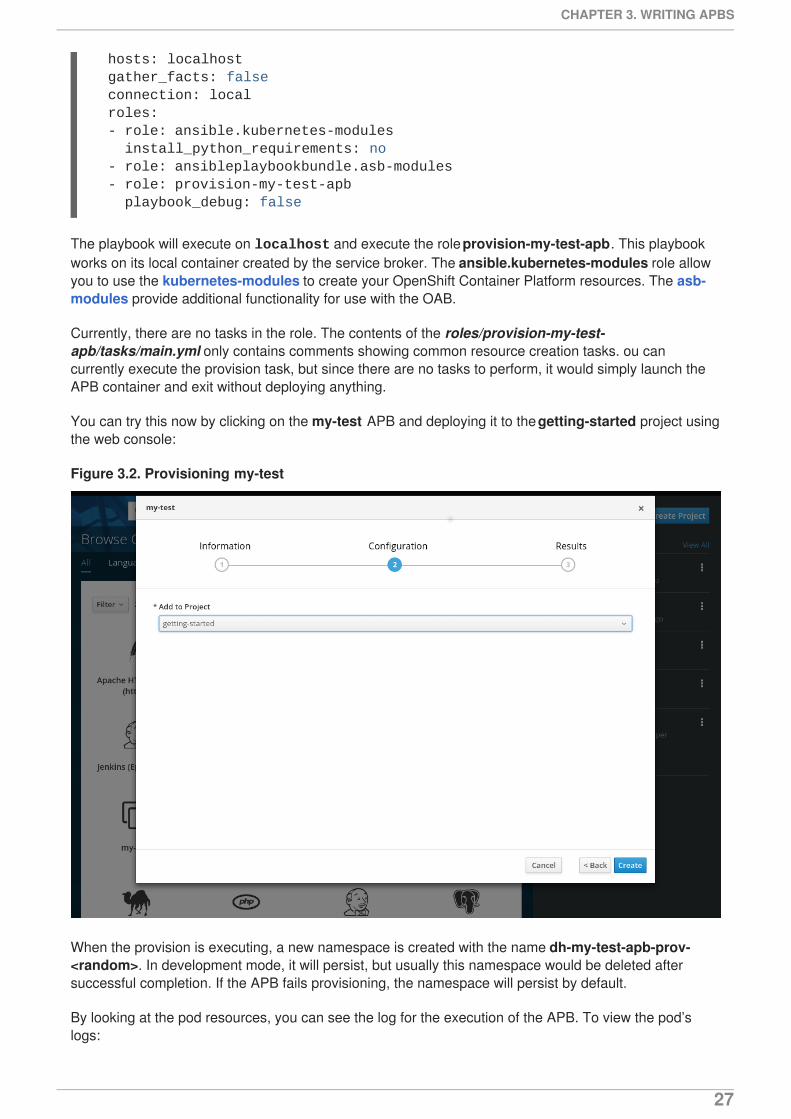
The playbook will execute on localhost and execute the role provision-my-test-apb. This playbookworks on its local container created by the service broker. The ansible.kubernetes-modules role allowyou to use the kubernetes-modules to create your OpenShift Container Platform resources. The asb-modules provide additional functionality for use with the OAB.
Currently, there are no tasks in the role. The contents of the roles/provision-my-test-apb/tasks/main.yml only contains comments showing common resource creation tasks. ou cancurrently execute the provision task, but since there are no tasks to perform, it would simply launch theAPB container and exit without deploying anything.
You can try this now by clicking on the my-test APB and deploying it to the getting-started project usingthe web console:
Figure 3.2. Provisioning my-test
When the provision is executing, a new namespace is created with the name dh-my-test-apb-prov-<random>. In development mode, it will persist, but usually this namespace would be deleted aftersuccessful completion. If the APB fails provisioning, the namespace will persist by default.
By looking at the pod resources, you can see the log for the execution of the APB. To view the pod’slogs:
hosts: localhost gather_facts: false connection: local roles: - role: ansible.kubernetes-modules install_python_requirements: no - role: ansibleplaybookbundle.asb-modules - role: provision-my-test-apb playbook_debug: false
CHAPTER 3. WRITING APBS
27
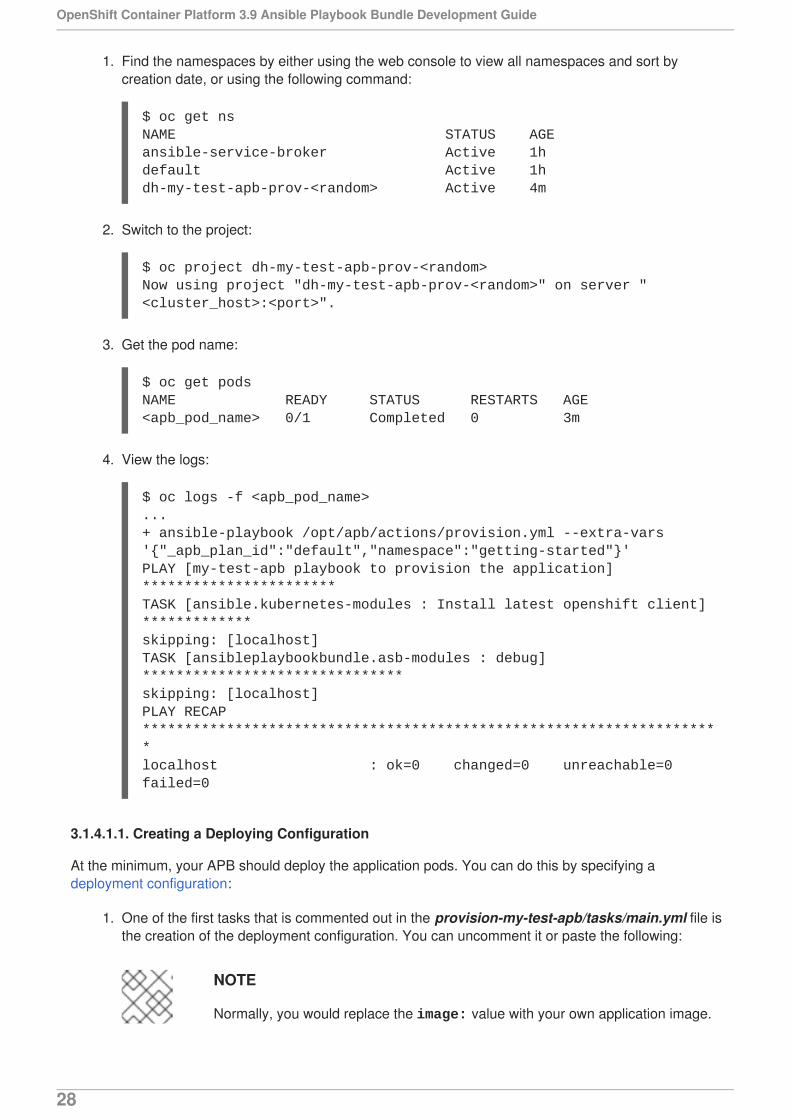
1. Find the namespaces by either using the web console to view all namespaces and sort bycreation date, or using the following command:
$ oc get nsNAME STATUS AGEansible-service-broker Active 1hdefault Active 1hdh-my-test-apb-prov-<random> Active 4m
2. Switch to the project:
$ oc project dh-my-test-apb-prov-<random>Now using project "dh-my-test-apb-prov-<random>" on server "<cluster_host>:<port>".
3. Get the pod name:
$ oc get podsNAME READY STATUS RESTARTS AGE<apb_pod_name> 0/1 Completed 0 3m
4. View the logs:
$ oc logs -f <apb_pod_name>...+ ansible-playbook /opt/apb/actions/provision.yml --extra-vars '{"_apb_plan_id":"default","namespace":"getting-started"}'PLAY [my-test-apb playbook to provision the application] ***********************TASK [ansible.kubernetes-modules : Install latest openshift client] *************skipping: [localhost]TASK [ansibleplaybookbundle.asb-modules : debug] *******************************skipping: [localhost]PLAY RECAP *********************************************************************localhost : ok=0 changed=0 unreachable=0 failed=0
3.1.4.1.1. Creating a Deploying Configuration
At the minimum, your APB should deploy the application pods. You can do this by specifying adeployment configuration:
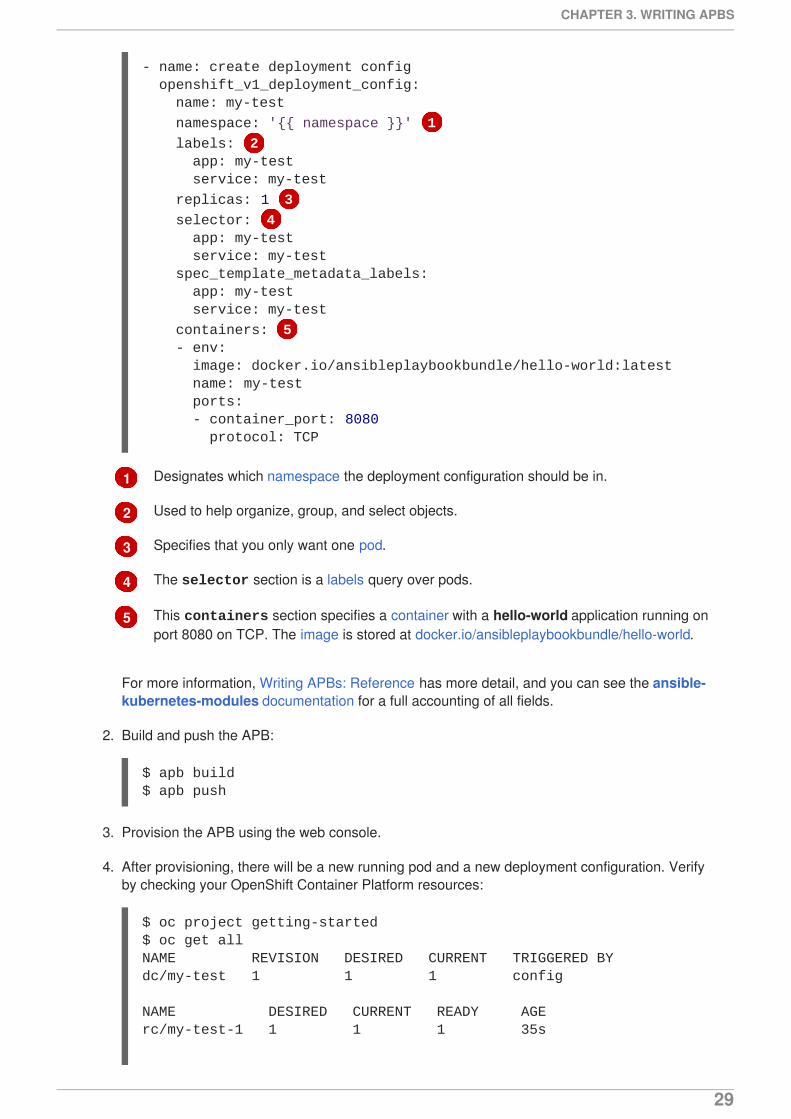
1. One of the first tasks that is commented out in the provision-my-test-apb/tasks/main.yml file isthe creation of the deployment configuration. You can uncomment it or paste the following:
NOTE
Normally, you would replace the image: value with your own application image.
OpenShift Container Platform 3.9 Ansible Playbook Bundle Development Guide
28
1
2
3
4
5
Designates which namespace the deployment configuration should be in.
Used to help organize, group, and select objects.
Specifies that you only want one pod.
The selector section is a labels query over pods.
This containers section specifies a container with a hello-world application running onport 8080 on TCP. The image is stored at docker.io/ansibleplaybookbundle/hello-world.
For more information, Writing APBs: Reference has more detail, and you can see the ansible-kubernetes-modules documentation for a full accounting of all fields.
2. Build and push the APB:
$ apb build$ apb push
3. Provision the APB using the web console.
4. After provisioning, there will be a new running pod and a new deployment configuration. Verifyby checking your OpenShift Container Platform resources:
$ oc project getting-started$ oc get allNAME REVISION DESIRED CURRENT TRIGGERED BYdc/my-test 1 1 1 config
NAME DESIRED CURRENT READY AGErc/my-test-1 1 1 1 35s
- name: create deployment config openshift_v1_deployment_config: name: my-test
namespace: '{{ namespace }}' 1
labels: 2 app: my-test service: my-test
replicas: 1 3
selector: 4 app: my-test service: my-test spec_template_metadata_labels: app: my-test service: my-test
containers: 5 - env: image: docker.io/ansibleplaybookbundle/hello-world:latest name: my-test ports: - container_port: 8080 protocol: TCP
CHAPTER 3. WRITING APBS
29

NAME READY STATUS RESTARTS AGEpo/my-test-1-2pw4t 1/1 Running 0 33s
You will also be able to see the deployed application in the web console on the project’sOverview page.
The only way to use this pod in its current state is to use:
$ oc describe pods/<pod_name>
to find its IP address and access it directly. If there were multiple pods, they would be accessedseparately. To treat them like a single host, you need to create a service, described in the next section.
TIP
To clean up before moving on and allow you to provision again, you can delete the getting-startedproject and recreate it or create a new one.
3.1.4.1.2. Creating a Service
You will want to use multiple pods, load balance them, and create a service so that a user can accessthem as a single host:
1. Modify the provision-my-test-apb/tasks/main.yml file and add the following:
The selector section will allow the my-test service to include the correct pods. The ports willtake the target port from the pods (8080) and expose them as a single port for the service (80).Notice the application was running on 8080 but has now been made available on the defaultHTTP port of 80.
The name field of the port allows you to specify this port in the future with other resources. Moreinformation is available in the k8s_v1_service module.
2. Build and push the APB:
$ apb build$ apb push
3. Provision the APB using the web console.
- name: create my-test service k8s_v1_service: name: my-test namespace: '{{ namespace }}' labels: app: my-test service: my-test selector: app: my-test service: my-test ports: - name: web port: 80 target_port: 8080
OpenShift Container Platform 3.9 Ansible Playbook Bundle Development Guide
30
After provisioning, you will see a new service in the web console or CLI. In the web console, you canclick on the new service under Networking in the application on the Overview page or underApplications → Services. The service’s IP address will be shown which you can use to access the loadbalanced application.
To view the service information from the command line, you can do the following:
$ oc project getting-started$ oc get services$ oc describe services/my-test
The describe command will show the IP address to access the service. However, using an IP addressfor users to access your application is not generally what you want. Instead, you should create a route,described in the next section.
TIP
To clean up before moving on and allow you to provision again, you can delete the getting-startedproject and recreate it or create a new one.
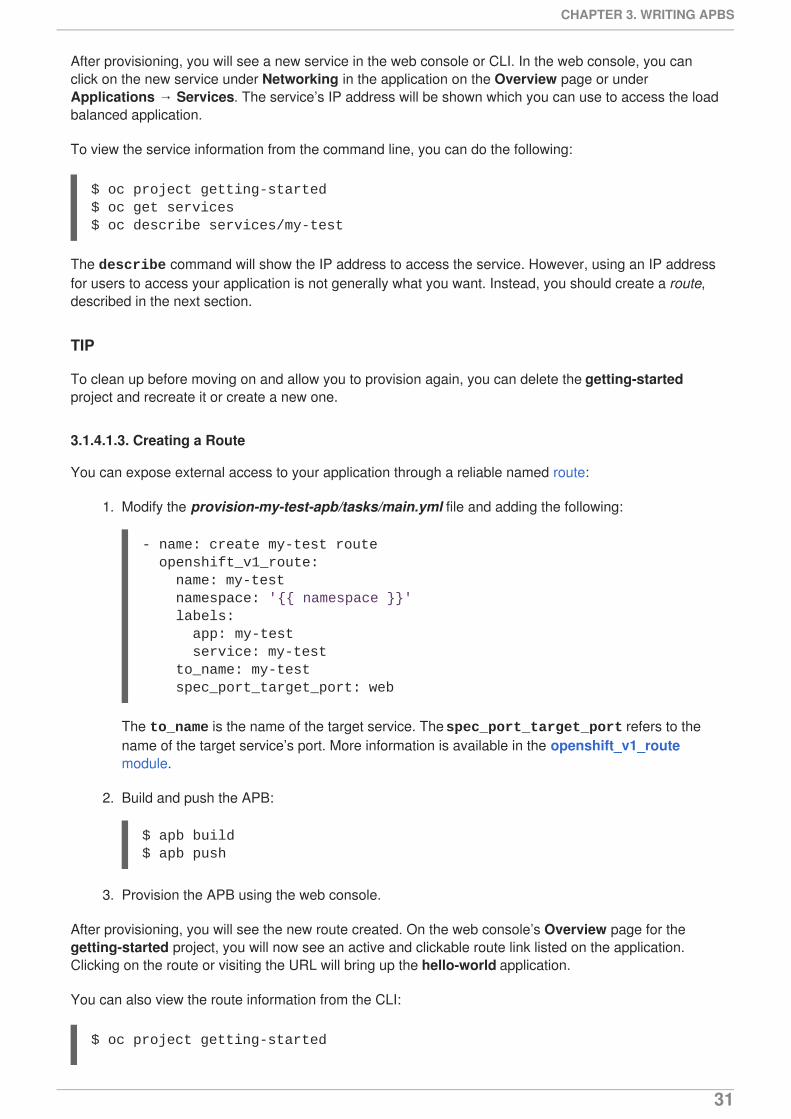
3.1.4.1.3. Creating a Route
You can expose external access to your application through a reliable named route:
1. Modify the provision-my-test-apb/tasks/main.yml file and adding the following:
The to_name is the name of the target service. The spec_port_target_port refers to thename of the target service’s port. More information is available in the openshift_v1_routemodule.
2. Build and push the APB:
$ apb build$ apb push
3. Provision the APB using the web console.
After provisioning, you will see the new route created. On the web console’s Overview page for thegetting-started project, you will now see an active and clickable route link listed on the application.Clicking on the route or visiting the URL will bring up the hello-world application.
You can also view the route information from the CLI:
$ oc project getting-started
- name: create my-test route openshift_v1_route: name: my-test namespace: '{{ namespace }}' labels: app: my-test service: my-test to_name: my-test spec_port_target_port: web
CHAPTER 3. WRITING APBS
31
1
2
$ oc get routesNAME HOST/PORT PATH SERVICES PORT TERMINATION WILDCARDmy-test my-test-getting-started.172.17.0.1.nip.io my-test web None
$ oc describe routes/my-testName: my-testNamespace: getting-started...
At this point, your my-test application is fully functional, load balanced, scalable, and accessible. Youcan compare your finished APB to the hello-world APB in the hello-world-apb example repository.
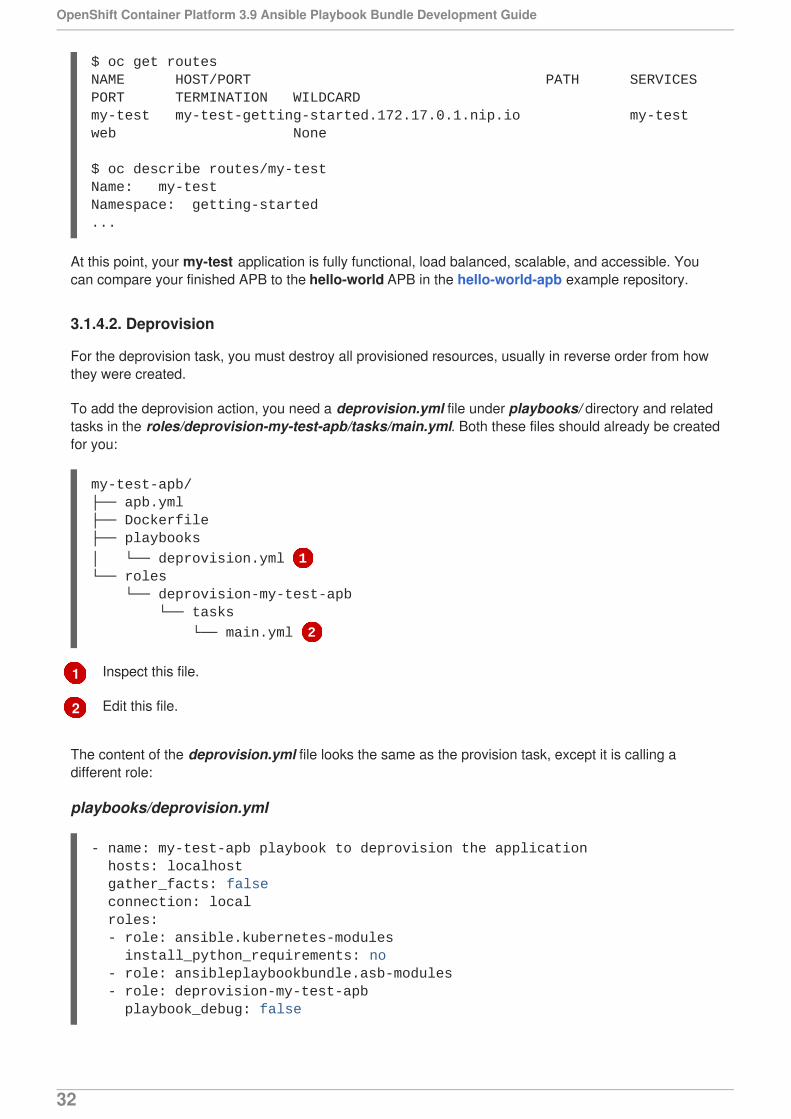
3.1.4.2. Deprovision
For the deprovision task, you must destroy all provisioned resources, usually in reverse order from howthey were created.
To add the deprovision action, you need a deprovision.yml file under playbooks/ directory and relatedtasks in the roles/deprovision-my-test-apb/tasks/main.yml. Both these files should already be createdfor you:
Inspect this file.
Edit this file.
The content of the deprovision.yml file looks the same as the provision task, except it is calling adifferent role:
playbooks/deprovision.yml
my-test-apb/├── apb.yml├── Dockerfile├── playbooks
│ └── deprovision.yml 1└── roles └── deprovision-my-test-apb └── tasks
└── main.yml 2
- name: my-test-apb playbook to deprovision the application hosts: localhost gather_facts: false connection: local roles: - role: ansible.kubernetes-modules install_python_requirements: no - role: ansibleplaybookbundle.asb-modules - role: deprovision-my-test-apb playbook_debug: false
OpenShift Container Platform 3.9 Ansible Playbook Bundle Development Guide
32
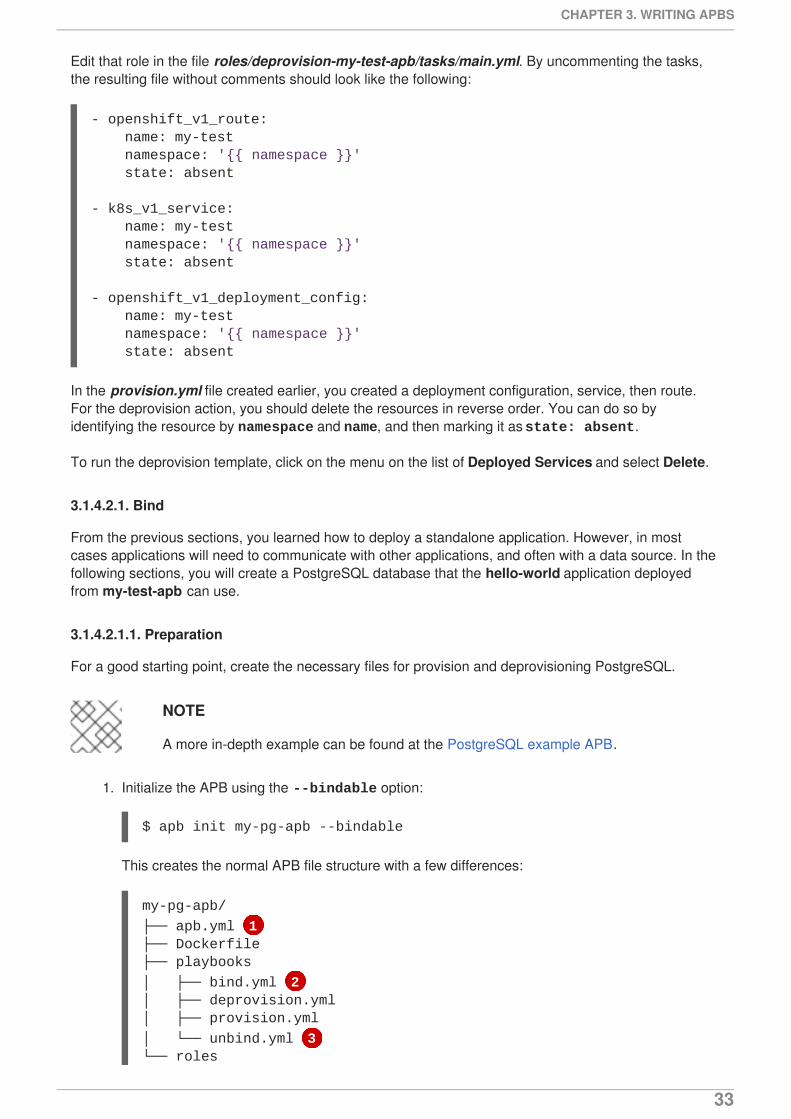
Edit that role in the file roles/deprovision-my-test-apb/tasks/main.yml. By uncommenting the tasks,the resulting file without comments should look like the following:
In the provision.yml file created earlier, you created a deployment configuration, service, then route.For the deprovision action, you should delete the resources in reverse order. You can do so byidentifying the resource by namespace and name, and then marking it as state: absent.
To run the deprovision template, click on the menu on the list of Deployed Services and select Delete.
3.1.4.2.1. Bind
From the previous sections, you learned how to deploy a standalone application. However, in mostcases applications will need to communicate with other applications, and often with a data source. In thefollowing sections, you will create a PostgreSQL database that the hello-world application deployedfrom my-test-apb can use.
3.1.4.2.1.1. Preparation
For a good starting point, create the necessary files for provision and deprovisioning PostgreSQL.
NOTE
A more in-depth example can be found at the PostgreSQL example APB.
1. Initialize the APB using the --bindable option:
$ apb init my-pg-apb --bindable
This creates the normal APB file structure with a few differences:
- openshift_v1_route: name: my-test namespace: '{{ namespace }}' state: absent
- k8s_v1_service: name: my-test namespace: '{{ namespace }}' state: absent
- openshift_v1_deployment_config: name: my-test namespace: '{{ namespace }}' state: absent
my-pg-apb/
├── apb.yml 1├── Dockerfile├── playbooks
│ ├── bind.yml 2│ ├── deprovision.yml│ ├── provision.yml
│ └── unbind.yml 3└── roles
CHAPTER 3. WRITING APBS
33
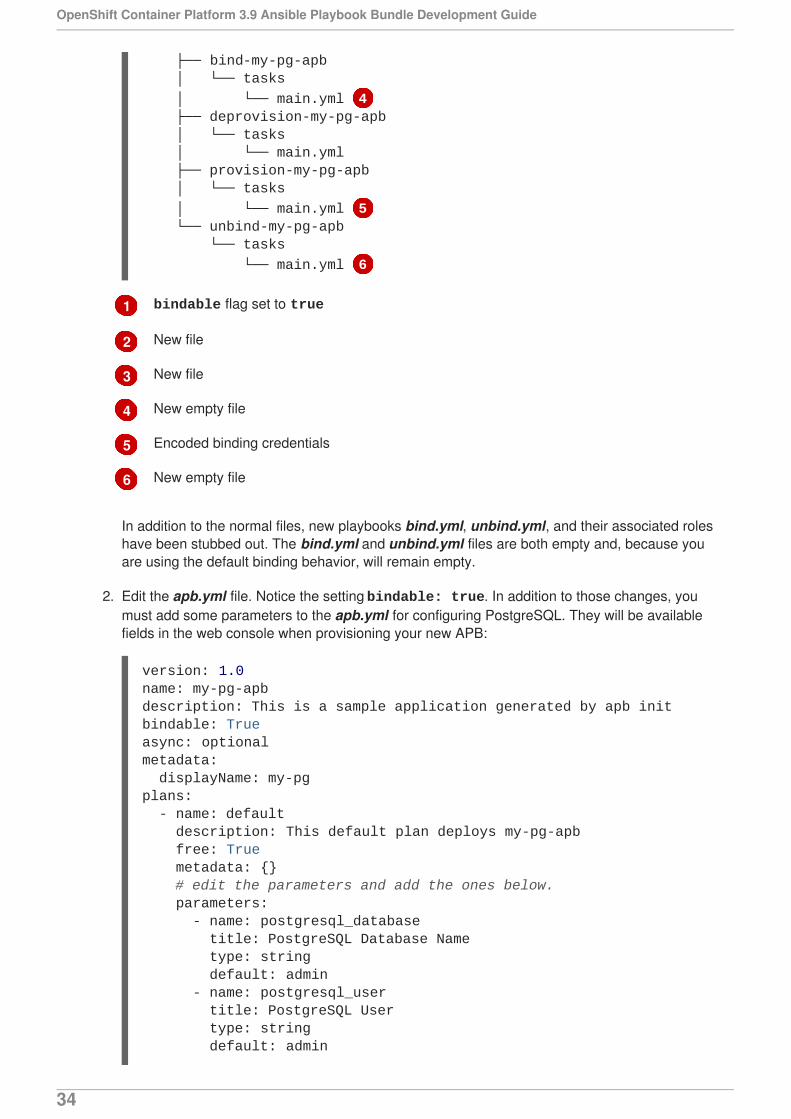
1
2
3
4
5
6
bindable flag set to true
New file
New file
New empty file
Encoded binding credentials
New empty file
In addition to the normal files, new playbooks bind.yml, unbind.yml, and their associated roleshave been stubbed out. The bind.yml and unbind.yml files are both empty and, because youare using the default binding behavior, will remain empty.
2. Edit the apb.yml file. Notice the setting bindable: true. In addition to those changes, youmust add some parameters to the apb.yml for configuring PostgreSQL. They will be availablefields in the web console when provisioning your new APB:
├── bind-my-pg-apb │ └── tasks
│ └── main.yml 4 ├── deprovision-my-pg-apb │ └── tasks │ └── main.yml ├── provision-my-pg-apb │ └── tasks
│ └── main.yml 5 └── unbind-my-pg-apb └── tasks
└── main.yml 6
version: 1.0name: my-pg-apbdescription: This is a sample application generated by apb initbindable: Trueasync: optionalmetadata: displayName: my-pgplans: - name: default description: This default plan deploys my-pg-apb free: True metadata: {} # edit the parameters and add the ones below. parameters: - name: postgresql_database title: PostgreSQL Database Name type: string default: admin - name: postgresql_user title: PostgreSQL User type: string default: admin
OpenShift Container Platform 3.9 Ansible Playbook Bundle Development Guide
34
The playbooks/provision.yml will look like the following:
The playbooks/deprovision.yml will look like the following:
3. Edit the roles/provision-my-pg-apb/tasks/main.yml file. This file mirrors your hello-worldapplication in many respects, but adds a persistent volume (PV) to save data between restartsand various configuration options for the deployment configuration.In addition, a new task has been added at the very bottom after the provision tasks. To save thecredentials created during the provision process, you must encode them for retrieval by theOAB. The new task, using the module asb_encode_binding, will do so for you.
You can safely delete everything in that file and replace it with the following:
- name: postgresql_password title: PostgreSQL Password type: string default: admin
- name: my-pg-apb playbook to provision the application hosts: localhost gather_facts: false connection: local roles: - role: ansible.kubernetes-modules install_python_requirements: no - role: ansibleplaybookbundle.asb-modules - role: provision-my-pg-apb playbook_debug: false
- name: my-pg-apb playbook to deprovision the application hosts: localhost gather_facts: false connection: local roles: - role: ansible.kubernetes-modules install_python_requirements: no - role: deprovision-my-pg-apb playbook_debug: false
# New persistent volume claim- name: create volumes k8s_v1_persistent_volume_claim: name: my-pg namespace: '{{ namespace }}' state: present access_modes: - ReadWriteOnce resources_requests: storage: 1Gi
- name: create deployment config openshift_v1_deployment_config: name: my-pg namespace: '{{ namespace }}' labels:
CHAPTER 3. WRITING APBS
35

app: my-pg service: my-pg replicas: 1 selector: app: my-pg service: my-pg spec_template_metadata_labels: app: my-pg service: my-pg containers: - env: - name: POSTGRESQL_PASSWORD value: '{{ postgresql_password }}' - name: POSTGRESQL_USER value: '{{ postgresql_user }}' - name: POSTGRESQL_DATABASE value: '{{ postgresql_database }}' image: docker.io/centos/postgresql-94-centos7 name: my-pg ports: - container_port: 5432 protocol: TCP termination_message_path: /dev/termination-log volume_mounts: - mount_path: /var/lib/pgsql/data name: my-pg working_dir: / volumes: - name: my-pg persistent_volume_claim: claim_name: my-pg test: false triggers: - type: ConfigChange
- name: create service k8s_v1_service: name: my-pg namespace: '{{ namespace }}' state: present labels: app: my-pg service: my-pg selector: app: my-pg service: my-pg ports: - name: port-5432 port: 5432 protocol: TCP target_port: 5432
# New encoding task makes credentials available to future bind operations- name: encode bind credentials asb_encode_binding:
OpenShift Container Platform 3.9 Ansible Playbook Bundle Development Guide
36
The encode bind credentials task will make available several fields as environmentvariables: DB_TYPE, DB_HOST, DB_PORT, DB_USER, DB_PASSWORD, and DB_NAME. This is thedefault behavior when the bind.yml file is left empty. Any application (such as hello-world) canuse these environment variables to connect to the configured database after performing a bindoperation.
4. Edit the roles/deprovision-my-pg-apb/tasks/main.yml and uncomment the following lines sothat the created resources will be deleted during deprovisioning:
5. Finally, build and push your APB:
$ apb build$ apb push
At this point, the APB can create a fully functional PostgreSQL database to your cluster. You can test itout in the next section.
3.1.4.2.1.2. Executing From the UI
To test your application, you can bind a hello-world application to the provisioned PostgreSQLdatabase. You can use the application previously created in the Provision section of this tutorial, or youcan use the hello-world-apb:
1. First, provision my-test-apb.
2. Then, provision my-pg-apb and select the option to Create a secret:
fields: DB_TYPE: postgres DB_HOST: my-pg DB_PORT: "5432" DB_USER: "{{ postgresql_user }}" DB_PASSWORD: "{{ postgresql_password }}" DB_NAME: "{{ postgresql_database }}"
- k8s_v1_service: name: my-pg namespace: '{{ namespace }}' state: absent
- openshift_v1_deployment_config: name: my-pg namespace: '{{ namespace }}' state: absent
- k8s_v1_persistent_volume_claim: name: my-pg namespace: '{{ namespace }}' state: absent
CHAPTER 3. WRITING APBS
37

OpenShift Container Platform 3.9 Ansible Playbook Bundle Development Guide
38

3. Now, if you have not already done so, navigate to the project. You can see both your hello-world application and your PostgreSQL database. If you did not select to create a binding atprovision time, you can also do so here with the Create binding link.
4. After you the binding has been created, you must add the secret created by the binding into theapplication. First, navigate to the secrets on the Resources → Secrets page:
CHAPTER 3. WRITING APBS
39
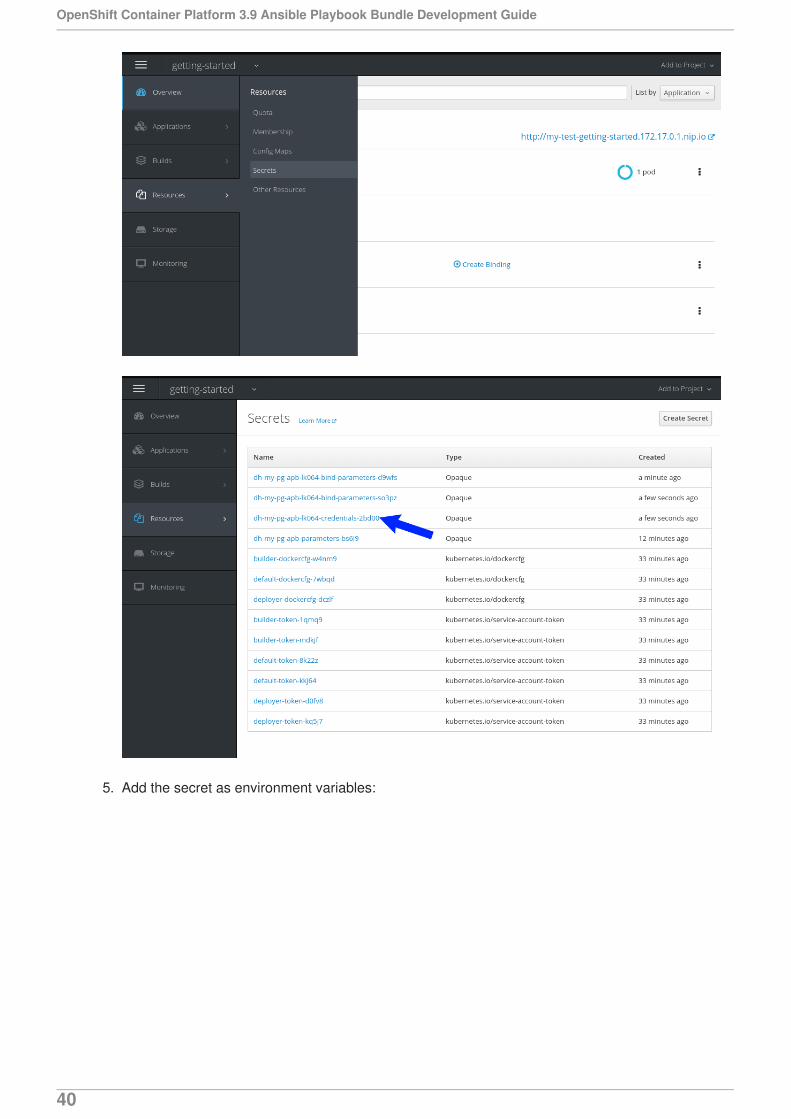
5. Add the secret as environment variables:
OpenShift Container Platform 3.9 Ansible Playbook Bundle Development Guide
40
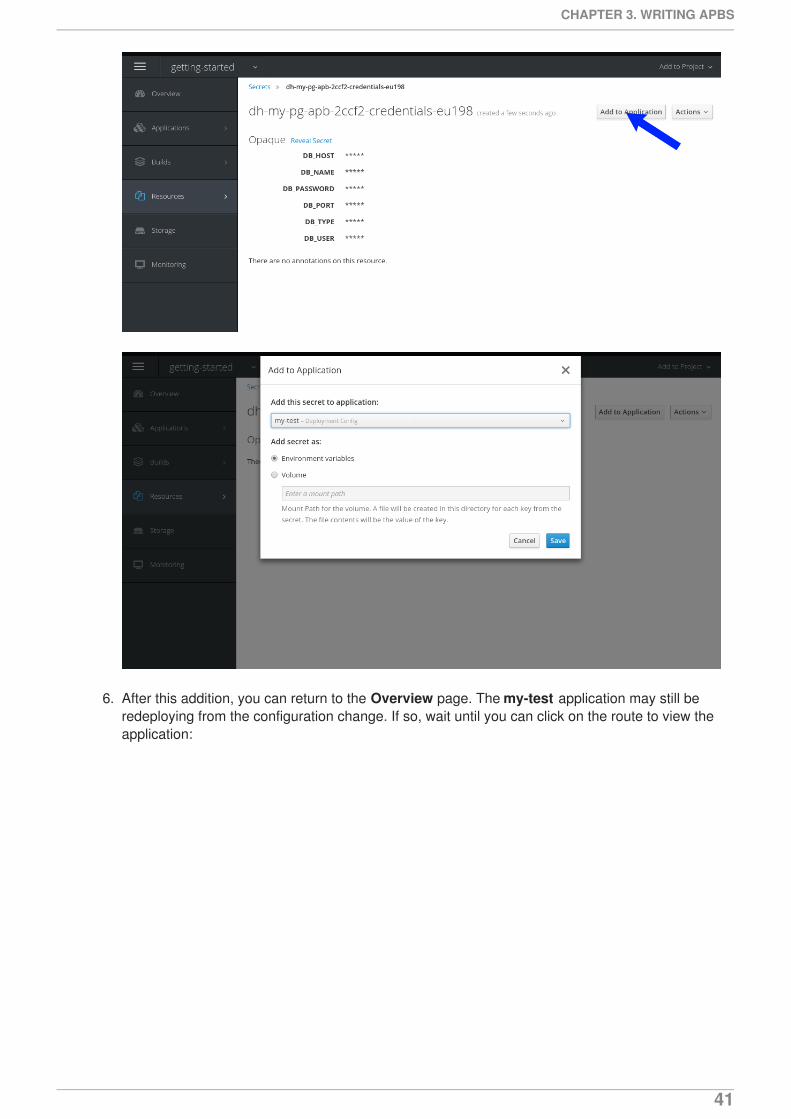
6. After this addition, you can return to the Overview page. The my-test application may still beredeploying from the configuration change. If so, wait until you can click on the route to view theapplication:
CHAPTER 3. WRITING APBS
41

After clicking the route, you will see the hello-world application has detected and connected tothe my-pg database:
3.1.4.2.2. Test
Test actions are intended to check that an APB passes a basic sanity check before publishing to theservice catalog. They are not meant to test a live service. OpenShift Container Platform provides theability to test a live service using liveness and readiness probes, which you can add when provisioning.
The actual implementation of your test is left to you as the APB author. The following sections provideguidance and best practices.
3.1.4.2.2.1. Writing a Test Action
OpenShift Container Platform 3.9 Ansible Playbook Bundle Development Guide
42

1
2
3
4
To create a test action for your APB:
Include a playbooks/test.yml file.
Include defaults for the test in the playbooks/vars/ directory.
To orchestrate the testing of an APB, you should use the include_vars and include_role modules inyour test.yml file:
test.yml
Load the Ansible Kubernetes modules.
Include the default values needed for provision from the test role.
Include the provision role to run.
Include the verify role to run. See Writing a Verify Role.
3.1.4.2.2.2. Writing a Verify Role
A verify role allows you to determine if the provision has failed or succeeded. The verify_<name> roleshould be in the roles/ directory. This should be a normal Ansible role.
my-apb/├── ...├── playbooks/ ├── test.yml └── vars/ └── test_defaults.yml
- name: test media wiki abp hosts: localhost gather_facts: false connection: local
roles:
- role: ansible.kubernetes-modules 1 install_python_requirements: no
post_tasks:
- name: Load default variables for testing 2 include_vars: test_defaults.yaml - name: create project for namespace openshift_v1_project: name: '{{ namespace }}'
- name: Run the provision role. 3 include_role: name: provision-mediawiki123-apb
- name: Run the verify role. 4 include_role: name: verify-mediawiki123-apb
my-apb/
CHAPTER 3. WRITING APBS
43

An example task in the main.yml file could look like:
3.1.4.2.2.3. Saving Test Results
The asb_save_test_result module can also be used in the verify role, allowing the APB to save testresults so that the apb test command can return them. The APB pod will stay alive for the tool toretrieve the test results.
For example, adding asb_save_test_result usage to the previous main.yml example:
3.1.4.2.2.4. Running a Test Action
After you have defined your test action, you can use the CLI tooling to run the test:
$ apb test
├── ...└── roles/ ├── ... └── verify_<name> ├── defaults └── defaults.yml └── tasks └── main.yml
- name: url check for media wiki uri: url: "http://{{ route.route.spec.host }}" return_content: yes register: webpage failed_when: webpage.status != 200
- name: url check for media wiki uri: url: "http://{{ route.route.spec.host }}" return_content: yes register: webpage
- name: Save failure for the web page asb_save_test_result: fail: true msg: "Could not reach route and retrieve a 200 status code. Recieved status - {{ webpage.status }}" when: webpage.status != 200
- fail: msg: "Could not reach route and retrieve a 200 status code. Recieved status - {{ webpage.status }}" when: webpage.status != 200
- name: Save test pass asb_save_test_result: fail: false when: webpage.status == 200
OpenShift Container Platform 3.9 Ansible Playbook Bundle Development Guide
44
The test action will:
build the image,
start up a pod as if it was being run by the service broker, and
retrieve the test results if any were saved.
The status of pod after execution has finished will determine the status of the test. If the pod is in an errorstate, then something failed and the command reports that the test was unsuccessful.
3.2. WRITING APBS: REFERENCE
3.2.1. Overview
While the Getting Started topic provides a step by step walkthrough on creating your first AnsiblePlaybook Bundle (APB), this topic provides more in-depth reference material. The fundamentalcomponents that make up an APB are explained in further detail to help an experienced APB developerget a better understanding of each individual component within an APB.
For completed APB examples, you can browse APBs in the ansibleplaybookbundle organization onGitHub.
3.2.2. Directory Structure
The following shows an example directory structure of an APB:
3.2.3. APB Spec File
The APB spec file is located at apb.yml and is where the outline of your application is declared. Thefollowing is an example APB spec:
example-apb/├── Dockerfile├── apb.yml└── roles/│ └── example-apb-openshift│ ├── defaults│ │ └── main.yml│ └── tasks│ └── main.yml└── playbooks/ └── provision.yml └── deprovision.yml └── bind.yml └── unbind.yml
version: 1.0 name: example-apb description: A short description of what this APB does bindable: True
async: optional 1 metadata: documentationUrl: <link_to_documentation>
CHAPTER 3. WRITING APBS
45
1 Async bind and unbind is an experimental feature and is not supported or enabled by default.
3.2.3.1. Top-level Structure
Field Description
version Version of the APB spec. See APB Spec Versioningfor details.
name Name of the APB. Names must be valid ASCII andmay contain lowercase letters, digits, underscores,periods, and dashes. See Docker’s guidelines forvalid tag names.
description Short description of this APB.
bindable Boolean option of whether or not this APB can bebound to. Accepted fields are true or false.
metadata Dictionary field declaring relevant metadatainformation.
plans A list of plans that can be deployed. See Plans fordetails.
imageUrl: <link_to_url_of_image> dependencies: ['<registry>/<organization>/<dependency_name_1>', '<registry>/<organization>/<dependency_name_2>'] displayName: Example App (APB) longDescription: A longer description of what this APB does providerDisplayName: "Red Hat, Inc." plans: - name: default description: A short description of what this plan does free: true metadata: displayName: Default longDescription: A longer description of what this plan deploys cost: $0.00 parameters: - name: parameter_one required: true default: foo_string type: string title: Parameter One maxlength: 63 - name: parameter_two required: true default: true title: Parameter Two type: boolean
OpenShift Container Platform 3.9 Ansible Playbook Bundle Development Guide
46
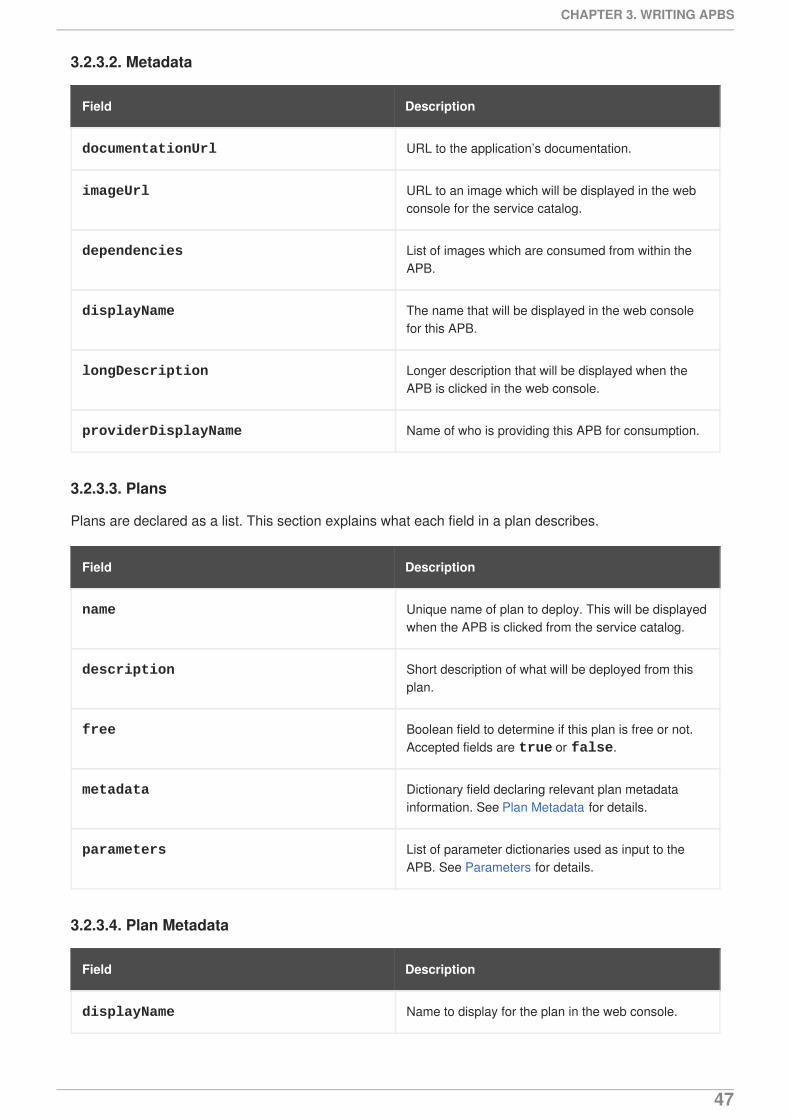
3.2.3.2. Metadata
Field Description
documentationUrl URL to the application’s documentation.
imageUrl URL to an image which will be displayed in the webconsole for the service catalog.
dependencies List of images which are consumed from within theAPB.
displayName The name that will be displayed in the web consolefor this APB.
longDescription Longer description that will be displayed when theAPB is clicked in the web console.
providerDisplayName Name of who is providing this APB for consumption.
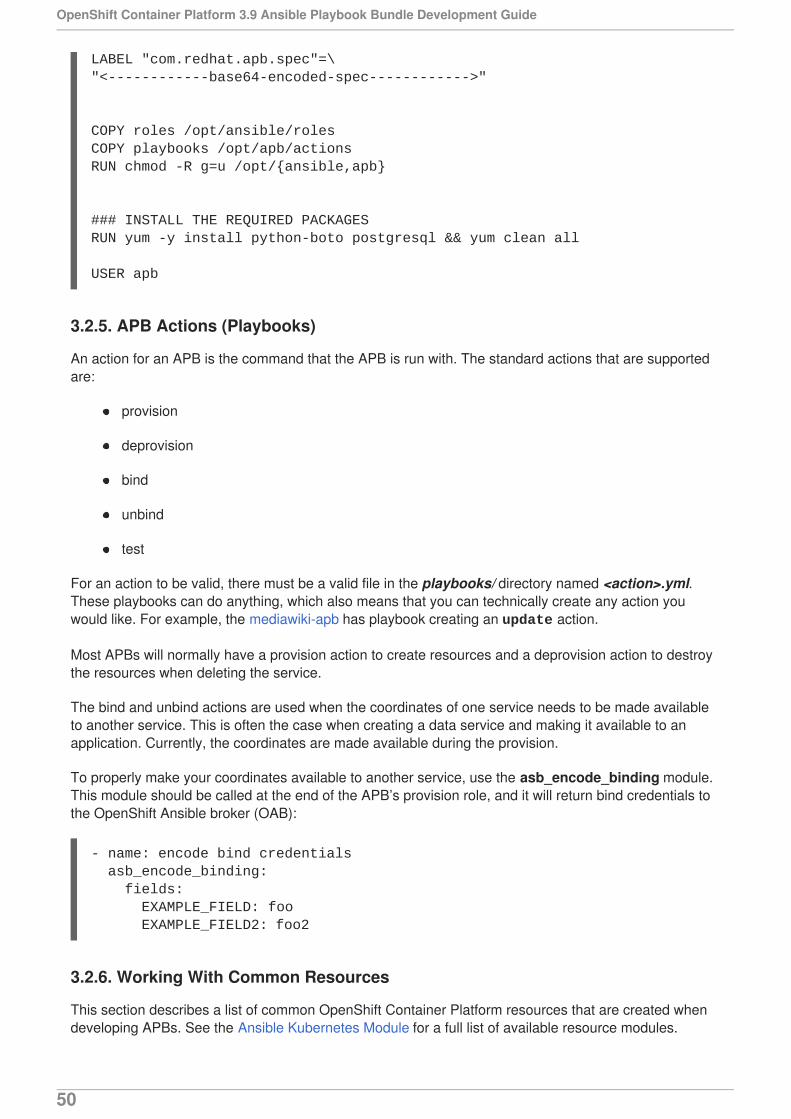
3.2.3.3. Plans
Plans are declared as a list. This section explains what each field in a plan describes.
Field Description
name Unique name of plan to deploy. This will be displayedwhen the APB is clicked from the service catalog.
description Short description of what will be deployed from thisplan.
free Boolean field to determine if this plan is free or not.Accepted fields are true or false.
metadata Dictionary field declaring relevant plan metadatainformation. See Plan Metadata for details.
parameters List of parameter dictionaries used as input to theAPB. See Parameters for details.
3.2.3.4. Plan Metadata
Field Description
displayName Name to display for the plan in the web console.
CHAPTER 3. WRITING APBS
47

longDescription Longer description of what this plan deploys.
cost How much the plan will cost to deploy. Accepted fieldis $x.yz.
Field Description
3.2.3.5. Parameters
Each item in the parameters section can have several fields. The name field is required. The order ofthe parameters will be displayed in sequential order in the form in the OpenShift Container Platform webconsole.
Field Description
name Unique name of the parameter passed into the APB.
title Displayed label in the web console.
type Data type of the parameters as specified by link json-schema, such as string, number, int, boolean, or enum. Default input field type in theweb console will be assigned if no display_typeis assigned.
required Whether or not the parameter is required for APBexecution. Required field in the web console.
default Default value assigned to the parameter.
display_type Display type for the web console. For example, youcan override a string input as a password to hide itin the web console. Accepted fields include text, textarea, password, checkbox, or select.
parameters: - name: my_param title: My Parameter type: enum enum: ['X', 'Y', 'Z'] required: True default: X display_type: select display_group: Group 1
OpenShift Container Platform 3.9 Ansible Playbook Bundle Development Guide
48

display_group Will cause a parameter to display in groups withadjacent parameters with matching display_group fields. In the above example,adding another field below with display_group: Group 1 will visually group them together in theweb console under the heading Group 1.
Field Description
When using a long list of parameters, it can be useful to use a shared parameter list. For an example ofthis, see the rhscl-postgresql-apb.
3.2.3.6. APB Spec Versioning
The APB spec uses semantic versioning with the format of x.y where x is a major release and y is aminor release.
The current spec version is 1.0.
3.2.3.6.1. Major Version
The APB spec will increment the major version whenever an API breaking change is introduced to thespec. Some examples include:
Introduction or deletion of a required field.
Changing the YAML format.
New features.
3.2.3.6.2. Minor Version
The APB spec will increment the minor version whenever a non-breaking change is introduced to thespec. Some examples include:
Introduction or deletion of an optional field.
Spelling change.
Introduction of new options to an existing field.
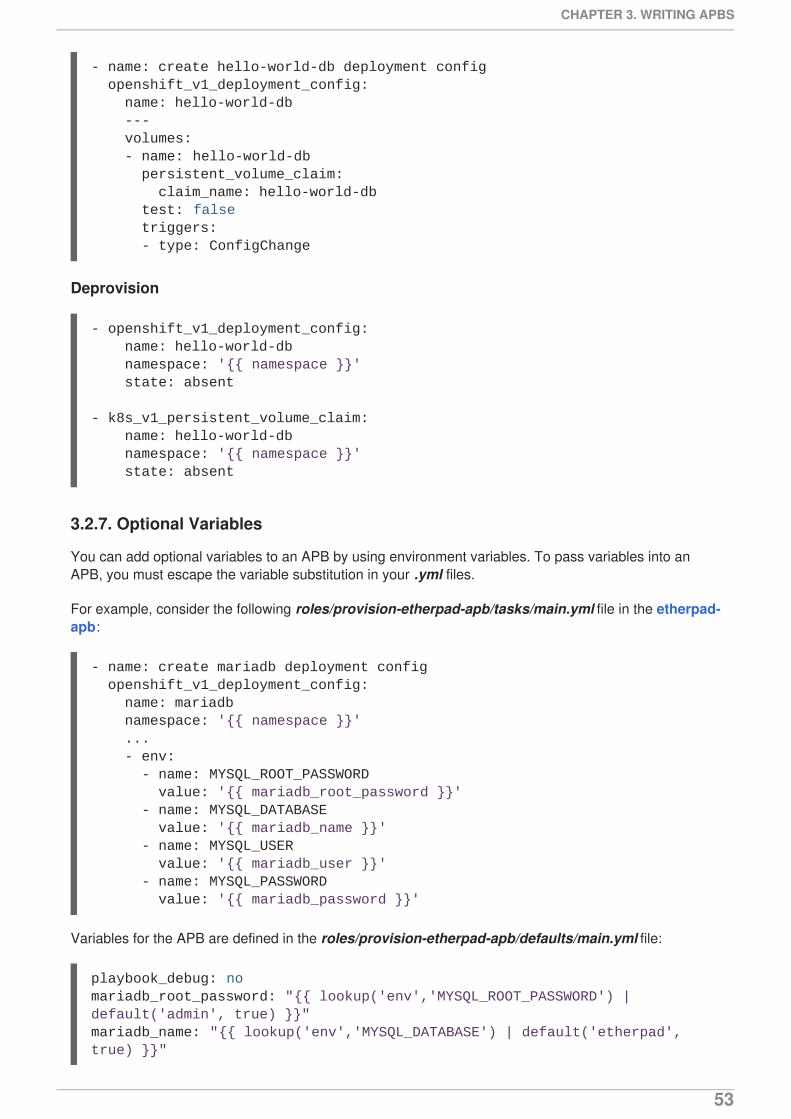
3.2.4. Dockerfile
The Dockerfile is what is used to actually build the APB image. As a result, sometimes you will need tocustomize it for your own needs. For example, if running a playbook that requires interactions withPostgreSQL, you may want to install the required packages by adding the yum install command:
FROM ansibleplaybookbundle/apb-baseMAINTAINER Ansible Playbook Bundle Community
CHAPTER 3. WRITING APBS
49
LABEL "com.redhat.apb.spec"=\"<------------base64-encoded-spec------------>"
COPY roles /opt/ansible/rolesCOPY playbooks /opt/apb/actionsRUN chmod -R g=u /opt/{ansible,apb}
### INSTALL THE REQUIRED PACKAGESRUN yum -y install python-boto postgresql && yum clean all
USER apb
3.2.5. APB Actions (Playbooks)
An action for an APB is the command that the APB is run with. The standard actions that are supportedare:
provision
deprovision
bind
unbind
test
For an action to be valid, there must be a valid file in the playbooks/ directory named <action>.yml.These playbooks can do anything, which also means that you can technically create any action youwould like. For example, the mediawiki-apb has playbook creating an update action.
Most APBs will normally have a provision action to create resources and a deprovision action to destroythe resources when deleting the service.
The bind and unbind actions are used when the coordinates of one service needs to be made availableto another service. This is often the case when creating a data service and making it available to anapplication. Currently, the coordinates are made available during the provision.
To properly make your coordinates available to another service, use the asb_encode_binding module.This module should be called at the end of the APB’s provision role, and it will return bind credentials tothe OpenShift Ansible broker (OAB):
3.2.6. Working With Common Resources
This section describes a list of common OpenShift Container Platform resources that are created whendeveloping APBs. See the Ansible Kubernetes Module for a full list of available resource modules.
- name: encode bind credentials asb_encode_binding: fields: EXAMPLE_FIELD: foo EXAMPLE_FIELD2: foo2
OpenShift Container Platform 3.9 Ansible Playbook Bundle Development Guide
50

3.2.6.1. Service
The following is a sample Ansible task to create a service named hello-world. The namespace variablein an APB will be provided by the OAB when launched from the web console.
Provision
Deprovision
3.2.6.2. Deployment Configuration
The following is a sample Ansible task to create a deployment configuration for the imagedocker.io/ansibleplaybookbundle/hello-world which maps to service hello-world.
Provision
- name: create hello-world service k8s_v1_service: name: hello-world namespace: '{{ namespace }}' labels: app: hello-world service: hello-world selector: app: hello-world service: hello-world ports: - name: web port: 8080 target_port: 8080
- k8s_v1_service: name: hello-world namespace: '{{ namespace }}' state: absent
- name: create deployment config openshift_v1_deployment_config: name: hello-world namespace: '{{ namespace }}' labels: app: hello-world service: hello-world replicas: 1 selector: app: hello-world service: hello-world spec_template_metadata_labels: app: hello-world service: hello-world containers: - env: image: docker.io/ansibleplaybookbundle/hello-world:latest name: hello-world ports:
CHAPTER 3. WRITING APBS
51

Deprovision
3.2.6.3. Route
The following is an example of creating a route named hello-world which maps to the service hello-world.
Provision
Deprovision
3.2.6.4. Persistent Volume
The following is an example of creating a persistent volume claim (PVC) resource and deploymentconfiguration that uses it.
Provision
In addition to the resource, add your volume to the deployment configuration declaration:
- container_port: 8080 protocol: TCP
- openshift_v1_deployment_config: name: hello-world namespace: '{{ namespace }}' state: absent
- name: create hello-world route openshift_v1_route: name: hello-world namespace: '{{ namespace }}' spec_port_target_port: web labels: app: hello-world service: hello-world to_name: hello-world
- openshift_v1_route: name: hello-world namespace: '{{ namespace }}' state: absent
# Persistent volume resource- name: create volume claim k8s_v1_persistent_volume_claim: name: hello-world-db namespace: '{{ namespace }}' state: present access_modes: - ReadWriteOnce resources_requests: storage: 1Gi
OpenShift Container Platform 3.9 Ansible Playbook Bundle Development Guide
52
Deprovision
3.2.7. Optional Variables
You can add optional variables to an APB by using environment variables. To pass variables into anAPB, you must escape the variable substitution in your .yml files.
For example, consider the following roles/provision-etherpad-apb/tasks/main.yml file in the etherpad-apb:
Variables for the APB are defined in the roles/provision-etherpad-apb/defaults/main.yml file:
- name: create hello-world-db deployment config openshift_v1_deployment_config: name: hello-world-db --- volumes: - name: hello-world-db persistent_volume_claim: claim_name: hello-world-db test: false triggers: - type: ConfigChange
- openshift_v1_deployment_config: name: hello-world-db namespace: '{{ namespace }}' state: absent
- k8s_v1_persistent_volume_claim: name: hello-world-db namespace: '{{ namespace }}' state: absent
- name: create mariadb deployment config openshift_v1_deployment_config: name: mariadb namespace: '{{ namespace }}' ... - env: - name: MYSQL_ROOT_PASSWORD value: '{{ mariadb_root_password }}' - name: MYSQL_DATABASE value: '{{ mariadb_name }}' - name: MYSQL_USER value: '{{ mariadb_user }}' - name: MYSQL_PASSWORD value: '{{ mariadb_password }}'
playbook_debug: nomariadb_root_password: "{{ lookup('env','MYSQL_ROOT_PASSWORD') | default('admin', true) }}"mariadb_name: "{{ lookup('env','MYSQL_DATABASE') | default('etherpad', true) }}"
CHAPTER 3. WRITING APBS
53

3.2.8. Working With the Restricted SCC
When building an OpenShift Container Platform image, it is important that you do not have yourapplication running as the root user when at all possible. When running under the restriced securitycontext, the application image is launched with a random UID. This causes problems if your applicationfolder is owned by the root user.
A good way to work around this is to add a user to the root group and make the application folder ownedby the root group. See OpenShift Container Platform-Specific Guidelines for details on supportingarbitrary user IDs.
The following is a Dockerfile example of a node application running in /usr/src. This command wouldbe run after the application is installed in /usr/src and the associated environment variables set:
ENV USER_NAME=haste \ USER_UID=1001 \ HOME=/usr/src
RUN useradd -u ${USER_UID} -r -g 0 -M -d /usr/src -b /usr/src -s /sbin/nologin -c "<username> user" ${USER_NAME} \ && chown -R ${USER_NAME}:0 /usr/src \ && chmod -R g=u /usr/src /etc/passwdUSER 1001
3.2.9. Using a ConfigMap Within an APB
There is a temporary workaround for creating ConfigMaps from Ansible due to a bug in the Ansiblemodules.
One common use case for ConfigMaps is when the parameters of an APB will be used within aconfiguration file of an application or service. The ConfigMap module allows you to mount a ConfigMapinto a pod as a volume, which can be used to store the configuration file. This approach allows you toalso leverage the power of Ansible’s template module to create a ConfigMap out of APB paramters.
The following is an example of creating a ConfigMap from a Jinja template mounted into a pod as avolume:
mariadb_user: "{{ lookup('env','MYSQL_USER') | default('etherpad', true) }}"mariadb_password: "{{ lookup('env','MYSQL_PASSWORD') | default('admin', true) }}"etherpad_admin_password: "{{ lookup('env','ETHERPAD_ADMIN_PASSWORD') | default('admin', true) }}"etherpad_admin_user: "{{ lookup('env','ETHERPAD_ADMIN_USER') | default('etherpad', true) }}"etherpad_db_host: "{{ lookup('env','ETHERPAD_DB_HOST') | default('mariadb', true) }}"state: present
- name: Create hastebin config from template template: src: config.js.j2 dest: /tmp/config.js
- name: Create hastebin configmap
OpenShift Container Platform 3.9 Ansible Playbook Bundle Development Guide
54
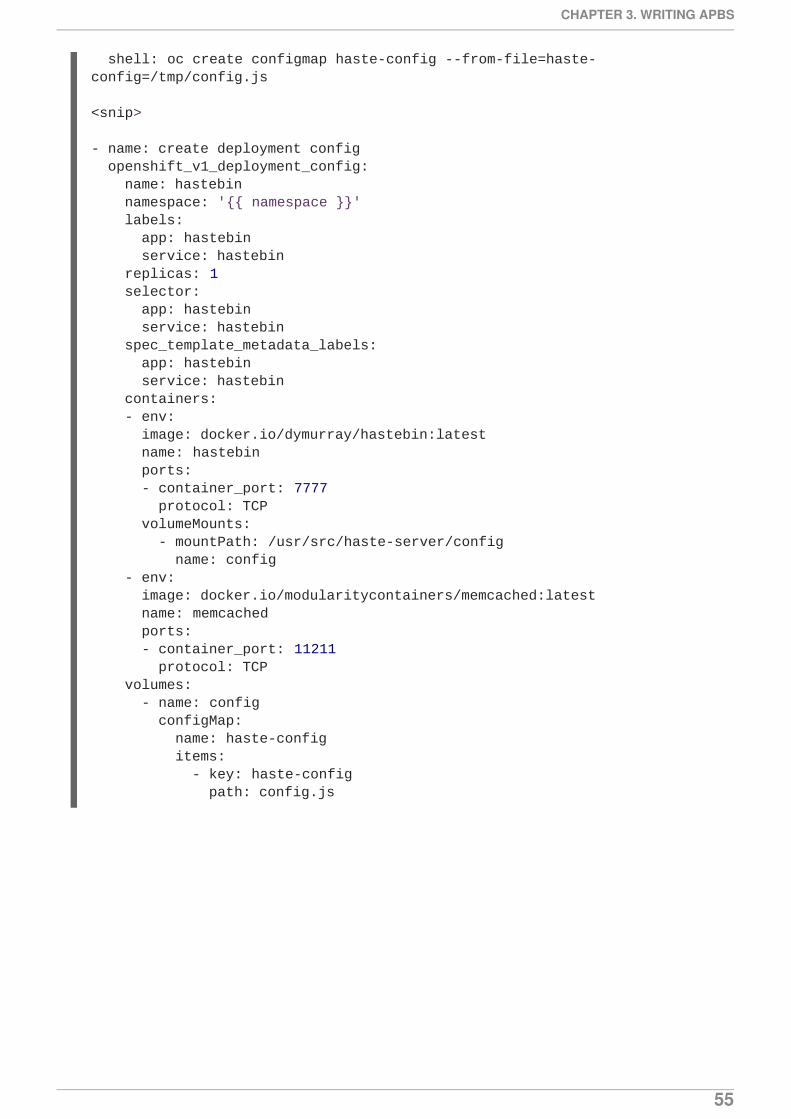
shell: oc create configmap haste-config --from-file=haste-config=/tmp/config.js
<snip>
- name: create deployment config openshift_v1_deployment_config: name: hastebin namespace: '{{ namespace }}' labels: app: hastebin service: hastebin replicas: 1 selector: app: hastebin service: hastebin spec_template_metadata_labels: app: hastebin service: hastebin containers: - env: image: docker.io/dymurray/hastebin:latest name: hastebin ports: - container_port: 7777 protocol: TCP volumeMounts: - mountPath: /usr/src/haste-server/config name: config - env: image: docker.io/modularitycontainers/memcached:latest name: memcached ports: - container_port: 11211 protocol: TCP volumes: - name: config configMap: name: haste-config items: - key: haste-config path: config.js
CHAPTER 3. WRITING APBS
55