online scheduling - registrar.umd.edu · f5 teachers - retrieves instructor update screen for...
TRANSCRIPT

OFFICE OF
THE
REGI STRAR
Course and
Classroom
Scheduling
Services
Scheduling
Contacts
301-314-8243
Suzanne Baer, Assistant
Tiffany Coates,
Assistant
Edith Shields,
Manager
1
Online Scheduling
Contents PART ONE: Navigating in SIS ................................................................................. 2
The Scheduling Office Menus ........................................................................................................... 2
Function Keys ....................................................................................................................................... 2
Screen Shortcuts .................................................................................................................................. 2
PART TWO: Course Scheduling ............................................................................. 3
Add or Delete a Course .................................................................................................................... 3
Add or Delete a Section .................................................................................................................... 8
Add or Break a Cross-list ................................................................................................................. 9
Class Meeting Times ........................................................................................................................... 10
Course Restrictions ............................................................................................................................ 11
Course Suffixes .................................................................................................................................... 12
Create a Special Topics Corse ......................................................................................................... 13
Cross-Listed vs. Shared ..................................................................................................................... 14
Error Messages and their Translations .......................................................................................... 15
Grading Method ................................................................................................................................... 16
Non-Print Notes .................................................................................................................................. 16
Repeatable Courses ............................................................................................................................ 18
Subterms & Non-standard Semester Dates ................................................................................. 19
Summer and Winter Terms.............................................................................................................. 21
Teacher Collect Process ................................................................................................................... 20
Web Enhanced Courses .................................................................................................................... 23
PART THREE: UMd Electronic Grades - UMEG .................................................... 23
For questions or assistance, please contact:
Course and Classroom Scheduling
Services
301-314-8243
OFFICE OF
THE
REGI STRAR
Course and
Classroom
Scheduling
Services
Scheduling
Contacts
301-314-8243
Suzanne Baer,
Assistant
Tiffany Coates,
Assistant
Edith Shields,
Manager

OFFICE OF
THE
REGI STRAR
Course and
Classroom
Scheduling
Services
Scheduling
Contacts
301-314-8243
Suzanne Baer, Assistant
Tiffany Coates,
Assistant
Edith Shields,
Manager
2
PART ONE: Navigating in SIS (CICS)
The Scheduling Office Menus
1) To log into CICS (SIS); choose “A” at the prompt; press Enter
2) In the next screen enter login and password; press
Enter
3) In the Production Main Menu screen, choose Online
Navigation Environment
4) In the CP-One Main Menu screen, choose Scheduling
Office Menu
5) In the CP-One Scheduling Office Menu screen,
choose Term Course Menu; the Term Course Menu
screen is where the options for online scheduling are
found.
Function Keys
F1 Help - Displays information about the processor currently in use.
F2 Clear - Clears information accessed on the screen.
F3 Return/Exit - Returns to previous menu or screen.
F4 Delete - Deletes course or section from the system.
F5 Teachers - Retrieves instructor update screen for multiple entries.
F6 Print - Prints copy displayed on screen.
F7 Previous Course/Section - Displays previous course/section.
F8 Next Course/Screen: Course (CO)
Screen Shortcuts Using these shortcuts can save some time. Press “F9” and type the appropriate command below.
In SIS ‘Update’ Screens
co .......................... to get to the course update screen
se ........................... to get to the section update screen
xl ........................... to create a cross-list
cn .......................... to create course notes (non-print notes)
te ........................... to add or update instructors and teaching assistants

OFFICE OF
THE
REGI STRAR
Course and
Classroom
Scheduling
Services
Scheduling
Contacts
301-314-8243
Suzanne Baer, Assistant
Tiffany Coates,
Assistant
Edith Shields,
Manager
3
In SIS ‘View’ Screens
go crs .................. view details at course level
crsnotes ............. view course notes
events ................. view a one-time event (can meet for multiple days)
go rm .................. view the details of a specific room
rmbook .............. view room schedules
rmstat ................ view the room conflicts under a specific prefix/dept.
restrl ................... view course restrictions
seats .................... viewing seats offered, issued and waitlist counts
go sec .................. view details at section level
secnotes ............ view section notes
trmresv .............. view a reservation (a full semester event)
ts ........................... view teacher schedules
tcs ......................... view teacher course summary
trackl ................... view listing of courses connected with a cluster
wl .......................... view waitlist by student id number
wlsec ................... view waitlist by course and section number
In SIS ‘Course Catalog’ Screens
apcrs ..................... Item ID - n/a ...... view approved/pending course information
apnotes ............... Item ID - de ....... view approved course description
apnotes ............... Item ID - ks ........ view Kuali prerequisites & restriction description
PART TWO: Course Scheduling
Add or Delete a Course
Course prefix, number, and title must be university approved.
For courses that do not have university approval, a pilot course (former one-term approvals) must
be entered into Testudo Curriculum Management by the department. Training in this system can be
arranged by contacting Mike Colson ([email protected]), Office of Academic Planning and Pro-
grams. If training can’t be arranged in time, email [email protected] to have the pilot course creat-
ed by Course and Classroom Scheduling Services.

OFFICE OF
THE
REGI STRAR
Course and
Classroom
Scheduling
Services
Scheduling
Contacts
301-314-8243
Suzanne Baer, Assistant
Tiffany Coates,
Assistant
Edith Shields,
Manager
4
Pilot Course Instructions for Testudo Curriculum Management Users
Below are procedures for handling courses that are requested for one‐term exceptions to be of-
fered pending approval (often referred to as “one‐term approvals”). We are now calling these one‐
term courses “Pilot” courses.
There are three situations where you would be working with a Pilot course:
1) You are creating a Pilot course for the first time.
2) You are requesting a new Pilot term for the Pilot course.
3) You want to make a Pilot course “permanent” (i.e., submit the course for VPAC ap-
proval).
1) Creating a Pilot. When requesting a Pilot course for the first time, use “Create a Course” from
the main page to enter in the essential information for the course (at this point, learning outcomes
and a syllabus are not required). Check the Pilot box on the page for Active Dates. After submitting
the proposal, you can contact the Scheduling Office and ask them to approve the proposal‐‐they will
“blanket approve” the proposal and make it effective for that one term.
2) Requesting an Additional Term for a Pilot. Instead of creating a new Pilot course in order to
add another term (which adds two unrelated instances of the same course), use “Find a Course”
from the main page to find the original Pilot course (the course will appear as “Retired” because it
has an end term). Once you find the course and select the course, select “Modify Course” to make
a modification to the original Pilot Course. On the Active Dates page, select a new Start Term, and
re‐check the Pilot Box (make sure that End Term is the same as the Start Term). Submit the course,
and contact Mike Colson ([email protected]) in the Office of Academic Planning and Programs for
approval to add another pilot term. If approved, Mike will forward the request to the Scheduling
Office for blanket approval.
3. Making a Pilot Course Permanent. Instead of creating a new Pilot course (which again would
add multiple, unrelated instances of the same course), use “Find a Course” from the main page to
find the original Pilot course (the course will appear as “Retired” because it has an end term). Once
you find and select the course, select “Modify Course” to make a modification to the original Pilot
Course. Make whatever changes you would like to make to the course. Be sure to add Learning
Outcomes and a syllabus unless it is not required for the course (e.g., a special topics course). On
the Active Dates page, the term that you select for the Start Term should be after the last Pilot
term. Make sure that the Pilot box is unchecked. Submit the proposal as you would any other
course modification proposal.
As #2 and #3 indicate, it is important that you are working with the same Pilot course as
opposed to creating a new course, because this will make sure that the Pilot is related to
each Pilot version as well as related to the permanent version of the course. This will be
very important when the Enrollment phase of the program is implemented.
Please contact the Mike Colson at [email protected] or 301‐405‐5626 if you have any
questions.

OFFICE OF
THE
REGI STRAR
Course and
Classroom
Scheduling
Services
Scheduling
Contacts
301-314-8243
Suzanne Baer, Assistant
Tiffany Coates,
Assistant
Edith Shields,
Manager
5
The following instructions are for hard coded course numbers (ending in 0-7) and not repeatable
numbers/soft coded numbers (ending in an 8 or 9).
1) Start on the command line (F9) and enter
‘go co.’ The course update screen should
look like this:
2) Enter the course prefix and number, and
press the tab key once. Enter the term and
press the enter key. Notice the message
“This is a NEW record, update fields and
press enter” at the bottom of the screen. It
should look like this:
Populate the remaining fields.
Tip: Remember that the default grading method for undergraduates is ‘Regular, Pass/Fail, or Audit
(RPA); for graduates, ‘Regular or Audit’ (RA). There are two alternate grading options as well - Reg-
ular (REG) and Satisfactory/Fail (S/F). However, in order to offer (S/F), the course must have been
approved for this specific grading option.
If you have done everything correctly, the
message at the bottom of the screen should
say: Make changes and press enter to update.
Press the enter key; your screen should
look like this:

OFFICE OF
THE
REGI STRAR
Course and
Classroom
Scheduling
Services
Scheduling
Contacts
301-314-8243
Suzanne Baer, Assistant
Tiffany Coates,
Assistant
Edith Shields,
Manager
6
3) Once you have completed the
course update screen move your cur-
sor to the command line (F9) and enter
‘go se.’ The section update screen will
appear and look like this (note that the
field for the section number appears in
red).
4) Enter the section number and press
the enter key The message:
This is a NEW record, update fields and
press ENTER
should now appear at the bottom of
the screen.
5) Enter the number of seats offered
and press the enter key. At this point,
The delivery method field is now in red
indicating information is missing. The
message: Delivery Method cannot be
left blank is appearing at the bottom of
the screen. The screen should look like
this.
6) The delivery method can be re-
trieved by entering a question mark
(?) in the DM field and then press
the enter key. The screen should
look like this.

OFFICE OF
THE
REGI STRAR
Course and
Classroom
Scheduling
Services
Scheduling
Contacts
301-314-8243
Suzanne Baer, Assistant
Tiffany Coates,
Assistant
Edith Shields,
Manager
7
7) This will direct you to
a menu screen listing
the four options. The
screen should like this.
Select a number choice
and press the enter key.
8) This brings you back
to the original section
update screen and you
can now enter the class
(LEC), meeting days
and times (MWF 10am-
10:50am), the location
(CSS 2416), and the
instructor’s UID
(100311020) and press
the enter key. This will
complete the process.
The to complete this
process. These last two
screens reflect the end
of the process.
Tip: If you are familiar with the delivery method codes, you would be able to skip going
through the menu and just enter the codes directly into the DM filed manually.

OFFICE OF
THE
REGI STRAR
Course and
Classroom
Scheduling
Services
Scheduling
Contacts
301-314-8243
Suzanne Baer, Assistant
Tiffany Coates,
Assistant
Edith Shields,
Manager
8
To Delete a Course:
1– Use the ‘go co’ command to get to the course update screen
2 - Break all cross-lists (may only be broken by the department offering the primary course - see ‘Break a
Cross-list in this publication) or contact Classroom Scheduling and Space Management
3 - Enter the course and the term (Semester) in the appropriate fields.
4 - Press F4 to delete; then F2 to confirm the deletion (or F12 to cancel).
Tip: a course deleted from the system automatically deletes all sections as well.
Add or Delete a Section
Screen: Section (SE)
To Add a Section:
1 - Enter the relevant information in the
course, term and section fields.
2 - For courses taught during the first or
second half of the semester only, enter 1 or
2 in the ‘Sub Trm’ field (summer courses
will usually have one of these numbers en-
tered). If the course has non-standard dates,
enter those dates in the ‘Dates’ field before
the section has been entered into the sys-
tem. A note will appear in the Schedule.
Leave this field blank if the course will be taught the entire semester. (For further information see
Subterms and Non-standard Dates in this publication.)
3 - Enter total number of seats offered in the ‘Offered’ field.
4 - Enter the limit as a percent in the ‘Limit’ field. The default is 100%; this value adjusts the number
of students allowed to enroll in a course at a particular time (ex: if there are 10 seats offered and
the limit is set at 90%, 9 students will be allowed to register for the course until the limit is reset).
5 - Enter “H” in ‘Stat’ field if the section should be on hold; otherwise leave blank. The room is held;
registration will not be allowed; section will not appear in the Schedule of Classes.
6 - In the ‘Cls’ field enter Lec for lecture, Lab for laboratory, or Dis for discussion.
Tip: If there are multiple lectures, labs or discussions, denote the additional meetings with a 2,
3...and so on (eg. Lec2...Lec3...etc.).
7 - Enter meeting times in respective field. The codes for days and times are as follows:
M = Monday, T = Tuesday, W = Wednesday, H = Thursday, F = Friday, S = Saturday, U = Sunday
If a class period exceeds 50 minutes, an end time must be provided. For example, if a class meets
from 9:00 to 9:50 am, enter “9”; if a class meets from 9:30-10:45 am, enter “930-1045.” If you do
not have all the information required for the days and times, enter TBA in both the ’Days and Times’
OFFICE OF
THE
REGI STRAR
Course and
Classroom
Scheduling
Services
Scheduling
Contacts
301-314-8243
Suzanne Baer, Assistant
Tiffany Coates,
Assistant
Edith Shields,
Manager
9
and ‘Room’ fields.
8 - Enter an alphabetic building code in the ‘Bldg’ field and a room number in the ‘Room’ field.
Leave both Bldg and Room fields blank if the Scheduling Office is to assign a room. Enter TBA in the
room field only if you do not need the Scheduling Office to locate and schedule a room; the TBA
designation signals Scheduling that a room is not needed.
Tip: If a “C” (conflict) appears in the RM STAT field:
Use F10 to show the course in conflict.
If the conflicting course is in your department, resolve the conflict.
If the course is outside your department, leave the information intact and the Scheduling Office
will resolve the conflict.
9 - If a section is shared with another section/course, note the course number in the Non-Print
Note screen and the Scheduling Office will make the modification.
10 - Enter the instructor’s UID or last name, first name (up to 9 characters) in the ’Teacher’ field.
To add additional instructors to a course, use the F5 key to get to the Instructor Update Screen. If
the name/ss# appears in red after entering and “no name found” appears at the bottom of the
screen, record the course and section numbers, and the instructor name and social security num-
ber in the ‘Non-Print Notes’ screen and the Scheduling Office will update.
11 - Enter the lead section number (if there is one) in the ‘Group’ field. This will automatically put
the lead section information into any additional sections grouped together (usually done with a
large lecture that has several discussion times).
Tip: Lecture information will automatically display on the additional sections.
12 - Enter “U” in the ‘Pub’ field if the section information should not be published.
To Delete a Section:
1 - Enter the Course and Term.
2 - Press F4 to delete; then F2 to confirm the deletion (or F12 to cancel).
3 - If there is only one section of a course offered, the delete should be processed at the course
level rather than the section level.
Tip: If a lead group section is deleted and the secondaries are to remain, the section following the
lead must serve as the new lead and the secondaries must be regrouped accordingly.
Add or Break a Cross-List
Screen: Cross-List (XL)
(For a full explanation of cross listing, see “Cross-Listed vs. Shared” in this publication.)
To add a cross-list
All information for the primary course must be entered in the ‘Course’ and ‘Section’ screens, and
all information for the secondary course must be entered in the ‘Course’ screen, before cross-
listing. Secondary courses must have the same information as the primary course (credits, content,
times, rooms, number of sections, instructors).

OFFICE OF
THE
REGI STRAR
Course and
Classroom
Scheduling
Services
Scheduling
Contacts
301-314-8243
Suzanne Baer, Assistant
Tiffany Coates,
Assistant
Edith Shields,
Manager
10
1 - In the XL screen, enter the semester in
the ‘Term’ field and the primary course
number in the ‘Primary Course’ field.
2 - Enter secondary course numbers.
3 - Press ‘Enter’
To Break a cross-list
1 - Only the department offering the primary course, or Course and Classroom Scheduling Services,
can break a cross-list.
2 - Enter the Term and Primary Course.
3 - Using the space bar, blank out any or all courses to be removed.
4 - Press ‘Enter’ to update.
5 - Go ‘co’ to delete the course (see section on deleting courses).
Class Meeting Times
"Contact hours" or "face time" The University of Maryland follows the Maryland Higher Educa-
tion Commission's policies on "contact hours," a shorthand term referring to the amount of time
required in various forms of education to earn credit. Contact hour requirements apply to both
undergraduate and graduate courses.
Quick rule of thumb: An easy-to-remember approximation of the policy for the regular academic
semester is that standard 3-credit lecture/discussion courses must meet three hours per week; la-
boratories require twice as many hours, and internships require three times as many hours. Online
courses must be comparable. Courses offered in non-standard formats must still meet MHEC re-
quirements, specifically that "one semester hour of credit will be awarded for:
A minimum of 15 hours, of 50 minutes each of actual class time, exclusive of registration, study
days, and holidays;
A minimum of 30 hours, of 50 minutes each of supervised laboratory or studio time, exclusive
of registration, study days and holidays;
A minimum of 45 hours, of 50 minutes each of instructional situations such as practica, inter-
ships, and cooperative education placements, when supervision is ensured and learning is docu-
mented."
This policy applies to all levels, including graduate, and is mandatory for academic accreditation. For further
information on this topic go to: www.vpac.ud.edu/policies.html.

OFFICE OF
THE
REGI STRAR
Course and
Classroom
Scheduling
Services
Scheduling
Contacts
301-314-8243
Suzanne Baer, Assistant
Tiffany Coates,
Assistant
Edith Shields,
Manager
11
Standard Class Times
Spring and Fall standard class meeting times:
Monday / Wednesday / Friday: 50 minutes, beginning on the hour - Ex: 10am-10:50am
Tuesday/Thursday: 8:00-9:15, 9:30-10:45, 11:00-12:15, 12:30-1:45, 2:00-3:15, 3:30-4:45
Non-standard Class Times
Any class meeting times other than those listed above (including classes that meet once a week) are
considered non-standard and require approval for an exception. The Student Information System
(SIS) will not accept non-standard times without prior approval. Justifications or approvals for non-
standard times from either the college office (for undergraduate courses) or the department chair/
program director for graduate courses) should be directed to [email protected].
Provost’s Guidelines
The Provost’s guidelines for the distribution of class times are as follows:
No more than 70% scheduled on MWF
No more than 45% scheduled on T-Th
At least 20% scheduled before 9am and after 3pm.
Course Restrictions
Restrictions on courses in the Schedule of Classes must be consistent with University catalogs.
By Permission Only
The course scheduling system allows users to choose from two types of permission. The permission
of department / instructor option blocks students from registering for the course without an electron-
ic stamp from the department. The permission of department / instructor option should not be
used as a primary means of restricting entry into the class, but should instead be used in conjunc-
tion with prerequisites (e.g., GEOL 102 or permission of instructor.)
The BPO restriction may be set under the following conditions:
For both Undergraduate and Graduate courses:
Permission of department as stated in the catalog course description.
Pre-requisite and/or co-requisite in catalog course description.
Other restriction in catalog course description: such as admission to program, or
completion of a test.
Course numbers ending in 8 or 9 (eg. ARTT 498).
For Undergraduate course only:
HONR or “H” suffixed courses.
386 (Experiential Learning) courses
“X” suffixed English courses where English is a second language.

OFFICE OF
THE
REGI STRAR
Course and
Classroom
Scheduling
Services
Scheduling
Contacts
301-314-8243
Suzanne Baer, Assistant
Tiffany Coates,
Assistant
Edith Shields,
Manager
12
For Majors Only
The For Majors Only restriction may be set under the following conditions:
Major course in selective admission / limited enrollment programs. Any department
that is approved as a participant in the Limited Enrollment Program is eligible to re-
quest a ‘For Majors Only’ restriction. Once notified, Course and Classroom Schedul-
ing Services can add a course note and set the restriction on a semester basis. (Note:
For this restriction to appear in the Undergraduate catalog, a course proposal must be sub-
mitted to the Vice President’s Advisory Committee (VPAC)).
Graduate courses
Class Level
300-level courses may require junior standing; 400-level courses may require senior standing.
Miniumum Grade / GPA
Courses requiring a minimum grade, or grade point average, must have prior approval from VPAC.
Action
Changes to restrictions must by approved by the PCC/VPAC. Please contact the representative
from your college/ school for information on the course approval process.
Course Suffixes
Adding a suffix to a course is a technique for offering two or more versions of a single approved
course and may be used to distinguish the following:
Audience
Limit the course to a specific group of students such as honors.
Ex: MATH 140H Calculus I (Formal Title)
Open only to general honors students (note within)
Content
Specify a topic (when permitted by course approval). Courses that allow suffixes for content distinction
must usually be approved for subtitle use. Subtitles supersede formal titles for student transcript records.
These courses usually end in 8 or 9 or are specific HONR, KNES or MUSC courses.
Ex: MATH 498F Selected Topics in Mathematics: Combination and Graphs (Formal Title)
Combination & Graphs (Subtitle)
Credit
Specify versions distinguished by variable credits (when permitted by course approval).
OFFICE OF
THE
REGI STRAR
Course and
Classroom
Scheduling
Services
Scheduling
Contacts
301-314-8243
Suzanne Baer, Assistant
Tiffany Coates,
Assistant
Edith Shields,
Manager
13
Create a Special Topics Course
Screen: CO
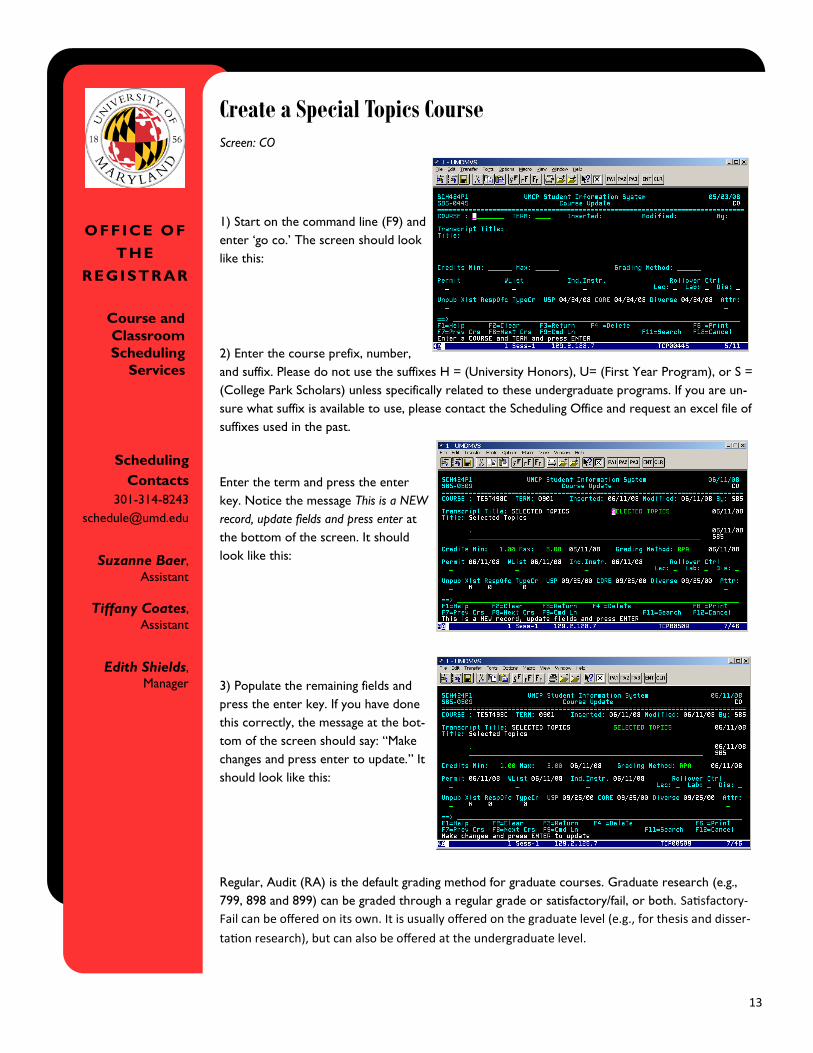
1) Start on the command line (F9) and
enter ‘go co.’ The screen should look
like this:
2) Enter the course prefix, number,
and suffix. Please do not use the suffixes H = (University Honors), U= (First Year Program), or S =
(College Park Scholars) unless specifically related to these undergraduate programs. If you are un-
sure what suffix is available to use, please contact the Scheduling Office and request an excel file of
suffixes used in the past.
Enter the term and press the enter
key. Notice the message This is a NEW
record, update fields and press enter at
the bottom of the screen. It should
look like this:
3) Populate the remaining fields and
press the enter key. If you have done
this correctly, the message at the bot-
tom of the screen should say: “Make
changes and press enter to update.” It
should look like this:
Regular, Audit (RA) is the default grading method for graduate courses. Graduate research (e.g.,
799, 898 and 899) can be graded through a regular grade or satisfactory/fail, or both. Satisfactory-
Fail can be offered on its own. It is usually offered on the graduate level (e.g., for thesis and disser-
tation research), but can also be offered at the undergraduate level.
OFFICE OF
THE
REGI STRAR
Course and
Classroom
Scheduling
Services
Scheduling
Contacts
301-314-8243
Suzanne Baer, Assistant
Tiffany Coates,
Assistant
Edith Shields,
Manager
14
Tip: Remember that the default grading method for undergraduates is RPA; for graduates, RA.
There are two alternate grading options: Regular (REG) and Satisfactory/Fail (S/F).; however, in or-
der to offer the grading option of (S/F) the course must have been approved for this specific grading
option.
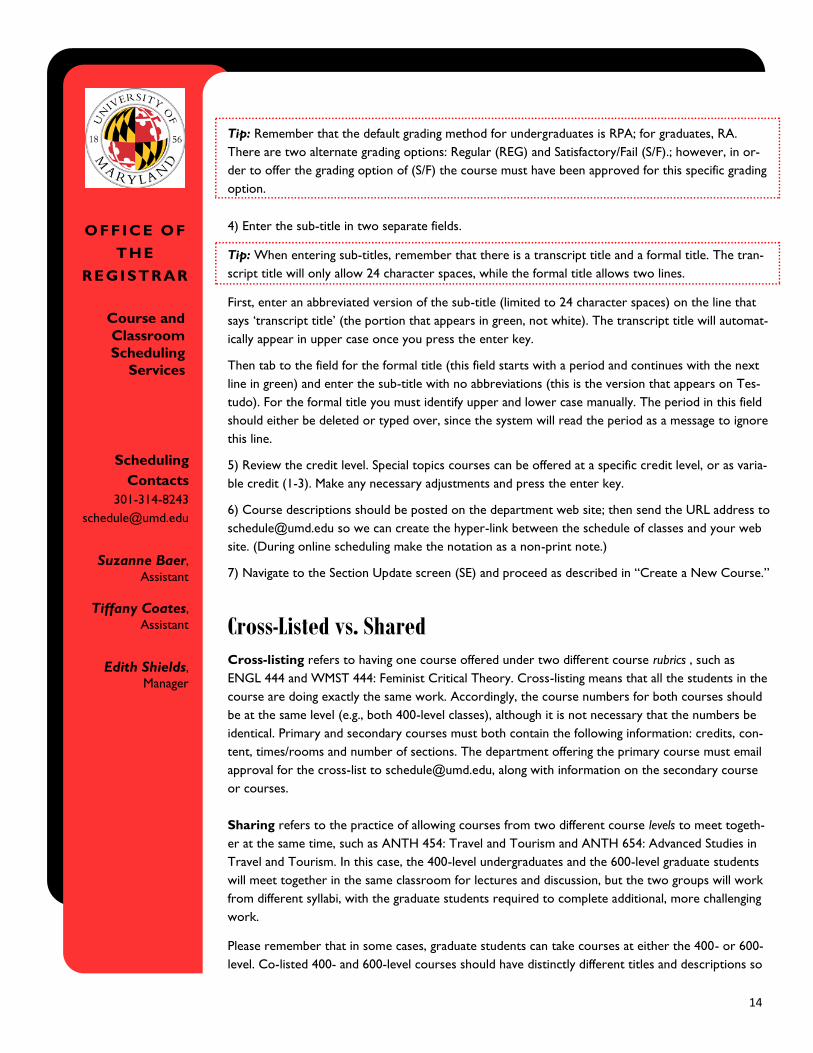
4) Enter the sub-title in two separate fields.
Tip: When entering sub-titles, remember that there is a transcript title and a formal title. The tran-
script title will only allow 24 character spaces, while the formal title allows two lines.
First, enter an abbreviated version of the sub-title (limited to 24 character spaces) on the line that
says ‘transcript title’ (the portion that appears in green, not white). The transcript title will automat-
ically appear in upper case once you press the enter key.
Then tab to the field for the formal title (this field starts with a period and continues with the next
line in green) and enter the sub-title with no abbreviations (this is the version that appears on Tes-
tudo). For the formal title you must identify upper and lower case manually. The period in this field
should either be deleted or typed over, since the system will read the period as a message to ignore
this line.
5) Review the credit level. Special topics courses can be offered at a specific credit level, or as varia-
ble credit (1-3). Make any necessary adjustments and press the enter key.
6) Course descriptions should be posted on the department web site; then send the URL address to
[email protected] so we can create the hyper-link between the schedule of classes and your web
site. (During online scheduling make the notation as a non-print note.)
7) Navigate to the Section Update screen (SE) and proceed as described in “Create a New Course.”
Cross-Listed vs. Shared
Cross-listing refers to having one course offered under two different course rubrics , such as
ENGL 444 and WMST 444: Feminist Critical Theory. Cross-listing means that all the students in the
course are doing exactly the same work. Accordingly, the course numbers for both courses should
be at the same level (e.g., both 400-level classes), although it is not necessary that the numbers be
identical. Primary and secondary courses must both contain the following information: credits, con-
tent, times/rooms and number of sections. The department offering the primary course must email
approval for the cross-list to [email protected], along with information on the secondary course
or courses.
Sharing refers to the practice of allowing courses from two different course levels to meet togeth-
er at the same time, such as ANTH 454: Travel and Tourism and ANTH 654: Advanced Studies in
Travel and Tourism. In this case, the 400-level undergraduates and the 600-level graduate students
will meet together in the same classroom for lectures and discussion, but the two groups will work
from different syllabi, with the graduate students required to complete additional, more challenging
work.
Please remember that in some cases, graduate students can take courses at either the 400- or 600-
level. Co-listed 400- and 600-level courses should have distinctly different titles and descriptions so

OFFICE OF
THE
REGI STRAR
Course and
Classroom
Scheduling
Services
Scheduling
Contacts
301-314-8243
Suzanne Baer, Assistant
Tiffany Coates,
Assistant
Edith Shields,
Manager
15
that it is evident in the Graduate Catalog that these are substantively different courses with different
expectations.
Error Messages and their Translations
This Course is not in the Term database
This message appears when the course update screen (CO) has not been created. Please update this
screen before creating/entering the section information.
This is not an approved course
This message appears when the course number being entered has not been approved by the Vice
President’s Advisory Committee (VPAC). A course proposal should be initiated as soon as possible.
In the meantime, a request to the scheduling office ([email protected]) can be made for a pilot
course (formerly referred to as one-term pending status). Additional approval is required if this ex-
ception has already been used; contact Michael Colson ([email protected]) in the Office of Aca-
demic Planning and Programs in order to extend the pilot course for an additional semester.
TBA designation entered in the wrong field signals an incomplete (I) scheduling process
The TBA designation should be entered in the ROOM column. If the TBA designation is mistakenly
en- tered in the BLDG column, as in the Example
1 below, the letter ‘I’ will appear in the RM STAT column. An incomplete
status signals the Scheduling Office to assign a classroom to the section. Correct placement of the
TBA designation is illustrated in Example 2 below.
This room does not exist for this term
This message appears when a room that is not part or our room inventory, sometimes referred to
as a non-database room, is entered
into the section update screen. In
order to process a section that will
meet in a non-database room, the RM
STAT field should be populated with
the letter ‘N’ and then press the en-
ter key. The screen below demon-
strates the completed screen.
Example 1 Example 2

OFFICE OF
THE
REGI STRAR
Course and
Classroom
Scheduling
Services
Scheduling
Contacts
301-314-8243
Suzanne Baer, Assistant
Tiffany Coates,
Assistant
Edith Shields,
Manager
16
Grading Method
Regular, Pass-Fail, Audit (RPA) is the default grading method for undergraduate courses. Aca-
demic Affairs and the Office of the Registrar strongly recommend the use of this grading method in
all undergraduate course proposals to maintain the greatest flexibility for the department, as it al-
lows the Dean to permit a late change in grading method (e.g., to Audit) in the case of a student
emergency such as grave illness or injury. Pass-Fail and Audit options may be offered or restricted at
the discretion of the department on a semester-by-semester basis, so approval of these options
does not automatically require the department to offer them.
Pass-Fail is a limited undergraduate grading method option for students. Graduates are not eligible
to receive this grading option. Pass-Fail cannot be offered by itself but is offered with Regular or
Regular, Audit. See the Undergraduate Catalog section on Registration, Academic Requirements and Regulations for
additional restrictions on Pass-Fail.
Regular, Audit (RA) is the default grading method for graduate courses. This grading method
allows an instructor to assign a regular grade (A, B, C, D, or F) or a satisfactory / fail grade. Howev-
er, grades must be assigned consistently within a course / grade sheet and not a mixture of both.
Non-print Notes
Screen: Course Notes Updates (CN)
TIP: Prior to entering new notes; please review the current information that was rolled over from
the previous semester. The following screens in sis (crsnotes, secnotes) will help you review the
information. If the note is correct - it is not necessary to re-enter the same information as a non-
print note.
The following instructions are for entering a non-print note. This option is located within the course
note screen (CN). Listed below are examples of when you might use a non-print note.
Any message or special instruction that should be brought to the attention of Course and
Classroom Scheduling Services.
Documenting a shared or cross-listed course by placing the notation under the primary course;
the notation does not need to be duplicated under the secondary course.
New course and/or section notes.
Request a specific room and/or equipment.
Tech equipped room is required; please remember to enter this as a non-print note even f the
class is currently scheduled in a technology classroom.
A room with moveable seating vs. fixed seating (activity groups)
Instructors’ health issues (low
mobility, limited vision/hearing,
allergies to chalk).
White board will be required.
Special equipment, demonstra-
tions with chemical or fragile
materials that are not transporta-
ble to other locations.
Document any web-technology (ELMS)
to be used for classes.
Requests to add a web link for course
specific websites or syllabi.

OFFICE OF
THE
REGI STRAR
Course and
Classroom
Scheduling
Services
Scheduling
Contacts
301-314-8243
Suzanne Baer, Assistant
Tiffany Coates,
Assistant
Edith Shields,
Manager
17
Requesting changes to current cours-
es and/or section notes. (If there are
no changes additional notes are not
necessary.)
1) The course notes update screen will
appear blank and no menu will appear
until the course and term information
have been entered.
2) Enter the course prefix and number,
press the tab key once, enter the term,
and press the enter key. The screen
should now look like this:
3) Notice the message, “Place cursor un-
der Note Type and press enter to edit”,
below the listing of the functions keys.
Place your cursor on ‘NO Non-Print
Note’ and press the enter key. The
screen should now look like this:
4) Type your message and press the en-
ter key. If your message will use more
than one line keep typing as you would in
any other document. Avoid beginning any
line with a period (.) - this tells the sys-
tem to ignore the line. Once you have
completed your note press the enter key.
In the example at right, notice how the
word “number” is separated into two
lines.
The next step demonstrates how to adjust formatting.
5) Entering the WW command as illustrated below left allows word-wrap and fixes split words.
Frequently used prefix commands for non-print notes, and their instructions, are as follows:

OFFICE OF
THE
REGI STRAR
Course and
Classroom
Scheduling
Services
Scheduling
Contacts
301-314-8243
Suzanne Baer, Assistant
Tiffany Coates,
Assistant
Edith Shields,
Manager
18
FF -- marks a block for formatting. After the block has been marked, extra spaces are re-
moved, word spacing is maximized, and words are hyphenated appropriately. The length of the
resulting lines is as close as possible to the right margin defined by the 'RMARGIN' command
(see below). The left margin cannot be altered.
RMARGIN -- To format text with leading blanks, just set RMARGIN to less than the maximum
length, format the block, and use the block shift commands (prefix commands '))' or '>>') to
move the text to the right. The indentation of the first line of the block will remain after the
block is formatted.
Note: If line(s) need to be split in order for them to remain within the RMARGIN boundary and
there is not enough room in the file to add a line, the only formatting that will occur on the line
will be the deletion of extraneous spaces.
R -- replicates the line n times after the marked line
RR -- replicates the text within the block after the last line of the block
S -- splits the line at the first occurrence of the character '/' in the line
/ -- makes the marked line the current line
D -- deletes a specified line starting at the marked line
DD -- deletes the block of text in between the 'DD' pair
CC -- copies the block of text in between the 'CC' pair to the specified target
I -- inserts additional lines after the marked line; example: i3 = three additional lines
IB -- inserts additional lines above first line of text
6) Once you have completed the non-print note press the F3 key to exit the screen.
Repeatable Courses
Repeatable courses are those in which a student may enroll for credit multiple times when course
content differs. Repeatable courses are either (1) standard academic elements such as colloquia or
thesis research, or (2) umbrella special topics courses through which new courses are piloted or
discrete iterations of a broad theme are offered.
On the University of Maryland College Park campus, all repeatable courses must use a number end-
ing in "8" or "9," such as ENSP399: Special Topics in Environmental Science and Policy. Individual
topics are then differentiated from each other by adding a letter suffix to the course number (e.g.,
ENSP399A: Special Topics in Environmental Science and Policy: Introduction to Environmental Law).
Certain letter suffixes should be avoided because they are used to designate special sections dedi-
cated to particular academic programs, such as Honors (H), College Park Scholars (S), or sections of
English courses designed for students for whom English is a second language (X).

OFFICE OF
THE
REGI STRAR
Course and
Classroom
Scheduling
Services
Scheduling
Contacts
301-314-8243
Suzanne Baer, Assistant
Tiffany Coates,
Assistant
Edith Shields,
Manager
19
Subterms and Non-standard Semester Dates
Subterm fields should be populated when the class will not meet for the full semester or when the
start and/or end dates are non-standard. Incorrect semester dates can impact classroom availability.
Additionally, the related semester dates should be adjusted when necessary. In this case, when we
refer to non-standard dates it is in reference to the semester dates or the first and last day of class.
For example:
Full-Semester: 01/26/09 – 05/12/09
Subterm 1: 01/26/09 – 03/14/09
Subterm 2: 03/15/09 – 05/12/09
1) Enter the course information in the
course update screen (CO) first (if neces-
sary), then go directly to the section update
screen (SE). Notice that seats offered is
zero (0) and the message at the bottom of
the screen says “This is a NEW record, up-
date fields and press ENTER.” It should look
like this.
2) Enter the number of seats that are being
offered and press enter to create this sec-
tion. This is the minimum amount of data entry needed to establish a section. If you are not sure of
the number of seats being offered, enter 1.
3) Notice that the default dates near the bottom of the screen reflect the full semester (Example 1).
If the class is being offered in either the first or second half of the semester, enter subterm code 1
or 2. Notice that the default dates change once a subterm is entered (Examples 2 and 3). If your
class meets according to non-standard semester dates, enter those dates in the field to the left of
the default (Example 4).
Example 1 Example 2
Example 3 Example 4
OFFICE OF
THE
REGI STRAR
Course and
Classroom
Scheduling
Services
Scheduling
Contacts
301-314-8243
Suzanne Baer, Assistant
Tiffany Coates,
Assistant
Edith Shields,
Manager
20
Tip: If dates are not recorded accurately it could create a room conflict.
If this does not describe your situation please continue to the next step in these instructions.
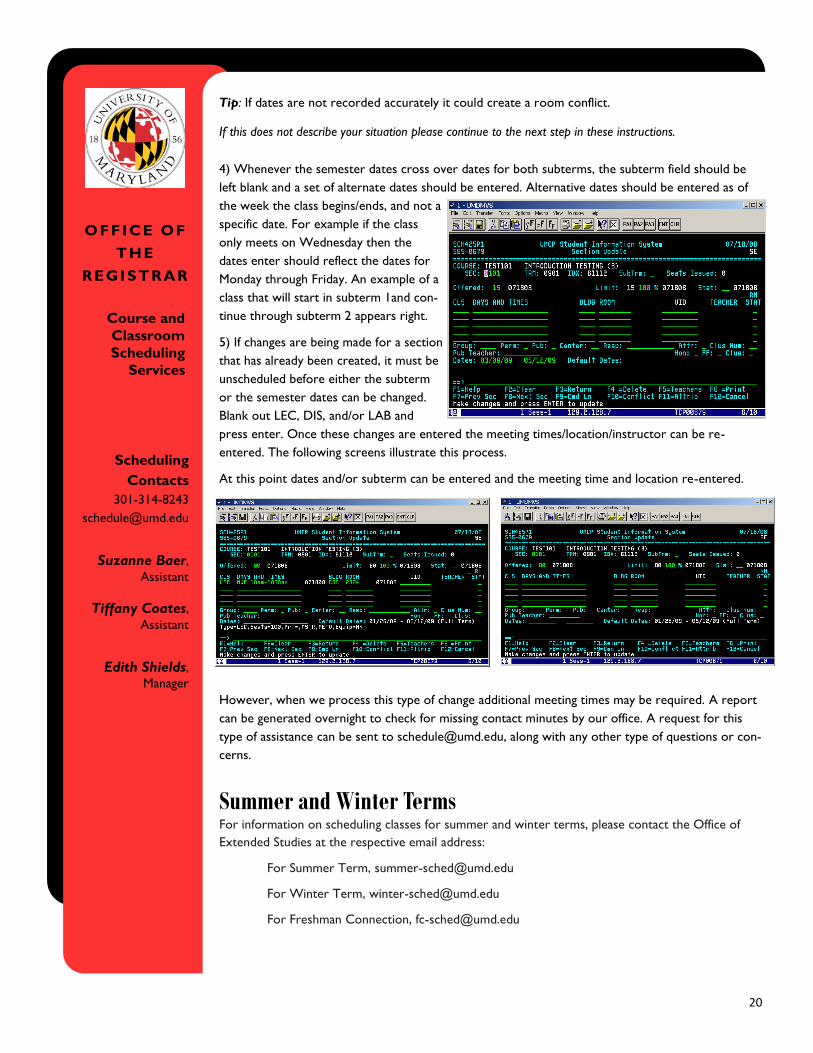
4) Whenever the semester dates cross over dates for both subterms, the subterm field should be
left blank and a set of alternate dates should be entered. Alternative dates should be entered as of
the week the class begins/ends, and not a
specific date. For example if the class
only meets on Wednesday then the
dates enter should reflect the dates for
Monday through Friday. An example of a
class that will start in subterm 1and con-
tinue through subterm 2 appears right.
5) If changes are being made for a section
that has already been created, it must be
unscheduled before either the subterm
or the semester dates can be changed.
Blank out LEC, DIS, and/or LAB and
press enter. Once these changes are entered the meeting times/location/instructor can be re-
entered. The following screens illustrate this process.
At this point dates and/or subterm can be entered and the meeting time and location re-entered.
However, when we process this type of change additional meeting times may be required. A report
can be generated overnight to check for missing contact minutes by our office. A request for this
type of assistance can be sent to [email protected], along with any other type of questions or con-
cerns.
Summer and Winter Terms For information on scheduling classes for summer and winter terms, please contact the Office of
Extended Studies at the respective email address:
For Summer Term, [email protected]
For Winter Term, [email protected]
For Freshman Connection, [email protected]

OFFICE OF
THE
REGI STRAR
Course and
Classroom
Scheduling
Services
Scheduling
Contacts
301-314-8243
Suzanne Baer, Assistant
Tiffany Coates,
Assistant
Edith Shields,
Manager
21
The Teacher Collect Process Screen: Teacher Collect (TE)
The Teacher Collect process allows the entry of personnel who are either directly or indirectly involved
in the delivery of instructional services (including faculty, teaching assistants, adjuncts, course manag-
ers, teaching administrators).
Benefits from completing this process are:
Allows the instructor of record to grant access to class rosters and grade sheets, and the ability to
delegate data entry, to a teaching assistant or other instructor; allows access to class rosters for
all others.
Accurate workload credit in the faculty workload reports as identified by the workload percentages
Electronic key card entry to the University’s technology classrooms (when entered three weeks
prior to the beginning of the semester).
Designate individual(s) who should be included in the online evaluation process.
Getting Started
Teacher Collect must be updated using the
student information system (SIS) 3270 cli- ent
via VPN. Do not update instructor information us-
ing the web version of SIS. To access the
Teacher Collect screen (TE), type ‘go TE’ on
the command line [F9] in SIS. Fill in the se-
lection criteria across the top of the
screen as follows:
Prefix..................... The course prefix you are processing, e.g., BIOL
Term ..................... The term you are processing, e.g.., Fall 2008 = 0808, Spring 2009 = 0901
Sub-term.............. Set to ‘B’ For both Fall and Spring; Set to ‘1’ or ‘2’ for Summer sessions
Missing .................. Enter ‘Y’ if you want to see only those courses/sections which have no Instructor
entered; enter ‘N’ if you want all sections of all courses being offered by your department this term.
For this procedure, we suggest using ‘N’ to see all sections of your courses. (Held and Canceled sec-
tions will not show.)
Seats Issued ........ Enter ‘Y’ if you want the screen to show only those sections with enrollments;
Enter ‘N’ if you want to see all open sections, regardless of whether or not students are registered
in them. We suggest using ‘N’ most of the time.
Ind Instr ................ Enter ‘Y’ to see all of the faculty ‘section numbers’ associated with your individual
Instruction courses. Enter ‘N’ to suppress those sections. We suggest using ‘N’ most of the time.
Tip: When evaluating your faculty involvement in Individual Instruction, use Y for both individual
instruction (Ind Instr) and Seats Issued ; then you will only see those Individual Instruction sections
in which students are enrolled for the given term. This must be done before the official Freeze date.
FID ......................... Enter ‘N’ to have the screen reflect the UID (University Identification Number);
OFFICE OF
THE
REGI STRAR
Course and
Classroom
Scheduling
Services
Scheduling
Contacts
301-314-8243
Suzanne Baer, Assistant
Tiffany Coates,
Assistant
Edith Shields,
Manager
22
Enter ‘Y’ to have the screen reflect the FID (Faculty Identification Number/Social Security Number).
We suggest using ‘N’ most of the time.
Once you are finished entering your selection criteria, hit Enter and the processor will list all of the
courses your department is offering in the given term. Move your cursor from section to section,
course to course, correcting the UID’s/FID’s as necessary.
Instructor Update
To enter more than one teacher per class, put your cursor on the class and use the F5 function key
to move to the Instructor Update screen. When you are finished, use F3 to return to the Teacher
Collect (TE) screen.
Function indicates the type of relationship between the given employee (UID/FID) and the associat-
ed class. Every lead class (Lecture or stand-alone Lab) must have at least one Instructor of Record
assigned to it. If only one UID/FID is entered for a given class, this person will automatically default
to Instructor of Record. You may enter as many different UIDs/FIDs per class as you need in order to
properly cover all of those associated with that class.
Instructional Functions:
Instructor of Record ......... Published instructor, usually the lecturer. Administrates the curricular
aspects of the given section; is responsible for the grades of the section. To be used only with Lec-
ture classes and stand-alone Labs. (TA status and can be given access to enter grades.)
Other Instructor ................ Not published, but still receives a portion of instructional credit for
workload calculations according to the amount recorded in Teaching Percent
Lab/Discussion Leader ..... Lab or Discussion leaders on secondary Lab or Discussion classes; not to
be used for the leader of stand-alone Labs
Non-Instructional Functions*:
DSS Aid ......................... Non-instructional, supports DSS student(s), e.g.; a translator for hearing im-
paired.
Non-teaching Course Manager ..... Administrates non-instructional aspects of the course, such as
staffing and equipping labs, etc.; usually only associated with large, lecture/lab format courses.
Grader ........................... Non-instructional assistant assigned duties such as test-scoring, reading pa-
pers, etc.
Technical Support ..... Non-instructional student, assists with instructional technology
Course Advisor ........... Non-instructional faculty, mentors individual students enrolled in certain
courses.
*No electronic grade access.
Percent of Instruction
Percent of Instruction (Pct Inst) indicates the percentage of workload consideration assigned to the
given Instructor (UID/FID). Where there is only one instructor, percent of instruction defaults to
100%. Where there are multiple instructors, percent of instruction is evenly distributed among
Instructors of Record and Other Instructors. If the percentage needs to be changed after the initial

OFFICE OF
THE
REGI STRAR
Course and
Classroom
Scheduling
Services
Scheduling
Contacts
301-314-8243
Suzanne Baer, Assistant
Tiffany Coates,
Assistant
Edith Shields,
Manager
23
setting, please send your requests to [email protected].
Profile Codes
Nearly all Profile indicators are derived automatically from official UM personnel records. You do
not need to enter any profile codes; they are for informational purposes only. A balances program
runs against the University’s PHR data and sets the appropriate profile codes as follows:
Faculty ................................... Has a current active appointment in the Academic Resource System; in-
cludes both tenure/tenure track and non-tenure track instructional personnel
Special Instructor .............. Visiting faculty; Consortium; non-paid, etc.
Administrator ..................... UM staff administrator also serving as a course instructor
Confirmed TA .................... UM graduate student with an official assistantship
Web Enhanced Courses
A non-print note should be created to document web enhanced courses. Please include the level of
technology and the percentage of class time for web and classroom. For example, one class meeting
maybe taught entirely on-line and a classroom not necessary for that amount of time.
PART THREE: U of Md Electronic Grades - UMEG
Using UMEG www.umeg.umd.edu
Services Available from UMEG:
View rosters for your courses
Submit and review your grades, both early warning (midterm) and final grades
Make grading corrections
Download class rosters to your email account
Notify the registrar electronically of non-attending students
Download student e-mail addresses
Download class waitlists to your e-mail account
Change your PIN
Update your e-mail address
1 - Log into UMEG (if you have trouble logging in, contact the UMEG Helpline at x48267)
2 - Choose from the following services listed:
Electronic Rosters
Enter Course and Section Number

OFFICE OF
THE
REGI STRAR
Course and
Classroom
Scheduling
Services
Scheduling
Contacts
301-314-8243
Suzanne Baer, Assistant
Tiffany Coates,
Assistant
Edith Shields,
Manager
24
Choose option: view roster, view waitlist, download either to e-mail
Report non-attending students: choose Verify Roster. (Students attending class who are
not on the roster should contact the Office of the Registrar immediately: 301-314-
8240.)
Electronic Grades
Choose option: enter grades for a course, review grades for a course, correct a sub-
mitted grade
SIS/UMEG> ELMS/Canvas Role Mapping
Once entered to the scheduling system, the following UMEG roles are automatically given a role
(“mapped”) in ELMS (http://elms.umd.edu).
Important: Please enter UMEG roles as soon as possible because it can take up to two days for the
system to enter the roles in ELMS. Until that occurs, the individuals will not be able to request or
access their ELMS courses.
Tip: Be sure you are in the correct semester when using the services listed below
UMEG Role
Code
UMEG Role ELMS Roles*
1 Instructor of Record Teacher
2 Other Instructor Co-Instructor
3 Lab/Discussion Leader (aka TA) TA
4 DSS Aid Observer
5 Non-teaching Crs Mgr Course Manager
6 [Not visible in OIT’s UMEG view] No mapping/no access
7 Grader Grader
8 Technical Support Designer
9 Course Advisor Instructional Colleague
10, 11, 12 [Not visible in OIT’s UMEG view] No mapping/no access

OFFICE OF
THE
REGI STRAR
Course and
Classroom
Scheduling
Services
Scheduling
Contacts
301-314-8243
Suzanne Baer, Assistant
Tiffany Coates,
Assistant
Edith Shields,
Manager
25
* Elms Roles: explanation of access to ELMS
Instructor: Access to all ELMS features.
TA: Access to all ELMS course building and grading features.
Grader: Only has access to grading features.
Course Builder: Only has access to course building features; no access to gradebook or
grading features.
** Designer Faculty may also email [email protected] to request that we
manually add someone to their ELMS course as a Course Builder, if the person
does not have an scheduled role in UMEG.