online manualgdlp01.c-wss.com/gds/7/0300021957/01/printing_and...borderless printing only supports...
TRANSCRIPT

MX450 series
Online Manual
PrintingCopying
English

Printing Printing from a Computer
Printing with Application Software that You are Using (Printer Driver) Printing Using the Operation Panel of the Machine
Printing Template Forms Such As Lined Paper or Graph Paper Printing from a Bluetooth Compliant Device
Printing from Mobile Phone via Bluetooth Communication About Bluetooth Communication
Handling Precautions Preparation to Use the Bluetooth Unit Printing Data via Bluetooth Communication Basic Procedure for Printing via Bluetooth Communication Bluetooth Settings Specifications

Printing from a Computer Printing with Application Software that You are Using (Printer Driver)

Printing Using the Operation Panel of the Machine Printing Template Forms Such As Lined Paper or Graph Paper

About Bluetooth Communication Handling Precautions Preparation to Use the Bluetooth Unit Printing Data via Bluetooth Communication Basic Procedure for Printing via Bluetooth Communication Bluetooth Settings Specifications

Copying
Making Copies Basic Setting Items Reducing or Enlarging a Copy About Special copy Menu Copying Two Pages to Fit onto a Single Page Copying Four Pages to Fit onto a Single Page Copying Thick Originals Such as Books Copying without Borders Collated Copying

Printing with Application Software that You are Using (PrinterDriver)
Printing with Easy Setup Basic Various Printing Methods Changing the Print Quality and Correcting Image Data Overview of the Printer Driver Updating the Printer Driver

Printing with Easy SetupThe simple setup procedure for carrying out appropriate printing on this machine is as follows:
1. Check that the machine is turned onConfirming that the Power Is On
2. Load paper on the machineLoading Paper
3. Select the printerSelect your model from the Printer list in the Print Dialog.
Print Dialog
Note Click Show Details ( (the disclosure triangle)) to switch the Setup window to the detailed
display.
4. Select the paper sizeFor Paper Size, select the paper size to be used.If necessary, set the number of copies, the pages to be printed, and the orientation.

5. Select Quality & Media from the pop-up menu
6. Select the media typeFor Media Type, select the same paper type loaded in the machine.

7. Select the print qualityFor Print Quality, select High, Standard, or Fast according to your purpose.
Important The print quality settings that can be selected may differ depending on a printing profile.
8. Complete the setupClick Print.When you execute print, the document will be printed in accordance with the type and size of themedia.
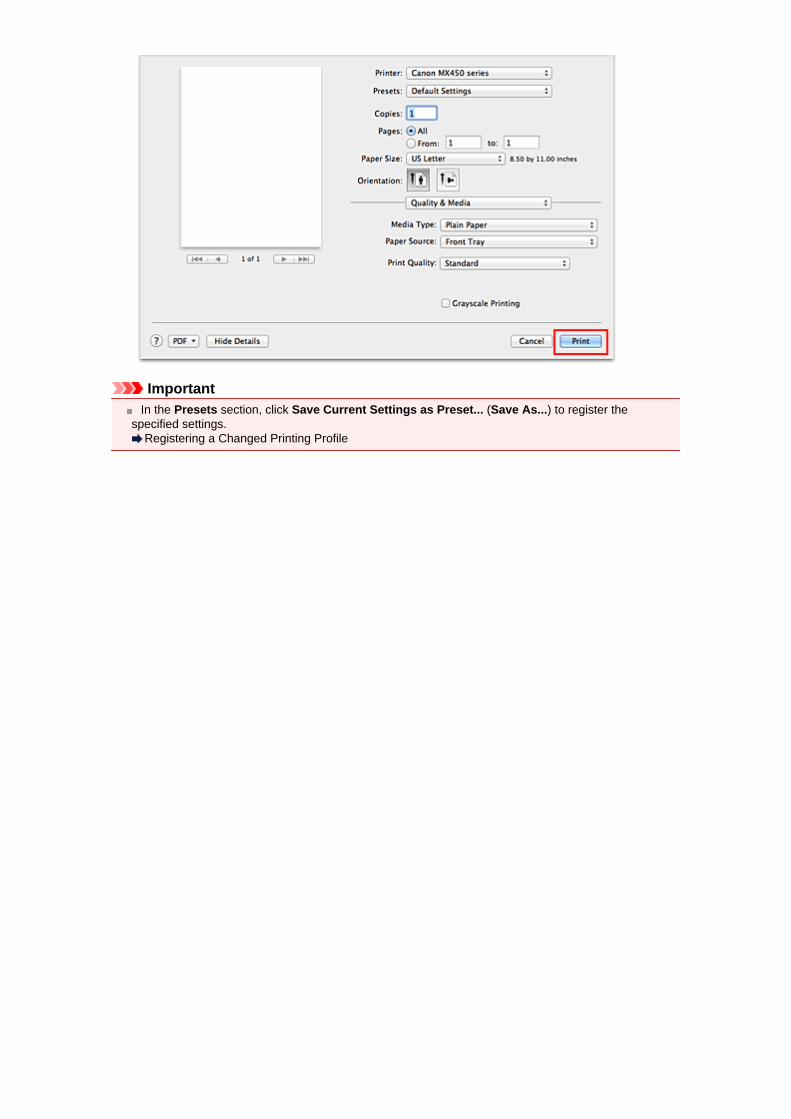
Important In the Presets section, click Save Current Settings as Preset... (Save As...) to register the
specified settings.Registering a Changed Printing Profile

Setting the Media Type with the Printer DriverWhen you use this machine, selecting a media type that matches the print purpose will help you achievethe best print results.You can use the following media types on this machine.
Commercially available papersMedia name Media Type in the printer driver
Plain Paper (including recycled paper) Plain PaperEnvelopes Envelope
Canon genuine papers (Photo Printing)Media name <Model No.> Media Type in the printer driver
Photo Paper Pro Platinum <PT-101> Photo Paper Pro PlatinumGlossy Photo Paper "Everyday Use" <GP-501> Glossy Photo PaperPhoto Paper Glossy <GP-502> Glossy Photo PaperPhoto Paper Plus Glossy II <PP-201> Photo Paper Plus Glossy IIPhoto Paper Pro Luster <LU-101> Photo Paper Pro LusterPhoto Paper Plus Semi-gloss <SG-201> Photo Paper Plus Semi-glossMatte Photo Paper <MP-101> Matte Photo Paper
Canon genuine papers (Business Letter Printing)Media name <Model No.> Media Type in the printer driver
High Resolution Paper <HR-101N> High Resolution Paper
Canon genuine papers (Original Products)Media name <Model No.> Media Type in the printer driver
T-Shirt Transfers <TR-301> T-Shirt TransfersPhoto Stickers <PS-101> Glossy Photo Paper
Various Printing Methods Setting the Number of Copies and Printing Order Setting the Stapling Margin Execute Borderless Printing Scaling the Printing to Fit the Paper Size Scaled Printing Page Layout Printing Printing on Postcards Displaying the Print Results before Printing Setting Paper Dimensions (Custom Size)

Setting the Number of Copies and Printing Order
Collate pages + Reverse Collate pages + Normal Reverse
The procedure for specifying the number of copies and printing order is as follows:
1. Specify the number of copies to be printedSpecify the number of copies to print from the Copies in the Print Dialog.
2. Select Paper Handling from the pop-up menu
3. Check the Collate pages check box when you are specifying multiple copies in theCopies boxCheck the Collate pages check box to print all the pages of a single copy together.Uncheck this check box to print all pages with the same page number together.
4. Specify the print orderCheck Page Order.When you select Automatic or Reverse, printing starts from the last page.When you select Normal, printing starts from the first page.

5. Complete the setupClick Print.When you execute print, the specified number of copies will be printed with the specified printing order.
Important When the application software that you used to create the document has the same function, specify
the settings on the printer driver. However, if the print results are not acceptable, specify the functionsettings on the application software. When you specify the number of copies and the printing orderwith both the application software and this printer driver, the number of copies may be multipliednumbers of the two settings or the specified printing order may not be enabled.
Setting the Stapling Margin
The procedure for setting the staple side and the margin width is as follows:
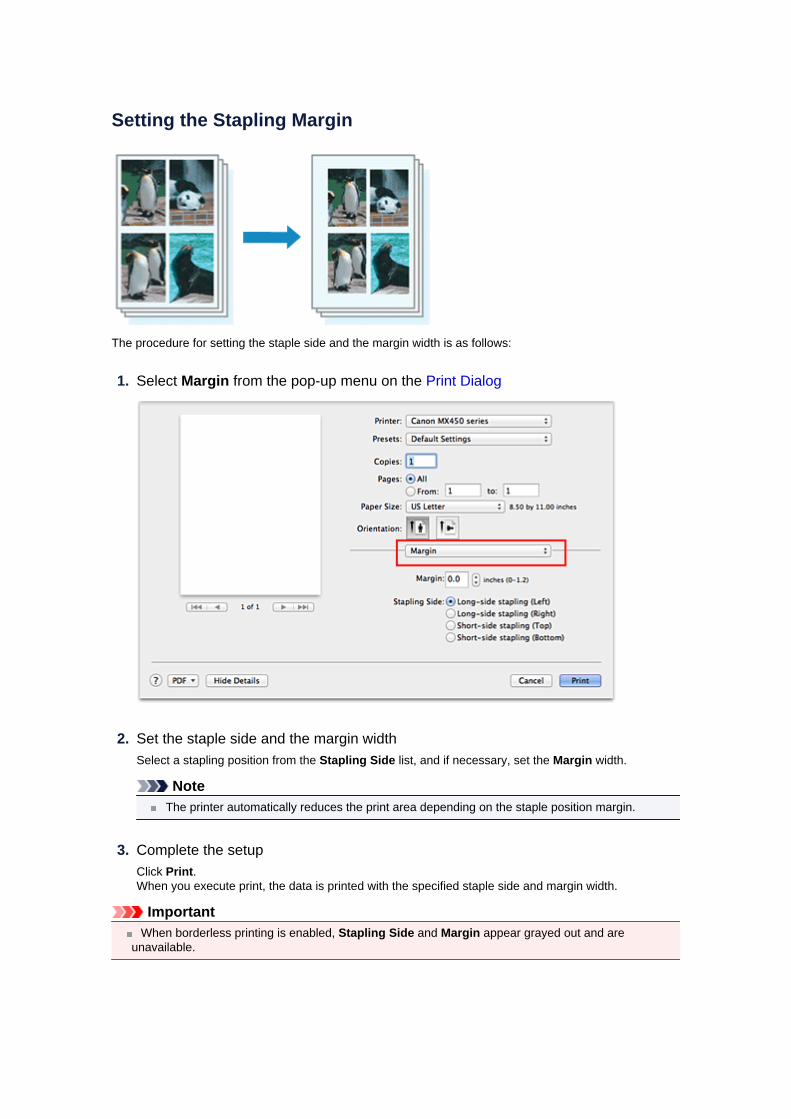
1. Select Margin from the pop-up menu on the Print Dialog
2. Set the staple side and the margin widthSelect a stapling position from the Stapling Side list, and if necessary, set the Margin width.
Note The printer automatically reduces the print area depending on the staple position margin.
3. Complete the setupClick Print.When you execute print, the data is printed with the specified staple side and margin width.
Important When borderless printing is enabled, Stapling Side and Margin appear grayed out and are
unavailable.

Execute Borderless PrintingThe borderless printing function allows you to print data without any margin by enlarging the data so that itextends slightly off the paper. In standard printing, margins are created around the document area.However, in borderless printing function, these margins are not created. When you want to print data suchas a photo without providing any margin around it, set borderless printing.
The procedure for performing borderless printing is as follows:
Setting Borderless Printing
1. Select the size of the paper for borderless printingSelect "XXX (borderless)" from the Paper Size in the Print Dialog.
2. Select Borderless Printing from the pop-up menu
3. Adjust the amount of extension from the paperIf necessary, adjust the amount of extension using the Amount of Extension slider.Moving the slider to the right increases the amount extending off the paper, and moving the slider tothe left decreases the amount.It is recommended to set the slider at the second position from the right for most cases.
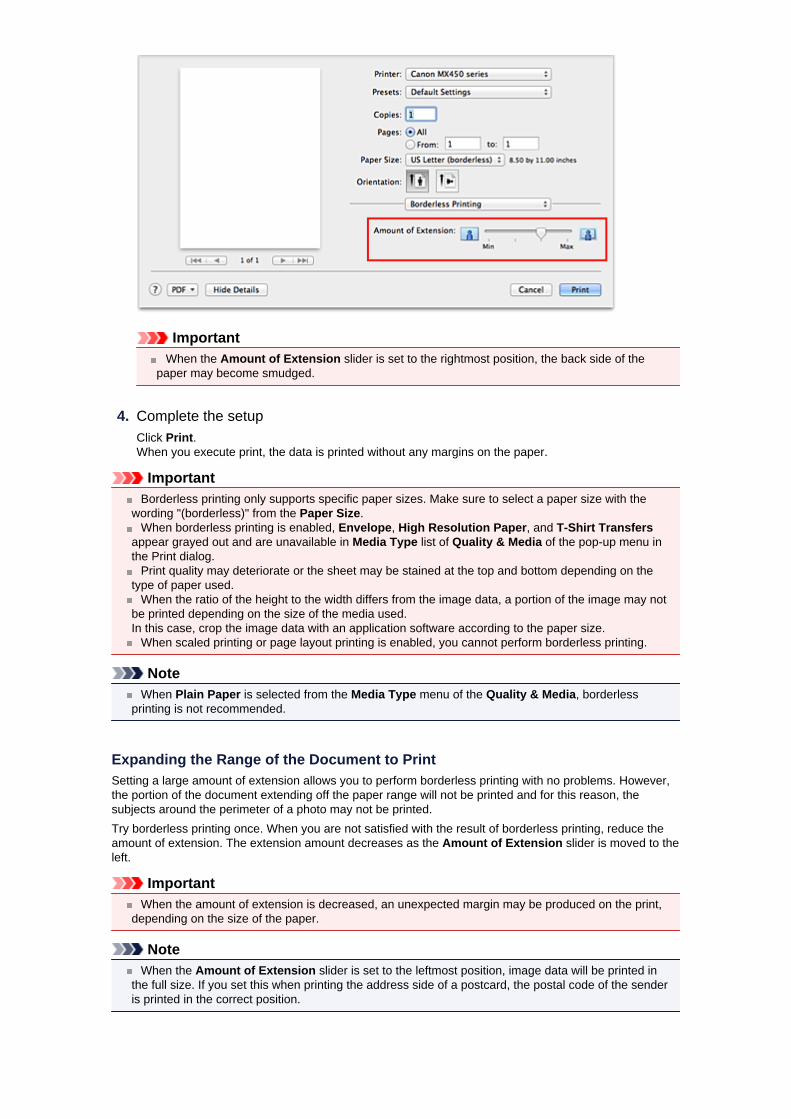
Important When the Amount of Extension slider is set to the rightmost position, the back side of the
paper may become smudged.
4. Complete the setupClick Print.When you execute print, the data is printed without any margins on the paper.
Important Borderless printing only supports specific paper sizes. Make sure to select a paper size with the
wording "(borderless)" from the Paper Size. When borderless printing is enabled, Envelope, High Resolution Paper, and T-Shirt Transfers
appear grayed out and are unavailable in Media Type list of Quality & Media of the pop-up menu inthe Print dialog. Print quality may deteriorate or the sheet may be stained at the top and bottom depending on the
type of paper used. When the ratio of the height to the width differs from the image data, a portion of the image may not
be printed depending on the size of the media used.In this case, crop the image data with an application software according to the paper size. When scaled printing or page layout printing is enabled, you cannot perform borderless printing.
Note When Plain Paper is selected from the Media Type menu of the Quality & Media, borderless
printing is not recommended.
Expanding the Range of the Document to PrintSetting a large amount of extension allows you to perform borderless printing with no problems. However,the portion of the document extending off the paper range will not be printed and for this reason, thesubjects around the perimeter of a photo may not be printed.Try borderless printing once. When you are not satisfied with the result of borderless printing, reduce theamount of extension. The extension amount decreases as the Amount of Extension slider is moved to theleft.
Important When the amount of extension is decreased, an unexpected margin may be produced on the print,
depending on the size of the paper.
Note When the Amount of Extension slider is set to the leftmost position, image data will be printed in
the full size. If you set this when printing the address side of a postcard, the postal code of the senderis printed in the correct position.

Scaling the Printing to Fit the Paper Size
The procedure for printing a document that is automatically enlarged or reduced to fit the page size to beused is as follows:
1. Check the paper sizeCheck that the Paper Size in the Print Dialog is the same as the paper size that you set in theapplication software.
2. Select Paper Handling from the pop-up menu
3. Set the print paper sizeCheck the Scale to fit paper size check box. Then from the Destination Paper Size pop-up menu,select the paper size that is actually loaded in the machine.
4. If necessary, check the Scale down only check boxWhen you check this check box, the document will be reduced to fit to the paper size when thedocument size is larger than the page size. The document will be printed in the original size when thedocument size is smaller than the page size.
5. Complete the setupClick Print.When you execute print, the document will be enlarged or reduced to fit to the page size.

Scaled Printing
The procedure for printing a document with pages enlarged or reduced is as follows:
1. Select the printerIn the Page Setup Dialog, select your model name from the Format For list.
2. Set scaled printingSpecify the scaling factor in the Scale box, and click OK.
Note If you are using Mac OS X v10.7, you can set the Scale rate to a value in the range from 1 to
999%.If you are using Mac OS X v10.6, set a value in the range from 1 to 10000%. If you enter anyother value, an error message will be displayed.
3. Complete the setupOn the Print Dialog, click Print.When you execute print, the document will be printed with the specified scale.
Important When the application software which you used to create the original has the scaled printing function,
configure the settings on your application software. You do not need to configure the same setting inthe Page Setup dialog.

Page Layout PrintingThe page layout printing function allows you to print more than one page image on a single sheet of paper.
The procedure for performing page layout printing is as follows:
1. Select Layout from the pop-up menu in the Print Dialog
2. Set the number of original you print on one pageIn Pages per Sheet, specify the number of page you print on one page.
3. If necessary, set the following items
Layout DirectionTo change the page placement order, select an icon from the list.
BorderTo print a page border around each document page, select a type of page border.
Reverse page orientationSelect this check box to change the paper orientation.
Flip horizontallySelect this check box to reverse left and right of the document.
4. Complete the setup

Click Print.When you execute print, the specified number of pages will be arranged on each sheet of paper in thespecified order.

Printing on PostcardsFor details about loading postcards into this machine, see "Loading Paper."This section describes the procedure for postcard printing.
1. Select paper size in the Print DialogSelect Postcard or Postcard Double from the Paper Size menu.
Important Return postcards can be used only when you print them from the computer. When printing a return postcard, always set the paper size to Postcard Double from your
application software or the printer driver. Do not fold the return postcard. If a crease is formed, the machine will not be able to feed the
postcard properly, and this condition will cause line shifts or a paper jam. With return postcards, borderless printing cannot be used.
2. Select Quality & Media from the pop-up menu
3. Select the media typeFor Media Type, select the same paper type loaded in the machine.
Important This machine cannot print on postcards that have photos or stickers attached. When printing on each side of a postcard separately, you will get cleaner printing if you print the
message side first and then print the address side.
4. Complete the setupClick Print.When you execute printing, the data will be printed onto the postcard.

Displaying the Print Results before PrintingIf you are using Mac OS X v10.6, you can display and check the print result before printing.
To display the print result before printing, click Preview on the Print Dialog.
Note When you click (the disclosure triangle) in the Print dialog and switch to the detailed display,
Preview is not displayed.For detailed display, a preview is displayed on the left side of the Print dialog.

Setting Paper Dimensions (Custom Size)You can specify the height and width of paper when its size cannot be selected from the Paper Size menu.Such a paper size is called "custom size."
The procedure for specifying a custom size is as follows:
1. Creating a new custom paper sizeIn the Print Dialog, select Manage Custom Sizes... from Paper Size.In the Custom Paper Sizes dialog, click +.
Untitled will be added to the list.
2. Setting details about the custom paper sizeDouble-click Untitled, enter the name of the paper size you want to register, and specify the Widthand Height of the paper for Paper Size.Select User Defined or your model for Non-Printable Area, and enter the margins.
3. Registering the custom paper sizeClick OK.The custom size is registered.
Important If the application software that created the document has a function for specifying height and width
values, use the application software to set the values. If the application software does not have such afunction or if the document does not print correctly, perform the above procedure from the printer driverto set the values.
Note To duplicate the registered paper size, select the paper size that you want to duplicate from the
Custom Paper Sizes list, and click Duplicate. To delete a registered paper size, select the paper size that you want to delete from the Custom
Paper Sizes list, and click -.
Changing the Print Quality and Correcting Image Data Setting the Print Quality Level (Custom) Printing a Color Document in Monochrome Specifying Color Correction Optimal Photo Printing of Image Data Adjusting Colors with the Printer Driver Printing with ICC Profiles (Specifying an ICC Profile from the Application Software) Printing with ICC Profiles (Specifying an ICC Profile from the Printer Driver) Adjusting Color Balance Adjusting Brightness Adjusting Intensity Adjusting Contrast

Setting the Print Quality Level (Custom)The print quality level can be set in the Custom.
The procedure for setting the print quality level is as follows:
1. Select Quality & Media from the pop-up menu on the Print Dialog
2. Select the print qualitySelect Custom for Print Quality.
3. Setting the print quality levelMove the Quality slider to select the print quality level.
4. Complete the setupClick Print.When you execute print, the image data is printed with the selected print quality level.
Important Certain print quality levels cannot be selected depending on the settings of Media Type.
Related Topics Specifying Color Correction Adjusting Color Balance Adjusting Brightness Adjusting Intensity Adjusting Contrast
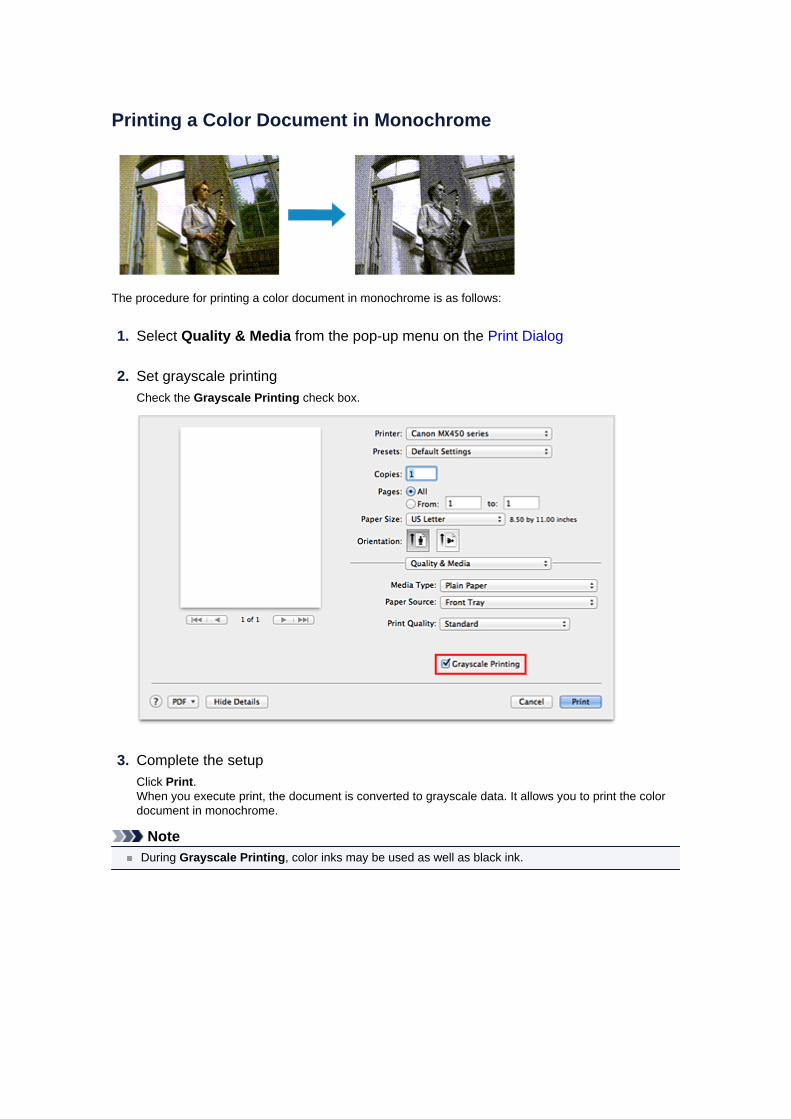
Printing a Color Document in Monochrome
The procedure for printing a color document in monochrome is as follows:
1. Select Quality & Media from the pop-up menu on the Print Dialog
2. Set grayscale printingCheck the Grayscale Printing check box.
3. Complete the setupClick Print.When you execute print, the document is converted to grayscale data. It allows you to print the colordocument in monochrome.
Note During Grayscale Printing, color inks may be used as well as black ink.
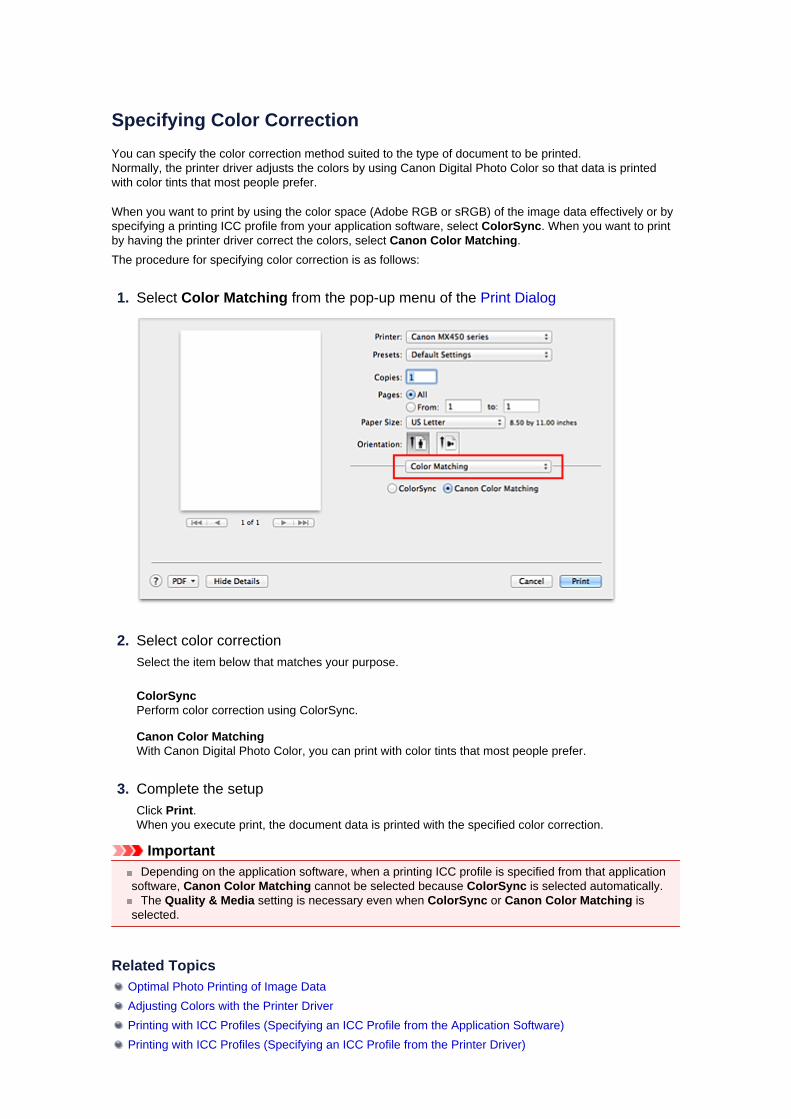
Specifying Color CorrectionYou can specify the color correction method suited to the type of document to be printed.Normally, the printer driver adjusts the colors by using Canon Digital Photo Color so that data is printedwith color tints that most people prefer.
When you want to print by using the color space (Adobe RGB or sRGB) of the image data effectively or byspecifying a printing ICC profile from your application software, select ColorSync. When you want to printby having the printer driver correct the colors, select Canon Color Matching.The procedure for specifying color correction is as follows:
1. Select Color Matching from the pop-up menu of the Print Dialog
2. Select color correctionSelect the item below that matches your purpose.
ColorSyncPerform color correction using ColorSync.
Canon Color MatchingWith Canon Digital Photo Color, you can print with color tints that most people prefer.
3. Complete the setupClick Print.When you execute print, the document data is printed with the specified color correction.
Important Depending on the application software, when a printing ICC profile is specified from that application
software, Canon Color Matching cannot be selected because ColorSync is selected automatically. The Quality & Media setting is necessary even when ColorSync or Canon Color Matching is
selected.
Related Topics Optimal Photo Printing of Image Data Adjusting Colors with the Printer Driver Printing with ICC Profiles (Specifying an ICC Profile from the Application Software) Printing with ICC Profiles (Specifying an ICC Profile from the Printer Driver)

Optimal Photo Printing of Image DataWhen people print images taken with digital cameras, they sometimes feel that the printed color tones differfrom those of actual image or those displayed on the monitor.To get the print results as close as possible to the desired color tones, you must select a printing methodthat is best suited to the application software used or to your purpose.
Color ManagementDevices such as digital cameras, scanners, monitors, and printers handle color differently. Colormanagement (color matching) is a method that manages device-dependent "colors" as a common colorspace.For Mac OS, a color management system called "ColorSync" is built into the operating system.Adobe RGB and sRGB are popularly used as common color spaces. Adobe RGB has a wider color spacethan sRGB.ICC profiles convert device-dependent "colors" into a common color space. By using an ICC profile andcarrying out color management, you can draw out the color space of the image data within the colorreproduction area that the printer can express.
Selecting a Printing Method Suited to the Image DataThe recommended printing method depends on the color space (Adobe RGB or sRGB) of the image dataor the application software to be used.There are two typical printing methods.Check the color space (Adobe RGB or sRGB) of the image data and the application software to be used,and then select the printing method suited to your purpose.
Adjusting Colors with the Printer DriverDescribes the procedure for printing by using the color correction function of the printer driver.
• To print using Canon Digital Photo ColorThe printer prints data with color tints that most people prefer, reproducing colors of the original imagedata and producing three-dimensional effects and high, sharp contrasts.
• To print by directly applying editing and touch-up results of an application softwareWhen printing the data, the printer brings out subtle color difference between dark and light areas, whileleaving the darkest and lightest areas intact.When printing the data, the printer applies fine adjustment results, such as brightness adjustments madewith an application software.
Printing with ICC Profiles (Specifying an ICC Profile from the Application Software)Describes the procedure for printing by using the color space of Adobe RGB or sRGB effectively.You can print with a common color space by setting up the application software and the printer driver sothat the color management matches the input ICC profile of the image data.The method for setting up the printer driver differs depending on the application software to be used.

Adjusting Colors with the Printer DriverYou can specify the color correction function of the printer driver to print with color tints that most peopleprefer through the use of Canon Digital Photo Color.When printing from an application software that can identify ICC profiles and allows you to specify them,use a printing ICC profile in the application software, and select settings for color management.
The procedure for adjusting colors with the printer driver is as follows:
1. Select Color Matching from the pop-up menu of the Print Dialog
2. Select color correctionSelect Canon Color Matching.
3. Set the other itemsFrom the pop-up menu, select Color Options. If necessary, adjust the color balance (Cyan, Magenta,Yellow) and adjust Brightness, Intensity, and Contrast settings.
4. Complete the setupClick Print.When you execute print, the printer driver adjusts the colors when printing the data.
Related Topics Setting the Print Quality Level (Custom) Specifying Color Correction Adjusting Color Balance Adjusting Brightness Adjusting Intensity Adjusting Contrast

Printing with ICC Profiles (Specifying an ICC Profile from theApplication Software)When you print from Adobe Photoshop, Canon Digital Photo Professional, or any application software thatcan identify input ICC profiles and allows you to specify such profiles, printer uses the color managementsystem (ColorSync) built-into Mac OS when printing. The printer prints the editing and touch-up results ofthe application software and effectively uses the color space of the input ICC profile specified in the imagedata.To use this printing method, use your application software to select color management items and specifyan input ICC profile and a printing ICC profile in the image data.Even if you print using a printing ICC profile that you created yourself from your application software, besure to select color management items from your application software.For instructions on specifying an ICC profile with an application software program, refer to the user'smanual of your application software.
1. Select Color Matching from the pop-up menu of the Print Dialog
2. Select color correctionSelect ColorSync.You can leave Profile set to Automatic.
Important Depending on the application software you use, you may not be able to select setting items
other than ColorSync. If you choose a Profile setting other than Automatic, the machine will not be able to print with
the correct colors.
3. Complete the setupClick Print.When you execute print, the machine uses the color space of the image data.
Related Topics Setting the Print Quality Level (Custom) Specifying Color Correction Adjusting Color Balance Adjusting Brightness

Adjusting Intensity Adjusting Contrast

Printing with ICC Profiles (Specifying an ICC Profile from thePrinter Driver)Print from an application software that cannot identify or specify input ICC profiles by using the color spaceof the input ICC profile (sRGB) found in the data.
1. Select Color Matching from the pop-up menu of the Print Dialog
2. Select color correctionSelect ColorSync.You can leave Profile set to Automatic.
Important If you choose a Profile setting other than Automatic, the machine will not be able to print with
the correct colors.
3. Complete the setupClick Print.When you execute print, the machine uses the color space of the image data.
Important You cannot specify an input ICC profile from the printer driver.
Related Topics Setting the Print Quality Level (Custom) Specifying Color Correction Adjusting Color Balance Adjusting Brightness Adjusting Intensity Adjusting Contrast

Adjusting Color BalanceYou can adjust the color tints when printing.Since this function adjusts color balance of the output by changing the ink ratios of each color, it changesthe total color balance of the document. Use the application software when you want to change the colorbalance significantly. Use the printer driver only when you want to adjust the color balance slightly.The following sample shows the case when color balance is used to intensify cyan and to diminish yellowso that the overall colors are more uniform.
No adjustment Adjust color balance
The procedure for adjusting color balance is as follows:
1. Select Color Options from the pop-up menu of the Print Dialog
2. Adjust color balanceThere are individual sliders for Cyan, Magenta, and Yellow. Each color becomes stronger when thecorresponding slider is moved to the right, and becomes weaker when the corresponding slider ismoved to the left. For example, when cyan becomes weaker, the color red becomes stronger.You can also directly enter a value linked to the slider. Enter a value in the range from -50 to 50. Thecurrent settings are displayed in the settings preview on the left side of the printer driver.
Important Adjust the slider gradually.
3. Complete the setup

Click Print.When you execute print, the document is printed with the adjusted color balance.
Important When the Grayscale Printing check box is checked for Quality & Media, the color balance (Cyan,
Magenta, Yellow) appear grayed out and are unavailable. If you select ColorSync for Color Matching, then the color balance (Cyan, Magenta, Yellow)
appear grayed out and is unavailable.
Related Topics Setting the Print Quality Level (Custom) Specifying Color Correction Adjusting Brightness Adjusting Intensity Adjusting Contrast

Adjusting BrightnessYou can change the brightness of the overall image data during printing.This function does not change pure white or pure black but it changes the brightness of the intermediatecolors.The following sample shows the print result when the brightness setting is changed.
Light is selected Normal is selected Dark is selected
The procedure for adjusting brightness is as follows:
1. Select Color Options from the pop-up menu of the Print Dialog
2. Specify the brightnessSelect Light, Normal, or Dark for Brightness. The current settings are displayed in the settingspreview on the left side of the printer driver.
3. Complete the setupClick Print.When you execute print, the data is printed at the specified brightness.
Important If you select ColorSync for Color Matching, then the Brightness appear grayed out and is
unavailable.
Related Topics Setting the Print Quality Level (Custom) Specifying Color Correction

Adjusting Color Balance Adjusting Intensity Adjusting Contrast

Adjusting IntensityYou can dilute (brighten) or intensify (darken) the colors of the overall image data during printing.The following sample shows the case when the intensity is increased so that all colors become moreintense when the image data is printed.
No adjustment Higher intensity
The procedure for adjusting intensity is as follows:
1. Select Color Options from the pop-up menu of the Print Dialog
2. Adjust intensityMoving the Intensity slider to the right intensifies (darkens) the colors, and moving the slider to the leftdilutes (brightens) the colors.You can also directly enter a value linked to the slider. Enter a value in the range from -50 to 50. Thecurrent settings are displayed in the settings preview on the left side of the printer driver.
Important Adjust the slider gradually.
3. Complete the setupClick Print.When you execute print, the image data is printed with the adjusted intensity.
Important If you select ColorSync for Color Matching, then the Intensity appear grayed out and is
unavailable.

Related Topics Setting the Print Quality Level (Custom) Specifying Color Correction Adjusting Color Balance Adjusting Brightness Adjusting Contrast

Adjusting ContrastYou can adjust the image contrast during printing.To make the differences between the light and dark portions of images greater and more distinct, increasethe contrast. On the other hand, to make the differences between the light and dark portions of imagessmaller and less distinct, reduce the contrast.
No adjustment Adjust the contrast
The procedure for adjusting contrast is as follows:
1. Select Color Options from the pop-up menu of the Print Dialog
2. Adjust the contrastMoving the Contrast slider to the right increases the contrast, and moving the slider to the leftdecreases the contrast.You can also directly enter a value linked to the slider. Enter a value in the range from -50 to 50. Thecurrent settings are displayed in the settings preview on the left side of the printer driver.
Important Adjust the slider gradually.
3. Complete the setupClick Print.When you execute print, the image is printed with the adjusted contrast.
Important If you select ColorSync for Color Matching, then the Contrast appear grayed out and is
unavailable.

Related Topics Setting the Print Quality Level (Custom) Specifying Color Correction Adjusting Color Balance Adjusting Brightness Adjusting Intensity
Overview of the Printer Driver Canon IJ Printer Driver How to Open the Printer Driver Setup Window Page Setup Dialog Print Dialog Quality & Media Color Options Borderless Printing Margin Canon IJ Printer Utility Opening the Canon IJ Printer Utility Maintenance of this Machine Display the Printing Status Screen Deleting the Undesired Print Job Instructions for Use (Printer Driver)

Canon IJ Printer DriverThe Canon IJ printer driver (called printer driver below) is a software that is installed on your computer forprinting data with this machine.The printer driver converts the print data created by your application software into data that your printer canunderstand, and sends the converted data to the printer.Because different models support different print data formats, you need a printer driver for the specificmodel you are using.
Using Help of the Printer DriverYou can display Help function from the Print Dialog.
Select a setup item from the pop-up menu in the Print dialog. Then click at the bottom left of the screento display an explanation of the item.Help for the print driver is displayed when the following pop-up menu item is selected:
• Quality & Media
• Color Options
• Borderless Printing
• Margin

How to Open the Printer Driver Setup WindowYou can display the printer driver setup window from the application software you are using.
Opening the Page Setup DialogUse this procedure to set the page (paper) settings before printing.
1. Select Page Setup... from the File menu of the application softwareThe Page Setup Dialog opens.
Opening the Print DialogUse this procedure to set the print settings before printing.
1. Select Print... from the File menu of the application softwareThe Print Dialog opens.

Page Setup DialogIn the Page Setup dialog, you configure the basic print settings such as the size of paper loaded in themachine or the scaling ratio.
To open the Page Setup dialog, you typically select Page Setup... from the File menu of your applicationsoftware.
SettingsClick the pop-up menu, and then select the following items:
Page AttributesSet the paper size or scaled printing.
Save as DefaultYou can save the attributes of the displayed page as the default settings.
Format ForSelect the model to be used for printing.
Paper SizeSelect the size of the paper to be used for printing.To set a non-standard size, select Manage Custom Sizes....
OrientationSelect the print orientation.
ScaleSet the scaling percentage.You can expand or reduce the size of the document when printing.

Print DialogIn the Print dialog, you can set paper type and print quality to start printing.
To open the Print dialog, you typically select Print... from the File menu of your application software.
PrinterSelect the model to be used for printing.When you click Add Printer..., a dialog for specifying the printer opens.
PresetsYou can save or delete the settings of the Print dialog.
Note If you are using Mac OS X v10.7, you can select Show Presets... to check the print settings that are
set in the Print dialog.
CopiesYou can set the number of copies to be printed.
Note If you are using Mac OS X v10.6, you can also set collate printing. If you are using Mac OS X v10.7, you can set collated printing by choosing Paper Handling from the
pop-up menu.
PagesYou can set the range of pages to be printed.
Paper SizeSelect the size of the paper to be used for printing.To set a non-standard size, select Manage Custom Sizes....
OrientationSelect the print orientation.
Pop-up MenuYou can switch between pages in the Print dialog by the pop-up menu. The first menu to appear differsdepending on the application software that opened the Print dialog.You can choose one of the following items from the pop-up menu.
LayoutYou can set page layout printing.Use Reverse page orientation to change the paper orientation, and use Flip horizontally to print amirror image of the document.

Color MatchingSelect the color correction method.
Paper HandlingYou can set the pages to be printed on paper and the print order.
Cover PageYou can output cover pages both before and after a document.
SchedulerYou can set the print start time and print priorities.
Quality & MediaYou can set basic print settings that match the machine.
Color OptionsYou can adjust the print colors as you desire.
Borderless PrintingYou can adjust the amount of document that extends off the paper when performing borderlessprinting.
MarginYou can set the stapling side and the stapling margin.
Supply LevelsA rough indication of the remaining ink level is displayed.
SummaryThe selected items in the Print dialog are displayed.
Important If you are using Mac OS X v10.7, you cannot use Scheduler and Summary.
PDFYou can save a document in PDF (Portable Document Format) format.
PreviewIf you are using Mac OS X v10.6, when you click (the disclosure triangle) on the side of Printer andswitch to the simple display, Preview is displayed.This button allows you to check the print results on the screen before printing.

Quality & MediaThis dialog allows you to create a basic print setup in accordance with the paper type. Unless specialprinting is required, normal printing can be performed just by setting the items in this dialog.
Media TypeSelect the type of media to be used.You must select the type of media actually loaded in the machine. This selection enables the printer tocarry out printing properly for the material of the media used.
Paper SourceShows the source from which paper is supplied.
Print QualitySelect the one that is closest to the original document type and the purpose.When one of the radio buttons is selected, the appropriate quality will be set automatically.
HighGives priority to print quality over printing speed.
StandardPrints with average speed and quality.
FastGives priority to printing speed over print quality.
CustomSelect this radio button to specify a quality.
QualitySelecting Custom in the Print Quality allows you to adjust the print quality level.Dragging the slider to the right enhances the print quality while dragging the slider to the left increasesthe printing speed.
Grayscale PrintingSet grayscale printing. Grayscale printing refers to the function of converting your document to grayscaledata in the printer to print it in monochrome.When you check the check box, both monochrome and color documents will be printed in monochrome.When printing a color document, be sure to uncheck the check box.
Related Features Setting the Print Quality Level (Custom)

Printing a Color Document in Monochrome
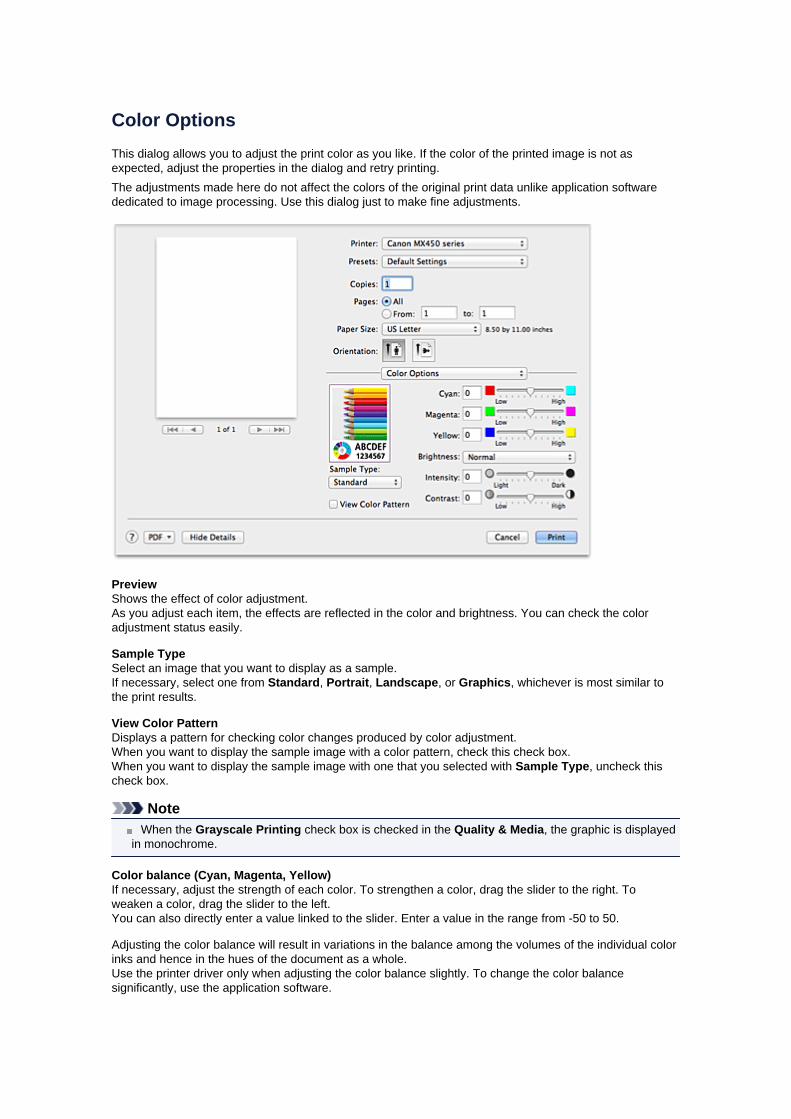
Color OptionsThis dialog allows you to adjust the print color as you like. If the color of the printed image is not asexpected, adjust the properties in the dialog and retry printing.The adjustments made here do not affect the colors of the original print data unlike application softwarededicated to image processing. Use this dialog just to make fine adjustments.
PreviewShows the effect of color adjustment.As you adjust each item, the effects are reflected in the color and brightness. You can check the coloradjustment status easily.
Sample TypeSelect an image that you want to display as a sample.If necessary, select one from Standard, Portrait, Landscape, or Graphics, whichever is most similar tothe print results.
View Color PatternDisplays a pattern for checking color changes produced by color adjustment.When you want to display the sample image with a color pattern, check this check box.When you want to display the sample image with one that you selected with Sample Type, uncheck thischeck box.
Note When the Grayscale Printing check box is checked in the Quality & Media, the graphic is displayed
in monochrome.
Color balance (Cyan, Magenta, Yellow)If necessary, adjust the strength of each color. To strengthen a color, drag the slider to the right. Toweaken a color, drag the slider to the left.You can also directly enter a value linked to the slider. Enter a value in the range from -50 to 50.
Adjusting the color balance will result in variations in the balance among the volumes of the individual colorinks and hence in the hues of the document as a whole.Use the printer driver only when adjusting the color balance slightly. To change the color balancesignificantly, use the application software.

BrightnessSelect the brightness of printed images.You cannot change the levels of pure white and black. You can change the contrast of the colors betweenwhite and black.
IntensitySelect this method to adjust the overall density of your print.To increase the overall intensity, drag the slider to the right. To decrease the overall intensity, drag theslider to the left.You can also directly enter a value linked to the slider. Enter a value in the range from -50 to 50.
ContrastThe Contrast function changes the differences between light and dark in images during printing.To make the differences between the light and dark portions of images greater and more distinct, increasethe contrast. On the other hand, to make the differences between the light and dark portions of imagessmaller and less distinct, reduce the contrast.You can also directly enter a value linked to the slider. Enter a value in the range from -50 to 50.
Important When the Grayscale Printing check box is checked for Quality & Media, the color balance (Cyan,
Magenta, Yellow) appear grayed out and are unavailable. If you select ColorSync for Color Matching, then the color balance (Cyan, Magenta, Yellow),
Brightness, Intensity, and Contrast appear grayed out and are unavailable.
Related Features Specifying Color Correction Adjusting Color Balance Adjusting Brightness Adjusting Intensity Adjusting Contrast

Borderless PrintingThis dialog allows you to adjust the amount of the document that extends off the paper when borderlessprinting is performed.
Amount of ExtensionUse the Amount of Extension slider to adjust the amount of the document that extends off the paper.Moving the slider to the right makes the amount larger and moving the slider to the left makes the amountsmaller.
Related Feature Execute Borderless Printing

MarginThis dialog allows you to set the stapling side and amount of margin for stapling multiple sheets of paper.
MarginSpecify the amount of margin space for stapling the paper. Enter a value between 0 inches (0 mm) to 1.2inches (30 mm).
Stapling SideSpecify the stapling side.
Long-side stapling (Left) / Long-side stapling (Right)Select this option to staple the long side of the paper.Choose left or right.
Short-side stapling (Top) / Short-side stapling (Bottom)Select this option to staple the short side of the paper.Choose top or bottom.
Related Feature Setting the Stapling Margin
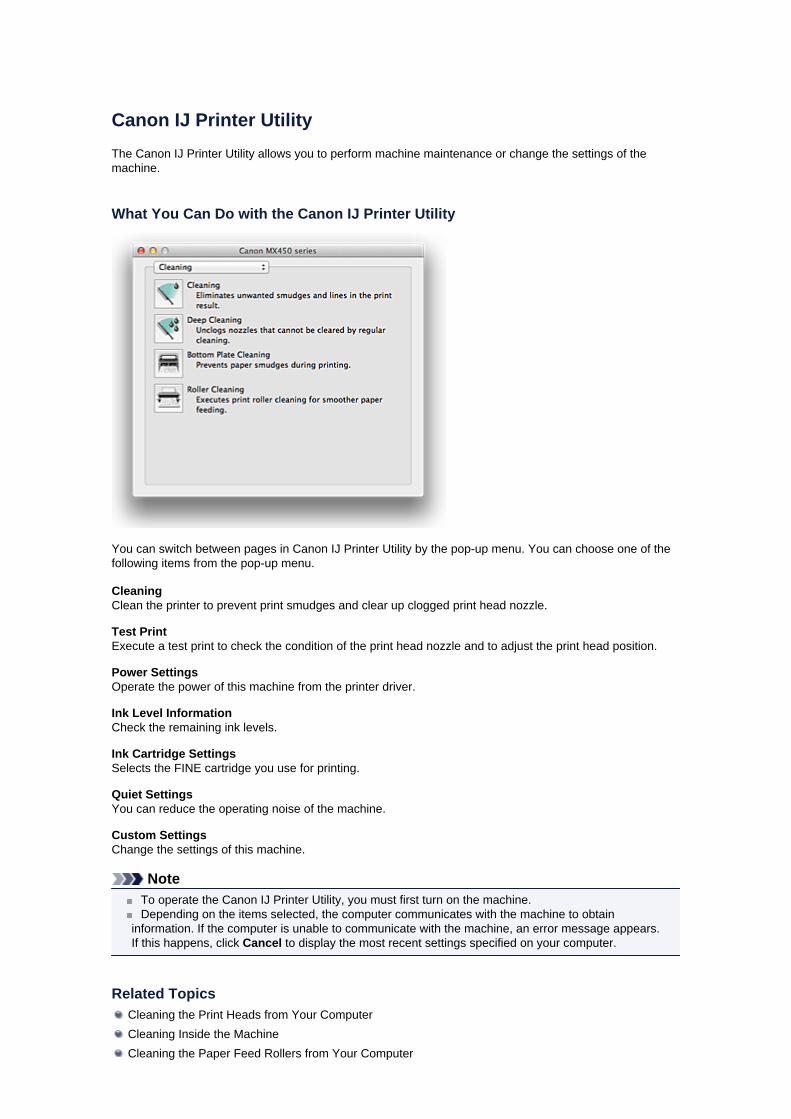
Canon IJ Printer UtilityThe Canon IJ Printer Utility allows you to perform machine maintenance or change the settings of themachine.
What You Can Do with the Canon IJ Printer Utility
You can switch between pages in Canon IJ Printer Utility by the pop-up menu. You can choose one of thefollowing items from the pop-up menu.
CleaningClean the printer to prevent print smudges and clear up clogged print head nozzle.
Test PrintExecute a test print to check the condition of the print head nozzle and to adjust the print head position.
Power SettingsOperate the power of this machine from the printer driver.
Ink Level InformationCheck the remaining ink levels.
Ink Cartridge SettingsSelects the FINE cartridge you use for printing.
Quiet SettingsYou can reduce the operating noise of the machine.
Custom SettingsChange the settings of this machine.
Note To operate the Canon IJ Printer Utility, you must first turn on the machine. Depending on the items selected, the computer communicates with the machine to obtain
information. If the computer is unable to communicate with the machine, an error message appears.If this happens, click Cancel to display the most recent settings specified on your computer.
Related Topics Cleaning the Print Heads from Your Computer Cleaning Inside the Machine Cleaning the Paper Feed Rollers from Your Computer

Use Your Computer to Print a Nozzle Check Pattern Aligning the Print Head Position from Your Computer Checking the Ink Status from Your Computer Setting the Ink Cartridge to be Used Managing the Machine Power Reducing the Machine Noise Changing the Machine Operation Mode

Opening the Canon IJ Printer UtilityTo open the Canon IJ Printer Utility, follow the steps below.
1. Open System Preferences, and select Print & Scan (Print & Fax)
2. Start the Canon IJ Printer UtilitySelect your model from the printer list, and click Options & Supplies....Click Open Printer Utility in Utility tab.Canon IJ Printer Utility is launched.

Maintenance of this Machine Cleaning the Print Heads from Your Computer Cleaning Inside the Machine Cleaning the Paper Feed Rollers from Your Computer Use Your Computer to Print a Nozzle Check Pattern Aligning the Print Head Position from Your Computer Checking the Ink Status from Your Computer Setting the Ink Cartridge to be Used Managing the Machine Power Reducing the Machine Noise Changing the Machine Operation Mode

Display the Printing Status ScreenCheck the print progress according to the following procedure:
1. Launch the printing status screen
• If the print data has been sent to the machine
The printing status screen opens automatically. To display the printing status screen, click the (the printer icon) displayed on the Dock.
• If the print data has not been sent to the machineOpen System Preferences, and select Print & Scan (Print & Fax).To display the printing status screen, select the name of your printer model from the printer list, andthen click Open Print Queue....
2. Checking the printing statusYou can check the name of the file being printed or ready for being printed.
Deletes the specified print job.
Stops printing the specified document.
Resumes printing the specified document.
Displays the print job information.
Stops printing all documents.
Displayed only when printing of all documents is being stopped, and resumes printing alldocuments.

Deleting the Undesired Print JobIf the printer does not start printing, canceled or failed print job data may be remaining.Delete unnecessary print jobs from the print status check screen.
1. Open System Preferences, and select Print & Scan (Print & Fax)
2. Select your model, and then click Open Print Queue...The print status check screen appears.
3. Select the unnecessary print job and click DeleteThe selected print jobs will be deleted.

Instructions for Use (Printer Driver)This printer driver is subject to the following restrictions. Keep the following points in mind when using theprinter driver.
Restrictions on the Printer Driver• When you set up the Page Setup dialog, be sure to begin by selecting the model you are using from
the Format For list. If you select another printer, printing may not be performed properly.
• If the Canon IJ Printer Utility does not display the remaining ink level in the Ink Level Information,check whether the FINE cartridge is properly installed.
• When the Canon IJ Printer Utility displays the Ink Level Information, close the paper output cover ofthe machine.
• The following functions cannot be used in Mac OS, though they can be used in Windows computers.
• Duplex Printing
• Booklet Printing
• Tiling/Poster Printing
• Depending on the application software that you are using, a preview may not be displayed on the leftside of the Print dialog.
• Do not start up the Canon IJ Network Tool while printing.
• Do not print when the Canon IJ Network Tool is running.
• If you connect this machine and AirPort with a USB cable and print, you must install the latest AirPortfirmware.
Notes on Adding a Printer• If you will be installing the Canon printer driver on Mac OS X and using the printer through a network
connection, you can select Bonjour or Canon IJ Network in the Add Printer dialog.Canon recommends you to use Canon IJ Network for printing.If Bonjour is selected, remaining ink level messages may differ from those indicated by Canon IJNetwork.

Updating the Printer Driver Obtaining the Latest Printer Driver Delete the Unnecessary Canon IJ Printer from the Printer List Before Installing the Printer Driver Installing the Printer Driver
Obtaining the Latest Printer DriverBy updating the printer driver to the latest version of the printer driver, unresolved problems may be solved.
Obtaining the Printer DriverYou can access our website and download the latest printer driver for your model.
Important You can download the printer driver for free, but any Internet access charges incurred are your
responsibility.
Related Topics Before Installing the Printer Driver Installing the Printer Driver
Delete the Unnecessary Canon IJ Printer from the Printer ListA Canon IJ Printer that you no longer use can be deleted from the printer list.Before deleting the Canon IJ Printer, disconnect the cable that connects the machine to the computer.
The procedure to delete the unnecessary Canon IJ Printer from the printer list is as follows:You cannot delete the Canon IJ Printer unless you are logged in as a user with the administrative right. Forinformation about an administrative user, refer to the user's manual for the Mac OS.
1. Open System Preferences, and select Print & Scan (Print & Fax)
2. Delete the Canon IJ Printer from the printer listFrom the printer list, select the Canon IJ Printer to be deleted, and then click -.
Note Even if a Canon IJ Printer is deleted from the printer list, you can re-register it automatically by
connecting the machine to your computer.
Before Installing the Printer DriverThis section describes the items that you should check before installing the printer driver. You should alsorefer to this section if the printer driver cannot be installed.
Checking the Personal Computer Settings• Terminate all running applications.
• Log on as the computer administrator. The installer will prompt you to enter the name and password ofthe administrative user. When multiple users are using Mac OS X, log on with the account of theadministrator who registered first.
Important When you upgrade from Mac OS X v10.6 to Mac OS X v10.7, all printer drivers that were installed
will be deleted.If you plan to continue using this machine, re-install the latest printer driver.
Related Topics Obtaining the Latest Printer Driver Installing the Printer Driver
Installing the Printer DriverYou can access our web site through the Internet and download the latest printer driver for your model.
The procedure for installing the downloaded printer driver is as follows:
1. Mount the diskDouble-click the disk image file you have downloaded.The file is unpacked, and then the disk is mounted.
2. Start the installerDouble-click "PrinterDriver_XXX_YYY.pkg" (where "XXX" is your model name, and "YYY" is version)contained in the disk.
3. Start the installationInstall the printer driver according to the messages on the screen.When the Software License Agreement is displayed, check the contents, and click Continue. If you donot agree to the terms of the Software License Agreement, you cannot install this software.
4. Selecting the install destinationIf necessary, select where you want to install the printer driver, and then click Continue.
5. Executing the installationClick Install.When the authentication screen is displayed, enter the name and password of the administrator, andthen click Install Software.
6. Complete the installationWhen the completion message appears, click Close.
The printer driver is installed successfully.
Important If the Installer does not operate properly, select Quit Installer from the Installer menu of the Finder
to quit the Installer. Then start the Installer again. You can download the printer driver for free, but you are responsible for paying any connection fees
to the Internet.
Related Topics Obtaining the Latest Printer Driver Delete the Unnecessary Canon IJ Printer from the Printer List Before Installing the Printer Driver

Printing Using the Operation Panel of the Machine Printing Template Forms Such As Lined Paper or Graph Paper
Printing Template Forms Such As Lined Paper or Graph PaperYou can print a template form such as lined paper, graph paper, or checklist, etc. on A4, B5, or Letter-sizedplain paper.
Printable template formsPrinting template forms
Printable template formsThe following templates are available:
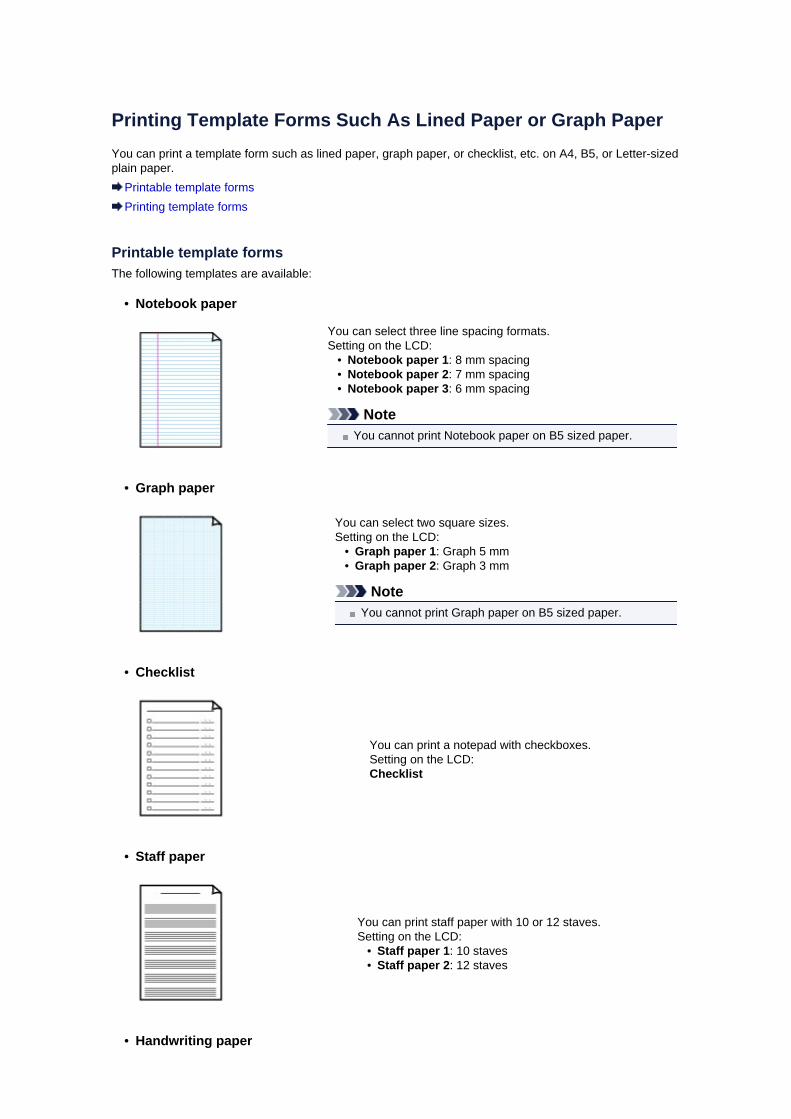
• Notebook paper
You can select three line spacing formats.Setting on the LCD:
• Notebook paper 1: 8 mm spacing• Notebook paper 2: 7 mm spacing• Notebook paper 3: 6 mm spacing
NoteYou cannot print Notebook paper on B5 sized paper.
• Graph paper
You can select two square sizes.Setting on the LCD:
• Graph paper 1: Graph 5 mm• Graph paper 2: Graph 3 mm
NoteYou cannot print Graph paper on B5 sized paper.
• Checklist
You can print a notepad with checkboxes.Setting on the LCD:Checklist
• Staff paper
You can print staff paper with 10 or 12 staves.Setting on the LCD:
• Staff paper 1: 10 staves• Staff paper 2: 12 staves
• Handwriting paper
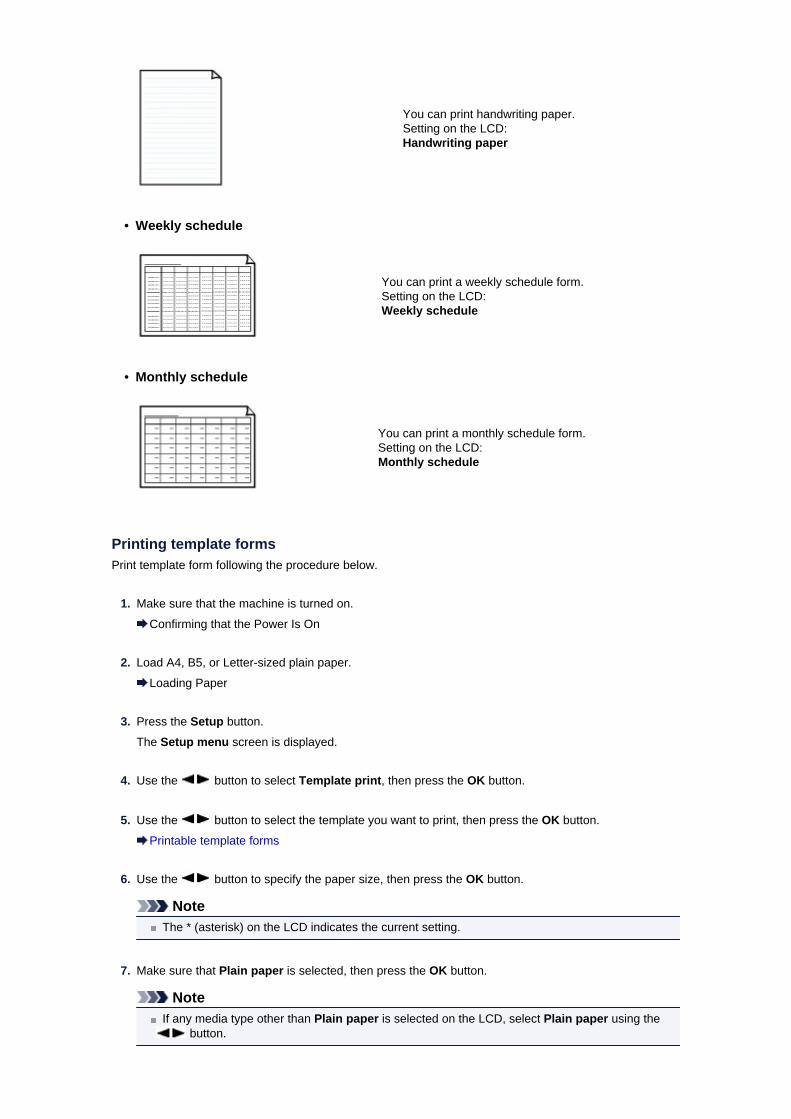
You can print handwriting paper.Setting on the LCD:Handwriting paper
• Weekly schedule
You can print a weekly schedule form.Setting on the LCD:Weekly schedule
• Monthly schedule
You can print a monthly schedule form.Setting on the LCD:Monthly schedule
Printing template formsPrint template form following the procedure below.
1. Make sure that the machine is turned on.
Confirming that the Power Is On
2. Load A4, B5, or Letter-sized plain paper.
Loading Paper
3. Press the Setup button.
The Setup menu screen is displayed.
4. Use the button to select Template print, then press the OK button.
5. Use the button to select the template you want to print, then press the OK button.
Printable template forms
6. Use the button to specify the paper size, then press the OK button.
NoteThe * (asterisk) on the LCD indicates the current setting.
7. Make sure that Plain paper is selected, then press the OK button.
NoteIf any media type other than Plain paper is selected on the LCD, select Plain paper using the
button.
8. Use the (-) (+) button or the Numeric buttons to specify the number of copies.
9. Press the OK button to start printing.
NoteYou can also press the Color button or Black button to start printing.

Printing from a Bluetooth Compliant Device Printing from Mobile Phone via Bluetooth Communication
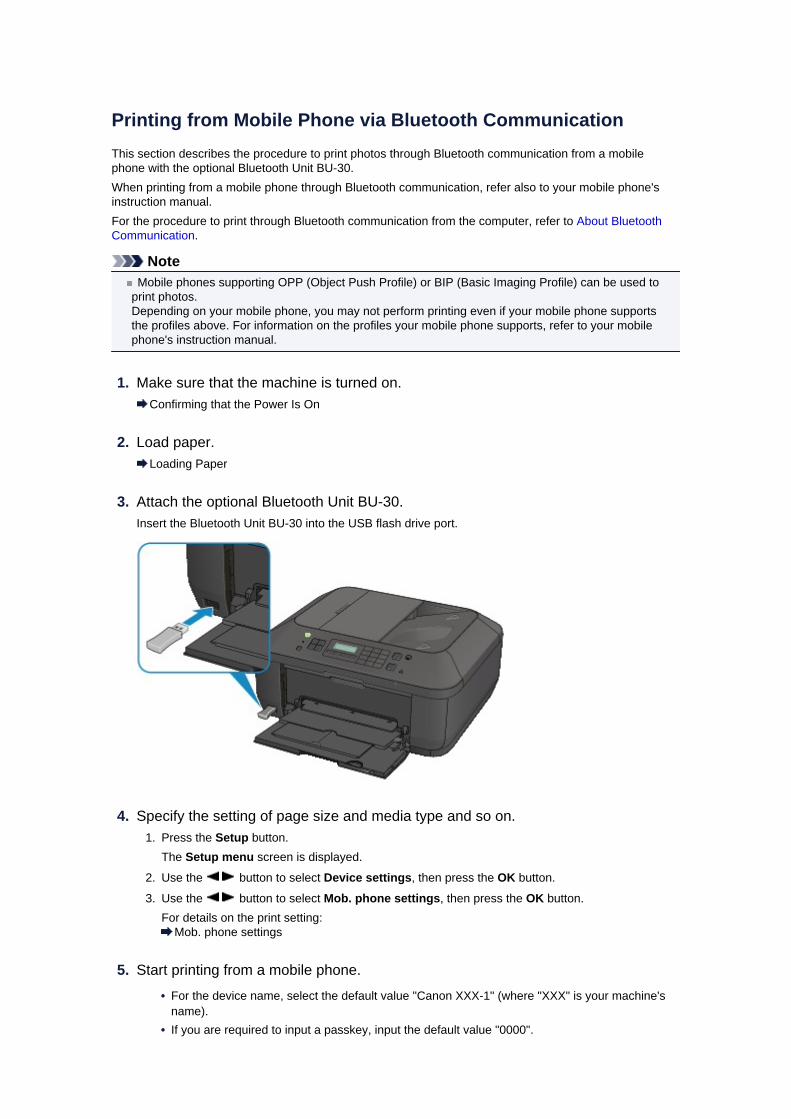
Printing from Mobile Phone via Bluetooth CommunicationThis section describes the procedure to print photos through Bluetooth communication from a mobilephone with the optional Bluetooth Unit BU-30.When printing from a mobile phone through Bluetooth communication, refer also to your mobile phone'sinstruction manual.For the procedure to print through Bluetooth communication from the computer, refer to About BluetoothCommunication.
NoteMobile phones supporting OPP (Object Push Profile) or BIP (Basic Imaging Profile) can be used to
print photos.Depending on your mobile phone, you may not perform printing even if your mobile phone supportsthe profiles above. For information on the profiles your mobile phone supports, refer to your mobilephone's instruction manual.
1. Make sure that the machine is turned on.Confirming that the Power Is On
2. Load paper.Loading Paper
3. Attach the optional Bluetooth Unit BU-30.Insert the Bluetooth Unit BU-30 into the USB flash drive port.
4. Specify the setting of page size and media type and so on.1. Press the Setup button.
The Setup menu screen is displayed.
2. Use the button to select Device settings, then press the OK button.
3. Use the button to select Mob. phone settings, then press the OK button.For details on the print setting:
Mob. phone settings
5. Start printing from a mobile phone.
• For the device name, select the default value "Canon XXX-1" (where "XXX" is your machine'sname).
• If you are required to input a passkey, input the default value "0000".

You can change the device name of the machine, passkey, and so on from the Bluetoothsettings screen.
Setting Bluetooth Printing
NoteCommunication is possible in a range of up to about 33 ft. / 10 m depending on the conditions
below. Printing speed may vary depending on the following conditions:Presence of obstacles between the communication equipment, and radio conditions.Presence of magnetic fields, static electricity, or electromagnetic interference.Receiver sensitivity and antenna performance of the communication equipment.Video files cannot be printed.Depending on your mobile phone, data saved on a memory card may not be printed.About transmittable data
Due to security settings on the mobile phone, downloaded content or photos downloadedfrom a URL attached to an E-mail cannot be printed.Depending on the size of a photo, it may take a while for this machine to start printing after
starting wireless communication.Printed quality and orientation (portrait or landscape) are determined automatically
according to the shot photo size.Depending on the photo size shot on the mobile phone, the edges of the image may be cut
off when performing borderless printing; the margin size may change when printing withborders.If the photo file is over 1.8 MB in size, it may not be possible to send the file.

About Bluetooth Communication Handling Precautions Preparation to Use the Bluetooth Unit Printing Data via Bluetooth Communication Basic Procedure for Printing via Bluetooth Communication Bluetooth Settings Specifications

Handling Precautions Shipping the Bluetooth Unit

Shipping the Bluetooth UnitThe Bluetooth unit may not be used in countries or regions other than the country or region where it waspurchased due to local laws and regulations. Please note that the use of the Bluetooth unit in suchcountries or regions may lead to penalties and that Canon should not be liable for such punishment.

Preparation to Use the Bluetooth Unit Bluetooth Unit Attaching to and Removing from the Printer
Bluetooth UnitThe Bluetooth Unit BU-30 (hereafter referred to as the Bluetooth unit) is an adaptor which can be used witha Canon IJ printer with Bluetooth interface.By attaching the Bluetooth unit to a Canon IJ printer with Bluetooth interface, wireless printing from aBluetooth enabled device, such as a computer or mobile phone, is possible.
NoteCommunication is possible in a range of up to about 33 ft. / 10 m depending on the conditions below.
Printing speed may vary depending on the following conditions:Presence of obstacles between the communication equipment and radio wave conditions.Presence of magnetic fields, static electricity or electromagnetic interference.Software and operating system to be used.Receiver sensitivity and antenna performance of the communication equipment.

Attaching to and Removing from the PrinterAttaching the Bluetooth Unit to the PrinterRemoving the Bluetooth Unit from the Printer
Attaching the Bluetooth Unit to the PrinterAttach the Bluetooth unit to the USB flash drive port of the printer in accordance with the followingprocedure.Refer to Front View for the position of the USB flash drive port.
1. Make sure that the printer is turned on.
Confirming that the Power Is On
2. Insert the Bluetooth unit to the USB flash drive port of the printer.
Detach the cap from the Bluetooth unit. Store the cap in a safe location.
NoteWhen the Bluetooth unit is properly attached to the printer, the message is displayed on the
LCD.
Removing the Bluetooth Unit from the PrinterRemove the Bluetooth unit from the USB flash drive port of the printer in accordance with the followingprocedure.
1. Remove the Bluetooth unit from the USB flash drive port of the printer.
Important
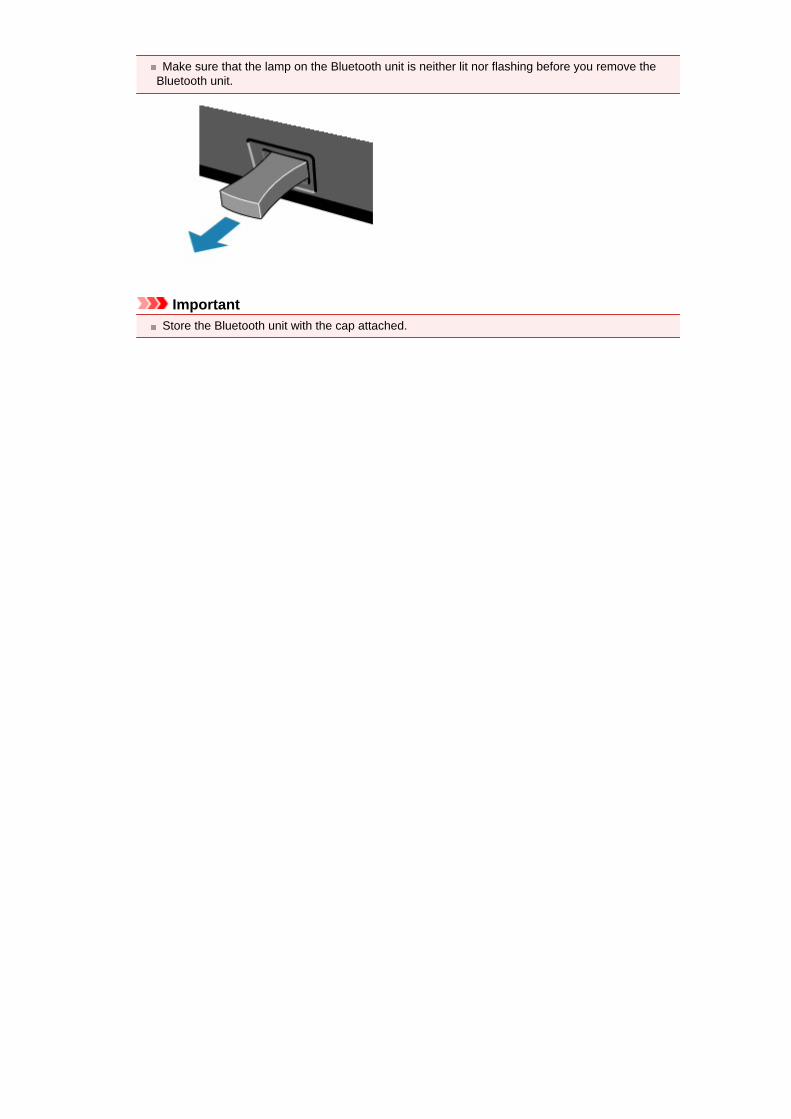
Make sure that the lamp on the Bluetooth unit is neither lit nor flashing before you remove theBluetooth unit.
ImportantStore the Bluetooth unit with the cap attached.

Printing Data via Bluetooth Communication Preparation Installing the MP Drivers Checking the Device Name of the Printer Registering the Printer
PreparationIn order to print via Bluetooth communication with a Macintosh, the following system requirements must besatisfied.
• ComputerMacintosh with the internal Apple Bluetooth moduleMacintosh attached D-LINK DBT-120 USB Bluetooth rev.B
• OSMac OS X v.10.7.x or Mac OS X v.10.6.8
In order to connect the Bluetooth unit and print via Bluetooth communication, the following steps arerequired.
1. Check that the Bluetooth unit is properly attached to the printer.See Attaching to and Removing from the Printer.
2. Install the MP Drivers.See Installing the MP Drivers.
3. Check the device name of the printer using the LCD.See Checking the Device Name of the Printer.
4. Register the printer for Bluetooth printing.See Registering the Printer.

Installing the MP Drivers
NoteIf you use the printer connecting with a computer, the MP Drivers have already been installed. In this
case, move to the next step.Checking the Device Name of the Printer
Before connecting the Bluetooth unit to the printer for wireless printing, install the MP Drivers to yourcomputer.If you reinstall the MP Drivers, reinstall the MP Drivers using the Setup CD-ROM.

Checking the Device Name of the PrinterThis section describes the procedures for checking the settings of the Bluetooth unit on the LCD of theprinter in preparation for Bluetooth printing.Canon IJ printers with the Bluetooth interface are divided into two types. One is equipped with a graphicLCD, and the other with a text LCD.If you need more information about the Bluetooth settings, see Setting Bluetooth Printing.
1. Make sure that the printer is turned on.Confirming that the Power Is On
2. Attach the Bluetooth unit.For information about how to attach the Bluetooth unit, see Attaching to and Removing from thePrinter.
3. Display the Bluetooth settings (Graphic LCD)/Bluetooth settings (Text LCD)screen on the LCD.For information about how to display the Bluetooth settings (Graphic LCD)/Bluetooth settings (TextLCD) screen, refer to Changing the Machine Settings on the LCD.
Graphic LCD
Text LCD
NoteIf the Bluetooth settings (Graphic LCD)/Bluetooth settings (Text LCD) screen is not displayed
on the LCD, the Bluetooth unit may not be attached correctly. Remove the Bluetooth unit from theprinter and attach it once again.For details, see Attaching to and Removing from the Printer.If the Bluetooth settings (Graphic LCD)/Bluetooth settings (Text LCD) screen is not yetdisplayed, the Bluetooth unit may be faulty. In this case, contact the service center.
4. Select Select device name (Graphic LCD)/Device name (Text LCD).The Select device name (Graphic LCD)/Device name (Text LCD) screen is displayed.

Graphic LCD
Text LCD
5. Check the device name.The device name is necessary to register the printer as a Bluetooth device. Be sure to note the devicename.
NoteIf multiple printer units with the same model name are connected to the system, assigning a
different device name to each printer is recommended for easy identification of the printer you willuse. See Select device name (Graphic LCD)/Device name (Text LCD) Screen.
After checking the device name, use the OK button on the printer to finish setting.After checking the Bluetooth settings using the LCD, register the printer on your computer.
Registering the Printer
Registering the PrinterFollow the procedure below to register the printer as a Bluetooth device.
1. Select System Preferences from the Apple menu.
2. Click Print & Scan.In Mac OS X v.10.6.8, click Print & Fax.
3. Click the + button.
4. Select the device name of the printer.
• In Mac OS X v.10.7.x:
1. Click Add Other Printer or Scanner, then select the device name of the printer from AddPrinter.
2. Select the device name of the printer with bluetooth on Kind.
• In Mac OS X v.10.6.8:
1. Select the device name of the printer from Add Printer.2. Select the device name of the printer with bluetooth on Kind.
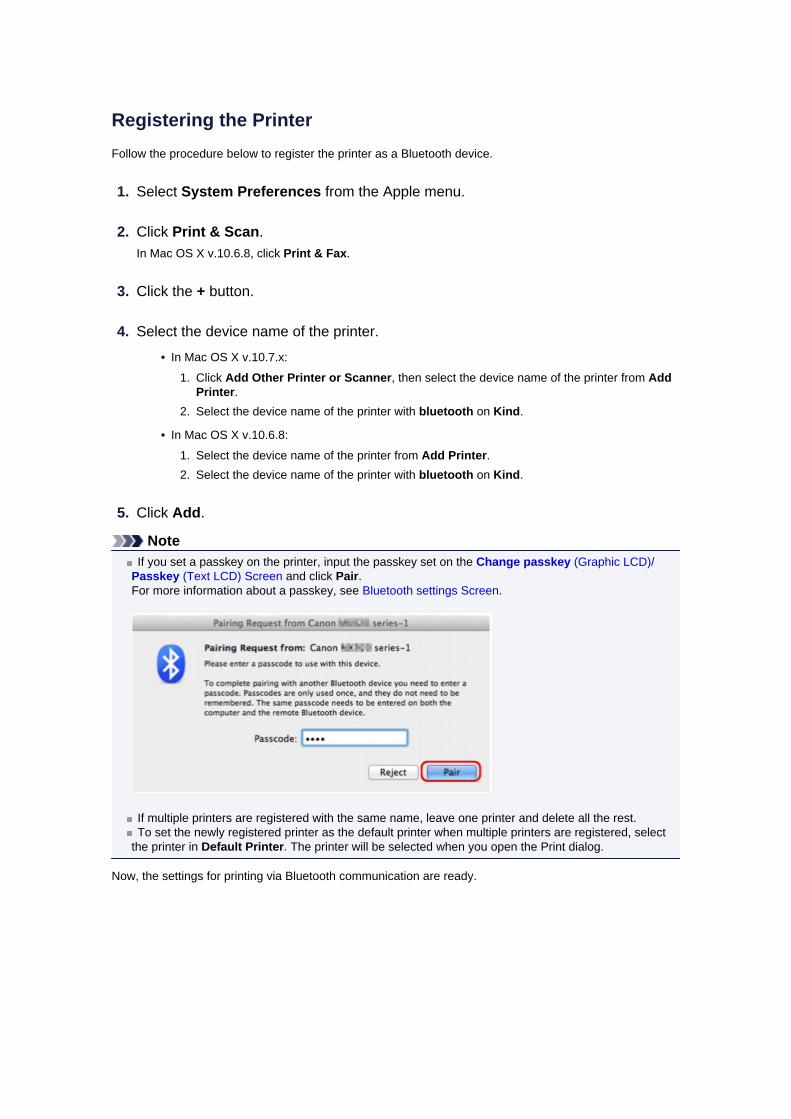
5. Click Add.
NoteIf you set a passkey on the printer, input the passkey set on the Change passkey (Graphic LCD)/
Passkey (Text LCD) Screen and click Pair.For more information about a passkey, see Bluetooth settings Screen.
If multiple printers are registered with the same name, leave one printer and delete all the rest.To set the newly registered printer as the default printer when multiple printers are registered, select
the printer in Default Printer. The printer will be selected when you open the Print dialog.
Now, the settings for printing via Bluetooth communication are ready.

Basic Procedure for Printing via Bluetooth Communication Printing with Computers Printing with Bluetooth Compliant Devices other than a Computer

Printing with ComputersWhen using Bluetooth communication, also refer to the computer's instruction manual.When printing from a Bluetooth compliant device other than a computer, see Printing with BluetoothCompliant Devices other than a Computer.
NoteDepending on your application software, operations may differ. For details, refer to your software
application's instruction manual.Bluetooth communication distance: Approx. 33 ft./10 m in normal environment.
The distance may vary depending on the radio conditions or the communication equipment.
1. Make sure that the printer is turned on.Confirming that the Power Is On
2. Attach the Bluetooth unit.For information about how to attach the Bluetooth unit, see Attaching to and Removing from thePrinter.
3. Load paper.Loading Paper
4. Create a document or open a file to print using an appropriate application software.
5. Select the page size.1. Select Page Setup on the application software's File menu.
The Page Setup dialog opens.2. Select the printer to which you attached the Bluetooth unit such as "Canon XXX-X" from Format
for.3. Select the page size of the loaded paper from Paper Size.4. Click OK.
NoteThe registered printer is displayed as "Canon XXX-X"."X" is a device name or a digit. The number of digits may differ depending on the printer.For more information about how to use the MP Drivers functions, refer to Various Printing
Methods.
6. Specify the required settings.

1. Select Print on the application software's File menu.The Print dialog opens.
2. Select the printer to which you attached the Bluetooth unit such as "Canon XXX-X" from Printer.3. Select Quality & Media in the popup menu.4. Select the media type of the loaded paper in Media Type.5. Select the print mode appropriate to your document from Print Quality.
7. Click Print to print the document.Printing begins.
NoteClick the printer icon in the Dock to display the list of print jobs in progress.
To cancel a print job in progress, select the desired document in the Name list and click Delete.To temporarily stop a job in progress, click Hold. To temporarily stop all the jobs in the list, clickPause Printer.After printing is canceled, a sheet of paper may be ejected with no printing results.

Printing with Bluetooth Compliant Devices other than aComputerThe LCD of the printer allows you to perform settings for printing using Bluetooth compliant devices otherthan a computer.When you print with one of these devices, also refer to your device's instruction manual.When printing from a computer, see Printing with Computers.
NoteMobile phones, PDAs and digital cameras supporting OPP (Object Push Profile) or BIP (Basic
Imaging Profile) can print photos.Depending on your device, you may not perform printing even if your device supports the profilesabove. For details of profiles, refer to your device's instruction manual.
1. Make sure that the printer is turned on.Confirming that the Power Is On
2. Attach the Bluetooth unit.For information about how to attach the Bluetooth unit, see Attaching to and Removing from thePrinter.
3. Load paper.Loading Paper
4. Display the Mobile phone print settings (Graphic LCD)/Mob. phone settings(Text LCD) screen on the LCD and set the media type and the paper size.For information about how to display the Mobile phone print settings (Graphic LCD)/Mob. phonesettings (Text LCD) screen, refer to Changing the Machine Settings on the LCD.
5. Start printing from the Bluetooth compliant device.When you select the device name, select the initial value of the printer "Canon XXX-1" (where "XXX" isyour printer's name).If you are required to input the passkey, input the initial value "0000".You can change the device name of the printer or passkey on the Bluetooth settings (Graphic LCD)/Bluetooth settings (Text LCD) screen on the LCD.
Setting Bluetooth Printing

Bluetooth Settings Setting Bluetooth Printing Bluetooth settings Screen
Setting Bluetooth Printing
1. Make sure that the printer is turned on.Confirming that the Power Is On
2. Attach the Bluetooth unit.For information about how to attach the Bluetooth unit, see Attaching to and Removing from thePrinter.
NoteWhen the Bluetooth unit is properly attached to the printer, the message is displayed on the
LCD.
3. Display the Bluetooth settings (Graphic LCD)/Bluetooth settings (Text LCD)screen on the LCD.For information about how to display the Bluetooth settings (Graphic LCD)/Bluetooth settings (TextLCD) screen, refer to Changing the Machine Settings on the LCD.
4. Select the contents which you want to set on the LCD.Bluetooth settings Screen
NoteFor information about how to set a media type and a paper size when printing from a mobile
phone, refer to Changing the Machine Settings on the LCD.

Bluetooth settings Screen
• Graphic LCD
• Text LCD
1. Select device name (Graphic LCD)/Device name (Text LCD)Displays the device name of the printer to which the Bluetooth unit is attached.
Select device name (Graphic LCD)/Device name (Text LCD) Screen
2. Access refusal setting (Graphic LCD)/Access refusal (Text LCD)Selecting ON (Graphic LCD)/ON (Text LCD) will disable searching of this printer by a Bluetooth-compatible device.
Access refusal setting (Graphic LCD)/Access refusal (Text LCD) Screen
3. Security settings (Graphic LCD)/Security settings (Text LCD)Select Enable (Graphic LCD)/Enable (Text LCD) and then specify the security mode to activate thepasskey set on the Change passkey (Graphic LCD)/Passkey (Text LCD) screen.
Security settings (Graphic LCD)/Security settings (Text LCD) Screen
4. Change passkey (Graphic LCD)/Passkey (Text LCD)You can change the passkey. The passkey refers to an identification number to be determined. It isused to prevent unwanted access from other Bluetooth devices. The initial value is set to "0000".
Change passkey (Graphic LCD)/Passkey (Text LCD) Screen
Select device name (Graphic LCD)/Device name (Text LCD) ScreenAllows you to set the device name of the printer on a Bluetooth device.

In the example used for this explanation, the model name is set to "MX520 series".When a model other than "MX520 series" is used, whatever appears in place of "MX520" becomes themodel name use.Ex:When you select MX520 series-2, the printer name displayed on the Bluetooth device is Canon MX520series-2.The initial value is set to MX520 series-1.
• Graphic LCD
• Text LCD
Access refusal setting (Graphic LCD)/Access refusal (Text LCD) ScreenWhen you search from a Bluetooth device, you can enable or disable the display of the printer name.
• ON (Graphic LCD)/ON (Text LCD)Disables searching from a Bluetooth device.
• OFF (Graphic LCD)/OFF (Text LCD) (Default setting)Enables searching and printing from a Bluetooth device.
Security settings (Graphic LCD)/Security settings (Text LCD) Screen
• Enable (Graphic LCD)/Enable (Text LCD)Selecting Enable (Graphic LCD)/Enable (Text LCD) allows you to choose either of the security modesbelow.
• Mode 3(recommended) (Graphic LCD)/Mode 3 (recommend) (Text LCD)This mode is activated on link level enforced security.The passkey will be required when a Bluetooth device communicates with the printer. Normallyselect this mode.
• Mode 2 (Graphic LCD)/Mode 2 (Text LCD)This mode is activated on service level enforced security.The passkey will be required when printing through the Bluetooth communication.
After setting the security mode, we recommend making a trial print through Bluetooth communication.If printing does not start, change the security mode and try again.Setting a passkey will prevent unwanted access from other Bluetooth devices. You can change thepasskey on the Change passkey (Graphic LCD)/Passkey (Text LCD) screen.
• Disable (Graphic LCD)/Disable (Text LCD) (Default setting)When you register the printer, you are not required to input a passkey.

Change passkey (Graphic LCD)/Passkey (Text LCD) ScreenWhen you select Enable (Graphic LCD)/Enable (Text LCD) on the Security settings (Graphic LCD)/Security settings (Text LCD) screen, you are required to set a passkey to register the printer on otherBluetooth devices.After you change the passkey, you may be asked to input the passkey on the Bluetooth devices you wereable to print from before the passkey was changed. In this case, input the new passkey.
• Graphic LCD
• Text LCD

Specifications
Communication method Bluetooth v2.0
Maximum Speed 1.44 Mbps
Output Bluetooth Power Class 2
Communication distance
Line-of-sight distance: approx. 33 ft./10 m ** It may vary depending on factors including the presence of obstaclesbetween communication equipment, radio wave conditions, the presence ofmagnetic fields around microwave ovens and locations where electrostatic andradio interference occur, the types of software and operating systems used,and receiver sensitivity and antenna performance of communicationequipment.
Profile
SPP (Serial Port Profile)OPP (Object Push Profile)BIP (Basic Imaging Profile)HCRP (Hardcopy Cable Replacement Profile)
Compatible PCsMacintosh with the internal Apple Bluetooth moduleMacintosh attached D-LINK DBT-120 USB Bluetooth rev.BOS: Mac OS X v.10.7.x or Mac OS X v.10.6.8
Frequency band 2.4 GHz band (2.400 GHz to 2.4835 GHz)
Power supply Supplied from the USB flash drive port on the printer, DC 4.4 V to 5.25 V
Maximum powerconsumption 500 mW (MAX)
Operating temperature 5 to 35°C (41 to 95°F)
Operating humidity 10 to 90% RH (no condensation)
Dimensions (Width xDepth x Height)
18.5 (W) x 47.5 (D) x 8.7 (H) mm (with cap attached)0.73 (W) x 1.87 (D) x 0.35 (H) inches
Weight Approx. 7 g (0.25 oz)

Copying
Making Copies Basic Setting Items Reducing or Enlarging a Copy About Special copy Menu Copying Two Pages to Fit onto a Single Page Copying Four Pages to Fit onto a Single Page Copying Thick Originals Such as Books Copying without Borders Collated Copying

Making CopiesLoad the original to copy.This section describes the basic procedure to perform standard copying.
1. Make sure that the machine is turned on.Confirming that the Power Is On
2. Load paper.Loading Paper
3. Press the COPY button.The Copy standby screen is displayed.
4. Load the original document on the platen glass or in the ADF.Loading Originals
5. Confirm the page size and magnification.
1. Magnification2. Page size
NoteTo change or confirm the page size, magnification, or other settings, press the Menu
button, then use the button to display the desired setting item.Setting Items
Press the Stop button to reset the magnification to 100%.
6. Use the (-) (+) button or the Numeric buttons to specify the number ofcopies.
7. Press the Color button for color copying, or the Black button for black & whitecopying.The machine starts copying.Remove the original on the platen glass or from the document output slot after copying iscomplete.
ImportantIf you load the original on the platen glass, do not open the document cover or remove the
original while Scanning.. is displayed on the screen.If you load the original in the ADF, do not move the original until copying is complete.
NoteTo cancel copying, press the Stop button.If you load the original on the platen glass, you can add the copying job while printing.
Adding the Copying Job (Reserve copy)
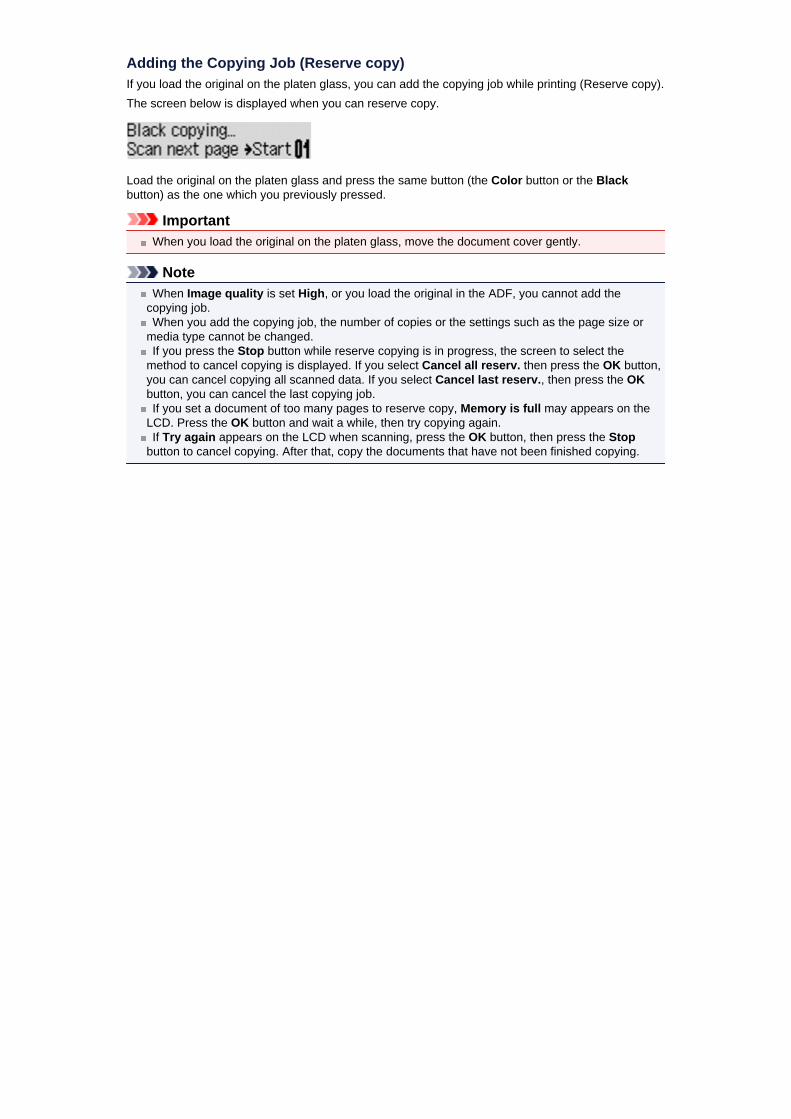
Adding the Copying Job (Reserve copy)If you load the original on the platen glass, you can add the copying job while printing (Reserve copy).The screen below is displayed when you can reserve copy.
Load the original on the platen glass and press the same button (the Color button or the Blackbutton) as the one which you previously pressed.
ImportantWhen you load the original on the platen glass, move the document cover gently.
NoteWhen Image quality is set High, or you load the original in the ADF, you cannot add the
copying job.When you add the copying job, the number of copies or the settings such as the page size or
media type cannot be changed.If you press the Stop button while reserve copying is in progress, the screen to select the
method to cancel copying is displayed. If you select Cancel all reserv. then press the OK button,you can cancel copying all scanned data. If you select Cancel last reserv., then press the OKbutton, you can cancel the last copying job.If you set a document of too many pages to reserve copy, Memory is full may appears on the
LCD. Press the OK button and wait a while, then try copying again.If Try again appears on the LCD when scanning, press the OK button, then press the Stop
button to cancel copying. After that, copy the documents that have not been finished copying.

Setting ItemsYou can change the copy settings such as the page size, media type, and intensity.
Press the Menu button, use the button to select a setting item, then press the OK button.
Use the button to adjust each setting item, then press the OK button. The next setting item isdisplayed.The LCD returns to the Copy standby screen when all the settings are complete.
NoteThe * (asterisk) on the LCD indicates the current setting.Some settings cannot be specified in combination with the setting of other setting items or the
copy menu.The settings of the page size, media type, etc. are retained even if the machine is turned off.
• Enlarge/ReduceSelect the reduction/enlargement method.
Reducing or Enlarging a CopyEx:
• Copy intensityChange the intensity.Ex:
NoteIf you select Auto adjust, load the original on the platen glass.If you select Manual adjust, use the button to decrease the intensity or the button to
increase it.
• Page sizeSelect the page size of the loaded paper.Ex:
• Media typeSelect the media type of the loaded paper.Ex:
• Image qualitySelect the image quality according to the original.Ex:

NoteIf you use Fast with the media type set to Plain paper and the quality is not as good as
expected, select Standard or High and try copying again.Select High to copy in grayscale. Grayscale renders tones in a range of grays instead of
black or white.

Reducing or Enlarging a CopyYou can specify the magnification optionally or select the preset-ratio copying or fit-to-page copying.
In the copy mode, press the Menu button, use the button to select Enlarge/Reduce, thenpress the OK button.
Use the button to select the reduction/enlargement method, then press the OK button.Ex:
NoteSome of the reduction/enlargement methods are not available depending on the copy menu.
• Preset ratioYou can select one of the preset ratios to reduce or enlarge copies.
Use the button to select a preset ratio to match the size of your original document andprinting paper, then press the OK button.
• MagnificationYou can specify the copy ratio as a percentage to reduce or enlarge copies.
Use the (-) (+) button or the Numeric buttons to specify the reduction or enlargement ratio(25 - 400%), then press the OK button.
NotePress and hold the (-) (+) button to quickly advance through the ratios. For details,
see Key repeat.
• Fit to pageThe machine automatically reduces or enlarges the image to fit the page size.
NoteWhen you select Fit to page, the document size may not be detected correctly depending
on the original. In this case, select Preset ratio or Magnification.When Fit to page is selected, load the document on the platen glass.
About Special copy MenuThe following menus are selectable in the Special copy menu.
• Frame erase copyWhen copying thick originals such as books, you can make a copy without black margins aroundthe image and gutter shadows.
Copying Thick Originals Such as Books
• Borderless copyYou can copy images so that they fill the entire page without borders.
Copying without Borders
• 2-on-1 copyYou can copy two original pages onto a single sheet of paper by reducing each image.
Copying Two Pages to Fit onto a Single Page
• 4-on-1 copyYou can copy four original pages onto a single sheet of paper by reducing each image.
Copying Four Pages to Fit onto a Single Page
• Collated copyYou can obtain sorted printouts when making multiple copies of a multi-paged original.
Collated Copying

Copying Two Pages to Fit onto a Single PageYou can copy two original pages onto a single sheet of paper by reducing each image.
1. Make sure that the machine is turned on.Confirming that the Power Is On
2. Load paper.Loading Paper
3. Press the COPY button.The Copy standby screen is displayed.
4. Press the Menu button.The Copy menu screen is displayed.
5. Use the button to select Special copy, then press the OK button.
6. Use the button to select 2-on-1 copy, then press the OK button.If a page size setting or a media type setting that cannot be used in 2-on-1 copying is selected,the LCD displays the following message.
1. Use the button to select the page size, then press the OK button.
2. Use the button to select the media type, then press the OK button.
7. Load the original document on the platen glass or in the ADF.Loading Originals
8. Use the (-) (+) button or the Numeric buttons to specify the number ofcopies.Change the print settings as necessary.
Setting Items
9. Press the Color button for color copying, or the Black button for black & whitecopying.
• When the document has been loaded on the platen glass:When the machine finishes scanning the first document, the message below is displayed.

If you have the next sheet of document to scan, load it on the platen glass and press theOK button. The machine starts copying.If you do not need more scanning, press the tone button to start copying. The machinestarts copying.
NoteYou can add the copying job while printing.
Adding the Copying Job (Reserve copy)
• When the document has been loaded in the ADF:The machine starts scanning the next sheet of document automatically after one sheet ofdocument finishes being scanned.
NoteIf Memory is full appears on the LCD when scanning, set the image quality to Standard or
reduce the number of sheets of documents, then try copying again. If the problem is notresolved, set the image quality to Fast and try copying again.

Copying Four Pages to Fit onto a Single PageYou can copy four original pages onto a single sheet of paper by reducing each image. Four differentlayouts are available.
Layout 1 Layout 2
Layout 3 Layout 4
1. Make sure that the machine is turned on.Confirming that the Power Is On
2. Load paper.Loading Paper
3. Press the COPY button.The Copy standby screen is displayed.
4. Press the Menu button.The Copy menu screen is displayed.
5. Use the button to select Special copy, then press the OK button.
6. Use the button to select 4-on-1 copy, then press the OK button.If a page size setting or a media type setting that cannot be used in 4-on-1 copying is selected,the LCD displays the following message.
1. Use the button to select the page size, then press the OK button.
2. Use the button to select the media type, then press the OK button.
7. Specify the layout.Follow the procedure below to select the layout.
1. Press the Menu button.The Copy menu screen is displayed.
2. Use the button to select 4-on-1 layout, then press the OK button.3. Select the layout, then press the OK button.
Select the layout from Layout 1, Layout 2, Layout 3, or Layout 4.
NoteThe * (asterisk) on the LCD indicates the current setting.
8. Load the original document on the platen glass or in the ADF.Loading Originals
9. Use the (-) (+) button or the Numeric buttons to specify the number ofcopies.Change the print settings as necessary.
Setting Items
10. Press the Color button for color copying, or the Black button for black & whitecopying.
• When the document has been loaded on the platen glass:When the machine finishes scanning each sheet from the first to the third document, themessage below is displayed.
If you have the next sheet of document to scan, load it on the platen glass and press theOK button. The machine starts copying.If you do not need more scanning, press the tone button to start copying. The machinestarts copying.
NoteYou can add the copying job while printing.
Adding the Copying Job (Reserve copy)
• When the document has been loaded in the ADF:The machine starts scanning the next sheet of document automatically after one sheet ofdocument finishes being scanned.
NoteIf Memory is full appears on the LCD when scanning, set the image quality to Standard or
reduce the number of sheets of documents, then try copying again. If the problem is notresolved, set the image quality to Fast and try copying again.

Copying Thick Originals Such as BooksWhen copying thick originals such as books, you can make a copy without black marginsaround the image and gutter shadows. Using this function, you can reduce unnecessary inkconsumption.
1. Make sure that the machine is turned on.Confirming that the Power Is On
2. Load paper.Loading Paper
3. Press the COPY button.The Copy standby screen is displayed.
4. Press the Menu button.The Copy menu screen is displayed.
5. Use the button to select Special copy, then press the OK button.
6. Use the button to select Frame erase copy, then press the OKbutton.
7. Load the original on the platen glass.Loading Originals
NoteWhen you use this function, load the original on the platen glass.
8. Use the (-) (+) button or the Numeric buttons to specify the numberof copies.Change the print settings as necessary.
Setting Items
9. Press the Color button for color copying, or the Black button for black &white copying.The machine starts copying.
NoteClose the document cover.There may be a narrow black margin that appears around the image. This function
removes the dark margins only. If a scanned book is too thin or when the machine is usednear a window or in a bright environment, a faint black frame may remain. Also, if the colorof an original is dark, the machine cannot distinguish the document color from the shadowand this may cause slight cropping or a shadow on the crease.

Copying without BordersYou can copy images so that they fill the entire page without borders.
1. Make sure that the machine is turned on.Confirming that the Power Is On
2. Load the photo paper.Loading Paper
3. Press the COPY button.The Copy standby screen is displayed.
4. Press the Menu button.The Copy menu screen is displayed.
5. Use the button to select Special copy, then press the OK button.
6. Use the button to select Borderless copy, then press the OK button.If a page size setting or a media type setting that cannot be used in borderless copying isselected, the LCD displays the following message.
1. Use the button to select the page size, then press the OK button.
2. Use the button to select the media type, then press the OK button.
7. Load the original document on the platen glass.Loading Originals
NoteWhen you use this function, load the original on the platen glass.
8. Use the (-) (+) button or the Numeric buttons to specify the numberof copies.Change the print settings as necessary.
Setting Items
9. Press the Color button for color copying, or the Black button for black &white copying.The machine starts borderless copying.
Note

Slight cropping may occur at the edges since the copied image is enlarged to fill the wholepage. You can change the width to be cropped from the borders of the original image asneeded. However, the cropped area will be larger if the extension amount is large.For details:
Extended copy amt.For details on the paper size and the media type available for borderless copying:
Printing Area

Collated CopyingYou can obtain sorted printouts when making multiple copies of a multi-paged original.
• When Collated copy is selected:
• When Collated copy is not selected:
1. Make sure that the machine is turned on.Confirming that the Power Is On
2. Load the paper.Loading Paper
3. Press the COPY button.The Copy standby screen is displayed.
4. Press the Menu button.The Copy menu screen is displayed.
5. Use the button to select Special copy, then press the OK button.
6. Use the button to select Collated copy, then press the OKbutton.
7. Load the original in the ADF.Loading Originals
NoteWhen you use this function, load the original in the ADF.
8. Use the (-) (+) button or the Numeric buttons to specify thenumber of copies.Change the print settings as necessary.
Setting Items

9. Press the Color button for color copying, or the Black button for black& white copying.The machine starts copying.
NoteThe number of pages the machine can read varies with the document. If Memory is
full appears on the LCD when scanning, reduce the number of document pages toscan and try copying again.