online electronic notice of intent (noi) · online reporting system (ors) to create an account. ......
TRANSCRIPT
Online Electronic Notice of Intent
(eNOI)
For the Special Conditions for Stormwater Discharges Associated with Construction Activity
Department of Natural Resources & Environmental Control
Sediment and Stormwater Program
89 Kings Hwy, Dover Delaware 19901
302.739.9921November 2018
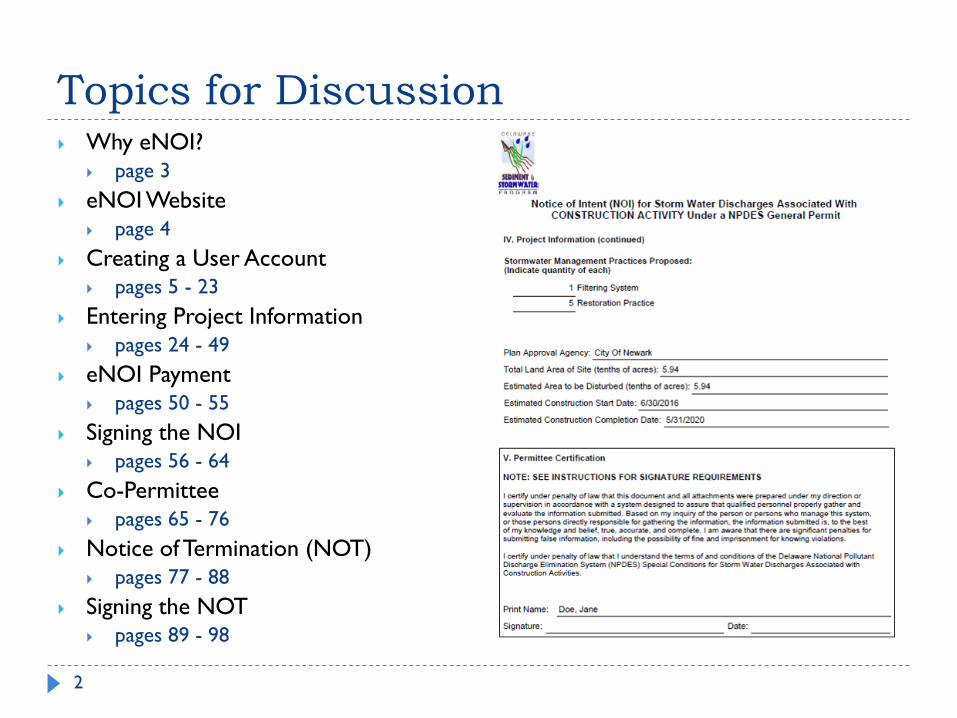
Topics for Discussion
2
Why eNOI?
page 3
eNOI Website
page 4
Creating a User Account
pages 5 - 23
Entering Project Information
pages 24 - 49
eNOI Payment
pages 50 - 55
Signing the NOI
pages 56 - 64
Co-Permittee
pages 65 - 76
Notice of Termination (NOT)
pages 77 - 88
Signing the NOT
pages 89 - 98

Why eNOI
In September 2005, EPA promulgated new regulations for online reporting known as Cross Media Electronic Reporting Rule (CROMERR).
DNREC is complying with this regulation through its Online Reporting System (ORS)
In accordance with these regulations, States receiving electronic reports must comply with certain minimum requirements.
States had to receive EPA’s approval for systems receiving electronic reports.
Delaware’s system to receive reports online has been approved by EPA.
EPA promulgated eReporting Rule in December 2015 requiring the electronic submission of NOI data.
3

eNOI website
DNREC’s eNOI site can be found at https://apps.dnrec.state.de.us/eNOI/default.aspx
4
Creating a User Account
Data Entry Only
Data Entry and Signing Rights
5
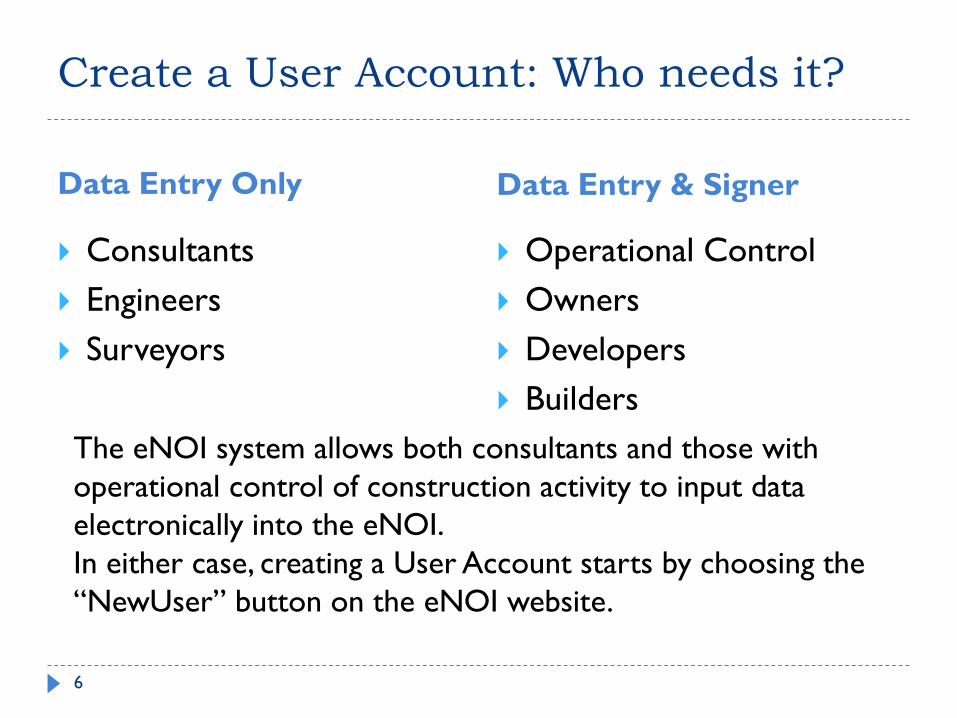
Create a User Account: Who needs it?
Data Entry Only Data Entry & Signer
Consultants
Engineers
Surveyors
Operational Control
Owners
Developers
Builders
The eNOI system allows both consultants and those with
operational control of construction activity to input data
electronically into the eNOI.
In either case, creating a User Account starts by choosing the
“NewUser” button on the eNOI website.
6

Create a User Account
The NewUser button takes you to the Create an Account webpage.
7

Create a User Account
8
As a NewUser, you will be
directed to the DNREC
Online Reporting System
(ORS) to create an
account.
The DNREC ORS is the
online tool used by
DNREC to comply with
EPA’s electronic reporting
rule (CROMERR).

Create a User Account
Fields with asterisks(*) are mandatory.
For address, city, state and zip, enter work address.
The Desired Login Name will be your User ID (for logging in) Your email address can be used as a
User ID/Login name.
Click Check Availability to find out if the Login Name is still available (every Login Name has to be unique to this system).
Choose a Security Question from the drop down menu.
Provide an Answer to the Security Question.
Keep a personal copy of your security question and answer.
9

Create a User Account: User Privilege
Data Entry Only Data Entry & Signing Rights
Individual(s) that enter data into the NOI only, they do not sign the NOI. For example:
Consultant
Engineer
Individual(s) that may or may
not enter data into the NOI,
but are authorized to sign
the NOI. For example:
Owner
Developer
Builder
Operational control of a
project
10
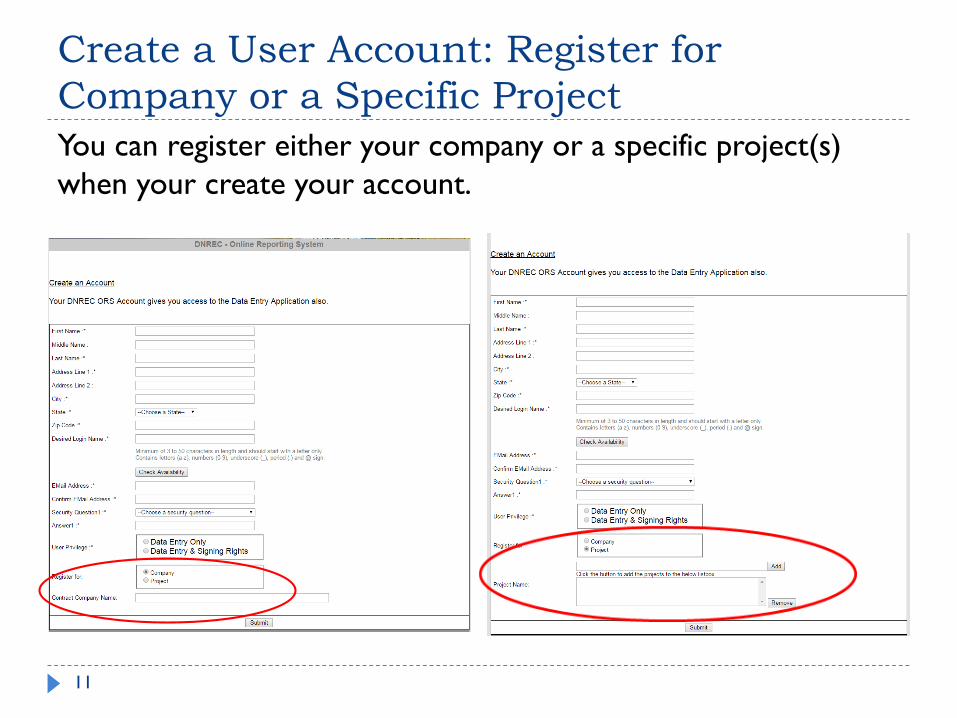
Create a User Account: Register for
Company or a Specific Project
You can register either your company or a specific project(s)
when your create your account.
11

Create a User Account: Register for
Your Company
To register your Company
Simply enter your
company’s name.
Click Submit.
Skip to page 15 of
instructions.
12
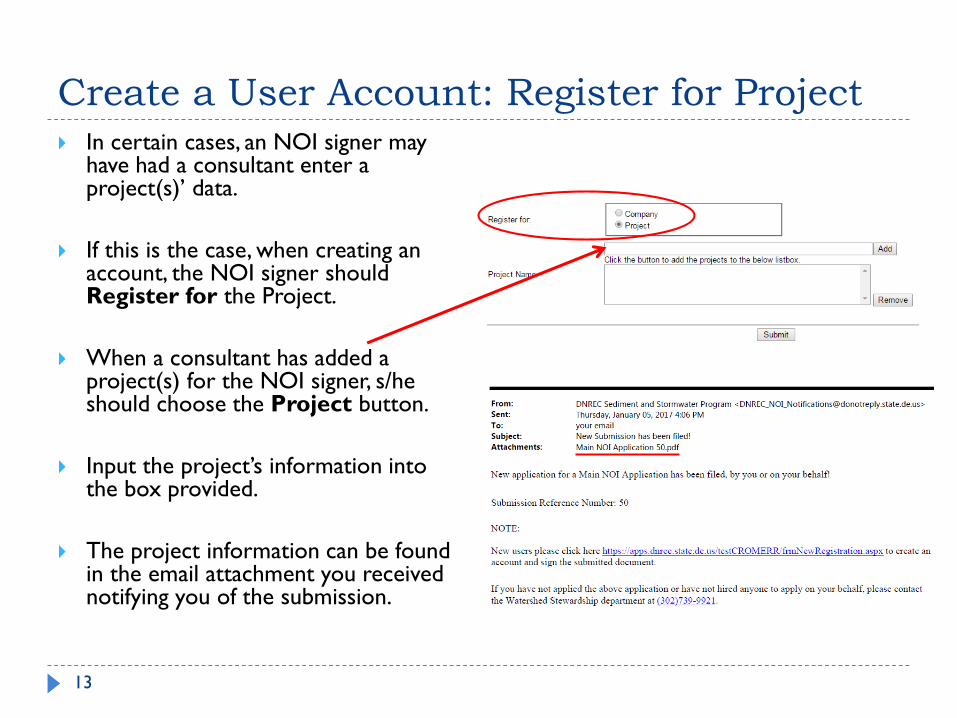
Create a User Account: Register for Project In certain cases, an NOI signer may
have had a consultant enter a project(s)’ data.
If this is the case, when creating an account, the NOI signer should Register for the Project.
When a consultant has added a project(s) for the NOI signer, s/he should choose the Project button.
Input the project’s information into the box provided.
The project information can be found in the email attachment you received notifying you of the submission.
13

Creating a User Account: Register for Project
Once you have input the
project information, click
the Add button.
Then click the Submit
button.
14

Create an Account: Confirmation
After pressing Submit,
the following screen will
be displayed. This is a
confirmation that the first
step of the registration
has been completed.
Click the Close Window
button.
15

Create an Account: Confirmation
An email will be sent with a link to complete the process of creating an account.
This is a sample of the email that will be received to confirm the registration.
Follow the instructions in order to validate the email address and to continue with the registration process.
16

Create an Account: Confirmation
The email link, Click here
to continue, will navigate
to the DNREC ORS
webpage.
Enter the answer to the
Security Question that
you selected on the
registration form and
press Submit.
17
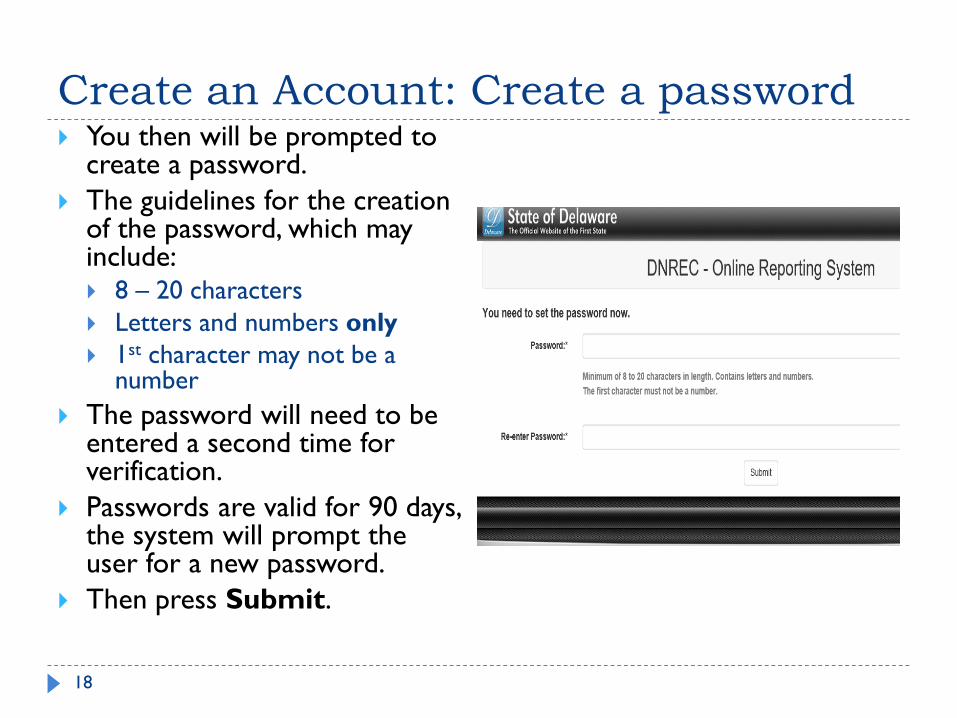
Create an Account: Create a password You then will be prompted to
create a password.
The guidelines for the creation of the password, which may include: 8 – 20 characters
Letters and numbers only
1st character may not be a number
The password will need to be entered a second time for verification.
Passwords are valid for 90 days, the system will prompt the user for a new password.
Then press Submit.
18
Create an Account: Password confirmed
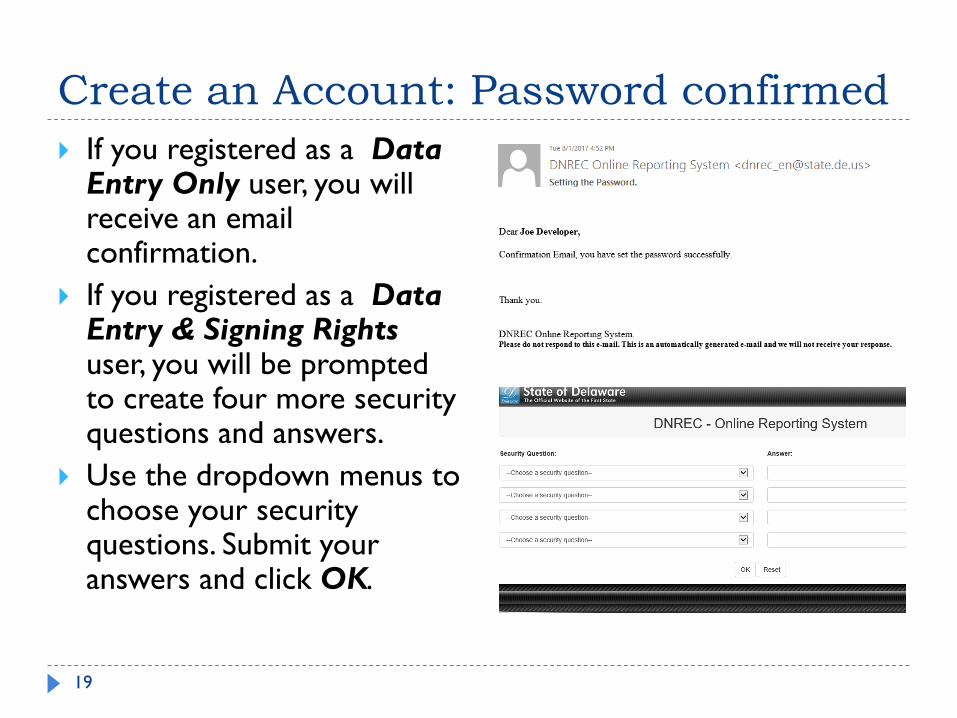
If you registered as a Data Entry Only user, you will receive an email confirmation.
If you registered as a Data Entry & Signing Rights user, you will be prompted to create four more security questions and answers.
Use the dropdown menus to choose your security questions. Submit your answers and click OK.
19

Create an Account: Electronic Signature
The user is then directed
to the electronic signature
agreement. You may need
to scroll down to find the
prompts.
Click Print Agreement.
Check the I have printed
the agreement box.
Click Submit.
20
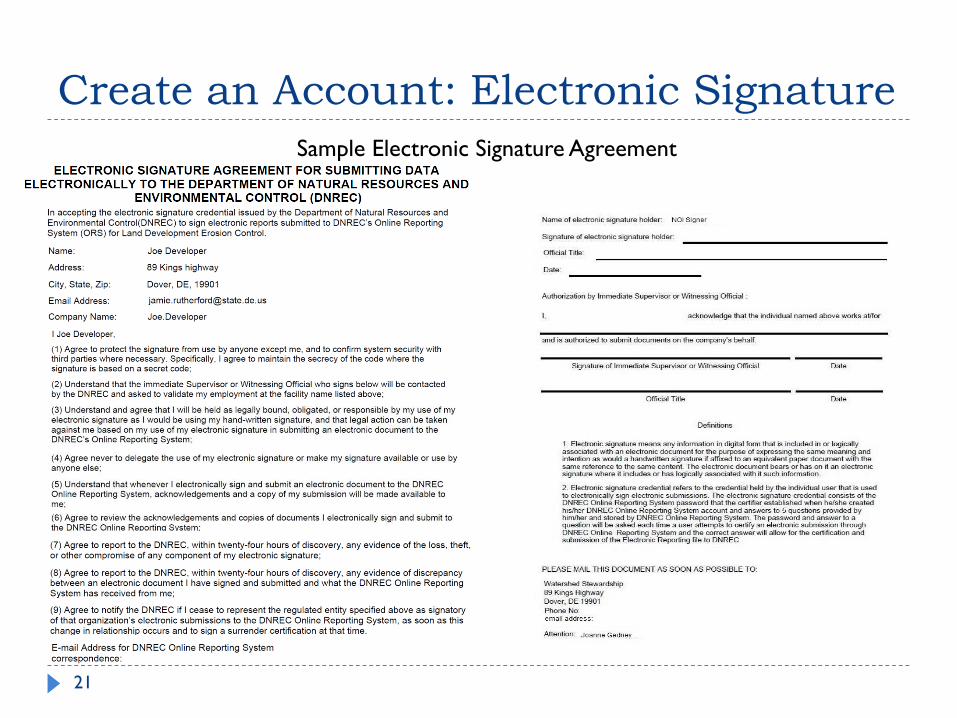
Create an Account: Electronic Signature
Sample Electronic Signature Agreement
21
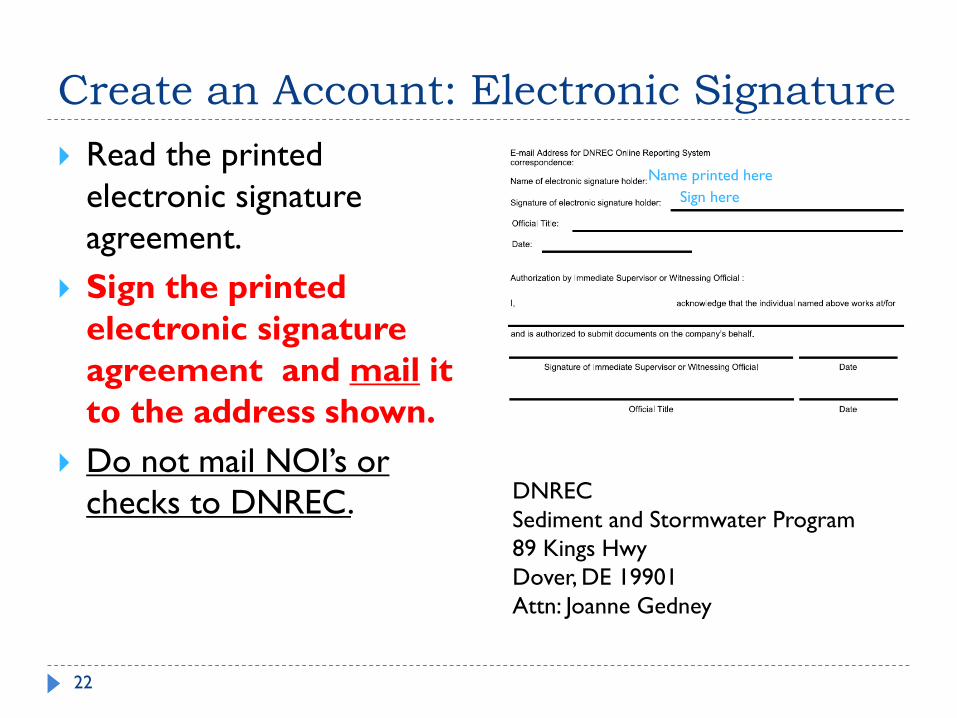
Create an Account: Electronic Signature
Read the printed
electronic signature
agreement.
Sign the printed
electronic signature
agreement and mail it
to the address shown.
Do not mail NOI’s or
checks to DNREC.
Sign here
Name printed here
22
DNREC
Sediment and Stormwater Program
89 Kings Hwy
Dover, DE 19901
Attn: Joanne Gedney

Create an Account: Electronic Signature
After the Electronic
Signature Agreement is
received, verified, and
approved by Sediment and
Stormwater Program, an
email confirmation is sent
to the user.
The user with signing
rights will be able to
electronically sign the
NOI.
23

Entering Data into the eNOI
DNREC eNOI
24

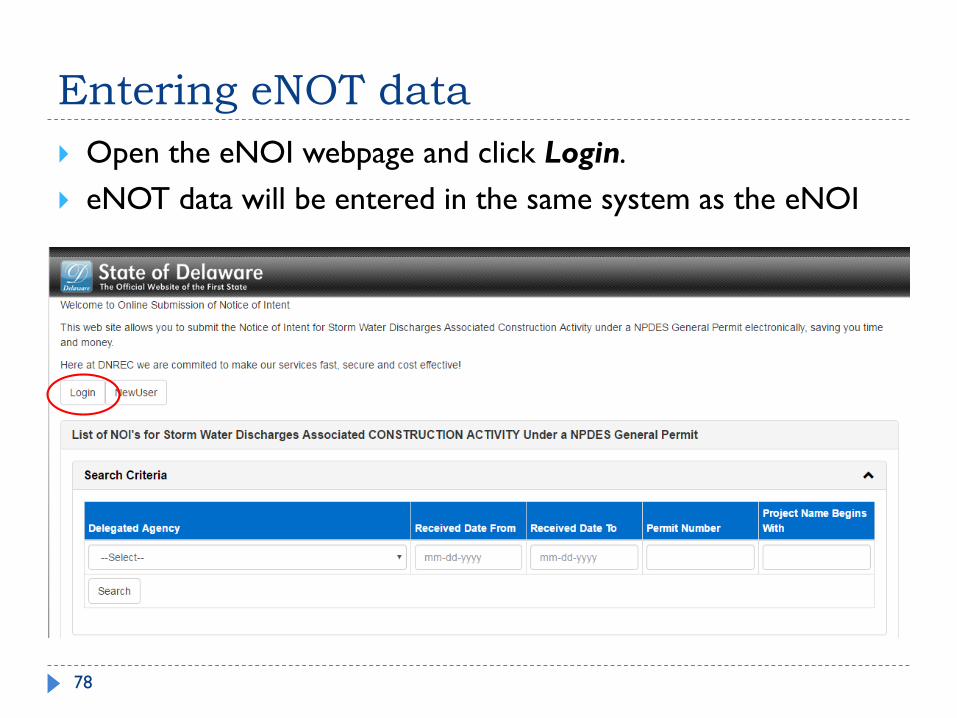
Entering eNOI data
Data Entry Only Data Entry & Signing Rights
25
Once you have created an
account and DNREC has
approved your account,
you will be able to enter
data into the electronic
NOI.
Once you have created an
account, signed and
submitted the Electronic
Signature Agreement, and
DNREC has approved
your account, you will be
able to enter data into the
electronic NOI and
electronically sign NOIs.

Entering eNOI data Once you have completed the registration, you can log into the
eNOI system.
Open the eNOI webpage and click Login.
26

eNOI login screen Enter your User Name (Login Name) and Password.
If you have forgotten your password click Forgot Password and follow the prompts to reset password
27

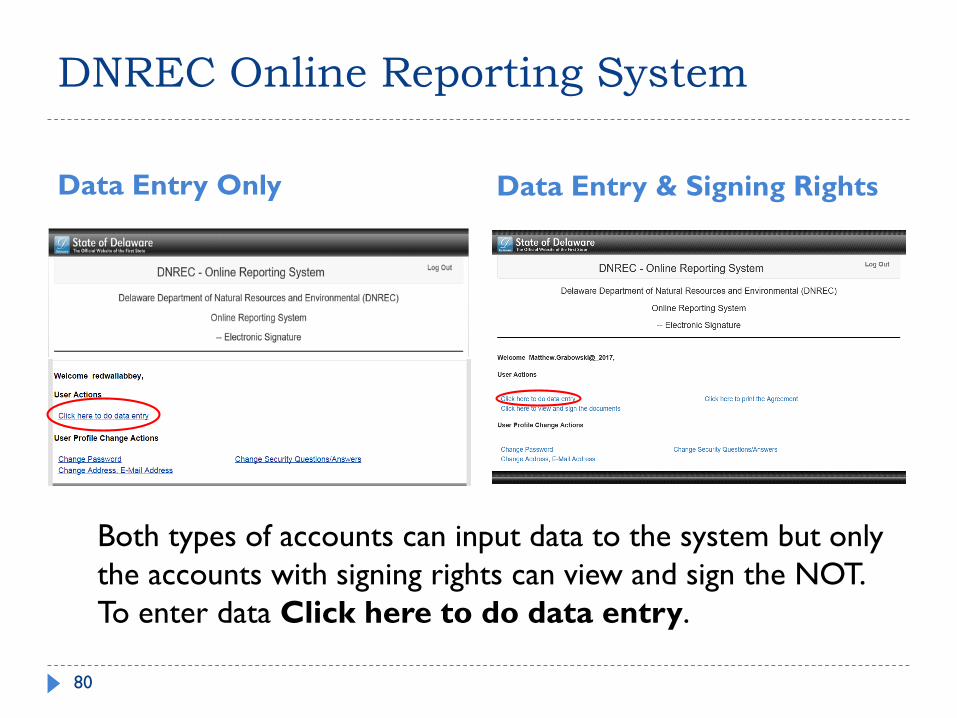
DNREC Online Reporting System
Data Entry Only Data Entry & Signing Rights
Both types of accounts can input data to the system but only
the accounts with signing rights can view and sign the NOI.
To enter data Click here to do data entry.
28
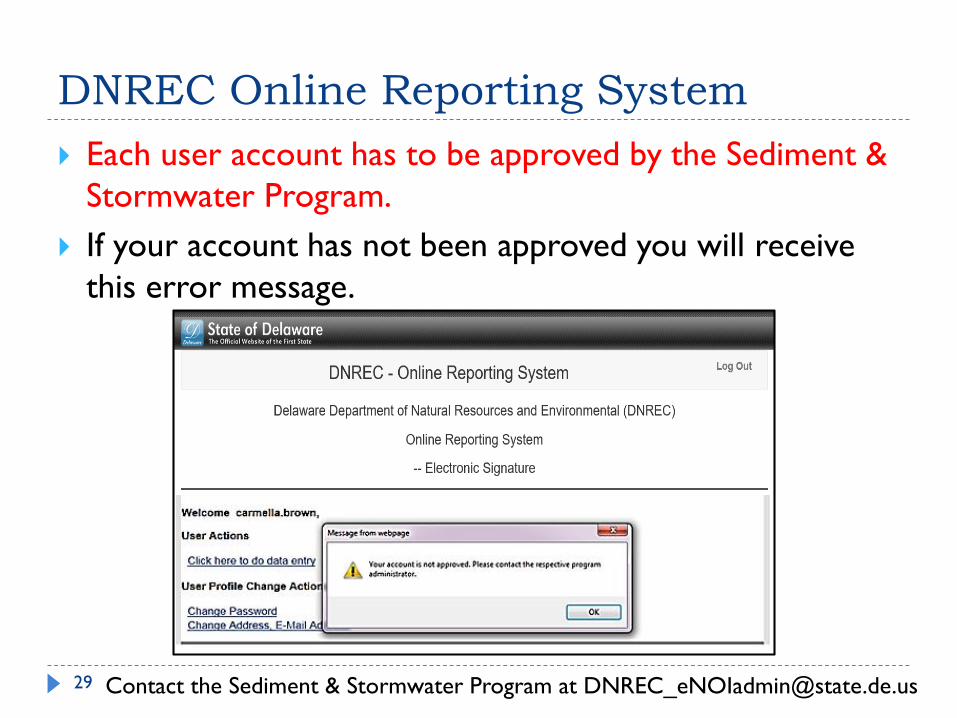
DNREC Online Reporting System
Each user account has to be approved by the Sediment &
Stormwater Program.
If your account has not been approved you will receive
this error message.
Contact the Sediment & Stormwater Program at [email protected]

DNREC Online Reporting System
When your account is approved, the system will take you to
main page of electronic Notice Of Intent (eNOI) application.
Click Add New Submission to start the data entry of a new
NOI.
30

eNOI Data Entry
Enter the data
elements for your
project starting
with the owner’s
information.
Use the dropdown
menu to choose
the Company
Type.
Fields with
asterisks(*) are
mandatory.
31
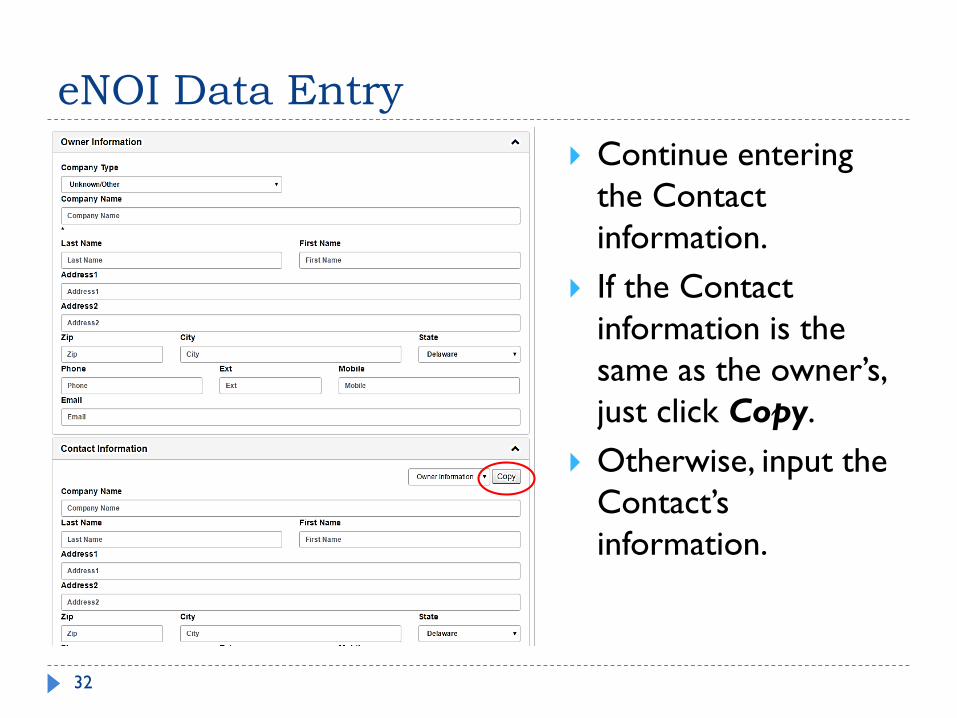
eNOI Data Entry
Continue entering
the Contact
information.
If the Contact
information is the
same as the owner’s,
just click Copy.
Otherwise, input the
Contact’s
information.
32

eNOI Data Entry
Continue entering the Billing information.
The billing information should reflect the person/company paying for the NOI.
Use the dropdown menu to copy either the owner’s or contact’s info and click Copy.
Otherwise, input the billing information.
33

eNOI Data Entry
After completing the Owner, Contact, and Billing
information click Next.
34
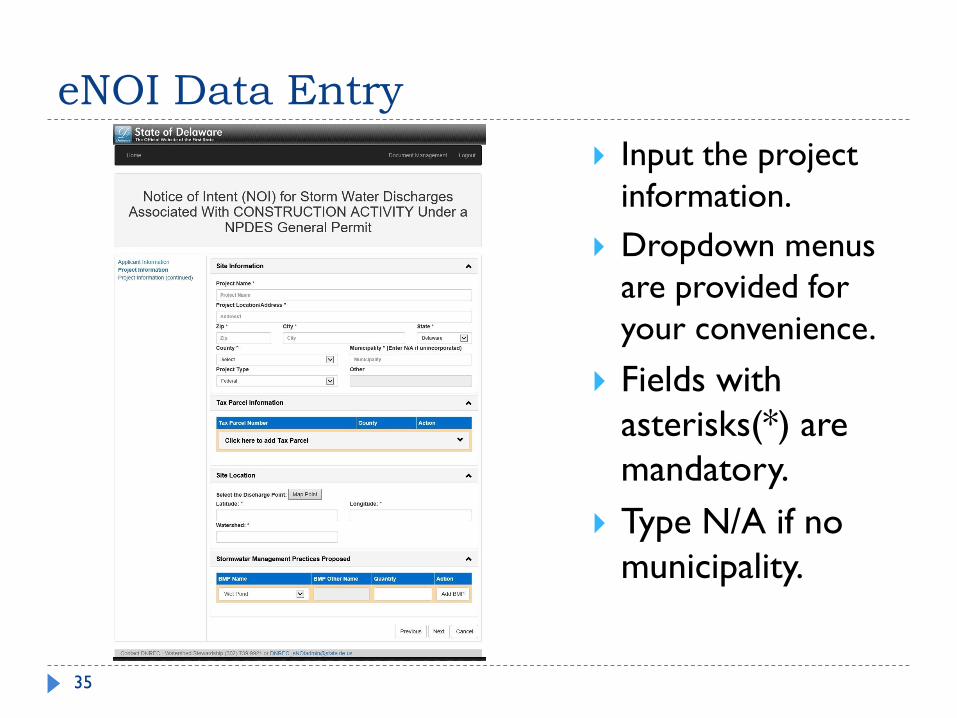
eNOI Data Entry
Input the project
information.
Dropdown menus
are provided for
your convenience.
Fields with
asterisks(*) are
mandatory.
Type N/A if no
municipality.
35
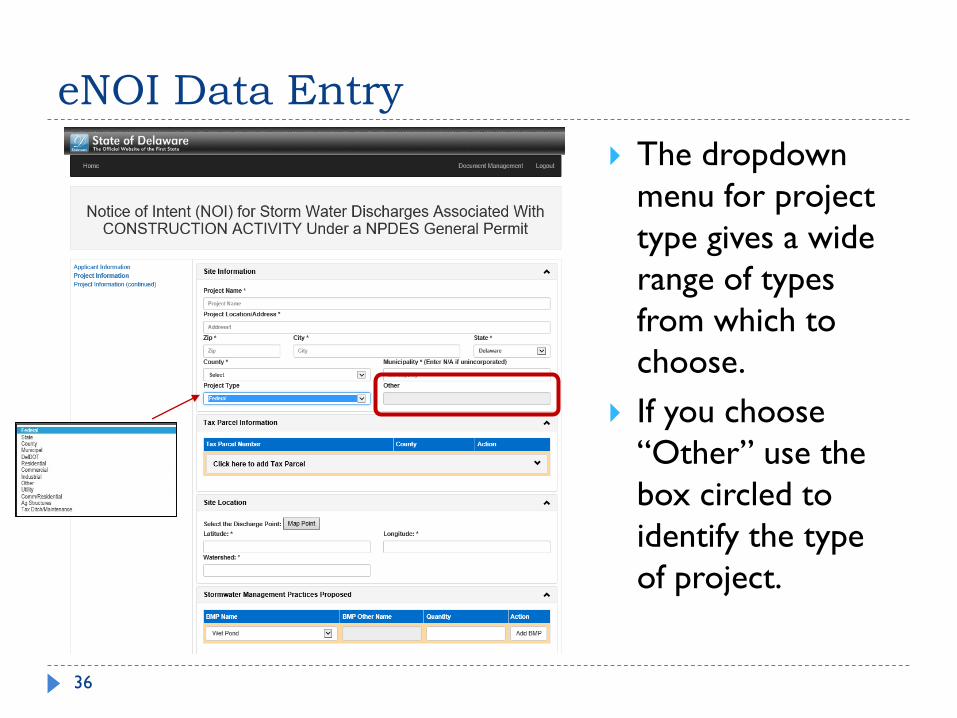
eNOI Data Entry
The dropdown
menu for project
type gives a wide
range of types
from which to
choose.
If you choose
“Other” use the
box circled to
identify the type
of project.
36

eNOI Data Entry
To add the project's Tax Parcel Information choose Click here to add Tax Parcel to open the section.
Choose the County where the project is located.
Input the tax Parcel Number into the boxes.
Click Add Tax Parcel.
37
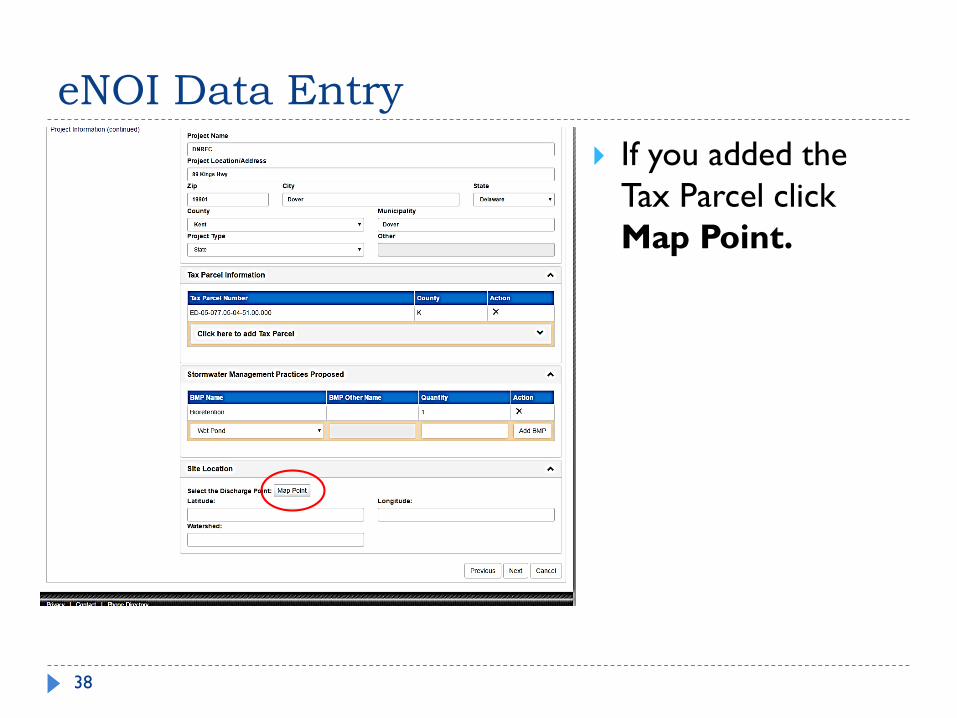
eNOI Data Entry
If you added the
Tax Parcel click
Map Point.
38

eNOI Data Entry
A map with the Parcel outlined
in red should appear.Use your curser/pointer and click the discharge point from the lot.
The Latitude and Longitude of the Parcel should appear.
39

eNOI Data Entry
Click the X in the corner of the
map.The Latitude, Longitude, and
Watershed will automatically
populate the cells.
40

eNOI Data Entry You can also add the Latitude and Longitude manually and the watershed will be automatically
populated.
The Latitude and Longitude should extend 6-digits past the decimal point (e.g. 39.160327).
The longitude should have a negative sign in front of the digits.
Click Map Point to ensure the latitude and longitude you entered corresponds to your project.
41

eNOI Data Entry
Use the dropdown menu to choose your BMP(s).
Include all BMPs and the quantity of BMPs.
Click Add BMPfor each new BMP you add.
Click Next to navigate to
the next screen.
42

eNOI Data Entry
Your NOI must be approved prior to obtaining Sediment and Stormwater Plan approval.
Use the dropdown menu to select the Approval Agency.
Land areas should be input to the tenth of an acre.
Click Save.
43

eNOI Certification
*IMPORTANT*
If you are a Data Entry Only user, you must include the email
of the owner in cell titled Permittee 1 Email address.
If you are a Data Entry & Signing Rights user and signing this
NOI, check the Check this Box if you are signing this
application.
44
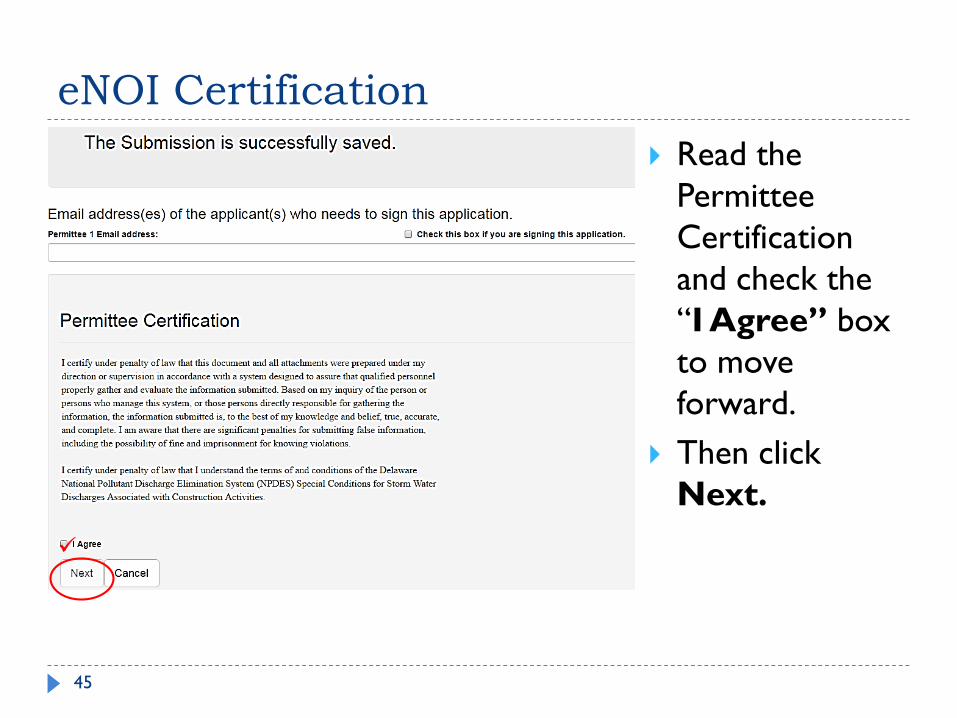
eNOI Certification
Read the
Permittee
Certification
and check the
“I Agree” box
to move
forward.
Then click
Next.
45
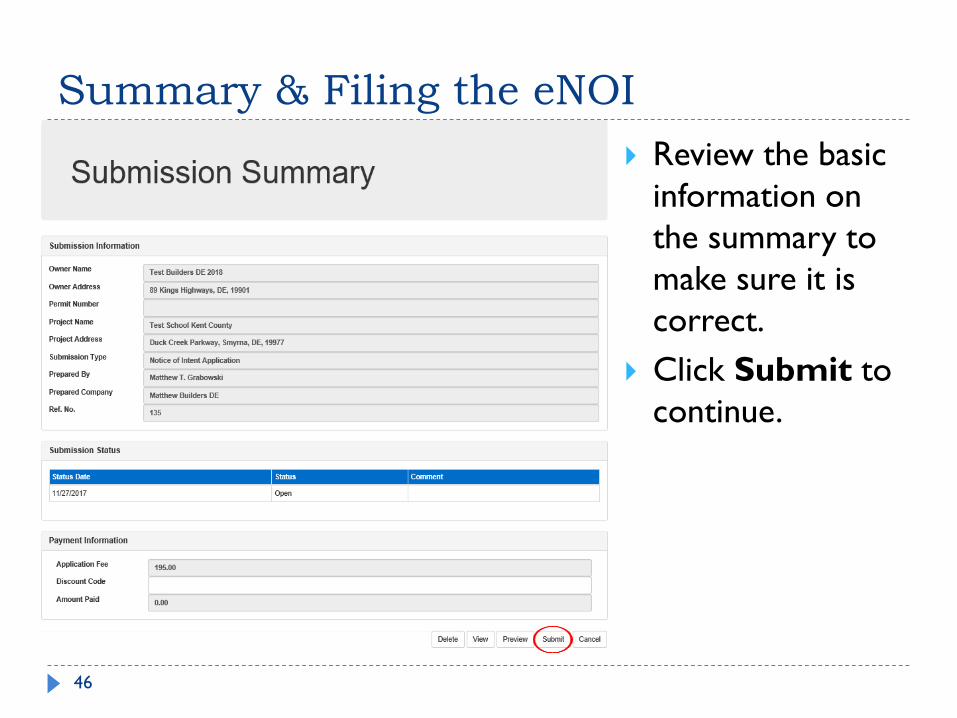
Summary & Filing the eNOI
Review the basic
information on
the summary to
make sure it is
correct.
Click Submit to
continue.
46
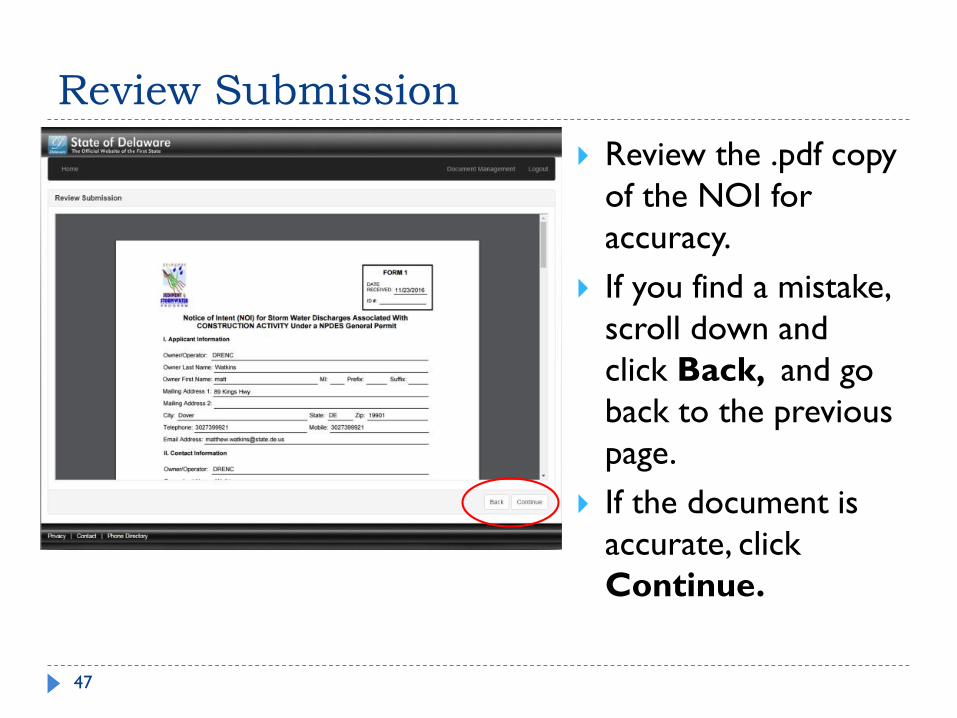
Review Submission
Review the .pdf copy
of the NOI for
accuracy.
If you find a mistake,
scroll down and
click Back, and go
back to the previous
page.
If the document is
accurate, click
Continue.
47
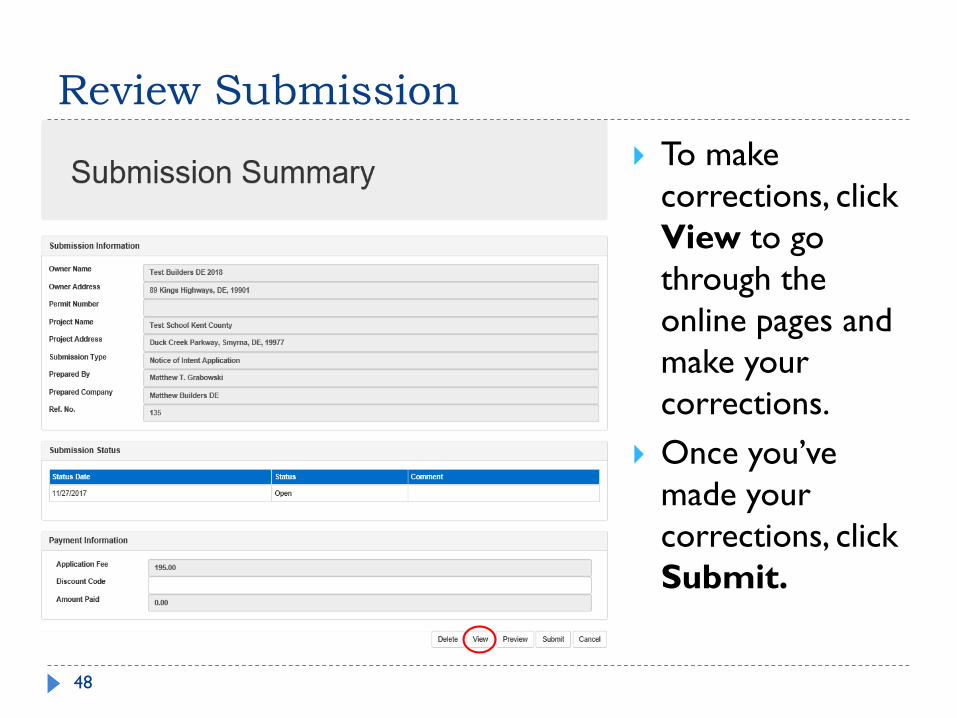
Review Submission
To make
corrections, click
View to go
through the
online pages and
make your
corrections.
Once you’ve
made your
corrections, click
Submit.
48

Review Submission
Review Submission
and Click
Continue.
49

Billing Information
Input your billing
information and
click Continue.
50

eNOI payment
Choose which payment method you’d like to use.
If you choose personal or corporate check you’ll need to
know your routing and account numbers.
51

Corporate or Personal Check
52
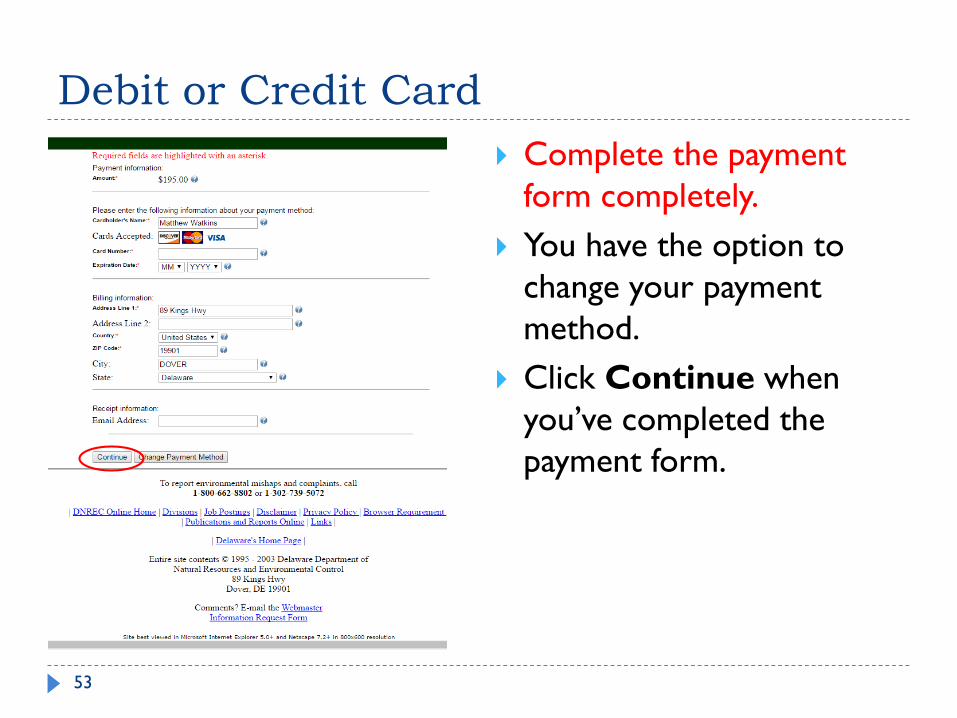
Debit or Credit Card
Complete the payment
form completely.
You have the option to
change your payment
method.
Click Continue when
you’ve completed the
payment form.
53

eNOI Payment
A confirmation page
verifying your payment
information will appear
(the example here is for
Credit Card payment).
Click Confirm Payment
to continue.
You’re NOI has been
submitted for approval!
54

eNOI Confirmation
You may receive 3 separate email confirmations for one eNOI submission.
“Thank You for the Payment - Notice Of Intent Application Fee”
“DNREC Online Reporting - Document Submission”
“New Submission has been filed!”
55

After paying for the
NOI, you will be
sent back to the
ORS home page.
An email will be sent
to owner instructing
them to sign the
NOI.
Electronically Signing the NOI
Data Entry Only
56

Electronically Signing the NOI
Data Entry Only
57
If a consultant completed
the eNOI, the authorized
signer will receive an
email entitled, “New
Submission has been
filed!”
Log into the ORS system
to sign the NOI.

Electronically Signing the NOI
Authorized Signature
58
From the ORS home page, Click here to view and
sign documents to find the document you need to
sign.
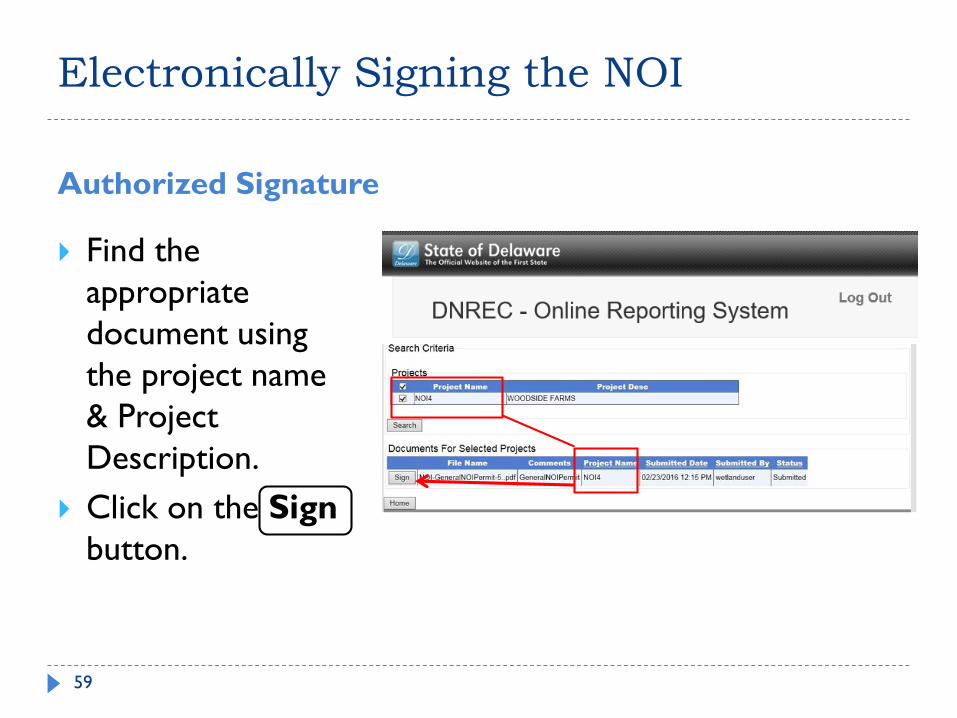
Electronically Signing the NOI
Authorized Signature
59
Find the
appropriate
document using
the project name
& Project
Description.
Click on the Sign
button.
Electronically Signing the NOI
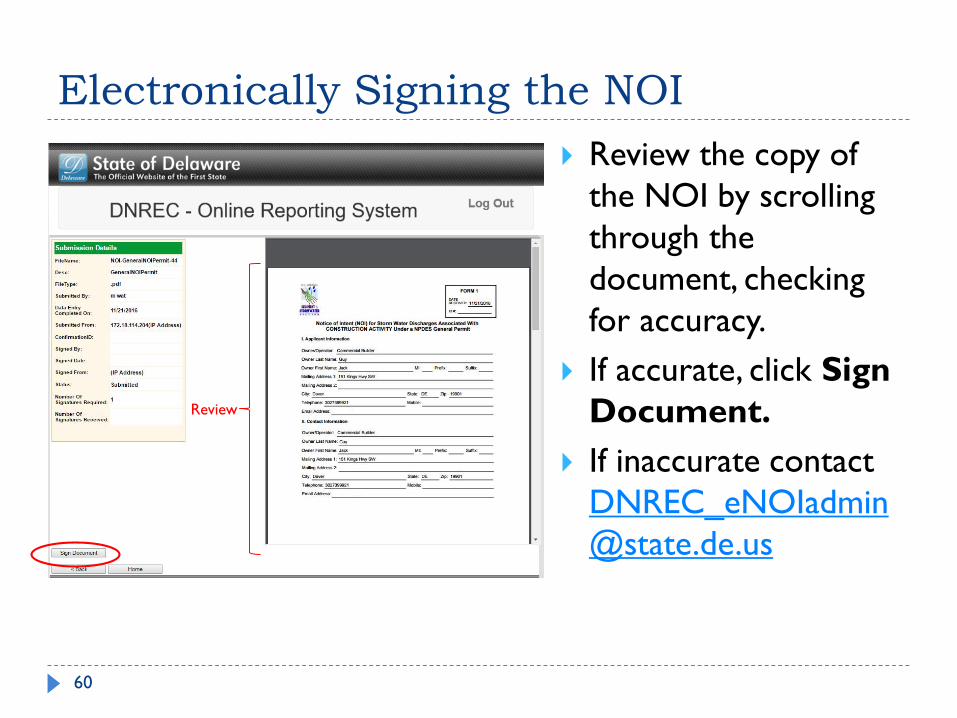
60
Review the copy of
the NOI by scrolling
through the
document, checking
for accuracy.
If accurate, click Sign
Document.
If inaccurate contact
DNREC_eNOIadmin
@state.de.us
Review

Electronically Signing the NOI
61
To confirm your
Electronic Signature,
input your
password and click
Submit.

Electronically Signing the NOI
62
The Electronic Signature confirmation requires a second authentication.
Input the answer to the security question, and click Submit.
The NOI has now been signed electronically

Electronically Signing the NOI
63
After providing your
password and answer to
your security question, the
ORS returns to the list of
projects.
Note that after signing the
NOI the status of the
project changed from
“Submitted” to “Signed.”

Electronically Signing the NOI
64
You also receive an email
providing a link to the
electronically signed NOI.

Co-Permittee
65
Filing for Co-Permittee
66
The Special Conditions for Stormwater Discharges Associated with Construction Activity requires any person engaged in land disturbing activity over one acre submit a Notice of Intent.
In certain cases, more than one entity may be engaged in land disturbing activity at a particular site. For example, a land developer may be installing infrastructure in a subdivision while a homebuilder or homebuilders may be building homes at the same project.
In a case where more than one entity is engaged in land disturbing activity, each entity must either obtain an NOI or file as a Co-Permittee on the original NOI for the project.

Filing for Co-Permittee
67
When Filing for a Co-Permittee, the initial NOI signer
must begin the process.
The Co-Permittee must electronically sign the NOI.
The Co-Permittee must create an account in DNREC’s
ORS in order to electronically sign the NOI.

Filing for Co-Permittee
The initial NOI signer (owner, developer or person with operational control of the project) must Login into the eNOI Online Reporting System webpage.
68

Filing for Co-Permittee Enter your User Name (Login Name) and Password
Under “User Actions” click the hyperlink “Click here to do data entry”
69

Filing for Co-Permittee
70
Use the Select the Submission Type drop down menu and
choose CoPermittee and click Add New Submission.

Filing for Co-Permittee
71
The Online Reporting System will display your List of approved projects.
Choose the project that you want to add Co-Permittee by clicking Add CoPermittee attached to the appropriate project.

Filing for Co-Permittee
72
The Co-Permittee
Application.
Confirm the permit
information and original
permittee information
Input the co-permittee’s
information.
Be sure to include the co-
permittee’s email address.
Filing for Co-Permittee
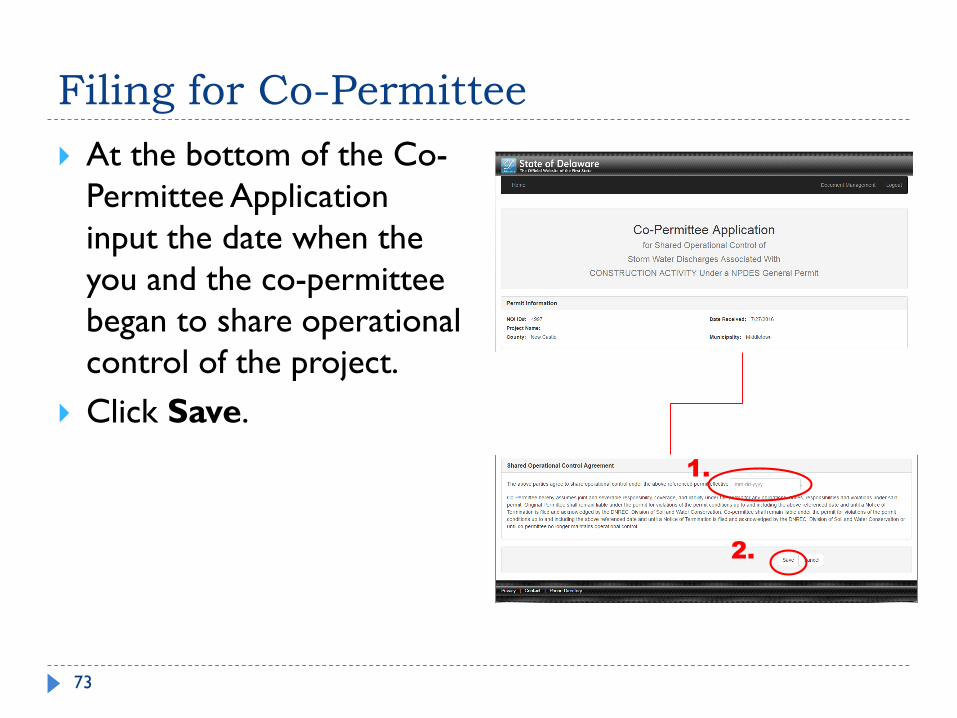
73
At the bottom of the Co-
Permittee Application
input the date when the
you and the co-permittee
began to share operational
control of the project.
Click Save.
1.
2.

Filing for Co-Permittee
Data Entry Only Data Entry & Signing Rights
74
Add the emails of the two
Co-Permittees in the
appropriate boxes.
Add the email of the Co-
Permittee in the Permittee
2 Email address box.

Filing for Co-Permittee
75
After inputting the co-
permittee emails check
the I Agree box and click
Next.

Filing for Co-Permittee
76
From the summary page,
follow the instructions on
pages 46 – 49.
Review the NOI
Email confirmation
There is no fee for the co-
permittee
Electronically sign the
NOI (pp. 57 – 64).

Notice of Termination (NOT)
77
Entering eNOT data
Open the eNOI webpage and click Login.
eNOT data will be entered in the same system as the eNOI
78

eNOI login screen Enter your User Name (Login Name) and Password.
If you have forgotten your password click Forgot Password and follow the prompts to reset password
79
DNREC Online Reporting System
Data Entry Only Data Entry & Signing Rights
Both types of accounts can input data to the system but only
the accounts with signing rights can view and sign the NOT.
To enter data Click here to do data entry.
80

DNREC Online Reporting System
From drop down menu “Select the Submission Type” Click
Terminate NOI
Click Add New Submission to start the data entry of NOT.
81

DNREC Online Reporting System
82
From the List of Approved General Permit Submissions Click
“Add Termination” for the project you wish to submit an NOT
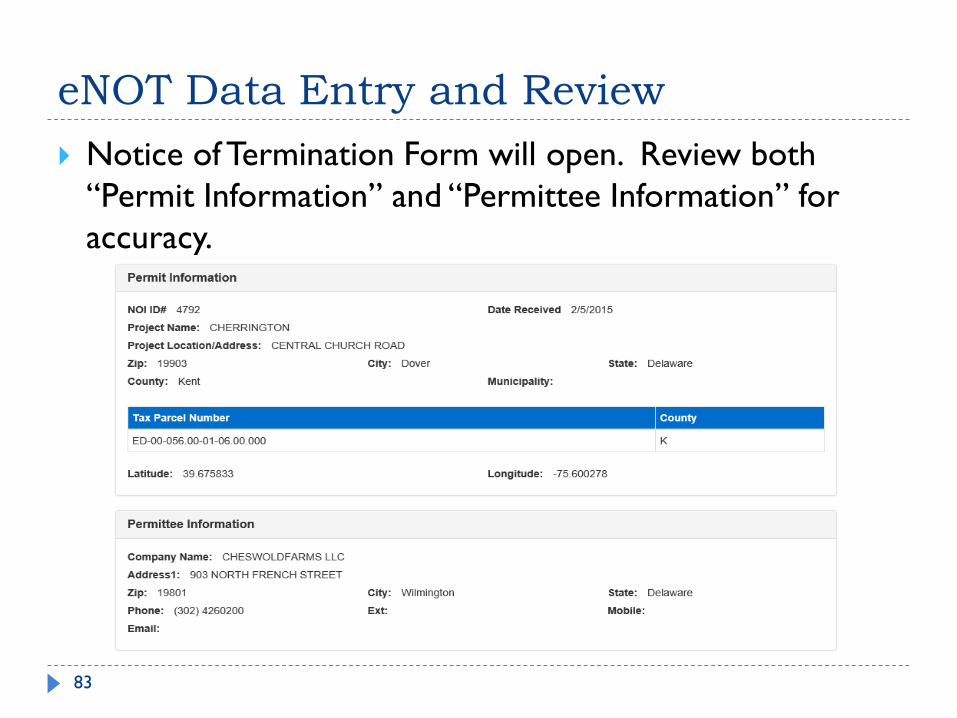
eNOT Data Entry and Review
83
Notice of Termination Form will open. Review both
“Permit Information” and “Permittee Information” for
accuracy.

eNOT Data Entry and Review
84
Complete “Termination of Coverage Information”
section and add comments as appropriate. Click Save
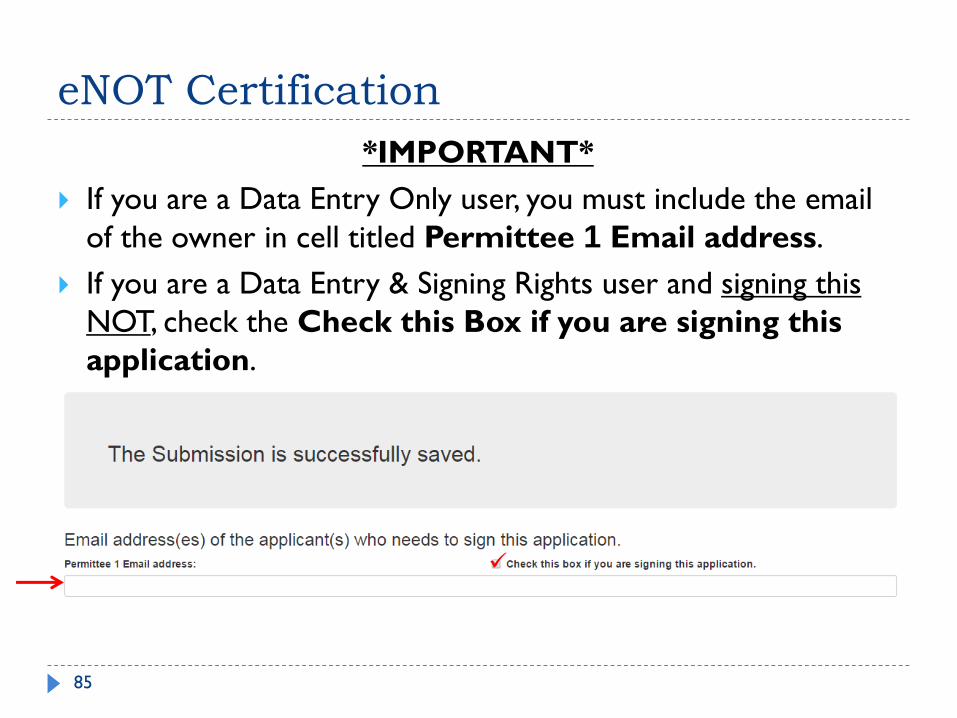
eNOT Certification
*IMPORTANT*
If you are a Data Entry Only user, you must include the email
of the owner in cell titled Permittee 1 Email address.
If you are a Data Entry & Signing Rights user and signing this
NOT, check the Check this Box if you are signing this
application.
85
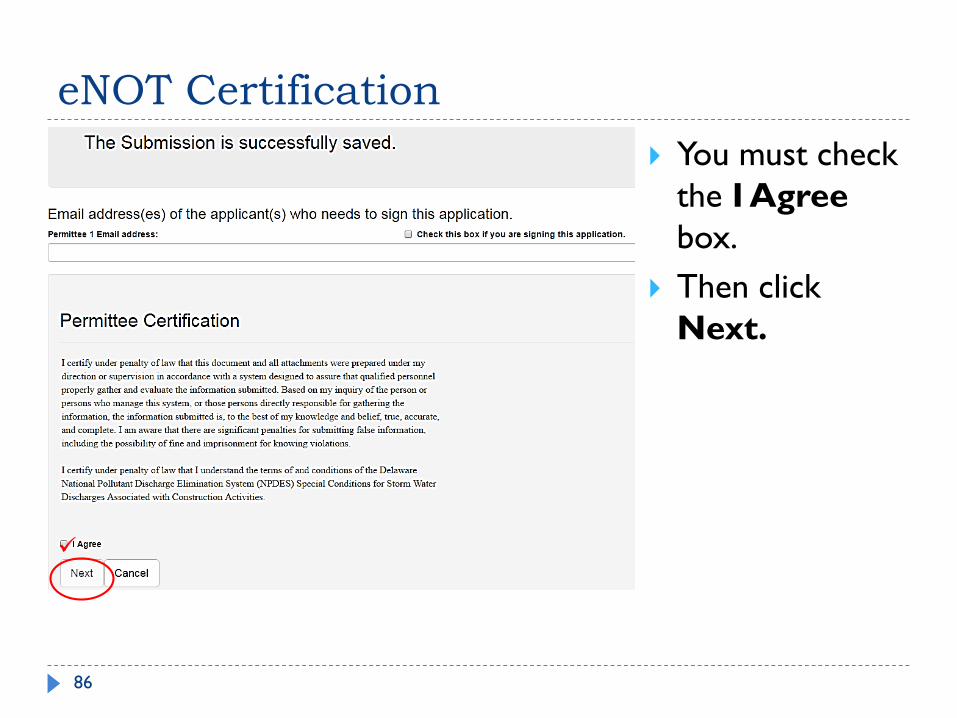
eNOT Certification
You must check
the I Agree
box.
Then click
Next.
86

Summary & Filing the eNOT
Review the basic
information on
the summary to
make sure it is
correct.
Click Submit to
continue.
87

Review Submission
Review the .pdf copy
of the NOT for
accuracy.
If you find a mistake,
scroll down and
click Back, and go
back to the previous
page.
If the document is
accurate, click
Continue.
88
Electronic Signature
Notice of Termination (NOT)
89
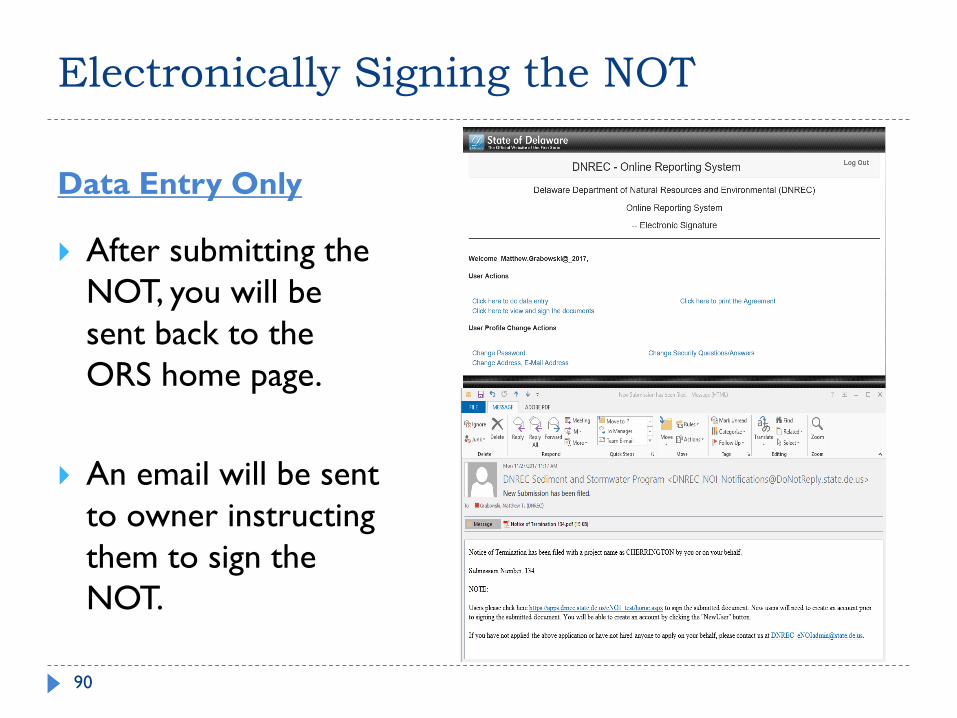
After submitting the
NOT, you will be
sent back to the
ORS home page.
An email will be sent
to owner instructing
them to sign the
NOT.
Electronically Signing the NOT
Data Entry Only
90

Electronically Signing the NOT
Data Entry Only
91
If a consultant completed
the eNOT, the authorized
signer will receive an
email entitled, “New
Submission has been
filed!”
Log into the ORS system
to sign the NOT.

Electronically Signing the NOT
Authorized Signature
92
From the ORS home page,
Click here to view and
sign documents to find
the document you need to
sign.

Electronically Signing the NOT
Authorized Signature
93
Find the
appropriate
document using
the project name
& Project
Description.
Click on the Sign
button.

Electronically Signing the NOT
94
Review the copy of
the NOT by scrolling
through the
document, checking
for accuracy.
If accurate, click Sign
Document.
If inaccurate contact
DNREC_eNOIadmin
@state.de.us

Electronically Signing the NOT
95
To confirm your
Electronic Signature,
input your
password and click
Submit.
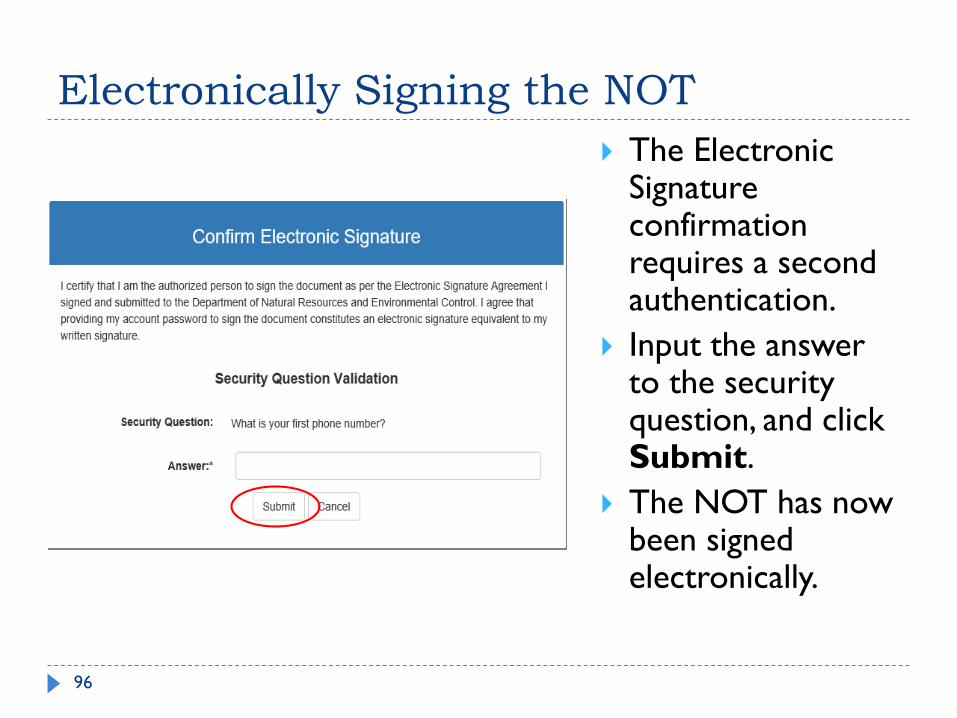
Electronically Signing the NOT
96
The Electronic Signature confirmation requires a second authentication.
Input the answer to the security question, and click Submit.
The NOT has now been signed electronically.

Electronically Signing the NOT
97
After providing your
password and answer to
your security question, the
ORS returns to the list of
projects.
Note that after signing the
NOT the status of the
project changed from
“Submitted” to “Signed.”

Electronically Signing the NOT
98
You also receive an email
providing a link to the
electronically signed NOT.
The owner will receive a
pdf copy of the NOT once
the document has been
approved by DNREC.