omm for trauma patients after hospital discharge - c.ymcdn.com · experienced severe trauma will...
TRANSCRIPT

OMM for trauma
patients after hospital
discharge
ANGELA LIM, D.O.
SANDRA B. SKATES, D.O.
OSTEOPATHIC MANIPULATIVE MEDICINE
NORTHBAY CENTER FOR INTEGRATIVE MEDICINE

Purpose of OMM in the trauma patient
• Reduce pain
• Assist with return to normal Range of Motion of the affected areas and the whole
body
• Help reintegrate function of the body as a whole.
• Increase blood/lymphatic flow to and from injured areas
• Restore normal autonomic function
• Assist with emotional impact of the trauma itself and potential long term after
effects.
• This lecture focuses on post hospital discharge.
• There are also OMM techniques that can be used on the acute trauma patient.

Choosing techniques
• Area of injury
• This is fairly self explanatory. First do no harm.
• Especially in the patient who is in a stable post hospital stage we don’t need to completely avoid injured areas but
always be aware of anatomy and it’s alterations due to trauma, potential for disrupting healing tissue and increasing
patient discomfort.
• Ability of patient to sit, stand, lie supine or prone
• Comfort of patient with technique.
• It’s not necessary that we don’t cause any discomfort, just that they feel better when we’re done.
• Overall health of the patient is also important.
• A relatively debilitated patient will do better with a more direct approach that is driven by the doctor rather than the
patient.
• This would include gentle techniques used directly, such as direct myofascial release, direct balanced ligamentous
tension, very gentle muscle energy, direct inhibition etc.

Thoracic diaphragm
• Commonly restricted in patients who have undergone physical trauma
• Note depth of breath, expansion of chest, movement of the diaphragm itself and
the abdomen, use of accessory muscles.
• This area can hold emotion and some patients, especially those who have
experienced severe trauma will have some kind of emotional release when the
abdominal diaphragm is being treated.
• Supportive presence throughout treatment and any after effects is the physician’s
best tool.
SEATED DIAPHRAGM RELEASE

Seated Hemidiaphragm Release

Doctor stands behind patient

Doctor puts foot on table on side opposite diaphragm to be treated.
Patient’s bent arm rests on Doctor’s thigh.

Patient slouches and leans slightly into
doctor
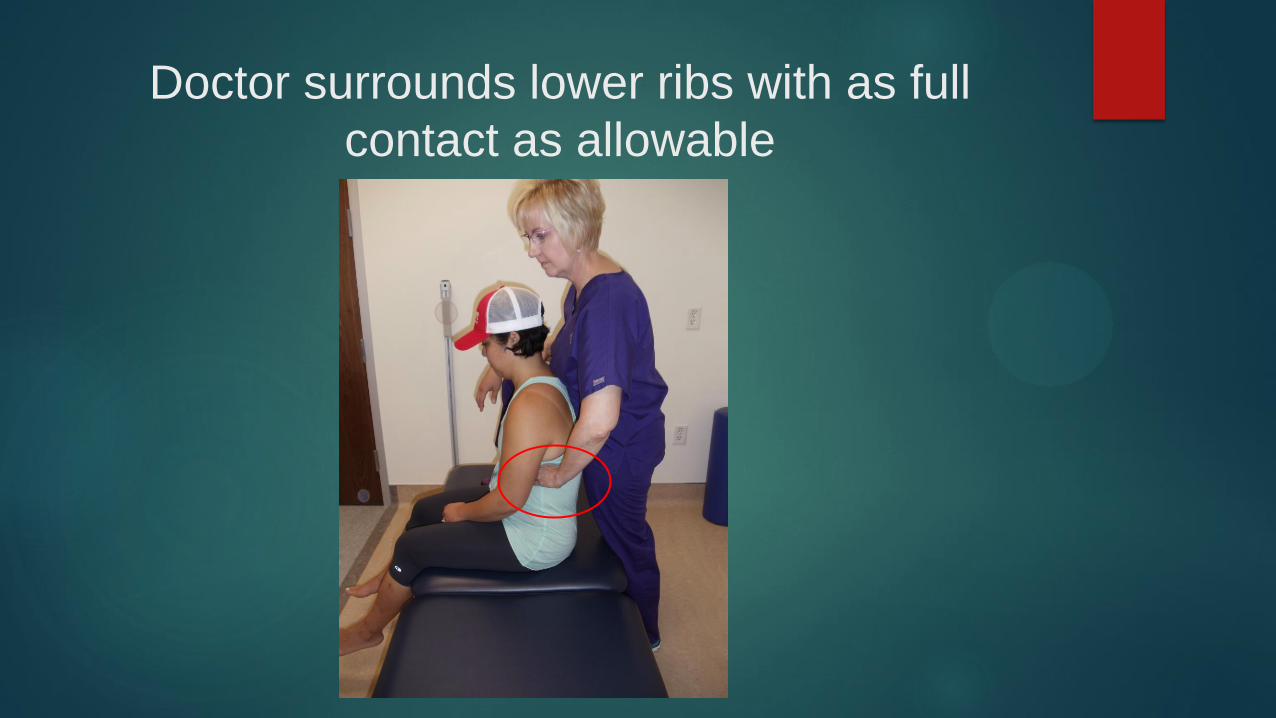
Doctor surrounds lower ribs with as full
contact as allowable

If there is not acute or incompletely healed abdominal or
lower rib trauma the fingers can be wrapped under the
ribs.

Note that there is still contact with rest of the hand over
the lower ribs.

- Have patient sit up straight, find costal border and wrap fingers under.
- Then have patient slouch and lean slightly into the doctor as before, allowing
increased depth of palpation.

Doctor moves knee laterally to localize to
opposite diaphragm

Doctor’s hand on chest assists with flexion,
SB and/or rotation of torso to help localize.

Doctor’s hand on chest also helps patient
feel stable and relax into the treatment.

Alternate holds for patient comfort and/or
best localization.

Treatment

TREATMENT
• Myofascial Release:
• Can be done as direct or indirect technique.
• Gently test rotation, sidebending, flexion and extension and move patient in direction of ease/restriction until ROM of
torso and of the diaphragm in breathing increases.
• Muscle Energy:
• Gently resist as patient turns their body away from the treatment side,
• Hold for 3-10 seconds until release is palpated
• Have patient relax then increase rotation to new barrier
• Alternately have patient take deep breath in and out
• Then reposition in all planes to new barrier
• Repeat 1-5 times until diaphragm release is achieved.
• Retest inhalation and exhalation

Bilateral thoracic diaphragm release
• For patients who can tolerate having both sides treated at once.
• May use contact just on lower ribs
• Or subcostal.
• Again have patient sit up straight
• Doctor places hands
• Then patient slouches and slightly leans into the doctor
• May use MFR, MET, etc as appropriate.


SUPINE DIAPHRAGM RELEASE
bilateral
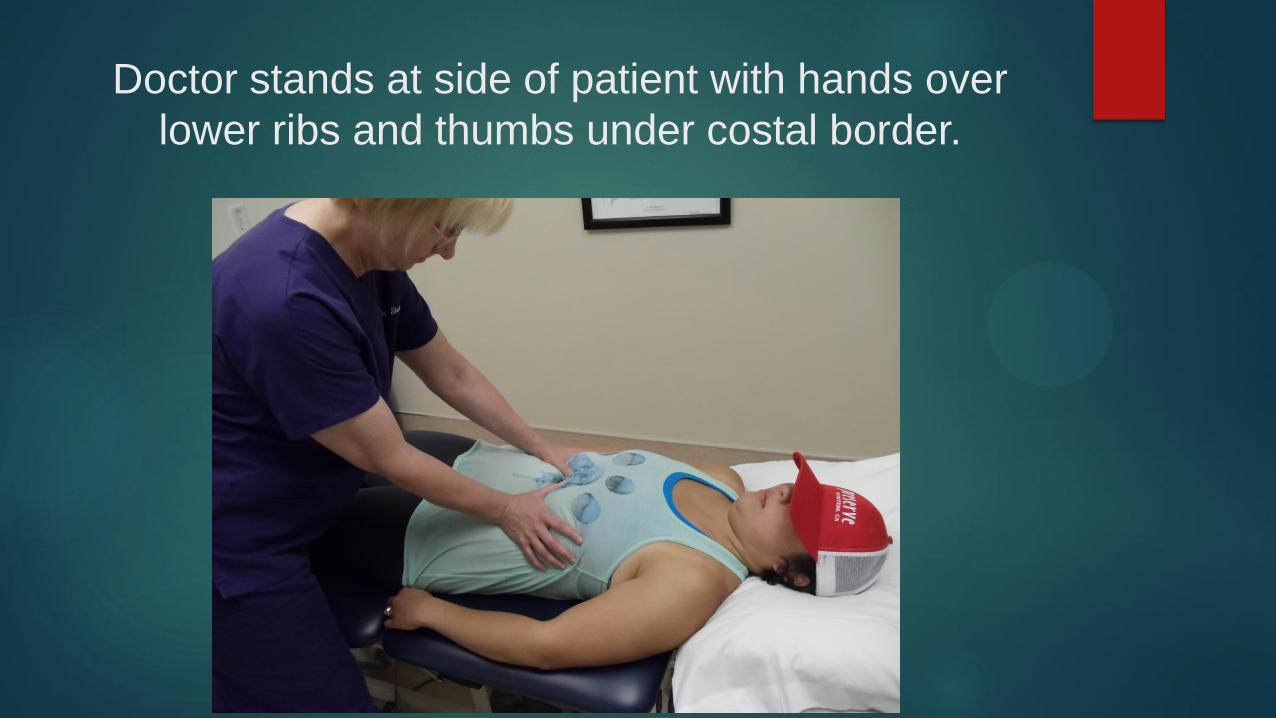
Doctor stands at side of patient with hands over
lower ribs and thumbs under costal border.


Treatment
• May test motion of diaphragm with breath or motion of the ribs and diaphragm
with relation to surrounding structures.
• Treatment is direct or indirect myofascial release
• i.e. take the tissue in the direction of ease or restriction until it releases
• May have patient take deep breaths in and out or hold breath in or out to assist.

SUPINE DIAPHRAGM RELEASE
unilateral

Doctor sits at side to be treated.
Anterior hand contacts ribs as much as possible.

Fingers may curl around costal border…

….. Or not

Posterior fingers wrap around rib angles then
contact surrounding area with whole hand.

Treatment
• May test motion of diaphragm with breath or motion of the ribs and diaphragm
with relation to surrounding structures.
• Treatment is direct or indirect myofascial release
• i.e. take the tissue in the direction of ease or restriction until it releases
• May have patient take deep breaths in and out or hold breath in or out to assist.

THORACIC INLET RELEASE
seated

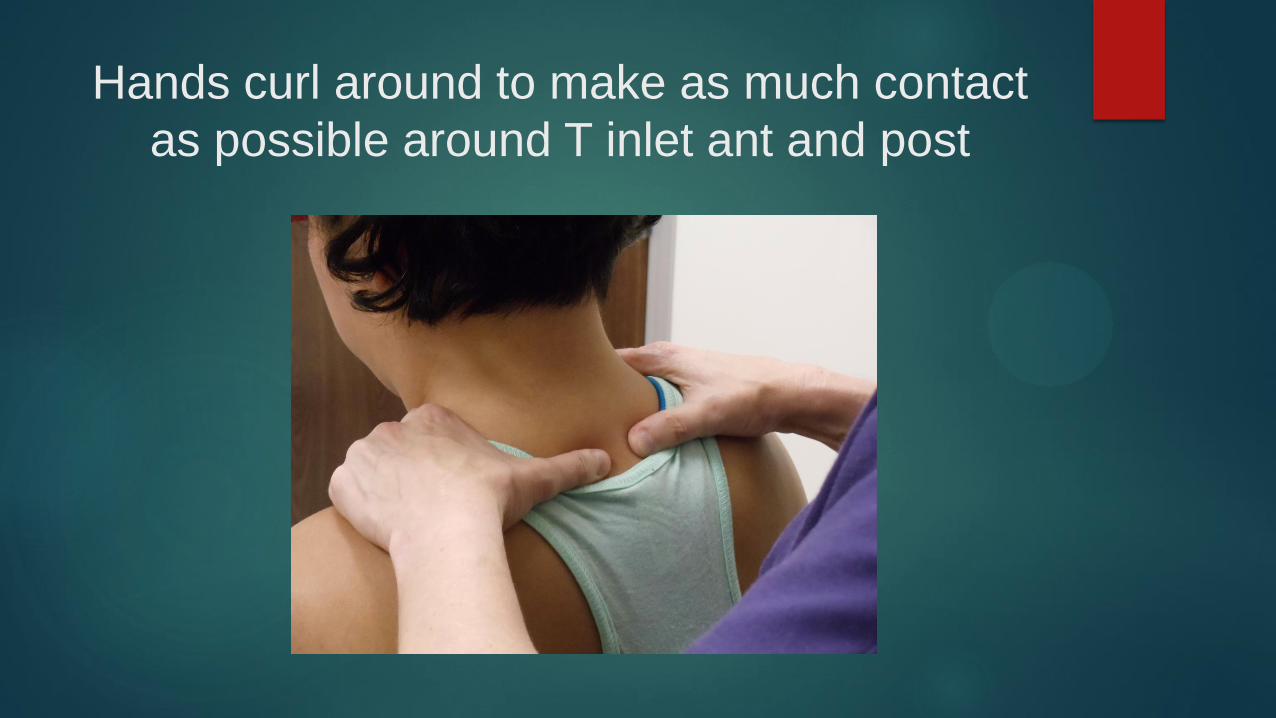
Hands curl around to make as much contact
as possible around T inlet ant and post

May have patient rotate, sidebend, flex or
extend or may feel for motion/fascial strain

Unilateral allows for more doctor control of
the head

Patient not wearing hat won’t get their eyes
squished.
Treatment
• Direct or indirect myofascial release
• i.e. take the tissue in the direction of ease or restriction until it releases
• Muscle Energy
• Have patient rotate/SB/F/E and gently resist then take up the slack
• May have patient take deep breaths in and out or hold breath in or out to assist.

THORACIC INLET RELEASE
supine
Gentle and appropriate for fragile or
acutely ill patients.

BROAD contact with thumb to
superior/posterior clavicle
Clavicle

Other hand behind head and will provide
flexion of head/neck.
Treatment
• Gently take up slack of Thoracic inlet tissue and encourage clavicle into
anterior/superior motion
• Patient takes breath in while doctor maintains position
• As Patient breathes out doctor gently follows tissue, taking up slack
• And flexes the head slightly to allow more access to the area behind the clavicle.


THORACIC INLET RELEASE
supine
Can be done gently but suggested for
more robust patients.

Patient’s shoulder abducted and elbow bent,
resting on Doctor’s knee

Fingers aim inferiorly in tissue posterior to
clavicle
Clavicle


Treatment
• Can be done as myofascial release with gentle rotation of the arm and insinuating
fingers into thoracic inlet tissue as it releases
• May have patient use breath to assist
• Usually done as Muscle Energy Technique………

Patient gently brings forearm toward the
ceiling as Doctor resists

When patient relaxes, Doctor brings wrist
closer to the floor

Treatment
• Care must be taken if the patient has shoulder joint pain/pathology. They may not
be able to tolerate the required shoulder internal rotation.

MEDASTINUM RELEASE
seated or supine
Gentle and appropriate for fragile or
acutely ill patients.


May have patient assist or just slide hand under
mid thoracic area while they are supine.

Treatment
• Gentle pressure on both hands will provide palpatory sense of mediastinum or
thorax as desired.
• Treatment is direct or indirect Myofascial Release.
• May motion test to determine ease/restriction or just follow palpated motion
patterns.
• May use patient’s breath to assist, either deep breathing or holding in inhalation or
exhalation

Pectoralis release to increase compliance of
ribcage
Have patient breath in and follow
the tissues
Leaning back, resist exhalation
Repeat 3-5 breaths or until
palpable change of tissues occur

Suboccipital Release

Suboccipital Release
Purpose: Balance parasympathetics
Treatment:
Fingertips almost on C1, in the belly of suboccipital muscles
Occiput resting in cupped palms
Lift fingers towards ceiling, lifting patient’s chin
Distract cephalad
Hold until tissues soften
Can use respirations to as activating force

Pelvic Diaphragm balancing
Posterior Hand Placement

Pelvic Diaphragm balancing
Anterior hand thenar eminence on
pubic tubercles
Using myofascial, pelvic soft tissues
can be balanced between the
anterior and posterior hands either
directly or indirectly
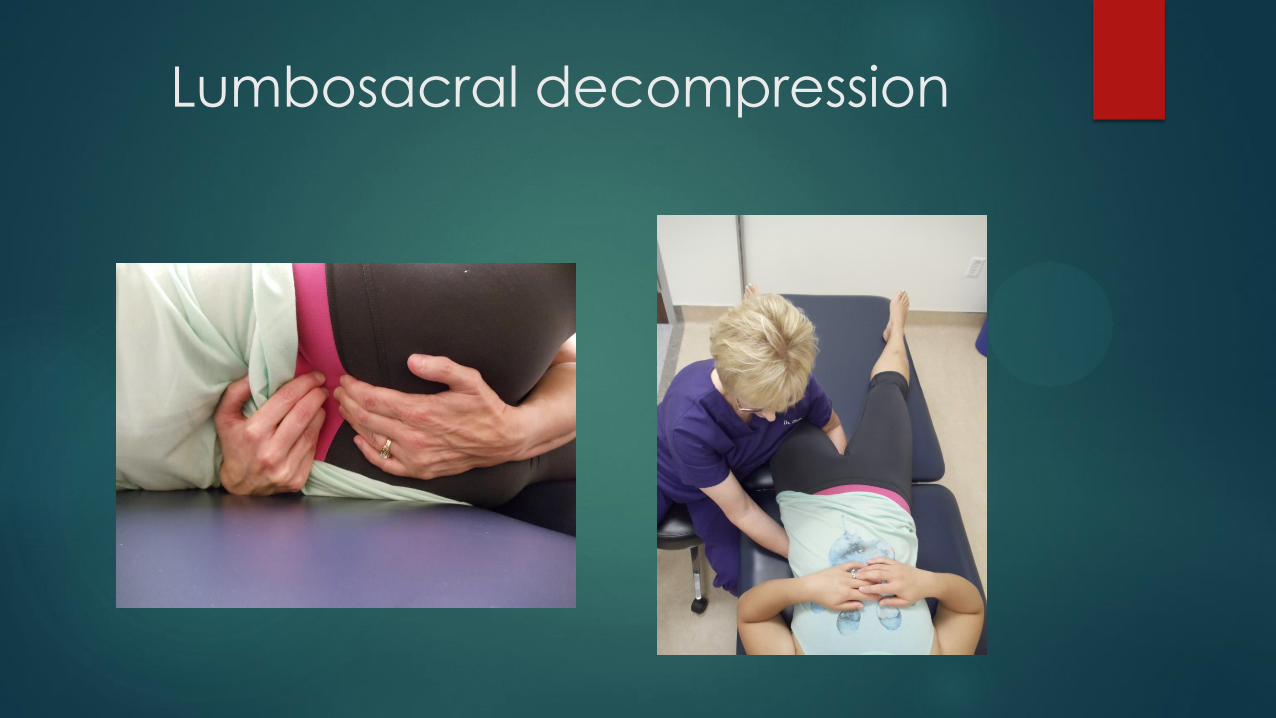
Lumbosacral decompression

Lumbosacral decompression
Purpose: balance parasympathetics by freeing up sacral movement
Treatment:
Distract hand on sacrum from hand on L5
Hold until tissues soften
Can also add rotational and sidebending components
Respirations can be used as an activating force

Sacroiliac decompression
Hand placement as shown
Patient lays supine on physician’s hands
Purpose: balance parasympathetics by freeing sacral movement
Treatment:
apply gentle anterior pressure and lateral traction
Can also rock sacral base and ILA alternately to find/treat at the barrier
Hold until tissues soften

Inhibitory Pressure
Purpose: to balance sympathetics
in thoracolumbar spine
Treatment:
Heal of hands are lateral to spinous
processes
Gentle pressure applied laterally
Treatment is done when tissues
soften
Work up and down entire
thoracolumbar spine or spot treat
where the most dysfunction is
found

Pedal Pump
Assists with blood flow to and blood/lymphatic flow away from
affected areas.
Appropriate for those patients with partially healed or still painful
thoracic or abdominal trauma
Choose thoracic or abdominal lymphatic pump in patients with
severe leg soft tissue injuries or leg fractures until sufficient healing has taken place.

Treatment
• Start with some kind of thoracic inlet and abdominal/thoracic diaphragm release.
• Doctor sits or stands at the foot end of the table with patient’s feet at or slightly
hanging off table.
• Feet start in slight dorsiflexion
• Gentle superior/inferior motion is done mostly with the doctor’s body such that the
“wave” can be seen throughout the patient’s body.
• Motion is NOT alternating dorsi/plantar flexion of the feet.
• Continue for 1-4 minutes.
• Family member, spouse or caregiver can usually be easily taught this technique.
