of kings and pawns - universal publishers · th e major goal of any king and pawn endgame is to get...
TRANSCRIPT

OF KINGS AND
PAWNS
CHESS STRATEGY IN THE ENDGAME
ERIC SCHILLER
Universal Publishers Boca Raton • 2006

Of Kings and Pawns: Chess Strategy in the Endgame
Copyright © 2006 Eric Schiller All rights reserved.
Universal Publishers Boca Raton , Florida
USA • 2006
ISBN: 1-58112-909-2 (paperback) ISBN: 1-58112-910-6 (ebook)
Universal-Publishers.com

PrefaceEndgames with just kings and pawns look simple but they are
actually among the most complicated endgames to learn. This book contains 26 endgame positions in a unique format that gives you not only the starting position, but also a critical position you should use as a target. Your workout consists of looking at the starting position and seeing if you can figure out how you can reach the indicated target position. Although this hint makes solving the problems easier, there is still plenty of work for you to do. The positions have been chosen for their instructional value, and often combined many different themes. You’ll find examples of the horse race, the opposition, zugzwang, stalemate and the importance of escorting the pawn with the king marching in front, among others.
When you start out in chess, king and pawn endings are not very important because usually there is a great material imbalance at the end of the game so one side is winning easily. However, as you advance through chess you’ll find that these endgame positions play a great role in determining the outcome of the game. It is critically important that you understand when a single pawn advantage or positional advantage will lead to a win and when it will merely wind up drawn with best play. By carefully examining the material in this book you’ll find significant improvement in your ability to play King and pawn endgames, and that will lead to greater success at the chessboard.
I hope you find these examples entertaining as well as instructive, and that your increased skill in the king and pawn endgames will help you gain rating points and prizes. At the very least, you should have fewer reasons to complain about the one that got away.

Of Kings and Pawns
Acknowledgements
Thanks to Daniel Kazhdan and Jimmy Yu, who helped proofread the manuscript.
Produced in December, 2005 by Chessworks Unlimited using Chess Assistant and Adobe InDesign.
Some of the material in this book is based on commentary from my previous books Improve Your Endgame!, Encyclopedia of Chess Wis-dom, and 639 Essential Endgame Positions.
The author can be contacted at [email protected]. His website is www.ericschiller.com.
This book is dedicated to my late father, Peter Nicholas Schiller (1922–2005), who gave me the necessary foundation to live a productive life and from whom I inherited whatever analytical skills I possess. His decision to teach me chess brought me into contact with the Royal Game, and is just one of many things for which I am eternally grateful.

ContentsIntroduction 6
Study by Reti 15
Study by Adamson 20
Study by Bianchetti 28
Study by Capablanca 31
Study by Polerio 34
Study by Kling (Improved solution by Majzelis) 38
Study by Adamson 42
Study by Behting 48
Study by Bianchetti 53
Study by Bianchetti 57
Study by Botvinnik 61
Study by Grigoriyev 67
Study by Salvioli 72
Study by Selesniyev 75
Study by Behting 78
Study by Kling & Horwitz 82
Study by Petroff 86
Study by Troitsky 97
Study by Horwitz 102
Study by Krejick 106
Study by Cheron 112
Study by Euwe 120
Study by Walker 126
Karpov vs. Kasparov,Las Palmas, 1996 130
Timman vs. Vogel, Netherlands, 1974 135
Study by Em. Lasker 140
A.
B.
C.
D.
E.
F.
G.
H.
I.
J.
K.
L.
M.
N.
O.
P.
Q.
R.
S.
T.
U.
V.
W.
X.
Y.
Z.
6
Of Kings and Pawns
IntroductionBefore moving on to the puzzles, let’s review some of the
basic concepts of king and pawn endgames. More advanced players can skip this section and dive right into the problem-solving, but it doesn’t hurt to review the material even if it is familiar to you.
The RacecuuuuuuuuC(wdwdwdwi}cuuuuuuuuC(wdwdwdwi}cuuuuuuuuC
7dwdwdwdp}(wdwdwdwi}7dwdwdwdp}(wdwdwdwi}
6wDwDwdwD}7dwdwdwdp}6wDwDwdwD}7dwdwdwdp}
5DwDwDwDw}6wDwDwdwD}5DwDwDwDw}6wDwDwdwD}
&wDwDwDwD}5DwDwDwDw}&wDwDwDwD}5DwDwDwDw}
3DwdwDwDw}&wDwDwDwD}3DwdwDwDw}&wDwDwDwD}
2Pdwdwdwd}3DwdwDwDw}2Pdwdwdwd}3DwdwDwDw}
%Iwdwdwdw}2Pdwdwdwd}%Iwdwdwdw}2Pdwdwdwd}
v,./9EFJMV%Iwdwdwdw}v,./9EFJMV%Iwdwdwdw}
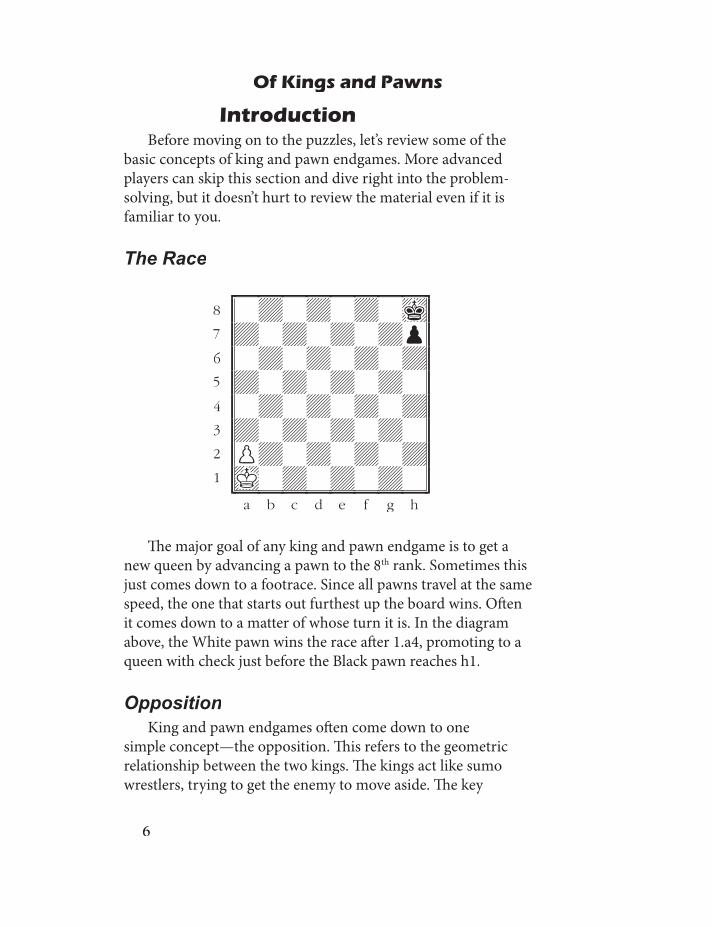
Th e major goal of any king and pawn endgame is to get a new queen by advancing a pawn to the 8th rank. Sometimes this just comes down to a footrace. Since all pawns travel at the same speed, the one that starts out furthest up the board wins. Oft en it comes down to a matter of whose turn it is. In the diagram above, the White pawn wins the race aft er 1.a4, promoting to a queen with check just before the Black pawn reaches h1.
OppositionKing and pawn endgames oft en come down to one
simple concept—the opposition. Th is refers to the geometric relationship between the two kings. Th e kings act like sumo wrestlers, trying to get the enemy to move aside. Th e key

7
position, ignoring the possibility of other pieces, is the following:
cuuuuuuuuC(wdwdwdwd}cuuuuuuuuC(wdwdwdwd}cuuuuuuuuC
7dwdwdwdw}(wdwdwdwd}7dwdwdwdw}(wdwdwdwd}
6wDwDkDwD}7dwdwdwdw}6wDwDkDwD}7dwdwdwdw}
5DwDwDwDw}6wDwDkDwD}5DwDwDwDw}6wDwDkDwD}
&wDwDKDwD}5DwDwDwDw}&wDwDKDwD}5DwDwDwDw}
3DwDwDwDw}&wDwDKDwD}3DwDwDwDw}&wDwDKDwD}
2wdwdwdwd}3DwDwDwDw}2wdwdwdwd}3DwDwDwDw}
%dwdwdwdw}2wdwdwdwd}%dwdwdwdw}2wdwdwdwd}
v,./9EFJMV%dwdwdwdw}v,./9EFJMV%dwdwdwdw}
White’s goal is to make progress up the board. Th e mighty king will try to assist the promotion of the pawn by reaching the 7th or 8th
rank. Th e fi rst step is to cross the meridian to the fi ft h rank. Th is can be accomplished here because it is Black’s turn to move. White has the opposition, since any move by Black must give ground and allow the White king forward. If it were White to move, Black would have the opposition.
When the kings are close to each other, as in the diagram above, this is fairly obvious. Th e same rule holds when the kings are far apart, but only when there are an odd number of squares between them. It is important to keep in mind whether the number of squares separating the king is even or odd. If the Black king stood on e7 rather than e6, then Black would be able to control the opposition by playing 1...Ke6, forcing White to move.
Introduction

8
Of Kings and Pawns
cuuuuuuuuC(wdwdwdwd}cuuuuuuuuC(wdwdwdwd}cuuuuuuuuC
7dwdwiwdw}(wdwdwdwd}7dwdwiwdw}(wdwdwdwd}
6wDwDwDwD}7dwdwiwdw}6wDwDwDwD}7dwdwiwdw}
5DwDwDwDw}6wDwDwDwD}5DwDwDwDw}6wDwDwDwD}
&wDwDwDwD}5DwDwDwDw}&wDwDwDwD}5DwDwDwDw}
3DwDwIwDw}&wDwDwDwD}3DwDwIwDw}&wDwDwDwD}
2wdwdwdwd}3DwDwIwDw}2wdwdwdwd}3DwDwIwDw}
%dwdwdwdw}2wdwdwdwd}%dwdwdwdw}2wdwdwdwd}
v,./9EFJMV%dwdwdwdw}v,./9EFJMV%dwdwdwdw}
With White to move, Black has the opposition. If White plays 1.Kd4, Black plays 1....Kd6. On 1.Ke4 there is 1...Ke5. !...Kf4 allows 1...Kf6. In each case we get the simple opposition position, with White to move. White can move along the third rank, but the Black king will still make progress, for example 1.Kf3 Kd6 (but not 1...Kf6? 2.Kf4 when White has the opposition!) 2.Ke4 Ke6!
Moving White’s king back another rank, the opposition magically returns to White! Th ere are now an even number of squares, four, between the two kings.
cuuuuuuuuC(wdwdwdwd}cuuuuuuuuC(wdwdwdwd}cuuuuuuuuC
7dwdwiwdw}(wdwdwdwd}7dwdwiwdw}(wdwdwdwd}
6wDwDwDwD}7dwdwiwdw}6wDwDwDwD}7dwdwiwdw}
5DwDwDwDw}6wDwDwDwD}5DwDwDwDw}6wDwDwDwD}
&wDwDwDwD}5DwDwDwDw}&wDwDwDwD}5DwDwDwDw}
3DwDwDwDw}&wDwDwDwD}3DwDwDwDw}&wDwDwDwD}
2wdwdKdwd}3DwDwDwDw}2wdwdKdwd}3DwDwDwDw}
%dwdwdwdw}2wdwdKdwd}%dwdwdwdw}2wdwdKdwd}
v,./9EFJMV%dwdwdwdw}v,./9EFJMV%dwdwdwdw}

9
If it is White’s turn, then 1.Kd3 seizes the opposition. If Black plays 1...Kd6, then 2.Kd4 reaches a simple opposition position. Th e same result follows 1...Ke6 2.Ke4.
Most endgame battles do not take place on a single fi le. Long distance and short distance belly bumping can take place anywhere. Th ere are many complex mathematical explanations, but here is a practical approach I adapt from Jeremy Silman, author of many fi ne instructional chess books.
Wherever the two kings are, draw an imaginary rectangle using the kings as the corners. Imagine a line drawn from c3 to c7 to g7 to g3. Th at would form a square.
cuuuuuuuuC(wdwdwdwd}cuuuuuuuuC(wdwdwdwd}cuuuuuuuuC
7dwdwdwiw}(wdwdwdwd}7dwdwdwiw}(wdwdwdwd}
6wDwDwDwD}7dwdwdwiw}6wDwDwDwD}7dwdwdwiw}
5DwDwDwDw}6wDwDwDwD}5DwDwDwDw}6wDwDwDwD}
&wDwDwDwD}5DwDwDwDw}&wDwDwDwD}5DwDwDwDw}
3DwIwDwDw}&wDwDwDwD}3DwIwDwDw}&wDwDwDwD}
2wdwdwdwd}3DwIwDwDw}2wdwdwdwd}3DwIwDwDw}
%dwdwdwdw}2wdwdwdwd}%dwdwdwdw}2wdwdwdwd}
v,./9EFJMV%dwdwdwdw}v,./9EFJMV%dwdwdwdw}
When the shape is a square, whoever is not on the move has the opposition. If White is to move in the diagram above, then Black has the opposition, and vice versa.
Th ere is even a more general rule: if the four corners of the rectangle are of the same color, then the side that is not on the move has the opposition. Since c3, c7, g7 and g3 are all dark squares, the rule holds. Th e same would be true for a position with kings at c2 (or e2), and c6, e2 (or e6). Try to picture that without a chess board. Are all the corner squares of the same color? If so, then whichever corners you put the kings on, if it is White to move, Black has the opposition.
Introduction
7dwdwdwiw}6wDwDwDwD}7dwdwdwiw}6wDwDwDwD}7dwdwdwiw}
5DwDwDwDw}6wDwDwDwD}5DwDwDwDw}6wDwDwDwD}
&wDwDwDwD}5DwDwDwDw}&wDwDwDwD}5DwDwDwDw}
3DwIwDwDw}&wDwDwDwD}3DwIwDwDw}&wDwDwDwD}
2wdwdwdwd}3DwIwDwDw}2wdwdwdwd}3DwIwDwDw}
7dwdwdwiw}6wDwDwDwD}7dwdwdwiw}6wDwDwDwD}7dwdwdwiw}
5DwDwDwDw}6wDwDwDwD}5DwDwDwDw}6wDwDwDwD}
&wDwDwDwD}5DwDwDwDw}&wDwDwDwD}5DwDwDwDw}
3DwIwDwDw}&wDwDwDwD}3DwIwDwDw}&wDwDwDwD}
7dwdwdwiw}6wDwDwDwD}7dwdwdwiw}6wDwDwDwD}7dwdwdwiw}
5DwDwDwDw}6wDwDwDwD}5DwDwDwDw}6wDwDwDwD}
&wDwDwDwD}5DwDwDwDw}&wDwDwDwD}5DwDwDwDw}
3DwIwDwDw}&wDwDwDwD}3DwIwDwDw}&wDwDwDwD}
7dwdwdwiw}6wDwDwDwD}7dwdwdwiw}6wDwDwDwD}7dwdwdwiw}
5DwDwDwDw}6wDwDwDwD}5DwDwDwDw}6wDwDwDwD}
&wDwDwDwD}5DwDwDwDw}&wDwDwDwD}5DwDwDwDw}
3DwIwDwDw}&wDwDwDwD}3DwIwDwDw}&wDwDwDwD}

10
Of Kings and PawnsTh is rule is very important, especially when we get to king and
pawn endgames. Let’s look at one fi nal example:
cuuuuuuuuC {wDwdwDwi} cuuuuuuuuC {wDwdwDwi} cuuuuuuuuC
{DwDwDwdw} {wDwdwDwi} {DwDwDwdw} {wDwdwDwi}
{wDwDwDwD} {DwDwDwdw} {wDwDwDwD} {DwDwDwdw}
{DwdwdwDw} {wDwDwDwD} {DwdwdwDw} {wDwDwDwD}
{wDwDwDwD} {DwdwdwDw} {wDwDwDwD} {DwdwdwDw}
{DwDwIwDw} {wDwDwDwD} {DwDwIwDw} {wDwDwDwD}
{wdwDwDwd} {DwDwIwDw} {wdwDwDwd} {DwDwIwDw}
{DwDwDwDw} {wdwDwDwd} {DwDwDwDw} {wdwDwDwd}
v,./9EFJMV{DwDwDwDw} v,./9EFJMV{DwDwDwDw}
White grabs the opposition with 1.Kf4! If you are not convinced, set up the position on a chessboard and try it out. You can’t give it to your chess computer, because technically the position is a draw according to the rules (because there is nothing on the board except the two kings), and most chessplaying programs won’t touch it!
ZugzwangTh e German term zugzwang, is generally taken to refer to a
position where a player loses because of the obligation to move. If a “pass” were possible, the game would not be lost. Here it is in its simplest form.

11
cuuuuuuuuC(wdwiwdwd}cuuuuuuuuC(wdwiwdwd}cuuuuuuuuC
7dwdPdwdw}(wdwiwdwd}7dwdPdwdw}(wdwiwdwd}
6wDwDKDwD}7dwdPdwdw}6wDwDKDwD}7dwdPdwdw}
5DwDwDwDw}6wDwDKDwD}5DwDwDwDw}6wDwDKDwD}
&wDwDwDwD}5DwDwDwDw}&wDwDwDwD}5DwDwDwDw}
3DwDwDwDw}&wDwDwDwD}3DwDwDwDw}&wDwDwDwD}
2wdwdwdwd}3DwDwDwDw}2wdwdwdwd}3DwDwDwDw}
%dwdwdwdw}2wdwdwdwd}%dwdwdwdw}2wdwdwdwd}
v,./9EFJMV%dwdwdwdw}v,./9EFJMV%dwdwdwdw}
If it is Black to move, the only legal move is 1…Kc7, but then White plays 2.Ke7 and wins by promoting the pawn. On the other hand, with White to move, only 1.Kd6 saves the pawn, but that position is stalemate. Each player gets a worse result if on the move. Black loses instead of drawing. White draws instead of winning.
Th e squeeze is a related concept, oft en confused with zugzwang. A player who is in a squeeze has to move, and suff ers the consequences, but even a “pass” would not help, because the opponent has waiting moves available. Th e following position shows the squeeze in action.
cuuuuuuuuC(wdwdwdwd}cuuuuuuuuC(wdwdwdwd}cuuuuuuuuC
7dpdkdwdw}(wdwdwdwd}7dpdkdwdw}(wdwdwdwd}
6w)wDwDwD}7dpdkdwdw}6w)wDwDwD}7dpdkdwdw}
5Dw)KDwDw}6w)wDwDwD}5Dw)KDwDw}6w)wDwDwD}
&wDwDwDwD}5Dw)KDwDw}&wDwDwDwD}5Dw)KDwDw}
3DwDwDwDw}&wDwDwDwD}3DwDwDwDw}&wDwDwDwD}
2wdwdwdwd}3DwDwDwDw}2wdwdwdwd}3DwDwDwDw}
%dwdwdwdw}2wdwdwdwd}%dwdwdwdw}2wdwdwdwd}
v,./9EFJMV%dwdwdwdw}v,./9EFJMV%dwdwdwdw}
Introduction

12
Of Kings and Pawns1.Ke5! White must not fall for 1.c6+ Kc8! 2.Kd6 Kb8 3.c7+ Kc8 is
a draw. 1...Kc6. 1...Ke7 2.c6! bxc6 3.b7 gains a new queen. 2.Kd4 Kd7 3.Kd5. We have the starting position of the diagram, and it is Black to move. Black has been squeezed into zugzwang. 3...Kc8 4.Ke6 Kd8.Necessary, as the corner is not safe. 4...Kb8 5.Kd7 transposes. 5.Kd6 Kc8 6.Ke7 Kb8 7.Kd7 Ka8 8.c6 bxc6 9.Kc7! c5 10.b7+ Ka7 11.b8Q+ Ka6 12.Qb6#
TriangulationTriangulation is endgame situation in which the king takes two
moves to get to a square he could have gone to in one move, thus giving the appearance of tracing a triangle. Triangulation is used to bring about a zugzwang situation.
cuuuuuuuuC(wdkdwdwd}cuuuuuuuuC(wdkdwdwd}cuuuuuuuuC
7dwdwdwdw}(wdkdwdwd}7dwdwdwdw}(wdkdwdwd}
6pDPDwDwD}7dwdwdwdw}6pDPDwDwD}7dwdwdwdw}
5)wDKDwDw}6pDPDwDwD}5)wDKDwDw}6pDPDwDwD}
&wDwDwDwD}5)wDKDwDw}&wDwDwDwD}5)wDKDwDw}
3DwDwDwDw}&wDwDwDwD}3DwDwDwDw}&wDwDwDwD}
2wdwdwdwd}3DwDwDwDw}2wdwdwdwd}3DwDwDwDw}
%dwdwdwdw}2wdwdwdwd}%dwdwdwdw}2wdwdwdwd}
v,./9EFJMV%dwdwdwdw}v,./9EFJMV%dwdwdwdw}
If White infi ltrates to d6 immediately, Black can make a draw: 1.Kd6? Kd8 2.c7 Kc8 and White must give up the pawn, since 3.Kc6 is stalemate! So, White uses triangulation. 1.Kc4! Kd8 If the king goes to c7, then White moves the king to c5, with the opposition. Th e king will get to b6 and win the Black a-pawn: 1…Kc7 2.Kc5 Kc8 3.Kb6 Kb8 4.Kxa6 Kc7 5.Kb5 and White wins easily. 2.Kd4! Th e retreat is only temporary.

13
cuuuuuuuuC(wdwiwdwd}cuuuuuuuuC(wdwiwdwd}cuuuuuuuuC
7dwdwdwdw}(wdwiwdwd}7dwdwdwdw}(wdwiwdwd}
6pDPDwDwD}7dwdwdwdw}6pDPDwDwD}7dwdwdwdw}
5)wDwDwDw}6pDPDwDwD}5)wDwDwDw}6pDPDwDwD}
&wDwIwDwD}5)wDwDwDw}&wDwIwDwD}5)wDwDwDw}
3DwDwDwDw}&wDwIwDwD}3DwDwDwDw}&wDwIwDwD}
2wdwdwdwd}3DwDwDwDw}2wdwdwdwd}3DwDwDwDw}
%dwdwdwdw}2wdwdwdwd}%dwdwdwdw}2wdwdwdwd}
v,./9EFJMV%dwdwdwdw}v,./9EFJMV%dwdwdwdw}
2…Kc8. If 2…Kc7, then 3.Kc5 wins as above. 3.Kd5!
cuuuuuuuuC(wdkdwdwd}cuuuuuuuuC(wdkdwdwd}cuuuuuuuuC
7dwdwdwdw}(wdkdwdwd}7dwdwdwdw}(wdkdwdwd}
6pDPDwDwD}7dwdwdwdw}6pDPDwDwD}7dwdwdwdw}
5)wDKDwDw}6pDPDwDwD}5)wDKDwDw}6pDPDwDwD}
&wDwDwDwD}5)wDKDwDw}&wDwDwDwD}5)wDKDwDw}
3DwDwDwDw}&wDwDwDwD}3DwDwDwDw}&wDwDwDwD}
2wdwdwdwd}3DwDwDwDw}2wdwdwdwd}3DwDwDwDw}
%dwdwdwdw}2wdwdwdwd}%dwdwdwdw}2wdwdwdwd}
v,./9EFJMV%dwdwdwdw}v,./9EFJMV%dwdwdwdw}
We now have the starting position with Black to move, so White has the opposition and will win, for example 3…Kd8 4.Kd6 Kc8 5.c7 and the Black king must give way, allowing White to move the king to the seventh rank and escort the pawn to the promotion square.
Th e basic themes you have seen in this introduction will surface time and time again during your tour of the exercises in this book. You will need to recognize these themes at the appropriate times, but if you keep them in mind it will be much easier to undertand the solutions
Introduction

14
Of Kings and Pawnsto the tasks. Try to calculate the opposition whenever possible, and keep a sharp eye out for stalemating positions. Th e examples in this book were for the most part designed for their beauty and hidden puzzles, so you’ll need to keep your wits about you at all times. Still, it always comes down to the fundamentals, and all of the puzzles are just variations on the same themes.

15
AStudy by Reti
The Geometry of the Chessboard
cuuuuuuuuC(wdwdwdwI}cuuuuuuuuC(wdwdwdwI}cuuuuuuuuC
7dwdwdwdw}(wdwdwdwI}7dwdwdwdw}(wdwdwdwI}
6kdPdwdwd}7dwdwdwdw}6kdPdwdwd}7dwdwdwdw}
5dwdwdwdp}6kdPdwdwd}5dwdwdwdp}6kdPdwdwd}
&wdwdwdwd}5dwdwdwdp}&wdwdwdwd}5dwdwdwdp}
3dwdwdwdw}&wdwdwdwd}3dwdwdwdw}&wdwdwdwd}
2wdwdwdwd}3dwdwdwdw}2wdwdwdwd}3dwdwdwdw}
%dwdwdwdw}2wdwdwdwd}%dwdwdwdw}2wdwdwdwd}
v,./9EFJMV %dwdwdwdw}v,./9EFJMV %dwdwdwdw}
Starting PositioncuuuuuuuuC(wdwdwdwd}cuuuuuuuuC(wdwdwdwd}cuuuuuuuuC
7dwdwdwdw}(wdwdwdwd}7dwdwdwdw}(wdwdwdwd}
6wiPdwdwd}7dwdwdwdw}6wiPdwdwd}7dwdwdwdw}
5dwdwIwdw}6wiPdwdwd}5dwdwIwdw}6wiPdwdwd}
&wdwdwdw0}5dwdwIwdw}&wdwdwdw0}5dwdwIwdw}
3dwdwdwdw}&wdwdwdw0}3dwdwdwdw}&wdwdwdw0}
2wdwdwdwd}3dwdwdwdw}2wdwdwdwd}3dwdwdwdw}
%dwdwdwdw}2wdwdwdwd}%dwdwdwdw}2wdwdwdwd}
v,./9EFJMV %dwdwdwdw}v,./9EFJMV %dwdwdwdw}
Target Position

16
Of Kings and Pawns
cuuuuuuuuC(wdwdwdwI}cuuuuuuuuC(wdwdwdwI}cuuuuuuuuC
7dwdwdwdw}(wdwdwdwI}7dwdwdwdw}(wdwdwdwI}
6kdPdwdwd}7dwdwdwdw}6kdPdwdwd}7dwdwdwdw}
5dwdwdwdp}6kdPdwdwd}5dwdwdwdp}6kdPdwdwd}
&wdwdwdwd}5dwdwdwdp}&wdwdwdwd}5dwdwdwdp}
3dwdwdwdw}&wdwdwdwd}3dwdwdwdw}&wdwdwdwd}
2wdwdwdwd}3dwdwdwdw}2wdwdwdwd}3dwdwdwdw}
%dwdwdwdw}2wdwdwdwd}%dwdwdwdw}2wdwdwdwd}
v,./9EFJMV%dwdwdwdw}v,./9EFJMV%dwdwdwdw}
As Jonathan Speelman, one of the greatest living endgame theoreticians, once noted. this endgame is almost impossible to solve if you haven’t seen it before. Trying to work it out by mere calculations is very diffi cult, but it is simple if you understand the geometry of the chessboard. White cannot catch the advanced h-pawn. Th erefore the only possible defense must involve the c-pawn. Black threatens to gobble it up aft er ...Kb6, and the king is too far away to help. So all seems lost. Th e solution involves bringing the king to the d-fi le to protect the pawn. Th at takes four moves, which seems impossible. But on the chessboard, the shortest distance between two points in not necessarily a straight line!
1.Kg7 White’s fi rst move must be to try to catch the Black pawn, while
simultaneously heading to the defense of the pawn at c6.1.c7?? is bad beacuse of 1...Kb7.
17
cuuuuuuuuC(wdwdwdwd}cuuuuuuuuC(wdwdwdwd}cuuuuuuuuC
7dwdwdwIw}(wdwdwdwd}7dwdwdwIw}(wdwdwdwd}
6kdPdwdwd}7dwdwdwIw}6kdPdwdwd}7dwdwdwIw}
5dwdwdwdp}6kdPdwdwd}5dwdwdwdp}6kdPdwdwd}
&wdwdwdwd}5dwdwdwdp}&wdwdwdwd}5dwdwdwdp}
3dwdwdwdw}&wdwdwdwd}3dwdwdwdw}&wdwdwdwd}
2wdwdwdwd}3dwdwdwdw}2wdwdwdwd}3dwdwdwdw}
%dwdwdwdw}2wdwdwdwd}%dwdwdwdw}2wdwdwdwd}
v,./9EFJMV%dwdwdwdw}v,./9EFJMV%dwdwdwdw}
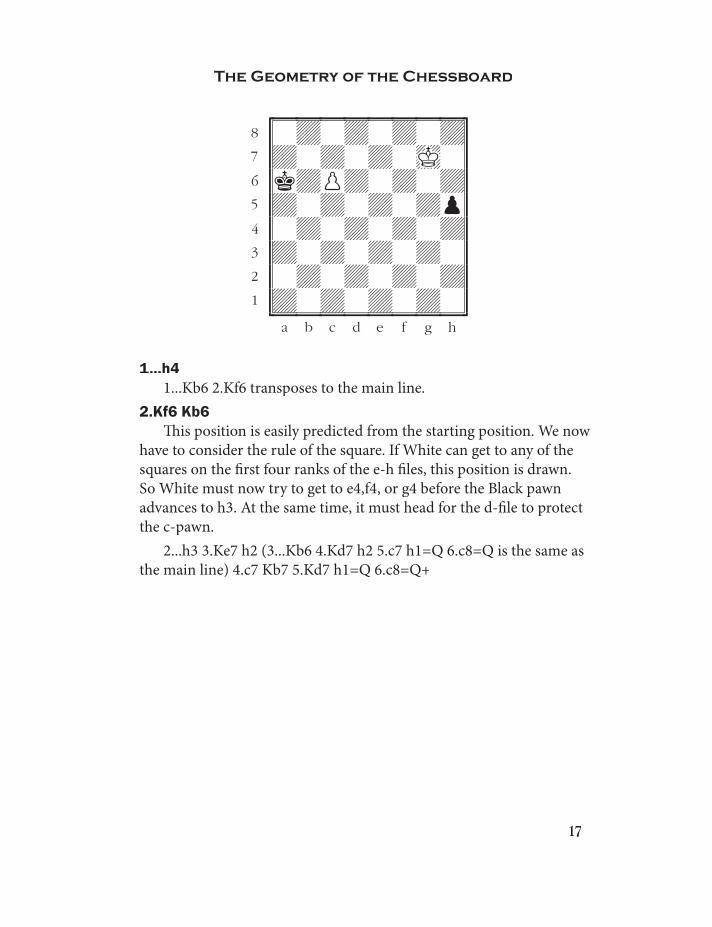
1...h41...Kb6 2.Kf6 transposes to the main line.
2.Kf6 Kb6 Th is position is easily predicted from the starting position. We now
have to consider the rule of the square. If White can get to any of the squares on the fi rst four ranks of the e-h fi les, this position is drawn. So White must now try to get to e4,f4, or g4 before the Black pawn advances to h3. At the same time, it must head for the d-fi le to protect the c-pawn.
2...h3 3.Ke7 h2 (3...Kb6 4.Kd7 h2 5.c7 h1=Q 6.c8=Q is the same as the main line) 4.c7 Kb7 5.Kd7 h1=Q 6.c8=Q+
The Geometry of the Chessboard

18
Of Kings and Pawns
cuuuuuuuuC(wdwdwdwd}cuuuuuuuuC(wdwdwdwd}cuuuuuuuuC
7dwdwdwdw}(wdwdwdwd}7dwdwdwdw}(wdwdwdwd}
6wiPdwIwd}7dwdwdwdw}6wiPdwIwd}7dwdwdwdw}
5dwdwdwdw}6wiPdwIwd}5dwdwdwdw}6wiPdwIwd}
&wdwdwdw0}5dwdwdwdw}&wdwdwdw0}5dwdwdwdw}
3dwdwdwdw}&wdwdwdw0}3dwdwdwdw}&wdwdwdw0}
2wdwdwdwd}3dwdwdwdw}2wdwdwdwd}3dwdwdwdw}
%dwdwdwdw}2wdwdwdwd}%dwdwdwdw}2wdwdwdwd}
v,./9EFJMV%dwdwdwdw}v,./9EFJMV%dwdwdwdw}
3.Ke5! cuuuuuuuuC(wdwdwdwd}cuuuuuuuuC(wdwdwdwd}cuuuuuuuuC
7dwdwdwdw}(wdwdwdwd}7dwdwdwdw}(wdwdwdwd}
6wiPdwdwd}7dwdwdwdw}6wiPdwdwd}7dwdwdwdw}
5dwdwIwdw}6wiPdwdwd}5dwdwIwdw}6wiPdwdwd}
&wdwdwdw0}5dwdwIwdw}&wdwdwdw0}5dwdwIwdw}
3dwdwdwdw}&wdwdwdw0}3dwdwdwdw}&wdwdwdw0}
2wdwdwdwd}3dwdwdwdw}2wdwdwdwd}3dwdwdwdw}
%dwdwdwdw}2wdwdwdwd}%dwdwdwdw}2wdwdwdwd}
v,./9EFJMV%dwdwdwdw}v,./9EFJMV%dwdwdwdw}
3...h3 Otherwise the h-pawn falls.3...Kxc6 4.Kf4 h3 5.Kg3 h2 6.Kxh2
4.Kd6! Now both pawn will promote, and the game will be drawn.

19
cuuuuuuuuC(wdwdwdwd}cuuuuuuuuC(wdwdwdwd}cuuuuuuuuC
7dwdwdwdw}(wdwdwdwd}7dwdwdwdw}(wdwdwdwd}
6wiPIwdwd}7dwdwdwdw}6wiPIwdwd}7dwdwdwdw}
5dwdwdwdw}6wiPIwdwd}5dwdwdwdw}6wiPIwdwd}
&wdwdwdwd}5dwdwdwdw}&wdwdwdwd}5dwdwdwdw}
3dwdwdwdp}&wdwdwdwd}3dwdwdwdp}&wdwdwdwd}
2wdwdwdwd}3dwdwdwdp}2wdwdwdwd}3dwdwdwdp}
%dwdwdwdw}2wdwdwdwd}%dwdwdwdw}2wdwdwdwd}
v,./9EFJMV%dwdwdwdw}v,./9EFJMV%dwdwdwdw}
4...h2 5.c7 h1=Q 6.c8=Q cuuuuuuuuC(wdQdwdwd}cuuuuuuuuC(wdQdwdwd}cuuuuuuuuC
7dwdwdwdw}(wdQdwdwd}7dwdwdwdw}(wdQdwdwd}
6wiwIwdwd}7dwdwdwdw}6wiwIwdwd}7dwdwdwdw}
5dwdwdwdw}6wiwIwdwd}5dwdwdwdw}6wiwIwdwd}
&wdwdwdwd}5dwdwdwdw}&wdwdwdwd}5dwdwdwdw}
3dwdwdwdw}&wdwdwdwd}3dwdwdwdw}&wdwdwdwd}
2wdwdwdwd}3dwdwdwdw}2wdwdwdwd}3dwdwdwdw}
%dwdwdwdq}2wdwdwdwd}%dwdwdwdq}2wdwdwdwd}
v,./9EFJMV%dwdwdwdq}v,./9EFJMV%dwdwdwdq}
Barring a major blunder, this position will be drawn.
The Geometry of the Chessboard

20
Of Kings and Pawns
BStudy by Adamson
The JailorcuuuuuuuuC(wdKdwdwd}cuuuuuuuuC(wdKdwdwd}cuuuuuuuuC
7iwdwdwdw}(wdKdwdwd}7iwdwdwdw}(wdKdwdwd}
6wdwdwdw0}7iwdwdwdw}6wdwdwdw0}7iwdwdwdw}
5dwdwdwdw}6wdwdwdw0}5dwdwdwdw}6wdwdwdw0}
&wdwdwdwd}5dwdwdwdw}&wdwdwdwd}5dwdwdwdw}
3dwdwdwdw}&wdwdwdwd}3dwdwdwdw}&wdwdwdwd}
2wdwdwdPd}3dwdwdwdw}2wdwdwdPd}3dwdwdwdw}
%dwdwdwdw}2wdwdwdPd}%dwdwdwdw}2wdwdwdPd}
v,./9EFJMV %dwdwdwdw}v,./9EFJMV %dwdwdwdw}
Starting PositioncuuuuuuuuC(wdwdwdwd}cuuuuuuuuC(wdwdwdwd}cuuuuuuuuC
7dwdwdwdw}(wdwdwdwd}7dwdwdwdw}(wdwdwdwd}
6wdwdwdw0}7dwdwdwdw}6wdwdwdw0}7dwdwdwdw}
5dwdkdKdw}6wdwdwdw0}5dwdkdKdw}6wdwdwdw0}
&wdwdwdwd}5dwdkdKdw}&wdwdwdwd}5dwdkdKdw}
3dwdwdw)w}&wdwdwdwd}3dwdwdw)w}&wdwdwdwd}
2wdwdwdwd}3dwdwdw)w}2wdwdwdwd}3dwdwdw)w}
%dwdwdwdw}2wdwdwdwd}%dwdwdwdw}2wdwdwdwd}
v,./9EFJMV %dwdwdwdw}v,./9EFJMV %dwdwdwdw}
Target Position

21
cuuuuuuuuC(wdKdwdwd}cuuuuuuuuC(wdKdwdwd}cuuuuuuuuC
7iwdwdwdw}(wdKdwdwd}7iwdwdwdw}(wdKdwdwd}
6wdwdwdw0}7iwdwdwdw}6wdwdwdw0}7iwdwdwdw}
5dwdwdwdw}6wdwdwdw0}5dwdwdwdw}6wdwdwdw0}
&wdwdwdwd}5dwdwdwdw}&wdwdwdwd}5dwdwdwdw}
3dwdwdwdw}&wdwdwdwd}3dwdwdwdw}&wdwdwdwd}
2wdwdwdPd}3dwdwdwdw}2wdwdwdPd}3dwdwdwdw}
%dwdwdwdw}2wdwdwdPd}%dwdwdwdw}2wdwdwdPd}
v,./9EFJMV%dwdwdwdw}v,./9EFJMV%dwdwdwdw}
A deceptively simple position. In fact, it is a very complex position. If the Black king becomes active, a draw is likely. White cannot just go running aft er the h-pawn, but must carefully keep the enemy monarch under lock and key. 1.Kc7!
1.Kd7? Kb7 (2…Kb6!) 2.Ke6 Kc6 3.Kf6 Kd6 (3…Kd5!) 4.Kg6 Ke5! and now White has to worry about ...Kf4-g3, but if 5.g4 then Kf4 draws. White can win with 3.g4!
cuuuuuuuuC(wdwdwdwd}cuuuuuuuuC(wdwdwdwd}cuuuuuuuuC
7iwIwdwdw}(wdwdwdwd}7iwIwdwdw}(wdwdwdwd}
6wdwdwdw0}7iwIwdwdw}6wdwdwdw0}7iwIwdwdw}
5dwdwdwdw}6wdwdwdw0}5dwdwdwdw}6wdwdwdw0}
&wdwdwdwd}5dwdwdwdw}&wdwdwdwd}5dwdwdwdw}
3dwdwdwdw}&wdwdwdwd}3dwdwdwdw}&wdwdwdwd}
2wdwdwdPd}3dwdwdwdw}2wdwdwdPd}3dwdwdwdw}
%dwdwdwdw}2wdwdwdPd}%dwdwdwdw}2wdwdwdPd}
v,./9EFJMV%dwdwdwdw}v,./9EFJMV%dwdwdwdw}
The Jailor
22
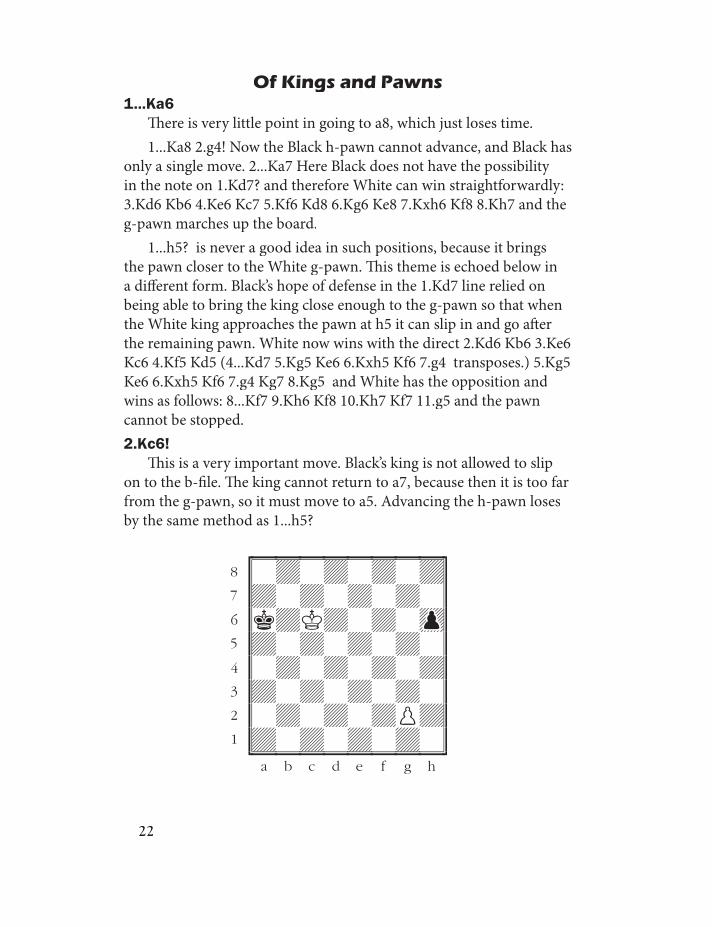
Of Kings and Pawns1...Ka6
Th ere is very little point in going to a8, which just loses time.1...Ka8 2.g4! Now the Black h-pawn cannot advance, and Black has
only a single move. 2...Ka7 Here Black does not have the possibility in the note on 1.Kd7? and therefore White can win straightforwardly: 3.Kd6 Kb6 4.Ke6 Kc7 5.Kf6 Kd8 6.Kg6 Ke8 7.Kxh6 Kf8 8.Kh7 and the g-pawn marches up the board.
1...h5? is never a good idea in such positions, because it brings the pawn closer to the White g-pawn. Th is theme is echoed below in a diff erent form. Black’s hope of defense in the 1.Kd7 line relied on being able to bring the king close enough to the g-pawn so that when the White king approaches the pawn at h5 it can slip in and go aft er the remaining pawn. White now wins with the direct 2.Kd6 Kb6 3.Ke6 Kc6 4.Kf5 Kd5 (4...Kd7 5.Kg5 Ke6 6.Kxh5 Kf6 7.g4 transposes.) 5.Kg5 Ke6 6.Kxh5 Kf6 7.g4 Kg7 8.Kg5 and White has the opposition and wins as follows: 8...Kf7 9.Kh6 Kf8 10.Kh7 Kf7 11.g5 and the pawn cannot be stopped.2.Kc6!
Th is is a very important move. Black’s king is not allowed to slip on to the b-fi le. Th e king cannot return to a7, because then it is too far from the g-pawn, so it must move to a5. Advancing the h-pawn loses by the same method as 1...h5?
cuuuuuuuuC(wdwdwdwd}cuuuuuuuuC(wdwdwdwd}cuuuuuuuuC
7dwdwdwdw}(wdwdwdwd}7dwdwdwdw}(wdwdwdwd}
6kdKdwdw0}7dwdwdwdw}6kdKdwdw0}7dwdwdwdw}
5dwdwdwdw}6kdKdwdw0}5dwdwdwdw}6kdKdwdw0}
&wdwdwdwd}5dwdwdwdw}&wdwdwdwd}5dwdwdwdw}
3dwdwdwdw}&wdwdwdwd}3dwdwdwdw}&wdwdwdwd}
2wdwdwdPd}3dwdwdwdw}2wdwdwdPd}3dwdwdwdw}
%dwdwdwdw}2wdwdwdPd}%dwdwdwdw}2wdwdwdPd}
v,./9EFJMV%dwdwdwdw}v,./9EFJMV%dwdwdwdw}

23
2...Ka52...Ka7 3.g4! and the White winds up with the opposition aft er. 3...
Kb8 4.Kd6 Kc8 5.Ke6 Kd8 6.Kf6 Ke8 7.Kg6 Kf8 8.Kxh6 Kg8 9.g5. Th e rest is forced. 9...Kh8 (9...Kf7 10.Kh7) 10.g6 Kg8 11.g7.3.Kc5
White escorts the Black king up the board. If Black retreats, the win is achieved by the same method as in the previous note. We must think in terms of strategy here, as the winning position still lies far in the future. Th e plan now is to bring the Black king to the second rank, aft er which an eventual g4 will put the pawn far enough forward so that the enemy king cannot catch it.
cuuuuuuuuC(wdwdwdwd}cuuuuuuuuC(wdwdwdwd}cuuuuuuuuC
7dwdwdwdw}(wdwdwdwd}7dwdwdwdw}(wdwdwdwd}
6wdwdwdw0}7dwdwdwdw}6wdwdwdw0}7dwdwdwdw}
5iwIwdwdw}6wdwdwdw0}5iwIwdwdw}6wdwdwdw0}
&wdwdwdwd}5iwIwdwdw}&wdwdwdwd}5iwIwdwdw}
3dwdwdwdw}&wdwdwdwd}3dwdwdwdw}&wdwdwdwd}
2wdwdwdPd}3dwdwdwdw}2wdwdwdPd}3dwdwdwdw}
%dwdwdwdw}2wdwdwdPd}%dwdwdwdw}2wdwdwdPd}
v,./9EFJMV%dwdwdwdw}v,./9EFJMV%dwdwdwdw}
3...Ka4 4.Kc4 Ka3 5.Kc3 Ka2 6.Kc2 Black is now on the horns of a dilemma. Retreating runs into a
familiar scenario but going into the corner loses because the king is too far away.
The Jailor
24
Of Kings and Pawns
cuuuuuuuuC(wdwdwdwd}cuuuuuuuuC(wdwdwdwd}cuuuuuuuuC
7dwdwdwdw}(wdwdwdwd}7dwdwdwdw}(wdwdwdwd}
6wdwdwdw0}7dwdwdwdw}6wdwdwdw0}7dwdwdwdw}
5dwdwdwdw}6wdwdwdw0}5dwdwdwdw}6wdwdwdw0}
&wdwdwdwd}5dwdwdwdw}&wdwdwdwd}5dwdwdwdw}
3dwdwdwdw}&wdwdwdwd}3dwdwdwdw}&wdwdwdwd}
2kdKdwdPd}3dwdwdwdw}2kdKdwdPd}3dwdwdwdw}
%dwdwdwdw}2kdKdwdPd}%dwdwdwdw}2kdKdwdPd}
v,./9EFJMV%dwdwdwdw}v,./9EFJMV%dwdwdwdw}
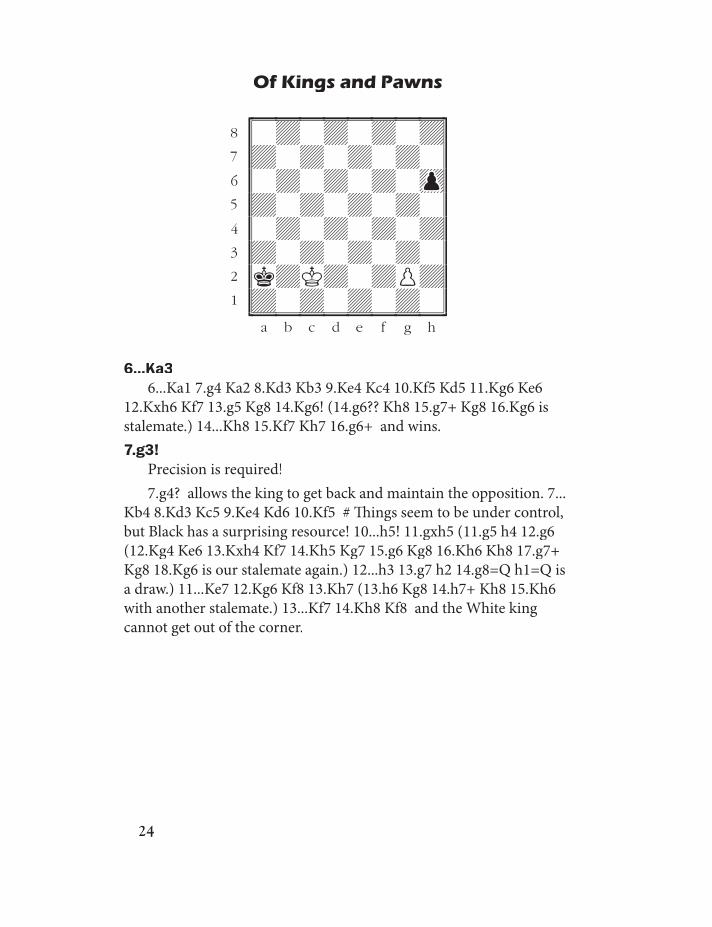
6...Ka36...Ka1 7.g4 Ka2 8.Kd3 Kb3 9.Ke4 Kc4 10.Kf5 Kd5 11.Kg6 Ke6
12.Kxh6 Kf7 13.g5 Kg8 14.Kg6! (14.g6?? Kh8 15.g7+ Kg8 16.Kg6 is stalemate.) 14...Kh8 15.Kf7 Kh7 16.g6+ and wins.7.g3!
Precision is required!7.g4? allows the king to get back and maintain the opposition. 7...
Kb4 8.Kd3 Kc5 9.Ke4 Kd6 10.Kf5 # Th ings seem to be under control, but Black has a surprising resource! 10...h5! 11.gxh5 (11.g5 h4 12.g6 (12.Kg4 Ke6 13.Kxh4 Kf7 14.Kh5 Kg7 15.g6 Kg8 16.Kh6 Kh8 17.g7+ Kg8 18.Kg6 is our stalemate again.) 12...h3 13.g7 h2 14.g8=Q h1=Q is a draw.) 11...Ke7 12.Kg6 Kf8 13.Kh7 (13.h6 Kg8 14.h7+ Kh8 15.Kh6 with another stalemate.) 13...Kf7 14.Kh8 Kf8 and the White king cannot get out of the corner.

25
cuuuuuuuuC(wdwdwdwd}cuuuuuuuuC(wdwdwdwd}cuuuuuuuuC
7dwdwdwdw}(wdwdwdwd}7dwdwdwdw}(wdwdwdwd}
6wdwdwdw0}7dwdwdwdw}6wdwdwdw0}7dwdwdwdw}
5dwdwdwdw}6wdwdwdw0}5dwdwdwdw}6wdwdwdw0}
&wdwdwdwd}5dwdwdwdw}&wdwdwdwd}5dwdwdwdw}
3iwdwdw)w}&wdwdwdwd}3iwdwdw)w}&wdwdwdwd}
2wdKdwdwd}3iwdwdw)w}2wdKdwdwd}3iwdwdw)w}
%dwdwdwdw}2wdKdwdwd}%dwdwdwdw}2wdKdwdwd}
v,./9EFJMV%dwdwdwdw}v,./9EFJMV%dwdwdwdw}
7...Kb47...Ka2 lets White win by advancing the g-pawn. 8.g4! Ka1 (8...Ka3
9.Kd3 Kb3 10.Ke4 Kc4 11.Kf5 Kd5 12.Kg6 Ke6 13.Kxh6 Kf7 14.g5 Kf8 15.Kh7 should be familiar by now.) 9.Kd3 Kb2 10.Ke4 Kc3 11.Kf5 Kd4 12.Kg6 Ke5 13.Kxh6 Kf6 14.g5+ Kf7 15.Kh7 with the usual inevitable result.8.Kd3
Both sides move closer to the kingside. 8...Kc5 9.Ke4 Kd6 10.Kf5 Kd5
White is winning, but must not be hasty. Going directly aft er the h-pawn allows Black to slip away with a draw.
The Jailor