objects specialty group postprints objects specialty … · harvey and roth-wells aic objects...
TRANSCRIPT

Article: Collaborative conservation of the Charles Hubbard natural history dioramas Author(s): Ron Harvey and Nina Roth-Wells Source: Objects Specialty Group Postprints, Volume Fifteen, 2008 Pages: 43-57 Compilers: Howard Wellman, Christine Del Re, Patricia Griffin, Emily Hamilton, Kari Kipper, and Carolyn Riccardelli © 2008 by The American Institute for Conservation of Historic & Artistic Works, 1156 15th Street NW, Suite 320, Washington, DC 20005. (202) 452-9545 www.conservation-us.org Under a licensing agreement, individual authors retain copyright to their work and extend publications rights to the American Institute for Conservation. Objects Specialty Group Postprints is published annually by the Objects Specialty Group (OSG) of the American Institute for Conservation of Historic & Artistic Works (AIC). A membership benefit of the Objects Specialty Group, Objects Specialty Group Postprints is mainly comprised of papers presented at OSG sessions at AIC Annual Meetings and is intended to inform and educate conservation-related disciplines. Papers presented in Objects Specialty Group Postprints, Volume Fifteen, 2008 have been edited for clarity and content but have not undergone a formal process of peer review. This publication is primarily intended for the members of the Objects Specialty Group of the American Institute for Conservation of Historic & Artistic Works. Responsibility for the methods and materials described herein rests solely with the authors, whose articles should not be considered official statements of the OSG or the AIC. The OSG is an approved division of the AIC but does not necessarily represent the AIC policy or opinions.


AIC Objects Specialty Group Postprints, Vol. 15, 2008
COLLABORATIVE CONSERVATION OF THE CHARLES HUBBARD NATURAL HISTORY DIORAMAS
RON HARVEY AND NINA ROTH-WELLS
ABSTRACT
This paper will address the treatment of natural history dioramas in the L.C. Bates Museum in Hinckley, Maine. The collection has been exhibited in its present building since 1911 as a teaching museum for the residents/students of the Good Will-Hinckley Home for Boys and Girls. The L.C. Bates Museum houses a unique collection of natural history and fine art within an historic structure. The dioramas were created by painter/naturalist Charles Hubbard to illustrate the mammalian and avian species of Maine. The treatment of the dioramas followed a holistic approach and was carried out through collaboration of the objects and painting conservators. As the dioramas had never been treated before, the treatment goal was to retain the specimens and early 20th-century interpretation while repairing damages, updating lighting systems, and retrofitting cases to reduce infiltration of dust and create more stable environmental conditions.
1. HISTORICAL BACKGROUND The L.C. Bates Museum is situated in rural Maine on the campus of the Good Will-Hinckley Home for Boys and Girls. The Good Will-Hinckley Home for Boys was founded by the Rev. George Hinckley in 1889 as a home for needy boys. Today Good Will-Hinckley continues to provide services for children, both boys and girls. The museum was designed in 1903 by the architect William R. Miller, a Maine native who was very fond of the Romanesque style. The museum building was originally the manual training school, however, it was converted to a museum in the 1920s when Lewis Carleton Bates paid for building improvements and museum exhibits. Rev. Hinckley’s personal collections formed the basis for the museum collection. His main areas of interest were natural history and rural culture, which he felt complemented the mission of Good Will-Hinckley.
Fig. 1. Exterior of L. C. Bates Museum (Photograph by authors)
43

Harvey and Roth-Wells AIC Objects Specialty Group Postprints, Vol. 15, 2008
Fig. 2. The Roundel (Photograph by authors) In 1912, American impressionist Charles Hubbard was commissioned to design a logo for the Good Will-Hinckley Home. Hubbard designed the roundel, which is in essence a pictorial representation of Rev. Hinckley’s six main principles of child rearing: Home, Education, Discipline, Industry, Recreation, and Religion. The relationship between Hubbard and Hinckley continued, and in 1915 Hubbard traveled to Good Will-Hinckley where he and Hinckley discussed plans for a museum. By the 1920s, the museum planning was underway and Hinckley commissioned Hubbard to design the natural history dioramas for the L.C. Bates Museum. There are 32 dioramas that depict the flora, fauna, and scenery of Maine. Additionally, there is one diorama with a hyena and the pyramids of Egypt in the background. Like many impressionists, Hubbard painted en plein air. He traveled around the state of Maine and painted sketches for what was to become the backgrounds to the dioramas. Hubbard was also an avid photographer and he photographed each location so that the background scenes could be reconstructed with accuracy once he had returned to the studio. The museum is modeled on a late 19th century cabinet of curiosities, and the museum remains much as it was to this day. Because of this philosophy, the dioramas have not been reinterpreted to fit scientific advances in the understanding of natural history, therefore they are among the oldest and best-preserved dioramas in New England. The conservation of the natural history dioramas at the L.C. Bates Museum began as the result of an Institute for Museum and Library Services (IMLS) funded Conservation Assessment in 1999-2000. The assessment identified the dioramas as high conservation priorities as well as historically important components of the museum. The dioramas were designed, constructed, and installed by Charles Hubbard, an American impressionist artist. Mr. Hubbard selected taxidermy mounts from the collection and incorporated them into environmental settings with painted backgrounds of known locations within Maine. With the exception of the spotted hyena, all of the dioramas reflect the natural habitat, flora, and fauna of diverse locations within the state.
44

Harvey and Roth-Wells AIC Objects Specialty Group Postprints, Vol. 15, 2008
Fig. 3. Charles Hubbard painting en plein air
Figs. 4 and 5. Interior of L.C. Bates Museum (Photographs by authors) The IMLS Conservation Project grant funded in 2001-2002 supported the conservation of the first group of bird dioramas within the museum. The purpose of the project was to address the identified issues that threatened the dioramas. These issues included internal incandescent lighting, high light levels within the dioramas, dust and debris that had accumulated within the dioramas due to gaps between the wood frames holding the glass, the lack of proper coverings at the tops of the cases, and damage from decades past insect infestation. Another problem that threatened the preservation of the dioramas was the necessity to open the cases to change interior lighting. Changing the lights required removing the wood frame and glass to access the interior of the dioramas. In addition, due to the presence of arsenic associated with the historic taxidermy mounts, a handling protocol was established (appendix 1).
An earlier test on isolated mounts within the L.C. Bates Museum undertaken by Tuckerbrook Conservation detected a range of toxic materials and heavy metal poisons that had been used when preparing natural history mounts. The testing identified the presence of arsenic
45

Harvey and Roth-Wells AIC Objects Specialty Group Postprints, Vol. 15, 2008
as the most consistently used material during the preparation of the taxidermy mounts. Prior to beginning any work with the diorama interiors, each mount was tested for the presence of any toxic materials that would have been used on 19th and 20th century taxidermy mounts. A modification for using the Merckoquant Arsenic Test Kit provided by Catherine Hawks appears in appendix 1. 2. TREATMENT The dioramas’ background paintings were in good condition with minor areas in need of treatment. However, the mounts have suffered from long-term exposure to light and past insect infestation. Our treatment plan focused on intervention and developing a preventive care and maintenance model in which the dioramas could be treated in situ. 2.1 TREATMENT OF PAINTED BACKGROUNDS The backgrounds of the dioramas were painted on a thick cellulose-based support similar to artist’s board. In most of the dioramas the supports of the painted backgrounds were stable and in good condition. Exceptions to this could be seen on five dioramas that are against exterior walls. In these cases, temperature and humidity fluctuations from the adjacent exterior masonry wall had caused warping in the cardboard support panels. The treatment of warped panels with the specimens in situ required creative thinking to design a support that allowed safe access to the panels without threatening the artifacts or the conservator. Treatment of the diorama backgrounds with stable supports was considerably easier. Once the glass in the front of the case was removed, the painted surface was examined closely in raking light to ensure there were no areas of insecure or flaking paint. Occasionally, flaking paint was discovered near nail heads used to attach the painted backgrounds to the case. When necessary, tiny flakes were consolidated with 5% Paraloid B-72 in xylene. The next step was to dry brush and vacuum the painted surface to remove any particulate matter. The paintings were in remarkably good condition. They were not varnished, so discoloration of a surface coating was not a problem. Furthermore, they had been in cases resulting in very little surface grime. When necessary, visual integration was undertaken by first isolating adjacent paint layers with Golden MSA matte varnish (brush applied), followed by filling with Modostuc, a commercial water-activated fill material consisting of a calcium carbonate base material with small amounts of barium sulfate and a polyvinyl acetate copolymer binder. After the fills had set, they were inpainted with Golden Acrylic paint to blend with original surfaces. 2.2 CLEANING PROTOCOL A protocol was established for the cleaning of the interior of the dioramas and the cleaning and rearrangement of the feathers, fur, glass eyes, legs, feet, and bases of the mounts. Due to the complexity of the dioramas, the shallow interiors, and the fragility of the leaves and plant material, it was determined that all cleaning would occur without removing items. The cleaning consisted of removing surface dust by mechanical means, that is, dry-brush dusting of surfaces with a natural fiber brush (Hake and assorted small artist brushes) and capturing the raised dust with a variable-speed Nilfisk HEPA vacuum. The nozzle of the vacuum tube was covered with a section of nylon stocking to capture any loose or detached elements of the mounts. The interior ground cover elements, such as leaves, tree branches, trunks, stones and plant material, were cleaned using this technique. The mounts were not removed from the
46

Harvey and Roth-Wells AIC Objects Specialty Group Postprints, Vol. 15, 2008
dioramas and were dry brushed and HEPA vacuum cleaned in place. The hyena mount was the exception to cleaning in place. The glass eyes of the mounts develop a heavy accumulation of dust that clouds and dulls their appearance and affects the aesthetics of the mounts. Cleaning the glass eyes required the use of cotton micro swabs dampened with distilled water or ethanol to thoroughly remove the surface accretions. Care was taken to reduce the impact of solvents and water on toned areas around eyes and any exposed skin or hide elements. Bamboo skewers, tweezers, and micro spatulas were used to separate, realign, and preen the mounts after dry cleaning.
Fig. 6. Cleaning seagull mounts (Photograph by authors) 2.3 TREATMENT OF MOUNTS Some of the mounts within the mammal dioramas required conservation treatment. A primary example would be the fox family, a pair of adults with two kits. The insect damage of the adult male mount included loss of fur along the back of the mount as well as the complete loss of fur on the tail. Replacement of the missing fur was accomplished by first mapping the areas of loss using 0.5 mil polyester sheeting (Mylar) and a Sharpie marker. The mapped losses were cut out of the Mylar and used as templates. A faux raccoon fur was purchased to test the fur replacement process. The faux raccoon fur was identified as an acrylic fiber with cloth backing, and was cut to size using the Mylar maps. The faux fur was trimmed to the length of the original fur adjacent to the replacement areas. The faux fur was toned using a cold encaustic paint. To make this paint, a small amount of Victory microcrystalline wax (3-5%) was added to mineral
47
Harvey and Roth-Wells AIC Objects Specialty Group Postprints, Vol. 15, 2008
spirits and mixed at room temperature. The wax acted as the toning medium and dry pigments were added until the desired color was achieved. The wax-pigment toning system was brush-applied to the faux fur and allowed to dry. After drying, the tinted fur was teased using a sharpened bamboo skewer as well as a small stippling brush to separate the fur and provide a more natural appearance. The tinted faux fur was placed in the areas of fur loss on the hide of the mount and held in place using size 0 stainless steel insect pins. The perimeter of the faux fur was blended into the original fur using a sharpened bamboo skewer and a synthetic fan brush. This process was continued until all of the fur losses were completed. The missing tail was replaced using a commercially tanned fox tail that had been treated with a commercial taxidermy insect deterrent, Protex Mount Care. Protex Mount Care contains di-N-alkyl dimethylammonium chloride, N-alkyl dimethylbenzylammonium chloride that has disinfectant and microbial inhibitor properties. The tail was placed over the original wire support and held in place by applying a 20% solution of Paraloid B-72 in acetone to the underside of the tail hide and wrapping the hide over the wire support. The tail would mimic the original placement of the tail and provide the full, bushy quality that was missing from the damaged mount.
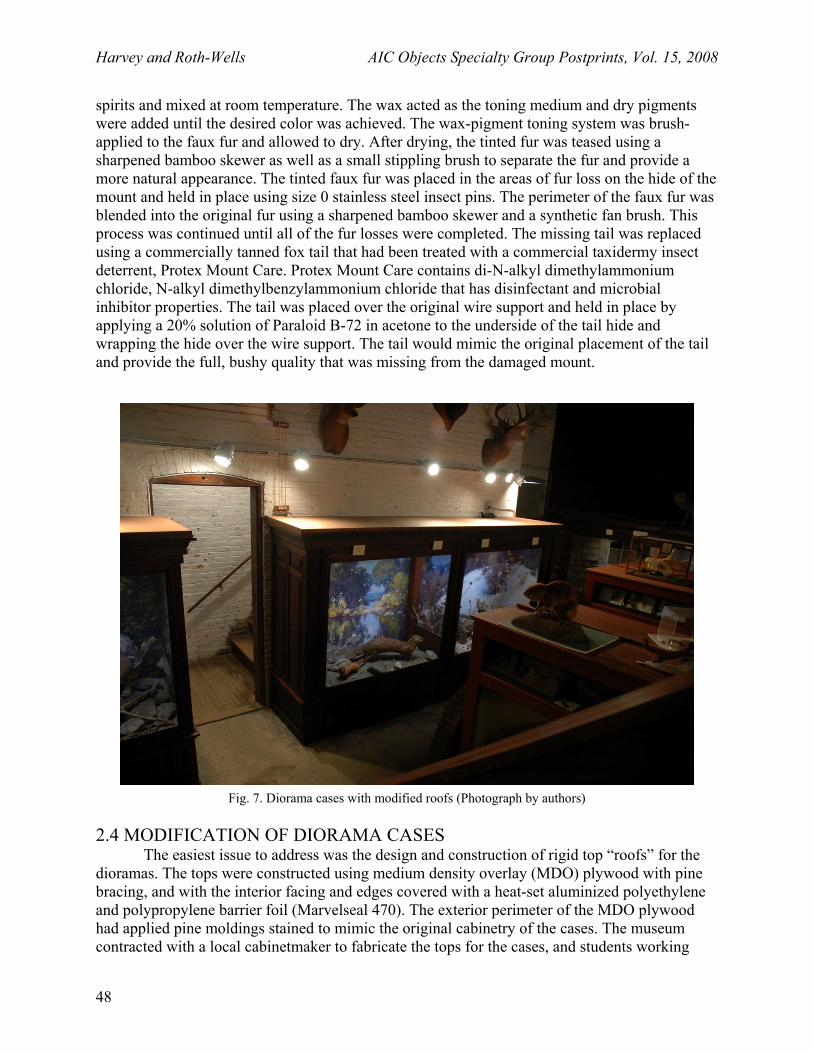
Fig. 7. Diorama cases with modified roofs (Photograph by authors) 2.4 MODIFICATION OF DIORAMA CASES The easiest issue to address was the design and construction of rigid top “roofs” for the dioramas. The tops were constructed using medium density overlay (MDO) plywood with pine bracing, and with the interior facing and edges covered with a heat-set aluminized polyethylene and polypropylene barrier foil (Marvelseal 470). The exterior perimeter of the MDO plywood had applied pine moldings stained to mimic the original cabinetry of the cases. The museum contracted with a local cabinetmaker to fabricate the tops for the cases, and students working
48

Harvey and Roth-Wells AIC Objects Specialty Group Postprints, Vol. 15, 2008
under the supervision of the museum director applied the laminate to the interior surfaces and edges of the custom-cut MDO plywood. A layer of fabric-grade Tyvek was installed between the MDO plywood and the original top of the cabinet to further reduce the infiltration of dust. The Tyvek was secured in place along the interior wood framing using Monel rust-resistant staples. The gaps and openings noted where the interior surfaces of the wood-framed glass fronts and the pine interior frames meet allowed the infiltration of dust and airborne particulate into the dioramas. A silicone, pressure-sensitive acrylic adhesive backed gasket (Strip-N-Stick Silicone Rubber gasket 200A) was applied to the face of the interior frame to contact the surface of the wood framed glass panels and reduce or eliminate particulate infiltration into the dioramas. 2.5 LIGHTING Interior lighting was next addressed with the goal to lower light levels, reduce or eliminate any heat buildup in the case, reduce the need to enter the case to change out light bulbs, and provide a light system that would be free of any ultraviolet radiation. Many of the cases had existing interior lighting consisting of knob and tube with ceramic or metal fixtures, incandescent light bulbs, and milk glass shades. Discussions with the director resulted in the decision to leave the original lighting in place, but attempt to use a single bulb approach to illuminate the diorama interior. The first seven cases in the Audubon Room were initially illuminated using an acrylic fiber-optic lighting system (NOUVIR) in which the light source (driver) was mounted on top of the diorama case and out of the line of sight of the viewer. The advantage to this system was the ability to provide light through the acrylic fibers into a clear bulb that had been modified to accommodate the acrylic fibers and have the appearance of a single bulb. Although this approach did meet the goal of providing illumination through an existing, though modified, light fixture, it did not provide adequate light to meet the viewers’ needs. In a second attempt, acrylic fiber-optic lighting was introduced through gaps in the ceiling at the front of the diorama. Fixtures were attached to the interior face of the framing and aimed to provide adequate lighting to meet visitors’ needs as well as conservation standards for natural history collections: 50 lux or 5 footcandles as recommended by Garry Thomson. The staff can change the bulbs in the illuminators without accessing the interior of the dioramas. A motion-activated sensor that would turn the diorama case lighting on as visitors were approaching the entrance to the Audubon Room controlled this lighting system. The use of the motion-activated system will further protect the mounts and organic interior elements from prolonged light exposure, therefore providing greater preservation of the fragile collections. The second phase of diorama conservation supported by the award of an IMLS Conservation Project grant involved a bank of shallow cases with bird mounts, minimal ground cover, and Hubbard-painted backgrounds. The cleaning protocol established with the first group of bird dioramas was implemented on the second group of dioramas. At the request of the museum director, the lighting for this group of dioramas was a glass fiber-optic lighting system manufactured by LSI. The museum director’s decision was driven by the reported longevity of glass versus acrylic fiber-optics and her investigation into the LSI system. The conservator installed the glass fiber-optic lighting through the top of the diorama caps and into the dioramas through gaps and openings that were present in the original construction. Brass rod mounts were fabricated to direct the ends of the fiber optic bundles and illuminate the interiors of the shallow dioramas. The shallow depths of the dioramas accommodated the point source illumination, however, there were some areas that fell into shadow within some of the dioramas. The new
49

Harvey and Roth-Wells AIC Objects Specialty Group Postprints, Vol. 15, 2008
lighting within the dioramas met conservation standards for illumination for the preservation of the specimens. A motion-activated sensor switch to reduce long-term exposure to light as well as to reduce energy consumption controlled the glass fiber-optic lighting system. A third round of IMLS funding provided for the conservation of the last group of bird dioramas in the Audubon Room. The established protocol for the cleaning of the interiors and mounts was followed, as was the construction and placement of the caps and reproduction moldings. The museum director, Deborah Staber, attended a New England Museum Association Annual Conference and took a workshop on museum lighting. The development and use of light emitting diodes (LED) in systems termed LIA (LED Illumination Assembly) as lighting sources in a museum setting has been investigated by Richard Kerschner, Director of Preservation and Conservation at the Shelburne Museum, Vermont. Kerschner presented a workshop on his lighting research and use at Shelburne during the New England Museum Association Annual Conference in 2004. At the request of the museum director and after investigation by the conservator, yet another system of interior lighting was installed to address lighting of the shallow dioramas. A test was undertaken using a 12 in. strip of the 4000K LIA LED placed in a 16 in. square acrylic cube with a HOBO Pro datalogger. A second logger was placed outside the case and the LIA was activated by a timer and run for eight hours a day. At the end of two weeks, the data from the two loggers was compared and a 1° F rise was detected in the interior temperature throughout the day. The amount of heat generated by this system of LED lighting would not adversely affect the interior temperature (or relative humidity) within the diorama cases.
The LED lighting manufactured by Prolume is available in a range of color temperatures (3200 and 4000K), spacing of LED “bulbs” (1 in., ½ in., etc.), beam spreads (20 and 40), and unit lengths, as each strip is custom made. The strips of LEDs can be easily installed in the case using nylon cable clips or custom fabricated brass mounts. Various lengths, pitch of lights and consistent color temperature provided an even illumination within the shallow dioramas. The longevity of the LED system (13-year guarantee), the decrease in energy consumption to drive the lighting, the consistent color temperature of the lighting, the light levels in the diorama and the lack of ultraviolet or infrared light will provide long-term preservation of the mounts and background paintings and will reduce the necessity of opening the dioramas for lighting maintenance. The drivers (transformers) for the LED lighting was located on top of the diorama cases to allow ease of access as well as replacement of the transformers when needed. The remainder of the dioramas (mammals), with the exception of the single, large diorama (caribou, black bear family, white-tailed deer, etc.) have been lit using 4000K LEDs for the background paintings. The foreground and mounts have been illuminated using 3200K LEDs to complement the warmer colors. The difference in lighting is most noticeable when photographing the dioramas using digital photography. Newer LED lighting at 3000K has been used in relamping exhibit cases in the museum. 3. CASE STUDY: HYENA DIORAMA The spotted hyena mount required extensive conservation intervention. The 19th century mount prepared by Ward’s Natural Science Establishment, Rochester, NY had suffered from past insect infestation resulting in the loss of hide along the underside of the body. In addition, excessive damp resulted in the deterioration of the internal threaded iron rods in the legs used to support
50

Harvey and Roth-Wells AIC Objects Specialty Group Postprints, Vol. 15, 2008
and mount the hyena to an oak base. The deteriorated metal rods expanded in the plaster that formed the legs of the hyena resulting in a split of the hide along old seams.
Fig. 8. Hyena diorama (Photograph by authors) The mount was initially cleaned of surface dust and particulate by dry brushing with a natural fiber artist brush and the particulate was captured using a Nilfisk M80, variable-speed HEPA vacuum. The loose plaster fill material was photographed and then vacuum cleaned. The failing rusting iron rods were cut and removed. Each leg was measured and sections of 316 stainless steel 3/8 in. threaded rod were cut to extend up into the leg and overlap the original iron rod, replacing the deteriorated sections. Several inches of the exposed old rods were given a brush application of an epoxy (System Three T-88) to act as a separator and to seal the surface of the iron rod. After curing, the new rods lapped several inches of the old iron rods and were attached to the old iron rods using a structural epoxy adhesive (System Three T-88). The openings at the legs and damage to the feet were repaired by filling gaps in the plaster with a water-based cellulose fill material (Modostuc) with the addition of 10% alpha-cellulose powder for strength. Large gaps were initially filled with a sculpted section of expanded polyethylene foam (Ethafoam) and then the gaps were filled with the Modostuc and alpha-cellulose. The feet and legs were shaped into correct form and held in place using plumbers’ Teflon tape (non-adhesive) until set. The hide was realigned and reattached using water-based flexible polyvinyl acetate adhesive (Jade 403) and a strong, medium-weight 100% Kozo Japanese tissue (Kizukishi) to bridge gaps. The paper was attached to the interior edges of the hide with a dilute Jade 403 solution and was aligned at the seam with the other edge of the hide. The remaining edge of the Kozo paper was given a light application of the dilute Jade adhesive and then worked behind the hide to form a bridge. The hide was held in place using sections of a nylon stocking wrapped around the exterior of the leg until the hide repair dried. This was repeated until all four of the legs were repaired.
51

Harvey and Roth-Wells AIC Objects Specialty Group Postprints, Vol. 15, 2008
The damaged underbelly of the hyena had been eaten by insects in the past and the hide loss exposed the string and fiber understructure associated with the original taxidermy. The strings were realigned and tucked in to hold them in place. Strips of the Japanese paper were attached along the inner edge of the hide surrounding the area of loss using Jade 403 adhesive thinned with distilled water. The exposed area of the mount support was faced with a single layer of the Kozo paper and held in place with Jade 403 adhesive thinned with distilled water. The paper covering was gently tamped in place over the mount support to form a protective covering and was attached to the perimeter paper using the thinned Jade adhesive. The paper was held in place using stainless steel pins until the adhesive dried. The Japanese paper repair covered the exposed inner mount and provided a stable surface on which to attach the faux fur.
Fig. 9. Hyena legs with rods during treatment (Photograph by authors) A synthetic (modacrylic) fur was chosen that was similar in hair size though it was white in color. A template of the missing fur area was made and was used to shape the faux fur. The fur was trimmed using an electric trim shaver to adjust the length of the hair to more closely match the length of the original fur on the hyena. The faux fur fill was toned using the wax/solvent/dry pigment technique and allowed to dry. The faux fur was glued in place over the paper facing using Jade 403 and held in place using stainless steel pins until dry. The pins were removed and the faux hair was brushed using a fan tip brush to align the faux fur with the original fur. Toning was adjusted using the wax/solvent/dry pigment system to more effectively blend the fill with original fur color.
52

Harvey and Roth-Wells AIC Objects Specialty Group Postprints, Vol. 15, 2008
Areas of hair loss from past insect damage noted throughout the body of the hyena were toned to reduce their visibility. Toning was undertaken using gouache applied with a fine artist brush to areas of exposed hide. The areas of color loss (cracks) around the eyes were also toned using gouache. The small losses on the nose of the hyena were toned using gouache to blend with surrounding surfaces. The fur of the mammal was realigned using the point of a bamboo skewer and various artist brushes. The glass eyes were examined and found to be stable within the mount. The eyes of the mount were cleaned using distilled water applied with cotton-tipped applicators and allowed to air dry. The completed hyena was attached to a new mount using stainless steel washers and nuts. The original wood flooring of the diorama was covered with a multi-layer laminate (Marvelseal 470) to reduce future moisture migration into the diorama. Any openings along the interior perimeter of the diorama were sealed using expanded polyethylene rod (Backer Rod). The sand was reinstalled on the deck of the diorama and the hyena was installed in the diorama. One 60 in. section of the 3400K LEDs with 1 in. separation was installed on the inside surface above the window of the diorama to illuminate the case. A silicone, pressure-sensitive acrylic adhesive backed gasket (Strip-N-Stick silicone rubber gasket 200A) was applied to the face of the wood frame to contact the interior surface of the glass panels and reduce or eliminate particulate infiltration into the diorama.
Fig. 10. Hyena during treatment (Photograph by authors)
53

Harvey and Roth-Wells AIC Objects Specialty Group Postprints, Vol. 15, 2008
4. CONCLUSION The variety of issues associated with the care and handling of natural history specimens, the complexity of conserving both natural and artificial materials included in the Hubbard Dioramas, and the unique and historic visual content of the dioramas made them both a challenge and a joy to conserve. The success of this project is a result of the collaboration of two conservators working in difficult and challenging circumstances to address the conservation of these unique and historically significant dioramas. APPENDIX. USING THE MERCKOQUANT ARSENIC TEST KIT The Merckoquant (EM Quant) Arsenic Test Kit is designed to detect the presence of arsenic (3+ or 5+ valance states) in water, soil extracts, pharmaceuticals, prepared biological materials, and liquid foods. The kit is designed to detect trivalent or pentavalent arsenic by converting the arsenic to arsine gas. This is accomplished by adding zinc dust (Reagent 1) to the samples, then hydrochloric acid (Reagent 2). The reaction between the metal and the acid generates hydrogen gas that combines with arsenic in the samples to produce arsenic trihydride (arsine, AsH3), a very toxic, colorless gas with an odor of garlic (consequently, it is important to do the test with closed caps and to do it in a well ventilated area). The arsine gas reacts with the treated portion of the test strip to produce a color change that is said to be indicative of the concentration of the arsenic present in the sample. The treated portion of the strip contains mercury bromide, which reacts with the arsine to form a colored compound. Always wear a lab coat or a rubber lab apron, safety goggles, and heavyweight nitrile gloves while doing the tests. Conduct the tests in a fume cabinet or in a well-ventilated area. Never attempt to test more than 10 samples at a time. Take samples using cotton-tipped swabs dampened very lightly with deionized water. Roll one side of the swab gently on the surface of the object/specimen, over as much area as possible. When dealing with taxidermy mounts and animal skins, concentrate on the areas around the eyes, nose, mouth, ears, ventral suture (if present), base of tail, and bottom of feet. Collect samples from each object/specimen on at least three swabs. Always conduct the tests using a negative control – a fresh cotton swab tip dampened with deionized water. As long as there is no discoloration of the test strip over this swab, the results for the actual samples should be valid.
The test has been modified by Catherine Hawks: Using disposable styrene vials with snap caps as test vials (5 or 7 dram). The snap
caps are slit to accommodate the test strips that are part of the kit, so that the test area of the strips extends into the headspace of the vials. Once the reagents have been added, the cap is immediately placed on the vial.
Cutting the tips of the swabs and placing the tips in individual test vials. Adding few drops of a 1M or 1N potassium hydroxide solution to the swab tips in the
vials to help dissolve the samples. NOT diluting the samples with water. Adding reagents in smaller quantities than indicated in the instructions. Usually ½
scoop of the Reagent 1 and 3 drops or so of Reagent 2 will suffice.
54

Harvey and Roth-Wells AIC Objects Specialty Group Postprints, Vol. 15, 2008
While the strips purportedly give a quantitative indication, the concentration is largely irrelevant for most museum objects. Arsenic salts were never applied evenly on these objects and the concentration in the sample is an artifact of the sampling procedure rather than a reflection of the overall concentration of arsenic on the objects. Consequently, the test results should be regarded as simply positive or negative for arsenic. If test results are equivocal (it is uncertain whether there has been a color change on the test strips for at least two of the three test samples), repeat the tests with fresh samples. When the tests are completed, push the test strips down into the vials, collect the used vials in a sealed, heavyweight, zip top, plastic bag. The bag can be disposed of in ordinary trash because the amount of arsenic involved in 10 or fewer samples does not constitute hazardous waste (at least, based on testing to date), and because the potassium hydroxide helps to neutralize the acid. SOURCES OF MATERIALS Alpha cellulose powder
Sigma P.O. Box 14508 St. Louis, MO 63178
Backer Rod Thermwell Products Co., Inc. Mahwah, NJ 07430
Dry pigments
Kremer Pigments Inc. 228 Elizabeth Street New York, NY 10012
Golden Artist Acrylic Paints, MSA varnish
Golden Artist Colors, Inc. New Berlin, NY 13411
Gouache
Winsor & Newton London, England HA3 5RH
Grizzly craft fur #676-1654
Joanne Fabrics Kizukishi paper
Andrews/Nelson/Whitehead 31-10 48th Street Long Island City, NY 11101
55

Harvey and Roth-Wells AIC Objects Specialty Group Postprints, Vol. 15, 2008
LED: LIA & RIAs ProLume Inc. 525 Fan Hill Road Monroe, CT 06468
Merckoquant (EM Quant) Arsenic Test Kit
No longer available from Lab Safety Supply at www.lss.com. Modostuc
Peregrine Brushes & Tools 41 N. Center, P.O. Box 200 Wellsville, UT 84339
Paraloid B-72, Jade 403, Marvelseal 470
University Products, Inc. 517 Main Street, P.O. Box 101 Holyoke, MA 01041-0101
Protex Mount Care
Knoblochs 1850 Dogwood Street Louisville, CO 80027
Strip-N-Stick Silicone Rubber gasket (200A)
Greene Rubber Co. Inc. 20 Cross Street Woburn, MA 01801-5606
Stainless steel insect pins
Bioquip 2321 Gladwick Street Rancho Dominguez, CA 90220
T-88 structural epoxy
System Three Resins, Inc. 3500 West Valley Highway North, Suite 105 Auburn, WA 98001
Tyvek 1422A
University Products, Inc. 517 Main Street, P.O. Box 101 Holyoke, MA 01041-0101
56

Harvey and Roth-Wells AIC Objects Specialty Group Postprints, Vol. 15, 2008
Victory Wax Conservation Support Systems 924 West Pedregosa Street Santa Barbara, CA 93101
RONALD HARVEY has a Master of Fine Arts (MFA) in Sculpture from the University of Wisconsin-Milwaukee, served a three-year formal apprenticeship in conservation, and has 28 years of experience in the field. He served as assistant and then senior conservator at the Milwaukee Public Museum for 10 years. In 1990 he opened a private conservation practice, Tuckerbrook Conservation L.L.C., serving the conservation needs for both private and public collections throughout the United States, Mexico, Switzerland and Ethiopia. Address: 2498 Belfast Rd., Lincolnville, ME 04849. E-mail: [email protected] NINA ROTH-WELLS graduated in 1994 with Master of Art Conservation from Queens University in Kingston, Ontario with a specialization in Paintings and Painted Surfaces. From 1994-1999 she worked as an assistant conservator of paintings at West Lake Conservators in Skaneateles, NY. In 2000 she opened a private practice in Georgetown, Maine where she serves private collectors, museums and historical societies. In addition she is an instructor at Colby College where she teaches an introductory course on the theories and ethics of art conservation. Address: 81 Williams Rd., Georgetown, ME 04548. E-mail: [email protected]
57