objective new user guide 2016-2017 use the find objects window when you need to search for and...
TRANSCRIPT

Objective New User Guide
2016-2017
1

Guide Index
Navigation P.3
Displaying Document Information (Metadata) P.4
Finding Documents P.5
Editing, Releasing and Document States P.6
Saving Documents into Objective P.7
Managing Versions of Documents P.8
Adding Email to Objective P.9
Sending Objective Documents via Email P.10
Handy Folder P.11
Document Aliases P.12
Looking Up Fields P.13-14
File Creation Requests P.15
2
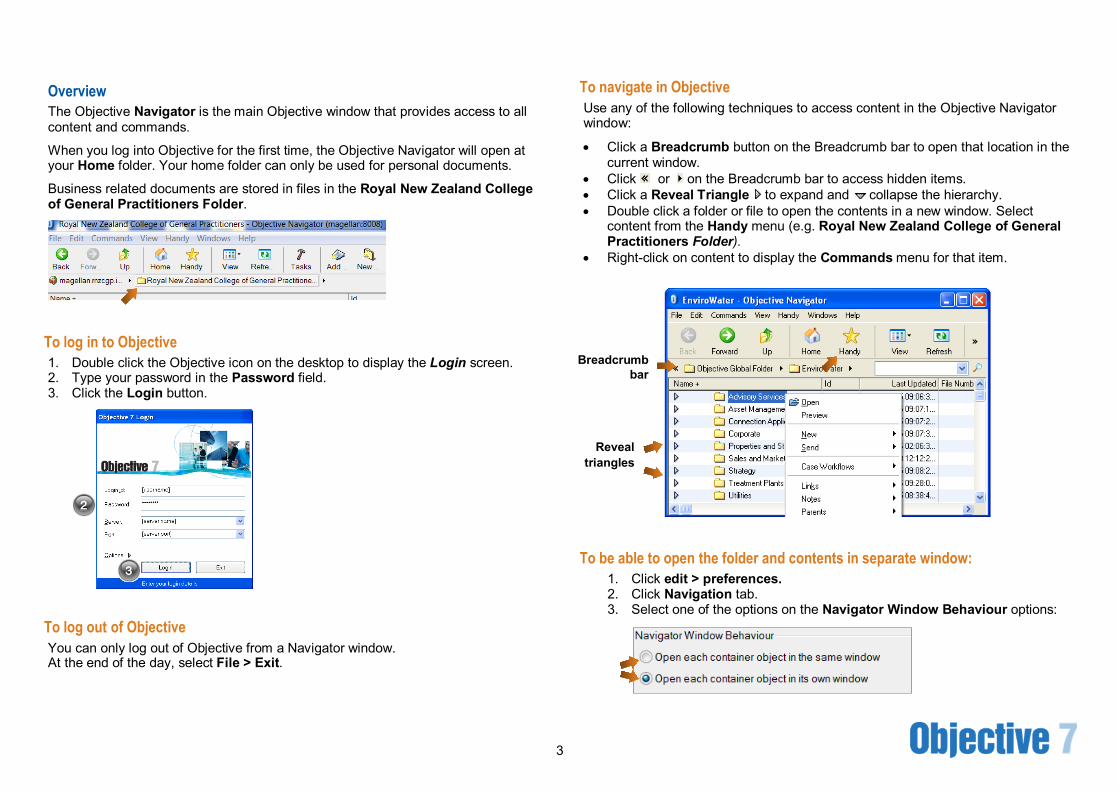
Overview The Objective Navigator is the main Objective window that provides access to all content and commands.
When you log into Objective for the first time, the Objective Navigator will open at your Home folder. Your home folder can only be used for personal documents.
Business related documents are stored in files in the Royal New Zealand College of General Practitioners Folder.
To log in to Objective 1. Double click the Objective icon on the desktop to display the Login screen. 2. Type your password in the Password field. 3. Click the Login button.
To log out of Objective You can only log out of Objective from a Navigator window. At the end of the day, select File > Exit.
To navigate in Objective Use any of the following techniques to access content in the Objective Navigator window:
• Click a Breadcrumb button on the Breadcrumb bar to open that location in the current window.
• Click or on the Breadcrumb bar to access hidden items. • Click a Reveal Triangle to expand and collapse the hierarchy. • Double click a folder or file to open the contents in a new window. Select
content from the Handy menu (e.g. Royal New Zealand College of General Practitioners Folder).
• Right-click on content to display the Commands menu for that item.
To be able to open the folder and contents in separate window: 1. Click edit > preferences. 2. Click Navigation tab. 3. Select one of the options on the Navigator Window Behaviour options:
Reveal triangles
Breadcrumb bar
3

Overview Metadata is document information about the content stored in Objective. There are several different ways to display content metadata.
To display document information (metadata) in the Properties window 1. Right click on document and select Properties to open the Properties
window.2. Select the General tab.
.
To display summary document information (metadata) • To display a summary of document information (metadata), press CTRL while
hovering the mouse pointer on an icon.
• To display a summary of a document's content, press ALT while hovering themouse pointer on a document name.
To display additional columns 1. Select View > Show Columns.
2. Select a field from Available Fields.3. Click Add.4. Click the Move Up/Move Down buttons to change column position.5. Click OK.
Note: There are a number of Available Fields which you might find useful.If you are trying to find out the colleague who is editing or was last to edit thedocument you need select Last Edited By to give you the person’s name.
4

Overview Use the Find Objects window when you need to search for and locate content in Objective.
To use the Find Documents window 1. Select Windows > Find Objects .
2. Choose an object type from the Find list.3. For a text search, select the Search text.. checkbox and provide search text.4. For a metadata search, select the Search object metadata.. checkbox and
provide criteria in the criteria row.5. Click Search.
Metadata (Document Information) search tips
• Use the Add button for additional criteria rows. • Use the Remove button to remove criteria rows. • Change search criteria logic with the and/or list.
Content search tips • Use the Edit button to search for multiple object types. • Expand the Search text.. field to change zones and/or scope.
Example searches • Any object by Object ID.
• Emails based on a date.
• Documents being edited by me.
5
Overview Documents in Objective can exist in one of 3 states: draft , edit and published.
Each time a document is edited , a new version is created, and other users are locked out of editing the document.
When you are ready to close the document you are editing, you will be prompted to release the document as either a draft or published version.
A draft version is considered to be a work in progress, perhaps subject to review. A published version is considered to be finalised to a particular stage, and available to all users with the appropriate privileges.
When Corporate Value is applied to a version, the document becomes a record and cannot be deleted.
To edit a document 1. Right click a document and select Edit New Version to open the New Version
window.
2. Provide a comment (optional). 3. Click Create. 4. Make the required changes, then save and close the document. The Release
from Editing window will be displayed as shown in the next steps.
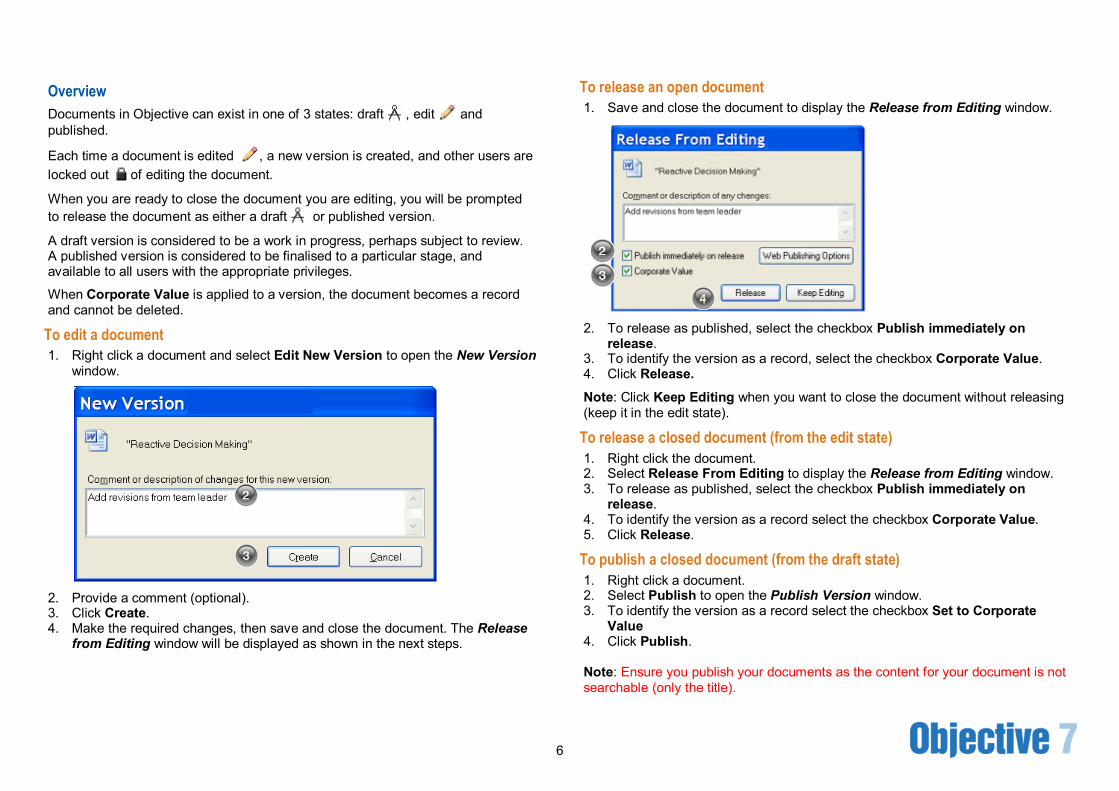
To release an open document 1. Save and close the document to display the Release from Editing window.
2. To release as published, select the checkbox Publish immediately on
release. 3. To identify the version as a record, select the checkbox Corporate Value. 4. Click Release. Note: Click Keep Editing when you want to close the document without releasing (keep it in the edit state).
To release a closed document (from the edit state) 1. Right click the document. 2. Select Release From Editing to display the Release from Editing window. 3. To release as published, select the checkbox Publish immediately on
release. 4. To identify the version as a record select the checkbox Corporate Value. 5. Click Release.
To publish a closed document (from the draft state) 1. Right click a document. 2. Select Publish to open the Publish Version window. 3. To identify the version as a record select the checkbox Set to Corporate
Value 4. Click Publish. Note: Ensure you publish your documents as the content for your document is not searchable (only the title).
6

Overview Existing documents can be saved from your hard drive in to Objective. New documents can also be saved directly to Objective.
To copy existing documents into Objective 1. Right click the parent location, and select New > Add Document to open the
Import Document window.
2. Navigate to and select the document(s) to be added. 3. Click Open to open the Add Document to Objective window.
4. If required, modify the Name. 5. Select any required Options. 6. Click OK.
Note: When adding more than one document, the Add Multiple Objects window opens before the Add Document to Objective window. The default in this window is to add each document as a New Document. If you deselect the checkbox Edit one set of metadata (document information) for all objects, a separate Add Document to Objective window will display for each document.
To save documents to Objective from another application 1. From the application, select Save As to open the Save As window.
2. Select the Objective icon. 3. Navigate to where the document will be stored. 4. Click Save to open the Add Document to Objective window. 5. Provide a name for the document in the Name field. 6. Complete any other fields as required. 7. Click OK to add the new document to Objective and leave it open for further
editing.
Note: Use Objective for all your documents- there is a risk of losing your documents if they are stored on the C or J drive.
7

Overview A new version of a document is created whenever it is edited. The new version can be released as either draft or published. When older versions of the document are retained, they can be opened, printed, emailed or copied from.
To display document versions 1. Right click the document and select Properties to open the Properties
window.
2. Select the Versions tab.3. Select the checkbox Display Draft Versions.4. Right click any version to display the Commands menu.
To revert a version of Document1. Right click a document in an edit state.2. Select Revert Version.3. Click Revert to confirm the
action.
Note: Any content added during the most recent edit state will be lost and cannot be recovered.
To restore a version of Document 1. Display the Versions tab of a
document (draft or published).2. Right click the required version.3. Select Restore Version to open
the Restore Version window.4. Click Restore to open the newly
created version in an edit state.
To add as a new version of Document 1. Right click an existing Objective document.2. Select New version From Disk to open the Import Document window.3. Navigate to the directory containing the external document.4. Select the external document.5. Click Open to open the New Version from Disk window
6. Select the required options.7. Click OK.
Note: You can also add documents as new versions when adding multiple documents to Objective (from the Add Multiple Objects window).
8

Overview Objective and Microsoft Outlook (email) work alongside each other providing access to Objective content while still utilising the full functionality of both applications.
To access Objective content from your Email 1. Select the Objective folder from the Folders List in the left pane.
2. Expand the Objective structure as per other Outlook folders. 3. Right click on object in the right pane to display the Objective Commands
menu.
Adding email to Objective Email messages that you send and receive can be stored in Objective. Email messages with attachments are stored as separate items linked together.
To add email to Objective 1. Select the email message(s) to be added to Objective 2. Select Objective > Store All. 3. If multiple objects were selected, make the required selections from the Add
Multiple Objects window and click OK. 4. Complete the required fields in the Add Document to Objective window 5. Click OK.
To add email to Objective using Drag and Drop 1. From an Outlook folder, select one or more email messages. 2. Expand the Objective hierarchy to display the required Parent location for the
email. 3. Drag the selected email messages to the required Objective location. 4. If multiple objects were selected, make the required selections from the Add
Multiple Objects window and click OK. 5. Complete the required fields in the Add Document to Objective window 6. Click OK.
9

Overview You can send Objective documents as attachments in email messages. Attachments can be sent as references to users who have access to Objective. When users do not have access to Objective, copies of documents can be sent as attachments.
To attach an Objective reference in an email (internal) 1. Select one or more items in Objective.2. Right-click the selected objects and select Send > Send Reference To to
open an email message window with the Objective content attached asreferences.
3. Complete the required email information and send as usual.
Note: When you select and send multiple objects as references, only one reference is attached in the email. This reference will open a window with all the selected attachments.
To attach copies of Objective documents in an email (external) 1. Select one or more documents in Objective.2. Right-click the selected documents.
3. Select Send > Send Copy To to open the Send a Copy Options window.4. Select the version to be sent and click OK for each selected document.
This will open an email message window with the copies attached.
5. Complete the required email information and send as usual.
10
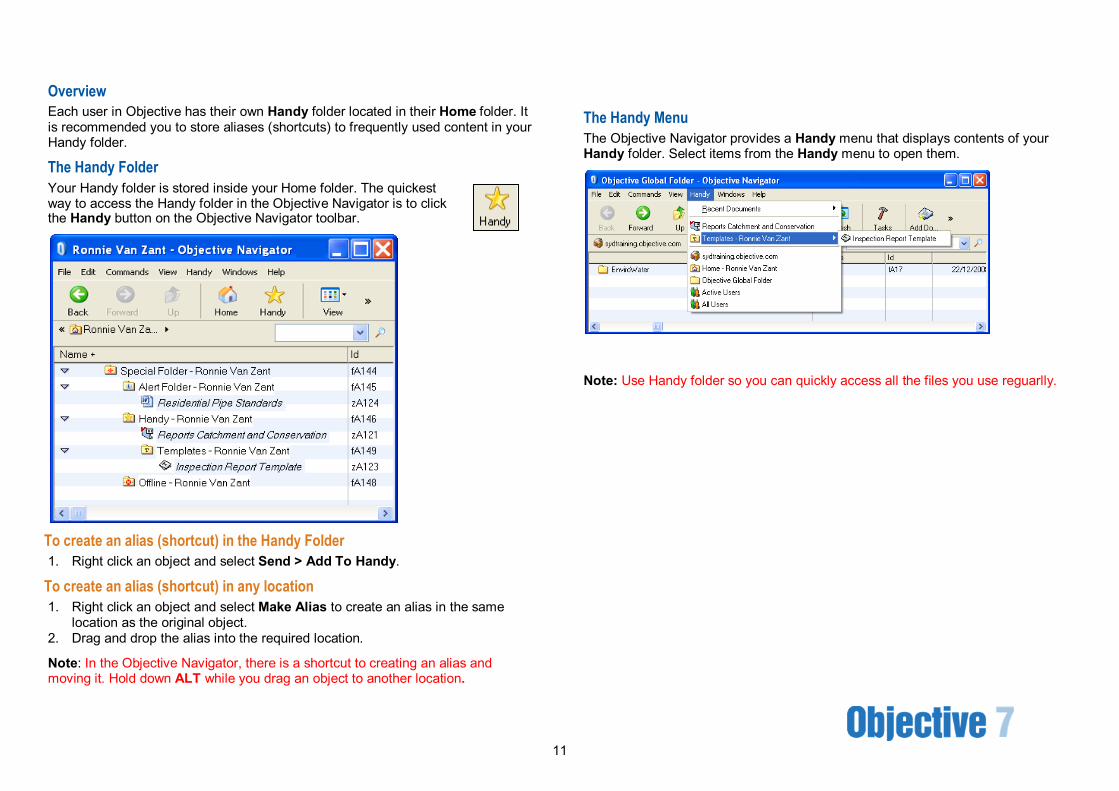
Overview Each user in Objective has their own Handy folder located in their Home folder. It is recommended you to store aliases (shortcuts) to frequently used content in your Handy folder.
The Handy Folder Your Handy folder is stored inside your Home folder. The quickest way to access the Handy folder in the Objective Navigator is to click the Handy button on the Objective Navigator toolbar.
To create an alias (shortcut) in the Handy Folder 1. Right click an object and select Send > Add To Handy.
To create an alias (shortcut) in any location1. Right click an object and select Make Alias to create an alias in the same
location as the original object.2. Drag and drop the alias into the required location.
Note: In the Objective Navigator, there is a shortcut to creating an alias and moving it. Hold down ALT while you drag an object to another location.
The Handy Menu The Objective Navigator provides a Handy menu that displays contents of your Handy folder. Select items from the Handy menu to open them.
Note: Use Handy folder so you can quickly access all the files you use reguarlly.
11

Aliases An alias can be created for any object you have the privilege to see (to see how to use privileges, refer back to P.4 –to display additional columns). You can add aliases to any location where you have the privilege to create. In many instances, commands can be used on an alias as though it were the original item. For example documents can be edited, released and published via their alias. However an alias is an object in its own right. It can be deleted without affecting the item it points to.
Note: Aliases generally display in italicised text.
To find the original content from an alias 1. Right click an alias.2. Select Find Original.
To create an alias in any location1. Right click an object and select Make Alias to create an alias in the same location as the original object.2. Drag and drop the alias into the required location.
Note: In the Objective Navigator, there is a shortcut to creating an alias and moving it. Hold down ALT while you drag an object to another location.
Original Alias
12

Overview A Look Up field is a single valued field that allows you to select from a drop-down list. The contents of the drop down list will depend on your most recent selections.
When the folder, document or file you want is not in the available from the drop down list, you can look it up so that it will become part of the available list in the future.
To get to the Look Up Field click on the magnifying glass next to the search bar (the top right hand side). The Find Objects window will appear.
(Look Up Field indicated by arrow)
There are three techniques for looking up values that are not available in the lookup list:
• Use the Look Up icon• Type the values• Drag and drop
To use the Look Up icon The Look up icon displays on the left of the look up field. It controls the type of content allowed in the look up field.
1. Click the Look up icon to open the Select Objects window.
2. If required, select the object type you are looking up from the Find list.3. Complete the criteria row as required.4. Click Search to display the search results.5. Select the item required from the Results list.6. Click Select to return the selected value into the look up field.
To type values in the Look Up field 1. Click in the Look up field2. Type the first few letters or numbers of the name of the item you want.3. Press the TAB key to invoke a lookup search of all objects (of the specified
type) beginning with those letters or numbers.4. If the search value is not unique, the Select Objects window will display.
Complete steps 2-6 of To use the Look Up icon.
To drag values into the Look Up field 1. While the window with the lookup field is open, open a second window that
displays the item required in the look up field.2. Drag the value from the second window into the look up field.
13
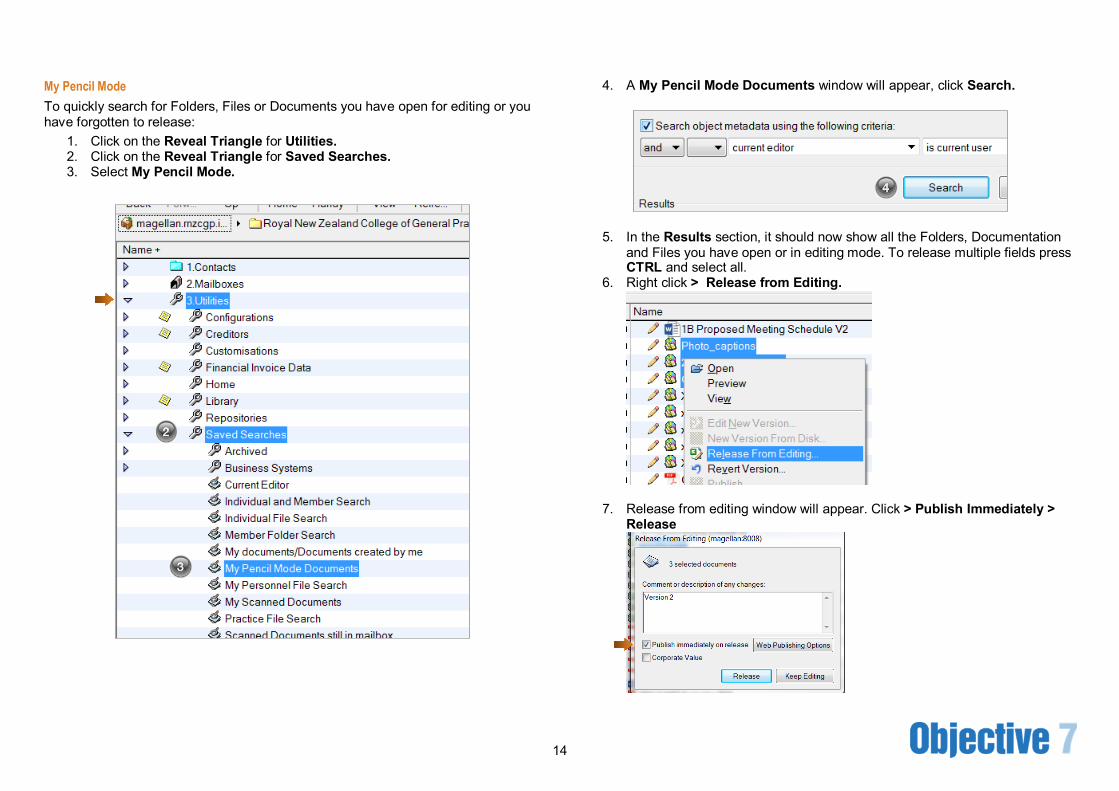
My Pencil Mode To quickly search for Folders, Files or Documents you have open for editing or you have forgotten to release:
1. Click on the Reveal Triangle for Utilities.2. Click on the Reveal Triangle for Saved Searches.3. Select My Pencil Mode.
4. A My Pencil Mode Documents window will appear, click Search.
5. In the Results section, it should now show all the Folders, Documentationand Files you have open or in editing mode. To release multiple fields pressCTRL and select all.
6. Right click > Release from Editing.
7. Release from editing window will appear. Click > Publish Immediately >Release
14

Overview You can submit requests for new files and file parts in Objective when the required file does not exist. Requests are typically delegated to administration staff members who will approve and process your file request. Content can still be added to a file while awaiting approval.
You can request a new file as either virtual (to store all electronic content) or physical (when you have hard copy content to register).
To request creation of a new file 1. Right click the parent folder that will contain the new file.2. Select New > Add File to open the Add File to Objective window.
3. Provide a Name for the file.4. Choose the type of file required from the Creation State drop down list.5. Choose the user or group who will process this request from the Delegate to
drop down list.
6. If a physical file is requested, choose the name of the person who will hold thisfile from the Custodian drop down list.
7. Complete remaining fields as required and click OK to save the new filerequest.
To request creation of a new file part 1. Right click the file that will contain the new file part.2. Select New > New File Part to open the Create New File Part window.3. Choose the type of file part required from the Creation State drop down list.4. Choose the user or group who will process this request from the Delegate to
drop down list.5. If a physical file part is requested, choose the name of the person who will hold
this file part from the Custodian drop down list.6. Complete remaining fields as required.7. Click OK to save the new file part request
Note: Your Group Manager is responsible for the creation of folders and is responsible for their designated Tier 2 folders. Anyone below manager status will be able to create Tier 3 folders and below.
15