obd edition - gps tracking software® family gps tracking system obd edition use guide . ... 2 quick...
TRANSCRIPT

File Name MEITRACK Family OBD Edition Creator Renny Lee Project TC68 Creation Date
Update Date 2012-08-23 2013-06-27
Sub Project User Guide Page - 1 - of 28 Revision V1.2 Confidential External Documentation
MEITRACK® Family GPS Tracking System
OBD Edition
Use Guide
Copyright © 2013 Meitrack Group All rights reserved. - 1 -

File Name MEITRACK Family OBD Edition Creator Renny Lee Project TC68 Creation Date
Update Date 2012-08-23 2013-06-27
Sub Project User Guide Page - 2 - of 28 Revision V1.2 Confidential External Documentation
Content
1 Copyright and Disclaimer ..................................................................................................................................... - 3 - 2 Quick Start Instruction ......................................................................................................................................... - 4 -
2.1 Check IMEI Number ............................................................................................................................... - 4 - 2.2 Insert SIM Card....................................................................................................................................... - 4 - 2.3 Log in Platform ....................................................................................................................................... - 4 -
2.3.1 Ways to Login ............................................................................................................................... - 5 - 2.3.2 Check Location ............................................................................................................................. - 6 -
2.4 Troubleshooting ..................................................................................................................................... - 7 - 2.4.1 Login Problem............................................................................................................................... - 7 - 2.4.2 Location Problem ......................................................................................................................... - 7 -
3 Software Function ..............................................................................................................................................- 10 - 3.1 Position .................................................................................................................................................- 10 -
3.1.1 Position .......................................................................................................................................- 10 - 3.1.2 History GPS Log ..........................................................................................................................- 17 -
3.2 Account Centre.....................................................................................................................................- 18 - 3.3 Statistics Centre ...................................................................................................................................- 19 -
3.3.1 History Record ............................................................................................................................- 19 - 3.3.2 Alarm Records ............................................................................................................................- 21 - 3.3.3 Fault Records ..............................................................................................................................- 23 - 3.3.4 Snapshot .....................................................................................................................................- 24 -
3.4 Command Centre .................................................................................................................................- 26 - 3.4.1 Sending command......................................................................................................................- 26 - 3.4.2 Setting Command ....................................................................................................................... - 27 -
Copyright © 2013 Meitrack Group All rights reserved. - 2 -

File Name MEITRACK Family OBD Edition Creator Renny Lee Project TC68 Creation Date
Update Date 2012-08-23 2013-06-27
Sub Project User Guide Page - 3 - of 28 Revision V1.2 Confidential External Documentation
1 Copyright and Disclaimer
Copyright © 2013 MEITRACK. All rights reserved.
MEITRACK and are trademarks that belong to Meitrack Group
The user manual may be changed without prior notification.
This user manual, or any part thereof, may not be reproduced for any purpose whatsoever without the written
authorization of Meiligao (MEITRACK), or transmitted in any form, either electronically or mechanically, including
photocopying and recording.
In no event shall Meiligao (MEITRACK) be liable for direct, indirect, special, incidental, or consequential damages
(including but not limited to economic loss, personal injury, and loss of asset and property) arising out of the use
or inability or illegality to use the product or documentation.
Copyright © 2013 Meitrack Group All rights reserved. - 3 -

File Name MEITRACK Family OBD Edition Creator Renny Lee Project TC68 Creation Date
Update Date 2012-08-23 2013-06-27
Sub Project User Guide Page - 4 - of 28 Revision V1.2 Confidential External Documentation
2 Quick Start Instruction
2.1 Check IMEI Number Check the IMEI No. on TC68 which consists of 15 digits, this IMEI number can be used as account name to log in
Meitrack Family GPS Tracking System.
2.2 Insert SIM Card The default setting of GPRS for the device is open to report and update location data to the server every 1
minute.
Insert the SIM Card and TF Card:
Notice:Please turn off TC68 before insert the SIM card and TF Card
SIM Card:
Remove the cover of SIM card and insert SIM card as picture (chip down),then recover
it.
Notice:
� Make sure there is enough charge (test it by SMS and Call after the SIM card
inserted );
� Make sure turn off the PIN function of the SIM card ;
� Make sure you have set Caller Identification function if you want so.
TF Card :
Remove the cover of TF card and insert TF card as picture (chip down), then recover it.
Insert SIM Card
Insert TF Card
2.3 Log in Platform Log in platform through: http://obd.trackingmate.com
Copyright © 2013 Meitrack Group All rights reserved. - 4 -
File Name MEITRACK Family OBD Edition Creator Renny Lee Project TC68 Creation Date
Update Date 2012-08-23 2013-06-27
Sub Project User Guide Page - 5 - of 28 Revision V1.2 Confidential External Documentation
2.3.1 Ways to Login There are 4 ways to log in platform: IMEI number, QQ account, MSN account, self-registered account.
Note: data sync will not be affected by different login ways.
Logging in by IMEI number is fit for the users who have only one tracking device, it’s very convenient for the
first use through IMEI number.
Logging in by QQ/MSN account is fit for the users who have registered many user accounts.
Logging in by registered account is fit for the users who have more than one tracking devices, users can
name their own registered accounts.
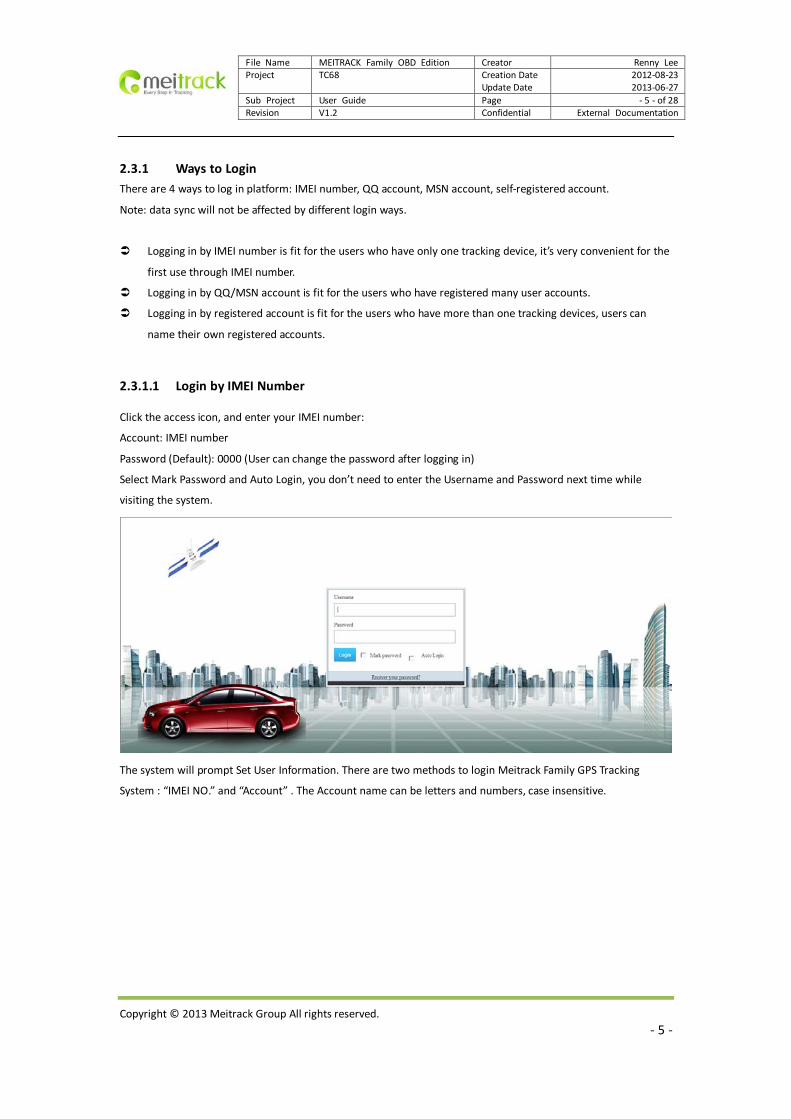
2.3.1.1 Login by IMEI Number
Click the access icon, and enter your IMEI number:
Account: IMEI number
Password (Default): 0000 (User can change the password after logging in)
Select Mark Password and Auto Login, you don’t need to enter the Username and Password next time while
visiting the system.
The system will prompt Set User Information. There are two methods to login Meitrack Family GPS Tracking
System : “IMEI NO.” and “Account” . The Account name can be letters and numbers, case insensitive.
Copyright © 2013 Meitrack Group All rights reserved. - 5 -

File Name MEITRACK Family OBD Edition Creator Renny Lee Project TC68 Creation Date
Update Date 2012-08-23 2013-06-27
Sub Project User Guide Page - 6 - of 28 Revision V1.2 Confidential External Documentation
Click Next to Set Vehicle Information. Meitrack Family will set your vehicle and the IMEI No. automatically.
2.3.1.2 Login by Self-Registered Account
If you want to use only one account to manage multi devices, you can register an account at first, then add more
other devices under this registered account.
When you register, it will require you to fill in the IMEI number of your first device. You can add more other
devices after log in the platform.
2.3.2 Check Location After log in the platform successfully, you can choose the right device from the Device Panel on the right side to
check the latest real-time location.
Copyright © 2013 Meitrack Group All rights reserved. - 6 -
File Name MEITRACK Family OBD Edition Creator Renny Lee Project TC68 Creation Date
Update Date 2012-08-23 2013-06-27
Sub Project User Guide Page - 7 - of 28 Revision V1.2 Confidential External Documentation
2.4 Troubleshooting
2.4.1 Login Problem If fail in logging in by IMEI number, please contact your seller and inform your IMEI number to fix the problem.
2.4.2 Location Problem If fail in checking location after logging successfully , or single clicking and double clicking the device, the device
doesn't send data to the server, and popping up the following notice, you can set and check problem by the
following methods:
2.4.2.1 Set by SMS Command
SMS: 0000,F12
Reply: IMEI,F12,OK
Note:
0000 is the default password of the device, not the pass word of Meitrack Family GPS Tracking System. Please use
the new password if you have changed.
This command is for running the GPRS report, and set GPRS parameter (default) as the below:
IP: 67.203.13.26
Port: 6800
GPRS Mode: TCP
Time Interval for Report : 60 secs
APN:CMNET
APN Account, APN Password: Null
Copyright © 2013 Meitrack Group All rights reserved. - 7 -

File Name MEITRACK Family OBD Edition Creator Renny Lee Project TC68 Creation Date
Update Date 2012-08-23 2013-06-27
Sub Project User Guide Page - 8 - of 28 Revision V1.2 Confidential External Documentation
2.4.2.2 Configure by Computer with Meitrack Manager
If you use Meitrack Manager, please configure the parameter as following:
GPRS Connection Mode: TCP
IP Domain and Port: fill in the server's IP, our server's IP is 67.203.13.26. Port number is TCP/IP port on the
server used for receiving GPRS. Our server's port is 6800.
Backup IP Domain and Port: it fits for the users who have multi servers. When the first server can't work,
the device will automatically send data to the backup server. Our backup server's IP and port are
67.203.13.26 and 6801 respectively.
APN, APN User Name, APN Password: enter APN, APN Username, APN Password. You can leave them blank
if no APN username or password is required.
GPRS Time Interval: fill in the GPRS report time interval you want, the unit is 10 seconds, 6 represents one
minute is recommended.
GPRS Report Times: "No Limit" means no limit for report times. Fill in specific number to control GPRS
report times.
GPRS Time Zone: the default time zone is 0. The platform will automatically match the time zone with
user's computer system time.
Copyright © 2013 Meitrack Group All rights reserved. - 8 -

File Name MEITRACK Family OBD Edition Creator Renny Lee Project TC68 Creation Date
Update Date 2012-08-23 2013-06-27
Sub Project User Guide Page - 9 - of 28 Revision V1.2 Confidential External Documentation
Items Descriptions
GPRS
Close: Close GPRS upload time.
TCP: TCP is a stable connection. It is recommended to use this model.
UCP: UCP can save rates, but is a less stable option.
IP/Domain Set main server’s IP address and port number.
Backup IP/Domain Backup server’s IP address and port number to avoid losing data when main server is
down.
APN, APN Username,
APN Password
Max 32 bytes. If no username and password, leave them blank.
China Mobile APN: CMNET, China Unicom APN: NINET, no username and password.
GPRS Time Interval
Track by time interval via GPRS
Set time interval for GPRS tracking, in 10 seconds ( fill in 6 means 60 seconds)
= 0, cancel GPRS tracking by time interval; max time interval = 65535*10 seconds.
GPRS Report Times
= 0, no limit, unlimited times for report;
= [1,65535], set report times, tracker will stop reporting when reaching the preset
times.
GPRS Time zone GPRS time zone minute = 0, GMT 0 (default)
GPRS time zone minute = [-32768,32767], set different time zones.
GPRS Timing Report
(Ignition Off)
This function is only for T1; not suit for MT90 and TC68.
After the Input 3 of T1 connected with ACC and set this function, the GPRS data can be
sent by different time interval while the engine is ON/OFF.
Setting GPRS Timing Report (Ignition Off),the unit is 10 seconds(Set 6 means 60
seconds).
= 0, cancel the GPRS Time Interval; Max Time Interval=65535*10 seconds
Event Report List all the GPRS events, it was showed by different way by different items.
GPRS While the event which were set happened, the device will send the corresponding
GPRS event report to the server.
Sound Reminders
(TC68 Only)
This function is only for TC68. While the event which were set happened, The build-in
buzzer of TC68 will make a sound to remind.
Save Save current settings to the tracker.
Copyright © 2013 Meitrack Group All rights reserved. - 9 -
File Name MEITRACK Family OBD Edition Creator Renny Lee Project TC68 Creation Date
Update Date 2012-08-23 2013-06-27
Sub Project User Guide Page - 10 - of 28 Revision V1.2 Confidential External Documentation
3 Software Function
3.1 Position There are two parts : Position and History Recap.
3.1.1 Position
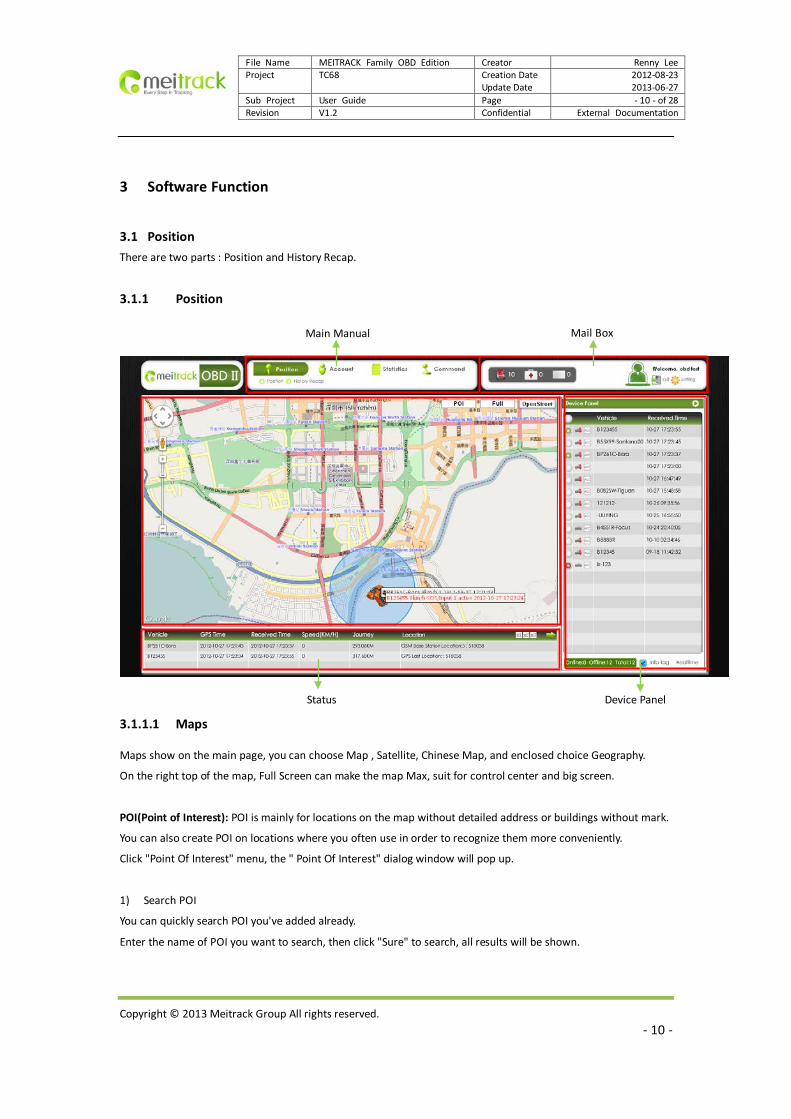
3.1.1.1 Maps
Maps show on the main page, you can choose Map , Satellite, Chinese Map, and enclosed choice Geography.
On the right top of the map, Full Screen can make the map Max, suit for control center and big screen.
POI(Point of Interest): POI is mainly for locations on the map without detailed address or buildings without mark.
You can also create POI on locations where you often use in order to recognize them more conveniently.
Click "Point Of Interest" menu, the " Point Of Interest" dialog window will pop up.
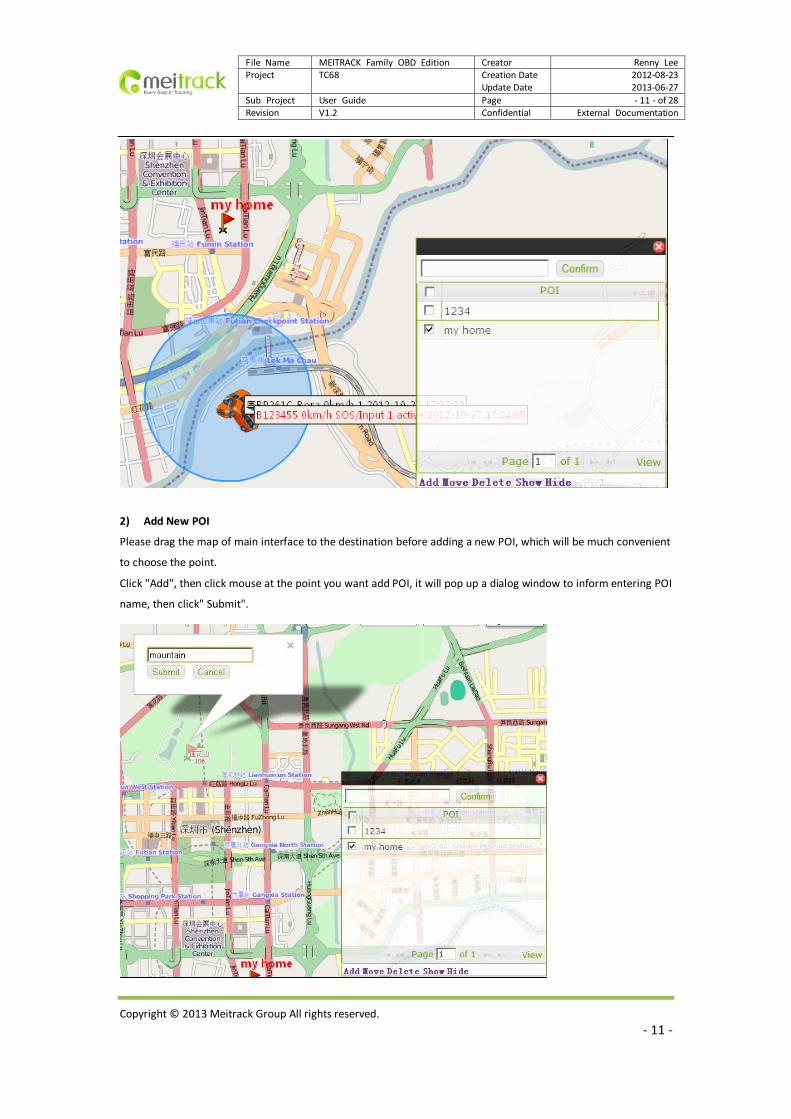
1) Search POI
You can quickly search POI you've added already.
Enter the name of POI you want to search, then click "Sure" to search, all results will be shown.
Main Manual Mail Box
Status Device Panel
Copyright © 2013 Meitrack Group All rights reserved. - 10 -
File Name MEITRACK Family OBD Edition Creator Renny Lee Project TC68 Creation Date
Update Date 2012-08-23 2013-06-27
Sub Project User Guide Page - 11 - of 28 Revision V1.2 Confidential External Documentation
2) Add New POI
Please drag the map of main interface to the destination before adding a new POI, which will be much convenient
to choose the point.
Click "Add", then click mouse at the point you want add POI, it will pop up a dialog window to inform entering POI
name, then click" Submit".
Copyright © 2013 Meitrack Group All rights reserved. - 11 -

File Name MEITRACK Family OBD Edition Creator Renny Lee Project TC68 Creation Date
Update Date 2012-08-23 2013-06-27
Sub Project User Guide Page - 12 - of 28 Revision V1.2 Confidential External Documentation
3) Move POI
Select POI you want move, click "Move", there will be a light red flag on the map where you can put the POI.
Move mouse to select, click it to enter name. If you don't want to change name, click "Submit". The old POI will
disappear after it was moved.
4) Delete POI
Select the POI you want to delete, click "- Delete", then "Sure".
5) Show Selected POI
Select all POI you want to show, click "Show", all POI you selected will show on the map.
6) Hide POI
If you want to hide POI on the map for a while, select the POI you want to hide, then click "Hide".
3.1.1.2 Setting Device Panel
Device Panel is for checking vehicles, shown the vehicles’ status of GPRS, Engine ON/OFF, the Last Uploading Time,
Numbers of Vehicles Online/Offline/Amout, etc.
Item Description
Pick On Vehicle Choose the Vehicles needed to be shown on the map
Picked on: Not Picked On: Vehicle is not avaiable: While the device did not upload any data onto the system, it is shown not
available status
Copyright © 2013 Meitrack Group All rights reserved. - 12 -

File Name MEITRACK Family OBD Edition Creator Renny Lee Project TC68 Creation Date
Update Date 2012-08-23 2013-06-27
Sub Project User Guide Page - 13 - of 28 Revision V1.2 Confidential External Documentation
GPRS Online Status/Alarm
Status
It shows if the devices connected with the GPS System, if not uploading any
data within 10min, it will be shown offline.
(Note: While the device enter into the area without GSM signal, shutdown by
low power or man-made, it means GPRS offline anomaly. The GPS Tracking
System can not identify the status of GPRS is offline, so it shows still online.
After 10min it shows actual status.)
Online: Offline:
Online and Alarms not Remove:
Offline and Online and Alarms not Remove:
Engine ON/OFF Shows the engine on/off
ON: OFF:
Name of Vehicle Shows the name of the vehicle, it is suggested name it as License NO.+ Item
NO. of Vehicle.
Example: 粤 B8888R-FOX 2012
Time of Receipt Show the last Time of Receipt, help to analysis
Form: Month-Date Hours:Min:Sec Example: 10-29 15:49:29
Online Summary statistics Shows the amount for the vehicles by online/offline
Vehicle Tag ON/OFF Shown the data while chosen
Not shown the data while not chosen
Example:
Real-time Tracking Real-time Tracking is showed by button, it will get several dialog while clicked,
to check the chosen vehicles. The speed is related to the Timing or Interval of
the reception.
If need to tracking more closer, short the tracking timing interval .
Copyright © 2013 Meitrack Group All rights reserved. - 13 -

File Name MEITRACK Family OBD Edition Creator Renny Lee Project TC68 Creation Date
Update Date 2012-08-23 2013-06-27
Sub Project User Guide Page - 14 - of 28 Revision V1.2 Confidential External Documentation
Click any data point, it shows the Speed and Time of Receipt
Fault Alarm While the vehicle get Fault, the Fault Alarm shown.
Information: Name of Vehicle, GPS Time, Freeze Frame, Address, Fault Record,
etc. Please click Mark to clean the fault while fix the problem.
Adjust the window
by dragging
Copyright © 2013 Meitrack Group All rights reserved. - 14 -

File Name MEITRACK Family OBD Edition Creator Renny Lee Project TC68 Creation Date
Update Date 2012-08-23 2013-06-27
Sub Project User Guide Page - 15 - of 28 Revision V1.2 Confidential External Documentation
Contraction Section If need to hide the Device Panel, click the Button To recover , please double click the green scroll.
3.1.1.3 Status
There are two parts: Details and Uploading Report .
Click and to changing-over the two column.
If need to zoom in the column, please click x1 x2 x3 buttons.
Details: Shows Name of Vehicle, GPS Time, Time of Receipt, Speed, Mileage, Address, etc.
Uploading Report: Shows the information list of the device data updated, including Time, Name of Vehicle,
Type of Report.
Copyright © 2013 Meitrack Group All rights reserved. - 15 -
File Name MEITRACK Family OBD Edition Creator Renny Lee Project TC68 Creation Date
Update Date 2012-08-23 2013-06-27
Sub Project User Guide Page - 16 - of 28 Revision V1.2 Confidential External Documentation
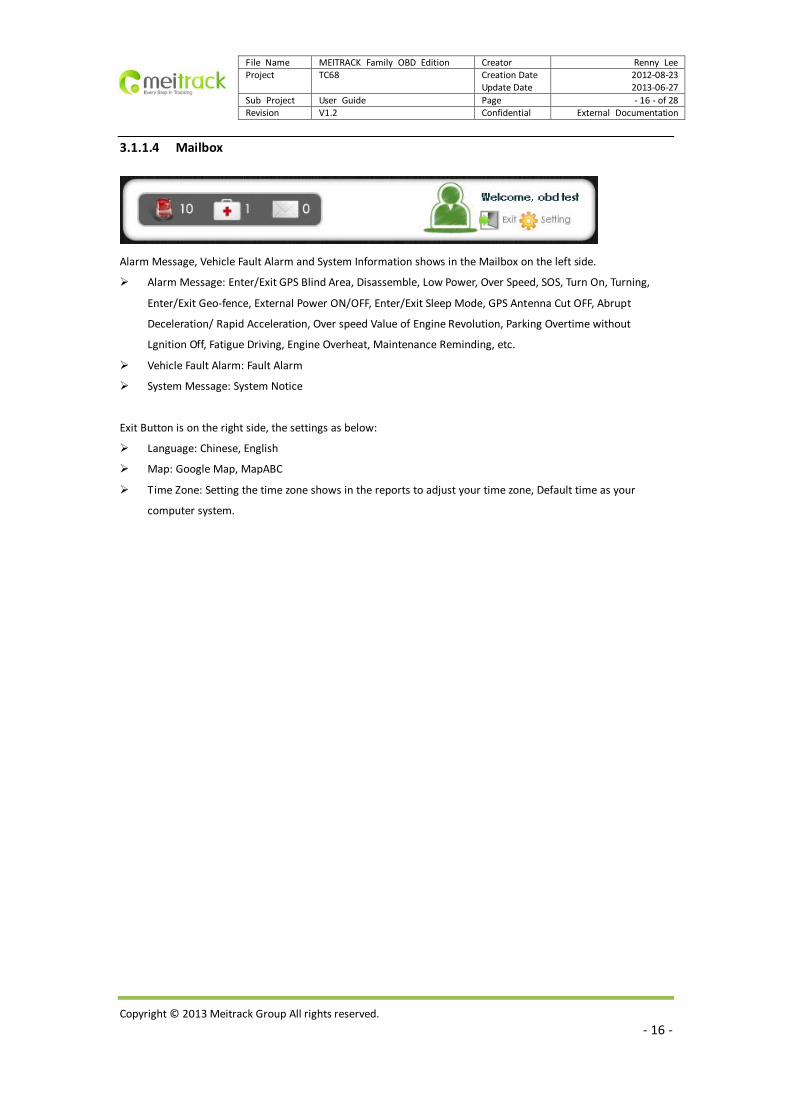
3.1.1.4 Mailbox
Alarm Message, Vehicle Fault Alarm and System Information shows in the Mailbox on the left side.
Alarm Message: Enter/Exit GPS Blind Area, Disassemble, Low Power, Over Speed, SOS, Turn On, Turning,
Enter/Exit Geo-fence, External Power ON/OFF, Enter/Exit Sleep Mode, GPS Antenna Cut OFF, Abrupt
Deceleration/ Rapid Acceleration, Over speed Value of Engine Revolution, Parking Overtime without
Lgnition Off, Fatigue Driving, Engine Overheat, Maintenance Reminding, etc.
Vehicle Fault Alarm: Fault Alarm
System Message: System Notice
Exit Button is on the right side, the settings as below:
Language: Chinese, English
Map: Google Map, MapABC
Time Zone: Setting the time zone shows in the reports to adjust your time zone, Default time as your
computer system.
Copyright © 2013 Meitrack Group All rights reserved. - 16 -

File Name MEITRACK Family OBD Edition Creator Renny Lee Project TC68 Creation Date
Update Date 2012-08-23 2013-06-27
Sub Project User Guide Page - 17 - of 28 Revision V1.2 Confidential External Documentation
3.1.2 History GPS Log Choose “Position” -> “History Report ”
Map and the Play button are on the left, and you can set the parameter on the right.
Item Description
Full Screen Click “Full Screen” to max the map, it is for the control centre.
Play Button Play and control the speed of playing.
The speed of playing: 1X, 2X, 3X, 4X, 5X
Back to Beginning Slower Play Pause faster Go to the End
Time Range Form: Year-Month-Date Hours - Min
Name of
Vehicle
Select the vehicles you want to check the status
Smart Time
Today: Choose today’s time range among 0:00 – 11:59
Yesterday: Choose yesterday’s time range among 0:00 – 11:59
Last 7 Days: Choose last 7 days’ time range.
This Month: Choose the 1st to the present date.
Last 30 days: Choose the last 30 days from the date to the present date.
Custom Date: Click and choose the starting time and the ending time , then click “Check” to play
Copyright © 2013 Meitrack Group All rights reserved. - 17 -
File Name MEITRACK Family OBD Edition Creator Renny Lee Project TC68 Creation Date
Update Date 2012-08-23 2013-06-27
Sub Project User Guide Page - 18 - of 28 Revision V1.2 Confidential External Documentation
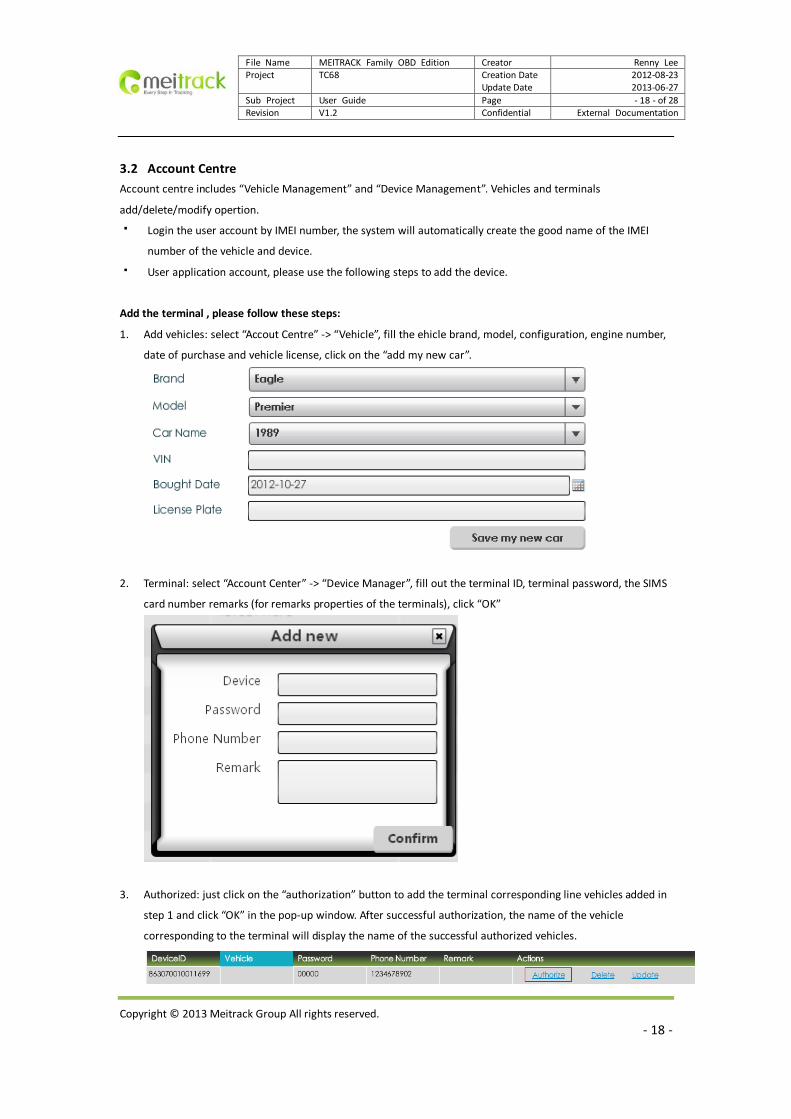
3.2 Account Centre Account centre includes “Vehicle Management” and “Device Management”. Vehicles and terminals
add/delete/modify opertion.
� Login the user account by IMEI number, the system will automatically create the good name of the IMEI
number of the vehicle and device.
� User application account, please use the following steps to add the device.
Add the terminal , please follow these steps:
1. Add vehicles: select “Accout Centre” -> “Vehicle”, fill the ehicle brand, model, configuration, engine number,
date of purchase and vehicle license, click on the “add my new car”.
2. Terminal: select “Account Center” -> “Device Manager”, fill out the terminal ID, terminal password, the SIMS
card number remarks (for remarks properties of the terminals), click “OK”
3. Authorized: just click on the “authorization” button to add the terminal corresponding line vehicles added in
step 1 and click “OK” in the pop-up window. After successful authorization, the name of the vehicle
corresponding to the terminal will display the name of the successful authorized vehicles.
Copyright © 2013 Meitrack Group All rights reserved. - 18 -

File Name MEITRACK Family OBD Edition Creator Renny Lee Project TC68 Creation Date
Update Date 2012-08-23 2013-06-27
Sub Project User Guide Page - 19 - of 28 Revision V1.2 Confidential External Documentation
3.3 Statistics Centre
3.3.1 History Record History Report is different from the historical track playback function, the raw data for viewing and analysis.
Item Description
Set the field
The default display fields: vehicle name, GPS time receiver time, GPS validity, latitude, longitude,
altitude, speed, angle, type of alarm.
Click on the upper right corner of the “setting the field”, the following window pops up.
Copyright © 2013 Meitrack Group All rights reserved. - 19 -
File Name MEITRACK Family OBD Edition Creator Renny Lee Project TC68 Creation Date
Update Date 2012-08-23 2013-06-27
Sub Project User Guide Page - 20 - of 28 Revision V1.2 Confidential External Documentation
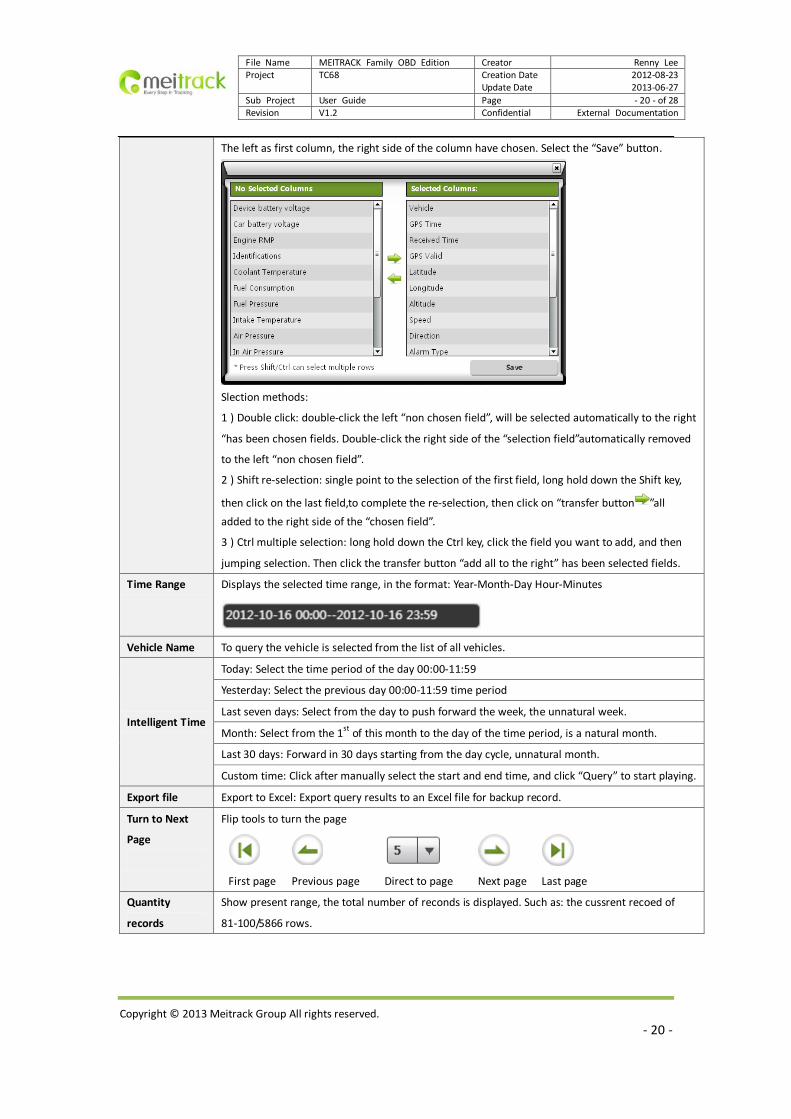
The left as first column, the right side of the column have chosen. Select the “Save” button.
Slection methods:
1 ) Double click: double-click the left “non chosen field”, will be selected automatically to the right
“has been chosen fields. Double-click the right side of the “selection field”automatically removed
to the left “non chosen field”.
2 ) Shift re-selection: single point to the selection of the first field, long hold down the Shift key,
then click on the last field,to complete the re-selection, then click on “transfer button ”all added to the right side of the “chosen field”.
3 ) Ctrl multiple selection: long hold down the Ctrl key, click the field you want to add, and then
jumping selection. Then click the transfer button “add all to the right” has been selected fields.
Time Range Displays the selected time range, in the format: Year-Month-Day Hour-Minutes
Vehicle Name To query the vehicle is selected from the list of all vehicles.
Intelligent Time
Today: Select the time period of the day 00:00-11:59
Yesterday: Select the previous day 00:00-11:59 time period
Last seven days: Select from the day to push forward the week, the unnatural week.
Month: Select from the 1st of this month to the day of the time period, is a natural month.
Last 30 days: Forward in 30 days starting from the day cycle, unnatural month.
Custom time: Click after manually select the start and end time, and click “Query” to start playing.
Export file Export to Excel: Export query results to an Excel file for backup record.
Turn to Next
Page
Flip tools to turn the page
First page Previous page Direct to page Next page Last page
Quantity
records
Show present range, the total number of reconds is displayed. Such as: the cussrent recoed of
81-100/5866 rows.
Copyright © 2013 Meitrack Group All rights reserved. - 20 -

File Name MEITRACK Family OBD Edition Creator Renny Lee Project TC68 Creation Date
Update Date 2012-08-23 2013-06-27
Sub Project User Guide Page - 21 - of 28 Revision V1.2 Confidential External Documentation
3.3.2 Alarm Records
The alarm logging some alarm on driving behavior include and not limited to as follows: forward / GPS blind spots,
disassemble, low power, speeding, SOS distress, power, turning into / out of the electronic fence, an external
power supply is turned on / off,to enter / exit the sleep mode, the GPS antenna disconnect hard acceleration /
rapid deceleration, engine speed is too high, parking is not flame too long, fatigue driving, the engine water
temperature is too high, maintenance tips, and ect.
Item Description
Time Range
Displays the selected time range, in the format: Year-Month-Day hour-Minutes
Vehicle Name To query the vehicle is selected of all from the list of all vehicles.
Event Type
Select the type of event that you want to query multiple choices. Chosen to be equal to
select all default to select all.
Intelligent Time
Today: select the time period of the day: 00:00-11:59
Yesterday: select the previous day 00:00-11:59 time period.
Last 7 days: Select from the day to push forward the week, the unnatural week.
Month: Select from the 1st of this month to the day of the time period, is a natural month.
Last 30 days: forward in 30 days starting from the day cycle, unnatural month.
Custom time: click to start playing manually select the start and end time, click “Query” to
start playing.
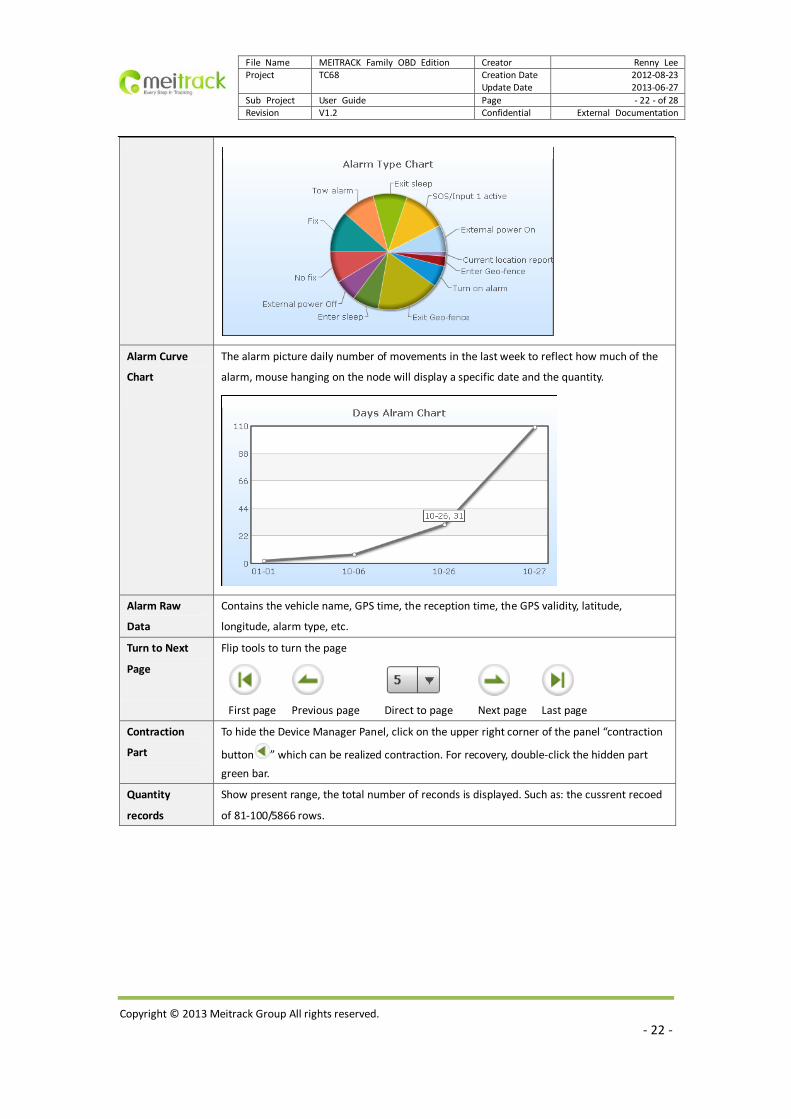
Alarm
Classification
Chart
This classification is presented by pie chart which shows the proportion of various alarm.
Copyright © 2013 Meitrack Group All rights reserved. - 21 -
File Name MEITRACK Family OBD Edition Creator Renny Lee Project TC68 Creation Date
Update Date 2012-08-23 2013-06-27
Sub Project User Guide Page - 22 - of 28 Revision V1.2 Confidential External Documentation
Alarm Curve
Chart
The alarm picture daily number of movements in the last week to reflect how much of the
alarm, mouse hanging on the node will display a specific date and the quantity.
Alarm Raw
Data
Contains the vehicle name, GPS time, the reception time, the GPS validity, latitude,
longitude, alarm type, etc.
Turn to Next
Page
Flip tools to turn the page
First page Previous page Direct to page Next page Last page
Contraction
Part
To hide the Device Manager Panel, click on the upper right corner of the panel “contraction
button ” which can be realized contraction. For recovery, double-click the hidden part green bar.
Quantity
records
Show present range, the total number of reconds is displayed. Such as: the cussrent recoed
of 81-100/5866 rows.
Copyright © 2013 Meitrack Group All rights reserved. - 22 -
File Name MEITRACK Family OBD Edition Creator Renny Lee Project TC68 Creation Date
Update Date 2012-08-23 2013-06-27
Sub Project User Guide Page - 23 - of 28 Revision V1.2 Confidential External Documentation
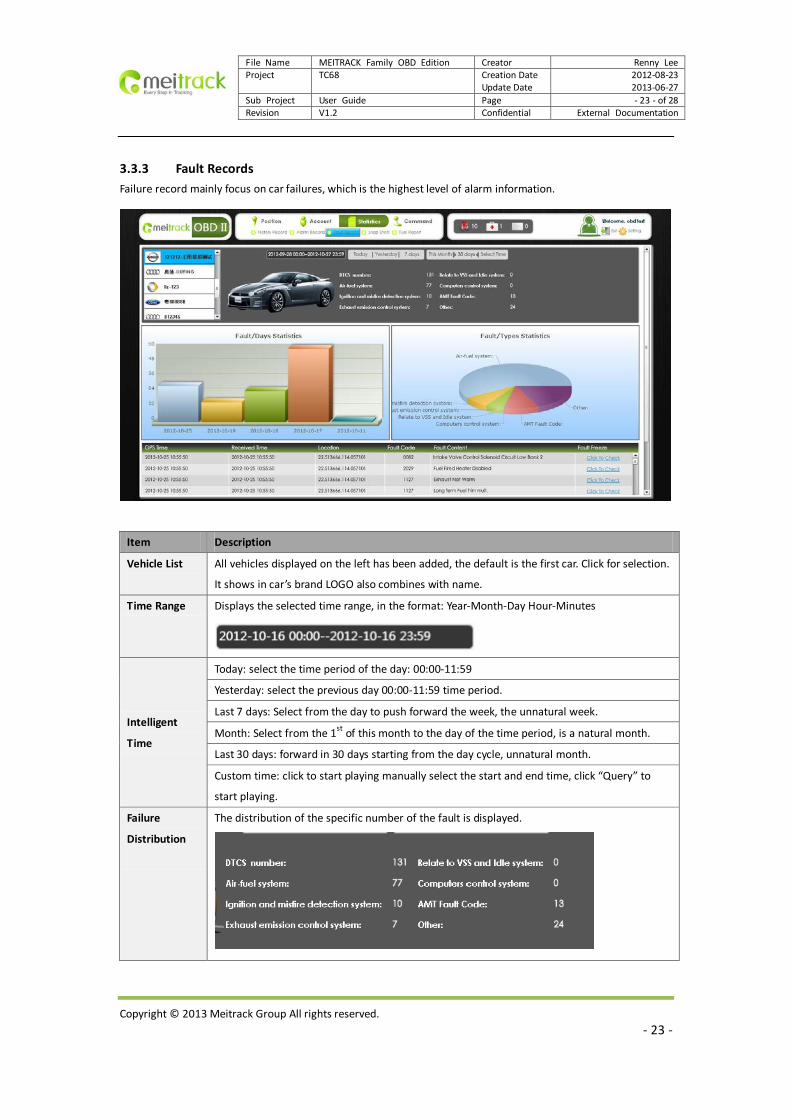
3.3.3 Fault Records Failure record mainly focus on car failures, which is the highest level of alarm information.
Item Description
Vehicle List
All vehicles displayed on the left has been added, the default is the first car. Click for selection.
It shows in car’s brand LOGO also combines with name.
Time Range Displays the selected time range, in the format: Year-Month-Day Hour-Minutes
Intelligent
Time
Today: select the time period of the day: 00:00-11:59
Yesterday: select the previous day 00:00-11:59 time period.
Last 7 days: Select from the day to push forward the week, the unnatural week.
Month: Select from the 1st of this month to the day of the time period, is a natural month.
Last 30 days: forward in 30 days starting from the day cycle, unnatural month.
Custom time: click to start playing manually select the start and end time, click “Query” to
start playing.
Failure
Distribution
The distribution of the specific number of the fault is displayed.
Copyright © 2013 Meitrack Group All rights reserved. - 23 -
File Name MEITRACK Family OBD Edition Creator Renny Lee Project TC68 Creation Date
Update Date 2012-08-23 2013-06-27
Sub Project User Guide Page - 24 - of 28 Revision V1.2 Confidential External Documentation
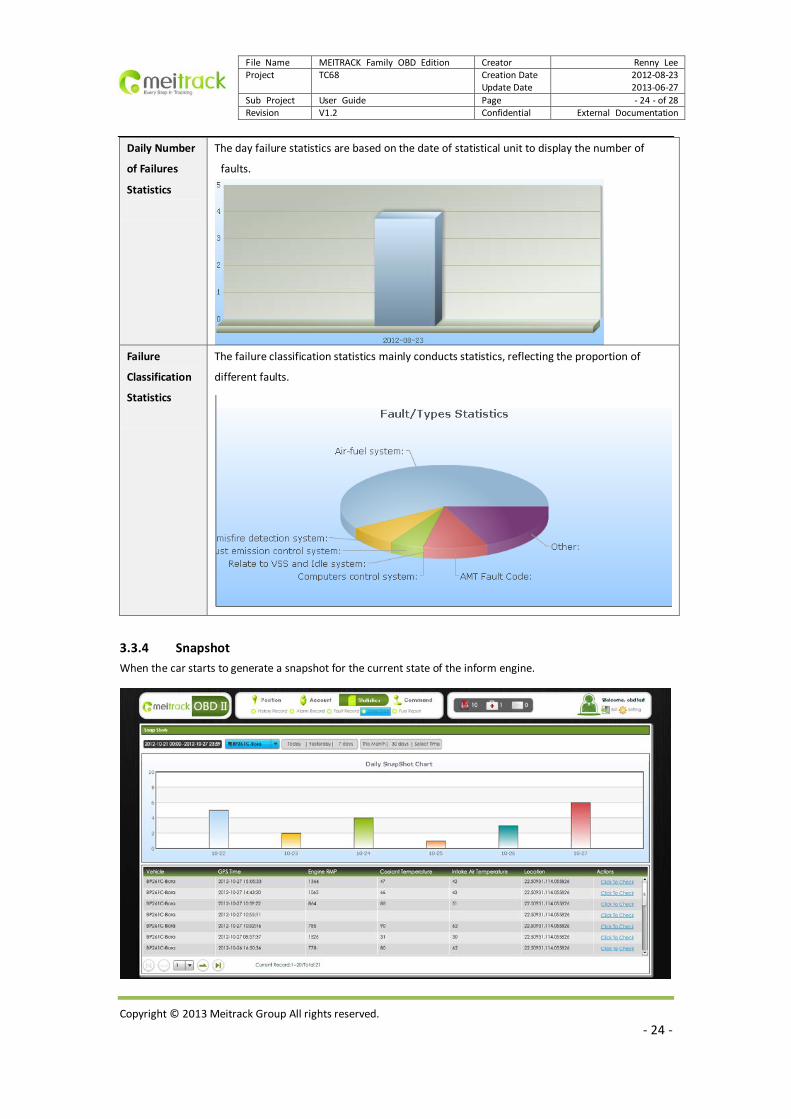
Daily Number
of Failures
Statistics
The day failure statistics are based on the date of statistical unit to display the number of
faults.
Failure
Classification
Statistics
The failure classification statistics mainly conducts statistics, reflecting the proportion of
different faults.
3.3.4 Snapshot When the car starts to generate a snapshot for the current state of the inform engine.
Copyright © 2013 Meitrack Group All rights reserved. - 24 -
File Name MEITRACK Family OBD Edition Creator Renny Lee Project TC68 Creation Date
Update Date 2012-08-23 2013-06-27
Sub Project User Guide Page - 25 - of 28 Revision V1.2 Confidential External Documentation
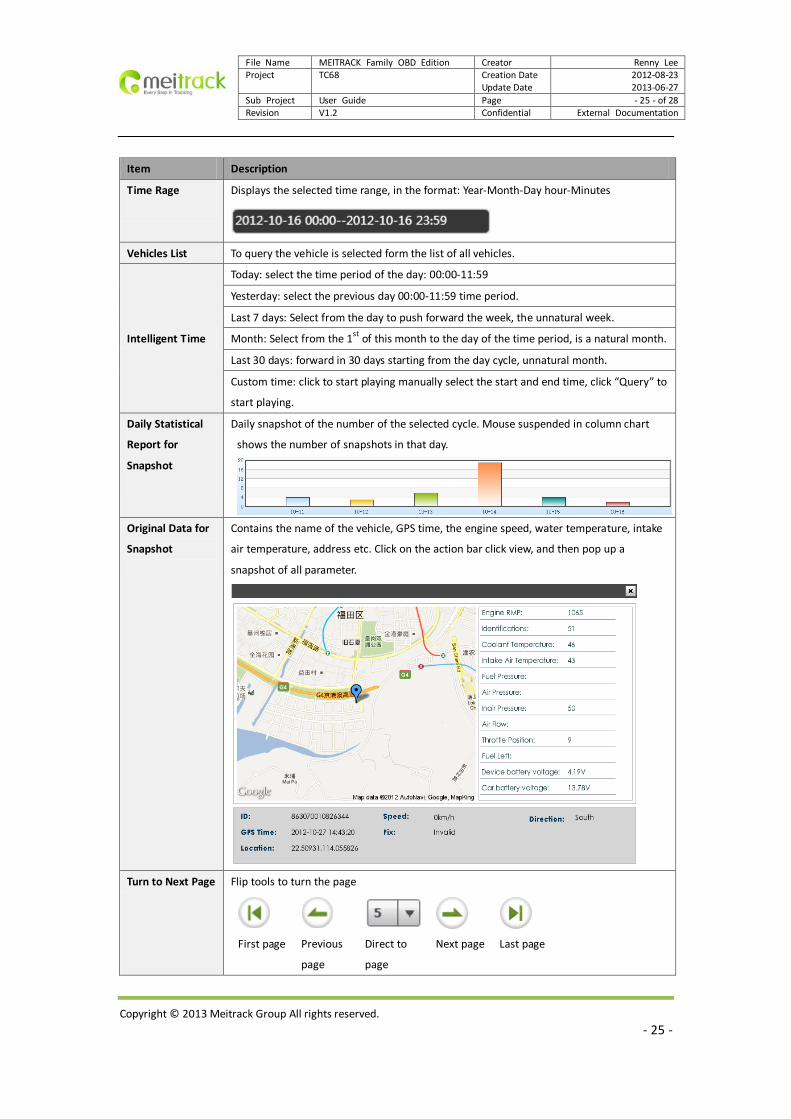
Item Description
Time Rage
Displays the selected time range, in the format: Year-Month-Day hour-Minutes
Vehicles List To query the vehicle is selected form the list of all vehicles.
Intelligent Time
Today: select the time period of the day: 00:00-11:59
Yesterday: select the previous day 00:00-11:59 time period.
Last 7 days: Select from the day to push forward the week, the unnatural week.
Month: Select from the 1st of this month to the day of the time period, is a natural month.
Last 30 days: forward in 30 days starting from the day cycle, unnatural month.
Custom time: click to start playing manually select the start and end time, click “Query” to
start playing.
Daily Statistical
Report for
Snapshot
Daily snapshot of the number of the selected cycle. Mouse suspended in column chart
shows the number of snapshots in that day.
Original Data for
Snapshot
Contains the name of the vehicle, GPS time, the engine speed, water temperature, intake
air temperature, address etc. Click on the action bar click view, and then pop up a
snapshot of all parameter.
Turn to Next Page Flip tools to turn the page
First page Previous
page
Direct to
page
Next page Last page
Copyright © 2013 Meitrack Group All rights reserved. - 25 -
File Name MEITRACK Family OBD Edition Creator Renny Lee Project TC68 Creation Date
Update Date 2012-08-23 2013-06-27
Sub Project User Guide Page - 26 - of 28 Revision V1.2 Confidential External Documentation
Contraction Part
To hide the Device Manager Panel, click on the upper right corner of the panel
“contraction button ” which can be realized contraction. For recovery, double-click the hidden part green bar.
Quantity Records
Show present range, the total number of reconds is displayed. Such as: the cussrent
recoed of 81-100/5866 rows.
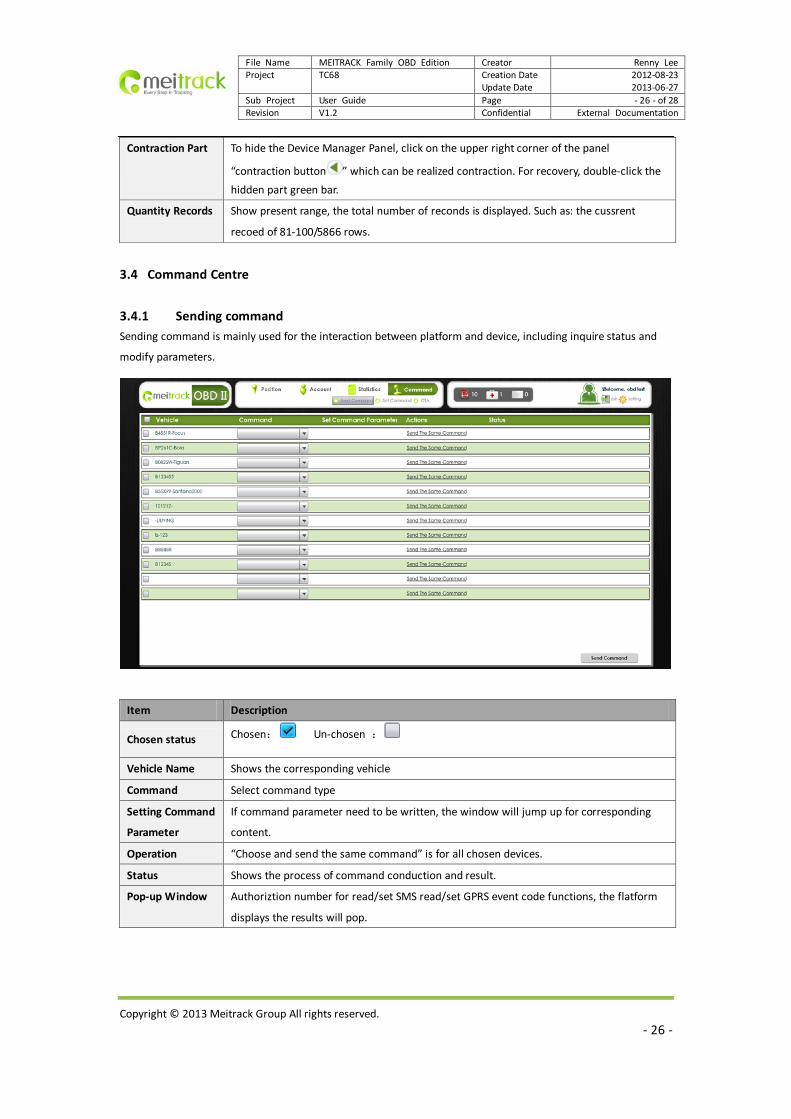
3.4 Command Centre
3.4.1 Sending command Sending command is mainly used for the interaction between platform and device, including inquire status and
modify parameters.
Item Description
Chosen status Chosen: Un-chosen :
Vehicle Name Shows the corresponding vehicle
Command Select command type
Setting Command
Parameter
If command parameter need to be written, the window will jump up for corresponding
content.
Operation “Choose and send the same command” is for all chosen devices.
Status Shows the process of command conduction and result.
Pop-up Window Authoriztion number for read/set SMS read/set GPRS event code functions, the flatform
displays the results will pop.
Copyright © 2013 Meitrack Group All rights reserved. - 26 -
File Name MEITRACK Family OBD Edition Creator Renny Lee Project TC68 Creation Date
Update Date 2012-08-23 2013-06-27
Sub Project User Guide Page - 27 - of 28 Revision V1.2 Confidential External Documentation
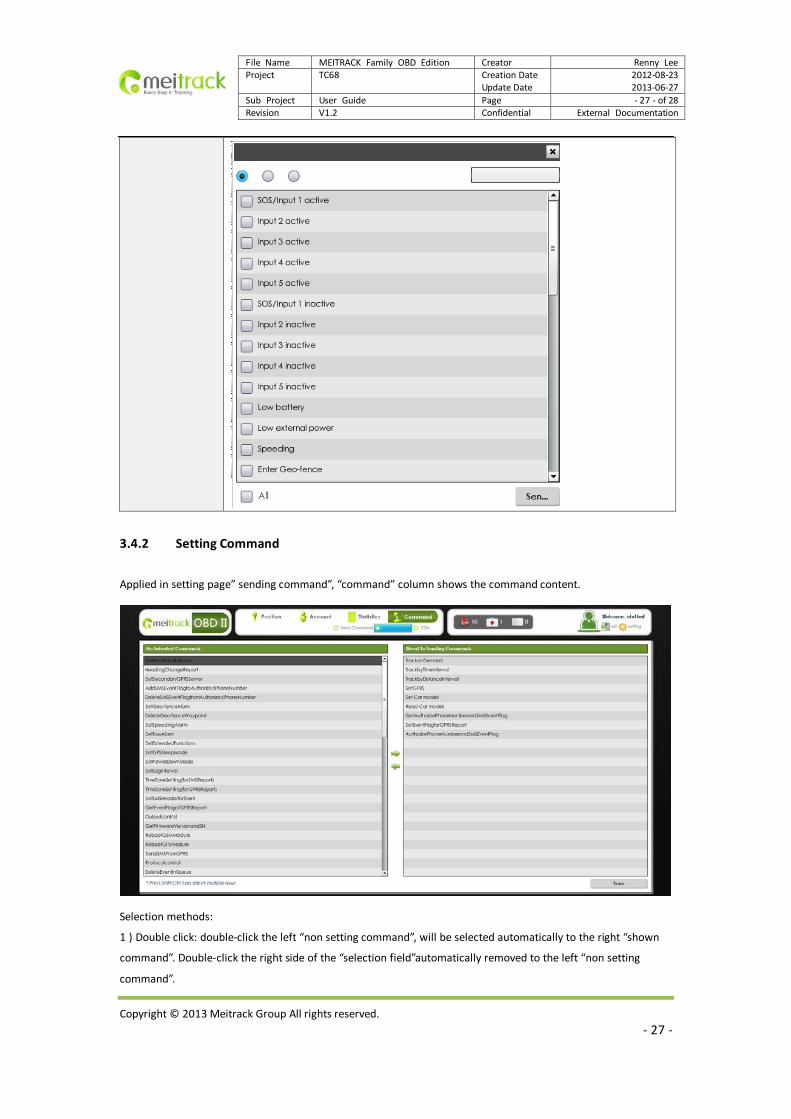
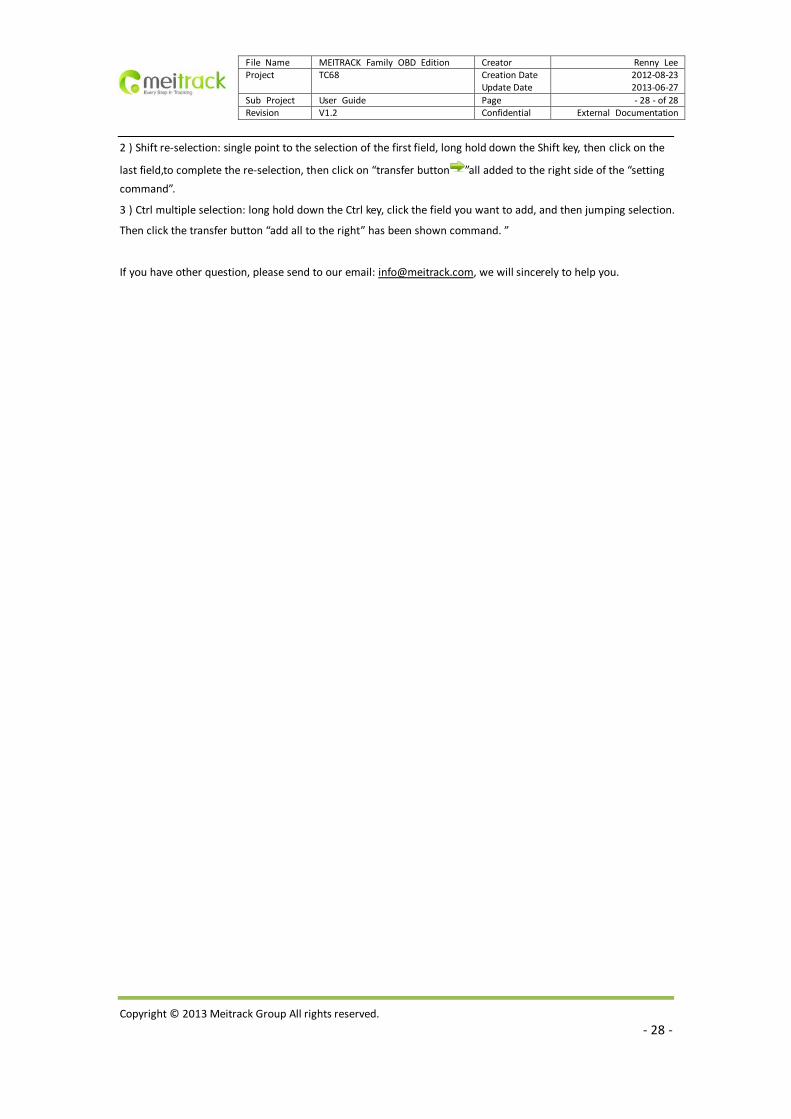
3.4.2 Setting Command
Applied in setting page” sending command”, “command” column shows the command content.
Selection methods:
1 ) Double click: double-click the left “non setting command”, will be selected automatically to the right “shown
command”. Double-click the right side of the “selection field”automatically removed to the left “non setting
command”.
Copyright © 2013 Meitrack Group All rights reserved. - 27 -
File Name MEITRACK Family OBD Edition Creator Renny Lee Project TC68 Creation Date
Update Date 2012-08-23 2013-06-27
Sub Project User Guide Page - 28 - of 28 Revision V1.2 Confidential External Documentation
2 ) Shift re-selection: single point to the selection of the first field, long hold down the Shift key, then click on the
last field,to complete the re-selection, then click on “transfer button ”all added to the right side of the “setting command”.
3 ) Ctrl multiple selection: long hold down the Ctrl key, click the field you want to add, and then jumping selection.
Then click the transfer button “add all to the right” has been shown command. ”
If you have other question, please send to our email: [email protected], we will sincerely to help you.
Copyright © 2013 Meitrack Group All rights reserved. - 28 -