oasis basics quick reference guide
TRANSCRIPT
Office of the Chief Technology Officer
Contents Next Page Previous Page
Online Administrative Student Information System (OASIS) Basics Quick Reference Guide
Version 1.1 June 2012

2 OASIS Basics Quick Reference Guide
Contents
Getting Started
Logging In To OASIS
Logging Out Of OASIS
Viewing Your OASIS Profile
Understanding the Basic OASIS Page Layout
Searching for Student Records
Performing a Quick Search
Performing an Advanced Search
Managing Search Results
Sorting Search Results
Viewing and Printing a Student’s Personal Information
Exporting Search Results to Excel
Basic Tips and Tricks
Contents Next Page Previous Page
Introduction The Online Administrative Student Information System (OASIS) provides a central location for view-ing and updating student administrative data online. This guide explains how to perform basic func-tions in OASIS.
The OASIS web pages represented in this document might vary slightly from those on your screen. Some OASIS functions are available only during specific times of the year and are shown and accessi-ble only during those times. Also, the design of pages in some OASIS modules might vary slightly from those shown in this document.
For readability, you can press Ctrl+L to view this document in Full Screen Mode. Press the Esc key to return to normal viewing mode.

3 OASIS Basics Quick Reference Guide Contents Next Page Previous Page
Getting Started Logging In To OASIS Generally, you must log in to OASIS from within the MCPS network. However, you can log in to the OASIS Special Services module from a home computer. All other OASIS access is blocked from home logins.
1. Open the MCPS website.
2. Click the Staff tab. Scroll down the page and click the Student Data tab.
3. Click the Student systems applications link.
4. On the Student Systems Home Page, click the Log in to OASIS button.
5. On the Login page, enter your login information.
In the User name field, do not include your domain name (mcpsmd, es, sec), which indicates whether your work location is an MCPS central office, an elementary school, or a secondary school. Instead, ensure that the domain name in the Log on to field is correct.
6. Click the Go button.
Alternative ways to access the OASIS Login page are as follows:
If you are in a school, click the OASIS link or icon on your school menu.

4 OASIS Basics Quick Reference Guide
Getting Started
Contents Next Page Previous Page
In your browser, enter the following web address: http://studentweb.mcpsmd.org/Oasis/Content/Common/Login.aspx.
In myMCPS on the Students tab, click the OASIS link.
OASIS times out if it is open and inactive for 30 minutes. The time might be less, depending on workstation settings at your school.
Logging Out Of OASIS
In the upper right corner of the page, click the Log Out link.
Viewing Your OASIS Profile Your OASIS profile includes your security role(s) based on your MCPS job function. Security roles determine which OASIS modules and features you can access.
1. In the upper right corner of the page, click the View Profile link. Your OA-SIS user information, similar to the following, will be displayed.
2. When you have finished viewing your user profile, click the Close button.

5 OASIS Basics Quick Reference Guide Contents Next Page Previous Page
Understanding the Basic OASIS Page Layout
1
2
3
4
5
6
7
8
Basic application tasks such as logging out and viewing your user profile.
Tab bar for accessing OASIS modules. The modules you can view depend on your MCPS job function.
Current options available based on the selected tab.
Current student/school detail resulting from a search.
Quick search field for finding a student record using only a student ID.
Tip area with helpful hints for using OASIS.
Content area for entering and viewing student data.
Printer Friendly link for displaying information in the content area as a text file for printing and copying.
6
5
4
3
7
1
8
2

6 OASIS Basics Quick Reference Guide Contents Next Page Previous Page
Searching for Student Records In OASIS, you can perform a quick search using only the student ID or perform an advanced search using one or more search parameters.
Performing a Quick Search Following are instructions for quickly searching for a student record using only the student ID.
1. On the left of the page in the Find Another Student field, enter the ID of the student whose record you want to find.
2. Click the Go button. On the left of the page, information about the stu-dent will be displayed on the Student Detail tab.
At this point, you can perform OASIS functions for the current student by selecting options in one of two ways. One way is to hover your mouse over a tab in the tab bar at the top of the page to display a menu, as shown below, then select an option from the menu.
A second way is to click a tab to display the same menu options as links on the left and in the content area of the page, as shown below.
Performing an Advanced Search Following are instructions for searching for a student record using one or more search parameters.
1. On the left of the page, click either the Advanced Search link; or in the upper right corner of the page, click the Student Search link.
Click the Hide/Open link to hide or show student detail other than the student name and ID.

7 OASIS Basics Quick Reference Guide
Searching for Student Records
Contents Next Page Previous Page
2. On the Student Search page, enter one or more search parameters. A student ID number search is best. If you enter a first name, you must also enter a last name.
This is an exact match search so, for example, Smith finds exactly that last name and not last names such as Smith, Jr. or Smith IV. You can use the percent sign (%) as a wildcard to enter part of a name or num-ber. Up to three wildcards are allowed in a single search parameter, such as last name. For example, Beck% finds Beck, Beckman, and Beck, Jr. Sm%th finds Smith, Smyth, and Smooth. %Rodri%uez% finds Alfaro-Rodriguez, Rodriguez, Rodrigues, Rodriques, and Rodriquez-Shakaji.
3. Click the Search button to display a list of student records that matches your search parameters.
Managing Search Results If multiple student records result from a search, you can sort, page through, print, or export the results as shown and explained below.
Sorting Search Results If multiple student records result from your search, follow the instructions below to sort them so that you can more easily find the desired record.
In OASIS, an underlined column heading indicates that the column can be sorted. However, not all columns that can be sorted have an under-lined column heading. To verify if a column can be sorted, hover your mouse over the column heading and look for an indicator such as the following:
or
1. On the search results page, do one of the following:
Click a column heading to sort by that column.
Click the Multi Sort link to sort by more than one column. Continue with the next step.
2. Under Include, select Yes for the column(s) that you want to use for sorting.
3. Under Direction, select ASC to sort a column in ascending order, or select DSC to sort a column in descending order.
4. Under Sort Order, specify the sequence in which columns will be sorted. For example, to sort by student ID, first name, then last name; select 1 for student ID, 2 for first name, and 3 for last name.
Click this link to show search results as a text file for printing and copying.
Click this button to view search results in an Excel spreadsheet.
Click here to go to the next or previous page or to show all search results.
Click a column heading to sort.
Click this link to sort by more than one column.
Bold rows represent currently enrolled active students.

8 OASIS Basics Quick Reference Guide
Searching for Student Records
Contents Next Page Previous Page
5. Click the Do Sort button to initiate the sort.
Viewing and Printing a Student’s Personal Information 1. In the Student Inquiry module, if multiple student records result from
your search, click a student ID link to view personal information about the student on the Demographics page. If only one student record results from your search, the Demographics page for that student will automati-cally be displayed.
2. Toward the top right of the page, click the Printer Friendly link. The stu-dent’s personal information will be displayed as a formatted text file for printing and copying.
3. Click the Send to Printer link to print the student’s personal information.
4. To copy and paste the information into another program, do the follow-ing:
Highlight the text you want to copy, or press Ctrl+A to select all of the text on the page.
Press Ctrl+C to copy the text.
Press Ctrl+V to paste the text.
5. Click the Close Window link to close the printer friendly view.
Exporting Search Results to Excel If multiple student records result from your search, follow the instructions below to view the results in an Excel spreadsheet.
1. On the search results page, click the Excel button to export the results to Excel.
9 OASIS Basics Quick Reference Guide
Searching for Student Records
Contents Next Page Previous Page
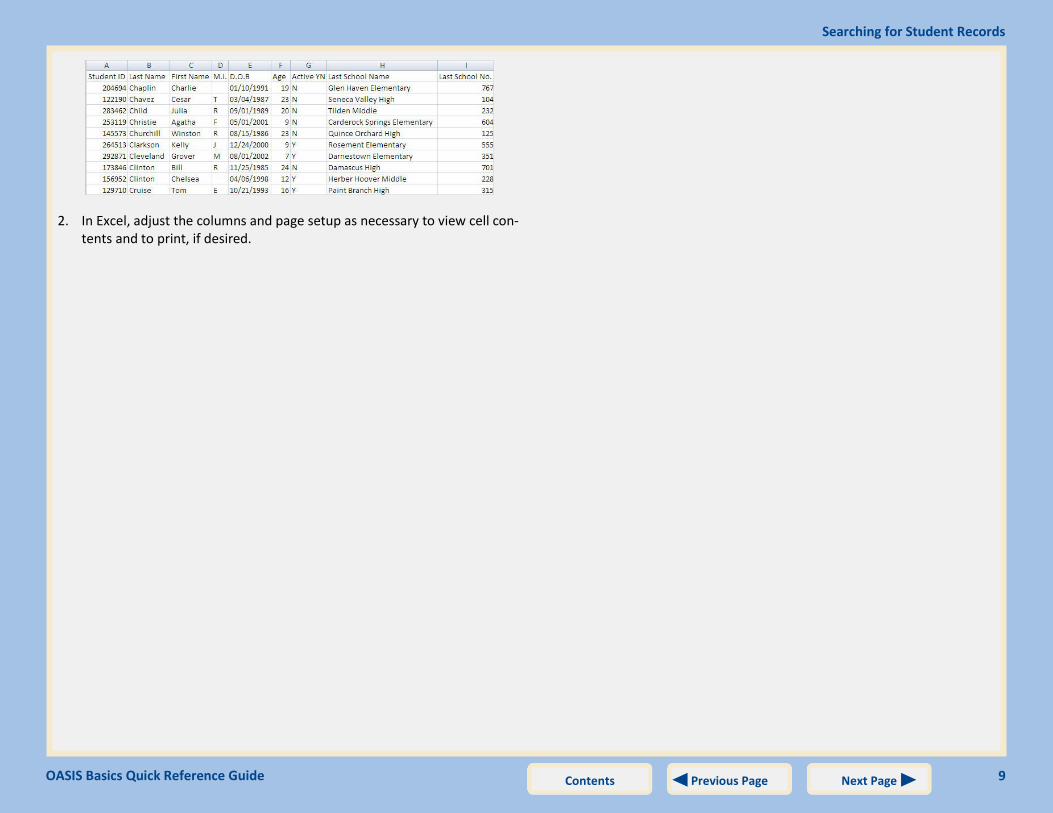
2. In Excel, adjust the columns and page setup as necessary to view cell con-tents and to print, if desired.

10 OASIS Basics Quick Reference Guide Contents Next Page Previous Page
Basic Tips and Tricks To move between data entry fields, press Tab to go to the next field and
Shift+Tab to go to the previous field.
To quickly find data on a page, press Ctrl+F. A Find feature, similar to the one shown below, will open in your browser immediately above OASIS. As you type in the Find field, matching text on the page will be highlight-ed. Click the Next and Previous buttons to move through the matches. Select from the options to show only matches that are complete words versus part of another word or phrase and only matches with the same capitalization as the text you typed in the Find field.
To close the Find feature, click the X to the left of the Find field.
To copy and paste information to Word or Excel, highlight the infor-mation or press Ctrl+A to select all of the text, press Ctrl+C to copy, and press Ctrl+V to paste the text in the other program.
When selecting a date using a calendar, days that are not available for selection are gray.

Montgomery County Public Schools 850 Hungerford Drive, Rockville, Maryland 20850
Contents Next Page Previous Page