nov. 3 20.8, 21.1- 21.2 nov. 5 boardwork nov. 7 21.3-21.5 quiz 7 nov. 10 boardwork nov. 12 21.5-21.7...
Post on 19-Dec-2015
226 views
TRANSCRIPT
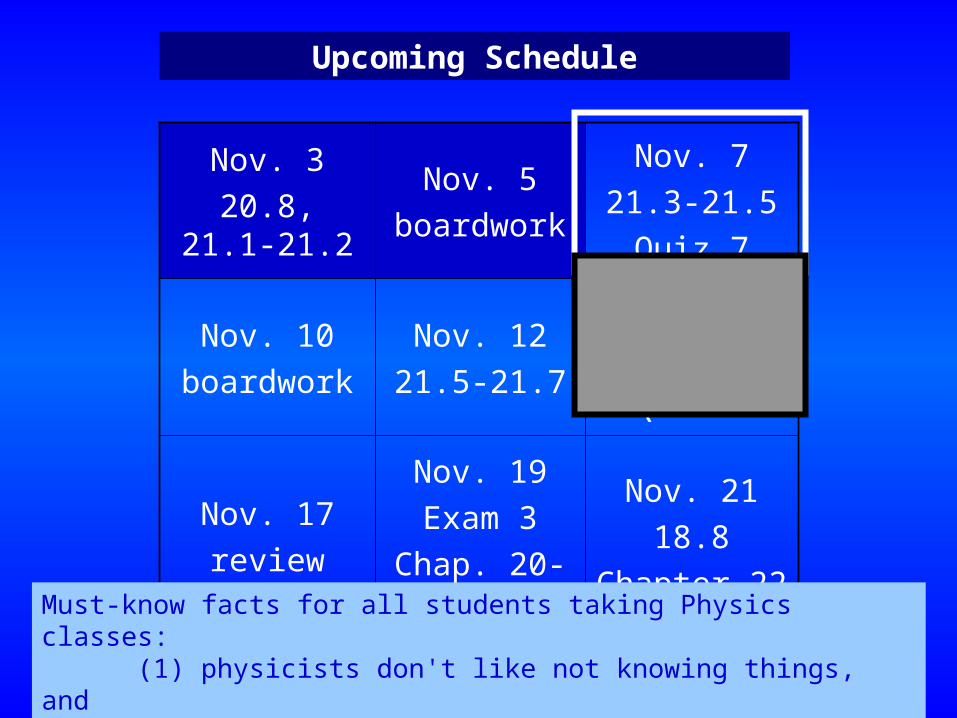
Nov. 320.8, 21.1-
21.2
Nov. 5boardwork
Nov. 721.3-21.5
Quiz 7
Nov. 10boardwork
Nov. 1221.5-21.7
Nov. 14boardwork
Quiz 8
Nov. 17review
Nov. 19Exam 3
Chap. 20-21
Nov. 2118.8
Chapter 22
Upcoming Schedule
Must-know facts for all students taking Physics classes:(1) physicists don't like not knowing things, and (2) never point this fact out to a physicist.
Original "homework3.pdf" showed lecture on November 12 covering 21.6. Corrected file shows lecture on November 12 covering 21.5-21.7. I don’t expect to finish 21.5 today, so I will finish 21.5 on the 12th. I also intended all along to lecture on transformers (21.7). The homework problem assignments are unchanged.
according to CERN web page (worlds biggest particle accelerator):physicists don't like not knowing things, and never point this fact out to a physicist.
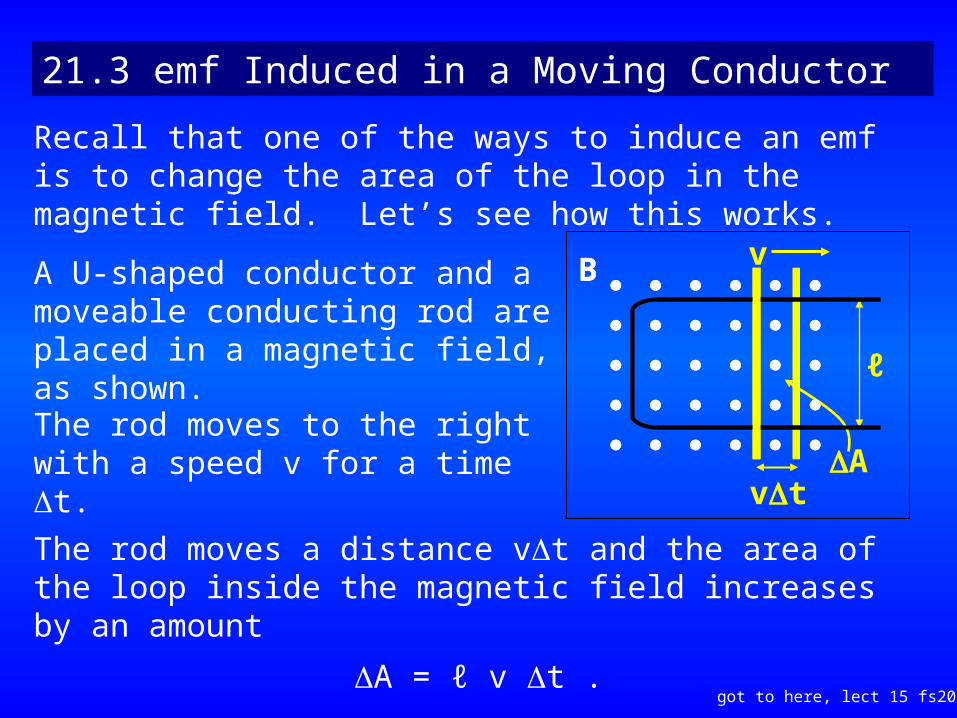
21.3 emf Induced in a Moving Conductor
Recall that one of the ways to induce an emf is to change the area of the loop in the magnetic field. Let’s see how this works.
v
ℓ
B
vtA
A U-shaped conductor and a moveable conducting rod are placed in a magnetic field, as shown.The rod moves to the right with a speed v for a time t.
The rod moves a distance vt and the area of the loop inside the magnetic field increases by an amount
A = ℓ v t .
got to here, lect 15 fs2002
B
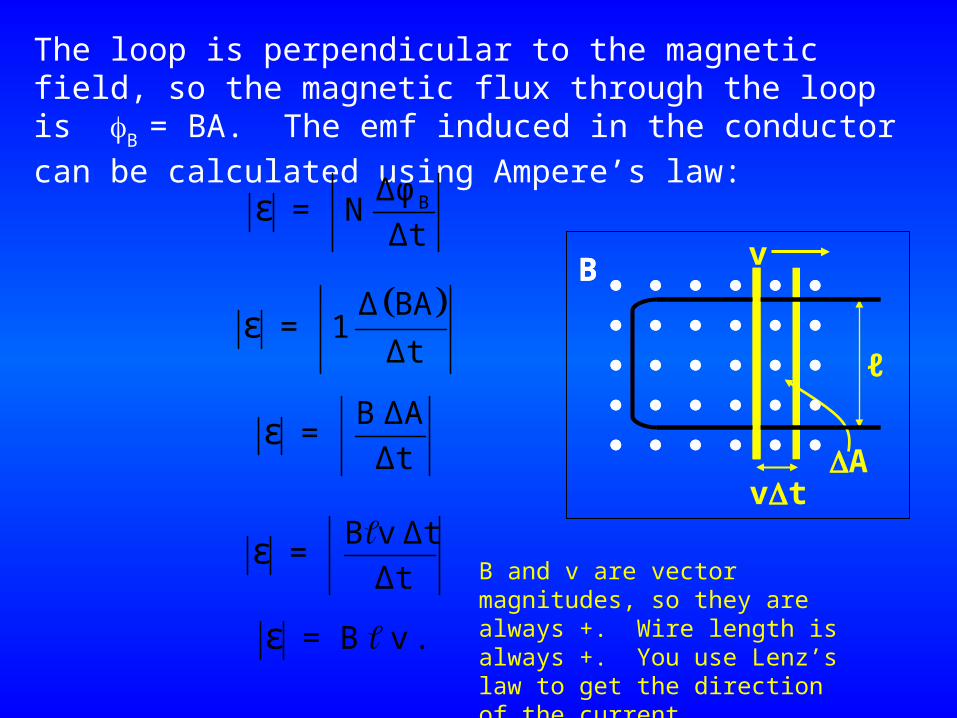
The loop is perpendicular to the magnetic field, so the magnetic flux through the loop is B = BA. The emf induced in the conductor can be calculated using Ampere’s law:
BΔφ = N
Δtε
Δ BA = 1
Δtε
B ΔA =
Δtε
B v Δt =
Δtε
= B v . ε
B and v are vector magnitudes, so they are always +. Wire length is always +. You use Lenz’s law to get the direction of the current.
v
ℓ
B
vtA
B
The induced emf causes current to flow in the loop.
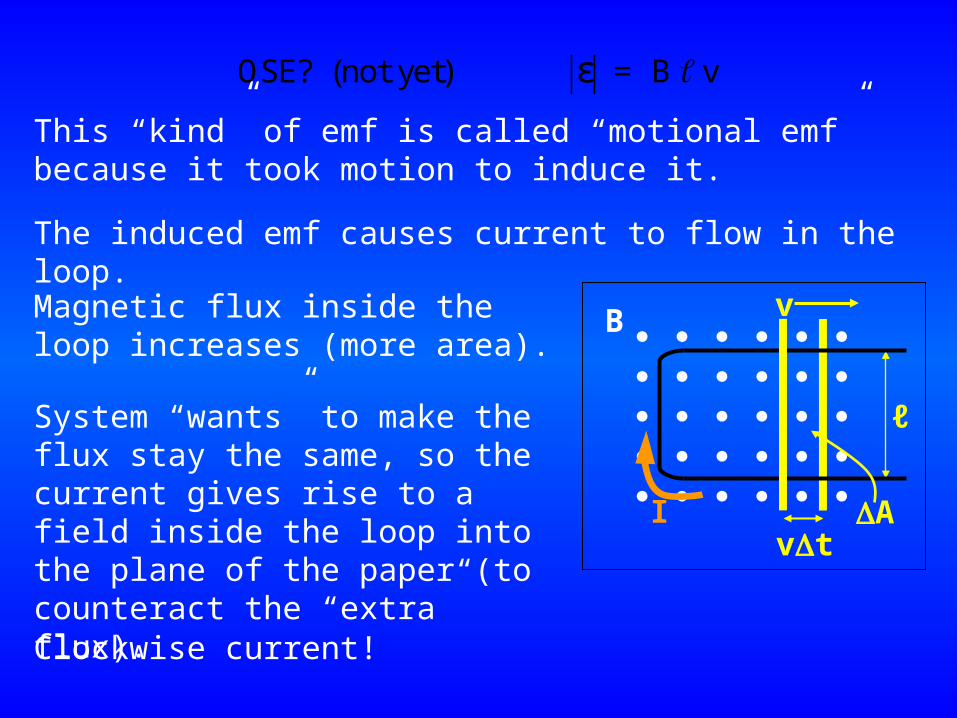
OSE? (not yet) = B vε
This “kind” of emf is called “motional emf” because it took motion to induce it.
v
ℓ
B
vtA
Magnetic flux inside the loop increases (more area).
System “wants” to make the flux stay the same, so the current gives rise to a field inside the loop into the plane of the paper (to counteract the “extra” flux).Clockwise current!
I
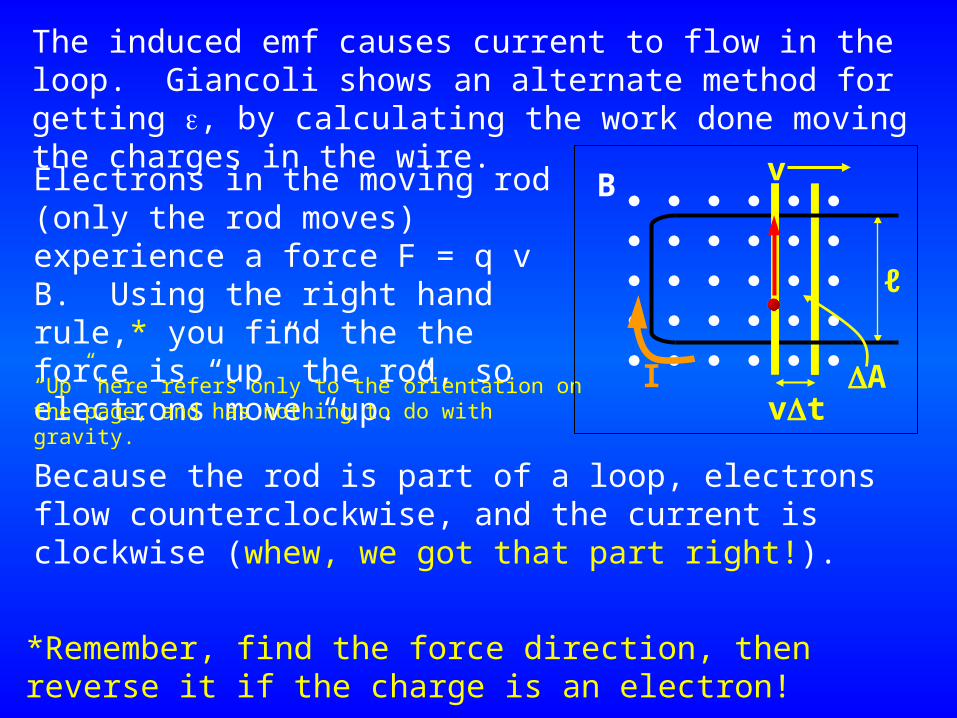
The induced emf causes current to flow in the loop. Giancoli shows an alternate method for getting , by calculating the work done moving the charges in the wire.Electrons in the moving rod (only the rod moves) experience a force F = q v B. Using the right hand rule,* you find the the force is “up” the rod, so electrons move “up.”
v
ℓ
B
vtAI
*Remember, find the force direction, then reverse it if the charge is an electron!
Because the rod is part of a loop, electrons flow counterclockwise, and the current is clockwise (whew, we got that part right!).
“Up” here refers only to the orientation on the page, and has nothing to do with gravity.
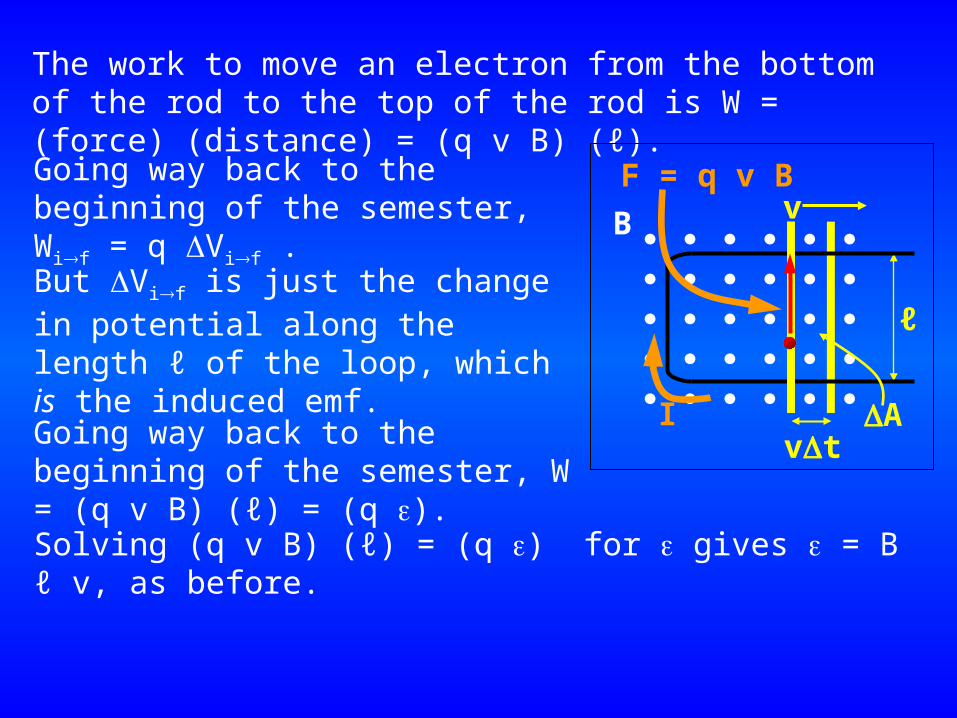
The work to move an electron from the bottom of the rod to the top of the rod is W = (force) (distance) = (q v B) (ℓ).
v
ℓ
B
vtAI
F = q v BGoing way back to the beginning of the semester, Wif = q Vif .
But Vif is just the change in potential along the length ℓ of the loop, which is the induced emf.
Going way back to the beginning of the semester, W = (q v B) (ℓ) = (q ).Solving (q v B) (ℓ) = (q ) for gives = B ℓ v, as before.
I won’t ask you to reproduce the derivation on an exam, but a problem could (intentionally or not) ask you to calculate the work done in moving a charge (or a wire) through a magnetic field, so be sure to study your text.“But you haven’t given us the OSE yet!”
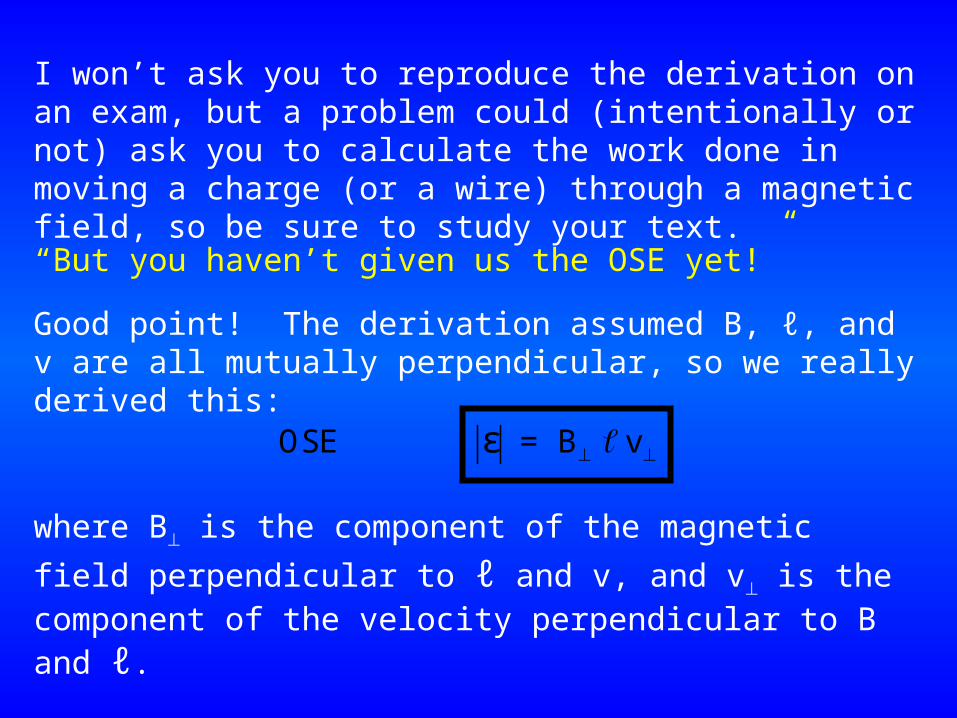
Good point! The derivation assumed B, ℓ, and v are all mutually perpendicular, so we really derived this:
OSE = B vε
where B is the component of the magnetic field
perpendicular to ℓ and v, and v is the component of
the velocity perpendicular to B and ℓ.
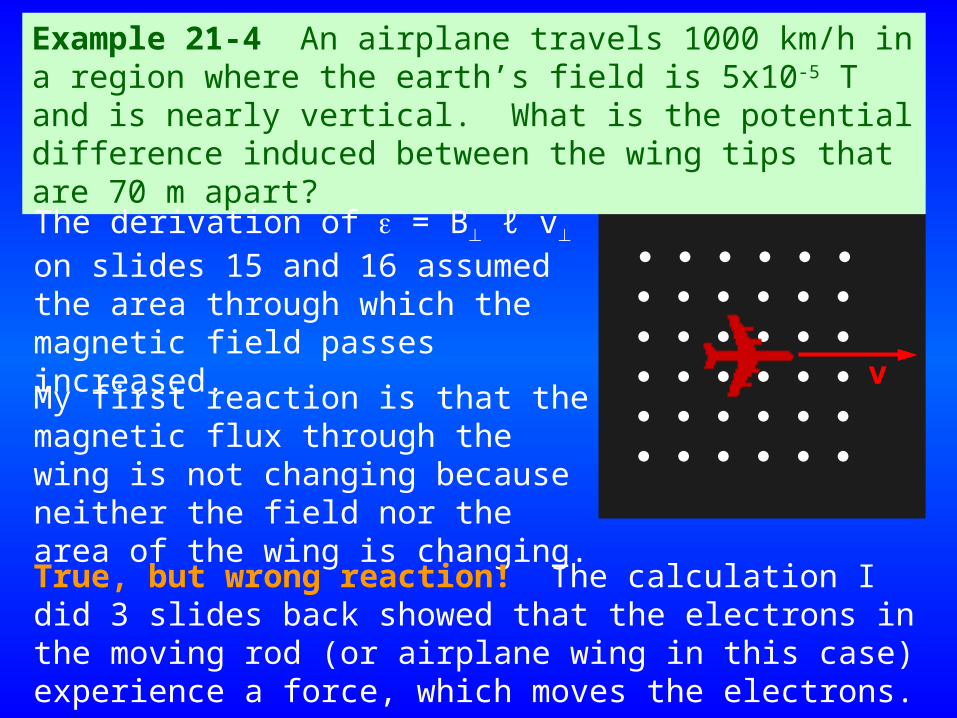
Example 21-4 An airplane travels 1000 km/h in a region where the earth’s field is 5x10⁻⁵ T and is nearly vertical. What is the potential difference induced between the wing tips that are 70 m apart?
My first reaction is that the magnetic flux through the wing is not changing because neither the field nor the area of the wing is changing.
v
The derivation of = B ℓ v on slides 15 and 16 assumed the area through which the magnetic field passes increased.
True, but wrong reaction! The calculation I did 3 slides back showed that the electrons in the moving rod (or airplane wing in this case) experience a force, which moves the electrons.
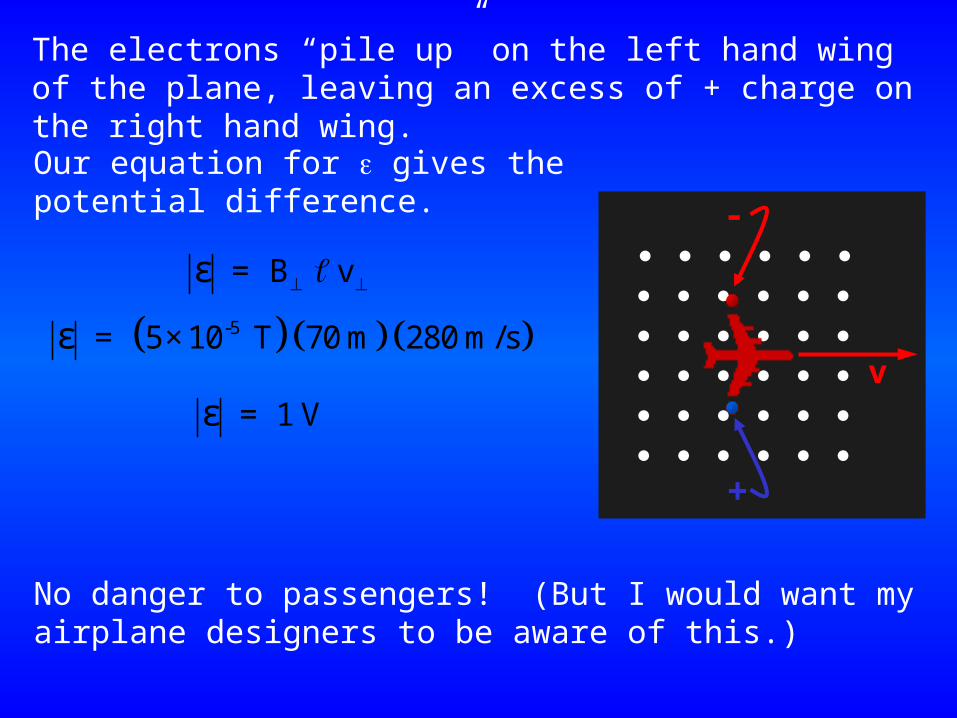
The electrons “pile up” on the left hand wing of the plane, leaving an excess of + charge on the right hand wing.
v
-
+
Our equation for gives the potential difference.
= B vε
-5 = 5×10 T 70 m 280 m/sε
= 1 Vε
No danger to passengers! (But I would want my airplane designers to be aware of this.)
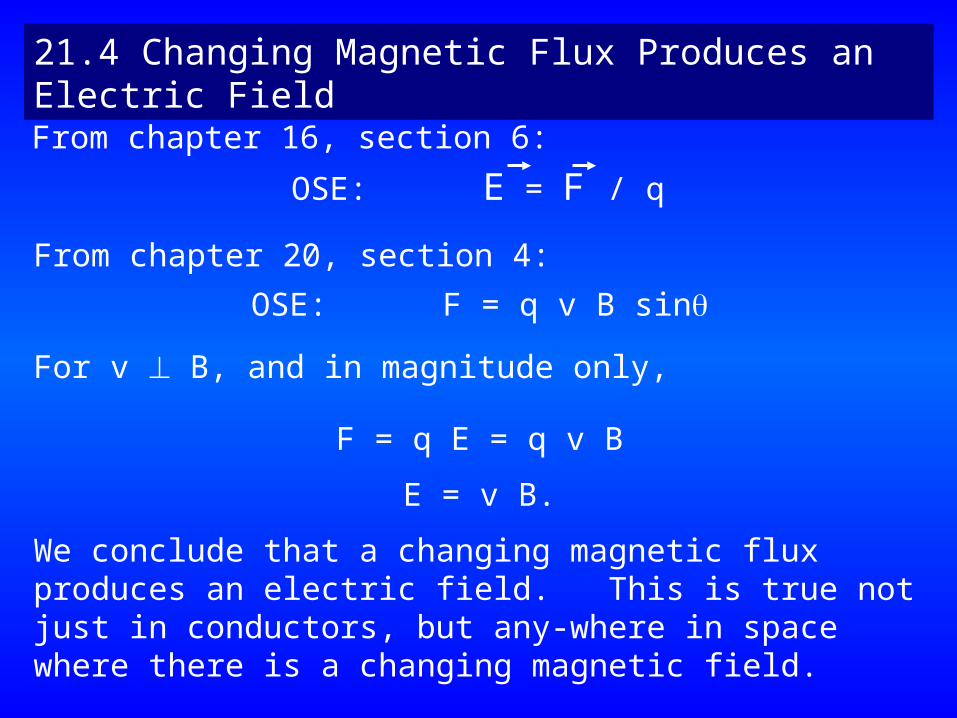
21.4 Changing Magnetic Flux Produces an Electric Field
OSE: E = F / qFrom chapter 16, section 6:
From chapter 20, section 4:
OSE: F = q v B sin
For v B, and in magnitude only,
F = q E = q v B
E = v B.
We conclude that a changing magnetic flux produces an electric field. This is true not just in conductors, but any-where in space where there is a changing magnetic field.
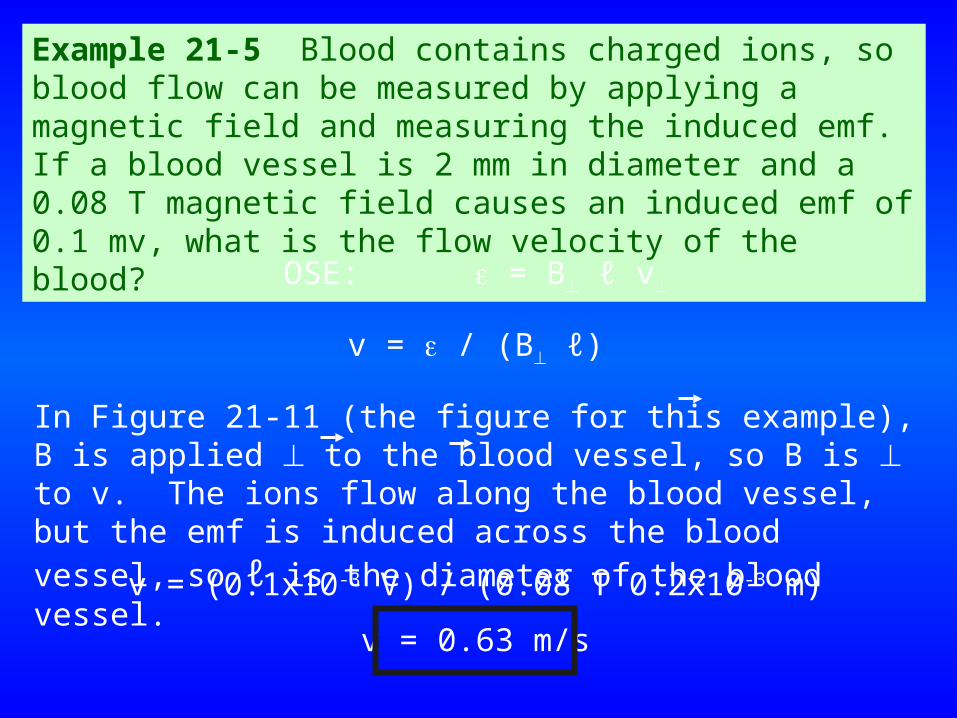
Example 21-5 Blood contains charged ions, so blood flow can be measured by applying a magnetic field and measuring the induced emf. If a blood vessel is 2 mm in diameter and a 0.08 T magnetic field causes an induced emf of 0.1 mv, what is the flow velocity of the blood?
OSE: = B ℓ v
v = / (B ℓ)
In Figure 21-11 (the figure for this example), B is applied to the blood vessel, so B is to v. The ions flow along the blood vessel, but the emf is induced across the blood vessel, so ℓ is the diameter of the blood vessel.v = (0.1x10⁻³ V) / (0.08 T 0.2x10⁻³ m)
v = 0.63 m/s
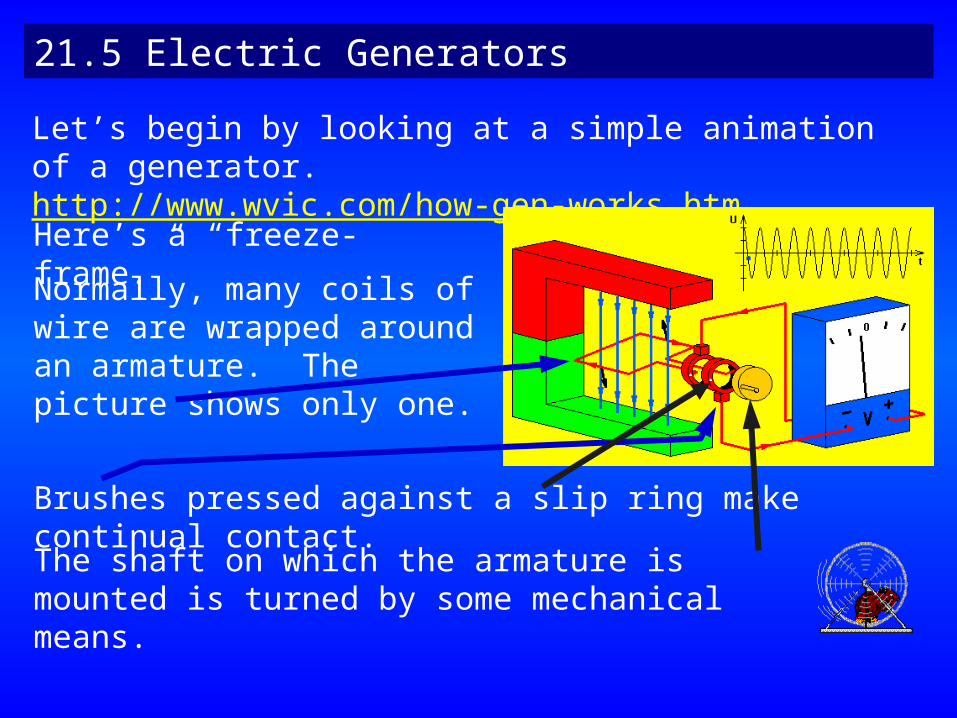
21.5 Electric Generators
Let’s begin by looking at a simple animation of a generator. http://www.wvic.com/how-gen-works.htm
Here’s a “freeze-frame.”
Normally, many coils of wire are wrapped around an armature. The picture shows only one.
Brushes pressed against a slip ring make continual contact.The shaft on which the armature is mounted is turned by some mechanical means.
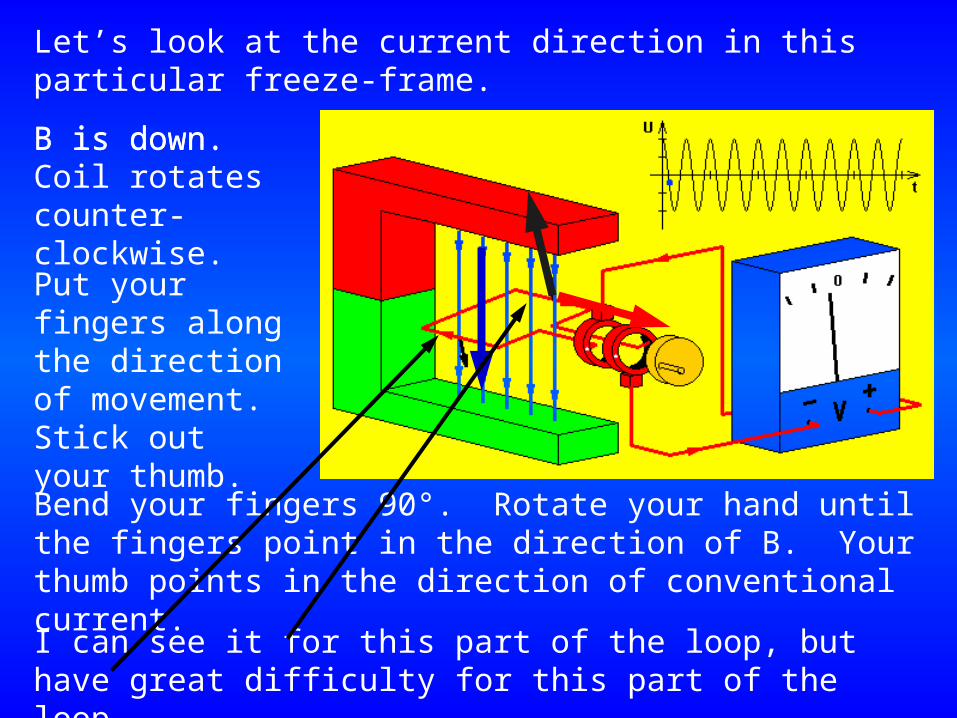
Let’s look at the current direction in this particular freeze-frame.
B is down.
Put your fingers along the direction of movement. Stick out your thumb. Bend your fingers 90°. Rotate your hand until the fingers point in the direction of B. Your thumb points in the direction of conventional current.
B is down. Coil rotates counter-clockwise.
I can see it for this part of the loop, but have great difficulty for this part of the loop.
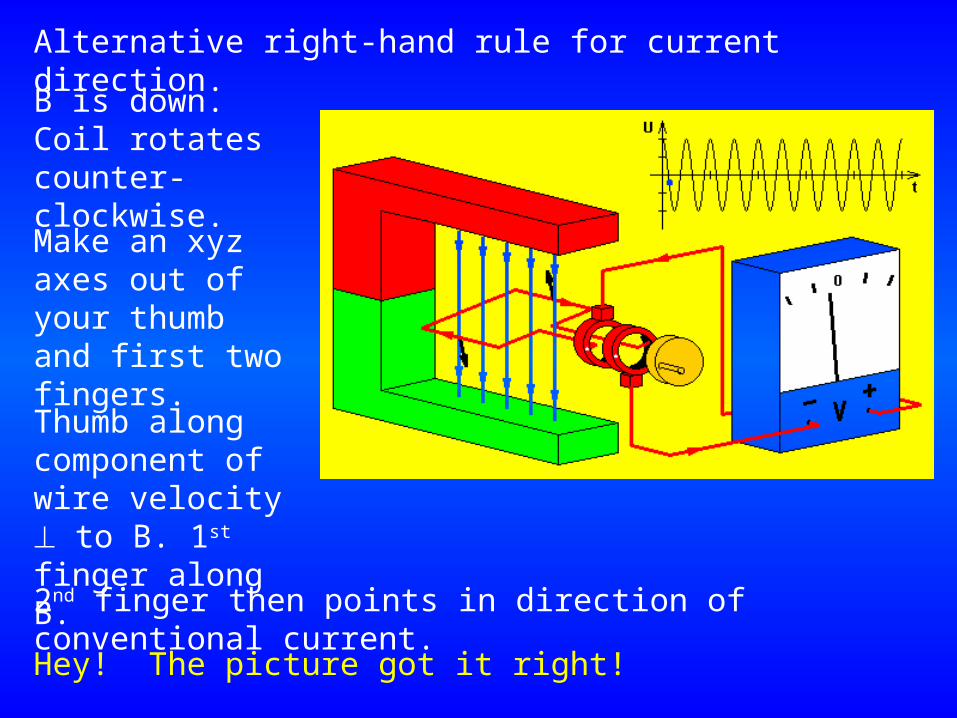
Alternative right-hand rule for current direction.
B is down. Coil rotates counter-clockwise.
Make an xyz axes out of your thumb and first two fingers.
2nd finger then points in direction of conventional current.
Thumb along component of wire velocity to B. 1st finger along B.
Hey! The picture got it right!
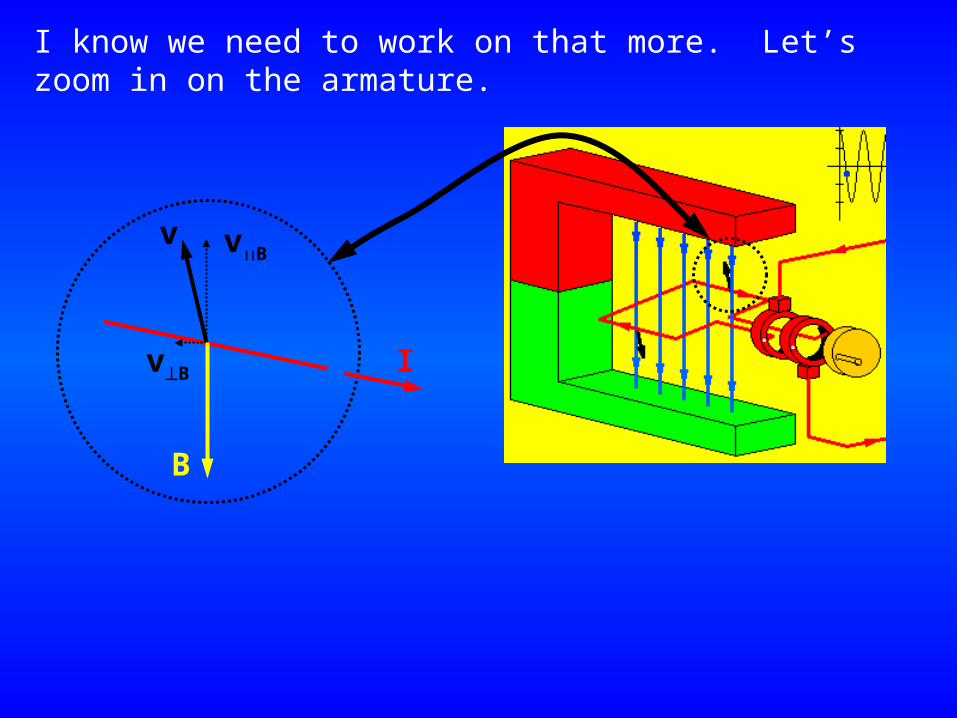
I know we need to work on that more. Let’s zoom in on the armature.
v vB
vB
B
I
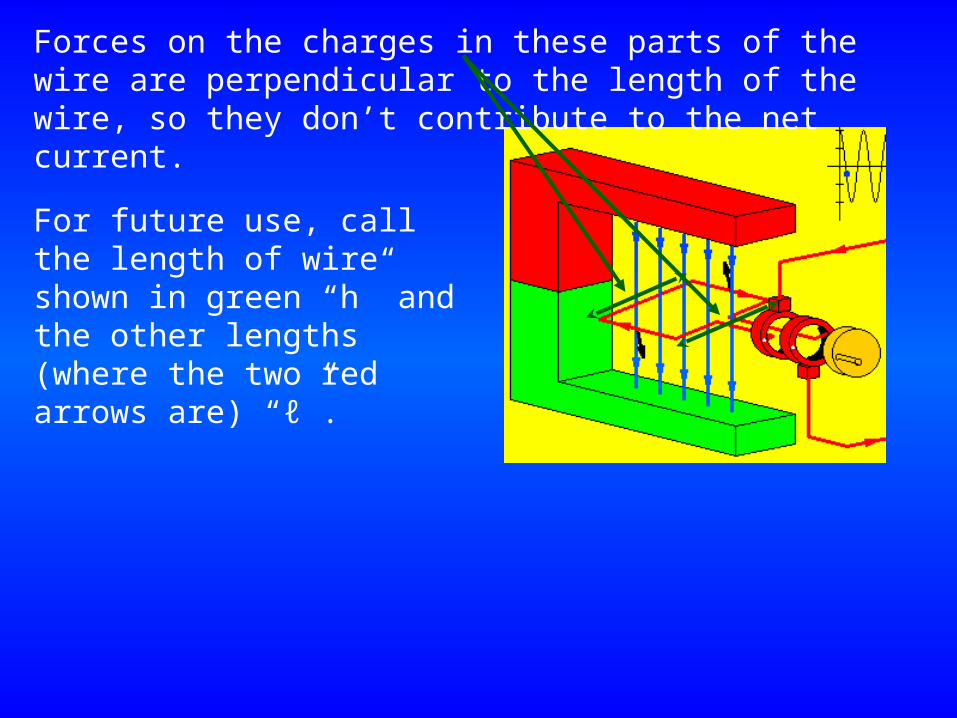
Forces on the charges in these parts of the wire are perpendicular to the length of the wire, so they don’t contribute to the net current.
For future use, call the length of wire shown in green “h” and the other lengths (where the two red arrows are) “ℓ”.
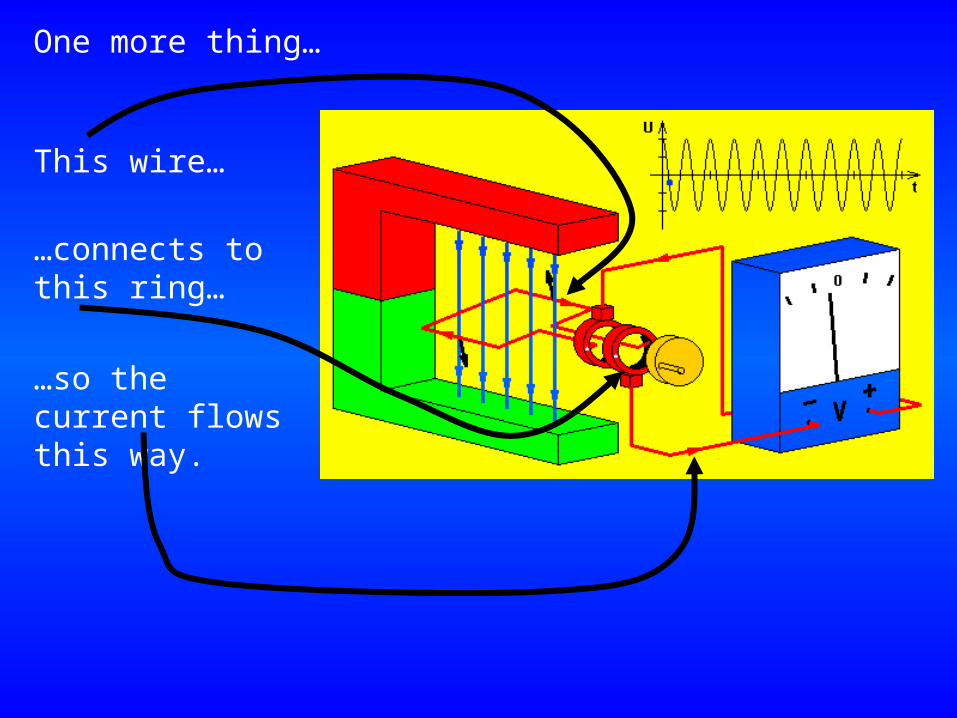
One more thing…
This wire…
…connects to this ring…
…so the current flows this way.
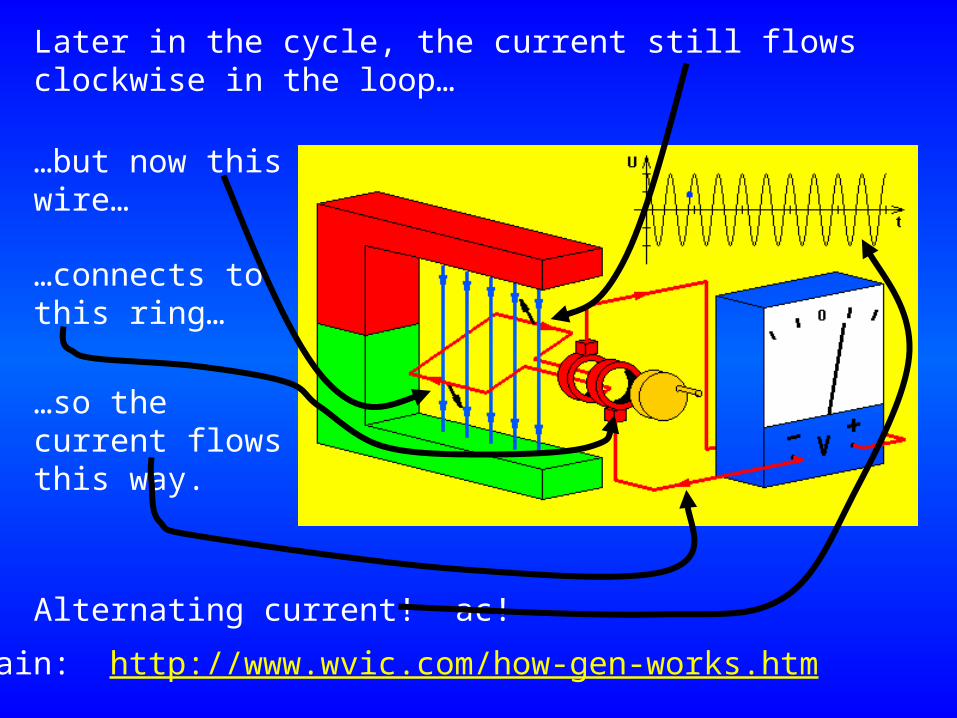
Later in the cycle, the current still flows clockwise in the loop…
…but now this wire…
…connects to this ring…
…so the current flows this way.
Alternating current! ac!
Again: http://www.wvic.com/how-gen-works.htm
“Dang! That was complicated. Are you going to ask me to do that on the exam?”
No. Not anything that complicated. But you still need to understand each step, because each step is test material.Click here and scroll down to “electrodynamics” to see some visualizations that might help you!
Understanding how a generator works is “good,” but we need to quantify our knowledge.
We begin with our OSE = B ℓ v. (ℓ was defined on slide 17.) In our sample generator on the last 7 slides, we had only one loop, but two sides of the loop in the magnetic field. If the generator has N loops, then = 2 N B ℓ v.
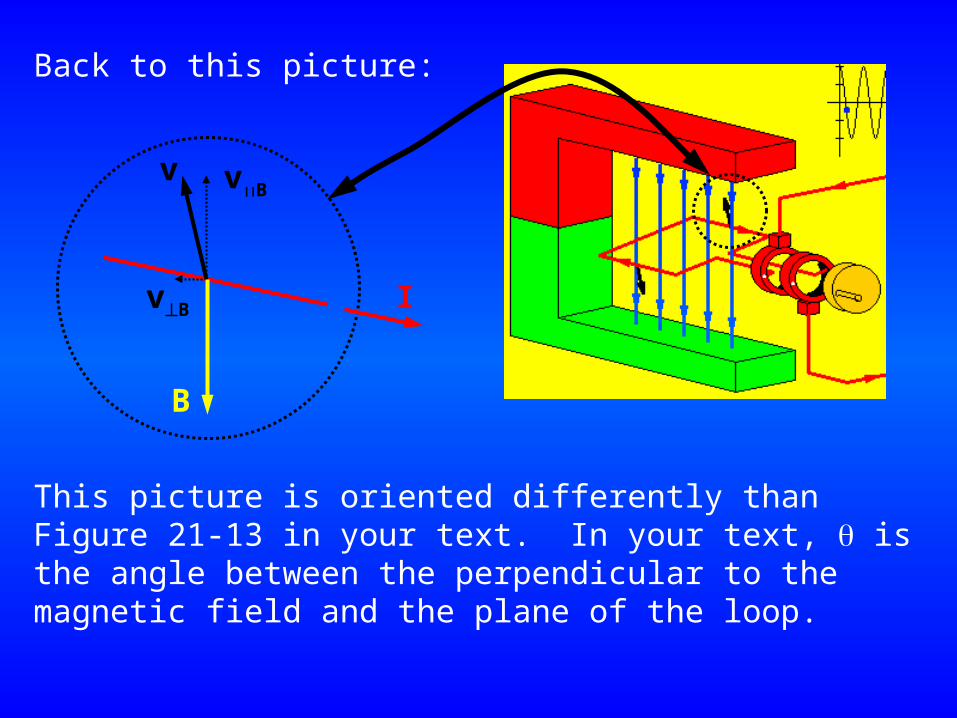
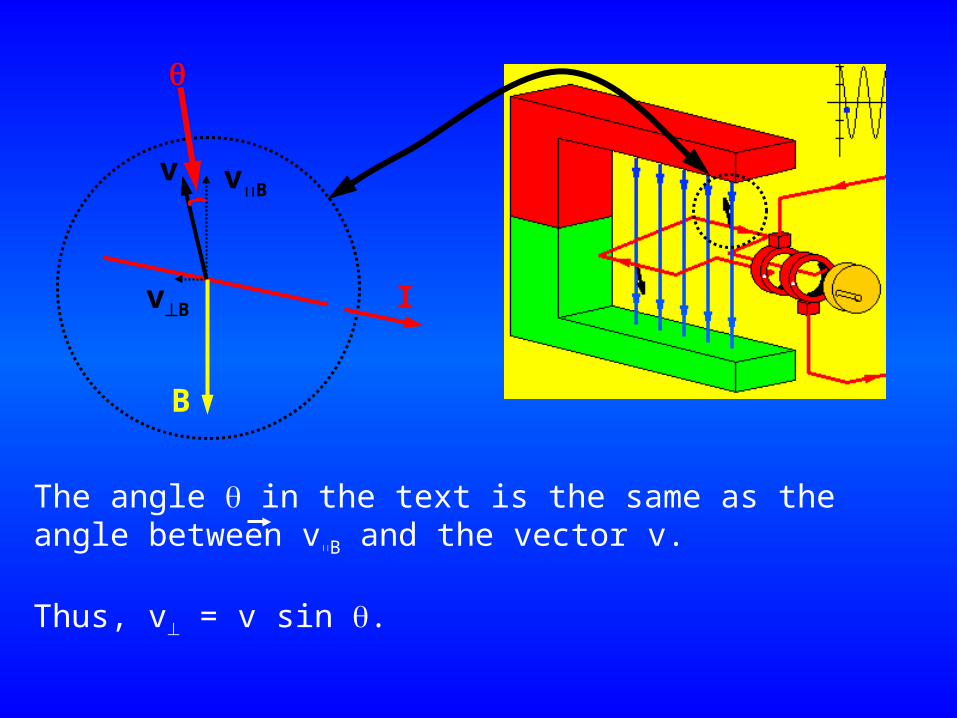
Back to this picture:
v vB
vB
B
I
This picture is oriented differently than Figure 21-13 in your text. In your text, is the angle between the perpendicular to the magnetic field and the plane of the loop.
v vB
vB
B
I
The angle in the text is the same as the angle between vB and the vector v.
Thus, v = v sin .
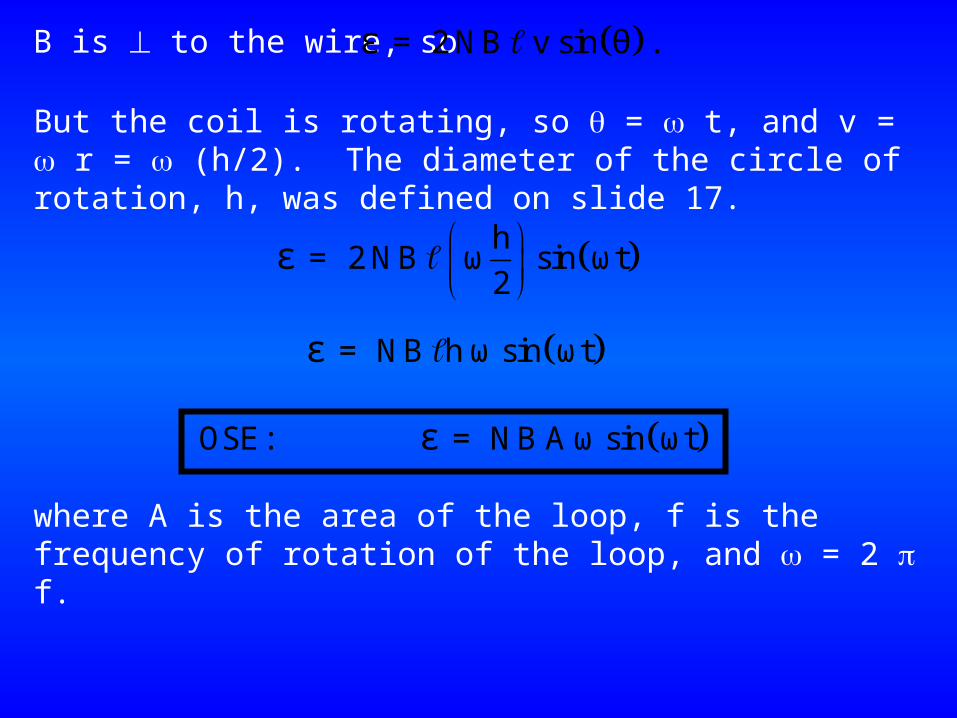
B is to the wire, so = 2 N B v sin θ .ε
But the coil is rotating, so = t, and v = r = (h/2). The diameter of the circle of rotation, h, was defined on slide 17.
h = 2 N B ω sin ωt
2ε
= N B h ω sin ωt ε
OSE: = N B A ω sin ωt ε
where A is the area of the loop, f is the frequency of rotation of the loop, and = 2 f.
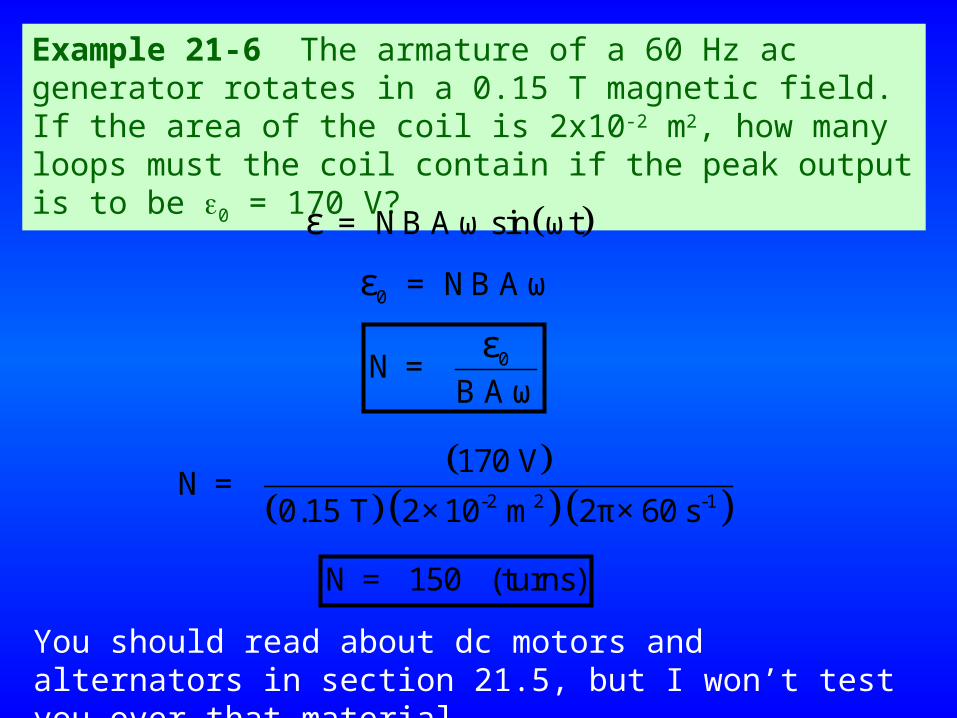
Example 21-6 The armature of a 60 Hz ac generator rotates in a 0.15 T magnetic field. If the area of the coil is 2x10⁻² m2, how many loops must the coil contain if the peak output is to be 0 = 170 V?
= N B A ω sin ωt ε
0 = N B A ωε
0N = B A ω
ε
-2 2 -1
170 VN =
0.15 T 2×10 m 2π×60 s
N = 150 (turns)
You should read about dc motors and alternators in section 21.5, but I won’t test you over that material.