nobles tidy-vac ul op parts - floor equipment parts nobles tidy-vac is designed for the vacuuming of...
TRANSCRIPT

Tidy-VacVacuum Cleaner · Aspirateur · Aspiradora
NOBLES12875 RANSOM STREETHOLLAND MI 49424
1-800-365-6625616-994-4000FAX: 1-800-678-4240
Models No.:610784 with 1.25� Attachments610785 with 1.5� Attachments
Operator and Parts Manual
Mode d'Emploi et Liste despièces Détachées
Manual de operador y piezas
�
611715Rev. 03 (02-03)

Vacuum cleaner/ Aspirateur à poussière/ Aspiradora
2 (02-02)
Contents / Table des matières / Índice GB 4
GB.1 INTRODUCTION 4
GB.2 SAFETY PRECAUTIONS 4
GB.3 MODIFICATIONS 5
GB.4 MACHINE COMPONENTS 5
GB.5 MACHINE INSTALLATION 5GB.5.1 Machine contents 5GB.5.2 Assembly of the suction hose, hand tubes and nozzle: 5
GB.6 MACHINE SETUP 5
GB.7 MACHINE OPERATION 5
GB.8 STORING MACHINE 6
GB.9 MAINTENANCE ADVICE 6GB.9.1 Regular maintenance 6GB.9.2 Replacement of Filters 6
GB.9.2.1 Paper filter bag 6GB.9.2.2 Micro filter 7GB.9.2.3 Exhaust filter 7
GB.9.3 Changing the power cord 7GB.9.4 Spares and accessories 7
GB.10. TROUBLE SHOOTING 7
F 8
F.1 INTRODUCTION 8
F.2 PRÉCAUTIONS DE SÉCURITÉ 8
F.3 MODIFICATIONS 9
F.4 COMPOSANTES DE L�APPAREIL 9
F.5 INSTALLATION DE L'APPAREIL 9F.5.1 Contenu de l'appareil 9F.5.2 Assembler le tuyau d'aspiration, les tuyaux rigides et l'embout : 10
F.6 PRÉPARATION DE L'APPAREIL 10
F.7 FONCTIONNEMENT DE L'APPAREIL 10
F.8 RANGEMENT DE L'ASPIRATEUR 10
F.9 CONSEILS POUR LA MAINTENANCE 10F.9.1 Maintenance normale 10F.9.2 Remplacement des filtres 10
F.9.2.1 Sacs filtre papier 10F.9.2.2 Micro filter 11F.9.2.3 Filtre d'aspiration 11
F.9.3 Remplacement du fil électrique 11F.9.4 Pièces de rechange et accessoires 12
F.10 PANNES ET DÉPANNAGE 12
SP 13
SP.1 INTRODUCCIÓN 13
SP.2 PRECAUCIONES DE SEGURIDAD 13Instrucciones para la puesta a tierra 14
SP.3 MODIFICACIONES 14
SP.4 PIEZAS DE LA ASPIRADORA 14

Vacuum cleaner/ Aspirateur à poussière/ Aspiradora
(02-02) 3
SP.5 INSTALACIÓN DE LA MÁQUINA 14SP.5.1 Contenido de la aspiradora 14SP.5.2 Montaje del tubo flexible de aspiración, de los tubos manuales y de la tobera 15
SP.6 PREPARACIÓN DE LA ASPIRADORA 15
SP.7 USO DE LA ASPIRADORA 15
SP.8 GUARDAR LA ASPIRADORA 15
SP.9 AVISOS DE MANTENIMIENTO 15SP.9.1 Mantenimiento periódico 15SP.9.2 Sustitución de filtros 15
SP.9.2.1 Bolsa de filtro de papel 15SP.9.2.2 Microfiltro 16SP.9.2.3 Filtro de escape 16
SP.9.3 Cambio del cable de la red 16SP.9.4 Repuestos y accesorios 16
SP.10 ELIMINACIÓN DE FALLAS 16
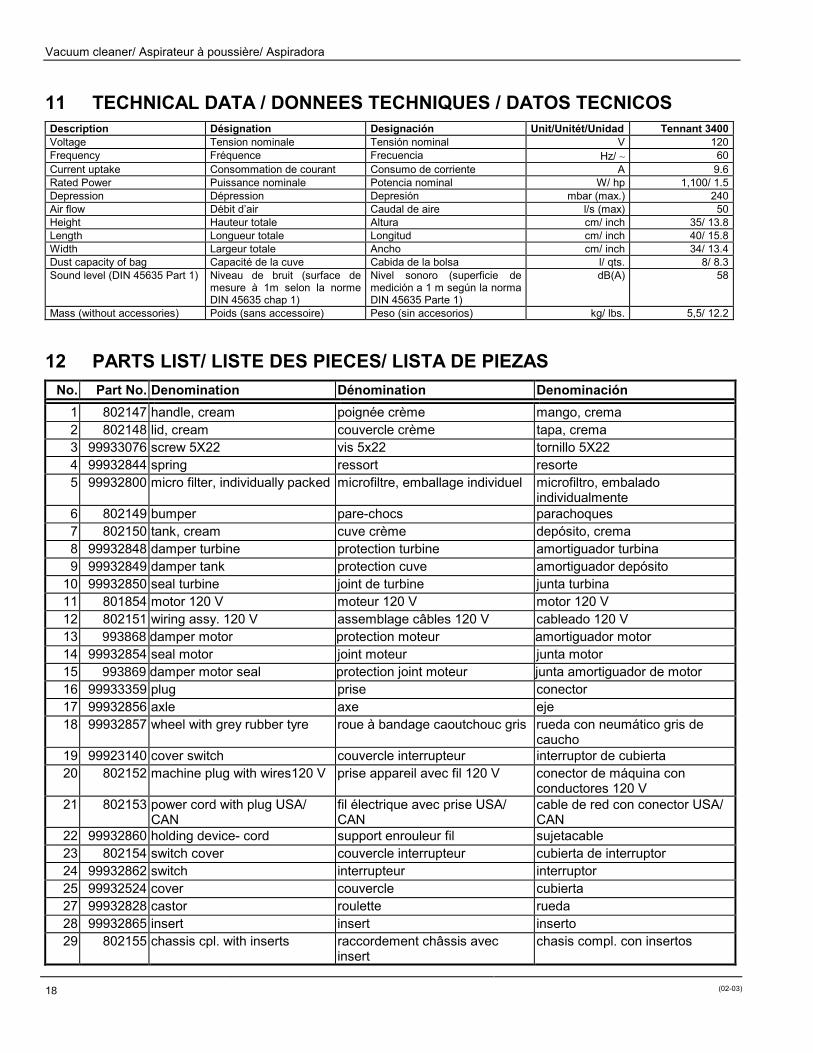
11 TECHNICAL DATA / DONNÉES TECHNIQUES / DATOS TÉCNICOS 18
12 PARTS LIST/ LISTE DES PIÈCES/ LISTA DE PIEZAS 18
13 BLOW UP DIAGRAM / ECLATÉ TECHNIQUE / DESPIECE 20
14 WIRING DIAGRAM/ SCHÉMA DE CÂBLAGE/ ESQUEMA DE CONDUCTORES 21
Copyright 2002 Tennant Company
Vacuum cleaner/ Aspirateur à poussière/ Aspiradora
GB
4 (02-02)
GB.1 INTRODUCTIONYour new Nobles Tidy-Vac Commercial Vacuum Cleaning Machineis designed for the professional daily maintenance of carpets. If thesafety precautions and maintenance instructions are strictlyadhered to, you will enjoy many years of trouble free operation. Aprovision is that this manual is carefully read and understood by alloperators. In the unlikely event of technical defects or faults thenplease contact your nearest Tennant dealer.
GB.2 SAFETY PRECAUTIONSThe Nobles Tidy-Vac is designed for the vacuuming of non-explosive dusts. It is designed for commercial vacuumcleaning applications e.g. hospitals, hotels, schools, officesand factories.All electrical parts are thoroughly secured and protected andcan only be removed with the correct tools.The following safety alert symbols are used throughout thismanual as indicated in their description:
WARNING:To warn of hazards or unsafe practices whichcould result in severe personal injury or death.
For safety:To identify actions which must be followed for safe operationof equipment.
IMPORTANT SAFETYINSTRUCTIONS
WHEN USING AN ELECTRICAL APPLIANCE, BASICPRECAUTIONS SHOULD ALWAYS BE FOLLOWED,INCLUDING THE FOLLOWING:
READ ALLINSTRUCTIONS BEFOREUSING THIS APPLIANCE
WARNING:To reduce the risk of fire, explosion, electricalshock, or injury:
1. DO NOT USE TO PICK UP FLAMMABLE ORCOMBUSTIBLE MATERIAL, SUCH AS GASOLINE, ORUSE IN AREAS WHERE THEY MAY BE PRESENT.
2. DO NOT LEAVE APPLIANCE WHEN PLUGGED IN.UNPLUG FROM OUTLET WHEN NOT IN USE ANDBEFORE SERVICING.
3. WARNING � TO REDUCE THE RISK OF ELECTRICSHOCK � DO NOT USE ON WET SURFACES OROUTDOORS. DO NOT EXPOSE TO RAIN. STOREINDOORS.
4. DO NOT ALLOW TO BE USED AS A TOY. CLOSEATTENTION IS NECESSARY WHEN USED BY ORNEAR CHILDREN.
5. USE ONLY AS DESCRIBED IN THIS MANUAL. USEONLY MANUFACTURERS RECOMMENDEDATTACHMENTS.
6. DO NOT USE WITH DAMAGED CORD OR PLUG. IFAPPLIANCE IS NOT WORKING AS IT SHOULD, HASBEEN DROPPED, DAMAGED, LEFT OUTDOORS ORDROPPED INTO WATER, RETURN IT INTO A SERVICECENTER.
7. DO NOT PULL OR CARRY BY CORD, USE CORD AS AHANDLE, CLOSE A DOOR ON CORD, OR PULL CORDAROUND SHARP EDGES OR CORNERS. DO NOTRUN APPLIANCE OVER CORD. KEEP CORD AWAYFROM HEATED SURFACES.
8. DO NOT UNPLUG BY PULLING ON CORD. TOUNPLUG, GRASP THE PLUG, NOT THE CORD.
9. DO NOT HANDLE PLUG OR APPLIANCE WITH WETHANDS.
10. DO NOT PUT ANY OBJECT INTO OPENINGS. DONOT USE WITH ANY OPENING BLOCKED; KEEPFREE OF DUST, LINT, HAIR AND ANYTHING THATMAY REDUCE AIR FLOW.
11. KEEP HAIR, LOOSE CLOTHING, FINGERS, AND ALLPARTS OF BODY AWAY FROM OPENINGS ANDMOVING PARTS.
12. TURN OFF ALL CONTROLS BEFORE UNPLUGGING.13. USE EXTRA CARE WHEN CLEANING ON STAIRS.14. ALWAYS TURN OFF THIS APPLIANCE BEFORE
CONNECTING OR DISCONNECTING MOTORIZEDNOZZLE.
15. CONNECT TO A PROPERLY GROUNDED OUTLETONLY. SEE GROUNDING INSTRUCTIONS.
16. DO NOT PICK UP ANYTHING THAT IS BURNING ORSMOKING, SUCH AS CIGARETTES, MATCHES ORHOT ASHES.
17. DO NOT USE WITHOUT FILTER CARTRIDGE ANDPAPER FILTER BAG IN PLACE.
18. DO NOT USE FOR VACUUMING OF TOXICMATERIAL.
SAVE THESEINSTRUCTIONS!
GROUNDING INSTRUCTIONSThis appliance must be grounded. If it should malfunction orbreakdown, grounding provides a path of least resistance forelectrical current to reduce the risk of electrical shock. Thisappliance is equipped with a cord having an equipment-grounding conductor and grounding plug. The plug must beinserted into an appropriate outlet that is properly installedand grounded in accordance with all local codes andordinances.

GB Vacuum cleaner/ Aspirateur à poussière/ Aspiradora
(02-02) 5
WARNING � Improper connection of the equipment-grounding conductor can result in a risk of electrical shock.Check with a qualified electrician or service person if youare in doubt as to whether the outlet is properly grounded.Do not modify the plug provided with the appliance � if it willnot fit the outlet, have a proper outlet installed by a qualifiedelectrician.
WARNING:Hazardous Voltage. Shock or electrocution canresult. Unplug machine before servicing.
GB.3 MODIFICATIONS
Note: We would like to point out that only original partsand accessories are to be used. Failure to adhereto these recommendations could result inmachine failure and damage that will not becovered by the appliances warranty. Damagedequipment could also result in injury to persons.
The manufacturer, its distributors and agentscannot be held responsible at all for any damageor injury whatsoever, caused by the improper useof the appliance, unauthorized use, unauthorizedmodifications or non-original spares.
GB.4 MACHINE COMPONENTS
1 Hose connector2 Bent tube3 Hand tube4 Tank coupling5 Nozzle6 Cover7 Handle
8 Opening spring9 On/ Off switch10 Power supply cord
GB.5 MACHINE INSTALLATIONGB.5.1 Machine contentsCarefully check carton for signs of damage. Report damages tocarrier immediately.Check machine contents to ensure carton is complete. Contactdistributor for missing items.Machine contents:• Tank• Cover with handle• Filter cartridge (inside tank)• Paper filter bag (inside tank)• Exhaust filter (pre-installed)• Hand tubes (two pieces)• Bent tube• Flexible suction hose• Nozzle.
GB.5.2 Assembly of the suction hose, hand tubesand nozzle:
WARNING Hazardous Voltage. Shock or electrocution canresult. Unplug machine before servicing.
• Holding the rubber cuff of the suction hose coupling, insert it
into the tank coupling and rotate it clockwise.• Assemble the two hand tubes and bent tube by simply pushing
them together. Now fit the nozzle to the lower end of the handtubes and connect the end of the suction hose to the bent tube.
Note: The length of the wand may be adjusted to suitthe operator. Simply remove the bent tube, turn itaround and reinsert it into the straight section.
GB.6 MACHINE SETUPEnsure that the paper filter bag and filter cartridge are in the tank ofthe machine and correctly positioned. Always ensure that filters areclean and that the suction hose, wand and nozzle are not blocked.
GB.7 MACHINE OPERATIONFOR SAFETY: Do not operate machine unless operatormanual is read and understood.• Connect the plug to the main supply and switch the machine on
by depressing the ON/OFF switch.• Begin vacuuming floor. Operate machine with a back and forth
motion.• Taking off wand and floor nozzle, the end of the flexible tube
can be used as a upholstery tool or crevice nozzle.• To stop vacuuming, switch the machine off by depressing the
ON/OFF switch.• Disconnect the plug from the main supply wall socket. Do not
pull on the cord as it may be damaged.• Always wind up the cord and hang it on the handle/cord hanger
on the top cover of the machine.

Vacuum cleaner/ Aspirateur à poussière/ Aspiradora
GB
6 (02-02)
WARNING:Do not use to pick up flammable or combustiblematerial or use in areas where they may bepresent.
GB.8 STORING MACHINE When machine not in use, cord should be wound around handle onlid and kept away from moving or hot parts. Store machine in a dryarea. Attention: Do not expose to rain. Store indoors. Keep out of the reach of children.
GB.9 MAINTENANCE ADVICE GB.9.1 Regular maintenance
WARNINGAlways disconnect the plug from the main supplybefore commencing any cleaning or maintenanceof the machine. Always refer to the manufacturerstechnical data and instructions when replacingany parts.
Regular maintenance has 4 stages: Daily inspection:• Visually inspect machine for any damaged parts, damaged
cords or electrical connections and• Check that the paper filter bag is neither full nor damaged. Monthly maintenance:• Check the brush strips on the floor nozzle - if worn out these
should be changed.• Check the cartridge filter - should it be cleaned or replaced? 6 month maintenance:• Change the exhaust filter. Annual check up:• Clean the cord and inspect for damaged insulation.• Clean and lubricate the wheels and castors.• Check all machine functions.
GB.9.2 Replacement of Filters
Note: Please use only original Tennant filters and takenote of the instructions on the filter or filter pack!
Spare filters can be purchased from your Tennant distributor.Please note that only genuine Tennant filters are guaranteed to givea constant high filter performance.
WARNINGHazardous Voltage. Shock or electrocution canresult. Unplug machine before servicing.
For every maintenance operation not included in the above, theuser has to contact an authorised service representative. GB.9.2.1 Paper filter bag• Please take note of the information printed on each original
paper filter bag - it will assist you when changing the bag.
• Firstly hold the coupling of the suction hose, rotate this anti-
clockwise and remove the coupling from the tank connector.
• Hold onto the tab of the filter bag closing flange and gently pull
upwards. This will automatically close the flange (preventing anydust from escaping) and the bag will slide upwards and out ofthe tank

GB Vacuum cleaner/ Aspirateur à poussière/ Aspiradora
(02-02) 7
• The new paper filter bag may now be installed. Simply locatethe cardboard edges of the paper bag mounting plate into thelocating grooves in the tank and slide the bag down intoposition.
• The suction hose coupling may now be reinserted into the tank
socket - insert the coupling and lock into position by rotatingclockwise.
GB.9.2.2 Micro filter
The micro filter is secured in position above the motor by means ofa simple press fitting. Two recesses, in the motor hood, below thecartridge filter, on the left and right sides, allow you to insert themiddle fingers of both the left and right hands and gently pullupwards on the underside of the cartridge filter. To replace the newor cleaned cartridge simply push it gently downwards onto themounting ring. GB.9.2.3 Exhaust filter The exhaust filter is designed to primarily filter the carbon dust fromthe carbon brushes of the motor. It is situated on the front of themachine, in the chassis, under the tank socket. Pull the filteroutwards by firmly holding onto the black plastic tab/handle. Openthe filter frame which now exposes the filter fleece. Replace thefleece, close the frame and reinsert it into the machine. The exhaust filter should be changed at least every six months.
GB.9.3 Changing the power cord
• A damaged cord can be easily replaced. After disconnecting theplug from the main power supply, turn the machine over toexpose the chassis. Slide the plug retaining clip forwards andflip upwards to expose the plug. Remove the old plug with cordand reinsert the new plug with cord. Flip the retaining clip downand slide it back. A click will be heard once it is in position.
FOR SAFETY: When servicing machine, unplug cordfrom wall outlet. Use manufacturer supplied or approvedreplacement parts.
GB.9.4 Spares and accessoriesShould you require spares, accessories or consumables, pleasecontact your distributor.
GB.10. TROUBLE SHOOTINGPROBLEM CAUSE SOLUTIONMachine does not operate Faulty power cord. Change power cord.
Faulty On/Off switch. Contact Service Center.Loose wiring. Contact Service Center.Building circuit breaker tripped. Reset circuit breaker.Internal thermal overload sensor tripped. Disconnect the cord from the main supply for at
least 20 minutes. Remove air obstruction. Motor willrestart when the temperature has cooled down.
Worn carbon brushes in vacuum motor. Contact Service CenterDefective vacuum motor. Contact Service Center
Poor vacuum performance Full bag. Replace bag.Clogged cartridge filter. Replace secondary filter.Loose vacuum hose connections. Tighten hose connections.Defective vacuum hose. Replace hose.Tank lid not closed tightly. Close lid.Clogged hose. Remove clogged material.Clogged tank coupling. Remove clogged material.
Poor brush pick-up. Entangled debris in brush. Remove clogged material.Worn brushes. Replace brush strips.Worn nozzle wheels. Replace wheels.
Vacuum cleaner/ Aspirateur à poussière/ Aspiradora
F
8 (02-02)
F.1 INTRODUCTIONVotre nouvel machine de nettoyage commerciale Nobles Tidy-Vacest destiné à la maintenance industrielle quotidienne des tapis etmoquettes. Si vous respectez toutes les précautions de sécurité etles instructions de maintenance, cet appareil vous assurerapendant de longues années un fonctionnement parfait. L'utilisateurdoit impérativement lire attentivement et bien comprendre tout lecontenu de ce mode d'emploi. Si malgré tous nos contrôles vousdeviez constater un défaut technique ou une panne, veuillezcontacter votre revendeur Tennant le plus proche.
F.2 PRECAUTIONS DE SECURITELe Tidy-Vac est destiné à l'aspiration de poussières nonexplosives. Il est prévu pour une utilisation industrielle, par ex.dans des hôpitaux, hôtels, écoles, bureaux et usines.Toutes les pièces électriques sont soigneusement protégées etpeuvent être démontées uniquement à l'aide des outils prévusà cet effet.Vous trouverez ci-dessous l'explication des symbolesd'avertissement qui sont utilisés dans ce mode d'emploi.
AVERTISSEMENT :Avertit des dangers ou des utilisations risquéesqui peuvent entraîner des blessures graves ou lamort.
ATTENTION: Indique la marche à suivre pour une utilisation del'équipement en toute sécurité.
IMPORTANT MESURESDE SECURITE
L�UTILISATION D�UN APPAREIL ELECTRIQUEDEMANDE CERTAINES PRECAUTIONS:
Lire toutes les instructionsavant de faire fonctionner
cet appareilAVERTISSEMENT :Pour réduire les risques d�incendie, l�explosion,de choc électrique ou de blessure :
1. NE PAS ASPIRER DES LIQUIDES INFLAMMABLES OUCOMBUSTIBLES, COMME DE L�ESSENCE, ET NE PASFAIRE FONCTIONNER DANS DES ENDROITS OU PEUVENTSE TROUVER DE TELS LIQUIDES.
2. NE PAS LAISSER L�APPAREIL SANS SURVEILLANCELORSQU�IL EST BRANCHE. DEBRANCHER LORSQUEL�APPAREIL N�EST PAS UTILISE ET AVANT L�ENTRETIEN.
3. AVERTISSEMENT. POUR REDUIRE LES RISQUES DECHOC ELECTRIQUE, NE PAS ASPIRER DES MATIERESHUMIDES, NE PAS EXPOSER A LA PLUIE ET RANGER
L�ASPIRATEUR A L�INTERIEUR.4. NE PAS PERMETTRE AUX ENFANTS DE JOUER AVEC
L�APPAREIL. UNE ATTENTION PARTICULIERE ESTNECESSAIRE LORSQUE L�APPAREIL EST UTILISE PAR DESENFANTS OU A PROXIMITE DES CES DERNIERS.
5. N�UTILISER QUE CONFORMEMENT A CETTE NOTICE AVECLES ACCESSOIRES RECOMMANDES PAR LE FABRICANT.
6. NE PAS UTILISER SI LE CORDON OU LA FICHE ESTENDOMMAGE. RETOURNER L�APPAREIL A UN ATELIER DEREPARATION S�IL NE FONCTIONNE PAS BIEN, S�IL ESTTOMBE OU S�IL A ETE ENDOMMAGE, OUBLIE AL�EXTERIEUR OU IMMERGE.
7. NE PAS TIRER SOULEVER NI TRAINER L�APPAREIL PARLE CORDON. NE PAS UTILISER LE CORDON COMME UNEPOIGNEE, LE COINCER DANS L�EMBRASURE D�UNEPORTE OU L�APPUYER CONTRE DES ARETES VIVES OUDES COINS. NE PAS FAIRE ROULER L�APPAREIL SUR LECORDON. GARDER LE CORDON A L�ECART DESSURFACES CHAUDES.
8. NE PAS DEBRANCHER EN TIRANT SUR LE CORDON.TIRER PLUTOT LA FICHE.
9. NE PAS TOUCHER LA FICHE NI APPAREIL LORSQUE VOSMAINS SONT HUMIDES.
10. N�INSERER AUCUN OBJET DANS LES OUVERTURES. NEPAS UTILISER L�APPAREIL LORSQU�UNE OUVERTURE ESTBLOQUEE. S�ASSURER QUE DE LA POUSSIERE, DE LAPELUCHE, DES CHEVEUX OU D�AUTRES MATIERES NEREDUISENT PAS LE DEBIT D�AIR.
11. MAINTENIR LES CHEVEUX, LES VETEMENTS AMPLES,LES DOIGTS ET TOUTES LES PARTIES DU CORPS AL�ECART DES OUVERTURES ET DES PIECES MOBILES.
12. METTRE TOUTES LES COMMANDES A LA POSITIONARRÊT AVANT DE DEBRANCHER L�APPAREIL.
13. USER DE PRUDENCE LORS DU NETTOYAGE DESESCALIERS.
14. TOUJOURS METTRE L�INTERRUPTEUR DE L�APPAREIL ALA POSITION ARRÊT AVANT DE BRANCHER OU DEDEBRANCHER LA BROSSE A MOTEUR.
15. NE BRANCHER QU�A UNE PRISE DE COURANT AVEC MISEA LA TERRE. VOIR LES INSTRUCTION VISANT LA MISE ALA TERRE.
16. NE PAS ASPIRER DES MATIERES EN COMBUSTION OUQUI DEGAGENT DE LA FUMEE, COMME DES CIGARETTES,DES ALLUMETTES OU DES CENDRES CHAUDES.
17. NE PAS UTILISER L�APPAREIL SI LE SAC A POUSSIERE OULE FILTRE N�EST PAS EN PLACE.
18. POUR L�ASPIRATION DE POUSSIERE TOXIQUES.
CONSERVER CESINSTRUCTIONS

F Vacuum cleaner/ Aspirateur à poussière/ Aspiradora
(02-02) 9
Instructions visant la mise à la terreCet appareil doit être mis à terre. En cas de défaillance oude panne, la mise à la terre fournit au courant un chemin demoindre résistance qui réduit le risque de choc électrique.Cet appareil est pourvu d�un cordon muni d�un conducteurde terre et d�une fiche avec broche de terre. La fiche doitêtre branchée dans une prise appropriée correctementinstallée et mise à la terre conformément aux règlements etordonnances municipaux.
AVERTISSEMENT. Un conducteur de terre malraccordé peut entraîner un risque de choc électrique.Consulter un électricien ou un technicien d�entretien qualifiése vous n�êtes pas certain que la prise est correctementmise à la terre. Ne pas modifier la fiche fournie avecl�appareil � si elle ne peut être insérée dans la prise, faireinstaller une prise adéquate par un électricien qualifié.
AVERTISSEMENT :Voltage dangereux pouvant entraîner chocsélectriques ou électrocution. Débrancherl'appareil avant toute maintenance.
F.3 MODIFICATIONSAttention: Nous attirons votre attention sur la nécessité
d'utiliser uniquement des pièces et accessoiresd'origine. Le défaut de respect de cesrecommandations peut provoquer sur l'appareildes pannes et des dommages qui ne seront pascouverts par la garantie. Un équipementdéfectueux peut également causer desblessures aux personnes.
Le fabricant, ses distributeurs et agents nepeuvent être tenus responsables d'acundommage ou blessure dû à une utilisationincorrecte de l'appareil, à un usage nonapproprié, à des modifications faites sansautorisation ou à des pièces de rechange nonoriginales.
F.4 COMPOSANTES DEL�APPAREIL
1 Connexion tuyau2 Coude3 Manche4 Raccordement cuve5 Embout6 Couvercle7 Poignée8 Ressort9 Interrupteur10 Fil électrique
F.5 INSTALLATION DEL'APPAREILF.5.1 Contenu de l'appareilVérifier soigneusement l'emballage. En cas de signes apparents dedommages sur le carton, avertissez immédiatement le transporteur.Vérifiez le contenu du carton afin de vous assurer que l'aspirateurest complet. Contactez votre distributeur s'il manque desaccessoires.L'appareil se compose de :• Cuve• Couvercle avec poignée• Cartouche filtre (à l'intérieur de la cuve)• Sac filtre papier (à l'intérieur de la cuve)• Filtre d'aspiration (prémonté)• Tube rigide (deux parties)• Coude• Tuyau d'aspiration souple• Embout.

Vacuum cleaner/ Aspirateur à poussière/ Aspiradora
F
10 (02-02)
F.5.2 Assembler le tuyau d'aspiration, lestuyaux rigides et l'embout :
AVERTISSEMENT Voltage dangereux pouvant entraîner chocsélectriques ou électrocution. Débrancher l'appareilavant toute maintenance.
• Tenir le raccord en caoutchouc du tuyau d'aspiration et
l'engager dans le raccord de branchement de la cuve, tournerensuite dans le sens des aiguilles d'une montre.
• Assembler les deux parties du tube rigide en les poussant l'unedans l'autre. Placer ensuite l'embout sur la partie inférieure dutuyau et relier le tuyau souple d'aspiration au coude du tuyaurigide.
Attention: La longueur du manche est réglable selon lataille de l'utilisateur. Il suffit de démonter lecoude et de le régler en tournant puis de leremettre en place sur la section droite.
F.6 PREPARATION DEL'APPAREIL Vérifier que le sac filtre en papier et la cartouche filtre sont bien enplace dans la cuve de l'aspirateur est correctement positionné.Vérifier toujours que les filtres sont propres et que le manche etl'embout sont bien fixés.
F.7 FONCTIONNEMENT DEL'APPAREIL Bien lire et comprendre les PRÉCAUTIONS DE SÉCURITÉ avanttoute utilisation de l'appareil.• Brancher la fiche dans la prise de courant d'alimentation et
mettre l'aspirateur en marche en appuyant sur l'interrupteur deMARCHE / ARRÊT (ON/OFF).
• Commencez à passer l'aspirateur. Faire un mouvement de vaet vient avec l'appareil.
• Après avoir enlevé le manche et l'embout vous pouvez utiliser letuyau flexible pour les tissus d'ameublement ou les rainures.
• Pour arrêter l'aspirateur, couper l'alimentation en appuyant surl'interrupteur ON/FF.
• Débranchez l'alimentation électrique en enlevant la fiche de laprise murale. Ne pas tirer sur le fil pour ne pas l'endommager.
• Enroulez toujours le fil et accrochez-le au support de poignée/filplacé sur le couvercle de l'appareil.
AVERTISSEMENT No use la maquina para recoger liquidosinflamables o combustibles, como gasolina ;tampoco la use en areas en donde haya talessustancias.
F.8 RANGEMENT DEL'ASPIRATEUR Quand la machine n�est pas en emploi le fil électrique soit enrouléautour de l�anse du couvercle et soit tenu éloigné des partiesmobiles et chaudes. Ranger l'aspirateur dans un endroit sec.
Avertissement: Ne pas l'exposer à la pluie. Ranger à l'intérieur. Ne pas laisser à la portée des enfants.
F.9 CONSEILS POUR LAMAINTENANCE F.9.1 Maintenance normale
AVERTISSEMENTPour éviter tout danger lié au courant électrique,débrancher la fiche d'alimentation avant decommencer le nottoyage ou la maintenance del'appareil. Toujours se reporter aux donnéestechniques du constructeur et suivre sesinstructions pour le remplacement de toute pièce.
La maintenance normale se divise en 4 étapes : Contrôle quotidien :• inspection visuelle de l'appareil pour rechercher tout dommage
sur une pièce, le fil ou les connexions électriques et• Vérification de l'état du sac filtre en papier qui ne doit être ni
plein, ni endommagé. Maintenance mensuelle :• Vérifier l'état des garnitures de la brosse de l'embout et les
remplacer si elles sont abîmées.• Vérifier la cartouche filtre - nettoyer ou remplacer le cas
échéant. Maintenance tous les 6 mois• Changer le filtre d'aspiration. Vérification annuelle :• Nettoyer le fil et vérifier le bon état de son isolation.• Nettoyer et lubrifier les roulettes et leur axes.• Vérifier toutes les fonctions de l'appareil.
AVERTISSEMENTVoltage dangereux pouvant entraîner chocsélectriques ou électrocution. Débrancherl'appareil avant toute maintenance.
Pour chaque entretien qui n�est pas enclu au susmentionnél�usager est obligé de contacter un représentant de serviceautorisé.
F.9.2 Remplacement des filtres
Attention: Utiliser uniquement des filtres originauxTennant respecter les instructions qui figurentsur le filtre ou sa cartouche !
Vous pouvez vous procurer des filtres de rechange auprès de votredistributeur Tennant. N'oubliez pas que seuls les filtres Tennantvous garantissent une filtration constante et optimale. F.9.2.1 Sacs filtre papier• Bien lire les informations imprimées sur chaque sac filtre papier
original - cela vous aidera pour le changement de ce sac.
F Vacuum cleaner/ Aspirateur à poussière/ Aspiradora
(02-02) 11
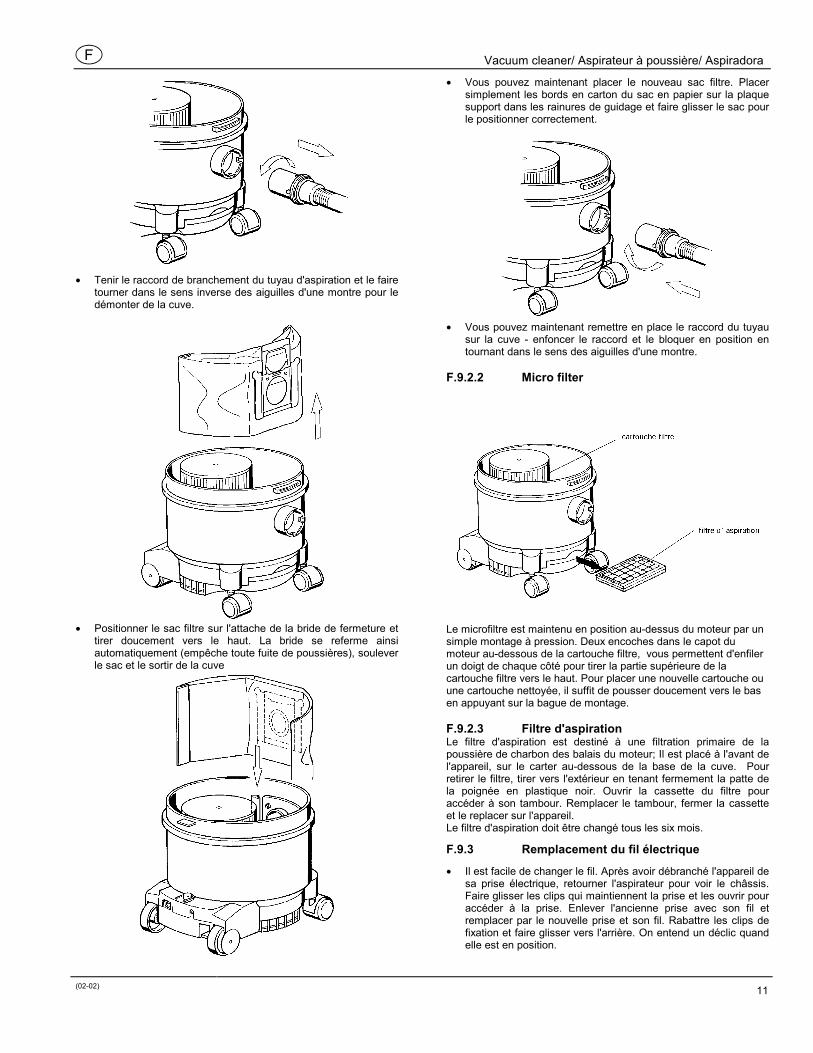
• Tenir le raccord de branchement du tuyau d'aspiration et le faire
tourner dans le sens inverse des aiguilles d'une montre pour ledémonter de la cuve.
• Positionner le sac filtre sur l'attache de la bride de fermeture et
tirer doucement vers le haut. La bride se referme ainsiautomatiquement (empêche toute fuite de poussières), souleverle sac et le sortir de la cuve
• Vous pouvez maintenant placer le nouveau sac filtre. Placersimplement les bords en carton du sac en papier sur la plaquesupport dans les rainures de guidage et faire glisser le sac pourle positionner correctement.
• Vous pouvez maintenant remettre en place le raccord du tuyau
sur la cuve - enfoncer le raccord et le bloquer en position entournant dans le sens des aiguilles d'une montre.
F.9.2.2 Micro filter
Le microfiltre est maintenu en position au-dessus du moteur par unsimple montage à pression. Deux encoches dans le capot dumoteur au-dessous de la cartouche filtre, vous permettent d'enfilerun doigt de chaque côté pour tirer la partie supérieure de lacartouche filtre vers le haut. Pour placer une nouvelle cartouche ouune cartouche nettoyée, il suffit de pousser doucement vers le basen appuyant sur la bague de montage. F.9.2.3 Filtre d'aspiration Le filtre d'aspiration est destiné à une filtration primaire de lapoussière de charbon des balais du moteur; Il est placé à l'avant del'appareil, sur le carter au-dessous de la base de la cuve. Pourretirer le filtre, tirer vers l'extérieur en tenant fermement la patte dela poignée en plastique noir. Ouvrir la cassette du filtre pouraccéder à son tambour. Remplacer le tambour, fermer la cassetteet le replacer sur l'appareil. Le filtre d'aspiration doit être changé tous les six mois.
F.9.3 Remplacement du fil électrique
• Il est facile de changer le fil. Après avoir débranché l'appareil desa prise électrique, retourner l'aspirateur pour voir le châssis.Faire glisser les clips qui maintiennent la prise et les ouvrir pouraccéder à la prise. Enlever l'ancienne prise avec son fil etremplacer par le nouvelle prise et son fil. Rabattre les clips defixation et faire glisser vers l'arrière. On entend un déclic quandelle est en position.

Vacuum cleaner/ Aspirateur à poussière/ Aspiradora
F
12 (02-02)
Attention: POUR VOTRE SÉCURITÉ : Débrancherl'appareil de la prise électrique avant deprocéder à sa maintenance. Utiliser uniquementdes pièces de rechanges fournies ou autoriséespar le fabricant.
F.9.4 Pièces de rechange et accessoires Si vous avez besoin de pièces de rechange, d'accessoires ou deconsommables, contactez votre distributeur.
F.10 PANNES ET DEPANNAGE PROBLEME CAUSE SOLUTION L'appareil ne fonctionne pas Fil électrique défectueux. Remplacer le fil. Interrupteur de marche/arrêt défectueux. Contacter le SAV. Câblage mal serré. Contacter le SAV. Déclenchement du coupe circuit intégré. Remettre le coupe-circuit à zéro. Déclenchement du détecteur de surcharge
thermique. Débrancher la fiche d'alimentation. Enlevez del�obstruction de l�air. Le moteur va démarrer soi-même dans 20 minutes après que la températureait rafraîchie.
Les balais des charbons du moteur sont usés. Contacter le SAV Moteur d'aspiration défectueux. Contacter le SAV L'aspiration est mauvaise Sac plein. Remplacer le sac. Cartouche filtre obstrué. Remplacer le filtre secondaire Branchement du tuyau d'aspiration mal serré. Resserrer les branchements du tuyau. Tuyau d'aspiration défectueux. Remplacer le tuyau. Couvercle de cuve mal fermé. Fermer le couvercle Tuyau obstrué. Enlever le matériel obstrué. Raccord de cuve obstrué. Enlever le matériel obstrué. La brosse manque d'efficacité. Déchets coincés dans les poils de la brosse. Enlever le matériel obstrué. Brosse usée. Changer les garnitures de brosse endommagées. Roulettes de l'embout usées. Remplacer les roulettes.
SP Vacuum cleaner/ Aspirateur à poussière/ Aspiradora
(02-02) 13
SP.1 INTRODUCCION Su nueva máquina de limpieza comercial Nobles Tidy-Vac ha sidoconcebida para la limpieza diaria y profesional de alfombras ymoquetas. Si se respetan minuciosamente las precauciones deseguridad y las instrucciones de mantenimiento, podrá contar conmuchos años de funcionamiento libre de averías. Ello exige, noobstante, que este manual sea leído atentamente y entendido portodos los operadores. En el caso poco probabe de fallas o defectostécnicos, debe ponerse en contacto con su concesionario Tennantmás cercano.
SP.2 PRECAUCIONES DESEGURIDAD La aspiradora Tidy-Vac ha sido concebida para aspirarpolvos no explosivos. Está destinada a la aspiracióncomercial, por ejemplo en hospitales, hoteles, escuelas,oficinas y fábricas. Todas las piezas eléctricas han sido aseguradas y protegidasampliamente, pudiendo ser extraídas sólo con herramientasadecuadas. En este manual se emplean los siguientes símbolos deadvertencia de seguridad conforme a lo descrito acontinuación:
ADVERTENCIA:para advertir sobre peligros o prácticas pocoseguras que podrían provocar heridas graves oincluso la muerte.
Para su seguridad:para identificar medidas que han de tomarse para unfuncionamiento seguro del equipo.
ADVERTENCIA: Instrucciones importantes deseguridad. Lea todas las instrucciones antes de usar laaspiradora.
INSTRUCCIONESIMPORTANTES DE
SEGURIDADAL USAR ARTEFACTOS ELECTRICOS HAN TOMARSE LASPRECAUCIONES BASICAS Y PRESTAR ATENCION A LOSIGUIENTE:
LEA TODAS LASINSTRUCCIONES ANTES DE
UTILIZAR ESTA MÁQUINA
ADVERTENCIA:Para reducir el riesgo de incendio, explosión,choque eléctrico, o lesiones:
1. NO USE LA MÁQUINA PARA RECOGER LÍQUIDOSINFLAMABLES O COMBUSTIBLES, COMO GASOLINA;TAMPOCO LA USE EN ÁREAS EN DONDE HAYA TALESSUSTANCIAS.
2. NO DEJE LA MÁQUINA CUANDO ESTÉ ENCHUFADA.DESENCHÚFELA CUANDO NO LA USE Y ENCHÚFELA
ANTES DE REPARARLA.3. ADVERTENCIA � A FIN DE REDUCIR LOS RIESGOS
DE ELECTROCUTARSE, NO USE LA MÁQUINA AL AIRELIBRE NI EN SUPERFICIES MOJADAS.
4. NO PERMITA QUE LOS NIÑOS EMPLEEN LA MÁQUINACOMO JUGUETE. PRESTE SUMA ATENCIÓN CUANDOLA UTILICE EN COMPAÑÍA DE NIÑOS O CERCA DEELLOS.
5. ÚSELA SOLAMENTE CONFORME A LASINSTRUCCIONES CONTENIDAS EN ESTE MANUAL.EMPLEE ÚNICAMENTE LOS ANEXOS RECOMENDADOSPOR EL FABRICANTE.
6. NO USE LA MÁQUINA SI TIENE EL CABLE DAÑADO O SIEL ENCHUFE ESTÁ ESTROPEADO. HAY QUEDEVOLVER LA MÁQUINA AL CENTRO DE SERVICIO SINO FUNCIONA DEBIDAMENTE O PORQUE SUFRIÓ UNGOLPE AL CAERSE, O SE DAÑÓ, O FUE DEJADA ALAIRE LIBRE O SE CAYÓ EN EL AGUA.
7. NO TIRE DE LA MAQUINA NI LA TRANSPORTE POR ELCABLE. NO USE EL CABLE PARA MANIOBRARLA. NOCIERRE LA PUERTA ENCIMA DEL CABLE. NO TIRE DELCABLE ALREDEDOR DE BORDES EMPINADOS YRINCONES ESTRECHOS. NO PERMITA QUE LAMÁQUINA CORRA POR ENCIMA DEL CABLE.MANTENGA EL CABLE ALEJADO DE SUPERFICIESCALIENTES.
8. NO DESENCHUFE LA MÁQUINA TIRANDO DEL CABLE.PARA DESCONECTARLA, RETÍRELA CON LA MANO DELA TOMA DE CORRIENTE PERO NO JALANDO ELCABLE.
9. NO MANIPULE EL ENCHUFE NI LA MÁQUINA CUANDOTENGA LAS MANOS MOJADAS.
10. NO PONGA NINGÚN TIPO DE OBJETO EN LASABERTURAS. NO USE LA MÁQUINA SI ALGUNA DE LASABERTURAS ESTÁ BLOQUEADA. MANTENGA LAMÁQUINA EXENTA DE POLVO, PELUSAS, CABELLO YCUALQUIER OTRA COSA QUE PUEDA REDUCIR ELFLUJO DE AIRE.
11. MANTENGA EL CABELLO, LA ROPA HOLGADA, LOSDEDOS Y TODAS LAS PARTES CORPORALESALEJADOS DE LAS ABERTURAS Y PIEZAS MOVILES.
12. DESCONECTE TODOS LOS CONTROLES ANTES DEDESENCHUFAR LA MAQUINA.
13. OBRE CON SUMA PRECAUCIÓN CUANDO LIMPIEESCALERAS.
14. DESCONECTE SIEMPRE LA MÁQUINA ANTES DECONECTAR O DESCONECTAR LA TOBERAMOTORIZADA.
15. CONECTE LA MÁQUINA SÓLO EN UNA TOMA DECORRIENTE PUESTA A TIERRA CORRECTAMENTE.LEA LAS INSTRUCCIONES RELATIVAS A LA PUESTA ATIERRA.
16. NO RECOJA NADA CON LA MÁQUINA QUE ESTÉARDIENDO O ECHANDO HUMO, COMO CIGARRILLOS,CERILLAS O CENIZAS CALIENTES.
17. NO USE LA MAQUINA SIN QUE EL CARTUCHO Y LABOLSA DE PAPEL FILTRANTES ESTEN EN SU SITIO.
18. NO USE LA MÁQUINA PARA ASPIRAR POLVOSTÓXICOS.

Vacuum cleaner/ Aspirateur à poussière/ Aspiradora
SP
14 (02-02)
GUARDE ESTASINSTRUCCIONES
Instrucciones para la puesta a tierraEs indispensable enchufar esta máquina en una toma que estépuesta a tierra. En caso de que la máquina funcionase mal o seaveriase, la puesta a tierra procionará una ruta de menorresistencia a la corriente eléctrica a fin de disminuir el riesgo deelectrocutación. Esta máquina está equipada con un cable con unconductor y un enchufe puestos a tierra. El enchufe ha deinsertarse en una toma de corriente apropiada, instaladacorrectamente y puesta a tierra de conformidad con todas lasprescripciones y ordenanzas de la localidad.
ADVERTENCIA �Una conexión impropia del conductor de puesta atierra del equipo puede causar electrocución. Consulte a unelectricista calificado o al Centro de Servicio si usted no estáseguro de que la toma de corriente está puesta a tierradebidamente. No modifique el enchufe suministrado con la máquina�si éste no cabe en la toma de corriente, deje que un electricistacalificado le instale una toma apropiada.
ADVERTENCIA:Voltaje peligroso. Riesgo de choque oelectrocución. Desenchufar la aspiradora antesde iniciar trabajos de mantenimiento.
SP.3 MODIFICACIONESLe advertimos que sólo deben emplearse piezas yaccesorios originales. La falta de cumplimientode estas recomendaciones puede resultar endaños y fallas de la aspiradora no cubiertas por lagarantía. Los equipos dañados asimismo puedenprovocar heridas de personas.
El fabricante, sus distribuidores y agentes noresponderán por daños o heridas secundarios aluso indebido del aparato, a su utilización noautorizada o a modificaciones no autorizadas opiezas no originales.
SP.4 PIEZAS DE LA ASPIRADORA
1 Conector de tubo flexible2 Tubo acodado3 Tubo de mano4 Acoplamiento de depósito5 Tobera6 Tapa7 Mango8 Resorte9 Interruptor10 Cable de red
SP.5 INSTALACION DE LAMAQUINASP.5.1 Contenido de la aspiradoraControlar cuidadosamente el cartón en cuanto a indicios de daño.Los daños deben comunicarse sin demora al transportista. Contro-lar el contenido de la aspiradora para comprobar que el cartón estécompleto. Póngase en contacto con el distribuidor si faltan piezas.Contenido:• Depósito• Cubierta con asa• Cartucho de filtro (dentro del depósito)• Bolsa de filtro de papel (dentro del depósito)• Filtro de escape (preinstalado)• Tubos de mano (dos piezas)• Tubo acodado• Tubo flexible de aspiración• Tobera.

SP Vacuum cleaner/ Aspirateur à poussière/ Aspiradora
(02-02) 15
SP.5.2 Montaje del tubo flexible de aspiración, delos tubos manuales y de la tobera
ADVERTENCIA Voltaje peligroso. Riesgo de choque oelectrocución. Desenchufar la aspiradora antesde iniciar trabajos de mantenimiento.
• Sujetando el manguito de goma del acoplamiento del tubo
flexible de aspiración, insertarlo en el acoplamiento del depósitoy girar en sentido de las agujas del reloj.
• Montar los dos tubos de mano y el tubo acodado juntándolos.Montar ahora la tobera al extremo inferior de los tubosmanuales y conectar el extremo del tubo flexible de aspiraciónal tubo acodado.
El largo puede adaptarse al operador respectivo.Basta con quitar el tubo acodado, darlo vuelta yreinsertarlo en la parte recta.
SP.6 PREPARACIÓN DE LAASPIRADORA Cerciórese de que la bolsa de filtro de papel y el cartucho de filtrose encuentren en el depósito de la máquina, estandocorrectamente posicionados. Cerciórese siempre que los filtrosestén limpios y que el tubo flexible de aspiración, el tubo intermedioy la tobera no estén bloqueados.
SP.7 USO DE LA ASPIRADORA Leer y entender las PRECAUCIONES DE SEGURIDAD antes deusar la aspiradora.• Enchufar el cable de red y conectar la máquina pulsando el
interruptor ON/OFF.• Aspirar moviendo la máquina hacia adelante y atrás.• Quitando el tubo intermedio y la tobera, puede emplearse el
extremo del tubo flexible para limpiar acolchados y grietas.• Para terminar la limpieza, desconectar la máquina accionando
el interruptor ON/FF.• Desenchufar la aspiradora. No tirar del cable para no dañarlo.• Siempre arrollar el cable y colgar en el dispositivo
correspondiente en la cubierta superior de la aspiradora.
PARA SU SEGURIDAD: Al usar la aspiradora nodesenchufarla tirando del cable.
SP.8 GUARDAR LA ASPIRADORACuando no se use la máquina, hay que enrollar el cable alrededorde la empuñadura en la tapa y mantenerlo distanciado de laspiezas móviles o calientes. Guardar la aspiradora en un área seca. Atención: No exponer a la lluvia. Almacenar en el interior.Mantener fuera del alcance de niños.
SP.9 AVISOS DE MANTENIMIENTO SP.9.1 Mantenimiento periódico
ADVERTENCIAPara evitar peligros eléctricos, desenchufar laaspiradora siempre antes de iniciar trabajos de
limpieza o de mantenimiento. Consultar siemprelos datos técnicos y las instrucciones delfabricante al sustituir piezas.
El mantenimiento periódico abarca 4 escalones: Inspección diaria:• Examinar visualmente la aspiradora en cuanto a pieza dañadas,
cables o conexiones eléctricas dañados y• comprobar que la bolsa de filtro de papel no esté llena ni
tampoco dañada. Mantenimiento mensual:• Controlar los cepillos de la tobera de suelo. Si estuviera
desgastados han de ser recambiados.• Controlar el cartucho de filtro para ver si debe ser limpiado o
sustituido Mantenimiento a los 6 meses• Cambiar el filtro de escape. Control anual:• Limpiar el cable y controlar en cuanto a un aislamiento dañado.• Limpiar y lubricar las ruedas y los rodillos.• Comprobar todas las funciones de la máquina.
ADVERTENCIAVoltaje peligroso. Riesgo de choque oelectrocución. Desenchufar la aspiradora antesde iniciar trabajos de mantenimiento
El usuario ha de ponerse en contacto con el representanteautorizado para efectuar el servicio cuando sea preciso hacercualquier trabajo de mantenimiento no incluído en lo antesmencionado,
SP.9.2 Sustitución de filtros
Sírvase emplear sólo filtros originales de Tennanty respete las instrucciones en el filtro o elpaquete de filtros.
Puede comprar filtros de repuesto a su distribuidor local deTennant. Tenga en cuenta que sólo los filtros orginales de Tennantestán garantizados para ofrecer un rendimiento filtrador constante yalto. SP.9.2.1 Bolsa de filtro de papel• Tenga en cuenta la información impresa en cada bolsa de filtro
de papel original - ésta le ayudará a cambiar la bolsa.
• Sujetar primero el tubo flexible de aspiración, girarlo en sentido
antihorario y quitar el acoplamiento del conector del depósito.

Vacuum cleaner/ Aspirateur à poussière/ Aspiradora
SP
16 (02-02)
• Sujetar el saliente de la brida de cierre de la bolsa de filtro y
tirarlo levemente hacia arriba. Ello cerrará automáticamente labrida (preveniendo el escape de polvo), deslizándose la bolsahacia arriba y saliendo del depósito.
• Ahora puede instalarse la nueva bolsa de filtro de papel. Basta
con colocar los bordes de cartón de la placa de montaje de labolsa de papel en las ranuras de localización en el depósito ydeslizar la bolsa a su posición debida.
• Ahora, el tubo flexible de aspiración podrá reinsertarse en elracor del depósito - insertar el acoplamiento y enclavarlo enposición mediante giro en sentido de las agujas del reloj.
SP.9.2.2 Microfiltro
El microfiltro está asegurado en posición encima del motormediante un racor de presión. Dos escotaduras, en el capó delmotor, debajo del cartucho de filtro, en los lados izquierdo yderecho, le permiten insertar los dedos corazón de las manosizquierda y derecha y extraer ligeramente hacia arriba en el ladoinferior del cartucho del filtro. Para sustituir el cartucho nuevo olimpiado, basta con empujarlo ligeramente hacia abajo en el anillode montaje. SP.9.2.3 Filtro de escape El filtro de escape ha sido concebido para filtrar en primer lugar elpolvo de carbón de las escobillas del motor. Se encuentra situadoen el frente de la máquina, en el chasis, debajo del racor deldepósito. Extraer el filtro, sujetando firmemente el saliente/mangonegro de plástico. Abrir el bastidor de filtro que revela el vellón delfiltro. Sustituir el vellón, cerrar el bastidor y reinsertar en lamáquina. El filtro de escape debe limpiarse al menos cada seis meses.
SP.9.3 Cambio del cable de la red
• Un cable dañado es fácil de sustituir. Después de desenchufarla aspiradora, darla vuelta para exponer el chasis. Deslizarhacia adelante el clip sujetaconector y mover hacia arriba paraexponer el conector. Quitar el conector viejo con cable yreinsertar el conector nuevo con cable. Bajar el clip deretención y deslizarlo hacia atrás. Escuchará un "clic" cuandose encuentra en posición.
PARA SU SEGURIDAD: Antes de iniciar trabajosde mantenimiento debe desconectar laaspiradora. Emplear piezas de repuestoautorizadas o suministradas por el fabricante.
SP.9.4 Repuestos y accesorios
Si necesita piezas de repuesto, accesorios o materiales deconsumo póngase en contacto con su distribuidor.
SP.10 ELIMINACION DE FALLASPROBLEMA CAUSA SOLUCIÓNLa máquina no funciona Cable defectuoso de la red. Cambiar cable de la red.
Interruptor On/Off defectuoso. Ponerse en contacto con el Centro de Servicio.Cableado suelto. Ponerse en contacto con el Centro de Servicio.Excitación de disyuntor. Reset del disyuntor.Activación del sensor de sobrecarga térmica. Desenchufar la aspiradora. Retire lo que obstruya
la circulación del aire. El motor volverá a arrancar

SP Vacuum cleaner/ Aspirateur à poussière/ Aspiradora
(02-02) 17
por sí mismo después de 15 a 20 minutos una vezque se haya enfriado la temperatura.
Escobillas desgastadas en el motor de laaspiradora.
Ponerse en contacto con el Centro de Servicio.
Motor defectuoso de la aspiradora. Ponerse en contacto con el Centro de Servicio.Rendimiento aspirador insuficiente Bolsa llena. Sustituir la bolsa.
Filtro de cartucho atascado. Sustituir el filtro secundario.Conexiones sueltas de tubo flexible deaspiración.
Apretar las conexiones de tubo flexible.
Tubo flexible de aspiración defectuoso. Sustituir el tubo flexible.Cierre del depósito no cerradoherméticamente.
Cerrar la tapa.
Tubo flexible atascado. Quitar todo material atascado.Acoplamiento atascado de depósito. Quitar todo material atascado.
Arrastre insuficiente de los cepillos Cepillo sucio. Quitar todo material atascado.Cepillos desgastados. Sustituir los cepillos.Ruedas de tobera desgastadas. Sustituir las ruedas.
Vacuum cleaner/ Aspirateur à poussière/ Aspiradora
18
11 TECHNICAL DATA / DONNEES TECHNIQUES / DATOS TECNICOSDescription Désignation Designación Unit/Unitét/Unidad Tennant 3400Voltage Tension nominale Tensión nominal V 120Frequency Fréquence Frecuencia Hz/ ∼ 60Current uptake Consommation de courant Consumo de corriente A 9.6Rated Power Puissance nominale Potencia nominal W/ hp 1,100/ 1.5Depression Dépression Depresión mbar (max.) 240Air flow Débit d�air Caudal de aire l/s (max) 50Height Hauteur totale Altura cm/ inch 35/ 13.8Length Longueur totale Longitud cm/ inch 40/ 15.8Width Largeur totale Ancho cm/ inch 34/ 13.4Dust capacity of bag Capacité de la cuve Cabida de la bolsa l/ qts. 8/ 8.3Sound level (DIN 45635 Part 1) Niveau de bruit (surface de
mesure à 1m selon la normeDIN 45635 chap 1)
Nivel sonoro (superficie demedición a 1 m según la normaDIN 45635 Parte 1)
dB(A) 58
Mass (without accessories) Poids (sans accessoire) Peso (sin accesorios) kg/ lbs. 5,5/ 12.2
12 PARTS LIST/ LISTE DES PIECES/ LISTA DE PIEZASNo. Part No. Denomination Dénomination Denominación
1 802147 handle, cream poignée crème mango, crema2 802148 lid, cream couvercle crème tapa, crema3 99933076 screw 5X22 vis 5x22 tornillo 5X224 99932844 spring ressort resorte5 99932800 micro filter, individually packed microfiltre, emballage individuel microfiltro, embalado
individualmente6 802149 bumper pare-chocs parachoques7 802150 tank, cream cuve crème depósito, crema8 99932848 damper turbine protection turbine amortiguador turbina9 99932849 damper tank protection cuve amortiguador depósito
10 99932850 seal turbine joint de turbine junta turbina11 801854 motor 120 V moteur 120 V motor 120 V12 802151 wiring assy. 120 V assemblage câbles 120 V cableado 120 V13 993868 damper motor protection moteur amortiguador motor14 99932854 seal motor joint moteur junta motor15 993869 damper motor seal protection joint moteur junta amortiguador de motor16 99933359 plug prise conector17 99932856 axle axe eje18 99932857 wheel with grey rubber tyre roue à bandage caoutchouc gris rueda con neumático gris de
caucho19 99923140 cover switch couvercle interrupteur interruptor de cubierta20 802152 machine plug with wires120 V prise appareil avec fil 120 V conector de máquina con
conductores 120 V21 802153 power cord with plug USA/
CANfil électrique avec prise USA/CAN
cable de red con conector USA/CAN
22 99932860 holding device- cord support enrouleur fil sujetacable23 802154 switch cover couvercle interrupteur cubierta de interruptor24 99932862 switch interrupteur interruptor25 99932524 cover couvercle cubierta27 99932828 castor roulette rueda28 99932865 insert insert inserto29 802155 chassis cpl. with inserts raccordement châssis avec
insertchasis compl. con insertos
(02-03)

Vacuum cleaner/ Aspirateur à poussière/ Aspiradora
(02-03) 19
31 801803 carbon brush 100-120 V balais de charbon 120 V escobilla de carbón 120 V32 99932868 tank coupling raccordement cuve acoplamiento de depósito33 99932869 hose connector 1.25�� connexion tuyau 1.25�� conector de tubo flexible 1.25��33 801888 hose connector 1.5�� connexion tuyau 1.5 �� conector de tubo flexible 1.5��34 99932870 seal joint d'étanchéité junta35 801614 paper filter bag, set of 10 pcs. sac filtre papier, pochette de 10 bolsa de filtro de papel, juego de
10 piezas36 801647 exhaust air filter, set of 5 pcs. filtre d'aspiration, pochette de 5 filtro de escape de aire, juego de
5 piezas37 802156 filter cassette cassette filtre casete de filtro38 802157 frame cadre bastidor39 993872 silencer air guide, middle part guide silencieux air, partie
centraleguía de aire de silenciador, partecéntrica
40 99932874 silencer air guide, side guide silencieux air, côté guía de aire de silenciador, partelateral
41 802158 exhaust air guide guide d'aspiration d'air guía de aire de escape42 99932801 hose 1.25�� cpl. tuyau rac. 1.25�� tubo flexible de 1.25�� compl.42 802159 hose 1.5�� cpl. tuyau rac. 1.5�� tubo flexible de 1.5�� compl.43 99923234 clip ring 1.25�� bague de serrage 1.25�� anillo clip 1.25��43 801932 clip ring 1.5�� bague de serrage 1.5�� anillo clip 1.5��44 99923232 screw ring 1.25�� bague filetée 1.25�� anillo roscado 1.25��44 802160 screw ring 1.5�� bague filetée 1.5�� anillo roscado 1.5��45 99923230 swivel slanted cuff 1.25�� embout pivotant inclinable 1.25�� manguito giratorio inclinado 1.25��45 801933 swivel slanted cuff 1.5�� embout pivotant inclinable 1.5�� manguito giratorio inclinado 1.5��46 99923442 bent tube 1.25�� coude 1.25�� tubo acodado 1.25��46 802161 bent tube 1.5�� coude 1.5�� tubo acodado 1.5��47 99932841 hand tube 1.25�� manche 1.25�� tubo de mano 1.25��47 802162 hand tube 1.5�� manche 1.5�� tubo de mano 1.5��48 99919330 nozzle D 306, 1.25�� embout D 306, 1.25�� tobera D 306, 1.25��48 802163 nozzle D 306, 1.5�� embout D 306, 1.5�� tobera D 306, 1.5��49 607980 decal Nobles autocollant calcomania

Vacuum cleaner/ Aspirateur à poussière/ Aspiradora
20 (02-02)
13 BLOW UP DIAGRAM / ECLATÉ TECHNIQUE / DESPIECE
Note: For safety reasons only genuine Tennant spare parts should be used! Any unauthorized opening of theappliance, technical modifications or non-original parts will annul the guarantee!
Avertissement: N'oubliez pas que la sécurité de votre appareil est garantie à condition d�utiliser des accessoires etpièces de rechange Tennant d�origine! Ouvrir l'appareil sans autorisation ou le modifier entraînel�annulation de la garantie.
Advertencia: ¡Por motivos de seguridad sólo deben utilizarse piezas originales de Tennant! ¡La apertura no autorizadadel aparato, las modificaciones técnicas o el uso de piezas no originales invalidará la garantía!
49

Vacuum cleaner/ Aspirateur à poussière/ Aspiradora
(02-02) 21
14 WIRING DIAGRAM/ SCHEMA DE CABLAGE/ ESQUEMA DECONDUCTORES
J1 plug prise conectorS1 switch interrupteur interruptorT1 thermal switch înterrupteur thermique relé térmicoM1 motor moteur motor

611764 Rev. 01 (11–01) Manual Warranty Insert
The warranty terms outlined below are in lieu of any other warranties, either expressed or implied, including any implied warranty ofmerchantability, fitness for a particular purpose or otherwise. Under no circumstances will seller be liable for any loss, damage, ex-pense or consequential damages arising in connection with the use or inability to use, these products.
This warranty does not apply to damage or defect caused by accident, misuse, negligence, abuse, fire or to any Nobles product thathas been serviced by anyone other than an authorized Nobles/Tennant service representative. Housings or parts that have becomedamaged as a result of improper use of the machine are excluded from this warranty. Refer to Owner’s Manual for proper machineuse and maintenance. Parts that are expected to wear from normal use and, therefore, are not covered under the parts warrantyinclude: batteries (warranty pro–rated for one year); bearings; belts; brushes; filters; squeegees; switches; and tires.
This warranty commences on the date of purchase of the product by the original end user from an authorized Nobles sales representa-tive, subject to proof of purchase. A Machine Installation/Warranty Report form included with the Owner’s Manual must becompleted and returned immediately at the time of purchase. If proof of purchase date is unavailable, the warranty begins 90days after the sale of the product to an authorized Nobles dealer.
Date Purchased:
Model Number:
Serial Number:
Please make sure to record this information. This information will be necessary for future warranty claims.
U.S. AND CANADIAN NEW MACHINE
Our Commitment to Customer Satisfaction
WARRANTY POLICY
Nobles � 12875 Ransom Street � Holland, MI 49424 USA � (800) 522–7839
Nobles reserves the right to change its warranty policy without notice.
10–3–3 Warranty for Walk Behind Models� Subject to the conditions outlined above, Nobles warrants the rotationally–molded polyethylene housings and parts on all of its ma-chines to be free from defects in materials and workmanship, under normal use and service for ten (10) years to the original end user.
� Under this warranty, Nobles guarantees the performance of non–polyethylene parts and components on Nobles models to be freefrom defects for up to three (3) years or 2,500 hours of operation, whichever comes first, to the original end user. Parts replaced orrepaired under this warranty are guaranteed for the remainder of the original warranty period.
� Labor charges are covered for three (3) full years from the date of purchase for Nobles products, provided an authorized Nobles/Ten-nant service provider is used for repair. Travel is covered for 90 days for battery models. No travel coverage is extended for cordelectric models or the Typhoon16 Battery unit.
10–2–6 Warranty for Rider Models� Subject to the conditions outlined above, Nobles warrants the rotationally–molded polyethylene housings and parts on its rider mod-els to be free from defects in materials and workmanship under normal use and service for ten (10) years to the original end user.
� Under this warranty, we guarantee the performance of non–polyethylene parts and components on rider models to be free fromdefects for up to two (2) years or 1,000 hours of operation, whichever comes first, to the original end user. Parts replaced or repairedunder this warranty are guaranteed for the remainder of the original warranty period.
� Travel and labor charges are covered for six (6) months from date of installation. Nobles will, at its option, provide travel (maximumof 3 hours) and labor for repair, or pay for outside repair service in accordance with Nobles Company’s flat rate schedule for certainwarranty repairs.
Product Exceptions and Exclusions: A one year warranty is extended to the original end user against manufacturing defects andworkmanship on non–wear components for these machines: Anserportable spotter; TV1200, Pathmaker,and Viper vacuums; theTidy–Vac dry canister vacuum; the Scout 27 and 28 sweepers; the Cyclone dryer; and the TrailBlazer Series. Battery chargers andall accessories are warranted for one year.