nit 2 - mr. wilsons technology site - home...
TRANSCRIPT

In this Unit:Chapter 4 Hand Tools
Chapter 5 Power Saws
Chapter 6 Other Power & Pneumatic Tools
Chapter 7 Ladders, Scaffolds, & Other Support
Tools & Equipment
UNIT 2
Starting Your Own Carpentry Business After completing this unit, you will research the cost of the tools and equipment you will need to start your own carpentry business. You will also research terms and interest rates for small-business loans and determine the monthly payment, including interest, for a loan to start your business.
Project ChecklistAs you read the chapters in this unit, use this checklist to prepare for the unit project:✓ List the tools and equipment that every
carpenter needs.✓ Identify the skills that an independent
contractor needs to be successful.✓ Think about ways high-quality tools and
equipment can save time and money, and help the environment. Go to glencoe.com for this book’s OLC.
Find the WebQuest activity for Unit 2 called “Making a Business Plan.”
104 Unit 2

Explore the PhotoTools for the Job Selecting the appropriate tool is vital to completing any job with accuracy and effi ciency. What features of this tool might help the carpenter work effi ciently?
General Contractor
Go to glencoe.com for this book’s OLC to fi nd more information about carpentry and construction careers.
Profi le A construction and building inspector examines houses, buildings, streets, water systems, and other structures. The inspector ensures that construction, remodeling, or repair complies with building codes and other regulations.
Academic Skills and Abilities ...........................................................................................
Career Path .......................................................................................................................
Construction & Building Inspector
• algebra• geometry
• verbal and written communication skills
• interpersonal skills• drafting• blueprint reading
• on-the-job training• certifi cate or associate’s
degree in building inspection technology
• community college courses• bachelor’s degree in
engineering or architecture
• apprenticeship programs• certifi cation
Unit 2 Tools & Equipment 105

Hand Tools
Discuss the PhotoHigh-Quality Tools Most professionals recommend purchasing tools of the highest quality you can afford. What characteristics do you think a good tool should have?
Writing Activity: Create a DescriptionA description is a group of words that gives a mental picture of
something. Select a common carpentry tool. Write three to fi ve sentences describing the tool. Include details such as the shape, color, and size of the tool. Share your description with another person to see if he or she can identify the tool that you have described.
Section 4.1Measuring & Layout Tools
Section 4.2Cutting & Shaping Tools
Section 4.3Tools for Assembling & Disassembling
4
Chapter ObjectivesAfter completing this chapter, you will be able to:
• Identify hand tools used for measuring and layout.
• Identify hand tools used for cutting and shaping.
• Identify hand tools used for assembling and disassembling.
• Explain what various hand tools are used for.
• Describe common mathematical problems carpenters solve using hand tools.
106 Chapter 4 Hand ToolsAlamy

Type of Tool Used for...
Content Vocabulary
Academic VocabularyYou will fi nd these words in your reading and on your tests. Use the academic vocabulary glossary to look up their defi nitions if necessary.
■ angles ■ adjacent ■ arc ■ horizontal ■ vertical
Graphic OrganizerAs you read, use a chart like the one shown to organize information about hand tools, adding rows as needed.
4
Academic Standards
Mathematics
Number and Operation: Understand numbers, ways of representing numbers, relationship among numbers, and number systems (NCTM)Number and Operations: Compute fl uently and make reasonable estimates (NCTM)Geometry: Analyze characteristics and properties of two- and three-dimensional geometric shapes and develop mathematical arguments about geometric relationships (NCTM)
English Language Arts
Use information resources to gather information and create and communicate knowledge (NCTE 8)
Science
Science and Technology: Abilities of technological design (NSES)Science and Technology: Understandings about science and technology (NSES)Physical Science: Motions and forces (NSES)Industry StandardsHand Tools
Before You Read Preview
Scan the chapter and pick out a picture of a tool you fi nd. Brainstorm what tasks you think that tool is used for. When you fi nd the tool in the text, check to see if your defi nition is correct. Change your defi nition as needed.
NCTE National Council of Teachers of EnglishNCTM National Council of Teachers of Mathematics
NSES National Science Education Standards
●● square●● level
●● wrench●● pliers
Go to glencoe.com for this book’s OLC for a downloadable version of this graphic organizer.
Chapter 4 Reading Guide 107

Tape Measures, Rules, & Other ToolsWhat are some common measuring tools?
A variety of hand tools is necessary for building a house, so a good selection of tools is essential. Some tools, such as a steel tape measure, are used in all building trades. Others are used primarily within one trade. For example, a framing square is used most often by carpenters. A square is a tool that is used primarily to measure or check angles.
Tools and TasksMembers of all trades must measure,
mark, and lay out projects many times a day. Carpenters must determine the correct angles and cuts for rafters. Plumbers must cut and assemble pipes to provide proper drainage.
Tool SafetyBefore using any measuring and layout
tools, review the safety material in Chapter 3.
Measuring & Layout Tools 4.1
Layout Tape Measure A steel or fi berglass tape in a rust-resistant case with a reel-in crank. Comes in lengths of 50', 100', and 200'. In situations that require greater accuracy, some prefer to use a steel tape. Steel tape does not display the stretch under tension that occurs in a fi berglass tape. It is used for: • Laying out foundations.• Locating site features, such as walkways and
driveways.
Steel Tape Measure A steel tape with a sliding hook on the end is accurate whether it is used for inside measurements or outside measurements. The case has a belt clip and a tape-locking button. Comes in various widths and in lengths from 6' to 33'. The tape most commonly used by carpenters is 25'. The wider the tape, the better it is at measuring long lengths unsup-ported. It is used for:• Performing general measuring tasks. • Making accurate inside measurements. The
measurement is read by adding a specifi ed amount to the reading on the tape. This amount is the length of the case.
Figure 4-1 Layout Tape Measure
Figure 4-2 Steel Tape Measure
108 Chapter 4 Hand ToolsArnold & Brown; Kevin May Corporation

Folding Rule A rigid wood rule, 6' or 8' long, that folds into a compact size. A metal slide in one end can be used for measuring depth. Uses:• Making inside measurements and measuring
the depth of a mortise or channel.• Measuring plumbing runs.
Chalk Line A chalk line is powdered chalk and a reel of string in a steel or plastic case. A hook is used to secure one end of the string. It is used for:• Quickly creating a straight layout or cutting
line over long lengths, as on panel products.• Indicating the position of walls on a subfl oor.
Carpenter’s Pencil A sturdy, thick pencil with a wood casing. The thick lead resists breakage and can be sharpened with a utility knife. Uses:• All-purpose marking and layout where great
precision is not necessary.
Try Square A fi xed-blade square with a metal blade and a wood, plastic, or metal handle. The blade may be graduated in inches and is positioned at 90° to the handle. Uses:• Checking adjacent surfaces
for squareness.• Making layout lines across
the face or edge of stock.
Caring for Tools Good tools require proper care. Keep them in a toolbox when you are not using them. Do not leave tools outdoors in wet or damp weather. Inspect hand tools regularly for signs of wear or damage. Keep cutting edges sharp. If a worn or damaged tool cannot be repaired, replace it.
Figure 4-6 Try Square
Figure 4-3 Chalk Line
Figure 4-4 Folding Rule
Figure 4-5 Carpenter’s Pencil
Section 4.1 Measuring & Layout Tools 109Arnold & Brown; Kevin May Corporation

Right Angles An angle is a fi gure created by two lines that meet at a common endpoint, or vertex. Angles are measured in degrees. A right angle is formed when two lines are perpendicular to one another. A right angle can also be defi ned as one quarter of a circle. How many degrees are in right angle?Starting Hint A full circle has 360 degrees. 1 degree is 1⁄360th of a full circle.
Sliding T-Bevel A sliding metal blade that can be set at an angle to the handle and then locked into place. Uses:• Transferring an angle, which means measuring an angle between
0° and 180° and duplicating it somewhere else.• Checking or testing a miter cut at other than 45°.
Combination Square A blade that slides along its handle or head. The handle may contain a leveling vial. The removable blade can be used as a straightedge. Uses:• Checking adjacent surfaces for a correct angle of 45° or 90°.• Making layout lines at 45° and 90° across the face or edge of stock.• Measuring the depth of a mortise or channel.• Roughly leveling or plumbing a surface.
Framing Square Sometimes called a carpenter’s square. A large metal square consisting of a blade, or body, and a tongue. Identical in general appearance is the rafter square, which has tables printed on it that contain the solutions to various rafter layout problems. Uses:• Checking for squareness.• Using as a straightedge.• Determining angle cuts
on rafters and stair parts.
Dividers/Compass A measuring tool with two metal legs. On some, one leg can be removed and replaced with a pencil, forming a com-pass (shown here). Uses:• Stepping off measurements.• Laying out an arc or circle.• Scribing (fi tting) a part such as a
countertop to a surface such as a wall that may not be perfectly straight.
Geometry
Figure 4-7 Combination Square
Figure 4-8 Sliding T-Bevel
Figure 4-10 Dividers/Compass
Figure 4-9 Framing Square
110 Chapter 4 Hand ToolsArnold & Brown; Kevin May Corporation

Triangular Framing Square A square marked with degrees for fast layouts. It also typically has marks to indicate plumb cuts for both common and hip/valley rafters. Its small size makes it easy to keep in a tool pouch. It is more durable than a standard framing square. Uses:• Performing the functions of a framing square.• Guiding power saws during crosscutting.
Carpenter’s Level A level is a long wood, metal, or fi berglass instrument with several glass leveling vials that measures the levelness or plumbness of a surface. Typical lengths are 24'', 48'', 72'', and 96'', with 48'' being the most common. It is sometimes called a spirit level (after the liquid inside the vials). Uses:• Determining whether or not a surface is level (horizontal) or plumb (vertical).
Torpedo Level A small spirit level approximately 9'' long. It has leveling vials for plumb, level, and 45° angles. Sometimes called a pocket level. Uses:• Leveling or plumbing small surfaces, such as pipes, or surfaces that are diffi cult to reach.
Laser Level A laser level uses a highly focused beam of light to project a straight, level line across a surface or through the air. An inter-nal device levels the beam automatically. Laser levels come in a variety of shapes and sizes. Some models can be used to establish plumb lines. Uses:• Establishing a level line across long
distances or on intersecting walls.• Installing shelving.• Transferring layout marks from fl oor to
ceiling.
Figure 4-11 Triangular Framing Square
Figure 4-13 Torpedo Level
Figure 4-12 Carpenter’s Level
Figure 4-14 Laser Level
Section 4.1 Measuring & Layout Tools 111Arnold & Brown; Kevin May Corporation; Courtesy of Calculated Industries

After You Read: Self-Check 1. What is a layout tape measure used for? 2. What tool can be used to indicate the position of walls on a subfl oor? 3. Which type of square can be used to check 45° angles? 4. Which tool would you use to scribe a line on metal?
Academic Integration: Science 5. Exploring Gravity Carpenters use a plumb bob to determine if walls, doors, and other
structural elements are vertical. A simple plumb bob is a weight that hangs at the end of a string. The gravity of the Earth pulls the plumb bob toward the center of the earth and the string represents a vertical line. Gravity is a force that draws objects toward one another. Use a plumb bob to test articles in your classroom to determine if they are truly vertical.
Go to glencoe.com for this book’s OLC to check your answers.
4.1
Construction Calculator A portable calculator that computes measurements directly in feet and inches. Uses:• Calculating volumes and areas.• Converting decimals to fractions.• Solving various roof framing layout problems.• Solving stairway rise/run per step equations.
Plumb Bob and String Line A metal weight with a pointed tip. The tip may be replaced if damaged. The top of the weight has a hole for attaching the string line. Uses:• Locating the corners of buildings during
foundation layout.• Establishing a true vertical line.
Scratch Awl A pointed metal marking tool. Uses:• Scribing a line accurately, particularly
on metal.• Starting a hole before drilling into wood.• As an anchoring pin for chalk or masons’ lines.
Figure 4-16 Plumb Bob and String Line
Figure 4-15 Scratch Awl
Figure 4-17 Construction Calculator
112 Chapter 4 Hand ToolsArnold & Brown; Kevin May Corporation; Courtesy of Calculated Industries
Cutting & Shaping Tools 4.2
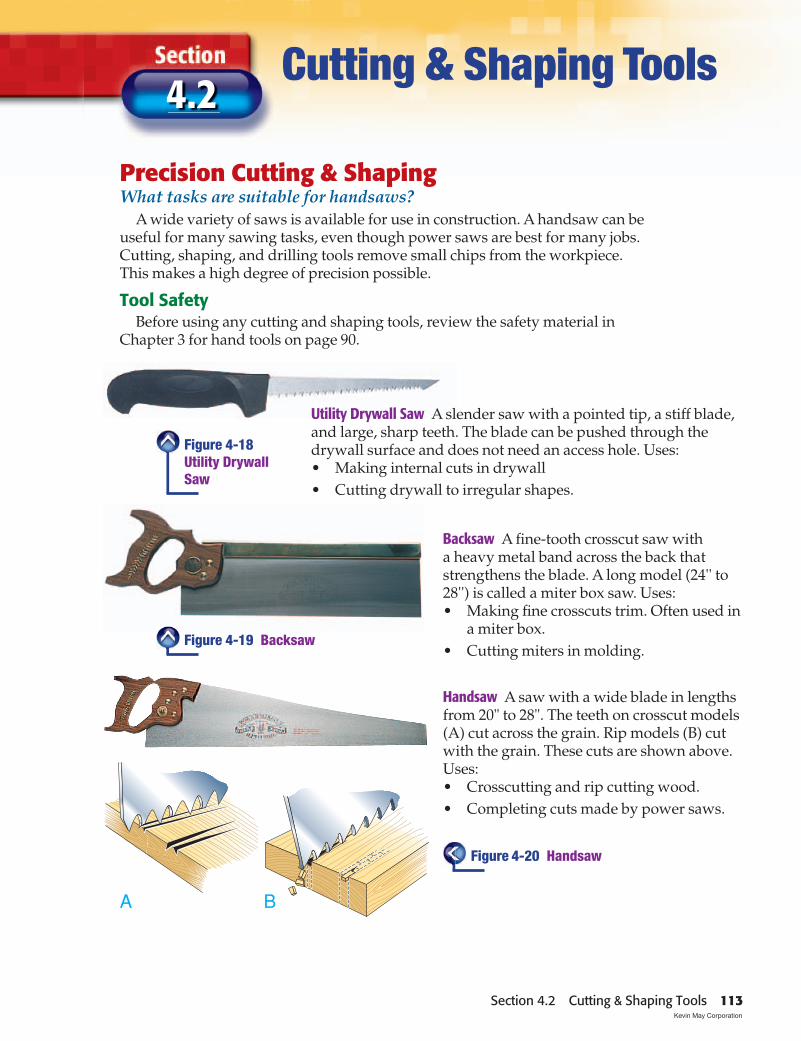
Utility Drywall Saw A slender saw with a pointed tip, a stiff blade, and large, sharp teeth. The blade can be pushed through the drywall surface and does not need an access hole. Uses:• Making internal cuts in drywall • Cutting drywall to irregular shapes.
Precision Cutting & ShapingWhat tasks are suitable for handsaws?
A wide variety of saws is available for use in construction. A handsaw can be useful for many sawing tasks, even though power saws are best for many jobs. Cutting, shaping, and drilling tools remove small chips from the workpiece. This makes a high degree of precision possible.
Tool SafetyBefore using any cutting and shaping tools, review the safety material in
Chapter 3 for hand tools on page 90.
Backsaw A fi ne-tooth crosscut saw with a heavy metal band across the back that strengthens the blade. A long model (24'' to 28'') is called a miter box saw. Uses:• Making fi ne crosscuts trim. Often used in
a miter box.• Cutting miters in molding.
Handsaw A saw with a wide blade in lengths from 20" to 28". The teeth on crosscut models (A) cut across the grain. Rip models (B) cut with the grain. These cuts are shown above. Uses:• Crosscutting and rip cutting wood.• Completing cuts made by power saws.
Figure 4-19 Backsaw
Figure 4-20 Handsaw
Figure 4-18 Utility Drywall Saw
A B
Section 4.2 Cutting & Shaping Tools 113Kevin May Corporation

Pull Saw A pull saw is used primarily for wood. It has teeth that are angled toward the handle so that they cut on the pull stroke. It is sometimes called a Japanese saw. The blade is unusually thin and the teeth have no set (deviation from a straight line). Uses:• Cutting overhead, where use of a heavier saw
would be tiring.• Making fi ne cuts, as when mitering trim
or cutting dovetails.• Cutting the base of door jambs when laying fi nish fl ooring.
Hacksaw A saw with a U-shaped steel frame fi tted with replaceable metal-cutting blades. Standard and high-tension models are avail-able. Uses:• Cutting all types of metal fasteners and
hardware.• Cutting plastic.
Keyhole Saw A saw with a narrow 10" replaceable blade with fi ne teeth. The blade tapers to a sharp point. A compass saw is similar but has slightly bigger teeth and a longer blade. Uses:• Cutting curves.• Enlarging holes.
Coping Saw A saw with a U-shaped frame having a deep throat. The replaceable 1⁄8'' wide blade with tiny teeth can be rotated to cut at various angles. Uses:• Cutting curves in wood molding and trim.• Shaping the end of molding for joints.• Cutting scroll work.
Dovetail Saw This type of saw is similar to a backsaw, but the blade is narrower and thinner, and has very fi ne teeth. Uses:• Making short, straight cuts of superior
smoothness and accuracy.• Cutting dovetails and other joints.
Figure 4-21 Hacksaw
Figure 4-24 Coping Saw
Figure 4-23 Pull Saw
Figure 4-25 Dovetail Saw
Figure 4-22 Keyhole Saw
114 Chapter 4 Hand ToolsKevin May Corporation

Block Plane A small (about 6" long) plane with a blade that cuts bevel-side up. Standard models have a blade angled 20° to the sole (bottom). Low-angle models are angled at about 12°. Uses:• Planing end grain.• Fitting doors.• Beveling an edge.
Cold Chisel A tool-steel chisel with a hardened and tempered edge for cutting metal. The angle of the beveled cutting edge is about 60°. Uses:• Cutting off a rivet or nail.• Getting a tight or rusted nut started.
Figure 4-30 Wood Rasp
Wood Rasp A wood rasp is similar to a metal fi le but has raised teeth. On some models, the teeth are located on a replaceable, thin metal plate that is attached to the handle. In others, the teeth and handle are formed from a solid piece. Uses:• Rounding corners and edges.• Quickly removing stock where a smooth edge is not required.
Figure 4-27 Jack Plane
Figure 4-26 Block Plane
Wood Chisel A wood chisel has a steel blade sharpened to a fi ne edge at one end, with a wood or plastic handle at the other. Many blade types and shapes are available. A standard set of chisels usually includes blade widths from 1⁄4" to 11⁄2". Uses:• Trimming and shaping wood.• Clearing mortises.
Figure 4-29 Cold Chisel
Jack Plane A 12" to 15" long plane with a blade that cuts bevel-side down. It is also called a jointer plane. Although there are no absolute defi nitions, a jack (or “#5”) plane is typically 12" to 15" long. The jointer plane is longer, at 20" to 24". Both have blades that cut bevel side down. Uses:• Smoothing and fl attening edges for making a close-
fi tting joint.• Planing long workpieces, such as the edges of doors.
Figure 4-28 Wood Chisel
Section 4.2 Cutting & Shaping Tools 115Arnold & Brown; Kevin May Corporation

After You Read: Self-Check 1. What is the difference in cutting action between a block plane and a jointer plane? 2. How does a wood rasp differ from a fi le? 3. What is a utility knife used to cut? 4. What material is cut using a hooked blade on a utility knife?
Academic Integration: Mathematics 5. Fractions A carpenter is using a plane to trim the edge of an antique door from
337⁄8 inches to 333⁄4 inches. How much material should the carpenter remove?
Fractions are a way of expressing an equal number of parts of an object. Fractions have two parts: the numerator, which gives the number of parts, and the denominator, which is the number of parts in a whole. To add or subtract fractions with different denominators, convert them to fractions with the same denominators. Then add or subtract their numerators to get your answer.
Step 1: Look at the two denominators and fi nd the least common denominator (LCD). Since 4 divides evenly into 8, the LCD is 8. Step 2: Convert 3⁄4 to an equivalent fraction with 8 as the denominator by multiplying both the numerator and the denominator by 2: 3⁄4 � 6⁄8 Step 3: Subtract the numerators: 7⁄8 � 6⁄8 � ?
Go to glencoe.com for this book’s OLC to check your answers.
4.2
Utility Knife An all-purpose knife with extremely sharp, replaceable blades. On some models, the blade is retractable. Uses:• Cutting roof shingles, tar paper, batt
insulation, wood veneer, and many other materials.
• Cutting carpeting when a hooked blade is attached.
• Sharpening a carpenter’s pencil.
Sharper Is Safer Be sure to keep the edge on cutting tools sharp. This makes the tool safer as well as more satisfying to use. Protect sharp edges with a plastic sheath where possible.
Go to glencoe.com for this book’s OLC for more on job safety.
Metal File A solid metal bar with patterned cutting ridges formed in one or more surfaces and edges. Single-cut and double-cut models are most common. Uses:• Sharpening tools.• Smoothing the edges of metal products
and rounding metal corners.• Trimming the edges of plastic laminate.
Figure 4-32 Utility Knife
Figure 4-31 Metal File
116 Chapter 4 Hand ToolsArnold & Brown; Kevin May Corporation
Tools for Assembling & Disassembling
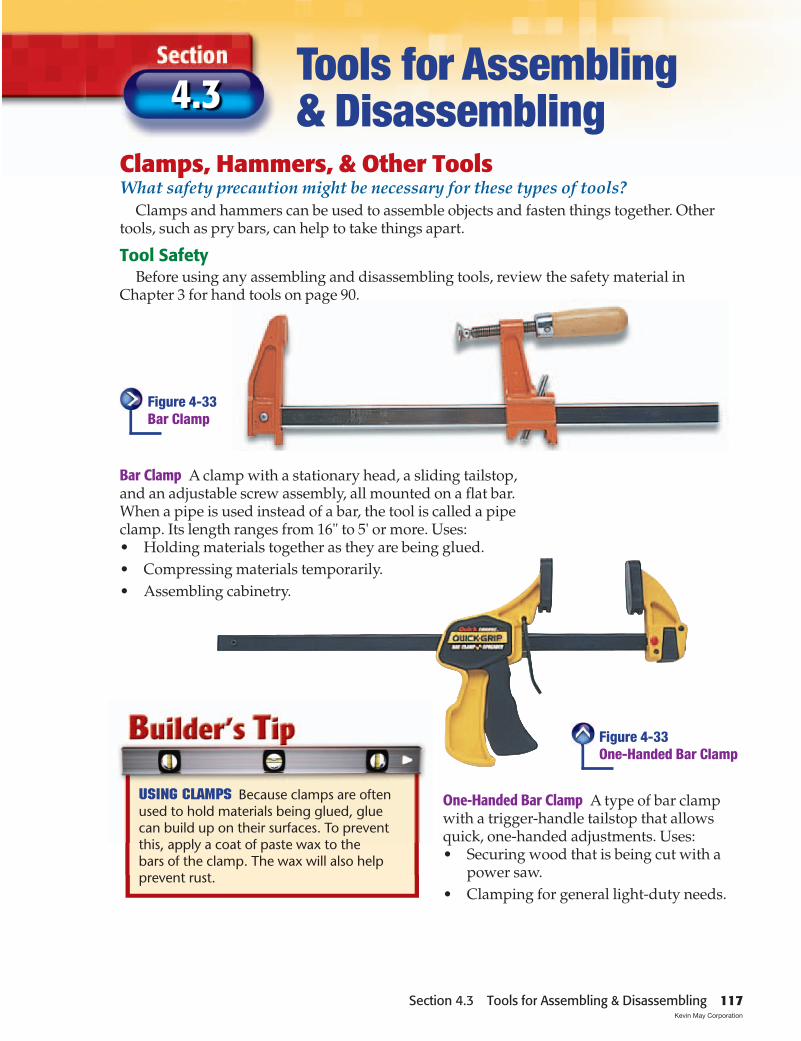
Using Clamps Because clamps are often used to hold materials being glued, glue can build up on their surfaces. To prevent this, apply a coat of paste wax to the bars of the clamp. The wax will also help prevent rust.
Clamps, Hammers, & Other ToolsWhat safety precaution might be necessary for these types of tools?
Clamps and hammers can be used to assemble objects and fasten things together. Other tools, such as pry bars, can help to take things apart.
Tool SafetyBefore using any assembling and disassembling tools, review the safety material in
Chapter 3 for hand tools on page 90.
One-Handed Bar Clamp A type of bar clamp with a trigger-handle tailstop that allows quick, one-handed adjustments. Uses:• Securing wood that is being cut with a
power saw.• Clamping for general light-duty needs.
Bar Clamp A clamp with a stationary head, a sliding tailstop, and an adjustable screw assembly, all mounted on a fl at bar. When a pipe is used instead of a bar, the tool is called a pipe clamp. Its length ranges from 16" to 5' or more. Uses:• Holding materials together as they are being glued.• Compressing materials temporarily.• Assembling cabinetry.
4.3
Figure 4-33 Bar Clamp
Figure 4-33 One-Handed Bar Clamp
Section 4.3 Tools for Assembling & Disassembling 117Kevin May Corporation

Claw Hammer A hammer with a curved claw. Heads weigh from 8 to 20 oz. A 16 oz. head is suitable for general construction. An 8 oz. head is a good fi nishing hammer. The face is slightly crowned, with beveled edges. Handles may be of hickory, steel, or fi berglass. Uses:• Driving nails.• Removing nails.
Rip Hammer Also called a straight-claw hammer, a rip ham-mer has a wedge-shaped claw. Heads weigh from 13 to 25 oz. The handle may be made of hickory, steel, or fi berglass. Models used by framing carpenters have longer handles and checkered faces to reduce the chance of glancing blows and fl ying nails. Uses:• Driving and removing nails.• Prying apart pieces that
have been nailed together.
Warrington Hammer A hammer with a fl attened peen instead of a claw. Heads weigh from 3½ to 10 oz. Uses:• Driving fi nishing nails into molding and trim.• Starting brads.
Hand Sledge A hammer with a two-faced head weighing between 2 and 4 lbs. It has a wood or steel handle. Also called a hand drilling hammer. Uses:• Striking steel tools such as
cold chisels, brick chisels, and punches.
• Driving stakes during site layout.
Mallet A hammerlike tool with two separate faces that may be rubber or plastic. A traditional mallet has a wood head. Uses:• Striking blows where steel hammers would mar or damage the surface,
as when assembling wood joints or driving wood pegs.• Striking other tools, such as chisels, where a metal-headed hammer
may damage the tool being struck.
Figure 4-35 Claw Hammer
Figure 4-39 Mallet
Figure 4-37 Warrington Hammer
Figure 4-38 Hand Sledge
Figure 4-36 Rip Hammer
118 Chapter 4 Hand ToolsArnold & Brown; Kevin May Corporation

Cat’s Paw A small pry bar/nail puller with a head that is aggressively scooped and is at a 90° degree angle to the handle. A hammer is used to drive the head (jaws) down into the wood to extract deeply imbedded nails.
Pry Bar A steel bar 6" to 14" long, with a nail-removing claw at one or both ends. Some models have a wide, fl attened end for prying molding from a wall. Uses:• Prying nailed lumber and trim apart.• Pulling nails.
Screwdrivers A screwdriver is a steel shank of various lengths with a wood or plastic handle and a tip formed to fi t a particular type of screw. A standard slotted head widens from tip to shank. A cabinet-slotted head has a uniform width to reach recessed screws. A Phillips head has the shape of an X at the tip to reduce slippage. Square-drive and Torx heads also prevent slippage. Uses:• Driving and removing screws.
Nail Set A steel shank 4" long with a concave tip, a knurled body, and a square striking surface. Comes in a set of four that are sized from 1⁄32" to 1⁄8" at the tip of each shank. Use:• Driving fi nishing nails below
the surface of wood. Nail holes can then be fi lled.
Figure 4-40 Ripping Bar
Figure 4-42 Pry Bar
Figure 4-43 Nail Set
Ripping Bar A bar with fl at claws at each end. Available in lengths up to 8'. A 3' bar is suited for general use. Uses:• Pulling large nails and spikes.• Prying off old materials during
renovation.• Demolishing built work.
Figure 4-44 Screwdrivers
Figure 4-41 Cat’s Paw
Section 4.3 Tools for Assembling & Disassembling 119Arnold & Brown; Kevin May Corporation

Hammer Tacker A slender stapler with a handle at one end. It is used with a striking motion to quickly drive staples. Used for light-duty, high-volume fastening. Uses:• Attaching insulation.• Attaching roofi ng felt.• Installing building paper.
WrenchesA wrench is a hand tool designed for turning a fastener, such as a bolt or a nut.
Adjustable Wrench A steel tool with one adjustable jaw. This wrench exerts its greatest strength when hand pressure is applied to the side with the fi xed jaw. Uses:• Turning nuts and bolts where there is plenty of clearance.
Open-End Wrench A nonadjustable wrench with accurately machined openings on either end. For a variety of tasks, a complete set is needed. Sets are available in metric and standard sizes. Uses:• Turning nuts and bolts in diffi cult-to-reach areas.
Stapler A heavy-duty stapler with a spring driven plunger that drives up to 9⁄16" staples. Uses:• Attaching ceiling tile, screening,
and other soft or thin materials.
Figure 4-45 Stapler
Figure 4-46 Hammer Tacker
Figure 4-47 Adjustable Wrench
Figure 4-48 Open-End Wrench
120 Chapter 4 Hand ToolsArnold & Brown; Kevin May Corporation

Locking Pliers An all-purpose tool with double-lever action that locks the jaws to clamp a workpiece. Uses:• Substitutes for a vise, clamp, pipe
wrench, fi xed wrench, or adjustable wrench.
Pipe Wrench A pipe wrench has hard-ened, cut teeth on the jaws. The jaws tighten as the wrench is turned. Uses:• Tightening or removing pipes.
It should not be used on nuts or bolts.
Figure 4-50 Socket Wrench Set
Figure 4-49 Box Wrench
Figure 4-51 Locking Pliers
Figure 4-52 Pipe Wrench
Box Wrench A metal wrench with two enclosed ends. Heads are offset from 15° to 45°. It is available in metric and standard sizes. Uses:• Making adjustments where there is
limited space for movement.• Turning nuts and bolts when a
secure grip is essential.
Socket Wrench Set A series of metal sockets that fi t onto a handle containing a ratcheting mechanism. Sets come in metric and standard sizes. A basic set contains ten sockets, a ratcheting handle, and a non-ratcheting handle. Uses:• Installing and
removing nuts, bolts, and lag screws quickly.
Section 4.3 Tools for Assembling & Disassembling 121Arnold & Brown; Kevin May Corporation

PliersPliers are a hand tools with opposing jaws that are designed to hold things. They should
not be used to turn nuts or bolts because they can damage them. Use a wrench instead.
Slip-Joint Pliers An all-purpose adjustable tool for light-duty gripping. Uses:• Holding and turning round
pieces other than nuts or the heads of bolts.
Needle-Nose Pliers Pliers with a long, thin nose and cutting edges near the joint. Uses:• Holding and bending
thin wire and metal fi ttings.
• Cutting light-gauge electrical wire.
Groove-Joint Pliers Large pliers with a slip joint that can be set more than two positions. Sometimes called box-joint pliers or waterpump pliers. Uses:• Holding and turning large, round parts.• General gripping and turning.
Allen Wrench A hexagonal steel bar with a bent end. Either end fi ts the hexagonal recess in the top of some screws. Some-times called a hex key. Uses:• Tightening and loosening set screws,
some of which secure pulleys and wheels on power tools and equipment.
Figure 4-53 Allen Wrench
Figure 4-54 Slip-Joint Pliers
Figure 4-55 Needle-Nose Pliers
Figure 4-56 Groove-Joint Pliers
122 Chapter 4 Hand ToolsArnold & Brown; Kevin May Corporation

After You Read: Self-Check1. Which is the heaviest hammer described in this section?2. Which tools are used for pulling nails?3. Which general type of tool should be used to turn nuts or bolts?4. What other terms are used for metal snips?
Academic Integration: Science5. Simple Machines A simple machine is a machine that has no moving parts or few moving
parts. A small amount of force is used to apply a greater force or to move a heavier weight. Simple machines can help make work easier, but they do not decrease the amount of work done. A lever is a simple machine made up of a stiff bar and a pivot point, called a fulcrum. By applying force to one side of the fulcrum, you increase the force on the other side and can lift heavier objects. Which tools in this section are levers? Explain.
Starting Hint A claw hammer functions as a lever when removing nails.
Go to glencoe.com for this book’s OLC to check your answers.
4.3
Metal Snips Tool with scissors-like handles for cutting metal. Metal snips are sometimes called tin snips. Those with straight blades are primarily used for making straight cuts. Duckbill blades on some models can make curved or straight cuts. Com-pound-action snips (sometimes called aviation snips) can cut thicker stock. Uses:• Cutting light-gauge metal sheet stock and ducts.
Lineman’s Pliers Pliers with stout, fl attened jaws and long, slightly curved handles. Cutting edges are formed into one side of the jaws. Sometimes called side cutters. Uses:• Cutting electrical and other wire.• Twisting and grasping wire.
Figure 4-58 Metal Snips
Figure 4-57 Lineman’s Pliers
Section 4.3 Tools for Assembling & Disassembling 123

4
Review Content Vocabulary and Academic Vocabulary1. Use each of these content vocabulary and academic vocabulary words in a sentence or diagram.
Content Vocabulary• square (p. 108)• level (p. 111)• wrench (p. 120)• pliers (p. 122)
Academic Vocabulary• angles (p. 108) • adjacent (p. 109) • arc (p. 110) • horizontal (p. 111)• vertical (p. 111)
Like a ProTechnical Terms2. Work with a classmate to defi ne the follow-
ing terms used in the chapter: squareness (p. 109), straightedge (p. 110), stepping off (p. 110), scribing (p. 110), jointer plane (p. 115), peen (p. 118), knurled (p. 119), ratcheting (p. 121), light-gauge (p. 123).
Review Key Concepts3. Describe three hand tools that are used for
measuring and layout.
4. Explain how a saw and a plane are used to cut and shape wood.
5. Demonstrate how one tool can be used for both assembling and disassembling.
6. Summarize the uses of a try square, coping saw, and a mallet.
7. Explain which tools carpenters can use to calculate angles.
Review and Assessment
4.1
Chapter SummaryWorkers in all construction trades need to measure, mark, and lay out projects. They need a variety of tools for measuring and layout. These include tape measures and folding rules; squares and sliding T-bevels for angular measurements; levels and plumb bobs for straight lines; and chalk lines, carpenter’s pencils, and scratch awls for marking.
Hand tools used for cutting and shaping can help workers achieve a high level of precision. These types of tools include utility drywall saws, backsaws, handsaws, hacksaws, keyhole saws, pull saws, coping saws, dovetail saws, block planes, jointer planes, wood chisels, cold chisels, wood rasps, metal fi les, and utility knives.
Assembly, fastening, and disassembly tools help put things together and take them apart. These types of tools include clamps, hammers, mallets, bars, nail sets, screwdrivers, sta-plers, and tackers; wrenches such as adjustable, open-end, box, pipe, and Allen; different types of pliers such as slip joint, needle-nose, groove-joint, and lineman’s pliers; and metal snips.
4.2
Section
Section
4.3Section
124 Chapter 4 Review and Assessment

Critical Thinking8. Analyze Why are hand tools preferred for
some carpentry tasks?
9. Apply In what situation might a carpenter fi nd a one-handed bar clamp more useful than a bar clamp?
Academic and Workplace Applications
10. Work In physics, work is defi ned as force multiplied by distance (W � fd). You are doing work when you use a force (a push or a pull) to cause something to move. When calculating work, force, or distance, use meters as the unit of distance. Work is measured in units called joules; force is mea-sured in units called Newtons.
If you apply a force of 1N to a push a nail 2 centimeters into a piece of wood, what is the amount of work being done?
Step 1: Convert centimeters to meters.(2 centimeters � 0.02 meters)
Step 2: Multiply the force (1) by the distance (0.02) to fi nd the amount of work done.
11. Diameter and Circumference A carpenter used a compass to draw a circle on a piece of drywall that has a diameter of 5 inches. What is the circumference of the circle?
The diameter of a circle is the distance from one side of the circle to the other. The distance around a circle is called the circumference. Use a math calcu-lator or construction calculator to fi nd the circumference using the formula
C � dπ
where C is the circumference and d is the diameter. If you do not have a calculator, use 3.14 in place of π.
12. Creativity and Innovation Choose three tools that you have read about in this chapter that are new to you or that interest you. Create an informational poster that includes a picture of each tool, a description of each tool, and the uses of each tool. You can draw the tool, copy a drawing, or cut out a picture from an advertisement.
Multiple ChoiceDirections Write down the letter next to the correct answer for each question.
13. Which type of saw is used for crosscutting and rip cutting wood?
a. keyhole sawb. hacksawc. handsawd. none of the above
14. What is a name for a nonadjustable wrench with accurately machined openings on either end?
a. tire wrenchb. open-end wrench c. box wrenchd. all of the above
15. What is the removable blade of acombination square used for?
a. roughly leveling or plumbing a surfaceb. checking adjacent surfaces for the correct
angle of 45° and 90° c. making layout lines at 45° and 90° across
the face or edge of stockd. all of the above
In some multiple-choice tests, more than one answer may be possible. Read through all of the choices. Check for answers such as “all of the above” or “none of the above” before deciding on an answer.
* These questions will help you practice for nationalcertifi cation assessment.
Chapter 4 Review and Assessment 125