ni 2565 user manual
TRANSCRIPT

Computer-BasedInstruments
NI 2565 User Manual16-Channel Mechanical Relay Switch
NI 2565 User Manual
December 1998 EditionPart Number 322121A-01

Internet SupportE-mail: [email protected] Site: ftp.natinst.comWeb Address: http://www.natinst.com
Bulletin Board SupportBBS United States: 512 794 5422BBS United Kingdom: 01635 551422BBS France: 01 48 65 15 59
Fax-on-Demand Support512 418 1111
Telephone Support (USA)Tel: 512 795 8248Fax: 512 794 5678
International OfficesAustralia 03 9879 5166, Austria 0662 45 79 90 0, Belgium 02 757 00 20, Brazil 011 288 3336, Canada (Ontario) 905 785 0085, Canada (Québec) 514 694 8521, Denmark 45 76 26 00, Finland 09 725 725 11, France 01 48 14 24 24, Germany 089 741 31 30, Hong Kong 2645 3186, Israel 03 6120092, Italy 02 413091, Japan 03 5472 2970, Korea 02 596 7456, Mexico 5 520 2635, Netherlands 0348 433466, Norway 32 84 84 00, Singapore 2265886, Spain 91 640 0085, Sweden 08 730 49 70, Switzerland 056 200 51 51, Taiwan 02 377 1200, United Kingdom 01635 523545
National Instruments Corporate Headquarters6504 Bridge Point Parkway Austin, Texas 78730-5039 USA Tel: 512 794 0100
© Copyright 1998 National Instruments Corporation. All rights reserved.

Important Information
WarrantyThe NI 2565 switch card and accessories are warranted against defects in materials and workmanship for a period of one year from the date of shipment, as evidenced by receipts or other documentation. National Instruments will, at its option, repair or replace equipment that proves to be defective during the warranty period. This warranty includes parts and labor.
The media on which you receive National Instruments software are warranted not to fail to execute programming instructions, due to defects in materials and workmanship, for a period of 90 days from date of shipment, as evidenced by receipts or other documentation. National Instruments will, at its option, repair or replace software media that do not execute programming instructions if National Instruments receives notice of such defects during the warranty period. National Instruments does not warrant that the operation of the software shall be uninterrupted or error free.
A Return Material Authorization (RMA) number must be obtained from the factory and clearly marked on the outside of the package before any equipment will be accepted for warranty work. National Instruments will pay the shipping costs of returning to the owner parts which are covered by warranty.
National Instruments believes that the information in this manual is accurate. The document has been carefully reviewed for technical accuracy. In the event that technical or typographical errors exist, National Instruments reserves the right to make changes to subsequent editions of this document without prior notice to holders of this edition. The reader should consult National Instruments if errors are suspected. In no event shall National Instruments be liable for any damages arising out of or related to this document or the information contained in it.
EXCEPT AS SPECIFIED HEREIN, NATIONAL INSTRUMENTS MAKES NO WARRANTIES, EXPRESS OR IMPLIED, AND SPECIFICALLY DISCLAIMS ANY WARRANTY OF MERCHANTABILITY OR FITNESS FOR A PARTICULAR PURPOSE. CUSTOMER’S RIGHT TO RECOVER DAMAGES CAUSED BY FAULT OR NEGLIGENCE ON THE PART OF NATIONAL INSTRUMENTS SHALL BE LIMITED TO THE AMOUNT THERETOFORE PAID BY THE CUSTOMER. NATIONAL INSTRUMENTS WILL NOT BE LIABLE FOR DAMAGES RESULTING FROM LOSS OF DATA, PROFITS, USE OF PRODUCTS, OR INCIDENTAL OR CONSEQUENTIAL DAMAGES, EVEN IF ADVISED OF THE POSSIBILITY THEREOF. This limitation of the liability of National Instruments will apply regardless of the form of action, whether in contract or tort, including negligence. Any action against National Instruments must be brought within one year after the cause of action accrues. National Instruments shall not be liable for any delay in performance due to causes beyond its reasonable control. The warranty provided herein does not cover damages, defects, malfunctions, or service failures caused by owner’s failure to follow the National Instruments installation, operation, or maintenance instructions; owner’s modification of the product; owner’s abuse, misuse, or negligent acts; and power failure or surges, fire, flood, accident, actions of third parties, or other events outside reasonable control.
CopyrightUnder the copyright laws, this publication may not be reproduced or transmitted in any form, electronic or mechanical, including photocopying, recording, storing in an information retrieval system, or translating, in whole or in part, without the prior written consent of National Instruments Corporation.
TrademarksCVI™, LabVIEW™, and PXI™ are trademarks of National Instruments Corporation.
Product and company names mentioned herein are trademarks or trade names of their respective companies.
WARNING REGARDING MEDICAL AND CLINICAL USE OF NATIONAL INSTRUMENTS PRODUCTSNational Instruments products are not designed with components and testing intended to ensure a level of reliability suitable for use in treatment and diagnosis of humans. Applications of National Instruments products involving medical or clinical treatment can create a potential for accidental injury caused by product failure, or by errors on the part of the user or application designer. Any use or application of National Instruments products for or involving medical or clinical treatment must be performed by properly trained and qualified medical personnel, and all traditional medical safeguards, equipment, and procedures that are appropriate in the particular situation to prevent serious injury or death should always continue to be used when National Instruments products are being used. National Instruments products are NOT intended to be a substitute for any form of established process, procedure, or equipment used to monitor or safeguard human health and safety in medical or clinical treatment.
Compliance
FCC/DOC Radio Frequency Interference Class A Compliance
This equipment generates and uses radio frequency energy and, if not installed and used in strict accordance with the instructions in this manual, may cause interference to radio and television reception. Classification requirements are the same for the Federal Communications Commission (FCC) and the Canadian Department of Communications (DOC). This equipment has been tested and found to comply with the following two regulatory agencies:
Federal Communications CommissionThis equipment has been tested and found to comply with the limits for a Class A digital device, pursuant to part 15 of the FCC Rules. These limits are designed to provide reasonable protection against harmful interference when the equipment is operated in a commercial environment. This equipment generates, uses, and can radiate radio frequency energy and, if not installed and used in accordance with the instruction manual, may cause harmful interference to radio communications. Operation of this equipment in a residential area is likely to cause harmful interference in which case the user will be required to correct the interference at his own expense.
Notices to User: Changes or modifications not expressly approved by National Instruments could void the user’s authority to operate the equipment under the FCC Rules.
This device complies with the FCC rules only if used with shielded interface cables of suitable quality and construction. National Instruments used such cables to test this device and provides them for sale to the user. The use of inferior or nonshielded interface cables could void the user’s authority to operate the equipment under the FCC rules.
If necessary, consult National Instruments or an experienced radio/television technician for additional suggestions. The following booklet prepared by the FCC may also be helpful: Interference to Home Electronic Entertainment Equipment Handbook. This booklet is available from the U.S. Government Printing Office, Washington, DC 20402.
Canadian Department of CommunicationsThis Class A digital apparatus meets all requirements of the Canadian Interference-Causing Equipment Regulations.Cet appareil numérique de la classe A respecte toutes les exigences du Règlement sur le matériel brouilleur du Canada.

Conventions
The following conventions are used in this manual.
<> Angle brackets containing numbers separated by an ellipsis represent a range of values associated with a port, bit, or signal name (for example, CH<0..15> stands for the signals CH0 through CH15).
This icon to the left of bold italicized text denotes a note, which alerts you to important information.
This icon to the left of bold italicized text denotes a caution, which advises you of precautions to take to avoid injury, data loss, or a system crash.
This icon to the left of bold italicized text denotes a warning, which advises you of precautions to take to avoid being electrically shocked.
bold italic Bold italic text denotes a note, caution, or warning.
italic Italic text denotes variables, emphasis, a cross reference, or an introduction to a key concept. This font also denotes text from which you supply the appropriate word or value, as in CHx.
!
© National Instruments Corporation vii NI 2565 User Manual
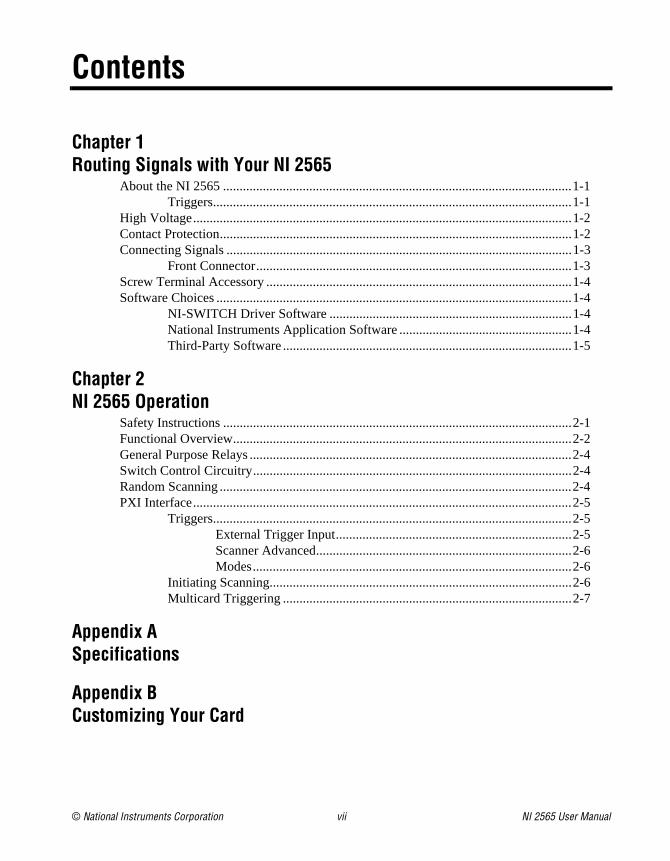
Contents
Chapter 1Routing Signals with Your NI 2565
About the NI 2565 .........................................................................................................1-1Triggers............................................................................................................1-1
High Voltage..................................................................................................................1-2Contact Protection..........................................................................................................1-2Connecting Signals ........................................................................................................1-3
Front Connector...............................................................................................1-3Screw Terminal Accessory ............................................................................................1-4Software Choices ...........................................................................................................1-4
NI-SWITCH Driver Software .........................................................................1-4National Instruments Application Software ....................................................1-4Third-Party Software .......................................................................................1-5
Chapter 2NI 2565 Operation
Safety Instructions .........................................................................................................2-1Functional Overview......................................................................................................2-2General Purpose Relays .................................................................................................2-4Switch Control Circuitry................................................................................................2-4Random Scanning ..........................................................................................................2-4PXI Interface..................................................................................................................2-5
Triggers............................................................................................................2-5External Trigger Input.......................................................................2-5Scanner Advanced.............................................................................2-6Modes................................................................................................2-6
Initiating Scanning...........................................................................................2-6Multicard Triggering .......................................................................................2-7
Appendix ASpecifications
Appendix BCustomizing Your Card

Contents
NI 2565 User Manual viii © National Instruments Corporation
Appendix CArchitecture Drawing
Appendix DCommon Questions
Appendix ECustomer Communication
Glossary
Index
FiguresFigure 1-1. Front Connector Pinout Assignments ................................................... 1-3
Figure 2-1. NI 2565 Module Block Diagram .......................................................... 2-3
Figure B-1. NI 2565 Parts Locator Diagram............................................................ B-2Figure B-2. Replacing a Relay ................................................................................. B-4
Figure C-1. NI 2565 Switch Architecture ................................................................ C-2
TableTable 1-1. Front Connector Signal Description .................................................... 1-3
© National Instruments Corporation 1-1 NI 2565 User Manual
1Routing Signals with Your NI 2565
This manual describes the electrical and mechanical aspects of the NI 2565 general-purpose 16-channel 1form A mechanical relay switch card and contains information concerning its installation and operation.
About the NI 2565This section summarizes the features and operation of the NI 2565 switch card. Refer to Chapter 2, NI 2565 Operation, for more complete details. In addition, refer to Appendix A, Specifications, for detailed specifications of the switch card.
The NI 2565 is a 16-channel general purpose relay switch card. The NI 2565 uses single-pole single-throw (also known as 1form A) relays. The board can switch voltages up to 250 VAC and 125 VDC, and currents up to 7 A AC and 5 A DC. You can use the National Instruments NI-SWITCH software included with your kit to configure and operate the NI 2565 switch card.
TriggersTwo triggers are used to handshake the NI 2565 switch with other PXI instruments. The Scanner Advanced trigger indicates when the card has closed all the necessary switches for the next scan and the switches have settled, or debounced.
The External Trigger Input trigger is sourced by another instrument or by software, and causes the NI 2565 to advance to the next entry in the scan list. The triggers can be routed to any of the PXI TTL triggers or to the PXI star trigger. If no external trigger input is available, you can have the software trigger the NI 2565 to advance to the next entry in the scan list.
Refer to Chapter 2, NI 2565 Operation, for more information on triggers.

Chapter 1 Routing Signals with Your NI 2565
NI 2565 User Manual 1-2 © National Instruments Corporation
High VoltageThe NI 2565 general purpose switch card is rated for reinforced insulation, 250 V, Cat. II. This classification provides safety insulation from any terminal to any other accessible part on the card. The switch card is rated for basic insulation, 250 V Cat. II, from any screw terminal connection to any other screw terminal connection.
Insulation coordination can be achieved only if transient overvoltages are controlled to specified levels. Refer to the Glossary for more information about Categories I and II overvoltage specifications.
Caution For additional safety, if you will be switching power lines or high voltage, place an F7A 250 V in-line fuse before the switch card.
Always disconnect the screw terminal plug from the front connector before removing the module from the PXI chassis.
Before applying high voltage to the module, always tighten the four captive screws to provide a ground connection from the module to the chassis.
Warning Do not exceed 250 V channel-to-channel or channel-to-ground. Any connections that exceed the maximum settings for the NI 2565 can result in an electrical shock hazard and damage to the switch card and any or all of the boards connected to the PXI backplane. National Instruments is NOT liable for any damages or injuries resulting from exceeding maximum voltage ratings. Refer to Appendix A, Specifications, for information.
Contact Protection
Caution When inductive loads are connected to the relays, a large counter electromotive force may occur at relay switching time due to the energy stored in the inductive load. These flyback voltages can severely damage the relay contacts and greatly shorten the life of the relay.
It is best to limit flyback voltages at your inductive load by installing a flyback diode for DC loads or a varistor for AC loads. Refer to Appendix B, Customizing Your Card, for more information on flyback voltage protection.
!
!
Chapter 1 Routing Signals with Your NI 2565
© National Instruments Corporation 1-3 NI 2565 User Manual
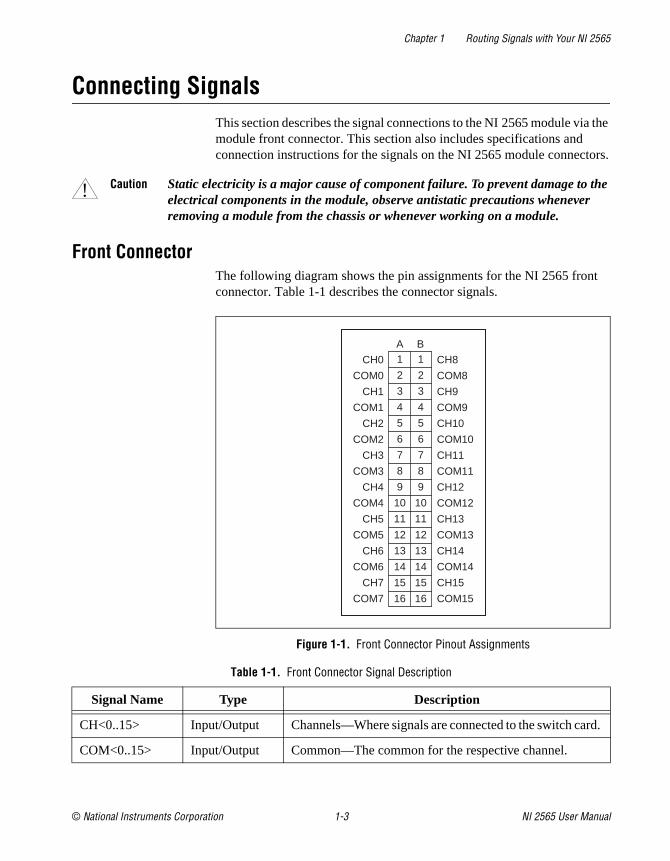
Connecting SignalsThis section describes the signal connections to the NI 2565 module via the module front connector. This section also includes specifications and connection instructions for the signals on the NI 2565 module connectors.
Caution Static electricity is a major cause of component failure. To prevent damage to the electrical components in the module, observe antistatic precautions whenever removing a module from the chassis or whenever working on a module.
Front ConnectorThe following diagram shows the pin assignments for the NI 2565 front connector. Table 1-1 describes the connector signals.
Figure 1-1. Front Connector Pinout Assignments
Table 1-1. Front Connector Signal Description
Signal Name Type Description
CH<0..15> Input/Output Channels—Where signals are connected to the switch card.
COM<0..15> Input/Output Common—The common for the respective channel.
!
COM7
CH7
COM6
CH6
COM5
CH5
COM4
CH4
COM3
CH3
COM2
CH2
COM1
CH1
COM0
CH0
16 16
15 15
14 14
13 13
12 12
11 11
10 10
9 9
8 8
7 7
6 6
5 5
4 4
3 3
2 2
1 1
COM15
CH15
COM14
CH14
COM13
CH13
COM12
CH12
COM11
CH11
COM10
CH10
COM9
CH9
COM8
CH8
A B

Chapter 1 Routing Signals with Your NI 2565
NI 2565 User Manual 1-4 © National Instruments Corporation
Screw Terminal AccessoryYour kit includes a screw terminal mini-combicon connector with protective housing and strain relief.
Software ChoicesYou have several options to choose from when programming your National Instruments switch card. You can use the NI-SWITCH driver software or National Instruments application software.
NI-SWITCH Driver SoftwareThe NI-SWITCH instrument driver is an Interchangeable Virtual Instrument (IVI compliant instrument driver that is bundled with NI-SWITCH cards at no cost).
NI-SWITCH features a set of operations and attributes that exercise all the functionality of the switching hardware, including configuration, opening/closing, and scanning. In addition, NI-SWITCH comes with an interactive soft front panel and online documentation.
NI-SWITCH eliminates the need to understand complex register programming and interrupt handling in the Microsoft operating systems, and frees you to focus on creating your test system.
National Instruments Application Software LabVIEW and LabWindows/CVI are innovative program development software packages for data acquisition and control applications. LabVIEW uses graphical programming, whereas LabWindows/CVI enhances traditional programming languages. Both packages include extensive libraries for data acquisition, instrument control, data analysis, and graphical data presentation. Using LabVIEW or LabWindows/CVI can significantly reduce the development time for your data acquisition and control application.
LabVIEW features interactive graphics, a state-of-the-art user interface, and a powerful graphical programming language. The LabVIEW NI-SWITCH VI Library, a series of virtual instruments (VIs) for using LabVIEW with National Instruments switch hardware, is included with the NI-SWITCH driver.

Chapter 1 Routing Signals with Your NI 2565
© National Instruments Corporation 1-5 NI 2565 User Manual
LabWindows/CVI features interactive graphics, a state-of-the-art user interface, and uses the ANSI standard C programming language. The LabWindows/CVI NI-SWITCH Library, a series of functions for using LabWindows/CVI with National Instruments switch hardware, is included with the NI-SWITCH driver.
Third-Party SoftwareThe NI-SWITCH instrument driver also includes support files for Microsoft Visual C++ and Microsoft Visual Basic. See the NI-SWITCH readme file for version support information.

© National Instruments Corporation 2-1 NI 2565 User Manual
2NI 2565 Operation
This chapter contains safety instructions and a functional overview of the NI 2565 switch card, and explains the operation of each functional unit making up the switch card.
Safety Instructions
Caution Do NOT OPERATE THIS INSTRUMENT IN AN EXPLOSIVE ATMOSPHERE OR WHERE THERE MAY BE FLAMMABLE GASES OR FUMES.
Equipment described in this document must be used in an Installation Category II environment per IEC 664. This category requires local level supply mains-connected installation.
To prevent safety hazards, the maximum voltage between any of the channel inputs and the ground of the computer should never exceed ±250 VDC or 250 Vrms.
DO NOT OPERATE DAMAGED EQUIPMENT. The safety protection features built into this instrument can become impaired if the instrument becomes damaged in any way. If the instrument is damaged, do not use it until service-trained personnel can check its safety. If necessary, return the instrument to National Instruments for service and repair to ensure that its safety is not compromised.
Do not operate this instrument in a manner that contradicts the information specified in this document. Misuse of this instrument could result in a shock hazard.
DO NOT SUBSTITUTE PARTS OR MODIFY EQUIPMENT beyond what is described in Appendix B, Customizing Your Card. Because of the danger of introducing additional hazards, do not install unauthorized parts or modify the instrument. Return the instrument to National Instruments for service and repair to ensure that its safety is not compromised.
Connections that exceed any of the maximum signal ratings on the NI 2565 can create a shock or fire hazard or can damage any or all of the devices connected to
!

Chapter 2 NI 2565 Operation
NI 2565 User Manual 2-2 © National Instruments Corporation
the NI 2565. National Instruments is NOT LIABLE FOR ANY DAMAGES OR INJURIES resulting from incorrect signal connections.
Clean instrument and accessories by brushing off light dust with a soft, nonmetallic brush. Remove other contaminants with a stiff nonmetallic brush. The unit must be completely dry and free from contaminants before returning to service.
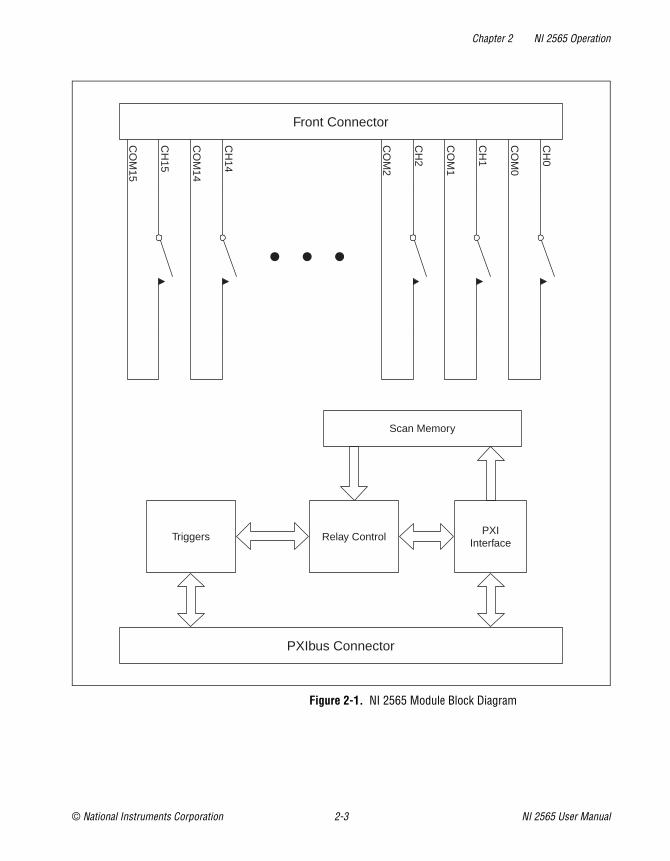
Functional OverviewThe following block diagram illustrates the key functional components of the NI 2565 switch card module.
The major components of the NI 2565 module are as follows:
• General purpose relays
• Relay switch control circuitry
• Random scanning
• PXIbus interface
• Triggers
Chapter 2 NI 2565 Operation
© National Instruments Corporation 2-3 NI 2565 User Manual
Figure 2-1. NI 2565 Module Block Diagram
CO
M1
CH
1
CO
M2
CH
2
CO
M14
CH
14
CO
M0
CH
0
CO
M15
CH
15
Front Connector
Relay ControlTriggersPXI
Interface
Scan Memory
PXIbus Connector

Chapter 2 NI 2565 Operation
NI 2565 User Manual 2-4 © National Instruments Corporation
General Purpose RelaysThe general-purpose relay consists of 16 channels (CH0 through CH15). Each channel has a corresponding common (COM0 through COM15).
Each channel connects to the corresponding common by closing its relay. The relay name is based on the corresponding signal name. For example, the relay connecting CH9 to COM9 is CH9. You can have multiple channels connected to the corresponding commons simultaneously. See Appendix C, Architecture Drawing, for an illustration of the NI 2565 architecture.
The NI 2565 relays are single-side stable. When power is removed from the relay coil, the relay returns to its de-energized state. The de-energized state opens all the relays, disconnecting each channel signal from its corresponding common.
Switch Control CircuitryThe switch control circuitry (SCC) is responsible for opening and closing relays on the NI 2565. You can load commands for the SCC into memory storage using the driver software you received with your kit. Consult the online help or your software documentation for specific information on the appropriate commands. There are two reasons for storing the commands in memory before the SCC can process them:
• The operate and release times for the NI 2565 are 10 ms and 5 ms, respectively. Using memory storage, the software can send multiple commands to the SCC without having to wait for a relay action to complete.
• The memory is used to store a scan list necessary for hardware random scanning.
Random ScanningThe NI 2565 can perform random scanning. In random scanning, the switch card can open or close relays in any order.
The scan list is downloaded to onboard memory. Commands in the scan list can:
• Open or close relays
• Wait for an external trigger

Chapter 2 NI 2565 Operation
© National Instruments Corporation 2-5 NI 2565 User Manual
• Generate a scanner advanced trigger
• Generate a breakpoint interrupt
You can use the driver software to configure the switch card for continuous or one-time scanning. In continuous scanning, the switch card cycles through the scan list until you disable scanning. For one-time scanning, the switch card runs through the scan list only once.
You can also use software commands to clear the scan list or reset it to the beginning at any time.
The onboard control logic for the NI 2565 switch card gives you direct access to open and close the relays, and also the capability to download up to 1024 random scanning instructions. The software included with the card automatically configures the NI 2565 and downloads the scan list to hardware for you. The scan list itself downloads directly into the memory of the card to deliver the fastest scan possible with no controller intervention. You can configure the switch card to process the scan list once or to continuously loop through the scan list.
PXI InterfaceThe NI 2565 switch card has a PXI interface through which you can use your driver software to configure and control the card. The NI 2565 takes advantage of PXI features. It uses the PXI TTL triggers to synchronize scanning with a measurement device such as a National Instruments NI 4060 PXI digital multimeter (DMM).
Triggers
External Trigger InputThe NI 2565 can use an external trigger input to advance between scan setups in a scan list. Using the driver software, you can configure the switch card to route the external trigger from any of the PXI TTL trigger lines or the PXI star trigger. Alternatively, you can use a software command to trigger the switch card.
All external trigger lines are compatible with TTL voltage levels and are edge sensitive. The minimum pulse width from the PXI TTL triggers and PXI star trigger is 70 ns.

Chapter 2 NI 2565 Operation
NI 2565 User Manual 2-6 © National Instruments Corporation
Scanner AdvancedThe NI 2565 can generate a scanner advanced trigger to indicate when the switch card is set up and ready to take measurements. Using the driver software, you can configure the switch card to route the scanner advanced (SCANADV) trigger to any PXI TTL trigger line or to the PXI star trigger. You can configure the switch card to generate the SCANADV trigger when a relay has settled (or debounced).
Because the NI 2565 has open collector drives on the PXI TTL trigger lines, you can have multiple switch cards using the same trigger line in the multicard SCANADV mode.
ModesSCANADV has two modes of operation. In its default mode, the SCANADV trigger asserts for 1 µs after the relay has debounced. You can also configure the switch card for handshaking mode, in which the SCANADV trigger goes high after a relay settles, and the SCANADV trigger goes low after the external trigger input asserts. You can use this handshaking mode for multicard scanning.
Note The NI 2565 ignores external triggers when it is not in a wait-for-trigger state while scanning.
Initiating ScanningWhen you use the NI 2565 to initiate a scan, make sure the measurement device is armed (waiting for trigger) before enabling scanning on the switch card. Enabling scanning causes the first switch(es) in the scan list to close and generates a scanner advanced trigger after the relay switches have settled or debounced.
When you use the measurement device to initiate a scan, make sure scanning is enabled on the NI 2565 before the measurement device starts to take measurements. This ensures that the switch card has the correct signal routed and that the switch card is waiting for an external trigger from the measurement device.
Always configure the triggers in a system before configuring the measurement device or the NI 2565 for scanning. When triggers are configured, a state change or pulse could occur on the trigger line. This is also possible when you reset the switch card.

Chapter 2 NI 2565 Operation
© National Instruments Corporation 2-7 NI 2565 User Manual
Multicard TriggeringYou can use multiple NI 2565 switch cards—or multiple other National Instruments switch cards such as the NI 2503—together in conjunction with an instrument such as a DMM. In multiple switch-card systems, be sure to identify one switch card as the master switch card.
All other switch cards for the system are identified as slave switch cards. The master switch card can route an external trigger from the front connector to a PXI backplane trigger. In addition, the master switch card can route the SCANADV trigger from the PXI backplane to either the front connector or another backplane trigger. This functionality makes it possible to wire external triggers from/to only one switch card in the system, which simplifies the wiring scheme.
Note The NI 2565 does not support triggers on the front panel connector. If the measurement instrument is external to the chassis you must use a different National Instruments switch card, such as the NI 2503, as the master switch card.
For more information, refer to the NI-SWITCH Software User Manual.

© National Instruments Corporation A-1 NI 2565 User Manual
ASpecifications
This appendix lists the specifications for the NI 2565 switch card. These specifications are typical at 25° C unless otherwise noted.
Input CharacteristicsNumber of Relays ................................. 16
Common Mode Voltage
Channel to Channel......................... 250 Vrms/250 VDC
Channel to Earth ............................. 250 Vrms/250 VDC
Maximum Switching Voltage
AC................................................... 250 Vrms
DC................................................... 125 VDC
Maximum Switching Capacity per Channel
DC................................................... 5 A @ 30 VDC (resistive load)
DC................................................... 3 A @ 30 VDC (inductive load)
AC................................................... 7 A @ 250 VAC (resistive load)
AC................................................... 5 A @ 250 VAC (inductive load)
Maximum SwitchingPower per Channel ................................. 1750 VA, 150 W
Contact On Resistance (Initial) .............. 30 mΩ
Contact Material..................................... Gold-flash over silver alloy

Appendix A Specifications
NI 2565 User Manual A-2 © National Instruments Corporation
Dynamic CharacteristicsMaximum Switching Rate ......................5 cycles/s at rated load
Relay Operate Time (@ 20° C)
Typical.............................................5 ms
Maximum ........................................10 ms
Relay Release Time (@ 20° C)
Typical.............................................4 ms
Maximum ........................................5 ms
Expected Life
Mechanical (@ 180 cpm) ................5 × 107 operations
Electrical at MaximumSwitching Capacity..........................105 operations
Caution Exceeding the maximum switching capability will decrease the expected life of the NI 2565.
PXI Bus InterfaceSlave
PXI Trigger BusTrigger Lines ..........................................8
Star Trigger.............................................1
Power Requirement+5 VDC
Minimum (All Relays Opened) .......350 mA
Maximum (All Relays Closed)........1.4 A
Generated WattageAll Relays Opened..................................1.75 W
All Relays Closed, 0.0 A per Channel....7.0 W
All Relays Closed, 5.0 A per Channel....21.5 W
All Relays Closed, 7.0 A per Channel....35.0 W

Appendix A Specifications
© National Instruments Corporation A-3 NI 2565 User Manual
PhysicalDimensions............................................. 10 by 16 by 4 cm
(3.9 by 6.3 by 1.6 in)
Weight .................................................... 0.41 kg (0.9 lb)
I/O Connector......................................... 16 x 2 mini-combicon header
I/O Mating Connector ............................ Two 1 x 16 mini-combicon connectors
EnvironmentOperating Temperature.........................0° to 50° C
Storage Temperature ............................–20° to 70° C
Relative Humidity .................................. 5% to 85% non-condensing
Maximum Altitude................................. 2,000 m
SafetyApproved Usage..................................... UL-listed PXI or
Compact PCI Chassis
Installation Category ............................Category II, Pollution Degree II
Reinforced Insulation Rating,Channel to Earth..................................... 250 V
Basic Insulation Rating,Channel to Channel ................................ 250 V
Certifications and CompliancesCE Mark Compliance
This product meets applicable EU directives as follows:
Safety Isolation ...................................... low-voltage safety,EN 61010-1:1993
EMC Directive
Immunity......................................... EN 50082-1:1992
Emissions ........................................ EN 55011:1991,Group 1 Class A at 10 m

© National Instruments Corporation B-1 NI 2565 User Manual
BCustomizing Your Card
This appendix describes options for customizing your NI 2565 card.
Flyback Voltage ProtectionWhen inductive loads are connected to the relays, a large counter electromotive force may occur at relay switching time due to the energy stored in the inductive load. These flyback voltages can severely damage the relay contacts and greatly shorten the life of the relay.
You can limit flyback voltages at your inductive load by installing a flyback diode for DC loads or a varistor for AC loads. The NI 2565 module has solder connections for a diode or varistor. With this diode/varistor installed, you can limit flyback voltages when switching inductive loads.
Caution Before installing the diode or varistor in your module, ensure that no signals are connected to your module front connector.
Before installing your module in the PXI chassis, install the diode/varistor by performing the following steps. Refer to Figure B-1.
!

Appendix B Customizing Your Card
NI 2565 User Manual B-2 © National Instruments Corporation
1. Ground yourself via a grounding strap or a ground connected to your PXI chassis. Properly grounding yourself prevents damage to your PXI module from electrostatic discharge.
2. Loosen the four screws that fasten the NI 2565 relay module board to the switch carrier module and front panel.
Figure B-1. NI 2565 Parts Locator Diagram
1 Carrier module2 Solder location for
flyback voltage protection device
3 Relay module4 Screws
5 Insulator6 Relay and socket
7 Ribbon cable
1
2
3
4
5
6
7
Appendix B Customizing Your Card
© National Instruments Corporation B-3 NI 2565 User Manual
3. Remove the plastic insulator cover.
4. Lift up the card and disconnect the ribbon cable from the relay module.
5. Insert the diode/varistor into the appropriate location, labeled RVx, where x corresponds to the channel number.
6. Solder and trim the leads.
7. Reassemble the module.
Replacing RelaysThe NI 2565 uses socketed relays, which are easy to replace when they fail. The electrical life of the relay is approximately 105 operations when switching at the rated load.
You can order a relay replacement kit from National Instruments. The replacement kit includes 16 new relays. Follow these instructions to replace the failed relay. Refer to Figure B-1.
1. Ground yourself via a grounding strap or a ground connected to your PXI chassis. Properly grounding yourself prevents damage to your PXI module from electrostatic discharge.
2. Remove the four screws that fasten the NI 2565 relay module board to the switch carrier module and front panel.
3. Lift up the card as shown in Figure B-1.
4. Remove the relay by applying force in the direction shown in Figure B-2.
5. Before inserting the new relay, match the direction of the relay and the socket.
6. Insert the relay, making sure the relay is properly seated and the socket hooks the top of the relay.
7. Reassemble the module.

Appendix B Customizing Your Card
NI 2565 User Manual B-4 © National Instruments Corporation
Figure B-2. Replacing a Relay
When removing the relay, applyforce in the direction as shown.
1. Match the direction ofrelay and socket.
2. Seat the relay securely so that the sockethooks on the top surface of the relay.
Correct Incorrect
© National Instruments Corporation C-1 NI 2565 User Manual
CArchitecture Drawing
This appendix contains an architecture drawing for the NI 2565 switch card.
Relay names are based on the signal names. For example, the relay that connects CH9 to COM9 is named CH9.

Appendix C Architecture Drawing
NI 2565 User Manual C-2 © National Instruments Corporation
Figure C-1. NI 2565 Switch Architecture
COM1 CH1
COM0 CH0
COM2 CH2
COM4 CH4
COM5 CH5
COM3 CH3
COM6 CH6
COM7 CH7
COM8 CH8
COM9 CH9
COM11 CH11
COM12 CH12
COM10 CH10
COM13 CH13
COM14 CH14
COM15 CH15

© National Instruments Corporation D-1 NI 2565 User Manual
DCommon Questions
This appendix addresses common questions you may have while using your NI 2565 switch card.
What should I do if the software detects the board but the switches do not switch?
• Verify that the switches do not switch. Close your application program and then launch the soft front panel as described in the Set up and Test document you received with your kit. The soft front panel shows the state of each relay on the board. Try closing and opening the switches.
• Also be sure to check the return codes of the NI-SWITCH operation to ensure that there are no errors (negative value) or warnings (positive value). You can also use the NI-Spy utility to check for error codes.
• Finally, verify that your code is correct. For reference, see the examples described in the NI-SWITCH Software User Manual. The NI-SWITCH driver also ships with several examples in source code. Compare your algorithm to those in the examples.
What should I do if scanning does not work?
• First, ensure that you have configured the switch card and the instrument to match trigger lines. The output trigger of the instrument should connect to the trigger input of the switch card. In addition, the scanner advanced trigger of the switch card should be connected to the input trigger of the instrument.
• If the switch card is used to initiate the scan, make sure the DMM is waiting for a trigger before enabling scanning on the switch card. This is the recommended method for hardware scanning.
• If the DMM is used to initiate the scan, enable scanning on the switch card before configuring the DMM to start taking measurements.
• Also be sure to check the return codes of the NI-SWITCH operation to ensure that there are no errors (negative value) or warnings (positive value). You can also use the NI-Spy utility to check for error codes.

Appendix D Common Questions
NI 2565 User Manual D-2 © National Instruments Corporation
• Finally, verify that your code is correct. For reference, see the examples described in the NI-SWITCH Software User Manual. The NI-SWITCH driver also ships with several examples in source code. Compare your algorithm to the ones in the examples.
Do I need to program the switch card myself?
The NI 2565 comes with the NI-SWITCH driver software, which exports the full functionality of the card. NI-SWITCH handles the complex issues of direct memory access, interrupts, and operating system interfacing.

© National Instruments Corporation E-1 NI 2565 User Manual
ECustomer Communication
For your convenience, this appendix contains forms to help you gather the information necessary to help us solve your technical problems and a form you can use to comment on the product documentation. When you contact us, we need the information on the Technical Support Form and the configuration form, if your manual contains one, about your system configuration to answer your questions as quickly as possible.
National Instruments has technical assistance through electronic, fax, and telephone systems to quickly provide the information you need. Our electronic services include a bulletin board service, an FTP site, a fax-on-demand system, and e-mail support. If you have a hardware or software problem, first try the electronic support systems. If the information available on these systems does not answer your questions, we offer fax and telephone support through our technical support centers, which are staffed by applications engineers.
Electronic Services
Bulletin Board SupportNational Instruments has BBS and FTP sites dedicated for 24-hour support with a collection of files and documents to answer most common customer questions. From these sites, you can also download the latest instrument drivers, updates, and example programs. For recorded instructions on how to use the bulletin board and FTP services and for BBS automated information, call 512 795 6990. You can access these services at:
United States: 512 794 5422Up to 14,400 baud, 8 data bits, 1 stop bit, no parity
United Kingdom: 01635 551422Up to 9,600 baud, 8 data bits, 1 stop bit, no parity
France: 01 48 65 15 59Up to 9,600 baud, 8 data bits, 1 stop bit, no parity
FTP SupportTo access our FTP site, log on to our Internet host, ftp.natinst.com, as anonymous and use your Internet address, such as [email protected], as your password. The support files and documents are located in the /support directories.

NI 2565 User Manual E-2 © National Instruments Corporation
Fax-on-Demand SupportFax-on-Demand is a 24-hour information retrieval system containing a library of documents on a wide range of technical information. You can access Fax-on-Demand from a touch-tone telephone at 512 418 1111.
E-Mail Support (Currently USA Only)You can submit technical support questions to the applications engineering team through e-mail at the Internet address listed below. Remember to include your name, address, and phone number so we can contact you with solutions and suggestions.
Telephone and Fax SupportNational Instruments has branch offices all over the world. Use the list below to find the technical support number for your country. If there is no National Instruments office in your country, contact the source from which you purchased your software to obtain support.
Country Telephone FaxAustralia 03 9879 5166 03 9879 6277Austria 0662 45 79 90 0 0662 45 79 90 19Belgium 02 757 00 20 02 757 03 11Brazil 011 288 3336 011 288 8528Canada (Ontario) 905 785 0085 905 785 0086Canada (Québec) 514 694 8521 514 694 4399Denmark 45 76 26 00 45 76 26 02Finland 09 725 725 11 09 725 725 55France 01 48 14 24 24 01 48 14 24 14Germany 089 741 31 30 089 714 60 35Hong Kong 2645 3186 2686 8505Israel 03 6120092 03 6120095Italy 02 413091 02 41309215Japan 03 5472 2970 03 5472 2977Korea 02 596 7456 02 596 7455Mexico 5 520 2635 5 520 3282Netherlands 0348 433466 0348 430673Norway 32 84 84 00 32 84 86 00Singapore 2265886 2265887Spain 91 640 0085 91 640 0533Sweden 08 730 49 70 08 730 43 70Switzerland 056 200 51 51 056 200 51 55Taiwan 02 377 1200 02 737 4644United Kingdom 01635 523545 01635 523154United States 512 795 8248 512 794 5678

Technical Support FormPhotocopy this form and update it each time you make changes to your software or hardware, and use the completed copy of this form as a reference for your current configuration. Completing this form accurately before contacting National Instruments for technical support helps our applications engineers answer your questions more efficiently.
If you are using any National Instruments hardware or software products related to this problem, include the configuration forms from their user manuals. Include additional pages if necessary.
Name __________________________________________________________________________
Company _______________________________________________________________________
Address ________________________________________________________________________
_______________________________________________________________________________
Fax ( ___ ) ________________Phone ( ___ ) __________________________________________
Computer brand____________ Model ___________________Processor _____________________
Operating system (include version number) ____________________________________________
Clock speed ______MHz RAM _____MB Display adapter __________________________
Mouse ___yes ___no Other adapters installed _______________________________________
Hard disk capacity _____MB Brand_________________________________________________
Instruments used _________________________________________________________________
_______________________________________________________________________________
National Instruments hardware product model _____________ Revision ____________________
Configuration ___________________________________________________________________
National Instruments software product ___________________ Version _____________________
Configuration ___________________________________________________________________
The problem is: __________________________________________________________________
_______________________________________________________________________________
_______________________________________________________________________________
_______________________________________________________________________________
_______________________________________________________________________________
List any error messages: ___________________________________________________________
_______________________________________________________________________________
_______________________________________________________________________________
The following steps reproduce the problem: ___________________________________________
_______________________________________________________________________________
_______________________________________________________________________________
_______________________________________________________________________________
_______________________________________________________________________________

NI 2565 Hardware and Software Configuration FormRecord the settings and revisions of your hardware and software on the line to the right of each item. Complete a new copy of this form each time you revise your software or hardware configuration, and use this form as a reference for your current configuration. Completing this form accurately before contacting National Instruments for technical support helps our applications engineers answer your questions more efficiently.
National Instruments ProductsHardware revision ________________________________________________________________
Switching mode__________________________________________________________________
List National Instruments Software Installed and Version
NI-SWITCH version _______________________________________________________________
LabVIEW version _________________________________________________________________
LabWindows/CVI version___________________________________________________________
Other National Instruments software version ____________________________________________
________________________________________________________________________________
Programming choice _______________________________________________________________
Other ProductsPXI chassis make and model________________________________________________________
Microprocessor __________________________________________________________________
Clock frequency or speed __________________________________________________________
Type of video board installed _______________________________________________________
Operating system version __________________________________________________________
Operating system mode____________________________________________________________
Programming language ____________________________________________________________
Programming language version______________________________________________________
Switch accessories________________________________________________________________
_______________________________________________________________________________
Instruments connected to switch _____________________________________________________
_______________________________________________________________________________

List All Boards in PXI Mainframe
PXI Slot Manufacturer, Description, and Function
1
2
3
4
5
6
7
8

Documentation Comment FormNational Instruments encourages you to comment on the documentation supplied with our products. This information helps us provide quality products to meet your needs.
Title: NI 2565 User Manual
Edition Date: December 1998
Part Number: 322121A-01
Please comment on the completeness, clarity, and organization of the manual.
_______________________________________________________________________________
_______________________________________________________________________________
_______________________________________________________________________________
_______________________________________________________________________________
_______________________________________________________________________________
_______________________________________________________________________________
_______________________________________________________________________________
If you find errors in the manual, please record the page numbers and describe the errors.
_______________________________________________________________________________
_______________________________________________________________________________
_______________________________________________________________________________
_______________________________________________________________________________
_______________________________________________________________________________
_______________________________________________________________________________
_______________________________________________________________________________
Thank you for your help.
Name _________________________________________________________________________
Title __________________________________________________________________________
Company _______________________________________________________________________
Address ________________________________________________________________________
_______________________________________________________________________________
E-Mail Address __________________________________________________________________
Phone ( ___ ) __________________________ Fax ( ___ ) _______________________________
Mail to: Technical Publications Fax to: Technical PublicationsNational Instruments Corporation National Instruments Corporation6504 Bridge Point Parkway 512 794 5678Austin, Texas 78730-5039

© National Instruments Corporation G-1 NI 2565 User Manual
Glossary
Prefix Meanings Value
n- nano- 10–9
µ- micro- 10– 6
m- milli- 10–3
k- kilo- 103
M- mega- 106
G- giga- 109
Numbers and Symbols
° degrees
Ω ohms
% percent
± plus or minus
1form A single-pole, single-throw relay
A
A amperes
AC alternating current
ANSI American National Standards Institute
B
breakpoint a specified point in program code where the program pauses to perform some action; a breakpoint interrupt can be added to a scan list for debugging or other special needs.

Glossary
NI 2565 User Manual G-2 © National Instruments Corporation
bus the group of conductors that interconnect individual circuitry in a computer. Typically, a bus is the expansion vehicle to which I/O or other devices are connected. Examples of PC buses are the ISA and PCI bus.
C
C Celsius
Category I, Category II, CAT I, CAT II
These categories refer to different levels in impulse voltage. Category I is at the signal level, and refers to special equipment or parts of equipment, telecommunication, electronic, and so on, with smaller transient overvoltages than Category II. Category II is local level, and refers to such items as appliances and portable equipment. The impulse withstand voltages for each category are as follows:
Voltage Phase-to_Earth Category I Category II
150 V 800 V 1,500 V
300 V 1,500 V 2,500 V
channel pin or wire lead on the multiplexer to which you apply or from which you read the analog or digital signal. Signals can be single-ended or differential.
contact bounce the intermittent switching that occurs when the movable metal parts of a relay make or break contact
D
DC direct current
debounced indicates when the contact bounce has ended. See contact bounce.
device a plug-in board, card, or pad that can contain multiple channels and conversion devices. Some examples of devices are computers, multimeters, multiplexers, oscillators, operator interfaces, and counters.
digital multimeter a multifunction meter used to make measurements such as voltage, current, resistance frequency, temperature, and so on
DIN Deutsche Industrie Norme
diode an electronic component that acts primarily as a one-way valve

Glossary
© National Instruments Corporation G-3 NI 2565 User Manual
DMA direct memory access—a method by which data can be transferred to/from computer memory from/to a device or memory on the bus while the processor does something else. DMA is the fastest method of transferring data to/from computer memory.
DMM See digital multimeter.
drivers/driver software software that controls a specific hardware device such as a switch card
E
external trigger a voltage pulse from an external source that triggers an event such as A/D conversion
F
flyback voltage the voltage spike generated the instant current stops flowing through an inductor
H
handshaking the use of two trigger lines between two instruments, such as a switch and a DMM, to synchronize their actions
Hz hertz—the number of scans read or updates written per second
I
in. inches
Interchangeable Virtual Instrument
an advanced architecture for instrument drivers that includes features such as simulation and state caching
I/O input/output—the transfer of data to/from a computer system involving communications channels, operator interface devices, and/or data acquisition and control interfaces
ISA Industry Standard Architecture
IVI See Interchangeable Virtual Instrument.

Glossary
NI 2565 User Manual G-4 © National Instruments Corporation
M
MB megabytes of memory
N
NI-SWITCH an IVI-based instrument driver that supports the National Instruments line of switch cards
P
PXI PCI with extensions for instrumentation
R
random scanning scanning the channels in a mux in any order
relay a switch that connects or disconnects the signal to a common through the physical movement of a metal arm
RMA Return Material Authorization
rms root mean square—the square root of the average value of the square of the instantaneous signal amplitude; a measure of signal amplitude
RTD resistance temperature detector—a metallic probe that measures temperature based upon its coefficient of resistivity
S
s seconds
scan the data acquisition of signals connected to multiple channels of a multiplexer. Typically, the measurement device uses a trigger to advance the multiplexer to the next channel in the scan.
scan list a list of channels supplied to NI-SWITCH that indicates the order in which channels will be scanned

Glossary
© National Instruments Corporation G-5 NI 2565 User Manual
scanner advanced trigger
the trigger generated by the switch card when scanning. The trigger occurs after the switch card has closed a switch and the switch has settled.
sensor a device that responds to a physical stimulus (heat, light, sound, pressure, motion, flow, and so on), and produces a corresponding electrical signal
settling time the amount of time required for a voltage to reach its final value within specified limits
soft front panel a graphical program included with NI-SWITCH that you can use to interactively control the switch
T
thermistor a semiconductor sensor that exhibits a repeatable change in electrical resistance as a function of temperature. Most thermistors exhibit a negative temperature coefficient.
thermocouple a temperature sensor created by joining two dissimilar metals. The junction produces a small voltage as a function of the temperature.
trigger any event that causes or starts some form of data capture
TTL Transistor-Transistor Logic
V
V volts
varistor an electrical resistor whose resistance depends on the applied voltage
VDC volts, direct current
VI virtual instrument—(1) a combination of hardware and/or software elements, typically used with a PC, that has the functionality of a classic stand-alone instrument (2) a LabVIEW software module (VI), which consists of a front panel user interface and a block diagram program

Glossary
NI 2565 User Manual G-6 © National Instruments Corporation
W
W watts
wire data path between nodes

© National Instruments Corporation I-1 NI 2565 User Manual
Index
Aantistatic cautions, 1-3architecture drawing, C-1
BBBS tech support, E-1
CC++, 1-5carrier module, B-2Categories I and II overvoltage specifications,
G-2certifications and compliances, A-3commands in scan list, capabilities, 2-4common mode voltage, A-1common questions, D-1configuration
NI-SWITCH driver software, 1-4connecting signals, 1-3contact
material, A-1on resistance, A-1protection, 1-2
contact bounce, definition of, G-2continuous scanning, 2-5current switching capabilities, 1-1customer communication, E-1customizing, B-1
Ddebounced
See also contact bouncedefinition of, G-2
diagram, parts locator, B-2dimensions, A-3diode/varistor installation, B-1DMM and multicard triggering, 2-7dynamic characteristics, A-2
Eelectronic services, E-1expected life, A-2external trigger, 2-7
Fflyback voltage, B-1
definition of, G-3flyback voltage protection, B-1front connector, 1-3
signal description of, 1-3functional overview, 2-2fuse, safety, 1-2
Ggeneral-purpose relays, 2-4generated wattage, A-2
Hhigh voltage, 1-2
II/O connector, A-3I/O mating connector, A-3initiating scanning, 2-6input characteristics, A-1

Index
NI 2565 User Manual I-2 © National Instruments Corporation
installationof diode varistor, B-1of NI 2565 module, B-1
insulationcoordination of, 1-2rating, A-3reinforced, 1-2
insulator (in Parts Locator Diagram), B-2interrupt handling, 1-4IVI (Interchangeable Virtual Instrument), 1-4
definition of, G-3
LLabVIEW, 1-4LabVIEW NI-SWITCH VI Library, 1-4LabWindows/CVI, 1-4LabWindows/CVI NI-SWITCH Library, 1-5
Mmaster switch card, 2-7maximum altitude (environment), A-3maximum switching
capacity per channel, A-1exceeding capability, A-2power per channel, A-1rate (dynamic characteristics), A-2voltage, A-1
modes, 2-6module block diagram, 2-3multicard triggering, 2-7
NNI 2503 switch card, using in conjunction, 2-7NI 2565
about, 1-1architecture drawing, C-1common questions, D-1customizing, B-1
definition of, 1-1expected life, A-2front connector, 1-3functional overview, 2-2general purpose relays, 2-4module block diagram, 2-3operate and release times, 2-4operation, 2-1parts locator diagram, B-2routing signals, 1-1safety instructions, 2-1switch architecture, C-2technical support form, E-3, E-5
NI-Spy utility, D-1NI-SWITCH driver software, 1-4, D-2
features of, 1-4NI-SWITCH Software User Manual, 2-7, D-1,
D-2number of relays, A-1
Oonboard control logic
capabilities, 2-5one-time scanning, 2-5operate and release times, 2-4operating temperature, A-3operation, 2-1overvoltage specifications, categories, G-2
Pparts locator diagram, B-2pin assignments
front connector, 1-3power requirement, A-2programming, 1-4PXI interface, 2-5, A-2PXI star trigger, 2-5, 2-6PXI trigger bus, A-2PXI TTL trigger, 2-5, 2-6

Index
© National Instruments Corporation I-3 NI 2565 User Manual
Rrandom scanning, 2-4reinforced insulation, 1-2relative humidity (environment), A-3relay
1form A, 1-1electrical life of, B-3names, C-1operate time, A-2release time, A-2
relay and socket (in Parts Locator Diagram), B-2
replacing relays, B-3, B-4ribbon cable, B-2routing signals, 1-1
Ssafety, 2-1, A-3, B-1scan list
clearing, resetting, 2-5SCANADV trigger modes, 2-6scanner advanced trigger, 1-1, 2-6
definition of, G-5scanning
common questions, D-1continuous, 2-5initiating, 2-6NI-SWITCH driver software, 1-4one-time, 2-5random, 2-4
SCC (switch control circuitry), 2-4screw terminal accessory, 1-4signals
connections, 1-3single-pole single-throw relays, 1-1slave switch card, 2-7software choices, 1-4
data acquisition, 1-4data analysis, 1-4
graphical data presentation, 1-4instrument control, 1-4National Instruments application
software, 1-4NI-SWITCH driver software, 1-4third-party software, 1-5
solder location for flyback-voltage protection, B-2
specifications, A-1overvoltage specifications categories, G-2
storage temperature, A-3storing commands in memory, reasons for, 2-4switch architecture, C-2switch card
common questions, D-1master, 2-7programming, D-2slave, 2-7
switch control circuitry (SCC), 2-4
Ttechnical support
bulletin board support, E-1configuration form, E-3customer communication, E-1documentation comment form, E-7e-mail support, E-2fax-on-demand support, E-2FTP support, E-1hardware and software configuration, E-5telephone and fax support, E-2
transient overvoltages, 1-2triggers
external trigger input, 1-1, 2-5, 2-7minimum pulse width from, 2-5multicard, 2-7on front panel connector, 2-7PXI star trigger, 2-5, 2-6PXI TTL, 2-5, 2-6
Index
NI 2565 User Manual I-4 © National Instruments Corporation
SCANADV trigger modes, 2-6, 2-7scanner advanced trigger, 1-1, 2-6
definition of, G-5types used, 1-1wait-for-trigger state, 2-6
Uuser interface, 1-5
VVisual Basic, 1-5voltage switching capabilities, 1-1
Wwait-for-trigger state, 2-6weight, A-3