netburner eclipse ide getting started guide - …€¦ · netburner eclipse ide . getting started...
TRANSCRIPT
NetBurner Eclipse IDE
Getting Started Guide
Revision 1.8, Sep 22, 2009

Table of Contents
1 INTRODUCTION ...............................................................................................................................................3 1.1 HOW TO USE THIS GUIDE ...............................................................................................................................3 1.2 SOURCE CODE FOR EXAMPLE PROGRAMS ......................................................................................................3 1.3 HARDWARE SETUP .........................................................................................................................................3 1.4 NETWORK VERSUS NON-NETWORK PLATFORMS............................................................................................3 1.5 SOFTWARE INSTALLATION .............................................................................................................................3
1.5.1 Upgrading From a Previous Installation...............................................................................................4 1.5.2 Java Installation ....................................................................................................................................4
1.6 DEBUG PORT ..................................................................................................................................................4 2 OVERVIEW OF THE NETBURNER DEVELOPMENT PLATFORMS.....................................................5
3 THE NBECLIPSE MINDSET............................................................................................................................6 3.1 NBECLIPSE PROJECT MANAGEMENT .............................................................................................................6 3.2 STARTING NBECLIPSE....................................................................................................................................6 3.3 THE NBECLIPSE WORKSPACE ........................................................................................................................7 3.4 CHOOSING THE DEFAULT NBECLIPSE WORKSPACE LOCATION .....................................................................7
4 CREATING A PROJECT FOR A NETBURNER EXAMPLE APPLICATION..........................................8 4.1 CREATING AN NBECLIPSE EMPTY PROJECT ...................................................................................................8 4.2 IMPORTING SOURCE CODE FILES INTO AN EXISTING PROJECT .....................................................................15
5 DOWNLOADING APPLICATIONS TO NETBURNER HARDWARE – CREATING "RUN" AND "DEBUG" CONFIGURATIONS.............................................................................................................................21
5.1.1 Application File Types and Locations .................................................................................................21 5.1.2 Auto Creating an NBEclipse Run/Debug Configuration .....................................................................21 5.1.3 Creating a NBEclipse Run Configuration ...........................................................................................21
6 CREATING PROJECTS IN LOCATIONS OTHER THAN THE NBECLIPSE WORKSPACE ............27 6.1 CLEANING THE PROJECT DIRECTORY ...........................................................................................................27 6.2 CREATING THE NBECLIPSE PROJECT............................................................................................................27
7 REMOVING AN NBECLIPSE PROJECT FROM AN EXISTING PROJECT DIRECTORY................31
8 DEBUGGING WITH NBECLIPSE.................................................................................................................31 8.1 SETUP ON NETWORK PLATFORMS ................................................................................................................31
8.1.1 Using a Crossover Cable.....................................................................................................................31 8.2 SETUP ON NON-NETWORK PLATFORMS........................................................................................................32 8.3 ADDING DEBUG CAPABILITY TO YOUR APPLICATION..................................................................................33
8.3.1 Network Platforms ...............................................................................................................................33 8.3.2 Non-Network Platforms .......................................................................................................................35
8.4 RUNNING THE DEBUGGER ............................................................................................................................36 8.5 STEP BY STEP DEBUG SESSION.....................................................................................................................38
8.5.1 Create an Application with the Application Wizard ............................................................................38 8.5.2 Edit the Application Wizard Source Code ...........................................................................................45 8.5.3 Create Run and Debug Configurations ...............................................................................................46 8.5.4 Non-Network Platforms – Start Speed Serial Debug...........................................................................47 8.5.5 Launch the Debugging Session............................................................................................................47 8.5.6 Breakpoints and Stepping Through Code ............................................................................................49
8.6 MODIFYING CODE AND RESTARTING THE DEBUGGER..................................................................................50 8.7 THE VARIABLE WATCH WINDOW ................................................................................................................50 8.8 DEBUGGING SYSTEM SOURCE FILES AND CRITICAL SECTIONS ....................................................................52
NetBurner Eclipse Getting Started Guide Page 2
1 Introduction
1.1 How to Use This Guide The goal of the NetBurner Eclipse Getting Started Guide is to familiarize new users with the NetBurner Eclipse (NBEclipse) interface and basic operation. NBEclipse is based on the standard Eclipse release with additional features to support development with NetBurner hardware, such as application downloads to flash memory and the ability to locate NetBurner hardware on a network. It will provide a general overview of how NBEclipse works and provide details on the following:
• How to create a new project • Import, compile, and execute example programs • Debug an example program • Use the application wizard to create a new program • Various tips on useful features of the NBEclipse environment
1.2 Source Code for Example Programs Source code for the examples in this document are located in the \Nburn\examples directory of your NetBurner tools installation.
1.3 Hardware Setup This document assumes you have a working hardware platform on which you can run the examples. Your NetBurner development kit hardware is pre-programmed with an example application at the factory. Before executing the examples in this document, it would be a good idea to connect your NetBurner device to your computer and verify you have serial and network communication with the device as described in the NNDK Quick Start Guide.
1.4 Network versus Non-Network Platforms Throughout this document, there will be references to network and non-network platforms. The NetBurner tools separate the two platform categories by placing system files in separate directories. The "nn" suffix is used to represent non-network code. For example, include files are stored in \Nburn\include and \Nburn\include_nn, while system files are stored in \Nburn\system and \Nburn\system_nn. You may have one or both of these directory sets depending on the NetBurner platforms purchased and installed on your computer.
1.5 Software Installation The NetBurner software tools run on Microsoft Windows NT 4.0, 2000, and XP. The autorun feature should automatically start the install after inserting the CD-ROM into the optical drive. If it does not, then access the CD-ROM through Windows Explorer and run the "setup.exe" file.
NetBurner Eclipse Getting Started Guide Page 3
1.5.1 Upgrading From a Previous Installation Do not install over an existing version when upgrading from a previous version of the NetBurner tools. The upgrade requires that you either rename or uninstall the existing installation directory. The recommended procedure is as follows:
1. Backup any existing projects you want to save, especially if they are in the NetBurner tools installation directory.
2. Rename the existing tools installation folder. For example, rename C:\Nburn to C:\NburnVerX, where ‘X’ is the previous version number. You can always get back to the previous installation by renaming the directory back to the original name this way.
3. Run the installation for the new tools.
1.5.2 Java Installation NBEclipse requires the Java Runtime Environment (JRE) revision 1.6 or higher. If there is no JRE installed, then you will receive an error message when starting NBEclipse stating that it cannot find the JRE executable. The JRE is free from http://java.sun.com. Download either the Java SE (Standard Edition) Development Kit (JDK) or Runtime Environment and follow the installation prompts. You may need to restart your computer after installation is complete.
1.6 Debug Port Throughout this guide, we will refer to the "serial debug port". The serial debug port is one of the RS-232 ports that can be used to interact with your NetBurner device in the example programs. Stdout, stdin, and stderr are mapped to the debug port by default, so when you use functions like printf(), scanf(), gets(), they read and write to the serial debug port. Mapping of the stdio is configurable, as you can disable the serial debug port and use it as a general purpose UART, or reassign the stdio file descriptors to use other serial or network interfaces. Debugging in NBEclipse on network-enabled platforms will occur through the Ethernet connection, while debugging on non-network platforms will use the serial port.
NetBurner Eclipse Getting Started Guide Page 4

2 Overview of the NetBurner Development Platforms Your NetBurner Network Development Kit provides two options for development:
• GNU make utility via Windows command line • NBEclipse Integrated Development Environment (IDE)
The choice of what platform you wish to use depends on personal preferences. The command line tools use makefiles familiar to development on Unix and Linux environments. This make utility can also be invoked from within other IDEs and code editors such as SlickEdit. NBEclipse is an enterprise level professional IDE that provides editing, downloading, and debugging in one package. NBEclipse was designed to be extensible to any number of platforms and programming languages, and as a consequence it has more features than most people will probably ever use. However, most people find that it quickly becomes their IDE of choice after spending a little time learning the environment. NBEclipse has the capability to add plug-ins for additional features. For example, there is a SlickEdit plug-in for those who prefer to use that editor.
NetBurner Eclipse Getting Started Guide Page 5
3 The NBEclipse Mindset The following points are useful to users who have not used a similar type of project manager. There are three main ways to maintain and build a project:
1. Use NBEclipse to manage the project with the project files located in the NBEclipse workspace. This is the recommended method.
2. Use NBEclipse to manage the project with the project files located in an existing directory outside the NBEclipse workspace.
3. Configure NBEclipse to use an external makefile that you maintain. Those new to the Eclipse IDE may find the following operation different from previous development environments. A summary of these differences are listed below and each will be covered in detail in the following sections:
1. NBEclipse will default to a compile mode of "Build Automatically" that will compile the source code each time a source code file is saved. This can be disabled from the main menu by selecting Project Build Automatically. However, most people find it to be a very useful feature once they get used to it.
2. NBEclipse uses a "workspace" in which projects are created and source files are copied. 3. All recognized files in a project directory will be compiled. Recognized files have extensions of .c, .cpp,
and .s (.s is an assembly language file). 4. A "Run" configuration must be created for each project in order to download the application image to your
NetBurner target. 5. The "C/C++ Projects" tab on the left side of the NBEclipse IDE is a navigation window just like Windows
Explorer – it is not a file project manager. All recognized files are built as stated in item (3) above. If you have non-project related files in your project directory and wish to see only the project files in the tab, you can select a filter to display only source code files.
6. Application build output files such as .o, .elf, .map, and .s19 files will be written to project subdirectories named "Release" and "Debug" that correspond to the type of build executed.
3.1 NBEclipse Project Management Keep in mind that NBEclipse is a project-based (IDE) tool; it is not intended to be a general purpose editor for quickly opening source code files from Windows Explorer by double-clicking on them. You have the option of using various code editors such as SlickEdit or Notepad++ for quick viewing of the source files. Of course, you can view any file with NBEclipse, but to effectively use the IDE, you must first create a project, and then import files into the project space.
3.2 Starting NBEclipse NBEclipse can be started from the Windows "Start" button on the desktop: Start Programs (All Programs in XP) NetBurner NNDK NBEclipse
NetBurner Eclipse Getting Started Guide Page 6
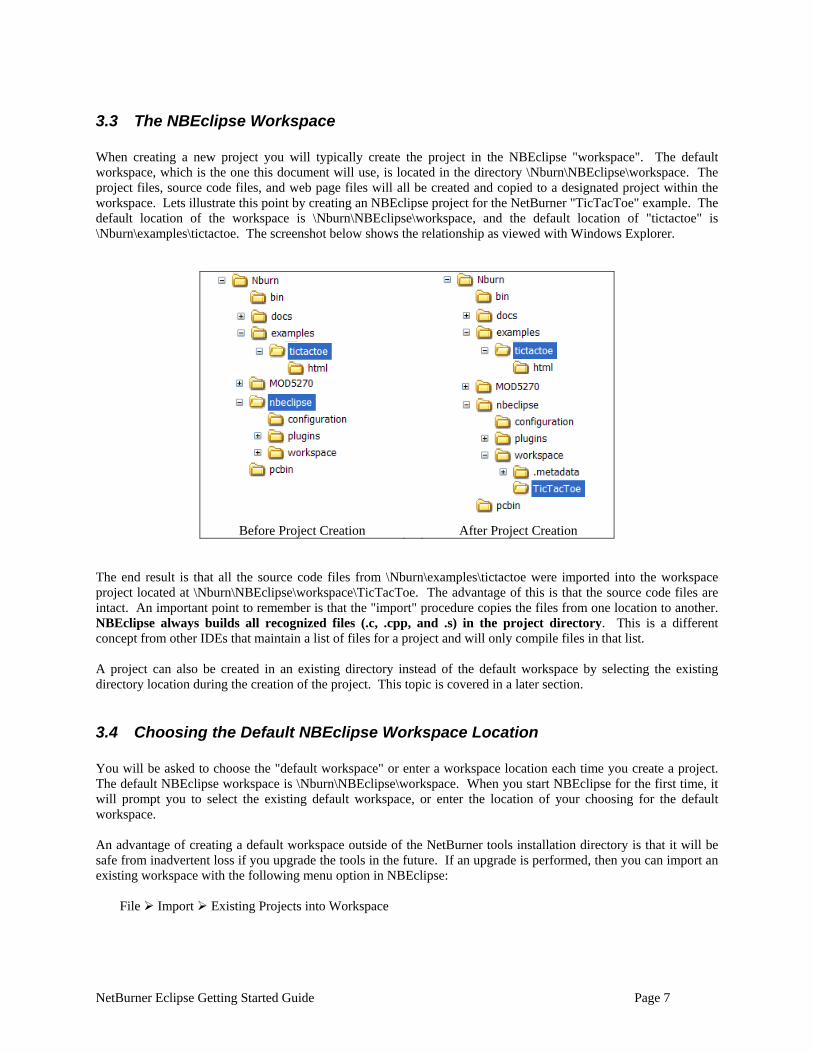
3.3 The NBEclipse Workspace When creating a new project you will typically create the project in the NBEclipse "workspace". The default workspace, which is the one this document will use, is located in the directory \Nburn\NBEclipse\workspace. The project files, source code files, and web page files will all be created and copied to a designated project within the workspace. Lets illustrate this point by creating an NBEclipse project for the NetBurner "TicTacToe" example. The default location of the workspace is \Nburn\NBEclipse\workspace, and the default location of "tictactoe" is \Nburn\examples\tictactoe. The screenshot below shows the relationship as viewed with Windows Explorer.
Before Project Creation After Project Creation
The end result is that all the source code files from \Nburn\examples\tictactoe were imported into the workspace project located at \Nburn\NBEclipse\workspace\TicTacToe. The advantage of this is that the source code files are intact. An important point to remember is that the "import" procedure copies the files from one location to another. NBEclipse always builds all recognized files (.c, .cpp, and .s) in the project directory. This is a different concept from other IDEs that maintain a list of files for a project and will only compile files in that list. A project can also be created in an existing directory instead of the default workspace by selecting the existing directory location during the creation of the project. This topic is covered in a later section.
3.4 Choosing the Default NBEclipse Workspace Location You will be asked to choose the "default workspace" or enter a workspace location each time you create a project. The default NBEclipse workspace is \Nburn\NBEclipse\workspace. When you start NBEclipse for the first time, it will prompt you to select the existing default workspace, or enter the location of your choosing for the default workspace. An advantage of creating a default workspace outside of the NetBurner tools installation directory is that it will be safe from inadvertent loss if you upgrade the tools in the future. If an upgrade is performed, then you can import an existing workspace with the following menu option in NBEclipse: File Import Existing Projects into Workspace
NetBurner Eclipse Getting Started Guide Page 7

4 Creating a Project for a NetBurner Example Application This section will provide step-by-step instructions on how to create an NBEclipse project from a NetBurner example application. These steps can be used to import any existing projects. A summary of the steps required are:
• Create an empty NBEclipse project • Import the source files from the NetBurner example • Build the application and load it into a NetBurner device
NetBurner provides both network-enabled and non-network hardware platforms. We will cover one of each type in this section: the Mod5213 (non-network) and the Mod5270 (network-enabled). The platform choices only affect the NetBurner example chosen in the import process. If you are using a different NetBurner hardware device you can select a different example application in the \Nburn\examples directory.
4.1 Creating an NBEclipse Empty Project The first step is to create an NBEclipse project. The project will store the settings for building the application and managing the build process. We can import the source code files from the example once the project is created. From the NBEclipse main menu, select: File New Project...
NetBurner Eclipse Getting Started Guide Page 8
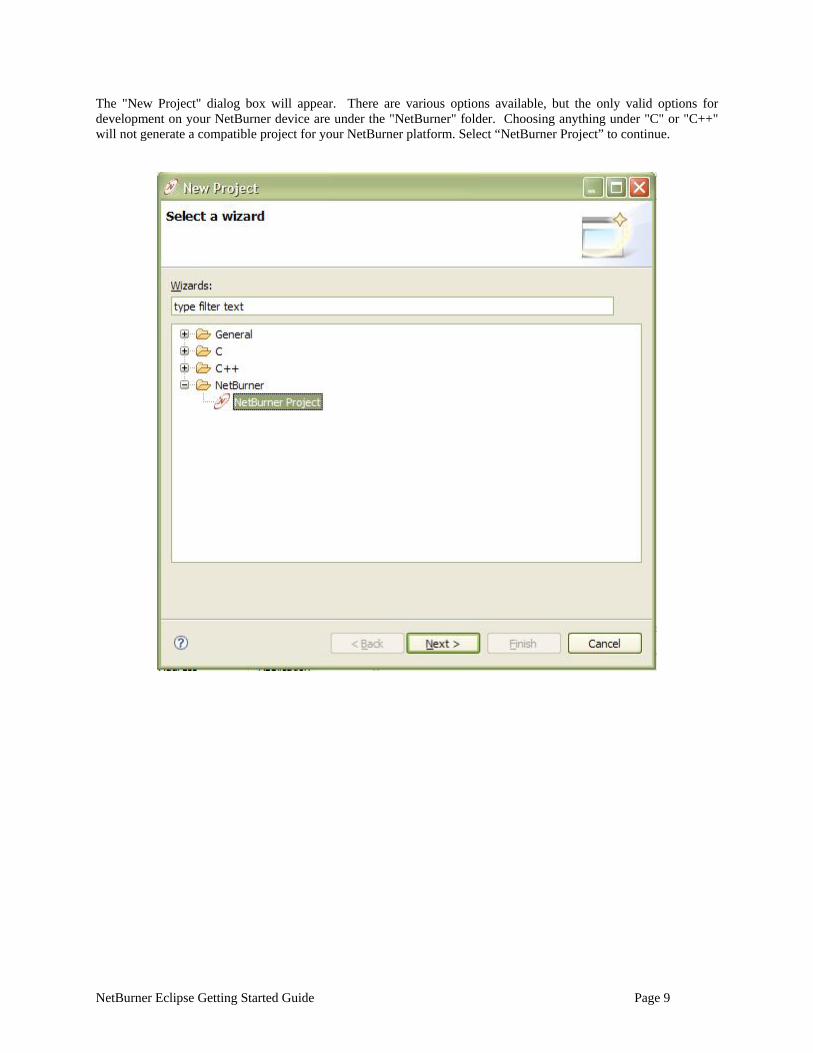
The "New Project" dialog box will appear. There are various options available, but the only valid options for development on your NetBurner device are under the "NetBurner" folder. Choosing anything under "C" or "C++" will not generate a compatible project for your NetBurner platform. Select “NetBurner Project” to continue.
NetBurner Eclipse Getting Started Guide Page 9
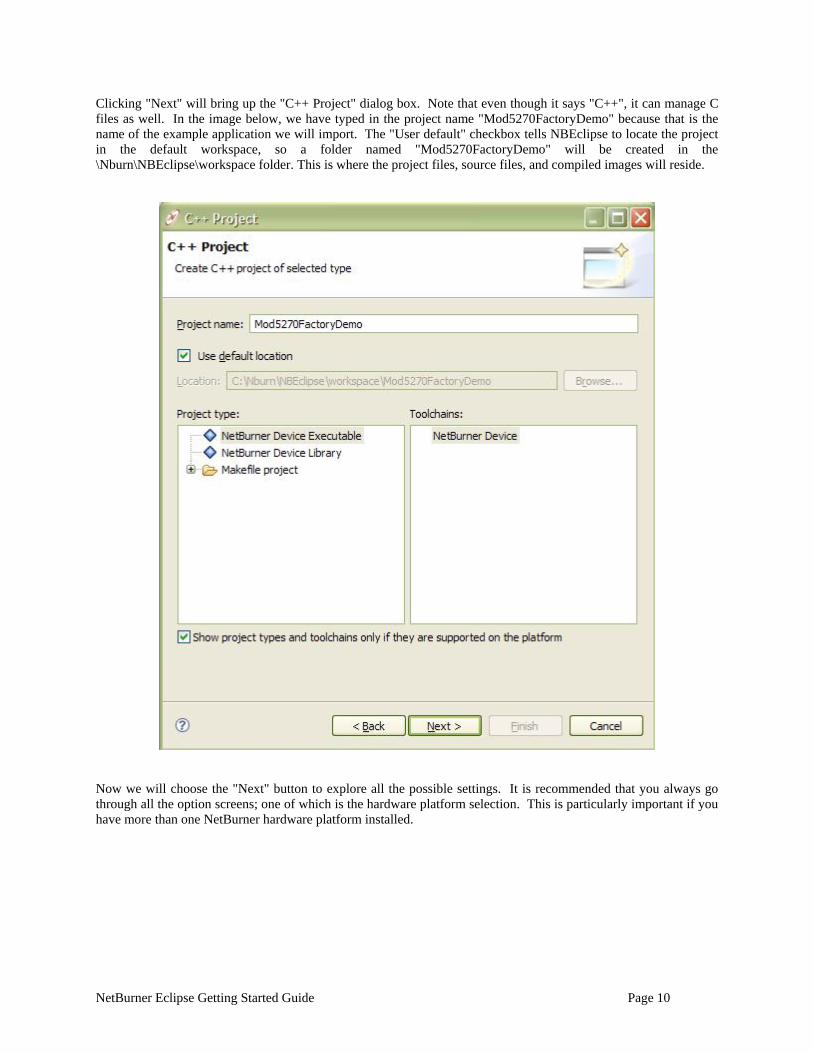
Clicking "Next" will bring up the "C++ Project" dialog box. Note that even though it says "C++", it can manage C files as well. In the image below, we have typed in the project name "Mod5270FactoryDemo" because that is the name of the example application we will import. The "User default" checkbox tells NBEclipse to locate the project in the default workspace, so a folder named "Mod5270FactoryDemo" will be created in the \Nburn\NBEclipse\workspace folder. This is where the project files, source files, and compiled images will reside.
Now we will choose the "Next" button to explore all the possible settings. It is recommended that you always go through all the option screens; one of which is the hardware platform selection. This is particularly important if you have more than one NetBurner hardware platform installed.
NetBurner Eclipse Getting Started Guide Page 10

Clicking "Next" displays the configurations options page. We want to be able to build both release and debug builds, so leave both checkboxes checked in the configuration section as shown below.
NetBurner Eclipse Getting Started Guide Page 11
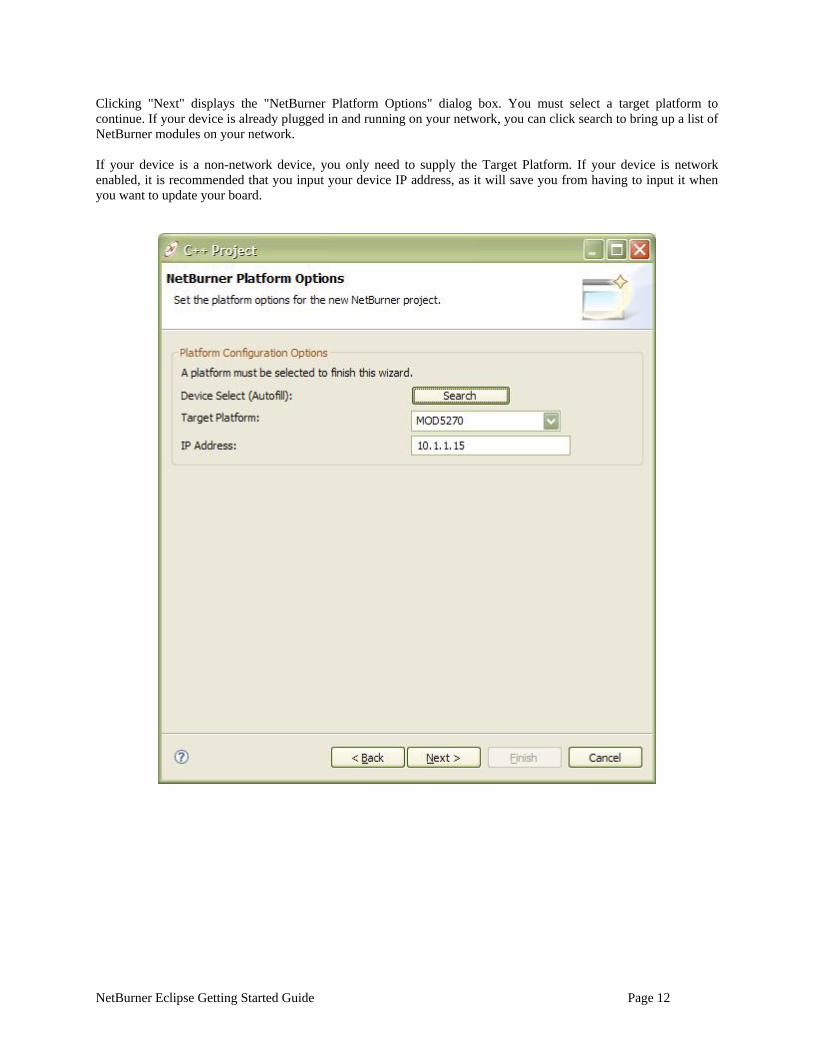
Clicking "Next" displays the "NetBurner Platform Options" dialog box. You must select a target platform to continue. If your device is already plugged in and running on your network, you can click search to bring up a list of NetBurner modules on your network. If your device is a non-network device, you only need to supply the Target Platform. If your device is network enabled, it is recommended that you input your device IP address, as it will save you from having to input it when you want to update your board.
NetBurner Eclipse Getting Started Guide Page 12
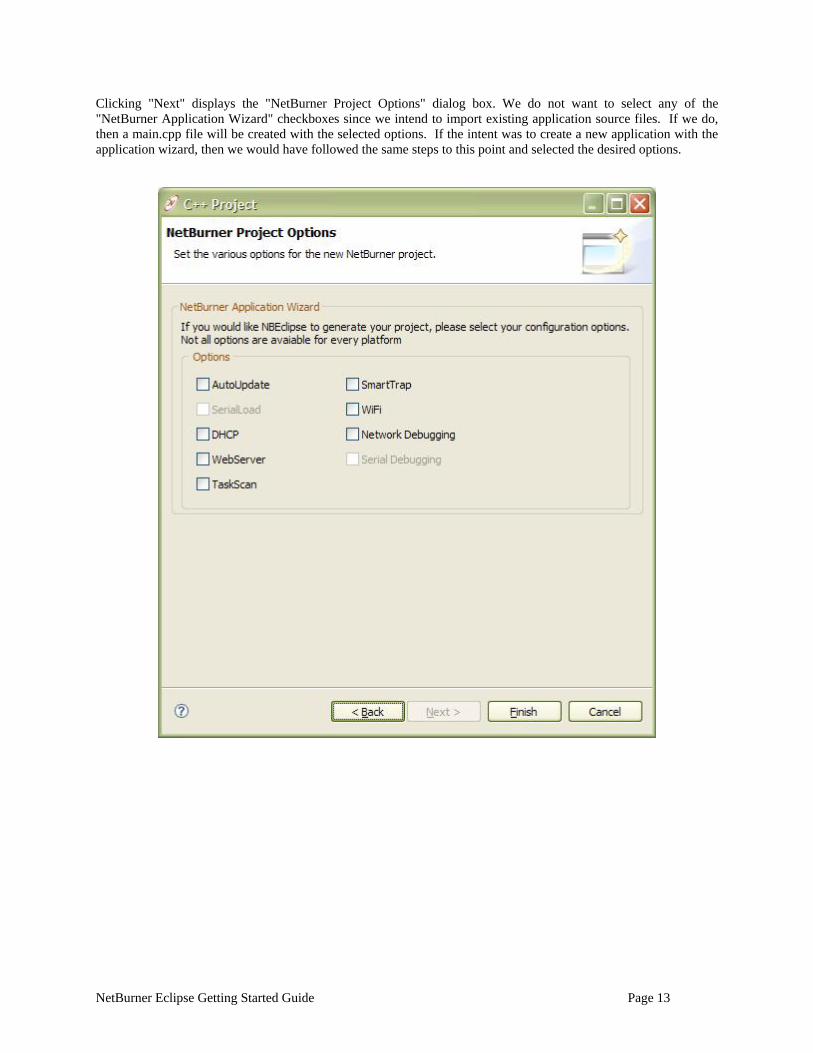
Clicking "Next" displays the "NetBurner Project Options" dialog box. We do not want to select any of the "NetBurner Application Wizard" checkboxes since we intend to import existing application source files. If we do, then a main.cpp file will be created with the selected options. If the intent was to create a new application with the application wizard, then we would have followed the same steps to this point and selected the desired options.
NetBurner Eclipse Getting Started Guide Page 13
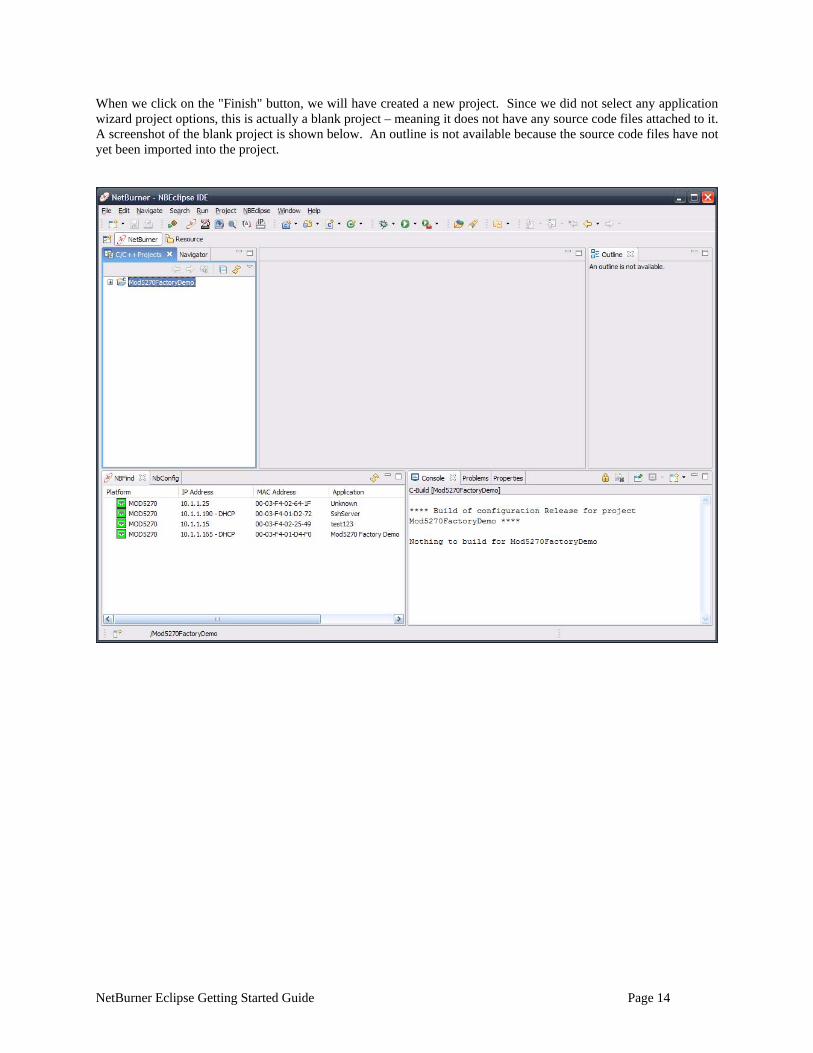
When we click on the "Finish" button, we will have created a new project. Since we did not select any application wizard project options, this is actually a blank project – meaning it does not have any source code files attached to it. A screenshot of the blank project is shown below. An outline is not available because the source code files have not yet been imported into the project.
NetBurner Eclipse Getting Started Guide Page 14
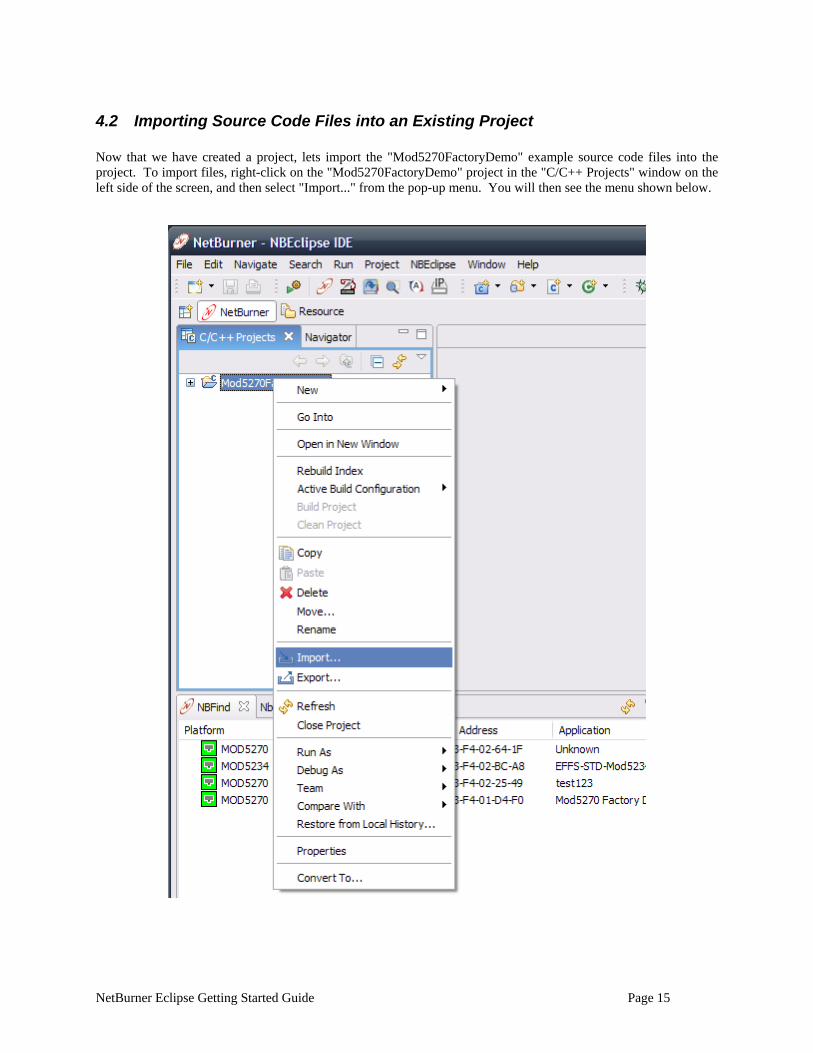
4.2 Importing Source Code Files into an Existing Project Now that we have created a project, lets import the "Mod5270FactoryDemo" example source code files into the project. To import files, right-click on the "Mod5270FactoryDemo" project in the "C/C++ Projects" window on the left side of the screen, and then select "Import..." from the pop-up menu. You will then see the menu shown below.
NetBurner Eclipse Getting Started Guide Page 15

Clicking on "Import..." will display the dialog box shown below. We want to import source code files from the "Mod5270FactoryDemo" example, so select: General File System, and then click on the "Next" button. The other options in this dialog box will not be used with your NetBurner tools.
NetBurner Eclipse Getting Started Guide Page 16
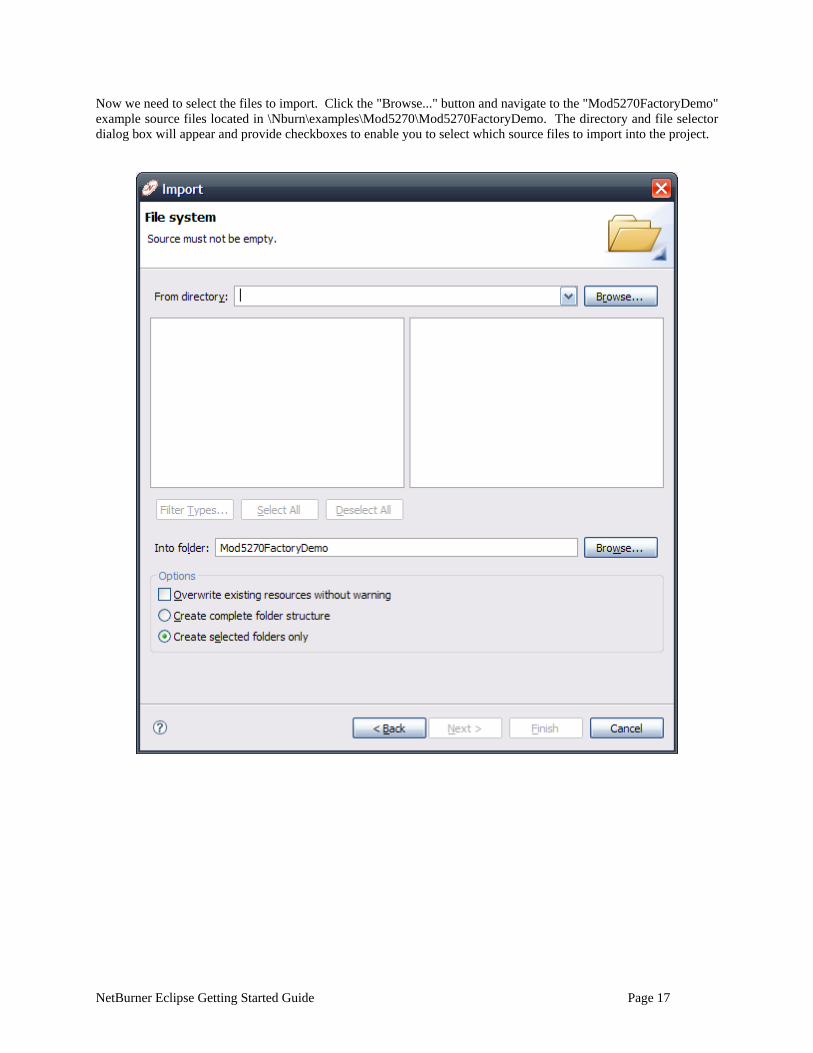
Now we need to select the files to import. Click the "Browse..." button and navigate to the "Mod5270FactoryDemo" example source files located in \Nburn\examples\Mod5270\Mod5270FactoryDemo. The directory and file selector dialog box will appear and provide checkboxes to enable you to select which source files to import into the project.
NetBurner Eclipse Getting Started Guide Page 17
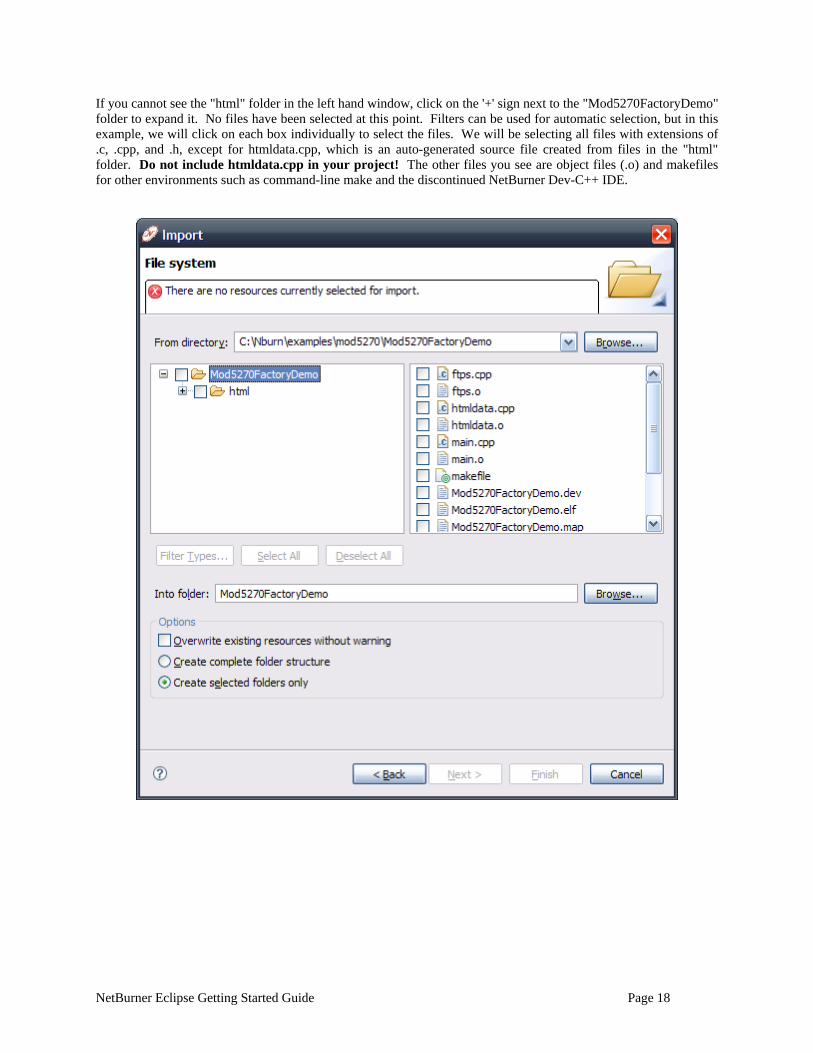
If you cannot see the "html" folder in the left hand window, click on the '+' sign next to the "Mod5270FactoryDemo" folder to expand it. No files have been selected at this point. Filters can be used for automatic selection, but in this example, we will click on each box individually to select the files. We will be selecting all files with extensions of .c, .cpp, and .h, except for htmldata.cpp, which is an auto-generated source file created from files in the "html" folder. Do not include htmldata.cpp in your project! The other files you see are object files (.o) and makefiles for other environments such as command-line make and the discontinued NetBurner Dev-C++ IDE.
NetBurner Eclipse Getting Started Guide Page 18
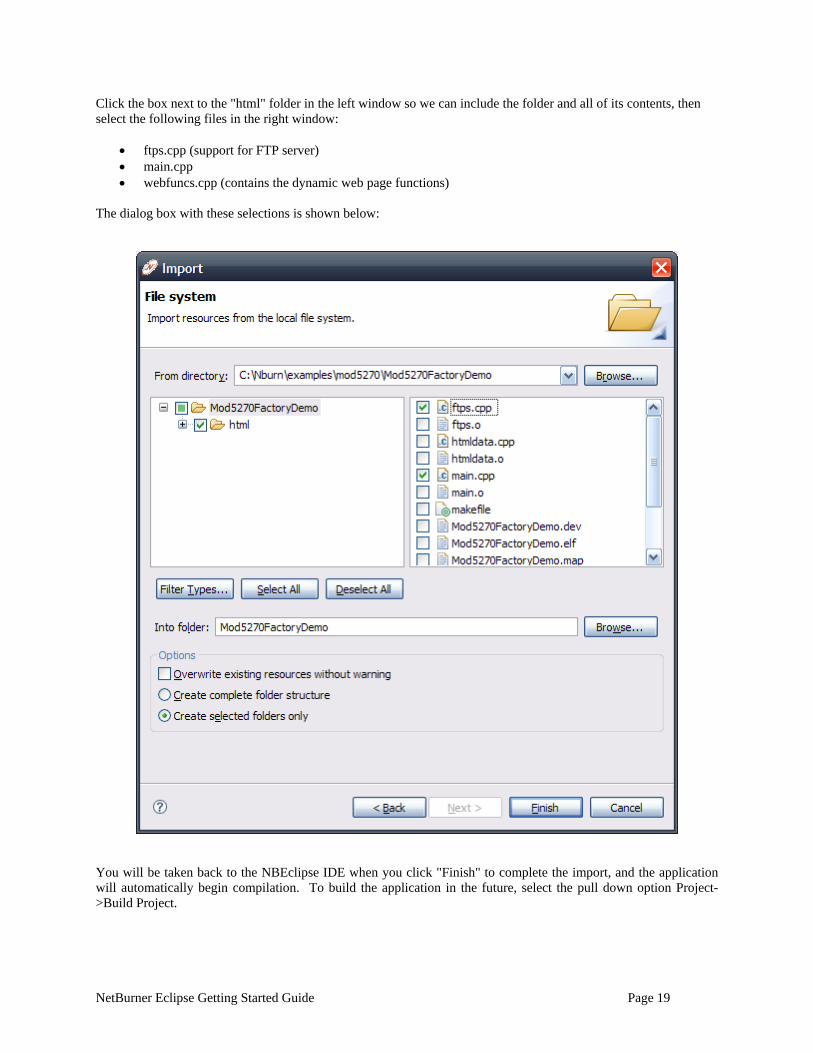
Click the box next to the "html" folder in the left window so we can include the folder and all of its contents, then select the following files in the right window:
• ftps.cpp (support for FTP server) • main.cpp • webfuncs.cpp (contains the dynamic web page functions)
The dialog box with these selections is shown below:
You will be taken back to the NBEclipse IDE when you click "Finish" to complete the import, and the application will automatically begin compilation. To build the application in the future, select the pull down option Project->Build Project.
NetBurner Eclipse Getting Started Guide Page 19
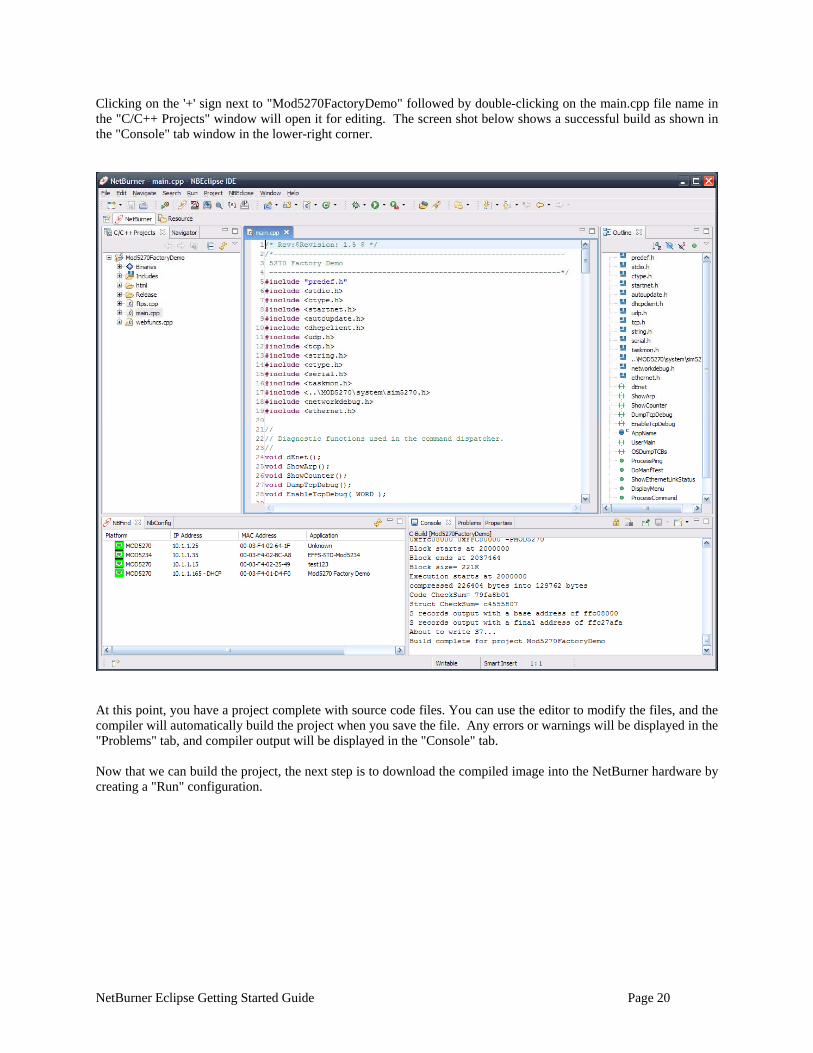
Clicking on the '+' sign next to "Mod5270FactoryDemo" followed by double-clicking on the main.cpp file name in the "C/C++ Projects" window will open it for editing. The screen shot below shows a successful build as shown in the "Console" tab window in the lower-right corner.
At this point, you have a project complete with source code files. You can use the editor to modify the files, and the compiler will automatically build the project when you save the file. Any errors or warnings will be displayed in the "Problems" tab, and compiler output will be displayed in the "Console" tab. Now that we can build the project, the next step is to download the compiled image into the NetBurner hardware by creating a "Run" configuration.
NetBurner Eclipse Getting Started Guide Page 20

5 Downloading Applications to NetBurner Hardware – Creating "Run" and "Debug" Configurations
Up to this point, we have created a project, imported C/C++ and HTML source code files, and have compiled the source code files into an application image. The next step is to download and run the application image into the NetBurner hardware. To accomplish this task, we need to create a "Run" configuration for the project that identifies the target NetBurner hardware. You will normally create the "Debug" configuration at the same time, which enables you to download and run the application in the NBEclipse debugger.
5.1.1 Application File Types and Locations Each time an application is built as a "Release", two files are created: one is mapped for execution in RAM with an extension of ".s19", and the other is compressed and mapped for storage in flash memory with an extension of "_APP.s19". These files are stored in your project directory in a folder named "Release". The files are located in \Nburn\NBEclipse\workspace\Mod5270FactoryDemo\Release in our example. The "Release" is the optimized build intended for your product release. In comparison, a "Debug" build turns optimization off and is intended for use with the NBEclipse debugger. The application files follow the same naming format as the Release build with a "DB" prefix and are stored in a project subdirectory named "Debug". An example of file names for the "Mod5270FactoryDemo" project are:
• Mod5270FactoryDemo.s19, release build mapped for SDRAM • Mod5270FactoryDemo_APP.s19, release build mapped for flash • DBMod5270FactoryDemo.s19, debug build mapped for SDRAM • DBMod5270FactoryDemo_APP.s19, debug build mapped for flash
You do not need to worry about these file locations or extensions when using NBEclipse for code development. The application download from within NBEclipse will automatically use the compressed flash image and download it to your NetBurner hardware for both "Release" and "Debug" builds. If you wish to use the builds mapped for SDRAM, then you will need to manually download them by using the "DL" command at the "nb>" prompt through the MTTTY serial terminal to the NetBurner device.
5.1.2 Auto Creating an NBEclipse Run/Debug Configuration If you have a network enabled NetBurner device, the easiest way to create a run configuration is to allow NBEclipse to automatically create your run configuration. To automatically create a run configuration, click on your project in the Project Explorer window. Once selected, simply click on the Run button (a white play in a green circle). Your project will automatically be compiled, built and loaded onto your board. Creating debug configuration works much the same. Click on your project in the Project Explorer window. Once selected, simply click on the Debug button (a green bug). This will compile, build, load and connect the debugger to your device.
5.1.3 Creating a NBEclipse Run Configuration To create a "Run" configuration we will use the "Run" combo box on the NBEclipse tool bar. There are two components to the "Run" button icon: a green-filled circle with a white triangle within pointing to the right, and a small black triangle pointing down next to the green circle icon. Selecting the small black triangle drops down a menu with "Run" configuration options. Selecting the green circle icon will replay the previous "Run" configuration. Once you have created a "Run" configuration, you can simply click on the green circle icon during development to quickly download the application to your NetBurner hardware. You must create a separate "Run" configuration for each project.
NetBurner Eclipse Getting Started Guide Page 21
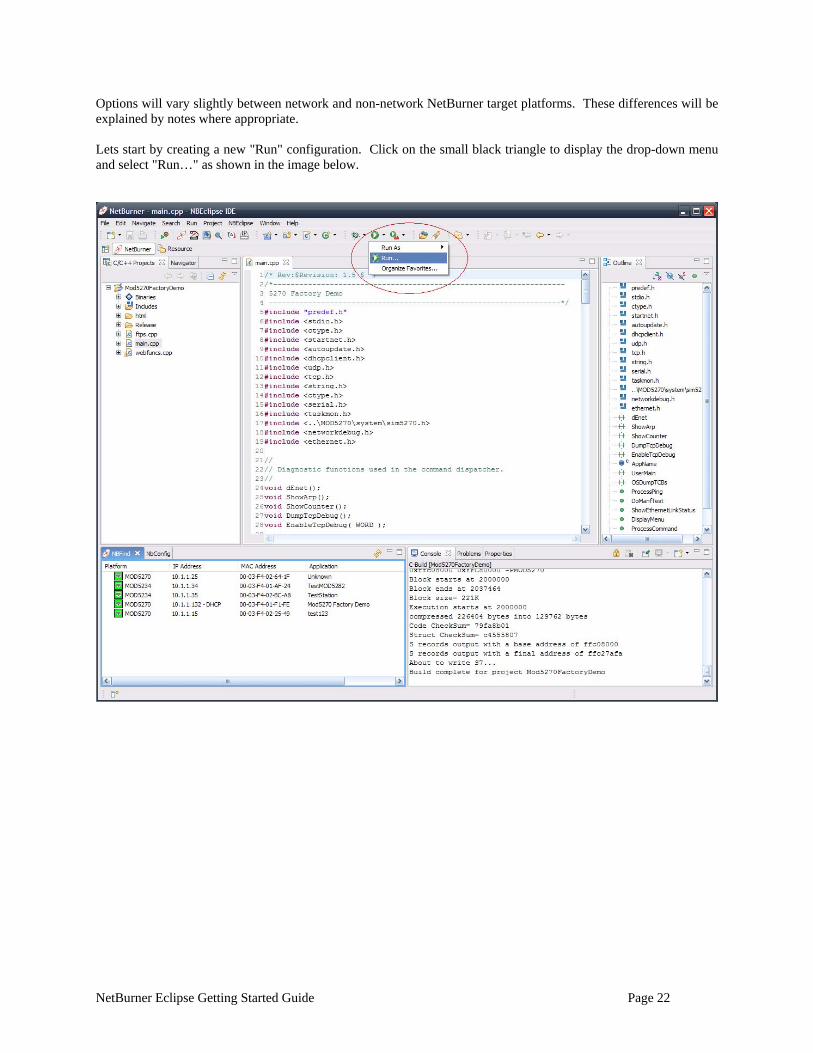
Options will vary slightly between network and non-network NetBurner target platforms. These differences will be explained by notes where appropriate. Lets start by creating a new "Run" configuration. Click on the small black triangle to display the drop-down menu and select "Run…" as shown in the image below.
NetBurner Eclipse Getting Started Guide Page 22
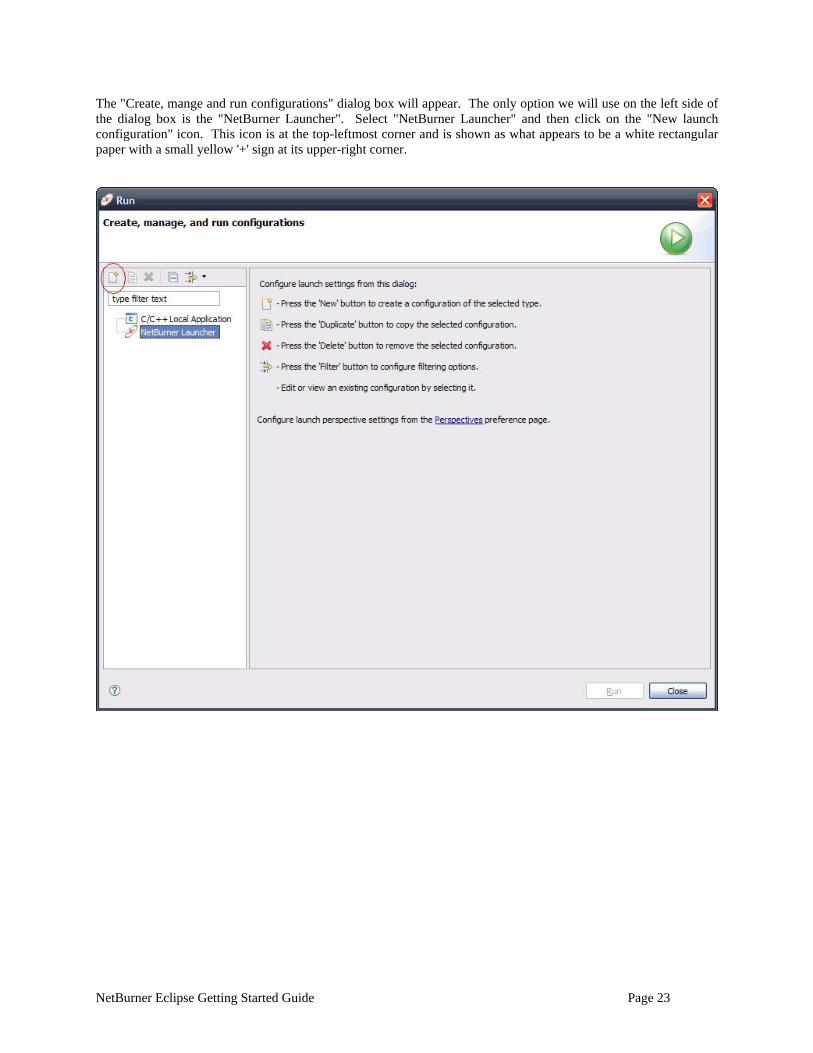
The "Create, mange and run configurations" dialog box will appear. The only option we will use on the left side of the dialog box is the "NetBurner Launcher". Select "NetBurner Launcher" and then click on the "New launch configuration" icon. This icon is at the top-leftmost corner and is shown as what appears to be a white rectangular paper with a small yellow '+' sign at its upper-right corner.
NetBurner Eclipse Getting Started Guide Page 23
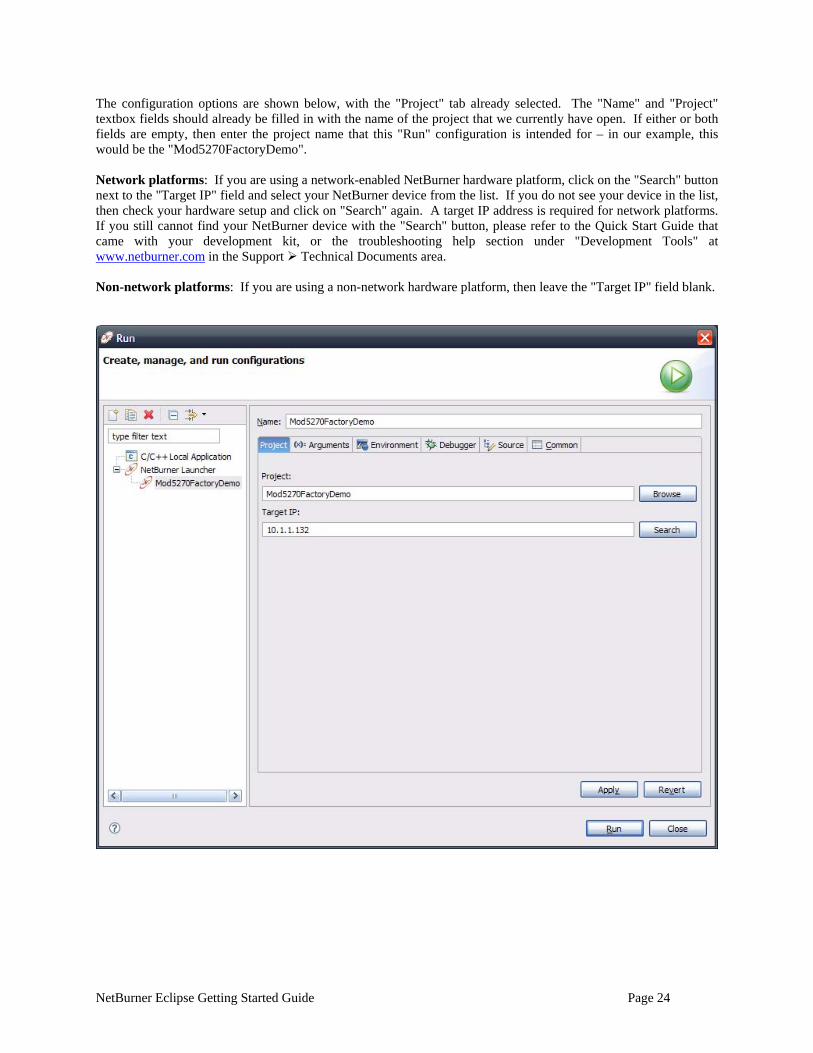
The configuration options are shown below, with the "Project" tab already selected. The "Name" and "Project" textbox fields should already be filled in with the name of the project that we currently have open. If either or both fields are empty, then enter the project name that this "Run" configuration is intended for – in our example, this would be the "Mod5270FactoryDemo". Network platforms: If you are using a network-enabled NetBurner hardware platform, click on the "Search" button next to the "Target IP" field and select your NetBurner device from the list. If you do not see your device in the list, then check your hardware setup and click on "Search" again. A target IP address is required for network platforms. If you still cannot find your NetBurner device with the "Search" button, please refer to the Quick Start Guide that came with your development kit, or the troubleshooting help section under "Development Tools" at www.netburner.com in the Support Technical Documents area. Non-network platforms: If you are using a non-network hardware platform, then leave the "Target IP" field blank.
NetBurner Eclipse Getting Started Guide Page 24
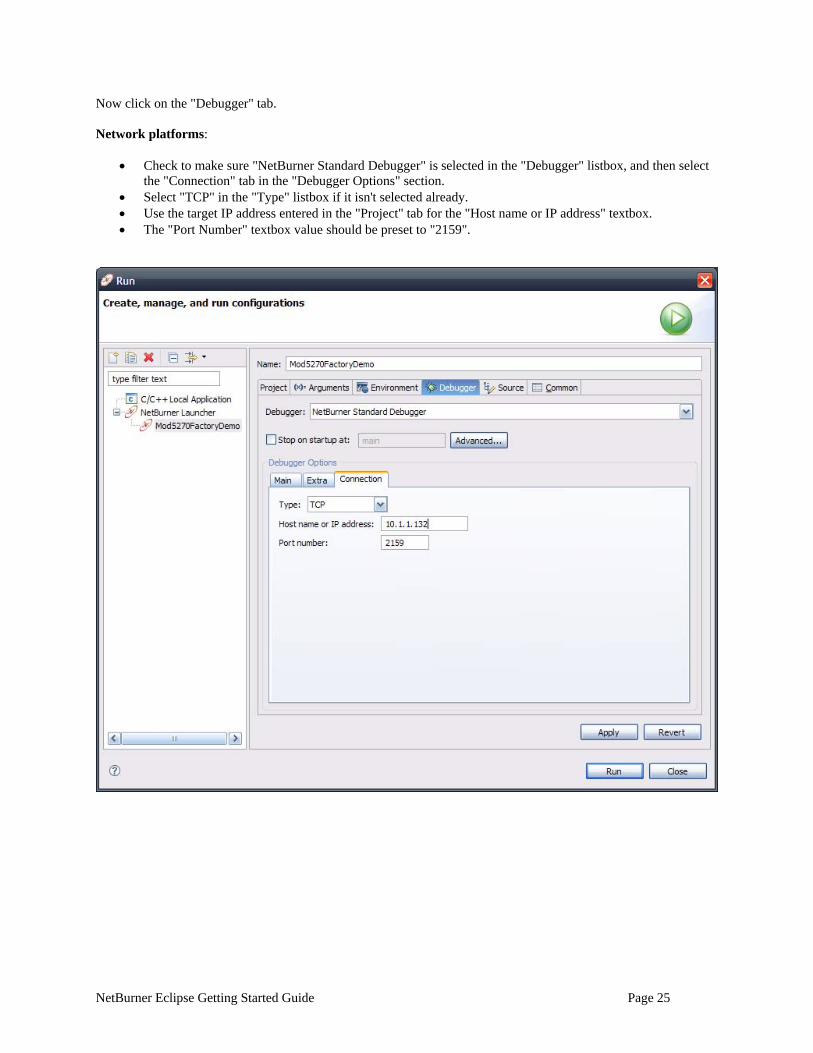
Now click on the "Debugger" tab. Network platforms:
• Check to make sure "NetBurner Standard Debugger" is selected in the "Debugger" listbox, and then select the "Connection" tab in the "Debugger Options" section.
• Select "TCP" in the "Type" listbox if it isn't selected already. • Use the target IP address entered in the "Project" tab for the "Host name or IP address" textbox. • The "Port Number" textbox value should be preset to "2159".
NetBurner Eclipse Getting Started Guide Page 25
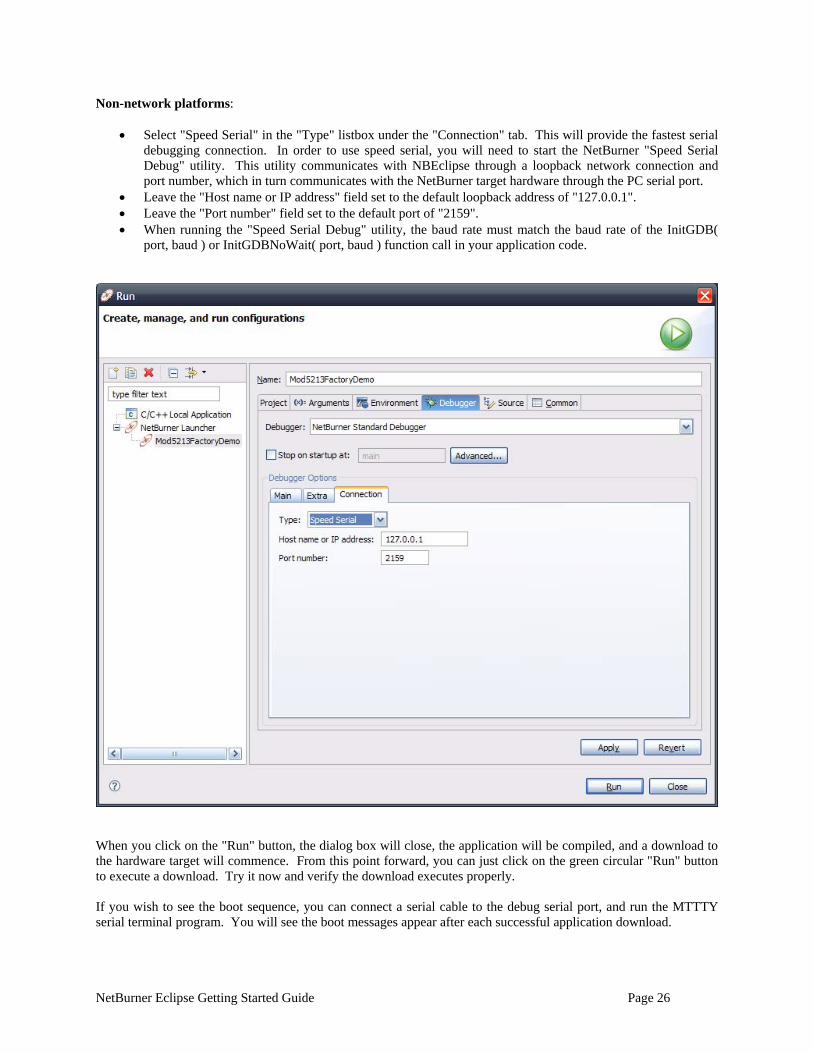
Non-network platforms:
• Select "Speed Serial" in the "Type" listbox under the "Connection" tab. This will provide the fastest serial debugging connection. In order to use speed serial, you will need to start the NetBurner "Speed Serial Debug" utility. This utility communicates with NBEclipse through a loopback network connection and port number, which in turn communicates with the NetBurner target hardware through the PC serial port.
• Leave the "Host name or IP address" field set to the default loopback address of "127.0.0.1". • Leave the "Port number" field set to the default port of "2159". • When running the "Speed Serial Debug" utility, the baud rate must match the baud rate of the InitGDB(
port, baud ) or InitGDBNoWait( port, baud ) function call in your application code.
When you click on the "Run" button, the dialog box will close, the application will be compiled, and a download to the hardware target will commence. From this point forward, you can just click on the green circular "Run" button to execute a download. Try it now and verify the download executes properly. If you wish to see the boot sequence, you can connect a serial cable to the debug serial port, and run the MTTTY serial terminal program. You will see the boot messages appear after each successful application download.
NetBurner Eclipse Getting Started Guide Page 26
6 Creating Projects in Locations Other Than the NBEclipse Workspace
The previous section created a new project in the NBEclipse workspace. In this section, we will create a project in an existing directory with source code files already present. The procedure is essentially the same as before except without the step on importing the source code. When a project is created in an existing directory structure:
1. All recognized source files will automatically be included and built. Recognized files are those with .c, .cpp, and .s extensions, as well as any files in a directory named "html". You do not need to explicitly tell NBEclipse which files are to be built.
2. The "C/C++ Projects" window on the left side of the IDE works the same as the Windows File Explorer; it will show all the files in the directory. This window does not represent which files are to be built for a project – the files included in the build are all recognized source code files. If for some reason you have a source code file in the directory that you do not want to include in the project build, then you will need to right-click on the file name, select "Properties" in the pop-up menu, select "C/C++ Build" in the pop-up dialog box, check the box "Exclude from build", and then press the "OK" button.
We will create a project in the existing \Nburn\examples\\mod5270\Mod5270FactoryDemo directory as an example.
6.1 Cleaning the Project Directory NBEclipse uses a make utility to manage projects that will attempt to build all files in your project directory. All non-source code files, including .o, .elf, .map, .mk, .dev, and the generated htmldata.cpp files, must be removed from the existing project directory so that they will not interfere with the build. NBEclipse will store all output files similar to these in project subdirectories named "Release" and "Debug" corresponding to the build type preformed.
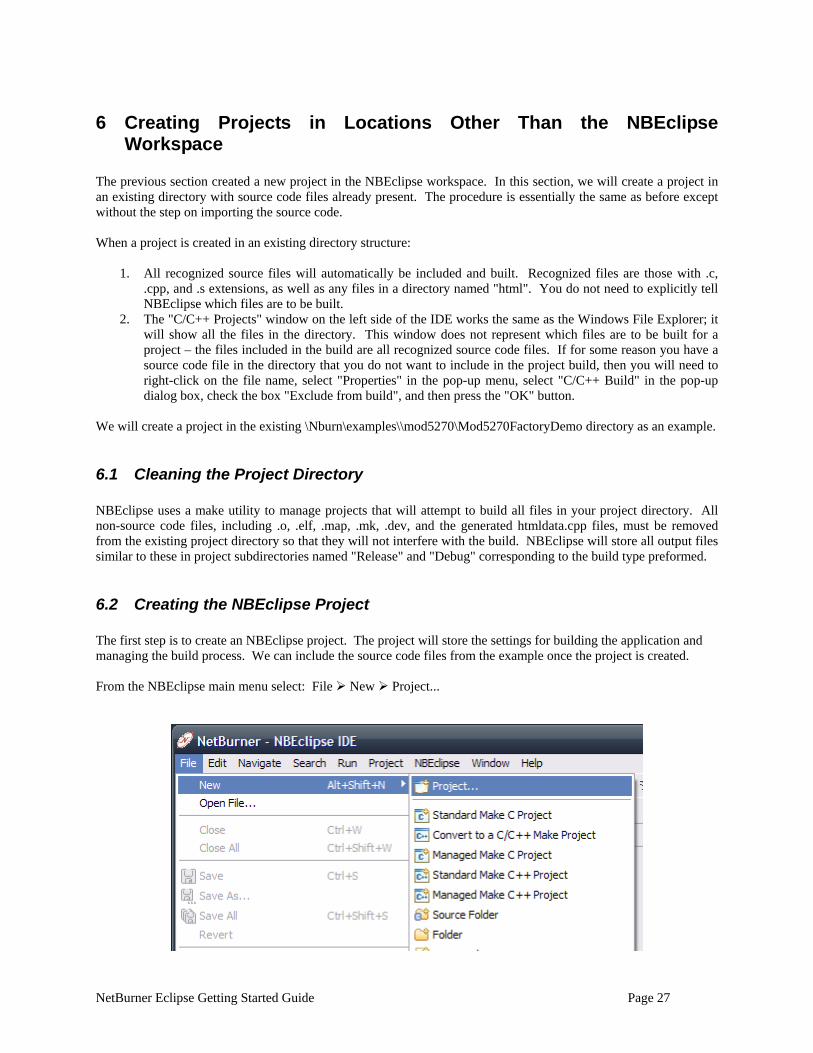
6.2 Creating the NBEclipse Project The first step is to create an NBEclipse project. The project will store the settings for building the application and managing the build process. We can include the source code files from the example once the project is created. From the NBEclipse main menu select: File New Project...
NetBurner Eclipse Getting Started Guide Page 27
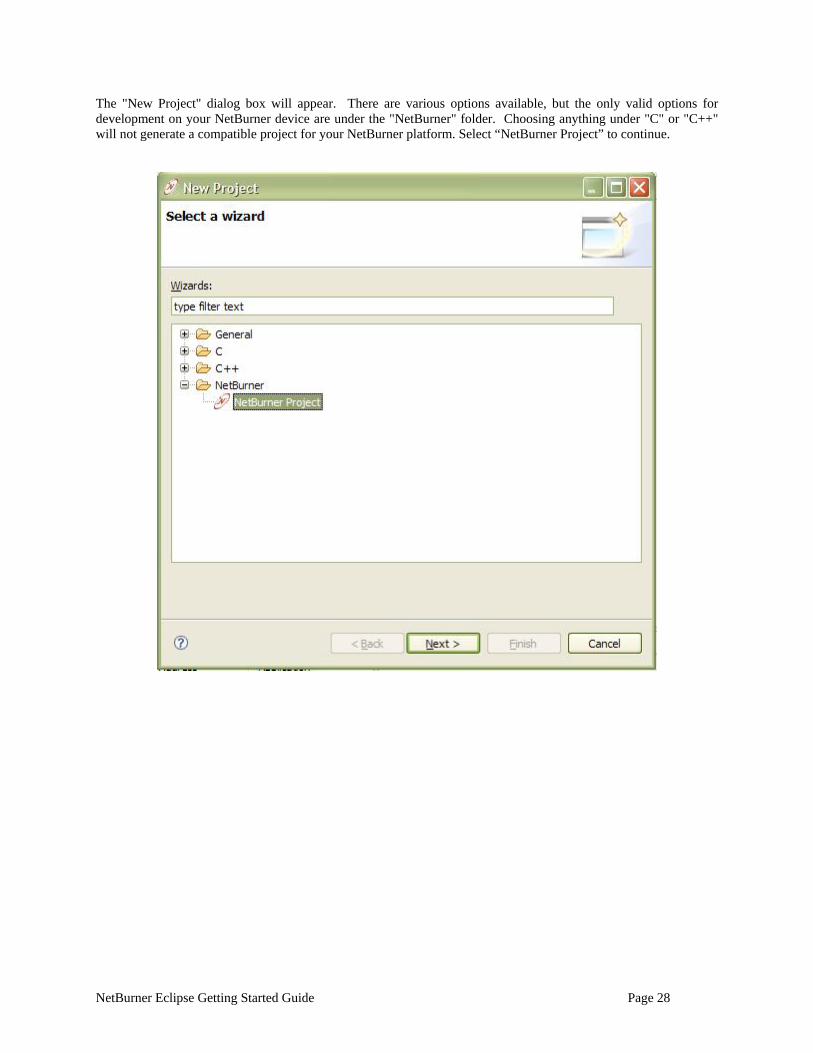
The "New Project" dialog box will appear. There are various options available, but the only valid options for development on your NetBurner device are under the "NetBurner" folder. Choosing anything under "C" or "C++" will not generate a compatible project for your NetBurner platform. Select “NetBurner Project” to continue.
NetBurner Eclipse Getting Started Guide Page 28
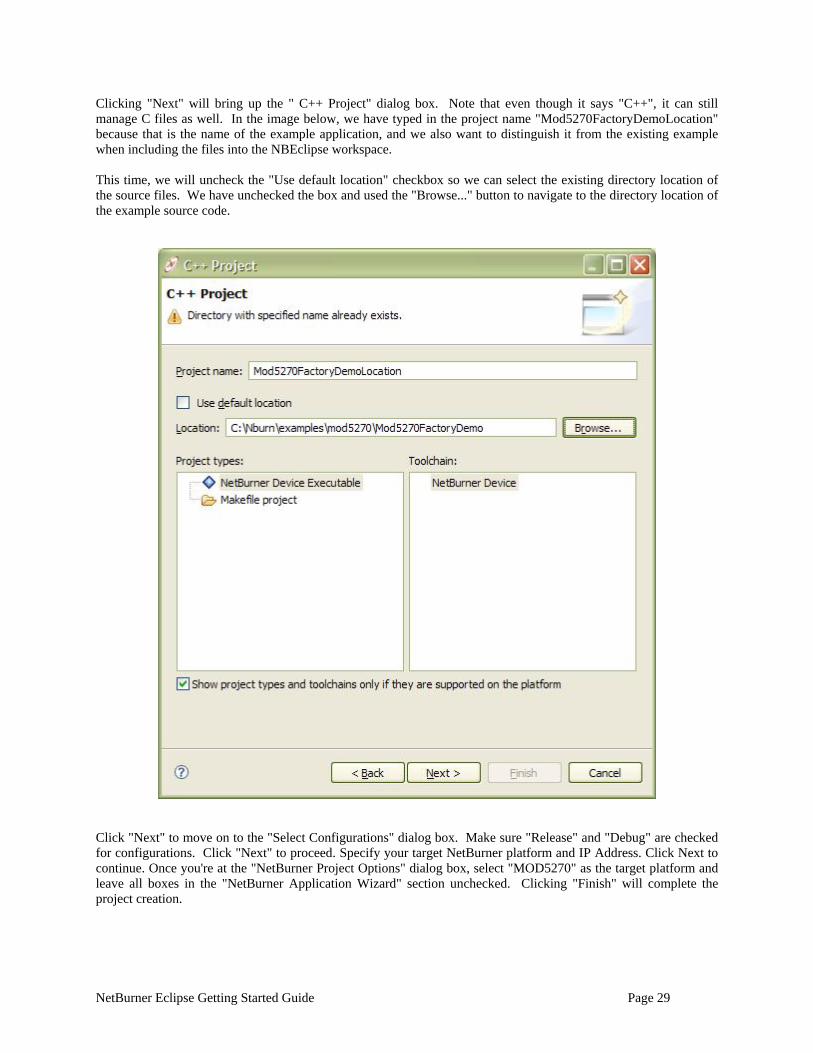
Clicking "Next" will bring up the " C++ Project" dialog box. Note that even though it says "C++", it can still manage C files as well. In the image below, we have typed in the project name "Mod5270FactoryDemoLocation" because that is the name of the example application, and we also want to distinguish it from the existing example when including the files into the NBEclipse workspace. This time, we will uncheck the "Use default location" checkbox so we can select the existing directory location of the source files. We have unchecked the box and used the "Browse..." button to navigate to the directory location of the example source code.
Click "Next" to move on to the "Select Configurations" dialog box. Make sure "Release" and "Debug" are checked for configurations. Click "Next" to proceed. Specify your target NetBurner platform and IP Address. Click Next to continue. Once you're at the "NetBurner Project Options" dialog box, select "MOD5270" as the target platform and leave all boxes in the "NetBurner Application Wizard" section unchecked. Clicking "Finish" will complete the project creation.
NetBurner Eclipse Getting Started Guide Page 29

NBEclipse will automatically import the source files and attempt to build the project. You will then need to create a "Run" configuration once your project builds successfully as described in Section 5.1.2 in order to download the application to your NetBurner device.
NetBurner Eclipse Getting Started Guide Page 30
7 Removing an NBEclipse Project from an Existing Project Directory The following procedure is used to remove an existing NBEclipse project while protecting your source code files. If you wish to create a new NBEclipse project in a location where an NBEclipse project already exists, then the following procedure must be taken before attempting to create the new project.
1. Navigate to the project directory with Windows Explorer. 2. Remove the following directories and files beginning with a ‘.’: .settings, .cdtbuild, .cdtproject, .nbbuild,
.project, etcetera. 3. Remove the subdirectories named "Release" and "Debug".
8 Debugging with NBEclipse Only a few additional steps are needed to begin debugging once you have an NBEclipse project and "Run" configuration that can successfully build and download your application. To debug an application, we will need to do the following:
• Verify the NetBurner hardware is set up and communicating properly. • Add debug capability to the application source code (an include preprocessor directive and function call). • Create a "Debug" configuration to build the debug version of the application. This is similar to the "Run"
configuration", but includes information required for the debugger. • Launch the debugger.
8.1 Setup on Network Platforms The communication interface between NBEclipse and network-enabled NetBurner platforms is the Ethernet connection, which will require knowing the IP address of your target platform. This is set up via the "Debug" configuration. If you do not have it set up already, then please refer to Section 5.1.2 on how to do this. Network debug checklist:
• The NetBurner hardware device is powered on and can communicate with your computer. • Start the MTTTY utility and verify that serial communication is able to take place on the NetBurner
hardware debug serial port. • You can communicate with the NetBurner hardware with a web browser or the ping utility. Both the PC
and NetBurner device must have correct network configurations to proceed. • The "Debug" configuration has the correct IP address of your NetBurner hardware in the "Host name or IP
address" field.
8.1.1 Using a Crossover Cable If you are using a crossover cable to connect your PC directly to your NetBurner device, then you will need to configure static IP addresses for both the PC and NetBurner device. You can use the IPSetup tool to configure the NetBurner device. To configure the PC (the following lists steps for a Windows XP environment):
• Open the "Network Connections" dialog box via the "Start" menu or "Control Panel". • Right-click on the appropriate network connection and select "Properties" from the pop-up menu.
NetBurner Eclipse Getting Started Guide Page 31
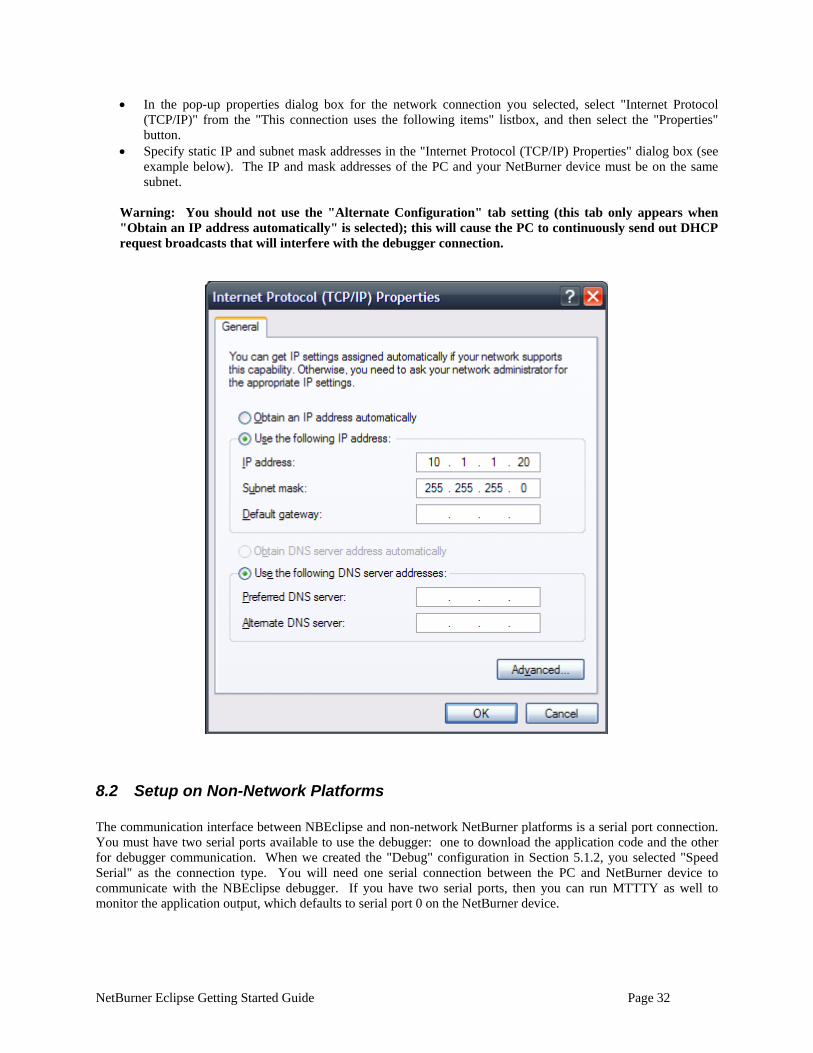
• In the pop-up properties dialog box for the network connection you selected, select "Internet Protocol (TCP/IP)" from the "This connection uses the following items" listbox, and then select the "Properties" button.
• Specify static IP and subnet mask addresses in the "Internet Protocol (TCP/IP) Properties" dialog box (see example below). The IP and mask addresses of the PC and your NetBurner device must be on the same subnet.
Warning: You should not use the "Alternate Configuration" tab setting (this tab only appears when "Obtain an IP address automatically" is selected); this will cause the PC to continuously send out DHCP request broadcasts that will interfere with the debugger connection.
8.2 Setup on Non-Network Platforms The communication interface between NBEclipse and non-network NetBurner platforms is a serial port connection. You must have two serial ports available to use the debugger: one to download the application code and the other for debugger communication. When we created the "Debug" configuration in Section 5.1.2, you selected "Speed Serial" as the connection type. You will need one serial connection between the PC and NetBurner device to communicate with the NBEclipse debugger. If you have two serial ports, then you can run MTTTY as well to monitor the application output, which defaults to serial port 0 on the NetBurner device.
NetBurner Eclipse Getting Started Guide Page 32

NetBurner has created a fast serial communication utility called "Speed Serial Debug". Before attempting to debug on a non-network platform, start the utility from the NBEclipse main menu: NBEclipse Speed Serial Debug. When the dialog box appears, select the PC serial communications port you wish to use and the baud rate (the baud rate will need to match value specified in the debug function call of your application, which will be explained in the next section). The network port should default to "2159"; enter this value if it isn't already in the textbox, and then click on the "Connect" button. You will receive an error if some other application (such as MTTTY) is using the same serial port.
• Verify the NetBurner hardware device is powered on and can communicate with your computer. • Start the MTTTY utility and verify serial communication can take place on the NetBurner hardware serial
port. An easy way to do this is to press the reset button on the NetBurner device and verify that the start-up messages appear.
• Start the "Speed Serial Debug" utility and configure it to use your second serial port, then click on "Connect".
We recommend the Cables Unlimited USB-to-serial adapter (USB-2920) product if you need to add a second serial port. It is usually available for less than $11 (US) and requires no special drivers on Windows XP.
8.3 Adding Debug Capability to Your Application The NetBurner example programs that contain the text "FactoryDemo" in the project name should already have the debug code in the application’s main.cpp file. This section explains what code is required for debugging and how it functions. The preceding sections covered items related to the NBEclipse configuration, which also included making sure the application is configured to accept a debugger connection. For both network and non-network platforms, the requirements are the same: include the debugger header file and call a function to listen for the NBEclipse debugger connection.
8.3.1 Network Platforms Include the NetworkDebug.h header file and one of the following two functions: InitializeNetworkGDB_and_Wait() or InitializeNetworkGDB(). The difference between the two is that the "wait" version will block until the debugger connects; the "non-wait" version will start running immediately and is the recommended method. A sample code snippet is shown on the next page:
NetBurner Eclipse Getting Started Guide Page 33
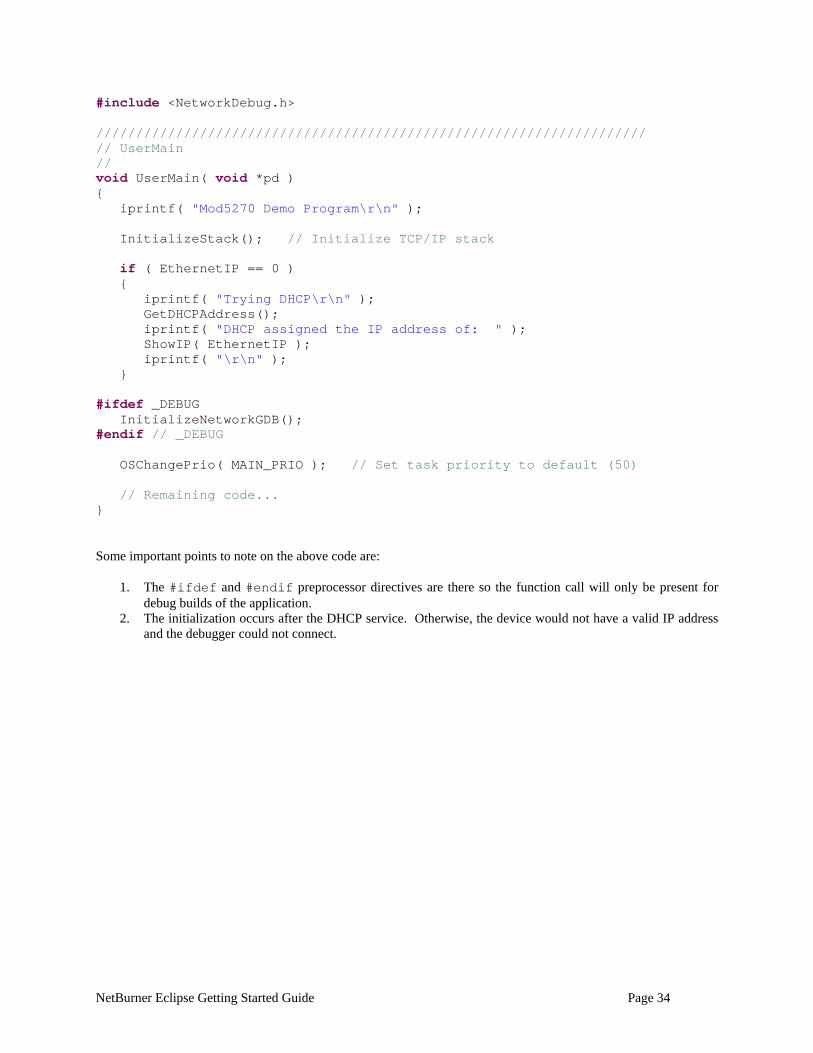
#include <NetworkDebug.h> ///////////////////////////////////////////////////////////////////// // UserMain // void UserMain( void *pd ) { iprintf( "Mod5270 Demo Program\r\n" ); InitializeStack(); // Initialize TCP/IP stack if ( EthernetIP == 0 ) { iprintf( "Trying DHCP\r\n" ); GetDHCPAddress(); iprintf( "DHCP assigned the IP address of: " ); ShowIP( EthernetIP ); iprintf( "\r\n" ); } #ifdef _DEBUG InitializeNetworkGDB(); #endif // _DEBUG OSChangePrio( MAIN_PRIO ); // Set task priority to default (50) // Remaining code... } Some important points to note on the above code are:
1. The #ifdef and #endif preprocessor directives are there so the function call will only be present for debug builds of the application.
2. The initialization occurs after the DHCP service. Otherwise, the device would not have a valid IP address and the debugger could not connect.
NetBurner Eclipse Getting Started Guide Page 34
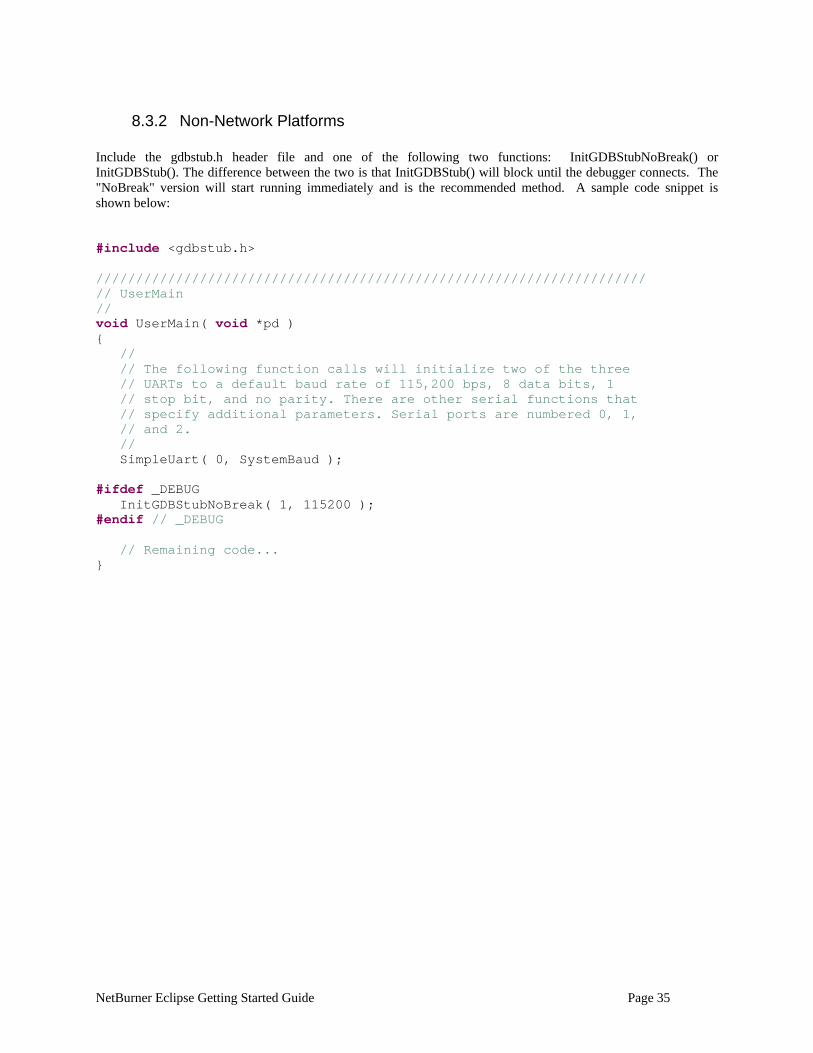
8.3.2 Non-Network Platforms Include the gdbstub.h header file and one of the following two functions: InitGDBStubNoBreak() or InitGDBStub(). The difference between the two is that InitGDBStub() will block until the debugger connects. The "NoBreak" version will start running immediately and is the recommended method. A sample code snippet is shown below: #include <gdbstub.h> ///////////////////////////////////////////////////////////////////// // UserMain // void UserMain( void *pd ) { // // The following function calls will initialize two of the three // UARTs to a default baud rate of 115,200 bps, 8 data bits, 1 // stop bit, and no parity. There are other serial functions that // specify additional parameters. Serial ports are numbered 0, 1, // and 2. // SimpleUart( 0, SystemBaud ); #ifdef _DEBUG InitGDBStubNoBreak( 1, 115200 ); #endif // _DEBUG // Remaining code... }
NetBurner Eclipse Getting Started Guide Page 35
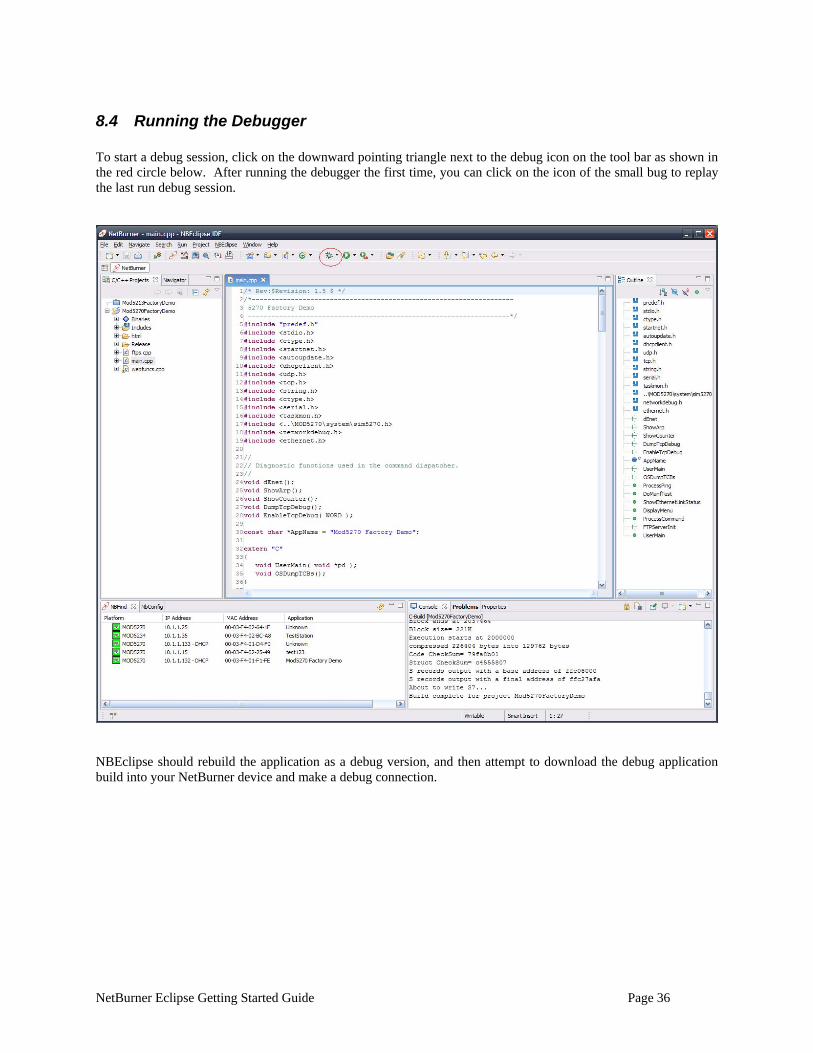
8.4 Running the Debugger To start a debug session, click on the downward pointing triangle next to the debug icon on the tool bar as shown in the red circle below. After running the debugger the first time, you can click on the icon of the small bug to replay the last run debug session.
NBEclipse should rebuild the application as a debug version, and then attempt to download the debug application build into your NetBurner device and make a debug connection.
NetBurner Eclipse Getting Started Guide Page 36
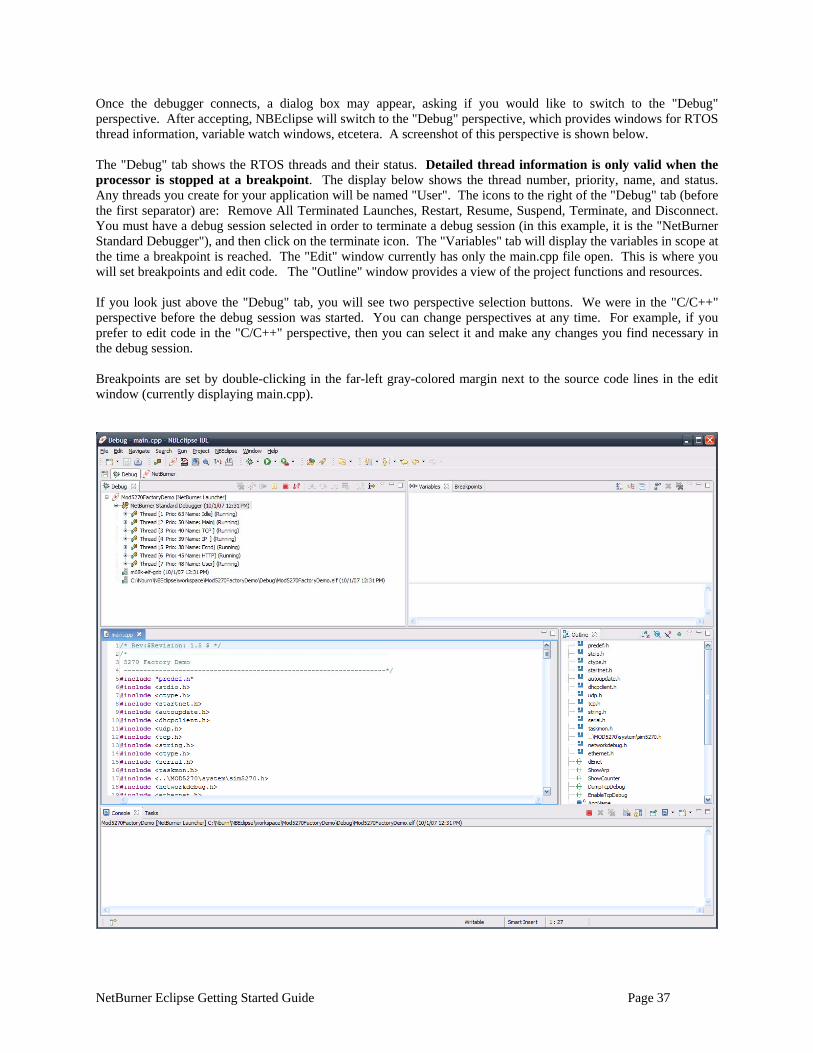
Once the debugger connects, a dialog box may appear, asking if you would like to switch to the "Debug" perspective. After accepting, NBEclipse will switch to the "Debug" perspective, which provides windows for RTOS thread information, variable watch windows, etcetera. A screenshot of this perspective is shown below. The "Debug" tab shows the RTOS threads and their status. Detailed thread information is only valid when the processor is stopped at a breakpoint. The display below shows the thread number, priority, name, and status. Any threads you create for your application will be named "User". The icons to the right of the "Debug" tab (before the first separator) are: Remove All Terminated Launches, Restart, Resume, Suspend, Terminate, and Disconnect. You must have a debug session selected in order to terminate a debug session (in this example, it is the "NetBurner Standard Debugger"), and then click on the terminate icon. The "Variables" tab will display the variables in scope at the time a breakpoint is reached. The "Edit" window currently has only the main.cpp file open. This is where you will set breakpoints and edit code. The "Outline" window provides a view of the project functions and resources. If you look just above the "Debug" tab, you will see two perspective selection buttons. We were in the "C/C++" perspective before the debug session was started. You can change perspectives at any time. For example, if you prefer to edit code in the "C/C++" perspective, then you can select it and make any changes you find necessary in the debug session. Breakpoints are set by double-clicking in the far-left gray-colored margin next to the source code lines in the edit window (currently displaying main.cpp).
NetBurner Eclipse Getting Started Guide Page 37
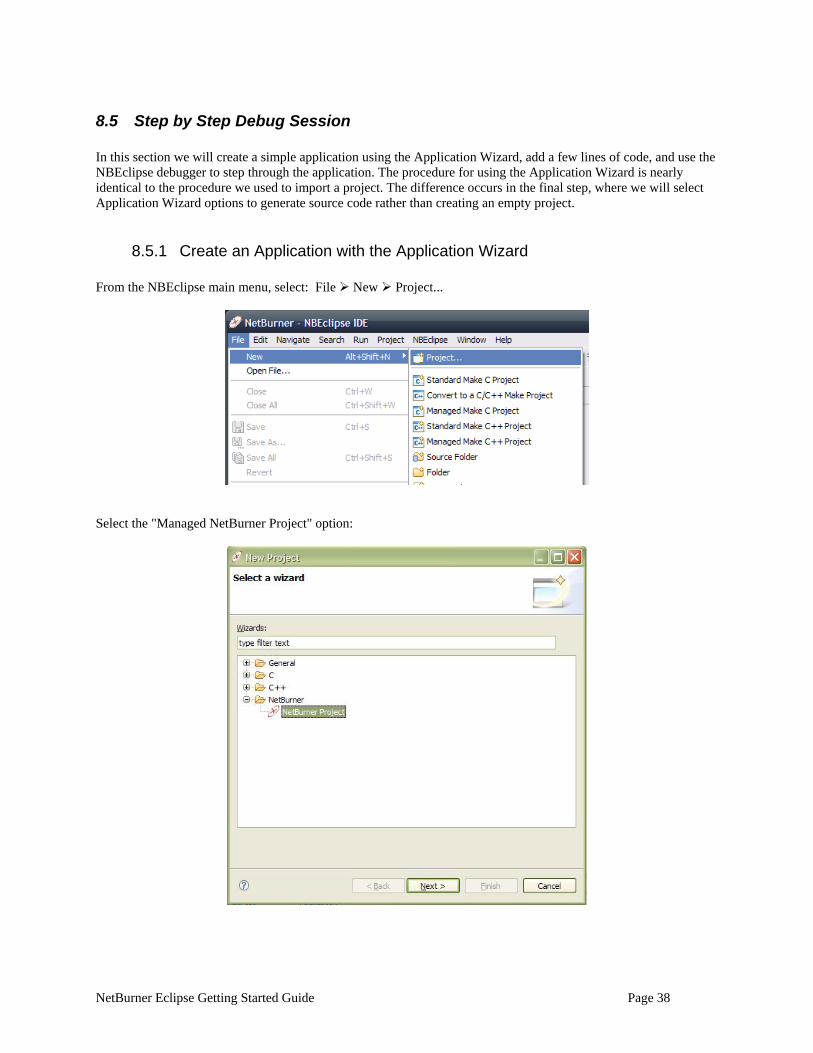
8.5 Step by Step Debug Session In this section we will create a simple application using the Application Wizard, add a few lines of code, and use the NBEclipse debugger to step through the application. The procedure for using the Application Wizard is nearly identical to the procedure we used to import a project. The difference occurs in the final step, where we will select Application Wizard options to generate source code rather than creating an empty project.
8.5.1 Create an Application with the Application Wizard From the NBEclipse main menu, select: File New Project...
Select the "Managed NetBurner Project" option:
NetBurner Eclipse Getting Started Guide Page 38
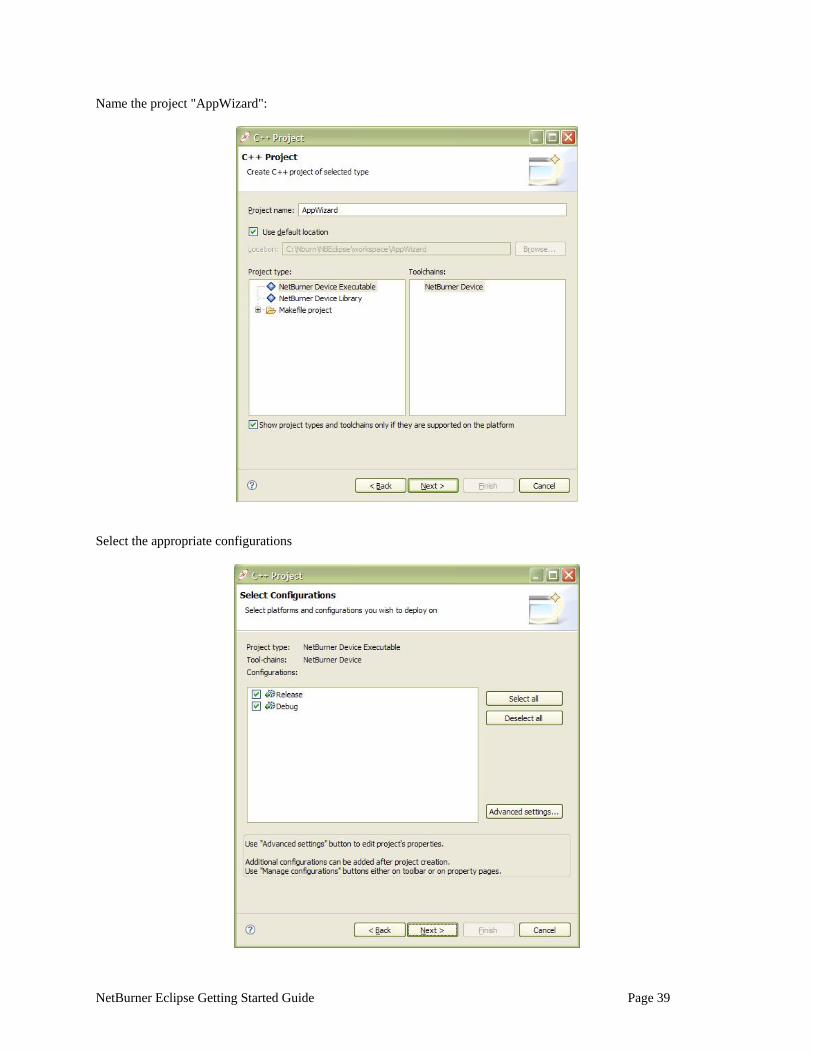
Name the project "AppWizard":
Select the appropriate configurations
NetBurner Eclipse Getting Started Guide Page 39
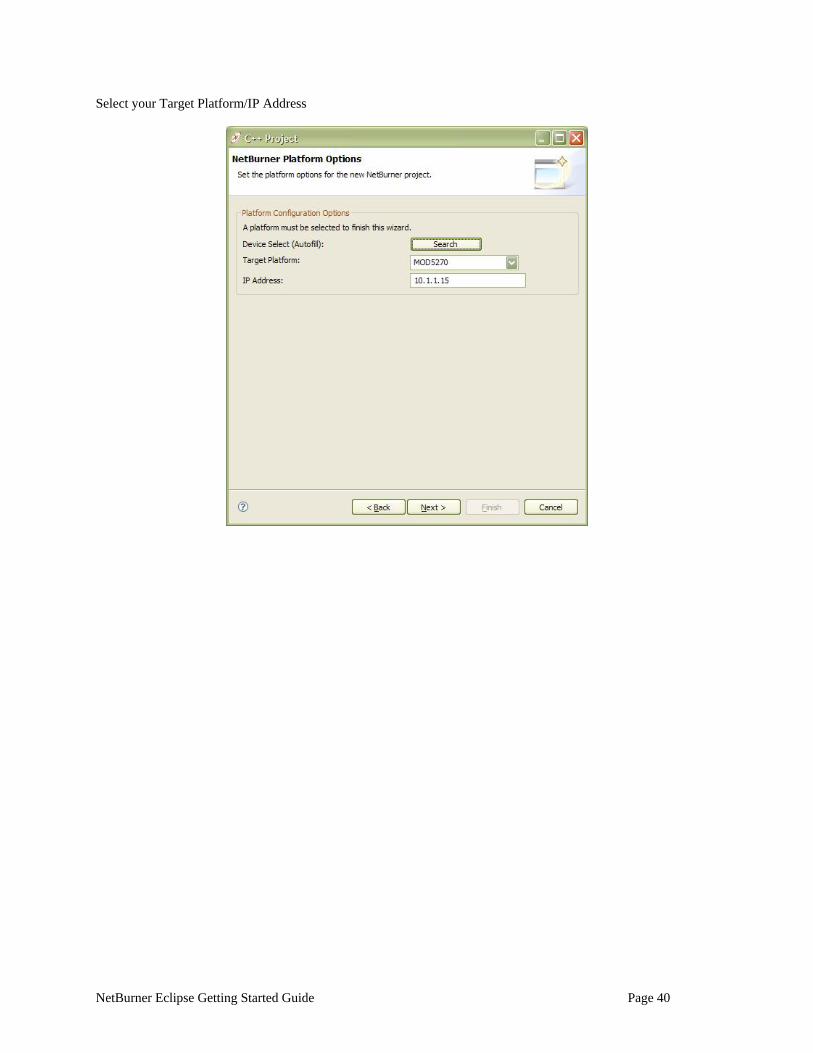
Select your Target Platform/IP Address
NetBurner Eclipse Getting Started Guide Page 40
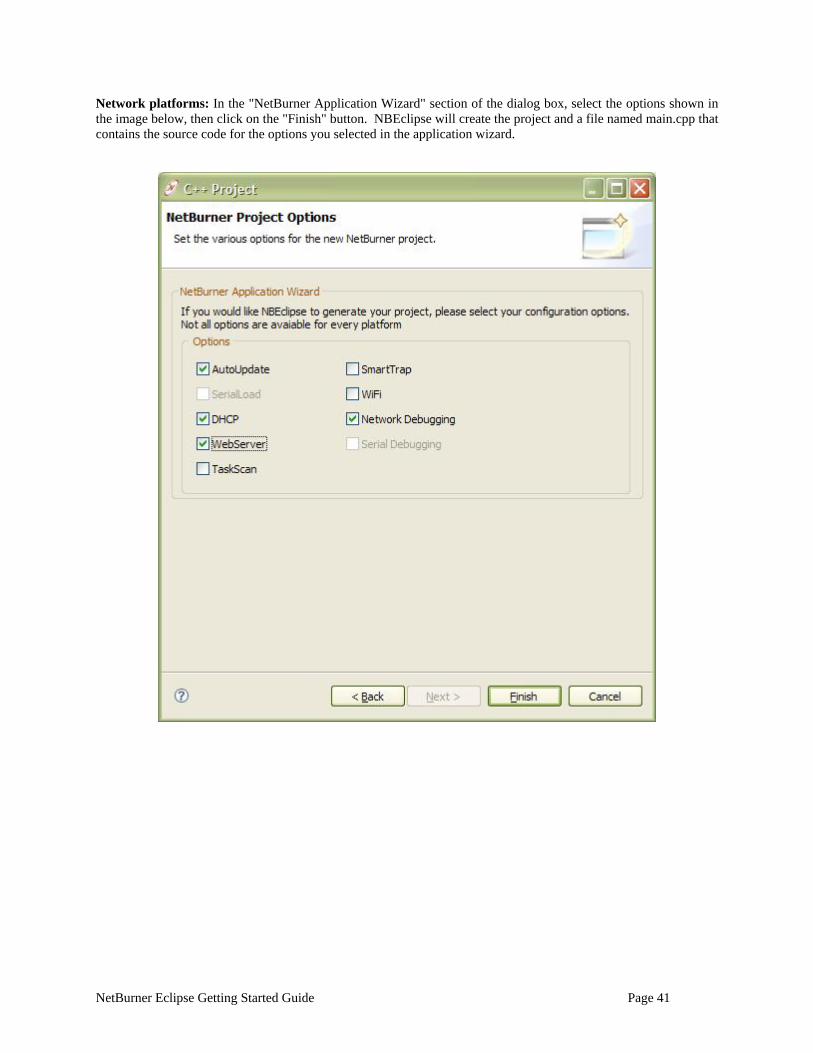
Network platforms: In the "NetBurner Application Wizard" section of the dialog box, select the options shown in the image below, then click on the "Finish" button. NBEclipse will create the project and a file named main.cpp that contains the source code for the options you selected in the application wizard.
NetBurner Eclipse Getting Started Guide Page 41
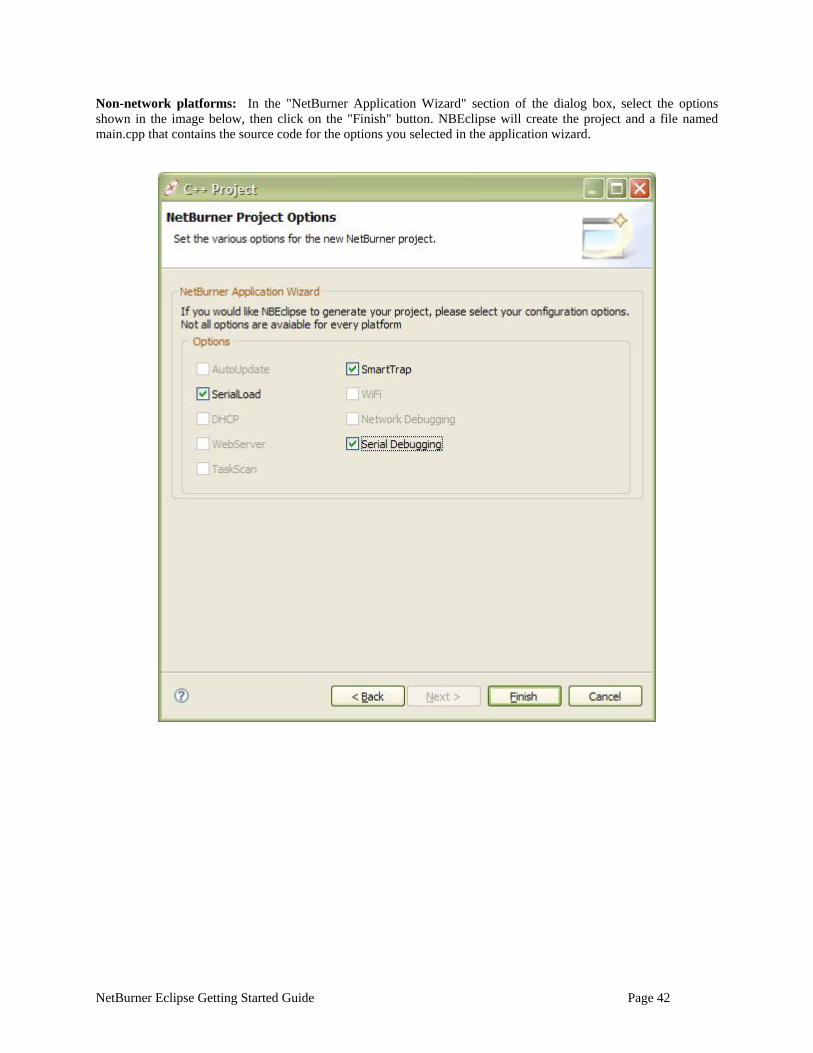
Non-network platforms: In the "NetBurner Application Wizard" section of the dialog box, select the options shown in the image below, then click on the "Finish" button. NBEclipse will create the project and a file named main.cpp that contains the source code for the options you selected in the application wizard.
NetBurner Eclipse Getting Started Guide Page 42
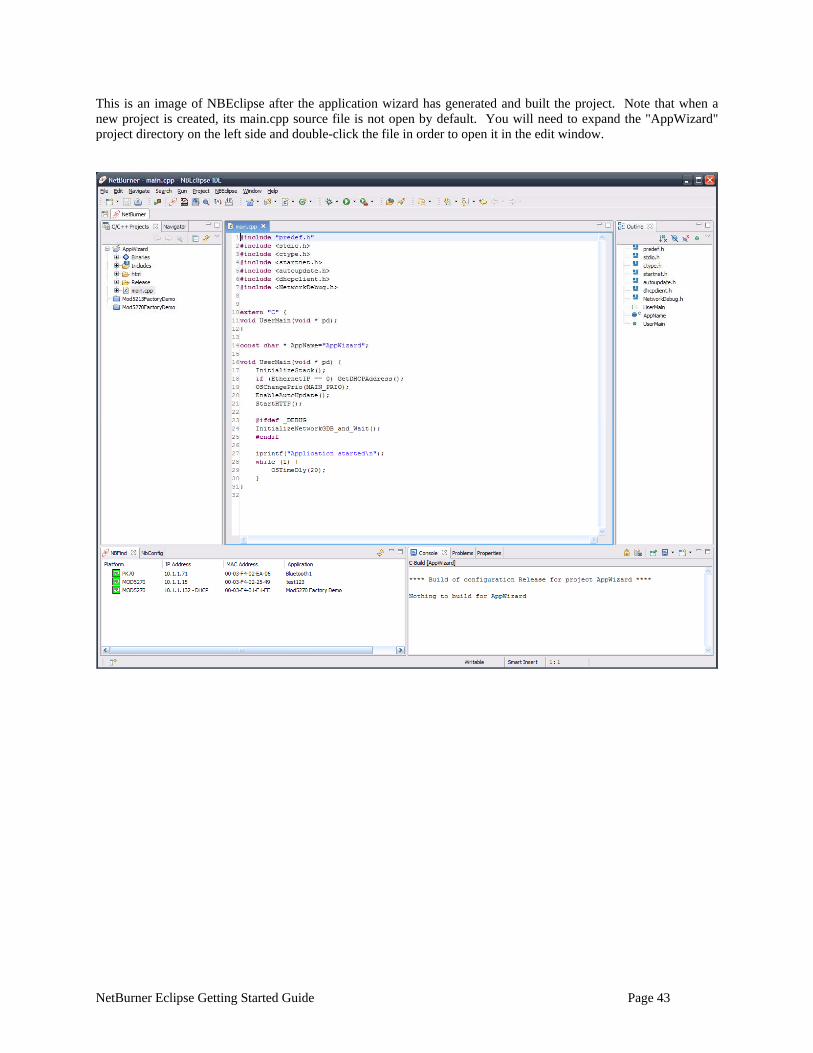
This is an image of NBEclipse after the application wizard has generated and built the project. Note that when a new project is created, its main.cpp source file is not open by default. You will need to expand the "AppWizard" project directory on the left side and double-click the file in order to open it in the edit window.
NetBurner Eclipse Getting Started Guide Page 43
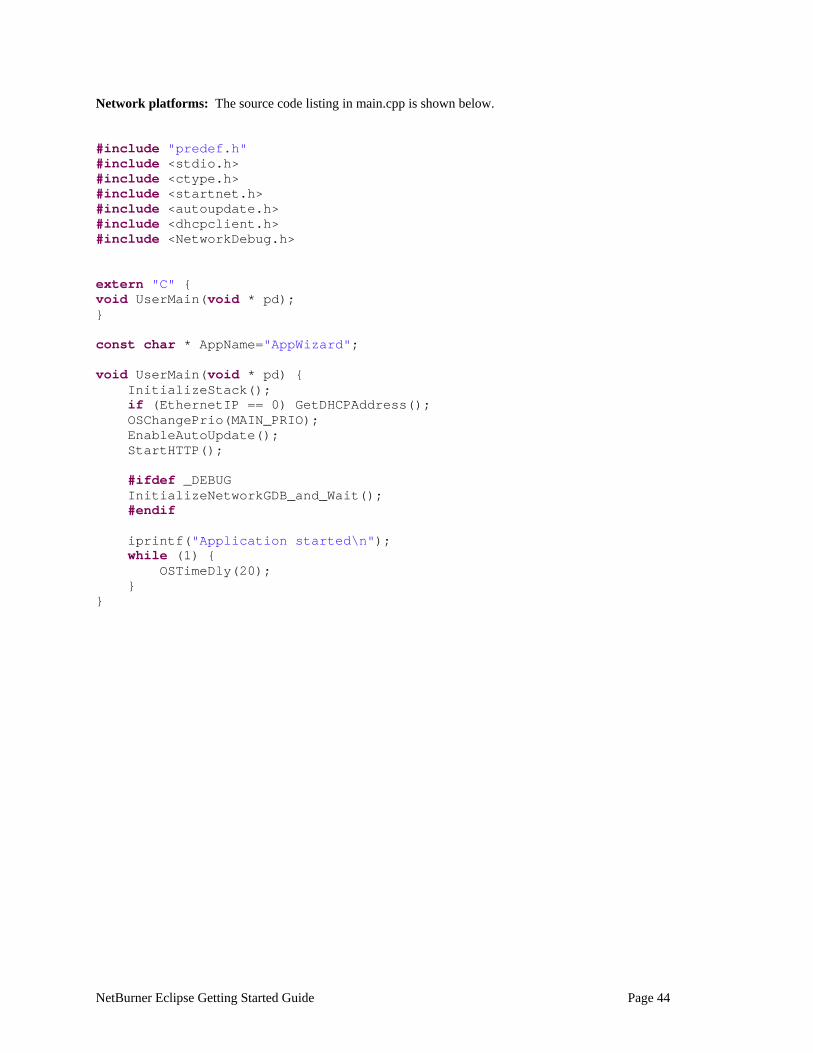
Network platforms: The source code listing in main.cpp is shown below. #include "predef.h" #include <stdio.h> #include <ctype.h> #include <startnet.h> #include <autoupdate.h> #include <dhcpclient.h> #include <NetworkDebug.h> extern "C" { void UserMain(void * pd); } const char * AppName="AppWizard"; void UserMain(void * pd) { InitializeStack(); if (EthernetIP == 0) GetDHCPAddress(); OSChangePrio(MAIN_PRIO); EnableAutoUpdate(); StartHTTP(); #ifdef _DEBUG InitializeNetworkGDB_and_Wait(); #endif iprintf("Application started\n"); while (1) { OSTimeDly(20); } }
NetBurner Eclipse Getting Started Guide Page 44
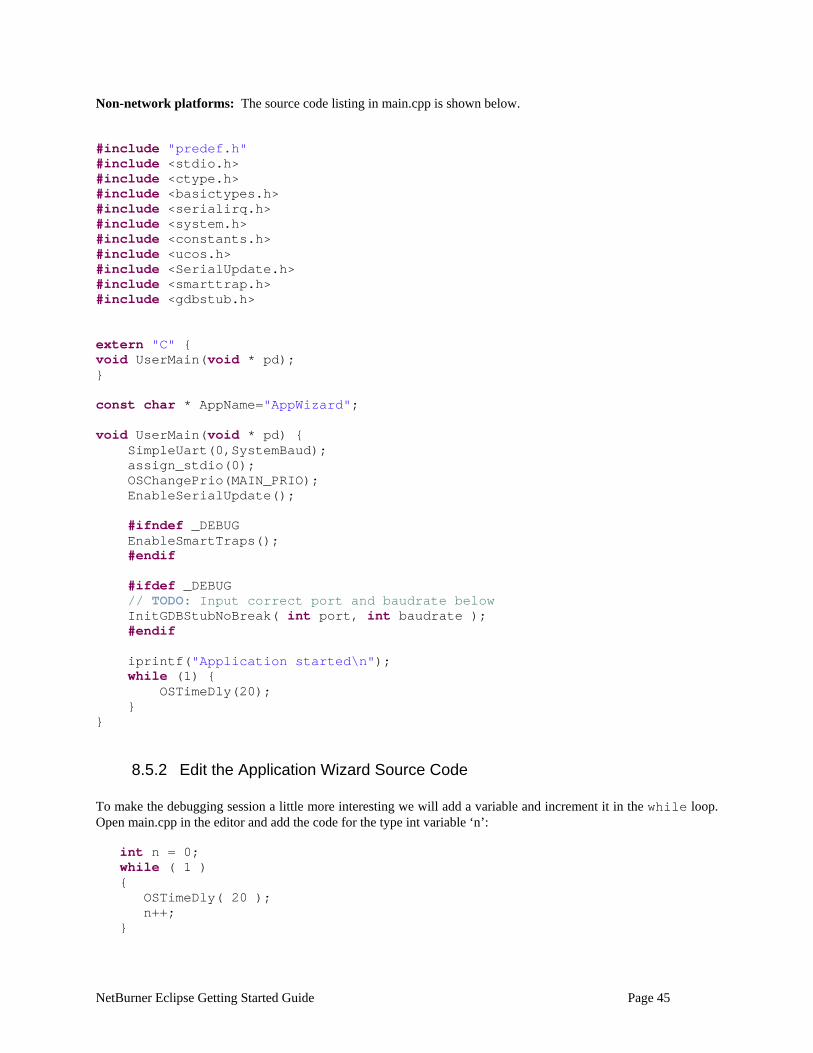
Non-network platforms: The source code listing in main.cpp is shown below. #include "predef.h" #include <stdio.h> #include <ctype.h> #include <basictypes.h> #include <serialirq.h> #include <system.h> #include <constants.h> #include <ucos.h> #include <SerialUpdate.h> #include <smarttrap.h> #include <gdbstub.h> extern "C" { void UserMain(void * pd); } const char * AppName="AppWizard"; void UserMain(void * pd) { SimpleUart(0,SystemBaud); assign_stdio(0); OSChangePrio(MAIN_PRIO); EnableSerialUpdate(); #ifndef _DEBUG EnableSmartTraps(); #endif #ifdef _DEBUG // TODO: Input correct port and baudrate below InitGDBStubNoBreak( int port, int baudrate ); #endif iprintf("Application started\n"); while (1) { OSTimeDly(20); } }
8.5.2 Edit the Application Wizard Source Code To make the debugging session a little more interesting we will add a variable and increment it in the while loop. Open main.cpp in the editor and add the code for the type int variable ‘n’: int = 0; n while ( 1 ) { OSTimeDly( 20 ); n++; }
NetBurner Eclipse Getting Started Guide Page 45

Non-network platforms: Modify the InitGDBStubNoBreak() function call to add the NetBurner device serial port number and baud rate. Valid serial port numbers are 0, 1, and 2. Serial port 0 is used for stdin, stdout, and stderr by default. InitGDBStubNoBreak( 1, 115200 );
8.5.3 Create Run and Debug Configurations Click on the small, downward-pointing triangle next to the "Run" icon on the NBEclipse toolbar. Select the "Run..." option from the drop-down menu. The "Run" configuration and "Debug" configuration share the same set of tabbed dialog boxes, so you can configure them both at the same time. Create the run and debug configurations as we did in Section 5: "Downloading Applications to NetBurner Hardware – Creating 'Run' and 'Debug' Configurations".
NetBurner Eclipse Getting Started Guide Page 46

8.5.4 Non-Network Platforms – Start Speed Serial Debug If you are using a non-network platform, then start the "Speed Serial Debug" utility, verify configuration, and connect. From the main menu: NBEclipse Speed Serial Debug. Note that when using the "Speed Serial Debug" utility, you need two serial ports: one for code download and one for debugging.
8.5.5 Launch the Debugging Session Click on the "Debug" icon on the NBEclipse toolbar, which is to the left of the "Run" icon in the picture below. Since this is the first time we are starting this debug session, a dialog box will appear showing a list of debug sessions. Select the debug configuration we just created in Section 8.5.3.
NetBurner Eclipse Getting Started Guide Page 47
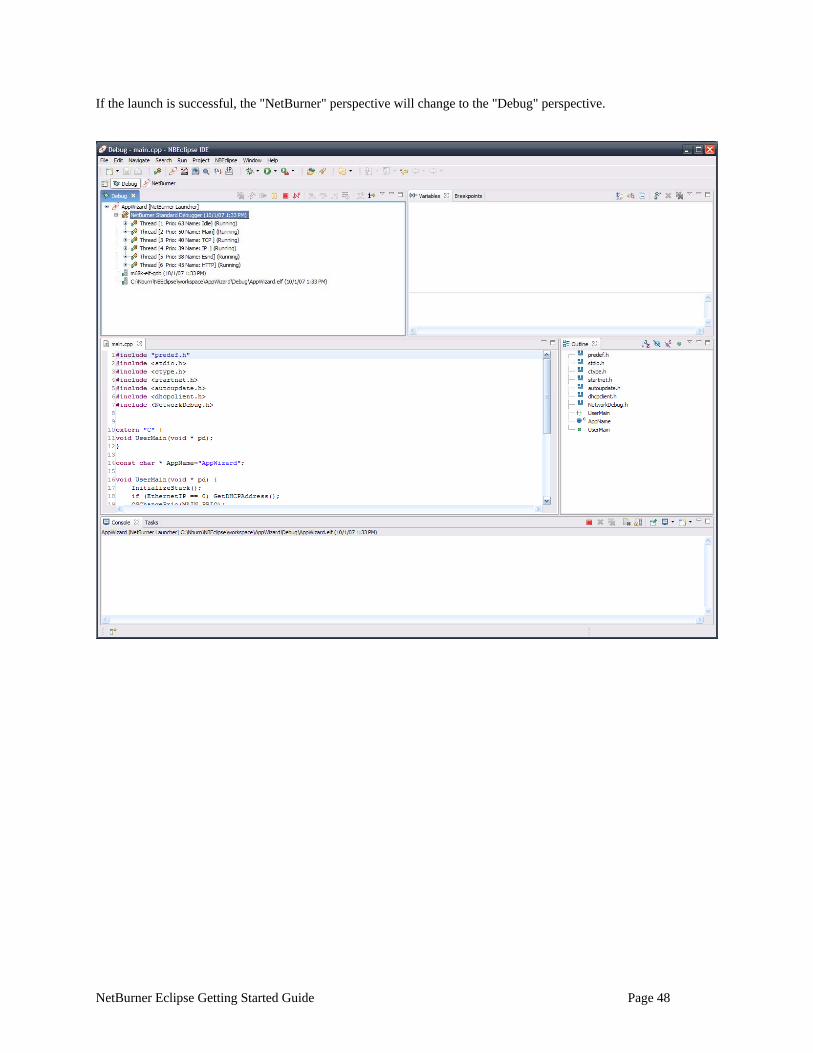
If the launch is successful, the "NetBurner" perspective will change to the "Debug" perspective.
NetBurner Eclipse Getting Started Guide Page 48
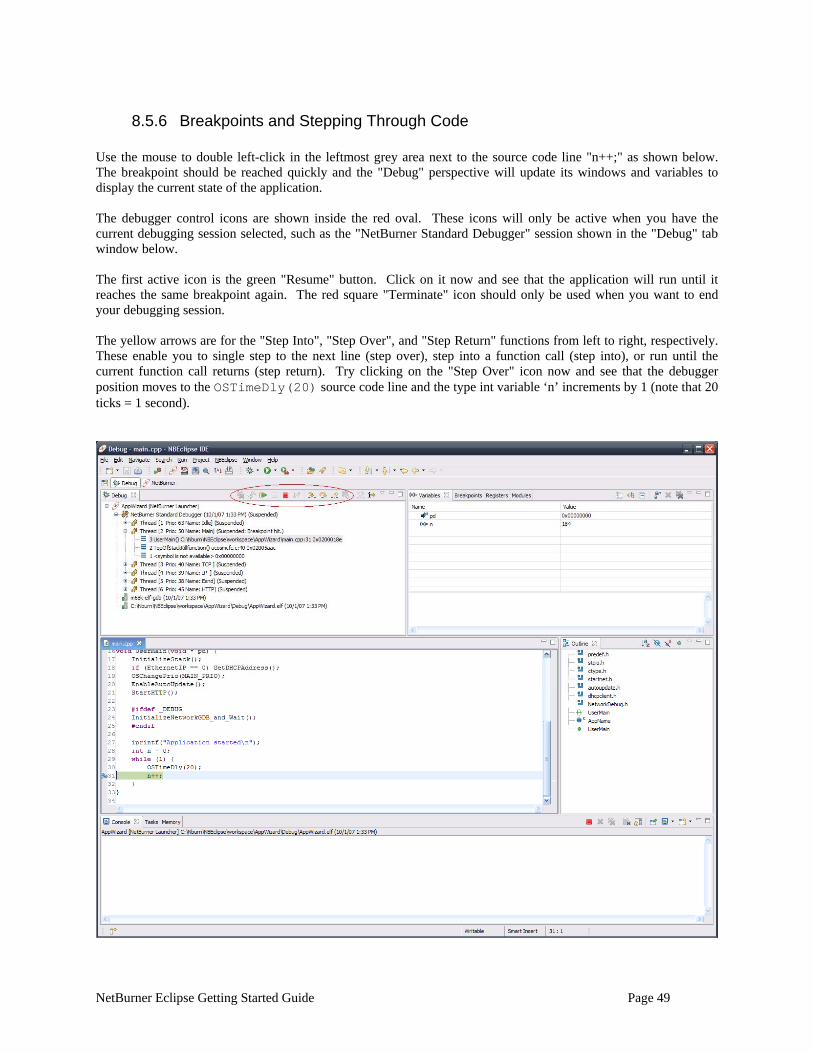
8.5.6 Breakpoints and Stepping Through Code Use the mouse to double left-click in the leftmost grey area next to the source code line "n++;" as shown below. The breakpoint should be reached quickly and the "Debug" perspective will update its windows and variables to display the current state of the application. The debugger control icons are shown inside the red oval. These icons will only be active when you have the current debugging session selected, such as the "NetBurner Standard Debugger" session shown in the "Debug" tab window below. The first active icon is the green "Resume" button. Click on it now and see that the application will run until it reaches the same breakpoint again. The red square "Terminate" icon should only be used when you want to end your debugging session. The yellow arrows are for the "Step Into", "Step Over", and "Step Return" functions from left to right, respectively. These enable you to single step to the next line (step over), step into a function call (step into), or run until the current function call returns (step return). Try clicking on the "Step Over" icon now and see that the debugger position moves to the OSTimeDly(20) source code line and the type int variable ‘n’ increments by 1 (note that 20 ticks = 1 second).
NetBurner Eclipse Getting Started Guide Page 49
8.6 Modifying Code and Restarting the Debugger The most common way to make modifications and start a new debugging session is to:
• Click on the red square "Terminate" button to end the current debugging session. • Click on the "NetBurner" perspective button to reconfigure the view. Alternatively, you can make edits
right in the "Debug" perspective. • Click on the "Debug" icon on the NBEclipse toolbar to download the modified application and start a new
debugging session.
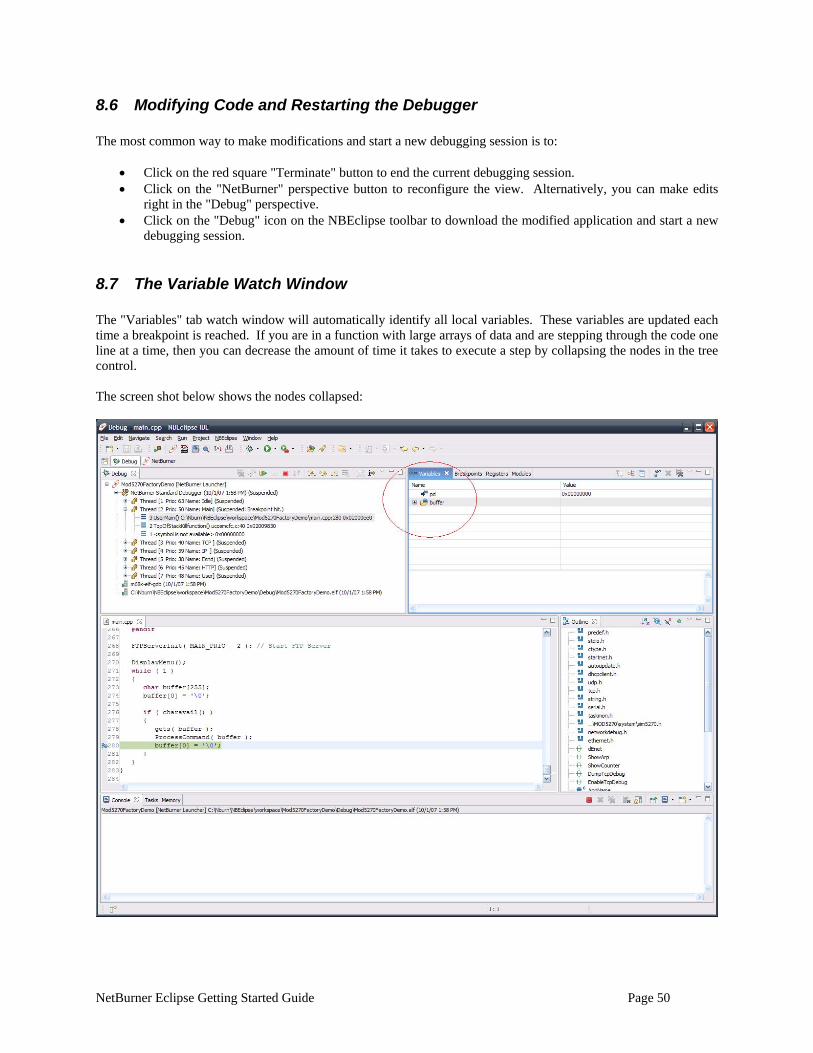
8.7 The Variable Watch Window The "Variables" tab watch window will automatically identify all local variables. These variables are updated each time a breakpoint is reached. If you are in a function with large arrays of data and are stepping through the code one line at a time, then you can decrease the amount of time it takes to execute a step by collapsing the nodes in the tree control. The screen shot below shows the nodes collapsed:
NetBurner Eclipse Getting Started Guide Page 50
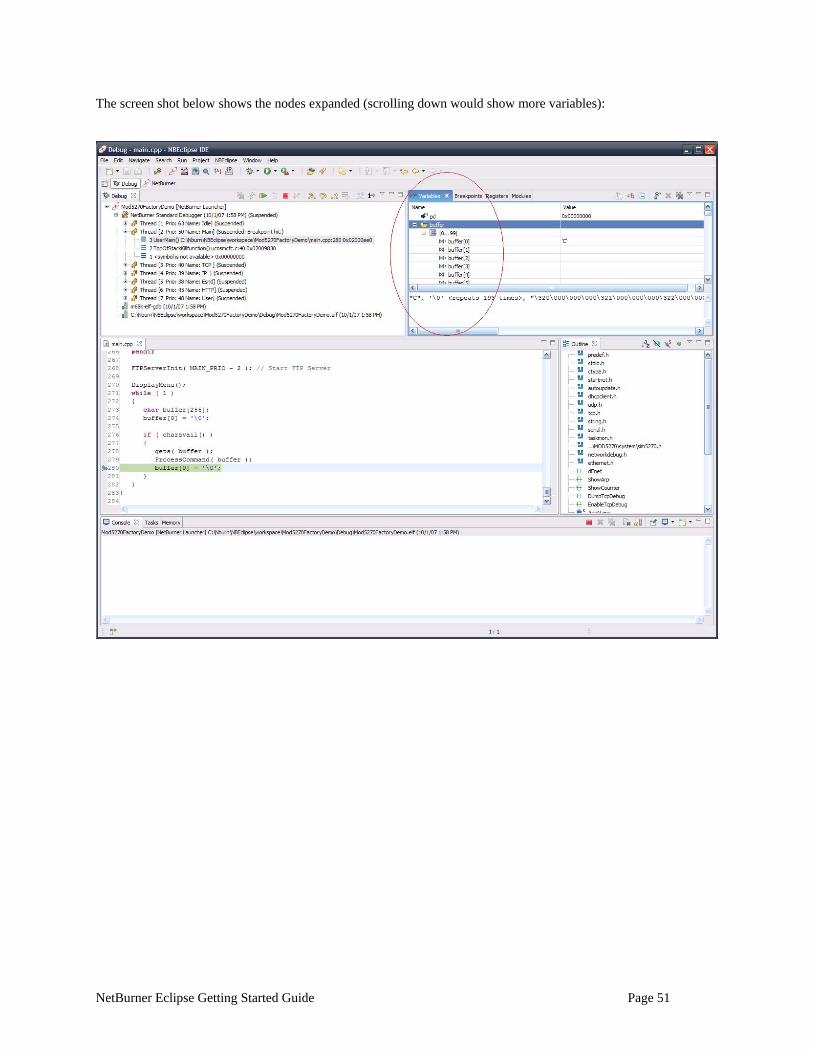
The screen shot below shows the nodes expanded (scrolling down would show more variables):
NetBurner Eclipse Getting Started Guide Page 51
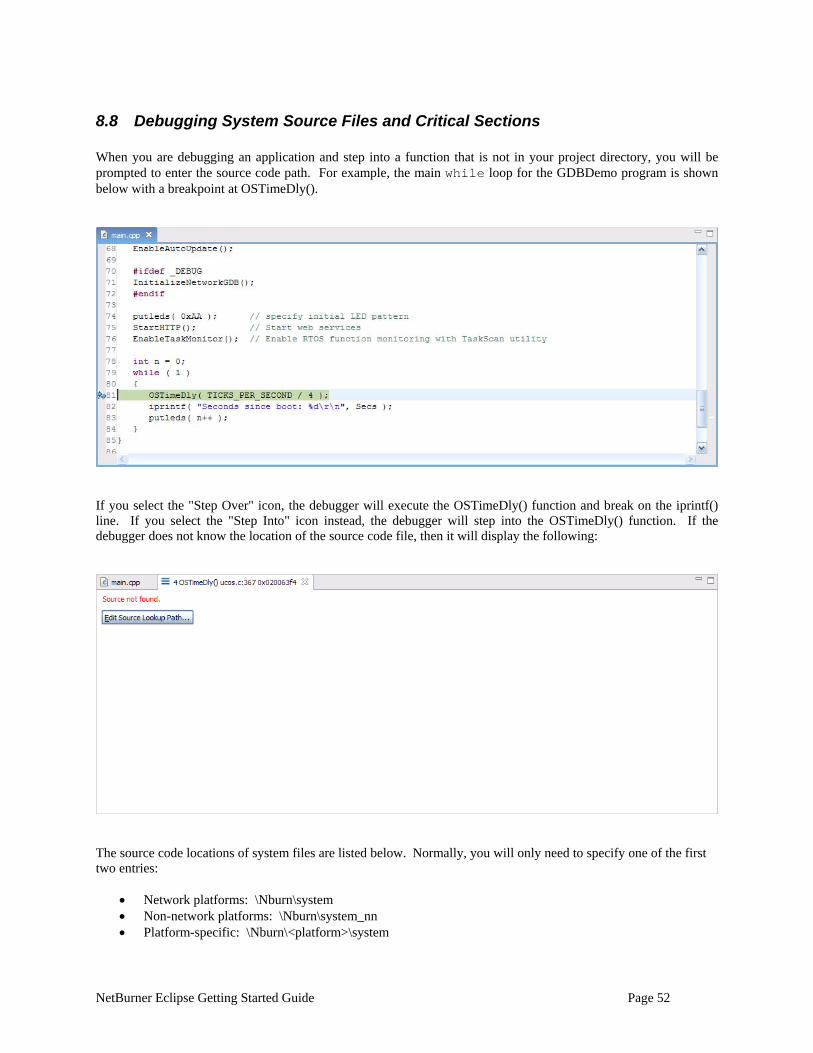
8.8 Debugging System Source Files and Critical Sections When you are debugging an application and step into a function that is not in your project directory, you will be prompted to enter the source code path. For example, the main while loop for the GDBDemo program is shown below with a breakpoint at OSTimeDly().
If you select the "Step Over" icon, the debugger will execute the OSTimeDly() function and break on the iprintf() line. If you select the "Step Into" icon instead, the debugger will step into the OSTimeDly() function. If the debugger does not know the location of the source code file, then it will display the following:
The source code locations of system files are listed below. Normally, you will only need to specify one of the first two entries:
• Network platforms: \Nburn\system • Non-network platforms: \Nburn\system_nn • Platform-specific: \Nburn\<platform>\system
NetBurner Eclipse Getting Started Guide Page 52
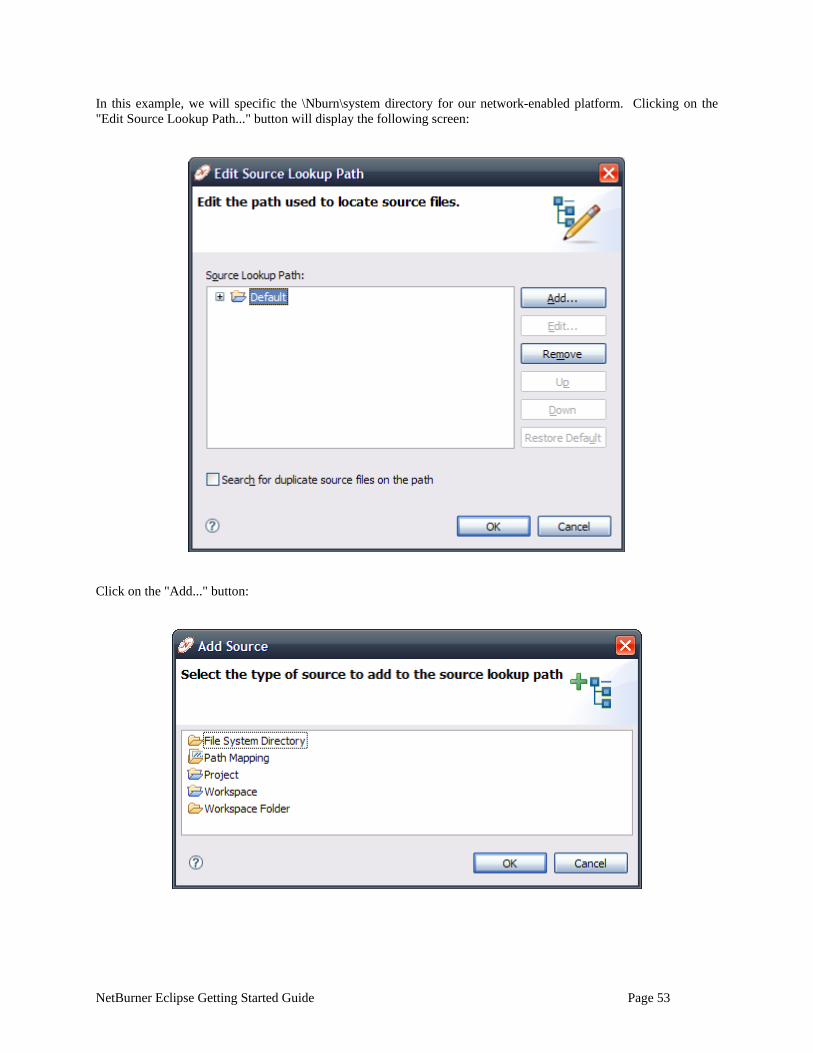
In this example, we will specific the \Nburn\system directory for our network-enabled platform. Clicking on the "Edit Source Lookup Path..." button will display the following screen:
Click on the "Add..." button:
NetBurner Eclipse Getting Started Guide Page 53
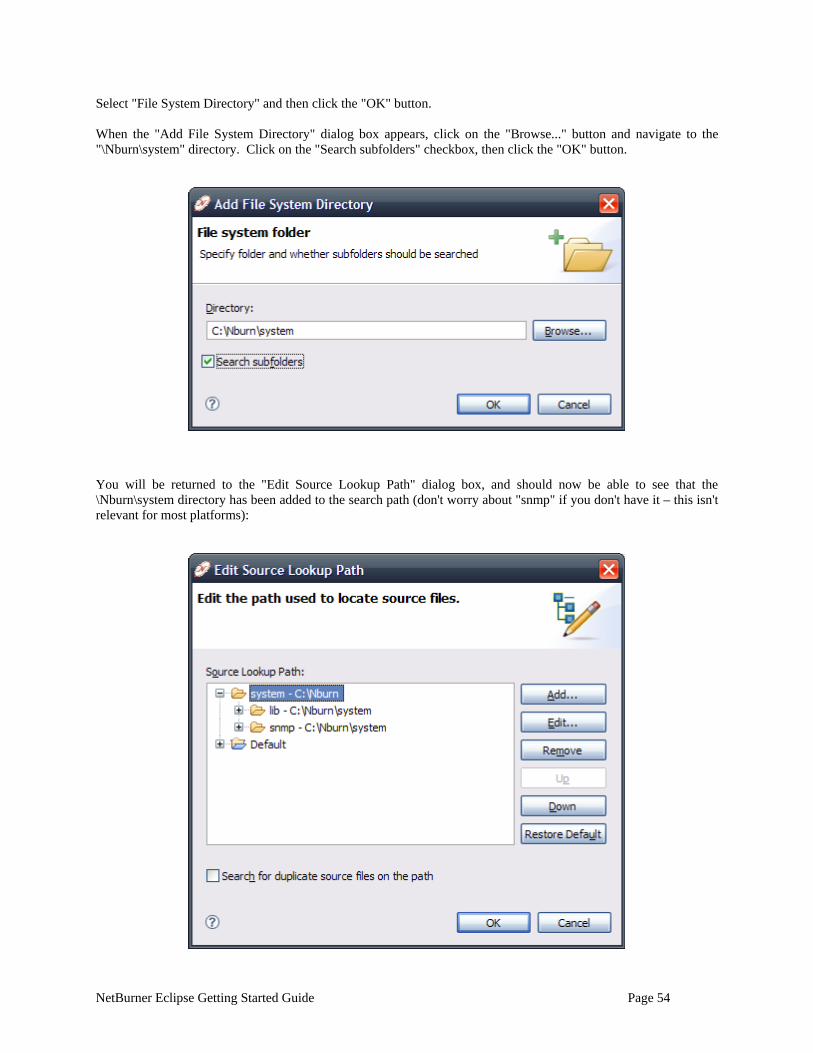
Select "File System Directory" and then click the "OK" button. When the "Add File System Directory" dialog box appears, click on the "Browse..." button and navigate to the "\Nburn\system" directory. Click on the "Search subfolders" checkbox, then click the "OK" button.
You will be returned to the "Edit Source Lookup Path" dialog box, and should now be able to see that the \Nburn\system directory has been added to the search path (don't worry about "snmp" if you don't have it – this isn't relevant for most platforms):
NetBurner Eclipse Getting Started Guide Page 54
NetBurner Eclipse Getting Started Guide Page 55
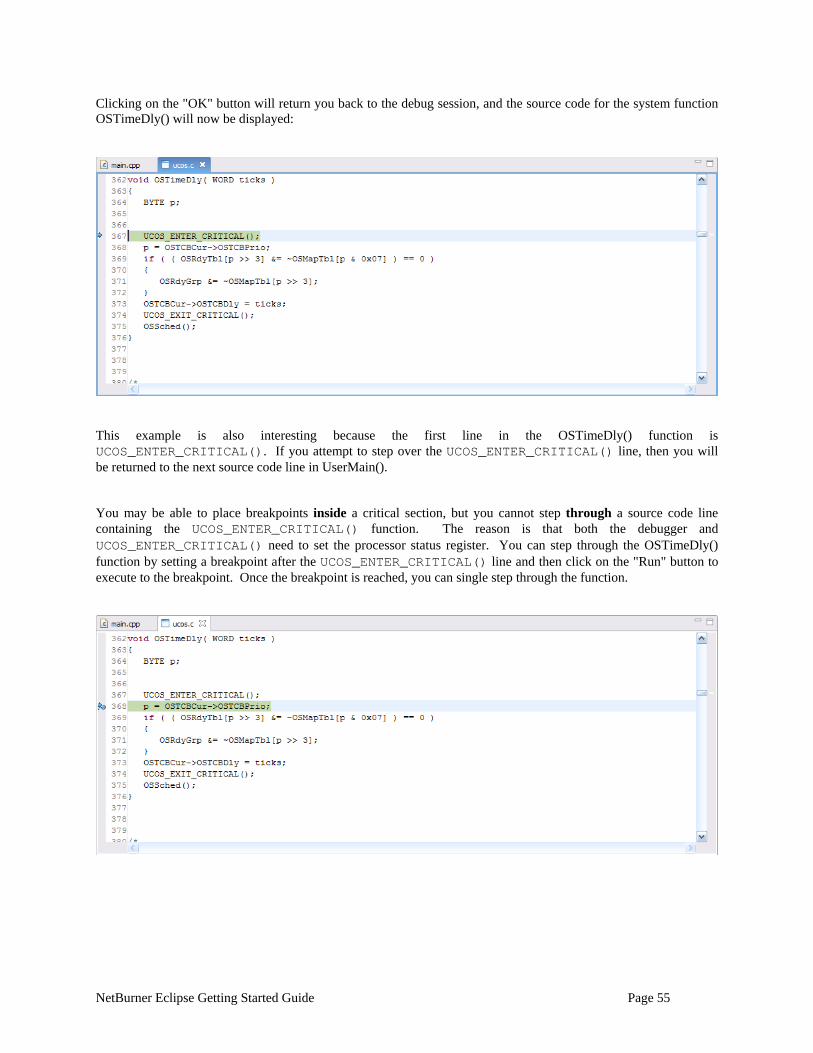
Clicking on the "OK" button will return you back to the debug session, and the source code for the system function OSTimeDly() will now be displayed:
This example is also interesting because the first line in the OSTimeDly() function is UCOS_ENTER_CRITICAL(). If you attempt to step over the UCOS_ENTER_CRITICAL() line, then you will be returned to the next source code line in UserMain(). You may be able to place breakpoints inside a critical section, but you cannot step through a source code line containing the UCOS_ENTER_CRITICAL() function. The reason is that both the debugger and UCOS_ENTER_CRITICAL() need to set the processor status register. You can step through the OSTimeDly() function by setting a breakpoint after the UCOS_ENTER_CRITICAL() line and then click on the "Run" button to execute to the breakpoint. Once the breakpoint is reached, you can single step through the function.