net-console server program - tsogo sun blog user guide.pdf · net-console server program is...
TRANSCRIPT

08
/20
10
INSTALLATION GUIDE
NET-CONSOLE SERVER PROGRAM

INSTALLATION GUIDE
AUGUST-2010

NET-CONSOLE/NET-CM - KK- REV. AAD – 12.08.2010KAREL reserves the right to make modifications in product features mentioned in thisdocument for development and improvement purposes, without prior notice. Individualproducts may possess characteristics different from those that have been mentioned inthis document, due to their differences in software and hardware versions.
Version TableSoftware Version Date/Version of Guide
AAA-AAG AAA/16.09.2003AAH-AAP AAB/28.05.2007AAQ-AAY AAC/07.01.2009ABA-ABE AAD/12.08.2010

CONTENTSGENERAL INFORMATION................................................................................................. 1
INTRODUCTION............................................................................................................. 1PARTS LIST ON DELIVERY........................................................................................... 2MAKING THE CONNECTION BETWEEN THE PABX AND THE SERVER COMPUTER2COMPATIBILITY ............................................................................................................. 2THE SYSTEM CONFIGURATIONS ................................................................................ 3
SPECIFICATIONS & REQUIREMENTS............................................................................. 4
CONFIDURATION ALTERNATIVES............................................................................... 4NET-CONSOLE SERVER AND NET-CM INSTALLATION ALTERNATIVES ................. 6NET-CONSOLE SERVER AND NET-CONSOLE INSTALLATION ALTERNATIVES ..... 6INSTALLATION OF THE TCP/IP PROTOCOL ............................................................... 8
HOW TO INSTALL............................................................................................................ 11
INSTALLATION STEPS FOR NET-CONSOLE SERVER, NET-CONSOLE (FORSYSTEM ADMINISTRATOR) AND NET-CM ................................................................ 11NET-CONSOLE (FOR NORMAL USERS) INSTALLATION STEPS............................. 24INSTALLATION STEPS FOR SYSTEM ADMINISTRATOR ......................................... 26INSTALLATION STEPS FOR ADVANCED TAPI SERVICE PROVIDER (TSP) ........... 27INSTALLATION STEPS FOR TAPI SERVICE PROVIDER (TSP) ................................ 30UNINSTALLING THE PROGRAMS .............................................................................. 32
APPENDIX ........................................................................................................................ 33
COMMAND-LINE PARAMETERS............................................................................. 33COMMAND LINE PARAMETERS FOR NET-CM.................................................. 33COMMAND-LINE PARAMETERS FOR NET-CONSOLE ..................................... 33
PHONE DIRECTORIES FOR NET-CONSOLE AND NET CM.................................. 35TRANSFER OF PHONE DIRECTORIES FROM NET-CM TO NET-CONSOLE... 35TRANSFER OF PHONE DIRECTORIES FROM NET-CONSOLE TO NET-CM... 36

1
GENERAL INFORMATION
INTRODUCTIONNet-Console/Net-CM software package is a Computer Telephony Integration (CTI)module that combines the KAREL PABX and a computer network at a common pointenabling their cooperative usage at many points.
That multi-purpose module consists of the units below:
1) Net-Console Server
2) Net-Console
3) Net-CM
4) System Administrator
5) TAPI Service Provider
6) Advanced TAPI Service Provider
- The Net-Console Server is the communication program of the module andprovides the connection between the PABX and the computer network.
- The Net-Console program provides both programming of the PABX systems overcomputers and means for extensions to manage their telephones throughcomputers that have been connected to the network.
- The Net-CM program, on the other hand, provides processing of call records bycomputer.
- The System Administrator provides programming of the PABX systems byestablishing a TCP/IP connection with the Net-Console Server.
- TAPI Service Provider enables TAPI compatible programs (like Outlook, OutlookExpress, Phone Dialer) to make phone calls.
- Advanced TAPI Service Provider enables TAPI compatible programs (likeOutlook, Outlook Express, Phone Dialer) to make phone calls. In addition, itenables advanced TAPI compatible programs to make call control (dialing, holdingand retrieving calls, parking, call back, intrude, leaving voice messages,conference, call transfer, call pickup, etc.).
That package can be used individually as Net-Console or Net-CM, as well as for bothof those programs.

2
PARTS LIST ON DELIVERYNet-Console/Net-CM consists of the parts below:
- 1 unit of RS232 Cable
- 1 unit of UGB Security Plug
- 1 unit of CM48 Card (This card is supplied only with the programs to be used withMS48 and MS48-ISDN PABX systems.)
- 1 unit of Program CD (With software-specific serial numbers on it, which arecalled the activation keys.)
MAKING THE CONNECTION BETWEEN THEPABX AND THE SERVER COMPUTERInstall the CM48 card to the PABX, if the PABX is MS48 or MS48-ISDN. The RS232cable provides the connection between the PABX and the computer. After connectingone side of the RS232 cable to the CM48 card, plug the other side into an availableRS232 port of the computer.
If your PABX is not MS48 or MS48-ISDN, after connecting one side of the RS232cable to the CM port of your PABX, plug the other side into an available RS232 port ofthe computer (the computer, on which the Net-Console Server program will run).
If the computer has no available RS232 port, then this connection can be made viaKarel USB-Serial Converter interface to an USB connector or the computer.
Regardless of the model of PABX, the UGB (USB Security Plug) must be plugged intoan USB port of the computer.
COMPATIBILITYNet-Console Server program is compatible with the MS26C, MS38S, MS38-ISDN,MS48S, MS48, MS48-ISDN, MS128, MS224 PABX systems with software of version3.11 or better and the MS26S systems with software of version 1.08m or better. Afterthe Net-Console software version of AAF, Net-Console Server is compatible with DSseries systems with main software version z_aba or better.

3
Net-CM and Net-console programs used to require separate licenses in AAS andearlier versions. A single license can also be used with both programs since AATversion.
Net-Console and Net-CM programs can be installed on operating systems listedbelow;
o Windows 2000o Windows Vista Businesso Windows 7 Enterpriseo Windows XP Professionalo Windows Server 2008 R2 Enterprise*o Windows Server 2003 Enterprise*
* Programs work smoothly without need any extra application in ABB and laterversions.
THE SYSTEM CONFIGURATIONSThe Net-Console Server, Net-Console, Net-CM, System Administrator programs andTAPI Service Providers are designed to run under Windows 9.x, Windows ME,Windows NT, Windows 2000 operating systems. The computers to be used shouldhave a configuration to support one of these operating systems. Any computer, whichhas a better configuration, increases the efficiency of the programs.
It is recommended that the screen resolutions of the computers, on which the Net-Console program will be installed, should be at least 800x600 in order to view the mainscreen completely.
Taking the fact into consideration that the Net-Console Server program is managingthe communication between the PABX and the clients, it will be useful to install thisprogram on a computer, which is fast enough to maintain the traffic load and with noother software running on it.
Moreover, since the programs are supplied in an installation CD, a CD-ROM drive isrequired for the computer(s) on which the programs will be installed. If there is no CD-ROM drive on the computer(s) on which the programs will be installed, then the driveof another computer can be shared and the installation is done over the network.

4
SPECIFICATIONS & REQUIREMENTS
CONFIDURATION ALTERNATIVESThe whole system is formed up of six different programs in client - server structure.These are Net-Console Server, Net-Console, Net-CM, System Administrator,Advanced TAPI Service Provider and TAPI Service Provider. The setup of eachprogram is important as the programs require some network information and allprograms are interacting with each other. Also, as the customer requirements mayvary the system structure may vary to meet the customer requirements for each setup.
Net-Console Server program can be used on MS26S, MS26C, MS38S, MS38-ISDN,MS48S, MS48, MS48-ISDN, MS128, MS224, DS200M, DS200S and DS200 PABXsystems as a server for all Net-Console, Net-CM, System Administrator, AdvancedTAPI Service Provider and TAPI Service Provider. However, Net-Console Serverprogram can be used on MS26S PABX systems as a server only for Net-CM program,since Net-Console, System Administrator and TAPI Service Providers can not be usedon MS26S PABXs.
The compatibility information for the present PABX systems and the programs ispresented in the table below:
The system can be adjusted according to the specific needs of particular environmentsand can be installed and used in various configurations.

5
Each of Net-Console, Net-CM and Advanced TAPI Service Provider programs requiresa license to run. If you pay for a license of these programs, you should have anactivation key with the product in hand. In order to be able to run these programs, youmust enter those activation keys in the correct places on Net-Console Serverconfiguration window (this is explained later in this document). However, when USB-Serial Converter is used, if you have no license for these programs and you will onlyuse the programs that don't require a license to run (such as System Administrator andTAPI Service Provider), you should run Net-Console Server program with /npcommand-line parameter. In this mode, Net-Console Server program will not look for asecurity plug on serial port, and it will not try to make license verification, but it will notserve Net-Console, Net-CM and Advanced TAPI Service Provider programs, either.User should make this adjustment by herself/himself, by editing the properties of Net-Console Server shortcut that is created by the Setup program and by entering /npparameter manually. Otherwise, when there is no security plug between serial port ofPC and PABX; Net-Console Server may not work correctly for some old PABXsystems, so programs that don't require a license may not work either. Please run Net-Console Server program with /np parameter for such a usage.

6
Moreover, if USB-Serial Converter is used for the application, Net-Console Serverprogram must be used with “/usb” command line parameter. In this way, operatingdelays formed during the USB-Serial converting can be tolerated and supplied tocommunicate with the security plug properly. Actually the command line parameter isdefined as “/usb:xxx”. The value of xxx is optional and it defines the communicationdelay duration that can be tolerated. If no value is defined for xxx, the default value of50 milliseconds will be used. If there is a problem occurred this “xxx” value can bedecreased or increased to set the proper operating value. (Other command lineparameters will be explained in detail in “Appendix” section.)
NET-CONSOLE SERVER AND NET-CMINSTALLATION ALTERNATIVESIn order to run the Net-CM program, Net-Console Server Program is required to beinstalled on a computer that is connected to the serial port of a KAREL exchange.
Net-Console Server program communicates with the Net-CM program by usingTCP/IP protocol. For the communication between two programs; while entering theconfiguration information of Net-CM program, the PC's address (IP address or thePC's name on the network) that Net-Console Server program is running on it, must beentered.
NET-CONSOLE SERVER AND NET-CONSOLEINSTALLATION ALTERNATIVESNet-Console Server program must be installed to a computer that is connected to aKarel system through its serial port so that Net-Console program can work with thesystem. The Net-Console Server program communicates with the Net-Consoleprogram by using TCP/IP protocol. Hence, a computer with the TCP/IP protocolinstalled is needed, in order to run the Net-Console program.
If the Net-Console program will be installed to a single computer, primarily the TCP/IPprotocol must have been installed to that computer. In addition to that, the Net-ConsoleServer program should be installed to a computer with a permanent IP number. In thecase of installation to a single computer, the IP address of the server can be enteredas 127.0.0.1 to the Net-Console program.
If the Net-Console program will be installed to more than one PC, then the TCP/IPprotocol should be installed to all of those PC’s. Only during the Net-Console (Admin)setup, the server address is required. In this case server address (IP address orcomputer name) must be entered correctly. After Net-Console (Admin) setup, adminshould login to the system and enter the same server address for each client that is
7
defined in User Manager window. (Actually, once you have entered server addressduring the Net-Console (Admin) setup, Net-Console will bring you the same serveraddress during a new client account creation.)
Moreover, a common folder, which is shared by the other persons who will use theprogram as authorized with all the privileges, is needed in order to contain thecommon database files that will be used by all the Net-Console programs.

8
INSTALLATION OF THE TCP/IP PROTOCOLTo check whether the TCP/IP protocol has been installed:
* For Windows 9.x / ME Operating Systems:
- Click the “Network” icon in the “Control Panel”. You will see the installed networkcomponents in the “Configuration” page.
- If there is TCP/IP in the list of the network components, then the TCP/IP protocolhas been installed. You can close the window.
- If TCP/IP is not in the list, then you will need to install it. If you have purchasedmore than one license for the Net-Console program, apply to the systemadministrator about installing the TCP/IP protocol to all of the computers that willrun the program. If you purchased the program with single user license and thereis no network environment; or if the computer that the program will be installed tohas no Ethernet card or modem, then, by performing a standard modeminstallation, the TCP/IP protocol can be installed as if there is a modem in thesystem.
* For Windows NT Operating System:
- Click the “Network” icon in the “Control Panel”.
- If there is TCP/IP in the protocol page, then the TCP/IP protocol has beeninstalled. You can close the window.
- If the TCP/IP protocol is not in the protocol page, then you will have to install it. Ifyou have purchased more than one license for the Net-Console program, apply tothe system administrator about installing the TCP/IP protocol to all of thecomputers that will run the program. If you purchased the program with singleuser license and the TCP/IP protocol has not been installed, then it canindividually be installed.
* For Windows 2000 and upper version Operating Systems:
- Windows 2000 and upper version Operating Systems are supplied with TCP/IP.
9
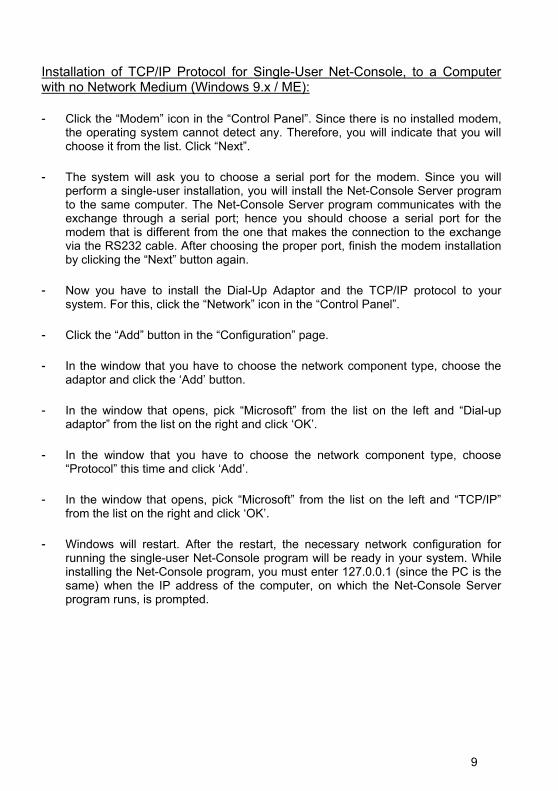
Installation of TCP/IP Protocol for Single-User Net-Console, to a Computerwith no Network Medium (Windows 9.x / ME):
- Click the “Modem” icon in the “Control Panel”. Since there is no installed modem,the operating system cannot detect any. Therefore, you will indicate that you willchoose it from the list. Click “Next”.
- The system will ask you to choose a serial port for the modem. Since you willperform a single-user installation, you will install the Net-Console Server programto the same computer. The Net-Console Server program communicates with theexchange through a serial port; hence you should choose a serial port for themodem that is different from the one that makes the connection to the exchangevia the RS232 cable. After choosing the proper port, finish the modem installationby clicking the “Next” button again.
- Now you have to install the Dial-Up Adaptor and the TCP/IP protocol to yoursystem. For this, click the “Network” icon in the “Control Panel”.
- Click the “Add” button in the “Configuration” page.
- In the window that you have to choose the network component type, choose theadaptor and click the ‘Add’ button.
- In the window that opens, pick “Microsoft” from the list on the left and “Dial-upadaptor” from the list on the right and click ‘OK’.
- In the window that you have to choose the network component type, choose“Protocol” this time and click ‘Add’.
- In the window that opens, pick “Microsoft” from the list on the left and “TCP/IP”from the list on the right and click ‘OK’.
- Windows will restart. After the restart, the necessary network configuration forrunning the single-user Net-Console program will be ready in your system. Whileinstalling the Net-Console program, you must enter 127.0.0.1 (since the PC is thesame) when the IP address of the computer, on which the Net-Console Serverprogram runs, is prompted.

10
Installation of TCP/IP Protocol for Single-User Net-Console, to a Computerwith no Network Medium (Windows NT):
- Click the “Network” icon in the “Control Panel”.
- Click “Add” in the protocol page. Choose the TCP/IP protocol from the list.
- If you are prompted whether you want to use DHCP, click ‘No’.
- After the installation is complete, click the “Close” button that is at the bottom ofthe network window. Your computer will restart.
- While installing the Net-Console program, you must enter 127.0.0.1 (since the PCis the same) when the IP address of the computer, on which the Net-ConsoleServer program runs, is prompted.
Important Note:
It is recommended that all the other programs running on the computer, to which theNet-Console Server, Net-Console and Net-CM programs will be installed, should beclosed before the installation.

11
HOW TO INSTALLIn this chapter, the necessary steps for the installation, assuming that all the programscomprising the Net-Console/Net-CM module will be installed to the system, arementioned. The Net-Console Server program must be installed, in order to run theother programs. If the other programs will not be installed, the related steps should beomitted. In order to install or uninstall the programs to or from the computers with NTbased operating systems, one should log on as a user with “Administrator” privileges.
INSTALLATION STEPS FOR NET-CONSOLESERVER, NET-CONSOLE (FOR SYSTEMADMINISTRATOR) AND NET-CM
• First, determine the computers, to which you will install the Net-Console Server,Net-Console and Net-CM programs.
• The PC that Net-Console Server Program is running, must be connected to theserial port of your KAREL exchange and the TCP/IP protocol is required to beinstalled on it.
• The TCP/IP protocol is required to be installed on the PCs that Net-Consoleand Net-CM programs are running on it.
• After having determined the computer on which the Net-Console Serverprogram will run, start the installation program on that computer. If the CD-ROMauto-run feature has not been disabled in your system, then the installationprogram should begin as soon as you insert the CD.
• As the first step of installation, select the language of the program (English,Spanish and Polish) and choose the type of the PABX that the programs willcommunicate with, from the list, and then click ‘OK’. Since the activation key(s),supplied on the CD cover, are PABX-specific, you are supposed to choose thatinformation according to the PABX whose license you have purchased;otherwise, the programs will simply not work.

12
• In order to install the Net-Console Server program, point to the text “Net-Console Server” or the icon next to it with your mouse and click.
• The installation program will ask you whether you want to install the serverprogram for the PABX type you have chosen. Click ‘Yes’.
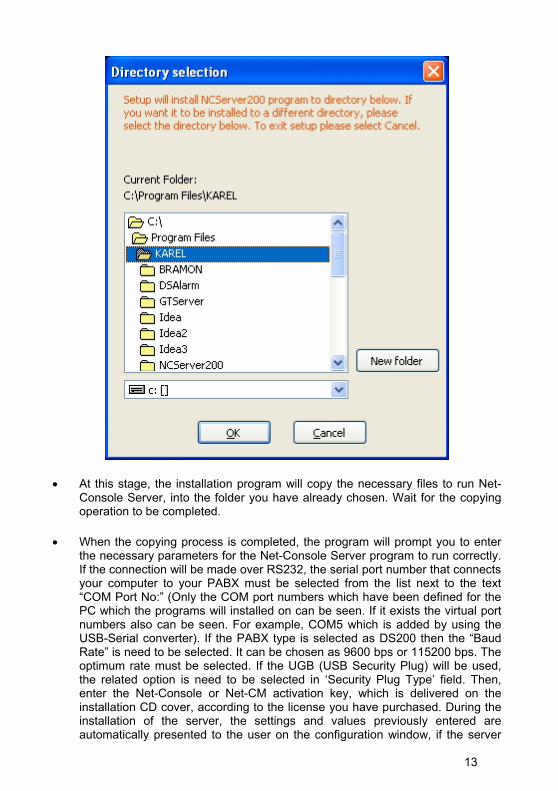
• Then the installation program will ask for the folder, in which you want to installthe server program. Unless another folder name is chosen, the installationprogram will automatically copy the program files into the folder “KAREL” that isin the folder “Program Files” (for example, C:\Program Files \KAREL\ NCServer200). If you would like to install into another folder or drive, you can browse thefolder tree, or if you want to create a new folder, within another folder you havechosen, you can do that by clicking the “New Folder” button. You can proceedby clicking ‘OK’, after having chosen the folder to which you will install theprogram.
13
• At this stage, the installation program will copy the necessary files to run Net-Console Server, into the folder you have already chosen. Wait for the copyingoperation to be completed.
• When the copying process is completed, the program will prompt you to enterthe necessary parameters for the Net-Console Server program to run correctly.If the connection will be made over RS232, the serial port number that connectsyour computer to your PABX must be selected from the list next to the text“COM Port No:” (Only the COM port numbers which have been defined for thePC which the programs will installed on can be seen. If it exists the virtual portnumbers also can be seen. For example, COM5 which is added by using theUSB-Serial converter). If the PABX type is selected as DS200 then the “BaudRate” is need to be selected. It can be chosen as 9600 bps or 115200 bps. Theoptimum rate must be selected. If the UGB (USB Security Plug) will be used,the related option is need to be selected in ‘Security Plug Type’ field. Then,enter the Net-Console or Net-CM activation key, which is delivered on theinstallation CD cover, according to the license you have purchased. During theinstallation of the server, the settings and values previously entered areautomatically presented to the user on the configuration window, if the server
14
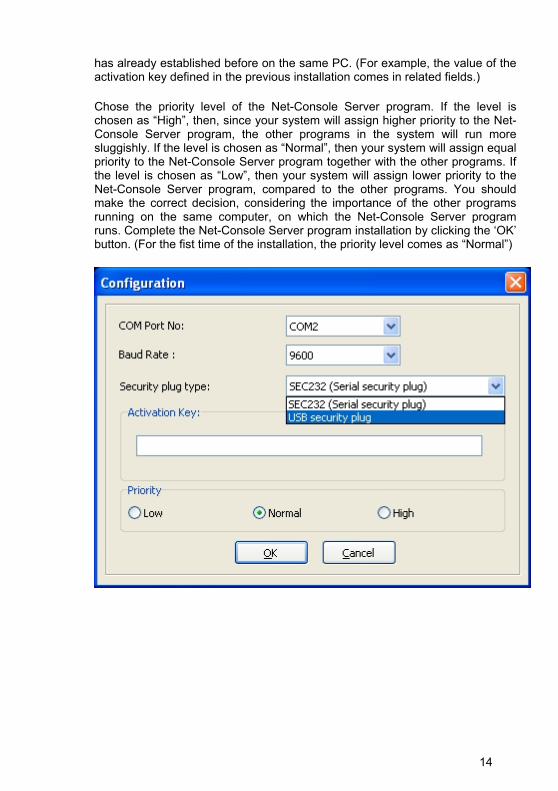
has already established before on the same PC. (For example, the value of theactivation key defined in the previous installation comes in related fields.)
Chose the priority level of the Net-Console Server program. If the level ischosen as “High”, then, since your system will assign higher priority to the Net-Console Server program, the other programs in the system will run moresluggishly. If the level is chosen as “Normal”, then your system will assign equalpriority to the Net-Console Server program together with the other programs. Ifthe level is chosen as “Low”, then your system will assign lower priority to theNet-Console Server program, compared to the other programs. You shouldmake the correct decision, considering the importance of the other programsrunning on the same computer, on which the Net-Console Server programruns. Complete the Net-Console Server program installation by clicking the ‘OK’button. (For the fist time of the installation, the priority level comes as “Normal”)

15
• There is another tab called as “IP Filters” taken place in the “Configuration”window which is seen when the program is run -namely after the installation ofthe server program-. (This “IP Filter” tab can not be seen during theinstallation). The clients’ IP addresses for Net-CM and IDEA programs whichare performed through the server PC can be defined over this tab and only therequirements of the client whose IP address has been defined in these fieldswill be considered. For MS Series systems, there is only the field for Net-CM IPaddresses located, for DS Series Systems both fields for Net-CM and IDEA IPaddresses are located in this tab. Each IP address should be entered into adifferent line. If these lists are left blank any client can be perform Net-CM orIDEA program.

16
• Finally the installation program will add the icons that belong to the Net-Console Server program to the Start menu and then will inform you about thecompletion of the installation as well as the name of the PC where Net-ConsoleServer program is installed. You can close that window by clicking the ‘OK’button. Thus, you have completed the installation of the Net-Console Serverprogram.
• Net-Console Server Program firstly checks the system type which they connectto and give an error message if it is not compatible with the system. In additionto that Server Program gives error messages for some definite situations.These are explained below:
- If there is not UGB Security Plug attached and there is not anyconnection to the system the message “PABX is not answering” for MSSeries Systems and the message “Unable to get system versioninformation” for DS Series Systems will be appeared,
- If the UGB Security Plug is attached but the connection is not supplied

17
the message “PABX is not answering” for MS Series Systems and themessage “Unable to get system version information” for DS SeriesSystems will be appeared,
- If the connection is supplied but there is not UGB Security Plug attachedthe message “Unable to find the security plug” will be appeared,
- If there is a connection and a UGB Security Plug on the system but in thecase of the activation key is invalid, the message “Activation Key isInvalid” will be displayed,
- If the server is used with serial security plug through Karel USB SerialConverter but “/usb” command is not entered, the message “ActivationKey is Invalid” will be displayed,
- In the case of the serial port is out of order the message “Unable to openthe serial port” will be displayed,
- If the serial port can not opened the message “Unable to open the serialport” will be displayed. (In case of the different port is used for theconnection instead of the defined one, the message “Unable to getsystem version information” or “PABX is not answering” will bedisplayed.)
• If you have purchased license for the Net-CM program, then you should havedetermined the computer, to which you will install the Net-CM program, asmentioned earlier. If you are installing both of the Net-Console Server and theNet-CM programs to the same computer, then you can start the installation ofthe Net-CM program, without closing the installation program. If you havedecided to install the Net-CM program to another computer, then you have toexit the installation program and eject the installation CD. Then you will insertthat CD into the PC to which you will install the Net-CM program, and start theinstallation. If the CD-ROM auto-run feature has not been disabled in yoursystem, then the installation program should begin as soon as you insert theCD.
• If you have restarted the installation, again, as the first step for the installationprocess, choose the language of the programs to be installed and the type ofthe PABX with which the programs will communicate, from the list and click the‘OK’ button.
• In order to install the Net-CM program, point to the text “Net-CM (Call RecordManagement)” or the icon next to it with your mouse and click.
• The installation program will ask whether you would like to install the Net-CMprogram. Click the ‘OK’ button.

18
• Then the installation program will ask for the folder to which you want to installthe Net-CM program. Unless another folder name is chosen, the installationprogram will automatically copy the program files into the folder “KAREL” that isin the folder “Program Files” (for example, C:\Program Files\KAREL\Net-CM). Ifyou would like to install into another folder or drive, you can browse the foldertree, or if you want to create a new folder, within another folder you chose, youcan do that by clicking the “New Folder” button. You can proceed by clicking‘OK’ after having chosen the folder to which you will install the program.
• In that step, the installation program will copy the necessary files to run Net-CM, into the folder you have already chosen. Wait for the copying operation tobe completed.
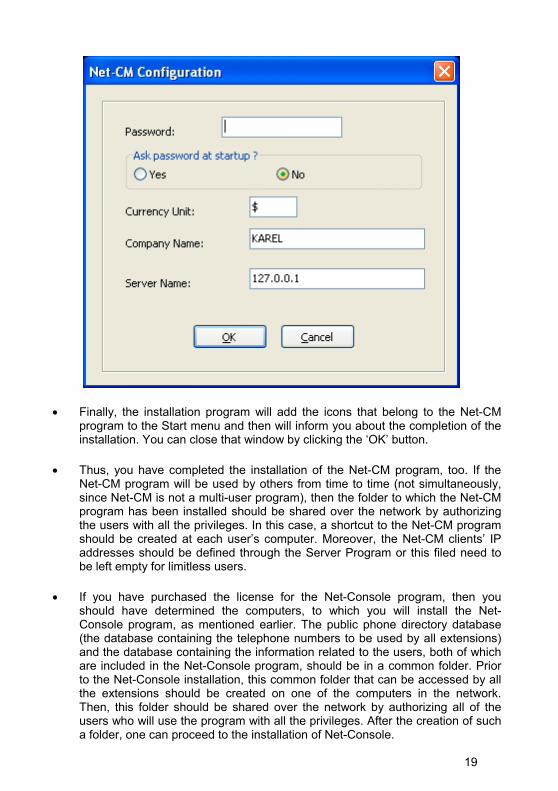
• When the copying process is completed, the program will prompt you to enterthe necessary parameters for the Net-CM program to run correctly. You canassign a password to the system, in order to prevent any unauthorized peopleto view and/or modify call records. This password is the one that will beprompted upon logging into the Net-CM program. Moreover, this password willbe asked for in order to delete records from the main file during archiving of callrecords. Therefore, the password must not be forgotten. After the passwordentry, if you want to be prompted for the password every time the programstarts, then click ‘Yes’ below the question “Ask password at start up?” If you donot want, click ‘No’. Even though you have chosen “No”, the program will stillask the password in order to delete records from the main file during archivingof call records. Then the appropriate currency unit is entered in the CurrencyUnit field if required. If you enter the name of your company to the section“Company Name”, this will be placed into some reports as header. "ServerName" field must be filled correctly and the network name of the server PC onthe Microsoft Network or IP address of the server PC must be entered in thisfield. After filling all the fields as explained above, click ‘OK’ to continue.
19
• Finally, the installation program will add the icons that belong to the Net-CMprogram to the Start menu and then will inform you about the completion of theinstallation. You can close that window by clicking the ‘OK’ button.
• Thus, you have completed the installation of the Net-CM program, too. If theNet-CM program will be used by others from time to time (not simultaneously,since Net-CM is not a multi-user program), then the folder to which the Net-CMprogram has been installed should be shared over the network by authorizingthe users with all the privileges. In this case, a shortcut to the Net-CM programshould be created at each user’s computer. Moreover, the Net-CM clients’ IPaddresses should be defined through the Server Program or this filed need tobe left empty for limitless users.
• If you have purchased the license for the Net-Console program, then youshould have determined the computers, to which you will install the Net-Console program, as mentioned earlier. The public phone directory database(the database containing the telephone numbers to be used by all extensions)and the database containing the information related to the users, both of whichare included in the Net-Console program, should be in a common folder. Priorto the Net-Console installation, this common folder that can be accessed by allthe extensions should be created on one of the computers in the network.Then, this folder should be shared over the network by authorizing all of theusers who will use the program with all the privileges. After the creation of sucha folder, one can proceed to the installation of Net-Console.
20
• Before installing the Net-Console program as Admin, if there are others usingthe same program, they must log off the system, because during the installationby Admin, the common databases must not be accessed by anyone.
• If you will install the Net-Console program to the same computer with the Net-Console Server program, you can start the Net-Console installation withoutexiting the installation program. If you have decided to install the Net-Consoleprogram to another computer, then you have to exit the installation programand eject the installation CD. Then you will insert that CD into the PC to whichyou will install the Net-Console program, and start the installation program. Ifthe CD-ROM auto-run feature has not been disabled in your system, then theinstallation program should begin as soon as you insert the CD.
• The Net-Console program runs in two distinct modes: Admin and Normal User.By using the Net-Console program, Admin, as well as performing all theoperations that a Normal User can do, can access and modify the other users’data, create the public phone directory, and adjust all the parameters of thePABX. When the Net-Console program is installed as Admin, unlike the otherinstallation methods, a common folder, into which the common database fileswill be copied, should be selected. The database files for all the users will becopied to that common folder which has previously been determined. Thiscopying operation is done only once. The other users will just determine thelocation of that folder during the installation. Moreover, since Admin willmanage the user accounts, it is essential to install the Net-Console program asAdmin at first, considering the necessity of determining the location of commondatabase files and the user accounts. The Net-Console program may be runfrom the same computer by using different user accounts. For example, Admincan log in the system with her/his own username and password, through anyuser’s Net-Console program, and s/he can perform all the operations that s/hecan do by using her/his own computer, through that computer. (Except callcontrol, since the Net-Console program that has been installed to the othercomputer would allow only that person to use her/his telephone line. Thisoperation mode is considered as the guest user mode within the Net-Consoleprogram.) Therefore, especially the Admin password must be known by theAdmin only, for the sake of the security of the PABX system.
• In order to install the Net-Console program as Admin, move the mouse cursorto the text “Net-Console (Admin)” or the icon next to it and select.
• The installation program will ask whether you want to install the Net-Consoleprogram as “Admin”. Click the ‘Yes’ button.
• The Net-Console program requires the installation of the “Borland DatabaseEngine” program, which is necessary for the access and management ofdatabases. The installation program checks whether that program haspreviously been installed to your system. If it has been installed, the installationprogram checks its version and if it is an older version than the one in the CD,installation of “Borland Database Engine” will automatically start. All you will

21
have to do is wait until the installation is complete. The system will inform youafter the end of the process. Then, you will be prompted by the installationprogram to choose the common database folder including the public phonedirectory and user accounts. You should have created that folder andauthorized all the relevant users with all the privileges by now. Choose therelevant folder from the folder tree and click the “OK” button. If you are notinstalling for the first time and that folder contains user accounts and publicphone directory records from the previous installations, the installation programwill ask whether you want to update those files. You are supposed to reply as‘No’ if you want to make use of those records. If there is no such information inthat folder, the program will create empty databases and would not ask thosequestions.

22
• Then you will be asked for the IP address of the computer, on which the Net-Console Server program is running. Continue with the installation after enteringthe IP address and clicking ‘OK’.
• Then the installation program will ask for the folder to which you want to installthe Net-Console program. Unless another folder name is chosen, theinstallation program will automatically copy the Net-Console program files intothe folder “KAREL” that is in the folder “Program Files” (like C:\ProgramFiles\KAREL\Net-Console). If you would like to install into another folder ordrive, you can browse the folder tree, or if you want to create a new folder,within another folder you chose, you can do that by clicking the “New Folder”button. You can proceed by clicking ‘OK’, after having chosen the folder towhich you will install the program.
• At this stage, the installation program will copy the necessary files to run Net-Console into the folder you have already chosen. In the meantime, if the Net-Console program has previously been installed to the same computer, and thepersonal records has been preserved during an uninstall operation, or theprevious copy of the Net-Console program has not been uninstalled, you will beasked whether you want to keep the previous information. If you want to keepthem, continue with the installation by choosing ‘Yes’ and wait for the copyingof the other files to be completed.
23
• Finally, the installation program will add the icons that belong to the Net-Console program to the Start menu and then will inform you about thecompletion of the installation. You can close that window by clicking the “OK”button. Thus, you have completed the installation of the Net-Console program(as Admin).
• You have already completed the installation of the Net-Console program asAdmin. Now, accounts for other users should be created. In order to do that,run the Net-Console program. Enter “admin” as the username and thepassword of the Admin as password. (If this is the first system login, thepassword of the Admin account is “karel”. This password must be changedthrough the “User Manager” at once, following the first login as Admin.) Afterlogging into the system, choose “User Manager” from the “Admin Tools” menuand create user accounts by using the “User Manager” (you may apply to thehelp pages of the program for more detailed information). Now the system isready for the installation of the Net-Console programs for the normal users.
24
NET-CONSOLE (FOR NORMAL USERS)INSTALLATION STEPS
• Before installing the Net-Console program for the first time as normal user, theinformation you have to get from your Admin is below:
o If you are authorized to install and use the Net-Console program, yourusername and password. (If you do not have an account, apply to Admin.)
o The name and the exact location of the folder that stores the commondatabases used by the Net-Console program.
o Find out whether the configuration of your computer is adequate for the Net-Console program operation (For example: Do you have a networkconnection and TCP/IP protocol installed?)
Take note of that information, since you will enter it when prompted by theinstallation program at certain stages during the installation.
• Insert the installation CD into CD-ROM drive and start the installation program.If the CD-ROM auto-run feature has not been disabled in your system, then theinstallation program should begin as soon as you insert the CD.
• As the first step of the installation, choose the language of the program you willinstall from the list and click the “OK” button. Type of the PABX you are usingdoes not matter for you.
• In order to install the Net-Console program, point to the text “Net-Console(Normal User)” or the icon next to it with the mouse cursor and select. If you arenot really the Admin, then the program will not work correctly when you attemptto install it as Admin. Therefore, you have to install as “Normal User”.
• The installation program will ask you whether you want to install the Net-Console program as “Normal User”. Click the “Yes” button.
• The Net-Console program requires the installation of the “Borland DatabaseEngine” program, which is necessary for accessing the databases. Theinstallation program checks whether that program has previously been installedto your system. If it has been installed, the installation program checks itsversion and if it is an older version than the one in the CD, installation of“Borland Database Engine” will automatically start. All you will have to do iswaiting until the installation is complete. The system will inform you after theend of the process.
25
• Then the installation program will ask for the folder to which you want to installthe Net-Console program. Unless another folder name is chosen, theinstallation program will automatically copy the Net-Console program files intothe folder “KAREL” that is in the folder “Program Files”(like C:\ProgramFiles\KAREL\Net-Console). If you would like to install into another folder ordrive, you can browse the folder tree, or if you want to create a new folder,within another folder you chose, you can do that by clicking the “New Folder”button. You can proceed by clicking “OK”, after having chosen the folder towhich you will install the program.
• If the Net-Console program has previously been installed to the same computerand the personal records has been preserved during an uninstall operation, orthe previous copy of the Net-Console program has not been uninstalled, youwill be asked whether you want to keep the previous information. If you want tokeep them, continue with the installation by choosing “Yes”.
• Then the installation program will ask you to choose the folder that containsuser information. You should have obtained that information from your Adminbefore. Click the button on the right side of the window with three dots on it andthe folder tree will open. Choose the folder from the tree considering theinformation you have obtained from your Admin and click the “OK” button.
• At this stage, the installation program will copy the necessary files to run theNet-Console program into the folder you have already chosen.
• Finally, the installation program will add the icons that belong to the Net-Console program to the Start menu and then will inform you about thecompletion of the installation. You can close that window by clicking the “OK”button. Thus, you have completed the installation of the Net-Console program.
• Now run the program from the Start menu. (For example: Start\ProgramFiles\Karel\Net-Console\Net-Console). The program will display a warning as: “No user has been defined for this client. Define now?” Click “OK”. Then enterthe username, the password and the type information of your telephone thatyou obtained from your Admin. Then click the “Connect” button. If theinformation you have received from Admin is correct, if you have installed theprogram successfully and the Net-Console Server program is running, then youcan log into the system. In cases when the Net-Console Server program is notrunning, you can click the “Offline” button in the entrance window and you canorganize your personal information by connecting offline. However, offlineconnection is not possible upon first login.

26
INSTALLATION STEPS FOR SYSTEMADMINISTRATORSystem Administrator program can be installed and used without any license forMS38S, MS26C, MS38-ISDN, MS48, MS48S, MS48-ISDN, MS128 and MS224PABXs. If Net-Console license is already bought, to install System Administrator is notnecessary as System Administrator comes as a module with Net-Console.
System Administrator makes a connection with the PABX by establishing a TCP/IPconnection with the Net-Console Server. In order to run System Administrator, Net-Console Server program must be installed before the installation of SystemAdministrator. The installation steps for System Administrator are as below:
• Insert the setup CD to the CD-ROM of the PC on which the Net-Consoleprogram will be setup. Auto run will start the setup program automatically, if it isnot disabled on the PC.
• Select the PABX type. Click OK to continue.
• To setup System Administrator program, click "System Administrator" line orthe icon.
• The setup program asks for your confirmation to setup the program. Click "Yes"to continue.
• System Administrator program requires Borland Database Engine (BDE) fordatabase access and management. Therefore, at the beginning the setupprogram checks if relevant version of BDE is installed on the PC or not. If setupprogram needs to install BDE, this process is started automatically and whenfinished, you will be notified by a message.
• Setup program asks you the folder in which the program will be setup. If youconfirm the default folder, the program is setup in a folder named Karel inProgram Files folder (i.e. C:\Program Files\Karel\SysMgr). If another folder isselected for the setup, then this can be made easily through the folder tree. Tocontinue after selecting the folder, click OK.
• The setup program copies the necessary files in the folder previously selected.
• Finally, setup program creates necessary icons and shortcuts in the start menuand tells you the installation is finished. Click "OK" button. You have finishedinstalling System Administrator.

27
There are two different working modes for System Administrator that can be controlledby command-line parameters. In the first mode, System Administrator program startsby displaying a login window like the login window of Net-Console. In this mode, bypressing the options button, you can reach a server list. In this list, several serveraddresses may be defined, so they can be reached at different System Administratorsessions, by only selecting the name of the server from the list in the login window.This mode is for the cases, where parameters of one (or more) PABX are needed tobe programmed remotely.
The second mode (called Local Connection mode) can selected by /L command-lineparameter. In this mode, System Administrator program makes a local TCP/IPconnection with the Net-Console Server, assuming that Net-Console Server is alsorunning on the same PC (server address is assumed to be 127.0.0.1). This mode issuitable for the cases, where PABX is connected to the same PC where SystemAdministrator is running. In this mode IP address of the server is not required. If nopassword is provided in Options window, in this mode, System Administrator openswith the main window directly, without a login window. If a password is providedhowever, it displays a password window. Setup program creates icons for both modesin Start menu. You should select and run whichever mode is most suitable for yourneeds.
INSTALLATION STEPS FOR ADVANCED TAPISERVICE PROVIDER (TSP)Advanced TAPI Service Provider (TSP) can be installed and used for MS (exceptMS26S) and DS series systems. It enables TAPI compatible programs (like Outlook,Outlook Express, Phone Dialer) to make phone calls by using that driver. In addition, itenables advanced TAPI compatible programs to make call control (dialing, holding andretrieving calls, parking, call back, intrude, leaving voice messages, conference, calltransfer, call pickup, etc.) by using that driver. However, Advanced TSP requires alicense to run like Net-Console. Actually, Net-Console and Advanced TSP shares thesame licenses. For instance, if one has four Net-Console licenses, he/she can usethem for only four Net-Console connections, or for two Net-Console and two AdvancedTSP connections, or for four Advanced TSP connections, at the same time. As aresult, sum of number of Net-Console and Advanced TSP connections that can bemade with the Net-Console Server can not exceed number of licenses. (DS seriesCPU software must be Z_ABA or better in order to have Advanced TSP working.)Advanced TSP makes a connection with the PABX by establishing a TCP/IPconnection with the Net-Console Server. In order to run it, one must install Net-Console Server program before the installation of the Advanced TSP. Follow the stepsbelow in order to install the Advanced TSP successfully:

28
• Insert the setup CD to the CD-ROM of the PC on which the Net-Consoleprogram will be setup. Auto run will start the setup program automatically, if it isnot disabled on the PC.
• Select the language of the program and the PABX type. Click ‘Ok’ to continue.
• To setup the Advanced TSP, click "Advanced TAPI Service Provider" line or theicon.
• The setup program asks for your confirmation to setup the program. Click ‘Yes’to continue.
• Setup program copies the file(s) necessary for the language you have selectedto the system, and shows a configuration window. If you installed the AdvancedTSP before, and it's being used by a TAPI compatible program, you must closethat program; otherwise setup program cannot copy the file(s) necessary to thesystem.
• If you are installing the Advanced TSP for the first time, the configurationwindow will come up as blank, i.e. no configuration parameter is entered. Firstyou should install a line, by pressing the "Add" button. TAPI compatibleprograms usually presents you a list of TAPI service providers installed on yoursystem to select a line though which the phone calls will be made. "Name"parameter is the name of the line of our Advanced TSP that will be listed in thislist. Enter the address (name or the IP address) of the Net-Console Server as"Server Address". "Server Base Port No" parameter is given for the caseswhere the 25000th TCP port is in use on server PC. In such cases another TCPport can be given, then the same adjustment must be made for Net-ConsoleServer, otherwise programs cannot talk to each other. Unless such a problemexists, you should not make any change on this value, and leave it as 25000.Enter your extension number for "Client Extension Number" parameter, andselect type of your telephone for "Client Telephone Type" parameter.

29
• If the Advanced TSP was installed before, setup program copies newAdvanced TSP file(s) to your system, and brings up existing TSP configurationsettings on configuration window. So, you can only press ‘OK’ button (if yourprevious settings are correct) to upgrade TSP file(s).
After the TSP is installed, if also Net-Console is installed on your system, you canmake phone calls from Net-Console or Outlook at the same time for example. If youwant you can make call control using Net-Console, for the calls you started fromOutlook. However, to run both Net-Console and Advanced TSP at the same time, onemust have two licenses, one for each.

30
INSTALLATION STEPS FOR TAPI SERVICEPROVIDER (TSP)TAPI Service Provider (TSP) can be installed and used without any license for MS(except MS26S) and DS series systems. It enables TAPI compatible programs (likeOutlook, Outlook Express, Phone Dialer) to make phone calls by using that driver.
TSP makes a connection with the PABX by establishing a TCP/IP connection with theNet-Console Server. In order to run it, one must install Net-Console Server programbefore the installation of the TSP. The installation steps for TSP are as below:
• Insert the setup CD to the CD-ROM of the PC on which the Net-Consoleprogram will be setup. Auto run will start the setup program automatically, if it isnot disabled on the PC.
• Select the language of the program and the PABX type. Click ‘OK’ to continue.
• To setup the TSP, click "TAPI Service Provider" line or the icon.
• The setup program asks for your confirmation to setup the program. Click ‘Yes’to continue.
• Setup program copies the file(s) necessary for the language you have selectedto the system, and shows a configuration window. If you installed the TSPbefore, and it's being used by a TAPI compatible program, you must close thatprogram; otherwise setup program cannot copy the file(s) necessary to thesystem.
• If you are installing the TSP for the first time, the configuration window willcome up as blank, i.e. no configuration parameter is entered. First you shouldinstall a line, by pressing the "Add" button. TAPI compatible programs usuallypresents you a list of TAPI service providers installed on your system to selecta line though which the phone calls will be made. "Name" parameter is thename of the line of our TSP that will be listed in this list. Enter the address(name or the IP address) of the Net-Console Server as "Server Address"."Server Base Port No" parameter is given for the cases where the 25000th TCPport is in use on server PC. In such cases where another TCP port is given,then the same adjustment must be made for Net-Console Server, otherwiseprograms cannot talk to each other. Unless such a problem exists, this valuemust be kept as 25000. Enter your extension number for "Client ExtensionNumber" parameter, and select type of your telephone for "Client TelephoneType" parameter.

31
• If the TSP was installed before, setup program copies new TSP file(s) to yoursystem, and brings up existing TSP configuration settings on configurationwindow so that you can only press "OK" button (if your previous settings arecorrect) to upgrade TSP file(s).
After the TSP is installed, if also Net-Console is installed on your system, you canmake phone calls using different programs. For example: You can make phone callsfrom Net-Console or Outlook at the same time for example; or, you can make callcontrol using Net-Console, for the calls you started from Outlook.
32
UNINSTALLING THE PROGRAMSThe Net-Console Server, Net-Console and Net-CM programs can be uninstalledthrough the computers they have been installed to. For each installed program, thereare icons in each program folder in Start menu to uninstall the program
(Like Start > Program Files > Karel > Net-CM > Net-CM Uninstall,
Start > Program Files > Karel > Net-Console > Net-Console Uninstall,
Start > Program Files > Karel > NCServer48 > NCServer48 Uninstall,
Start > Program Files > Karel > System Administrator > System AdministratorUninstall)
Alternatively, the programs can be uninstalled through “Control Panel” > “Add/RemovePrograms”, by choosing from the list of installed programs (like Karel Net-Console,Karel Net-CM, Karel NCServer48.)
Uninstall operation of each program is done upon confirmation of the user. As long asthe user does not confirm, the programs are not uninstalled from the system. If youconfirm an uninstall operation operation, the system will display a notification such as:“Program … has been uninstalled from your system.” after the operation is completed.
For all the programs, only the files copied during the installation will be uninstalledduring the uninstall operation. Since the files created later will not be deleted, theprogram folders may not be cleaned up completely. If such files still exist following theuninstall operation, they may be deleted from the relevant folders by using theWindows Explorer. However, the folders containing the program files must not bedeleted to uninstall the programs. Primarily one of the two methods mentioned aboveshould be used to uninstall the programs and then the remaining files should bedeleted separately (upon wish).
The uninstall operation procedure of the Net-Console program is a little bit different. Ifyou are a normal user, the Net-Console program will ask you whether you want tokeep your personal files during the uninstall operation: “Do you want to save data files(Contacts, Notes, etc.)?” If you will re-install the program and use the sameinformation, click the “OK” button for that information not to be deleted, or all thepersonal data will be deleted together with the program files. If you are the Admin theNet-Console program will ask you whether you want to keep your personal files duringthe uninstall operation. If you will re-install the program and use the same information,click the “OK” button for that information not to be deleted, or all the personal data willbe deleted together with the program files. Moreover, the system will display a warningmessage: “Delete shared files? Deleting these files can affect other users.” If you willnot use that data for a future installation, you may want it to be deleted. In this case, alluser accounts and the public phone directory will have to be created again.

33
APPENDIXCOMMAND-LINE PARAMETERS
COMMAND LINE PARAMETERS FOR NET-CM
Following parameters can be entered manually at the end of the “Target” line on theproperties of Net-CM shortcut. (Like, C:\Program Files\KAREL\Net-CM\cm.exe /K).Command-line parameters can be written within the desired combination or order andby using capital or small letters.
• While the call records are transferred from the “CALL” file to the “CALL.DTA” mainfile, at the same time all these call records can be saved to the “RECORDS” textfile with the same format by entering /K parameter.
• In order to format the call charging information on Net-CM program the number ofthe decimal part after the character “.” can be defined by entering /DAD:Xparameter. Maximum 6 digits can be defined for the value of X. The default valueis 2 digits.
• By entering /DEBUG parameter, all required log files, such as the messagingbetween Net-CM and server or LAN adaptor about their connection or interruption,can be saved into the “debug.log” file. When required, the technical person cananalyze this log file to observe the faulty cases.
• The duration for the Net-CM to start to communicate with the server can bedetermined by entering /ONLINE:x parameter. X= The connection duration forNet-CM in seconds.
• With the /PERSIAN parameter, Net-CM program can be run with PersianCalendar.
COMMAND-LINE PARAMETERS FOR NET-CONSOLE
Following parameters can be entered manually at the end of the “Target” line on theproperties of Net-Console Server shortcut. (Like: C:\Program Files\KAREL\NCServer48\ncserver48.exe /np). Command-line parameters can be written within thedesired combination or order and by using capital or small letters.
• Through /L parameter, server can log all serial port traffic as an “encrypted” on the‘nks’ file. To analyze this log file NK Log Converter program need to be used.
• /USB:XXX is a necessary command if Karel USB Serial Converter is used. Thus,the occuring delays during the USB-serial conversion can be tolerated, and propercommunication with safety lock can be provided. The value ‘XXX’ in command is

34
optional and indicates the tolerable delay. Unless any value is entered, for theinitial value of the "XXX" duration is defined as 50 milliseconds.
• /NP is a necessary command if Karel USB Serial Converter and programs that donot require licenses(System Administrator, TAPI Service Provider etc.) will beused.
• By using the command ‘/RCM’, call logs can be taken by the server even if theNet-CM is not working; then, these logs can be sent to the Net-CM program, afterthe Net-CM is connected

35
PHONE DIRECTORIES FOR NET-CONSOLE ANDNET CM
TRANSFER OF PHONE DIRECTORIES FROM NET-CM TONET-CONSOLE
A separate application which comes with the Net-CM software in Utils folder is used forthis purpose.
In Utils folder click NetCM2NetKonsol exe file.
Here you select the PABX type and the phone directory file as shown in below andclick continue.
Then you get the message which informs you the directory has been successfullytransferred. The critical point here is that you can transfer this phone directory fromNet-CM only to Public Directory on the Net-Console. After getting this message click‘Close’ to end the process.
36
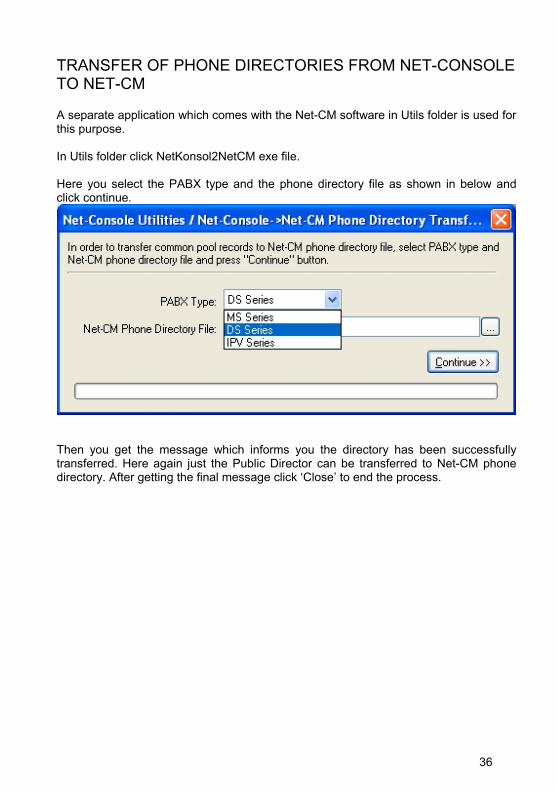
TRANSFER OF PHONE DIRECTORIES FROM NET-CONSOLETO NET-CM
A separate application which comes with the Net-CM software in Utils folder is used forthis purpose.
In Utils folder click NetKonsol2NetCM exe file.
Here you select the PABX type and the phone directory file as shown in below andclick continue.
Then you get the message which informs you the directory has been successfullytransferred. Here again just the Public Director can be transferred to Net-CM phonedirectory. After getting the final message click ‘Close’ to end the process.

08
/20
10
INSTALLATION GUIDE
NET-CONSOLE SERVER PROGRAM