needles: the cutting edge - s3. : the cutting edge 2016 by brian skellie as it passes through, the...
TRANSCRIPT

Needles: The cutting edge 2016 by Brian Skellie www.brnskll.com
APP Disclaimer All piercing technique classes presented at the Association of Professional Piercers Conference are taught from the point of view of the individual instructors. The APP does not sanction a particular piercing technique. The views presented by piercing technique instructors are the instructor’s opinions alone, and not those of the APP.
Techniques Disclaimer [Thanks OSHA compliance experts!] ● You should secure the needle before transferring jewelry and/or disposing of the needle. ● You should dispose of the dirty needle as soon as you can. ● You should not hold the dirty needle any longer than you have to.
Let’s think about how the cutting surfaces of a needle work
A needle is a tool. And like any tool, it has a working part and a handle. The bevel is the working part. It travels through the skin on that edge. The rest of the needle is for us to hold it. The bevel is a simple machine: a wedge. Made into a blade, it moves the tip of the needle in the direction of the angle it is ground to. Visualizing the bevel centered on the line that passes straight through →> is close to having it at 90° to the angle of the entry and exit points. This can help with accuracy, especially for cartilage. One of the biggest faults of the hypodermic piercing needle is that it pierces off center. You can compensate by centering the A of the bevel in line with the piercing, instead of centering the shaft of the needle. This way you don't overcompensate and create a U shaped cut with a flap, and you can control the displacement in all directions pretty equally on your entry and exit, reducing drag along the way.
Not like push pins Aside: It is still weird to me that we use punches (inconvenient and
messy) and hypos (off center) for piercing. I did all of my original piercings with custom made solid needles. They were essentially very sharp polished tapered skewers with the same centered distribution as a push pin or sewing needle. Though very accurate with almost no distortion from the center point, they required more pressure for penetrating tougher tissues.
Point configurations ASTM F1840 X1.1 Because there is a clinical need for a variety of surgical suture needles for surgical procedures, they are manufactured in various configurations and from various materials. For practical purposes these devices supplied by different manufacturers necessitate a defined system of terms.
Needles: The cutting edge 2016 by Brian Skellie www.brnskll.com
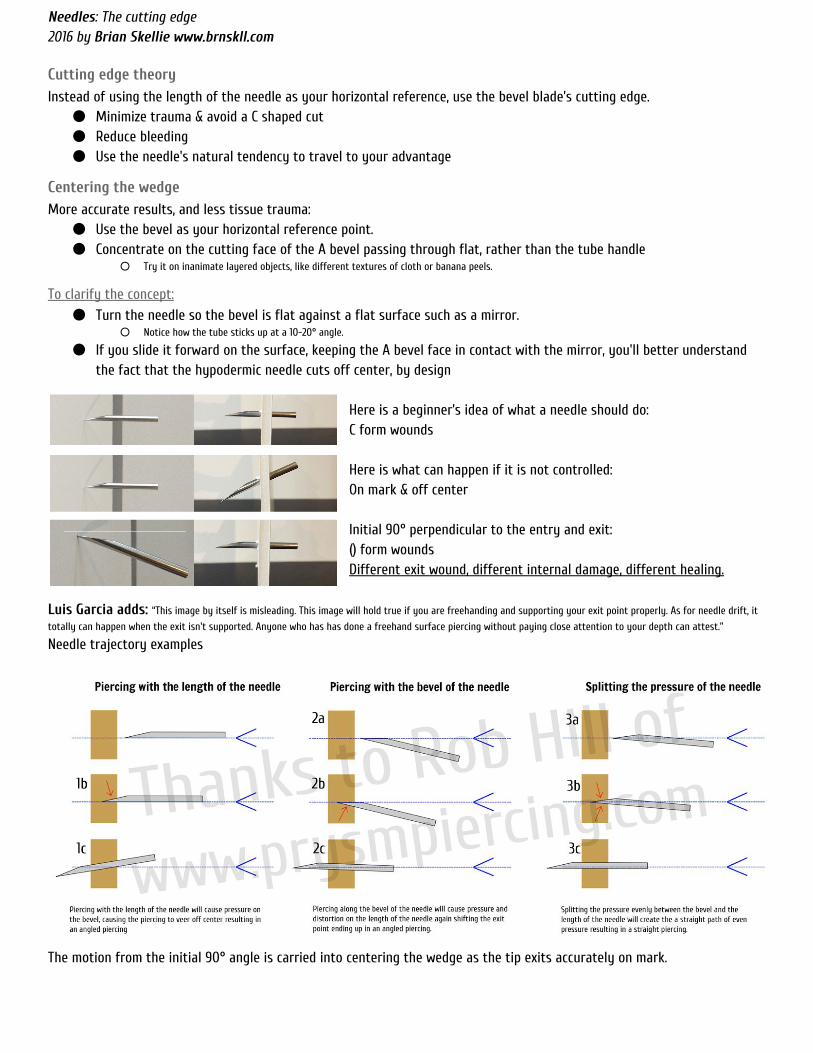
Cutting edge theory Instead of using the length of the needle as your horizontal reference, use the bevel blade’s cutting edge.
● Minimize trauma & avoid a C shaped cut ● Reduce bleeding ● Use the needle's natural tendency to travel to your advantage
Centering the wedge More accurate results, and less tissue trauma:
● Use the bevel as your horizontal reference point. ● Concentrate on the cutting face of the A bevel passing through flat, rather than the tube handle
○ Try it on inanimate layered objects, like different textures of cloth or banana peels.
To clarify the concept:
● Turn the needle so the bevel is flat against a flat surface such as a mirror. ○ Notice how the tube sticks up at a 10-20° angle.
● If you slide it forward on the surface, keeping the A bevel face in contact with the mirror, you'll better understand the fact that the hypodermic needle cuts off center, by design
Here is a beginner’s idea of what a needle should do: C form wounds Here is what can happen if it is not controlled: On mark & off center Initial 90° perpendicular to the entry and exit: () form wounds Different exit wound, different internal damage, different healing.
Luis Garcia adds: “This image by itself is misleading. This image will hold true if you are freehanding and supporting your exit point properly. As for needle drift, it
totally can happen when the exit isn't supported. Anyone who has has done a freehand surface piercing without paying close attention to your depth can attest.”
Needle trajectory examples
The motion from the initial 90° angle is carried into centering the wedge as the tip exits accurately on mark.

Needles: The cutting edge 2016 by Brian Skellie www.brnskll.com
As it passes through, the tissue is pulled over the smooth solid outer wall of the needle, taking pressure off the opening & cutting edges. Focus more on pulling the tissue away from the exit point to distribute the forces evenly, rather than pushing the needle through. "Plunger" style piercing with the finger pushing from the back of the needle tends to result in less control over the exit and in more drag and internal damage. Ron Garza adds: “doing a piercing like you first get the point through the skin , hitting your marks, then slide the skin over the rest of the bevel - not slide the
needle in sideways, which will result in a crooked piercing. This does work and using this method keeps it from having that piece of skin that pops out after when you go in and slam the needle like the first diagram. Works best with bevel down as well - which is another thing people still don't agree with either, but remember there isn't one way to do anything.. including making people shiny.”
Wound shaping: It is possible to create a | or () shaped slit instead of a C or U shaped flap. The angle of how you aim influences this:
1. Slow down 2. Keep entry and exit perpendicular 3. Make a tiny incision and stretch it 4. Center the wedge
Minimize the flap of tissue that could result in a scarred bump while healing Try on banana peels, paper or jeans until you get the hang of spreading the tissue evenly without cutting. Jef Saunders adds: “Essentially, by doing this technique you've turned your needle into a flat scalpel. You will genuinely feel the difference. You've probably done
this when you do industrials, that's where I first grocked it. I was right where you are, and then I had that "a-ha" moment.”
Accuracy: Won’t holding the needle perfectly straight
execute a perfect piercing?
You can still achieve a straight piercing that way, but with a C shaped cut, additional drag, trauma & surfaces to heal. Holding the needle as demonstrated in this photo could also result in a piercing that is high on the back. It's not as much about piercing straighter, unless that is a problem for the person, as it is about reducing tissue trauma, bleeding, & skin flaps which is most noticed with thicker gauge needles.
Motion & dilation Test medium braced in piercing forceps / Control without clamps
Resulting deformations: Shaped exit → O distribution, Straight exit → C flap

Needles: The cutting edge 2016 by Brian Skellie www.brnskll.com
Typical curvatures: Commonly used curves for blade needles.
S curve & other compound curvatures not shown.
Penetration testing described by: ASTM F3014
Example of Rotational axis: Hinged plastic surgeon’s ear piercer by Snowden-Pencer Bevel orientation and Y support should make () shape.
Tragus curvature Back to front: rotational force with thumb and forefinger, roll and pitch with ring finger.
Example of straight needle piercing device commercial “needle piercer” Bevel orientation would cause a C flap.
Tension and release “A state of tension exists naturally in skin. For instance, wounded skin will gape, becoming elliptical instead of round.” — Langer's Lines: To Use or Not to Use; Wilhelmi, Bradon J.; Blackwell, Steven J.; Phillips, Linda G.; Plastic & Reconstructive Surgery. 104(1):208-214, July 1999
Dividing lines
● Skin tension or cleavage lines ● Folds visible when pinching skin
“Thirty-six differently named guidelines have developed as surgeons have searched for an ideal guide for elective incisions. Many surgeons prefer Langer's lines. These lines were developed by Karl Langer, an anatomy professor, from cadavers in rigor mortis. However, Kraissl preferred lines oriented perpendicular to the action of the underlying muscles. Later, Borges described relaxed skin tension lines, which follow furrows formed when the skin is relaxed and are produced by pinching the skin. However, these are only guidelines; there are many contributors to the camouflaging of scars, including wrinkle and contour lines. Borges's and Kraissl's lines (not Langer's) may be the best guides for elective incisions of the face and body, respectively.” — Maxillofacial Reconstruction of Ballistic Injuries
http://www.intechopen.com/books/a-textbook-of-advanced-oral-and-maxillofacial-surgery/maxillofacial-reconstruction-of-ballistic-injuries

Needles: The cutting edge 2016 by Brian Skellie www.brnskll.com
Let’s study a little histology
Summary: 1. Minimizing damage to the perichondrium 2. Epithelial strip in wound 3. Cartilage fragments and tears 4. Subperichondrial abscess if pocket is formed
Ear piercing techniques and their effect on cartilage, a histologic study M.P.van Wijka,*, J.A.Kummerb, M.Kona a. department of plastic surgery, university medical center Utrecht, Heidelberglaan 100, 3584CX Utrecht,The Netherlands b. department of pathology, university medical center Utrecht, Heidelberglaan 100, 3584CX Utrecht,The Netherlands Received 12 October 2006; accepted 18 January 2007
Background: The popularity of high ear piercing has led to an increased incidence of perichondritis. Damage to the relatively avascular cartilage will make the ear
prone to infection. The literature suggests that a piercing gun, mainly used by jewellers to pierce the lobule, may give excessive cartilaginous damage. Therefore some authors favour the piercing needle, as used in piercing studios. But until now, no comparative histological studies have been performed.
Example of injury patterns within: (slide through hole, x50, light microscopy, hematoxylin & eosin staining). Figure 6 (a) mainly perichondrial detachment (small arrows) ; (b) mainly fragmentation of cartilage (small arrows). Big arrows: direction of piercing; from anterior to posterior
Conclusions: In contradiction with assumptions in the literature, all piercing methods [measured] give the same extent of damage to cartilage and perichondrium.
● Each method is expected to have the same risk for perichondritis ● Focus should be on other factors such as hygiene and after-care
Hypothesis for future test: Proposed needle method ● Needle should be more tapered, less cutting ● No plastic sheath or hub: blade instead of catheter ● Same size or slightly larger than jewelry ● Center and distribute the forces at the point ● Adequate exit support to prevent “tenting”