navision attain essentials
TRANSCRIPT
Navision Attain Essentials


Navision Attain Essentials

NOTICE
This material is for informational purposes only. Navision a/s disclaims all warranties and conditions with regard to use of the material for other purposes. Navision a/s shall not, at any time, be liable for any special, direct, indirect or consequential damages, whether in an action of contract, negligence or other action arising out of or in connection with the use or performance of the material. This material is subject to change without notice.
According to Danish copyright legislation it is against the law to reproduce any part of this material in any form or by any means without the permission of Navision a/s.
The software described is supplied under license and must be used and copied in accordance with the enclosed license terms and conditions.
COPYRIGHT NOTICE
Copyright 2002 Navision a/s, Frydenlunds Allé 6, 2950 Vedbaek, Denmark. All rights reserved.
TRADEMARKS
The trademarks referenced herein and marked with either TM or are either trademarks or registered trademarks of Navision a/s or Navision Development a/s. However, the trademarks Microsoft, Windows, Windows NT, SQL Server and BackOffice are either registered trademarks or trademarks of Microsoft Corporation in the United States and/or other countries.
Any rights not expressly granted herein are reserved.
The trademarks of Navision a/s and Navision Development a/s are listed on this Web site: http://trademarks.navision.com
The Arial font was used.
Published by Navision a/s.
Published in Denmark 2002.
DocID: AT-360-SST-006-v01.00-W1W1

TABLE OF CONTENTS
CHAPTER 1.
INTRODUCTION 1-1
1.1 The Navision Attain Essentials Course 1-2
1.2 Installing Navision Attain 1-6
1.3 Database Structure and System Requirements 1-7
1.4 Application-Wide Functionality 1-14
1.5 Review Questions 1-29
CHAPTER 2.
GENERAL LEDGER 2-1
2.1 Overview 2-2
2.2 General Ledger Setup 2-7
2.3 The Chart of Accounts 2-30
2.4 Posting Groups 2-39
2.5 Dimensions 2-61
2.6 Journals & Batches 2-71
2.7 Bank Accounts 2-81
2.8 Financial Reports 2-86
2.9 Budgets 2-93
2.10 Review Questions 2-95
CHAPTER 3.

TABLE OF CONTENTS
SALES & RECEIVABLES 3-1
3.1 Overview & Setup 3-2
3.2 Sales Quotes 3-15
3.3 Creating Sales Orders 3-19
3.4 Posting Sales Orders 3-27
3.5 Creating and Posting Sales Invoices 3-31
3.6 The Sales Posting Process 3-33
3.7 Credit Memos 3-34
3.8 Receivables 3-40
3.9 Periodic Activities 3-46
3.10 Review Questions 3-49
CHAPTER 4.
PURCHASES & PAYABLES 4-1
4.1 Overview & Setup 4-2
4.2 Purchase Quotes & Purchase Orders 4-13
4.3 Purchase Invoices 4-23
4.4 The Purchase Posting Process 4-25
4.5 Credit memos 4-26
4.6 Payment Journals and Check Writing 4-30
4.7 Review Questions 4-39
CHAPTER 5.
INVENTORY 5-1
5.1 Basic Inventory Setup 5-2
5.2 The Item Card 5-13
5.3 Bill of Materials 5-16
5.4 Item Variants and Stockkeeping Units (SKUs) 5-21
5.5 Review Questions 5-24
Appendix A.
DAILY SCHEDULE II
Appendix B.
SYSTEM REQUIREMENTS II
Appendix C.
GRANULE LIST FOR NAVISION ATTAIN 3.60 II
Appendix D.
CHAPTER 2 GENERAL LEDGER II
CHAPTER 3 SALES AND RECEIVABLES IX
CHAPTER 4 PURCHASES AND PAYABLES XVII
CHAPTER 5 INVENTORY XXXII
Appendix E.
CHAPTER 2 GENERAL LEDGER II
CHAPTER 3 SALES AND RECEIVABLES III
CHAPTER 4 PURCHASES AND PAYABLES V
Index


PREFACE
This course is designed as self-study for students who wish to take the Navision Attain Essentials Test. Students who want to take further specialist training and certification in the Navision Curriculum must take the Navision Attain Essentials Test.


Chapter 1.
Introduction
In this chapter you will learn about:
1.1 The Navision Attain Essentials Course
1.2 Installing Navision Attain
1.3 Database Structure and System Requirements
1.4 Application-Wide Functionality
1.5 Review Questions
1-2 Navision Attain Essentials
1.1 THE NAVISION ATTAIN ESSENTIALS COURSE
This Navision Attain Essentials Course is primarily a self–study course designed to introduce you the product. However, it may be used as a basis for an instructor-led training course. It provides you with an introduction to the core functionality of Navision Attain. It also provides you with the basic knowledge needed to prepare for tests leading to Navision Certification. It should be noted that we always recommend gaining some experience with the product before undertaking the tests.
Course organization
The course consists of the following chapters:
Introduction ·
·
·
·
·
·
·
·
·
·
General Ledger
Sales and Receivables
Purchases and Payables
Inventory
The chapter consists of instructional text, which introduces an area of the program, examples of how it works, and exercises, which allow you to practice. At the end of each chapter is a set of review questions to aid you in preparing for the test leading to certification.
In addition to the course chapters, a number of appendices offer you additional guidance and information:
Appendix A: Course Schedule
Appendix B: System Requirements
Appendix C: Granules
Appendix D: Exercise Solutions
Appendix E: Class Project
Target Audience
The course is primarily aimed at new NSC employees who are not familiar with the Navision application. This includes both Navision Attain and the previous product, Navision Financials. After completing the course,
Introduction 1-3
employees will have obtained the knowledge to demonstrate the basic functionality of Navision Attain and/or go on to further training in the Navision Curriculum.
Course Prerequisites
None
However, it is recommended that participants have a user-level knowledge of Windows, MS Office Products and MS Internet Explorer.
Course Objectives
Teach students the skills required for demonstrating the concept and use of Navision Attain
·
·
·
Prepare students for taking further courses in the Navision Curriculum
Prepare students for the Navision Attain Essentials test
Course Overview
Before you begin the course, you must install the program on your computer. The next section of this chapter tells you how to do it. This chapter also briefly outlines the system requirements and the GUI functionality common throughout the whole application.
Chapter 2, General Ledger, shows some of the basics of setting up company information in the program. This includes the creation of posting groups, the chart of accounts and how to set up the Value-Added Tax (VAT) accounting in the program. Students also learn about the concept of Dimensions and are introduced to journals, financial reporting and budgeting.
Chapter 3, Sales and Receivables, shows how to process sales transactions with your customers. In addition, the recording of payment receipts, and credit memos for these Sales also is outlined.
Chapter 4, Purchases and Payables, is similar in content to chapter 3. This is due to the fact that the Purchases and Payables functionality mirrors the Sales and Receivables functionality to a large extent. In the chapter you will learn how to process purchase transactions with your vendors. In addition, you will learn how the program can suggest payments of vendor orders as well as how to make credit memos for purchases.

1-4 Navision Attain Essentials
Chapter 5, Inventory, provides you with an introduction to the setup of the inventory system as well as the basic item card. The Bill of Materials item is also described in this chapter. You will also learn about how the program can handle item variants.
The chapters of this course contain the following elements:
Concepts—which explain the business processes that can be managed using Navision Attain.
·
·
·
·
Examples—which give practical step-by-step descriptions of how to use the application.
Exercises—which give the learner the opportunity to practice. Solutions are provided in Appendix D.
Class Projects—which are longer problem-solving exercises where you find your own solution, based on what you have learned.
The material contains the following typographic conventions:
FieldName is used for names of fields, windows and tables.
InputText is used for text you must select or enter.
Suggested Course Duration
The course is primarily designed as a self-paced, self-study course. We recommend that the course is undertaken over a period of 3 days. You can find a suggested schedule in appendix A.
System Dates used in the Course Material
The dates in the course material are in the American format. In order to avoid confusion when reading the material and following the exercises, it is a good idea to change the date format in Windows before starting the training session.
Demonstration Data
All exercises are based on a fictitious company, CRONUS International Ltd. The demonstration data required for the exercises is sometimes set up only in one location. To make sure that you have access to the relevant data, you must log on using the appropriate location as the log on name.

Introduction 1-5
Further Information
You can learn more about Navision Attain in the following courses in the Navision Curriculum:
Financial Management ·
·
·
·
·
·
·
·
Resources and Jobs
Fixed Assets
Inventory Costing
Distribution
Manufacturing
Service Management
Relationship Management

1-6 Navision Attain Essentials
1.2 INSTALLING NAVISION ATTAIN
Before beginning the course, you must install Navision Attain on your computer.
The installation procedure is described below. The browser will automatically load the install file when you insert the CD. If the browser does not load the install file, you can open it manually:
1 In the Start menu, click Run...
2 In the Run window, in the Open: field, enter x:\startcd.exe (replace x by the drive letter of your CD-ROM drive) and click OK.
This is the installation procedure:
1 Insert the CD-ROM. The browser now displays the different options that you have.
2 Click Client.
3 Click Navision Attain Client. The installation now begins.
4 The Navision Attain W1 Installation Wizard window welcomes you to the setup wizard. Click Next>.
5 In the User Name: and Organization: fields enter your customer information. Click Next>.
6 Click All users or Only for me fields to select either of them. Click Next>.
Note
Selecting All users gives access to basic company functionality.
7 Click the Typical field to select the setup type and click Next>.
8 Click Install to indicate that you are ready to install the program.
The installation process begins.
9 Click Finish to complete the installation of Navision Attain.

Introduction 1-7
1.3 DATABASE STRUCTURE AND SYSTEM REQUIREMENTS
This section is only a very brief and mostly conceptual overview of the database functionality and system requirements for Navision Attain. These topics will be covered in more depth in the following Installation Manuals:
Installation & System Management: Navision Attain Database Server ·
·
·
·
·
·
·
·
·
Installation & System Management: Microsoft SQL Server Option
The Database
Application Objects
The database file contains all of the information that is specific to a Navision Attain installation. The programs and company data are stored in the database file. Unlike traditional accounting products where the programs and data are stored in separate physical files, Navision Attain stores this information in one physical file. The one file for Navision Attain contains application objects and data. Application objects can be thought of as the traditional accounting system physical files each with its own special purpose. There are five types of objects in the database. Application objects are usually referred to by their object number.
Tables- Used to store data structure definitions including triggers and routines that are used when entering data.
Forms - Used to create windows and menus.
Reports Used - to create reports and batch jobs.
Dataports - Used to store Import and Export routines.
Codeunits - Used to store program routines.
Company Data - A database can contain more than one company’s data. Companies in the same database share the same application objects. This means if you change an application object, the change will be reflected in all companies in the database.
Data Common to All Companies - User IDs, security permissions, client setup information, and report menus are common data Items. This information is backed up only when the entire database is backed up or a customized backup is performed.

1-8 Navision Attain Essentials
Note:
In the case where you wish to find some more detailed information in relation to specific field or form, you are encouraged to use the Online Help. To do this, press F1 in the field or form you wish to know more about.
Outside the Database
Development Environment and Other Executables
The development environment (C/SIDE) includes the executables you see in the program subdirectory on the hard disk. C/SIDE consists of the code needed to interpret the application objects, development system tools (editors, debugger, etc.), The data base management system (DBMS) and the operating system interface. Also you will find files for licensing, help messages, error messages, and syntax messages.
Operating System
Clients using different operating systems can access any Navision database. Application objects do not need to be changed across platforms because the development environment's operating system interface handles all possibilities.
SALES NOTE:
With Navision Attain you can choose between the Navision Attain Database Server and the Microsoft SQL Server Option. Functionality in the databases allows you to do endless drill-downs. As a result the program has features that are not available in other software packages.
Overview of Database Design
A database system is basically a computerized record keeping system. You can think of it as an electronic filing cabinet.
In order for a database, or a filing cabinet, to be useful you must be able to:
Add new empty files ·
·
·
Insert new data into existing files
Retrieve data from existing files

Introduction 1-9
Update data in existing files ·
·
·
Delete data from existing files
Delete existing files
In Navision Attain, the data in the database is both integrated and shared.
By integrated we mean that the database can be thought of as a unification of several otherwise distinct data files with any redundancy among those files wholly or partly eliminated. For example, a given database might contain both an employee file giving employee names, addresses, departments, salaries, etc.; and an enrollment file representing the enrollment of employees in training courses. Suppose that in order to administer the course it is necessary to know the department for each enrolled student. Then there’s clearly no need to include that information redundantly in the enrollment file because it can always be discovered by referring to the employee file instead.
By shared we mean that the individual pieces of data in the database can be shared among several different users in the sense that each of those users can have access to the same piece of data and different users can use it for different purposes. In fact, different users can even be accessing the same piece of data at the same time. Such sharing is partly a consequence of the fact that the database is integrated.
In the employee enrollment example, users in the personnel department and users in the education department would typically share the department information in the employee file. And those two types of users would typically use that information for different purposes.
Another consequence of the fact that the database is integrated is that any given user would typically be concerned only with some small portion of the total database. In other words, different users would perceive a given database in a variety of different ways. In fact even when two users share the same portion of the database their views of the database might differ considerably at a detailed level.
Thus, the database is both integrated and shared. It can be considered integrated by its use of the relational database model and also can be considered shared by the fact that multiple users can share the data at the same time and actually access the same pieces of information at the same time.
1-10 Navision Attain Essentials
The Relational Model
Our program is based on the relational model, which is the most efficient method of storing and retrieving data. The reason being that the relational model is designed to avoid duplication of data. Duplication of data slows you down. It requires you to maintain data in several different places. And also requires you to use up space that could be otherwise used.
The database will use all of the space that has been allocated to it. Whenever new data is recorded, existing data modified, or a posting occurs, the program creates a new version of the record while still maintaining the old version. This results in these unique features:
Optimistic concurrency ·
·
·
Database consistency (transactions)
SIFT technology
Optimistic Concurrency
Version-based database technology eliminates the need for record locking. Instead, the program uses optimistic concurrency. This benefits you as follows:
Reporting While Entering Data
You can run reports or backups at the same time data is being entered into the system, using the same tables. This is possible because the system, in effect, takes a "snapshot" of a consistent (balanced) set of data in the database at the moment a report or backup is started. While new versions are being created for other tasks, the program will continue to use that version for the original task, avoiding inconsistent reports or backups, and avoiding collisions between the report or backup job and users processing information.

Introduction 1-11
SUPPORT NOTE
With all great features there are some limitations. There is a possibility that the version being used for a report or backup may be overwritten prior to the completion of the task. This occurs because the program places a higher priority on data entry than on reports or backups. Therefore, when faced with either stopping new data entry or interrupting a report or backup, the program will choose new data entry. This situation can only occur when the remaining free database space is relatively small, in that there is not enough space in the database to create a new version and the number of transactions being recorded is relatively high. If this occurs, the user will get a message that says the version in use has been lost. The user must restart the report or task.
Concurrent Access
As discussed with reports and backups, Navision will allow two users to access the same information (record) at the same time. However, unlike a reporting situation, sometimes two users will access the same record and attempt to edit it. When this occurs, the user who completes the task and exits the record first will have his or her changes written. The second user will receive a message when attempting to exit the record that the changes need to be re-entered.
SALES NOTE
With Optimistic Concurrency, users are not stopped from doing their job because someone else is working with the same data. This means a more productive staff and fewer complaints from users about the system being "tied up."

1-12 Navision Attain Essentials
Optimistic concurrency has the clear advantage of allowing access to information that is in use. It is called "optimistic" because this principle assumes that data collisions of this nature are rare. A record-locking system is considered pessimistic, because it assumes that users will always change information and therefore locks the second user out without even a view.
Database Consistency (Transactions)
The commit-rollback feature eliminates out-of-balance situations and reduces the time required for recovery from power outages or other catastrophic situations. The version management feature ensures that each user task works with a consistent set of data; for example, the trial balance is always in balance. With commit rollback, the system can always roll back to the original unposted version in the case of a mid-posting power outage, completely avoiding any out of balance situations or corrupted data errors you might receive in other systems.
SUPPORT NOTES:
The version-based feature also applies to restoring backups. If the database does not have enough room to restore the backup, Navision will allow you to increase the database size and then continue with the restore process. It can continue because it is version-based.
Allow 15% free space in the database. As free space lessens, the database will run slower. The administrator must monitor this information.

Introduction 1-13
SIFT (Sum Index Flow Technology)
SIFT is another database technology that gives the program its power. SIFT’s two main benefits are improved query performance and OLAP (On Line Analytical Processing) which allows the end-user to slice and dice information within the system and to retrieve the information that he or she wants. A secondary benefit that SIFT provides is that since all balances in the program are calculated and not stored, master records, such as customer information, do not need to be updated during a posting routine. This results in faster posting processes (another performance gain) and improved optimistic concurrency.
SIFT is implemented using FlowFields, FlowFilters and SumIndexFields, concepts that will be covered in more detail later.
System Requirements
Navision Attain can operate on different platforms and operating systems. The program does have some recommended requirements both for the server and client installations in terms of the following:
Operating System Requirements ·
·
·
·
Processor Requirements
Memory Requirements
Hard Drive Requirements
The minimum and any recommended requirements for Navision Attain can be found in Appendix B for the Course.

1-14 Navision Attain Essentials
1.4 APPLICATION-WIDE FUNCTIONALITY
In this section, you will learn about the application-wide functionality of Navision Attain. In particular, you will learn about getting around in Navision Attain (GUI), Uniform Data Structure (tables), AssistButtons, Navigate and Dimensions.
Getting around in Navision Attain (GUI)
Graphical User Interface
The graphical user interface (GUI) enables you to communicate with the program.
The graphical user interface is intuitive and consistent. It is therefore easy for you to recognize features and find what you are looking for in Navision Attain.
For example, the field names indicate what information should be put in the respective field. As you would expect, you enter the customer’s VAT registration number in the VAT Registration No. field. Another example is the tab names. In the customer card window you find the General tab, which contains general information about the customer, such as the address. The Communication tab contains information such as the customer’s phone and fax number.
The graphical user interface also is comfortable for you to look at and use. Visual design and color selection are key factors. Navision Attain uses gray shades and a simple design with the fewest possible elements on the screen at any given time.
Application Window
In Navision Attain, the application window is always open. It is the place where you perform your daily work.

Introduction 1-15
Navision Attain is designed with bars and buttons to make the entry of data easier and faster. For example, the Toolbar and Status bar in the application window consist of buttons and information that are significant when using the program.
The Title Bar displays the name of the company you are working with.
The Menu Bar contains menus that let you select commands for Navision Attain. The commands consist of editing functions, filters, help and maintenance options. These options can be accessed either by keystrokes or the mouse.
The Toolbar gives quick access to the most frequently used Menu Bar functions, as well as two other functions: the Main Menu and List. The Toolbar can be modified or hidden by using the View, Toolbar menu.
There are two specific button groups that are unique to Navision Attain:
Filter buttons ·
· Browse buttons
The Field Filter, Table Filter, FlowFilter and Show All buttons comprise the Filter button group. You can use field and table filters to have a window
1-16 Navision Attain Essentials
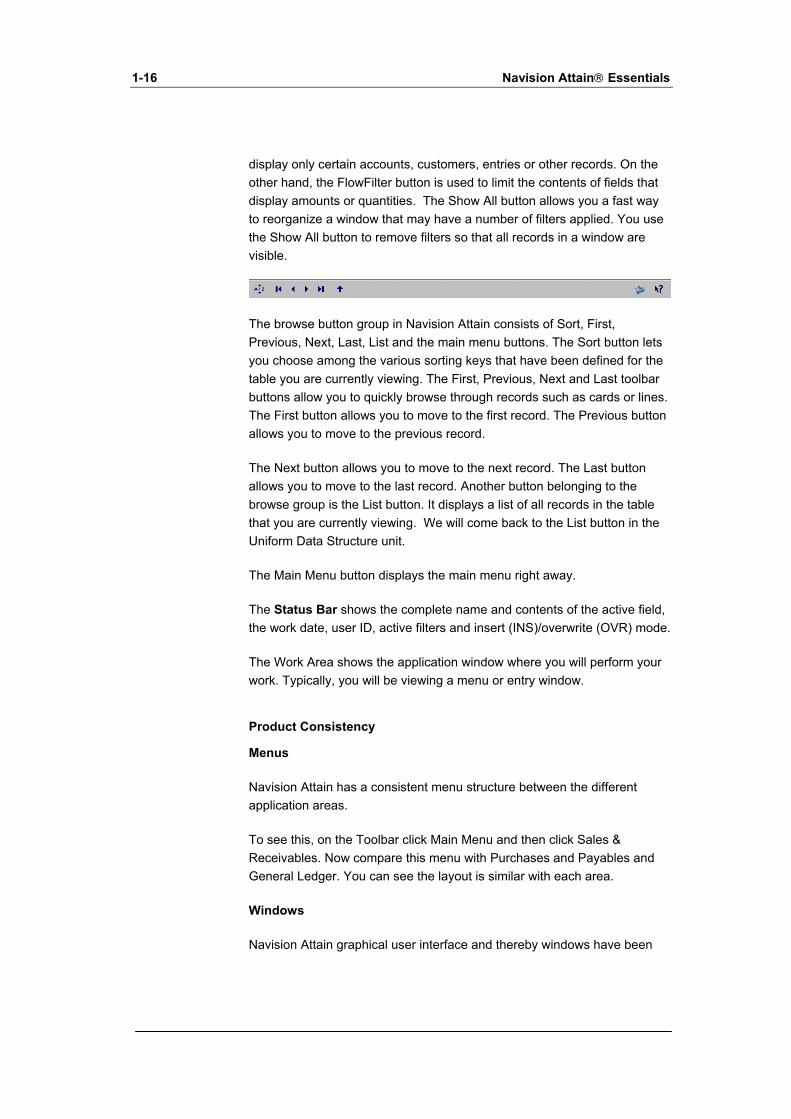
display only certain accounts, customers, entries or other records. On the other hand, the FlowFilter button is used to limit the contents of fields that display amounts or quantities. The Show All button allows you a fast way to reorganize a window that may have a number of filters applied. You use the Show All button to remove filters so that all records in a window are visible.
The browse button group in Navision Attain consists of Sort, First, Previous, Next, Last, List and the main menu buttons. The Sort button lets you choose among the various sorting keys that have been defined for the table you are currently viewing. The First, Previous, Next and Last toolbar buttons allow you to quickly browse through records such as cards or lines. The First button allows you to move to the first record. The Previous button allows you to move to the previous record.
The Next button allows you to move to the next record. The Last button allows you to move to the last record. Another button belonging to the browse group is the List button. It displays a list of all records in the table that you are currently viewing. We will come back to the List button in the Uniform Data Structure unit.
The Main Menu button displays the main menu right away.
The Status Bar shows the complete name and contents of the active field, the work date, user ID, active filters and insert (INS)/overwrite (OVR) mode.
The Work Area shows the application window where you will perform your work. Typically, you will be viewing a menu or entry window.
Product Consistency
Menus
Navision Attain has a consistent menu structure between the different application areas.
To see this, on the Toolbar click Main Menu and then click Sales & Receivables. Now compare this menu with Purchases and Payables and General Ledger. You can see the layout is similar with each area.
Windows
Navision Attain graphical user interface and thereby windows have been

Introduction 1-17
designed to assist users with learning the product. For example, once you learn how to use the Customer Card window, you should be familiar with all other cards in the system: Vendor, Account, Item, Job, and so on.
Click Customers to see the Customer Card window. ·
·
·
·
·
·
·
·
·
·
·
Editing Fields
You can edit a field several ways. At any point before committing the change, pressing Esc will return the original value.
If the value of the field is highlighted, you can simply begin typing and you will type over the existing information.
If the value of the field is highlighted, press F2 and the cursor will be inserted at the beginning of the field. Press F2 twice to move the cursor to the end of the field.
Use the mouse to place the cursor at any location in the field.
Click the General tab and move the cursor to the Name field.
Entering Dates and Times
There are many ways to enter a date in Navision Attain. Entering digits and letters are translated in the following ways:
TWO DIGITS: specifies the day and automatically adds the month and workdate year.
FOUR DIGITS: specifies the day plus month and automatically adds the workdate year.
DAY, MONTH AND LAST TWO DIGITS OF A YEAR: specifies the entire six-digit date
DAY AND WEEK NO.: specifies the day in a specific week of the year and automatically adds the year. For example Mon252 will give the date of Monday in week 25 of the year 2002.
T: specifies today’s date or the computer system date.
W: specifies the predefined work date .
C AND SIX DIGIT DATE: specifies closing date to indicate that an entry is a closing entry.

1-18 Navision Attain Essentials
When entering times, each time unit must contain two digits (for example, 6 o'clock is written 06), and you do not need to write minutes, seconds or AM/PM. You can insert any separator sign you like between the units, but it is not necessary.
Datetime fields – You can also enter a date and time in a single field in some windows in the program. In these fields you should enter the date and time separated by a space. If you only enter a date, the program will automatically add the time that represents midnight at the beginning of that date (12:00:00 AM).
Some examples of how you enter information in the fields can be seen below:
Entry Interpretation
121302 123456 12-13-02 12:34:56
1-12-02 10 01-12-02 10:00:00
1.12.02 5 01-12-02 5:00:00
1.12.02 01-12-02 0:00:00
M Monday of the current week - midnight
T Tuesday of the current week - midnight
W Wednesday of the current week - midnight
Th Thursday of the current week - midnight
F Friday of the current week - midnight
S Saturday of the current week - midnight
Su Sunday of the current week - midnight
Using Filters
You set a filter by specifying criteria for one or for several fields in a table. The program then tests all records and only records that match the criteria pass through the filter. If criteria are specified for several fields at the same time, records must match all criteria to pass through the filter.

Introduction 1-19
Note
Field and table filters are window-dependent. If you to set a filter on a table in a window and then see the same table in a different window, the filter is not in effect there. On the other hand, the filter will remain in effect in the window where you set it until you remove it.
Field Filter - A field filter performs the same function as a table filter. But the field filter sets a filter only on the field that contains the cursor when you choose the function. It is a good idea to check your filters by occasionally using the table filter function to get an overview of all the filters that have been set in a window.
Table Filter - Use the table filter function to filter more than one field at a time.
Flow Filter - A Flow Filter limits the contents of the fields that display amounts or quantities that the program calculates from entries in other tables. By using these filters, you can choose to see entries in the other tables, for example, within a certain date interval or with a particular location code. FlowFilters can be entered in fields that end with the term Filter, such as Date Filter, Global Dimension 1 Filter or Location Filter. These are called FlowFilter fields. Press SHIFT+F7 or click View, FlowFilter to open a window where you can enter the criteria.
Entering Criteria in Filters
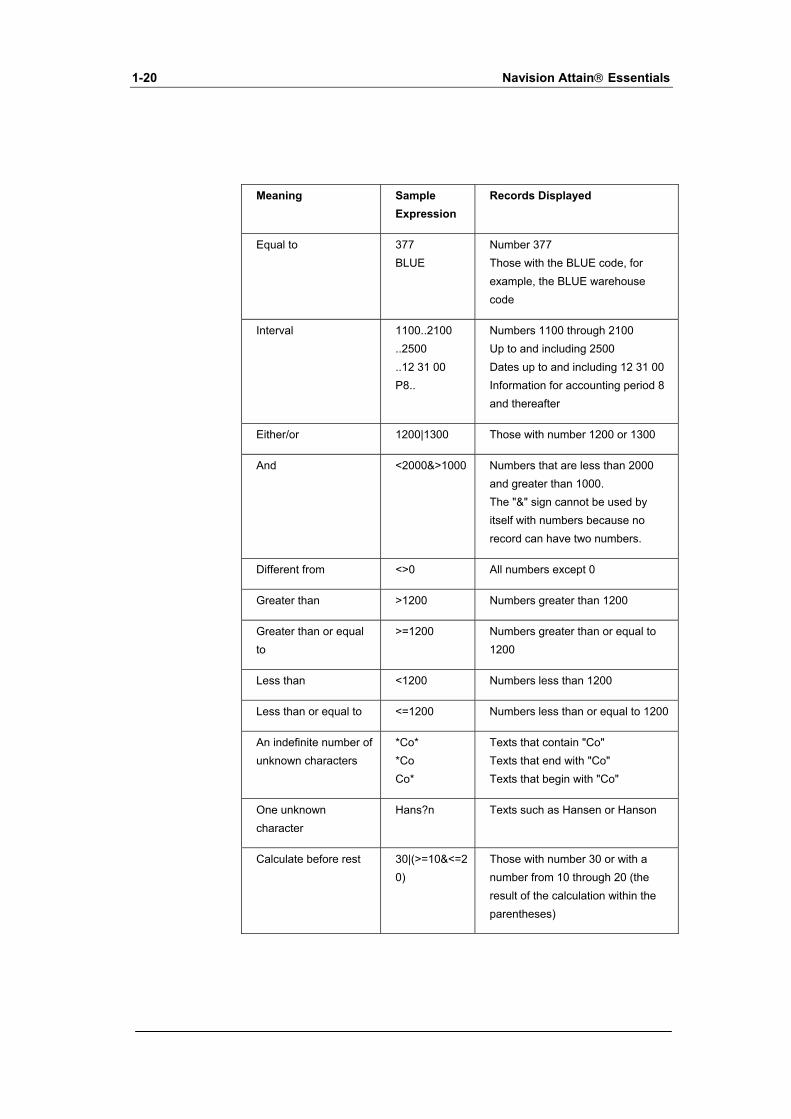
When you enter criteria, you can use all the numbers and letters that you can normally use in the field. In addition, you can use some special symbols or mathematical expressions. Here are the available formats:
1-20 Navision Attain Essentials
Meaning Sample Expression
Records Displayed
Equal to 377 BLUE
Number 377 Those with the BLUE code, for example, the BLUE warehouse code
Interval 1100..2100 ..2500 ..12 31 00 P8..
Numbers 1100 through 2100 Up to and including 2500 Dates up to and including 12 31 00 Information for accounting period 8 and thereafter
Either/or 1200|1300 Those with number 1200 or 1300
And <2000&>1000 Numbers that are less than 2000 and greater than 1000. The "&" sign cannot be used by itself with numbers because no record can have two numbers.
Different from <>0 All numbers except 0
Greater than >1200 Numbers greater than 1200
Greater than or equal to
>=1200 Numbers greater than or equal to 1200
Less than <1200 Numbers less than 1200
Less than or equal to <=1200 Numbers less than or equal to 1200
An indefinite number of unknown characters
*Co* *Co Co*
Texts that contain "Co" Texts that end with "Co" Texts that begin with "Co"
One unknown character
Hans?n Texts such as Hansen or Hanson
Calculate before rest 30|(>=10&<=20)
Those with number 30 or with a number from 10 through 20 (the result of the calculation within the parentheses)
Introduction 1-21
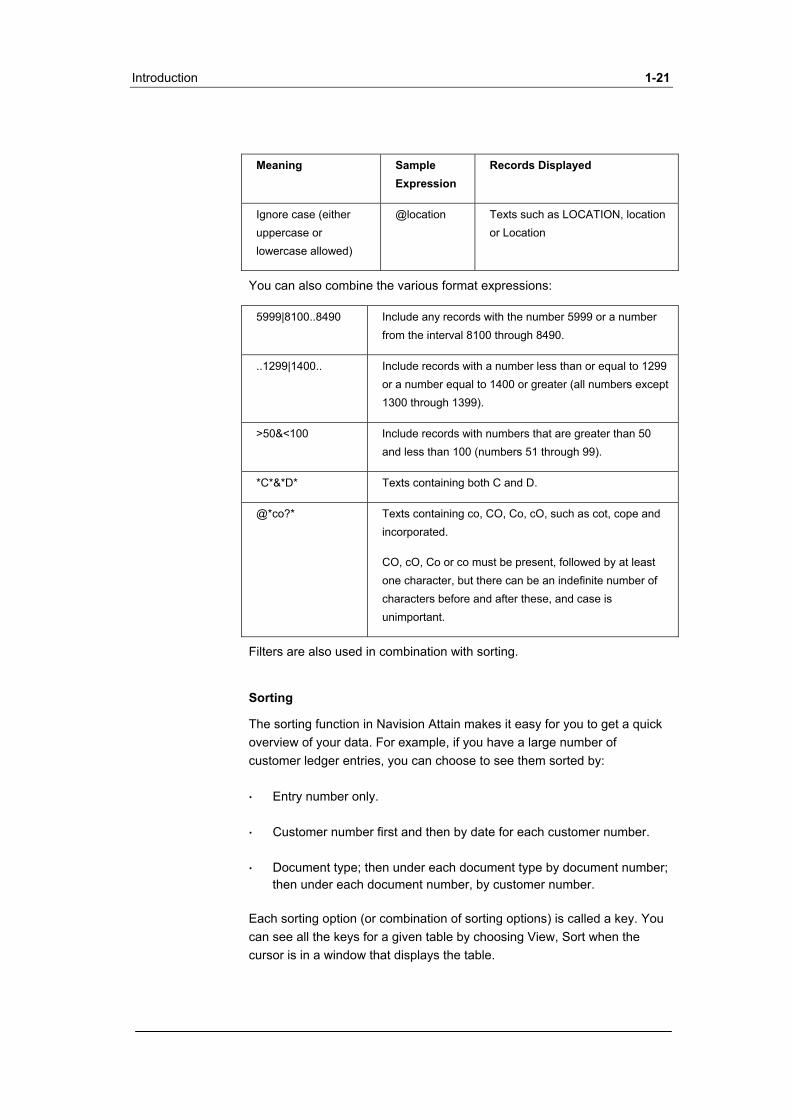
Meaning Sample Expression
Records Displayed
Ignore case (either uppercase or lowercase allowed)
@location Texts such as LOCATION, location or Location
You can also combine the various format expressions:
5999|8100..8490 Include any records with the number 5999 or a number from the interval 8100 through 8490.
..1299|1400.. Include records with a number less than or equal to 1299 or a number equal to 1400 or greater (all numbers except 1300 through 1399).
>50&<100 Include records with numbers that are greater than 50 and less than 100 (numbers 51 through 99).
*C*&*D* Texts containing both C and D.
@*co?* Texts containing co, CO, Co, cO, such as cot, cope and incorporated.
CO, cO, Co or co must be present, followed by at least one character, but there can be an indefinite number of characters before and after these, and case is unimportant.
Filters are also used in combination with sorting.
Sorting
The sorting function in Navision Attain makes it easy for you to get a quick overview of your data. For example, if you have a large number of customer ledger entries, you can choose to see them sorted by:
Entry number only. ·
·
·
Customer number first and then by date for each customer number.
Document type; then under each document type by document number; then under each document number, by customer number.
Each sorting option (or combination of sorting options) is called a key. You can see all the keys for a given table by choosing View, Sort when the cursor is in a window that displays the table.

1-22 Navision Attain Essentials
You can use this function either by choosing View, Sort from the menu bar or by clicking the Sort button on the toolbar. You can also activate the function by clicking Sort on reports.
Data Entry and Data Modifications
The ESC IS a useful shortcut key when entering data or modifying a field. For example, if you discover that you are entering the wrong data in a field, you can press ESC to undo the entire entry for as long as the cursor is in the field. Moving from one window field to another means that the information entered into the field is saved in the application as soon as you exit the field.
There is no need to press ENTER in order to confirm input. Information entered is automatically saved to the database upon exiting a window. A quick way to exit a window is by pressing Esc.
Button Characteristics
Command buttons and menu buttons are used in windows to open other windows. There are many situations in which you may want to be able to open a window from another window.
A command button performs an action when it is clicked. An example of this is the Print button.
A menu button can be clicked just like a command button, but it does not perform an action. When you click it, a menu opens containing a number of menu items from which you can choose.
In addition to these buttons, Navision Attain contains a number of AssistButtons. You will learn about these in the AssistButtons unit.
F Keys
Keyboard shortcuts have been created for commonly used functions in application windows and for main menu items. These shortcuts are assigned to the function keys or F Keys. An overview of these F Key shortcuts is shown below:

Introduction 1-23
F KEY CTRL F KEY SHIFT F KEY
F1 Help Toggle Mark What is …
F2 Edit Designer AssistEdit
F3 Insert New
F4 Delete Close
F5 List Entries Card
F6 Lookup Next Window Drill-down
F7 Field Filter Table Filter FlowFilter
F8 Copy Previous Zoom Sort
F9 Statistics Reconcile Apply Entries
F10 Menu Bar
F11 Post Post and Print
F12 Main Menu Object Designer
Uniform Data Structure (tables)
There is a uniform data structure throughout the program. This can be demonstrated using the following example.
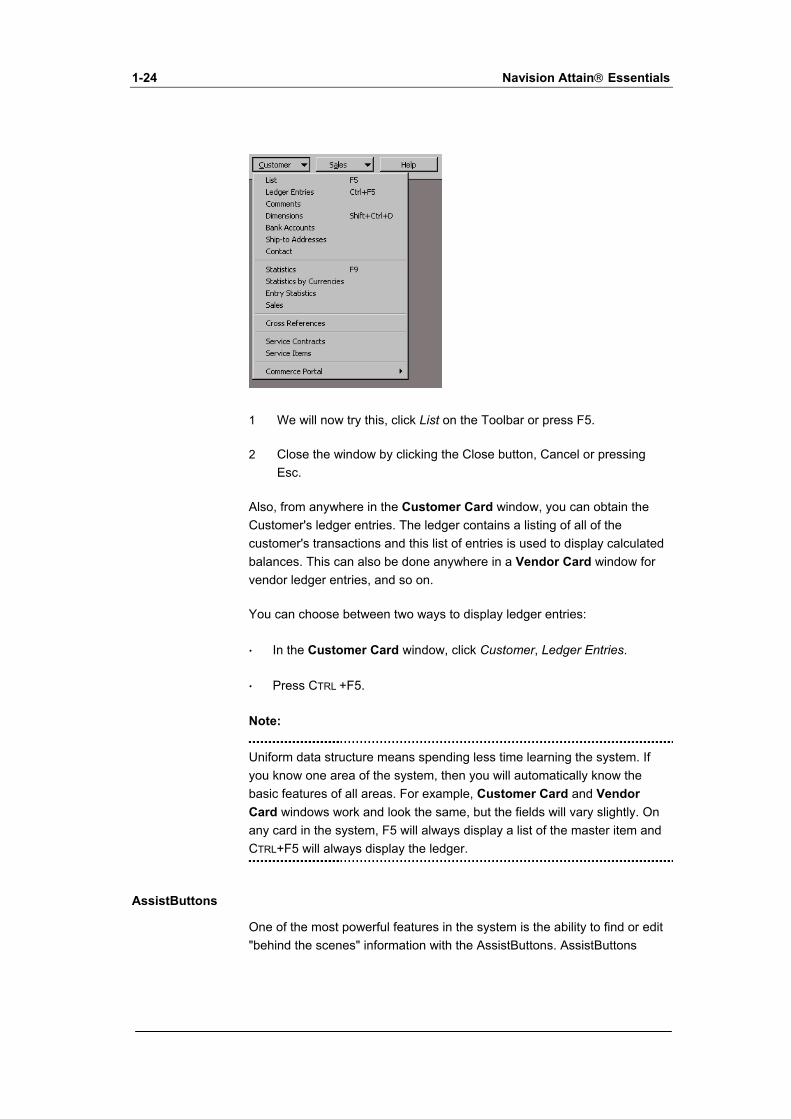
From anywhere in the Customer Card window, you can get a listing of all customers in Navision Attain. You can the List button to open a similar list from all cards as well as purchase and sales documents.
There are three ways to open the listing:
Click List on the Toolbar. ·
Press F5. ·
· In the Customer Card window, click Customer, List.
1-24 Navision Attain Essentials
1 We will now try this, click List on the Toolbar or press F5.
2 Close the window by clicking the Close button, Cancel or pressing Esc.
Also, from anywhere in the Customer Card window, you can obtain the Customer's ledger entries. The ledger contains a listing of all of the customer's transactions and this list of entries is used to display calculated balances. This can also be done anywhere in a Vendor Card window for vendor ledger entries, and so on.
You can choose between two ways to display ledger entries:
In the Customer Card window, click Customer, Ledger Entries. ·
· Press CTRL +F5.
Note:
Uniform data structure means spending less time learning the system. If you know one area of the system, then you will automatically know the basic features of all areas. For example, Customer Card and Vendor Card windows work and look the same, but the fields will vary slightly. On any card in the system, F5 will always display a list of the master item and CTRL+F5 will always display the ledger.
AssistButtons
One of the most powerful features in the system is the ability to find or edit "behind the scenes" information with the AssistButtons. AssistButtons
Introduction 1-25
provide easy lookup, drill-down, dropdown and editing assistance features. A field may have one of these symbols to indicate that there is information of some type behind it. By clicking the symbol you will see the options available. Alternatively you can press F6 to display any lookup, drill-down and dropdown information or SHIFT-F2 for editing assistance. Keep in mind that the options are field specific. You can see an example of each AssistButton on the Customer Card.
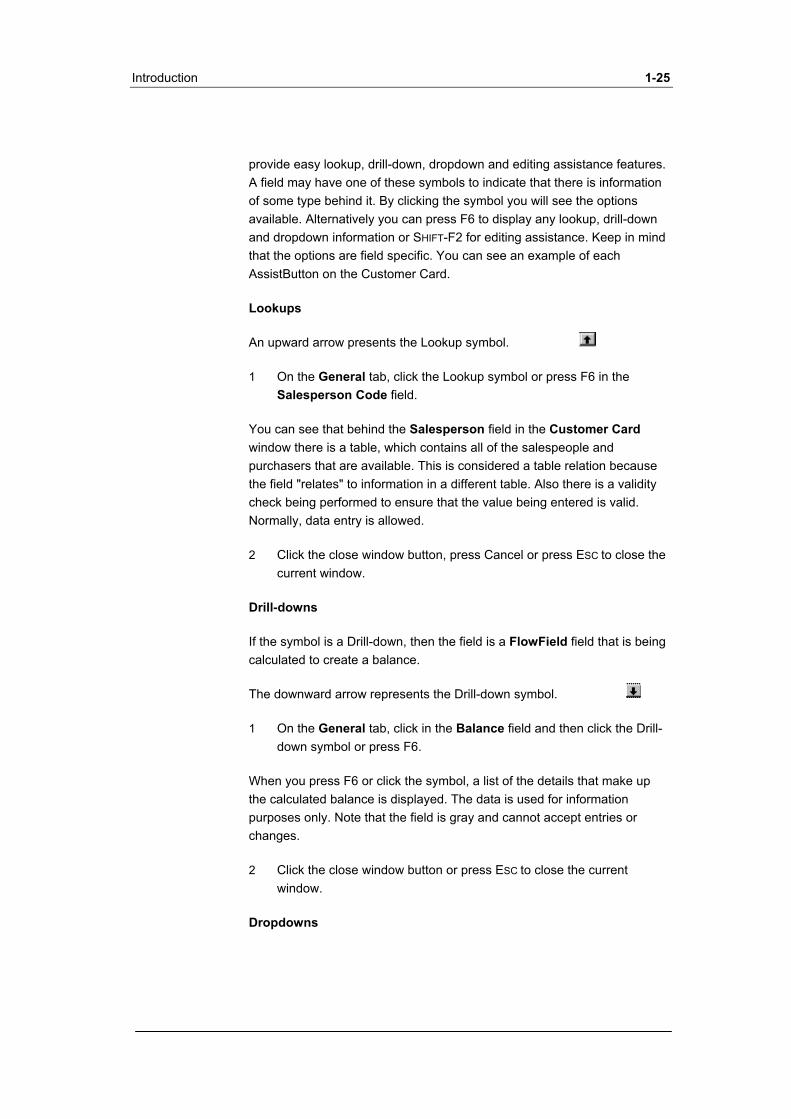
Lookups
An upward arrow presents the Lookup symbol.
1 On the General tab, click the Lookup symbol or press F6 in the Salesperson Code field.
You can see that behind the Salesperson field in the Customer Card window there is a table, which contains all of the salespeople and purchasers that are available. This is considered a table relation because the field "relates" to information in a different table. Also there is a validity check being performed to ensure that the value being entered is valid. Normally, data entry is allowed.
2 Click the close window button, press Cancel or press ESC to close the current window.
Drill-downs
If the symbol is a Drill-down, then the field is a FlowField field that is being calculated to create a balance.
The downward arrow represents the Drill-down symbol.
1 On the General tab, click in the Balance field and then click the Drill-down symbol or press F6.
When you press F6 or click the symbol, a list of the details that make up the calculated balance is displayed. The data is used for information purposes only. Note that the field is gray and cannot accept entries or changes.
2 Click the close window button or press ESC to close the current window.
Dropdowns
1-26 Navision Attain Essentials
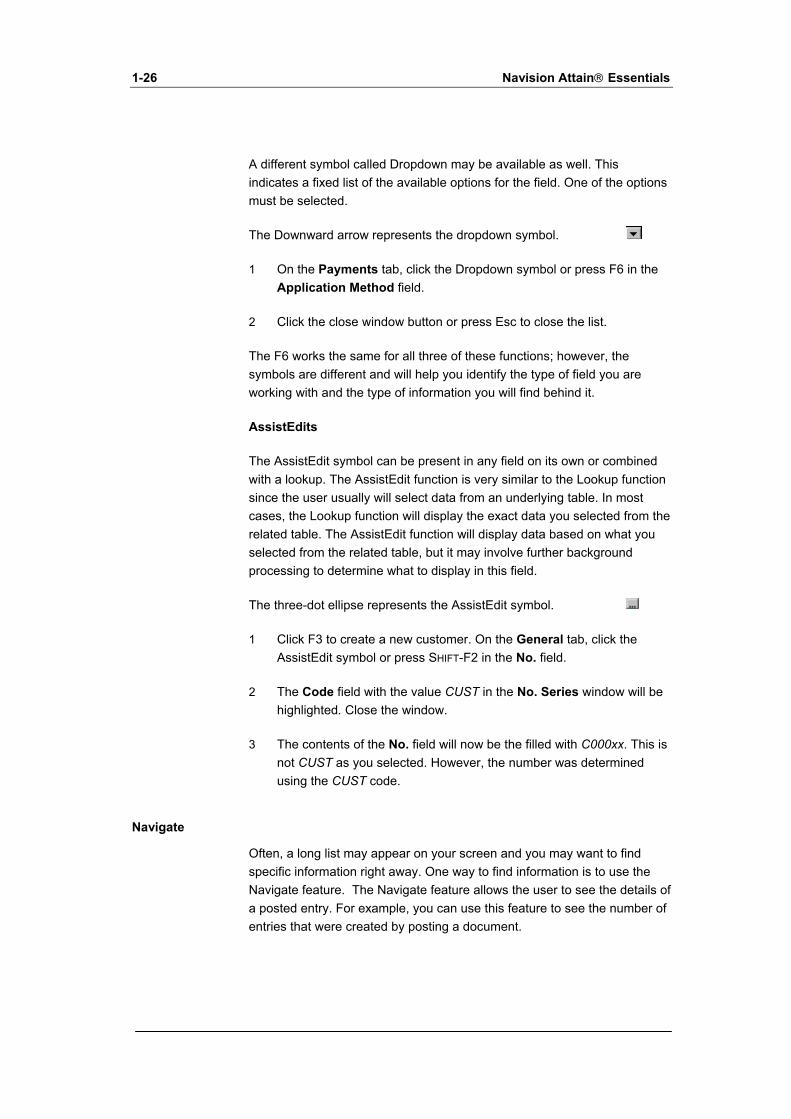
A different symbol called Dropdown may be available as well. This indicates a fixed list of the available options for the field. One of the options must be selected.
The Downward arrow represents the dropdown symbol.
1 On the Payments tab, click the Dropdown symbol or press F6 in the Application Method field.
2 Click the close window button or press Esc to close the list.
The F6 works the same for all three of these functions; however, the symbols are different and will help you identify the type of field you are working with and the type of information you will find behind it.
AssistEdits
The AssistEdit symbol can be present in any field on its own or combined with a lookup. The AssistEdit function is very similar to the Lookup function since the user usually will select data from an underlying table. In most cases, the Lookup function will display the exact data you selected from the related table. The AssistEdit function will display data based on what you selected from the related table, but it may involve further background processing to determine what to display in this field.
The three-dot ellipse represents the AssistEdit symbol.
1 Click F3 to create a new customer. On the General tab, click the AssistEdit symbol or press SHIFT-F2 in the No. field.
2 The Code field with the value CUST in the No. Series window will be highlighted. Close the window.
3 The contents of the No. field will now be the filled with C000xx. This is not CUST as you selected. However, the number was determined using the CUST code.
Navigate
Often, a long list may appear on your screen and you may want to find specific information right away. One way to find information is to use the Navigate feature. The Navigate feature allows the user to see the details of a posted entry. For example, you can use this feature to see the number of entries that were created by posting a document.

Introduction 1-27
You can use the Navigate feature to scan across all tables in the database to find document entries, which match the search criteria entered.
You can access the Navigate window in two ways:
From the menu for most application areas. ·
· From all Ledger Entry windows and windows containing posted documents (shipments, invoices, and so on).
We will try this now.
1 On the General Ledger menu, click Navigate.
The Navigate window appears.
You will notice that there are two tabs.
The General tab enables you to search for documents created by the program such as, invoices, posted entries. The External tab enables you to search for documents that have been created by your vendors. For example, searching for an invoice using the vendor’s invoice number.
We will use the search criteria contained in the General Tab.
The two search fields in this tab are Document No. and Posting Date. By completing these fields you can use Navigate to find all entries posted within the same date and document number.
Let’s carry out a search for all the documents posted on 01/25/01.

1-28 Navision Attain Essentials
2 Type 01/25/01 in the Posting Date field and then click Find.
The program has searched the database and now displays all the documents that were posted on the date. You will remember that the Navision Attain database consists of a number of tables. The data in these tables are shown in windows by the program.
Navigate shows you how many documents were posted by table name. But, that is not all. Navigate can show you even more information.
3 Select the row for the posted purchase invoices and then click Show.
As you can see, Navigate now enables you to see the details of the individual purchase invoice documents posted on 01/25/01. So, you can see that Navigate is a useful tool that helps you to find specific documents.

Introduction 1-29
1.5 REVIEW QUESTIONS
Now you have the basic ideas behind the application-wide functionality of Navision Attain. Here are some questions to help you review the material you’ve just covered. Answers are not provided. This is a study-aid.
1 What are the five Object Types that make up a Navision Database and the purpose of each?
2 What does it mean that the Navision Database is both integrated and shared? Why is this advantageous?
3 What is the relational model?
4 Under what circumstances can Optimistic Concurrency fail?
5 Commit Rollback eliminates what situation?
6 What does SIFT stand for and what are two advantages of SIFT?
7 What are the four kinds of AssistButtons? Why are they a powerful feature in the system?
8 What does the Navigate feature do in Navision Attain?
9 What are the common functions that are available from every Master Item as defined under the term Uniform Data Structure?
10 Which operating systems does Navision Attain support?
11 Name five ways to enter dates in Navision Attain.
12 True or False? Field and Table filters are window-dependent?
13 What is a FlowFilter?


Chapter 2.
General Ledger
General Ledger is the central application area of Navision Attain where all financial information is posted, summarized, processed and reported.
This chapter contains an overview of the Navision Attain general ledger functionality. Specifically, you will learn about:
2.1 Overview
2.2 General Ledger Setup
2.3 The Chart of Accounts
2.4 Posting Groups
2.5 Dimensions
2.6 Journals and Batches
2.7 Bank Accounts
2.8 Financial Reports
2.9 Budgets
2.10 Review Questions

2-2 Navision Attain Essentials
2.1 OVERVIEW
In this section, you will learn about the basic setup of Navision Attain.
Set up a Company
The first step you take when you set up a new company is to create a new company.
In the program, the term company is used to designate a complete set of accounting information and financial statements for a business. You can set up more than one company in the program, for example a parent company and a subsidiary. To set up a new company, you must enter various types of information before the program can be used for daily work.
1 On the menu bar, click File menu, Company. A drop-down menu appears with the five menu options.
Here you can create a new company, open an existing company, rename a company, delete a company, or close a company.
2 Click Open.
The window displays all companies in the current database.
3 Select CRONUS International, Ltd. and click OK.
You must set up most of the company specific information in the General Ledger setup.
Setup Checklist
In the program, you find a setup checklist. This checklist is very useful when you set up the company in the program. The Setup Checklist feature has two main purposes, and you can therefore use the Setup Checklist window to:
Simplify the process of setting up your company in the program. The window contains a list of the tables to which you have access (according to your license file) and you can facilitate the setup process by using data from an existing company, such as the demonstration company.
·
· Monitor the implementation and set up process for each company. The checklist breaks down the program into application areas. It lets you

General Ledger 2-3
monitor who is responsible for a specific area, track the expected date for starting and ending each area, and enter comments for each process as the work is completed all in one place.
To open the Setup Checklist window;
1 On the menu bar, click General Ledger to display the General Ledger menu.
2 Click Setup and then Setup Checklist.
The Setup Checklist window appears.
Copy Data window
The copy data function allows you to copy information between companies within the same database file. For example, you can copy, the application area setup table and other information from one company to another.
1 Click Functions, Copy Data.
The Copy Data window appears.

2-4 Navision Attain Essentials
Company Information
In the Company Information window, you set up a company's general information. The program uses this information to print company information on document headers.
To open the Company Information window, on the General Ledger menu Click Setup, Company Information.
The Company Information window appears.
The important fields to remember on the General tab are:
Name field - Used on all reports generated by the program. ·
·
·
Address and Address 2 fields - Used as default for all documents such as invoices if the document does not have a responsibility center attached.
VAT Registration No. field - Used on all statutory documents e.g. VAT

General Ledger 2-5
statements
Support Note
If the address fields are not completed, purchase documents such as purchase orders will contain blank Ship-to Address fields, if the document does not have a responsibility center attached.
On the Communication tab, you can enter information on the company’s communication details
On the Payments tab, you can fill in information for one primary bank.
On the Shipping tab, you can enter the ship-to address that will appear on all purchase orders. Also, notice the Location Code field. Complete this field if you want a default delivery location when you purchase items.
Accounting Periods
You use the Accounting Periods window to open new fiscal years, define accounting periods and close fiscal years. You must set up at least one accounting period for each fiscal year. Before you can post in a fiscal year, you must open the fiscal year and define its accounting periods.
The number of accounting periods per year is limited to the number of days per year. There is no restriction on the length of periods, except they cannot be smaller than one day or larger than one year. You are allowed to have as many periods (or years) open as you wish. The program does not limit data entry. Even if a period is closed, data entry is allowed. The entry will be marked as a "prior period entry." Because there are no "hard close" or "buckets," the program is date sensitive and will allow you to make entries into any of the existing periods.
Creating a New Fiscal Year
To open the Accounting Periods window click Setup, Accounting Periods.
The Accounting Periods window appears.

2-6 Navision Attain Essentials
You can create a new period or year in two ways: in the Accounting Periods window manually or automatically using the Create Fiscal Year batch job. The manual method lets you insert the starting date and the name for each period in the fiscal year. To indicate the start of the year, place a check mark in the New Fiscal Year field. The New Fiscal Year field must contain a check mark, if an accounting period is the first one in a fiscal year. The program uses that period to determine which periods to close when you run the Close Year function.
To create a new period automatically, click Create Year and run the Create fiscal Year batch job. In the Create Fiscal Year window, you enter basic information about the new year such as starting date, number of periods and period length. The program creates the remaining information.
Exercise 1 Create a new fiscal year
Create a new fiscal year for 2003. The fiscal year begins on the 1st of January 2003 and ends on the 31st of December 2003. The length of an accounting period is a month.
You can find the steps and solution to this exercise in Appendix D.
General Ledger 2-7
2.2 GENERAL LEDGER SETUP
In this section, you will learn about the General Ledger Setup Card, No. Series, Posting Groups, Bank Accounts, Users, Chart of Accounts and Currencies.
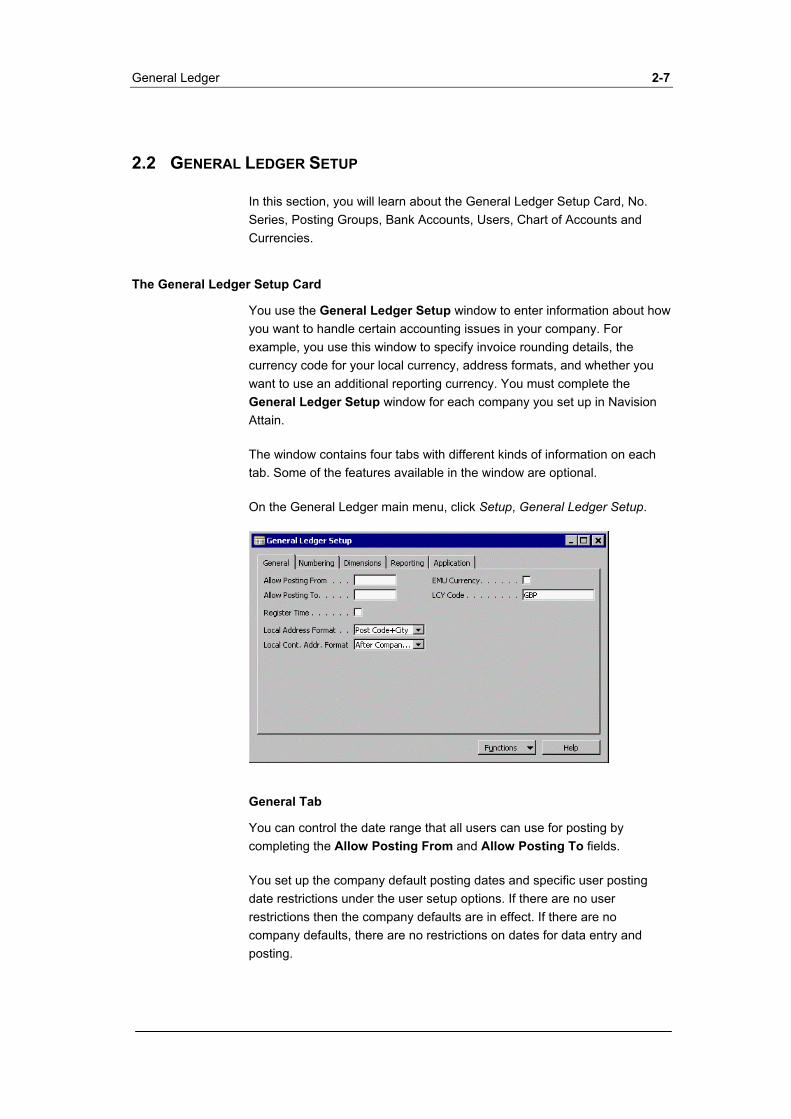
The General Ledger Setup Card
You use the General Ledger Setup window to enter information about how you want to handle certain accounting issues in your company. For example, you use this window to specify invoice rounding details, the currency code for your local currency, address formats, and whether you want to use an additional reporting currency. You must complete the General Ledger Setup window for each company you set up in Navision Attain.
The window contains four tabs with different kinds of information on each tab. Some of the features available in the window are optional.
On the General Ledger main menu, click Setup, General Ledger Setup.
General Tab
You can control the date range that all users can use for posting by completing the Allow Posting From and Allow Posting To fields.
You set up the company default posting dates and specific user posting date restrictions under the user setup options. If there are no user restrictions then the company defaults are in effect. If there are no company defaults, there are no restrictions on dates for data entry and posting.
2-8 Navision Attain Essentials
Why is this important? Since the program does not require "closing" as a part of its accounting cycle, you can use the posting date ranges to procedurally "close" periods, to prevent entries that could change prior period data. You can always adjust the dates temporarily to allow specific entries to be posted.
Other fields on the General tab include:
Register Time field - Here you can specify whether the program will register the user's time usage.
·
·
·
·
·
·
Local Address Format field - Here you can specify the format in which addresses must appear on printouts.
Local Cont. Addr. Format field - Here you can specify where you want the contact name to appear in mailing addresses.
EMU Currency field - Place a check mark in this field if LCY is an EMU currency. This field is only used when you apply entries in different currencies.
LCY Code field – In this field, you enter the currency code for LCY. The value is only used on printouts, since the program uses <Blank> as the indicator for LCY when displaying information in tables.
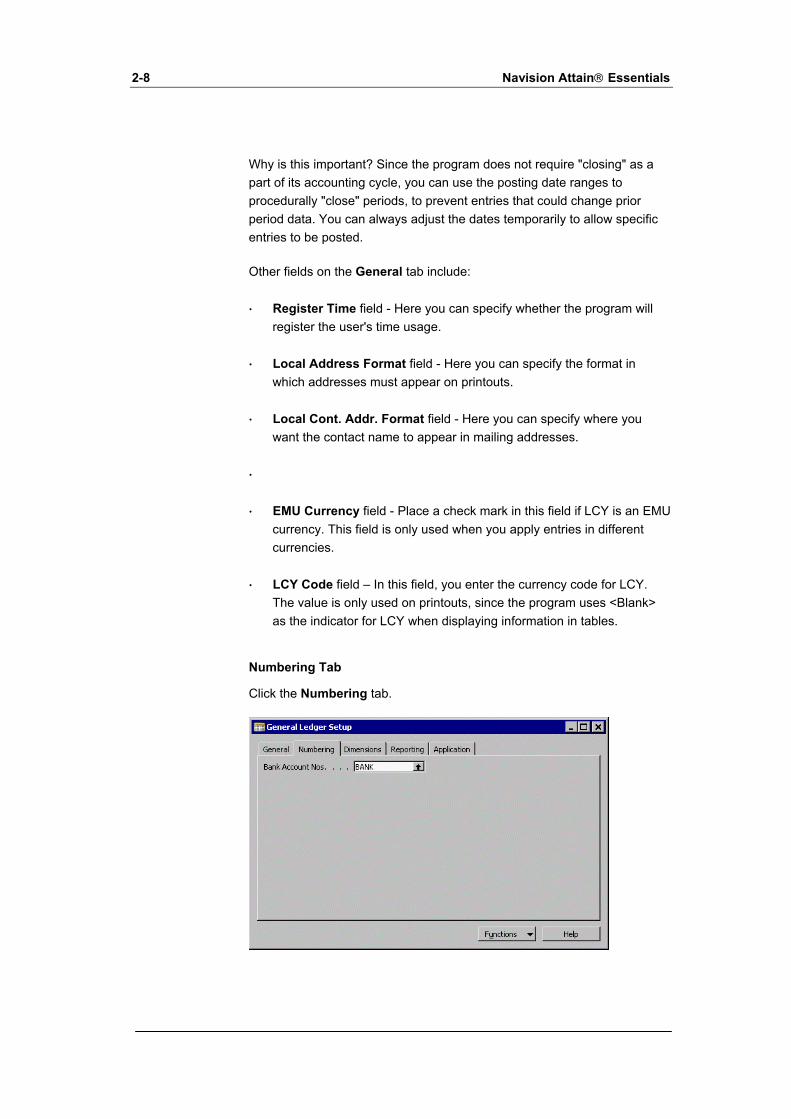
Numbering Tab
Click the Numbering tab.

General Ledger 2-9
There is one field on the Numbering tab, the Bank Account Nos. field. Here you can enter the code for the number series that will be used to assign numbers to bank accounts. We will return to number series later in this section.
Dimensions Tab
Click the Dimensions tab.
On this tab, you must select the two global dimensions that you will use the most frequently in your reports. You can also select your shortcut dimensions. You must select the dimensions from the dimension codes that you have already set up in the Dimension table.
The fields on the Dimension tab include:
Global Dimension 1 Code field and Global Dimension 2 Code field as well as eight different shortcut dimension fields. The program automatically creates first two shortcut dimensions using the Global Dimensions. You will only be able to use the other six shortcut dimensions if you have purchased the Advanced Dimensions granule.
You will learn more about global and shortcut dimensions later in Section 2.4 Dimensions.
Reporting Tab
Click the Reporting tab.
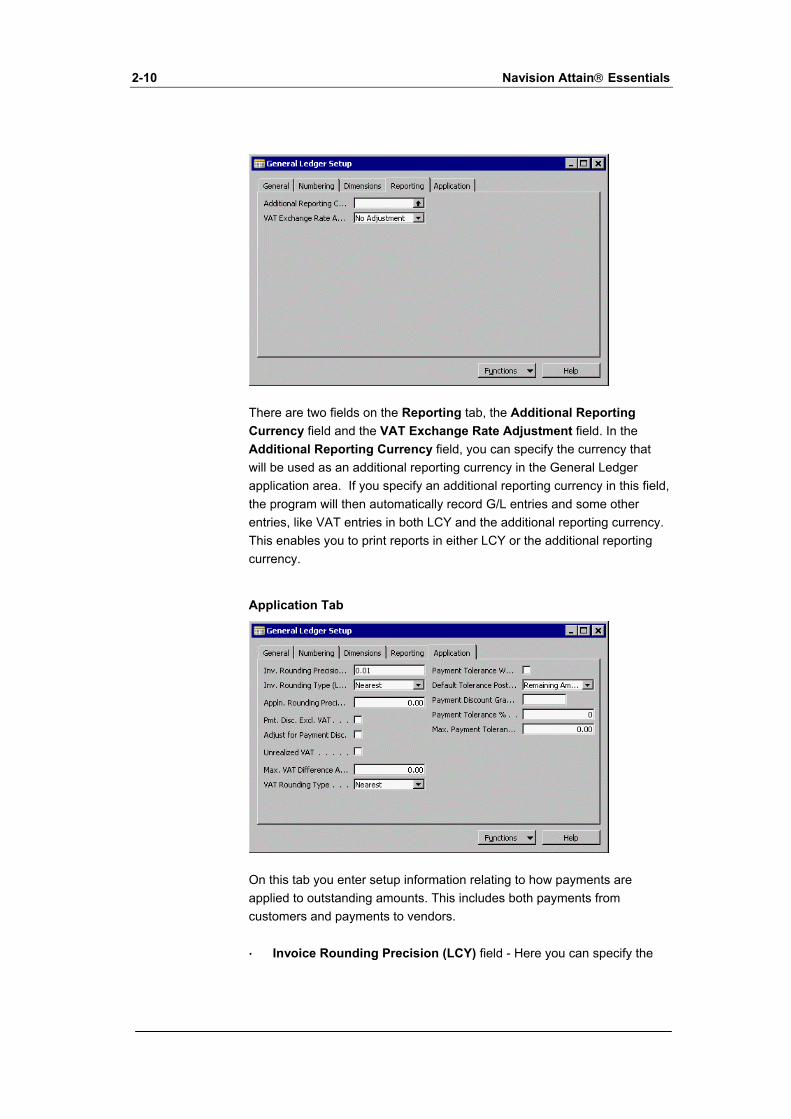
2-10 Navision Attain Essentials
There are two fields on the Reporting tab, the Additional Reporting Currency field and the VAT Exchange Rate Adjustment field. In the Additional Reporting Currency field, you can specify the currency that will be used as an additional reporting currency in the General Ledger application area. If you specify an additional reporting currency in this field, the program will then automatically record G/L entries and some other entries, like VAT entries in both LCY and the additional reporting currency. This enables you to print reports in either LCY or the additional reporting currency.
Application Tab
On this tab you enter setup information relating to how payments are applied to outstanding amounts. This includes both payments from customers and payments to vendors.
Invoice Rounding Precision (LCY) field - Here you can specify the ·

General Ledger 2-11
size of the interval to be used when rounding amounts in your local currency.
Invoice Rounding Type (LCY) field - Here you can specify how the program will round an invoice amount.
·
·
·
·
·
·
·
Appln. Rounding Precision field - In this field, you can specify the size of the interval that will be allowed as a rounding difference for LCY when you apply entries in LCY to entries in a different currency.
Pmt. Disc. Excl. VAT field - Here you can specify whether the payment discount should be based on amounts including or excluding VAT.
Adjust for Payment Disc. field – In this field, you can place a check mark if you want the program to recalculate VAT amounts when you post payments that trigger payment discounts.
Unrealized VAT field – In this field, you can specify whether you want the program to handle unrealized VAT.
Max. VAT Difference Allowed field - In this field you can enter the maximum VAT correction amount allowed for the local currency.
VAT Rounding Type field - In this field, you can select how the program will round VAT when calculated for the local currency.
No. Series
You use the No. Series window to set up all the number series that you will use for your company. You can assign number series to certain tables (such as the Customer, Vendor and Item tables), sales and purchase documents (such as quotes, shipments and posted invoices), and journal templates and batches.
You can set up a complete numbering system consisting of an unlimited number of number series for all types of basic information (except G/L accounts) and documents. You can combine this with manual numbering for specific areas or you can use manual numbering entirely.
The document numbering functionality provides a flexible way of numbering all documents, journals, batches and journal lines. Documents include, but are not limited to orders, invoices, shipments and credit memos.
2-12 Navision Attain Essentials
In the setup table for each application area and in the journal templates, you specify which No. Series will be used for which purpose. For example, if you have set up a No. Series for customers, you would enter the code for this No. Series in the Customer Nos. field in the Sales & Receivables Setup table. Then when you create a new customer, the program will use the information associated with the code to assign the customer number.
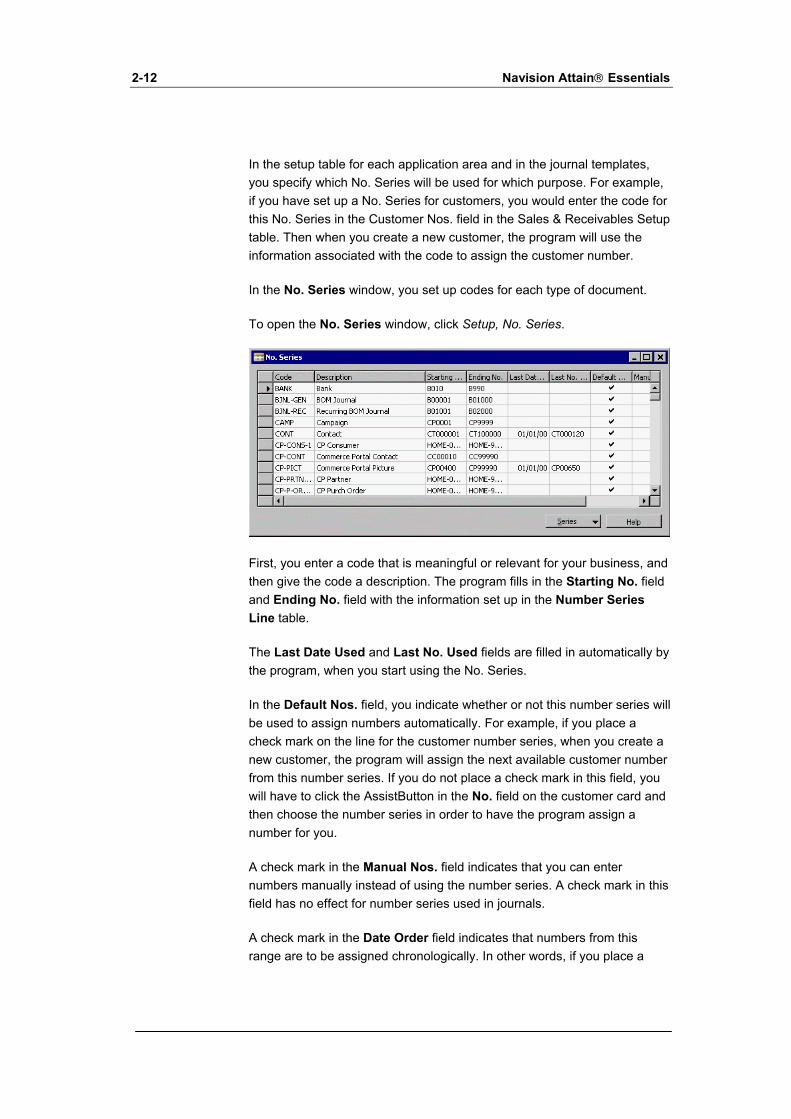
In the No. Series window, you set up codes for each type of document.
To open the No. Series window, click Setup, No. Series.
First, you enter a code that is meaningful or relevant for your business, and then give the code a description. The program fills in the Starting No. field and Ending No. field with the information set up in the Number Series Line table.
The Last Date Used and Last No. Used fields are filled in automatically by the program, when you start using the No. Series.
In the Default Nos. field, you indicate whether or not this number series will be used to assign numbers automatically. For example, if you place a check mark on the line for the customer number series, when you create a new customer, the program will assign the next available customer number from this number series. If you do not place a check mark in this field, you will have to click the AssistButton in the No. field on the customer card and then choose the number series in order to have the program assign a number for you.
A check mark in the Manual Nos. field indicates that you can enter numbers manually instead of using the number series. A check mark in this field has no effect for number series used in journals.
A check mark in the Date Order field indicates that numbers from this range are to be assigned chronologically. In other words, if you place a

General Ledger 2-13
check mark here, the program will run a test at the time of posting to make sure documents and journal lines are assigned numbers in ascending order according to the posting date.
A number series will be associated with one or more lines in the No. Series Lines table, where you set up additional information about the number series. So let's take a look at the options on the Series button.
In the No. Series window, select EMP., and then click Series, Lines.
This window lets you establish the numbering you want to use (including starting dates for specific ranges of numbers) and set up additional information about the number series.
The first field is the Starting Date field. Here you can enter the date from which you would like this line to apply. You use this field if you want to start a new No. Series at the beginning of a new period. You set up a number series line for each period. The program will automatically switch to the new series on the starting date. If left blank it will take effect immediately.
In the Starting No. field and Ending No. field, you define the range of numbers you will use for that particular code. These fields are alphanumeric and have a length of 20 characters to allow flexible schemes.
The contents of the Last Date Used field and Last No. Used field are generated by the program and will display the last date a number was assigned and the last number in the series that was used. The contents of these two fields are also displayed in the No. Series window.
The Warning No. field lets you choose a number from your predefined series that will return a warning when it is used. It should be used to help you when you are nearing the end of a number series.

2-14 Navision Attain Essentials
The Increment by No. field allows you to select the size of the interval by which you would like your numbering to increase. If you use an increment rather than consecutive numbers, this would allow the future addition of numbers in that range and in between the assigned numbers. For example, the customer code has an increment-by number value of '10'. This means that the customer numbers will be numbered C00010, C00020, and so on. If at a later date, you want to insert one manually, we could assign C00015 if we allow for an interval between numbers rather than making them consecutive.
The Open field indicates whether or not the number series is open. A series will remain open until the last number in it is used. At that time, the program removes the check mark from this field. This field is not editable.
Press ESC to close the window. ·
·
·
Sometimes, you may want to assign more than one No. Series Code to a single No. Series field. For example, if you have more than one No. Series for inventory items, you can setup a relationship between these No. Series.
The No. Series Relationships window is used to set up relationships between multiple No. Series. When you set up relationships you must associate all of the related No. Series to one No. Series code. Then you can enter this code on the Numbering tab in Setup for the appropriate application area and you will be able to choose between all of the related No. Series when assigning numbers.
In the No. Series window, in the Code field, find and select ITEM1. Notice, that there are 5 different No. Series Codes for Item Numbers (ITEM1, ITEM2, ITEM3, ITEM4, ITEM5)
Click Series, Relationships. The No. Series Relationships window appears.

General Ledger 2-15
You can see that there is a relationship set up for the 5 Item No. Series. ITEM2, ITEM3, ITEM4 and ITEM5 all relate to ITEM1.
The No. Series ITEM1 is assigned in Inventory Setup as the No. Series Code for Item Nos. When you create a new Item you can click the Ellipsis button next to Item No. which will open the No. Series window showing the ITEM1 No. Series along with all of the related No. Series. You can now select the No. Series you want for this new Item.
Responsibility Centers
On the General Ledger Menu, click Setup, Responsibility Centers. The Responsibility Center window appears.
You can use the Responsibility Center window to record information about your responsibility center. A responsibility center can be a cost center, a profit center or an investment center. Examples of responsibility centers are a sales office, a purchasing department for several locations, and a plant planning office.
In the program, you set up responsibility centers to help administer your business. For example, a responsibility center can administer sales and purchases for one or more warehouses or distribution centers, where goods are handled and stored prior to use.
Each responsibility center has a Name (for example, the address of the regional office) as well as a Code representing the name. On the General tab, you can enter an address for the responsibility center that may be different to the company address. You can also select default global dimensions for the responsibility center. To select additional default dimensions, click Resp. Ctr., Dimensions and enter them in the Responsibility Center - Default Dimensions window. Use the Location Code field to assign a default location to the responsibility center. If the

2-16 Navision Attain Essentials
responsibility center is entered on a sales or purchase document, the program will update the Location Code field on the document with the default location.
On the Communications tab, you can set up phone, e-mail and website details for the responsibility center that may also be different to the company communication details.
Once the responsibility center is created, the code can be used in the Responsibility Center fields elsewhere in the program. For example, when you enter a responsibility center code on purchase and sales documents it affects the address, dimensions, and prices on the documents.
The address displayed in printed sales and purchase documents will be the responsibility center's address not the company address.
·
·
·
The program will automatically assign the default dimensions for the responsibility center to the document.
Different item prices can be established for different responsibility centers.
Entering a responsibility center code on a Location Card will mean that the location (for example, a warehouse or distribution center) is administered by the responsibility center represented by that code. If the location is selected on a sales or purchase document, the program will automatically fill in the Responsibility Center field on the document with the assigned responsibility center.
General Posting Groups and VAT Posting Groups
This will be covered in the Posting Groups section of this chapter.
Trail Codes
This is where the program's audit trails begin. Trail codes setup lets you set up source codes and reason codes that help define information to be assigned to transactions.
On the General Ledger menu, click Setup, Trail Codes.
Source Codes
Source Codes are used to assist the user in finding the point of origin for an

General Ledger 2-17
entry (audit trails). Source codes are assigned to transactions. Each journal can have a source code; the ones listed in the Source Codes window are the system defaults. As new journals or data entry points are added, then a source code should be added as well to identify where the transaction originated. Source Codes are the basis for the audit trail in the program.
You assign source codes to the different journals and data entry points in the Source Code Setup Window.
Reason Codes
Reason Codes are used to explain why an entry exists. For example, if you must return items from a sale you can set up a reason code to denote the reason such as damaged, wrong color, wrong size, etc. After you set up reason codes, you can add the reason code field to the journal or other window.
Dimensions
You will learn about dimensions in the Dimensions section of this chapter.
Bank Accounts
Using the program, you can manage any number of bank accounts across a variety of different banks. These accounts can be either deposit accounts or loan accounts. You can set up bank accounts in local or foreign currency. If you use Bank Accounts you will need to specify Bank Accounts Posting Groups to link the Bank Accounts to G/L accounts.
On the General Ledger menu, click Setup, Bank Accounts, Posting Groups.
·

2-18 Navision Attain Essentials
Here you specify the General Ledger accounts that will be used for the different Bank Account Posting Groups
On the General Ledger menu, click Setup, Bank Accounts, Report Selections.
·
In the Bank Account Report Selections window you can select which reports you want printed out for Cash Management documents like Checks, Bank Statements and Bank Reconciliation Test Report.
You will learn more about how to set up bank accounts in the Bank Account section of this chapter.
Intrastat
All EU businesses must report their trade with other EU countries. This is known as INTRASTAT reporting. As part of performing INTRASTAT reporting you may need to set up tariff numbers, transaction types, transaction specifications, transport methods, entry/exit points in a country and areas within a country. All these can be setup in the General Ledger application area by clicking Setup, Intrastat and selecting the related menu item.
When you need to create an Intrastat report, use must use the Intrastat Journal window. This can be found in the General Ledger application area by clicking Periodic Activities, Intrastat Journals. You can fill in the journal with the relevant item ledger entries by clicking Get Entries, or you can fill them in manually. If you have relevant G/L entries, you must fill these in manually. Once you have filled in the journal, you can print an Intrastat report onto a form or create one on a disk.
General Ledger 2-19
General
Standard Text Codes
You use the Standard Text Codes window to enter texts that you use often, such as "Shipping Charge" or "Monthly Depreciation." You assign a code to each text, such as SC for "Shipping Charge." Then, when you enter the code in the No. field on a document line where the Type field is Blank (for example, on an invoice), the program will enter the entire text in the Description field. You can also enter a question mark, followed by the code, in a text field (such as the Description field in a general journal), and the entire text will be entered in the field. For example, if you enter "?SC" in the Description field in a general journal, the program updates the contents of the Description field with the text "Shipping Charge."
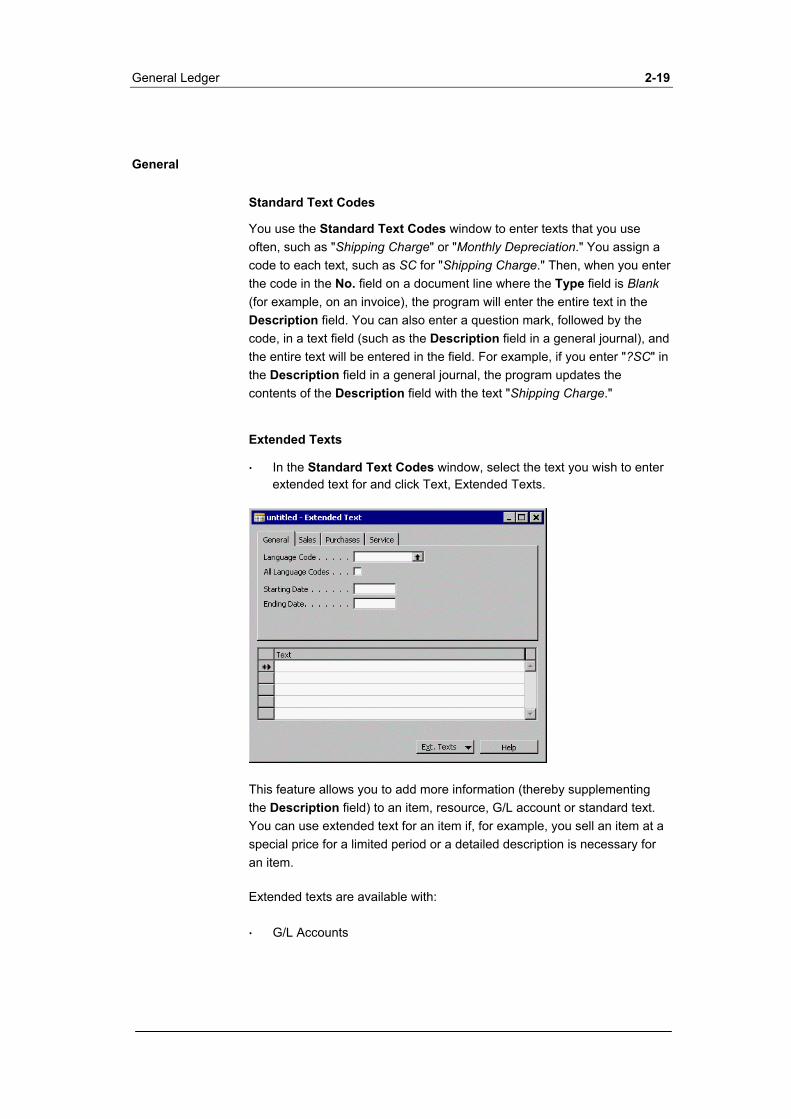
Extended Texts
In the Standard Text Codes window, select the text you wish to enter extended text for and click Text, Extended Texts.
·
This feature allows you to add more information (thereby supplementing the Description field) to an item, resource, G/L account or standard text. You can use extended text for an item if, for example, you sell an item at a special price for a limited period or a detailed description is necessary for an item.
Extended texts are available with:
G/L Accounts ·
2-20 Navision Attain Essentials
Item Cards ·
·
·
Resource Cards
Standard Texts
You use the Sales, Purchase and Service tabs to select which documents the extended texts may appear in. For example, the extended text you create can be inserted on sales and purchase lines, which supplement the description for the relevant item. The text can be inserted manually or automatically.
On the General tab, you can enter a specific language code on the extended text header. This ensures that the text appears only on documents created for customers or vendors with the specified language code. You can also define a time interval during which the text will be valid.
You can create several texts for the same item. You decide exactly when and where the extended text will be used by the combination of language code, time interval and type of purchase or sales document you specify for the extended text.
Post Codes
You can use the Post Code window to set up links between specific postcodes and cities.
When you enter the postcode in the Post Code field, the program will fill in the City field automatically. This can be useful when working with orders, invoices, vendor cards, customer cards, and so on.
Territories
You can use the Territory window to set up territory codes. After a territory code has been set up, you can enter it in the Territory Code field on a contact, customer, vendor or bank account card.
In the Relationship Management application area, you can assign territory codes to your contacts and then use this information create segments.
Languages
You use the Languages window to set up language codes. The Languages window contains a line for each language. You can set up as many languages as necessary.
General Ledger 2-21
The program is also multi-language enabled. You can change the language in which the program displays forms and tables, to match the language of your users. This can be done at the user level, which means that it is now possible, for example, for a US and a Danish worker to work on the same database.
Note
Information entered in the database will always be in the language it has been entered, unless you have also entered a translation text for the data.
Countries
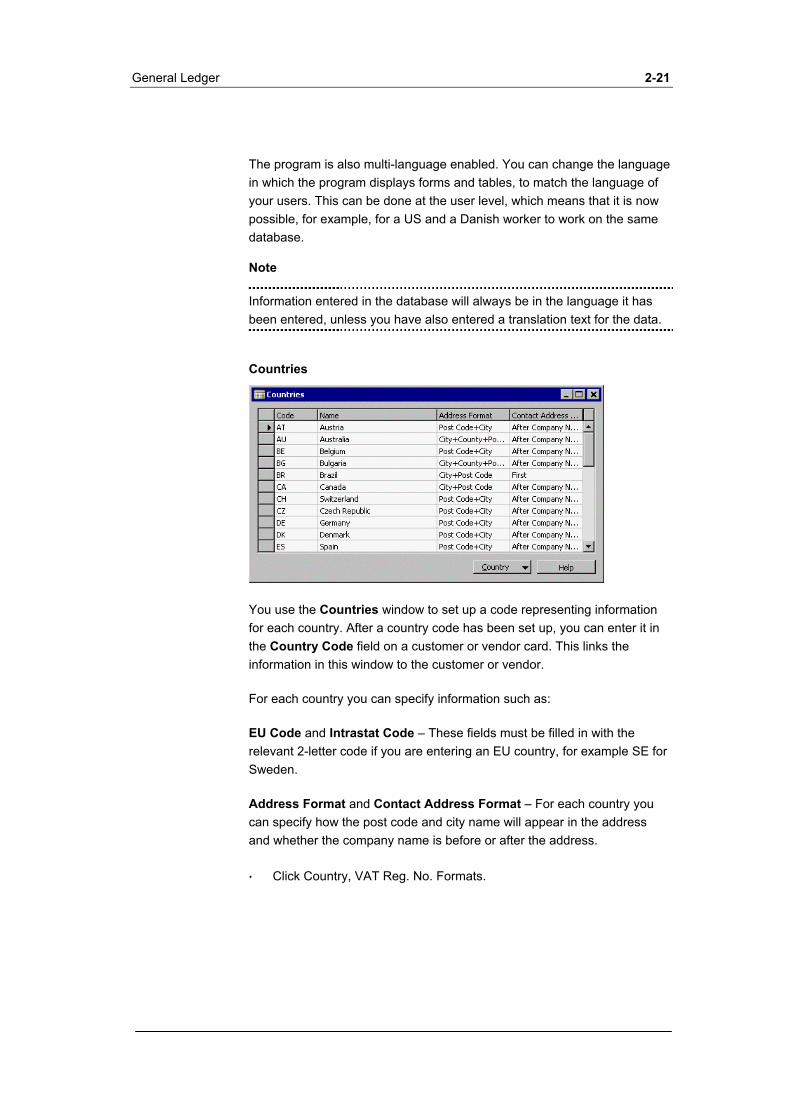
You use the Countries window to set up a code representing information for each country. After a country code has been set up, you can enter it in the Country Code field on a customer or vendor card. This links the information in this window to the customer or vendor.
For each country you can specify information such as:
EU Code and Intrastat Code – These fields must be filled in with the relevant 2-letter code if you are entering an EU country, for example SE for Sweden.
Address Format and Contact Address Format – For each country you can specify how the post code and city name will appear in the address and whether the company name is before or after the address.
Click Country, VAT Reg. No. Formats. ·

2-22 Navision Attain Essentials
In the VAT Registration No. Formats window, you specify the format of the country’s VAT registration number.
# - Here you can only enter a digit. @ - Here you can only enter a letter (a-z or A-Z). ? - Here you can enter any character.
You can use characters other than those listed above if the characters are always present in a country's VAT registration number. For example, if all Austrian VAT registration numbers are to begin with ATU, then it would be entered as ATU########.
Currencies
The program makes it easy to handle different currencies. For example, you can invoice in foreign currencies, post in foreign currencies, record exchange rate differences and generate statements in foreign currencies. You can post to a customer or vendor in an unlimited number of currencies. The resulting ledger entries will show the currency of each transaction.
Creating Currencies
To open the Currencies window, on the General Ledger menu, click Setup, General and then Currencies.
·

General Ledger 2-23
The window contains a line for each currency. You must set up a code for each currency you use if you buy or sell in currencies other than LCY, have receivables or payables in other currencies, or record G/L transactions in both LCY and an additional reporting currency.
In the Currencies window, you must specify the following for each currency:
Amount Rounding Precision field - You must define the precision for the rounding of values in the Amount field on documents.
Amount Decimal Places - You can specify the number of decimal places the program will display. You can set up a fixed number or a minimum and maximum number (separated by a colon). The default setting is 2:2. This means the amount will be shown with minimum 2 decimal and maximal with 2 decimal places.
Invoice Rounding Precision – This works like any other amount rounding, but relates to the invoice amount. You will specify whether you want the program to use invoice rounding in the Sales & Receivables Setup and Purchase & Payables Setup tables.
Unit Amount Rounding Precision works like the other rounding precisions, but in relation to the unit amount.
Unit Amount Decimal Places - You can also specify the number of decimal places for the unit amount.
In the Appln. Rounding Precision field you can specify the size of the interval that will be allowed as a rounding difference when you apply entries in different currencies to one another.
Example
2-24 Navision Attain Essentials
A customer payment in LCY is applied to a customer invoice in EUR and an application rounding precision of 0.02 is specified for LCY, then the program will accept a difference of LCY 0.02 or less, and the program will completely close the entries involved in the application. The rounding difference is posted to the account specified in the Debit Curr. Appln. Rndg. Acc. field or the Credit Curr. Appln. Rndg. Acc. field in the Customer Posting Groups window.
Realized Gains Acc., Realized Losses Acc., Unrealized Gains Acc. and Unrealized Losses Acc. – For every currency that you allow the exchange rate to change, you must specify which GL accounts you want to post realized gains and losses to. Unrealized amounts are expected gains/losses as a result of exchange rate adjustments, while the realized amount is the difference between the LCY value of an invoice and the payment that closes the invoice.
Setting up Currency Exchange Rates
You must also set up exchange rates for each currency in the Currency Exchange Rates window.
To open the Currency Exchange Rates window, in the Currencies window click Exch. Rates.
·
You use the Currency Exchange Rates window to register exchange rates and specify from which dates the exchange rates are valid. For example, you can enter daily exchange rates, monthly exchange rates or quarterly exchange rates for each foreign currency.
The Relational Currency for each exchange rate is the base currency that you record your exchange rates in. This is usually the LCY and is therefore left BLANK. You then specify the relative amounts of each currency that make up the exchange rate.
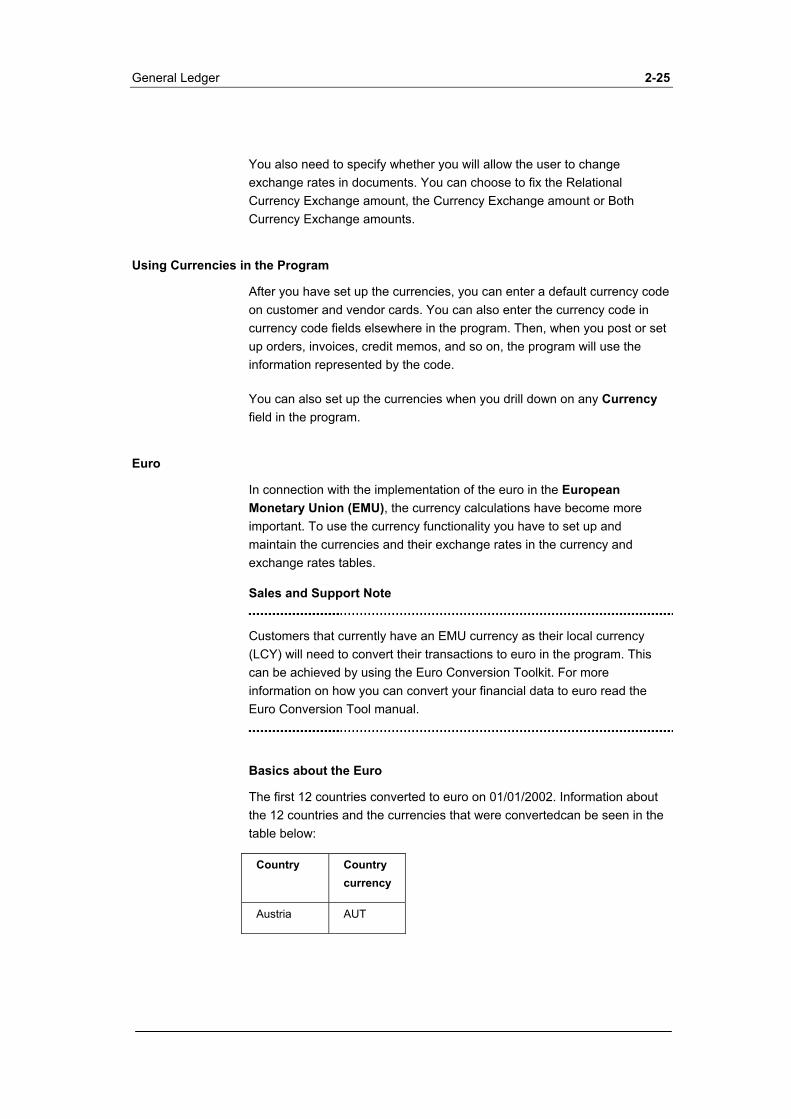
General Ledger 2-25
You also need to specify whether you will allow the user to change exchange rates in documents. You can choose to fix the Relational Currency Exchange amount, the Currency Exchange amount or Both Currency Exchange amounts.
Using Currencies in the Program
After you have set up the currencies, you can enter a default currency code on customer and vendor cards. You can also enter the currency code in currency code fields elsewhere in the program. Then, when you post or set up orders, invoices, credit memos, and so on, the program will use the information represented by the code.
You can also set up the currencies when you drill down on any Currency field in the program.
Euro
In connection with the implementation of the euro in the European Monetary Union (EMU), the currency calculations have become more important. To use the currency functionality you have to set up and maintain the currencies and their exchange rates in the currency and exchange rates tables.
Sales and Support Note
Customers that currently have an EMU currency as their local currency (LCY) will need to convert their transactions to euro in the program. This can be achieved by using the Euro Conversion Toolkit. For more information on how you can convert your financial data to euro read the Euro Conversion Tool manual.
Basics about the Euro
The first 12 countries converted to euro on 01/01/2002. Information about the 12 countries and the currencies that were convertedcan be seen in the table below:
Country Country currency
Austria AUT

2-26 Navision Attain Essentials
Country Country currency
Belgium BEF
Finland FIM
France FRF
Germany DEM
Greece GRD
Ireland IEP
Italy ITL
Luxembourg LUF
Netherlands NLG
Portugal PTE
Spain ESP
For any other countries that in future also wish to participate in the EMU and convert their local currency to euro, the principals for conversion are expected to be the same as it is now. Local currencies that are replaced with euro will have a fixed exchange rate with the euro. To calculate the exchange rate with any foreign currencies, this fixed exchange rate must be used in combination with the exchange rate of the foreign currency to euro.
First, the program calculates the foreign currency amount in euro. The program then converts the euro value to the local currency using the fixed exchange rate. It is not allowed to calculate directly from any currency to the local currency. This method of conversion is termed triangular conversion. For example: You want to convert US dollars into your LCY, which is an EMU currency. You have to convert the US dollar into euro in the first step and then into the EMU currency.
Setting up EURO currencies
In the Currencies window you must specify which currencies belong to the EMU currency by placing a check mark in the EMU Currency field.
General Ledger 2-27
Click on the Exch. Rates button to open the Currency Exchange Rates window for the relevant currency code. To set up the triangular conversion, all currencies that are to be replaced by the euro, must have a relational currency of EUR and except for the euro itself which has a relational currency of LCY.
When you set up a new currency that is an EMU currency, the relational exchange rate will be the euro. Please notice, that the EMU currencies have a fixed exchange rate. You have to specify this in the Fix Exchange Rate Amount field. When you have chosen the option Both, is it not possible to change the exchange rate in the Currency Exchange Rates window.
Exercise 2 Create a new currency
Create a new currency code HUF for “Hungarian forint”.
Use the same G/L accounts for gains and losses as in the other currencies. Set up the exchange rate 380.011 HUF = 1 GBP (LCY).
The starting date is 01/01/2000.
You can find the steps and solution to this exercise in Appendix D.
Users
In the User Setup window, you can set up users and specify posting date ranges. This gives greater control over data entry. The program can be set to track the amount of time a user is on the system, and a different Main Menu can be specified for each user so that a different menu path is followed.
On the General Ledger menu, click Setup, Users, and then User Setup.
·

2-28 Navision Attain Essentials
In the posting range fields you can specify user specific posting periods. These periods overwrite the company wide posting period specified in General Ledger Setup window.
You can specify a different Main Menu than the default. If you have a user you want to access only the Sales & Receivables area you can specify the Form ID for the Sales & Receivables Menu. This way the user will see only the Sales & Receivables menu, when logging in to the system and not the default Main Menu. This can be very useful when setting up security.
You can also enter a default sales, purchase or service responsibility center for a user.
User Time Registers
To open the User Time Registers window, on the General Ledger menu, click Setup, Users, and then User Time Registers.
You use the User Time Register window to have the program register how much time an individual user works on the accounts. The User Time Register window is useful for accounting firms that want to register the
General Ledger 2-29
amount of time spent working on each company. You may also want to see who has worked on the companies and in which period the work was carried out.
The User Time Registers window displays the user ID, login date and amount of time spent in the program. This is not a full-fledged time billing program. It is, however, helpful in tracking general time in the program and is a good basis for modifications for time billing.
Printer Selections
In Printer Selections you can assign a default printer by user, report, or a combination of the two. You can set up reports such as invoices or checks to always be generated on a specific printer with the correct forms.
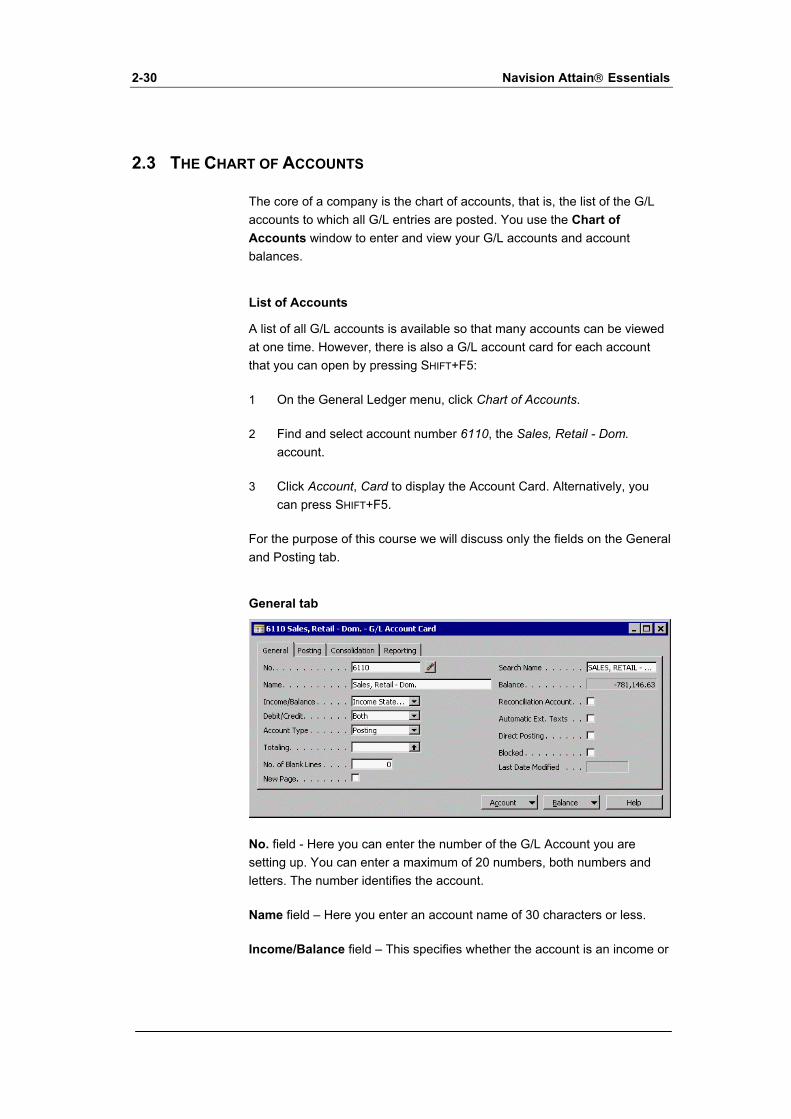
2-30 Navision Attain Essentials
2.3 THE CHART OF ACCOUNTS
The core of a company is the chart of accounts, that is, the list of the G/L accounts to which all G/L entries are posted. You use the Chart of Accounts window to enter and view your G/L accounts and account balances.
List of Accounts
A list of all G/L accounts is available so that many accounts can be viewed at one time. However, there is also a G/L account card for each account that you can open by pressing SHIFT+F5:
1 On the General Ledger menu, click Chart of Accounts.
2 Find and select account number 6110, the Sales, Retail - Dom. account.
3 Click Account, Card to display the Account Card. Alternatively, you can press SHIFT+F5.
For the purpose of this course we will discuss only the fields on the General and Posting tab.
General tab
No. field - Here you can enter the number of the G/L Account you are setting up. You can enter a maximum of 20 numbers, both numbers and letters. The number identifies the account.
Name field – Here you enter an account name of 30 characters or less.
Income/Balance field – This specifies whether the account is an income or
General Ledger 2-31
balance sheet account. This field is important in determining what accounts will be closed at the fiscal year end.
Debit/Credit field - This field allows the user to determine the normal type of transactions that are made to this account. It does not restrict the type of transactions, only enhances the reporting ability.
Account Type field – This field identifies the purpose of the account.
Posting - Used to accumulate transactions. Heading - Used for descriptive purposes only. Total - Used to total a range of accounts. The user determines the ranges for these accounts. These accounts can be useful for totaling groups of accounts that are not in the same classification (Gross Income). Begin-Total and End-Total - The Begin-Total account marks the beginning of an account range and the End-Total account marks the end of the range. Each End-Total account has an account range in the Totaling field. The range can be calculated or entered manually. If you do not manually enter the range, the Indentation field is used to determine the beginning account for the range. The ending account for the range should always be the End-Total Account that contains the range. You can also create a multi-level chart of accounts with Begin-Total and End-Total accounts nested within other Begin-Total and End-Total accounts.
Totaling field - This field is used to determine which accounts will go into a Total or an End-Total entry.
No. of Blank Lines, New Page and Indentation fields – These fields determine how the account appears in reports. They determine
The number of blank lines before the account is displayed in a report. ·
·
·
If a new report page is printed after the account is displayed in the report.
The number of spaces the account is indented from the standard report margin.
Reconciliation Account field - Here you can choose whether this G/L account will be included in the Reconciliation window in the general journal. You can find the Reconciliation window by clicking Posting, Reconcile or CTRL+F9 in journals. The Reconciliation window is used after you have filled in a general journal (but before you post it) to reconcile the accounts being posted to in the journal. In the demonstration company, the cash accounts have a check mark in the Reconciliation Account field.

2-32 Navision Attain Essentials
This is so that the liquid resources can be reconciled with the day's payments received and made.
Automatic Ext. Texts field – If you have placed a check mark in this field, any extended text description that has been added for the account will be added to sales and purchase documents in the description field. If you do not want to have the extended description added automatically, there is an option in the documents to add it manually. To create the extended text, click Account, Extended Text. Automatic Ext. Texts can be set up for accounts, items, and resources.
Direct Posting field – This field indicates if it is allowed to post directly into this account from a journal line.
Blocked field – Here you can choose to block the account so that entries cannot be posted to it. To block the account, place a check mark in the check box. Sometimes, for various reasons, you may want to block certain accounts so that entries cannot be posted to them. You can modify an account's blocked or open status in this field.
Posting tab
The Posting tab you contains the information the program uses for recording the G/L and VAT transactions.
Gen. Posting Type - The code defines whether the account will be used only in connection with a Sale or Purchase transaction or with both kinds of transactions. The program uses the Gen. Posting Type field, together with the VAT Bus. Posting Group and VAT Prod. Posting Group fields, to find the account to which the program posts VAT. This field should be filled in only for revenue and expense accounts where VAT is involved. For other accounts, select Blank.
·

General Ledger 2-33
Gen. Bus. Posting Group – The default general business posting group for the account. The general business posting group code indicates whom you sell to or buy from. The program uses this code together with the Gen. Prod. Posting Group and Gen. Posting Type fields, to find the G/L accounts to which the program posts sales, purchases, discount amounts, COGS and inventory adjustments.
·
·
·
·
Gen. Prod. Posting Group – The default general product posting group for the account. The general product posting group code indicates which type of item you sell or purchase. The program uses this code together with the Gen. Bus. Posting Group and Gen. Posting Type fields, to find the G/L accounts to which the program posts sales, purchases, discount amounts, COGS and inventory adjustments.
VAT Bus. Posting Group – The default VAT business posting group for the account. The program uses this code together with the VAT Prod. Posting Group and Gen. Posting Type fields to determine VAT % and VAT calculation type and to find the G/L accounts to which the program posts VAT.
VAT Prod. Posting Group – The default VAT product posting group for the account. The program uses this code together with the VAT Bus. Posting Group and Gen. Posting Type fields to determine VAT % and VAT calculation type and to find the G/L accounts to which the program posts VAT.
Note
It is possible to set up a default VAT business posting group for a general business posting group. When you assign the posting group in the Gen. Bus. Posting Group field, the program automatically copies the default VAT business posting group to the VAT Bus. Posting Group field. You will learn more about this in the Posting Groups section of this chapter.
After you have attached the posting type and all the posting group codes to a G/L account, these codes will automatically be inserted in a journal, sales or purchase line when you select the G/L account.

2-34 Navision Attain Essentials
The Account Button
Each account card has an Account button with the following functions:
List – Display a list of all accounts. Note, this is not the same as the chart of accounts since it does not include and balance or amount information.
·
·
·
·
·
·
Ledger Entries – Display all ledger entries for the account.
Comments – Display or enter any additional comments relating to the account.
Dimensions – Display or enter default dimensions for the account.
Extended Texts – Display or enter extended text for the account.
Receivables-Payables

General Ledger 2-35
This report provides a summary of expected net operational cash flow from customers and vendors over time. It is simply a summary of the open customer and vendor ledger entries sorted by their Due Date instead of Posting Date. You can specify the period you wish to view, such as daily, monthly, quarterly and so on. If you wish to see the expected net balance of outstanding customer and vendor balances at any particular date, you should choose the Balance at Date view. If you wish to see the expected cash flow movement for a particular period, you should choose the Net Change view.
The Balance Button
The Balance button is used to show information about the balances and transaction amounts for the account.
G/L Account Balance – Displays the balance or net change for the G/L account over time.
·
·
·
G/L Balance – Displays the balance or net change for all G/L accounts for a specific time period.
G/L Balance by Dimensions – Displays balance or net change information for all accounts. You can choose the information shown in columns and lines from G/L account, Period or the two Global Dimensions.
Chart of Accounts Window
Close the G/L account card to return to the Chart of Accounts window.

2-36 Navision Attain Essentials
The Chart of Accounts window contains all fields on the G/L Account Card but in table format. In addition to the information on the account cards, it also shows the current Net Change and Balance information for the accounts.
Note
If you have account numbers that are numeric only, they will be sorted differently in the Chart of Accounts window depending on whether you use the Navision Server or the Microsoft SQL Server. With the Navision Server account numbers will be sorted in ascending numerical order. With the Microsoft SQL Server, account numbers will be sorted in ascending alphabetical order. As a result, care should be taken when setting up a numeric account number structure to ensure you have the correct ordering of accounts in your chart of accounts.
At the bottom of the Chart of Accounts window is the Functions button. Its function, Indent Chart of Accounts, is used to format the Total, Begin-Total and End-Total fields and to indent accounts according to the defined hierarchy. The hierarchy is established using the account types Begin-Total and End-Total. Account numbers between these will be included in the end-total range in the Totaling field.
Sales Note
The program's chart of accounts is different from other programs' because it can include only the summary G/L accounts. Traditionally, detailed dimensional analysis of transactions was achieved by setting up a detailed chart of accounts with a large number of accounts. In the program, detail can now be stored in separate tables as dimensions and only assigned to transactions at the time the transaction is recorded. This results in a smaller chart of accounts while still maintaining the necessary detailed
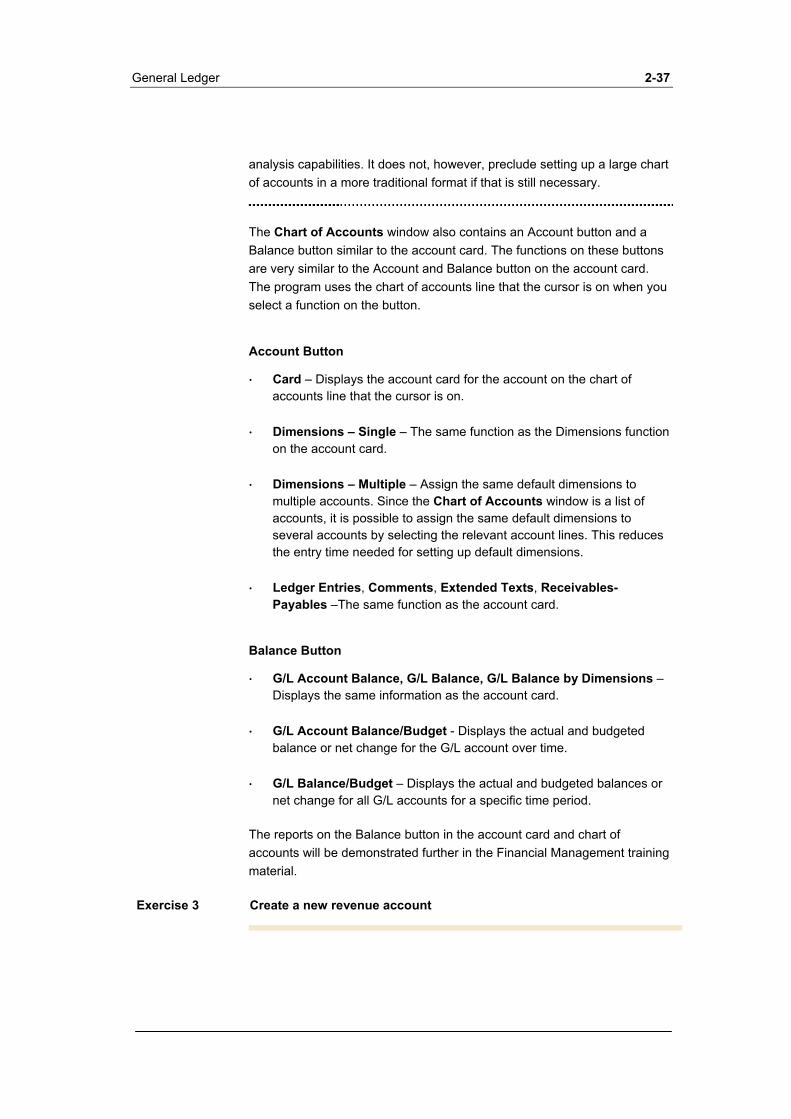
General Ledger 2-37
analysis capabilities. It does not, however, preclude setting up a large chart of accounts in a more traditional format if that is still necessary.
The Chart of Accounts window also contains an Account button and a Balance button similar to the account card. The functions on these buttons are very similar to the Account and Balance button on the account card. The program uses the chart of accounts line that the cursor is on when you select a function on the button.
Account Button
Card – Displays the account card for the account on the chart of accounts line that the cursor is on.
·
·
·
·
·
·
·
Dimensions – Single – The same function as the Dimensions function on the account card.
Dimensions – Multiple – Assign the same default dimensions to multiple accounts. Since the Chart of Accounts window is a list of accounts, it is possible to assign the same default dimensions to several accounts by selecting the relevant account lines. This reduces the entry time needed for setting up default dimensions.
Ledger Entries, Comments, Extended Texts, Receivables-Payables –The same function as the account card.
Balance Button
G/L Account Balance, G/L Balance, G/L Balance by Dimensions – Displays the same information as the account card.
G/L Account Balance/Budget - Displays the actual and budgeted balance or net change for the G/L account over time.
G/L Balance/Budget – Displays the actual and budgeted balances or net change for all G/L accounts for a specific time period.
The reports on the Balance button in the account card and chart of accounts will be demonstrated further in the Financial Management training material.
Exercise 3 Create a new revenue account

2-38 Navision Attain Essentials
Open the Account card window and create a new G/L account for Sales Miscellaneous with the No. 6140. The account has the following features:
It is an income statement account and direct posting is allowed.
Select the following posting groups in the Posting tab:
Gen Posting Type Sale Gen. Bus. Posting group NATIONAL Gen. Prod. Posting group MISC VAT Bus. Posting group NATIONAL VAT Prod. Posting group VAT25
You don’t need to enter anything in the consolidation and reporting tab of this window.
You can find the steps and solution to this exercise in Appendix D.

General Ledger 2-39
2.4 POSTING GROUPS
If you use other application areas in addition to General Ledger and therefore post to accounts such as Customers, Vendors, Items or Resources you need to set up a link between these accounts and the G/L accounts. If you only use the General Ledger application area, it is not necessary to set up posting groups.
Posting Groups are used to create these links between the different application areas and the General Ledger application area. As a result, you must have set up the chart of accounts before you can create the posting groups. When sales, purchases, and other transactions are recorded and posted where a specific G/L Account is not specified directly, the Posting Groups provide the mapping to the correct accounts. For example, in the sale of an item to a Customer on a Sales Order, no general ledger accounts are specified directly. However, upon completing the Navigate function, the review of a posted invoice shows entries that were posted to the G/L. This result occurs because the customers and items were assigned Posting Groups to identify the G/L accounts.
There are three major types of posting groups that deal with selling inventory and resources to customers and buying inventory from vendors:
Specific Posting Groups ·
·
·
General Posting Groups
VAT Posting Groups
We will analyze the Specific Posting Groups initially, then we’ll take a look at General Posting Groups and VAT Posting Groups, and finally review how all of the Posting Groups fit together by looking at a posted sales invoice.
Specific Posting Groups
The primary purpose for Specific Posting Groups is to identify the primary Balance Sheet Account for each supporting Ledger. For instance, the total outstanding accounts receivable balance of all of the customers should tie to the total balance of the Accounts Receivable accounts in the Balance Sheet. Therefore, specific posting groups are assigned to Customers, Vendors, Items, Bank Accounts, and Fixed Assets. These posting groups create the direct link to the primary Balance Sheet Account for each Master Item. The specific posting groups that should be set up are as follows:
2-40 Navision Attain Essentials
Customer Posting Group - This posting group will map the accounts receivable account, payment discount accounts, invoice and application rounding accounts, interest and fee accounts relating to customers.
Vendor Posting Group - This posting group will map the accounts payable account, payment discount accounts, invoice and application rounding accounts, interest and fee accounts relating to vendors.
Inventory Posting Group – This posting group is used to specify the inventory. Each Inventory Posting Group is then combined with each appropriate Location Code in the Inventory Posting Setup window. For each combination you can map the inventory accounts, WIP account and other variance accounts relating to inventory in the Chart of Accounts.
Bank Account Posting Groups - This posting group is used to map a bank G/L account to a bank account in the program.
Job Posting Groups – This is covered in the Financial Management training material.
Fixed Asset Posting Groups –This is covered in the Financial Management training material.
General Posting Groups
There are two kinds of General Posting Groups:
General Business Posting Group – specifying “who we sell to” (Customers) and “who we buy from” (Vendors).
·
·
·
General Product Posting Group – specifying, “what we sell” (Items and Resources) or “what we buy” (Items).
General Business Posting Groups
You assign business posting groups to customers and vendors. In the General Business Posting Groups window, you enter a code and a description for the posting group.
On the General Ledger menu, click Setup, General Posting Groups, Business Posting Groups.

General Ledger 2-41
When setting up business groups, you must consider how many groups you need for breaking down sales by customers and how many groups you need for breaking down purchases by vendors. The business groups can be set up to group customers and vendors by geographical area (Domestic, EU countries, Overseas, and so on) or type of business (retail, industrial, wholesale, service) or to distinguish between private entities and government agencies. It is also possible to not set up any General Business Posting Groups if you do not wish to distinguish sales and purchases by location. The number of groups will be directly related to the chart of accounts.
Sales Note
Traditionally, detailed analysis of financial data could be achieved by setting up many detailed posting groups and a large number of specific G/L sales and purchases accounts. You can now perform detailed sales and purchase analysis by assigning dimensions to general ledger transactions. By classifying and analysing transactions by dimensions it is possible to reduce the level of detail needed in the chart of accounts structure. As a result, the number of accounts created in the chart of accounts also can be reduced.
In the General Business Posting Groups window you can enter the following information:
Code – The code that will be assigned to customers, vendors, and G/L accounts in the program. Description – A description of the general business posting group. Def. VAT Bus. Posting Group – Select a VAT business posting group that will be used as a default for transactions involving this General Business Posting Group. Auto Insert Default – If you place a check mark in this field, whenever you

2-42 Navision Attain Essentials
assign the General Business Posting Group to a customer, vendor or G/L account, the program will automatically fill in the VAT Bus. Posting Group for the customer, vendor or G/L account with the Def. VAT Bus. Posting Group.
Product Posting Groups
You assign product posting groups to items and resources. In the Product Posting Groups window, you enter a code and a description for the posting group.
On the General Ledger menu, click Setup, General Posting Groups, Product Posting Groups.
·
When setting up product groups, you must consider:
How many groups you need for breaking down sales by products (items and resources)
·
· How many groups you need for breaking down purchases by items.
The Product Posting Groups as shown above are broken down into Raw Materials, Retail, Resources, Capacities, Miscellaneous with VAT and Miscellaneous without VAT. The Product Posting Groups provide the major product groups that will be reflected in the Chart of Accounts. Each Inventory Item and Resource set will be assigned a Product Posting Group.
Exercise 4 Create a new Product Posting group
Create a new General Product Posting group with the Code HOME and the description Home & Garden. Enter a default VAT Product Posting

General Ledger 2-43
group code VAT25. Answer any questions asked by the program with Yes.
You can find the steps and solution to this exercise in Appendix D.
General Posting Setup
The General Posting Setup window is a matrix that combines business and product posting groups. With each combination the user can determine to which accounts the program will post:
Sales & Purchases Sales and Purchase Credit Memos Sales and Purchase invoice discounts and payment discounts Cost of Goods Sold and Inventory Adjustments Direct Cost Applied and Overhead Applied Purchase Variances
On the General Ledger menu, click Setup, General Posting Groups, General Posting Setup.
·
The General Posting Setup window appears.
For each combination of business and product posting groups you can assign a different set of G/L accounts. As a result, it is possible to post the sale of the same item to different sales accounts in the G/L due to customers being assigned different business posting groups.

2-44 Navision Attain Essentials
Copying Posting Setup Lines
The more product and business posting groups you have, the more lines there will be in the General Posting Setup window. This can mean a lot of data entry to set up the general posting setup for the company. While there may be many different combinations of business and product posting group, it is possible that different combinations will still post to the same G/L accounts. To limit the amount of manual entry, you can copy the G/L accounts from an existing line in the General Posting Setup window.
1 You must first enter the Gen. Bus. Posting Group and Gen. Prod. Posting Group of the line you wish to copy to.
2 In the General Posting Setup window select the line you wish to copy to and click Copy.
In the Copy – General Posting Setup batch job, you specify the Gen. Bus. Posting Group and Gen. Prod. Posting Group of the line you wish to copy from. The program will then copy all accounts from that line, or only the specific account group that you select to copy.
Creating Setup Lines for a Specific Product or Business Posting Group
You can also create posting setups using the Setup button in the Gen. Business Posting Groups or Gen. Product Posting Groups windows. If you select a line in the Gen. Product Posting Groups window and click the Setup button, the General Posting Setup window will open. The posting setup lines will be filtered to only show those lines with the general product posting group from the line you selected in the Gen. Product Posting Groups window. If you have not entered any lines, the program will fill in the Gen. Prod. Posting Group field on the first empty line based on the line you selected in the Gen. Product Posting Groups window.

General Ledger 2-45
The process is the same with the Gen. Business Posting Groups window.
Exercise 5 Set up a new General Posting group
Open the General Posting Group window and create a new line. Enter the combination of the Gen. Bus. Posting Group code NATIONAL and the new Gen. Product Posting Group code you created in the previous exercise. Use the same G/L accounts as the combination of NATIONAL and RETAIL.
You can find the steps and solution to this exercise in Appendix D.
VAT Posting Groups
Value-added tax (VAT) is a transaction tax. VAT is paid by the end consumer, including businesses. You will need to set up VAT Posting Groups to be able to specify the VAT percentage the program needs to calculate depending on ‘who we sell to’ or ‘who we buy from’ and ‘what we sell’ or ‘what we buy’.
The principles for setting up VAT Posting Group, both Business and Product, are similar to those used for setting up General Posting Groups.
To set up VAT, you first create VAT business posting group codes for customers and vendors, and then create VAT product posting group codes for items and resources.
To open the VAT Business Posting Group window click Setup, VAT Posting Group and then Business Posting Groups.
·

2-46 Navision Attain Essentials
You enter codes for the VAT business posting groups in the VAT Business Posting Group window. You can enter a maximum of 10 characters, both numbers and letters. The VAT business posting group codes in Cronus are set up so that VAT is calculated and posted according to the location (country) of the customer or vendor involved in the transaction.
Use codes that are easy to remember and that describe the business group, for example, EU or OVERSEAS. The code must be unique - you cannot have the same code twice in one table. You can set up as many codes as you like.
Press ESC to close the window. ·
Note
The VAT Business Posting Groups in Cronus are recommended as the minimum number of VAT Business Posting Groups. In some cases, there may be a need for more detailed groups. For example, a different VAT % may apply within NATIONAL customers for the same item, depending on whether the customer is a person or a company.
Open the VAT Product Posting Group window by clicking Setup, VAT Posting Group and then Product Posting Groups.

General Ledger 2-47
You enter codes for the VAT product posting groups in the VAT Product Posting Group window. That works in a similar way to entering codes for VAT business posting groups. The VAT product group codes determine calculation and posting of VAT according to the type of item being purchased or the type of item or resource being sold.
Use codes that are easy to remember and that describe the product posting group, for example, NO-VAT for miscellaneous without VAT, VAT10 miscellaneous with 10 % VAT, VAT25 for miscellaneous with 25 % VAT, and so on.
You must also set up combinations of VAT business posting groups and VAT product posting groups in the VAT Posting Setup window. To open the VAT Posting Setup window click Setup, VAT Posting Group and then VAT Posting Setup.
You fill in a line for each combination of VAT business posting group and VAT product posting group. For each combination, you can fill in the VAT

2-48 Navision Attain Essentials
percent, VAT calculation type and G/L account numbers for posting of VAT related to sales, purchases, and reverse charge VAT. It is also possible to specify for each combination, whether VAT will be recalculated when a payment discount is granted or received.
You can enter as many combinations as necessary. If you want to group VAT Posting Setups with similar attributes, you can define a VAT Identifier for each group and assign the identifier to the group members. A typical use is to group setups with similar VAT percentages. In the demonstration company, VAT identifiers have been created based on the VAT percentages.
To make the entry process easier, you can copy information from existing lines in the VAT Posting Setup window. The process is similar to copying lines in the general posting setup.
1 You must first enter the VAT Bus. Posting Group, VAT Prod. Posting Group and VAT Identifier of the line you wish to copy to.
2 In the VAT Posting Setup window select the line you wish to copy to and click Copy.
In the Copy – VAT Posting Setup batch job, you specify the VAT Bus. Posting Group and VAT Prod. Posting Group of the line you wish to copy from. The program will then copy all information from that line, or only the information you select to copy.
VAT% etc. – VAT%, VAT Calculation Type, Unrealized VAT Type and the Adjust for Payment Discount settings will be copied.
·
·
·
Sales Accounts – All sales account information will be copied.
Purchases Accounts – The Purchases and Reverse Charge account information will be copied.

General Ledger 2-49
Similar to general posting groups, you can also create new VAT posting setup lines by clicking the Setup button in the VAT Business Posting Groups and VAT Product Posting Groups windows.
VAT Calculation Type
The program has four methods for calculating VAT:
Normal VAT - Use this option to have the program calculate VAT for items sold or purchased with this particular combination of business posting group and product posting group code. In this case, the seller of the item calculates and withholds the VAT.
Reverse Charge VAT - Use this option when you trade with other countries within the EU where the purchaser must calculate and settle VAT accounts with the tax authorities. You must also fill in the Reverse Chrg. VAT Acc. field. When you sell goods with reverse charge VAT, you neither calculate nor withhold VAT. When you purchase goods, the program will calculate the VAT amount, debit the Purchase VAT Account and credit the Reverse Chrg. VAT Account.
Full VAT - Use this option when the amount you want to post that has this particular combination of VAT business posting group and VAT product posting group consists entirely of VAT. This option can be useful if, for example, you wish to record import VAT or make a corrective entry in order to correct a VAT calculation error.
Note
If you do make a corrective entry using Full VAT, it will not refer to the original VAT entries. This may make the preparation of the VAT Statement

2-50 Navision Attain Essentials
more difficult.
Sales Tax - This option is only used if the program must handle US sales tax instead of VAT.
Adjust for Payment Discount
Click to enter a check mark in this field if you want the program to recalculate VAT amounts when you post payments that trigger payment discounts.
For example, if a customer receives payment discounts for a timely payment, the program will recalculate the VAT amount using the same VAT % as when you originally posted the sales invoice for this customer. The renewed calculation will be based on the invoice amount less the payment discount. Your sales VAT account will then be reduced by the difference between the original and the new VAT amount.
Before you can use this feature you must have activated it by placing a check mark in the Adjust for Payment Disc. field in the General Ledger Setup window.
Rounding for Documents
Rounding on sales/purchase documents is now easier to understand than in earlier versions of the program. Values that result in posted values are rounded and displayed in a way that corresponds to the final precision (after posting). In earlier versions of the product there might be discrepancies between the VAT calculations users see and the VAT entries that are posted and VAT on external documents might not be in accordance with the system-calculated VAT. To solve this problem, VAT is now calculated for an entire document. This means that VAT is calculated for all the lines in a document, and not per line, using the VAT identifier.
Reverse Charge VAT for Trade between EU Countries
Companies in the EU must use Reverse Charge VAT when trading with other companies in the EU.
Note
This rule ONLY applies when trading with companies that are registered as VAT liable in another EU country. If you do business directly with consumers in other EU countries, you should contact your tax authorities

General Ledger 2-51
for the applicable VAT rules.
Purchases from EU Countries
When you post a purchase from a vendor in another EU country, VAT must be calculated using the rate applicable in your own country. On the VAT statement, the VAT amount is added to the domestic sales VAT and to the domestic purchase VAT. This means the calculated VAT does not affect the VAT payable. You must report the value of purchases from EU countries (base amount used to calculate purchase VAT) separately on your VAT statement.
In order to have VAT on purchases from EU countries treated correctly in the program, you should:
Set up VAT Bus. Posting Group and VAT Prod. Posting Group combinations with Reverse Charge VAT in the VAT Calculation Type field. The G/L account to which reverse charge VAT will be posted must also be entered in the Reverse Chrg. VAT Account field.
·
·
·
Assign the VAT Bus. Posting Groups in the VAT Bus. Posting Group field on the Vendor Card of each EU vendor. You should also enter the vendor's VAT registration number in the VAT Registration No. field on the Foreign Trade tab.
When you post a purchase from a vendor in another EU country, the program calculates the VAT amount and debits the purchase VAT account and credits the reverse charge VAT account. Thus, the posting of VAT does not affect the company's financial statements. The program also creates a VAT entry containing the VAT base amount (purchase price before VAT) and specifies the amount is a reverse charge VAT amount.
Sales to EU Countries
VAT is not calculated on sales to VAT-liable companies in other EU countries. You must report the value of such sales EU countries separately on your VAT statement.
In order to have VAT on purchases from EU countries treated correctly in the program, you should:
If you have already set up lines in the VAT Posting Setup window for purchases from EU Countries, you can also use these for sales. Otherwise you must set up a line for sales with exactly the same information as described earlier for purchases.
2-52 Navision Attain Essentials
Assign the VAT Bus. Posting Groups in the VAT Bus. Posting Group field on the Invoicing tab of the Customer Card of each EU customer. You should also enter the customer's VAT registration number in the VAT Registration No. field on the Foreign Trade tab.
·
When you post a sale to a customer in another EU country, the program calculates the VAT amount and creates a VAT entry with the information about the reverse charge VAT and the VAT base (the amount used to calculate the VAT amount). No entries are posted to the VAT accounts in the general ledger.
Exercise 6 Create some new VAT Posting groups
There is to be a change in the EU VAT% from 25% to 26%.
Create a new VAT Product Posting Group called VAT26. Enter a line in the VAT Posting Setup window for each combination of the new VAT Prod. Posting Group with the existing VAT Bus. Posting Groups (EU, NATIONAL and EXPORT).
For each new combination of VAT Business Posting Group with the new VAT26 posting group, the same VAT information and G/L accounts as with the VAT25 posting group will be used.
Normally you should create new G/L accounts to post the G/L entries with the new VAT percentage to separate accounts. But for this exercise we will not do this.
You can find the steps and solution to this exercise in Appendix D
Determining Posting Groups
We have discussed the General Business Posting Group and the General Product Posting Group. So, how did we determine how we were going to group these posting groups?
The Chart of Accounts served as the guide to establishing these groups. Let’s take a look at the Chart of Accounts. Since we are discussing General Posting Groups, we will focus on the Income Statement Accounts because the General Posting Groups deals specifically with these types of accounts.

General Ledger 2-53
The primary classification of the Sales accounts is Resources, Raw Materials and Retail. These divisions represent the products that Cronus sells. If you scroll further down in the Chart of Accounts, you will see that there are also Purchases Accounts for Retail and Raw Materials. These divisions represent the products that Cronus purchases. Therefore, the information from the General Product Posting Group setup directly supports the Chart of Accounts setup in Cronus.
The accounts are then further broken down into Domestic, EU and Export for the Sales Accounts and the Purchases Accounts. These are the classification of the customers and vendors that Cronus sells to or purchases from. This information from the chart of accounts supports the General Business Posting Group setup in Cronus.
Posting Transactions to the G/L Using Posting Groups
We will now analyze the effect on the Chart of Accounts and the impact of the posting setup through an analysis of a previously posted transaction. Let's take a look at a simple sale transaction. The transaction involves a

2-54 Navision Attain Essentials
sale of two different types of items to customer 10000.
The expected ledger entries involved with such a sale are as follows:
Account Debit Credit
Receivables Sale Amount +VAT
Sales Account Sale Amount
Sales VAT Account VAT
Cost of Goods Sold Account Cost of items sold
Inventory Cost of items sold
1 On the Sales & Receivables Menu, click Posted Invoices
2 Select F5 to get a list of Sales Orders
3 Select 103018 in the number field and click OK.
4 To see all documents and ledger entries related to this posted invoice, click the Navigate button in the Posted Sales Invoice window.
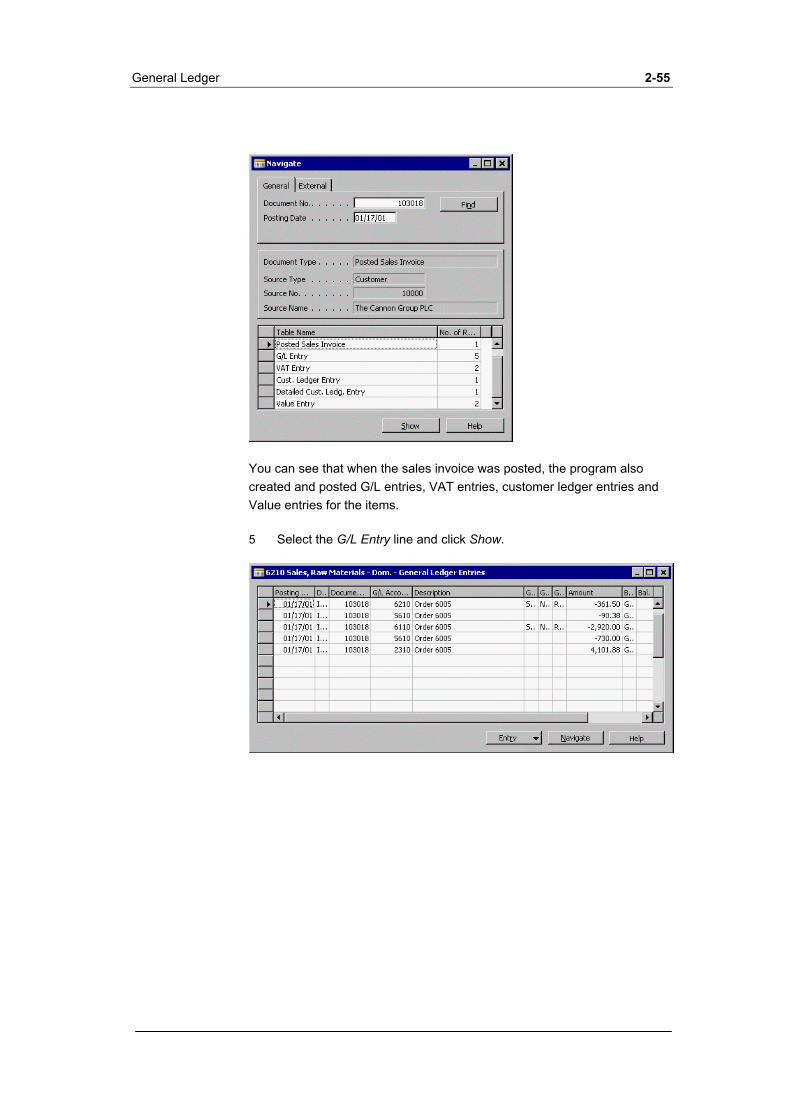
General Ledger 2-55
You can see that when the sales invoice was posted, the program also created and posted G/L entries, VAT entries, customer ledger entries and Value entries for the items.
5 Select the G/L Entry line and click Show.
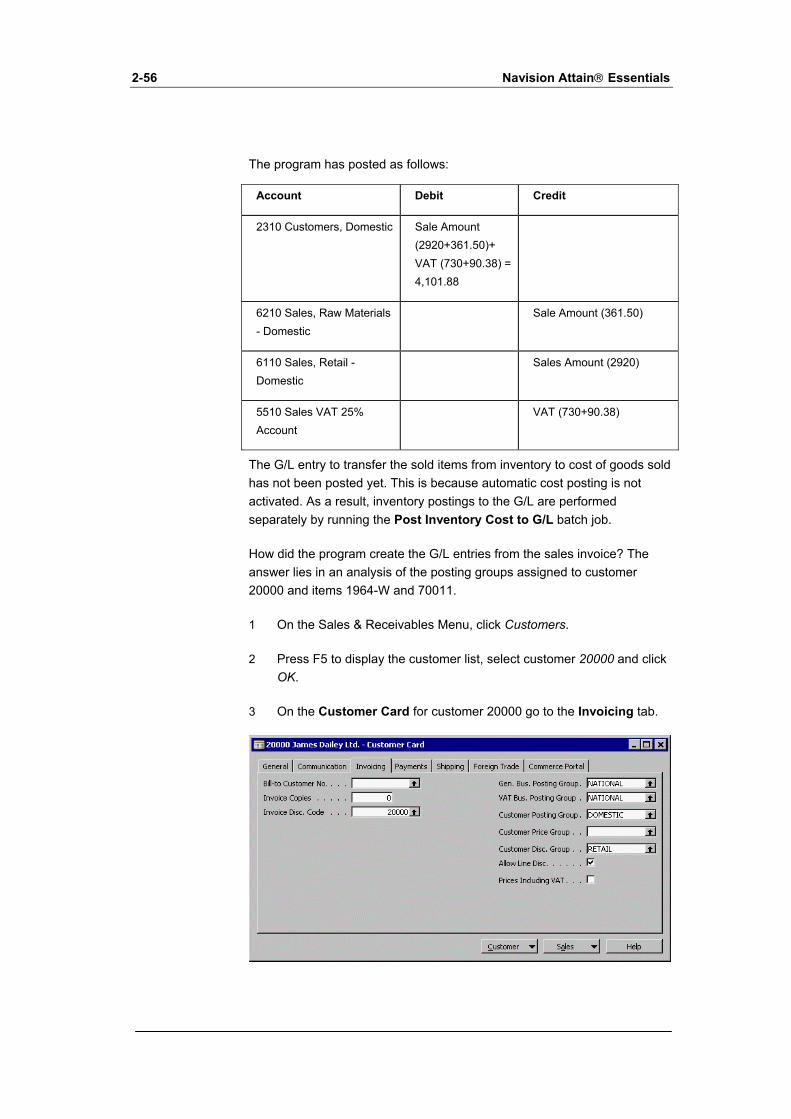
2-56 Navision Attain Essentials
The program has posted as follows:
Account Debit Credit
2310 Customers, Domestic Sale Amount (2920+361.50)+ VAT (730+90.38) = 4,101.88
6210 Sales, Raw Materials - Domestic
Sale Amount (361.50)
6110 Sales, Retail - Domestic
Sales Amount (2920)
5510 Sales VAT 25% Account
VAT (730+90.38)
The G/L entry to transfer the sold items from inventory to cost of goods sold has not been posted yet. This is because automatic cost posting is not activated. As a result, inventory postings to the G/L are performed separately by running the Post Inventory Cost to G/L batch job.
How did the program create the G/L entries from the sales invoice? The answer lies in an analysis of the posting groups assigned to customer 20000 and items 1964-W and 70011.
1 On the Sales & Receivables Menu, click Customers.
2 Press F5 to display the customer list, select customer 20000 and click OK.
3 On the Customer Card for customer 20000 go to the Invoicing tab.

General Ledger 2-57
You can see that the customer has been assigned the following general posting group and VAT posting group:
Gen. Bus. Posting Group = NATIONAL VAT Bus. Posting Group = NATIONAL
If you click the AssistButton in the Customer Posting Group field, you can that the DOMESTIC customer posting group has account 2310 entered in the Receivables Account field. This is the account to which the program posted the receivable amount of 4,101.88.
4 Close the Customer Posting Group window by pressing ESC.
5 Close the Customer Card window by pressing ESC.
Let's look at the item cards now.
1 On the Inventory Menu, click Items.
2 Press F5, select item 1964-W from the Item List and click OK.
3 On the Item Card, select the Invoicing tab.
You can see that item 1964-W has been assigned the following general posting group and VAT posting group:
Gen. Prod. Posting Group = RETAIL VAT Prod. Posting Group = VAT25
The item has also been assigned the group FINISHED in the Inventory Posting Group field. When the Post Inventory Cost to G/L batch job runs, the program will combine this group with the location code on the

2-58 Navision Attain Essentials
invoice to select the inventory account in the Inventory Posting Setup window.
4 Press F5, select item 70011 from the Item List and click OK.
5 On the Item Card, select the Invoicing tab.
Item 70011 has been assigned the following general posting group and VAT posting group:
Gen. Prod. Posting Group = RAW MAT VAT Prod. Posting Group = VAT25
The item has also been assigned the group RAW MAT in the Inventory Posting Group field. When the Post Inventory Cost to G/L batch job runs, the program will combine this group with the location code on the invoice to select the inventory account in the Inventory Posting Setup window.
6 Close the Item Card.
We now have the following general and VAT posting group information from the customers and items involved with the sale:
General Bus. Posting Group
General Prod.Posting Group
VAT Bus. Posting Group
VAT Prod. Posting Group
Sale of Item 1964-W
NATIONAL RETAIL NATIONAL VAT 25
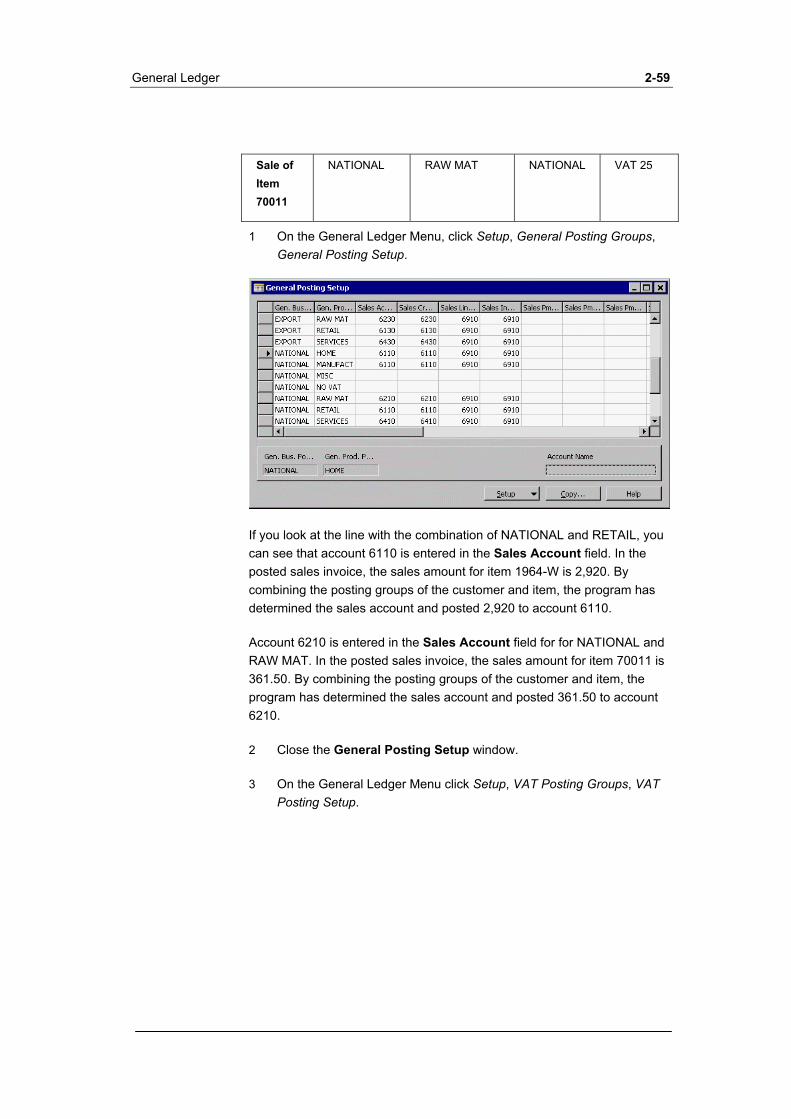
General Ledger 2-59
Sale of Item 70011
NATIONAL RAW MAT NATIONAL VAT 25
1 On the General Ledger Menu, click Setup, General Posting Groups, General Posting Setup.
If you look at the line with the combination of NATIONAL and RETAIL, you can see that account 6110 is entered in the Sales Account field. In the posted sales invoice, the sales amount for item 1964-W is 2,920. By combining the posting groups of the customer and item, the program has determined the sales account and posted 2,920 to account 6110.
Account 6210 is entered in the Sales Account field for for NATIONAL and RAW MAT. In the posted sales invoice, the sales amount for item 70011 is 361.50. By combining the posting groups of the customer and item, the program has determined the sales account and posted 361.50 to account 6210.
2 Close the General Posting Setup window.
3 On the General Ledger Menu click Setup, VAT Posting Groups, VAT Posting Setup.
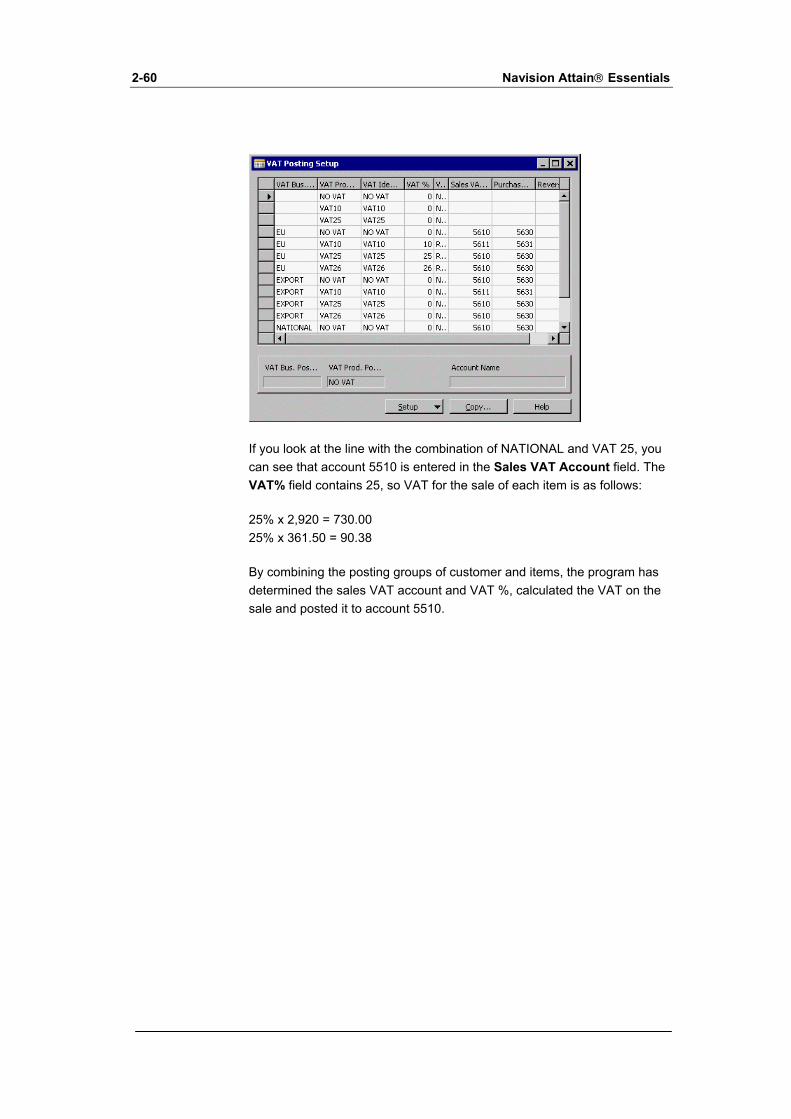
2-60 Navision Attain Essentials
If you look at the line with the combination of NATIONAL and VAT 25, you can see that account 5510 is entered in the Sales VAT Account field. The VAT% field contains 25, so VAT for the sale of each item is as follows:
25% x 2,920 = 730.00 25% x 361.50 = 90.38
By combining the posting groups of customer and items, the program has determined the sales VAT account and VAT %, calculated the VAT on the sale and posted it to account 5510.
General Ledger 2-61
2.5 DIMENSIONS
What are dimensions and dimension values?
A dimension is data that you can add to an entry as a kind of marker so that the program can group entries with similar characteristics and easily retrieve these groups for analysis purposes. Dimensions can be used throughout the program on entries in journals and documents, as well as budgets.
The term dimension is used in the program to describe how analysis occurs. A two-dimensional analysis, for example, would be sales per area. However, by using more than two dimensions when creating an entry, you can carry out a more complex analysis at a later time, for example, sales per sales campaign per customer group per area.
Each dimension can have an unlimited series of dimension values that are sub-units of that dimension. For example, a dimension called Department can have departments called Sales, Administration and so on as subunits. These departments are dimension values. Dimensions and dimension values are user-defined and unlimited, which means you can create dimensions tailored to your company's needs and business processes.
Why should you use dimensions?
A company's accounts are made up of many entries from many different sources and are associated with numerous activities within the company. It is often necessary to create statements, statistics and analyses that are extracts of the complete financial statements. These extracts can be created using individual dimensions or combinations of dimensions.
If you set up a dimension called Department, and then use this dimension and a dimension value when posting an entry, you can later retrieve information on, for example, which items have been sold by which departments. If more than one dimension has been used on posted entries, the user can create a richer analysis of a company's activities. For example, a single sales entry can include multiple dimension information about which account the item sale has been posted to, where the item was sold, who sold it, and what kind of customer made the purchase.
By using dimension, you can analyze trends and compare various characteristics across a range of entries. The analysis view functionality is particularly effective for this purpose when you are using multiple dimensions. However, even if you only use the two global dimensions, you
2-62 Navision Attain Essentials
can also use filters, account schedules and reports to create informative dimension analyses. We will come back to reports, account schedules and Analyses by Dimensions later in this chapter.
Sales Note
You must be aware that only the two global dimensions are part of the Basic Dimensions granule. You must purchase the Advanced Dimensions granule to be able to make an unlimited number of dimensions and create analyses on dimensions other than the global dimensions.
Supporting Business Rules
Business rules are the expression of policies or procedures in an organization. By automating these policies and procedures, you are better able to influence how your accounting is conducted and increase the consistency of data entry, and thereby data output. You can automate policies and procedures in the program by specifying:
Default dimensions and dimension values for individual accounts, customers, items and so on. This helps increase consistency of data entry by reducing the time needed to enter the dimension information for transactions.
·
·
·
·
·
Value-posting rules for the default dimensions. These rules specify whether dimension values must be posted or whether a specific dimension value must be posted. This helps improve data output by ensuring information that must be categorized by dimensions cannot be posted unless the dimensions are entered.
Dimension priority rules that determine how contradicting default dimension values should be prioritized.
Dimension combination rules that determine how dimensions and dimensions values may be combined when posting. These help to support business policies and improve data output, by ensuring that prohibited or illogical dimension combinations cannot be posted.
Blocked dimensions and dimension values. Blocking dimensions, for example at the end of a sales campaign, also helps to support business policies and improve data output, by ensuring that prohibited dimensions and dimension values can no longer be posted.

General Ledger 2-63
Dimensions and Dimension Values
You will now learn how to create new dimensions and new values for the dimensions.
1 On the General Ledger menu, click Setup, Dimensions, Dimensions to display the Dimensions window:
You will see all the existing dimensions in the system. Each dimension has the following attributes:
Code – the reference for the dimension that is selected when entering dimensions on journals and in documents
·
·
·
·
Name and Description – the name of the dimension that will be displayed in reports and analysis views. The description is for information purposes only.
Blocked – If you place a check mark in this field, you will not be able to post any journals containing this dimension.
Code Caption and Filter Caption – These are the captions that will appear as the shortcut dimension field names on documents and journals and the shortcut dimension filters in reports, budgets, analysis views and account schedules.
Support Note
Dimensions use dynamic field caption functionality to automatically update the shortcut dimension field names based on the dimensions you select.
To enter the new values:
2 In the Dimensions window, place the cursor on the dimension code that you are creating values for. For this example, select the AREA

2-64 Navision Attain Essentials
Dimension.
3 Click Dimension, Dimension Values to open the Dimension Values window.
A Dimension Value is a subset within a Dimension. For example, for a Dimension "AREA" the user can choose between the Dimension Values "20,50,85 and so on": all of which can be given the common name "AREA". Each Dimension can have an infinite number of values, though each value code must be unique within the given Dimension. These values are used on ledger entries.
Dimension Value Type is used to create a hierarchical relationship between Dimension Values within a Dimension. It describes the manner in which a Dimension Value will be used when posting, and corresponds almost exactly to Account Type in the Chart of Accounts. Similar to the chart of accounts, you can also indent the dimension value hierarchy by clicking Functions, Indent Dimension Values.
In the demonstration company, a hierarchy has been set up for the "Area" Dimension. Therefore, 30, 85 and so on are "AREA" Dimension Values. This means that the user can post an entry with Dimension Value "30" but that analysis of sales on “45” or “55” will also include the "30" entry.
Dimension Values Types are as follows:
Standard – used for standard posting of dimension values
Heading – Heading for a group of dimension values
Total – used to total a series of balances on dimension values that do not immediately precede the Total dimension value. You must then fill in the Totaling field with the range of accounts to be totaled.

General Ledger 2-65
Begin-Total – A marker for the beginning of a series of dimension values to be totaled ends with an End-Total dimension value type.
End-Total - A total of a series of dimension values that starts with the dimension value type Begin-Total. You must then fill in the Totaling field with the range of accounts to be totaled.
Dimension Values are automatically assigned Standard. You can only post entries with following value types: Standard and Begin-Total.
Similar to blocking the entire dimension, you can also block the posting of journals containing specific dimension values using the Blocked field for that dimension value.

2-66 Navision Attain Essentials
Dimension Types
Once you have set up your dimension codes and values, you can also attribute extra functionality to some of the dimensions.
Global Dimensions
You can select two global dimensions from the dimensions already set up. The dimensions that you select to be global dimensions are available for use throughout the program. This means that global dimensions can be used as filters for G/L entries, as well as on all reports, account schedules and batch jobs. Both global dimensions are also automatically made available by the program for use on entry lines and document headers as shortcut dimensions 1 and 2.Global dimensions are typically a company's most used and important dimensions because of their availability throughout the program.
Support Note
A Global Dimension retains the same functionality as the already existing Department and Project Codes but provides the flexibility to choose which dimensions should appear on reports and filters. This has been done in order to minimize disruption to current installations of Navision Financials. The two global dimensions will be recorded in the G/L Entry table and all other dimension information linked to an entry will be recorded in a sub-table. This will ease the upgrade-process for existing customers, who can choose whether they wish to simply retain Department and Project as the two global dimensions. For new customers, the dynamic captioning also allows you to easily create global dimensions other than Department and Project.
Shortcut Dimensions
With shortcut dimensions, the user can enter dimensions and dimension values directly on the lines in journals, and sales and purchase documents. You click View, Show Column, and select the shortcut dimension you use frequently in that particular document to be shown on the document line. You can specify a total of eight shortcut dimensions. The program defines the first two shortcut dimensions as being the same dimensions used as global dimensions. You can select the remaining six shortcut dimensions from among the dimensions your company has set up. These six shortcut dimensions can also be changed regularly to suit company needs. They are set up in the G/L Setup window. To enter dimension information for dimensions not selected as shortcuts, you must use a separate dimensions window.
General Ledger 2-67
Budget Dimensions
For each budget, you can define four dimensions in addition to the two global dimensions. These budget-specific dimensions are called budget dimensions. You select the budget dimensions for each budget from among the dimensions you have already set up. Budget dimensions can be used to set filters on a budget and to add dimension information to budget entries.
Selecting Global Dimensions
The dimension setup is easily accessible via the General Ledger Setup menu. A global dimension is a dimension that you can use as a filter anywhere in Navision Attain. You can select two dimensions as global dimensions. Choose the two dimensions that you will use most frequently in your reports. You can, however, use any dimension as a filter in the Analysis View window.
To select the Global Dimensions:
1 Click General Ledger, Setup, General Ledger Setup.
2 On the Dimensions tab, in the Global Dimension 1 Code field, click the AssistButton and select a dimension. Click OK to copy the code to the field.
3 Repeat the procedure for Global Dimension 2 Code field.
Note
Changing a global dimension requires that the program makes changes to all the entries posted using that dimension. This can take some time. To avoid having to make such a change, you should choose your global dimensions carefully.
Entering Dimensions in Documents and Journals
Shortcut Dimensions
When entering dimension information, it is important that the entry process as a whole is not hindered. To make the entry process as quick and natural as possible, you can select eight dimensions as shortcut dimensions. Shortcut dimensions are dimensions that are presented as fields on journal and document lines to make data entry as easy as possible. Note, that the

2-68 Navision Attain Essentials
fields must be shown before they can be used.
To see how dimensions are recorded in documents in the program, let's look at sales order 101017.
1 On the Sales & receivables menu, click Orders and select order 101017.
2 The order document dimensions can be seen in the Document Dimensions window by clicking Order, Dimensions.
If you wish, you can change the dimensions and dimension values for a specific document using the Document Dimension window. You can also change dimension values for shortcut dimensions by adding the Shortcut Dimension fields to the document header.

General Ledger 2-69
3 Similarly, the dimensions for the first order line can be seen by selecting the first line and clicking Line, Dimensions.
In this case, the dimensions for the line are the same as for the order header. As a default, the header dimensions are copied to all lines in the order. The dimensions and dimension values for each line can also be changed using the Document Dimension window. You can also change the lines' dimension values for shortcut dimensions by adding the Shortcut Dimension fields to the document lines.
Default Dimensions
Manually entering dimension information using shortcut dimensions can still be quite time consuming if you have many different dimension codes. As an alternative to manual entry in each document or journal, you may wish to set up default dimensions for certain accounts, customers, vendors and items. Each time the account is used in a journal or document, the default dimensions assigned to the account will automatically be copied to the journal or document. In our sales order example the dimensions were automatically added based on the customer that the order was for and the items contained in the lines.
4 Press SHIFT + F5 to display the Customer card.
5 Click Customer, Dimensions.

2-70 Navision Attain Essentials
You will see the AREA, CUSTOMERGROUP and DEPARTMENT dimensions for the order relate to the customer the order was for.
6 Close the window to return to the Sales Order.
7 On the General tab of the Customer Card, click the Salesperson Code.
8 In the Salespeople/Purchasers window, click Salesperson, Dimensions, Dimensions – Single.
It is obvious that the remaining dimension, SALESPERSON, relates to the salesperson for the order.
It is important to realize these are default dimensions for the order. If you have placed no restrictions on dimension combinations, it is possible to change all of these manually in the document if you wish.
General Ledger 2-71
2.6 JOURNALS & BATCHES
In this section, you will obtain an overview of journals and batches, you will learn how about numbering for journals, how to create a journal templates, batches and journals and to use Hide/Show.
Overview of Journals and Batches
General journals enable you to enter data into general ledger accounts and other accounts, for instance, customer accounts, vendor accounts and bank accounts. The journal entry system has three layers: journal templates, journal batches and journal lines.
Journal Templates
Journals are typically used for different types or groups of entries, such as purchases, payments, sales and receivables. Each journal type is set up with its own journal template. Journal templates provide the basic journal structure where you can specify default settings and information for all batches created using the template.
Journal Batches
Journal Batches are created based on the journal templates. All journal batches created from a specific template will have the same structure, default settings and information defined in the template. However, as these settings are only defaults, it is possible to change them for a specific journal batch. Batches are typically used to separate one user's entries from another. For example, Todd and Sue both work on general journal entries. Todd typically makes entries and posts them at a later time when they are approved. In order to keep Sue's entries from becoming mixed with Todd's entries, separate batches can be assigned to the two users.
Journal Lines
Journal lines are the journal entries that you wish to post. This information entered in the journal lines includes the account number, posting date and amount of the journal.
An illustration of the journal structure can be seen in the following diagram.

2-72 Navision Attain Essentials
All three layers are always there, but only the journal lines and batch name are always displayed in a journal window. When you have not created any additional journal templates or batches, the standard journal templates and DEFAULT batch are used. However, when you decide to add a new journal template or batch, all templates and batches will be displayed for selection.
Creating Journal Templates
1 On the General Ledger Menu, click Setup, Journal Templates.
The General Journal Templates window contains a list of the standard journal templates that are set up for the company. The journal templates have been set up to reflect the type of transaction that the journal relates to.

General Ledger 2-73
If you look at the GENERAL Template, it has the following fields.
Name and Description – A code and description identifying the journal template.
Type – The journal type determines the structure of the journal window such as the fields shown. You can choose between General, Sales, Purchases, Cash Receipts, Payments and Assets.
Recurring – Determines whether the journal template is used to make recurring journals. If you place a check mark in the Recurring field, the No. Series field must be left blank.
Bal. Account Type and Bal. Account No. – You can set up a default balancing account for all journal lines in all batches created under the template. This default account can always be changed in a particular batch or journal line, if you wish.
No. Series field – Select the default number series that will be used to assign document numbers to journal lines in journal batches created using this template. If you leave this field blank, you will need to manually enter document numbers in journal lines in the batches. Remember that the field Manual Nos in the No. Series window does not have any effect in relation to journals.
Posting No. Series - Select the number series that will be used to assign document numbers to ledger entries that are posted from this journal batch. You may wish to only assign document numbers when you post journals. You can achieve this by leaving the No. Series field blank and filling in the Posting No. Series field. Alternatively, you may wish to enter journal lines using one number series and use a different number series for posted journal lines. In this case you fill in the No. Series field and Posting No. Series field with different number series codes. When you post the journal, the program will replace the Document No. on the journal line with the next number in the posting number series.
Source Code – Select the source code to assign to all journal batches created from this template.
Reason Code – Select the default reason code to assign to all journal batches created from this template. You can always change this default for a particular journal batch or journal line.
Force Doc. Balance - Here you can specify whether documents that are posted in this general journal template must balance by document number

2-74 Navision Attain Essentials
and document type. If you leave this field blank, the program will only balance the journal by date.
Copy VAT Setup to Jnl. Lines – Place a check mark in the field if you want the program to automatically fill in the Gen. Posting Type and VAT posting groups for accounts and balancing accounts on the journal lines of the selected journal template. This will be the default setting for all journal batches created using the template. However, you can always change this setting for a particular journal batch. If you place a check mark in the field or remove a check mark from the field, the program will ask you if you want to update the journal batches for the selected journal.
Allow VAT Difference - Place a check mark in the field if you want to allow the manual adjustment of VAT amounts in journals. This will be the default setting for all journal batches created using the template. However, you can always change this setting for a particular journal batch. If you place a check mark in the field or remove a check mark from the field, the program will ask you if you want to update the journal batches for the selected journal.
Creating a Journal Batch
Let’s say you wish to create two new general journal batches for Sue and Todd.
1 To open the journal batches, click General Ledger, General Journals.
2 In the General Journal window, click the AssistButton in the Batch Name field.
This is a list of the current batches that are based on the GENERAL journal template. An alternative method for viewing the existing batches, is to select a journal template in the General Journal Templates window and

General Ledger 2-75
click Template, Batches.
3 Create a batch for both Sue and Todd by pressing F3 and ENTER and entering the following information.
Name SUE TODD Description Sue’s Journal Batch Todd’s Journal Batch
Bal. Account Type and Bal. Account No. – The journal batches are based on the GENERAL journal template that has no balancing account. As a result, the batches have no balancing account either. For this example, there will be no balancing account so leave these fields as they are.
No. Series and Posting No. Series - The batches in the example are based on the GENERAL journal template. As a result, the No. Series field will automatically be filled in with the No. Series defined in the journal template. We wish to keep the number series assigned from the template, so leave GJNL-GEN in the No. Series field and leave the Posting No. Series field blank.
Reason Code, Copy VAT Setup to Jnl. Lines and Allow VAT Difference - Leave these fields with the default settings that are copied from the GENERAL journal template.
4 When you are finished, the journal batches should look as follows.
5 Close the window.
6 Press ESC to return to the General Ledger menu.

2-76 Navision Attain Essentials
Automatic Numbering for Journals
To use automatic numbering, you must define number series codes and number series lines as described earlier in this chapter. Afterward, on each journal template or journal batch, you must enter a number series code in the No. Series field. If you specify the number series code on a journal template, the code will be copied to all journal batches you create under the template, but you can substitute or delete the code on individual batches. If you do not specify a code on a journal template, you must specify a code on each journal batch if you want to use automatic document numbering.
Manual Numbering for Journals
To use manual document numbering for a journal batch, leave both the No. Series field and/or the Posting No. Series field on the journal batch empty. You can decide to use manual numbering for one or more specific journal batches and automatic numbering for others. In the general journal batches, for example, you could choose to have documents in the CASH journal batch numbered manually and documents in the DEFAULT journal batch numbered automatically. This would mean that you must clear the No. Series field on the line with the CASH name, but leave the GNJL-GEN code on the line with the DEFAULT name.
Creating Journal Entries
Now that you understand the structure of journals, let's create and post a journal entry.
1 On the General Ledger menu, click General Journals.
2 In the Batch Name field, click the AssistButton and select the batch for Todd.
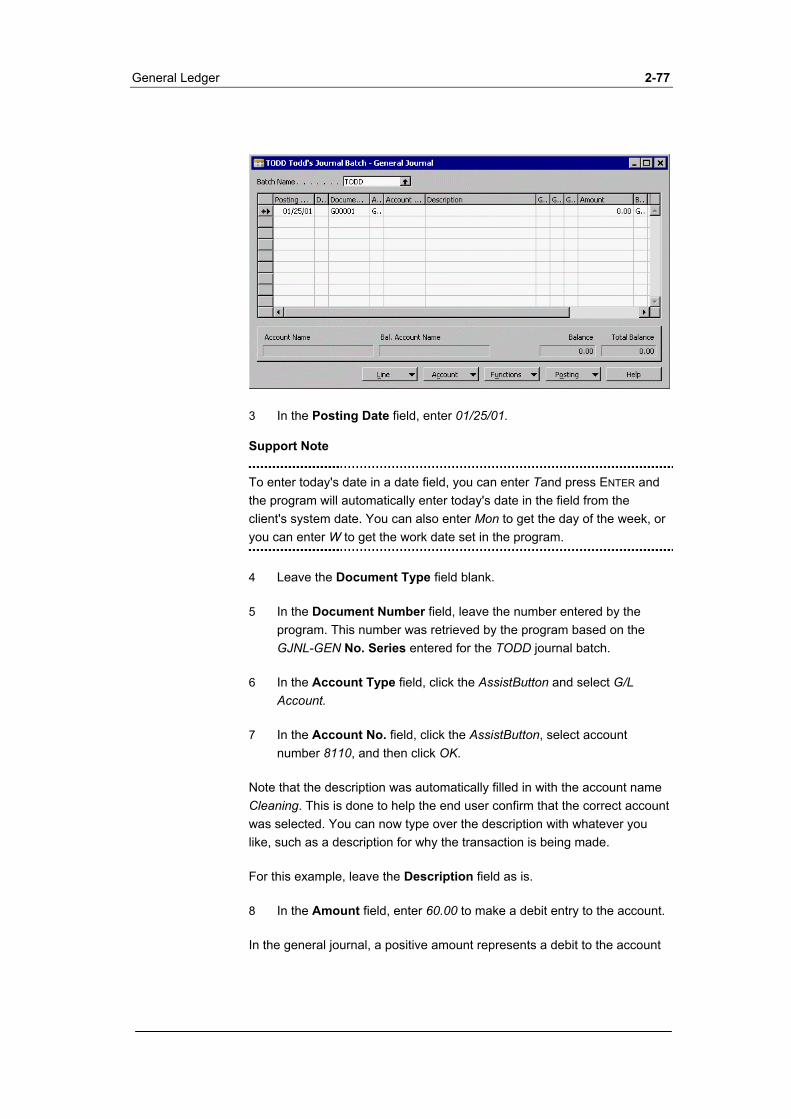
General Ledger 2-77
3 In the Posting Date field, enter 01/25/01.
Support Note
To enter today's date in a date field, you can enter Tand press ENTER and the program will automatically enter today's date in the field from the client's system date. You can also enter Mon to get the day of the week, or you can enter W to get the work date set in the program.
4 Leave the Document Type field blank.
5 In the Document Number field, leave the number entered by the program. This number was retrieved by the program based on the GJNL-GEN No. Series entered for the TODD journal batch.
6 In the Account Type field, click the AssistButton and select G/L Account.
7 In the Account No. field, click the AssistButton, select account number 8110, and then click OK.
Note that the description was automatically filled in with the account name Cleaning. This is done to help the end user confirm that the correct account was selected. You can now type over the description with whatever you like, such as a description for why the transaction is being made.
For this example, leave the Description field as is.
8 In the Amount field, enter 60.00 to make a debit entry to the account.
In the general journal, a positive amount represents a debit to the account
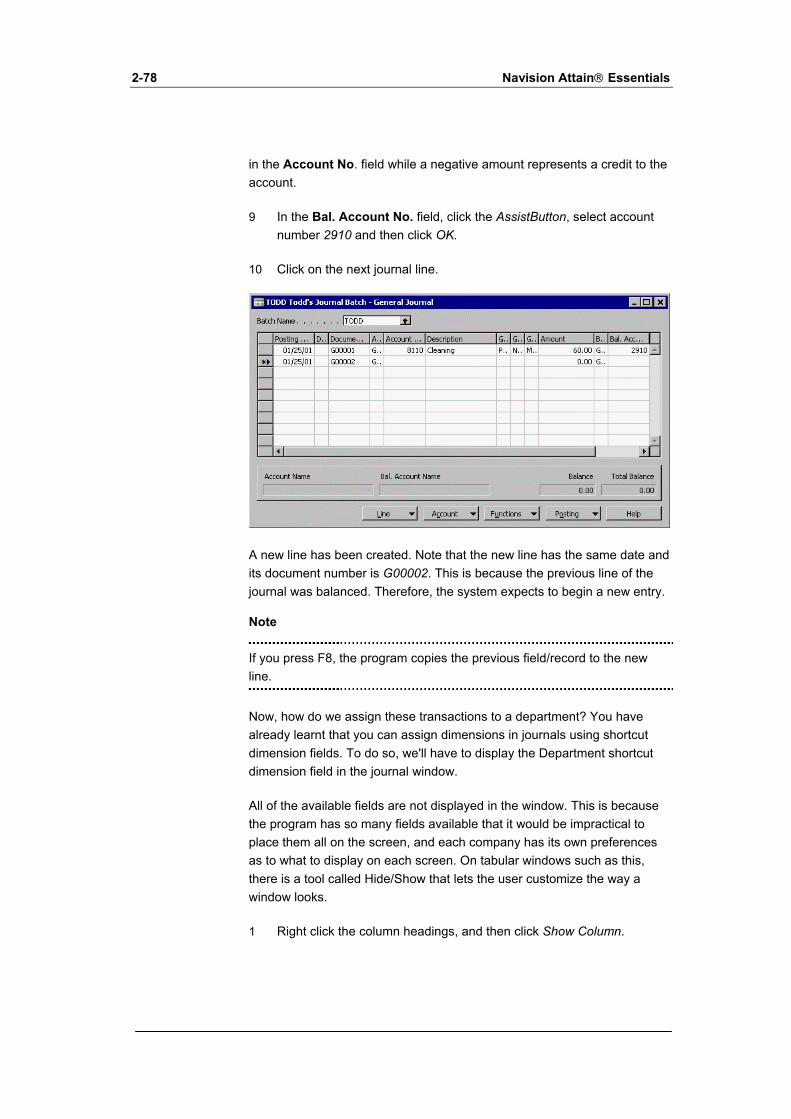
2-78 Navision Attain Essentials
in the Account No. field while a negative amount represents a credit to the account.
9 In the Bal. Account No. field, click the AssistButton, select account number 2910 and then click OK.
10 Click on the next journal line.
A new line has been created. Note that the new line has the same date and its document number is G00002. This is because the previous line of the journal was balanced. Therefore, the system expects to begin a new entry.
Note
If you press F8, the program copies the previous field/record to the new line.
Now, how do we assign these transactions to a department? You have already learnt that you can assign dimensions in journals using shortcut dimension fields. To do so, we'll have to display the Department shortcut dimension field in the journal window.
All of the available fields are not displayed in the window. This is because the program has so many fields available that it would be impractical to place them all on the screen, and each company has its own preferences as to what to display on each screen. On tabular windows such as this, there is a tool called Hide/Show that lets the user customize the way a window looks.
1 Right click the column headings, and then click Show Column.
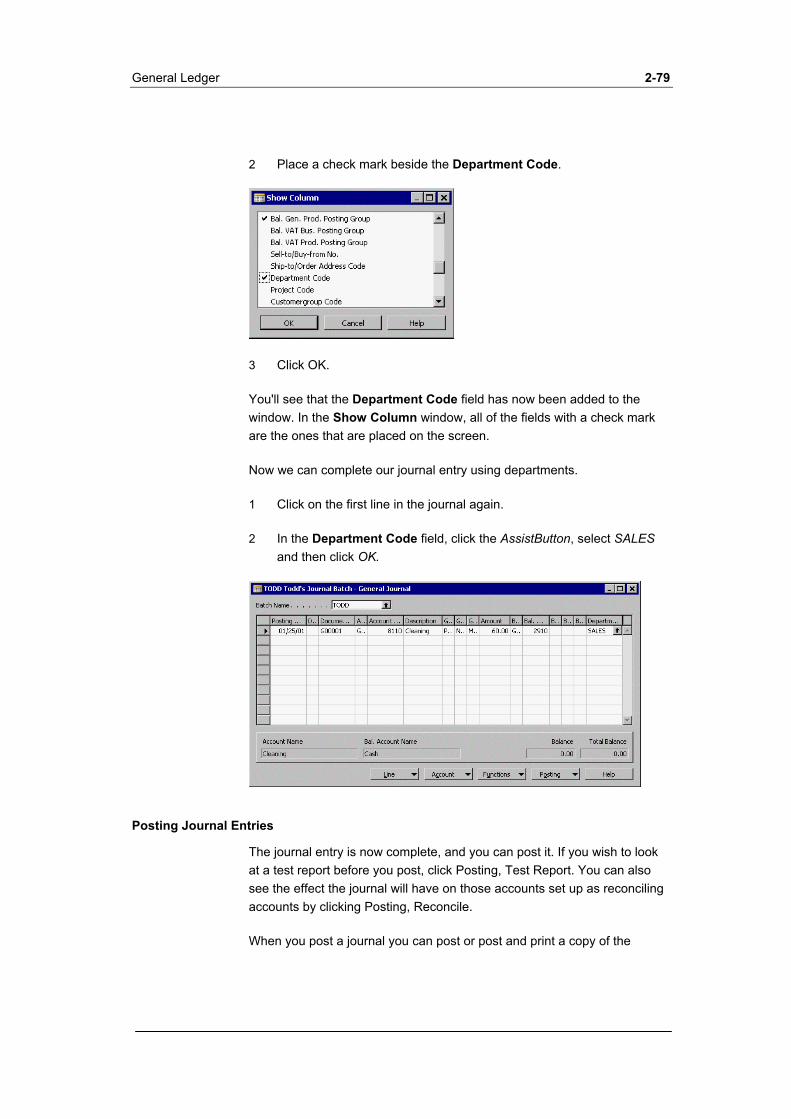
General Ledger 2-79
2 Place a check mark beside the Department Code.
3 Click OK.
You'll see that the Department Code field has now been added to the window. In the Show Column window, all of the fields with a check mark are the ones that are placed on the screen.
Now we can complete our journal entry using departments.
1 Click on the first line in the journal again.
2 In the Department Code field, click the AssistButton, select SALES and then click OK.
Posting Journal Entries
The journal entry is now complete, and you can post it. If you wish to look at a test report before you post, click Posting, Test Report. You can also see the effect the journal will have on those accounts set up as reconciling accounts by clicking Posting, Reconcile.
When you post a journal you can post or post and print a copy of the
2-80 Navision Attain Essentials
journal for you records. In this case, we will only post the journal.
3 Click Posting, Post.
4 Click Yes to confirm.
All lines that are visible in the journal and are in balance will be posted. If you apply a field or table filter so that you filter the journal lines by a specific Posting Date or Document Number, then only those entries that are visible after filtering will be posted. The entries that were hidden as a result of applying the filter will not be posted, even if they are in balance.
You can also post several batches at once by clicking Posting, Post in the General Journal Batches window. All lines in all batches appearing in the General Journal Batches window will be posted as a result.
You can see the result of posting the journal by looking at the last entry in the G/L register. Click Register, General Ledger to display the G/L entries that were created.
Exercise 7 Create a Journal Entry
Create another journal entry using the same G/L accounts except post a debit to 8110 using the two departments, the Sales department for 100, and then the Administration department for 60. Post the credit to account 2910, make sure that this line doesn't include a department.
You can find the steps and solution to this exercise in Appendix D.

General Ledger 2-81
2.7 BANK ACCOUNTS
Each bank account has its own card containing different kinds of information. For each transaction you make using a bank account, the program will post a bank account ledger entry. If you make manual or computer check payments, the program also posts a check ledger entry to record the check transaction and the current status of the check. The bank account posting group assigned to the bank account enables the program to post the related G/L entries with the transaction.
Let’s look at an existing bank account in the program:
1 On the General Ledger menu, click Bank Accounts.
2 Press F5, select the WWB-OPERATING Bank from the list and click OK.
General Tab
This tab contains all the general information about the bank at which the account is held such as the name, address, contact person at the bank and search name. In addition to this information, the general tab includes the following fields:
No. – The alphanumeric code used to represent the bank account in the program. It does NOT have to be the account number used by the bank that is entered in the Bank Account No. field.
Bank Branch No. – The alphanumeric code used to represent the bank branch number for the bank account. All banks have a number series that specifies the branch of the bank the account was opened at.

2-82 Navision Attain Essentials
Bank Account No. – The number of the bank account used by the bank.
Balance and Balance (LCY) – These fields are flow fields that calculate the current bank balance based on the bank ledger entries.
Min. Balance – The minimum balance that the bank account can have. The amount is in the currency of the bank account and can be positive or negative.
Our Contact Code – The contact person in your company responsible for the bank account. In the program, this must be somebody set up in the Salespeople/Purchasers window.
Blocked – Place a check mark in this field if you wish to block the account from being used to make transactions.
Communication Tab
This tab contains phone and fax numbers, e-mail and home page addresses for the bank.

General Ledger 2-83
Posting Tab
The Posting tab contains the following fields:
Currency Code – The currency for the bank account.
If you select a currency code in this field, you can only use this bank account to receive and make payments in the currency you have selected in this field.
·
· If you do not select a currency code, you can receive payments using any currency including LCY. You can make payments that are not checks using any currency including LCY. You can only make check payments in LCY.
Note
Check payments can only be made in the currency of the bank account. If the Currency Code field of a bank account is blank, this means that you can only make check payments in LCY for that account.
Last Check No. – If you use checks, you can specify the last check number used. The program will update this number every time a new check is created.
Transit No. – An alphanumeric code used to represent the bank where the account is held, such as a transit number or SWIFT code.
Last Statement No. – This field contains the Statement No. of the last Bank Account Statement reconciled in the program.

2-84 Navision Attain Essentials
Balance Last Statement - This field contains the Statement Ending Balance of the last Bank Account Statement reconciled in the program.
Bank Acc. Posting Group – The bank account posting group assigned to this bank account. The program uses this to post the related G/L entries for each transaction using the bank account.
Bank Acc. Button
List – Displays a list of all bank accounts in the system.
Statistics – Displays the current balance for the account in the bank account currency and LCY and comparative figures from prior periods.
Comments - Display or enter any detailed comments relating to this bank account.
Dimensions –Display or enter default dimensions for this bank account.
Balance – Displays the Bank Account Balance window. It shows the balance or net change in the bank account in the bank account currency and LCY over time.
Statements – Displays the reconciled Bank Account Statements for this bank account.
Ledger Entries – Displays bank account ledger entries for this bank
General Ledger 2-85
account.
Check Ledger Entries – Displays check ledger entries for this bank account.
Contact – Creates a contact card for the bank in the Relationship Management application area.
Example
Let’s say we have just opened a new euro bank account at a bank in Germany. To create the bank account in the program:
1 On the General Ledger menu, click Bank Accounts and press F3.
2 Enter COBA in the No. field and fill in Cronus - Commerzbank in the Name field. The address is as follows: Blankeneser Bahnhofstr. 1, in Hamburg. Select the Post Code DE-20097 and the Country Code DE.
3 The Bank Branch No. is: 20080000 and the Account No. 12/11111.
4 Click the posting tab and select the Currency code EUR in the corresponding field.
5 Select the Bank Account Posting Group CURRENCIES in the corresponding field and close the window.
This bank account will have entries posted in EUR. However, the balance will always be converted to LCY. You can see the balances in both currencies in the relevant fields on the General tab of the Bank Account Card window or in the bank ledger entries. The G/L balance in the chart of accounts is always in LCY.
You can learn more about Bank Accounts, Check Payments and Bank Reconciliation in the Financial Management training material.
2-86 Navision Attain Essentials
2.8 FINANCIAL REPORTS
In this section, you will obtain an overview of reports; learn about request forms, options, screen viewing & printing, account schedules and analyses by dimensions. More detailed information on the financial reporting features in the program can be found in the Financial Management training material.
As entries are posted and amounts are accumulated in the General Ledger application area, the challenge is to examine and manage the information presented there.
There are several ways to prepare analyses of G/L accounts (based on posted G/L entries):
You can do simple calculations in the Chart of Accounts by using Field Filters and/or FlowFilters. Formulas for filters have already been covered in Chapter 1 of this course.
·
·
·
·
·
·
·
·
You can use the standard reports in the program.
You can create more complex statements and calculations using Account Schedules to communicate the information.
You can also use Analyses by Dimensions based on an Analysis View.
Chart of Accounts
You have briefly learnt about analysis using the chart of accounts in the Chart of Accounts section of this chapter. You can learn more about analysis using the Chart of Accounts in the Financial Management training material.
Standard Reports
The program contains a number of standard printed reports. These can be found under the Reports menu item in each application area. Standard reports in the General Ledger application area include:
Trial Balance reports
Ledger reconciliation reports
Dimension reports
Bank Account reports

General Ledger 2-87
Consolidation reports ·
·
·
·
·
Account Schedules
Budgets
VAT reports
Intrastat reports
You can set filtering or options for each report using the request form for the report.
Request Forms
Once you have selected a report from the reports menu, a request form will be displayed. The request form lets you enter the parameters that you want the report to use when it runs. The report we are going to look at was selected because it contains all of the different parameters that you might encounter on a request form. Request forms are also used to set the parameters on imports and batch jobs.
1 On the General Ledger menu, click Reports.
2 In the G/L Reports – Print window, select Budget.
3 Click Print.
The Budget Request Form appears.
In the program, reports can be run for many different ranges. Filters allow you to set the report specifications so that it will print only the information you need. For example, you could run a Budget for a particular G/L Account or for a range of Accounts, a range of entry dates or date periods, or dimension values. There will be a different tab for filters that can be set

2-88 Navision Attain Essentials
for each table that is used during a report.
In addition, you can also change the sorting of the report. For example, on this report you can print the accounts sorted by Account Number, Search Name, or based on whether it is a balancing account or not. This can be done by choosing the Sort button from the Account Lookup window. We will not be changing our sort, however you should be aware of this option.
Options
Most reports in Navision Attain also contain an Options tab including additional options. These options are always explained in the Help for the report.
Screen Viewing, Printing to Printers and Printing to HTML Files
You can also print all reports to either the screen, paper or to a HTML file.
1 Let’s say we wish to see the budget report for all accounts with the Posting Account Type.
2 Click Preview to preview the report on screen.
When you click Print, you get a standard Windows printer screen to select the printer for printing the report. The program uses the operating system to print.
It is also possible to print reports in HTML format to a file. To do this:
Complete the report request form as if you are printing to a printer. ·
· From the Main Menu, select File, Save as HTML. Note, this menu item will only be available for selection because you are using a report. When you select the menu item, the program will automatically create

General Ledger 2-89
the report in HTML format.
Enter a filename for the HTML file containing the report and click Save to save the file.
·
Account schedules are intended for calculations that cannot be done directly in the chart of accounts. You can use an account schedule to create subtotals for groups of accounts. These subtotals can be included in new totals that can then be used in other totals. This means that you can create customized financial reports without using the Report Designer.
You can create as many Account Schedules as you like, each with a unique name. You can set up various report layouts and print the reports with the current figures whenever necessary.
You use account schedules to analyze figures in G/L accounts or to compare G/L entries with G/L budget entries. For example, you can view the G/L entries as percentages of the budget entries. You use the Account Schedule window to set up account schedules.
Account schedules also can be called financial statement layouts. They provide an easy way to format user-defined financial statements. In the program, columns are determined by the Column Layout selected on the request form at the time the report is run.
By employing user-defined rows and columns, you can decide exactly which figures you wish to compare and how. This means that you can create as many customized financial statements as you want without using the Report Designer.
It is also possible to export your Account Schedules to MS Excel. This allows other parties to use a copy of your data without requiring direct access to the program.
Support Note
The program does not come with any financial statements and you must therefore create financial statements in account schedules.
Account Schedules
You can make custom reports based on your G/L information over time using an account schedule report. Each account schedule report consists of two elements:

2-90 Navision Attain Essentials
The Account Schedule (or row layout) ·
· The Column Layout
1 On the General Ledger menu, click Account Schedules.
The Account Schedule window is used to create the report lines based on your G/L information. In addition to defining which G/L accounts to include in the report, you can also use formulas to perform calculations based on other rows in the account schedule. In the Column Layout window, you can define criteria that relate to the amount that will be shown in each column. This can be the time period the amount relates to, whether you wish to see the balance or net change and whether the amount is an actual or budgeted amount. This means you can create reports such as:
Monthly and Year to Date comparisons of actual balances to budgeted balances for selected G/L accounts.
·
· Comparisons of current year balances to prior year balances for selected G/L accounts.
By separating the layout of rows and columns, you can easily create different reports by combining the same row layout with different column layouts. So if you have an Income Statement account schedule and two column layouts, one that shows department and another that shows months you can print the Income Statement and select if you want to show it per department or per month. Instead of having to create two complete reports, you only need to create one row layout and two different column layouts.
You use the Account Schedule Names window to set up a default column layout for a particular account schedule. If you wish to view the Account

General Ledger 2-91
schedule without printing it, you click Acc. Sched., Overview in the Account Schedule window. The Acc. Schedule Overview window appears.
The printed report has a limit of six visible columns, while you can view as many columns as you want in the Acc. Schedule Overview matrix.
Analyses by Dimensions
1 On the General Ledger menu, click Analyses by Dimensions.
As mentioned earlier, dimensions are also very useful for analyzing data. By using dimensions, you can analyze trends and compare various characteristics across a range of entries. The analysis view functionality is

2-92 Navision Attain Essentials
particularly effective for this purpose, but you can also use filters, account schedules and reports to create informative dimensions analyses.
The primary purpose of using dimensions on G/L entries, budgets and so on is that at a later date you can analyze the dimension information you have posted. By using analysis views, you can retrieve information about dimensions according to the criteria you set. You can then investigate trends and analyze relationships based on the dimension information that you have posted.
For each analysis view, you can specify up to four dimensions, as well as specify criteria for G/L accounts, dates and budgets. You can also set filters on dimensions not included in the analysis view, by clicking Analysis, Filters on the analysis view card. Different analysis views can therefore be created for different purposes.
Sales Note
The analysis view is an intuitive tool that allows you to monitor your company’s performance and enables you to investigate relationships and exploit opportunities more quickly
You will learn more about analysis by dimensions in the Financial Management Training Material.

General Ledger 2-93
2.9 BUDGETS
On the General Ledger menu, click Budgets.
The Budget window has the same look and feel as matrix windows elsewhere in the program. This means that the budgeting process is gathered in one intuitive form.
Some of the features for budgets include:
1 You can have multiple budgets for identical time periods by creating budgets with separate names.
2 You can budget in the matrix window by selecting a combination of G/L account, period, the two global dimensions and four budget dimensions. It is simple to budget with dimensions and this allows comparisons with actual results. You can compare budgeted amounts with actual amounts per dimension, G/L account and period on the Analysis by Dimension form.
3 You can easily copy budgets from previous periods and revise budget figures using an adjustment factor. You can attach an unlimited number of dimensions to a budget entry. You copy a budget by using an adjustment factor. You must apply the adjustment factor to either G/L entries or G/L budget entries.
4 You can easily export budgets to and import budgets from Excel – this makes the budgeting process flexible and efficient. You can set filters on exported budgets and select which dimension information to export

2-94 Navision Attain Essentials
to Excel. When you import budget entries from Excel, these can be added to or replace existing budget entries in the program.

General Ledger 2-95
2.10 REVIEW QUESTIONS
Now you have the basic ideas behind the General Ledger application area of Navision Attain. Here are some questions to help you review the material you’ve just covered. Answers are not provided. This is a study-aid.
1 What are the two ways to create a new accounting period?
2 What are Trail codes?
3 What objects can you assign No. series to?
4 What are some of the documents to which you can assign No. Series?
5 Can you combine automatic and manual numbering for your various No. series?
6 What are some of the activities you can perform in different currencies?
7 What is triangular conversion?
8 How does using Dimensions result in a smaller chart of accounts for a company?
9 What are the options available relating to Company on the File menu?
10 True or False? Dimensions can be used throughout the program on entries in journals, documents and budgets?
11 What are Dimensions used primarily for?
12 How many Dimensions can you set up?
13 What are the four Account Types in the Chart of Accounts? What is the function of each?
14 What is the purpose of Posting Groups? What must be set up first in order to use them?
15 What are the two types of General Posting Groups?
16 What are the program’s four methods for calculating VAT?
17 Can you adjust VAT amounts for payment discounts?
2-96 Navision Attain Essentials
18 What are the three layers of the journal entry system? Which are always displayed?
19 How can you copy the previous field/record to a new line?
20 Which reports will work without setup?
21 What purpose do Account Schedules serve?
22 Can you use Dimensions on budgets?
23 Can you export budgets to and import budgets from Excel? Is it possible to use filters when doing so?

Chapter 3.
Sales & Receivables
You use the Sales & Receivables application area to manage sales and accounts receivables through individual accounts for each customer. This area is fully integrated with the General Ledger. This means that posting an entry made in Sales & Receivables automatically posts all necessary entries to the sales account, the receivables account and possible discount and VAT accounts.
This chapter contains an overview of the Navision Attain sales and receivables functionality. Specifically, you will learn about;
3.1 Overview & Setup
3.2 Sales Quotes
3.3 Creating Sales Orders
3.4 Posting Sales Orders
3.5 Creating & Posting Sales Invoices
3.6 The Sales Posting Process
3.7 Credit Memos
3.8 Receivables
3.9 Periodic Activities
3.10 Review Questions

3-2 Navision Attain Essentials
3.1 OVERVIEW & SETUP
In this section, you will learn about the basic setup in the Sales & Receivables application area and Customer Cards.
Basic Setup
In the Sales & Receivables Setup, you specify how you want the program to manage certain aspects of your sales and receivables.
In the Sales & Receivables Setup window, you set up certain basic rules to be used in the Sales & Receivables application area.
On the Sales & Receivables menu, click Setup, and then click Sales & Receivables Setup. The Sales & Receivables Setup window appears.
The General tab
On the General tab, you specify options such as how you want to calculate and post discounts and what warnings you would like to have displayed.
The General tab contains the following fields:
Discount Posting field - Here you can specify the type of sales discounts the program will post separately.
·
·
·
Credit Warnings field – In this field, you can specify whether you want the program to give a warning about the customer's status when you create a sales document.
Stockout Warning field – By placing a check mark in this field, you can specify whether you want the program to warn you when a sale will

Sales & Receivables 3-3
result in a negative inventory for an inventory item.
Shipment on Invoice field – Here you can choose to have the program automatically set up shipments in connection with sales invoices.
·
·
·
·
·
·
·
·
·
Return Receipt on Credit Memo field – Here you can choose to have the program automatically set up sales return receipts in connection with sales credit memos.
Invoice Rounding field – A check mark in this field indicates that the program will round amounts for sales invoices. You specify the invoice rounding precision for local currency in the G/L Setup and for other currencies in the currency table.
Ext. Doc. No. Mandatory – Here you can specify whether it is mandatory to enter an external document number in the following situations: In the External Document No. field on a sales header. In the External Document No. field on a general journal line, where the contents of the Document Type field = Invoice, Credit Memo or Finance Charge and the contents of the Account Type field = Customer.
Appln. between Currencies field – Here you can specify to what extent the application of entries in different currencies is allowed in the Sales & Receivables application area.
Copy Comments Blanket to Order field – Here you can specify whether you want the program to copy comments from blanket orders to sales orders.
Copy Comments Order to Invoice field – Here you can specify whether you want the program to copy comments from sales orders to sales invoices.
Copy Comments Order to Shpt. field – In this field, you can specify whether you want the program to copy comments from sales orders to shipments.
Copy Comments Ret.Ord to Cr. Memo field – Here you can specify whether you want the program to copy comments from sales return

3-4 Navision Attain Essentials
orders to sales credit memos.
Copy Comments Ret.Ord to Ret. Rcpt field – In this field, you can specify whether you want the program to copy comments from sales return orders to sales return receipts.
·
·
·
·
·
Allow VAT Difference field – Place a check mark in the field if you want to allow the manual adjustment of VAT amounts in sales documents.
Calc. Inv. Discount field – Place a check mark in this field if you want the program to automatically calculate the invoice discount amount in connection with sales documents. If you do not place a check mark here, you can still calculate invoice discounts manually by going to the Sales & Receivables Setup and selecting Calculate Invoice Discounts.
Calc. Inv. Disc. Per VAT ID field – If you place a check mark in this field, the invoice discount will be calculated per VAT Identifier. If you choose not to place a check mark here, the invoice discount will be calculated on the document total.
Exact Cost Reversing Mandatory field - A check mark in this field indicates that the program will not allow a return transaction to be posted unless the Appl.-from Item Entry field on the sales order line contains an entry. This function is used when the company wants to apply an exact cost reversing policy in connection with sales returns. This means that the sales return is valued at exactly the same cost as the original sale when being put back on inventory. If an additional cost is later added to the original sale, the program updates the value of the sales return respectively.
The Numbering tab
Click the Numbering tab.

Sales & Receivables 3-5
On the Numbering tab, you must specify the number series that will be used for customers, sales documents, reminders, and so on.
Other Options under Setup
Let’s look at some of the other items under Setup.
Customer Posting Groups – This is where you will set up what accounts your customers will post to on the Balance Sheet.
We can set up multiple customer posting groups. Each customer posting group can have different G/L accounts or the same accounts assigned. An advantage of having different groups with the same accounts is that it allows another way to group customers together for reporting purposes. For example, a report could be run displaying only DOMESTIC customers. Even though multiple groups can be set up as stated above, each customer will only be assigned one customer posting group on the customer card.
Item Charges – You use the Item Charges window to set up item charge numbers. The item charge numbers represent combinations of general product posting groups, tax group codes, VAT product posting groups and item charge numbers. You can set up as many combinations as you need. Item Charges are direct costs other than the actual purchase price such as transportation, packaging and so on. We will return to this later.
Payment Terms – You use the Payment Terms window to set up codes for each set of payment terms. The payment terms table will be used on both the Sales & Receivables side and the Purchases & Payables side. You can specify the due date and the discount date when you set up a payment term.
Payment Methods – You set up payment method codes to select the

3-6 Navision Attain Essentials
different payment methods, for example check, cash, installment payment and so on. You need this information, when you receive a detailed overview about the outstanding entries. Furthermore, the payment method allows you to create a default balancing G/L or Bank account to each payment method e.g. cash. You use this for cash sale customers and not for normal accounts receivable processing.
Support Note
When you invoice a sales order or post a sales invoice, the program will create an Invoice customer ledger entry. If the sales order or sales invoice contains a Payment Method with a default balancing account, the program will also post and fully apply a Payment customer ledger entry to the Invoice customer ledger entry. This is how the program can handle cash sales. When you post a sales credit memo, the program will create a Credit Memo customer ledger entry. If the sales credit memo contains a Payment Method with a default balancing account, the program will NOT post and fully apply a Refund customer ledger entry to the Credit Memo customer ledger entry. Refunds must always be entered manually through the cash receipt journal or general journal.
Reminder Terms - You use the Reminder Terms window to set up codes for reminder terms. Each line contains a set of reminder terms identified by a code. You can set up as many codes as necessary. You will learn more about reminders in the end of this chapter.
Finance Charge Terms - You use the Finance Charge Terms window to set up the conditions for finance charge calculations. Each line contains a set of finance charge terms identified by a code. You must set up a code representing each finance charge calculation. You will learn more about Finance Charge memos in the end of this chapter.
Customer Price Groups and Customer Disc. Groups – You can set up price and discount groups for customers to be assigned to. This provides great flexibility in customer pricing and discounting while minimizing the data entry needed. You will learn more about prices and discounts in the Financial Management training material.
Customer Cards
You use the Customer Card to set up information on all your customers. You must set up a card for each customer, on which you enter basic
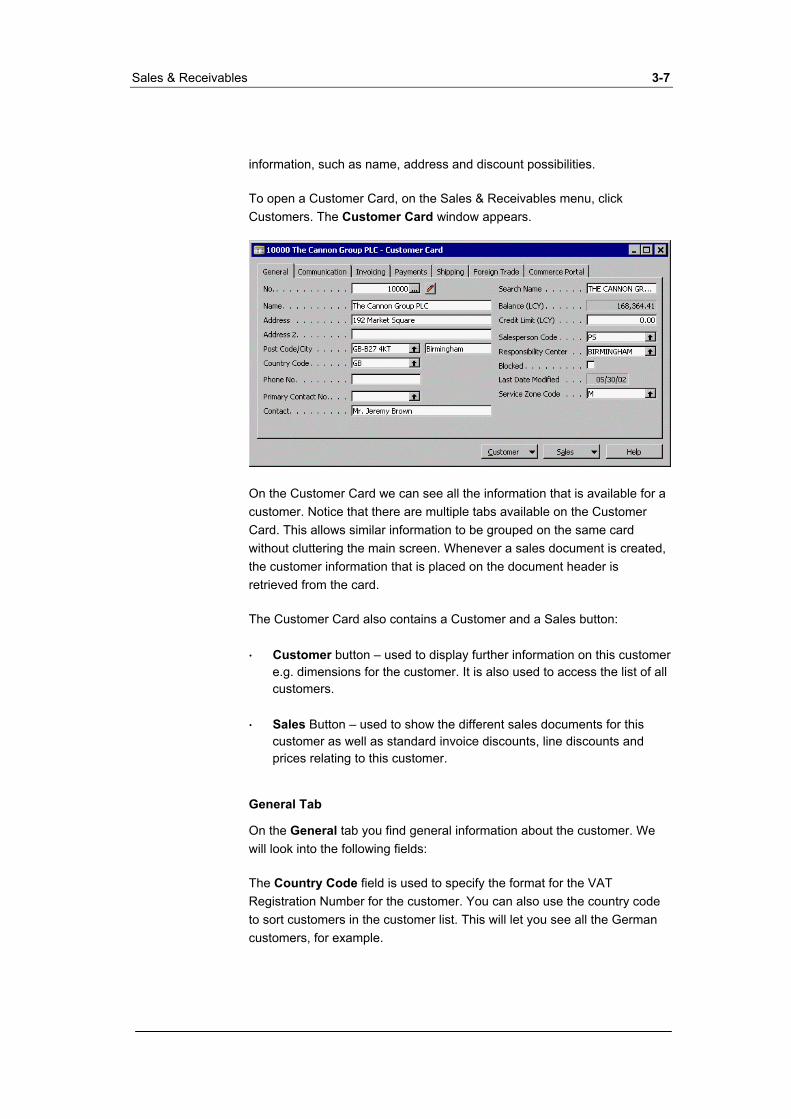
Sales & Receivables 3-7
information, such as name, address and discount possibilities.
To open a Customer Card, on the Sales & Receivables menu, click Customers. The Customer Card window appears.
On the Customer Card we can see all the information that is available for a customer. Notice that there are multiple tabs available on the Customer Card. This allows similar information to be grouped on the same card without cluttering the main screen. Whenever a sales document is created, the customer information that is placed on the document header is retrieved from the card.
The Customer Card also contains a Customer and a Sales button:
Customer button – used to display further information on this customer e.g. dimensions for the customer. It is also used to access the list of all customers.
·
· Sales Button – used to show the different sales documents for this customer as well as standard invoice discounts, line discounts and prices relating to this customer.
General Tab
On the General tab you find general information about the customer. We will look into the following fields:
The Country Code field is used to specify the format for the VAT Registration Number for the customer. You can also use the country code to sort customers in the customer list. This will let you see all the German customers, for example.

3-8 Navision Attain Essentials
The Search Name field – You use this field to set up an additional descriptive name for a customer which you can search by. The program copies the customer name to this field as a default.
Credit Limit (LCY) - You can enter a local currency credit limit for sales transactions for this customer. A warning will be issued if any new transaction will exceed this credit limit.
The Blocked field – This option blocks any transactions from being entered for this customer. For example, it prevents a sales person from entering an order for a customer with whom you have a dispute.
The Service Zone Code field - This field contains the code for the service zone in which the customer is located. You can set up service zone codes in the Service Zone table – these service zones split your company's market into geographical regions. For example, east, west, central and so on.
Communication Tab
Click the Communication tab.
On the Communication tab, you enter communication details on the customer.
Next to the Phone No. field, you find the Make Phone Call button. If the customer is also recorded as a contact in the Relationship Management application area, when you click this button, the Make Phone Call wizard appears. When you click Finish in the wizard, the program automatically records the phone call as an interaction in the Interaction Log Entry table.

Sales & Receivables 3-9
On the Communication tab, you also find the E-mail field in which you can fill in the e-mail address for the customer. The e-mail address can be used to send quotes, orders, invoices, and/or statements directly to a customer.
You have the possibility of referring to a Web site on the World-Wide-Web (WWW) and access it directly by clicking on the Hyperlink button. You find the Home Page field together with a Hyperlink button on all relevant windows for customers, vendors, bank accounts, prospects and contacts.
Invoicing Tab
Click the Invoicing tab.
On the Invoicing tab, you can find the fields relevant to the posting and invoicing of sales transactions for this customer:
The Bill-to Customer No. field: It may be that when you ship to this customer, the invoice should be sent to a different customer. In this case, enter here the number of the customer who should be invoiced. The program will enter this customer number on quotes, orders, invoices and credit memos as a default, which you will be able to change.
The Invoice Disc. Code: When you set up a new customer card, the program automatically enters the customer number in this field. Any standard invoice discounts that you create for this customer will be assigned using this code.
Customer Posting Group - You use this field to select the posting group that determines the balance sheet receivables accounts that sales transactions will be posted to for this customer. In our data, the customer posting groups are broadly based on customer location (DOMESTIC,
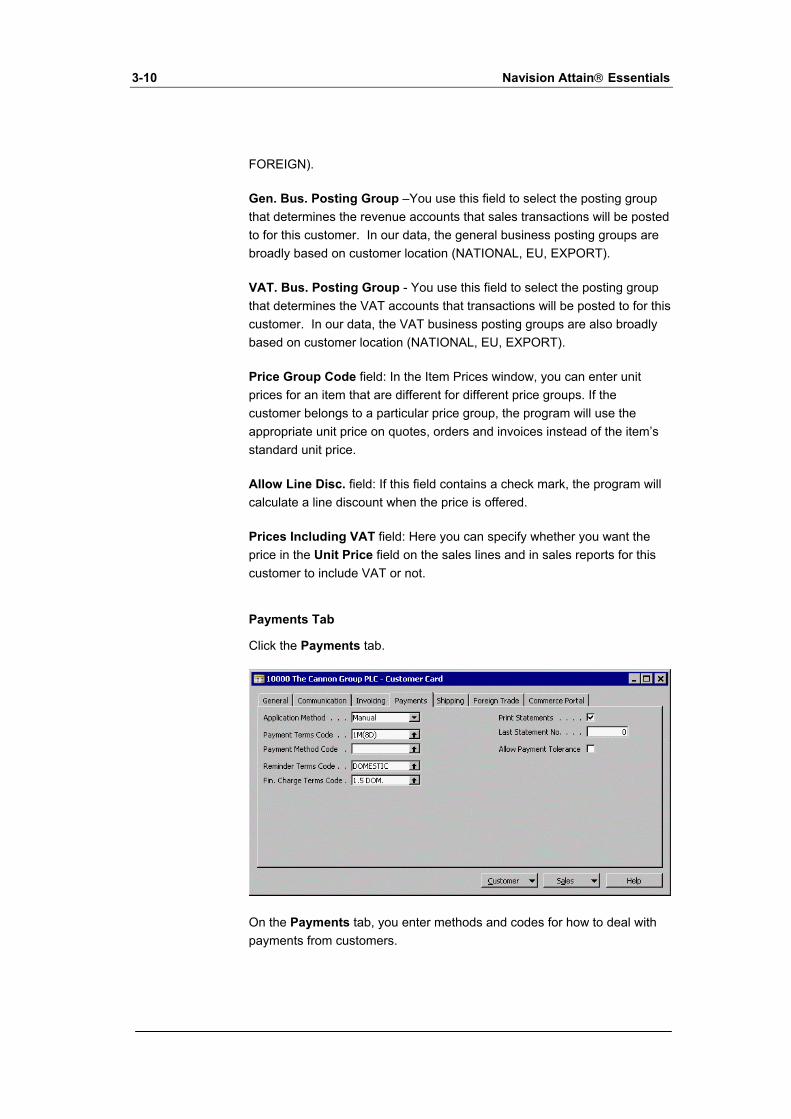
3-10 Navision Attain Essentials
FOREIGN).
Gen. Bus. Posting Group –You use this field to select the posting group that determines the revenue accounts that sales transactions will be posted to for this customer. In our data, the general business posting groups are broadly based on customer location (NATIONAL, EU, EXPORT).
VAT. Bus. Posting Group - You use this field to select the posting group that determines the VAT accounts that transactions will be posted to for this customer. In our data, the VAT business posting groups are also broadly based on customer location (NATIONAL, EU, EXPORT).
Price Group Code field: In the Item Prices window, you can enter unit prices for an item that are different for different price groups. If the customer belongs to a particular price group, the program will use the appropriate unit price on quotes, orders and invoices instead of the item’s standard unit price.
Allow Line Disc. field: If this field contains a check mark, the program will calculate a line discount when the price is offered.
Prices Including VAT field: Here you can specify whether you want the price in the Unit Price field on the sales lines and in sales reports for this customer to include VAT or not.
Payments Tab
Click the Payments tab.
On the Payments tab, you enter methods and codes for how to deal with payments from customers.

Sales & Receivables 3-11
You use the Application Method field to tell the program how you will apply payments you receive from the customer. You have two options:
Manual – The program will apply payments only if you specify a document.
·
· Apply to Oldest – The program will apply payments to the oldest outstanding Invoice.
The Payment Terms Code field is used to select the period this customer will have to pay their outstanding invoices and if any payment discounts will be granted to the customer for early payment. The Payment Method code is used to record whether this customer pays cash, cheque, bank transfer or any other payment method. The Allow Payment Tolerance field is used to determine whether you will allow some tolerance when applying payments from this customer to the customer’s outstanding amounts.
If you are to use the Reminders and Finance Charge Memo features, you also need to select the appropriate codes to use when generating these documents for this customer. You can also record if the customer receives printed customer statements and the number of the last statement.
Later in this chapter, you will learn how to apply payments, and create reminders and finance charge memos.
Shipping Tab
Click the Shipping tab.
On the Shipping tab, you find all kind of information related to the methods of shipping.

3-12 Navision Attain Essentials
The Location Code field: If the field contains a location code, the program will always suggest items from a particular inventory location when you invoice the customer.
The Reserve field – In this field, you can determine whether the program will allow reservations to be made for this customer.
The Shipping Advice field – This field contains advice about whether the customer will accept a partial shipment of the order or will only accept complete shipments.
The Shipping Agent Service Code – This field contains a code that represents the shipping agent that is used as the default shipping agent for this customer.
The Shipping Time field - This field contains the shipping time to the customer. That is, the time it takes from the moment the order is shipped from the warehouse to the moment the order is delivered at the customers address. The program uses the Shipping Time field to calculate the planned delivery date and the promised delivery date on the sales order.
Foreign Trade tab
Click the Foreign Trade tab.
The Currency Code field allows you to set a default currency code for the vendor. This value will be copied into documents and journals you create for this vendor. However, it is possible to overwrite the currency code in documents and journals to post the vendor entries with multiple currencies.
The Language Code field specifies the language for item texts, reminder

Sales & Receivables 3-13
texts and other text codes.
VAT Registration No. field: Here you enter the corresponding VAT Registration No. of your customers. The program checks the contents of this field complies with any country specific VAT registration numbers formats you have setup in the program.
Commerce Portal tab
Click the Commerce Portal tab.
On this tab, you enter information related to commerce portal functionality.
Exercise 8 Set Up a New Customer
Create a new customer card and enter the following information:
Customer Name ABC Design Furniture Address 1 Rose Street Post Code / City GB-B27 4KT /Birmingham Country Code GB Search Name Furniture. General Business Posting Group NATIONAL VAT Business Posting Group NATIONAL Customer Posting Group DOMESTIC Application Method Manual Payment Terms Net 1 Month/8 days 2%
You can find the steps and the solution to this exercise in Appendix D.

3-14 Navision Attain Essentials

Sales & Receivables 3-15
3.2 SALES QUOTES
In this section, you will learn about sales documents, entering a quote and converting a quote to an order.
In the program, orders can originate as a quote. A sales quote can be used as a preliminary draft for an order. The order can then be invoiced.
Sales Documents
Sales documents in the program have two sections – the Sales header and the Sales Lines. The Sales Header is the top section of the Sales Document while the lines are the bottom section.
Sales Header
The Sales Header contains four tabs:
General tab – Contains the customer details and date(s) for the sales document.
Depending on the status of the customer, several warnings may be displayed as you enter sales documents:
A credit limit warning is displayed if a customer’s balance is more than a customer’s credit limit.
·

3-16 Navision Attain Essentials
An overdue balance warning is displayed if a customer has an outstanding invoice amount that is past its due date.
·
Invoicing tab – Contains invoicing details for the sales document. The program automatically enters most of the information for the tab when the user selects the customer.
Shipping tab – Contains information as to how the contents of the sales documents is to be shipped.
Foreign Trade tab – Contains information related to foreign transactions such as the currency the invoice amounts are in.
Sales Lines
The sales lines contain the actual goods or services that are to be sold to the customer for this document.
Entering a Quote
We will now enter a quote.
1 On the main menu, click Sales & Receivables.
2 Click Quotes. The Sales Quote window appears.
3 Press F3 to create a new quote. Press ENTER to have the No. field filled in automatically.

Sales & Receivables 3-17
4 In the Sell to Customer No. field, click the AssistButton and select customer No. 20000, James Dailey Ltd. In this case, if an overdue balance warning appears, click Yes.
5 Select the option Item in the Type field in the first quote line.
6 In the Number field, select item number 80100 – the printing paper and click OK.
7 In the Location field select the GREEN warehouse as this is where you store the printing paper.
8 In the Quantity field, enter 10.
The sales price from the item card appears in the line and will be calculated with the quantity and any discounts.
You have now created a new sales quote.
Converting a Quote to an Order
Now the customer has decided to buy, and you can convert this sales quote to an order.
1 On the Sales Quote window, click Make Order.

3-18 Navision Attain Essentials
2 Click Yes to convert the quote to an order.
3 Click Yes to the overdue balance warning(s).
When the conversion is complete, you will receive a message that informs you that the quote has been changed to an order and which order number it has received.
4 Note the order number as you will need it when you want to process the order further.
5 Close the Sales Quote window.
To find the sales order we just created:
1 Click Orders from the Sales & Receivables menu.
2 Press F5 to display the order list. Scroll to the last order in the list. This should be the order that you have just converted. You can check by comparing the number you noted when you converted the quote.
3 Click Ok to select the Order.
Exercise 9 Create a Quote and Convert it to an Order
Now you will create a quote for the customer 30000, John Haddock Insurance. Use the item 70000 Side Panel and quote a quantity of 100.
Then convert this quote into an order.
You can find the steps and solutions for this exercise in Appendix D.
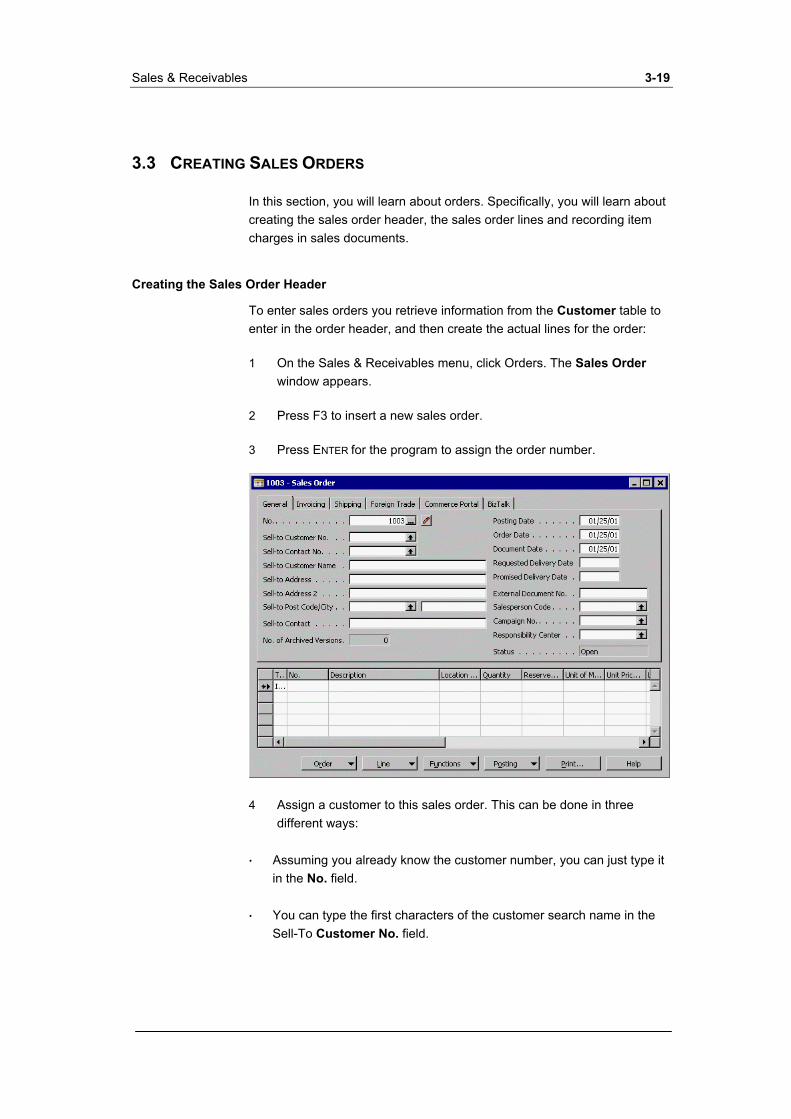
Sales & Receivables 3-19
3.3 CREATING SALES ORDERS
In this section, you will learn about orders. Specifically, you will learn about creating the sales order header, the sales order lines and recording item charges in sales documents.
Creating the Sales Order Header
To enter sales orders you retrieve information from the Customer table to enter in the order header, and then create the actual lines for the order:
1 On the Sales & Receivables menu, click Orders. The Sales Order window appears.
2 Press F3 to insert a new sales order.
3 Press ENTER for the program to assign the order number.
4 Assign a customer to this sales order. This can be done in three different ways:
Assuming you already know the customer number, you can just type it in the No. field.
·
· You can type the first characters of the customer search name in the Sell-To Customer No. field.

3-20 Navision Attain Essentials
Click the AssistButton in the Sell-to Customer No. field to view a list of customers and find the customer you want (You can also press F6). The customer list is the same customer list mentioned earlier for the customer card.
·
·
·
·
·
·
5 Select Customer 20000, James Dailey Ltd. from the customer list and confirm.
6 Click Yes on the warning.
7 The program fills in the Document Date, Order Date and Posting Date fields with the Work Date. Leave them as they are for this example.
Creating Sales Order Lines
The details for an order are entered on the sales line in the lower section of the page.
Some of the more important fields and their uses are as follows:
Type
Here you enter the line type.
Available types include:
G/L Account - This option allows the sales lines to be directly coded to a G/L Account.
Item - This option allows the sales line to be coded for an inventory item.
Resource - This option allows the sales line to be coded for a resource.
Fixed Asset - This option allows the sales line to be coded for a fixed asset.
Charge (Item) – This option allows the sales line to be coded for an item charge. You will learn more about this later in this chapter.
If you leave the field blank, you can enter a text in the Description field (you cannot use the other fields). You can enter a maximum of 50 characters. This can be useful if you want to make a comment about the sales line above.

Sales & Receivables 3-21
For the purpose of this example:
1 Click the AssistButton in the Type field and Select Item.
No.
Here you can enter a G/L account number or an item number, depending on what you selected in the Type field. For example, if the Type field is set to G/L Account, then the No. field look up will display the list of G/L accounts. If you leave the Type field blank, you can also use the standard text codes.
2 In No. field, click the AssistButton, select Item No 70000 from the item list and click OK.
Notice that when you selected the item number, the program automatically completed the Description field, the unit of Measure field, the Unit price field and the Line Discount fields. The program copies or calculates the values based on information contained in the customer and item cards.
3 In the Quantity field, enter 10.
The Line Amount field is also completed for the lines once the Quantity is entered. The program uses the Quantity and Unit Price fields to calculate the amounts.
You can also see that when the quantity was entered, the Qty. to Ship and the Qty. to Invoice fields were also filled in with the same quantity. These two fields represent the quantities that will be shipped or invoiced when the order is posted. You can reduce these amounts prior to posting if you are going to partially ship and/or partially invoice the order. An order may have as many shipments and invoices as are necessary to complete the order. Upon posting the order, if the order is not complete the Qty Shipped field and Qty Invoiced field will reflect the completed portion of the order.
4 Enter a new line with Item 70001 with a quantity of 10.
Let's now take a look at how we can assign item charges to this order.
Item Charges
Knowing the cost of shipping sold items can be as vital to your company as knowing the landed cost of purchased items. In the program, you can enter item charges, such as freight or handling charges, into the program and link them to sold items. This makes it possible for you to establish the exact
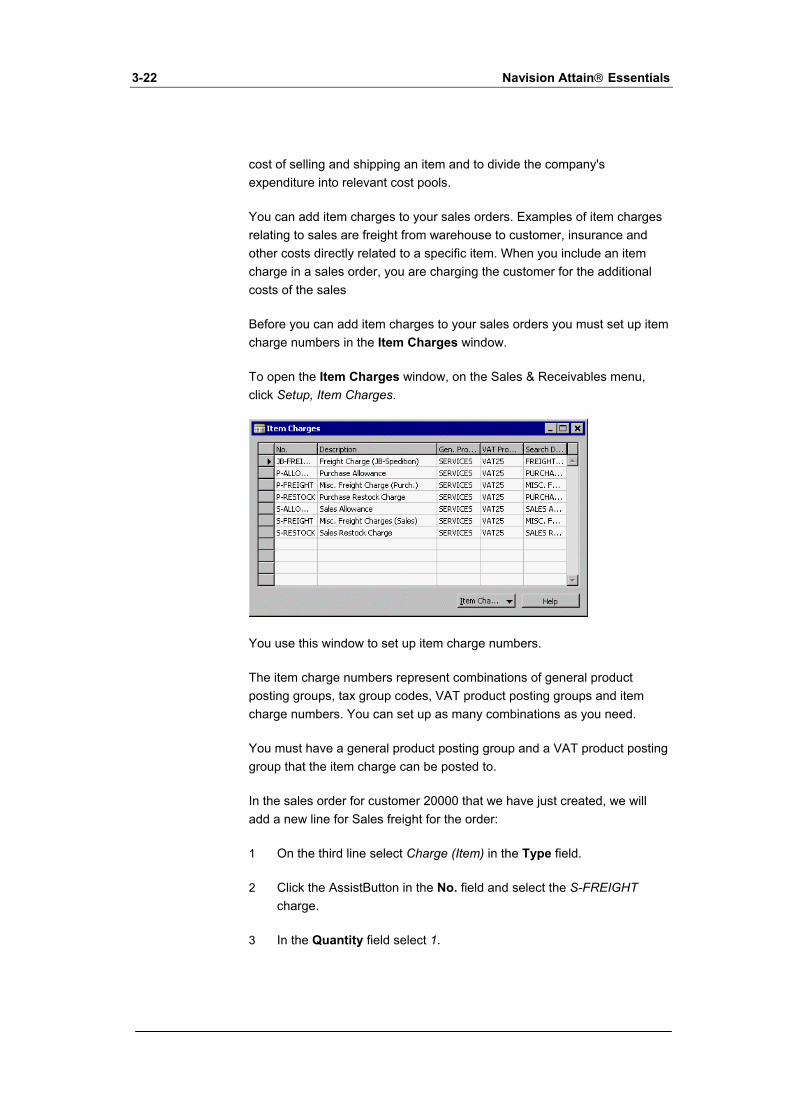
3-22 Navision Attain Essentials
cost of selling and shipping an item and to divide the company's expenditure into relevant cost pools.
You can add item charges to your sales orders. Examples of item charges relating to sales are freight from warehouse to customer, insurance and other costs directly related to a specific item. When you include an item charge in a sales order, you are charging the customer for the additional costs of the sales
Before you can add item charges to your sales orders you must set up item charge numbers in the Item Charges window.
To open the Item Charges window, on the Sales & Receivables menu, click Setup, Item Charges.
You use this window to set up item charge numbers.
The item charge numbers represent combinations of general product posting groups, tax group codes, VAT product posting groups and item charge numbers. You can set up as many combinations as you need.
You must have a general product posting group and a VAT product posting group that the item charge can be posted to.
In the sales order for customer 20000 that we have just created, we will add a new line for Sales freight for the order:
1 On the third line select Charge (Item) in the Type field.
2 Click the AssistButton in the No. field and select the S-FREIGHT charge.
3 In the Quantity field select 1.

Sales & Receivables 3-23
4 In the Unit Price Excl. VAT field enter 50.00.
5 Click the AssistButton in the Qty. to Assign field. The Item Charge Assignment (Sales) window appears.
Let’s say the freight costs only related to the shipping of item 70000.
6 Enter 1 in the Qty. to Assign field in the first line and close the window.
Notice the program fills in the Assigned Amount field with the freight amount.
7 Close the window.
8 Now the Order is finished and looks as follows:
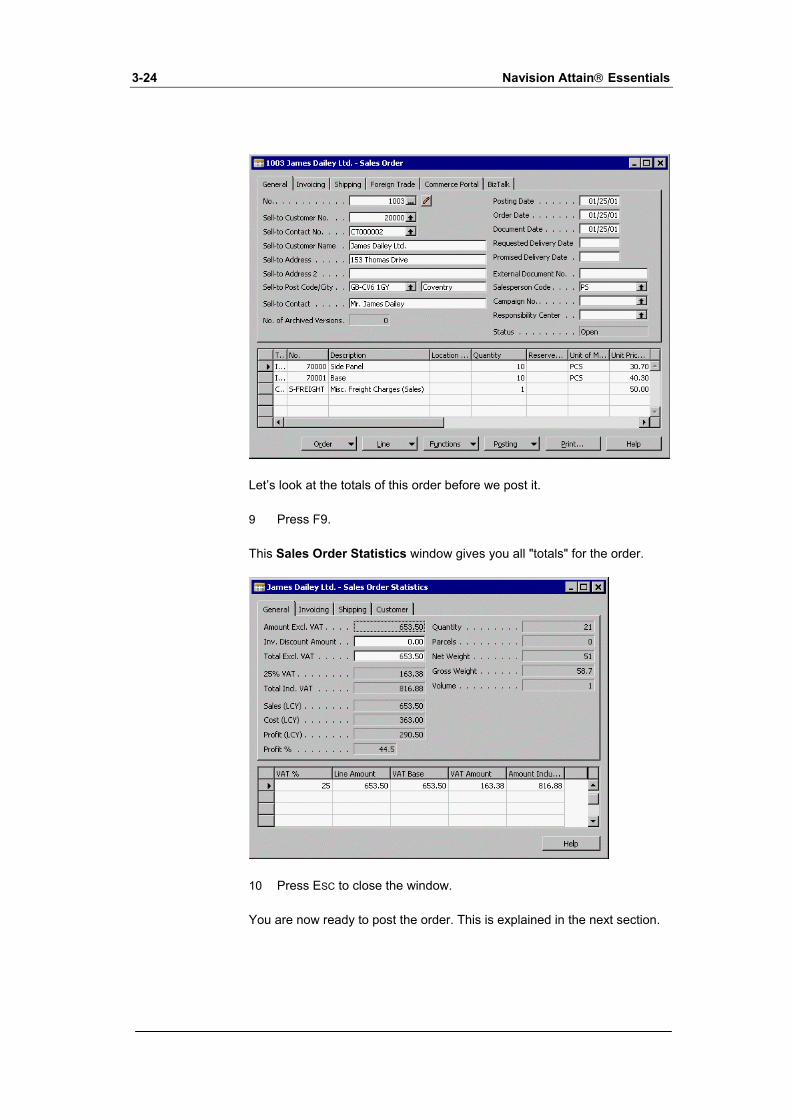
3-24 Navision Attain Essentials
Let’s look at the totals of this order before we post it.
9 Press F9.
This Sales Order Statistics window gives you all "totals" for the order.
10 Press ESC to close the window.
You are now ready to post the order. This is explained in the next section.

Sales & Receivables 3-25
Order Promising Functionality
As e-technology increases the number and speed of transactions, many companies find themselves having to manage many small orders and deal with demanding and selective customers. Under these circumstances, the ability to provide customers with accurate information about order delivery and to estimate the receipt of orders shipped by the vendors becomes very important.
In Navision Attain, the date calculation functionality and the Order Promising feature are the cornerstone of managing the sales orders. The program calculates the delivery and shipment dates that meet the dates requested by customers based on availability dates.
The program operates with two concepts:
available to promise (ATP), and ·
· capable to promise (CTP).
ATP is used in connection with the date calculation functionality and is based on the inventory reservation system. When the ATP function is used the program performs the availability check of the uncommitted (unreserved) portion of a company's inventory in terms of planned production, purchase, transfers and sales return. Based on the availability date of the items, the delivery date at the customer is calculated.
CTP is used to perform “what if” scenarios. If no items are available in inventory and there are no inbound orders scheduled, the program can calculate the earliest date that items can be available if they are produced, bought or transferred from another location. From the availability date of the items, the program calculates the delivery date at the customer, creates order lines for this date and reserves the inventory. The CTP function includes capacity constraint issues in the calculation and it may be integrated to production scheduling, manufacturing, transfer and purchase planning. The level of CTP greatly depends on the model selected in the capacity-scheduling engine.
With the date calculation functionality, companies can also make estimates concerning the expected dates for order receipts from their vendors.
To learn more about the possibilities of the program to support companies in promising orders to customers and estimating purchase and transfer order receipts, please refer to the Distribution course. This information is provided here to make you aware that such functionality exists in Navision

3-26 Navision Attain Essentials
Attain.
Sales & Receivables 3-27
3.4 POSTING SALES ORDERS
Now that we have entered the lines for the order, it is time to post the order.
1 Click Posting.
Prior to posting an order you can run a test report that will find some of the errors you may have made during the entry process. You can also print an invoice at the same time as posting by clicking Post and Print.
2 Click Post.
You have the following options:
Ship – If you post using this option, the order is updated to reflect that the items have been physically sent to the customer but the invoice has not been sent. The program creates a posted shipment.
Invoice - If you post using this option, the order is updated to reflect that the items have now been invoiced. The program creates a posted invoice. You can only invoice an order if the order has been shipped. If the order is fully invoiced, the order is deleted.
Ship and Invoice - If you post using this option, the order is shipped and invoiced in the one transaction. The program creates a posted shipment and a posted invoice. If the order is fully invoiced, the order is deleted.
3 Click Ship and Invoice and click OK.
Since you have fully invoiced the order, it will be deleted after you have posted it.
4 Close the Order window.
You can see the orders that have already been shipped and/or invoiced by looking at Posted Shipments and Posted Invoices.
Posted Shipments
On the Sales & Receivables menu in the right column, we are going to look at the option Posted Shipments.
You use the Posted Sales Shipment window to view sales orders that have been shipped. The window is very similar to the Sales Order window, but it contains additional information about the shipment. It contains a
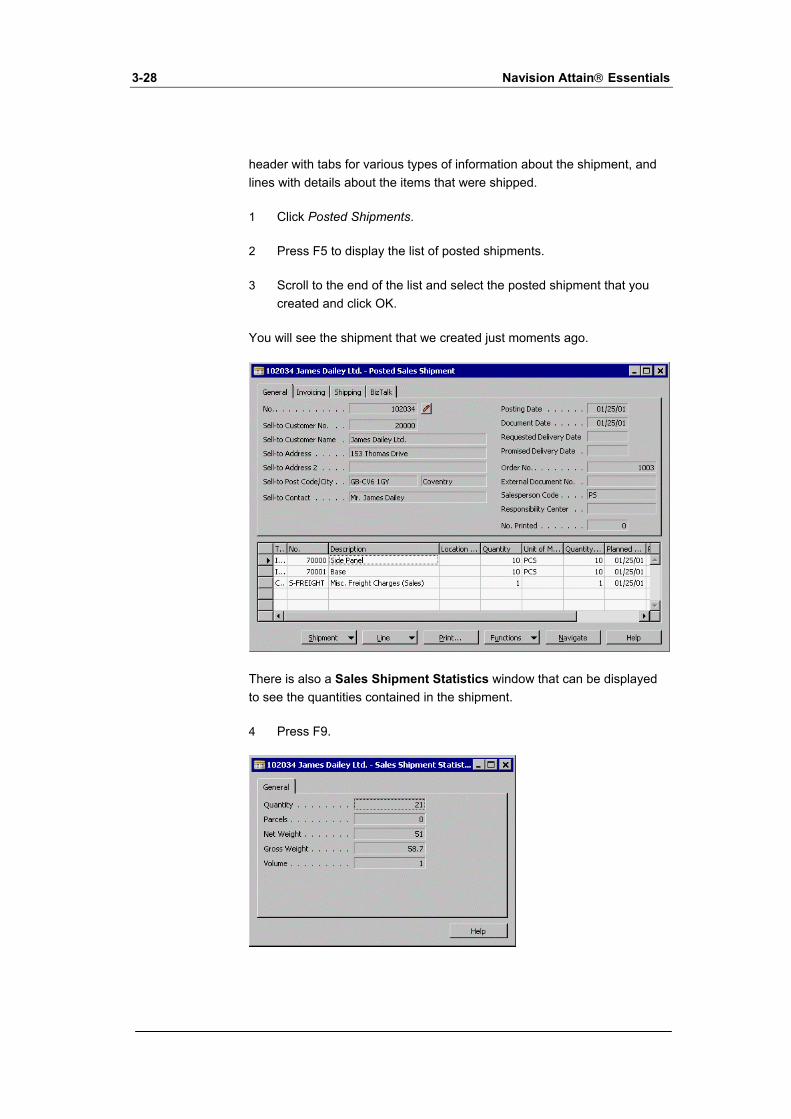
3-28 Navision Attain Essentials
header with tabs for various types of information about the shipment, and lines with details about the items that were shipped.
1 Click Posted Shipments.
2 Press F5 to display the list of posted shipments.
3 Scroll to the end of the list and select the posted shipment that you created and click OK.
You will see the shipment that we created just moments ago.
There is also a Sales Shipment Statistics window that can be displayed to see the quantities contained in the shipment.
4 Press F9.
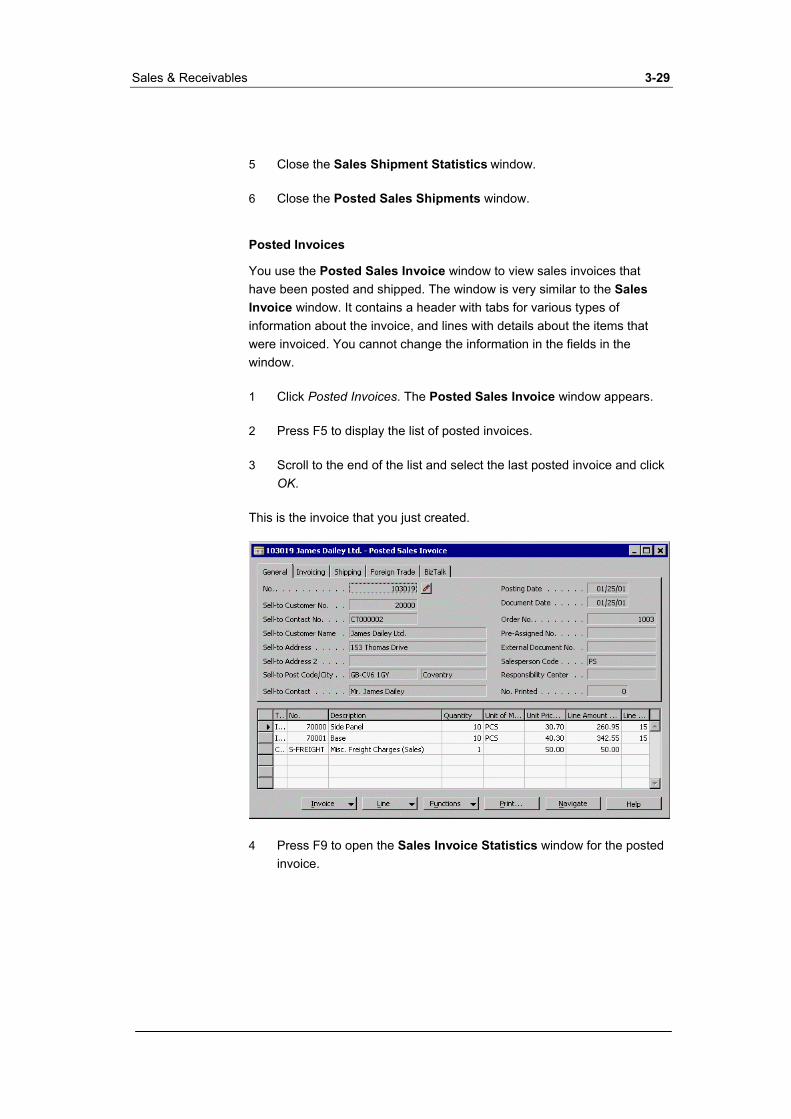
Sales & Receivables 3-29
5 Close the Sales Shipment Statistics window.
6 Close the Posted Sales Shipments window.
Posted Invoices
You use the Posted Sales Invoice window to view sales invoices that have been posted and shipped. The window is very similar to the Sales Invoice window. It contains a header with tabs for various types of information about the invoice, and lines with details about the items that were invoiced. You cannot change the information in the fields in the window.
1 Click Posted Invoices. The Posted Sales Invoice window appears.
2 Press F5 to display the list of posted invoices.
3 Scroll to the end of the list and select the last posted invoice and click OK.
This is the invoice that you just created.
4 Press F9 to open the Sales Invoice Statistics window for the posted invoice.

3-30 Navision Attain Essentials
You can see the VAT details as well as Quantity and Amount information for the invoice.
5 Close the Sales Invoice Statistics window.
6 Close the Posted Sales Invoice window.
Exercise 10 Create & Post a Sales Order
Create a sales order for the customer 10000.
The customer will order 100 of Item 70100. The order has sales freight costs of 35.00 LCY.
When you have created the order, you must post the shipment and invoicing of the order.
Use the posting date 01/25/01.
You can find the steps and solutions for this exercise in Appendix D.

Sales & Receivables 3-31
3.5 CREATING AND POSTING SALES INVOICES
You can also create invoices without creating an order first.
You may do this when you are certain that you already have the items the customer requires in stock.
1 On the Sales and Receivables Menu, click Invoices. The Sales Invoice window appears. You press F3 to create a new invoice.
The process for creating invoices is similar to quotes and orders. You enter information in the header and lines to complete the invoice.
2 When you have completed filling in the invoice you can post the invoice by clicking Posting, Post. An example of a completed invoice is shown below:
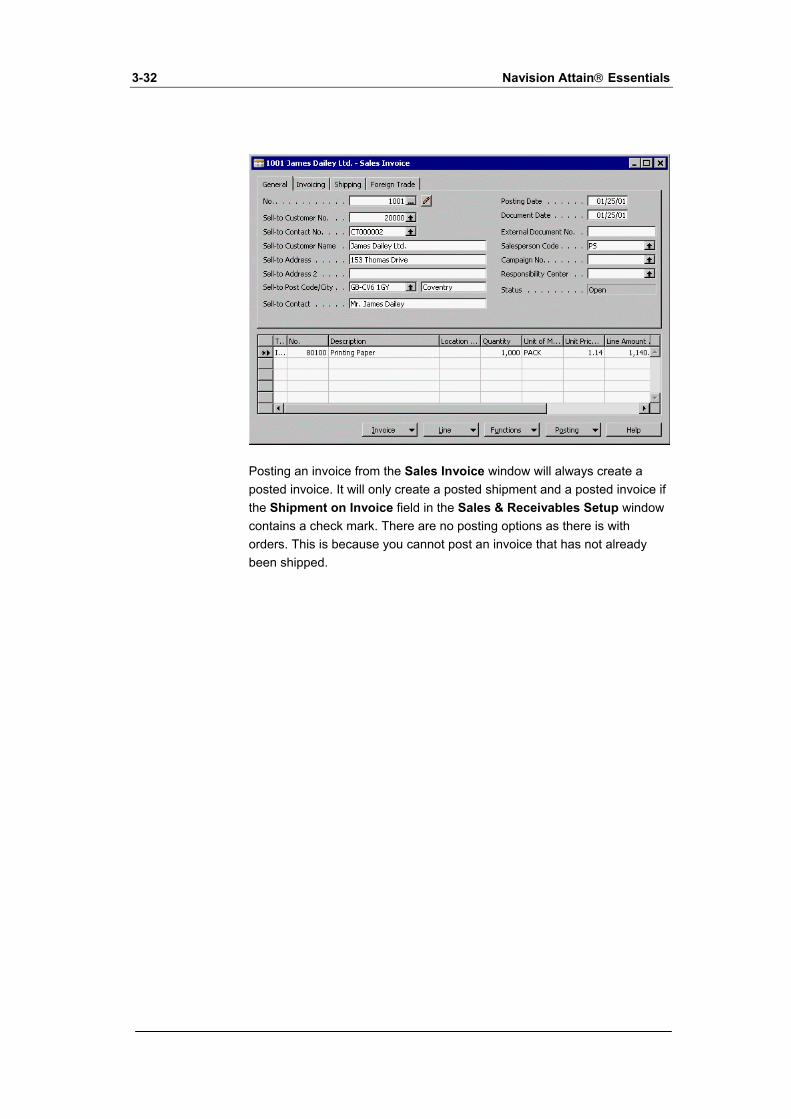
3-32 Navision Attain Essentials
Posting an invoice from the Sales Invoice window will always create a posted invoice. It will only create a posted shipment and a posted invoice if the Shipment on Invoice field in the Sales & Receivables Setup window contains a check mark. There are no posting options as there is with orders. This is because you cannot post an invoice that has not already been shipped.
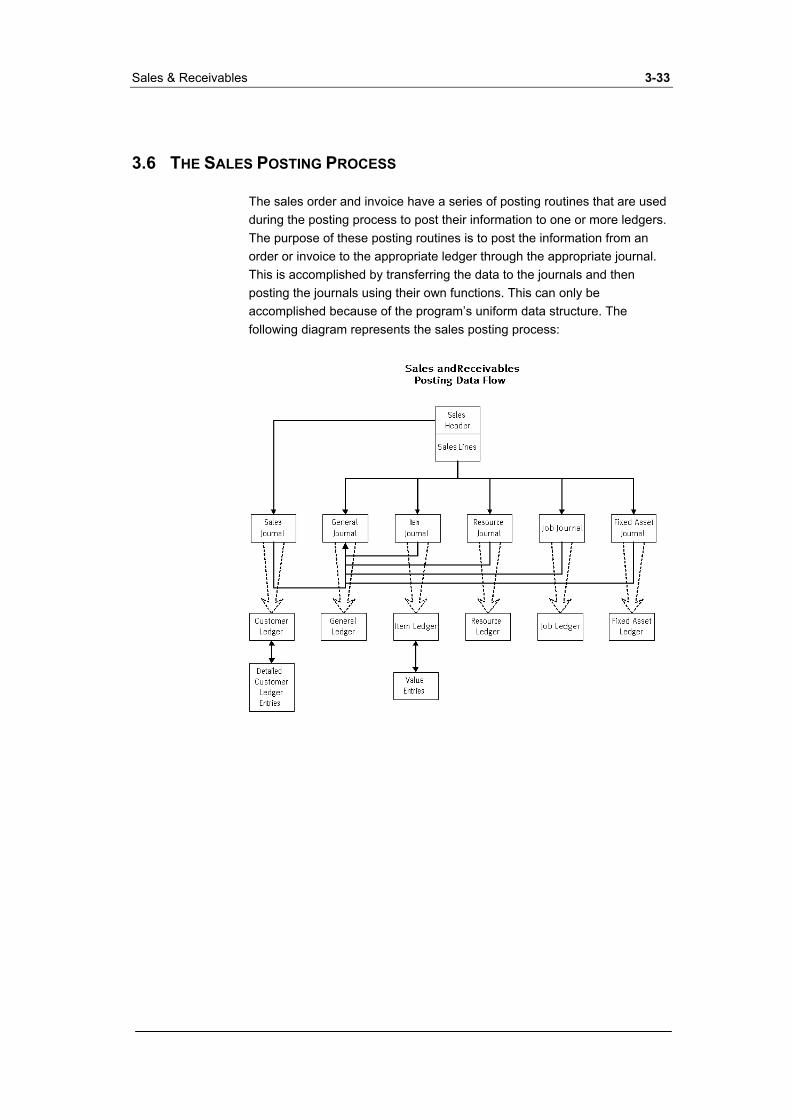
Sales & Receivables 3-33
3.6 THE SALES POSTING PROCESS
The sales order and invoice have a series of posting routines that are used during the posting process to post their information to one or more ledgers. The purpose of these posting routines is to post the information from an order or invoice to the appropriate ledger through the appropriate journal. This is accomplished by transferring the data to the journals and then posting the journals using their own functions. This can only be accomplished because of the program’s uniform data structure. The following diagram represents the sales posting process:

3-34 Navision Attain Essentials
3.7 CREDIT MEMOS
In this section, you will learn about credit memos and in particular issuing credit memos and posting credit memos.
A sales credit can be used to give a customer compensation for a problem with the order and to correct an erroneous invoice. Credit memos make it easier to manage your receivables by giving you a way to reverse an invoice transaction that was posted with some erroneous information. We will look at some of the functionality available to make it easy to create a credit memo.
Issuing Credit Memos
1 From the Sales & Receivables menu, click Credit Memos. The Sales Credit Memo window appears.
2 Press F3 and press ENTER to create a new Sales Credit Memo.
You will notice that the sales credit memo is also a sales document that has the same characteristics as a sales order or sales invoice. The header information is the company information, which comes from the customer card. The lines are copied from the posted sales invoice line information from the original transaction.
3 Click Functions, Copy Document.
4 In the Document Type field, select Posted Invoice.

Sales & Receivables 3-35
5 Click the AssistButton in the Document No. field. The Posted Sales Invoices window appears.
6 Select the posted invoice for Customer 20000, James Dailey Ltd, with no. 103007 and click OK.
7 Place a check mark in the Include Header field, and leave the Recalculate Lines field blank.
The Copy Sales Document window will look like this:
8 Click OK.

3-36 Navision Attain Essentials
You will see that the credit memo document is now filled in with all of the information from the posted sales invoice.
Posting Credit Memos
For the sake of this example, let us say that the desk that was ordered by the customer was not the item that they wanted. They have returned the item to us. We will now post the credit memo that we have just created.
1 Click Posting, Post.
2 Click Yes to confirm that you wish to post the credit memo.
3 Close the Sales Credit Memo window.
You can see the credit memo you have just posted in the Posted Credit Memos window:
4 On the Sales & Receivables menu, click Posted Credit Memos.
5 Press F5 and select the last posted sales credit memo in the list and click OK.

Sales & Receivables 3-37
This is the credit memo that you have just created.
6 Press F9 to see the Sales Credit Memo Statistics.
You can see the VAT details as well as Quantity and Amount information for the credit memo.
7 Close the Sales Credit Memo Statistics window.
8 Close the Sales Credit Memo window.
If a customer is also recorded as a contact in the Relationship Management application area, and if you have specified an interaction template code for

3-38 Navision Attain Essentials
sales credit memos in the Relationship Management Setup window, when you click Print to print the sales credit memo, the program automatically records an interaction in the Interaction Log Entry table.
Exercise 11 Create & Post a Credit Memo
Create and post a credit memo for the posted invoice with document number 103014 for Customer No. 47563218, Klubben.
You can find the steps and solutions for this exercise in Appendix D.
Returns Management
Related to credit memos are Navision Attain’s returns management granules. For many wholesalers and distributors, sales returns are a standard element of their customer service policy, which directly influences the customer’s perception of the service level. Timely crediting for returned items, repairing/replacing a damaged item, and replacing a wrong item are among those aspects of handling returns that a customer associates with good service. The more seamless and efficient these return procedures appear to the customer, the more likely it is that the company will retain that customer.
From the company’s perspective, the internal handling of return-related processes can appear rather extensive. In most cases, companies need to adjust customer (and vendor) balances, account for additional costs, update inventory quantities and values. Additionally, they may also need to inspect the returned items, send the returned items to the vendor for repair and so on. The scope of these processes will depend on a wide range of factors, such as the customer’s request, reason for return, item type and value, causes of damage and practices common in a specific line of business.
The handling of these processes involves different tasks that are performed by various groups of employees: sales people, warehouse personnel, bookkeepers, purchasers and inspectors. Although logically related, those different tasks are not necessarily operationally dependent. For example, the replacement for a damaged item can be shipped to a customer before the damaged item has been returned. Similarly, a customer can be credited for a returned item before the company has inspected and approved the return. In such a multi-process environment, the challenge is to ensure that

Sales & Receivables 3-39
all return-associated processes are completed in a timely manner and possible errors can be easily recovered.
Due to the complexity and scope of the return-related processes, a company’s costs involved in handling these processes can be substantial. To control costs, companies need to optimize their return management processes.
The Sales Return Order Management and the Purchase Return Order Management granules offer an optimal solution to companies that strive to achieve responsive customer service by implementing cost-efficient customer and vendor return policies. Specifically, the application provides a functionality that is characterized by the following key features:
Rapid response to customers’ requests ·
·
·
·
Flexibility
Traceability and overview
Automation of the return to vendor process
Personnel responsible for the customer interface are now able to register the details of their agreement with the customer regarding the return as well as information relevant to further handling of the return using just one entry point.
For more information and in-depth details on the key features of the returns management functionality of Navision Attain, please refer to the Distribution course. As with Order Promising above, this information is provided here to make you aware that such functionality exists in Navision Attain.
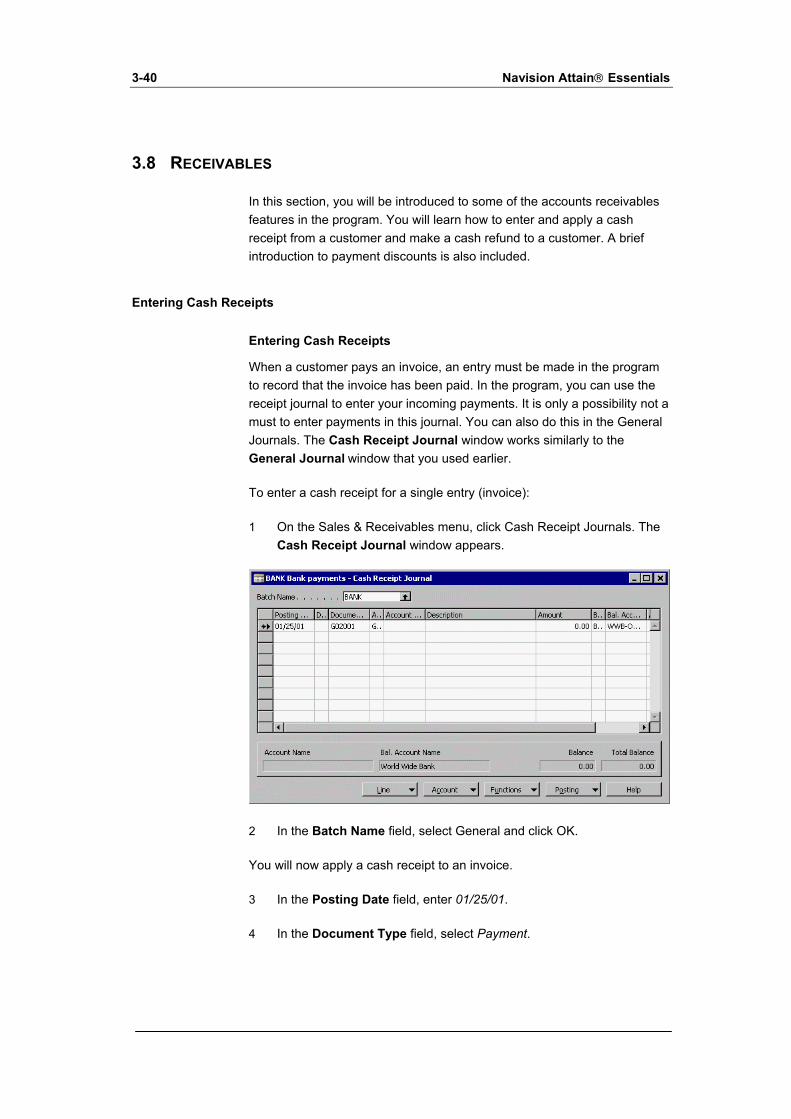
3-40 Navision Attain Essentials
3.8 RECEIVABLES
In this section, you will be introduced to some of the accounts receivables features in the program. You will learn how to enter and apply a cash receipt from a customer and make a cash refund to a customer. A brief introduction to payment discounts is also included.
Entering Cash Receipts
Entering Cash Receipts
When a customer pays an invoice, an entry must be made in the program to record that the invoice has been paid. In the program, you can use the receipt journal to enter your incoming payments. It is only a possibility not a must to enter payments in this journal. You can also do this in the General Journals. The Cash Receipt Journal window works similarly to the General Journal window that you used earlier.
To enter a cash receipt for a single entry (invoice):
1 On the Sales & Receivables menu, click Cash Receipt Journals. The Cash Receipt Journal window appears.
2 In the Batch Name field, select General and click OK.
You will now apply a cash receipt to an invoice.
3 In the Posting Date field, enter 01/25/01.
4 In the Document Type field, select Payment.

Sales & Receivables 3-41
Note
You must select Payment if you want to the program to calculate any payment discounts in connection with the application of an entry.
5 The document number is created by the program in the Document No. field. Leave this as it is for this example.
6 In the Account Type field, select Customer since it is the customer who is paying.
7 In the Account No. field, enter Customer No. 20000, James Dailey Ltd.
8 Leave the Amount field blank. But it is also possible enter the received amount. For a cash receipt journal with Document Type Payment, this field must contain a negative value.
Now we have to tell the program which G/L account should receive positive value or the debit. Normally, it will be a cash G/L account or a bank account.
9 In the Balance Account Type field, select Bank Account.
10 In the Bal. Account No field, select WWB-OPERATING.
Applying Cash Receipts
We will be paying an existing invoice in the program.
11 In the Applies-to Doc. Type field, select Invoice.
12 In the Applies-to Doc. No. field, click the AssistButton to open the Apply Customer Entries window. This window contains a list of all open customer ledger entries for the customer. A customer ledger entry will be open if the Open field contains a check mark.
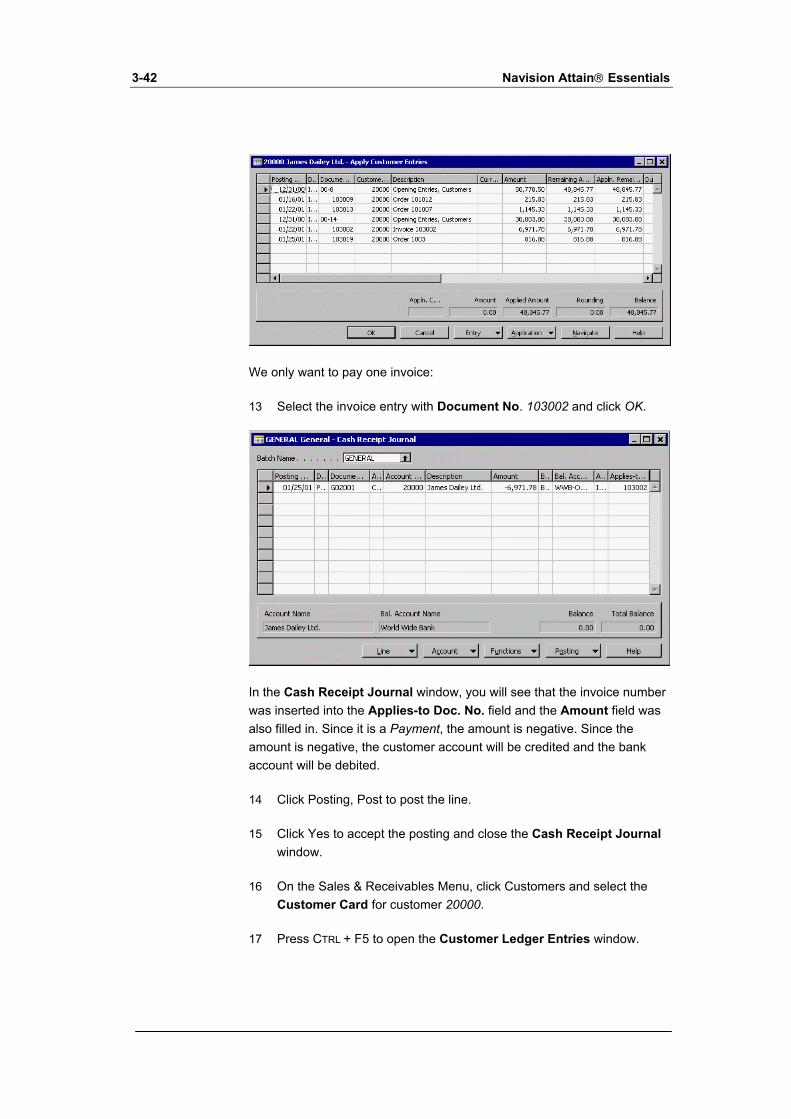
3-42 Navision Attain Essentials
We only want to pay one invoice:
13 Select the invoice entry with Document No. 103002 and click OK.
In the Cash Receipt Journal window, you will see that the invoice number was inserted into the Applies-to Doc. No. field and the Amount field was also filled in. Since it is a Payment, the amount is negative. Since the amount is negative, the customer account will be credited and the bank account will be debited.
14 Click Posting, Post to post the line.
15 Click Yes to accept the posting and close the Cash Receipt Journal window.
16 On the Sales & Receivables Menu, click Customers and select the Customer Card for customer 20000.
17 Press CTRL + F5 to open the Customer Ledger Entries window.

Sales & Receivables 3-43
18 You can see that a customer ledger entry has been created for the payment. The Open field is blank, showing that the payment is fully applied.
19 If you look at the invoice entry with Document No. 103002 you can see that the Open field no longer contains a check mark. The invoice entry is also fully applied.
20 Close the Customer Ledger Entries window and close the Customer Card.
When you enter payments, the amount does not have to match the amount of the invoice. You can apply a partial amount to an invoice. When you do this, you must enter the amount and then apply the payment to the invoice. You can also apply the cash receipt to the customer's ledger as an open cash receipt, not specifying an invoice to apply it to. The example above is the easiest method of applying a payment to a sales invoice.
Exercise 12 Receiving & Posting Payment
You have now received the full payment for invoice 00-15 from customer 30000, John Haddock Insurance Co. Use WWW-operating as the balancing account and the work date as the posting date.
You can find the steps and solutions for this exercise in Appendix D.
Entering and Applying Refunds
In the previous example, we applied a payment to an invoice entry that was open. After the payment was fully applied to the invoice, the Open field on the customer ledger entry for the invoice was blank. The invoice can no longer be applied to other customer ledger entries.
Let's say the following situation occurs:
You have shipped some items to a customer and have sent an invoice to a customer. The customer has not yet received the items, but quickly sends you the payment for the invoice to take advantage of a payment discount. You enter the payment and apply it to the invoice in the program so that both the payment and invoice entries are no longer open. After the customer receives the items, they discover that the items are damaged and
3-44 Navision Attain Essentials
wish to return them. In the program you enter a credit memo to record the return. If the invoice had not been paid, you would apply the credit memo to the invoice when you post the credit memo. However, in this case the invoice is already fully applied to a payment and is not available to be applied to the credit memo.
This situation can be handled in two ways:
The credit memo remains open until a future sale is made to the customer. The credit memo is then applied to the new invoice. This concept is similar to an item exchanges or item replacements offered by a retail store.
·
·
·
·
·
·
If the customer would like the matter settled quickly or if a future sale may not be likely, you can post a refund and apply it to the credit memo.
Refunds are also entered using the Cash Receipt Journal window. The procedure for entering and applying a refund is the same as entering and applying a payment except for the following differences:
The Document Type must be Refund.
In the Cash Receipt Journal window, the contents of the Amount field in the will be positive. As a result, the customer account will be debited and the cash G/L account or bank account will be credited.
In the Apply Customer Entries window, you apply the refund to the open credit memo.
Similar to payments, when you enter refunds, the amount does not have to match the amount of the credit memo. You can apply a partial refund amount to a credit memo. You can also post the refund to the customer's ledger as an open refund, not specifying a credit memo to apply it to. However, in the case of refunds, it is most likely that they will be applied when they are posted.
Payment Discounts
Before you can use the payment discount feature in the program, you must set up the payment terms and the payment discount accounts for the customers and vendors. The terms are set up in the Payment Terms window. The accounts are set up in either:
The payment discount accounts in the General Ledger Setup window

Sales & Receivables 3-45
OR
The payment discount accounts in the Customer Posting Group and Vendor Posting Group windows.
·
Payment Discounts occur when the invoice payment is applied and posted before the payment discount date for the invoice.
If you apply a payment to an invoice when you post the payment, the program will reduce the amount posted in the payment journal by the discount.
If you have already posted the payment without applying, you must follow specific procedures to ensure that the payment discount is calculated correctly. This will be outlined further in the Financial Management Course.
To see whether payment discounts have been calculated for a specific entry, you can use the Detailed Customer Ledg. Entries window. This window shows a summary of all the posted entries and adjustments related to a specific ledger entry. Therefore you see why a certain entry was made on a certain account in connection with not only discounts but also roundings and currency exchange adjustments. Detailed Customer and Vendor Ledger entries are discussed in more detail in the Financial Management Course.
Sales Note
Detailed ledger entries provide full information and are unaltered by the program. The tracability of customer and vendor ledger entries is easy and complete. A direct relationship between customer and vendor ledger entries and G/L entries exist.

3-46 Navision Attain Essentials
3.9 PERIODIC ACTIVITIES
In this section, you will learn about periodic activities and in particular reminders and finance charge memos.
Reminders
In most cases you need a reminder system, because you cannot expect that all customers will pay their open entries on time. A reminder is a document you use to remind your customer of an outstanding balance.
The reminder facilities are based on the core data for each customer. They offer you extensive options, such as applying a number of predefined text options, flexible interest rates and other fees when creating reminders for your customers. You can also choose whether or not interest and/or fees should be posted to the relevant G/L and customer accounts.
Let’s try creating a reminder:
1 On the Sales & Receivables menu, click Periodic Activities, Reminders.
In the Reminder window, click Functions and select Create Reminders
2 On the Options tab, place a check mark in the Only Entries with Overdue Amounts field.
3 Click OK.
4 In the Reminder window, click F5 and select the first reminder from the list that has now been created.
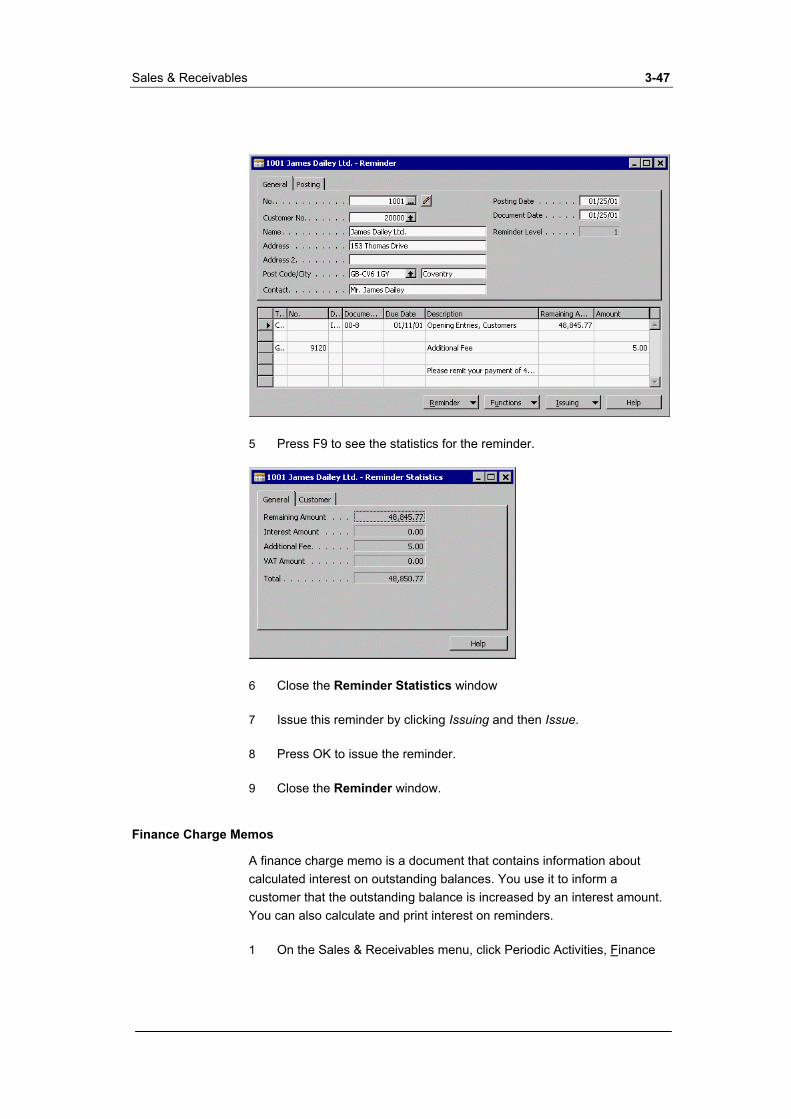
Sales & Receivables 3-47
5 Press F9 to see the statistics for the reminder.
6 Close the Reminder Statistics window
7 Issue this reminder by clicking Issuing and then Issue.
8 Press OK to issue the reminder.
9 Close the Reminder window.
Finance Charge Memos
A finance charge memo is a document that contains information about calculated interest on outstanding balances. You use it to inform a customer that the outstanding balance is increased by an interest amount. You can also calculate and print interest on reminders.
1 On the Sales & Receivables menu, click Periodic Activities, Finance

3-48 Navision Attain Essentials
Charge Memos.
2 In the Finance Charge Memo window, click Functions, Create Finance Charge Memos
3 Click OK.
4 Click F5 and select the first Finance Charge Memo Number from the list.
5 Issue the Fin. Charge Memo by clicking Issuing, Issue.
6 Press OK to issue the finance charge memo.
7 Close the Finance Charge Memo window.

Sales & Receivables 3-49
3.10 REVIEW QUESTIONS
Now you have the basic ideas behind the Sales & Receivables application area of Navision Attain. Here are some questions to help you review the material you’ve just covered. Answers are not provided. This is a study-aid.
1 When creating a sales order, what are three possible warning messages that can occur and where is each warning setup to be generated?
2 The primary account associated with a Customer Posting Group is _____________?
3 Name six of the possible No. series associated with the Sales & Receivables Setup
4 What happens if you enter a Price Group Code for a customer?
5 Do you have to create a quote to generate an order?
6 What are the three options for posting a sales order? In what circumstances would you use each?
7 Can you invoice without creating an order first?
8 What journal is used for entering incoming payments? Do you have to use it?
9 What has to be set up before you can use the payment discount feature?
10 Is there a direct relationship between customer and vendor ledger entries and G/L entries?

Chapter 4.
Purchases & Payables
The Purchases & Payables application area helps you manage purchases and accounts payable.
The Purchases & Payables application area is fully integrated with the General Ledger application area. Thus, when you post a transaction such as an invoice, the program automatically posts all necessary transactions to all relevant accounts such as the purchases account, the payables account, and the applicable discount and VAT accounts.
This chapter contains an overview of the Navision Attain purchases and payables functionality. Specifically, it covers:
4.1 Overview & Setup
4.2 Purchase Quotes & Purchase Orders
4.3 Purchase Invoices
4.4 The Purchase Posting Process
4.5 Credit Memos
4.6 Payment Journals & Check Writing
4.7 Review Questions

4-2 Navision Attain Essentials
4.1 OVERVIEW & SETUP
In this section, you will learn about the setup and vendor cards in the Purchases & Payables application area.
Basic Setup
In this unit, you will learn how to set up Purchases & Payables.
Before using the Purchases & Payables application area, you need to specify how you want the program to manage certain aspects of your purchases and payables. For example, you must define basic rules for ordering and invoicing as well as specify the number series that will be used for vendors, purchase documents, and so on. You must also specify other options such as how you want to calculate and post discounts and whether you want to round invoices.
You use the Purchases & Payables Setup window to specify how you want the program to manage these aspects of your purchases & payables.
To open the Purchases & Payables Setup window on the Purchases & Payables menu click Setup, Purchases & Payables Setup.
The Purchases & Payables Setup window appears.
On the General tab of the Purchases & Payables Setup window, you specify options such as how you want to calculate and post discounts and whether you want to round invoices. The tab contains the following fields:
Discount Posting – Here you can specify the type of purchase discounts the program will post separately.
·
Purchases & Payables 4-3
Receipt on Invoice – Here you can choose to have the program automatically set up receipts in connection with purchase invoices. The program will automatically post a receipt when you post a purchase invoice.
·
·
·
·
·
·
·
·
·
Invoice Rounding – A check mark in this field indicates that the program will round amounts for purchase invoices. You set the rounding precisions for LCY in the GL setup and for foreign currencies in the currency table.
Ext. Doc. No. Mandatory – Here you can specify whether it is mandatory to enter an external document number in the following situations: In the Vendor Invoice No. field or the Vendor Cr. Memo No. field on a purchase header. In the External Document No. field on a general journal line, where the contents of the Document Type field = Invoice, Credit Memo or Finance Charge and the contents of the Account Type field = Vendor.
Allow VAT difference – You can place a check mark in the field if you want to allow the manual adjustment of VAT amounts in purchase documents. You must then specify the “Maximum VAT Difference Allowed” in the GL setup.
Calc. Inv. Discount – Place a check mark in this field if you want the program to automatically calculate the invoice discount amount in connection with purchase documents.
Calc. Inv. Disc. per VAT ID. – If you place a check mark in this field, the invoice discount will be calculated per VAT Identifier. If you choose not to place a check mark here, the invoice discount will be calculated on the purchase document total.
Appln. between Currencies – Here you can specify to what extent the application of entries in different currencies is allowed in the Purchases and Payables application area.
Copy Comments Blanket to Order – If you enter a check mark in this field, comments that you enter on a blanket order will be copied to the purchase orders that are created from the blanket order.
Copy Comments Order to Invoice – If you enter a check mark in this

4-4 Navision Attain Essentials
field, comments that you enter on a purchase order will be copied to the purchase invoice that is created from the order.
Copy Comments Order to Receipt – If you enter a check mark in this field, comments that you enter on a purchase order will be copied to the receipt that is created from the order.
·
· Copy Cmts Cr.Memo to Ret.Shpt – If you place a check mark in this field, the program will copy comments from the credit memo to the posted return shipment.
Click the Numbering tab.
On the Numbering tab you must specify the number series that will be used for vendors, purchase documents, and so on.
Other Options under Setup
We will now look at some other options under Setup.
Click Setup.
Vendor Posting Group – You use the Vendor Posting Groups window to set up one or more vendor posting groups. For each posting group you set up, you must create links to the relevant G/L accounts. You can use the same G/L account numbers or different account numbers for each posting group. After you have set up the posting groups, you assign them to the relevant vendor accounts. When you post to a vendor account, the program will post to the G/L account that is specified by the vendor posting group linked to the vendor account. We will return to the posting process later in this chapter.

Purchases & Payables 4-5
Item Charges - You use the Item Charges window to set up item charge numbers. If you want to learn more about item charges, see Chapter 3, Sales & Receivables.
Payment Terms – You use the Payment Terms window to set up codes for each set of payment terms – that is due date calculations for invoicing. We will look at payment terms in more detail later in this section.
Payment Methods – Will allow you to create a default balancing account to each payment method. In other words, closing each invoice. Be careful when you handle balance accounts in payment methods, this will apply the invoice immediately, by posting. This is for cash purchasers and not for normal accounts payable processing.
Report Selections – Assigning a particular report number to a purchase document.
Req. Worksheet templates – Here you can create templates and batch jobs for requisition worksheets.
Vendor Cards
On the Purchases and Payables Menu, click Vendors. The Vendor Card window appears.
From the vendor card we can see all the information that is available for a vendor. Notice that there are six tabs on the vendor card. This allows similar information to be grouped on the same card without cluttering up the main screen. The program uses this information to print vendor information on purchase document headers.

4-6 Navision Attain Essentials
You must therefore set up a card for each vendor, on which you enter basic information such as name, address and the kinds of discounts that are available. You create a new vendor by pressing F3 and pressing ENTER to obtain the next number in the number series, but for now we will look at an existing Vendor Card.
The Vendor Card also contains a Vendor and a Purchases button:
Vendor button – used to display further information on this vendor e.g. dimensions for the vendor. It is also used to access the list of all vendors.
·
· Purchases Button – used to show the different purchase documents for this vendor as well as standard invoice discounts relating to this vendor.
The General Tab
You enter basic information such as the vendor name, address, post code and contact on the General tab. You can also see the vendor's current balance on the General tab.
Notice that the foreign EU vendors need a country code, because this information is necessary for the Intrastat and VAT statements.
Use the Search Name field to set up an additional descriptive name for a vendor which you can search by. The program copies the vendor name to this field as a default.
The Communication Tab
Click the Communication tab.

Purchases & Payables 4-7
On the Communication tab, you enter the vendor’s telephone number, fax number, e-mail address and home page.
Next to the Phone No. field, you find the Make Phone Call button. If the customer is also recorded as a contact in the Relationship Management application area, when you click this button, the Make Phone Call wizard appears. When you click FINISH in the wizard, the program automatically records the phone call as an interaction in the Interaction Log Entry table.
On the Communication tab, you also find the E-mail field in which you can fill in the e-mail address for the customer. The e-mail address can be used to send quotes, orders, invoices, and/or statements directly to a customer.
You also have the possibility of referring to a Web site on the World-Wide-Web (WWW) and access it directly by clicking the Hyperlink button.
The Invoicing Tab
Click the Invoicing tab.
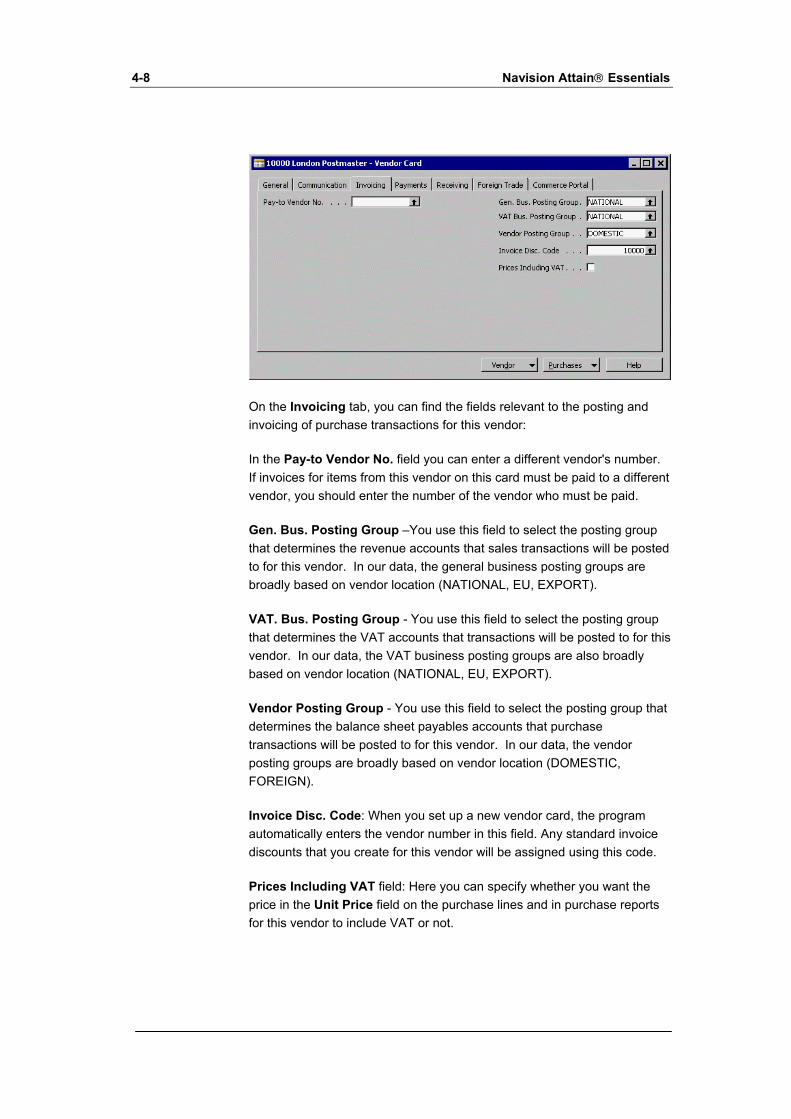
4-8 Navision Attain Essentials
On the Invoicing tab, you can find the fields relevant to the posting and invoicing of purchase transactions for this vendor:
In the Pay-to Vendor No. field you can enter a different vendor's number. If invoices for items from this vendor on this card must be paid to a different vendor, you should enter the number of the vendor who must be paid.
Gen. Bus. Posting Group –You use this field to select the posting group that determines the revenue accounts that sales transactions will be posted to for this vendor. In our data, the general business posting groups are broadly based on vendor location (NATIONAL, EU, EXPORT).
VAT. Bus. Posting Group - You use this field to select the posting group that determines the VAT accounts that transactions will be posted to for this vendor. In our data, the VAT business posting groups are also broadly based on vendor location (NATIONAL, EU, EXPORT).
Vendor Posting Group - You use this field to select the posting group that determines the balance sheet payables accounts that purchase transactions will be posted to for this vendor. In our data, the vendor posting groups are broadly based on vendor location (DOMESTIC, FOREIGN).
Invoice Disc. Code: When you set up a new vendor card, the program automatically enters the vendor number in this field. Any standard invoice discounts that you create for this vendor will be assigned using this code.
Prices Including VAT field: Here you can specify whether you want the price in the Unit Price field on the purchase lines and in purchase reports for this vendor to include VAT or not.
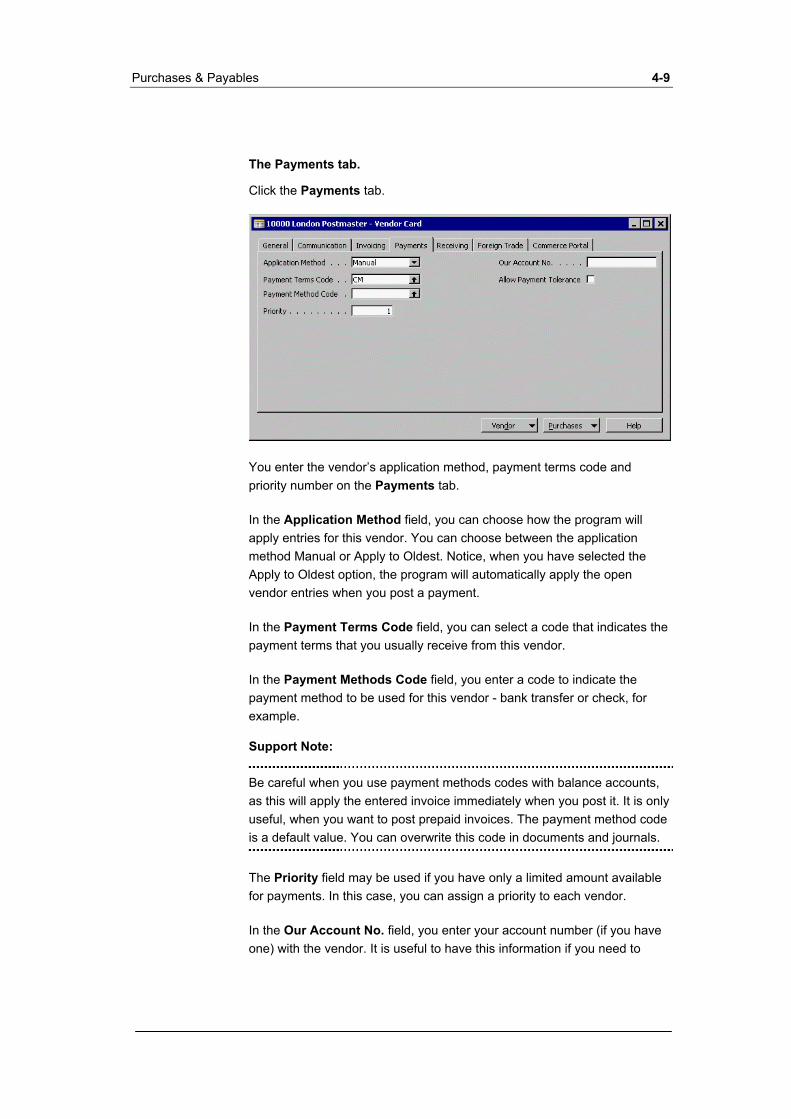
Purchases & Payables 4-9
The Payments tab.
Click the Payments tab.
You enter the vendor’s application method, payment terms code and priority number on the Payments tab.
In the Application Method field, you can choose how the program will apply entries for this vendor. You can choose between the application method Manual or Apply to Oldest. Notice, when you have selected the Apply to Oldest option, the program will automatically apply the open vendor entries when you post a payment.
In the Payment Terms Code field, you can select a code that indicates the payment terms that you usually receive from this vendor.
In the Payment Methods Code field, you enter a code to indicate the payment method to be used for this vendor - bank transfer or check, for example.
Support Note:
Be careful when you use payment methods codes with balance accounts, as this will apply the entered invoice immediately when you post it. It is only useful, when you want to post prepaid invoices. The payment method code is a default value. You can overwrite this code in documents and journals.
The Priority field may be used if you have only a limited amount available for payments. In this case, you can assign a priority to each vendor.
In the Our Account No. field, you enter your account number (if you have one) with the vendor. It is useful to have this information if you need to

4-10 Navision Attain Essentials
contact your vendor to discuss your account.
The Receiving Tab
Click the Receiving tab.
On the Receiving tab, you specify how to receive items from this vendor.
The Location Code field contains the default location you have set up for the receiving of purchases from this vendor.
The Shipment Method Code field shows the agreed terms of delivery. You select a code for the method that you want the vendor to use when shipping items to you.
The program will use the Lead Time Calculation field to calculate the lead time on purchase orders to this vendor, if you have not entered a lead time calculation on the item or stockkeeping unit cards. The program uses the formula to calculate the Planned Receipt Date (the date the items will arrive at your location).
The Foreign Trade Tab
Click the Foreign Trade tab.
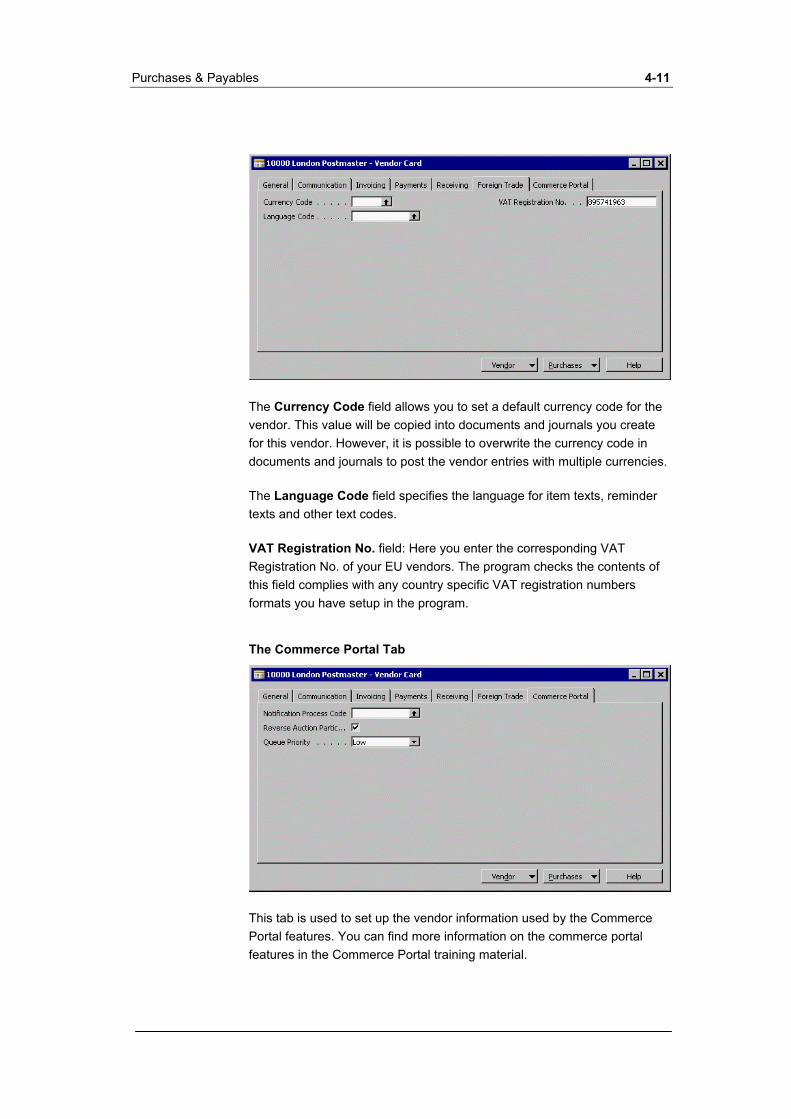
Purchases & Payables 4-11
The Currency Code field allows you to set a default currency code for the vendor. This value will be copied into documents and journals you create for this vendor. However, it is possible to overwrite the currency code in documents and journals to post the vendor entries with multiple currencies.
The Language Code field specifies the language for item texts, reminder texts and other text codes.
VAT Registration No. field: Here you enter the corresponding VAT Registration No. of your EU vendors. The program checks the contents of this field complies with any country specific VAT registration numbers formats you have setup in the program.
The Commerce Portal Tab
This tab is used to set up the vendor information used by the Commerce Portal features. You can find more information on the commerce portal features in the Commerce Portal training material.

4-12 Navision Attain Essentials
Exercise 13 Set up a New Vendor
Set up a Vendor Card for your new vendor South Pole Adventures and fill in the following information:
The address is SouthSide 1, DK-0009, Down Town. The country code is DK and the phone number is 23 15 97 84. The contact is Ms. South and the Purchaser Code is AH.
The General Business Posting Group is EU, the VAT Business Posting Group is EU and the Vendor Posting Group is EU.
The prices for this customer are NOT to include VAT
The application method is manual, the payment terms are 1 Month/2% 8 days, the payment method code is bank and our account number with the vendor is 0000 0001.
The shipment method is Ex Warehouse.
You have to fill in the VAT Registration No. field. Use the number 48967351.
Enter the currency code DKK.
You can find the steps and solution to this exercise in Appendix D.
Purchases & Payables 4-13
4.2 PURCHASE QUOTES & PURCHASE ORDERS
The purchase document functionality is very similar to the sales document functionality that you learned in Chapter 3, Sales and Receivables. The following three sections are designed to give you a basic understanding of the purchase document process. In these sections, you will learn about purchase quotes, orders, invoices and the purchase posting process.
Purchase Documents
The Purchase documents in the program are virtually the same as the sales documents. They are made up of a purchase header section with four tabs (General, Invoicing, Shipping, Foreign Trade) and a lower section of Purchase lines.
Creating a new Purchase Quote
If you would like to request a quote from a vendor, you can prepare a purchase quote in Navision Attain and send it to the vendor as a Purchase – Quote report. The vendor can then use the information to prepare a quote for you.
Purchase quotes in Navision Attain do not affect other areas of the application, so the items on the purchase quote will not appear in the inventory. You use a purchase order when you want to commit to an agreement to buy goods from one of your vendors.
A purchase quote can also be used as a forerunner to a purchase order. After the purchase quote is converted into a purchase order, the items can be reserved from Inventory.
We will now purchase some items that are no longer in stock. To do this you would first create a quote and when you can approve this quote you turn it into an order.
1 Click Purchases & Payables.
2 Click Quotes.
The Quotes window appears.
3 Press F3 to insert a new purchase quote and press ENTER to obtain the next number in the number series.

4-14 Navision Attain Essentials
We will purchase this item from our vendor Furniture Industries, so we will now create a purchase quote as the initial step.
4 Type 44756404 in the Buy-from Vendor No. field, and then press ENTER.
Notice that the information for Furniture Industries appears.
Purchase Lines
Now, let’s enter some information in the purchase lines:
1 In the Type field of the first line, select Item and press ENTER.
2 Select Item 766BC-C in the No. field and press ENTER.
3 Enter 10 in the Quantity field.
4 Move the cursor to the Type field of the next available empty line. The default value should be Item. Since we are going to add another item line, leave this as it is.
5 Select Item 766BC-A in the No. field and press ENTER.
Notice that all of the item’s information has been brought to the lines from the item card. You can also see that there is an extended text related to this item.
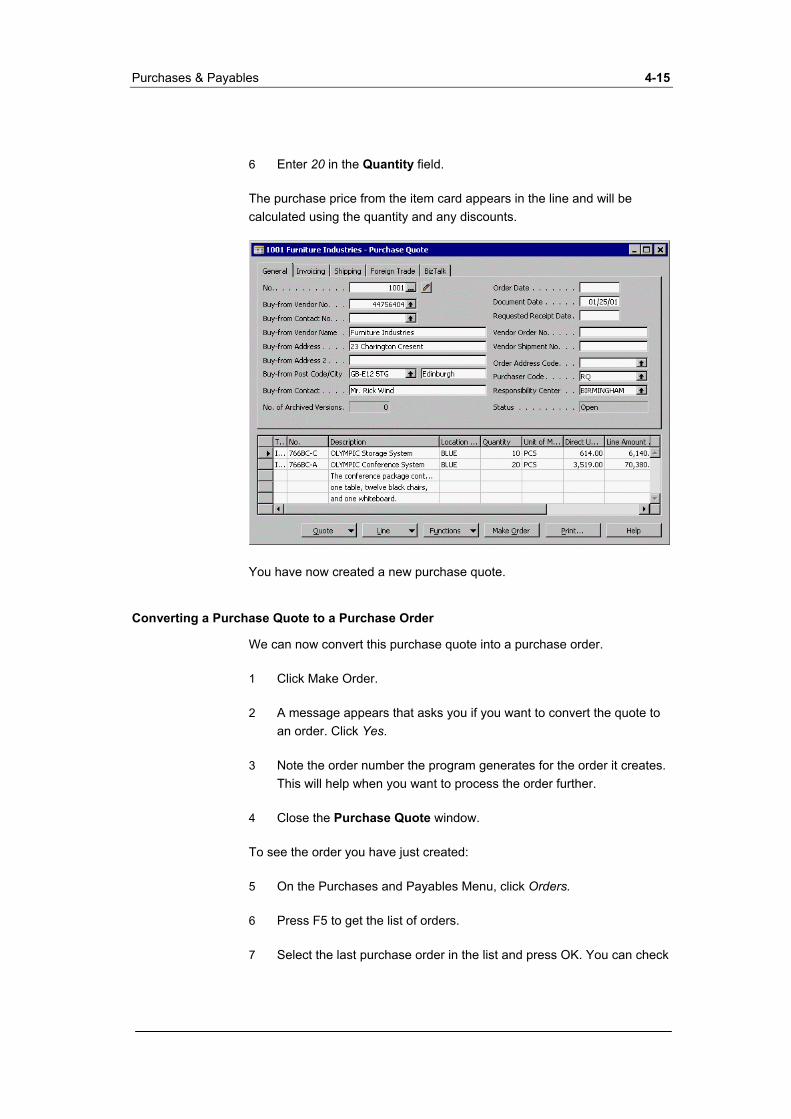
Purchases & Payables 4-15
6 Enter 20 in the Quantity field.
The purchase price from the item card appears in the line and will be calculated using the quantity and any discounts.
You have now created a new purchase quote.
Converting a Purchase Quote to a Purchase Order
We can now convert this purchase quote into a purchase order.
1 Click Make Order.
2 A message appears that asks you if you want to convert the quote to an order. Click Yes.
3 Note the order number the program generates for the order it creates. This will help when you want to process the order further.
4 Close the Purchase Quote window.
To see the order you have just created:
5 On the Purchases and Payables Menu, click Orders.
6 Press F5 to get the list of orders.
7 Select the last purchase order in the list and press OK. You can check

4-16 Navision Attain Essentials
it’s the correct order by looking for the Document number the program created when it converted the quote.
This is the order we just made from the Purchase Quote.
Receiving an Order
You may not always receive the invoice from your vendor at the same time as you physically receive the goods. Purchase orders functions like sales orders except that you receive instead of ship. You can partially receive and partially invoice, just like a sales order.
In our example, you have now received a note from an employee in the warehouse that the items have arrived and that they are being put in stock.
To record the receipt of the shipment:
1 Select the order you have just converted from the quote.
2 Enter 01/25/01 in the Posting Date field.
3 Click Posting, Post.
You have the following options:
Receive – If you post using this option, the order is updated to reflect that the items have been physically received from the vendor but the vendor
Purchases & Payables 4-17
invoice has not been received yet. The program creates a posted receipt.
Invoice - If you post using this option, the order is updated to reflect that the items have now been invoiced. The program creates a posted invoice. You can only invoice an order if the order has been received. If the order is fully invoiced, the order is deleted.
Receive and Invoice - If you post using this option, the order is shipped and invoiced in the one transaction. The program creates a posted receipt and a posted invoice. If the order is fully invoiced, the order is deleted.
4 Since we have not yet received our vendor invoice, select Receive and click OK.
The program will now post the receipt of the order and create a posted receipt. The program will update the Qty. to Receive and Qty. Received fields on the order lines to reflect that the order has been received.
5 When the posting is complete, close the Purchase Order window.
You can view the posted receipt as follows:
6 Click Posted Receipts.
7 Press F5 to display the list of posted receipts.
8 Scroll to the end of the list and select the posted receipt that you created and click OK.
You will see the receipt that we created just moments ago.
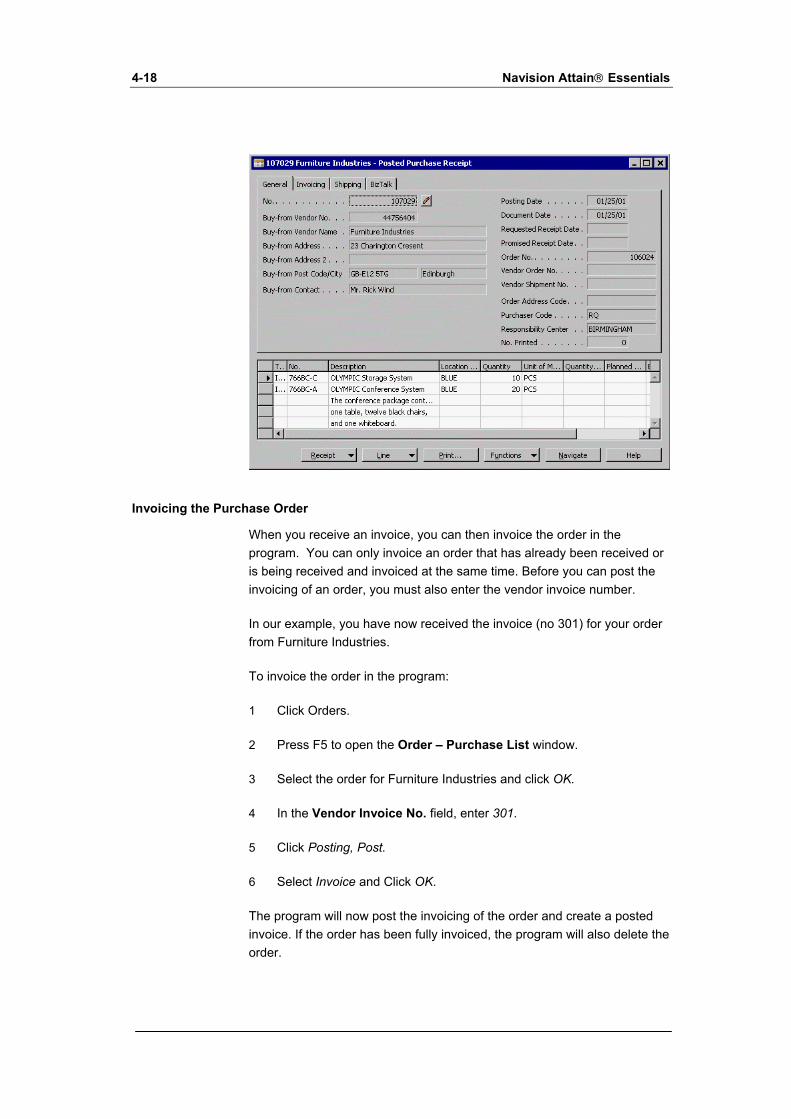
4-18 Navision Attain Essentials
Invoicing the Purchase Order
When you receive an invoice, you can then invoice the order in the program. You can only invoice an order that has already been received or is being received and invoiced at the same time. Before you can post the invoicing of an order, you must also enter the vendor invoice number.
In our example, you have now received the invoice (no 301) for your order from Furniture Industries.
To invoice the order in the program:
1 Click Orders.
2 Press F5 to open the Order – Purchase List window.
3 Select the order for Furniture Industries and click OK.
4 In the Vendor Invoice No. field, enter 301.
5 Click Posting, Post.
6 Select Invoice and Click OK.
The program will now post the invoicing of the order and create a posted invoice. If the order has been fully invoiced, the program will also delete the order.

Purchases & Payables 4-19
7 When the posting is complete, close the Purchase Order window.
You can view the result of the invoicing of the order as follows:
8 Click Posted Invoices. The Posted Purchase Invoice window appears.
9 Press F5 to display the list of posted invoices.
10 Scroll to the end of the list and select the last posted invoice and click OK.
This is the invoice that you just created.
11 Press F9 to open the Purchase Invoice Statistics window for the posted invoice.
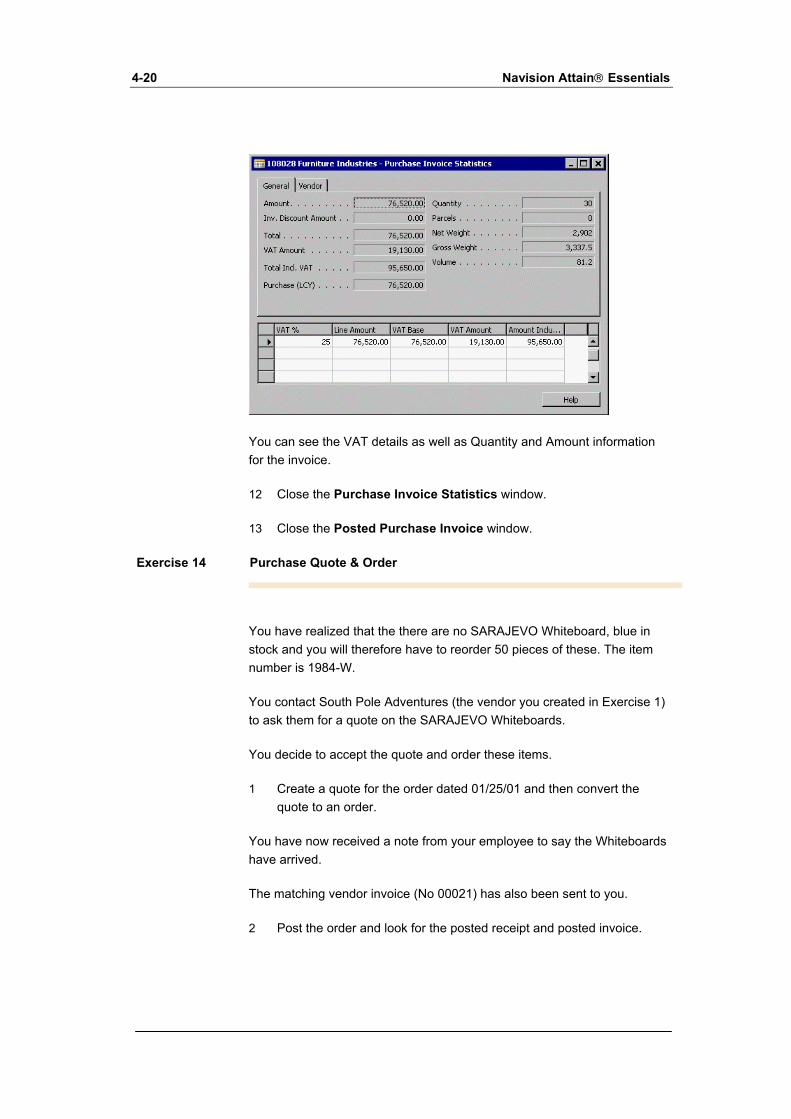
4-20 Navision Attain Essentials
You can see the VAT details as well as Quantity and Amount information for the invoice.
12 Close the Purchase Invoice Statistics window.
13 Close the Posted Purchase Invoice window.
Exercise 14 Purchase Quote & Order
You have realized that the there are no SARAJEVO Whiteboard, blue in stock and you will therefore have to reorder 50 pieces of these. The item number is 1984-W.
You contact South Pole Adventures (the vendor you created in Exercise 1) to ask them for a quote on the SARAJEVO Whiteboards.
You decide to accept the quote and order these items.
1 Create a quote for the order dated 01/25/01 and then convert the quote to an order.
You have now received a note from your employee to say the Whiteboards have arrived.
The matching vendor invoice (No 00021) has also been sent to you.
2 Post the order and look for the posted receipt and posted invoice.

Purchases & Payables 4-21
You can find the steps and solution to this exercise in Appendix D.
Creating Purchase Orders without using Quotes
It is also possible to create an order without creating a quote first.
1 Click Orders on the Purchases and Payables Menu
2 In the Purchase Order Window, press F3 in the No. field and press ENTER.
The information entered is the same as when you create a quote. The posting process is the same as an order converted from a quote.
Exercise 15 Create and Post an Order Without Converting a Quote
You have placed an order with your vendor 30000, Coolwood Technologies.
Use a Posting Date, Order Date and Document Date of 01/25/01.
You have ordered 10 Berlin Guest Chairs (Item 1936-S) and 100 cans Paint, black (Item 70100). Your warehouse has received the items and you

4-22 Navision Attain Essentials
have the vendor invoice (number 1524).
Create a new order and post the receipt and invoicing of the order.
Open the Posted Receipts and Posted Invoices to see the results.
You can find the steps and solution to this exercise in Appendix D.
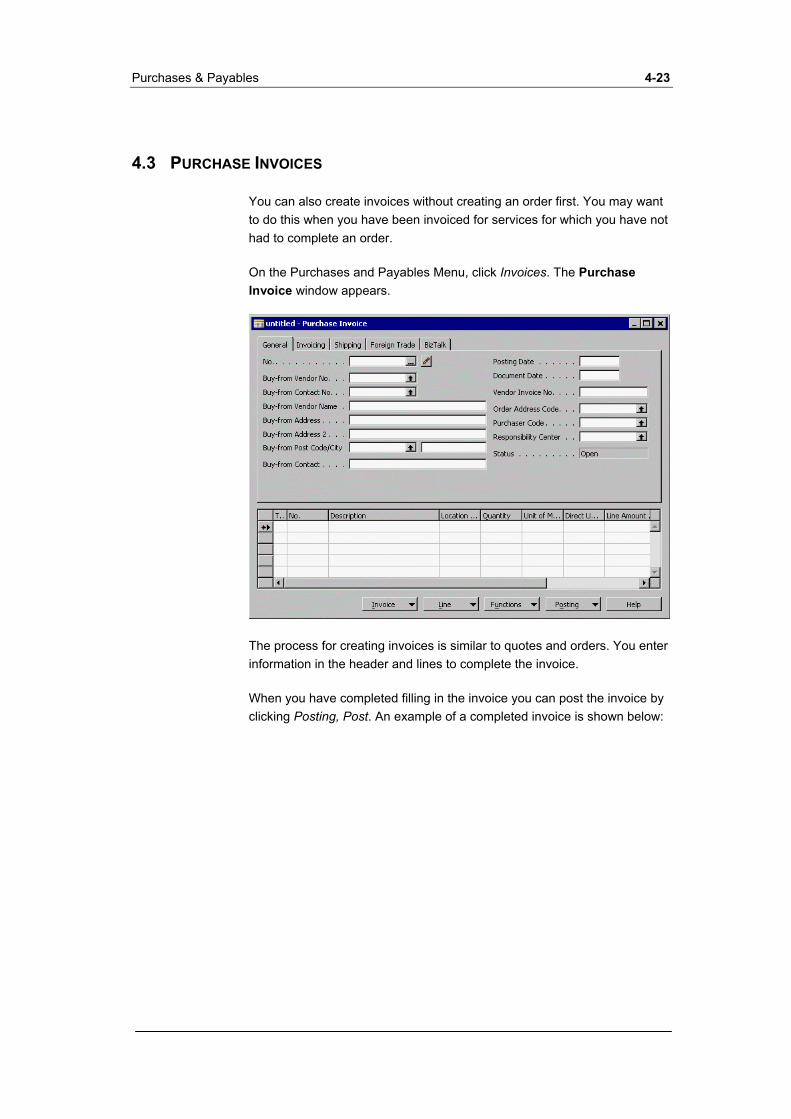
Purchases & Payables 4-23
4.3 PURCHASE INVOICES
You can also create invoices without creating an order first. You may want to do this when you have been invoiced for services for which you have not had to complete an order.
On the Purchases and Payables Menu, click Invoices. The Purchase Invoice window appears.
The process for creating invoices is similar to quotes and orders. You enter information in the header and lines to complete the invoice.
When you have completed filling in the invoice you can post the invoice by clicking Posting, Post. An example of a completed invoice is shown below:

4-24 Navision Attain Essentials
There are no posting options as there is with orders. If you have placed a check mark in the Receipt on Invoice field in the Purchases & Payables Setup window, posting an invoice from the Purchase Invoice window will create a posted invoice and a posted receipt. Otherwise, only a posted invoice will be created.
If you only post invoices and not receipts from the Purchase Invoice window, you must create the information in the invoice lines by using the Copy Purchase Document or Get Receipt Lines functions in the invoice. You cannot post an invoice for items that have not already been received.

Purchases & Payables 4-25
4.4 THE PURCHASE POSTING PROCESS
The purchase order and invoice have a series of posting routines that are used during the posting process to post their data into one or more ledgers. The purpose of these posting routines is to post the information from an order or invoice to the appropriate ledger through the appropriate journal. This is accomplished by transferring the data to the journals and then posting the journals using their own functions. This can only be accomplished because of the program’s uniform data structure. The following diagram represents the purchase posting process:

4-26 Navision Attain Essentials
4.5 CREDIT MEMOS
In this section, you will learn about credit memos and in particular receiving a credit memo, matching the credit memo to the proper invoice and posting a credit memo.
If you use the invoicing facilities in the program, it is a good idea to use purchase credit memos, too. They make it easier for you to manage your payables.
Receiving a Credit Memo
You usually receive purchase credit memos when you return items to a vendor, but you can also receive them as compensation – a purchase allowance. In addition, you can use a purchase credit memo to correct an incorrect purchase invoice.
When you receive a purchase credit memo, you would enter the details in the Purchase Credit Memo window.
To open the Purchase Credit Memo window, on the Purchases & Payables menu, click Credit Memos.
The Purchase Credit Memo window appears.
Press F3 and press ENTER to create a new credit memo.
You use the Purchase Credit Memo window to enter all the relevant

Purchases & Payables 4-27
information when you create purchase credit memos.
You will notice that the purchase credit memo is a document so it has the same characteristics as a purchase order or purchase invoice. The header information is the company information, which comes from the vendor card. The lines are copied from the posted purchase invoice line information from the original transaction.
1 Click Functions, Copy Document.
2 Select Document Type: Posted Invoice.
3 In the Document No. field, click the AssistButton to display the Posted Purchase Invoices.
4 Select the posted invoice for Vendor 30000, Coolwood Technologies, with Document No. 108026.
5 Place a check mark in the Include Header field, and leave the Recalculate Lines field blank.
6 Click OK.
You will see that the credit memo document is now filled in with all of the information from the posted purchase invoice.
On the four tabs you enter general information about the buy-from vendor, pay-to vendor, shipment and currency. Most information about the vendor is copied from the vendor card when you enter the vendor number on the

4-28 Navision Attain Essentials
purchase credit memo. On the lines you enter information about the items.
7 Enter CR0001 in the Vendor Credit Memo No. field.
You must enter the Vendor Credit Memo No. on the General tab before you can post the credit memo.
Posting a Credit Memo
After you have entered all the information in the Purchase Credit Memo window and made any corrections, you can post the credit memo. It is recommended that you print a test report before you post the credit memo.
To post the purchase credit memo:
1 On the credit memo that you want to post, click Posting, Post.
If, however, you want to print the credit memo at the same time as you post, click Posting, Post and Print.
2 The credit memo posts in exactly the same way as an invoice except you ship rather than receive. Click Yes to confirm the posting of the credit memo.
Support Note:
You can see the resulting entries by clicking Purchases & Payables, Posted Credit Memos and Navigate.
If you have placed a check mark in the Return Shipment on Credit Memo field in the Purchases & Payables Setup window, the program creates both a posted return shipment and a posted credit memo. To see the posted return shipments, click Purchases & Payables, Posted Return Shipments.
Exercise 16 Create and Post a Credit Memo
After you posted invoice 108023 from Vendor 10000, the vendor realized that there was an error in the invoice sent to you. You wish to cancel the invoice in the program using a credit memo. The vendor credit memo number is CR23456

Purchases & Payables 4-29
Enter a credit memo for the vendor 10000.
Copy the lines from the posted invoice with the number 108023.
Post the credit memo and look at the posted credit memos and posted return shipments to see the result.
You can find the steps and solution to this exercise in Appendix D.

4-30 Navision Attain Essentials
4.6 PAYMENT JOURNALS AND CHECK WRITING
In this section, you will learn about payment journals and in particular paying purchase invoices, automatic selection of invoices for payment and payment discounts. You will also learn about check writing.
Paying Purchase Invoices
Now that we have created some purchase invoices, we need to pay them. We can use the payment journal to issue checks to vendors. The payment journal behaves just like the cash receipt journal does in Sales & Receivables. We select vendors, and find invoices to apply payments to.
1 In Purchases & Payables, click Payment Journals.
The Payment Journal window appears. You can enter your payment of an invoice in a payment journal just as in the general journal. The only difference is that the payment journal offers you additional functionality in relation to the automatic selection of invoices.
The following example will show you how to enter payments in payment journals and apply them to open vendor entries.
1 After you have opened the Payment Journal window, select GENERAL in the Batch Name field.
2 Enter the following information for the journal Posting Date 01/31/01 Document Type Payment Account Type Vendor

Purchases & Payables 4-31
Account No. 10000
3 Press SHIFT F9 to open the Apply Vendor Entries window.
4 In the Applies to ID field on the first line press F9 to set an Apply To-ID reference. Notice that the ID inserted is the document number of the journal.
5 Set an Apply to ID reference in the second line.
6 Close the window by clicking OK. The total amount of the two invoices will be transferred to the journal line.
7 Select Bank account in the Bal. Account Type field
8 Click the AssistButton in the Bal. Account No. field, select WWB-OPERATING and click OK.
9 Post the journal by clicking Posting, Post.
Automatic Selection of Invoices for Payment
You can let the program do all the work by using the function to automatically select invoices for payment. Let’s see how this works:
1 In the Payment Journal window, select the BANK Batch Name.
You select this journal batch because this batch has no number series assigned to it. You must not use a pre-defined number series in the journal, if you wish to make the payment using a computer check.
2 Click Payments, Suggest Vendor Payments.

4-32 Navision Attain Essentials
This batch job processes vendor ledger entries for unpaid invoices, finance charge memos, credit memos and payments and, on the basis of them, creates payment suggestions as lines in a payment journal.
When the batch job is completed, you can modify the suggested payment entries in the payment journal and add lines in the journal with balancing entries for the payments. The batch job fills in the Applies-to Doc. Type and No. fields in the lines, so that when you post the payment journal, the vendor ledger entries that are paid will be applied to automatically. Note that before posting, you can verify the effect of posting the checks on cash account balances before printing the checks by clicking Posting, Reconcile.
You must specify a Last Payment Date to be used in the batch job. You can set filters to control the characteristics of the payments to be selected. You can also run the batch job in such a way that it also includes payments for which it is possible to obtain a discount. Only vendor entries that are not marked on hold are included in the batch job.
We will complete the necessary filter information and process the payments.
3 Leave the two fields on the Vendor tab blank.
4 Click the Options tab.
5 On the Options tab, enter 01/31/01 as the last payment date.
6 Enter GO4002 in the Starting Document No. field.
7 Select Bank Account in the Bal. Account Type field, WWB-

Purchases & Payables 4-33
OPERATING in the Bal. Account No. field, and Computer Check in the Bank Payment Type field.
8 Click OK.
You can see the result in the Payment Journal window:
You can insert and delete lines in the journal if you do not wish to pay some of the invoices the program has suggested.
For now, you do not want to post these payments since they are check payments and require you to print the check before you can post them.
9 Select all the lines and press F4 to delete all suggested payments.

4-34 Navision Attain Essentials
Payment Discounts
As we saw earlier, you can set up the Suggest Vendor Payment batch job so that for example, it will suggest payments that will be due soon or payments where a discount is available.
Before you can use the payment discount feature in the program, you must set up the payment terms and the payment discount accounts for the customers and vendors. The terms are set up in the Payment Terms window. The accounts are set up in either:
The payment discount accounts in the General Ledger Setup window ·
·
OR
The payment discount accounts in the Customer Posting Group and Vendor Posting Group windows.
You can only let the program find the payment discounts automatically when you have used payment terms including discount percentage and discount due dates in the documents. In this case the program will automatically calculate a possible discount amount in connection with the invoice posting.
To see whether payment discounts have been calculated for a specific entry, you can use the Detailed Vendor Ledg. Entries window. This window shows a summary of all the posted entries and adjustments related to a specific ledger entry. Therefore you see why a certain entry was made on a certain account in connection with not only discounts but also roundings and currency exchange adjustments. Detailed Customer and Vendor Ledger entries are discussed in more detail in the Financial Management Course.
Check Writing
You can preview individual checks or print checks for the batch job. When you have finalized which of the suggested vendor entries you wish to pay, you can start the check writing.
Note
If you select computer checks in the bank payment type field, the program will not allow you to post the payment journals until you have printed the checks.
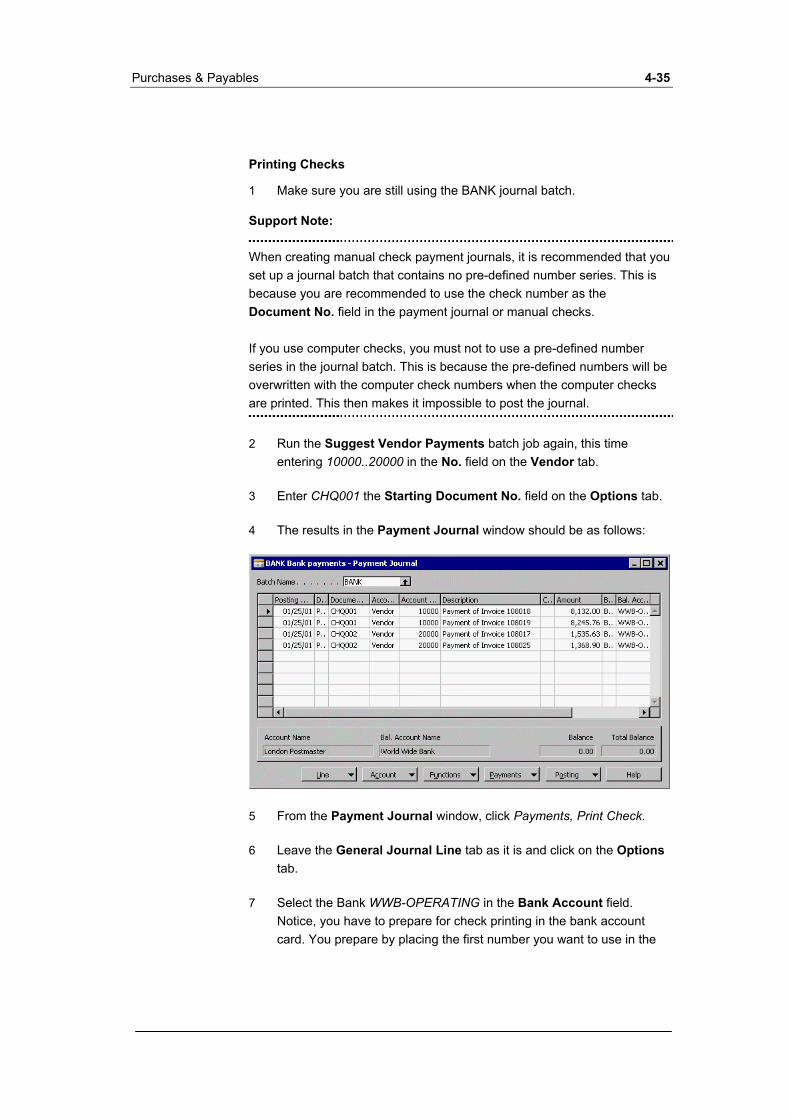
Purchases & Payables 4-35
Printing Checks
1 Make sure you are still using the BANK journal batch.
Support Note:
When creating manual check payment journals, it is recommended that you set up a journal batch that contains no pre-defined number series. This is because you are recommended to use the check number as the Document No. field in the payment journal or manual checks. If you use computer checks, you must not to use a pre-defined number series in the journal batch. This is because the pre-defined numbers will be overwritten with the computer check numbers when the computer checks are printed. This then makes it impossible to post the journal.
2 Run the Suggest Vendor Payments batch job again, this time entering 10000..20000 in the No. field on the Vendor tab.
3 Enter CHQ001 the Starting Document No. field on the Options tab.
4 The results in the Payment Journal window should be as follows:
5 From the Payment Journal window, click Payments, Print Check.
6 Leave the General Journal Line tab as it is and click on the Options tab.
7 Select the Bank WWB-OPERATING in the Bank Account field. Notice, you have to prepare for check printing in the bank account card. You prepare by placing the first number you want to use in the
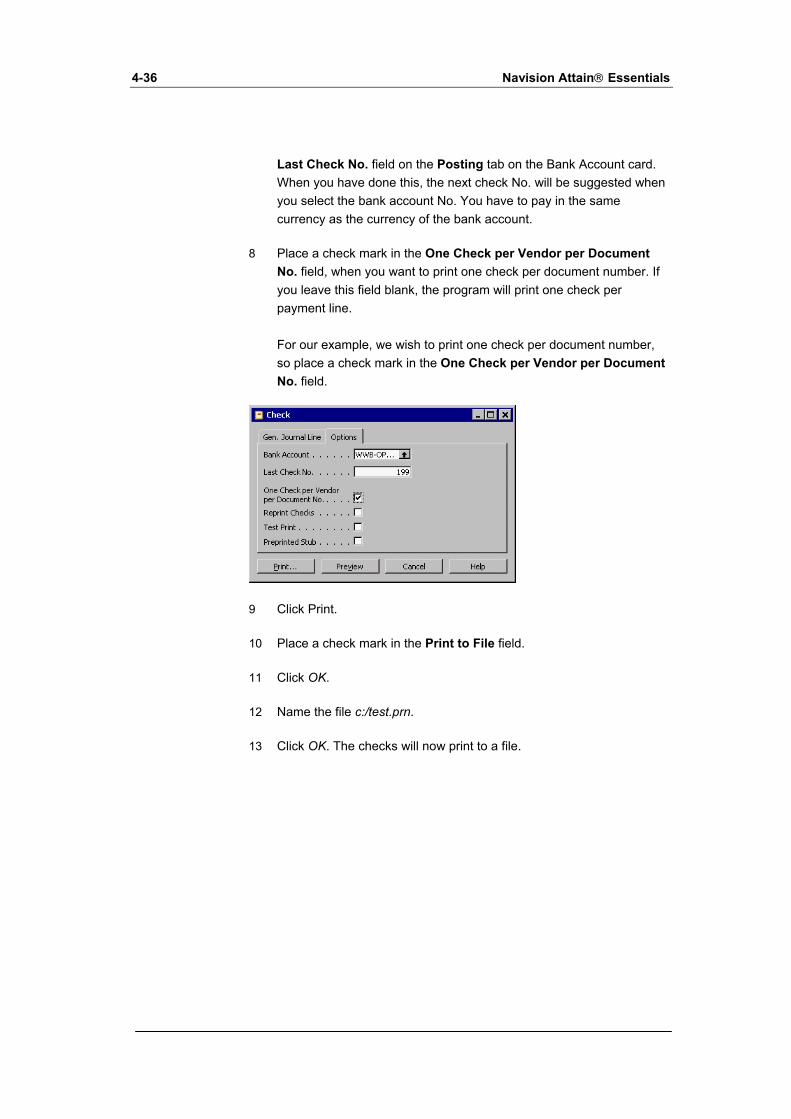
4-36 Navision Attain Essentials
Last Check No. field on the Posting tab on the Bank Account card. When you have done this, the next check No. will be suggested when you select the bank account No. You have to pay in the same currency as the currency of the bank account.
8 Place a check mark in the One Check per Vendor per Document No. field, when you want to print one check per document number. If you leave this field blank, the program will print one check per payment line. For our example, we wish to print one check per document number, so place a check mark in the One Check per Vendor per Document No. field.
9 Click Print.
10 Place a check mark in the Print to File field.
11 Click OK.
12 Name the file c:/test.prn.
13 Click OK. The checks will now print to a file.

Purchases & Payables 4-37
In the Payment Journal window, you can see that the program has now removed the balancing accounts from the suggested payment lines and created balancing journal lines. The Document Number field has been filled in with the check no.
You will now be able to post the payment journals related to the checks.
Posting Checks
14 In the Payment Journal window, click Posting, Post.
15 Click Yes to post the Journal lines.
16 Click OK to complete the job.
Paying Invoices and Taking Credit Memos.
It is also possible to net credit memos against invoices when calculating the suggested amount for a check. You do this by placing a checkmark in the Summarize per Vendor field in the Suggest Vendor Payments batch job. This will be explained further in the Financial Management Course.
Exercise 17 Process the Payment of an Invoice
You now want to suggest and pay all outstanding invoices at 01/31/01 for Vendor 30000, Coolwood Technologies with a single check.
Use the posting date 01/25/01.

4-38 Navision Attain Essentials
Use the WWB-OPERATING bank account as the balancing account and select Computer check as the Bank Payment Type.
Suggest the invoices using the program and then print the check to a file.
Post the journal.
You can find the steps and solution to this exercise in Appendix D.

Purchases & Payables 4-39
4.7 REVIEW QUESTIONS
Now you have the basic ideas behind the Purchases & Payables application area of Navision Attain. Here are some questions to help you review the material you’ve just covered. Answers are not provided. This is a study-aid.
1 How do you convert a quote to an order?
2 Can you create an order without first creating a quote?
3 Can you create an invoice without first creating an order?
4 What are the three posting options for receiving an order? Under what circumstances would each be used?
5 When posting a Purchase Order and Invoicing, what additional document number has to be entered on the Purchase Header and what setup option required this?
6 What is the payment journal used for?
7 Which Vendor Ledger Entries are included in the Suggest Vendor Payments batch job?
8 Can the Suggest Vendor Payments batch job include invoice for which payment discounts are possible? What has to be set up for this to occur?
9 What do you do if you do not wish to pay all of the invoices the program has suggested?
10 If you are using computer checks, can you post to the payment journals without having printed the checks?


Chapter 5.
Inventory
The inventory area of the program is extensive and therefore covered in greater detail in the Distribution, Manufacturing and Inventory Costing training materials.
For the purpose of this training material you will learn about the following:
5.1 Basic Inventory Setup
5.2 The Item Card
5.3 Bill of Materials
5.4 Item Variants and Stockkeeping Units (SKUs)
5.5 Review Questions

5-2 Navision Attain Essentials
5.1 BASIC INVENTORY SETUP
The inventory area of the program is extensive and therefore covered in greater detail in the Distribution and Manufacturing training materials. For the purpose of this training material we will briefly cover items and the inventory setup.
From the Main Menu, Click Inventory, Setup, Inventory Setup.
The Inventory Setup window appears.
General Tab
Automatic Cost Posting: A check mark in this field indicates that the program will use the automatic cost posting function. If you use this function when posting items to an item account, the program will automatically post to the inventory account, adjustment account and COGS account in the general ledger. If you use this function, however, it is still necessary to run the Adjust Cost - Item Entries and Post Inventory Cost to G/L batch jobs periodically. If you only use automatic cost posting, your inventory account will not be accurate in cases where you do not know the cost of items at the time of sale. For example, if you sometimes sell before buying.
Expected Cost Posting: If you place a check mark in this field, you can post an estimate of the cost of items you have received but not invoiced in the program. This situation arises in the case where a vendor has sent you the items you ordered and you have sold them to your customer but you have not yet received the invoice for the items from the vendor.
Average Cost Calc. Type: This field contains information about the method that the program uses to calculate average cost:
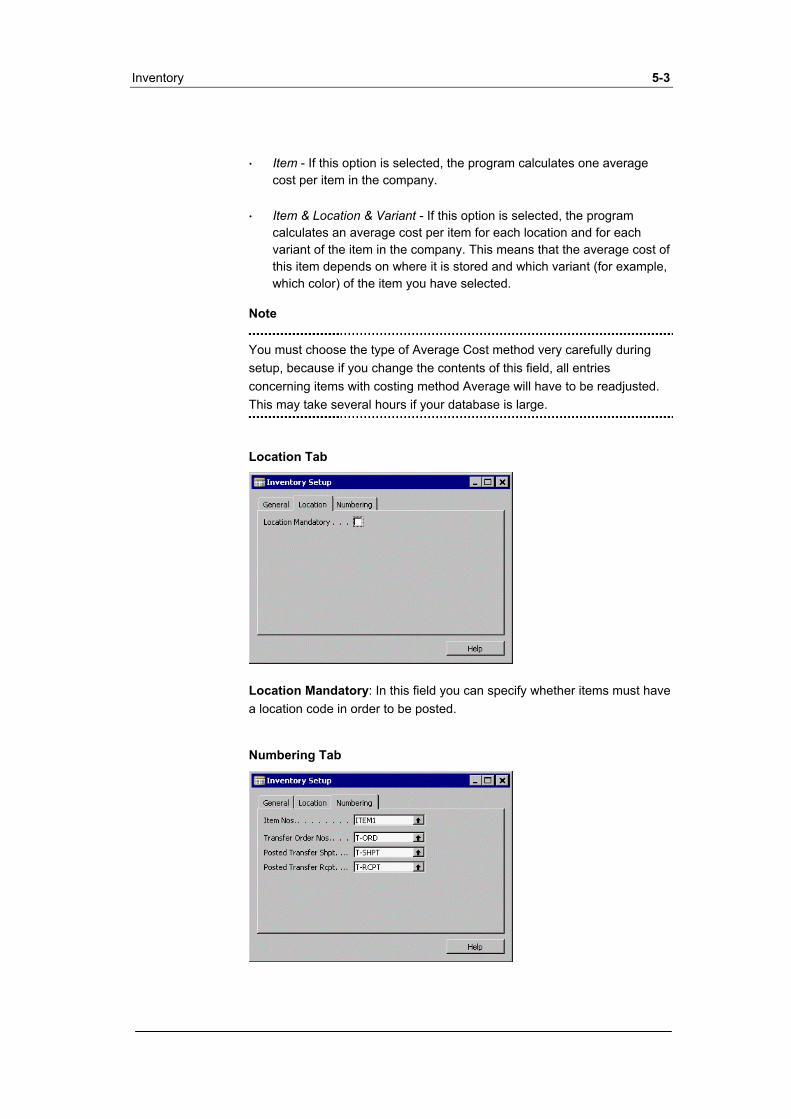
Inventory 5-3
Item - If this option is selected, the program calculates one average cost per item in the company.
·
· Item & Location & Variant - If this option is selected, the program calculates an average cost per item for each location and for each variant of the item in the company. This means that the average cost of this item depends on where it is stored and which variant (for example, which color) of the item you have selected.
Note
You must choose the type of Average Cost method very carefully during setup, because if you change the contents of this field, all entries concerning items with costing method Average will have to be readjusted. This may take several hours if your database is large.
Location Tab
Location Mandatory: In this field you can specify whether items must have a location code in order to be posted.
Numbering Tab

5-4 Navision Attain Essentials
On this tab you can enter the code for the number series that will be used to assign numbers to items and transfers.
Inventory Posting Setup
In this window, you set up combinations of inventory posting groups and locations and link these combinations to G/L accounts. This provides the opportunity of posting different accounts for different locations.
1 You must first set up the Inventory Posting Groups. These Posting Groups are composed of two fields: Code and Description.
2 You can then assign the appropriate G/L accounts to the Inventory Posting Groups and locations in the Inventory Posting Setup window. Click Setup, Inventory Posting, Inventory Posting Setup.
For the purpose of this training material we will only look at the Inventory Account and Inventory Account (Interim) fields. All the other fields are manufacturing-related and are covered in the Manufacturing training material.
Inventory Account: This field contains the account number that will be posted to for this combination of Inventory Group and Location. When you post an item-related transaction, the amount has to be posted to G/L. This is achieved by:
Activating the Automatic Cost Posting field in the Inventory Setup window
·
OR

Inventory 5-5
Using the Adjust Cost - Item Entries and Post Inventory Cost to G/L batch jobs to calculate and post inventory transactions.
·
Regardless of the method of posting, both will post to the account specified in the Inventory Account Field in the Inventory Posting Setup window.
Inventory Account (Interim): This field contains the number of the G/L account to which you want the program to post transactions with expected cost for items in this posting setup. The interim account is balanced with the account in the Inventory Account field when the invoice is posted.
Nonstock Item Setup
As a distributor you may sell goods by catalogue. So it may be not useful to save everything in the catalogue as an item. For this you can use Nonstock Items. If you sell these goods they are copied into an item.
The Nonstock Item Setup window contains information about the format of the item number that the program automatically creates when you enter a nonstock item on a sales order for the first time.
Before you begin working with nonstock items, you must fill in the No. Format and No. Format Separator fields.
In the No. Format field you have 3 options:
Item No.: When creating the Item card for the item, the Vendor Item No. from the Nonstock Item Card is used as the Item Number.
·
·
·
Mfr. + Item No.: The Manufacturer Code followed by the Vendor Item Number is used as the Item Number.
Item No. + Mfr: The Vendor Item Number followed by the Manufacturer Code is used as the Item Number.

5-6 Navision Attain Essentials
The No. Format Separator field contains the character that serves as a separator between the elements of your nonstock item number format if you have chosen a format using both a code and a number in the No. Format field.
To enter information about Nonstock Items, click Nonstock Items on the Inventory Menu.
Item Tracking Codes
The program can track item movements. You must set up item tracking codes that you can then enter in the item card.
In the Item Tracking Codes window you can specify several Item Tracking Codes for different tracking methods. You click Item Tracking Code, Card to enter the details for each code.
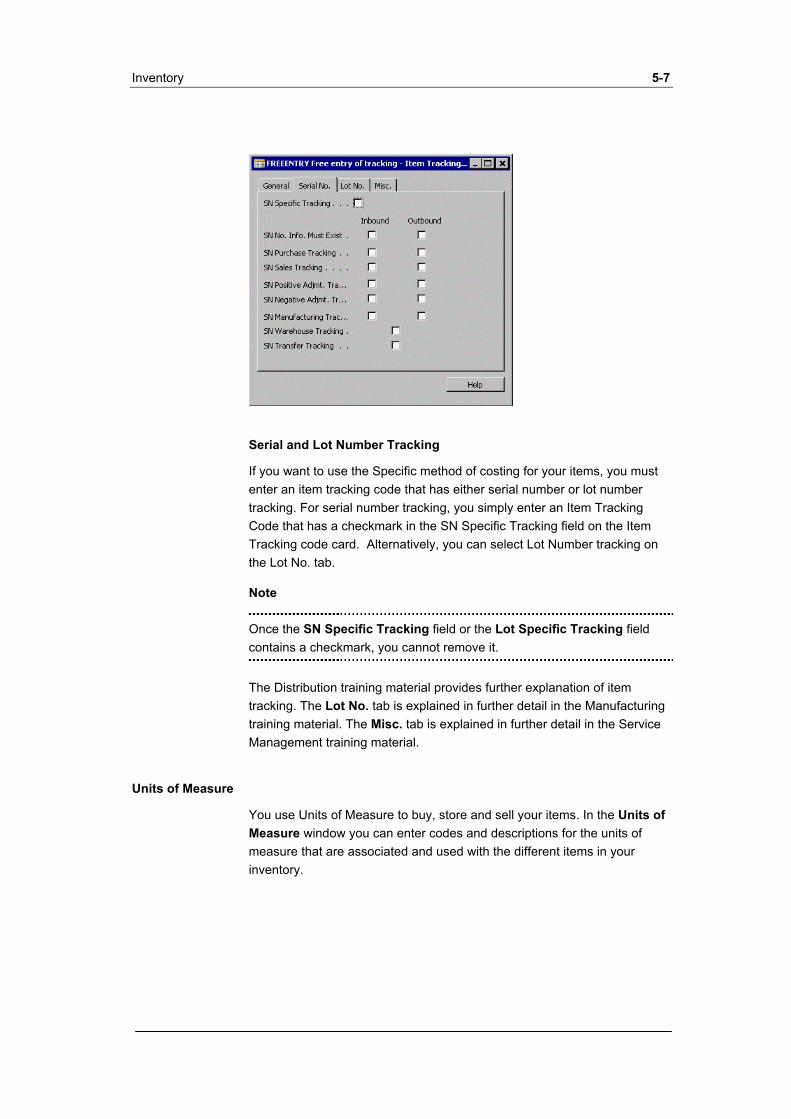
Inventory 5-7
Serial and Lot Number Tracking
If you want to use the Specific method of costing for your items, you must enter an item tracking code that has either serial number or lot number tracking. For serial number tracking, you simply enter an Item Tracking Code that has a checkmark in the SN Specific Tracking field on the Item Tracking code card. Alternatively, you can select Lot Number tracking on the Lot No. tab.
Note
Once the SN Specific Tracking field or the Lot Specific Tracking field contains a checkmark, you cannot remove it.
The Distribution training material provides further explanation of item tracking. The Lot No. tab is explained in further detail in the Manufacturing training material. The Misc. tab is explained in further detail in the Service Management training material.
Units of Measure
You use Units of Measure to buy, store and sell your items. In the Units of Measure window you can enter codes and descriptions for the units of measure that are associated and used with the different items in your inventory.

5-8 Navision Attain Essentials
If you need to have different language translations of your units of measure codes and descriptions, you can also enter them from the Units of Measure window by clicking Unit, Translations.
Each item will have a base unit of measure that has a quantity of 1 of the item. However, it is possible to set up different units of measure for the same item e.g. the base unit may be 1 piece but you normally sell a box of 200 pieces. To set up the different units of measure for an item, click Item, Units of Measure on the Item Card.
Item Categories
The Item Categories window contains information about default values for posting groups, costing methods and tax groups. Item categories help reduce the amount of data entry involved with creating new items. You simply assign an item category to an item card. At the same time, the program automatically copies the Def. Gen. Prod. Posting Group, Def. Inventory Posting Group, Def. VAT Prod. Posting Group, Def. Tax Group Code and Def. Costing Method fields to their related fields on the item card.

Inventory 5-9
Note
When the program automatically creates an item card for a nonstock item the first time the nonstock item is entered on a sales line, the content of the Item Category field on the nonstock item card is copied to the item card.
Product Groups
Within the Item Categories you can set up information about the product groups. After you assign an item to an item category, such as furniture, you can assign it to a product group within the item category, for example, chairs, tables or sofas. You enter the product group code on the item card or the nonstock item card.
Locations and Transfer Routes
You use the Location window to record information about your locations (for example, warehouses and distribution centers).
You can keep track of items in different locations using the Location window. Each location has a name as well as a code representing the name. You use the table to assign a code to a location name. You can then enter the code in location code fields elsewhere in the program, for example, on purchase or sales document lines. This will then record the transactions for the location when you post.
You must set up a Location card and Location code for each warehouse location or distribution center location. When you record increases or decreases in inventory, you enter the code for the relevant location. Then you can always see where specific items are in stock.

5-10 Navision Attain Essentials
On the General tab you can enter the name and address of your location. The Communication Tab contains phone, fax, e-mail and Internet information for the warehouse. The Use As In-Transit field and the Warehouse tab will be explained in the Distribution training material.
Locations can be used in documents, Stockkeeping Units, customers and vendors as a location or in combination with a responsibility center. You will learn more on locations in the Distribution training material.
Rounding Methods
In the Rounding Method table, you can set up the rounding rules to be used if you have the program adjust prices. When you run the Adjust Item Cost/Prices, Suggest Item Price in Wksh. or Suggest Sales Price in Wksh. batch jobs, the program will round the item prices. These batch jobs are described in the Sales Prices and Discounts section of the Financial Management Training material.
Minimum Amount: Here you can enter the minimum amount you want the program to round. For example, if you want the program to round only amounts over 100.00, enter 100.
Inventory 5-11
Amount Added Before: Here you can enter an amount that the program will add before it rounds.
Type: Here you tell the program how to round. Your choices are:
Nearest: Round up if the digit to be rounded is >= 5. Otherwise, round down.
·
·
·
Up: Amounts are always rounded up.
Down: Amounts are always rounded down.
Precision: Here you can enter the size of the interval you want between rounded amounts. This field is combined with the field Type. For example, you can specify that you want the program to round to the nearest LCY 0.25.
Amount Added After: Here you can enter an amount that the program will add after it rounded.
Item Discount Groups
You use the Item Disc. Groups window to set up item discounts groups. You can then combine the item discount group with customers, or customer discount groups in the Sales Line Discounts window.
Pricing and discounting is explained further in the Sales Prices and Discounts chapter of the Financial Management training material.
Requisition Methods
In this table, you specify the requisition method. The program uses the method to determine the material requirements when it calculates the scheduled need in the planning worksheet. For further information see the Manufacturing training material.
Exercise 18 Inventory Posting Setup Using Locations
You have opened a new warehouse in Austria in which you only store finished goods. To see the value of inventory in this warehouse you need to setup a new AUSTRIA location combine it with the FINISHED Inventory Posting Group Code in the Inventory Posting Setup window. The inventory balances for the Austria warehouse need to be recorded in
5-12 Navision Attain Essentials
separate G/L inventory accounts:
2122 Finished Goods (AT) 2123 Finished Goods (AT/Interim)
You should make sure the Direct Posting field is empty as these accounts are only to be posted to automatically.
Complete the setup necessary to record the value of inventory in the Austrian Warehouse in the General Ledger.
You can find the steps and solution to this exercise in Appendix D.

Inventory 5-13
5.2 THE ITEM CARD
On the Inventory menu, click Items. An item card will appear.
The item card should be familiar because we've used items in the previous chapters on Sales and Receivables and Purchases and Payables. Some of the fields on the item card will be briefly mentioned but for further information on specific fields, you should consult the online help for the Card.
General Tab
The general tab contains descriptive information about the item as well as information about the quantity of the item on order and in inventory.
Invoicing Tab

5-14 Navision Attain Essentials
This tab contains the price and unit cost information for the item. The unit cost is determined by the costing method selected in the Costing Method field. The Invoicing tab also contains the profit calculation method for the sale of the item. Discount information for the item and the Product and VAT Posting Groups for the item are also entered on this tab.
Costing Methods
Click the Costing Method field on the Invoicing tab and press F6. The program provides 5 costing methods:
FIFO: First In, First Out. ·
·
·
·
·
LIFO: Last In, First Out.
Specific: Specific cost for an item; must use a serial number.
Average: Bases the item cost on all purchases and positive adjustments associated with the item.
Standard: The unit cost is user defined. If the unit cost for a particular transaction differs from the standard cost, a cost variance arises.
Basic information on inventory costing performed by the program will be provided in the Financial Management training material. However, you should refer to the Manufacturing training material if you wish to have detailed information about inventory costing.
Ordering, Manufacturing, Foreign Trade, Reporting, Item Tracking, Commerce Portal Tabs
For information on the use of these tabs you should refer to the Financial Management, Distribution, Manufacturing, or Commerce Portal training material.
Exercise 19 Create an Item
You have decided to sell stereo systems to your customers at a markup of 20% above cost. The item has the following details:
Name Super Stereo System Base Unit of Measure PCS Costing Method FIFO

Inventory 5-15
Price/Profit Calculation Price=Cost + Profit Profit % 20 Gen. Prod. Posting Group RETAIL VAT Prod. Posting Group VAT25 Inventory Posting Group RESALE
The item is allowed to be included in invoice discount calculations and should have a Item Disc. Group of RESALE.
Complete an item card for this new item.
You can find the steps and solution to this exercise in Appendix D.

5-16 Navision Attain Essentials
5.3 BILL OF MATERIALS
BOM items
A bill of materials or BOM is an item that consists of other items, materials or resources. Items can themselves be BOMs. It is recommended, however, to set up as simple a structure as possible.
After you have created the BOM item, you have to produce it before you can sell it.
It is thereby important to provide enough available items for the components in the inventory to produce a BOM.
You can find further information on producing BOM items in the Manufacturing training material.
Create a new BOM
Let's look at an existing BOM in the demo data. Open the item card of the item 1952-W. This is a BOM Item. Open the Bill of materials window of this item. You can see that this BOM includes another BOM item with the number 766BC-C.
Example
Let’s create a new BOM.
1 Enter a new item, 70500.
2 Enter the Description: “Track Mountain Bike”.
3 Select PCS as the Base Unit of Measure.
4 The Costing method is Standard.
5 The Unit Price is 1899.
6 The General Product Posting Group is RETAIL, the VAT Product Posting Group is VAT25, and the Inventory Posting group is RESALE.
7 Click Item, Assembly List, Bill of Materials to enter the following components:
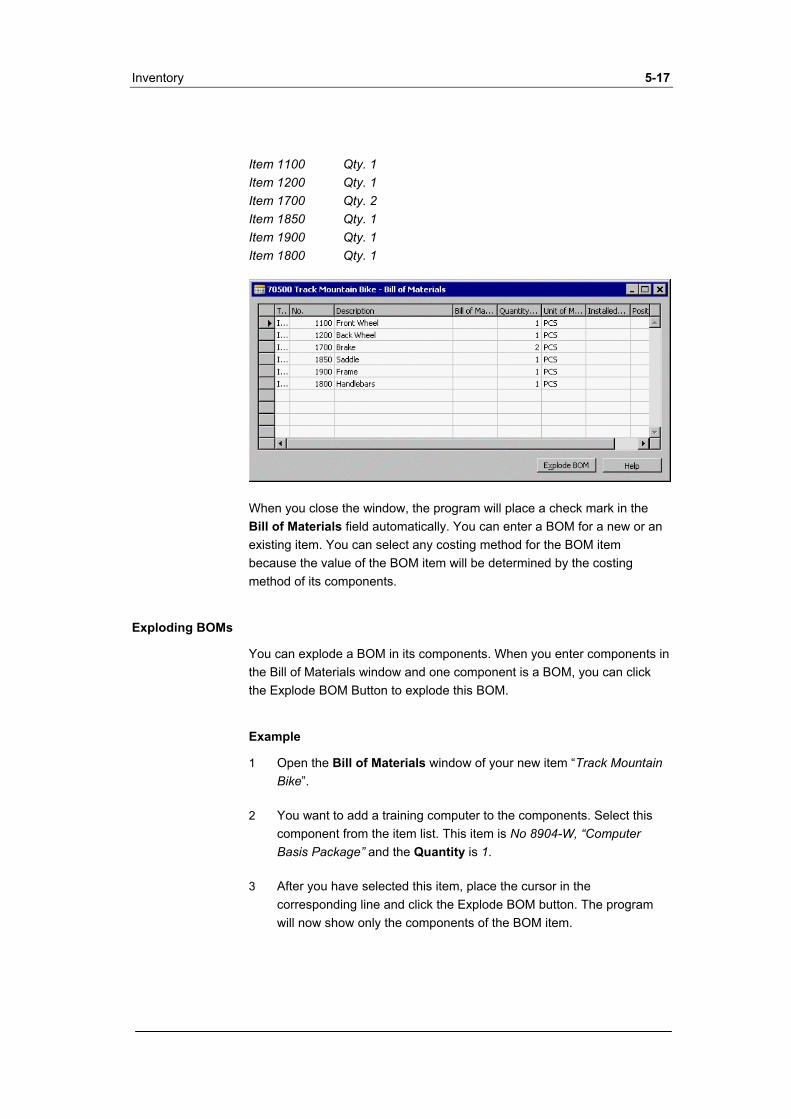
Inventory 5-17
Item 1100 Qty. 1 Item 1200 Qty. 1 Item 1700 Qty. 2 Item 1850 Qty. 1 Item 1900 Qty. 1 Item 1800 Qty. 1
When you close the window, the program will place a check mark in the Bill of Materials field automatically. You can enter a BOM for a new or an existing item. You can select any costing method for the BOM item because the value of the BOM item will be determined by the costing method of its components.
Exploding BOMs
You can explode a BOM in its components. When you enter components in the Bill of Materials window and one component is a BOM, you can click the Explode BOM Button to explode this BOM.
Example
1 Open the Bill of Materials window of your new item “Track Mountain Bike”.
2 You want to add a training computer to the components. Select this component from the item list. This item is No 8904-W, “Computer Basis Package” and the Quantity is 1.
3 After you have selected this item, place the cursor in the corresponding line and click the Explode BOM button. The program will now show only the components of the BOM item.

5-18 Navision Attain Essentials
Producing BOMs
When you want to produce a BOM, it must be entered in and posted from a BOM journal. The program automatically makes a negative adjustment to inventory for the items that are included in the BOM and a positive adjustment for the BOM.
If your BOM has more than one level, you have to produce the “intermediate products” first, before you can produce the final BOM item. The production works as follows:
1 Produce any components that are intermediate BOMs.
2 Enter the BOM with the required quantity and the location.
3 The program will post the required quantity of the components when you post the BOM journal. The program will terminate with an error if there are not enough items available or if a component has the costing method “specific”.
NOTE
If you produce a BOM, the program will increase the inventory value by the unit cost of the BOM item. The increase is calculated from the unit cost of the components of the BOM item. If the unit cost of the components changes, the unit cost of the BOM will not change automatically. Whenever a component's unit cost changes, you must update the unit cost of the BOM with the Calc. Standard Cost batch job.
BOM Standard Unit Costs
After you create a new BOM, you can calculate its unit cost. The unit cost of a BOM always equals the total of the unit costs of its component items. The Unit Cost field on the item cards must be filled in so that the unit cost of the BOM is calculated correctly.
To Calculate Unit Costs of BOMs:
1 Click Inventory, Items, and then browse to the card for the BOM that you have created.
2 Click Item, Assembly List, Calc. Standard Cost.
3 Select either Single Level or All Levels to determine what level of standard costing you wish to perform.
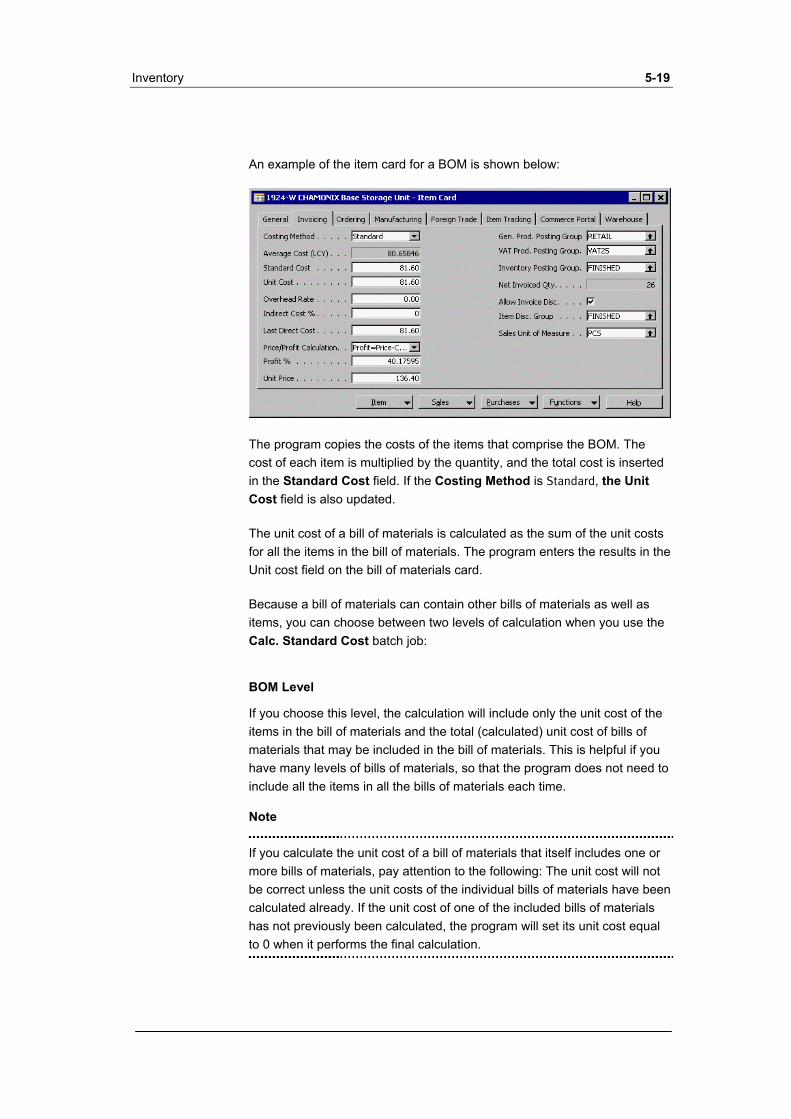
Inventory 5-19
An example of the item card for a BOM is shown below:
The program copies the costs of the items that comprise the BOM. The cost of each item is multiplied by the quantity, and the total cost is inserted in the Standard Cost field. If the Costing Method is Standard, the Unit Cost field is also updated.
The unit cost of a bill of materials is calculated as the sum of the unit costs for all the items in the bill of materials. The program enters the results in the Unit cost field on the bill of materials card.
Because a bill of materials can contain other bills of materials as well as items, you can choose between two levels of calculation when you use the Calc. Standard Cost batch job:
BOM Level
If you choose this level, the calculation will include only the unit cost of the items in the bill of materials and the total (calculated) unit cost of bills of materials that may be included in the bill of materials. This is helpful if you have many levels of bills of materials, so that the program does not need to include all the items in all the bills of materials each time.
Note
If you calculate the unit cost of a bill of materials that itself includes one or more bills of materials, pay attention to the following: The unit cost will not be correct unless the unit costs of the individual bills of materials have been calculated already. If the unit cost of one of the included bills of materials has not previously been calculated, the program will set its unit cost equal to 0 when it performs the final calculation.
5-20 Navision Attain Essentials
All BOM Levels
If you choose this level, the calculation will include the unit cost of all the item components of the bill of materials, including the items that possibly are part of another bill of materials. This is helpful if you are not certain whether the unit cost has previously been calculated for any bills of materials that are included as components in the bill of materials for which you are now calculating the unit cost.
Exercise 20 Calculate the Standard Cost of a BOM Item
You wish to calculate the standard cost for Item 70500, Track Mountain Bike.
Before you do this, make sure you delete the components of the Basis computer BOM you previously exploded in the example. The components will be items 80001..80211.
After you have deleted these components, update the standard cost by running the Calc. Standard Cost batch job.
You can find the steps and solution to this exercise in Appendix D.

Inventory 5-21
5.4 ITEM VARIANTS AND STOCKKEEPING UNITS (SKUS)
This section will introduce you to the following topics:
Variants ·
· Stockkeeping Units
The program has several other item-handling features including item tracking, order promising and warehouse management. These features are explained in the Distribution training material.
Item Variants
Variants are useful if you have a large number of almost identical items that vary only in color, for example. Instead of setting up each variant as a separate item, you can set up one item and then specify the various colors as variants of the item.
Example
You want to set up some wood variants for the ANTWERP conference table since it can be made in oak, pine or mahogany.
1 From the Inventory Menu, click Items and press F5 to display the item list.
2 Select Item No. 1920-S, and click OK to display the Item Card window.
3 Click Item, Variants. The Item Variants window appears.
4 Enter a code and description for each type of wood.

5-22 Navision Attain Essentials
Exercise 21 Create Some Item Variants
Create variants of Blue, Yellow, Black and Silver for item 70500 Track Mountain Bike.
Close the Item card window and open the Sales & Receivables menu to enter the following sales invoice:
Sell-to Customer 10000 Posting Date 01/31/01 Type Item Item Description Track Mountain bike Variant Code Blue Quantity 1
Do not use a location code, because the item has been posted without one.
You do not have to post the invoice.
You can find the steps and solution to this exercise in Appendix D.
Stockkeeping Units (SKUs)
Stockkeeping units are used to record information about your items for a specific location and/or a specific variant code.
You can use stockkeeping units as a supplement to item cards, but they do not replace them. You should note that the information on the Stockkeeping Unit card has priority over the item card. Stockkeeping units allow you to differentiate information about an item for a specific location (such as a warehouse or distribution center) or a specific variant (such as different shelf numbers and different replenishment information), for the same item.
Example
You want to set up a stockkeeping unit for the Paris Guest Chair (Item 1900-S).
1 Click Inventory, Stockkeeping Unit.

Inventory 5-23
2 Find Item 1900-S Paris Guest Chair.
3 Be sure that the Item No. and Location Code (or Variant Code) fields are filled in.
After you have set up the first Stockkeeping Unit card for an item, the program places a check mark in the Stockkeeping Unit Exists field on the Item Card.

5-24 Navision Attain Essentials
5.5 REVIEW QUESTIONS
Now you have the basic ideas behind inventory in Navision Attain. Here are some questions to help you review the material you’ve just covered. Answers are not provided. This is a study-aid.
1 Why should one choose the Average Cost Calculation type carefully?
2 What is the Nonstock Item Card? How does it differ from an ordinary Item Card?
3 The base unit of measure must be a quantity of ________?
4 Where do you set up Rounding Methods?
5 What are Price Groups? Item Discount Groups?
6 What are the five Inventory costing methods in Navision Attain?
7 What is a BOM?
8 Where do you produce a BOM?
9 How do you update unit costs of BOMs?
10 What is an Item Variant?
11 What is a Stockkeeping Unit?
Appendix A.
Course Schedule
Although these materials are designed to be used as self-study, they can be used as the basis for an instructor-led course. We make the following recommendations for teaching the course in the classroom:
A course schedule suggesting in which order the chapters should be taught.
A schedule suggesting how long the course should take. We recommend that it be undertaken in three days. This makes it an intensive course.
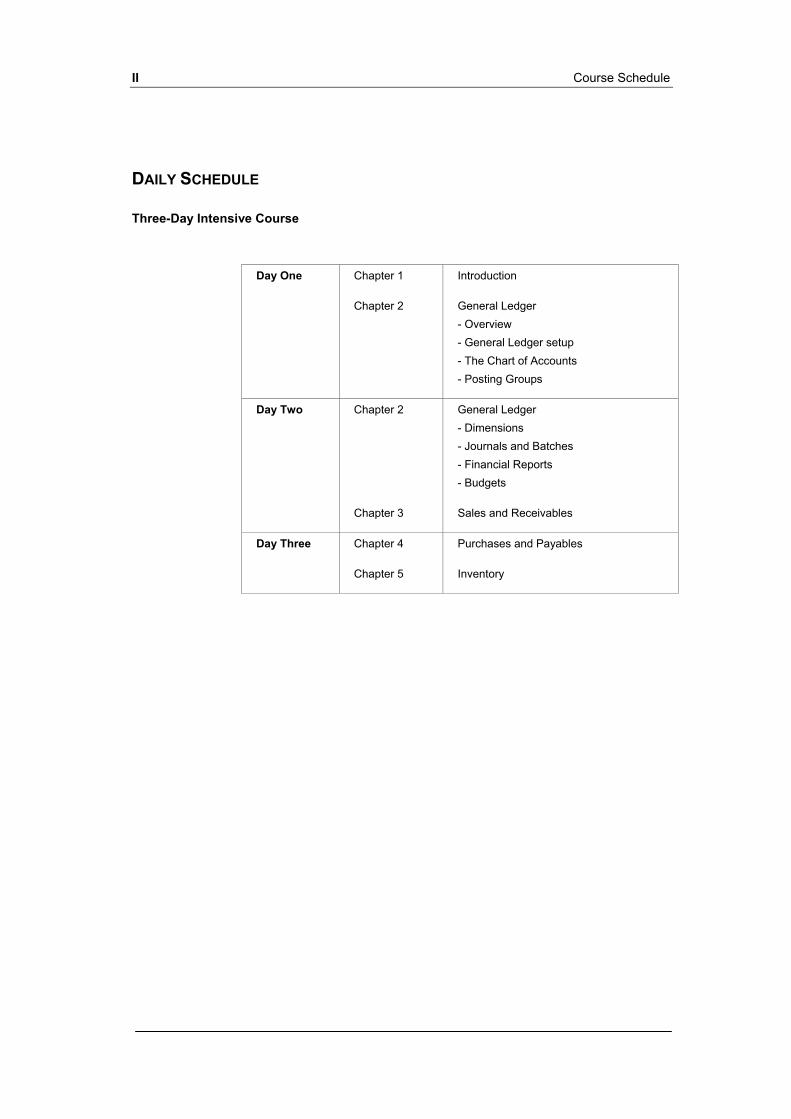
II Course Schedule
DAILY SCHEDULE
Three-Day Intensive Course
Day One Chapter 1
Chapter 2
Introduction
General Ledger - Overview - General Ledger setup - The Chart of Accounts - Posting Groups
Day Two Chapter 2
Chapter 3
General Ledger - Dimensions - Journals and Batches - Financial Reports - Budgets
Sales and Receivables
Day Three Chapter 4
Chapter 5
Purchases and Payables
Inventory

Appendix B.
System Requirements
This appendix contains a table of System Requirements.

II System Requirements
SYSTEM REQUIREMENTS
Client or Single User Installation Requirements
Operating System Requirements Microsoft Windows 98 SE (Second Edition) Microsoft Windows NT (Intel) version 4.0 - Service Pack 6a Microsoft Windows 2000 Professional - Service Pack 1 Microsoft Windows XP
Processor Requirements Not available at this time
Memory Requirements Not available at this time
Hard Drive Requirements Not available at this time
Navision Attain Database Server (Network) Requirements
Operating System Requirements Microsoft Windows NT (Intel) version 4.0 – Service Pack 6a Microsoft Windows 2000 Server – Service Pack 1 IBM AIX version 4.3 on IBM RISC System/6000 HP-UX version 11.00 on HP9000 Series 800 (existing customers only) Reliant Unix version 5.44 (existing customers only)
Processor Requirements Not available at this time
Memory Requirements Not available at this time
Hard Drive Requirements Not available at this time
Microsoft SQL Server Option Requirements
Operating System Requirements Microsoft SQL Server 7.0 – Service Pack 3

System Requirements III
Microsoft SQL Server 2000
Processor Requirements Not available at this time
Memory Requirements Not available at this time
Hard Drive Requirements Not available at this time
Networks
WinSockets-compatible TCP/IP
NetBIOS-compatible LANs
Special Integration Features
To use special integration features, it is also necessary to install the following products on the client computer:
General ability to start an email program from within Navision Attain: requires Microsoft Outlook 98 or Microsoft Outlook 2000.
·
·
·
·
·
Relationship Management
Handling Microsoft Word documents that have merge fields linked to fields in Navision Attain: requires Microsoft Word 2000.
Support for automatic phone dialing to contact persons: requires TAPI 2.0 or higher.
Financial Management
General Ledger – Import and export of budgets, account schedules and dimensional analyses: requires Microsoft Excel 2000
XBRL features require an XML parser which is available at no cost from Microsoft’s website.
SALES NOTE
Navision Attain is a multi-platform system taking advantage of client/server technology. This means: You can use Windows 98, Windows 2000, Windows NT, Windows XP, Unix, or any combination for clients.

IV System Requirements
Regardless of platform, Navision feels, and behaves the same. The program allows your customer to use existing hardware and operating environments, which means less of a learning curve and also eliminates the need to change their existing systems. Customization uses the same code regardless of platform, so all customizations apply to all platforms.

Appendix C.
Granule list
This appendix contains
Granule List for Navision Attain 3.60
Note, that the information included in this appendix is as at June 14, 2002.

II Granule list
GRANULE LIST FOR NAVISION ATTAIN 3.60
Application Area
Granule (Granule ID)
Description
General Ledger Basic General Ledger (3,010)
You use this granule to set up a company and post to the general ledger.
The granule provides you with the basic facilities necessary for setting up a company and posting to the general ledger: chart of accounts, general journals, VAT facilities, recurring journals and source codes. It also includes facilities for internal and external reporting.
The granule allows you to post and report in the company's base currency. If you also purchase the Multiple Currencies granule, you can post and report in an additional currency as well.
The granule allows two languages from the beginning – the English US language and the native language for the particular country.
The granule allows 1 instance of Navision Attain Application Server.
This granule must always be included as part of the initial purchase of a solution because it includes 1 session and the first company.
Requirements: The granule Navision Attain Version 3.60
Budgets (3,030)
This granule allows you to work with budgets in G/L accounts.
Once you have created a budget, you can print a balance compared to the budget showing variances by percentages. You can work with several budgets. Budgets are normally entered per period for the relevant G/L accounts. You can create, copy and work with any number of budgets at the same time. You can work with, for example, a 100% budget, a 110% budget, and so on.
Requirements: Basic General Ledger
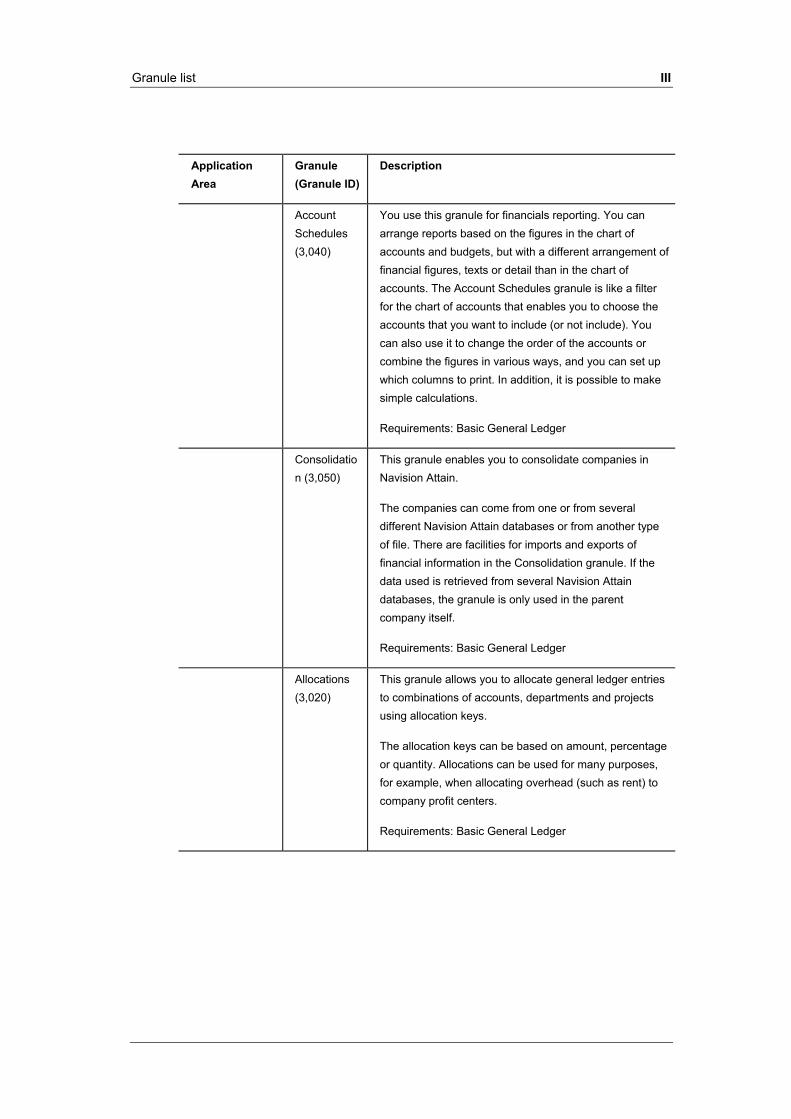
Granule list III
Application Area
Granule (Granule ID)
Description
Account Schedules (3,040)
You use this granule for financials reporting. You can arrange reports based on the figures in the chart of accounts and budgets, but with a different arrangement of financial figures, texts or detail than in the chart of accounts. The Account Schedules granule is like a filter for the chart of accounts that enables you to choose the accounts that you want to include (or not include). You can also use it to change the order of the accounts or combine the figures in various ways, and you can set up which columns to print. In addition, it is possible to make simple calculations.
Requirements: Basic General Ledger
Consolidation (3,050)
This granule enables you to consolidate companies in Navision Attain.
The companies can come from one or from several different Navision Attain databases or from another type of file. There are facilities for imports and exports of financial information in the Consolidation granule. If the data used is retrieved from several Navision Attain databases, the granule is only used in the parent company itself.
Requirements: Basic General Ledger
Allocations (3,020)
This granule allows you to allocate general ledger entries to combinations of accounts, departments and projects using allocation keys.
The allocation keys can be based on amount, percentage or quantity. Allocations can be used for many purposes, for example, when allocating overhead (such as rent) to company profit centers.
Requirements: Basic General Ledger
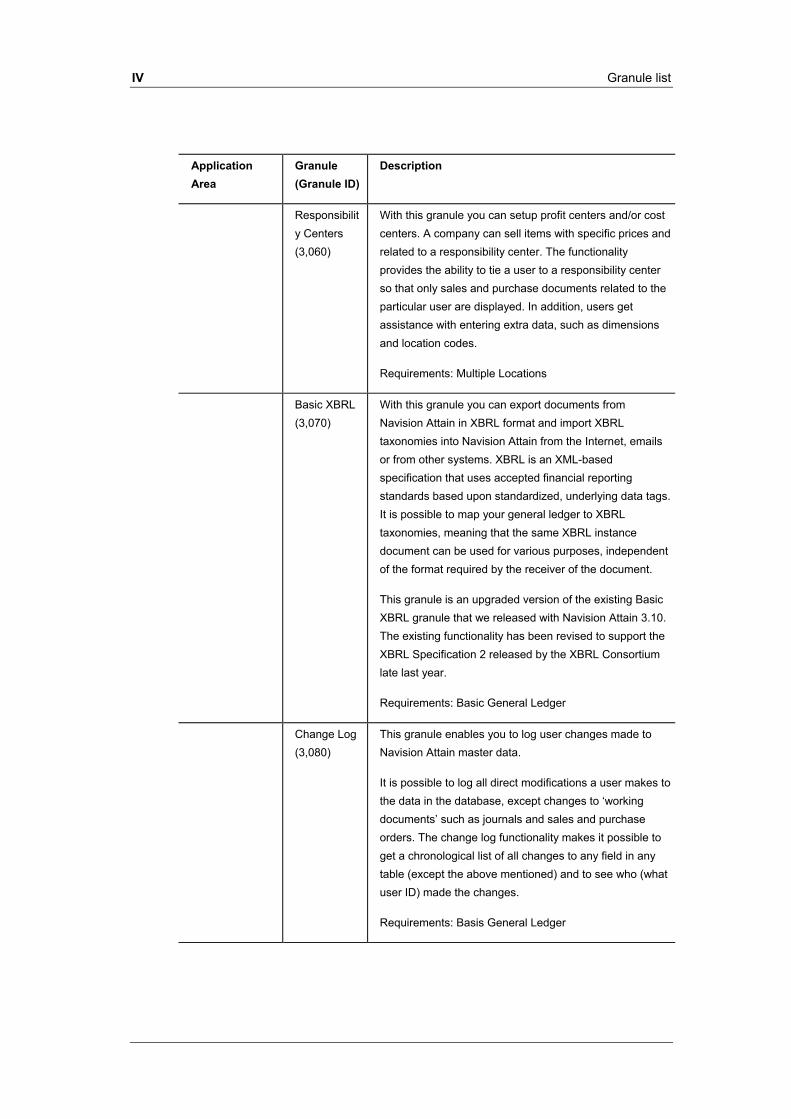
IV Granule list
Application Area
Granule (Granule ID)
Description
Responsibility Centers (3,060)
With this granule you can setup profit centers and/or cost centers. A company can sell items with specific prices and related to a responsibility center. The functionality provides the ability to tie a user to a responsibility center so that only sales and purchase documents related to the particular user are displayed. In addition, users get assistance with entering extra data, such as dimensions and location codes.
Requirements: Multiple Locations
Basic XBRL (3,070)
With this granule you can export documents from Navision Attain in XBRL format and import XBRL taxonomies into Navision Attain from the Internet, emails or from other systems. XBRL is an XML-based specification that uses accepted financial reporting standards based upon standardized, underlying data tags. It is possible to map your general ledger to XBRL taxonomies, meaning that the same XBRL instance document can be used for various purposes, independent of the format required by the receiver of the document.
This granule is an upgraded version of the existing Basic XBRL granule that we released with Navision Attain 3.10. The existing functionality has been revised to support the XBRL Specification 2 released by the XBRL Consortium late last year.
Requirements: Basic General Ledger
Change Log (3,080)
This granule enables you to log user changes made to Navision Attain master data.
It is possible to log all direct modifications a user makes to the data in the database, except changes to ‘working documents’ such as journals and sales and purchase orders. The change log functionality makes it possible to get a chronological list of all changes to any field in any table (except the above mentioned) and to see who (what user ID) made the changes.
Requirements: Basis General Ledger

Granule list V
Application Area
Granule (Granule ID)
Description
Cash Manager Bank Account Management (5,010)
This granule allows you to manage an unlimited number of bank accounts in both local and foreign currencies.
Requirements: Basic General Ledger
Check Writing (5,020)
This granule allows you to generate printed checks with unique number series for each bank account.
An already printed check can be voided or reprinted.
You can specify on the journal line whether you want the payment to be made with a computer check or a manual check.
Requirements: Bank Account Management
Bank Reconciliation (5,030)
This granule enables you to reconcile your bank accounts in Navision Attain with the bank’s statements.
You can apply amounts from your bank account ledger to the reconciliation form and keep track of all bank statements.
Requirements: Bank Account Management
Sales & Receivables
Basic Receivables (3,260)
You use this granule to set up and maintain the customer table. With this granule, you can also post sales transactions in journals and manage receivables.
The granule allows you to register customers and manage receivables using general journals. It is always used when you need to have a customer table. Sales Invoicing (see description below) is also frequently used with the Basic Receivables granule.
Basic Receivables is integrated with General Ledger and Inventory and is required for the configuration of all other Sales & Receivables granules.
If you have the Multiple Currencies granule, you can post sales transactions and manage receivables in multiple currencies for each customer.
Requirements: Basic General Ledger

VI Granule list
Application Area
Granule (Granule ID)
Description
Sales Invoicing (3,270)
You use this granule to set up, post and print customer invoices and sales credit memos. It is fully integrated with General Ledger and Inventory.
Requirements: Basic Receivables
Sales Invoice Discounts (3,290)
This granule allows you to calculate invoice discounts automatically.
You can set up any number of invoice discount terms, for which you define a certain minimum amount, discount percentage and/or a service charge. You can do this in both LCY and in foreign currencies.
The discount is calculated on the individual item lines and becomes part of the net sum of the invoice.
Requirements: Sales Invoicing
Sales Order Management (3,280)
You use this granule to manage sales quotes, blanket sales orders and sales order processes.
The differences between setting up an invoice directly and setting up a sales order are:
Quantity available is adjusted as soon as an amount is entered on a sales order line, but it is not affected by an invoice until the invoice is posted.
You can use the Sales Order Management granule to manage partial shipments.
You can ship and invoice separately with the Sales Order Management granule.
There is also a difference regarding the time frame for the sale. There can be a long period between the time items are ordered and the time they are sold. The granule also enables you to use quotes and blanket orders in the sales phase. Quotes and blanket orders do not affect inventory figures.
Requirements: Sales Invoicing
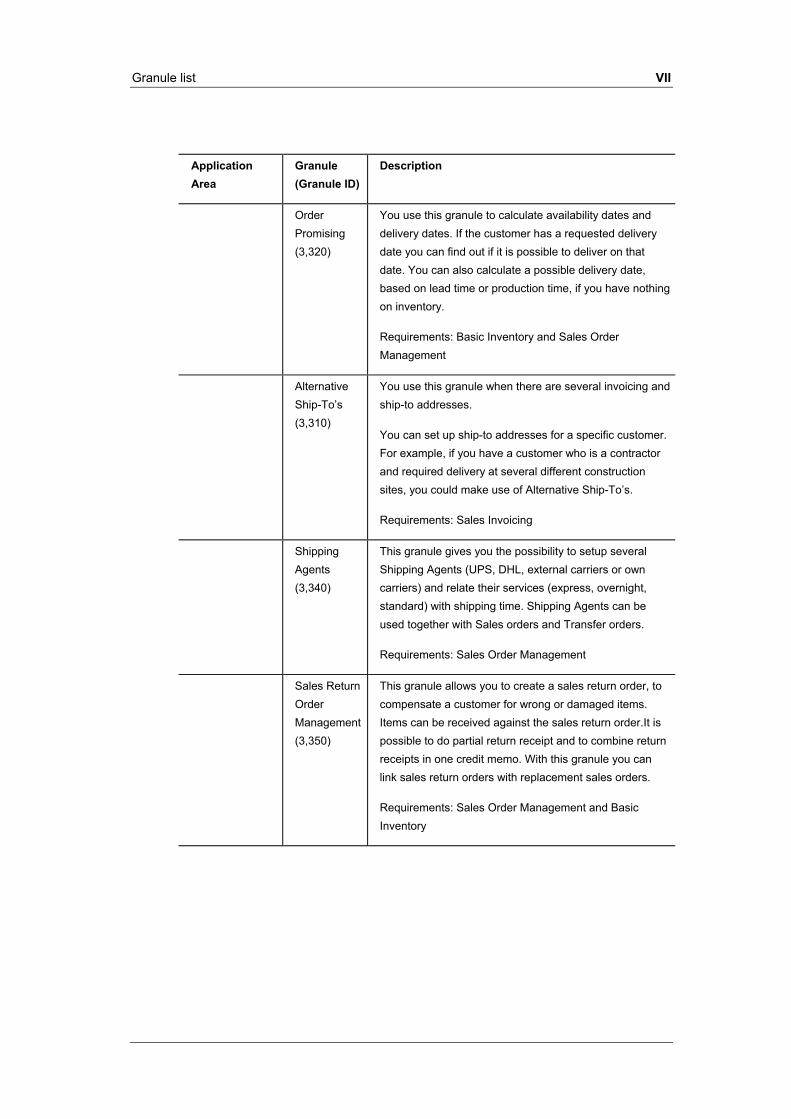
Granule list VII
Application Area
Granule (Granule ID)
Description
Order Promising (3,320)
You use this granule to calculate availability dates and delivery dates. If the customer has a requested delivery date you can find out if it is possible to deliver on that date. You can also calculate a possible delivery date, based on lead time or production time, if you have nothing on inventory.
Requirements: Basic Inventory and Sales Order Management
Alternative Ship-To’s (3,310)
You use this granule when there are several invoicing and ship-to addresses.
You can set up ship-to addresses for a specific customer. For example, if you have a customer who is a contractor and required delivery at several different construction sites, you could make use of Alternative Ship-To’s.
Requirements: Sales Invoicing
Shipping Agents (3,340)
This granule gives you the possibility to setup several Shipping Agents (UPS, DHL, external carriers or own carriers) and relate their services (express, overnight, standard) with shipping time. Shipping Agents can be used together with Sales orders and Transfer orders.
Requirements: Sales Order Management
Sales Return Order Management (3,350)
This granule allows you to create a sales return order, to compensate a customer for wrong or damaged items. Items can be received against the sales return order.It is possible to do partial return receipt and to combine return receipts in one credit memo. With this granule you can link sales return orders with replacement sales orders.
Requirements: Sales Order Management and Basic Inventory

VIII Granule list
Application Area
Granule (Granule ID)
Description
Calendars (3,360)
With this granule, you can set up calendars with working and non-working days. A base calendar can be assigned to Customers, Vendors, Locations, Company, Shipping Agent Services and to the Service Management Setup. It is possible to add changes to the base calendar for each of the above-mentioned. The calendar entries will be used in the date calculations on Sales orders, Purchase orders, Transfer orders, Production orders, Service orders and in the Requisition Worksheet and Planning Worksheet.
Requirements: Basic Inventory
Sales Discounting (3,370)
You use this granule to work with customer discounts that are either customer specific or customer group specific. A discount can then be shared among several customers. With a line discount, you negotiate the percentage that the customer or customer discount group will get as a discount.
Requirements: Basic Inventory and Sales Invoicing
Sales Pricing (3,380)
You use this granule to work with sales prices that are either customer specific or customer group specific.
A sales price can then be shared among several customers. With a sales price, you negotiate the actual prices with the customer or customer price group.
Requirements: Basic Inventory and Sales Invoicing
Sales Tax Sales Tax (3,410)
You use this granule when you are required to calculate US Sales Tax.
You can set up individual tax areas for each customer/vendor. The calculation will include a possibility to calculate use tax and tax on tax. Calculation of sales tax is also possible from the General Journal Lines.
Requirements: Basic General Ledger.

Granule list IX
Application Area
Granule (Granule ID)
Description
CRM Marketing & Sales
Contact Management (5,110)
In the Contact Management granule, you can record your contact information for all your business relationships. For each contact you can specify the individual contact persons related to this contact.
The duplicate check function automatically alerts you if you enter contact information that already exists.
You can categorize your contacts based on profiling questions in order to have a precise view of prospects and customers.
The granule is tightly integrated with Sales & Receivables application area which means, for example, that you can issue quotes to prospects or create sales documents for specific contact persons (requires Sales Order Management)
Requirements: Basic General Ledger
Contact Classification (5,120)
You use this granule to classify your contacts into different categories. In this granule, you can have the program automatically classify your customers based on criteria specified by you, for example, you can have the program group contacts in terms of revenue. You can use this information to target contacts for your campaigns.
You can segment your customers into ABC segments and even use this granule for rating. In other words you can assign the weights of two questions to identify the value of a third question.
Requirements: Contact Management
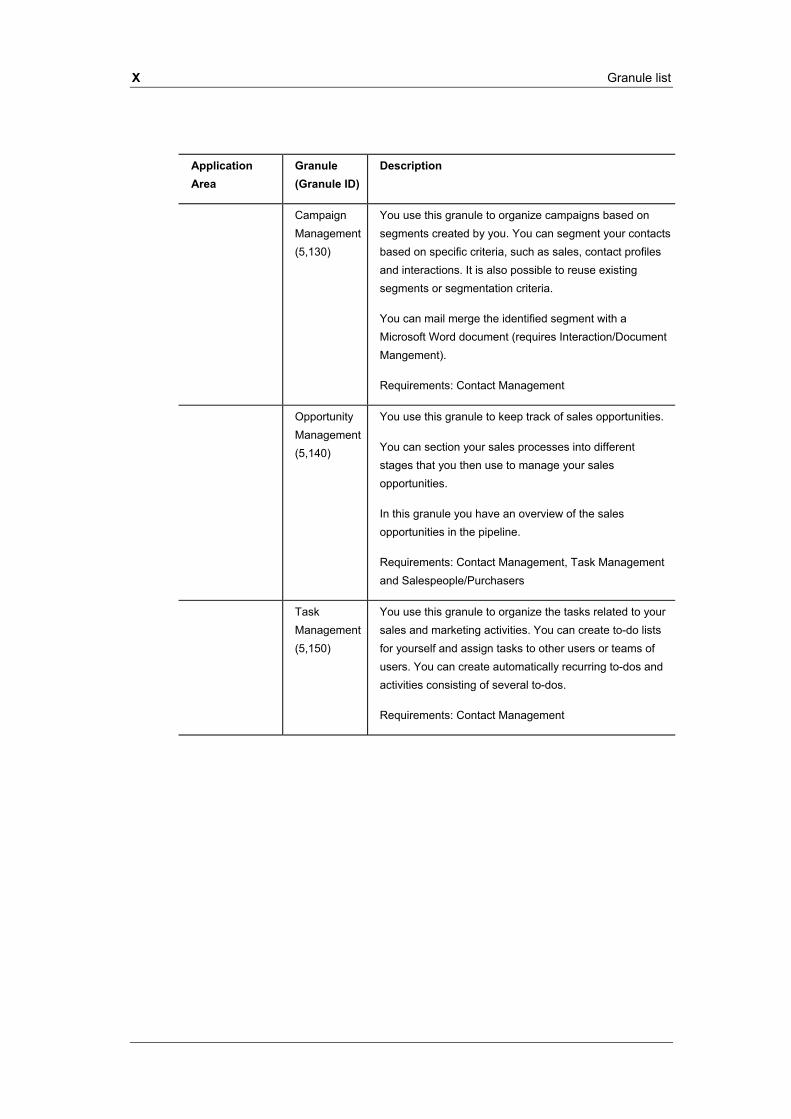
X Granule list
Application Area
Granule (Granule ID)
Description
Campaign Management (5,130)
You use this granule to organize campaigns based on segments created by you. You can segment your contacts based on specific criteria, such as sales, contact profiles and interactions. It is also possible to reuse existing segments or segmentation criteria.
You can mail merge the identified segment with a Microsoft Word document (requires Interaction/Document Mangement).
Requirements: Contact Management
Opportunity Management (5,140)
You use this granule to keep track of sales opportunities.
You can section your sales processes into different stages that you then use to manage your sales opportunities.
In this granule you have an overview of the sales opportunities in the pipeline.
Requirements: Contact Management, Task Management and Salespeople/Purchasers
Task Management (5,150)
You use this granule to organize the tasks related to your sales and marketing activities. You can create to-do lists for yourself and assign tasks to other users or teams of users. You can create automatically recurring to-dos and activities consisting of several to-dos.
Requirements: Contact Management

Granule list XI
Application Area
Granule (Granule ID)
Description
Interaction/Document Management (5,160)
You can use this granule to record all the interactions that you have with your contacts, such as telephone calls, meetings or letters. You can attach documents to interactions, for example, Microsoft Word documents, Microsoft Excel files, or .txt files.
You can also have the program automatically record interactions when you perform other actions in Navision Attain.
All interactions can be recorded whether they involve e-mail, correspondence, telephone calls, invoicing, reminders or services.
Requirements: Contact Management and Salespeople/Purchasers.
Contact Search (5,170)
You can use this granule to record all the interactions that you have with your contacts, such as telephone calls, meetings or letters. You can attach documents to interactions, for example, Microsoft Word documents, Microsoft Excel files, or .txt files.
You can also have the program automatically record interactions when you perform other actions in Navision Attain. All Navision documents that you send to your contact, like sales orders or quotes, can be logged and retrieved at a later stage.
By using TAPI (Telephony Application Programming Interface) compliant telecom devices, you can call a contact by clicking a button on the contact card.
Requirements: Contact Management and Salespeople / Purchasers

XII Granule list
Application Area
Granule (Granule ID)
Description
Email Logging for MS Exchange (5,180)
You use this granule to log all email correspondence. You can log inbound and outbound emails sent through Attain or Outlook and you can even set-up the program to log automatically or manually in Attain.
The solution is server based and requires Microsoft Exchange Server (min. version 5.5 with service pack 4) in order for you to keep emails in their natural environment and thereby ease your administration.
Requirements: Contact Management and Interaction/Document Management
Outlook Client Integration
You use this granule to synchronize your to-dos and your contacts in Attain with meetings, tasks and contacts in MS Outlook. You can create, update, cancel and delete in one program and the other program is automatically synchronized.
You can also use this granule when you need access to information or even update information when working offline. This is due to a batch job that you can run when you are online again.
Requirements: Contact Management and Task Management
CRM Service Service Order Management (5,910)
You use this granule to register your after-sales issues including service requests, services due, service orders, and repair requests. Service requests can be initiated by your customers or automatically according to the terms stipulated in your service contract. Data can be entered in the service orders by a call-center employee or by your repair shop. You can also use this granule to register ad hoc or ‘one-off’ service orders. In this granule you can register and manage loaner equipment, lent out to customers. A complete history of your service orders and service order quotes is also available through the Service Order Log.
Requirements: Basic General Ledger, Basic Receivables, Sales Invoicing, Basic Inventory, Basic Resources and Calendars.
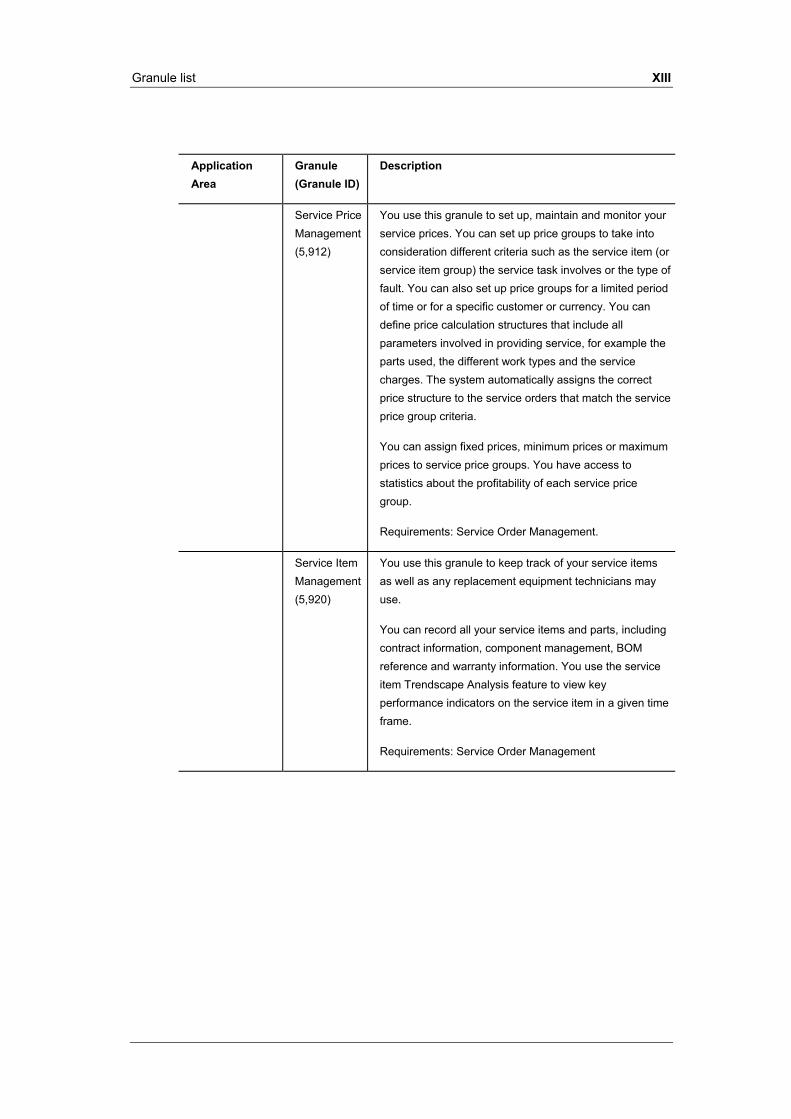
Granule list XIII
Application Area
Granule (Granule ID)
Description
Service Price Management (5,912)
You use this granule to set up, maintain and monitor your service prices. You can set up price groups to take into consideration different criteria such as the service item (or service item group) the service task involves or the type of fault. You can also set up price groups for a limited period of time or for a specific customer or currency. You can define price calculation structures that include all parameters involved in providing service, for example the parts used, the different work types and the service charges. The system automatically assigns the correct price structure to the service orders that match the service price group criteria.
You can assign fixed prices, minimum prices or maximum prices to service price groups. You have access to statistics about the profitability of each service price group.
Requirements: Service Order Management.
Service Item Management (5,920)
You use this granule to keep track of your service items as well as any replacement equipment technicians may use.
You can record all your service items and parts, including contract information, component management, BOM reference and warranty information. You use the service item Trendscape Analysis feature to view key performance indicators on the service item in a given time frame.
Requirements: Service Order Management
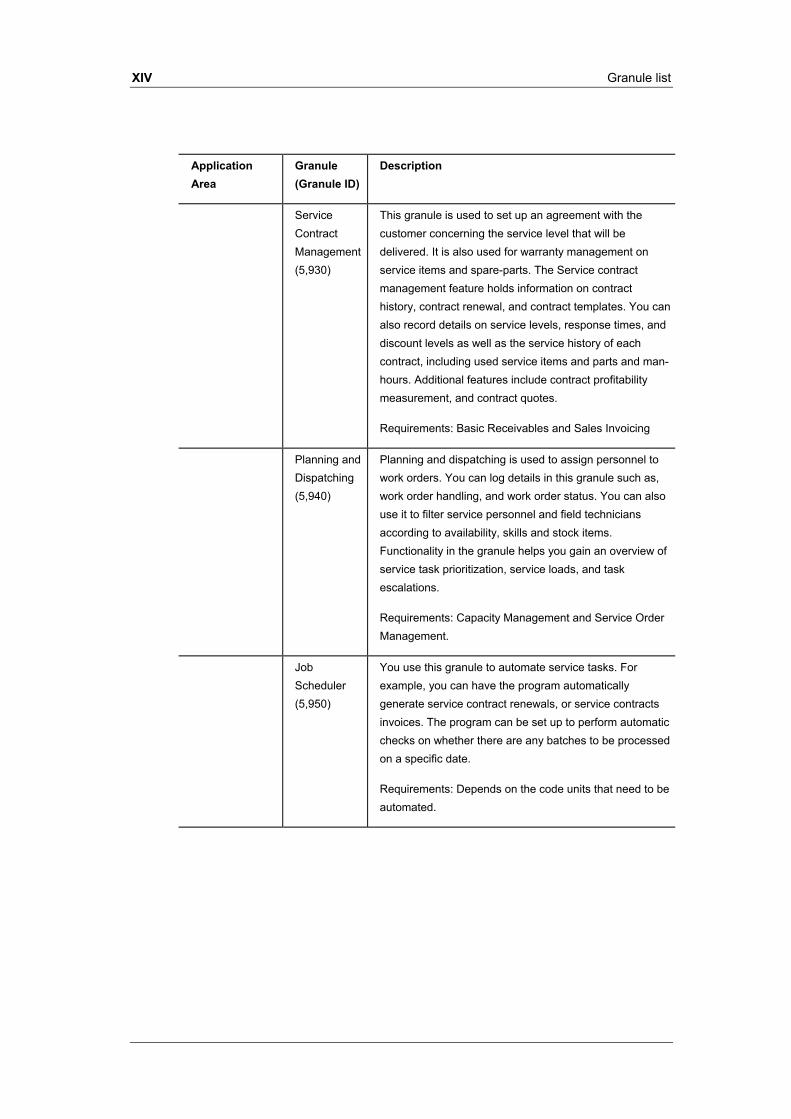
XIV Granule list
Application Area
Granule (Granule ID)
Description
Service Contract Management (5,930)
This granule is used to set up an agreement with the customer concerning the service level that will be delivered. It is also used for warranty management on service items and spare-parts. The Service contract management feature holds information on contract history, contract renewal, and contract templates. You can also record details on service levels, response times, and discount levels as well as the service history of each contract, including used service items and parts and man-hours. Additional features include contract profitability measurement, and contract quotes.
Requirements: Basic Receivables and Sales Invoicing
Planning and Dispatching (5,940)
Planning and dispatching is used to assign personnel to work orders. You can log details in this granule such as, work order handling, and work order status. You can also use it to filter service personnel and field technicians according to availability, skills and stock items. Functionality in the granule helps you gain an overview of service task prioritization, service loads, and task escalations.
Requirements: Capacity Management and Service Order Management.
Job Scheduler (5,950)
You use this granule to automate service tasks. For example, you can have the program automatically generate service contract renewals, or service contracts invoices. The program can be set up to perform automatic checks on whether there are any batches to be processed on a specific date.
Requirements: Depends on the code units that need to be automated.

Granule list XV
Application Area
Granule (Granule ID)
Description
Purchases & Payables
Basic Payables (3,510)
You use this granule to set up and maintain a vendor table. With this granule, you can also post purchase transactions in journals and manage payables.
The Basic Payables granule includes the vendor table and allows you to generate vendor ledger entries using general journals. This granule is always used if you must have a vendor table, but it also lets you manage payables. Purchase Invoicing is also frequently used with this granule (see description below).
Basic Payables is integrated with General Ledger and Inventory and is required for the configuration of all other Purchase & Payables granules.
If you have the Multiple Currencies granule, you can post purchase transactions and manage payables in multiple currencies for each vendor.
Requirements: Basic General Ledger
Purchase Invoicing (3,520)
You use this granule to set up, post and print purchase invoices and purchase credit memos. It is integrated with General Ledger and Inventory.
Requirements: Basic Payables
Purchase Invoice Discounts (3,540)
This granule lets you calculate invoice discounts automatically.
The discount can differ from vendor to vendor with different minimum amounts (also in different currencies) and different rates, depending on the size of the invoice. The discount is calculated on the individual item lines and becomes part of the net sum of the invoice.
Requirements: Purchase Invoicing
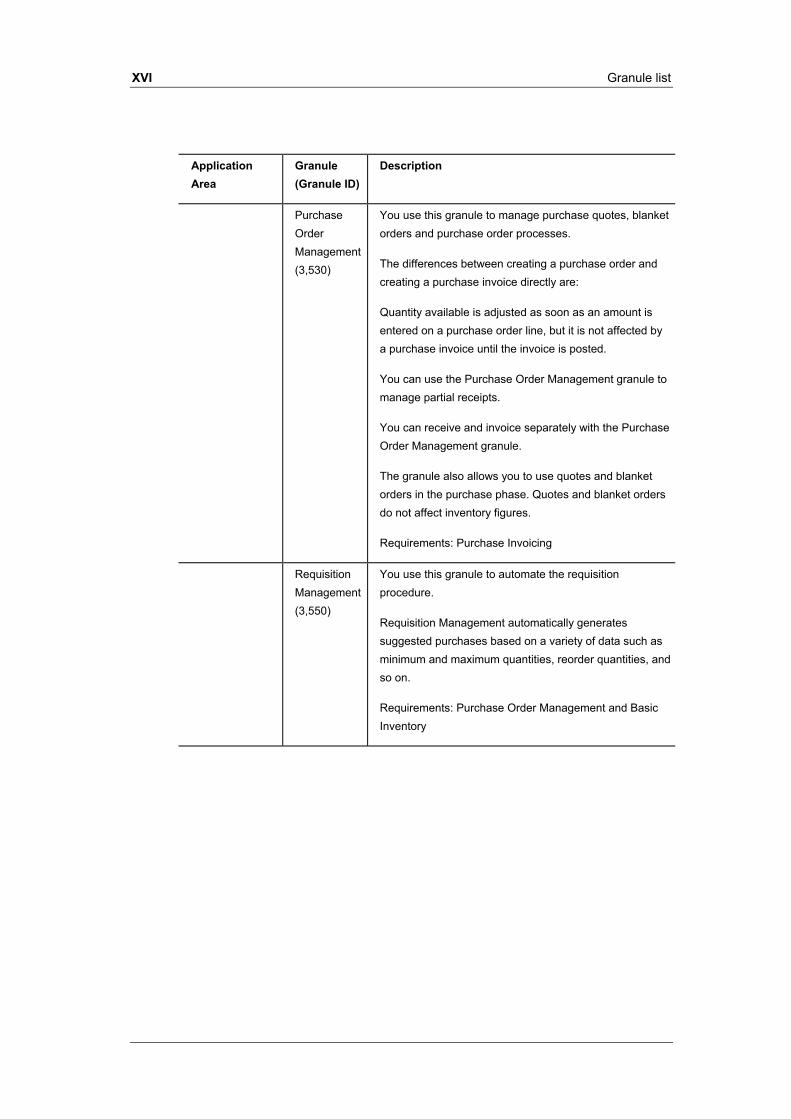
XVI Granule list
Application Area
Granule (Granule ID)
Description
Purchase Order Management (3,530)
You use this granule to manage purchase quotes, blanket orders and purchase order processes.
The differences between creating a purchase order and creating a purchase invoice directly are:
Quantity available is adjusted as soon as an amount is entered on a purchase order line, but it is not affected by a purchase invoice until the invoice is posted.
You can use the Purchase Order Management granule to manage partial receipts.
You can receive and invoice separately with the Purchase Order Management granule.
The granule also allows you to use quotes and blanket orders in the purchase phase. Quotes and blanket orders do not affect inventory figures.
Requirements: Purchase Invoicing
Requisition Management (3,550)
You use this granule to automate the requisition procedure.
Requisition Management automatically generates suggested purchases based on a variety of data such as minimum and maximum quantities, reorder quantities, and so on.
Requirements: Purchase Order Management and Basic Inventory

Granule list XVII
Application Area
Granule (Granule ID)
Description
Drop Shipments (3,770)
You use this granule to link sales and purchase orders to one another and when items are shipped directly from the vendor to the customer.
Drop Shipments enables you to handle items being shipped directly from the vendor to the customer without manual application of inventory entries. The invoicing process is not affected by drop shipments. Drop Shipments is useful for businesses that sell items that are shipped directly from the vendor to the customer without ever being placed in inventory.
Requirements: Sales Order Management and Purchase Order Management
Alternative Order Addresses (3,560)
You use this granule for vendors with more than one order address.
The number of possible order addresses is unlimited.
Requirements: Purchase Invoicing
Purchase Return Order Management (3,570)
This granule allows you to create a purchase return order, to compensate your own company for wrong or damaged items. Items can be picked from the purchase return order. It is possible to do partial return shipments and to combine return shipments in one credit memo. With this granule you can link purchase return orders with replacement purchase orders.
Requirements: Purchase Order Management and Basic Inventory
Purchase Discounting (3,580)
You use this granule to work with purchase discounts that are vendor specific. With a line discount, you negotiate the percentage that the vendor, will give as a discount.
Requirements: Basic Inventory and Purchase Invoicing
Purchase Pricing (3,590)
You use this granule to work with purchase prices that are vendor specific. With a purchase price, you negotiate the actual prices with the vendor.
Requirements: Basic Inventory and Purchase Invoicing
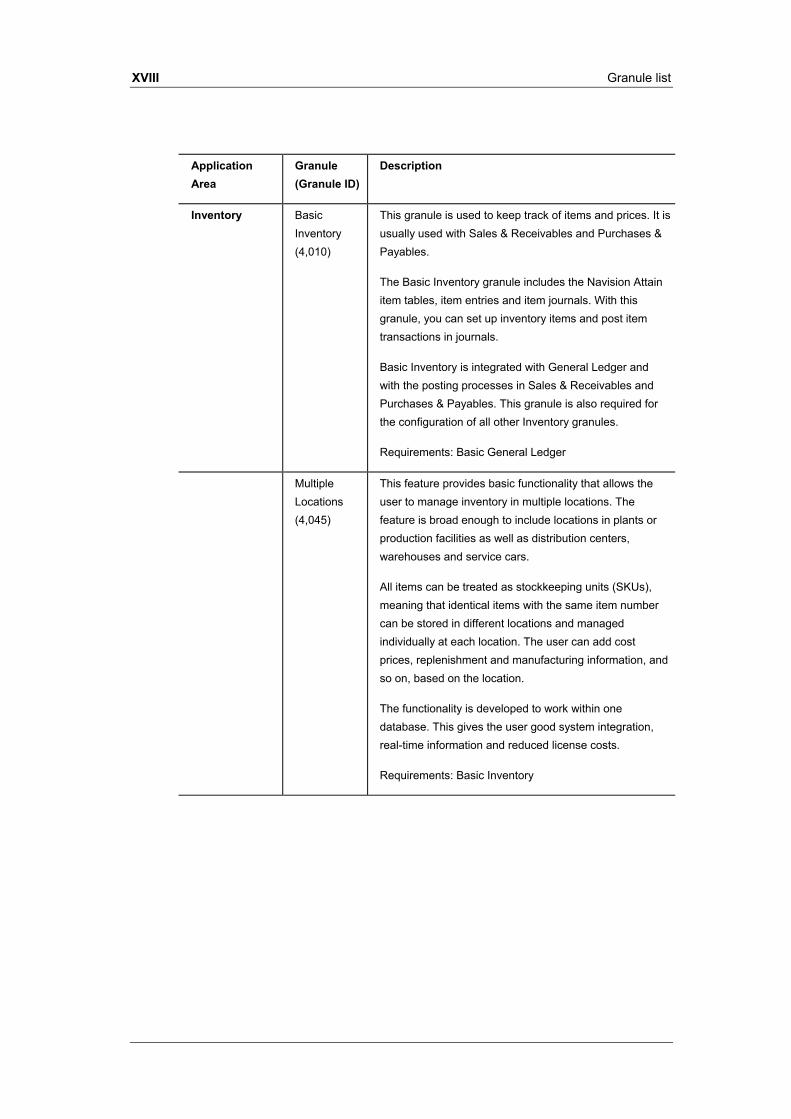
XVIII Granule list
Application Area
Granule (Granule ID)
Description
Inventory Basic Inventory (4,010)
This granule is used to keep track of items and prices. It is usually used with Sales & Receivables and Purchases & Payables.
The Basic Inventory granule includes the Navision Attain item tables, item entries and item journals. With this granule, you can set up inventory items and post item transactions in journals.
Basic Inventory is integrated with General Ledger and with the posting processes in Sales & Receivables and Purchases & Payables. This granule is also required for the configuration of all other Inventory granules.
Requirements: Basic General Ledger
Multiple Locations (4,045)
This feature provides basic functionality that allows the user to manage inventory in multiple locations. The feature is broad enough to include locations in plants or production facilities as well as distribution centers, warehouses and service cars.
All items can be treated as stockkeeping units (SKUs), meaning that identical items with the same item number can be stored in different locations and managed individually at each location. The user can add cost prices, replenishment and manufacturing information, and so on, based on the location.
The functionality is developed to work within one database. This gives the user good system integration, real-time information and reduced license costs.
Requirements: Basic Inventory

Granule list XIX
Application Area
Granule (Granule ID)
Description
Stockkeeping Units (4,045)
This feature provides basic functionality that allows the user to manage stockkeeping units (SKUs), meaning that identical items with the same item number can be stored in different locations and managed individually at each location. The user can add cost prices, replenishment and manufacturing information, and so on, based on the location.
Requirements: Multiple Locations
Location Transfers (4,100)
This granule enables you to track inventory effectively as it is moved from one location to another. You can also better account for the value of inventory in transit and at various locations.
Requirements: Multiple Locations
Item Substitutions (4,110)
With this granule, you can link items with the same or similar characteristics. If a customer orders an item that is not available, you can offer substitute items and avoid losing the sale. Or you can provide an extra service to your customer by offering lower-cost alternatives.
Requirements: Sales Order Management and Basic Inventory
Item Cross References (4,120)
Using this granule, you can quickly and precisely identify the items a customer is ordering on the basis of item numbers other than your own. Cross-reference information from customers, vendors and manufacturers as well as generic numbers, universal product codes (UPCs) and European article numbers (EANs) can be stored and easily accessed.
Requirements: Basic Inventory

XX Granule list
Application Area
Granule (Granule ID)
Description
Nonstock Items (4,130)
You use this granule when you offer items that are not part of your inventory but that you can order from the vendor or manufacturer. Such items are registered as nonstock items but otherwise are treated like any other item.
Requirements: Sales Order Management and Basic Inventory
Item Tracking (4,140)
With this granule, you can handle and track serial and lot numbers. Serial and lot numbers can be assigned manually or automatically. The feature will allow the user to receive and ship multiple-quantities with serial/lot numbers from a single order line entry.
Requirements: Basic Inventory
Alternative Vendors (4,050)
You use this granule when you purchase the same items from several different vendors.
This granule enables you to create alternative vendor and price information for inventory items. It can be used when a company has several possible vendors for the same items.
Requirements: Basic Inventory
Bills of Materials (4,060)
You use this granule to break down finished goods into bills of materials.
Bills of materials can be used to describe constructions, package deals and other products that are always sold together. Bills of materials are set up in the item table with a bill of materials description specifying items, resources, quantities, and so on. There are also batch jobs for calculating the direct unit cost of the bills of materials.
Requirements: Basic Inventory

Granule list XXI
Application Area
Granule (Granule ID)
Description
Item Charges (4,150)
You use this granule when you want to include the value of additional cost components into the unit cost or unit price of an item. Such cost components can for example be freight, insurance, or other costs related to the item.
Requirements: Basic Inventory
Cycle Counting (4,160)
Cycle counting is a basic method of verifying inventory record data. It is used to maintain and increase inventory accuracy. Cycle counting is set up on item or SKU level.
Cycle counting is available as a basic granule, which means that it can be used with or without either WM or WMS.
Requirement: Basic Inventory
Warehouse Management
Warehouse Management (4,610)
This granule is used for communication between the sales and warehousing functions. It provides the basic functionality to assist warehouse employees in recording the receipt of inventory, arranging orders for picking, picking items for shipments and making shipments. All released orders (sales, purchase, transfer and production) can be handled in the warehouse.
Requirements: Multiple Locations, Sales Order Management and Purchase Order Management
Warehouse Management Systems (4,620)
An advanced granule, which gives you the ability to handle items on a bin level. You can receive and put away items in a bin as well as pick items from a bin. Items are put away according to a put-away template, and items are picked based on the (zone and) bin ranking. It is possible to move items between bins, either manually or based on a report for optimizing the space usage and the picking process. Warehouse instruction documents will be created for the pick and put-away process.
The pick and put away process can be performed for sales, purchase, transfers, returns and production orders. Service orders is not included.
Requirement: Warehouse Management

XXII Granule list
Application Area
Granule (Granule ID)
Description
Internal Pick and Put Away (4,630)
This granule allows you to create pick and put-away orders for internal purposes, without having a source document (such as a purchase order or a sales order). For instance, you can pick items for testing or put away production output. Warehouse instruction documents will be created, but using these orders does not require source documents.
Requirement: Warehouse Management
Automated Data Capture System (4,640)
With the Automated Data Capture System you can capture data automatically. It will be possible to keep data accurate, even in a hectic environment.This granule uses Navision Attain Application Server (ATAS), and it supports some of the workflows in the new WMS that enables the automation of the warehouse.
Requirement: Warehouse Management Systems
Resources Basic Resources (4,260)
You use this granule to keep track of resources and prices.
It allows you to register and sell resources. Related resources can be combined into one resource group or you can keep track of individual resources. Resources can be divided into labor and equipment.
Resources can be allocated to a specific job in a time schedule. To do this, you need the Basic Jobs and the Budgets/Estimates granules.
Requirements: Basic General Ledger
Capacity Management (4,270)
You use this granule for planning capacity, sales and usage statistics and profitability of resources. You create your plan in a calendar system with the level of detail and for the period of time that you need. You can also monitor your use of resources.
You can get a complete overview of your capacity for each resource with information about availability and planned costs on orders and quotes.
Requirements: Basic Resources
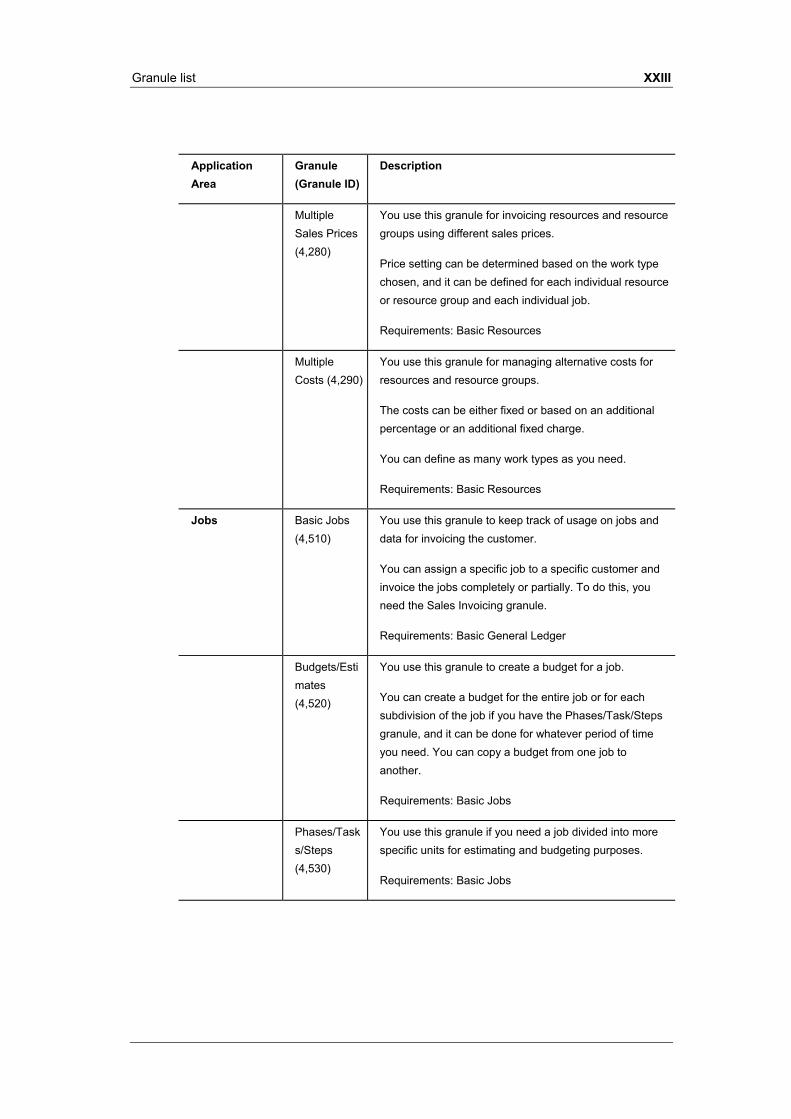
Granule list XXIII
Application Area
Granule (Granule ID)
Description
Multiple Sales Prices (4,280)
You use this granule for invoicing resources and resource groups using different sales prices.
Price setting can be determined based on the work type chosen, and it can be defined for each individual resource or resource group and each individual job.
Requirements: Basic Resources
Multiple Costs (4,290)
You use this granule for managing alternative costs for resources and resource groups.
The costs can be either fixed or based on an additional percentage or an additional fixed charge.
You can define as many work types as you need.
Requirements: Basic Resources
Jobs Basic Jobs (4,510)
You use this granule to keep track of usage on jobs and data for invoicing the customer.
You can assign a specific job to a specific customer and invoice the jobs completely or partially. To do this, you need the Sales Invoicing granule.
Requirements: Basic General Ledger
Budgets/Estimates (4,520)
You use this granule to create a budget for a job.
You can create a budget for the entire job or for each subdivision of the job if you have the Phases/Task/Steps granule, and it can be done for whatever period of time you need. You can copy a budget from one job to another.
Requirements: Basic Jobs
Phases/Tasks/Steps (4,530)
You use this granule if you need a job divided into more specific units for estimating and budgeting purposes.
Requirements: Basic Jobs

XXIV Granule list
Application Area
Granule (Granule ID)
Description
Human Resources
Basic Human Resources (5,760)
You use this granule for efficiently managing your company's human resources.
You can group and track relevant employee information and organize your employees according to different types of information, ranging from experience, skills, education and training to the employee’s union membership.
You can even store personal information, track job openings in your organization and extract a list of candidates for these positions.
You can keep track of benefits and distributed company items such as keys, credit cards, computers and cars.
You can easily record all types of absences in units of measure that you define, and you can attach alternative addresses and relatives to the employees.
Requirements: Basic General Ledger
Fixed Assets Basic Fixed Assets (5,260)
You use this granule to keep track of fixed assets such as buildings, machinery and equipment.
With the Basic Fixed Assets granule, you can post various fixed asset transactions: acquisitions, depreciation, write-downs, appreciation and the disposal of assets.
For each fixed asset, you set up depreciation books in which depreciation methods and other conditions used for calculating depreciation are defined. You can set up an unlimited number of depreciation books to satisfy legal requirements, tax purposes and internal accounting purposes.
The Basic Fixed Assets granule is well suited for international companies that need to use many depreciation methods.
Requirements: Basic General Ledger

Granule list XXV
Application Area
Granule (Granule ID)
Description
Insurance (5,270)
You use this granule to keep track of insurance coverage and annual insurance premiums of your fixed assets. With this granule, you can easily determine whether your assets are underinsured or overinsured. It is possible to attach each asset to one or more insurance policies.
The Insurance granule also allows you to index insurance amounts.
Requirements: Basic Fixed Assets
Maintenance (5,280)
With this granule, you can record maintenance and service expenses for each fixed asset. This provides you with the information needed for detailed analysis and decision making related to the renewal and disposal of fixed assets.
You can integrate the Maintenance granule with General Ledger.
Requirements: Basic Fixed Assets
Allocations (5,290)
This granule allows you to use allocation keys to allocate different percentages of fixed asset transactions, such as acquisition cost and depreciation, to different departments or projects. This feature can be used if several departments share a fixed asset.
Requirements: Basic Fixed Assets
Reclassification (5,300)
With this granule, you can reclassify a fixed asset or a part of a fixed asset, for example, from one department to another. One fixed asset can also be split up into several fixed assets, and several fixed assets can be combined into one fixed asset.
This functionality is necessary if you need to dispose of one part of a fixed asset. The granule allows you to split the asset into two assets and then dispose of one of them.
Requirements: Basic Fixed Assets

XXVI Granule list
Application Area
Granule (Granule ID)
Description
Application-Wide
Multiple Currencies (3,760)
This granule offers significant flexibility for companies carrying out international business. It's possible to manage multiple currencies throughout the system including payables and receivables, general ledger reports, resource and inventory items, and bank accounts (when integrated with the Cash Manager granule). The method of entering exchange rates and of currency conversion fully complies with euro legislation (including “triangulation”) in the EMU countries. "Triangulation" is the required method of currency conversion during the transitional period of the euro.
Currency conversion is performed according to exchange rates that are stored and maintained in the exchange rate table. After you set up a currency in the exchange rate table and specify the format, amounts will always be shown in the correct format on all forms and reports throughout the system. In the exchange rate table, you can enter exchange rates for a date or for a period. For each conversion of a currency amount to a local amount, the program uses the exchange rate associated with the date on the transaction. You can also save historical exchange rates in the exchange rate table in order to keep track of fluctuation over a period of time.
Companies can transact business in any number of currencies for any customer and vendor. For example, companies can issue an invoice in one currency and accept payment for that invoice in a different currency. Automatic currency conversion ensures dynamic management and efficient processing of exchange rate changes. Details of transactions involving receivables and payables are stored in local and foreign currencies so that aging and reports for receivables and payables can be printed in local or foreign currency.
The Exchange Rate Adjustment option adjusts receivables/payables and posts unrealized gains/losses to the general ledger. At payment, gains/losses are realized, and corresponding postings are made in the general ledger. If you use an additional reporting currency in the general ledger, the exchange rate adjustment option also adjusts the general ledger according to your setup for each G/L account.
Requirements: Basic General Ledger
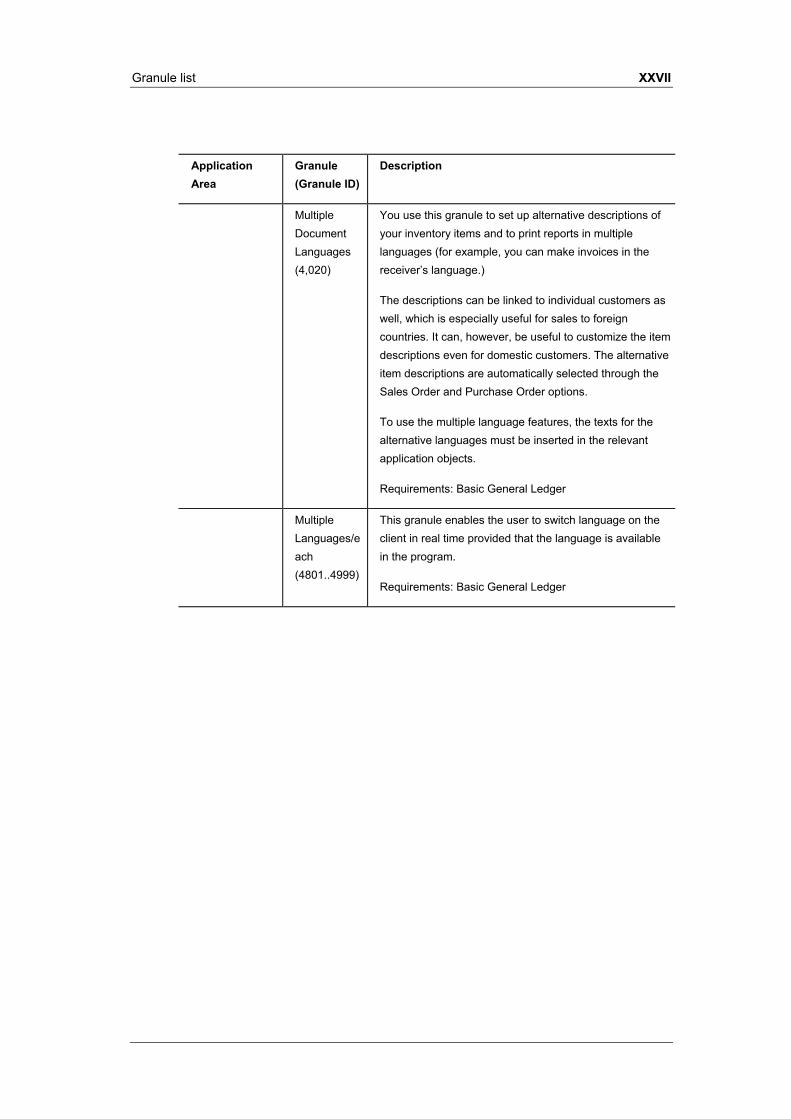
Granule list XXVII
Application Area
Granule (Granule ID)
Description
Multiple Document Languages (4,020)
You use this granule to set up alternative descriptions of your inventory items and to print reports in multiple languages (for example, you can make invoices in the receiver’s language.)
The descriptions can be linked to individual customers as well, which is especially useful for sales to foreign countries. It can, however, be useful to customize the item descriptions even for domestic customers. The alternative item descriptions are automatically selected through the Sales Order and Purchase Order options.
To use the multiple language features, the texts for the alternative languages must be inserted in the relevant application objects.
Requirements: Basic General Ledger
Multiple Languages/each (4801..4999)
This granule enables the user to switch language on the client in real time provided that the language is available in the program.
Requirements: Basic General Ledger

XXVIII Granule list
Application Area
Granule (Granule ID)
Description
Basic Dimensions (4,760)
This granule adds two additional dimensions to the general ledger and to any of the other ledgers in Navision Attain. You can give the two dimensions the names most appropriate for your business.
You can assign dimension codes to each transaction that involves a general ledger account, customer, vendor, fixed asset, resource, job or an inventory item. This gives greater flexibility when working with statistics.
In addition, it will be possible to define default dimension values and rules for the default values for all account types (G/L, customer, vendor, item, and so on). This will help you add dimensions easily to all transactions.
This granule can be used in companies that, for example, have several projects, regions or profit centers. Companies that work with projects across departments and functions can closely analyze projects with this granule.
The granule can also be used for a statement of operations for a company car account, where the individual automobiles are set up as projects. You can establish a single account for all company cars, even though a detailed statement per car is called for. You can, for example, print a balance for a given department or project or for combinations of the two.
Requirements: Basic General Ledger

Granule list XXIX
Application Area
Granule (Granule ID)
Description
Advanced Dimensions (4,780)
This granule gives you an unlimited number of dimensions to use in transactions in all ledgers. You can name all the dimensions as most appropriate for your business.
In addition to an unlimited number of dimensions, the granule includes advanced dimensions functionality. With this granule you can:
- Set up rules for how to combine dimensions and dimension values. This will help you control the use of dimensions and make output based on dimensions extremely reliable.
- Set up rules for prioritization of default values. This gives you the possibility to define dimension rules to fit your specific business.
- Setup and use analysis views. In analysis views you can analyze general ledger transactions per dimension and combine dimensions as you please. You can also include budget information in analysis views. You can combine analysis of dimensions with the use of account schedules. Analysis views are a very advanced way of analyzing data with dimensions information.
Requirements: Basic Dimensions
Reason Codes (4,770)
This granule lets you define a set of reason codes that can be assigned to individual transactions throughout the system.
This provides an additional, user-defined audit trail that complements the information already provided by system-assigned audit trails and posting descriptions.
You can place reason codes on journals as well as on sales and purchase headers. For example, reason codes can be used to mark all ledger entries made in connection with the closing of the fiscal year.
Requirements: Basic General Ledger

XXX Granule list
Application Area
Granule (Granule ID)
Description
Salespeople /Purchasers (3,780)
This granule lets you assign purchasers to vendors and salespeople to customers to keep track of purchases and sales per person. Purchasers and salespersons are tracked in the Vendor Ledger, Customer Ledger, Item Ledger, Job Ledger and Resource Ledger.
Statistics are generated about individual salespeople and purchasers based on this information. These can be used to calculate commissions.
Requirements: Basic General Ledger
Extended Text (3,800)
This granule enables you to set up an unlimited number of lines to describe inventory items, resources and G/L accounts.
You can set up extended text so that an additional description is copied automatically onto sales or purchase documents during entry of lines. The description can also be made date sensitive to allow for special messages for a specific period, for example, to communicate certain promotional offerings or certain warranty conditions. In addition, the extended text can be specified for various languages.
Requirements: Basic General Ledger
Intrastat (3,790)
You use this granule when you report INTRASTAT information to the statistics authorities.
The granule allows you to automatically retrieve the necessary information for reporting INTRASTAT information to the statistics authorities. The local customs authorities can inform you whether or not your company is obligated to file such a report.
Requirements: Basic General Ledger

Granule list XXXI
Application Area
Granule (Granule ID)
Description
Basic Manufacturing
Production Orders (5,410)
You use this granule for creating and handling production orders.
The granule provides you with the basic facilities necessary for creating production orders and posting consumption and output to the production orders. Once you have created a production order, you can calculate net requirements based on that production order.
Requirements: Basic Inventory
Production Bill Of Materials (5,420)
You use this granule for creating bills of materials.
The granule is also required for configuration of all other Navision Manufacturing granules. The granule also includes facilities for standard cost calculation.
Requirements: Production Orders
Version Management (5,430)
You use this granule for creation and handling of versions of manufacturing bill of materials and routings.
You must purchase basic capacity planning, before you can set up versions of routings.
Requirements: Agile Manufacturing and Production Bill Of Materials
Agile Manufacturing
Agile Manufacturing (5,805)
This granule gives you access to run Agil Manufacturing including Supply Planning and Capacity Planning
Version Management (5,430)
You use this granule for creation and handling of versions of manufacturing bill of materials and routings. You must
You must purchase Basic Capacity Planning before you can set up versions of routings.
Requirements: Agile Manufacturing, Production Bill of Materials

XXXII Granule list
Application Area
Granule (Granule ID)
Description
Supply Planning
Basic Supply Planning (5,810)
You use this granule for material requirements planning based on demand.
The granule includes features for master production scheduling and material requirements planning. The granule also includes action messages for fast and easy balancing of supply and demand. The material requirements planning feature supports bucketless and bucketed material requirements planning. You can set up items with their own reordering policy, and you can register whether they are manufactured by or purchased from a third party. The granule automatically creates production orders and purchase orders.
Requirements: Production Bill Of Materials and Requisition Management
Demand Forecasting (5,820)
You use this granule for demand forecasting based on items.
Requirements: Basic Supply Planning
Capacity Planning
Basic Capacity Planning (6,010)
The granule is used for adding capacities (work centers) to the manufacturing process. You can set up routings and use these routings on production orders and in material requirements planning. This lets you see loads and the task list for the capacities.
Requirements: Agile Manufacturing and Production Orders
Machine Centers (6,020)
The granule is used for adding machine centers as capacities to the manufacturing process.
Requirements: Basic Capacity Planning

Granule list XXXIII
Application Area
Granule (Granule ID)
Description
Finite Loading (6,030)
You use this granule for finite loading of capacity-constraint resources.
Finite Loading helps planners make more reliable plans by taking capacity constraints into account. This ensures that no more work is assigned to a work center than the capacities can be expected to execute during a given time period.
If the Order Promising granule (see Sales & Receiveables) has been purchased, Finite loading also enables the system to calculate capable-to-promise.
Requirements: Basic Capacity Planning
User Portal User Portal (6,710)
User Portal
Base & Sales Activity Center (6,720)
This granule adds setup and management of User Portal functionality from within Navision Attain. It includes handling of customers and prospects and other salesperson activities, for example, orders, quotes, comments, and tasks to complete. This activity center (role) is based on features from Contact Management and Navision Advanced Distribution. This role can both be addressed to sales representatives working in the office as well as those out at customer sites and on the road.
Requirements: Basic General Ledger, User Portal, Web Users, Basic Receivables, Sales Order Management, Basic Payables, Basic Inventory, Basic Contact Management, and Activities.
Product Design Activity Center (6,730)
This granule includes handling of products related to manufacturing. For example, items, Bill Of Materials, and cost calculations for people working with the responsibility as Product Designer.
Requirements: Basic General Ledger Base & Sales Activity Center, Web Users, Basic Manufacturing, and Capacity Requirements Planning.

XXXIV Granule list
Application Area
Granule (Granule ID)
Description
Commerce Gateway
Commerce Gateway (99,008,510)
This granule adds setup and management functionality of Commerce Gateway to Navision Attain. It includes setup of customers, vendors and other partners. Setup consists of the partners you will exchange documents with, and the documents themselves.
The granule gives you access to 10 partners. A partner can either be a customer, vendor or a marketplace. If a partner is both a customer and a vendor, this only counts as 1 partner.
The granule includes 16 different XML schemas, which are listed below:
Sales - Request for Quote, Quote, Order, Confirmation, Delivery note, Invoice, Credit Memo
Purchase - Request for Quote, Quote, Order, Confirmation, Receipt note, Invoice, Credit Memo
Inventory - Product Catalog (both import and export)
Requirements: Basic General Ledger
NOTE - Customers buying Commerce Gateway will also require at least one of the following granules: Sales & Receivables - Sales Invoicing and Inventory - Basic Inventory or Purchase & Payables - Purchase Invoicing and Inventory - Basic Inventory.
Commerce Gateway Unlimited Partners (99,008,520)
This granule gives you access to an unlimited number of partners.
Requirements: Commerce Gateway

Granule list XXXV
Application Area
Granule (Granule ID)
Description
Commerce Portal
Commerce Portal for version 3.10 & 3.60 (6,220)
This granule provides you with the facilities to connect your customers and vendors to your business management system by way of the Internet. You respond to your partners’ needs with Web access to real-time information and self-service features from within your Navision solution. Information is always up-to-date and accurate, and self-service features are relevant to the user’s particular business needs.
Commerce Portal is completely integrated with your Navision Financials enterprise business solution and uses its business logic, which means that for example maintenance and orders require virtually no administration.
Furthermore, everyday maintenance of your Web sites does not require special HTML skills.
Requirements: Basic General Ledger, Contact Management, Basic Inventory, Salespeople/Purchasers, Navision Attain Version 3.xx
Further the following granules are optional: (depending on which parts of Navision the customer wants to enable integration)
Basic Receivables, Sales Invoicing, Sales Order Management, Alternative Ship-To's, Basic Payables, Purchase Invoicing, Purchase Order Management, Requisition Management, Drop Shipments, Alternative Order Addresses, Alternative Vendors, Multiple Currencies, Multiple Document Languages
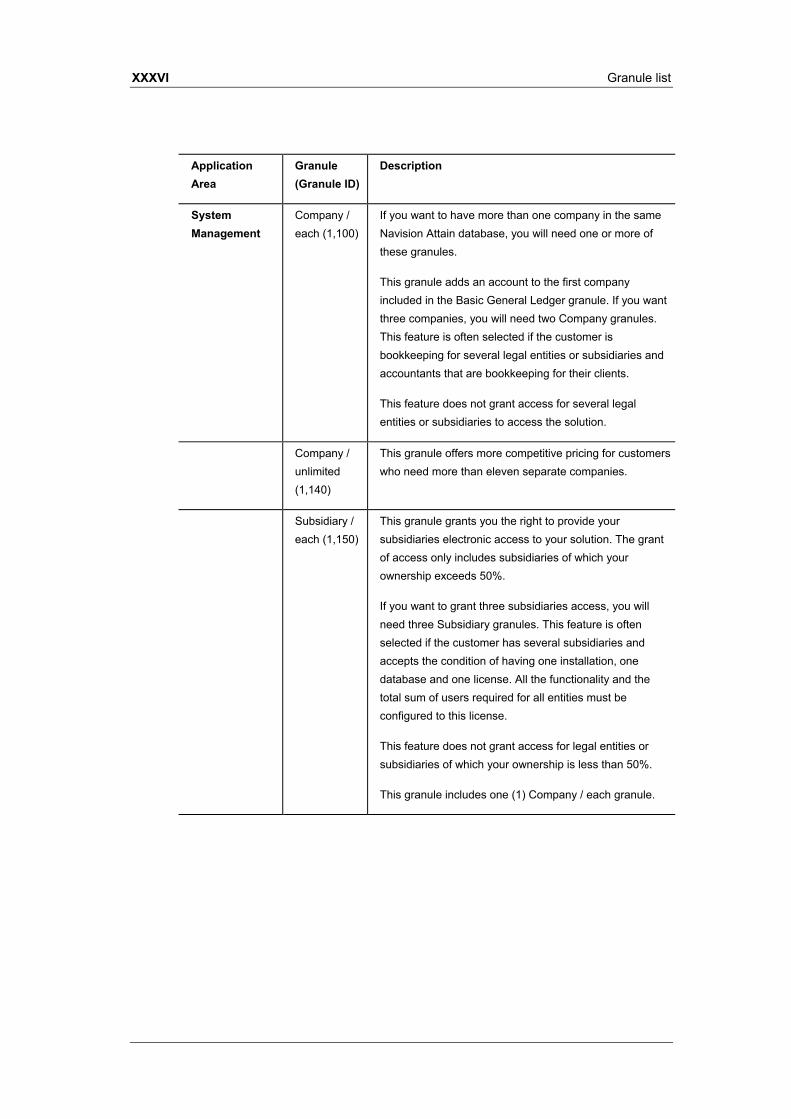
XXXVI Granule list
Application Area
Granule (Granule ID)
Description
System Management
Company / each (1,100)
If you want to have more than one company in the same Navision Attain database, you will need one or more of these granules.
This granule adds an account to the first company included in the Basic General Ledger granule. If you want three companies, you will need two Company granules. This feature is often selected if the customer is bookkeeping for several legal entities or subsidiaries and accountants that are bookkeeping for their clients.
This feature does not grant access for several legal entities or subsidiaries to access the solution.
Company / unlimited (1,140)
This granule offers more competitive pricing for customers who need more than eleven separate companies.
Subsidiary / each (1,150)
This granule grants you the right to provide your subsidiaries electronic access to your solution. The grant of access only includes subsidiaries of which your ownership exceeds 50%.
If you want to grant three subsidiaries access, you will need three Subsidiary granules. This feature is often selected if the customer has several subsidiaries and accepts the condition of having one installation, one database and one license. All the functionality and the total sum of users required for all entities must be configured to this license.
This feature does not grant access for legal entities or subsidiaries of which your ownership is less than 50%.
This granule includes one (1) Company / each granule.
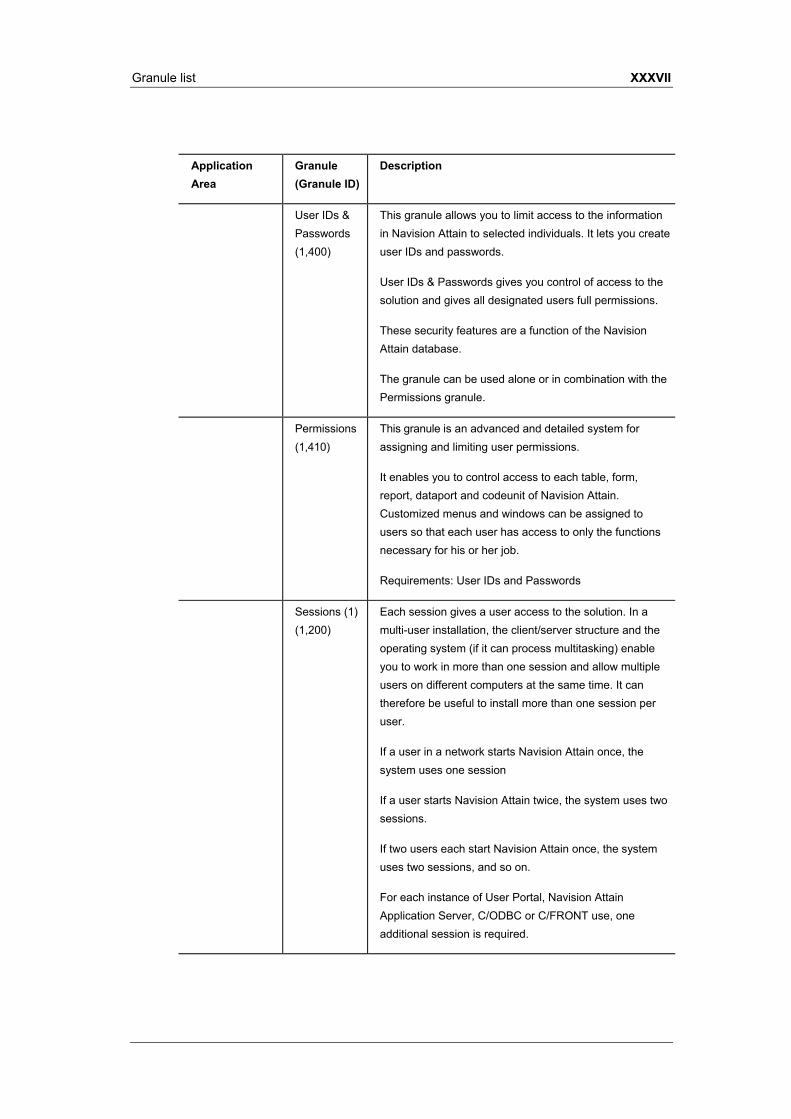
Granule list XXXVII
Application Area
Granule (Granule ID)
Description
User IDs & Passwords (1,400)
This granule allows you to limit access to the information in Navision Attain to selected individuals. It lets you create user IDs and passwords.
User IDs & Passwords gives you control of access to the solution and gives all designated users full permissions.
These security features are a function of the Navision Attain database.
The granule can be used alone or in combination with the Permissions granule.
Permissions (1,410)
This granule is an advanced and detailed system for assigning and limiting user permissions.
It enables you to control access to each table, form, report, dataport and codeunit of Navision Attain. Customized menus and windows can be assigned to users so that each user has access to only the functions necessary for his or her job.
Requirements: User IDs and Passwords
Sessions (1) (1,200)
Each session gives a user access to the solution. In a multi-user installation, the client/server structure and the operating system (if it can process multitasking) enable you to work in more than one session and allow multiple users on different computers at the same time. It can therefore be useful to install more than one session per user.
If a user in a network starts Navision Attain once, the system uses one session
If a user starts Navision Attain twice, the system uses two sessions.
If two users each start Navision Attain once, the system uses two sessions, and so on.
For each instance of User Portal, Navision Attain Application Server, C/ODBC or C/FRONT use, one additional session is required.

XXXVIII Granule list
Application Area
Granule (Granule ID)
Description
Session (10) (1,210)
Each configuration gives access to 10 more sessions of the solution.
Session (25) (1,220)
Each configuration gives access to 25 more sessions of the solution.
Session (50) (1,230)
Each configuration gives access to 50 more sessions of the solution.
Web Users (1) (2,310)
Each Web User gives an internal casual user access to the solution. A Web User does not require much transactional performance of the solution, and therefore fits the concept of browser usage, which this user primarily will be. An internal user is an employee or contractual worker working for the legal entity that has acquired the solution.
A Web User is a named user. Each internal user needs one (1) Web User to access the solution with any device. Configurations of Web Users are independent from the configuration of Sessions, C/OCX, C/ODBC and C/FRONT.
The required number of Web Users is not reduced by the use of software or hardware that decreases the number of devices or internal users directly accessing the solution (sometimes called multiplexing or pooling). The required number of Web Users is equal to the number of internal users that access the front end of the solution. Only one (1) Web User is required per internal employee regardless of the access to the solution. This includes, but is not limited to, access via the Application Server, any other third party application servers and any other multiplexing and pooling software and hardware. This excludes those Navision products or agreements made explicitly with third parties, for which another type of user exists.
Web Users (25) (2,320)
Each configuration gives access to 25 more Web Users of the solution.
Web Users (100) (2,330)
Each configuration gives access to 100 more Web Users of the solution.
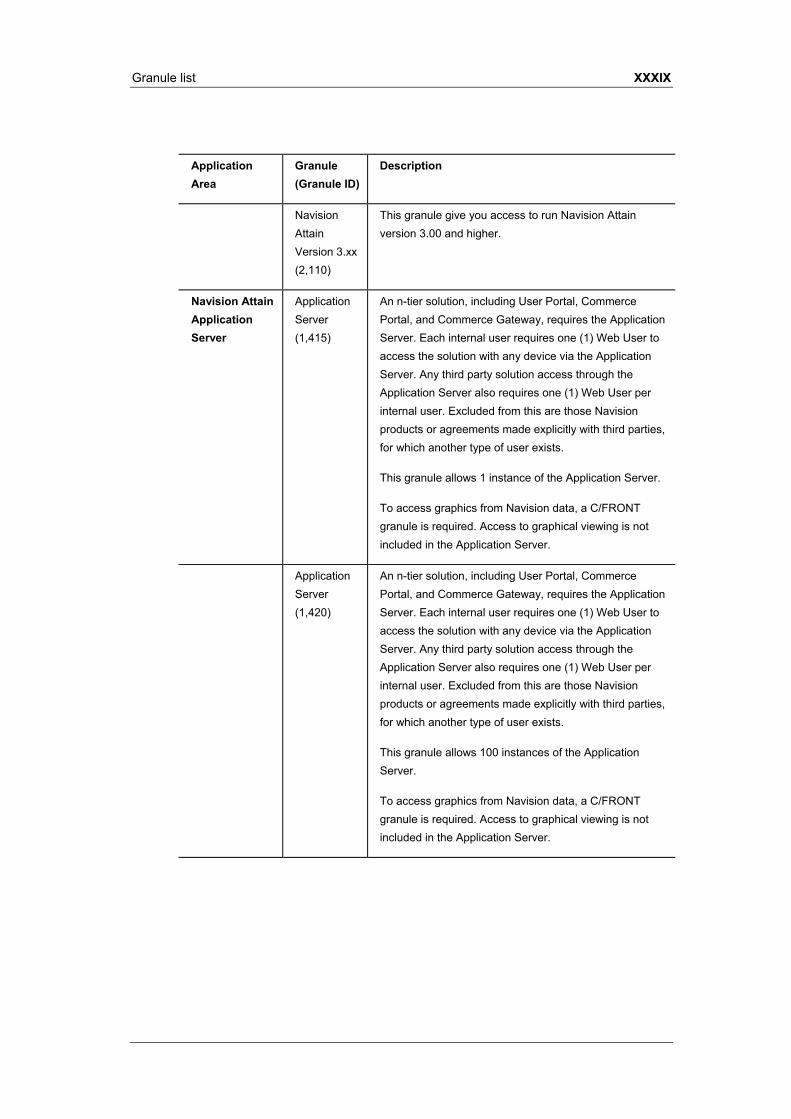
Granule list XXXIX
Application Area
Granule (Granule ID)
Description
Navision Attain Version 3.xx (2,110)
This granule give you access to run Navision Attain version 3.00 and higher.
Navision Attain Application Server
Application Server (1,415)
An n-tier solution, including User Portal, Commerce Portal, and Commerce Gateway, requires the Application Server. Each internal user requires one (1) Web User to access the solution with any device via the Application Server. Any third party solution access through the Application Server also requires one (1) Web User per internal user. Excluded from this are those Navision products or agreements made explicitly with third parties, for which another type of user exists.
This granule allows 1 instance of the Application Server.
To access graphics from Navision data, a C/FRONT granule is required. Access to graphical viewing is not included in the Application Server.
Application Server (1,420)
An n-tier solution, including User Portal, Commerce Portal, and Commerce Gateway, requires the Application Server. Each internal user requires one (1) Web User to access the solution with any device via the Application Server. Any third party solution access through the Application Server also requires one (1) Web User per internal user. Excluded from this are those Navision products or agreements made explicitly with third parties, for which another type of user exists.
This granule allows 100 instances of the Application Server.
To access graphics from Navision data, a C/FRONT granule is required. Access to graphical viewing is not included in the Application Server.

XL Granule list
Application Area
Granule (Granule ID)
Description
Navision Attain Server Options
Windows NT (Intel) (1,520)
IBM AIX (1,540)
IBM iSeries (1,610)
A multi-user solution requires the configuration of a server. If the solution is later moved to another platform, the new server must be configured. The original server platform will no longer be valid.
If you want to run multiple servers, you must buy multiple licenses. One license only allows you to run one server.
You are, however, allowed to start the server program several times to connect several networks to the same server (database). You are allowed to start several servers (databases) at the same time with the same license for the specific purpose of testing and developing, but only one license must be used to run one server (database) for the purpose of creating and maintaining your own data and accounts.
Microsoft SQL Server Option
Microsoft SQL Server (2,010)
A single-user and multi-user solution requires the configuration of a Microsoft SQL Server. If the solution is later moved to another platform, the new server must be configured. The original server platform will no longer be valid.
If you want to run multiple servers, you must buy multiple licenses. One license allows you to run only one server. This also includes the Microsoft Desktop Edition.
You are, however, allowed to start the server program several times to connect several networks to the same server (database). You are allowed to start several servers (databases) at the same time with the same license for the specific purpose of testing and developing, but only one license must be used to run one server (database) for the purpose of creating and maintaining your own data and accounts.
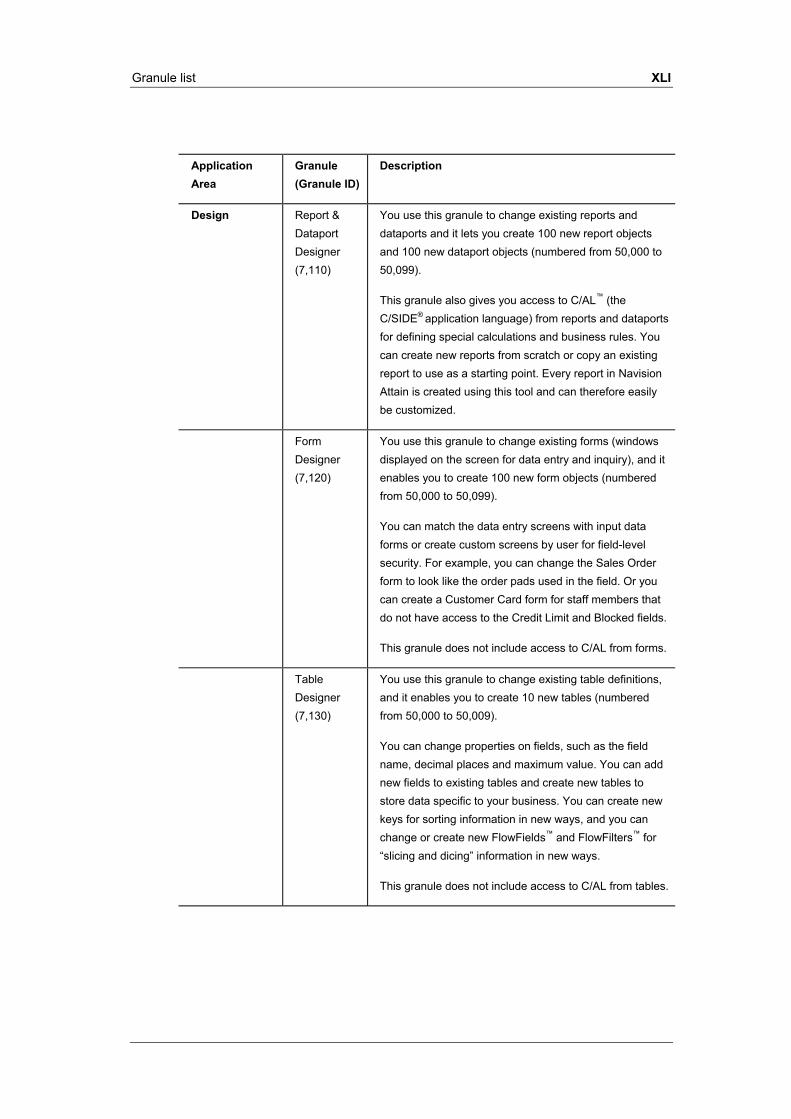
Granule list XLI
Application Area
Granule (Granule ID)
Description
Design Report & Dataport Designer (7,110)
You use this granule to change existing reports and dataports and it lets you create 100 new report objects and 100 new dataport objects (numbered from 50,000 to 50,099).
This granule also gives you access to C/AL™ (the C/SIDE® application language) from reports and dataports for defining special calculations and business rules. You can create new reports from scratch or copy an existing report to use as a starting point. Every report in Navision Attain is created using this tool and can therefore easily be customized.
Form Designer (7,120)
You use this granule to change existing forms (windows displayed on the screen for data entry and inquiry), and it enables you to create 100 new form objects (numbered from 50,000 to 50,099).
You can match the data entry screens with input data forms or create custom screens by user for field-level security. For example, you can change the Sales Order form to look like the order pads used in the field. Or you can create a Customer Card form for staff members that do not have access to the Credit Limit and Blocked fields.
This granule does not include access to C/AL from forms.
Table Designer (7,130)
You use this granule to change existing table definitions, and it enables you to create 10 new tables (numbered from 50,000 to 50,009).
You can change properties on fields, such as the field name, decimal places and maximum value. You can add new fields to existing tables and create new tables to store data specific to your business. You can create new keys for sorting information in new ways, and you can change or create new FlowFields™ and FlowFilters™ for “slicing and dicing” information in new ways.
This granule does not include access to C/AL from tables.

XLII Granule list
Application Area
Granule (Granule ID)
Description
Application Builder (7,200)
You use this granule to change the business rules and special calculations that work behind the scenes.
These business rules and special calculations are defined in a language we call C/AL ( C/SIDE Application Language). While Application Builder includes access to C/AL, it does not allow access to existing C/AL code that updates write-protected tables (postings for instance). Application Builder lets you create entirely new areas of functionality for your application, enabling you to tailor Navision Attain to fit your entire organization.
This tool also enables you to create 100 Codeunit objects (numbered from 50,000 to 50,099).
Requirements: Report & Dataport Designer, Form Designer and Table Designer
Solution Developer (7,300)
You use this granule for the same purposes as the Application Builder granule, but it also gives you access to code that updates write-protected tables.
This granule gives you the access necessary to change or create any object type, and gives you access to the Merge Tool and Upgrade Tool.
This granule also enables you to use the menu options Translate/Export and Translate/Import in the Object Designer. These options are not available with the Application Builder granule.
Requirements: Application Builder
Application Objects
Tables (1o) (8,200)
The entire application consists of five kinds of objects. You can acquire additional objects and have new functions created gradually as the need for them arises.
Application objects are stored in the database, so when you import new objects, they are immediately incorporated in the solution.
Tables are the basis of the data structure and are used to set up and define the fields that are used in the application.

Granule list XLIII
Application Area
Granule (Granule ID)
Description
Forms (100) (8,300)
Forms are used to display fields and data in windows.
Reports (100) (8,400)
Reports are used for all types of internal and external reporting.
Dataports (100) (8,500)
Dataports are used to define importing and exporting of data.
Codeunits (100) (8,600)
Codeunits are used to code new functions in the application.
Tools C/ODBC (1,700)
This granule enables you to continue working on Navision Attain data in other programs that support ODBC.
Examples of programs that support ODBC are Microsoft Word, Microsoft Excel and Lotus 1-2-3.
For each instance of C/ODBC use, one additional session is required.

XLIV Granule list
Application Area
Granule (Granule ID)
Description
C/OCX (1,750)
This granule enables you to use C/SIDE as an automation controller, and to use OCXs (Custom Controls).
The automation controller functionality means that you can control an application that is an automation server (for example, Microsoft Excel or Microsoft Word) from C/AL. In this way, you can use Microsoft Excel as a function library, or you can transfer data from C/SIDE to Microsoft Excel and generate a graph based on this data. You can also create a form letter in Microsoft Word directly from C/SIDE. Other possibilities include integration with Microsoft Outlook (for example, creating an Outlook Contact directly from a Customer record).
Non-visual OCXs are also supported. An OCX is a COM object that executes in-process (that is, it is not a stand-alone program). An OCX could contain, for example, a mathematical function library or an interface to an external device. You can buy third-party controls, or develop your own in Microsoft Visual C++ or Visual Basic.
The most important feature not supported is events. This mean that neither the automation server nor the OCX cannot call back to C/SIDE.
This granule allows you to create OCX and Automation variables in any object containing C/AL code. It also allows you to import objects in text format that contains OCX and Automation variables. This granule is, however, not required to run objects that use OCX or Automation variables.

Granule list XLV
Application Area
Granule (Granule ID)
Description
C/FRONT (1,800)
This granule allows you to use the C programming language to make an external program function as a client of a Navision Attain database.
C/FRONT is a programming interface (API) for the Navision Attain database.
Among other things, C/FRONT allows you to integrate Navision Attain with an electronic mail system. The granule can be used with specific Attain developed for Navision Attain.
For each instance of C/FRONT use, one additional session is required.
Client Monitor (2,000)
This tool registers all communication between a client and a server in terms of the communication between the client using the tool and the server – in other words, it does not monitor everything happening on the server itself.
The Client Monitor granule can be used by C/AL programmers and/or the system manager to analyze communication since all database calls are saved with detailed information. It is useful for performance tuning.
Navision Developer’s Toolkit – Source Analyzer (99,003,640)
Navision Developer’s Toolkit provides you with a collection of tools to reduce the time to get into the structure of a Navision Attain database that is defined by the objects and their properties.
This granule gives you access to the Source Analyzer functionality of Navision Developer’s Toolkit.
The Source Analyzer is a graphical cross-reference tool. It provides you with a collection of tools to view and analyze object data from a Navision Financials/Attain database. Source Analyzer gives you fast access to the object structure in your application database.
Requirements: C/FRONT, Application Builder

XLVI Granule list
Application Area
Granule (Granule ID)
Description
Navision Developer’s Toolkit – Compare and Merge (99,003,650)
Navision Developer’s Toolkit provides you with a collection of tools to reduce the time to get into the structure of a Navision Attain database that is defined by the objects and their properties.
This granule gives you access to the Compare and Merge functionality of Navision Developer’s Toolkit.
The Compare & Merge Tool is a utility designed to help Navision Solution Centers and Customers to document, compare, upgrade and maintain modified customer solutions. This tool can also be used for implementing or upgrading add-on solutions in a modified customer version.
Requirements: Navision Developer’s Toolkit – Source Analyzer

Appendix D.
Exercise Solutions
This appendix contains exercise solutions for all chapters.
The solutions are outlined as follows:
Chapter 2 General Ledger
Chapter 3 Sales & Receivables
Chapter 4 Purchases & Payables
Chapter 5 Inventory

II Exercise Solutions
CHAPTER 2 GENERAL LEDGER
Exercise 1: Create a new fiscal year
Create a new fiscal year for 2003. The fiscal year begins on the 1st of January 2003 and ends on the 31st of December 2003. The length of an accounting period is a month.
Solution
1 Open the Accounting Periods window, click Setup, Accounting Periods.
2 Click Create Year to run the Create Year batch job
3 Fill out the Create Year window as follows:
4 Click OK to create the year
This should give you a fiscal year like this:
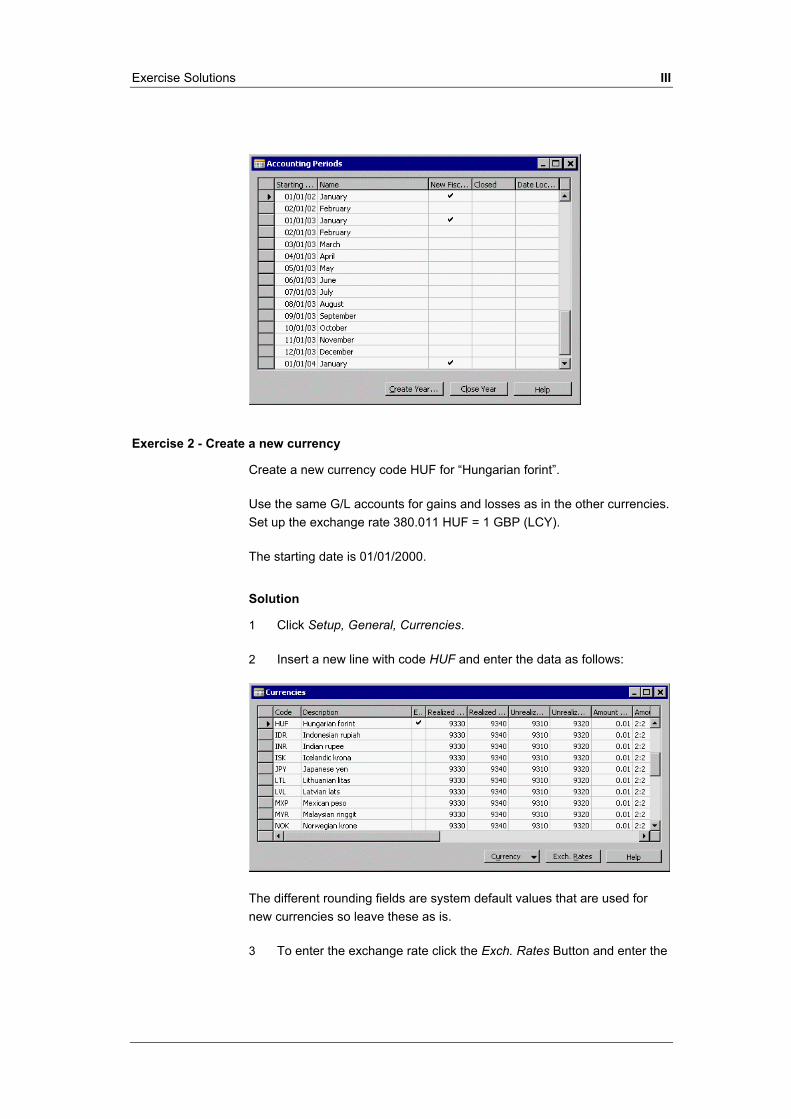
Exercise Solutions III
Exercise 2 - Create a new currency
Create a new currency code HUF for “Hungarian forint”.
Use the same G/L accounts for gains and losses as in the other currencies. Set up the exchange rate 380.011 HUF = 1 GBP (LCY).
The starting date is 01/01/2000.
Solution
1 Click Setup, General, Currencies.
2 Insert a new line with code HUF and enter the data as follows:
The different rounding fields are system default values that are used for new currencies so leave these as is.
3 To enter the exchange rate click the Exch. Rates Button and enter the

IV Exercise Solutions
line as shown
Exercise 3 - Create a new revenue account
Open the Account card window and create a new G/L account for Sales Miscellaneous with the No. 6140. The account has the following features:
It is an income statement account and direct posting is allowed.
Select the following posting groups in the Posting tab:
Gen Posting Type Sale Gen. Bus. Posting group NATIONAL Gen. Prod. Posting group MISC VAT Bus. Posting group NATIONAL VAT Prod. Posting group VAT25
You don’t need to enter anything in the consolidation and reporting tab of this window.
Solution
1 On the General Ledger menu, click Chart of Accounts.
2 Click Account, Card to open the G/L Account Card window.
3 Press F3 to enter a new account.
4 In the General tab enter the information as follows:
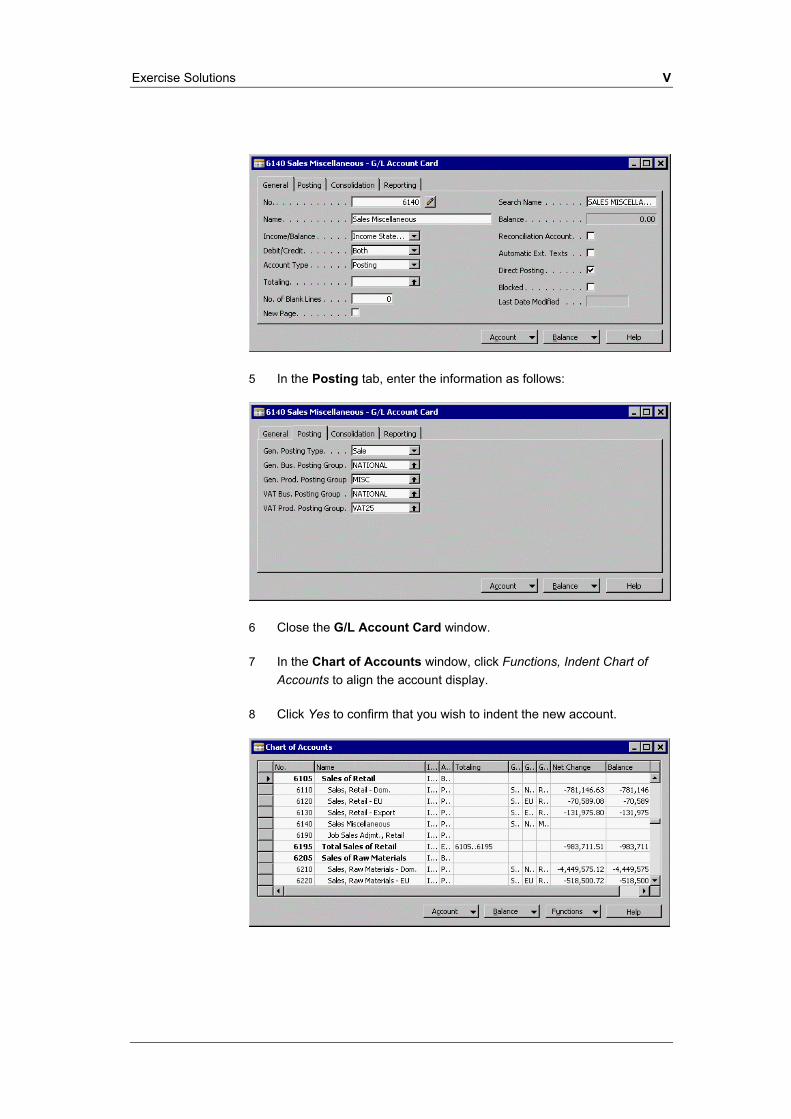
Exercise Solutions V
5 In the Posting tab, enter the information as follows:
6 Close the G/L Account Card window.
7 In the Chart of Accounts window, click Functions, Indent Chart of Accounts to align the account display.
8 Click Yes to confirm that you wish to indent the new account.

VI Exercise Solutions
Exercise 4 - Create a new Product Posting group
Create a new General Product Posting group with the Code HOME and the description Home & Garden. Enter a default VAT Product Posting group code VAT25. Answer any questions asked by the program with Yes.
Solution
1 Click Setup, General Posting Groups, Product Posting Groups.
2 Make a new line with the folloing information: Code HOME Description Home & Garden Def. VAT Prod. Posting Group VAT25 Auto Insert Default Yes
Exercise 5 - Set up a new General Posting group
Open the General Posting Group window and create a new line. Enter the combination of the Gen. Bus. Posting Group code NATIONAL and the new Gen. Product Posting Group code you created in the previous exercise. Use the same G/L accounts as the combination of NATIONAL and RETAIL.
Solution
1 Click Setup, General Posting Groups, General Posting Setup.
2 Make a new line with the combination NATIONAL and HOME.
3 Enter the same sales and purchase accounts used in the NATIONAL and RETAIL combination. You can also use the Copy – General Posting Setup batch job to fill in the accounts if you wish.
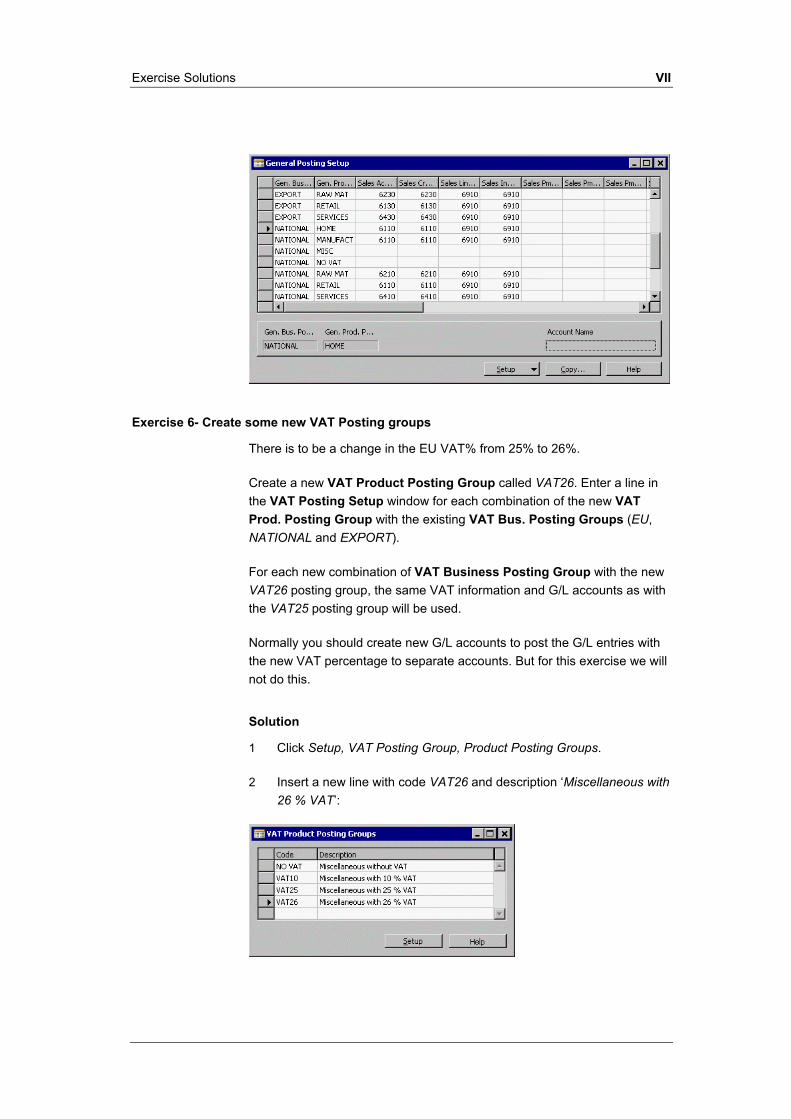
Exercise Solutions VII
Exercise 6- Create some new VAT Posting groups
There is to be a change in the EU VAT% from 25% to 26%.
Create a new VAT Product Posting Group called VAT26. Enter a line in the VAT Posting Setup window for each combination of the new VAT Prod. Posting Group with the existing VAT Bus. Posting Groups (EU, NATIONAL and EXPORT).
For each new combination of VAT Business Posting Group with the new VAT26 posting group, the same VAT information and G/L accounts as with the VAT25 posting group will be used.
Normally you should create new G/L accounts to post the G/L entries with the new VAT percentage to separate accounts. But for this exercise we will not do this.
Solution
1 Click Setup, VAT Posting Group, Product Posting Groups.
2 Insert a new line with code VAT26 and description ‘Miscellaneous with 26 % VAT’:

VIII Exercise Solutions
3 Close the VAT Product Posting Groups window.
4 Click Setup, VAT Posting Group, VAT Posting Setup.
5 Create a new line and enter NATIONAL in the VAT Bus. Posting Group field, VAT26 in the VAT Prod. Posting Group field and VAT26 in the VAT Identifier field.
The new line will be now be placed just below the VAT Posting Setup combination of NATIONAL and VAT25. Since you should copy VAT Calculation Type and the G/L accounts from the combination of NATIONAL and VAT25, you can just show all fields and press F8 (copy previous) in all fields. Alternatively, you can use the Copy – VAT Posting Setup batch job to copy the NATIONAL and VAT25 combination.
6 Repeat the above steps for the EU and VAT26 combination and the EXPORT and VAT26 combination. You should end up with the following lines in the VAT Posting Setup window.
Exercise 7 - Create a Journal Entry
Create another journal entry using the same batch and G/L accounts except post a debit to 8110 using the two departments, the Sales department for 100, and then the Administration department for 60. Post the credit to account 2910, make sure that this line doesn't include a department.
Solution
To split the debit amounts to two departments and keep one total credit without departments attached, you have to make three separate journal

Exercise Solutions IX
lines all with blank in the balancing account field and all with the same document no.
1 Enter the following lines in the General Journal:
Notice that the automatically inserted Document No. does not change before you have created the third line that makes the document balance.
CHAPTER 3 SALES AND RECEIVABLES
Exercise 8 - Set Up a New Customer
Create a new customer card and enter the following information:
Customer Name ABC Design Furniture Address 1 Rose Street Post Code / City GB-B27 4KT /Birmingham Country Code GB Search Name Furniture General Bus. Posting Group NATIONAL VAT Bus. Posting Group NATIONAL Customer Posting Group DOMESTIC Application Method Manual Payment Terms Net 1 Month/2% 8 days
Solution
1 Click on Customers in the Sales & Receivables Menu.
2 Press F3 and then ENTER for the program to assign a new customer number.

X Exercise Solutions
3 Enter the information from the exercise in the relevant fields on the General tab:
4 On the Invoicing tab, click the Assist button on the relevant fields and select the values mentioned in the exercise:
5 Enter the payment information on the Payments tab.

Exercise Solutions XI
You have now set up the customer.
Exercise 9 - Create a Quote and convert it to an order
Now you will create a quote for the customer 30000, John Haddock Insurance. Use the item 70000 Side Panel and quote a quantity of 100.
Then convert this quote into an order.
Solution
1 Click on Quotes in the Sales & Receivables Menu.
2 Press F3 to create a new quote.
3 Press ENTER for the program to assign a quote number.
4 In the Sell-to Customer No. field on the Sales Quote header, enter no. 30000 and press ENTER.
5 Click Yes to the warning that the customer has an overdue balance.
6 In the first quote line enter the information from the exercise in the relevant fields.

XII Exercise Solutions
7 On the Sales Quote window, click Make Order.
8 Click Yes to convert the quote to an order.
9 Click Yes to the warning about the customer has an overdue balance.
Exercise 10 - Create & Post a Sales Order
Create a sales order for the customer 10000.
The customer will order 100 of Item 70100. The order has sales freight costs of 35.00 LCY.
When you have created the order, you must post the shipment and invoicing of the order.
Use the posting date 01/25/01.
Solution
To create and post a new sales order:
1 Click on Orders in the Sales & Receivables Menu.
2 Press F3 to create a new sales order.
3 Press ENTER for the program to assign a sales order number.

Exercise Solutions XIII
4 In the Sell-to Customer No. field on the Sales Order header enter no. 10000 and press ENTER.
5 In the sales lines enter the Item and Charge (item) with the information from the exercise in the relevant fields.
6 Click the AssistButton in the Qty. to Assign field on the item charge line to display the Item Charge Assignment (Sales) window.
7 In the Qty to Assign field enter 1.
8 Close the Item Charge Assignment (Sales) window.

XIV Exercise Solutions
9 Click Posting and click Post.
10 Click Ship and Invoice to do both shipping and invoicing at the same time, and press OK.
11 Close the Sales Order window.
Exercise 11 - Create & Post a Credit Memo
Create and post a credit memo for the posted invoice with document number 103014 for Customer No. 47563218, Klubben.
Solution
1 Click on Credit Memos on the Sales & Receivables Menu.
2 Press F3 to create a new credit memo.
3 Press ENTER for the program to assign a credit memo number.
4 Click Functions and select Copy Document, and the Copy Sales Document window appears.
5 In the Document Type field select Posted Invoice and press OK.
6 In the Document No. field use the AssistButton and select the posted invoice number 103014 and press OK.
7 Place a checkmark in the Include Header field, and leave the Recalculate Lines field blank.
8 Press OK, and the credit memo has now been filled in with the information from the posted sales invoice.

Exercise Solutions XV
9 Click Posting and Click Post.
10 Click Yes to post the credit memo.
11 Close the Sales Credit Memo window.
Exercise 12: Receiving and Posting Payment
You have now received the full payment for invoice 00-15 from customer 30000, John Haddock Insurance Co. Use WWW-operating as the balancing account and the work date as the posting date.
Solution
1 Click on Cash Receipt Journal in the Sales & Receivables Menu.
2 Select General in the Batch Name field and press OK.
3 Enter the work date in the Posting Date field.
4 Select Payment in the Document Type field.
5 Select Customer in the Account Type field.
6 Enter customer no. 30000 in the Account No. field.
7 Select Bank Account in the Balance Account Type field.
8 In the Bal. Account No. field use the AssistButton and select WWW-

XVI Exercise Solutions
OPERATING bank account and press OK.
9 Select Invoice in the Applies-to Doc. Type field.
10 Click the AssistButton in the Applies-to Doc. No field and select the invoice no. 00-15.
11 Click OK to apply the payment. The Apply Customer Entries window will close.
12 In the Cash Receipts Journal window, the Applies to ID field will now contain the invoice number 00-15.
13 Select the journal line to update the amount in the Amount field based on the invoice you have selected.
14 Click Posting, Post.
15 Click Yes to accept the posting.

Exercise Solutions XVII
16 Close the Cash Receipt Journal window.
CHAPTER 4 PURCHASES AND PAYABLES
Exercise 13 - Set up a New Vendor
Set up a Vendor Card for your new vendor South Pole Adventures and fill in the following information:
The address is SouthSide 1, DK-0009, Down Town. The country code is DK and the phone number is 159. The contact is Ms. South and the Purchaser Code is AH.
The General Business Posting Group is EU, the VAT Business Posting Group is EU and the Vendor Posting Group is EU.
The prices for this customer are NOT to include VAT
The application method is manual, the payment terms are 1 Month/2% 8 days, the payment method code is bank and our account number with the vendor is 0000 0001.
The shipment method is Ex Warehouse.
You have to fill in the VAT Registration No. field. Use the number 48967351.
Enter the currency code DKK.
Solution
1 From the Purchases and Payables Menu, click Vendors.
2 Press F3 and then press ENTER to create a new vendor.
3 Enter the Vendor Name, Address, PostCode, Country, Phone Number, Contact and Purchaser details in the General tab fields as follows:

XVIII Exercise Solutions
4 The program will copy the phone number to the Phone Number field on the Communication tab:
5 Enter the Posting Groups and Prices Including VAT details in the Invoicing tab fields as follows:
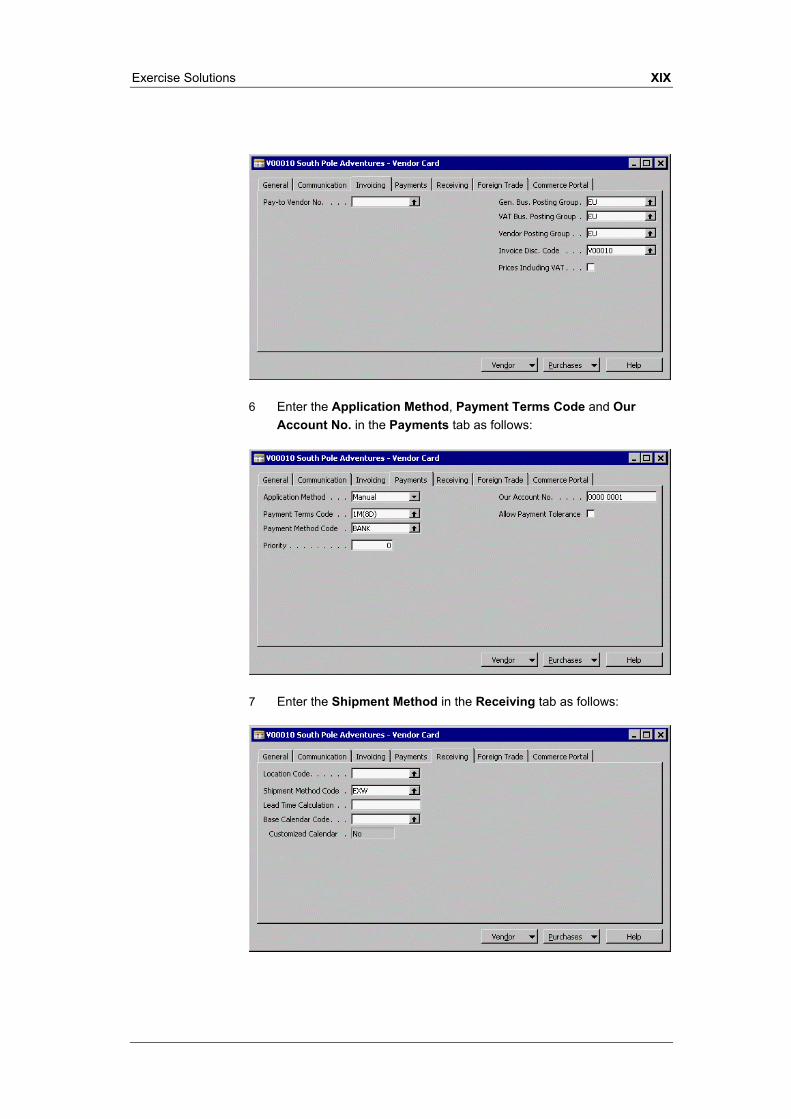
Exercise Solutions XIX
6 Enter the Application Method, Payment Terms Code and Our Account No. in the Payments tab as follows:
7 Enter the Shipment Method in the Receiving tab as follows:

XX Exercise Solutions
8 Enter the Currency Code and VAT Registration No. in the Foreign Trade tab as follows:
You have now created the Vendor.
Exercise 14 – Purchase Quote and Order
You have realized that the there are no SARAJEVO Whiteboard, blue in stock and you will therefore have to reorder 50 pieces of these. The item number is 1984-W.
You contact South Pole Adventures (the vendor you created in Exercise 1) to ask them for a quote on the SARAJEVO Whiteboards.
You decide to accept the quote and order these items.
1 Create a quote for the order dated 01/25/01 and then convert the quote to an order.
You have now received a note from your employee to say the Whiteboards have arrived.
The matching vendor invoice (No 00021) has also been sent to you.
2 Post the order and look for the posted receipt and posted invoice.
Solution
To create the Quote and Convert it to an order:
1 From the Purchases and Payables Menu, click Quotes.

Exercise Solutions XXI
2 Press F3 to insert a new purchase quote and press ENTER to obtain the next number in the number series.
3 Type V00010 in the Buy-from Vendor No. field, and then press ENTER.
4 In the Type field of the first line, select Item and press ENTER.
5 Enter 1984-W in the No. field and press ENTER. The name of the item (Sarajevo Whiteboard, blue) should be filled in by the program.
6 Enter 50 in the Quantity field.
7 Click Make Order.
8 A message appears that asks you if you want to convert the quote to an order. Click Yes.
9 Note the order number the program generates for the order it creates. This will help when you want to process the order further.
10 Close the Purchase Quote window.
To post the invoicing and receipt of the order:
11 Click Orders.
12 Press F5 to get the list of orders.
13 Select the last purchase order in the list and press OK. You can check that it is the correct order by looking for the Document number the program created when it converted the quote.
14 Enter 01/25/01 as the Posting Date.
15 Enter 00021 in the Vendor Invoice No. field.

XXII Exercise Solutions
16 Click Post. The posting options form appears:
17 Since you have received the goods and the invoice, you should select Receive and Invoice. and click OK.
18 Close the Purchase Order window.
Exercise 15 - Create and Post an Order Without Converting a Quote
You have placed an order with your vendor 30000, Coolwood Technologies.
Use a Posting Date, Order Date and Document Date of 01/25/01.
You have ordered 10 Berlin Guest Chairs (Item 1936-S) and 100 cans Paint, black (Item 70100). Your warehouse has received the items and you have the vendor invoice (number 1524).
Create a new order and post the receipt and invoicing of the order.

Exercise Solutions XXIII
Open the Posted Receipts and Posted Invoices to see the results.
Solution
1 Click Orders on the Purchases and Payables Menu
2 In the Purchase Order Window, press F3 in the No. field and press ENTER.
3 Type 30000 in the Buy-from Vendor No. field, and then press ENTER.
4 In the Type field of the first line, select Item and press ENTER.
5 Enter 1936- S in the No. field and press ENTER. The name of the item (Berlin Chairs) should be filled in by the program.
6 Enter 10 in the Quantity field.
7 Click the second line. The Type field should automatically default to Item. If the program does not do this, select Item in the Type field on the second line.
8 Enter 70100 in the No. field and press ENTER. The name of the item (Paint, black) should be filled in by the program.
9 Enter 100 in the Quantity field.
10 Enter 1524 in the Vendor Invoice No. field.
When you have finished the order should look as follows:
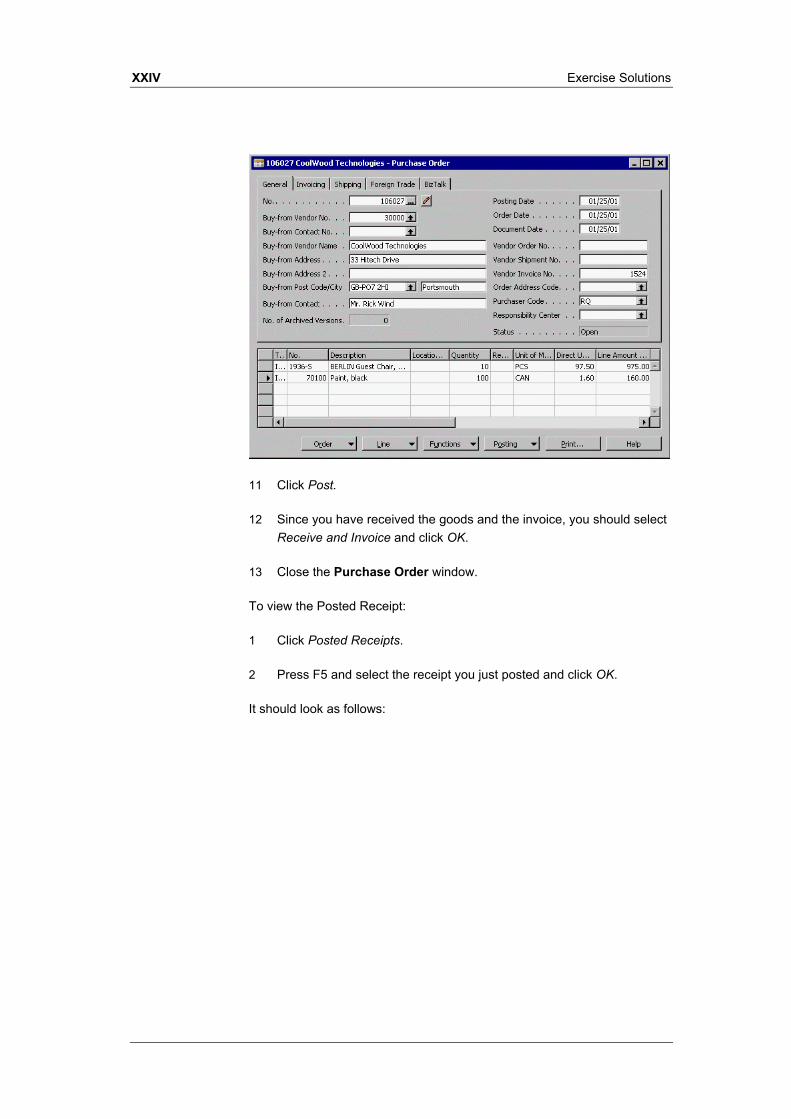
XXIV Exercise Solutions
11 Click Post.
12 Since you have received the goods and the invoice, you should select Receive and Invoice and click OK.
13 Close the Purchase Order window.
To view the Posted Receipt:
1 Click Posted Receipts.
2 Press F5 and select the receipt you just posted and click OK.
It should look as follows:
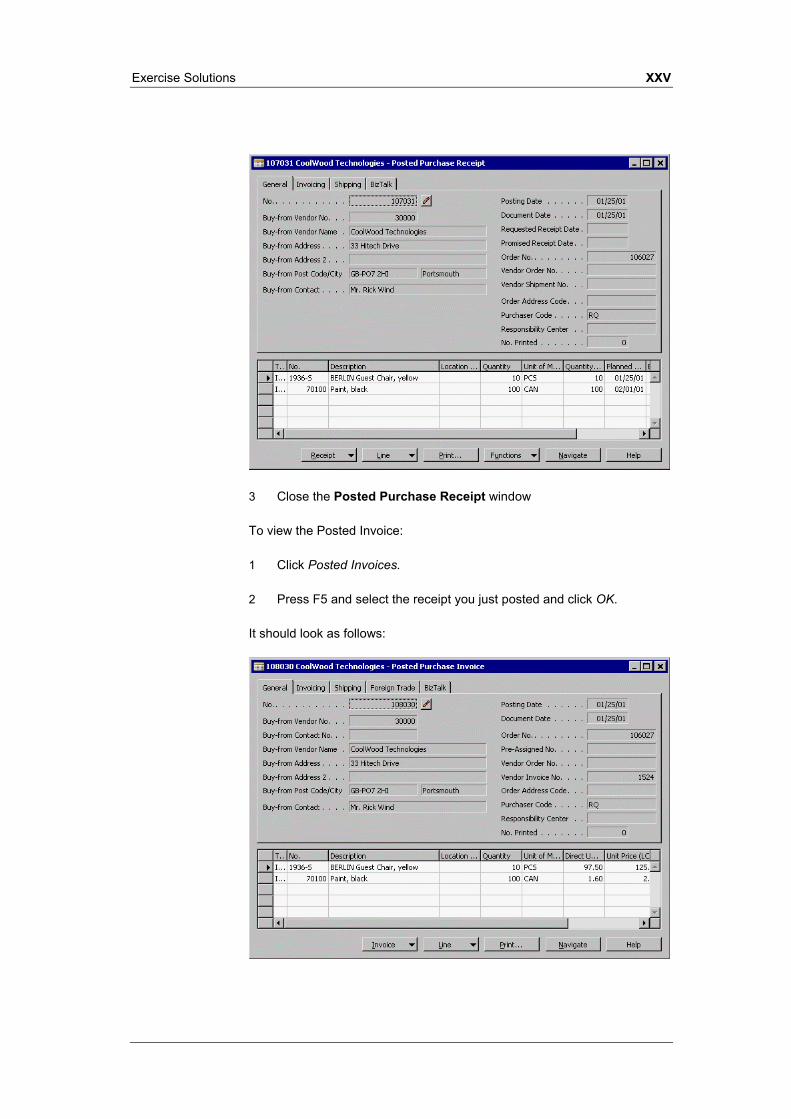
Exercise Solutions XXV
3 Close the Posted Purchase Receipt window
To view the Posted Invoice:
1 Click Posted Invoices.
2 Press F5 and select the receipt you just posted and click OK.
It should look as follows:

XXVI Exercise Solutions
3 Close the Posted Purchase Invoice window.
Exercise 16 - Create and Post a Credit Memo
After you posted invoice 108023 from Vendor 10000, the vendor realized that there was an error in the invoice sent to you. You wish to cancel the invoice in the program using a credit memo. The vendor credit memo number is CR23456
Enter a credit memo for the vendor 10000.
Copy the lines from the posted invoice with the number 108023.
Post the credit memo and look at the posted credit memos and posted return shipments to see the result.
Solution
1 On the Purchases & Payables menu, click Credit Memos.
2 Press F3 and press ENTER to create a new credit memo.
3 Click Functions, Copy Document.
4 Select Document Type: Posted Invoice.
5 In the Document No. field, click the AssistButton to display the Posted Purchase Invoices.
6 Select the posted invoice for Vendor 10000 with Document No. 108023.
7 Place a checkmark in the Include Header field, and leave the Recalculate Lines field blank.

Exercise Solutions XXVII
8 Click OK.
You will see that the credit memo document is now filled in with all of the information from the posted purchase invoice.
9 Enter CR23456 in the Vendor Credit Memo No. field. The credit memo should now look as follows:
10 Click Posting, Post.
11 Click Yes to confirm that you wish to post the credit memo.
12 When the credit memo has posted, close the Purchase Credit Memo window.
To view the posted credit memo:
13 On the Purchases and Payables Menu, click Posted Credit Memos.
14 Press F5 and, from the list, select the credit memo you just posted and click OK. (It should be the last in the list).
It should look as follows:

XXVIII Exercise Solutions
15 Close the Posted Purchase Credit Memo window.
To view the posted return shipment:
16 On the Purchases and Payables Menu, click Posted Return Shipment.
17 Press F5 and, from the list, select the return shipment you just posted and click OK. (It should be the last in the list).
It should look as follows:
18 Close the Posted Return Shipment window.
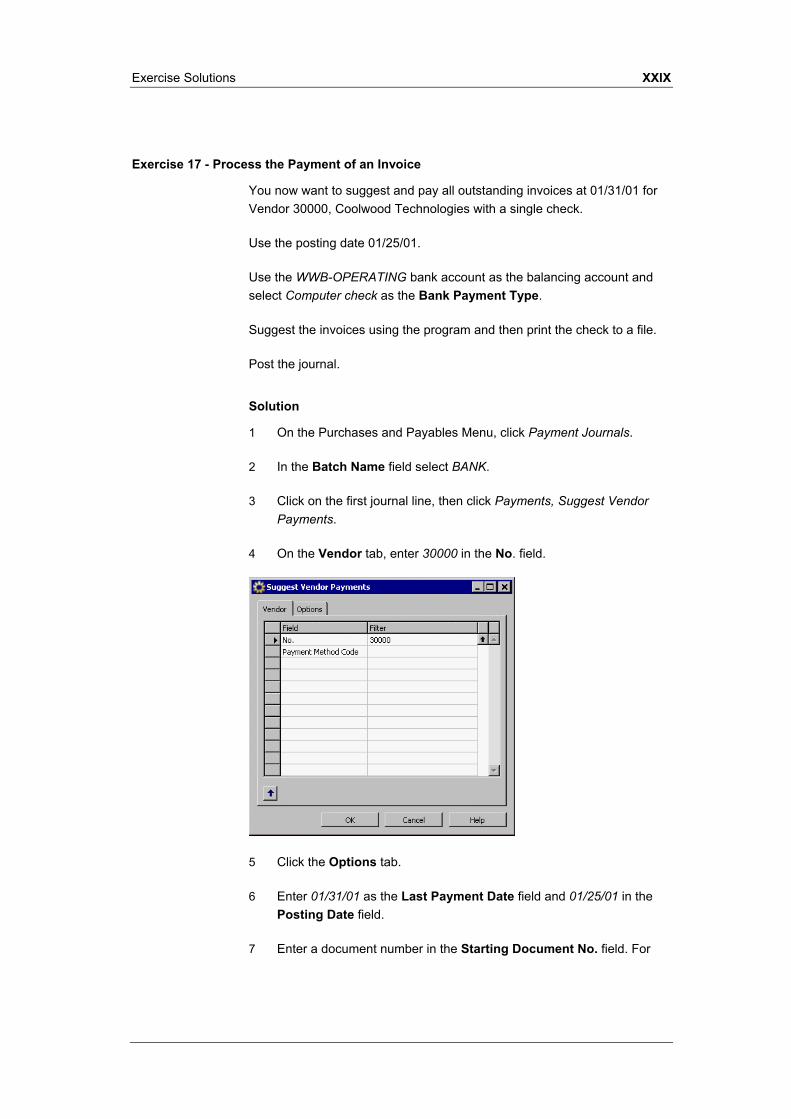
Exercise Solutions XXIX
Exercise 17 - Process the Payment of an Invoice
You now want to suggest and pay all outstanding invoices at 01/31/01 for Vendor 30000, Coolwood Technologies with a single check.
Use the posting date 01/25/01.
Use the WWB-OPERATING bank account as the balancing account and select Computer check as the Bank Payment Type.
Suggest the invoices using the program and then print the check to a file.
Post the journal.
Solution
1 On the Purchases and Payables Menu, click Payment Journals.
2 In the Batch Name field select BANK.
3 Click on the first journal line, then click Payments, Suggest Vendor Payments.
4 On the Vendor tab, enter 30000 in the No. field.
5 Click the Options tab.
6 Enter 01/31/01 as the Last Payment Date field and 01/25/01 in the Posting Date field.
7 Enter a document number in the Starting Document No. field. For

XXX Exercise Solutions
this exercise, we will use CHEQ001.
8 Select Bank Account in the Bal. Account Type field, WWB-OPERATING in the Bal. Account No. field, and Computer Check in the Bank Payment Type field.
9 Click OK
The program will create the payment journal lines and these will now be displayed in the Payment Journal window as follows:
To print the check:
10 From the Payment Journal window, click Payments, Print Check.
11 Leave the General Journal Line tab as it is and click on the Options

Exercise Solutions XXXI
tab.
12 Select the Bank WWB-OPERATING in the Bank Account field.
13 The program should fill in the Last Check No. field. Leave the contents of this field as they are.
14 Make sure the One Check per Vendor per Document No. field contains a check mark. This will print a single check for the vendor.
15 Make sure all other fields are blank as follows:
16 Click Print.
17 Place a check mark in the Print to File field.
18 Click OK.
19 Name the file c:/ex5.prn.
20 Click OK. The checks will now print to a file.
In the Payments Journal window you will now see that the program has filled in the Document Number field with the check number.

XXXII Exercise Solutions
To post the check:
21 In the Payment Journal window, click Posting, Post.
22 Click Yes to post the Journal lines.
23 Click OK to complete the job.
CHAPTER 5 INVENTORY
Exercise 18 – Inventory Posting Setup Using Locations
You have opened a new warehouse in Austria in which you only store finished goods. To see the value of inventory in this warehouse you need to setup a new AUSTRIA location combine it with the FINISHED Inventory Posting Group Code in the Inventory Posting Setup window. The inventory balances for the Austria warehouse need to be recorded in separate G/L inventory accounts:
2122 Finished Goods (AT) 2123 Finished Goods (AT/Interim)
You should make sure the Direct Posting field is empty as these accounts are only to be posted to automatically.
Complete the setup necessary to record the value of inventory in the Austrian Warehouse in the General Ledger.
Solution
To enter the new G/L accounts:
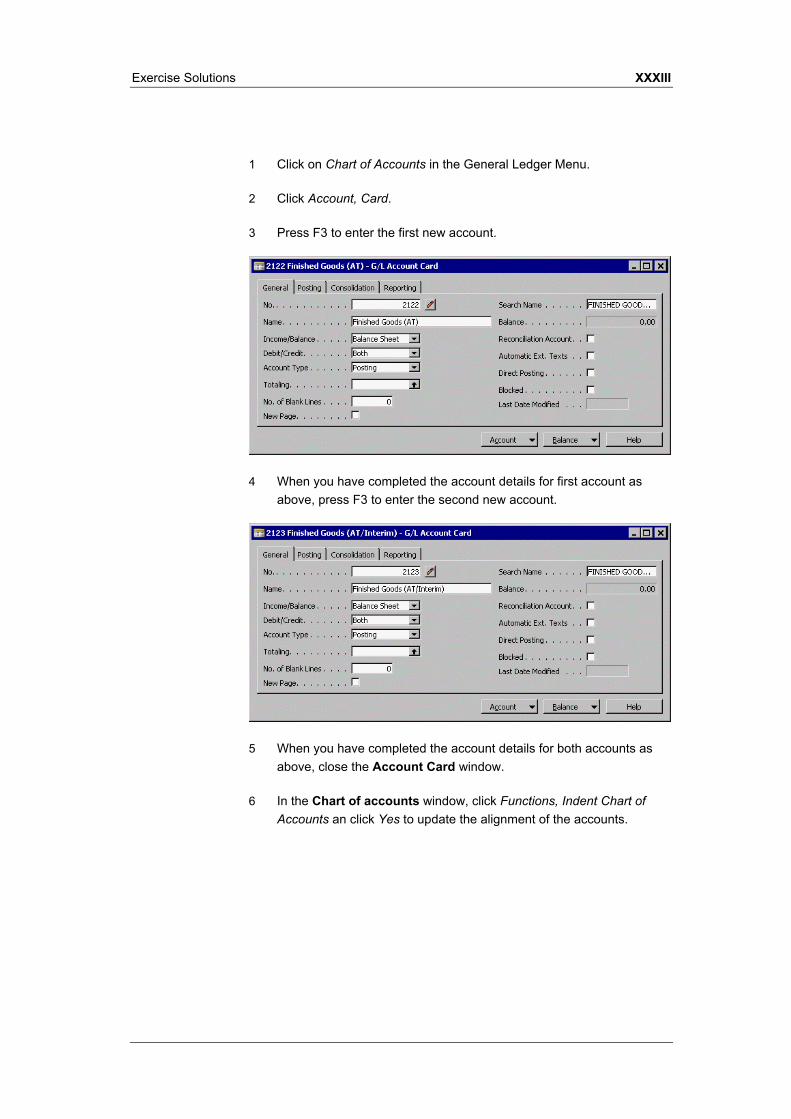
Exercise Solutions XXXIII
1 Click on Chart of Accounts in the General Ledger Menu.
2 Click Account, Card.
3 Press F3 to enter the first new account.
4 When you have completed the account details for first account as above, press F3 to enter the second new account.
5 When you have completed the account details for both accounts as above, close the Account Card window.
6 In the Chart of accounts window, click Functions, Indent Chart of Accounts an click Yes to update the alignment of the accounts.

XXXIV Exercise Solutions
To setup the Location:
7 On the Inventory menu, click Setup, Locations.
8 Press F3 to create a new Location.
9 Enter AUSTRIA in the Code field.
10 You can also fill in the Address, Postcode and Country fields if you wish but ignore all the other tabs for this exercise:
To combine the location with the Inventory Posting Group:
11 On the Inventory Menu click Setup, Inventory Posting, Inventory Posting Setup.
12 Press F3 to enter a new line.
13 In the Location Code field select AUSTRIA.
14 In the field Inventory Posting Group Code enter FINISHED.
15 You only need to fill in the new accounts in the fields Inventory

Exercise Solutions XXXV
Account and Inventory Account (Interim). Leave the remaining fields blank.
16 Close the Inventory Posting Setup window.
Exercise 19 - Create an Item
You have decided to sell stereo systems to your customers at a markup of 20% above cost. The item has the following details:
Name Super Stereo System Base Unit of Measure PCS Costing Method FIFO Price/Profit Calculation Price=Cost + Profit Profit % 20 Gen. Prod. Posting Group RETAIL VAT Prod. Posting Group VAT25 Inventory Posting Group RESALE
The item is allowed to be included in invoice discount calculations and should have a Item Disc. Group of RESALE.
Complete an item card for this new item.
Solution
1 On the Inventory Menu, click Items.
2 Press F3 and then press ENTER to create a new item card.
3 Enter a Description of Super Stereo System
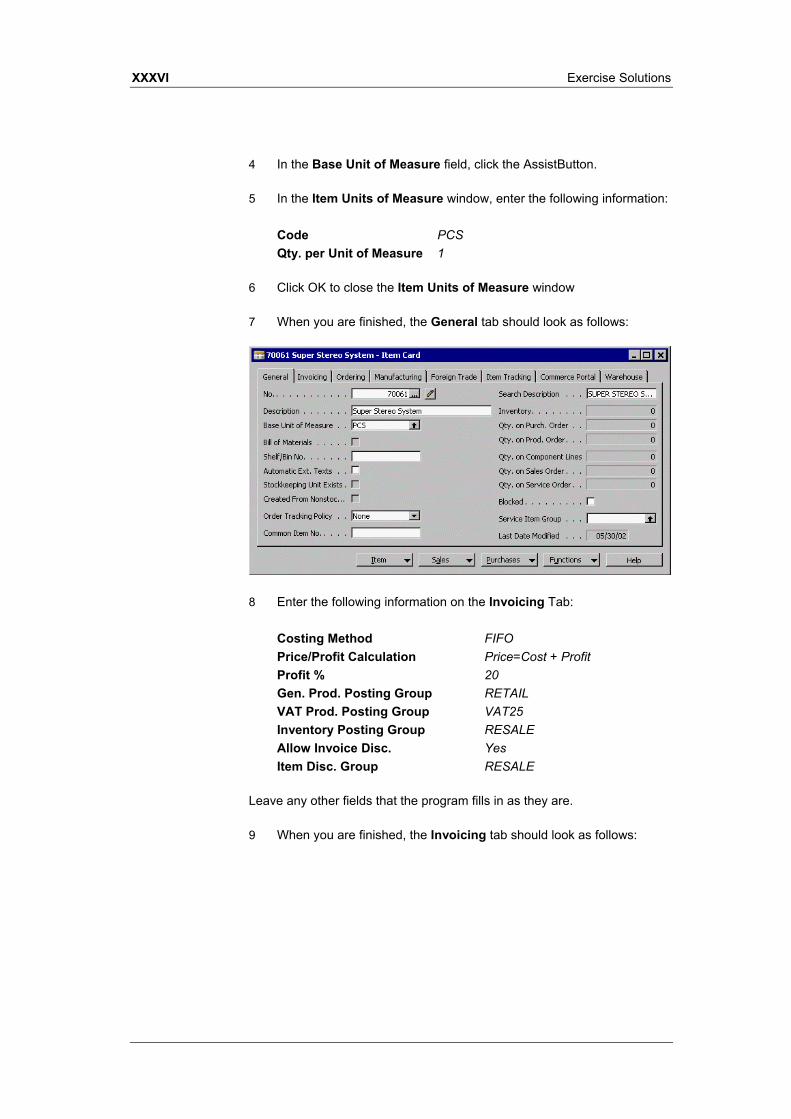
XXXVI Exercise Solutions
4 In the Base Unit of Measure field, click the AssistButton.
5 In the Item Units of Measure window, enter the following information: Code PCS Qty. per Unit of Measure 1
6 Click OK to close the Item Units of Measure window
7 When you are finished, the General tab should look as follows:
8 Enter the following information on the Invoicing Tab: Costing Method FIFO Price/Profit Calculation Price=Cost + Profit Profit % 20 Gen. Prod. Posting Group RETAIL VAT Prod. Posting Group VAT25 Inventory Posting Group RESALE Allow Invoice Disc. Yes Item Disc. Group RESALE
Leave any other fields that the program fills in as they are.
9 When you are finished, the Invoicing tab should look as follows:

Exercise Solutions XXXVII
You have now set up the item.
Exercise 20 – Calculate the Standard Cost of a BOM Item
You wish to calculate the standard cost for Item 70500, Track Mountain Bike.
Before you do this, make sure you delete the components of the Basis computer BOM you previously exploded in the example. The components will be items 80001..80211.
After you have deleted these components, update the standard cost by running the Calc. Standard Cost batch job.
Solution
1 Open the Item Card for 70500 (if you have not already done so) and click Item, Assembly List, Bill of Materials.
If you have not already deleted the BOM components for the Basis Computer Package from before the screen will look as follows:
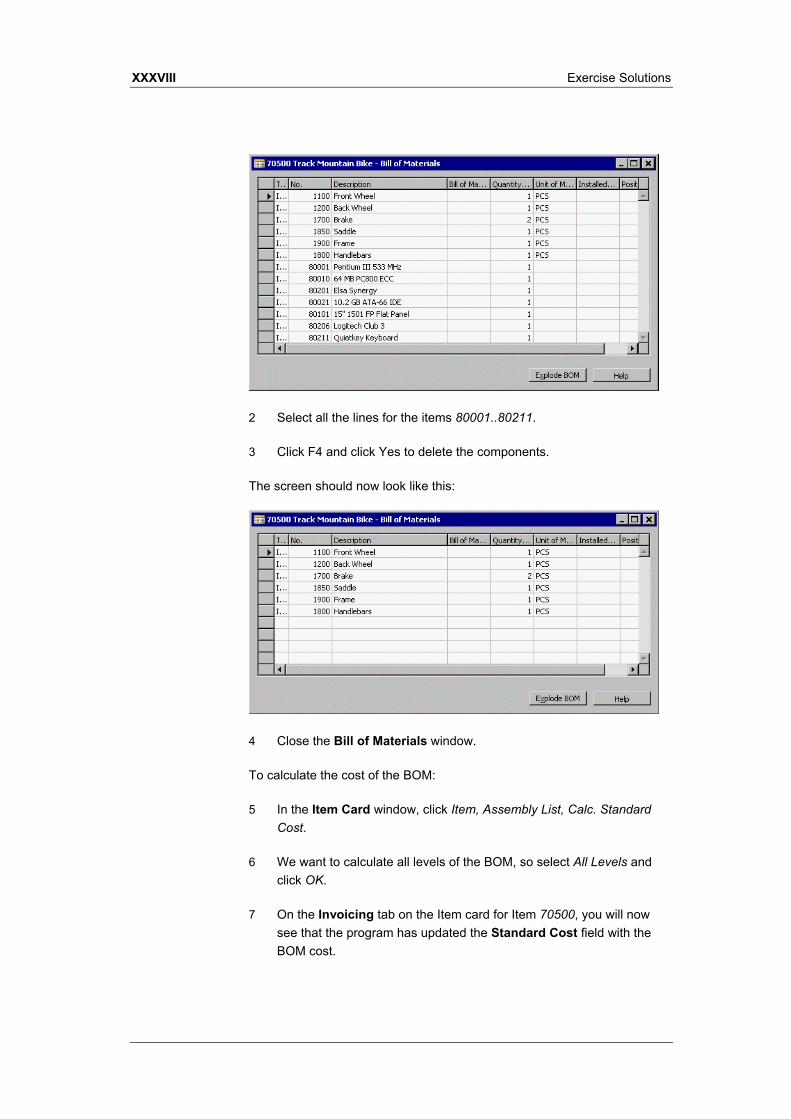
XXXVIII Exercise Solutions
2 Select all the lines for the items 80001..80211.
3 Click F4 and click Yes to delete the components.
The screen should now look like this:
4 Close the Bill of Materials window.
To calculate the cost of the BOM:
5 In the Item Card window, click Item, Assembly List, Calc. Standard Cost.
6 We want to calculate all levels of the BOM, so select All Levels and click OK.
7 On the Invoicing tab on the Item card for Item 70500, you will now see that the program has updated the Standard Cost field with the BOM cost.

Exercise Solutions XXXIX
8 Close the Item Card to complete the exercise.
Exercise 21 - Create Some Item Variants
Create variants of Blue, Yellow, Black and Silver for item 70500, Track Mountain Bike.
Close the Item card window and open the Sales & Receivables menu to enter the following sales invoice:
Sell-to Customer 10000 Posting Date 01/31/01 Type Item Item Description Track Mountain bike Variant Code Blue Quantity 1
Do not use a location code, because the item has been posted without one.
You do not have to post the invoice.
Solution
1 From the Inventory Menu, click Items and press F5 to display the item list.
2 Select Item No. 70500, and click OK to display the Item Card window.
3 Click Item, Variants.
4 In the Code field enter each color variant and followed by a description as follows:
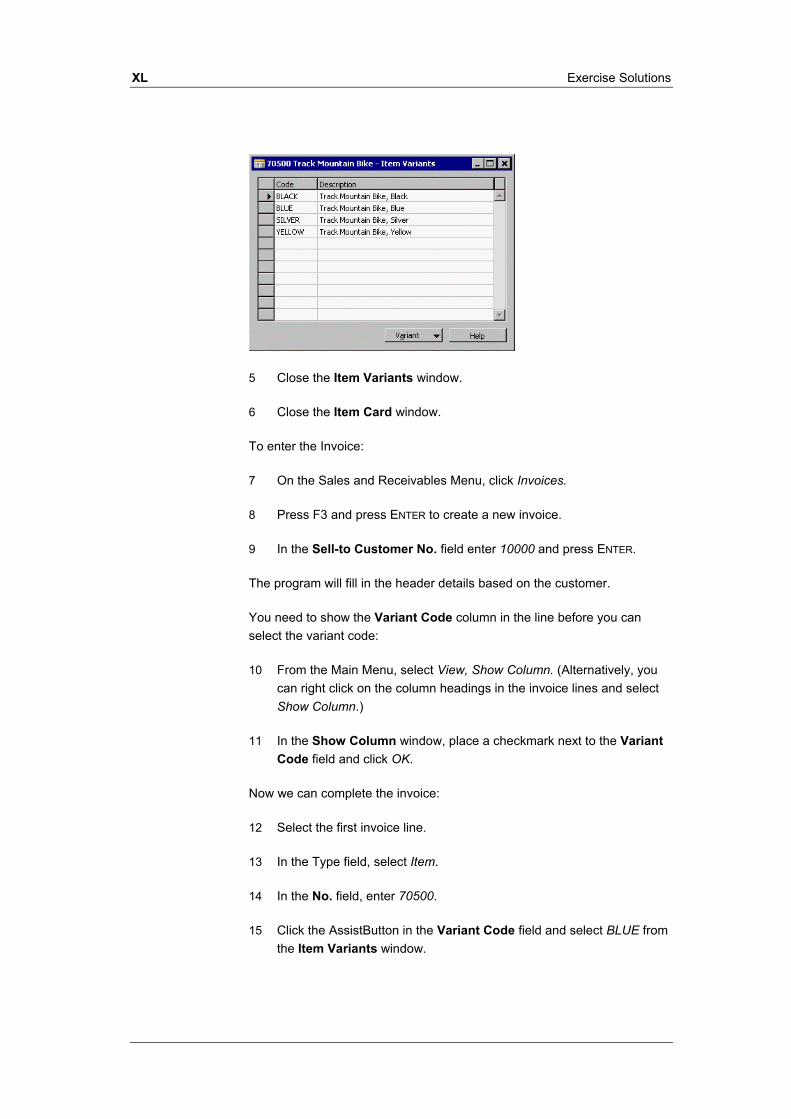
XL Exercise Solutions
5 Close the Item Variants window.
6 Close the Item Card window.
To enter the Invoice:
7 On the Sales and Receivables Menu, click Invoices.
8 Press F3 and press ENTER to create a new invoice.
9 In the Sell-to Customer No. field enter 10000 and press ENTER.
The program will fill in the header details based on the customer.
You need to show the Variant Code column in the line before you can select the variant code:
10 From the Main Menu, select View, Show Column. (Alternatively, you can right click on the column headings in the invoice lines and select Show Column.)
11 In the Show Column window, place a checkmark next to the Variant Code field and click OK.
Now we can complete the invoice:
12 Select the first invoice line.
13 In the Type field, select Item.
14 In the No. field, enter 70500.
15 Click the AssistButton in the Variant Code field and select BLUE from the Item Variants window.

Exercise Solutions XLI
16 Click OK to return to the invoice.
17 In the Quantity field enter 1.
18 Click Yes to the insufficient inventory warning.
19 The invoice should now look as follows:
Note that the Description field is filled in with the variant description and not the description from the item card.
20 Close the Sales Invoice window.

Appendix E.
Class Projects
This appendix contains three class projects. They can be used by instructors as extra exercises or the inspiration for new, customized exercises. In the self-study context, learners can use them as extra practice.
The class projects are as follows:
Chapter 2 General Ledger
Chapter 3 Sales & Receivables
Chapter 4 Purchases & Payables
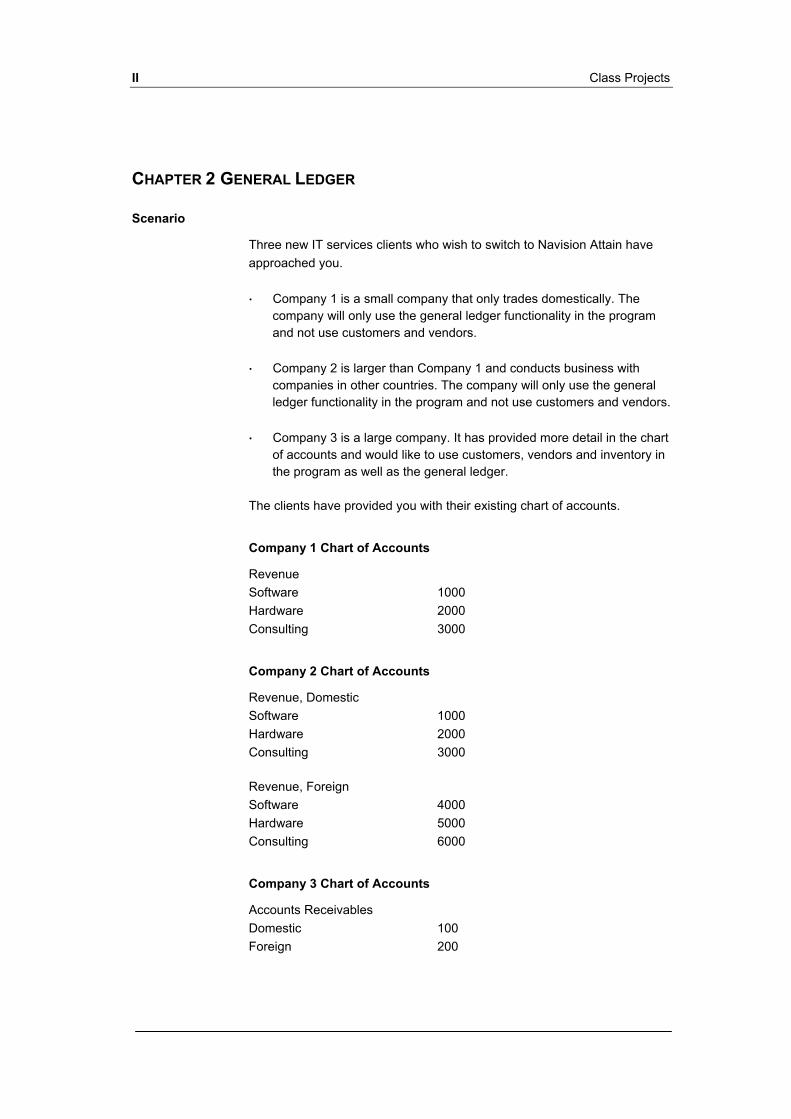
II Class Projects
CHAPTER 2 GENERAL LEDGER
Scenario
Three new IT services clients who wish to switch to Navision Attain have approached you.
Company 1 is a small company that only trades domestically. The company will only use the general ledger functionality in the program and not use customers and vendors.
·
·
·
Company 2 is larger than Company 1 and conducts business with companies in other countries. The company will only use the general ledger functionality in the program and not use customers and vendors.
Company 3 is a large company. It has provided more detail in the chart of accounts and would like to use customers, vendors and inventory in the program as well as the general ledger.
The clients have provided you with their existing chart of accounts.
Company 1 Chart of Accounts
Revenue Software 1000 Hardware 2000 Consulting 3000
Company 2 Chart of Accounts
Revenue, Domestic Software 1000 Hardware 2000 Consulting 3000
Revenue, Foreign Software 4000 Hardware 5000 Consulting 6000
Company 3 Chart of Accounts
Accounts Receivables Domestic 100 Foreign 200

Class Projects III
Inventory Computers 300 Printers 400
Account Payables Vendors 500
Revenue Software 1000 Hardware 2000 Consulting 3000
Cost of Goods Purchase, Software 4000 Purchase, Hardware 5000 Cost of Hardware Sold 6000 Cost of Hardware Sold (interim) 6050 Cost of Software Sold 7000 Cost of Software Sold (interim) 7050
Tasks
Your task is to analyze the chart of accounts information provided and determine the appropriate posting groups and combinations of posting groups in the posting setup tables. For Company 3, you also need to suggest how you will set up and integrate customers, vendors and items to the general ledger.
CHAPTER 3 SALES AND RECEIVABLES
Scenario:
Cronus International Ltd. is a rapidly growing company based in Great Britain with a diversified product line. The OLYMPIC Office Furniture line of highly successful office furniture is the corner stone of the business. It has enabled Cronus to become market leader in the domestic market and is ranked number three in two large export markets.
Tasks:
Your task is to maintain the Sales & Receivables setup, create and update customer information, handle all customer related documents such as quotes and orders, and manage incoming customer payments.

IV Class Projects
Procedures:
1 You have received information that a new group of customers are very interested in buying the OLYMPIC Office Furniture line. To be prepared for the workload to come, you want to set up the customer posting group called GOVERNMENT.
2 You know that the sale to the new customer group will require a separate Item Charge on the documents because they demand a specific carrier. Set up an item charge using a code GOVT-FREIGHT.
3 You also know that the payment terms will be 60 days. Set up this payment term.
4 You receive a fax asking for a quote from the first customer Waterworks Ltd., 44 Strawberry Mansions in Coventry. The customer is located in the same country as Cronus and is therefore considered to be a NATIONAL Business customer. Create this new customer and fill in all relevant fields according to the information above.
5 From the fax you see the required items: 1 OLYMPIC Conference System 1 OLYMPIC Office System 1 OLYMPIC Storage System Freight Costs 100.00 LCY per item ordered. Fill in the quote accordingly. Remember to put in the item charge as well.
6 Now the customer has accepted your quote and you need to convert it into an order.
7 Post the order.
8 When the customer received the shipment, the OLYMPIC Storage System was damaged and therefore returned to Cronus International Ltd. Waterworks Ltd. still wants the OLYMPIC Storage System so you agree to ship them a new one. The freight company was responsible for damaging the goods. Rather than having to issue you with a credit note and new invoice, they agree to simply ship the replacement item for free.
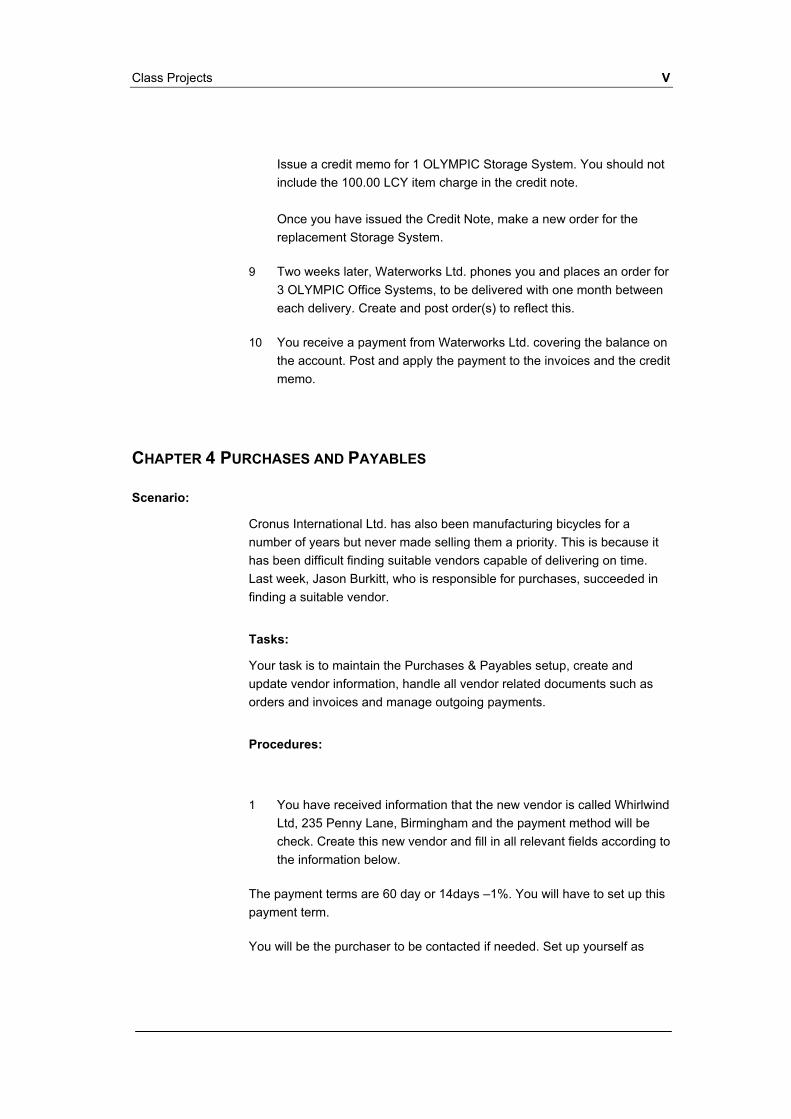
Class Projects V
Issue a credit memo for 1 OLYMPIC Storage System. You should not include the 100.00 LCY item charge in the credit note. Once you have issued the Credit Note, make a new order for the replacement Storage System.
9 Two weeks later, Waterworks Ltd. phones you and places an order for 3 OLYMPIC Office Systems, to be delivered with one month between each delivery. Create and post order(s) to reflect this.
10 You receive a payment from Waterworks Ltd. covering the balance on the account. Post and apply the payment to the invoices and the credit memo.
CHAPTER 4 PURCHASES AND PAYABLES
Scenario:
Cronus International Ltd. has also been manufacturing bicycles for a number of years but never made selling them a priority. This is because it has been difficult finding suitable vendors capable of delivering on time. Last week, Jason Burkitt, who is responsible for purchases, succeeded in finding a suitable vendor.
Tasks:
Your task is to maintain the Purchases & Payables setup, create and update vendor information, handle all vendor related documents such as orders and invoices and manage outgoing payments.
Procedures:
1 You have received information that the new vendor is called Whirlwind Ltd, 235 Penny Lane, Birmingham and the payment method will be check. Create this new vendor and fill in all relevant fields according to the information below.
The payment terms are 60 day or 14days –1%. You will have to set up this payment term.
You will be the purchaser to be contacted if needed. Set up yourself as

VI Class Projects
purchaser in the Salespeople/ Purchasers setup window.
2 From the foreman Richard Quist you receive instruction to order 20 Front Wheels, 20 Back Wheels, 10 Saddles and 10 Frames. Create a purchase order to Whirlwind Ltd. for these items. The date to be used for the transaction is 02/01/01.
3 In two days you receive an order confirmation and five days later the goods are received in the warehouse. The delivery note and invoice are forwarded to you. Post the purchase order.
4 From the warehouse you also receive instructions to make a credit memo for five Front Wheels because they are damaged and will be returned to Whirlwind. Create and post the credit memo.
5 On 02/20/01, you receive another instruction from Richard Quist to order 10 Front Wheels because they are needed in production. Make an invoice and post it.
6 On the 18th of each month, you process outstanding invoices for payment. Make and post the payment of the first invoice including the credit note from the Payment Journal.
7 A month passes and it is now time to pay the second invoice. This time you must pay the invoice with a computer check. You must print the check for approval by Jason Burkitt. Make a new computer check and print it.

INDEX
Not Available at this time