nasa engineering design challenges - nasa jet … · session 1: introduce the ... construct posters...
TRANSCRIPT
Educational Product
Educators Grades 5–8
EG-2008-09-134-MSFC
National Aeronautics and Space Administration
NASA Engineering Design ChallengesEnvironmental Control and Life Support Systems Water Filtration Challenge

Cover Image: This is a close-up view of the Environmental Control and Life Support System (ECLSS) Water Recovery System (WRS) racks. The WRS provides clean water through the reclamation of wastewaters, including water obtained from the Space Shuttle’s fuel cells, crewmember urine, used hand wash and oral hygiene water, cabin humidity condensate, and extravehicular activity (EVA) wastes.

NASA Engineering Design ChallengesEnvironmental Control and Life Support Systems
Water Filtration Challenge
National Aeronautics and Space Administration
NASA Marshall Space Flight CenterScience and Technology Directorate: Research Planning and Integration Office
Environmental Control and Life Support System (ECLSS) DivisionAcademic Affairs Office
NASA HeadquartersExploration Systems Mission Directorate: Office of Education
This publication is in the public domain and is not protected by copyright.Permission is not required for duplication for classroom use.
i

ii
iii
Acknowledgements
Project Director/Editor Twila Schneider, Ed.S. Schafer Corporation Huntsville, Alabama Technical AdvisorsRobyn CarrasquilloEnvironmental Control and Life Support System Division NASA Marshall Space Flight Center Larry Davis Avionics and Software Systems BranchSpacecraft and Vehicle Systems DepartmentNASA Marshall Space Flight Center Randy KeenE3 and Electrical Integration BranchInstrument and Payload Systems DepartmentNASA Marshall Space Flight Center
Charlie NolaAvionics and Software Systems BranchSpacecraft and Vehicle Systems DepartmentNASA Marshall Space Flight Center
Monsi RomanEnvironmental Control and Life Support System DivisionNASA Marshall Space Flight Center
Todd SchneiderSpace Environments and Effects BranchNASA Marshall Space Flight Center
Education Content ReviewersJulie CliftWILL Technology, Inc.Huntsville, Alabama
Dawn MercerWILL Technology, Inc.Huntsville, Alabama
Vanessa SuggsAcademic Affairs OfficeElementary and Secondary ProgramsNASA Marshall Space Flight Center
Document Design and LayoutPedro RodriguezTRAX InternationalHuntsville, Alabama
Pablo GarciaTRAX InternationalHuntsville, Alabama
Jason ShoemateTRAX InternationalHuntsville, Alabama
Daniel FrewTRAX InternationalHuntsville, Alabama
Melissa HigdonTRAX InternationalHuntsville, Alabama

iv
v
Organization of this Educator Guide
This guide is organized into seven chapters.
I. Overview
II. The Design Challenge
III. Connections to National Curriculum Standards
IV. Preparing to Teach
V. Classroom Sessions
VI. Opportunities for Extension
VII. Teacher Resources
This Educator Guide has been set up to help you find things quickly and to minimize your need to “jump around.” In large part, you can start at the front and continue straight through to the end.
Chapter I, Overview, provides information about Environmental Control and Life Support Systems used on NASA spacecraft.
Chapter II, The Design Challenge, provides a brief description of the challenge, time requirements, and materials and cost estimates. A more detailed list of materials appears in chapter IV.
Chapter III, Connections to National Curriculum Standards, provides correlations to the National Science Education Standards, the Standards for School Mathematics, and the Standards for Technological Literacy.
Chapter IV, Preparing to Teach, contains all of the basic information you need to know, and lists everything you need to do, before using the challenge in your classroom.
Chapter V, Classroom Sessions, provides information that will guide you through each session.
Chapter VI, Opportunities for Extension, describes optional activities that are related to the basic challenge. These extensions are described but not actually developed for you.
Chapter VII, Teacher Resources, contains useful websites, information regarding NASA’s Educator Resource Center Network, and black line masters for classroom use.

vi
vii
Table of Contents
I. Overview ......................................................................................................................................................... 1 Introduction to Environmental Control and Life Support Systems ............................................................ 1 Environmental Control and Life Support on the International Space Station............................................ 1 Purification Process ................................................................................................................................... 3 II. The Design Challenge ................................................................................................................................... 7 The Challenge ............................................................................................................................................ 7 Time Requirements.................................................................................................................................... 7 Materials and Cost Estimates .................................................................................................................... 7 An Inquiry-based Challenge ...................................................................................................................... 7
III. Connections to National Curriculum Standards ........................................................................................ 9 National Science Education Standards ..................................................................................................... 9 Standards for School Mathematics ........................................................................................................... 9 Standards for Technological Literacy ...................................................................................................... 10
IV. Preparing to Teach....................................................................................................................................... 11 Detailed Materials Lists ........................................................................................................................... 11 Measuring Conductivity ........................................................................................................................... 13 Directions for Building the Conductivity Tester ....................................................................................... 14 Directions for Making the Filtration Device .............................................................................................. 15 Directions for Making Simulated Wastewater ......................................................................................... 16 Measuring pH .......................................................................................................................................... 16 Common pH Measurements ................................................................................................................... 16 Safety Considerations ............................................................................................................................. 16 Teaching Strategies for an Engineering Design Challenge ...................................................................... 17 Helping Students Understand the Design Process ................................................................................. 17
V. Classroom Sessions .................................................................................................................................... 19 Session 1: Introduce the Challenge ......................................................................................................... 20 (1–2 class periods) Session 2: Design and Test a Filtration Device ....................................................................................... 22 (1–2 class periods) Session 3: A Filtration Device for the Class ............................................................................................ 25 (1–2 class periods) Session 4: Construct Posters ………………………………………………………………………………… 27 (1 class period) Session 5: Student Presentations ........................................................................................................... 28 (1 class period)
VI. Opportunities for Extension ........................................................................................................................ 29
VII. Teacher Resources ...................................................................................................................................... 31 Web Sites................................................................................................................................................. 31 NASA Resources for Educators .............................................................................................................. 31 Black Line Masters .................................................................................................................................. 33 Glossary ................................................................................................................................................... 42

viii
Chapter I: Overview
Introduction to Environmental Control and Life Support SystemsEarth’s natural life support system provides the air we breathe, the water we drink, and other conditions that support life. The purpose of an Environmental Control and Life Support System (ECLSS) is to provide these needs when outside the Earth’s biosphere. The functions of an ECLSS include: atmosphere revitalization; atmosphere control and sup-ply; temperature and humidity control; water recovery and management; waste management; and fire detection and suppression. Other functions that may be considered part of the ECLSS include: food storage and preparation; plant growth facilities; radiation protection; external dust removal; thermally conditioned storage; and hyperbaric chambers and airlocks. The activities in this guide focus on water recovery and management.
The life support systems on the Mercury, Gemini, and Apollo spacecraft in the 1960s were designed to be used once and discarded. Oxygen for breathing was provided from high-pressure or cryogenic storage tanks. Carbon dioxide was removed from the air by lithium hydroxide in replaceable canisters. Contaminants in the air were removed by replaceable filters and activated charcoal integrated with the lithium hydroxide canisters. Water for the Mercury and Gemini missions was stored in tanks, while fuel cells on the Apollo spacecraft produced electricity and provided water as a byproduct. Urine and wastewater were collected and stored (for disposal upon return to Earth) or vented overboard.
The Space Shuttle is a reusable vehicle, unlike those earlier spacecraft, and its life support system incorporates some advances, but it still relies heavily on the use of consumables, limiting the time it can stay in space. Advances include removing carbon monoxide (CO) from the air by converting it to carbon dioxide (CO2) and passing it through a reus-able CO2 removal assembly in place of the lithium hydroxide assembly initially installed on the Shuttle. This process greatly reduces the stowage volume and the crew time required, since no components require replacement during normal operation.
The International Space Station (ISS) includes further advances in life support technology and currently relies on a combination of expendable and limited regenerative life support technologies located in the U.S. Destiny lab module and the Russian Zvezda service module. Advances include the development of regenerable methods of supplying oxygen (by electrolysis of water) and water (by recovering potable water from wastewater).
Missions to return to the Moon and to venture to Mars and beyond will require even more advances in life support technology. The task of providing a healthy, productive living and working environment away from the Earth’s bio-sphere becomes increasingly challenging as exploration of space leads to voyages of longer duration and more distant destinations. The general trend with advancing technology is toward doing more with less. This means devel-oping technologies that are inherently more reliable, capable, and efficient than previously used technologies; reduc-ing the use of expendables; and developing other means of minimizing the total mass, volume, power consumption, and cost of an ECLSS while ensuring safe operation.
Environmental Control and Life Support on the International Space StationThe National Aeronautics and Space Administration’s (NASA) Marshall Space Flight Center (MSFC) is responsible for the design, construction, and testing of regenerative life support hardware for the ISS, as well as providing technical support for other systems that will provide the crew with a comfortable environment and minimize the resupply burden. The ECLSS for the Station performs several functions:
• Providesoxygenformetabolic consumption.• Providespotablewaterforconsumption,foodpreparation,andhygieneuses.• Removescarbondioxidefromthecabinair.• Filtersparticulates and microorganisms from the cabin air.• Removesvolatileorganictracegasesfromthecabinair.• Monitorsandcontrolscabinairpartialpressuresofnitrogen,oxygen,carbondioxide,methane,hydrogen,and
water vapor.• Maintainstotalcabinpressure.• Maintainscabintemperatureandhumiditylevels.• Distributescabinairbetweenconnectedmodules.
1
2
The Space Station ECLSS consists of two key components – the Water Recovery System (WRS) and the Oxygen Generation System (OGS). These systems will be packaged into three refrigerator-sized racks.
The Water Recovery System (WRS)The WRS provides clean water by reclaiming wastewater (including water from crewmember urine, hand wash, and oral hygiene waters); cabin humidity condensate; and extravehicular activity (EVA) wastes. The recovered water must meet stringent standards before it can be used to support crew, EVA, and payload activities.
The WRS is designed to recycle crewmember urine and wastewater for reuse as clean water. By doing so, the system reduces the net mass of water and consumables that would need to be launched from Earth to support six crewmembers by 2,760 kg (6,000 lbs) per year.
The WRS consists of a Urine Processor Assembly (UPA) and a Water Processor Assembly (WPA). A low-pressure vacuum distillation process is used to recover water from urine. The entire process occurs within a rotating distillation assembly that compensates for the absence of gravity and therefore aids in the separation of liquids and gases in space. Product water from the UPA is combined with other wastewaters and delivered to the WPA for treatment. The WPA removes free gas and solid materials (hair, lint, etc.) from the water before it goes through a series of multifiltra-tion beds for further purification. Any remaining organic contaminants and microorganisms are removed by a high-temperature catalytic reactor assembly. The purity of product water is checked by electrical conductiv-ity sensors (the conductivity of water is increased by the presence of typi-cal contaminants). Unacceptable water is reprocessed, and clean water is sent to a storage tank, ready for use by the crew.
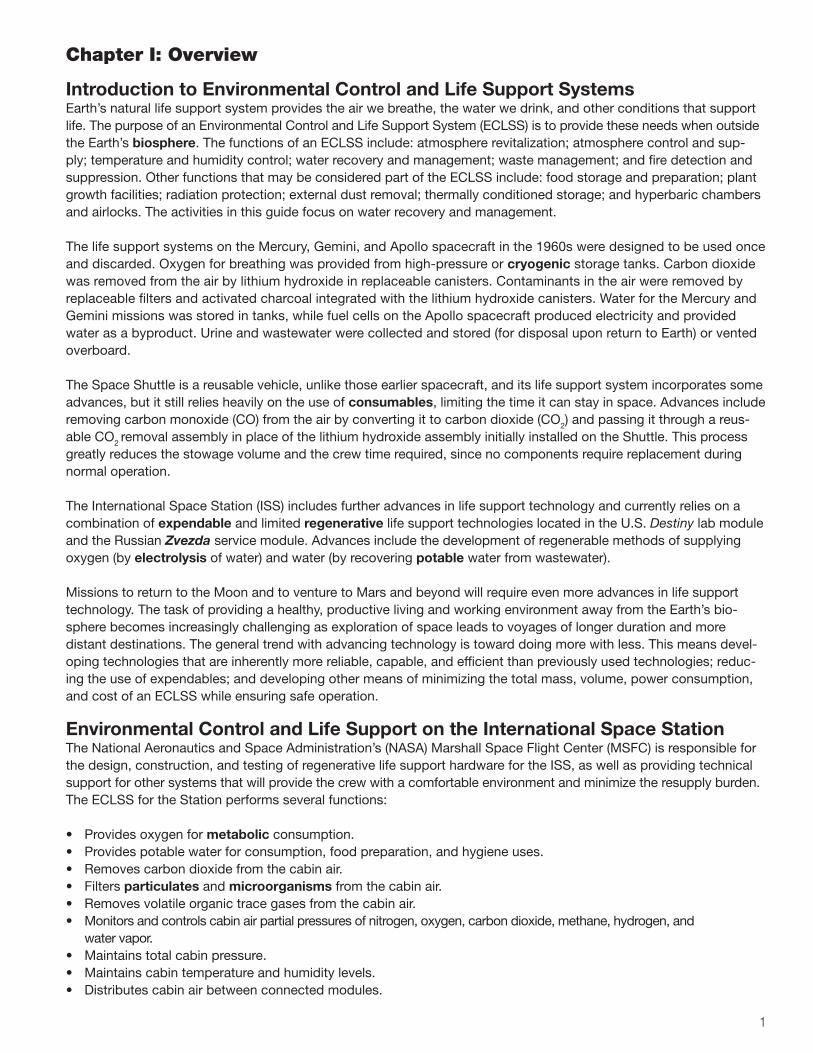
This diagram shows the flow of recyclable resources in the International Space Station (ISS). The regenerative Environmental Control and Life Support System (ECLSS), whose main components are the Water Recovery System (WRS) and the Oxygen Generation System (OGS), reclaims and recycles water and oxygen. The ECLSS maintains a pressurized habitation environment, provides water recovery and storage, maintains and provides fire detection/suppression, and provides breathable air and a comfortable atmosphere in which to live and work within the ISS.
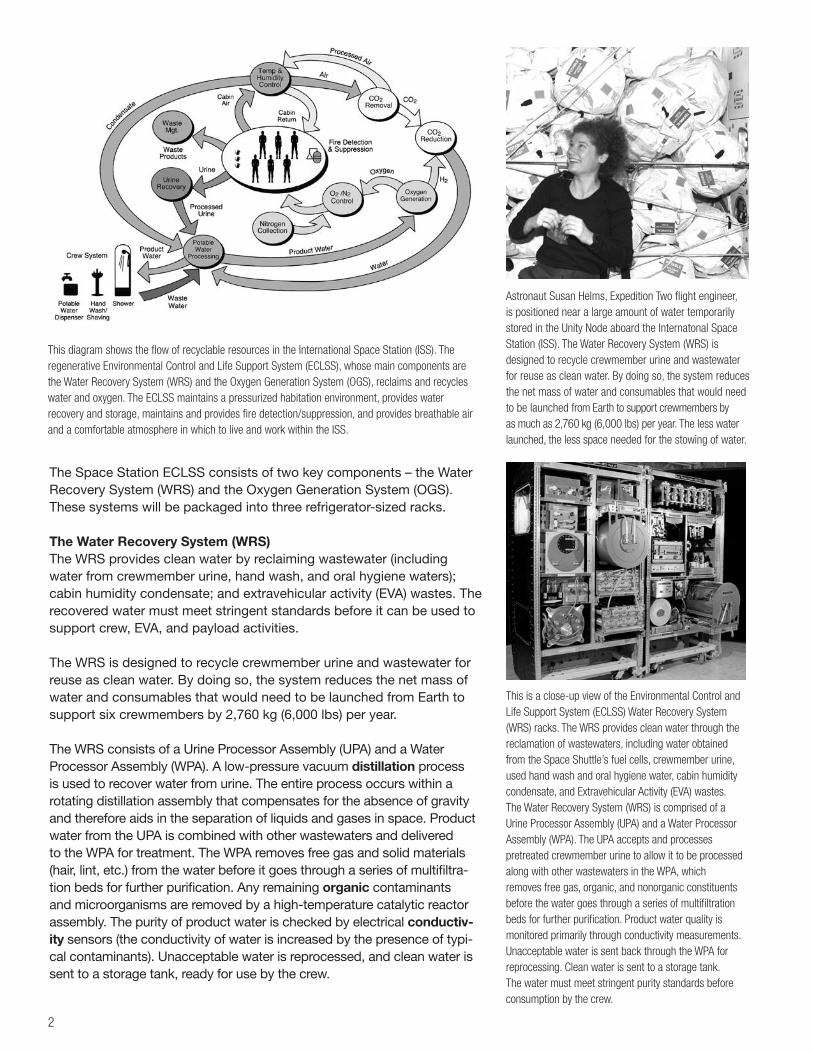
Astronaut Susan Helms, Expedition Two flight engineer, is positioned near a large amount of water temporarily stored in the Unity Node aboard the Internatonal Space Station (ISS). The Water Recovery System (WRS) is designed to recycle crewmember urine and wastewater for reuse as clean water. By doing so, the system reduces the net mass of water and consumables that would need to be launched from Earth to support crewmembers by as much as 2,760 kg (6,000 lbs) per year. The less water launched, the less space needed for the stowing of water.
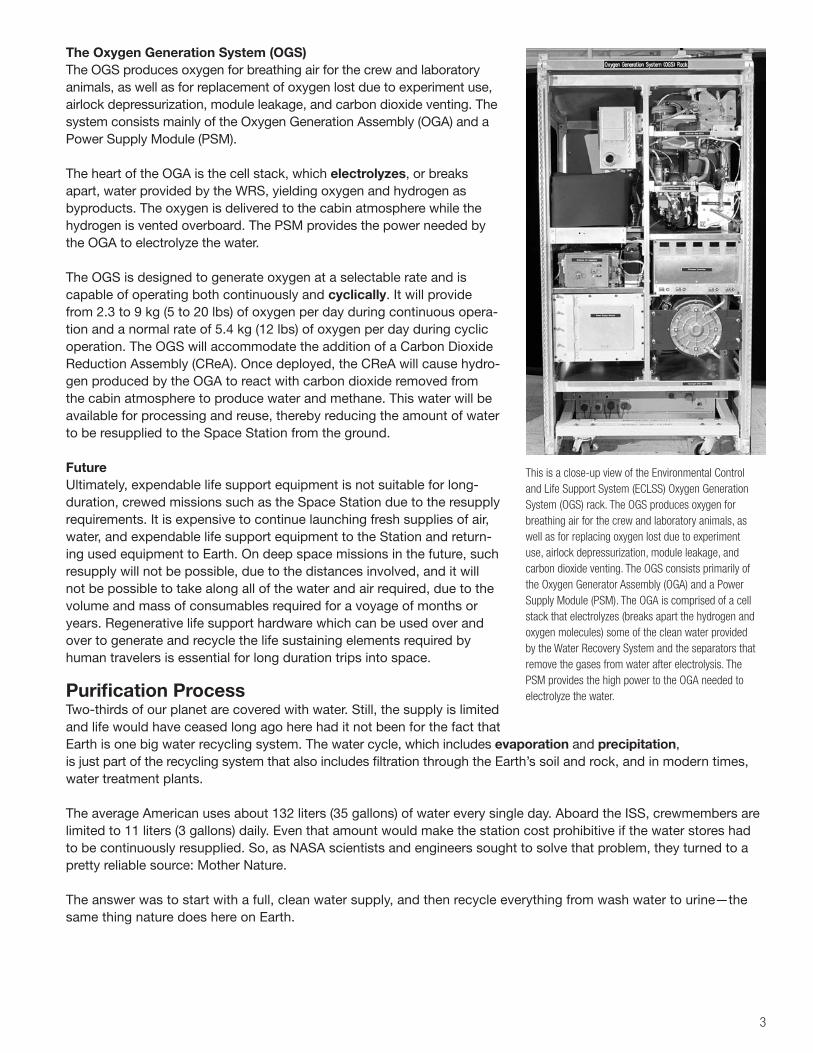
This is a close-up view of the Environmental Control and Life Support System (ECLSS) Water Recovery System (WRS) racks. The WRS provides clean water through the reclamation of wastewaters, including water obtained from the Space Shuttle’s fuel cells, crewmember urine, used hand wash and oral hygiene water, cabin humidity condensate, and Extravehicular Activity (EVA) wastes. The Water Recovery System (WRS) is comprised of a Urine Processor Assembly (UPA) and a Water Processor Assembly (WPA). The UPA accepts and processes pretreated crewmember urine to allow it to be processed along with other wastewaters in the WPA, which removes free gas, organic, and nonorganic constituents before the water goes through a series of multifiltration beds for further purification. Product water quality is monitored primarily through conductivity measurements. Unacceptable water is sent back through the WPA for reprocessing. Clean water is sent to a storage tank. The water must meet stringent purity standards before consumption by the crew.
3
The Oxygen Generation System (OGS)The OGS produces oxygen for breathing air for the crew and laboratory animals, as well as for replacement of oxygen lost due to experiment use, airlock depressurization, module leakage, and carbon dioxide venting. The system consists mainly of the Oxygen Generation Assembly (OGA) and a Power Supply Module (PSM).
The heart of the OGA is the cell stack, which electrolyzes, or breaks apart, water provided by the WRS, yielding oxygen and hydrogen as byproducts. The oxygen is delivered to the cabin atmosphere while the hydrogen is vented overboard. The PSM provides the power needed by the OGA to electrolyze the water.
The OGS is designed to generate oxygen at a selectable rate and is capable of operating both continuously and cyclically. It will provide from 2.3 to 9 kg (5 to 20 lbs) of oxygen per day during continuous opera-tion and a normal rate of 5.4 kg (12 lbs) of oxygen per day during cyclic operation. The OGS will accommodate the addition of a Carbon Dioxide Reduction Assembly (CReA). Once deployed, the CReA will cause hydro-gen produced by the OGA to react with carbon dioxide removed from the cabin atmosphere to produce water and methane. This water will be available for processing and reuse, thereby reducing the amount of water to be resupplied to the Space Station from the ground.
FutureUltimately, expendable life support equipment is not suitable for long-duration, crewed missions such as the Space Station due to the resupply requirements. It is expensive to continue launching fresh supplies of air, water, and expendable life support equipment to the Station and return-ing used equipment to Earth. On deep space missions in the future, such resupply will not be possible, due to the distances involved, and it will not be possible to take along all of the water and air required, due to the volume and mass of consumables required for a voyage of months or years. Regenerative life support hardware which can be used over and over to generate and recycle the life sustaining elements required by human travelers is essential for long duration trips into space.
This is a close-up view of the Environmental Control and Life Support System (ECLSS) Oxygen Generation System (OGS) rack. The OGS produces oxygen for breathing air for the crew and laboratory animals, as well as for replacing oxygen lost due to experiment use, airlock depressurization, module leakage, and carbon dioxide venting. The OGS consists primarily of the Oxygen Generator Assembly (OGA) and a Power Supply Module (PSM). The OGA is comprised of a cell stack that electrolyzes (breaks apart the hydrogen and oxygen molecules) some of the clean water provided by the Water Recovery System and the separators that remove the gases from water after electrolysis. The PSM provides the high power to the OGA needed to electrolyze the water.Purification Process
Two-thirds of our planet are covered with water. Still, the supply is limited and life would have ceased long ago here had it not been for the fact that Earth is one big water recycling system. The water cycle, which includes evaporation and precipitation, is just part of the recycling system that also includes filtration through the Earth’s soil and rock, and in modern times, water treatment plants.
The average American uses about 132 liters (35 gallons) of water every single day. Aboard the ISS, crewmembers are limited to 11 liters (3 gallons) daily. Even that amount would make the station cost prohibitive if the water stores had to be continuously resupplied. So, as NASA scientists and engineers sought to solve that problem, they turned to a pretty reliable source: Mother Nature.
The answer was to start with a full, clean water supply, and then recycle everything from wash water to urine —the same thing nature does here on Earth.
4
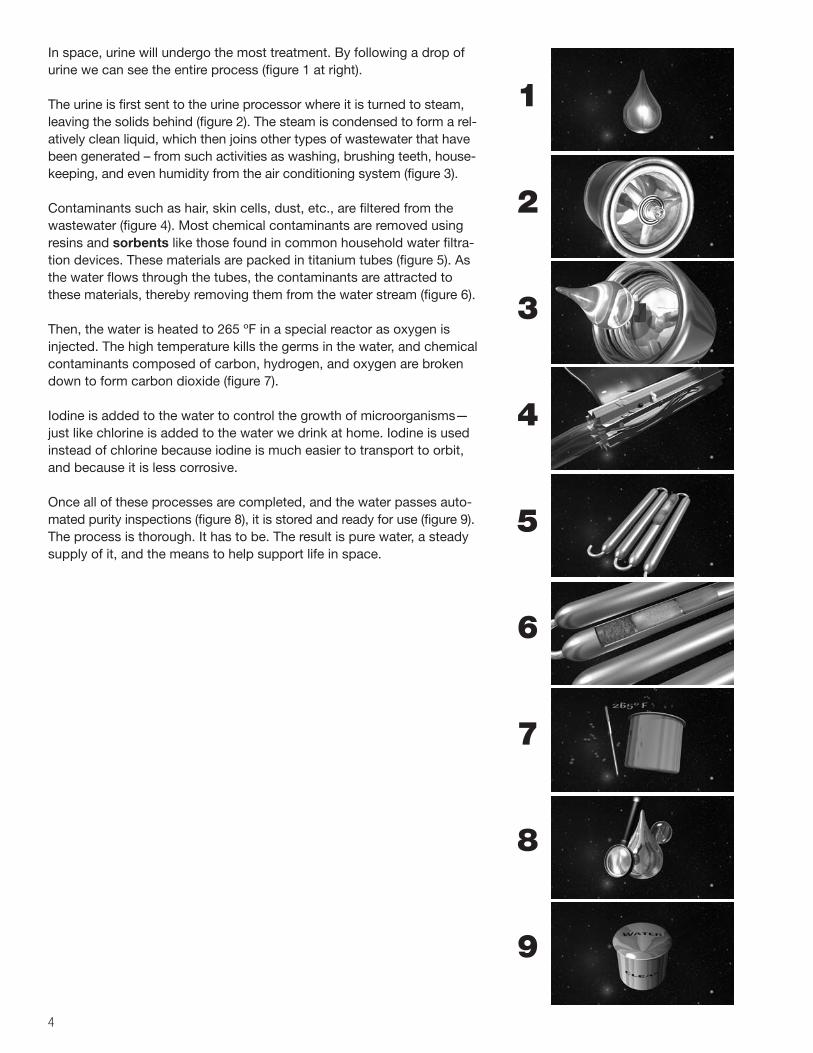
In space, urine will undergo the most treatment. By following a drop of urine we can see the entire process (figure 1 at right).
The urine is first sent to the urine processor where it is turned to steam, leaving the solids behind (figure 2). The steam is condensed to form a rel-atively clean liquid, which then joins other types of wastewater that have been generated – from such activities as washing, brushing teeth, house-keeping, and even humidity from the air conditioning system (figure 3).
Contaminants such as hair, skin cells, dust, etc., are filtered from the wastewater (figure 4). Most chemical contaminants are removed using resins and sorbents like those found in common household water filtra-tion devices. These materials are packed in titanium tubes (figure 5). As the water flows through the tubes, the contaminants are attracted to these materials, thereby removing them from the water stream (figure 6).
Then, the water is heated to 265 ºF in a special reactor as oxygen is injected. The high temperature kills the germs in the water, and chemical contaminants composed of carbon, hydrogen, and oxygen are broken down to form carbon dioxide (figure 7).
Iodine is added to the water to control the growth of microorganisms—just like chlorine is added to the water we drink at home. Iodine is used instead of chlorine because iodine is much easier to transport to orbit, and because it is less corrosive.
Once all of these processes are completed, and the water passes auto-mated purity inspections (figure 8), it is stored and ready for use (figure 9). The process is thorough. It has to be. The result is pure water, a steady supply of it, and the means to help support life in space.
1
2
3
4
5
6
7
8
9
Career Highlight
5
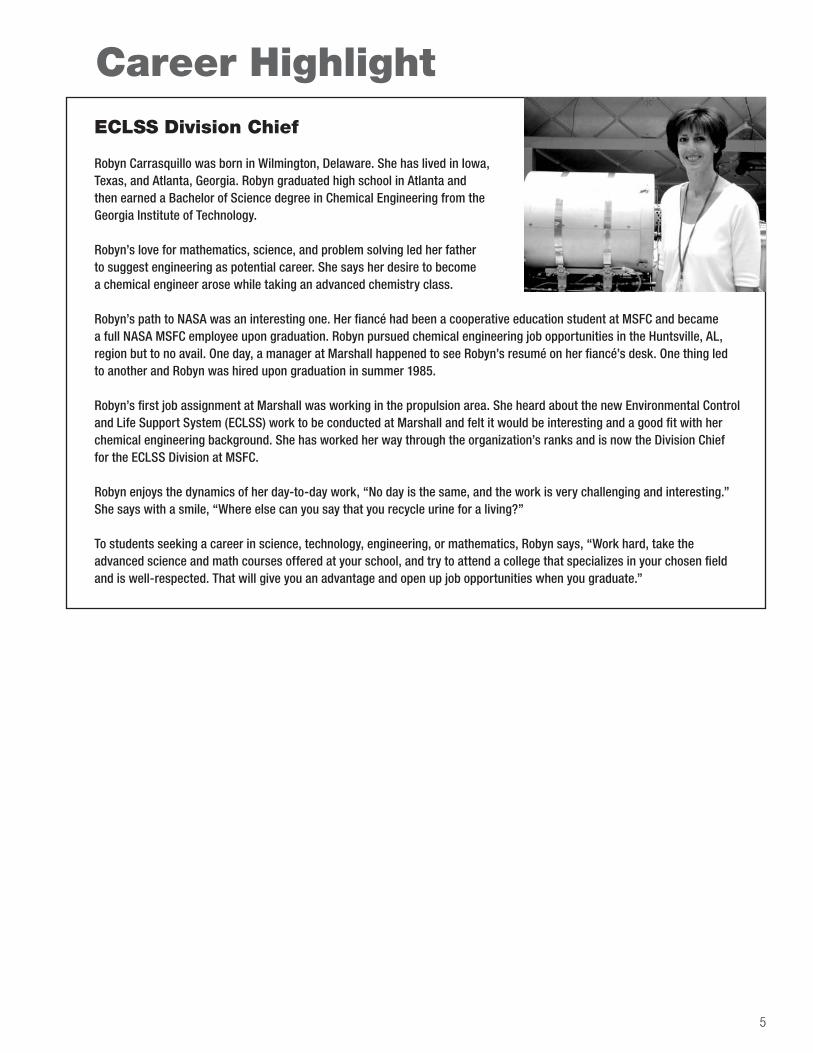
ECLSS Division Chief
Robyn Carrasquillo was born in Wilmington, Delaware. She has lived in Iowa, Texas, and Atlanta, Georgia. Robyn graduated high school in Atlanta and then earned a Bachelor of Science degree in Chemical Engineering from the Georgia Institute of Technology.
Robyn’s love for mathematics, science, and problem solving led her father to suggest engineering as potential career. She says her desire to become a chemical engineer arose while taking an advanced chemistry class.
Robyn’s path to NASA was an interesting one. Her fiancé had been a cooperative education student at MSFC and became a full NASA MSFC employee upon graduation. Robyn pursued chemical engineering job opportunities in the Huntsville, AL, region but to no avail. One day, a manager at Marshall happened to see Robyn’s resumé on her fiancé’s desk. One thing led to another and Robyn was hired upon graduation in summer 1985.
Robyn’s first job assignment at Marshall was working in the propulsion area. She heard about the new Environmental Control and Life Support System (ECLSS) work to be conducted at Marshall and felt it would be interesting and a good fit with her chemical engineering background. She has worked her way through the organization’s ranks and is now the Division Chief for the ECLSS Division at MSFC.
Robyn enjoys the dynamics of her day-to-day work, “No day is the same, and the work is very challenging and interesting.” She says with a smile, “Where else can you say that you recycle urine for a living?”
To students seeking a career in science, technology, engineering, or mathematics, Robyn says, “Work hard, take the advanced science and math courses offered at your school, and try to attend a college that specializes in your chosen field and is well-respected. That will give you an advantage and open up job opportunities when you graduate.”

6
7
Chapter II: The Design Challenge
The ChallengeThe challenge is to design and build a water filtration device using commonly available materials. To meet this chal-lenge, students use an iterative repeating process as they build, test, and measure the performance of the filtration device, analyze the data collected, and use this information to work towards an improved filtration design. It is the same design process used by engineers and scientists working on ECLSS for NASA. Although students will work in teams of two–three, they are encouraged to think of their entire class as a single design team working cooperatively and learning from the efforts of all members in order to produce the best water filtration device.
Students measure the effectiveness of their filtration device using pH test strips and a conductivity tester that is assembled from readily available materials and that requires about one half-hour to construct. Detailed plans and a complete materials list are provided.
Time RequirementsBefore starting this challenge with your students, allow time to carefully read this guide. Allow several hours to gather and prepare the materials your students will need for the challenge, and about one half-hour to build each conductivity tester. Students may be able to assemble the conductivity testers for you.
It is possible for your students to engage in the challenge and to experience the design process within the span of five or six class sessions. If you add a session or two to that, you will have more time to discuss the embedded science during the challenge, and students will have more time to analyze data and improve the performance of their filtration devices by conducting more than one filtration run.
Materials and Cost EstimatesThe materials you will need to build the filtration device and the conductivity tester are very simple and easy to acquire. Much of what you need you can get from a local home improvement store, a discount store, and an aquarium or pet supply store. Many items, such as pH strips, rubber bands, Erlenmeyer flasks, and a triple beam balance (or alterna-tive) may already be in your classroom or school. More specialized items include digital multimeters and battery snap connectors. These items are available at an electronics supply store or through retailers via catalog.
The hardware and nonconsumables you may need to purchase will greatly influence your costs, and that in turn will depend on what you presently have available to you in your classroom or school. In terms of consumables, the acti-vated carbon is the most expensive item. However, the carbon can be used many times before it must be discarded. After use, spread it out evenly on newspaper to dry, then store in a jar or baggie. The cost for the consumables will be approximately $50 (this includes the carbon) for 10 student teams to do the challenge. If you purchase the quantities listed in the Materials Lists, there are ample supplies of most items, with the exception of the carbon and the gravel, to conduct the challenge with 20 or more student teams. Thus, if you wish to conduct this activity with more than 10 student teams, purchase more activated carbon and gravel than is listed. An Inquiry-based ChallengeThe Water Filtration Device challenge engages students in a high-interest, hands-on scientific inquiry. Participants will propose filtration device designs, test them, make observations, collect data, and collaborate as they analyze results and attempt to identify the best filter media to use. Based on their analysis and on study of other filtration devices, each team will make modifications to their model and repeat the process in an effort to produce the most effective filtration apparatus possible. Ultimately, teams will communicate their results to the larger community.

8
9
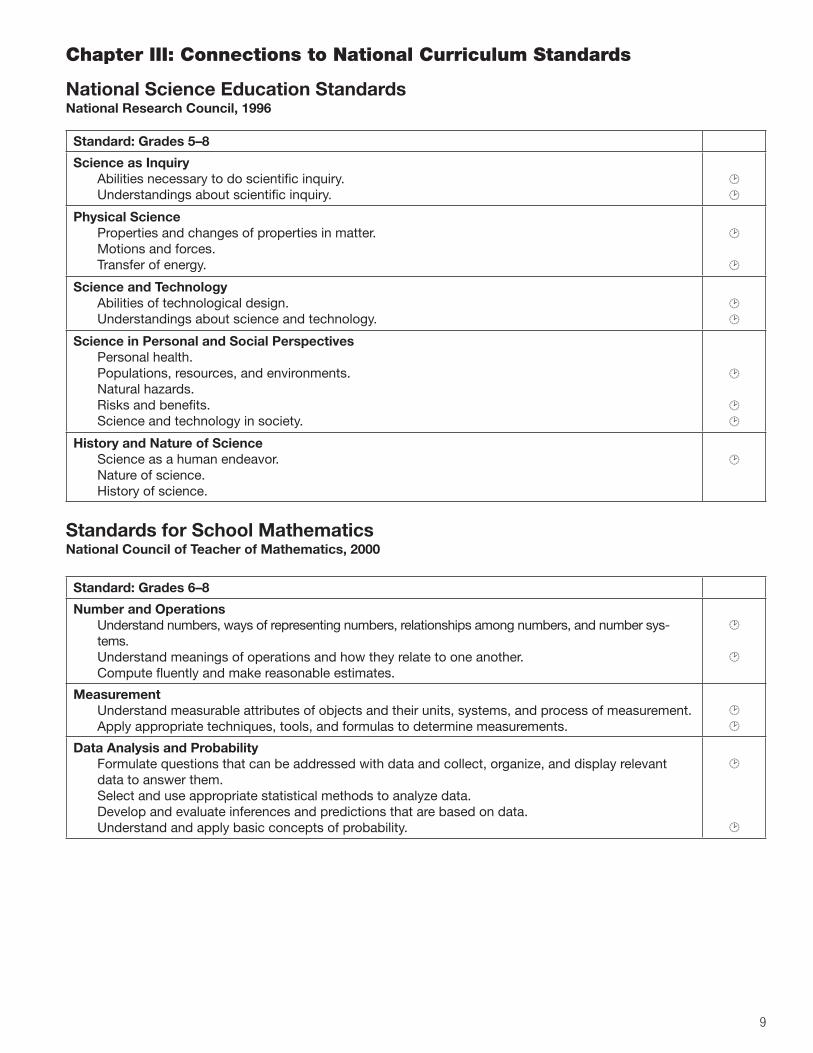
Chapter III: Connections to National Curriculum Standards
National Science Education Standards National Research Council, 1996
Standard: Grades 5–8
Science as Inquiry Abilities necessary to do scientific inquiry. Understandings about scientific inquiry.
¸¸
Physical Science Properties and changes of properties in matter. Motions and forces. Transfer of energy.
¸
¸
Science and Technology Abilities of technological design. Understandings about science and technology.
¸¸
Science in Personal and Social Perspectives Personal health. Populations, resources, and environments. Natural hazards. Risks and benefits. Science and technology in society.
¸
¸¸
History and Nature of Science Science as a human endeavor. Nature of science. History of science.
¸
Standards for School Mathematics National Council of Teacher of Mathematics, 2000
Standard: Grades 6–8
Number and Operations Understand numbers, ways of representing numbers, relationships among numbers, and number sys-
tems. Understand meanings of operations and how they relate to one another. Compute fluently and make reasonable estimates.
¸
¸
Measurement Understand measurable attributes of objects and their units, systems, and process of measurement. Apply appropriate techniques, tools, and formulas to determine measurements.
¸¸
Data Analysis and Probability Formulate questions that can be addressed with data and collect, organize, and display relevant
data to answer them. Select and use appropriate statistical methods to analyze data. Develop and evaluate inferences and predictions that are based on data. Understand and apply basic concepts of probability.
¸
¸

10
Standards for Technological Literacy International Technology Education Association, 2000
Standard: Grades 6–8
The Nature of Technology Characteristics and scope of technology. Core concepts of technology. Relationships among technologies and the connections between technology and other fields.
¸¸¸
Technology and Society Cultural, social, economic, and political effects of technology. Effects of technology on the environment. Role of society in the development and use of technology. Influence of technology on history.
¸
Design Attributes of design. Engineering design. Role of troubleshooting, research and development, invention and innovation, and experimentation in problem-solving.
¸¸¸
Abilities for a Technological World Apply the design process. Use and maintain technological products and systems. Assess the impact of products and systems.
¸

11
Chapter IV: Preparing to Teach
Detailed Materials ListsThe purpose of these Detailed Materials Lists is to identify everything you will need to gather in order to implement this challenge. Estimated costs are provided for items you are likely to need exclusively for this project and that are not likely to already be available in your classroom or school. Therefore, no cost estimate is provided for such items as the triple beam balance and the rubber bands. Likewise, no cost estimates are provided for items you or your students might have at home, such as plastic water bottles.
• Table1liststheitemsyouwillneedfortheclassroom.• Table2liststheitemsyouwillneedtobuildaconductivitytester.• Table3liststheitemsyouwillneedtobuildthefiltrationdevice.• Table4liststheitemstobeusedasfiltermediainthefiltrationdevice.• Table5liststheitemsyouwillneedtomakethesimulatedwastewater.• Table6liststheitemsyouwillneedforthestudentposters/presentations.
Table 1: Materials needed for the classroom.
Item Qty. Comments Est. Cost
Triple beam balance or alternative
2–3 Students will need to weigh filter media.
Conductivity tester 3 Students will use the tester to measure the conductivity of their unfiltered and filtered wastewater.
See Table 2
Sink or bucket for used wastewater
1–2 If no sink is available, 1–2 buckets or large pans will work.
Graduated cylinder, 250 mL
1–2 Students will need to measure the amount of simu-lated wastewater they are required to use. If you have enough, the students can use these for pouring the wastewater into the filtration device.
pH test strip 3–4 per team
The strips should have a range of 1–12 or 14. The total number needed depends upon how many student teams you have.
$16.50 pkg. of 1,000
Plastic cup, 16 oz.or alternative
6–8 per team
In case there are not enough graduated cylinders for each group, a cup will be needed to hold the measured wastewater. The wastewater will be poured from this cup into the filtration device.
$2.00pkg. of 50
File folder 1 per team
Each team will need a file folder to store their Design and Evaluation Sheets and any notes.
Newspaper For drying activated carbon. Transparency pen and Sharpie marker
1 per team
—
Large, plastic, wide-mouthed jars
2 These are for rinsing gravel and charcoal. Label accord-ingly on both the lids and sides of jars.
Table 2: Materials needed for each conductivity tester.
Item Qty. Comments Est. Cost
Multimeter (digital) 1 The multimeter must be able to measure current in mil-liamps. Be sure the meter includes test leads.
$10–$20
9 volt battery 1 It is a good idea to have 1 – 2 extra batteries on hand. $5 for pkg. of 2
Battery snap connector 1 Used to connect the battery to the meter leads. $2 each
Electrical tape, black 15 cm(6 in)
Needed to hold snap connector wire to multimeter lead. $0.47 per roll
Wire stripper or knife 1 Needed to strip insulation from battery snap connector.
12
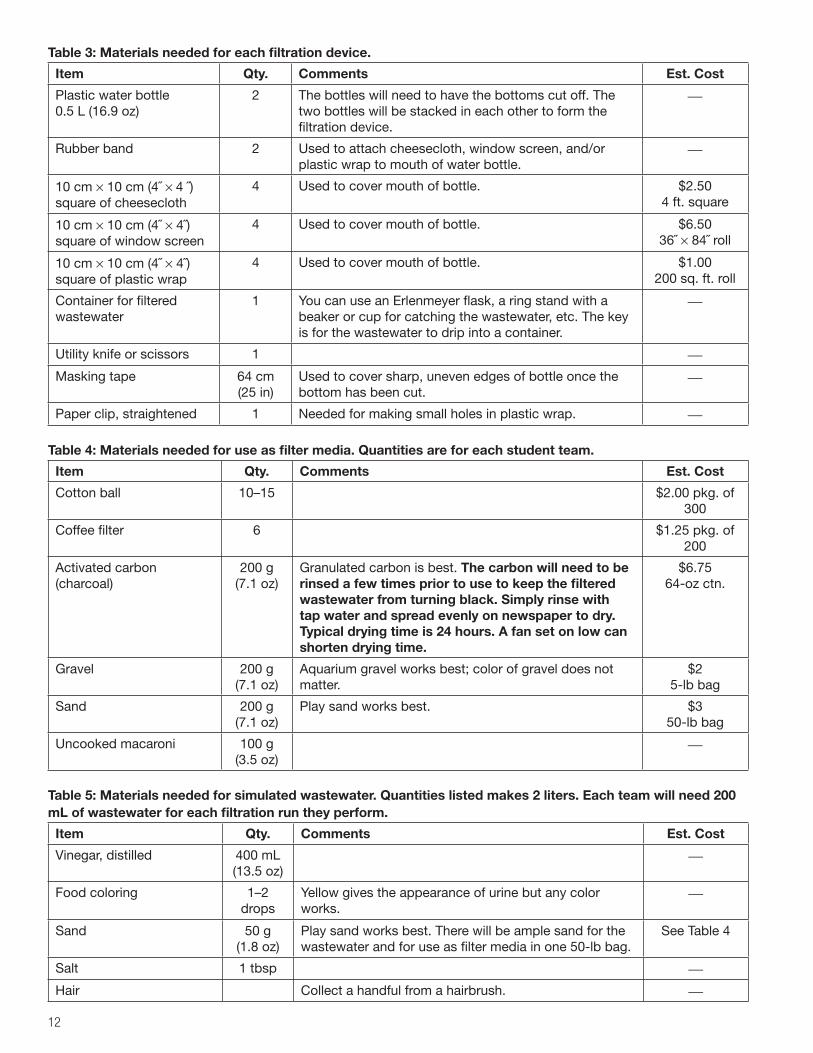
Table 3: Materials needed for each filtration device.
Item Qty. Comments Est. Cost
Plastic water bottle 0.5 L (16.9 oz)
2 The bottles will need to have the bottoms cut off. The two bottles will be stacked in each other to form the filtration device.
Rubber band 2 Usedtoattachcheesecloth,windowscreen,plastic wrap to mouth of water bottle.
and/or
10 cm × 10 cm (4˝ × 4 ˝)square of cheesecloth
4 Used to cover mouth of bottle. $2.50 4 ft. square
10 cm × 10 cm (4˝ × 4˝)square of window screen
4 Used to cover mouth of bottle. $6.5036˝ × 84˝ roll
10 cm × 10 cm (4˝ × 4˝)square of plastic wrap
4 Used to cover mouth of bottle. $1.00200 sq. ft. roll
Container for filtered wastewater
1 You can use an Erlenmeyer flask, a ring stand with a beaker or cup for catching the wastewater, etc. The key is for the wastewater to drip into a container.
Utility knife or scissors 1 Masking tape 64 cm
(25 in)Used to cover sharp, uneven edges of bottle once the bottom has been cut.
Paper clip, straightened 1 Needed for making small holes in plastic wrap.
Table 4: Materials needed for use as filter media. Quantities are for each student team.
Item Qty. Comments Est. Cost
Cotton ball 10–15 $2.00 pkg. of 300
Coffee filter 6 $1.25 pkg. of 200
Activated carbon (charcoal)
200 g(7.1 oz)
Granulated carbon is best. The carbon will need to be rinsed a few times prior to use to keep the filtered wastewater from turning black. Simply rinse with tap water and spread evenly on newspaper to dry. Typical drying time is 24 hours. A fan set on low can shorten drying time.
$6.7564-oz ctn.
Gravel 200 g(7.1 oz)
Aquarium gravel works best; color of gravel does not matter.
$25-lb bag
Sand 200 g(7.1 oz)
Play sand works best. $350-lb bag
Uncooked macaroni 100 g(3.5 oz)
Table 5: Materials needed for simulated wastewater. Quantities listed makes 2 liters. Each team will need 200 mL of wastewater for each filtration run they perform.
Item Qty. Comments Est. Cost
Vinegar, distilled 400 mL(13.5 oz)
Food coloring 1–2 drops
Yellow gives the appearance of urine but any color works.
Sand 50 g (1.8 oz)
Play sand works best. There will be ample sand for the wastewater and for use as filter media in one 50-lb bag.
See Table 4
Salt 1 tbsp Hair Collect a handful from a hairbrush.
Dust Collect a handful from a piece of furniture, window sill, etc.
Tap water Place all items in beaker prior to adding water. Fill beaker with water to the 2-liter mark.
2 liter beaker 1 Mix simulated wastewater in this container. Students will use graduated cylinders to measure out the amount needed for the challenge.
Stirring device 1 The wastewater will need to be stirred prior to each team measuring out their sample. The sand, hair, and dust settle to the bottom when the mixture is allowed to rest.
Table 6: Materials needed for each student team poster/presentation.
Item Comments Est. Cost
Poster board or alternative Each student team will need one poster board or alternative. Markers, colored pencils, crayons, etc.
Scissors Glue or tape
Measuring ConductivityConductivity is a measure of a material’s capacity to conduct electricity. Conductivity is a standard method to mea-sure the purity of water, specifically the quantity of inorganic contaminants (which conduct electricity). Completely pure water will not conduct electrical current. Thus, the smaller the amount of current that flows through the treated wastewater, the lower the concentration of inorganic contaminants. The water recovered and purified by the WRS on the ISS has an average conductivity of approximately 1 µmho/cm, most of which is due to the residual iodine added to the water for its biocidal properties. (µmhos/cm is the unit of measure of conductivity.)
In order to measure conductivity, a circuit must be created. A circuit is a closed path through which a continuous cur-rent can flow. Circuits are designed to do specific jobs, such as light a bulb. Circuits can be found everywhere and serve many different purposes.
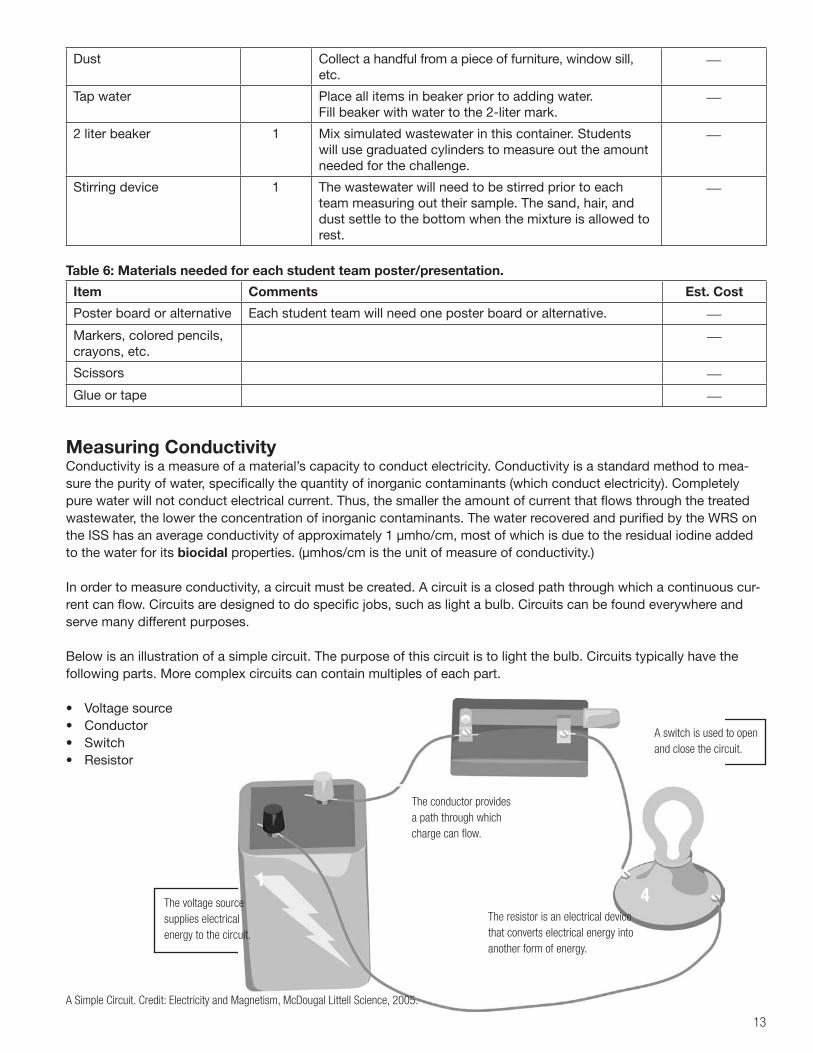
Below is an illustration of a simple circuit. The purpose of this circuit is to light the bulb. Circuits typically have the following parts. More complex circuits can contain multiples of each part.
• Voltagesource• Conductor• Switch• Resistor
1The voltage source supplies electrical energy to the circuit.
2The conductor provides a path through which charge can flow.
3A switch is used to open and close the circuit.
4The resistor is an electrical device that converts electrical energy into another form of energy.
A Simple Circuit. Credit: Electricity and Magnetism, McDougal Littell Science, 2005.
13
14
Directions for Building the Conductivity TesterAllow approximately 30 minutes to build and test each conductivity tester.
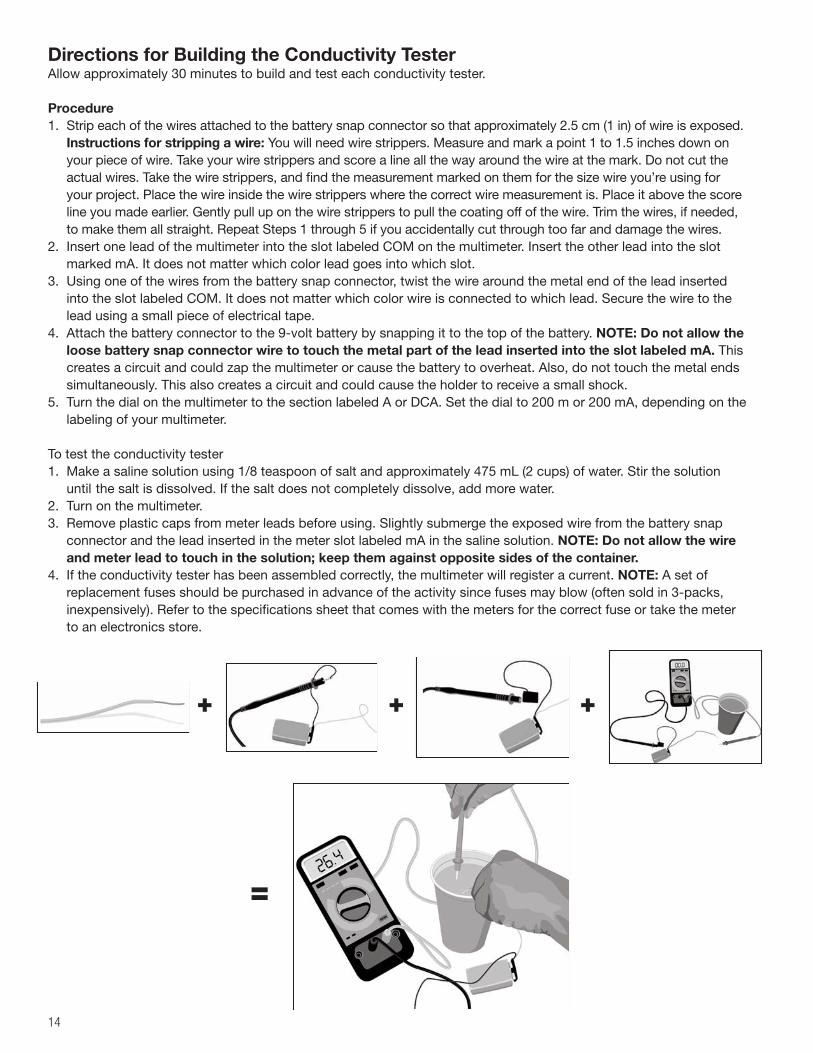
Procedure1. Strip each of the wires attached to the battery snap connector so that approximately 2.5 cm (1 in) of wire is exposed.
Instructions for stripping a wire: You will need wire strippers. Measure and mark a point 1 to 1.5 inches down on your piece of wire. Take your wire strippers and score a line all the way around the wire at the mark. Do not cut the actual wires. Take the wire strippers, and find the measurement marked on them for the size wire you’re using for your project. Place the wire inside the wire strippers where the correct wire measurement is. Place it above the score line you made earlier. Gently pull up on the wire strippers to pull the coating off of the wire. Trim the wires, if needed, to make them all straight. Repeat Steps 1 through 5 if you accidentally cut through too far and damage the wires.
2. Insert one lead of the multimeter into the slot labeled COM on the multimeter. Insert the other lead into the slot marked mA. It does not matter which color lead goes into which slot.
3. Using one of the wires from the battery snap connector, twist the wire around the metal end of the lead inserted into the slot labeled COM. It does not matter which color wire is connected to which lead. Secure the wire to the lead using a small piece of electrical tape.
4. Attach the battery connector to the 9-volt battery by snapping it to the top of the battery. NOTE: Do not allow the loose battery snap connector wire to touch the metal part of the lead inserted into the slot labeled mA. This creates a circuit and could zap the multimeter or cause the battery to overheat. Also, do not touch the metal ends simultaneously. This also creates a circuit and could cause the holder to receive a small shock.
5. Turn the dial on the multimeter to the section labeled A or DCA. Set the dial to 200 m or 200 mA, depending on the labeling of your multimeter.
To test the conductivity tester1. Makeasalinesolutionusing1/8teaspoonofsaltandapproximately475mL(2cups)ofwater.Stirthesolution
until the salt is dissolved. If the salt does not completely dissolve, add more water.2. Turn on the multimeter.3. Remove plastic caps from meter leads before using. Slightly submerge the exposed wire from the battery snap
connector and the lead inserted in the meter slot labeled mA in the saline solution. NOTE: Do not allow the wire and meter lead to touch in the solution; keep them against opposite sides of the container.
4. If the conductivity tester has been assembled correctly, the multimeter will register a current. NOTE: A set of replacement fuses should be purchased in advance of the activity since fuses may blow (often sold in 3-packs, inexpensively). Refer to the specifications sheet that comes with the meters for the correct fuse or take the meter to an electronics store.
+ + +
=
15
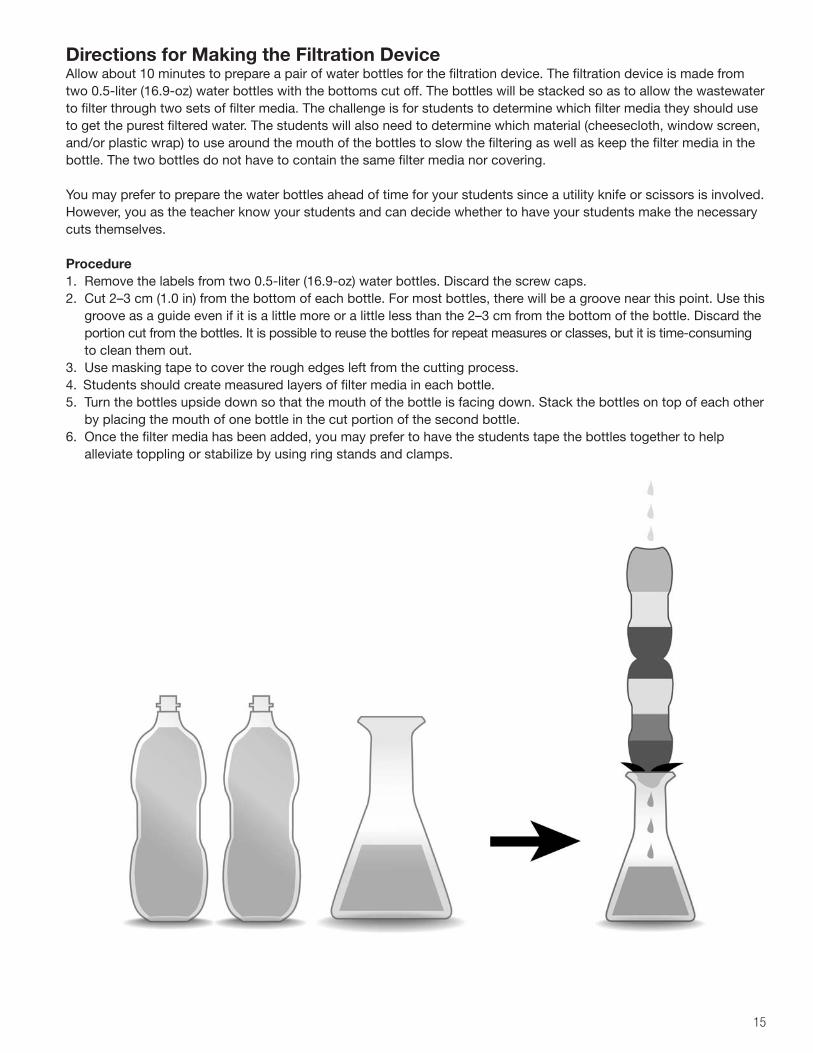
Directions for Making the Filtration DeviceAllow about 10 minutes to prepare a pair of water bottles for the filtration device. The filtration device is made from two 0.5-liter (16.9-oz) water bottles with the bottoms cut off. The bottles will be stacked so as to allow the wastewater to filter through two sets of filter media. The challenge is for students to determine which filter media they should use to get the purest filtered water. The students will also need to determine which material (cheesecloth, window screen, and/orplasticwrap)tousearoundthemouthofthebottlestoslowthefilteringaswellaskeepthefiltermediainthebottle. The two bottles do not have to contain the same filter media nor covering.
You may prefer to prepare the water bottles ahead of time for your students since a utility knife or scissors is involved. However, you as the teacher know your students and can decide whether to have your students make the necessary cuts themselves.
Procedure 1. Remove the labels from two 0.5-liter (16.9-oz) water bottles. Discard the screw caps.2. Cut 2–3 cm (1.0 in) from the bottom of each bottle. For most bottles, there will be a groove near this point. Use this
groove as a guide even if it is a little more or a little less than the 2–3 cm from the bottom of the bottle. Discard the portion cut from the bottles. It is possible to reuse the bottles for repeat measures or classes, but it is time-consuming to clean them out.
3. Use masking tape to cover the rough edges left from the cutting process.4. Students should create measured layers of filter media in each bottle.5. Turn the bottles upside down so that the mouth of the bottle is facing down. Stack the bottles on top of each other
by placing the mouth of one bottle in the cut portion of the second bottle.6. Once the filter media has been added, you may prefer to have the students tape the bottles together to help
alleviate toppling or stabilize by using ring stands and clamps.
Safety ConsiderationsIt is important to discuss with students how to use the Conductivity Tester. Do notallow the two exposed metal ends — the wire coming from the battery snap connector and the multimeter lead — to touch. This could cause the battery to overheat or the multimeter to not function properly. Do not allow a student to physically touch the metal ends simultaneously. This would create a circuit causing a 9-volt flow of electric current. Distance of leads from bottom and distance leads are apart will affect current readings, so make sure ALL students decide on this distance and stay consistent, e.g., place leads 1 cm from bottom of 100 mL beakers and keep them on opposite sides against the glass. Swish gently immediately before taking reading, then count to ten and record mA value. Leads need to be cleaned and dried between all tests.
16
Directions for Making Simulated WastewaterThe simulated wastewater will take approximately 15 minutes to make. This should be done the morning of the filtra-tion experiment. Each team will need 200 mL of the wastewater. Thus, a 2-liter supply will allow for 10 student teams to conduct the filtration experiment once each.
Procedure1. Measure the dry materials and place in the container one at a time.2. Measure the vinegar and add to the dry materials.3. Add enough water to fill the container to 2 liters.4. Add 1–2 drops of food coloring. 5. Stir to mix.
Measuring pHAn acid is any of a class of substances that yields hydrogen ions (H+) when dissolved in water. The greater the con-centration of hydrogen ions produced, the more acidic the substance is. Acids are characterized by a sour taste and the ability to react with bases and certain metals to form salts.
A base is any of a class of substances that yields hydroxide ions (OH-) when dissolved in water. The greater the con-centration of hydroxide ions produced, the more basic the substance is. Bases are characterized by a bitter taste, a slippery feel, and the ability to react with acids to form salts.
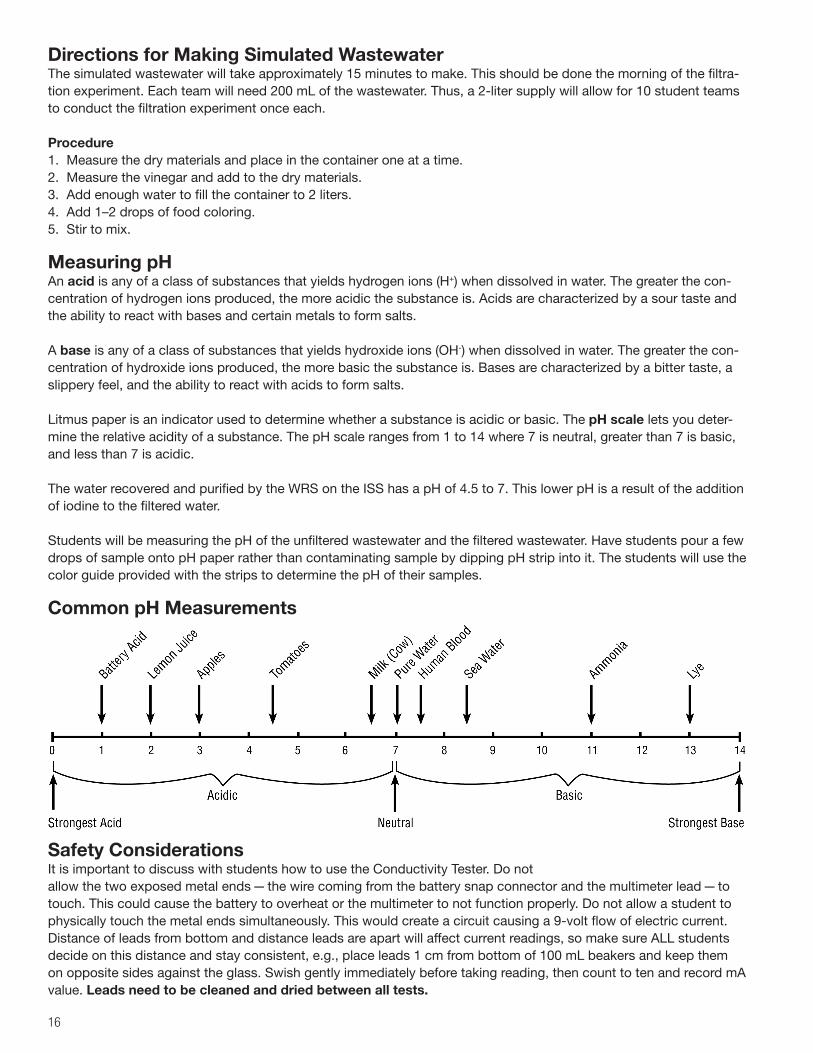
Litmus paper is an indicator used to determine whether a substance is acidic or basic. The pH scale lets you deter-mine the relative acidity of a substance. The pH scale ranges from 1 to 14 where 7 is neutral, greater than 7 is basic, and less than 7 is acidic.
The water recovered and purified by the WRS on the ISS has a pH of 4.5 to 7. This lower pH is a result of the addition of iodine to the filtered water.
Students will be measuring the pH of the unfiltered wastewater and the filtered wastewater. Have students pour a few drops of sample onto pH paper rather than contaminating sample by dipping pH strip into it. The students will use the color guide provided with the strips to determine the pH of their samples.
Common pH Measurements

17
Teaching Strategies for an Engineering Design ChallengeLike any inquiry-based activity, this engineering design challenge requires the teacher to allow students to explore and experiment, make discoveries, and make mistakes. The following guidelines are intended to help you make this activity as productive as possible.
• Besuretodiscussthedesignsbeforeandaftertestingandifpossible,makeobservationsoraskquestionsdur-ing the test. Discussing the designs before testing forces students to think about and communicate why they have designed as they have. Discussing the designs after the testing, while the test results are fresh in their minds, helps them reflect on and communicate what worked and what didn’t and how they can improve their design the next time.
• Watchcarefullywhatstudentsdoandlistencarefullytowhattheysay.Thiswillhelpyouunderstandtheirthinkingand help you guide them to better understanding.
• Remindthemofwhattheyhavealreadydone;comparetheirdesignstopreviousonestheyhavetriedinearlierruns. This will help them learn from the design-test-redesign approach.
• Steerstudentstowardamorescientificapproach.Iftheyhavechangedmultipleaspectsofadesignandobservedchanges in results, ask them which of the things they changed caused the difference in performance. If they are not sure what caused the change, suggest they try changing only one thing at a time. This helps them learn the value of controlling variables.
• Modelbrainstorming,carefulobservation,anddetaileddescriptionusingappropriatevocabulary.• Ask“guiding”or“focusing”questions.• Requirestudentstousespecificlanguageandbepreciseaboutwhattheyaredescribing.• Comparedesignstothoseofothergroups.Endorseborrowing.Afterall,engineersborrowagoodideawhenever
they can. However, be sure that the team that came up with the good idea is given credit in documentation.• Emphasizeimprovementovercompetition.Thegoalofthechallengeisforeachteamtoimproveitsowndesign.
However, there should be some recognition of designs that perform extremely well. There should also be recognition for teams whose designs improve the most, for teams that originate design innovations that are used by others, for elegance of design, and for quality of construction.
• Encourageconjecturing.Getstudentstoarticulatewhattheyaredoingintheformof“Iwanttoseewhatwill happen if…”
• Connectwhatstudentsaredoingtowhatengineersdo.Itwillhelpstudentsseethesignificanceofthedesignchallenge if they see that the process they are following is the same process that adult engineers follow.
• Helpstudentsunderstandthatdesignsthat“fail”arepartofthenormaldesignprocess.Muchcanbelearnedfroma “failed” design. Discuss how engineers and scientists learn from their failures.
Helping Students Understand the Design ProcessEngineering involves systematically working to solve problems. To do this, engineers employ an iterative process of design-test-redesign, until they reach a satisfactory solution. To help students visualize the cyclic nature of the design process, we have provided a chart that you can use in a class discussion.
Once students have sufficient experience in designing, building, and testing models, it is valuable for them to formally describe the design process they are undertaking. Students require a significant amount of reinforcement to learn that they should study not just their own results but the results of other teams as well. They need to realize that they can learn from the successes and failures of others too.
Select a time when you feel the students have had enough experience with the design process to be able to discuss it. Use the black line master of The Design Process in the Teacher Resources section to make an overhead transparency. Using it as a guide, go through the process step-by-step, using a particular design as an example. It’s useful to hold up the model and point out specific features that may be the result of studying the test data or unsuccessful builds or additional research. For example, using a particular model, ask “How did this feature come about? Where did you get the idea? Was it a result of a previous test, either by you or by another team?”

18
19
Chapter V: Classroom SessionsThese sessions are intended to be a guide for you to use when implementing this project. You will know your class and how to best pace the sessions so as to make optimum use of the material included in this guide.
Session 1: Introduce the Challenge This session can be completed in one to two class periods.
Session 2: Design and Test a Filtration Device This session can be completed in one to two class periods.
Session 3: A Filtration Device for the Class This session can be completed in one to two class periods.
Session 4: Construct Posters This session can be completed in one class period. NOTE: Constructing posters can be done while fil-
tration is occurring. After filtration, students will run tests to get values needed to complete their before and after charts.
Session 5: Student Presentations This session can be completed in one class period.
Career Highlight
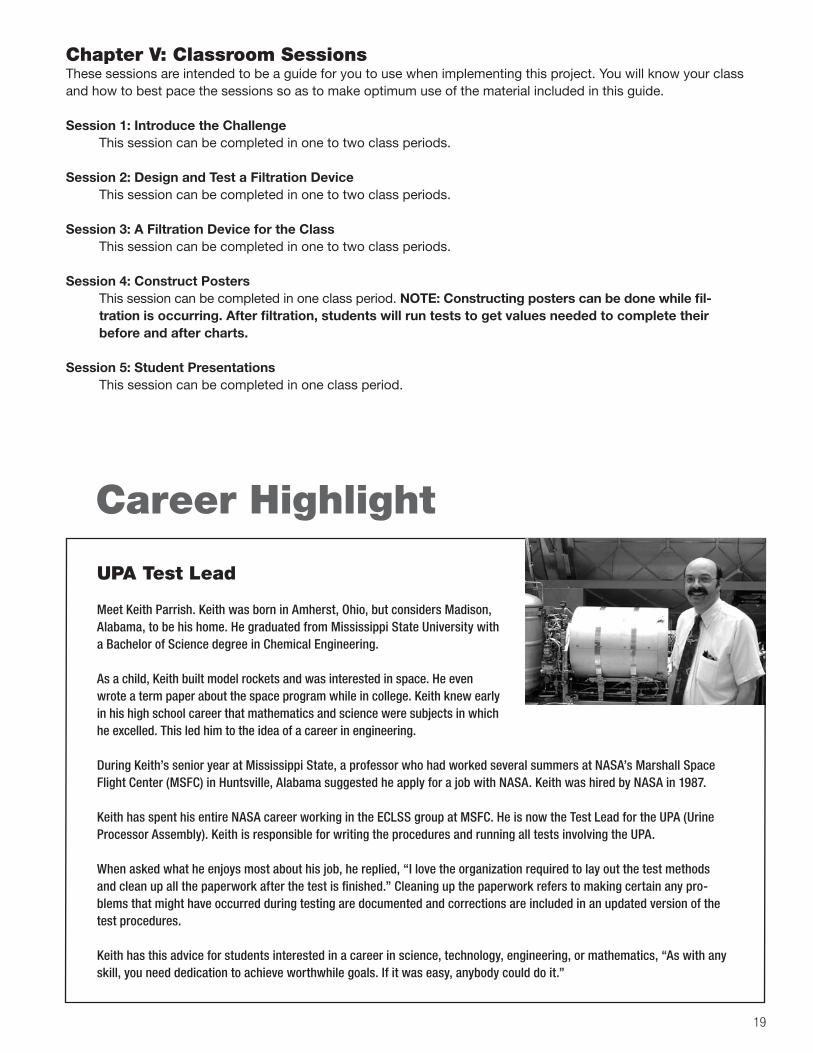
UPA Test Lead
Meet Keith Parrish. Keith was born in Amherst, Ohio, but considers Madison, Alabama, to be his home. He graduated from Mississippi State University with a Bachelor of Science degree in Chemical Engineering.
As a child, Keith built model rockets and was interested in space. He even wrote a term paper about the space program while in college. Keith knew early in his high school career that mathematics and science were subjects in which he excelled. This led him to the idea of a career in engineering.
During Keith’s senior year at Mississippi State, a professor who had worked several summers at NASA’s Marshall Space Flight Center (MSFC) in Huntsville, Alabama suggested he apply for a job with NASA. Keith was hired by NASA in 1987.
Keith has spent his entire NASA career working in the ECLSS group at MSFC. He is now the Test Lead for the UPA (Urine Processor Assembly). Keith is responsible for writing the procedures and running all tests involving the UPA.
When asked what he enjoys most about his job, he replied, “I love the organization required to lay out the test methods and clean up all the paperwork after the test is finished.” Cleaning up the paperwork refers to making certain any pro-blems that might have occurred during testing are documented and corrections are included in an updated version of the test procedures.
Keith has this advice for students interested in a career in science, technology, engineering, or mathematics, “As with any skill, you need dedication to achieve worthwhile goals. If it was easy, anybody could do it.”
20
Session 1: Introduce the Challenge
OverviewThe material in this session provides the essential information students should know before they start the hands-on portion of the challenge. This is a busy session. You may find it necessary to break this into two class periods.
GoalsStudents will:• UnderstandtheimportanceandfunctionoflifesupportsystemsusedbyNASA.• BecomefamiliarwiththeECLSSusedontheISS.• Understandthatthechallengeistobuildthemosteffectivewaterfiltrationdevice.• BecomefamiliarwiththeDesign and Evaluation Sheet.• Understandthedesignprocess.• Becomefamiliarwiththematerialstheywillusetodesignandtesttheirwaterfiltrationdevice.
Materials• Transparenciesfortheoverheadprojector(seeBlack Line Masters in Teacher Resources section): The System Diagram The Purification Process The Conductivity Tester The Filtration Device Design and Evaluation Sheet• Design and Evaluation Sheet for each student• Materialstobeusedtobuildandtestthewaterfiltrationdevice(toshowstudentsthematerialstheywillbe
working with): Conductivity tester pH strips Water bottles Activated carbon Uncooked macaroni Cotton balls Coffee filters Sand Gravel Window screen Cheesecloth Plastic wrap• Saltwater(todemonstratetheconductivitytester)• Bakingsodasolution(todemonstratepHstrips)• Vinegar(todemonstratepHstrips)
Detailed Steps1. Discuss life support systems (Earth and early spacecraft).Tell students that they are about to start a multisession engineering design challenge that is related to the life support work of NASA. Ask students what they know about life support systems, both on Earth and in NASA spacecraft. Then provide them with some background material to help them (see Chapter 1).
2. Discuss the ECLSS on the ISS.Use the information included in Chapter 1 along with The System Diagram and The Purification Process transparen-cies to teach students about the ECLSS used on the ISS.
3. Introduce the challenge.The challenge is to design a water filtration device that will yield the purest water. This will be determined by measur-ing the conductivity and pH of the unfiltered simulated wastewater and of the filtered wastewater. Show students the materials they will be using to create their filtration device. Discuss with the students what role each of the media
21
might play in filtering the wastewater. If any of the students have an aquarium you may ask them to share how they use activated carbon and gravel to help filter aquarium water. Use a transparency of The Filtration Device to show the students what they will be using.
4. Introduce and demonstrate the conductivity tester and pH strips.(You may have asked students to help you build and test the Conductivity Testers. If so, you may want to let those students demonstrate the tester.)
Set up a conductivity tester and introduce its major components (battery, battery snap connector, multimeter, and mul-timeter leads). Explain that the multimeter is used to measure current. Completely pure water will not conduct an electri-cal current. Using a salt solution, demonstrate how to use the conductivity tester. Allow all students to try the tester.
If your students are not familiar with using pH strips you will need to demonstrate how to use them. A small amount of vinegar can be used to show an acidic pH. The baking soda solution (a small amount of soda mixed with water) can be used to show a more basic pH. It is important for the students to be able to distinguish the color of the strip and match that color to the color chart that came with the pH strips.
5. Describe the procedures and expectations of the challenge.One of the main opportunities that the Engineering Design Challenges offer is for students to participate in a pro-cess known as the design process (see Helping Students Understand the Design Process in Chapter IV: Preparing to Teach). Although it is recommended that a formal introduction of this process be deferred until Session 3, students should nevertheless start to follow some of the related procedures from the very first day of their hands-on work. Two of those procedures should be described in this session, and reinforced in each future session.
Learn from one another. Students should be encouraged to think of their entire class as a single engineering design team that
learns from the successes and failures of each member and that uses that information to help move toward the most effective water filtration apparatus design.
Using the Design and Evaluation Sheet Give each student a copy of the Design and Evaluation Sheet and discuss each element of the form
with them. Let them know they should complete the top and left side of the sheet prior to beginning the filtration of the wastewater. The right side of the sheet is designed to help them focus their observations during the test, to allow them to record their data, and to make notes about what needs to be changed to improve the performance of their filtration device.
Finally, let students know they will be required to prepare a poster and presentation to share their design and results with others.
A Note about Filter MediaActivated carbon is used in the removal of organic contaminants in water. Organic contaminants are usually responsi- ble for taste, odor, color, and turbidity (clarity) problems. Activated carbon will remove chlorine and reduce particulates in the water.
Sand and gravel are natural filter materials. Our own groundwater filters through layers of dirt, stone, gravel, and sand. These materials act as a strainer and trap particulates. This is known as mechanical, or physical, filtration.
The uncooked macaroni, cotton balls, and coffee filters all serve to trap particulates and they absorb water. Since there is salt (sodium chloride – NaCl) in the simulated wastewater, as water is absorbed by the filter media, ions of sodium (Na+) and chlorine (Cl-) are also absorbed. The salt is what makes the wastewater conductive. Thus, the absorption of sodium and chlorine ions could lower the conductivity of the wastewater.
As water is absorbed, the food coloring in the simulated wastewater is also absorbed. Therefore, the uncooked maca-roni,cottonballs,andcoffeefiltersabsorbfoodcoloringandhelptochangethecolor/clarityofthefilteredwastewater.
22
Session 2: Design and Test a Filtration Device
OverviewThis is the first session for students to design and build a filtration device. It is important to allow the students enough time to discuss their designs with their team members prior to beginning the actual assembly and testing of their device. You may find that it could take most of one class period for students to gather the materials needed and to discuss their designs. If this is the case, there needs to be ample space in your classroom for the teams to store their filtration devices overnight and then begin filtering the wastewater at the beginning of the next class period. To save time, have all the materials the students will use ready when they arrive in class. Be sure to have the simulated waste-water made beforehand as well.
Remind students of the importance of working as a team and carefully recording information on the Design and Evaluation Sheet.
GoalsStudents will:• Experienceworkingasateamtodesignawaterfiltrationdevice.• Expresstheirdesignrationaleverbally• DevelopproficiencyusingtheDesign and Evaluation Sheet.• Becomefamiliarwithusingtheconductivitytester.• BecomefamiliarwithusingpHstrips
Materials• Materials Lists from Teacher Resources section (one per team) • Filefolders(oneperteam)• Design and Evaluation Sheet (given to each student in previous session)• Triplebeambalanceoralternative• Conductivitytesters• Graduatedcylinders• Plasticcups• Waterbottles• Activatedcarbon• Uncookedmacaroni• Cottonballs• Coffeefilters• Sand• Gravel• Windowscreen• Cheesecloth• Plasticwrap• Paperclips• Rubberbands• Simulatedwastewater• Stirringdevice• Beakers• Bucket/container(forusedwastewater)• Longforceps• Twolarge-mouthedplasticcontainers(forcollectingandrinsingusedcharcoalandgravel,respectively)
Detailed Steps1. Designate teams.You may have predesignated teams for activities such as this one. If you do not, you will need to divide your students into teams of two to three students each. This can be done randomly by drawing cards or numbers, or you may wish to assign students to teams. Give the students a few minutes to come up with a name for their team. Give each team a file folder and have them label it with their team name.
23
2. Discuss possible designs.Before each team has assembled their materials, they should spend some time discussing how they want to design their filtration device. Which filter media do they want to use? In what order should they place the materials in the bottle? Should each bottle use the same filter media in the same order? Which material, cheesecloth, window screen, and/orplasticwrap,shouldbeusedtosecurethemouthofeachbottle?Thesearethingstheteamsshoulddiscussand decide prior to putting anything into or on the plastic water bottles. Students may present their proposed filtration designs to the whole-class “engineering department.”
Let students know they do not have to use every media provided. They also do not have to use all of a particular media just because they have it. If they only want to use 50 g of uncooked macaroni then that is acceptable. They should make note of how much of the media they use. The measurements are vital to describing the design. This will aid them when evaluating and redesigning their devices.
It is important that the activated carbon be used. Hopefully the need for using the carbon will have emerged in the discussion from the previous session. If not, it is suggested to wait until the second round to tell them.
NOTE: If there is not enough time left in the class period to complete the remaining steps in this session, this is the point at which it is easiest to stop. Have the students label their cups with their team name. The students should put their notes and Design and Evaluation Sheets into the file folder. All other materials need to be neatly stacked together. You should designate an area for each team to place their materials.
3. Teams collect materials for activity.Each team will need to gather the materials needed for assembling and testing the filtration device. The lists are pro-vided as a Black Line Master in the Teacher Resources section of this guide. The students should put their measured quantities of carbon, sand, gravel, and uncooked macaroni into plastic cups (or whatever other container you have chosen). If there are not enough graduated cylinders for each team, the simulated wastewater can be measured with one cylinder and then transferred to plastic cups. The other materials can be easily handled without the need for con-tainers. NOTE: Coffee filters make good containers for dry materials. Plastic cups can be converted to graduated cyl-inders by placing lines on the outside for every 10 mL of water added (lower accuracy than a graduated cylinder, but good when you’re low on the real thing).
Depending on the size of your class, the number of triple beam balances available, and the number of graduated cylinders you have, this part of the session could take 20–30 minutes.
4. Assemble the filtration device.Once students have justified their filter media designs and received department approval, it is time to start assembling the filtration device. Remind the students to cover the mouth of each bottle prior to putting any filter media into the bottles. The students should use cheesecloth, window screen, plastic wrap, or any combination of the three materials to insure the filter media does not fall through the mouth of the bottle. If a team elects to use the plastic wrap, make sure the students remember to punch a couple of holes into it using the straightened paper clip.
The filtration device should be placed in an Erlenmeyer flask or other container for catching and holding the filtered water. The filtration device should rest on or in the opening of the container but not on the bottom of the container. Make sure the container is stable and there is no risk of toppling. RIng stands and clamps may help keep filtration device bottles upright.
Remind students to sketch their filtration device onto the Design and Evaluation Sheet prior to beginning the filtration process.
NOTE: The activated carbon can, and will need to be, reused. In order to keep the carbon separated from the other filter media and easier to retrieve for rinsing and reuse, have students use a coffee filter between the carbon and any of the following: gravel, sand, and uncooked macaroni. For example, the team decides to put cotton balls in the mouth of the bottle. The carbon can go on top of the cotton without a problem because it is easy to separate these two items later. If the team chooses to put gravel, sand, or macaroni on top of the carbon, it is difficult to separate these items from the carbon. Have the students place the gravel, sand, or macaroni in a coffee filter before placing it on top of the carbon. Since only dry activated charcoal should be used, reuse means a day’s delay for a second class to do the activity.
24
5. Record observations and measurements.Each team will need 200 mL of simulated wastewater. Remind the teams they must measure the conductivity and determine the pH of their unfiltered wastewater. These values should be recorded on their Design and Evaluation Sheet. Students should also note any odors and the color and clarity of their sample before pouring through their filtration device.
6. Pour on the wastewater.It will be necessary to pour the water very slowly and in small increments. If all 200 mL is poured in at one time, it will overflow the bottle. It is also important for the students to pour the water in a circular motion so as to use the entire surface of whatever media is on top; do not pour all 200 mL in the exact same spot.
The wastewater should be allowed to flow naturally through the filtration device. The students should not squeeze, shake, or otherwise put force on the device to increase the flow. The filtration should be slow, with ample time for as much wastewater as possible to flow into the catch container. This will take, on average, 15 minutes.
7. Complete the Design and Evaluation Sheet.Once the wastewater has run through the filtration device it is time to collect the necessary data to complete the Design and Evaluation Sheet. The filtered wastewater will need to be poured into a graduated cylinder and the volume measured. The pH and conductivity of the filtered water should be obtained and other observations for pre- and post-filtering differences noted (color, clarity, smell, etc.).
Upon completion of the filtration run students will need to clean up their areas. Filtered wastewater should be col-lected in one bucket or container. The activated carbon should be rinsed and spread out on newspaper to dry. The gravel may also need to be rinsed and spread out to dry. The water bottles can also be reused; rinse them and allow them to air dry. All other filter media used should be discarded since it will not be reused.
Have each team place their Design and Evaluation Sheet in the team folder. Any notes taken during the design discus-sion should also be placed in the folder. Each team should elect one person to be responsible for keeping the folder and bringing it to class the next day.
NOTE: It is now time to decide whether or not to allow the students to do a second filtration run. This will require another class period. At the beginning of the period, have students discuss their design and results prior to assem-bling their next version of the filtration device. It is recommended that students do one more run, but if time does not permit, proceed to the next session.
25
Session 3: A Filtration Device for the Class
OverviewThis session is designed to allow and encourage class discussion about each team’s filtration device and to reach consensus on the most effective design. Each team will share their design and test results with the class. The stu-dents will then use this information to come up with a class design. The class will then test the design.
To save time, have all the materials the students will use ready when they arrive in class. Be sure to have the simulated wastewater made beforehand as well.
GoalsStudents will:• Analyzetestdataanddrawconclusions.• Incorporateandimproveuponthedesignsofothers.• Learnessentialelementsofthedesignprocess.• Refineobservationandrecordingskills.
Materials• Materials Lists from Teacher Resources section (several to be shared by students)• The Design Process transparency• Class Data transparency• Design and Evaluation Sheet for each student• Transparencypens(adifferentcolorforeachteam,ifpossible)• Triplebeambalanceoralternative• Conductivitytesters• Graduatedcylinders• Plasticcups• Waterbottles• Activatedcarbon• Uncookedmacaroni• Cottonballs• Coffeefilters• Sand• Gravel• Windowscreen• Cheesecloth• Plasticwrap• Paperclips• Rubberbands• Simulatedwastewater• Stirringdevice• Beakers• Bucket/container(forusedwastewater)• Longforceps• Twolarge-mouthedplasticcontainers(forcollectingandrinsingusedcharcoalandgravel,respectively)
26
Detailed Steps1. Discuss the design process.This is a good time to introduce the design process. Place The Design Process transparency on the overhead. Refer to Helping Students Understand the Design Process in Chapter IV to lead this discussion.
2. Review the results of the previous session.This part of the challenge—analyzing a collection of data—is an essential activity, not only to this challenge but also to science, technology, engineering, and mathematics activities in general. Stress that working together and learning from each other is important.
Have each team report on the filter media they used and in what order they placed it in the filtration device. (If a media was used in both bottles it should appear in their ordered list twice.) Have each team record the requested data on the Class Data Sheet transparency. It may be necessary to have several transparencies available.
Ask the students to look at the characteristics of each of the filtration devices. What do they all have in common? Does one stand out above the rest as being the highest performing? Knowing that the pH needs to be neutral and the conduc-tivity should be as low as possible, ask the class to rank the devices from highest performing to lowest performing.
3. Select and test the new design(s).Based upon the results posted by each team, the discussion about each design, and the ranking of effectiveness of each design, students should reach consensus on a design for a class filtration device. If consensus cannot be reached, allow students to come up with two or three designs. A run-off can then be held to determine which is best.
NOTE: Depending on the amount of time left in the class period, it may be necessary to postpone testing of the class filtration device, or devices, until the next class period.
Have students gather the necessary materials to assemble the class filtration device. Depending on your class size, there may not be enough tasks for each student to participate in putting together all that is needed. As much as pos-sible, have different students complete each task (e.g., have a different student weigh each filter media, have one stu-dent take the pH of the unfiltered wastewater, have a different student measure the conductivity of the unfiltered water, etc.)
Each student in the class should complete a Design and Evaluation Sheet for the class filtration device(s). You may want to have a transparency available of the Design and Evaluation Sheet. Let different students fill in the needed information. Project the transparency during the class period so that everyone can keep up with the data as it is acquired.
4. Wrap-up and preview.Once the test and the Design and Evaluation Sheet are completed, have students discuss the results and what they have learned. If you elected to have two or three designs compete in a run-off, determine the best design from the data col-lected. There may be time to complete posters during filtration so another day will not be needed.
“Otherwise, tell students that during the next class period each team will work on a poster about their design and test results. Select two to three students to make a poster for the class-designed filtration device.
27
Session 4: Construct Posters
Overview As a culminating activity, each student team will create a poster to document their water filtration device design from the beginning stages to the end. The poster offers students the opportunity to summarize and make sense of their design process. It provides a way for students to see how their design work has progressed.
GoalsStudents will:• Summarizeandreflectonresults.• Organizeresultsforcommunicationtoanaudience.
Materials• Posterboardoralternative(1perteam)• Markers,coloredpencils,crayons• Scissors• Glueortape• Teamfolder
Detailed Steps1. Explain the assignment.Explain to students that they will be creating a poster to tell the story of their water filtration device design to an audi-ence that is unfamiliar with the project. Explain that professional conferences often include poster sessions at which researchers present the results of their work. You can do a search on the Internet to locate tips on creating research posters. You may wish to make this information available to your students.
The poster should include a Design and Evaluation Sheet for each version of the water filtration device designed by the team, a sketch of the conductivity tester (to help explain how they measured the conductivity), an introduction to the challenge, and a brief written description of how their design evolved.
2. Define the assessment criteria.Explain to students that their posters will be evaluated using the following criteria (suggested criteria; you may wish to modify):
The poster should:• Includeanintroductiontothechallenge.• Presentaclear,organizedstorylinetoshowthedevelopmentofthedesign.• Containclearsketcheswithkeyfeaturesidentified.• Includetestresultsandadescriptionofwhathappenedtothedesignduringthetests(shouldbeincludedoneach
Design and Evaluation Sheet).• Usescientificvocabulary.• Haveanappealinglayoutwithatitle.• Usecorrectgrammarandspelling.
3. Create the posters.Give students at least one class period to create their posters. If necessary, allow the teams to complete this for home-work.
28
Session 5: Student Presentations
OverviewHere are a few options for sharing the students’ posters.
• Setupaschedulefortheteamstopresenttheirposterstotheclass.Dependingonthenumberofstudentteamsthis may take more than one day. Require students to stick to the time limit you set. Allow for a question and answer period at the end of each presentation.
• Organizeapostersessionmodeledafterthosethatoccuratprofessionalconferences.Havetheteamsdisplaytheirpostersinanappropriateroom(cafeteria,mediacenter/library,etc.).Halfthestudentteamswillstaywiththeirposter displays while the other half wander through the room reviewing the posters and asking questions of the presenting teams. At the half way mark of the class period, have the teams switch roles.
• Setupapostersessionandinvitestudentsfromotherclassesinyourschool.• SetupapostersessionataPTA/PTO/PTSAmeeting.Invitelocalofficialsandmediatoattend.
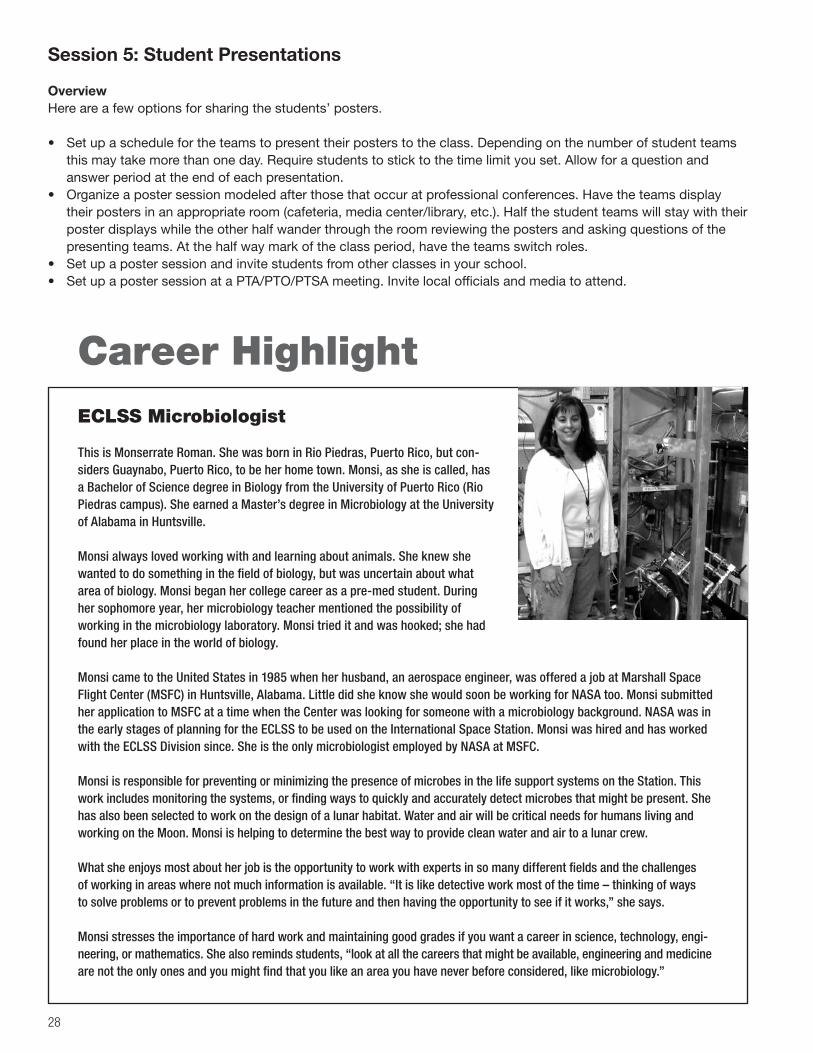
Career HighlightECLSS Microbiologist
This is Monserrate Roman. She was born in Rio Piedras, Puerto Rico, but con-siders Guaynabo, Puerto Rico, to be her home town. Monsi, as she is called, has a Bachelor of Science degree in Biology from the University of Puerto Rico (Rio Piedras campus). She earned a Master’s degree in Microbiology at the University of Alabama in Huntsville.
Monsi always loved working with and learning about animals. She knew she wanted to do something in the field of biology, but was uncertain about what area of biology. Monsi began her college career as a pre-med student. During her sophomore year, her microbiology teacher mentioned the possibility of working in the microbiology laboratory. Monsi tried it and was hooked; she had found her place in the world of biology.
Monsi came to the United States in 1985 when her husband, an aerospace engineer, was offered a job at Marshall Space Flight Center (MSFC) in Huntsville, Alabama. Little did she know she would soon be working for NASA too. Monsi submitted her application to MSFC at a time when the Center was looking for someone with a microbiology background. NASA was in the early stages of planning for the ECLSS to be used on the International Space Station. Monsi was hired and has worked with the ECLSS Division since. She is the only microbiologist employed by NASA at MSFC.
Monsi is responsible for preventing or minimizing the presence of microbes in the life support systems on the Station. This work includes monitoring the systems, or finding ways to quickly and accurately detect microbes that might be present. She has also been selected to work on the design of a lunar habitat. Water and air will be critical needs for humans living and working on the Moon. Monsi is helping to determine the best way to provide clean water and air to a lunar crew.
What she enjoys most about her job is the opportunity to work with experts in so many different fields and the challenges of working in areas where not much information is available. “It is like detective work most of the time – thinking of ways to solve problems or to prevent problems in the future and then having the opportunity to see if it works,” she says.
Monsi stresses the importance of hard work and maintaining good grades if you want a career in science, technology, engi-neering, or mathematics. She also reminds students, “look at all the careers that might be available, engineering and medicine are not the only ones and you might find that you like an area you have never before considered, like microbiology.”
29
Chapter VI: Opportunities for Extension
The list below is by no means complete. Hopefully this will serve as a springboard to other ideas.
• Collectandfilterothersamplesofwater.Examplesarerainwater,handwashwater,streamorpondwater,etc.• TryusingotherfiltermediasuchasStyrofoam™ pieces, potting soil, marbles, and popped popcorn.• Havestudentsresearchhowthewaterinyourtownisfiltered/treated.Maybetakeafieldtriptothewatertreat-
ment plant, or check into having someone from the water treatment plant come to your classroom.• Becauseweightisalwaysanissuewhenlaunchingintospace(theheavieritisthemoreitcoststolaunchit),set
a weight limit for the filtration device (including filter media). Hold a competition to see which team has the purest water (lowest conductivity and most neutral pH) using the lightest filtration device.
• Ifequipmentisavailable,havestudentteamstape/filmtheirworkortakepictures.Thiscanthenbeusedtocreatean electronic diary and presentation of their filtration device and results. Have the teams share their creation with the class.
• Investigateotherwatertreatmentmethods,suchasdesalination,andconductclassroomexperimentsusingthesemethods.

30
31
Chapter VII: Teacher Resources
Web SitesNASAwww.nasa.gov
NASA Educationwww.education.nasa.gov
NASA Educational Materialshttp://www.nasa.gov/audience/foreducators/topnav/materials/about/index.html
NASA Education TV Schedulehttp://www.nasa.gov/audience/foreducators/topnav/schedule/about/index.html
NASA Facts: International Space Station Environmental Control and Life Support Systemhttp://www.nasa.gov/centers/marshall/pdf/104840main_ECLSS%20Fact%20Sheet.pdf
NASA Image Exchangehttp://nix.nasa.gov/
Marshall Image Exchangehttp://mix.msfc.nasa.gov/
NASA Resources for EducatorsCentral Operation of Resources for Educators (CORE) was established for the national and international distribu-tion of NASA-produced educational materials in multimedia format. Educators can obtain a catalogue and an order form by one of the following methods:
NASA CORE Lorain County Joint Vocational School 15181 Route 58 South Oberlin, OH 44074-9799 Phone: (440) 775-1400 FAX: (440) 775-1460 E-mail [email protected] HomePage:http://education.nasa.gov/edprograms/core/home/index.html
Educator Resource Center Network (ERCN)To make additional information available to the education community, NASA has created the NASA Educator Resource Center (ERC) network. Educators may preview, copy, or receive NASA materials at these sites. Phone calls are welcome if you are unable to visit the ERC that serves your geographic area. A list of the centers and the regions they serve include:
AK, Northern CA, HI, ID, MT, NV, OR, UT, WA, WYNASA Educator Resource CenterNASA Ames Research CenterMail Stop 253-2Moffett Field, CA 94035–1000Phone: (650) 604–3574http://amesnews.arc.nasa.gov/erc/erchome.html
32
IL, IN, MI, MN, OH, WI NASA Educator Resource CenterNASA Glenn Research CenterMail Stop 8-121000 Brookpark RoadCleveland, OH 44135Phone: (216) 433–2017http://www.grc.nasa.gov/WWW/PAO/html/edteachr.htm
CT, DE, DC, ME, MD, MA, NH, NJ, NY, PA, RI, VTNASA Educator Resource LaboratoryNASA Goddard Space Flight CenterMail Code 130.3Greenbelt, MD 20771–0001Phone: (301) 286–8570http://www.gsfc.nasa.gov/vc/erc.html
CO, KS, NE, NM, ND, OK, SD, TXSpace Center HoustonNASA Educator Resource Center forNASA Johnson Space Center1601 NASA Road OneHouston, TX 77058Phone: (281) 244–2129http://www.spacecenter.org/educator_resource.html
FL, GA, PR, VINASA Educator Resource CenterNASA Kennedy Space CenterMail Code ERCKennedy Space Center, FL 32899Phone: (321) 867–4090http://www-pao.ksc.nasa.gov/kscpao/educate/edu.htm
KY, NC, SC, VA, WVVirginia Air & Space CenterNASA Educator Resource Center forNASA Langley Research Center600 Settlers Landing RoadHampton, VA 23669–4033Phone: (757) 727–0900 x 757http://www.vasc.org/erc/
AL, AR, IA, LA, MO, TNU.S. Space and Rocket CenterNASA Educator Resource Center for NASA Marshall Space Flight CenterOne Tranquility BaseHuntsville, AL 35807Phone: (256) 544–5812http://erc.msfc.nasa.gov

33
MSNASA Educator Resource CenterNASA Stennis Space CenterMail Stop 1200Stennis Space Center, MS 39529-6000Phone: (228) 688–3338http://education.ssc.nasa.gov/erc/erc.htm
CANASA Educator Resource Center forNASA Jet Propulsion LaboratoryVillage at Indian Hill1460 East Holt Avenue, Suite 20Pomona, CA 91767Phone: (909) 397–4420http://learn.jpl.nasa.gov/resources/resources_index.html
AZ and Southern CA NASA Educator Resource CenterNASA Dryden Flight Research CenterPOBox273M/S4839Edwards, CA 93523–0273Phone: (661) 246–2445Toll Free: 800–521–3416 x2445http://www.dfrc.nasa.gov/Education
VA and MD’s Eastern ShoresNASA Educator Resource Center forGoddard Space Flight Center/Wallops Flight FacilityVisitor Center Building J-17Wallops Island, VA 23337Phone: (757) 824–2298http://www.wff.nasa.gov/~WVC/ERC.htm
Black Line MastersThe black line masters are provided as a resource for classroom presentations. Masters included are:• The System Diagram• The Purification Process• The Conductivity Tester• The Filtration Device• The Design Process• Design and Evaluation Sheet• Materials Lists • Class Data Sheet
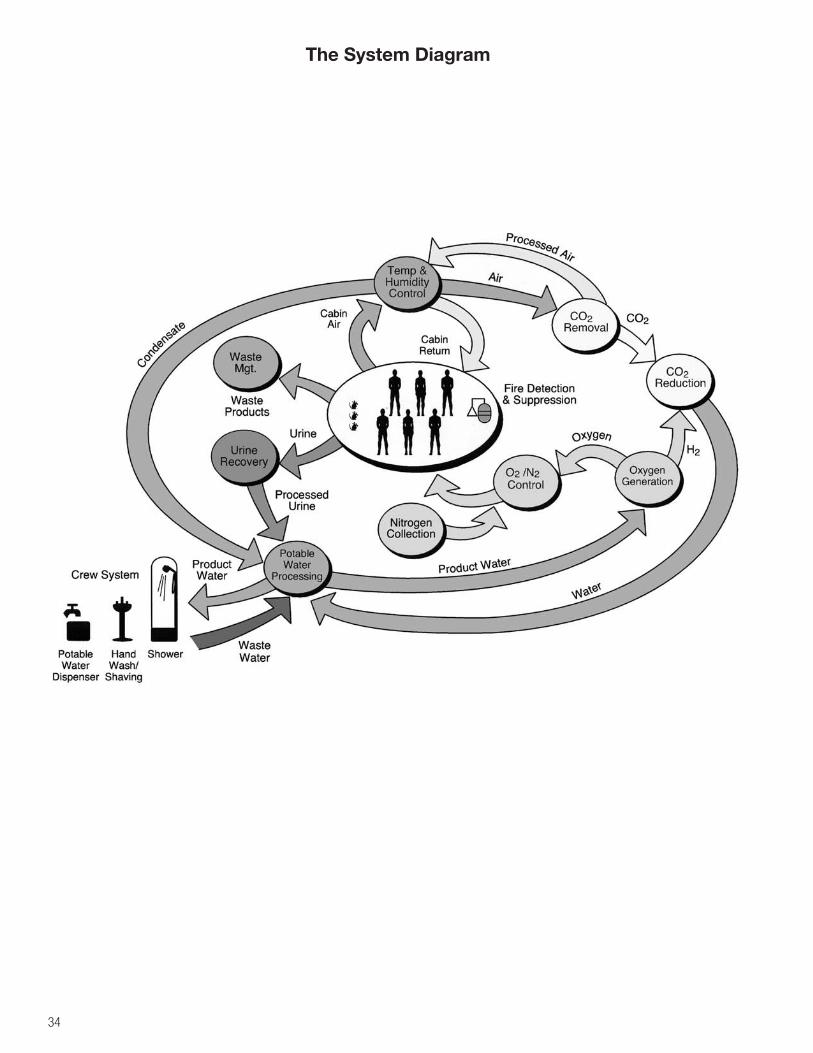
34
The System Diagram
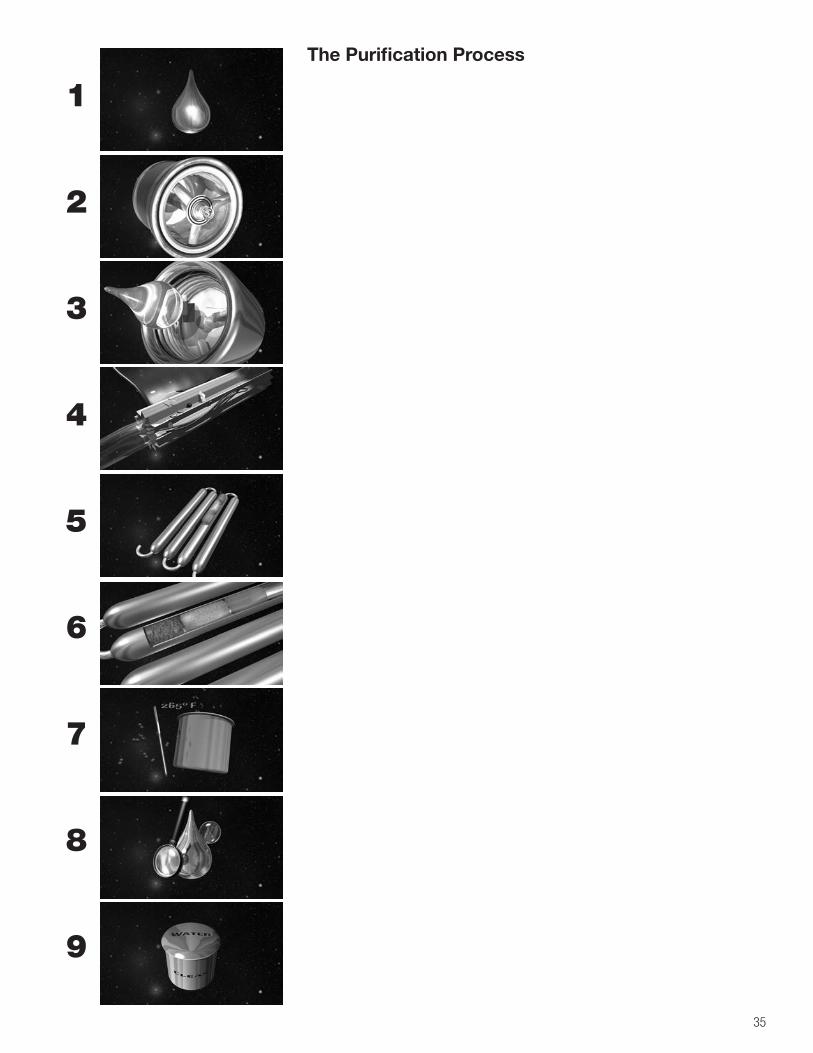
35
The Purification Process
1
2
3
4
5
6
7
8
9
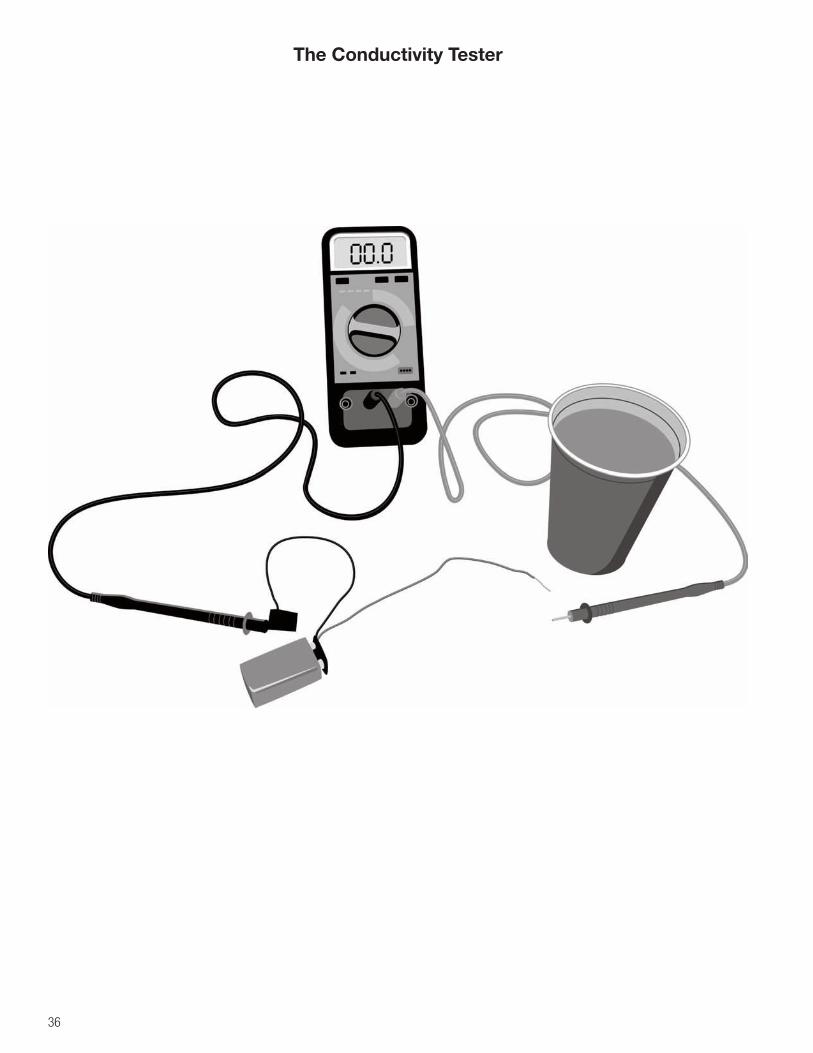
36
The Conductivity Tester
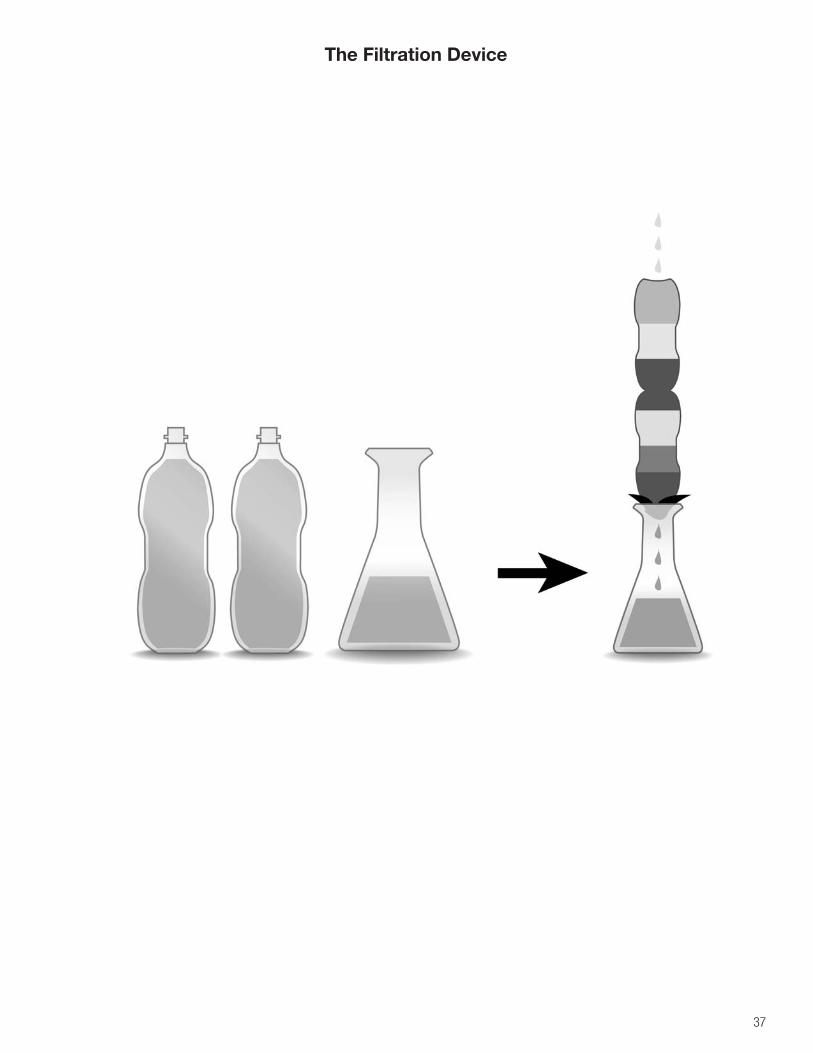
37
The Filtration Device
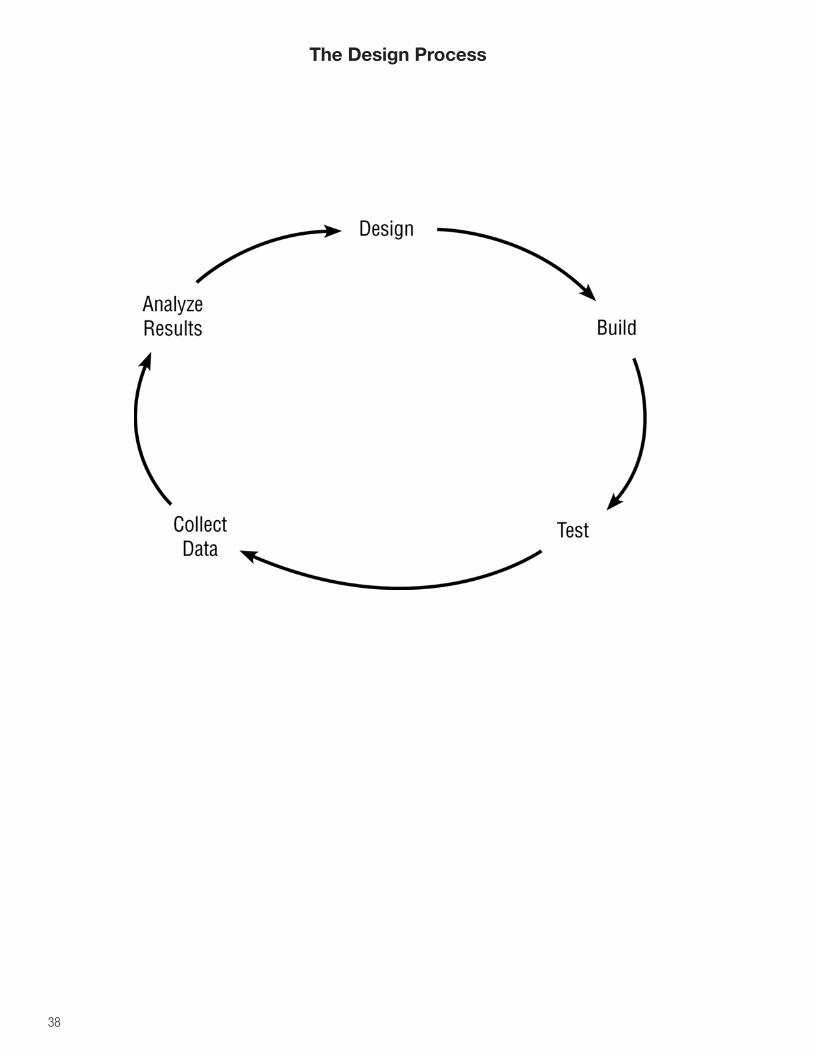
38
The Design Process
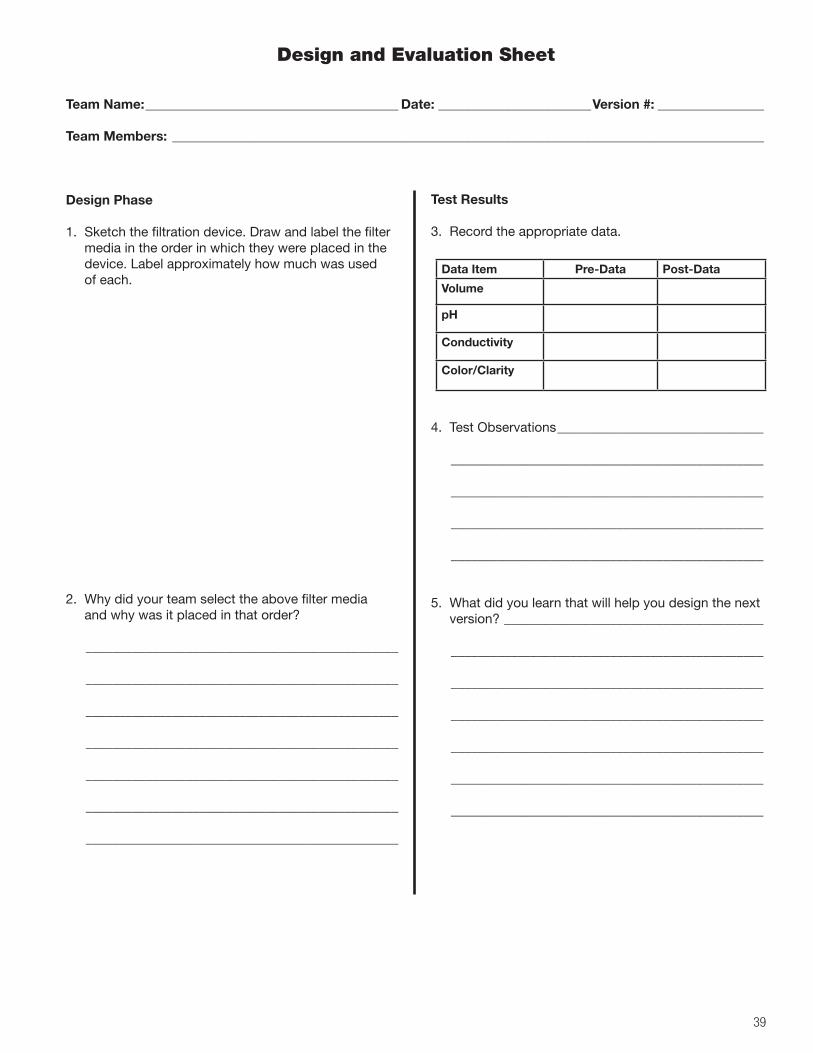
39
Design and Evaluation Sheet
Team Name: ______________________________________ Date: _______________________Version #: ________________
Team Members: _________________________________________________________________________________________
Design Phase
1. Sketch the filtration device. Draw and label the filter media in the order in which they were placed in the device. Label approximately how much was used of each.
2. Why did your team select the above filter media and why was it placed in that order?
_______________________________________________
_______________________________________________
_______________________________________________
_______________________________________________
_______________________________________________
_______________________________________________
_______________________________________________
Test Results
3. Record the appropriate data.
Data Item Pre-Data Post-Data
Volume
pH
Conductivity
Color/Clarity
4. Test Observations_______________________________
_______________________________________________
_______________________________________________
_______________________________________________
_______________________________________________
5. What did you learn that will help you design the next version?_______________________________________
_______________________________________________
_______________________________________________
_______________________________________________
_______________________________________________
_______________________________________________
_______________________________________________
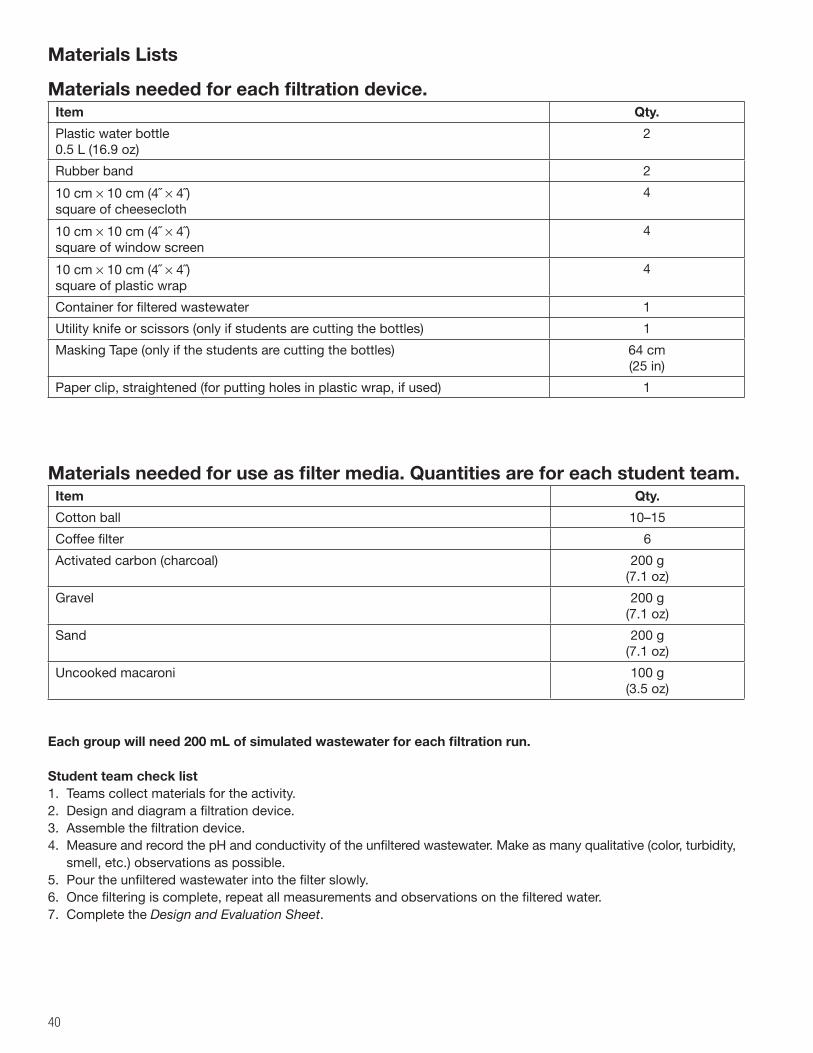
40
Materials Lists
Materials needed for each filtration device.Item Qty.
Plastic water bottle 0.5 L (16.9 oz)
2
Rubber band 2
10 cm × 10 cm (4˝ × 4˝)square of cheesecloth
4
10 cm × 10 cm (4˝ × 4˝)square of window screen
4
10 cm × 10 cm (4˝ × 4˝)square of plastic wrap
4
Container for filtered wastewater 1
Utility knife or scissors (only if students are cutting the bottles) 1
Masking Tape (only if the students are cutting the bottles) 64 cm(25 in)
Paper clip, straightened (for putting holes in plastic wrap, if used) 1
Materials needed for use as filter media. Quantities are for each student team.Item Qty.
Cotton ball 10–15
Coffee filter 6
Activated carbon (charcoal) 200 g (7.1 oz)
Gravel 200 g (7.1 oz)
Sand 200 g (7.1 oz)
Uncooked macaroni 100 g (3.5 oz)
Each group will need 200 mL of simulated wastewater for each filtration run.
Student team check list1. Teams collect materials for the activity.2. Design and diagram a filtration device.3. Assemble the filtration device.4. Measure and record the pH and conductivity of the unfiltered wastewater. Make as many qualitative (color, turbidity,
smell, etc.) observations as possible. 5. Pour the unfiltered wastewater into the filter slowly.6. Once filtering is complete, repeat all measurements and observations on the filtered water. 7. Complete the Design and Evaluation Sheet.

41
Class D
ata Sheet
UF – unfi
ltered
F – filtered
Team
Nam
eFilter M
edia (To
p to
Bo
ttom
)U
F pH
F pH
UF C
ond
uctivityF C
ond
uctivity
42
Glossary
acid – any of a class of substances whose aqueous solutions are characterized by a sour taste, the ability to turn blue litmus red, and the ability to react with bases and certain metals to form salts; a substance that yields hydrogen ions when dissolved in water.
base – any of a class of compounds whose aqueous solutions are characterized by a bitter taste, a slippery feel, the ability to turn red litmus blue, and the ability to react with acids to form salts; a substance that yields hydroxide ions when dissolved in water.
biocidal – of or relating to an agent that is destructive to living organisms.
biosphere – the regions of the surface and atmosphere of the Earth (or other planet) where living organisms exist.
conductivity – the ability or power to conduct or transmit heat, electricity, or sound.
condensation – the process by which a gas or vapor changes to a liquid.
consumable – something that may be depleted or worn out by use.
cryogenic – of or relating to very low temperatures.
cyclical – recurring in cycles.
distillation – the evaporation and subsequent collection of a liquid by condensation as a means of purification.
electrolysis – a process in which electrical energy is used to bring about a chemical change.
electrolyze – to cause to decompose by electrolysis.
evaporation – the change by which any substance is converted from a liquid state into and carried off in vapor.
expendable – normally used up or consumed in service; more easily or economically replaced than rescued, salvaged, or protected.
fuel cell – an electrochemical cell in which the energy of a reaction between a fuel (e.g., liquid hydrogen) and an oxi-dant (e.g., liquid oxygen) is converted directly and continuously into electrical energy.
metabolic – of, relating to, or resulting from metabolism.
microorganism – an organism of microscopic or submicroscopic size, especially a bacterium or protozoan.
organic – of, relating to, or derived from a living organism.
particulate – a minute separate particle, as of a granular substance or powder.
pH scale – provides a measure on a scale from 0 to 14 of the acidity or basicity of a solution; 7 is neutral, greater than 7 is basic, and less than 7 is acidic.
potable – drinkable.
precipitation – any form of water, such as rain, snow, sleet, or hail, that falls to the Earth’s surface.
regenerative – able to generate again.
sorbent – a surface that takes up or holds as by absorption and adsorption
Zvezda – one of the International Space Station Modules. Zvezda is Russian for star.


National Aeronautics and Space Administration
George C. Marshall Space Flight CenterHuntsville, AL 35812www.nasa.gov/marshall
www.nasa.gov
8–358924