nas how-to guide - sharecenter add-on sdk v1.0.docx
TRANSCRIPT

Hardware and Software RequirementsThe SDK can be used with NAS devices that have add-on features or services.
The latest firmware release from D-Link’s website Download the SDK from D-Link’s website A text editor
Intended AudienceThis document is about creating add-on packages. As such, it assumes that the reader already has some previous knowledge about add-ons and at least knows how to install and enable an add-on package. This document assumes that you have a basic knowledge of common Linux shell commands. It also helps if you have some familiarity with shell scripts.
Getting StartedWe’ll start by creating, building, and testing a sample add-on, and then we’ll get a little deeper as we explain each component of the add-on and where you will need to put your changes.
A good level of competency in the following is recommended before writing with the SDK:
LINUX shell environment and shell scripts GCC compiler tools / Libraries - LIBXML 2 & Standard C environment Desktop PC to write the files
You will need to be running the latest ShareCenter version on a supported device.
Workflow Process
1: Download the SDK2: Prepare the necessary files3: Create an add-on package using the SDK
Tutorial 1: Create an add-on without a GUITutorial 2: Create an add-on with a GUI

1. Download the SDKFirst, you’ll need to download the D-Link add-on SDK. The SDK contains the necessary templates for your add-on, including some sample scripts to jumpstart your add-on, and a wrapper tool to package your add-on into a proper binary format that is recognizable.
It is recommended that you create and build your add-on on any Linux platform. Install the add-on SDK from the CD-ROM or download it from the http://www.dlink.com/support website. It is in a tar-gzip format, so you may need to right-click and save the file. Extract the file to your preferred directory, then install it.
2. Preparing the necessary filesThe “wrapper” - mkapkg - is a tool that allows users to create their own add-ons for D-Link NAS systems. It is primarily run on Linux based systems.
Please make sure the libxml2 library and the GNU “tar” commands are ready in your Linux environment in order to run mkapkg properly.
Note: In case your linux system does not have the xml2 library, it may show the error message “missing xml2.” This happens predominantly in Fedora. Correct this error by typing:
$ yum -y install libxml2 libxml2-devel
Create the apkg.rc fileWe begin with a description of the apkg.rc configuration file, which defines common variables for the SDK packages.
Use a text editor to set the following variables:

Product - Product NamePackage - The original add-on package nameSection - The category of the add-onVersion - The version of the add-onPackager - The maintainerEmail - The email address of the maintainerHomepage - The official website of this GPL add-onDescription - An explanation or information of the add-onAddonShowName - The add-on’s name that is shown on NAS’s webgui.AddonIndexpage - The homepage of the add-on.AddonUsedPort - The Port address used by the add-on.InstDepend - MySQL needs to be installed before installing this add-on.StartDepend - MySQL needs to be running before this add-on.
apkg.rc file Dependencies and RulesHere are the add-on dependencies and conflict rules defined by the SDK 2.0. Letters are used for example purposes and clarification only.
InstDepend: Requires the named add-on (B) to be installed before the current add-on package (A).InstConflict: The current add-on package (A) cannot be installed if the named add-on (C) is already installed.

StartDepend: The named add-on (D) must be run before running the current add-on package (A). StartConflict: The current add-on package (A) cannot start if the named add-ons (E and F) are currently running.
Generate the apkg.xml fileWhen you run the mkapkg tool, it parses the file you just created (apkg.rc). It then generates an apkg.xml file which is used by the add-on server to provide the necessary information for the add-on to work. Here is a sample apkg.xml file that may be created:
Note: The version tag format should be: x.x where x is a numeral. (Examples: 1.2, 1.02, or 10.1)
3. Create an add-on package using the SDKThis section provides step-by-step examples of how to create an add-on using the SDK. There are two tutorials: one for creating an add-on without a GUI, and one for creating an add-on that includes a GUI.
Tutorial 1 : Create an add-on without a GUI

For this tutorial, we will be making an add-on called utelnetd.
Step 1: Prepare the necessary binaries of your own application, and place the binaries into the folder you are going to create in the next step. In our example, the binary utelnetd has been placed under the subfolder bin.
To create the binary code, you can compile the source code using the tool-chain, which can be found in the GPL code released on sh’s support site
Step 2: Create a folder name. The folder name must have the same name as the add-on package. This defines the apkg.rc file you created.
Example:
Step 3: Create an apkg.rc file. The package is utelnetd, and utelnetd will be the created folder name.
Note: In our example, this add-on package does not require a GUI, so we need to set AddonIndexPage to NULL:
AddonIndexPage: NULL
Step 4: Create the preinst script file for pre-installation:
preinst.sh

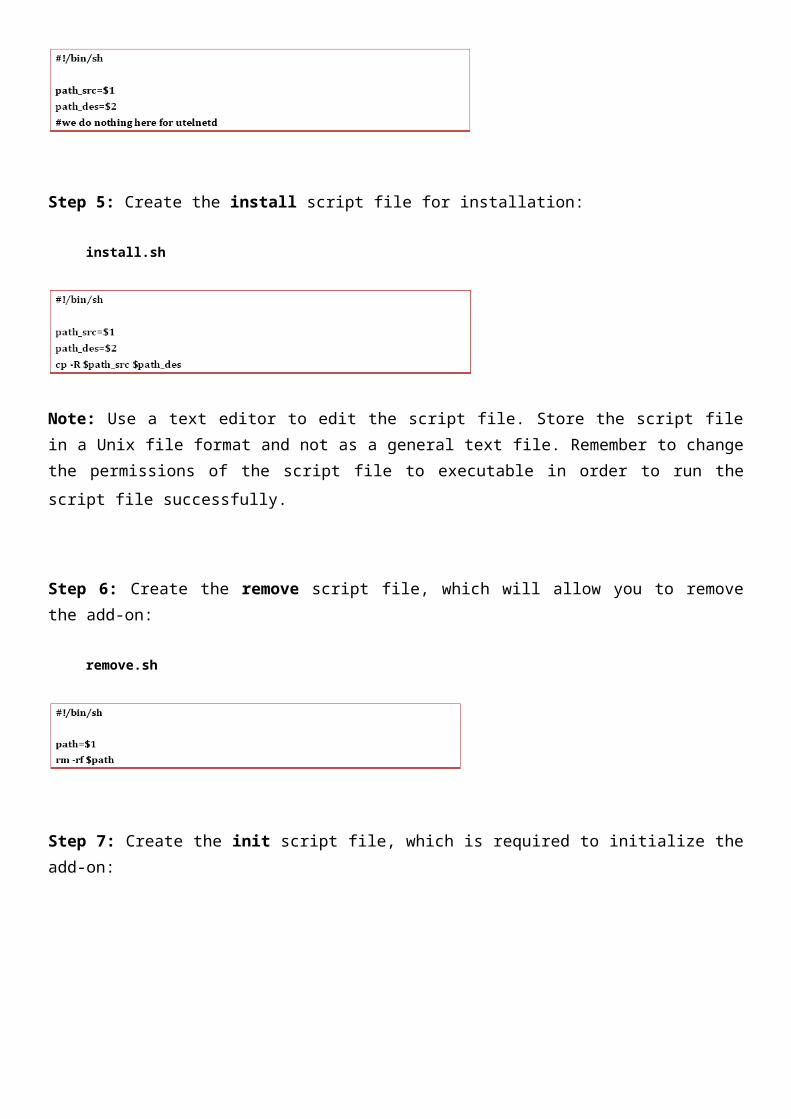
Step 5: Create the install script file for installation:
install.sh
Note: Use a text editor to edit the script file. Store the script file in a Unix file format and not as a general text file. Remember to change the permissions of the script file to executable in order to run the script file successfully.
Step 6: Create the remove script file, which will allow you to remove the add-on:
remove.sh
Step 7: Create the init script file, which is required to initialize the add-on:
Step 8: Create the clean script. This will delete the related links and files created during the add-on installation process:
clean.sh
Step 9: Create the start script, which will start the add-on:
start.sh
Step 10: Create the stop script, which will stop the add-on:
stop.sh
Step 11: Create the add-on package using the mkapkg command:
mkapkg - m [module name]

The add-on is now complete.
When installed on a device, a finished add-on should appear in the device GUI similar to the following image:

CautionOnce you have created a package, it may not be able to run if you have not yet followed the correct rules in order to create the script files properly. At this stage, it is not advisable to install any other add-ons as it may complicate debugging.
To resolve this issue, it is recommended that you remove the installed package folder and send rescan commands to the add-on daemon by running the following command(again, utelnetd is the add-on used in our example):
Tutorial 2 : Create an add-on with a GUI
For this tutorial, we will be making an add-on called HelloWorld.
Step 1: First, follow all the steps in Tutorial 1.
Step 2: Add the home page of your add-on to the AddonIndexPage variable in your apkg.rc file. In this example, it is index.html.
Step 3: Once the add-on html pages are created, you can create the necessary icons and add-on images to install it on the web interface. If you don’t want to create your own icons, you can use the default icons that come with the SDK.
For the Application page, you will need to create add-on icons with a recommended image size of 140x156 pixels.
For the naming rules, create the following:
[YourAddonName]_display.png

[YourAddonName]_off.png[YourAddonName]_on.png
For example, if your package name is “Hello World” then rename your icons with these parameters.
HelloWorld_display.pngHelloWorld_off.pngHelloWorld_on.png
Note: For your convenience, a set of default icons is included in the SDK.
Step 4: Place all your files in one directory on the NAS, and place all your .html, .jpg, and .css files in a folder named webpage.
Step 5: Link this folder to your web server’s root directory. In this example, it is located in /var/www in the root file system. The complete file string will be:
/var/www/HelloWorld
Step 6: If you have implemented cgi, link it to:
/var/www/cgi-bin
Also edit the init.sh and clean.sh scripts to add the related link.

Run and view the add-onThe program can now run in its entirety in a brower. If you created the add-on with a GUI interface, just open your browser and enter:
http://192.168.0.100/HelloWorld/index.html
…and replace 192.168.0.100 with the IP address of your NAS.
Another way to run the add-on is by browsing to the Applications page, clicking on the Applications icon, and clicking on the add-on icon you created earlier.
When clicking on the newly created add-on, a screen similar to the following image will appear. When you click on the Launch Interface button, the add-on’s GUI will be opened.

Reference: Add-on Package Naming Rules To wrap the application, run mkapkg by typing:
mkapkg-m [package name]
The image below demonstrates how to use mkapkg, though it is not a sample of the package installed.
The Add-on package naming rule is:

[Model Name] [Package Name] [Version number]_[Date]
For example:
DNS-345 AjaXplorer Package v1.00_06162011
About Shell ScriptsHere is an explanation of the scripts used in this guide and what each script is used for.
preinst.sh - this script is used to run some commands before the installation calls the install.sh. It is used when backing up configuration files and data to /tmp, /var/tmp directories or any other directory even before running the installation or calling install.sh install.sh - This copies the related files over and installs the add-ons to the appropriate folder.
remove.sh - This removes/uninstalls the add-on from a ShareCenter device.
init.sh - This creates symbolic links before the add-ons are executed. The correct locations for the symbolic links are created in the /usr/bin or /usr/sbin folders. However, if you wish to restore the configuration files that are stored by the preinst.sh, do it here. The configuration data will be restored to the add-on installation folder.
clean.sh - Removes all links and files associated with the init.sh script.
start.sh - Starts the add-on daemon.
stop.sh - Stops the add-on daemon.
When the NAS uploads the add-on package to the Web GUI the following commands are executed.
The installation and upload paths are scanned dynamically by the add-on server when the daemon is initiated.
When installing a new add-on the following shell script is used:

When uninstalling an add-on the following shell script is used:
When enabling an add-on the following shell script is used:
When disabling an add-on the following shell script is used:
When reinstalling an add-on the following shell script is used:
Shell Script WarningsAn important thing to consider when developing add-ons is the configuration files. Take every precaution to check the configuration files in your add-on. Not all add-ons have configuration files, so always remember to examine this script. Back up these files using the preinst.sh script file and copy the files back using the init.sh script. This is necessary because remove.sh deletes all add-on configuration files on the hard disk, so it is better to reinstall them using the install.sh command.
Creating incorrect shell scripts may cause the system to hang or freeze. For example, without removing the symbolic links to the hard drive correctly or completely, an error such as “Hard drive failure” or “Format hard drive” may pop up if the hard drive was not dismounted correctly.