nagios xi – monitoring windows using wmi
TRANSCRIPT
Purpose
This document describes how to monitor Windows machines with Nagios® XI™ using
Windows Management Instrumentation (WMI). WMI allows for agentless monitoring of
Windows machines which without having to install or configure agents.
Target Audience
This document is intended for use by Nagios XI Administrators who want to monitor Windows servers and
workstations without having to install an agent.
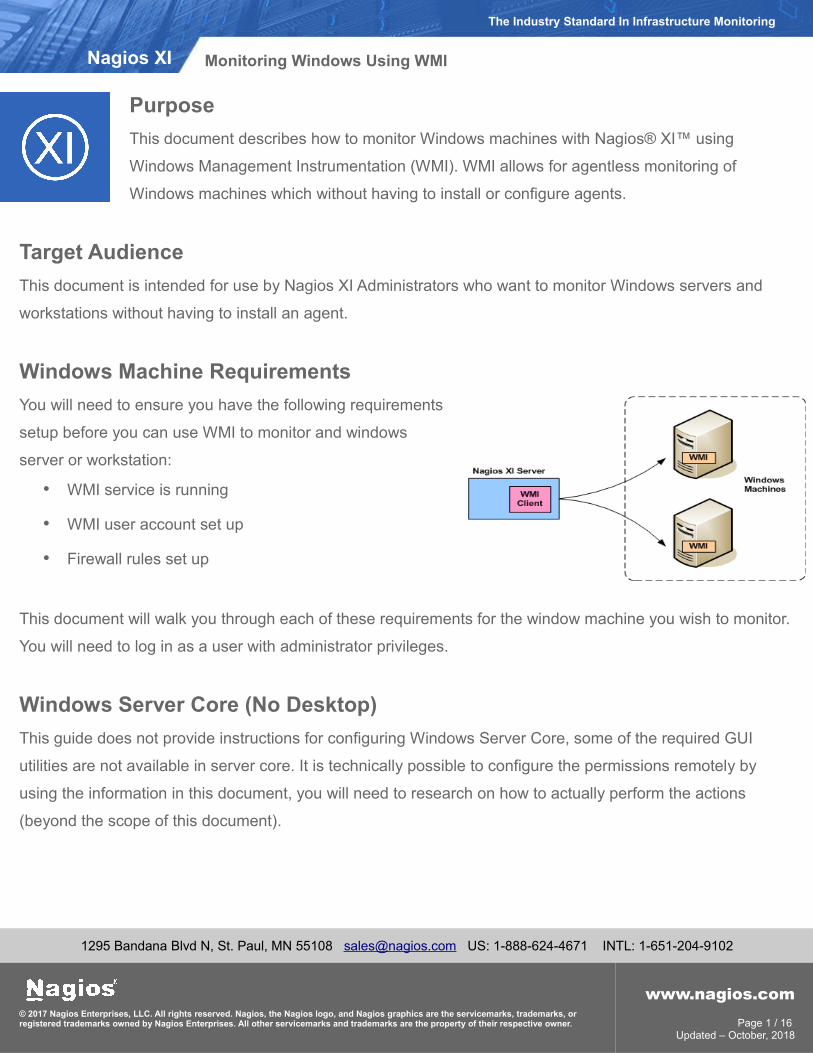
Windows Machine Requirements
You will need to ensure you have the following requirements
setup before you can use WMI to monitor and windows
server or workstation:
• WMI service is running
• WMI user account set up
• Firewall rules set up
This document will walk you through each of these requirements for the window machine you wish to monitor.
You will need to log in as a user with administrator privileges.
Windows Server Core (No Desktop)
This guide does not provide instructions for configuring Windows Server Core, some of the required GUI
utilities are not available in server core. It is technically possible to configure the permissions remotely by
using the information in this document, you will need to research on how to actually perform the actions
(beyond the scope of this document).
1295 Bandana Blvd N, St. Paul, MN 55108 [email protected] US: 1-888-624-4671 INTL: 1-651-204-9102
© 2017 Nagios Enterprises, LLC. All rights reserved. Nagios, the Nagios logo, and Nagios graphics are the servicemarks, trademarks, or registered trademarks owned by Nagios Enterprises. All other servicemarks and trademarks are the property of their respective owner.
www.nagios.comPage 1 / 16
Updated – October, 2018
Nagios XI
The Industry Standard In Infrastructure Monitoring
Monitoring Windows Using WMI
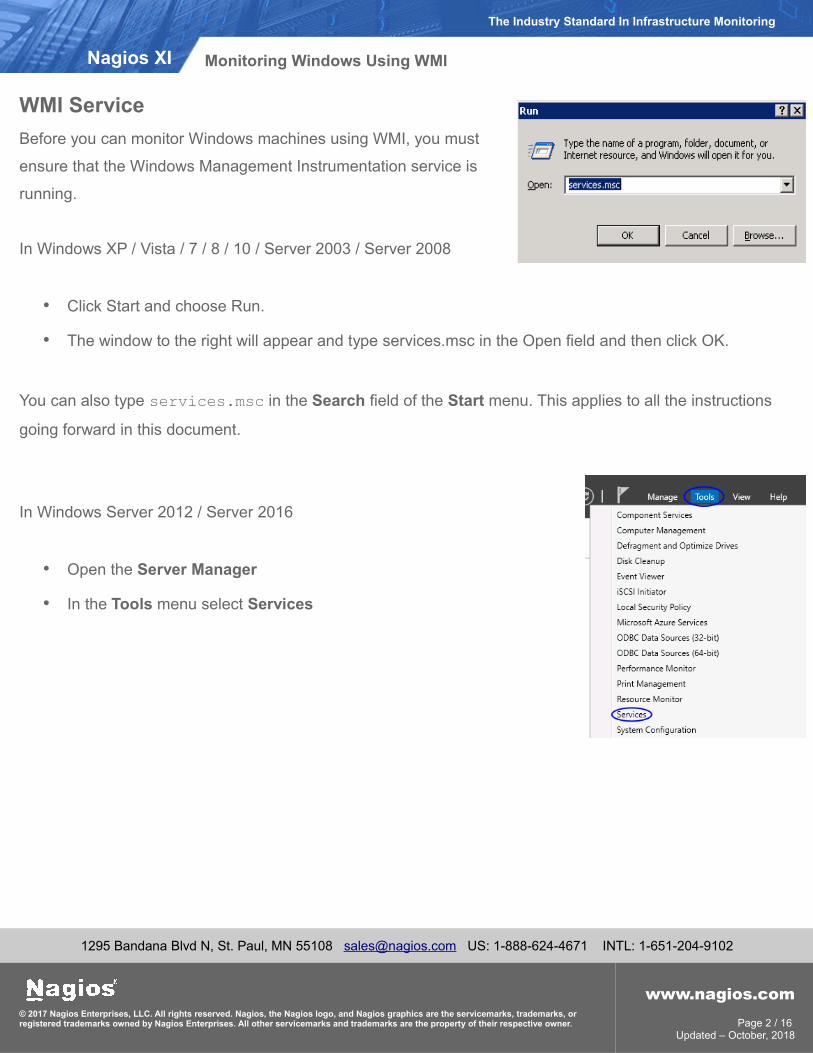
WMI Service
Before you can monitor Windows machines using WMI, you must
ensure that the Windows Management Instrumentation service is
running.
In Windows XP / Vista / 7 / 8 / 10 / Server 2003 / Server 2008
• Click Start and choose Run.
• The window to the right will appear and type services.msc in the Open field and then click OK.
You can also type services.msc in the Search field of the Start menu. This applies to all the instructions
going forward in this document.
In Windows Server 2012 / Server 2016
• Open the Server Manager
• In the Tools menu select Services
1295 Bandana Blvd N, St. Paul, MN 55108 [email protected] US: 1-888-624-4671 INTL: 1-651-204-9102
© 2017 Nagios Enterprises, LLC. All rights reserved. Nagios, the Nagios logo, and Nagios graphics are the servicemarks, trademarks, or registered trademarks owned by Nagios Enterprises. All other servicemarks and trademarks are the property of their respective owner.
www.nagios.comPage 2 / 16
Updated – October, 2018
Nagios XI
The Industry Standard In Infrastructure Monitoring
Monitoring Windows Using WMI
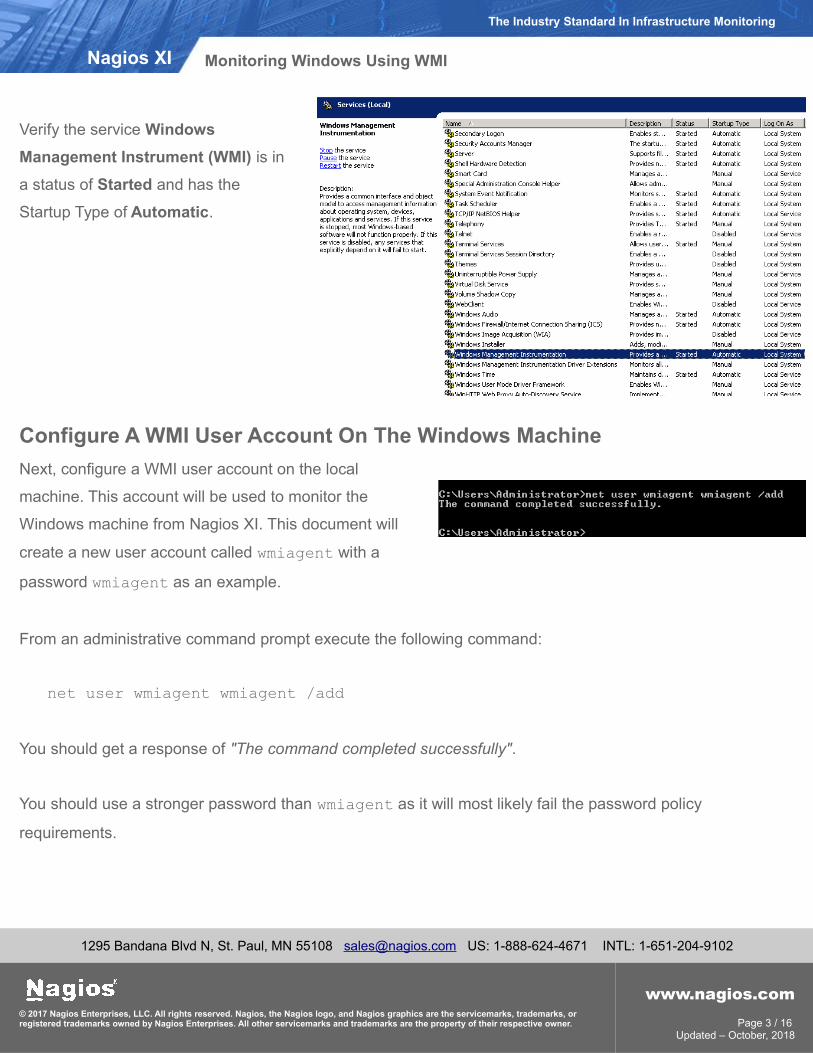
Verify the service Windows
Management Instrument (WMI) is in
a status of Started and has the
Startup Type of Automatic.
Configure A WMI User Account On The Windows Machine
Next, configure a WMI user account on the local
machine. This account will be used to monitor the
Windows machine from Nagios XI. This document will
create a new user account called wmiagent with a
password wmiagent as an example.
From an administrative command prompt execute the following command:
net user wmiagent wmiagent /add
You should get a response of "The command completed successfully".
You should use a stronger password than wmiagent as it will most likely fail the password policy
requirements.
1295 Bandana Blvd N, St. Paul, MN 55108 [email protected] US: 1-888-624-4671 INTL: 1-651-204-9102
© 2017 Nagios Enterprises, LLC. All rights reserved. Nagios, the Nagios logo, and Nagios graphics are the servicemarks, trademarks, or registered trademarks owned by Nagios Enterprises. All other servicemarks and trademarks are the property of their respective owner.
www.nagios.comPage 3 / 16
Updated – October, 2018
Nagios XI
The Industry Standard In Infrastructure Monitoring
Monitoring Windows Using WMI
Setting WMI Permissions
WMI requires a valid username and password on the target system. The following steps outline how to add
only the permissions needed to the Windows user account. Some of these permissions do not need to be set
if your user account is a member of the local administrators group HOWEVER from a security perspective it's
best to use an account with only the minimal required permissions.
Note: If you wish to monitor multiple computers across the domain, instead add the user to be a member of
the “Distributed Com Users”, “Performance Log Users” and “Performance Monitor Users” groups.
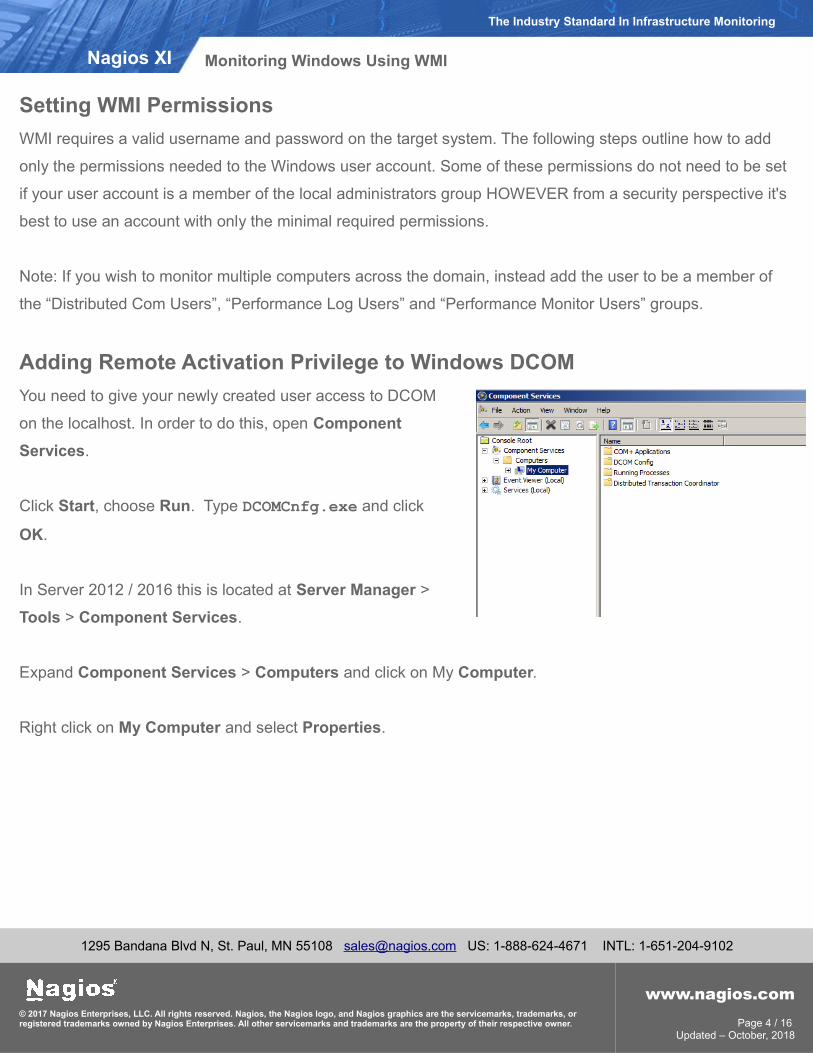
Adding Remote Activation Privilege to Windows DCOM
You need to give your newly created user access to DCOM
on the localhost. In order to do this, open Component
Services.
Click Start, choose Run. Type DCOMCnfg.exe and click
OK.
In Server 2012 / 2016 this is located at Server Manager >
Tools > Component Services.
Expand Component Services > Computers and click on My Computer.
Right click on My Computer and select Properties.
1295 Bandana Blvd N, St. Paul, MN 55108 [email protected] US: 1-888-624-4671 INTL: 1-651-204-9102
© 2017 Nagios Enterprises, LLC. All rights reserved. Nagios, the Nagios logo, and Nagios graphics are the servicemarks, trademarks, or registered trademarks owned by Nagios Enterprises. All other servicemarks and trademarks are the property of their respective owner.
www.nagios.comPage 4 / 16
Updated – October, 2018
Nagios XI
The Industry Standard In Infrastructure Monitoring
Monitoring Windows Using WMI
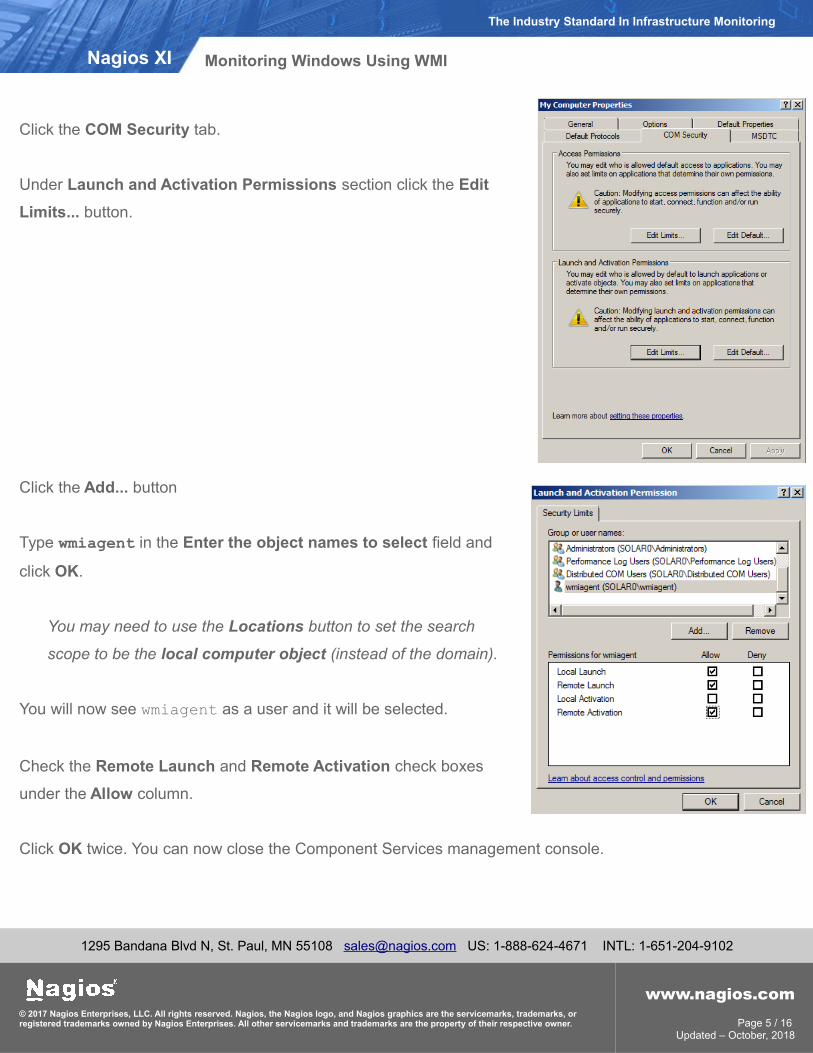
Click the COM Security tab.
Under Launch and Activation Permissions section click the Edit
Limits... button.
Click the Add... button
Type wmiagent in the Enter the object names to select field and
click OK.
You may need to use the Locations button to set the search
scope to be the local computer object (instead of the domain).
You will now see wmiagent as a user and it will be selected.
Check the Remote Launch and Remote Activation check boxes
under the Allow column.
Click OK twice. You can now close the Component Services management console.
1295 Bandana Blvd N, St. Paul, MN 55108 [email protected] US: 1-888-624-4671 INTL: 1-651-204-9102
© 2017 Nagios Enterprises, LLC. All rights reserved. Nagios, the Nagios logo, and Nagios graphics are the servicemarks, trademarks, or registered trademarks owned by Nagios Enterprises. All other servicemarks and trademarks are the property of their respective owner.
www.nagios.comPage 5 / 16
Updated – October, 2018
Nagios XI
The Industry Standard In Infrastructure Monitoring
Monitoring Windows Using WMI
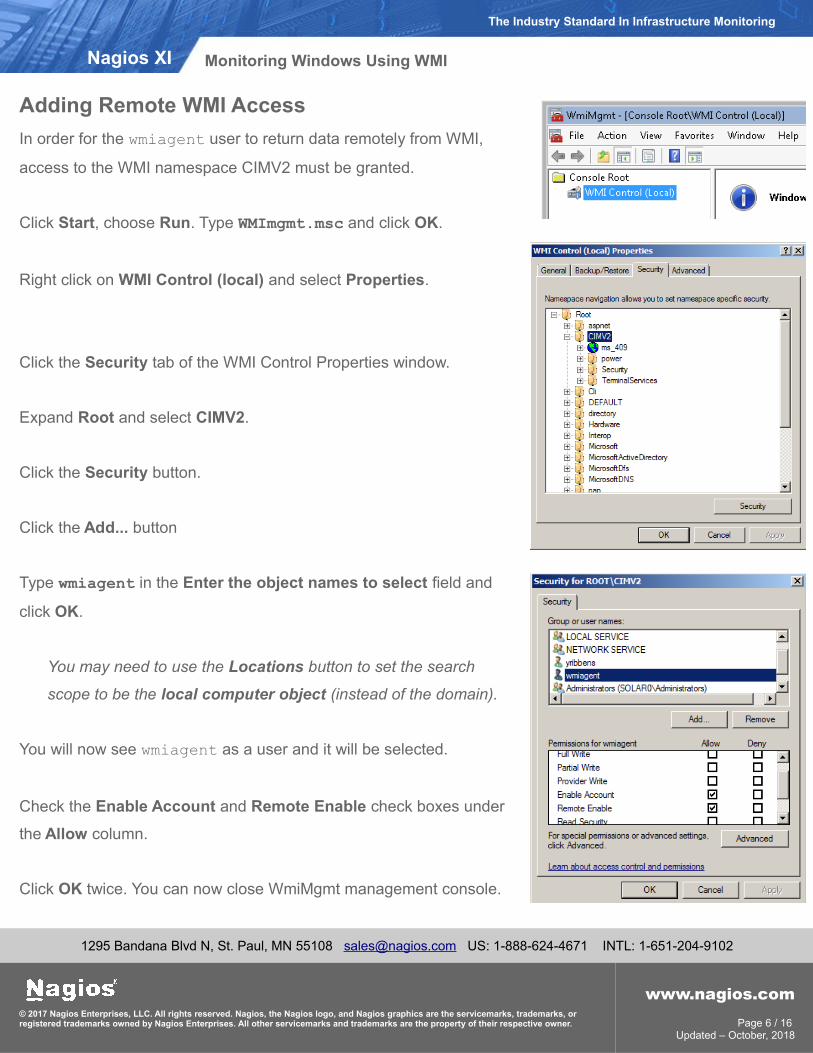
Adding Remote WMI Access
In order for the wmiagent user to return data remotely from WMI,
access to the WMI namespace CIMV2 must be granted.
Click Start, choose Run. Type WMImgmt.msc and click OK.
Right click on WMI Control (local) and select Properties.
Click the Security tab of the WMI Control Properties window.
Expand Root and select CIMV2.
Click the Security button.
Click the Add... button
Type wmiagent in the Enter the object names to select field and
click OK.
You may need to use the Locations button to set the search
scope to be the local computer object (instead of the domain).
You will now see wmiagent as a user and it will be selected.
Check the Enable Account and Remote Enable check boxes under
the Allow column.
Click OK twice. You can now close WmiMgmt management console.
1295 Bandana Blvd N, St. Paul, MN 55108 [email protected] US: 1-888-624-4671 INTL: 1-651-204-9102
© 2017 Nagios Enterprises, LLC. All rights reserved. Nagios, the Nagios logo, and Nagios graphics are the servicemarks, trademarks, or registered trademarks owned by Nagios Enterprises. All other servicemarks and trademarks are the property of their respective owner.
www.nagios.comPage 6 / 16
Updated – October, 2018
Nagios XI
The Industry Standard In Infrastructure Monitoring
Monitoring Windows Using WMI
Windows Firewall Settings
Next, configure the firewall rules specific to the version of windows being monitored.
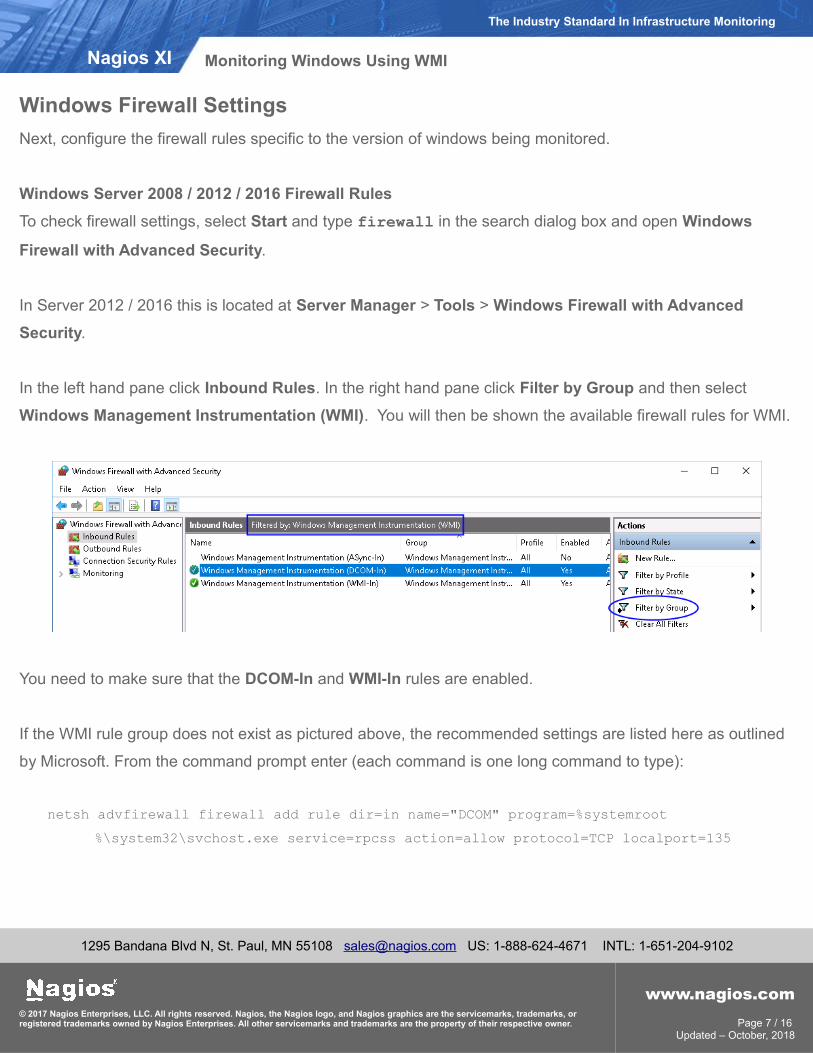
Windows Server 2008 / 2012 / 2016 Firewall Rules
To check firewall settings, select Start and type firewall in the search dialog box and open Windows
Firewall with Advanced Security.
In Server 2012 / 2016 this is located at Server Manager > Tools > Windows Firewall with Advanced
Security.
In the left hand pane click Inbound Rules. In the right hand pane click Filter by Group and then select
Windows Management Instrumentation (WMI). You will then be shown the available firewall rules for WMI.
You need to make sure that the DCOM-In and WMI-In rules are enabled.
If the WMI rule group does not exist as pictured above, the recommended settings are listed here as outlined
by Microsoft. From the command prompt enter (each command is one long command to type):
netsh advfirewall firewall add rule dir=in name="DCOM" program=%systemroot
%\system32\svchost.exe service=rpcss action=allow protocol=TCP localport=135
1295 Bandana Blvd N, St. Paul, MN 55108 [email protected] US: 1-888-624-4671 INTL: 1-651-204-9102
© 2017 Nagios Enterprises, LLC. All rights reserved. Nagios, the Nagios logo, and Nagios graphics are the servicemarks, trademarks, or registered trademarks owned by Nagios Enterprises. All other servicemarks and trademarks are the property of their respective owner.
www.nagios.comPage 7 / 16
Updated – October, 2018
Nagios XI
The Industry Standard In Infrastructure Monitoring
Monitoring Windows Using WMI

netsh advfirewall firewall add rule dir=in name ="WMI" program=%systemroot
%\system32\svchost.exe service=winmgmt action = allow protocol=TCP localport=any
netsh advfirewall firewall add rule dir=in name ="UnsecApp" program=%systemroot
%\system32\wbem\unsecapp.exe action=allow
netsh advfirewall firewall add rule dir=out name ="WMI_OUT" program=%systemroot
%\system32\svchost.exe service=winmgmt action=allow protocol=TCP localport=any
More details about 2008 firewall settings can be found at:
http://msdn.microsoft.com/en-us/library/windows/desktop/aa822854(v=vs.85).aspx
1295 Bandana Blvd N, St. Paul, MN 55108 [email protected] US: 1-888-624-4671 INTL: 1-651-204-9102
© 2017 Nagios Enterprises, LLC. All rights reserved. Nagios, the Nagios logo, and Nagios graphics are the servicemarks, trademarks, or registered trademarks owned by Nagios Enterprises. All other servicemarks and trademarks are the property of their respective owner.
www.nagios.comPage 8 / 16
Updated – October, 2018
Nagios XI
The Industry Standard In Infrastructure Monitoring
Monitoring Windows Using WMI

Windows Server 2003 Firewall Rules
The following section describes firewall and DCOM port configuration for a 2003 Windows Server. By default
DCOM communicates with the client on a random port, so in order to write firewall rules, specifying a port
range is also described.
Click Start, choose Run, type DCOMCnfg.exe and click
OK.
Expand Component Services, expand Computers, right-
click My Computer, and select Properties.
Click the Default Protocols tab
Click Properties button.
1295 Bandana Blvd N, St. Paul, MN 55108 [email protected] US: 1-888-624-4671 INTL: 1-651-204-9102
© 2017 Nagios Enterprises, LLC. All rights reserved. Nagios, the Nagios logo, and Nagios graphics are the servicemarks, trademarks, or registered trademarks owned by Nagios Enterprises. All other servicemarks and trademarks are the property of their respective owner.
www.nagios.comPage 9 / 16
Updated – October, 2018
Nagios XI
The Industry Standard In Infrastructure Monitoring
Monitoring Windows Using WMI
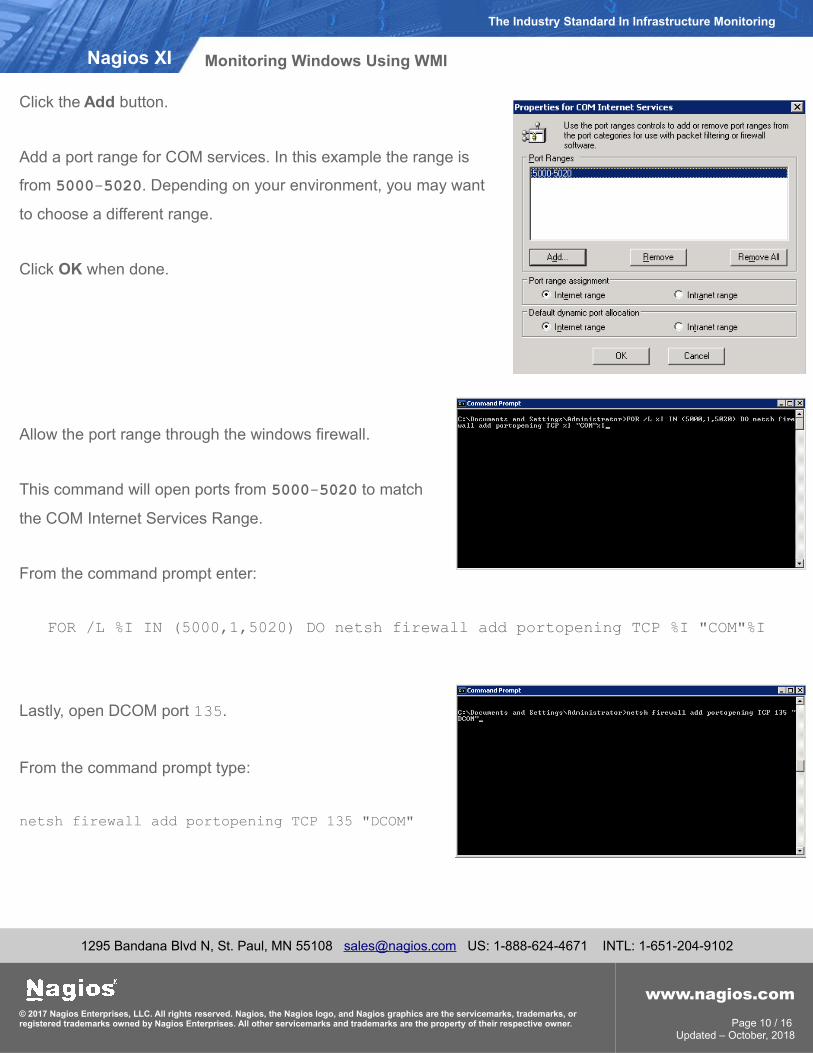
Click the Add button.
Add a port range for COM services. In this example the range is
from 5000-5020. Depending on your environment, you may want
to choose a different range.
Click OK when done.
Allow the port range through the windows firewall.
This command will open ports from 5000-5020 to match
the COM Internet Services Range.
From the command prompt enter:
FOR /L %I IN (5000,1,5020) DO netsh firewall add portopening TCP %I "COM"%I
Lastly, open DCOM port 135.
From the command prompt type:
netsh firewall add portopening TCP 135 "DCOM"
1295 Bandana Blvd N, St. Paul, MN 55108 [email protected] US: 1-888-624-4671 INTL: 1-651-204-9102
© 2017 Nagios Enterprises, LLC. All rights reserved. Nagios, the Nagios logo, and Nagios graphics are the servicemarks, trademarks, or registered trademarks owned by Nagios Enterprises. All other servicemarks and trademarks are the property of their respective owner.
www.nagios.comPage 10 / 16
Updated – October, 2018
Nagios XI
The Industry Standard In Infrastructure Monitoring
Monitoring Windows Using WMI

Windows XP Firewall Rules
If you are running a firewall on the Windows machine, you must
ensure that the Nagios server can contact the WMI service.
To do this, you must open TCP Port 135 on the Windows firewall.
Navigate to Start > All Programs > Accessories > System Tools
> Security Center.
From the Windows Security Center click on the link to Manage Setting for: Windows Firewalls.
Switch to the Exception tab and click the Add Port button.
Enter WMI for the Name and Port number 135, then click OK.
Running The Windows WMI Wizard
Now that WMI has been configured on your windows machine you can now run the Windows WMI wizard
from your Nagios XI server. To begin using the Windows WMI wizard navigate via the top menu bar to
Configure > Run a configuring wizard and select the Windows WMI wizard. In the following screenshot
you can see how the search field allows you to quickly find a wizard.
1295 Bandana Blvd N, St. Paul, MN 55108 [email protected] US: 1-888-624-4671 INTL: 1-651-204-9102
© 2017 Nagios Enterprises, LLC. All rights reserved. Nagios, the Nagios logo, and Nagios graphics are the servicemarks, trademarks, or registered trademarks owned by Nagios Enterprises. All other servicemarks and trademarks are the property of their respective owner.
www.nagios.comPage 11 / 16
Updated – October, 2018
Nagios XI
The Industry Standard In Infrastructure Monitoring
Monitoring Windows Using WMI
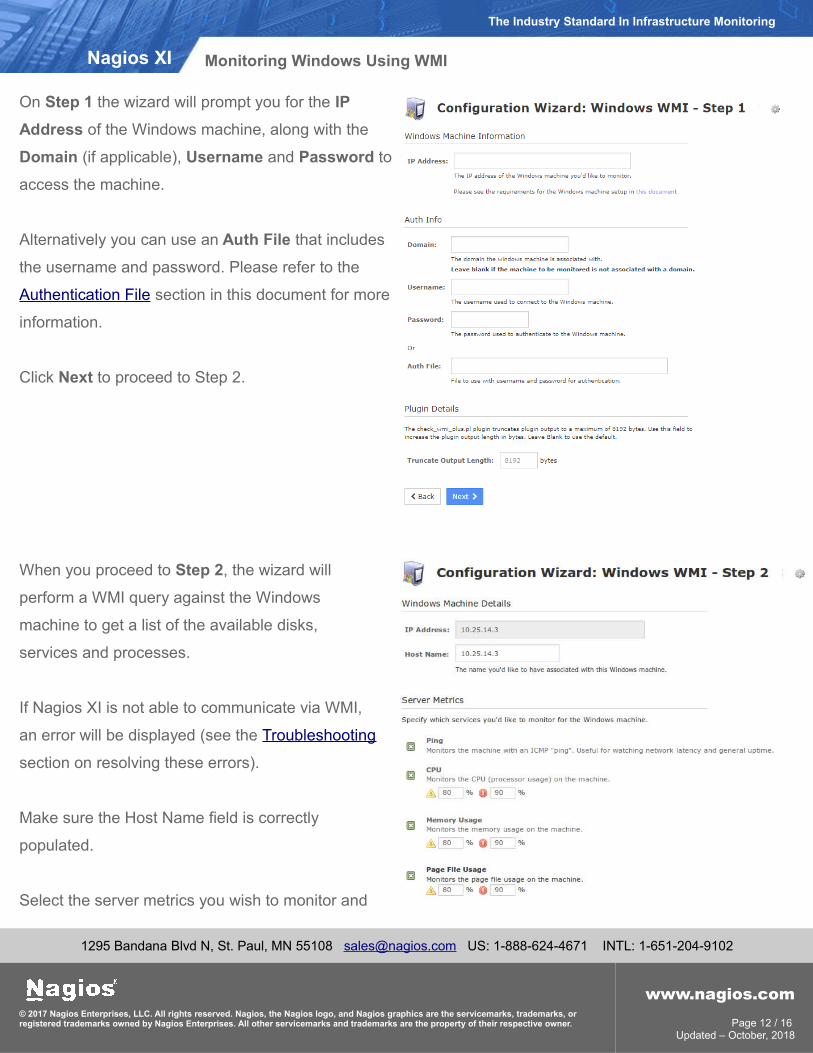
On Step 1 the wizard will prompt you for the IP
Address of the Windows machine, along with the
Domain (if applicable), Username and Password to
access the machine.
Alternatively you can use an Auth File that includes
the username and password. Please refer to the
Authentication File section in this document for more
information.
Click Next to proceed to Step 2.
When you proceed to Step 2, the wizard will
perform a WMI query against the Windows
machine to get a list of the available disks,
services and processes.
If Nagios XI is not able to communicate via WMI,
an error will be displayed (see the Troubleshooting
section on resolving these errors).
Make sure the Host Name field is correctly
populated.
Select the server metrics you wish to monitor and
1295 Bandana Blvd N, St. Paul, MN 55108 [email protected] US: 1-888-624-4671 INTL: 1-651-204-9102
© 2017 Nagios Enterprises, LLC. All rights reserved. Nagios, the Nagios logo, and Nagios graphics are the servicemarks, trademarks, or registered trademarks owned by Nagios Enterprises. All other servicemarks and trademarks are the property of their respective owner.
www.nagios.comPage 12 / 16
Updated – October, 2018
Nagios XI
The Industry Standard In Infrastructure Monitoring
Monitoring Windows Using WMI
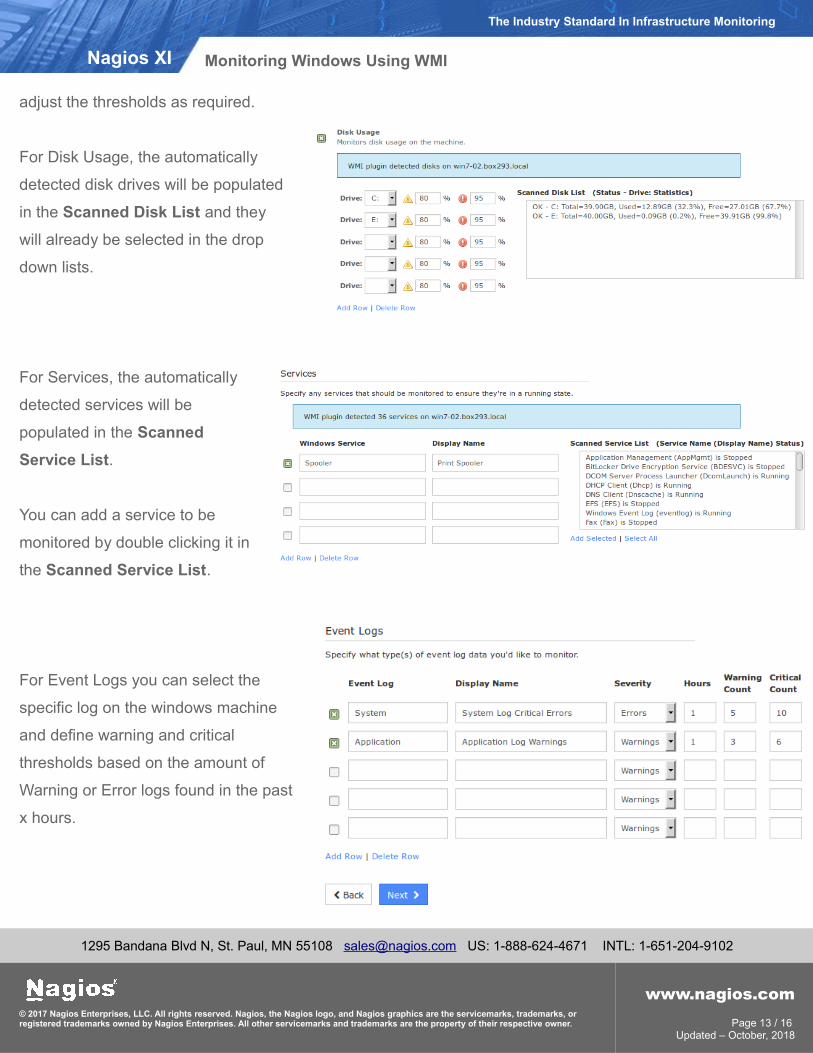
adjust the thresholds as required.
For Disk Usage, the automatically
detected disk drives will be populated
in the Scanned Disk List and they
will already be selected in the drop
down lists.
For Services, the automatically
detected services will be
populated in the Scanned
Service List.
You can add a service to be
monitored by double clicking it in
the Scanned Service List.
For Event Logs you can select the
specific log on the windows machine
and define warning and critical
thresholds based on the amount of
Warning or Error logs found in the past
x hours.
1295 Bandana Blvd N, St. Paul, MN 55108 [email protected] US: 1-888-624-4671 INTL: 1-651-204-9102
© 2017 Nagios Enterprises, LLC. All rights reserved. Nagios, the Nagios logo, and Nagios graphics are the servicemarks, trademarks, or registered trademarks owned by Nagios Enterprises. All other servicemarks and trademarks are the property of their respective owner.
www.nagios.comPage 13 / 16
Updated – October, 2018
Nagios XI
The Industry Standard In Infrastructure Monitoring
Monitoring Windows Using WMI
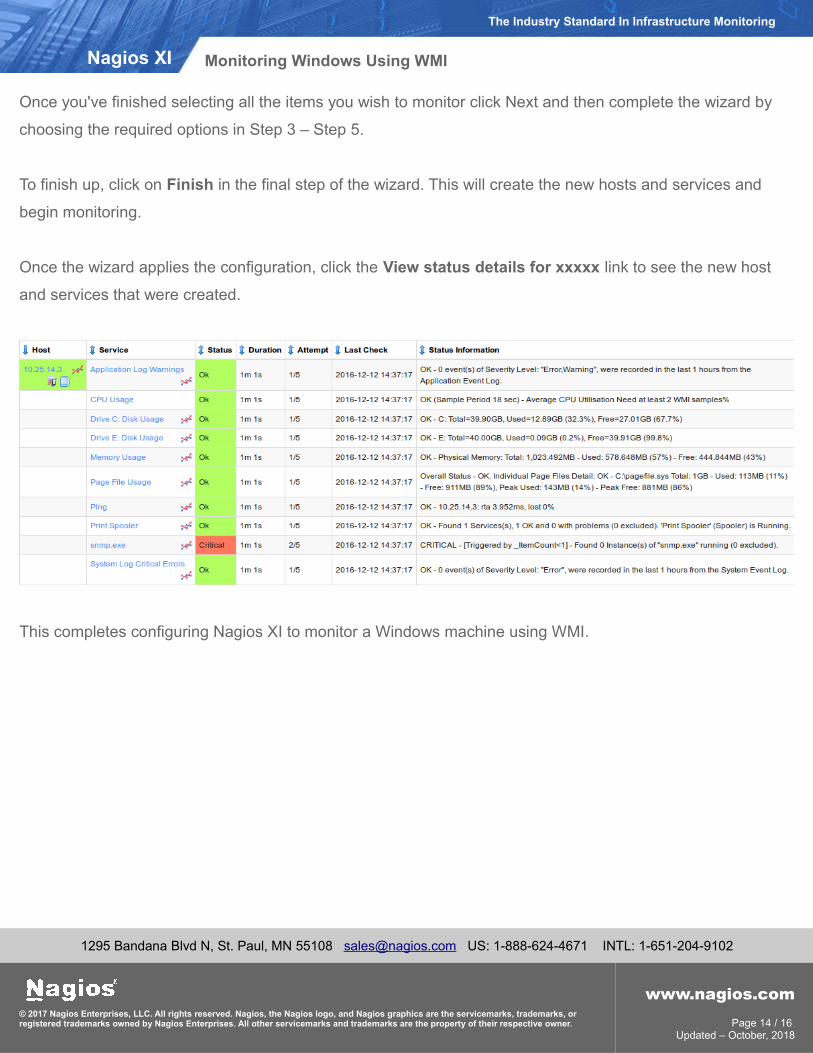
Once you've finished selecting all the items you wish to monitor click Next and then complete the wizard by
choosing the required options in Step 3 – Step 5.
To finish up, click on Finish in the final step of the wizard. This will create the new hosts and services and
begin monitoring.
Once the wizard applies the configuration, click the View status details for xxxxx link to see the new host
and services that were created.
This completes configuring Nagios XI to monitor a Windows machine using WMI.
1295 Bandana Blvd N, St. Paul, MN 55108 [email protected] US: 1-888-624-4671 INTL: 1-651-204-9102
© 2017 Nagios Enterprises, LLC. All rights reserved. Nagios, the Nagios logo, and Nagios graphics are the servicemarks, trademarks, or registered trademarks owned by Nagios Enterprises. All other servicemarks and trademarks are the property of their respective owner.
www.nagios.comPage 14 / 16
Updated – October, 2018
Nagios XI
The Industry Standard In Infrastructure Monitoring
Monitoring Windows Using WMI
Authentication File
On Step 1 of the configuration wizard you can provide the location of a file that contains the authentication
username and password. This provides the following advantages:
• Credentials are stored in one location, if you need to update the credentials you only need to update the
file and all services that use the file are immediately affected
• Admins using Core Configuration Manager won't see these credentials, they will only see the reference
to the file
To create a file you will need to establish a terminal session to your Nagios XI server. This example will create
a file called wmi_auth.txt that will be stored in /usr/local/nagios/etc/. Create the file by opening vi
using this command:
vi /usr/local/nagios/etc/wmi_auth.txt
When using the vi editor, to make changes press i on the keyboard first to enter insert mode. Press Esc to
exit insert mode.
Add two lines that contain your username and password, for example:
username=wmiagent
password=wmiagent
When you have finished, save the changes in vi by typing:
:wq
and press Enter.
You can now close your terminal session and proceed to the following page to see how to use the
authentication file in the configuration wizard.
1295 Bandana Blvd N, St. Paul, MN 55108 [email protected] US: 1-888-624-4671 INTL: 1-651-204-9102
© 2017 Nagios Enterprises, LLC. All rights reserved. Nagios, the Nagios logo, and Nagios graphics are the servicemarks, trademarks, or registered trademarks owned by Nagios Enterprises. All other servicemarks and trademarks are the property of their respective owner.
www.nagios.comPage 15 / 16
Updated – October, 2018
Nagios XI
The Industry Standard In Infrastructure Monitoring
Monitoring Windows Using WMI
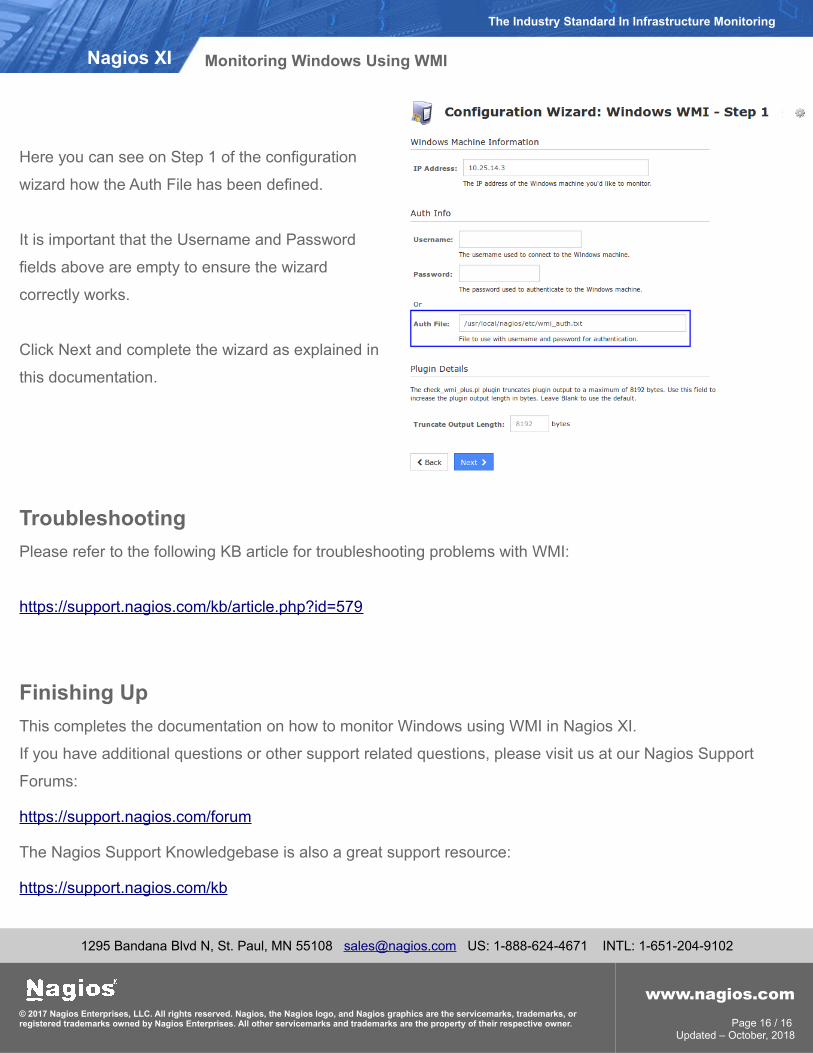
Here you can see on Step 1 of the configuration
wizard how the Auth File has been defined.
It is important that the Username and Password
fields above are empty to ensure the wizard
correctly works.
Click Next and complete the wizard as explained in
this documentation.
Troubleshooting
Please refer to the following KB article for troubleshooting problems with WMI:
https://support.nagios.com/kb/article.php?id=579
Finishing Up
This completes the documentation on how to monitor Windows using WMI in Nagios XI.
If you have additional questions or other support related questions, please visit us at our Nagios Support
Forums:
https://support.nagios.com/forum
The Nagios Support Knowledgebase is also a great support resource:
https://support.nagios.com/kb
1295 Bandana Blvd N, St. Paul, MN 55108 [email protected] US: 1-888-624-4671 INTL: 1-651-204-9102
© 2017 Nagios Enterprises, LLC. All rights reserved. Nagios, the Nagios logo, and Nagios graphics are the servicemarks, trademarks, or registered trademarks owned by Nagios Enterprises. All other servicemarks and trademarks are the property of their respective owner.
www.nagios.comPage 16 / 16
Updated – October, 2018
Nagios XI
The Industry Standard In Infrastructure Monitoring
Monitoring Windows Using WMI