mymaths · pdf filemonitoring homework ... and other learning tools that are available on the...
TRANSCRIPT
MyMaths
User Guide for Teachers
Secondary Level

Edition 1.5 February 2015
Table of Contents
Sending messages to students . . . . . . . . . . . . . . . . . . . 35
Managing students and classes
Importing and exporting classes . . . . . . . . . . . . . . . . . . . . 37
Creating a .csv File . . . . . . . . . . . . . . . . . . . . . . . . . . . 37
Downloading a template . . . . . . . . . . . . . . . . . . . . . . . 38
Welcome to the MyMaths user guide
What is MyMaths? . . . . . . . . . . . . . . . . . . . . . . . . . . . . . . 5
Who is this user guide for? . . . . . . . . . . . . . . . . . . . . . . . 5
What do I need to access MyMaths? . . . . . . . . . . . . . . . . . 5
Getting started . . . . . . . . . . . . . . . . . . . . . . . . . . . . . . . . 6
Logging in
Password levels . . . . . . . . . . . . . . . . . . . . . . . . . . . . . . . 8
Logging in to Assessment Manager . . . . . . . . . . . . . . . . . . 9
Creating a class . . . . . . . . . . . . . . . . . . . . . . . . . . . . . . . 10
Creating students . . . . . . . . . . . . . . . . . . . . . . . . . . . . . . 11
Setting tasks and activities
Setting a task . . . . . . . . . . . . . . . . . . . . . . . . . . . . . . . . 14
Setting a task for multiple classes . . . . . . . . . . . . . . . . 15
Viewing a summary of allocated tasks . . . . . . . . . . . . . . . . 16
Changing a task deadline . . . . . . . . . . . . . . . . . . . . . . 17
Giving one or more students an extension . . . . . . . . . . . 17
Leaving feedback . . . . . . . . . . . . . . . . . . . . . . . . . . . . 18
Viewing the task . . . . . . . . . . . . . . . . . . . . . . . . . . . . 19
Monitoring homework . . . . . . . . . . . . . . . . . . . . . . . . . 19
Setting an activity . . . . . . . . . . . . . . . . . . . . . . . . . . . . . 20
Viewing outstanding work . . . . . . . . . . . . . . . . . . . . . . . . 21
Viewing students’ results
Viewing class results . . . . . . . . . . . . . . . . . . . . . . . . . . . . 23
Downloading a Markbook . . . . . . . . . . . . . . . . . . . . . . 28
Monitoring progress . . . . . . . . . . . . . . . . . . . . . . . . . . 29
Viewing individual results . . . . . . . . . . . . . . . . . . . . . . 32
Using the ‘Find student’ function . . . . . . . . . . . . . . . . . 34
Table of Contents
Toolkit . . . . . . . . . . . . . . . . . . . . . . . . . . . . . . . . . . . 66
Other activities
Guide to installing Flash Player . . . . . . . . . . . . . . . . . . . . . 67
Resources for teachers . . . . . . . . . . . . . . . . . . . . . . . . . . 68
Making a spreadsheet from scratch . . . . . . . . . . . . . . . 39
Importing the .csv file into the MyMaths website . . . . . . 40
Exporting a class as a spreadsheet . . . . . . . . . . . . . . . . 42
Editing student details . . . . . . . . . . . . . . . . . . . . . . . . . . . 43
Editing student name and login details . . . . . . . . . . . . . 44
Adding a student to another class . . . . . . . . . . . . . . . . 44
Removing a student from a class . . . . . . . . . . . . . . . . . 45
Deleting a student from the school . . . . . . . . . . . . . . . . 46
Deleting a class . . . . . . . . . . . . . . . . . . . . . . . . . . . . . 46
Creating a class manually . . . . . . . . . . . . . . . . . . . . . . 48
Changing school account settings . . . . . . . . . . . . . . . . . 50
Parent letters
Generating a parent letter . . . . . . . . . . . . . . . . . . . . . . . . 52
The students’ experience
How do students access the site? . . . . . . . . . . . . . . . . . . . 53
Lessons . . . . . . . . . . . . . . . . . . . . . . . . . . . . . . . . . . . . . 54
Homework . . . . . . . . . . . . . . . . . . . . . . . . . . . . . . . . . . . 56
Submitting homework . . . . . . . . . . . . . . . . . . . . . . . . . 57
Checkout . . . . . . . . . . . . . . . . . . . . . . . . . . . . . . . . . . 58
My Feed . . . . . . . . . . . . . . . . . . . . . . . . . . . . . . . . . . . . 59
My Results . . . . . . . . . . . . . . . . . . . . . . . . . . . . . . . . . . . 59
Leaving feedback . . . . . . . . . . . . . . . . . . . . . . . . . . . . 60
My Levels . . . . . . . . . . . . . . . . . . . . . . . . . . . . . . . . . . . 60
My Boosters . . . . . . . . . . . . . . . . . . . . . . . . . . . . . . . . . . 60
My Resources . . . . . . . . . . . . . . . . . . . . . . . . . . . . . . . . . 61
Games . . . . . . . . . . . . . . . . . . . . . . . . . . . . . . . . . . . 63
Booster packs . . . . . . . . . . . . . . . . . . . . . . . . . . . . . . 65
A Level . . . . . . . . . . . . . . . . . . . . . . . . . . . . . . . . . . . 65
MyMaths User Guide
Page 5 of 70
Welcome to the MyMaths user guide
This user guide will help you get the most out of the mymaths.co.uk website. It covers everything from logging in to the website, through to lessons, homework, games and more.
If you want to go straight to a specific section, you can click on the relevant section in the table of contents.
What is MyMaths?
MyMaths is a subscription website for schools, that provides access to a range of ready-made lessons and online homework tasks for all ages and abilities right up to A Level.
This guide shows you how to add classes and students from your school to the MyMaths database. It also explains how to access the lessons, games, booster packs and other learning tools that are available on the site as well as showing you how to set homework for your students. The guide explains how you can view your students’ results, send them messages and reminders, and handle the data the site is capable of producing.
Who is this user guide for?
This guide is for secondary school teachers.
What do I need to access MyMaths?
MyMaths is a website, so to use it you will need:
• an internet connection
• a web browser, such as Chrome, Firefox or Internet
Explorer. Make sure it’s an up-to-date version
• a program called Flash Player
• the login details for your school, and your account.
Flash Player is used by some websites to make them more interactive.
If you’re not sure if you have Flash Player installed, click here to check.
We’ve written a quick, step-by-step guide to installing Flash. To read it, go to ’Guide
to installing Flash Player’.
MyMaths User Guide
Page 6 of 70
Getting started
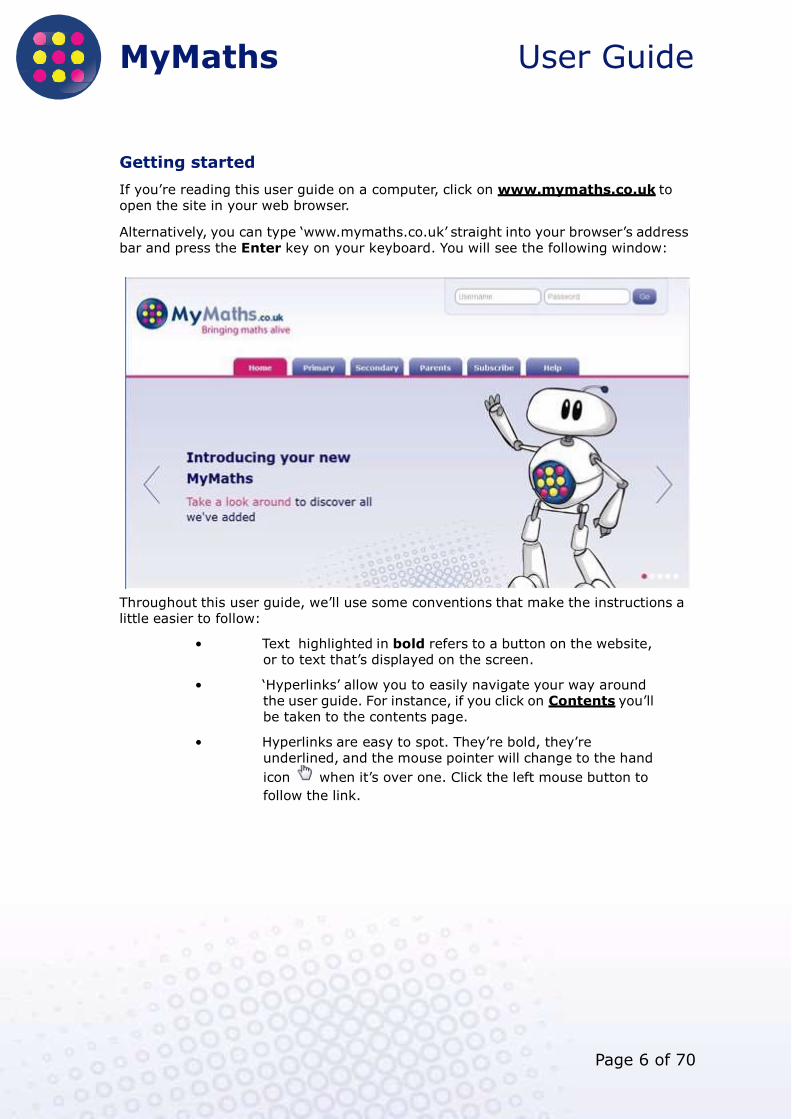
If you’re reading this user guide on a computer, click on www.mymaths.co.uk to open the site in your web browser.
Alternatively, you can type ‘www.mymaths.co.uk’ straight into your browser’s address bar and press the Enter key on your keyboard. You will see the following window:
Throughout this user guide, we’ll use some conventions that make the instructions a little easier to follow:
• Text highlighted in bold refers to a button on the website, or to text that’s displayed on the screen.
• ‘Hyperlinks’ allow you to easily navigate your way around the user guide. For instance, if you click on Contents you’ll be taken to the contents page.
• Hyperlinks are easy to spot. They’re bold, they’re underlined, and the mouse pointer will change to the hand
icon when it’s over one. Click the left mouse button to
follow the link.
MyMaths User Guide
Page 7 of 70
Logging in
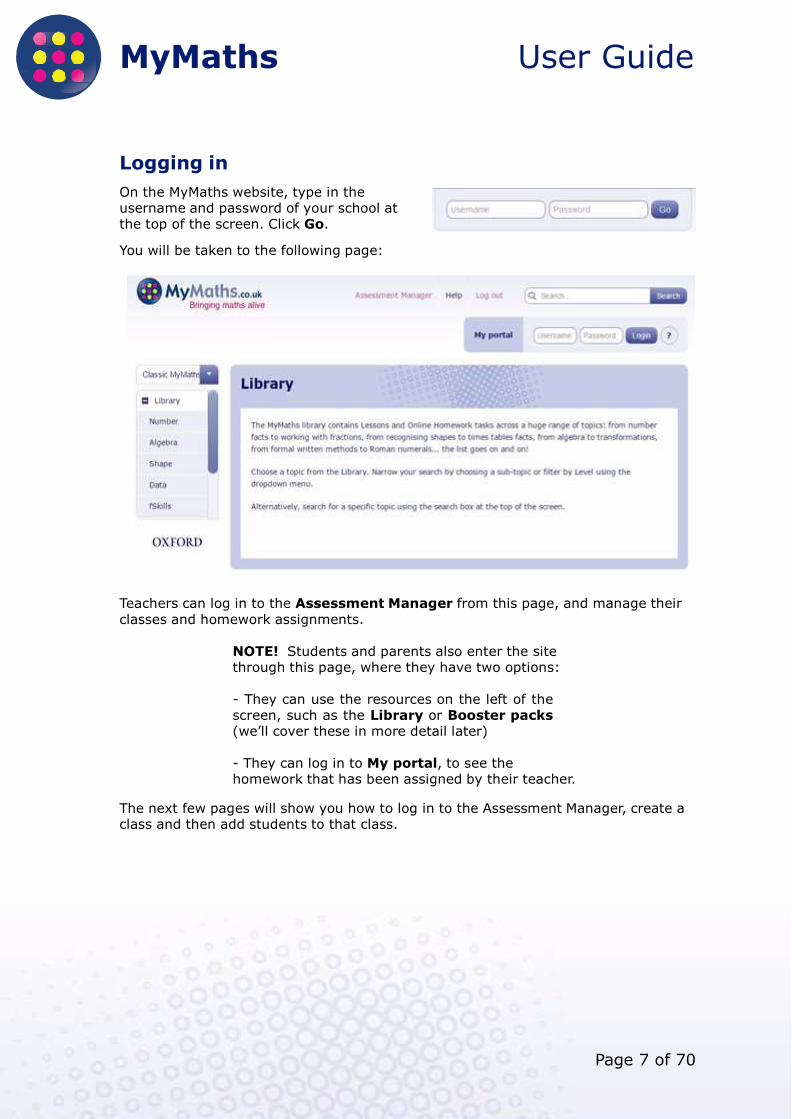
On the MyMaths website, type in the username and password of your school at the top of the screen. Click Go.
You will be taken to the following page:
Teachers can log in to the Assessment Manager from this page, and manage their
classes and homework assignments.
NOTE! Students and parents also enter the site through this page, where they have two options:
- They can use the resources on the left of the screen, such as the Library or Booster packs (we’ll cover these in more detail later)
- They can log in to My portal, to see the homework that has been assigned by their teacher.
The next few pages will show you how to log in to the Assessment Manager, create a class and then add students to that class.
MyMaths User Guide
Page 8 of 70
Password levels
MyMaths uses three levels of passwords:
• the first level is the username and password for the school, this is used by students and teachers to access the specific MyMaths site for their school
• the second level username and password is unique for each pupil. Teachers within a school share a common second level username and password
• the third level is used to access administrative tasks, such as creating, editing or deleting classes or students.
NOTE! You can opt whether to assign a third level password or not. It’s more secure to assign a third level password, and it allows you to limit who can make administrative changes.
You will be given the option to create a third level password when you first attempt to access an administrative task. Once the third level password has been created, you will only need to enter it in future if you are making administrative changes.
The third level password only needs to be entered once in a session.
MyMaths User Guide
Page 9 of 70
Logging in to Assessment Manager
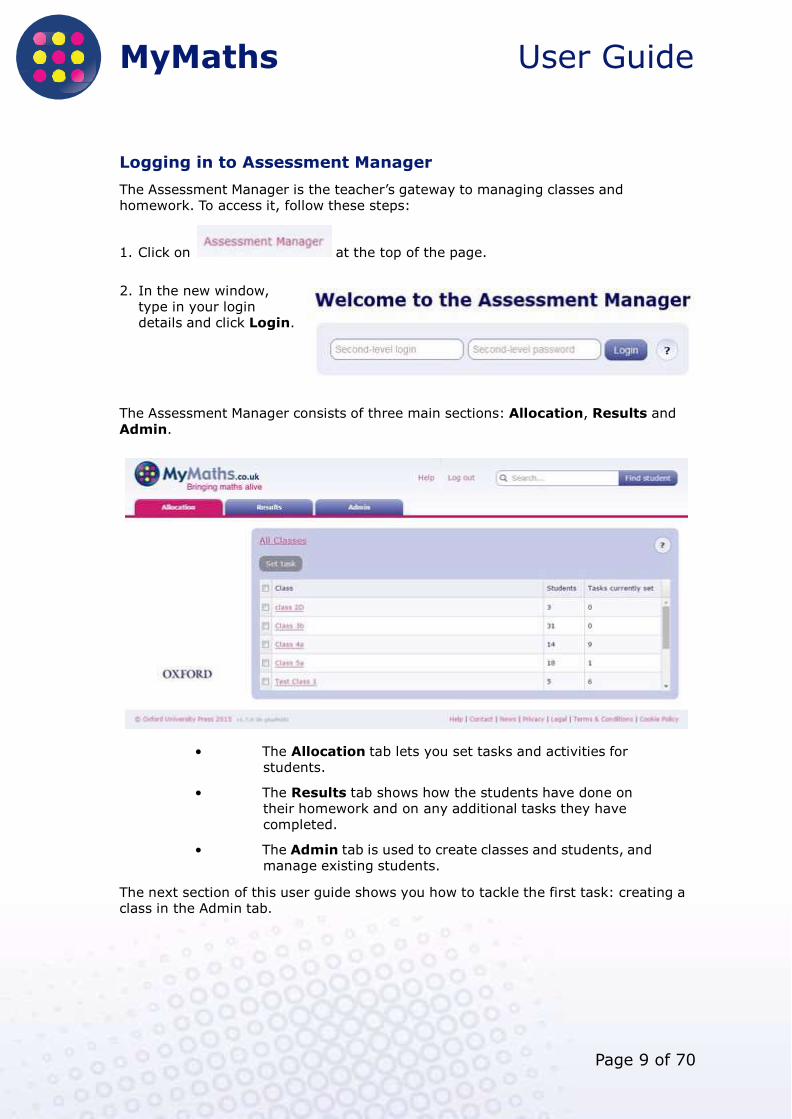
The Assessment Manager is the teacher’s gateway to managing classes and homework. To access it, follow these steps:
1. Click on at the top of the page.
2. In the new window,
type in your login details and click Login.
The Assessment Manager consists of three main sections: Allocation, Results and
Admin.
• The Allocation tab lets you set tasks and activities for students.
• The Results tab shows how the students have done on their homework and on any additional tasks they have completed.
• The Admin tab is used to create classes and students, and manage existing students.
The next section of this user guide shows you how to tackle the first task: creating a class in the Admin tab.
MyMaths User Guide
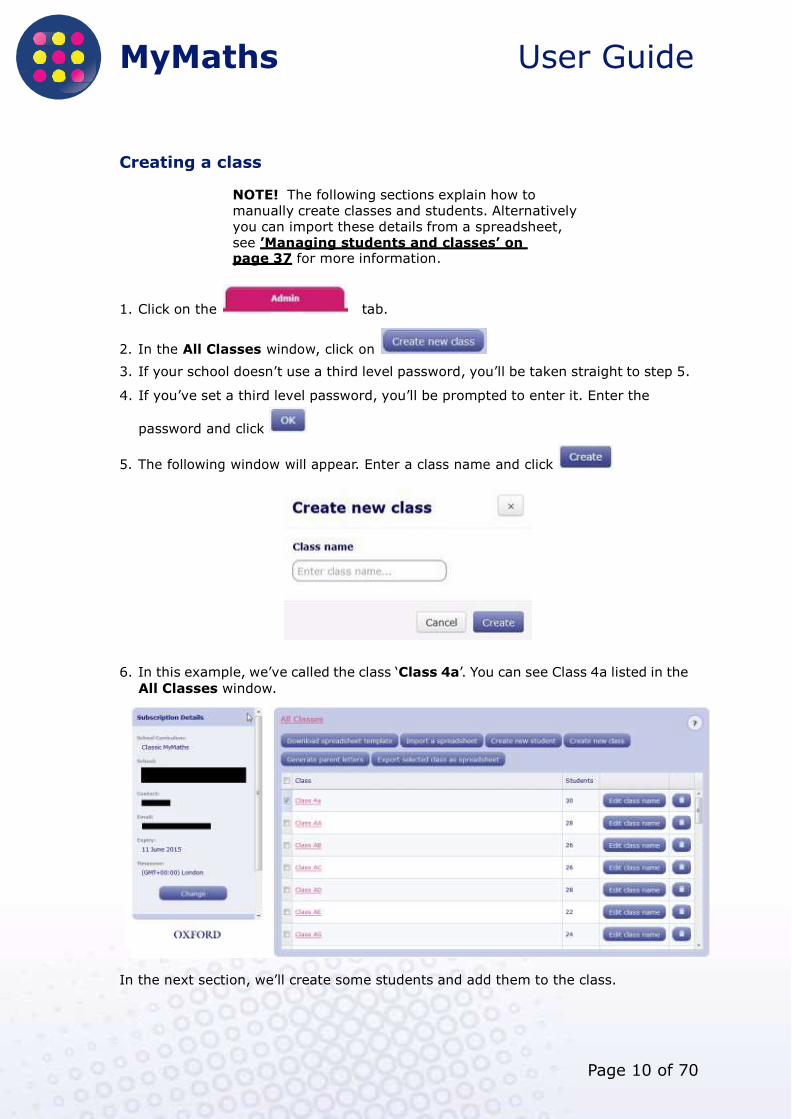
Creating a class
NOTE! The following sections explain how to manually create classes and students. Alternatively you can import these details from a spreadsheet, see ’Managing students and classes’ on page 37 for more information.
1. Click on the tab.
2. In the All Classes window, click on
3. If your school doesn’t use a third level password, you’ll be taken straight to step 5.
4. If you’ve set a third level password, you’ll be prompted to enter it. Enter the
password and click
5. The following window will appear. Enter a class name and click
6. In this example, we’ve called the class ‘Class 4a’. You can see Class 4a listed in the
All Classes window.
In the next section, we’ll create some students and add them to the class.
Page 10 of 70
MyMaths User Guide
Page 11 of 70
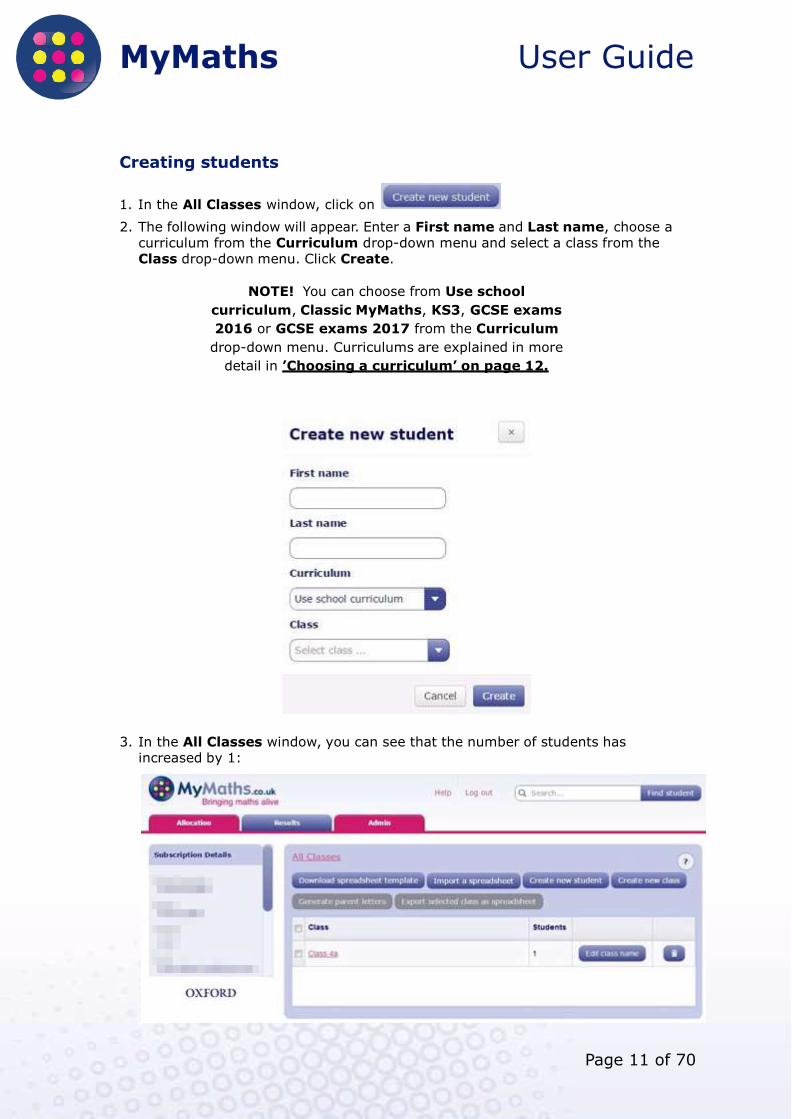
Creating students
1. In the All Classes window, click on
2. The following window will appear. Enter a First name and Last name, choose a curriculum from the Curriculum drop-down menu and select a class from the Class drop-down menu. Click Create.
NOTE! You can choose from Use school
curriculum, Classic MyMaths, KS3, GCSE exams
2016 or GCSE exams 2017 from the Curriculum
drop-down menu. Curriculums are explained in more
detail in ’Choosing a curriculum’ on page 12.
3. In the All Classes window, you can see that the number of students has
increased by 1:
MyMaths User Guide
Page 12 of 70
4. Click on again to add another student to the class. Repeat this step until all the students have been created.
5. To add another class, click and add students to it in the same way.
NOTE! You will need to let your students know their login and password details, before they can access the site.
The MyMaths website can automatically generate letters containing the usernames and passwords for each student, which you can then send to their parents or carers. Refer to ’Parent letters’ on page 51 for more information.
When you’re ready, click here to manage your students and classes. We’ll show you how to display all the login details for a class or the whole school, how to move students between classes, or export the information to a spreadsheet.
Alternatively, click here to learn how to set your classes tasks, or homework.
Choosing a curriculum
The content in MyMaths is mapped to different curricula.
The choice of curriculum will affect how resources are displayed on the MyMaths website. When a student logs into My Portal they will see the curriculum you have assigned them as their default. Students are free to change views using the dropdown. Regardless of the curriculum selected, however, students will always see all of their assigned homework under My Homework. In the Results section of the Assessment Manager, you will be able to monitor how students are progressing against your choice of curriculum. Please be aware that all content is only available in Classic MyMaths view, the other views will only include the content that is relevant. If you wish to see all work the student has done, please select Classic MyMaths.
NOTE! You can view a student’s results for a particular curriculum; this is explained on page 26.
You can also change which curriculum is assigned to a student, this is explained in
’Assigning a student a different curriculum’ on page 45.
MyMaths User Guide
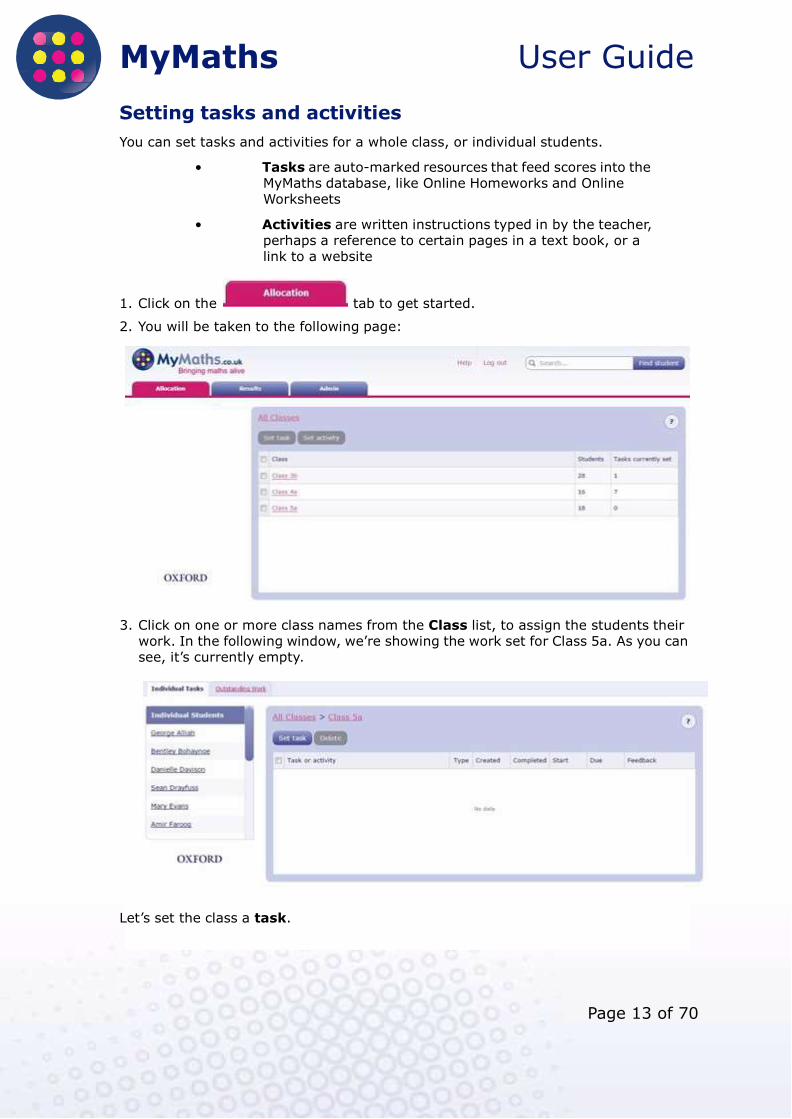
Setting tasks and activities
You can set tasks and activities for a whole class, or individual students.
• Tasks are auto-marked resources that feed scores into the MyMaths database, like Online Homeworks and Online Worksheets
• Activities are written instructions typed in by the teacher, perhaps a reference to certain pages in a text book, or a link to a website
1. Click on the tab to get started.
2. You will be taken to the following page:
3. Click on one or more class names from the Class list, to assign the students their work. In the following window, we’re showing the work set for Class 5a. As you can see, it’s currently empty.
Let’s set the class a task.
Page 13 of 70
MyMaths User Guide
Page 14 of 70
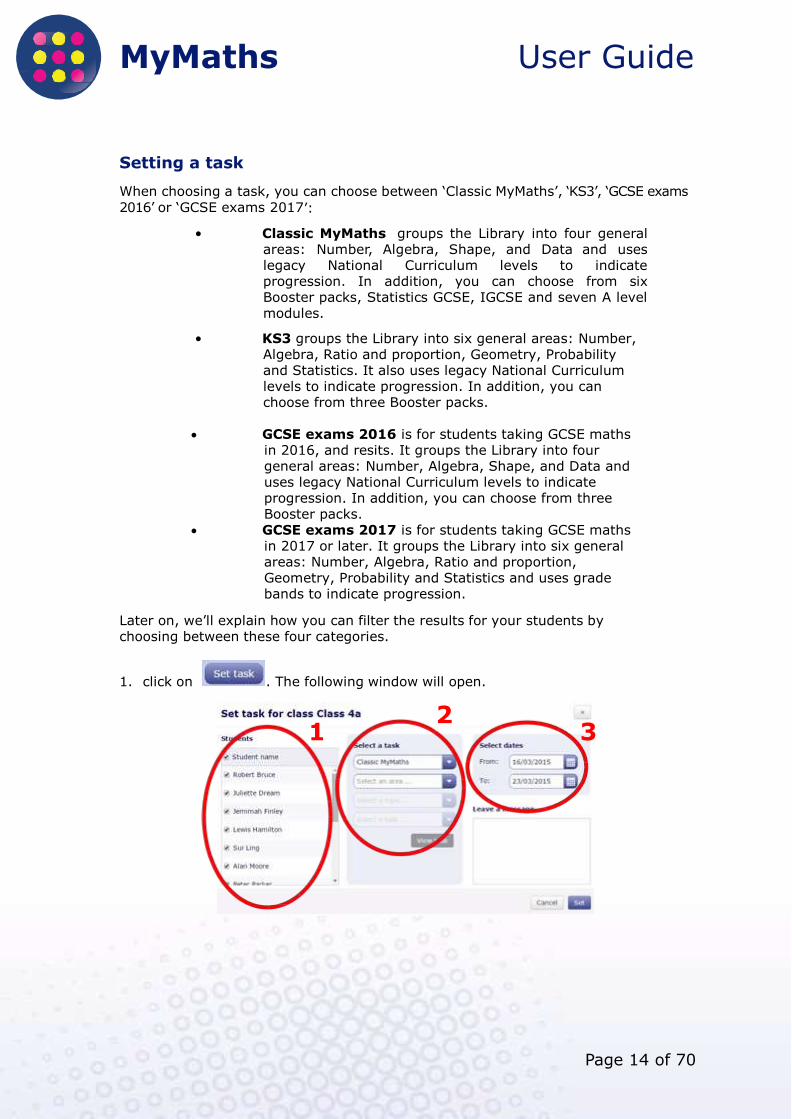
Setting a task
When choosing a task, you can choose between ‘Classic MyMaths’, ‘KS3’, ‘GCSE exams
2016’ or ‘GCSE exams 2017’:
• Classic MyMaths groups the Library into four general areas: Number, Algebra, Shape, and Data and uses legacy National Curriculum levels to indicate progression. In addition, you can choose from six Booster packs, Statistics GCSE, IGCSE and seven A level modules.
• KS3 groups the Library into six general areas: Number, Algebra, Ratio and proportion, Geometry, Probability and Statistics. It also uses legacy National Curriculum levels to indicate progression. In addition, you can choose from three Booster packs.
GCSE exams 2016 is for students taking GCSE maths
in 2016, and resits. It groups the Library into four general areas: Number, Algebra, Shape, and Data and uses legacy National Curriculum levels to indicate progression. In addition, you can choose from three Booster packs.
GCSE exams 2017 is for students taking GCSE maths in 2017 or later. It groups the Library into six general areas: Number, Algebra, Ratio and proportion, Geometry, Probability and Statistics and uses grade bands to indicate progression.
Later on, we’ll explain how you can filter the results for your students by choosing between these four categories.
1. click on . The following window will open.
2 1 3
MyMaths User Guide
Page 15 of 70
2. Area 1 (circled in red) is a list of all the students in Class 4a. You can click on
next to a particular name, if you want to deselect them. Students who have been deselected won’t be set this particular task.
For now, leave them all ticked.
3. Area 2 is where you select a task. Click on the drop-down
menu, and choose Classic MyMaths, KS3, GCSE exams 2016 or GCSE exams
2017.
NOTE! You can scroll through the list using the mouse wheel, keyboard ‘down’ arrow or by dragging the grey menu bar.
4. Next, click on the drop-down menu, and choose one of
the topics listed.
5. Next, click on the drop-down menu, and choose one of the topics listed.
6. Finally, click on the drop-down menu, and choose the task
you want to set for the class.
7. Once you’ve chosen a task, you can click to open the task in a new window. Close the window when you’re done. You can choose a different task if that wasn’t the one you intended to set!
8. Area 3 lets you set the time period in which your students must complete the task.
Click on next to From: and To: in order to display the calendar. Click on the
required dates.
9. You can click in the box below Leave a message if you want to type in some guidance for your
students.
10. Click on . The task is now set for your students.
NOTE! If the start date is today, the task will immediately be visible to students in My portal. If the start date is in the future, it will become visible to them on that date.

MyMaths User Guide
Page 16 of 70
Setting a task for multiple classes
From the tab, you can set a task or activity for more than one
class.
1. Put a tick next to each of the classes that you want to allocate a task to.
2. Click on
3. Choose a task to allocate to all the selected classes, in the same way as we described in ’Setting a task’ on page 14.

MyMaths User Guide
Page 16 of 70
Viewing a summary of allocated tasks
If you click on the tab and then click on the name of the class
you’ve just set a task for, you’ll see the following summary:
From this window, you can:
• change a task deadline or start date (as long as it’s in the future)
• monitor homework
• leave one or more students feedback on homework
• remove a student or students from a task allocation
• delete an assignment (this doesn’t delete any results students have already achieved: it just removes it from their task lists in My portal)
MyMaths User Guide
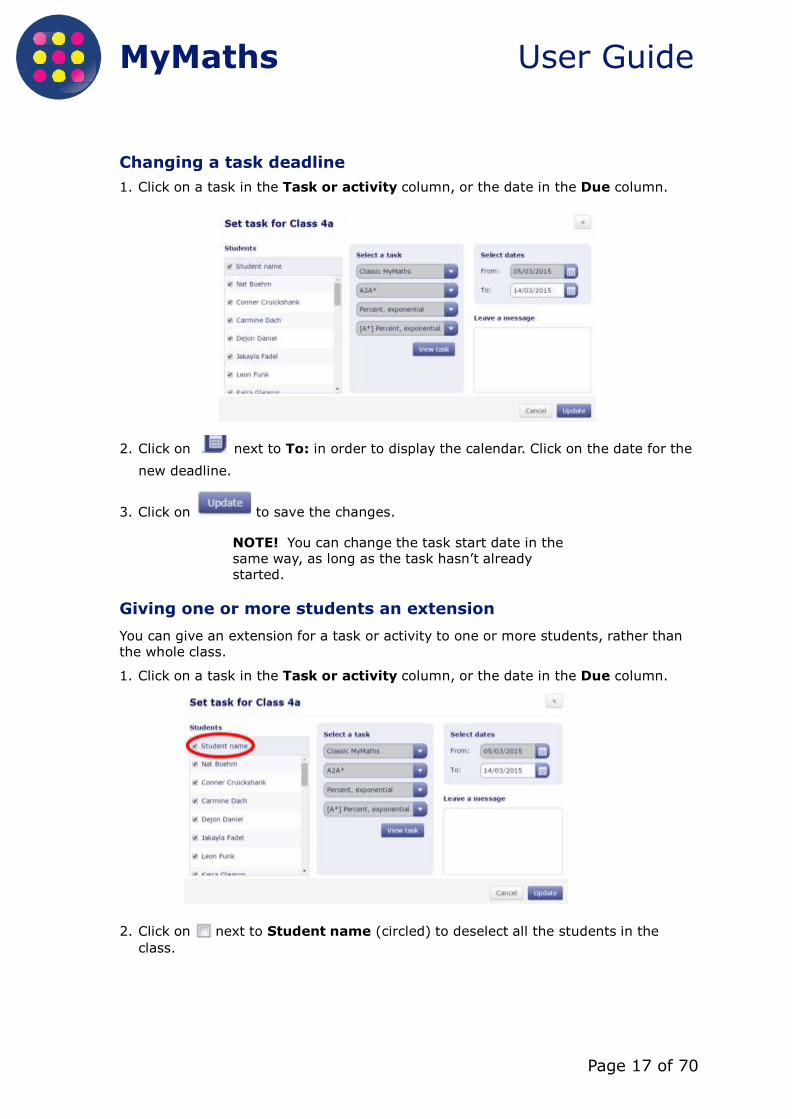
Changing a task deadline
1. Click on a task in the Task or activity column, or the date in the Due column.
2. Click on next to To: in order to display the calendar. Click on the date for the
new deadline.
3. Click on to save the changes.
NOTE! You can change the task start date in the same way, as long as the task hasn’t already started.
Giving one or more students an extension
You can give an extension for a task or activity to one or more students, rather than the whole class.
1. Click on a task in the Task or activity column, or the date in the Due column.
2. Click on next to Student name (circled) to deselect all the students in the
class.
Page 17 of 70

MyMaths User Guide
3. Click on next to the names of the students that you want to give an
extension to.
4. Click on next to To: in order to display the calendar. Click on the date for the
new deadline.
5. Click on to save the changes.
NOTE! Granting an extension will create a duplicate in the list of allocated tasks: there will be one entry for pupils who haven’t been granted an extension, and another for those who have.
The Completed column will show how many pupils are in each allocation, so you can quickly tell them apart.
Leaving feedback
The feedback button is available on any allocation that has been completed by one or more students.
1. Click on in the Feedback column.
NOTE! To reach the Feedback column, You may need to move the slider with your mouse:
2. To leave feedback for all the students in a class, click in the Quick feedback field
and type your message.
3. To leave feedback for an individual student, click in the field below their name and type your message.
4. When you’ve finished, click on
The students will be able to see your feedback in My Results and My Feed, next time they log in.
Page 18 of 70
MyMaths User Guide
Viewing the task
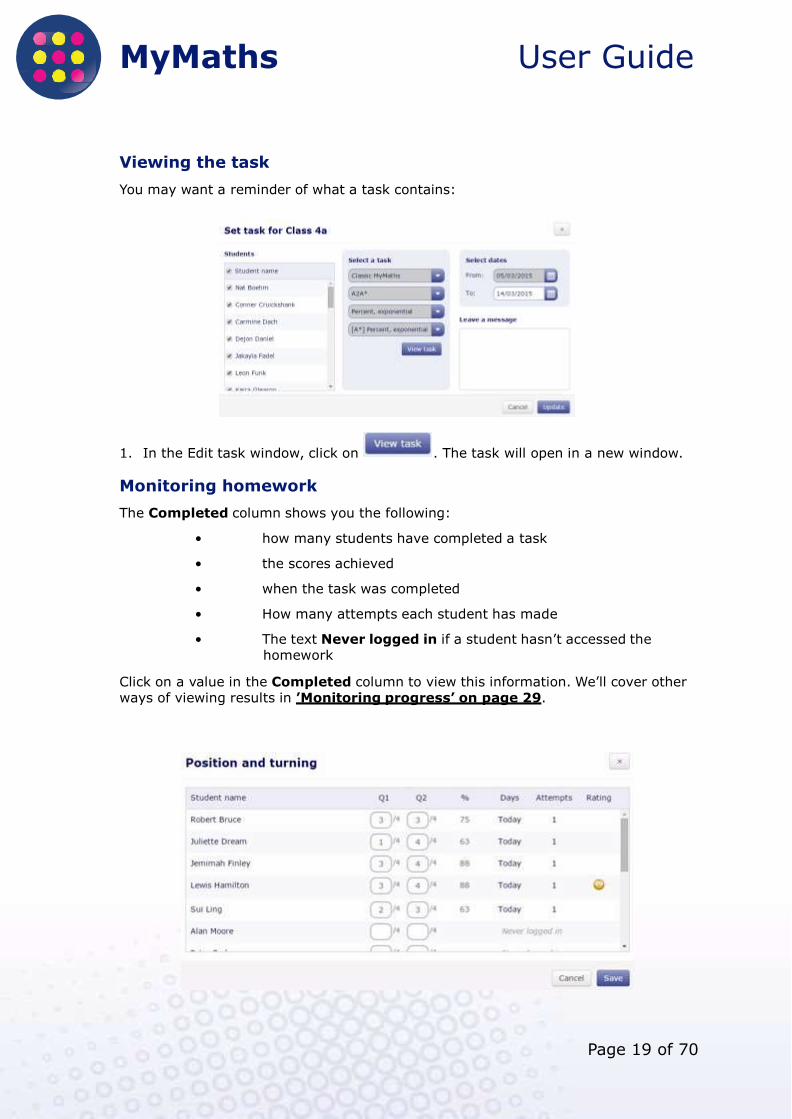
You may want a reminder of what a task contains:
1. In the Edit task window, click on . The task will open in a new window.
Monitoring homework
The Completed column shows you the following:
• how many students have completed a task
• the scores achieved
• when the task was completed
• How many attempts each student has made
• The text Never logged in if a student hasn’t accessed the homework
Click on a value in the Completed column to view this information. We’ll cover other ways of viewing results in ’Monitoring progress’ on page 29.
Page 19 of 70
MyMaths User Guide
Page 20 of 70
Setting an activity
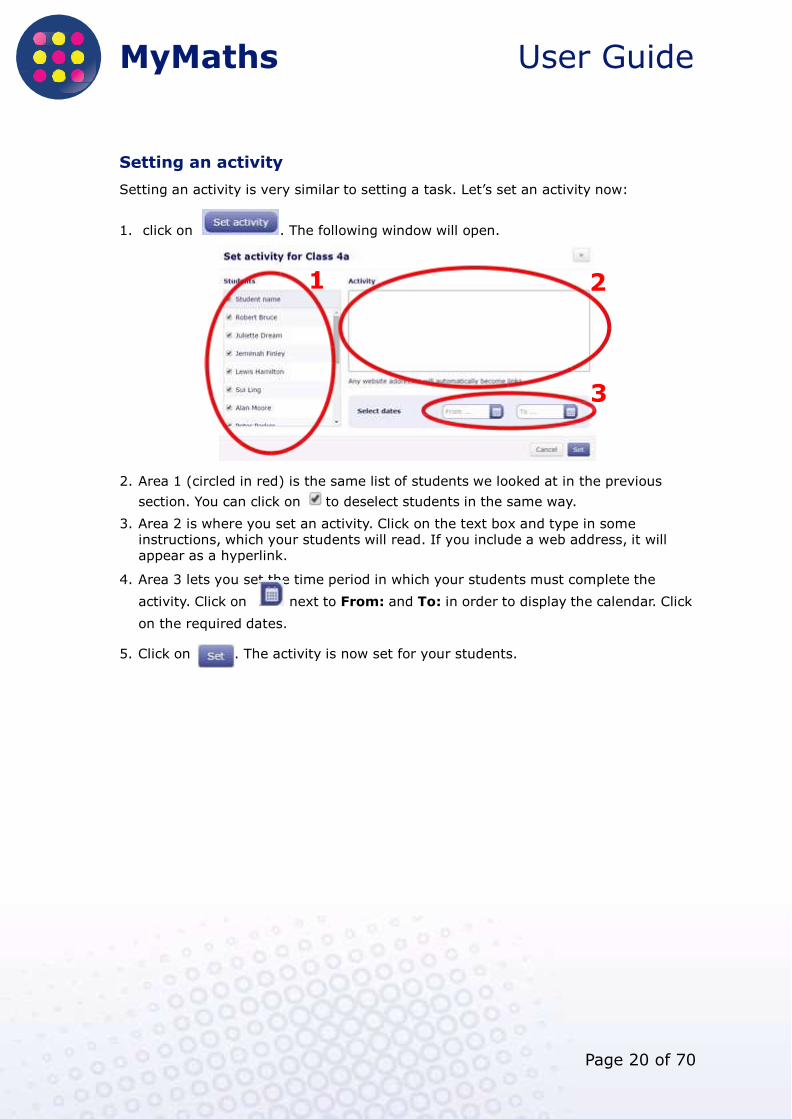
Setting an activity is very similar to setting a task. Let’s set an activity now:
1. click on . The following window will open.
1 2
3
2. Area 1 (circled in red) is the same list of students we looked at in the previous
section. You can click on to deselect students in the same way.
3. Area 2 is where you set an activity. Click on the text box and type in some instructions, which your students will read. If you include a web address, it will appear as a hyperlink.
4. Area 3 lets you set the time period in which your students must complete the
activity. Click on next to From: and To: in order to display the calendar. Click
on the required dates.
5. Click on . The activity is now set for your students.
MyMaths User Guide
Page 21 of 70
Viewing outstanding work
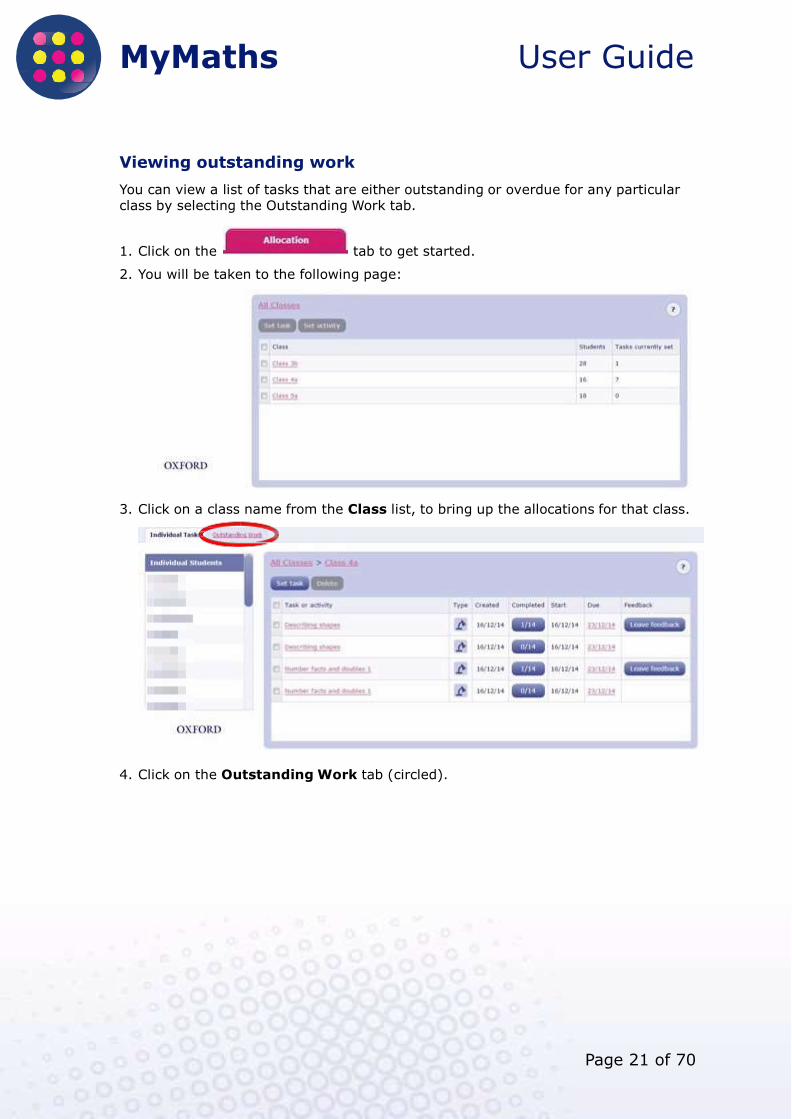
You can view a list of tasks that are either outstanding or overdue for any particular class by selecting the Outstanding Work tab.
1. Click on the tab to get started.
2. You will be taken to the following page:
3. Click on a class name from the Class list, to bring up the allocations for that class.
4. Click on the Outstanding Work tab (circled).
MyMaths User Guide
Page 22 of 70
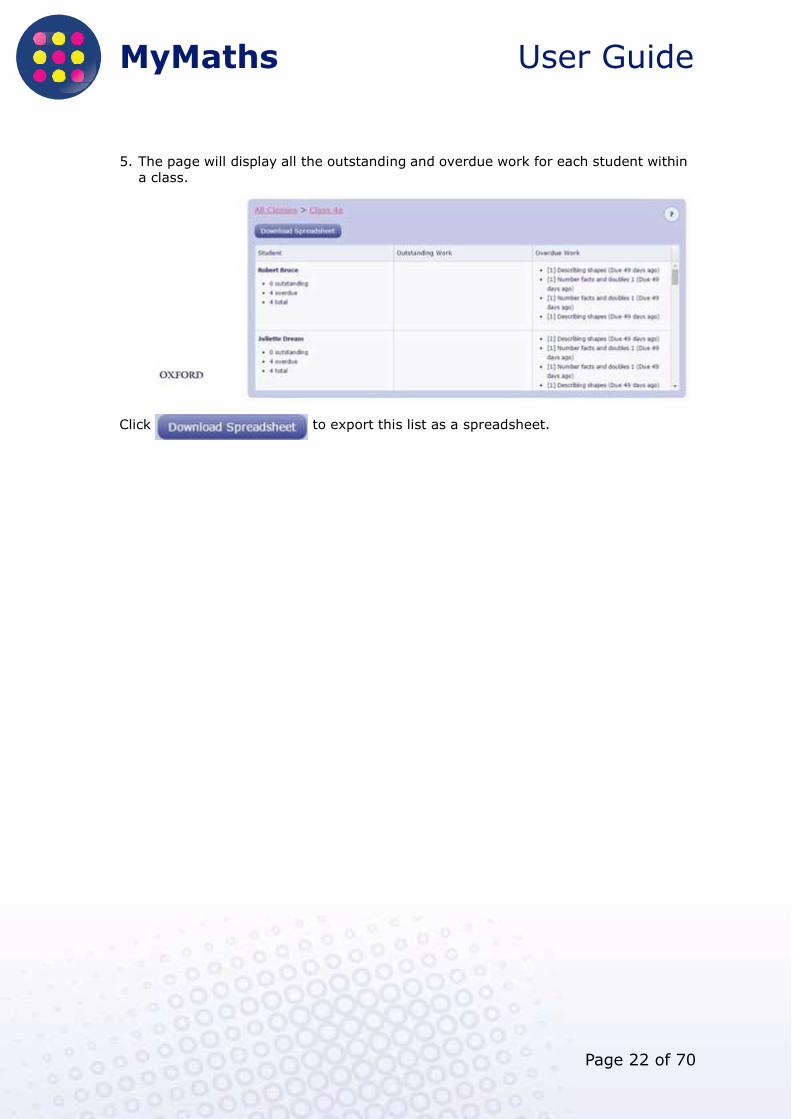
5. The page will display all the outstanding and overdue work for each student within
a class.
Click to export this list as a spreadsheet.

MyMaths User Guide
Page 23 of 70
Viewing students’ results
You can view how your students are progressing overall by clicking on the Results
tab.
In this area of the website, you can:
• see all of the results for your class
• look at results for specific dates, levels or areas
• look at results for tasks aligned with the curriculum view of your choice
• see detailed results for each student
• download results as a spreadsheet
• monitor overall progress.
The Results section allows you to view individual tasks, or see a summary of how a whole class or individual student is doing.
Viewing class results
This section explains how to view all of the results for a chosen class, across the whole of the MyMaths platform. This will include tasks that students have completed independently, as well as the tasks that you have assigned.
You can view specific results using the filters built into MyMaths.
NOTE! You can also download this information as a spreadsheet. We’ll explain how in ’Downloading a Markbook’ on page 28.
1. Click on the tab to get started.

MyMaths User Guide
Page 24 of 70
2. You will be taken to the school results page:
NOTE! This page shows how many assignments have been attempted this week. 14 tasks have been completed by Class 4a.
3. Click on next to a class and click . In the following example, we’re
looking at Class 4a. The students have attempted a few more of the tasks:
NOTE! The tab (circled) indicates that you’re viewing individual tasks.
To see all the students in the class, move the slider
with your mouse:
MyMaths User Guide
Page 25 of 70
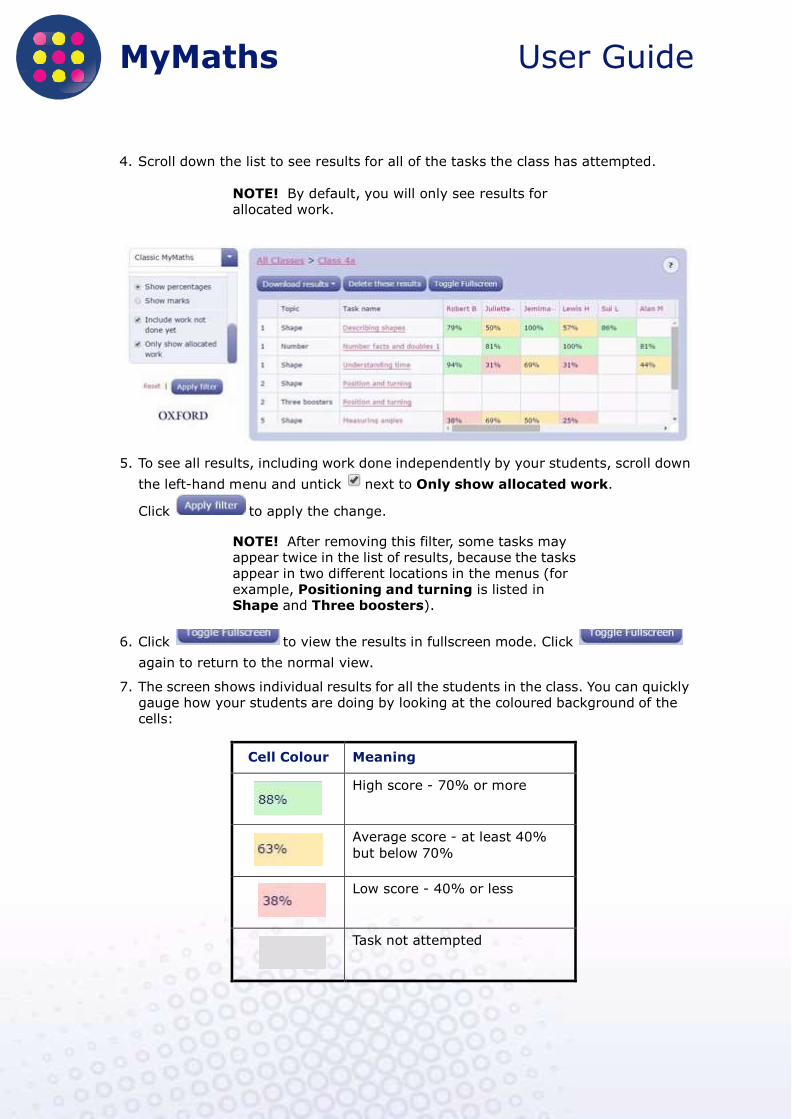
4. Scroll down the list to see results for all of the tasks the class has attempted.
NOTE! By default, you will only see results for allocated work.
5. To see all results, including work done independently by your students, scroll down
the left-hand menu and untick next to Only show allocated work.
Click to apply the change.
NOTE! After removing this filter, some tasks may appear twice in the list of results, because the tasks appear in two different locations in the menus (for example, Positioning and turning is listed in Shape and Three boosters).
6. Click to view the results in fullscreen mode. Click
again to return to the normal view.
7. The screen shows individual results for all the students in the class. You can quickly gauge how your students are doing by looking at the coloured background of the cells:
Cell Colour Meaning
High score - 70% or more
Average score - at least 40%
but below 70%
Low score - 40% or less
Task not attempted
MyMaths User Guide
Page 26 of 70
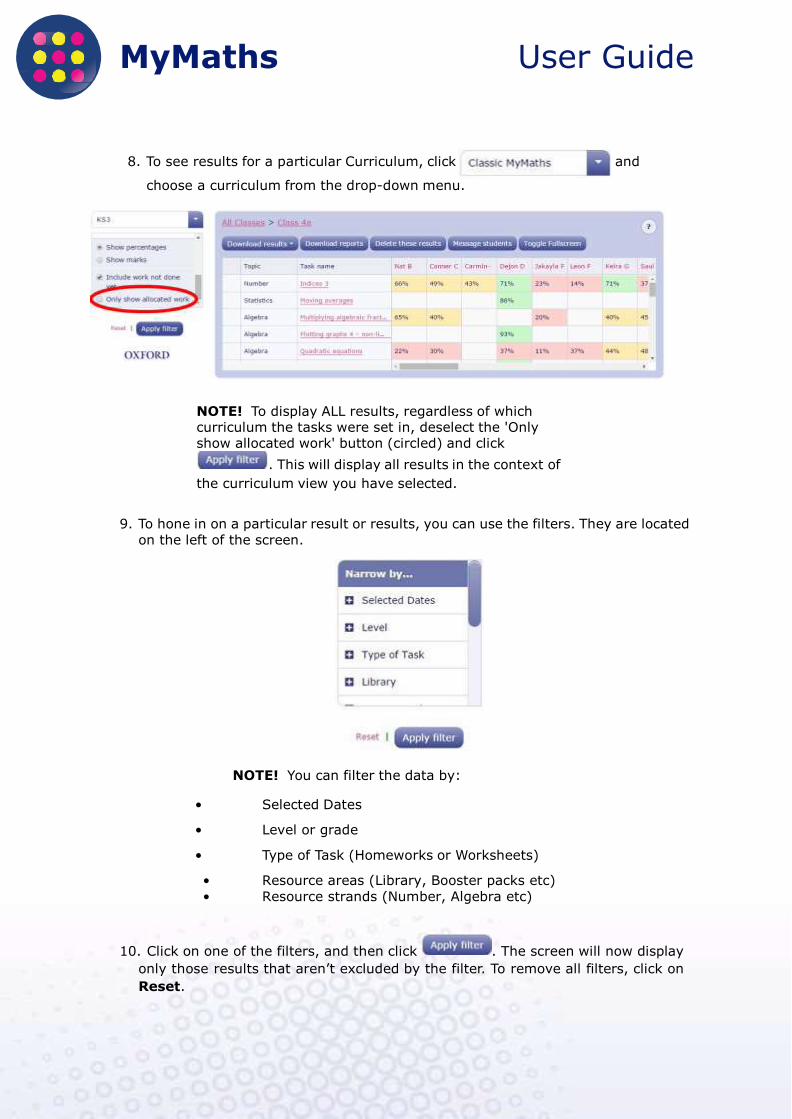
8. To see results for a particular Curriculum, click and
choose a curriculum from the drop-down menu.
NOTE! To display ALL results, regardless of which curriculum the tasks were set in, deselect the 'Only show allocated work' button (circled) and click
. This will display all results in the context of
the curriculum view you have selected.
9. To hone in on a particular result or results, you can use the filters. They are located
on the left of the screen.
NOTE! You can filter the data by:
• Selected Dates
• Level or grade
• Type of Task (Homeworks or Worksheets)
• Resource areas (Library, Booster packs etc)
• Resource strands (Number, Algebra etc)
10. Click on one of the filters, and then click . The screen will now display
only those results that aren’t excluded by the filter. To remove all filters, click on
Reset.
MyMaths User Guide
Page 27 of 70
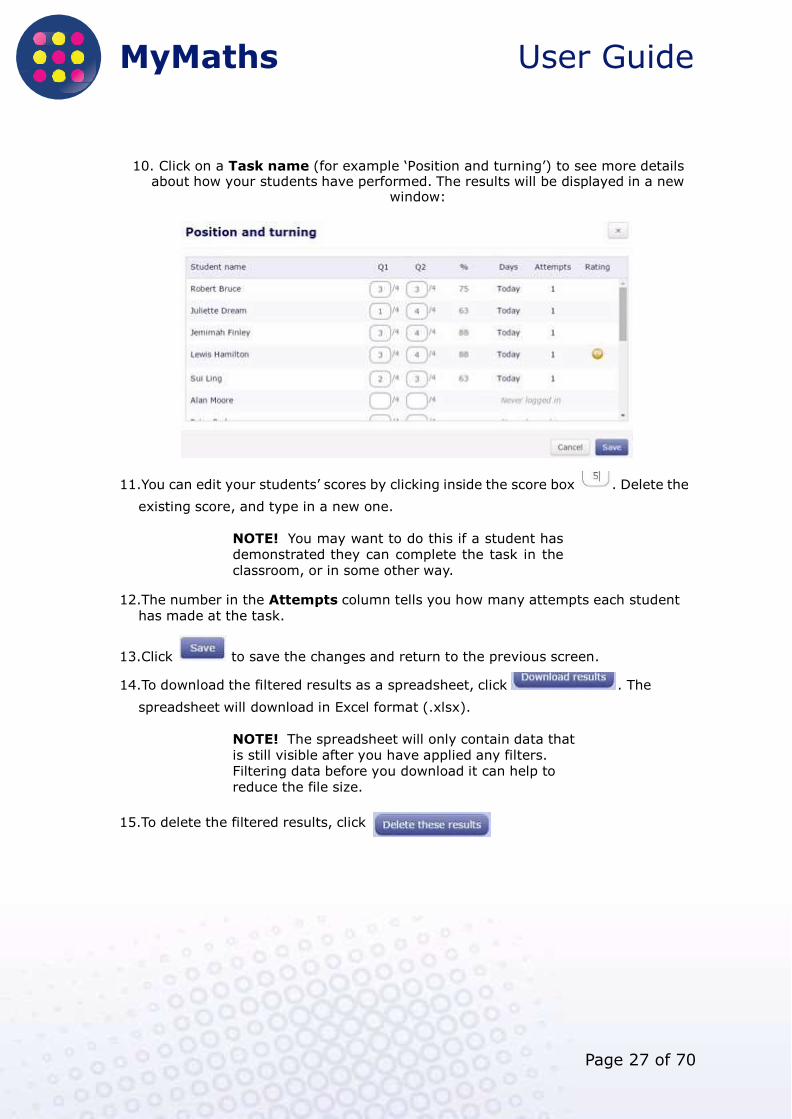
10. Click on a Task name (for example ‘Position and turning’) to see more details about how your students have performed. The results will be displayed in a new
window:
11.You can edit your students’ scores by clicking inside the score box . Delete the
existing score, and type in a new one.
NOTE! You may want to do this if a student has demonstrated they can complete the task in the classroom, or in some other way.
12.The number in the Attempts column tells you how many attempts each student
has made at the task.
13.Click to save the changes and return to the previous screen.
14.To download the filtered results as a spreadsheet, click . The
spreadsheet will download in Excel format (.xlsx).
NOTE! The spreadsheet will only contain data that is still visible after you have applied any filters. Filtering data before you download it can help to reduce the file size.
15.To delete the filtered results, click
MyMaths User Guide
Page 28 of 70
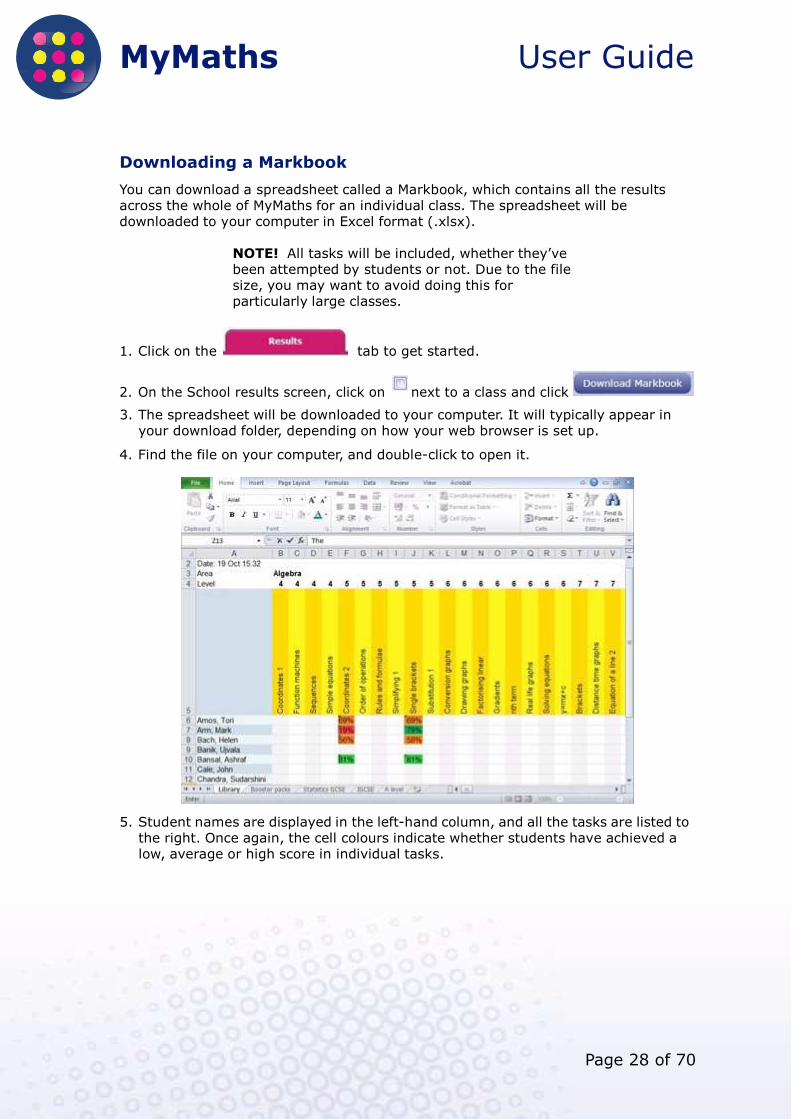
Downloading a Markbook
You can download a spreadsheet called a Markbook, which contains all the results across the whole of MyMaths for an individual class. The spreadsheet will be downloaded to your computer in Excel format (.xlsx).
NOTE! All tasks will be included, whether they’ve been attempted by students or not. Due to the file size, you may want to avoid doing this for particularly large classes.
1. Click on the tab to get started.
2. On the School results screen, click on next to a class and click
3. The spreadsheet will be downloaded to your computer. It will typically appear in your download folder, depending on how your web browser is set up.
4. Find the file on your computer, and double-click to open it.
5. Student names are displayed in the left-hand column, and all the tasks are listed to the right. Once again, the cell colours indicate whether students have achieved a low, average or high score in individual tasks.
MyMaths User Guide
Page 29 of 70
Monitoring progress
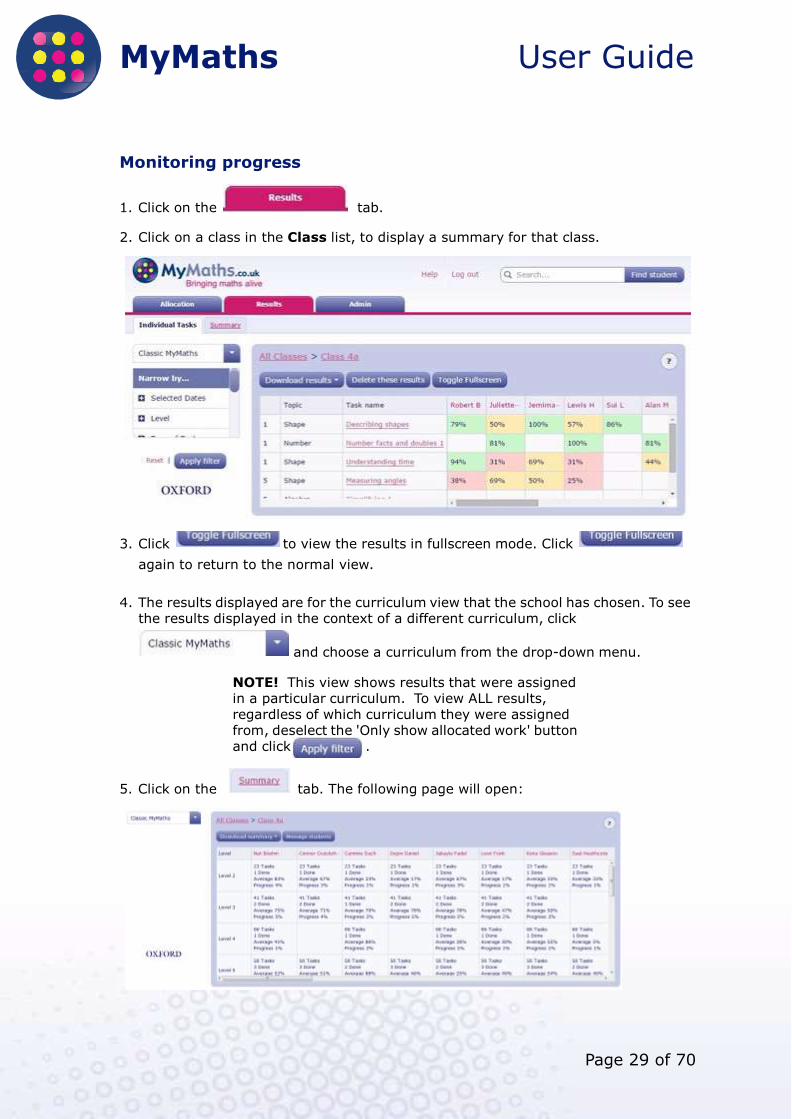
1. Click on the tab.
2. Click on a class in the Class list, to display a summary for that class.
3. Click to view the results in fullscreen mode. Click
again to return to the normal view.
4. The results displayed are for the curriculum view that the school has chosen. To see the results displayed in the context of a different curriculum, click
and choose a curriculum from the drop-down menu.
NOTE! This view shows results that were assigned in a particular curriculum. To view ALL results, regardless of which curriculum they were assigned from, deselect the 'Only show allocated work' button and click .
5. Click on the tab. The following page will open:
MyMaths User Guide
Page 30 of 70
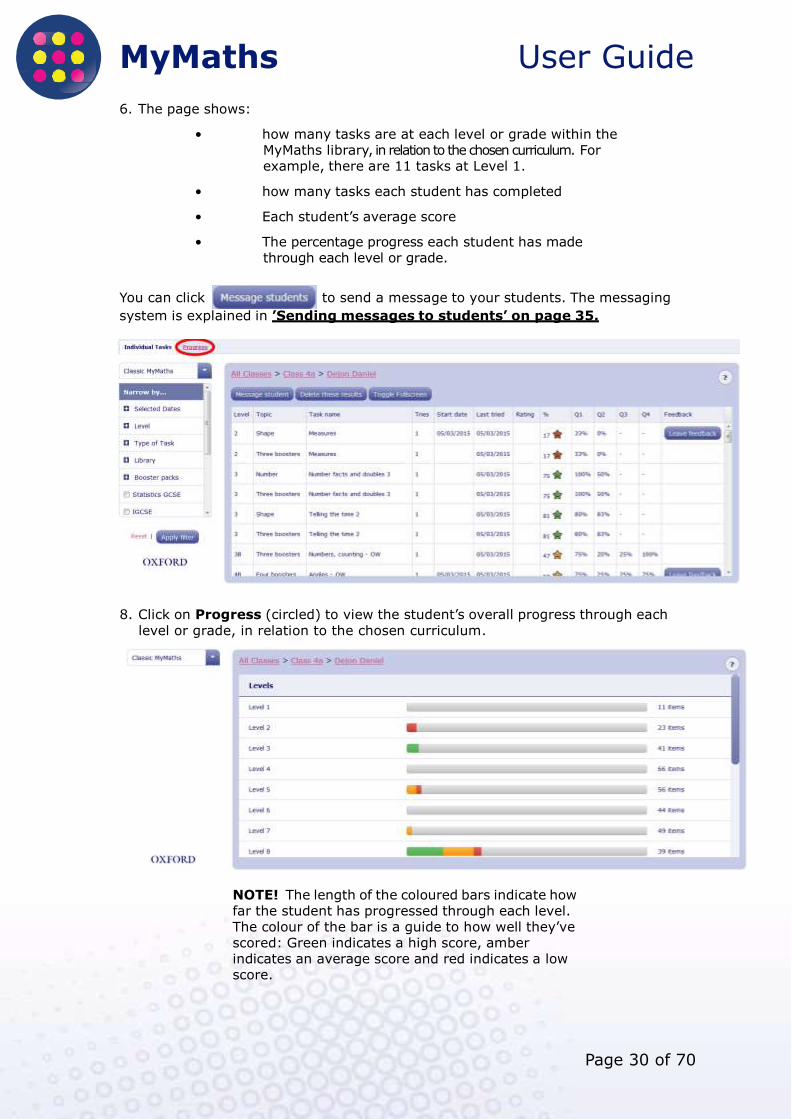
6. The page shows:
• how many tasks are at each level or grade within the MyMaths library, in relation to the chosen curriculum. For example, there are 11 tasks at Level 1.
• how many tasks each student has completed
• Each student’s average score
• The percentage progress each student has made through each level or grade.
You can click to send a message to your students. The messaging
system is explained in ’Sending messages to students’ on page 35.
7. To see how a student is progressing by levels, click on the student’s name in the top row. In this example, we’ve clicked on Lewis Hamilton.
8. Click on Progress (circled) to view the student’s overall progress through each
level or grade, in relation to the chosen curriculum.
NOTE! The length of the coloured bars indicate how far the student has progressed through each level. The colour of the bar is a guide to how well they’ve scored: Green indicates a high score, amber indicates an average score and red indicates a low score.
MyMaths User Guide
Page 31 of 70
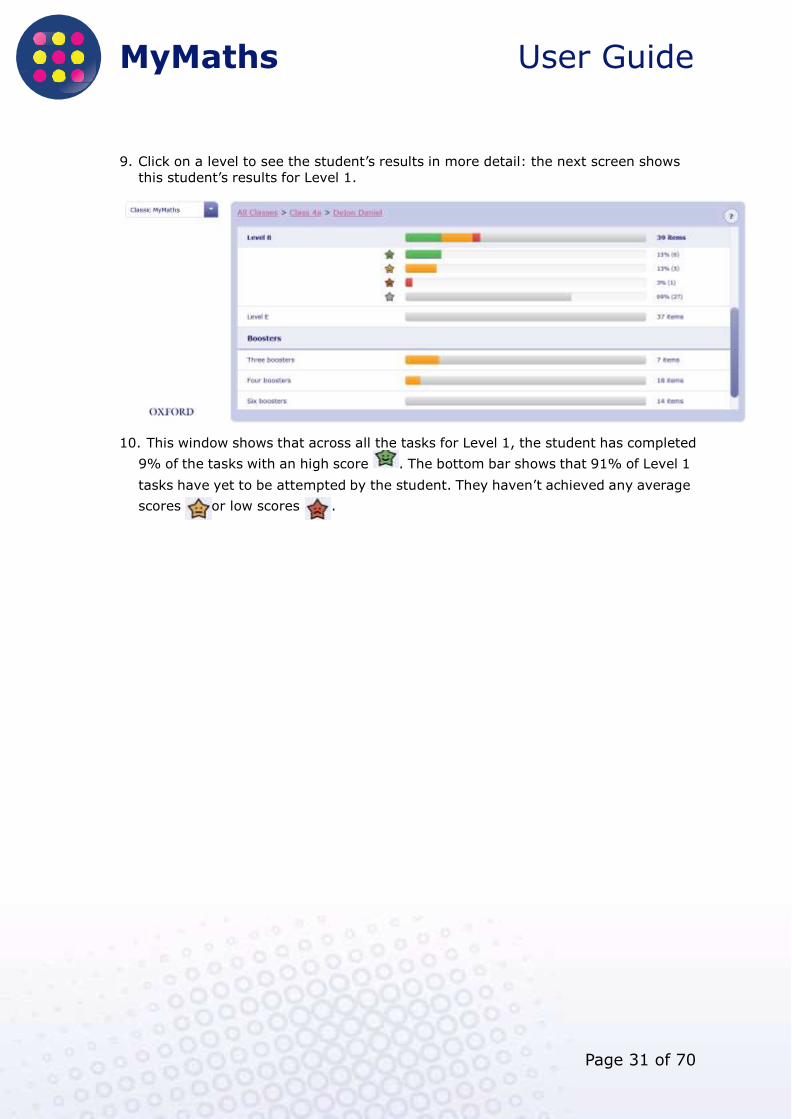
9. Click on a level to see the student’s results in more detail: the next screen shows
this student’s results for Level 1.
10. This window shows that across all the tasks for Level 1, the student has completed
9% of the tasks with an high score . The bottom bar shows that 91% of Level 1
tasks have yet to be attempted by the student. They haven’t achieved any average
scores or low scores .
MyMaths User Guide
Page 32 of 70
Viewing individual results
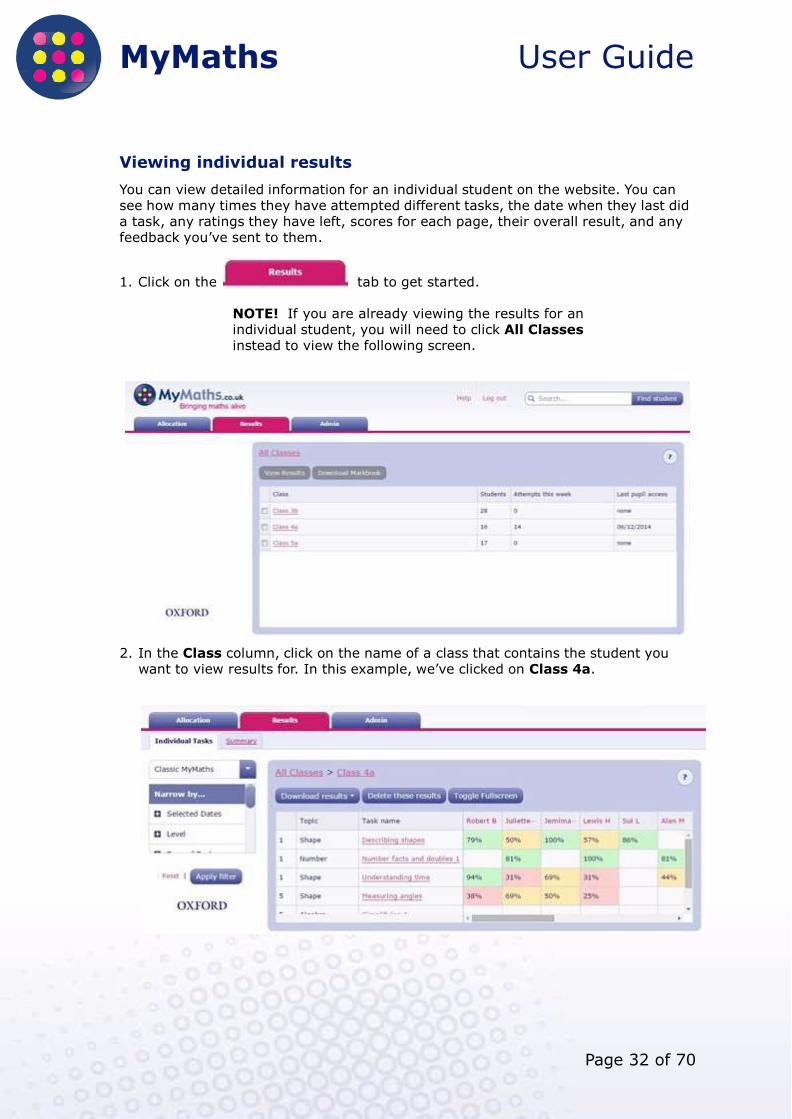
You can view detailed information for an individual student on the website. You can see how many times they have attempted different tasks, the date when they last did a task, any ratings they have left, scores for each page, their overall result, and any feedback you’ve sent to them.
1. Click on the tab to get started.
NOTE! If you are already viewing the results for an individual student, you will need to click All Classes instead to view the following screen.
2. In the Class column, click on the name of a class that contains the student you want to view results for. In this example, we’ve clicked on Class 4a.
MyMaths User Guide
Page 33 of 70
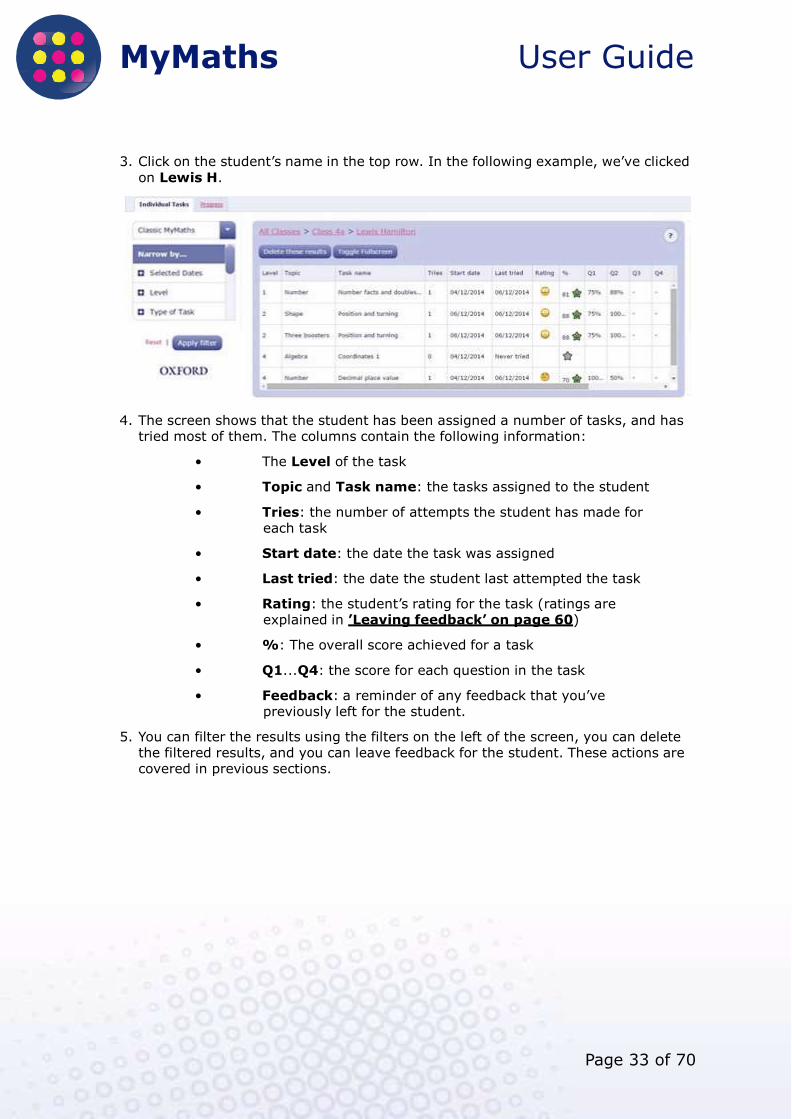
3. Click on the student’s name in the top row. In the following example, we’ve clicked
on Lewis H.
4. The screen shows that the student has been assigned a number of tasks, and has tried most of them. The columns contain the following information:
• The Level of the task
• Topic and Task name: the tasks assigned to the student
• Tries: the number of attempts the student has made for each task
• Start date: the date the task was assigned
• Last tried: the date the student last attempted the task
• Rating: the student’s rating for the task (ratings are explained in ’Leaving feedback’ on page 60)
• %: The overall score achieved for a task
• Q1...Q4: the score for each question in the task
• Feedback: a reminder of any feedback that you’ve previously left for the student.
5. You can filter the results using the filters on the left of the screen, you can delete the filtered results, and you can leave feedback for the student. These actions are covered in previous sections.
MyMaths User Guide
Page 34 of 70
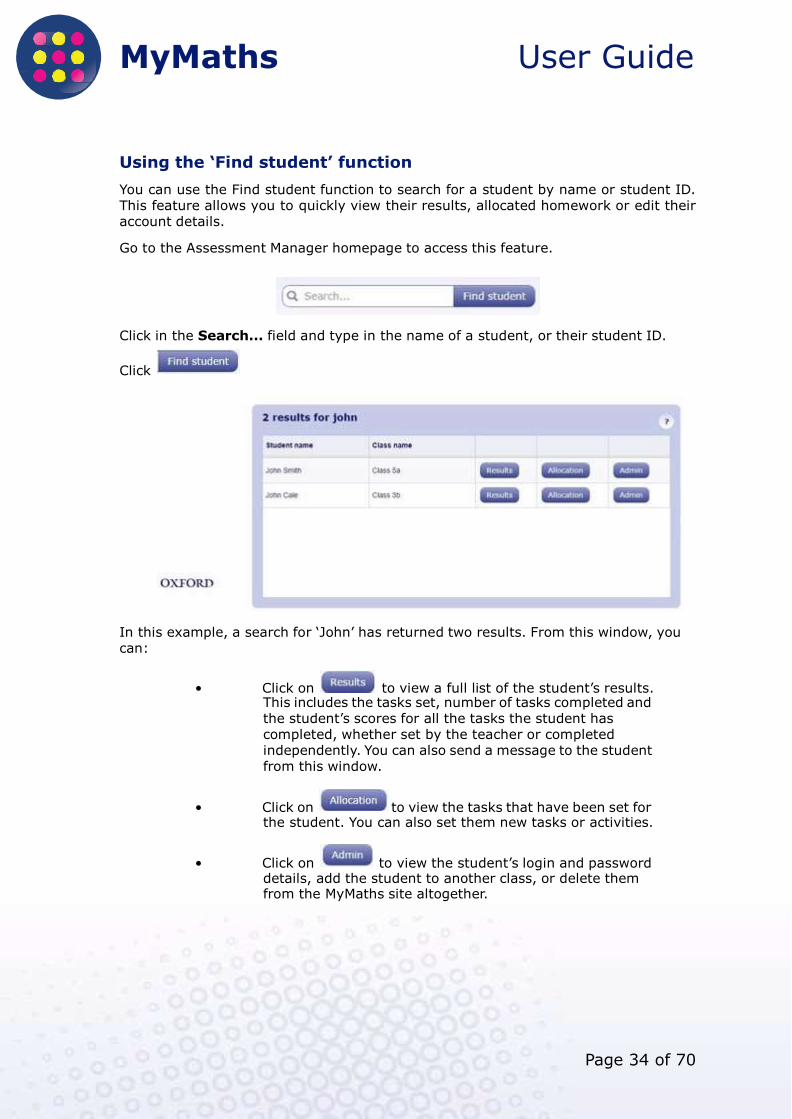
Using the ‘Find student’ function
You can use the Find student function to search for a student by name or student ID. This feature allows you to quickly view their results, allocated homework or edit their account details.
Go to the Assessment Manager homepage to access this feature.
Click in the Search... field and type in the name of a student, or their student ID.
Click
In this example, a search for ‘John’ has returned two results. From this window, you can:
• Click on to view a full list of the student’s results. This includes the tasks set, number of tasks completed and the student’s scores for all the tasks the student has completed, whether set by the teacher or completed independently. You can also send a message to the student from this window.
• Click on to view the tasks that have been set for the student. You can also set them new tasks or activities.
• Click on to view the student’s login and password details, add the student to another class, or delete them from the MyMaths site altogether.
MyMaths User Guide
Page 35 of 70
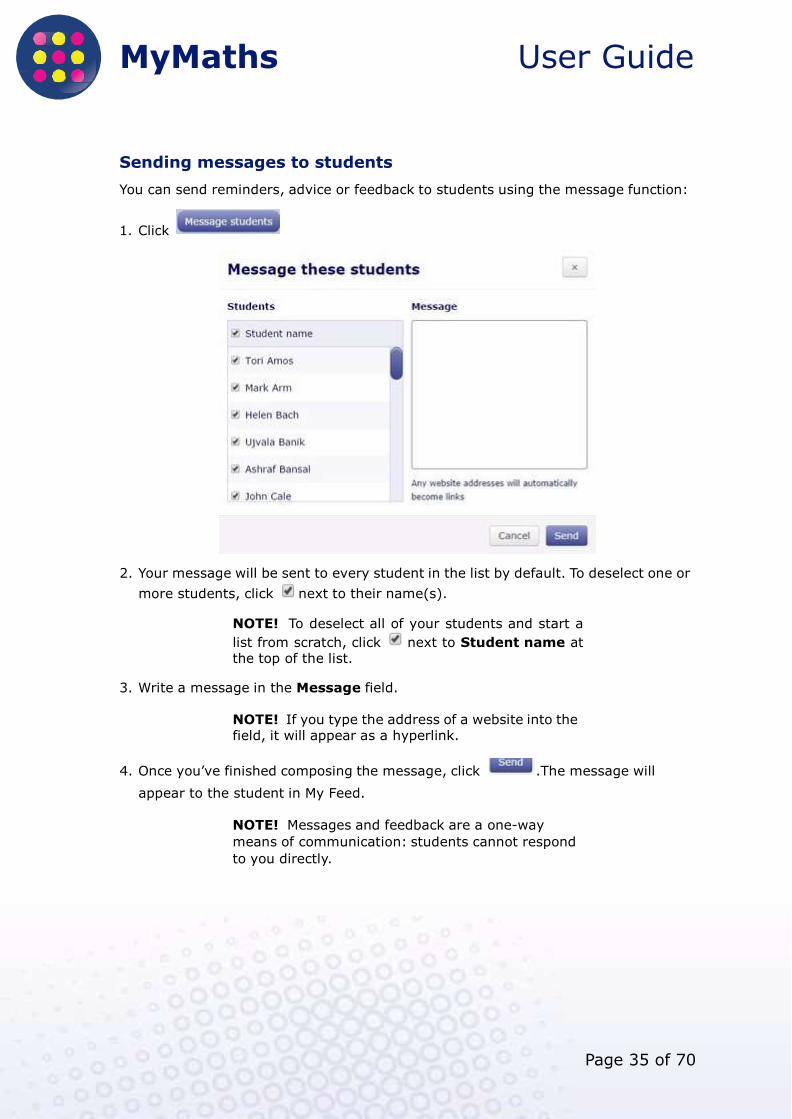
Sending messages to students
You can send reminders, advice or feedback to students using the message function:
1. Click
2. Your message will be sent to every student in the list by default. To deselect one or
more students, click next to their name(s).
NOTE! To deselect all of your students and start a
list from scratch, click next to Student name at the top of the list.
3. Write a message in the Message field.
NOTE! If you type the address of a website into the field, it will appear as a hyperlink.
4. Once you’ve finished composing the message, click .The message will
appear to the student in My Feed.
NOTE! Messages and feedback are a one-way
means of communication: students cannot respond
to you directly.
Page 36 of 70
This page is intentionally blank

Page 37 of 70
Managing students and classes
This section will guide you through editing student details, adding students to a class, deleting school leavers and importing and exporting class spreadsheets.
NOTE! You may require a third level password to edit student details, depending on whether or not your school has opted to set one.
Importing and exporting classes
The MyMaths website allows you to import class and student details from a spreadsheet. You can also export data from the website, to a spreadsheet: the spreadsheet will contain student results, names, login names and passwords, and any general messages you have left for classes they belong to.
To import data from a spreadsheet, the spreadsheet must be saved in .csv format.
NOTE! .csv is a format that’s widely used, and the extension simply denotes data that is separated by commas.
There are two ways to create your first spreadsheet:
• Create your classes and students in the MyMaths website, as discussed in ’Creating a class’ on page 10 and ’Creating students’ on page 11. Then export this data as a spreadsheet
• Create a .csv file from scratch. You can make a spreadsheet in Excel, and then save it as a .csv file. Or you can download a template from the Admin page.
We’ll go through the second option first.
Creating a .csv File
In this example, we’ll create a .csv file using Microsoft Excel.
The way the spreadsheet is laid out is really important. If it’s not done properly, the website won’t be able to use it. There are a number of things to look out for, which we’ll guide you through in a moment:
• The column headings are case sensitive
• The column headings must be in the right order
• The User Name and Password will be filled in or created automatically by the website, the first time you upload your spreadsheet.
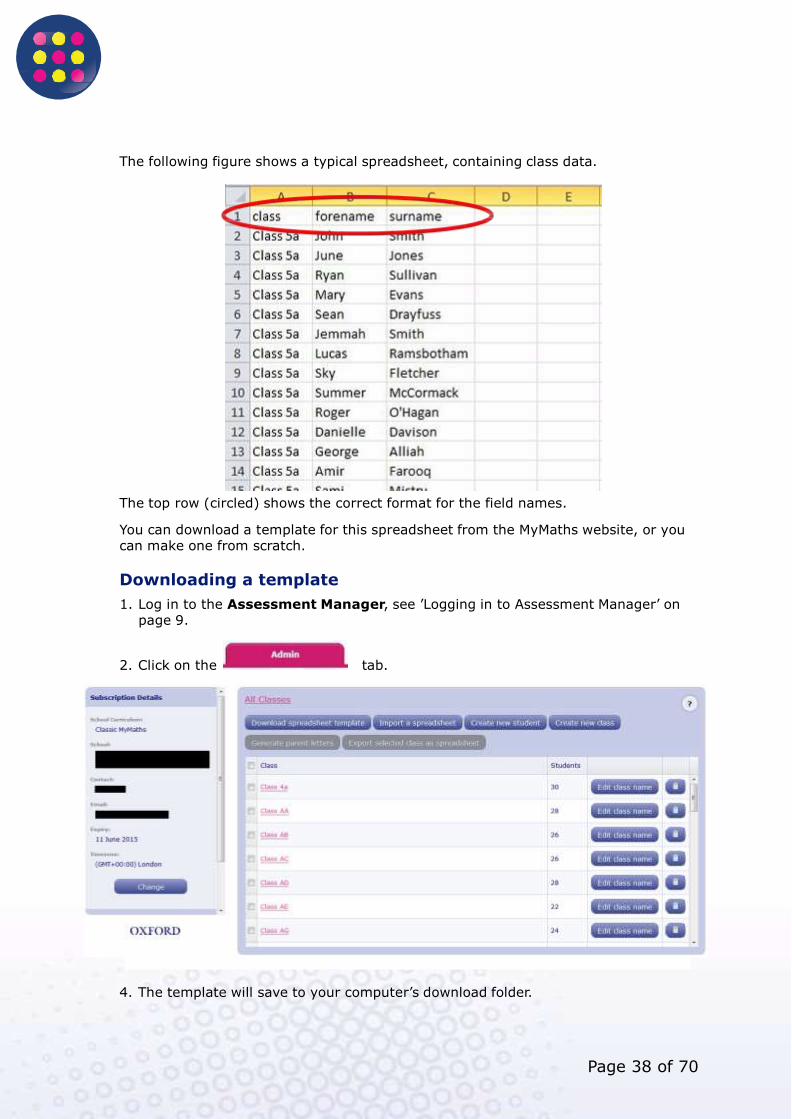
The following figure shows a typical spreadsheet, containing class data.
The top row (circled) shows the correct format for the field names.
You can download a template for this spreadsheet from the MyMaths website, or you can make one from scratch.
Downloading a template
1. Log in to the Assessment Manager, see ’Logging in to Assessment Manager’ on page 9.
2. Click on the tab.
3. In the following window, click on
4. The template will save to your computer’s download folder.
Page 38 of 70
Page 39 of 70
Making a spreadsheet from scratch
1. Open a new spreadsheet in Excel, and type the text we’ve circled into the columns of the first row.
NOTE! Copy the text exactly: use lower case for
class, forename and surname.
2. Copy in the data for class, forename and surname.
NOTE! The User Name and Password will be created automatically by the MyMaths website, once you’ve imported the data.
NOTE! You don’t need to create a separate spreadsheet for each class. Students will automatically be grouped by class name on the website, depending on what’s been typed into the class column: you can paste all your students into one large spreadsheet.
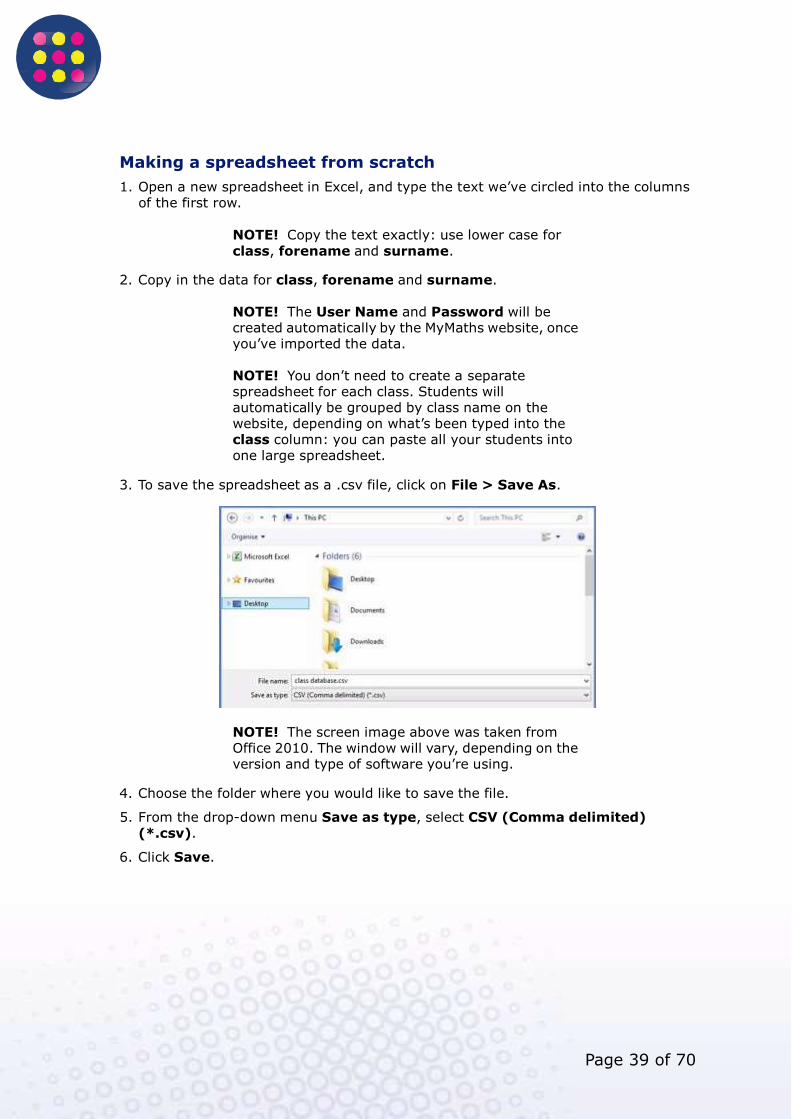
3. To save the spreadsheet as a .csv file, click on File > Save As.
NOTE! The screen image above was taken from Office 2010. The window will vary, depending on the version and type of software you’re using.
4. Choose the folder where you would like to save the file.
5. From the drop-down menu Save as type, select CSV (Comma delimited) (*.csv).
6. Click Save.
Page 40 of 70
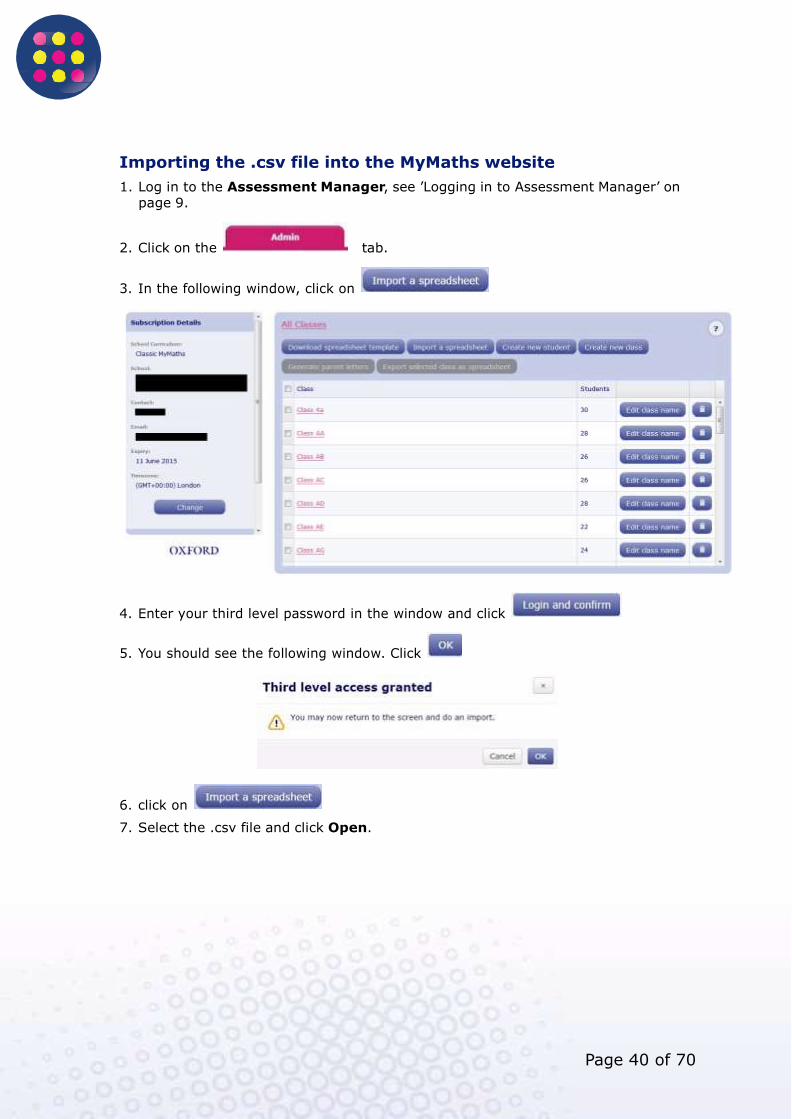
Importing the .csv file into the MyMaths website
1. Log in to the Assessment Manager, see ’Logging in to Assessment Manager’ on page 9.
2. Click on the tab.
3. In the following window, click on
4. Enter your third level password in the window and click
5. You should see the following window. Click
6. click on
7. Select the .csv file and click Open.
Page 41 of 70
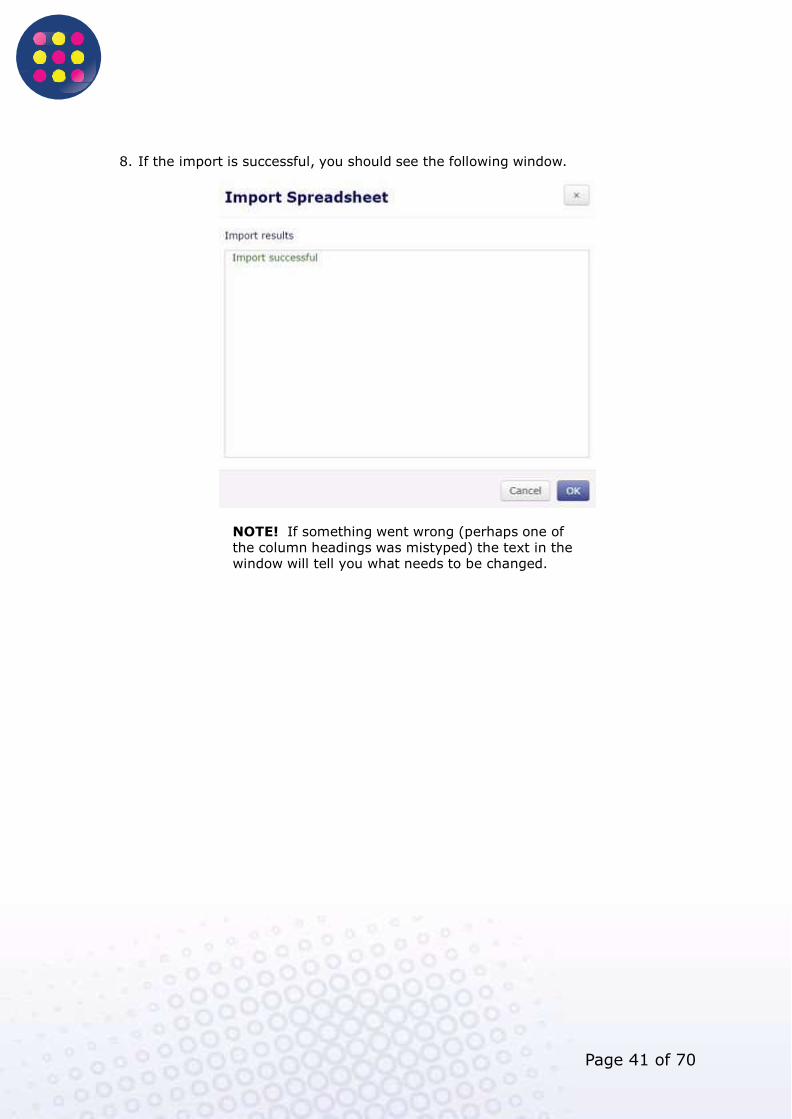
8. If the import is successful, you should see the following window.
NOTE! If something went wrong (perhaps one of the column headings was mistyped) the text in the window will tell you what needs to be changed.
Page 42 of 70
Exporting a class as a spreadsheet
You can export the details of a class as a spreadsheet.
NOTE! The spreadsheet will be exported in Excel format (.xlsx).
To export class data as a spreadsheet, use the following steps.
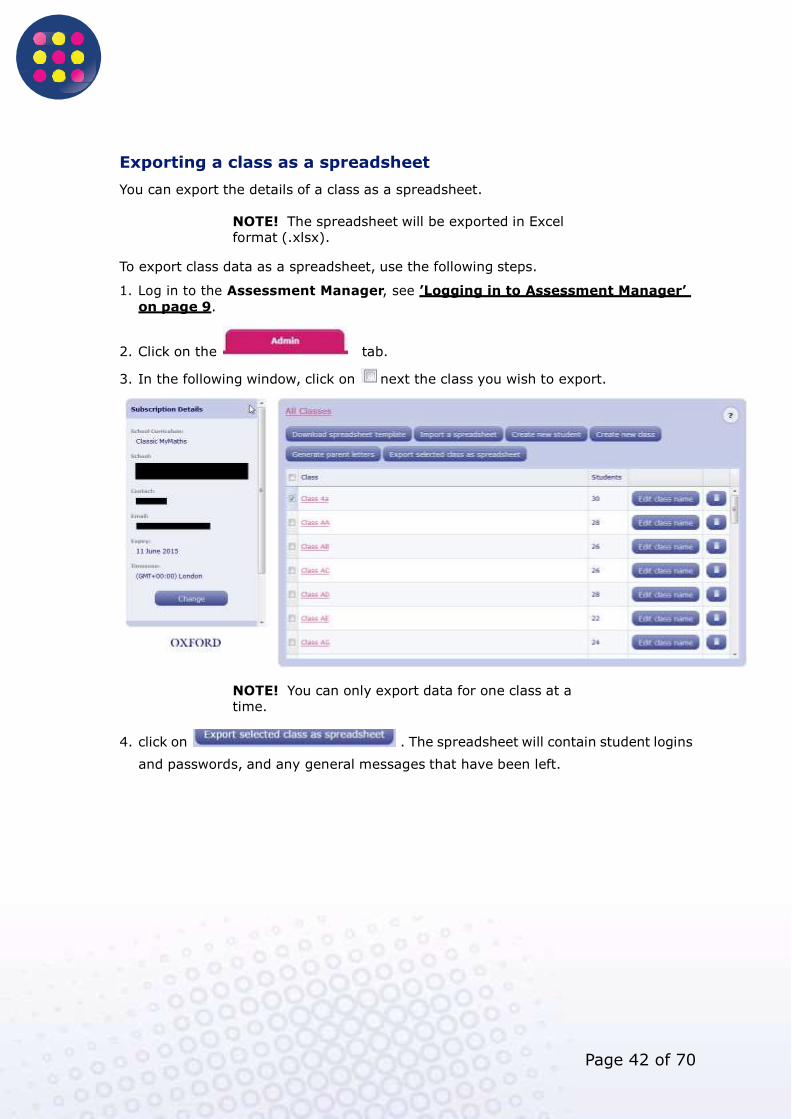
1. Log in to the Assessment Manager, see ’Logging in to Assessment Manager’
on page 9.
2. Click on the tab.
3. In the following window, click on next the class you wish to export.
NOTE! You can only export data for one class at a time.
4. click on . The spreadsheet will contain student logins
and passwords, and any general messages that have been left.
Page 43 of 70
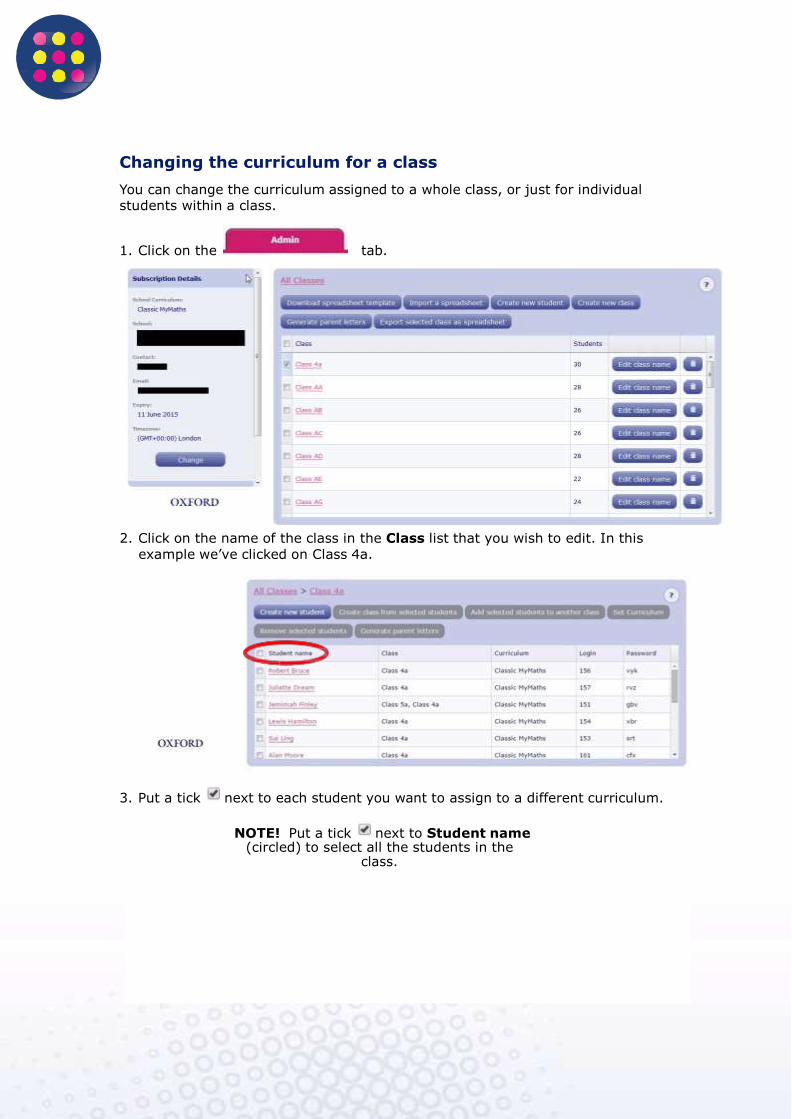
Changing the curriculum for a class
You can change the curriculum assigned to a whole class, or just for individual students within a class.
1. Click on the tab.
2. Click on the name of the class in the Class list that you wish to edit. In this
example we’ve clicked on Class 4a.
3. Put a tick next to each student you want to assign to a different curriculum.
NOTE! Put a tick next to Student name (circled) to select all the students in the
class.
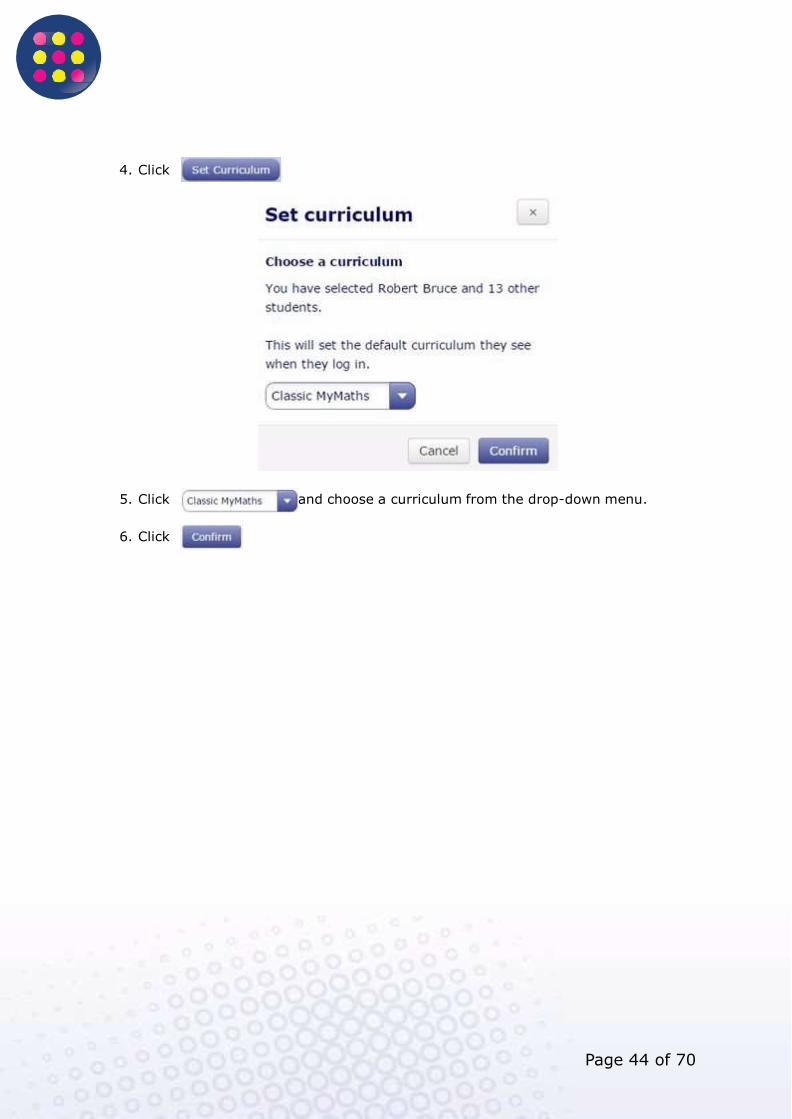
Page 44 of 70
4. Click
5. Click and choose a curriculum from the drop-down menu.
6. Click
Page 45 of 70
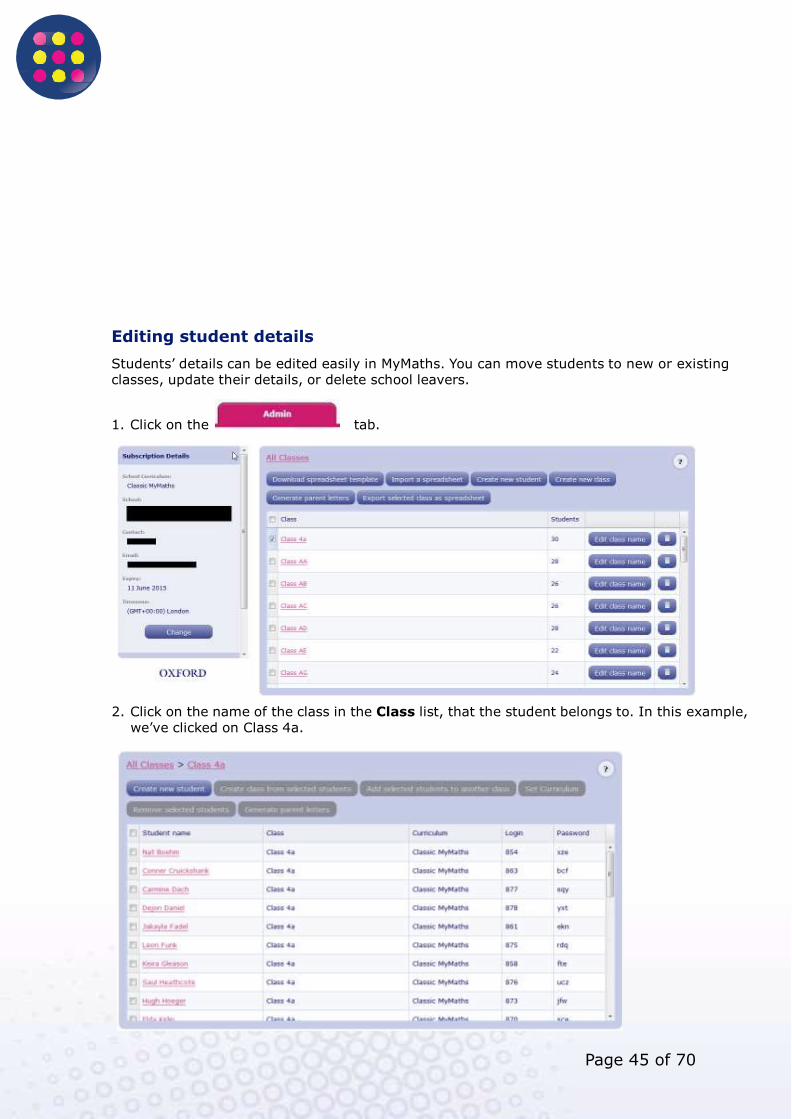
Editing student details
Students’ details can be edited easily in MyMaths. You can move students to new or existing classes, update their details, or delete school leavers.
1. Click on the tab.
2. Click on the name of the class in the Class list, that the student belongs to. In this example, we’ve clicked on Class 4a.
Page 46 of 70
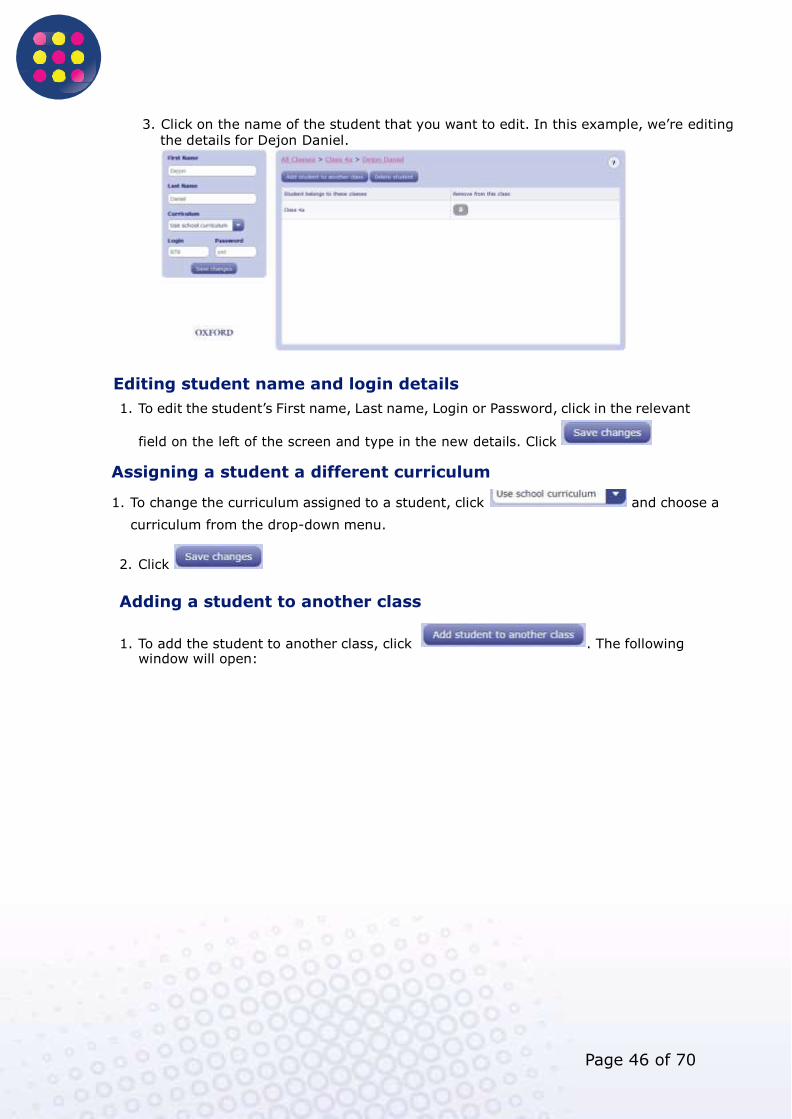
3. Click on the name of the student that you want to edit. In this example, we’re editing
the details for Dejon Daniel.
Editing student name and login details
1. To edit the student’s First name, Last name, Login or Password, click in the relevant
field on the left of the screen and type in the new details. Click
Assigning a student a different curriculum
1. To change the curriculum assigned to a student, click and choose a
curriculum from the drop-down menu.
2. Click Adding a student to another class
1. To add the student to another class, click . The following window will open:
Page 47 of 70
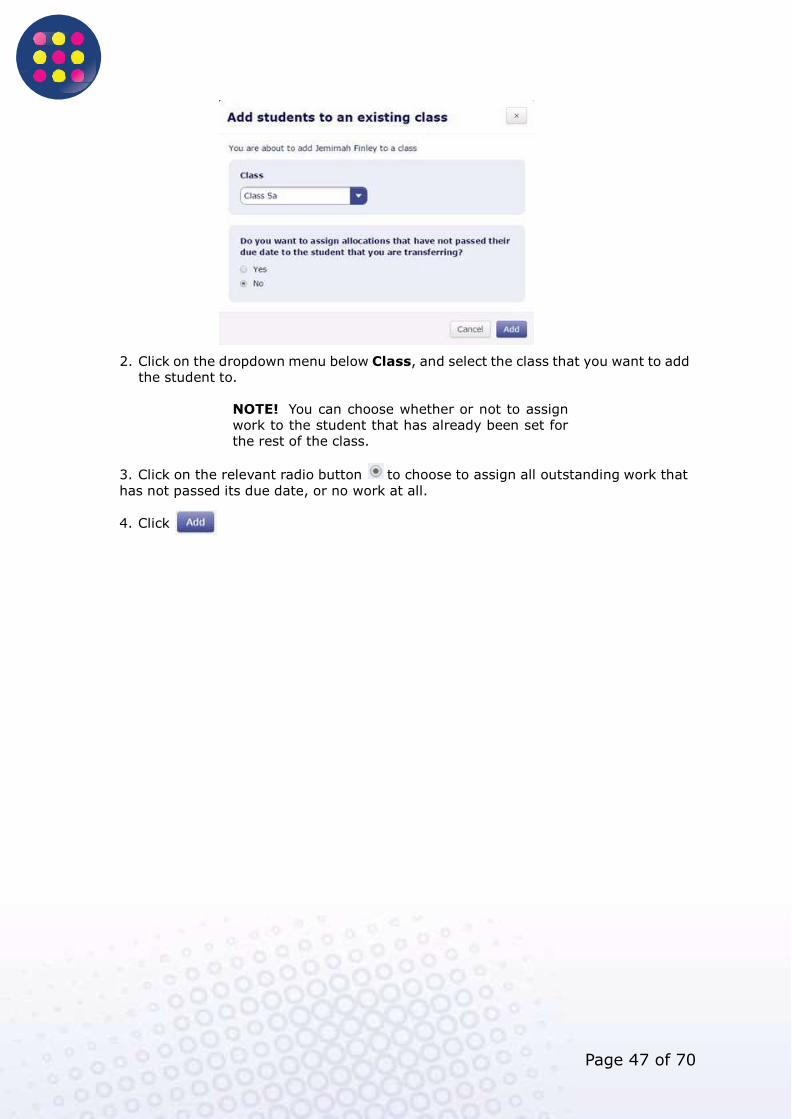
2. Click on the dropdown menu below Class, and select the class that you want to add the student to.
NOTE! You can choose whether or not to assign work to the student that has already been set for the rest of the class.
3. Click on the relevant radio button to choose to assign all outstanding work that
has not passed its due date, or no work at all.
4. Click
Page 48 of 70
Removing a student from a class
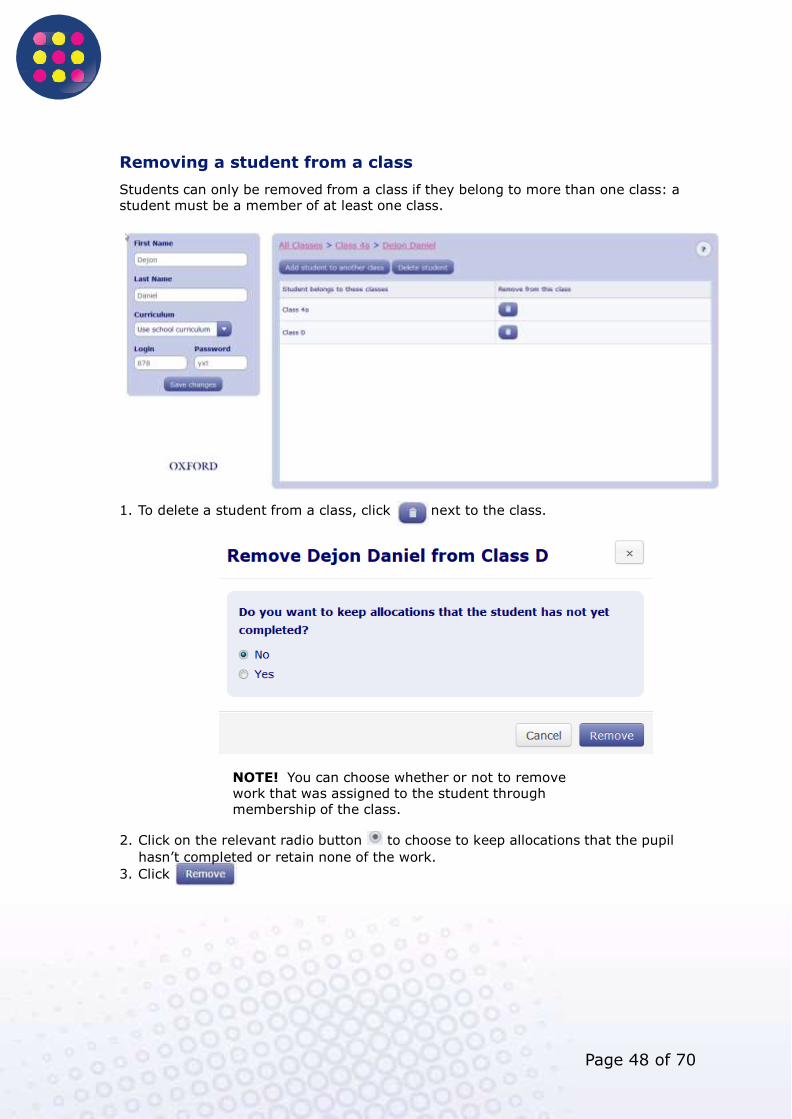
Students can only be removed from a class if they belong to more than one class: a student must be a member of at least one class.
1. To delete a student from a class, click next to the class.
NOTE! You can choose whether or not to remove work that was assigned to the student through membership of the class.
2. Click on the relevant radio button to choose to keep allocations that the pupil
hasn’t completed or retain none of the work.
3. Click
Page 49 of 70
Deleting a student from the school
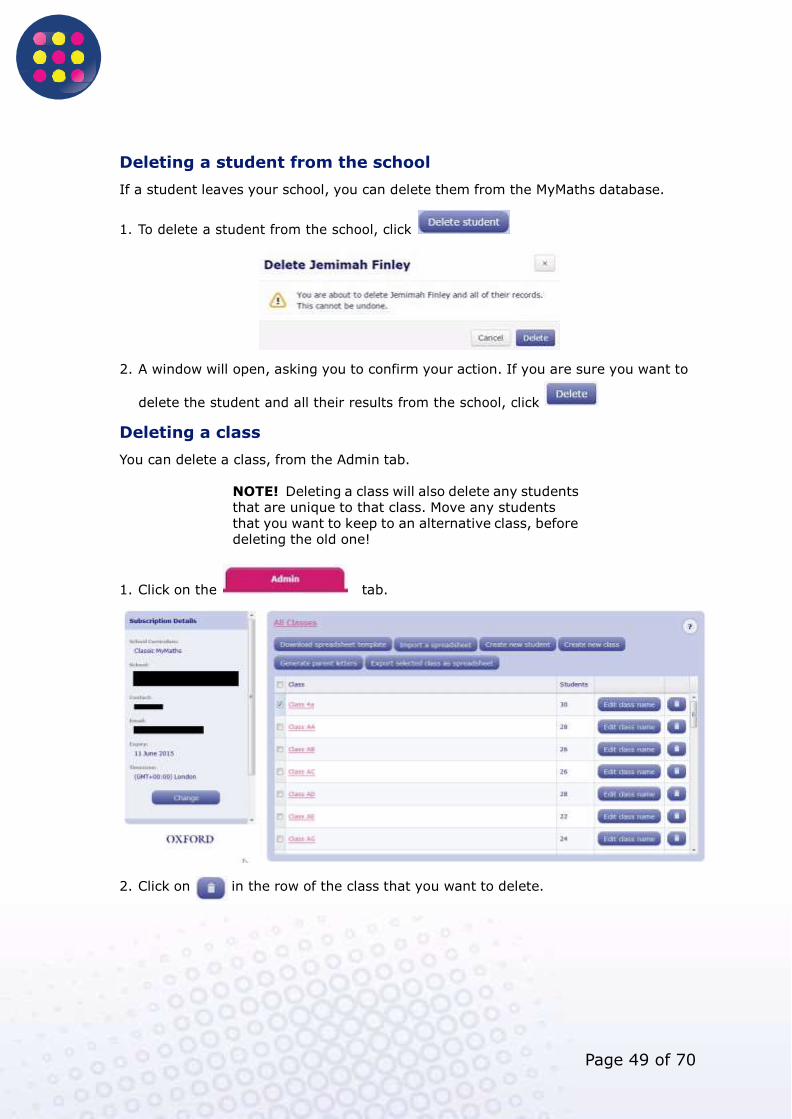
If a student leaves your school, you can delete them from the MyMaths database.
1. To delete a student from the school, click
2. A window will open, asking you to confirm your action. If you are sure you want to
delete the student and all their results from the school, click
Deleting a class
You can delete a class, from the Admin tab.
NOTE! Deleting a class will also delete any students that are unique to that class. Move any students that you want to keep to an alternative class, before deleting the old one!
1. Click on the tab.
2. Click on in the row of the class that you want to delete.
Page 50 of 70
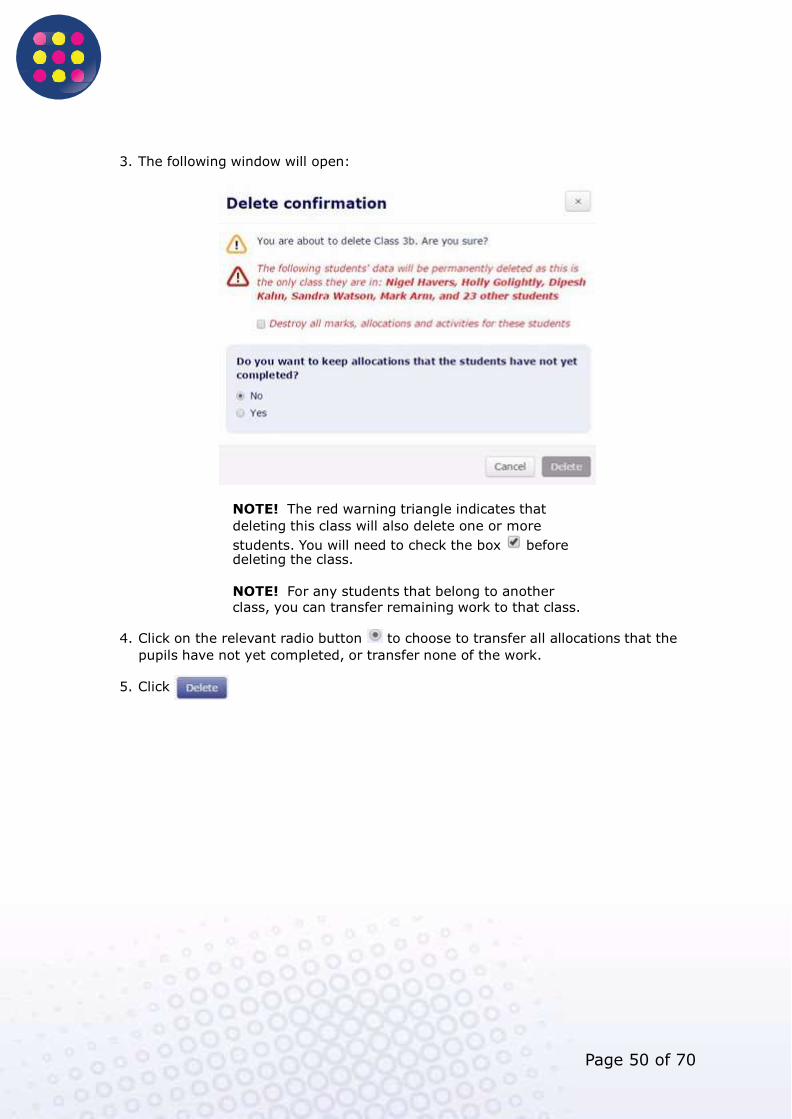
3. The following window will open:
NOTE! The red warning triangle indicates that
deleting this class will also delete one or more
students. You will need to check the box before deleting the class.
NOTE! For any students that belong to another class, you can transfer remaining work to that class.
4. Click on the relevant radio button to choose to transfer all allocations that the
pupils have not yet completed, or transfer none of the work.
5. Click
Page 49 of 70
Creating a class manually
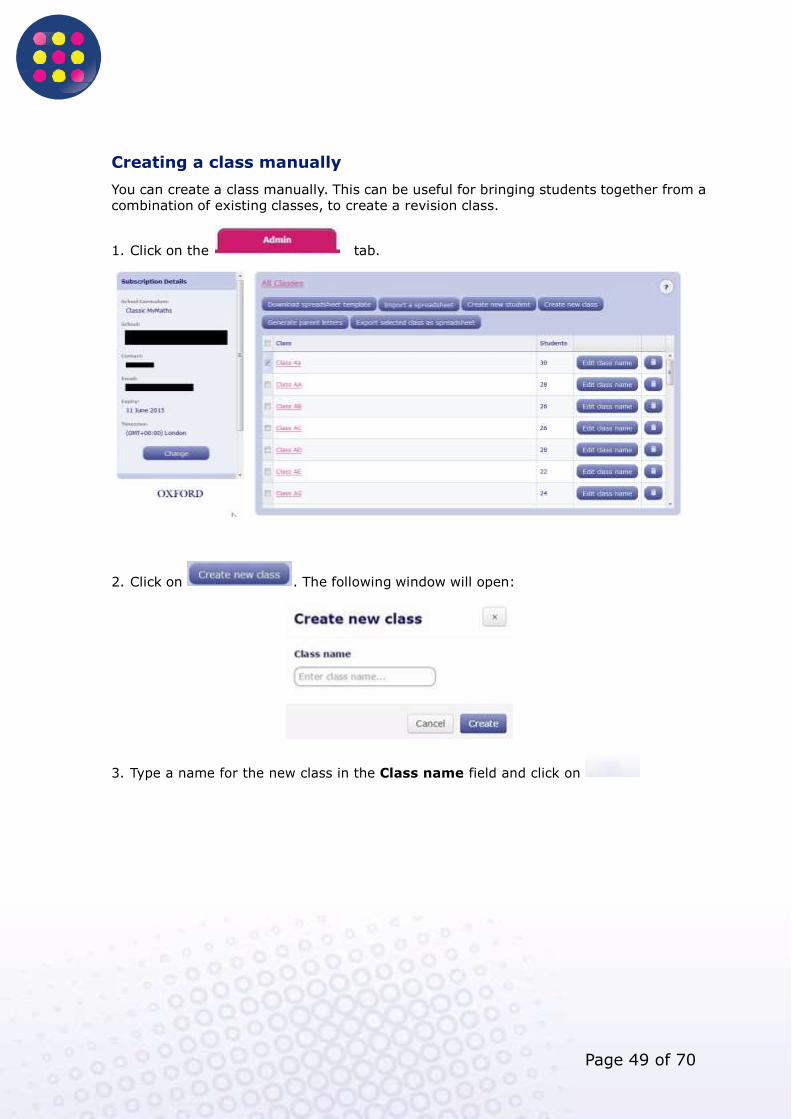
You can create a class manually. This can be useful for bringing students together from a combination of existing classes, to create a revision class.
1. Click on the tab.
2. Click on . The following window will open:
3. Type a name for the new class in the Class name field and click on
Page 50 of 70
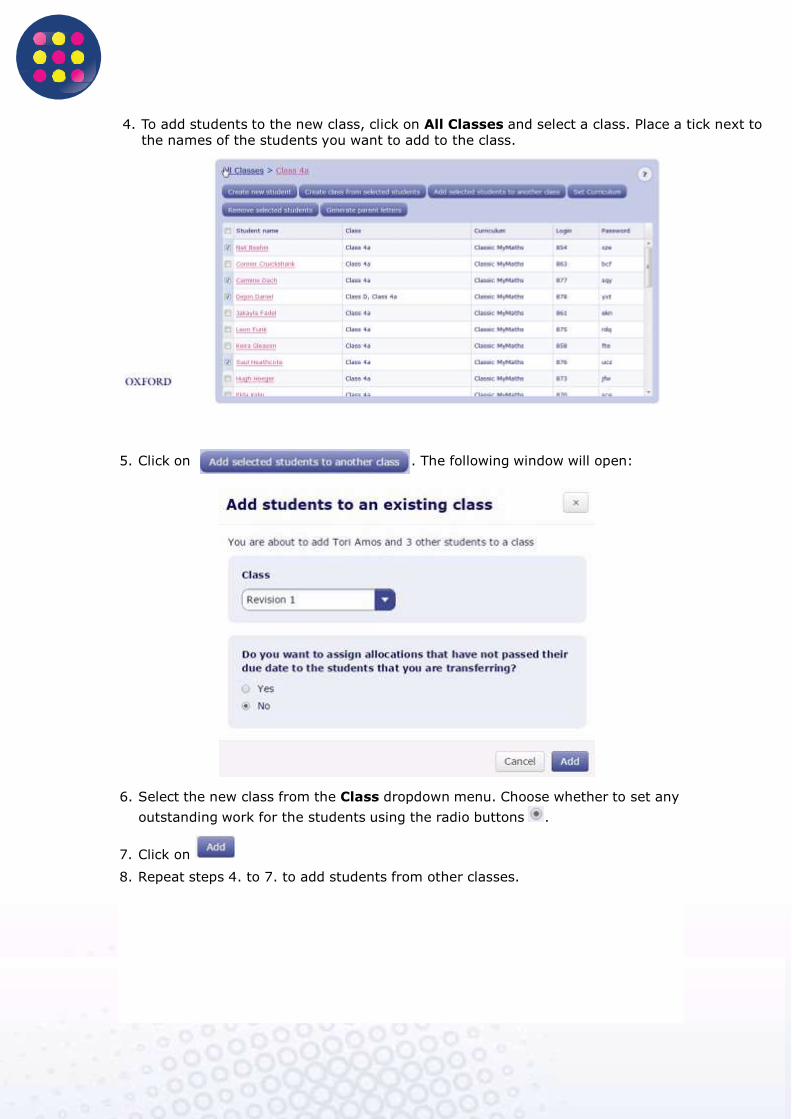
4. To add students to the new class, click on All Classes and select a class. Place a tick next to
the names of the students you want to add to the class.
5. Click on . The following window will open:
6. Select the new class from the Class dropdown menu. Choose whether to set any
outstanding work for the students using the radio buttons .
7. Click on
8. Repeat steps 4. to 7. to add students from other classes.
Page 51 of 70
Changing school account settings
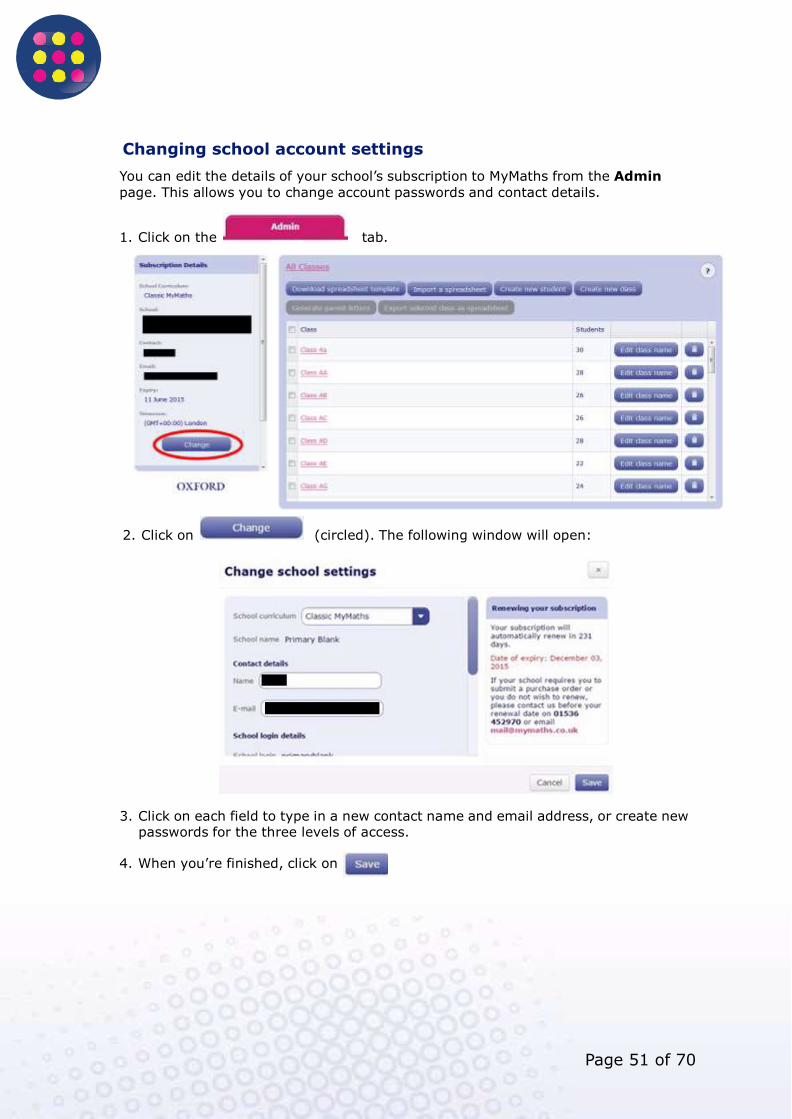
You can edit the details of your school’s subscription to MyMaths from the Admin
page. This allows you to change account passwords and contact details.
1. Click on the tab.
2. Click on (circled). The following window will open:
3. Click on each field to type in a new contact name and email address, or create new passwords for the three levels of access.
4. When you’re finished, click on
Page 52 of 70
Parent letters
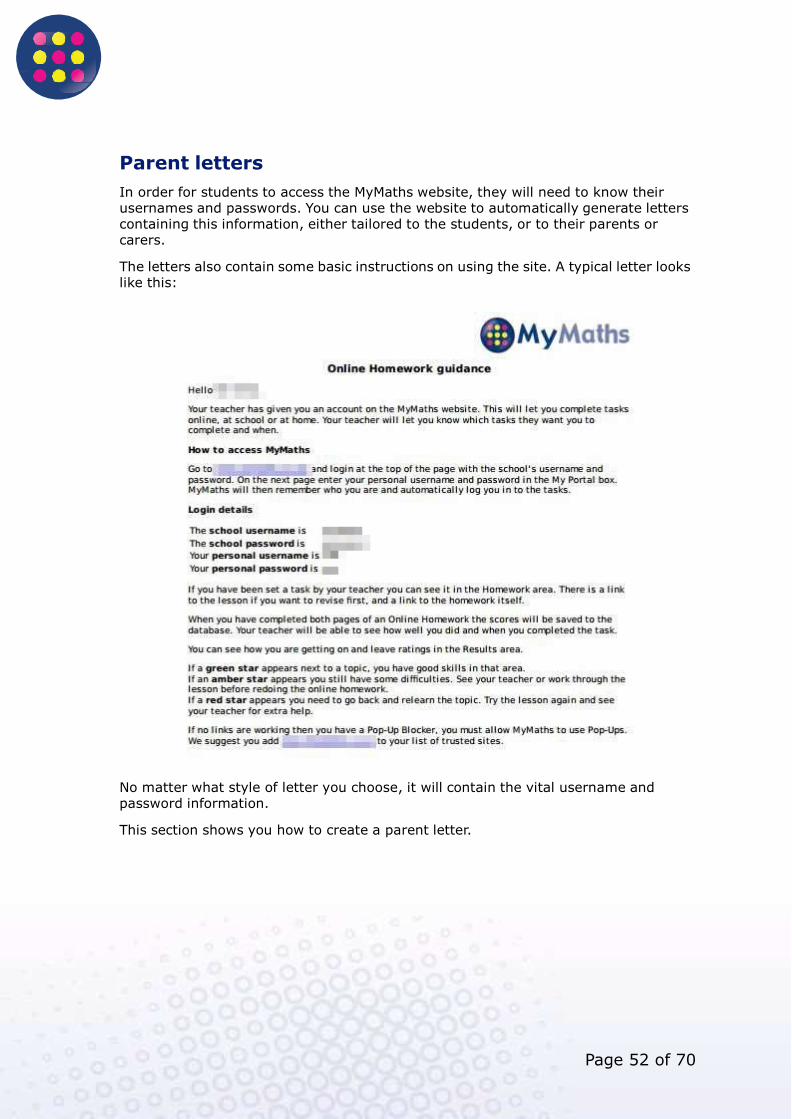
In order for students to access the MyMaths website, they will need to know their usernames and passwords. You can use the website to automatically generate letters containing this information, either tailored to the students, or to their parents or carers.
The letters also contain some basic instructions on using the site. A typical letter looks like this:
No matter what style of letter you choose, it will contain the vital username and password information.
This section shows you how to create a parent letter.
Page 52 of 70
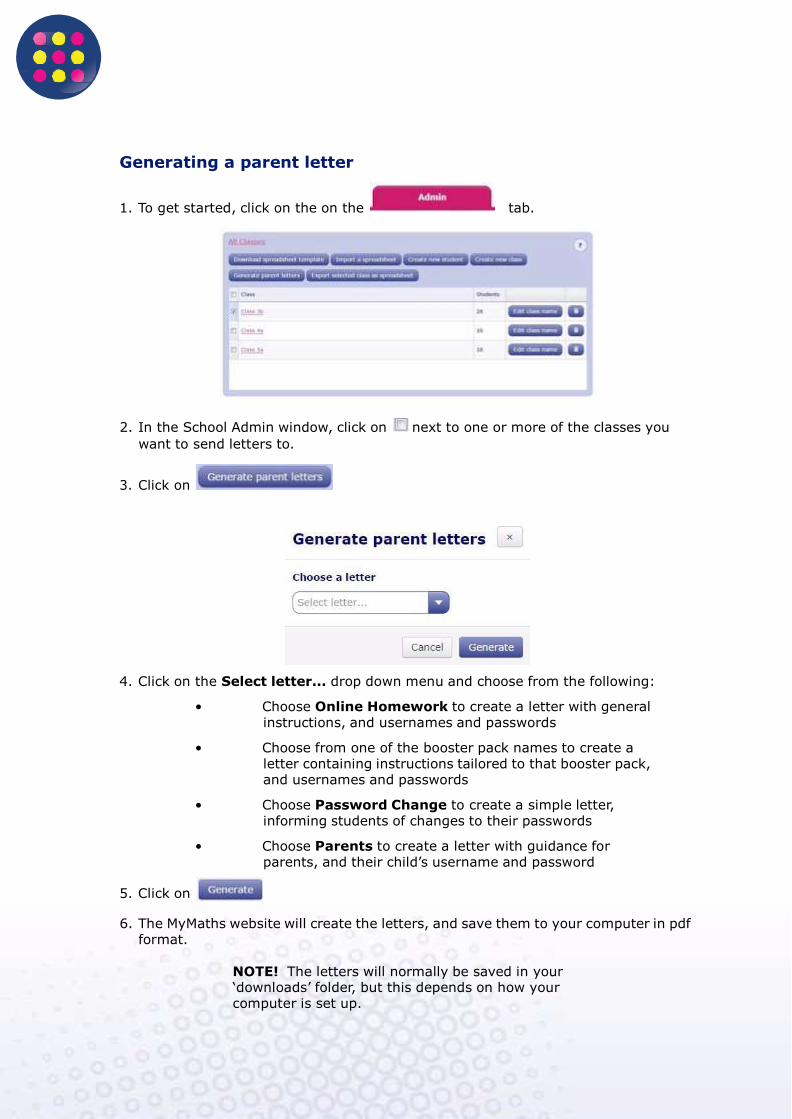
Generating a parent letter
1. To get started, click on the on the tab.
2. In the School Admin window, click on next to one or more of the classes you
want to send letters to.
3. Click on
4. Click on the Select letter... drop down menu and choose from the following:
• Choose Online Homework to create a letter with general instructions, and usernames and passwords
• Choose from one of the booster pack names to create a letter containing instructions tailored to that booster pack, and usernames and passwords
• Choose Password Change to create a simple letter, informing students of changes to their passwords
• Choose Parents to create a letter with guidance for parents, and their child’s username and password
5. Click on
6. The MyMaths website will create the letters, and save them to your computer in pdf
format.
NOTE! The letters will normally be saved in your ‘downloads’ folder, but this depends on how your computer is set up.
The students’ experience
How do students access the site?
Once a student has received a letter containing their username and password (see
’Parent letters’ on page 51), they can log in to the site.
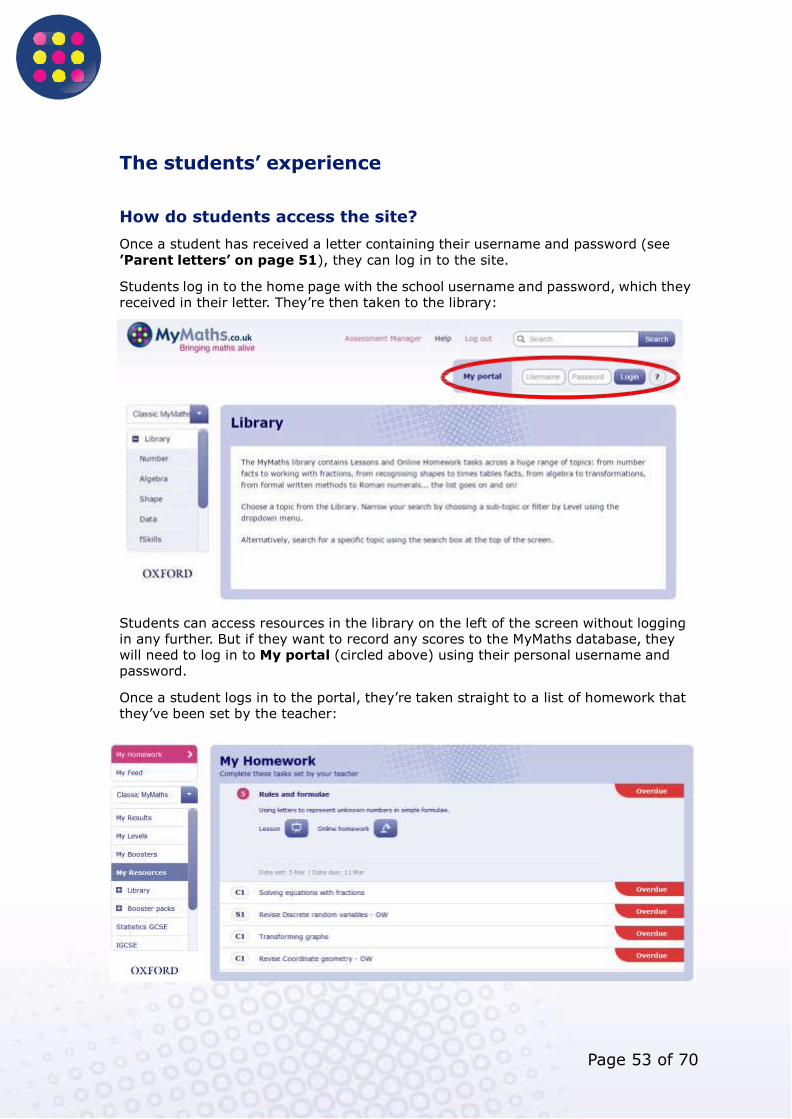
Students log in to the home page with the school username and password, which they received in their letter. They’re then taken to the library:
Students can access resources in the library on the left of the screen without logging in any further. But if they want to record any scores to the MyMaths database, they will need to log in to My portal (circled above) using their personal username and password.
Once a student logs in to the portal, they’re taken straight to a list of homework that they’ve been set by the teacher:
Page 53 of 70
Page 54 of 70
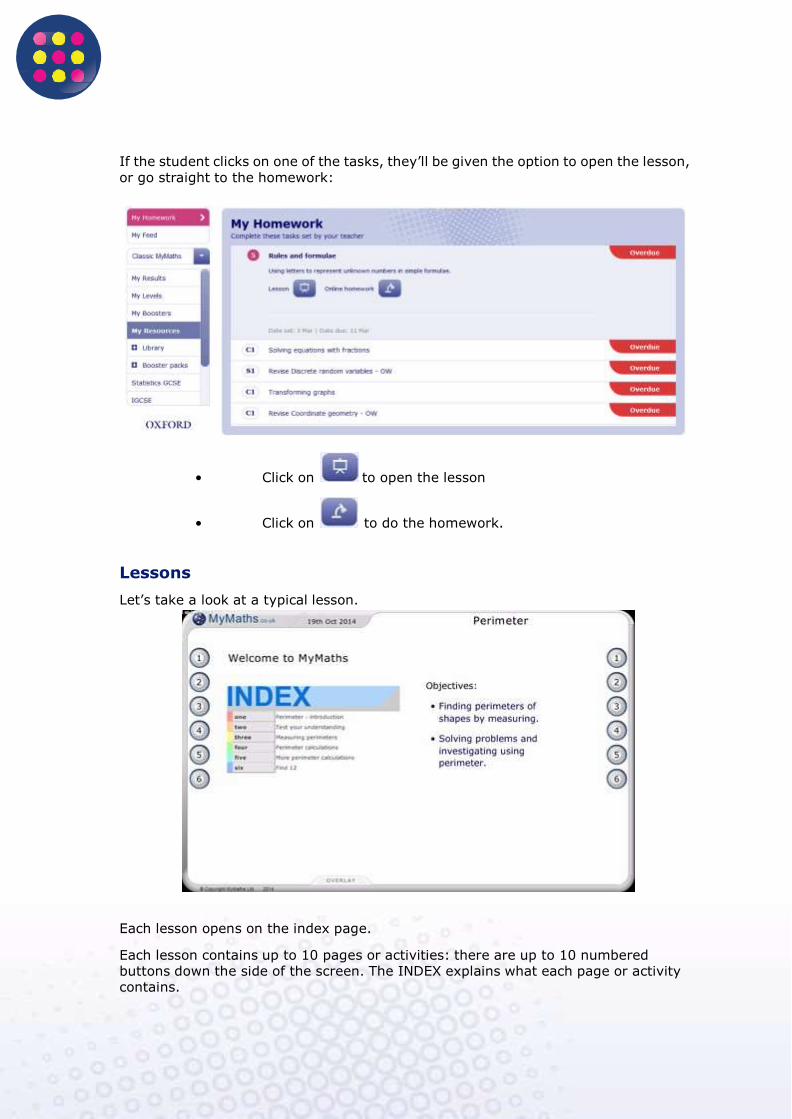
If the student clicks on one of the tasks, they’ll be given the option to open the lesson,
or go straight to the homework:
• Click on to open the lesson
• Click on to do the homework.
Lessons
Let’s take a look at a typical lesson.
Each lesson opens on the index page.
Each lesson contains up to 10 pages or activities: there are up to 10 numbered buttons down the side of the screen. The INDEX explains what each page or activity contains.
Page 55 of 70
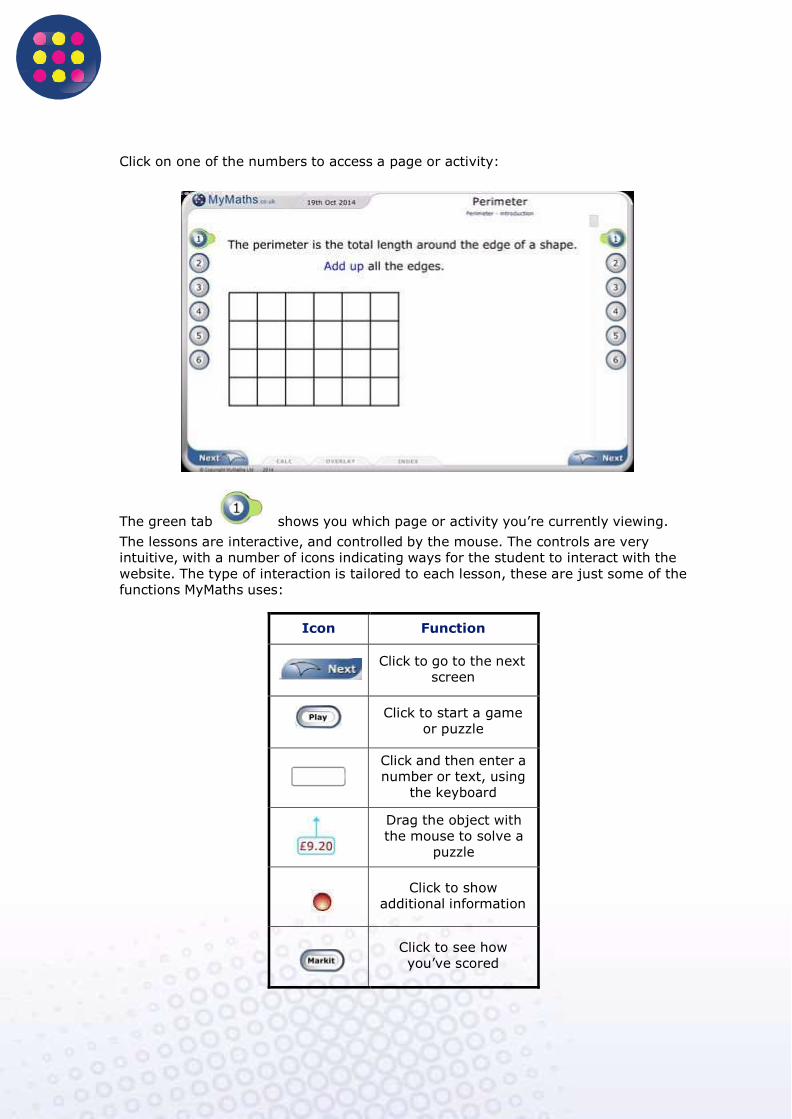
Click on one of the numbers to access a page or activity:
The green tab shows you which page or activity you’re currently viewing.
The lessons are interactive, and controlled by the mouse. The controls are very intuitive, with a number of icons indicating ways for the student to interact with the website. The type of interaction is tailored to each lesson, these are just some of the functions MyMaths uses:
Icon Function
Click to go to the next screen
Click to start a game or puzzle
Click and then enter a number or text, using
the keyboard
Drag the object with the mouse to solve a
puzzle
Click to show additional information
Click to see how you’ve scored
Page 56 of 70
Homework
From the tab, a student can click on to access their homework. They will be
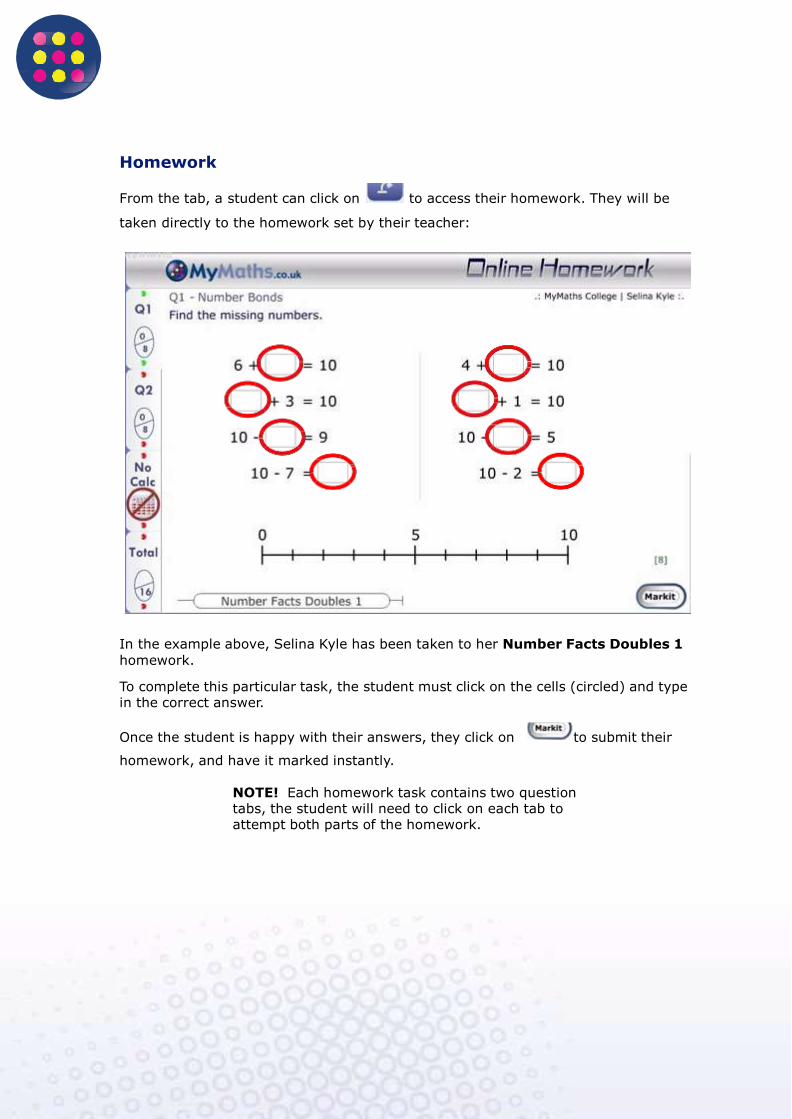
taken directly to the homework set by their teacher:
In the example above, Selina Kyle has been taken to her Number Facts Doubles 1
homework.
To complete this particular task, the student must click on the cells (circled) and type in the correct answer.
Once the student is happy with their answers, they click on to submit their
homework, and have it marked instantly.
NOTE! Each homework task contains two question tabs, the student will need to click on each tab to attempt both parts of the homework.

Page 57 of 70
The question tabs are on the left of the screen, along with some other important
information about the homework:
There are two ‘Question’ tabs. This shows that this homework task is
divided into two sections. The score for each section is shown in the ovals
(currently 0/8).
‘No Calc’ indicates that the calculator
must not be used for this task. Once you’ve submitted your homework, this changes to the Checkout tab.
The final tab shows the total score for the whole task.
Submitting homework
The student should submit their answers for each section of their homework in turn.
Once they’ve finished the last section of the homework and clicked on , they
should see the following window:
When you next log in as a teacher, you will be able to see confirmation that the student has completed this task, as well as the score achieved.
Page 58 of 70
Checkout
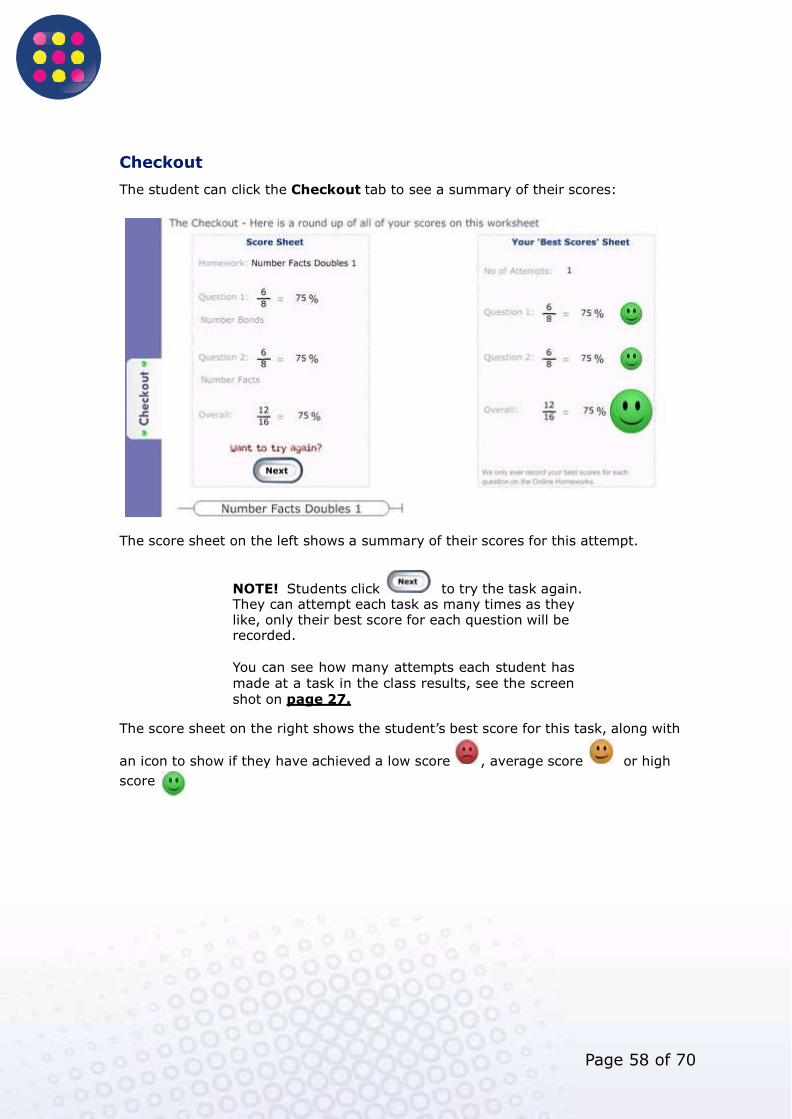
The student can click the Checkout tab to see a summary of their scores:
The score sheet on the left shows a summary of their scores for this attempt.
NOTE! Students click to try the task again. They can attempt each task as many times as they like, only their best score for each question will be recorded.
You can see how many attempts each student has made at a task in the class results, see the screen shot on page 27.
The score sheet on the right shows the student’s best score for this task, along with
an icon to show if they have achieved a low score , average score or high
score
Page 59 of 70
My Feed
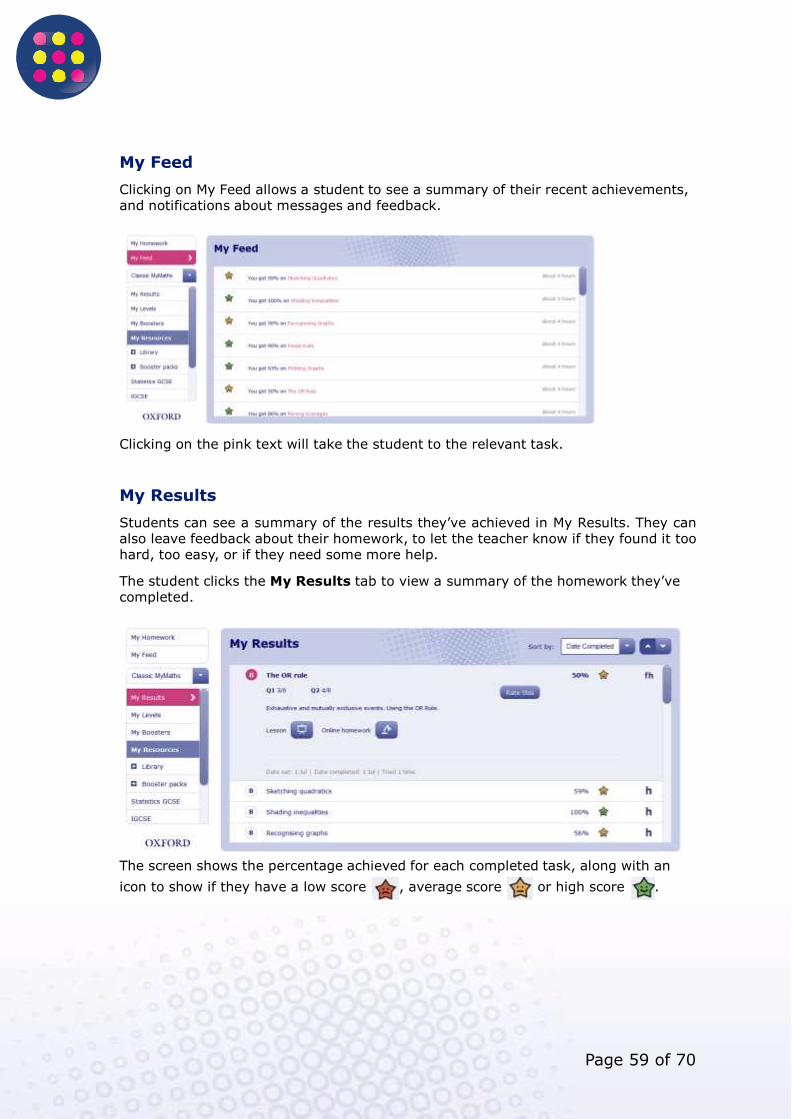
Clicking on My Feed allows a student to see a summary of their recent achievements, and notifications about messages and feedback.
Clicking on the pink text will take the student to the relevant task.
My Results
Students can see a summary of the results they’ve achieved in My Results. They can also leave feedback about their homework, to let the teacher know if they found it too hard, too easy, or if they need some more help.
The student clicks the My Results tab to view a summary of the homework they’ve completed.
The screen shows the percentage achieved for each completed task, along with an
icon to show if they have a low score , average score or high score .
Page 60 of 70
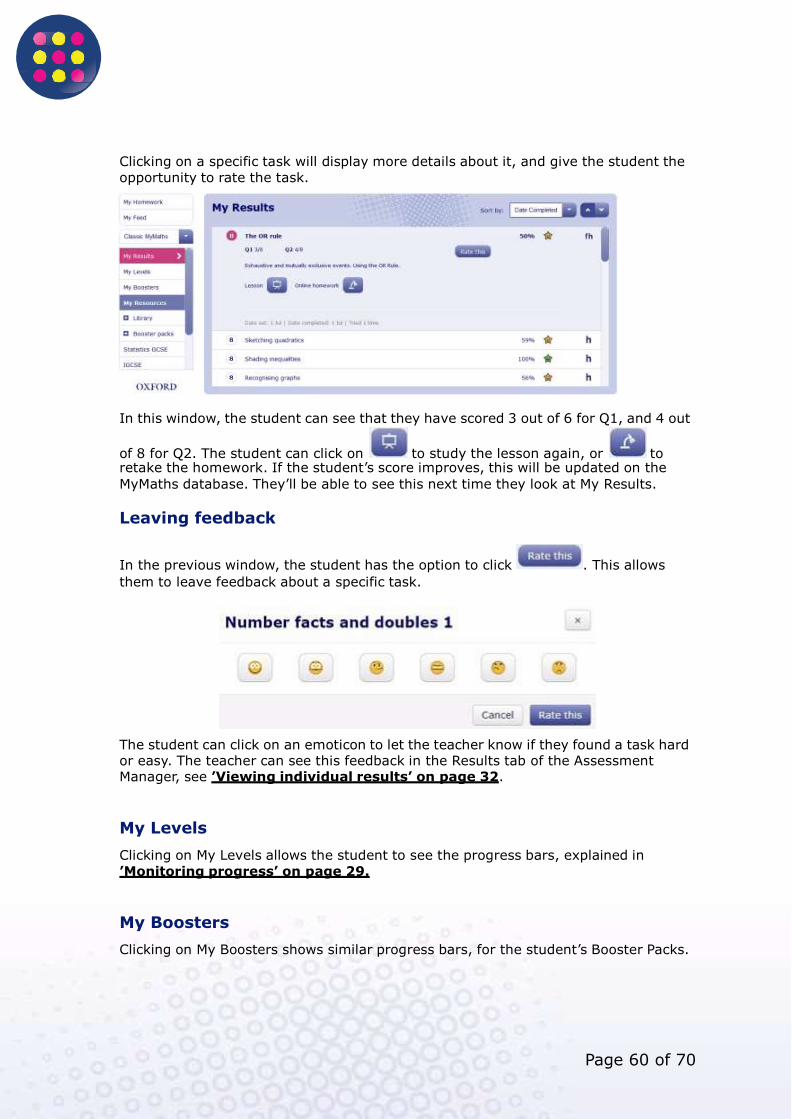
Clicking on a specific task will display more details about it, and give the student the
opportunity to rate the task.
In this window, the student can see that they have scored 3 out of 6 for Q1, and 4 out
of 8 for Q2. The student can click on to study the lesson again, or to retake the homework. If the student’s score improves, this will be updated on the
MyMaths database. They’ll be able to see this next time they look at My Results.
Leaving feedback
In the previous window, the student has the option to click . This allows
them to leave feedback about a specific task.
The student can click on an emoticon to let the teacher know if they found a task hard or easy. The teacher can see this feedback in the Results tab of the Assessment Manager, see ’Viewing individual results’ on page 32.
My Levels
Clicking on My Levels allows the student to see the progress bars, explained in
’Monitoring progress’ on page 29.
My Boosters
Clicking on My Boosters shows similar progress bars, for the student’s Booster Packs.
Page 61 of 70
Progress bars
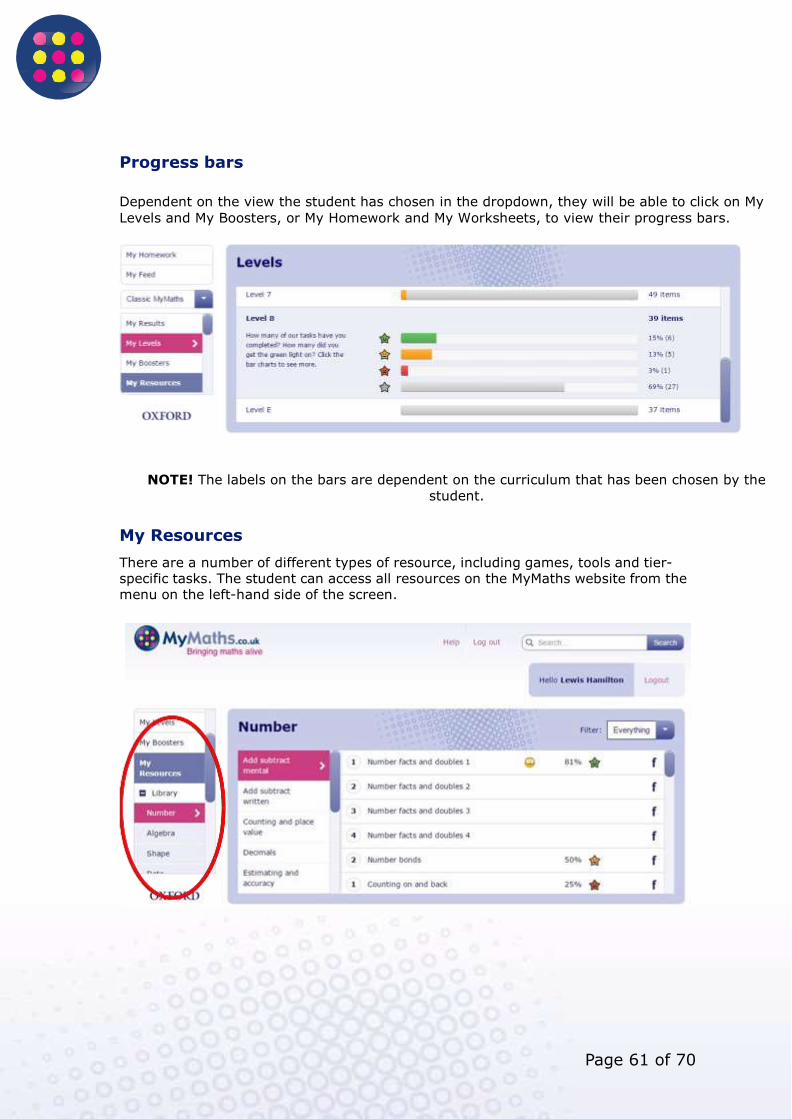
Dependent on the view the student has chosen in the dropdown, they will be able to click on My
Levels and My Boosters, or My Homework and My Worksheets, to view their progress bars.
NOTE! The labels on the bars are dependent on the curriculum that has been chosen by the
student.
My Resources
There are a number of different types of resource, including games, tools and tier- specific tasks. The student can access all resources on the MyMaths website from the menu on the left-hand side of the screen.
Page 62 of 70
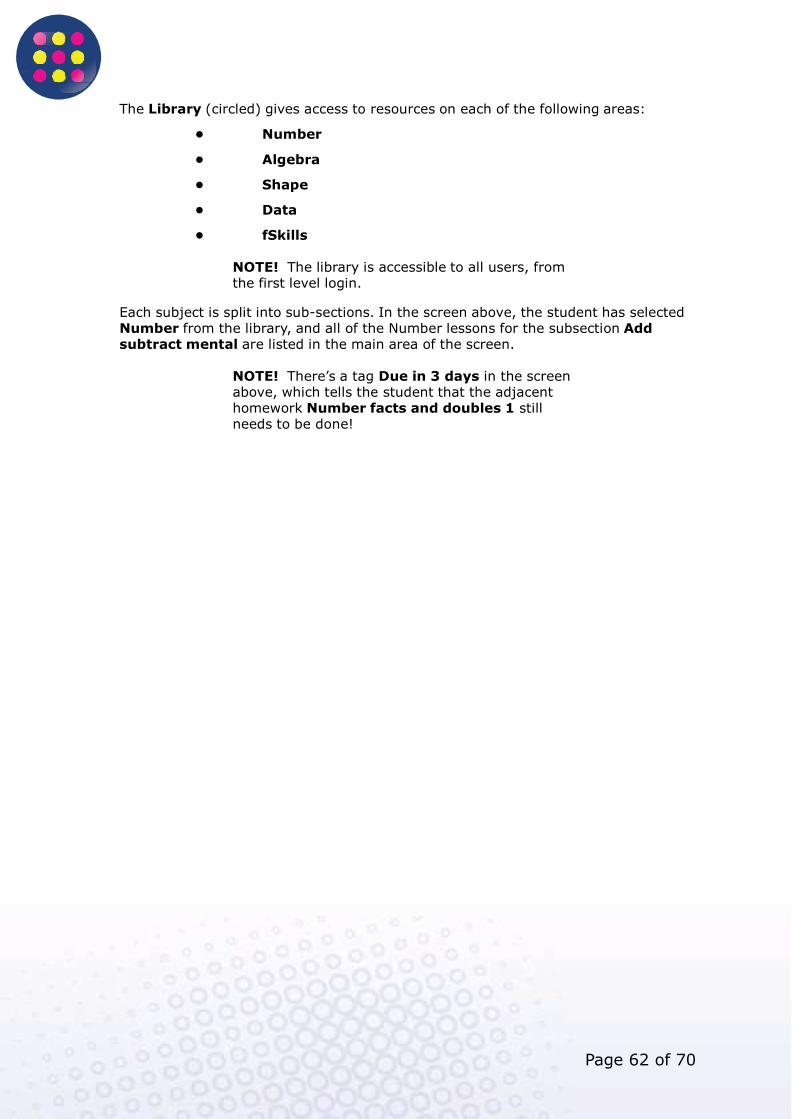
The Library (circled) gives access to resources on each of the following areas:
• Number
• Algebra
• Shape
• Data
• fSkills
NOTE! The library is accessible to all users, from the first level login.
Each subject is split into sub-sections. In the screen above, the student has selected Number from the library, and all of the Number lessons for the subsection Add subtract mental are listed in the main area of the screen.
NOTE! There’s a tag Due in 3 days in the screen above, which tells the student that the adjacent homework Number facts and doubles 1 still needs to be done!
Page 62 of 70
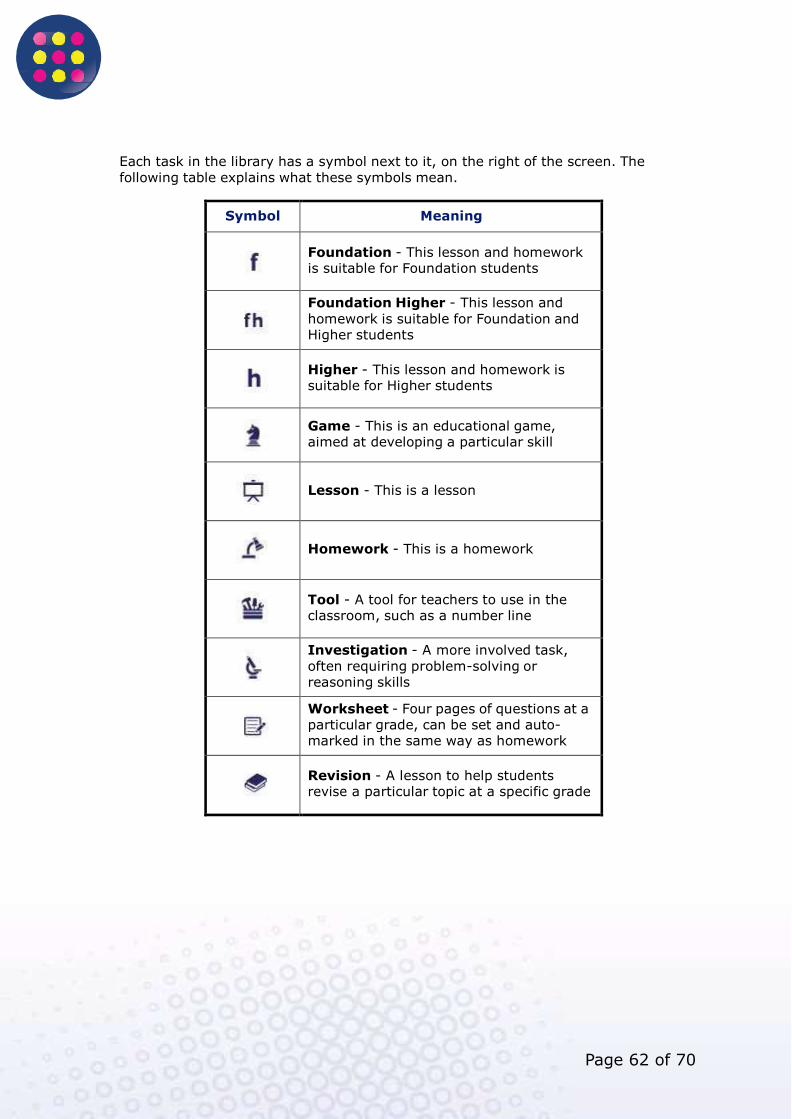
Each task in the library has a symbol next to it, on the right of the screen. The
following table explains what these symbols mean.
Symbol Meaning
Foundation - This lesson and homework is suitable for Foundation students
Foundation Higher - This lesson and
homework is suitable for Foundation and Higher students
Higher - This lesson and homework is suitable for Higher students
Game - This is an educational game, aimed at developing a particular skill
Lesson - This is a lesson
Homework - This is a homework
Tool - A tool for teachers to use in the classroom, such as a number line
Investigation - A more involved task,
often requiring problem-solving or reasoning skills
Worksheet - Four pages of questions at a particular grade, can be set and auto- marked in the same way as homework
Revision - A lesson to help students revise a particular topic at a specific grade
Page 63 of 70
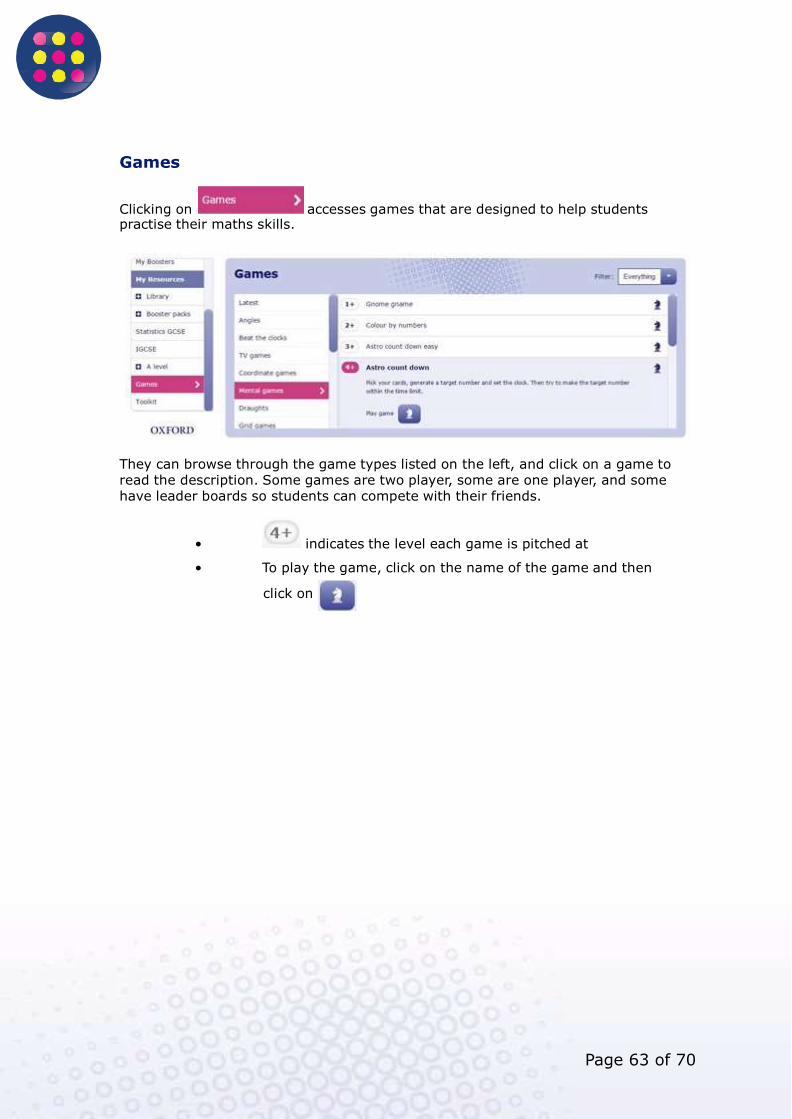
Games
Clicking on accesses games that are designed to help students practise their maths skills.
They can browse through the game types listed on the left, and click on a game to read the description. Some games are two player, some are one player, and some have leader boards so students can compete with their friends.
• indicates the level each game is pitched at
• To play the game, click on the name of the game and then
click on
Page 64 of 70
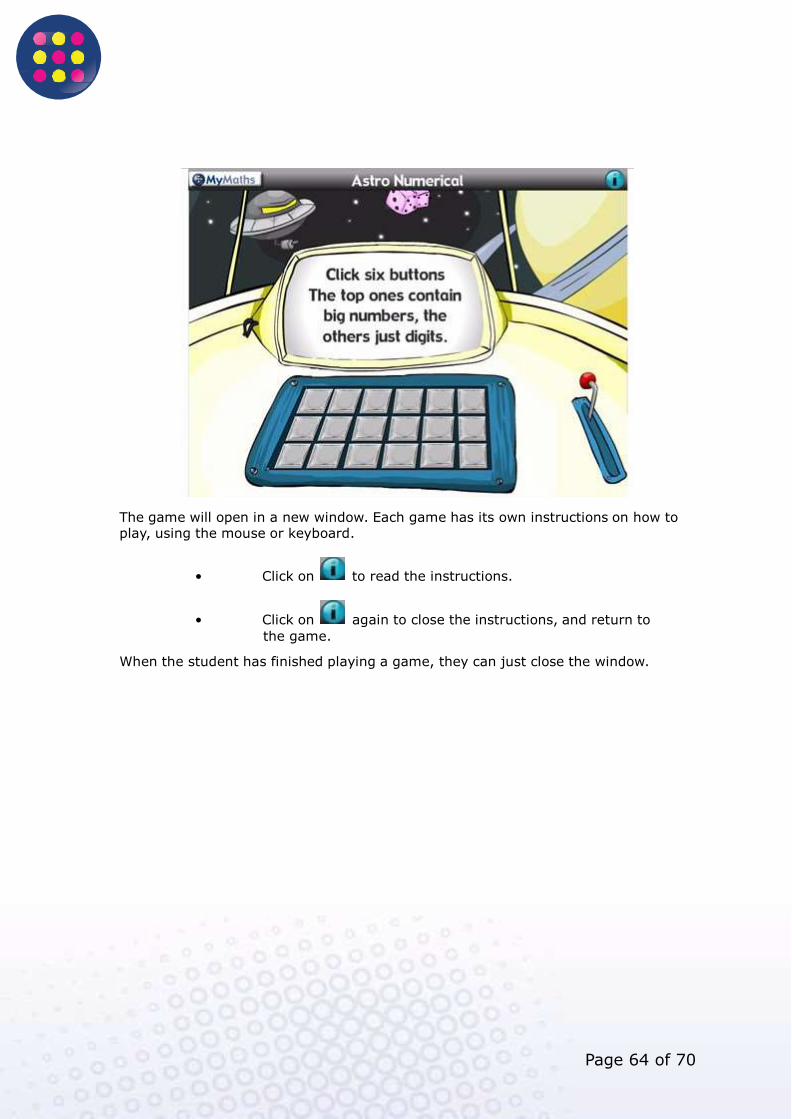
The game will open in a new window. Each game has its own instructions on how to play, using the mouse or keyboard.
• Click on to read the instructions.
• Click on again to close the instructions, and return to
the game.
When the student has finished playing a game, they can just close the window.
Page 65 of 70
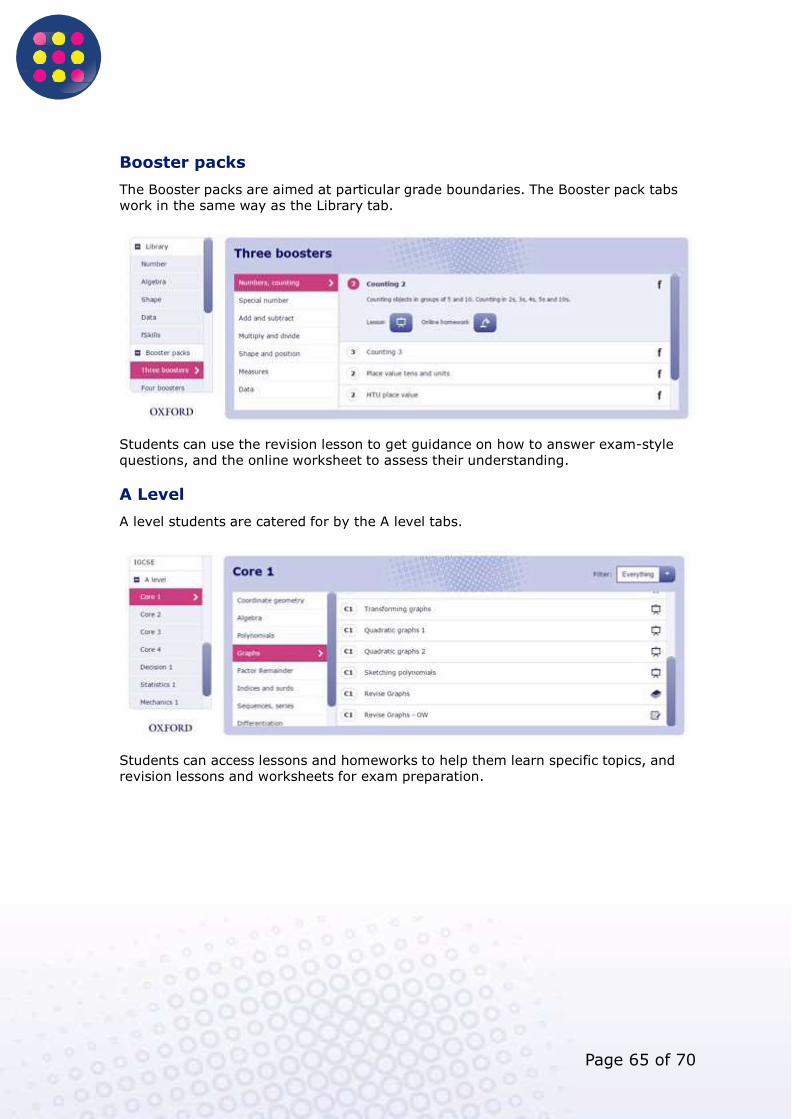
Booster packs
The Booster packs are aimed at particular grade boundaries. The Booster pack tabs work in the same way as the Library tab.
Students can use the revision lesson to get guidance on how to answer exam-style questions, and the online worksheet to assess their understanding.
A Level
A level students are catered for by the A level tabs.
Students can access lessons and homeworks to help them learn specific topics, and revision lessons and worksheets for exam preparation.
Page 66 of 70
Toolkit
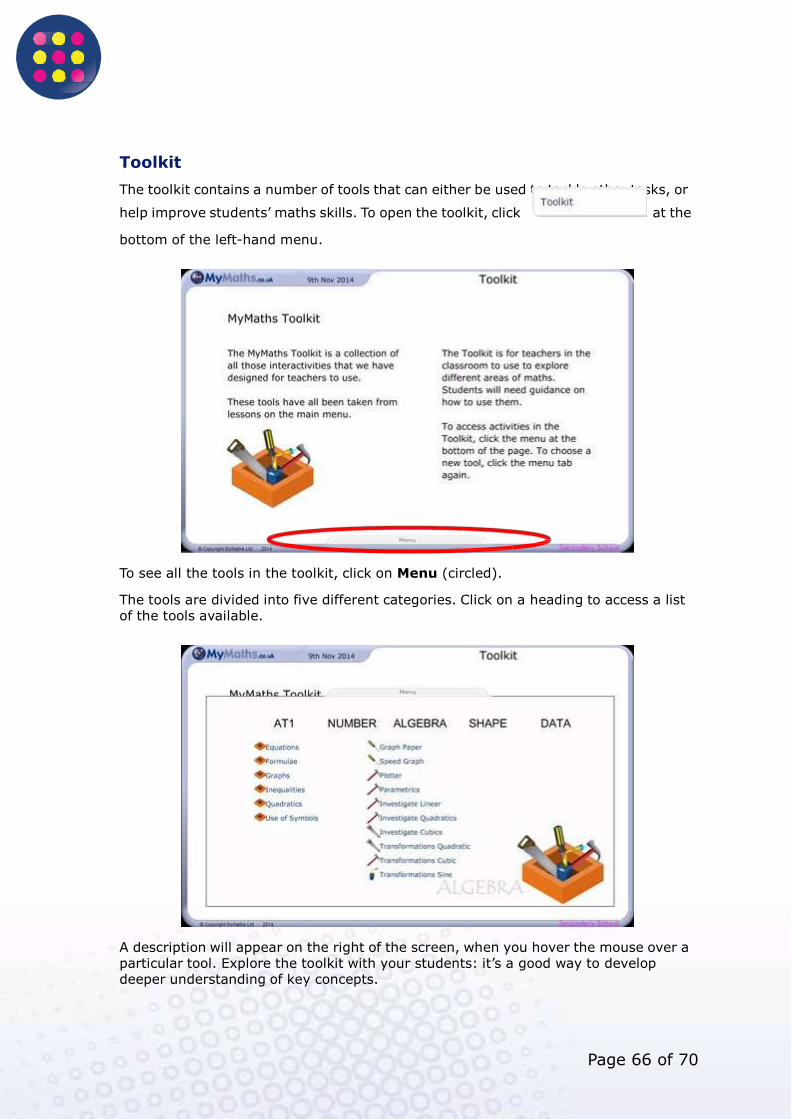
The toolkit contains a number of tools that can either be used to tackle other tasks, or
help improve students’ maths skills. To open the toolkit, click at the
bottom of the left-hand menu.
To see all the tools in the toolkit, click on Menu (circled).
The tools are divided into five different categories. Click on a heading to access a list of the tools available.
A description will appear on the right of the screen, when you hover the mouse over a particular tool. Explore the toolkit with your students: it’s a good way to develop deeper understanding of key concepts.
Page 66 of 70
Page 67 of 70
Other activities
This section describes how to install Flash Player on a PC, and how to access resources for teachers.
Guide to installing Flash Player
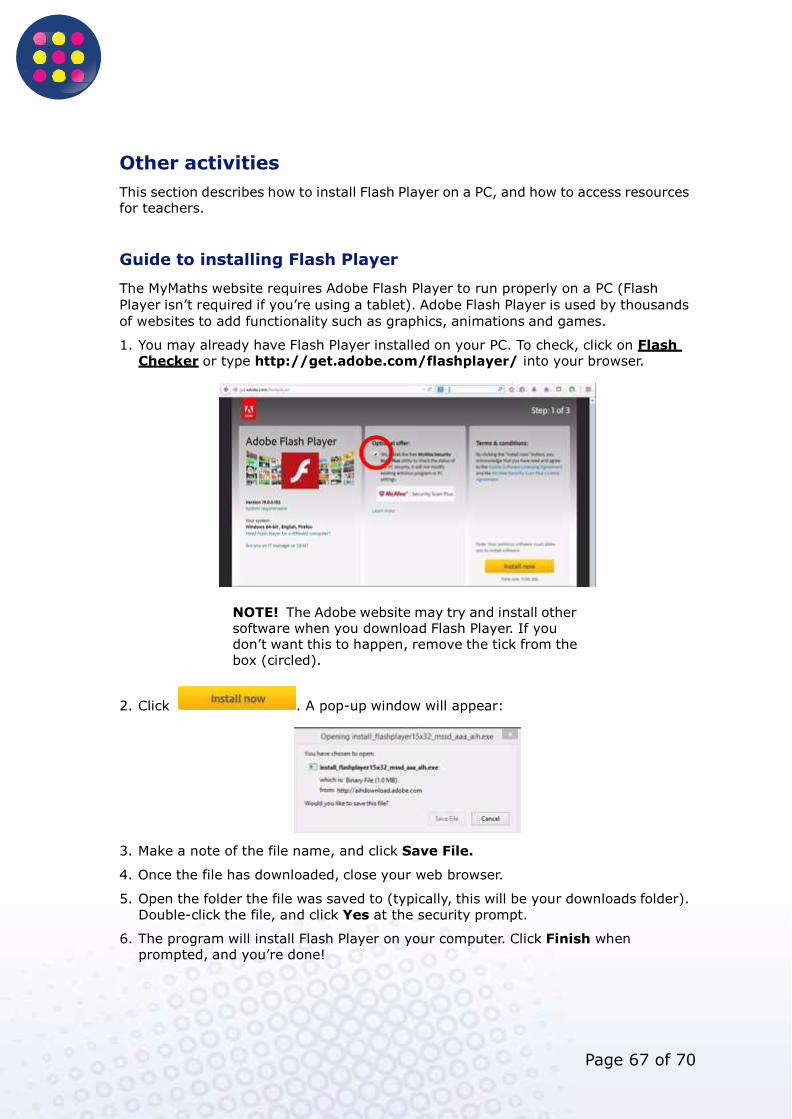
The MyMaths website requires Adobe Flash Player to run properly on a PC (Flash
Player isn’t required if you’re using a tablet). Adobe Flash Player is used by thousands
of websites to add functionality such as graphics, animations and games.
1. You may already have Flash Player installed on your PC. To check, click on Flash Checker or type http://get.adobe.com/flashplayer/ into your browser.
NOTE! The Adobe website may try and install other software when you download Flash Player. If you don’t want this to happen, remove the tick from the box (circled).
2. Click . A pop-up window will appear:
3. Make a note of the file name, and click Save File.
4. Once the file has downloaded, close your web browser.
5. Open the folder the file was saved to (typically, this will be your downloads folder).
Double-click the file, and click Yes at the security prompt.
6. The program will install Flash Player on your computer. Click Finish when prompted, and you’re done!
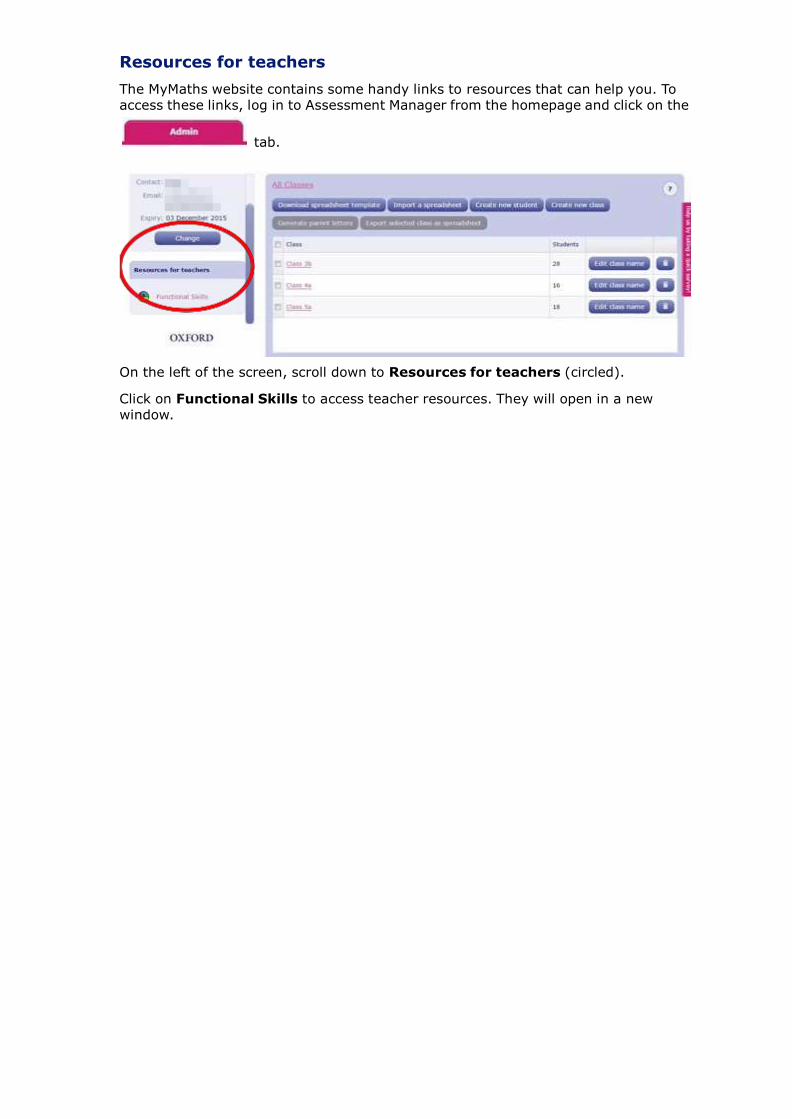
Resources for teachers
The MyMaths website contains some handy links to resources that can help you. To access these links, log in to Assessment Manager from the homepage and click on the
tab.
On the left of the screen, scroll down to Resources for teachers (circled).
Click on Functional Skills to access teacher resources. They will open in a new window.

February 2015 Edition 1.5
• MyMathS.co.uk Bringing maths alive