mycricket basics 2015-16manlyjuniorcricket.nsw.cricket.com.au/files/2953/files... · 2016-09-08 ·...
TRANSCRIPT

1
MyCricket Basics
Season 2016/17
Brett Holliday
Cricket NSW

2
Logging in to MyCricket Go to mycricketadmin.cricket.com.au
OR
Go to mycricket.cricket.com.au and click on the “Login” button. Enter your Login ID and Password.
Forgotten your password? Any person with the “User Manager” role in their credentials can re-set your password. Often this will be the Principal User. To find out who the Principal User is, click on “About” and select “Details”.
Once logged in, you will observe the following header:
Please note:
If you are logging in as a Club Administrator, or your Association does not organise its own cricket competition, you will not see the “Competitions” tab in between the “Teams” and “Administration” tabs.
Some menu and sub-menu items are available for selection in multiple tabs, for example, the “People” menu item appears under “Teams”, “Competitions”, and “Administration” tabs.

3
Adding New Players into MyCricket In the “People” menu, select “Add a New Person”
Enter the person’s name that you wish to add. Often using a commonly shortened version of a person’s first name is a superior method for searching for them. In this instance, “Don” has been used instead of “Donald”.
The “Help of this topic” link, which can be found on most pages of MyCricket, is an invaluable tool in assisting with navigating the site. It also contains a link to print the information for future reference.

4

5
If you were searching for the Don Bradman born in 1987, you would apply for a Transfer if you the player is adding Club cricket to an existing Representative cricket record in MyCricket, or adding Representative cricket to an existing Club cricket record in MyCricket. If you are creating a new Club record for a player with an existing Club cricket record with another club, you would apply for a Clearance. Likewise when moving from representing one Association to representing another.
Please note:
These actions constitute a notification-based system. There are no deadlines imposed upon player movements. Personal details of participants will not be visible to the new entity for a period of ten (10) days to provide for privacy protection in circumstances of impropriety.
These actions do not delete the record or statistics of a player at his or her previous Club or Association. They instead create a copy of the player’s record and link it via a common player ID
It is always preferable to apply for a transfer or Clearance for an existing player rather than creating a duplicate record for an existing player under a new and different player ID. This separates his or her playing records and statistics, and creates confusion within the system. You can use the Year of birth field to help guide you in instances where a player has a reasonably common full name.
Person Merge Request If a person who had an existing player ID has been inadvertently added with a new player ID, this can be resolved by applying a Person Merge Request.

6
If the Don Bradman being searched for was not born in 1987, you will have to create a player record for him. Click where it says “click here” to advance to the next screen.
Selecting a Role To create an ID for a player, select PLAYER from the drop-down list. Other options are available to add other types of participants to your organisation, including contacts (sponsors?), umpires, officials (coaches, managers, scorers etc), in2CRICKET participants and Office Bearers (presidents, secretaries, treasurers etc).

7
Selecting a Sub-Role Allocate a Sub-Role to a player to aid with identifying and communicating with certain groups of players within your organisation.
Entering Participant Information
Fill out the fields with the relevant information. All fields denoted with an asterix (*) are mandatory. Ask your Club or Association to set up a generic email address, e.g. [email protected], to use for any players who don’t have an email address (or parent’s/spouse’s that they can use for this purpose).

8
Register a Player to Play in a Competition The next screen provides the opportunity to immediately register a player to play in a competition(s). Select the relevant parent organisation (Cricket Association or Cricket Council) with which the player will participate, and click “Register this Player”. There is also an option to skip this step until a later stage.
Confirmation will be provided, along with the registration history, and a button with which to de-register the player from a certain parent organisation. A player may be registered to play in additional Associations by making an alternate selection in the Select parent Organisation drop-down list. An example of this would be a junior player who also plays in an afternoon open age competition, or a player who plays club cricket but also participates in an Association representative team.
An alternative method is to go to the “Teams” tab, select the “Player” menu”, the “Player Registration” sub-menu and select “Register Players” from the next drop-down list.

9
Click on a Player’s name and then click the “Add->” button to add them to the registered players list. Alternatively, double-click on the Player’s name. Don’t forget to click the “Update” button at the bottom of the screen to save your changes!
These players will now be available for selection in a match.

10
Match Day Tasks: Select Team
All of the match-day tasks are located under the “Matches” menu in the “Teams” tab. The first task is to select your team, and this should be done prior to the commencement of the match where possible.
Player Selection Screen Ensure that the Season is set to the current season in the drop-down list Ensure that the Round number is displaying as the correct number or “CURR” Select the correct Grade and playing Association from the drop-down list Highlight a player in the “Player List” on the left. Double-click on the player, or click on the
“Add” button to move them to the “Selected Players” list to the right. More, or less, than 11 players may be selected in the team, to cater for modified formats, teams playing short, or replacement/additional players.
From Round 2 onwards, the selected team from the previous round will auto-fill and act as a starting point for the new round’s team selection.
Highlight the Captain in the “Selected Players” list and click “Set” further to the right. Click “Clear” to reverse this selection. Repeat for the Wicketkeeper any Substitute Fieldsmen, and note that more than one Wicketkeeper, and more than one Substitute Fieldsman, can be selected if desired.
As always, don’t forget to click “Update” at the bottom of the page to save your selections.

11
12
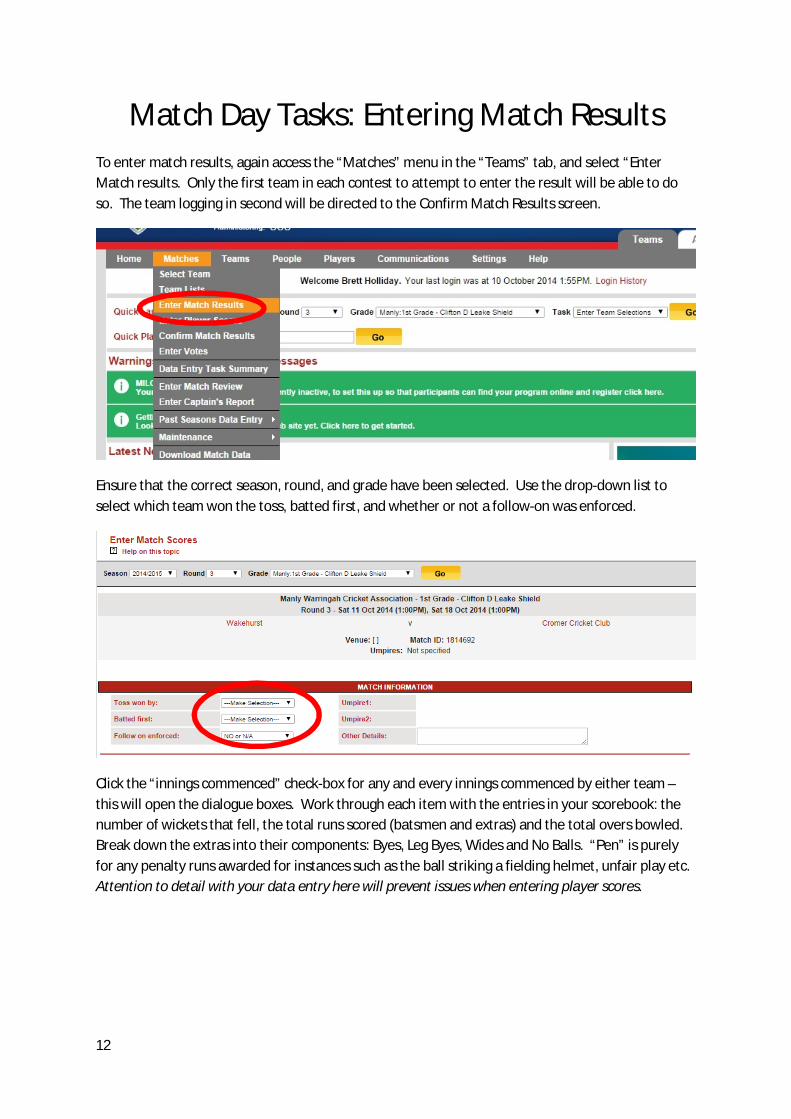
Match Day Tasks: Entering Match Results To enter match results, again access the “Matches” menu in the “Teams” tab, and select “Enter Match results. Only the first team in each contest to attempt to enter the result will be able to do so. The team logging in second will be directed to the Confirm Match Results screen.
Ensure that the correct season, round, and grade have been selected. Use the drop-down list to select which team won the toss, batted first, and whether or not a follow-on was enforced.
Click the “innings commenced” check-box for any and every innings commenced by either team – this will open the dialogue boxes. Work through each item with the entries in your scorebook: the number of wickets that fell, the total runs scored (batsmen and extras) and the total overs bowled. Break down the extras into their components: Byes, Leg Byes, Wides and No Balls. “Pen” is purely for any penalty runs awarded for instances such as the ball striking a fielding helmet, unfair play etc. Attention to detail with your data entry here will prevent issues when entering player scores.

13
Select the means by which the innings drew to a close: All Out (all wickets fell), Compulsory Close (the team batted for their entire allotment of overs), Declared (the captain declared the innings closed), End of Match (the team batting last surpassed the target score) or Other/In Progress (for the purpose of providing a progress score/update only). If the match has ended, select a result from the drop-down lists. The variety of options will be pre-set by the Association and will correspond to the format(s) of cricket that are being played. Click “Save” to submit the match result.

14
Match Day Tasks: Enter Player Scores Undoubtedly one of the most exciting aspects of MyCricket is the ability to record players’ statistics. To do this, you will need to enter the players’ scores each and every game.
In the “Matches” menu, select “Enter Player Scores”.
The column visibility options hide and display the various components of the scorecard: batting, bowling and fielding.
Working from left to right, use the arrows in the “Num” column to drag players up and down the list to correspond with the batting order implemented in the match.
Make a selection in the “How Out” column: dnb = did not bat, no = not out, c = caught, lbw = leg before wicket, b = bowled, st = stumped, ro = run out, hw = hit wicket, rh = retired hurt, ht = hit ball twice, to = timed out, hb = handled the ball, of = obstructed the field, rt = retired, rtno = retired not out, abs = absent. Note that “rt” will count as a dismissal in a batsman’s batting average, while “rh” and “rtno” will not.

15
If the opposition have selected their team, you will be able to select the fielder and bowler involved in each dismissal (where applicable) for the purposes of the completeness of the scorecard. Where enabled, you will be able to complete these fields on behalf of the opposition via the “Opposition Dismissals” tab.
Enter the Runs scored by each batsman, and, if desired, the Balls Faces (“BF”). Please note that if you only count the balls faced for some matches and not others, this will skew the batsman’s strike rate in his or her overall statistics. Enter the number of 4s and 6s if desired, and the Fall Of Wicket (“FOW”). Entering the FOW allows partnership records to auto-calculate and be included in a player’s career batting records.
In the bowling section, use the “Num” column to list the order in which the players bowled where desired. 1 = the 1st bowler to bowl, 2 = the 2nd and so on. Fill out the Overs (O), Maidens (M), Wickets (W) and Runs (‘R). Unassisted Wickets (UnW) can be recorded for the purpose of tallying additional Champion Player points for Bowled and LBW dismissals. Wides (Wd) and No Balls (Nb) can also be recorded. In the fielding section, enter catches (Ct), stumpings (St) and run outs (Ro As). Use the “Ct Wk” column for catches caught by a wicketkeeper, “RO Unas” for Direct Hit run outs. Byes conceded by a wicketkeeper can also be tallied (Byes Wk).
Click “Save” to submit the player scores, or “Save as Draft” to complete later.

16
Report Customisation Certain columns can be displayed or hidden via the Report Customisation menu.
Data Task Entry Summary A handy tool for viewing which Match Day Tasks have been completed, and which are still outstanding, is the Data Entry Task Summary link, found under the “Home” menu of the “Teams” tab.
Completed items are coloured with green, items requiring action with red, and actions requiring action from another party in yellow.