mycook 1 - taurus professional · mycook 1.8 dear customer, many thanks for choosing to purchase a...
TRANSCRIPT

MYCOOK 1.8
2
- The appliance’s plug must fit into the mains socket properly. Do not alter the plug. Do not use plug adaptors.- Do not use or store the appliance outdoors.- If any of the appliances’s casing breaks, immediately disconnect the appliance from the mains to prevent the possibility of an electric shock.- Do not use the appliance if it has fallen on the floor, if there are visible signs of damage or if it has a leak.- Do not force the electrical wire. Never use the electric wire to lift up, carry or unplug the appliance.-Do not allow the connection cable to come into contact with the appliance’s hot surfaces. - Remove and have available the required length of cable for working with the appliance, preventing accident risk situations.- Do not touch the plug with wet hands.
Personal safety- Do not use the appliance, in the case of you have medical implants (such as a cardiac pacemaker…).- Take the necessary measures to avoidstarting the appliance involuntarily.- Do not touch any of the appliance’smoving parts while it is operating.- Do not touch metal parts or the bodywhen it is operating, as it may causeserious burns.
Use and care- Do not use the appliance if theaccessories or consumables attached toit are defective.Replace them immediately.- Do not use the appliance if the parts or accessories are not properly fitted.
ENGLISH
Cooking blenderMycook 1.8
Dear customer, Many thanks for choosing to purchase a TAURUS brand electrical appliance. Thanks to its technology, design and operation and the fact that it exceeds the strictest quality standards, a fully satisfactory use and long product life can be assured.
Safety advice and cautions- Read these instructions carefully before switching on the appliance and keep them for future reference. Failure to follow and observe these instructions could lead to an accident.- Clean all the parts of the product that will be in contact with food, as indicated in the cleaning section, before use.
Use or working environment:-This appliance heats by induction. Do not leave metallic objects on the working surface, such as knives, forks, spoons or lids, as they could become hot.- Keep children and bystanders away when using this appliance.- Position the appliance on a flat, stable surface, which can withstand high temperatures, away from other sources of heat and the splashing of water.
Electrical safety- Do not use the appliance if the cable or plug is damaged.- Ensure that the voltage indicated on the nameplate matches the mains voltage before plugging in the appliance.- Connect the appliance to a base with an earthed socket rated at 16 amps.

Image 1
Image 2
3
- Do not use the appliance while thejar is empty.- Do not use the appliance if the on/offswitch does not work.- Do not move the appliance while inuse.- Do not force the appliance’s workcapacity.- Respect the MAXIMUM and MINIMUMlevels.- After its use, disconnect the appliance;do not trust the container’s detector- Unplug the appliance from the mainswhen not in use and before undertakingany cleaning task.- This appliance is for household useonly, not professional or industrial use.- This appliance is intended for adult use.Ensure that this product is not used bythe disabled, children or people unusedto its handling.- This appliance should be stored out ofreach of children and/or the disabled.- This appliance is not a toy. Childrenshould be supervised to ensure that theydo not play with the appliance.- Do not put the appliance away if it isstill hot.- Make sure that the fan grid on theappliance is not blocked by dust, dirt orother foreign objects. - Keep the appliance in good condition.Check that the moving parts are notmisaligned or locked and make surethere are no broken parts or anomaliesthat may prevent the appliance fromoperating correctly.- Keep the base of the jar and thejar’s temperature sensor clean sothat it operates correctly(Images 1 and 2).
-Make periodical checks of the conditionof the lid silicone gasket.- Check that the lid is closed properlybefore starting the appliance.- Do not remove the lid while the liquidin the container is boiling.- Never leave the appliance unattendedwhile in use.- Pay special attention when assemblingand removing the accessories, as theblades are sharp. Be careful and avoiddirect contact with the blades’ cuttingedges.- Any misuse or failure to follow theinstructions for use renders the guarantee and the manufacturer’s liability null andvoid.

Description, accessories and documentation (Images 3 and 4)
AccessoriesA Central unit.B Measuring cup.C Jar lid.D Lid gasket.E Jar.F Blades.G Blade gasket.H Jar support with attachment clamp.I Mixing accesory.J Spatula with removable handle. Documentation- Cooking techniques guide.- Instruction manual.- Guarantee.
4
Image 3
Image 5
Image 6
Image 4
To save space, the appliance is packedwith the jar placed in a non-operatingposition.
To take the jar out of the central unit:Take it by the handle, turn it clockwise to the limit and lift up.(Image 5).
Accessory description
Measuring cup (Image 6)
The measuring cup is used to:1. To measure the amount of the different ingredients. It is marked with a measuring scale. Its maximum capacity is 100ml.2. To avoid splashing.3. To avoid heat loss during cooking. (Image 7)
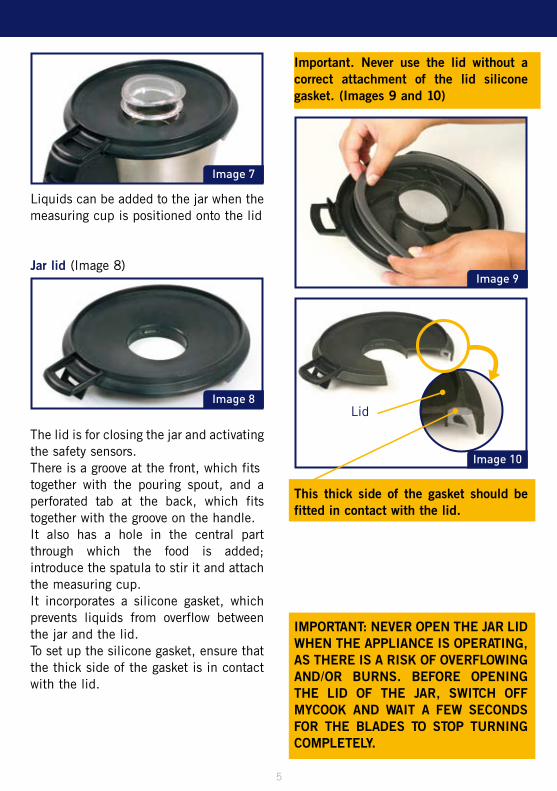
Liquids can be added to the jar when the measuring cup is positioned onto the lid
Jar lid (Image 8)
Important. Never use the lid without a correct attachment of the lid silicone gasket. (Images 9 and 10)
5
Image 9
Image 10
Image 7
Image 8
The lid is for closing the jar and activating the safety sensors.There is a groove at the front, which fitstogether with the pouring spout, and a perforated tab at the back, which fits together with the groove on the handle.It also has a hole in the central part through which the food is added; introduce the spatula to stir it and attach the measuring cup.It incorporates a silicone gasket, which prevents liquids from overflow between the jar and the lid.To set up the silicone gasket, ensure that the thick side of the gasket is in contact with the lid.
Lid
This thick side of the gasket should be fitted in contact with the lid.
IMPORTANT: NEVER OPEN THE JAR LID WHEN THE APPLIANCE IS OPERATING, AS THERE IS A RISK OF OVERFLOWING AND/OR BURNS. BEFORE OPENING THE LID OF THE JAR, SWITCH OFF MYCOOK AND WAIT A FEW SECONDS FOR THE BLADES TO STOP TURNING COMPLETELY.

The jar (Image 11)
To fit the lid: Fit the back tab into the handle groove (Image 15), lower the front part (Image 16) and push the lid in the direction of the arrow (Image 17a) until you hear a click, which will indicate that it has been attached correctly.
6
Image 11
Image 12
Image 13
The jar has a maximum capacity of 2 litres. On the inside it has a measure scale, which indicates 1 litre, 1.5 litres and 2 litres (Images 11 and 12).
To remove the lid: Slide the handle control downwards and, when the lid has become detached, take it out by pulling it (Images 13 and 14).
Image 14
Image 15
Image 16
Image 17a
You can also proceed by (Image 17b)

To attach the jar: Hold the jar by the handle and place it onto the central unit, making sure the arrows of the jar base and central unit are lined up correctly. Turn the jar in a counterclockwise direction until the arrow of the jar base coincides with the lock of the central unit (Image 18).
7
Image 17b
Image 18
Image 19
To detach the jar: Hold the jar by its handle and turn in a clockwise direction up to the limit (both arrows coinciding) and lift the jar (Image 19).
Important: For safety reasons, the jar cannot be covered or uncovered when it is attached to the central unit. The arrow of the jar base coincides with the lock of the central unit. (Image 18)Do not use force. A safety element might be broken. To cover or uncover the jar it must be detached from the central unit turning it clockwise until it comes off. (Make sure that the arrow on the side of the jar coincides with the arrow on the central unit (Image 19).Do not activate the heating function with the jar empty.
Jar support with clamp(Image 20)
Image 20
Image 21
The jar support is for:1. Fixing the blades to the jar.2. Fixing the jar to the central unit.3. Supporting the jar when it is hot on all types of surface, without causing burns. (Image 21)
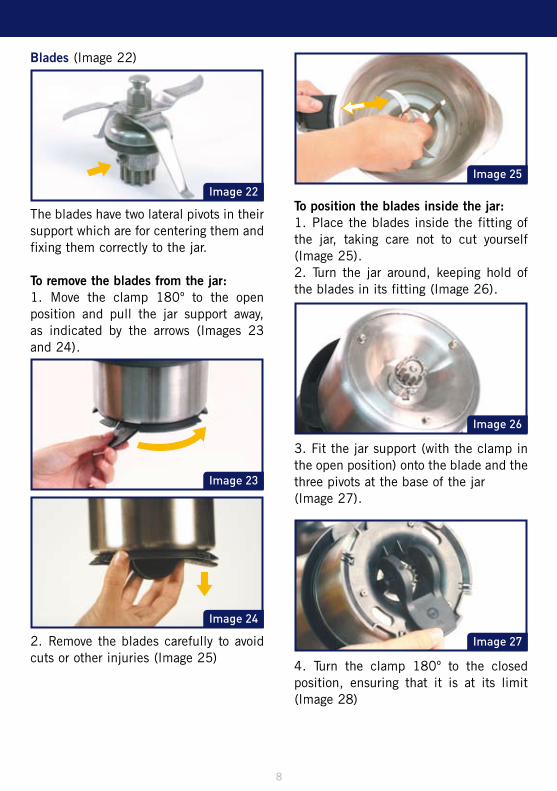
Blades (Image 22)
To position the blades inside the jar: 1. Place the blades inside the fitting of the jar, taking care not to cut yourself (Image 25).2. Turn the jar around, keeping hold of the blades in its fitting (Image 26).
8
Image 22
Image 23
Image 24
The blades have two lateral pivots in their support which are for centering them and fixing them correctly to the jar.
To remove the blades from the jar: 1. Move the clamp 180º to the open position and pull the jar support away, as indicated by the arrows (Images 23 and 24).
2. Remove the blades carefully to avoid cuts or other injuries (Image 25)
Image 25
Image 26
Image 27
3. Fit the jar support (with the clamp in the open position) onto the blade and the three pivots at the base of the jar (Image 27).
4. Turn the clamp 180º to the closed position, ensuring that it is at its limit (Image 28)

Important. The blades must always have the silicone gasket correctly positioned. Take special care when handling the blades as they are very sharp. Never submerge the blades in water or wash them in a dishwasher, as the internal mechanism could become damaged if water got inside.
Spatula (Image 29)
To detach the spatula handle:Hold it with one hand and press on the safety ring with your thumb (Image 30b).
9
Image 28 Image 30a
Image 30b
Image 30c
Image 29
The spatula is for mixing ingredients, preventing them from sticking to the walls of the jar and emptying the contents of the jar.
It is made up of two main pieces:
The head, which has a safety ringpreventing access to the blades and, atthe end, a detachable case made of asoft rubber material so that the jarwill not be scratched(Image 30a)and the handle.
To attach the spatula: Fit both parts together and press. (Image 30c)

Important: Never introduce the spatula into the central hole of the lid, if working with the mixing accesory fixed to the blades. (Image 31)
The mixing accessory is used for:1. Whipping cream, custards, egg whites... 2. Mixing ingredients without blending them.3. To avoid ingredients sticking to the walls of the jar when working with hot substances.
To attach the mixing accesory:Attach it in a single position over the blades and pressing softly downwards until you hear a click, which indicates that it is properly anchored. (Image 34)
10
Image 33
Image 31
Image 32
Attention. Never use utensils other than the spatula. It can be dangerous. (Image 32)
Mixing accessory (Image 33)
Image 34
Image 35
To detach the mixing accesory:Pull upwards until it becomes detached. (Image 35)
Important: Never use the mixing accesory at speeds higher than speed 5. Never introduce the spatula into the central hole of the lid, if working with the mixing accessory fixed to the blades. (Image 31)
IMPORTANT: WHEN COOKING WITH HEAT OR STEAMING, HIGH TEMPERATURES ARE REACHED. BE CAREFUL WHEN HANDLING THE APPLIANCE AND ITS ACCESSORIES, ESPECIALLY THE METALLIC PARTS, AS THERE IS A RISK OF SUFFERING BURNS
Instructions for use
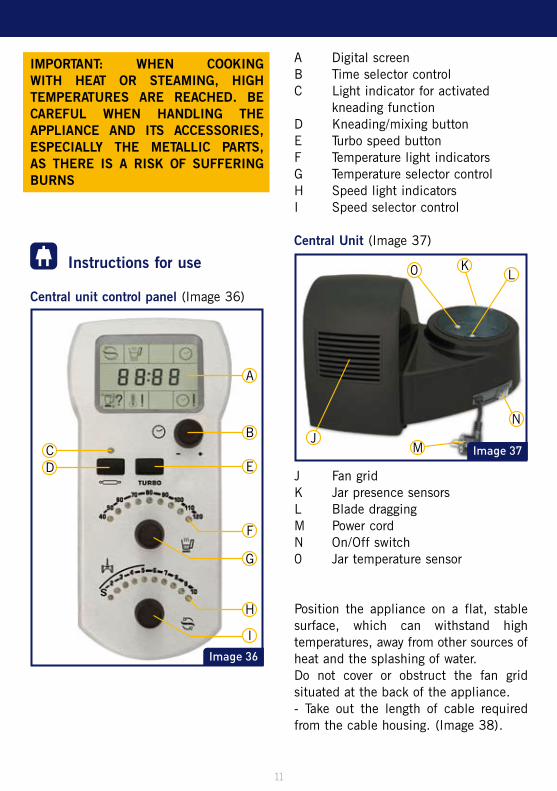
Central unit control panel (Image 36)
A Digital screenB Time selector control C Light indicator for activated kneading functionD Kneading/mixing buttonE Turbo speed buttonF Temperature light indicatorsG Temperature selector controlH Speed light indicatorsI Speed selector control Central Unit (Image 37)
11
Image 36
Image 37
J Fan gridK Jar presence sensorsL Blade draggingM Power cord N On/Off switch0 Jar temperature sensor
Position the appliance on a flat, stable surface, which can withstand high temperatures, away from other sources of heat and the splashing of water.Do not cover or obstruct the fan grid situated at the back of the appliance.- Take out the length of cable required from the cable housing. (Image 38).

- Connect the appliance to the mains.- Turn the appliance on, activating the on/off switch (Image 38). The appliance carries out a self-check and 00:00 appears on the digital screen. (Image 39)
Icons indicating control in the central part:T Timer
Icons indicating information in the lower part: U Jar missing/jar wrongly covered or jar wrongly attached to the central unit. V The jar and the temperature sensor are hot. X Timer ended.
Timer selector control (Image 41)
12
Image 38
Image 39Image 41
Image 40
On/Off switch
The appliance is now ready for use.
Digital screen (Image 40)
Icons indicating function in the upper part: Q Blades activated R Heating activated S Timer activated
Turn the control slowly to the right to select the function time. Maximum: 90 minutes. Turn the control slowly to the left to reduce the time.
Activation scale:From 0 to 1 minute. Counted in seconds.From 1 minute to 10 minutes. Counted in 30 second intervals From 10 minutes to 90 minutes. Counted in minutes. Turning the control quickly allows a faster selection.
S

Kneading/mixing button (Image 42) Turbo speed button (Image 44)
13
Image 42
Image 43
Press the button to activate the kneading/mixing function. The light indicator lights up green and begins to count the operating time. Press the button to stop the kneading/mixing function. The light indicator switches off.After the kneading/mixing function finishes and after previously selecting a functioning time, the appliance emits a warning sound and the light indicator flashes. (Image 43)
To stop: Press the kneading/mixing button again. This function is suitable for the preparation of homogenous mixes of all kinds of dough and mixtures.The kneading/mixing function is activated from a stop position. It is not advisable to activate this function if the jar is at a temperature higher than 60º C.
Image 44
Keep the button pressed to activate the turbo function. The 10 maximum speed light indicators will light up (Image 44).If working without heat: When the button is released the turbo function stops. The maximum speed light indicators will switch off.If working with heat: For safety reasons and in order to avoid splashes, the turbospeed will increment progressively. When the button is released the turbo function stops.It is not possible to activate the turbo function with speeds 1, 2 and 3.The turbo function is the fastest and the most powerful and is ideal for chopping hard elements or a large quantity of them.

How to process when hot Follow the procedure below:1st. Select time. Turn the time selector control slowly to the right/left to select the function time. (Image 45)
3rd. Select speed. Turn the speed selector control slowly to the right/left to select the function speed. The light indicators of the speed selected will light up in green and the light indicators of the temperature selected will then light up in red. The appliance begins to heat up (Image 47).
14
Image 45
Image 46
2nd. Select temperature. Turn the temperature selector control slowly to the right/left to select a heating temperature. The light indicators of the temperature selected will light up in green. (Image 46)
Image 47
Attention. Use speed 1 only for “Sofritos” (i.e. Bolognese sauce).Do not activate the heating function with the jar empty.
When the operation ends, the appliance gives out a warning sound, the light indicators of the selected temperature flash and the blades begin to turn at speed 2 (light indicators lit up in green) to prevent the food from sticking or burning. (Image 48)

How to process when cold: Turn the control slowly to the right/left to select the function speed. The light indicators of the selected speed light up in green and the blades turns on (Image 49).
15
Image 48
Image 49
To stop: Turn the speed selector to the left until the speed light indicators turn off.
IMPORTANT: ALWAYS STOP THE APPLIANCE USING THE SPEED SELECTOR CONTROL. BEFORE LIFTING THE LID OF THE JAR WAIT A FEW SECONDS UNTIL THE BLADES HAVE STOPPED COMPLETELY. NEVER OPEN THE JAR LID WHEN THE APPLIANCE IS OPERATING, AS THERE IS A RISK OF OVERFLOWING AND/OR BURNS.
When the operation ends, after the operating time has been selected, the appliance gives out a warning sound and the light indicators of the selected temperature flash (Image 50).

To stop: Turn the speed selector to the left until the speed light indicators turn off.
When the appliance starts operating and the jar or lid is not properly attached, it gives out a warning sound and the digital screen displays the information icon (Image 51).
After processing when hot, the digital screen displays the information icon illuminated: Jar and temperature sensor hot (Image 52).
16
Image 50
Image 51
Image 52
To process when cold, the jar and the temperature sensor must be cooled (Image 2). To do this, cool the jar under the tap, attach it to the central unit and wait for the information icon to turn off.
When the appliance will not be used for a period of time:1. Turn the appliance off, using the on/off switch.2. Unplug the appliance from the mains.3. Put the power cord in the cable housing.
Cleaning- Unplug the appliance from the mains and let it cool before starting any cleaning.- Clean the equipment with a damp cloth with a few drops of washing-up liquid and then dry.- Do not use solvents or products with an acid or base ph such as bleach, or abrasive products, for cleaning the
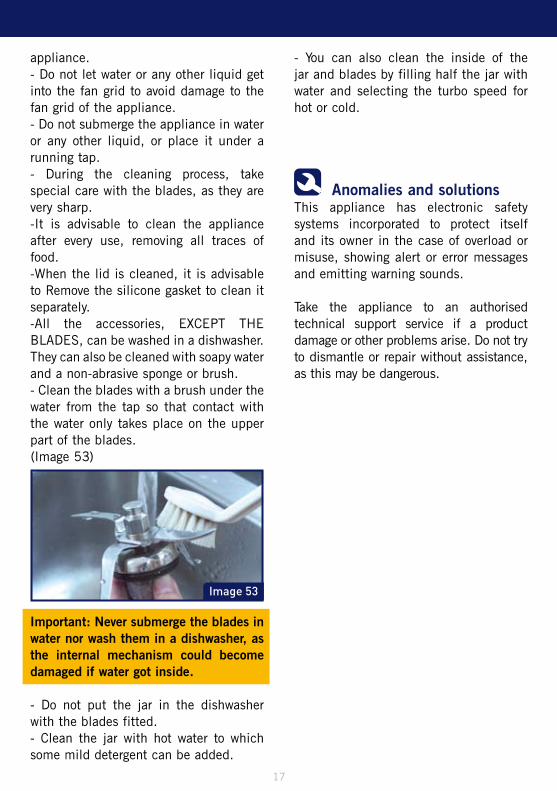
appliance.- Do not let water or any other liquid get into the fan grid to avoid damage to the fan grid of the appliance. - Do not submerge the appliance in water or any other liquid, or place it under a running tap.- During the cleaning process, take special care with the blades, as they are very sharp.-It is advisable to clean the appliance after every use, removing all traces of food.-When the lid is cleaned, it is advisable to Remove the silicone gasket to clean it separately.-All the accessories, EXCEPT THE BLADES, can be washed in a dishwasher. They can also be cleaned with soapy water and a non-abrasive sponge or brush.- Clean the blades with a brush under the water from the tap so that contact with the water only takes place on the upper part of the blades. (Image 53)
- You can also clean the inside of the jar and blades by filling half the jar with water and selecting the turbo speed for hot or cold.
Anomalies and solutionsThis appliance has electronic safety systems incorporated to protect itself and its owner in the case of overload or misuse, showing alert or error messages and emitting warning sounds.
Take the appliance to an authorised technical support service if a product damage or other problems arise. Do not try to dismantle or repair without assistance, as this may be dangerous.
17
Image 53
Important: Never submerge the blades in water nor wash them in a dishwasher, as the internal mechanism could become damaged if water got inside.
- Do not put the jar in the dishwasher with the blades fitted.- Clean the jar with hot water to which some mild detergent can be added.

18
ANOMALY MESSAGE ON DIGITAL SCREEN
REPAIR
The digital screen displaysERR4.
Possible overload of the motor.Remove the food from the jar.
The digital screen displaysERR5.
Possible overload of the motor.Leave the appliance to cool.
The digital screen displaysERR1, 2, 3, 6, 7, 10.
Disconnect / connect the electrical current. If “error” still appears, write down the number and take the appliance to the Taurus Technical Assistance Services.
The digital screen displaysERR8.
Possible overheating of the induction. Disconnect form the mains and remove the jar. Leave to cool.
The digital screen displaysERR9.
Possible overheating of the induction. Disconnect form the mains and remove the jar. Leave to cool. If “error” still appears, write down the number and take the appliance to the Taurus Technical Assistance Services.
The digital screen displaysERR11.
The jar and/or the lid have become detached. Attach the lid and the jar correctly.

19
If the connection to the mains has been damaged, it must be replaced and you should proceed as you would in the case of damage.
Technical Characteristics- Maximum capacity of the jar: 2 litres.
For EU product versions and/or in case that it is requested in your country:
Ecology and recyclability of the product - The materials of which the packaging of this appliance consists are included in a collection, classification and recycling system. Should you wish to dispose of them, use the appropriate public containers for each type of material.- The product does not contain concentrations of substances that could be considered harmful to the environment.
This appliance complies with Directive 2006/95/EC on Low Voltage and Directive 2004/108/EC on Electromagnetic Compatibility.
ANOMALY REPAIR
It does not turn on Check whether it is connected to the mains.Check that the general switch is in an “ON” position.Check that the lid and the jar are well attached.
It does not heat Check that you have done the following:1 Selected time. 2 Selected temperature.3 Selected speed.
It heats too much Check that you have selected the correct temperature.Check that the temperature sensor is clean and that it makes good contact with the jar.
- This symbol means that in case you wish to dispose of the product once its working life has ended, take it to an authorised waste agent for the selective collection of Waste from Electric and Electronic Equipment (WEEE).

Avda. Barcelona, s/nE 25790 - OLIANASpainwww.taurus.es
Product weight (aproximate)Mycook 1.8: G.W. 8,8 Kg N.W. 7,8 Kg
Cod
. 062
667/
2