mvhs band study guide - mount vernon band program€¦ · the circle of 4ths musicians must become...
TRANSCRIPT
Mount Vernon High School Band
Study Guide
Table of Contents
Study Guides ..............................................................................................................................0 The Circle of 4ths ...................................................................................................................2 Tone .......................................................................................................................................3 The Pyramid of Sound ............................................................................................................4 Balance and Blend ..................................................................................................................5 Dynamics................................................................................................................................5 Intonation (Pitch) ....................................................................................................................6 6-Step Beatless Tuning Process...............................................................................................7 Articulation.............................................................................................................................7 Style .......................................................................................................................................9 The Classic Shaped Note.......................................................................................................10 Road Maps............................................................................................................................11 Duration................................................................................................................................11 Pulse/Flow............................................................................................................................11 Texture .................................................................................................................................12 Musical Expression...............................................................................................................12 Vibrato and Intonation ..........................................................................................................15 Effective Rehearsals..............................................................................................................16 Marking Parts during Rehearsal ............................................................................................17 Helpful Hints for Musical Performance.................................................................................18
Music Related Websites............................................................................................................21 Notes, Sources, References .......................................................................................................22
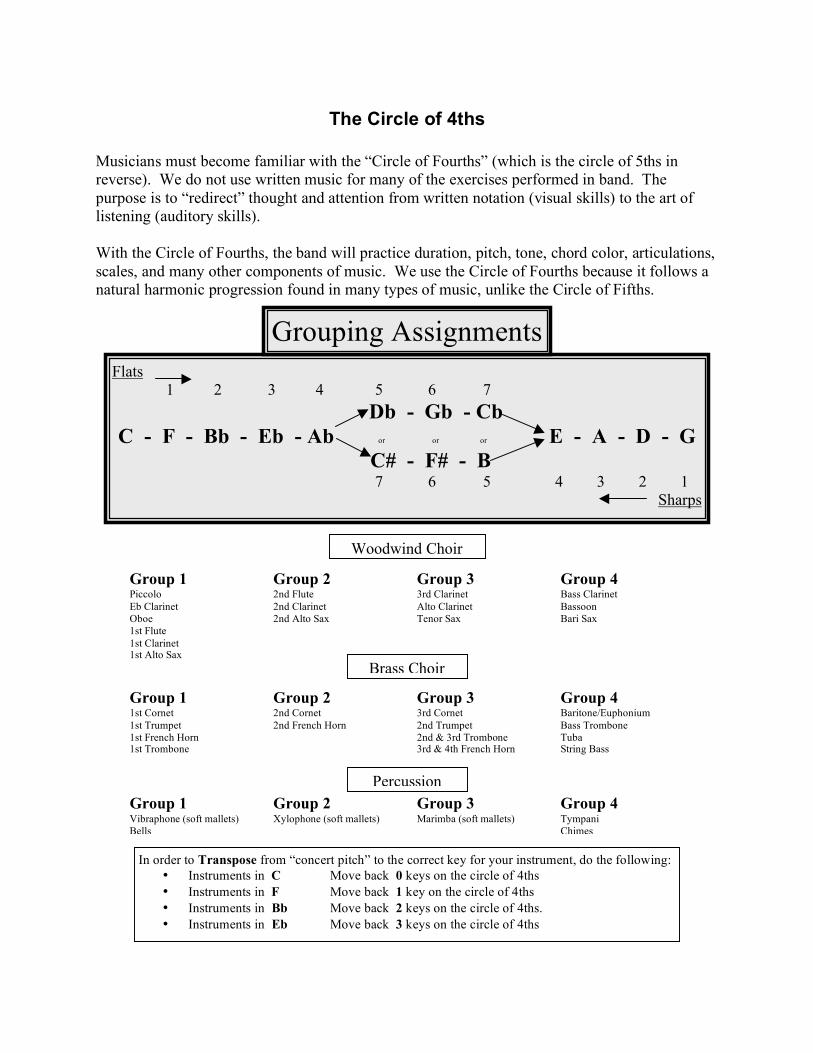
The Circle of 4ths Musicians must become familiar with the “Circle of Fourths” (which is the circle of 5ths in reverse). We do not use written music for many of the exercises performed in band. The purpose is to “redirect” thought and attention from written notation (visual skills) to the art of listening (auditory skills). With the Circle of Fourths, the band will practice duration, pitch, tone, chord color, articulations, scales, and many other components of music. We use the Circle of Fourths because it follows a natural harmonic progression found in many types of music, unlike the Circle of Fifths.
Percussion Group 1 Group 2 Group 3 Group 4 Vibraphone (soft mallets) Xylophone (soft mallets) Marimba (soft mallets) Tympani Bells Chimes
Group 1 Group 2 Group 3 Group 4 1st Cornet 2nd Cornet 3rd Cornet Baritone/Euphonium 1st Trumpet 2nd French Horn 2nd Trumpet Bass Trombone 1st French Horn 2nd & 3rd Trombone Tuba 1st Trombone 3rd & 4th French Horn String Bass
Flats 1 2 3 4 5 6 7
Db - Gb - Cb C - F - Bb - Eb - Ab or or or E - A - D - G
C# - F# - B 7 6 5 4 3 2 1
Sharps
Grouping Assignments
Woodwind Choir
Brass Choir
Group 1 Group 2 Group 3 Group 4 Piccolo 2nd Flute 3rd Clarinet Bass Clarinet Eb Clarinet 2nd Clarinet Alto Clarinet Bassoon Oboe 2nd Alto Sax Tenor Sax Bari Sax 1st Flute 1st Clarinet 1st Alto Sax
In order to Transpose from “concert pitch” to the correct key for your instrument, do the following: • Instruments in C Move back 0 keys on the circle of 4ths • Instruments in F Move back 1 key on the circle of 4ths • Instruments in Bb Move back 2 keys on the circle of 4ths. • Instruments in Eb Move back 3 keys on the circle of 4ths
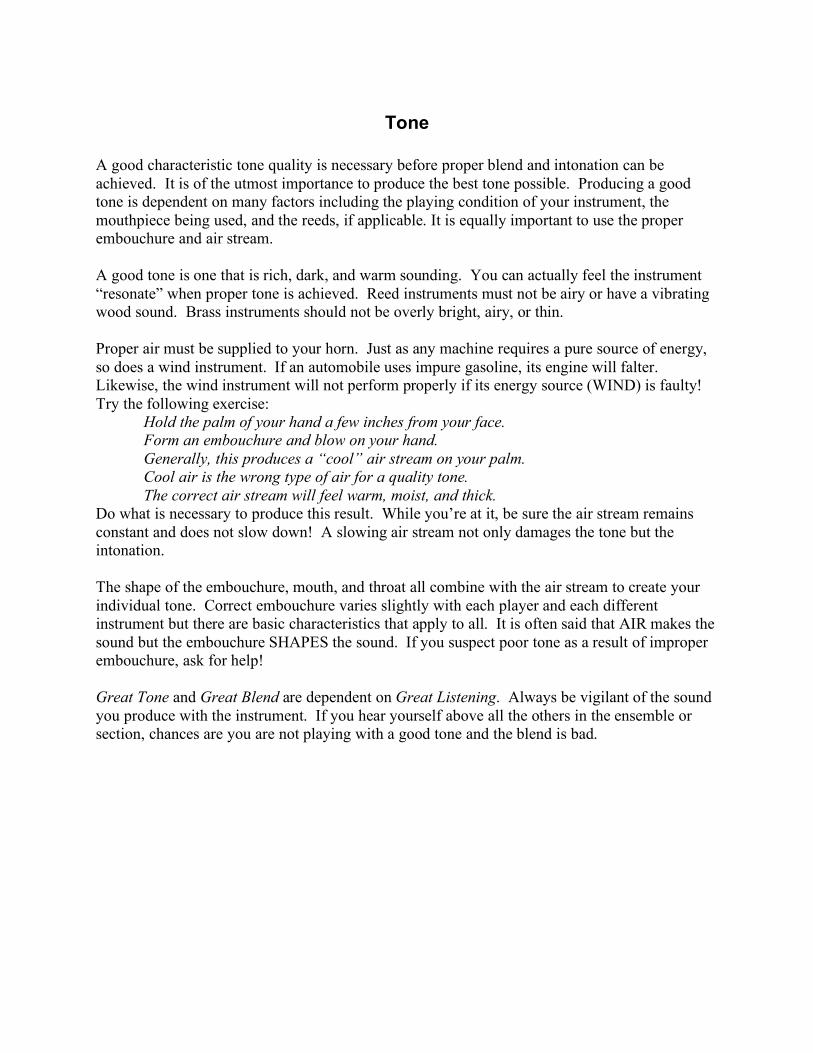
Tone A good characteristic tone quality is necessary before proper blend and intonation can be achieved. It is of the utmost importance to produce the best tone possible. Producing a good tone is dependent on many factors including the playing condition of your instrument, the mouthpiece being used, and the reeds, if applicable. It is equally important to use the proper embouchure and air stream. A good tone is one that is rich, dark, and warm sounding. You can actually feel the instrument “resonate” when proper tone is achieved. Reed instruments must not be airy or have a vibrating wood sound. Brass instruments should not be overly bright, airy, or thin. Proper air must be supplied to your horn. Just as any machine requires a pure source of energy, so does a wind instrument. If an automobile uses impure gasoline, its engine will falter. Likewise, the wind instrument will not perform properly if its energy source (WIND) is faulty! Try the following exercise:
Hold the palm of your hand a few inches from your face. Form an embouchure and blow on your hand. Generally, this produces a “cool” air stream on your palm. Cool air is the wrong type of air for a quality tone. The correct air stream will feel warm, moist, and thick.
Do what is necessary to produce this result. While you’re at it, be sure the air stream remains constant and does not slow down! A slowing air stream not only damages the tone but the intonation. The shape of the embouchure, mouth, and throat all combine with the air stream to create your individual tone. Correct embouchure varies slightly with each player and each different instrument but there are basic characteristics that apply to all. It is often said that AIR makes the sound but the embouchure SHAPES the sound. If you suspect poor tone as a result of improper embouchure, ask for help! Great Tone and Great Blend are dependent on Great Listening. Always be vigilant of the sound you produce with the instrument. If you hear yourself above all the others in the ensemble or section, chances are you are not playing with a good tone and the blend is bad.
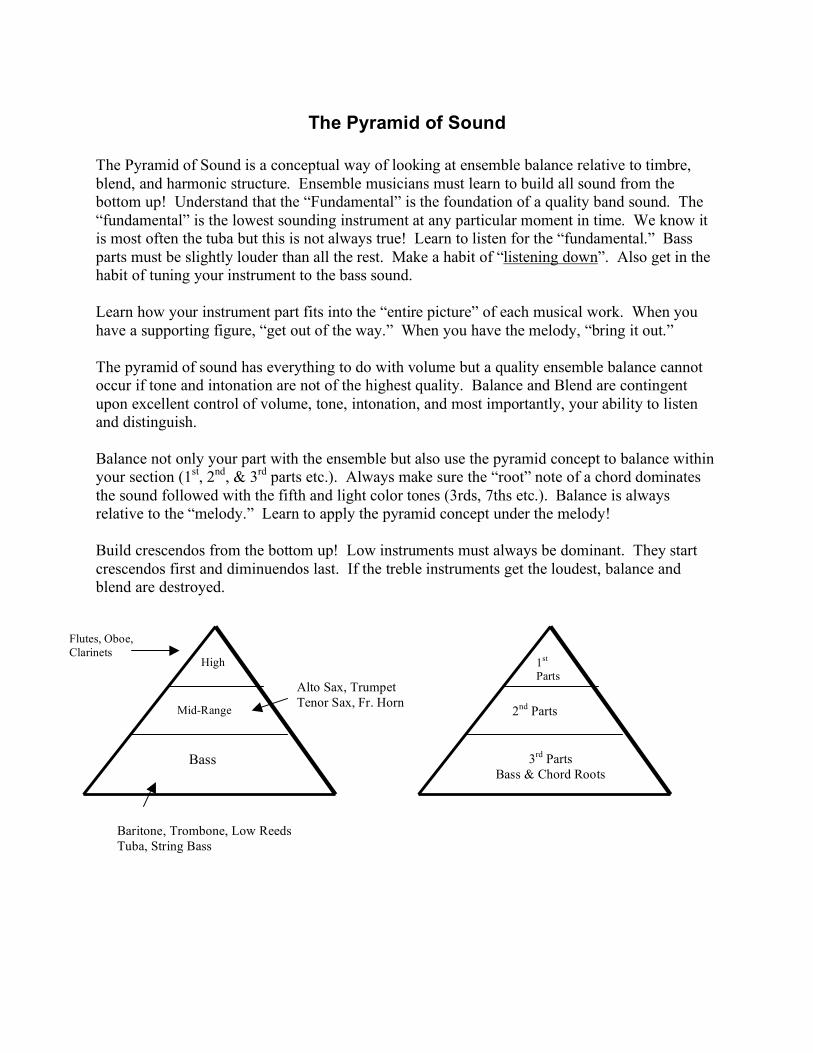
The Pyramid of Sound The Pyramid of Sound is a conceptual way of looking at ensemble balance relative to timbre, blend, and harmonic structure. Ensemble musicians must learn to build all sound from the bottom up! Understand that the “Fundamental” is the foundation of a quality band sound. The “fundamental” is the lowest sounding instrument at any particular moment in time. We know it is most often the tuba but this is not always true! Learn to listen for the “fundamental.” Bass parts must be slightly louder than all the rest. Make a habit of “listening down”. Also get in the habit of tuning your instrument to the bass sound. Learn how your instrument part fits into the “entire picture” of each musical work. When you have a supporting figure, “get out of the way.” When you have the melody, “bring it out.” The pyramid of sound has everything to do with volume but a quality ensemble balance cannot occur if tone and intonation are not of the highest quality. Balance and Blend are contingent upon excellent control of volume, tone, intonation, and most importantly, your ability to listen and distinguish. Balance not only your part with the ensemble but also use the pyramid concept to balance within your section (1st, 2nd, & 3rd parts etc.). Always make sure the “root” note of a chord dominates the sound followed with the fifth and light color tones (3rds, 7ths etc.). Balance is always relative to the “melody.” Learn to apply the pyramid concept under the melody! Build crescendos from the bottom up! Low instruments must always be dominant. They start crescendos first and diminuendos last. If the treble instruments get the loudest, balance and blend are destroyed.
High
Mid-Range
Bass
Flutes, Oboe, Clarinets
Alto Sax, Trumpet Tenor Sax, Fr. Horn
Baritone, Trombone, Low Reeds Tuba, String Bass
1st Parts
2nd Parts
3rd Parts Bass & Chord Roots
Balance and Blend Learn to listen how your musical part fits into the “entire picture” of each musical composition we rehearse. When you have the melody, “Bring it Out”, but when you play a supporting line, “get out of the way.” Understand the “Pyramid of Sound” and how it relates to the FUNDAMENTAL. The fundamental is the lowest (bass) sound playing at any particular time. Most often it is the tubas and low reeds but this is not always the case. Keep your ears “tuned-in” to the bass lines. Make sure your part is played at a volume and similar tone as to complement the low parts. Balance deals with volume. “Is my volume too soft or too loud?” Blend deals with tone quality. “Is my tone too bright or shrill?” “Does my tone match my section’s sound?” Learn how to adjust your tone and always strive for a dark and rich tone. It is typically much easier to brighten one’s tone than it is to darken it, on a moment’s notice. Equipment (instrument, reed, ligature, mouthpiece, etc.) often greatly affects a musician’s tone quality and thus, their ability to blend with their section. If you are having trouble blending with your section and you have tried everything you can with your embouchure and airflow to improve your sound, you should look at a change in your equipment.
Dynamics Understand that dynamics are always relative to what musical experience is occurring at any particular moment. There are no absolute “volume levels.” Each musician must strive for the ability to produce at least 6 distinguishable levels of volume (pp, p, mp, mf, f, ff) that can be reproduced as demanded by the particular music being performed. To help develop this ability start playing a long-tone as loud as you can while still maintaining a quality tone. NEVER sacrifice quality tone for volume! Now, play the softest long-tone possible while still maintaining that same quality tone. Do not let the sound go airy or let the pitch fluctuate. These two volumes become your personal ff (fortissimo) and pp (pianissimo). They will not be the same for every player or every instrument. From this point, find four levels in between (p, mp, mf, & f ). Learn to be accurate in reproducing these six levels of volume. Learn to balance your personal volumes to the overall section and ensemble sound.
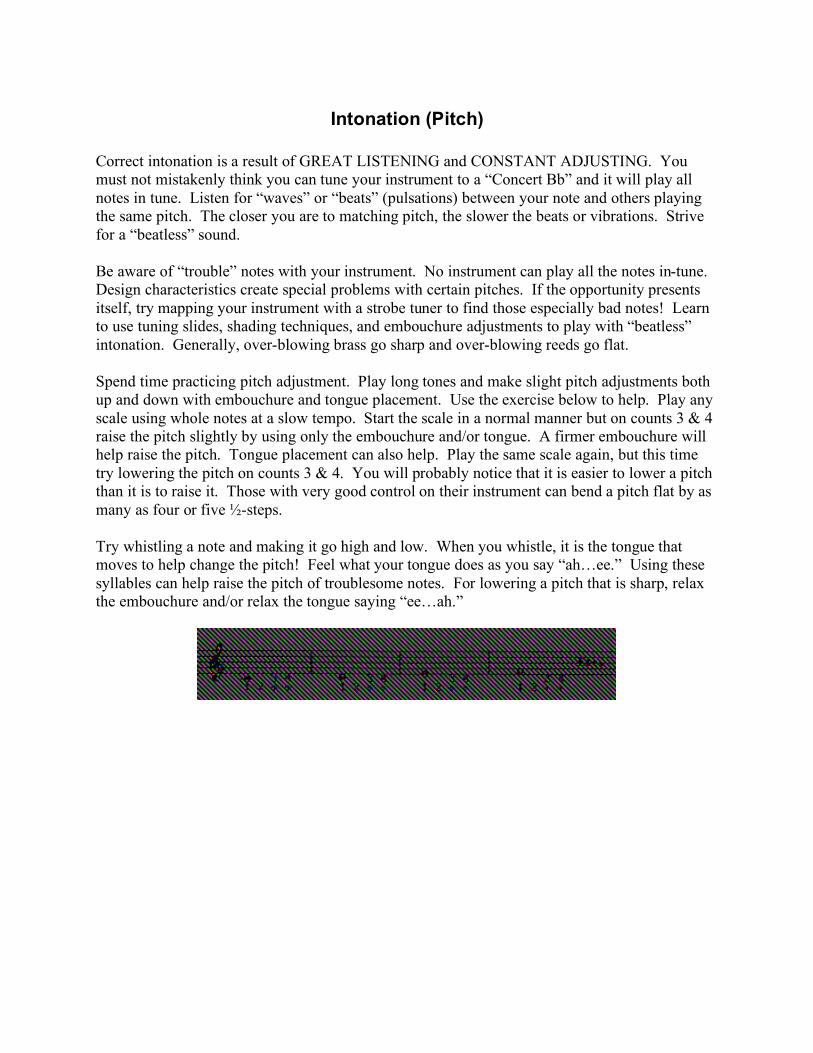
Intonation (Pitch) Correct intonation is a result of GREAT LISTENING and CONSTANT ADJUSTING. You must not mistakenly think you can tune your instrument to a “Concert Bb” and it will play all notes in tune. Listen for “waves” or “beats” (pulsations) between your note and others playing the same pitch. The closer you are to matching pitch, the slower the beats or vibrations. Strive for a “beatless” sound. Be aware of “trouble” notes with your instrument. No instrument can play all the notes in-tune. Design characteristics create special problems with certain pitches. If the opportunity presents itself, try mapping your instrument with a strobe tuner to find those especially bad notes! Learn to use tuning slides, shading techniques, and embouchure adjustments to play with “beatless” intonation. Generally, over-blowing brass go sharp and over-blowing reeds go flat. Spend time practicing pitch adjustment. Play long tones and make slight pitch adjustments both up and down with embouchure and tongue placement. Use the exercise below to help. Play any scale using whole notes at a slow tempo. Start the scale in a normal manner but on counts 3 & 4 raise the pitch slightly by using only the embouchure and/or tongue. A firmer embouchure will help raise the pitch. Tongue placement can also help. Play the same scale again, but this time try lowering the pitch on counts 3 & 4. You will probably notice that it is easier to lower a pitch than it is to raise it. Those with very good control on their instrument can bend a pitch flat by as many as four or five ½-steps. Try whistling a note and making it go high and low. When you whistle, it is the tongue that moves to help change the pitch! Feel what your tongue does as you say “ah…ee.” Using these syllables can help raise the pitch of troublesome notes. For lowering a pitch that is sharp, relax the embouchure and/or relax the tongue saying “ee…ah.”
6-Step Beatless Tuning Process
The designated tuning pitch (Bb concert) is played and sustained by the Tuba and/or the section leader.
1. As you play Bb concert with your section leader, listen for the “beats”… Make an adjustment with the barrel, mouthpiece, or slide… Did the “beats” speed up or slow down?
2. If the “beats” are faster… You made the wrong move with the barrel, mouthpiece, or slide… Adjust the length of your instrument in the opposite direction.
3. If the “beats” became slower… You are making the correct move… Continue in this direction until all “beats” are eliminated.
4. If you find yourself “pinching” your embouchure (raising pitch) to eliminate “beats”… Your instrument is too long. It must be shortened.
5. If you find yourself “relaxing” your embouchure (lowering pitch) to eliminate “beats”… Your instrument is too short. It must be lengthened.
6. When you and your section play the same pitch, without any unnecessary embouchure pressure or relaxation, and you are not able to identify any “individual sound” in your section… You and your section are perfectly in tune and playing with proper balance and blend!
Articulation Staccato notes are also approached differently depending on the style of the music being performed and its historical placement. There are three ways to execute a staccato (separated) note. The first is the most commonly used staccato note. These notes are separated by a slight shortening of the time value. The tongue does not stop air nor is it ever fully stopped by any means! Think of a field sprinkler. As the sprinkler turns, the oscillating bar only interrupts the flow of water; it does not stop the flow of water. Use the same principle with your tongue and the air stream.
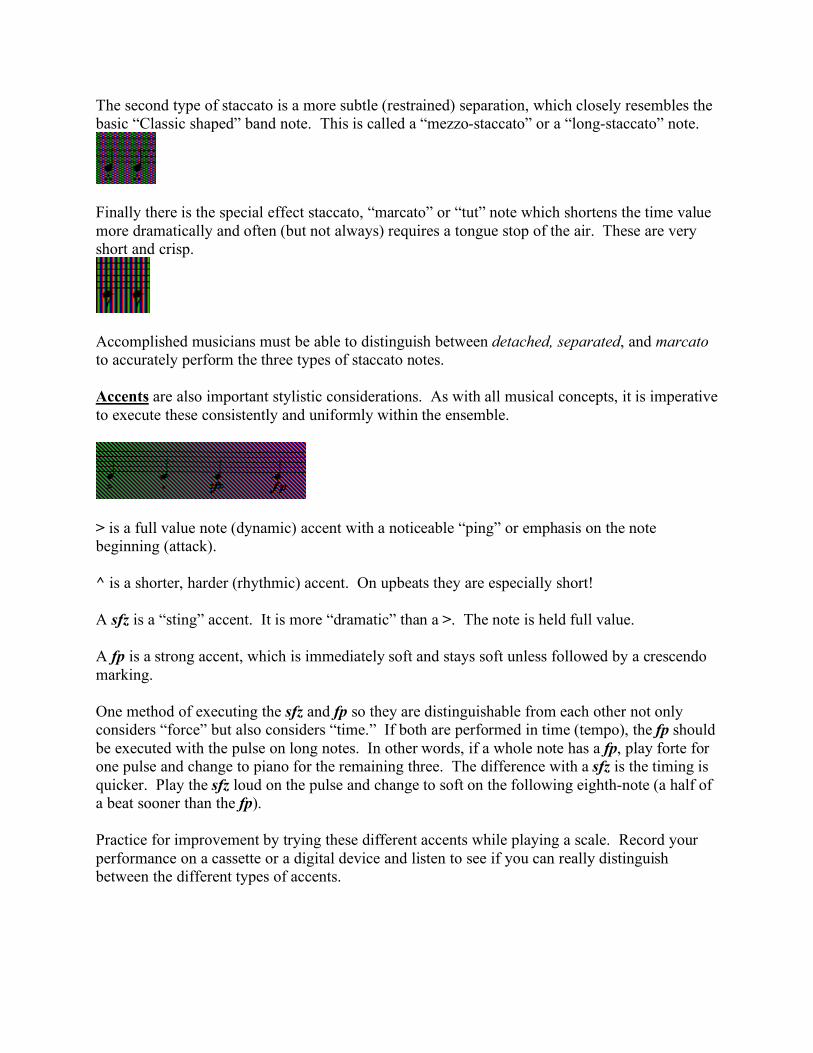
The second type of staccato is a more subtle (restrained) separation, which closely resembles the basic “Classic shaped” band note. This is called a “mezzo-staccato” or a “long-staccato” note.
Finally there is the special effect staccato, “marcato” or “tut” note which shortens the time value more dramatically and often (but not always) requires a tongue stop of the air. These are very short and crisp.
Accomplished musicians must be able to distinguish between detached, separated, and marcato to accurately perform the three types of staccato notes. Accents are also important stylistic considerations. As with all musical concepts, it is imperative to execute these consistently and uniformly within the ensemble.
> is a full value note (dynamic) accent with a noticeable “ping” or emphasis on the note beginning (attack). ^ is a shorter, harder (rhythmic) accent. On upbeats they are especially short! A sfz is a “sting” accent. It is more “dramatic” than a >. The note is held full value. A fp is a strong accent, which is immediately soft and stays soft unless followed by a crescendo marking. One method of executing the sfz and fp so they are distinguishable from each other not only considers “force” but also considers “time.” If both are performed in time (tempo), the fp should be executed with the pulse on long notes. In other words, if a whole note has a fp, play forte for one pulse and change to piano for the remaining three. The difference with a sfz is the timing is quicker. Play the sfz loud on the pulse and change to soft on the following eighth-note (a half of a beat sooner than the fp). Practice for improvement by trying these different accents while playing a scale. Record your performance on a cassette or a digital device and listen to see if you can really distinguish between the different types of accents.

Style Musical style results in character and authenticity of musical performance. Much of this is attributable to historical interpretation and the execution of some basic concepts of articulation and dynamics. The musician must be aware of the entire NOTE SHAPE. This shape must be developed by the individual player and then unified within the ensemble. Note shapes consist of two basic types. The “Classic” shaped note, for non-melodic notes in Baroque, Classical, and Contemporary styles of music, and the “Romantic” shaped note used for chorales, hymns, and Romantic styles of music. The Classic shaped band note uses a normal “D” tongue or (doo) attack followed by a slight increase in air (perceived crescendo) with a delicate taper at the release. DO NOT STOP AIR WITH THE TONGUE! Each one of these notes is ever so slightly detached from the proceeding note unless otherwise indicated in the music. The Romantic shaped note is more smooth and connected than the Classic shaped note. This is not to say that the Classic note should be harsh and strongly articulated, that would be a misinterpretation. The Romantic shaped note is more like a less distinct or a more blended together version of the Classic shaped note. A picture of two Classic Shaped notes might look like this: Slightly detached While a picture of two Romantic notes might look like this: Smoothly connected
AIR AIR
AIR AIR
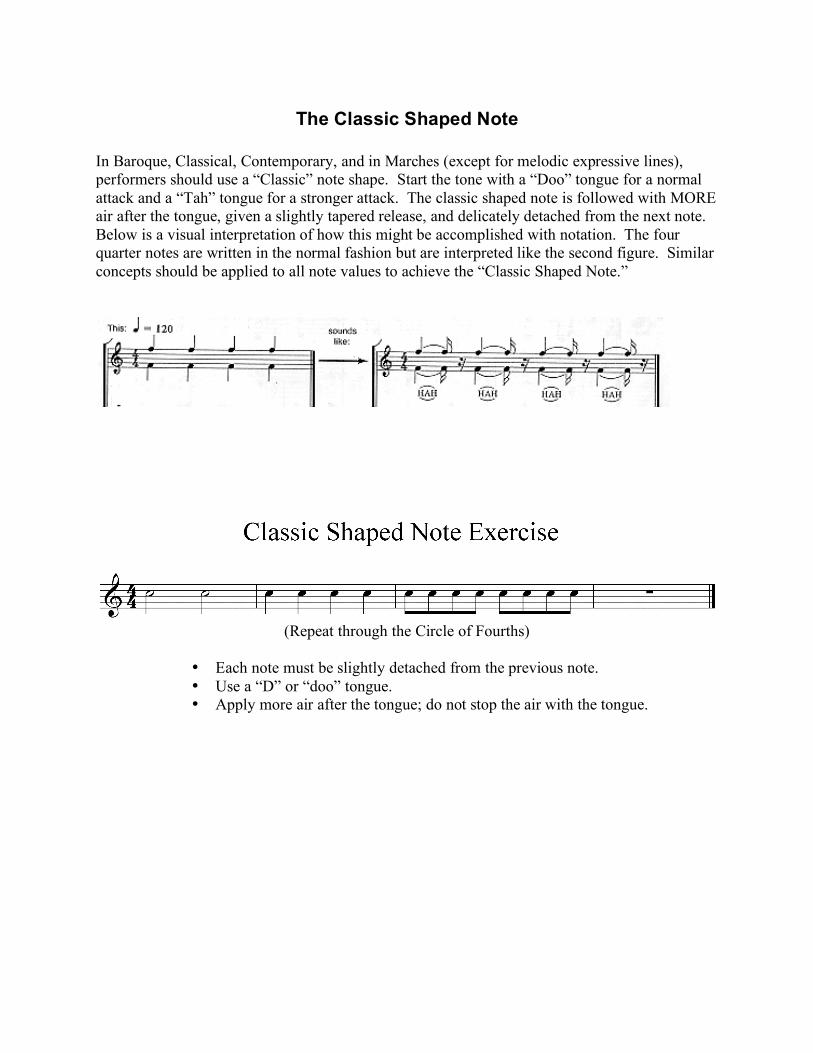
The Classic Shaped Note In Baroque, Classical, Contemporary, and in Marches (except for melodic expressive lines), performers should use a “Classic” note shape. Start the tone with a “Doo” tongue for a normal attack and a “Tah” tongue for a stronger attack. The classic shaped note is followed with MORE air after the tongue, given a slightly tapered release, and delicately detached from the next note. Below is a visual interpretation of how this might be accomplished with notation. The four quarter notes are written in the normal fashion but are interpreted like the second figure. Similar concepts should be applied to all note values to achieve the “Classic Shaped Note.”
(Repeat through the Circle of Fourths)
• Each note must be slightly detached from the previous note. • Use a “D” or “doo” tongue. • Apply more air after the tongue; do not stop the air with the tongue.
Road Maps Do not ignore the musical terms and signs on your printed music. Likewise, do not wait for someone else to “enlighten” you about the meaning. Look up the unknown terms in an appropriate reference book or on-line. You are responsible for understanding all the musical terms on your sheet music.
Duration Duration refers to the length in time a note exists. Combinations of different note lengths are what make rhythm. Difficult rhythmic figures (note groupings) must be practiced slowly but accurately. The brain learns by electric impulses going over the same path hundreds of times. If we walk an unfamiliar meadow of tall grass, we eventually find our way and wear down a correct path. So it is with difficult passages in music. Stay on the correct path. Play it Slowly and Correctly Every Time! This way your brain will only know the correct way! Develop an acute awareness of the silences (rests) in your music. Give as much care to shaping them as you do shaping sounds (notes). It is the quality of the silence that proceeds or succeeds any musical event (entrance, note, rhythms, articulations, etc.) that determines the quality of that musical occurrence. Too often our time and thought is with the left side of notes (attack) and we don’t give enough credence to the right side of notes (how we release and start the silence). The entire ensemble must become unified by “timed thought.”
Pulse/Flow To accurately perform rhythms as an ensemble, each performer must learn to “subdivide” the pulse into smaller units. These smaller units are eighth-notes and ultimately sixteenth-notes. This is called the “hidden pulse.” Counting only the pulse shown by the conductors beat is not an accurate enough increment for excellent ensemble movement. The tolerances are simply not close enough. How can precise measurements be taken if the only unit of measure is an inch? Musicians must be able to feel and count the “hidden pulse” within the music being performed. It is physically impossible, in most pieces, for the director to conduct these “hidden pulses”. During rehearsals, watch the conductor and instead of counting the directed pulse beat (usually quarter-notes); subdivide what you see into smaller units (eighths or sixteenths). The “hidden pulse” subdivision is the key to good ritardandos and accelerandos. It is the only way an entire ensemble can remain homogenous in movement.
Texture Texture has to do with those thick/thin, high/low, entire ensemble vs. choir grouping, and sustained chords/flowing rhythms relationships of the music being performed at any particular moment in time. Sometimes, the entire ensemble is playing a part. When this occurs it can be said the texture is thick or heavy. Other times in a song just the flutes and clarinets may be playing. This is an example of a thin texture and requires different types of adjustments to sustain a quality sound. All ensemble members must be “in touch” with these types of changes and make the necessary adjustments to maintain ensemble quality and excellence.
Musical Expression Throughout the school year we will study and experience “intangibles” in music. One Preeminent skill we wish to develop is musical expression, our ability to perform music with “feeling.” The following concepts may be initially confusing but as each one is visited during class lessons, your skill with music intangibles will grow. Often when a director asks the student to “play with more feeling” the student agrees but really has no idea of how to accomplish the request! There are five basic laws of musical expression, which can be used as tools to help create an expressive performance. Law #1: Music converges towards a definite point of repose. Expression is a musical ”journey” to a point of repose. Repose is that feeling of being at a state of rest. This is how a musical phrase is created. Phrasing in music is like using commas, periods, and question marks in speech. Music uses pauses and spaces as punctuation. Without phrasing, music will make little sense and make communicating with others difficult. You, as an accomplished musician, must try to play a musical phrase in such a way that the listener will understand that you have completed a “thought.” Like a sentence, you must punctuate by adding a little space or pause at the end of the phrase (repose). To do this you may have to make the length of a note shorter or take away a little of the next beat. Simply pause for an instant at the end of a phrase and insert some silence. When you are talking, you usually let your voice fall slightly and then pause at the end of each sentence. Likewise in music it is best if you don’t end a phrase too abruptly. PREPARE the ending of a phrase by getting a little softer and perhaps slowing down just slightly (do not slow down the air stream). Then take your short pause to signal the end of the phrase.
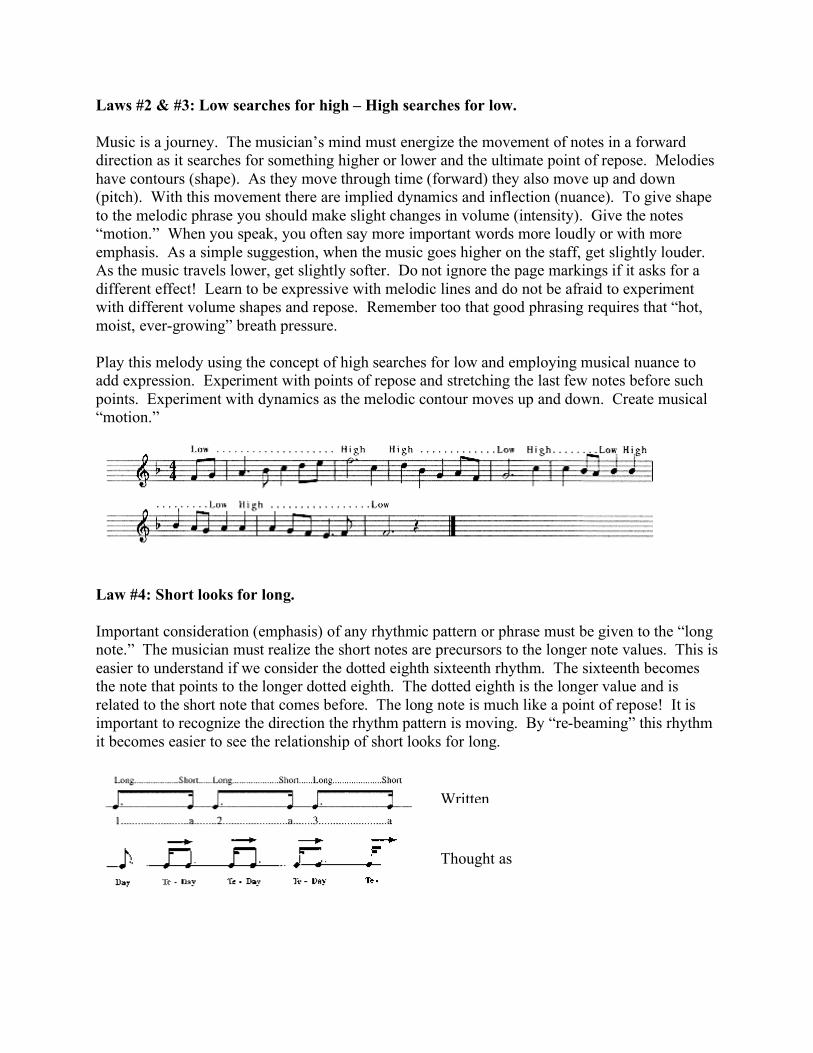
Laws #2 & #3: Low searches for high – High searches for low. Music is a journey. The musician’s mind must energize the movement of notes in a forward direction as it searches for something higher or lower and the ultimate point of repose. Melodies have contours (shape). As they move through time (forward) they also move up and down (pitch). With this movement there are implied dynamics and inflection (nuance). To give shape to the melodic phrase you should make slight changes in volume (intensity). Give the notes “motion.” When you speak, you often say more important words more loudly or with more emphasis. As a simple suggestion, when the music goes higher on the staff, get slightly louder. As the music travels lower, get slightly softer. Do not ignore the page markings if it asks for a different effect! Learn to be expressive with melodic lines and do not be afraid to experiment with different volume shapes and repose. Remember too that good phrasing requires that “hot, moist, ever-growing” breath pressure. Play this melody using the concept of high searches for low and employing musical nuance to add expression. Experiment with points of repose and stretching the last few notes before such points. Experiment with dynamics as the melodic contour moves up and down. Create musical “motion.”
Law #4: Short looks for long. Important consideration (emphasis) of any rhythmic pattern or phrase must be given to the “long note.” The musician must realize the short notes are precursors to the longer note values. This is easier to understand if we consider the dotted eighth sixteenth rhythm. The sixteenth becomes the note that points to the longer dotted eighth. The dotted eighth is the longer value and is related to the short note that comes before. The long note is much like a point of repose! It is important to recognize the direction the rhythm pattern is moving. By “re-beaming” this rhythm it becomes easier to see the relationship of short looks for long.
Written
Thought as
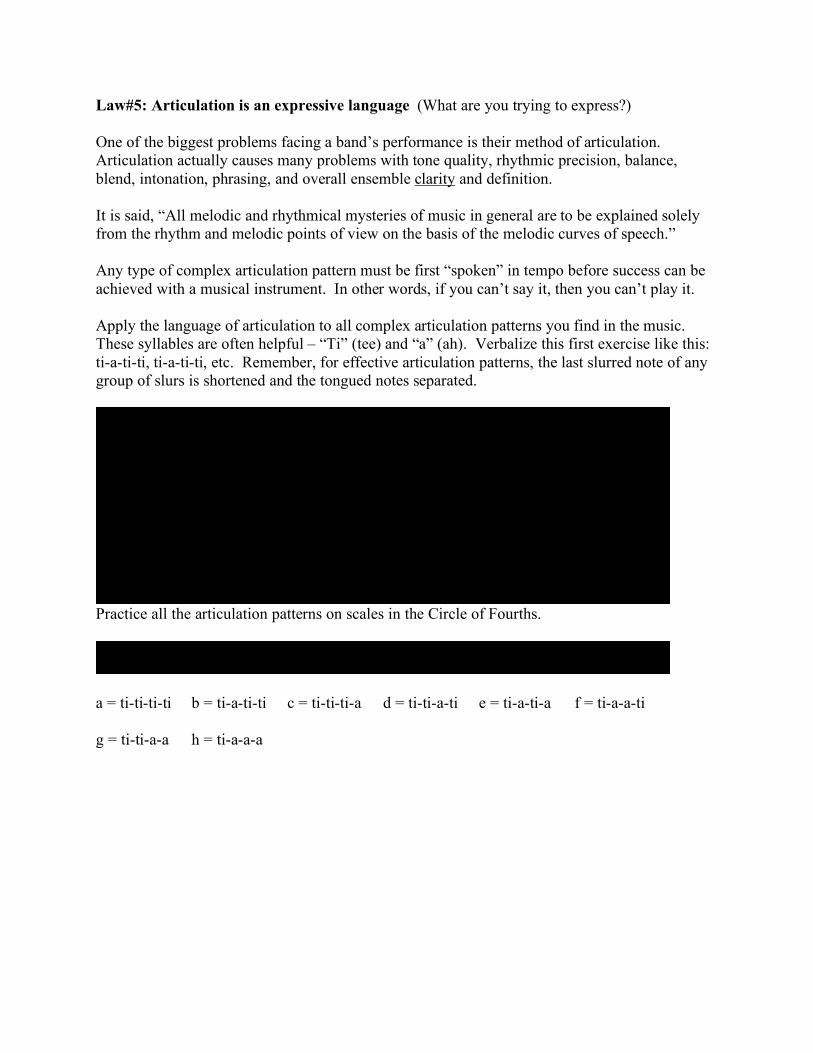
Law#5: Articulation is an expressive language (What are you trying to express?) One of the biggest problems facing a band’s performance is their method of articulation. Articulation actually causes many problems with tone quality, rhythmic precision, balance, blend, intonation, phrasing, and overall ensemble clarity and definition. It is said, “All melodic and rhythmical mysteries of music in general are to be explained solely from the rhythm and melodic points of view on the basis of the melodic curves of speech.” Any type of complex articulation pattern must be first “spoken” in tempo before success can be achieved with a musical instrument. In other words, if you can’t say it, then you can’t play it. Apply the language of articulation to all complex articulation patterns you find in the music. These syllables are often helpful – “Ti” (tee) and “a” (ah). Verbalize this first exercise like this: ti-a-ti-ti, ti-a-ti-ti, etc. Remember, for effective articulation patterns, the last slurred note of any group of slurs is shortened and the tongued notes separated.
Practice all the articulation patterns on scales in the Circle of Fourths.
a = ti-ti-ti-ti b = ti-a-ti-ti c = ti-ti-ti-a d = ti-ti-a-ti e = ti-a-ti-a f = ti-a-a-ti g = ti-ti-a-a h = ti-a-a-a
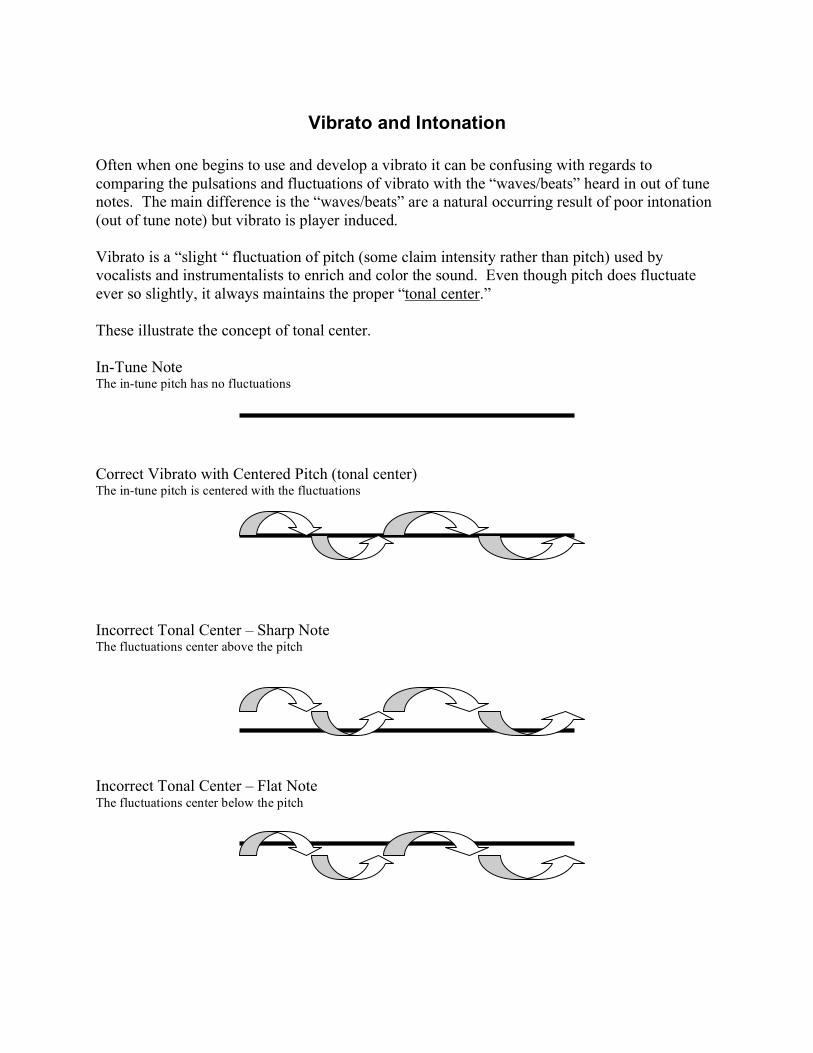
Vibrato and Intonation Often when one begins to use and develop a vibrato it can be confusing with regards to comparing the pulsations and fluctuations of vibrato with the “waves/beats” heard in out of tune notes. The main difference is the “waves/beats” are a natural occurring result of poor intonation (out of tune note) but vibrato is player induced. Vibrato is a “slight “ fluctuation of pitch (some claim intensity rather than pitch) used by vocalists and instrumentalists to enrich and color the sound. Even though pitch does fluctuate ever so slightly, it always maintains the proper “tonal center.” These illustrate the concept of tonal center. In-Tune Note The in-tune pitch has no fluctuations Correct Vibrato with Centered Pitch (tonal center) The in-tune pitch is centered with the fluctuations Incorrect Tonal Center – Sharp Note The fluctuations center above the pitch Incorrect Tonal Center – Flat Note The fluctuations center below the pitch
Effective Rehearsals
With sometimes six to eight weeks to prepare a concert program, those 275 minutes of rehearsal time each week can create the attitude of “why do it today if I can do it tomorrow”. This in turn creates repetitious rehearsals, which are less effective, and often boring for those who have accomplished the performance objectives in a timely fashion. Ideally, there are three stages to concert preparation: Reading, Rehearsing, and Refining. Through greater individual effort, commitment, and concentration, we will have the ability to give “high-quality” performances of “high-quality” literature every concert. In addition, we will have the luxury of picking a few the best works from a folder full of music that has been mastered over a six to eight week period. Without individual effort and accountability from every band member, we will be relegated to playing the same three or four less challenging selections everyday in order to simply get through a concert. Individual accountability is now at the forefront. It simply is not fair to those musicians who “know” the music to rehearse many of the same things over and over again for those who don’t! Do your part and encourage others to do theirs. If we allow ourselves or our fellow band members to put forth an effort that is mediocre or worse, then how can we expect to achieve superior results? Over the years the ___HS Bands have accomplished great goals. Many musicians have grown musically and spiritually. Growth must never stop. We must continue to strive for even higher levels of excellence. It is imprudent to settle for easily attained goals or mediocrity. Always move yourself forward, if not by leaps and bounds, then step by step!
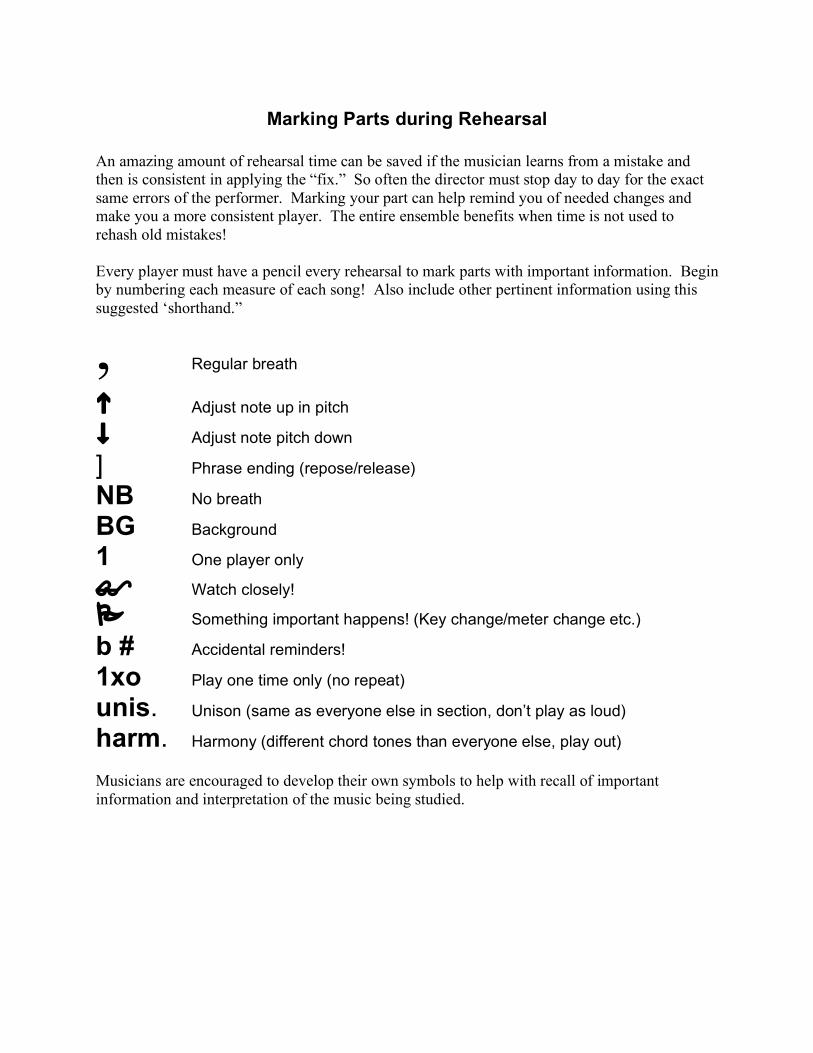
Marking Parts during Rehearsal An amazing amount of rehearsal time can be saved if the musician learns from a mistake and then is consistent in applying the “fix.” So often the director must stop day to day for the exact same errors of the performer. Marking your part can help remind you of needed changes and make you a more consistent player. The entire ensemble benefits when time is not used to rehash old mistakes! Every player must have a pencil every rehearsal to mark parts with important information. Begin by numbering each measure of each song! Also include other pertinent information using this suggested ‘shorthand.”
, Regular breath
Adjust note up in pitch
Adjust note pitch down
] Phrase ending (repose/release)
NB No breath
BG Background
1 One player only
Watch closely!
Something important happens! (Key change/meter change etc.)
b # Accidental reminders!
1xo Play one time only (no repeat)
unis. Unison (same as everyone else in section, don’t play as loud)
harm. Harmony (different chord tones than everyone else, play out) Musicians are encouraged to develop their own symbols to help with recall of important information and interpretation of the music being studied.
Helpful Hints for Musical Performance
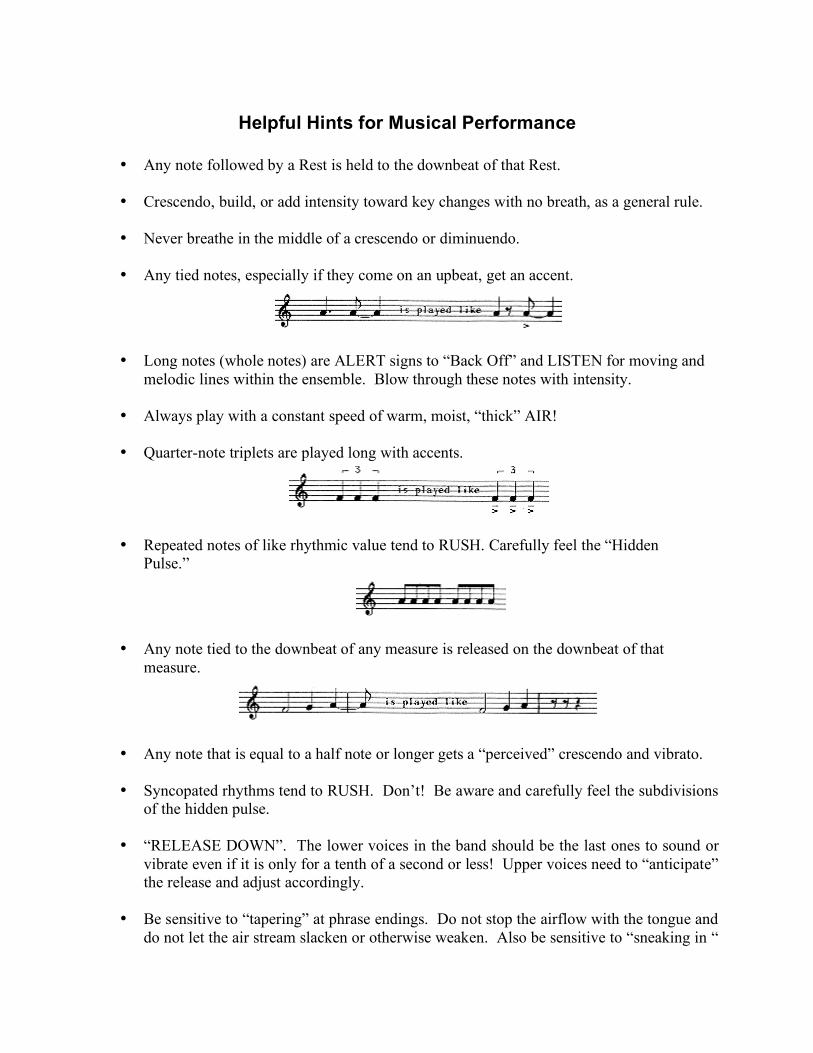
• Any note followed by a Rest is held to the downbeat of that Rest.
• Crescendo, build, or add intensity toward key changes with no breath, as a general rule.
• Never breathe in the middle of a crescendo or diminuendo.
• Any tied notes, especially if they come on an upbeat, get an accent.
• Long notes (whole notes) are ALERT signs to “Back Off” and LISTEN for moving and melodic lines within the ensemble. Blow through these notes with intensity.
• Always play with a constant speed of warm, moist, “thick” AIR!
• Quarter-note triplets are played long with accents.
• Repeated notes of like rhythmic value tend to RUSH. Carefully feel the “Hidden Pulse.”
• Any note tied to the downbeat of any measure is released on the downbeat of that measure.
• Any note that is equal to a half note or longer gets a “perceived” crescendo and vibrato. • Syncopated rhythms tend to RUSH. Don’t! Be aware and carefully feel the subdivisions
of the hidden pulse.
• “RELEASE DOWN”. The lower voices in the band should be the last ones to sound or vibrate even if it is only for a tenth of a second or less! Upper voices need to “anticipate” the release and adjust accordingly.
• Be sensitive to “tapering” at phrase endings. Do not stop the airflow with the tongue and
do not let the air stream slacken or otherwise weaken. Also be sensitive to “sneaking in “
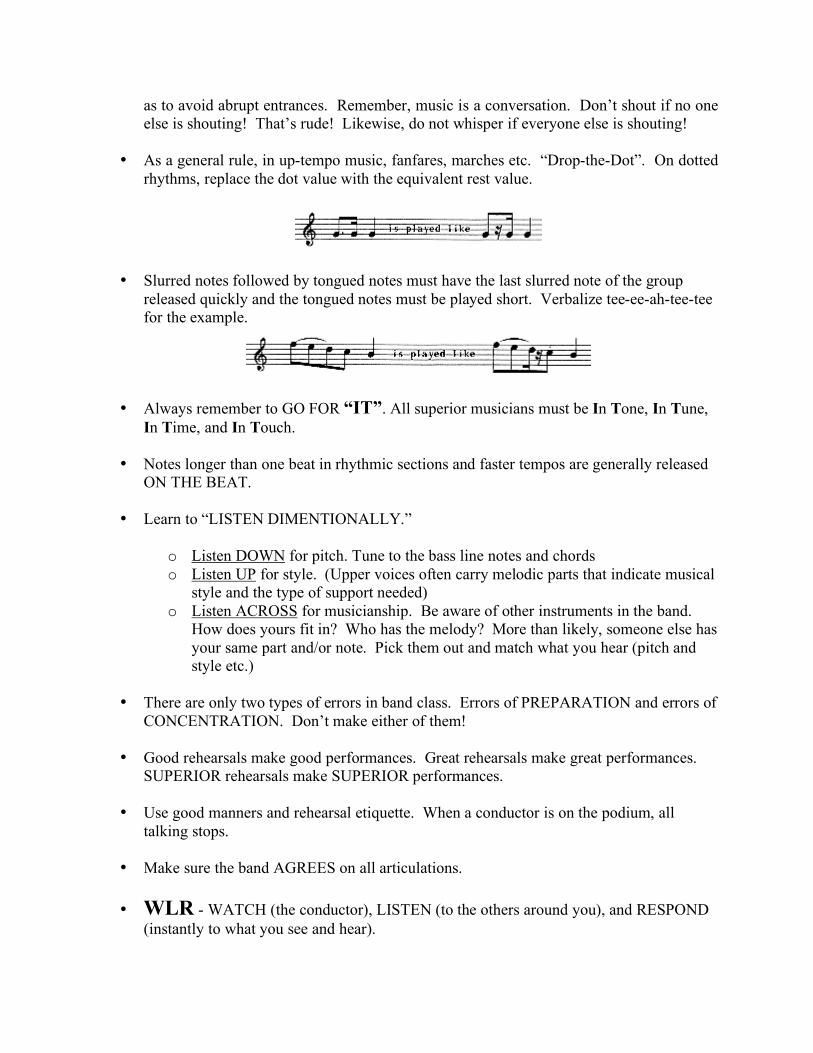
as to avoid abrupt entrances. Remember, music is a conversation. Don’t shout if no one else is shouting! That’s rude! Likewise, do not whisper if everyone else is shouting!
• As a general rule, in up-tempo music, fanfares, marches etc. “Drop-the-Dot”. On dotted
rhythms, replace the dot value with the equivalent rest value.
• Slurred notes followed by tongued notes must have the last slurred note of the group released quickly and the tongued notes must be played short. Verbalize tee-ee-ah-tee-tee for the example.
• Always remember to GO FOR “IT”. All superior musicians must be In Tone, In Tune,
In Time, and In Touch. • Notes longer than one beat in rhythmic sections and faster tempos are generally released
ON THE BEAT.
• Learn to “LISTEN DIMENTIONALLY.”
o Listen DOWN for pitch. Tune to the bass line notes and chords o Listen UP for style. (Upper voices often carry melodic parts that indicate musical
style and the type of support needed) o Listen ACROSS for musicianship. Be aware of other instruments in the band.
How does yours fit in? Who has the melody? More than likely, someone else has your same part and/or note. Pick them out and match what you hear (pitch and style etc.)
• There are only two types of errors in band class. Errors of PREPARATION and errors of
CONCENTRATION. Don’t make either of them! • Good rehearsals make good performances. Great rehearsals make great performances.
SUPERIOR rehearsals make SUPERIOR performances.
• Use good manners and rehearsal etiquette. When a conductor is on the podium, all talking stops.
• Make sure the band AGREES on all articulations.
• WLR - WATCH (the conductor), LISTEN (to the others around you), and RESPOND
(instantly to what you see and hear).

• Generally speaking, “If your mouth is moving, little learning is taking place.”
• Learn to “silent finger” your parts while the conductor works with other sections of the ensemble. This improves muscle memory, which will in turn free your mind to focus on listening (pitch, balance, blend, etc.), as opposed to just “the next right note”.
• Three rules to live by:
o No talking while the conductor is on the podium o Follow directions the 1st time o Do the right thing
• Get into good habits.
o When the music stops the conductor has something to say. Hold any thoughts that you may have until he has finished talking, before sharing them with fellow musicians.
o Mark your music (in pencil) according to the conductor’s suggestions every time. This will make rehearsals more efficient and effective.
o Make a distinction between work time and play time. Use rehearsal time to focus on the music. If you need to talk, it should be about the music. Use breaks and other “free time” to relax. The more focused we are in rehearsal, the more we can accomplish.
o Compliment a musician or section when they do something well. o Encourage a musician or section to keep working hard if they seem to struggle.
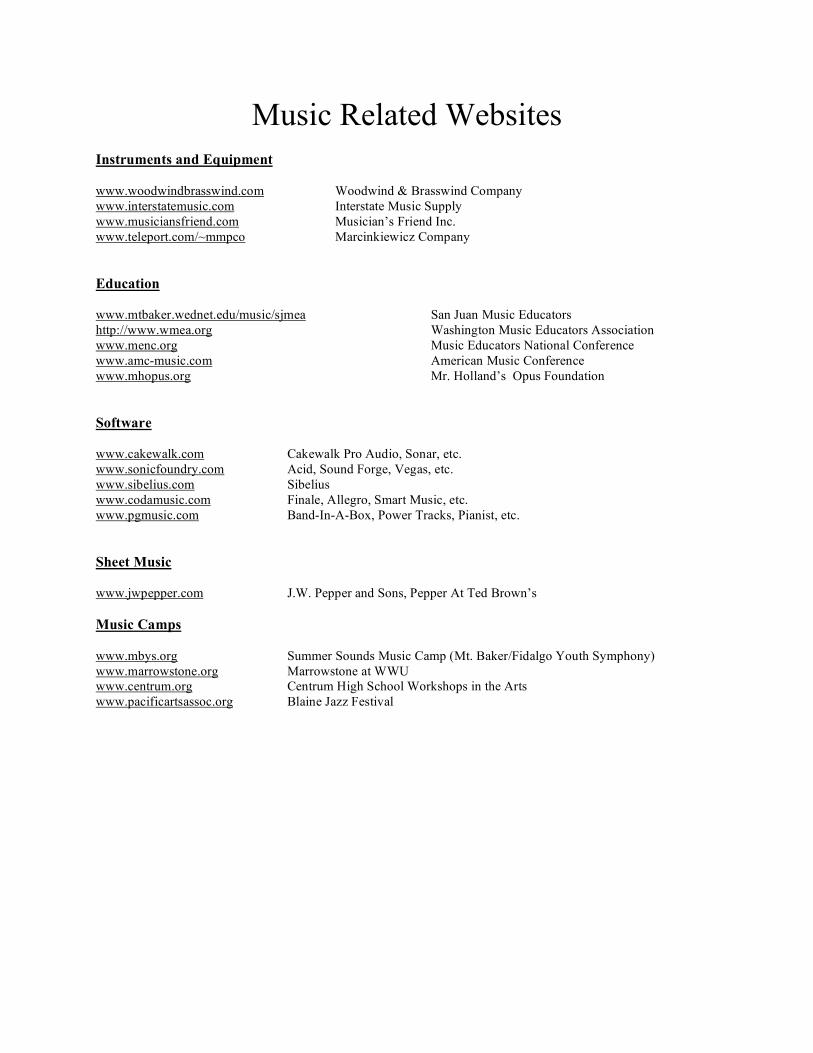
Music Related Websites Instruments and Equipment www.woodwindbrasswind.com Woodwind & Brasswind Company www.interstatemusic.com Interstate Music Supply www.musiciansfriend.com Musician’s Friend Inc. www.teleport.com/~mmpco Marcinkiewicz Company Education www.mtbaker.wednet.edu/music/sjmea San Juan Music Educators http://www.wmea.org Washington Music Educators Association www.menc.org Music Educators National Conference www.amc-music.com American Music Conference www.mhopus.org Mr. Holland’s Opus Foundation Software www.cakewalk.com Cakewalk Pro Audio, Sonar, etc. www.sonicfoundry.com Acid, Sound Forge, Vegas, etc. www.sibelius.com Sibelius www.codamusic.com Finale, Allegro, Smart Music, etc. www.pgmusic.com Band-In-A-Box, Power Tracks, Pianist, etc. Sheet Music www.jwpepper.com J.W. Pepper and Sons, Pepper At Ted Brown’s Music Camps www.mbys.org Summer Sounds Music Camp (Mt. Baker/Fidalgo Youth Symphony) www.marrowstone.org Marrowstone at WWU www.centrum.org Centrum High School Workshops in the Arts www.pacificartsassoc.org Blaine Jazz Festival
Notes, Sources, References Frank Bencrissutto Total Musicianship Hal Leonard Publishing Edward S. Lisk Alternative Rehearsal Techniques Meredith Music Publications 1987 Ft. Lauderdale, Florida 33334 Edward S. Lisk Intangibles of Musical Performance Meredith Music Publications 1987 Ft. Lauderdale, Florida 33334 Richard Miles Teaching Musicianship Through Performance In Band Vol. 1, 2, & 3 GIA Publications Chicago, Illinois 60638 Band World WIBC Publishing Ashland, Oregon 97520 Kirk Saville Regattas and Rehearsals Band Directors Guide Nov. 1995 Village Press Traverse City, MI 49684 Mark Whitlock Rehearsals Get Better When Everyone Listens The Instrumentalist Company Nov. 1996 Northfield, Illinois 60093 Essential Academic Learning Requirements Washington Commission On Student Learning The Center for Educational Integration 1270 S. Birmingham Rd. West Chester PA 19382 Arts Education Standards Project Washington State Arts Commission Goals 2000, Educate America Act Washington D.C. U.S. Dept. of Education

This page was intentionally left blank. In no way was it a mistake on my part.
Please sign this page, remove it from the handbook, and return to Mr. Scherr by the end of the first week of school. We have received a copy of the Instrumental Music Student Handbook. I am aware that the contents include Course Descriptions, Grading Criteria, and many more components regarding Instrumental Music at Mount Vernon High School.
As a student, I have read and agree to comply with all of the set policies of the Band Handbook
As a parent, I have read and agree to help my student comply with all of the set policies of the Band Handbook
I understand that I must pay the uniform usage fee to participate in Marching Band $20
I understand that (if I do not already have one) I must purchase a current Pep Band T-Shirt for $15
____________________________________ Student – Print Name ____________________________________ ___________________ Student – Signature Date ____________________________________ ___________________ Parent – Signature Date
Band Handbook Confirmation of Receipt
Please sign this page, remove it from the handbook, and return to Mr. Scherr by the end of the first week of school. I agree to accept the responsibility of properly caring for the band uniform, proper storage of the uniform, and proper cleaning of the uniform as described below. I further understand that improper care and/or loss of the uniform or any of the uniform accessories will result in a monetary fine and/or replacement charge for those parts missing or abused. Student Name (Print) ____________________________________________ Student Signature ____________________________________________ Parent Signature ____________________________________________ Date __________________
• Uniform cleaning fee is $________ paid by _________ • Carefully inspect your uniform when received. Once you take possession you are
responsible for any damage or missing parts. • Uniforms must be kept in garment bags when not in use. Never put a wet uniform in a
garment bag! • Uniforms must be hung properly on hangers. Pants must not overlap or be twisted on the
hangers. • The floor is not a proper place to put your uniform while changing. Uniforms and
accessories must be kept off the floor at all times. • Do not use pants, which are too long without first hemming! • Do not store uniforms in school lockers. Marching uniforms must be stored properly in
the uniform storage areas adjacent to the band room. Concert uniforms must be stored properly at home.
• Uniform parts that are left in the band room after a performance will be confiscated and may be returned for a fee. Make sure that you have all of your uniform parts properly hung on the hanger or otherwise stored away before you leave!
Uniform Usage Contract