mutual aid resource planner user manual - … aid resource planner user manual developed by g&h...
TRANSCRIPT

MUTUAL AID RESOURCE PLANNER
User Manual
Developed by G&H International Services
In Support of the Department of Homeland Security
Science & Technology Directorate, First Responders Group
1090 Vermont Ave • Suite 1100
Washington, DC 20005
Phone 202.955.9505

ii
This document, the Mutual Aid Resource Planner User Guide has an online, interactive companion training containing detailed directions for transitioning the MARP to your organizational account. The interactive training guide can be accessed here: http://www.nisconsortium.org/marp1.0/training.

Table of Contents Overview .......................................................................................... 2
Deploying the Application ................................................................ 4
Getting Started with a new Resource Plan ..................................... 7
A Tour of the Tool ............................................................................ 8
The Resource Planning panel: ............................................................... 8
The Main Map Viewer: .......................................................................... 10
Top Menu Bar: ....................................................................................... 10
Adding Resources ......................................................................... 11
Adding Resource Partners ............................................................ 12
Reports .......................................................................................... 13
Switching Web Map Layers with the vUSA+ Widget ................... 15
Sharing the Tool & Resource Plan with Partners ......................... 16
Creating New Planning Layers ..................................................... 18
Processes for Using Your Own Geography in the MARP ........... 19
Glossary ......................................................................................... 20
2
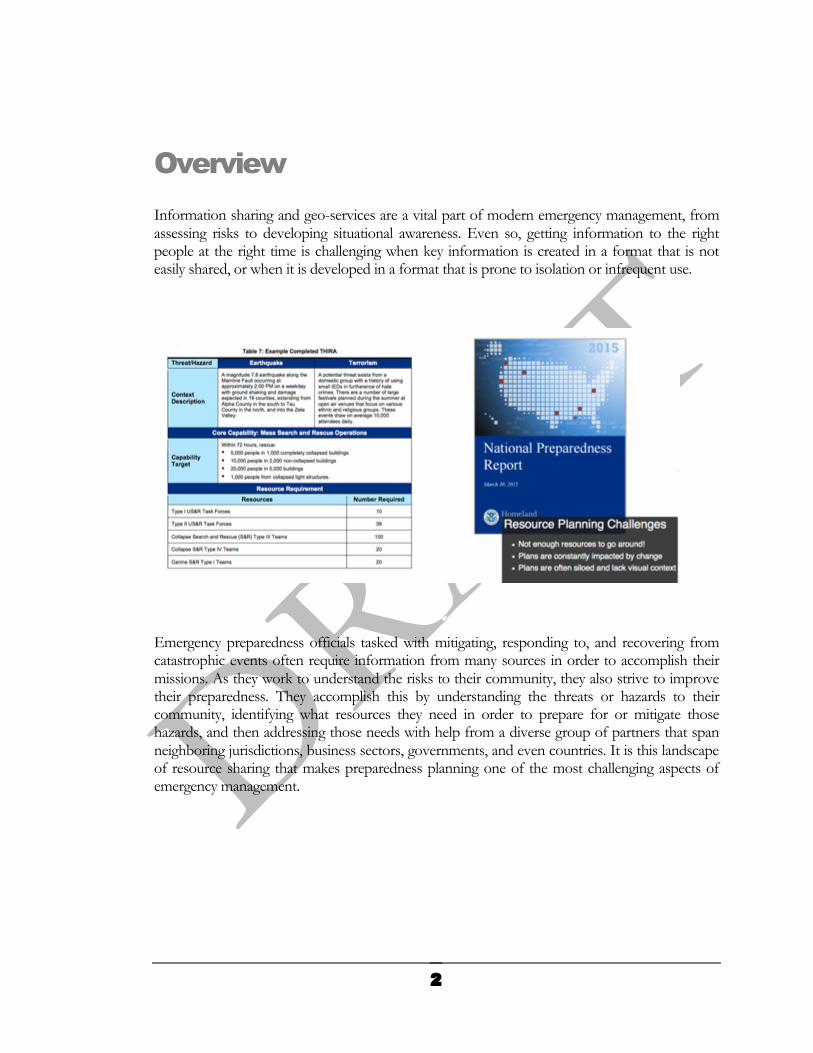
Overview Information sharing and geo-services are a vital part of modern emergency management, from assessing risks to developing situational awareness. Even so, getting information to the right people at the right time is challenging when key information is created in a format that is not easily shared, or when it is developed in a format that is prone to isolation or infrequent use.
Emergency preparedness officials tasked with mitigating, responding to, and recovering from catastrophic events often require information from many sources in order to accomplish their missions. As they work to understand the risks to their community, they also strive to improve their preparedness. They accomplish this by understanding the threats or hazards to their community, identifying what resources they need in order to prepare for or mitigate those hazards, and then addressing those needs with help from a diverse group of partners that span neighboring jurisdictions, business sectors, governments, and even countries. It is this landscape of resource sharing that makes preparedness planning one of the most challenging aspects of emergency management.

3
With the support from DHS S&T First Responders Group, the Mutual Aid Resource Planner was developed with this challenge in mind. This application helps emergency management planners create shareable plans for hazard-based scenarios. As planners discover gaps in their mitigation and response capabilities, this tool is intended to help them mobilize their community around preparedness goals that can only be accomplished by developing partnerships. The steps involved in this process are described in the figure below.

4
Deploying the Application The Mutual Aid Resource Planner (MARP) is a configurable application based on the ArcGIS Web AppBuilder framework, which leverages Esri's ArcGIS Online cloud platform. The MARP Automated Transition Tool simplifies the process of migrating this application into your ArcGIS Online organization, and can be accessed here:
http://www.nisconsortium.org/portal/madeploy
Deploying the Mutual Aid Resource Planner app to your organization means that:
• You control access to the app and to the data • Your capability plan is hosted in a cloud that you control • You grant access to individuals who understand the planning process
Alternatively, you can manually deploy the MARP to your organization by following the instructions provided here:
1. Create a Mutual Aid sharing group that will consist of individuals you invite into the planning process. It will contain feature layers, web maps, and an App that pulls it all together into a purposeful, collaborative workspace. • Name this group THIRA Capability & Resource Planning
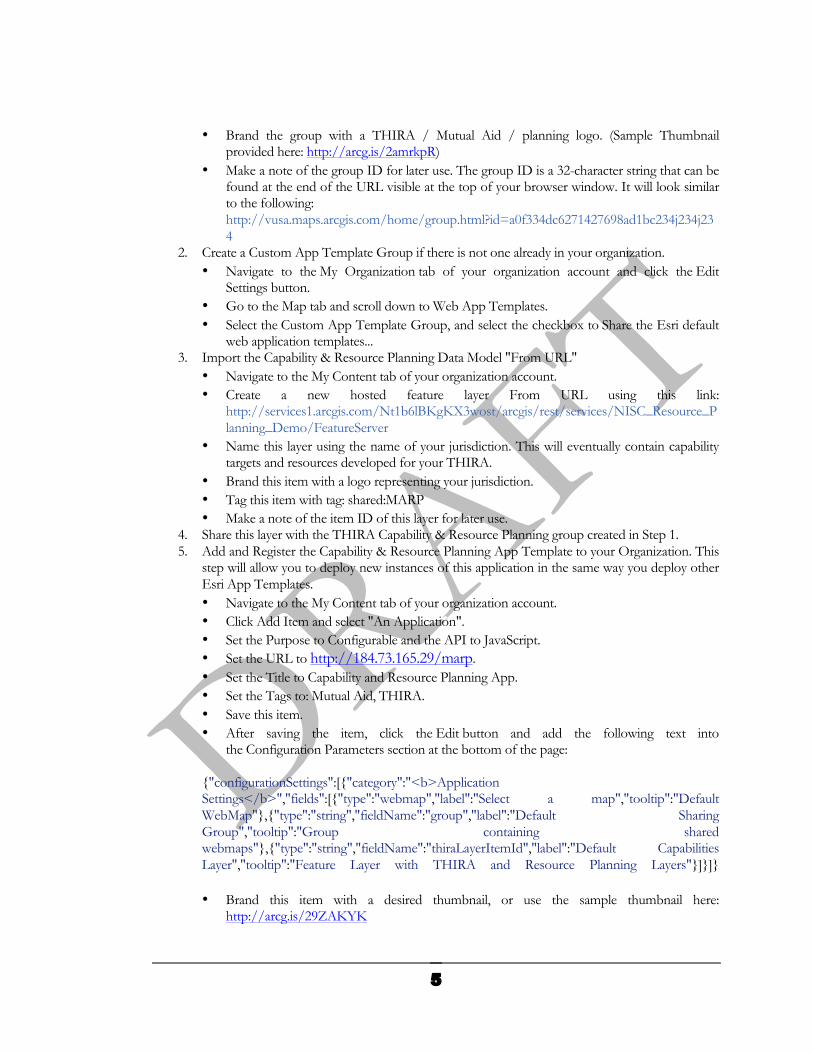
5
• Brand the group with a THIRA / Mutual Aid / planning logo. (Sample Thumbnail provided here: http://arcg.is/2amrkpR)
• Make a note of the group ID for later use. The group ID is a 32-character string that can be found at the end of the URL visible at the top of your browser window. It will look similar to the following: http://vusa.maps.arcgis.com/home/group.html?id=a0f334dc6271427698ad1bc234j234j234
2. Create a Custom App Template Group if there is not one already in your organization. • Navigate to the My Organization tab of your organization account and click the Edit
Settings button. • Go to the Map tab and scroll down to Web App Templates. • Select the Custom App Template Group, and select the checkbox to Share the Esri default
web application templates... 3. Import the Capability & Resource Planning Data Model "From URL"
• Navigate to the My Content tab of your organization account. • Create a new hosted feature layer From URL using this link:
http://services1.arcgis.com/Nt1b6lBKgKX3wost/arcgis/rest/services/NISC_Resource_Planning_Demo/FeatureServer
• Name this layer using the name of your jurisdiction. This will eventually contain capability targets and resources developed for your THIRA.
• Brand this item with a logo representing your jurisdiction. • Tag this item with tag: shared:MARP • Make a note of the item ID of this layer for later use.
4. Share this layer with the THIRA Capability & Resource Planning group created in Step 1. 5. Add and Register the Capability & Resource Planning App Template to your Organization. This
step will allow you to deploy new instances of this application in the same way you deploy other Esri App Templates. • Navigate to the My Content tab of your organization account. • Click Add Item and select "An Application". • Set the Purpose to Configurable and the API to JavaScript. • Set the URL to http://184.73.165.29/marp. • Set the Title to Capability and Resource Planning App. • Set the Tags to: Mutual Aid, THIRA. • Save this item. • After saving the item, click the Edit button and add the following text into
the Configuration Parameters section at the bottom of the page: {"configurationSettings":[{"category":"<b>Application Settings</b>","fields":[{"type":"webmap","label":"Select a map","tooltip":"Default WebMap"},{"type":"string","fieldName":"group","label":"Default Sharing Group","tooltip":"Group containing shared webmaps"},{"type":"string","fieldName":"thiraLayerItemId","label":"Default Capabilities Layer","tooltip":"Feature Layer with THIRA and Resource Planning Layers"}]}]} • Brand this item with a desired thumbnail, or use the sample thumbnail here:
http://arcg.is/29ZAKYK

6
• This Template is being hosted by the NISC, for that reason there is no need to register the App. If you would like to host this prototype on your own server, please contact the NISC for more information.
6. Share the Capability and Resource Planning App Template with the Custom App Template Group.
7. Share relevant web maps with the THIRA Capability & Resource Planning group. 8. Deploy this App using WebMap content from your own Organization. There are two ways that
you may do this: • Option 1: Go to My Content and select Create App > Using a Template and search
for Capability and Resource Planning App • Option 2: From an existing WebMap, select the Share button and search for Capability and
Resource Planning App • For Option 1 and Option 2:
• Set the Name and other options to describe the Application. • The App will load with a configuration pane on the right-side with three required
settings: The Default WebMap, the Default Sharing Group ID (Use the ID collected in Step 1) and the Default Capabilities Layer ID (Use the ID collected in Step 3).

7
Getting Started with a new Resource Plan When you first enter your Mutual Aid Resource Planner, you'll be prompted to initiate your first Resource Plan. Begin by entering the state and county for the planning jurisdiction. The form will attempt to autocomplete names as you fill them in. Press "save" and "ok" in the confirmation popup.
Next, create your capability target. Specify the threat type that you're planning for, (e.g. Tornado), select Core Capability from the dropdown list, and fill out the remaining fields, as labeled.
For an example of this, view the Resource Plan Video Walkthrough:
https://vimeo.com/175426972
8
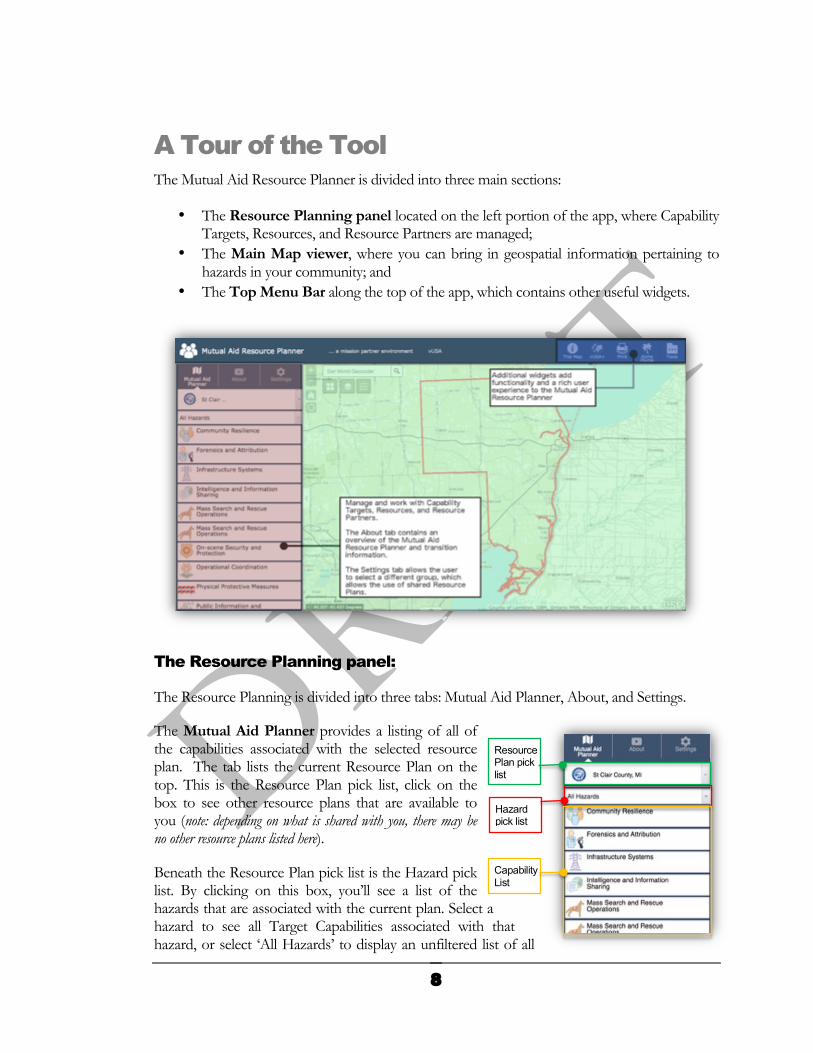
A Tour of the Tool The Mutual Aid Resource Planner is divided into three main sections:
• The Resource Planning panel located on the left portion of the app, where Capability Targets, Resources, and Resource Partners are managed;
• The Main Map viewer, where you can bring in geospatial information pertaining to hazards in your community; and
• The Top Menu Bar along the top of the app, which contains other useful widgets.
The Resource Planning panel:
The Resource Planning is divided into three tabs: Mutual Aid Planner, About, and Settings.
The Mutual Aid Planner provides a listing of all of the capabilities associated with the selected resource plan. The tab lists the current Resource Plan on the top. This is the Resource Plan pick list, click on the box to see other resource plans that are available to you (note: depending on what is shared with you, there may be no other resource plans listed here).
Beneath the Resource Plan pick list is the Hazard pick list. By clicking on this box, you’ll see a list of the hazards that are associated with the current plan. Select a hazard to see all Target Capabilities associated with that hazard, or select ‘All Hazards’ to display an unfiltered list of all
Hazard pick list
Resource Plan pick list
Capability List

9
capabilities.
The Capability List lists all of the capabilities found in the current Resource Plan that are associated with the selected Hazard type. Clicking on a Capability will show additional details for that Capability, as well as the associated Resources, Partnerships and other reporting capabilities. These features are covered in subsequent chapters.
The About tab contains information about the application, a link to provide feedback to the development team, as well as a link to display the splash screen that appears when you first open the application.
The Settings Tab provide a dropdown pick list that lets you change the current sharing group. The sharing group is any ArcGIS Online group that you are a member of that contain resource planning layers. When you select a new group from the list, the number of resource planning layers will be displayed beneath the pick list.
The Settings Tab also provides the option to create a new Resource Planning layer and share this layer with the default sharing group that was defined when the application was first configured. Note: you must have Publisher or Administrator rights for your ArcGIS Online user account in order to create a new planning layer.
10
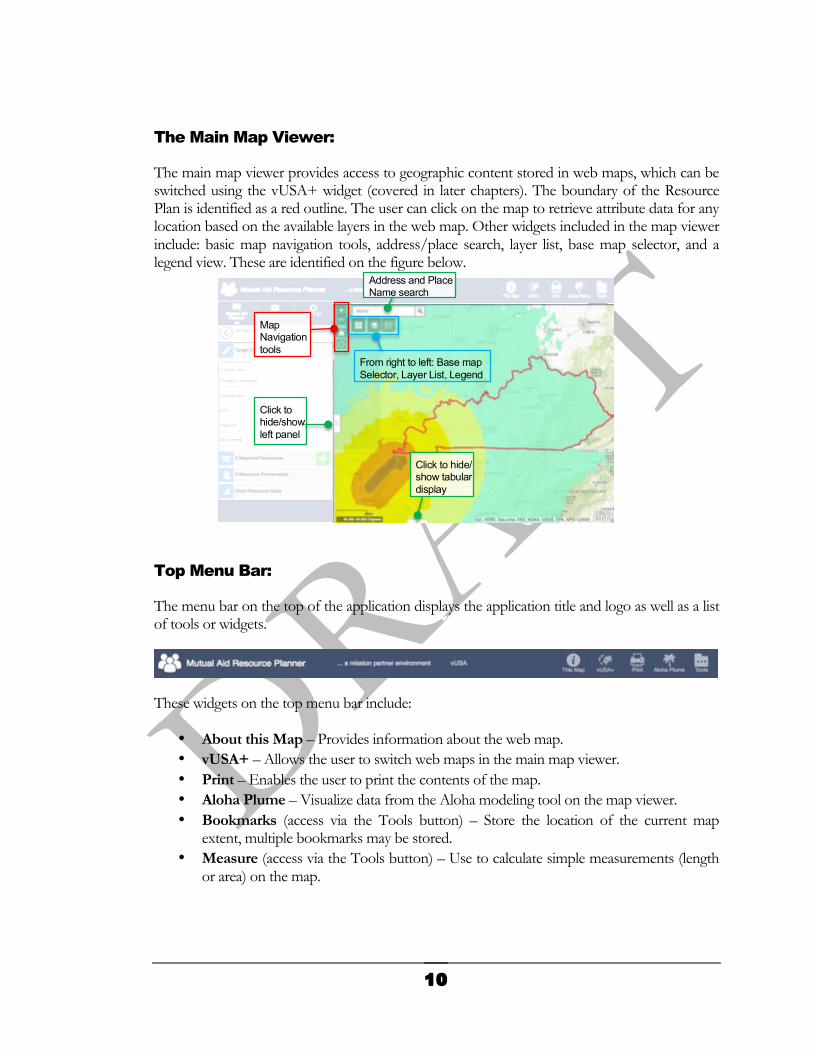
The Main Map Viewer:
The main map viewer provides access to geographic content stored in web maps, which can be switched using the vUSA+ widget (covered in later chapters). The boundary of the Resource Plan is identified as a red outline. The user can click on the map to retrieve attribute data for any location based on the available layers in the web map. Other widgets included in the map viewer include: basic map navigation tools, address/place search, layer list, base map selector, and a legend view. These are identified on the figure below.
Top Menu Bar:
The menu bar on the top of the application displays the application title and logo as well as a list of tools or widgets.
These widgets on the top menu bar include:
• About this Map – Provides information about the web map. • vUSA+ – Allows the user to switch web maps in the main map viewer. • Print – Enables the user to print the contents of the map. • Aloha Plume – Visualize data from the Aloha modeling tool on the map viewer. • Bookmarks (access via the Tools button) – Store the location of the current map
extent, multiple bookmarks may be stored. • Measure (access via the Tools button) – Use to calculate simple measurements (length
or area) on the map.
Click to hide/show left panel
Click to hide/ show tabular display
Map Navigation tools
Address and Place Name search
From right to left: Base map Selector, Layer List, Legend

11
Adding Resources You may add Required Resources for each Target Capability listed in your Resource Plan. Pressing the green button (green plus sign) in the Required Resources row allows you to start the process. A popup window will give you the opportunity to list a Category, Name, Type, and how many are required for this particular Resource.
See the video to the right to see this process in a visual walkthrough:
https://player.vimeo.com/video/175550758
In the left pane, if you click on the name of a Resource, the panel will open to show more details. Click on the blue edit button (blue pencil) to update or delete the Resource.
12
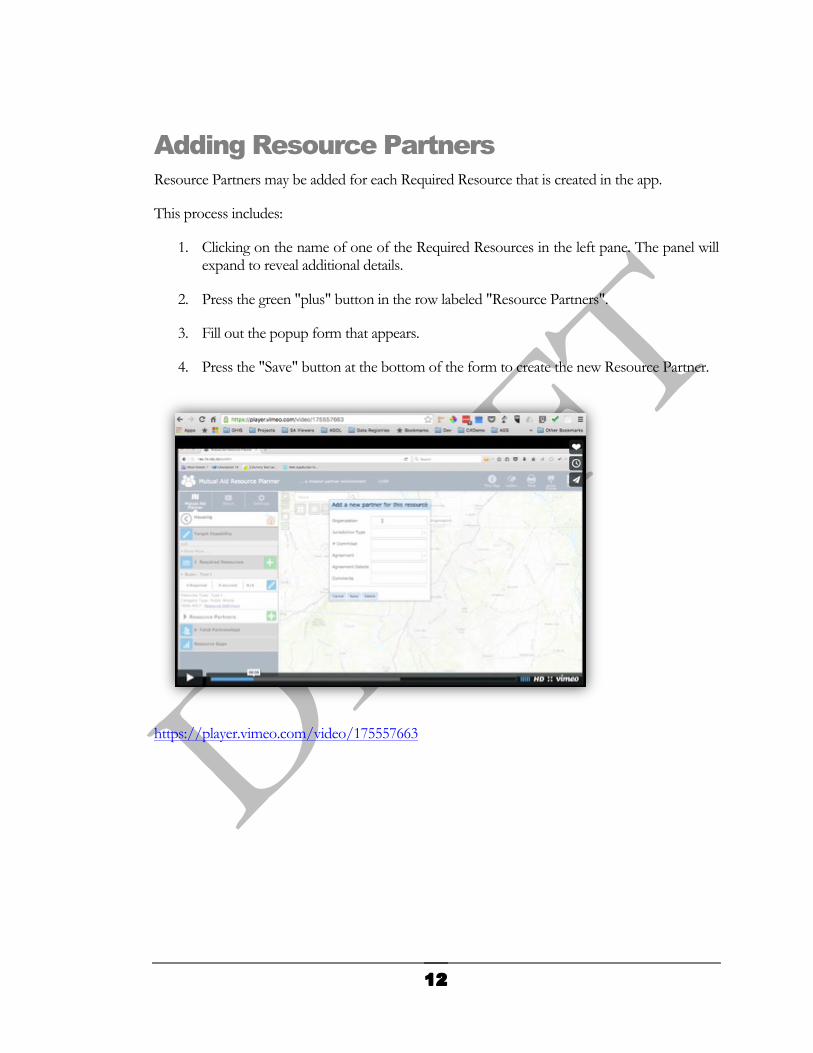
Adding Resource Partners Resource Partners may be added for each Required Resource that is created in the app.
This process includes:
1. Clicking on the name of one of the Required Resources in the left pane. The panel will expand to reveal additional details.
2. Press the green "plus" button in the row labeled "Resource Partners".
3. Fill out the popup form that appears.
4. Press the "Save" button at the bottom of the form to create the new Resource Partner.
https://player.vimeo.com/video/175557663
13
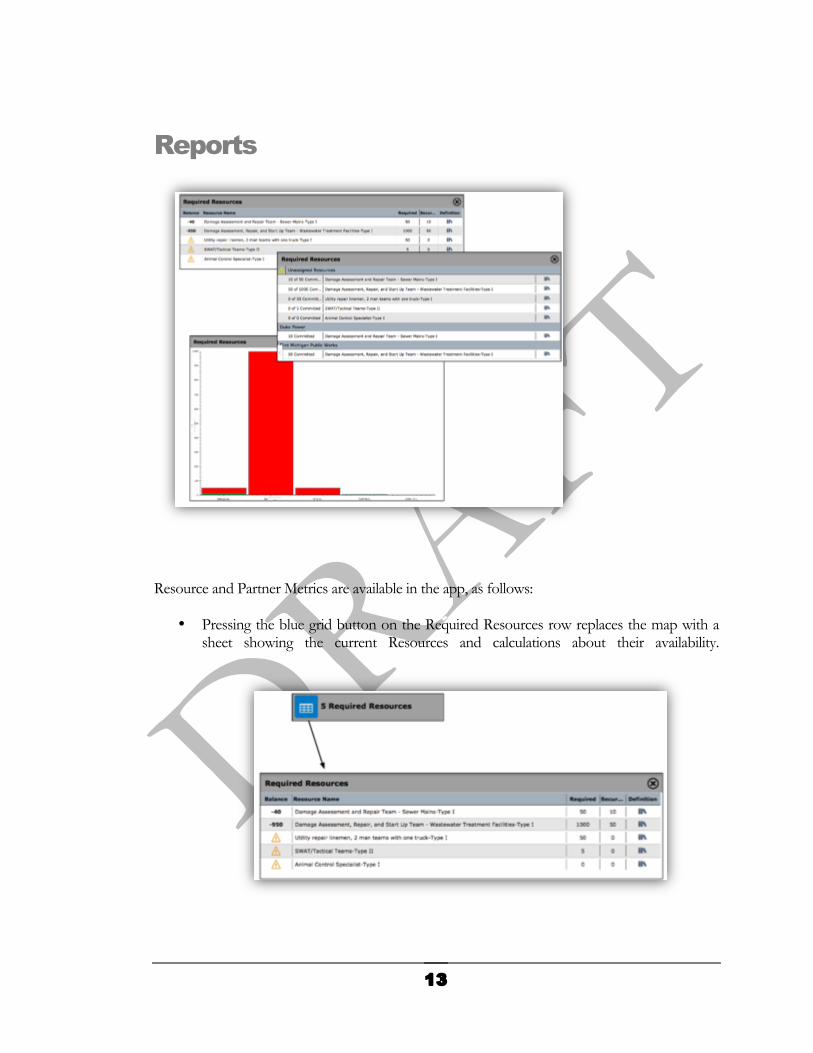
Reports
Resource and Partner Metrics are available in the app, as follows:
• Pressing the blue grid button on the Required Resources row replaces the map with a sheet showing the current Resources and calculations about their availability.
14
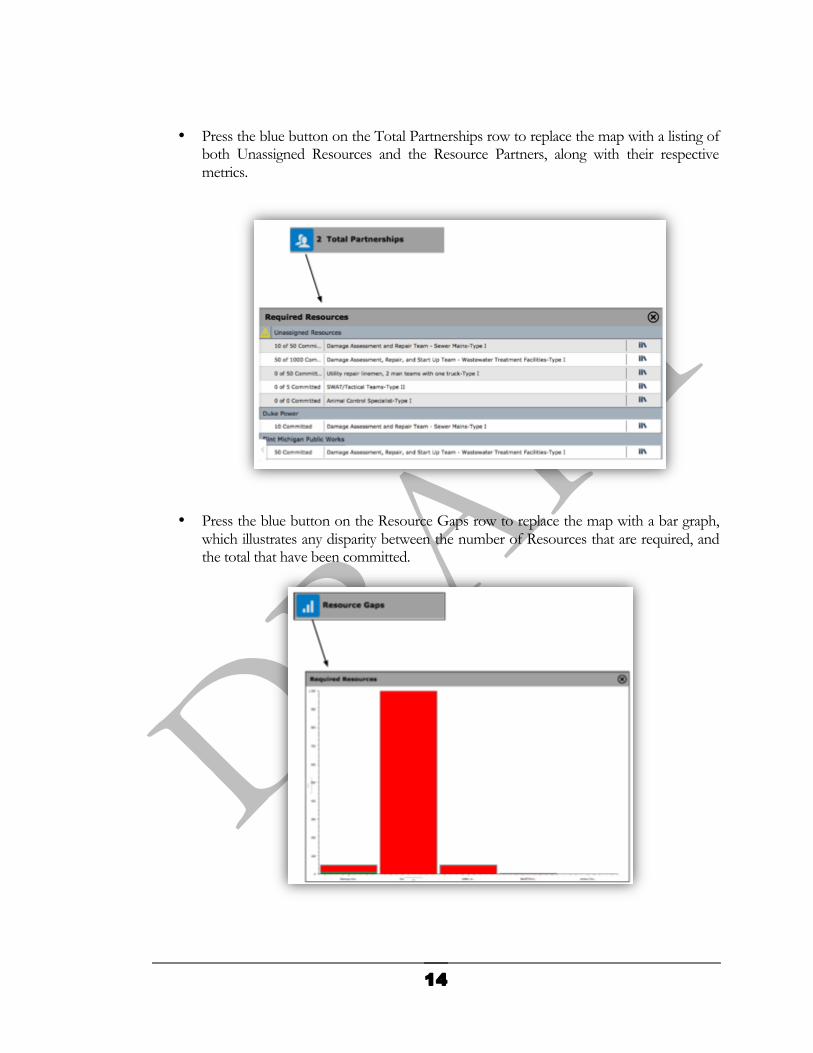
• Press the blue button on the Total Partnerships row to replace the map with a listing of both Unassigned Resources and the Resource Partners, along with their respective metrics.
• Press the blue button on the Resource Gaps row to replace the map with a bar graph, which illustrates any disparity between the number of Resources that are required, and the total that have been committed.

15
Switching Web Map Layers with the vUSA+ Widget The vUSA+ widget allows the user to search publicly-available web maps for content that may be helpful when planning. If the tool is logged-in, it can also reveal content that is in his/her ArcGIS Online organizational account.
The vUSA+ widget is started by pressing its icon in the top right of the Mutual Aid Resource Planner screen. A dropdown menu at the top of the widget permits the search to be within the listed organizations and groups. A search bar also provides a means for searching by a text string.
A "Login" button is placed at the bottom left of the widget. If pressed, the widget re-populates itself to include groups and content to which the user has access.
Watch the Video Walkthrough at right for a demonstration of the vUSA+ widget.
https://player.vimeo.com/video/175602841

16
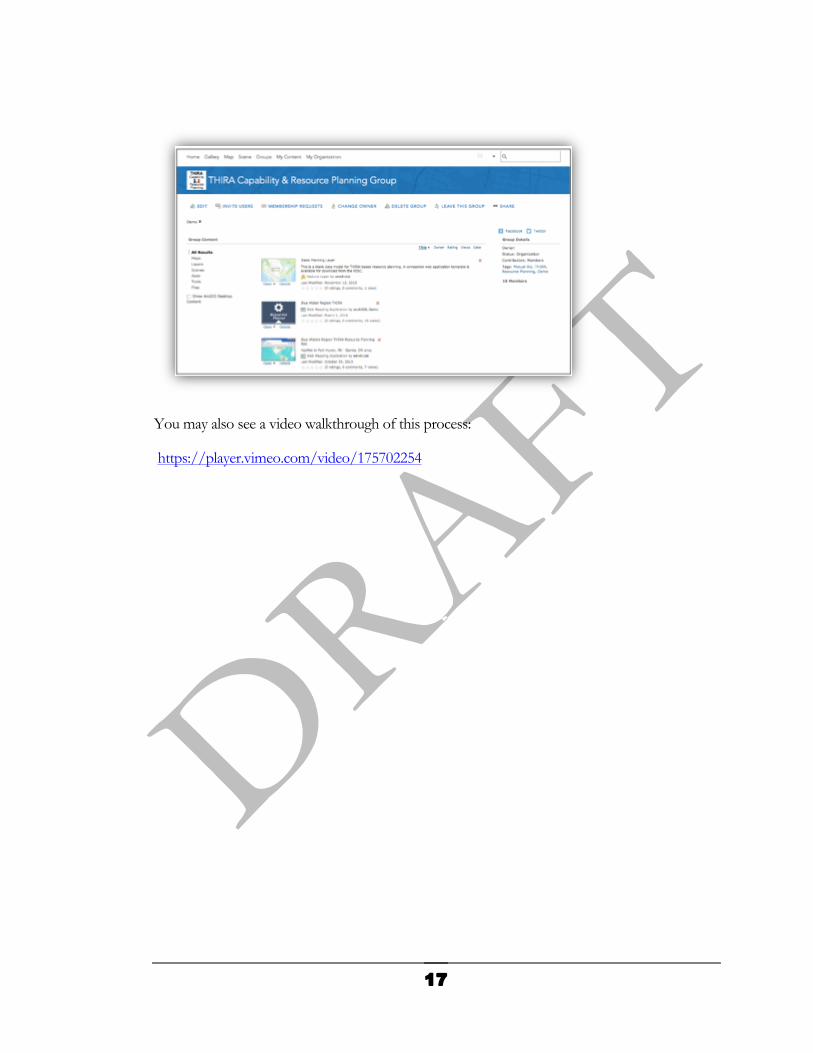
Sharing the Tool & Resource Plan with Partners The Group is Esri's mechanism for collaboration and sharing in ArcGIS Online. The group owner (and account administrators) may choose who is included in the group, and may include registered users from both inside and outside the organization.
By adding users to your sharing group for the Mutual Aid Resource Planner, you give them the ability to consume the application and its content. Use the following steps to share the MARP with other users:
1. Log in as the owner of the MARP sharing group. (Or as an account Administrator) 2. Using the Groups tab at the top, or the search function at the top right of the ArcGIS
Online page, find your Mutual Aid Resource Planner sharing group, and go to its page. 3. Click on "Invite Users" at the top of the group page, to open that dialogue box. 4. In the top text box, enter a search string for the user that you would like to invite to the
group. This may be done by putting in a first or last name, or their username, if you know it. Press Enter to search (Note: Uncheck "Only search for members in NISC vUSA ArcGIS Online Portal" if you are inviting someone from outside of your organization.)
5. When the desired name appears in the Users list, click on their name to move them into the Invitation List.
6. Press the "Send Invitation" Button.
This process will initiate a workflow by which the invited user may accept, and then be listed as a member of the sharing group. At that point, they should be able to access the content in the Mutual Aid Resource Planner application.
17
You may also see a video walkthrough of this process:
https://player.vimeo.com/video/175702254
12
Creating New Planning Layers Planning layers in the Mutual Aid Resource Planner are made by creating a new ArcGIS Online feature service, using a current planner layer as a template. Please follow these instructions, exactly as written, to create a new MARP planning layer, or follow along with the video: https://player.vimeo.com/video/175746973
1. Find your current Resource Planner feature layer in your ArcGIS Online Content page, then select "View item details".
2. Find the URL for this service by scrolling down and looking to the right side of the page. Press the "Copy" button to copy the URL to your computer's clipboard.
3. Press "My Content" to return to your content list. 4. At the top of the content list, press "Create" to get a dropdown list. Select "Feature
Layer" from the options. Select the "From URL" tab in the popup window. 5. Paste in the copied URL from the 2nd step, and press the "Next" button at the
bottom of the popup window. 6. Press "Next" again to accept all of the needed layers in the service, and "Next" on
the next page to select the default geography. 7. Give the new Resource Planning service a Title (e.g. "My New Resource Plan"),
and add something descriptive in the Summary text field. For the Tags field, enter "shared:thira". (Without the quotes, and lower case) This tag allows the Mutual Aid Resource Planner to add this new layer to its list.
8. Press the "Done" button at the bottom of the popup.
It may take a few moments for the new feature service to be created. When it is done, you will be taken to its details page. Press the "Share" button on the right side of the page, and check the box to share it with your Resource Planning sharing group.
19
Processes for Using Your Own Geography in the MARP TBD - pending the development of this capability in the IOC
MARP resources are organized within a "sharing group" in ArcGIS Online...

20
Glossary ArcGIS Online - An online, collaborative web GIS that allows you to use, create, and share maps, apps, layers, and data. ArcGIS Online is hosted in Esri's secure cloud.
Core Capabilities - activities which address the greatest risks to a jurisdiction.
ESF - Emergency Support Functions, the grouping of governmental and certain private sector capabilities into an organizational structure to provide support, resources, program implementation, and services that are most likely needed to save lives, protect property and the environment, restore essential services and critical infrastructure, and help victims and communities return to normal following domestic incidents.
GIS - Geographic Information System, a system designed to capture, store, manipulate, analyze, manage, and present all types of spatial or geographical data.
Mass Care - the ability to coordinate with partner agencies to address the public health, medical, and mental/behavioral health needs of those impacted by an incident in a jurisdiction.
Resource Plan - The result of identifying what resources an agency needs in order to prepare for or mitigate hazards.
THIRA - Threat & Hazard Identification and Risk Assessment, a process developed by FEMA that helps communities identify capability targets and resource requirements needed to mitigate the anticipated and unanticipated hazards.
Web Map - An ArcGIS web map is an interactive display of geographic information that you can use to tell stories and answer questions. The vUSA+ widget is used to change Web Maps in the main map viewer. Web Maps are authored using ArcGIS Online.
Widget - modular software which adds functionality to a GIS web application.