mural, paste the wall
TRANSCRIPT

1
How to install
Mural,Paste the wall
SuppliedSoft Squeegee
What you’ll needTape MeasureSpirit LevelSoft PencilLow tack masking tapePlumb LineStanley Knife or similar sharp bladeStraight RulerWallpaper PasteWallpaper Roller
If you have any questions about installation, please contact us on +44(0)118 922 1327 or email [email protected] for further information and advice.
www.surfaceview.co.uk/support/muralwww.surfaceview.co.uk/support/mural/film
Please read these instructions carefully before installing your mural. These instructions can also be downloaded as a PDF. If you’d rather we took care of it, contact our us to arrange professional installation by our specialists.
2
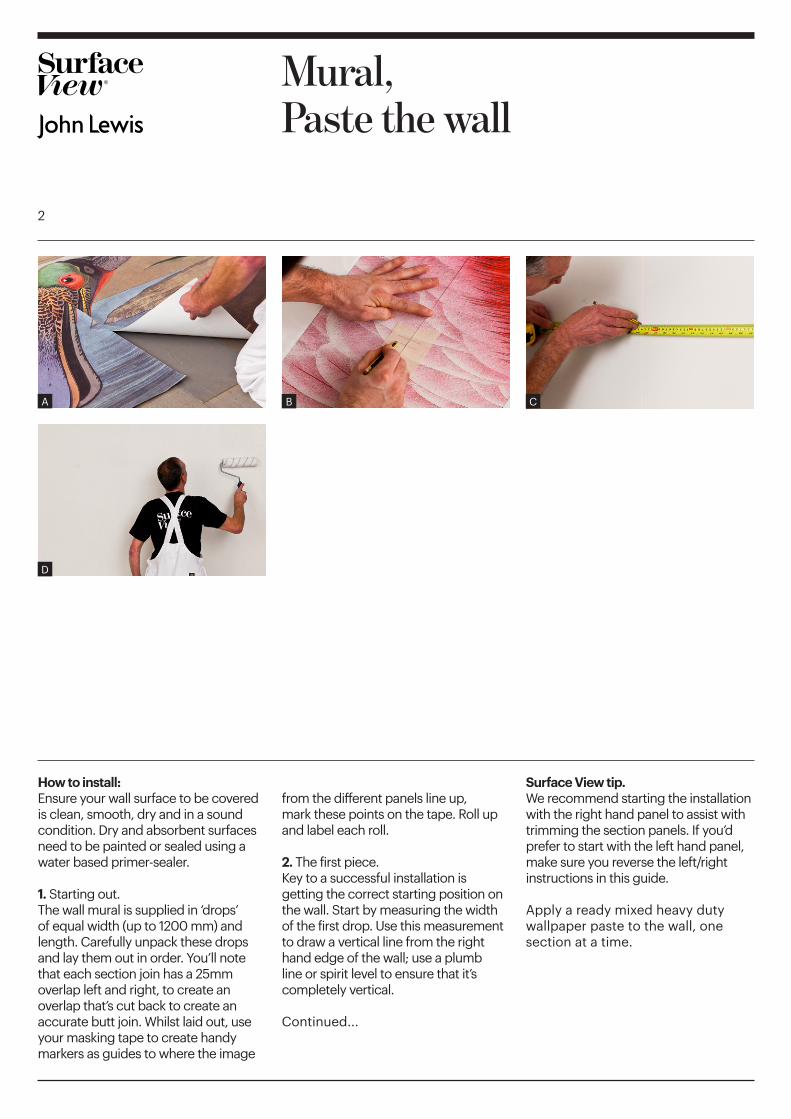
How to install: Ensure your wall surface to be covered is clean, smooth, dry and in a sound condition. Dry and absorbent surfaces need to be painted or sealed using a water based primer-sealer.
1. Starting out.The wall mural is supplied in ‘drops’ of equal width (up to 1200 mm) and length. Carefully unpack these drops and lay them out in order. You’ll note that each section join has a 25mm overlap left and right, to create an overlap that’s cut back to create an accurate butt join. Whilst laid out, use your masking tape to create handy markers as guides to where the image
from the different panels line up,mark these points on the tape. Roll up and label each roll.
2. The first piece.Key to a successful installation is getting the correct starting position on the wall. Start by measuring the width of the first drop. Use this measurement to draw a vertical line from the right hand edge of the wall; use a plumb line or spirit level to ensure that it’s completely vertical.
Continued...
Surface View tip.We recommend starting the installation with the right hand panel to assist with trimming the section panels. If you’d prefer to start with the left hand panel, make sure you reverse the left/right instructions in this guide.
Apply a ready mixed heavy duty wallpaper paste to the wall, one section at a time.
A
D
B C
Mural,Paste the wall

3
2. (continued) Fix the first drop from the right hand side, making sure the left hand edge of this drop aligns with the vertical line. This is the most critical point and this first panel must be vertical to the plumb line. Smooth out any bubbles or ripples with a brush or your squeegee, in a vertical direction only. Wipe off any excess paste with a damp sponge.
3. Applying the second and subsequent drops.Apply wallpaper paste to the next section of wall. The second and subsequent drops should be overlapped by 50mm to make sure that the image aligns accurately. Use
your masking tape guides to help align these image overlaps. Smooth out any bubbles or ripples with a brush or your squeegee, in a vertical direction. Continue until all panels are up before moving on to trimming. Remove masking tape.
4. Trim top and bottom.Trim the right hand edge and the top and bottom, using a straight edge for guidance.
5. Trimming the joins.Gently lift the two overlapped edges and fix the supplied 50mm plastic strip to the wall (the paste should hold it in place) under the lifted edges. Smooth
the edges over the plastic strip. Using a straight edge and sharp blade, trim down the middle of the overlap, then remove the plastic strip and excess wall mural. A final application of paste can applied beneath the joints using a paintbrush. Smooth down both edges to make a seamless butt join, making sure the wall mural is fixed at the edges.
E
H
F
I
G
J
K
Mural,Paste the wall