multitest 50 – tablet hardness tester - translation … · 7.2 calibration ... • general...
TRANSCRIPT

MultiTest 50 – Tablet Hardness Tester Operating Manual
Valid for: Firmware 1.11 and higher
Order number: 918127
Revision: 009 Document ID
ID categories Details
Document: Operating Manual for MultiTest 50 tablet hardness tester Language: English Valid for: Firmware 1.11 and higher Models / versions: FastTestTM WTDH / WTDH / FastTestTM TDH / TDH / DH / H Valid since: 20. February 2012 File name: 918127_MT50_MO_E_A4_V009 Revision: 009
Pharmatron AG Uttigenstrasse 28 CH-3600 Thun Switzerland P: +41 (0)33 227 50 00 F: +41 (0)33 227 50 01 [email protected] www.pharmatron.com

Table of contents
1. INTRODUCTION ...................................................................................................................................... 9
1.1 Main features................................................................................................................................................................... 10
1.2 General information ..................................................................................................................................................... 11 1.2.1 Measurements ........................................................................................................................................................................... 11 1.2.2 Programming / Testing ........................................................................................................................................................ 12 1.2.3 Tablet orientation ................................................................................................................................................................... 13 1.2.4 Statistics & Reports ................................................................................................................................................................ 14
1.3 System overview ............................................................................................................................................................ 15 1.3.1 Standard MultiTest 50 .......................................................................................................................................................... 15 1.3.2 MultiTest 50 “FastTestTM” .................................................................................................................................................. 16 1.3.3 Front panel / Touch screen ................................................................................................................................................. 17
1.4 Interfaces / Connection ports .................................................................................................................................. 18
1.5 Models & Enabled parameters ............................................................................................................................... 19
1.6 Technical Specifications .............................................................................................................................................. 19 1.6.1 Measuring range ....................................................................................................................................................................... 19 1.6.2 Accuracy ..................................................................................................................................................................................... 20 1.6.3 Units of measure ...................................................................................................................................................................... 20 1.6.4 Other specifications ................................................................................................................................................................ 20 1.6.5 Materials of build .................................................................................................................................................................... 20
1.7 Options & Accessories ................................................................................................................................................ 21
1.8 Documentation ............................................................................................................................................................... 21
1.9 Service & Support ......................................................................................................................................................... 22
2. SYSTEM INSTALLATION ................................................................................................................... 23
2.1 Checklist for unpacking .............................................................................................................................................. 23 2.1.1 All MultiTest 50 models ...................................................................................................................................................... 23 2.1.2 MultiTest 50 “FastTestTM” .................................................................................................................................................. 24
2.2 Removal of shipping material ................................................................................................................................. 26
2.3 Debris collection bins .................................................................................................................................................. 27
2.4 Special jaw installation ................................................................................................................................................ 27
2.5 Installation of FastTestTM configuration .............................................................................................................. 28
2.6 Connect external balance .......................................................................................................................................... 32 2.6.1 Mettler Toledo® balance ..................................................................................................................................................... 33 2.6.2 Sartorius® balance .................................................................................................................................................................. 34
2.7 Connect external thickness gauge ........................................................................................................................ 35

Table of Contents
2.8 Connect local printer ................................................................................................................................................... 37 2.8.1 USB PostScript printer .......................................................................................................................................................... 38 2.8.2 40col serial printer .................................................................................................................................................................. 40
2.9 Connect power cord .................................................................................................................................................... 42
3. NETWORK SETUP ................................................................................................................................ 43
3.1 Physical network connection.................................................................................................................................... 44
3.2 Assign IP address to tester ....................................................................................................................................... 44
3.3 Setup for network printer .......................................................................................................................................... 44
3.4 Setup for TabStatTM DataCenter ............................................................................................................................. 45
4. SYSTEM CONFIGURATION / SETTINGS ..................................................................................... 46
4.1 Checklist: Most important global settings ......................................................................................................... 46
4.2 Select printer type ......................................................................................................................................................... 48
4.3 Select balance type ...................................................................................................................................................... 49
4.4 Special jaw: Program diameter offset .................................................................................................................. 52
4.5 Activate internal thickness measuring ................................................................................................................. 54
4.6 Set date and time ......................................................................................................................................................... 56
5. OPERATING INSTRUCTIONS .......................................................................................................... 57
5.1 Power up / Initialization ............................................................................................................................................. 57
5.2 Start screen / Main elements .................................................................................................................................. 58 5.2.1 Main menu ................................................................................................................................................................................ 58 5.2.2 Status bar ................................................................................................................................................................................... 59 5.2.3 QuickInfo (Start screen)........................................................................................................................................................ 60
5.3 Introduction to the touch screen interface ....................................................................................................... 61 5.3.1 Menu levels ............................................................................................................................................................................... 61 5.3.2 Menu navigation ...................................................................................................................................................................... 61 5.3.3 Active / inactive items ........................................................................................................................................................... 63 5.3.4 Confirm / Discard data change .......................................................................................................................................... 65 5.3.5 Selection buttons ..................................................................................................................................................................... 65 5.3.6 Data entry buttons / Alpha-numeric keypad .................................................................................................................. 67 5.3.7 Data entry buttons / Numeric keypad ............................................................................................................................. 68 5.3.8 Toggle buttons ......................................................................................................................................................................... 70 5.3.9 Checkboxes................................................................................................................................................................................ 71
5.4 Product ............................................................................................................................................................................... 72
Table of contents
5.4.1 What is a product? .................................................................................................................................................................. 72 5.4.2 Why program nominal value and limits? .......................................................................................................................... 73 5.4.3 Program a new product ......................................................................................................................................................... 74 5.4.4 Edit an existing product ........................................................................................................................................................ 79 5.4.5 Delete an existing product .................................................................................................................................................... 81
5.5 Method ............................................................................................................................................................................... 83 5.5.1 What is a method? .................................................................................................................................................................. 83 5.5.2 Recommended naming of methods .................................................................................................................................... 83 5.5.3 Program a new method .......................................................................................................................................................... 84 5.5.4 Edit an existing method ......................................................................................................................................................... 86 5.5.5 Delete an existing method ..................................................................................................................................................... 88
5.6 Introduction to testing ................................................................................................................................................ 90 5.6.1 Introduction: FullTest / EasyTest / SingleTest ........................................................................................................... 90 5.6.2 Introduction: Views ................................................................................................................................................................ 91 5.6.3 Checklist: Important global settings /product settings ................................................................................................ 93 5.6.4 Start button ............................................................................................................................................................................... 93 5.6.5 Pause button ............................................................................................................................................................................. 94 5.6.6 Stop / Abort button .............................................................................................................................................................. 94
5.7 Test ....................................................................................................................................................................................... 95 5.7.1 FullTest ...................................................................................................................................................................................... 95 5.7.2 Behavior with plausibility violation .................................................................................................................................... 97 5.7.3 EasyTest ..................................................................................................................................................................................... 98 5.7.4 SingleTest ............................................................................................................................................................................... 101
6. (GLOBAL) SETTINGS ......................................................................................................................... 102
6.1 General ............................................................................................................................................................................ 102
6.2 Printer............................................................................................................................................................................... 103
6.3 Report .............................................................................................................................................................................. 103
6.4 Parameter ....................................................................................................................................................................... 104
6.5 Mode ................................................................................................................................................................................ 105
6.6 Units .................................................................................................................................................................................. 106
6.7 Balance ............................................................................................................................................................................ 106
7. CALIBRATION & VERIFICATION .................................................................................................. 108
7.1 Function checking device (FCD) .......................................................................................................................... 108 7.1.1 Recommended setup for regular checking routine (example).................................................................................. 109 7.1.2 Perform checking routine using a FCD (example) ..................................................................................................... 111
7.2 Calibration ...................................................................................................................................................................... 112
Table of Contents
7.2.1 Required calibration tools.................................................................................................................................................. 112 7.2.2 Weight ..................................................................................................................................................................................... 113 7.2.3 Thickness (external) ............................................................................................................................................................ 116 7.2.4 Thickness (internal) ............................................................................................................................................................. 117 7.2.5 Width ...................................................................................................................................................................................... 117 7.2.6 Diameter ................................................................................................................................................................................. 118 7.2.7 Hardness ................................................................................................................................................................................. 122 7.2.8 Print calibration report ....................................................................................................................................................... 130
7.3 Verification ..................................................................................................................................................................... 131 7.3.1 Required verification tools ................................................................................................................................................ 131 7.3.2 Weight ..................................................................................................................................................................................... 132 7.3.3 Thickness (external) ............................................................................................................................................................ 136 7.3.4 Thickness (internal) ............................................................................................................................................................. 138 7.3.5 Width ...................................................................................................................................................................................... 138 7.3.6 Diameter ................................................................................................................................................................................. 139 7.3.7 Hardness ................................................................................................................................................................................. 143 7.3.8 Print verification report ...................................................................................................................................................... 151
8. PRINT REPORTS ................................................................................................................................. 152
8.1 Standard report ........................................................................................................................................................... 152
8.2 Graphic report .............................................................................................................................................................. 155
8.3 Test setup report ........................................................................................................................................................ 160
8.4 Product setup report ................................................................................................................................................ 161
8.5 Method setup report ................................................................................................................................................ 163
8.6 Calibration verification report ............................................................................................................................... 164 8.6.1 Calibration report ................................................................................................................................................................. 164 8.6.2 Verification report ............................................................................................................................................................... 166
8.7 Global report ................................................................................................................................................................ 168 8.7.1 Global settings report .......................................................................................................................................................... 168 8.7.2 Error messages report .......................................................................................................................................................... 171
9. SERVICE ................................................................................................................................................. 172
9.1 Verification ..................................................................................................................................................................... 172
9.2 Calibration ...................................................................................................................................................................... 172
9.3 Special .............................................................................................................................................................................. 173
9.4 Backup ............................................................................................................................................................................. 173
9.5 Interface .......................................................................................................................................................................... 174

Table of contents
9.6 License ............................................................................................................................................................................. 174
10. SECURITY .............................................................................................................................................. 175
10.1 Change user .................................................................................................................................................................. 175
10.2 Change password ....................................................................................................................................................... 176
10.3 Add new user ............................................................................................................................................................... 177
10.4 Remove user ................................................................................................................................................................. 177
10.5 Default passwords ...................................................................................................................................................... 178
11. APPENDICES ........................................................................................................................................ 179
11.1 Appendix A: Conversion factors & Force calculations .............................................................................. 179
11.2 Appendix B: Sample test reports ........................................................................................................................ 180
11.3 Appendix C: Balance settings ............................................................................................................................... 180 11.3.1 Mettler AB54-OEM ........................................................................................................................................................... 180 11.3.2 Mettler AG Series ................................................................................................................................................................. 181 11.3.3 Sartorius .................................................................................................................................................................................. 182
11.4 Appendix D: EPSON TM-U220D settings ........................................................................................................ 182
11.5 Appendix E: Copyright ............................................................................................................................................. 183
11.6 Appendix F: Disclaimer of Warranty .................................................................................................................. 183
11.7 Appendix G: Revision details of this Manual ................................................................................................ 184

Reference documents The following documents have been used as a reference / guideline: [1] #918129, MultiTest 50 Options & Spares Manual, Revision 002
Purpose and scope • General introduction to the MultiTest 50 tablet hardness tester • Installation instructions for correct setup • Main settings that need to be configured according to connected external devices • Introduction to the touch screen user interface • Detailed operating instructions for each menu item • How to perform calibration and verification • How to use the MultiTest 50 with security settings enabled
NOTE: Some descriptions may not apply to your MultiTest 50 model This manual has been written for a MultiTest 50 that has been configured to measure:
• Weight • Thickness • Width • Diameter • Hardness
It also covers operation in “FastTestTM” configuration. If your MultiTest 50 is configured for a subset of these parameters, ignore the references to parameters which are not available on your machine.
WARNING: Using the MultiTest 50 tablet hardness tester differently / in a method other than described in this operating manual may impair the safety precautions!

INTRODUCTION
File name: 918127_MT50_MO_E_A4_V009 Valid for: Firmware 1.11 and higher
9 / 184 Revision: 009 Order number: 918127
Valid since: 20. February 2012 Copyright: © Pharmatron AG, 2012
1. INTRODUCTION
Welcome to the Dr. Schleuniger® Pharmatron family! Your MultiTest 50 is a state-of-the-art tablet hardness tester that combines precision measuring technology with user-friendly touch screen operation. Like all Dr. Schleuniger® Pharmatron products, the MultiTest 50 has been designed to provide you with years of faithful service.
Read this manual carefully. It provides you with all the information you need to operate your MultiTest 50.
MultiTest 50 tablet hardness tester
Swiss quality High quality components paired with Swiss precision engineering provide for a long product life and minimize costly machine downtime. In order to ensure maximum reliability of your MultiTest 50, all instruments are tested according to strict internal quality standards before they leave our factory.
Hardness testing With more than 35 years of experience and more than 15’000 testers in the market, Dr. Schleuniger® hardness measuring technology is a safe investment. Like all our hardness testers, the MultiTest 50 offers consistently accurate test results and fully complies with current USP (chapter <1217, tablet breaking force) and EP (2.9.8, resistance to crushing of tablets) requirements.
Quality matters.
INTRODUCTION
10 / 184
File name: 918127_MT50_MO_E_A4_V009 Valid for: Firmware 1.11 and higher
Revision: 009 Order number: 918127
Valid since: 20. February 2012 Copyright: © Pharmatron AG, 2012
1.1 Main features
From simple hardness tests to executing a whole series of tests – intelligent touch screen operation paired with precision mechanics make the MultiTest 50 extremely versatile and very easy to operate.
• Up to 5 parameters (weight, thickness, width, diameter/length, hardness)
• Fast and intuitive programming with touch screen Very easy, almost language-independent icon-based navigation
• Languages Additional language possible
• FastTestTM configuration Very fast and efficient measuring of larger sample sizes
• 3 test modes: FullTest, EasyTest, SingleTest Pre-program up to 100 products or quickly set up tests without programming
• View the data that you need during test Currently measured results, list view or hardness curve
• Easy upgrade at later stage possible (e.g. upgrade from “hardness only” to “5 parameters” no hardware change required!)
• Proven precision with S-beam load cell, state-of-the-art electronics, solid mechanics High accuracy and reliability
• Quick-change tongues for reliable tablet orientation (e.g. with / without groove; machine comes with standard flat tongue)
• Simple and fast cleaning Remove broken tablet debris with quick-change tongue
• Integrated collection bin To collect broken tablet debris
• Comprehensive reporting All statistics, individual test results – with or without graphs
• Print reports with standard printer USB or network printer with Post-Script
• Backup / restore data Simple with standard USB stick

INTRODUCTION
File name: 918127_MT50_MO_E_A4_V009 Valid for: Firmware 1.11 and higher
11 / 184 Revision: 009 Order number: 918127
Valid since: 20. February 2012 Copyright: © Pharmatron AG, 2012
1.2 General information
1.2.1 Measurements
With all parameters enabled, the MultiTest 50 accumulates the following measurements in one single report including statistics:
• Weight • Thickness • Width • Diameter / Length • Hardness All MultiTest 50 models allow you to measure tablet hardness (breaking force) in:
• Newton (N) • Kilopond (Kp) • Strong Cobb (Sc) • User-defined unit of measurement (= factor based on Newton measurement)
The MultiTest 50 can also measure tablet diameter and thickness (internal) in mm or inches. If an external thickness gauge (micrometer) and balance are connected, the MultiTest 50 accumulates thickness (external) in mm or inches and weight data in either g or mg. Up to 100 measurements of each parameter can be taken and / or collected for statistical analysis.
MultiTest 50 “FastTestTM” with integrated thickness gauge
and connected Mettler Toledo® balance
INTRODUCTION
12 / 184
File name: 918127_MT50_MO_E_A4_V009 Valid for: Firmware 1.11 and higher
Revision: 009 Order number: 918127
Valid since: 20. February 2012 Copyright: © Pharmatron AG, 2012
1.2.2 Programming / Testing
The graphical touch screen user interface of the MultiTest 50 makes programming very fast and easy to understand. The operator can choose whether to pre-program products including T1/T2 limits and plausibility limits, or simply define the sample size to be tested.
• FullTest Use pre-programmed products and sample sizes (= method) to start a test
• EasyTest Simply set the sample size and nominal value for each parameter and start testing
• SingleTest Select the parameter(s) you would like to test and push start
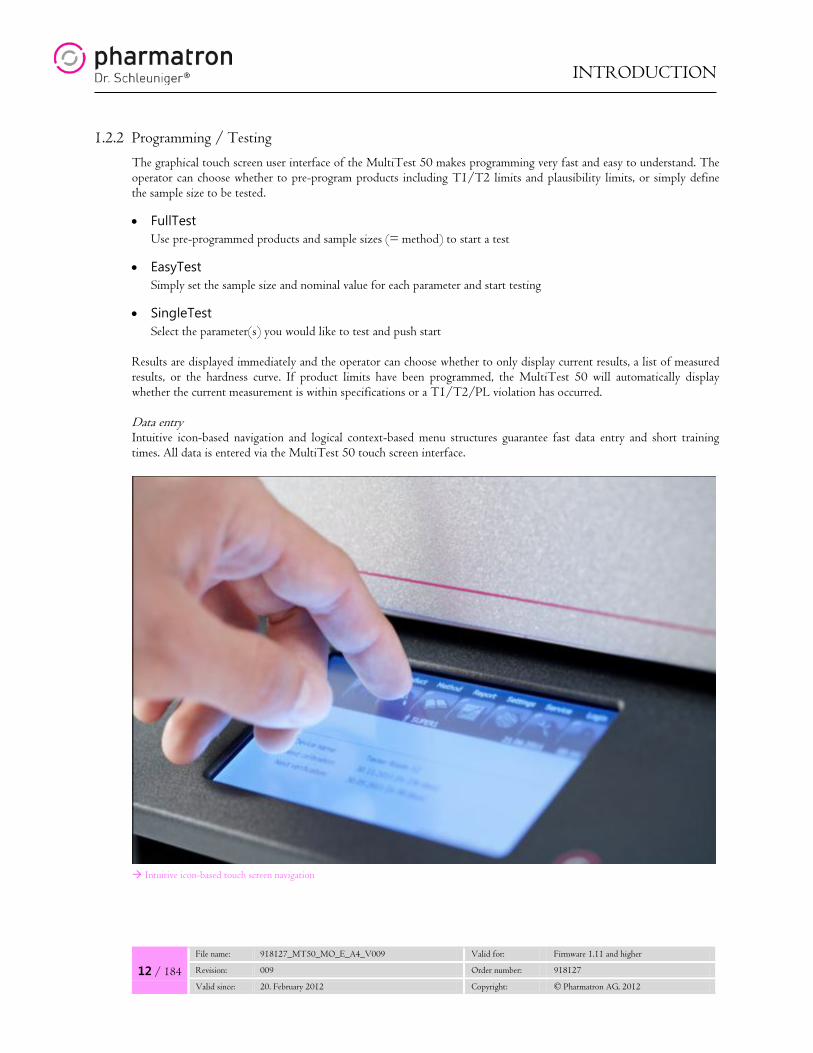
Results are displayed immediately and the operator can choose whether to only display current results, a list of measured results, or the hardness curve. If product limits have been programmed, the MultiTest 50 will automatically display whether the current measurement is within specifications or a T1/T2/PL violation has occurred. Data entry Intuitive icon-based navigation and logical context-based menu structures guarantee fast data entry and short training times. All data is entered via the MultiTest 50 touch screen interface.
Intuitive icon-based touch screen navigation

INTRODUCTION
File name: 918127_MT50_MO_E_A4_V009 Valid for: Firmware 1.11 and higher
13 / 184 Revision: 009 Order number: 918127
Valid since: 20. February 2012 Copyright: © Pharmatron AG, 2012
1.2.3 Tablet orientation
Test samples are placed in the test area on the right side of the machine. The open design of the tester provides a high visibility and easy accessibility throughout the testing process. Quick-change tongues with or without groove guarantee simple and reliable tablet orientation. When a test is started, the left jaw moves to break the tablet. Broken tablet debris can be quickly discarded with one simple movement of the quick-change tongue.
Highly accessible test area with quick-change tongues For unconventional tablet shapes, customized quick-change tongues can be manufactures to your specifications. Special jaws for 3-point bending strength tests or for testing objects larger than 35mm are optionally available.
Special jaws and custom tongues available
For a complete list of all available special jaws refer to the
MultiTest 50 Options & Spares Manual
INTRODUCTION
14 / 184
File name: 918127_MT50_MO_E_A4_V009 Valid for: Firmware 1.11 and higher
Revision: 009 Order number: 918127
Valid since: 20. February 2012 Copyright: © Pharmatron AG, 2012
1.2.4 Statistics & Reports
When a test has been completed, the MultiTest 50 automatically calculates test statistics and prints a report (if a USB or network printer is connected). Statistical data can also be printed in graphical format. A complete set of statistics and graphs for up to 100 tablet readings for each parameter includes:
• Primary header (for statistics) • Product setup information • Hardness measuring method • Statistics • Nominal value • Plausibility • T1, T2 limits • Mean value • Minimum value • Range • Absolute standard deviation • T1, T2 violations
For every measured value:
• Test stamp number • Time (starting and ending) • MultiTest 50 serial number
If a plausibility range has been defined, individual measurements outside that range are marked as implausible and test data from that sequence is automatically not used for statistical calculations.
For sample test reports, refer to the Appendix of this manual.

INTRODUCTION
File name: 918127_MT50_MO_E_A4_V009 Valid for: Firmware 1.11 and higher
15 / 184 Revision: 009 Order number: 918127
Valid since: 20. February 2012 Copyright: © Pharmatron AG, 2012
1.3 System overview
This section gives a short introduction to the main system components of the MultiTest 50.
1.3.1 Standard MultiTest 50
Applies to all MultiTest 50 models, including MultiTest 50 “FastTestTM”.
For back of machine / interfaces see section “Interfaces / Connection ports”.
Component Description
1 Housing single-piece housing to protect the mechanics & electronics
2 Test area tablets are placed between 2 jaws (moveable / fixed)
3 Front panel with integrated touch screen
A Quick-change tongue with ergonomic holder to exchange tongue within seconds
2 A
3
1
INTRODUCTION
16 / 184
File name: 918127_MT50_MO_E_A4_V009 Valid for: Firmware 1.11 and higher
Revision: 009 Order number: 918127
Valid since: 20. February 2012 Copyright: © Pharmatron AG, 2012
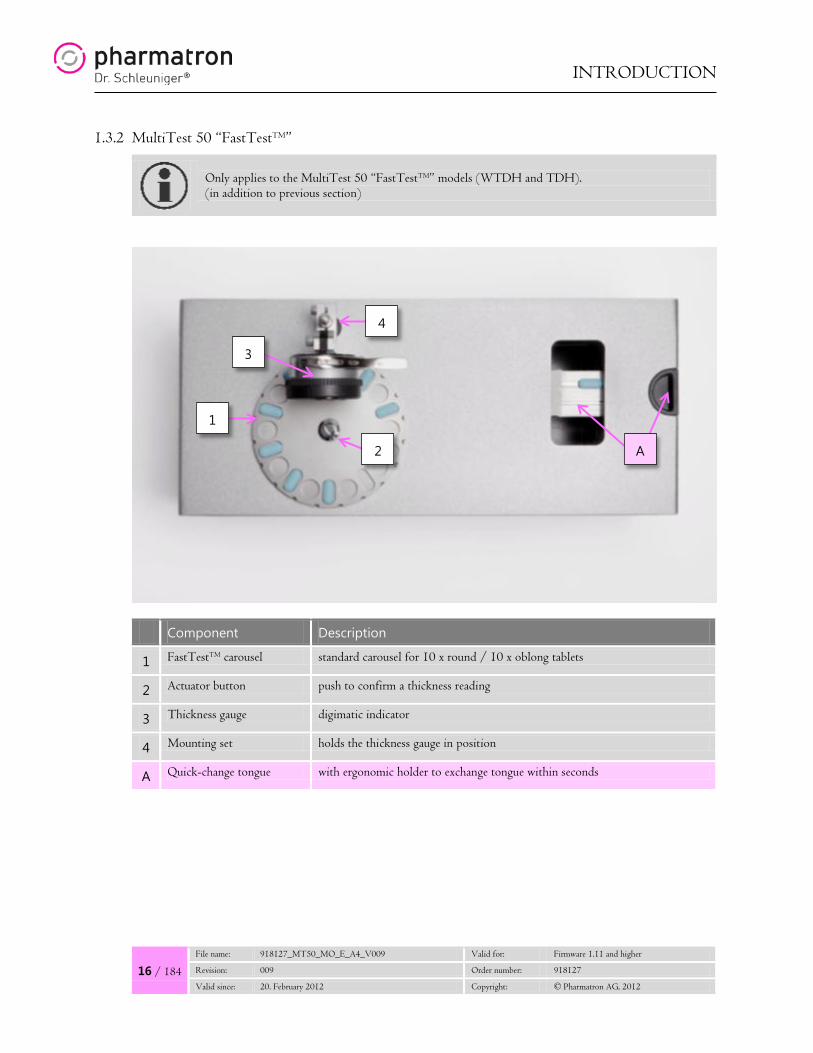
1.3.2 MultiTest 50 “FastTestTM”
Only applies to the MultiTest 50 “FastTestTM” models (WTDH and TDH). (in addition to previous section)
Component Description
1 FastTestTM carousel standard carousel for 10 x round / 10 x oblong tablets
2 Actuator button push to confirm a thickness reading
3 Thickness gauge digimatic indicator
4 Mounting set holds the thickness gauge in position
A Quick-change tongue with ergonomic holder to exchange tongue within seconds
2
3
1
4
A

INTRODUCTION
File name: 918127_MT50_MO_E_A4_V009 Valid for: Firmware 1.11 and higher
17 / 184 Revision: 009 Order number: 918127
Valid since: 20. February 2012 Copyright: © Pharmatron AG, 2012
1.3.3 Front panel / Touch screen
Applies to all MultiTest 50 models, including MultiTest 50 “FastTestTM”.
The front panel can be swivelled out for high readability of the integrated touch screen. Because the touch screen is capacitive, it is also perfectly suited for operation with gloves.
side view: panel “parked”
side view: panel extended

INTRODUCTION
18 / 184
File name: 918127_MT50_MO_E_A4_V009 Valid for: Firmware 1.11 and higher
Revision: 009 Order number: 918127
Valid since: 20. February 2012 Copyright: © Pharmatron AG, 2012
1.4 Interfaces / Connection ports
All MultiTest 50 models have seven (7) interfaces on the back of the machine.
Interface Purpose
1 USB 1 To connect USB printer
2 USB 2 To connect USB flash memory stick (for backup / restore)
3 Balance (RS232) To connect external balance
4 RS232 To connect serial 40col. printer
5 Host (RS232) To perform service tasks (e.g. firmware update)
6 Thickness (RS232) To connect external thickness gauge (indicator)
7 Ethernet To connect PC and/or network printer via Ethernet LAN (TCP/IP)
A Power switch To turn the tester ON / OFF
B Power supply To connect power cable (electrical connection)
C Debris collection bin To collect tested (broken) samples and debris
D Debris collection bin
C D
1 2
3 4 5 6
7
A B

INTRODUCTION
File name: 918127_MT50_MO_E_A4_V009 Valid for: Firmware 1.11 and higher
19 / 184 Revision: 009 Order number: 918127
Valid since: 20. February 2012 Copyright: © Pharmatron AG, 2012
1.5 Models & Enabled parameters
The MultiTest 50 is a multi-purpose instrument to reliably measure hardness, diameter/ length and width of virtually all tablet shapes. Additionally, it accumulates measurements from an external balance and thickness gauge in a single report.
Parameter upgrade It is possible to upgrade your existing MultiTest 50 with additional parameters. Contact your local sales & service partner for more information.
MultiTest 50 model W T WD D H
WTDH “FastTestTM”
WTDH
TDH “FastTestTM”
TDH
DH
H enabled parameter W Weight T Thickness (external / internal) WD Width D Diameter / Length H Hardness
1.6 Technical Specifications
1.6.1 Measuring range
Measurement Range
Hardness • 4 – 400 Newton (standard) • 0.5 – 50 Newton (optional) • 5 – 500 Newton (optional) • 8 – 800 Newton (optional)
Weight • Mettler AB54: 0.1mg – 50g • Sartorius: varies depending upon model used
Thickness (external) • 1.0 – 13 mm (typical) 0.040 – 0.512 inch (typical)
Thickness (internal) See Diameter
Diameter / Length / Width 0 – 30+ mm (1.2+ inch) standard 0 – 62+ mm (2.4+ inch) optional
INTRODUCTION
20 / 184
File name: 918127_MT50_MO_E_A4_V009 Valid for: Firmware 1.11 and higher
Revision: 009 Order number: 918127
Valid since: 20. February 2012 Copyright: © Pharmatron AG, 2012
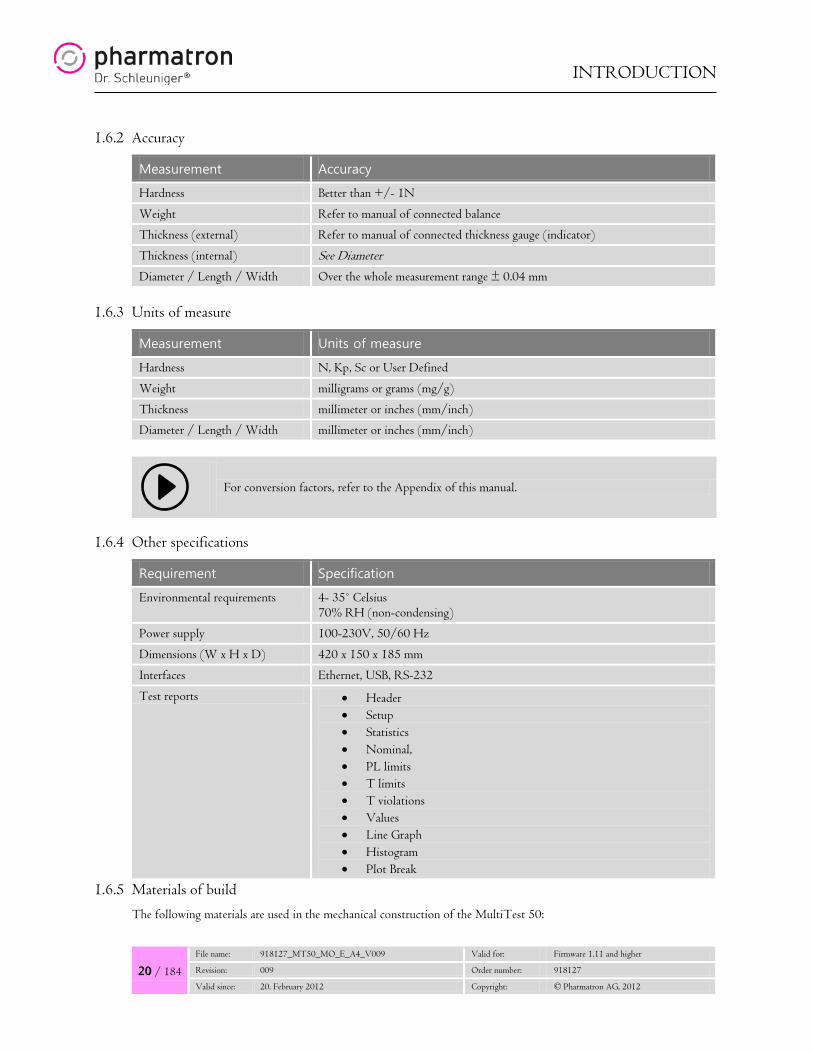
1.6.2 Accuracy
Measurement Accuracy
Hardness Better than +/- 1N
Weight Refer to manual of connected balance
Thickness (external) Refer to manual of connected thickness gauge (indicator)
Thickness (internal) See Diameter
Diameter / Length / Width Over the whole measurement range ± 0.04 mm 1.6.3 Units of measure
Measurement Units of measure
Hardness N, Kp, Sc or User Defined
Weight milligrams or grams (mg/g)
Thickness millimeter or inches (mm/inch)
Diameter / Length / Width millimeter or inches (mm/inch)
For conversion factors, refer to the Appendix of this manual.
1.6.4 Other specifications
Requirement Specification
Environmental requirements 4- 35˚ Celsius 70% RH (non-condensing)
Power supply 100-230V, 50/60 Hz
Dimensions (W x H x D) 420 x 150 x 185 mm
Interfaces Ethernet, USB, RS-232
Test reports • Header • Setup • Statistics • Nominal, • PL limits • T limits • T violations • Values • Line Graph • Histogram • Plot Break
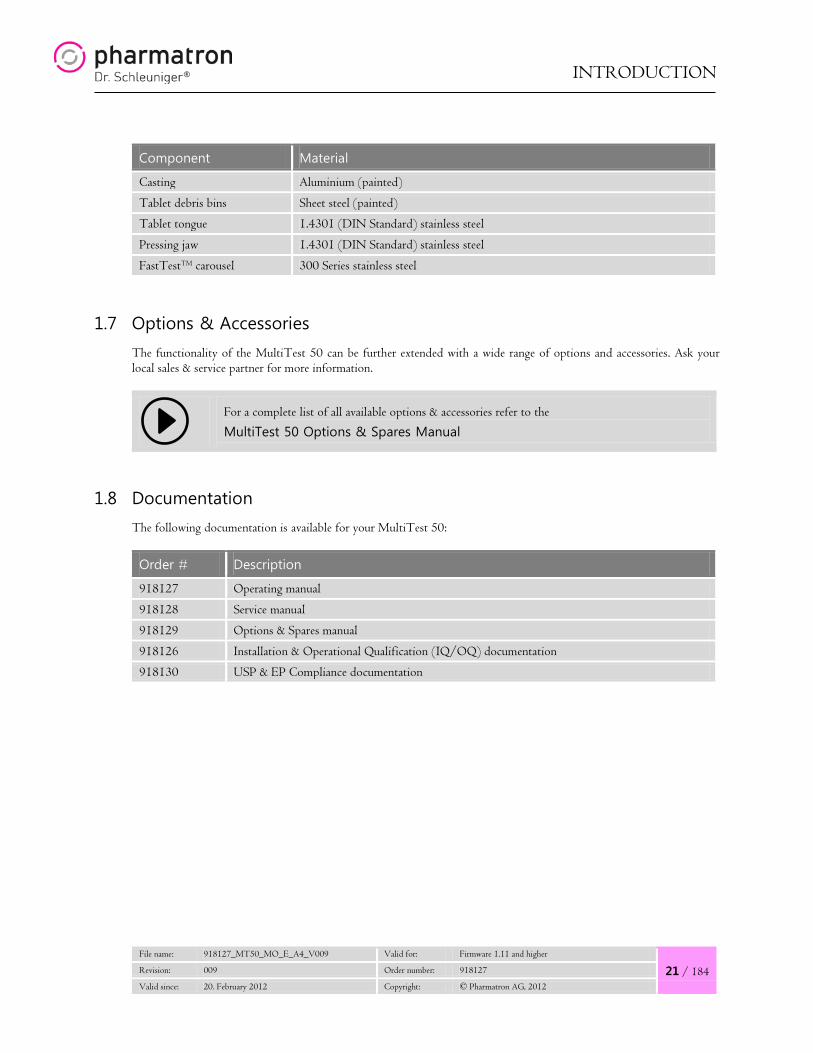
1.6.5 Materials of build
The following materials are used in the mechanical construction of the MultiTest 50:
INTRODUCTION
File name: 918127_MT50_MO_E_A4_V009 Valid for: Firmware 1.11 and higher
21 / 184 Revision: 009 Order number: 918127
Valid since: 20. February 2012 Copyright: © Pharmatron AG, 2012
Component Material
Casting Aluminium (painted)
Tablet debris bins Sheet steel (painted)
Tablet tongue 1.4301 (DIN Standard) stainless steel
Pressing jaw 1.4301 (DIN Standard) stainless steel
FastTestTM carousel 300 Series stainless steel
1.7 Options & Accessories
The functionality of the MultiTest 50 can be further extended with a wide range of options and accessories. Ask your local sales & service partner for more information.
For a complete list of all available options & accessories refer to the
MultiTest 50 Options & Spares Manual
1.8 Documentation
The following documentation is available for your MultiTest 50:
Order # Description
918127 Operating manual
918128 Service manual
918129 Options & Spares manual
918126 Installation & Operational Qualification (IQ/OQ) documentation
918130 USP & EP Compliance documentation

INTRODUCTION
22 / 184
File name: 918127_MT50_MO_E_A4_V009 Valid for: Firmware 1.11 and higher
Revision: 009 Order number: 918127
Valid since: 20. February 2012 Copyright: © Pharmatron AG, 2012
1.9 Service & Support
Our global network of factory-trained and certified Dr. Schleuniger® Pharmatron sales & service partners provide you with competent and uncomplicated local support. Refer to our website to find your local partner.
www.pharmatron.com/sales
IT’S FREE AND EASY – Register online as a customer now!
By registering you will get your personal customer login, which allows you to access to additional information about Dr. Schleuniger® Pharmatron products and services.
www.pharmatron.com
SYSTEM INSTALLATION
File name: 918127_MT50_MO_E_A4_V009 Valid for: Firmware 1.11 and higher
23 / 184 Revision: 009 Order number: 918127
Valid since: 20. February 2012 Copyright: © Pharmatron AG, 2012
2. SYSTEM INSTALLATION
CAUTION: Using or handling the MultiTest 50 differently / in a method other than described in this operating manual may impair the safety precautions!
Carefully read this chapter before unpacking the MultiTest 50
2.1 Checklist for unpacking
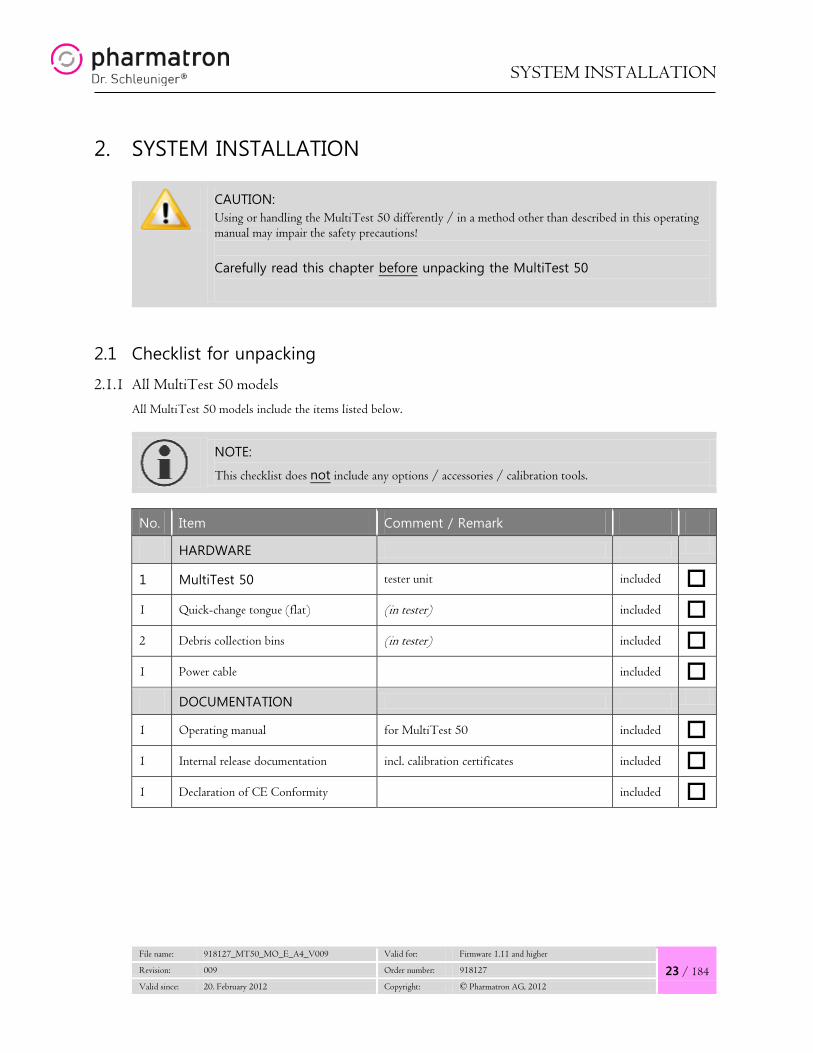
2.1.1 All MultiTest 50 models
All MultiTest 50 models include the items listed below.
NOTE:
This checklist does not include any options / accessories / calibration tools.
No. Item Comment / Remark
HARDWARE
1 MultiTest 50 tester unit included 1 Quick-change tongue (flat) (in tester) included 2 Debris collection bins (in tester) included 1 Power cable included DOCUMENTATION
1 Operating manual for MultiTest 50 included 1 Internal release documentation incl. calibration certificates included 1 Declaration of CE Conformity included

SYSTEM INSTALLATION
24 / 184
File name: 918127_MT50_MO_E_A4_V009 Valid for: Firmware 1.11 and higher
Revision: 009 Order number: 918127
Valid since: 20. February 2012 Copyright: © Pharmatron AG, 2012
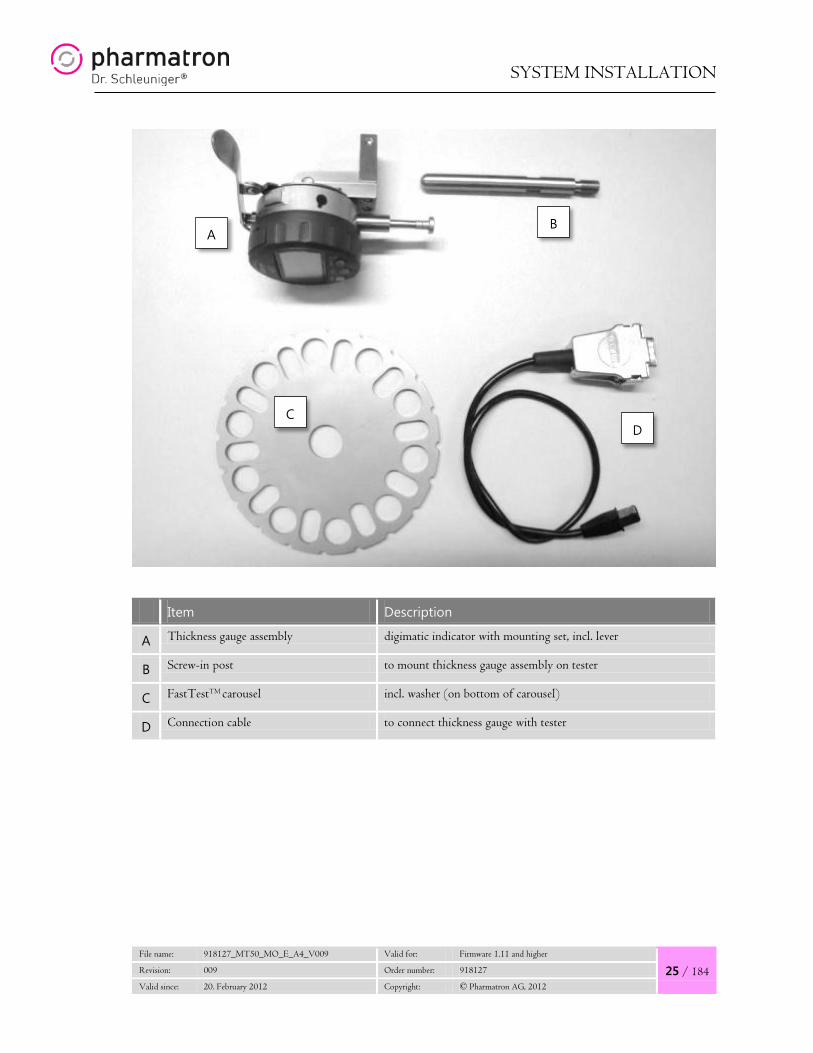
2.1.2 MultiTest 50 “FastTestTM”
Only applies to the MultiTest 50 “FastTestTM” models (WTDH and TDH). (in addition to standard scope of delivery)
For MultiTest 50 “FastTestTM” the following additional items are included:
No. Item Comment / Remark
HARDWARE
1 Carousel base plate with integrated actuator button fully assembled on MultiTest 50 included
1 FastTestTM carousel incl. washer (disk) included 1 Mitutoyo digimatic indicator (= thickness gauge) included 1 Mounting set, complete assembled, incl. screw-in post included 1 Connection cable to connect thickness gauge included DOCUMENTATION
1 Operating manual Mitutoyo digimatic indicator included
SYSTEM INSTALLATION
File name: 918127_MT50_MO_E_A4_V009 Valid for: Firmware 1.11 and higher
25 / 184 Revision: 009 Order number: 918127
Valid since: 20. February 2012 Copyright: © Pharmatron AG, 2012
Item Description
A Thickness gauge assembly digimatic indicator with mounting set, incl. lever
B Screw-in post to mount thickness gauge assembly on tester
C FastTestTM carousel incl. washer (on bottom of carousel)
D Connection cable to connect thickness gauge with tester
A
C
B
D
SYSTEM INSTALLATION
26 / 184
File name: 918127_MT50_MO_E_A4_V009 Valid for: Firmware 1.11 and higher
Revision: 009 Order number: 918127
Valid since: 20. February 2012 Copyright: © Pharmatron AG, 2012
2.2 Removal of shipping material
NOTE: The MultiTest 50 is shipped inside a cardboard box with special rubber foam protection pieces. Keep all packaging material in case the machine needs to be shipped again.
ATTENTION – NO DEEP INCISIONS! Sharp objects / deep incisions into cardboard box may scratch the housing of the MultiTest 50 and/or damage other items contained inside.
• Open the cardboard shipping box
• Remove all loose items located on top of the MultiTest 50 after having opened the cardboard box
WARNING – LOOSE ITEMS! When removing the MultiTest 50 from the cardboard box, make sure the two (2) debris collection bins on the back of the machine don’t fall out.
• Carefully take the MultiTest 50 out of the cardboard box
(including all rubber foam protection pieces).
• Place the tester on a flat workbench and remove all shipping material

SYSTEM INSTALLATION
File name: 918127_MT50_MO_E_A4_V009 Valid for: Firmware 1.11 and higher
27 / 184 Revision: 009 Order number: 918127
Valid since: 20. February 2012 Copyright: © Pharmatron AG, 2012
2.3 Debris collection bins
The MultiTest 50 has two (2) debris collection bins next to each other on the back of the machine. Make sure that both bins are in their locking position and no parts are inside the bins. A mechanical stop prevents the bins from falling out when the machine is moved.
To remove a bin, first lift and then pull out.
Debris collection bin pulled out half-way both debris collection bins inside
2.4 Special jaw installation
OPTIONAL EQUIPMENT Only applies when option has been ordered separately.
Special jaws are usually mounted on the standard jaw of the MultiTest 50. Depending on the type of jaw, different methods of assembly may apply.
For installation instructions, see respective Application Note (AN).

SYSTEM INSTALLATION
28 / 184
File name: 918127_MT50_MO_E_A4_V009 Valid for: Firmware 1.11 and higher
Revision: 009 Order number: 918127
Valid since: 20. February 2012 Copyright: © Pharmatron AG, 2012
2.5 Installation of FastTestTM configuration
Only applies to the MultiTest 50 “FastTestTM” models (WTDH and TDH).
Starting reference: Top of tester before installation
MultiTest 50 “FastTestTM”
1
Install screw-in post
• Insert post
• Turn the post by hand multiple times all the way to the stop ( post will lower itself while being turned)
2
• Tighten post using a wrench

SYSTEM INSTALLATION
File name: 918127_MT50_MO_E_A4_V009 Valid for: Firmware 1.11 and higher
29 / 184 Revision: 009 Order number: 918127
Valid since: 20. February 2012 Copyright: © Pharmatron AG, 2012
3
• Loosen the hex screw [A] on the base of the thickness gauge assembly
4
Mount thickness gauge
• Mount thickness gauge assembly by gently moving its base over the post until the gauge foot touches the carousel base plate
• Push lever and simultaneously move the gauge assembly 1-2mm further down
5
Level thickness gauge
• Make sure that the gauge foot is level with the carousel base plate ( the foot is in parallel to the post)
• Adjust gauge assembly if required ( loosen hex screw [B] to adjust)
6
• Tighten all screws
A
B

SYSTEM INSTALLATION
30 / 184
File name: 918127_MT50_MO_E_A4_V009 Valid for: Firmware 1.11 and higher
Revision: 009 Order number: 918127
Valid since: 20. February 2012 Copyright: © Pharmatron AG, 2012
7
• Push lever and check distance between carousel base plate and gauge foot (must be at least 13mm)
• Adjust if required
8
Install carousel
• Push lever so that gauge foot comes up
• Mount carousel
• Turn carousel so that gauge foot rests in one of the carousel sample positions ( not on the carousel itself)
• Release lever so that the gauge foot lowers itself
9
• Check that carousel can be easily turned when lever is pushed ( gauge foot is in upper position)
10
Install communication cable
• Connect communication cable with thickness gauge [C]
• Route cable through wire guide [D] on side of gauge assembly D
C
SYSTEM INSTALLATION
File name: 918127_MT50_MO_E_A4_V009 Valid for: Firmware 1.11 and higher
31 / 184 Revision: 009 Order number: 918127
Valid since: 20. February 2012 Copyright: © Pharmatron AG, 2012
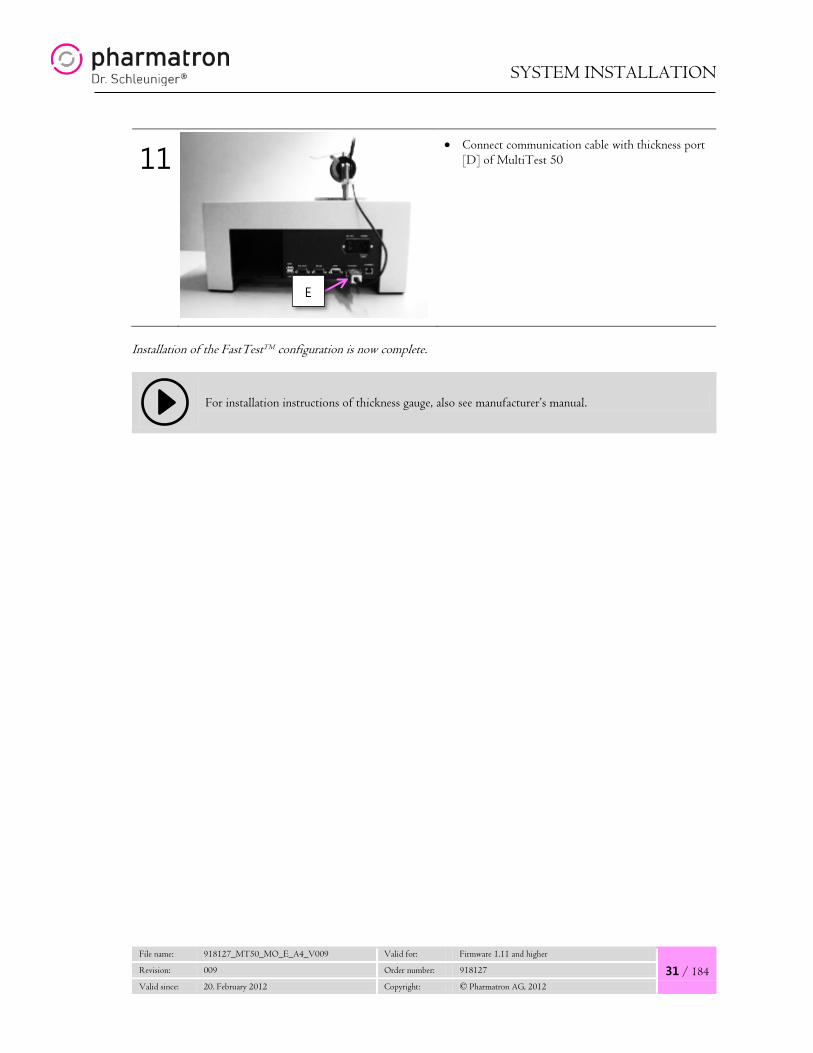
11
• Connect communication cable with thickness port [D] of MultiTest 50
Installation of the FastTestTM configuration is now complete.
For installation instructions of thickness gauge, also see manufacturer’s manual.
E
SYSTEM INSTALLATION
32 / 184
File name: 918127_MT50_MO_E_A4_V009 Valid for: Firmware 1.11 and higher
Revision: 009 Order number: 918127
Valid since: 20. February 2012 Copyright: © Pharmatron AG, 2012
2.6 Connect external balance
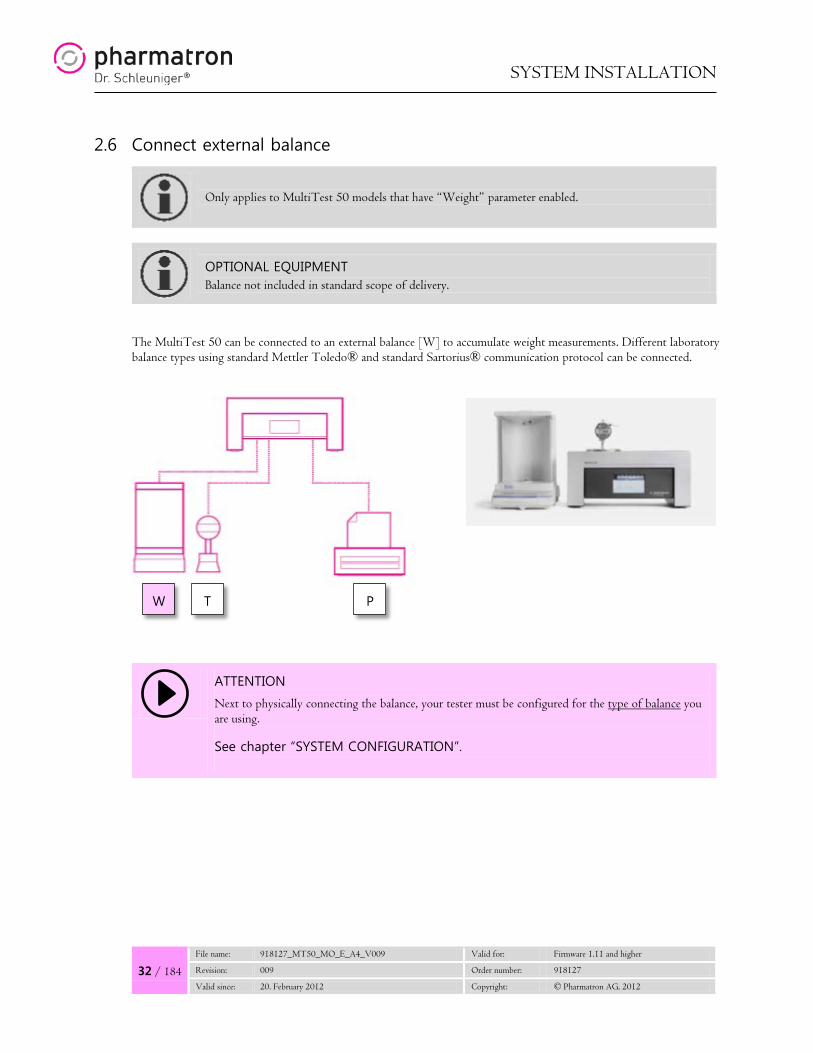
Only applies to MultiTest 50 models that have “Weight” parameter enabled.
OPTIONAL EQUIPMENT Balance not included in standard scope of delivery.
The MultiTest 50 can be connected to an external balance [W] to accumulate weight measurements. Different laboratory balance types using standard Mettler Toledo® and standard Sartorius® communication protocol can be connected.
ATTENTION
Next to physically connecting the balance, your tester must be configured for the type of balance you are using.
See chapter “SYSTEM CONFIGURATION”.
W T P

SYSTEM INSTALLATION
File name: 918127_MT50_MO_E_A4_V009 Valid for: Firmware 1.11 and higher
33 / 184 Revision: 009 Order number: 918127
Valid since: 20. February 2012 Copyright: © Pharmatron AG, 2012
2.6.1 Mettler Toledo® balance
For installation instructions of balance, see manufacturer’s manual.
Make sure you have the correct RS232 communication cable for your balance type:
RS232 connection cable
(1:1, m/f, D-Sub, 9pol)
To connect a Mettler Toledo® balance with the MultiTest 50
Info: Included with balance when ordered from Dr. Schleuniger® Pharmatron
The balance port is used to transfer data from the external balance to the MultiTest 50.
1
MultiTest 50
• Connect the RS232 cable to the balance port of the MultiTest 50
(female, D-Sub, 9pol)
2
Balance
• Connect the other end of the RS232 cable to the balance
(male, D-Sub, 9pol)

SYSTEM INSTALLATION
34 / 184
File name: 918127_MT50_MO_E_A4_V009 Valid for: Firmware 1.11 and higher
Revision: 009 Order number: 918127
Valid since: 20. February 2012 Copyright: © Pharmatron AG, 2012
2.6.2 Sartorius® balance
For installation instructions of balance, see manufacturer’s manual.
Make sure you have the correct RS232 communication cable for your balance type:
RS232 connection cable
(Null-modem cable, m: D-Sub, 25pol / f: D-Sub, 9pol)
To connect a Sartorius® balance with the MultiTest 50
The balance port is used to transfer data from the external balance to the MultiTest 50.
1
MultiTest 50
• Connect the RS232 cable to the balance port of the MultiTest 50
(female, D-Sub, 9pol)
2
Balance
• Connect the other end of the RS232 cable to the balance
(male, D-Sub, 25pol)
SYSTEM INSTALLATION
File name: 918127_MT50_MO_E_A4_V009 Valid for: Firmware 1.11 and higher
35 / 184 Revision: 009 Order number: 918127
Valid since: 20. February 2012 Copyright: © Pharmatron AG, 2012
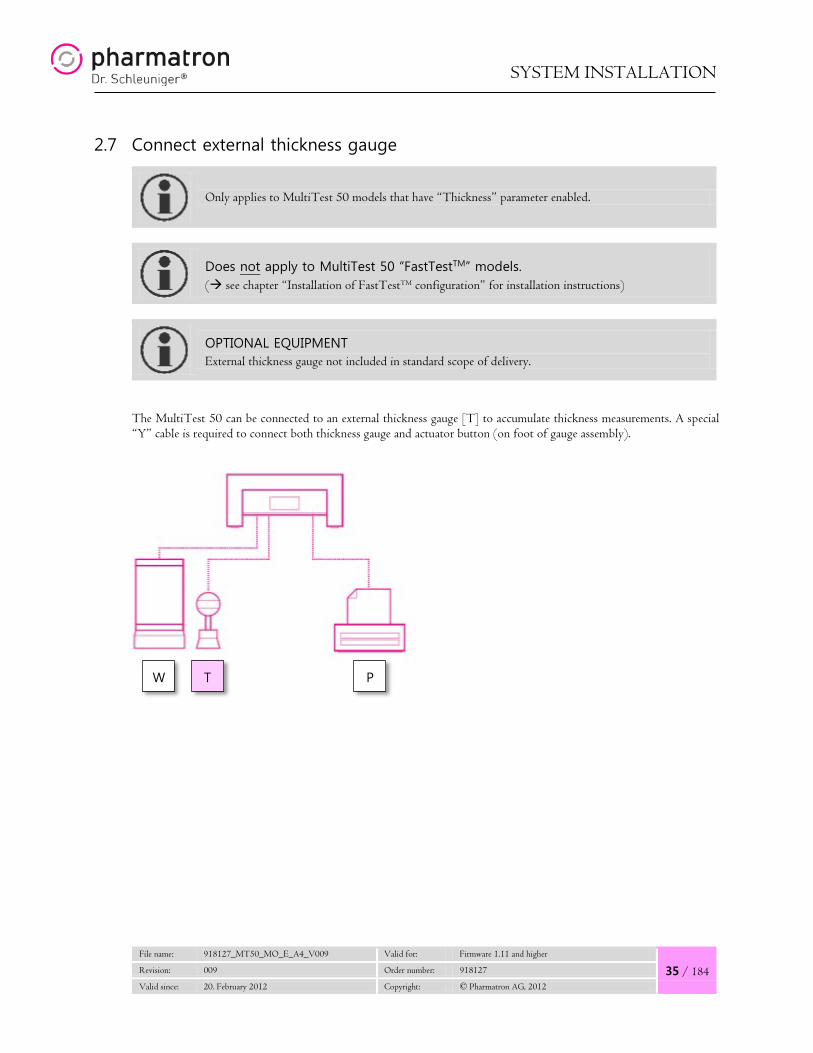
2.7 Connect external thickness gauge
Only applies to MultiTest 50 models that have “Thickness” parameter enabled.
Does not apply to MultiTest 50 “FastTestTM” models. ( see chapter “Installation of FastTestTM configuration” for installation instructions)
OPTIONAL EQUIPMENT External thickness gauge not included in standard scope of delivery.
The MultiTest 50 can be connected to an external thickness gauge [T] to accumulate thickness measurements. A special “Y” cable is required to connect both thickness gauge and actuator button (on foot of gauge assembly).
W T P

SYSTEM INSTALLATION
36 / 184
File name: 918127_MT50_MO_E_A4_V009 Valid for: Firmware 1.11 and higher
Revision: 009 Order number: 918127
Valid since: 20. February 2012 Copyright: © Pharmatron AG, 2012
Make sure you have the correct “Y” connection cable:
Connection cable “Y”, for Thickness Gauge
(m: D-Sub, 9pol / jack 3.5mm / special Mitutoyo) Special cable to connect the Mitutoyo Digimatic Indicator and actuator button of the Thickness Gauge hardware assembly with the MultiTest 50. Info: Included with Thickness Gauge when ordered from Dr. Schleuniger® Pharmatron
For installation instructions of thickness gauge, see manufacturer’s manual.
The thickness port is used to transfer data from the external thickness gauge to the MultiTest 50.
1
MultiTest 50
• Connect the RS232 cable end to the thickness port of the MultiTest 50
(male, D-Sub, 9pol)
2
Digimatic indicator (thickness gauge)
• Connect the special Mitutoyo cable end to the thickness gauge
(special Mitutoyo)
3
Thickness gauge hardware assembly
• Connect the jack cable end to the actuator button of the thickness gauge
(jack 3.5mm)
SYSTEM INSTALLATION
File name: 918127_MT50_MO_E_A4_V009 Valid for: Firmware 1.11 and higher
37 / 184 Revision: 009 Order number: 918127
Valid since: 20. February 2012 Copyright: © Pharmatron AG, 2012
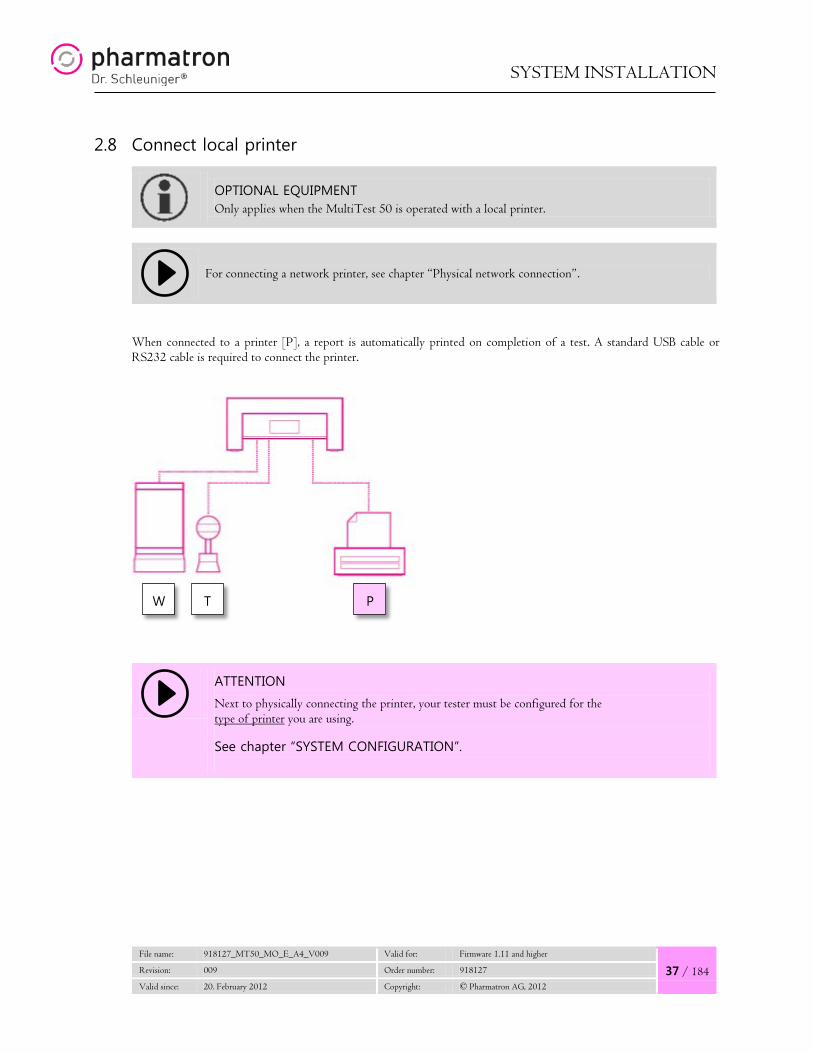
2.8 Connect local printer
OPTIONAL EQUIPMENT Only applies when the MultiTest 50 is operated with a local printer.
For connecting a network printer, see chapter “Physical network connection”.
When connected to a printer [P], a report is automatically printed on completion of a test. A standard USB cable or RS232 cable is required to connect the printer.
ATTENTION
Next to physically connecting the printer, your tester must be configured for the type of printer you are using.
See chapter “SYSTEM CONFIGURATION”.
W T P
SYSTEM INSTALLATION
38 / 184
File name: 918127_MT50_MO_E_A4_V009 Valid for: Firmware 1.11 and higher
Revision: 009 Order number: 918127
Valid since: 20. February 2012 Copyright: © Pharmatron AG, 2012
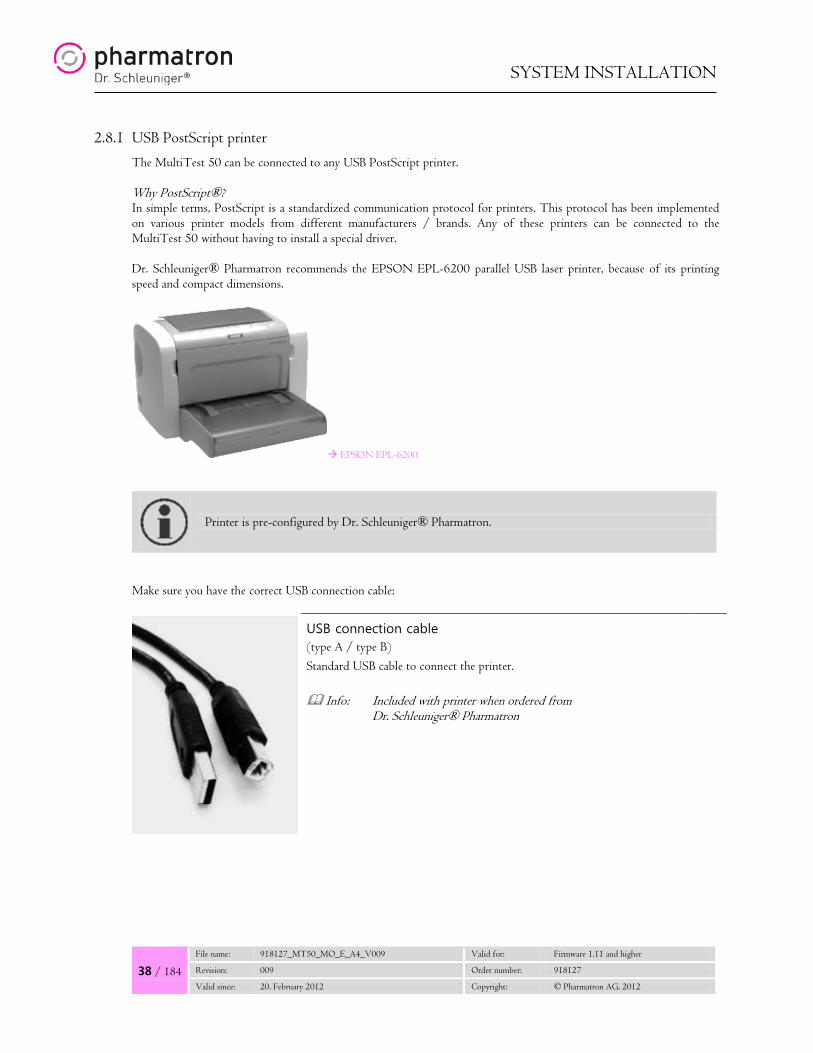
2.8.1 USB PostScript printer
The MultiTest 50 can be connected to any USB PostScript printer. Why PostScript®? In simple terms, PostScript is a standardized communication protocol for printers. This protocol has been implemented on various printer models from different manufacturers / brands. Any of these printers can be connected to the MultiTest 50 without having to install a special driver. Dr. Schleuniger® Pharmatron recommends the EPSON EPL-6200 parallel USB laser printer, because of its printing speed and compact dimensions.
EPSON EPL-6200
Printer is pre-configured by Dr. Schleuniger® Pharmatron.
Make sure you have the correct USB connection cable:
USB connection cable (type A / type B) Standard USB cable to connect the printer. Info: Included with printer when ordered from Dr. Schleuniger® Pharmatron

SYSTEM INSTALLATION
File name: 918127_MT50_MO_E_A4_V009 Valid for: Firmware 1.11 and higher
39 / 184 Revision: 009 Order number: 918127
Valid since: 20. February 2012 Copyright: © Pharmatron AG, 2012
For installation instructions of printer, see manufacturer’s manual.
1
MultiTest 50
• Connect the type A cable end to the USB1 port of the MultiTest 50
(type A)
2
Printer
• Connect the type B cable end to the USB port of the printer
(type B)
ATTENTION
Next to physically connecting the printer, your tester must be configured for the type of printer you are using.
See chapter “SYSTEM CONFIGURATION”.

SYSTEM INSTALLATION
40 / 184
File name: 918127_MT50_MO_E_A4_V009 Valid for: Firmware 1.11 and higher
Revision: 009 Order number: 918127
Valid since: 20. February 2012 Copyright: © Pharmatron AG, 2012
2.8.2 40col serial printer
The MultiTest 50 can be connected to the EPSON TM-U220D serial 9-dot matrix printer. Compact dimensions and fast printing make this printer type an all-time favourite.
Printer is pre-configured by Dr. Schleuniger® Pharmatron.
Make sure you have the correct RS232 connection cable:
RS232 connection cable
(Null-modem cable, m: D-Sub, 25pol / f: D-Sub, 9pol)
Info: Included with EPSON TM-U220D, serial printer when ordered from Dr. Schleuniger® Pharmatron
For installation instructions of printer, see manufacturer’s manual.
For correct printer configuration (dip switch settings) see Appendix of this manual
EPSON TM-U220D

SYSTEM INSTALLATION
File name: 918127_MT50_MO_E_A4_V009 Valid for: Firmware 1.11 and higher
41 / 184 Revision: 009 Order number: 918127
Valid since: 20. February 2012 Copyright: © Pharmatron AG, 2012
1
MultiTest 50
• Connect the male 9pol cable end to the RS232 port of the MultiTest 50
2
Printer
• Connect the female 25pol cable end to the printer
ATTENTION
Next to physically connecting the printer, your tester must be configured for the type of printer you are using.
See chapter “SYSTEM CONFIGURATION”.

SYSTEM INSTALLATION
42 / 184
File name: 918127_MT50_MO_E_A4_V009 Valid for: Firmware 1.11 and higher
Revision: 009 Order number: 918127
Valid since: 20. February 2012 Copyright: © Pharmatron AG, 2012
2.9 Connect power cord
The MultiTest 50 requires A/C power from an 115V or 230V source. The appropriate cable for your type of power supply is included with your tester.
WARNING – RISK OF ELECTRIC SHOCK Make sure the power switch on the back of the MultiTest 50 is OFF.
• Plug the power cord [A] into the power supply socket of the MultiTest 50.
• Plug the other end into an A/C power source.
A
OFF

NETWORK SETUP
File name: 918127_MT50_MO_E_A4_V009 Valid for: Firmware 1.11 and higher
43 / 184 Revision: 009 Order number: 918127
Valid since: 20. February 2012 Copyright: © Pharmatron AG, 2012
3. NETWORK SETUP
IMPORTANT Networking functions are only available for firmware versions 1.10 and higher.
OPTIONAL EQUIPMENT Only required when the MultiTest 50 is operated with a network printer and/or TabStatTM DataCenter software.
The MultiTest 50 can be networked to a central PC and/or a network printer (P) via your company LAN. Networking allows connection of several MultiTest 50 units to one central PC with TabStatTM DataCenter software. It is also possible for several testers to print reports on a shared network printer if required.
IMPORTANT To establish a network connection, the assistance of your IT department is required to ensure that all security settings / firewall settings etc. are configured to accept the MultiTest 50 in the network.
RECOMMENDED STEPS Because setting up a network connection requires the MultiTest 50 to be fully operational, please complete all other steps of the system installation and return to this section afterwards.
P

NETWORK SETUP
44 / 184
File name: 918127_MT50_MO_E_A4_V009 Valid for: Firmware 1.11 and higher
Revision: 009 Order number: 918127
Valid since: 20. February 2012 Copyright: © Pharmatron AG, 2012
3.1 Physical network connection
The Ethernet port is be used to transfer data to a network printer or to send / receive data from the TabStatTM DataCenter software. Only one standard Ethernet LAN cable is needed.
1
MultiTest 50
• Connect a network LAN cable to the Ethernet port of the MultiTest 50
(standard)
2
Physical network connection
• Connect the other end of the LAN cable to your company network
(standard)
3.2 Assign IP address to tester
Function not yet available.
NOTE: For network printing it is not required to assign an IP address to the tester.
CHECK WITH YOUR IT DEPARTMENT Check with your company’s IT department what IP address is still free / from which IP range you should assign the specific IP address for the MultiTest 50.
3.3 Setup for network printer
CHECK WITH YOUR IT DEPARTMENT Get the IP address of the printer you would like to connect to.

NETWORK SETUP
File name: 918127_MT50_MO_E_A4_V009 Valid for: Firmware 1.11 and higher
45 / 184 Revision: 009 Order number: 918127
Valid since: 20. February 2012 Copyright: © Pharmatron AG, 2012
Go to: Settings Printer
• Toggle with
until the Printer type reads “Net. PS”
• Enter the IP address of the network printer in the respective field.
• Save and confirm the entries with
3.4 Setup for TabStatTM DataCenter
Function not yet available.
CHECK WITH YOUR IT DEPARTMENT Get the IP address of the network PC (= host computer) where the TabStatTM DataCenter is installed.
SYSTEM CONFIGURATION / SETTINGS
46 / 184
File name: 918127_MT50_MO_E_A4_V009 Valid for: Firmware 1.11 and higher
Revision: 009 Order number: 918127
Valid since: 20. February 2012 Copyright: © Pharmatron AG, 2012
4. SYSTEM CONFIGURATION / SETTINGS
Before running tests on the MultiTest 50, you should configure the tester to your individual system setup and test requirements. It is particularly important to configure:
• External devices (e.g. balance type, printer) • Global settings ( only if you don’t want to use the factory default settings)
NOTE:
If you are not familiar with operating the MultiTest 50, read the chapter “Operating Instructions” first and then return to this chapter.
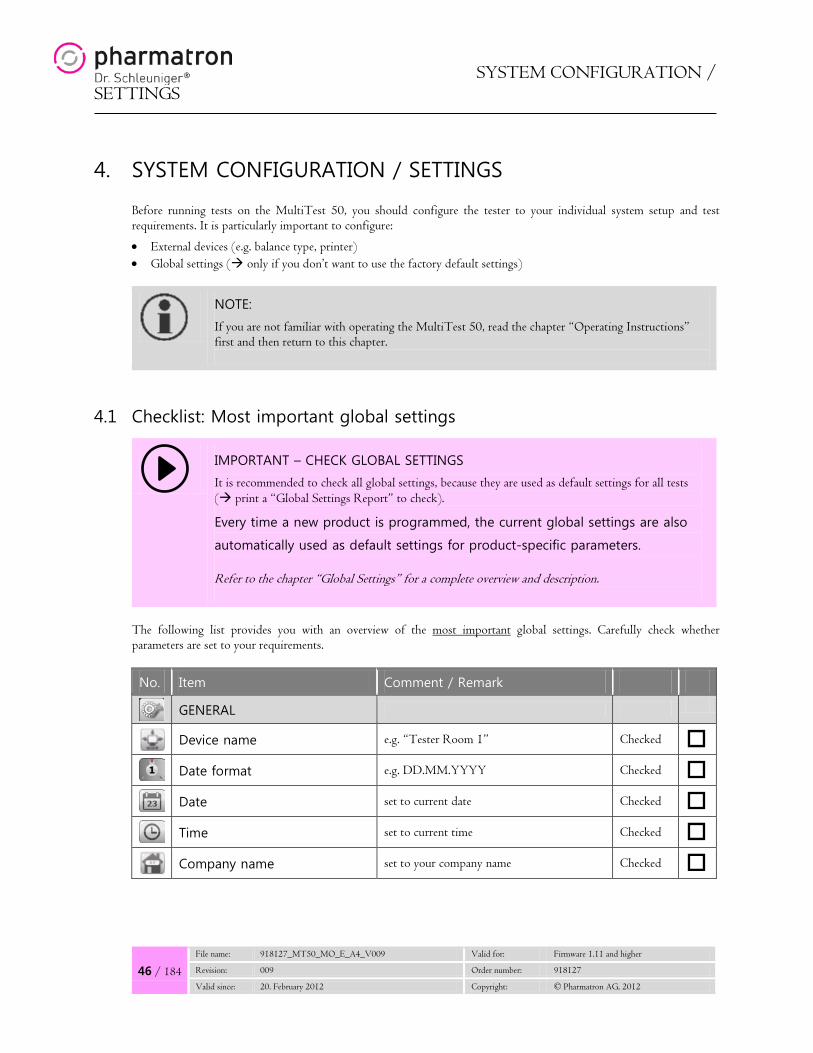
4.1 Checklist: Most important global settings
IMPORTANT – CHECK GLOBAL SETTINGS
It is recommended to check all global settings, because they are used as default settings for all tests ( print a “Global Settings Report” to check).
Every time a new product is programmed, the current global settings are also
automatically used as default settings for product-specific parameters. Refer to the chapter “Global Settings” for a complete overview and description.
The following list provides you with an overview of the most important global settings. Carefully check whether parameters are set to your requirements.
No. Item Comment / Remark
GENERAL
Device name e.g. “Tester Room 1” Checked Date format e.g. DD.MM.YYYY Checked Date set to current date Checked Time set to current time Checked Company name set to your company name Checked
OPERATING INSTRUCTIONS
File name: 918127_MT50_MO_E_A4_V009 Valid for: Firmware 1.11 and higher
47 / 184 Revision: 009 Order number: 918127
Valid since: 20. February 2012 Copyright: © Pharmatron AG, 2012
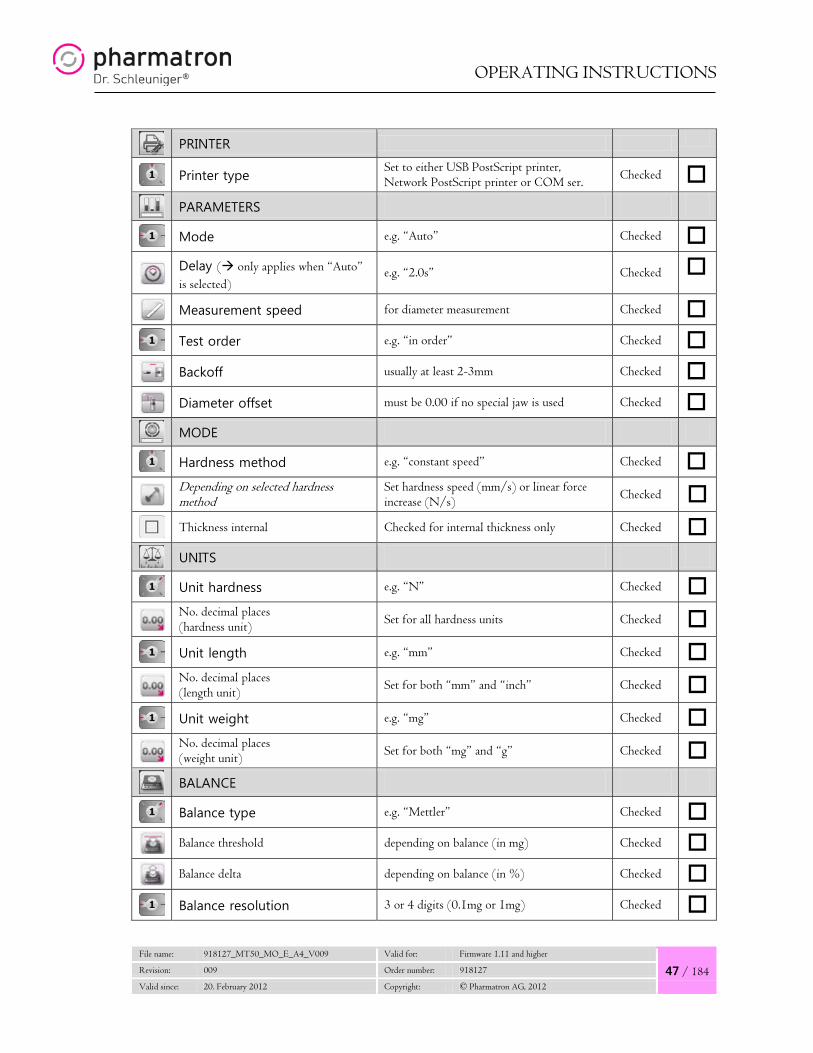
PRINTER
Printer type Set to either USB PostScript printer, Network PostScript printer or COM ser. Checked
PARAMETERS
Mode e.g. “Auto” Checked
Delay ( only applies when “Auto” is selected)
e.g. “2.0s” Checked
Measurement speed for diameter measurement Checked Test order e.g. “in order” Checked Backoff usually at least 2-3mm Checked Diameter offset must be 0.00 if no special jaw is used Checked MODE
Hardness method e.g. “constant speed” Checked
Depending on selected hardness method
Set hardness speed (mm/s) or linear force increase (N/s) Checked
Thickness internal Checked for internal thickness only Checked
UNITS
Unit hardness e.g. “N” Checked
No. decimal places (hardness unit) Set for all hardness units Checked
Unit length e.g. “mm” Checked
No. decimal places (length unit) Set for both “mm” and “inch” Checked
Unit weight e.g. “mg” Checked
No. decimal places (weight unit) Set for both “mg” and “g” Checked
BALANCE
Balance type e.g. “Mettler” Checked
Balance threshold depending on balance (in mg) Checked
Balance delta depending on balance (in %) Checked Balance resolution 3 or 4 digits (0.1mg or 1mg) Checked

SYSTEM CONFIGURATION / SETTINGS
48 / 184
File name: 918127_MT50_MO_E_A4_V009 Valid for: Firmware 1.11 and higher
Revision: 009 Order number: 918127
Valid since: 20. February 2012 Copyright: © Pharmatron AG, 2012
4.2 Select printer type
OPTIONAL EQUIPMENT Only applies when the MultiTest 50 is operated with printer.
NOTE: If you are using a network printer and have successfully executed all steps to connect to the printer (see previous chapter), you may skip this section.
Go to: Settings Printer
• Toggle to select from the following options: - USB PS (local PostScript printer) - Net. PS (network PostScript printer) - COM ser. (40 col. serial printer)
• If applicable enter the IP address of the network printer
• Confirm data change
OPERATING INSTRUCTIONS
File name: 918127_MT50_MO_E_A4_V009 Valid for: Firmware 1.11 and higher
49 / 184 Revision: 009 Order number: 918127
Valid since: 20. February 2012 Copyright: © Pharmatron AG, 2012
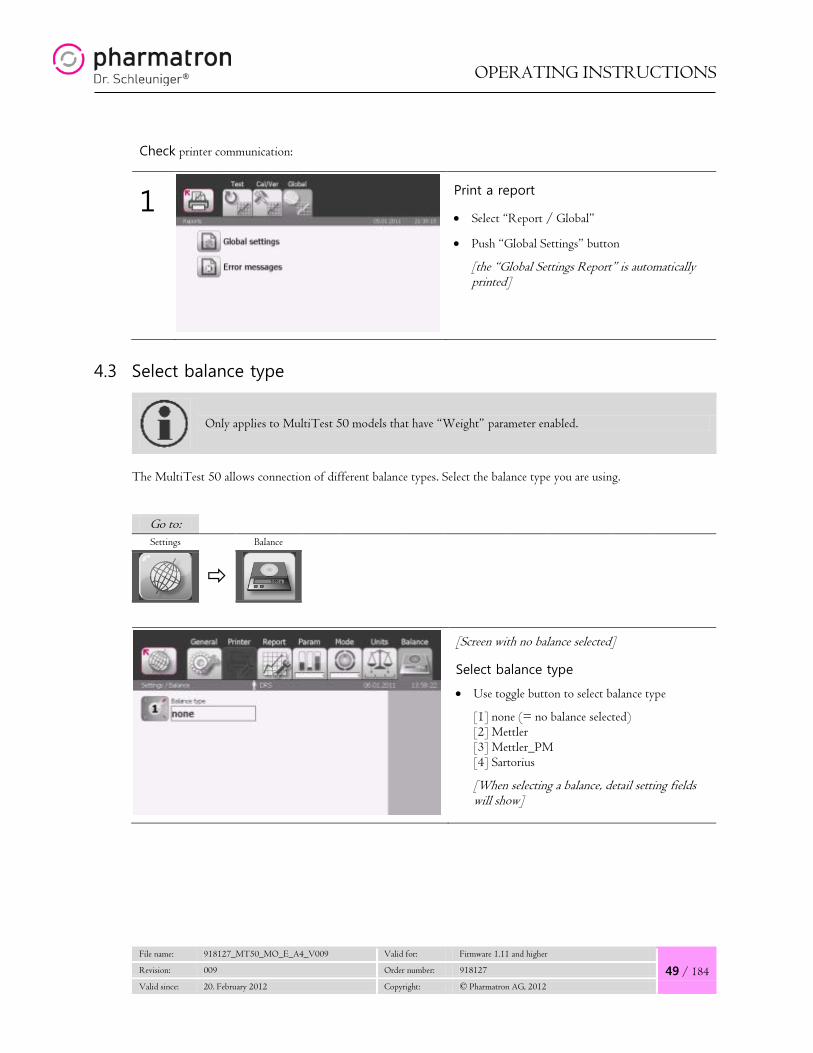
Check printer communication:
1
Print a report
• Select “Report / Global”
• Push “Global Settings” button
[the “Global Settings Report” is automatically printed]
4.3 Select balance type
Only applies to MultiTest 50 models that have “Weight” parameter enabled.
The MultiTest 50 allows connection of different balance types. Select the balance type you are using.
Go to: Settings Balance
[Screen with no balance selected]
Select balance type
• Use toggle button to select balance type
[1] none (= no balance selected) [2] Mettler [3] Mettler_PM [4] Sartorius
[When selecting a balance, detail setting fields will show]

SYSTEM CONFIGURATION / SETTINGS
50 / 184
File name: 918127_MT50_MO_E_A4_V009 Valid for: Firmware 1.11 and higher
Revision: 009 Order number: 918127
Valid since: 20. February 2012 Copyright: © Pharmatron AG, 2012
Check balance detail settings
(change if required)
• Balance threshold
• Balance delta
• Balance resolution (3 or 4 digits 0.1mg or 1mg resolution)
• Confirm data change
Check communication with balance:
1
Test setup
• Select “Test / SingleTest”
• Select “Weight”
• Push “Start” button “Start” button will become inactive other menu tabs will become inactive
If this error message appears, no communication can be established between MultiTest 50 and balance
Check communication cable
Check selected balance type
Check configuration of balance
OPERATING INSTRUCTIONS
File name: 918127_MT50_MO_E_A4_V009 Valid for: Firmware 1.11 and higher
51 / 184 Revision: 009 Order number: 918127
Valid since: 20. February 2012 Copyright: © Pharmatron AG, 2012
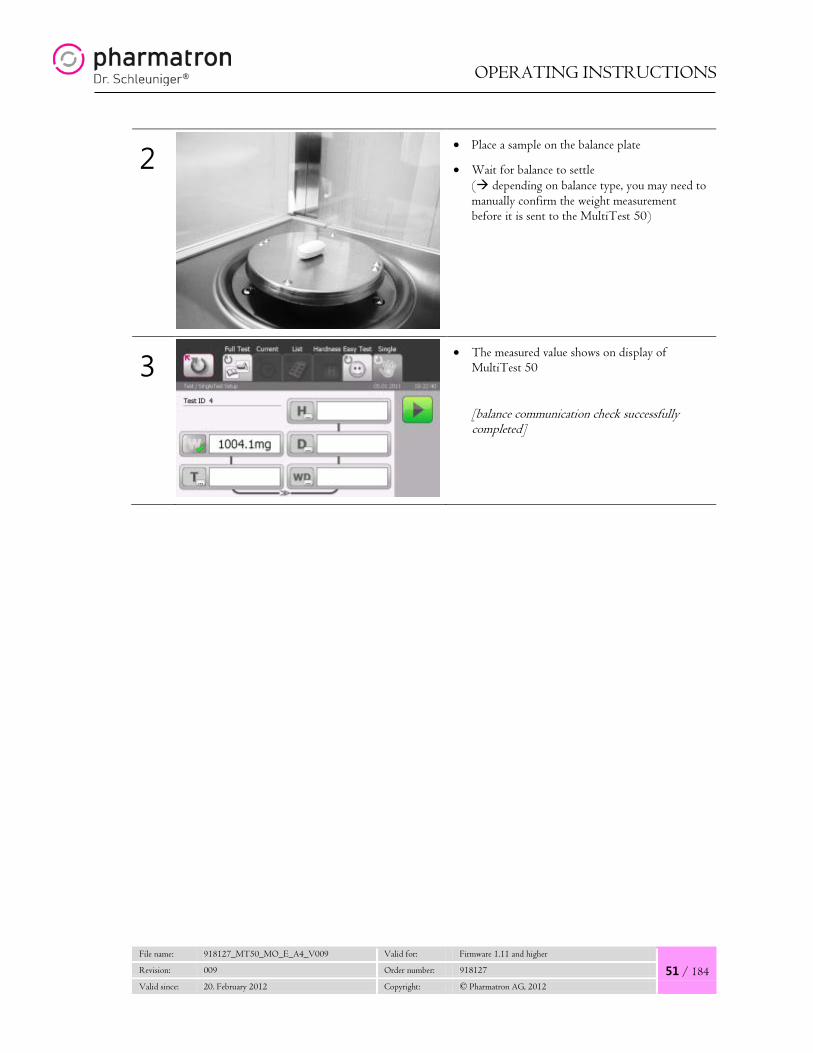
2
• Place a sample on the balance plate
• Wait for balance to settle ( depending on balance type, you may need to manually confirm the weight measurement before it is sent to the MultiTest 50)
3
• The measured value shows on display of MultiTest 50
[balance communication check successfully completed]
SYSTEM CONFIGURATION / SETTINGS
52 / 184
File name: 918127_MT50_MO_E_A4_V009 Valid for: Firmware 1.11 and higher
Revision: 009 Order number: 918127
Valid since: 20. February 2012 Copyright: © Pharmatron AG, 2012
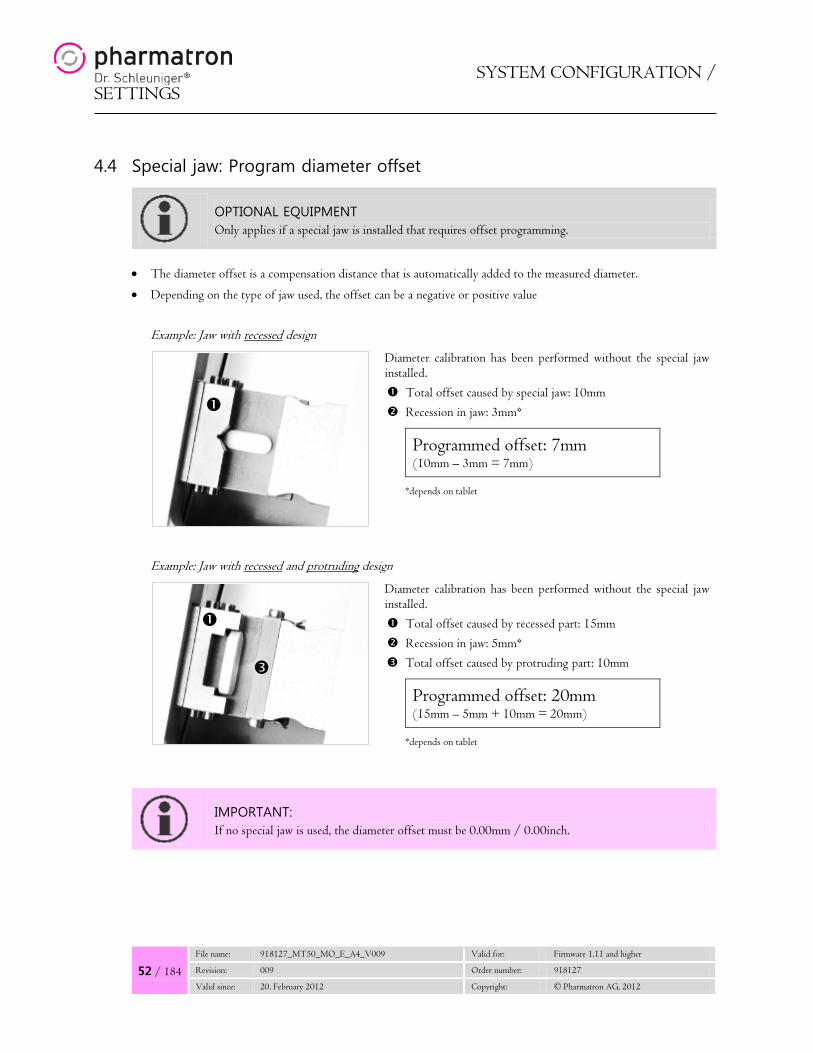
4.4 Special jaw: Program diameter offset
OPTIONAL EQUIPMENT Only applies if a special jaw is installed that requires offset programming.
• The diameter offset is a compensation distance that is automatically added to the measured diameter.
• Depending on the type of jaw used, the offset can be a negative or positive value
Example: Jaw with recessed design
Diameter calibration has been performed without the special jaw installed. Total offset caused by special jaw: 10mm Recession in jaw: 3mm*
Programmed offset: 7mm (10mm – 3mm = 7mm)
*depends on tablet
Example: Jaw with recessed and protruding design
Diameter calibration has been performed without the special jaw installed. Total offset caused by recessed part: 15mm Recession in jaw: 5mm* Total offset caused by protruding part: 10mm
Programmed offset: 20mm (15mm – 5mm + 10mm = 20mm)
*depends on tablet
IMPORTANT: If no special jaw is used, the diameter offset must be 0.00mm / 0.00inch.

OPERATING INSTRUCTIONS
File name: 918127_MT50_MO_E_A4_V009 Valid for: Firmware 1.11 and higher
53 / 184 Revision: 009 Order number: 918127
Valid since: 20. February 2012 Copyright: © Pharmatron AG, 2012
IMPORTANT: Programmed diameter offset is a global setting and applies to all width and diameter/length measurements taken (also to internal thickness, if applicable).
Go to: Settings Param
[Screen with no balance selected]
Program diameter offset
• Click on “Diameter Offset” button
[a new screen with numeric keypad opens]
• Clear currently set value
• For entering a negative value, push +/-
• Enter offset distance
• Confirm data entry
• Confirm data change

SYSTEM CONFIGURATION / SETTINGS
54 / 184
File name: 918127_MT50_MO_E_A4_V009 Valid for: Firmware 1.11 and higher
Revision: 009 Order number: 918127
Valid since: 20. February 2012 Copyright: © Pharmatron AG, 2012
4.5 Activate internal thickness measuring
Only applies to MultiTest 50 models that have “Thickness” parameter enabled.
Skip this chapter if you are using an external thickness gauge or a MultiTest 50 in
“FastTestTM” configuration!
It is possible to measure thickness internally (= without having an external thickness gauge or integrated FastTestTM thickness gauge). If this mode is activated, tablets need to be turned manually for thickness measuring prior to measuring width / diameter / hardness. Example: tablet orientation for measuring thickness internally
Example: oblong tablet laying on side
Go to: Settings Mode
[Screen with no internal thickness selected]
Select internal thickness
• Click on checkbox

OPERATING INSTRUCTIONS
File name: 918127_MT50_MO_E_A4_V009 Valid for: Firmware 1.11 and higher
55 / 184 Revision: 009 Order number: 918127
Valid since: 20. February 2012 Copyright: © Pharmatron AG, 2012
[Screen with internal thickness selected]
• Confirm data change
Check whether internal thickness has been activated:
1
Test setup
• Select “Test / SingleTest”
• Select “Thickness”
2
• Place a sample in the test area
• Push “Start”
the “Start” button becomes inactive all menu tabs and buttons become inactive moveable jaw moves to take the thickness
measuring

SYSTEM CONFIGURATION / SETTINGS
56 / 184
File name: 918127_MT50_MO_E_A4_V009 Valid for: Firmware 1.11 and higher
Revision: 009 Order number: 918127
Valid since: 20. February 2012 Copyright: © Pharmatron AG, 2012
3
• The measured value shows on display of MultiTest 50
[internal thickness check successfully completed]
4.6 Set date and time
Check the date and time displayed in the status bar of the MultiTest 50. If required, change date and/or time according to your local time / date. You can also change the format in which they are displayed.
Go to: Settings General

OPERATING INSTRUCTIONS
File name: 918127_MT50_MO_E_A4_V009 Valid for: Firmware 1.11 and higher
57 / 184 Revision: 009 Order number: 918127
Valid since: 20. February 2012 Copyright: © Pharmatron AG, 2012
5. OPERATING INSTRUCTIONS
NOTE: Some descriptions may not apply to your MultiTest 50 model This manual has been written for a MultiTest 50 that has been configured to measure:
• Weight • Thickness • Width • Diameter • Hardness
It also covers operation in “FastTestTM” configuration. If your MultiTest 50 is configured for a subset of these parameters, ignore the references to functions which are not available on your machine.
5.1 Power up / Initialization
EXTERNAL DEVICES If you use your MultiTest 50 with external devices (e.g. printer, balance, thickness gauge), switch on all external devices before switching on the tester.
• Put the power switch in ON position
• Wait until the MultiTest 50 has calibrated the home position and loaded all program parameters message in display “loading, please wait…” a status bar shows you the progress of the initialization
• When initialization / loading is complete, the start screen is displayed
ON
OPERATING INSTRUCTIONS
58 / 184
File name: 918127_MT50_MO_E_A4_V009 Valid for: Firmware 1.11 and higher
Revision: 009 Order number: 918127
Valid since: 20. February 2012 Copyright: © Pharmatron AG, 2012
5.2 Start screen / Main elements
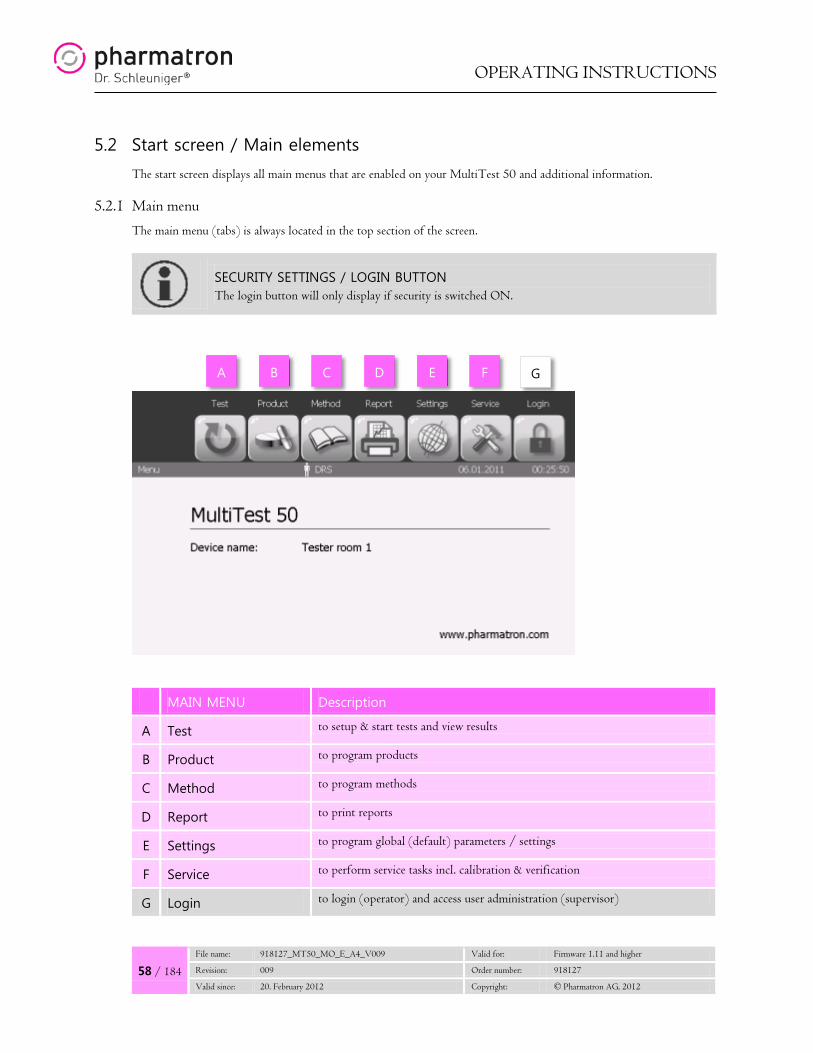
The start screen displays all main menus that are enabled on your MultiTest 50 and additional information. 5.2.1 Main menu
The main menu (tabs) is always located in the top section of the screen.
SECURITY SETTINGS / LOGIN BUTTON The login button will only display if security is switched ON.
MAIN MENU Description
A Test to setup & start tests and view results
B Product to program products
C Method to program methods
D Report to print reports
E Settings to program global (default) parameters / settings
F Service to perform service tasks incl. calibration & verification
G Login to login (operator) and access user administration (supervisor)
A B C D E F G

OPERATING INSTRUCTIONS
File name: 918127_MT50_MO_E_A4_V009 Valid for: Firmware 1.11 and higher
59 / 184 Revision: 009 Order number: 918127
Valid since: 20. February 2012 Copyright: © Pharmatron AG, 2012
5.2.2 Status bar
The status bar is always displayed in all menus.
SECURITY SETTINGS / USER The user will only display if security is switched ON.
STATUS BAR Description
1 Menu path displays the context / path where you currently are
2 User user that is currently logged in
3 Date current date
4 Time current time
1 3 4 2

OPERATING INSTRUCTIONS
60 / 184
File name: 918127_MT50_MO_E_A4_V009 Valid for: Firmware 1.11 and higher
Revision: 009 Order number: 918127
Valid since: 20. February 2012 Copyright: © Pharmatron AG, 2012
5.2.3 QuickInfo (Start screen)
On the start screen, basic information about the tester and next calibration / verification date is displayed. Note: only (I) available for firmware 1.x
MAIN MENU Description
I Device name name of MultiTest 50 ( can be set individually)
II Next calibration next calibration date
III Next verification next verification date
IV Firmware version version of currently installed firmware
I
II
III
IV

OPERATING INSTRUCTIONS
File name: 918127_MT50_MO_E_A4_V009 Valid for: Firmware 1.11 and higher
61 / 184 Revision: 009 Order number: 918127
Valid since: 20. February 2012 Copyright: © Pharmatron AG, 2012
5.3 Introduction to the touch screen interface
Operating the MultiTest 50 is intuitive and simple. This introduction explains the basic logic of the touch screen user interface to better understand how to navigate through the menu and how the MultiTest 50 will respond to your user inputs.
5.3.1 Menu levels
The MultiTest 50 has 2-3 vertical and up to 7 horizontal menu levels. Users can see the context of their current operation at all times.
Leve
l 1
Leve
l 2
…
Leve
l 3
…
5.3.2 Menu navigation
• To navigate to a menu, simply click on the respective menu tab.
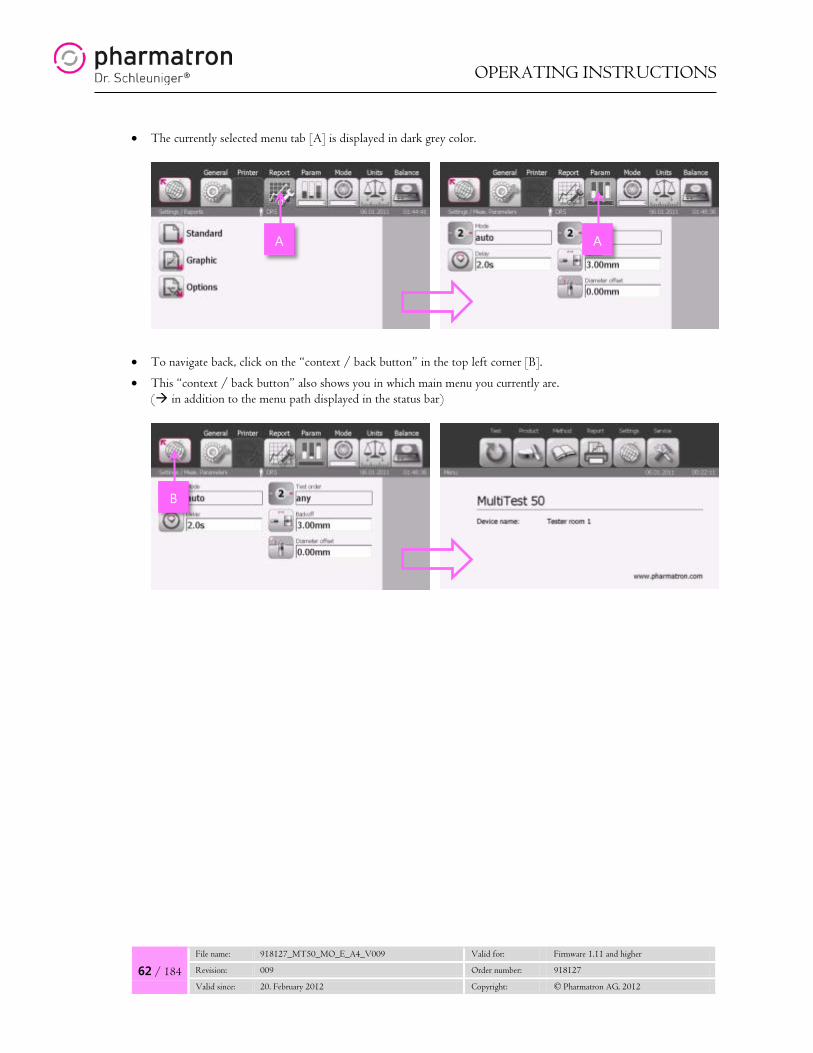
OPERATING INSTRUCTIONS
62 / 184
File name: 918127_MT50_MO_E_A4_V009 Valid for: Firmware 1.11 and higher
Revision: 009 Order number: 918127
Valid since: 20. February 2012 Copyright: © Pharmatron AG, 2012
• The currently selected menu tab [A] is displayed in dark grey color.
• To navigate back, click on the “context / back button” in the top left corner [B].
• This “context / back button” also shows you in which main menu you currently are. ( in addition to the menu path displayed in the status bar)
A A
B
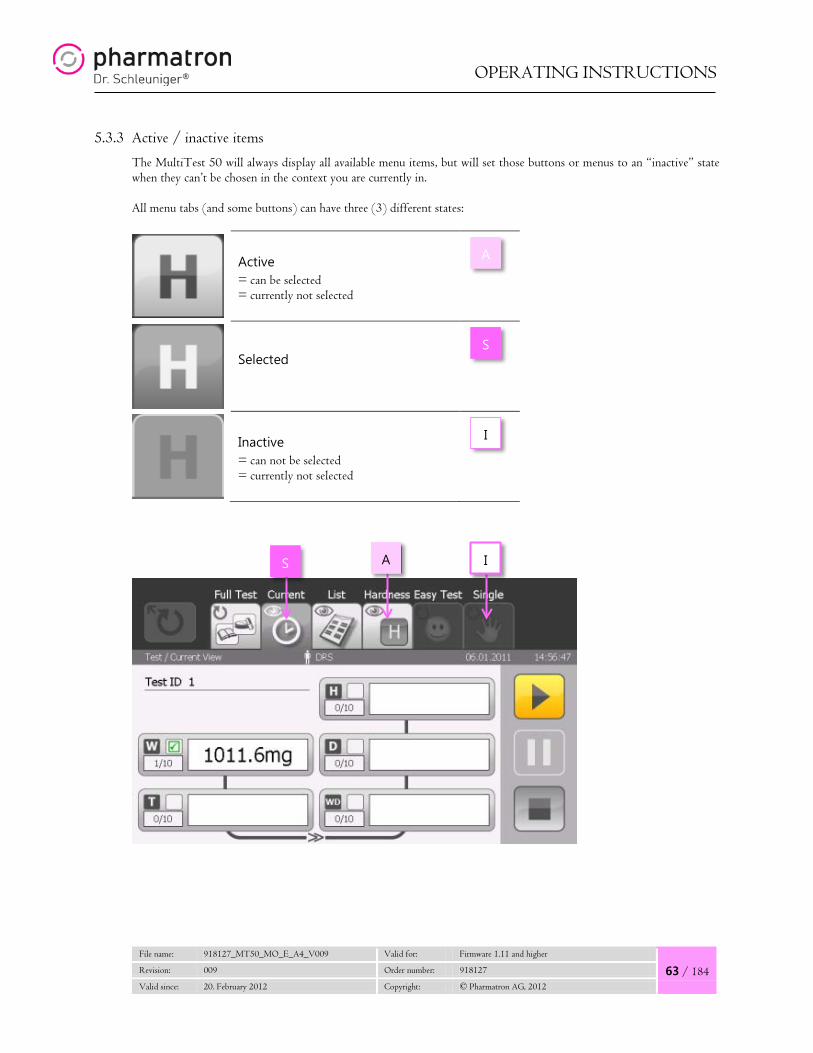
OPERATING INSTRUCTIONS
File name: 918127_MT50_MO_E_A4_V009 Valid for: Firmware 1.11 and higher
63 / 184 Revision: 009 Order number: 918127
Valid since: 20. February 2012 Copyright: © Pharmatron AG, 2012
5.3.3 Active / inactive items
The MultiTest 50 will always display all available menu items, but will set those buttons or menus to an “inactive” state when they can’t be chosen in the context you are currently in. All menu tabs (and some buttons) can have three (3) different states:
Active = can be selected = currently not selected
Selected
Inactive = can not be selected = currently not selected
A
S
I
S A I

OPERATING INSTRUCTIONS
64 / 184
File name: 918127_MT50_MO_E_A4_V009 Valid for: Firmware 1.11 and higher
Revision: 009 Order number: 918127
Valid since: 20. February 2012 Copyright: © Pharmatron AG, 2012
Example: Test setup & views
FullTest – Test setup
• Menu tabs to select a test are active
• Context / back button is active
• Views are inactive
FullTest – Running
• Menu tabs to select a test are inactive ( still possible to view FullTest setup)
• Context / back button is inactive
• Views are active
EXAMPLE – NOTE “INTELLIGENT OPERATOR SUPPORT”
• Note that the start button has changed color to yellow ( when pushed, the next measurement in the test sequence is taken)
• Note that “Pause” and “Abort” buttons are displayed
• Note that “Internal Thickness” is active ( otherwise “Start” button would still be green)

OPERATING INSTRUCTIONS
File name: 918127_MT50_MO_E_A4_V009 Valid for: Firmware 1.11 and higher
65 / 184 Revision: 009 Order number: 918127
Valid since: 20. February 2012 Copyright: © Pharmatron AG, 2012
5.3.4 Confirm / Discard data change
Whenever you make a permanent data change, you are required to confirm this data change before it is saved. If “Discard” is clicked, no data change is made.
NOTE: Every time you make a permanent data change, the MultiTest 50 will automatically set the “context / back button” to an inactive state. This means you cannot exit the menu without either confirming or aborting your data change.
Example: Behavior when a setting is changed ( “Thickness internal” selected)
No changes made
• Context / back button is active
• All menu tabs are active
Data change made
• Confirm / Discard data change buttons are displayed
• Context / back button is inactive
• All menu tabs are active
5.3.5 Selection buttons
Buttons that allow you to choose from a selection. This may include searching an existing list, but will not allow you to create new data entries.

OPERATING INSTRUCTIONS
66 / 184
File name: 918127_MT50_MO_E_A4_V009 Valid for: Firmware 1.11 and higher
Revision: 009 Order number: 918127
Valid since: 20. February 2012 Copyright: © Pharmatron AG, 2012
Example: Selection button in “FullTest” setup
Selection button
• Selection buttons always have a small magenta arrow in the bottom right
[Select product]
• When selection button is clicked, a selection menu appears
• Search / choose from programmed or predefined data
EXAMPLE – NOTE “INTELLIGENT OPERATOR SUPPORT”
• The currently loaded product is pre-selected
• In the preview (below selection dropdown), nominal values of the selected product are shown

OPERATING INSTRUCTIONS
File name: 918127_MT50_MO_E_A4_V009 Valid for: Firmware 1.11 and higher
67 / 184 Revision: 009 Order number: 918127
Valid since: 20. February 2012 Copyright: © Pharmatron AG, 2012
5.3.6 Data entry buttons / Alpha-numeric keypad
Buttons that allow you to enter any text (= both numeric values and characters). A alpha-numeric keypad will display for data entry. You can switch between 3 layers:
• Capital letters • Small letters • Numbers and special characters Example: Data entry button in “FullTest” setup
Data entry button
• Data entry buttons never have a magenta arrow
[Enter container]
• When the data entry button is clicked, an alpha-numeric keypad appears for free text / data entry
• To clear all text use “sweeper”
• To delete last character use “backspace”
Switch between keypad layers
• Use “layer toggle” to switch between capital letters / small letters / numbers & special characters
• The “layer toggle” always displays the next possible layer

OPERATING INSTRUCTIONS
68 / 184
File name: 918127_MT50_MO_E_A4_V009 Valid for: Firmware 1.11 and higher
Revision: 009 Order number: 918127
Valid since: 20. February 2012 Copyright: © Pharmatron AG, 2012
• Confirm data entry
or
• Discard data entry ( no changes made)
[changes discarded in example]
EXAMPLE – NOTE “INTELLIGENT OPERATOR SUPPORT”
The icon in the keypad corresponds with the button that has been clicked ( context is maintained)
5.3.7 Data entry buttons / Numeric keypad
Buttons that only allow you to enter numeric values. A numeric keypad will display for data entry. You can only confirm values that are within the possible range of data entries.
Example: Data entry button in “Product / Hardness”:
Data entry button
• Data entry buttons never have a magenta arrow
[Enter nominal value]
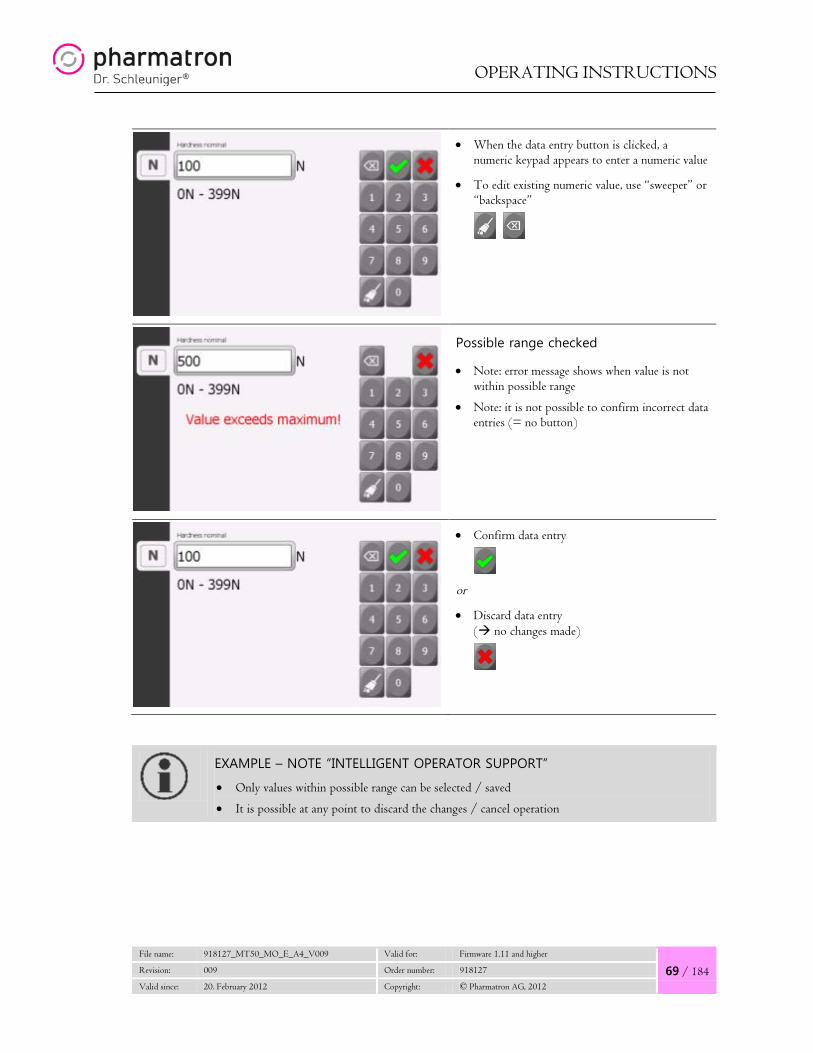
OPERATING INSTRUCTIONS
File name: 918127_MT50_MO_E_A4_V009 Valid for: Firmware 1.11 and higher
69 / 184 Revision: 009 Order number: 918127
Valid since: 20. February 2012 Copyright: © Pharmatron AG, 2012
• When the data entry button is clicked, a numeric keypad appears to enter a numeric value
• To edit existing numeric value, use “sweeper” or “backspace”
Possible range checked
• Note: error message shows when value is not within possible range
• Note: it is not possible to confirm incorrect data entries (= no button)
• Confirm data entry
or
• Discard data entry ( no changes made)
EXAMPLE – NOTE “INTELLIGENT OPERATOR SUPPORT”
• Only values within possible range can be selected / saved
• It is possible at any point to discard the changes / cancel operation

OPERATING INSTRUCTIONS
70 / 184
File name: 918127_MT50_MO_E_A4_V009 Valid for: Firmware 1.11 and higher
Revision: 009 Order number: 918127
Valid since: 20. February 2012 Copyright: © Pharmatron AG, 2012
5.3.8 Toggle buttons
Toggle buttons are a type of selection button where only a limited number of choices are available. Each time you push the button, a different value is selected.
Example: Toggle button in “Settings / Parameter” “Mode”:
Toggle button
• Push toggle button to set to next choice
[Choice 2 selected]
• Push toggle button again to set to next choice
[Choice 1 selected]
• Note: because a change has been made to the settings, you need to click “confirm” or “discard” before you can exit the settings menu
[change discarded in example]
EXAMPLE – NOTE “INTELLIGENT OPERATOR SUPPORT”
It is possible to make several data changes and confirm all of them simultaneously

OPERATING INSTRUCTIONS
File name: 918127_MT50_MO_E_A4_V009 Valid for: Firmware 1.11 and higher
71 / 184 Revision: 009 Order number: 918127
Valid since: 20. February 2012 Copyright: © Pharmatron AG, 2012
5.3.9 Checkboxes
The most simple form of a selection button (= on / off).
Example: Checkbox in “Settings / Mode” “Thickness internal”
Toggle button
• Not selected ( no checkmark)
[OFF - no selection]
• Selected ( with checkmark)
[ON – selected]
• Note: because a change has been made to the settings, you need to click “confirm” or “discard” before you can exit the settings menu
[change discarded in example]
EXAMPLE – NOTE “INTELLIGENT OPERATOR SUPPORT”
It is possible to make several data changes and confirm all of them simultaneously

OPERATING INSTRUCTIONS
72 / 184
File name: 918127_MT50_MO_E_A4_V009 Valid for: Firmware 1.11 and higher
Revision: 009 Order number: 918127
Valid since: 20. February 2012 Copyright: © Pharmatron AG, 2012
5.4 Product
NOTE:
If you are using the MultiTest 50 in combination with the TabStatTM DataCenter, all product specifications are managed on a central PC.
5.4.1 What is a product?
The MultiTest 50 allows you to program up to 100 products, which can be retrieved for fast test setup in the “FullTest”. The product includes all specifications for each parameter and additional product information. Product specifications:
• General information (e.g. product name, product description)
• How the product should be measured (e.g. in “Auto mode”, using “Constant speed”)
• Which reporting template should be used (e.g. including graphics)
• T1/T2/PL limits for each parameter o Weight o Thickness o Width o Diameter / Length o Hardness
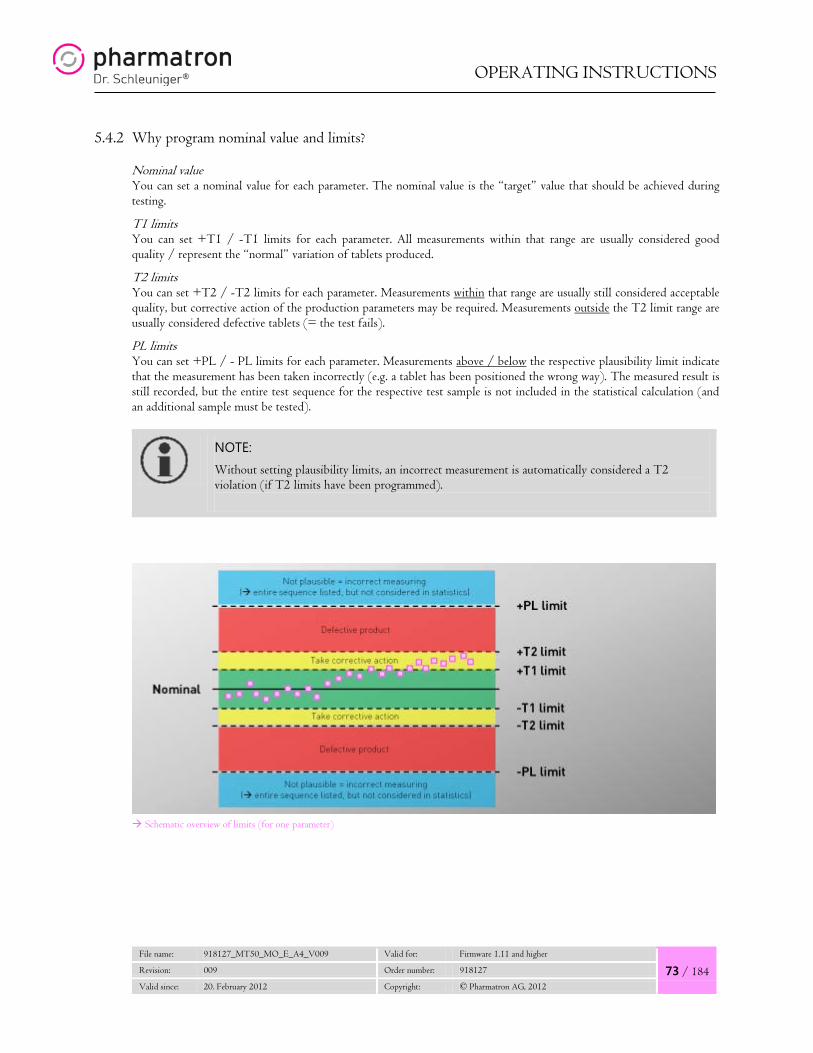
OPERATING INSTRUCTIONS
File name: 918127_MT50_MO_E_A4_V009 Valid for: Firmware 1.11 and higher
73 / 184 Revision: 009 Order number: 918127
Valid since: 20. February 2012 Copyright: © Pharmatron AG, 2012
5.4.2 Why program nominal value and limits?
Nominal value You can set a nominal value for each parameter. The nominal value is the “target” value that should be achieved during testing.
T1 limits You can set +T1 / -T1 limits for each parameter. All measurements within that range are usually considered good quality / represent the “normal” variation of tablets produced.
T2 limits You can set +T2 / -T2 limits for each parameter. Measurements within that range are usually still considered acceptable quality, but corrective action of the production parameters may be required. Measurements outside the T2 limit range are usually considered defective tablets (= the test fails).
PL limits You can set +PL / - PL limits for each parameter. Measurements above / below the respective plausibility limit indicate that the measurement has been taken incorrectly (e.g. a tablet has been positioned the wrong way). The measured result is still recorded, but the entire test sequence for the respective test sample is not included in the statistical calculation (and an additional sample must be tested).
NOTE:
Without setting plausibility limits, an incorrect measurement is automatically considered a T2 violation (if T2 limits have been programmed).
Schematic overview of limits (for one parameter)
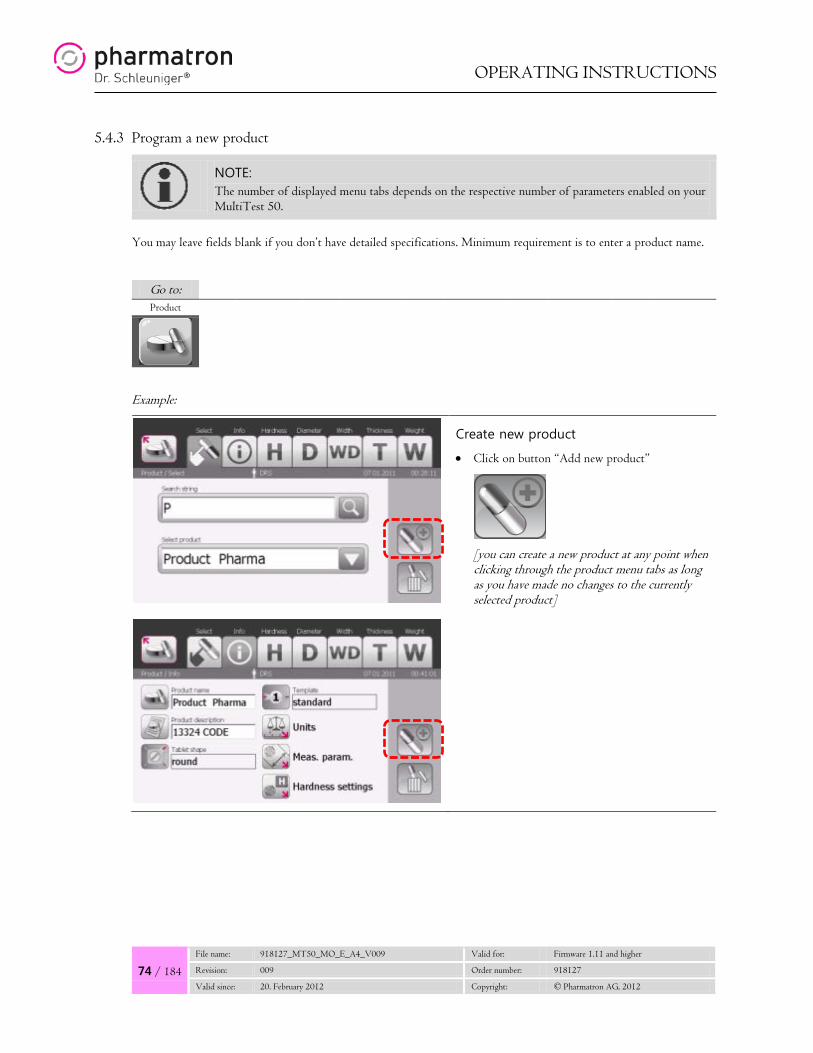
OPERATING INSTRUCTIONS
74 / 184
File name: 918127_MT50_MO_E_A4_V009 Valid for: Firmware 1.11 and higher
Revision: 009 Order number: 918127
Valid since: 20. February 2012 Copyright: © Pharmatron AG, 2012
5.4.3 Program a new product
NOTE: The number of displayed menu tabs depends on the respective number of parameters enabled on your MultiTest 50.
You may leave fields blank if you don’t have detailed specifications. Minimum requirement is to enter a product name.
Go to: Product
Example:
Create new product
• Click on button “Add new product”
[you can create a new product at any point when clicking through the product menu tabs as long as you have made no changes to the currently selected product]
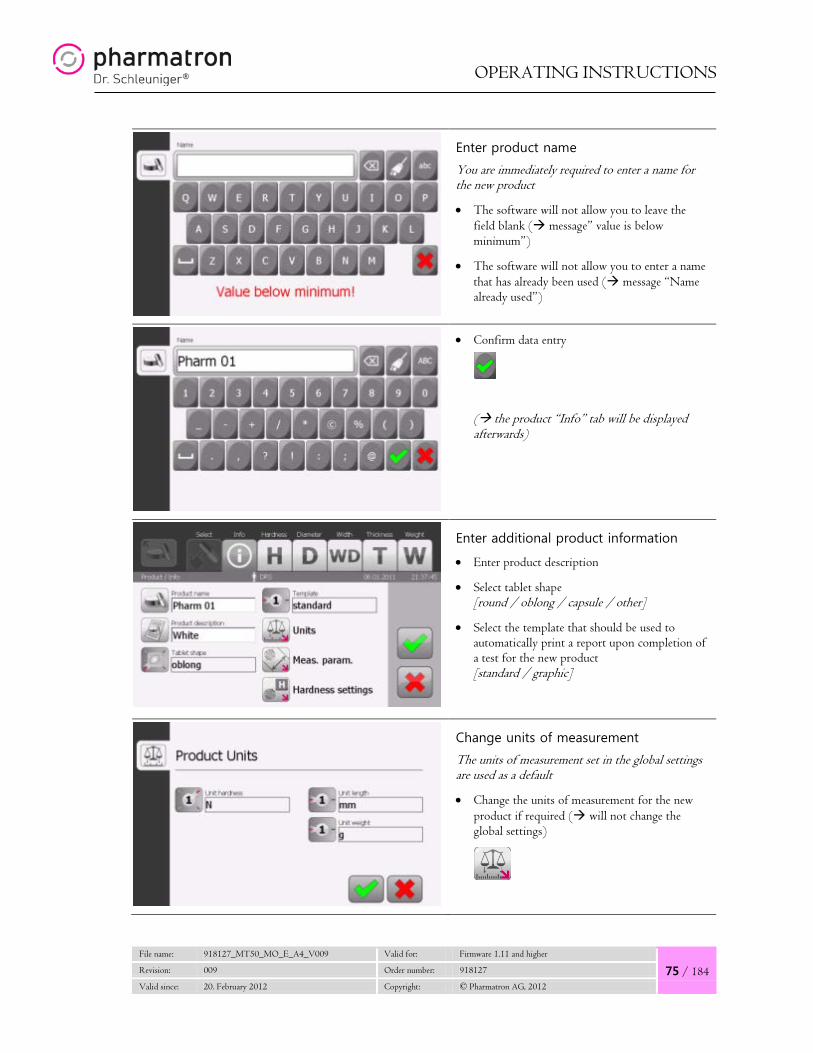
OPERATING INSTRUCTIONS
File name: 918127_MT50_MO_E_A4_V009 Valid for: Firmware 1.11 and higher
75 / 184 Revision: 009 Order number: 918127
Valid since: 20. February 2012 Copyright: © Pharmatron AG, 2012
Enter product name
You are immediately required to enter a name for the new product
• The software will not allow you to leave the field blank ( message” value is below minimum”)
• The software will not allow you to enter a name that has already been used ( message “Name already used”)
• Confirm data entry
( the product “Info” tab will be displayed afterwards)
Enter additional product information
• Enter product description
• Select tablet shape [round / oblong / capsule / other]
• Select the template that should be used to automatically print a report upon completion of a test for the new product [standard / graphic]
Change units of measurement
The units of measurement set in the global settings are used as a default
• Change the units of measurement for the new product if required ( will not change the global settings)

OPERATING INSTRUCTIONS
76 / 184
File name: 918127_MT50_MO_E_A4_V009 Valid for: Firmware 1.11 and higher
Revision: 009 Order number: 918127
Valid since: 20. February 2012 Copyright: © Pharmatron AG, 2012
Change measurement parameters
The measurement parameters set in the global settings are used as a default
• Change the measurement parameters for the new product if required (e.g. “Auto mode”)
Change hardness settings
The hardness settings set in the global settings are used as a default
• Change the hardness settings for the new product if required (e.g. change measuring principle)
Hardness: Enter specifications
• Enter nominal value first
• Choose whether to enter the limits in absolute values (N) or in percentage (%) of nominal value
[Toggle button]
• Enter limits
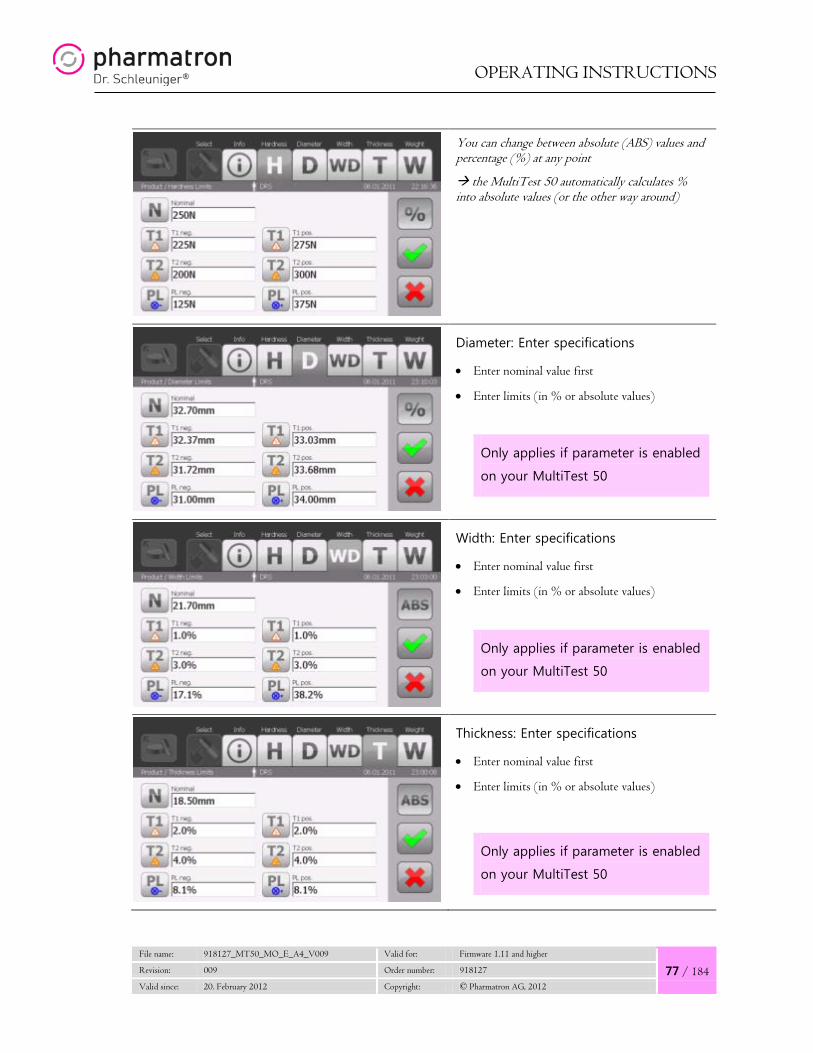
OPERATING INSTRUCTIONS
File name: 918127_MT50_MO_E_A4_V009 Valid for: Firmware 1.11 and higher
77 / 184 Revision: 009 Order number: 918127
Valid since: 20. February 2012 Copyright: © Pharmatron AG, 2012
You can change between absolute (ABS) values and percentage (%) at any point
the MultiTest 50 automatically calculates % into absolute values (or the other way around)
Diameter: Enter specifications
• Enter nominal value first
• Enter limits (in % or absolute values)
Only applies if parameter is enabled
on your MultiTest 50
Width: Enter specifications
• Enter nominal value first
• Enter limits (in % or absolute values)
Only applies if parameter is enabled
on your MultiTest 50
Thickness: Enter specifications
• Enter nominal value first
• Enter limits (in % or absolute values)
Only applies if parameter is enabled
on your MultiTest 50
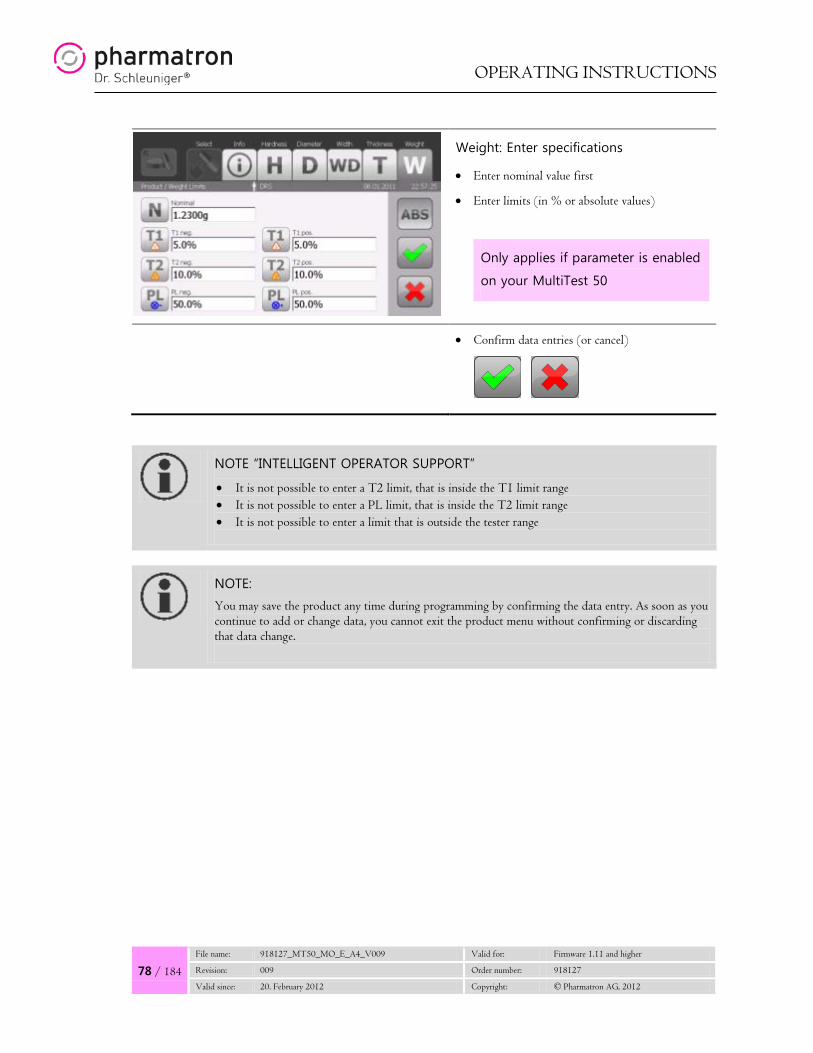
OPERATING INSTRUCTIONS
78 / 184
File name: 918127_MT50_MO_E_A4_V009 Valid for: Firmware 1.11 and higher
Revision: 009 Order number: 918127
Valid since: 20. February 2012 Copyright: © Pharmatron AG, 2012
Weight: Enter specifications
• Enter nominal value first
• Enter limits (in % or absolute values)
Only applies if parameter is enabled
on your MultiTest 50
• Confirm data entries (or cancel)
NOTE “INTELLIGENT OPERATOR SUPPORT”
• It is not possible to enter a T2 limit, that is inside the T1 limit range • It is not possible to enter a PL limit, that is inside the T2 limit range • It is not possible to enter a limit that is outside the tester range
NOTE:
You may save the product any time during programming by confirming the data entry. As soon as you continue to add or change data, you cannot exit the product menu without confirming or discarding that data change.

OPERATING INSTRUCTIONS
File name: 918127_MT50_MO_E_A4_V009 Valid for: Firmware 1.11 and higher
79 / 184 Revision: 009 Order number: 918127
Valid since: 20. February 2012 Copyright: © Pharmatron AG, 2012
5.4.4 Edit an existing product
You can edit existing products by simply selecting the product and making the required changes. As soon as you have made the first change, the MultiTest 50 requires you to confirm the changes made before you can exit the menu.
Go to: Product
Example:
Select product
• If you have a lot of programmed products, narrow down the selection displayed in the dropdown by entering the first 1-3 characters of the product you are looking for into the search field
• Select product from dropdown list
• All product specifications are now loaded and can be viewed by clicking through the menu tabs
[you can exit the product menu at any point with the “context / back button” in the product menu bar]

OPERATING INSTRUCTIONS
80 / 184
File name: 918127_MT50_MO_E_A4_V009 Valid for: Firmware 1.11 and higher
Revision: 009 Order number: 918127
Valid since: 20. February 2012 Copyright: © Pharmatron AG, 2012
Edit product
• As soon as you make a change to any of the fields (in any menu tab), you cannot exit the product menu without confirming or discarding your data change
[confirm / discard buttons display]
• You can change all product specifications if required
• Confirm your data changes (or discard all changes)
NOTE “INTELLIGENT OPERATOR SUPPORT”
When changing the product name, the MultiTest 50 will automatically check whether that name is already in use and notify the operator immediately while making the change.

OPERATING INSTRUCTIONS
File name: 918127_MT50_MO_E_A4_V009 Valid for: Firmware 1.11 and higher
81 / 184 Revision: 009 Order number: 918127
Valid since: 20. February 2012 Copyright: © Pharmatron AG, 2012
5.4.5 Delete an existing product
Go to: Product
Example:
Select product
• If you have a lot of programmed products, narrow down the selection displayed in the dropdown by entering the first 1-3 characters of the product you are looking for into the search field
• Select product from dropdown list
• All product specifications are now loaded and can be viewed by clicking through the menu tabs (if required)
[you can exit the product menu at any point with the “context / back button” in the product menu bar]
Delete product
• Click the “Delete” button to delete the currently loaded product
[you can delete the product at any point when clicking through the menu tabs]

OPERATING INSTRUCTIONS
82 / 184
File name: 918127_MT50_MO_E_A4_V009 Valid for: Firmware 1.11 and higher
Revision: 009 Order number: 918127
Valid since: 20. February 2012 Copyright: © Pharmatron AG, 2012
• Confirm the message that you want to delete the product (or cancel)
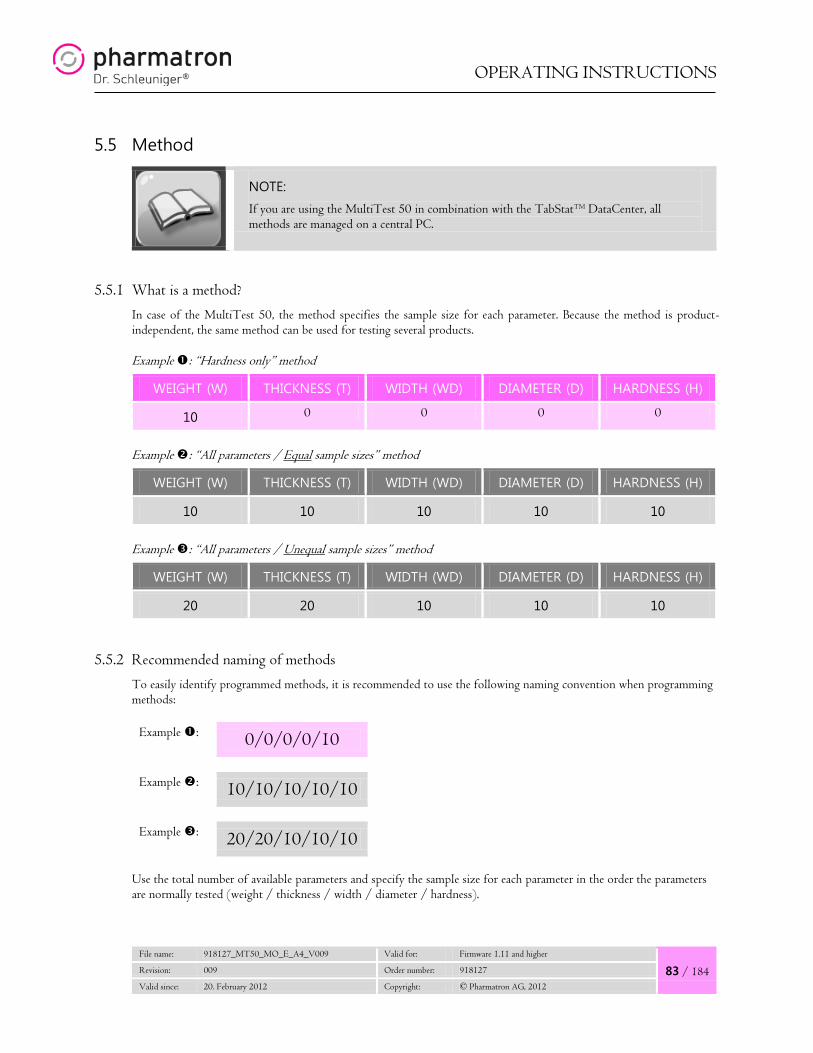
OPERATING INSTRUCTIONS
File name: 918127_MT50_MO_E_A4_V009 Valid for: Firmware 1.11 and higher
83 / 184 Revision: 009 Order number: 918127
Valid since: 20. February 2012 Copyright: © Pharmatron AG, 2012
5.5 Method
NOTE:
If you are using the MultiTest 50 in combination with the TabStatTM DataCenter, all methods are managed on a central PC.
5.5.1 What is a method?
In case of the MultiTest 50, the method specifies the sample size for each parameter. Because the method is product-independent, the same method can be used for testing several products. Example : “Hardness only” method
WEIGHT (W) THICKNESS (T) WIDTH (WD) DIAMETER (D) HARDNESS (H)
10 0 0 0 0
Example : “All parameters / Equal sample sizes” method
WEIGHT (W) THICKNESS (T) WIDTH (WD) DIAMETER (D) HARDNESS (H)
10 10 10 10 10
Example : “All parameters / Unequal sample sizes” method
WEIGHT (W) THICKNESS (T) WIDTH (WD) DIAMETER (D) HARDNESS (H)
20 20 10 10 10
5.5.2 Recommended naming of methods
To easily identify programmed methods, it is recommended to use the following naming convention when programming methods:
Example : 0/0/0/0/10
Example : 10/10/10/10/10
Example : 20/20/10/10/10
Use the total number of available parameters and specify the sample size for each parameter in the order the parameters are normally tested (weight / thickness / width / diameter / hardness).
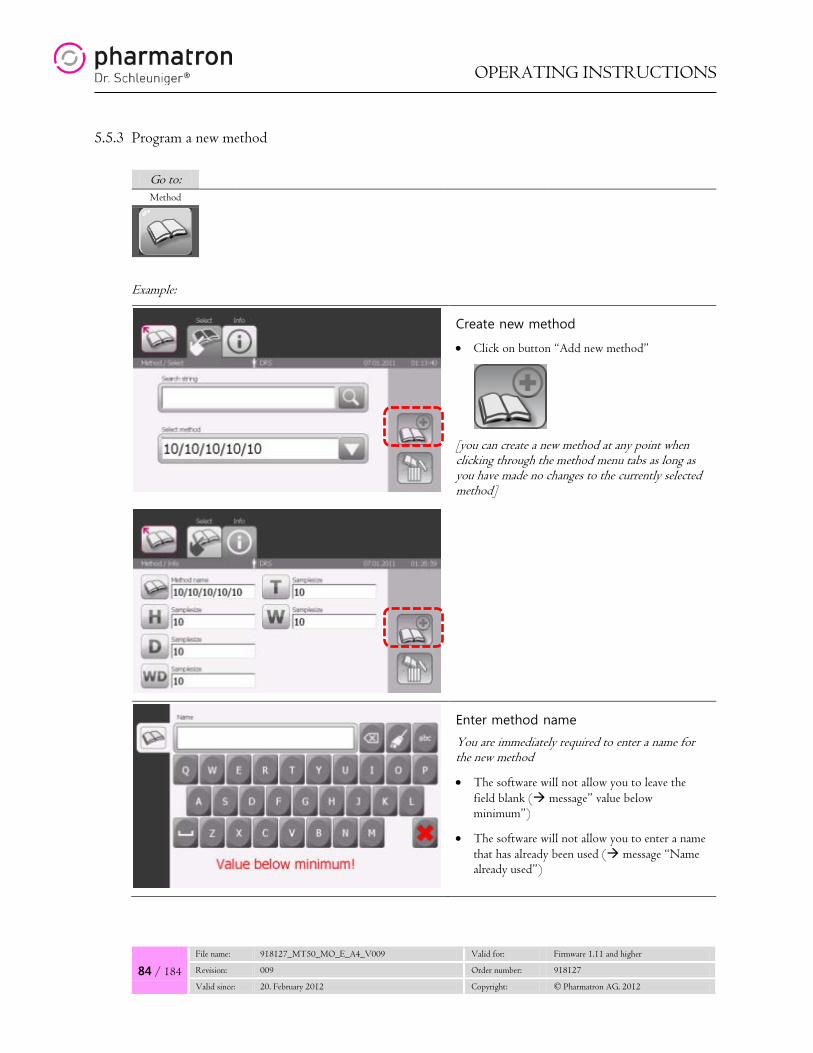
OPERATING INSTRUCTIONS
84 / 184
File name: 918127_MT50_MO_E_A4_V009 Valid for: Firmware 1.11 and higher
Revision: 009 Order number: 918127
Valid since: 20. February 2012 Copyright: © Pharmatron AG, 2012
5.5.3 Program a new method
Go to: Method
Example:
Create new method
• Click on button “Add new method”
[you can create a new method at any point when clicking through the method menu tabs as long as you have made no changes to the currently selected method]
Enter method name
You are immediately required to enter a name for the new method
• The software will not allow you to leave the field blank ( message” value below minimum”)
• The software will not allow you to enter a name that has already been used ( message “Name already used”)

OPERATING INSTRUCTIONS
File name: 918127_MT50_MO_E_A4_V009 Valid for: Firmware 1.11 and higher
85 / 184 Revision: 009 Order number: 918127
Valid since: 20. February 2012 Copyright: © Pharmatron AG, 2012
• Confirm data entry
( the method “Info” tab will be displayed afterwards)
Enter sample sizes
• Enter a sample size for those parameters you would like to test
• If your method name describes the sample sizes, make sure the sample sizes you enter correspond to the name
• Make sure parameters you don’t want to test are set to zero (0)
• Confirm data entry (or cancel)
NOTE:
You may save the method any time during programming by confirming the data entry. As soon as you continue to add or change data, you cannot exit the method menu without confirming or discarding that data change.
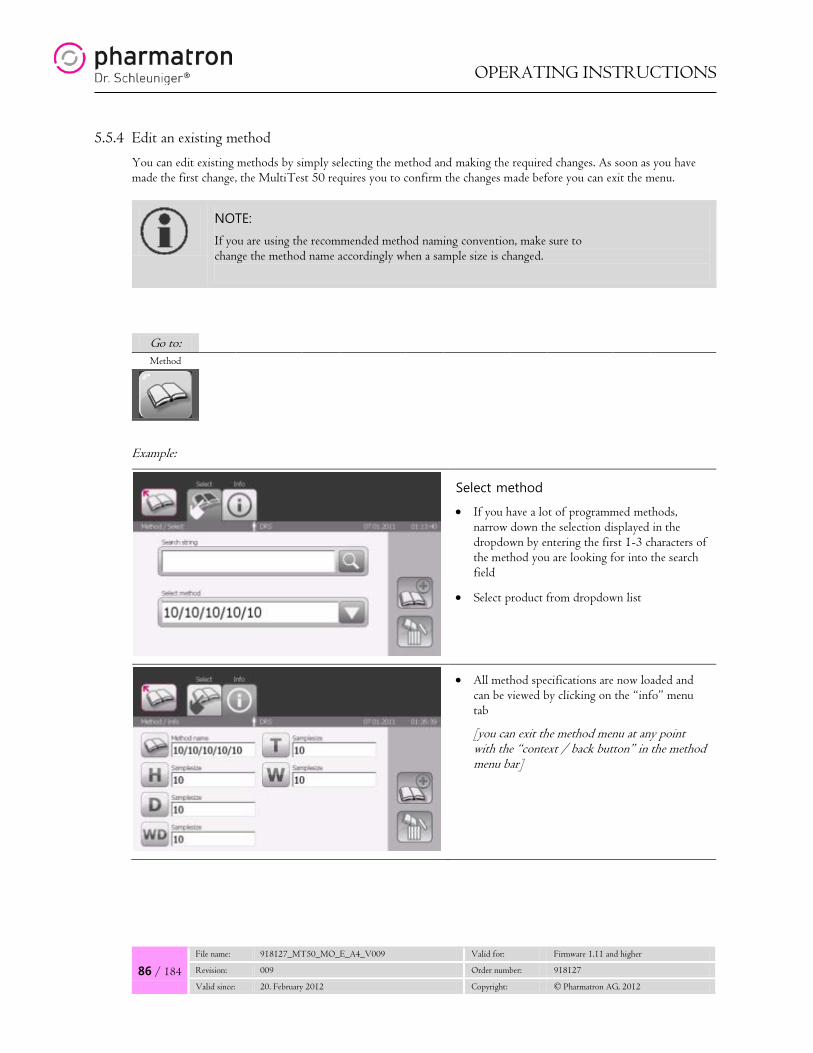
OPERATING INSTRUCTIONS
86 / 184
File name: 918127_MT50_MO_E_A4_V009 Valid for: Firmware 1.11 and higher
Revision: 009 Order number: 918127
Valid since: 20. February 2012 Copyright: © Pharmatron AG, 2012
5.5.4 Edit an existing method
You can edit existing methods by simply selecting the method and making the required changes. As soon as you have made the first change, the MultiTest 50 requires you to confirm the changes made before you can exit the menu.
NOTE:
If you are using the recommended method naming convention, make sure to change the method name accordingly when a sample size is changed.
Go to: Method
Example:
Select method
• If you have a lot of programmed methods, narrow down the selection displayed in the dropdown by entering the first 1-3 characters of the method you are looking for into the search field
• Select product from dropdown list
• All method specifications are now loaded and can be viewed by clicking on the “info” menu tab
[you can exit the method menu at any point with the “context / back button” in the method menu bar]

OPERATING INSTRUCTIONS
File name: 918127_MT50_MO_E_A4_V009 Valid for: Firmware 1.11 and higher
87 / 184 Revision: 009 Order number: 918127
Valid since: 20. February 2012 Copyright: © Pharmatron AG, 2012
Edit method
• As soon as you make a change to any of the fields, you cannot exit the method menu without confirming or discarding your data change
[confirm / discard buttons display]
• Confirm your data changes (or discard all changes)
NOTE “INTELLIGENT OPERATOR SUPPORT”
When changing the method name, the MultiTest 50 will automatically check whether that name is already in use and notify the operator immediately while making the change.

OPERATING INSTRUCTIONS
88 / 184
File name: 918127_MT50_MO_E_A4_V009 Valid for: Firmware 1.11 and higher
Revision: 009 Order number: 918127
Valid since: 20. February 2012 Copyright: © Pharmatron AG, 2012
5.5.5 Delete an existing method
Go to: Product
Example:
Select method
• If you have a lot of programmed methods, narrow down the selection displayed in the dropdown by entering the first 1-3 characters of the method you are looking for into the search field
• Select method from dropdown list
• All method specifications are now loaded and can be viewed by clicking on the “Info” tab
[you can exit the method menu at any point with the “context / back button” in the method menu bar]
Delete method
• Click the “Delete” button to delete the currently loaded method

OPERATING INSTRUCTIONS
File name: 918127_MT50_MO_E_A4_V009 Valid for: Firmware 1.11 and higher
89 / 184 Revision: 009 Order number: 918127
Valid since: 20. February 2012 Copyright: © Pharmatron AG, 2012
• Confirm the message that you want to delete the method (or cancel)

OPERATING INSTRUCTIONS
90 / 184
File name: 918127_MT50_MO_E_A4_V009 Valid for: Firmware 1.11 and higher
Revision: 009 Order number: 918127
Valid since: 20. February 2012 Copyright: © Pharmatron AG, 2012
5.6 Introduction to testing
5.6.1 Introduction: FullTest / EasyTest / SingleTest
The MultiTest 50 has three (3) different test modes to execute tests:
FullTest Combine pre-programmed products and methods and press start. The “FullTest” is ideally suited for frequently reoccurring tests and allows testing including all T1/T2/PL limits.
Example: FullTest
EasyTest Set the sample size for each parameter you need to test and press start. If needed, you can also enter the nominal value for each parameter. The “EasyTest” is ideally suited for quickly testing multiple samples without having to pre-program a product and method.
Example: EasyTest
SingleTest Simply select the parameters you want to test and press start. As the name indicates, ideally suited for quickly testing one single sample without having to set or program anything.
Example: SingleTest without weight
F
E
S

OPERATING INSTRUCTIONS
File name: 918127_MT50_MO_E_A4_V009 Valid for: Firmware 1.11 and higher
91 / 184 Revision: 009 Order number: 918127
Valid since: 20. February 2012 Copyright: © Pharmatron AG, 2012
5.6.2 Introduction: Views
While a test is running, the operator can view measured results in three (3) different ways:
Current view The currently measured results are displayed for all parameters (= the last measurement taken per parameter). For each parameter, the total sample size and the number of samples that have already been measured are shown. If limits have been defined, the MultiTest 50 will immediately display whether the measured value is a T1/T2/PL violation.
Item Description
A No. of samples measured
B Total sample size
C Measurement evaluation Limit violations are immediately displayed (as icon)
No violation
+T1 violation -T1 violation
+T2 violation -T2 violation
+PL violation -PL violation
PL violation occurred in previous measurement of same sample
A B C

OPERATING INSTRUCTIONS
92 / 184
File name: 918127_MT50_MO_E_A4_V009 Valid for: Firmware 1.11 and higher
Revision: 009 Order number: 918127
Valid since: 20. February 2012 Copyright: © Pharmatron AG, 2012
List view Always displays the all measurements taken for all parameters in list view (sets of 5). Particularly useful when larger sample sizes and/or unequal sample sizes are tested.
Example: List view
Hardness view Displays the current hardness measurement in form of a curve and the last 5 results in a list. Particularly useful when analyzing break-force characteristics of tested samples.
Example: Hardness view
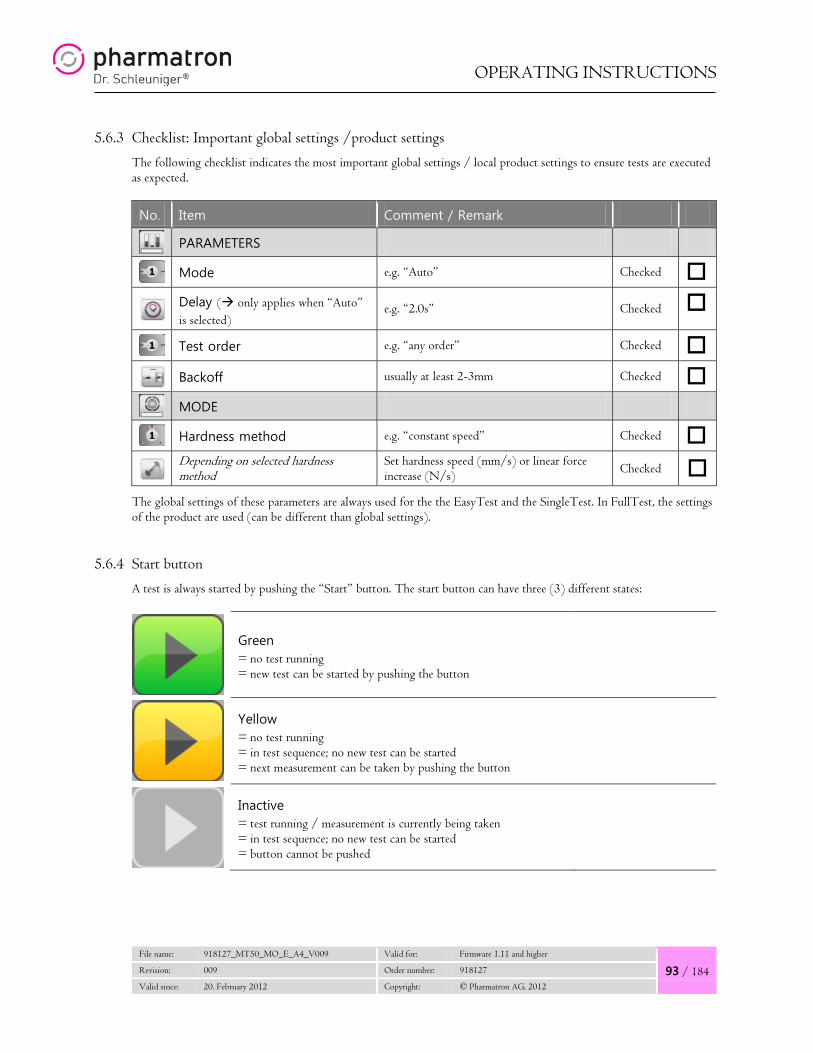
OPERATING INSTRUCTIONS
File name: 918127_MT50_MO_E_A4_V009 Valid for: Firmware 1.11 and higher
93 / 184 Revision: 009 Order number: 918127
Valid since: 20. February 2012 Copyright: © Pharmatron AG, 2012
5.6.3 Checklist: Important global settings /product settings
The following checklist indicates the most important global settings / local product settings to ensure tests are executed as expected.
No. Item Comment / Remark
PARAMETERS
Mode e.g. “Auto” Checked
Delay ( only applies when “Auto” is selected)
e.g. “2.0s” Checked
Test order e.g. “any order” Checked Backoff usually at least 2-3mm Checked MODE
Hardness method e.g. “constant speed” Checked
Depending on selected hardness method
Set hardness speed (mm/s) or linear force increase (N/s) Checked
The global settings of these parameters are always used for the the EasyTest and the SingleTest. In FullTest, the settings of the product are used (can be different than global settings).
5.6.4 Start button
A test is always started by pushing the “Start” button. The start button can have three (3) different states:
Green = no test running = new test can be started by pushing the button
Yellow = no test running = in test sequence; no new test can be started = next measurement can be taken by pushing the button
Inactive = test running / measurement is currently being taken = in test sequence; no new test can be started = button cannot be pushed

OPERATING INSTRUCTIONS
94 / 184
File name: 918127_MT50_MO_E_A4_V009 Valid for: Firmware 1.11 and higher
Revision: 009 Order number: 918127
Valid since: 20. February 2012 Copyright: © Pharmatron AG, 2012
5.6.5 Pause button
When a test is started, the “Pause” button is displayed throughout the test sequence. Especially in “Auto” mode, where measurements are taken automatically (without the operator pushing the start button between individual measurements), it can be useful to pause a test. To resume testing, push the (yellow) “Start” button again.
Active = test running / measurement being taken = push to pause test sequence
Inactive = test sequence paused = button cannot be pushed ( push “Start” button to resume testing)
NOTE:
Whenever the MultiTest 50 is waiting for the operator to push the “Start” button within a test sequence (e.g. in “Manual” mode), the “Pause” button is inactive.
5.6.6 Stop / Abort button
When a test is started, the “Abort” button is displayed throughout the test sequence. You can abort a test anytime. The MultiTest 50 will ask the user whether to print a report or not.
Active Can be pushed anytime when a test is running / paused
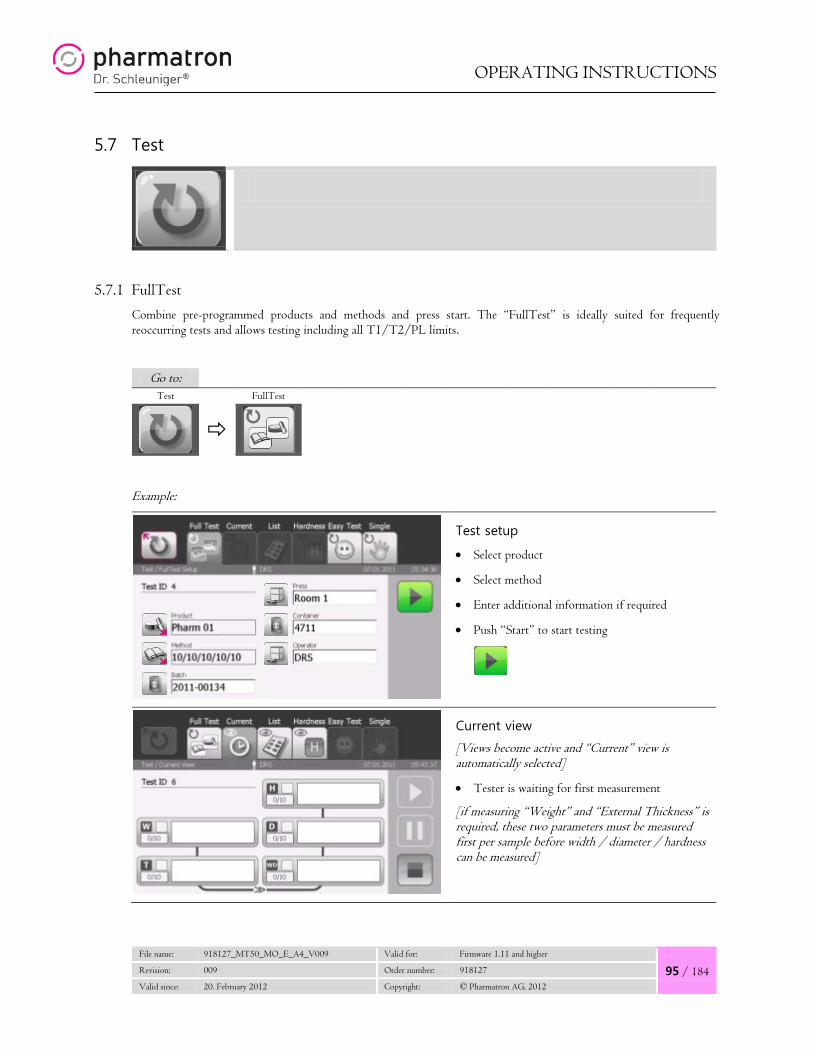
OPERATING INSTRUCTIONS
File name: 918127_MT50_MO_E_A4_V009 Valid for: Firmware 1.11 and higher
95 / 184 Revision: 009 Order number: 918127
Valid since: 20. February 2012 Copyright: © Pharmatron AG, 2012
5.7 Test
5.7.1 FullTest
Combine pre-programmed products and methods and press start. The “FullTest” is ideally suited for frequently reoccurring tests and allows testing including all T1/T2/PL limits.
Go to: Test FullTest
Example:
Test setup
• Select product
• Select method
• Enter additional information if required
• Push “Start” to start testing
Current view
[Views become active and “Current” view is automatically selected]
• Tester is waiting for first measurement
[if measuring “Weight” and “External Thickness” is required, these two parameters must be measured first per sample before width / diameter / hardness can be measured]

OPERATING INSTRUCTIONS
96 / 184
File name: 918127_MT50_MO_E_A4_V009 Valid for: Firmware 1.11 and higher
Revision: 009 Order number: 918127
Valid since: 20. February 2012 Copyright: © Pharmatron AG, 2012
Example: with internal thickness measuring
[The “Start” button becomes active when the first measurement sequence inside the test area can be taken]
• Place a test sample inside the test area and push start
• Ensure that the test sample is correctly oriented for the measurement
ListView
[If you are testing multiple samples, use the ListView to maintain an overview of your complete test]
HardnessView
[Change to hardness view to check the break force curve if required]
Print test report
• A test report is automatically printed once you have completed the test (= you have taken all measurements according to the selected method)
• Return to test setup ( click confirm)

OPERATING INSTRUCTIONS
File name: 918127_MT50_MO_E_A4_V009 Valid for: Firmware 1.11 and higher
97 / 184 Revision: 009 Order number: 918127
Valid since: 20. February 2012 Copyright: © Pharmatron AG, 2012
5.7.2 Behavior with plausibility violation
If a plausibility violation occurs during testing:
• all measurements for that sample will not be included in the statistics • an additional sample must be tested Example: thickness measurement not plausible
Explanation
• First, weight measurements have been taken for five (5) samples (= “any order”)
• Thickness measurement for sample number 3 has been implausible
• No further measurements required for that sample
• All measurements where the plausibility violation occurred are still displayed and will show in report (not included in statistical calculation)
• An additional sample must be measured
Note: • Current view: Implausible measurement is marked with “!” • Current view: Total sample size is marked with “*” • List view: Already taken measurements in sequence are crossed out • List view: Sequence where plausibility violation occurred is market with “!”
+PL violation -PL violation
PL violation occurred in previous measurement of same sample

OPERATING INSTRUCTIONS
98 / 184
File name: 918127_MT50_MO_E_A4_V009 Valid for: Firmware 1.11 and higher
Revision: 009 Order number: 918127
Valid since: 20. February 2012 Copyright: © Pharmatron AG, 2012
5.7.3 EasyTest
Set the sample size for each parameter you need to test and press start. If needed, you can also enter the nominal value for each parameter. The “EasyTest” is ideally suited for quickly testing multiple samples without having to pre-program a product and method.
Go to: Test EasyTest
Example:
Test setup
• If you need to enter additional information (e.g. product name) that will show in the test report click
[Extended test setup]
• Use “sweeper” to clear all old info (if required)
• Enter information
• Confirm all entries
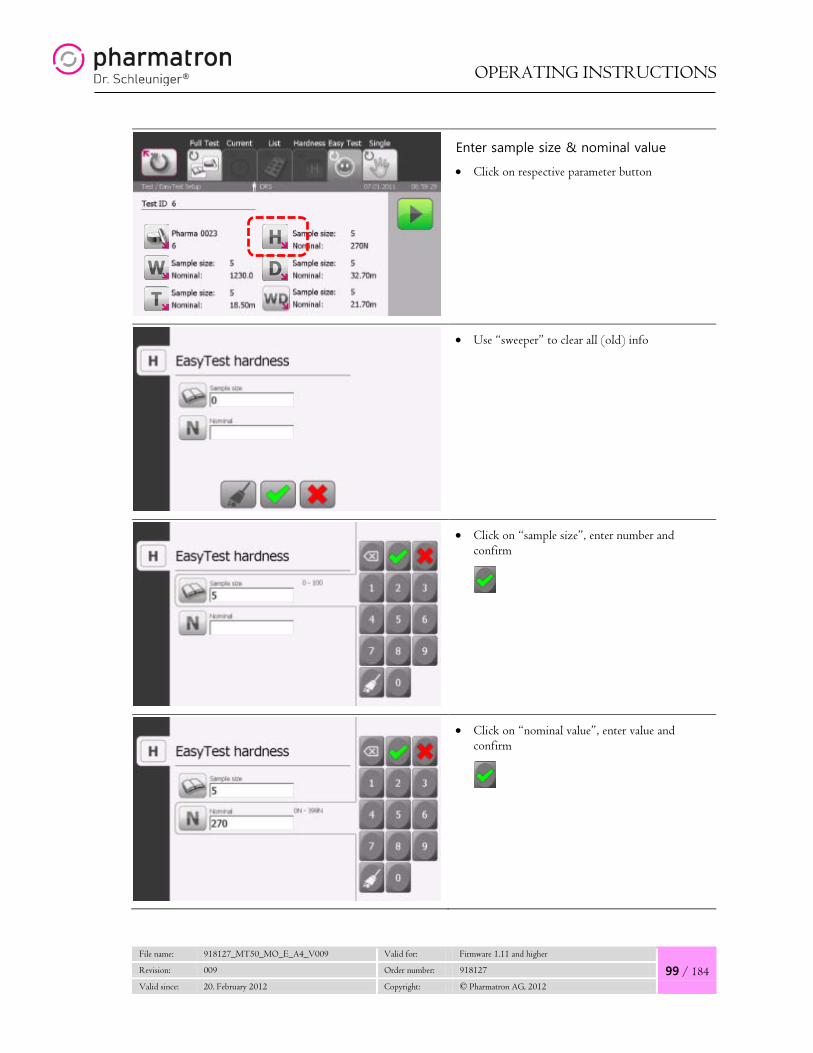
OPERATING INSTRUCTIONS
File name: 918127_MT50_MO_E_A4_V009 Valid for: Firmware 1.11 and higher
99 / 184 Revision: 009 Order number: 918127
Valid since: 20. February 2012 Copyright: © Pharmatron AG, 2012
Enter sample size & nominal value
• Click on respective parameter button
• Use “sweeper” to clear all (old) info
• Click on “sample size”, enter number and confirm
• Click on “nominal value”, enter value and confirm
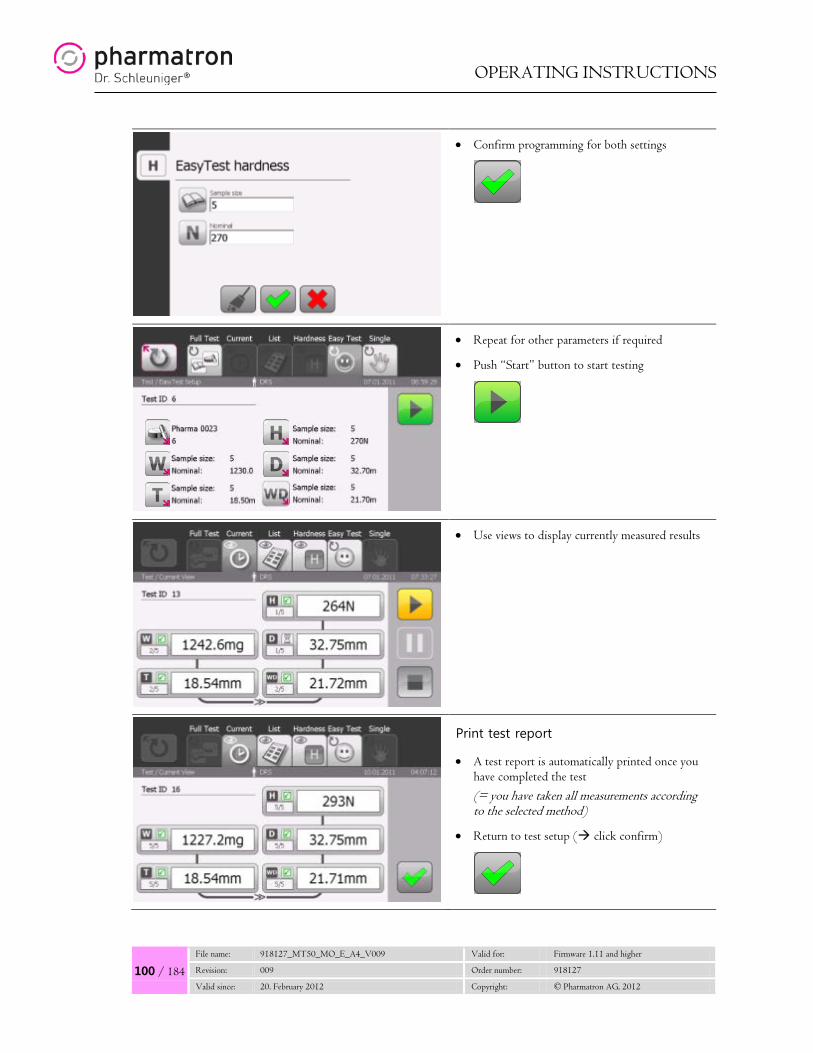
OPERATING INSTRUCTIONS
100 / 184
File name: 918127_MT50_MO_E_A4_V009 Valid for: Firmware 1.11 and higher
Revision: 009 Order number: 918127
Valid since: 20. February 2012 Copyright: © Pharmatron AG, 2012
• Confirm programming for both settings
• Repeat for other parameters if required
• Push “Start” button to start testing
• Use views to display currently measured results
Print test report
• A test report is automatically printed once you have completed the test (= you have taken all measurements according to the selected method)
• Return to test setup ( click confirm)
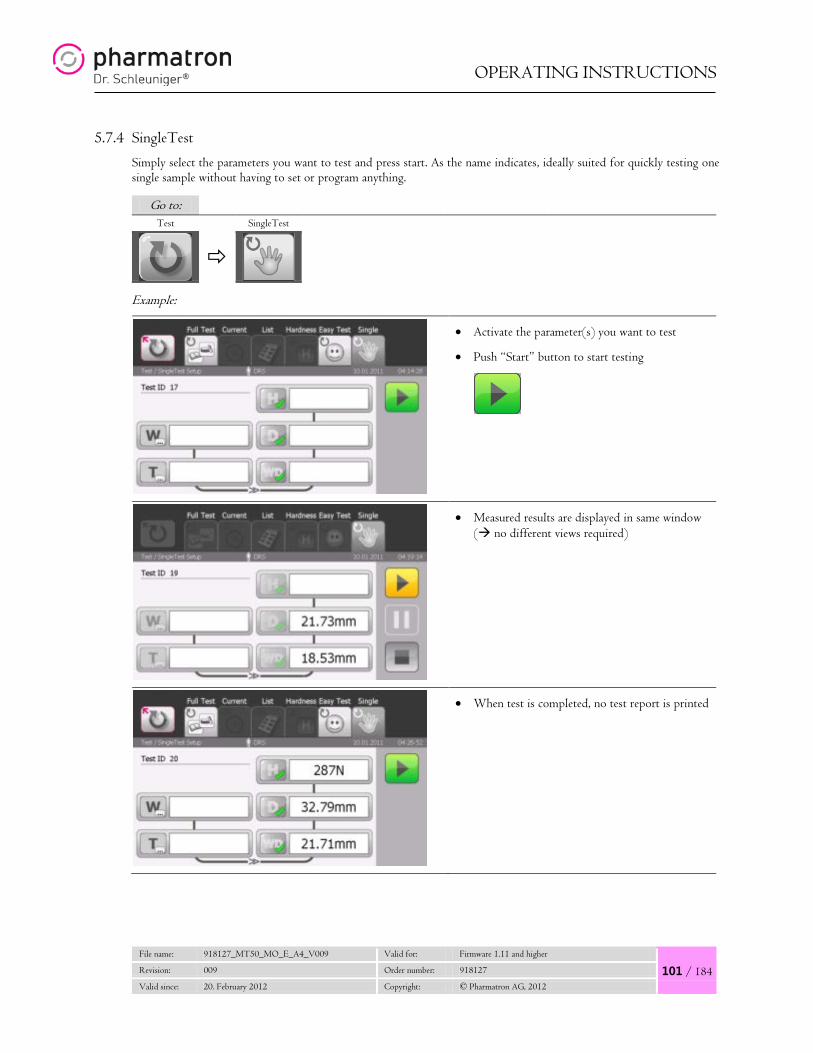
OPERATING INSTRUCTIONS
File name: 918127_MT50_MO_E_A4_V009 Valid for: Firmware 1.11 and higher
101 / 184 Revision: 009 Order number: 918127
Valid since: 20. February 2012 Copyright: © Pharmatron AG, 2012
5.7.4 SingleTest
Simply select the parameters you want to test and press start. As the name indicates, ideally suited for quickly testing one single sample without having to set or program anything.
Go to: Test SingleTest
Example:
• Activate the parameter(s) you want to test
• Push “Start” button to start testing
• Measured results are displayed in same window ( no different views required)
• When test is completed, no test report is printed

(GLOBAL) SETTINGS
102 / 184
File name: 918127_MT50_MO_E_A4_V009 Valid for: Firmware 1.11 and higher
Revision: 009 Order number: 918127
Valid since: 20. February 2012 Copyright: © Pharmatron AG, 2012
6. (GLOBAL) SETTINGS
Global Settings are the settings that you want to set for all Test and Product Setups that are programmed in the MultiTest 50. The Global Settings are system, rather than product, specific. Examples of Global Settings are the Date, the Date Format and the type of balance that is used with the MultiTest 50.
Go to: Settings General
6.1 General
• Language (English)
• External beep (Audible signal for external collected data, e.g. balance and thickness)
• Key beep (Audible signal for touch input)
• Device name (Enter device name of your choice, information will be shown on test reports)
• Date format Toggle to switch between
[1] DD.MM.YYYY [2] MM.DD:YYYY [3] YYYY.MM.DD
• Date (Enter current date)
• Time (Enter current time)
• Company name (Enter your company name)
• Confirm data change

(GLOBAL) SETTINGS
File name: 918127_MT50_MO_E_A4_V009 Valid for: Firmware 1.11 and higher
103 / 184 Revision: 009 Order number: 918127
Valid since: 20. February 2012 Copyright: © Pharmatron AG, 2012
6.2 Printer
• Toggle to switch between
[1] USB PS (connect any USB printer with post script language) [2] COM serial (40col serial printer)
• Confirm data change
6.3 Report
• Configuration of templates for printout.
• Select template “Standard”.
• Confirm data change
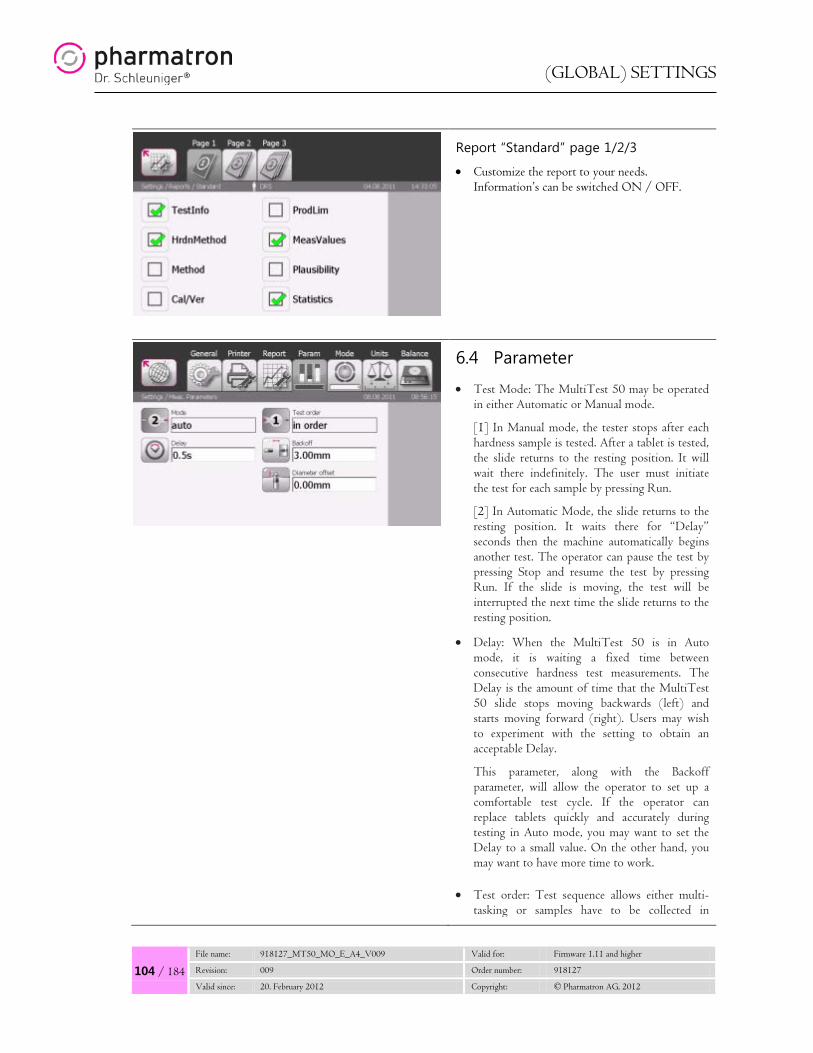
(GLOBAL) SETTINGS
104 / 184
File name: 918127_MT50_MO_E_A4_V009 Valid for: Firmware 1.11 and higher
Revision: 009 Order number: 918127
Valid since: 20. February 2012 Copyright: © Pharmatron AG, 2012
Report “Standard” page 1/2/3
• Customize the report to your needs. Information’s can be switched ON / OFF.
6.4 Parameter
• Test Mode: The MultiTest 50 may be operated in either Automatic or Manual mode.
[1] In Manual mode, the tester stops after each hardness sample is tested. After a tablet is tested, the slide returns to the resting position. It will wait there indefinitely. The user must initiate the test for each sample by pressing Run.
[2] In Automatic Mode, the slide returns to the resting position. It waits there for “Delay” seconds then the machine automatically begins another test. The operator can pause the test by pressing Stop and resume the test by pressing Run. If the slide is moving, the test will be interrupted the next time the slide returns to the resting position.
• Delay: When the MultiTest 50 is in Auto mode, it is waiting a fixed time between consecutive hardness test measurements. The Delay is the amount of time that the MultiTest 50 slide stops moving backwards (left) and starts moving forward (right). Users may wish to experiment with the setting to obtain an acceptable Delay.
This parameter, along with the Backoff parameter, will allow the operator to set up a comfortable test cycle. If the operator can replace tablets quickly and accurately during testing in Auto mode, you may want to set the Delay to a small value. On the other hand, you may want to have more time to work.
• Test order: Test sequence allows either multi-tasking or samples have to be collected in

(GLOBAL) SETTINGS
File name: 918127_MT50_MO_E_A4_V009 Valid for: Firmware 1.11 and higher
105 / 184 Revision: 009 Order number: 918127
Valid since: 20. February 2012 Copyright: © Pharmatron AG, 2012
[1] Example “In order”
[2] Example “Any order”
straight order.
[1] In order: Fix order of measurement sequence.
[2] Any order: Test sequence according to individual process.
• Backoff: When the Multitest 50 begins a test the slide moves forward until it contacts the tablet. At this point, the MultiTest 50 stores the tablet diameter. The Backoff is added to the tablet diameter to determine the resting position to use between each test sample.
• Diameter offset: The Diameter Offset is a compensation distance that is added to the diameter that is measured by the MultiTest 50. The Diameter Offset may be a positive or a negative value depending upon the accessory jaw which is used at the time of the measurement. The Diameter Offset value is automatically added to the measured diameter in order to determine the actual diameter of the sample.
• Confirm data change
6.5 Mode
• Hardness method: The MultiTest 50 can measure the breaking force either in constant speed, constant force increase or using the so-called 6D mode.
[1] Constant speed: Range 0.05mm/s – 5mm/s.
[2] Constant force: Range 10N/s – 200N/s
Fixed setting to achieve comparable results to the model 6D.
• Thickness internal: The MultiTest 50 can measure the thickness either internally or with an external Mitutoyo gauge (Fast Test configuration).

(GLOBAL) SETTINGS
106 / 184
File name: 918127_MT50_MO_E_A4_V009 Valid for: Firmware 1.11 and higher
Revision: 009 Order number: 918127
Valid since: 20. February 2012 Copyright: © Pharmatron AG, 2012
6.6 Units
• Unit hardness: The MultiTest 50 can measure the breaking force in 4 different units of measure. Optionally the decimal places can be changed.
[1] Newton, with 0 or 1 decimal place [2] Kilopond, with 0,1 or 2 decimal places [3] Strong Cobb, with 0,1 or 2 decimal places [4] User defined, with 0,1,2 or 3 decimal places
• Unit length: The MultiTest 50 can measure the length either in mm or inch. Optionally the decimal places can be changed.
[1] mm, with 0,1 or 2 decimal places [2] inch, with 0,1,2,3 or 4 decimal places
• Unit weight: The MultiTest 50 can measure the weight either in Milligram (mg or in Gram (g). Optionally the decimal places can be changed.
[1] grams, with 0 or 1 decimal place [2] milligrams, with 0,1,2,3 or 4 decimal places
6.7 Balance
• Balance: Currently 3 types of balances can be connected to your MultiTest 50. All Mettler balances with MT-SICS protocol, Mettler PM and most Sartorius are supported.
[1] None: Activate this option if no balance is connected.
[2] Mettler: Balances with MT-SICS
[3] Mettler: Balances with PM
[4] Sartorius
• Balance threshold: The threshold is the lowest data value that will be accepted by the MultiTest 50.
• Balance delta: After a valid weight value is accepted and the unstable weight data changes from the previous stable value by more than the delta weight, the next stable value will be accepted as valid by the MultiTest.
• Balance resolution: Toggle to switch between:

(GLOBAL) SETTINGS
File name: 918127_MT50_MO_E_A4_V009 Valid for: Firmware 1.11 and higher
107 / 184 Revision: 009 Order number: 918127
Valid since: 20. February 2012 Copyright: © Pharmatron AG, 2012
[1] 3 Digits (1mg resolution)
[2] 4 Digits (0.1mg resolution)
• Confirm data change

CALIBRATION & VERIFICATION
108 / 184
File name: 918127_MT50_MO_E_A4_V009 Valid for: Firmware 1.11 and higher
Revision: 009 Order number: 918127
Valid since: 20. February 2012 Copyright: © Pharmatron AG, 2012
7. CALIBRATION & VERIFICATION
Your MultiTest 50 has been calibrated and verified by the manufacturer. Dr. Schleuniger® Pharmatron recommends to calibrate the MultiTest 50 at least once per year and execute verification in regular intervals to ensure proper functioning.
7.1 Function checking device (FCD)
“Mechanical tablet” (= tablet simulator) to quickly check the hardness measuring performance of your MultiTest 50 before starting a test. Each function checking device has a serial number and comes with a calibration certificate.
Function checking devices are available for the following forces:
• 5kp • 10kp • 15kp • 20kp
NOTE:
When using a function checking device (FCD), it is recommended to perform 3 tests with 10 hardness measurements per test. Only the last test (= last 10 measurements) are to be considered.
To efficiently execute a routine check of 10 hardness measurements, it is recommended to:
• Program a product for each FCD • Program a method ( can be used for all FCDs)
Function checking devices (FCD)

CALIBRATION & VERIFICATION
File name: 918127_MT50_MO_E_A4_V009 Valid for: Firmware 1.11 and higher
109 / 184 Revision: 009 Order number: 918127
Valid since: 20. February 2012 Copyright: © Pharmatron AG, 2012
7.1.1 Recommended setup for regular checking routine (example)
Go to: Product
SETUP A PRODUCT FOR THE “FCD”
• Program a product “FCD – 10kp”
• Set “tablet shape” to “other”
• Add a product description if required (e.g. “function check”)
• Go to “Units” set “Unit hardness” to “KP”
• Go to “Product measurement parameters” set “Mode” to “Auto” set “Delay” to “0.0s” set “Backoff” to “0.1mm”

CALIBRATION & VERIFICATION
110 / 184
File name: 918127_MT50_MO_E_A4_V009 Valid for: Firmware 1.11 and higher
Revision: 009 Order number: 918127
Valid since: 20. February 2012 Copyright: © Pharmatron AG, 2012
• Select menu tab “Hardness” set nominal value to “10 Kp” set +T1 to 1% and –T1 to 1% set +T2 to 3% and –T2 to 3%
• Leave all other fields blank and save product
Go to: Method
SETUP A METHOD FOR THE “FCD”
• Program a method “FCD check”
• Set sample size for “Hardness” to “10” (or 20 if desired)
• Leave all other fields blank and save method
You can now use the programmed product and method anytime to quickly check the hardness measuring performance (see next chapter).

CALIBRATION & VERIFICATION
File name: 918127_MT50_MO_E_A4_V009 Valid for: Firmware 1.11 and higher
111 / 184 Revision: 009 Order number: 918127
Valid since: 20. February 2012 Copyright: © Pharmatron AG, 2012
7.1.2 Perform checking routine using a FCD (example)
Load pre-programmed product “FCD – 10kp” and method “FCD check”. Perform a series of hardness tests. The mean of measured results should be 10kp (+/- 1%).
Go to: Test FullTest
INSERT FCD
• Place the FCD in the test area (on side of fixed jaw)
• Load product “FCD – 10kp”
• Load method “FCD check”
• Push “Start” button
• Complete a series of 10 hardness tests
• Check measured values / check printed report mean should be 10kp (+/- 1%)
Note: you should perform 3 tests with 10 measurements each and only consider the last test (an average of 20 measurements is required to stabilize the FCD)
MT50 ca. 10kp
10.0 kp
10.0 kp
10.0 kp
10.0 kp
10.0 kp

CALIBRATION & VERIFICATION
112 / 184
File name: 918127_MT50_MO_E_A4_V009 Valid for: Firmware 1.11 and higher
Revision: 009 Order number: 918127
Valid since: 20. February 2012 Copyright: © Pharmatron AG, 2012
7.2 Calibration
WARNING: Calibration should only be performed by certified Dr. Schleuniger® Pharmatron service engineers.
PERFORMING CALIBRATION INCORRECTLY WILL RESULT IN FALSE
MEASUREMENTS AND MAY ALSO DAMAGE YOUR TESTER PERMANENTLY.
RECOMMENDATION:
Dr. Schleuniger® Pharmatron recommends performing a full calibration of the MultiTest 50 at least every 6 months.
7.2.1 Required calibration tools
To perform a full calibration of the MultiTest 50 (WTDH), the following tools are required:
MEASURING REQUIRED FOR CALIBRATION
A Weight Reference weight depends on balance see manufacturer’s manual
C External thickness Usually 10mm gauge block see manufacturer’s manual
C Internal thickness
10mm gauge block C Width
C Diameter / length
D Hardness 5kg reference weight [D]
Calibration kit (calibration plate [E] and calibration cube [F])
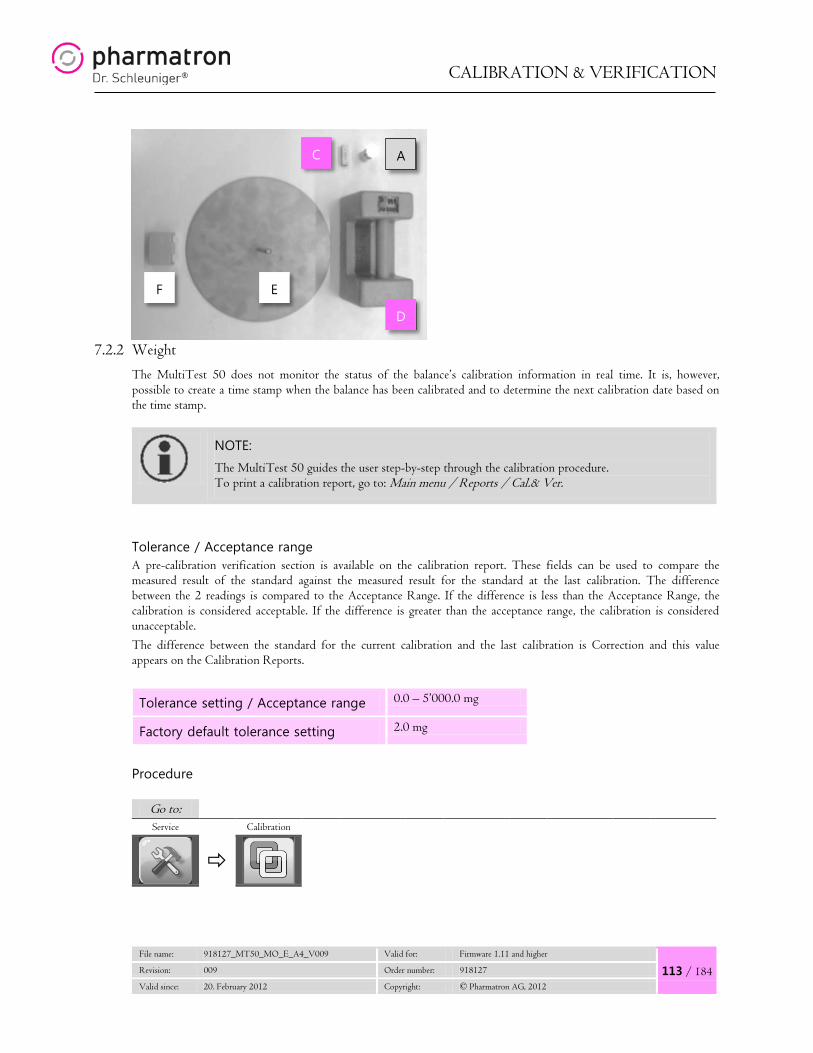
CALIBRATION & VERIFICATION
File name: 918127_MT50_MO_E_A4_V009 Valid for: Firmware 1.11 and higher
113 / 184 Revision: 009 Order number: 918127
Valid since: 20. February 2012 Copyright: © Pharmatron AG, 2012
7.2.2 Weight
The MultiTest 50 does not monitor the status of the balance’s calibration information in real time. It is, however, possible to create a time stamp when the balance has been calibrated and to determine the next calibration date based on the time stamp.
NOTE:
The MultiTest 50 guides the user step-by-step through the calibration procedure. To print a calibration report, go to: Main menu / Reports / Cal.& Ver.
Tolerance / Acceptance range A pre-calibration verification section is available on the calibration report. These fields can be used to compare the measured result of the standard against the measured result for the standard at the last calibration. The difference between the 2 readings is compared to the Acceptance Range. If the difference is less than the Acceptance Range, the calibration is considered acceptable. If the difference is greater than the acceptance range, the calibration is considered unacceptable. The difference between the standard for the current calibration and the last calibration is Correction and this value appears on the Calibration Reports.
Tolerance setting / Acceptance range 0.0 – 5’000.0 mg
Factory default tolerance setting 2.0 mg
Procedure
Go to: Service Calibration
A C
D
E F

CALIBRATION & VERIFICATION
114 / 184
File name: 918127_MT50_MO_E_A4_V009 Valid for: Firmware 1.11 and higher
Revision: 009 Order number: 918127
Valid since: 20. February 2012 Copyright: © Pharmatron AG, 2012
• Select “Settings calibration weight”
[note in example: “Thickness ext.” is not displayed, because “internal thickness” is activated]
• Check “Tolerance” settings
• Check “Interval” settings (= days until next calibration)
• Select “Weight”
• Calibrate the balance according to the
operating manual of the balance
• Confirm that calibration has been performed
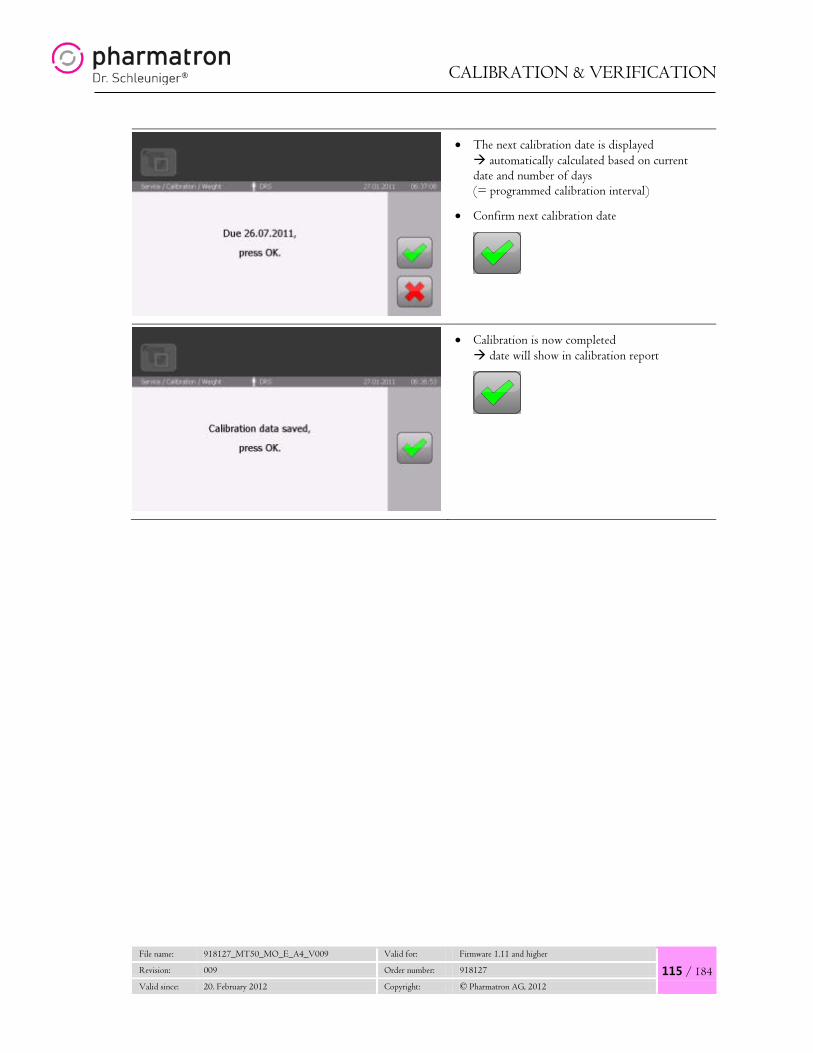
CALIBRATION & VERIFICATION
File name: 918127_MT50_MO_E_A4_V009 Valid for: Firmware 1.11 and higher
115 / 184 Revision: 009 Order number: 918127
Valid since: 20. February 2012 Copyright: © Pharmatron AG, 2012
• The next calibration date is displayed automatically calculated based on current date and number of days (= programmed calibration interval)
• Confirm next calibration date
• Calibration is now completed date will show in calibration report

CALIBRATION & VERIFICATION
116 / 184
File name: 918127_MT50_MO_E_A4_V009 Valid for: Firmware 1.11 and higher
Revision: 009 Order number: 918127
Valid since: 20. February 2012 Copyright: © Pharmatron AG, 2012
7.2.3 Thickness (external)
The MultiTest 50 does not monitor the status of the thickness gauge’s calibration information in real time. It is, however, possible to create a time stamp when the thickness gauge has been calibrated and to determine the next calibration date based on the time stamp.
NOTE:
The MultiTest 50 guides the user step-by-step through the calibration procedure. To print a calibration report, go to: Main menu / Reports / Cal.& Ver.
Tolerance / Acceptance range A pre-calibration verification section is available on the calibration report. These fields can be used to compare the measured result of the standard against the measured result for the standard at the last calibration. The difference between the 2 readings is compared to the Acceptance Range. If the difference is less than the Acceptance Range, the calibration is considered acceptable. If the difference is greater than the acceptance range, the calibration is considered unacceptable. The difference between the standard for the current calibration and the last calibration is Correction and this value appears on the Calibration Reports.
Tolerance setting / Acceptance range 0.00 – 1.00 mm
Factory default tolerance setting 0.20 mm
Procedure
Go to: Service Calibration
• Select “Settings calibration thickness”
• Check “Tolerance” settings
• Check “Interval” settings (= days until next calibration)
• Select “Thickness (ext.)”
• Calibrate the thickness gauge
according to the manufacturer’s
manual

CALIBRATION & VERIFICATION
File name: 918127_MT50_MO_E_A4_V009 Valid for: Firmware 1.11 and higher
117 / 184 Revision: 009 Order number: 918127
Valid since: 20. February 2012 Copyright: © Pharmatron AG, 2012
• Confirm that calibration has been performed
• The next calibration date is displayed automatically calculated based on current date and number of days (= programmed calibration interval)
• Confirm next calibration date
• Calibration is now completed date will show in calibration report
7.2.4 Thickness (internal)
NOTE:
There is no dedicated calibration procedure for internal thickness. Refer to “Diameter” calibration, because the measuring station is the same (= moveable jaw).
7.2.5 Width
NOTE:
There is no dedicated calibration procedure for width measuring. Refer to “Diameter” calibration, because the measuring station is the same (= moveable jaw).

CALIBRATION & VERIFICATION
118 / 184
File name: 918127_MT50_MO_E_A4_V009 Valid for: Firmware 1.11 and higher
Revision: 009 Order number: 918127
Valid since: 20. February 2012 Copyright: © Pharmatron AG, 2012
7.2.6 Diameter
The MultiTest 50 monitors the status of the diameter calibration.
WARNING: Do not attempt to calibrate the MultiTest 50 unless you have the proper calibration equipment and have been trained to perform calibration.
Executing the calibration routine without proper calibration tools will cause the
MultiTest 50 to lose its calibration reference!
NOTE:
The MultiTest 50 guides the user step-by-step through the calibration procedure. To print a calibration report, go to: Main menu / Reports / Cal.& Ver.
Required tools to perform calibration:
• 10mm gauge block
Tolerance / Acceptance range A pre-calibration verification section is available on the calibration report. These fields can be used to compare the measured result of the standard against the measured result for the standard at the last calibration. The difference between the 2 readings is compared to the Acceptance Range. If the difference is less than the Acceptance Range, the calibration is considered acceptable. If the difference is greater than the acceptance range, the calibration is considered unacceptable. The difference between the standard for the current calibration and the last calibration is Correction and this value appears on the Calibration Reports.
Tolerance setting / Acceptance range 0.00 – 35.00 mm
Factory default tolerance setting 0.20 mm

CALIBRATION & VERIFICATION
File name: 918127_MT50_MO_E_A4_V009 Valid for: Firmware 1.11 and higher
119 / 184 Revision: 009 Order number: 918127
Valid since: 20. February 2012 Copyright: © Pharmatron AG, 2012
Procedure
Go to: Service Calibration
• Select “Settings calibration diameter”
[note in example: “Thickness ext.” is not displayed, because “internal thickness” is activated]
• Check “Tolerance” settings
• Check “Interval” settings (= days until next calibration)
• Select “Diameter”

CALIBRATION & VERIFICATION
120 / 184
File name: 918127_MT50_MO_E_A4_V009 Valid for: Firmware 1.11 and higher
Revision: 009 Order number: 918127
Valid since: 20. February 2012 Copyright: © Pharmatron AG, 2012
• Make sure that the test area and jaws are cleaned / free of tablet debris
• Press “Run” button
[the jaw moves and calibrates the zero point message “Please wait…”]
• Insert 10mm gauge block in test area directly at fixed jaw
• Press “Run” button
[the jaw moves and calibrates the 10mm point message “Please wait…”]
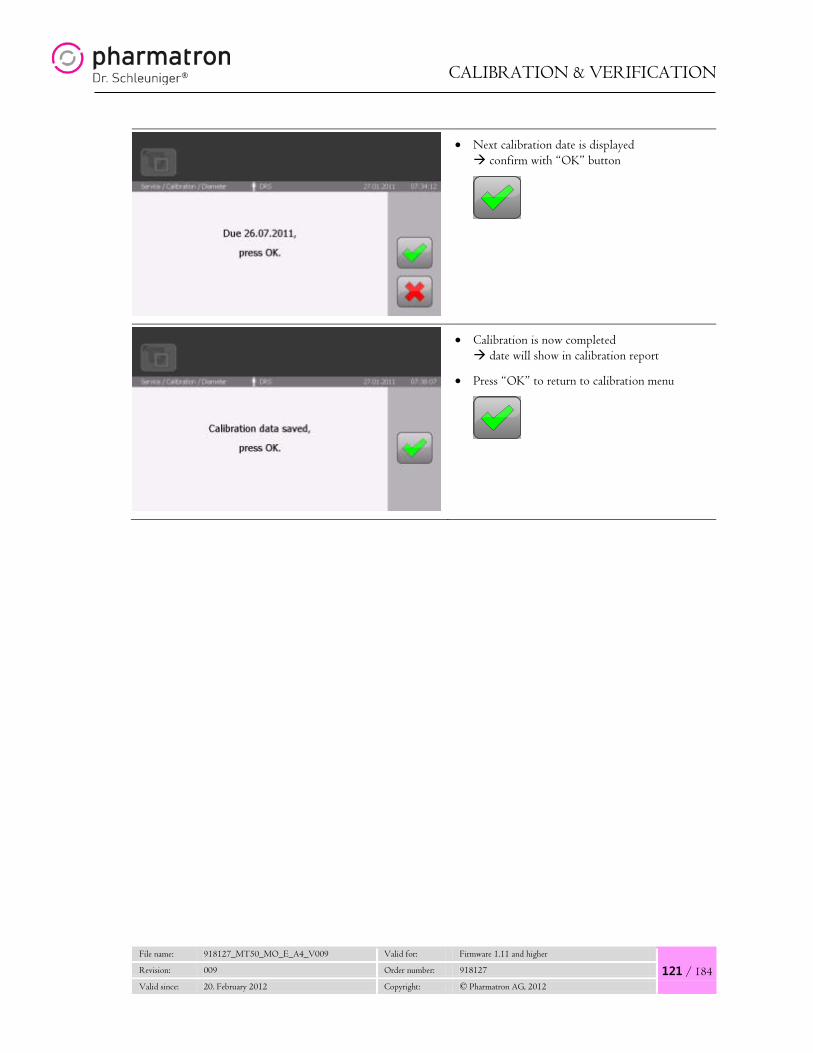
CALIBRATION & VERIFICATION
File name: 918127_MT50_MO_E_A4_V009 Valid for: Firmware 1.11 and higher
121 / 184 Revision: 009 Order number: 918127
Valid since: 20. February 2012 Copyright: © Pharmatron AG, 2012
• Next calibration date is displayed confirm with “OK” button
• Calibration is now completed date will show in calibration report
• Press “OK” to return to calibration menu

CALIBRATION & VERIFICATION
122 / 184
File name: 918127_MT50_MO_E_A4_V009 Valid for: Firmware 1.11 and higher
Revision: 009 Order number: 918127
Valid since: 20. February 2012 Copyright: © Pharmatron AG, 2012
7.2.7 Hardness
The MultiTest 50 monitors the status of the hardness calibration.
WARNING: Do not attempt to calibrate the MultiTest 50 unless you have the proper calibration equipment and have been trained to perform calibration.
Executing the calibration routine without proper calibration tools will cause the
MultiTest 50 to lose its calibration reference and may cause permanent damage!
NOTE:
The MultiTest 50 guides the user step-by-step through the calibration procedure. To print a calibration report, go to: Main menu / Reports / Cal.& Ver.
Required tools to perform calibration:
• Calibration kit (calibration plate + calibration cube) • 5kg reference weight
Tolerance / Acceptance range A pre-calibration verification section is available on the calibration report. These fields can be used to compare the measured result of the standard against the measured result for the standard at the last calibration. The difference between the 2 readings is compared to the Acceptance Range. If the difference is less than the Acceptance Range, the calibration is considered acceptable. If the difference is greater than the acceptance range, the calibration is considered unacceptable. The difference between the standard for the current calibration and the last calibration is Correction and this value appears on the Calibration Reports.
Tolerance setting / Acceptance range 0.00 – 1.00 kg
Factory default tolerance setting 0.40 kg

CALIBRATION & VERIFICATION
File name: 918127_MT50_MO_E_A4_V009 Valid for: Firmware 1.11 and higher
123 / 184 Revision: 009 Order number: 918127
Valid since: 20. February 2012 Copyright: © Pharmatron AG, 2012
WARNING: Make sure the MultiTest 50 is switched on BEFORE placing the machine in the vertical position!
MECHANICAL PREPARATIONS
• Make sure machine and all connected devices are switched ON

CALIBRATION & VERIFICATION
124 / 184
File name: 918127_MT50_MO_E_A4_V009 Valid for: Firmware 1.11 and higher
Revision: 009 Order number: 918127
Valid since: 20. February 2012 Copyright: © Pharmatron AG, 2012
• Carefully place machine in vertical position
• Make sure the machine is steady and leveled
• Remove quick-change tongue

CALIBRATION & VERIFICATION
File name: 918127_MT50_MO_E_A4_V009 Valid for: Firmware 1.11 and higher
125 / 184 Revision: 009 Order number: 918127
Valid since: 20. February 2012 Copyright: © Pharmatron AG, 2012
• Remove fixed jaw loosen 2 screws
• Make sure not to drop the fixed jaw once both screws are lose
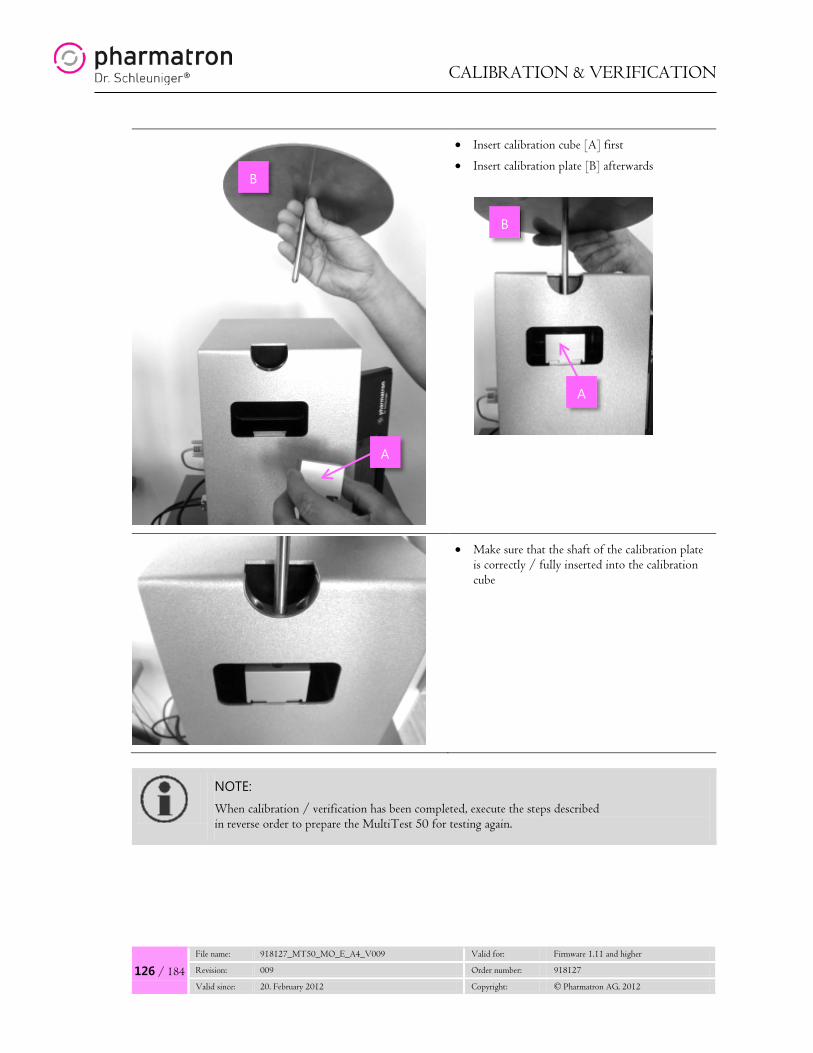
CALIBRATION & VERIFICATION
126 / 184
File name: 918127_MT50_MO_E_A4_V009 Valid for: Firmware 1.11 and higher
Revision: 009 Order number: 918127
Valid since: 20. February 2012 Copyright: © Pharmatron AG, 2012
• Insert calibration cube [A] first
• Insert calibration plate [B] afterwards
• Make sure that the shaft of the calibration plate is correctly / fully inserted into the calibration cube
NOTE:
When calibration / verification has been completed, execute the steps described in reverse order to prepare the MultiTest 50 for testing again.
B
B
A
A

CALIBRATION & VERIFICATION
File name: 918127_MT50_MO_E_A4_V009 Valid for: Firmware 1.11 and higher
127 / 184 Revision: 009 Order number: 918127
Valid since: 20. February 2012 Copyright: © Pharmatron AG, 2012
CALIBRATION PROCEDURE
WARNING: Avoid touching or bumping the machine or table during the calibration procedure. Vibrations will lead to incorrect calibration values!
Go to: Service Calibration
• Select “Settings calibration hardness”
[note in example: “Thickness ext.” is not displayed, because “internal thickness” is activated]
• Check “Tolerance” settings
• Check “Interval” settings (= days until next calibration)

CALIBRATION & VERIFICATION
128 / 184
File name: 918127_MT50_MO_E_A4_V009 Valid for: Firmware 1.11 and higher
Revision: 009 Order number: 918127
Valid since: 20. February 2012 Copyright: © Pharmatron AG, 2012
• Select “Hardness”
• Make sure that the calibration plate and calibration cube are correctly installed
• Press “Run” button
• Place the 5kg reference weight on the calibration plate
center of gravity must be exactly in
the middle!
WARNING: Do not drop the 5kg reference weight onto the calibration plate. This may permanently damage the load cell!

CALIBRATION & VERIFICATION
File name: 918127_MT50_MO_E_A4_V009 Valid for: Firmware 1.11 and higher
129 / 184 Revision: 009 Order number: 918127
Valid since: 20. February 2012 Copyright: © Pharmatron AG, 2012
• Press “Run” button
[hardness is calibrated message “Please wait…]
• Next calibration date is displayed confirm with “OK” button
• Calibration is now completed date will show in calibration report
• Press “OK” to return to calibration menu
If no further validation of the hardness measuring is performed:
• Remove the reference weight • Remove calibration kit • Insert the fixed jaw and tighten both screws • Insert quick-change tongue • Return the MultiTest 50 into the normal horizontal position

CALIBRATION & VERIFICATION
130 / 184
File name: 918127_MT50_MO_E_A4_V009 Valid for: Firmware 1.11 and higher
Revision: 009 Order number: 918127
Valid since: 20. February 2012 Copyright: © Pharmatron AG, 2012
7.2.8 Print calibration report
A calibration report can be printed anytime showing all details of the last calibration performed.
Go to: Reports Cal. / Ver.
• Press “Calibration” a report is printed immediately

CALIBRATION & VERIFICATION
File name: 918127_MT50_MO_E_A4_V009 Valid for: Firmware 1.11 and higher
131 / 184 Revision: 009 Order number: 918127
Valid since: 20. February 2012 Copyright: © Pharmatron AG, 2012
7.3 Verification
WARNING: Verification should only be performed by certified Dr. Schleuniger® Pharmatron service engineers.
PERFORMING VERIFICATION INCORRECTLY DOES NOT ALLOW TO VERIFY
CALIBRATION AND MAY DAMAGE YOUR TESTER PERMANENTLY.
RECOMMENDATION:
Dr. Schleuniger® Pharmatron recommends performing a full verification of the MultiTest 50 at least every 6 months.
7.3.1 Required verification tools
You can use the same tools used for calibration. It is, however, recommended to use additional reference weights / gauge blocks to verify the complete measuring range.
MEASURING MINIMUM REQUIREMENTS FOR VERIFICATION
A Weight Reference weight depends on balance see manufacturer’s manual
C External thickness Usually 10mm gauge block see manufacturer’s manual
C Internal thickness
10mm gauge block C Width
C Diameter / length
D Hardness 5kg reference weight [D]
Calibration kit (calibration plate [E] and calibration cube [F])
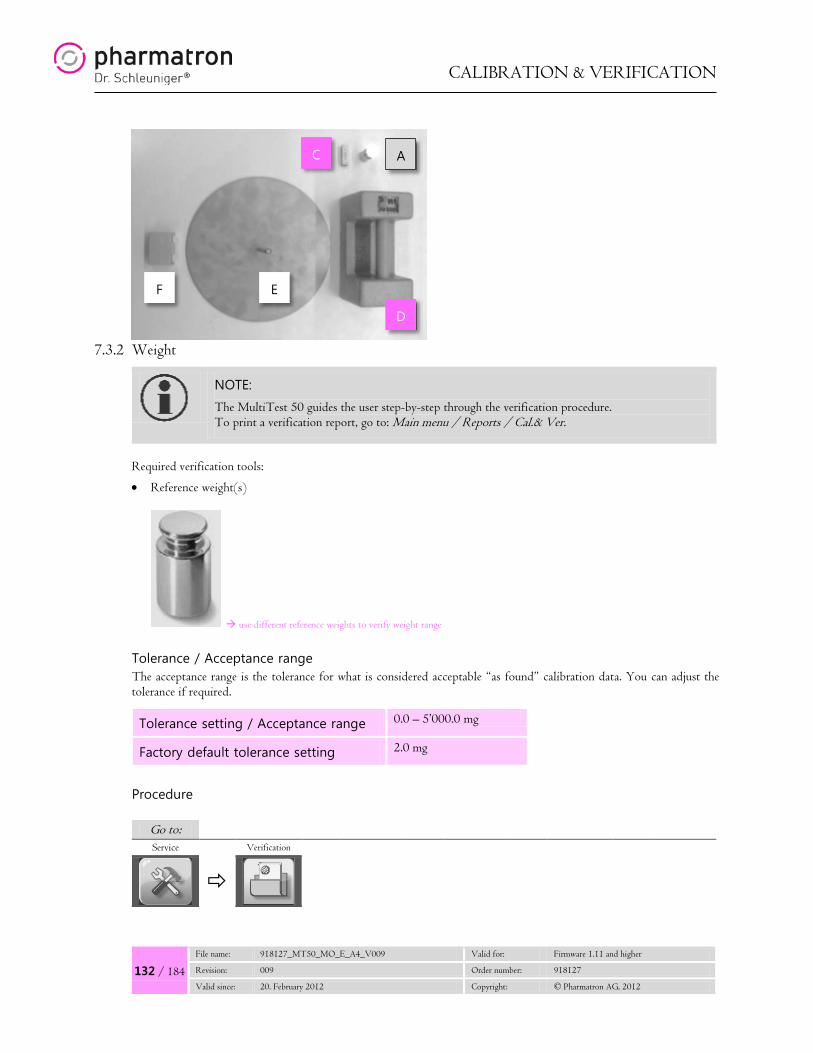
CALIBRATION & VERIFICATION
132 / 184
File name: 918127_MT50_MO_E_A4_V009 Valid for: Firmware 1.11 and higher
Revision: 009 Order number: 918127
Valid since: 20. February 2012 Copyright: © Pharmatron AG, 2012
7.3.2 Weight
NOTE:
The MultiTest 50 guides the user step-by-step through the verification procedure. To print a verification report, go to: Main menu / Reports / Cal.& Ver.
Required verification tools:
• Reference weight(s)
use different reference weights to verify weight range
Tolerance / Acceptance range The acceptance range is the tolerance for what is considered acceptable “as found” calibration data. You can adjust the tolerance if required.
Tolerance setting / Acceptance range 0.0 – 5’000.0 mg
Factory default tolerance setting 2.0 mg
Procedure
Go to: Service Verification
A C
D
E F

CALIBRATION & VERIFICATION
File name: 918127_MT50_MO_E_A4_V009 Valid for: Firmware 1.11 and higher
133 / 184 Revision: 009 Order number: 918127
Valid since: 20. February 2012 Copyright: © Pharmatron AG, 2012
• Select “Settings verification weight”
[note in example: “Thickness ext.” is not displayed, because “internal thickness” is activated]
• Check “Tolerance” settings
• Check “Interval” settings (= days until next verification)
• Select “Weight”
• Enter a value for the reference weight you are using for verification you can use any reference weight within the weight range of the connected balance

CALIBRATION & VERIFICATION
134 / 184
File name: 918127_MT50_MO_E_A4_V009 Valid for: Firmware 1.11 and higher
Revision: 009 Order number: 918127
Valid since: 20. February 2012 Copyright: © Pharmatron AG, 2012
• Place the reference weight on the balance
• Press “Start”
[the measured value from the balance is taken]
• The measured result is displayed and evaluated whether acceptable or not
• To continue with verification using other reference weights, press “RUN”
• To complete verification procedure, press “OK”
• The next verification date is displayed automatically calculated based on current date and number of days (= programmed verification interval)
• Confirm next verification date
• Verification is now completed press “OK” to return to verification menu
CALIBRATION & VERIFICATION
File name: 918127_MT50_MO_E_A4_V009 Valid for: Firmware 1.11 and higher
135 / 184 Revision: 009 Order number: 918127
Valid since: 20. February 2012 Copyright: © Pharmatron AG, 2012

CALIBRATION & VERIFICATION
136 / 184
File name: 918127_MT50_MO_E_A4_V009 Valid for: Firmware 1.11 and higher
Revision: 009 Order number: 918127
Valid since: 20. February 2012 Copyright: © Pharmatron AG, 2012
7.3.3 Thickness (external)
NOTE:
The MultiTest 50 guides the user step-by-step through the verification procedure. To print a verification report, go to: Main menu / Reports / Cal.& Ver.
Tolerance / Acceptance range The acceptance range is the tolerance for what is considered acceptable “as found” calibration data. You can adjust the tolerance if required.
Tolerance setting / Acceptance range 0.0 – 1.0 mm
Factory default tolerance setting 0.20 mm
Procedure
Go to: Service Verification
• Select “Settings calibration thickness”
• Check “Tolerance” settings
• Check “Interval” settings (= days until next verification)
• Select “Thickness (ext.)”
• Enter a value for the reference gauge you are using for verification you can use any reference gauge within the range of the connected thickness gauge

CALIBRATION & VERIFICATION
File name: 918127_MT50_MO_E_A4_V009 Valid for: Firmware 1.11 and higher
137 / 184 Revision: 009 Order number: 918127
Valid since: 20. February 2012 Copyright: © Pharmatron AG, 2012
• Place the reference gauge block under the thickness gauge
• Press “Start”
[the measured value from the thickness gauge is taken]
• The measured result is displayed and evaluated whether acceptable or not
• To continue with verification using other reference gauges, press “RUN”
• To complete verification procedure, press “OK”
• The next verification date is displayed automatically calculated based on current date and number of days (= programmed calibration interval)
• Confirm next verification date
• Verification is now completed press “OK” to return to verification menu
CALIBRATION & VERIFICATION
138 / 184
File name: 918127_MT50_MO_E_A4_V009 Valid for: Firmware 1.11 and higher
Revision: 009 Order number: 918127
Valid since: 20. February 2012 Copyright: © Pharmatron AG, 2012
7.3.4 Thickness (internal)
NOTE:
There is no dedicated verification procedure for internal thickness. Refer to “Diameter” verification, because the measuring station is the same (= moveable jaw).
7.3.5 Width
NOTE:
There is no dedicated verification procedure for width measuring. Refer to “Diameter” verification, because the measuring station is the same (= moveable jaw).

CALIBRATION & VERIFICATION
File name: 918127_MT50_MO_E_A4_V009 Valid for: Firmware 1.11 and higher
139 / 184 Revision: 009 Order number: 918127
Valid since: 20. February 2012 Copyright: © Pharmatron AG, 2012
7.3.6 Diameter
The MultiTest 50 monitors the status of the diameter verification.
WARNING: Do not attempt to verify the MultiTest 50 unless you have the proper verification equipment and have been trained to perform verification services.
NOTE:
The MultiTest 50 guides the user step-by-step through the verification procedure. To print a verification report, go to: Main menu / Reports / Cal.& Ver.
Required tools to perform verification:
• 10mm gauge block • Other reference gauge blocks if required
use different reference gauges to verify measuring range
Tolerance / Acceptance range The acceptance range is the tolerance for what is considered acceptable “as found” calibration data. You can adjust the tolerance if required.
Tolerance setting / Acceptance range 0.00 – 35.00 mm
Factory default tolerance setting 0.20 mm

CALIBRATION & VERIFICATION
140 / 184
File name: 918127_MT50_MO_E_A4_V009 Valid for: Firmware 1.11 and higher
Revision: 009 Order number: 918127
Valid since: 20. February 2012 Copyright: © Pharmatron AG, 2012
Procedure
Go to: Service Verification
• Select “Settings verification diameter”
[note in example: “Thickness ext.” is not displayed, because “internal thickness” is activated]
• Check “Tolerance” settings
• Check “Interval” settings (= days until next verification)
• Select “Diameter”

CALIBRATION & VERIFICATION
File name: 918127_MT50_MO_E_A4_V009 Valid for: Firmware 1.11 and higher
141 / 184 Revision: 009 Order number: 918127
Valid since: 20. February 2012 Copyright: © Pharmatron AG, 2012
• Make sure that the test area and jaws are cleaned / free of tablet debris
• Enter value for verification reference (= reference gauge)
• Insert 10mm gauge block in test area directly at fixed jaw
• Press “Run” button
[the jaw moves and verifies the reference distance message “Please wait…”]
• The measured result is displayed and evaluated whether acceptable or not
• To continue with verification using other reference gauges, press “RUN”
• To complete verification procedure, press “OK”

CALIBRATION & VERIFICATION
142 / 184
File name: 918127_MT50_MO_E_A4_V009 Valid for: Firmware 1.11 and higher
Revision: 009 Order number: 918127
Valid since: 20. February 2012 Copyright: © Pharmatron AG, 2012
• The next verification date is displayed automatically calculated based on current date and number of days (= programmed calibration interval)
• Confirm next verification date
• Verification is now completed press “OK” to return to verification menu
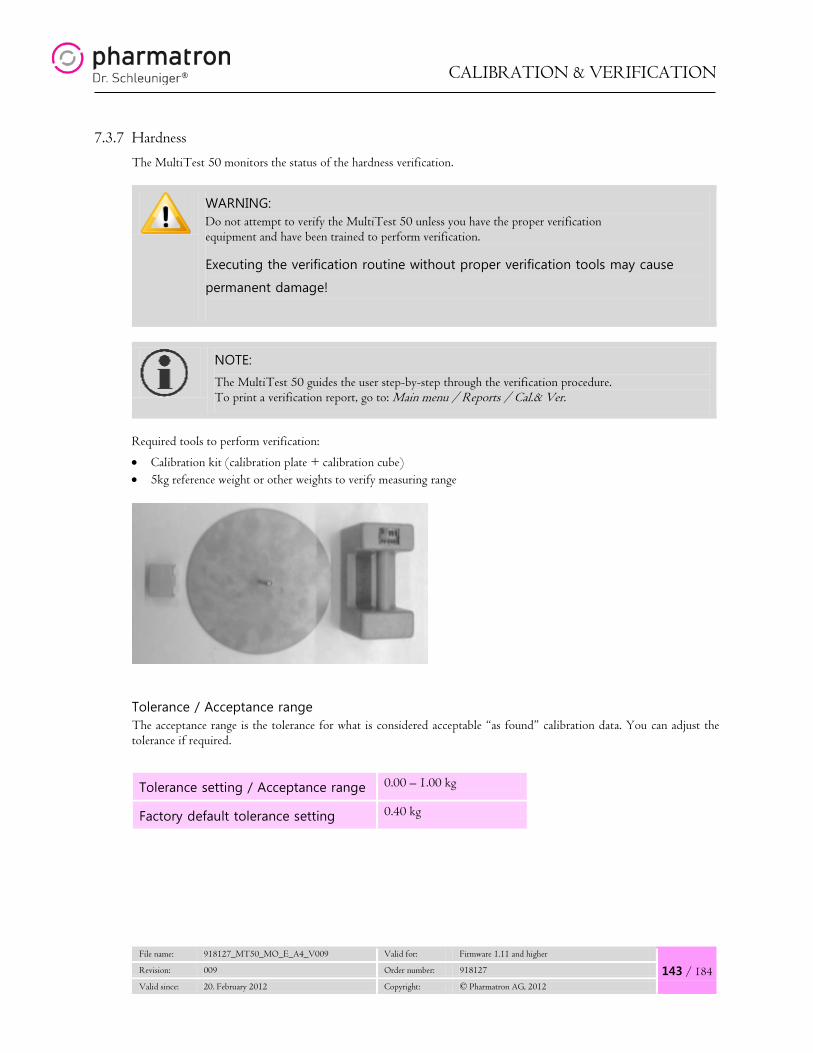
CALIBRATION & VERIFICATION
File name: 918127_MT50_MO_E_A4_V009 Valid for: Firmware 1.11 and higher
143 / 184 Revision: 009 Order number: 918127
Valid since: 20. February 2012 Copyright: © Pharmatron AG, 2012
7.3.7 Hardness
The MultiTest 50 monitors the status of the hardness verification.
WARNING: Do not attempt to verify the MultiTest 50 unless you have the proper verification equipment and have been trained to perform verification.
Executing the verification routine without proper verification tools may cause
permanent damage!
NOTE:
The MultiTest 50 guides the user step-by-step through the verification procedure. To print a verification report, go to: Main menu / Reports / Cal.& Ver.
Required tools to perform verification:
• Calibration kit (calibration plate + calibration cube) • 5kg reference weight or other weights to verify measuring range
Tolerance / Acceptance range The acceptance range is the tolerance for what is considered acceptable “as found” calibration data. You can adjust the tolerance if required.
Tolerance setting / Acceptance range 0.00 – 1.00 kg
Factory default tolerance setting 0.40 kg

CALIBRATION & VERIFICATION
144 / 184
File name: 918127_MT50_MO_E_A4_V009 Valid for: Firmware 1.11 and higher
Revision: 009 Order number: 918127
Valid since: 20. February 2012 Copyright: © Pharmatron AG, 2012
WARNING: Make sure the MultiTest 50 is switched on BEFORE placing the machine in the vertical position!
MECHANICAL PREPARATIONS
• Make sure machine and all connected devices are switched ON

CALIBRATION & VERIFICATION
File name: 918127_MT50_MO_E_A4_V009 Valid for: Firmware 1.11 and higher
145 / 184 Revision: 009 Order number: 918127
Valid since: 20. February 2012 Copyright: © Pharmatron AG, 2012
• Carefully place machine in vertical position
• Make sure the machine is steady and leveled
• Remove quick-change tongue

CALIBRATION & VERIFICATION
146 / 184
File name: 918127_MT50_MO_E_A4_V009 Valid for: Firmware 1.11 and higher
Revision: 009 Order number: 918127
Valid since: 20. February 2012 Copyright: © Pharmatron AG, 2012
• Remove fixed jaw loosen 2 screws
• Make sure not to drop the fixed jaw once both screws are lose

CALIBRATION & VERIFICATION
File name: 918127_MT50_MO_E_A4_V009 Valid for: Firmware 1.11 and higher
147 / 184 Revision: 009 Order number: 918127
Valid since: 20. February 2012 Copyright: © Pharmatron AG, 2012
• Insert calibration cube [A] first
• Insert calibration plate [B] afterwards
• Make sure that the shaft of the calibration plate is correctly / fully inserted into the calibration cube
NOTE:
When verification has been completed, execute the steps described in reverse order to prepare the MultiTest 50 for testing again.
B
B
A
A
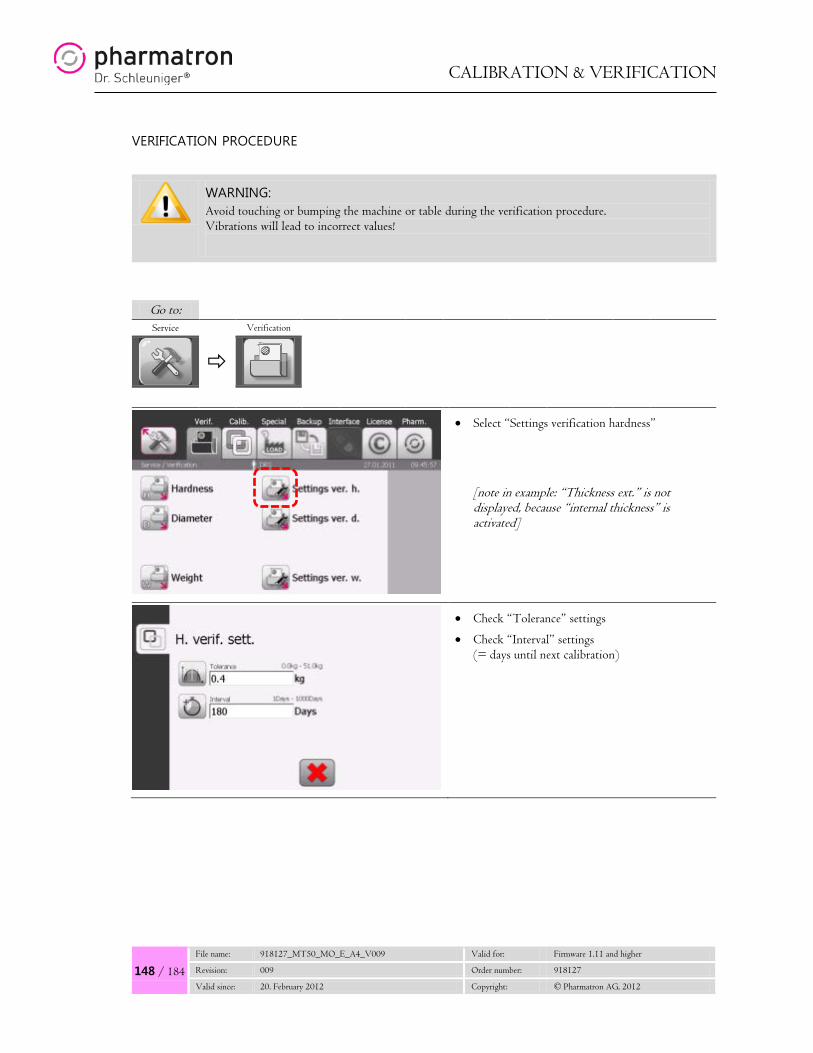
CALIBRATION & VERIFICATION
148 / 184
File name: 918127_MT50_MO_E_A4_V009 Valid for: Firmware 1.11 and higher
Revision: 009 Order number: 918127
Valid since: 20. February 2012 Copyright: © Pharmatron AG, 2012
VERIFICATION PROCEDURE
WARNING: Avoid touching or bumping the machine or table during the verification procedure. Vibrations will lead to incorrect values!
Go to: Service Verification
• Select “Settings verification hardness”
[note in example: “Thickness ext.” is not displayed, because “internal thickness” is activated]
• Check “Tolerance” settings
• Check “Interval” settings (= days until next calibration)

CALIBRATION & VERIFICATION
File name: 918127_MT50_MO_E_A4_V009 Valid for: Firmware 1.11 and higher
149 / 184 Revision: 009 Order number: 918127
Valid since: 20. February 2012 Copyright: © Pharmatron AG, 2012
• Select “Hardness”
• Make sure that the calibration plate and calibration cube are correctly installed
• Press “Run” button
• Place the reference weight on the calibration plate
center of gravity must be exactly in
the middle!
WARNING: Do not drop the reference weight onto the calibration plate. This may permanently damage the load cell!

CALIBRATION & VERIFICATION
150 / 184
File name: 918127_MT50_MO_E_A4_V009 Valid for: Firmware 1.11 and higher
Revision: 009 Order number: 918127
Valid since: 20. February 2012 Copyright: © Pharmatron AG, 2012
• Enter the weight of the reference you are using
• Press “Run” button
• The measured result is displayed and evaluated whether acceptable or not
• To continue with verification using other reference weights, press “RUN”
• To complete verification procedure, press “OK”
• The next verification date is displayed automatically calculated based on current date and number of days (= programmed calibration interval)
• Confirm next verification date
• Verification is now completed press “OK” to return to verification menu
After completion of hardness verification:

CALIBRATION & VERIFICATION
File name: 918127_MT50_MO_E_A4_V009 Valid for: Firmware 1.11 and higher
151 / 184 Revision: 009 Order number: 918127
Valid since: 20. February 2012 Copyright: © Pharmatron AG, 2012
• Remove the reference weight • Remove calibration kit • Insert the fixed jaw and tighten both screws • Insert quick-change tongue • Return the MultiTest 50 into the normal horizontal position
7.3.8 Print verification report
A verification report can be printed anytime showing all details of the last verification performed.
Go to: Reports Cal. / Ver.
• Press “Verification” a report is printed immediately

PRINT REPORTS
152 / 184
File name: 918127_MT50_MO_E_A4_V009 Valid for: Firmware 1.11 and higher
Revision: 009 Order number: 918127
Valid since: 20. February 2012 Copyright: © Pharmatron AG, 2012
8. PRINT REPORTS
The Multitest50 features several printouts which can be generated at every time if a printer is attached. Any USB Postscript printer is compatible, EPSON 40col serial printer is as well supported.
8.1 Standard report
The data from the last test is always stored and can be printed out later on if needed. Following printout is generated with all options ON. For customizing your report refer global settings chapter 6.3 report.
Go to: Reports Test
• Press “Standard report” a report is printed immediately

PRINT REPORTS
File name: 918127_MT50_MO_E_A4_V009 Valid for: Firmware 1.11 and higher
153 / 184 Revision: 009 Order number: 918127
Valid since: 20. February 2012 Copyright: © Pharmatron AG, 2012
Example report “Standard report”

PRINT REPORTS
154 / 184
File name: 918127_MT50_MO_E_A4_V009 Valid for: Firmware 1.11 and higher
Revision: 009 Order number: 918127
Valid since: 20. February 2012 Copyright: © Pharmatron AG, 2012

PRINT REPORTS
File name: 918127_MT50_MO_E_A4_V009 Valid for: Firmware 1.11 and higher
155 / 184 Revision: 009 Order number: 918127
Valid since: 20. February 2012 Copyright: © Pharmatron AG, 2012
8.2 Graphic report
The data from the last test is always stored and can be printed out later on if needed. Following printout is generated with all options ON. For customizing your report refer global settings chapter 6.3 report.
Go to: Reports Test
• Press “Graphic report” a report is printed immediately
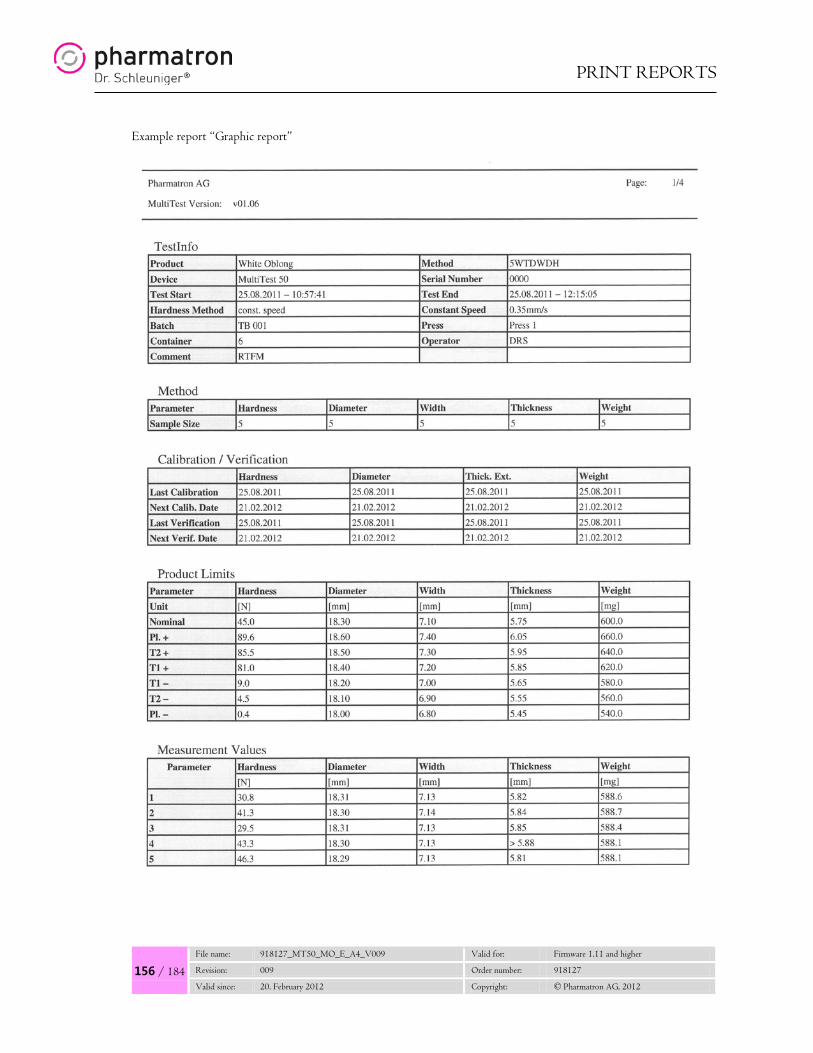
PRINT REPORTS
156 / 184
File name: 918127_MT50_MO_E_A4_V009 Valid for: Firmware 1.11 and higher
Revision: 009 Order number: 918127
Valid since: 20. February 2012 Copyright: © Pharmatron AG, 2012
Example report “Graphic report”

PRINT REPORTS
File name: 918127_MT50_MO_E_A4_V009 Valid for: Firmware 1.11 and higher
157 / 184 Revision: 009 Order number: 918127
Valid since: 20. February 2012 Copyright: © Pharmatron AG, 2012

PRINT REPORTS
158 / 184
File name: 918127_MT50_MO_E_A4_V009 Valid for: Firmware 1.11 and higher
Revision: 009 Order number: 918127
Valid since: 20. February 2012 Copyright: © Pharmatron AG, 2012

PRINT REPORTS
File name: 918127_MT50_MO_E_A4_V009 Valid for: Firmware 1.11 and higher
159 / 184 Revision: 009 Order number: 918127
Valid since: 20. February 2012 Copyright: © Pharmatron AG, 2012

PRINT REPORTS
160 / 184
File name: 918127_MT50_MO_E_A4_V009 Valid for: Firmware 1.11 and higher
Revision: 009 Order number: 918127
Valid since: 20. February 2012 Copyright: © Pharmatron AG, 2012
8.3 Test setup report
The test setup report shows the information of the last performed or selected test, e.g. product, method and used report options.
Go to: Reports Test
• Press “Test setup” a report is printed immediately
Example report “Test setup”

PRINT REPORTS
File name: 918127_MT50_MO_E_A4_V009 Valid for: Firmware 1.11 and higher
161 / 184 Revision: 009 Order number: 918127
Valid since: 20. February 2012 Copyright: © Pharmatron AG, 2012
8.4 Product setup report
The Product setup report shows the information of the selected product, e.g. product name, units and used limits in absolute and relative values.
Go to: Reports Test
• Press “Product setup” a report is printed immediately
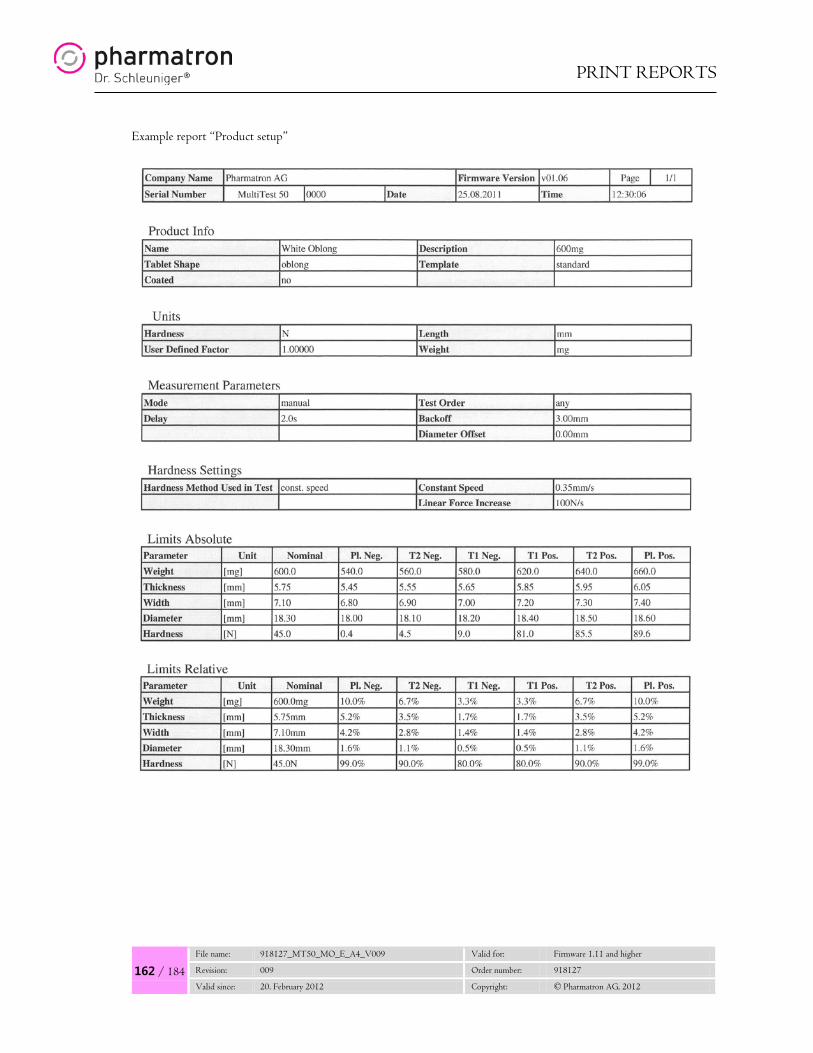
PRINT REPORTS
162 / 184
File name: 918127_MT50_MO_E_A4_V009 Valid for: Firmware 1.11 and higher
Revision: 009 Order number: 918127
Valid since: 20. February 2012 Copyright: © Pharmatron AG, 2012
Example report “Product setup”

PRINT REPORTS
File name: 918127_MT50_MO_E_A4_V009 Valid for: Firmware 1.11 and higher
163 / 184 Revision: 009 Order number: 918127
Valid since: 20. February 2012 Copyright: © Pharmatron AG, 2012
8.5 Method setup report
The Method setup report shows the information of the selected method, e.g. method name, selected parameter and amount of samples.
Go to: Reports Test
• Press “Method setup” a report is printed immediately
Example report “Method setup”
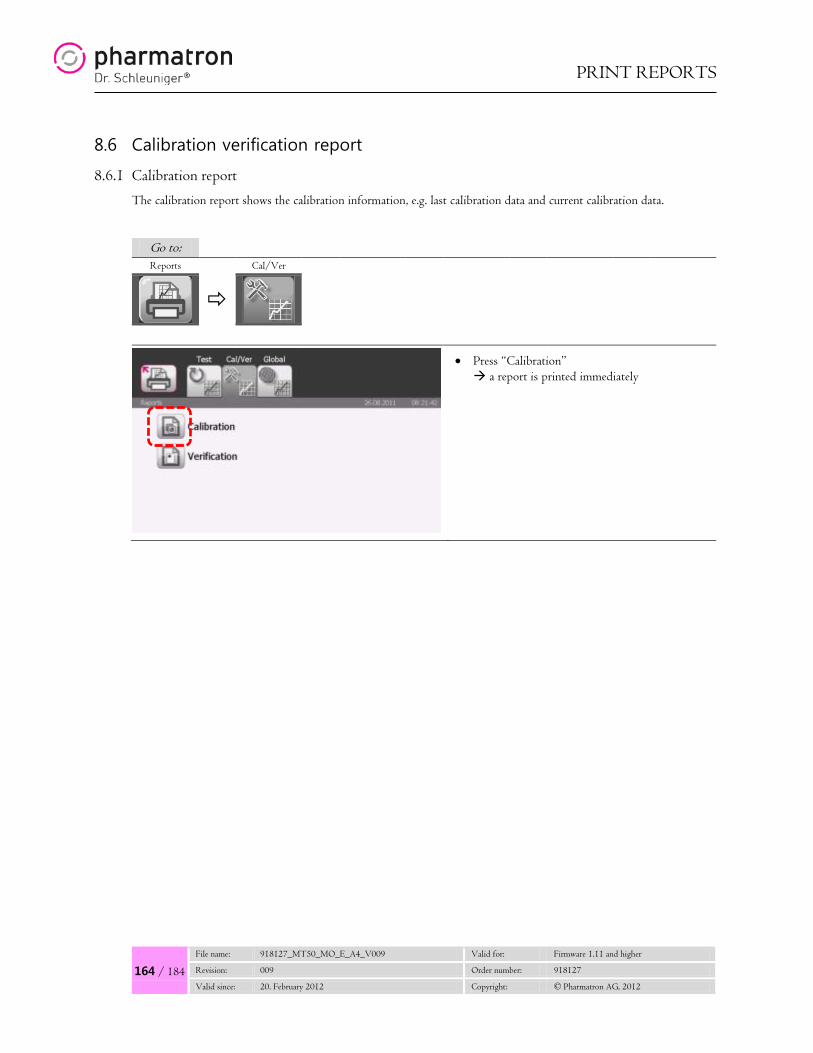
PRINT REPORTS
164 / 184
File name: 918127_MT50_MO_E_A4_V009 Valid for: Firmware 1.11 and higher
Revision: 009 Order number: 918127
Valid since: 20. February 2012 Copyright: © Pharmatron AG, 2012
8.6 Calibration verification report
8.6.1 Calibration report
The calibration report shows the calibration information, e.g. last calibration data and current calibration data.
Go to: Reports Cal/Ver
• Press “Calibration” a report is printed immediately

PRINT REPORTS
File name: 918127_MT50_MO_E_A4_V009 Valid for: Firmware 1.11 and higher
165 / 184 Revision: 009 Order number: 918127
Valid since: 20. February 2012 Copyright: © Pharmatron AG, 2012
Example report “calibration”

PRINT REPORTS
166 / 184
File name: 918127_MT50_MO_E_A4_V009 Valid for: Firmware 1.11 and higher
Revision: 009 Order number: 918127
Valid since: 20. February 2012 Copyright: © Pharmatron AG, 2012
8.6.2 Verification report
The verification report shows the calibration information, e.g. last calibration data and current calibration data.
Go to: Reports Cal/Ver
• Press “Verification” a report is printed immediately

PRINT REPORTS
File name: 918127_MT50_MO_E_A4_V009 Valid for: Firmware 1.11 and higher
167 / 184 Revision: 009 Order number: 918127
Valid since: 20. February 2012 Copyright: © Pharmatron AG, 2012
Example report “Verification”

PRINT REPORTS
168 / 184
File name: 918127_MT50_MO_E_A4_V009 Valid for: Firmware 1.11 and higher
Revision: 009 Order number: 918127
Valid since: 20. February 2012 Copyright: © Pharmatron AG, 2012
8.7 Global report
8.7.1 Global settings report
The global settings report shows the calibration information, e.g. last calibration data and current calibration data.
Go to: Reports Global
• Press “Global settings” a report is printed immediately

PRINT REPORTS
File name: 918127_MT50_MO_E_A4_V009 Valid for: Firmware 1.11 and higher
169 / 184 Revision: 009 Order number: 918127
Valid since: 20. February 2012 Copyright: © Pharmatron AG, 2012
Example report “Global settings”
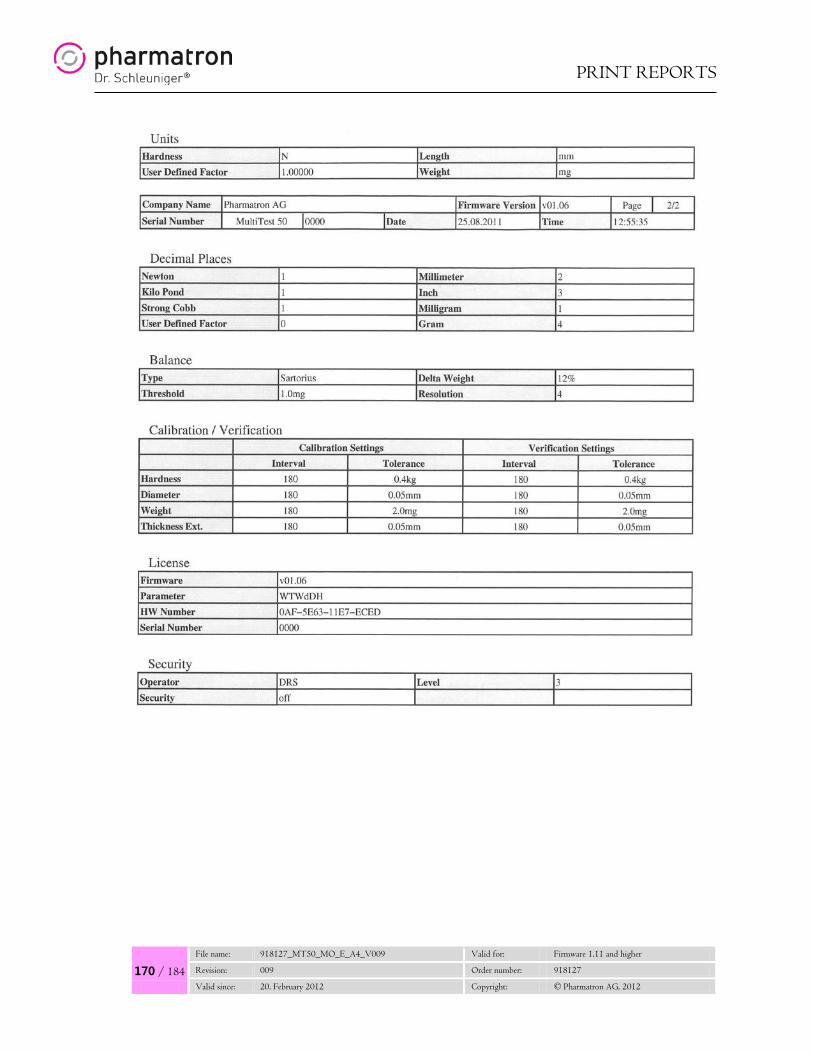
PRINT REPORTS
170 / 184
File name: 918127_MT50_MO_E_A4_V009 Valid for: Firmware 1.11 and higher
Revision: 009 Order number: 918127
Valid since: 20. February 2012 Copyright: © Pharmatron AG, 2012

PRINT REPORTS
File name: 918127_MT50_MO_E_A4_V009 Valid for: Firmware 1.11 and higher
171 / 184 Revision: 009 Order number: 918127
Valid since: 20. February 2012 Copyright: © Pharmatron AG, 2012
8.7.2 Error messages report
The error messages report shows error messages generated by the system, e.g. external devices errors, load cell overload and more. For detailed information about the messages refer service manual.
Go to: Reports Global
• Press “Error messages” a report is printed immediately
Example report “Error messages”
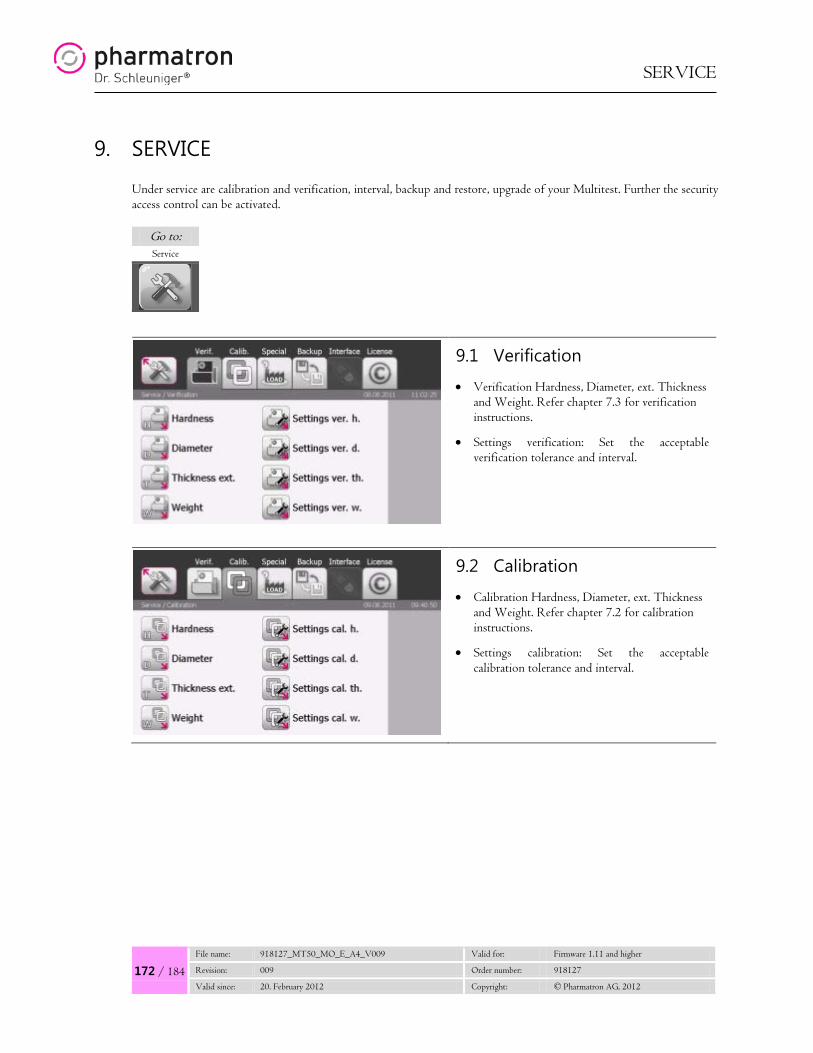
SERVICE
172 / 184
File name: 918127_MT50_MO_E_A4_V009 Valid for: Firmware 1.11 and higher
Revision: 009 Order number: 918127
Valid since: 20. February 2012 Copyright: © Pharmatron AG, 2012
9. SERVICE
Under service are calibration and verification, interval, backup and restore, upgrade of your Multitest. Further the security access control can be activated.
Go to: Service
9.1 Verification
• Verification Hardness, Diameter, ext. Thickness and Weight. Refer chapter 7.3 for verification instructions.
• Settings verification: Set the acceptable verification tolerance and interval.
9.2 Calibration
• Calibration Hardness, Diameter, ext. Thickness and Weight. Refer chapter 7.2 for calibration instructions.
• Settings calibration: Set the acceptable calibration tolerance and interval.
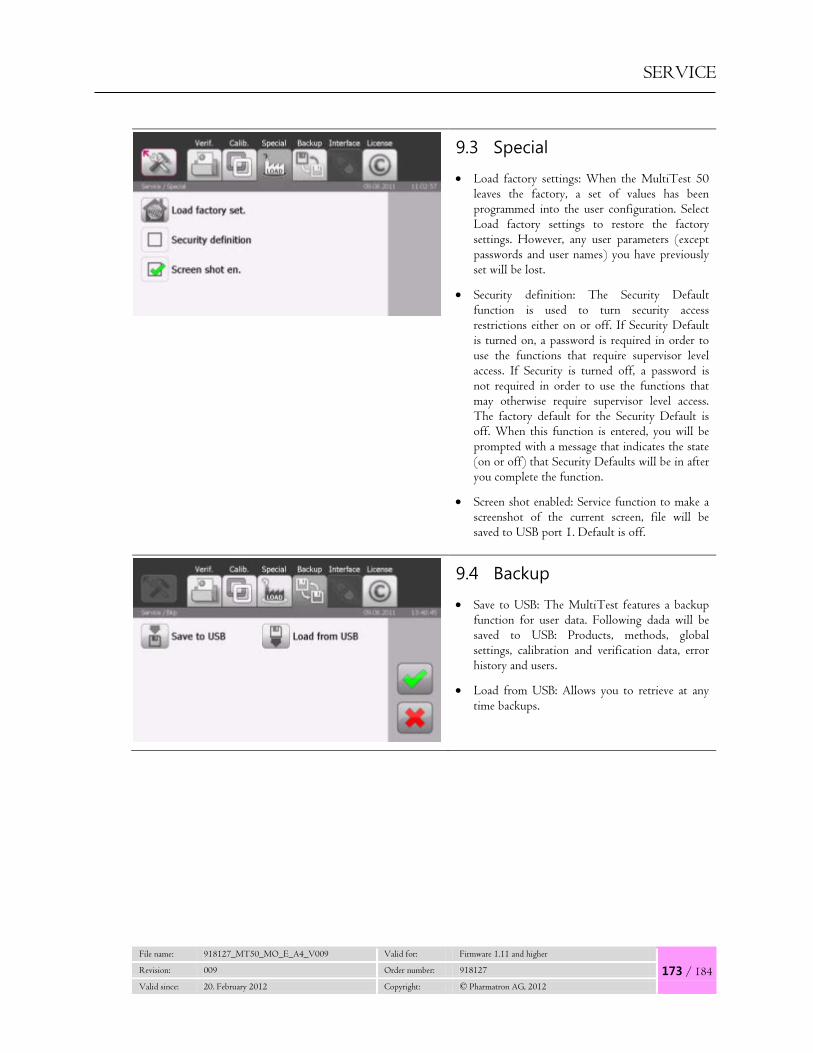
SERVICE
File name: 918127_MT50_MO_E_A4_V009 Valid for: Firmware 1.11 and higher
173 / 184 Revision: 009 Order number: 918127
Valid since: 20. February 2012 Copyright: © Pharmatron AG, 2012
9.3 Special
• Load factory settings: When the MultiTest 50 leaves the factory, a set of values has been programmed into the user configuration. Select Load factory settings to restore the factory settings. However, any user parameters (except passwords and user names) you have previously set will be lost.
• Security definition: The Security Default function is used to turn security access restrictions either on or off. If Security Default is turned on, a password is required in order to use the functions that require supervisor level access. If Security is turned off, a password is not required in order to use the functions that may otherwise require supervisor level access. The factory default for the Security Default is off. When this function is entered, you will be prompted with a message that indicates the state (on or off) that Security Defaults will be in after you complete the function.
• Screen shot enabled: Service function to make a screenshot of the current screen, file will be saved to USB port 1. Default is off.
9.4 Backup
• Save to USB: The MultiTest features a backup function for user data. Following dada will be saved to USB: Products, methods, global settings, calibration and verification data, error history and users.
• Load from USB: Allows you to retrieve at any time backups.
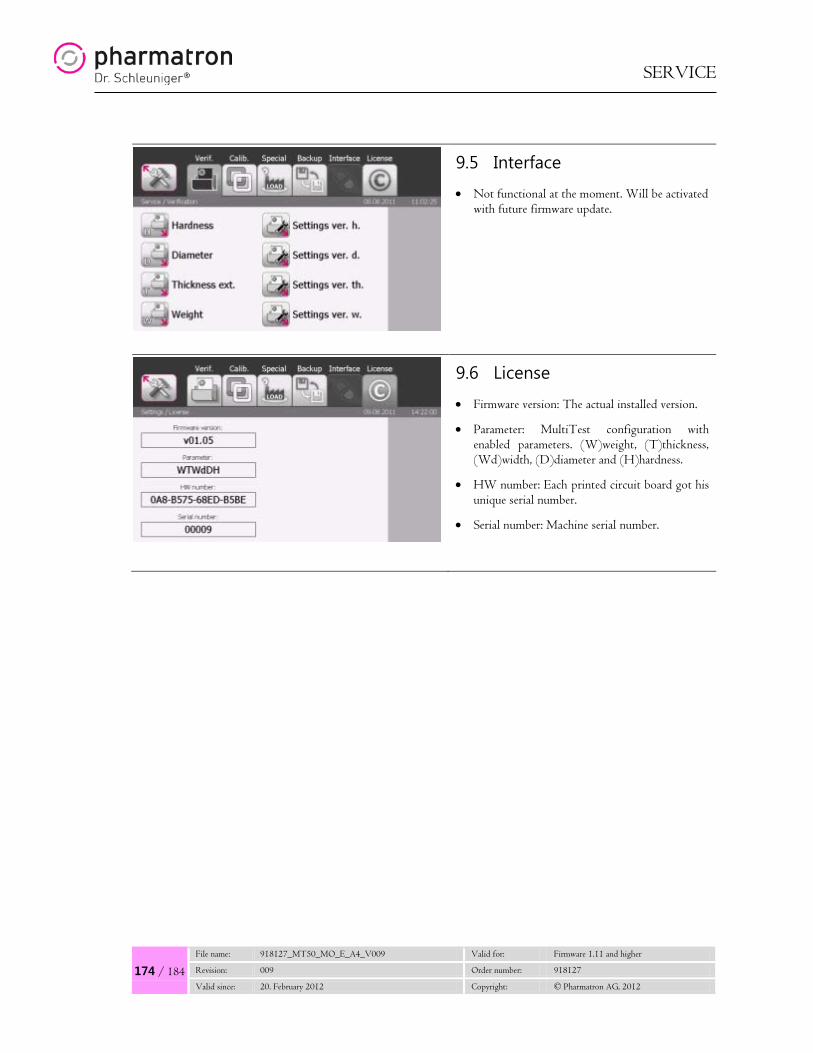
SERVICE
174 / 184
File name: 918127_MT50_MO_E_A4_V009 Valid for: Firmware 1.11 and higher
Revision: 009 Order number: 918127
Valid since: 20. February 2012 Copyright: © Pharmatron AG, 2012
9.5 Interface
• Not functional at the moment. Will be activated with future firmware update.
9.6 License
• Firmware version: The actual installed version.
• Parameter: MultiTest configuration with enabled parameters. (W)weight, (T)thickness, (Wd)width, (D)diameter and (H)hardness.
• HW number: Each printed circuit board got his unique serial number.
• Serial number: Machine serial number.
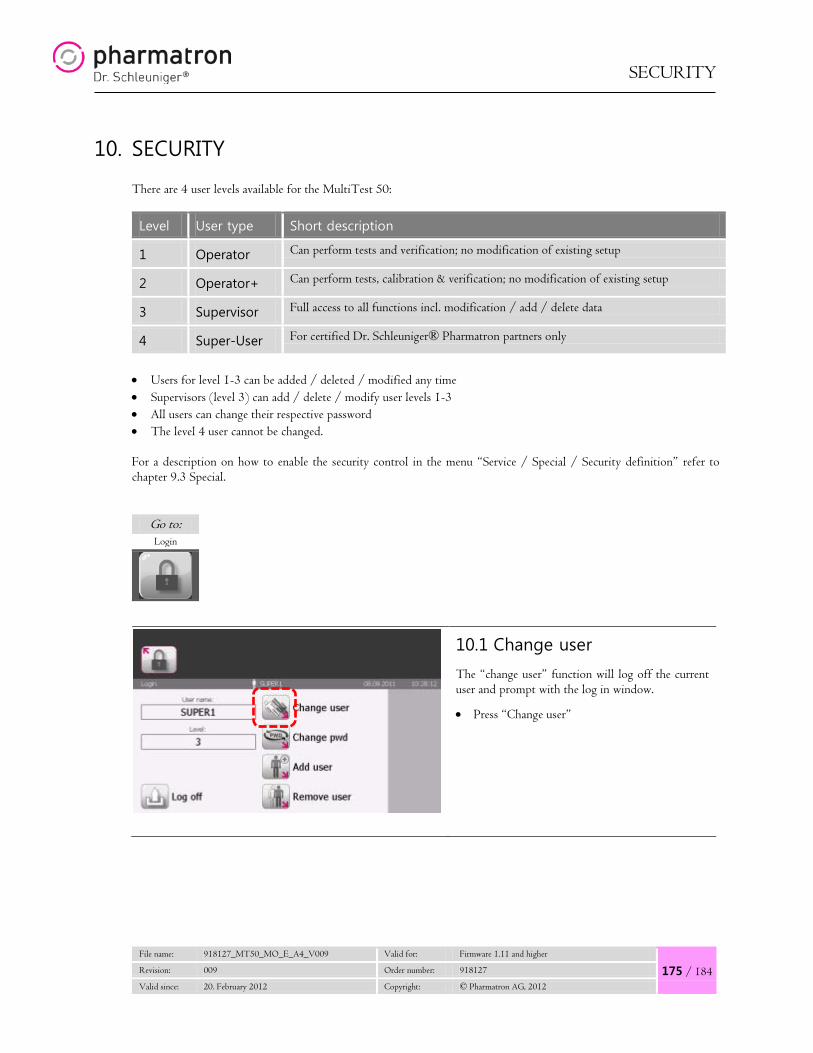
SECURITY
File name: 918127_MT50_MO_E_A4_V009 Valid for: Firmware 1.11 and higher
175 / 184 Revision: 009 Order number: 918127
Valid since: 20. February 2012 Copyright: © Pharmatron AG, 2012
10. SECURITY
There are 4 user levels available for the MultiTest 50:
Level User type Short description
1 Operator Can perform tests and verification; no modification of existing setup
2 Operator+ Can perform tests, calibration & verification; no modification of existing setup
3 Supervisor Full access to all functions incl. modification / add / delete data
4 Super-User For certified Dr. Schleuniger® Pharmatron partners only
• Users for level 1-3 can be added / deleted / modified any time • Supervisors (level 3) can add / delete / modify user levels 1-3 • All users can change their respective password • The level 4 user cannot be changed. For a description on how to enable the security control in the menu “Service / Special / Security definition” refer to chapter 9.3 Special.
Go to: Login
10.1 Change user
The “change user” function will log off the current user and prompt with the log in window.
• Press “Change user”
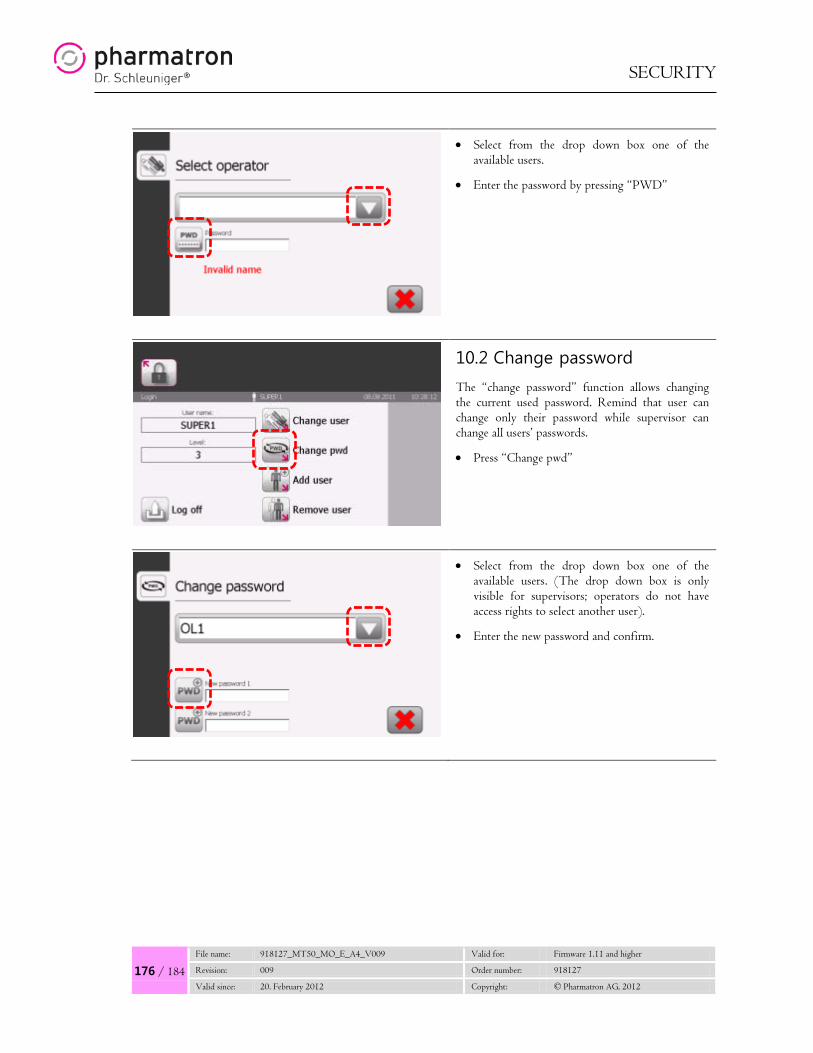
SECURITY
176 / 184
File name: 918127_MT50_MO_E_A4_V009 Valid for: Firmware 1.11 and higher
Revision: 009 Order number: 918127
Valid since: 20. February 2012 Copyright: © Pharmatron AG, 2012
• Select from the drop down box one of the available users.
• Enter the password by pressing “PWD”
10.2 Change password
The “change password” function allows changing the current used password. Remind that user can change only their password while supervisor can change all users’ passwords.
• Press “Change pwd”
• Select from the drop down box one of the available users. (The drop down box is only visible for supervisors; operators do not have access rights to select another user).
• Enter the new password and confirm.

SECURITY
File name: 918127_MT50_MO_E_A4_V009 Valid for: Firmware 1.11 and higher
177 / 184 Revision: 009 Order number: 918127
Valid since: 20. February 2012 Copyright: © Pharmatron AG, 2012
10.3 Add new user
This function is only accessible for supervisors. Operators do not have access rights to add new users.
• Login as supervisor
• Press “Add user”
• Enter operator name and password.
• Select user level, supervisor, operator or operator+.
• Store modification.
10.4 Remove user
This function is only accessible for supervisors. Operators do not have access rights to remove users.
• Press “Remove user”

SECURITY
178 / 184
File name: 918127_MT50_MO_E_A4_V009 Valid for: Firmware 1.11 and higher
Revision: 009 Order number: 918127
Valid since: 20. February 2012 Copyright: © Pharmatron AG, 2012
• Select the user which should be removed from the drop down box.
• Confirm modification.
10.5 Default passwords
The following is the list of default passwords that are downloaded into the MultiTest 50 when either the configuration or the version is changed.
Level Username Password
4 DRS Secret password for certified Dr. Schleuniger® Pharmatron partners only
3 Super1 SUPERVISOR1
3 Super2 SUPERVISOR2
1 OL1 OPER1
1 OL2 OPER2
1 OL3 OPER3
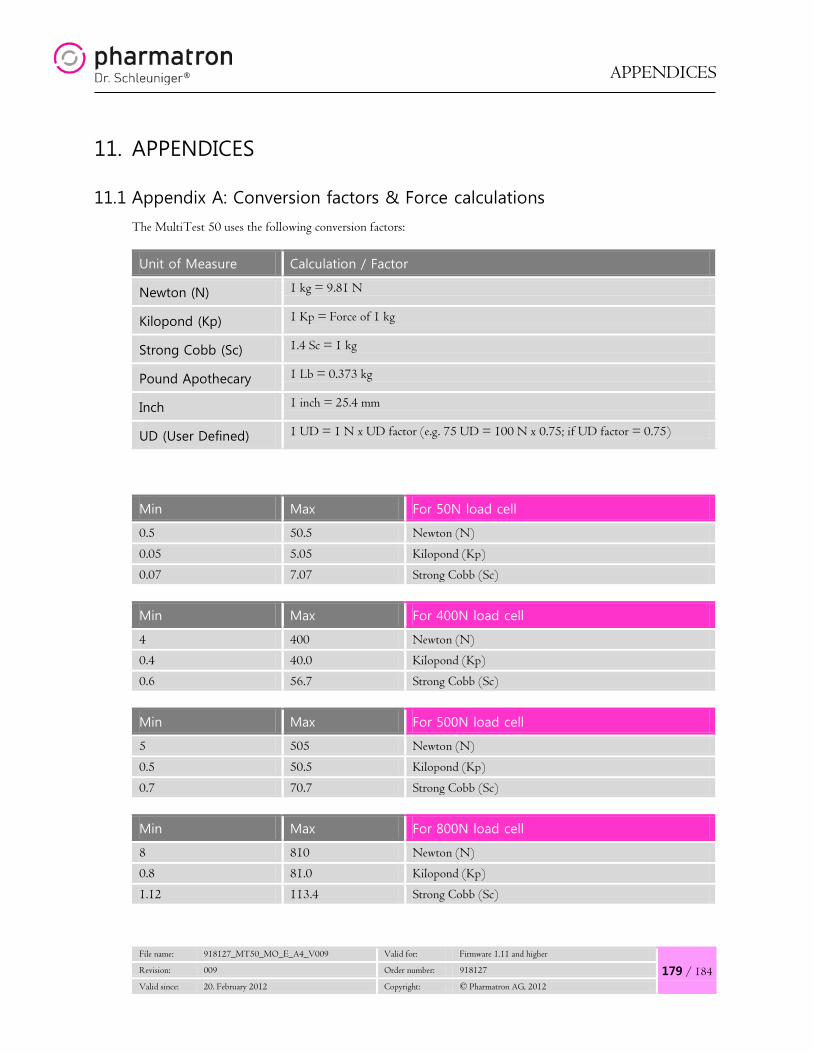
APPENDICES
File name: 918127_MT50_MO_E_A4_V009 Valid for: Firmware 1.11 and higher
179 / 184 Revision: 009 Order number: 918127
Valid since: 20. February 2012 Copyright: © Pharmatron AG, 2012
11. APPENDICES
11.1 Appendix A: Conversion factors & Force calculations
The MultiTest 50 uses the following conversion factors:
Unit of Measure Calculation / Factor
Newton (N) 1 kg = 9.81 N
Kilopond (Kp) 1 Kp = Force of 1 kg
Strong Cobb (Sc) 1.4 Sc = 1 kg
Pound Apothecary 1 Lb = 0.373 kg
Inch 1 inch = 25.4 mm
UD (User Defined) 1 UD = 1 N x UD factor (e.g. 75 UD = 100 N x 0.75; if UD factor = 0.75)
Min Max For 50N load cell
0.5 50.5 Newton (N)
0.05 5.05 Kilopond (Kp)
0.07 7.07 Strong Cobb (Sc)
Min Max For 400N load cell
4 400 Newton (N)
0.4 40.0 Kilopond (Kp)
0.6 56.7 Strong Cobb (Sc)
Min Max For 500N load cell
5 505 Newton (N)
0.5 50.5 Kilopond (Kp)
0.7 70.7 Strong Cobb (Sc)
Min Max For 800N load cell
8 810 Newton (N)
0.8 81.0 Kilopond (Kp)
1.12 113.4 Strong Cobb (Sc)

APPENDICES
180 / 184
File name: 918127_MT50_MO_E_A4_V009 Valid for: Firmware 1.11 and higher
Revision: 009 Order number: 918127
Valid since: 20. February 2012 Copyright: © Pharmatron AG, 2012
11.2 Appendix B: Sample test reports
Chapter will be added.
11.3 Appendix C: Balance settings
11.3.1Mettler AB54-OEM
The standard Mettler Balance (AB 54-OEM) communication protocol should be Host Mode, 9600 baud, 8 bits, 1 stop bit, No parity and software handshaking. (Hint: Reset the factory defaults, on the scale, then change the mode from Printer to Host.) The Mettler PM (Printer Mode) Balance communication protocol should be Send Cont., 9600 baud, 8 bits, No parity and software handshaking.
The Mettler Balance communication protocol for AB-S and PB-S series scales is as follows:
• rESEt
• CAL int
• F nonE
• Std
• Unit 1 g
• Unit 2 g
• A 2Ero
• Host
• S Cont
• 10.S. SICS
• 11.bd 9600
• 12.8b-no
• 13.HS Soft
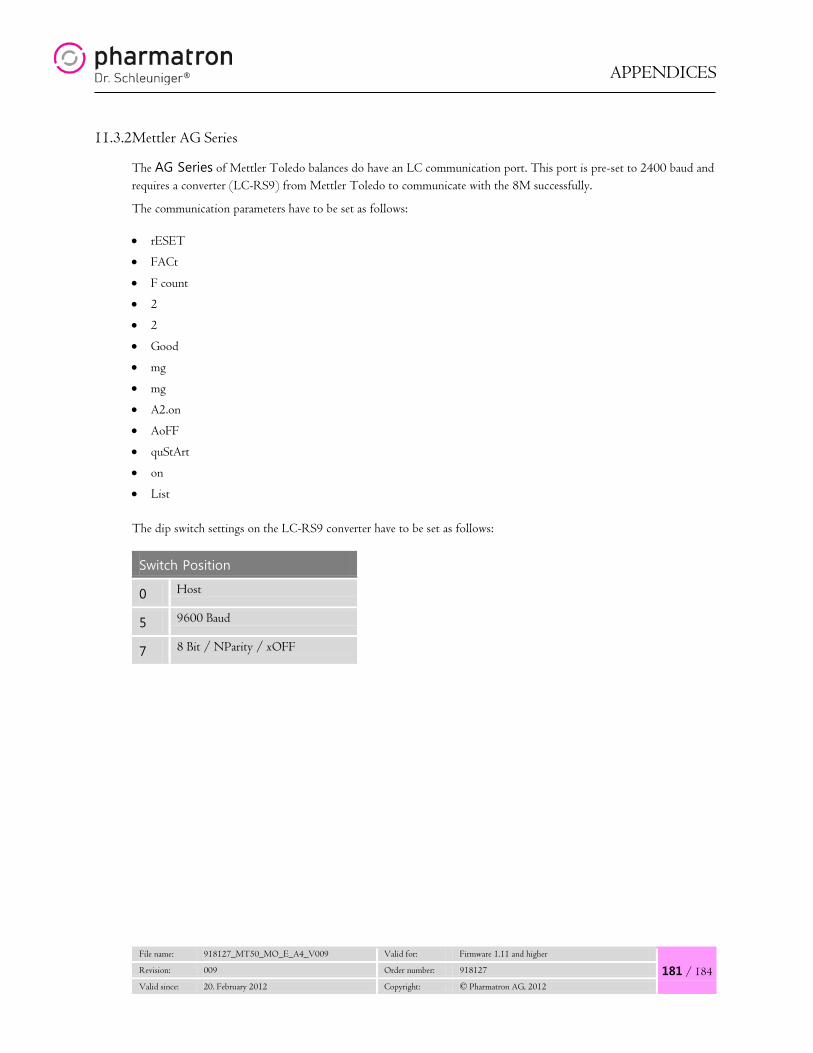
APPENDICES
File name: 918127_MT50_MO_E_A4_V009 Valid for: Firmware 1.11 and higher
181 / 184 Revision: 009 Order number: 918127
Valid since: 20. February 2012 Copyright: © Pharmatron AG, 2012
11.3.2Mettler AG Series
The AG Series of Mettler Toledo balances do have an LC communication port. This port is pre-set to 2400 baud and requires a converter (LC-RS9) from Mettler Toledo to communicate with the 8M successfully.
The communication parameters have to be set as follows:
• rESET
• FACt
• F count
• 2
• 2
• Good
• mg
• mg
• A2.on
• AoFF
• quStArt
• on
• List The dip switch settings on the LC-RS9 converter have to be set as follows:
Switch Position
0 Host
5 9600 Baud
7 8 Bit / NParity / xOFF
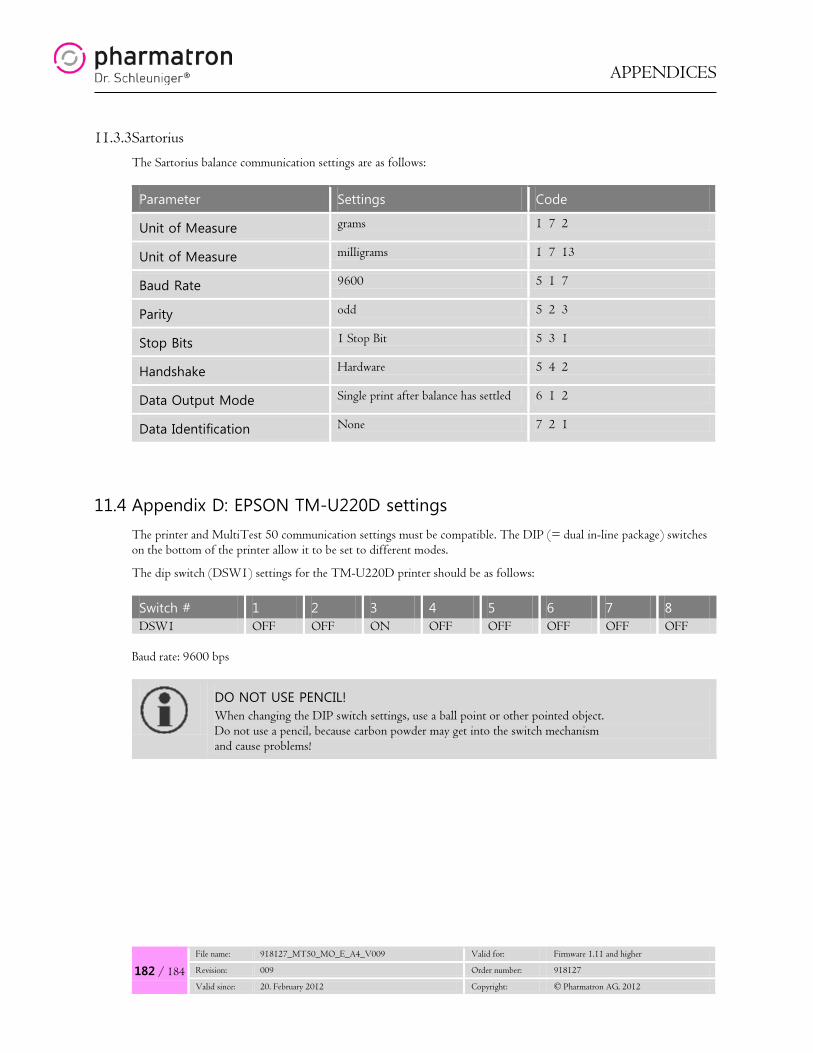
APPENDICES
182 / 184
File name: 918127_MT50_MO_E_A4_V009 Valid for: Firmware 1.11 and higher
Revision: 009 Order number: 918127
Valid since: 20. February 2012 Copyright: © Pharmatron AG, 2012
11.3.3Sartorius
The Sartorius balance communication settings are as follows:
Parameter Settings Code
Unit of Measure grams 1 7 2
Unit of Measure milligrams 1 7 13
Baud Rate 9600 5 1 7
Parity odd 5 2 3
Stop Bits 1 Stop Bit 5 3 1
Handshake Hardware 5 4 2
Data Output Mode Single print after balance has settled 6 1 2
Data Identification None 7 2 1
11.4 Appendix D: EPSON TM-U220D settings
The printer and MultiTest 50 communication settings must be compatible. The DIP (= dual in-line package) switches on the bottom of the printer allow it to be set to different modes.
The dip switch (DSW1) settings for the TM-U220D printer should be as follows:
Switch # 1 2 3 4 5 6 7 8 DSW1 OFF OFF ON OFF OFF OFF OFF OFF
Baud rate: 9600 bps
DO NOT USE PENCIL! When changing the DIP switch settings, use a ball point or other pointed object. Do not use a pencil, because carbon powder may get into the switch mechanism and cause problems!
APPENDICES
File name: 918127_MT50_MO_E_A4_V009 Valid for: Firmware 1.11 and higher
183 / 184 Revision: 009 Order number: 918127
Valid since: 20. February 2012 Copyright: © Pharmatron AG, 2012
11.5 Appendix E: Copyright
Copyright © 1992 – 2011, Pharmatron AG All rights reserved. Distributed by Pharmatron AG and Pharmatron, Inc. Pharmatron AG Pharmatron, Inc. Uttigenstrasse 28 25 Sundial Avenue CH-3600 Thun Manchester, NH 03103 Switzerland USA
Except as permitted under the U.S. Copyright Act and Swiss Copyright legislation, no part of this publication may be reproduced or distributed in any form or by any means, or stored in a database or retrieval system, without the written permission of Pharmatron AG or Pharmatron, Inc.. Dr. Schleuniger® and Pharmatron® are registered trademarks of Pharmatron AG. All other brand and product names are trademarks of their respective companies. Both product information and technical specifications in this document are subject to change without notice and do not represent a commitment on the part of the vendor.
11.6 Appendix F: Disclaimer of Warranty
This product and documentation are sold “as is” and without warranties as to the performance or merchantability. The seller’s salesperson may have made statements about this product. Any such statements do not constitute warranties and shall not be relied on by the buyer in deciding whether to purchase this product. This product is sold without any express or implied warranties whatsoever. Because of the diversity of the conditions under which this product may be used, no warranty or fitness for a particular purpose is offered. The user is advised to test the product thoroughly before relying on it. The user must assume the entire risk of using the product. Any liability of seller or manufacturer will be limited exclusively to product replacement.

APPENDICES
184 / 184
File name: 918127_MT50_MO_E_A4_V009 Valid for: Firmware 1.11 and higher
Revision: 009 Order number: 918127
Valid since: 20. February 2012 Copyright: © Pharmatron AG, 2012
11.7 Appendix G: Revision details of this Manual
Prepared by Date Description Rev.
HH 09.05.2011 New manual 001
HH 28.05.2011 Updated printer info 002
HH 09.06.2011 003
HH 08.08.2011 Updated global settings, service 004
HH 26.08.2011 Updated report section. 005
HH 08.09.2011 Updated security section 006
HH 06.02.2012 Updated security section 007
RR 08.02.2012 Network printing 008
RR 20.02.2012 6D mode, updated printer selection 009
Checked by Date Signature
THB 20.02.2012
Approved by Date Signature
HH 20.02.2012
QM References
AEM# - -
Contact your local sales & service partner for more information.
Visit our website www.pharmatron.com.