multispec tutorial 4 - purdue university · multispec tutorial 4 supervised classification page 2...
TRANSCRIPT
Revised 9/10/2015 Page 1 of 7
MultiSpec Tutorial: Supervised Classification - Select Training Fields Requirements: MultiSpec application and image titled “ag020522_DPAC_cd.lan”. One can also do a supervised classification by selecting training areas for specified classes from known areas. Open the image if it is not already displayed in a multispectral image window following the guidelines given in tutorial 1. 4.1 Select Training Fields 4.1.1 If a project window is open, from the Window menu, select Project, and then double click
in the upper left to close the current project and project window. One may have been created during the cluster analysis.
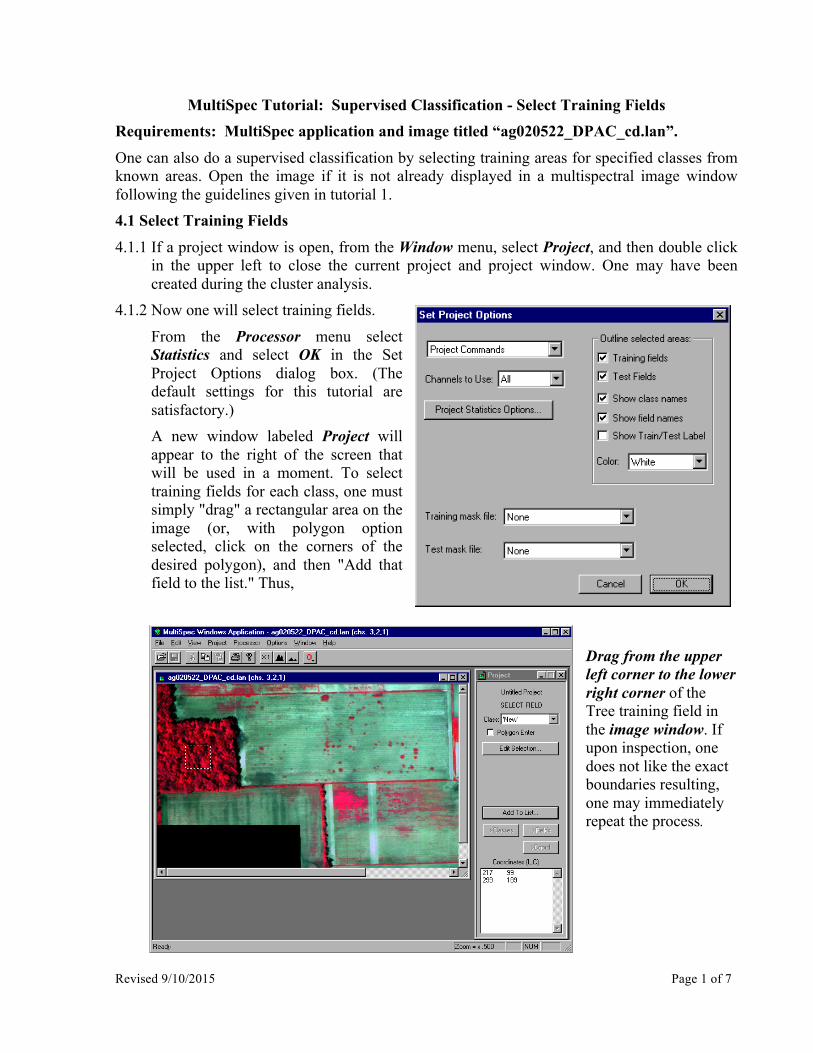
4.1.2 Now one will select training fields.
From the Processor menu select Statistics and select OK in the Set Project Options dialog box. (The default settings for this tutorial are satisfactory.) A new window labeled Project will appear to the right of the screen that will be used in a moment. To select training fields for each class, one must simply "drag" a rectangular area on the image (or, with polygon option selected, click on the corners of the desired polygon), and then "Add that field to the list." Thus,
Drag from the upper left corner to the lower right corner of the Tree training field in the image window. If upon inspection, one does not like the exact boundaries resulting, one may immediately repeat the process.

MultiSpec Tutorial 4 Supervised Classification
Page 2 of 7 Revised 9/10/2015
Caution: A mistake that is made many times is to select training areas very near edges of a field. One should stay away from the edges by a couple of pixels to reduce the chance of edge affects.
Note in the Project dialog box, that the coordinates (row and column numbers) of the upper left corner and the lower right corner of the selected area appear in box near bottom. Now,
4.1.3 Select the Add to list button. A dialog box will appear to allow one to name the class and give the field a special designation, as desired. Thus, Type Trees into the Class Name box and then select OK.
Note that one can designate the selected area as a training or test area.
4.1.4 Since there is to be only one training field for this class, we are ready to select the training for the second training class. Thus next,
Drag across the second training field in the Image Window shown below for Wheat.
Select the Add to list button in the Project window. Select the training areas for the rest of the six
classes – Image blank, Weeds, Soil, Light soil.

Supervised Classification MultiSpec Tutorial 4
Revised 9/10/2015 Page 3 of 7
The Project Window can have four different modes – the Select training field mode, the Class list mode, the Field list mode and the Coordinate list mode. The modes are controlled by four buttons just above the list box at the bottom of the Project Window. The “>Select” button causes the Project window to be in the select mode. The “>Classes” button causes the Project classes to be displayed. The “>Fields” button causes the fields for the selected class to be displayed. The “>Coord.” button causes the coordinates for the selected field to be displayed.
One can delete a class by selecting the class in the class list and then selecting “Cut Class” in the Edit menu. One can also do the same for deleting a specific field.
One can also use polygonal type fields to define training classes. To do this, select the “Polygon Enter” checkbox in the Project Window when in Select mode. Click in the image window to define each corner of the polygon. Double click on the last point. To turn the polygon type selection off, just select the “Polygon Enter” checkbox to deselect it.
Note that the clustering step described in Tutorial 3 can be useful in the classifier training step in determining how many classes might be separable in a given data set and where to define training areas such that the spectral characteristics of the pixels are similar.

MultiSpec Tutorial 4 Supervised Classification
Page 4 of 7 Revised 9/10/2015
4.2 Classification 4.2.1 From the Processor menu select Classify…. In the Set Classification Specifications dialog
box which appears, select the √ near Image Selection under Classify to de-select it since, during this pass, it is desired to classify only the training fields in order to obtain an initial estimate of the quality of the class definition and training.
Note that under Write classification results to: One can also select the Disk File button causing a disk file version of the results to be written. Since we have no need for this file in this case, leave this button unselected.
Since the other default options are satisfactory, select OK and then Update to the "Update Project Statistics" dialog box to begin the classification.
The classification will be complete momentarily. 4.2.2 From the Window menu select Text Output, to bring the text window forward and make it
active, since it contains the classification results. The “TRAINING CLASS PERFORMANCE (Resubstitution Method)” table tabulates how the pixels of each field and class were classified. See example table below. There should be nearly 100% accuracy on the training fields. If the Reference Accuracy is particularly low (say less than 50%) for a class, then the training pixels for that class should be reexamined and new training pixels selected.

Supervised Classification MultiSpec Tutorial 4
Revised 9/10/2015 Page 5 of 7
Classification of Training Fields TRAINING CLASS PERFORMANCE (Resubstitution Method) Project Reference Number of Samples in Class Class Class Accuracy+ Number 1 2 3 4 5 6 Name Number (%) Samples Trees Wheat Image Blank Weeds Soil Light Soil Trees 1 98.4 8249 8117 126 0 6 0 0 Wheat 2 97.5 4277 102 4170 0 5 0 0 Image Blank 3 100.0 1485 0 0 1485 0 0 0 Weeds 4 97.9 1102 2 21 0 1079 0 0 Soil 5 100.0 6069 0 0 0 0 6069 0 Light Soil 6 100.0 3933 0 1 0 0 0 3932 TOTAL 25115 8221 4318 1485 1090 6069 3932 Reliability Accuracy (%)* 98.7 96.6 100.0 99.0 100.0 100.0 OVERALL CLASS PERFORMANCE (24852 / 25115 ) = 99.0% Kappa Statistic (X100) = 98.6%. Kappa Variance = 0.000001. + (100 - percent omission error); also called producer's accuracy. * (100 - percent commission error); also called user's accuracy. 4.2.3 Assuming satisfactory results, we are ready to classify the whole area. From the Processor
menu choose Classify… - Under Areas to Classify de-select Training (resubstitution) by selecting the √ by it, and,
- Select Image selection. Make sure that the entire area of the image is to be classified (lines 1-709 and columns 1-1501). Select the square button, if activated, to the left of lines and columns, to force all lines and columns in the image to be used.
- Also select Disk File under Write classification results to: so that a disk file for later use will be created.
- One can also select Image Window Overlay to cause the classification to be displayed as an overlay on the multispectral image window if you wish to.
- Also select the Create Probability Results File checkbox so that a classification probability map will be saved to a disk file.
- Then select OK.
- Select Save in the dialog box that follows regarding a file name for the results. We will use the default name and location for the output classification file and for the probability map file. As soon as the classification is complete, one will see a summary of the results displayed in the text window.
4.2.4 You save the project using the File–>Save Project menu item. You will be presented with a dialog box to enter the name (or use the default name). The training and test areas that you selected will be saved. You can open this file up at a later time to continue your analyses.

MultiSpec Tutorial 4 Supervised Classification
Page 6 of 7 Revised 9/10/2015
4.3 View Classification Map. 4.3.1 Now open the classified image named “ag020522_DPAC_cd.gis”. It should appear similar
to the image below. This is a Thematic type image.
4.3.2 After displaying the classified image “ag020522_DPAC_cd.gis”, from the Project menu,
select Add as Associated Image to cause the training field outlines to be drawn on the image. You can change the field outline color to black using the Processor->Statistics… menu item and selecting “Black” in the Color popup under the “Outline selected areas:” group. There are some things that one can do to evaluate the results. One is to move the cursor over a color chip, hold the shift key down (cursor will change to an open eye) and click the left mouse button down and up to cause the colors for that class to blink off and on (alternate between white and the color). If one holds down both the shift and ctrl keys and then clicks the left mouse button down and up, then all of the other classes will blink off and on. These procedures are helpful in understanding the extent of the classes in the image and to determine where classification errors may be. One may need to change training fields or add other classes if there appears to be confusion between the categories that you wish to identify.
One can also change the class color by double clicking on the color chip as was done in the cluster section.

Supervised Classification MultiSpec Tutorial 4
Revised 9/10/2015 Page 7 of 7
4.4 Classification Probability Map. One can view the classification probability map to evaluate which portions of the image have lower and higher probabilities of being classified correctly. There may be other classes in the image that our training fields do not adequately represent.
4.4.1 Open the probability map named “ag020522_DPAC_cdProb.gis”. It should appear similar to the image below after associating it to the Project. This is a Thematic type image.
Yellow to red colors represent a high probability of being correct. These pixels are very close to our training pixels for the classified class. Dark green to blues represent a low probability of being correct. These pixels are very far from the training pixels for all of the classes. The classified image though may still represent the area well enough for our purposes. For our classification, we could probably do a better job of separating out the sparse weeds from the wheat. There are probably more than the six classes that we selected than can be separated successfully.
Concluding Remarks There are many other operations that one can do with MultiSpec including several Reformatting processes. See other tutorials or the MultiSpec Introduction at the MultiSpec web site for more information. The MultiSpec web site is: https://engineering.purdue.edu/~biehl/MultiSpec/. Or contact Larry Biehl at [email protected] with questions.