multishare 31 hdbt transmitter - kindermann · bedienungsanleitung operating instructions 04.2018...
TRANSCRIPT
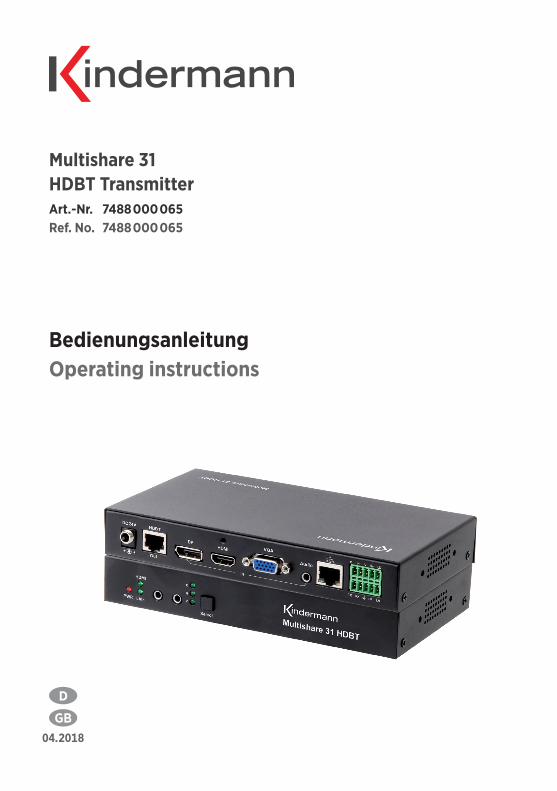
Multishare 31 HDBT TransmitterArt.-Nr. 7488000065Ref. No. 7488000065
BedienungsanleitungOperating instructions
04.2018
GB
D
2
Gerätebeschreibung - SpecificationDer Kindermann Multishare 31 - HDBT Transmitter ist ein Multiformat Signalwandler mit HDMI, VGA und Display Port (DP) Eingängen und einem HDBT Ausgang. HDBT kann unkomprimierte Video-, Audio-Da-ten, sowie Steuerbefehle (IR, RS232) gleichzeitig über ein Cat-6 Kabel (AWG 23) bis 70 m weit über-tragen. Ein unabhängiger Audio-Eingang kann in die Signale der Video-Eingänge eingebettet werden. Das Gerät kann über Tastendruck, eingebauten Web-Server, RS232 und verschiedene Kontakt-Eingänge gesteuert werden.
The Kindermann Multishare 31 - HDBT Transmitter is a multi-format switcher with HDMI, VGA and Display Port inputs to HDBT output. The audio port is independent and could be embedded into any of the video signal and send it to the far end. The product support web server and it could be controlled by the but-ton, LAN, RS232, contact closure. IR and RS232 can pass through.
Lieferumfang - Contents• 1 x Kindermann Multishare 31 - HDBT Transmitter• 1 x 24V, 1A DC Netzteil• 2 x Befestigungswinkel zur Montage• 1 x Bedienungsanleitung
• 1 x Kindermann Multishare 31 - HDBT transmitter• 1 x 24V 1A DC power adapter• 2 x Wall mounting bracket• 1 x Operating instruction
Sicherheitshinweise - Safety instructions• Bitte die Anleitung sorgfältig durchlesen und aufbewahren• Signalwandler dürfen nur mit Sicherheitskleinspannung betrieben werden• Das System darf nur in trockenen, geschlossenen Räumen gelagert und eingesetzt werden• Bitte beachten Sie die Sicherheitshinweise der anzuschließenden Geräte
• Please read the instructions carefully and store them• The switch must be operated at safety low voltage• The unit may only be stored and used in a dry place• Please note the safety instructions of the connected equipment
3
Funktionen - Functions• Übertragung der Video-, Audio-, IR- und RS232 Steuersignale über ein Cat-6/Cat-6a/Cat-7 Kabel bis 70 m
• Unterstützt VGA bis WUXGA-Auflösung (1920×1200 Bildpunkte)
• Unterstützt HDMI 4K x 2K und 3D
• Unterstützt DP 1.2 mit 4K@30Hz
• Unterstützt automatische oder manuelle Umschaltung
• Unterstützt HDCP 1.4 und EDID Management
• Einfache Firmware Aktualisierung möglich
• Der eingebaute Web-Server dient für Management, Überwachung und Konfiguration
• Überträgt IR- und RS232 Steuersignale (pass through – durchlaufend)
• LAN-Zugang für Steuerung und Web-Server
• Steuerung über Tastendruck, eingebauten Web-Server, RS232, Kontakt-Eingänge
• Unabhängiger Audio-Eingang
• Spannungsversorgung lokal oder über PoC durch geeigneten Receiver (z. B. 7488000066)
• Status-LEDs für alle Eingänge an Vorderseite
• Transmission of Audio/Video/Control up to 70 m over one Cat-6/Cat-6a/Cat-7 cable
• Supports VGA with WUXGA resolution
• Supports HDMI 4K x 2K and 3D
• Supports DP1.2 with 4K@30Hz
• Supports Auto/Manual switching
• Supports EDID management
• Supports field FW upgrade
• Supports web server for management, monitor and configuration
• HDCP 1.4 compliant
• IR and RS-232 pass through
• LAN for local control and web server access
• Control switching through button/RS232/contact closure or web server
• Independent audio input
• Remotely or locally powered
• Status LED for all connections on front
4
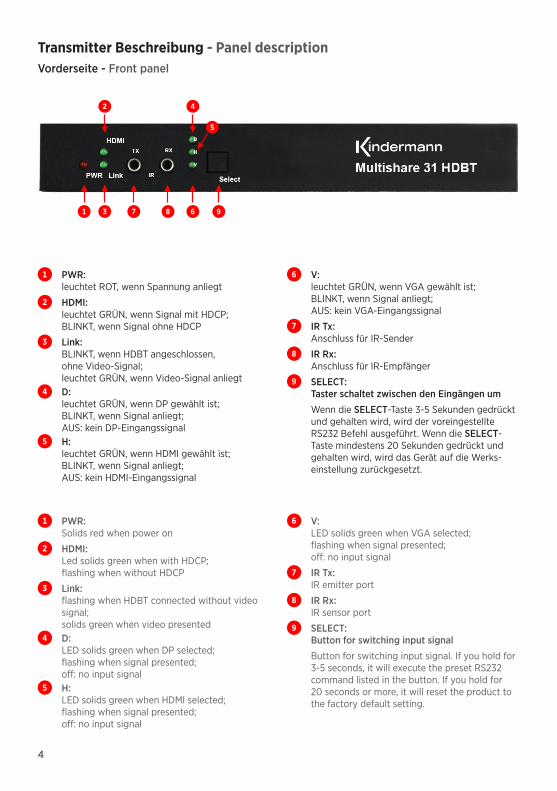
Transmitter Beschreibung - Panel descriptionVorderseite - Front panel
1 PWR: Solids red when power on
2 HDMI: Led solids green when with HDCP; flashing when without HDCP
3 Link: flashing when HDBT connected without video signal; solids green when video presented
4 D: LED solids green when DP selected; flashing when signal presented; off: no input signal
5 H: LED solids green when HDMI selected; flashing when signal presented; off: no input signal
6 V: LED solids green when VGA selected; flashing when signal presented; off: no input signal
7 IR Tx: IR emitter port
8 IR Rx: IR sensor port
9 SELECT: Button for switching input signal
Button for switching input signal. If you hold for 3-5 seconds, it will execute the preset RS232 command listed in the button. If you hold for 20 seconds or more, it will reset the product to the factory default setting.
1 PWR: leuchtet ROT, wenn Spannung anliegt
2 HDMI: leuchtet GRÜN, wenn Signal mit HDCP; BLINKT, wenn Signal ohne HDCP
3 Link: BLINKT, wenn HDBT angeschlossen, ohne Video-Signal; leuchtet GRÜN, wenn Video-Signal anliegt
4 D: leuchtet GRÜN, wenn DP gewählt ist; BLINKT, wenn Signal anliegt; AUS: kein DP-Eingangssignal
5 H: leuchtet GRÜN, wenn HDMI gewählt ist; BLINKT, wenn Signal anliegt; AUS: kein HDMI-Eingangssignal
6 V: leuchtet GRÜN, wenn VGA gewählt ist; BLINKT, wenn Signal anliegt; AUS: kein VGA-Eingangssignal
7 IR Tx: Anschluss für IR-Sender
8 IR Rx: Anschluss für IR-Empfänger
9 SELECT: Taster schaltet zwischen den Eingängen um
Wenn die SELECT-Taste 3-5 Sekunden gedrückt und gehalten wird, wird der voreingestellte RS232 Befehl ausgeführt. Wenn die SELECT-Taste mindestens 20 Sekunden gedrückt und gehalten wird, wird das Gerät auf die Werks-einstellung zurückgesetzt.
1
2 4
3
5
67 8 9
5
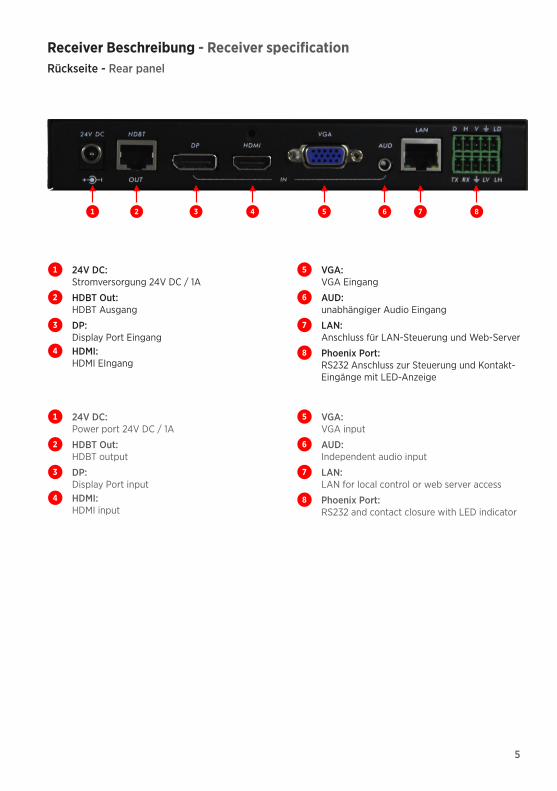
Receiver Beschreibung - Receiver specificationRückseite - Rear panel
1 2 3 4 5 6 7 8
1 24V DC: Power port 24V DC / 1A
2 HDBT Out: HDBT output
3 DP: Display Port input
4 HDMI: HDMI input
5 VGA: VGA input
6 AUD: Independent audio input
7 LAN: LAN for local control or web server access
8 Phoenix Port: RS232 and contact closure with LED indicator
1 24V DC: Stromversorgung 24V DC / 1A
2 HDBT Out: HDBT Ausgang
3 DP: Display Port Eingang
4 HDMI: HDMI EIngang
5 VGA: VGA Eingang
6 AUD: unabhängiger Audio Eingang
7 LAN: Anschluss für LAN-Steuerung und Web-Server
8 Phoenix Port: RS232 Anschluss zur Steuerung und Kontakt-Eingänge mit LED-Anzeige
6
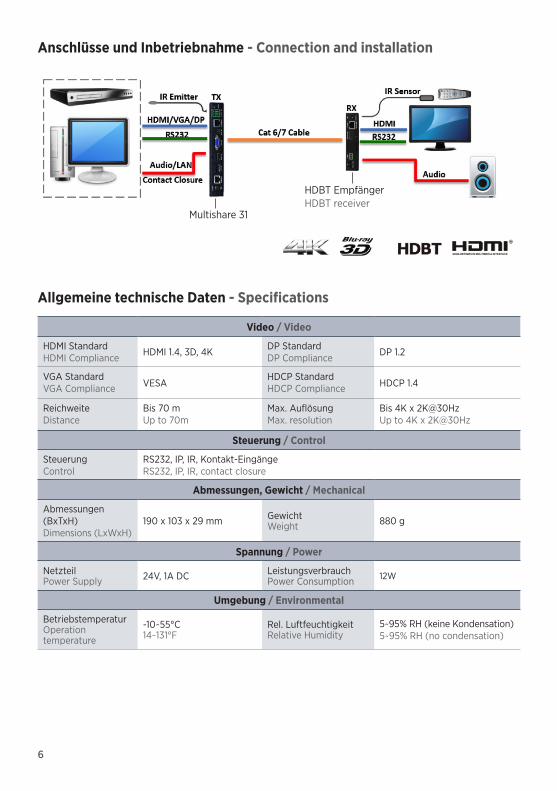
Anschlüsse und Inbetriebnahme - Connection and installation
Allgemeine technische Daten - Specifications
Video / Video
HDMI Standard HDMI Compliance HDMI 1.4, 3D, 4K DP Standard
DP Compliance DP 1.2
VGA Standard VGA Compliance VESA
HDCP Standard HDCP Compliance HDCP 1.4
Reichweite Distance
Bis 70 m Up to 70m
Max. Auflösung Max. resolution
Bis 4K x 2K@30Hz Up to 4K x 2K@30Hz
Steuerung / Control
Steuerung Control
RS232, IP, IR, Kontakt-Eingänge RS232, IP, IR, contact closure
Abmessungen, Gewicht / Mechanical
Abmessungen (BxTxH) Dimensions (LxWxH)
190 x 103 x 29 mm Gewicht Weight 880 g
Spannung / Power
Netzteil Power Supply 24V, 1A DC Leistungsverbrauch
Power Consumption 12W
Umgebung / Environmental
Betriebstemperatur Operation temperature
-10~55°C 14~131°F
Rel. Luftfeuchtigkeit Relative Humidity
5~95% RH (keine Kondensation) 5~95% RH (no condensation)
Multishare 31
HDBT EmpfängerHDBT receiver
7
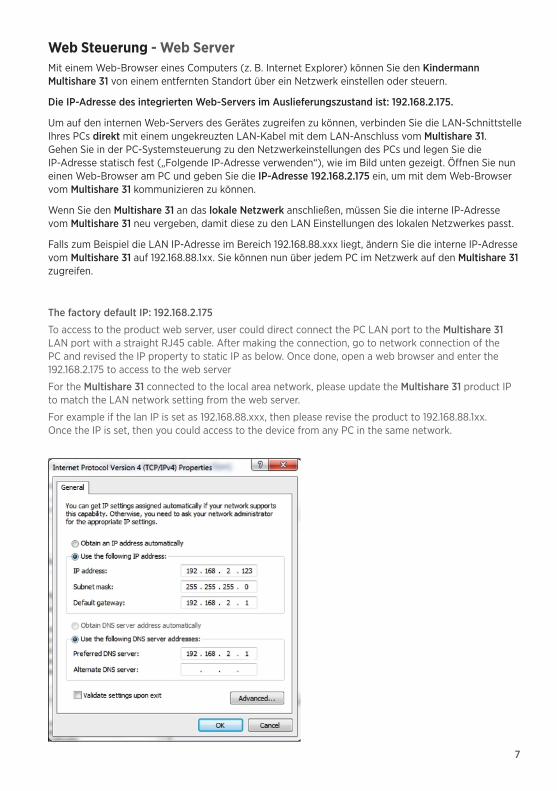
Web Steuerung - Web ServerMit einem Web-Browser eines Computers (z. B. Internet Explorer) können Sie den Kindermann Multishare 31 von einem entfernten Standort über ein Netzwerk einstellen oder steuern.
Die IP-Adresse des integrierten Web-Servers im Auslieferungszustand ist: 192.168.2.175.
Um auf den internen Web-Servers des Gerätes zugreifen zu können, verbinden Sie die LAN-Schnittstelle Ihres PCs direkt mit einem ungekreuzten LAN-Kabel mit dem LAN-Anschluss vom Multishare 31. Gehen Sie in der PC-Systemsteuerung zu den Netzwerkeinstellungen des PCs und legen Sie die IP-Adresse statisch fest („Folgende IP-Adresse verwenden“), wie im Bild unten gezeigt. Öffnen Sie nun einen Web-Browser am PC und geben Sie die IP-Adresse 192.168.2.175 ein, um mit dem Web-Browser vom Multishare 31 kommunizieren zu können.
Wenn Sie den Multishare 31 an das lokale Netzwerk anschließen, müssen Sie die interne IP-Adresse vom Multishare 31 neu vergeben, damit diese zu den LAN Einstellungen des lokalen Netzwerkes passt.
Falls zum Beispiel die LAN IP-Adresse im Bereich 192.168.88.xxx liegt, ändern Sie die interne IP-Adresse vom Multishare 31 auf 192.168.88.1xx. Sie können nun über jedem PC im Netzwerk auf den Multishare 31 zugreifen.
The factory default IP: 192.168.2.175
To access to the product web server, user could direct connect the PC LAN port to the Multishare 31 LAN port with a straight RJ45 cable. After making the connection, go to network connection of the PC and revised the IP property to static IP as below. Once done, open a web browser and enter the 192.168.2.175 to access to the web server
For the Multishare 31 connected to the local area network, please update the Multishare 31 product IP to match the LAN network setting from the web server.
For example if the lan IP is set as 192.168.88.xxx, then please revise the product to 192.168.88.1xx. Once the IP is set, then you could access to the device from any PC in the same network.
8
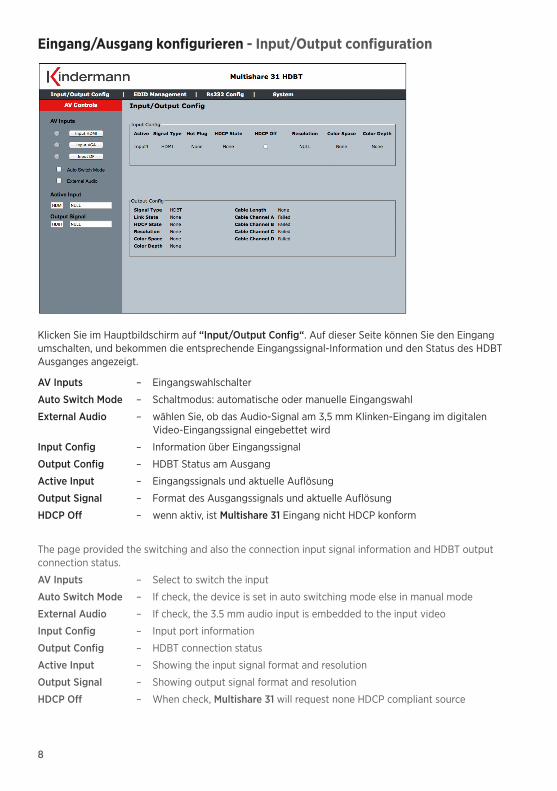
Eingang/Ausgang konfigurieren - Input/Output configuration
Klicken Sie im Hauptbildschirm auf “Input/Output Config“. Auf dieser Seite können Sie den Eingang umschalten, und bekommen die entsprechende Eingangssignal-Information und den Status des HDBT Ausganges angezeigt.
AV Inputs – Eingangswahlschalter
Auto Switch Mode – Schaltmodus: automatische oder manuelle Eingangswahl
External Audio – wählen Sie, ob das Audio-Signal am 3,5 mm Klinken-Eingang im digitalen Video-Eingangssignal eingebettet wird
Input Config – Information über Eingangssignal
Output Config – HDBT Status am Ausgang
Active Input – Eingangssignals und aktuelle Auflösung
Output Signal – Format des Ausgangssignals und aktuelle Auflösung
HDCP Off – wenn aktiv, ist Multishare 31 Eingang nicht HDCP konform
The page provided the switching and also the connection input signal information and HDBT output connection status.
AV Inputs – Select to switch the input
Auto Switch Mode – If check, the device is set in auto switching mode else in manual mode
External Audio – If check, the 3.5 mm audio input is embedded to the input video
Input Config – Input port information
Output Config – HDBT connection status
Active Input – Showing the input signal format and resolution
Output Signal – Showing output signal format and resolution
HDCP Off – When check, Multishare 31 will request none HDCP compliant source

9
EDID Management - EDID management
Auf dieser Seite können Sie das EDID-Management einstellen.
Follow Output – EDID wird vom angeschlossenen Display ausgelesen
CuanBo-HDMI/-VGA /-DP – interne, vordefinierte EDID-Tabelle
This page provided switching and EDID management.
Follow Output – EDID from Display
CuanBo-HDMI/-VGA /-DP – internal preloaded EDID
10
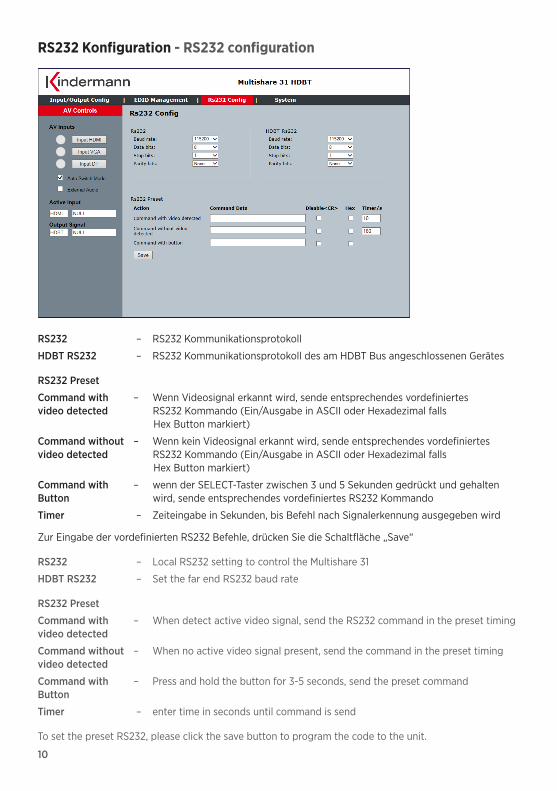
RS232 Konfiguration - RS232 configuration
RS232 – RS232 Kommunikationsprotokoll
HDBT RS232 – RS232 Kommunikationsprotokoll des am HDBT Bus angeschlossenen Gerätes
RS232 Preset
Command with – Wenn Videosignal erkannt wird, sende entsprechendes vordefiniertes video detected RS232 Kommando (Ein/Ausgabe in ASCII oder Hexadezimal falls Hex Button markiert)
Command without – Wenn kein Videosignal erkannt wird, sende entsprechendes vordefiniertes video detected RS232 Kommando (Ein/Ausgabe in ASCII oder Hexadezimal falls Hex Button markiert)
Command with – wenn der SELECT-Taster zwischen 3 und 5 Sekunden gedrückt und gehalten Button wird, sende entsprechendes vordefiniertes RS232 Kommando
Timer – Zeiteingabe in Sekunden, bis Befehl nach Signalerkennung ausgegeben wird
Zur Eingabe der vordefinierten RS232 Befehle, drücken Sie die Schaltfläche „Save“
RS232 – Local RS232 setting to control the Multishare 31
HDBT RS232 – Set the far end RS232 baud rate
RS232 Preset
Command with – When detect active video signal, send the RS232 command in the preset timing video detected
Command without – When no active video signal present, send the command in the preset timing video detected
Command with – Press and hold the button for 3-5 seconds, send the preset command Button
Timer – enter time in seconds until command is send
To set the preset RS232, please click the save button to program the code to the unit.

11
System - System
Daten des Gerätes und Information über Firmware. Der Benutzer kann hier die Netzwerk-Einstellungen verändern. Um zu aktivieren, klicken Sie auf die Schaltfläche „Apply“.
System and firmware information. User could modify the IP setting on the page. Please remember to click on „Apply“ for the changes.

12
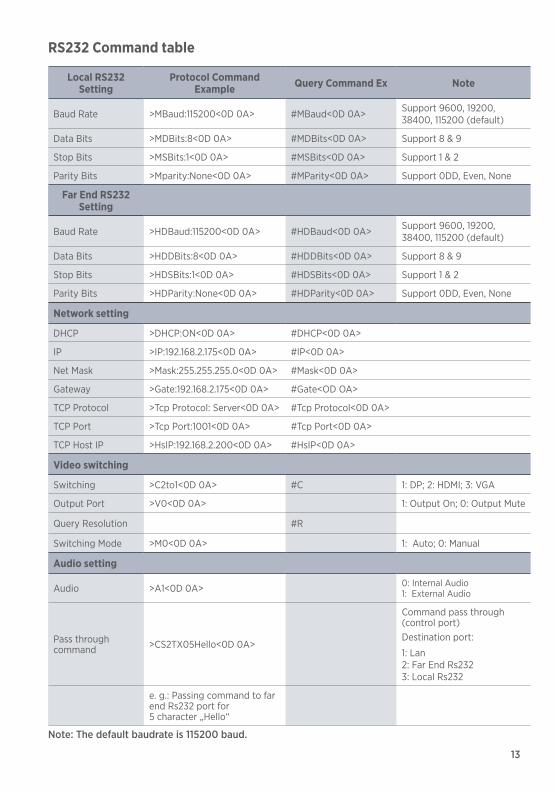
RS232 Befehlstabelle
RS232 Einstellung Befehlsliste Multishare 31
Abfrage-BefehlBeispiel Hinweis
Baud Rate >MBaud:115200<0D 0A> #MBaud<0D 0A> Support 9600, 19200, 38400, 115200 (default)
Data Bits >MDBits:8<0D 0A> #MDBits<0D 0A> Support 8 & 9
Stop Bits >MSBits:1<0D 0A> #MSBits<0D 0A> Support 1 & 2
Parität >MParity:None<0D 0A> #MParity<0D 0A> Support 0DD, Even, None
RS232 Extern - Einstellung
Baud Rate >HDBaud:115200<0D 0A> #HDBaud<0D 0A> Support 9600, 19200, 38400, 115200 (default)
Data Bits >HDDBits:8<0D 0A> #HDDBits<0D 0A> Support 8 & 9
Stop Bits >HDSBits:1<0D 0A> #HDSBits<0D 0A> Support 1 & 2
Parität >HDParity:None<0D 0A> #HDParity<0D 0A> Support 0DD, Even, None
Netzwerk
DHCP >DHCP:ON<0D 0A> #DHCP<0D 0A>
IP >IP:192.168.2.175<0D 0A> #IP<0D 0A>
Net Mask >Mask:255.255.255.0<0D 0A> #Mask<0D 0A>
Gateway >Gate:192.168.2.175<0D 0A> #Gate<OD OA>
TCP Protocol >Tcp Protocol: Server<0D 0A> #Tcp Protocol<0D 0A>
TCP Port >Tcp Port:1001<0D 0A> #Tcp Port<0D 0A>
TCP Host IP >HsIP:192.168.2.200<0D 0A> #HsIP<0D 0A>
Video umschalten
Umschalten >C2to1<0D 0A> #C 1: DP; 2: HDMI; 3: VGA
Ausgang >V0<0D 0A> 1: Output On; 0: Output Mute
Auflösung abfragen #R
Switching Mode >M0<0D 0A> 1: Auto; 0: Manual
Audio umschalten
Audio >A1<0D 0A> 0: Internal Audio 1: External Audio
RS232 durchlaufend (Far end) >CS2TX05Hello<0D 0A>
Durchlaufender Befehl (control port)Zieladresse:
1: Lan 2: Far End Rs232 3: Local Rs232
Bsp.: durchlaufender Befehl RS232 Port für 5 Buchstaben „Hello“
Hinweis: Die voreingestellte Baudrate ist 115200 baud.
13
RS232 Command table
Local RS232 Setting
Protocol Command Example Query Command Ex Note
Baud Rate >MBaud:115200<0D 0A> #MBaud<0D 0A> Support 9600, 19200, 38400, 115200 (default)
Data Bits >MDBits:8<0D 0A> #MDBits<0D 0A> Support 8 & 9
Stop Bits >MSBits:1<0D 0A> #MSBits<0D 0A> Support 1 & 2
Parity Bits >Mparity:None<0D 0A> #MParity<0D 0A> Support 0DD, Even, None
Far End RS232 Setting
Baud Rate >HDBaud:115200<0D 0A> #HDBaud<0D 0A> Support 9600, 19200, 38400, 115200 (default)
Data Bits >HDDBits:8<0D 0A> #HDDBits<0D 0A> Support 8 & 9
Stop Bits >HDSBits:1<0D 0A> #HDSBits<0D 0A> Support 1 & 2
Parity Bits >HDParity:None<0D 0A> #HDParity<0D 0A> Support 0DD, Even, None
Network setting
DHCP >DHCP:ON<0D 0A> #DHCP<0D 0A>
IP >IP:192.168.2.175<0D 0A> #IP<0D 0A>
Net Mask >Mask:255.255.255.0<0D 0A> #Mask<0D 0A>
Gateway >Gate:192.168.2.175<0D 0A> #Gate<OD OA>
TCP Protocol >Tcp Protocol: Server<0D 0A> #Tcp Protocol<0D 0A>
TCP Port >Tcp Port:1001<0D 0A> #Tcp Port<0D 0A>
TCP Host IP >HsIP:192.168.2.200<0D 0A> #HsIP<0D 0A>
Video switching
Switching >C2to1<0D 0A> #C 1: DP; 2: HDMI; 3: VGA
Output Port >V0<0D 0A> 1: Output On; 0: Output Mute
Query Resolution #R
Switching Mode >M0<0D 0A> 1: Auto; 0: Manual
Audio setting
Audio >A1<0D 0A> 0: Internal Audio 1: External Audio
Pass through command >CS2TX05Hello<0D 0A>
Command pass through (control port)Destination port:
1: Lan 2: Far End Rs232 3: Local Rs232
e. g.: Passing command to far end Rs232 port for 5 character „Hello“
Note: The default baudrate is 115200 baud.
14
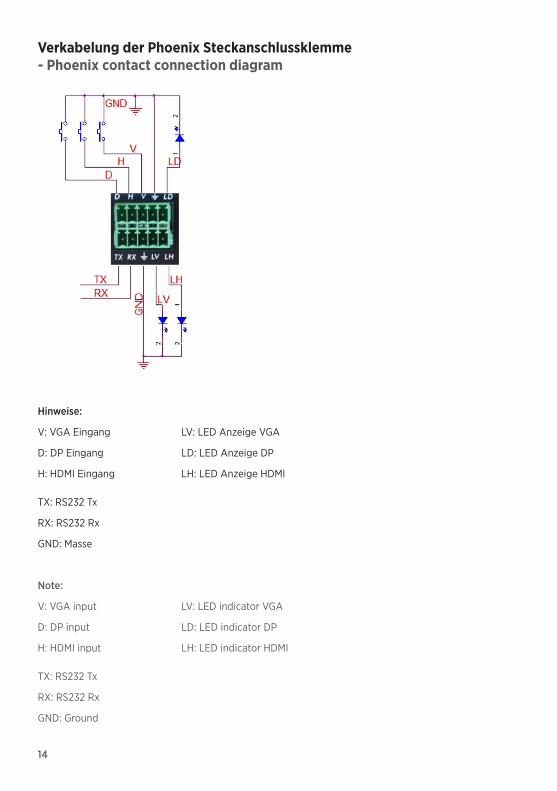
Verkabelung der Phoenix Steckanschlussklemme - Phoenix contact connection diagram
Hinweise:
V: VGA Eingang LV: LED Anzeige VGA
D: DP Eingang LD: LED Anzeige DP
H: HDMI Eingang LH: LED Anzeige HDMI
TX: RS232 Tx
RX: RS232 Rx
GND: Masse
Note:
V: VGA input LV: LED indicator VGA
D: DP input LD: LED indicator DP
H: HDMI input LH: LED indicator HDMI
TX: RS232 Tx
RX: RS232 Rx
GND: Ground
15
Verfügbares Zubehör - Available accessories• HDBT Receiver (7488000066)
Ausgang: HDMI, RS232, IR• HDMI-Kabel, Typ A, 19-Pin (58090007xx)• Flaches HDMI-Kabel, Typ A, 19-Pin (58090004xx)• DisplayPort-Kabel, 20-Pin (58090002xx)• VGA-Kabel, 15-Pin (74830004xx)• VGA-Kabel mit Audio, 15-Pin und 3-Pin (74830002xx)• Audio Kabel Stereo-Klinke (576600000x/576700000x)• Neets-Mediensteuerung (55550000x0)
• HDBT receiver (7488000066) Output: HDMI, RS232, IR
• HDMI cable, type A, 19-pin (58090007xx)
• Flat HDMI cable, type A, 19-pin (58090004xx)
• DisplayPort-cable, 20-pin (58090002xx)
• VGA-cable, 15-pin (74830004xx)
• VGA-cable with audio, 15-pin and 3-pin (74830002xx)
• Audio cable stereo jack (576600000x/576700000x)
• Neets media control system (55550000x0)

7488 000 065 D/GB 2018-04 842 150 Änderungen vorbehalten / Subject to alterations Printed in Germany
Kindermann GmbH · Mainparkring 3 · D-97246 Eibelstadt · E-Mail: [email protected] · www.kindermann.com