multiple image resizer .net v4.5 · multiple image resizer .net is designed, developed and...
TRANSCRIPT

Multiple Image Resizer .NET isdesigned, developed and maintainedby:
Acumen Business Systems Ltd16 The Boiler HouseElectric WharfSandy LaneCoventryCV1 4JUUnited Kingdom
http://www.acumensystems.com
Multiple Image Resizer.NET v4.5.2
Help Documentation
Product Website https://www.multipleimageresizer.net
Online Help URL https://www.multipleimageresizer.net/help/version4-5-2
Help Author Acumen Business Systems Ltd
Help Revision 02/03/2015 14:22

Revision: 02/03/2015 14:22 Multiple Image Resizer .NET v4.5.2 - Help Documentation
Contents
Multiple Image Resizer .NET Help Introduction.........................................................................6
Using Multiple Image Resizer .NET...........................................................................................7
Controls, Panels and Dialogs.................................................................................................... 8
The Files List......................................................................................................................... 9
The Select Images Panel...................................................................................................... 10
The Processing Options Panel..............................................................................................11
The Resizing Options Panel..................................................................................................12
The Rotate and Flip Panel.................................................................................................... 14
The Border Options Panel.....................................................................................................15
The Cropping Options Panel.................................................................................................16
The Text Options Panel.........................................................................................................17
The Image Overlay Panel..................................................................................................... 19
The Save Options Panel....................................................................................................... 21
The Go Panel........................................................................................................................ 23
The Unprocessed Image Panel.............................................................................................24
The Processed Image Panel.................................................................................................25
The Fill Dialog....................................................................................................................... 26
The Font Dialog.....................................................................................................................28
The Colour Selector Dialog................................................................................................... 29
The Visual Crop Dialog......................................................................................................... 32
The Replace File Dialog........................................................................................................33
Menus........................................................................................................................................ 34
The File Menu....................................................................................................................... 35
File Menu - Open Profile Command................................................................................. 36
File Menu - Save Profile Command..................................................................................37
File Menu - Save As Profile Command.............................................................................38
File Menu - Exit Command............................................................................................... 39
The Language Menu............................................................................................................. 40
The Theme Menu..................................................................................................................43
The Window Menu................................................................................................................ 46
Window Menu - Select Images Command....................................................................... 48
Window Menu - Processing Options Command...............................................................49
Window Menu - Resizing Options Command...................................................................50
Window Menu - Rotate and Flip Command......................................................................51
Window Menu - Border Options Command......................................................................52
Window Menu - Cropping Options Command.................................................................. 53
2

Revision: 02/03/2015 14:22 Multiple Image Resizer .NET v4.5.2 - Help Documentation
Window Menu - Text Options Command..........................................................................54
Window Menu - Image Overlay Options Command......................................................... 55
Window Menu - Save Options Command.........................................................................56
Window Menu - Go Command......................................................................................... 57
Window Menu - View Unprocessed Image Command..................................................... 58
Window Menu - View Processed Image Command......................................................... 59
Window Menu - Hide All Command..................................................................................60
Window Menu - Show All Command................................................................................ 61
Window Menu - Restore Default Layout Command......................................................... 62
Window Menu - Open Window Layout Command............................................................63
Window Menu - Save Window Layout Command............................................................ 64
The Scripting Menu............................................................................................................... 65
Scripting Menu - Export Profile to Script File Command.................................................. 66
Scripting Menu - Export Image Files to Script Image List File Command........................ 67
The Help Menu......................................................................................................................68
Help Menu - Purchase Commercial License Command...................................................69
Help Menu - Support Command.......................................................................................70
Help Menu - Help Command............................................................................................ 71
Help Menu - About Command.......................................................................................... 72
Help Menu - Check for Updates Command......................................................................73
The Files List Context Menu................................................................................................. 74
Files List Context Menu - Add Folder of Images Command.............................................75
Files List Context Menu - Scan for Images Command..................................................... 76
Files List Context Menu - Add Individual Images Command............................................77
Files List Context Menu - Remove Selected Images Command...................................... 78
Files List Context Menu - Clear All Images Command.....................................................79
Files List Context Menu - View Unprocessed Image (Full Size) Command..................... 80
Files List Context Menu - View Processed Image (Full Size) Command......................... 81
Files List Context Menu - Properties Command...............................................................82
Other Windows.......................................................................................................................... 83
The About Window................................................................................................................84
The Support Window.............................................................................................................87
Multiple Image Resizer .NET Interface Layout.......................................................................... 88
Handling Errors..........................................................................................................................92
Checking For Updates............................................................................................................... 97
Supported Image Files...............................................................................................................101
Special Text Tags...................................................................................................................... 103
Command Line Arguments........................................................................................................ 112
3

Revision: 02/03/2015 14:22 Multiple Image Resizer .NET v4.5.2 - Help Documentation
Multiple Image Resizer .NET License Agreement.....................................................................114
Scripting.....................................................................................................................................116
Creating Script Files..............................................................................................................117
Validating Script Files............................................................................................................119
Creating Image List Files.......................................................................................................122
Running Script and Image List Files..................................................................................... 123
Scripting Functions................................................................................................................125
Scripting Function - AddBorder.........................................................................................127
Scripting Function - AddText............................................................................................ 128
Scripting Function - AddTextWithRotation........................................................................130
Scripting Function - AddTextByPosition........................................................................... 132
Scripting Function - AddTextByPositionWithRotation.......................................................134
Scripting Function - CreateFillLinearGradient...................................................................136
Scripting Function - CreateFillSolid.................................................................................. 137
Scripting Function - CreateFont........................................................................................138
Scripting Function - Crop.................................................................................................. 139
Scripting Function - Flip.................................................................................................... 140
Scripting Function - OverlayImage................................................................................... 141
Scripting Function - OverlayImageByPosition.................................................................. 143
Scripting Function - ProcessingInterpolationMode........................................................... 145
Scripting Function - ProcessingSmoothingMode..............................................................146
Scripting Function - ProcessingTextRenderHint...............................................................147
Scripting Function - Resize...............................................................................................148
Scripting Function - ResizeMaximumSize........................................................................ 149
Scripting Function - ResizePercentage............................................................................ 150
Scripting Function - ResizeScaleByLargestDimension.................................................... 151
Scripting Function - ResizeScaleToHeight....................................................................... 152
Scripting Function - ResizeScaleToWidth........................................................................ 153
Scripting Function - ResizeWithinDimensions..................................................................154
Scripting Function - ResizeWithinDimensionsAddBackground........................................ 155
Scripting Function - Rotate............................................................................................... 156
Scripting Function - SaveToFolder................................................................................... 157
Scripting Function - SaveToFolderJpeg........................................................................... 158
Scripting Function - SaveToFolderJpegWithTargetSize...................................................160
Scripting Function - SaveToFolderTiff.............................................................................. 162
Scripting Function - SaveToSubFolder.............................................................................163
Scripting Function - SaveToSubFolderJpeg.....................................................................164
Scripting Function - SaveToSubFolderJpegWithTargetSize............................................ 165
4
Revision: 02/03/2015 14:22 Multiple Image Resizer .NET v4.5.2 - Help Documentation
Scripting Function - SaveToSubFolderTiff........................................................................167
Scripting Function - SetResolution................................................................................... 168
Scripting Function - SetResolutionToOriginal...................................................................169
Scripting Function - UnderlayImage................................................................................. 170
Scripting Function - UnderlayImageByPosition................................................................ 172
Scripting Function Parameter Types.....................................................................................174
Scripting Function Parameter Type - AlignmentValue......................................................175
Scripting Function Parameter Type - ArgbColorValue..................................................... 176
Scripting Function Parameter Type - BooleanValue........................................................ 177
Scripting Function Parameter Type - FlipMethodValue....................................................178
Scripting Function Parameter Type - FontStyleValue...................................................... 179
Scripting Function Parameter Type - ImageFormatValue................................................ 180
Scripting Function Parameter Type - IntegerValueAny.................................................... 182
Scripting Function Parameter Type - IntegerValueGreaterEqualOne.............................. 183
Scripting Function Parameter Type - IntegerValueGreaterEqualZero..............................184
Scripting Function Parameter Type - IntegerValuePercentage........................................ 185
Scripting Function Parameter Type - InterpolationModeValue.........................................186
Scripting Function Parameter Type - OrientationValue.................................................... 187
Scripting Function Parameter Type - OverlayTransparencyMethod................................ 188
Scripting Function Parameter Type - PositionValue.........................................................189
Scripting Function Parameter Type - TextRenderingModeValue..................................... 190
Scripting Function Parameter Type - ResolutionMeasurementValue...............................191
Scripting Function Parameter Type - RotateMethodValue............................................... 192
Scripting Function Parameter Type - SmoothingModeValue........................................... 193
Scripting Function Parameter Type - StringValue............................................................ 194
Scripting Function Parameter Type - StringValueFileNameExisting................................ 195
Scripting Function Parameter Type - StringValueFolderName........................................ 196
Scripting Function Parameter Type - StringValueFontName........................................... 197
Scripting Function Parameter Type - StringValueSubFolderName.................................. 198
Script Parser Errors...............................................................................................................199
Command Line Arguments (MirDotNetScript.exe)................................................................201
5

Revision: 02/03/2015 14:22 Multiple Image Resizer .NET v4.5.2 - Help Documentation
Multiple Image Resizer .NET Help Introduction
Welcome to Multiple Image Resizer .NET!
With Multiple Image Resizer .NET, you can resize, add borders, add text, add overlay images,crop, rotate and flip - with a few simple mouse clicks.
Multiple Image Resizer .NET also features a scripting language to allow you to batch processimages via command line.
And what's more, Multiple Image Resizer .NET is FREE for personal and educational use!
We do ask that commercial/business users purchase a license from us. Purchase a commercialuse license from our online store at https://www.multipleimageresizer.net/store.
Multiple Image Resizer .NET also has a completely customisable user interface that you canarrange to suit yourself.
Multiple Image Resizer .NET Copyright © 2000-2015 Acumen Business Systems Ltd.
6

Revision: 02/03/2015 14:22 Multiple Image Resizer .NET v4.5.2 - Help Documentation
Using Multiple Image Resizer .NET
How to process images using Multiple Image Resizer .NET
1. Add images to your File List using the Select Images Panel or the File List Context Menu
2. Select the processing options that you'd like to apply using the Processing Options Panel
3. Define the image size, rotation, border, crop size, text and image overlay that you'd like toapply to your images
4. Select a file format and location to save your processed images to using the Save OptionsPanel
5. Go! - process your images!
7
Revision: 02/03/2015 14:22 Multiple Image Resizer .NET v4.5.2 - Help Documentation
Controls, Panels and Dialogs
Multiple Image Resizer .NET controls are grouped according to their purpose (for example, all ofthe controls to do with image resizing are to be found on the Resizing Options Panel). Controlsact upon the images listed in your Files List.
Files to be processed are listed in the Files List.
The Files List is managed by the controls in the Select Images Panel.
The Processing Options Panel defines what processes will be applied to your images.
The Resizing Options Panel defines the dimensions of your processed files.
The Rotate and Flip Panel defines rotation or "flip" processing for your images.
The Border Options Panel defines a border for your images.
The Crop Options Panel defines any cropping to be performed on your images.
The Text Options Panel defines any text to be added to your images.
The Image Overlay Options Panel defines an image to overlay on your images.
The Save Options Panel defines how and where to save your processed images.
The Go Panel is where you set the processing running.
The Unprocessed Image Panel displays the image selected in the Files List
The Processed Image Panel displays a preview of how the image selected in the Files List willlook with your current processing options.
Patterns and Colours for borders and text are defined using the Fill Dialog.
Fonts for text are defined using the Font Dialog.
Colours are selected using the Colour Selector Dialog.
Two other dialogs of importance are the Visual Crop Dialog which can be used to define acropping region when using the Crop Options Panel, and the Replace File Dialog which may bedisplayed dependant on the settings of the Save Options Panel.
8

Revision: 02/03/2015 14:22 Multiple Image Resizer .NET v4.5.2 - Help Documentation
The Files List
The main files list displays information about all of the images that you have selected to processusing Multiple Image Resizer .NET.
The file name and folder, size in kilobytes, width and height in pixels, and the image file type aredisplayed.
To access commands associated with the file list, click anywhere in the list with the right-handmouse button - The Files List Context Menu will appear.
Files can be added to or removed from the list by using commands from the Select ImagesPanel or The Files List Context Menu.
Files can be added to the file list by dragging and dropping images files from Windows Exploreronto to file list (applies to v2.3.0.0 and higher). You can drag a single image file, multiple imagefiles and / or a folder of image files from Windows Explorer to the file list.
To select a single file in the files list (the file highlighted in grey in the above illustration has beenselected), click on it with the left-hand mouse button. You may also use the cursor up, cursordown, page up, page down, home and end keys to scroll through the list.
The Files List is always visible - control panels and groups will dock around it.
9

Revision: 02/03/2015 14:22 Multiple Image Resizer .NET v4.5.2 - Help Documentation
The Select Images Panel
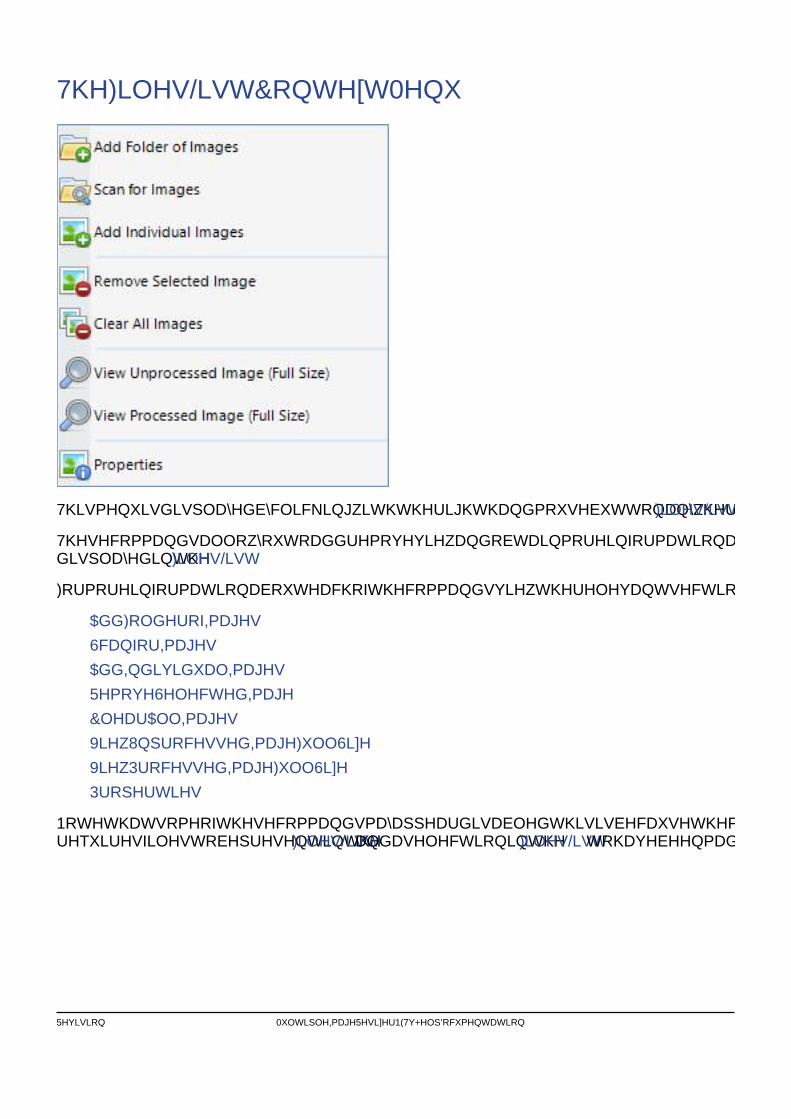
This panel allows you to select images to add to your Files List. The commands here are alsofeatured in the Files List Context Menu.
For more information about each of the command buttons, see the associated Context MenuCommand help topic, listed below:
● Add Folder of Images
● Scan for Images
● Add Individual Images
● Remove Selected Image
● Clear All Images
This panel can be docked, floated, hidden and resized - see the Multiple Image Resizer .NETInterface Layout help topic for more information.
10
Revision: 02/03/2015 14:22 Multiple Image Resizer .NET v4.5.2 - Help Documentation
The Processing Options Panel
This panel allows you to state which processes will be applied to your images and in whichorder they should be applied.
Choose the processing options that you would like to apply to your images by ticking/un-tickingthe processing options in the list. The processing options available are Crop, Resize, Rotateand Flip, Border, Add Text and Overlay Image. Note that an error will occur if none of theseoptions is selected.
You may alter the order in which the processes are applied to your images. You alter the order
by selecting a processing option from the list and then use the and arrows to alterthe order in which they are applied. The processes are applied as per the order in the list e.g.the process at the top of the list is applied first, followed by the second process in the list, etc.
You can reset the order of the processing options in the list back to the default order by clicking
Changing the settings in this panel will enable or disable the associated controls in the ResizingOptions Panel, the Rotate and Flip Panel, the Border Options Panel, the Cropping OptionsPanel, the Text Options Panel and the Image Overlay Options Panel.
This panel can be docked, floated, hidden and resized - see the Multiple Image Resizer .NETInterface Layout help topic for more information.
11

Revision: 02/03/2015 14:22 Multiple Image Resizer .NET v4.5.2 - Help Documentation
The Resizing Options Panel
This panel allows you to specify how your images should be resized.
There are 8 methods by which your images can be resized:
1. Height and Width - Using this method each image is resized to the exact size specified inthe Height and Width text boxes. The aspect ratio of each image is not preserved.
2. Percentage - Using this method each image is resized according to the value entered inthe Percentage text box. For example, to double the height and width of an image, enter"200", to halve it enter "50". This method maintains the aspect ratio of the image.
3. Scale to Height - This method causes the height of each image to be resized to the valueentered in the Height text box. The width of the image is adjusted by the same proportion.This method maintains the aspect ratio of the image.
4. Scale to Width - This method causes the width of each image to be resized to the valueentered in the Width text box. The height of the image is adjusted by the same proportion.This method maintains the aspect ratio of the image.
5. Maximum Size - This method causes the height and width of each image to be resized sothat the image is not larger than the values specified in the Height and Width text boxes.This method maintains the aspect ratio of the image.
6. Within Dimensions - This method causes the height and width of each image to beresized so that the image is not larger than the values specified in the Height and Widthtext boxes. This method maintains the aspect ratio of the image. The image is only resizedif the original image is larger than the height and/or width specified.
7. Scale by Largest Dimension - This method causes the image to be scaled by its largestdimension. The value specified in the Dimension text box will be the new size for thelargest dimension (either the width or height whichever is larger). This method maintainsthe aspect ratio of the image.
8. Within Dimensions Add Background - This method causes the height and width of eachimage to be resized so that the image is not larger than the values specified in the Heightand Width text boxes. This method maintains the aspect ratio of the image. Once theimage has been resized if the image is smaller than the Height and Width it is thenpadded to the Height and Width using the selected Background Colour.
12

Revision: 02/03/2015 14:22 Multiple Image Resizer .NET v4.5.2 - Help Documentation
Note that an error will occur if a negative or non-numerical value is entered in any of the textboxes.
Changing the settings in this panel will require you to refresh your Image Preview Panel.
Note that the controls in this panel are only available if the relevant option is selected in theProcessing Options Panel.
This panel can be docked, floated, hidden and resized - see the Multiple Image Resizer .NETInterface Layout help topic for more information.
13

Revision: 02/03/2015 14:22 Multiple Image Resizer .NET v4.5.2 - Help Documentation
The Rotate and Flip Panel
This panel allows you to specify whether your images will be rotated or flipped.
Use the radio buttons to specify a rotation, flip or a combination of the two.
Rotate Method - None - no rotation of the image.
Rotate Method - 90 Degrees - rotates the image 90 degrees clockwise (quarter turn).
Rotate Method - 180 Degrees - rotates the image 180 degrees clockwise (half turn).
Rotate Method - 270 Degrees - rotates the image 270 degrees clockwise (three-quarter turn).
Flip Method - None - no flipping of the image.
Flip Method - Horizontal - mirrors the image horizontally (the left edge of the image becomesthe right, and vice-versa).
Flip Method - Vertical - mirrors the image vertically (the top edge becomes the bottom andvice-versa).
Flip Method - Horizontal and Vertical - applies both a vertical and a horizontal flipsimultaneously.
Changing the settings in this panel will require you to refresh your Image Preview Panel.
Note that the controls in this panel are only available if the relevant option is selected in theProcessing Options Panel.
This panel can be docked, floated, hidden and resized - see the Multiple Image Resizer .NETInterface Layout help topic for more information.
14

Revision: 02/03/2015 14:22 Multiple Image Resizer .NET v4.5.2 - Help Documentation
The Border Options Panel
This panel allows you to create a single or double border around your images.
Use the Border Method radio buttons to select how many borders to add.
Use the Top, Bottom, Left and Right text boxes to define the width of each border side. Notethat an error will occur if a negative or non-numerical value is entered in these text boxes.
Use the Choose Border Colour button to set a colour or fill pattern for your border.
Changing the settings in this panel will require you to refresh your Image Preview Panel.
Note that the controls in this panel are only available if the relevant option is selected in theProcessing Options Panel.
This panel can be docked, floated, hidden and resized - see the Multiple Image Resizer .NETInterface Layout help topic for more information.
15

Revision: 02/03/2015 14:22 Multiple Image Resizer .NET v4.5.2 - Help Documentation
The Cropping Options Panel
Use this panel to crop your images before any other processing is done - ideal if you onlyrequire that a certain part of your image(s) be processed.
Use the X Coordinate, Y Coordinate, Width and Height text boxes to define, in pixels, theregion that will be cropped. Note that an error will occur if a negative or non-numerical value isentered in these text boxes.
Use the Visually Set Crop Area button to visually define the cropping region.
Changing the settings in this panel will require you to refresh your Image Preview Panel.
Note that the controls in this panel are only available if the relevant option is selected in theProcessing Options Panel.
This panel can be docked, floated, hidden and resized - see the Multiple Image Resizer .NETInterface Layout help topic for more information.
16
Revision: 02/03/2015 14:22 Multiple Image Resizer .NET v4.5.2 - Help Documentation
The Text Options Panel
This panel allows you to add text to your images.
Use the Enter Text text box to define the text to add to the image.
When entering your text into the Enter Text text box you may also enter Special Text Tags totell Multiple Image Resizer .NET to replace the tags with other information such as originalimage file name, processed image file name, Exif information etc. For a full list of the specialtags see the Special Text Tags page.
There are two ways of specifying the location of text that you would like to add to the images.You can specify the text position by X and Y Coordinates or using the Position with Offset -click the radio buttons in the Text Position Method box to enable the options for your selectedtext positioning method.
Using X and Y Coordinates text positioning:
● Use the X Coordinate and Y Coordinate text boxes to specify where on the images thetext will appear (note that the coordinates specified are the position of the top left corner ofthe text on the processed images). If you enter a negative or non-numerical value intothese text boxes an error will occur.
Using Position with Offset text positioning:
● Use the 9 radio buttons to specify the position of the text on the images. If you would liketext at the top right hand corner of your images select the top right radio button, if youwould like text in the center of your images select the central radio button, etc.
● You can use the X Offset and Y Offset text boxes to specify that the text should be offsetby an amount from the edge of the image. Note that only certain positions allow you toenter offsets e.g. top right allows you to enter both x and y offsets, whereas if you elect tocenter the text you do not get the option to select x and y offsets, etc. If you enter anegative or non-numerical value into these text boxes an error will occur.
17

Revision: 02/03/2015 14:22 Multiple Image Resizer .NET v4.5.2 - Help Documentation
Use the Orientation radio buttons to select whether the text should run horizontally ("across"the image), vertically ("down" the image), or at a user configurable rotation (text can run at anyangle across the image, and can be specified in degrees).
Use the Alignment radio buttons to select whether multi-line text should be aligned to the left,to the right or be centered.
Use the Transparency slider to select how transparent your text should be - when the slider isat 0% the text will be solid, the higher the percentage you select the more transparent the textwill become.
Use the Choose Font button to choose the font, size and style of the text from The Font Dialog.
Use the Choose Font Colour button to set a colour or fill pattern for your text from The FillDialog.
The area above the Choose Font and Choose Font Colour buttons displays a preview of yourtext in your selected font and font colour, against a neutral colour.
Changing the settings in this panel will require you to refresh your Image Preview Panel.
Note that the controls in this panel are only available if the relevant option is selected in theProcessing Options Panel.
This panel can be docked, floated, hidden and resized - see the Multiple Image Resizer .NETInterface Layout help topic for more information.
18

Revision: 02/03/2015 14:22 Multiple Image Resizer .NET v4.5.2 - Help Documentation
The Image Overlay Panel
This panel allows you to overlay an image onto your images.
Use the Browse button to select the image file that you would like to use as the overlay image.Note that if no image file is selected or the image file you have previously selected does notexist then an error will occur.
There are two ways of specifying the location of image that you would like to overlay onto yourimages. You can specify the overlay position by X and Y Coordinates or using the Positionwith Offset - click the radio buttons in the Overlay Position box to enable the options for yourselected overlay positioning method.
Using X and Y Coordinates text positioning:
● Use the X Coordinate and Y Coordinate text boxes to specify where on the images theoverlay image will appear (note that the coordinates specified are the position of the top leftcorner of the overlay image on the processed images). If you enter a negative ornon-numerical value into these text boxes an error will occur.
Using Position with Offset text positioning:
● Use the 9 radio buttons to specify the position of the overlay image on the processedimages. If you would like the overlay image at the top right hand corner of your imagesselect the top right radio button, if you would like overlay image in the center of yourimages select the central radio button, etc.
● You can use the X Offset and Y Offset text boxes to specify that the overlay image shouldbe offset by an amount from the edge of the image. Note that only certain positions allowyou to enter offsets e.g. top right allows you to enter both x and y offsets, where as if youelect to center the overlay image you do not get the option to select x and y offsets, etc. Ifyou enter a negative or non-numerical value into these text boxes an error will occur.
19

Revision: 02/03/2015 14:22 Multiple Image Resizer .NET v4.5.2 - Help Documentation
Use the options in the Overlay Transparency box to specify the type of transparency to usewhen overlaying the image:
● Selecting Existing Image Transparency means that the image to overlaye on the imagesbeing processed will use its existing transparent colour (if it exists).
● Selecting Areas Matching Colour allows you to specify a colour which will be transparentwhen the overlay image is added to the processed images. Use the Choose Colour buttonto select the colour which you would like to be transparent.
Set the percentage for the overall transparency of the overlay image using the Overlay OverallTransparency setting in the Miscellaneous Settings box. If you select 50% your overlayimage will appear 50% transparent; this allows you to easily create semi-transparent imagewatermarks.
You can also perform a reverse overlay by ticking the Reverse Overlay tick box in theMiscellaneous Settings box. When you choose to reverse the overlay the images that you areprocessing are overlayed on top of the overlay image you have selected (effectively thesoftware is performing an Underlay). Note your selected overlay image should be larger thanyour processed image at the point where the overlay is performed.
Changing the settings in this panel will require you to refresh your Image Preview Panel.
Note that the controls in this panel are only available if the relevant option is selected in theProcessing Options Panel.
This panel can be docked, floated, hidden and resized - see the Multiple Image Resizer .NETInterface Layout help topic for more information.
20

Revision: 02/03/2015 14:22 Multiple Image Resizer .NET v4.5.2 - Help Documentation
The Save Options Panel
This panel allows you to specify how your processed images will be saved.
You can save your processed images to a single folder by selecting the Save ProcessedImage To Folder radio button and then use the Browse button to select the folder where yourimages should be saved.
Alternatively you can save your processed images to a sub folder that is created under thefolder where the original images reside by selecting Save Processed Image To Sub Folderradio button and enter a sub folder name in the text box under the radio button. If you enter anincorrect/invalid sub folder name into the text box an error will occur.
Use the Processed Image File Type combo to choose one of the supported image formats.Your processed files will be saved in this format.
If the image type you select is a JPEG Format you can then go on to specify the JPEG Qualityusing the slider control. This control sets the level of detail in your images, which also has aneffect on file size. Typically, a value in the range of 50-70% is perfectly acceptable for images tobe used on a website. For good quality photographic images where file size is less of an issue,set the slider to 100%.
If the image type you select is a Tagged Image File Format you can then go on to specify theTIFF Compression Level using the combo box. This control sets the level of compressionapplied to your images.
The Image Resolution box allows you to set the resolution of your output images. If you selectMaintain Original Resolution then each processed image will have the same resolution as theoriginal image. If you select Manually Set Resolution then the resolution of all the processedimages will be as specified in DPI (Dots Per Inch) text box. Again, most users can happily leavethis set to the default value of 96 DPI.
The Interpolation Method combo box allows you to select the method by which new pixelvalues are calculated when you process images. This feature is intended for advanced users -most users can happily leave it set to the highest quality setting of "Bicubic (High Quality)".
Use the Add Prefix and Add Suffix tick boxes and text boxes in the Image File Renaming box
21

Revision: 02/03/2015 14:22 Multiple Image Resizer .NET v4.5.2 - Help Documentation
to add a prefix and or suffix to the file name of your processed images.
If you are saving your processed images as JPEG Format then you can tick the Retain EXIFMeta Information tick box in the Miscellaneous Settings box to copy the EXIF informationfrom the original image to the processed image. Note this will only copy the EXIF metainformation to the processed image if the original image actually has EXIF meta information.
When the File Replace Warning tick box is ticked and processing images will cause existingimage files to be overwritten you will be prompted to confirm that the existing file should bereplaced. If you do not want the warning prompts to occur when an existing image will beoverwritten during processing un-tick the File Replace Warning tick box.
When the Recreate Original Folder Structure tick box is ticked the processed images will besaved to the output folder in sub folders matching the folder structure of original images. Notethis option only works if you have specified that all the processed images should be saved to asingle folder e.g. you have selected Save Processed Image To Folder
This panel can be docked, floated, hidden and resized - see the Multiple Image Resizer .NETInterface Layout help topic for more information.
22

Revision: 02/03/2015 14:22 Multiple Image Resizer .NET v4.5.2 - Help Documentation
The Go Panel
This panel provides a summary of the processes that will be applied to your images, and is usedto start image processing.
Clicking on the GO button will cause the image processing to start. Each image in your Files Listwill be processed according to the Image Processing Options that you have set, and saved in aformat and location that you have specified in the Save Options Panel.
A message will appear when processing is complete. Note that you may not alter any settingswhile processing is being carried out. You can use the Stop button at any time to abortprocessing.
This panel can be docked, floated, hidden and resized - see the Multiple Image Resizer .NETInterface Layout help topic for more information.
23

Revision: 02/03/2015 14:22 Multiple Image Resizer .NET v4.5.2 - Help Documentation
The Unprocessed Image Panel
This panel provides a view of the original, unprocessed image.
This panel can be docked, floated, hidden and resized - see the Multiple Image Resizer .NETInterface Layout help topic for more information.
24

Revision: 02/03/2015 14:22 Multiple Image Resizer .NET v4.5.2 - Help Documentation
The Processed Image Panel
This panel provides a preview of how your processed image will look.
If any image processing settings are changed, a message suggesting that you refresh thepreview will appear.
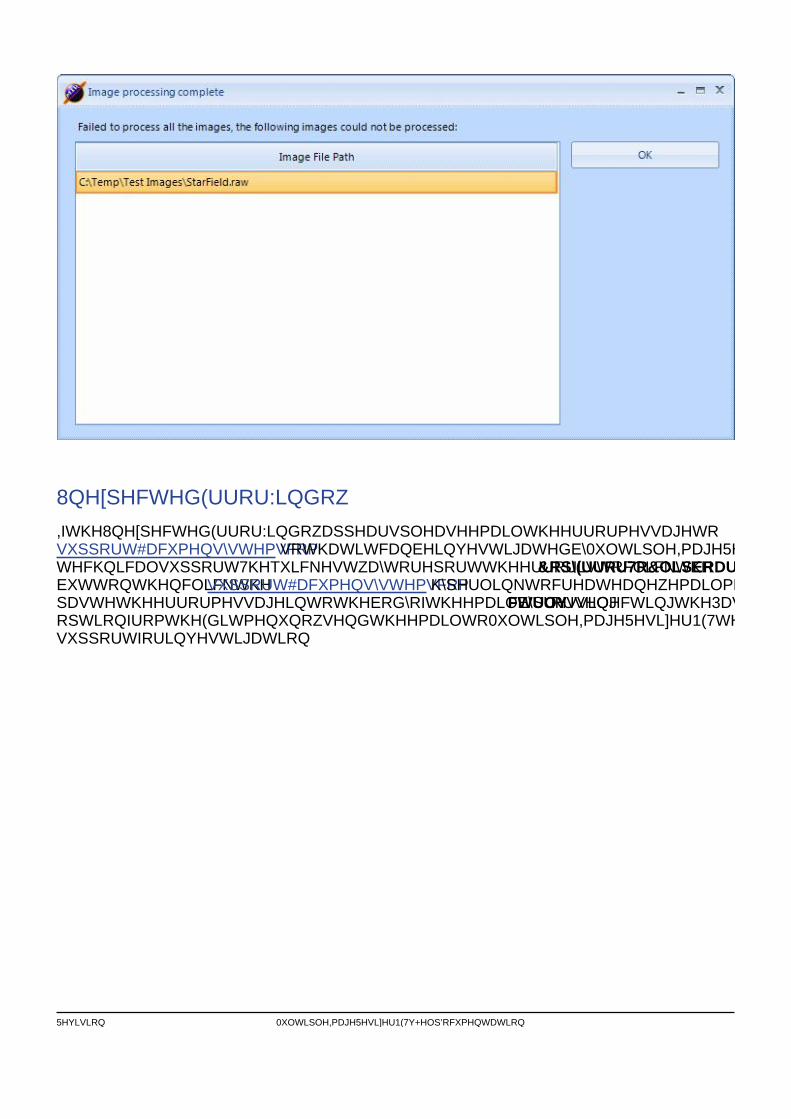
If Multiple Image Resizer .NET is unable to process an image for any reason, an error messagewill appear in this panel, with suggestions as to how to correct the error.
This panel can be docked, floated, hidden and resized - see the Multiple Image Resizer .NETInterface Layout help topic for more information.
25

Revision: 02/03/2015 14:22 Multiple Image Resizer .NET v4.5.2 - Help Documentation
The Fill Dialog
The fill dialog is used to create coloured and/or patterned fills for Borders and Text.
There are three types of fill that can be created using this dialog (when you are happy with yourselection, press the OK button, you may cancel this dialog at any time):
Solid fill
A solid fill of a single colour is produced. Use the Pick Colour button to select the colour for thefill. The Fill Preview control displays a sample of the fill.
Hatched fill
26

Revision: 02/03/2015 14:22 Multiple Image Resizer .NET v4.5.2 - Help Documentation
A patterned, two-colour fill is produced. Use the Pick Colour buttons to select the fore and backcolours for the fill. Use the Hatch Style list to select a pattern. The Fill Preview control displaysa sample of the fill.
Linear Gradient Fill
A patterned fill that fades from one colour to another is produced. Use the Pick Colour buttonsto select the first and second colours for the fill. The Fill Preview control displays a sample ofthe fill.
27

Revision: 02/03/2015 14:22 Multiple Image Resizer .NET v4.5.2 - Help Documentation
The Font Dialog
The font dialog is used to choose the font for Text.
Using the dialog you can customize your font selection by choosing:
● Font Type
● Font Style
● Font Effects
● Font Size
When you are happy with your selection, press the OK button. You may cancel this dialog atany time.
28

Revision: 02/03/2015 14:22 Multiple Image Resizer .NET v4.5.2 - Help Documentation
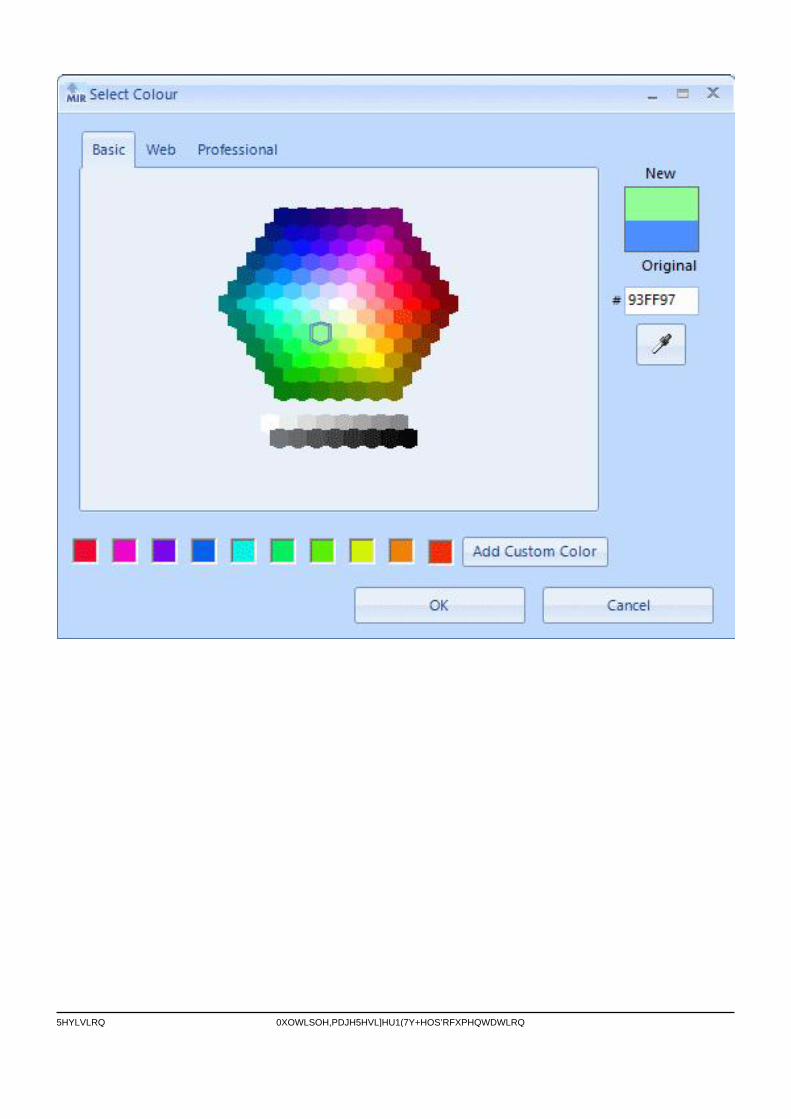
The Colour Selector Dialog
The colour selector dialog is used to choose a colour.
Using the dialog you can choose a colour using one of the three different palette types (whenyou are happy with your selection, press the OK button, you may cancel this dialog at any time):
Professional Palette
Web Palette
29

Revision: 02/03/2015 14:22 Multiple Image Resizer .NET v4.5.2 - Help Documentation
Basic Palette
30
Revision: 02/03/2015 14:22 Multiple Image Resizer .NET v4.5.2 - Help Documentation
31

Revision: 02/03/2015 14:22 Multiple Image Resizer .NET v4.5.2 - Help Documentation
The Visual Crop Dialog
The visual crop dialog is opened via the Cropping Options Panel and is used to define a cropregion on a preview image.
To define the crop region right click on the image, drag the mouse, and release the right mousebutton.
When you are happy with your selection, press the OK button. You may cancel this dialog atany time.
32
Revision: 02/03/2015 14:22 Multiple Image Resizer .NET v4.5.2 - Help Documentation
The Replace File Dialog
The Replace File Dialog is displayed when you start processing images if the software detectsthat the image processing will replace / overwrite some / all of your existing images files.
Note: this dialog is only displayed when you have ticked the File Replace Warning tick box onThe Save Options panel.
Using the dialog you can choose which images should or should not be replaced / overwrittenduring image processing.
To replace some of the images in the list, tick the images that should be replaced then press theReplace Selected Files button to start image processing.
To replace all of the images in the list press the Replace All Files button to start imageprocessing.
To replace none of the images in the list press the Do Not Replace Files button to start imageprocessing.
To cancel image processing click the Cancel button.
33

Revision: 02/03/2015 14:22 Multiple Image Resizer .NET v4.5.2 - Help Documentation
Menus
Multiple Image Resizer .NET commands are accessed via the main menu.
● File Menu
● Language Menu
● Theme Menu
● Window Menu
● Scripting Menu
● Help Menu
One other menu of commands is obtained by clicking with the right-hand mouse buttonanywhere in the Files List - the Files List Context Menu
34

Revision: 02/03/2015 14:22 Multiple Image Resizer .NET v4.5.2 - Help Documentation
The File Menu
This menu is displayed by clicking the File option on the main menu bar.
For more information about each of the commands, view the relevant section:
● Open Profile
● Save Profile
● Save As Profile
● Exit
35
Revision: 02/03/2015 14:22 Multiple Image Resizer .NET v4.5.2 - Help Documentation
File Menu - Open Profile Command
This command will allow you to open Multiple Image Resizer image processing settings storedin a previously saved profile (see Save As Profile for information on how to save you currentimage processing settings to a profile).
Selecting this option carries out the following actions:
1. A File Open Dialog is displayed - select the profile file that you would like to open usingthis dialog. You may also cancel the command at this stage.
2. The image processing settings in the selected profile will be loaded.
36

Revision: 02/03/2015 14:22 Multiple Image Resizer .NET v4.5.2 - Help Documentation
File Menu - Save Profile Command
This command saves your current Multiple Image Resizer .NET image processing settings.
This command is only available after you have opened an existing profile. Using thiscommand will overwrite the image processing options in the profile file that you opened.
To open a saved profile use the Open Profile menu item.
37

Revision: 02/03/2015 14:22 Multiple Image Resizer .NET v4.5.2 - Help Documentation
File Menu - Save As Profile Command
This command saves your current Multiple Image Resizer .NET image processing settings to afile of your choice.
Selecting this option carries out the following actions:
1. A File Save As Dialog is displayed - enter a name for your profile and click Save toconfirm. You may also cancel the command at this stage.
2. The image processing settings are saved to the file specified in step 1.
To open a saved profile use the Open Profile menu item.
38

Revision: 02/03/2015 14:22 Multiple Image Resizer .NET v4.5.2 - Help Documentation
File Menu - Exit Command
This command closes Multiple Image Resizer .NET.
All of your image processing settings are saved, as is the current screen layout.
39

Revision: 02/03/2015 14:22 Multiple Image Resizer .NET v4.5.2 - Help Documentation
The Language Menu
This menu is displayed by clicking the Language option on the main menu bar.
Change the language that the Multiple Image Resizer .NET user interface is displayed in, bysimply clicking on a language name from the language menu.
Multiple Image Resizer .NET is fully resourced and thus language ready.
The languages supported by Multiple Image Resizer .NET at this time are English, Spanish,Dutch, Danish, French, Portuguese, Czech, Galician, German, Italian, Hungarian, Swedish,Bulgarian, Greek, Catalan, Polish, Turkish, Arabic, Chinese (Traditional), Russian and
40

Revision: 02/03/2015 14:22 Multiple Image Resizer .NET v4.5.2 - Help Documentation
Ukrainian.
If you would like to see Multiple Image Resizer .NET in your own language then you canvolunteer to translate the software at http://www.multipleimageresizer.net/translate.aspx.
We would like to thank the following people/companies for providing completetranslations of all the words and phrases used in Multiple Image Resizer .NET v2 and v4:
Thanks to Frank Reelick for providing the Dutch translation.
Thanks to Michel Bornand (http://www.zavezvu.com) for providing the French translation.
Thanks to Giuseppe Leva for providing the Italian translation.
Thanks to Kamen Todorov for providing the Bulgarian translation.
Thanks to M.Onur GÜLERYÜZ for providing the Turkish translation.
Thanks to MFM Dawdeh for providing the Arabic translation.
Thanks to Piotr Jankoś for providing the Polish translation.
Thanks to kw81830 for providing the Chinese (Traditional) translation.
Thanks to Pavel Kravchenko (http://www.oszone.net) for providing the Russian and Ukrainiantranslations.
We would also like to thank the following people/companies for providing translations ofall the words and phrases used in Multiple Image Resizer .NET v2:
Thanks to GF-Sistemas (http://www.gf-sistemas.com.mx) for providing the Spanish translation.
Thanks to Søren Schnell Rasmussen for providing the Danish translation.
Thanks to ViPeR5000 (Rui Melo) for providing the Portuguese translation.
Thanks to Richard Danêk for providing the Czech translation.
Thanks to Alexander De Sousa Macedo for providing the Galician translation.
Thanks to Roman Bæriswyl (http://www.palindrom.ch) and also to CoolT for providing Germantranslations.
Thanks to Daniel Nicholas Kiss for providing the Hungarian translation.
Thanks to Anders Dahlgren for providing the Swedish translation.
Thanks to the "ikalamata.gr Internet City Guide" - http://www.ikalamata.gr for providing theGreek translation.
Thanks to Daniel Rubio López for providing the Catalan translation.
Note: Unfortunately we weren't able to contact some of people/companies that provided originalMultiple Image Resizer .NET v2 translations for the version 4 update. The additional Spanish,
41

Revision: 02/03/2015 14:22 Multiple Image Resizer .NET v4.5.2 - Help Documentation
Danish, Portuguese, Czech, Galician, German, Hungarian, Swedish, Greek, and Catalantranslations required for version 4 of Multiple Image Resizer .NET were translated usingMicrosoft Bing Translator (and then double checked using Google Translate). If you are one ofthe original translators we couldn't reach or speak one of the languages mentioned and wouldlike to correct or update the additional 76 words / phrases used in version 4 please contact us([email protected]) for additional information.
42

Revision: 02/03/2015 14:22 Multiple Image Resizer .NET v4.5.2 - Help Documentation
The Theme Menu
This menu is displayed by clicking the Theme option on the main menu bar.
Change the Theme that the Multiple Image Resizer .NET user interface is displayed in, bysimply clicking on a theme name from the theme menu.
The software has three different themes:
Blue
Silver
43

Revision: 02/03/2015 14:22 Multiple Image Resizer .NET v4.5.2 - Help Documentation
Black
44

Revision: 02/03/2015 14:22 Multiple Image Resizer .NET v4.5.2 - Help Documentation
45

Revision: 02/03/2015 14:22 Multiple Image Resizer .NET v4.5.2 - Help Documentation
The Window Menu
This menu is displayed by clicking the Window option on the main menu bar.
For more information about each of the commands, view the relevant section:
● Select Images
● Processing Options
● Resizing Options
● Rotate and Flip
● Border Options
● Cropping Options
46

Revision: 02/03/2015 14:22 Multiple Image Resizer .NET v4.5.2 - Help Documentation
● Text Options
● Image Overlay Options
● Save Options
● Go
● View Unprocessed Image
● View Processed Image
● Hide All
● Show All
● Restore Default Layout
● Open Window Layout
● Save Window Layout
47

Revision: 02/03/2015 14:22 Multiple Image Resizer .NET v4.5.2 - Help Documentation
Window Menu - Select Images Command
This command will show or hide the Select Images Panel.
When the check mark is visible, the panel is visible and vice-versa. See the Multiple ImageResizer .NET Interface Layout topic for more details.
48

Revision: 02/03/2015 14:22 Multiple Image Resizer .NET v4.5.2 - Help Documentation
Window Menu - Processing Options Command
This command will show or hide the Processing Options Panel.
When the check mark is visible, the panel is visible and vice-versa. See the Multiple ImageResizer .NET Interface Layout topic for more details.
49

Revision: 02/03/2015 14:22 Multiple Image Resizer .NET v4.5.2 - Help Documentation
Window Menu - Resizing Options Command
This command will show or hide the Resizing Options Panel.
When the check mark is visible, the panel is visible and vice-versa. See the Multiple ImageResizer .NET Interface Layout topic for more details.
50

Revision: 02/03/2015 14:22 Multiple Image Resizer .NET v4.5.2 - Help Documentation
Window Menu - Rotate and Flip Command
This command will show or hide the Rotate and Flip Panel.
When the check mark is visible, the panel is visible and vice-versa. See the Multiple ImageResizer .NET Interface Layout topic for more details.
51

Revision: 02/03/2015 14:22 Multiple Image Resizer .NET v4.5.2 - Help Documentation
Window Menu - Border Options Command
This command will show or hide the Border Options Panel.
When the check mark is visible, the panel is visible and vice-versa. See the Multiple ImageResizer .NET Interface Layout topic for more details.
52
Revision: 02/03/2015 14:22 Multiple Image Resizer .NET v4.5.2 - Help Documentation
Window Menu - Cropping Options Command
This command will show or hide the Cropping Options Panel.
When the check mark is visible, the panel is visible and vice-versa. See the Multiple ImageResizer .NET Interface Layout topic for more details.
53

Revision: 02/03/2015 14:22 Multiple Image Resizer .NET v4.5.2 - Help Documentation
Window Menu - Text Options Command
This command will show or hide the Text Options Panel.
When the check mark is visible, the panel is visible and vice-versa. See the Multiple ImageResizer .NET Interface Layout topic for more details.
54

Revision: 02/03/2015 14:22 Multiple Image Resizer .NET v4.5.2 - Help Documentation
Window Menu - Image Overlay Options Command
This command will show or hide the Image Overlay Options Panel.
When the check mark is visible, the panel is visible and vice-versa. See the Multiple ImageResizer .NET Interface Layout topic for more details.
55

Revision: 02/03/2015 14:22 Multiple Image Resizer .NET v4.5.2 - Help Documentation
Window Menu - Save Options Command
This command will show or hide the Save Options Panel.
When the check mark is visible, the panel is visible and vice-versa. See the Multiple ImageResizer .NET Interface Layout topic for more details.
56

Revision: 02/03/2015 14:22 Multiple Image Resizer .NET v4.5.2 - Help Documentation
Window Menu - Go Command
This command will show or hide the Go Panel.
When the check mark is visible, the panel is visible and vice-versa. See the Multiple ImageResizer .NET Interface Layout topic for more details.
57
Revision: 02/03/2015 14:22 Multiple Image Resizer .NET v4.5.2 - Help Documentation
Window Menu - View Unprocessed Image Command
This command will show or hide the View Unprocessed Image Panel.
When the check mark is visible, the panel is visible and vice-versa. See the Multiple ImageResizer .NET Interface Layout topic for more details.
58
Revision: 02/03/2015 14:22 Multiple Image Resizer .NET v4.5.2 - Help Documentation
Window Menu - View Processed Image Command
This command will show or hide the View Processed Image Panel.
When the check mark is visible, the panel is visible and vice-versa. See the Multiple ImageResizer .NET Interface Layout topic for more details.
59

Revision: 02/03/2015 14:22 Multiple Image Resizer .NET v4.5.2 - Help Documentation
Window Menu - Hide All Command
This command will hide all visible Control Panels. See the Multiple Image Resizer .NETInterface Layout topic for more details.
60

Revision: 02/03/2015 14:22 Multiple Image Resizer .NET v4.5.2 - Help Documentation
Window Menu - Show All Command
This command will display all of the Control Panels. See the Multiple Image Resizer .NETInterface Layout topic for more details.
61

Revision: 02/03/2015 14:22 Multiple Image Resizer .NET v4.5.2 - Help Documentation
Window Menu - Restore Default Layout Command
This command will return the user interface to its factory settings. See the Multiple ImageResizer .NET Interface Layout topic for more details.
62

Revision: 02/03/2015 14:22 Multiple Image Resizer .NET v4.5.2 - Help Documentation
Window Menu - Open Window Layout Command
This command will allow you to open a previously saved window layout (see Save WindowLayout for information on how to save a window layout).
Selecting this option carries out the following actions:
1. A File Open Dialog is displayed - select the saved window layout file that you would liketo open using this dialog. You may also cancel the command at this stage.
2. The selected saved window layout is applied to the user interface.
See the Multiple Image Resizer .NET Interface Layout topic for more details on user interfaceand window layout customization.
63

Revision: 02/03/2015 14:22 Multiple Image Resizer .NET v4.5.2 - Help Documentation
Window Menu - Save Window Layout Command
This command will allow you to save the current window layout.
Selecting this option carries out the following actions:
1. A File Save As Dialog is displayed - enter a name for your window layout and click Saveto confirm. You may also cancel the command at this stage.
2. The window layout is saved to the file specified in step 1.
To open a saved window layout see Open Window Layout.
See the Multiple Image Resizer .NET Interface Layout topic for more details on user interfaceand window layout customization.
64

Revision: 02/03/2015 14:22 Multiple Image Resizer .NET v4.5.2 - Help Documentation
The Scripting Menu
This menu is displayed by clicking the Scripting option on the main menu bar.
For more information about each of the commands, view the relevant section:
● Export Profile to Script File
● Export Image Files to Script Image List File
65

Revision: 02/03/2015 14:22 Multiple Image Resizer .NET v4.5.2 - Help Documentation
Scripting Menu - Export Profile to Script File Command
This command will allow you to save your current image processing settings / profile to aMultiple Image Resizer .NET Script File (for use with Multiple Image Resizer .NET's commandline batch scripting feature).
Selecting this option carries out the following actions:
1. A File Save As Dialog is displayed - enter a name for your script file and click Save toconfirm. You may also cancel the command at this stage.
2. The script file is saved to the file specified in step 1.
Please see the Scripting section of this help file for information on what to do with your savedScript file.
66

Revision: 02/03/2015 14:22 Multiple Image Resizer .NET v4.5.2 - Help Documentation
Scripting Menu - Export Image Files to Script Image ListFile Command
This command will allow you to save your current list of images in The Files List to a MultipleImage Resizer .NET Script Image List File (for use with Multiple Image Resizer .NET'scommand line batch scripting feature).
Selecting this option carries out the following actions:
1. A File Save As Dialog is displayed - enter a name for your image list file and click Saveto confirm. You may also cancel the command at this stage.
2. The image list file is saved to the file specified in step 1.
Please see the Scripting section of this help file for information on what to do with your savedScript Image List file.
67

Revision: 02/03/2015 14:22 Multiple Image Resizer .NET v4.5.2 - Help Documentation
The Help Menu
This menu is displayed by clicking the Help option on the main menu bar.
For more information about each of the commands, view the relevant section:
● Purchase Commercial License
● Support
● Help
● About
● Check for Updates
68

Revision: 02/03/2015 14:22 Multiple Image Resizer .NET v4.5.2 - Help Documentation
Help Menu - Purchase Commercial License Command
We do ask that commercial/business users purchase a license from us. This command opens aweb browser that allows commercial users to purchase a commercial use license of MultipleImage Resizer .NET from our online store at https://www.multipleimageresizer.net/store.
69
Revision: 02/03/2015 14:22 Multiple Image Resizer .NET v4.5.2 - Help Documentation
Help Menu - Support Command
This command opens the Support Window.
70

Revision: 02/03/2015 14:22 Multiple Image Resizer .NET v4.5.2 - Help Documentation
Help Menu - Help Command
This command displays this help file. Note that pressing the F1 key at any time will also displaythis help file.
71

Revision: 02/03/2015 14:22 Multiple Image Resizer .NET v4.5.2 - Help Documentation
Help Menu - About Command
This command displays the About Window.
72
Revision: 02/03/2015 14:22 Multiple Image Resizer .NET v4.5.2 - Help Documentation
Help Menu - Check for Updates Command
This command Checks For Updates to the software.
73
Revision: 02/03/2015 14:22 Multiple Image Resizer .NET v4.5.2 - Help Documentation
The Files List Context Menu
This menu is displayed by clicking with the right-hand mouse button anywhere in the Files List.
These commands allow you to add, remove, view and obtain more information about the filesdisplayed in the Files List.
For more information about each of the commands, view the relevant section:
● Add Folder of Images
● Scan for Images
● Add Individual Images
● Remove Selected Image
● Clear All Images
● View Unprocessed Image (Full Size)
● View Processed Image (Full Size)
● Properties
Note that some of these commands may appear disabled - this is because the commandrequires files to be present in the Files List, and a selection in the Files List to have been made.
74

Revision: 02/03/2015 14:22 Multiple Image Resizer .NET v4.5.2 - Help Documentation
Files List Context Menu - Add Folder of ImagesCommand
This command will add an entire folder of images to your Files List in a single action.
Selecting this option carries out the following actions:
1. A Folder Browser Dialog is displayed - select a folder on your computer using thisdialog. You may also cancel the command at this stage.
2. Files within the selected folder are added to your files list - any supported image fileswithin the folder chosen at step 1 are added to your Files List.
Note that any image file can only be added to the Files List once.
75

Revision: 02/03/2015 14:22 Multiple Image Resizer .NET v4.5.2 - Help Documentation
Files List Context Menu - Scan for Images Command
This command will search a folder and all of its sub-folders for image files and add any imagesfound to your Files List.
Selecting this option carries out the following actions:
1. A Folder Browser Dialog is displayed - select a folder on your computer using thisdialog. You may also cancel the command at this stage.
2. Files within the selected folder are added to your files list - any supported image fileswithin the folder chosen at step 1 are added to your Files List.
3. Files within any subfolders to the selected folder are added to your files list - anysupported image files within subfolders to the folder chosen at step 1 are added to yourFiles List.
Note that any image file can only be added to the Files List once.
76

Revision: 02/03/2015 14:22 Multiple Image Resizer .NET v4.5.2 - Help Documentation
Files List Context Menu - Add Individual ImagesCommand
This command will add selected individual images to your Files List.
Selecting this option carries out the following actions:
1. A File Open Dialog is displayed - select one or more supported image files on yourcomputer using this dialog. You may also cancel the command at this stage.
2. The selected image files are added to your files list - the image files chosen at step 1are added to your Files List.
Note that any image file can only be added to the Files List once.
77

Revision: 02/03/2015 14:22 Multiple Image Resizer .NET v4.5.2 - Help Documentation
Files List Context Menu - Remove Selected ImagesCommand
This command will remove the currently selected image file from the Files List.
78

Revision: 02/03/2015 14:22 Multiple Image Resizer .NET v4.5.2 - Help Documentation
Files List Context Menu - Clear All Images Command
This command will clear all files from your Files List.
79

Revision: 02/03/2015 14:22 Multiple Image Resizer .NET v4.5.2 - Help Documentation
Files List Context Menu - View Unprocessed Image (FullSize) Command
This command displays the currently selected image file from the Files List at full size, in itsoriginal state. The image is displayed in a new window.
80

Revision: 02/03/2015 14:22 Multiple Image Resizer .NET v4.5.2 - Help Documentation
Files List Context Menu - View Processed Image (FullSize) Command
This command displays the currently selected image file from the Files List at full size, with allImage Processing Options applied. The image is displayed in a new window.
81

Revision: 02/03/2015 14:22 Multiple Image Resizer .NET v4.5.2 - Help Documentation
Files List Context Menu - Properties Command
This command will display the Windows File Properties Dialog for the currently selected imagefile in the Files List.
This command has the same effect as selecting the Properties command in Windows Explorer.
82

Revision: 02/03/2015 14:22 Multiple Image Resizer .NET v4.5.2 - Help Documentation
Other Windows
Three other windows provide additional information or assistance in Multiple Image Resizer.NET
● The About Window
● The Support Window
83

Revision: 02/03/2015 14:22 Multiple Image Resizer .NET v4.5.2 - Help Documentation
The About Window
84

Revision: 02/03/2015 14:22 Multiple Image Resizer .NET v4.5.2 - Help Documentation
The About Window displays information about your version of Multiple Image Resizer .NET, and
85

Revision: 02/03/2015 14:22 Multiple Image Resizer .NET v4.5.2 - Help Documentation
the development tools used to create it.
The Multiple Image Resizer .NET, Acumen Business Systems Ltd, Visual Studio, andFreeImage logos are all hyperlinks to the relevant companies' web sites.
86

Revision: 02/03/2015 14:22 Multiple Image Resizer .NET v4.5.2 - Help Documentation
The Support Window
The Support Window provides details of how to contact Acumen Business Systems Ltd thecreators of Multiple Image Resizer .NET.
The Multiple Image Resizer .NET logo is a hyperlink to the Multiple Image Resizer .NET website.
The Acumen Business Systems Ltd logo is a hyperlink to the web site of the creators of MultipleImage Resizer .NET.
The Email and Web links are also hyperlinks.
87

Revision: 02/03/2015 14:22 Multiple Image Resizer .NET v4.5.2 - Help Documentation
Multiple Image Resizer .NET Interface Layout
The Multiple Image Resizer .NET interface is composed of several elements:
1. A menu bar containing File, Language, Window and Help menus
2. A Files List
3. Twelve panels of controls
Although the menu bar and Files List are fixed in place, the control panels can be movedaround, hidden, docked (stuck to the edges of the main window), organised into groups, shrunk,enlarged or floated off into separate windows altogether!
When you first start Multiple Image Resizer .NET, the main window will be arranged much likethe picture above. You can return to this arrangement any time you like, by using the RestoreDefault Layout command from the Window menu.
By default, most of Multiple Image Resizer .NET's panels are docked to the edges of the mainwindow. You'll notice that the Unprocessed Image Panel has its own title bar and a number oficons - a push-pin button and a close button. Experiment with these to see what they do (don'tworry if any of your panels disappear - take a look at the Window menu and you'll see how tobring them back - and remember, you can Restore Default Layout any time you like).
You may prefer to use different window layouts when doing different tasks; you can save thecurrent window layout by using the Save Window Layout command from the Window menu. To
88

Revision: 02/03/2015 14:22 Multiple Image Resizer .NET v4.5.2 - Help Documentation
open a previously saved window layout use the Open Window Layout command from theWindow menu.
Docked panels can be resized - hover your mouse pointer over the thin frame between theSelect Images Panel and the Files List - the cursor will change to a pair of resizing arrows.Click and drag to resize the panel. Experiment!
Panels can also be made to float off on their own - double-click on the tab for the SelectedImages Panel (down there in the bottom left, where it says "Selec..."). You should seesomething like this happen:
The panel is now free-floating. It can be resized like any other window, and it has a close button.If you were to close Multiple Image Resizer .NET now, this panel would re-appear in the sameplace when Multiple Image Resizer .NET was next started.
Get hold of the floating Select Images panel by its title bar (the silver border at the top) anddrag it over the Unprocessed Image panel - the docking navigator will appear in the center ofthe Unprocessed Image panel
89

Revision: 02/03/2015 14:22 Multiple Image Resizer .NET v4.5.2 - Help Documentation
Drop the Select Images panel onto the icon, the result should look like this:
Note that there are now two tabs in the lower panel - we've created a new group.
By experimenting with dragging panels and dropping them onto the docking navigator you'llrapidly be able to customise Multiple Image Resizer .NET's interface to suit your ownrequirements. There may be panels that you never use - so hide them. A preview might beimportant and might therefore be deserving of a lot of screen area.
90

Revision: 02/03/2015 14:22 Multiple Image Resizer .NET v4.5.2 - Help Documentation
Finally, one more time - if you get stuck, or lose a panel, or just want to start afresh - use theRestore Default Layout command.
91

Revision: 02/03/2015 14:22 Multiple Image Resizer .NET v4.5.2 - Help Documentation
Handling Errors
Errors in Multiple Image Resizer .NET usually occur because an inappropriate value has beenentered into one of the controls.
Errors are notified to the user in a number of ways:
Message Box
A message will pop up on screen.
Error Icon
A flashing error icon will appear next to the control the error has occurred in. Hover over theicon with your mouse to obtain more information about the error.
92

Revision: 02/03/2015 14:22 Multiple Image Resizer .NET v4.5.2 - Help Documentation
Preview Processed Image Panel
A message will appear in the Preview Processed Image panel.
93

Revision: 02/03/2015 14:22 Multiple Image Resizer .NET v4.5.2 - Help Documentation
Image processing complete - Failed to process all the images message
Occasionally Multiple Image Resizer .NET might not be able to process one or more of yourimages. This may occur for a number of reasons, the first thing to check is to make sure thatyour image file isn't corrupt (try viewing the image file in a Paint / Photo package), if the file isn'tcorrupt and you would like us to investigate the reason why the image(s) will not process pleasecontact us ([email protected]).
94
Revision: 02/03/2015 14:22 Multiple Image Resizer .NET v4.5.2 - Help Documentation
Unexpected Error Window
If the Unexpected Error Window appears please email the error message [email protected] so that it can be investigated by Multiple Image Resizer .NETtechnical support. The quickest way to report the error is to click the Copy Error To Clipboardbutton, then click the [email protected] hyperlink to create a new email message,paste the error message into the body of the email (by pressing ctrl-v or selecting the Pasteoption from the Edit menu), now send the email to Multiple Image Resizer .NET technicalsupport for investigation.
95

Revision: 02/03/2015 14:22 Multiple Image Resizer .NET v4.5.2 - Help Documentation
Other Errors
If you encounter any other error messages, please contact us using the details providedby the Support command on the Help menu.
96

Revision: 02/03/2015 14:22 Multiple Image Resizer .NET v4.5.2 - Help Documentation
Checking For Updates
This feature contacts www.multipleimageresizer.net and checks for a more recent version ofMultiple Image Resizer .NET.
Use this feature by selecting the Check For Updates option from the Help Menu.
Please note that you DO NOT HAVE to use this feature, and it NEVER runs automatically.
Similarly, NO INFORMATION ABOUT YOU, YOUR COMPUTER, OR THE FILES ON IT ARESENT TO ACUMEN BUSINESS SYSTEMS LIMITED AS PART OF THIS PROCESS.
Multiple Image Resizer .NET is not Spyware!
Updating the Software
When you select Check For Updates you will see this window:
If no updates are found e.g. you have the latest version you will see this message (when youclick on "OK" the Check for Updates feature will close):
If an update is available the then you will receive this message - giving you the option ofdownloading the update:
97

Revision: 02/03/2015 14:22 Multiple Image Resizer .NET v4.5.2 - Help Documentation
If you select "Cancel" the update will not be downloaded and the Check for Updates feature willclose.
If you select "OK" then the update will be downloaded from the site and you will see this dialogwhilst the download is performed:
You may "Cancel" the download of the update at any time by clicking the "Cancel" button.
Once the update has downloaded the software will close and you will be prompted to allow"MirDotNetUpdater.exe" OR "Multiple Image Resizer .NET Updater" to run.
IMPORTANT: In order for the update to be installed you must enter the details of anAdministrative user account and then click the "Yes" button.
98

Revision: 02/03/2015 14:22 Multiple Image Resizer .NET v4.5.2 - Help Documentation
After you enter the details of an Administrative account and click "Yes" you will see the followingwindow:
99

Revision: 02/03/2015 14:22 Multiple Image Resizer .NET v4.5.2 - Help Documentation
The window only appears for a very short period of time. When the window disappears thesoftware update will have been installed, you may now restart Multiple Image Resizer .NET.
100
Revision: 02/03/2015 14:22 Multiple Image Resizer .NET v4.5.2 - Help Documentation
Supported Image Files
Multiple Image Resizer .NET can read the following 31 image formats:
● Windows Bitmap (.bmp)
● Dr. Halo (.cut)
● DirectDraw Surface (.dds)
● Enhanced Windows Metafile (.emf)
● Exchangeable Image File (.exif)
● Graphics Interchange Format (.gif)
● High Dynamic Range (.hdr)
● Windows Icon (.ico)
● Amiga IFF (.iff)
● Deluxe Paint (.lbm)
● JPEG Network Graphics (.jng)
● JPEG Format (.jpg, .jpeg, .jif, .jpe)
● Commodore 64 Koala (.koa)
● Multiple Network Graphics (.mng)
● Portable Bitmap (ASCII & Binary) (.pbm)
● Kodak PhotoCD (.pcd)
● Zsoft Paintbrush PCX Bitmap (.pcx)
● Portable Graymap (ASCII & Binary) (.pgm)
● Portable Network Graphics (.png)
● Portable Pixelmap (ASCII & Binary) (.ppm)
● Adobe Photoshop (.psd)
● Sun Rasterfile (.ras)
● Truevision Targa (.tga, .targa)
● Tagged Image File Format (.tif, .tiff)
● Wireless Bitmap (.wbmp)
● Windows Metafile (.wmf)
● X11 Bitmap Format (.xbm)
● X11 Pixmap Format (.xpm)
● Macintosh PICT (.pct)
● Silicon Graphics SGI File Format (.sgi)
● RAW Camera Image Files (supporting most manufacturers) .3fr, .arw, .bay, .bmq, .cap,.cine, .cr2, .crw, .cs1, .dc2, .dcr, .dng, .drf, .dsc, .erf, .fff, .ia, .iiq, .k25, .kc2, .kdc, .mef,.mos, .mrw, .nef, .nrw, .orf, .pef, .ptx, .pxn, .qtk, .raf, .raw, .rdc, .rw2, .rwz, .sr2, .srf, .sti,.x3f)
101
Revision: 02/03/2015 14:22 Multiple Image Resizer .NET v4.5.2 - Help Documentation
Multiple Image Resizer .NET can save processed images in the following 16 image formats:
● Windows Bitmap (.bmp)
● Enhanced Windows Metafile (.emf)
● Exchangeable Image File (.exif)
● Graphics Interchange Format (.gif)
● High Dynamic Range (.hdr)
● Windows Icon (.ico)
● JPEG Format (.jpg, .jpeg, .jif, .jpe)
● Portable Bitmap (ASCII & Binary) (.pbm)
● Portable Graymap (ASCII & Binary) (.pgm)
● Portable Network Graphics (.png)
● Portable Pixelmap (ASCII & Binary) (.ppm)
● Truevision Targa (.tga, .targa)
● Tagged Image File Format (.tif, .tiff)
● Wireless Bitmap (.wbmp)
● Windows Metafile (.wmf)
● X11 Pixmap Format (.xpm)
102

Revision: 02/03/2015 14:22 Multiple Image Resizer .NET v4.5.2 - Help Documentation
Special Text Tags
Multiple Image Resizer .NET allows you to specify special tags within your text when using theText Options Panel or one of the text scripting functions. Just enter one or more of the SpecialTags within your text and the software will replace the tag with its corresponding value.
The special tags supported by the software are split into three categories
● File Tags
● Character Tags
● Exif Tags
The tables that follow list the supported tags and give a brief description of what they do. If itdoubt just experiment a little!
Special File Tags
The table shows the supported special tags that will be replaced for insertion of file nameinformation into text overlay.
Special Tag Description
$(ORIGINALFILENAME) File name of the original image including theextension but excluding original path.
$(ORIGINALFILENAMENOEXT) File name of the original image excludingextension and original path.
$(ORIGINALFILENAMEWITHPATH) File name of the original image includingextension and original path.
$(ORIGINALFILECREATIONDATETIME) Creation date and time of the original image.
$(ORIGINALFILECREATIONDATETIME,
"DATE FORMAT")
This is a special version of$(ORIGINALFILECREATIONDATETIME) thatallows you to specify the format of the datetime. Simply replace DATE FORMAT with dateformat you require (see Date Formatting withSpecial Tags for help with date formatting).
$(ORIGINALFILEMODIFIEDDATETIME) Last modified date and time of the originalimage.
$(ORIGINALFILEMODIFIEDDATETIME,
"DATE FORMAT")
This is a special version of$(ORIGINALFILEMODIFIEDDATETIME) thatallows you to specify the format of the datetime. Simply replace DATE FORMAT with dateformat you require (see Date Formatting withSpecial Tags for help with date formatting).
$(PROCESSEDFILENAME) File name of the processed image including the
103

Revision: 02/03/2015 14:22 Multiple Image Resizer .NET v4.5.2 - Help Documentation
extension but excluding processed path.
$(PROCESSEDFILENAMENOEXT) File name of the processed image excludingextension and processed path.
$(PROCESSEDFILENAMEWITHPATH) File name of the processed image includingextension and processed path.
Special Character Tags
The table shows the supported character tags that will be replaced into text overlay. Currentlythere is only one tag in this category and it is primarily for use with command line scripting textfunctions although the GUI also supports this tag.
Special Tag Description
$(ASCII, "ASCII Code") This allows you to add an ASCII character viaits character code. Simply replace ASCII Codewith the ASCII character code (0-255) of thecharacter that you require. .
Special Exif Tags
If your original images have Exif meta data then you can use special tags from the followingtable to add the information into text overlay.
Note: If your original images do not have Exif information or the Exif infomation does not existfor the special tag specified then the special tag will be replaced by a blank string.
Special Tag Description
$(DATETIME) Date and time.
$(DATETIME, "DATE FORMAT") This is a special version of $(DATETIME) thatallows you to specify the format of the datetime. Simply replace DATE FORMAT with dateformat you require (see Date Formatting withSpecial Tags for help with date formatting).
$(DATETIMEORIGINAL) Date and time of original data generation.
$(DATETIMEORIGINAL, "DATE FORMAT") This is a special version of$(DATETIMEORIGINAL) that allows you tospecify the format of the date time. Simplyreplace DATE FORMAT with date format yourequire (see Date Formatting with Special Tagsfor help with date formatting).
104
Revision: 02/03/2015 14:22 Multiple Image Resizer .NET v4.5.2 - Help Documentation
$(DATETIMEDIGITIZED) Date and time of digital data generation.
$(DATETIMEDIGITIZED, "DATE FORMAT") This is a special version of$(DATETIMEDIGITIZED) that allows you tospecify the format of the date time. Simplyreplace DATE FORMAT with date format yourequire (see Date Formatting with Special Tagsfor help with date formatting).
$(IMAGEWIDTH) Image width.
$(IMAGELENGTH) Image height.
$(BITSPERSAMPLE) Number of bits per component.
$(COMPRESSION) Compression scheme.
$(PHOTOMETRICINTERPRETATION) Pixel composition.
$(ORIENTATION) Orientation of image.
$(SAMPLESPERPIXEL) Number of components.
$(PLANARCONFIGURATION) Image data arrangement.
$(YCBCRSUBSAMPLING) Subsampling ratio of Y to C.
$(YCBCRPOSITIONING) Y and C positioning.
$(XRESOLUTION) Image resolution in width direction.
$(YRESOLUTION) Image resolution in height direction.
$(RESOLUTIONUNIT) Unit of X and Y resolution.
$(STRIPOFFSETS) Image data location.
$(ROWSPERSTRIP) Number of rows per strip.
$(STRIPBYTECOUNTS) Bytes per compressed strip.
$(JPEGINTERCHANGEFORMAT) Offset to JPEG SOI.
$(JPEGINTERCHANGEFORMATLENGTH) Bytes of JPEG data.
$(TRANSFERFUNCTION) Transfer function.
$(WHITEPOINT) White point chromaticity.
$(PRIMARYCHROMATICITIES) Chromaticities of primaries.
$(TRANSFERFUNCTION) Color space transformation matrix coefficients.
$(REFERENCEBLACKWHITE) Pair of black and white reference values.
$(IMAGEDESCRIPTION) Image title.
105

Revision: 02/03/2015 14:22 Multiple Image Resizer .NET v4.5.2 - Help Documentation
$(MAKE) Image input equipment manufacturer.
$(MODEL) Image input equipment model.
$(SOFTWARE) Software used.
$(ARTIST) Person who created the image.
$(COPYRIGHT) Copyright holder.
$(EXIFVERSION) Exif version.
$(FLASHPIXVERSION) Supported FlashPix version.
$(COLORSPACE) Color space information.
$(COMPONENTSCONFIGURATION) Meaning of each component.
$(COMPRESSEDBITSPERPIXEL) Image compression mode.
$(PIXELXDIMENSION) Valid image width.
$(PIXELYDIMENSION) Valid image height.
$(USERCOMMENT) User comments.
$(RELATEDSOUNDFILE) Related audio file.
$(SUBSECTIME) DateTime subseconds.
$(SUBSECTIMEORIGINAL) DateTimeOriginal subseconds.
$(SUBSECTIMEDIGITIZED) DateTimeDigitized subseconds.
$(EXPOSURETIME) Exposure time.
$(FNUMBER) F number.
$(EXPOSUREPROGRAM) Exposure program.
$(SPECTRALSENSITIVITY) Spectral sensitivity.
$(ISOSPEEDRATINGS) ISO speed rating.
$(OECF) Optoelectric conversion factor.
$(SHUTTERSPEEDVALUE) Shutter speed.
$(APERTUREVALUE) Aperture.
$(BRIGHTNESSVALUE) Brightness.
$(EXPOSUREBIASVALUE) Exposure bias.
$(MAXAPERTUREVALUE) Maximum lens aperture.
$(SUBJECTDISTANCE) Subject distance.
106

Revision: 02/03/2015 14:22 Multiple Image Resizer .NET v4.5.2 - Help Documentation
$(METERINGMODE) Metering mode.
$(LIGHTSOURCE) Light source.
$(FLASH) Flash.
$(FOCALLENGTH) Lens focal length.
$(FLASHENERGY) Flash energy.
$(SPATIALFREQUENCYRESPONSE) Spatial frequency response.
$(FOCALPLANEXRESOLUTION) Focal plane X resolution.
$(FOCALPLANEYRESOLUTION) Focal plane Y resolution.
$(FOCALPLANERESOLUTIONUNIT) Focal plane resolution unit.
$(SUBJECTLOCATION) Subject location.
$(EXPOSUREINDEX) Exposure index.
$(SENSINGMETHOD) Sensing method.
$(FILESOURCE) File source.
$(SCENETYPE) Scene type.
$(CFAPATTERN) CFA pattern.
$(GPSVERSIONID) GPS tag version.
$(GPSLATITUDEREF) North or South Latitude.
$(GPSLATITUDE) Latitude.
$(GPSLONGITUDEREF) East or West Longitude.
$(GPSLONGITUDE) Longitude.
$(GPSALTITUDEREF) Altitude reference.
$(GPSALTITUDE) Altitude.
$(GPSTIMESTAMP) GPS time (atomic clock).
$(GPSSATELLITES) GPS satellites used for measurement.
$(GPSSTATUS) GPS receiver status.
$(GPSMEASUREMODE) GPS measurement mode.
$(GPSDOP) Measurement precision.
$(GPSSPEEDREF) Speed unit.
$(GPSSPEED) Speed of GPS receiver.
107
Revision: 02/03/2015 14:22 Multiple Image Resizer .NET v4.5.2 - Help Documentation
$(GPSTRACKREF) Reference for direction of movement.
$(GPSTRACK) Direction of movement.
$(GPSIMGDIRECTIONREF) Reference for direction of image.
$(GPSIMGDIRECTION) Direction of image.
$(GPSMAPDATUM) Geodetic survey data used.
$(GPSDESTLATITUDEREF) Reference for latitude of destination.
$(GPSDESTLATITUDE) Latitude of destination.
$(GPSDESTLONGITUDEREF) Reference for longitude of destination.
$(GPSDESTLONGITUDE) Longitude of destination.
$(GPSDESTBEARINGREF) Reference for bearing of destination.
$(GPSDESTBEARING) Bearing of destination.
$(GPSDESTDISTANCEREF) Reference for distance to destination.
$(GPSDESTDISTANCE) Distance to destination.
$(IMAGEUNIQUEID) Unique image ID.
$(SUBJECTAREA) Subject area.
$(CUSTOMRENDERED) Custom image processing.
$(EXPOSUREMODE) Exposure mode.
$(WHITEBALANCE) White balance.
$(DIGITALZOOMRATIO) Digital zoom ratio.
$(FOCALLENGTHIN35MMFILM) Focal length in 35 mm film.
$(SCENECAPTURETYPE) Scene capture type.
$(GAINCONTROL) Gain control.
$(CONTRAST) Contrast.
$(SATURATION) Saturation.
$(SHARPNESS) Sharpness.
$(DEVICESETTINGDESCRIPTION) Device settings description.
$(SUBJECTDISTANCERANGE) Subject distance range.
$(GPSPROCESSINGMETHOD) Name of GPS processing method.
$(GPSAREAINFORMATION) Name of GPS area.
108
Revision: 02/03/2015 14:22 Multiple Image Resizer .NET v4.5.2 - Help Documentation
$(GPSDATESTAMP) GPS date.
$(GPSDIFFERENTIAL) GPS differential correction.
Date Formatting with Special Tags
Special Tags relating to dates can also be given a custom DATE FORMAT which allows you tospecify how the date should be displayed.
The following table shows some examples of custom date formats using the $(DATETIME,"DATE FORMAT") special tag as the example, based upon the fact that the image was taken onNovember 9, 2006, 5:08 PM, 20 seconds:
Example Will Display
$(DATETIME, "M/d/yy") 11/9/06
$(DATETIME, "d-MMM") 9-Nov
$(DATETIME, "d-MMMM-yy") 9-November-06
$(DATETIME, "d MMMM") 9 November
$(DATETIME, "MMMM yy") November 07
$(DATETIME, "hh:mm tt") 05:08 PM
$(DATETIME, "h:mm:ss t") 5:08:20 P
$(DATETIME, "H:mm") 17:08
$(DATETIME, "H:mm:ss") 17:08:20
$(DATETIME, "M/d/yyyy H:mm") 11/9/2006 17:08
$(DATETIME, "yyyy/MM/dd H:mm:ss") 2006/11/09 17:08:20
The following table shows characters you can use to create your own date format (please notethat the characters are case sensitive!).
Character Description
: Time separator. In some locales, othercharacters may be used to represent the timeseparator. The time separator separates hours,minutes, and seconds when time values areformatted. The actual character used as thetime separator in formatted output isdetermined by your system's locale value.
/ Date separator. In some locales, other
109
Revision: 02/03/2015 14:22 Multiple Image Resizer .NET v4.5.2 - Help Documentation
characters may be used to represent the dateseparator. The date separator separates theday, month, and year when date values areformatted. The actual character used as thedate separator in formatted output isdetermined by your locale.
d Displays the day as a number without a leadingzero (for example, 1). Use %d if this is the onlycharacter in your user-defined numeric format.
dd Displays the day as a number with a leadingzero (for example, 01).
ddd Displays the day as an abbreviation (forexample, Sun).
dddd Displays the day as a full name (for example,Sunday).
M Displays the month as a number without aleading zero (for example, January isrepresented as 1). Use %M if this is the onlycharacter in your user-defined numeric format.
MM Displays the month as a number with a leadingzero (for example, 01/12/01).
MMM Displays the month as an abbreviation (forexample, Jan).
MMMM Displays the month as a full month name (forexample, January).
gg Displays the period/era string (for example,A.D.)
h Displays the hour as a number without leadingzeros using the 12-hour clock (for example,1:15:15 PM). Use %h if this is the onlycharacter in your user-defined numeric format.
hh Displays the hour as a number with leadingzeros using the 12-hour clock (for example,01:15:15 PM).
H Displays the hour as a number without leadingzeros using the 24-hour clock (for example,1:15:15). Use %H if this is the only character inyour user-defined numeric format.
HH Displays the hour as a number with leadingzeros using the 24-hour clock (for example,01:15:15).
110

Revision: 02/03/2015 14:22 Multiple Image Resizer .NET v4.5.2 - Help Documentation
m Displays the minute as a number withoutleading zeros (for example, 12:1:15). Use %m ifthis is the only character in your user-definednumeric format.
mm Displays the minute as a number with leadingzeros (for example, 12:01:15).
s Displays the second as a number withoutleading zeros (for example, 12:15:5). Use %s ifthis is the only character in your user-definednumeric format.
ss Displays the second as a number with leadingzeros (for example, 12:15:05).
T Uses the 12-hour clock and displays anuppercase A for any hour before noon; displaysan uppercase P for any hour between noon and11:59 P.M. Use %t if this is the only characterin your user-defined numeric format.
tt For locales that use a 12-hour clock, displaysan uppercase AM with any hour before noon;displays an uppercase PM with any hourbetween noon and 11:59 P.M. For locales thatuse a 24-hour clock, displays nothing.
y Displays the year number (0-9) without leadingzeros. Use %y if this is the only character inyour user-defined numeric format.
yy Displays the year in two-digit numeric formatwith a leading zero, if applicable.
yyy Displays the year in four-digit numeric format.
yyyy Displays the year in four-digit numeric format.
111

Revision: 02/03/2015 14:22 Multiple Image Resizer .NET v4.5.2 - Help Documentation
Command Line Arguments
Multiple Image Resizer .NET (MirDotNet.exe) has a few command line arguments.
Each command line argument is explained below:
/reset
Resets the software back to its factory default settings. Performing a reset will remove yourcurrent settings.
Usage:
MirDotNet.exe /reset
/multicore
By default the software detects if your machine has a multi-core processer (CPU) and eitherenables or disables multi-core image processing appropriately. This command line argumentcan be used to force the software to enable or disable multi-core processing as required.
Usage - Disable Multi-core Processing:
MirDotNet.exe /multicore=0
Usage - Enable Multi-core Processing:
MirDotNet.exe /multicore=1
/maxparallel
When the software detects your machine has a multi-core processer (CPU) the softwareparallelizes images in batches. By default the software parallelizes images in batches of 4, thisvalue can be overridden using this command line argument. This can improve or decreasemulti-core processing performance depending on the many factors, we recommend that you donot use this command line option unless you have contacted technical support first!
Usage - Set images per parallelization batch to 8:
MirDotNet.exe /maxparallel=8
Usage - Set images per parallelization batch to 16:
MirDotNet.exe /maxparallel=16
Scripting Command Line Arguments (Legacy)
IMPORTANT: The scripting command line arguments will be removed from MirDotNet.exe in alater version of the software, if you are using the batch scripting feature please useMirDotNetScript.exe instead - see the Scripting section of the help file.
112

Revision: 02/03/2015 14:22 Multiple Image Resizer .NET v4.5.2 - Help Documentation
The following command line arguments are specific to Multiple Image Resizer .NET's batchcommand line scripting feature.
Each command line argument is explained below:
/scriptfile
This command line argument is specifically to do with the batch command line scripting featurethat is built into the software. Please see the Scripting section of the Help file for full details onthe usage of this command line argument.
/imagelistfile
This command line argument is specifically to do with the batch command line scripting featurethat is built into the software. Please see the Scripting section of the Help file for full details onthe usage of this command line argument.
/silent
This command line argument is specifically to do with the batch command line scripting featurethat is built into the software. When used with other scripting command line arguments thisoption suppresses all scripting output messages. We recommend usage of this argument if youare calling the scripting functionality from batch files.
/log
This command line argument is specifically to do with the batch command line scripting featurethat is built into the software. When used with other scripting command line arguments thisoption sends all scripting output messages to a log file.
Usage - Output script output messages to a log file located at "C:\MirLog.txt":
/log="C:\MirLog.txt"
113

Revision: 02/03/2015 14:22 Multiple Image Resizer .NET v4.5.2 - Help Documentation
Multiple Image Resizer .NET License Agreement
Important Notice
This End User License Agreement ("EULA") is a legal agreement between YOU as Licenseeand Acumen Business Systems Ltd for Multiple Image Resizer .NET and the Multiple ImageResizer .NET Script Engine ("the SOFTWARE"). By installing, downloading, copying, orotherwise using the SOFTWARE, YOU agree to be bound by the terms of this EULA. If YOU donot agree to the terms of this EULA, delete any copies of this software in your possession. Thecopyright in the SOFTWARE and its documentation is owned by Acumen Business SystemsLtd. Subject to the terms of this EULA, YOU are granted a non-exclusive right for the duration ofthe EULA to use the SOFTWARE. YOU do not acquire ownership of copyright or otherintellectual property rights in any part of the SOFTWARE by virtue of this EULA. Your use of thissoftware indicates your acceptance of this EULA and warranty.
License Grant
The SOFTWARE is intended solely for your personal and/or educational, non-commercial use.The SOFTWARE may be used for commercial use, providing a commercial use licenseappropriate to the number of users of the SOFTWARE has been purchased from AcumenBusiness Systems Ltd at http://www.multipleimageresizer.net/store.
Restrictions
YOU MAY NOT: (a) sublicense, lease, or rent this SOFTWARE to another; (b) cause or permitreverse engineering, disassembly, decompilation or alteration of this SOFTWARE; (c) removeany product identification, copyright notices, or other notices or proprietary restrictions from thisSOFTWARE; (d) copy the documentation accompanying the SOFTWARE.
Term
This License is effective until terminated. You may terminate it at any time by destroying theSOFTWARE, together with all copies thereof. This License will also terminate if you fail tocomply with any term or condition of this Agreement. Upon such termination, you agree todestroy the SOFTWARE, together with all copies thereof.
Copyright and Ownership
This SOFTWARE and its source code are proprietary products of Acumen Business SystemsLtd and are protected by copyright and other intellectual property laws. The SOFTWARE islicensed and not sold. You acquire only the right to use the SOFTWARE and do not acquire anyrights, express or implied, in the SOFTWARE other than those specified in this License.Interaction or inclusion of parts of the SOFTWARE in third-party products does not mean thatthe SOFTWARE, or any portion of it, is part of these products nor property of the companiesowning these products.
Disclaimer of Warranties
Acumen Business Systems Ltd does not warrant that: (a) the operation of the software will beuninterrupted or error-free or that functions contained in the software will operate incombinations of software or hardware that may be selected for use by you; (b) the software willmeet your requirements or expectations; or (c) any results, output, or data generated by the
114

Revision: 02/03/2015 14:22 Multiple Image Resizer .NET v4.5.2 - Help Documentation
software will be functional, complete or reliable. Except as expressly stated in this section, to themaximum extent permitted by law, Acumen Business Systems Ltd specifically disclaims allother warranties, express or implied, oral or written, relating to this agreement and the softwareand any services provided to you, including without limitation, any implied warranties ofmerchantability, fitness for a particular purpose, title and non-infringement of third party rights.
Disclaimer of Damages
The liability of Acumen Business Systems Ltd under this agreement, regardless of the basis ofliability or the form of action, will not exceed the fees paid to Acumen Business Systems Ltd forthe portion of the software or services causing the liability. In no event will Acumen BusinessSystems Ltd be liable for any indirect, special, incidental or consequential damages, howevercaused, whether for breach of contract, negligence or otherwise, and regardless of whetherAcumen Business Systems Ltd has been advised of the possibility of those damages, includingwithout limitation, the use or inability to use the software, or any results obtained from or throughthe software.
Governing Law and Jurisdiction
This Agreement shall be construed, interpreted, and applied in accordance with the Englandand Wales Law. The Courts of England and Wales shall be the exclusive forum and venue toresolve any and all disputes arising out of or relating to this Agreement.
Acumen Business Systems Ltd, 16 The Boiler House, Electric Wharf, Sandy Lane, Coventry,CV1 4JU, United Kingdom
Tel: +44 (0) 2476 228 759 Email: [email protected]
115
Revision: 02/03/2015 14:22 Multiple Image Resizer .NET v4.5.2 - Help Documentation
Scripting
Multiple Image Resizer .NET features a scripting language to allow you to batch process imagesvia the command line.
Before you continue to learn about Multiple Image Resizer .NET scripting we recommend thatyou have the following knowledge:
● You can open a command line prompt.
● You can run an application via a command line prompt.
● You can run an application via a command line prompt also specifying command linearguments.
● You are familiar with using a text editor like Notepad.
● You are familiar with one or more other scripting language or programming language (thisis advantageous but not essential).
If you are reading this then you must be ready to learn how to batch process images usingMultiple Image Resizer .NET scripting!
In order to use the scripting functionality you must follow these four steps:
1. Create a script file - a text file containing the list of image processing functions that youwant apply to a set of images.
2. Validate the script file - the script file should be parsed by Multiple Image Resizer .NETScript Engine (MirDotNetScript.exe) to ensure that the script functions you specified arevalid.
3. Create an image list file - a text file containing a list of image files and/or folders thatcontain images that you want to process with the script you have created.
4. Run the script and image list files - use Multiple Image Resizer .NET Script Engine(MirDotNetScript.exe) via the command line to perform batch image processing using thescript file and the image list file.
NOTE: We have added a new Scripting menu to the Graphical User Interface of Multiple ImageResizer .NET 4 to encourage users to try command line batch scripting. On the Scripting menuthere are two options:
● Export Profile to Script File - helps users to quickly Create a script file using the currentimage processing settings in the software.
● Export Image Files to Script Image List File - helps users quickly Create an image list fileusing the current list of images in the files list of the software.
116

Revision: 02/03/2015 14:22 Multiple Image Resizer .NET v4.5.2 - Help Documentation
Creating Script Files
A Multiple Image Resizer .NET script file is essentially a text file containing a list of imageprocessing functions that you would like to apply to a set of images.
General Scripting Rules
● Multiple Image Resizer .NET script is case insensitive
● Each script function must be placed on a separate line in the script file
● Each comment line must be place on a separate line in the script file
Script files should be created using a text editor (e.g. Notepad). When you have finishedcreating your script file in your chosen text editor you should save it, and then tell the MultipleImage Resizer .NET script file parser to check the script file for errors (see Validating ScriptFiles).
Script Examples
Below are some simple script file examples, with comments to tell you what the script function isdoing (note a comment line is in Green and a script function line is in Blue):
Example 1 - Resize images to 800x600 and specify the processed images should be saved asJPEG files in a single folder named "processed" on the C drive:
' Resize images to 800x600
Resize 800, 600
' Save images as JPEG's at 100% quality to "c:\processed"
SaveToFolderJpeg "c:\processed", 100, False
Example 2 - Resize images to 1004x748, add a 20 pixel border to each edge of the image inred, and specify that processed images should be saved as BMP files in a single folder named"processed" on the C drive:
' Resize images to 1004x748
Resize 1024, 748
' Create a solid fill in red to use as the border color
CreateFillSolid "myBorderFill", Argb(255, 255, 0, 0)
' Add a 20 pixel border around each image
AddBorder "myBorderFill", 20, 20, 20, 20
' Save images as BMP's to "c:\processed"
SaveToFolder "c:\processed" , bmp
117

Revision: 02/03/2015 14:22 Multiple Image Resizer .NET v4.5.2 - Help Documentation
Example 3 - Adds some text to the bottom right corner of each image (offset 10 pixels in frombottom right corner), the text is filled with a gradient fill. It then specifies that images should besaved to a sub folder named "processed" beneath each original image locations in GIF format:
' Create the font to use for the text
CreateFont "myFont", "Arial", Bold, False, False, 20
' Create the gradient fill used when applying the text
CreateFillLinearGradient "myGradientFill", Argb(255, 128, 128, 40), Argb(255, 255,
38, 68), 45
' Add the text to the bottom right corner of each image offset by 10 pixels
AddTextByPosition "Image processed by Multiple Image Resizer .NET", "myFont",
"myGradientFill", Horizontal, BottomRight, 10, 10
' Save images as GIF's to the "processed" sub folder under original image
SaveToSubFolder "processed", gif
Script files can obviously be more complex than the examples shown above. You can specify asmany or as few script functions in a script file as you like, but remember to specify one of theSave functions at the bottom of your script file or you processed image files will not be saved!
For a full list of the image processing functions supported in Multiple Image Resizer .NET scriptsee image processing functions reference.
118

Revision: 02/03/2015 14:22 Multiple Image Resizer .NET v4.5.2 - Help Documentation
Validating Script Files
Now you have finished creating a script file you must use the Multiple Image Resizer .NETScript Engine (MirDotNetScript.exe) to check the script file for errors.
If a script file contains errors then they must be corrected before Multiple Image Resizer .NETScript Engine can use you script file to perform batch image processing.
To check your script file for errors follow the steps outlined below:
1). Open a Command Prompt
2). Using the Command Prompt navigate to the folder where Multiple Image Resizer .NETScript Engine is installed
● By default this is "C:\Program Files\Multiple Image Resizer .NET 4.5.2"
119

Revision: 02/03/2015 14:22 Multiple Image Resizer .NET v4.5.2 - Help Documentation
3). Run Multiple Image Resizer .NET Script Engine with following command line (note thatyou will need to replace "D:\Temp\MirScript.txt" with the full path of the script file you arechecking for errors)
4). After running the script through the Multiple Image Resizer .NET Script Engine one oftwo scenarios will occur:
Scenario 1: The script file is valid:
Scenario 2: The script file contains errors:
If the Multiple Image Resizer .NET Script Engine reports that your script file contains errors, youmust correct the problem(s) in your script file, save it, and then re-parse the script file again. Forinformation about specific error messages please review the Script Parser Errors section.
120

Revision: 02/03/2015 14:22 Multiple Image Resizer .NET v4.5.2 - Help Documentation
When your script file is valid you need to Create an Image List file that specifies the image filesand/or folders of images that you would like to process with the script.
121

Revision: 02/03/2015 14:22 Multiple Image Resizer .NET v4.5.2 - Help Documentation
Creating Image List Files
Image List files are text files containing lists of image files and/or folders that contain imagesthat you would like to process with a Multiple Image Resizer .NET script file you have created.
Image List files should be created using a text editor (e.g. Notepad).
General Image List File Rules
● Each image file / folder name that is specified in an Image List file must be placed on aseparate line.
● Each image file specified must be the full path an image file; please do not use relativepaths!
● Each folder of images specified must be the full path to the folder; again please do not userelative paths!
● You may add a question mark (?) symbol at the beginning of a path to a folder of images -this tells the software to scan the folder and its subfolders (and their subfolders etc.) forimages.
The following screen shot shows an example of an Image List file:
● Lines 1 to 4 in the Image List file pictured above are full paths to image files.
● Lines 5 and 6 in the Image List file pictured above specify particular folders of images.
● Line 7 in the Image List file pictured above specifies a folder of images - the question mark(?) symbol before the folder path tells the software to find all images under this folder andits sub folders.
When you have finished creating your Image List file in your chosen text editor you should saveit. You are now ready to Run the script and image list file with Multiple Image Resizer .NETScript Engine to perform batch image processing.
122

Revision: 02/03/2015 14:22 Multiple Image Resizer .NET v4.5.2 - Help Documentation
Running Script and Image List Files
Now you have created and validated your script file, have created an image list file you can useMultiple Image Resizer .NET Script Engine (MirDotNetScript.exe) to perform command linebatch processing.
To run your script file and image list file with Multiple Image Resizer .NET Script Engine followthe steps outlined below:
1). Open a Command Prompt
2). Using the Command Prompt navigate to the folder where Multiple Image Resizer .NET Script Engine is installed.
● By default this is "C:\Program Files\Multiple Image Resizer .NET 4.5.2"
123

Revision: 02/03/2015 14:22 Multiple Image Resizer .NET v4.5.2 - Help Documentation
3). Run Multiple Image Resizer .NET Script Engine with following command line (note thatyou will need to replace "D:\Temp\MirScript.txt" with the full path of the script file youusing and replace "D:\Temp\ImageList.txt" with the full path of the Image List file)
4). Whilst running the script and image list through the Multiple Image Resizer .NETScript Engine you will see:
4). When Multiple Image Resizer .NET Script Engine has finished processing you will see:
You have now learnt to use the command line batch image processing functionality in MultipleImage Resizer .NET's Script Engine.
124

Revision: 02/03/2015 14:22 Multiple Image Resizer .NET v4.5.2 - Help Documentation
Scripting Functions
Multiple Image Resizer .NET script uses functions to perform image processing.
Information about each of the different functions can be found by clicking on the relevant linkbelow:
Font and Fill Creation Functions
● CreateFont
● CreateFillSolid
● CreateFillLinearGradient
Resizing Functions
● Resize
● ResizePercentage
● ResizeScaleToHeight
● ResizeScaleToWidth
● ResizeMaximumSize
● ResizeWithinDimensions
● ResizeScaleByLargestDimension
● ResizeWithinDimensionsAddBackground
Text Functions
● AddText
● AddTextWithRotation
● AddTextByPosition
● AddTextByPositionWithRotation
Border Functions
● AddBorder
Flip and Rotate Functions
● Flip
● Rotate
Crop Functions
● Crop
Image Overlay / Underlay Functions
● OverlayImage
125

Revision: 02/03/2015 14:22 Multiple Image Resizer .NET v4.5.2 - Help Documentation
● OverlayImageByPosition
● UnderlayImage
● UnderlayImageByPosition
Image Resoloution Functions
● SetResolution
● SetResolutionToOriginal
Save Functions
● SaveToFolder
● SaveToFolderJpeg
● SaveToFolderJpegWithTargetSize
● SaveToFolderTiff
● SaveToSubFolder
● SaveToSubFolderJpeg
● SaveToSubFolderJpegWithTargetSize
● SaveToSubFolderTiff
Miscellaneous Functions
● ProcessingInterpolationMode
● ProcessingSmoothingMode
● ProcessingTextRenderHint
126

Revision: 02/03/2015 14:22 Multiple Image Resizer .NET v4.5.2 - Help Documentation
Scripting Function - AddBorder
The function adds a border to each image. The colour and size of the border can be specified.
Syntax
AddBorder userfillname As StringValue, top As IntegerValueGreaterEqualZero, bottom AsIntegerValueGreaterEqualZero, left As IntegerValueGreaterEqualZero, right AsIntegerValueGreaterEqualZero
Parameters
userfillname - the name of the border fill color/pattern that you would like to apply to the border.Note that you must create the fill specified in this parameter using either the CreateFillSolid orCreateFillLinearGradient function before you use this function.
top - the size in pixels for the border at the top of the image
bottom - the size in pixels for the border at the bottom of the image
left - the size in pixels for the border at the left of the image
right - the size in pixels for the border at the right of the image
Example
The following example creates a solid fill for the border, and adds a border of 10 pixels to thetop and bottom and a 25 pixel border to the left and right of the image:
CreateFillSolid "myBorderFill", Argb(255, 0, 255, 255)
AddBorder "myBorderFill", 10, 10, 25, 25
Version Information
Supported in Multiple Image Resizer .NET v2.0.0.0
See Also
● Functions
● Function Parameter Types
127

Revision: 02/03/2015 14:22 Multiple Image Resizer .NET v4.5.2 - Help Documentation
Scripting Function - AddText
The function adds text each image. The location of the text is specified by x and y coordinates.
Syntax
AddText text As StringValue, userfontname As StringValue, userfillname As StringValue,orientation As OrientationValue, x As IntegerValueGreaterEqualZero, y AsIntegerValueGreaterEqualZero
Parameters
text - the text the add each processed image. Note you may also use Special Text Tags withinyour text.
userfontname - the name of the font that you would like to apply to the text. Note that you mustcreate the font specified in this parameter using the CreateFont function before you use thisfunction.
userfillname - the name of the font fill color/pattern that you would like to apply to the text. Notethat you must create the fill specified in this parameter using either the CreateFillSolid orCreateFillLinearGradient function before you use this function.
orientation - the orientation of the text
x - the x coordinate where the top left corner of the text should be positioned
y - the y coordinate where the top left corner of the text should be positioned
Example
The following example creates a new font, creates a solid fill for the font and then adds ahorizontal text message at 100 pixels from the top of the image and 200 pixels in from the leftedge of the image:
CreateFont "myFont", "Arial", Regular, True, False, 25
CreateFillSolid "myFill", Argb(255, 0, 255, 0)
AddText "This is some text", "myFont", "myFill" , Horizontal, 100, 200
Version Information
Supported in Multiple Image Resizer .NET v2.0.0.0
128

Revision: 02/03/2015 14:22 Multiple Image Resizer .NET v4.5.2 - Help Documentation
See Also
● Functions
● Function Parameter Types
129

Revision: 02/03/2015 14:22 Multiple Image Resizer .NET v4.5.2 - Help Documentation
Scripting Function - AddTextWithRotation
The function adds text rotated by a specified angle to each image. The location of the text isspecified by x and y coordinates.
Syntax
AddTextWithRotation text As StringValue, userfontname As StringValue, userfillname AsStringValue, angle As IntegerValueAny, x As IntegerValueGreaterEqualZero, y AsIntegerValueGreaterEqualZero, alignment As AlignmentValue, transparencyPercentage AsIntegerValuePercentage
Parameters
text - the text the add each processed image. Note you may also use Special Text Tags withinyour text.
userfontname - the name of the font that you would like to apply to the text. Note that you mustcreate the font specified in this parameter using the CreateFont function before you use thisfunction.
userfillname - the name of the font fill color/pattern that you would like to apply to the text. Notethat you must create the fill specified in this parameter using either the CreateFillSolid orCreateFillLinearGradient function before you use this function.
angle - the angle of the text in degrees (note the angle can be specified as a positive ornegative number)
x - the x coordinate where the top left corner of the text should be positioned
y - the y coordinate where the top left corner of the text should be positioned
alignment - the alignment of the text (note only works for multi-line text)
transparencyPercentage - the transparency of the text in percent (0 = solid non transparent text,100 = fully transparent text)
Example
The following example creates a new font, creates a solid fill for the font and then adds ahorizontal text message at 100 pixels from the top of the image and 200 pixels in from the leftedge of the image at an angle of 45 degrees, with the text left aligned and 25% transparent:
CreateFont "myFont", "Arial", Regular, True, False, 25
CreateFillSolid "myFill", Argb(255, 0, 255, 0)
AddTextWithRotation "This is some text", "myFont", "myFill" , 45, 100, 200, Left, 25
130

Revision: 02/03/2015 14:22 Multiple Image Resizer .NET v4.5.2 - Help Documentation
Version Information
Supported in Multiple Image Resizer .NET v2.3.0.0
See Also
● Functions
● Function Parameter Types
131

Revision: 02/03/2015 14:22 Multiple Image Resizer .NET v4.5.2 - Help Documentation
Scripting Function - AddTextByPosition
The function adds text each image. The location of the text is specified by position and x and yoffsets.
Syntax
AddTextByPosition text As StringValue, userfontname As StringValue, userfillname AsStringValue, orientation As OrientationValue, position As PositionValue, xoffset AsIntegerValueGreaterEqualZero, yoffset As IntegerValueGreaterEqualZero
Parameters
text - the text the add each processed image. Note you may also use Special Text Tags withinyour text.
userfontname - the name of the font that you would like to apply to the text. Note that you mustcreate the font specified in this parameter using the CreateFont function before you use thisfunction.
userfillname - the name of the font fill color/pattern that you would like to apply to the text. Notethat you must create the fill specified in this parameter using either the CreateFillSolid orCreateFillLinearGradient function before you use this function.
orientation - the orientation of the text
position - the position of the text
xoffset - the x offset from the edge of the image relative the position
yoffset - the y offset from the edge of the image relative the position
Example
The following example creates a new font, creates a linear gradient fill for the font and thenadds a vertical text message to the top right of the image that is offset 25 pixels from the topright edges of the image:
CreateFont "myFont2", "Arial", Bold, False, False, 40
CreateFillLinearGradient "myGradientFill", Argb(255, 128, 128, 40), Argb(255, 255,
38, 68), 45
AddTextByPosition "This is some text", "myFont2", "myGradientFill", Vertical,
TopRight, 25, 25
132

Revision: 02/03/2015 14:22 Multiple Image Resizer .NET v4.5.2 - Help Documentation
Version Information
Supported in Multiple Image Resizer .NET v2.0.0.0
See Also
● Functions
● Function Parameter Types
133
Revision: 02/03/2015 14:22 Multiple Image Resizer .NET v4.5.2 - Help Documentation
Scripting Function - AddTextByPositionWithRotation
The function adds text rotated by a specified angle to each image. The location of the text isspecified by position and x and y offsets.
Syntax
AddTextByPositionWithRotation text As StringValue, userfontname As StringValue, userfillnameAs StringValue, angle As IntegerValueAny, position As PositionValue, xoffset AsIntegerValueGreaterEqualZero, yoffset As IntegerValueGreaterEqualZero, alignment AsAlignmentValue, transparencyPercentage As IntegerValuePercentage
Parameters
text - the text the add each processed image. Note you may also use Special Text Tags withinyour text.
userfontname - the name of the font that you would like to apply to the text. Note that you mustcreate the font specified in this parameter using the CreateFont function before you use thisfunction.
userfillname - the name of the font fill color/pattern that you would like to apply to the text. Notethat you must create the fill specified in this parameter using either the CreateFillSolid orCreateFillLinearGradient function before you use this function.
angle - the angle of the text in degrees (note the angle can be specified as a positive ornegative number)
position - the position of the text
xoffset - the x offset from the edge of the image relative the position
yoffset - the y offset from the edge of the image relative the position
alignment - the alignment of the text (note only works for multi-line text)
transparencyPercentage - the transparency of the text in percent (0 = solid non transparent text,100 = fully transparent text)
Example
The following example creates a new font, creates a linear gradient fill for the font and thenadds a text message at an angle of 75 degrees to the top right of the image that is offset 25pixels from the top right edges of the image, with the text left aligned and 20% transparent:
CreateFont "myFont2", "Arial", Bold, False, False, 40
CreateFillLinearGradient "myGradientFill", Argb(255, 128, 128, 40), Argb(255, 255,
38, 68), 45
134

Revision: 02/03/2015 14:22 Multiple Image Resizer .NET v4.5.2 - Help Documentation
AddTextByPositionWithRotation "This is some text", "myFont2", "myGradientFill", 75,
TopRight, 25, 25, Left, 20
Version Information
Supported in Multiple Image Resizer .NET v2.3.0.0
See Also
● Functions
● Function Parameter Types
135

Revision: 02/03/2015 14:22 Multiple Image Resizer .NET v4.5.2 - Help Documentation
Scripting Function - CreateFillLinearGradient
The function creates a linear gradient fill that will be used inconjunction with AddText,AddTextByPosition and AddBorder functions.
Syntax
CreateFillLinearGradient userfillname As StringValue, colorone As ArgbColorValue, colortwo AsArgbColorValue, gradientangle As IntegerValueGreaterEqualZero
Parameters
userfillname - the name that you want to assign to the fill you are creating
colorone - the first color for the fill
colortwo - the second color for the fill
gradientangle - the angle in degrees of the gradient between the first and second color
Example
The following creates a gradient fill named "Fill2" between the colors red and blue and an angleof 60 degrees:
CreateFillLinearGradient "Fill2", Argb(255, 255, 0, 0), Argb(255, 0, 0, 255), 60
Version Information
Supported in Multiple Image Resizer .NET v2.0.0.0
See Also
● Functions
● Function Parameter Types
136

Revision: 02/03/2015 14:22 Multiple Image Resizer .NET v4.5.2 - Help Documentation
Scripting Function - CreateFillSolid
The function creates solid (single color) fill that will be used inconjunction with AddText,AddTextByPosition and AddBorder functions.
Syntax
CreateFillSolid userfillname As StringValue, color As ArgbColorValue
Parameters
userfillname - the name that you want to assign to the fill you are creating
color - the color of the fill
Example
The following creates a solid fill named "Fill1" in the color green:
CreateFillSolid "Fill1", Argb(255, 0, 255, 0)
Version Information
Supported in Multiple Image Resizer .NET v2.0.0.0
See Also
● Functions
● Function Parameter Types
137

Revision: 02/03/2015 14:22 Multiple Image Resizer .NET v4.5.2 - Help Documentation
Scripting Function - CreateFont
The function creates a font that will be used inconjunction with AddText and AddTextByPositionfunctions.
Syntax
CreateFont userfontname As StringValue, fontname As StringValueFontName, fontstyle AsFontStyleValue, fontstrikeout As BooleanValue, fontunderline As BooleanValue, fontsize AsIntegerValueGreaterEqualOne
Parameters
userfontname - the name that you want to assign to the font you are creating
fontname - the actual name of the font e.g. "Verdana", "Arial", "Times New Roman" etc
fontstyle - the font style
fontstrikeout - the font stikeout effect flag
fontunderline - the font underline effect flag
fontsize - the size of the font specified in pixels
Example
The following example creates a font named "Font1", in the Arial font type face, with a Boldstyle, with no strikeout, but underlined at a size of 30 pixels:
CreateFont "Font1", "Arial", Bold , False, True, 30
Version Information
Supported in Multiple Image Resizer .NET v2.0.0.0
See Also
● Functions
● Function Parameter Types
138

Revision: 02/03/2015 14:22 Multiple Image Resizer .NET v4.5.2 - Help Documentation
Scripting Function - Crop
The function crops each image. Cropping is specified by x, y, and width and height in pixels.
Syntax
Crop x As IntegerValueGreaterEqualZero, y As IntegerValueGreaterEqualZero, width AsIntegerValueGreaterEqualOne, height As IntegerValueGreaterEqualOne
Parameters
x - the x coordinate in pixels where the top left area of the crop will start
y - the y coordinate in pixels where the top left area of the crop will start
width - the width in pixels of the area to crop
height - the height in pixels of the area to crop
Example
The following example crops images starting a 50 pixels in from the left and top edges with acropping width of 100 pixels and cropping height of 150 pixels:
Crop 50, 50, 100, 150
Version Information
Supported in Multiple Image Resizer .NET v2.0.0.0
See Also
● Functions
● Function Parameter Types
139

Revision: 02/03/2015 14:22 Multiple Image Resizer .NET v4.5.2 - Help Documentation
Scripting Function - Flip
The function performs a flip operation. Each image is flipped as per the flip method specified.
Syntax
Flip flipmethod As FlipMethodValue
Parameters
flipmethod - the flip method
Example
The following example flips images horizontally:
Flip Horizontal
Version Information
Supported in Multiple Image Resizer .NET v2.0.0.0
See Also
● Functions
● Function Parameter Types
140

Revision: 02/03/2015 14:22 Multiple Image Resizer .NET v4.5.2 - Help Documentation
Scripting Function - OverlayImage
The function overlays a specified image onto each image. The location of the image overlay isspecified by x and y coordinates.
Syntax
OverlayImage overlayimagefile As StringValueFileNameExisting, transparencymethod AsOverlayTransparencyMethod, transparentcolor As ArgbColorValue, x AsIntegerValueGreaterEqualZero, y As IntegerValueGreaterEqualZero, transparencyPercentageAs IntegerValuePercentage
Parameters
overlayimagefile - the full path of the image file that you would like to overlay onto each image
transparencymethod - the overlay transparency method used during the overlay operation
transparentcolor - the color in the overlay image that will be made transparent during the overlayoperation. Note if you have chosen to use ExistingImageTransparency for thetransparencymethod parameter then this color parameter will not be used, but you specify itanyway!
x - the x coordinate where the top left corner of the overlay image should be positioned
y - the y coordinate where the top left corner of the overlay image should be positioned
transparencyPercentage - Optional Parameter - Specifies the overall transparency (in percent)of the overlay image (defaults to 0 if not specified).
Example
The following example overlays an image file onto each image. The overlay image file alreadyhas an existing transparent layer which we want to use so we set the transparencymethodparameter to ExistingImageTransparency, the top left corner of the overlay image is positioned50 pixels from the left edge and 80 pixels from the top edge of the images:
OverlayImage "c:\temp\image34.gif", ExistingImageTransparency, Argb(0, 0, 0, 0), 50,
80
Version Information
Supported in Multiple Image Resizer .NET v2.0.0.0
Optional Parameter transparencyPercentage added in Multiple Image Resizer .NET v4.0.0.0
141

Revision: 02/03/2015 14:22 Multiple Image Resizer .NET v4.5.2 - Help Documentation
See Also
● Functions
● Function Parameter Types
142

Revision: 02/03/2015 14:22 Multiple Image Resizer .NET v4.5.2 - Help Documentation
Scripting Function - OverlayImageByPosition
The function overlays a specified image onto each image. The location of the overlay image isspecified by position and x and y offsets.
Syntax
OverlayImageByPosition overlayimagefile As StringValueFileNameExisting,transparencymethod As OverlayTransparencyMethod, transparentcolor As ArgbColorValue,position As PositionValue, xoffset As IntegerValueGreaterEqualZero, yoffset AsIntegerValueGreaterEqualZero, transparencyPercentage As IntegerValuePercentage
Parameters
overlayimagefile - the full path of the image file that you would like to overlay onto each image
transparencymethod - the overlay transparency method used during the overlay operation
transparentcolor - the color in the overlay image that will be made transparent during the overlayoperation. Note if you have chosen to use ExistingImageTransparency for thetransparencymethod parameter then this color parameter will not be used, but you specify itanyway!
position - the position of the image to to overlay
xoffset - the x offset from the edge of the image relative the position
yoffset - the y offset from the edge of the image relative the position
transparencyPercentage - Optional Parameter - Specifies the overall transparency (in percent)of the overlay image (defaults to 0 if not specified).
Example
The following example overlays an image file onto each image. The overlay image file does nothave any existing transparent layer but we want the color Argb(255,0,0,255) in the overlayimage to be transparent, the overlay image is to appear at the bottom right and is not offset fromthe bottom right edges of the images:
OverlayImageByPosition "c:\temp\image245.jpg", AreasMatchingColor, Argb(255, 0, 0,
255), BottomRight, 0, 0
Version Information
Supported in Multiple Image Resizer .NET v2.0.0.0
143

Revision: 02/03/2015 14:22 Multiple Image Resizer .NET v4.5.2 - Help Documentation
Optional Parameter transparencyPercentage added in Multiple Image Resizer .NET v4.0.0.0
See Also
● Functions
● Function Parameter Types
144

Revision: 02/03/2015 14:22 Multiple Image Resizer .NET v4.5.2 - Help Documentation
Scripting Function - ProcessingInterpolationMode
Sets the interpolation mode that is used to calculate new pixel values when processing images.
Syntax
ProcessingInterpolationMode interpolationmode As InterpolationModeValue
Parameters
interpolationmode - the interpolation mode
Example
The following example sets the interpolation mode to Bicubic High Quality:
ProcessingInterpolationMode HighQualityBicubic
Version Information
Supported in Multiple Image Resizer .NET v2.0.0.0
See Also
● Functions
● Function Parameter Types
145

Revision: 02/03/2015 14:22 Multiple Image Resizer .NET v4.5.2 - Help Documentation
Scripting Function - ProcessingSmoothingMode
Sets the smoothing mode that is applied to lines and curves and the edges of filled areas whenprocessing images.
Syntax
ProcessingSmoothingMode smoothingmode As SmoothingModeValue
Parameters
smoothingmode - the smoothing mode
Example
The following example sets the smoothing mode to Anti Alias:
ProcessingSmoothingMode AntiAlias
Version Information
Supported in Multiple Image Resizer .NET v2.0.0.0
See Also
● Functions
● Function Parameter Types
146

Revision: 02/03/2015 14:22 Multiple Image Resizer .NET v4.5.2 - Help Documentation
Scripting Function - ProcessingTextRenderHint
Sets the quality of text rendering when processing images.
Syntax
ProcessingTextRenderHint textrenderingmode As TextRenderingModeValue
Parameters
textrenderingmode - the text rendering mode
Example
The following example sets the interpolation mode to Clear Type Grid Fit:
ProcessingTextRenderHint ClearTypeGridFit
Version Information
Supported in Multiple Image Resizer .NET v2.0.0.0
See Also
● Functions
● Function Parameter Types
147

Revision: 02/03/2015 14:22 Multiple Image Resizer .NET v4.5.2 - Help Documentation
Scripting Function - Resize
The function performs a resizing operation. Each image is resized to the exact size specified.The aspect ratio of each image is not preserved.
Syntax
Resize width As IntegerValueGreaterEqualOne, height As IntegerValueGreaterEqualOne
Parameters
width - the width of the processed image in pixels
height - the height of the processed image in pixels
Example
The following example resizes images to a width of 640 pixels and a height of 480 pixels:
Resize 640, 480
Version Information
Supported in Multiple Image Resizer .NET v2.0.0.0
See Also
● Functions
● Function Parameter Types
148

Revision: 02/03/2015 14:22 Multiple Image Resizer .NET v4.5.2 - Help Documentation
Scripting Function - ResizeMaximumSize
The function performs a resizing operation. Each image is resized so that the image is not largerthan the width and height values specified. This function maintains the aspect ration of theimage.
Syntax
ResizeMaximumSize width As IntegerValueGreaterEqualOne, height AsIntegerValueGreaterEqualOne
Parameters
width - the width of the processed image in pixels
height - the height of the processed image in pixels
Example
The following example resizes images to not larger than a width of 800 pixels and a height of600 pixels:
ResizeMaximumSize 800, 600
Version Information
Supported in Multiple Image Resizer .NET v2.0.0.0
See Also
● Functions
● Function Parameter Types
149
Revision: 02/03/2015 14:22 Multiple Image Resizer .NET v4.5.2 - Help Documentation
Scripting Function - ResizePercentage
The function performs a resizing operation. Each image is resized to the percentage specified.This function maintains the aspect ratio of the image.
Syntax
ResizePercentage percentage As IntegerValueGreaterEqualOne
Parameters
percentage - the percentage to resize the processed image by
Example
The following example resizes images to 50% of the original size:
ResizePercentage 50
Version Information
Supported in Multiple Image Resizer .NET v2.0.0.0
See Also
● Functions
● Function Parameter Types
150

Revision: 02/03/2015 14:22 Multiple Image Resizer .NET v4.5.2 - Help Documentation
Scripting Function - ResizeScaleByLargestDimension
The function performs a resizing operation. Each image is scaled by its largest dimension, thedimension specified will be the new size for the images largest dimension (either the width orheight which ever is larger). This function maintains the aspect ration of the image.
Syntax
ResizeScaleByLargestDimension newdimension As IntegerValueGreaterEqualOne
Parameters
newdimension - the new size in pixels for the largest dimension
Example
The following example scales images largest dimension to 1000 pixels:
ResizeScaleByLargestDimension 1000
Version Information
Supported in Multiple Image Resizer .NET v2.0.0.0
See Also
● Functions
● Function Parameter Types
151

Revision: 02/03/2015 14:22 Multiple Image Resizer .NET v4.5.2 - Help Documentation
Scripting Function - ResizeScaleToHeight
The function performs a resizing operation. Each image is resized to the specified height, thewidth of the image is adjusted by the same proportion. This function maintains the aspect rationof the image.
Syntax
ResizeScaleToHeight height As IntegerValueGreaterEqualOne
Parameters
height - the height of the processed image in pixels
Example
The following example scales images to a height of 500 pixels:
ResizeScaleToHeight 500
Version Information
Supported in Multiple Image Resizer .NET v2.0.0.0
See Also
● Functions
● Function Parameter Types
152

Revision: 02/03/2015 14:22 Multiple Image Resizer .NET v4.5.2 - Help Documentation
Scripting Function - ResizeScaleToWidth
The function performs a resizing operation. Each image is resized to the specified width, theheight of the image is adjusted by the same proportion. This function maintains the aspect rationof the image.
Syntax
ResizeScaleToWidth width As IntegerValueGreaterEqualOne
Parameters
width - the height of the processed image in pixels
Example
The following example scales images to a width of 800 pixels:
ResizeScaleToWidth 800
Version Information
Supported in Multiple Image Resizer .NET v2.0.0.0
See Also
● Functions
● Function Parameter Types
153
Revision: 02/03/2015 14:22 Multiple Image Resizer .NET v4.5.2 - Help Documentation
Scripting Function - ResizeWithinDimensions
The function performs a resizing operation. Each image is resized so that the image is not largerthan the width and height values specified, this function will only resize images larger than widthand height specified. This function maintains the aspect ration of the image.
Syntax
ResizeWithinDimensions width As IntegerValueGreaterEqualOne, height AsIntegerValueGreaterEqualOne
Parameters
width - the width of the processed image in pixels
height - the height of the processed image in pixels
Example
The following example resizes images within dimensions of a width of 1024 pixels and a heightof 768 pixels:
ResizeWithinDimensions 1024, 768
Version Information
Supported in Multiple Image Resizer .NET v2.0.0.0
See Also
● Functions
● Function Parameter Types
154

Revision: 02/03/2015 14:22 Multiple Image Resizer .NET v4.5.2 - Help Documentation
Scripting Function -ResizeWithinDimensionsAddBackground
The function performs a resizing operation. Each image is resized so that the image is not largerthan the width and height values specified, this function will only resize images larger than widthand height specified. This function maintains the aspect ration of the image. Once the image isresized the function adds a background to the image to pad the image to the specified width andheight.
Syntax
ResizeWithinDimensions width As IntegerValueGreaterEqualOne, height AsIntegerValueGreaterEqualOne, userbackgroundfillname As StringValue
Parameters
width - the width of the processed image in pixels
height - the height of the processed image in pixels
userbackgroundfillname - the name of the background fill color/pattern that you would like toapply. Note that you must create the fill specified in this parameter using either theCreateFillSolid or CreateFillLinearGradient function before you use this function.
Example
The following example resizes images within dimensions of a width of 500 pixels and a height of500 pixels, adding a red background:
CreateFillSolid "myBackgroundFill", Argb(255, 255, 0, 0)
ResizeWithinDimensionsAddBackground 500, 500, "myBackgroundFill"
Version Information
Supported in Multiple Image Resizer .NET v4.0.0.0
See Also
● Functions
● Function Parameter Types
155

Revision: 02/03/2015 14:22 Multiple Image Resizer .NET v4.5.2 - Help Documentation
Scripting Function - Rotate
The function performs a rotate operation. Each image is rotated as per the rotate methodspecified.
Syntax
Rotate rotatemethod As RotateMethodValue
Parameters
rotatemethod - the rotation method
Example
The following example rotates images by 180 degrees:
Rotate OneEightyDegrees
Version Information
Supported in Multiple Image Resizer .NET v2.0.0.0
See Also
● Functions
● Function Parameter Types
156

Revision: 02/03/2015 14:22 Multiple Image Resizer .NET v4.5.2 - Help Documentation
Scripting Function - SaveToFolder
The function specifies a folder where each processed image file will be saved. The image fileformat and extension of the processed images are also specified using the function.
Syntax
SaveToFolder foldername As StringValueFolderName, imageformat As ImageFormatValue,recreateoriginalfolderstructure As BooleanValue
Parameters
foldername - the full path to the folder where processed image files will be saved. Note that ifthe specified folder does not exist it will be created.
imageformat - the image file format type. Each ImageFormatValue specifies a image file formatand and extension.
recreateoriginalfolderstructure - Optional Parameter - When set to True the original folderstructure of the images will be created under the output folder. When set to False or notincluded in the function call the processed images will be saved into the output folder.
Example
The following example specifies that all the processed images should be saved to a foldernamed "processed" in the root of the C: drive, and that the processed images will be savedusing the Windows Bitmap image format:
SaveTofolder "c:\processed" , bmp
Version Information
Supported in Multiple Image Resizer .NET v2.0.0.0
Optional Parameter recreateoriginalfolderstructure added in Multiple Image Resizer .NETv2.5.0.0
See Also
● Functions
● Function Parameter Types
157

Revision: 02/03/2015 14:22 Multiple Image Resizer .NET v4.5.2 - Help Documentation
Scripting Function - SaveToFolderJpeg
The function specifies a folder where each processed image file will be saved. The function isspecial version of SaveToFolder that saves images in the JPEG image file format. The functionallows you to specify JPEG quality and if the any existing EXIF Meta Information from eachoriginal image file should be added to each processed image.
Syntax
SaveToFolderJpeg foldername As StringValueFolderName, quality As IntegerValuePercentage,writeexifinformation As BooleanValue, recreateoriginalfolderstructure As BooleanValue
Parameters
foldername - the full path to the folder where processed image files will be saved. Note that ifthe specified folder does not exist it will be created.
quality - the percentage for JPEG quality (where 1 is the lowest quality setting and 100 is thehighest quality setting)
writeexifinformation - the write EXIF Meta Information flag
recreateoriginalfolderstructure - Optional Parameter - When set to True the original folderstructure of the images will be created under the output folder. When set to False or notincluded in the function call the processed images will be saved into the output folder.
Example
The following example specifies that all the processed images should be saved as the JPEGimage file format to a folder named "temp" in the root of the C: drive. Each processed image willbe saved with a quality setting of 80%, and EXIF Meta Information will not be copied from eachoriginal image:
SaveToFolderJpeg "c:\temp", 80, False
Version Information
Supported in Multiple Image Resizer .NET v2.0.0.0
Optional Parameter recreateoriginalfolderstructure added in Multiple Image Resizer .NETv2.5.0.0
See Also
● Functions
158
Revision: 02/03/2015 14:22 Multiple Image Resizer .NET v4.5.2 - Help Documentation
● Function Parameter Types
159
Revision: 02/03/2015 14:22 Multiple Image Resizer .NET v4.5.2 - Help Documentation
Scripting Function - SaveToFolderJpegWithTargetSize
The function specifies a folder where each processed image file will be saved. The function isspecial version of SaveToFolder that saves images in the JPEG image file format. The functionallows you to specify a target file size for the processed images and if the any existing EXIFMeta Information from each original image file should be added to each processed image. Usethe target file size to set the maximum size in kilobytes of the processed image files (note thatthe function automatically calculates the JPEG quality setting needed to achieve target file size,if the file size cannot be achieved then the function will save the processed image with a JPEGquality setting of 1%).
Syntax
SaveToFolderJpegWithTargetSize foldername As StringValueFolderName, targetsize AsIntegerValueGreaterEqualOne, writeexifinformation As BooleanValue,recreateoriginalfolderstructure As BooleanValue
Parameters
foldername - the full path to the folder where processed image files will be saved. Note that ifthe specified folder does not exist it will be created.
targetsize - the file size in kilobytes that you are trying to achieve when the image files aresaved.
writeexifinformation - the write EXIF Meta Information flag
recreateoriginalfolderstructure - Optional Parameter - When set to True the original folderstructure of the images will be created under the output folder. When set to False or notincluded in the function call the processed images will be saved into the output folder.
Example
The following example specifies that all the processed images should be saved as the JPEGimage file format to a folder named "temp" in the root of the C: drive. Each processed image willbe saved with a file size no larger than 250KB (where possible), and EXIF Meta Information willnot be copied from each original image:
SaveToFolderJpegWithTargetSize "c:\temp", 250, False
Version Information
Supported in Multiple Image Resizer .NET v2.0.0.0
Optional Parameter recreateoriginalfolderstructure added in Multiple Image Resizer .NETv2.5.0.0
160

Revision: 02/03/2015 14:22 Multiple Image Resizer .NET v4.5.2 - Help Documentation
See Also
● Functions
● Function Parameter Types
161

Revision: 02/03/2015 14:22 Multiple Image Resizer .NET v4.5.2 - Help Documentation
Scripting Function - SaveToFolderTiff
The function specifies a folder where each processed image file will be saved. The function isspecial version of SaveToFolder that saves images in Tagged Image File Format (TIFF). Thefunction allows you to specify if LZW compression is used when saving each processed image.
Syntax
SaveToFolderTiff foldername As StringValueFolderName, uselzwcompression AsBooleanValue, recreateoriginalfolderstructure As BooleanValue
Parameters
foldername - the full path to the folder where processed image files will be saved. Note that ifthe specified folder does not exist it will be created.
uselzwcompression - the use LZW compression flag
recreateoriginalfolderstructure - Optional Parameter - When set to True the original folderstructure of the images will be created under the output folder. When set to False or notincluded in the function call the processed images will be saved into the output folder.
Example
The following example specifies that all the processed images should be saved using TaggedImage File Format (TIFF) to a folder named "c:\temp\myimages". Each processed image will besaved with LZW compression:
SaveToFolderTiff "c:\temp\myimages", True
Version Information
Supported in Multiple Image Resizer .NET v2.0.0.0
Optional Parameter recreateoriginalfolderstructure added in Multiple Image Resizer .NETv2.5.0.0
See Also
● Functions
● Function Parameter Types
162

Revision: 02/03/2015 14:22 Multiple Image Resizer .NET v4.5.2 - Help Documentation
Scripting Function - SaveToSubFolder
The function specifies that each processed image file will be saved to a specified sub folderbeneath each original image files location. The image file format and extension of theprocessed images are also specified using the function.
Syntax
SaveToSubFolder subfoldername As StringValueSubFolderName, imageformat AsImageFormatValue
Parameters
subfoldername - the sub folder name where processed image files will be saved. Note that if thespecified sub folder does not exist it will be created.
imageformat - the image file format type. Each ImageFormatValue specifies a image file formatand and extension.
Example
The following example specifies that each processed image should be saved to a sub foldernamed "MyProcessedImages" beneath the original location of each image, and that theprocessed images will be saved using the Graphics Interchange Format image file format:
SaveToSubFolder "MyProcessedImages", gif
Version Information
Supported in Multiple Image Resizer .NET v2.0.0.0
See Also
● Functions
● Function Parameter Types
163

Revision: 02/03/2015 14:22 Multiple Image Resizer .NET v4.5.2 - Help Documentation
Scripting Function - SaveToSubFolderJpeg
The function specifies that each processed image file will be saved to a specified sub folderbeneath each original image files location. The function is special version of SaveToSubFolderthat saves images in the JPEG image file format. The function allows you to specify JPEGquality and if the any existing EXIF Meta Information from each original image file should beadded to each processed image.
Syntax
SaveToSubFolderJpeg subfoldername As StringValueSubFolderName, quality AsIntegerValuePercentage, writeexifinformation As BooleanValue
Parameters
subfoldername - the sub folder name where processed image files will be saved. Note that if thespecified sub folder does not exist it will be created.
quality - the percentage for JPEG quality (where 1 is the lowest quality setting and 100 is thehighest quality setting)
writeexifinformation - the write EXIF Meta Information flag
Example
The following example specifies that each processed image should be saved as the JPEGimage file format to a sub folder named "Processed" beneath the original location of eachimage. Each processed image will be saved with a quality setting of 100%, and EXIF MetaInformation will be copied from each original image:
SaveToSubFolderJpeg "Processed", 100, True
Version Information
Supported in Multiple Image Resizer .NET v2.0.0.0
See Also
● Functions
● Function Parameter Types
164

Revision: 02/03/2015 14:22 Multiple Image Resizer .NET v4.5.2 - Help Documentation
Scripting Function -SaveToSubFolderJpegWithTargetSize
The function specifies that each processed image file will be saved to a specified sub folderbeneath each original image files location. The function is special version of SaveToSubFolderthat saves images in the JPEG image file format. The function allows you to specify a target filesize for the processed images if any existing EXIF Meta Information from each original imagefile should be added to each processed image. Use the target file size to set the maximum sizein kilobytes of the processed image files (note that the function automatically calculates theJPEG quality setting needed to achieve target file size, if the file size cannot be achieved thenthe function will save the processed image with a JPEG quality setting of 1%).
Syntax
SaveToSubFolderJpegWithTargetSize subfoldername As StringValueSubFolderName,targetsize As IntegerValueGreaterEqualOne, writeexifinformation As BooleanValue
Parameters
subfoldername - the sub folder name where processed image files will be saved. Note that if thespecified sub folder does not exist it will be created.
targetsize - the file size in kilobytes that you are trying to achieve when the image files aresaved.
writeexifinformation - the write EXIF Meta Information flag
Example
The following example specifies that each processed image should be saved as the JPEGimage file format to a sub folder named "Processed" beneath the original location of eachimage. Each processed image will be saved with a file size no larger than 400KB (wherepossible), and EXIF Meta Information will be copied from each original image:
SaveToSubFolderJpegWithTargetSize "Processed", 400, True
Version Information
Supported in Multiple Image Resizer .NET v2.0.1.0
See Also
165

Revision: 02/03/2015 14:22 Multiple Image Resizer .NET v4.5.2 - Help Documentation
● Functions
● Function Parameter Types
166

Revision: 02/03/2015 14:22 Multiple Image Resizer .NET v4.5.2 - Help Documentation
Scripting Function - SaveToSubFolderTiff
The function specifies that each processed image file will be saved to a specified sub folderbeneath each original image files location. The function is special version of SaveToSubFolderthat saves images in Tagged Image File Format (TIFF). The function allows you to specify ifLZW compression is used when saving each processed image.
Syntax
SaveToSubFolderTiff subfoldername As StringValueSubFolderName, uselzwcompression AsBooleanValue
Parameters
subfoldername - the sub folder name where processed image files will be saved. Note that if thespecified sub folder does not exist it will be created.
uselzwcompression - the use LZW compression flag
Example
The following example specifies that each processed image should be saved using TaggedImage File Format (TIFF) to a sub folder named "MyImages" beneath the original location ofeach image. Each processed image will be saved without LZW compression (no compression):
SaveToSubFolderTiff "MyImages", False
Version Information
Supported in Multiple Image Resizer .NET v2.0.0.0
See Also
● Functions
● Function Parameter Types
167

Revision: 02/03/2015 14:22 Multiple Image Resizer .NET v4.5.2 - Help Documentation
Scripting Function - SetResolution
The function sets the resolution of each image to the specified resolution.
This function can be used at any time but it is recommended that it be used after you haveperformed all other image processing functions e.g. resizing, cropping etc but before you useone of the save functions.
Syntax
SetResolution resolution As IntegerValueGreaterEqualOne, resolutionmeasurement AsResolutionMeasurementValue
Parameters
resolution - the resolution value
resolutionmeasurement - the resolution value measurement type
Example
The following example sets the images resolution to 200 dots per inch:
SetResolution 200, Dpi
Version Information
Supported in Multiple Image Resizer .NET v2.0.0.0
See Also
● Functions
● Function Parameter Types
168

Revision: 02/03/2015 14:22 Multiple Image Resizer .NET v4.5.2 - Help Documentation
Scripting Function - SetResolutionToOriginal
The function sets the resolution of each image to the resolution of each of the original images.
This function can be used at any time but it is recommended that it be used after you haveperformed all other image processing functions e.g. resizing, cropping etc but before you useone of the save functions.
Syntax
SetResolutionToOriginal
Parameters
This function has no parameters.
Example
The following example sets the images resolution to the original images resolution:
SetResolutionToOriginal
Version Information
Supported in Multiple Image Resizer .NET v2.0.0.0
See Also
● Functions
● Function Parameter Types
169

Revision: 02/03/2015 14:22 Multiple Image Resizer .NET v4.5.2 - Help Documentation
Scripting Function - UnderlayImage
The function underlays a specified image beneath each image, the function performs a reverseof the OverlayImage function. The location of the image overlay is specified by x and ycoordinates.
Syntax
Underlay underlayimagefile As StringValueFileNameExisting, transparencymethod AsOverlayTransparencyMethod, transparentcolor As ArgbColorValue, x AsIntegerValueGreaterEqualZero, y As IntegerValueGreaterEqualZero, transparencyPercentageAs IntegerValuePercentage
Parameters
underlayimagefile - the full path of the image file that you would like to underlay beneath eachimage
transparencymethod - the overlay transparency method used during the overlay operation
transparentcolor - the color in the overlay image that will be made transparent during the overlayoperation. Note if you have chosen to use ExistingImageTransparency for thetransparencymethod parameter then this color parameter will not be used, but you specify itanyway!
x - the x coordinate where the top left corner of the overlay image should be positioned
y - the y coordinate where the top left corner of the overlay image should be positioned
transparencyPercentage - Optional Parameter - Specifies the overall transparency (in percent)of the overlay image (defaults to 0 if not specified).
Example
The following example overlays an image file onto each image. The overlay image file alreadyhas an existing transparent layer which we want to use so we set the transparencymethodparameter to ExistingImageTransparency, the top left corner of the overlay image is positioned50 pixels from the left edge and 80 pixels from the top edge of the images:
UnderlayImage "c:\temp\image34.gif", ExistingImageTransparency, Argb(0, 0, 0, 0), 50,
80
Version Information
Supported in Multiple Image Resizer .NET v4.0.0.3
170

Revision: 02/03/2015 14:22 Multiple Image Resizer .NET v4.5.2 - Help Documentation
See Also
● Functions
● Function Parameter Types
171

Revision: 02/03/2015 14:22 Multiple Image Resizer .NET v4.5.2 - Help Documentation
Scripting Function - UnderlayImageByPosition
The function underlays a specified image beneath each image, the function performs a reverseof the OverlayImageByPosition function. The location of the overlay image is specified byposition and x and y offsets.
Syntax
UnderlayImageByPosition underlayimagefile As StringValueFileNameExisting,transparencymethod As OverlayTransparencyMethod, transparentcolor As ArgbColorValue,position As PositionValue, xoffset As IntegerValueGreaterEqualZero, yoffset AsIntegerValueGreaterEqualZero, transparencyPercentage As IntegerValuePercentage
Parameters
underlayimagefile - the full path of the image file that you would like to underlay beneath eachimage
transparencymethod - the overlay transparency method used during the overlay operation
transparentcolor - the color in the overlay image that will be made transparent during the overlayoperation. Note if you have chosen to use ExistingImageTransparency for thetransparencymethod parameter then this color parameter will not be used, but you specify itanyway!
position - the position of the image to to overlay
xoffset - the x offset from the edge of the image relative the position
yoffset - the y offset from the edge of the image relative the position
transparencyPercentage - Optional Parameter - Specifies the overall transparency (in percent)of the overlay image (defaults to 0 if not specified).
Example
The following example overlays an image file onto each image. The overlay image file does nothave any existing transparent layer but we want the color Argb(255,0,0,255) in the overlayimage to be transparent, the overlay image is to appear at the bottom right and is not offset fromthe bottom right edges of the images:
UnderlayImageByPosition "c:\temp\image245.jpg", AreasMatchingColor, Argb(255, 0, 0,
255), BottomRight, 0, 0
Version Information
172
Revision: 02/03/2015 14:22 Multiple Image Resizer .NET v4.5.2 - Help Documentation
Supported in Multiple Image Resizer .NET v4.0.0.3
See Also
● Functions
● Function Parameter Types
173
Revision: 02/03/2015 14:22 Multiple Image Resizer .NET v4.5.2 - Help Documentation
Scripting Function Parameter Types
Multiple Image Resizer .NET script functions may require that you specify parameters whenthey are used.
Information about each of the different function parameter types can be found by clicking on therelevant link below:
● IntegerValueAny
● IntegerValueGreaterEqualZero
● IntegerValueGreaterEqualOne
● IntegerValuePercentage
● StringValue
● StringValueFileNameExisting
● StringValueFolderName
● StringValueSubFolderName
● StringValueFontName
● ImageFormatValue
● BooleanValue
● FlipMethodValue
● RotateMethodValue
● ResolutionMeasurementValue
● FontStyleValue
● ArgbColorValue
● OrientationValue
● PositionValue
● InterpolationModeValue
● SmoothingModeValue
● TextRenderingModeValue
● OverlayTransparencyMethod
● AlignmentValue
174

Revision: 02/03/2015 14:22 Multiple Image Resizer .NET v4.5.2 - Help Documentation
Scripting Function Parameter Type - AlignmentValue
Specifies alignment.
Value Description
Left Specifies left alignment.
Center Specifies center alignment.
Right Specifies right alignment.
Version Information
Supported in Multiple Image Resizer .NET v2.3.0.0
See Also
● Function Parameter Types
● Functions
175
Revision: 02/03/2015 14:22 Multiple Image Resizer .NET v4.5.2 - Help Documentation
Scripting Function Parameter Type - ArgbColorValue
Represents a color in terms of it alpha, red, green and blue parts.
The following example shows how to specify the color Red:
Argb(255, 255, 0, 0)
Version Information
Supported in Multiple Image Resizer .NET v2.0.0.0
See Also
● Function Parameter Types
● Functions
176

Revision: 02/03/2015 14:22 Multiple Image Resizer .NET v4.5.2 - Help Documentation
Scripting Function Parameter Type - BooleanValue
A True or False value.
Value Description
True Specifies the boolean value True.
False Specifies the boolean value False.
Version Information
Supported in Multiple Image Resizer .NET v2.0.0.0
See Also
● Function Parameter Types
● Functions
177

Revision: 02/03/2015 14:22 Multiple Image Resizer .NET v4.5.2 - Help Documentation
Scripting Function Parameter Type - FlipMethodValue
Specifies the flip mode used when images are flipped.
Value Description
None Specifies no flip.
Horizontal Specifies horizontal flip (the left edge of theimage becomes the right, and vice-versa).
Vertical Specifies vertical flip (the top edge becomesthe bottom and vice-versa).
HorizontalAndVertical Specifies horizontal and vertical flip (appliesboth a horizontal and a vertical flipsimultaneously).
Version Information
Supported in Multiple Image Resizer .NET v2.0.0.0
See Also
● Function Parameter Types
● Functions
178

Revision: 02/03/2015 14:22 Multiple Image Resizer .NET v4.5.2 - Help Documentation
Scripting Function Parameter Type - FontStyleValue
Specifies the font style used when creating a font.
Value Description
Regular Specifies regular font style.
Bold Specifies bold font style.
Italic Specifies italic font style.
BoldItalic Specifies bold italic font style.
Version Information
Supported in Multiple Image Resizer .NET v2.0.0.0
See Also
● Function Parameter Types
● Functions
179

Revision: 02/03/2015 14:22 Multiple Image Resizer .NET v4.5.2 - Help Documentation
Scripting Function Parameter Type - ImageFormatValue
Specifies the image file format and extension when images are saved.
Value Description
emf Specifies Enhanced Windows Metafile imagefile format with a .emf file extension.
exif Specifies Exchangeable Image File format witha .exif file extension.
gif Specifies Graphics Interchange Format imagefile format with a .gif file extension.
hdr Specifies High Dynamic Range image fileformat with a .hdr file extension.
jpg Specifies JPEG image file format with a .jpg fileextension.
jpeg Specifies JPEG image file format with a .jpegfile extension.
jif Specifies JPEG image file format with a .jif fileextension.
jpe Specifies JPEG image file format with a .jpe fileextension.
pbmascii Specifies Portable Bitmap ASCII image fileformat with a .pbm file extension.
pbmraw Specifies Portable Bitmap Binary image fileformat with a .pbm file extension.
pgmascii Specifies Greymap ASCII image file format witha .pgm file extension.
pgmraw Specifies Greymap Binary image file formatwith a .pgm file extension.
png Specifies Portable Network Graphics image fileformat with a .png file extension.
ppmacsii Specifies Portable Pixelmap ASCII image fileformat with a .ppm file extension.
ppmraw Specifies Portable Pixelmap Binary image fileformat with a .ppm file extension.
tif Specifies Tagged Image File Format with a .tiffile extension.
180

Revision: 02/03/2015 14:22 Multiple Image Resizer .NET v4.5.2 - Help Documentation
tiff Specifies Tagged Image File Format with a .tifffile extension.
tga Specifies Truevision Targa image file formatwith a .tga file extension.
targa Specifies Truevision Targa image file formatwith a .targa file extension.
bmp Specifies Windows Bitmap image file formatwith a .bmp file extension.
ico Specifies Windows Icon image file format with a.ico file extension.
wmf Specifies Windows Metafile image file formatwith a .wmf file extension.
wbmp Specifies Wireless Bitmap image file formatwith a .wbmp file extension.
xpm Specifies X11 Pixmap image file format with a.xpm file extension.
Version Information
Supported in Multiple Image Resizer .NET v2.0.0.0
See Also
● Function Parameter Types
● Functions
181

Revision: 02/03/2015 14:22 Multiple Image Resizer .NET v4.5.2 - Help Documentation
Scripting Function Parameter Type - IntegerValueAny
A positive or negative whole number.
Version Information
Supported in Multiple Image Resizer .NET v2.3.0.0
See Also
● Function Parameter Types
● Functions
182

Revision: 02/03/2015 14:22 Multiple Image Resizer .NET v4.5.2 - Help Documentation
Scripting Function Parameter Type -IntegerValueGreaterEqualOne
A whole number which has a value greater or equal to one.
Version Information
Supported in Multiple Image Resizer .NET v2.0.0.0
See Also
● Function Parameter Types
● Functions
183

Revision: 02/03/2015 14:22 Multiple Image Resizer .NET v4.5.2 - Help Documentation
Scripting Function Parameter Type -IntegerValueGreaterEqualZero
A whole number which has a value greater or equal to zero.
Version Information
Supported in Multiple Image Resizer .NET v2.0.0.0
See Also
● Function Parameter Types
● Functions
184

Revision: 02/03/2015 14:22 Multiple Image Resizer .NET v4.5.2 - Help Documentation
Scripting Function Parameter Type -IntegerValuePercentage
A whole number which has a value between 0 and 100.
Version Information
Supported in Multiple Image Resizer .NET v2.0.0.0
See Also
● Function Parameter Types
● Functions
185

Revision: 02/03/2015 14:22 Multiple Image Resizer .NET v4.5.2 - Help Documentation
Scripting Function Parameter Type -InterpolationModeValue
Specifies the algorithm that is used when images are processed.
Value Description
Bicubic Specifies bicubic interpolation. No prefiltering isdone. This mode is not suitable for shrinking animage below 25 percent of its original size.
Bilinear Specifies bilinear interpolation. No prefiltering isdone. This mode is not suitable for shrinking animage below 50 percent of its original size.
High Specifies high quality interpolation.
HighQualityBicubic Specifies high-quality, bicubic interpolation.Prefiltering is performed to ensure high-qualityshrinking. This mode produces the highestquality transformed images.
HighQualityBilinear Specifies high-quality, bilinear interpolation.Prefiltering is performed to ensure high-qualityshrinking.
Low Specifies low quality interpolation.
NearestNeighbor Specifies nearest-neighbor interpolation.
Version Information
Supported in Multiple Image Resizer .NET v2.0.0.0
See Also
● Function Parameter Types
● Functions
186

Revision: 02/03/2015 14:22 Multiple Image Resizer .NET v4.5.2 - Help Documentation
Scripting Function Parameter Type - OrientationValue
Specifies orientation.
Value Description
Horizontal Specifies horizontal orientation.
Vertical Specifies vertical orientation.
Version Information
Supported in Multiple Image Resizer .NET v2.0.0.0
See Also
● Function Parameter Types
● Functions
187

Revision: 02/03/2015 14:22 Multiple Image Resizer .NET v4.5.2 - Help Documentation
Scripting Function Parameter Type -OverlayTransparencyMethod
Specifies overlay transparency method when using the overlay image function.
Value Description
ExistingImageTransparency Specifies that when the overlay is performedthe overlay images existing transparent color (ifit exists) should be used.
AreasMatchingColor Specifies that a user specifed color should bemade tansparent when the overlay isperformed.
Version Information
Supported in Multiple Image Resizer .NET v2.0.0.0
See Also
● Function Parameter Types
● Functions
188

Revision: 02/03/2015 14:22 Multiple Image Resizer .NET v4.5.2 - Help Documentation
Scripting Function Parameter Type - PositionValue
Specifies the a position when using positional functions.
Value Description
TopLeft Specifies top left position.
TopMiddle Specifies top center position.
TopRight Specifies top right position.
MiddleLeft Specifies center left position.
MiddleMiddle Specifies center position.
MiddleRight Specifies center right position.
BottomLeft Specifies bottom left position.
BottomMiddle Specifies bottom center position.
BottomRight Specifies bottom right position.
Version Information
Supported in Multiple Image Resizer .NET v2.0.0.0
See Also
● Function Parameter Types
● Functions
189

Revision: 02/03/2015 14:22 Multiple Image Resizer .NET v4.5.2 - Help Documentation
Scripting Function Parameter Type -TextRenderingModeValue
Specifies the quality of text rendering.
Value Description
AntiAlias Each character is drawn using its antialiasedglyph bitmap without hinting. Better quality dueto antialiasing. Stem width differences may benoticeable because hinting is turned off.
AntiAliasGridFit Each character is drawn using its antialiasedglyph bitmap with hinting. Much better qualitydue to antialiasing, but at a higher performancecost.
ClearTypeGridFit Each character is drawn using its glyphClearType bitmap with hinting. The highestquality setting. Used to take advantage ofClearType font features.
SingleBitPerPixel Each character is drawn using its glyph bitmap.
SingleBitPerPixelGridFit Each character is drawn using its glyph bitmap.Hinting is used to improve characterappearance on stems and curvature.
SystemDefault Each character is drawn using its glyph bitmap,with the system default rendering hint. The textwill be drawn using whatever smoothingsettings the user has selected.
Version Information
Supported in Multiple Image Resizer .NET v2.0.0.0
See Also
● Function Parameter Types
● Functions
190
Revision: 02/03/2015 14:22 Multiple Image Resizer .NET v4.5.2 - Help Documentation
Scripting Function Parameter Type -ResolutionMeasurementValue
Specifies the resolution measurement method used when setting the resolution of images.
Value Description
dpi Specifies the resolution measurement is DotsPer Inch.
dpcm Specifies the resolution measurement is DotsPer Centimeter.
Version Information
Supported in Multiple Image Resizer .NET v2.0.0.0
See Also
● Function Parameter Types
● Functions
191

Revision: 02/03/2015 14:22 Multiple Image Resizer .NET v4.5.2 - Help Documentation
Scripting Function Parameter Type - RotateMethodValue
Specifies the rotate mode used when images are rotated.
Value Description
None Specifies no rotation.
NinetyDegrees Specifies 90 degrees clockwise rotation.
OneEightyDegrees Specifies 180 degrees clockwise rotation.
TwoSeventyDegrees Specifies 270 degrees clockwise rotation.
Version Information
Supported in Multiple Image Resizer .NET v2.0.0.0
See Also
● Function Parameter Types
● Functions
192

Revision: 02/03/2015 14:22 Multiple Image Resizer .NET v4.5.2 - Help Documentation
Scripting Function Parameter Type -SmoothingModeValue
Specifies whether smoothing (antialiasing) is applied to lines and curves and the edges of filledareas when images are processed (note this does not affect text).
Value Description
AntiAlias Specifies antialiased rendering.
HighQuality Specifies high quality, low speed rendering.
HighSpeed Specifies high speed, low quality rendering.
None Specifies no antialiasing.
Version Information
Supported in Multiple Image Resizer .NET v2.0.0.0
See Also
● Function Parameter Types
● Functions
193

Revision: 02/03/2015 14:22 Multiple Image Resizer .NET v4.5.2 - Help Documentation
Scripting Function Parameter Type - StringValue
Zero or more characters encased in double quotes e.g.
"This is an example of a string"
Version Information
Supported in Multiple Image Resizer .NET v2.0.0.0
See Also
● Function Parameter Types
● Functions
194

Revision: 02/03/2015 14:22 Multiple Image Resizer .NET v4.5.2 - Help Documentation
Scripting Function Parameter Type -StringValueFileNameExisting
A StringValue that contains a full path to an existing file e.g.
"c:\temp\image1.jpg"
Version Information
Supported in Multiple Image Resizer .NET v2.0.0.0
See Also
● Function Parameter Types
● Functions
195

Revision: 02/03/2015 14:22 Multiple Image Resizer .NET v4.5.2 - Help Documentation
Scripting Function Parameter Type -StringValueFolderName
A StringValue that contains a full path to a folder (note that the folder specified does not need toexist) e.g.
"c:\temp\myimages"
Version Information
Supported in Multiple Image Resizer .NET v2.0.0.0
See Also
● Function Parameter Types
● Functions
196
Revision: 02/03/2015 14:22 Multiple Image Resizer .NET v4.5.2 - Help Documentation
Scripting Function Parameter Type -StringValueFontName
A StringValue that contains a valid font name e.g.
"Arial"
Version Information
Supported in Multiple Image Resizer .NET v2.0.0.0
See Also
● Function Parameter Types
● Functions
197

Revision: 02/03/2015 14:22 Multiple Image Resizer .NET v4.5.2 - Help Documentation
Scripting Function Parameter Type -StringValueSubFolderName
A StringValue that contains a sub folder name (note that sub folder name specified does notneed to exist) .e.g.
"SomeImagesSubFolder"
When specifying a sub folder name ensure that you do not use invalid characters such as/\:*?"<>|
Version Information
Supported in Multiple Image Resizer .NET v2.0.0.0
See Also
● Function Parameter Types
● Functions
198

Revision: 02/03/2015 14:22 Multiple Image Resizer .NET v4.5.2 - Help Documentation
Script Parser Errors
If a script file contains errors when it is validated by the Multiple Image Resizer .NET ScriptEngine you will receive a list of Script Errors to help you locate and correct the errors in yourscript file.
Script Errors are split into two categories "General Errors" and "Function Argument ValidationErrors". The following lists all the Script Errors that can occur:
General Errors
Note that [X] will be replaced by the line number in the script file on which the error was found.
● Script Parser Error: Script Error - Line [X]: Unrecognized function please check the spellingof the function.
● Script Parser Error: Script Error - Line [X]: Function has incorrect number of arguments orthe arguments are formatted incorrectly.
Function Argument Validation Errors
Note that [X] will be replaced by the line number in the script file on which the error was found,and [Argument Name] will be replaced by the name of the argument that is invalid.
● Script Parser Error: Script Error - Line [X]: Argument [Argument Name] is invalid. Theargument should be a number greater than or equal to one.
● Script Parser Error: Script Error - Line [X]: Argument [Argument Name] is invalid. Theargument should be a number between 1 and 100 (inclusive).
● Script Parser Error: Script Error - Line [X]: Argument [Argument Name] is invalid. The filespecified in the argument does not exist.
● Script Parser Error: Script Error - Line [X]: Argument [Argument Name] is invalid. The folderspecified in the argument is invalid.
● Script Parser Error: Script Error - Line [X]: Argument [Argument Name] is invalid. Thesubfolder name specified in the argument cannot be a blank string.
● Script Parser Error: Script Error - Line [X]: Argument [Argument Name] is invalid. Thesubfolder name specified in the argument contains invalid characters.
● Script Parser Error: Script Error - Line [X]: Argument [Argument Name] is invalid. The fontname specified in the argument is not installed on this machine, please check the spellingof the font name.
● Script Parser Error: Script Error - Line [X]: Argument [Argument Name] is invalid. You havenot created the font named in the argument.
● Script Parser Error: Script Error - Line [X]: Argument [Argument Name] is invalid. You havenot created the fill named in the argument.
● Script Parser Error: Script Error - Line [X]: Argument [Argument Name] is invalid. You havealready created a font using the same name.
● Script Parser Error: Script Error - Line [X]: Argument [Argument Name] is invalid. You have
199

Revision: 02/03/2015 14:22 Multiple Image Resizer .NET v4.5.2 - Help Documentation
already created a fill using the same name.
● Script Parser Error: Script Error - Line [X]: Argument [Argument Name] is invalid. The alphaargument of the ARGB color should be a number between 0 and 255 (inclusive).
● Script Parser Error: Script Error - Line [X]: Argument [Argument Name] is invalid. The redargument of the ARGB color should be a number between 0 and 255 (inclusive).
● Script Parser Error: Script Error - Line [X]: Argument [Argument Name] is invalid. The greenargument of the ARGB color should be a number between 0 and 255 (inclusive).
● Script Parser Error: Script Error - Line [X]: Argument [Argument Name] is invalid. The blueargument of the ARGB color should be a number between 0 and 255 (inclusive).
200

Revision: 02/03/2015 14:22 Multiple Image Resizer .NET v4.5.2 - Help Documentation
Command Line Arguments (MirDotNetScript.exe)
Multiple Image Resizer .NET script engine (MirDotNetScript.exe) has a number of commandline arguments.
Each command line argument is explained below:
/multicore
By default the software detects if your machine has a multi-core processer (CPU) and eitherenables or disables multi-core image processing appropriately. This command line argumentcan be used to force the software to enable or disable multi-core processing as required.
Usage - Disable Multi-core Processing:
MirDotNetScript.exe /multicore=0
Usage - Enable Multi-core Processing:
MirDotNetScript.exe /multicore=1
/maxparallel
When the software detects your machine has a multi-core processer (CPU) the softwareparallelizes images in batches. By default the software parallelizes images in batches of 4, thisvalue can be overridden using this command line argument. This can improve or decreasemulti-core processing performance depending on the many factors, we recommend that you donot use this command line option unless you have contacted technical support first!
Usage - Set images per parallelization batch to 8:
MirDotNetScript.exe /maxparallel=8
Usage - Set images per parallelization batch to 16:
MirDotNetScript.exe /maxparallel=16
/scriptfile
This command line argument is specifically to do with the batch command line scripting featurethat is built into the software. Please see the Scripting section of the Help file for full details onthe usage of this command line argument.
/imagelistfile
This command line argument is specifically to do with the batch command line scripting featurethat is built into the software. Please see the Scripting section of the Help file for full details onthe usage of this command line argument.
201

Revision: 02/03/2015 14:22 Multiple Image Resizer .NET v4.5.2 - Help Documentation
/silent
This command line argument is specifically to do with the batch command line scripting featurethat is built into the software. When used with other scripting command line arguments thisoption suppresses all scripting output messages. We recommend usage of this argument if youare calling the scripting functionality from batch files.
/log
This command line argument is specifically to do with the batch command line scripting featurethat is built into the software. When used with other scripting command line arguments thisoption sends all scripting output messages to a log file.
Usage - Output script output messages to a log file located at "C:\MirLog.txt":
/log="C:\MirLog.txt"
202