ms 235 esd - dodocompany.rododocompany.ro/assets/3-sikafloor-235-esd-method-s… · ·...
TRANSCRIPT

The information contained herein and any other advice are given in good faith based on Sika's current knowledge and experience of the products when properly stored, handled and applied under normal conditions in accordance with Sika's recommendations. The information only applies to the application(s) and product(s) expressly referred to herein. In case of changes in the parameters of the application, such as changes in substrates etc., or in case of a different application, consult Sika's Technical Service prior to using Sika products. The information contained herein does not relieve the user of the products from testing them for the intended application and purpose. All orders are accepted subject to our current terms of sale and delivery. Users must always refer to the most recent issue of the local Product Data Sheet for the product concerned, copies of which will be supplied on request.
Cons
truct
ion
Method Statement Sikafloor P
®P-235 ESD
BU-Contractors Scope: Method statement for the application of Sikafloor P
®P-235 ESD, a 2-part epoxy electrostatic
conductive self-smoothing system.
1/32

Cons
truct
ion
Table of Contents: 1. Products and Description.......................................................................... 3
2. Sikafloor P®P-235 ESD System Build Up ....................................................... 4
3. Substrate Requirements............................................................................ 5
3.1 Pull off and compressive strength ......................................................... 5
3.2 Moisture content ...................................................................................... 5
3.3 Ambient and surface temperature .......................................................... 6
4. Substrate Preparation................................................................................ 8
5. Substrate Priming and Levelling............................................................. 10
6. Mixing of Sikafloor®-156 .......................................................................... 11
7. Application of Sikafloor®-156 as a Primer.............................................. 14
8. Mixing and Application of the Scratch Coat .......................................... 15
9. Placing of Earthing Points....................................................................... 16
9.1 Installation Instruction........................................................................... 17
10. Mixing and application of Sikafloor®P-220 W Conductive ...................... 18
11. Mixing of Sikafloor®P-235 ESD.................................................................. 19
12. Application of Sikafloor®P-235 ESD.......................................................... 20
13. Test methods............................................................................................ 22
13.1 Resistance to ground........................................................................ 22
13.2 System Test ....................................................................................... 23
13.3 Walkingtest ........................................................................................ 24
14. Tools and Equipment............................................................................... 25
14.1 Measuring equipment “Resistance to earth” .................................. 26
14.2 Measuring equipment “System Test” .............................................. 27
14.3 Measuring equipment “Walking Test” ............................................. 28
15. Cleaning and Subsequent Maintenance................................................. 29
13. Additional Recommendation................................................................... 32
14. Health and Safety Recommendations .................................................... 32
2/32

Cons
truct
ion
1. Products and Description
• Sikafloor®-156 Two part, economic, solvent-free epoxy resin
binder for priming, levelling mortars and screeds.
• Sikafloor®-220 W Conductive Two part, water dispersed, epoxy resin with
a high electrostatic conductivity.
• SikafloorP
®P-235 ESD
Two part, solvent-free, pigmented epoxy resin binder for self-smoothing screeds.
• Quartz sand 0.1 - 0.3 mm
3/32

Cons
truct
ion
2. SikafloorP
®P-235 ESD System Build Up
Coating System Product Consumption
Primer Sikafloor P
®P-156 0.35 - 0.55 kg/m²
Levelling (optional) Sikafloor P
®P-156 levelling mortar Refer to PDS of Sikafloor P
®P-156
Earthing Connection Sikafloor P
®P Earthing Kit 1 earthing point per 300 m²
Conductive coat Sikafloor P
®P 220 W Conductive 0.08 - 0.10 kg/m²
Dissipative wearing course smooth (Film thickness ~ 1.5 mm )
SikafloorP
®P-235 ESD
filled with quartz sand 0.1 - 0.3Maximum 2.5 kg/m² Binder + quartz sand
10-20°C: 1:0.2 pbw (~ 2.1 + 0.4 kg/m²)
20-30°C: 1:0.3 pbw (~ 1.9 + 0.6 kg/m²)
Dissipative wearing course textured (Film thickness ~ 0.5 mm)
SikafloorP
®P-235 ESD
+ Extender T + Thinner C
0.75 kg/m² 2,00 % (by weight) 2% (by weight)
4/32

Cons
truct
ion
3. Substrate Requirements 3.1 Pull off and compressive strength The concrete substrate must be sound and of sufficient compressive strength (minimum 25 N/mmP
2P) with a minimum pull off strength of 1.5 N/mmP
2P.
The substrate must be clean, dry and free of all contaminants such as dirt, oil, grease, coatings and surface treatments, etc. If in doubt, apply a test area first.
T e s t in g o f th e s u b s t r a t e c o h e sP u l l-o f f s t r e n g t h > 1 .5 N /m m ²e .g . P r o c e q p u l l-o f f t e s t e r
T e s t in g o f th e s u b s t r a t e c o h e sP u l l-o f f s t r e n g t h > 1 .5 N /m m ²e .g . P r o c e q p u l l-o f f t e s t e r
3.2 Moisture content Prior to application, confirm substrate moisture content, r.h. and dew point. If > 4% pbw moisture content, Sikafloor P
®P EpoCemP
®P may be applied as a T.M.B.
(temporary moisture barrier) system.
Testing of the substrate Pull-off strength > 1.5 N/mmP
2P.B
E.g. Proceq, Dyna pull-off tester.
Measuring of the substrate moisture: Moisture content < 4% by weight.B
E.g. Sika Tramex moisture meter.
5/32

Cons
truct
ion
Tramex moisture meter. There must be no rising moisture according to ASTM D 4263 (Polyethylene sheet test)
< 4% pbw if priming with SikafloorP
®P-156
> 4% pbw application of a temporary moisture barrier with SikafloorP
®P-81 EpoCem
(please refer to Sikafloor®-81 EpoCem Product Data Sheet)
3.3 Ambient and surface temperature UAmbient and Surface temperature: • Min. +10°C (but at least 3°C above dew point)
• Max. +30°C
Defining the climatic conditions: Substrate temp. > 3°C above dew pointB
E.g. thermometer, hygrometer, dew point table.
6/32

Cons
truct
ion
USubstrate temperature:
Substrate temperature > 10ºC UAmbient temperature:U URelative air humidity: U
Ambient temperature below 30ºC Relative air humidity max. 80% Note: The speed of any chemical reaction is dependent on temperature. As a general rule, the higher the temperature, the more rapid the reaction.
Beware of condensation! The substrate must be at least 3°C above dew point.
7/32

Cons
truct
ion
4. Substrate Preparation Concrete substrates must be mechanically prepared using abrasive blast cleaning to remove cement laitance, existing coatings and achieve a gripping profile that is clean, dry and free from laitance, dirt, grease, oil and any other form of surface contamination. Vacuum blasting or similar techniques are ideally suited. Weak concrete must be removed and surface defects such as blowholes and voids must be fully exposed. Repairs to the substrate, filling of blowholes / voids and surface levelling must be carried out using appropriate products from the Sikafloor P
®P, SikaDurP
®P
and SikaGard P
®P range of materials.
The concrete or screed substrate has to be primed or levelled in order to achieve an even surface. High spots must be removed by e.g. grinding. All dust, loose and friable material must be completely removed from all surfaces before application of the product, preferably by brush and/or vacuum. The selected method of preparation will depend on the surface condition, environmental constraints and availability of services. The method may be selected on the basis of trial areas, approved by the Contract Administrator.
Preparation of the substrate: Blast cleaning or other mechanical means. B
E.g. Blastrac.
8/32

Cons
truct
ion
Vacuum shot blasting
Concrete substrates must be prepared mechanically using abrasive blast cleaning or scarifying equipment to remove cement laitance and achieve a profiled open textured surface
Cleaning of the surface
All dust, loose and friable material must be completely removed from all surfaces before application of the product, preferably by brush and vacuum.
Clean substrate
The surface must be clean, dry and free of all contaminants, e.g. dirt, oils, grease, coatings and surface treatments, etc.
Substrate defects, such as cracks, blow holes and voids must be repaired using appropriate products from the SikaTop P
®P, Sika P
®P MonoTopP
®P, SikafloorP
®P,
SikadurP
®P or Sikagard P
®P range.
If in doubt apply a test area first.
9/32
Cons
truct
ion
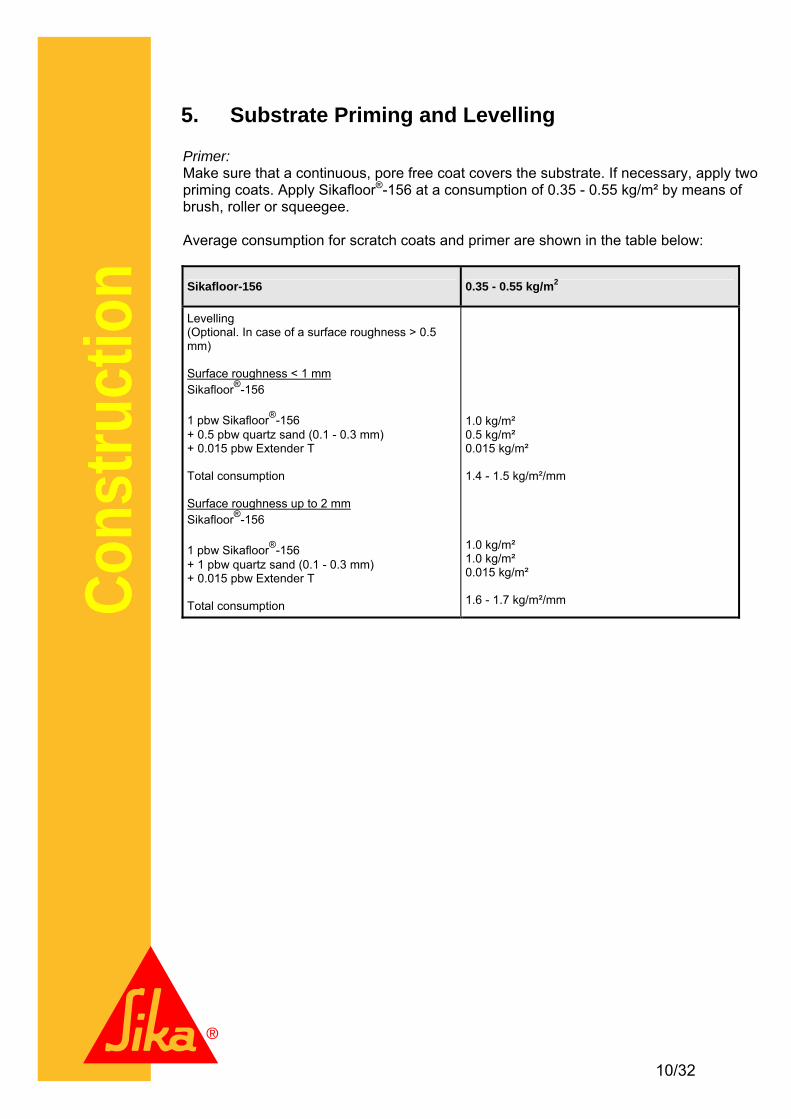
5. Substrate Priming and Levelling Primer: Make sure that a continuous, pore free coat covers the substrate. If necessary, apply two priming coats. Apply Sikafloor P
®P-156 at a consumption of 0.35 - 0.55 kg/m² by means of
brush, roller or squeegee. Average consumption for scratch coats and primer are shown in the table below:
Sikafloor-156 0.35 - 0.55 kg/mP
2P
Levelling (Optional. In case of a surface roughness > 0.5 mm) USurface roughness < 1 mm U Sikafloor®-156 1 pbw Sikafloor®-156 + 0.5 pbw quartz sand (0.1 - 0.3 mm) + 0.015 pbw Extender T Total consumption USurface roughness up to 2 mm U Sikafloor®-156 1 pbw Sikafloor®-156 + 1 pbw quartz sand (0.1 - 0.3 mm) + 0.015 pbw Extender T Total consumption
1.0 kg/m² 0.5 kg/m² 0.015 kg/m² 1.4 - 1.5 kg/m²/mm 1.0 kg/m² 1.0 kg/m² 0.015 kg/m² 1.6 - 1.7 kg/m²/mm
10/32

Cons
truct
ion
6. Mixing of Sikafloor®-156
Mixing area: Make sure that all materials are available and easy accessible so that during the application a "wet edge" can always be maintained. Note: Mix Component A using an electric or pneumatic drum mixer (300 - 400 rpm) for at least 3 minutes. Mix Component A and B of Sikafloor®-156 using an electric or pneumatic stirrer (300 - 400 rpm) for at least 3 minutes or longer, until homogeneous, uniform mix is achieved. Mix Ratio of A : B = 3 : 1 by weight Transfer mixed material to a clean container and mix for another minute.
11/32

Cons
truct
ion
Prior to mixing, stir component A (resin) and add all of component B (hardener).
Make sure the hardener is fully emptied into the resin component
Mix both components thoroughly with a low speed electric stirrer (300 - 400 rpm).
Mix for at least 3 minutes until a uniform mix has been achieved.
12/32

Cons
truct
ion
Transfer mixed material to a clean container.
Mix for another minute.
13/32

Cons
truct
ion
7. Application of Sikafloor®-156 as a Primer Make sure, that all substrate requirements are met, such as temperature, moisture content of the prepared substrate etc. (please refer to section 5). Apply Sikafloor®-156, if the moisture content is below 4%, (test method: Sika-Tramex, or CM-measurement or Oven-dry-method; no rising moisture according to ASTM (Polyethylene-sheet)). If the moisture content is above 4%, apply Sikafloor® EpoCem system as a temporary moisture barrier – please refer to the PDS). Apply the mixed material by roller, taking care to ensure good wetting of the substrate but avoiding puddles on the surface. Work within the pot life of the material (15 minutes at 30 P
°PC).
Clean all tools and application equipment with Thinner C immediately after use. Hardened and / or cured material can only be removed mechanically. Freshly applied Sikafloor P
®P-156 should be protected from damp, condensation and water
for at least 24 hours. Sikafloor P
®P-156 mortar screed is not suitable for frequent or
permanent contact with water unless sealed.
Apply by brush, roller or squeegee and work well into the substrate.
14/32

Cons
truct
ion
8. Mixing and Application of the Scratch Coat Make sure, that the application of the scratch coat is still within the overcoating time. Mix Component A and B of Sikafloor®
P-156 using an electric or pneumatic stirrer (300 - 400 rpm) for at least 2 minutes or longer, until homogeneous colour is obtained. Mix Ratio of A : B = 3 : 1 by weight When Parts A and B have been mixed, add the quartz sand and if required Extender T and mix for a further 2 minutes until a uniform mix has been achieved. Mix Ratio of A+B: quartz sand : Extender T = USurface roughness < 1 mmU USurface roughness up to 2 mm U 1 pbw Sikafloor®
P -156 1 pbw Sikafloor®P -156
+ 0.5 pbw quartz sand (0.1 - 0.3 mm) + 1 pbw quartz sand (0.1 - 0.3 mm) + 0.015 pbw Extender T + 0.015 pbw Extender T Transfer to a clean container and mix again shortly. Pour onto the floor and then spread it evenly using a twin blade trowel ore squeegee in the required layer thickness. Work within the pot life of the material (15 minutes at 30°C). Clean all tools and application equipment with Thinner C immediately after use. Hardened and / or cured material can only be removed mechanically. After curing, grinding of the whole area is recommended to remove high spots.
Application of the scratch coat by squeegee / trowel to the required thickness – kneeling down or ...
…. standing up.
15/32

Cons
truct
ion
9. Placing of Earthing Points Every earthing point is able to conduct approx. 300 m². Ensure the longest distance of each point in the area is max. 10 m to the next earthing point. For longer distances, additional earthing plates have to be placed. If site conditions do not allow placing of additional earthing points, longer distances (>10 m) have to be bridged with copper tapes. The earthing spots have to be connected to the ring-mains. This work must be executed and approved by an electrical engineer and in accordance with any relevant local regulations The optimum number of earth connections depends on the local conditions and should be specified by using a drawing. Example sees below:
21 m4 m
4 m11 m 10 m
1.5
m6.
5 m
6 m
14 m
Earthing point
Earthing point
Earthing point
Earthing point
21 m4 m
4 m11 m 10 m
1.5
m6.
5 m
6 m
14 m
21 m4 m
4 m11 m 10 m
1.5
m6.
5 m
6 m
14 m
Earthing point
Earthing point
Earthing point
Earthing point
16/32

Cons
truct
ion
9.1 Installation Instruction
- Prepare and prime the substrate in accordance with the PDS.
- Drill a hole with diameter of 8 mm and a depth of > 50 mm. - Remove all dust, loose and friable material and insert anchor,
anchor must be flush with the floor surface.
- Screw Allen screw with an Allen key into the anchor, so that 16 mm of the Allen screw stick out.
- Apply the copper tapes (2 x 10 mm) at either side of the drill-
hole as shown in the picture
- Fix the large (D=60 mm) and the medium size (D=30 mm) washer with the nut (M 6) at the Allen screw.
- Fit the small plastic tube onto the Allen screw and fasten tightly. - Make sure the plastic tube is fitted tightly before the application
of Sikafloor®P materials.
- Apply the black conductive primer.
- Apply the conductive wearing course.
- After curing of Sikafloor® materials, remove the plastic tube.
- Clean the head of the Allen screw properly.
- Fix the brass eyelet using the self-locking nut (M 6) at the Allen screw.
- Connect the grounding cable with the brass eyelet.
17/32

Cons
truct
ion
10. Mixing and application of Sikafloor®P-220 W
Conductive Prior to mixing, stir part A mechanically. When all of part B has been added to part A, mix continuously for 3 minutes until a uniform mix has been achieved. Mix Ratio of A : B = 83 : 17 by weight. To ensure thorough mixing pour materials into another container and mix again to achieve a consistent mix. Over mixing must be avoided to minimise air entrainment. Apply the mixed Sikafloor®-220 W Conductive over the whole area of the floor by roller, taking care to ensure good wetting of the substrate and overcoat as well the washer of the earthing point up to the anchor. Work within the pot life of the material (1 hour at 30°C). Do not apply higher than 0.1 kg/m P
2P.
The fully cured film must show a mat and even black appearance.
Application of Sikafloor®-220 W Conductive using a short haired roller.
Conductivity of Sikafloor®-220 W has to be tested and checked, prior to the application of the top coat. Desired value: Resistance to ground RG: >1•103 Ω - <5•103 Ω (>1 K Ω - < 5 K Ω)
18/32

Cons
truct
ion
11. Mixing of Sikafloor®P-235 ESD
Prior to mixing, stir part A mechanically. When all of part B has been added to part A, mix continuously for 2 minutes until a uniform mix has been achieved. When parts A and B have been mixed, add the quartz sand 0.1 - 0.3 mm and mix for a further 2 minutes until a uniform mix has been achieved. To ensure thorough mixing pour materials into another container and mix again to achieve a consistent mix. Over mixing must be avoided to minimise air entrainment.
Mixing of Sikafloor®
P-235 ESD
Note: Please refer to the section 6 with regards to the mixing procedure, which is analogue to that of Sikafloor®
P-156.
19/32

Cons
truct
ion
12. Application of Sikafloor®P-235 ESD
Make sure, that the application of SikafloorP
®P-235 ESD is still within the overcoating time.
SikafloorP
®P-235 ESD is poured, spread evenly by means of a serrated trowel. Turn the
serrated trowel and smooth the surface in order to remove air bubbles. Roll immediately in two directions with a spiked roller to ensure even thickness and to remove entrapped air. Clean all tools and application equipment with Thinner C immediately after use. Hardened / cured material can only be mechanically removed.
SikafloorP
®P-235 ESD is poured,
spread evenly by means of a serrated trowel, either standing up or kneeling down.
After spreading the material evenly, turn the serrated trowel and smooth the surface in order to achieve an aesthetically higher grade of finish.
Close up.
20/32

Cons
truct
ion
Roll immediately in two directions with a spiked roller to ensure even thickness and to remove entrapped air.
Using a steel spiked roller.
21/32

Cons
truct
ion
13. Test methods ESD protection with floor coverings Application range and requirements according IEC 61340-5-1
13.1 Resistance to ground
The method of conductivity measurement must be stated in the specification, method statement and bidding documents. It sets the reference of the upcoming application. UResistance to ground (RUBUG UBU) and Body Voltage Generation according to IEC 61340-5-1
Surface Resistance electrode/probe Weight: 2.50 kg (+/- 0.25 kg) Diameter: 65 mm (+/- 5 mm) Rubber pad hardness: Shore A 60 (+/- 10)
Typical average resistance to ground (RG): 104 Ω - 106 Ω* (IEC 61340-4-1) * Readings might vary, depending on ambient conditions (i.e. temperature, humidity) and measurement equipment.
Typical Body voltage generation: < 30 V * * Readings might vary, depending on ambient conditions (i.e. temperature, humidity) and measurement equipment.
Preferred test method: Surface to ground test (RBG B) The measuring of resistance to earth is recommended by Sika as shown in the chart below:
Ready applied area Number of measurements
< 10 m² 6 measurements
< 100 m² 10-20 measurements
< 1000 m² 50 measurements
< 5000 m² 100 measurements
The measuring points must have a distance of minimal 30 cm to the next measuring point. In case of a value lower/higher as required, an additional measuring has to be carried out, 30 cm around the point with the insufficient result. If then the value is in accordance to the requirements, the total area is acceptable.
Measurement Procedure: 1. Place the electrode on the floor and connect the probe via wire to the ohm meter 2. Connect the second wire first with the earthing point and second with the ohm meter 3. Take measurements 4. Number of measurements must be coordinated with the ESD-representative
22/32

Cons
truct
ion
13.2 System Test
According to IEC 61340-4-5 and IEC 61340-5-1 Flooring-footwear resistance in combination with person. Measurement device: Resistance meter (ohm meter) Range min. 1x10³ Ω /1x104 Ω – 1x10¹³ Ω Footwear: Must be grinded with a sandpaper Type P 280 and afterwards cleaned with Ethanol (>95%) and a cotton cloth. The ESD-shoes must be used 10 minutes before the measurement. Hand-held electrode: Bar/tube out of stainless steel 25 mm x 75 mm
U
Measurement Procedure: 1. Place both feet on the floor - measuring 2. Repeat only with the left foot 3. Repeat only with the right foot 4. Number of measurements must be coordinated with the ESD-representative
23/32

Cons
truct
ion
13.3 Walkingtest
Walking test according to IEC 61340-5-1 and ANSI/ESD S 20.20 Measurement device: Electrostatic voltmeter: ≥ 1014 Ω Footwear: Must be grinded with a sandpaper Type P 280 and afterwards cleaned with Ethanol (>95%) and a cotton cloth. The ESD-shoes must be used 10 minutes before the measurement. Hand-held electrode: Bar/tube out of stainless steel 25 mm x 75 mm
UMeasuring procedure: 1. Discharging, 2. Walking on the floor, 3. No friction, no rotation, 4. Raise the feet not more than 5 - 8 cm, 5. Continue walking on the floor until the body voltage does not rise any longer or 60 s are reached.
24/32

Cons
truct
ion
14. Tools and Equipment Application equipment: Professional equipment is required to achieve a functioning floor, such as: vacuum shot blaster, grinder, scabbler etc.
Preparation of the substrate:Blast cleaning or other mechanicalmeans e.g. Blastrac
Preparation of the substrate:Blast cleaning or other mechanicalmeans e.g. Blastrac
Even application of Primer coat:Sikafloor®-156 with medium to long haired roller or brushe.g. Polyplan roller and brush.
Even application of Primer coat:Sikafloor®-156 with medium to long haired roller or brushe.g. Polyplan roller and brush.
Removal of entrapped air:Spike rolling immediatelye.g. Polyplan spike roller
Removal of entrapped air:Spike rolling immediatelye.g. Polyplan spike roller
Recommended Supplier of Tools: PPW-Polyplan-Werkzeuge GmbH www.polyplan.com Techno-Werkzeuge A.E. Vertriebs GmbH www.techno-vertrieb.de Korbach Werkzeug Co.GmbH & Co.KG. Pajarito-Werkzeugfabrik www.pajarito.de Collomix Rühr- und Mischgeräte GmbH www.collomix.de
Preparation of the substrate: Blast cleaning or other mechanical means e.g. Blastrac
Even application of Primer coat SikafloorP
®P-156 and the conductive Layer
SikafloorP
®P-220 W Conductive:
with medium to long haired roller or brush. E.g. Polyplan roller and brush.
Removal of entrapped air: Spike rolling immediately e.g. Polyplan spike roller.
Spreading of SikafloorP
®P-235 ESD
with notched trowel. E.g. Polyplan notched trowel 5/7 mm.
25/32

Cons
truct
ion
14.1 Measuring equipment “Resistance to earth”
Measurement device: Resistance meter (ohm meter) Range min. 1x10³ Ω/1x104 Ω – 1x10¹³ Ω Voltage: 10 V for resistances < 1x10⁶ Ω 100 V for resistances ≥ 1x 10⁶ Ω Measurement duration: 15 ± 2 s Measuring electrodes: Metal electrodes with a contact area 65 ± 5 mm for hard non-conformable surfaces: Conductive rubber pad Shore A 60 ± 10: Weight: 2.5 ± 0.25 kg for hard non-conformable surfaces 5.0 ± 0.25 kg for all other surfaces Equipment recommendation: - Insulation Tester ET-150 PC - Carbon Rubber electrode” Supplier: ET & ESD Lösungen Diana Conrads Birkenweg 12 D-89188 Merklingen Phon: +49 7337 922283 Fax +49 7337 922284 URL: http://www.et-esd.com Email: [email protected]
26/32
Cons
truct
ion
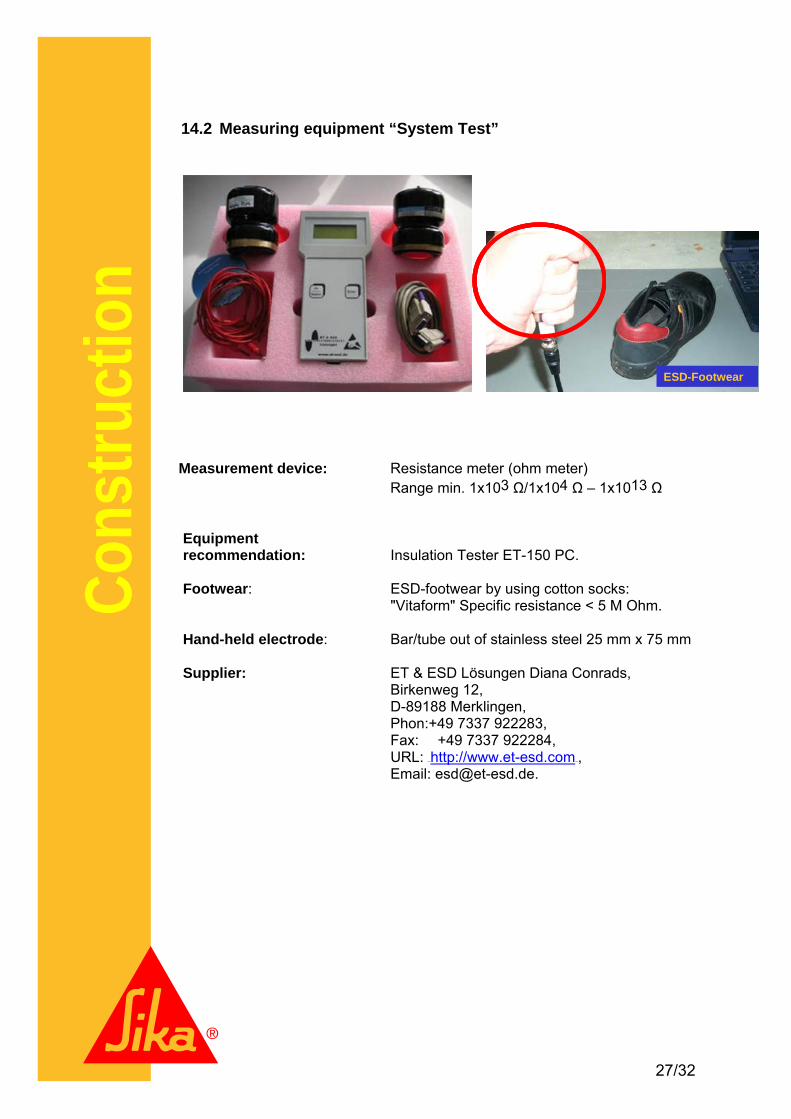
14.2 Measuring equipment “System Test”
ESD-FootwearESD-Footwear
Measurement device: Resistance meter (ohm meter) Range min. 1x10³ Ω/1x104 Ω – 1x10¹³ Ω Equipment recommendation: Insulation Tester ET-150 PC. Footwear: ESD-footwear by using cotton socks: "Vitaform" Specific resistance < 5 M Ohm. Hand-held electrode: Bar/tube out of stainless steel 25 mm x 75 mm Supplier: ET & ESD Lösungen Diana Conrads, Birkenweg 12, D-89188 Merklingen, Phon:+49 7337 922283, Fax: +49 7337 922284, URL: HTUhttp://www.et-esd.comUTH, Email: [email protected].
27/32

Cons
truct
ion
14.3 Measuring equipment “Walking Test”
Measurement device: - Electrostatic voltmeter: ≥ 1014 Ω - Capacitance voltmeter: ≤ 30 pF - Resolving power: 1 0 V (at 100V) - Response time: 0.25 s Equipment recommendation: Walking Test-Kit ET-200 Footwear: ESD-footwear by using cotton socks: "Vitaform" Specific resistance < 5 M Ohm. Hand-held electrode: Bar/tube out of stainless steel 25 mm x 75 mm Supplier: ET & ESD Lösungen Diana Conrads, Birkenweg 12, D-89188 Merklingen, Phon:+49 7337 922283, Fax: +49 7337 922284, URL: HTUhttp://www.et-esd.comUTH, Email: [email protected].
28/32

Cons
truct
ion
15. Cleaning and Subsequent Maintenance To ensure that your Sika flooring system stays in the best of shape and gives you years of satisfaction the correct cleaning and maintenance schedule should be used. When first installed and fully cured your floor should be cleaned with an appropriate floor cleaner using the most suitable equipment for the area concerned.
UInitial Clean:U
Firstly, you should sweep the area to remove any loose debris. An inspection of the area should then be undertaken to see, if there are any areas that require individual treatment such as oil spillages or scuff marks from shoes or fork lift tyres. Application of industrial cleaning detergents to these areas, either as supplied or diluted with water, then given some agitation and allowed to dwell for 5 to 10 minutes will help to remove these. The floor area should then be cleaned using a mild alkaline cleaner or the heavier duty alkaline cleaner. Method of and equipment for the cleaning of the area will depend upon size and manpower available. On site surveys should be carried out by a professional specialist floor cleaning company. Their representatives have knowledge of resin products coupled with the correct chemicals and machinery to clean and maintain your SikafloorP
®P
to the highest levels at all times. UPre-use Inspection:U
The floor should now be inspected to ensure that it has been cleaned to your required standard and that all soiling has been removed.
29/32

Cons
truct
ion
UPrecautions:U
If you will now be placing equipment, storage racking, goods, furniture, filing cabinets etc. on the floor, then every effort should be taken to minimise surface scratching and marking. Dragging of heavy articles across the flooring may damage the surface. Fork lift trucks should be driven with care to avoid marking caused by wheel spin or slide. ULooking After Your Floor: U
If the correct cleaning and maintenance schedule is used the appearance of your floor can be easily maintained. For floors with a high gloss finish it is acceptable practice to lay a sacrificial layer of an acrylic polish, which will keep the high gloss finish, give a hard wearing surface, have the ability to allow for the removal of surface scratches or blemishes, whilst still incorporating anti-slip properties. Once the above action or the decision to leave the floor as supplied has been taken, then the floor will require regular cleaning with either a neutral or mildly alkaline floor cleaner depending upon the type and level of soiling encountered. If you have decided to use a sacrificial surface polish on your floor then any visible wear can be overlaid with a fresh coat. However, if continual additions of coats are made then it may be necessary to occasionally remove the polish and start-a-fresh. USpillages:U
Spillages of any liquid should be wiped up or absorbed and removed as soon as possible. Not only is this a responsible action as far as Health and Safety is concerned, it will also help you to keep your floor in good condition. Once the spillage is removed the area should be cleaned as usual with your standard floor cleaner. If a sacrificial coat has been previously applied the floor should be inspected to see if this remains. If not, it should be reapplied as soon as possible. URemember: Initial clean before use. • Take care when installing equipment etc. • Sacrificial polish if required. • Regular cleaning with the right product and equipment where necessary. • Clean up spillages. And your SikafloorP
®P will give you years of hard wear and still look good.
U
30/32

Cons
truct
ion
Sikafloor-Cleaning Regime with cleaning agents from Kärcher (available on www.sika.com):
Recommended supplier of cleaning products: Alfred Kärcher GmbH & Co. KG www.kaercher.com Wetrok AG www.wetrok.de JohnsonDiversey www.johnsondiversey.com Johannes Kiehl KG www.kiehl-group.com
31/32

Cons
truct
ion
13. Additional Recommendation Read the Product Data Sheet carefully, particularly the Notes on Applications / Limitations for further information on how to prevent application mistakes. No specific conductivity or electrical resistance values mentioned in any of the international or national standards are mandatory. The values can be adapted to meet the local requirements by the responsible authorities. Before applying an ESD or conductive flooring system, Sika always recommends a detailed assessment of at least the following parameters and then for the appropriate values to be agreed and accepted by all of the parties involved:
• Limits for the electrical resistance and body voltage generation • Methods of Measurement • Equipment to make these measurements • Any applicable standards or specifications A final acceptance of the agreed parameters must be set in conjunction with a reference area.
14. Health and Safety Recommendations Ensure sufficient ventilation during application. Wear proper safety equipment (gloves, eye goggles, safety boots and protective clothes) during application. For more details, refer to Individual Safety Data Sheet (available upon request).
32/32