mould-making techniques -...
TRANSCRIPT

Mould-making techniques

2 Mould-making techniquesThe CC-Silicone System
At the core of mould manufacturing is the model. Almost every object is suitable. In general, a master model of the object is prepared. This requires artistic or technical skills, because there are different ways for making this manually:
• Modelling with a modelling clay or plasticine• Carving in wood or wax• Gouging out the sculpture from soapstone or
gypsum• Mounting and shaping with wood, glass, paper-
board, styrofoam, plastic, or metal
The methods are known, the techniques are not new. Apparently, nothing has changed from the very beginning, because the oldest tech-nique of lost wax is practiced today as it has been for centuries. (The lost wax technique was first used in the 4th century B.C. in Egypt). This method involves making a replica in a lost form*, a procedure that constitutes the number one method even today in the artistic glass melting field, by Pâte de Verre and bronze casting.
Despite sophisticated technology, more refined tools and modern aids, it is still not possible to apply a similar, cost-effective method in the area of product development. This is worth mentioning, particularly for prototyping, where after producing the first model, a replica will be cast for practical testing, or will be “printed” with the newest state-of-the-art 3-D printer. However, even that is insufficient, because something still needs to be changed a bit afterwards, improved, and further developed. It is only possible then to make the first practical test with this replication model, which normally necessitates further model changes. As a consequence, a further test model must be produced, a new attempt made... – all according to the known method “learning by doing”. This is only a small example of the diversity of mould-making technical application that is often faster to implement than theoretical calculations or computer simulations (rapid prototyping). The tangible, direct model is understandable to non-specialists as well. It is clear, comprehensible, and can be observed from all angles, and tested in a practical way. This is important, because not only mecha-nical aspects and function, but also aesthetics, handling and design are important development criteria.
The most important prerequisite for this is the production of a required form, quickly available, and without great technical effort. This moulding implies that the materials and the accessories are universally usable so that a fully functional mould can be quickly made without a great deal of prior knowledge.
The CREARTEC mould-making techniques system is based on these criteria. It essentially consists of four different silicones, all of which can be combined and mixed with each other. This unique materials program is completed by additional accessories of a modular system, developed especially for it. With these, the prepared mould making material can be changed and adjusted individually to suit its intended application, so that it precisely fulfils its function:
• The curing time can be reduced or extended• The silicon viscosity can be modified. It can be adjusted to be more fluid and free-flowing, or thicker. Additionally, it may be thi-
xotropic, i.e. drip fast, or can be made as a spatula-ready paste.• The silicones can be mixed with each other. This creates an elastic, viscoelastic, solid, extremely form-stable, or highly elastic
moulding material• A flexible, elastic moulding material can be made from a rigid, heat-resistant silicone, for the production of moulds suitable for
direct casting of tin figures using low-melting point metals.
*Lost form: The model is made of wax and jacketed with a gypsum-sand mixture („HGF“ Hot Glass Form casting material, 56 102). Thereafter, the mould is strongly heated, which results in the wax flowing from it, and at the same time hot bronze or molten glass flowing in. After cooling and solidification of the bronze/glass cast part, the outer form case is destroyed, fulfilling the function of a lost form.

3Mould-making techniquesThe mould-making rangeThe CREARTEC mould-making technique is divided into eight basic product areas, which are completed by special additional articles in the form of a modular system:
1. Creaform quick-casting-paste 2. Mouldable quick casting silicon compound3. Dip mould manufacturing with latex emulsions4. Economic moulds made of Formaform5. The silicone mould system6. Special silicones 7. Chemical supplements (modular system)8. Food moulding with Schokomould
Which material fits for which moulding?
Bas-reliefs without undercuts(Coins, seals, plaques, fittings)
ooo ooo ooo ooo ooo ooo ooo ooo ooo oo ooo ooo ooo
Models with small undercuts Handles, bowls, furniture trim, etc.
ooo ooo oo oo ooo ooo ooo oo ooo o ooo ooo ooo
Reliefs with extreme undercutsFull plastic figures, techn. mouldings
o ooo o o o o oo o ooo ooo ooo ooo
Wall and ceiling reliefs, surface structuresPartial impressions of sculptures, models, devices
ooo ooo ooo
Moulding wet clay modelsRelief panels, sculptures, design surfaces
ooo
Figures and techn. used partsScrews, tools, equipment
o oo oo oo ooo ooo ooo o o ooo oo
Skin-like coatings on sculptures ooo o o o oo o ooo o oo o
Big figures (together with an abutment) o oo oo o ooo o oo o
Figures from low-melting alloysBusts, components, tools
ooo ooo
Manufacture of rubber-like mouldingsWheels (model), play figures, techn. mouldings
o oo o oo o ooo oo o oo
Manufacture of rubber-elastic MouldingsDecoration, bending and moving parts
o o oo oo o oo
Potting of electronic componentsEmbed blackbox circuits
o o o oo o oo o
Form
afor
m
Crea
form
Silic
one
-Rub
ber -
NV
Silic
on-K
auts
chuk
- N
VE
Silic
one
- Ru
bber
- H
B
Silic
one
- Ru
bber
- H
E
Silic
one
- Ru
bber
- H
V
Late
x m
ould
ing
emul
sion
Silic
on-C
ompo
und
Late
x-M
odel
lfix
Silc
otra
ns -
NVT
Silc
odup
li -
VHE
Scho
kom
ould
o suitableoo well suitableooo very well suitable

4 Mould-making techniques1. Creaform quick casting paste
CreaformThe casting alginate (powder) based on purely natural ingredients is free of harmful substances (lead and cadmium). It is ecological because it contains no preservatives. In order for this material structure to have sufficient stabi-lity after the emergence of a negative form, it is also mixed with micro-fine silane shred. After mixing with water, the result is a stable form, rather than the usual sponge-like negative mould. When mixing the Creaform powder, it first shows a gel-like fluid consistency, which coats the moulding object, almost without air bubbles. However, it is still riddled with small crumb-like particles that dissolve within a minute or two, and cause the mould to solidify to a foam-like consistency, and form a stable skin cover. Creaform is dimen-sionally stabilized, which allows the replicated objects to be readily removed from the mould. The mould retains its original size and shape.
After pouring with casting material, the no longer needed mould can be dispo-sed of in household waste, since the material has an excellent, environmentally friendly biocompatibility.
Mixing ratio in terms of weight: 3 parts of cold water and 1 part Creaform powder
100 g of powder mixed with 300 g of water yields 400 g quick casting material. This corresponds to a material volume of 340 ml. The processing time from mixing material to complete rubber-like hardening is approximately 6-10 minutes. After that, the mould is ready, and the ceramic casting compound Artestone (Article 56 011) can be poured immediately.
Important: no plaster or similar casting materials should be used, since they are hygroscopic (water-attracting) and would absorb the water still contained in the mould wall. This would lead to a change in the surface of the replica that results in an uneven structure (orange peel). By using hydrophobic* Artestone that does not happen.
If the mould is to be filled with other casting materials such as polyester, polyurethane, wax, casting soap, etc. it must first dry, and can be filled 60 minutes later. (The inner wall of the mould is then almost dry, thus compatible with the other mentioned casting materials.) Creaform is self-releasing. This property is required for moulding non-absorbing models made of wood, stone, ceramic, porcelain, glass, metal, plastic, rubber, etc.; it does not need any additional release agent.Important: the models must be wetted (moistened) before moulding!
Because of its natural, trouble-free and skin-neutral composition, Creaform is also suitable for the creation of body mouldings, for example hands, feet, and other body parts.
Technical Properties: Test method Value Colour powdery material blue Odour Creaform powder neutral Mixing ratio volume mixing 1 : 1Mixing ratio weight mixture water powder = 3 : 1 Working time timing 3–4 minutes Density at 20 ° C DIN 53217 0.28 g/cm3Alkaline value pH 7.5–8 %
Creaform is supplied with detailed use instructions.
*hydrophobic comes from ancient Greek and means „water-shunning“.
60 201 Creaform (quick casting paste) 225 g Plastic bucket PE 6
60 202 Creaform (quick casting paste) 500 g Plastic bucket PE 6
60 203 Creaform (quick casting paste) 1000 g Plastic bucket PE 6
60 204 Creaform (quick casting paste) 4000 g Plastic bucket PE 1

5Mould-making techniquesCreaform curing retarderFor certain impression projects, the normal working time may be too short. To get around this problem, this curing retarder was developed. It extends the working and curing time by about 3 – 4 minutes. The amount of the retarder required is about 1 – 5 % (where approximately 1% results in a delay of one minute). The curing retarder is mixed with the amount of water needed for the moulding, and then added to the Creaform powder and stirred. In this case, the result is a uniform, slow cure.
Creaform reproduction-setThis idea package contains the complete materials for moulding one adult or two small children’s hands. The idea of getting a model of your own hand is not only inspiring, but also the fact that this moulding process takes no longer than an hour is impressive. The procedure is as follows: The Creaform powder is mixed with water in the supplied container. The hand to be modelled is placed in the mixture, and withdrawn about 3-4 minutes later. Then the supplied Artestone® casting powder is mixed with water until it is a creamy porridge. It is then poured into the self-made form. Just 30 minutes later, the ceramic casting material will have hardened. The finished reproduction model of your own hands can be removed (extracted) from the mould and stands as a unique decorative object.
Mixing ratio in terms of weight: 3 parts of cold water and 1 part Creaform powder
The package was well thought out and put together, so that the delivery container can also be a mould holder. It contains:
1 package Creaform 450 g1 package Artestone 1000 g1 working instructions
60 206 Creaform Curing Retarder 25 ml Plastic box PE 3
60 211 Creaform reproduction-set 1450 g Complete package PE 3
Adding Creaform and water into the mixing container
Mixing the materials
The successfully moulded hand and reusable mould.
Moulding of the hand The mould is finished. The hand can be removed, and the finished mould can be
filled with casting material

6 Mould-making techniques2. Silicon-Compound
Silicon-Compound (quick moulding material)A fully functional mould can be produced within minutes and is immediately ready for filling with a casting material. This is accomplished by using this universal quick-moulding material. In addition to rapid moulding, one can dispense with much of the additional work required in producing a mould. Yet there are even more advantages to use of this silicone moulding composition:Silicon-Compound can be applied without a release agent on every object or surface. Because this is so easily possible, it also eliminates a casting frame. In addition, all these features allow you to im-mediately create a mould with this material at any time and place. Remove the two different looking silicone compound materials (white and brown) from the packaging, mix them by kneading them in a 1:1 weight proportion and they are ready for use.
The light, dry impression material is either placed directly on the moulding object, or rolled into 2-3 mm thick patties, and distributed by pressing or shaping on the moulding object. The material cures in within 5 minutes. Therefore, it is advantageous that you immediately knead a further amount of material, if more is needed, to apply to the already cured mould surface and connect to it seamlessly. This makes it possible to cover even big pictures and sculptures quickly and securely, or to produce a solid, contiguous, elastic, and self-sustaining form.
Silicon-Compound is self-releasing, so it does not combine with the original, or the reproduction model. The final shape can be poured with all casting materials: wax, polyesters, polyurethanes, casting soap, plaster, cement, or ceramic casting materials.
For other product and application information, see the detailed processing instructions that come with each package.
Technical Details: Test Method Unit/Property Component A/B kneadable material white-brownOdour silicone material odour-neutralMixing ratio: in terms of weight 1 : 1Pot life mix/knead time 40–60 sec.Total curing time at 20°C 4–5 minutesShore A hardness after 8 days DIN 53505/ISO 868 40Skin compatibility pH-value 5–6 (pH skin neutral)Flexural strength N/mm2/ISO 37 3.6Elongation at break ISO 37 % 350Tear strength N/mm ASTM D 624 B > 12
Security measures are not necessary when processing this silicone!
> an application video can be found on our website: www.creartec.de
The components A and B are accurately weighed in 1:1 ratio.
Both materials are carefully kneaded together.
The silicone material is placed on the work surface and rolled out with a rolling pin or bottle to a sheet of dough, then it must be pre-react for one minute. The material is
then ready to use.
60 445 Silicon-Compound 300 g SB-Set PE 6
60 446 Silicon-Compound 600 g Packet PE 6
60 447 Silicon-Compound 1000 g Packet PE 3
60 449 Silicon-Compound 5000 g Packet PE 1

7Mould-making techniques
60 151 Formalate „low ammoniac“ 300 ml Plastic box PE 6
60 152 Formalate „low ammoniac“ 800 ml Plastic box PE 6
60 154 Formalate „low ammoniac“ 2500 ml Plastic bottle PE 2
60 156 Formalate „low ammoniac“ 20 l Plastic canister PE 1
3. Dip moulding process with latex emulsionsThe latex obtained in Thailand and Malaysia as milky sap from rubber trees is mainly known in chemistry as an elastomeric polymer dispersion. It is ideal as a dip-coating composition for the production of thin-walled, elastic rubber moulds or universally usable rubber parts. Latex is a first component material that cures firm, dimensio-nally stable, and elastic, in connection with the atmospheric oxygen.
Formalate – > low ammoniated latex milk <The latex emulsion (low ammoniac) pre-cured in a manner similar to natural rubber and preserved with a small amount of ammonia, is particularly suited for producing seamless tube shapes. Therefore is the most commonly used moulding material.
To produce a mould, the original model is completely immersed into liquid latex. After withdrawing the model, a thin latex skin is formed, and must be allowed to dry.
Following drying, a next immersion is performed. This kind of moulded skin prepa-ration must be repeated several times, and is dependent on the size and the extent of the moulded form (the thicker the model, the more immersions are required). It usually takes 4-5 immersions to create a stable, durable form.
The final latex mould is characterised by a high moulding accuracy and long service life. Therefore, moulds made of Formalate are particularly well suited for casting with ceramic materials, cast plaster, wood stone, wax, casting soap, polyester and polyurethane resins.
The same latex is also used for shoe soles (latex soles), to make foot and floor mats, technical mouldings (rubber seals), or as a repair material for tires. For example, it is poured into bicycle and car tires. In case of a tire leak, the out flowing air carries with it a portion of the latex located in the tube nearby, thus sealing the hole.
The liquid Formalate is ivory-coloured, and shows an ochre hue after curing. It con-tains no harmful or harsh ingredients. It can therefore be used by young people and students as a learning material for the first production tests of a seamless mould (tube form).
Technical Details: Test Method Unit/Property Colour fluid latex ivoryOdour fluid latex ammonia-likeCuring time per dipping cycle temperature dependent 30–60 minutesSolids content % TSC 60.5Low level of ammonia content % 0.3 min.Density at 20 °C DIN 53217 0.95 g/cm3Module Elongation 700 %, MPa 11–14Elongation at break % DIN 53504 S1 / ISO 37 800–950Tensile strength ASTM D 624 B MPa 25–29Viscosity dynamic at 26 °C Brookfield 120 max.Alkaline value pH 9.5–10.5Shrinkage after coagulation 7.8 %
Formalate is supplied with a detailed application instructions and a balloon*.
*The balloon is inflated somewhat by the use of latex, knotted airtight, and wrapped in the partially emptied latex box. Due to the reduced oxygen content in the latex, the latex container therein does not thickened, thus retaining its existing consistency.
Model coated with latex
Cast model made of Artestone
Finished latex form

8 Mould-making techniques
60 162 Formalate Spezial – „Odourless“ 300 ml Plastic box PE 6
60 163 Formalate Spezial – „Odourless“ 800 ml Plastic box PE 6
60 164 Formalate Spezial – „Odourless“ 2500 ml Plastic bottle PE 2
60 165 Formalate Spezial – „Odourless“ 20 l Plastic canister PE 1
Formalate Special – odourless latex emulsionThis rubber emulsion based on natural rubber is completely odourless. It contains an odour-less potassium hydroxide solution as preservative instead of a strong-smelling ammonia compound (Formalate standard). This makes handling more pleasant and allows use of the latex a variety of completely different applications, not only as a moulding material, but also for such things as the production of films for latex clothing, soles-nap-latex (applied in small points on the soles of slipper socks or knitted slippers to prevent sliding or slipping), rubber gloves, balloons, inflatable toys, etc.
Beyond that, the material has the same processing properties as normal latex, and nearly identical product characteristics as well. Due to its special composition, it is priced a bit higher than latex containing ammoniac.
Colouring latex: Latex, either with ammonia, or odourless (modified with a potassium hy-droxide solution) can also be dyed with specially developed toning colours (60 176). This is done for example if you need coloured latex for latex clothing, balloons, inflatable swim toys, etc.
Technical Details: Test Method Unit/PropertiesColour fluid latex ivoryOdour fluid latex odourlessCuring time per coat temperature dependent 30 – 60 minutesSolids content % TSC 59.5 %Alkalinity % 0.40 min.Density at 20 °C DIN 53217 0.95 g/cm3Module 700 % elongation, MPa 9 12Elongation at break % DIN 53504 S1 / ISO 37 800 950Tensile strength ASTM D 624 B MPa 19 23Viscosity dynamic at 26 °C Brookfield 400 max.Alkaline value pH 9.0 – 10.0Shrinkage % linear 7.6
„Odourless“ Formalate is supplied with a detailed application instructions and a balloon*.
*The balloon is partially inflated by the use of latex, knotted airtight, and packed in the partially emptied latex box. Due to the reduced oxygen content in the latex container, the remaining latex does not thicken, and thus retains its original consistency.
Original model the latex mould produced from it finished replica of Artestone

9Mould-making techniques
Latex thickenerDipping the models in liquid latex is not always possible. In order to cover large objects with a uniformly thick skin, they are placed in an appropriately large collecting container and doused with latex. It is advantageous if the material is a little more pasty. It then forms a stronger application at each coating, which coagulates and builds an evenly thick skin layer. To achieve this, the latex is mixed with 1-3% latex thickener and becomes viscous (thixotropic). Due to its pasty consistency it can be also applied more easily onto vertical objects (walls, figures, etc.). It then forms a uniform, compact form of the skin that can be removed as a textured skin or film.
Rubber painting colourThese special colours allow items made of latex and other rubber materials, such as: masks, tires, rubber sleeves, gloves, swim caps, swim toys and latex fabrics, to be decoratively painted. This rubber paint adheres not only to latex, but also on ceramic, porcelain, ceramic models from casting materials, glass, metal, wood, polythene bags, various plastics (not PVC), as well as synthetic fabrics, such as umbrellas, rainwear, also on rubber boots, rubber balls, synthetic leather bags, pencil cases etc. The colour dries to a satin finish within 60-100 minutes depending on the ambient temperature, is elastic, and cannot be removed again.
colours:
08 medium red
14 violet
22 medium blue
99 colourless
36 green
46 sunny yellow
63 orange
68 white
78 black
Rubber paint hardens with oxygen in the air. Therefore, the filled alu-minium colour tubes must always be carefully sealed.
60 171 Latex thickener 50 ml Plastic bottle PE 6
60 172 Latex thickener 100 ml Plastic bottle PE 6
60 161 Latex coalescing agent 100 ml Plastic bottle PE 6
Latex coalescing agentLatex does not adhere particularly well to smooth glass, ceramic, metal, and plastic surfaces.In order to use the latex for moulding models made of these materials, they need to be coated with a thin layer of latex coalescing agent prior to latex immersion. The coalescing agent en-sures a consistent, and especially faster and thicker skin formation, which is why it is always applied thinly to all such models as curing activation agent. Since the casting models are coated only once prior to use, the contents of a 100 ml bottle is sufficient for a great number of casting models.
72 171 Transparent rubber paint 20 ml Tube PE 6
72 172 Transparent rubber paint 50 ml Tube PE 6
72 176 Opaque rubber paint 20 ml Tube PE 6
72 177 Opaque rubber paint 50 ml Tube PE 3

10 Mould-making techniquesFormalate Mould MakingYou can dip almost any object in the latex material and produce a mould out of it. It is important to note that the model is not allowed to have any gaps. By the term “gap” we mean any kind of opening. That is why a figure with open legs on a base, for example, is not suitable for this casting technique. For this, a two-part silicone form must be produced. The so-called „cone figures“, which do not have any openings, are needed to produce castings using latex.
After completion of the latex form, a suspension fixture (hanger) is required to suspend the mould during the filling of casting material and the following curing. The support is usually made of a sturdy cardboard, from which a round or oval opening is cut to fit the mounting form. The opening must be large enough that the shape can be inserted and placed exactly at the end of the bead shape, over the open edges of the cardboard. To make this possible, a precisely cut to fit 6–8 mm thick plywood piece is either glued or screwed on to the base of the model before moulding. The piece is 10–20 mm bigger than the mould base and therefore extends slightly beyond on all sides. This is important, so that the mould bead of the final mould rests securely on the mentioned cardboard border.
On the back of the base plate, fasten a small screw or a screw hook and attach an approx. 60–80 cm long cord (string).
Dipping into latex The figure is ready for dipping into latex. Smooth mould parts made of metal, glass, ceramics, porcelain and plastic should first be brushed with latex coalescing agent (60 161). On one hand, the coalescing agent causes the latex to adhere well, as otherwise it would drain off the smooth surfaces. On the other hand, it ensures that a slightly thicker layer of latex is deposited on the immersion model, accelerating the mould-making process.
The model is fully immersed once in the latex, withdrawn again, and then the adherent latex must be spread with fingers. This eliminates possible air bubble inclusions. After re-immersion into the latex, the coated model is pulled out and tied with the cord to a support located above the latex container holder, for example a cabinet handle, back of a chair, etc. with about 10 cm free over the container. This offers the advantage that dripping latex falls back directly into the supply container.
The mould bead The thin latex layer on the coated model now needs to dry. This may take 30 to 60 minutes depending on the ambient temperature. After the latex has dried and adheres as a thin skin on the model, the model is once again immersed in the latex until the base is completely covered with latex. This dipping process is repeated twice. Only then is the thin layer of latex, adherent to the base surface, pierced with a knife, and the thin latex skin on all sides rolled back to the base edges, so that it sticks like a tight bead around the side edge of the base. This is followed by another immersion over this bead edge. This is important, because the previously prepared bead must completely embedded again in the latex material.
Immersion into the latex is required 4–5 times for simple figures with a height up to 12 cm. Larger models, especially thicker ones, must be dipped 6 or 7 times.
After the last coat, the mould on the model form must post-cure for one day, meaning „coagu-late“ (clot) in technical jargon.
Releasing the mould from the modelTo be able to easily remove the finished mould from the model, it is rubbed externally with detergent and water. Then the bead is carefully peeled from the base at different points and pulled down directly off the model. The other hand must hold the base, so that the mould can peel off almost by itself from the model. Due to the slippery water-detergent application, the latex skin slips off easily.
The still adhering soap residues on the mould are washed off with cold tap water, so in the end we have a wet, but clean form. If the inside was twisted to the outside through rolling or peeling off, it must be rolled back and the mould is then immediately ready for filling with the provided casting material.
hanger
plywood board
form bead
undercuts

11Mould-making techniquesFilling the mould with a casting materialFor mounting the form use the aforementioned stable cardboard.
Next, the casting material needed for the filling of the mould is mixed and poured into the completed mould until it is half full. The mould is then carefully removed from the cardboard holder and kneaded. This is very important because bubbles, which have settled between the mould edge and casting material into the mould, will be pushed away. The success of this work is visible when small air bubbles rise to the surface of the casting material.
Pay special attention to toes and other protruding mould parts. It is easiest if they are pressed into the form, and then pulled out again. Air bubbles present here will be eliminated.
The mould is then again suspended from the support and completely filled with the moulding composition. Make sure that it is not completely filled to the rim. If so, the replica model would get an ugly high pedestal, which does not look good. Therefore, the casting composition should only be filled up to the bead in the mould. Depending on which ceramic casting material is used, which is normally hardened after 30 minutes, the completed model can then be immediately removed from the mould. For this purpose, it is again rubbed with the water-soap mixture from the outside.
The latex mould can be reused often, sometimes more than a hundred times, which is why many reproduction models can be cast in this self-made form.
Besides the aforementioned ceramic casting materials, such as Artelin (56 006), Artestone (56 011) or Woodstone (52 061), casting is also possible with polyester resins, polyester casting wood (52 202) and polyester casting resin (51 012). As these resins contain aggressive solvent-containing binders, the mould must first be coated or spread with the mould release agent (51 101). After drying of the release agent in the mould, the selected resin mixture is added.
Other interesting information about this latex impression technique can be found in the book: „Make your own moulds“ (05 172).
The figures can also be given classic aging effects using oxidizing agents, for example, verdigris or blue patina.
The models cast in the mould can be artfully refined with va-rious colours and glazes; therefore it is possible to stylishly
imitate all material effects: ceramics, porcelain, wood, stone, metal, bronze, copper, tin, iron, rust-aging
effect verdigris or blue patina, etc.

12 Mould-making techniquesFormalate-ModellfixIn contrast to conventional latex, Formalate-Modellfix is creamy. This thick liquid latex is well sui-ted for coating relief-like image panels and the reproduction of dioramas, architectural models, freshly modelled clay tablets (reliefs, grave panels, signs and models). There is no other more suitable impression material than Formalate-Modellfix, especially for moulding still wet clay mo-dels, because it settles perfectly on the surface and thus captures all the fine details exactly. Despite that, it can easily be peeled off after the latex mould hardens.
In the past, such a model was cast in plaster in order to produce a negative mould and the plaster removed and washed out of the mould, which was then coated with petroleum jelly. Then new plaster was mixed and poured into the mould. After hardening of the plaster, the positive mould was removed from the plaster mould. This was very complicated, because most models broke and were thus destroyed. This had the consequence that the clay model had to be modelled again and the procedure had to be repeated again. That was in the past!
Direct transfer moulding of the clay model with Formalate-Modellfix is not only easier, but also safer. Formalate-Modellfix is applied on all sides and edges of the clay model to form a coat thickness of at least 12 mm, and is then lightly pressed with a flat wooden spatula to obtain a smooth surface. A brush should not be used as this may damage the still soft clay structure.
The latex layer on the clay model combines with the clay, absorbing the condensation produced during the hardening of the clay. This process even removes air pockets that might have been added by the latex material, so that precisely accurate casting is guaranteed. The latex layer takes about 5-6 days to dry. In this case, the moisture absorbed from the model, together with the water present in the latex, is eliminated, so that a leathery-solid, stable latex form is available that can easily be removed from the still soft clay model. It can then be used intact for other applications or impressions.
For large models, it is recommended to additionally apply some plaster bandages on the latex form, so as to produce a plaster rein-forcement that is so stable that the form is easy to fill, even with heavy casting materials.
The final latex mould can be filled with all the usual casting materials.
Technical Details: Test Method Unit/PropertiesColour as delivered ivoryOdour as delivered odourlessCuring time depending on film thickness 4–6 daysSolids content TSC % 61.8Alkalinity % 0.40 min.Density at 20 °C DIN 53217 0.91 g/cm3Module 750 % elongation 9–12 MPa.Elongation at break % DIN 53504 S1 / ISO 37 850–980Tensile strength ASTM D 624 B, MPa 22–26Viscosity dynamic at 26 °C Brookfield 400 max.Alkaline value pH 9.8–10.0Shrinkage % linear 6.8
Formalate-Modellfix is supplied with detailed instructions for use.
60 166 Formalate-Modellfix 500 ml Plastic tin PE 6
60 167 Formalate-Modellfix 1000 ml Plastic tin PE 6
60 168 Formalate-Modellfix 2000 ml Plastic tin PE 3

13Mould-making techniques
Latex tinting colourLatex emulsions can be coloured with water-soluble pigments. A small amount of the la-tex composition is poured into a separate vessel, the powder pigment added and thoroughly mixed in. The final colour paste is then added to the latex composition and thoroughly mixed. It is important that prior testing be done to determine which pigment is the best-suited.
Colouring the latex with the specially developed liquid latex tinting colours is not only easy, but also safe. To this end, the selected colour is stirred into the latex. Then colouring is finished. Different colours can also be specifically mixed together, so any shade can be produced.
For dyeing liquid latex it is important that the colour mixture is made very intense, because the latex becomes lighter when drying and the colour also lightens.
Instructions for useThe thick liquid latex is applied carefully with a wooden spatula onto the still wet clay relief and distributed such that a uniformly thick sur-face results. It is important that the side edges of the model are also covered with a thick layer of latex.
After the coagulation (hardening) of the latex composition, the fini-shed mould is carefully removed from the clay relief. To accomplish this, first the side edges and corners are lifted from the model. This process is repeated several times at different angular edges, to form the elastic shell that can be easily lifted from the model surface. Then it has to harden for 1 to 2 days. This increases the life of the mould. Only then is it coated with a release agent.
Depending on the rim height of the mould, it can now be filled with any casting materials. For large models or those with a low edge, the mould should be evenly covered with plaster bandages prior to remo-val from the model. This produces a plaster reinforcement stabilising the mould.
60 176 Latex tinting colour 100 ml Plastic bottle PE 6
60 177 Latex tinting colour 250 ml Plastic bottle PE 3
08red
14violet
21blue
36green
45yellow
63orange
68white
78black
The clay-modelled master model.
Partial view of a painted architecture model in the landscape formations
The clay model is fitted into a correspondingly large casting form and then completely covered (smoothly spread) with Formalate-Modellfix.
A few days later the practical latex negative mould is ready for pouring a ceramic casting material.

14 Mould-making techniques
60 181 Formaform I Packet content 1250 g Packet PE 6
60 182 Formaform II Packet content 2500 g Packet PE 3
60 183 Formaform III Packet content 8000 g Bucket PE 1
60 184 Formaform IV Packet content 25 kg Hobbock PE 1
4. Economic moulds made of FormaformThe diversity of this interesting mould making range is shown by the following product which is made of high quality meltable gel, especially designed for this mould-making technique.
FormaformFormaform is a synthetic, rubber-like mould making material, which is melted like wax in a water bath on a hot plate, and is then immediately ready for moulding. The liquid moulding material is poured directly into the casting mould model, where it immediately spreads evenly and creates the desired shape. 30 to 40 minutes later, the moulding composition is cool and can be removed as a complete mould of the model. It must then post-cure for 1 - 2 hours before it can be used for moulding.
Formaform is a universal form of mould-making material with unique applications. Compared to silicone, it is cheaper as an unsuccessful mould can be remelted at any time and reused to make a new one. The failed mould is cut up with scissors into small pieces, remelted and reused for making a mould. A flawless finished mould is . Recycling of this material is possible up to 6 times. A disadvantage however is that the mould can only be used once, because it is neither heat nor water resistant. However, this can be changed: It can be impregnated with Formaform-Thermolan, also included in the set, this creates a silicone-like mould that can be used several times. It is then heat and water resistant, and can be used repeatedly (10-20 times). However, it loses the melting property due to the impregnation.
The mould made of Formaform is medium.hard and has good mechanical strength values, which is why mouldings of all ceramic casting materials, polyester and epoxy resins, wax, casting soap, plaster and cement, etc. can be poured.
Technical Details: Test Method Unit/Properties Condition as delivered coarse granular formColour as delivered ochreOdour in molten condition slightly sweet Density at 20 °C g/cm3 DIN 53 217 0.74Viscosity at 60 °C MPa.s 35–45Shore hardness after 8 days DIN 53505/ISO 868 42Melting point °C 48–56Processing temperature °C 58–65Solidification point °C 35Alkaline value ph 6–7Elongation at break % DIN 53 504 N 200–220Tear strength ASTM D 624 B N/mm 18
Package content Art. 60 181 60 182 60 183 60 1841 Packet Formaform (Granules) 800 g 1600 g 5120 g 16000 g1 Bottle Formaform-Liquid 325 g 650 g 2080 g 6500 g1 Bottle Formaform-Thermolan 125 g 250 g 800 g 2500 gMaterial content komplet: 1250 g 2500 g 8000 g 25000 g
The packet contents are delivered with detailed use and processing instructions.
Formaform LiquidWith each new melting process an additional quantity, = approx. 3%, of Formaform Liquid should be added and carefully mixed into the hot, molten moulding compound. The moulding material then becomes as liquid and flowable as before. Formaform Liquid also causes the mould to retain its original elasticity. (For each new melting process, a part of the liquid contained in the Forma-form is used up, which is compensated for by this mixing. This additive product is also available separately).
60186 Formaform-Liquid 325 g Plastic bottle PE 3
Material requirements for 100 ml100 g Formaform
+ 40 g Liquid= 140 g
15Mould-making techniques5. The silicone mould systemSilicone oils are synthetic polymers derived from ground silicon. They can be distinguished based on their curing temperature as cold (RTV = room temperature vulcanisation) and hot (HTV = high temperature vulcanisation) polymers. HTV silicones are processed in a high temperature range. Thus, they provide a quick mass production option, indispensable in industrial production. In contrast, the RTV silicones have proven to be suitable moulding materials, particularly for arts and crafts moulding. It must be noted that there are two different systems:
Addition-curing silicones (Silcodupli) cure with complete volume stability. The moulds do not shrink or expand during curing. This means that the final shape has exactly the same internal dimensions as the model. This advantage, however, has a negative effect on demoulding, because the removal of the original from the mould, as well as the removal of the cast shape from the mould, can cause problems.
Condensation-Curing silicones offer smoother processing and demoulding is easier. The reason is that the mould shrinks during curing, which has a positive impact when removing the original from the mould and when removing the finished object from the mould casting box. Therefore, condensation silicones are preferred for manual, artisanal mould making as opposed to the addition-curing ones (Silicone NV, MVE, HE, HB and HV). The shrinkage of the mould is due to the natural expansion, especially in the curing reaction phase, in which silicone mixture reaction products (alcohol gasses) are generated and then diffuse out. This creates the shrinkage, which depends on the composition of the silicone mixture and can be 0.1 to 0.4%.
The Creartec silicone system offers yet another, equally important advantage: the different types of silicone can be individually mixed with each other or applied by a simple on or over moulding on an existing silicone layer. This is due to the use of a compatible silicone-based material (oil) and a universal curing agent.
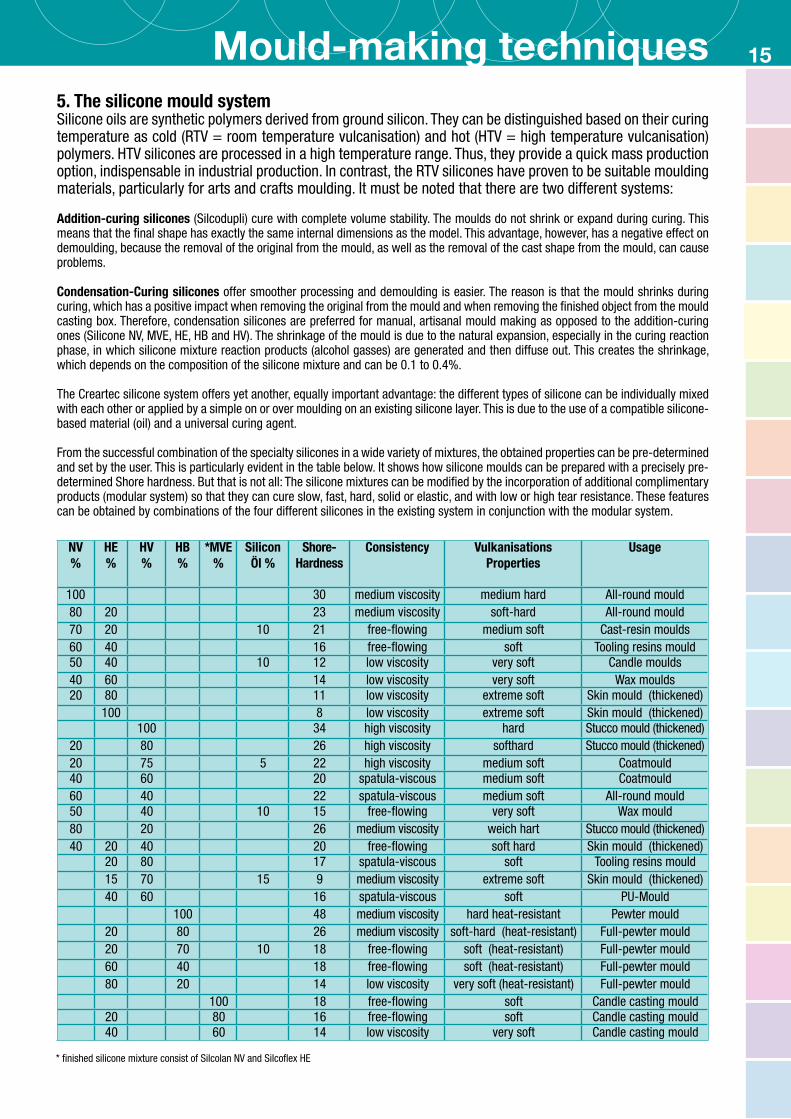
From the successful combination of the specialty silicones in a wide variety of mixtures, the obtained properties can be pre-determined and set by the user. This is particularly evident in the table below. It shows how silicone moulds can be prepared with a precisely pre-determined Shore hardness. But that is not all: The silicone mixtures can be modified by the incorporation of additional complimentary products (modular system) so that they can cure slow, fast, hard, solid or elastic, and with low or high tear resistance. These features can be obtained by combinations of the four different silicones in the existing system in conjunction with the modular system.
NV%
HE%
HV %
HB%
*MVE %
SiliconÖl %
Shore-Hardness
Consistency VulkanisationsProperties
Usage
100 30 medium viscosity medium hard All-round mould80 20 23 medium viscosity soft-hard All-round mould70 20 10 21 free-flowing medium soft Cast-resin moulds60 40 16 free-flowing soft Tooling resins mould50 40 10 12 low viscosity very soft Candle moulds40 60 14 low viscosity very soft Wax moulds20 80 11 low viscosity extreme soft Skin mould (thickened) 100 8 low viscosity extreme soft Skin mould (thickened) 100 34 high viscosity hard Stucco mould (thickened)20 80 26 high viscosity softhard Stucco mould (thickened)20 75 5 22 high viscosity medium soft Coatmould40 60 20 spatula-viscous medium soft Coatmould60 40 22 spatula-viscous medium soft All-round mould50 40 10 15 free-flowing very soft Wax mould80 20 26 medium viscosity weich hart Stucco mould (thickened)40 20 40 20 free-flowing soft hard Skin mould (thickened) 20 80 17 spatula-viscous soft Tooling resins mould 15 70 15 9 medium viscosity extreme soft Skin mould (thickened) 40 60 16 spatula-viscous soft PU-Mould 100 48 medium viscosity hard heat-resistant Pewter mould 20 80 26 medium viscosity soft-hard (heat-resistant) Full-pewter mould 20 70 10 18 free-flowing soft (heat-resistant) Full-pewter mould 60 40 18 free-flowing soft (heat-resistant) Full-pewter mould 80 20 14 low viscosity very soft (heat-resistant) Full-pewter mould 100 18 free-flowing soft Candle casting mould 20 80 16 free-flowing soft Candle casting mould 40 60 14 low viscosity very soft Candle casting mould
* finished silicone mixture consist of Silcolan NV and Silcoflex HE

16 Mould-making techniquesSilcolan-NVThis is a low viscosity RTV silicone rubber, pourable and spreadable. It is well suited for creating single and multi-part moulds for negative reliefs, utensils, technical mouldings (matrices, casting templates), figures, etc. Due to its ease of processing and positive shape properties, this silicone is one of the most used mould making products in arts and crafts.
Silcolan-NV has good flowability, is self-venting, and is characterized by very precise moulding qualities. It has an average elasticity, so it can be also used for the sheathing of shape models which have been coated with a silicone soft skin as an additional support mould.
The moulds prepared from Silcolan-NV can be universally filled with almost any casting materials, such as plaster, cement, ceramic casting materials, Formestone, Woodstone, moulding soap, wax, crystal clear and technical polyester resins such as mould and liquid wood, except polyurethane casting materials.
Silcolan-NV is mixed with 1.5–2.5% silicone curing agent, and cures at an ambient/material tem-perature of 20 ° C within 1–3 hours to a immediately ready to use, versatile mould.
It can be mixed with the different silicones in this system so that the newly formed silicone mixture allows completely different usage properties. For example, mixing with Silcoform-HV produces a hard, robust mould, which has a high intrinsic stability and can be used for sheathing or as a supporting form. Mixed with Silcoflex-HE, it increases the elasticity of the mould so that it not only has excellent flexibility, but also has a high tear resistance. This form of ma-terial has been developed to be well suited for moulding of complicated prototypes with undercuts. This is particularly advantageous in the field of technical modelling.
Added curing agent 1.5–2 %.
Technical Details: Test Method Unit/Properties Colouring as delivered white-greyDensity at 20 °C - g/cm3 DIN 53217 1.24Mixing ratio % Silicone + curing agent 100 : 1.5–2.5Curing time temperature dependent 2–4 hoursPot life at 20 °C temperature dependent 40–100 minutesShorehardness A after 14 days DIN 53505 / ISO 868 30Elongation at break % DIN 53504 S1 / ISO 37 250Tear strength N/mm2 DIN 53504 S1 / ISO 37 4.5Tear resistence N/mm2 ASTM D 624 B 32Viscosity dynamic at 23 °C Brookfield - mPa.s 24.000Thermal resistence °C of the cured mould 180Shrinkage % linear 0.4
Silcolan-NV is delivered with the appropriate curing agent, a detailed with detailed use and processing instructions.
60 400 Silcolan-NV 490 g and Silicone hardener 10 ml = 500 g Tin PE 6
60 401 Silcolan-NV 980 g and Silicone hardener 20 ml = 1000 g Tin PE 6
60 402 Silcolan-NV 4900 g and Silicone hardener 100 ml = 5 kg Bucket PE 1
60 404 Silcolan-NV 24500 g and Silicone hardener 500 ml = 25 kg Hobbock PE 1
Raw cast Artestone (56 011)
Finished painted Madonna portrait
Damaged and weathered model Moulding with Silcoform HV.Application of plaster bandages as
reinforcement
Model casting with Arte-Carving Wax Blocks (80 067). Reworking with soldering
and carving.
Finished wax model and new casting mould of Silcolan-NV.

17Mould-making techniques
60 421 Silcoval-MVE 490 g and silicone hardener 10 ml = 500 g Tin PE 6
60 422 Silcoval-MVE 980 g and silicone hardener 20 ml = 1000 g Tin PE 6
60 423 Silcoval-MVE 4900 g and silicone hardener 100 ml = 5 kg Bucket PE 1
60 424 Silcoval-MVE 24500 g and silicone hardener 500 ml = 25 kg Hobbock PE 1
Silcoval-MVEThis medium viscosity RTV silicone rubber is castable and spreadable, so that moulds with a me-dium tear resistance and good elasticity can be produced. The silicone is a pleasant, ivory colour, and is ideal for moulding complex, technical and handicraft models. It is also used for moulds with undercuts, where one or two-piece moulds are required instead of a multi-part mould. Silcoval-MVE is preferentially used for the production of candle moulds, as the soft touch material does not cause unpeeling / demoulding problems when the finished wax parts are removed.
This special mixture of silicone is particularly suitable for the candle casting technique, where a relief-like lining that contains the decorative candle pattern is poured first. After completion of the mould plate, it is rolled up and attached to the bottom base, which takes the shape of the plug tip in a normal tubular sleeve (cardboard tube). Subsequently, the tube is closed on both sides with a cover. The wick is pulled through and knotted on the outside at the bottom mould, the tube lid is tightened and the wick is brought to the other end of the second cover behind the plug, which has a wick holding slot next to the filling opening. This construction results in a practical candle casting mould, which is filled with wax and provides the opportunity to pour hundreds of candles.
The same technique, that is, the rolling up of a soft mould insert is increasingly used for the preparation of figures. It is advantageous that even models with undercuts and openings in a one-piece shape can be moulded quickly and safely with this rolling technique.
Silcoval-MVE is the example of a successful combination of various silicones in the Creartec silicon system. (The silicone candle mould described here is also available as a finished candle > Candles Techniques Art. No. 80 901-80 956).
Technical Details: Test Method Unit/Properties Colouring as delivered ivoryDensity at 20 °C g/cm3 DIN 53479 A 1.21Mixing ratio % Silicon : Vernetzer 100 : 1.5 – 2Curing time temperature dependent 2 - 5 hours Pot life at20 °C temperature dependent 60–100 minutesShore hardness A after 14 days DIN 53505 / ISO 868 18Elongation at break % DIN 53504 S1 / ISO 37 380 400Tear strength N/mm2 DIN 53504 S1 / ISO 37 9.5Tear resistence N/mm2 ASTM D 624 B 19Viscosity dynamic at 23 °C Brookfield mPa.s 20.000Temperature resistance °C of the cured form > 220Shrinkage % linear 0.2
Silcoval-MVE is delivered with a curing agent, a mixing bowl, and detailed usage instructions.
1-part candle casting form
1-part candle casting form 1-part round form

18 Mould-making techniques
60 411 Silcoflex-HE 490 g and silicone hardener 10 ml = 500 g Tin PE 6
60 412 Silcoflex-HE 980 g and silicone hardener 20 ml = 1000 g Tin PE 6
60 413 Silcoflex-HE 4900 g and silicone hardener 100 ml = 5 kg Bucket PE 1
60 414 Silcoflex-HE 24500 g and silicone hardener 500 ml = 25 kg Hobbock PE 1
Silcoflex-HEThis soft, uniquely elastic RTV silicone rubber has a high tear resistance. Therefore, it is especially suitable as a high-quality silicone for moulding complex models or structures, including those with significant undercuts. The making of multi-part forms in the context of rapid prototyping is also possible. With this method, large sculptures, including those with undercuts, can be moulded.
Silcoflex-HE is extremely flexible due to its unique material composition. Durable skin moulds can be made, for example, for the production of functional models that are used for acupuncture. A sandwich technique, which is particularly good for reproducing more fragile surface structures (sculptures), is used. The skin mould, which may be only a few millimetres thick, is usually made by gently brushing the object with the Silcoflex-HE partly mixed with silicone thickener. The thickener in the silicone causes a thixotropic reaction, which prevents this thin material from flowing away from vertical surfaces. After curing, a thick trowel silicone composition is applied with a spatula to the first silicone skin and spread evenly. Another potential layer would give the mould durability and stability. Depending on the shape of the model, thickened Silcolan-NV is also suitable for providing support and stabilisation. The same results can also be obtained with the troweable Silcoform-HV. All these silicones combine well with the previously applied skin to obtain a cohesive mould.
Another important application area is possible by mixing this silicone with Silcotin-HB. This creates a high-temperature resistant silicone mixture which is particularly suitable for producing more complex pewter casting moulds. So far, it has not been possible to cast intricate pewter figures with highly sculpted forms, because the heat-resistant silicones are too solid and inflexible, and three or multi-part moulds would have to be built for such mould constellations. An effort that could only be carried out by very few mould-making professionals.
The development of flexible, heat-resistant distinctive Silcoflex-HE means it is now possible to mix it with heat-resistant Silcotin-HB and create an elastic mould for tin figures. This allows a come-back for the pewter casting technology that can now produce precise, fully three-dimensional figures in any desired style. The mixed silicone allows short-term temperature exposure up to 380°C, which is ideal for casting with lead, tin and zamac.
Silcoflex-HE is already one of the professional silicones that are used when particularly valuable or sensitive models must be reproduced.
Technical Details: Test Method Unit/Properties Colouring as delivered pale blueDensity at 20 °C g/cm3 DIN 53479 A 1.15Mixing ratio % Silicone + curing agent 100 : 2–2.5Pot life at 20 °C temperature dependent 60–120 MinutesCuring time at20 °C temperature dependent 4–8 Hours Shore hardness A after 14 days DIN 53505 / ISO 868 8Elongation at break % DIN 53504 S1 / ISO 37 650Tear strength N/mm2 DIN 53504 S1 / ISO 37 4.0Tear resistance N/mm2 ASTM D 624 B 24Viscosity dynamic at23 °C Brookfield mPa.s 16.000Temperature resistance °C of the curing mould > 380Shrinkage % linear 0.2Temperature resistance °C cured mould 160 °C
Silcoflex-HE is supplied with the appropriate curing agent, a mixing bowl and instructions for use.
19Mould-making techniques
60 406 Silcotin-HB 490 g and Silicone hardener 10 ml = 500 g Tin PE 6
60 407 Silcotin-HB 980 g and Silicone hardener 20 ml = 1000 g Tin PE 6
60 408 Silcotin-HB 4900 g and Silicone hardener 100 ml = 5 kg Bucket PE 1
60 409 Silcotin-HB 24500 g and Silicone hardener 500 ml = 25 kg Hobbock PE 1
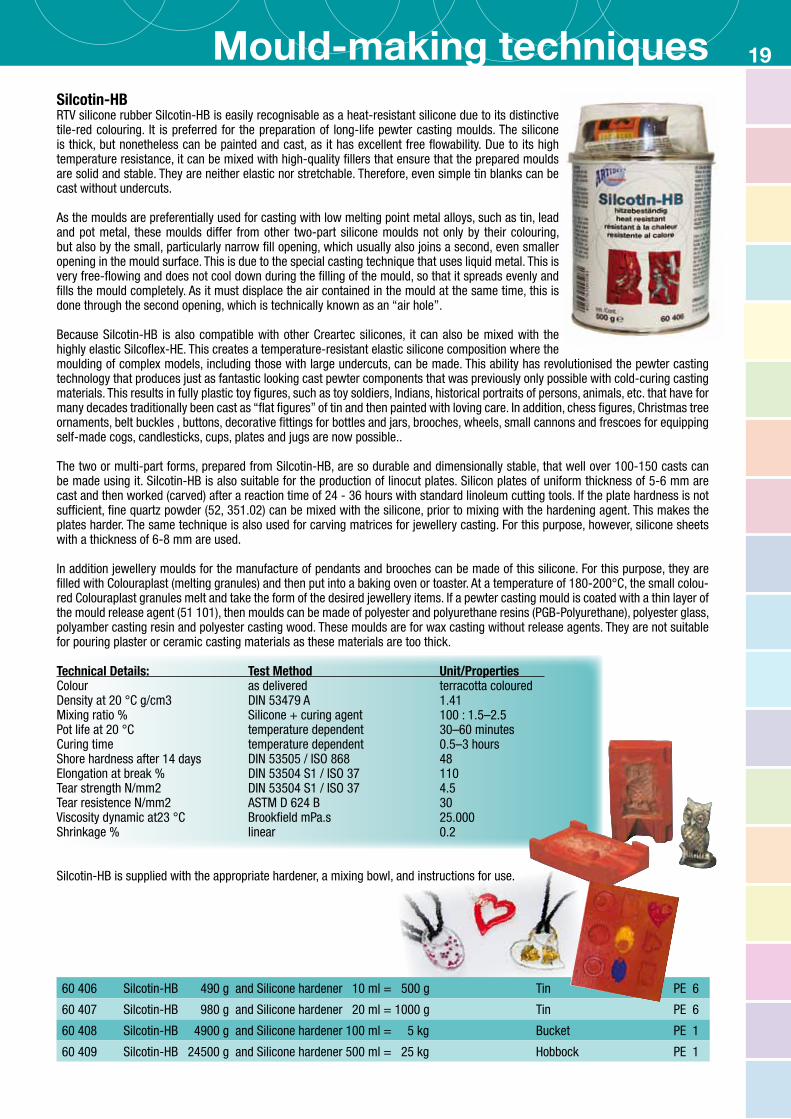
Silcotin-HBRTV silicone rubber Silcotin-HB is easily recognisable as a heat-resistant silicone due to its distinctive tile-red colouring. It is preferred for the preparation of long-life pewter casting moulds. The silicone is thick, but nonetheless can be painted and cast, as it has excellent free flowability. Due to its high temperature resistance, it can be mixed with high-quality fillers that ensure that the prepared moulds are solid and stable. They are neither elastic nor stretchable. Therefore, even simple tin blanks can be cast without undercuts.
As the moulds are preferentially used for casting with low melting point metal alloys, such as tin, lead and pot metal, these moulds differ from other two-part silicone moulds not only by their colouring, but also by the small, particularly narrow fill opening, which usually also joins a second, even smaller opening in the mould surface. This is due to the special casting technique that uses liquid metal. This is very free-flowing and does not cool down during the filling of the mould, so that it spreads evenly and fills the mould completely. As it must displace the air contained in the mould at the same time, this is done through the second opening, which is technically known as an “air hole”.
Because Silcotin-HB is also compatible with other Creartec silicones, it can also be mixed with the highly elastic Silcoflex-HE. This creates a temperature-resistant elastic silicone composition where the moulding of complex models, including those with large undercuts, can be made. This ability has revolutionised the pewter casting technology that produces just as fantastic looking cast pewter components that was previously only possible with cold-curing casting materials. This results in fully plastic toy figures, such as toy soldiers, Indians, historical portraits of persons, animals, etc. that have for many decades traditionally been cast as “flat figures” of tin and then painted with loving care. In addition, chess figures, Christmas tree ornaments, belt buckles , buttons, decorative fittings for bottles and jars, brooches, wheels, small cannons and frescoes for equipping self-made cogs, candlesticks, cups, plates and jugs are now possible..
The two or multi-part forms, prepared from Silcotin-HB, are so durable and dimensionally stable, that well over 100-150 casts can be made using it. Silcotin-HB is also suitable for the production of linocut plates. Silicon plates of uniform thickness of 5-6 mm are cast and then worked (carved) after a reaction time of 24 - 36 hours with standard linoleum cutting tools. If the plate hardness is not sufficient, fine quartz powder (52, 351.02) can be mixed with the silicone, prior to mixing with the hardening agent. This makes the plates harder. The same technique is also used for carving matrices for jewellery casting. For this purpose, however, silicone sheets with a thickness of 6-8 mm are used.
In addition jewellery moulds for the manufacture of pendants and brooches can be made of this silicone. For this purpose, they are filled with Colouraplast (melting granules) and then put into a baking oven or toaster. At a temperature of 180-200°C, the small colou-red Colouraplast granules melt and take the form of the desired jewellery items. If a pewter casting mould is coated with a thin layer of the mould release agent (51 101), then moulds can be made of polyester and polyurethane resins (PGB-Polyurethane), polyester glass, polyamber casting resin and polyester casting wood. These moulds are for wax casting without release agents. They are not suitable for pouring plaster or ceramic casting materials as these materials are too thick.
Technical Details: Test Method Unit/Properties Colour as delivered terracotta colouredDensity at 20 °C g/cm3 DIN 53479 A 1.41Mixing ratio % Silicone + curing agent 100 : 1.5–2.5Pot life at 20 °C temperature dependent 30–60 minutesCuring time temperature dependent 0.5–3 hours Shore hardness after 14 days DIN 53505 / ISO 868 48Elongation at break % DIN 53504 S1 / ISO 37 110Tear strength N/mm2 DIN 53504 S1 / ISO 37 4.5Tear resistence N/mm2 ASTM D 624 B 30Viscosity dynamic at23 °C Brookfield mPa.s 25.000Shrinkage % linear 0.2
Silcotin-HB is supplied with the appropriate hardener, a mixing bowl, and instructions for use.

20 Mould-making techniquesSilcoform-HVThis highly viscous, non-flowable, but spreadable and trowelable RTV silicone rubber, because of its viscous consistency is suitable especially good for moulding of ceiling decorations, wall reliefs and borders. In addition, it is often used as a quick impression material for test form production. Due to its solid consistency, it can be trowelled directly into the master mould, where it hardens within minutes to a solid functional form. For this application technique no casting mould frame is needed.
Silcoform-HV is also used by scientists and researchers as a so-called „scraper silicone“ for the moulding of rock formations in caves and other structures, such as are present in a sandstone or slate wall fossils prints etc.
The professionalism of this material is shown during moulding of stucco works, wall reliefs, and for partial impressions on large busts, figures or monuments where special forms arise, despite their size and scope, and having a mould wall thickness of about 10 - 15 mm. Atthe next hollow casting, the forms thus produced show thatthey have a very greatstability and strength, thatwithstands without any deformations the weight of heavy casting materials used in the reproduction of these models.
For ceiling impressions Silcoform-HV is painted only thinly on the model surface. After curing, the se-cond following compound layer is previously applied thixotropic silicone thickener. This prevents drip-ping of the material, which can happen because of the self-gravity of the silicone. Additionally, it is possible to minimize the impression time. To this end, a silicone hardening accelerator, which is particularly recommended when working outside or in winter temperatures is added to the silicone mixture. The curing requires a considerably shorter period of time, and prevents silicone drips during this stage of the model. For the casting of large areas of 60 x 60 cm, etc., after the application of the second silicone layer, a fiberglass laminate fabric (52 396) is inserted. This is easily pressed into the silicone composition to support more silicone layers. This embedded fabric makes the resulting laminate-like structure of greater stability and strength.
Silcoform-HV is suitable for mixing with other silicones of this system, which is useful if you want to use a smoother, more elastic silicone instead of a rigid one.
Technical Details: Test Method Unit/Properties Colour as delivered pale greyDensity at20 °C g/cm3 DIN 53479 A 1.28Mixing ratio % Silicone + curing agent 100 : 2 – 2.5Pot life at 20 °C temperature dependent 30–60 minutesCuring time temperature dependent 10 – 30 minutesShore hardness A after 14 days DIN 53505 / ISO 868 34Elongation at break % DIN 53504 S1 / ISO 37 350Tear strength N/mm2 DIN 53504 S1 / ISO 37 4.5Resistance strength N/mm2 ASTM D 624 B 29Viscosity dynamic at23 °C Brookfield mPa.s 90.000Temperature resistance °C of the cured mould 115Shrinkage % linear 0.3
Silcoform-HV is supplied with the appropriate hardening agent, a mixing bowl and instructions for use.
60 416 Silcoform-HV 490 g and Silicone hardener 10 ml Tin 500 g PE 6
60 417 Silcoform-HV 980 g and Silicone hardener 20 ml Tin 1000 g PE 6
60 418 Silcoform-HV 4900 g and Silicone hardener 100 ml Bucket 5 kg PE 1

21Mould-making techniques
60 440 Silicon hardener 10 ml Glass bottle PE 6
60 441 Silicon hardener 20 ml Glass bottle PE 6
60 442 Silicon hardener 100 ml Glass bottle PE 3
Silicone hardener Mixing of silicone moulding materials (except for Silcotrans-NVT and Silcodupli VHE) is always carried out with the same hardener. It is therefore possible to mix all the base silicones together. The hardener amount used with these silicones is generally 1.5 - 2.5%. A reduced hardener amount of 1.5% may be best in the hot season, because the silicone reacts faster in the warmer ambient temperature. Alternatively, in winter it may be so cold that a hardener addition of 2.5% is needed in order to initiate the curing reaction, which is not immediately activated due to the cold material. Thus, in order to avoid using an incorrect hardener volume, the silicone temperature should be measured prior to mixing. The ideal temperature is 18 - 20°C, and requires a hardener amount of 2%.
Dosing the hardener is also possible by dripping it from the container. To this end, the bottle is equipped with a KiSi* dropper. 40 drops yield 1 g of silicone hardener.
52 351.02 „Sicron“ Quartz powder (white) 900 g Plastic bucket PE 6
52 352.02 „Sicron“ Quartz powder (white) 2500 g Plastic bucket PE 3
How was silicone discovered or invented…Silicone actually owes its invention or discovery to chance. The English chemist Frederic Stanley Kipping experimented in the years 1895-1906 with organic silicon compounds. The clumped ketones which he referred to as silicones emerged. He found no use for them because of their stickiness. That changed abruptly a few years later.
In 1940, the two chemists Eugene G. Rochow and Richard Müller worked simultaneously, but totally independently, on the production of chloromethylsilane. What neither of them knew was that the precursor of the synthetic polymer „silicone“ had been discovered.
If chloromethane comes into contact with powdered silicon (Si = chemical element = metalloid - origin = gravel or flint) at a tempera-ture of 350 ° C in the presence of a copper catalyst, dichlorodimethylsilane is produced. This process is now called the Müller-Rochow synthesis.
If silane is mixed with water, a highly exothermic reaction results. Adding hydrochloric acid to the silane mixture produces the familiar silicone polymer. The fast and versatile proliferation of the silicone is due to the fact that this substance has unique properties that are highly useful:
• water-repellent• temperature-resistant • elastic
*KiSi = child-safe closure
„Sicron“ quartz powderIf a silicone mixture needs to be stronger and harder, this can be achieved by adding quartz powder. Sometimes, when a larger quantity is required, the silicone mix may become too thick. To avoid this, the mixture can be thinned by adding a certain amount of silicone oil. Through targeted dosing of these two materials, the desired silicone mixture can be prepared. Using the same procedure, a silicone can be produced with a specific Shore hardness.
Not every quartz powder is suitable, because the finished preparation (silicone mould) is exposed to different thermal stresses and comes into contact with different resins. The quartz powder „Sicron“ has so far proven to be the best for this application.
Technical Details: Test Method Unit/PropertiesStandard colour value white 86Density at 20 °C g/cm3 ISO 787.10 2.65Bulk density g/cm3 ISO 60 0.54Moles hardness hard 7Alkaline value pH ISO 10390 7

22 Mould-making techniques
60 425 Silcotrans-NVT 105 g Base silicone and 105 g Hardening medium = 210 g Packet PE 3
60 426 Silcotrans-NVT 385 g Base silicone and 385 g Hardening medium = 770 g Packet PE 3
60 427 Silcotrans-NVT 760 g Base silicone and 760 g Hardening medium = 1520 g Packet PE 3
60 428 Silcotrans-NVT 2500 g Base silicone and 2500 g Hardening medium = 5000 g Packet PE 1
60 429 Silcotrans-NVT 10.000 g Base silicone and 10.000 g Hardening medium = 20 kg Packet PE 1
6. Special siliconesThe CREARTEC silicone program is complimented by some special mould-making materials. This refers to silicones being used for special mould-making techniques or special applications, for example as a decorative, insulating or dielectric protective substrate.
Silcotrans-NVT (Transparent casting silicone)This low-viscosity, transparent, clear, pourable and spreadable RTV-silicone is characte-rised by high tearing resistance, coupled with exceptionally high elasticity. It is mixed and processed from components A + B in 1 : 1 ratio, resulting in transparent mould blocks.
In addition to the usual production of attractive decorative blocks, Silcotrans-NVT is also suitable for embedding selected objects in moulds. This produces rubbery „pa-perweights“, which are ideal at trade fairs and exhibitions because of their elasticity as a representative decoration pattern. The second important application is for pot-ting sensitive electronic components or specific component groups that contain, for example, temperature-sensitive IC‘s or high-quality circuits that need to be installed in shock and vibration-sensitive equipment, such as elevators, excavators, vibrating machines, etc.
Especially interesting is that the object embedded in the silicone is clearly visible even after the mould material has cured. This makes it possible to cut the mould side so that the model can be removed undamaged from it. The mould is then filled with a casting material and thus is a convenient way to rapidly make replicas. This method is preferentially used for producing small series parts. The embedding of the model and the simple cutting of the form means that the manufacturing technique of moulding is greatly simplified. This gives the layman the opportunity to quickly make moulds and pour a second piece without extensive prior knowledge.
Silcotrans-NVT has a good separation capability compared to most casting materials, so it can be filled with ceramic casting materials, synthetic resins, casting and dental wax, casting soap, etc.
Colouring: The liquid silicone mixture can be mixed with a small amount of silicone colour paste (60 712) and then it turns a transparent colour. If the proportion of the colour paste is increased, transpa-rency decreases and the moulded skin becomes opaque. In addition, white and black colour silicone paste is available for making the widely produced „black boxes“.
Technical Details: Test Method Unit/Properties Colouring as delivered transparentDensity at20 °C g/cm3 DIN 53479 A 1.1Mixing ratio % anteilig A : B 1:1Pot life at 20 °C temperature dependent 30–90 minutesCuring time temperature dependent 3 – 8 hoursShore hardness A after 14 days DIN 53505 / ISO 868 30Elongation at break % DIN 53504 S1 / ISO 37 200Tear strength N/mm2 DIN 53504 S1 / ISO 37 4.0Tear strength N/mm2 ASTM D 624 B 10Viscosity dynamic at23 °C Brookfield mPa.s 35.000Shrinkage % linear 0.4Dielectric strength kV/mm IEC 60243 20Dielectric constant IEC 60250 < 3.0
Silcotrans-NVT is supplied as a 2-component casting silicone with detailed pro-cessing and use instructions.

23Mould-making techniquesSilcodupli VHE (Addition-curing silicone)When making reproduction models, for example, for prototypes, an addition-curing silicone is used. This hardens without any shrinkage, offering the ability to manufacture a dimensio-nally-accurate reproduction of the original model. This silicone is particularly well suited for such precision applications. Care was taken in the development of the material to produce a highly elastic product with a high tear resistance. It is therefore particularly suitable for moulding complex models, including those with extremely deep and/or pronounced fine structures.
In general, this RTV rubber is a unique rubber compound that is particularly well suited for the production of elastic printing pads, stamps, printing rollers. It has a low Shore hardness and is also designed for a high mechanical resistance so that the low hardness permits easy demoulding of complex compact shapes or models.
Silcodupli-VHE is preferentially used for the production of various stamps, rubber rollers and moulds. It is possible to copy a font or stamp image directly from an engraved plas-tic or metal negative plate. Due to its specifically high flowability, it flows very accurately into these often very finely worked engraving areas, and is also characterised by excellent reproduction of detail. Therefore, it can also produce robust stamping plates, paint rollers, rubber rolls and many other rubber products such as rubber bumpers, shock absorbers, rubber washers, etc.
Silcodupli-VHE is supplied as a 2-component casting silicone with detailed processing and use instructions.
Technical Details: Test Method Unit/Properties Colouring as delivered orangeDensity at 20 °C – g/cm3 DIN 53479 A 1.10Mixing ratio % anteilig A : B 1:1Pot life at 20 °C temperature dependent 60–100 minutesCuring time at20 °C temperature dependent 6–8 hours Shore hardness A after 14 days DIN 53505 / ISO 868 12Elongation at break % DIN 53504 S1 / ISO 37 800Tear strength N/mm2 DIN 53504 S1 / ISO 37 4.5Resistance strength N/mm2 ASTM D 624 B / ISO 37 20Viscosity dynamic at23 °C Brookfiield mPa.s 5.000Shrinkage % linear 0.1Temperature resistance °C of the cured mould > 160 °C
Silcodupli-VHE is supplied with the corresponding hardener*, detailed processing instruc-tions, and a mixing bowl.
*With regards to addition-curing silicone, the curing agent is not called the crosslinker, but the hardener.
60 431 Silcodupli VHE 250 g and Silcodupli hardener 250 g = 500 g Tin PE 3
60 432 Silcodupli VHE 750 g and Silcodupli hardener 750 g = 1500 g Tin PE 3
60 433 Silcodupli VHE 2500 g and Silcodupli hardener 2500 g = 5000 g Bucket PE 1
24 Mould-making techniques
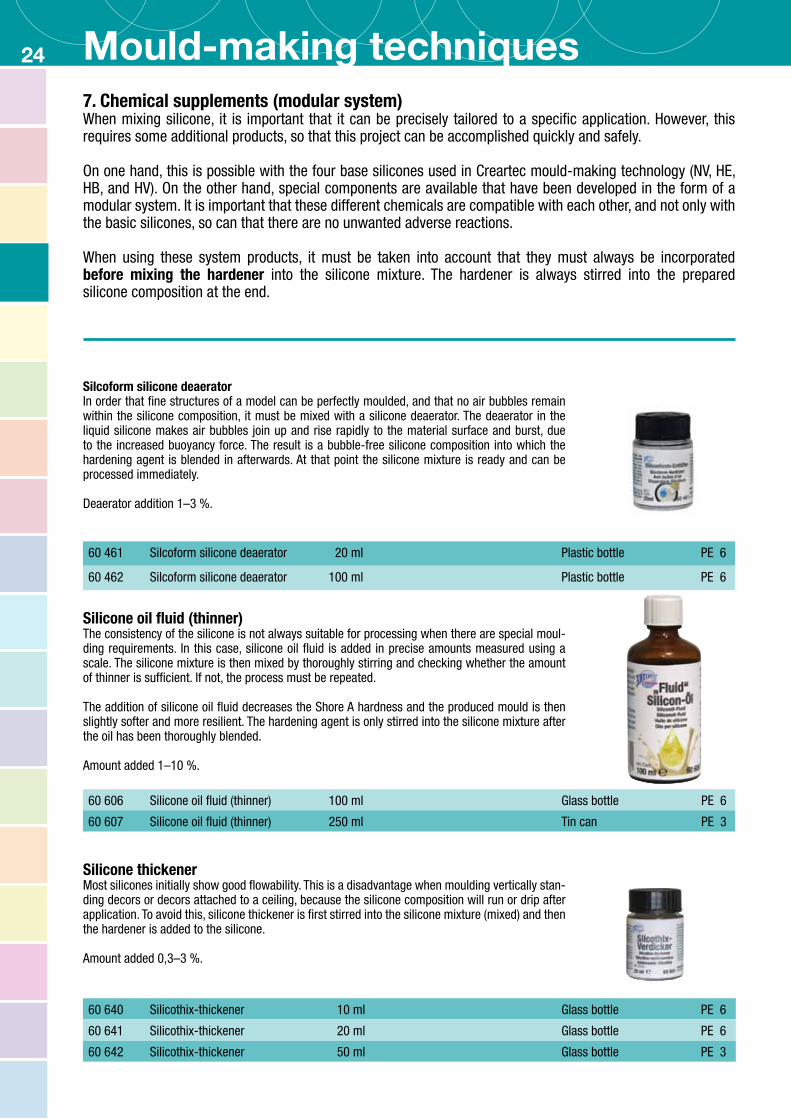
Silicone oil fluid (thinner)The consistency of the silicone is not always suitable for processing when there are special moul-ding requirements. In this case, silicone oil fluid is added in precise amounts measured using a scale. The silicone mixture is then mixed by thoroughly stirring and checking whether the amount of thinner is sufficient. If not, the process must be repeated.
The addition of silicone oil fluid decreases the Shore A hardness and the produced mould is then slightly softer and more resilient. The hardening agent is only stirred into the silicone mixture after the oil has been thoroughly blended.
Amount added 1–10 %.
Silicone thickenerMost silicones initially show good flowability. This is a disadvantage when moulding vertically stan-ding decors or decors attached to a ceiling, because the silicone composition will run or drip after application. To avoid this, silicone thickener is first stirred into the silicone mixture (mixed) and then the hardener is added to the silicone.
Amount added 0,3–3 %.
60 606 Silicone oil fluid (thinner) 100 ml Glass bottle PE 6
60 607 Silicone oil fluid (thinner) 250 ml Tin can PE 3
60 640 Silicothix-thickener 10 ml Glass bottle PE 6
60 641 Silicothix-thickener 20 ml Glass bottle PE 6
60 642 Silicothix-thickener 50 ml Glass bottle PE 3
60 461 Silcoform silicone deaerator 20 ml Plastic bottle PE 6
60 462 Silcoform silicone deaerator 100 ml Plastic bottle PE 6
7. Chemical supplements (modular system)When mixing silicone, it is important that it can be precisely tailored to a specific application. However, this requires some additional products, so that this project can be accomplished quickly and safely.
On one hand, this is possible with the four base silicones used in Creartec mould-making technology (NV, HE, HB, and HV). On the other hand, special components are available that have been developed in the form of a modular system. It is important that these different chemicals are compatible with each other, and not only with the basic silicones, so can that there are no unwanted adverse reactions.
When using these system products, it must be taken into account that they must always be incorporated before mixing the hardener into the silicone mixture. The hardener is always stirred into the prepared silicone composition at the end.
Silcoform silicone deaeratorIn order that fine structures of a model can be perfectly moulded, and that no air bubbles remain within the silicone composition, it must be mixed with a silicone deaerator. The deaerator in the liquid silicone makes air bubbles join up and rise rapidly to the material surface and burst, due to the increased buoyancy force. The result is a bubble-free silicone composition into which the hardening agent is blended in afterwards. At that point the silicone mixture is ready and can be processed immediately.
Deaerator addition 1–3 %.

25Mould-making techniquesSilicone Curing AcceleratorBy Mixing silicone with this accelerator reduces the curing time. The acceleration of a silicone curing agent may be done for many special reasons: for example, to complete an impression in a cold environment (outdoors) or a complicated ceiling or wall casting mould more quickly. The curing accelerator is therefore preferentially used during moulding of decorations and ornaments, impressions of fossils in caves, etc. Due to successive applications of a thin silicone layer on the mould object, it is possible that some layers may run or sag due to slower curing. To avoid this, the silicone is hardened with this curing accelerator. Added amount: 0.5–3%. The hardening agent is mixed in afterwards.
60 656 Silicone curing accelerator 30 ml Plastic bottle PE 6
Silicone Colour Paste (Tinting Colour) Often it is desirable that the silicone have a specific colour tone for a form to be prepared. For this purpose, a silicone tinting has been developed, which is suitable for dyeing all silicone mixtures, whether by condensation or addition-hardening RTV and HTV. All tinting colours are of very intense color, which is why only a small amount of colour is needed for colouring. In this case, the amount to be added depends on the intensity of the existing colour of the silicone. Light coloured silico-ne blends change colour best. The colours can be mixed together. Silicone colour paste is also suitable for coloring 1-component silicones that are used to fill joints or as a construction silicone sealant, adhesive etc.
colours:
60 712 Silicone Colour Paste 50 ml Plastic bottle PE 3
45 yellow
63 orange
68 white
78 black
35 green
22 blue
08 red
Colour pigmentsLiquid silicones can be coloured by mixing these colour pigments. Silicone oil fluid (60 606) is placed in a mixing bowl and a small amount of the selected pigment powder is slowly added and carefully stirred in. This creates a thick colour paste that can be directly added (mixed) to the silicone composition. Important: the colour powder should not be mixed directly into the silicone, since it can form lumps. The amount of the colour paste used is dependent on the desired colour intensity of the silicone. The hardening agent is added to the coloured silicone composition at the end.
02skin tone
31fir green
51light brown
68white
07 brick red
35leaf green
52earth braun
72cement grey
08medium red
36 dark green
54hazel
78black
09rubin red
42olive
55rust brown
11raspberry red
43moss green
20ultramarine blue
45yellow
21 light blue
58dark brown
50ocher
60terracotta
57oxide red
47 sunny yellow
71 511 Colour pigments (powder) 100 ml Shaker PE 6

26 Mould-making techniques
60 601 Silicon-remover 100 ml Glass bottle PE 6
60 602 Silicon-remover 250 ml Metal can PE 3
60 632 Mould modelling material 250 g Plastic pot PE 6
60 633 Mould modelling material 1000 g Aluminium pot PE 6
Silicone removerTo ensure that dirty tools and brushes used for mixing and processing silicon do not become unusable, they must be immediately cleaned after use with the solvent-based silicone remover. Uncured silicone residues can be removed at the same time.
Important: Tools and mixing cups made of plastic or metal should not be cleaned, because the silicone can be easily peeled off and removed after curing.
Mould Modelling MaterialMould models are fixed (attached) in the mould casting boxes with this slightly sticky mo-delling material. At the same time, unevenness between the model plate and the mould casting boxes is compensated for. Mould modelling material is also used for sealing any gaps (cracks) that may arise between the walls and the floor plate when using the mould casting boxes. When making a 2-part mould, the material for modelling the master model used for making the first half is embedded up to the separator.
The modelling material is reusable. At the beginning, it is usually hard and solid, depending on the temperature. This changes immediately when a small piece is heated by hand for a few minutes. It automatically becomes softer and more supple when shaping and mode-ling because of hand heat, so that filigree modelling work can be implemented. After being used in, e.g. embedding a model for mould making, the material slowly cools and becomes hard again. This is advantageous because, for example, a model surface can then be labelled or engraved. The modelling material is free of pollutants and produced from technical plasticine with wax, fillers and other derivatives. It is therefore also suitable for all common modelling work and is reusable.
Changing the Shore hardness of a silicone:By mixing silicone oil fluid, the silicone becomes more soft and elastic, thus reducing its Shore hardness. If a silicone needs to be stronger and harder, it should be mixed with Sikron quartz powder. This increases the Shore hardness. If the silicone mixture thickens too much when the quartz powder is added, silicone oil fluid can be mixed in until it returns to a normal, flowing state.
It is important that the additional materials mixed into the silicone are accurately weighed and the change of the mixture recipe noted. This will provide you with important information, which can also be used for similar blends.

27Mould-making techniques
49 324 Mould brush (1 piece) SB-Set PE 3
60 671 Adhesion medium (colourless) 100 ml Plastic bottle PE 6
60 672 Adhesion medium (colourless) 250 ml Plastic bottle PE 3
Adhesion mediumWhen filling latex and big silicone forms with hollow casting material, e.g. kersolith, a pro-blem may arise where the thick casting material does not adhere to the steep sides of the form and falls out. The same can happen when a form is coated with Woodstone Metallic (ceramic casting compound with metallic effect). The thick liquid casting material may not adhere in the desired layer thickness to the mould wall.
The mould is first coated with adhesion medium so that it is possible to form such surfaces. After drying, a barely visible lining material is produced. All aqueous and solvent-based casting materials and putties can be applied in a layer thickness of up to 1 mm and will stick. After drying, the coating thickness can be increased and stabilised by pour-casting, spreading or troweling with the same material.
The transparent adhesion medium bonds with the casting material and is incorpo-rated without adverse effects. The thin-walled mouldings can then, as usual, be treated with all colours and glazes, etc. This application is therefore particularly well suited for the production of hollow moulds.
Another application is the moulding of vertical surfaces, e.g. large reliefs, rock art, etc. The back-ground is pre-treated with adhesion medium. The casting material then adheres better.
Flow talcum (Form powder)All rubber-like moulds must be rubbed or brushed with this talcum powder after use and then packaged in an air-tight sealable polybag. This preserves the useful life of these valuable moulds.
Flow talcum, also referred to as steatite powder, prevents the moulds from drying out. At the same time, it ensures that they remain elastic and supple, stopping them from becoming brittle and friable.
The mould powder is mixed with Lycopodium (Lycopodium clavatum). It is therefore an excellent powder for improving flow during the casting of tin figures. The rubber-based braking effect of the silicone, which causes a slow filling of the mould, can be seen when pouring the liquid tin into the silicone mould. Poor flow behaviour is a cause of faulty tin castings. Coating the inner surface of the mould with this mould powder results in a faster and smoother flow of tin.
60 627 627 Flow talcum (mould powder) 5 g Plastic box PE 3
Mould brushA large, soft bristle brush, made with a durable synthetic hair bristles, is used to spread talcum powder or a release agent in the mould. The hairs of the brush are so fine and elastic that very delicate details cannot be deformed or damaged when spreading the talcum powder over the mould walls. It is also used for brushing out the mould which is already filled with a casting material in order to eliminate any remaining air bubbles.
Important: the brush must be cleaned immediately after use to prevent the ceramic casting compound from hardening and rendering this essential tool unusable.
Brush Size # 22.

28 Mould-making techniquesImportant additional products for mould production
Vario-Mould Casting Box DGBMIf casting with a liquid, pourable silicone mixture, a casting frame adapted for the size of the master model is required. Previously a wooden box used to be assembled with screws. That was a complicated process! The box had to be disassembled after the first mould half was completed and the mould removed. It then had to be screwed back together for the second mould half and disassembled again afterwards.
This required technical skills and was time-consuming. The process is easier and faster with this mould casting box. After loosening the wing nuts of the casting box, the side walls can be moved as required to form an elongated or square box for casting the model. Once the screws are tightened, the casting box is ready. The box frame is firmly pressed onto the base plate of the bottom board with a sturdy rubber band. The container is then evenly painted with the supplied lacquer and after drying the inner surface is coated with release wax. This pre-treatment is then only required after every third mould.
The casting box is delivered with the required accessories for mould making.1 mould casting box, adjustable - max. format 310 x 200 x 70 mm1 shape rubber band1 bottle of wood preservative sealing lacquer colourless 50 ml1 bottle mould release wax 60 ml1 synthetic hair brush No. 41 mixing / measuring cup with 500 ml scale1 aluminum plastic spatula 300 mm long1 Packet of form modeling material 250 g1 detailed instructions
Mould casting box (stackable) DGBMThis mould casting box has proven itself extremely useful in the construction of single-or multi-part forms. Handling is somewhat different to the Vario mould casting box. The box consists of a pegboard, with a grid of holes and a set of drilled wooden strips with dowels. The dowels hold the strips in place so that one or more walls can be fitted. It is important to offset the strips when positioning them (windmill vane principle).
This makes it possible to build any box format, either square or rectangular. This plug in strip method has many practical advantages, especially when contour models are required. The strips are initially only built up to the separating line of the master model. This makes it possible to completely embed the model. After completing this action, the box frame height can be increased by adding more frame strips as necessary, to ensure that the model is completely covered with silicone to at least 6 mm above the highest point.
The mould casting box comes complete with the required accessories:1 mould casting box with bottom panel,24 wooden strips and 8 wooden dowels, suitable for a box size of 375 x 295 x 70 mm1 shape rubber band1 bottle of wood preservative sealing lacquer colourless 100 ml1 bottle mould wax release 60 ml1 synthetic hair brush No. 41 mixing / measuring cup with 500 ml scale1 aluminum plastic spatula 300 mm long1 package of form modelling material 250 g1 detailed instructions
60 595 Mould casting box (plug-in) with complete accessories Complete packet PE 1
60 596 Mould casting box (pluggable) without accessories Complete packet PE 1
60 590 Vario mould casting box with complete accessories Complete packet PE 1
60 591 Vario mould casting box without accessories Complete packet PE 1

29Mould-making techniques
42 653 Mould rubber bands - set (6 Piece) SB-Set PE 6
Measuring cup (small)Stable measuring cups are used for the measuring and mixing of silicones with the hardener. The cups are made of solvent-resistant plastic.
Stirring sticks and rodsStirring sticks made of wood are available for mixing silicone with hardener and other auxiliary products. All stirring sticks are flat and smooth, and therefore easy to clean.
Mould rubber bandsThese stable 10 mm extra wide rubber bands are particularly well suited for holding 2 or multi-part moulds tightly together during filling with the casting material.
The set includes: 2 mould rubber bands 100, 120 and 150 mm Ø.
Stirring sticks - SetThe pack contains narrow and thin stirring sticks in two different lengths. They are particularly suitable for mixing colours..Pack contents: 30 stirring sticks 114 mm long - 8 mm wide 30 mm long stirring sticks 140 - 8 mm wide
Stirring and measuring ContainerThese measuring containers have a raised, embossed measurement scale on the side. They are temperature-resistant up to 110 °C, robust and almost unbreakable. On one side they have a practical spout, opposite which a handle is attached.
Measuring container with scale - solvent resistant.
Mixing cup 200 mlThe handy elastic measuring cup has a clear printed measuring scale on the outside. Measuring cup with scale - solvent resistant.
Laboratory measuring cupThese practical measuring cups are indispensable for measuring small quantities of material.Because of their usefulness, they can be used for numerous applications.
49 115 Stirring and measuring container (with handle) (1 Piece) 500 ml SB-Set PE 3
49 116 Stirring and measuring container (with handle) (1 Piece) 1000 ml SB-Set PE 3
49 103 Measuring cup (small) ( 6 Piece) 30 ml SB-Set PE 6
49 104 Measuring cup (small) (50 Piece) 30 ml SB-Set PE 1
49 110 Measuring/mixing container with scale 50 ml SB-Set PE 3
49 111 Measuring/mixing container with scale 100 ml SB-Set PE 3
49 106 Mixing Cup with Scale (2 Piece) 200 ml SB-Set PE 6
49 011 Stirring spatula (aluminium) 300 x 20 x 2 mm (1 Piece) SB-Set PE 6
49 004 Stirring sticks 114 und 140 mm x 8 mm (2 x 60 Piece) SB-Set PE 6
Stirring spatula (aluminium)Stable, reusable stirring spatula, suitable for mixing heavy, sometimes thick liquid silicone mixtures.
49 005 Stirring sticks (20 Piece) 150 x 20 mm SB-Set PE 6
49 006 Stirring sticks (30 Piece) 113 x 10 mm SB-Set PE 6
49 008 Stirring sticks ( 6 Piece) 250 x 18 mm SB-Set PE 6

30 Mould-making techniquesRelease agentThe release agent has a particularly important role in mould making. The model to be moulded must be painted with a uniformly thin coat of release agent. After the successful preparation of a form, it must be re-treated with a release agent, so that the mould surface is protected from the aggressive ingredients of the casting compo-sition used for pouring. This also ensures that the cured cast can be removed from the mould without damage.
Pre-treatment of the mould modelThe object selected for moulding must not be modified in its appearance by contact with the mould building material. Therefore, it must first be protected, i.e. pre-treated, so that the applied release agent can be easily removed from it. It is therefore necessary that models with absorbent surfaces be impregnated in advance. Since moulding originals are made of different materials, various varnishes and primers are available for the pre-treatment (impregnation).
• Raw wooden parts are coated with an aqueous matte varnish. The paint dries to an invisible coating.• Plaster, cement, concrete, stone and baked clay models are coated with a primer (casting materials primer). This seals the surface
so that the subsequently applied release agent is not absorbed, but remains on it (dries).• Parts made of metal, glass and fired ceramic are coated with an invisible Teflon coating.• Painted objects are also sprayed (protected) with this mould release spray.
The partially ready models that have been pre-treated with a transparent matte lacquer or a primer, are then subsequently treated with a release agent. This is important because the appearance of a mould object after the mould is successfully completed must be identical to its previous appearance - it should not be discoloured or damaged.
The wax solvent (60 611) contained in the mould release agent could possibly damage or dissolve the paint of painted mould objects. Therefore, such objects should be treated first with an aqueous release agent (mould release agent 51 101). This separating means should also be used when a mould is to be filled with a resin (epoxy resin or polyester resin).
In many cases, there is the question of compatibility: model - impregnation - release agents - impression. It must therefore be tested which release agent is best suited for this casting situation. That is why, in addition to the solvent-based mould release wax, solvent-free (aqueous) mould release agents are also available.
Unfortunately, not all separation problems are resolved in this manner as there are casting objects that cannot be treated with any of these release agents. For example, the surface painting could be dissolved and destroyed, a precious metal could oxidise or an under-coating used in the model surface adhesive could be dissolved. To avoid such damage, a high-quality mould release spray should be used for this object. The very thin layer of sprayed-on mould release agent protects the model, so that it looks the same as before after removing it from the newly manufactured mould. The Teflon is not a problem because it is invisible, and it also protects the original model against any mechanical damage. It takes over the function of an effective finish protection against moisture and weathering.
Separating agent pre-treatment for mouldsDue to the above reasons, a mould must also be protected with release agents from any aggressive ingredients before being filled with a casting material. This ensures the long-term preservation of the mould and, at the same time, easy, safe demoulding of the cast replica.
Aqueous casting materials Seperating agentsGypsum and ceramic casting materials, cement, concrete, soap Mould release wax
Solvent-based resins:Polyester, cold glaze, epoxy and polyurethane resins etc. Mould release agents
Wax-based casting materials Beeswax, paraffin, composition wax, stearin, These materials are self-releasing.casting and polish wax, wax compositions No release agent required.
After curing/cooling of the reproduction model, it is carefully released out of the mould and removed. Possible release agent residue is removed by scrubbing with soap and water. Blanks made of synthetic resin poured into a mould prepared with a release agent should be cleaned of any release agent residues with tap water, and then dried carefully.
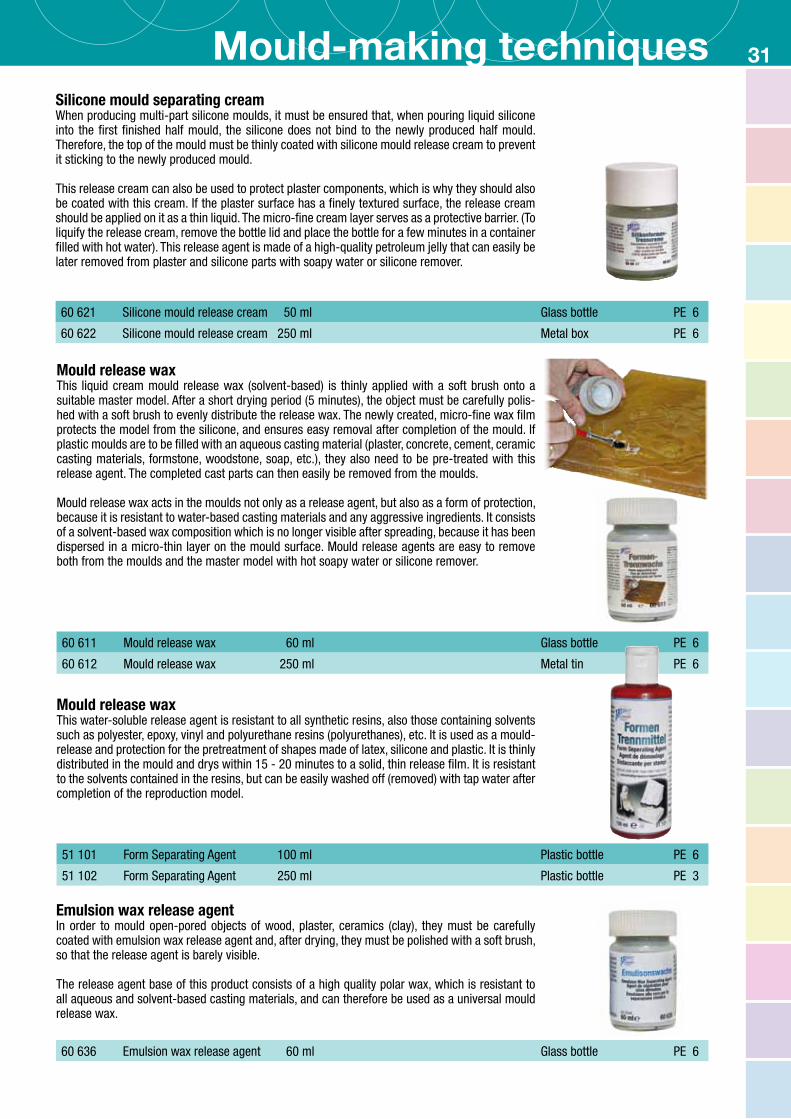
31Mould-making techniquesSilicone mould separating creamWhen producing multi-part silicone moulds, it must be ensured that, when pouring liquid silicone into the first finished half mould, the silicone does not bind to the newly produced half mould. Therefore, the top of the mould must be thinly coated with silicone mould release cream to prevent it sticking to the newly produced mould.
This release cream can also be used to protect plaster components, which is why they should also be coated with this cream. If the plaster surface has a finely textured surface, the release cream should be applied on it as a thin liquid. The micro-fine cream layer serves as a protective barrier. (To liquify the release cream, remove the bottle lid and place the bottle for a few minutes in a container filled with hot water). This release agent is made of a high-quality petroleum jelly that can easily be later removed from plaster and silicone parts with soapy water or silicone remover.
Mould release waxThis liquid cream mould release wax (solvent-based) is thinly applied with a soft brush onto a suitable master model. After a short drying period (5 minutes), the object must be carefully polis-hed with a soft brush to evenly distribute the release wax. The newly created, micro-fine wax film protects the model from the silicone, and ensures easy removal after completion of the mould. If plastic moulds are to be filled with an aqueous casting material (plaster, concrete, cement, ceramic casting materials, formstone, woodstone, soap, etc.), they also need to be pre-treated with this release agent. The completed cast parts can then easily be removed from the moulds.
Mould release wax acts in the moulds not only as a release agent, but also as a form of protection, because it is resistant to water-based casting materials and any aggressive ingredients. It consists of a solvent-based wax composition which is no longer visible after spreading, because it has been dispersed in a micro-thin layer on the mould surface. Mould release agents are easy to remove both from the moulds and the master model with hot soapy water or silicone remover.
Emulsion wax release agentIn order to mould open-pored objects of wood, plaster, ceramics (clay), they must be carefully coated with emulsion wax release agent and, after drying, they must be polished with a soft brush, so that the release agent is barely visible.
The release agent base of this product consists of a high quality polar wax, which is resistant to all aqueous and solvent-based casting materials, and can therefore be used as a universal mould release wax.
60 621 Silicone mould release cream 50 ml Glass bottle PE 6
60 622 Silicone mould release cream 250 ml Metal box PE 6
60 611 Mould release wax 60 ml Glass bottle PE 6
60 612 Mould release wax 250 ml Metal tin PE 6
60 636 Emulsion wax release agent 60 ml Glass bottle PE 6
Mould release waxThis water-soluble release agent is resistant to all synthetic resins, also those containing solvents such as polyester, epoxy, vinyl and polyurethane resins (polyurethanes), etc. It is used as a mould-release and protection for the pretreatment of shapes made of latex, silicone and plastic. It is thinly distributed in the mould and drys within 15 - 20 minutes to a solid, thin release film. It is resistant to the solvents contained in the resins, but can be easily washed off (removed) with tap water after completion of the reproduction model.
51 101 Form Separating Agent 100 ml Plastic bottle PE 6
51 102 Form Separating Agent 250 ml Plastic bottle PE 3

32 Mould-making techniques
Mould release soap (transparent)The moulding of art objects made of stone begins with proper release agent property selection to ensure that no trace of the agent remains after completion of the moulding process. Therefore, objects made of granite, basalt, expanded concrete, porous concrete, cement, pumice, gypsum, etc. must be coated before moulding with liquid release soap. The soap is heated for this purpose in a container in a hot water bath, so that it can be evenly distributed by hand or with a large wide brush as a creamy release agent, to compensate for all unevenness and depressions. This creates a uniform surface, which is well suited for moulding with silicone.
The same procedure applies to pre-treatment of old, fragile wooden parts, such as reliefs from bog oak, etc. Cracks in the wood parts are filled with the soap, so that a smooth mould model surface is produced, and so that all structures of the wooden object are still visible, but com-prehensively coated with just a thin layer of soap. The soap serves as a release agent, which is washed out of the models with hot water, after completing the moulding process. After drying, the mould parts are almost like new and definitely clean.
60 647 Form release soap (transparent) 250 ml Plastic tin PE 6
60 648 Form release soap (transparent) 800 ml Plastic tin PE 3
Silicon release varnish sprayThis high-quality release varnish spray, based on pollutant-free silicone, is suitable as a uni-versal release protection for all non-absorbing objects, including those with a paint or varnish coating that is not dissolved by the silicone oil-based spray coating. Moulds can be pre-treated before being filled with aqueous or solvent-based casting materials. The release agent is dry within 20–30 minutes, thus allowing rapid further treatment of the casting models, as well as the moulds.
Form-separating-Spray (with Teflon)In order to mould expensive painted originals or those decorated with valuable precious metals, safely and without damage, they must be carefully sprayed with mould release spray. The release agent is not visible, therefore it can remain after moulding. The model receives high-quality touch and wears protection that is resistant to environmental influences, skin perspiration, moisture and dust effects. The Teflon (polytetrafluoroethylene) contained in the spray ensures this protection.
The release agent is only suitable for parts made of non-absorbent materials such as glass, metal, ceramics, porcelain and plastic.It also can be used for painted or varnished decorative objects and articles of daily use. Intricately shaped latex and silicone moulds which can not be painted with a brush can be sprayed. Mould release spray provides an excellent long-term protective barrier.
Silicon mould adhesiveTo be able to reuse torn silicone moulds, the cracks should be cleaned carefully with silicone remover. After complete airing and drying, this adhesive is applied on both sides. Then the cracked parts are pressed firmly together. Approx. 4-6 hours later, the mould will be firmly glued and the repair completed. It can be used again after another post-reaction time of approx. 2 hours.
Package content:1 tube of silicone adhesive form 80 g 1 tube key1 long, narrow nozzle1 instructions for use
60 481 Silicone mould adhesive 80 g Tube PE 3
60 616 Mould release spray (with Teflon) 300 ml Spray can PE 12
60 661 Silicon release varnish spray 100 ml Bottle mit pump spray PE 6
33Mould-making techniquesSilicon mould extender (expander)Immersing a finished silicone mould in this medium will proportionally expand it by up to 10%. A short time after immersing the form in the silicone mould extender, it will begin to swell and reach its maximum form expansion within a period of 1-2 hours. It is then removed from the mould extender, rinsed with water, dried with a woolen cloth and can be immediately filled with the chosen casting material.
After hardening, the reproduction model produced must be carefully removed from the mould. Within a few hours, the mould will shrink back to its original size due to the evaporation of the mould extender.
60 667 Silicon mould extender (expander) 500 ml Plastic bottle PE 3
60 668 Silicon mould extender (expander) 1000 ml Plastic bottle PE 3
Mould-making lexicon (Klaus-P. Lührs)This small reference book has it all. It includes all terms of mould-making techniques from A to Z. It describes everything that is important to know about processing liquid mould ma-terials, with key terms exactly described and explained. This includes technical terms that are frequently used, but which hardly anyone knows properly, e.g. absorbing agents, elastic modulus, cone shape, prototype design, tensile strength, sandwich moulds, Shore hardness, thixotropic behaviour, vulcanisation interferences, air holes, etc.
The book contains more than 180 terms, 36 pages.
05 165 Mould-making lexicon- only available in German Book PE 6
Make your own moulds (Klaus-P. Lührs)With liquid moulding materials from model to replicaThe casting of an object is one of the most difficult and certainly most interesting of craft tech-niques. It is not only unique, but also fascinating, when a mould for casting of a replica model is completed with the help of a rubbery silicone material from an original model. Consequently, it is understandable that it is important to know beforehand not only about the materials and their processing, but also to learn about the what and how of mould-making technology. This is what this book is about. It travels step by step into the interesting realm of this design technique, explains the differences between various casting materials, and describes which product is best suited for which mould-making technique. It shows instructions in words and pictures to follow for making a simple, one-part mould that can be used for casting a relief and provides a guide for making a multi-part figure mould. All this is a knowledge transfer that makes under-standing and getting to know this Mould-making technique easy and quick to learn.
Nevertheless, this knowledge is insufficient for experienced mould makers, as each master model calls for its own methodology for mould making. In addition, basic knowledge for the pre-treatment of the originals and the use of mould release agents is required. Both are im-portant because each mould can be filled with aqueous or solvent-based casting materials, each of which requires a different release agent. And because there are not only moulds made of silicone or gelatin, a latex form may be more suitable in certain cases, possibly because it is often more cost-efficient. This shows that not only the moulding material, but also the use of a mould with the material selection is important. „Make your own moulds“ covers the whole spectrum of traditional craftsmanship. It begins with a quick impression of your own hand, the production of a tubular shape made of latex and finally leads to the classic construction of a silicone mould. This knowledge includes all subtleties and tricks that were previously told orally by the master to his apprentice. This alone justifies the purchase of this great book. It also addresses issues that go far beyond the production of a two-part mould, showing how, for example, to form objects for complex hollow figures, bisquit parts, and last, but not least, how to make heat-resistant pewter casting moulds. This is a great reference book written and compiled by a recognised expert of mould-making techniques.
240 pages, 75 graphics with over 200 colour illustrations.
05 172 Formen selbst gemacht (German) Instruction book PE 6
05 173 Make your own moulds (Englisch) Instruction book PE 6
1
Klaus-P. Lührs
Lexikonder Formbautechnik

34 Mould-making techniques
Schokomould hardenerWhile Schokmould silicone is always supplied together with the hardener required for curing, this is also available individually as replacement material. Only this hardener is a suitable crosslinking agent, meeting all food regulations for curing this food-grade silicone moulding material, as it is also based on a biological, pollutant-free composition.
Schokomould hardener must be mixed with silicone in a 1 : 10 ratio.
60 456.10 Schokomould-hardener 90 g Plastic bottle PE 3
8. Food moulding with SchokomouldSchokomould is a low-viscosity, pourable and spreadable RTV silicone rubber mixture which is particularly suitable for the production of silicone baking moulds due to its extensibility, elasticity and natural non-stick properties. Schokomould moulds are characterised by a long service life. Because of its statutory food safety approval, it is particularly well suited for casting hot, liquid chocolate, pralines and sugar compositions, as well as biscuit and pastry doughs.
Mixing ratio: 100 parts by weight Schokomould and 10 parts of hardening agent.
The finished mould mixture is applied by pouring or brushing it onto the mould model and hardens at room temperature within 4-6 hours to form a solid, dimensionally stable yet flexible mould, which is characterised by a high tear resistance.Praline and chocolate manufacturers constantly praise the high max. 230 °C temperature tolerance of the Schokomould moulds, which can therefore be filled with all sugar, chocolate or cake mixtures.
In addition to 2-dimensional (relief-type) models (chocolate, pralines, confections, biscuits and pastries), it is also possible to cast sculptured 3D figures or models in two-part moulds.
Food safety regulatory approvalThis silicone meets the requirements of the migration tests of the European Directive 1935/2004/EC and therefore may come into contact with food.
Technical Details: Test Method Value Colouring as delivered ivoryDensity at20 °C g/cm3 DIN 53479 A 1.13Mixing ratio % Silicon : Vernetzer 100 : 10Pot life at 20 °C temperature dependent 60–180 MinutesCuring time at 20 °C temperature dependent 6–10 Hours Shore hardness A after 14 days DIN 53505 / ISO 868 26Elongation at break % DIN 53504 S1 / ISO 37 600Tear strength N/mm2 DIN 53504 S1 / ISO 37 4.2Tear resistence N/mm2 ASTM D 624 B 22Viscosity dynamic at 23 °C Brookfield mPa.s 22.000Shrinkage % linear 0.1Temperature resistance of the cured form 230 °C
Schokomould silicone is supplied with the appropriate Schokomould hardener, a mixing bowl, and instructions for use.
60 457 Schokomould Silicone 450 g and Schokomould-hardener 50 g = 500 g Tin PE 3
60 458 Schokomould Silicone 860 g and Schokomould-hardener 90 g = 950 g Tin PE 3
60 459 Schokomould Silicone 5000 g and Schokomould-hardener 500 g = 5500 g Bucket PE 1
60 459.25 Schokomould Silicone 25.000 g and Schokomould-hardener 2500 g = 27.500 g Bucket PE 1

35Mould-making techniquesInstructions for the Proper Use of Silicone Bakeware
The ability to produce edible food figures like sweets and pastries has long been desired by candy-makers and pastry chefs. With this great casting silicone „Schokomould“ it has finally become a reality.
Model construction: For model preparation use a common modeling clay that you shape by kneading and moul-ding, so that the desired model is created, which you have imagined for your cake, biscuit, chocolate, frosting, or marzipan production.
Make Your Own Silicone Forms:Place the finished model parts for moulding into a form casting frame. Paint it over with mould release wax. This is followed by the carefully pouring the mixed Schokomould material with hardener, which will initially fill only in a small amount of the containment field. It should be just enough that you can carefully spread the material with a soft brush over all mouldings, and thereby prevent the inclusion of air bubbles. Pour Schokomould into the frame so that the the highest form of the model is thus covered by about 6 mm. There is nothing more to do. Then the moulding material hardenes. After 6 hours, the finished hardened elastic form can be removed from the casting frame.
Let them harden another day. Then, place the mould in the oven at a temperature of about 50-60 ˚C to anneal. This is important be-cause it allows the cleavage products, i.e. alcohol radicals that still may be in the form, to outgas. Thereafter, the mould is ready, so that you can it make many sweets and baked goods from it.
Clean the Completed Form:Clean the mould with hot water and detergent and dry them thoroughly. Your home-made silicone mould is finished and ready for use.
Coat Mould with a Release Agent:As with all other forms you must use a „mould release agent“ here. Since you are working with foods, you can choose between grease or flour. Both options ensure that manufactured parts of pastries or sweets do not adhere (stick) in the form.
Fill Form with Chocolate or Pastry Material:This form is easy to use in contrast with very thin „commercial forms“. Above all, it has, it has a firm footing, which is why you first pour the casting material in small quantity into the small forms and distribute or paint it with a brush. This will prevent any air bubbles from adhering to the mould edges that deface the cast parts with ugly holes.
Cooling the hot basting materials in the mould:After completely filling the moulds with hot sugar paste or chocolate, these materials need to cool and harden even more. It is different when filling dough for pastries and cookie mixtures. The filled silicone mould is placed in the oven, and processed according to further baking provisions. The heat resistant silicone is resistant to the temperatures used for it in the oven, and even offers the guarantee that the contained biscuit or pastry mixes will cook evenly.
Cleaning the silicone mould:After use, the silicone mould should be dipped in hot soapy water. Hard and crusty pastry residues will soften and can be easily re-moved.
Storing the moulds:In order to use the moulds as long as possible, you should store them in an airtight, sealable plastic bag. If the mould will not be used for extended periods, it is advisable to rub it with mould talcum (a special mould powder) so that it stays supple and does not age too quickly. Residues of this powder can be easily washed out of the mould with warm soapy water before reuse.

CREARTEC® trend-design-gmbhLauenbühlstrasse 59 · DE 88161 Lindenberg/AllgäuTel. 00 49 83 81/80 74 00 · Fax 00 49 83 81/80 74 0-10
E-mail: [email protected]
05 167
DE: 3,60 €AT: 3,80 €CH: 4,00 CHF
ISBN: 978-3-939903-25-3